1
Printing Reference
Phaserª 140 Drivers and Utilities
First printing October 1994
070-9070-0
Copyright © 1994 by Tektronix, Inc., Wilsonville, Oregon. Printed in the United States of America.
All rights reserved. Contents of this publication may not be reproduced in any form without permission of
Tektronix, Inc.
This instrument, in whole or in part, may be protected by one or more U.S. or foreign patents or patent
applications. Information provided upon request from Tektronix, Inc., P.O. Box 1000, Wilsonville, Oregon
97070-1000
If acquired subject to FAR or DFARS, the following shall apply:
■
Unpublished Ñ rights reserved under the copyright laws of the United States
■
Restricted Rights Legend Ñ Use, duplication or disclosure by the government is subject to restrictions as set
forth in subparagraph (c) (1) (ii) of the Rights in Technical Data and Computer Software at DFARS
252.227-7013, or in subparagraph (c) (2) of the Commercial Computer Software Ð Restricted Rights clause at
FAR 52.227-19, as applicable. Tektronix, Inc., P.O. Box 1000, Wilsonville, Oregon 97070-1000.
Tektronix¨ is a registered trademark of Tektronix, Inc. TekColorª is a trademark of Tektronix, Inc.
Phaserª is a trademark of Tektronix, Inc. for color printers and related products.
Adobeª and PostScriptª are trademarks of Adobe Systems, Incorporated which may be registered in certain
jurisdictions.
Timesª, Helveticaª and Palatinoª are trademarks of Linotype-Hell AG and/or its subsidiaries.
ITC Avant Garde Gothic, ITC Bookman, ITC Zapf Chancery, and ITC Zapf Dingbats are registered trademarks of
International Typeface Corporation.
UNIX is a trademark of AT&T Bell Laboratories.
Windows is a trademark of Microsoft Corporation.
StufÞt Deluxe is a trademark of Aladdin Systems, Inc. and Raymond Lau.
Novell¨ NetWare¨ is a registered trademark of Novell, Inc.
PANTONE¨* Colors generated by the Phaser 140 Color Printers are four-color process simulations and may not
match PANTONE-identiÞed solid color standards. Use current PANTONE Color Reference Manuals for
accurate colors.
PANTONE¨ Color simulations are only obtainable on these products when driven by qualiÞed
Pantone-licensed software packages. Contact Pantone, Inc. for a current list of qualiÞed licensees.
* Pantone, Inc.Õs check-standard trademark for color reproduction and color reproduction materials.
Pantone, Inc., 1988.
Other marks are trademarks or registered trademarks of the companies with which they are associated.
Warranty
Tektronix warrants that this product will be free from defects in materials and workmanship for a period of one
(1) year from the date of shipment. If this product proves defective during this warranty period, Tektronix, at its
option, will either repair the defective product without charge for parts and labor, or provide a replacement in
exchange for the defective product.
This warranty applies only to products returned to the designated Tektronix depot or the Tektronix authorized
representative from which the product was originally purchased. For products returned to other locations,
Customer will be assessed the applicable service charge. The above limitation shall not apply within the
European Economic Area, where products may be returned for warranty service to the nearest designated
service depot regardless of the place of purchase.
In order to obtain service under this warranty, Customer must provide the applicable ofÞce of Tektronix or its
authorized representative with notice of the defect before the expiration of the warranty period and make
suitable arrangements for the performance of service. Customer shall be responsible for packaging and
shipping the defective product to the service center designated by Tektronix or its representative, with shipping
charges prepaid. Tektronix or its representative shall pay for the return of the product to Customer. Customer
shall be responsible for paying any associated taxes or duties.
This warranty shall not apply to any defect, failure or damage caused by improper use or improper or
inadequate maintenance and care. Tektronix shall not be obligated to furnish service under this warranty a) to
repair damage resulting from attempts by personnel other than Tektronix representatives to install, repair or
service the product; b) to repair damage resulting from improper use or connection to incompatible equipment;
or c) to repair any damage or malfunction caused by the use of non-Tektronix supplies; d) to service a product
that has been modiÞed or integrated with other products when the effect of such modiÞcation or integration
increases the time or difÞculty of servicing the product; or e) to repair damage or malfunction resulting from
failure to perform user maintenance and cleaning at the frequency and as prescribed in the user manual.
THE ABOVE WARRANTIES ARE GIVEN BY TEKTRONIX WITH RESPECT TO THIS PRODUCT IN LIEU OF
ANY OTHER WARRANTIES, EXPRESS OR IMPLIED. TEKTRONIX AND ITS VENDORS DISCLAIM ANY
IMPLIED WARRANTIES OF MERCHANTABILITY OR FITNESS FOR A PARTICULAR PURPOSE.
TEKTRONIX' RESPONSIBILITY TO REPAIR OR REPLACE DEFECTIVE PRODUCTS IS THE SOLE AND
EXCLUSIVE REMEDY PROVIDED TO THE CUSTOMER FOR BREACH OF THIS WARRANTY. TEKTRONIX
AND ITS VENDORS WILL NOT BE LIABLE FOR ANY INDIRECT, SPECIAL, INCIDENTAL, OR
CONSEQUENTIAL DAMAGES IRRESPECTIVE OF WHETHER TEKTRONIX OR THE VENDOR HAS
ADVANCE NOTICE OF THE POSSIBILITY OF SUCH DAMAGES.
Users safety summary
Terms in manual:
CAUTION
WARNING
Conditions that can result in damage to the product.
Conditions that can result in personal injury or loss of life.
Power source: Do not apply more than 250 volts RMS between the supply conductors or between either supply
conductor and ground. Use only the speciÞed power cord and connector. Refer to a qualiÞed service technician
for changes to the cord or connector.
Operation of product: Avoid electric shock by contacting a qualiÞed service technician to replace fuses inside the
product. Do not operate without the covers and panels properly installed. Do not operate in an atmosphere of
explosive gases.
Safety instructions: Read all installation instructions carefully before you plug the product into a power source.
Terms on product:
CAUTION
DANGER
A personal injury hazard exists that may not be apparent. For example, a
panel may cover the hazardous area. Also applies to a hazard to property
including the product itself.
A personal injury hazard exists in the area where you see the sign.
Care of product: Disconnect the power plug by pulling the plug, not the cord. Disconnect the power plug if the
power cord or plug is frayed or otherwise damaged, if you spill anything into the case, if product is exposed to
any excess moisture, if product is dropped or damaged, if you suspect that the product needs servicing or repair,
and whenever you clean the product.
Ground the product: Plug the three-wire power cord (with grounding prong) into grounded AC outlets only. If
necessary, contact a licensed electrician to install a properly grounded outlet.
Symbols as marked on product:
DANGER high voltage:
Protective ground (earth) terminal:
Use caution. Refer to the manual(s) for information:
!
WARNING: If the product loses the ground connection, usage of knobs and controls (and other conductive parts)
can cause an electrical shock. Electrical product may be hazardous if misused.
Contents
1
Before You Begin
Using the printerÕs features 1-2
Checking the diskettes 1-4
2
Printing From a Macintosh
Using the Tektronix printer driver for the Macintosh 2-1
System requirements 2-1
Installing the driver 2-1
Using the driverÕs options 2-4
Using the LaserWriter 8.x printer driver 2-8
Using the Macintosh utility files 2-11
Decompressing the Macintosh utility files 2-12
Sending files to the printer 2-13
Changing the printer's name 2-16
Printing from an application 2-17
Printer description files for Aldus, Adobe, and other applications 2-19
Printer description file for QuarkXPress 2-21
PANTONE Color template for Adobe Illustrator 2-22
PANTONE Color library files for Aldus applications 2-23
3
Printing From a PC
Using the Tektronix printer driver for Windows 3-1
System requirements 3-1
Accessing on-line help 3-1
Do you already have Tektronix printers installed? 3-2
Installing the driver 3-3
Configuring the driver 3-5
Using the driverÕs options 3-9
Installing the Tektronix driver on a network 3-12
Updating the standard Microsoft Windows
PostScript driver 3-14
Updating a Windows NT PostScript driver 3-16
Printing from DOS 3-19
Printing Reference
iii
Using the PC utility files 3-20
Changing the printer's name 3-22
Adding Control-D characters to PC files 3-23
Setting PostScript job and wait timeouts 3-24
Printing from an application 3-26
Printer description files for Aldus, Adobe, and other applications 3-27
Printer description file for QuarkXPress 3-27
PANTONE Color library file for Adobe Illustrator 3-28
PANTONE Color library file for Aldus applications 3-29
PANTONE Color palette file for CorelDRAW! 3-31
4
Printing from a UNIX Workstation
Printing 4-1
Using the utility files 4-1
About Control-D characters 4-2
Mounting the PC/DOS diskette on a workstation 4-4
SGI IRIX versions 4.0.x and 5 4-4
Sun running Solaris 2.3 4-5
Obtaining the PC utility files 4-6
5
Selecting Media and Image Options
Selecting paper size 5-2
Selecting media type 5-5
Selecting image orientation 5-7
Enhance image detail (Finepoint Sharpening) 5-8
iv
Phaser 140 Drivers and Utilities
6
Using Color
TekColor Dynamic Correction 6-1
Working with color 6-2
Selecting color corrections 6-4
Turning off all color corrections 6-7
Printing a truer blue 6-8
Simulating display screen colors 6-9
Closely match printing press colors 6-10
Printing in gray scale 6-11
Using the printerÕs current color defaults 6-12
Printing the color sampler charts 6-13
Before you print the CMYK, RGB, and HSB color charts 6-15
Printing the CMYK, RGB, and HSB color charts 6-16
Printing the PANTONE¨ Color chart 6-18
7
Using Fonts
Macintosh fonts 7-1
Using Macintosh screen fonts 7-1
Printing a font sampler 7-3
Downloading fonts to the printer 7-4
PC fonts 7-5
Using fonts with Windows 7-5
Printing a font sampler 7-5
Downloading fonts to the printer 7-6
Printing Reference
v
8
Troubleshooting
Getting help 8-1
Using the Tektronix Bulletin Board Service 8-1
Reaching the Customer Support staff 8-1
Using the automated fax systems 8-2
Using the INTERNET to download Tektronix files 8-5
Opening the READ ME files on the Macintosh diskette 8-5
Solving PostScript printing problems 8-6
PostScript printing errors 8-6
Random PostScript errors 8-7
Using a PostScript error handler 8-8
Improving print speed 8-9
If your file doesnÕt print 8-10
General things to check for 8-10
Fixing timeout problems in Windows 8-12
Correcting printing problems 8-13
Printed colors are not what you expected 8-13
Use Tektronix halftone screens 8-14
Small lines disappear, colors shifting 8-15
Blue colors look too purple 8-15
Sharing the printer on a network 8-16
Driver and front panel interactions 8-16
LaserWriter Utility does not work 8-16
Programs crashing on a network (Macintosh) 8-16
Resetting the printer 8-17
Index
vi
Phaser 140 Drivers and Utilities
Chapter
1
Before You Begin
The Phaser 140 color printer lets you easily add color to your documents or
presentations. The drivers and utilities on the diskettes shipped with your
printer are designed to help you get the best printed results.
There are different ways to use the printerÕs features. Printer drivers are
available for Macintosh and Windows applications, and downloadable
utility Þles let you make selections and modify the printerÕs behavior. Most
of the features in the drivers are also available from the printerÕs front panel.
Refer to the tables on the following pages for details on the different ways to
use the printer.
Note
If you are using a workstation and cannot use the PC-DOS
diskette, refer to Chapter 4, ÒPrinting from a UNIX
Workstation,Ó for instructions on obtaining the utility Þles from
other sources.
Printing Reference
1-1
1 Before You Begin
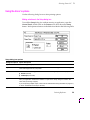
Using the printerÕs features
Tektronix printer drivers
When
to use
Options/
Features
■
Macintosh driver: Use with most
Macintosh applications.
■
Windows driver: Use with most
Windows applications.
Driver selections override utility Þle and
front panel selections for prints made from
the driver.
■
Select media size
(see page 5-2).
■
Select media type
(see page 5-5).
■
Select Finepoint Sharpening image
enhancement
(see page 5-8).
■
Where
to Þnd
1-2
Select TekColor color corrections
(see page 6-4).
Downloadable utility Þles
■
Use to modify the printer, such as changing
the printerÕs LocalTalk name, or downloading
the error handler.
■
Print the color and font sampler charts.
Many utility Þle selections affect all users.
■
Change the printerÕs name
(see page 2-16 for Macintosh, or
page 3-22 for PC).
■
Add Control-D characters to PC utility Þles
(see page 3-23).
■
Print color sampler charts
(see page 6-13).
■
Print font sampler charts
(see page 7-3 for Macintosh, or
page 7-5 for PC).
■
Download fonts
(see page 7-4 for Macintosh, or
page 7-6 for PC).
■
Use the Tektronix PostScript error handler
(see page 8-8).
■
Reset the printer (see page 8-17).
■
Use the Setscreen Patch
(see page 8-14).
■
Macintosh driver: Located on the
Macintosh Driver and Printer Utilities
diskette (see page 2-1 for installation
instructions).
■
Macintosh utility Þles: Located on the
Macintosh Driver and Printer Utilities
diskette (see page 2-12 for instructions on
decompressing and using the Þles).
■
Windows driver: Located on the Windows
3.1 Driver and Printer Utilities diskette (see
page 3-3 for installation instructions).
■
PC utility Þles: Located on the Windows 3.1
Driver and Printer Utilities diskette (see
page 3-20 for instructions on using the Þles).
Phaser 140 Drivers and Utilities
Before You Begin
1
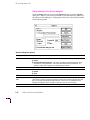
PrinterÕs front panel
When
to use
Options/
Features
Where
to Þnd
■
For use with applications/platforms that donÕt use
the Tektronix drivers.
■
For selecting features not available in the Tektronix
drivers.
■
For selecting a color adjustment when printing the
color sampler charts.
Front panel selections affect all users.
Exception: The ADJUST COLOR menu selections
affect prints made from the Tektronix drivers only
when the Use Printer Setting option is selected in
the driver.
■
PRINT SAMPLES
■
ADJUST COLOR
■
SET MEDIA TYPE
■
SET FINEPOINT
■
SET STARTUP PAGE
■
SET PAGE SIZE
■
SET LANGUAGE
■
CLEAN HEADS
■
PICK FILLED AREA
PrinterÕs front panel: Use arrow keys and Select
button to use menus. Refer to the Phaser 140 Color
Printer User Manual for instructions.
Printing Reference
1-3
1 Before You Begin
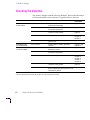
Checking the diskettes
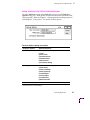
The printer is shipped with the following diskettes. Refer to the table below
to locate information on the contents of a speciÞc folder or directory.
Diskette
Folder/Directory
Contents
Where to Þnd
information
Macintosh Driver and
Printer Utilities
Top (root) level
Contains the printer driver Installer
program and related Þles.
page 2-1
Phaser 140 Apps.sea*
Contains printer description Þles for use
with speciÞc applications.
page 2-17
Phaser 140 Samplers.sea*
Contains Þles that print color sampler
charts and a font sampler.
page 6-13 and
page 7-3
Phaser 140 Utilities.sea*
Contains utility Þles for use with the printer.
Chapter 2
Chapter 5
Chapter 7
Phaser Screen Fonts.sea** Contains screen fonts to match the
printerÕs fonts.
page 7-1
AppleTalk Installer
(for the Macintosh)
Top (root) level
Contains Þles for updating AppleTalk
software.
page 8-7, and
page 8-16
Windows 3.1 Driver
and Printer Utilities
Top (root) level
Contains the Þles for installing the Tektronix
Windows 3.1 driver.
page 3-1
APPLSPEC
Contains printer description Þles for use
with speciÞc applications.
page 3-26
PHSR140
Contains utility Þles for use with the printer.
Chapter 3
Chapter 4
Chapter 6
Chapter 7
Chapter 8
SAMPLERS
Contains Þles that print color sampler
charts and a font sampler.
page 6-13 and
page 7-5
WPD
Contains Þles for updating the standard
Microsoft Windows PostScript driver for use
with Tektronix printers.
page 3-14
*These are compressed archive Þles; refer to page 2-12 for decompressing instructions.
**This is a compressed archive Þle; refer to page 7-2 for decompressing instructions.
1-4
Phaser 140 Drivers and Utilities
Chapter
2
Printing From a
Macintosh
Using the Tektronix printer driver for the Macintosh
System requirements
The Tektronix printer driver for the Macintosh requires the following
hardware and software:
■
An Apple Macintosh II computer (or later)
■
At least 4 Mbytes of memory
■
System Software version 6.0.7, or 7.0 and higher
Installing the driver
The Phaser 140 driver is a Tektronix-modiÞed version of Apple's LaserWriter
7.1.2 printer driver. This driver includes special paper sizes and TekColor
color correction options not available in the standard LaserWriter driver.
This installation procedure uses Apple's Installer program to load the
software for the Phaser 140 Driver onto your computer's hard disk. The
Installer also loads the LaserWriter 7.1.2 software if you are using system
software 6.0.7.
If the printer is shared on a network, install the same version of the Tektronix
driver on all Macintosh computers connected to the network.
Note
LaserWriter 7.1.2 software is required to operate the Tektronix
driver. It is automatically installed for system software 6.0.7
users. If you have system software 7.0 with LaserWriter 7.1.2
already installed, the Installer does not update these Þles.
Printing Reference
2-1
2 Printing From a Macintosh
2-2
1.
Make sure your Macintosh is powered up with system software
version 6.0.7, or 7.0 or higher, installed.
2.
Disable any virus protection programs you have running (some
virus protection software interferes with the driver installation).
To disable a virus protection program, hold down the Shift key
and restart your computer by selecting Restart from the
Special menu.
3.
Insert the Macintosh Driver and Printer Utilities diskette into the
disk drive. When the diskette appears on the desktop, you'll see
several icons.
4.
Double-click on the Installer icon to start the Installer program.
Read the introduction screen, then click OK. You'll see Easy
Install in the Installer window with the software listed.
Phaser 140 Drivers and Utilities
Printing From a Macintosh
5.
Click the Install button. All the necessary printer software is
automatically installed onto your hard disk.
6.
Click the Quit button in the dialog box that appears.
7.
Store the printer driver diskette in a safe place.
8.
Re-enable your virus protection program.
9.
If you want to rename the printer, refer to page 2-16 for
instructions.
2
Selecting the printer in the Chooser
1.
Select Chooser from the Apple menu.
2.
Click the Phaser 140 printer driver icon on the left side of the
Chooser. A list appears with the printers you have connected to
your Macintosh or printers that are available on a network. (If the
printer driver icon does not appear, Restart your Macintosh, and
repeat the printer driver installation procedure; also check the
cable connections on your computer and printer.)
3.
Click on the Tektronix printer you want in the list of printers on
the right side of the Chooser.
4.
Close the Chooser by clicking its close box.
Printing Reference
2-3
2 Printing From a Macintosh
Using the driverÕs options
Use the Page Setup, Print, and TekColor Options dialog boxes to select
printing options. Refer to other chapters in this printing reference for
instructions on performing common tasks with the driver.
Applications that use their own drivers
Some Macintosh applications, such as Aldus PageMaker 4.x and
QuarkXPress, use their own printer drivers. The best way to obtain the
TekColor color corrections on your prints is to use the Phaser 140 printer
driver. For example, you can force PageMaker 4.x to use the Tektronix driver
by holding down the Option key and choosing Print from the File menu.
For other applications, refer to the softwareÕs documentation for the correct
procedure. If you prefer to use the applicationÕs driver, refer to the
Phaser 140 Color Printer User Manual for instructions on selecting color
adjustments from the printerÕs front panel.
Extensions to the Print dialog box
Some applications add their own extensions to the Print dialog box. Refer to
the applicationÕs documentation for information on extra options not
described in this manual.
2-4
Phaser 140 Drivers and Utilities
2
Printing From a Macintosh
Making selections in the Page Setup dialog box
Choose Page Setup from the File menu to see the Page Setup dialog box.
Make printer selections in the Þelds described in the following table.
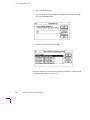
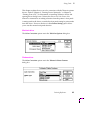
Page Setup dialog box options
Dialog box options
Option descriptions
Paper
Select a paper size from the pop-up menu. Refer to the
table on page 5-2 for a list of paper sizes and image
areas for your printer.
Reduce or Enlarge
Type in the percentage to reduce or enlarge your
printed image.
Orientation
Select one of the following options to determine how an
image is placed on the paper:
■
■
Printer Effects
Select one or more of the following options (refer to
Apple's documentation for details on these options):
■
■
■
■
Options button
Portrait
Landscape
Font Substitution
Text Smoothing
Graphics Smoothing
Faster Bitmap Printing
Refer to Apple's documentation for details on the
features in the Options dialog box.
Printing Reference
2-5
2 Printing From a Macintosh
Making selections in the Print dialog box
Choose Print from the File menu to see the Print dialog box. Make printer
selections in the Þelds described in the following table.
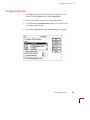
Print dialog box options
Dialog box options
Option descriptions
Copies
Type in the number of prints you want.
Pages
Type in the range of document page numbers you want
printed, or select All.
Cover Page
Select one of the following options:
■
■
■
No
First Page
Last Page
Paper Source
This printer does not support manual feed;
select Paper Cassette.
Print
Select one of the following options:
■
■
Destination
Select one of the following options:
■
■
TekColor button
Black & White: to print in black-and-white only.
Color/Grayscale*: to print in color.
Printer: To send a document to the printer.
PostScript File: To save a document to a Þle.
Click this button to see the TekColor Options dialog box.
*Select this option with all TekColor color correction options, including Monochrome.
2-6
Phaser 140 Drivers and Utilities
2
Printing From a Macintosh
Making selections in the TekColor Options dialog box
Click the TekColor button in the Print dialog box to see the TekColor
Options dialog box. Make printer selections in the Þelds described in the
following table. Refer to Chapter 5, ÒSelecting Media and Image Options,Ó
and Chapter 6, ÒUsing Color,Ó for details on these options.
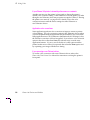
TekColor Options dialog box options
Dialog box options
Option descriptions
Color Corrections
Select one of the following options:
■
■
■
■
■
■
Media Type
Select one of the following options
■
■
■
■
■
■
■
Finepoint Sharpening
None
Vivid Color*
Simulate Screen
Simulate Press
Monochrome
Use Printer Setting
Plain (draft)
Plain (standard)*
Plain (premium)
Coated Paper
Glossy Paper
Transparency
Back Print Film
Check box either on or off; the default setting is off.
*These are the factory default settings.
Printing Reference
2-7
2 Printing From a Macintosh
Using the LaserWriter 8.x printer driver
You can use AppleÕs LaserWriter driver version 8.x with a Phaser 140 printer.
Some applications, such as Aldus PageMaker 5.0, use this driver instead of
the Tektronix driver. The options you select in this driverÕs Page Setup and
Print dialog boxes must be reselected for every print request.
Installing the LaserWriter 8.x driver
Note
During installation, the LaserWriter 8.x driver leaves other
versions of the LaserWriter driver intact, so this driver can
co-exist with the Tektronix driver.
Refer to the LaserWriter driverÕs documentation, LaserWriter 8.x Update
Guide, for instructions on installing the driver.
Using the LaserWriter 8.x driver with a Phaser 140
The LaserWriter 8.x driver uses printer-speciÞc 4.x PPDs (PostScript printer
description Þles) for information on a printerÕs page sizes, printing options,
and media type options. To use the LaserWriter 8.x driver with a Phaser 140
printer, do the following steps. If the printer is busy, it may take some time
to complete this conÞguration procedure; you may want to do this
procedure when the printer is idle. You only have to conÞgure a
printer once.
2-8
1.
The Phaser 140 Apps.sea archive Þle on the Macintosh Driver and
Printer Utilities diskette contains printer description Þles for a
Phaser 140 printer. Follow the instructions on page 2-12 to
decompress these Þles, then continue with the steps below.
2.
Locate the 4.x PPDs Folder in the folder on your hard disk
containing decompressed Þles. Open the folder and place the
TKPH1401.PPD Þle with other PPDs for the LaserWriter 8.x driver
in the Printer Descriptions folder, in the Extensions folder, inside the
System Folder.
3.
Open the Chooser.
4.
Select the LaserWriter 8.x driver icon.
Phaser 140 Drivers and Utilities
Printing From a Macintosh
5.
Select your printer from the list.
6.
Still in the Chooser, click the Setup button to see a list of options.
7.
In the dialog box that appears, click the More Choices button to
see the full range of options.
8.
Click the Printer Info button, then click the Update info button in
the next dialog box.
9.
Record the information on PostScript Version and Total Memory
Installed; you will need this information later. Click OK.
2
10. Click the Select PPD button; the Printer Descriptions folder in the
Extensions folder, inside the System Folder, is displayed.
11. Select the TKPH1401.PPD Þle. Make sure the information under
Printer Model matches the printer you have and the PostScript
Version information you got in Step 9.
Click Select.
Printing Reference
2-9
2 Printing From a Macintosh
Note
If the information under Printer Model is not an exact match,
use the closest printer name, and call Tektronix Customer
Support in the U.S. and Canada at 1-800-835-6100 for the latest
PPD Þle. Outside the U.S. and Canada, contact your local
Tektronix reseller. You can also download the latest PPD Þles
from the Tektronix Bulletin Board Service (BBS); see page 8-1
for instructions.
12. Click ConÞgure. In the Þeld for Memory ConÞguration under
Installable Options, select the amount of memory your printer
has installed. Check other options either Installed or
Not Installed, as appropriate.
13. Click OK in two dialog boxes and close the Chooser.
14. Open the Page Setup dialog box to see a pop-up menu with all of
the printerÕs supported paper sizes.
15. Open the Print dialog box and select Paper Cassette.
16. In the Print dialog box, click the Options button to see the Print
Options dialog box. There are printer-speciÞc TekColor features
listed at bottom of the dialog box. Refer to Chapter 5, ÒSelecting
Media and Image Options,Ó and Chapter 6, ÒUsing Color,Ó for
details on these options.
Auto Setup error message
If you click the Auto Setup button you may receive the following
error message:
There is a problem with the PPD file
ÒfilenameÓ. Use ÒSelect PPDÓ to choose
another Printer Description File.
The solution is to change the PPD Þle name (TKPH1401.PPD) to match the
ÒÞlenameÓ speciÞed in the error message. Locate the PPD Þle on your hard
disk. Highlight the name and type in the new name.
2-10
Phaser 140 Drivers and Utilities
Printing From a Macintosh
2
Using the Macintosh utility Þles
The Macintosh Driver and Printer Utilities diskette contains compressed
archive Þles with .sea extensions. These compressed Þles each contain a
group of Þles. For example, the Phaser 140 Utilities.sea Þle contains the
printer utility Þles for performing such tasks as enabling the error handler.
You need to decompress an entire archive Þle onto your hard disk, then
delete the individual Þles you don't want to use.
■
Phaser 140 Apps.sea contains the printer description Þles described
on page 2-11.
■
Phaser 140 Samplers.sea contains the color sampler charts described
on page 6-13, and the font sampler described on page 7-3.
■
Phaser 140 Utilities.sea contains the utility Þles described in several
places in this manual.
■
Screen Fonts.sea contains the screen fonts described on page 7-1.
Printing Reference
2-11
2 Printing From a Macintosh
Decompressing the Macintosh utility Þles
Note
Refer to page 7-2 for special instructions on decompressing the
Screen Fonts.sea archive Þle and installing fonts.
1.
Insert the Macintosh Driver and Printer Utilities diskette into your
computer's disk drive.
2.
Double-click on a compressed Þle with a .sea extension.
3.
At the Self-Extracting Archive dialog box, click Continue.
4.
In the dialog box, select the location, such as your hard drive,
where you want the decompressed Þles saved.
5.
At the prompt Install software as: you are asked to name
the folder where you want the decompressed Þles saved. Use
either the default folder name listed in the edit box or type in the
name you want for the folder. Then click Save.
6.
At the Installation was successful dialog box, click Quit.
The contents of the decompressed Þle are saved in the folder you
speciÞed and are ready for use.
2-12
Phaser 140 Drivers and Utilities
Printing From a Macintosh
2
Sending Þles to the printer
The utility Þles change the way the printer operates. First, decompress the
archive Þle from the diskette to a folder on your hard disk. Install the
Tektronix driver (or a LaserWriter driver) and select the appropriate printer
in the Chooser, then send the Þles to the printer. There are two ways to send
Þles to the printer: self-sending Þles, and using the LaserWriter Utility to
download Þles.
Using self-sending files
Certain Macintosh Þles, designated by a self-sender arrow icon, are
automatically sent to the currently selected printer when you double-click
on the icon. Most of the Þles in the Phaser 140 Samplers.sea and Phaser 140
Utilities.sea archive Þles are self-sending.
After double-clicking on the self-sender icon, a dialog box appears with the
name and a short description of the Þle you selected and the printer you are
sending the Þle to. Select Cancel or OK from this dialog box to continue.
Refer to the following table for a list of self-sending Þles.
Self-sending Þles
For details on
this Þle
CMYK Sampler
see page 6-13
RGB Sampler
see page 6-13
HSB Sampler
see page 6-13
Fonts Sampler
see page 7-3
Setscreen Patch
see page 8-14
Tek Error Handler
see page 8-8
Printing Reference
2-13
2 Printing From a Macintosh
Using the LaserWriter Utility to send files to the printer
If the Þle does not have the self-sending icon, use the LaserWriter Utility to
send the Þle to the printer. The LaserWriter Utility is an Apple utility you use
on the Macintosh to send PostScript Þles and fonts to the printer.
Note
The LaserWriter Utility cannot be used if the printer is
connected to a print server. See your system administrator to
temporarily remove the printer from the print server to download
the PANTONE-Tek Phaser 140 Þle, the Reset Printer Þle, and
to change the printerÕs LocalTalk/EtherTalk name.
The following Þles are not self-sending; use the LaserWriter Utility to send
these Þles to the printer:
2-14
Downloadable Þles
For details on
this Þle
PANTONE-Tek Phaser 140
(46-page PANTONE color
sampler chart)
see page 6-18
Reset Printer
see page 8-17
1.
Follow the instructions on page 2-12 to decompress the Phaser 140
Utilities.sea archive Þle on the Macintosh Driver and Printer
Utilities diskette to a folder on your hard disk.
2.
Install the Tektronix driver according to instructions on page 2-1.
3.
Select the appropriate printer in the Chooser.
Phaser 140 Drivers and Utilities
Printing From a Macintosh
4.
Locate the LaserWriter Utility in the folder of decompressed Þles.
Double-click on the LaserWriter Utility icon to start
the application.
5.
Select Download PostScript File from the Utilities menu.
6.
Select the Þle you want sent to the printer, and click Open.
7.
At the prompt Save PostScript output as: you are asked
for a Þle name for saving printer output. Use the default name
given in the edit box or type in a new name. Then click Save to
send the Þle to the printer. (Printer output includes status
messages generated by the printer reporting such conditions as
out of paper.)
8.
If no output is returned by the printer, the LaserWriter Utility
displays a dialog box; click OK in the box to continue.
If output is returned by the printer, you won't see this dialog box;
check your hard disk for the Þle the utility created for the
printer's output.
Printing Reference
2
2-15
2 Printing From a Macintosh
Changing the printer's name
This procedure lets you change the printer's LocalTalk name. If the printer is
also connected through EtherTalk, the name change is applied to both
LocalTalk and EtherTalk names. The name selected here prints on the startup
page and appears in the Chooser. The name can be up to 31 characters long,
and may contain any printable characters except @ (at sign) and : (colon).
The default printer name is Phaser 140. A change is persistent across printer
power cycles.
2-16
1.
The LaserWriter Utility is compressed into the Phaser 140
Utilities.sea archive Þle on the Macintosh Driver and Printer
Utilities diskette, and must be decompressed before you can use it.
Follow the instructions on page 2-12 to decompress this Þle, then
continue with the steps listed below.
2.
Select the appropriate printer in the Chooser.
3.
Locate the LaserWriter Utility Þle in the folder on your hard disk
containing decompressed utility Þles. You may want to place this
utility in a Utilities folder, or leave the utility on your desktop if
you use it often.
4.
Double-click on the LaserWriter Utility icon.
5.
Select Name Printer from the Utilities menu. The currently
selected printer is listed in the dialog box. Type the new name in
the edit box.
6.
Click the Rename button.
7.
At the conÞrmation dialog box, click OK.
8.
Open the Chooser to reselect the printer with its new name.
Phaser 140 Drivers and Utilities
Printing From a Macintosh
2
Printing from an application
Note
For hints and tips on printing from a speciÞc application, request
a document catalog from HAL or EuroHAL, the Tektronix
automated fax systems. Refer to page 8-2 for instructions on
using these systems.
The Phaser 140 Apps.sea archive Þle on the Macintosh Driver and Printer
Utilities diskette contains printer description Þles for your printer. Follow
the instructions on page 2-12 to decompress these Þles. These printer
description Þles are required by some applications; refer to your applicationÕs
documentation to determine if you need to use one or more of these Þles.
You should always use the most current printer description Þle. To
determine the date of the Þle you are using, select (highlight) the Þle and
choose Get Info from the File menu. Then check the Tektronix Bulletin
Board Service (BBS) for the most current printer description Þles. Refer to
page 8-1 for instructions on using the BBS.
Printing Reference
2-17
2 Printing From a Macintosh
A few applications and their corresponding printer description Þles are
listed in the table below; refer to the following pages for details on each
printer description Þle.
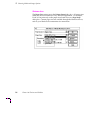
Printer Description Files for the Phaser 140
Application and version number
Printer Description File
Aldus PageMaker 4.0 or 4.01
Tek Phaser 140.APD*
Aldus PageMaker 4.2
(use both PPD and PDX)
TKPH1401.PPD (version 3.0)
TKPH1401.PDX
Aldus PageMaker 4.2A
(use both PPD and PDX)
TKPH1401.PPD (version 3.0)
TKPH1401.PDX
Aldus PageMaker 5.0
TKPH1401.PPD (version 4.x)
Aldus FreeHand 2.0
Tek Phaser 140.APD*
Aldus FreeHand 3.0 or 3.1
(use both PPD and PDX)
TKPH1401.PPD (version 3.0)
TKPH1401.PDX
Aldus FreeHand 4.0
TKPH1401.PPD (version 4.x)
QuarkXPress 3.11, 3.2, 3.3
Phaser 140.PDF
Canvas 3.0
TKPH1401.PPD (version 3.0)
*An APD Þle is not shipped with the printer. Check the Tektronix Bulletin
Board Service (BBS) for an APD Þle, or call Tektronix Customer Support;
refer to page 8-1 for instructions.
2-18
Phaser 140 Drivers and Utilities
Printing From a Macintosh
2
Printer description Þles for Aldus, Adobe, and other applications
There are 3.0 and 4.x versions of the PPD Þles; use the version required by
your application. Each version is located in a separate folder. However, if
you need to check the ÞleÕs version number (3.0 or 4.x), open the Þle in a text
editor and check the *FormatVersion line near the beginning of the Þle.
Applications that use 3.0 PPD Þles also use PDX Þles.
The PPD and PDX Þles are compressed into the Phaser 140 Apps.sea archive
Þle on the Macintosh Driver and Printer Utilities diskette, and must be
decompressed before you can use them. Follow the instructions on
page 2-12 to decompress these Þles, then continue with the steps listed
below for the application version you are using.
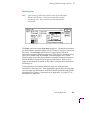
Aldus PageMaker 4.2 and 4.2A
Aldus FreeHand 3.0 and 3.1
Canvas 3.0
The TKPH1401.PDX Þle and the TKPH1401.PPD Þle in the 3.0 PPDs folder
are PostScript Printer Description Þles for use with Aldus, Adobe, and other
applications. Refer to your applicationÕs documentation to see if this is the
version PPD you should use.
■
Place the 3.0 PPD Þle and the PDX Þle with your other PPD Þles
on your hard disk according to application needs. Typically, PPD
Þles are located in the PPDs folder, in the Aldus folder, inside the
System Folder. Refer to your applicationÕs documentation for
details. This Þle is used automatically by applications that require
the information.
■
If you are using Canvas 3.0, drag the 3.0 PPD Þle and PDX Þle into
the PPDs folder on your computerÕs hard disk. The PPDs folder
may be found in the Canvas folder if you donÕt have any Aldus
applications.
Printing Reference
2-19
2 Printing From a Macintosh
Aldus PageMaker 5.0 and Aldus FreeHand 4.0
The TKPH1401.PPD Þle in the 4.x PPDs folder is a PostScript Printer
Description Þle for use with Aldus, Adobe, and other applications. Refer to
your applicationÕs documentation to see if this is the version PPD you
should use.
2-20
■
The 4.x PPD Þle is provided for support of future applications and
may not work with current applications that require the 3.0 PPD
Þle. Refer to your applicationÕs documentation to see which
version of the PPD Þle you should use.
Do not use this 4.x PPD Þle unless your application requires it.
■
Place the 4.x PPD Þle with your other PPD Þles on your
computerÕs hard disk according to application needs. Typically,
PPD Þles are located in the Printer Descriptions folder, in the
Extensions folder, inside the System Folder. Refer to the
applicationÕs documentation for details.
■
If you are using the LaserWriter 8.x printer driver, place the 4.x
PPD Þle in the Printer Descriptions folder, in the Extensions folder,
inside the System Folder.
Phaser 140 Drivers and Utilities
Printing From a Macintosh
2
Printer description Þle for QuarkXPress
The Phaser 140.PDF is a PostScript Printer Description Þle for QuarkXPress
3.11, 3.2, and 3.3. QuarkXPress lets you install support for additional
printers beyond those shipped with the application. This Þle adds the
Phaser 140 printer to the QuarkXPress list of supported printers.
The Phaser 140.PDF Þle is compressed into the Phaser 140 Apps.sea archive Þle
on the Macintosh Driver and Printer Utilities diskette, and must be
decompressed before you can use it. Follow the instructions on page 2-12 to
decompress this Þle, then continue with the steps listed below for the
application version you are using.
Note
For hints and tips on printing from QuarkXPress, request a
document catalog from HAL or EuroHAL, the Tektronix
automated fax systems. Refer to page 8-2 for instructions on
using these systems.
QuarkXPress 3.11 and 3.2
1.
Locate the Phaser 140.PDF Þle in the folder on your hard disk
containing decompressed utility Þles.
2.
Place the Phaser 140.PDF Þle in the same folder as the
QuarkXPress application on your computerÕs hard disk.
3.
The printerÕs name appears alphabetically in the list of installed
printers in the QuarkXPress custom Page Setup dialog box.
QuarkXPress 3.3
1.
Locate the Phaser 140.PDF Þle in the folder on your hard disk
containing decompressed utility Þles.
2.
Place the Phaser 140.PDF Þle in the PDF folder inside the
QuarkXPress 3.3 application folder on your computerÕs hard disk.
3.
The printerÕs name appears alphabetically in the list of installed
printers in the QuarkXPress custom Page Setup dialog box.
Printing Reference
2-21
2 Printing From a Macintosh
PANTONE Color template for Adobe Illustrator
Note
For the latest information on color libraries, call Tektronix
Customer Support in the U.S. and Canada at 1-800-835-6100.
Outside the U.S. and Canada, contact your local
Tektronix reseller.
The PANTONE-Tek Phaser 140.ai Þle lets you customize PANTONE Colors
for Adobe Illustrator and Phaser 140 printers. This Þle is application-speciÞc
and printer-speciÞc.
The PANTONE-Tek Phaser 140.ai Þle is compressed into the Phaser 140
Apps.sea archive Þle on the Macintosh Driver and Printer Utilities diskette,
and must be decompressed before you can use it. Follow the instructions on
page 2-12 to decompress these Þles, then continue with the steps listed
below for the application version you are using.
Adobe Illustrator 3.0
1.
Locate the PANTONE-Tek Phaser 140.ai Þle in the folder on your
hard disk containing decompressed utility Þles.
2.
Drag the PANTONE-Tek Phaser 140.ai Þle to the Illustrator
application folder on your hard disk.
3.
Use this Þle as a template to create documents for printing.
Adobe Illustrator 5.0
2-22
1.
Locate the PANTONE-Tek Phaser 140.ai Þle in the folder on your
hard disk containing decompressed utility Þles.
2.
Drag the PANTONE-Tek Phaser 140.ai Þle to the Illustrator
application folder on your hard disk.
3.
Choose Import Styles from the File menu and import the
PANTONE-Tek Phaser 140.ai Þle.
Phaser 140 Drivers and Utilities
Printing From a Macintosh
2
PANTONE Color library Þles for Aldus applications
Note
For the latest information on color libraries, call Tektronix
Customer Support in the U.S. and Canada at 1-800-835-6100.
Outside the U.S. and Canada, contact your local
Tektronix reseller.
The PANTONE-Tek Phaser 140.clib and PANTONE-Tek Phaser 140.acf Þles are
compressed into the Phaser 140 Apps.sea archive Þle on the Macintosh Driver
and Printer Utilities diskette, and must be decompressed before you can use
them. Follow the instructions on page 2-12 to decompress these Þles, then
continue with the steps listed below for the application version you
are using.
FreeHand 3.0 and 3.1
The PANTONE-Tek Phaser 140.clib Þle is used by the application to properly
specify PANTONE Colors for Aldus FreeHand and Phaser 140 printers. This
Þle is application-speciÞc and printer-speciÞc.
For FreeHand 3.0, refer to the Aldus FreeHand User Manual Version 3.0 for
Apple Macintosh computers for more information on color libraries.
For FreeHand 3.1, refer to the Aldus FreeHand Guide to Installation, System 7.0
Compatibility, and Feature Updates: Version 3.1 for Apple Macintosh computers
for more information on color libraries.
1.
Locate the PANTONE-Tek Phaser 140.clib Þle in the folder on your
hard disk containing decompressed utility Þles. Place the Þle in a
convenient location.
2.
Start FreeHand.
3.
Open the Colors palette in FreeHand (or press Command + 9).
4.
For FreeHand 3.0: Choose Library from the Colors palette
submenu; a dialog box appears listing available color libraries.
For FreeHand 3.1: Choose Import from the Colors palette
submenu; a dialog box appears listing available color libraries.
Printing Reference
2-23
2 Printing From a Macintosh
5.
Select and open the PANTONE-Tek Phaser 140.clib color library Þle.
A dialog box appears with a list of available colors.
6.
Select color type, either Process or Spot.
7.
Select the colors you want to use, then click OK. Select one color
at a time, or hold down the shift key and click to select several
colors, or press Command + A to select all colors in the list.
Selected colors are added to the Colors palette, the Colors dialog
box, and all Colors pop-up menus.
FreeHand 4.0
The PANTONE-Tek Phaser 140.acf Þle is used by the application to properly
specify PANTONE Colors for Aldus FreeHand and Phaser 140 printers. This
Þle is application-speciÞc and printer-speciÞc.
1.
Locate the PANTONE-Tek Phaser 140.acf Þle in the folder on your
hard disk containing decompressed utility Þles. Place the Þle in a
convenient location.
2.
Start FreeHand.
3.
From the Colorlist window choose Options, Import and select
PANTONE-Tek Phaser 140.acf.
PageMaker 5.0
The PANTONE-Tek Phaser 140.acf Þle is used by the application to properly
specify PANTONE Colors for Aldus PageMaker and Phaser 140 printers.
This Þle is application-speciÞc and printer-speciÞc.
2-24
1.
Locate the PANTONE-Tek Phaser 140.acf Þle in the folder on your
hard disk containing decompressed utility Þles.
2.
Place the PANTONE-Tek Phaser 140.acf Þle in the Color folder in
the Aldus folder, inside the System Folder.
3.
Start PageMaker.
4.
Choose Element, DeÞne Colors, New, Libraries, then select
PANTONE-Tek Phaser 140.acf.
Phaser 140 Drivers and Utilities
Chapter
3
Printing From a PC
Using the Tektronix printer driver for Windows
System requirements
The Tektronix Windows printer driver requires the following hardware
and software:
■
An IBM or compatible PC, with a 386, or higher, processor.
■
One ßoppy-disk drive (3.5-inch drive with 1.44-Mbyte capacity),
and a hard disk.
■
Two Mbytes of memory.
■
MS-DOS 5.0 operating system, or higher, and Windows
version 3.1.
Accessing on-line help
On-line help is available in two ways:
■
For general Windows 3.1 information about printers and setting
options, select Help from the Control Panel menu bar and choose
a topic from the Help menu. A Help window appears, offering
information on the selected topic and listing other related topics.
■
The Tektronix driver uses the Microsoft help Þle PSCRIPT.HLP.
This Þle comes with the Microsoft PostScript driver and must be
installed before you can use Help. After installing this Þle, you
can get information about the Tektronix driver by choosing Help
in the Setup dialog box. (Access this dialog box through the
Printers then the Printers-ConÞgure dialog boxes.)
Printing Reference
3-1
3 Printing From a PC
Do you already have Tektronix printers installed?
If you have any Tektronix printers that were installed with the older
Tektronix Installer program, and if you have the obsolete TekColor PS
Previewer software installed, you can remove the old Þles to clean up your
hard disk. Then, you can use the latest Tektronix Windows driver to reinstall
all of your Tektronix printers with the latest driver software. For
instructions on this procedure, request a document catalog from HAL or
EuroHAL, the Tektronix automated fax systems. Refer to page 8-2 for
instructions on using these systems.
3-2
Phaser 140 Drivers and Utilities
3
Printing From a PC
Installing the driver
The Tektronix Windows driver is a Windows PostScript driver customized
for Tektronix printers. These instructions assume a basic familiarity with
Windows operation and terminology. For additional information about
Windows, refer to your Microsoft Windows documentation.
1.
Insert the Tektronix Windows 3.1 Driver and Printer Utilities
diskette into your computerÕs disk drive, for example, drive B:.
2.
Start Windows.
3.
Open the Control Panel. Double-click on the Printers icon; the
Printers dialog box appears.
4.
Select the Add>> button.
5.
In the List of Printers, select Install Unlisted or Updated Printer.
Printing Reference
3-3
3 Printing From a PC
6.
Select the Install button.
7.
Type in the drive containing the PC diskette, for example, drive B:,
and select the OK button.
8.
Select your printer and choose OK.
The driver software you need is automatically installed. Continue with
ÒConÞguring the driverÓ on page 3-5.
3-4
Phaser 140 Drivers and Utilities
Printing From a PC
3
ConÞguring the driver
1.
The Printers dialog box should already be displayed; if not,
double-click the Printers icon in the Control Panel.
2.
Choose your printer from the list of installed printers.
3.
Choose the Set As Default Printer button if you want to select
your printer as the default.
4.
Choose the Connect button; the Connect dialog box appears.
Printing Reference
3-5
3 Printing From a PC
5.
Select the port the printer is connected to. Your printer is
connected to your computer through one of the computer's
communications ports. You need to tell the driver which port
your printer uses so the driver can print your documents.
Connect the printer either through the parallel port or through one
of the optional network ports. Refer to the Phaser 140 Color Printer
User Manual for connection instructions.
The port FILE: lets you send a PostScript document to a Þle
instead of to the printer. For more information about
communication ports, refer to your Windows documentation.
Note
3-6
The printerÕs conÞguration page contains information you may
need to set up the printerÕs network port. Refer to the Phaser 140
Color Printer User Manual for instructions on using the front
panel to print the conÞguration page.
■
For a parallel port setup in Windows: Select your parallel (LPT)
port in the list.
■
For a network port setup in Windows: Select your network port in
the list. Choose the Network button to see the Printers-Network
Connections dialog box. Fill in each item according to your
conÞguration, then choose the OK button. Refer to your Windows
documentation for details, or ask your network administrator
for help.
Phaser 140 Drivers and Utilities
3
Printing From a PC
6.
Set the Timeouts. These options regulate your computerÕs
communications with its printer ports.
■
Device Not Selected: Type a value of 0, or between 15 and 999, in
this text box to change the number of seconds Windows waits
before notifying you that a printer is off-line. The default is
15 seconds.
■
Transmission Retry: On large or multiple page documents you
may see an Alert message that the printer is no longer accepting
data before the job is completely downloaded to the printer. When
using the Print Manager with a shared printer, you should set this
option to a larger value, such as 850 to avoid these unnecessary
timeouts. Type a value between 45 and 850 in this text box; the
default setting is 45 seconds.
7.
Choose the OK button to return to the Printers dialog box, then
choose the Setup button. A dialog box appears with the name of
the printer you selected across the top. Use this dialog box to
select paper source, paper size and image orientation.
8.
Choose the Options button to see the Options dialog box. Check
the Color box to print in color.
9.
From the Options dialog box, choose the Advanced button to see
the Advanced Options dialog box. Make sure the Use PostScript
Level 2 Features check box is checked on. Choose the OK button
to return to the Options dialog box.
Note
The Use PostScript Level 2 Features option affects the print
time of bitmapped (raster) images by improving the image
transfer time from the computer to the printer, and by improving
the image processing time in the printer. This option is only
available to applications that use this Tektronix driver with
Tektronix PostScript Level 2 printers, such as the Phaser 140.
When this box is checked, the Compress Bitmaps option is
unavailable (grayed out).
Printing Reference
3-7
3 Printing From a PC
10. In the Options dialog box, choose the Printer Features button to
see the Tektronix Printer Features dialog box. Make color
correction, media type, and Finepoint Sharpening selections as
desired. Choose the OK button to return to the Options
dialog box.
11. Choose the OK button to return to the dialog box that lists your
printer's name across the top.
12. Choose the OK button to return to the Printers dialog box.
13. Choose the Close button.
If you are using PC/NFS
If you have PC/NFS software installed on your computer, you need to make
the following selection in the Network Options dialog box:
3-8
1.
From the Main window, double-click the Print Manager icon.
2.
From the Options menu in the Print Manager, select
Network Settings.
3.
In the Network Options dialog box, uncheck the
Print Net Jobs Direct box.
4.
Choose the OK button.
Phaser 140 Drivers and Utilities
3
Printing From a PC
Using the driverÕs options
Use the following dialog boxes to select printing options.
Making selections in the Setup dialog box
To reach the Setup dialog box without running an application, open the
Control Panel, double-click on the Printers icon, then choose the Setup
button. Make printer selections in the Þelds described in the following table.
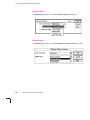
Setup dialog box options
Dialog box options
Option description
Paper Source
Select the Upper Tray option.
Paper Size
Select a paper size from the pop-up menu. Refer to the table on page 5-2 for a list of paper
sizes and image areas for your printer.
Orientation
Select one of the following options to determine how an image is placed on the paper:
■
■
Copies
Portrait (vertical)
Landscape (horizontal)
Type in the number of copies (prints) you want. (You may want to set the number of copies
from your application because the number of copies in the Setup dialog box remains the
same until you change it again.)
If you are printing multiple copies, make sure the Transmission Retry (described on page 3-7)
is set for at least 600 seconds (10 minutes).
Printing Reference
3-9
3 Printing From a PC
Making selections in the Options dialog box
From the Setup dialog box, choose the Options button to see the Options
dialog box. Refer to your Microsoft Windows documentation for details on
the options in this dialog box. Make printer selections in the Þelds described
in the following table.
Options dialog box options
Dialog box options
Option descriptions
Print To
Select one of the following options:
■ Printer
■ Encapsulated PostScript File (This option generates an EPS graphic that can be
imported into other applications. This option does not create a printable Þle. For
printing to a Þle, refer to page 3-6 for selecting the port FILE.)
Scaling
Type in a percentage value to scale the printed image.
Margins
Select one of the following options:
Default
■ None
■
Color
Check this box on to print in color.
Send Header with Each
Job
This box must be checked on.
(The Header contains important PostScript information that must accompany each print
job; it is not a banner page printed with each job. If this box is not checked, an error
message is displayed on your computer screen and your job does not print.)
Printer Features button
Choose this button to see the Tektronix Printer Features dialog box.
3-10
Phaser 140 Drivers and Utilities
Printing From a PC
3
Making selections in the Tektronix Printer Features dialog box
From the Options dialog box, choose the Printer Features button to see the
Tektronix Printer Features dialog box. Make printer selections in the Þelds
described in the following table. Refer to Chapter 5, ÒSelecting Media and
Image Options,Ó and Chapter 6, ÒUsing Color,Ó for details on these options.
Tektronix Printer Features dialog box options
Dialog box options
Option description
Color Correction
Select one of the following options:
■
■
■
■
■
■
Media Type
Select one of the following options:
■
■
■
■
■
■
■
Finepoint Sharpening
None
Vivid Color*
Simulate Screen
Simulate Press
Monochrome
Use Printer Setting
Plain (draft)
Plain (standard)*
Plain (premium)
Coated Paper
Glossy Paper
Transparency
Back Print Film
Check this box either on or off; the default setting is off.
*These are the factory default settings.
Printing Reference
3-11
3 Printing From a PC
Installing the Tektronix driver on a network
Note
For more information on the following procedure, request a
document catalog from HAL or EuroHAL, the Tektronix
automated fax systems. Refer to page 8-2 for instructions on
using these systems.
1.
Install the Tektronix Windows driver as described on page 3-3.
2.
Edit the CONTROL.INF Þle as follows to make the driver available
to other users:
a. Start Notepad, or a similar text editor.
b. Insert the Tektronix Windows 3.1 Driver and Printer Utilities
diskette into your computerÕs disk drive, for example drive B.
c. In Notepad, open the CONTROL.ADD Þle on the Tektronix
diskette.
d. Locate the entries for Tektronix Phaser printers. Select your
printer (highlight the line with your printer), and copy the line
to the Clipboard by selecting Copy from the Edit menu. If
desired, you can select and copy all of the Tektronix
printers listed.
e. In Notepad, open the CONTROL.INF Þle located in the
network Windows System directory, by selecting Open from
the File menu.
f. Search for the string Phaser to Þnd the existing Tektronix
printer entries.
g. Paste the printer information from the Clipboard into the
CONTROL.INF Þle above the existing Tektronix printer
entries, by selecting Paste from the Edit menu.
3-12
Phaser 140 Drivers and Utilities
Printing From a PC
3
h. If desired, the existing Tektronix printer entries can be deleted
or commented-out by placing a semicolon (;) at the beginning
of each line. It might be less confusing to users to have only
one Tektronix printer to choose from in the driver.
3.
Windows users can add the Tektronix printer to their Printers
Control Panel with the ADD button.
Printing Reference
3-13
3 Printing From a PC
Updating the standard Microsoft Windows
PostScript driver
If you prefer to use the standard Microsoft Windows PostScript printer
driver instead of the Tektronix Windows driver, follow these instructions.
This update procedure provides printer page size information for Windows
applications using the standard Microsoft driver. However, color corrections
and other PostScript Level 2 features are available only with the Tektronix
Windows 3.1 driver and are not supported by the standard Microsoft driver.
Refer to the Phaser 140 Color Printer User Manual for instructions on selecting
color adjustments from the printerÕs front panel.
These instructions assume a basic familiarity with Windows operation and
terminology. For additional information about Windows, refer to your
Microsoft Windows documentation.
Note
If you want to install the Tektronix Windows driver, follow the
instructions on page 3-3.
1.
Start Windows.
2.
Open the Control Panel.
3.
Double-click on Printers icon.
4.
Choose the Add>> button; a list of printers is displayed.
5.
Select Install Unlisted or Updated Printer.
6.
Choose the Install button.
7.
When prompted, insert the Tektronix Windows 3.1 Driver and
Printer Utilities diskette into your computerÕs disk drive.
8.
Type in the disk drive location of the diskette, and type in the
\WPD subdirectory on the diskette:
B:\WPD
Then choose OK.
3-14
Phaser 140 Drivers and Utilities
Printing From a PC
9.
Note
3
Choose your printer from the list, then choose the OK button.
Printers using the Tektronix driver for Windows have (TekColor)
listed in their name. Printers without this designation are using
the standard Microsoft Windows PostScript driver and the
WPD Þle.
10. When asked to insert a disk with the updated PSCRIPT.DRV Þle,
enter the path for your Windows\System directory, or insert the
appropriate Microsoft Windows diskette, so the current
PSCRIPT.DRV Þle is used. (The PSCRIPT.DRV Þle is not included
on the Tektronix diskettes.)
Printing Reference
3-15
3 Printing From a PC
Updating a Windows NT PostScript driver
If you are using Microsoft Windows NT, follow these instructions to print to
the Phaser 140. This update procedure provides printer page size
information for Windows NT applications. However, TekColor color
corrections and other PostScript Level 2 features are not supported by the
Windows NT driver. Refer to the Phaser 140 Color Printer User Manual for
instructions on selecting color adjustments from the printerÕs front panel.
Refer to your Microsoft Windows NT documentation for details on features
in the Windows NT driver.
These instructions assume a basic familiarity with Windows NT operation
and terminology. For additional information about Windows NT, refer to
your Microsoft Windows NT documentation.
Note
You may need your original Windows NT setup diskettes (or
CD-ROM) to complete this procedure if you need to install a
PostScript printer in Step 3 below.
1.
Start your system with Windows NT.
2.
If your computer platform has an Intel-compatible processor, go
on to Step 3.
If your computer platform is a MIPS or Alpha, you need to edit the
PRINTER.INF Þle in the APPLSPEC\PPD4.x directory on the
Tektronix Windows 3.1 Driver and Printer Utilities diskette.
a. The Tektronix Windows 3.1 Driver and Printer Utilities
diskette is write-protected. To edit the PRINTER.INF Þle, copy
the following Þles from the Tektronix diskette to a new,
formatted ßoppy diskette.
Place all three Þles at the top (root) level of the new diskette.
TEK1 (from the top level of the Tektronix diskette)
PRINTER.INF (from the APPLSPEC\PPD4.x sub-directory)
TKPH1401.PPD (from the APPLSPEC\PPD4.x sub-directory)
b. Open the copy of the PRINTER.INF Þle on the new diskette in
a text editor such as Notepad.
3-16
Phaser 140 Drivers and Utilities
Printing From a PC
3
c. Locate the following section in the Þle:
[ProductType]
STF_PLATFORM = I386
d. Replace the I386 with either MIPS (for a MIPS platform) or
Alpha_AXP (for an Alpha platform).
e. Save the PRINTER.INF Þle.
3.
From the Main window, double-click on the Print Manager icon.
4.
If you donÕt have a PostScript printer installed, install one now. If
you do have one installed, go on to Step 5.
a. From the Printer menu, select Create Printer; the Create
Printer dialog box appears.
b. Under Driver, scroll through the list and select a PostScript
printer, such as the Apple LaserWriter NT, and choose the
OK button.
c. Follow the on-line instructions to install the driver Þles from
your Windows NT CD-ROM or diskettes.
5.
Install the Tektronix Phaser 140 printer. From the Printer menu,
select Create Printer; the Create Printer dialog box appears.
6.
Under Driver, scroll to the end of the list and select Other; the
Install Driver dialog box appears.
7.
When prompted, insert either the Tektronix Windows 3.1 Driver
and Printer Utilities diskette, or the new diskette you created in
Step 2, into your computerÕs disk drive.
8.
If you are using the Tektronix Windows 3.1 Driver and Printer
Utilities diskette: Type in the disk drive location of the diskette
and change to the APPLSPEC\PPD4.x directory. Choose OK; the
Select Driver dialog box appears.
If you are using an edited copy of the PRINTER.INF Þle from
Step 2: Type in the disk drive location of the diskette. Choose
OK; the Select Driver dialog box appears.
Printing Reference
3-17
3 Printing From a PC
9.
Under Printer Driver, choose your Phaser 140 printer from the list,
then choose the OK button.
10. In the Windows NT Setup dialog box, type in the same path you
used in Step 8 (for example, B:\APPLSPEC\PPD4.x), and choose
the Continue button; the Noncritical Error dialog box appears.
11. When you are prompted for the location of the PSCRPTUI.DLL Þle
and the PSCRIPT.DLL Þle, choose the Ignore button. (These Þles
were installed in the procedure in Step 4 or were already
installed.)
12. When you are returned to the Create Printer dialog box, Þll in the
other Þelds as desired, then choose the OK button; the PostScript
Printer Setup dialog box appears.
13. Select options in the PostScript Printer Setup dialog box.
Enabling the Use Printer Halftoning option is recommended.
Then choose the OK button; the Windows NT Setup dialog
box appears.
14. If you had to install a PostScript printer in Step 4, follow this
procedure to delete it.
a. Select the printer you want to remove.
b. From the Printer menu, select Remove Printer.
c. At the prompt, choose the OK button to remove the
selected printer.
Note
3-18
Use the following page sizes with the Phaser 140: Letter, A4,
and Legal.
Phaser 140 Drivers and Utilities
Printing From a PC
3
Printing from DOS
Note
Driver-selectable TekColor color correction features are available
only though the Tektronix drivers for Macintosh computers and
the Windows environment as described in this manual. To obtain
TekColor corrections with another driver, you must use the
printerÕs front panel.
Printing from a driver
Many DOS applications include printer drivers for Tektronix printers.
Check the application you are using for a printer driver for a Phaser 140.
Install and use the driver according to the applicationÕs documentation.
If the application you are using does not have a driver for the Phaser 140,
check to see if other Tektronix Phaser series printers are listed, and choose
one of those. Otherwise, you can use a generic color PostScript printer
driver. However, generic drivers do not have information on the printerÕs
page sizes and image areas, and images may be clipped or shifted
when printed.
If your application does not have a driver for use with your printer, contact
the applicationÕs vendor, or call Tektronix Customer Support in the U.S. and
Canada at 1-800-835-6100, for printing information. Outside the U.S. and
Canada, contact your local Tektronix reseller.
Refer to the Phaser 140 Color Printer User Manual for information on using the
DOS MODE command to disable timeouts on a parallel port.
Using color corrections
DOS drivers do not include the TekColor color correction options. Refer to
the Phaser 140 Color Printer User Manual for instructions on selecting color
corrections from the printerÕs front panel.
Printing Reference
3-19
3 Printing From a PC
Using the PC utility Þles
The utility Þles change the way the printer operates. To use the Þles, send
them to the printer from the communications port your printer is
connected to. You can use either the DOS method or the Windows method
described below.
Downloading files from DOS
You can use the DOS COPY command to download PostScript Þles to
the printer.
1.
Locate the Þles you want to use on the Windows 3.1 Driver and
Printer Utilities diskette. You can copy the Þles to your
computer's hard disk, or use the Þles directly from the diskette.
2.
Use the DOS COPY command to send the desired Þle to
the printer.
For example, to reset the printer you would send the RESET.PS Þle
to the printer. If your printer is connected to the parallel (LPT)
port, type the following command (where x is 1, 2, or 3):
COPY RESET.PS LPTx:
If your printer is connected to a Novell or TCP/IP network, you
should follow the instructions provided with your network
software.
3-20
Phaser 140 Drivers and Utilities
Printing From a PC
3
Downloading files from Windows
You can use the Copy command in the File Manager in Windows to
download PostScript Þles to the printer.
1.
Locate the Þles you want to use on the Windows 3.1 Driver and
Printer Utilities diskette. You can copy the Þles to your
computer's hard disk, or use the Þles directly from the diskette.
2.
In Windows, double-click the File Manager icon in the Main
window.
3.
Locate the drive and directory or sub-directory location of the
printerÕs utility Þles.
4.
Select the utility Þle you want to send to the printer, for example
RESET.PS.
5.
From the File menu, select Copy. The Copy dialog box appears
with the utility Þle you selected listed in the From Þeld.
6.
In the To Þeld, type the port your printer is connected to. For
example, type LPT1: for a parallel port connection.
Choose the OK button.
7.
If the ConÞrm File Replace dialog box appears, choose the Yes
button to continue.
The Þle is downloaded to the printer.
Printing Reference
3-21
3 Printing From a PC
Changing the printer's name
This procedure lets you change the printer's LocalTalk name. If the printer is
also connected through EtherTalk, the name change is applied to both
LocalTalk and EtherTalk names. The name selected here prints on the startup
page. The name can be up to 31 characters long, and may contain any
printable characters except @ (at sign) and : (colon). The default printer
name is Phaser 140. A change is persistent across printer power cycles.
1.
Locate the PRNTNAME.PS Þle in the PHSR140 directory on the
Windows 3.1 Driver and Printer Utilities diskette.
2.
Copy the Þle to your hard disk for editing.
3.
View the PRNTNAME.PS Þle in a text editor.
4.
Edit the Þle to substitute a different printer name for
(My Printer Name) in the /PrinterName line.
5.
PC users: Use the DOS COPY command to send the Þle to the
printer. For example, to send the Þle to the parallel port, type the
following at the DOS prompt:
COPY
filename
LPT1:
Workstation users: Send the Þle to the printer as you would any
PostScript Þle.
Note
3-22
Some text editors add a carriage return or line feed after the last
Control-D character in a Þle you are editing. If your computer is
connected to the printer through the parallel port, the extra
characters will start a new job and the printer times out after a
few minutes. To avoid this, copy the CTRLD.PS Þle to the
printer after you send the PRNTNAME.PS Þle; see page 3-23 for
more information on the CTRLD.PS Þle.
Phaser 140 Drivers and Utilities
Printing From a PC
3
Adding Control-D characters to PC Þles
The ADDCTRLD.BAT and CTRLD.PS Þles are located in the PHSR140
directory on the Windows 3.1 Driver and Printer Utilities diskette. These
Þles are included for users who want to write their own PostScript Þles.
Note
If your computer is connected to the printer through the parallel
port, you need to have Control-D characters in your utility Þles or
in the Þles you create. However, if your computer is connected to
a network such as NetWare or TCP/IP, you should not add
Control-D characters to a utility Þle.
The non-text Control-D character is required at the end of PostScript Þles
sent to the printerÕs parallel port; it signals Òend-of-job.Ó A Control-D
should precede and follow most PostScript data Þles. ADDCTRLD.BAT and
CTRLD.PS help you add two Control-D characters to your Þles.
ADDCTRLD.BAT
ADDCTRLD.BAT is a batch Þle that adds a Control-D to the beginning and
the end of a Þle. Use this Þle if you are creating your own PostScript Þles.
To use ADDCTRLD.BAT, copy ADDCTRL.BAT and CTRLD.PS to the same
directory on your hard disk. Type the following command:
ADDCTRLD filename
where Þlename is the name of the Þle that needs Control-D characters.
CTRLD.PS
CTRLD.PS contains some PostScript comments plus the Control-D character.
Copy CTRLD.PS to the beginning and/or end of your PostScript Þles before
you send them to the printer. (PostScript utility Þles on the Windows 3.1
Driver and Printer Utilities diskette already have Control-D characters at the
beginning and end.) You can send CTRLD.PS to the printer by itself to make
sure the printer is in the Òend of jobÓ condition.
Printing Reference
3-23
3 Printing From a PC
Setting PostScript job and wait timeouts
The CONFIG.PS Þle changes the PostScript job and wait timeout values.
Changes are persistent across print jobs but not across printer power cycles.
■
The wait timeout is the amount of time in seconds the printer
waits for data to come from the computer during a job. If the
printer pauses for longer than the speciÞed number of seconds,
the job is discarded. If the value is exceeded, a timeout error is
generated, and the job is canceled.
■
The job timeout is the amount of time any single job may be active
before it must print. If the value is exceeded, a timeout error is
generated, and the job is canceled.
Note
The manual feed timeout is not used on this printer.
Note
This Þle affects printer operation. If the printer is shared on a
network, using this Þle may affect the prints requested from
other users.
1.
Locate the CONFIG.PS Þle in the PHSR140 directory on the
Windows 3.1 Driver and Printer Utilities diskette.
2.
The default values for the printer are 0 seconds for the job timeout
and 40 seconds for the wait timeout. A timeout value of 0
indicates no timeout; the printer waits indeÞnitely.
To change CONFIG.PS to specify different timeouts, substitute
new values for 0 and 40 in the JobTimeOut and WaitTimeOut
lines. Permitted timeout values are as follows:
3-24
■
JobTimeOut: 0 to 999
■
WaitTimeOut: 0, or 15 to 999
■
To specify no timeout, use 0
Phaser 140 Drivers and Utilities
Printing From a PC
Note
3
To avoid timeouts or job cancellation on Windows multiple-page
or multiple-copy print jobs, you may want to set the
WaitTimeOut to a high value or to 0 (zero).
In the following example, the timeouts are set to their
default values.
4 dict begin
/Password
() def
/JobTimeOut
0 def
/WaitTimeOut
40 def
currentsystemparams /ManualFeedTimeout known
{ /ManualFeedTimeout 60 def } if
currentdict end setsystemparams
3.
PC users: Use the DOS COPY command to send CONFIG.PS to
the printer. If the printer is connected to the parallel (LPT) port,
enter the following command:
COPY CONFIG.PS LPT1:
Workstation users: Send the Þle to the printer as you would any
PostScript Þle.
Printing Reference
3-25
3 Printing From a PC
Printing from an application
Note
For hints and tips on printing from a speciÞc application, request
a document catalog from HAL or EuroHAL, the Tektronix
automated fax systems. Refer to page 8-2 for instructions on
using these systems.
Printer description Þles are located in the APPLSPEC directory on the
Windows 3.1 Driver and Printer Utilities diskette. These Þles are required by
some applications; refer to your applicationÕs documentation to determine if you
need to use one or more of these Þles.
You should always use the most current printer description Þle. To
determine the date of the Þle you are using, open the Þle in a text editor.
Then check the Tektronix Bulletin Board Service (BBS) for the most current
printer description Þles. Refer to page 8-1 for instructions on using the BBS.
A few applications and their corresponding printer description Þles are
listed in the table below; refer to the following pages for details on each
printer description Þle.
Printer Description Files for the Phaser 140
3-26
Application and version number
Printer Description File
Aldus PageMaker 4.0, 4.2, 4.2A
(use both PPD and PDX)
TKPH1401.PPD (version 3.0)
TKPH1401.PDX
Aldus PageMaker 5.0
TKPH1401.PPD (version 4.x)
Aldus FreeHand 3.0 or 3.1
(use both PPD and PDX)
TKPH1401.PPD (version 3.0)
TKPH1401.PDX
Aldus FreeHand 4.0
TKPH1401.PPD (version 4.x)
QuarkXPress 3.3
(requires Windows 3.1)
TKPH1401.PDF
Phaser 140 Drivers and Utilities
Printing From a PC
3
Printer description Þles for Aldus, Adobe, and other applications
There are 3.0 and 4.x versions of the PPD Þles; use the version required by
your application. Applications that use 3.0 PPD Þles also use PDX Þles.
Aldus PageMaker 4.0, 4.2 and 4.2A
Aldus FreeHand 3.0 and 3.1
The \PPD3.0 subdirectory in the APPLSPEC directory on the Windows 3.1
Driver and Printer Utilities diskette contains the version 3.0 TKPH1401.PPD
Þle and the TKPH1401.PDX Þle that are required by some Windows
applications, such as Aldus FreeHand and PageMaker.
To use these Þles, copy them to the directory on your computerÕs hard disk
where other PPD Þles are located. For example, the subdirectory in
FreeHandÕs File Manager containing printer description Þles should be
called ALDUS\USENGLSH\PPDS. Refer to your applicationÕs
documentation for details on using printer description Þles.
Aldus PageMaker 5.0 and Aldus FreeHand 4.0
The \PPD4.x subdirectory in the APPLSPEC directory on the Windows 3.1
Driver and Printer Utilities diskette contains the version 4.x TKPH1401.PPD
printer description Þle. This Þle is provided for support of Windows
applications, such as newer Aldus applications.
To use this Þle, copy it to the directory on your hard disk where other PPD
Þles are located. For example, the subdirectory in FreeHandÕs File Manager
containing printer description Þles should be called
ALDUS\USENGLSH\PPD4. Refer to your applicationÕs documentation for
details on using printer description Þles.
Printer description Þle for QuarkXPress
The TKPH1401.PDF Þle is for use with Quark 3.3 and Windows 3.1. To
install the Þle, copy TKPH1401.PDF from the Windows 3.1 Driver and
Printer Utilities diskette into the PDF subdirectory of the Quark 3.3
application. For example:
COPY TKPH1401.PDF C:\XPRESS33\PDF
Printing Reference
3-27
3 Printing From a PC
PANTONE Color library Þle for Adobe Illustrator
Note
For the latest information on color libraries, call Tektronix
Customer Support in the U.S. and Canada at 1-800-835-6100.
Outside the U.S. and Canada, contact your local
Tektronix reseller.
The TEK_140.AI Þle is located in the APPLSPEC directory, on the Windows
3.1 Driver and Printer Utilities diskette. This Þle lets you customize
PANTONE Colors for Adobe Illustrator and a Phaser 140 printer. This Þle is
application-speciÞc and printer-speciÞc.
Adobe Illustrator 3.0 and 4.02
3-28
1.
Copy the TEK_140.AI Þle to your computerÕs hard disk, for
example, to Adobe IllustratorÕs Color directory.
2.
Start the Illustrator program.
3.
Open the Þle or image you want to use.
4.
From the File menu, select the Open command.
5.
In the dialog box that appears, locate the directory and Þle location
of the TEK_140.AI Þle, and open the Þle.
6.
When you are working on an image, use the Paint menu and
either the Paint Style or Custom Color commands to select
PANTONE Colors.
Phaser 140 Drivers and Utilities
Printing From a PC
3
PANTONE Color library Þle for Aldus applications
Note
For the latest information on color libraries, call Tektronix
Customer Support in the U.S. and Canada at 1-800-835-6100.
Outside the U.S. and Canada, contact your local
Tektronix reseller.
FreeHand 3.0 and 3.1
The TEK_140.CLB Þle is located in the APPLSPEC directory, on the Windows
3.1 Driver and Printer Utilities diskette. This Þle is used by the Aldus
FreeHand application to properly specify PANTONE Colors for a Phaser 140
printer. This Þle is application-speciÞc and printer-speciÞc.
1.
Copy the TEK_140.CLB Þle to your computerÕs hard disk, for
example, to the FreeHand applicationÕs directory.
2.
Open FreeHand.
3.
In FreeHand 3.0: Choose Library from the Colors palette
submenu; a dialog box appears listing available color libraries.
In FreeHand 3.1: Choose Import from the Colors palette
submenu; a dialog box appears listing available color libraries.
4.
Select and open the TEK_140.CLB color library; a dialog box
appears with a list of available colors.
5.
Select the colors you want to use, then click OK. Selected colors
are added to the Colors palette, the Colors dialog box, and all
Colors menus.
Printing Reference
3-29
3 Printing From a PC
PageMaker 5.0
The TEK_140.ACF Þle is located in the APPLSPEC directory, on the Windows
3.1 Driver and Printer Utilities diskette. This Þle is used by the application
to properly specify PANTONE Colors for Aldus PageMaker and the
Phaser 140 printer. This Þle is application-speciÞc and printer-speciÞc.
3-30
1.
Copy the TEK_140.ACF Þle from the Windows 3.1 Driver and
Printer Utilities diskette to your hard disk.
2.
Place the Þle in the usenglsh\color\ directory in the Aldus
application directory.
3.
Start PageMaker.
4.
Choose Element, DeÞne Colors, New, Libraries, then select the
Phaser 140 printer.
Phaser 140 Drivers and Utilities
Printing From a PC
3
PANTONE Color palette Þle for CorelDRAW!
Note
For the latest information on color libraries, call Tektronix
Customer Support in the U.S. and Canada at 1-800-835-6100.
Outside the U.S. and Canada, contact your local
Tektronix reseller.
The TEK_140.PAL Þle is located in the APPLSPEC directory, on the Windows
3.1 Driver and Printer Utilities diskette. This Þle is used by the CorelDRAW!
application to properly specify PANTONE Colors for a Phaser 140 printer.
This Þle is application-speciÞc and printer-speciÞc.
1.
Copy the TEK_140.PAL Þle to your computerÕs hard disk, for
example, to the Corel applicationÕs directory.
2.
Open CorelDRAW!.
3.
Open the document Þle you want to work in.
4.
Select the item you want Þlled with a PANTONE Color, then select
the Fill tool icon (paint bucket).
5.
Select the Fill tool icon again, then select the Open button
under Palette.
6.
In the dialog box under Path, specify the location of the
TEK_140.PAL Þle.
7.
Under Files, select the TEK_140.PAL Þle and select the
Load button.
Printing Reference
3-31
3 Printing From a PC
3-32
Phaser 140 Drivers and Utilities
Chapter
4
Printing from a UNIX
Workstation
Printing
You can send print Þles from your workstation to the Phaser 140 as you
would to any PostScript printer, for example, an Apple LaserWriter.
Workstation users can print from any application that generates PostScript
Level 1 or Level 2.
For more information on printing from a workstation, request a document
catalog from HAL or EuroHAL, the Tektronix automated fax systems. Refer
to page 8-2 for instructions on using these systems.
To use the TekColor color corrections and other printer features, use the
menus on the printerÕs front panel; refer to the Phaser 140 Color Printer User
Manual for instructions.
Using the utility Þles
For some printer features you can use the downloadable utility Þles
available on the Windows 3.1 Driver and Printer Utilities diskette. To mount
the diskette, refer to the instructions on page 4-4. If you cannot use this
diskette, refer to page 4-6 for instructions on obtaining the Þles from other
sources. The utility Þles perform such tasks as changing the printerÕs name,
resetting the printer, and using an error handler. The utility Þles on the
Windows 3.1 Driver and Printer Utilities diskette for PC/DOS are written in
the PostScript Level 2 programming language, and in a few cases you may
have to edit the Þles to change the default parameters.
Printing Reference
4-1
4 Printing from a UNIX Workstation
About Control-D characters
Over the parallel port, a Control-D character is used to indicate the end of a
Þle. Without a Control-D character in the Þle, the printer will continue
waiting for more input. All PostScript utility Þles, except RESET.PS, must
end with a Control-D character when sent from a workstation over a parallel
interface. In the Þle descriptions, Control-D is denoted as CTRL-D. For
more information about PostScript programming, refer to the PostScript
Language Reference Manual, second edition, Adobe Systems Incorporated.
If your workstation is connected to an Ethernet network such as NetWare or
TCP/IP, you should delete the Control-D characters from each utility Þle
you plan to use.
Removing Control-D characters from utility files
1.
Locate the delctrld UNIX shell script in the PHSR140 directory on
the Windows 3.1 Driver and Printer Utilities diskette for PC/DOS.
You must copy this Þle to your workstation before you can use it.
(Or, obtain this shell script through one of the methods described
on page 4-6.)
2.
To remove all Control-D characters from a Þle, type the following
command:
delctrld filename1.ps filename2.ps
where Þlename1.ps is the utility Þle you want to remove Control-D
characters from, and Þlename2.ps is the revised Þle with a new
name. (Both Þlename1.ps and Þlename2.ps can have the same name,
but the original Þle will be overwritten by the revision.)
3.
4-2
Send the utility Þle to the printer as you would any PostScript Þle.
Phaser 140 Drivers and Utilities
Printing from a UNIX Workstation
4
Adding Control-D characters to utility files
1.
Locate the addctrld UNIX shell script in the PHSR140 directory on
the Windows 3.1 Driver and Printer Utilities diskette for PC/DOS.
You must copy this Þle to your workstation before you can use it.
(Or, obtain this shell script through one of the methods described
on page 4-6.)
2.
To add Control-D characters to the beginning and end of a Þle,
type the following command:
addctrld filename1.ps filename2.ps
where Þlename1.ps is the utility Þle you want to add Control-D
characters to, and Þlename2.ps is the revised Þle with a new name.
(Both Þlename1.ps and Þlename2.ps can have the same name, but the
original Þle will be overwritten by the revision.)
3.
Send the utility Þle to the printer in the usual manner.
Printing Reference
4-3
4 Printing from a UNIX Workstation
Mounting the PC/DOS diskette on a workstation
Note
The following procedures give instructions for mounting the
PC/DOS diskette on SGI IRIX versions 4.0.x and 5, and Sun
running Solaris 2.3. For instructions on mounting the diskette
on a Sun OS 4.1.3, request document number 9501 from HAL,
the automated fax system. Refer to page 8-2 for instructions.
SGI IRIX versions 4.0.x and 5
PC/DOS-formatted diskettes can be easily mounted in the SGI environment.
For more information, print out the appropriate man pages on your system.
IRIX version 4.0.x uses the msdosd daemon to mount a ßoppy diskette.
IRIX version 5 uses the mediad daemon to mount all types of devices,
including ßoppy diskettes. Both operating system versions have the utilities
from_dos and to_unix to convert Þles and add or remove Control-M
characters.
To mount a diskette, insert the diskette into the disk drive.
msdosd
The msdosd daemon monitors a ßoppy diskette drive. When a diskette is
inserted, it is mounted appropriately if it is in MS-DOS format. To specify a
ßoppy disk drive, use the appropriate device special Þle in /dev/rdsk.
High-density diskettes are mounted by using ßoppy devices with the
hi sufÞx.
mediad
The mediad daemon monitors the removable media devices on a system.
When a diskette is inserted, it is mounted if it makes sense for that media
type and if there is a valid Þlesystem on it.
4-4
Phaser 140 Drivers and Utilities
4
Printing from a UNIX Workstation
Sun running Solaris 2.3
PC/DOS-formatted diskettes can be mounted in two ways in the Solaris
environment, either automatically or manually. For more information, print
out the appropriate man pages on your system.
Automatic diskette mounting instructions
If the volume manager is running, the PC/DOS diskette will be mounted
automatically when the diskette is inserted in the disk drive.
To see if the volume manager is running, type the following command:
ps -ef | grep vold
To see a list of the disketteÕs contents, do the following steps:
1.
Run OpenWindows.
2.
Open the File Manager.
3.
Insert the PC/DOS diskette.
4.
Click on the File button in the File Manager window, then click on
Check for Floppy.
The File Manager displays the Þles on the diskette. You can then
copy the Þles to your hard disk, or send the Þles to the printer
using the lp print command.
Manual diskette mounting instructions
If the volume manager is not running, you can manually mount the
PC/DOS diskette. Type the following command:
mount -F pcfs device-special directory-name
Or, if the device name /dev/diskette - /pcfs pcfs -no- is in your
/etc/vfstab directory, type the following command to mount the diskette:
mount /pcfs
You can then copy the Þles to your hard disk, or send the Þles to the printer.
Printing Reference
4-5
4 Printing from a UNIX Workstation
Obtaining the PC utility Þles
There are two ways to get the utility Þles if you cannot mount the PC/DOS
diskette:
4-6
■
Refer to page 8-5 for instructions on using the INTERNET to
download Tektronix Þles.
■
Refer to page 8-1 for instructions on using the Tektronix Bulletin
Board Service.
Phaser 140 Drivers and Utilities
Chapter
5
Selecting Media and
Image Options
This chapter explains how to select media size, media type, and image
orientation from the Tektronix printer drivers. You can also select media size
and media type from the printerÕs front panel; the image orientation option
is only available through the Tektronix drivers. You can also check your
application's documentation for instructions on selecting paper size and
orientation. Refer to Chapter 2, ÒPrinting From a Macintosh,Ó or Chapter 3,
ÒPrinting From a PC,Ó for information on opening driver dialog boxes.
Printing Reference
5-1
5 Selecting Media and Image Options
Selecting paper size
The Paper (Macintosh) or Paper Size (Windows) options in the Tektronix
drivers let you choose the paper size you want to print on. The drivers
support both US and metric media sizes. The default is Letter
(8.5 x 11 inches). Refer to the Phaser 140 Color Printer User Manual for
information on loading the media trays.
Phaser 140 special paper sizes
Paper sizes
Dimensions
Image area
Letter
8.5 x 11 ins.
8.09 x 10.4 ins.
A4
210 x 297 mm
199.8 x 281.8 mm
Legal
8.5 x 14 ins.
8.09 x 13.4
#10 Envelope
9.5 x 4.125 ins.
(241 x 105 mm)
8.09 x 3.43 ins.
(205.5 x 87.1 mm)
Envelope DL
8.67 x 4.33 ins
(220 x 110 mm)
8.09 x 3.63 ins.
(205.5 x 92.3 mm)
Smallest custom
page size
6 x 4 ins.
152.4 x 101.6 mm
5.6 x 3.4 ins.
142.2 x 86.4 mm
Largest custom
page size*
8.5 x 22 ins.
241.3 x 558.8 mm
8.09 x 21.4 ins.
205.5 x 543.6 mm
*Custom page sizes between 8.5 x 11 inches and 8.5 x 14 inches require 4 Mbytes
of additional memory; sizes between 8.5 x 14 inches and 8.5 x 22 inches require
16 Mbytes of additional memory. Refer to the Phaser 140 Color Printer User Manual
for ordering information. If you donÕt have enough memory installed for a custom page
size, your printed image may be clipped.
Caution
5-2
If the printer is loaded with paper narrower than the size
requested in the driver (or from the front panel), excess ink is
printed on the platen inside the printer. If this occurs, refer to
the Phaser 140 Color Printer User Manual for cleaning
instructions.
Phaser 140 Drivers and Utilities
Selecting Media and Image Options
5
Macintosh driver
Note
If you are using a PPD-driven printer driver for the Macintosh,
such as a LaserWriter 8.x driver, you may be able to specify
custom page sizes. Refer to the driverÕs documentation for
instructions.
The Paper options are in the Page Setup dialog box. The Þrst four selections
are the standard LaserWriter paper sizes (US Letter, US Legal, A4 Letter, and
B5 Letter). The Þfth Paper option Þeld is a pop-up menu with both
Macintosh and special Tektronix paper sizes. The printer's maximum image
area is not available with the standard LaserWriter paper sizes; use the
Tektronix page sizes in the pop-up menu to print the maximum image area.
Refer to the table on page 5-2 for image area information. Refer to your
Apple documentation for details on the other LaserWriter driver features in
this dialog box.
Some applications override the Tektronix page sizes with their own
extensions to this dialog box. These application-speciÞc page sizes use page
size and image area information about the Tektronix printer from the printer
description Þles. Refer to ÒPrinting from an applicationÓ on page 2-17 for
information on these Þles.
Printing Reference
5-3
5 Selecting Media and Image Options
Windows driver
The Paper Size options are in the Printer Setup dialog box. All paper sizes
listed may not be available for every Windows application. For example,
Excel 3.0 can print only on the paper sizes listed in its own Page Setup
dialog box. Custom page sizes are available through the Windows driver;
refer to your Windows documentation for instructions.
5-4
Phaser 140 Drivers and Utilities
5
Selecting Media and Image Options
Selecting media type
Each Media Type option in the Tektronix Macintosh and Windows printer
drivers produces the best printed results on a speciÞc media type. Select the
option that matches the type of media you are printing on. When you are
using plain paper, you can choose between three speed/quality modes.
Media Type options
Option descriptions
Suggested uses
Plain (draft)
This option provides the fastest printing on plain
paper, and in many cases uses less ink. This option
automatically turns off Finepoint Sharpening.
Plain (standard)
This option provides improved print quality on plain
paper; the print time is increased over Plain (draft).
This option is the default.
Correspondence, memos,
envelopes, draft copies,
reports, schedules,
sales targets
Plain (premium)
This option provides the best print quality on plain
paper; the print time is increased over Plain
(standard).
Coated Paper
This option produces the best print quality on
Tektronix coated paper.
Presentation handouts,
newsletters, report covers,
agendas, press releases
Glossy Paper
This option produces the best print quality on
Tektronix glossy paper.
Photographs, advertising ßyers,
promotions, coupons,
Real Estate properties,
illustrations, graphic art layouts,
product information sheets,
charts, daily specials,
trade show announcements
Transparency
This option produces the best print quality on
Tektronix transparency Þlm.
Overhead presentations,
clear overlays
Back Print Film
This option produces the best print quality on
Tektronix back print Þlm.
Image is printed in reverse (mirrored) to appear on
the back side of clear media.
Posters, retail signs,
advertisements,
lighted display boxes,
notices, maps,
safety information,
name badges,
card tents,
menus
Printing Reference
5-5
5 Selecting Media and Image Options
Macintosh driver
The Media Type options are in the TekColor Options dialog box.
Windows driver
The Media Type options are in the Tektronix Printer Features dialog box.
5-6
Phaser 140 Drivers and Utilities
5
Selecting Media and Image Options
Selecting image orientation
The Orientation option in the Tektronix Macintosh and Windows printer
drivers lets you choose the direction in which your document is placed on
the paper. Refer to your Phaser 140 Color Printer User Manual for more
information on image placement and paper loading. Select the orientation
option you want for your prints.
■
Portrait: Places your image vertically on the media.
■
Landscape: Places your image horizontally on the media.
Macintosh driver
The Orientation option is in the Page Setup dialog box.
Windows driver
The Orientation option is in the Setup dialog box.
Printing Reference
5-7
5 Selecting Media and Image Options
Enhance image detail (Finepoint Sharpening)
Finepoint Sharpening uses a special halftoning technique to produce sharp
images with crisp edges and smooth color detail for bitmap or scanned
image data.
Use Finepoint Sharpening to sharpen or enhance Þne detail in bitmapped
(rasterized) images only. Bitmapped images can be created in paint
programs, and any scanned photograph or picture becomes a bitmapped
image. Finepoint Sharpening works best with natural images, such as
scanned photographs, with lots of detail, texture, and muted (less intense or
saturated) colors. The Finepoint Sharpening options is also available
through the printerÕs front panel.
Note
5-8
Finepoint Sharpening is automatically turned off when you select
Plain (Draft) under Print Quality.
Phaser 140 Drivers and Utilities
5
Selecting Media and Image Options
Macintosh driver
The Finepoint Sharpening option is in the TekColor Options dialog box.
Check the box on or off.
Windows driver
The Finepoint Sharpening option is in the Tektronix Printer Features
dialog box. Check the box on or off.
Printing Reference
5-9
5 Selecting Media and Image Options
Image requirements for Finepoint Sharpening
Note
Outline graphics and text in the same picture are not adjusted.
Bitmapped images must meet the following requirements:
■
The edges of the bitmapped image must align with (or be parallel
to) the edges of the paper. That is, an image can only be rotated in
multiples of 90 degrees, and it can be inverted or mirrored.
■
The bitmapped image must be rectangular.
■
If you specify a clippath shape (also called clipping path, mask, or
masking) around an area in an image, it must be a rectangle and
the edges of the clippath must align with (or be parallel to) the
edges of the paper.
You may want to turn off Finepoint Sharpening for some bitmap images
created in paint programs (such as pie charts and graphs with large areas of
solid primary colors), in the following cases:
5-10
■
In images where small areas or narrow bands of color, either very
high or very low in intensity (or saturation), disappear or have
rounded corners when printed with Finepoint Sharpening.
■
In images with dramatic shifts in colors, for example, where an
area of dark color is next to an area of light color, or where an area
of highly saturated color is next to an area of lightly saturated
color. With the Finepoint Sharpening option checked on, you
may see some ÒghostingÓ or shading between these different
color areas.
Phaser 140 Drivers and Utilities
Chapter
6
Using Color
TekColor Dynamic Correction
This chapter explains how to select colors and how to make color corrections
on your prints. Also included are instructions for printing and using the
color sampler charts provided on the diskettes shipped with the printer.
The TekColor color corrections provide simulations of different
color devices:
■
Simulate Press is a printing press standard for graphic arts use.
■
Vivid Color and Simulate Screen are color corrections for business,
engineering, and scientiÞc imaging applications.
These color corrections are driver-selectable from Macintosh and Windows
applications using the Tektronix printer drivers. Color corrections can also
be set from the printerÕs front panel.
Note
TekColor color corrections do not affect colors speciÞed in the
PostScript Level 2 international color standard CIE XYZ
developed by the Commission Internationale de lÕEclairage
(International Commission on Illumination).
Printing Reference
6-1
6 Using Color
Working with color
You probably purchased your color printer with some idea of how you
wanted to use color in your work. Whether you are producing color
overhead transparencies for presentations, color handouts or reports, or
design comps, there are a few things to keep in mind when using color.
Colors look different depending on the size of the color area, the
surrounding colors, and the lighting conditions.
■
A large area of color looks more saturated (brighter) than a small
area of the same color.
■
A color looks brighter against a dark background than it does
against a white background.
■
Colors look different due to the background color or to the
surrounding colors.
■
The appearance of a color varies with the type and amount of
light, for example ßuorescent lighting versus sunlight.
General guidelines
6-2
■
Keep it simple and consistent.
■
Select colors that look good together and that reinforce your
message.
■
Check your application for standard palettes to get you started.
■
Use a color scheme of Þve or six shades, and in a series of images,
use the colors in a consistent manner throughout the series.
■
Use color to highlight the most important information, such as a
bar or pie segment in a chart or graph.
■
Use color to show relationships between objects, such as a range of
values. Objects with a similar meaning or value should be in
similar colors.
■
Use color as graphic elements in the design of newsletters, logos,
and brochures.
■
Avoid red and green combinations; these colors are hard for
people with red/green color blindness to distinguish.
Phaser 140 Drivers and Utilities
Using Color
6
Using color in presentations
When used consistently, color in your presentations will help your audience
remember key points. For example, graphics that represent your product
should always appear in the same color. If you represent data graphically, be
sure to put the most important data in red or the brightest, warmest color in
your selected palette. Put the data you do not want to emphasize in
cool colors.
General rules for colorful presentations:
■
Keep it simple; use up to 7 colors maximum.
■
Use color to indicate related elements.
■
Use complementary colors for basic color schemes; use split
complements for more subtle effects.
■
Avoid blue/red and yellow/purple combinations.
■
Use highly saturated warm colors sparingly for emphasis.
■
Use a cool, dark background color that wonÕt compete with the
foreground. Use foreground colors that stand out clearly against
the background. Research indicates that blue is the most preferred
background color, followed by black, gray, brown, red, green,
and purple.
General rules for text in presentations:
■
For readability, use dark text on a lighter background, or light text
on a darker background. For example, white or yellow text with a
deep blue background.
■
Make text bold for emphasis.
■
Text sizes on overhead transparencies or slides:
Use a 40-point or larger font for titles.
Use 24- to 36-point fonts for body text.
Use 5 to 7 lines of text maximum per slide or overhead.
Printing Reference
6-3
6 Using Color
Selecting color corrections
Color printers and computer display screens produce color differently.
Printers use the subtractive primaries CMYK (cyan, magenta, yellow, and
black), and produce color when light is reßected off the paper. Computers
use the additive primaries RGB (red, green, blue) with a light-emitting CRT
screen. The printer and the computer screen each have a different range of
possible colors they can produce, with some overlap between them.
Software application packages specify color in different ways, for example as
CMYK or RGB, or they may give you a choice. Get to know your
applications so you can get the most out of them.
The TekColor color correction options are available for a Þner degree of
control over color. Since no single color correction option can address all
uses, refer to the following table for the description that best Þts your
printing situation, and try the suggested color correction.
Printing objective or problem
Color correction to use
Where to Þnd
details
Overhead transparency presentations
Vivid Color
page 6-8
Blue colors are printing too purple
Vivid Color
page 6-8
Using PANTONE Colors
None
page 6-7
Colors should match computer display screen
Simulate Screen
page 6-9
Colors should match a printing press
Simulate Press
page 6-10
Colors are too dark
Simulate Screen
page 6-9
Colors are washed out or faded
Vivid Color
page 6-8
Print in gray scale
Monochrome
page 6-11
Use printerÕs current color defaults
Use Printer Setting
page 6-12
6-4
Phaser 140 Drivers and Utilities
Using Color
6
This chapter explains how to set color corrections with the Tektronix printer
drivers. Refer to Chapter 2, ÒPrinting From a Macintosh,Ó or Chapter 3,
ÒPrinting From a PC,Ó for information on installing Tektronix drivers and
opening driver dialog boxes. Refer to the Phaser 140 Color Printer User
Manual for instructions on making selections from the printerÕs front panel.
A setting made in the driver overrides the front panel setting for prints made
from the driver. However, the driverÕs Use Printer Setting option allows
you to use the current front panel selection.
Macintosh driver
The Color Correction options are in the TekColor Options dialog box.
Windows driver
The Color Correction options are in the Tektronix Printer Features
dialog box.
Printing Reference
6-5
6 Using Color
If your Phaser 140 printer is shared by other users on a network
Another user may use the printerÕs front panel to change the printerÕs
default color correction setting. If this situation occurs, the prints you make
through a non-Tektronix driver may not print as expected. Refer to ÒSharing
the printer on a networkÓ on page 8-16 for details on how the color
corrections interact with the driver settings for either Tektronix or
non-Tektronix drivers.
Application color corrections
Some applications perform color corrections to improve screen-to-printer
color matching. The color correction options in the Tektronix drivers adjust
colors in the printer after the application has performed its color corrections.
If the application uses CIE (Commission Internationale de lÕEclairage) colors,
the Tektronix corrections will not be applied. If you select a color correction
option in the driver other than None, the selection may override some
application features. If you try one of the driverÕs other options and the
printed results are not what you expected, then select the None option and
try reprinting your image with the new setting.
If you are using a non-Tektronix driver
To use the color corrections with a non-Tektronix driver, refer to the
Phaser 140 Color Printer User Manual for instructions on using the printerÕs
front panel.
6-6
Phaser 140 Drivers and Utilities
Using Color
6
Turning off all color corrections
If you do not want to use any Tektronix color corrections, you can specify no
corrections either from a Tektronix driver or with the printerÕs front panel.
Select no corrections when you are using applications that do their own
color adjusting.
Choose one of the following methods to turn off all color corrections:
■
Macintosh driver: Select the None option in the TekColor
Options dialog box.
■
Windows driver: Select the None option in the Tektronix Printer
Features dialog box.
■
PrinterÕs front panel: ADJUST COLOR menu, no color adjust
option.
Printing Reference
6-7
6 Using Color
Printing a truer blue
The Vivid Color option makes printed blue appear less purple by reducing
the amount of magenta used to print blue colors. Other colors in the
cyan-blue-purple-magenta range in the image are also adjusted to
compensate for the adjusted blue. Colors in the red-orange-yellow-green
range are not affected. This selection is good for making presentation
graphics, such as overhead transparencies, and for bright-looking colors that
donÕt need to match the screenÕs colors or printing press colors.
This option adjusts CMYK colors using a method that adds black to other
components. This option prints more saturated (darker) colors and may be
useful for printing overhead transparencies for presentations from some
applications, such as CorelDRAW!. Use this option if you have speciÞed a
color in the CMYK system, and the color has a black component, and the
color appears lighter than you expected when printed.
Choose one of the following methods to use the Vivid Color color correction.
6-8
■
Macintosh driver: Select the Vivid Color option in the TekColor
Options dialog box.
■
Windows driver: Select the Vivid Color option in the Tektronix
Printer Features dialog box.
■
PrinterÕs front panel: ADJUST COLOR menu, vivid color option.
Phaser 140 Drivers and Utilities
Using Color
6
Simulating display screen colors
The Simulate Screen option makes printed colors approximate the colors on
a standard display screen. This selection should improve the
screen-to-printer color accuracy for most applications that donÕt perform
their own color corrections. This selection is best for applications that deÞne
colors as RGB (red, green, blue), HLS (hue, lightness, saturation), or HSB
(hue, saturation, brightness).
Choose one of the following methods to use the Simulate Screen
color correction.
■
Macintosh driver: Select the Simulate Screen option in the
TekColor Options dialog box.
■
Windows driver: Select the Simulate Screen option in the
Tektronix Printer Features dialog box.
■
PrinterÕs front panel: ADJUST COLOR menu, simulate screen
option.
Printing Reference
6-9
6 Using Color
Closely match printing press colors
The Simulate Press option simulates a 4-process color commercial printing
press, not solid spot colors such as PANTONE Colors. Use this option if you
are previewing work for a 4-process color printing press.
Note
If you are selecting PANTONE Colors in your application, use
the None option; see page 6-7 for details. Also, use the None
option with other color management systems such as EÞColor.
Choose one of the following methods to use the Simulate Press option:
6-10
■
Macintosh driver: Select the Simulate Press option in the
TekColor Options dialog box.
■
Windows driver: Select the Simulate Press option in the
Tektronix Printer Features dialog box.
■
PrinterÕs front panel: ADJUST COLOR menu, simulate press
option.
Phaser 140 Drivers and Utilities
Using Color
6
Printing in gray scale
The Monochrome option prints your color image as a monochrome gray
scale (shades of gray between black and white). Use this option to print
page masters for photocopying in black-and-white.
Choose one of the following methods to use the Monochrome option:
■
Macintosh driver: Select the Monochrome option in the
TekColor Options dialog box.
■
Windows driver: Select the Monochrome option in the Tektronix
Printer Features dialog box.
■
PrinterÕs front panel: ADJUST COLOR menu, monochrome
option.
Printing Reference
6-11
6 Using Color
Using the printerÕs current color defaults
The Use Printer Setting option is available only in the Tektronix Macintosh
and Windows drivers. This option sends no color correction to the printer.
Use Printer Setting uses the currently selected option in the ADJUST
COLOR menu on the printerÕs front panel to process colors for printing.
Use one of the following methods to use the printerÕs default color
correction:
6-12
■
Macintosh driver: Select the Use Printer Setting option in the
TekColor Options dialog box.
■
Windows driver: Select the Use Printer Setting option in the
Tektronix Printer Features dialog box.
Phaser 140 Drivers and Utilities
Using Color
6
Printing the color sampler charts
You can select colors within an application using color component values.
Which color chart you print and use depends on how the application you are
using selects color. Refer to the applicationÕs documentation for information
on color selection, then print one of the charts listed in the table below.
Color sampler chart Þles
Color sampler chart
Number of
printed pages
Macintosh Þle name*
PC Þle name**
Print a sample of CMYK colors
18
CMYK Sampler
CMYK.PS
Print a sample of RGB colors
12
RGB Sampler
RGB.PS
Print a sample of HSB colors
12
HSB Sampler
HSB.PS
Print a sample of Pantone Colors
46
PANTONE-Tek Phaser 140
PANT140.PS
*The Macintosh Þles are located in the compressed Phaser 140 Samplers.sea archive Þle on the Macintosh Driver
and Printer Utilities diskette; refer to page 2-12 for decompressing instructions.
**The PC Þles are located in the SAMPLERS directory on the Windows 3.1 Driver and Printer Utilities diskette.
Printing Reference
6-13
6 Using Color
The color sampler charts are made up of areas of color with each colorÕs
components listed below it. Each color sampler chart is several pages long;
they are printed in panels that can be connected to form a wall chart or
placed in a binder for easy reference.
Illustration
6-14
Phaser 140 Drivers and Utilities
Using Color
6
Before you print the CMYK, RGB, and HSB color charts
To match colors on the charts to colors selected within an application, use the
same color correction to print the charts that you are going to use when
selecting and printing those colors within an application. The following
table lists the driver color correction settings with their corresponding front
panel settings.
For example, if you are going to print from an application with the driverÕs
Vivid Color option selected, then print the color chart with the vivid color
(ADJUST COLOR menu) front panel selection. Or, if you are not using a
Tektronix driver, use the same front panel selection to print the chart and to
print the colors from an application.
Driver and front panel settings
Tektronix printer driver setting
PrinterÕs front panel selection
(ADJUST COLOR menu)
Simulate Screen
simulate screen
Vivid Color
vivid color
Use Printer Setting
(any front panel color setting)*
Simulate Press
simulate press
None
no color adjust
*Make sure you use the same color correction to print the chart and later to print the
colors from an application.
Printing Reference
6-15
6 Using Color
Printing the CMYK, RGB, and HSB color charts
Macintosh users
1.
Follow the instructions on page 2-12 to decompress the Phaser 140
Samplers.sea archive Þle from the Macintosh Driver and Printer
Utilities diskette onto your hard disk.
2.
Determine which color correction you need to use by examining
the table on page 6-15. Then make the appropriate selection on the
printerÕs front panel.
3.
Select the appropriate printer in the Chooser.
4.
Locate the color sampler chart Þle you want in the folder on your
hard disk containing decompressed Þles.
Double-click the color sampler chartÕs self-sending arrow icon;
click OK in the dialog box to send the Þle to the printer.
5.
Select colors within an application using the colors on the chart.
6.
If you are printing from a Tektronix driver: Print your document
using the Tektronix printer driver with the same color correction
option selected in the driver that you used on the printerÕs front
panel to print the chart. Any other color correction selection in the
driver can cause the colors to print differently.
If you are not using a Tektronix driver: Print your document
with the same front panel color correction you used to print
the chart.
6-16
Phaser 140 Drivers and Utilities
Using Color
6
PC and workstation users
1.
Copy the color sampler chart Þles you want to use from the
SAMPLERS directory on the Windows 3.1 Driver and Printer
Utilities diskette onto your computerÕs hard disk. You may want
to place these Þles in a Utilities directory. Or, you can print these
Þles directly from the diskette.
2.
Determine which color correction you need to use by examining
the table on page 6-15. Then make the appropriate selection on the
printerÕs front panel.
3.
PC users: To print the color sampler charts, use the DOS COPY
command to send the sampler Þle to the printer.
Workstation users: To print the color sampler charts, send the Þle
to the printer as you would any PostScript Þle.
4.
Select colors within an application using the colors on the chart.
5.
If you are printing from a Tektronix driver: Print your document
using the Tektronix printer driver with the same color correction
option selected in the driver that you used on the front panel to
print the chart. Any other color correction selection in the driver
can cause the colors to print differently.
If you are not using a Tektronix driver: Print your document
with the same front panel color correction you used to print
the chart.
Printing Reference
6-17
6 Using Color
Printing the PANTONE Ò Color chart
Note
Do not use any color corrections in a driver or on the front panel
when printing the PANTONE color chart or when printing
PANTONE Colors from an application.
The PANTONE-Tek Phaser 140 (PANT140.PS) Þle prints a PANTONE Color
sampler chart (about 46 pages in length). Use the chart to select colors
within an application that allows you to specify PANTONE Colors.
Macintosh users
1.
Follow the instructions on page 2-12 to decompress the Phaser 140
Samplers.sea and the Phaser 140 Utilities.sea archive Þles from the
Macintosh Driver and Printer Utilities diskette onto your
hard disk.
2.
Select the no color adjust option in the ADJUST COLOR menu on
the printerÕs front panel.
3.
Select the appropriate printer in the Chooser.
4.
To print the chart, do the following:
a. Locate the LaserWriter Utility in the folder on your hard disk
containing decompressed Þles. Double-click the LaserWriter
Utility icon to start the application.
b. Select Download PostScript File from the Utilities menu.
c. Select the PANTONE-Tek Phaser 140 file, and click Open.
d. At the prompt Save PostScript output as: you are
asked for a Þle name for saving printer output. Use the
default name given in the edit box or type in a new name.
Then click Save to send the Þle to the printer.
e. If no output is returned by the printer, the LaserWriter Utility
displays a dialog box. Click OK in the box to continue.
6-18
Phaser 140 Drivers and Utilities
Using Color
5.
Select PANTONE Colors within an application using the colors on
the chart.
6.
If you are printing from a Tektronix driver: Print your document
with the None option selected. Any other color correction
selection in the driver will cause the PANTONE Colors to print
differently.
6
If you are not using a Tektronix driver: Print your document
with the no color adjust option selected in the ADJUST COLOR
menu on the printerÕs front panel.
PC and workstation users
1.
Copy the PANT140.PS sampler Þle from SAMPLERS directory on
the Windows 3.1 Driver and Printer Utilities diskette onto your
computerÕs hard disk. You may want to place this Þle in a Utilities
directory. Or, you can print this Þle directly from the diskette.
2.
Select the no color adjust option in the ADJUST COLOR menu on
the printerÕs front panel.
3.
PC users: To print the PANTONE Color chart, use the DOS COPY
command to send the sampler Þle to the printer.
Workstation users: To print the PANTONE Color chart, send the
Þle to the printer as you would any PostScript Þle.
4.
Select PANTONE Colors within an application using the colors on
the chart.
5.
If you are printing from a Tektronix driver: Print your document
with the None option selected. Any other color correction
selection in the driver will cause the PANTONE Colors to print
differently.
If you are not using a Tektronix driver: Print your document
with the no color adjust option selected in the ADJUST COLOR
menu on the printerÕs front panel.
Printing Reference
6-19
6 Using Color
6-20
Phaser 140 Drivers and Utilities
Chapter
7
Using Fonts
This chapter explains how to use fonts and print a font sampler in the
Macintosh and PC environments.
Note
For general information on fonts, request a document catalog
from HAL or EuroHAL, the Tektronix automated fax systems.
Refer to page 8-2 for instructions on using these systems.
Macintosh fonts
Using Macintosh screen fonts
Note
If you already have these fonts installed on your computer, you
don't need to install them again.
The Screen Fonts.sea archive Þle on the Macintosh Driver and Printer Utilities
diskette contains screen fonts in several typeface families. However, only
the following fonts are resident in the printer: Courier, Helvetica,
Helvetica Narrow, Symbol, and Times.
You need to decompress and install the screen fonts on your computer if you
want to see the printer's resident typefaces on the Macintosh screen. If you
select a font the printer doesn't have, the Macintosh creates a representative
font for printing.
Printing Reference
7-1
7 Using Fonts
Decompressing the fonts
Note
Do not decompress fonts directly into the System Folder; they
must be properly installed after they have been decompressed onto
your hard disk.
1.
Insert the Macintosh Driver and Printer Utilities diskette into your
computer's disk drive.
2.
Double-click on the Phaser ScreenFonts.sea archive Þle.
3.
At the Self-Extracting Archive dialog box, click Continue.
4.
In the dialog box, select the drive where you want the
decompressed fonts saved.
5.
At the prompt Install software as: you are asked to name
the folder where you want the decompressed fonts to reside. Use
either the default folder name listed in the edit box or type in the
name you want for the folder. Then click Save.
6.
At the Installation was successful dialog box, click Quit. The
decompressed fonts are saved in the folder you speciÞed.
Installing the decompressed fonts
For System 6.0.7 users: Use the Font/DA Mover (located on your
Apple system software diskettes) to install the fonts you want from
the Phaser Screen Fonts suitcase.
For System 7.0 users: Drag the fonts you want from the
Phaser Screen Fonts suitcase to the System Folder.
Select the printer font you want to use within an application and see the
same font on the screen.
7-2
Phaser 140 Color Printers
7
Using Fonts
Printing a font sampler
You can print a sample of the printerÕs resident fonts by downloading the
Font Sampler utility Þle to the printer.
1.
The Font Sampler is compressed into the Phaser 140 Samplers.sea
archive Þle on the Macintosh Driver and Printer Utilities diskette,
and must be decompressed before you can use it. Follow the
instructions on page 2-12 to decompress this Þle, then continue
with the steps listed below.
2.
Select the appropriate printer in the Chooser.
3.
Locate the Font Sampler Þle in the folder on your hard disk
containing decompressed Þles.
Double-click the Font Sampler self-sending arrow icon.
4.
Click OK in the dialog box to send the Þle to the printer.
Printing Reference
7-3
7 Using Fonts
Downloading fonts to the printer
The fonts resident in your printer are stored as outlines and are always
available for printing. The PostScript interpreter in the printer can also
accept and store additional fonts known as downloadable fonts. If you want
to print PostScript outline fonts that are not built into the printer, you can
transfer or download outline fonts from your computer to the printer.
Downloading fonts saves print time if you plan to print several documents
or a large document using those fonts.
When you download a font, it is stored in the printerÕs memory. You can
download as many outline fonts as the printerÕs memory allows.
1.
The LaserWriter Utility is compressed into the Phaser 140
Utilities.sea archive Þle on the Macintosh Driver and Printer
Utilities diskette, and must be decompressed before you can use it.
Follow the instructions on page 2-12 to decompress this Þle, then
continue with the steps listed below.
2.
Select the appropriate printer in the Chooser.
3.
Locate the LaserWriter Utility Þle in the folder on your hard disk
containing decompressed utility Þles. You may want to place this
utility in a Utilities folder, or leave the utility on your desktop if
you use it often.
4.
Double-click on the LaserWriter Utility icon.
5.
To send fonts to the printer, use the Download Fonts command in
the File menu.
(To send PostScript Þles to the printer, refer to ÒUsing the
LaserWriter Utility to send Þles to the printerÓ on page 2-14.)
6.
7-4
Select the font then click Open. The font is sent to the printer. The
font remains available until the printer is reset or switched off.
Phaser 140 Color Printers
7
Using Fonts
PC fonts
Using fonts with Windows
Before printing, you need to make sure the fonts speciÞed in your document
are installed in the printer. If you request a font in an application that is not
resident in the printer, the text is printed in the Courier typeface. Or, to use
fonts that are not resident in the printer, do one of the following:
■
Using a font downloader supplied with your font package,
download the desired font to the printer.
■
Edit your WIN.INI Þle so the Tektronix Windows driver
automatically downloads the fonts you need as part of a print job.
Refer to your Windows documentation for details on this
procedure.
Some font packages automatically update the PostScript port
entries in your WIN.INI Þle when you reinstall the fonts. Refer to
the font packageÕs documentation for instructions.
Printing a font sampler
You can print a sample of the printerÕs resident fonts by downloading the
FONTS.PS utility Þle to the printer.
1.
Locate the FONTS.PS Þle in the SAMPLERS directory on the
Windows 3.1 Driver and Printer Utilities diskette.
2.
Copy the Þle to your hard disk, or use the Þle from the diskette.
3.
PC users: Use the DOS COPY command to send the Þle to
the printer, or use the Copy command in the File Manager; see
page 3-21 for instructions.
Workstation users: Send the Þle to the printer as you would any
PostScript Þle.
Printing Reference
7-5
7 Using Fonts
Downloading fonts to the printer
The fonts resident in your printer are stored as outlines and are always
available for printing. The PostScript interpreter in the printer can also
accept and store additional fonts known as downloadable fonts. If you want
to print PostScript outline fonts that are not built into the printer, you can
transfer or download outline fonts from your computer to the printer.
Downloading fonts saves print time if you plan to print several documents
or a large document using those fonts.
When you download a font, it is stored in the printerÕs memory. You can
download as many outline fonts as the printerÕs memory allows.
A font downloader is an interactive program that lets you transfer Adobe
fonts and other PostScript Þles to the printer. Check your font package for a
downloader application. Or, check the Tektronix Bulletin Board Service
(BBS) for a PC font downloader; refer to page 8-1 for instructions.
7-6
Phaser 140 Color Printers
Chapter
8
Troubleshooting
Getting help
Using the Tektronix Bulletin Board Service
The Tektronix Bulletin Board Service (BBS) is available for direct
downloading of the latest versions of printer drivers, utilities, and Þles. If
you have a Macintosh or PC, communication software, and modem, you can
call the system and use the menus to locate and download the Þles
you want.
To access the BBS 24 hours a day, 7 days a week, call (503) 685-4504.
For a detailed instruction guide on system requirements, terminal settings,
protocol, modem, how to connect to our BBS, and how to download Þles,
request a document catalog from HAL or EuroHAL, the Tektronix
automated fax systems. Refer to page 8-2 for instructions on using
these systems.
Reaching the Customer Support staff
If your problem is still not resolved after trying the suggestions in this
chapter, call the Tektronix Customer Support Hotline in the United States
from 6 AM to 5 PM PST at 1-800-835-6100. Outside the U.S., contact your
reseller or local Tektronix ofÞce.
Also, refer to the HAL catalog for articles on using the printer, speciÞc
applications, and computing environments; see page 8-2 for instructions on
using HAL and EuroHAL.
Printing Reference
8-1
8 Troubleshooting
Using the automated fax systems
As an alternative to using the Customer Support Hotline, and to provide
up-to-date information quickly, Tektronix has set up HAL and EuroHAL,
two interactive, automated fax systems. These automated fax systems
provide Macintosh, PC, and workstation users with the latest technical hints
and tips (like color matching), solutions to common technical problems, and
application notes (like CorelDRAW! and QuarkXPress).
You may call HAL from anywhere in the world. The fax systems are
available 24 hours a day, seven days a week. If you have a fax machine and a
touch-tone voice telephone, you can order a HAL catalog listing all of the
information offered by HAL. Call (503) 682-7450 (direct) or, in the U.S. and
Canada, call 1-800-835-6100 (at the prompt, choose the option for technical
documentation via fax).
Use HAL to order a catalog or individual documents
in the U.S.A. and Canada
8-2
Note
Before ordering documents from HAL, order a catalog listing the
numbers of available documents. You may want to replace your
catalog periodically, since the system is often updated.
1.
Before you call, write down the area code and telephone number
for your fax machine. HAL will ask you to key this number
through the keypad on your voice telephone. If you are calling
from outside the United States or Canada, youÕll need to know the
international access code to reach your country from the United
States. Without a complete fax number, HAL cannot call your
fax machine.
2.
Call only from a touch-tone voice telephone.
3.
Follow through the voice-prompted (English) menu.
4.
Order individual documents by entering the desired documentÕs
number as listed in the HAL catalog. Enter the number by using
your telephoneÕs keypad.
5.
You can order up to three documents per call.
6.
The HAL catalog or documents you request are faxed to you in a
matter of minutes.
Phaser 140 Drivers and Utilities
8
Troubleshooting
Use EuroHAL to order a catalog or individual documents in Europe
EuroHAL includes many documents, some in English and some in other
European languages. If a local version of the document you want is
available, EuroHAL will send it in your language. Otherwise, it will send
English documents.
If you have a tone-dial telephone and a fax machine, then you can use
EuroHAL. If your telephone has star (*) and hash mark (#) keys then it can
probably use tones; ask your local telephone supplier if you are not sure.
If your telephone does not have these keys or has a dial, you will need to buy
a tone dialer from your local telephone or electronics shop. This small box is
held to the phone and will send the standard tones that you need to talk to
EuroHAL.
1.
To use EuroHAL, dial one of the numbers listed in the
following table.
Country
Number
Austria
00 44 628 478 347
Belgium
00 44 628 478 347
Denmark
0 09 44 628 478 347
Finland
990 44 628 478 347
France
05 90 81 86
Germany
0130 819 220
Holland
09 44 628 478 347
Italy
00 44 628 478 347
Norway
0 95 44 628 478 347
Spain
07 44 628 478 347
Sweden
0 09 44 628 478 347
Switzerland
00 44 628 478 347
UK
0628 478 347
Other countries
+44 628 478 347 (where + is your countryÕs
International Access Code)
Printing Reference
8-3
8 Troubleshooting
2.
EuroHAL answers and asks which language you want to use.
For English
For French
For German
3.
The Þrst time you use EuroHAL, you should order a catalog. This
lists all the documents that are available, and is constantly
updated.
4.
EuroHAL asks you for your fax machine number. If you are
calling from outside the UK, add your country code Þrst, as
shown in the following table.
Press #
when
Þnished
Country
Country code
Your area code and
fax number
Austria
010 43
area code fax number
#
Belgium
010 32
area code fax number
#
Denmark
010 45
area code fax number
#
Finland
010 358
area code fax number
#
France
010 33
area code fax number
#
Germany
010 49
area code fax number
#
Holland
010 31
area code fax number
#
Italy
010 39
area code fax number
#
Norway
010 47
area code fax number
#
Spain
010 34
area code fax number
#
Sweden
010 46
area code fax number
#
Switzerland
010 41
area code fax number
#
just enter your fax number
#
area code number
#
UK
Other countries
8-4
Press 1
Press 2
Press 3
Phaser 140 Drivers and Utilities
010 xx
8
Troubleshooting
Using the INTERNET to download Tektronix Þles
If you donÕt have the means of transferring Þles from the Windows 3.1
Driver and Printer Utilities diskette for PC/DOS, you can request Þles from
the Tektronix Color Printer Information Server, an automatic Þle serving
program that responds to requests for Þles.
If you can exchange electronic mail with other Internet sites, you can access
the Tektronix Color Printer Information Server. From this server you can
retrieve driver and utility Þles and color printer information.
In the following mail requests, substitute the library of your choice for
library-name, and the Þle of your choice for Þlename.
Send your requests for Þles to the following electronic mail address:
color_printer_info@TEKTRONIX.TEK.COM
To receive the list of information available on the server, type the following
at the Subject prompt:
send index
To examine the full index for any library, type this command:
send index from library-name
To request a single Þle from a directory, type this command:
send filename from library-name
To determine Þle size, type this command:
send list of filename from library-name
Opening the READ ME Þles on the Macintosh diskette
The Tektronix Macintosh diskette contains a READ ME Þle providing
information that arrived too late to be included in this manual. This READ
ME Þle was written in the TeachText program. You must have a copy of
TeachText installed on your hard disk to read this Þle. If you don't have a
copy already installed, copy TeachText from the same Apple system software
diskettes you last used to upgrade your computer.
Printing Reference
8-5
8 Troubleshooting
Solving PostScript printing problems
PostScript printing errors
If you get a PostScript error when printing from Aldus PageMaker, Aldus
FreeHand, QuarkXPress, or Canvas, you may be using an older or incorrect
version of the printer description Þle. Refer to ÒPrinting from an
applicationÓ on page 2-17 (Macintosh) or page 3-26 (PC) for instructions on
using printer description Þles.
When using printer description Þles, it is important to match the
applicationÕs version number to the printerÕs Þrmware version number. You
can check the printerÕs Þrmware version number by printing a copy of the
printerÕs startup page. Refer to the Phaser 140 Color Printer User Manual for
instructions on using the front panel to print the startup page. If you have
upgraded your printerÕs Þrmware version, you may need a newer printer
description Þle.
For the most current printer description Þles, check the Tektronix Bulletin
Board Service (BBS). Refer to page 8-1 for instructions on using the
Tektronix BBS.
The following table lists a few Macintosh applications and the possible
PostScript errors. For information on PC and other applications, request a
document catalog from HAL or EuroHAL, the Tektronix automated fax
systems. Refer to page 8-2 for instructions on using these systems.
Application
Error or problem
Solution
QuarkXPress 3.11
QuarkXPress 3.2
Offending Command: cblnd
You are probably using an older PDF Þle.
Check the BBS for the most current version
of this Þle.
QuarkXPress 3.1x
Graduated Þlls print in black and white
You are probably using an older PDF Þle.
Check the BBS for the most current version
of this Þle.
FreeHand 3.1
error:typecheck
offending command: put
A PostScript Þll is being used with a color
correction from the printer driver. Turn off any
color correction in the driver and the image
should print correctly.
FreeHand 3.1
TIFFs print in black and white
You are probably using the wrong PDX Þle.
Check the BBS for the most current version
of this Þle.
8-6
Phaser 140 Drivers and Utilities
8
Troubleshooting
Random PostScript errors
If you are using AppleTalk Network Software below version 58.x, you may
experience a problem with random PostScript errors when printing to a
Phaser 140 color printer. If this is the case, you should upgrade the
AppleTalk Network Software on your Macintosh computer.
The printing problem is due to a timing conßict between the older AppleTalk
software and the printer. The PostScript errors can be any type of error or
offending command, and may occur in any of the following situations:
■
May occur more often over LocalTalk than EtherTalk.
■
Sending the same Þle more than once may cause different errors or
offending commands each time, or the Þle may print without
an error.
■
Files from some applications may print, while Þles from other
applications may not.
■
Documents saved to PostScript Þles and sent to the printer with a
downloading utility may generate errors.
To upgrade your software
1.
Insert the AppleTalk Installer for the Macintosh diskette into your
computerÕs disk drive.
2.
Double-click on the Installer icon.
3.
Click OK in the introduction screen.
4.
Click Install in the Easy Install window to install the
recommended software. (Or, click Customize to select
individual items.)
5.
After successful installation, click Restart to restart
your computer.
Printing Reference
8-7
8 Troubleshooting
Using a PostScript error handler
The error handling utility is useful for diagnosing problems when a job
doesnÕt print. This utility installs a PostScript error-handling function in the
printer to help determine the cause of some PostScript printing problems.
PostScript errors are printed on a page with other status information when
an error occurs. This utility can be useful to programmers for debugging
PostScript code. The error handler is also available through the printerÕs
front panel; refer to the Phaser 140 Color Printer User Manual for instructions.
To turn on the error handler, follow the instructions below. To turn off the
error handler, follow the instructions on page 8-17 to reset the printer.
Macintosh users
1.
The Tek Error Handler Þle is compressed into the Phaser 140
Utilities.sea archive Þle on the Macintosh Driver and Printer
Utilities diskette, and must be decompressed before you can use it.
Follow the instructions on page 2-12 to decompress this Þle, then
continue with the steps listed below.
2.
Select the appropriate printer in the Chooser.
3.
Locate the Tek Error Handler Þle in the folder on your hard disk
containing decompressed utility Þles.
4.
Double-click the ÞleÕs self-sending arrow icon. Click OK in the
dialog box to send the Þle to the printer.
PC and workstation users
1.
Locate the TEKEHAND.PS Þle in the PHSR140 directory on the
Windows 3.1 Driver and Printer Utilities diskette.
2.
Copy the Þle to your hard disk, or use it from the diskette.
3.
PC users: Use the DOS COPY command to send the Þle to
the printer. To send the Þle to the parallel port, type the following
at the DOS prompt:
COPY TEKEHAND.PS LPT1:
Workstation users: Send the Þle to the printer as you would any
PostScript Þle.
8-8
Phaser 140 Drivers and Utilities
Troubleshooting
8
Improving print speed
Note
There are different ways to improve print speed, such as by
upgrading to EtherTalk on a Macintosh, to Novell on a PC, or to
TCP/IP on a workstation. For more information, request a
document catalog from HAL or EuroHAL, the Tektronix
automated fax systems. Refer to page 8-2 for instructions on
using these systems.
If you tried to print a document with bitmapped images to a PostScript Level
2 printer, but are dissatisÞed with the speed of the output, here are some
suggestions:
Macintosh and Windows users:
■
When you use any color correction option (other than None), your
printer can take longer to process bitmapped images.
■
The Plain (standard) option prints faster than the Plain
(premium) option. Select these modes from the Tektronix drivers
and from the printerÕs front panel.
Windows users:
■
Turn off the Print Manager; printing via the Print Manager is
slower, but turning it off ties up the PC longer.
■
Select the Tektronix Phaser 140 printer in the Printers dialog box.
■
Make sure the Use PostScript Level 2 Features check box in the
Advanced Options dialog box is turned on.
■
From your application, choose the Tektronix Phaser 140 as
your printer.
■
Try printing the document again.
Printing Reference
8-9
8 Troubleshooting
If your Þle doesnÕt print
If you've conÞgured the Tektronix driver for your printer but your printer
isn't printing, try the following suggestions. If these suggestions fail to solve
the problem, copy the Tektronix PostScript Level 2 error handler utility to
your printer to determine what is wrong. Refer to page 8-8 for information
on using the error handler.
General things to check for
Macintosh users:
■
Open the Chooser and select the Tektronix Phaser 140 driver and
the printer you want to use.
■
If you are having trouble printing from the Finder in System 7.1,
for example if the Phaser 140 driver dialog boxes are not opening,
it may be because the Finder doesnÕt have enough allocated
memory. Reinstall the Tektronix driver to automatically allocate
enough memory for printing from the Finder.
Windows users:
8-10
■
Make sure your printer is connected to the port you selected in the
Printers/Connect dialog box.
■
Try resetting the Transmission Retry timeout option in the
Printers/Connect dialog box to 850 seconds.
■
Check the Options dialog box to make sure Printer, not
Encapsulated PostScript File, is selected in the Print To box.
■
The following error message appears on your computer screen:
Windows Header has not been downloaded to the printer.
Open the Options dialog box and turn on the Send Header with
Each Job check box. Refer to page 3-10 for details.
Phaser 140 Drivers and Utilities
Troubleshooting
8
If you are using PC/NFS
If you have PC/NFS software installed on your computer, you need to make
the following selection in the Network Options dialog box:
1.
From the Main window, double-click the Print Manager icon.
2.
From the Options menu in the Print Manager, select
Network Settings.
3.
In the Network Options dialog box, uncheck the
Print Net Jobs Direct box.
4.
Choose the OK button.
Printing Reference
8-11
8 Troubleshooting
Fixing timeout problems in Windows
Try one of the following procedures to correct Windows timeout problems.
If the Windows procedure doesnÕt work for you, then try the DOS
procedure.
From Windows
1.
Select Control Panel from the Main menu.
2.
Select Printers.
3.
Select Connect.
4.
Increase the Transmission Retry to 850 seconds.
From DOS
Note
To use this procedure, the printer must be connected directly to
your computer, not on a network.
1.
At the DOS prompt, issue the DOS MODE command by typing
the following:
MODE LPT1:,,P
8-12
2.
Start Windows.
1.
Select Control Panel from the Main menu.
2.
Select Printers.
3.
Select Connect.
4.
Change the port selection from LPT1 to either LPT1.DOS or
LPT1.OS2 depending on the options you see in the dialog box.
Phaser 140 Drivers and Utilities
Troubleshooting
8
Correcting printing problems
Printed colors are not what you expected
■
Select another Color Correction option in the driver and print
your image again. Refer to Chapter 6, ÒUsing Color,Ó for more
information.
■
If you are not using a Tektronix driver and are sharing the printer
with other users on a network, another user may have changed the
printer's color adjustment setting. Refer to page 8-16 for more
information.
■
If you use the driver's Use Printer's Settings option and printed
colors are not what you expected, check the selection in the
ADJUST COLOR menu on the printer's front panel. These settings
change the printer's default color correction. Refer to page 8-16 for
details on how these settings affect prints made from the driver.
■
If PANTONE Colors are not printing as expected, make sure you
are printing without any color corrections as outlined below. Also,
refer to ÒPrinting the PANTONE Color chartÓ for more
information.
From the Tektronix Macintosh driver, select the None option in the
TekColor Options dialog box
From the Tektronix Windows driver, select the None option in the
Tektronix Printer Features dialog box.
If you are not using a Tektronix driver, select no color adjust in the
ADJUST COLOR menu on the printerÕs front panel.
If you have questions about PANTONE Color Matching, refer to
the HAL article on PANTONE. Refer to page 8-2 for instructions
on using HAL and EuroHAL.
Printing Reference
8-13
8 Troubleshooting
Use Tektronix halftone screens
Tektronix halftone screens are designed for Tektronix printers, and improve
print quality over application-set halftone screens. The Setscreen Patch utility
Þle redeÞnes the setscreen, setcolorscreen and sethalftone PostScript operators.
When downloaded to the printer, this Þle prevents applications from
overriding the Tektronix proprietary halftone screens.
Macintosh Þle name
PC Þle name
Setscreen Patch
SETSCRN.PS
Macintosh users
1.
The Setscreen Patch Þle is compressed into the Phaser 140
Utilities.sea archive Þle on the Macintosh Driver and Printer
Utilities diskette, and must be decompressed before you can use it.
Follow the instructions on page 2-12 to decompress this Þle, then
continue with the steps listed below.
2.
Select the appropriate printer in the Chooser.
3.
Locate the Setscreen Patch Þle in the folder on your hard disk
containing decompressed utility Þles.
4.
Double-click the Setscreen Patch self-sending arrow icon, then click
OK in the dialog box to send the Þle to the printer.
PC and workstation users
PC users: Use the DOS COPY command to send the Þle to the printer.
Workstation users: Send the Þle to the printer as you would any
PostScript Þle.
8-14
Phaser 140 Drivers and Utilities
Troubleshooting
8
Small lines disappear, colors shifting
You may want to turn off Finepoint Sharpening for some bitmap images
created in paint programs (such as pie charts and graphs with large areas of
solid primary colors), in the following cases:
■
In images where small areas or narrow bands of color, with either
very high or very low in intensity (or saturation), disappear or
have rounded corners when printed with Finepoint Sharpening.
■
In images with dramatic shifts in colors, for example, where an
area of dark color is next to an area of light color, or where an area
of highly saturated color is next to an area of lightly saturated
color. With the Finepoint Sharpening option checked on, you
may see some ÒghostingÓ or shading between these different
color areas.
Blue colors look too purple
Try printing with the Vivid Color color correction.
■
Macintosh driver: Select the Vivid Color option in the TekColor
Options dialog box.
■
Windows driver: Select the Vivid Color option in the Tektronix
Printer Features dialog box.
■
PrinterÕs front panel: ADJUST COLOR menu, vivid color option.
Printing Reference
8-15
8 Troubleshooting
Sharing the printer on a network
Driver and front panel interactions
If your Phaser 140 printer is shared by other users on a network, using the
printerÕs front panel to change the printerÕs default color correction setting
can affect prints made by other users.
■
All Tektronix driver selections, except Use Printer Setting,
override the printerÕs front panel for prints made from the driver.
■
The Tektronix driverÕs Use Printer Setting option uses the
selection on the printerÕs front panel ADJUST COLOR menu.
LaserWriter Utility does not work
The LaserWriter Utility cannot be used if the printer is connected to a print
server. See your system administrator to temporarily remove the printer
from the print server to download the PANTONE-Tek Phaser 140 Þle, the
Reset Printer Þle, and to change the printerÕs LocalTalk/EtherTalk name.
Programs crashing on a network (Macintosh)
On Macintosh computers with a 68040 microprocessor (Quadra, Centris, and
Performa 470 series), some programs may quit unexpectedly, or freeze the
computer, when you try to open them over a network. To Þx this problem,
install the Network Launch Fix from the AppleTalk Installer for the
Macintosh diskette.
8-16
1.
Insert the AppleTalk Installer for the Macintosh diskette into your
computerÕs disk drive.
2.
Drag the Network Launch Fix icon from the diskette to the
Extensions folder, inside the System Folder, on your computerÕs
hard disk.
3.
Restart your computer.
Phaser 140 Drivers and Utilities
Troubleshooting
8
Resetting the printer
The Reset Printer (RESET.PS) Þle resets the printer to its power-on conditions
(not its factory default conditions), without turning the printerÕs power
switch off and on. The power-on conditions include any custom changes
made to the printer that are stored in the printerÕs NVRAM, or changes that
are persistent across printer power cycles. For example, if you used a
downloadable utility Þle to change the printerÕs name, this is a power-on
condition that is not altered by resetting the printer. Resetting the printer
erases changes that are not persistent across printer power cycles, such as the
Tektronix error handler utility.
This Þle restarts the printer as soon as all the jobs in its queue are Þnished.
The printer remains unavailable while it initializes.
Macintosh Þle name
PC Þle name
Reset Printer and
LaserWriter Utility
RESET.PS
Macintosh users
Note
Do not use the Restart Printer command in the LaserWriter
UtilityÕs Utilities menu. Follow this procedure to reset
the printer using the LaserWriter Utility to download the
Reset Printer utility Þle.
1.
The LaserWriter Utility and the Reset Printer Þle are compressed
into the Phaser 140 Utilities.sea archive Þle on the Macintosh Driver
and Printer Utilities diskette, and must be decompressed before
you can use them. Follow the instructions on page 2-12 to
decompress these Þles, then continue with the steps listed below.
2.
Locate the LaserWriter Utility in the folder on your hard disk
containing decompressed utility Þles. You may want to place this
utility in a Utilities folder, or leave the utility on your desktop if
you use it often.
3.
Select the appropriate printer in the Chooser.
Printing Reference
8-17
8 Troubleshooting
4.
Double-click the LaserWriter Utility icon to start the application.
5.
Choose Download PostScript File from the Utilities menu.
6.
Select the Reset Printer Þle in the list then click Open.
7.
At the prompt Save PostScript output as: you are asked
for a Þle name for saving printer output. Use either the default
name given in the edit box or type in a new name. Click Save to
send the Þle to the printer.
Note
The process of resetting the printer takes a few minutes to
complete. You will receive a message on your screen indicating the
connection has been interrupted during the reset. The connection
is re-established after the reset, so you can ignore this message;
click the Continue button.
8.
If no output is returned by the printer, the LaserWriter Utility
displays a dialog box. Click OK in the box to continue.
PC and workstation users
1.
Locate the RESET.PS Þle in the PHSR140 directory on the
Windows 3.1 Driver and Printer Utilities diskette.
2.
Copy the Þle to your hard disk, or use the Þle from the diskette.
3.
PC users: Use the DOS COPY command to send the Þle to
the printer.
To send the Þle to the parallel port, type:
COPY filename LPT1:
Workstation users: Send the Þle to the printer as you would any
PostScript Þle.
8-18
Phaser 140 Drivers and Utilities
Index
A
addctrld, UNIX shell script 4-3
ADDCTRLD.BAT, PC utility Þle 3-23
adjusting printed colors 6-1
Adobe Illustrator, PANTONE color library Þle
Macintosh 2-22
PC 3-28
Aldus FreeHand, PANTONE color library Þle
Macintosh 2-23, 2-24
PC 3-29
Aldus PageMaker, PANTONE color library Þle
Macintosh 2-24
PC 3-30
applications
color adjusting 6-6
printing from
Macintosh 2-17
PC 3-26
automated fax systems 8-2
B
BBS (Bulletin Board Service) 8-1
before you begin 1-1
blue color adjust 6-8
Bulletin Board Service (BBS) 8-1
C
change printerÕs name 2-16, 3-22
CIE colors 6-1
CMYK Sampler, Macintosh utility Þle 6-14
CMYK.PS, PC utility Þle 6-13
color charts
CMYK 6-14
HSB 6-14
PANTONE 6-18
RGB 6-14
color corrections
from a driver 6-5
from an application 6-6
Monochrome 6-11
no corrections 6-7
Simulate Display 6-9
Simulate Press 6-10
Use Printer Setting 6-12
Vivid Color (blue) 6-8
colors, adjusting or correcting 6-1
commands, DOS
COPY command, using 3-20
MODE command, using 3-19
CONFIG.PS, PC utility Þle 3-24
Control-D
PC utility Þles 3-23
workstation 4-2
COPY command, using 3-20
CorelDRAW!, PANTONE color library Þle
PC 3-31
correcting printed colors 6-1
CTRLD.PS, PC utility Þle 3-23
customer support 8-1
D
decompressing Þles
Macintosh screen shots 7-1
Macintosh utility Þles 2-12
delctrld, UNIX shell script 4-2
diskette mounting instructions 4-4
diskettes, locating 1-1
display colors, simulating 6-9
DOS
COPY command, using 3-20
MODE command, using 3-19
printing from 3-19
downloading fonts 7-4, 7-6
Printing Reference
Index-1
H
drivers
installing
DOS 3-19
Macintosh 2-1
Windows 3-1, 3-16
using
DOS 3-19
Macintosh 2-4
Windows 3-16
when to use 1-2
HAL Ñ Highly Automated Library 8-2
HSB Sampler, Macintosh utility Þle 6-14
HSB.PS, PC utility Þle 6-13
I
image orientation 5-7
information server 8-5
interactions between drivers, utility Þles, and
front panel 1-2
INTERNET 8-5
introductory information 1-1
E
error handlers, PostScript 8-8
EtherTalk printer name 2-16, 3-22
EuroHAL Ñ Highly Automated Library for
Europe 8-3
F
fax systems, information 8-2
Þles, utility 1-2
Finepoint Sharpening
details 5-8
image requirements 5-10
memory requirements 5-8
using 5-8
Font Sampler, Macintosh utility Þle 7-3,
font sampler, printing 7-3, 7-5
fonts
decompressing, Macintosh 7-1
downloading, Macintosh 7-4
downloading, Windows 7-6
installing, Macintosh 7-2
FONTS.PS, PC utility Þle 7-3, 7-5
front panel, when to use 1-2
Index-2
Phaser 140 Drivers and Utilities
J
job timeout 3-24
L
landscape orientation 5-7
LaserWriter 8.x driver, using 2-8
LaserWriter Utility, Macintosh utility Þle 2-14
LocalTalk printer name 2-16, 3-22
M
7-5
Macintosh printer driver
installing 2-1
locating the software 1-2
Page Setup dialog box 2-5
paper sizes 5-2
Print dialog box 2-6
selecting printer in Chooser 2-3
system requirements 2-1
TekColor Options dialog box 2-7
using 2-4
Macintosh READ ME Þles, reading 8-5
Macintosh screen fonts, decompressing 7-1
Macintosh utility Þles 2-13
CMYK Sampler 6-14
decompressing 2-12
Font Sampler 7-3, 7-5
HSB Sampler 6-14
LaserWriter Utility 2-14
locating the software 1-2
PANTONE-Tek Phaser 140 2-14, 6-18
printer description Þles 2-17
Reset Printer 2-14, 8-17
RGB Sampler 6-14
self-sending 2-14
sending Þles to the printer 2-13
Tek Error Handler 8-8
using 2-11
using the LaserWriter Utility to send
Þles to the printer 2-14
making the best color prints 1-1
Microsoft Windows NT PostScript printer
driver, updating 3-16
Microsoft Windows standard PostScript printer
driver, updating 3-14
MODE command, using 3-19
mounting PC diskette 4-4
N
Netlib information server, retrieving
source Þles 8-5
network printing 8-16
NT, Windows NT PostScript printer
driver, updating 3-16
O
orientation, image 5-7
P
page sizes 5-2
PANT140.PS, PC utility Þle 6-18
PANTONE printer Þles, using
Adobe Illustrator
Macintosh 2-22
PC 3-28
Aldus FreeHand
Macintosh 2-23, 2-24
PC 3-29
Aldus PageMaker
Macintosh 2-24
PC 3-30
color charts 6-18
CorelDRAW!
PC 3-31
PANTONE-Tek Phaser 140, Macintosh
utility Þle 2-14, 6-18
paper sizes 5-2
PC DOS, printing from 3-19
PC utility Þles
ADDCTRLD.BAT 3-23
CMYK.PS 6-13
CONFIG.PS 3-24
CTRLD.PS 3-23
FONTS.PS 7-3, 7-5
HSB.PS 6-13
locating the software 1-2
PANT140.PS 6-18
PRNTNAME.PS 3-22
RESET.PS 8-17
RGB.PS 6-13
TEKEHAND.PS 8-8
using 3-20
PDF Þles, using
Macintosh 2-21
Windows 3-27
Printing Reference
Index-3
PDX Þles, using
Macintosh 2-19
portrait orientation 5-7
PostScript
Level 2 1-2
printing errors 8-6
random errors 8-7
timeout 3-24
PPD 3.0 Þles, using
Macintosh 2-19
PC 3-27
PPD 4.x Þles, using
Macintosh 2-20
PC 3-27
print a truer blue 6-8
print speed, improving 8-9
printer
front panel 1-2
resetting 8-17
using 1-2
printer description Þles, using
Macintosh 2-17, 5-3
PC 3-26
printer drivers
installing
DOS 3-19
Macintosh 2-1
Windows 3-1, 3-16
using
DOS 3-19
Macintosh 2-4
Windows 3-16
PRINTER.INF, updating Windows NT
driver 3-16
printing on a network 8-16
printing problems 8-10
PRNTNAME.PS, PC utility Þle 3-22
Index-4
Phaser 140 Drivers and Utilities
R
READ ME Þles, Macintosh, reading 8-5
rename printer 2-16, 3-22
Reset Printer, Macintosh utility Þle 2-14,
RESET.PS, PC utility Þle 8-17
resetting the printer 8-17
RGB Sampler, Macintosh utility Þle 6-14
RGB.PS, PC utility Þle 6-13
8-17
S
screen fonts, Macintosh 7-1
shell scripts, UNIX
addctrld 4-3
delctrld 4-2
simulate display colors 6-9
software diskettes 1-1
Source Þles, Netlib information server 8-5
speed, print, improving 8-9
standard Windows PostScript
driver, updating 3-14
support, customer 8-1
T
technical support 8-1
Tek Error Handler, Macintosh utility Þle 8-8
TekColor Dynamic Correction 6-1
TEKEHAND.PS, PC utility Þle 8-8
Tektronix Bulletin Board Service 8-1
Tektronix information server 8-5
timeouts
job 3-24
wait 3-24
Windows printer driver 3-7
Transmission Retry, Windows 3-7
troubleshooting 8-2
U
W
UNIX shell scripts
addctrld 4-3
delctrld 4-2
Use Printer Setting, Tektronix
driver setting 6-12
using color 6-4
using the printer 1-2
using utility Þles
Macintosh 2-11
PC 3-20
utility Þles
locating the software 1-2
Macintosh
decompressing 2-12
self-sending 2-14
sending Þles to the printer 2-13
using 2-11, 2-13
using the LaserWriter Utility to send Þles
to the printer 2-14
PC
using 3-20
using the software 1-2
wait timeout 3-24
WIN.INI Þle, editing 7-5
Windows NT printer driver
updating 3-16
using 3-16
Windows printer driver
conÞguring 3-5
fonts 7-5
installing 3-3
installing on a network 3-12
locating the software 1-2
on-line help 3-1
Options dialog box 3-10
paper sizes 5-2
port setup information 3-6
Setup dialog box 3-9
system requirements 3-1
Tektronix Printer Features dialog box 3-11
timeouts 3-7
using 3-9
Printing Reference
Index-5