1
Linux BSP for the Freescale
i.MX21ADS
User's Guide
Rev. 1.2
06/2007
How to Reach Us:
Home Page:
www.freescale.com
E-mail:
support@freescale.com
USA/Europe or Locations Not Listed:
Freescale Semiconductor
Technical Information Center, CH370
1300 N. Alma School Road
Chandler, Arizona 85224
+1-800-521-6274 or +1-480-768-2130
support@freescale.com
Europe, Middle East, and Africa:
Freescale Halbleiter Deutschland GmbH
Technical Information Center
Schatzbogen 7
81829 Muenchen, Germany
+44 1296 380 456 (English)
+46 8 52200080 (English)
+49 89 92103 559 (German)
+33 1 69 35 48 48 (French)
support@freescale.com
Japan:
Freescale Semiconductor Japan Ltd.
Headquarters
ARCO Tower 15F
1-8-1, Shimo-Meguro, Meguro-ku,
Tokyo 153-0064, Japan
0120 191014 or +81 3 5437 9125
support.japan@freescale.com
Asia/Pacific:
Freescale Semiconductor Hong Kong Ltd.
Technical Information Center
2 Dai King Street
Tai Po Industrial Estate
Tai Po, N.T., Hong Kong
+800 2666 8080
support.asia@freescale.com
For Literature Requests Only:
Freescale Semiconductor Literature Distribution Center
P.O. Box 5405
Denver, Colorado 80217
1-800-441-2447 or 303-675-2140
Fax: 303-675-2150
LDCForFreescaleSemiconductor@hibbertgroup.com
Information in this document is provided solely to enable system and software
implementers to use Freescale Semiconductor products. There are no express or
implied copyright licenses granted hereunder to design or fabricate any integrated
circuits or integrated circuits based on the information in this document.
Freescale Semiconductor reserves the right to make changes without further notice
to any products herein. Freescale Semiconductor makes no warranty, representation
or guarantee regarding the suitability of its products for any particular purpose, nor
does Freescale Semiconductor assume any liability arising out of the application or
use of any product or circuit, and specifically disclaims any and all liability, including
without limitation consequential or incidental damages. “Typical” parameters that may
be provided in Freescale Semiconductor data sheets and/or specifications can and
do vary in different applications and actual performance may vary over time. All
operating parameters, including “Typicals”, must be validated for each customer
application by customer’s technical experts. Freescale Semiconductor does not
convey any license under its patent rights nor the rights of others. Freescale
Semiconductor products are not designed, intended, or authorized for use as
components in systems intended for surgical implant into the body, or other
applications intended to support or sustain life, or for any other application in which
the failure of the Freescale Semiconductor product could create a situation where
personal injury or death may occur. Should Buyer purchase or use Freescale
Semiconductor products for any such unintended or unauthorized application, Buyer
shall indemnify and hold Freescale Semiconductor and its officers, employees,
subsidiaries, affiliates, and distributors harmless against all claims, costs, damages,
and expenses, and reasonable attorney fees arising out of, directly or indirectly, any
claim of personal injury or death associated with such unintended or unauthorized
use, even if such claim alleges that Freescale Semiconductor was negligent
regarding the design or manufacture of the part.
Learn More: For more information about Freescale products, please visit
www.freescale.com.
Freescale™ and the Freescale logo are trademarks of Freescale Semiconductor, Inc.
All other product or service names are the property of their respective owners.
© Freescale Semiconductor, Inc. 2005-2007. All rights reserved.
Contents
About This Book ................................................................................................... iv
Audience ..................................................................................................................................................iv
Organization.............................................................................................................................................iv
Conventions .............................................................................................................................................. v
Definitions, Acronyms, and Abbreviations............................................................................................... v
Introduction........................................................................................................ 2-1
1.1
LTIB Overview ........................................................................................................................2-1
1.2
BSP Overview ..........................................................................................................................2-1
Chapter 2 LTIB Basics........................................................................................ 2-1
2.1
Installing the BSP .....................................................................................................................2-1
2.2
Running LTIB ..........................................................................................................................2-1
Chapter 3 Target Configuration.......................................................................... 3-1
3.1
Supported Target Revisions......................................................................................................3-1
3.2
Target Set-up ............................................................................................................................3-1
Chapter 4 Target Deployment ............................................................................. 4-2
4.1
Host Set-up ...............................................................................................................................4-2
4.2
Flashing the blob Bootloader....................................................................................................4-3
4.2.1
On a new board ....................................................................................................................4-3
4.2.2
Using an existing bootloader................................................................................................4-4
4.2.3
Bootloader param file...........................................................................................................4-4
4.3
Development Deployment (NFS) .............................................................................................4-5
4.4
NOR Flash Deployment ...........................................................................................................4-5
4.5
NAND Flash Deployment ........................................................................................................4-6
Freescale Semiconductor
i.MX21ADS BSP User Manual
iii
About This Book
This User Manual provides information on the basic features supported by the BSP and provides you
with instructions about how to accomplish these tasks:
• Install the BSP on a host development system..
• Run Linux Target Image Builder (LTIB) to build target images.
• Deploy built images to the i.MX21ADS board.
• Boot Linux on the i.MX21ADS board.
Audience
This document is addressed to developers who want to take advantage of the Freescale Linux Target
Image Builder (LTIB) for the i.MX21ADS Board Support Package (BSP).
Organization
This document is organized into four chapters.
Chapter 1
An introduction to the i.MX21ADS BSP.
Chapter 2
Basic information on LTIB.
Chapter 3
Target set-up.
Chapter 4
Host and target-specific build and deployment.
Freescale Semiconductor
i.MX21ADS BSP User Manual
iv
Conventions
This document uses the following notational conventions:
•
Courier monospaced type indicates commands, command parameters, code examples,
expressions, data types, and directives.
•
Italic type indicates replaceable command parameters.
•
All source code examples are in C.
Definitions, Acronyms, and Abbreviations
The following list defines the abbreviations used in this document.
ATA
BSP
DPM
DVFS
LTIB
NFS
OSS
RTC
TFTP
USB
Advanced Technology Attachment
Board Support Package
Dynamic Power Management
Dynamic Voltage Frequency Scaling
Linux Target Image Builder
Network File System
Open Sound System
Real Time Clock
Trivial File Transfer Protocol
Universal Serial Bus
Freescale Semiconductor
i.MX21ADS BSP User Manual
v
Introduction
1.1
LTIB Overview
The Linux Target Image Builder (LTIB) is a tools framework used to manage, configure, extend and
build Linux software elements to easily build a Linux target image and a root filesystem. LTIB runs on an
x86 PC running the Linux OS.
The host development system used to run LTIB requires:
•
•
•
•
•
•
•
Ethernet card
Serial port
1 gigabyte of free disk space
NFS Server
TFTP Server
rsync
perl
NOTE: Be aware that some host side packages may not function properly on every Linux distribution.
The following are platforms on which LTIB has been tested.
•
•
•
•
1.2
Redhat: 7.3, 8.0, 9.0
Fedora Core: 1, 2, 3
Debian: 3.1r0 (stable), unstable
SuSE: 8.2, 9.2, 10.0
BSP Overview
Once this LTIB BSP is installed and running with its basic configuration, you can use LTIB to customize
your i.MX21ADS system with additional features.
The BSP components provide the tools, device drivers, and additional features needed for your embedded
Linux project.
Kernel Features:
- Linux-2.4.20 CELF kernel
- Loadable modules
- UART 1 at 115200 baud
- Framebuffer, LCD panel
- Keypad
- TV-OUT VGA, NTSC, PAL
- Ethernet
- Touchscreen
- iMagic IM8012 camera
Freescale Semiconductor
i.MX21ADS BSP User Manual
2-1
- Video4Linux: Pre-Processing support, SDC, ADC, iMagic Camera
- I2C
- Video Post-Processing
- Video Pre-Processing
- OSS
- USB OTG (limited)
- USB Host: Mass Storage, Ethernet, HID devices
- Power Management
- Battery Gauge
- NAND Boot, MTD
- NOR Boot, MTD
- CodeTEST kernel support
- Real Time Clock
- Watchdog
- PCMCIA
- Hantro
blob version 2.0.5_pre2
NOR, NAND Boot
GNU ARM gcc-3.3.2 glibc-2.3.2
Various user space packages including
base_libs
bash
busybox
coreutils
device files
dhcp
diffutils
dropbear
findutils
libjpeg
module-init-tools
ncurses
netperf
net-tools
openssl
portmap
procinfo
Qtopia
strace
Documentation. See START_HERE.html on this CD.
2-2
i.MX21ADS BSP User Manual
Freescale Semiconductor
Chapter 2
LTIB Basics
2.1
Installing the BSP
Please follow the steps below to install LTIB on your host machine.
1. As root, mount the ISO image on your machine:
mount –o loop <target-bsp.iso> <mount point>
2. As a non-root user, install the LTIB:
<mount point>/install
The install program will first display the BSP EULA. To continue installing, read and accept the license
then input the desired LTIB install path. Be sure the user has the correct write permissions for the install
path.
There are no uninstall scripts. To uninstall LTIB you need to manually remove the
/opt/freescale/pkgs, /opt/freescale/ltib and the directory in which you installed LTIB.
2.2
Running LTIB
To run LTIB, change to the directory in which you installed it and run LTIB.
cd <install_path>/ltib
./ltib --configure
The first time LTIB runs on your machine a number of host packages are built and installed that
support LTIB. This may take a few minutes. Results from the host package install are logged in
the file host_config.log.
After the host support packages are installed, LTIB displays a configuration screen for choosing
the target platform. Hit Enter to display the list of platforms, then use the arrow keys to pick the
platform, Enter to close the platform window, then select “Exit” (right arrow key) to save the
configuration.
After you save the target platform, LTIB’s next screen shows kernel, bootloader, package, etc.
options. Use the arrow keys and Enter to modify the configuration as needed. When you exit,
the configuration will be saved in the file config/platform/imx21ads/defconfig.dev.
Freescale Semiconductor
i.MX21ADS BSP User Manual
2-1
Important Note: Please be sure to set the “Target System Configuration” options for your
network environment the first time you build.
To build your target kernel, file system, and all enabled packages run LTIB with no options:
./ltib
Once your project is built, you will get the following target files:
•
•
•
rootfs – directory, the root file system that will be deployed on your board.
rootfs.jffs2 – JFFS2 filesystem that can be flashed to your board.
rootfs/boot/zImage – kernel image that can be loaded with your bootloader
If you want to change target configuration or enable/disable packages:
./ltib –m config
If you want to fully re-configure and re-compile all the packages, you can do the following,
though this is generally not necessary:
1. Clean up all the configure files and objects thoroughly:
./ltib –m distclean
2. You will be prompted to confirm that you want to remove all compiled binaries. Type
yes to perform a distclean.
3. Run ltib
./ltib
More information on LITB can be found in <install path>/doc, or at
http://savannah.nongnu.org/projects/ltib.
2-2
i.MX21ADS BSP User Manual
Freescale Semiconductor
Chapter 3
Target Configuration
3.1
Supported Target Revisions
The target system is the i.MX31ADS board. This BSP is known to work on the following board revisions:
M9328MX21ADSE (RoHS)
3.2
Target Set-up
1. Plug the i.MX21 CPU card into the ADS baseboard and attach the LCD and keypad boards.
2. Connect your board to the network via the Ethernet port.
3. Connect your board’s UART 1 port to your host machine’s serial port using a straight-through serial
cable.
4. Verify the dip switches and jumpers are set correctly.
Freescale Semiconductor
i.MX21ADS BSP User Manual
3-1
Chapter 4
Target Deployment
4.1
Host Set-up
Host setup is critical for your BSP to function. The host must be running tftp and nfs in order for
deployment to work. The following instructions are generic and may require root permissions. Your
system may be different and the commands should be adjusted accordingly.
1.
Turn off your host’s firewall for tftp to work. iptables -F or type "setup" at the command
line.
2.
Install tftp-server and nfs-server
3.
Create the tftboot directory.
Mkdir -p /tftpboot/imx21ads
4.
Link rootfs to an exportable directory once you have built your project.
ln –s <install_path>/rootfs /tftpboot/imx21ads/ltib
5.
Copy over kernel and flash filesystem images for your deployment to the
/tftpboot/imx21ads directory
cp <install_path>/ rootfs/boot/* /tftpboot/imx21ads
cp <install_path>/<flashfs> /tftpboot/imx21ads
6.
Edit /etc/exports and add the following line:
/tftpboot/imx21ads/ltib/ <target board IP> (rw,no_root_squash,async)
7.
Edit /etc/xinetd.d/tftp to enable tftp like this:
{
disable
socket_type
protocol
wait
user
server
server_args
}
8.
=
=
=
=
=
=
=
no
dgram
udp
yes
root
/usr/sbin/in.tftpd
/tftpboot
Restart the nfs and tftp servers on your host
/etc/init.d/xinetd restart
/etc/init.d/nfsserver restart
4-2
i.MX21ADS BSP User Manual
Freescale Semiconductor
9.
Verify that the board is connected to your network and connected to the host serial port.
10. Start and configure minicom:
- Serial Setup: Select correct serial device; Hardware & Software Flow control = No; Bps =
115,200
- Modem & dialing: Delete text for the following: Init String, Reset String, Hang-up String, No
flow control
11. Power on board and see the console prompt.
4.2
Flashing the blob Bootloader
4.2.1
On a new board
To flash the bootloader on an ADS board without an existing blob bootloader, follow these steps:
1. Build the hardwaretest package which contains the serial download utility:
./ltib –p hardwaretest-imx
The file imx21_download will be copied to <install_path>/bin/.
2. Make sure the bootloader is built:
./ltib –p blob-imx21ads.spec
3. Turn off the power switch on the i.MX21_ADS board.
4. Make sure the serial cable is connected between the host and target systems.
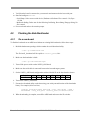
5. Set the i.MX21_ADS board configuration switches labeled S2 on the base board as shown.
Switch
S2
1
ON
2
ON
3
ON
4
ON
5
OFF
6
OFF
7
OFF
8
OFF
6. Turn on the i.MX21_ADS board.
7. Execute the download utility on the host using your serial port and location of the bootloader
binary. For example (all on one line):
<install_path>/bin/imx21_download –-port /dev/ttyS0 –-addr \
0xc0300000 --stop_auto_boot <install_path>/rootfs/boot/blob
8. When downloading is complete, turn off the ADS board and restore the S2 switches.
Freescale Semiconductor
i.MX21ADS BSP User Manual
4-3
4.2.2
Using an existing bootloader
To reprogram the bootloader using an existing running blob, load the bootloader image into SDRAM and
then program it into flash. Be sure to setup your host as outlined in section 4.1. The bootloader
commands are:
blob>
blob>
blob>
blob>
blob>
server 192.168.1.5
ip 192.168.1.10
Tftpfile /tftpboot/imx21ads/zImage
tftp blob
flash blob
Be sure to use IP addresses for your host and target. Reset your board to use the new bootloader.
You can also use the HAB Toolkit to flash the i.MX21ADS board from MS Windows with a full
kernel/file system image. You can find this software on the BSP CD in flash/.
4.2.3
Bootloader param file
If you wish to save the host/target network parameters, kernel command line, etc. in flash, you must
create a special param file. The steps to create and flash a blob param file are as follows:
1. Build the mkparamblock utility. Extract the blob source, change to the mkparamblock directory
and build the utility:
$
$
$
$
$
./ltib -p blob-imx21ads.spec -m prep
pushd rpm/BUILD/blob-2.0.5-pre2/utils/mkparamblock
make
cp mkparamblock <install_path> /bin/
popd
2. Create a plain text file blob.config.param with network, serial, boot settings. For example:
# Config file for Freescale i.MX21
ip 192.168.1.10
server 192.168.1.5
tftpfile /tftpboot/imx21ads/zImage
ramdisk
no
# default is yes
bootdelay 3
# default is 10
cmdline
root=/dev/mtdblock2 noinitrd ip=none
baud
115200, 115200 # best for serial deployment
autoboot
ram
# "flash" for XIP, "ram" for normal kernel
3. Process the plain text file with mkparamblock into the binary file param, then put the param file
in the tftp directory:
$ <install_path>bin/mkparamblock blob.config.param param
$ cp param /tftpboot/imx21ads
4. At the bootloader prompt, tftp and flash the file:
blob> tftp param
blob> flash param
4-4
i.MX21ADS BSP User Manual
Freescale Semiconductor
5. To verify that the parameters are used correctly, reset power on the board, and at the bootloader
prompt, type ‘status’.
4.3
Development Deployment (NFS)
1.
Copy the kernel image from <install_path>/rootfs/boot/zImage to the
/tftpboot/imx21ads directory created during host setup.
2.
At the bootloader prompt, give the host and target network addresses and set the path to the
kernel. For example:
blob> server 192.168.1.5
blob> ip 192.168.1.10
blob> Tftpfile /tftpboot/imx21ads/zImage
3.
Download the Linux kernel binary to SDRAM:
blob> tftp kernel
4.
Boot the kernel. Be sure to use appropriate Ethernet settings for your host, target, network
gateway, and netmask. For example (all on one line):
blob> boot noinitrd root=/dev/nfs nfsroot=<server \
ip>:/tftpboot/imx21ads/ltib ip=192.<target ip>:<server ip>
Note that specifying a command line is unneccessary if you flashed a param file as described in
the section “Bootloader param file.” Type ‘status’ at the bootloader prompt to check.
4.4
NOR Flash Deployment
1.
When configuring with ‘./ltib –m config’, make sure that the jffs2 erase block size in
kilobytes matches your hardware on the ‘Target Image Generation’ page. For the
M9328MX21ADSE (RoHS) board, use ‘256’. For previous versions of the CPU board with
AMD NOR flash parts, use ‘128’ k.
2.
Also during configuration, be sure that the option “Support NAND flash deploy” is disabled.
Exit to save the configuration, then if you have changed this option, force rebuild blob:
./ltib –p blob-imx21ads.spec –force
If you rebuild blob, reflash it as described earlier.
3.
Copy the kernel image from <install_path>/rootfs/boot/zImage to the
/tftpboot/imx21ads directory.
Freescale Semiconductor
i.MX21ADS BSP User Manual
4-5
4.
Copy the jffs2 filesystem image from your LTIB install directory to the /tftpboot/imx21ads
directory. Note that the blob bootloader requires the filename 'ramdisk.gz' so after copying
rootfs.jffs2 to /tftpboot/imx21ads, rename it to ‘ramdisk.gz’ or create a symbolic link.
5.
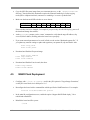
Make sure the boot mode DIP switches are set as shown:
Switch
S2
1
ON
2
OFF
3
OFF
4
ON
5
OFF
6
OFF
7
OFF
8
OFF
If the switches need to be changed, for example if you previously did a NAND deploy, power off
the board and change the switches.
6.
At the bootloader prompt, use the ‘status’ command to verify that the target IP address, tftp
server IP, MAC address, and tftp path to the kernel are set properly.
7.
If you want network parameters to be saved in flash, see the section “Bootloader param file.” If
you update any network settings or paths and regenerate your param file, tftp and flash it with:
blob> tftp param
blob> flash param
8.
Download and flash the filesystem image:
blob> erase ramdisk
blob> tftp ramdisk
blob> flash ramdisk
9.
Download and flash the Linux kernel, then boot:
blob> tftp kernel
blob> flash kernel
4.5
NAND Flash Deployment
1.
Configure with ‘./ltib –m config’, and for the jffs2 option in “Target Image Generation,”
set the jffs2 erase block size in kilobytes to ‘16’.
2.
Reconfigure the kernel with a command line which specifies the NAND mtd root. For example:
noinitrd root=/dev/mtdblock6 ip=none
3.
In the main ltib configuration screen, enable the option “Support NAND flash deploy,” force
rebuild and reflash blob.
4.
Rebuild the kernel and file system:
./ltib
4-6
i.MX21ADS BSP User Manual
Freescale Semiconductor
5.
Copy the kernel image from <install_path>/rootfs/boot/zImage to
/tftpboot/imx21ads.
6.
Copy the jffs2 filesystem image from directory where you installed LTIB to the
/tftpboot/imx21ads directory. Note that the blob bootloader requires the filename
'ramdisk.gz' so after copying rootfs.jffs2 to /tftpboot/imx21ads, rename it to ‘ramdisk.gz’.
7.
Power off the board and set the i.MX21ADS boot mode DIP switches to boot for NAND:
Switch
S2
8.
1
OFF
2
OFF
3
OFF
4
ON
5
OFF
6
OFF
7
OFF
8
OFF
Power on the board. If Blob autoboot is enabled you will need to type any character in the
console window to interrupt the autoboot sequence. Tftp and flash the filesystem and kernel, then
boot:
blob>
blob>
blob>
blob>
blob>
blob>
erase ramdisk
tftp ramdisk
flash ramdisk
tftp kernel
flash kernel
boot
Freescale Semiconductor
i.MX21ADS BSP User Manual
4-7