1
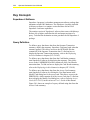
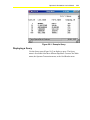
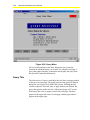
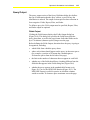
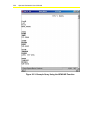
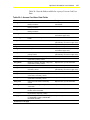
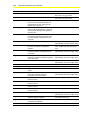
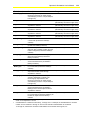
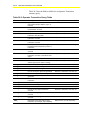
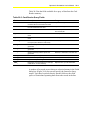
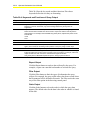
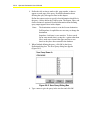
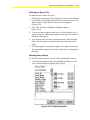
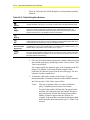
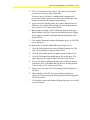
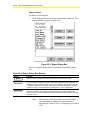
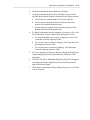
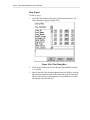
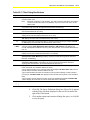
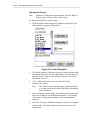
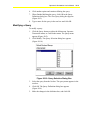
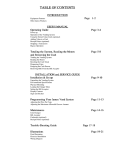
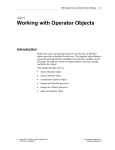
Operator Workstation User’s Guide
20-1
Chapter 20
Defining Queries
Introduction
The Query is a Superbase 4 tool for collecting and analyzing database
information concerning specific parts of the BAS. Use the query to
analyze data from three different databases: the Access Card summary,
the Operator Transaction summary, and the Card Reader summary.
For example, define a query from the Card Reader summary to find
out how often a particular door is used during certain times of the day.
Or define a query from the Operator Transaction summary to find out
how many times a particular operator has discarded Follow-Up reports
over a specific period of time.
This chapter describes how to:
•
define a query
•
modify a query
•
delete a query
•
display a query
•
print a query
•
save a query to a file
•
exit a query
© November 1, 2001 Johnson Controls, Inc.
Code No. LIT-120162
www.johnsoncontrols.com
20-2
Operator Workstation User’s Manual
Key Concepts
Superbase 4 Software
Superbase 4 program is a database management software package that
maintains certain OWS databases. The Superbase 4 package included
in Metasys software is a runtime version and does not have full
Superbase 4 software capabilities.
The runtime version of Superbase 4 software that comes with Metasys
Release 4.0 or higher can define the title and output sections of a
query. To define the destination section, purchase the full Superbase 4
package.
Query Definition
To define a query that draws data from the Operator Transaction
summary, display the summary. Superbase 4 software loads when the
summary appears. This allows access to the OPTRANS file that
contains all of the Operator Transaction data. To find out how to
display the Operator Transaction summary, refer to the Displaying
Archived Summaries chapter (LIT-120169).
To define a query that draws data from the Card Reader summary,
start Superbase 4 software by displaying the summary. This allows
access to the CARDRDR file which contains all of the Card Reader
transaction data. To find out how to display the Card Reader summary,
refer to the Displaying Archive Summaries chapter (LIT-120169).
To define a query that draws data from the Access Card summary,
start Superbase 4 software by clicking the User Data button in the
Modify Card dialog box for an access card. This allows access to the
PERSON file, which contains all of the Access Card data. To find out
how to display the Modify Card dialog box, refer to Defining Access
Cards (LIT-120153) in the Advanced User’s Guide of this manual.
Figure 20-1 shows an example of a query defined using data from the
Access Cards summary.
Operator’s Workstation User’s Manual
20-3
Figure 20-1: Example Query
Displaying a Query
Use the Query menu (Figure 20-2) to display a query. The Query
menu is accessible from three different Superbase 4 screens: the Main
menu, the Operator Transaction menu, or the Card Reader menu.
20-4
Operator Workstation User’s Manual
Figure 20-2: Query Menu
For best results and up-to-date data, display the query from the
function for which the query was created. For example, to display a
query that gathers Operator Transaction data, display the query from
the Operator Transaction Main menu.
Query Title
The title section of a query can display the title, date, and page number
of the query on each page. The upper portion of the Query Definition
dialog box (see Figure 20-4) defines this section. Defining the title
section is optional. If no title, date, or page numbers are defined, the
query data appears on the first line of the printed page or PC screen.
If the query has a title, it appears centered on each page. The date
appears in the upper left corner of each page, and the page number
appears in the upper right.
Operator’s Workstation User’s Manual
20-5
Query Output
The query output section of the Query Definition dialog box defines
the type of information that the query collects, as well as how the
information is ordered. The output section specifies data collection in
four categories: Fields, Report, Filter, and Order.
To define a query, the Fields output must be specified; Report, Filter,
and Order output are optional.
Fields Output
Clicking the Fields button displays the Fields Output dialog box
(Figure 20-6). This dialog box specifies the fields from which the
query draws data, as well as the page format. Individual fields can be
up to 70 columns (character spaces) long across the page.
Before defining the Fields Output, determine how the query is going to
be organized, including:
•
which fields from which the query draws
•
where each column should appear on the query, in character spaces
(for example, a position of 20 means the column begins at
20 character spaces from the left side of the page)
•
the limit to the number of characters that can appear in each field
•
whether any of the fields should have a heading different from the
field title that appears in the Fields dialog box (Figure 20-6)
•
whether the query appears in the standard table format (as in
Figure 20-1) or use the NEWLINE function (Figure 20-3). The
NEWLINE format is useful for queries in which the columns
would exceed the 70-character space maximum across the page.
20-6
Operator Workstation User’s Manual
Figure 20-3: Example Query Using the NEWLINE Function
Operator’s Workstation User’s Manual
20-7
Table 20-1 lists the fields available for a query of Access Card User
Data.
Table 20-1: Access Card User Data Fields
Field
Description
Ranges
Card_ID
Unique Card ID number as defined in
Metasys software
Numeric, up to 5 characters between
0 and 65535
Last_Name
Last name of the card holder as defined in
Metasys software
Text, up to 10 characters
First_Name
First name of the card holder as defined in
Metasys software
Text, up to 8 characters
Middle_Initial
Middle initial of the card holder
Text, 1 character (automatically
converted to upper case)
Company_ID
Unique ID number assigned to each card
holder
Numeric, from 0 to 65535
Mail_Station
Mail station of the card holder
Alphanumeric, up to 10 characters
(automatically converted to upper case)
Department
Department of the card holder
Alphanumeric, up to 20 characters
Bld_Floor
Building and floor of the card holder’s office
Alphanumeric, up to 20 characters
Work_Phone
Office phone number of the card holder
Text, up to 20 characters (automatically
converted to upper case)
Car1_License
License plate number of the card holder’s
primary vehicle
Alphanumeric, up to 10 characters
(automatically converted to upper case)
Car1_Year
Year of the card holder’s primary vehicle
Numeric, 4 characters
Car1_Make
Make (for example, Chevrolet, Ford) of the
card holder’s primary vehicle
Alphanumeric, up to 20 characters
Car1_Model
Model (for example, Chevette, LTD) of the
card holder’s primary vehicle
Alphanumeric, up to 20 characters
Car1_Color
Color of the card holder’s primary vehicle
Alphanumeric, up to 20 characters
Car2_License
License plate number of the card holder’s
secondary vehicle
Alphanumeric, up to 10 characters
(automatically converted to upper case)
Car2_Year
Year of the card holder’s secondary vehicle
Numeric, 4 characters
Car2_Make
Make (for example, Chevrolet, Ford) of the
card holder’s secondary vehicle
Alphanumeric, up to 20 characters
Car2_Model
Model (for example, Chevette, LTD) of the
card holder’s secondary vehicle
Alphanumeric, up to 20 characters
Car2_Color
Color of the card holder’s secondary
vehicle
Alphanumeric, up to 20 characters
Parking Lot
Name of the parking lot assigned to the
card holder
Alphanumeric, up to 20 characters
PIN
5-digit unique Personal Identification
Number of the card holder
Numeric, 1 through 65,535
Badge_Type
Type of card the card holder is issued (that
is, permanent, temporary, visitor)
Alphabetic, up to 20 characters
Badge_Media
Type of badge the card holder is using (that
is, WIEGAND, N-CRYPT, MAGSTRIP,
B/F NPAR, B/F PAR)
Alphabetic, up to 20 characters
Continued on next page . . .
20-8
Operator Workstation User’s Manual
Field (Cont.)
Description
Ranges
Issue_Date
Date the access card was issued
Alphanumeric, automatically converted
to the mmm, dd, yyyy format
Expiration Date
Date the access card expires
Alphanumeric, automatically converted
to the mmm, dd, yyyy format
Door_Access
Doors for which the card can be used to
enter or exit. (For Metasys Release 6.0,
this field does not exist, although it still
appears in the query list.)
Alphanumeric, up to 20 characters
Access_Days
Days of the week that the access card is
valid. (For Metasys Release 6.0, this field
does not exist, although it still appears in
the query list.)
Alphabetic, up to 20 characters
Access_Times
Times of day that the access card is valid.
(For Metasys Release 6.0, this field does
not exist, although it still appears in the
query list.)
Alphanumeric, up to 20 characters
Social_Security
Card holder’s social security number
Numeric, up to 11 characters
(automatically converted to upper case)
Full_Name
Card holder’s first name, middle initial, and
last name as defined in Superbase 4
software
Alphabetic, up to 24 characters--first
name, middle initial, last name (read
only)
Photo
Full path name (including the file extension)
of the file containing a photograph of the
card holder
Alphanumeric, up to 60 characters
(automatically converted to upper case)
Signature
The full path name (including the file
extension) of the file containing a signature
of the card holder
Alphanumeric, up to 60 characters
(automatically converted to upper case)
Home_Phone
Card holder’s home phone number
Alphanumeric, up to 20 characters
(automatically converted to upper case)
Home_Address
Card holder's home address
Alphanumeric, up to 30 characters
Home_City
City in which the card holder lives
Alphanumeric, up to 20 characters
Home_Zip
Zip code for the residence of the card
holder
Numeric, up to 5 characters
Emergency Info
Full path name (including the file extension)
for the file containing emergency
information for the card holder
Alphanumeric, up to 60 characters
(automatically converted to upper case)
User1
Information stored in the operator defined
field User Data 1
Alphanumeric, up to 40 characters
User2
Information stored in the operator defined
field User Data 2
Alphanumeric, up to 40 characters
User3
Information stored in the operator defined
field User Data 3
Alphanumeric, up to 40 characters
User4
Information stored in the operator defined
field User Data 4
Alphanumeric, up to 40 characters
Home_State
State in which the card holder lives
Alphanumeric, 2 characters
(automatically converted to upper case)
ID_Card
Unique card ID number for the access card
defined in Metasys software
Numeric, up to 5 characters between
0 and 65535 (read only)
ID_Company
Card holder’s unique company ID (defined
in Superbase 4 software)
Numeric, from 0 to 65535 (read only)
Continued on next page . . .
Operator’s Workstation User’s Manual
20-9
Field (Cont.)
Description
Ranges
Interlock_Grp
Interlock group that represents the GPL
interlock in which the AC object triggers
other Metasys process to run (for example,
turn lights on)
Numeric, from 0 to 64
FAX_Number
Card holder’s facsimile phone number
Alphanumeric, up to 20 characters
(automatically converted to upper case)
U1_Header
Field title for the User 1 field, as defined in
Superbase 4 software
Alphanumeric, up to 14 characters
(automatically converted to upper case)
U2_Header
Field title for the User 2 field, as defined in
Superbase 4 software
Alphanumeric, up to 14 characters
(automatically converted to upper case)
U3_Header
Field title for the User 3 field, as defined in
Superbase 4 software
Alphanumeric, up to 14 characters
(automatically converted to upper case)
U4_Header
Field title for the User 4 field, as defined in
Superbase 4 software
Alphanumeric, up to 14 characters
(automatically converted to upper case)
Card_Issue_Lev
Number of times a card has been issued to
a card holder (as defined in Metasys
software)
Numeric, from 0 to 7
Exec_Privilege
Executive privileges status of the card holder Boolean, 0 or 1 (0=No, 1=Yes)
(as defined in Metasys software)
SysObjName_1*
Name of the system and Access Control
object for each controller to which the card
holder is assigned (as defined in Metasys
software)
Alphanumeric, up to 17 characters
Proc_Grp_1*
JC-BASIC/GPL process interlock group in
which the card is linked (as defined in
Metasys software)
Numeric, from 0 to 99
TimeZone_1*
Times of the week a card holder may
access authorized doors (as defined in
Metasys software)
Numeric, from 0 to 9
Reader_1 through
Reader_16**
Card readers for a specific controller valid
for a card holder (as defined in Metasys
software)
Alphanumeric, up to 17 characters
Curr_SystObj
Name of the system and Access Control
object that was last viewed through
Superbase 4 software
Alphanumeric, up to 17 characters
Curr_Int_Grp
Interlock group for the last AC object
viewed in Superbase 4 software. The
interlock group represents the GPL
interlock in which the AC object triggers
other Metasys process to run (for example,
turn lights on)
Numeric, from 0 to 64
Curr_TimeZone
Times of the week a card holder may
access authorized doors (as defined in
Metasys) for the last AC object viewed in
Superbase 4 software
Numeric, from 0 to 9
Curr_Read1-16
Card readers for a specific controller valid
for a card holder (as defined in Metasys) for
the last AC object viewed in Metasys
software
Alphanumeric, up to 17 characters
*
**
This field repeats for each controller (up to 32). The end number indicates the number of the controller
shown on the Superbase 4 screen.
Card Readers are numbered consecutively, 1 through 512. For example, the Card Readers for controller
number one are numbered 1 through 16. The second controller’s Card Readers are numbered
17 through 32, and the third controller’s Card Readers are numbered 33 through 46, etc.
20-10
Operator Workstation User’s Manual
Table 20-2 lists the fields available for an Operator Transaction
summary query.
Table 20-2: Operator Transaction Query Fields
Field
Description
Ranges
TRANTYPE
Type of operator transaction that initiated a
report (that is, Report, Object, Logon, or
Feature)
Numeric, 1 character, from 0 to 3
LOCATION
Name of the PC file destination in which
the transaction occurred
Alphanumeric, up to 8 characters
GROUP_
PC group in which the transaction occurred
Alphanumeric, up to 26 characters
SYSTEM
Name of the system in which the
transaction was generated
Alphanumeric, up to 8 characters
OBJECT
Name of the object for which the
transaction occurred
Alphanumeric, up to 8 characters
ATTRIB
Name of the attribute for which the
transaction occurred
Alphanumeric, up to 8 characters
ACCSLEVL
Password level of the user that logs on, or
the password level required to perform a
transaction
Numeric, 1 character, from 0 through 7
DEVICE
Name of the device where the transaction
occurred
Alphanumeric, up to 8 characters
FEATURE
Either the name of the feature for which the
transaction occurred, or the status of the
object.
Alphanumeric, up to 8 characters
VALUE
Value of the affected object or attribute
Alphanumeric, up to 8 characters
UNITS
Units used to measure the value of the
affected object (if the object is analog)
Alphanumeric, up to 6 characters
DATE_Y
Year that the report was generated
Numeric, 2 characters, from 00 to 99
DATE_M
Month that the report was generated
Numeric, 2 characters, from 01 to 12
DATE_D
Day that the report was generated
Numeric, 2 characters, from 01 to 31
TIME_H
Hour of the day the report was generated
Numeric, 2 characters, from 00 to 23
TIME_M
Minute of the day the report was generated
Numeric, 2 characters, from 00 to 59
TIME_S
Second of the day the report was
generated
Numeric, 2 characters, from 00 to 59
OPERATOR
Initials of the operator who performed the
transaction
Text, up to 3 characters
ODATE_Y
Year that the original transaction occurred
Numeric, 2 characters, from 00 to 99
ODATE_M
Month that the original transaction occurred
Numeric, 2 characters, from 01 to 12
ODATE_D
Day that the original transaction occurred
Numeric, 2 characters, from 01 to 31
OTIME_H
Hour of the day original transaction
occurred
Numeric, 2 characters, from 00 to 23
OTIME_M
Minute of the day original transaction
occurred
Numeric, 2 characters, from 00 to 59
OTIME_S
Second of the day original transaction
occurred
Numeric, 2 characters, from 00 to 59
TEXT_
Description of the exact nature of the
transaction (for example, object disabled)
Alphanumeric, up to 89 characters
Operator’s Workstation User’s Manual 20-11
Table 20-3lists the fields available for a query of data from the Card
Reader summary:
Table 20-3: Card Reader Query Fields
Field
Description
Ranges
SYSTEM
Name of the system containing the Access
Controller whose card reader was used
Alphanumeric, up to 8 characters
OBJECT
Name of the Access Controller defined for
the card reader that was used
Alphanumeric, up to 8 characters
CARDNUM
Card ID defined for the access card used
Numeric, up to 5 characters,
from 0 to 65,535
L_NAME
Last name defined for the access card
used
Text, up to 11 characters
F_NAME
First name defined for the access card
used
Text, up to 9 characters
STATUS_
Status of the card reader that generated
the report (either Normal or Abnormal)
Status, up to 8 characters
TIME_H
Hour of the day that the report was
generated
Numeric, 2 characters, from 00 to 23
TIME_M
Minute of the day that the report was
generated
Numeric, 2 characters, from 00 to 59
TIME_S
Second of the day that the report was
generated
Numeric, 2 characters, from 00 to 59
DATE_Y
Year the report was generated
Numeric, 2 characters, from 00 to 99
DATE_M
Month that the report was generated
Numeric, 2 characters, from 01 to 12
DATE_D
Day that the report was generated
Numeric, 2 characters, from 01 to 31
TEXT_
Description of the transaction (for example,
CARD ID 25: Access Granted)
Alphanumeric, up to 60 characters
A number of keywords are not shown as selection buttons in the Fields
dialog box (Figure 20-6), but can still specify the format for Query
output. Type these keywords directly into the fields text box with
spaces or semicolons separating them from other words in the line.
20-12
Operator Workstation User’s Manual
Table 20-4 lists the key words and their functions. Place these
keywords before the text they are formatting.
Table 20-4: Keywords and Functions of Query Output
Keyword
Function
ALL
Includes all fields in the query output. You can add derived columns to this output.
FIELD
Suppresses column headings. To suppress all headings, place the keyword at the
beginning of the line. Otherwise, only those headings followed by the keyword are
suppressed.
DOWN
Outputs data for each field on a separate line. Place the keyword at the beginning of the line
before the field names. DOWN can also be used in conjunction with the Field keyword to
hide headings. For example, FIELD DOWN Last_Name.person, Department.person would
look like this:
Jones
1237
UL
Underlines all text
IT
Italicizes all text
OFF
Turns off the text style it follows (that is, UL OFF turns off underlining. UL ON turns it on
again.) This is useful for formatting certain portions of the query using a certain style.
ATTR OFF
Turns off all text style for styles that it precedes in the command line
EJECT
Ensures that all data for a single record is output on the same page. The number following
EJECT should be the number of lines occupied by the record data. For example, if two lines
output the data from each record, the command line might look like this:
Last_Name.person, NEWLINE Department.person, Card_ID.person EJECT 2
Report Output
Click the Report button to analyze data collected by the query. For
example, a report can count the total number of records in a query
Filter Output
Click the Filter button to limit the types of information the query
collects. For example, the query could collect data from records where
the Department field is defined as Research. The Filter works the same
way as the filter option in the browsing control panel.
Order Output
Click the Order button to select the order in which the query data
appears. The default order for the data is the order in which it is found
on the disk.
Operator’s Workstation User’s Manual 20-13
Detailed Procedures
Defining a Query
To define a query:
1. Start Superbase 4 software by displaying either the Operator
Transaction summary or the Card Reader summary, or by clicking
the User Data button in the Modify Card dialog box.
Note: Make sure to start Superbase 4 software from the correct
file in order to gain access to the appropriate database.
2. If you started Superbase 4 software from the access card Modify
Card dialog box, click Exit to return to the Main menu.
If you started Superbase 4 software by displaying the Operator
Transaction or Card Reader summary, click Cancel to exit to the
Operator Transaction or Card Reader menu.
3. Click the Query > Add. The Query Definition dialog box appears
(Figure 20-4).
Title
Query Definition
Title
Date
NETWORK MAP - Summary
Page
Fields
Output
Report
Filter
Order
Destination
Screen
Disk File
Printer
SB File
OK
Clear
Cancel
QUERYDEF
Figure 20-4: Query Definition Dialog Box
20-14
Operator Workstation User’s Manual
4. Define the title section to make a title, page number, or date to
appear on each page of the query. Detailed information about
defining the query title appears later in this chapter.
Define the output section to specify what information should be in
the query. Always define the Fields section. The Report, Filter, and
Order sections are optional. Detailed information about defining
query output appears later in this chapter.
Notes:
The destination section is set to the Screen destination.
Full Superbase 4 capabilities are necessary to change the
destination.
Superbase 4 software is case sensitive. To do a search
for an exact match (that is, using the = option rather than
Like), make sure to match the upper and lower case
letters as they have been entered in the database.
5. When finished defining the query, click OK in the Query
Definition dialog box. The Save Query dialog box appears
(Figure 20-5).
Figure 20-5: Save Query Dialog Box
6. Type a name to give the query in the text box and click OK
Operator’s Workstation User’s Manual 20-15
Defining the Query Title
To define the title section of a query:
1. Click the Query button from the Superbase 4 menu of the database
to which the query belongs (the Operator Transaction menu, Card
Reader menu, or Main menu). The Query menu appears
(Figure 20-2).
2. Click Add. The Query Definition dialog box appears
(Figure 20-4).
3. To have the date to appear on the query, click the date box. An X
appears in the box, and the date appears in the upper left corner of
each page of the query.
4. Type the title in the text box, located between the Date and Page
boxes. The title appears centered at the top of each page of the
query.
5. Click the Page box to number the pages. An X appears in the box.
The page number appears in the upper right corner of each page of
the query.
Defining Query Output
To define the query output for queries in the standard table format:
1.
Click the Fields button in the Query Definition dialog box. The
Query Fields dialog box appears (Figure 20-6).
Figure 20-6: Fields Dialog Box
20-16
Operator Workstation User’s Manual
Table 20-5 describes the Fields dialog box selection buttons and their
function.
Table 20-5: Fields Dialog Box Buttons
Button
Position
&
Length
AS
Function
Click this button to specify where each field should appear on the query. Use it to
organize the fields in the query, or to specify a certain amount of space between fields.
Click this button to limit the number of characters that can appear in a field, and to
specify the number of digits that can appear before and after a decimal point. For
example: if only the first few characters of a lengthy field are important, limit the field
length so that the query only displays the relevant information.
Click this button to specify a heading name other than the field name.
Heading
File
Use this button to extract data from more than one database for a query. This query is
called a Multi-File query and is not recommended for querying Metasys BAS data, since
current data can be accessed from only one database at a time.
+-*/()
Derived Column
Expressions
Use the mathematics keys on the right side of the dialog box to perform mathematic
computations on two or more numeric fields. For example, use the addition button (+) to
add the values of two fields to form another entry in a query.
ON
LINE
Line
Click this button to start a column heading on a new line. If a new line is not specified,
the query outputs the data in a tabular format. To specify a new line, click the Line button
and select the field that should begin on a new line. Click the Line button once for each
blank line between field headings.
2. Click the @ Position button and type the column number where the
first column in the query should begin in the Value text box. Click
Value or press Enter.
One column equals one character space wide, beginning at the left
margin. For example, @20 means that the column will be
positioned 20 character spaces from the left of the page. The first
column is usually positioned @1.
3. To limit the width of the column, click & Limit. Type the
maximum number of characters that the column should contain in
the Value text box. Click Value or press Enter.
Notes:
This step is optional. However, make sure that the
query’s columns do not overlap on each other.
To specify the number of digits that can appear before
and after a decimal point, type the number of digits to
appear before the decimal, the decimal point, and the
number of digits to appear after the decimal. For
example, if no more than two digits should appear both
before and after the decimal point, type 2.2 in the Value
text box.
Operator’s Workstation User’s Manual 20-17
4. Click on a field name in the list box. The values selected in the
previous two steps now apply to this field.
To create a query field that is a mathematical computation of
two or more numeric fields, use the Derived Column Expression
buttons, and enclose the equation in parentheses.
5. To give the field a heading in the query that is different from its
field name, click AS Heading and type the new heading into the
value text box. Click Value or press Enter.
6. Repeat Steps 2 through 5 for each field that appears in the query.
When finished, click OK. The query definition dialog box (Figure
20-4) reappears with the field output definition displayed in the
Fields text box.
7. Click another option and continue defining the query, or click OK
to save the query.
To define queries using the NEWLINE format (Figure 20-3):
1.
Click the Fields button in the Query Definition dialog box. The
Query Fields dialog box appears (Figure 20-6).
2.
Click the Line button. NEWLINE appears in the Field text box.
3.
Click the Field name that should appear first in the query. The
name appears to the right of NEWLINE in the Field text box.
4.
To give the field a heading in the query that is different from its
field name, click AS Heading and type the new heading into the
Value text box. Click Value or press Enter.
5.
Repeat steps 2 through 4 for all remaining fields that appears in
the query.
6.
When finished, click OK. The query definition dialog box
(Figure 20-4) appears with the field output definition displayed in
the Fields text box.
7.
Click another option and continue defining the query, or click OK
to save the query.
20-18
Operator Workstation User’s Manual
Report Output
To define a report function:
1.
Click the Report button on the Query Definition dialog box. The
Report dialog box appears (Figure 20-7).
Figure 20-7: Report Dialog Box
Table 20-6 details the functions of the buttons in the Report dialog
box.
Table 20-6: Report Dialog Box Buttons
Button
Function
Report
Click this button to analyze information drawn from all of the records in a file.
Group
Click this button to display information drawn from a subgroup of records within a file.
The way the query is ordered (using the Order button) determines which subgroups are
available for use in the Report section. Define the order before using the Group function
in the Report dialog box. For example, if the query is ordered by Department, count the
number of records in each department by clicking Group > Count > Department.
Summarize
Click this button before clicking OK in the Report dialog box to display a summary of the
query data specified in the Reports line without displaying the fields specified in the
Fields line. This is useful for displaying file Report calculations without going through the
individual records.
Note:
The functions of the Sum, Mean, and Count buttons
vary depending on whether the report function is
analyzing all records in a file or a subgroup of records in
a file.
Operator’s Workstation User’s Manual 20-19
2.
Click the fields that the report functions will affect.
3.
To analyze information drawn from all of the records in a file,
click the Report button. Report is displayed in the Report text box.
a. Click Count to count the number of records in the file.
b. For the sum of a numeric field, click Sum and select the
numeric field from the Report list box.
c. For the mean of a numeric field, click Mean and select the
numeric field from the Report list box.
4.
To display information about a subgroup of records in a file, click
the Group button. Group is displayed in the Report text box.
a. To count the number of records in a subgroup of a file, click
Count and select the subgroup (field).
b. To view the sum of a numeric subgroup, click Sum and select
the subgroup (numeric field).
c. To view the mean of a numeric subgroup, click Mean and
select the subgroup (numeric field).
5.
To view a summary of the query data specified in the Reports line
without displaying the fields specified in the Fields line, click
Summarize.
6.
Click OK. The Query Definition dialog box (Figure 20-4) appears
with Report selections displayed in the text box located to the
right of the Report button.
7.
Click another option and continue defining the query, or click OK
to save the query.
20-20
Operator Workstation User’s Manual
Filter Output
To filter a query:
1.
Click the Filter button in the Query Definition dialog box. The
Filter dialog box appears (Figure 20-8).
Figure 20-8: Filter Dialog Box
2.
Click on the fields in the list box that the filter should limit (that
is, Card_ID).
3.
Specify how the filter function should limit each field by clicking
the selection buttons located on the right side of the list box and
filling in the value for each limitation. An explanation of each of
the buttons is listed Table 20-7.
Operator’s Workstation User’s Manual 20-21
Table 20-7: Filter Dialog Box Buttons
Option
Filter Function
=
Displays a record with an exact value (for example, Card ID = 27 displays the record with a
Card ID number of 27)
Note:
Superbase 4 software is case sensitive. The upper and lower case letters used with the
= function should match those in the database. If you are unsure of the case, use the
LIKE function.
<>
Displays records excluding a specific value (for example, Department <> “Research” displays
all records except those with the Department field defined as Research)
<
Displays values less than a specific amount (for example, Card ID < 100 displays all records
with Card IDs defined as 99 or less)
>
Displays records with a value greater than a certain amount (for example, Card ID > 100
displays all records with Card IDs defined as 101 or more)
<=
Displays records with a value less than or equal to a specific amount (for example, Card ID <=
100 displays all records with Card IDs defined as 100 or less)
>=
Displays records with a value greater than or equal to a specific amount (for example, Card ID
>= 100 displays all records with Card IDs defined as 100 or more)
( AND )
AND
Displays records according to two expressions where one expression has higher priority than the
other (for example, NOT (Department LIKE “Research” AND Card ID < 17) displays only
records with Department defined as anything other than Research, and Card IDs defined as less
than 17)
Displays records where two conditions are true (for example, Card ID < 1000 AND Card ID > 100
displays records with Card IDs defined between 101 and 999)
OR
Displays records that meet one of two conditions (for example, Department LIKE “Research”
OR Department LIKE “Marketing” displays only those records with Department defined as
Research or Marketing)
NOT
Displays records with values that negate an expression (for example, NOT (Department LIKE
“Research” AND Card ID < 17) displays only those records with Department defined as
anything other than Research, and Card IDs defined as less than 17)
LIKE
Displays a record with an exact value (for example, Last Name LIKE “Jones” displays only
those records with the Last Name defined as Jones)
Type an asterisk in place of any unknown letters (for example, Last Name LIKE “Joh*” lists all
records with the first three characters defined as Joh).
Type an asterisk before and after the character to find any field containing a certain character
(for example, Last Name LIKE “*R*” displays all records with an R anywhere in the Last Name
field).
Type a question mark to denote the number of unknown characters (for example, Last Name LIKE
“???r*” displays all records with an R as the fourth letter of the Last Name).
+ * /
Mathematically compute two or more numeric fields
4.
Click OK. The Query Definition dialog box (Figure 20-4) appears
with the Filter selections displayed in the text box located to the
right of the Filter button.
5.
Click another option and continue defining the query, or click OK
to save the query.
20-22
Operator Workstation User’s Manual
Ordering the Output
Note:
Define the Fields output before defining the order. Refer to
Defining Query Output earlier in this section.
To display query data in a specific order:
1.
Click the Order button on the Query Definition dialog box. The
Order dialog box appears (Figure 20-9).
Figure 20-9: Order Dialog Box
2.
To limit the number of characters the query should consider when
ordering the field, click the & Length button. Type the number of
characters in the Value text box and press Enter or click Value.
The default value is 15.
3.
Click a field in the list box to use to order the file (for
example, Last_Name).
Note:
This field must be one that the query summarizes (that
is one that was selected in the Fields dialog box during
query definition).
4.
Click Ascending or Descending. An ascending order begins with
the lowest number or first alphabetical character. A descending
order begins with the highest number or the last alphabetical
character.
5.
Click OK. The Query Definition dialog box (Figure 20-4) appears
with the Order selections displayed in the text box next to the
Order button.
Operator’s Workstation User’s Manual 20-23
6.
Click another option and continue defining the query.
7.
When finished defining the query, click OK in the Query
Definition dialog box. The Save Query dialog box appears
(Figure 20-5).
8.
Type a name for the query in the text box and click OK.
Modifying a Query
To modify a query:
1.
Click the Query button on either the Main menu, Operator
Transaction menu, or Card Reader menu. The Query menu
appears (Figure 20-2).
2.
Click Modify. The Query Selection dialog box appears
(Figure 20-10).
Figure 20-10: Query Selection Dialog Box
3.
Select the query from the list box. The query name appears in the
text box.
4.
Click OK. The Query Definition dialog box appears
(Figure 20-4).
5.
Make the changes in the definition box, and click OK.
20-24
Operator Workstation User’s Manual
Deleting a Query
To delete a query:
1.
Click the Query button on either the Main menu, Operator
Transaction menu, or Card Reader menu. The Query menu
appears (Figure 20-2).
2.
Click Delete. The Query Selection dialog box appears
(Figure 20-10).
3.
Select the query from the list box. The query name appears in the
text box.
4.
Click Delete. The query is deleted, and the OWS returns to the
Query menu.
Displaying a Query
To display a query:
1.
Click the Query button on either the Main menu, Operator
Transaction menu, or Card Reader menu. The Query menu
appears (Figure 20-2).
To display the Operator Transaction summary or Card Reader
Transaction menu, click Cancel in the Operator Transaction or
Card Reader summary. The summary closes and its Transaction
Menu appears.
To display the Card Reader Main menu, display the Access Cards
summary, select a card, and click Modify Card Data from the
Action menu to display the Modify Card dialog box. Start
Superbase 4 software by clicking User Data, and click Exit in the
Employee menu to go to the Card Reader Main menu.
2.
Click Display in the current menu.
3.
Select the query from the list box. The query name appears in the
text box.
4.
Click OK. The query appears. (See Figure 20-1 for an example.)
5.
Click Clear to clear the selection or click Cancel to cancel the
query request.
Press the space bar to page down in a query. To return to the
beginning of a query, exit the query and display it again. To exit
the query, page down to the end of the query and press the space
bar again.
Operator’s Workstation User’s Manual 20-25
Printing a Query
To print a query:
1.
On the Query menu, click Print. The Query Selection dialog box
appears (Figure 20-10).
2.
Select the query from the list box. The query name appears in the
text box.
3.
Click OK. A message box appears indicating that the query is
being printed.
Saving a Query to a File
Note:
Click the File button on the Query menu to save the query to
an ASCII file rather than print it or display it on the PC.
To save the query to a file:
1.
Click the Query button on the Main Menu, Operator Transaction
Menu, or Card Reader Menu. The Query Menu appears
(Figure 20-2).
2.
Click File. The Query Selection dialog box appears
(Figure 20-10).
3.
Select a query to save to an ASCII file. The selected query name
appears in the text box.
4.
Click OK. The query is saved in the same directory as the selected
query in the ASCII format.
Note:
The ASCII file has an .ASC extension.
Exiting a Query
To exit a query:
1.
Page down to the end of the query by pressing the space bar. Press
the space bar again. The query closes, and the Query menu
appears.
Note:
2.
If the query is only one page long, press the space bar
once to return to the Query menu.
Click the Exit button, or click Exit on the Query Command menu.
The Query menu closes and the Main menu appears.
Note:
If the query was accessed from the Operator Transaction
or Card Reader summary, the OWS returns to the
summary rather than the Main menu.