1
An Introduction to the Mathematics
Department Unix System
by
Christopher Paul
Version 1.2
Sept. 15th 2001
Contents
1 Introduction
5
1.1
Overview . . . . . . . . . . . . . . . . . . . . . . . . . . . . . . . . . . . . .
5
1.2
Etiquette
. . . . . . . . . . . . . . . . . . . . . . . . . . . . . . . . . . . .
5
1.3
Terminology . . . . . . . . . . . . . . . . . . . . . . . . . . . . . . . . . . .
6
2 Getting Started
2.1
2.2
2.3
2.4
2.5
7
Logging In . . . . . . . . . . . . . . . . . . . . . . . . . . . . . . . . . . . .
7
2.1.1
Changing Your Account Details . . . . . . . . . . . . . . . . . . . .
7
The Root Window . . . . . . . . . . . . . . . . . . . . . . . . . . . . . . .
9
2.2.1
The Local Functions Menu . . . . . . . . . . . . . . . . . . . . . . .
10
2.2.2
The Screen Ops Menu . . . . . . . . . . . . . . . . . . . . . . . . . .
10
2.2.3
The Remote Machines Menu . . . . . . . . . . . . . . . . . . . . . .
10
A Typical X-Window . . . . . . . . . . . . . . . . . . . . . . . . . . . . . .
11
2.3.1
The Title Bar . . . . . . . . . . . . . . . . . . . . . . . . . . . . . .
11
2.3.2
The Close Button . . . . . . . . . . . . . . . . . . . . . . . . . . . .
12
2.3.3
The Kill Button . . . . . . . . . . . . . . . . . . . . . . . . . . . . .
12
2.3.4
The Resize Button . . . . . . . . . . . . . . . . . . . . . . . . . . .
12
2.3.5
The Iconize Button . . . . . . . . . . . . . . . . . . . . . . . . . . .
12
2.3.6
The Scroll Bar . . . . . . . . . . . . . . . . . . . . . . . . . . . . .
13
The Default X-Window Setup . . . . . . . . . . . . . . . . . . . . . . . . .
13
2.4.1
The xterm Window . . . . . . . . . . . . . . . . . . . . . . . . . . .
13
2.4.2
The xclock Window . . . . . . . . . . . . . . . . . . . . . . . . . .
14
2.4.3
The Icon Manager . . . . . . . . . . . . . . . . . . . . . . . . . . .
15
2.4.4
The xbiff Window . . . . . . . . . . . . . . . . . . . . . . . . . . .
15
2.4.5
The emacs Window . . . . . . . . . . . . . . . . . . . . . . . . . . .
15
Obtaining Help . . . . . . . . . . . . . . . . . . . . . . . . . . . . . . . . .
15
2.5.1
The Unix man Pages . . . . . . . . . . . . . . . . . . . . . . . . . .
15
2.5.2
The Unix info Pages . . . . . . . . . . . . . . . . . . . . . . . . . .
16
2.5.3
Other Sources of Help & Training Courses . . . . . . . . . . . . . .
17
3 The Unix Filesystem
18
3.1
The Basic Filesystem Commands . . . . . . . . . . . . . . . . . . . . . . .
18
3.2
Directory and File Security . . . . . . . . . . . . . . . . . . . . . . . . . . .
18
1
3.3
Disk Quotas . . . . . . . . . . . . . . . . . . . . . . . . . . . . . . . . . . .
20
3.4
Transferring Files . . . . . . . . . . . . . . . . . . . . . . . . . . . . . . . .
21
3.4.1
ftp – Transferring Files Between Machines . . . . . . . . . . . . . .
21
3.4.2
mtools – Transferring DOS Files (Linux only) . . . . . . . . . . . .
23
3.4.3
ncpmount – Accessing Files on a Novell Fileserver (Linux only) . . .
24
Restoring Deleted Files . . . . . . . . . . . . . . . . . . . . . . . . . . . . .
24
3.5
4 Previewing & Printing Files
4.1
4.2
26
4.0.1
Location of Printers
. . . . . . . . . . . . . . . . . . . . . . . . . .
26
4.0.2
Printing Allowances . . . . . . . . . . . . . . . . . . . . . . . . . . .
26
General Printing Commands . . . . . . . . . . . . . . . . . . . . . . . . . .
27
4.1.1
lpq – Listing a Printer Queue . . . . . . . . . . . . . . . . . . . . .
27
4.1.2
lprm – Cancelling a Print Job . . . . . . . . . . . . . . . . . . . . .
28
Previewing & Printing Different Types of Files . . . . . . . . . . . . . . . .
29
4.2.1
Text Files . . . . . . . . . . . . . . . . . . . . . . . . . . . . . . . .
29
4.2.2
(Encapsulated) PostScript Files . . . . . . . . . . . . . . . . . . . .
29
4.2.3
PDF Files . . . . . . . . . . . . . . . . . . . . . . . . . . . . . . . .
31
4.2.4
dvi Files . . . . . . . . . . . . . . . . . . . . . . . . . . . . . . . . .
31
4.2.5
HTML Files . . . . . . . . . . . . . . . . . . . . . . . . . . . . . . .
33
4.2.6
Graphics Files . . . . . . . . . . . . . . . . . . . . . . . . . . . . . .
33
5 Available Software
5.1
5.2
34
Text Editors . . . . . . . . . . . . . . . . . . . . . . . . . . . . . . . . . . .
34
5.1.1
joe . . . . . . . . . . . . . . . . . . . . . . . . . . . . . . . . . . . .
34
5.1.2
emacs . . . . . . . . . . . . . . . . . . . . . . . . . . . . . . . . . .
34
5.1.3
nedit (Linux only) . . . . . . . . . . . . . . . . . . . . . . . . . . .
35
5.1.4
pico . . . . . . . . . . . . . . . . . . . . . . . . . . . . . . . . . . .
36
5.1.5
vi . . . . . . . . . . . . . . . . . . . . . . . . . . . . . . . . . . . .
36
Software Compilers . . . . . . . . . . . . . . . . . . . . . . . . . . . . . . .
37
5.2.1
Fortran 77 . . . . . . . . . . . . . . . . . . . . . . . . . . . . . . . .
37
5.2.2
Fortran 90 . . . . . . . . . . . . . . . . . . . . . . . . . . . . . . . .
39
5.2.3
C and C++ . . . . . . . . . . . . . . . . . . . . . . . . . . . . . . .
39
5.2.4
Pascal . . . . . . . . . . . . . . . . . . . . . . . . . . . . . . . . . .
40
5.2.5
Profiling Programs . . . . . . . . . . . . . . . . . . . . . . . . . . .
40
5.2.6
Debugging Programs . . . . . . . . . . . . . . . . . . . . . . . . . .
41
2
5.2.7
5.3
5.4
5.5
5.6
Running Programs After Logging Out . . . . . . . . . . . . . . . .
41
Software Libraries . . . . . . . . . . . . . . . . . . . . . . . . . . . . . . . .
42
5.3.1
The NAg Fortran 77 Library . . . . . . . . . . . . . . . . . . . . . .
42
5.3.2
The NAg Fortran 90 Library (Linux only) . . . . . . . . . . . . . . .
43
5.3.3
The BLAS library . . . . . . . . . . . . . . . . . . . . . . . . . . . .
44
5.3.4
The LAPACK library . . . . . . . . . . . . . . . . . . . . . . . . . .
44
Mathematical Software . . . . . . . . . . . . . . . . . . . . . . . . . . . . .
44
5.4.1
Maple 6 (Linux only: one manual) . . . . . . . . . . . . . . . . . . .
45
5.4.2
Mathematica 4.1 (Linux only: two manuals) . . . . . . . . . . . . . .
45
5.4.3
Matlab . . . . . . . . . . . . . . . . . . . . . . . . . . . . . . . . . .
46
5.4.4
Pari-GP (Linux only) . . . . . . . . . . . . . . . . . . . . . . . . . .
46
5.4.5
R – A Statistical Package . . . . . . . . . . . . . . . . . . . . . . .
47
Data Visualization Packages . . . . . . . . . . . . . . . . . . . . . . . . . .
47
5.5.1
gnuplot – Plotting 2D & 3D Data . . . . . . . . . . . . . . . . . .
47
5.5.2
plotxy – Plotting 2D Data . . . . . . . . . . . . . . . . . . . . . .
48
5.5.3
plotmtv (Linux only) . . . . . . . . . . . . . . . . . . . . . . . . . .
48
5.5.4
tecplot 8.0 & 9.0 (Linux only: two manuals) . . . . . . . . . . . . .
49
5.5.5
uniras 7.2 (Gsharp 3.2) (Linux only) . . . . . . . . . . . . . . . . .
49
5.5.6
xfig - A Vector Drawing Program . . . . . . . . . . . . . . . . . .
49
5.5.7
PGPlot - A Fortran 77 Graphics Library . . . . . . . . . . . . . . .
49
Typesetting Mathematics Papers . . . . . . . . . . . . . . . . . . . . . . .
50
5.6.1
50
Creating PDF Files . . . . . . . . . . . . . . . . . . . . . . . . . . .
6 Electronic Mail (email)
6.1
6.2
52
The Available Email Software . . . . . . . . . . . . . . . . . . . . . . . . .
52
6.1.1
Unix mail . . . . . . . . . . . . . . . . . . . . . . . . . . . . . . . .
52
6.1.2
emacs RMAIL . . . . . . . . . . . . . . . . . . . . . . . . . . . . . .
54
6.1.3
elm . . . . . . . . . . . . . . . . . . . . . . . . . . . . . . . . . . . .
55
6.1.4
pine . . . . . . . . . . . . . . . . . . . . . . . . . . . . . . . . . . .
56
6.1.5
netscape Mail . . . . . . . . . . . . . . . . . . . . . . . . . . . . .
58
Local Email Aliases . . . . . . . . . . . . . . . . . . . . . . . . . . . . . . .
60
7 The World Wide Web and USENET
7.1
61
Surfing the Net . . . . . . . . . . . . . . . . . . . . . . . . . . . . . . . . .
61
7.1.1
63
Configuring Netscape . . . . . . . . . . . . . . . . . . . . . . . . . .
3
7.2
7.1.2
Setting Up your own Web Page . . . . . . . . . . . . . . . . . . . .
63
7.1.3
Creating HTML Webpages . . . . . . . . . . . . . . . . . . . . . . .
64
USENET Newsgroups . . . . . . . . . . . . . . . . . . . . . . . . . . . . .
64
7.2.1
emacs Net News . . . . . . . . . . . . . . . . . . . . . . . . . . . . .
65
7.2.2
netscape News . . . . . . . . . . . . . . . . . . . . . . . . . . . . .
65
8 Miscellaneous
8.1
67
Accessing Remote Machines . . . . . . . . . . . . . . . . . . . . . . . . . .
67
8.1.1
telnet . . . . . . . . . . . . . . . . . . . . . . . . . . . . . . . . . .
68
8.1.2
rlogin/slogin – (Secure) Remote Login . . . . . . . . . . . . . . .
68
8.1.3
rsh/ssh – (Secure) Remote Shell . . . . . . . . . . . . . . . . . . .
69
8.1.4
Trusted Machines and .rhosts Files . . . . . . . . . . . . . . . . . .
70
Compressing/Uncompressing and Manipulating Files . . . . . . . . . . . .
71
8.2.1
Compressing & Decompressing Files
. . . . . . . . . . . . . . . . .
71
8.2.2
Converting & Unconverting Binary Files to Text Files . . . . . . . .
72
8.2.3
Archiving & Dearchiving Files . . . . . . . . . . . . . . . . . . . . .
74
Improving System Performance . . . . . . . . . . . . . . . . . . . . . . . .
75
8.3.1
Determining the System Load . . . . . . . . . . . . . . . . . . . . .
76
8.3.2
Determining the Available Free Memory . . . . . . . . . . . . . . .
76
8.3.3
Finding and Killing Rogue Programs . . . . . . . . . . . . . . . . .
77
8.3.4
Running Remote X-Window Applications
. . . . . . . . . . . . . .
78
PC and Novell-Related Programs (Linux only) . . . . . . . . . . . . . . . .
79
8.4.1
xdos – The PC Emulator
. . . . . . . . . . . . . . . . . . . . . . .
79
8.4.2
Miscellaneous Novell Commands . . . . . . . . . . . . . . . . . . . .
79
8.5
The Public Linux Machines . . . . . . . . . . . . . . . . . . . . . . . . . .
80
8.6
Customizing Your X-Windows Environment . . . . . . . . . . . . . . . . .
81
8.6.1
The .Xresources File . . . . . . . . . . . . . . . . . . . . . . . . .
81
8.6.2
The .xsession and .twmrc Files . . . . . . . . . . . . . . . . . . .
82
8.6.3
Changing your Window Manager (Linux only) . . . . . . . . . . . .
82
8.6.4
Changing your Desktop Background
82
8.2
8.3
8.4
9 Frequently Asked Questions
. . . . . . . . . . . . . . . . .
84
4
1
Introduction
The purpose of this guide is to provide an introduction to the Unix system in the Mathematics Department. It is not, neither is it intended to be, a replacement for the Unix
man pages (§2.5.1) and info pages (§2.5.2) or any online documentation or user-guides.
Although this guide is mainly intended for use by people new to Unix, it also provides a
reference to the various software packages that are available and general information on
how the Unix system is setup locally.
1.1
Overview
The Unix system in the Mathematics Department consists of a number of different machines – PCs running RedHat linux and Suns running Solaris (§8.5). All the machines run
X-windows – a windows, icons, mouse, pointer (WIMP) environment – the default WIMP
environments on the Suns and Linux PCs are identical (and rather basic). Whilst it is possible for users to customize their X-windows environment (§8.6), this is not recommended
for users new to Unix, especially as
Help cannot be guaranteed to users having problems with customized environments
1.2
Etiquette
Unix is a multi-user computing environment which means that, while only one person may
be logged on at the keyboard, other users may be logged onto the computer from anywhere
in the Department. Some user’s programs run for days, even weeks, so that resetting or
turning computers off can lose a considerable amount of work. Thus
Unix computers should not be reset or turned off by anyone except support staff
especially since you are liable to corrupt and/or damage the hard disk. As an incentive not
to reboot machines, persistent “offenders” may have their account suspended for a short
period of time.
There is a limited number of Unix terminals within the Department (39 public, 14 PG
office), so that users are encouraged not to monopolize them. Unix programs may be “run
in the background” (§5.2.7) – run without the user actually being logged on. If you need
5
to leave your terminal for a few minutes, for security, you should either log out or use the
xlock command.
Please do not xlock terminals for long periods of time
as other people may wish to use them.
1.3
Terminology
For those people new to using a Unix and WIMP environment, this section describes some
of the technical terms for basic keyboard and windows operations.
• Clicking an object refers to the action of placing the mouse pointer over the object
and pressing and releasing a mouse button.
• Double clicking an object is similar to clicking an object, except that the mouse
button is pressed and released twice in quick succession without moving the mouse.
• Dragging and dropping an object is the action of placing the mouse pointer over
an object, pressing a mouse button and whilst holding the mouse button down moving
the mouse. When the object that is being dragged is in the correct position, the
mouse button is then released.
• Dragging and selecting an item is the action of moving the mouse pointer over an
item whilst holding down a mouse button and, when the item is highlighted, releasing
the mouse button.
• <Ctrl-?> is the notation used in this guide to represent the following sequence of
keypresses – whilst holding down the <Ctrl> key, press the ? key.
• Flags are optional arguments that change the default behaviour of Unix commands.
6
2
2.1
Getting Started
Logging In
Once you have received your username and password, it is possible to log into any of the
public Unix machines within the Department. (Note that Unix is case-sensitive so that
Unix commands, passwords and usernames must all be typed in the correct case.) On the
login screen, type your username at the Username: prompt and press <Enter>, then type
your password (note that the password is NOT displayed as it is typed ) and press <Enter>.
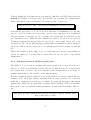
After a short delay, the following X-windows desktop should appear:
2.1.1
Changing Your Account Details
• Changing Your Password
When you log in for the first time, you should change your password to one that you can
7
easily remember – and therefore be able to type quickly. Please ensure that the password
you choose is reasonably secure; it should be at least 7 characters long and contain a
mixture of upper and lower case letters and at least one non-alphanumeric character. You
should also avoid using well-known strategies for choosing passwords, for example, adding
a digit to the start or end of a word, or replacing the letter “s” by a “5” or “o” by a “0”.
You can change your password from any Unix machine using the command
yppasswd
You will first be prompted to enter your current password to confirm your identity. If you
correctly entered your password, you will be prompted to enter your new password. Next
you will be asked to re-enter your new password to ensure that you entered it correctly
the first time. If your new password is not too weak then your password will be changed,
otherwise an error message will be displayed. Note that none of the passwords are displayed
as they are typed.
Changing your password on one Unix machine changes it on all the Unix machines
• Changing Your Name (Linux only)
When you are given a Unix account, part of the account information specified by the
system administrator is the name of the user – this is not the same as the username (or
login name), for example,
vummath/snoopy> finger snoopy
Login
Name
TTY
snoopy Peppermint Paddy
pts/26
Idle
When
Where
<Aug 18, 2001> vummath
This name is also used when you send an email, so that even if your username bears no
resemblance to your real name, the recipient of the email can still see who sent it. If you
do change your name, then your identity must still be clear - in some parts of the world it
is illegal to send emails where the sender’s identity is not clear.
Your name can be changed using the command
ypchfn
8
and entering your password. If you correctly entered your password then you will be
prompted to enter your new name and other information that is used by the finger
command.
• Changing Your Default Shell (Linux only)
Unless you know what you are doing and the implications of changing your default shell,
you should use the one that is already supplied with your account – the tcsh shell. A list
of the installed shells on each machine is contained in the file /etc/shells; however please
note that some shells are only available on Linux and some only on Solaris. The command
for changing your default shell is
ypchsh
• .plan Files
The finger command (see above) can also return additional information about a specific
user if they have installed a .plan file in their home directory. A user’s .plan file can
contain any amount of text that is displayed whenever their account is fingered. Typical
uses of a .plan file are for containing contact details, for example, fax numbers and postal
addresses.
2.2
The Root Window
The root window or desktop (see page 7 ) is the Unix name for the grey background 1 on
which all other windows appear. When the mouse pointer is over the root window, it
appears as a cross. Pressing a mouse button brings up a menu of window functions: The
left mouse button brings up the Local Functions menu (§2.2.1), the middle button brings
up the Screen Operations menu (§2.2.2), and the right mouse button brings up the Remote
Machines menu (§2.2.3). The items on each menu may be selected by dragging and
selecting.
1
See §8.6.4 on how to change the default grey background.
9
2.2.1
The Local Functions Menu
The Local Functions menu can be used to start additional command
(xterm) and editor (emacs) windows on the local machine, and to
logout of the machine. There is a choice of two different fontsizes,
although the fontsize of an existing xterm window can be changed by
moving the mouse pointer over the text area of the window, pressing
<Ctrl> and the right mouse button simultaneously, and dragging
and selecting a new fontsize; a similar procedure, but using <Shift>
and the left mouse button, can be used to change the fontsize of an
emacs window.
2.2.2
The Screen Ops Menu
The Screen Operations menu allows access to simple windows functions.
Each item can be selected by dragging and selecting, the mouse pointer
should then be placed over the window to be changed. In the case of
Lower, Raise, Iconify, Close and Kill, it is sufficient just to click the
window. For Move and Resize, it is necessary to drag and drop the
window (frame) to its new position (size). All the windows functions on
the Screen Operations menu can also be performed using a single mouse
click on the Title Bar or one of its buttons (§2.3).
2.2.3
The Remote Machines Menu
The Remote Machines menu provides easy access to all the other
public access Unix machines within the Department. Although it
is possible to open xterm windows on machines within (and, indeed, outside) the Department manually (§8.1), there are a number of stages to go through in order to be able to run X-windows
programs on a remote machine and have the X-window displayed
where you are logged on. The Remote Machines menu automatically performs the necessary operations that ensure X-windows
applications run on remote machines open their windows where
you are logged on. Linux machines are accessed by placing the
mouse pointer over the right-hand side of the menu item, waiting for the corresponding submenu to appear and then dragging
and selecting the required machine.
10
2.3
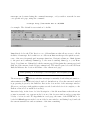
A Typical X-Window
Most X-windows programs open a window on the desktop. First, however, a skeletal outline
of the window is displayed (with a description of the type of window being given in the top
left-hand corner of the screen) to allow the user to position the window on the desktop;
this is achieved by moving the mouse until the window is correctly positioned and then
clicking the left mouse button. (If the right mouse button is clicked instead, the window
still appears in the usual position but its height is increased so that the bottom of the
window is at the bottom of the screen.)
Whilst a new window is waiting to be positioned, no other window activity occurs
– even the clock stops!
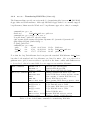
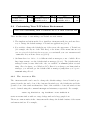
Whilst the exact nature of an X-window depends on the program being run (cf. the xterm
and emacs windows), most X-windows have a Title Bar with buttons and quite often a
vertical Scroll Bar, and sometimes a horizontal Scroll Bar as well.
Kill
button
Close
button
Title bar
Resize
button
Iconize
button
Scroll
bar
2.3.1
The Title Bar
The Title Bar provides easy access to some window functions by means of Buttons (see
below ). One feature of the desktop is that it is possible to have windows overlapping and,
indeed, totally covering other windows. These obscured windows may be “brought to the
front” by raising them or by lowering the windows obscuring them (§2.2.2). A quicker
method of lowering, moving and raising windows is to click on the Title Bar (or window
frame) with the appropriate mouse button: The left mouse button raises a window, the
right mouse button lowers a window, and the middle mouse button can be used to move
a window by dragging and dropping its Title Bar.
11
2.3.2
The Close Button
Clicking the Close Button
usually closes a window, if the window is an xterm window
then any programs running in the foreground (§2.4.1,§5.2.7) will also be closed down. When
the window closes, the program closes its open files and returns the memory it was using
to the operating system – if the window is not the main window of the program, then only
the sub-window closes. Sometimes, however, a window will refuse to close and then it is
necessary to use the Kill Button.
2.3.3
The Kill Button
Clicking the Kill Button
closes a window that cannot be closed by clicking on the
Close Button. (If the window belongs to a program, then the program is closed down as
well.) However when the program closes down, it often does not close its open files and
it can fail to return memory that it was using to the operating system. Too much use of
the Kill Button can mean that a computer runs out of memory even when there are no
programs running! Thus you should always try the Close Button first.
If a window is closed using the Kill Button, the program itself may continue to run
2.3.4
The Resize Button
One method of resizing a window is to place the mouse pointer over the Resize Button
and, whilst holding down any mouse button, dragging the window frame to its new
position. If a window is to be made smaller, it is first necessary to drag its frame outside
the current window as if intending to make it larger.
2.3.5
The Iconize Button
Clicking the Iconize Button
iconizes a window – removes it from the desktop without
closing it. The window may be restored to its original position by clicking the appropriate
icon on the Icon Manager.
Whilst a window is iconized, any programs that are running in it continue to run
12
2.3.6
The Scroll Bar
Many X-windows have Scroll Bars, for example, emacs and xterm windows. Scroll Bars
allow the contents of windows to be viewed when the actual contents exceed the size of the
window. The shaded part of the Scroll Bar corresponds to the visible part of the window,
its position and size indicate the relative position and size of the visible part of the window
to the contents of the window. Clicking the vertical [horizontal] Scroll Bar using the left
mouse button scrolls the window contents down [right] and clicking it using the right
mouse button scrolls the window contents up [left]. The number of lines scrolled on each
mouse button click is determined by the location of the mouse pointer on the Scroll Bar:
at the top [left] of the Scroll Bar, one line at a time is scrolled; at the bottom [right] of the
Scroll Bar, one window at a time is scrolled.
2.4
2.4.1
The Default X-Window Setup
The xterm Window
An xterm window allows a user to run programs and execute Unix commands on the
machine that the xterm window is running on – the machine name appears on the lefthand side of the Title Bar and as part of the command prompt. The command prompt
also includes the name of the current working directory. When a program is run in an
xterm window, the Unix prompt only re-appears once the program has finished running2 .
However for some programs, such as file previewers like xdvi (§4.2.4), it can be very tedious
stopping and restarting the previewer in between making changes. One solution to this
problem is to have two xterm windows open, however a better solution is to run xdvi “in
the background” by adding a ‘&’ after the command. (Currently running programs can be
“backgrounded” by suspending them using <Ctrl-z> and then running the command bg.)
A list of the programs currently running in the background of an xterm window and their
status can be obtained using the command jobs -l, for example,
vummath/snoopy> jobs -l
[1] 526 Running
[2] +
850 Suspended
xdvi guide
emacs guide.tex
where the number [n] is the job number and the other number is the process ID number
2
A running program can usually be cancelled by pressing <Ctrl-c>, or suspended by pressing <Ctrl-z>.
13
(PID) number (§8.3.3). Programs running (or suspended) in the background can be killed
using the command
kill %n
where n is the job number3 , or be brought to the foreground using the command fg %n.
Each xterm window has its own set of environment variables (which may be viewed using
the env command) that control, for example, the default printer selection. The most
important of these variables are PATH, PRINTER (§4) and DISPLAY (§8.1) – they may be
changed using the setenv command and displayed using the echo command, for example,
setenv PRINTER laser 405 and echo $PRINTER.
A list of previously executed commands can be viewed using the history command, for
example:
vummath/snoopy> history
1 10:26
ls
2 10:26
latex guide
3 10:26
xdvi guide
4 10:26
dvips guide
5 10:26
history
These commands can be re-executed in three different ways: For example, the command
xdvi guide can be re-executed using (i) the command !3 that runs the third command,
(ii) the command !xd that runs the last command that starts with xd, or (iii) pressing
the ↑ cursor key until the xdvi guide command appears and then pressing <Enter>. The
cursor keys can also be used to edit commands before re-executing them.
An xterm window may be closed using either the exit command or pressing <Ctrl-d>.
2.4.2
The xclock Window
The xclock window displays the current date and time accurate to ±0.01 second.
xclock does not appear on the Icon Manager, so if iconized it is “lost” forever
3
Programs that “refuse to die” can usually be killed using the command kill -9 %n.
14
2.4.3
The Icon Manager
Most X-windows have a corresponding icon in the Icon Manager. By clicking the appropriate icon, an X-window can be iconized (removed from the desktop but continue to
run) or uniconized (restored to the desktop). When an X-window is opened, its icon is
automatically added to the Icon Manager in alphabetical order, and when an X-window is
closed, its icon is automatically removed from the Icon Manager.
If the Icon Manager is closed down, any iconized X-windows will be “lost” forever
2.4.4
The xbiff Window
One of the facilities provided by Unix is email (§6). The xbiff window indicates the
arrival of new email, by default new email is checked for every 30 seconds. If new email
, otherwise the mail flag is down
. The mail flag
has arrived then the mail flag is up
is automatically reset whenever you read your email, but can also be reset by clicking it.
2.4.5
The emacs Window
emacs is one of the five text editors that are available on the Unix computers within the
Department. For more information about text editors, see §5.1.
2.5
Obtaining Help
There are several sources of help available on the Unix system, in addition to any printed
documentation that can be borrowed from the Department’s Computing Support. The
most easily accessible sources of help are the Unix man pages (§2.5.1) and info pages
(§2.5.2). Quite often more extensive information is located in an appropriately named subdirectory of the directory /usr/doc in the form of text, PostScript (§4.2.2), PDF (§4.2.3),
dvi (§4.2.4) or HTML (§4.2.5) files, or available online from within the software itself.
In some cases online documentation is available at http://www.ma.man.ac.uk/guides
(which can also be accessed via the directory /home/htdocs/guides).
2.5.1
The Unix man Pages
Most Unix commands and installed software have their own man(ual) page that can be
viewed using the man command. The man page gives a brief one line description of the
15
Unix command along with a list of the flags that can be used with the command. There
then follows a much more in-depth description of the command and a detailed list of the
flags and their functions.
There are several flags that can be used with the man command. The most useful one is
the -k keyword flag that can be used to obtain a list of man pages that contain keyword
in their one line description, for example,
vummath/snoopy> man -k help
gphelp (1)
- GP-PARI online help script
help [builtins2] (1) - bash built-in commands, see bash(1)
rstartd (1x)
- a sample implementation of a Remote Start rsh helper
wmconfig (1)
- Window Manager Config helper program
xrx (1x)
- RX helper program
B::Stackobj (3)
- Helper module for CC backend
When the man command is run, the directories that are searched for manual pages are the
default directories unless the MANPATH environment variable is set in your .cshrc file.
2.5.2
The Unix info Pages
Although most Unix commands have a man page, these pages cannot easily be printed
whilst being viewed and the text formatting information that they contain means that
they are not suitable for printing directly. Thus most recent versions of software come
with an info page that provides the same information as the man page, but in a more
convenient form. Some software comes with both man and info pages, but the man page
is usually no longer maintained and often contains the message
THIS MAN PAGE IS OBSOLETE! See the Texinfo documentation instead.
The info pages are usually contained in the directory /usr/info, but if the environment
variable INFOPATH is set then the directories that it contains are searched instead. A
description of most of the available info pages can be obtained by running the command
info with no arguments. Each line that starts with a * corresponds to an info page, items
are selected using <Tab> to move down the page and <Alt-Tab> to move up. When the
cursor is on the correct line, pressing <Enter> displays the corresponding info page.
When an info page is being displayed, it can be scrolled down by pressing <Space> and
scrolled up by pressing <Delete>. The previous info page can be viewed by pressing p and
16
the next page by pressing n. The currently displayed page can be printed on the default
printer by entering <Alt-x>print. Pressing q at any point returns to the Unix prompt.
The info page on a specific topic can be displayed using the command
info topic
If there is no corresponding info page but there is a man page, then the man page will be
displayed instead. This is probably the easiest way of printing man pages.
2.5.3
Other Sources of Help & Training Courses
In the case of software applications, you should check to see if there is either online documentation, documentation contained in the directory /usr/doc or printed documentation
available from Computing Support.
Printed documentation is also provided on the computing courses run by Manchester Computing (MC), a list of the available courses is given at
http://www.mcc.ac.uk/courses
If you wish to go on a course for which MC makes a charge, but which is necessary for your
research, then the Department will usually refund the cost. Places on courses run by MC
can be booked (and paid for) at the MC CompShop opposite the MC Information Point.
Printed documentation is also available for some site-licensed software from the MC Information Point. Whilst most printed documentation is free, there is a charge for some
documentation and so this documentation can only be obtained from the MC CompShop.
(If there is a genuine Departmental need for some non-free documentation, then it will
usually be bought by the Department’s Computing Support for borrowing.) A list of the
documentation available from MC can be obtained from
http://www.mcc.ac.uk/docs.shtml
However, often the quickest method of obtaining an answer to a simple problem is to ask
a colleague because
Fellow students and staff are also an invaluable source of information
17
3
The Unix Filesystem
Unix supports long filenames and an unlimited number of files per directory4 . Unix files,
as with DOS files, may also have file extensions that indicate their filetype, for example,
mailup.ps is a PostScript file.
Your Unix filestore is the same wherever you log on in the Department 5
3.1
The Basic Filesystem Commands
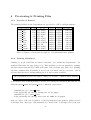
Below are some of the basic filesystem commands with their most frequently used flags:
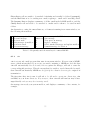
Listing directories
Listing files
Modifying directories
Modifying files
List contents of current directory
List contents of directory dir
Detailed list of current directory
Display full information on file file
Display contents of file file
Display contents of file file page by page
Display the first n lines of file file
Display the last n lines of file file
Change current directory to dir
Copy dir1 and its contents to dir2
Create directory dir
Rename directory dir1 to dir2 or
Move directory dir1 into existing dir2
Display full pathname of current directory
Delete directory dir and its contents
Copy file file1 to file2
Rename file file1 to file2
Delete file file
ls
ls dir
ls -l
ls -l file
cat file
less file
head -n file
tail -n file
cd dir
cp -r dir1 dir2
mkdir dir
mv dir1 dir2
pwd
rm -rf dir
cp file1 file2
mv file1 file2
rm file
Table 1: Some of the most basic Unix filesystem commands.
3.2
Directory and File Security
Unix has an elaborate system for determining who can execute, read and write to files and
directories. Each user can be a member of several different Unix groups, for example, staff,
4
5
This does not mean that you should not organize your filestore using appropriately named directories.
This may not be true if you have an account on one of the “private” research machines.
18
applied or the most common group users6 – only the System Administrator can alter the
membership list of groups. You can determine which groups you are a member of by using
the groups command. If you are included in the membership list of a group, you may
temporarily make that group your default group using the newgrp command, for example:
vummath/snoopy> groups
users staff
vummath/snoopy> newgrp staff
vummath/snoopy> groups
staff users
The main reason for changing groups is to preserve the group ownership of files that are
newly created or edited.
Each file and directory has a user owner, group owner and others owner, which can be
listed using the command ls -l. The user owner corresponds to an actual username, the
group owner corresponds to a Unix group and the others owner corresponds to every user
on the system. The ordering of the permissions given by the ls -l command is (user
owner, group owner, others owner):
-
u
rwx
g
rwx
o
rwx
where the first entry is used to indicate a directory (d), a normal file (-) or a linked file
(l), the r stands for readable, the w stands for writable, and the x stands for executable.
For example:
vummath/snoopy> ls -l guide.out
-rw-r--r-1 snoopy
users
15049 Aug 23 17:47 guide.out
indicates that the file is readable and writable by user snoopy and readable by group users
and others, but executable by no-one.
Access permissions for files and directories are modified using the chmod command
For example, the file guide.out may be made executable by the user and non-readable by
both group users and others using
6
Unix groups are not widely used in the Department and every user is a member of the users group.
19
vummath/snoopy> chmod
vummath/snoopy> ls -l
-rwxr--r-1 snoopy
vummath/snoopy> chmod
vummath/snoopy> ls -l
-rwx-----1 snoopy
u+x guide.out
guide.out
users
15049 Aug 23 17:47 guide.out
go-r guide.out
guide.out
users
15049 Aug 23 17:47 guide.out
An alternative way of setting file and directory permissions is to specify the permissions
directly, where each owner permission is the sum of 4 (readable), 2 (writable) and 1 (executable). Thus the numeric file permissions for the three examples above are 644, 744 and
700, respectively.
For directories, the executable permission controls who can access a directory, the read
permission controls who can list the contents of a directory, and the write permission
controls who can create, modify and delete files in a directory (assuming the appropriate
file permissions for modifying and deleting files).
If only the others executable flag is set on a directory then anyone can access it
but cannot list its contents, if the others readable flag is also set then anyone can
list its contents – in both cases, files that have their others readable flag set can
have their contents displayed
3.3
Disk Quotas
There is a limited amount of disk space available to users, 45.2Gb in total. In order to
ensure that no one user consumes all the available free disk space, each user has a disk quota
allocated to them. Initially this is 50Mb for all users, except visitors to the Department
whose quota is usually 25Mb. A disk quota consists of a quota and a limit: The quota
may be exceeded for up to 14 days, whereas the limit is an absolute limit than cannot be
exceeded at any time.
If you reach your quota limit, then you may have problems logging in.
You can determine your quota by using the quota command on any Unix machine.
vummath/snoopy> quota
Disk quotas for snoopy (uid 6747)
20
Filesystem
blocks
/dev/sdb2
4044
quota
limit
grace
files
100000 200000
23
quota
limit
0
grace
0
This indicates that user snoopy has used just over 4Mb of his 100Mb quota.
Only the System Administrator can change disk quotas
Requests for increased quotas should be emailed to support@maths.man.ac.uk. However,
before you request an increased quota, please ensure that you have made every effort to
reduce your filespace by deleting junk files (for example, core files and dvi files if you
still have the LATEX source file) and compressing infrequently accessed files using the gzip
command (§8.2.1). You can determine the size of a directory dir and its subdirectories in
kilobytes using the command
du -sk dir
3.4
Transferring Files
There are several methods of transferring files, which one to use depends on the machine
you are using and where you wish to transfer files to or from. There are Windows 98 PCs
located in both the seventh and eighteenth floor clusters that are equipped with 3 12 ” disk
drives and 100Mb ZIP drives, and with ftp and Novell software installed. There is also
a 12x4-speed CD rewriter located in the Computer Support office (Rm 7-08) that can be
used by staff for archiving files. In the case of students, requests to have files written on
CD should be made to the Computer Support team.
When transferring files from Unix to Windows PCs, it is important to note that
Unix supports case-sensitive filenames, MS-DOS does not!
Thus two different Unix files may have the same MS-DOS filename.
3.4.1
ftp – Transferring Files Between Machines
The most common method of transferring files on Unix computers is ftp. ftp can be
used to transfer files between machines within the Department or between machines on
the other side of the world. In order to transfer files to or from a machine, you need to
21
know its IP number or full name, for example, 130.88.16.53 or vummath.ma.man.ac.uk (for
machines with names ending in ma.man.ac.uk, using just the machine name is sufficient
within the Department).
For security, the only Departmental Unix machine that you can ftp to is vummath
In order to use ftp, you must have an account on the machine that you are ftp-ing to,
or the machine you are ftp-ing to must allow anonymous ftp logins (username ftp with
password “your full email address”). When you have successfully logged in, be sure to select
the correct transfer mode (ASCII or binary) for the files that you are transferring: Generally
text files should be transferred as ASCII, and all other files should be transferred as binary.
(This is because DOS uses a LineFeed+CarriageReturn to end a line, whereas Unix only
uses a LineFeed. Thus DOS text files have b M characters at the end of each line when
viewed in Unix, and Unix text files sometimes appear as a single line when viewed in DOS.
(see §9, Qn. 9 )
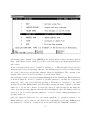
Directory commands cd dir
lcd dir
ls dir
mkdir dir
rmdir dir
File commands
del file
dir file
get file
mdel *.ps
mget *.ps
mput *.ps
put file
Other commands
ascii
binary
hash
help
prompt
quit
Change current directory on remote machine to dir
Change current directory on local machine to dir
List contents of directory dir on remote machine
Create the directory dir on remote machine
Delete directory dir on remote machine
Delete file file on remote machine
List details of file on remote machine
Get file file from remote machine
Delete files ending with *.ps from remote machine
Get files ending with *.ps from remote machine
Send files ending with *.ps from local machine
Send file file from local machine
Transfer all files as ASCII files
Transfer all files as binary files
Toggle monitoring of file transfers
List all available ftp commands
Toggle whether mdel/mget/mput prompt for each file
Finish ftp session
Table 2: Some ftp commands for transferring files between machines.
ftp treats DOS drives as directories, thus lcd d:\ refers to drive D: on a PC
22
3.4.2
mtools – Transferring DOS Files (Linux only)
The Linux machines provide an easier method of transferring files between 3 21 ” (MS-DOS)
floppy disks and Unix machines. Although MS-DOS floppy disks do not usually support
long filenames, Linux uses the Windows 95 long filename approach so that, for example:
vummath/snoopy> ls
Guide.tex
draft unix guide.tex guide.tex
vummath/snoopy> mcopy -t *.tex a:
Long file name ”guide.tex” already exists.
a)utorename A)utorename-all r)ename R)ename-all
s)kip S)kip-all q)uit (aArRoOsSq): a
Copying guide.tex-1
vummath/snoopy> mdir
guide
tex
25641 08-25-1998 11:05a
tex
4529 06-10-1998 10:45p
draft ˜1
guide˜1
tex
17357 07-07-1998 10:32a
o)verwrite O)verwrite-all
Guide.tex
draft unix guide.tex
guide.tex-1
Note that the long Unix filename has been given the standard DOS filename draft ˜1.tex,
but that both standard and long filenames are listed by mdir. Also note that before
guide.tex was copied, it was necessary to specify how the name conflict with Guide.tex was
to be resolved – this is because DOS does not support case-sensitive filenames.
Disk commands
mbadblocks a:
mformat a:
mlabel a:name
Directory commands mcd dir
mdeltree dir
mdir
mmd dir
mmove dir1 dir2
File commands
mcopy *.dvi a:
mcopy file a:
mcopy a:
mcopy a:file
mdel file
mmove file1 file2
mtype a:file
Check floppy disk integrity
Quick format floppy disk
Label floppy disk with label name
Change current DOS directory to dir
Delete DOS directory dir and its contents
List contents of current DOS directory
Create DOS directory dir
Move/rename DOS directory dir1 to dir2
Copy Unix files *.dvi to DOS
Copy Unix file file to DOS
Copy entire DOS directory to Unix
Copy DOS file file to Unix
Delete DOS file file
Rename DOS file file1 to file2
Display contents of DOS file file
Table 3: Some of the Linux commands for transferring DOS files.
23
The default transfer mode for mcopy is binary, for ASCII files use the -t flag.
3.4.3
ncpmount – Accessing Files on a Novell Fileserver (Linux only)
Whilst Linux provides considerable facilities for transferring files between local DOS disks
and Unix (§3.4.2), they cannot be used for accessing files on Novell fileservers. However
Linux does have the facility for mounting – attaching a filesystem so that it appears as a
directory – Novell filesystems to your Unix filestore. Once mounted, files in your Novell
account can be accessed just as if they were in your Unix account.
Before a filesystem can be mounted, it must have a mount point – a (preferably) empty
directory – where the remote filesystem can be attached, say, novell. The Novell filesystem
can then be attached using the command
ncpmount -S novell-fileserver -U novell-username -P novell-password novell
By default, ncpmount mounts all the Novell volumes on a fileserver. If you only want to
mount a specific Novell volume, then the flag -V novell-volume should be included with
the ncpmount command.
Once mounted, the directory and file access permissions of the Novell filestore are the same
as those of novell-username. i.e. You cannot do things with the Novell filestore that you
could not normally do by logging in from a PC. When you have finished transferring or
editing files, you should “logout” from the Novell fileserver using the command
ncpumount novell
where novell is the name of the mount point.
3.5
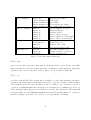
Restoring Deleted Files
Unix has no facility for undeleting files!!
However all user files (including users’ system mailboxes) are backed up every weekday
night. This means that if you delete a file (or directory) that was created or modified
before 12:01am, it is possible for it to be retrieved by the System Administrator. Please
note that it can take up to 30 minutes to retrieve a file or directory.
24
When requesting a file be restored, you should give its filename, the directory in
which it was located and (if possible) the approximate date when it was last
modified
25
4
Previewing & Printing Files
4.0.1
Location of Printers
The printing facilities in the Department are provided by 8 HP PostScript printers:
Printer Queue
laser g08
laser g08b
laser 212
laser 406
laser 704
laser 704m
colourA4
laser 1405
laser 1804
laser 1804m
Room
G-08
G-08
2-12
4-06
7-04
7-04
7-08
14-05
18-04
18-04
Model
HP 4000N
HP 4000N
HP 4100N
HP 4M+
HP 4050N
HP 4050N
HP 2500CM
HP 4M
HP 4000N
HP 4000N
Mode
simplex
simplex
simplex
simplex
duplex
simplex
simplex
simplex
duplex
simplex
Speed
16ppm
16ppm
25ppm
12ppm
17ppm
17ppm
2ppm
8ppm
16ppm
16ppm
Resolution
1200 dpi
1200 dpi
1200 dpi
600 dpi
1200 dpi
1200 dpi
600 dpi
600 dpi
1200 dpi
1200 dpi
Table 4: Names, locations and descriptions of Departmental laser printers.
4.0.2
Printing Allowances
Printing for people with Unix accounts is currently “free” within the Department – the
standard University A4 page charge is 5p. Each student receives an annual free printing
allowance that is announced by email at the start of the academic year. This “free” printing
allowance assumes that all printing done is both ‘reasonable’ and not ‘excessive’, and in
all cases that the user’s default printing mode is duplex where available.
The Department reserves the right to charge for excessive or unreasonable printing
You can find out how much printing you have done during the current month and in total
using the print month and print total commands, respectively:
vummath/snoopy> print month
Total printing for snoopy during Oct is 27 pages
vummath/snoopy> print total
Total printing for snoopy since Oct 01 2000 is 27 pages
Only two types of file can be printed on the Department’s laser printers, plain text and
PostScript. Any other type of file must first be converted into PostScript before being sent
26
to the printer, otherwise the result is literally hundreds of wasted sheets of paper.
4.1
General Printing Commands
When something is printed, it is sent to the default printer for that xterm window. (It is
possible to have different default printers for different xterm windows.)
Your default printer is specified in your .printer file
using the printer names given in Table 4. Whenever you open an xterm window, the
default printer for that window is displayed. You can (temporarily) change the default
printer for a specific xterm window (and all software subsequently run in that window)
using the command
setenv PRINTER printer name.
You can find out where printing from a particular xterm window is going using the command
echo $PRINTER
4.1.1
lpq – Listing a Printer Queue
Files that are printed are not sent directly to a printer, but are added to the printer queue
for that printer. This ensures that printing is done on a first-come first-served basis, but
can also lead to a long delay before your printing actually starts appearing if there is a
large queue ahead of your print job. The command for displaying the contents of the default
printer queue is
lpq -l
whereas the contents of a specific printer queue can be displayed using the command
lpq -l -Pprinter name
for example:
vummath/snoopy> lpq -l -Plaser 1404
27
Printer: laser 1404@unixserver
Queue: 3 printable jobs
Server: pid 1052 active
Unspooler: pid 1053 active
Rank
Owner/ID
Class
active snoopy@vummath+417
A
2
charlie@victoria+314
A
3
snoopy@vummath+418
A
Job
417
314
418
Files
cv.ps
application.ps
jobs-offers.ps
Size
98345
128592
6953
Time
14:58:48
14:59:12
15:03:33
Part of the information displayed by the lpq command is the print job ID number – you
need to know this number if you wish to cancel your print job.
Occasionally files may fail to print even though they disappear from the printer queue
(see §9, Qn. 2 ). You can check whether your file has been printed using the command
print check for the default printer for that window, or print check printer name to
specify an alternative printer.
4.1.2
lprm – Cancelling a Print Job
A print job in a printer queue can only be cancelled by its owner or the System Administrator. In order to cancel a print job, you first need to know its ID number which can
be obtained using the lpq -l command (§4.1.1). The command for cancelling a print job
from the default printer queue is
lprm jobnumber
and the command lprm -Pprinter name jobnumber cancels a print job from a specific
printer queue.
However, because each laser printer has its own memory, a print job that has already been
downloaded to the printer does not appear in the printer queue and so cannot be cancelled
directly. Even if the print job can be cancelled, if it has already started downloading
to the laser printer (indicated by active in the printer queue listing (see above)), there
can be several Mb of printing to do after the print job has been cancelled. Under these
circumstances, the procedure to follow is:
1. First cancel the print job using the lprm command.
2. Go to the printer and wait until your print job starts printing.
3. Press the cancel button – for security reasons, this does not work in Rm G-08.
28
4.2
Previewing & Printing Different Types of Files
Before you print a non-text file, you should always preview it to check that you are printing
what you intended to print. Previewers are available for a range of file types, and in some
cases it is necessary to use a previewer in order to obtain a PostScript file that can be
printed.
Only PostScript and text files should be printed directly!
Note that the printers in Rms 7-04 and 18-04 can print on both sides of the paper. It is
also possible to print .dvi files, PostScript files and text files so that two pages of output
fit on each A4 page. This is recommended for printing long computer listings and draft
copies of documents.
4.2.1
Text Files
Text files can be previewed using less (§3.1) or any text editor (§5.1).
It is not possible to print out selected pages of a text file directly. The command for
printing a text file file to the default printer is
lpr file
or lpr -Pprinter name file to print it on a specific printer. For draft or long documents,
two pages of text can be printed on each A4 page using the command
a2ps file
to print to the default printer, or a2ps -Pprinter name file to print to the printer
printer name.
4.2.2
(Encapsulated) PostScript Files
(Encapsulated) PostScript files (which usually have the file extensions .eps and .ps, respectively) can be previewed using either GhostScript (gs) or GhostView (ghostview) on any
Unix machine (and, additionally, gv on Linux machines). GhostScript is a no-frills piece of
software that displays one page of PostScript at a time. It is not possible to select specific
pages for printing or viewing, or to skip forwards or backwards through the PostScript file.
29
GhostView (and later versions of GhostView called gv on Linux) allows individual and selected pages of PostScript files to be viewed, magnified, extracted and, more importantly,
printed.
ghostview is recommended for viewing PostScript files
A PostScript file may be viewed with GhostScript using the command
gs filename.ps
which opens a viewing window. The only commands in GhostScript are <Enter> to display
the next page, and quit that displays each page without stopping.
A PostScript file may be viewed with GhostView or gv using the commands
ghostview filename.ps or gv filename.ps
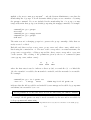
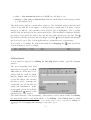
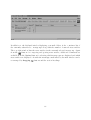
The picture on the right shows part of the GhostView window: At
the top is information about the origin of the PostScript file. On
the left are the menu buttons, in the middle is part of the Scroll Bar
for moving through the PostScript file and on the right are the page
numbers of the pages in the PostScript file. The < marker indicates
the page that is currently being displayed, to change it click the
middle mouse button on a new page number. The ∗’s indicate
marked pages; marked pages can be either printed or extracted
from the
menu. The inverted 45 are the currently selected
pages: To select a single page, click the left mouse button on it;
to select a range of pages, first select the starting page and then
click the right mouse button on the finishing page. Selected pages
menu.
can then be marked or unmarked from the
A quicker method of navigating a PostScript file is to use the following shortcut keys:
b
f
h
j
Move back one page
Move forward one page
Scroll current page left
Scroll down current page
k
l
m
o
Scroll up current page
Scroll current page right
Mark current page
Open new file
p Print marked pages
q Quit GhostView
s Save marked pages
Table 5: Some of the shortcut keys for ghostview.
30
PostScript files may be printed using either GhostView to print specific pages or the lpr
command (§4.2.1) to print the entire file.
Two pages of PostScript can be printed on each A4 page using the command
psland file.ps
to print to the default printer. A range of pages can be selected for printing using the flag
-ppfirst page:last page, for example, psland -pp3:7 file.ps prints pages 3 to 7.
4.2.3
PDF Files
PDF (Portable Document Format) is a development of the PostScript language. The two
main differences between PDF files and PostScript files are that PDF files can contain
hyperlinks – clickable text for navigating the files – and
PDF files cannot be printed directly!!
PDF files can be viewed and printed using GhostView (§4.2.2). However GhostView does
not support hyperlinks, so that not all the features of PDF files are available. A better
way of viewing PDF files is to use the command
acroread file.pdf
which runs the Unix version of Adobe’s Acrobat Reader. acroread supports all the features
of PDF files, including printing selected pages of a PDF document. However please note
that a small PDF document can generate an extremely large PostScript file. Thus if you
are going to print a PDF file, it should first be converted into a printable PostScript file
using the command
pdf2ps input.pdf output.ps
By doing so, it is possible to see how large the PostScript file is before printing it, as well
as being able to use the psland command to print two pages on each A4 page.
4.2.4
dvi Files
The most common “word processing” software on Unix for producing mathematical documents is LATEX (§5.6). LATEX “compiles” .tex text files to produce .dvi files that can be
viewed using the command
31
xdvi file.dvi
The xdvi window has a Button Bar on the right-hand side of the window for navigating
the .dvi file and for zooming in on the contents of the window. Additional facilities are
provided by the following shortcut keys:
b
c
d
f
Move back one page
Centre page on cursor
Scroll down page
Move forward one page
ng
l
q
r
Goto page n
Scroll page left
Quit xdvi
Scroll page right
ns
u
x
Shrink factor n
Scroll up page
Toggle Button Bar
Table 6: Some of the shortcut keys for xdvi.
By default xdvi assumes that the page format is A4 portrait, different page formats can
be specified using the flag -paper, for example,
xdvi -paper a3 file.dvi or xdvi -paper a4r file.dvi
for A3 portrait and A4 landscape formats, respectively.
dvi files may be printed to the default printer using the command
dvips file.dvi
dvips has a large number of flags, but the most frequently used ones are:
-Pprinter name
-ofilename
-pfirst page
-llast page
-npage count
-ppfirst page:last page
Specifies the printer to use
Saves the PostScript to file filename
Specifies the first page to be printed
Specifies the last page to be printed
Specifies the number of pages to be printed
Specifies a range of pages to be printed
Table 7: Some frequently used flags for dvips.
For draft or long documents, two pages of output can be printed on each A4 page using
the command
dviland file.dvi
A range of pages can be selected for printing using the flag -ppfirst page:last page,
for example, dviland -pp4:5 file.dvi prints pages 4 and 5.
32
4.2.5
HTML Files
HTML (HyperText Markup Language) files are the basis of the World Wide Web (WWW).
They are plain text files that include formatting information for text, graphics and even
sound samples, as well as HyperText links for navigating the page and for accessing other
HTML pages. The best way to view HTML files is with a Web browser (§7.1), on the Unix
system this means using the command
netscape file.html
Whilst it is possible to print HTML files as plain text (§4.2.1), the resulting output gives
no idea of what the actual page looks like, as well as lacking any graphics. It is much better
to print HTML files from within Netscape, either to a PostScript file for later viewing using
ghostview or for printing using psland, or directly to the default printer.
HTML files should be printed as Greyscale on A4 paper
HTML pages are virtual pages, this means that a single page of HTML can actually
correspond to hundreds of pages of A4 printout. Therefore, if in doubt, an HTML page
should first be printed to a file for previewing using ghostview (§4.2.2) before being sent
to the printer.
4.2.6
Graphics Files
There are very many different types of graphic file in existence – sometimes the only
software that can preview and print a certain type of file is the software that originally
created it.
Under no circumstances should graphics files be printed directly
There are two general purpose graphics file viewers available, gimp (Linux only) and xv.
Both programs can read and write graphics files in various different formats. Whilst xv allows some basic image editing to be done, gimp supports a full range of image manipulation
tools - the gimp user-manual is available at http://www.ma.man.ac.uk/guides/unix.
33
5
Available Software
Due to the historical way in which the Unix system has developed within the Department,
most of the available software is more relevant to Applied Mathematics and Pure Mathematics than Statistics. There is, however, a wide range of statistical software (Minitab,
SAS, SPSS) installed on the semi-public computing cluster located in Room G-08.
5.1
Text Editors
There are five text editors available on the Unix system: They range from the standard
basic Unix editor vi to the most comprehensive editor emacs which has specific “modes”
for editing different types of text file. The other three editors are joe, nedit and pico
which are basic text editors, but are easier to use than vi.
5.1.1
joe
joe is a text editor that runs in an xterm window. joe has its own online help pages that
can be accessed by typing <Ctrl-K>H. The top of the joe window gives the name of the
current file (and whether it has been modified or not), the current cursor position and the
current system time. On the Linux machines, the main joe help page looks like
where b stands for <Ctrl>, so that b KB means <Ctrl-K>B. Help pages for more complex
joe features can be accessed using <Ctrl-[.>. In order to ensure that all the help page is
visible, you should ensure that the xterm window is at least 80 characters wide.
5.1.2
emacs
emacs is the most commonly used text editor on the Unix system. Although it has considerably more features than the other text editors available, emacs is almost as easy to use.
34
When started emacs opens its own editing window:
emacs has its own Button Bar that gives rapid access to many of the basic (and less basic)
emacs commands. (There is also an X-window version of emacs called xemacs that has a
better X-window interface.) The ** at the bottom left-hand corner of the window indicates
that the file has been modified (a %% indicates that the file is read-only). The (Fortran)
indicates that emacs is in its Fortran mode, the L1 means that the cursor is on line 1, and
the All indicates that the entire text is being displayed in the emacs window.
Although emacs has a wide range of commands (over 1100), it is only necessary to know a
few keypresses in order to create and edit files. (A summary of basic emacs commands and
concepts can be obtained by typing <Ctrl-h>t. A list of commands including a keyword
can be obtained by typing <Ctrl-h>a and then entering the keyword.) Whilst emacs can
be used to edit several files (Buffers) at the same time, new users are recommended only
to edit one file at a time until they have become more familiar with emacs.
emacs is intended to be used in an X-windows environment, however it can also be run in
an xterm window using the command
emacs -nw
In this case, the emacs Button Bar no longer works and the mouse pointer cannot be used
to position the cursor in the emacs window. However all the emacs keypresses listed in
Table 8 still work.
5.1.3
nedit (Linux only)
nedit is a fully-featured text editor that runs in its own X-window. It has a Button Bar
that provides access to the most commonly used features and has a comprehensive online
help facility. In appearance it is very similar to xemacs, however unlike emacs and xemacs
it is a dedicated text editor.
35
File commands
Cursor commands
Editing commands
Miscellaneous
<Ctrl-x>i
<Ctrl-x><Ctrl-c>
<Ctrl-x><Ctrl-s>
<Ctrl-x><Ctrl-v>
<Ctrl-x><Ctrl-w>
<Alt-v>
<Ctrl-r>
<Ctrl-s>
<Ctrl-v>
<Ctrl-↑>
<Ctrl-↓>
<Alt-d>
<Alt-Delete>
<Ctrl-k>
<Ctrl-y>
<Alt-$>
<Ctrl-g>
<Insert>
Insert file into buffer
Quit emacs
Save buffer
Load new file into buffer
Save buffer with new name
Move backward one page
Search backward
Search forward
Move forward one page
Move backward one paragraph
Move forward one paragraph
Delete next word
Delete last word
Delete to end of line
Recover last deleted item
Spell check current word
Abandon current operation
Toggle overwrite mode
Table 8: Some basic emacs keypresses.
5.1.4
pico
pico is yet another text editor that runs in an xterm window. pico has its own online
help page that is accessed by typing <Ctrl-G>. A summary of the main pico keypresses
is given at the bottom of the pico window, where b R, say, stands for <Ctrl-R>.
5.1.5
vi
vi is the original Unix editor and should be available on every Unix machine everywhere.
It runs in an xterm window and despite its basic look, it has extensive editing facilities
and is still the preferred editor by many people for editing codes. vi has two modes of
operation: a command mode where keypresses are interpreted as commands (see Table 9 ),
and a text mode where keypresses are entered as text into the current file. The text mode
is entered using one of the Editing commands and exited by pressing <Ctrl-c>. vi may be
started by typing vi by itself or vi file to load a specific file on startup.
36
File commands
Cursor commands
Editing commands
:e file
:e! file
:f file
:q
:q!
:w
:wq
:w file
nG
H
M
L
w
<Ctrl-f>
<Ctrl-b>
/string
a
i
o
O
R
x
dd
<Ctrl-c>
Edit file file unless changes have been made
Edit file file, discarding any changes
Change filename to file
Quit unless changes have been made
Quit, discarding any changes
Save current file
Save current file and quit
Save current file as file
Move cursor to line n in file
Move cursor to top of window
Move cursor to middle of window
Move cursor to bottom of window
Move cursor to start of next word
Move forward one page
Move backward one page
Search text for string
Insert new material after current character
Insert new material before current character
Insert new material after current line
Insert new material before current line
Insert new material over old text (overtype)
Delete the current character
Delete the current line
Return to command mode
Table 9: Some basic vi keypresses.
5.2
Software Compilers
The main use of the Unix computers is solving numerical problems, and this is usually
achieved by writing some suitable Fortran code. However, Fortran is not the only programming language available on the Unix system, and compilers for C, C++ and Pascal
are available. Typically, after successful compilation, the executable program is written to
the file a.out, unless an alternative name is specified.
5.2.1
Fortran 77
Although Fortran 77 has been superceded by Fortran 90, it is still probably the most
commonly used programming language in the Department. There are several different
Fortran 77 compilers available, some of them actually being Fortran 90 compilers (§5.2.2)
37
because the Fortran 90 language includes the Fortran 77 language. The best choice of
Fortran 77 compiler depends on the particular problem being solved: Vendor-specific compilers benefit from being designed for the hardware that the programs are run on, however
GNU compilers have a reputation for often producing faster, more efficient optimized executable code. All the Fortran compilers are optimizing compilers, which means that they
allow different levels of optimization to be specified at compile time. Higher levels of optimization generally mean that the resulting executable code runs faster. However, in some
rare cases,
Optimizing a code may result in incorrect answers being obtained or even the
code failing to run
GNU Fortran 77 g77
The GNU Fortran 77 compiler g77 is available on both the Sun and Linux machines. g77
compiles Fortran text files with the .f extension into executable code. There are several
compilation flags, the most frequently used ones being:
-c
-g
-o file
Compile program only
Include debugging information
Save executable as file
-On
-Wall
Use optimization level n (0-3)
Display all compilation warnings
Table 10: Compilation flags for the GNU g77 compiler.
Thus, for example, the command
g77 -O3 -Wall -o runme test.f
compiles the program test.f with maximum code optimization and warning of any programming errors, and creates the executable program runme.
Sun Fortran 77 f77 (Solaris only)
The Sun Fortran 77 compiler f77 is available on victoria and vummath. f77 has a wide
range of compilation options that can be obtained from the f77 manual page (§2.5.1). One
significant difference between Fortran 77 on the Suns and the Linux machines is that Sun
Fortran supports extended precision (quadruple precision) arithmetic. The simplest method
of using extended precision arithmetic in Fortran 77 programs is to use the -r8 compilation
flag (see Table 11). The most frequently used compilation flags are given in Table 11.
38
-ansi
-c
-C
-g
-o file
Identify non-ANSI extensions
Compile program only
Check array subscripts when run
Include debugging information
Save executable as file
-On
-r8
-u
-w
Use optimization level n (0-4)
Treat REAL as DOUBLE PRECISION
Disable implicit variable typing
Suppress compilation warning messages
Table 11: Compilation flags for the Sun f77 compilers.
Rational Fortran 77 ratfor (Solaris only)
Rational Fortran is a Fortran 77-based programming language. It is provided for use by
people who are already familiar with it, and is not intended to be learnt by users. Rational
Fortran programs can be recognized from their .r file extension, and can be translated
into standard Fortran 77 source code using the command
ratfor testprog.r -o testprog.f
ratfor has only two compilation flags: -C for specifying that comments in the Ratfor
program should be included in the Fortran 77 source code, and -o for specifying the name
of the Fortran 77 file.
5.2.2
Fortran 90
Fortran 90 is the successor to Fortran 77. However it contains Fortran 77 as a subset, so
that Fortran 90 compilers can be used to compile Fortran 77 programs. Native Fortran 90
programs can be recognized from their .f90 file extension. The most frequently used
compilation flags for both compilers are the same, namely:
-c Compile program only
-o file Save executable as file
-C Check array subscripts when run -On
Produce optimized code
-g Include debugging information
-w
Suppress compilation warning messages
Table 12: Compilation flags for the f90 compilers.
5.2.3
C and C++
C and C++ compilers are installed on all the Unix machines, as the C language is the
basis of all modern computer software. However, neither C nor C++ are widely used in
39
the Department, as the programming language of choice is Fortran. For more information
on these compilers, consult the man and info pages on the commands gcc and g++.
5.2.4
Pascal
gpc – The GNU Pascal Compiler (Linux only)
The GNU Pascal compiler supports ISO, ANSI and IEEE Pascal and extended Pascal
standards. It also has limited support for several other Pascal standards, most notably
Borland Pascal 7.0 and Pascal-SC (Pascal extensions for scientific calculations). So, for
example, in addition to the standard Pascal datatypes, gpc also has dynamic string and
complex number datatypes. Lists of the recognized Pascal keywords and built-in identifiers
are included in the info pages. The info pages also include several complete program
listings that demonstrate the additional features of gpc over standard Pascal. However,
Beware gpc has several known bugs that are listed in the info pages
5.2.5
Profiling Programs
One way of improving the performance of programs is to compile them with optimization.
However even the best optimizing compilers cannot make inefficient code run efficiently,
and it is usually necessary to rewrite parts of the source code. The parts of the code
to rewrite first are those parts which are either executed most frequently or account for
most of the program execution time. This information can be discovered by profiling the
program, which is a three stage process:
1. Compile the program with the -pg flag.
2. Run the program as normal (which creates the file gmon.out).
3. Process the profiling information using the gprof command.
Part of the information produced by the gprof command is the percentage of the total
execution time spent in each routine, the number of times each routine was called and
average time spent in each routine. (A detailed description of each of the statistics produced
is also printed when the gprof command is run.)
40
5.2.6
Debugging Programs
Even the most carefully written programs can initially contain bugs: Some bugs may be
simple mistyped commands that usually prevent a program from compiling – these bugs
are usually quite easy to find and fix. However other bugs, such as the use of uninitialized
variables causing “segmentation faults” can be much more difficult to track down. Most
compilers have additional flags that can be used to help track down such programming
mistakes:
The Linux Fortran 90 compiler -C flag activates a number of run-time checks, the -nan
flag initialises all variables to NaN (“not a number”) so that using them before they have
been set generates a runtime error and the -u flag ensures that the types of all variables
must be explicitly set.
All compilers support the -g flag that includes interactive debugging information in the
executable code. Once compiled, the code can be executed from within an interactive
debugging environment that allows individual lines of code to be executed, local and global
variables viewed, etc. The debuggers on the Linux machines and Suns are called ddd and
workshop, respectively. They are both started from an xterm window, for example, ddd
a.out. The ddd user-guide is available at http://www.ma.man.ac.uk/guides/unix.
5.2.7
Running Programs After Logging Out
One of the main advantages of Unix over other operating systems is that it is possible to
leave programs running (“in the background”) after you have logged out. Normally when
you log out, any programs that you have running are killed. However if you start your
program using the nohup command, for example,
nohup a.out < input data > output file &
then the program a.out will continue to run after you have logged out. Any output to the
window will be stored in the file output file (if no output file is specified, then window
output will be saved in the file nohup.out). If the program normally requires input from
the keyboard, then this can be supplied via the input data file.
Many software applications can be run after logging out, not just simple executable binaries, for example, maple (§5.4.1), mathematica (§5.4.2) and matlab (§5.4.3). However, for
obvious reasons, interactive programs that do not support input via a file cannot be run
in the background. You should also be careful to ensure that programs like matlab script
41
files, if they are run in the background, end with a quit command so that matlab does
not wait for additional input after the program has finished running.
5.3
Software Libraries
Software libraries are collections of precompiled subroutines for solving commonly occurring
programming problems. Whilst there are typically hundreds of software libraries installed
on a Unix machine, most of them are concerned with the operating system itself and
are only usually of interest to people compiling software applications. The main software
libraries of interest to mathematicians are the NAg libraries, the BLAS subroutine library
and the LAPACK library.
5.3.1
The NAg Fortran 77 Library
The NAg Fortran 77 library contains routines for solving a wide range of mathematical problems, for example, solving ordinary differential equations, non-linear optimization
problems and boundary value problems. Online documentation for the NAg f77 library is
available at
http://www.ma.man.ac.uk/guides/unix
This online documentation is identical to the printed documentation that used to be available in the Department. The sample programs, data and results that are contained in the
online documentation are located in the directory
/opt/nag77/examples
Sample programs may be copied to the current directory, compiled and run by using the
nagexample command. A good starting point for writing your own driver program for a
NAg routine is to copy the corresponding sample program and modify it accordingly. For
example (on the Suns),
vummath/snoopy> nagexample d02kdf
Copying d02kdfe.f to current directory
Compiling d02kdfe.f :
f77 -dalign d02kdfe.f -lnag
Running a.out
42
D02KDF Example Program Results
A singular problem
Final results
K = 11 ELAM =
14.947 DELAM =
0.86D-03
HMAX(1,M-1) =
0.000
HMAX(1,M) =
5.456
Note the use of the -lnag flag for linking the NAg library. When using the Fortran 90
compiler on Solaris, it is also necessary to include the flag -lF77.
There are two versions of the NAg f77 library available on Linux: one for use with the
NAg f90 compiler (linked using the flag -lnag) and the other for use with the GNU f77
compiler (linked using the flag -lnagg77). Thus, for example,
vummath/snoopy> f90 d02kdfe.f -lnag
vummath/snoopy> a.out
D02KDF Example Program Results
A singular problem
Final results
K = 11 ELAM =
14.947 DELAM =
0.86D-03
HMAX(1,M-1) =
-0.000
HMAX(1,M) =
5.456
5.3.2
The NAg Fortran 90 Library (Linux only)
The NAg Fortran 90 library is only available on Linux machines
The NAg Fortran 90 library provides only a subset of the routines that are available in
the NAg Fortran 77 library. However the routines take full advantage of the new facilities
provided by Fortran 90, and as such are very unlike the routines in the NAg Fortran 77
library. Online documentation is available at
http://www.ma.man.ac.uk/guides/unix
The sample programs, data and results given in the NAg documentation are located in the
directory
/opt/nagf90/examples
As with the NAg Fortran 77 library, a good starting point for writing your own driver
program is to copy and modify the corresponding sample program. For example,
43
vummath/snoopy> nagexample nag t dist ex01
Copying nag t dist ex01.f90 to current directory
Compiling nag t dist ex01.f90 :
f95 nag t dist ex01.f90 -lnagfl90
Running a.out
Example Program Results for nag t dist ex01
TAIL
T
DF
PROB
DEVIATE
L
0.850 10.000 0.7924
0.8500
S
0.850 10.000 0.4152
0.8500
C
0.850 10.000 0.5848
0.8500
U
0.850 10.000 0.2076
0.8500
Note the use of the -lnagfl90 flag for linking the NAg Fortran 90 library.
5.3.3
The BLAS library
The BLAS (Basic Linear Algebra Subroutines) library consists of a collection of subroutines
for performing basic linear algebra functions. These subroutines are optimized for the
machine and operating system that they are running on. The version of the BLAS library
installed on all the machines is ATLAS BLAS, it may be linked using the -lblas flag.
5.3.4
The LAPACK library
The LAPACK (Linear Algebra PACKage) library consists of a collection of high-level
subroutines for performing linear algebra operations, such as LU and QR factorizations
and SVD decompositions. Version 3.0 of the LAPACK library is installed, and it may be
linked using the -llapack flag.
5.4
Mathematical Software
There are several mathematical software packages available on the Unix system. The
main ones are mathematica and matlab. There is also gap, gp (GP/PARI), maple and R
available on the Linux machines. Each package has its particular strengths and weaknesses:
Matlab is excellent for solving numerical problems and has very good graphics capabilities,
whereas Maple’s and Mathematica’s strengths are that they can be used for algebraic and
numerical calculations with arbitrary precision arithmetic. pari and gap are designed
for use primarily by Pure Mathematicians, and support algebraic calculations, arbitrary
44
precision arithmetic and a number of unusual data types. R is a statistical package based
on S-Plus.
5.4.1
Maple 6 (Linux only: one manual)
Maple is the algebraic and numerical computation package by Waterloo. There are two
ways of accessing Maple,
maple and xmaple.
The command maple provides a text-only version of maple (suitable for running Maple
scripts in the background (§5.2.7)); the command xmaple starts the X-window version of
Maple that has full online documentation via the Help Button. There is only one Maple 6
license available, so that you will get the error message
Licensed number of users already reached
if somebody is already using Maple. (The text-only version of Maple will queue your license
request so that as soon as the license becomes available, Maple will start.)
5.4.2
Mathematica 4.1 (Linux only: two manuals)
Mathematica is the algebraic, graphical and numerical manipulation package by Wolfram
Research. There are only twenty-five Mathematica licenses, so that if license limit is reached
you will get the message
The 25-user limit on this license has been reached.
Mathematica has extensive graphics facilities as well as being able to perform complex
algebraic and numerical calculations. There are two commands for running Mathematica:
math and mathematica.
math runs Mathematica in an xterm window with separate graphics windows (suitable for
running Mathematica scripts in the background (§5.2.7)), and mathematica runs Mathematica in a Mathematica Notebook window which has better command editing facilities.
Once Mathematica is running, help can be obtained on individual commands using the
help command ?, for example,
45
?Plot
All Mathematica commands are executed by pressing <Shift+Enter>. The command for
ending a Mathematica session is Quit – please use this command to exit Mathematica
rather than using the Close or Kill Buttons.
5.4.3
Matlab
Matlab is a graphical and numerical package used mainly by the Numerical Analysts in
the Department. Matlab (versions 5.3 and 6.1) is available on all the Unix machines in the
Department and the default Matlab 6.1 is started using the command
matlab
(Matlab 5.3 is started using the command matlab5.3.)
There are a range of Toolboxes available for Matlab – Toolboxes are packages of Matlab
commands for specific application areas, for example, Image Processing, Neural Networks
and Wavelets – the only installed Toolboxes are for Fuzzy Logic (4 campus licenses), Image
Processing (5 campus licenses), Optimization (2 campus licenses), Signal Processing (500
campus licenses), Statistics (2 campus licenses) and Symbolic Mathematics (50 Departmental licenses). Matlab’s capabilities can also be extended by writing your own .m files –
M-files can contain either a single Matlab function or a list of Matlab commands (a script
file).
Matlab 6.1 has extensive online help and documentation, and Matlab 5.3 has both built-in
help that is available using the Matlab help command and extensive documentation that
can be accessed by running the Unix command
matlabdoc
and then clicking on the MATLAB Help Desk hyperlink.
The built-in Matlab help command displays the comment lines (comment lines begin with
a %) at the top of an M-file. Thus the built-in help facilities can be extended to include
help for any user-written M-files.
5.4.4
Pari-GP (Linux only)
Pari (version 2.1.1) is primarily intended for use by Pure mathematicians, supporting
arithmetic over several different number fields, arbitrary precision arithmetic and limited
46
algebraic manipulation. Pari is started using the command
gp
and exited using the Pari command quit.
Online help is available within Pari using the ? command, for example,
? ?taylor
taylor(x,y)=taylor expansion of x with respect to the main variable of y.
There is also a 226 page Pari manual that may be viewed using the command gphelp.
5.4.5
R – A Statistical Package
R is a statistical package based on the commercial package S-plus. A complete list of the
installed packages along with a description of their contents and demonstration programs
can be obtained using the R command help.start(). Demonstration programs can be
cut and pasted directly into an xterm window running R, or run using the demo command,
for example, demo(image).
5.5
Data Visualization Packages
There are a number of data visualization packages installed on the Unix system: Some are
available as part of a more extensive package, such as Matlab (§5.4.3), Maple (§5.4.1) and
Mathematica (§5.4.2), whereas others are genuine standalone packages. These standalone
packages range from quite basic plotting software to commercial graphics packages. However, all the available packages are capable of creating PostScript graphics files for printing
or including in LATEX documents (§5.6).
5.5.1
gnuplot – Plotting 2D & 3D Data
gnuplot is a basic interactive plotting program that supports both 2D plots and 3D surface
and contour plots. (It can also be used for non-linear least squares data fitting as well,
see below .) Online help is available using the help command; help on subtopics can be
obtained directly using, for example, the command
help plot smooth
47
to obtain help on the subtopic smooth of the plot command. Additionally, there is a LATEX
tutorial (tutorial.dvi) (§4.2.4) on using gnuplot located in directory /usr/doc/gnuplot* along
with several gnuplot demonstrations in directory /usr/doc/gnuplot*/demo. These demonstrations should be run by copying the demonstration files in the demo directory to /tmp,
say, and then using the gnuplot command load, for example,
load "fit.dem"
runs the non-linear least squares data fitting demonstration.
At first sight there is no obvious way of printing a graphic (to a PostScript file), as there
is no print command7 . In order to print the current graphic to the file gnuplot.ps, say,
the following sequence of commands should be used
gnuplot>
gnuplot>
gnuplot>
gnuplot>
gnuplot>
gnuplot>
5.5.2
set term postscript portrait
set output "gnuplot.ps"
set size 1,0.5
replot
set term x11
set size 1,1
plotxy – Plotting 2D Data
plotxy is a basic 2D plotting program. By default, the output of plotxy is saved in the
file plotxy.ps, although this can be changed using the outp command. The user-guide for
plotxy is available at
http://www.ma.man.ac.uk/guides/plotxy.ps
5.5.3
plotmtv (Linux only)
plotmtv is a 2D and 3D xwindow plotting package. Several demonstration files indicating
the capabilities of plotmtv are located in the directory /usr/doc/plotmtv/examples and
may be run by executing the script file run.sh. A user-guide is available as a PostScript
file called DataFormat.ps located in the directory /usr/doc/plotmtv.
7
Actually there is a print command, but it does not do what you would expect.
48
5.5.4
tecplot 8.0 & 9.0 (Linux only: two manuals)
tecplot 9 is a commercial data visualization package for 2D and 3D data. (Tecplot 8.0
is still available for backwards compatibility via the command tecplot8.) There are only
two Departmental licenses for tecplot – you can discover who is using the licenses using
the command tlmadmin -l. There are online user-manuals and reference manuals for both
versions of tecplot available at http://www.ma.man.ac.uk/guides/unix.
5.5.5
uniras 7.2 (Gsharp 3.2) (Linux only)
uniras is another commercial data visualization package for 2D and 3D data. There is
an unlimited number of licences for uniras available. uniras has an extensive online
user-guide and reference manual accessed via the Help Button, as well as a “Gsharp in 10
minutes” tutorial.
5.5.6
xfig - A Vector Drawing Program
xfig is unlike the other graphics packages in this section in that its main use is not for
plotting data but for creating diagrams and figures. xfig has all the facilities of a vector
drawing packages: spline curves, polylines, boxes, circles and ellipses. These vector objects
can be scaled, copied, moved, rotated, reflected, grouped and aligned, as well as having
their colour and width changed. It is also possible to import several types of graphic file
into xfig so that they can be annotated or included in larger diagrams.
An indication of the power and flexibility of xfig can be seen from the sample .fig files
located in the directory /usr/X11R6/lib/X11/xfig/Libraries. Online help is available
via the Help Menu and brief descriptions of each button can be obtained by placing the
mouse pointer over the button for about 2 seconds.
5.5.7
PGPlot - A Fortran 77 Graphics Library
Unlike gnuplot, plotxy, plotmtv, tecplot and uniras which are all packages for postprocessing of data, PGPlot is a collection of Fortran 77 subroutines that can be used to
build graphics capabilities into Fortran programs. The advantage of this approach is that
if the same program is used to produce results for a large set of different parameters, then
visualizing the results can be much quicker than using a standalone graphics package.
Descriptions of the available plotting routines along with their specifications are given
49
in the text file /usr/local/pgplot/pgplot.doc. In the same directory, there is also a
collection of executable programs that demonstrate what can be achieved using PGPlot.
Programs that use the PGPlot library should be compiled with the flag -lpgplot.
5.6
Typesetting Mathematics Papers
Creating mathematics papers using a normal word-processing package can sometimes be
a problem because of the large number of mathematical formulae that they contain. The
solution to this problem is a mathematical typesetting language called LATEX, which can
be used to produce anything from a simple one page letter to a published mathematical
textbook8 . Most staff use LATEX to publish their papers and most students use it to write
their theses. (There is usually an Introduction to LATEX course held in the Department for
new students during the first semester.)
LATEX is very similar to a programming language such as Fortran. LATEX files are plain text
files (with a .tex extension) that contain LATEX commands that indicate how to format
text and construct mathematical formulae and tables. LATEX supports the inclusion of
PostScript graphics files, cross-referencing of sections, subsections, tables and figures, and
all the other facilities you would normally expect in a word-processor – in fact this guide
was written using LATEX. Having written a LATEX file, it is necessary to “compile” it using
the latex command to produce a .dvi file. If labels are used in the document then it is
usually necessary to compile the file twice, or three times if a table of contents is included.
Once compiled, the resulting .dvi file can be previewed using the xdvi command and
printed using the dvips command (§4.2.4).
LATEX is public domain software and available for PCs from Computing Support
5.6.1
Creating PDF Files
Some of the advantages of PDF files over PostScript files are that they can be scaled for
previewing and printing, for example A4 → letter, without any loss of quality, and they
generally produce smaller files than the equivalent PostScript files.
LATEX files may be used to create PDF files for inclusion on webpages by using the command
pdflatex. However, currently pdflatex does not support the inclusion of PostScript
8 A
LT
EX is the only word-processing package available on the Unix system, but Microsoft Word is available
on the G-08 PC cluster and on Windows PCs in postgraduate offices.
50
graphics files and so an alternative approach is necessary: Having created a .dvi file using
the latex command, an equivalent PDF file can be created using the command dvi2pdf.
51
6
Electronic Mail (email)
Email is the facility for electronically sending messages (and files) to other computer users.
The recipients can be actual usernames (either within the Department or anywhere else in
the world), aliases that correspond to either individual usernames or groups of usernames
within the Department (§6.2), or mailing lists. All users automatically receive an email
address when they get their Unix account. For sending and receiving emails within the
Mathematics Department, it is sufficient to use just the username of the recipient.
Your email address for receiving external email is username@maths.man.ac.uk
You can discover the email aliases of local users by running the command
aliases username
– without any argument, aliases displays all of your email aliases.
6.1
The Available Email Software
There are several programs available for reading and sending email: The simplest is Unix
mail (§6.1.1) which is only really suitable for sending plain text messages, the most complex
is netscape mail that forms part of the Netscape WWW browser (§7.1). However, because
each mail program stores messages in a different directory, once you have chosen your mail
program you should stick to it.
6.1.1
Unix mail
mail is the original Unix mailer and is somewhat basic in its facilities. There are two
modes of operation: sending and reading.
Sending an Email
An email may be sent to a single address using the command
mail auser or mail auser@maths.leeds.ac.uk
or to multiple addresses using the command
52
mail auser, anotheruser@whereever.com, somebodyelse
After entering a short but relevant description of the email at the Subject: prompt, the
text of the email can then be typed. You may abort an email by typing <Ctrl-c> twice.
Once completed, the email can be sent by typing <Ctrl-d> or entering a single “.” as the
first character on a line.
Binary files cannot be sent using mail directly
but must first be converted into plain text files using the uuencode command (§8.2.2).
Once converted, they may be included in the email using the er command in mail.
While entering the text of an email, there are several tilde commands that can be used at
the start of a new line for specifying additional mail options:
e?
eb
ec
ee
eh
er
list
list
file
Describe all tilde commands
Specify list of BlindCarbonCopy recipients
Specify list of CarbonCopy recipients
Load message into editor $EDITOR
Review (and edit) message details
Read file into message
Table 13: Frequently used tilde commands for the mail command.
Reading an Email
New and unread email may be read using the mail command with no arguments. The
mail command (with no flags) reads the user’s system mailbox, a typical mailbox might
look like
Mail version 5.5 6/1/90.
"/var/spool/mail/chris":
U
>N
Type ?
for help.
3 messages 1 new 2 unread
1 cthbaker
Tue Jun 16 10:08
12/332
"Solution of DDEs"
2 jon@cs.man.ac.uk
Fri Jul 10 14:47
163/6672
"Reference book"
3 peter@cs.cornell.edu
Mon Aug 31 20:34
120/8580
"On vacation"
The U in the first column indicates that the second email is an old but unread email, and
the N indicates that the third email is a new email. The second column gives the message
53
number, the third column indicates the sender of the email followed by the date and time
of the email. The next column gives the total number of lines and characters in the email,
followed by the subject of the email.
Individual emails may be read by simply entering their message number. If the email
contains a uuencoded or MIME-encoded file, then it should be saved to a file, edited to
remove the header information and then decoded using either the command uudecode or
mimencode (§8.2.2) as appropriate. Other frequently used commands within mail are:
d {list} Delete messages
f name
List email from name
h
Reshow email headers
q
Quit mail
R
Reply to sender
r
Reply to sender and recipients
s {list} file Save messages in file
u {list}
Undelete messages
x
Quit, leaving mailbox unchanged
z[-]
Show next [last] email headers
Table 14: Some of the frequently used mail commands
where {list} can be a single email, a list of comma separated emails (for example, 1,4,9)
or a range of emails (for example, 3-7). If no filename is specified when saving an email,
it is saved in the file given by the environment variable MBOX. More detailed information
about the commands available within mail and how to use mail folders can be obtained
from the mail manual page.
6.1.2
emacs RMAIL
RMAIL is the name of the email program that forms part of emacs. It does not include
support for sending binary files by email or for decoding uuencoded or MIME-encoded
files (§8.2.2) (cf. Unix mail above). RMAIL is best used when emacs is running in its
own window (window mode), rather than in an xterm window (xterm mode), because then
most of the mail commands are available from the emacs Button Bar. RMAIL may be
started from either the emacs Tools Button (by dragging and selecting Read Mail), or
by entering <Alt-x>rmail. When started, RMAIL automatically transfers any email from
the system mailbox to the RMAIL mailbox.
When running in window mode, the emacs Button Bar for RMAIL looks like
where the mail commands can be accessed from the Move, Delete, Mail, Summary and
Classify Buttons. The Move Button is used for navigating your RMAIL mailbox, the
54
Delete Button allows emails to be marked for deletion and actually be deleted (expunged),
and the Mail Button is for sending new email, replying to email and forwarding email.
The Summary Button displays a summary of all the email in the RMAIL mailbox, and the
Classify Button allows labels to be attached to emails and for them to be saved in mail
folders.
An alternative to using the emacs Buttons, or if emacs is running in an xterm window, are
the following shortcut keys:
d
f
g
h
m
n
Mark message for deletion
Forward message
Get new mail
List messages in mailbox
Send new email
View next message
o
<Ctrl-o>
p
r
s
u
Save message in RMAIL format
Save message
View previous message
Reply to message
Delete marked messages and update mailbox
Unmark message for deletion
Table 15: Frequently used shortcut keys for emacs RMAIL
6.1.3
elm
elm is a text-only email program that runs in an xterm window. However elm is MIMEaware, which means that if you receive an email containing a MIME-encoded file then
elm will automatically decode it and, if it recognizes the filetype, will ask to start the
corresponding file previewer. This also means that if you wish to send a binary file by email,
then elm will automatically MIME-encode (§8.2.2) it so that it does not get corrupted in
transmission.
The first time that elm is run, it will ask to be allowed to create two directories, .elm
and Mail, in your home directory. If you say no, then elm will still run but may behave
unpredictably and you may lose incoming email.
On startup, elm reads your system mailbox, and displays a summary of its contents, for
example,
55
The letters in the first column indicate the status of each message: Message 1 is an Old
message which contains Mime encoded information. Message 2 is a new message that has
already been read and is marked Urgent. Message 3 is a new unread message - the inverted
text indicates that message 3 is the current message. The current message may be read
by simply pressing <Enter>. At the bottom of the window are listed the most frequently
used keypresses, whilst a full list of keypresses may be obtained by typing ??.
6.1.4
pine
pine is another text-only email program that runs in an xterm window and is MIME-aware
(see elm above). The first time that pine is run, it creates the directory mail in your home
directory in which to store its mail folders.
The main pine window looks like
56
On startup, pine’s default folder (INBOX) is the system mailbox where incoming email is
kept – pine checks for new email every 150 seconds, and when some arrives pine indicates
who sent it.
A list of all mail folders can be obtained by pressing l – a different mail folder is selected
using the cursor keys, and pressing <Enter>. An email message is read by selecting it using
the ↑ and ↓ cursor keys and pressing <Enter> when it is highlighted. The contents of the
current folder can be viewed by pressing i from the Main Menu.
An email may be sent by selecting Compose Message from the Main Menu. Email addresses
from the Address Book can be obtained by pressing <Ctrl-t>, selecting the recipient by
using the ↑ and ↓ cursor keys and then pressing s. Files may be “attached” to the email
message by selecting Attach (<Ctrl-j>), then either entering the name of the file or pressing
<Ctrl-t> to browse the contents of your home directory and selecting the file using the
cursor keys and pressing <Enter> when the file is highlighted. Once the message has been
entered, it can be sent by pressing <Ctrl-x> or saved for later editing/transmission by
pressing <Ctrl-o>.
pine also supports Address Books – the email equivalent of a telephone address book.
Email addresses can be added to the Address Book manually by selecting AddNew from
the Address Book window, or extracted from an email using the TakeAddr command.
57
6.1.5
netscape Mail
netscape mail is the most sophisticated of the email readers available on the Unix system.
It is MIME-aware, but in addition it can automatically decode MIME-encoded files and
view them as part of the email. netscape may be configured (§7.1.1) so that the command
netscape starts the email reader instead of the WWW browser, otherwise the email reader
can be started by clicking the
Button at the bottom-right of the browser window, or
the Communicator Menu Button on the browser window (§7.1) and clicking the Messenger
item.
Reading Email
The netscape mail reader window looks like:
The most frequently used mail functions are available on clickable buttons, for example,
. If the mouse pointer is positioned over a button, then a brief description of its
function appears at the bottom-left on the mailer window. Additional mail functions are
available on the Menu Buttons, in particular,
• File → New Subfolder creates a new mail folder.
• File → Compact All Folders removes deleted messages from every mail folder.
• Edit → Find search a message for text string.
• Edit → Search Messages search mail folder(s) for sender/subject/content.
58
• View → View Attachments Inline view MIME encoded files in situ.
• Message → Add Sender to Address Book adds the email address of the message sender
to your Address Book.
The mail reader window contains three windows: The left-hand window lists the mail
folders along with the total number of messages they contain and how many of those
messages are unread – the currently selected mail folder is highlighted. The top right
window lists the messages in the current mail folder. The information displayed includes
the sender of the email, the subject line and the date/time the message was sent. The
flag indicates whether a message has been flagged, and the indicates whether the message
has been read or not. The bottom-right window contains the text of the message.
It is possible to re-arrange the mail reader window by dragging the
section headings to get, for example,
buttons and the
Sending Email
A new email is composed by clicking the New Msg Button, which opens the Compose
window.
The most frequently used mail
functions are accessible via clickable Buttons. Files may be included with the email by clicking the Attach button followed
by the File button and selecting
the files to send – netscape automatically encodes the files ensuring safe transmission. Additional email options are available
by clicking the
Button on the
left-hand side of the window.
The email addresses of the recipient(s)9 of the message can be entered either by clicking
the appropriate window and typing them, or by clicking on the Address Button, which
9
Carbon copies and blind carbon copies of the message may be sent to recipients by clicking the
Panel and dragging and selecting the appropriate option.
59
opens your personal address book, clicking the appropriate
icon to select the recipient
and then clicking one of the To, CC or BCC Buttons. This procedure can be repeated for
all the recipients in your address book, and the address book closed by clicking the OK
button. Once you have entered the text of your message in the main window, you despatch
your message by clicking the Send Button.
6.2
Local Email Aliases
One of the most useful features of email is email aliases: An alias can be an alternative
name for an email address or a list of email addresses. You may setup your own personal
email aliases by adding appropriate entries to your .mailrc file, for example,
alias
alias
snoopy
footy team
snoopy@peanuts.woodstock.co.uk
linus,charlie,marcie,woodstock,paddy
There are also a number of email aliases available for contacting groups of people within
the Mathematics Department:
60
all
writing_up
applied
emeritus
professors
postgrads
pure
staff
applied_staff
applied_postgrads
pure_staff
pure_postgrads
applied_professors
applied_msc applied_phd na_msc na_phd
pure_professors
pure_msc pure_phd logic_msc logic_phd
msc_students
secretaries
stats
stats_staff
stats_professors
visitors
stats_postgrads
stats_msc
stats_phd
phd_students
Table 16: Mathematics Department group email aliases
7
The World Wide Web and USENET
Every user has free access to the World Wide Web (WWW), more commonly (and incorrectly) referred to as the Internet, and the Internet newsgroups (USENET).
7.1
Surfing the Net
Although there are several web browsers available for Unix, the recommended web browser
is netscape. Actually netscape is more than just a web browser, it also has a built-in
USENET newsgroup reader (§7.2) and a MIME-aware email program (§6.1.5). netscape
can be configured so that it starts with either a web browser, newsgroup reader or email
reader window – the default is to start with a browser window. The built-in facilities of the
netscape browser can be extended by the addition of so-called plug-ins that may provide
support for audio files or realtime video, say.
61
netscape can be started using the command netscape, or if you wish to start the browser
on a specific web page, using the command
netscape http://www.maths.man.ac.uk/MCCM
for example. The default browser window looks like
Immediately below the Title Bar is a row of Menu Buttons that allows access to all the
facilities of netscape. Below this is a row of Shortcut Buttons that provides quick access to
some of the more frequently used netscape functions: Navigation Buttons – Back (return
to the previous document), Forward (go to the next document), Home (go to your Home
Page). Page Buttons – Reload (reloads the current page), Print (print the current page) and
Stop (stop the current download/page animations). The window pane below the Shortcut
Buttons indicates the location and name of the current web page.
When printing from netscape, select A4 paper and Greyscale print
The netscape icon
indicates whether netscape is currently downloading information –
when animated, information is being download. An indication of how the current download
is progressing is given by the Indicator Bar at the bottom left of the netscape window.
(However a web page with graphics requires several downloads before it is complete, so the
Indicator Bar is not as useful as it seems.)
Interactive help, in the form of a brief description of the Shortcut Button that the mouse
pointer is currently over, appears at the bottom of the browser window and a pop-up after
a delay of a few seconds. For hyperlinks in a web page, the name of the HTML file to be
loaded if clicked appears at the bottom of the browser window, and during long downloads
the current transfer rate and an estimate of the time remaining.
62
7.1.1
Configuring Netscape
When you first receive your Unix account, most of the configuration required by netscape
will have already been done by the System Administrator. Items can be changed by
clicking on the Edit → Preferences Menu Buttons. Most of the common user-configurable
items are listed below, unless you know what you are doing please do not change any of
the other items.
• Appearance to change the default startup mode for netscape (browser, email reader,
USENET reader or webpage editor).
• Navigator to specify the start page for the browser and your Home Page location.
• Mail & Newsgroups (Identity) to specify your email name, email address and other personal
information.
• Mail & Newsgroups (Mail Servers) to specify the location of your email folders.
• Mail & Newsgroups (Newsgroup Servers) to specify where posted newgroup items are kept
and your newsgroup server (localnews.mcc.ac.uk).
• Mail & Newsgroups (Copies and Folders) allows you to specify how to treat outgoing email
and newsgroup messages.
• Mail & Newsgroups (Disk Space) allows you to configure the automatic “garbage collection”.
• Advanced How to deal with webpages with java and javascript, and how to treat “cookies”.
• Advanced (Proxies) You need to have Automatic proxy configuration selected with Configuration location http://wwwconfig.man.ac.uk/config.pac.
If you make any changes, you should restart netscape to ensure that your changes have
taken effect.
7.1.2
Setting Up your own Web Page
One of the facilities that comes with your Unix account is the ability to create your own
web page. A very basic web page can be setup in a matter of minutes. However it is
quite easy to spend weeks designing an all singing-and-dancing web page, so do not get
discouraged when looking at other people’s pages.
There are three stages to creating a web page:
1. Create the directory public html in your home directory.
63
2. Set the access permissions (§3.2) on your home directory to 711 and on public html
to 755 if you want people to be able to access pages that are not linked (directly or
indirectly) from your home page, otherwise set the directory permissions to 711.
3. Create your Home Page file that must be called index.html – in its simplest form
this could be just a plain text file.
Congratulations, anybody can now access your Home Page at the location
http://www.maths.man.ac.uk/~username
The content of personal web pages is subject to approval by the Department
7.1.3
Creating HTML Webpages
The most basic webpage is simply a text file that can be created using a text editor (§5.1).
However more elaborate webpages can include different fonts, tables, pictures, animations,
movie and sound files. Other than using a text editor to write raw HTML code, there are
three ways of creating webpages:
latex2html (Linux only) The simplest way of creating a webpage that contains mathematical formulae is to create a LATEX file (§5.6) for the webpage and then use the command
latex2html to create an equivalent “webpage”; actually latex2html creates a subdirectory that contains several files that correspond to the webpage.
netscape Netscape (§7.1) as well as being a HTML browser includes a HTML editor (Netscape
Composer). This editor allows you to create “almost” WYSIWYG webpages in a
similar manner to a word processing package.
bluefish (Linux only) bluefish is a dedicated HTML editor for linux. bluefish has a Button
Bar for selecting a range of common HTML effects (similar to a word processing
package), however the “output” is not displayed in a WYSIWYG screen but as the
raw HTML code. When a webpage has been completed, it can be previewed in a
WYSIWYG window - the Netscape web browser.
7.2
USENET Newsgroups
In addition to the millions of web pages that are accessible on the WWW, there are
also several thousand discussion groups (newgroups) that are devoted to particular topics.
64
Anyone can read items posted to a newsgroup and, in most cases, post items to a newsgroup
themselves. However some newsgroups are moderated which means that any items posted to
them, before they actually appear in the newsgroup, have to be approved by the newsgroup
moderator. (The purpose of this is to ensure that only relevant items appear in the
newsgroup.) Whilst most newsgroups are unmoderated, you should still only post relevant
items to them.
7.2.1
emacs Net News
One of the many facilities provided by emacs is a text-based news reader. It can be accessed
from the emacs Button Bar via the Tools Button or by typing <Alt-x>gnus. When in news
mode, the emacs Button Bar looks like
The Misc Button gives access to general newsgroup commands, for posting articles, checking
for new articles and new newsgroups. The Groups Button provides access to commands for
manipulating newsgroups and the Group Button provides commands for reading a specific
newsgroup. Extensive help on using the emacs news reader is available by consulting the
info pages on the topic gnus.
7.2.2
netscape News
netscape news is the most sophisticated of the news readers available. Unlike the other
news readers, it is MIME-aware which means that if a news article contains a mimeencoded image, then the image is automatically displayed in the news reader window. The
netscape news reader can be selected as the default netscape window, alternatively it can
be opened by clicking on the Communicator Button and then clicking the Newsgroups
Button which open up the Message Center window.
The netscape news reader window is very similar to the netscape email window (§6.1.5)
with the Menu Buttons providing similar commands:
65
In addition to the left-hand window displaying your mail folders, it also contains a list of
the currently subscribed to newsgroups along with the number of unread news articles.
The top right window lists the news articles in the currently selected newsgroup. Apart
from the
Button for composing and posting news articles, additional commands are
available from the Options Button for selecting which newsgroups are displayed and which
news articles are displayed. As with the netscape email window, the mail window can be
re-arranged by dragging
buttons and the section headings.
66
8
Miscellaneous
8.1
Accessing Remote Machines
A “remote machine” is any machine other than the one you are currently sat at: It can be
the Unix machine on the table opposite you, or a machine on the other side of the world
– the methods of accessing them are exactly the same. There are several commands for
logging on to a remote machine, telnet (§8.1.1), rlogin/slogin (§8.1.2) and rsh/ssh
(§8.1.3). (The main use of rsh is to run a single command on a remote machine, however
if no command is given then the rsh command is equivalent to the rlogin command.)
The telnet, rlogin and slogin commands provide virtually the same facilities except
that
For security reasons, some sites only allow slogin connections
because slogin encrypts both your username and password when you log on and encrypts
your network traffic after logging on.
After logging on to a remote machine, it is possible to run programs and have them open
their X-windows on your local machine if the necessary security permissions have been set.
When you first log on to a Unix machine, only programs run on the local machine can open
X-windows on the desktop. This prevents other users’ programs opening their X-windows
on your desktop, and helps to prevent you from accidentally opening your X-windows on
remote machines.
Before logging on to a remote machine, victoria say, it is necessary to allow victoria access
to your desktop using the xhost command,
vummath/snoopy> xhost + victoria
victoria being added to access control list
The xhost command with no arguments displays a list of all machines that have access to
your desktop. A machine does not need to have a name in order to be given access to the
desktop, for example, xhost + 124.76.45.77. Every machine can be given access to the
desktop using the command xhost +, and machines can have their access revoked using
the command
vummath/snoopy> xhost - radau
67
radau being removed from access control list
After logging on to victoria, the DISPLAY environment variable must be set to the name
(or IP address) of the machine that you are sat in front. For example, if you are running
eXceed on the Windows 98 PC salmon to connect to vummath and then rlogin to victoria,
you would need to run the command
setenv DISPLAY salmon:0
To log on to Unix machines within the Department, use the Remote Machines menu
8.1.1
telnet
The most common method of logging on to remote machines is telnet, which is available
on both MS-DOS/Windows PCs and Unix machines. In order to use telnet, you must
know either the IP address or full name of the machine that you want to log on, for example,
130.88.16.53 or vummath.ma.man.ac.uk in the case of vummath. It is then sufficient to use
the command
telnet 130.88.16.53
Once the connection has been made, you will be prompted for your username on the remote
machine and your remote password (which is not displayed as it is typed). After logging
on, you can run programs in the xterm window as you would on a local xterm window.
However, if you want to run X-window programs or to display a large amount of data, you
are recommended to log on using rlogin as telnet has a habit of unpredictably closing
connections in the above circumstances. You can logout and close the connection by using
the exit command, as you would with any xterm window.
telnet is insecure, your username and password can be seen by
anyone monitoring the network
8.1.2
rlogin/slogin – (Secure) Remote Login
The rlogin and slogin commands provide a better way of logging on to a remote machine
than telnet. rlogin has slightly better security than telnet, whilst being more reliable
68
and supporting trusted machines and .rhosts files (§8.1.4). However when you logon to a
machine using rlogin, your username and password are sent as plain text, and someone
who is monitoring the network could view them. slogin is very similar to rlogin except
all network traffic is encrypted (and compressed), thus making it the most secure way of
logging onto machines outside the Department.
When logging on from outside the Department, always use slogin if it is available.
You can log on to a remote machine using your current username with the command
rlogin remote machine
or
rlogin -l username remote machine
if your username on the remote machine is different, and entering your remote password.
If the remote machine is a trusted machine (§8.1.4), then you can log on to it without
specifying a username or entering a password. Alternatively, if the remote machine is not
a trusted machine or you use a different username on a trusted machine, then you can install
an .rhosts file on the remote machine (§8.1.4).
By default, the slogin command uses SSH version 1 that is less secure than version 2. To
use SSH version 2 (Linux only) use the -2 flag; however if the machine that you are logging
into only supports SSH version 1, you will get an error message similar to, for example,
vummath/snoopy> slogin -2 vummath
Protocol major versions differ: 2 vs. 1
Similarly some servers only allow SSH version 2 connections because of the improved
security.
8.1.3
rsh/ssh – (Secure) Remote Shell
The rsh and ssh commands can be used to run commands on a remote machine, and if
no command is specified then you are rlogin-ed (slogin-ed) onto the machine instead.
rsh (ssh) is very similar to the rlogin (slogin) command, except that a Unix command
is also included, for example,
69
vummath/snoopy> uname -n
vummath
vummath/snoopy> rsh victoria uname -n
victoria
If the remote machine is a trusted machine then no username or password is required.
rsh/ssh cannot be used to run interactive commands on remote machines
8.1.4
Trusted Machines and .rhosts Files
Usually when you log on to another machine, you must enter your username and password
for that machine. In a cluster of Unix machines where a username always corresponds to
the same person, this can be somewhat tedious. A solution to this problem is to have a
list of trusted machines on each machine, so that if you try to log on using rlogin (§8.1.2)
or to start a remote shell using rsh from a trusted machine, then you are automatically
granted access. (Note that both slogin and ssh still require a password to be entered –
this is part of the “extra” security of the SSH protocol.) All the public Unix machines
within the Department are trusted machines, so that it is possible to log on to them using
the Remote Machines menu (§2.2.3) or the rlogin command. For example,
vummath/snoopy> whoami
snoopy
vummath/snoopy> rlogin victoria
victoria/snoopy> whoami
snoopy
victoria/snoopy> rlogin clare.mcc.ac.uk
Password:
clare/snoopy> whoami
snoopy
Note that because victoria is a trusted machine it is not necessary to enter a password to
log on as user snoopy, but because clare.mcc.ac.uk is not a trusted machine a password is
required.
Although the remote machine clare.mcc.ac.uk is not a trusted machine, it is still possible
to log on with username snoopy without entering a password by having an .rhosts file on
the remote machine. An .rhosts file contains a list of usernames and full machine names
70
(vummath.ma.man.ac.uk rather than vummath) corresponding to users who can rlogin and
rsh onto the remote machine as that user without entering a password. For example, if
user snoopy has an .rhosts file in his home directory on clare containing
bill victoria.ma.man.ac.uk
then user bill can use the rlogin command on victoria to log on to clare as user snoopy
without needing a password.
For security reasons, the file permissions of .rhosts files should be 600
8.2
Compressing/Uncompressing and Manipulating Files
The purpose of compressing files is self-evident, compressed files generally take up less disk
space – there is typically a 90%+ saving for PostScript files – and can be transferred more
quickly (either by ftp or by inclusion in an email). However in order to transfer files by
email successfully, the files themselves must not contain any non-alphanumeric characters.
This means that binary files must be converted into ASCII files prior to emailing and
converted back once they have been received (§8.2.2). Additionally, if a large number of
files are to be transferred or archived, it is useful to be able to join all the files into a single
file (§8.2.3).
8.2.1
Compressing & Decompressing Files
Unix supports several types of file compression: bzip2 (.bz2 files), gzip (.gz files),
compress (.Z files) and zip (.zip files) – pack and compact are no longer supported as
they are a lot less efficient than gzip and zip. (Actually zip creates compressed archives
(§8.2.3).)
• compress and uncompress
compress is less efficient than gzip producing larger compressed files. Also it can only be
used to compress files – it cannot be used to compress (the contents of) directories. Files
that are compressed using compress are given the file extension .Z and can be restored
using the uncompress command. The uncompressed contents of a compress-ed file can be
viewed using the zcat command and searched using the zgrep command.
71
• gzip, gunzip and gzexe
gzip was the most efficient file compression software available on Unix. gzip supports
a number of flags, the most important one being -r for compressing the contents of a
directory. Files that are compressed using gzip have the file extension .gz and can be
restored using the gunzip command. gunzip can also be used to restore files that were
compressed using compress and pack. The uncompressed contents of a gzip-ped file can
be viewed using the zcat command and searched using the zgrep command.
The command gzexe compresses an executable file and creates a self-uncompressing executable file. Whilst this approach is useful if disk space is short, the resulting executable
file will execute more slowly than the original file and, in some cases, may fail to work
properly.
• bzip2
bzip2 is currently the most efficient file compression software available. Unlike gzip, bzip2
does not support the recursive compression of directories and their contents. The most
commonly used flag is -t to test the integrity of a compressed file. bunzip2 and bzcat
decompresses and displays the contents of bzip2-ed files, respectively.
8.2.2
Converting & Unconverting Binary Files to Text Files
If you wish to send files that contain non-alphanumeric characters by email, then it is
necessary to convert them to ASCII files. This is because some email routers do not
support 8 bit characters, and so binary files usually get severely corrupted in transmission.
Some email software automatically encodes attached files – elm, pine and netscape mail –
but others do not, Unix mail and emacs RMAIL. Email software that does automatically
encode attached files encodes them as MIME files, and when an email containing a MIME
file is received the file is automatically decoded by MIME-aware mail programs. However
if you use Unix mail or emacs RMAIL, then you have to encode the files manually and
decode them manually (after saving them to a file). It is not recommended to send manually
encoded MIME files by email because additional information is required to enable email
software to recognize them as being MIME files.
• uuencode and uudecode
In order to successfully send binary files by email using either Unix mail or emacs RMAIL,
it is necessary to convert them to text files. This is done using the uuencode command,
72
for example,
uuencode filename file > filename.uue
where filename is the file to be encoded, file is the name of the file created when the
file is uudecoded, and filename.uue is the uuencoded file – the .uue is the standard file
extension for denoting a uuencoded file. (uuencoded files are always 35% larger than the
original binary files.) The file filename.uue is now suitable for sending via email.
If you receive an email that contains a uuencoded file, then it is necessary to uudecode it
manually (even if you are using a MIME-aware email program). This is achieved by saving
the entire email to a file, editing the file so that the first line looks like
begin 600 guide.dvi
– guide.dvi is the name of the file that will be created when the file is uudecoded – and
then decoding it using the command
uudecode filename.uue
Note that the uudecoded file has the same file permissions as the original file, for example,
600 in the example above.
• mimencode (and mimedecode)
MIME-aware email programs automatically encode attached files for sending and decode files for viewing. They do not use uuencode but a more efficient approach called
mimencode and include additional information about the file. Thus, although it is possible
to mimencode files manually for sending by email, they will not be automatically decoded
by MIME-aware email programs. The main use of the mimencode command is to decode
MIME-encoded files when you do not have access to (or use) a MIME-aware email program.
Having received an email that contains a MIME-encoded file, first save the message to a
file, mimetest, say. Next edit the file so that the first line looks similar to
9wIBg5LAHDsAAAAAA+gbIFRlWCBvdXRwdXQgMTk5OC4wOS4xNTowODUziwAAAAEAAAAAAAAA
(a line of unintelligible ASCII characters) and resave it. Finally, to obtain the original file,
use the command
mimencode -u mimetest > peanuts.dvi
73
to create the file peanuts.dvi. You can determine what sort of file has been sent by
looking at the additional MIME header information in the original email.
MIME emails can contain multiple files, each of which must be extracted separately.
8.2.3
Archiving & Dearchiving Files
Whilst it is possible to transfer (and email) individual files, this can be very tedious if
there are many files. Additionally, if the file permissions are significant or the files belong
in different (sub)directories, reconstructing the original file structure can be a nightmare!
The solution to this problem is to archive the files – store them in a single file that retains
the file permissions and directory structure – and then transfer (or email) this file. Although
Unix has only one “native” archive format, it also supports several of the different archive
formats found in the PC world.
• tar
The Unix tar command has numerous flags (see the info page), but for most use only
three sets are needed. The tar command is the standard method of creating Unix archives,
tar archives usually have a .tar file extension (or .taz if it has been compressed and
.tgz if it has been gzipped).
The flags used for creating an archive are cvpf, where c stands for create, v for verbose (list
the files being archived), p for preserve (retain the file/directory access permissions/times)
and f for file (create a file archive). Thus, for example,
tar cvpf games.tar spider xtetris
creates the file archive games.tar containing spider and xtetris which can be either files
or directories (and their contents).
Having created or received a tar file, you can obtain a detailed list of its contents using
the flags tvpf:
vummath/snoopy> tar tvpf games.tar
-rwxr-xr-x root/root
64192 1998-09-15 11:20 spider
-rwxr-xr-x root/root
25792 1998-09-15 11:20 xtetris
74
(The t flag stands for test, because the above command tests the archive for errors.)
Once you have viewed the contents of an archive, they can be extracted using the flags
xvfp (x for extract). The whole archive or individual directories and files can be extracted.
Newer versions of the tar command support the z flag which can be used for creating and
testing compressed tar files (.tgz files), and extracting files from a compressed tar file.
• zip and unzip (Linux only)
The zip command can be used for creating compressed archives that are compatible with
the DOS program PKZIP. These archives usually have the file extension .zip and can
be unzipped using the unzip command. A list of the flags for both commands can be
obtained by entering the relevant command with no arguments.
• zoo
Another compressed archive format, primarily associated with the PC world, is the ZOO
format (with file extension .zoo). The detailed contents of a ZOO archive can be displayed
using the command
zoo -t file.zoo
or extracted using the flag -x.
8.3
Improving System Performance
There are several ways in which a program can be made to run faster, other than optimizing
the executable code. The methods rely on making the best use of the available facilities,
as well as understanding how Unix works.
The available memory on each Unix machine is made up of “real” physical memory (memory chips) and virtual memory (disk space). Data transfer rates for physical memory vary
from 266Mb/sec for DDR memory to 100Mb/sec for SDRAM memory, whereas transfer
rates for virtual memory are in the region of 2Mb/sec to 5.5Mb/sec. Thus a program
that does not use virtual memory when running can run between 19 and 133 times faster.
Although it may not be possible to reduce the amount of memory required by a program to run, it is possible to choose the machine with the largest amount of free memory
(§8.3.2,§8.5) – although the speed of the machine and its current load (§8.3.1) should also
be taken into account when choosing a machine for running a large program.
75
The data transfer rate for virtual memory is the speed at which data can be written and
read from the local hard disk. However users’ filestore is located on a fileserver, so that
the data transfer rate is considerably less, between 850Kb/sec and 1.2Mb/sec. When a
file is saved to a user’s filestore, it is written in chunks: After each chunk is sent to the
fileserver, the sending machine waits for confirmation from the fileserver that the data
has been successfully written before sending the next chunk. Thus the data transfer rate
is highly dependent on the level of network traffic. However each Unix machine has a
directory called /tmp on the local disk that is writable by everybody.
Programs that read or write large quantities of data usually run considerably
faster when run from the /tmp directory
8.3.1
Determining the System Load
Unix is a multi-tasking computing environment which means that many user programs
can be running on the same machine at the same time. Therefore, before running a large
program, it is useful to choose a machine with a low load and lots of memory. The load
on a machine can be discovered using the command uptime, for example,
vummath/snoopy> uptime
10:29am up 11:41, 4 users, load average: 2.23, 0.92, 0.34
The load average (from left to right) gives the load on the machine over the past minute,
5 minutes and 15 minutes, respectively. A load of 1.00 means that the machine is already
running at 100% CPU utilization. More detailed information about machine usage can be
obtained using the command w.
The load averages of all the linux machines can be found using the rup command
8.3.2
Determining the Available Free Memory
Perhaps the most important factor that determines how fast a program runs, other than
the CPU speed, is the amount of available memory. When running in real memory, a
program may run at full speed, but if virtual memory is used then a program can run at
less than 5% of full speed. Thus, when deciding which machine to run your program on,
it is useful to know how much free memory is available on each machine. (Whilst Linux
76
provides precise figures on memory usage, it is necessary to approximate memory usage
figures for other Unix machines.) The amount of free real memory, swap space (virtual
memory) used and total swap space available can be found using the command freemem.
For example,
vummath/snoopy> freemem
141564k memory free, 0k swap used, 3124520k swap free
So long as the amount of free memory is quite large and the amount of swap used is small,
any programs that are running are most likely to be using real memory.
8.3.3
Finding and Killing Rogue Programs
The main factors affecting the speed at which programs run are the CPU and the amount
of free real memory available. Whilst it is not possible to change the CPU or add more
memory to a machine, it is possible to ensure that no programs are running that should
really be killed. (Typically these programs are netscape and GhostScript gs which have
been incorrectly closed down, or suspended programs.) A detailed list of programs running
on a machine and who owns them can be obtained using the command ps axu, for example,
vummath/snoopy> ps axu
USER
PID %CPU %MEM
SIZE
RSS TTY STAT START
TIME COMMAND
snoopy
66
0.0
0.1
1124
64
?
S
09:25
0:00 sh /usr/X11R6/lib/X11/
snoopy
78
0.0
0.4
2148
304
?
S
09:25
0:00 xconsole -geometry 500
snoopy
79
0.3
4.3
4952
2744
?
S
09:25
1:21 emacs -geometry 81x50-
snoopy
86
0.0
1.2
2344
784
?
S
09:25
0:02 twm
945 98.4
1.2
2680
1464
?
R
11:06 346:02 gs photo.ps
snoopy
snoopy
1102
0.0 42.3 29376 26806
?
T
15:49
0:23 f77 -c archi.f
snoopy
1152
0.0
0.5
872
372
p1 R
16:56
0:00 ps axu
root
1
0.0
0.1
844
64
?
S
09:24
0:08 init
root
9
0.0
0.0
820
44
?
S
09:24
0:20 /sbin/update
root
.
.
.
10
.
.
.
0.0
.
.
.
0.0
.
.
.
832
.
.
.
40
.
.
.
?
.
.
.
S
.
.
.
09:24
.
.
.
0:00 /sbin/kerneld
.
.
.
.
.
.
The most important information above is USER (the process owner), PID (the Process ID
number), %CPU (how much CPU power a process is consuming), %MEM (how much real memory a process is consuming), STAT (the status of a process – Running, Sleeping, Terminated,
77
Zombie), START (the date/time the process started), TIME (the total CPU time used) and
COMMAND (a description of the process). You can kill a process using the command kill
(PID), although in some cases it may be necessary to kill -9 a process.
Only the process owner or the System Administrator can kill a process
Generally the processes to look out for are those that have been Running for a long time
and are owned by normal users (not root), and processes that have been Terminated
and were started a long time ago. For example, the current time (as indicated by the
ps command) is 16:56: Thus the f77 command was started over an hour ago and was
Terminated (suspended) and probably forgotten about – and is using almost 43% of the
real memory! Also, the gs (GhostScript) command has been running at almost full speed
(98.4%) for almost 6 hours, and people do not usually spend 6 hours viewing a PostScript
file.
Thus if the machine you are using “feels” slow and there are some processes running on
it that are suspicious, you may want to email either the process owner or the System
Administrator.
8.3.4
Running Remote X-Window Applications
The ability to logon to remote machines and run programs as if you were sat in front of
them is one of the great strengths of Unix. The most common reason for doing this is if
the software that you wish to use is not installed on the machine that you are using, for
example, maple that is only available on the linux machines.
However, running X-window applications across the network can severely degrade the performance of the whole Unix system, especially if the program generates a lot of network
traffic due to frequent screen updates, for example, programs like netscape, xdvi and gs
(ghostview). Thus if the program that you want to run is installed on the local machine,
then run it on the local machine as this generates no X-window network traffic. That is to
say,
Run gimp, gs, maple, mathematica, matlab, netscape, tecplot, uniras, xdvi,
xfig locally where possible
78
8.4
PC and Novell-Related Programs (Linux only)
One of the disadvantages of Unix is that there is very little support for DOS and, consequently, access to Novell fileservers. Although Linux provides good facilities for transferring
files between Unix and DOS and for manipulating DOS disks (§3.4.2), this falls far short
of having an actual MS-DOS PC. However Linux also includes a PC emulator that runs
MS-DOS (version 6.22) and is almost as good as having an MS-DOS PC.
8.4.1
xdos – The PC Emulator
xdos is a PC emulator running in an X-window. On startup, xdos opens an X-window
on the desktop and boots the version of MS-DOS that is contained on the virtual DOS
disk – actually a very large file located on the local Linux machine. Although it is possible
to have more than one xdos program running at the same time, this is not recommended
because it can lead to corruption of the DOS disk if it is written to by more than one
of the xdos programs. The virtual DOS disk is publically readable, so do not store any
personal or confidential information on it – it may be accessed as drive C using the mtools
commands (§3.4.2). Any printing from within DOS is sent to the default Unix printer (for
the xterm window from which xdos was started).
It is possible to run most DOS software using xdos: xdos can also be used to logon to
Novell fileservers, as you would normally do from a PC, using the DOS command
net novell fileserver
where the default fileserver is UK-AC-MAN-MA-FS2. You will then be prompted for your
Novell username and Novell password as usual. Once successfully logged on, you can read
email using Pegasus mail and run most Novell commands that you would normally be able
to run.
xdos should be closed down by typing quit in the DOS window
8.4.2
Miscellaneous Novell Commands
Although it is possible to logon to Novell fileservers using xdos and run most Novell
commands, information about Novell fileservers can also be obtained and modified in a
different way. Most of the following commands requires a Novell username and password
to be specified:
79
nwfsinfo -S server -i
nwfstime -S server
nwpasswd -S server
nwuserlist -S server [-a]
nwvolinfo -S server [-v volume]
slist
8.5
Print detailed information about server
Print fileserver date and time
Change your Novell password
List current fileserver connections [with address]
Print information on Netware volume
List available Novell fileservers
The Public Linux Machines
Below is a list of the public access and postgraduate office Linux machines within the
Mathematics Department. This list does not include machines that have restricted access,
for example, machines belonging to members of staff or non-linux machines. If a machine
does not appear on the list below, then most likely you should not be trying to use it10 .
Location
Name
18-04 cluster breezy, frosty, hazy, elm, laurel, maple, misty, snowy, sunny, toasty
7-04 cluster beech, cedar, cloudy, conifer, pine, spruce, sycamore, willow, windy
2-12 cluster alpha, beta, chi, delta, epsilon, eta, gamma, iota, kappa, lambda, mu
omega, phi, psi, rho, sigma, tau, theta, xi, zeta
PG offices ash, dogwood, hawthorn, hickory, hornbeam, kelvin, leylandii, newton
palm, poplar, redwood, stewartson, teak
Table 17: Table of Public Access and Postgraduate Office Linux Machines
The specification of each linux machine can be discovered using the command pcinfo, for
example,
alpha/snoopy> pcinfo
alpha:1400MHz AMD Athlon(tm) processor, load 0.00, mem 474Mb free (511Mb), swap 2047Mb
alpha/snoopy> pcinfo beech
beech:350MHz Pentium II (Deschutes), load 0.00, mem 217Mb free (255Mb), swap 1027Mb
The load figure corresponds to the average CPU load over the last 5 minutes and the swap
figure to the size of the configured swap space.
pcinfo cluster lists the information for every public linux machine
An indication of the speed of each processor in Mflops11 is given below:
10
11
The obvious exceptions are the two Solaris machines, victoria and vummath.
Figures are for finding the singular value decomposition of a random 200x200 matrix using Matlab 5.3.
80
CPU
Mflops
350MHz Pentium II
800MHz Athlon
8.6
73
144
CPU
Mflops
400MHz Pentium II
1200MHz Athlon
86
173
CPU
450MHz Pentium III
1400MHz Athlon
Mflops
89
246
Customizing Your X-Windows Environment
*** Users customizing their X-windows do so at their own risk ***
There are three ways of customizing your X-windows environment:
1. The simplest and safest method is to install an .Xresources file in your home directory to change the default settings of X-windows applications (§8.6.1).
2. If you wish to change the default layout of the screen, the appearance of X-windows
(for example, the layout of the Title Bar) or the items on the menu buttons and
you are using the default window manager, you can install your own .xsession and
.twmrc files in your home directory (§8.6.2).
3. On linux there is a choice of six different window managers, some of which offer a
huge improvement over the default window manager (§8.6.3). The default window
manager is twm, because this is the only one available on vummath (when accessed
using eXceed software on a Windows PC). Even if you change your linux window
manager, you will still get the default window manager (twm) when you logon to
vummath using eXceed.
8.6.1
The .Xresources File
The .Xresources file can be used to change the default settings of most X-window programs, from the size and colour of the fonts used in windows to the default size and background colour of the windows themselves. Lists of the available colours and window fonts
can be obtained using the command showrgb and xlsfonts, respectively. For example,
xterm -fg BlueViolet -bg PeachPuff -font 9x15bold &
starts an xterm window with an orange background and a large purple font.
The most common entries in the .Xresources file change the default fontsizes of the xterm
and emacs windows. For example,
81
XTerm*Font:
9x15
emacs*Font:
9x15
emacs*Geometry:
80x40
emacs*Foreground:
Yellow
emacs*Background:
Black
8.6.2
The .xsession and .twmrc Files
The default .xsession and .twmrc files (on Linux machines) are /etc/X11/xdm/xsession
and /etc/X11/twm/system.twmrc, respectively. To customize the windows environment of
the default window manager, you should copy these files to your home directory renaming
them to .xsession and .twmrc, respectively – note that the .xsession file must be
executable. The .xsession file selects the default window manager and what programs
are run when you login (§2.4). The .twmrc file specifies the default behaviour of the twm
window manager, including the contents of the pop-up menus (§2.2.1,§2.2.2,§2.2.3), the
appearance of windows (§2.3) and their behaviour, etc.
8.6.3
Changing your Window Manager (Linux only)
All you need to do to change your window manager is to create a file called .wm style in
your home directory containing one of the following words:
afterstep A window manager that has a NEXTSTEP look and feel;
gnome An original Linux window manager;
wmaker Another NeXT-like window manager;
fvwm95 A 3D-look window manager with a Windows 95-type interface;
mwm Another 3D-look window manager but with a Motif windows interface.
If you have problems logging on after customizing your setup, simply telnet to
vummath and delete the .wm style file to return to the default setup
8.6.4
Changing your Desktop Background
The colour of the default desktop is grey, however almost any picture can be used as the
desktop background by using the command
82
xv -quit -root mypicture.jpg,
for example. If the picture is smaller than the desktop, then it is automatically tiled to
fill the desktop. Alternatively the picture can be magnified to fill the desktop by adding
the -max flag or, retaining the correct aspect ratio, the -maxpect flag. (There are some
picture files on the linux machines in /usr/share/pixmaps/backgrounds.)
83
9
Frequently Asked Questions
1. When I logon X-windows, the login screen disappears and then quickly reappears.
This problem generally indicates that you have exceeded your disk quota (§3.3). The
solution is to login to your Unix account from a text terminal (obtained by pressing
<Ctrl-Alt-F1>) and delete a few files – if you are not using the default window
manager (§8.6.3), you should also check that your .wm-style file is OK. You can
return to the login screen by pressing <Ctrl-Alt-F7>.
2. When I print a PostScript (PDF) file, although the file appears in the printer queue,
it does not print out.
Some PostScript files include postscript commands that are not recognised by the
printers, and this can result in only part (or none) of a file being printed. Try using
the command print2ps to print a troublesome PostScript or PDF file to your default
printer.
3. When using the netscape browser, my entire window freezes.
When there is a (temporary) problem with the web-cache, netscape can (temporarily) lock-up the X-window session until the problem resolves itself. There are several
solutions to this problem, (i) logon to the machine from a text terminal (see 1. above)
and kill -9 the netscape program (§8.3.3), logout and then return to X-windows.
(ii) Press <Ctrl-Alt-Backspace> to restart X-windows (thus logging you out). (iii)
If the keyboard is not responding, try logging onto the machine from another linux
machine and then kill -9 the netscape program (§8.3.3).
4. netscape cannot connect to websites outside the University.
When netscape terminates abnormally, it sometimes resets your preferences file to
the default setup. Consult §7.1.1 on how to restore the Automatic proxy configuration
setting.
5. When I run my Fortran code it aborts with an error; however if I compile my code
with debugging information, the code runs normally.
This problem generally indicates a bug in the code optimization of the compiler. If
this is the case, then the problem should also disappear if you compile your code
with optimization switched off.
84
6. Does the Department have an anonymous ftp upload site?
Yes, anyone can ftp to vummath as user ftp and upload files into the directory
pub/incoming. However only local users can list and copy the files that have been
uploaded into the directory /home/ftp/pub/incoming.
7. How can I redirect my email to a different address?
Create a file called .forward in your home directory containing your new email
address and give it access permissions 644. (The .forward file can contain multiple
comma-separated addresses, so that you can set it up to copy incoming email to a
different address.)
8. How can I include greek letters in PostScript graphics when the graphics software
that I use does not support greek letters?
You need to use the pstricks package that is part of the LATEX distribution.
9. How do I get rid of the b M characters in my text file?
The bM characters typically indicate that a text file originated on MS-DOS. They
can be removed using the (linux) command dos2unix – see the man page for more
information.
85