1
SIERRA VIDEO
Aspen 7272 HD/SDI 3G Routing Switcher
Models: 7272HD-3G
User’s Manual
ASPEN 7272 HD/SDI 3G ROUTING SWITCHER
User’s Manual
Sierra Video
P.O. Box 2462 Grass Valley, CA 95945
Tel: (530) 478-1000
Fax: (530) 478-1105
Email: info@sierravideo.com
Version 1.0
Publication Date: June 2012
The information contained in this manual is subject to change by Sierra Video
Regulatory Warnings & Safety Information
The information in the following section provides important warnings and safety guidelines for
both the operator and service personnel. Specific warnings and cautions may be found
throughout this manual. Please read and follow the important safety precautions noting especially
those instructions relating to risk of fire, electrical shock and injury to persons.
Any instructions in this manual that require opening the equipment cover or enclosure are
intended for use by qualified service personnel only. To reduce the risk of electrical shock, do not
perform any servicing other than what is contained in the operating instructions unless you are
qualified.
Warnings
Heed all warnings on the unit and in the operating instructions.
Disconnect AC power before installing or removing device or servicing unit.
Do not use this product in or near water.
This product is grounded through the grounding conductor of the power cord.
To avoid electrical shock, plug the power cord into a properly wired receptacle
before connecting inputs or outputs.
Route power cords and other cables so that they are not likely to be damaged, or
create a hazard.
Dangerous voltages exist at several points in this product. To avoid personal
injury, do not touch unsafe connections and components when the power is on.
Have qualified personnel perform safety checks after any completed service.
To reduce risk of electrical shock, be certain to plug each power supply cord
into a separate branch circuit employing a separate service ground.
If equipped with redundant power, this unit has two power cords. To reduce the
risk of electrical shock, disconnect both power cords before servicing.
Operate only with covers and enclosure panels in place – Do Not operate this
product when covers or enclosure panels are removed.
This is an FCC class A product. In a domestic environment, this product may
cause radio interference, in which case the user may be required to take
necessary measures.
Use the proper AC voltage to supply power to the switcher. When installing
equipment, do not attach the power cord to building surfaces.
Cautions
SIERRA VIDEO
Cautions (continued)
Use only the recommended interconnect cables to connect the switcher to other
frames.
Follow static precautions at all times when handling the equipment.
Power this product only as described in the installation section of this manual.
Leave the sides of the frame clear for air convection cooling and to allow room
for cabling. Slot and openings in the frame are provided for ventilation and
should not be blocked.
Only an authorized Sierra Video technician should service the switchers. Any
user who makes changes or modifications to the unit without the expressed
approval of Sierra Video will void the warranty.
If installed in a closed or multi-unit rack assembly, the operating ambient
temperature of the rack environment may be greater than the room ambient
temperature. Therefore, consideration should be given to installing the
equipment in an environment compatible with the manufacturer’s maximum
rated ambient temperature (TMRA).
Installation of the equipment in a rack should be such that the amount of air flow
required for safe operation of the equipment is not compromised.
Other connections between peripherals of this equipment may be made with low
voltage non-shielded computer data cables.
Network connections may consist of non-shielded CAT 5 cable.
Do not cover chassis ventilation slots or block enclosure openings.
FCC Notice
This equipment has been tested and found to comply with the limits for a Class A digital device, pursuant
to Part 15 of the FCC rules. These limits are designed to provide reasonable protection against harmful
interference when the equipment is operated in a commercial environment. This equipment generates,
uses, and can radiate radio frequency energy and, if not installed and used in accordance with the
instruction manual, may cause harmful interference to radio communications. Operation of this equipment
in a residential area is likely to cause harmful interference in which case the user will be required to
correct the interference at the expense of the user.
The user may find the following publication prepared by the Federal Communications Commission
helpful:
“How to Identify and Resolve Radio-TV Interference Problems” (Stock number 004-000-00345-4).
Available exclusively from the Superintendent of Documents, Government Printing Office,
Washington, DC 20402 (telephone 202 512-1800).
Warning
Changes or modifications not expressly approved by the party responsible for compliance to Part 15 of
the FCC Rules could void the user’s authority to operate the equipment.
SIERRA VIDEO
Power Supply Cords
Use only power cord(s) supplied with the unit.
If power cord(s) were not supplied with the unit, select as follows:
For units installed in the USA and Canada: select a flexible, three-conductor power cord that is
UL listed and CSA certified, with individual conductor wire size of #18 AWG, and a maximum
length of 4.5 meters. The power cord terminations should be NEMA Type 5-15P (three-prong
earthing) at one end and IEC appliance inlet coupler at the other end. Any of the following types
of power cords are acceptable; SV, SVE, SVO, SVT, SVTO, SVTOO, S, SE, SO, SOO, ST, STO,
STOO, SJ, SJE, SJO, SJOO, SJT, SJTOO, SP-3, G, W.
For units installed in all other countries; select only a flexible, three-conductor power cord,
approved by the cognizant safety organization of your country. The power cord must be Type
HAR (Harmonized), with individual conductor wire size of 0.75 mm². The power cord terminations
should be a suitably rated earthing-type plug at one end and IEC appliance inlet coupler at the
other end. Both of the power cord terminations must carry the certification label (mark) of the
cognizant safety organization of your country.
A non-shielded power cord may be used to connect AC power to every component and peripheral
of the system.
Connect an external 16 AWG or larger wire from earth ground to the chassis of the system as
designated by the earth ground symbol.
North American Power Supply Cords
This equipment is supplied with North American power cords with molded grounded plug (NEMA15P) at one end and molded grounding connector (IEC 320-C13) at the other end. Conductors
are CEE color coded, light blue(neutral), brown(line), and green/yellow(ground). Operation of the
equipment at voltages exceeding 130VAC will require power supply cords that comply with NEMA
configurations.
International Power Supply Cords
If shipped outside North America, this equipment is supplied with molded ground connector (IEC
320-C13) at one end and stripped connectors (50/5mm) at the other end. Connections are CEE
color coded, light blue (neutral), brown(line), and green/yellow(ground). Other IEC 320-C13 type
power cords can be used if they comply with safety regulations of the country in which they are
installed.
EMC Regulatory Notices
Federal Communications Commission (FCC) Part 15 Information: This device complies with Part
15 of the FCC standard rules. Operation is subject to the following conditions:
This device may not cause harmful interference
This device must accept any interference received including interference that may cause
undesirable operations.
Delivery Damage Inspection
Carefully inspect the frame and exterior components to be sure that there has been no shipping
damage.
Table of
Contents
Overview
Aspen 7272 HD/SDI 3G
Introduction
Model Suffix Designations
Model 7272 HD-3G
1 1
1
1
2
Installation
Introduction
Rack Mounting
Dimensions
Connecting To Video Devices
Connecting Peripherals
Reference Connector
AC Power Connections
3 3
3
3
4
4
5
5 Configuration
Ethernet Setup
Change Network Parameters
Change Serial Port Settings
Mode
Names
Salvos
Overview
Salvo Setup
Advanced
System Information
Inputs
Input Equalizers
Output Reclockers
Reference Settings
Reference Formats
Layers
Multi-Frame Systems
Dual Link Mode
GUI Panel
Alerts
Changing Password
Software Updates
Factory Defaults
7 7
9
10
10
11
12
12
12
13
13
14
14
16
18
19
20
21
22
24
26
27
28
29
Operation
Introduction
Web Page
Button Colors
Switching the Routing switcher
V and A Buttons
Destination based Switching
Break-away Switching
Destination based Status
Source based Switching
Source based Status
Salvo
Control via 9-pin Connectors
Control via Ethernet
31 31
31
31
32
32
32
32
32
33
33
33
34
34 HOST Protocol
Introduction
Command Summary
Commonly Used Switching Commands
35 35 37 42 Troubleshooting
Front Panel Error Indications
Power and Indicators
Video Signal
Control
Switching Malfunctions
Technical Support
43 43
44
45
46
46
46
Specifications
47 Warranty
49 Contents - 1
SIERRA VIDEO
1
Chapter
Overview
Aspen 7272 HD/SDI 3G
Introduction
The Sierra Video Aspen 7272 HD-3G routing switchers are compact units offering digital
video boards that work with SDI video SMPTE 259M-C, HD SMPTE 292M, and 3G
SMPTE 424M. These unique routing switchers can also route DVB-ASI signals.
Remote control is available using an RS-232/422 serial interface or an Ethernet port.
This manual covers the Aspen 7272 HD/SDI routing switcher. The 7272 HD/SDI system
accommodates, audio follow video (AFV), or breakaway (split) routing.
Model Suffix Designations
Model Suffix Designations
7272
Routing Switcher size
HD
Multi-format HD/SDI Digital Video
1
SIERRA VIDEO
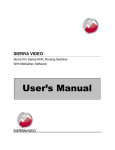
Model 7272 HD-3G
Frame Front Panel
Frame Back Panel
Side
2
SIERRA VIDEO
2
Chapter
Installation
Introduction
Installation procedures are similar for all frames covered under this manual. Exceptions, if
any, have been noted in each of the following paragraphs.
Rack Mounting
Carefully inspect the frame to ensure that there has been no shipping damage. Make
sure all shipping material is removed from the routing switcher frame.
The routing switcher described in this manual can be rack mounted in a standard 19"
(RU) EIA rack assembly and includes rack "ears" at the ends of the front of the frames. It
does not require spacing above or below the unit for ventilation.
To rack mount any of the routing switchers, simply place the unit's rack ears against the
rack rails of the rack, and insert proper rack screws through each of the holes in the rack
ears. Always rack mount the routing switcher prior to plugging the unit into a power
receptacle or attaching any cables.
CAUTION!
The operating temperature range of this product is 0 to 40ºC. Do not exceed the maximum (40ºC)
or minimum (0ºC) operating temperature.
If installed in a closed or multi-rack assembly, the operating ambient temperature of the rack
environment may be greater than the room ambient temperature. Therefore, consideration should
be given to installing the equipment in an environment compatible with the manufacturer’s
maximum rated ambient temperature.
Installation of the equipment in a rack should be such that the amount of air flow to the sides of
the routing switcher required for safe operation of the equipment is not compromised.
Dimensions
Aspen 7272 Series HD-3G Routing switcher frame is 4 rack units high, 19” wide, and 2.5” deep.
3
SIERRA VIDEO
Connecting To Video Devices
Video sources and output devices (such as monitors, or recorders) may be connected to
the routing switchers through the BNC type connectors located on the back of the unit.
Keep in mind that the output signal format will be that of the input signal format.
To ensure the highest quality of video routing and switching, special attention should be
observed to cables and connectors.
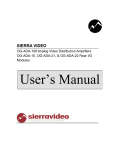
Connecting Peripherals
Control panels, video reference inputs, and power are all connected to the rear of the
frame. The peripherals area may vary depending on the model size and type.
RS-232/422
Control connector
Looping Video
Referencing
Inputs
Primary Power
Connection
Redundant Power
Connection
(Optional)
4
10/100 Base T
Ethernet Connector
ASPEN HD/SDI 3G ROUTING SWITCHER
Reference Connector
There are 4 BNC connectors labeled "VID REF1" and “VID REF 2”. These are "looping"
inputs for SMPTE analog video referencing. Connect composite, or tri-level sync to either
BNC. If desired, use the second BNC to loop the signal to another device. If the loop is
not used, terminate the second BNC with 75 ohms.
If a video reference signal is connected and the router is configured to use redundant
references, the routing switcher, will cause all switching to occur during the vertical
interval of the reference per SMPTE RP-168 and the supported video format standards
shown on page 19. If no reference signal is available or the router is configured for “no
references”, the routing switcher will switch at a random point rather than during the
vertical interval of the reference signal.
AC Power Connections
Aspen routing switchers offer optional redundant power supplies. The redundant power
supply must be ordered seperately. The power supplies have universal AC inputs
100VAC- 240VAC. Voltage selection is not necessary because the power supply senses
the correct AC input automatically.
The primary and optional redundant power supplies are external AC to DC converters.
Connect an external 16 AWG or larger wire from earth ground to the chassis of the
system as designated by the earth ground symbol.
CAUTION!
Only an authorized Sierra Video technician can service the switchers. Any user who
makes changes or modifications to the unit without the expressed approval of the
manufacturer will void the warranty
Use the proper AC voltage to supply power to the switcher.
Use only the factory provided AC-DC desktop power supply to supply power to the
switcher.
Use only the recommended interconnect cables to connect the switcher to other frames.
5
SIERRA VIDEO
3
Chapter
Configuration
Ethernet Setup
Default IP settings;
IP Address- 192.168.1.200
Subnet mask- 255.255.255.0
Gateway IP Address- 0.0.0.0
To configure the IP port, the routing switcher must first be connected to your PC. This
can be done by connecting cable to your PC and the routing switcher directly, or the
routing switcher may be added to your existing network. The routing switcher defaults to
an IP address of 192.168.1.200 which will not conflict with other devices in most systems.
If there is an IP address conflict, direct connection must be used to configure the routing
switchers Ethernet port. Once your PC and the routing switcher are on the same Ethernet
network, open your internet browser and type in the default address of the routing
switcher in the address line of the internet browser.
This will open a web page generated by the routing switcher. Routing switcher
information is displayed on this page.
7
SIERRA VIDEO
Note:
The “Operate” tab is discussed in Chapter 4 “Operation”.
You must login to set or modify Routing switcher parameters. To login, select the login button.
Enter the password and select “Login”.
Note:
The factory default password is “password”. To change the password see the section “Changing
Password” at the end of this chapter.
After a successful login, you will be provided with additional tabs as shown below.
The “refresh” button will re-read the current settings in the routing switcher.
8
ASPEN HD/SDI 3G ROUTING SWITCHER
Change Network Parameters
To make changes to the network communications (i.e. IP address), select the “Network”
tab.
The “refresh” button will re-read the current settings in the routing switcher.
Make any changes necessary and press “Save” to implement changes.
Note:
Changing any parameters in this window will cause your browser to lose communication with the
routing switcher. You must enter the new IP address in your browser to re-establish
communications.
Routing switcher need not be reset for changes to take effect.
DHCP is not supported.
9
SIERRA VIDEO
Change Serial Port Settings
To make changes to the serial port settings (i.e. Baud Rate), select the “Serial” tab.
The “refresh” button will re-read the current settings in the routing switcher.
Make any changes necessary and press “Save” to implement changes.
Note:
Routing switcher must be reset for changes to take effect. You will be prompted to reset the
routing switcher. If you do not reset the routing switcher at this time you must remember to do so
later by removing and re-applying the power.
*When controlling an external routing switcher via the 9-pin serial connection, a “null
modem” cable will probably be required. Check the pin-out on both devices to verify the
cable needed.
Mode
The serial port has two mode settings, “Master” and “Slave”. In the “Master” mode the
serial port is used to control external devices (layers). In the “Slave” mode the routing
switcher can be controlled via the serial port by an external device (i.e. automation) and
set to respond to either Sierra Video or Kramer 2000 protocol.
10
ASPEN HD/SDI 3G ROUTING SWITCHER
Names
To change names of the routing switcher, any of the sources, destinations, or layers,
select the “Names” tab.
Click on the cell you want to change and type in a new name.
Make any changes necessary and press “Save” to implement changes.
Note:
The routing switcher’s name is limited to 20 characters, other names are limited to 8 characters.
11
SIERRA VIDEO
Salvos
Overview
A Salvo is a list of crosspoint switches that are saved in the routing switcher and switched
by a single “Salvo Take” command or from a salvo button on the front panel.
Up to 72 Salvos are stored in the routing switcher.
To make and name salvos, select the “Salvo” tab.
Salvo Setup
To program a salvo, select a salvo number from the dropdown list. This number is the
input button number, on the front panel, where the salvo will be stored and fired.
Enter a name (not required).
Enter the desired Input/Output combinations.
Select an “Action” (“Take” switches the selected level and “Take All” switches all levels).
Click on the “Add Above” or “Add Below” button (“Add Above will put the entry one step
above the highlighted step and “Add Below will put the entry one step below the
highlighted step).
Salvo has a maximum of 72 steps/actions.
The “refresh” button will re-read the current salvo in the routing switcher.
Make any changes necessary and press “Save Salvo” to program the Salvo.
12
ASPEN HD/SDI 3G ROUTING SWITCHER
Advanced
The “Advanced” tab allows access to “engineering” settings such as input EQ, output
reclockers, routing switcher expansion, etc.
Clicking on the bars on the lefthand side of the screen gives access to adjustments and
status.
System Information
The “System Information” tab provides an overview of the system status and current
configuration settings of the routing switcher.
13
SIERRA VIDEO
Inputs
Select “Inputs” for access to cable equalizer adjustments and input signal status.
This screen will status input signal presence and signal type.
Input Equalizers
To set or change a single input equalizer, enter the input number, select the equalizer
mode from the drop down menu and press “Apply to Input”.
To set or change all input equalizers, select the equalizer mode and press “Apply to All
Inputs”.
The factory recommended mode is “ON”
14
ASPEN HD/SDI 3G ROUTING SWITCHER
If a valid input signal is detected, it will be indicated as “Present”.
The “Rate” column indicates the signal type detected at the input.
If the input is missing, the rate will be “Unknown”.
Note:
If the signals you are connecting to the Aspen routing switcher inputs have a bit rate < 125Mbps,
you may want to set the Equalizer mode to Bypass if you find you have bit errors in the video.
This should not be a requirement for most low bit-rate signals.
Warning!
Changes to this screen could effect operation of the routing switcher.
15
SIERRA VIDEO
Output Reclockers
Select “Output Reclockers” for access to reclocker adjustments and status.
This screen will report the reclocker status and allow you to set the reclocker mode.
To set the reclocker mode of a single output, enter the output number, select the
reclocker mode from the dropdown list and press “Apply to Output”.
To set the reclocker mode of all outputs, select the reclocker mode from the dropdown list
and press “Apply to All Outputs”.
There are five states for the Reclocking Mode;
16
Auto- Factory recommended mode
Bypass
HD (1.5G)
SD
3G
ASPEN HD/SDI 3G ROUTING SWITCHER
The “Reclocker State” column indicates if the output reclockers are locked. When locked it will
specify if it is SD, HD, or 3G.
Warning!
Changes to this screen could effect operation of the routing switcher.
17
SIERRA VIDEO
Reference Settings
This screen is for reporting status and setting the video reference input parameters
allowing the video to switch at the correct point for “seamless” switching per SMPTE RP168. If no reference signal is available or the “Redundant References” box is not
checked, the routing switcher will switch at a random point rather than during the correct
line (vertical interval) of the SDI input signal.
Selecting “Auto based on reference”, the reference input will automatically be detected
and the routing switcher will switch based on the signal type applied to the reference
input.
Selecting “Manual” allows you to manually select the video format of the signals passing
through the routing switcher.
18
ASPEN HD/SDI 3G ROUTING SWITCHER
Reference Formats
Video Reference
NTSC (59.94Hz)
PAL (50 Hz)
1080i@59.94Hz
(Tri-Level Sync)
1080i@50Hz
(Tri-Level Sync)
720p@59.94Hz
(Tri-Level Sync)
720p@50Hz
(Tri-Level Sync)
1080p@59.94Hz
(Tri-Level Sync)
1080p@50Hz
(Tri-Level Sync)
Supported
video formats
SD@59.94Hz
1080i@59.94Hz
720p@59.94Hz
1080p@59.94Hz
SD@50Hz
1080i@50Hz
720p@50Hz
1080p@50Hz
SD@59.94Hz
1080i@59.94Hz
720p@59.94Hz
1080p@59.94Hz
SD@50Hz
1080i@50Hz
720p@50Hz
1080p@50Hz
720p@59.94Hz
1080p@59.94Hz
720p@50Hz
1080p@50Hz
720p@59.94Hz
1080p@59.94Hz
720p@50Hz
1080p@50Hz
Comments
SD-SDI at 59.94Hz frame rate per SMPTE 259M-C (270Mbps)
HD-SDI @1080i5994
HD-SDI @720p5994
3G-SDI @1080p5994
SD-SDI at 50Hz frame rate per SMPTE 259M-C (270Mbps)
HD-SDI @1080i50
HD-SDI @ 720p50
3G-SDI @1080p50
SD-SDI at 59.94Hz frame rate per SMPTE 259M-C (270Mbps)
HD-SDI @1080i5994
HD-SDI @720p5994
3G-SDI @1080p5994
SD-SDI at 50Hz frame rate per SMPTE 259M-C (270Mbps)
HD-SDI @1080i50
HD-SDI @ 720p50
3G-SDI @1080p50
HD-SDI @ 720p5994
3G-SDI @1080p5994
HD-SDI @ 720p50
3G-SDI @1080p50
HD-SDI @ 720p5994
3G-SDI @1080p5994
HD-SDI @ 720p50
3G-SDI @1080p50
Note: In the table above, the default video format for each reference is marked in bold.
19
SIERRA VIDEO
Layers
The “Layers” screen is used for adding external devices (Layers) to the existing routing
switcher.
The “refresh” button will re-read the current settings in the routing switcher.
Make any changes necessary and press “Save” to implement changes.
20
ASPEN HD/SDI 3G ROUTING SWITCHER
Enter the number of external layers you want to add and press “Apply”.
Select the correct layer type from the dropdown list.
The “Video/Audio” selection determines whether the “A” or “V” button on the front panel
will control the level.
Note:
To control external layers via serial the routing switcher must be set to “Master” mode (see
“Serial” tab).
When controlling an external routing switcher via the 9-pin serial connection, a “null
modem” cable will probably be required. Check the pin-out on both devices to verify the
cable needed.
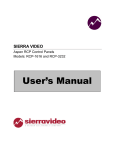
Multi-Frame Systems
When controlling an external routing switcher via the 9-pin serial connection, a “null
modem” cable will probably be required. Check the pin-out on both devices to verify the
cable needed.The null-modem cable is not supplied.
In the example below, the Aspen is connected to a Lassen routing switcher. In this case a
null-model cable is needed. The null-modem cable is not supplied.
Aspem 1616HD 3G
RS-232
9-Pin Null-Modem Cable
(Not Supplied)
Lassen 1616S
(Stereo Analog Audio)
RS-232
21
SIERRA VIDEO
Dual Link Mode
To set the routing switcher in the Dual Link mode, place a check in the “Dual Link Mode”
box.
When the Aspen 7272 is set in the dual link mode, it becomes a 36x36 with 2 BNC
connectors per input and output.
BNC connectors for input and outputs in the dual link mode are as follows;
Input Button #s
Input Connector #s
1
1-2
2
3-4
3
5-6
4
7-8
5
9-10
6
11-12
7
13-14
8
15-16
9
17-18
10
19-20
11
21-22
12
23-24
13
25-26
14
27-28
15
29-30
16
31-32
17
33-34
18
35-36
19
37-38
20
39-40
21
41-42
22
43-44
23
45-46
24
47-48
25
49-50
26
51-52
27
53-54
28
55-56
29
57-58
30
59-60
31
61-62
32
63-64
33
65-66
34
67-68
35
69-70
36
71-72
22
ASPEN HD/SDI 3G ROUTING SWITCHER
Output Button #s
1
2
3
4
5
6
7
8
9
10
11
12
13
14
15
16
17
18
19
20
21
22
23
24
25
26
27
28
29
30
31
32
33
34
35
36
Output Connector #s
1-2
3-4
5-6
7-8
9-10
11-12
13-14
15-16
17-18
19-20
21-22
23-24
25-26
27-28
29-30
31-32
33-34
35-36
37-38
39-40
41-42
43-44
45-46
47-48
49-50
51-52
53-54
55-56
57-58
59-60
61-62
63-64
65-66
67-68
69-70
71-72
23
SIERRA VIDEO
GUI Panel
The GUI Panel is the switching panel that appears when the “Operate” tab is selected (see
operation details in the next chapter).
The GUI switching panel can be enabled or disabled by placing a check in the box or not.
Status polling time can also be set on this page.
24
ASPEN HD/SDI 3G ROUTING SWITCHER
The GUI switching panel can be set for “Auto Take” mode. In the “Auto Take” mode, the routing
switcher switches as soon a destination and source are selected (or a source and destination are
selected if “Enable Source Based Switching” is selected (see below).
Source based switching allows for a source to be selected first followed by selecting a
destination.
The factory default setting is the destination is selected first followed by selecting a source (box
unchecked).
25
SIERRA VIDEO
Alerts
The front panel has 3 LEDs labeled PS 1, PS 2, and Alarm.
The PS 1 and PS 2 LEDs are green when power is present and off when not present.
The RED Alarm LED has 4 states;
Off
On
Slow Blink- 2 seconds on and 2 seconds off.
Fast Blink- ½ second on and ½ second off.
In normal operation, the alarm LED will be off if no error conditions are present. If there is an error
condition, the LED will be on or blinking. See the troubleshooting section of this manual for a
definition of error conditions.
Note:
If you do not have redundant power supplies, make sure the “Either Power Supply is Missing” box
is not checked
26
ASPEN HD/SDI 3G ROUTING SWITCHER
Changing Password
To change the password, or if you forgot your password, select “reset it” from the login
screen.
Enter the new password, serial number of the unit and press “Save”.
The password can also be changed from the “Advanced” tab (without entering the serial
number).
27
SIERRA VIDEO
Software Updates
From time to time software upgrades may be available from Sierra Video. Check our web
site sierravideo.com for available downloads, or contact the factory.
Place the software update file on your computer and select browse to locate the file.
Press “Update Software” and progress status will display.
Note:
The routing switcher will reset to complete the update.
28
ASPEN HD/SDI 3G ROUTING SWITCHER
Factory Defaults
This screen allows you to reset the routing switcher to the factory default settings.
All routing switcher parameters are reset including the IP address.
CAUTION!
If you restore factory defaults, you will lose all configuration changes that you have made.
29
SIERRA VIDEO
4
Chapter
Operation
Introduction
The purpose of a routing switcher is to switch any of the inputs (sources) to any of the
outputs (destinations). Any input can be connected to any or all outputs but each output
can only be connected to a single input. Control remains the most important component
of your new system. The web page control panel empowers full control of the routing
switcher. External control is also available via the Ethernet or serial port.
Web Page
The Aspen family of routing switchers can be switched using the built-in web pages.
Note:
If audio is not present, the “Audio” button will be “greyed out”.
Button Colors
Take button will be blinking RED when enabled. Otherwise, it will be off.
The FUNC button will be YELLOW in base operation.
The LOCK button will be RED when the panel is locked.Otherwise, it will be off.
The V (video levels) button will be GREEN when selected. Otherwise, it will be
off.
The A (audio levels) button will be BLUE when selected. Otherwise, it will be off.
31
SIERRA VIDEO
Switching the Routing switcher
V and A Buttons
V (Video levels) button will enable the video level(s) to switch.
A (Audio levels) button will enable the Audio level(s) to switch.
In normal operation with at least one audio level configured:
• The V button will be on by default.
The A button will be on by default.
• The V and A buttons will toggle on/off when pressed.
In normal operation with no audio level configured:
• The V button will remain on and will not respond to any selection of this button.
• The A button will remain off and will not respond to any selection of this button.
Destination based Switching
1. Select an output
2. Select (enable level) to be switched by toggling the “A” and “V” button.- see above
3. Select an input (In auto take mode, the switch will occur immediately.)
4. If auto take mode is not enabled the “Take” button will blink RED- press take to initiate
the switch.
Break-away Switching
After selecting an output the “A” and “V” buttons may light indicating that both audio and
video are preset to switch. Pressing the “A” or “V” button toggles the button on and off.
On= enabled, Off= disabled. If video is only to be switched, press the “A” button turning it
off so that only the video will switch.
Note:
If audio is not present, the “Audio” button will be “greyed out”.
Destination based Status
When an output is selected, the input currently connected to that output will light. When
video and audio(if available) are routed from the same source then only that source
button lamp will be lit.
Selected output button will be GREEN.
Input button colors:
CYAN to indicate video and audio.
GREEN to indicate video only.
BLUE to indicate audio only.
When a crosspoint switch is initiated from a point of control other than the local
pushbutton interface, AND it involves the currently selected destination, THEN the source
button tallies will be updated automatically.
32
ASPEN HD/SDI 3G ROUTING SWITCHER
Source based Switching
1. Select an input
2. Select (enable level) to be switched by toggling the “A” and “V” button.
3. Select an output (. In auto take mode, the switch will occur immediately)
4. If auto take mode is not enabled the “Take” button will blink RED- press take to initiate
the switch, or you can select additional outputs to preset takes for multiple outputs to the
same selected source. In the latter case all selected outputs will be switched to the
selected source when take is pressed.
Source based Status
When an input is selected, the output(s) currently connected to that input will light.
Selected input button will be GREEN.
Output button colors:
CYAN to indicate video and audio.
GREEN to indicate video only.
BLUE to indicate audio only.
Salvo
Salvos are programmed via the web page (see the Salvo Setup Section).
To fire a Salvo;
Select the FUNC button. The button turns YELLOW
Select the SALVO button. This button will illuminate BLUE.
Buttons One (1) to Thirty-Two (32) in the INPUT section illuminate BLUE to
indicate the registers available for choice. Only buttons that are stored as a salvo
registers are illuminated.
Select any of the illuminated buttons. The selected button will blink CYAN.
The TAKE button begins to blink red
Select TAKE
• The salvo is executed
• The FUNC button turns off
• The front panel returns to normal operation mode
33
SIERRA VIDEO
Control via 9-pin Connectors
The 9-pin connector allows you to control the routing switcher via an external computer
master router, or other controlling device. The serial port can be changed internally for
RS422 configuration (RS232 @ 9600 baud is factory configuration).
The routing switcher has one port labeled on the back panel as “RS232/422” (refer also
to the illustrations of back panel shown in Chapter 1):
Connection to the RS-232/422 port is made using a standard 9 pin (pin to pin) cable.
Pin
RS-232
RS-422
1
Not Used
Ground
2
Transmit
Transmit (-)
3
Receive
Receive (+)
4
Not used
Not used
5
Ground
Not used
6
Not used
Not used
7
Not used
Transmit (+)
8
Not Used
Receive (-)
9
Not Used
Ground
NOTE:
To convert the 9-pin connector to an RS422 serial port see the serial setup section.
Control via Ethernet
The crosspoints in the routing switcher may be controlled via Ethernet using the Host
Protocol. To control the routing switcher, establish a TCP/IP connection to the IP
address of the routing switcher using port number 10001. A communications program
such as telnet can be used to establish this connection. Once the connection is
established, sending the command **!! should cause the routing switcher to return ** OK
!!. This connection supports the entire Sierra Video Host protocol command set
supported by this model.
34
SIERRA VIDEO
5
Chapter
HOST Protocol
Introduction
This section of this manual contains the most common Host Protocol commands. For a more
detailed list of Protocol commands contact the Sierra Video factory.
The protocol uses the 7-bit ASCII character set. The protocol is compact, with few characters
required to cause switch changes to occur. It is also human-readable and thus easy to
understand and use.
All input, output, and level numbers begin at number 1, not 0.
Note:
When writing commands for a “third party” controller, pay careful attention to the levels of control.
Commands are sent to a routing switcher in a group called a command string.
A command string consists of a leader string of asterisk characters (**), zero, or more
commands, and a trailer string of exclamation marks (!!).
When a command string is received, it is not acted upon until the final trailer character (!) of the
command string is received.
Within the command string, certain ASCII characters may be present and are ignored: any ASCII
character whose code is less than the SPACE character (includes all control characters and the
SPACE character) and the DEL (ASCII 7F) character. Alphabetic characters within the command
string may be in either upper-case or lower-case letters. The routing switcher always sends upper
case characters, except for character strings such as input, output, and level names, which may
have lower case characters in them.
When sending commands to the routing switcher, SPACE characters are optional. SPACES may
also appear in character strings, such as input, output, and level names.
Certain commands have character strings that appear as arguments and use a ~ (tilda) character
to delimit the character strings. The use of the tilda varies and will be defined in the individual
commands.
After the command string has been executed, the routing switcher sends the following to the host.
**OK!!
This indicates that the command has executed successfully.
35
SIERRA VIDEO
The simplest possible command string would be:**!! which consists of the leader and trailer
characters. This command string would generate the response:
** OK !!
This can be useful for verifying that the communication to the routing switcher is operational.
If an error occurs within a command string, the remainder of the command string is ignored and
the routing switcher returns the string “ ERROR ", followed by an optional descriptive string
followed by a string of trailer characters, to the host.
The simplest error response is one with no optional descriptive string. For example, this
command string:
** XXX !!
might generate this response from the routing switcher:
** ERROR Syntax: No Number:XX !!
36
ASPEN HD/SDI 3G ROUTING SWITCHER
Command Summary
The following is the set of commands available for sending to the routing switcher.
Syntax
Example
Description
I
I
Capabilities Inquiry
Q
Q
Model Name and Software Version
Inquiry
L
L
Routing Switcher Size and Level
Names Inquiry
N
N
O
O5
Output Status inquiry
S
S
Status inquiry
U {0 1}
U0
Update request on/off
V
out,in,in…
V3,1,2,2
Connect levels
X out,in,lvl
X12,9,2
Connect crosspoint
Y out,in
Y1,7
Connect AFV
T {1-16}
T1
Trigger a Salvo Connect sequence
G
G
SRC_NAMES,1,0~
The command “G” is used to query or
modify a routing switcher configuration
parameter or parameters.
Source Status
“RESET”: Routing switcher Reset
When the routing switcher is powered up, the following will be sent on the serial port.
**RESET!!
“I”: Capabilities Inquiry
The command "I" requests that command capability information be returned to the host. The
information is sent as a string of characters. The first characters are a space followed by "I",
the next characters are the letters of the commands that are implemented and available in
this routing switcher, and the last character is "~" (tilde). Do not count on the characters being
in any specific order. Search all characters for a particular one.
For example, the command:
**I!!
might return the following string:
** ILSX~ OK !!
indicating that the routing switcher supports the I, L, S, and X commands from the host.
37
SIERRA VIDEO
“Q”: Model Name and Software Version Inquiry
The command "Q" requests that the routing switcher model name and software version
number string be returned to the host. The information is sent as a string of characters. The
first characters are a space followed by "Q", the next characters are the routing switcher
model name, terminated by a "~" (tilde). Following this are the characters of the software
version number string, again terminated by a "~" (tilde).
For example, the command:
**Q!!
might return the following string:
** QSmall~V2.1~ OK !!<CR>
indicating that the routing switcher model name is "Small" and the software version number is
"V2.1".
“L”: Routing Switcher Size and Level Names Inquiry
The command "L" requests that routing switcher size and level name information be returned
to the host. The information is sent as a string of characters. The first characters are a space
followed by "L", some optional values described below, then the number of outputs, a
comma, the number of levels, a comma, the number of inputs, a comma, and then the level
names, each terminated by a "~" (tilde), and the last followed by two tildes.
For example, the command:
**L!!
might return the following string:
** L64,3,32,VIDEO~AudioL~AudioR~~ OK !!
indicating that the routing switcher has 64 outputs, 3 levels, and 32 inputs, and the levels are
named "VIDEO", "Audio L", and "Audio R".
“N”: Source Status Inquiry
The command "N" requests that status information for a single source be returned to the host.
The status information is sent as one or more "Y" and/or "X" commands.
For example, the command:
**N4!!
to a router might have the following commands as its response:
** X12,4,1 X12,4,2 X12,4,3 X13,4,4 Y23,4 !!
showing that source 4 connects to
38
destination 12 on levels 1-3,
destination 13 on level 4, and
destination 23 on all levels.
ASPEN HD/SDI 3G ROUTING SWITCHER
“O”: Output Status Inquiry
The command "O" requests that the status information for a single output be returned to the
host. The status information is sent as a “Y” command or a “V” command or as a sequence of
L “X” commands, where L=number of levels.
For example, the command:
**O5!!
to a 3-level routing switcher might have the following three commands as its response:
** X65,23,1 X5,-,2 X5,0,3 !!
Note the dash, indicating that on level 2, output 65 is not connected to an input. Also note the
0, indicating that the connection on level 3 is either unknown or that output 65 doesn’t exist or
isn’t mapped on level 3.
Or, a 3-level routing switcher might have the following single command as its response:
** V65,23,-,0 !!
which has the same information as the three X commands in the previous example.
If the routing switcher has only one level, or if all levels are connected the same, the routing
switcher might instead use the Y command. For example:
** Y65,23 !!
“S”: Status Inquiry
Use command “S” to request that status information be returned to the host. The status
information is sent as a series of strings.
For example, the command:
**S!!
might have the following two strings at the beginning of its response:
**V1, 12!!
**V2, 2!!
This indicates that output 1 is connected to input 12 on level 1, and that output 2 is connected
to input 2 on level 1.
“U”: Update Request on/off
The command "U" turns on or off the automatic sending of output change reports. The current
mode can be queried with the command ** U !!. To change the setting, the command letter
must be followed by either a number 0,1 or 2 to specify the new automatic change report
state, as follows:
0: Automatic output change reporting is turned off.
1: Automatic output change reporting is turned on. Crosspoint change commands do not
immediately report changed status, but instead, the report comes up to a few seconds after
the crosspoint change command is received. The Aspen will send X commands when
crosspoints change.
2: Automatic output change reporting is turned on, and crosspoint change commands
immediately report changed status as part of the response to the command. The Aspen will
send X commands when crosspoints change.
39
SIERRA VIDEO
3: Same as mode 1 except the Aspen will send V commands when crosspoints change.
4: Same as mode 2 except the Aspen will send V commands when crosspoints change.
Output change reports are automatic messages sent to the host whenever an output is
crosspoint status (i.e. connected source) is changed.
For example, the command:
**U1!!
turns on automatic output change reporting. When a crosspoint is changed, the “X” command
will be sent to report the change. For example:
** X5,12,2 !!
indicating that output 5 is now connected to input 17 on level 1, to input 12 on level 2, and
does not exist or is not available on level 3.
To turn off output change reporting, use the command:
**U0!!
For example, suppose the routing switcher sends the following crosspoint connect
commands in a single command sequence:
** Y1,18!!
If U1 is in effect, the response to this command will be:
** OK !!
and then sometime later, the crosspoint change report will be sent
** X1,18 !!
“V”: Connect Levels
The command "V" is used to request that a connection be made. It must be followed by an
output number, a comma, and a comma-separated list of input numbers, one for each level.
Fewer than the number of levels in the routing switchermay be specified if desired, and the
remaining levels will be left unchanged.
For example, the command:
**V12,7,8,9!!
says that connections are to be made to output 12: from input 7 on level 1, input 8 on level 2,
and input 9 on level 3.
An input number of 0 means the output connection is to be left unchanged.
An input number of *-* (dash) means the output is to be disconnected. If the routing switcher
does not support disconnected outputs, the output connection will be left unchanged.
“X”: Connect Crosspoint
Use command X to request that a connection be made. It must be followed by an output
number, a comma, an input number, a comma, and a level number. For example:
**X8, 3, 2!!
This string says that a connection is to be made between output 8 and input 3 on level 2. If
the level number is specified as “0”, this means that the connection is to be made on all levels
(AFV).
40
ASPEN HD/SDI 3G ROUTING SWITCHER
“Y”: Connect AFV
Use command Y to request that a connection be made on all levels (AFV). It must be
followed by an output number, a comma, and an input number.
For example, the command:
**Y2, 8!!
This string says that input 8 is to be connected to output 2 on all levels.
“T”: Trigger a Salvo
The command "T" is used to trigger a previously set up salvo. It must be followed by a
register number from 1 to 32 giving the register to be triggered.
For example, the command:
** T2 !!
says to trigger salvo register 2.
If a salvo is triggered and it fails for some reason, the salvo trigger operation is aborted, and
an error is reported:
For example:
“ERROR Salvo Has Locked Xpts”.
“G” Command
Details of the “G” command can be found on our website or by contacting the factory.
41
SIERRA VIDEO
Commonly Used Switching Commands
This section contains the most commonly used switching commands. These commands are
explained in detail in the proceeding.
“Y” Command- All Levels
The “Y” command switches all levels (i.e. video and audio).
For example;
**Y2,8!!
This requests that input 8 be connected to output 2 on all levels.
“X” Command- Specify Levels
Using the “X” command requires that a level is specified.
For example;
**X8, 3, 2!!
This requests that a connection is to be made between output 8 and input 3 on level 2. If a
level number of “0” is used, all levels are switched.
“V” Command- Connect Levels
The “V” command is followed by an output number, a comma, and an input number for each
level, up to the number of levels on the routing switcher.
For example;
**V12, 7, 8, 9!!
This requests that connections are to be made to output 12 from input 7 on level 1, input 8 on
level 2, and input 9 on level 3.
42
SIERRA VIDEO
6
Chapter
Troubleshooting
Front Panel Error Indications
Alarm LED Error Conditions
For these errors list below, the error LED will be on or blinking if any one of these errors
is present. The error
LED will be off only if none of these error conditions are present.
Blinking
This is a serious problem with the router where it cannot operate properly.
To resolve the issue:
1.
2.
3.
4.
Connect to the unit via your web browser to determine the issue.
If you cannot connect via your web browser, power cycle the unit.
If you still cannot connect via your web browser, reset the unit to factory defaults.
If you still cannot connect via your web browser and the LED is still blinking, contact
customer service.
Other Errors
For these errors, the error LED will be on (not blinking) if any one of these errors is
present.
The conditions that the software can look for are listed below.
Power Supply Status
There are two options for Power Supply status (settable on the web page):
1. Turn on the error LED if either power supply is missing
2. Ignore power supply status
Reference Status
There are three options for Reference status (settable on the web page):
1. Turn on the error LED if either reference is missing
2. Turn on the error LED if both references are missing
3. Ignore references
Network Error
There are two options (settable on the web page):
1. Turn on the error LED if there is a network error
2. Ignore network errors
The conditions that will trigger a network error are:
No network connected
Invalid IP address in the router
43
SIERRA VIDEO
Fan Status
The software will turn on the error LED if the fan stops.
Temperature Status
The software will turn on the error LED if any internal temperature sensor within the unit
goes above a safe operating temperature.
NOTES:
If the output signal is disturbed or interrupted by electromagnetic interference, the signal
should return and stabilize when the interference ends. If not, disconnect the AC power
cord and reconnect it again to reset the switcher.
If the following recommended actions still do not result in satisfactory operation, please
consult your Sierra Video Dealer.
Power and Indicators
Problem
No power
44
Remedy
Confirm that power connections are secured at the switcher and at
the receptacle. Make sure the receptacle is active, with the proper
mains voltage.
ASPEN HD/SDI 3G ROUTING SWITCHER
Video Signal
Problem
No video at the
output device,
regardless of input
selected.
. Routing switcher
takes are not
“seamless”
switching
Remedy
Confirm that your source and destination devices are powered on and
connected properly. Video signals connected to the routing switcher
should have a video supported format supported by your video monitor
or other destination connected to the routing switcher output.
Confirm that any other switchers in the signal path have the proper input
and/or output selected.
Use a Video Tester to test the video path leading to/from your Routing
Switcher.
Verify that the video reference is terminated with a 75 ohm impedance.
Verify that the video reference is only terminated one time, and that the
termination is at the last piece of equipment in the video reference loop
thru chain.
Confirm that the connecting cables are of high quality and not damaged.
Ensure you have selected the correct, supported SDI format for the
video reference you have connected to the routing switcher.
Check that your video signal matches the SDI format you have selected
to provide “seamless” switching with the video reference format you
have connected to the routing switcher.
Check that the video reference is the format you have selected for
“seamless” switching.
Verify that “no references” is NOT checked on the advanced, reference
page of the webpage.
Check that the SDI sources connected to the routing switcher inputs are
vertically locked to the video reference connected to the routing switcher.
45
SIERRA VIDEO
Control
Problem
Remedy
No control of
Routing Switcher
from PC software
Confirm the correct wiring of the connecting cable. Be sure to use a
standard one to one 9 pin serial cable.
Confirm that the baud rate of your computer COM port is set to the same
as that of your Routing Switcher (9600-Baud factory default). Confirm
that the proper COM port is selected in the control software.
Use a terminal emulator program to send **!! commands and check for
**OK!! response.
If you do not receive **OK!!, the problem is with the switcher.
Switching Malfunctions
Problem
The switcher
succeeds in
switching a number
of sources then
fails to switch one.
Remedy
Malfunction in the particular source or cable assembly.
NOTE:
The most common failure mode in transferring the signal of an audio source
is a break in the connecting wire.
Disconnect the source from a channel that is switching successfully
and connect the suspect source to it. If the channel continues to switch
successfully, then there is something wrong with the Routing Switcher
or the suspect source was not connected properly. If it does not
continue to switch successfully, then there is something wrong with the
source or cable assembly.
Technical Support
Sierra Video has made every effort to insure that your unit has been fully tested and is configured
to your order specifications. If problems arise that can not be resolved, please contact the Sierra
Video technical support department.
Sierra Video factory- (530) 478-1000
Email- service@sierravideo.com
46
SIERRA VIDEO
7
Chapter
Specifications
Video
Data rates
19Mbps to 2.97 Gbps
Data types
SMPTE 259M-C, SMPTE 292, SMPTE 424M, DVB-ASI
Input cable equalization range
3G, 0 – 155 meters
(Belden 1694A)
HD, 0 – 200 meters
SD, 0 – 400 meters
≥15db@ 1.485Gps,
Input return loss
≥10db@ 2.97Gbps
Output level
800 mV p-p +/- 10%
SMPTE 424M ≤ 2.0UI
Output timing jitter
SMPTE 292 ≤ 1.0UI
SMPTE 259M-C ≤ 0.2UI
SMPTE 424M ≤ 0.3UI
Output alignment jitter
SMPTE 292 ≤ 0.2UI
SMPTE 259M-C ≤ 0.2UI
≥15db@ 1.485Gps,
Output return loss
≥10db@ 2.97Gbps
Mechanical
I/O connectors
75 Ohm BNC
Operating Temperature
0C – 40C (32F – 104F)
Dimensions
7.0 (178mm) x 19.0 (483mm) x 2.5 (64mm)
Weight
7.0 lbs (3.2 kg)
Electrical
AC Input Range
100-240V, 50-60Hz
Power
55W
Communication
Ethernet (1)
10/100 Base-T (RJ45)
Serial Port (1)
RS-232/422 (DB-9)
47
SIERRA VIDEO
8
Chapter
Warranty
A. General
Buyer assumes all responsibility for ascertaining the suitability of Sierra Video (hereinafter "SVS")
products for Buyer's intended use. No product sold by SVS is designed or manufactured for use
in any manner or under any conditions other than those described in SVS's instruction manuals
and other printed material for each particular product. If any product is used or applied in a
manner or under conditions not specifically authorized by such written materials or if any product
is used by unqualified or improperly trained personnel, Buyer agrees that SVS shall have no
liability of any kind arising from such use, and Buyer agrees to indemnify and hold SVS harmless
from any claims of third parties arising from such use, and Buyer shall provide SVS with counsel
of SVS's choice to defend against such claims.
B. Limited Warranty
1. This limited warranty applies only to the original purchaser and is non-transferable.This limited
warranty begins on the date of purchase and will be in effect for seven (7) years for new
equipment and for three (3) years for "Factory Refurbished" equipment. Power Supplies and fans
are warranteed for three (3) years from the date of purchase for new equipment and two (2) years for
“Factory Refurbished” units, from the date of purchase.
Buyer must obtain a Return Material Authorization ("RMA") number from SVS prior to returning a
product for repair. If, in SVS' sole discretion, the product is found to be defective during the term
of this warranty, SVS will at its option: (a) provide free replacement parts, and/or (b) repair the
unit at an SVS facility. During the warranty period, SVS will make every reasonable effort to
support critical emergencies by supplying no-cost loan equipment while the defective unit is being
repaired. SVS will provide replacement parts and/or factory service at no charge. Buyer bears
the cost of shipping products returned to SVS under this warranty. SVS will bear the cost of
shipping repaired products or replacement parts to the Buyer.
This limited warranty shall not apply to any of SVS's goods which have been altered or which
have been subjected to misuse, mishandling, improper storage or negligence. The
aforementioned provisions do not extend the original warranty period of any goods which have
been replaced by SVS. This limited warranty shall not apply to any goods not of SVS's
manufacture, Buyer to be entitled only to the warranty set forth in the original manufacturer's
limited warranty.
49
THIS LIMITED WARRANTY IS EXPRESSED IN LIEU OF ALL OTHER WARRANTIES,
EXPRESS, IMPLIED OR STATUTORY, INCLUDING WITHOUT LIMITATION THE IMPLIED
WARRANTIES OF MERCHANTABILITY AND OF FITNESS FOR A PARTICULAR PURPOSE,
AND ALL OTHER OBLIGATIONS OR LIABILITIES ON SVS'S PART.
SVS neither assumes nor authorizes any other person to assume for SVS any other liabilities in
connection with the sale of products of its own manufacture.
2. SVS's liability hereunder on any claim of any kind, except as set forth herein for any loss,
injury to person or property or damage, shall in no case exceed the price allocable to the goods
which give rise to such claim.
3. In no event shall SVS be liable for any damages or injuries to person or property if any
goods do not meet the above limited warranty, including, without limitation, incidental expenses or
consequential or special damages, except as set forth in such limited warranty. The foregoing
states the exclusive remedy of Buyer and the exclusive liability of SVS for any breach of the
foregoing limited warranty.
C. Cancellation
Except as provided in paragraph B immediately above, all sales are final, and Buyer may cancel
this order or return products only upon written consent of SVS.
D. General
In the event of a breach of any of the terms hereof, the non-breaching party shall be entitled to
recover all of its costs, fees, and expenses, including, without limitation, reasonable attorney's
fees, from the breach party incurred as a result of such breach, regardless of whether or not a
suit is actually filed to enforce the terms hereof.
The provision hereof shall be governed by the laws of the State of California (excluding its choice
of law provisions).
The headings are for convenience only and do not limit or amplify the terms and provisions
hereof.
In case any one or more of the provisions set forth herein shall be held to be invalid, illegal, or
unenforceable in any respect, the validity, legality, and enforceability of the remaining provisions
contained herein shall not in any way be affected or impaired thereby.
No waiver, alteration, or modification of any of the provisions hereof shall be binding unless in
writing and signed by an authorized Officer of SVS.
NOTE:
All products returned to SVS for service must have prior approval. Return authorization
requests may be obtained from your SVS dealer.
50