1
DSU II Digital Telephone System
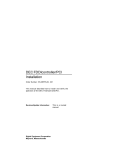
System Hardware &
Software Instructions
This publication supports Impact, Impression,
DigiTech, and Scout Telephones
IMI66-132.04 9/01
Printed in U.S.A.
This manual is for the following system:
DSU II Digital Telephone System
This System Manual applies to the following equipment:
• J0408, with software revision 5C and later
• J0816, with software revision 5C and later
• J1632, with software revision 5C and later
Contact you Comdial dealer for updates of this as well as other Comdial
publications.
IMI66–132
DSU II Digital Telephone System
Contents
1
Using this Manual . . . . . . . . . . . . . . . . . . . . . . . . 1
Using Related Publications . . . . . . . . . . . . . . . . . . . . . . . . . . . . . 2
Working with Electrostatically Sensitive Components . . . . . . . . . . . . . . . . . 2
Operating with DigiTech Telephones and Consoles . . . . . . . . . . . . . . . . . . 2
Operating with Impact Telephones and Consoles . . . . . . . . . . . . . . . . . . . . 2
Operating with Impression Telephones . . . . . . . . . . . . . . . . . . . . . . . . . 3
Operating with Industry-Standard Telephones through the ATI-D . . . . . . . . . . . 3
Detailing the Accessory Information . . . . . . . . . . . . . . . . . . . . . . . . 3
Analog Terminal Interface. . . . . . . . . . . . . . . . . . . . . . . . . . . . . . . . 3
Headset Operation . . . . . . . . . . . . . . . . . . . . . . . . . . . . . . . . . . . . 4
Battery Backup . . . . . . . . . . . . . . . . . . . . . . . . . . . . . . . . . . . . . 4
DSS/BLF Console . . . . . . . . . . . . . . . . . . . . . . . . . . . . . . . . . . . . 4
Caller ID . . . . . . . . . . . . . . . . . . . . . . . . . . . . . . . . . . . . . . . . . 4
Tracker. . . . . . . . . . . . . . . . . . . . . . . . . . . . . . . . . . . . . . . . . . 4
DVA . . . . . . . . . . . . . . . . . . . . . . . . . . . . . . . . . . . . . . . . . . . 4
DIU . . . . . . . . . . . . . . . . . . . . . . . . . . . . . . . . . . . . . . . . . . . 4
Summarizing the Hardware . . . . . . . . . . . . . . . . . . . . . . . . . . . . . 6
Describing the Common Equipment. . . . . . . . . . . . . . . . . . . . . . . . . 6
Describing the Stations . . . . . . . . . . . . . . . . . . . . . . . . . . . . . . . 7
DigiTech Telephones . . . . . . . . . . . . . . . . . . . . . . . . . . . . . . . . . . 7
Impact SCS Telephones . . . . . . . . . . . . . . . . . . . . . . . . . . . . . . . . . 9
Impact Telephones . . . . . . . . . . . . . . . . . . . . . . . . . . . . . . . . . . . 11
Impression Telephones . . . . . . . . . . . . . . . . . . . . . . . . . . . . . . . . . 13
Scout 900MX Telephone . . . . . . . . . . . . . . . . . . . . . . . . . . . . . . 14
Station Controls and Indicators. . . . . . . . . . . . . . . . . . . . . . . . . . . 16
Ringer Volume Control . . . . . . . . . . . . . . . . . . . . . . . . . . . . . . . . 16
Display Intensity . . . . . . . . . . . . . . . . . . . . . . . . . . . . . . . . . . . . 17
Understanding the General Specifications . . . . . . . . . . . . . . . . . . . . . 19
System Capacity . . . . . . . . .
Common Equipment Dimensions
Conferencing . . . . . . . . . . .
SMDA Storage Capacity . . . . .
Station Cable Requirements . . .
Programming the DSU II System
.
.
.
.
.
.
.
.
.
.
.
.
.
.
.
.
.
.
.
.
.
.
.
.
.
.
.
.
.
.
.
.
.
.
.
.
.
.
.
.
.
.
.
.
.
.
.
.
.
.
.
.
.
.
.
.
.
.
.
.
.
.
.
.
.
.
.
.
.
.
.
.
.
.
.
.
.
.
.
.
.
.
.
.
.
.
.
.
.
.
.
.
.
.
.
.
.
.
.
.
.
.
.
.
.
.
.
.
.
.
.
.
.
.
.
.
.
.
.
.
.
.
.
.
.
.
.
.
.
.
.
.
.
.
.
19
19
20
20
20
i
DSU II Digital Telephone System
IMI66–132
Operating Environment . . . . . . . . . . . . . . . . . . . . . . . . . . . . . . . . 20
Power Requirements . . . . . . . . . . . . . . . . . . . . . . . . . . . . . . . . . . 20
Terminations . . . . . . . . . . . . . . . . . . . . . . . . . . . . . . . . . . . . . . 20
Music Interface . . . . . . . . . . . . . . . . . . . . . . . . . . . . . . . . . . . . . 21
Station Message Detail Recording Port . . . . . . . . . . . . . . . . . . . . . . . . 21
PA Port . . . . . . . . . . . . . . . . . . . . . . . . . . . . . . . . . . . . . . . . . 21
Central Office Limits. . . . . . . . . . . . . . . . . . . . . . . . . . . . . . . . . . 21
Industry/Regulatory Standards . . . . . . . . . . . . . . . . . . . . . . . . . . . . . 22
Regulatory Codes . . . . . . . . . . . . . . . . . . . . . . . . . . . . . . . . . . . 22
Feature Codes . . . . . . . . . . . . . . . . . . . . . . . . . . . . . . . . . . . . . 22
System Ringing Patterns . . . . . . . . . . . . . . . . . . . . . . . . . . . . . . . . 25
Seeking Repair Assistance . . . . . . . . . . . . . . . . . . . . . . . . . . . . . 26
2
Telephone System Installation . . . . . . . . . . . . . . . . 27
Considering the Mounting Requirements . . . . . . . . . . . . . . . . . . . . . 27
Tools and Hardware . . . . . . . . . . . . . . . . . . . . . . . . . . . . . . . . 27
Underwriters Laboratories Installation Notice . . . . . . . . . . . . . . . . . . . 28
Hybrid Installation . . . . . . . . . . . . . . . . . . . . . . . . . . . . . . . . . 28
Mounting the Cabinet . . . . . . . . . . . . . . . . . . . . . . . . . . . . . . . 29
Making the AC Power Connection . . . . . . . . . . . . . . . . . . . . . . . . . 31
Identifying the Fuses . . . . . . . . . . . . . . . . . . . . . . . . . . . . . . . . 31
Grounding the System . . . . . . . . . . . . . . . . . . . . . . . . . . . . . . . . . 32
Connecting the Lines . . . . . . . . . . . . . . . . . . . . . . . . . . . . . . . . 34
Detailing the Line Connections . . . . . . . . . . . . . . . . . . . . . . . . . . . . 36
Reassigning the Line Ports . . . . . . . . . . . . . . . . . . . . . . . . . . . . . . . 36
Protecting the Lines . . . . . . . . . . . . . . . . . . . . . . . . . . . . . . . . . . 36
Connecting the Stations . . . . . . . . . . . . . . . . . . . . . . . . . . . . . . 38
Grounding the Unused Station Cables . . . .
Relocating the Stations . . . . . . . . . . . .
Installing the Cable Clips . . . . . . . . . .
Connecting Stations to the J0408 . . . . . .
Connecting Stations to the J0816 . . . . . .
Connecting Stations to the J1632 . . . . . .
Connecting Stations to the J1632 (continued)
Wall Mounting the Telephone Stations . . .
.
.
.
.
.
.
.
.
.
.
.
.
.
.
.
.
.
.
.
.
.
.
.
.
.
.
.
.
.
.
.
.
.
.
.
.
.
.
.
.
.
.
.
.
.
.
.
.
.
.
.
.
.
.
.
.
.
.
.
.
.
.
.
.
.
.
.
.
.
.
.
.
.
.
.
.
.
.
.
.
.
.
.
.
.
.
.
.
.
.
.
.
.
.
.
.
.
.
.
.
.
.
.
.
.
.
.
.
.
.
.
.
.
.
.
.
.
.
.
.
.
.
.
.
.
.
.
.
.
.
.
.
.
.
.
.
.
.
.
.
.
.
.
.
.
.
.
.
.
.
.
.
.
.
.
.
.
.
.
.
.
.
.
.
.
.
.
.
39
39
40
40
42
44
46
48
Installing DSS/BLF Consoles . . . . . . . . . . . . . . . . . . . . . . . . . . . 51
Connecting a Power Failure Station . . . . . . . . . . . . . . . . . . . . . . . . 53
Using the Auxiliary Equipment Interface . . . . . . . . . . . . . . . . . . . . . 54
ii
Programming the DSU II System
IMI66–132
DSU II Digital Telephone System
Connecting the Common
Audible and Auxiliary Ringing Interface . . . . . . . . . . . . . . . . . . . . . 56
Connecting Outside Lines . . . . . . . . . . . . . . . . . . . . . . . . . . . . . . . 56
Connecting Selected Ports . . . . . . . . . . . . . . . . . . . . . . . . . . . . . . . 56
Using the External Paging Interface . . . . . . . . . . . . . . . . . . . . . . . . 58
Using a Line Port as an External Paging Interface . . . . . . . . . . . . . . . . . 59
Connecting Data Devices to the System . . . . . . . . . . . . . . . . . . . . . . 59
Making Modular Jack Data Connections . . . . . . . . . . . . . . . . . . . . . . . 59
Making the Common Equipment Data Connections. . . . . . . . . . . . . . . . . . 61
Connecting a Personal Computer for Remote Programming . . . . . . . . . . . . . 63
Using the Music Interface . . . . . . . . . . . . . . . . . . . . . . . . . . . . . 65
Using the Add-on Expansion Modules . . . . . . . . . . . . . . . . . . . . . . . 66
Using the JM408 Module . . . . . . . . . . . . . . . . . . . . . . . . . . . . . . . 67
Using the JM008 Module . . . . . . . . . . . . . . . . . . . . . . . . . . . . . . . 69
Installing an Add-on Expansion Module. . . . . . . . . . . . . . . . . . . . . . . . 73
Checking the System Installation. . . . . . . . . . . . . . . . . . . . . . . . . . 75
Checking the Resistance . . . . . . . . . . . . . . . . . . . . . . . . . . . . . . . . 75
Checking the Voltage . . . . . . . . . . . . . . . . . . . . . . . . . . . . . . . . . 75
Checking the General Operating Conditions. . . . . . . . . . . . . . . . . . . . . . 76
Isolating Failures . . . . . . . . . . . . . . . . . . . . . . . . . . . . . . . . . . 76
Checking the System Status Indicator . . . . . . . . . . . . . . . . . . . . . . . . . 76
Testing the Stations . . . . . . . . . . . . . . . . . . . . . . . . . . . . . . . . . . 76
Loading Software. . . . . . . . . . . . . . . . . . . . . . . . . . . . . . . . . . 77
FCC Rules and Regulations . . . . . . . . . . . . . . . . . . . . . . . . . . . . 78
Notifying the Telephone Company . . . . . . . . . .
Understanding Telephone Network Compatibility. . .
Understanding Installation Requirements . . . . . . .
Understanding Party Line and Coin Line Limitations .
Troubleshooting the Service Problem . . . . . . . . .
Authorizing Repairs . . . . . . . . . . . . . . . . . .
Recognizing Radio Frequency Interference . . . . . .
Determining the Ringer Equivalence Number . . . . .
3
.
.
.
.
.
.
.
.
.
.
.
.
.
.
.
.
.
.
.
.
.
.
.
.
.
.
.
.
.
.
.
.
.
.
.
.
.
.
.
.
.
.
.
.
.
.
.
.
.
.
.
.
.
.
.
.
.
.
.
.
.
.
.
.
.
.
.
.
.
.
.
.
.
.
.
.
.
.
.
.
.
.
.
.
.
.
.
.
.
.
.
.
.
.
.
.
.
.
.
.
.
.
.
.
.
.
.
.
.
.
.
.
.
.
.
.
.
.
.
.
.
.
.
.
.
.
.
.
78
78
78
78
78
79
79
79
System Options and Accessories . . . . . . . . . . . . . . . 81
Installing the Optional Battery Backup Assembly . . . . . . . . . . . . . . . . . 81
Preparing the Battery Backup Assembly for Use . . . . . . . . . . . . . . . . . . . 81
Connecting the Battery Backup Assembly. . . . . . . . . . . . . . . . . . . . . . . 83
Installing the Analog Terminal Interface. . . . . . . . . . . . . . . . . . . . . . 85
Introducing the Analog Terminal Interface (ATI-D) . . . . . . . . . . . . . . . . . 85
Programming the DSU II System
iii
DSU II Digital Telephone System
IMI66–132
Mounting the Analog Terminal Interface . . . . . . . . . . . . . . . . . . . . . . . 87
Connecting the Analog Terminal Interface . . . . . . . . . . . . . . . . . . . . . . 89
Understanding Analog Terminal Interface Programming Requirements . . . . . . . 89
Installing a Voice Mail Interface . . . . . . . . . . . . . . . . . . . . . . . . . . . . 90
Installing an OPX Long Loop Adapter to
the Analog Terminal Interface for Off-Premise Service . . . . . . . . . . . . . . . . 91
Installing the Data Interface Unit. . . . . . . . . . . . . . . . . . . . . . . . . . 93
Installing the Mechanical Components . . . . . . . . . . . . . . . . . . . . . . . . 93
Making the Data Interface Unit Cable Connections . . . . . . . . . . . . . . . . . . 95
Preparing the DSU II for DIU Operation . . . . . . . . . . . . . . . . . . . . . . . 95
Supporting DVA Operation . . . . . . . . . . . . . . . . . . . . . . . . . . . . 97
To Install the DVA Device. . . . . . . . . . . . . . . . . . . . . . . . . . . . . . . 97
Installing the Personal Computer Interface Unit . . . . . . . . . . . . . . . . . . 99
Making the PCIU Cable Connections . . . . . . . . . . . . . . . . . . . . . . . . . 99
Making the PCIU Operational . . . . . . . . . . . . . . . . . . . . . . . . . . . . 100
Connecting the Voice Mail System . . . . . . . . . . . . . . . . . . . . . . . . 101
FCC Regulatory Rules and Regulations . . . . . . . . . . . . . . . . . . . . . 102
Federal Communications Commission (FCC)
And Industry Canada (IC) Rules And Regulations . . . . . . . . . . . . . . . . . . 102
4
Programming . . . . . . . . . . . . . . . . . . . . . . . . . 107
Understanding System Programming . . . . . . . . . . . . . . . . . . . . . . . 107
Using a Telephone to Program the System . . . . . . . . . . . . . . . . . . . . . . 107
Supporting Telephones (Revision I and later) . . . . . . . . . . . . . . . . . . . . 107
Converting Button Designations . . . . . . . . . . . . . . . . . . . . . . . . . . . 108
Using Block Programming . . . . . . . . . . . . . . . . . . . . . . . . . . . . . . 109
Master Clearing the System. . . . . . . . . . . . . . . . . . . . . . . . . . . . . . 110
Using Programming Overlays . . . . . . . . . . . . . . . . . . . . . . . . . . . . 110
Master Clearing and Defaulting the System . . . . . . . . . . . . . . . . . . . 111
Master Clearing the System. . . . . .
Defaulting the System . . . . . . . .
Defaulting the Lines . . . . . . . . .
Defaulting the Stations . . . . . . . .
Defaulting the Button Assignments. .
Defaulting the Toll Restriction Tables
Programming Password Protection . .
.
.
.
.
.
.
.
.
.
.
.
.
.
.
.
.
.
.
.
.
.
.
.
.
.
.
.
.
.
.
.
.
.
.
.
.
.
.
.
.
.
.
.
.
.
.
.
.
.
.
.
.
.
.
.
.
.
.
.
.
.
.
.
.
.
.
.
.
.
.
.
.
.
.
.
.
.
.
.
.
.
.
.
.
.
.
.
.
.
.
.
.
.
.
.
.
.
.
.
.
.
.
.
.
.
.
.
.
.
.
.
.
.
.
.
.
.
.
.
.
.
.
.
.
.
.
.
.
.
.
.
.
.
.
.
.
.
.
.
.
.
.
.
.
.
.
.
.
.
.
.
.
.
.
.
.
.
.
.
.
.
.
.
.
.
.
.
.
111
111
111
112
112
113
113
System Features . . . . . . . . . . . . . . . . . . . . . . . . . . . . . . . . . . 115
Automatic Station Relocation.
Data Baud Rate . . . . . . . .
Do Not Disturb (DND) . . . .
Exclusive Hold . . . . . . . .
iv
.
.
.
.
.
.
.
.
.
.
.
.
.
.
.
.
.
.
.
.
.
.
.
.
.
.
.
.
.
.
.
.
.
.
.
.
.
.
.
.
.
.
.
.
.
.
.
.
.
.
.
.
.
.
.
.
.
.
.
.
.
.
.
.
.
.
.
.
.
.
.
.
.
.
.
.
.
.
.
.
.
.
.
.
.
.
.
.
.
.
.
.
.
.
.
.
.
.
.
.
.
.
.
.
.
.
.
.
.
.
.
.
115
116
117
118
Programming the DSU II System
IMI66–132
DSU II Digital Telephone System
Music On Hold . . . . . . . . . . . . . . . . . . . . . . . . . . . . . . . . . . . . 119
LCD Messaging. . . . . . . . . . . . . . . . . . . . . . . . . . . . . . . . . . . . 119
PA Port Options. . . . . . . . . . . . . . . . . . . . . . . . . . . . . . . . . . . . 121
Station Monitoring . . . . . . . . . . . . . . . . . . . . . . . . . . . . . . . . . . 125
System Alarm Reporting . . . . . . . . . . . . . . . . . . . . . . . . . . . . . . . 127
System Clock . . . . . . . . . . . . . . . . . . . . . . . . . . . . . . . . . . . . . 128
System Speed Dial . . . . . . . . . . . . . . . . . . . . . . . . . . . . . . . . . . 129
Tandem Attendant . . . . . . . . . . . . . . . . . . . . . . . . . . . . . . . . . . 131
Tone or Voice Signaling . . . . . . . . . . . . . . . . . . . . . . . . . . . . . . . 131
Inhibiting System Features . . . . . . . . . . . . . . . . . . . . . . . . . . . . . . 131
Ringback on Transfer . . . . . . . . . . . . . . . . . . . . . . . . . . . . . . . . . 133
Call Forward Outside System. . . . . . . . . . . . . . . . . . . . . . . . . . . . . 133
System Timing . . . . . . . . . . . . . . . . . . . . . . . . . . . . . . . . . . 135
Call Park Recall Time. . . . . . . . . . . . . . . . . . . . . . . . . . . . . . . . . 135
Extended DTMF Tones for Automatic Dialing. . . . . . . . . . . . . . . . . . . . 136
Pause Time . . . . . . . . . . . . . . . . . . . . . . . . . . . . . . . . . . . . . . 137
Recall/Flash . . . . . . . . . . . . . . . . . . . . . . . . . . . . . . . . . . . . . . 138
Timed Hold Recall . . . . . . . . . . . . . . . . . . . . . . . . . . . . . . . . . . 139
Unanswered Call Transfer Recall Time . . . . . . . . . . . . . . . . . . . . . . . 140
Line Programming . . . . . . . . . . . . . . . . . . . . . . . . . . . . . . . . 141
Abandoned Hold Release . . . . . . . . . . . . . . . . . . . . . . . . . . . . . . . 141
Automatic Privacy . . . . . . . . . . . . . . . . . . . . . . . . . . . . . . . . . . 142
Line Disable. . . . . . . . . . . . . . . . . . . . . . . . . . . . . . . . . . . . . . 143
Line Groups . . . . . . . . . . . . . . . . . . . . . . . . . . . . . . . . . . . . . . 144
Line Names . . . . . . . . . . .
Line Port Functions . . . . . . .
Line to Line Port Reassignment
Pulse/Tone Switchable . . . . .
Block Programming. . . . . . .
Positive Disconnect Supervision
Disconnect Notification. . . . .
.
.
.
.
.
.
.
.
.
.
.
.
.
.
.
.
.
.
.
.
.
.
.
.
.
.
.
.
.
.
.
.
.
.
.
.
.
.
.
.
.
.
.
.
.
.
.
.
.
.
.
.
.
.
.
.
.
.
.
.
.
.
.
.
.
.
.
.
.
.
.
.
.
.
.
.
.
.
.
.
.
.
.
.
.
.
.
.
.
.
.
.
.
.
.
.
.
.
.
.
.
.
.
.
.
.
.
.
.
.
.
.
.
.
.
.
.
.
.
.
.
.
.
.
.
.
.
.
.
.
.
.
.
.
.
.
.
.
.
.
.
.
.
.
.
.
.
.
.
.
.
.
.
.
.
.
.
.
.
.
.
.
.
.
.
.
.
.
.
.
.
.
.
.
.
.
.
.
.
.
.
.
.
.
.
.
.
.
.
145
147
148
149
150
151
152
Station Features . . . . . . . . . . . . . . . . . . . . . . . . . . . . . . . . . . 153
Access Denied . . . . . . . . . . . . . .
All-Call and Zone Paging . . . . . . . . .
Audible Monitoring . . . . . . . . . . . .
Automatic Hold . . . . . . . . . . . . . .
Automatic Privacy . . . . . . . . . . . .
Call Forward on Busy/Ring—No Answer
Call Origination Denied. . . . . . . . . .
Central Message Desk . . . . . . . . . .
Data Security Port. . . . . . . . . . . . .
Programming the DSU II System
.
.
.
.
.
.
.
.
.
.
.
.
.
.
.
.
.
.
.
.
.
.
.
.
.
.
.
.
.
.
.
.
.
.
.
.
.
.
.
.
.
.
.
.
.
.
.
.
.
.
.
.
.
.
.
.
.
.
.
.
.
.
.
.
.
.
.
.
.
.
.
.
.
.
.
.
.
.
.
.
.
.
.
.
.
.
.
.
.
.
.
.
.
.
.
.
.
.
.
.
.
.
.
.
.
.
.
.
.
.
.
.
.
.
.
.
.
.
.
.
.
.
.
.
.
.
.
.
.
.
.
.
.
.
.
.
.
.
.
.
.
.
.
.
.
.
.
.
.
.
.
.
.
.
.
.
.
.
.
.
.
.
.
.
.
.
.
.
.
.
.
.
.
.
.
.
.
.
.
.
.
.
.
.
.
.
.
.
.
.
.
.
.
.
.
.
.
.
154
155
157
159
160
162
165
166
166
v
DSU II Digital Telephone System
IMI66–132
Dual Console Feature . . . . . . . . . . . . . . . . . . . . . . . . . . . . . . . . . 167
Executive Override . . . . . . . . . . . . . . . . . . . . . . . . . . . . . . . . . . 168
Flexible Ringing Assignments . . . . . . . . . . . . . . . . . . . . . . . . . . . . 169
Flexible Station Numbering. . . . . . . . . . . . . . . . . . . . . . . . . . . . . . 176
Group Call Pickup . . . . . . . . . . . . . . . . . . . . . . . . . . . . . . . . . . 177
Handset Volume Control on Telephones . . . . . . . . . . . . . . . . . . . . . . . 178
Headset Interface . . . . . . . . . . . . . . . . . . . . . . . . . . . . . . . . . . . 180
Interactive Buttons . . . . . . . . . . . . . . . . . . . . . . . . . . . . . . . . . . 181
Idle Line Preference. . . . . . . . . . . . . . . . . . . . . . . . . . . . . . . . . . 182
Personal Ringing Tones. . . . . . . . . . . . . . . . . . . . . . . . . . . . . . . . 183
Prime Line, Prime Group, and Prime Intercom. . . . . . . . . . . . . . . . . . . . 184
Message Wait Originate . . . . . . . . . . . . . . . . . . . . . . . . . . . . . . . 185
Ringing Line Preference . . . . . . . . . . . . . . . . . . . . . . . . . . . . . . . 185
Subdued Off-Hook Voice Announcement (SOHVA) Features . . . . . . . . . . . 186
Service Observing. . . . . . . . . . . . . . . . . . . . . . . . . . . . . . . . . . . 188
Station Disable . . . . . . . . . . . . . . . . . . . . . . . . . . . . . . . . . . . . 189
Station Name . . . . . . . . . . . . . . . . . . . . . . . . . . . . . . . . . . . . . 190
Station to Station Port Reassignment . . . . . . . . . . . . . . . . . . . . . . . . . 192
System Alarm Report Stations . . . . . . . . . . . . . . . . . . . . . . . . . . . . 193
Voice Announce Blocking . . . . . . . . . . . . . . . . . . . . . . . . . . . . . . 194
Block Programming. . . . . . . . . . . . . . . . . . . . . . . . . . . . . . . . . . 194
Quick Transfer . . . . . . . . . . . . . . . . . . . . . . . . . . . . . . . . . . . . 195
Button Mapping the Stations
(Non-Square System Configuration) . . . . . . . . . . . . . . . . . . . . . . . 196
Account Code Button . . . . . . . . . . . . . . . . . . . . . . . . . . . . . . . . . 197
Automatic Call-Back Button . . . . . . . . . . . . . . . . . . . . . . . . . . . . . 198
Blank Buttons . . . . . . . . . . . . . . . . .
Call Forward Button . . . . . . . . . . . . .
Call Park Orbit Button . . . . . . . . . . . .
Do Not Disturb (DND) Button . . . . . . . .
DSS/BLF Button . . . . . . . . . . . . . . .
Intercom Button Programming (SCS Phones)
Line Button . . . . . . . . . . . . . . . . . .
Line Group Button . . . . . . . . . . . . . .
Line Group Queue Button . . . . . . . . . .
Multiple Intercom Button . . . . . . . . . . .
Privacy Button . . . . . . . . . . . . . . . .
Save Button . . . . . . . . . . . . . . . . . .
Voice Announce Block Button . . . . . . . .
Zone Page/All-Call Button . . . . . . . . . .
.
.
.
.
.
.
.
.
.
.
.
.
.
.
.
.
.
.
.
.
.
.
.
.
.
.
.
.
.
.
.
.
.
.
.
.
.
.
.
.
.
.
.
.
.
.
.
.
.
.
.
.
.
.
.
.
.
.
.
.
.
.
.
.
.
.
.
.
.
.
.
.
.
.
.
.
.
.
.
.
.
.
.
.
.
.
.
.
.
.
.
.
.
.
.
.
.
.
.
.
.
.
.
.
.
.
.
.
.
.
.
.
.
.
.
.
.
.
.
.
.
.
.
.
.
.
.
.
.
.
.
.
.
.
.
.
.
.
.
.
.
.
.
.
.
.
.
.
.
.
.
.
.
.
.
.
.
.
.
.
.
.
.
.
.
.
.
.
.
.
.
.
.
.
.
.
.
.
.
.
.
.
.
.
.
.
.
.
.
.
.
.
.
.
.
.
.
.
.
.
.
.
.
.
.
.
.
.
.
.
.
.
.
.
.
.
.
.
.
.
.
.
.
.
.
.
.
.
.
.
.
.
.
.
.
.
.
.
.
.
.
.
.
.
.
.
.
.
.
.
.
.
.
.
.
.
.
.
.
.
.
.
.
.
.
.
.
.
.
.
.
.
.
.
.
.
.
.
.
.
199
200
201
202
203
204
205
206
207
208
209
210
211
212
Account Codes . . . . . . . . . . . . . . . . . . . . . . . . . . . . . . . . . . 213
vi
Programming the DSU II System
IMI66–132
DSU II Digital Telephone System
Account Code Length. . . . . . . . . . . . . . . . . . . . . . . . . . . . . . . . . 214
Account Code List . . . . . . . . . . . . . . . . . . . . . . . . . . . . . . . . . . 215
Enabled or Disabled Account Codes . . . . . . . . . . . . . . . . . . . . . . . . . 216
Forced or Optional Entry Account Codes . . . . . . . . . . . . . . . . . . . . . . 216
Message Display Time for Account Codes . . . . . . . . . . . . . . . . . . . . . . 217
Verify Account Code Entry. . . . . . . . . . . . . . . . . . . . . . . . . . . . . . 218
Secure Account Code Entry . . . . . . . . . . . . . . . . . . . . . . . . . . . . . 219
Industry-Standard Telephone (IST) Interface. . . . . . . . . . . . . . . . . . . 220
The JM008 Expansion Module . . . . . . . . . . . . . . . . . . . . . . . . . . . . 220
The Analog Terminal Interface . . . . . . . . . . . . . . . . . . . . . . . . . . . . 220
Understanding the Programming Requirements for the IST Interface . . . . . . . . 220
IST Station Port Line Assignment . . . . . . . . . . . . . . . . . . . . . . . . . . 221
IST Distinctive Ringing. . . . . . . . . . . . . . . . . . . . . . . . . . . . . . . . 223
IST through Dialing. . . . . . . . . . . . . . . . . . . . . . . . . . . . . . . . . . 224
Direct Department Calling . . . . . . . . . . . . . . . . . . . . . . . . . . . . 225
Access Codes for Direct Department Calling. . . . . . . . . . . . . . . . . . . . . 226
Line Ports for Direct Departmental Calling . . . . . . . . . . . . . . . . . . . . . 227
Station Ports for Direct Department Calling . . . . . . . . . . . . . . . . . . . . . 228
Unanswered Call Transfer Recall Time for Direct Department Calling . . . . . . . 229
Call Forward on Ring—No Answer . . . . . . . . . . . . . . . . . . . . . . . . . 230
DCD Type Ring All Stations . . . . . . . . . . . . . . . . . . . . . . . . . . . . . 231
DCD Type Longest Idle Distribution . . . . . . . . . . . . . . . . . . . . . . . . . 232
Direct Inward Station Dialing (DISD) . . . . . . . . . . . . . . . . . . . . . . 233
Dial Time Limit . . . . . . . . . . . . . . . . . . . . . . . . . . . . . . . . . . . . 234
Inhibiting DISD Digit Dialing . . . . . . . . . . . . . . . . . . . . . . . . . . . . 235
DISD Assist Station. . . . . . . . . . . . . . . . . . . . . . . . . . . . . . . . . . 236
DISD Incoming Rings . . . . . . . . . . . . . . . . . . . . . . . . . . . . . . . . 237
Enable/Disable Call Waiting Tone . . . . . . . . . . . . . . . . . . . . . . . . . . 238
Data Printer Service . . . . . . . . . . . . . . . . . . . . . . . . . . . . . . . . 239
Enable Data Printer Operation . . . . . . . . . . . . . . . . . . . . . . . . . . . . 239
Voice Mail Interface . . . . . . . . . . . . . . . . . . . . . . . . . . . . . . . 240
Voice Mail Port . . . . . . . . . . . .
Automatic Transfer of Voice Mail . .
Voice Mail Line ID . . . . . . . . . .
Voice Mail Transfer on Busy . . . . .
Transferring Callers to Voice Mail . .
Send Message Direct to Voice Mail .
Recording a Conversation in Progress
Positive Disconnect Supervision . . .
Voice Mail Pause . . . . . . . . . . .
Programming the DSU II System
.
.
.
.
.
.
.
.
.
.
.
.
.
.
.
.
.
.
.
.
.
.
.
.
.
.
.
.
.
.
.
.
.
.
.
.
.
.
.
.
.
.
.
.
.
.
.
.
.
.
.
.
.
.
.
.
.
.
.
.
.
.
.
.
.
.
.
.
.
.
.
.
.
.
.
.
.
.
.
.
.
.
.
.
.
.
.
.
.
.
.
.
.
.
.
.
.
.
.
.
.
.
.
.
.
.
.
.
.
.
.
.
.
.
.
.
.
.
.
.
.
.
.
.
.
.
.
.
.
.
.
.
.
.
.
.
.
.
.
.
.
.
.
.
.
.
.
.
.
.
.
.
.
.
.
.
.
.
.
.
.
.
.
.
.
.
.
.
.
.
.
.
.
.
.
.
.
.
.
.
.
.
.
.
.
.
.
.
.
.
.
.
.
.
.
.
.
.
.
.
.
.
.
.
.
.
.
.
.
.
.
.
.
.
.
.
241
244
245
245
246
246
246
247
248
vii
DSU II Digital Telephone System
IMI66–132
Versatile Voice Processing . . . . . . . . . . . . . . . . . . . . . . . . . . . . 249
Using the Tracker Paging System with VVP . . . . . . . . . . . . . . . . . . . . . 249
Using Tracker for Message Notification . . . . . . . . . . . . . . . . . . . . . . . 250
Transferring Callers to Voice Mail . . . . . . . . . . . . . . . . . . . . . . . . . . 250
Auto Station Logon . . . . . . . . . . . . . . . . . . . . . . . . . . . . . . . . . . 250
Visual Voice Mail Support . . . . . . . . . . . . . . . . . . . . . . . . . . . . . . 251
Integrated Call Costing . . . . . . . . . . . . . . . . . . . . . . . . . . . . . . 252
Call Costing Flow Diagram Examples . . . . . . . . . . . . . . . . . . . . . . . . 253
Exception Tables (Local Calls and Long Distance Calls) . . . . . . . . . . . . . . 255
Office Code Band Tables (Local Calls) . . . . . . . . . . . . . . . . . . . . . . . 256
Zone Call Band Tables (Long Distance Calls) . . . . . . . . . . . . . . . . . . . . 257
Area Code Band Table (Long Distance Calls) . . . . . . . . . . . . . . . . . . . . 258
Call Rate Tables (Local and Long Distance Calls) . . . . . . . . . . . . . . . . . . 259
Discard Digits . . . . . . . . . . . . . . . . . . . . . . . . . . . . . . . . . . . . . 261
Dialing Time and Answer Time . . . . . . . . . . . . . . . . . . . . . . . . . . . 262
LCD Speakerphone Display of Costed Calls . . . . . . . . . . . . . . . . . . . . . 263
Specialized Route Access (SRA) . . . . . . . . . . . . . . . . . . . . . . . . . 264
Enable the SRA Feature . . . . . . . . . . . . . . . . . . . . . . . . . . . . . . . 264
Enable SRA Office Code and Area Code Tables . . . . . . . . . . . . . . . . . . . 265
Enable Special SRA Area Code Tables. . . . . . . . . . . . . . . . . . . . . . . . 266
Insert Digits for SRA . . . . . . . . . . . . . . . . . . . . . . . . . . . . . . . . . 268
SRA Overflow Line Group . . . . . . . . . . . . . . . . . . . . . . . . . . . . . . 268
SRA Wait Time . . . . . . . . . . . . . . . . . . . . . . . . . . . . . . . . . . . . 269
SRA Alternate Line Groups . . . . . . . . . . . . . . . . . . . . . . . . . . . . . 269
Station Message Detail Accounting/Reporting (SMDA/SMDR) . . . . . . . . . 270
SMDA Department Numbers . . . . . . .
SMDA Station Assignment . . . . . . . .
SMDA Printout . . . . . . . . . . . . . .
SMDR Printout . . . . . . . . . . . . . .
SMDA Records Deleted by the Attendant
.
.
.
.
.
.
.
.
.
.
.
.
.
.
.
.
.
.
.
.
.
.
.
.
.
.
.
.
.
.
.
.
.
.
.
.
.
.
.
.
.
.
.
.
.
.
.
.
.
.
.
.
.
.
.
.
.
.
.
.
.
.
.
.
.
.
.
.
.
.
.
.
.
.
.
.
.
.
.
.
.
.
.
.
.
.
.
.
.
.
.
.
.
.
.
.
.
.
.
.
.
.
.
.
.
.
.
.
.
.
271
271
272
274
275
Toll Restriction Tables . . . . . . . . . . . . . . . . . . . . . . . . . . . . . . 276
Assign Entries to Toll Restriction Tables. . . . . . . . . . . . . . . . . .
Programming Toll Restriction Table Entries . . . . . . . . . . . . . . . .
Assign Toll Restriction Tables to Lines . . . . . . . . . . . . . . . . . .
Assign Toll Restriction Tables to Stations . . . . . . . . . . . . . . . . .
Assign Toll Restriction Tables to Stations for Night Transfer (of ringing)
Assign Toll Restriction Tables to System Speed Dial Calls . . . . . . . .
Assign Toll Restriction Override (TRO) Code . . . . . . . . . . . . . . .
Positive Disconnect Supervision . . . . . . . . . . . . . . . . . . . . . .
.
.
.
.
.
.
.
.
.
.
.
.
.
.
.
.
.
.
.
.
.
.
.
.
.
.
.
.
.
.
.
.
.
.
.
.
.
.
.
.
277
278
279
280
281
281
282
283
The Tracker Paging System . . . . . . . . . . . . . . . . . . . . . . . . . . . . 284
viii
Programming the DSU II System
IMI66–132
DSU II Digital Telephone System
Enabling the Tracker Paging System . . . . . . . . . . . . . . . . . . . . . . . . . 284
Enabling Tracker Pagers for Stations . . . . . . . . . . . . . . . . . . . . . . . . . 285
Setting the Data Parameters. . . . . . . . . . . . . . . . . . . . . . . . . . . . . . 285
Digital Voice Announcing (DVA) . . . . . . . . . . . . . . . . . . . . . . . . 286
Programming for DCD Operation . . . . . . . . . . . . . . . . . . . . . . . . . . 286
DCD Department Transfers before Disconnect. . . . . . . . . . . . . . . . . . . . 287
Programming for DISD Operation . . . . . . . . . . . . . . . . . . . . . . . . . . 288
Enabling/Disabling Digital Voice Announcing (DVA) . . . . . . . . . . . . . . . 288
Programming the DVA Messages . . . . . . . . . . . . . . . . . . . . . . . . . . 289
The Data Interface Unit . . . . . . . . . . . . . . . . . . . . . . . . . . . . . . 291
Programming Data Buttons . . . . . . . . . . . . . . . . . . . . . . . . . . . . . . 291
Remote Data Station . . . . . . . . . . . . . . . . . . . . . . . . . . . . . . . . . 292
Creating Data Security Groups . . . . . . . . . . . . . . . . . . . . . . . . . . . . 292
Caller ID Service Support. . . . . . . . . . . . . . . . . . . . . . . . . . . . . 293
Assigning Caller ID Lines (required programming) . . . . . . . . . . . . . . . . . 296
Assigning Caller ID Stations (required programming) . . . . . . . . . . . . . . . . 296
Configuring COM 2 Serial Data Port (required programming) . . . . . . . . . . . 297
Setting the Audible First Ring Feature (optional programming) . . . . . . . . . . . 297
Setting the Caller ID Distribution (optional programming) . . . . . . . . . . . . . 297
Assigning a “SAVE” Button (optional programming) . . . . . . . . . . . . . . . . 298
5
System Records. . . . . . . . . . . . . . . . . . . . . . . . 299
Programming Password Records . . . . . . . . . . . . . . . . . . . . . . . . . 299
System Configuration Records . . . . . . . . . . . . . . . . . . . . . . . . . . 299
Recording the Line Configurations . . . . . . . . . . . . . . . . . . . . . . . . 307
Recording the Station Configurations. . . . . . . . . . . . . . . . . . . . . . . 309
Recording Account Code Configuration . . . . . . . . . . . . . . . . . . . . . 317
Recording the Industry-Standard Telephone Configurations . . . . . . . . . . . 319
Direct Department Calling Records. . . . . . . . . . . . . . . . . . . . . . . . 320
Direct Inward Station Dialing (DISD) Records. . . . . . . . . . . . . . . . . . 322
Recording the Voice Mail Interface Configurations . . . . . . . . . . . . . . . 323
Recording the Integrated Call Costing Configurations . . . . . . . . . . . . . . 326
Station Message Detail Accounting/Reporting Records . . . . . . . . . . . . . 331
Recording the Specialized Route Access Configurations. . . . . . . . . . . . . 332
Toll Restriction Tables—Line Assignments . . . . . . . . . . . . . . . . . . . . . 342
Toll Restriction Assignments . . . . . . . . . . . . . . . . . . . . . . . . . . . . . 343
Caller ID Service Support Configuration Chart. . . . . . . . . . . . . . . . . . 345
Tracker Paging System Records . . . . . . . . . . . . . . . . . . . . . . . . . 346
Programming the DSU II System
ix
DSU II Digital Telephone System
IMI66–132
Digital Voice Announcing Records . . . . . . . . . . . . . . . . . . . . . . . . 347
Data Interface Unit Records. . . . . . . . . . . . . . . . . . . . . . . . . . . . 349
A
Describing the System Features . . . . . . . . . . . . . . . 351
Index . . . . . . . . . . . . . . . . . . . . . . . . . . . . . . 411
x
Programming the DSU II System
IMI66–132
DSU II Digital Telephone System
1
Using this Manual
This publication contains a technical discussion of the DSU II; it provides step-by-step
instructions for installation and programming. If you are unfamiliar with the equipment, read this
manual at least once before you attempt to install and program the system. The five chapters in
this manual are as follows:
• Chapter One, Using This Guide, is a general description of the digital telephone system,
the telephones, accessories, related publications, and the equipment hardware.
• Chapter Two, Telephone System Installation, contains installation instructions and
connection details.
• Chapter Three, System Options and Accessories, provides instructions for installing
accessories such as the battery backup, the analog terminal interface, data interface unit,
the digital voice announcer, the personal computer interface unit, and voice mail.
• Chapter Four, Programming, contains instructions for programming and configuring the
DSU II.
• Chapter Five, System Records, contains charts for recording programming settings
• Appendix A, Describing the System Features, is a glossary of the DSU II’s features.
Programming the DSU II
1
DSU II Digital Telephone System
IMI66–132
Using Related Publications
The following publications contain information applicable to the digital telephone system. Should
you need copies of these publications, contact your Comdial inside sales representative.
Comdial
Inside Sales Department
P.O. Box 7266
Charlottesville VA 22906
Call: 1-800-347-1432
Working with Electrostatically Sensitive Components
• IMI 01-005
Handling of Electrostatically Sensitive Components
Operating with DigiTech Telephones and Consoles
These user guides are for DigiTech telephones with product codes 7700S, 7714X, and 7714S,
with revision A through H, and console DD32X.
• GCA70–183—DigiTech Multiline Telephone System User’s Guide
• GCA70–182—DigiTech Attendant’s Guide
• GCA70–184—DigiTech Station User’s Guide
• GCA70–232—DigiTech Single-Line Proprietary Telephone User’s Guide
• GCA70–187—DigiTech DSS/BLF Console User’s Guide
These user guides are for DigiTech telephones with product codes 7700S, 7714X, and 7714S,
with revision I and later, and console DD32X.
• GCA70–220—DigiTech LCD Speakerphone System User’s Guide
• GCA70–221—DigiTech Multiline Telephone System User’s Guide
• GCA70–228—DigiTech Attendant’s Supplement
• GCA70–232—DigiTech Single-Line Proprietary Telephone User’s Guide
• GCA70–187—DigiTech DSS/BLF Console User’s Guide
Operating with Impact Telephones and Consoles
These user guides are for telephones with product codes 8324SJ, 8312SJ, 8212S, 8201N, IMIST,
8024S, 8124S, 8012S, 8112N, 8101N, and consoles IB48X and IB64X.
• GCA70–245—Impact LCD Speakerphone System User’s Guide
• GCA70–244—Impact Multiline Telephone System User’s Guide
• GCA70–247—Impact Attendant’s Supplement
2
Programming the DSU II
IMI66–132
DSU II Digital Telephone System
• GCA70–248—Impact Station User’s Guide
• GCA70–246—Impact Single-Line Proprietary Telephone User’s Guide
• GCA70–256—Impact DSS/BLF Console User’s Guide
Operating with Impression Telephones
These user guides are for telephones with product codes 2022S, 2122S, 2122X, and 2101N.
• GCA70–328—Impression LCD Speakerphone System User’s Guide
• GCA70–329—Impression non-LCD Speakerphone and Monitor Telephone System User’s Guide
• GCA70–330—Impression Single Line Proprietary Telephone User’s Guide
• GCA70–332—Impression LCD Speakerphone Station User’s Guide
• GCA70–333—Impression non-LCD Speakerphone And Monitor Telephone Station User’s Guide
Operating with Industry-Standard Telephones through the ATI-D
• GCA70–239—User’s Guide For The Industry-Standard Telephone
• IMI89–037—Installation Instructions For The Analog Terminal Interface (ATI-D).
Detailing the Accessory Information
The digital telephone system is capable of supporting several accessory software and hardware
devices. You can add voice mail, industry standard telephones, and headset capabilities to your
digital telephone system.
Analog Terminal Interface
By employing the Analog Terminal Interface device (ATI-D), the digital telephone system can
support the operation of the following accessories:
• VVP and voice processing systems,
• industry-standard telephones and telephone devices.
For more information on the ATI-D, see Installing the Analog Terminal Interface on page 85.
Programming the DSU II
3
DSU II Digital Telephone System
IMI66–132
Headset Operation
The Comdial DigiTech speakerphones with product codes of 7700S, revision H and earlier,
include a built-in headset port. Speakerphones with a revision of I and later and Impact LCD
speakerphones with product code 8024S provide an auxiliary jack for headset interface.
Additionally, the system can enable the auxiliary jack features on the SCS models 8312SJ,
8324SJ, and 8324FJ. The headset volume has 8 steps. The Impression telephone provides headset
capability through its handset jack.
Contact your Comdial Inside Sales Representative for a list of compatible headset manufacturers.
NOTE: The system delivers subdued off-hook voice announce (SOHVA) messages to
the headset port. Because a telephone headset exhibits a “coupling” effect
between the ear piece and the microphone, it may allow the outside party to
hear the SOHVA message.
Battery Backup
You can install an optional battery backup that provides power to the system in the event of a
power failure. For more information, see Connecting the Battery Backup Assembly on page .
DSS/BLF Console
You can add a separate DSS/BLF console to provide additional DSS/BLF buttons to a particular
station (such as an attendant). These additional DSS/BLF buttons work just like the DSS/BLF
buttons on the telephone. For more information, see Installing DSS/BLF Consoles on page 51.
Caller ID
Using the Caller Identification Interface (product code CID08), the digital telephone system
provides caller ID information as part of the SMDR printout and as ASCII data input for use with
PC-based application programs.
Tracker
With Tracker you can send messages to Tracker Pagers assigned to a station extension number.
When the pager is activated the user reads the message on the pager’s LCD display. The system
delivers alpha/numeric or numeric-only messages depending on the Tracker Model being used.
DVA
Digital voice announcing uses a hardware peripheral device (product code DVA01) connected to
a digital station port to play recorded messages during an in-progress call. The DVA stores the
messages in its memory for recall when needed.
DIU
The Data Interface Unit (DIU) is a device connected to a digital station port of a DSU. The DIU
provides connections for a digital multiline telephone and another device such as a industry
standard telephone (IST), FAX, or modem. The DIU switches the voice path from the DSU to
either the digital telephone or the IST by pressing a button on the digital telephone.
4
Programming the DSU II
IMI66–132
DSU II Digital Telephone System
14
.88
"
3.78"
2.13"
7.4
3"
16
"
.50
20
.50
"
"
.30
21
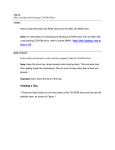
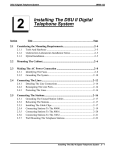
4-Line, 8-Station Base Unit
14
.88
"
3.78"
2.13"
7.4
3"
"
.25
16
26
.50
"
.58
"
27
8-Line, 16-Station Base Unit
CAJS074
14
.88
"
2.89"
4.54"
7.4
3"
16
"
.25
26
.50
"
.58
"
27
16-Line, 32-Station Base Unit
Common Equipment Dimensions
Programming the DSU II
5
DSU II Digital Telephone System
IMI66–132
Summarizing the Hardware
The digital telephone system consists of an electronic Digital Service Unit (DSU)—usually
referred to as “common equipment”—optional expansion modules to extend station and line
capacities, dedicated digital electronic key telephones, and interconnecting wiring consisting of
small, 2- or 4-conductor, twisted-pair cable. The digital telephone system supports all Comdial
proprietary digital telephone models.
The station and line capacity of the base unit and optional expansion modules are detailed in the
following chart.
Model Number
CO/PBX Capacity Station Capacity
J0408
J0816
J1632
JM408
4
8
16
4
JM008
0
8
16
32
8
8 industry-standard
telephones
Describing the Common Equipment
The common equipment base unit for the DSU II digital telephone system is a fully electronic
device. It is essentially a special purpose computer system acting as a communications controller
between central office (CO), private branch exchange (PBX), or CENTREX supplied lines and
the proprietary digital telephone stations. The software design of the common equipment provides
complete system support and great flexibility of operation.
All DSU II systems have analog, loop-start line interfaces to the public switched network.
Special integrated circuits (COder/DECoder or CODEC chips) in the line circuits translate analog
voice information to and from the digital domain. Internally, the system is fully digital and has
Pulse Code Modulation (PCM) highways that are time-division multiplexed into PCM channels.
Each digital station has two B-channels available for voice and/or data and one D-channel
available for telephone control. This arrangement is known as 2B+D. The system maintains
communication with the stations with digital loop transceiver circuits that are under system
software control. A time switch integrated circuit, also under system software control, routes
calls, creates conferences, and set padding levels as required.
The common equipment consists of a base unit, which provides complete feature support, and
optional expansion modules for additional lines and stations. It is contained in a contemporary
metal housing designed to be inconspicuous in a modern office environment. It is engineered to
be wall or rack mounted.
6
Programming the DSU II
IMI66–132
DSU II Digital Telephone System
Describing the Stations
The digital telephones used with the DSU II digital telephone system are electronic,
microprocessor-controlled, devices. They allow not only multiline pickup but also single button
access to features available from the serving CO, PBX, CENTREX, or common equipment. The
digital telephones are available in several different styles with several models available in each
style. The following list details the available telephones.
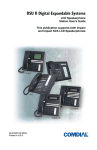
DigiTech Telephones
NOTE: Comdial no longer makes or sells DigiTech or Impression telephones. The
information is included in this manual to support DigiTech and Impression
telephones already in the field.
CAJS075
12X14LCD
DIGITECH
COMDIAL
DIGITECH
COMDIAL
T R ANS
CONF
T AP
T R ANS
CONF
T AP
S P KR
MU T E
S P KR
MU T E
H OL D
IT CM
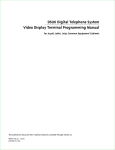
7714X Monitor Telephone
7714S Speaker Telephone
ABC
DEF
GHI
JKL
MNO
PRS
TUV
WXY
OPER
#
1
4
7
2
5
8
0
HOLD
H OL D
IT CM
7700S LCD Speakerphone
3
6
9
TAP
7701X Single Line Proprietary Telephone
DD32X DSS/BLF Console
Viewing the DigiTech Telephone Images
Programming the DSU II
7
DSU II Digital Telephone System
IMI66–132
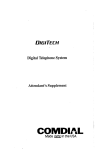
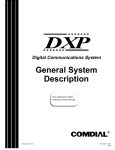
7.658"
4.983"
4.069"
8.625"
7714X
7714S
7700S
1.112"
4.007"
6.451"
2.887"
8.625"
7701X
CAJS045
1.251"
Detailing DigiTech Dimensions
8
Programming the DSU II
IMI66–132
DSU II Digital Telephone System
Impact SCS Telephones
1
ABC
2
DEF
3
GHI
4
JKL
5
MNO
6
PRS
7
TUV
8
WXY
9
*
0
1
ABC
2
DEF
3
GHI
4
JKL
5
MNO
6
PRS
7
TUV
8
WXY
9
MESSAGE
SHIFT
TAP
TRNS/CONF
#
COMDIAL
SPEAKER
*
MUTE
0
ABC
2
DEF
3
4
JKL
5
MNO
6
7
TUV
8
WXY
0
#
MUTE
HOLD
COMDIAL
1
*
TAP
SPEAKER
8312SJ
COMDIAL
PRS
SHIFT
TRNS/CONF
COMDIAL
HOLD
8324SJ
GHI
MESSAGE
9
#
1
ABC
2
DEF
3
GHI
4
JKL
5
MNO
6
PRS
7
TUV
8
WXY
*
0
9
#
MESSAGE
INTERCOM
TAP
MESSAGE
TRNS/CONF
TAP
SPEAKER
TRNS/CONF
MUTE
MUTE
HOLD
HOLD
8201N
scsphones
8212S
IB48X
Programming the DSU II
9
DSU II Digital Telephone System
IMI66–132
6.315
9.065
8.819
8324SJ, 8312SJ,
and IB48X
8.819
8212S and
8201N
scsphones02
4.442
3.283
1.550
Impact SCS Telephone Dimensions
10
Programming the DSU II System
IMI66–132
DSU II Digital Telephone System
Impact Telephones
1 QZ
1 QZ
2 ABC 3 DEF
2 ABC 3 DEF
4 GHI 5 JKL 6 MNO
4 GHI 5 JKL 6 MNO
7 PRS 8 TUV 9 WXY
7 PRS 8 TUV 9 WXY
0 OPER #
0 OPER #
TRNS/CNF
TRNS/CNF
HOLD
INTERCOM
TAP
SPEAKER
SHIFT
HOLD
MUTE
2 ABC 3 DEF
1 QZ
4 GHI 5 JKL 6 MNO
7 PRS 8 TUV 9 WXY
0 OPER #
SHIFT
MUTE
8124S Speakerphone
8024S LCD Speakerphone
1 QZ
SPEAKER
INTERCOM
TAP
2 ABC 3 DEF
4 GHI 5 JKL 6 MNO
7 PRS 8 TUV 9 WXY
SHIFT
SHIFT
0 OPER #
MUTE
TRNS/CNF
MUTE
TRNS/CNF
SPEAKER
TAP
HOLD
SPEAKER
INTERCOM
HOLD
8012S LCD Speakerphone
TAP
INTERCOM
8112S Speakerphone
CAJS076
1
QZ
2
ABC
3 DEF
1
QZ
2
ABC
4
GHI
5
JKL
6 MNO
4
GHI
5
JKL
6 MNO
7
PRS
8
TUV
9
7
PRS
8
TUV
9
WXY
3 DEF
WXY
0 OPER #
0 OPER #
COMDIAL
COMDIAL
TRNS/CNF
TAP
HOLD
INTERCOM
8112N Non-Monitor
IB64X DSS/BLF Console
TRNS/CNF
TAP
HOLD
INTERCOM
8101N
Single Line Proprietary Telephone
Viewing the Impact Telephone Images
Programming the DSU II
11
DSU II Digital Telephone System
IMI66–132
7.130
10.750
8.900
8024S, 8124S,
and IB64X
8101N,
8112N
8.900
CAJS077
4.640
3.731
9.080
8.900
8012S, 8112S
1.034
Detailing the Impact Dimensions
12
Programming the DSU II
IMI66–132
DSU II Digital Telephone System
Impression Telephones
NOTE: Comdial no longer makes or sells DigiTech or Impression telephones. The
information is included in this manual to support DigiTech and Impression
telephones already in the field.
1
ABC
2
DEF
3
1
ABC
2
DEF
GHI
4
JKL
5
MNO
6
GHI
4
JKL
5
MNO
6
PRS
7
TUV
8
WXY
9
PRS
7
TUV
8
WXY
9
OPER
0
#
SPKR
T/C
MUTE
HOLD
TAP
ITCM
OPER
0
3
#
SPKR
T/C
MUTE
HOLD
TAP
ITCM
unisyn01.cdr
unisyn05.cdr
2022S (22-Line LCD Speakerphone)
2122S (22-Line Speakerphone)
2122X (22-Line Monitor Telephone)
R
unisyn09.cdr
2101N (Single Line Proprietary Telephone)
DU32X (32-Button DSS/BLF Console)
unisyn11.cdr
Viewing the Impression Telephone Images
Programming the DSU II
13
DSU II Digital Telephone System
IMI66–132
Scout 900MX Telephone
scout22.cdr
TALK
T/C
HOLD
TAP
MEMO
1
2
ABC
3 DEF
4 GH I
5
JKL
6
MNO
7
8
TUV
9
WXY
OPER
#
PRS
0
F1
F2
F3
F4
F1
F2
F3
F4
CHARGE
BATT
POWER
CHARGE
Scout
900MX
Viewing the Scout 900MX Telephone
14
Programming the DSU II
IMI66–132
DSU II Digital Telephone System
VOL
MUTE
8.150
TALK
T/C
HOLD
TAP
MEMO
1
2
ABC
3 DEF
4 GH I
5
JKL
6
MNO
7
8
TUV
9
WXY
OPER
#
PRS
0
F1
F2
F3
F4
F1
F2
F3
F4
HEAD
SET
1.090
2.185
1.850
3.465
7.300
CH
AR
GE
Sc
B
CH ATT
AR
GE
ou
PO
W
ER
t
900
M
X
5.120
scout21.cdr
Detailing the Scout 900MX Dimensions
Programming the DSU II
15
DSU II Digital Telephone System
IMI66–132
Station Controls and Indicators
Ringer Volume Control
Each station has a ringer volume control. Adjust the ringer volume of each station to suit your
needs.
Telephone Model
7114S, 7114X, 8024S,
8124S, 8012S, 8112S
2022S, 2122S, 2122X
7701X, 8101N, 8112N
2101N
Scout 900MX
Control Location
Rocker switch located on front face plate.
Adjust while ringing to set volume.
Switch on bottom housing. Set for fixed
volume levels
Button on telephone’s upper right edge
Locating the Telephone Ringer Volume Control
CAJS075A
COMDIAL
DIGITECH
Ringer Volume Switch
TRANS
CONF
TAP
SPKR
MUTE
HOLD
CAJS096
Rocker Switch
ITCM
Volume Control
(Press once for
each setting.)
VOL
MUTE
HEAD
SET
EXP95vol
16
Programming the DSU II
IMI66–132
DSU II Digital Telephone System
Display Intensity
You can adjust the intensity (brightness and contrast) of the display on LCD telephones any time
the telephone is idle and on-hook.
To adjust the display intensity, press and hold the MUTE button on DigiTech telephones until
you achieve the desired intensity or select DISP on Impact and Impression telephones through the
interactive buttons.
Locating DigiTech and Impact Controls and Indicators
Programming the DSU II
17
DSU II Digital Telephone System
IMI66–132
LCD Display
Interactive Buttons
Speaker
Mute Button
T/C Button
1
ABC
2
DEF
GHI
4
JKL
5
MNO
6
PRS
7
TUV
8
WXY
9
SPKR Button
Message
Waiting Light
Hold Button
TAP Button
OPER
0
Feature Buttons,
Line Buttons, and
DSS Buttons
3
#
SPKR
T/C
MUTE
HOLD
TAP
ITCM
Volume Control
cajs110
Microphone Opening
ITCM Button
18
Programming the DSU II
IMI66–132
DSU II Digital Telephone System
Understanding the General Specifications
System Capacity
J0408
J0816
J01632
JM408
JM008
Lines
4
8
16
4
0
Stations
8
16
32
8
8 IST
DSS/BLF
Consoles
Two per
station—one
per station
port
Two per
station—one
per station
port
Two per
station—one
per station
port
Two per
station—one
per station
port
Not
Applicable
Intercom Paths
Non-blocking
Non-blocking
Non-blocking
Non-blocking
Non-blocking
Maximum
Simultaneous
Intercom
Conversations
Non-blocking
Non-blocking
Non-blocking
Non-blocking
Non-blocking
Paging Ports
1
1
1
Park Orbits
9
9
9
Not
Applicable
Not
Applicable
Not
Applicable
Not
Applicable
System Speed
Dials
99
99
99
Not
Applicable
Not
Applicable
Station Speed
Dials
10
10
10
Not
Applicable
Not
Applicable
auto
Unused
Button
Unused
Buttons
Unused
Buttons
Not
Applicable
Not
Applicable
Power Fail
Circuits
1
1
1
1
Not
Applicable
Memory Retention After Power
Loss
60 hours minimum
Common Equipment Dimensions
J0408
J0816
J1632
JM408 and
JM008
Width (inches)
16.5
16.5
16.5
16.5
Height (inches)
21.3
27.1
27.6
9.25
Depth (inches)
3.8
3.8
4.5
1.75
Weight (pounds)
17.5
26
30.5
4
Programming the DSU II
19
DSU II Digital Telephone System
IMI66–132
Conferencing
Maximum Combinations
at Any One Time
J0408 and J0816
J1632
1 five-way plus 1 three-way plus
2 SOHVA
2 four-way plus 2 SOHVA
1 four-way plus 3 three-way
5 three-way plus 1 SOHVA
4 five-way plus 1 three-way plus
1 SOHVA
6 four-way plus 2 three-way
3 four-way plus 9 three-way
16 three-way
SMDA Storage Capacity
J0408
J0816
J1632
800
1600
1600
Station Cable Requirements
Type
2-wire (1-pair) twisted, non-shielded cable
Maximum Length
1000 feet with 24 gauge wire, 2000 feet with 22 gauge wire
Switching Principle
Digital, time division multiplexing (TDM). Provides non-blocking switching with
stored program control
Operating Environment
Temperature
32-122 degrees F (0-50 degrees C)
Humidity
90 percent relative, non-condensing
Power Requirements
J0408
Voltage
J0816
J1632
JM408 and
JM008
90-129 VAC Single phase all models
Current
0.6A
2.0 A
2.1A
Not Applicable
Power
70W
135W
150W
Not Applicable
Volt/Amps
80VA
190VA
200VA
Not Applicable
Terminations
Station
Standard 50-pin male connectors for connection to external distribution field
Line
Standard 6-conductor mini-jack (USOC 14C)
20
Programming the DSU II
IMI66–132
DSU II Digital Telephone System
Music Interface
Input Level
3 Volts peak-to-peak maximum
Input Impedance
Approximately 500 Ohms
Connector
RCA phono jack
Station Message Detail Recording Port
Format
Serial, pseudo RS-232C
Parity
None
Data Bits
7 or 8 (programmable)
Stop Bits
1 or 2 (programmable)
Baud Rate
Programmable in class of service
Handshaking
X on -X off
Cable Length
500 feet maximum
Hardware -CTS
PA Port
Output Level
400 Millivolts peak-to-peak (typical speech)
Output Impedance
Approximately 500 Ohms
Connector
RCA phono jack
Central Office Limits
Loop Limits
1900 Ohms maximum loop
Cable Insulation Leakage
15,000 Ohms minimum
Programming the DSU II
21
DSU II Digital Telephone System
IMI66–132
Industry/Regulatory Standards
FCC Part 15, Class A RF emissions certified
FCC Part 68 Telco registered (fully protected)
IC CS03 Telco certified
UL 1459 safety approved by OSHA approved NAVLAP
CSA C22.2 No. 225 safety approved by OSHA approved NAVLAP
EIA RS478
Bell publication 48002 guidance
Hearing aid compatible handset
Regulatory Codes
FCC Registration Number–Key System
CVWUSA-61535-KF-E
FCC Registration Number–Hybrid System
CVWUSA-61536-MF-E
Facilities Interface Code (FIC)
02LS2
Universal Service Ordering Code (USOC)
9.0Y
Universal Service Ordering Code (USOC) Jacks
RJ14C or RJ21X
Ringer Equivalence Number(J0408, J0816, and J1632)
0.4B
Ringer Equivalence Number (JM408)
1.2B
Feature Codes
Feature
Dialing Code
All Call Page (through station speakers)
INTERCOM, 87
Attendant Calling
INTERCOM, 0
Programmed Button
Automatic Redialing
Background Music
Automatic Call Back
Station-to-Station
Messaging
LCD Messaging
22
On
INTERCOM, *1
Off
INTERCOM, #1
Activate
INTERCOM, (ext no), *6
Cancel
INTERCOM, #6
Activate
INTERCOM, (ext no), *7
Cancel
INTERCOM, #7, (ext no)
Set
INTERCOM, *02 (1–0)
Cancel
INTERCOM, #02
Programming the DSU II
IMI66–132
DSU II Digital Telephone System
Feature
Call Forward
Call Forward Outside
System (CFOS)
Call Park
Call Pick Up
Call Waiting Tone
Do Not Disturb
Dialing Code
Personal
INTERCOM, *05, (ext no)
Cancel
INTERCOM, #05
All Calls
INTERCOM, *5, (ext no)
Cancel
INTERCOM, #5
Activate
INTERCOM,
Cancel
Park Orbits 1–9
Pick Up
Directed
Group
Send
Cancel
Set
Cancel
*07, (ext no)
INTERCOM, #07
INTERCOM, * (91–99)
INTERCOM, # (91–99)
INTERCOM, *4, (ext no)
INTERCOM, #4
INTERCOM, (ext no), *01
Hang Up
Programmed Button
Programmed Button
Executive Override
INTERCOM, (ext no), *03
External Page
Set
Cancel
Manual
Exclusive
INTERCOM, 89
MUTE
MUTE
HOLD
HOLD, HOLD
Direct
INTERCOM, *90, (ext no)
Direct Hold Pick Up
INTERCOM, #90
Answer Inhibit
Hold
INTERCOM, 80
Line Answer From Any Station
Line Group Access
Line Queuing
Meet Me Answer Paging
Programming the DSU II
Group 1
INTERCOM, 9
Group 2
INTERCOM, 81
Group 3
INTERCOM, 82
Group 4
INTERCOM, 83
Enable Line Group
INTERCOM, (gp code), *8
Cancel
INTERCOM, #8
INTERCOM, 88
23
DSU II Digital Telephone System
IMI66–132
Feature
Message Waiting
Dialing Code
Set
INTERCOM, *3, (ext no)
Cancel From Idle
INTERCOM, #3, (ext no)
INTERCOM
INTERCOM, HOLD
Cancel On Line
Retrieve Message
On
INTERCOM, *#03,
Programmed Button
Off
INTERCOM, *#03,
Programmed Button
Set Tones 1–6
INTERCOM, **4 (1–6)
Night Transfer (Attendant)
Personal Ringing Tones
Pulse/Tone Switching
Redial Last Dialed Number
Save Number Redial
Use
Store
#
#
HOLD, Programmed Button
Programmed Button
INTERCOM, #03, (ext no)
Service Observing
TAP (on line)
Activate
Toll Restriction Override
Activate
0 –9
*01–99
INTERCOM, #04
INTERCOM, **6
Enable
INTERCOM, *06
Disable
INTERCOM, #06
Send Message
INTERCOM, #01
Block
INTERCOM, *2
Unblock
INTERCOM, #2
Zone 1
INTERCOM, 84
Zone 2
INTERCOM, 85
Zone 3
INTERCOM, 86
Speed Dial
Tracker Pager
Voice Announce Block
Zone Page
24
Station
System
(extension number, code)
Programming the DSU II
IMI66–132
DSU II Digital Telephone System
System Ringing Patterns
Ring Type
CO/PBX Line Ring
Intercom Tone Signaling
Voice Signaling alert
Timed hold recall at station that put call on hold
Call back alert
Queue Enabled
Call forward alert
Transfer ringing
Ring Cadence
Host system ring cadence
Two 150 msec. tone bursts every four seconds
One 215 msec. tone burst
Three 150 msec. tone bursts at the end of each
timeout period
One 80 msec. tone burst followed by three 150
msec. tone bursts and one 80 msec. tone burst
One 80 msec. tone burst
Two 1.1 sec tone busts every four seconds
Tone Type
Dial Tone
Called station ring-back
Base level program entry
Error tone—incorrect entry
All-call and zone paging notification tone
Busy tone
Override feature not allowed
Night transfer feature not allowed
Call waiting tone
Called station in do-not-disturb mode
Call-back busy feature on
System is awaiting memory dial number or key
mapping entry after location is specified
Override feature on warning tone
DISD ringback tone
DISD dial tone
DISD confirmation tone
DISD busy/error tone
Programming the DSU II
Tone Cadence
Continuous on
One sec. on and three sec. off
80 msec. tone burst sounded once
530 msec. tone burst sounded three times
80 msec. tone burst followed by 280 msec. tone
530 msec. tones sounded continuously
Three 80 msec. tone bursts sounded once
140 msec. tone burst sounded twice every 1.5 sec.
260 msec. tone burst sounded once
80 msec. tone burst sounded continuously
Six 100 msec. tone bursts sounded for 1.5 secs.
Dual 440/480 Hz tone sounded 1 sec. on/1 sec. off
381 Hz tone sounded continuously
Two 125 sec. bursts of 381 Hz tone sounded once
Three 500 msec. bursts of 381 Hz tone sounded once
25
DSU II Digital Telephone System
IMI66–132
Seeking Repair Assistance
“In warranty” defective product may be returned to American Phone Centers, postage or freight
prepaid. American Phone Centers will, at its option, repair or replace the defective product free of
charge.
“Out of warranty” defective equipment may be returned (postage or freight prepaid) to American
Phone Centers without prior authorization. American Phone Centers will, at its option, repair or
replace the defective unit, if the unit is deemed by APC to be repairable, at APC’s then current
rate for the repair. An evaluation and testing fee may be invoiced by APC if a unit is judged by
APC to be not repairable for any reason. Units are re-dated to allow for a new warranty, which is
half of the original warranty period.
Returns should be carefully packed to prevent damage. Any damage incurred during shipment
will be the responsibility of the sender.
A complete repair rate schedule is available by calling: 800-877-4448
All returns should be sent to:
American Phone Centers (APC)
395-120 Reas Ford Road
Earlysville VA 22936
26
Programming the DSU II
IMI66–132
2
DSU II Digital Telephone System
Telephone System Installation
Considering the Mounting Requirements
The following requirements will help you to install the DSU II digital telephone system.
• Locate the equipment cabinet within four feet of an AC electrical outlet dedicated
exclusively to the use of this equipment. The outlet must be a 117 VAC 15 AMP circuit
with a third-wire ground supplied to a standard electrical outlet (NEMA 5–15R).
• Mount the common equipment within 25 feet of the TELCO/PBX jacks. The
recommended nominal distance is 7 feet.
• Choose a secure and dry mounting location that has adequate ventilation. The temperature
range of the location must be within 32–122 degrees F (0–50 degrees C) and that the
relative humidity is less than 90 percent, non-condensing.
• If the mounting surface is damp or if it is made of concrete or masonry material, you must
attach a backboard to the mounting surface for mounting the common equipment. Suitable
mounting backboards are available commercially or you can construct one from 3/4-inch
plywood by cutting it to size.
Tools and Hardware
You will need the following tools and materials to install the common equipment.
• Fasteners—wood screws (1/4 x 1-inch round head), toggle bolts, or wall anchors,
• Screwdriver—to match fasteners,
• Electric drill—if prepared holes are required,
• Connecting tool—for fastening wires to a type-66 connector block,
• Crimping tool—for 623-type modular plugs,
• Volt/Ohm Meter.
Programming the DSU II System
27
DSU II Digital Telephone System
IMI66–132
Underwriters Laboratories Installation Notice
Per The Underwriters Laboratories standard 1459, 2nd edition, be aware of the following
precautions when installing telephone equipment that is to be directly connected to the telephone
company network:
• never install telephone wiring during a lightning storm,
• never install telephone jacks in wet locations unless the jack is specifically designed for
wet locations,
• never touch un-insulated telephone wires or terminals unless the telephone line has been
disconnected at the network interface,
• use caution when installing or modifying telephone lines.
Hybrid Installation
Whenever a programmer assigns lines to line groups, the digital telephone system automatically
assumes the hybrid mode. Your local telephone company may charge a higher monthly fee for
operation of a hybrid system; therefore, the FCC requires that you report the equipment-type
category designation number (KF for key system, MF for hybrid system) to the telephone
company at the time of installation.
FCC Registration
28
Key System
CVWUSA-61535-KF-E
Hybrid System
CVWUSA-61536-MF-E
Programming the DSU II
IMI66–132
DSU II Digital Telephone System
Mounting the Cabinet
After thoroughly reviewing Considering the Mounting Requirements on page 27 and fully
understanding its subject matter, use the following procedure to mount the common equipment
cabinet.
1. Unpack and carefully inspect all equipment for shipping damage. Notify the
shipper immediately of any damages that you find. Verify that the packages
contain all parts and accessories needed for proper installation and operation.
2. If the mounting location requires a backboard, attach it securely to provide a
stable mounting surface for the equipment.
3. Refer to the figure on the next page or to the PP032-001 mounting template
included in the literature that accompanies the common equipment cabinet for the
locating dimensions required for the three mounting screws, and mark their
locations on the mounting surface.
4. Drill holes in the mounting surface of a proper size to accommodate the hardware
being used. If necessary, prepare these holes with inserts, anchors or other
attachment devices as dictated by the type of mounting surface.
5. Insert the two top screws into the mounting surface and tighten them to within
approximately 1/8-inch of the surface.
6. Hang the cabinet on the top screws using the mounting holes located on the rear
of the cabinet. Note that these holes are elongated with an enlargement at one end.
This feature allows the cabinet to snap down on the screws to secure the mounting
when the cabinet is hung on them.
7. Insert a third screw through the mounting tab located on the lower edge of the
cabinet and into the mounting surface, and tighten it into place.
8. Place the individual telephone stations as desired and in keeping with accepted
industry and office standards. You can wall mount a telephone station if necessary
(see Wall Mounting the Telephone Station on page 48 for details).
Programming the DSU II
29
DSU II Digital Telephone System
IMI66–132
0.87"
16.50"
21.30"
3.78"
Back of
4-Line, 8-Station
Base Unit
20.50"
4-Line, 8-Station Base Unit
0.88"
16.50"
27.58"
3.78"
Back of
8-Line, 16-Station
Base Unit
26.25"
8-Line, 16-Station Base Unit
0.88"
16.50"
27.58"
4.54"
Back of
16-Line, 32-Station
Base Unit
26.65"
16-Line, 32-Station Base Unit
DSU250.CDR
Detailing the DSU II Cabinet Dimensions
30
Programming the DSU II
IMI66–132
DSU II Digital Telephone System
Making the AC Power Connection
You must employ a dedicated 15 AMP circuit, with a third-wire ground, supplied to a standard
electrical outlet (NEMA 5-15R) for the AC power connection.
• For added equipment protection, connect a plug-in power line surge protector between the
power cord and the AC outlet.
• Thoroughly check out the installation before connecting the power cord to an electrical
outlet to apply AC power to the system.
Dedicated 117VAC
15 AMP NEMA 5-15R
electrical outlet
with third-wire ground
Plug-in power
line surge
protector (typical)
DSU211
Fuse
(See text)
Grounding
terminal
Typical
earth
ground
Making the AC Power Connections
Identifying the Fuses
The system is protected against short circuit damage by a fuse located on the right side of the
common equipment cabinet. Always replace the fuse with one of the same value and type;
otherwise, equipment damage could result.
Comparing Cabinets and their Fuse
Types
Cabinet
J0408
J0816
J1632
Programming the DSU II
Fuse Value
1A 250V slow-blow type
3A 250V slow-blow type
3A 250V slow-blow type
31
DSU II Digital Telephone System
IMI66–132
Grounding the System
If spare conductors exist in the cables between the station and the 66M-xx connector blocks, it is
good practice to connect them to an earth ground. Doing this may help prevent them from
inducing radio frequency and/or AC interference into the system. It is also good practice to
disconnect any unused station jacks from the connector block and ground that wiring to an earth
ground as well.
Transient voltage spikes, if induced onto CO or CENTREX lines, can travel through the cable
and into the common equipment. The telephone company offers basic protection against this
condition but it is usually designed to protect the central office circuits. While it will also provide
some protection to the common equipment, you should not rely upon it for total protection. To
help ensure that external over-voltage surges do not damage the system, you should install and
properly ground primary protection devices, such as gas discharge tubes or similar devices, on all
lines. While the line boards have internal secondary surge protection on all line ports, in order for
this protection to be effective, you MUST connect the common equipment cabinet to a reliable,
effective earth ground.
Proper DSU grounding is necessary for trouble-free operation and personnel safety. The DSU has
the following three types of grounds:
• Service Ground—a neutral power line wire that is connected to the ground bus in the
premises’ AC power panel,
• System Ground—a non-current carrying power line wire that is connected to the ground
bus in the premises’ AC power panel,
• Frame Ground—a low impedance conductor that places the common equipment cabinet at
reference ground potential. The frame ground provides the greatest safety by limiting
electrical potential between non-current carrying parts of the system. The common
equipment cabinet provides a ground stud on its cabinet for access to its frame ground.
Effective grounding requires that you connect the frame ground to a good earth ground. A good
earth ground is one such as the ground bus in the premises’ AC power panel or a public metallic
cold water pipe at a point immediately at its entrance to the premises and ahead of any meters,
pumps, or insulating sections that have been added for vibration reduction. Avoid using the
premises’ structural steel frame as it may not be at earth ground potential. Make the ground
connection with #10 or #12 insulated, solid copper grounding wire. Keep the ground wire
separate from the three-wire AC line cord ground, do not splice it, and keep it as short as
possible.
The impedance of the wiring between the common equipment cabinet and the earth ground must
not exceed 0.25 ohms and the impedance between the earth ground and the power company’s
reference standard ground must not exceed 4 ohms. Use an acceptable low impedance measuring
device to measure the impedance of these paths. The #10 or #12 wire size will minimize the
wiring impedance; however, if the impedance between earth ground and the power company’s
standard reference ground exceeds 5 ohms, contact the local power company. The ground path
must always be of sufficient current-carrying capacity to prevent a build up of voltages that may
result in circuit noise, hazard to personnel, or equipment damage.
Be sure that all of the ground connections are without splices and are visible for inspection and
maintenance. Tag all of the ground connections with a sign that reads: Do Not Remove Or
Disconnect.
If you install expansion modules on the base cabinet, attach at least a #10 or #12 insulated, solid
copper wire between the frame ground stud on the expansion module(s) to the frame ground stud
on the base cabinet.
32
Programming the DSU II
IMI66–132
DSU II Digital Telephone System
Remember, if spare conductors exist in the cables that run between the stations and the connector
blocks, it is good practice to connect them to earth ground. Doing this may help prevent them
from introducing radio frequency and/or AC interference into the system. Also remember that it
is good practice to disconnect any unused station jacks from the connector block and ground that
wiring to earth ground as well.
DSU212
Frame Ground Stud
#10 or #12 Insulated, Solid
Copper Grounding Wire
Typical Earth Ground (see text)
Grounding the System
Programming the DSU II System
33
DSU II Digital Telephone System
IMI66–132
Connecting the Lines
The line terminations for the common equipment cabinet are standard modular plug/jack
connections. Line configuration must be loop start only. Each modular jack provides termination
for two lines. Modular line jacks 1 and 2 also provide termination for an auxiliary pair in addition
to the two outside lines. The outside line termination can be a type 66M-xx connector block or
individual 6-position modular jacks. The line cord that is routed between the outside line
termination and the common equipment termination should be twisted-pair wiring. The J0408,
J0816 and J1632 common equipment supports the installation of up to 4, 8, or 16 lines,
respectively. Add-on expansion modules are available to expand the line capacity of the systems.
8-Line, 16-Station Base Unit
4-Line, 8-Station Base Unit
Lines 3 & 4, Aux. Line 4
Lines 1 & 2, Aux. Line 2
Grounding
Terminal
Grounding
Terminal
Line Jacks 1 & 2, Aux. Line 2
Line Jacks 3 & 4, Aux. Line 4
Line Jacks 5 & 6
Line Jacks 7 & 8
16-Line, 32-Station Base Unit
Lines 1 & 2, Aux 1 (Line 2)
Lines 3 & 4, Aux 2 (Line 4)
Lines 5 & 6
Lines 7 & 8
Line 9 & 10
Line 11 & 12
Line 13 & 14
Line 15 & 16
DSU219
Grounding
Terminal
Locating the Line Connections
34
Programming the DSU II System
IMI66–132
DSU II Digital Telephone System
(Typical 8-Line, 16-Station
Base Unit Shown)
6-Wire Twisted
Pair Cable
{
{
{
{
RING 2
RING 1
TIP 1
TIP 2
RING 4
RING 3
TIP 3
TIP 4
RING 6
RING 5
TIP 5
TIP 6
CO/PBX
LINES
RING 8
RING 7
TIP 7
TIP 8
Line Terminations
Type 66M-XX
Connector Block
or
Individual 6-Position
Modular jacks
Aux. Ring
6
Ring 2
5
Ring 1
4
3
Tip 1
2
Tip 2
1
Aux. Tip
Pin designation for
Line Jacks 1 and 2
No Conn.
Ring 2
6
5
Ring 1
4
3
Tip 1
2
Tip 2
1
No. Conn.
Pin designation for
Line Jacks 5 and 6
CAJS083
Detailing the CO Interface
Programming the DSU II System
35
DSU II Digital Telephone System
IMI66–132
Detailing the Line Connections
The table on the next page shows the line connection details for all three of the common
equipment base units. Jacks one and two are the same for all three cabinets, jacks three and four
are the same for both the and J1632 cabinets, and jacks five through eight are only available on
the J1632 cabinet.
Reassigning the Line Ports
After you have initially connected a line to a particular line port and programmed its attributes (or
left it with the system defaulted values), you can reassign the line and its attributes to a different
port by programming action if you wish. Refer to Chapter 3 for the line to line port reassignment
programming details.
CAUTION
While this feature allows you to make adds, moves, and changes without relocating the line wiring,
it is not a substitute for correct wiring and should not be used as such. Be sure to record any
reassignments that you make.
Protecting the Lines
Transient voltage spikes, if induced onto CO or CENTREX lines, can travel through the cable
and into the common equipment. The telephone company offers basic protection against this
condition but it is usually designed to protect the central office circuits. While it will also provide
some protection to the common equipment, it should not be relied upon for total protection. To
help ensure that external over-voltage surges do not damage the system, the manufacturer
recommends that gas discharge tubes, or similar primary protection devices, be installed and
properly grounded on all lines (a selection of solid-state protection devices that are useful for this
purpose is available from ITW Linx, Elk Grove Village, Illinois 60007).
36
Programming the DSU II System
IMI66–132
DSU II Digital Telephone System
Understanding the Line Connection Details
Common
Equipment
Type
Line Jack Pin No.
1
J0408,
J0816,
and
J1632
2
3
J0816
and
J1632
4
5
J1632
6
Programming the DSU II
1
2
3
4
5
6
1
2
3
4
5
6
1
2
3
4
5
6
1
2
3
4
5
6
1
2
3
4
5
6
1
2
3
4
5
6
Connection
Telephone Number
Auxiliary 1 (Line 2) Tip
Line 2 Tip
Line 1 Tip
Line 1 Ring
Line 2 Ring
Auxiliary 1 (Line 2) Ring
Auxiliary 2 (Line 4) Tip
Line 4 Tip
Line 3 Tip
Line 3 Ring
Line 4 Ring
Auxiliary 2 (Line 4) Ring
No Connection
Line 6 Tip
Line 5 Tip
Line 5 Ring
Line 6 Ring
No Connection
No Connection
Line 8 Tip
Line 7 Tip
Line 7 Ring
Line 8 Ring
No Connection
No Connection
Line 10 Tip
Line 9 Tip
Line 9 Ring
Line 10 Ring
No Connection
No Connection
Line 12 Tip
Line 11 Tip
Line 11 Ring
Line 12 Ring
No Connection
37
DSU II Digital Telephone System
IMI66–132
Understanding the Line Connection Details
Common
Equipment
Type
Line Jack Pin No.
7
J1632
continued
8
1
2
3
4
5
6
1
2
3
4
5
6
Connection
Telephone Number
No Connection
Line 14 Tip
Line 13 Tip
Line 13 Ring
Line 14 Ring
No Connection
No Connection
Line 16 Tip
Line 15 Tip
Line 15 Ring
Line 16 Ring
No Connection
Connecting the Stations
The DSU II digital telephone system supports the operation of proprietary Comdial telephones.
The J0408, J0816 and J1632 common equipment supports the installation of up to eight, 16, or 32
telephones, respectively. Add-on expansion modules are available to expand the station capacity
of the systems. You can add one expansion module to the J0408, and two expansion modules to
the J0816 and J1632. The JM408 expansion module provides interface for eight proprietary
stations (plus interface for four lines) while the JM008 expansion module provides interface for
eight industry-standard devices.
Connections between the common equipment and the stations are typically via type connector
blocks which are cable connected to the common equipment’s 50–pin male connector. The
connector block is, in turn, wired to modular jacks that accept the modular line cord connected
between it and the telephones.
The maximum distance allowed from the common equipment to the stations is per the following
list:
• Multiline Telephones—1000 feet using #24 gauge, twisted-pair cable or 2000 feet using
#22 gauge cable
When installing the system telephones keep in mind that each station port supports only one
proprietary telephone and the system does not allow you to bridge two stations to a single
modular jack.
Always route station wiring a minimum of 12 inches from any other parallel wires or electrical
devices. If electrical noise or RF energy is at a high level, you may need to use shielded cable
with the shield connected to the cabinet ground lug.
38
Programming the DSU II
IMI66–132
DSU II Digital Telephone System
Grounding the Unused Station Cables
Remember, if spare conductors exist in the cables that run between the stations and the connector
blocks, it is good practice to connect them to earth ground. Doing this may help prevent them
from introducing radio frequency and/or AC interference into the system. Also remember that it
is good practice to disconnect any unused station jacks from the connector block and ground that
wiring to earth ground as well.
Remove insulation and twist together all spare wires at the wall outlet. Ground the wires at the to
the common equipment cabinet ground lug.
Relocating the Stations
The Comdial proprietary telephones identify themselves to the system when you install them. The
system assigns an extension number and all other programmable attributes to station ports as a
default that you can reprogram as needed. Plus, you can use programming action to reassign
attributes of one station port to a different station port if you wish. Refer to the automatic station
relocation programming procedure and the station-to-station programming procedure found in
Chapter 3.
NOTE: The system will not allow you to relocate the station 10 to station port 10
assignment.
8-Line, 16-Station Base Unit
4-Line, 8-Station Base Unit
Station 10-17,
Power Fail Station
Grounding
Terminal
Grounding
Terminal
Station 10-25
Power Fail Station
16-Line, 32-Station Base Unit
Stations 10-25
Power Fail Station
(pins 3 & 4)
Stations 26-41
DSU220
Grounding
Terminal
Locating the Station Connections
CAUTION
While this feature allows you to make adds, moves, and changes without relocating the station
wiring, it is not a substitute for correct wiring and should not be used as such. Be sure to record
any reassignments that you make.
Programming the DSU II
39
DSU II Digital Telephone System
IMI66–132
Installing the Cable Clips
Each cabinet-mounted 50-pin male connector is equipped with a retaining clip. This clip is
designed to secure the mated connection once it is made. The clip does this by snapping into a
slot on the cable-mounted connector when it is pressed together with the cabinet-mounted
connector. This retaining clip must be pulled back slightly to unsnap it before the connectors can
be separated.
Connecting Stations to the J0408
This table shows the color-coded connections for a J0408 common equipment cabinet.
Connecting Stations to the J0408 Common Equipment Cabinet
25-Pair Connections
Wire Color
White-Blue
Blue-White
White-Orange
Orange-White
White-Green
Green-White
White-Brown
Brown-White
White-Slate
Slate-White
Red-Blue
Blue-Red
Red-Orange
Orange-Red
Red-Green
Green-Red
40
Pair
1
2
3
4
5
6
7
8
Two-Wire Connections
Pin No.
Clip
Term.
26
1
27
2
28
3
29
4
30
5
31
6
32
7
33
8
1
2
3
4
5
6
7
8
9
10
11
12
13
14
15
16
Pair
Signal
Path
Signal
Path
Signal
Path
Signal
Path
Signal
Path
Signal
Path
Signal
Path
Signal
Path
Wire
Color
Green
Red
Green
Red
Green
Red
Green
Red
Green
Red
Green
Red
Green
Red
Green
Red
Station
Connections
Station Location
10
11
12
13
14
15
16
17
Programming the DSU II
IMI66–132
DSU II Digital Telephone System
Connecting Stations to the J0408 Common Equipment Cabinet
25-Pair Connections
Wire Color
Pair
Red-Brown
Brown-Red
Red-Slate
Slate-Red
Black-Blue
Blue-Black
Black-Orange
Orange-Black
Black-Green
Green-Black
Black-Brown
Brown-Black
Black-Slate
Slate-Black
Yellow-Blue
Blue-Yellow
Yellow-Orange
Orange-Yellow
Green-Yellow
Yellow-Green
Brown-Yellow
Yellow-Brown
Yellow-Slate
Slate-Yellow
Violet-Blue
Blue-Violet
Orange-Violet
Violet-Orange
Green-Violet
Violet-Green
Brown-Violet
Violet-Brown
Violet-Slate
Slate-Violet
Programming the DSU II
9
10
11
12
13
14
15
16
17
18
19
20
21
22
23
24
25
Two-Wire Connections
Pin No.
Clip
Term.
34
9
35
10
36
11
37
12
38
13
39
14
40
15
41
16
42
17
43
18
44
19
45
20
46
21
47
22
48
23
49
17
18
19
20
21
22
23
24
25
26
27
28
29
30
31
32
33
34
35
36
37
38
39
40
41
42
43
44
45
46
47
24
48
50
49
25
50
Pair
Wire
Color
Station
Connections
Station Location
Common
Audible
Station
17
Audible
Power
Fail
Station
41
DSU II Digital Telephone System
IMI66–132
Connecting Stations to the J0816
This table shows the color-coded connections for a J0816 common equipment cabinet.
Connecting Stations to the J0816 Common Equipment Cabinet
25-Pair Connections
Wire Color
White-Blue
Blue-White
White-Orange
Orange-White
White-Green
Green-White
White-Brown
Brown-White
White-Slate
Slate-White
Red-Blue
Blue-Red
Red-Orange
Orange-Red
Red-Green
Green-Red
Red-Brown
Brown-Red
Red-Slate
Slate-Red
Black-Blue
Blue-Black
Black-Orange
Orange-Black
Black-Green
Green-Black
Black-Brown
Brown-Black
Black-Slate
Slate-Black
Yellow-Blue
Blue-Yellow
42
Pair
1
2
3
4
5
6
7
8
9
10
11
12
13
14
15
16
Two-Wire Connections
Pin No.
Clip
Term.
26
1
27
2
28
3
29
4
30
5
31
6
32
7
33
8
34
9
35
10
36
11
37
12
38
13
39
14
40
15
41
16
1
2
3
4
5
6
7
8
9
10
11
12
13
14
15
16
17
18
19
20
21
22
23
24
25
26
27
28
29
30
31
32
Pair
Signal
Path
Signal
Path
Signal
Path
Signal
Path
Signal
Path
Signal
Path
Signal
Path
Signal
Path
Signal
Path
Signal
Path
Signal
Path
Signal
Path
Signal
Path
Signal
Path
Signal
Path
Signal
Path
Wire
Color
Green
Red
Green
Red
Green
Red
Green
Red
Green
Red
Green
Red
Green
Red
Green
Red
Green
Red
Green
Red
Green
Red
Green
Red
Green
Red
Green
Red
Green
Red
Green
Red
Station
Connections
Station Location
10
11
12
13
14
15
16
17
18
19
20
21
22
23
24
25
Programming the DSU II
IMI66–132
DSU II Digital Telephone System
Connecting Stations to the J0816 Common Equipment Cabinet
25-Pair Connections
Wire Color
Pair
Yellow-Orange
Orange-Yellow
Green-Yellow
Yellow-Green
Brown-Yellow
Yellow-Brown
Yellow-Slate
Slate-Yellow
Violet-Blue
Blue-Violet
Orange-Violet
Violet-Orange
Green-Violet
Violet-Green
Brown-Violet
Violet-Brown
Violet-Slate
Slate-Violet
Programming the DSU II
17
18
19
20
21
22
23
24
25
Two-Wire Connections
Pin No.
Clip
Term.
42
17
43
18
44
19
45
20
46
21
47
22
48
23
49
33
34
35
36
37
38
39
40
41
42
43
44
45
46
47
24
48
50
49
25
50
Pair
Wire
Color
Station
Connections
Station Location
Common
Audible
Station
17
Audible
Power
Fail
Station
43
DSU II Digital Telephone System
IMI66–132
Connecting Stations to the J1632
The following two tables show the color-coded connections for a J1632 common equipment
cabinet.
Connecting Stations to J1 on the J1632 Common Equipment Cabinet
25-Pair Connections
Wire Color
White-Blue
Blue-White
White-Orange
Orange-White
White-Green
Green-White
White-Brown
Brown-White
White-Slate
Slate-White
Red-Blue
Blue-Red
Red-Orange
Orange-Red
Red-Green
Green-Red
Red-Brown
Brown-Red
Red-Slate
Slate-Red
Black-Blue
Blue-Black
Black-Orange
Orange-Black
Black-Green
Green-Black
Black-Brown
Brown-Black
Black-Slate
Slate-Black
Yellow-Blue
Blue-Yellow
44
Pair
1
2
3
4
5
6
7
8
9
10
11
12
13
14
15
16
Two-Wire Connections
Pin No.
Clip
Term.
26
1
27
2
28
3
29
4
30
5
31
6
32
7
33
8
34
9
35
10
36
11
37
12
38
13
39
14
40
15
41
16
1
2
3
4
5
6
7
8
9
10
11
12
13
14
15
16
17
18
19
20
21
22
23
24
25
26
27
28
29
30
31
32
Pair
Signal
Path
Signal
Path
Signal
Path
Signal
Path
Signal
Path
Signal
Path
Signal
Path
Signal
Path
Signal
Path
Signal
Path
Signal
Path
Signal
Path
Signal
Path
Signal
Path
Signal
Path
Signal
Path
Wire
Color
Green
Red
Green
Red
Green
Red
Green
Red
Green
Red
Green
Red
Green
Red
Green
Red
Green
Red
Green
Red
Green
Red
Green
Red
Green
Red
Green
Red
Green
Red
Green
Red
Station
Connections
Station Location
10
11
12
13
14
15
16
17
18
19
20
21
22
23
24
25
Programming the DSU II
IMI66–132
DSU II Digital Telephone System
Connecting Stations to J1 on the J1632 Common Equipment Cabinet
25-Pair Connections
Wire Color
Pair
Yellow-Orange
Orange-Yellow
Green-Yellow
Yellow-Green
Brown-Yellow
Yellow-Brown
Yellow-Slate
Slate-Yellow
Violet-Blue
Blue-Violet
Orange-Violet
Violet-Orange
Green-Violet
Violet-Green
Brown-Violet
Violet-Brown
Violet-Slate
Slate-Violet
Programming the DSU II
17
18
19
20
21
22
23
24
25
Two-Wire Connections
Pin No.
Clip
Term.
42
17
43
18
44
19
45
20
46
21
47
22
48
23
49
24
50
25
33
34
35
36
37
38
39
40
41
42
43
44
45
46
47
48
49
50
Pair
Wire
Color
Station
Connections
Station Location
45
DSU II Digital Telephone System
IMI66–132
Connecting Stations to the J1632 (continued)
Connecting Stations to J2 on the J1632 Common Equipment Cabinet
25-Pair Connections
Wire Color
White-Blue
Blue-White
White-Orange
Orange-White
White-Green
Green-White
White-Brown
Brown-White
White-Slate
Slate-White
Red-Blue
Blue-Red
Red-Orange
Orange-Red
Red-Green
Green-Red
Red-Brown
Brown-Red
Red-Slate
Slate-Red
Black-Blue
Blue-Black
Black-Orange
Orange-Black
Black-Green
Green-Black
Black-Brown
Brown-Black
Black-Slate
Slate-Black
Yellow-Blue
Blue-Yellow
46
Pair
1
2
3
4
5
6
7
8
9
10
11
12
13
14
15
16
Two-Wire Connections
Pin No.
Clip
Term.
26
1
27
2
28
3
29
4
30
5
31
6
32
7
33
8
34
9
35
10
36
11
37
12
38
13
39
14
40
15
41
16
1
2
3
4
5
6
7
8
9
10
11
12
13
14
15
16
17
18
19
20
21
22
23
24
25
26
27
28
29
30
31
32
Pair
Signal
Path
Signal
Path
Signal
Path
Signal
Path
Signal
Path
Signal
Path
Signal
Path
Signal
Path
Signal
Path
Signal
Path
Signal
Path
Signal
Path
Signal
Path
Signal
Path
Signal
Path
Signal
Path
Wire
Color
Green
Red
Green
Red
Green
Red
Green
Red
Green
Red
Green
Red
Green
Red
Green
Red
Green
Red
Green
Red
Green
Red
Green
Red
Green
Red
Green
Red
Green
Red
Green
Red
Station
Connections
Station Location
26
27
28
29
30
31
32
33
34
35
36
37
38
39
40
41
Programming the DSU II
IMI66–132
DSU II Digital Telephone System
Connecting Stations to J2 on the J1632 Common Equipment Cabinet
25-Pair Connections
Wire Color
Pair
Yellow-Orange
Orange-Yellow
Green-Yellow
Yellow-Green
Brown-Yellow
Yellow-Brown
Yellow-Slate
Slate-Yellow
Violet-Blue
Blue-Violet
Orange-Violet
Violet-Orange
Green-Violet
Violet-Green
Brown-Violet
Violet-Brown
Violet-Slate
Slate-Violet
Programming the DSU II
17
18
19
20
21
22
23
24
25
Two-Wire Connections
Pin No.
Clip
Term.
42
17
43
18
44
19
45
20
46
21
47
22
48
23
49
24
50
25
33
34
35
36
37
38
39
40
41
42
43
44
45
46
47
48
49
50
Pair
Wire
Color
Station
Connections
Station Location
47
DSU II Digital Telephone System
IMI66–132
Wall Mounting the Telephone Stations
The DigiTech (product code 77nnn), Impact (product code 8nnnn), and Impression (product code
2nnnn) telephones are shipped from the factory configured for desk use. To convert them for wall
mounting, follow the procedures outlined below.
To convert the model 77nnn telephones for wall mounting,
1. Disconnect line cord and handset cord from telephone.
2. Turn telephone over to expose lower housing.
CAUTION
The telephone circuitry is sensitive to static electricity discharge. Be sure that your body and the
workplace are properly grounded to avoid any static electricity discharge while you perform step 3.
3. Remove screws that attach lower housing to upper housing. Carefully separate
lower and upper housings making sure not to disconnect wiring between them.
4. Rotate lower housing 180 degrees. Do not disturb any internal wiring.
5. lower housing to upper housing. Make sure no wires are caught between upper
and lower housings. Do not over-tighten screws wile refastening the housings.
6. Route line cord through appropriate channel on lower housing, and reconnect it to
telephone. You may substitute a shorter line cord if you wish.
7. Reconnect the handset cord.
Remove lower housing,
rotate 180 degrees
and replace
CAHS003
Upper housing
Rotating the Lower Housing on Model 77nnn Telephones
48
Programming the DSU II
IMI66–132
DSU II Digital Telephone System
To convert the Impact (models and 81nnn) and Impression (models 20nn and 21nnn)
telephones for wall-mounting,
1. Turn telephone over and disconnect line cord and handset cord from telephone.
Do not damage line cord on plastic dressing tabs.
2. Remove screws from pedestal and unlatch it from telephone housing, rotate it 180
degrees, re-latch its tabs in the slots in the lower housing of the telephone, and
replace screws.
3. Route line cord as appropriate, and reconnect it to telephone. Substitute shorter
line cord if desired.
4. This telephone has a reversible handset retaining hook. When wall mounting, pull
up this hook and rotate it 180 degrees.
5. Reconnect the handset cord.
There are wall-mounting enhancement kits available through your normal distribution channels.
These kits include a handset cradle cup that you can screw-mount to the telephone’s upper
housing. The product codes for these enhancement kits are: HCCI for the Impact telephones
(models 80nnn and 81nnn) and Impression telephones (models 20nnn and 21nnn), and HCCX for
the DigiTech telephones (model 77nnn).
Rotate pedestal
180 degrees for
wall mounting.
Pedestal
Lower
Housing
Unsnap
Pedestal
Here
CAJS005
Pull up spring-loaded
handset wall tab,
rotate it 180 degrees,
and release.
CAJS004
Reversing the Pedestal and Handset Hook
(Model 80nnn, 81nnn, 20nnn, and 21nnn Telephones)
Programming the DSU II
49
DSU II Digital Telephone System
IMI66–132
To wall-mount the telephones,
After configuring a telephone for wall mounting, either mount it directly on the wall using
two #10 pan-head screws (obtained locally), or mount it on a wall jack cover plate. If using a
wall jack cover plate, use an AT&T type wall plate for best results.
1. If #10 screws are used, thread them into the wall within 1/8-inch of the surface.
Refer to the illustration for the spacing dimensions.
2. Position the keyhole-shaped holes in the bottom of the telephone over the #10
screws or the cover plate studs. Slide the telephone down until a slight click is
felt.
3. To remove the telephone, lift to unsnap both screws or studs from the bottom
housing, and then lift away from the wall.
Wall Plate - OR - #10 Screws
NOTE: For a secure mount, Installers recommend
that you use an AT&T 630B wall plate.
3 15/16"
CAJS006
Detailing the Station Wall Mounting
50
Programming the DSU II
IMI66–132
DSU II Digital Telephone System
Installing DSS/BLF Consoles
The digital telephone system supports the installation and use of DigiTech DD32X, Impact
IB64X, and Impression DU32X consoles at any available station port. The number of installed
consoles is limited only by port availability; however, since a console complements a companion
telephone located in an adjacent station port, you can use up to one-half of the available station
ports for consoles. In addition, with the dual console feature (discussed later), a full two-thirds of
the total station port capacity is available for console use.
You can assign two consoles to one telephone, each taking its own station port. This feature is
especially useful with DD32X and Impression DU32X consoles and a J1632 system that has one
or two JM408 expansion modules included with it. This dual console feature allows a station user
to monitor up to 48 stations from one station location using 32-button consoles.
Install the first console at the station port that is logic-paired with the station that you wish to
complement. Install the second console at any station port except 10 or 11 and, using class of
service programming, assign it to the same station port that is logic-paired with the first console.
Detailing the Digital Station Port
Logic Pairing
10-11
12-13
14-15
16-17
18-19
20-21
22-23
24-25
26-27
28-29
30-31
32-33
34-35
36-37
38-39
40-41
42-43
44-45
46-47
48-49
50-51
52-53
54-55
56-57
You can install the DSS/BLF console at any station port and assign it to a station without first
installing a console at the station’s logic-paired port if you wish. This configuration is convenient
for adding a console to an existing telephone installation that already has its logic-paired port
occupied; however, do not use this configuration for assigning a console to station ports 10 and
12 because the console buttons will not be usable for programming. As discussed above, this
feature is also useful for adding a second console to a station that already has a paired console
installed with it.
The digital telephone system automatically recognizes a console when you connect it to a station
port and automatically assigns the station intercom numbers to the console buttons for direct
station selection (DSS) purposes with associated busy lamp field (BLF) status lights. However,
the console buttons are fully programmable and the station user can customize them as he or she
sees fit by programming them as DSS buttons or as automatic dialing (auto dial) buttons.
When the user programs the buttons for DSS use, capability is also available at a secondary level
at each DSS button.
Programming the DSU II
51
DSU II Digital Telephone System
IMI66–132
While the first console (the one installed at the logic-paired port) extends the auto dial buttons of
the paired telephone by 48 and provides DSS/BLF coverage for station ports 10 through 57, the
second console (the one installed at the programmed station port) provides DSS/BLF coverage as
follows:
• On a 32-station system with two 8-station expansion modules, the first 16 buttons are
automatically assigned (defaulted) to station ports 42 through 57 for DSS purposes.
• On a 32-station system with one 8-station expansion module, the first 8 buttons are
automatically assigned (defaulted) to station ports 42 through 49 for DSS purposes.
• On any other smaller station capacity system, all buttons are unassigned.
When you install a console and program it to complement a telephone without first having a
console installed at a port that is logic-paired to that telephone, its button assignment is
automatically defaulted, as described above, but the user can reprogram it as required. It is
important to remember that when you program for a second console, the system sets the console
button mapping to that which is described above. When you clear the assignment, the system
resets the button mapping to match a logic-paired console. This means that when you clear the
second console feature, the console installed at that port complements the telephone that is
installed at its logic-paired port instead of the telephone that is located at the program-designated
port, and its buttons are automatically reassigned to station ports 10 through 57.
{
{
{
DIGITECH
COMDIAL
1
2
3
4
5
6
7
8
9
10
11
12
13
14
15
16
17
18
19
20
21
22
23
24
25
26
27
28
29
30
31
32
33
34
35
36
37
38
39
40
41
42
43
44
45
46
47
48
49
50
50
26
25
1
CLIP TERMIINALS
T R ANS
CONF
T AP
S P KR
MU T E
H OL D
Typical
Telephone
CAJS008
IT CM
Paired-Port
DSS/BLF
Console
Second
DSS/BLF
Console
Connecting DSS/BLF Consoles
52
Programming the DSU II
IMI66–132
DSU II Digital Telephone System
Connecting a Power Failure Station
The system provides a tip and ring pair connected to line 1 as an emergency power failure circuit.
This circuit is active during a commercial AC power failure if an external battery assembly is not
installed to provide battery backup power to the system. Connect an industry standard, single-line
telephone, such as a model 2500, to a power failure pair and use it to provide communications
capability until the AC power to the system is restored.
NOTE: The system also provides one power failure connection with each add-on
expansion module, with the exception of the JM008 which is non-applicable.
Power Failure Terminals on
Station Connection Block
(4-Line, 8-Station and 8-Line, 16-Station Base Units)
Typical Industry Standard
Non-electronic Telephone
(Power Failure Interface)
{
37
38
39
40
41
42
43
44
45
46
47
48
49
50
123456
Power Failure Jack (pins 3 & 4)
(16-Line, 32-Station Base Unit)
DSU221
Pin 3 = Power Failure Tip
Pin 4 = Power Failure Ring
Typical Industry Standard
Non-electronic Telephone
(Power Failure Interface)
Making a Power Failure Connection
Programming the DSU II
53
DSU II Digital Telephone System
IMI66–132
Using the Auxiliary Equipment Interface
You can connect an industry-standard telephone or a data device such as a modem or a FAX
machine on a line ahead of the common equipment if you wish. If you do so, the system can
detect an off-hook condition in the connected device and turn on the line status light at the system
telephones to indicate that the line is busy.
Connection is across tip and ring of lines 2 and 4. The system provides the auxiliary interface
connections at terminals 1 and 6 of common equipment line jacks 1 and 2.
NOTE: When you are employing this auxiliary interface feature, the line-to-line port
reassignment feature (page 148) works as described except in regard to line 2
and line 4. You can only reassign Line 2 to line port 4 and line 4 to line port 2.
Line
Jack
1
Line
Jack
2
TIP 2
{
{
TIP 4
1
2
3
4
5
6
Auxiliary
Interface
for Line 2
RING 2
Auxiliary
Interface
for Line 4
1
2
3
4
5
6
RING 4
Optional non-key
system telephone
device or data
device. (No A-lead
control required)
DSU210
Making the Auxiliary Interface Connections
54
Programming the DSU II
IMI66–132
DSU II Digital Telephone System
(Wiring shown for low current application - see caution text)
Signalling
Device
Wire to
Common
Audible
Interface
Relay
24V @ 1A Max.
48V @ .5A Max.
Power
Source for
Signalling
Device
AC or DC
Input as
Required
(Wiring shown with slave relay connection for high current application - see caution text)
Wire to
Common
Audible
Interface
Relay
24V @ 1A Max.
48V @ .5A Max.
AC or DC
Input as
Required
Power
Source for
Signalling
Device
AC or DC
Input as
Required
Voltage Clamping Device
Recommended
Signalling
Device
Slave
Relay
Common
Audible {
{
Station 17
Audible
Power
Source for
Slave
Relay
39
40
41
42
43
44
45
46
47
48
49
50
123456
26
Common Audible Jack (pins 1 & 6)
(16-Line, 32-Station Base Unit)
1
CLIP TERMIINALS
Station Connector Block
(4-Line, 8-Station and
8-Line, 16-Station Base Units)
Pin 1
Pin 6
}=Common Audible Pair
DSU222
Connecting Typical Common Audible Interface Wiring
Programming the DSU II
55
DSU II Digital Telephone System
IMI66–132
Connecting the Common
Audible and Auxiliary Ringing Interface
You can use the relay closure dry-contact points for controlling external audible equipment.
These contact closures track the pattern of the ringing for incoming calls. The contacts are closed
during the ringing period and are open during the silent period.
CAUTION
Do not exceed a 1 amp at 24 volts (0.5 amp at 48 volts) load on these control terminals. If the load
requirements exceed this limit, connect the load through an external slave relay. DO NOT
CONNECT THESE CONTROL TERMINALS DIRECTLY TO THE LINE.
Connecting Outside Lines
Common audible terminals provide a dry-contact closure whenever any of the outside lines that
you have connected to the common equipment ring with an incoming call.
Connecting Selected Ports
Station 17 audible terminals provide a dry-contact relay closure whenever ringing is sent to
station 17 or to a programmable destination. Use class of service programming to choose either
the station 17 or the programmable paging port as the ringing destination. Refer to Chapter 3 for
programming details.
When you have programmed for station port 17 ringing, it is a common practice to use a
customer-supplied external device to provide loud ringing and connected in a manner similar to
the common audible arrangement shown in the illustration on the next page.
CAUTION
Do not connect an external paging device or any external ringing device to station port 17
connections.
56
Programming the DSU II
IMI66–132
DSU II Digital Telephone System
When you have programmed for paging port ringing, it is a common practice to use a
customer-supplied external paging amplifier connected to the paging port to amplify and
broadcast the ringing tones sent to the paging port by the system. You can employ the relay
closures that appear at the ringing terminals to energize the external paging amplifier during the
periods when the ringing tones are being sent if necessary.
NOTE: Refer to Using the External Paging Interface beginning on page 58 for a
discussion of external paging amplifier connections and information for using
the paging port ringing terminals in an alternate paging enable function.
Paging Port
J0408 Base Unit
Paging Port
J1 Connector Block
Station 17 Audible Connection for
(J0408 and J0816 Systems)
J0816 Base Unit
Connect Audio
Input To Common
Equipment
Paging Port
123456
PA System
Audio Input
Enable Input
Paging Port
DSU224
Pin 2
Pin 5
J1632 Base Unit
}=Station 17 Audible Pair
1
2
3
4
5
6
7
8
9
10
11
12
13
14
15
16
17
18
19
20
21
22
23
24
25
26
27
28
29
30
31
32
33
34
35
36
37
38
39
40
41
42
43
44
45
46
47
48
49
50
50
26
25
1
CLIP TERMIINALS
DSU224
Connecting a Typical External Paging Interface
Programming the DSU II
57
DSU II Digital Telephone System
IMI66–132
Using the External Paging Interface
The system provides a special transformer-isolated paging port that you can use to couple the
system to a customer-supplied external paging amplifier. This external paging port does not
provide a talk-back path nor will it recognize dial tones.
You can use the relay closure dry-contact points that the system makes available at the ringing
port terminal for controlling the external paging amplifier during a paging operation. These
contacts close and stay closed during the time that a paging operation is active to provide a
constant enable signal path for the paging amplifier.
NOTE: This paging enable constant closure function overrides the ring pattern
closure provided when ringing is sent to the paging port.
• Connect the audio input of a customer-supplied external paging amplifier to the paging
port.
• If the paging amplifier requires an enable signal, connect the enable leads to the station 17
audible terminals.
PA System
Audio
Input
Program line port as
auxiliary port and connect
PA system to tip and ring
pair of that port.
{
RING 2
RING 1
TIP 1
TIP 2
{
{
RING 6
RING 5
TIP 5
TIP 6
RING 8
RING 7
TIP 7
TIP 8
{
RING 4
RING 3
TIP 3
TIP 4
CO/PBX
LINES
Line Termination
Type 66M-XX
Connector Block
or
Individual 6-Position
Modular Jacks
.
.
DSU215
Connecting a Line Port as an External Paging Port
58
Programming the DSU II
IMI66–132
DSU II Digital Telephone System
Using a Line Port as an External Paging Interface
You can use class of service programming to program a line port to be an AUXILIARY port. As
an AUXILIARY port, a user can use it to couple a telephone to an external paging device that
you have wired to the line port. He or she does this from any station with that line presence by
pressing the proper line button to select the AUXILIARY port. The user can dial DTMF tones or
dial pulses through the AUXILIARY port as needed. The paging enable relay closure feature
discussed previously is not available for use with this installation.
• Connect the audio input of a customer-supplied external paging amplifier to the tip and
ring leads of the AUXILIARY port.
• You can install a tone select, zone-paging amplifier if you wish. If you do install this type
of amplifier, the user must dial the zone-select code after he or she presses the
AUXILIARY port line select button.
Connecting Data Devices to the System
The DSU II includes serial data ports for use. The common equipment cabinet provides these
ports as standard modular jacks labeled COM 1 and COM 2 This section contains information on
two stages of wiring these connections for data devices.
Making Modular Jack Data Connections, explains connections from stations to modular jacks.
Making the Common Equipment Data Connection on page 61 details wiring from the modular
jack to the DSU.
Making Modular Jack Data Connections
Modular jack connections are wiring connections from a station to a modular (wall) jack.
The system provides two serial data ports on the J0408:
• Connect a video display terminal (VDT), Tracker, or Voice Mail to COM 1.
• Connect a serial data printer or Caller ID to COM 2.
The system provides four serial data ports on the J0816 and J1632:
• Connect a video display terminal (VDT) to COM 1.
• Connect a serial data printer or Caller ID to COM 2.
• Connect Voice Mail to COM 3.
• Connect Tracker to Com 4.
NOTE: The distance between a data device and the common equipment can be up to
500 feet in a quiet electrical environment. Some sites may require shielded
cable for long runs. For longer distances, you must install limited distance
modems to relay the data communications between the common equipment
and a data device.
Programming the DSU II
59
DSU II Digital Telephone System
From COM 1
Serial Data Port
IMI66–132
TD
RD
SG
}
Typical modular to EIA adapter
wiring shown for reference only.
Typical VDT
Interface
TD
RD
Typical
625A2
Modular
Jack
4
3
Front
View of
Jack
2
654321
Front View
of Jack
}
4
5
7
20
8
21
23
24
25
IBM
6
19
22
Typical Personal Computer
3
16
18
SG
Industry Standard
Modular Line Cord
(4-conductor)
From COM 2
Serial Data Port
2
15
17
1
2
3
4
5
6
5
1
14
9
10
IBM
11
12
IBM
13
TD
Typical modular to EIA adapter
wiring shown for reference only.
SG
Typical Data
Printer Interface
14
Typical
625A2
Modular
Jack
RD
4
3
Front
View of
Jack
2
654321
16
17
1
2
3
4
5
6
5
15
Front View
of Jack
18
SG
19
20
21
22
23
Industry Standard
Modular Line Cord
(4-conductor)
24
25
1
Typical
Data Printer
2
3
4
5
6
7
8
9
10
11
12
13
dsu263.cdr
Typical Modular To 9-Pin EIA Adapter
Wiring Shown For Reference Only
1
2
3
4
5
6
Front View
of 6-Conductor
Modular Jack
SG
TD
RD
CTS
6
7
8
9
1
2
3
4
5
Rear View
of 9-Pin Female
EIA Connector
CAJS105
Connecting Data Devices through Modular Connections
60
Programming the DSU II
IMI66–132
DSU II Digital Telephone System
When preparing a cable for connection to a data device, refer to the manufacturer’s manual for
the equipment being interfaced and make the following wiring connections:
• Wire the common equipment RD (data from device to common equipment) connection to
the device TD (transmit data) connection.
• Wire the common equipment TD (data to device from common equipment) connection to
the device RD (receive data) connection.
• Wire the common equipment SG (signal ground) connection to the device SG (signal
ground) connection.
• If required for proper operation, wire the common equipment (clear-to-send status from
device to common equipment) connection to the device RTS (request-to-send) connection.
NOTE: The common equipment requires a positive voltage, with respect to signal
ground, in order to send data.
Making the Common Equipment Data Connections
You must make wiring connections from the modular jack (wall jack) to the common equipment
cabinet modular jack for the data connection.
The default data communications format is as follows:
• 8-bit data with 1 stop bit and no parity
• Baud rate of 9600 baud.
Configure a data device to match this format for initial operation or reprogram the system’s data
format to match those of a data device. The tables below list the system’s data ports.
NOTE: The distance between a data device and the common equipment can be up to
500 feet in a quiet electrical environment. Some sites may require shielded
cable for long runs. For longer distances, you must install limited distance
modems to relay the data communications between the common equipment
and a data device.
Programming the DSU II
61
DSU II Digital Telephone System
IMI66–132
Com 2
Com 1
J0408 Base Unit
Com 3
Com 4
Com 2
Com 1
J0816 Base Unit
Com 2
Com 3
Com 4
Com 1
DSU225
J1632 Base Unit
1.= Request to Send (RTS)
2.= Clear to Send (CTS)
3. = Receive Data (RD)
4. = Transmit Data (TD)
5. = Signal Ground (SG)
6. = No Connection
6
5
4
3
2
1
(Front View of Jack)
Making Data Connections to the System
62
Programming the DSU II
IMI66–132
DSU II Digital Telephone System
Connecting a Personal Computer for Remote Programming
You can connect a personal computer (PC) to the DSU II digital telephone system remotely
through modems as described below. For more specific information, see IMI66-094. (For
information on direct connection, refer to page 59 of this manual.)
You will need the following customer-supplied equipment:
• PC and appropriate software program,
• pair of data modems.
The data modems must be “Hayes-compatible,” capable of 300-, 1200-, 2400-, or 9600-baud data
speeds, and have auto-answer capability. Be sure to verify the auto-answer capability before
purchasing the units. You are assured of best results if you employ modems of the same make
and model at both the installation site and the remote programming site.
Make the equipment connections per the following procedure:
1. Determine the signal needs of the modem from the user’s manual for it. (The
digital telephone system only requires TD, RD, and SG but the modems may
require more signals. Check with the modem manufacturer for special
requirements.)
2. Wire the proper connector (to match the data jack) on one end of a length of
multiline cable.
3. Punch down the appropriate leads on the connector block.
4. Connect the network jack of the data modem to an outside telephone line. (If a
line is not reserved for remote programming, have a line switch installed so that
on site personnel can switch the outside telephone line between the data modem
and the digital telephone system cabinet when you are going to perform remote
programming.)
5. Refer to the user’s manual for the modem, and program the modem to
automatically answer after the first ring.
6. Interface the PC with the modem at the programming site per the user’s manuals
for the equipment be used.
7. Establish a communications link for programming the system from a remote site.
• If you have had a line switch installed at the customer site, call someone there
and ask them to set it for modem operation.
• After the outside line is connected to the modem, make the data link between the
originating and the remote modems, and perform programming from your remote
site just as if the PC was connected directly to the system.
Programming the DSU II
63
DSU II Digital Telephone System
IMI66–132
If you experience difficulty in establishing a communications path between your
PC, modems, and the digital telephone system, note the suggestions that are listed
below.
• Confirm that the modems are wired correctly. Be sure RD, TD, and SG are connected to the system’s serial data connection. Reverse connections at pins 2 and
3 if necessary. Sometimes you must strap pin 4 to 5, or pin 6 to 7, or pin 6 to 8 to
20 in the modem wiring. Check the modem’s installation manual for this
requirement. Also check the manual for any additional wiring connections.
• Use a breakout box data tester to troubleshoot the data communications lines.
• Be sure that your modem has: auto-answer capability, DTR override, and CD
override and that the Result Codes, On-Line Echo, Off-Line Echo, and Flow
Control are disabled. Plus, make sure that you have enabled the modem’s
auto-answer feature. The way to do this is to program an initialization string into
the modem. A typical initialization string that uses generic modem AT Commands for connection to a telephone system’s serial data port is as follows: AT
E0 F1 L2 Q1 S0=0 &C0 &D0 &K0 &W0 &Y0. Remember, this is a typical
initialization string—not all modems will respond to it. You should refer to your
modem’s instruction manual if you have difficulty.
Typical Common
Equipment Cabinet
Data
Port
Typical
Personal Computer
Line
Port
Data
Jack
Data
Modem
Line
Switch
Telco Network
Network
Jack
Data Jack
Data
Modem
Network Jack
dsu260.cdr
Installing a Personal Computer for Remote Programming
64
Programming the DSU II
IMI66–132
DSU II Digital Telephone System
Using the Music Interface
If music is to be part of the system, connect a customer-provided music source to the common
equipment music interface jack (phono jack) provided for this purpose. Use the volume control
on the music source to adjust the audio level of the music as required.
DSU216
Music Interface
Music Source
(for music on hold
and background music)
Using the Music Interface
Programming the DSU II
65
DSU II Digital Telephone System
IMI66–132
Using the Add-on Expansion Modules
You can install optional add-on expansion modules to the DSU II common equipment base unit
to increase the line and station capacity of an installed system.
• The JM408 expansion module provides an additional four lines and eight digital
proprietary stations.
• The expansion module provides interface and ring generation for eight industry-standard
telephone devices.
Base Unit
Type
Lines
System
Stations
J0408
4
8
J0816
8
16
J1632
66
Base Unit
Capacity
16
32
Expansion
Module
Type
one JM408
one JM008
one JM408
two JM408
one JM008
two JM008
one JM408
and one JM008
one JM408
two MJ408
one JM008
two JM008
one JM408
and one JM008
Total System Capacity
Lines
Systems
Stations
ISTs
8
4
12
16
8
8
16
8
24
32
16
16
8
8
16
12
24
8
20
24
16
16
40
48
32
32
8
16
20
40
8
Programming the DSU II
IMI66–132
DSU II Digital Telephone System
Using the JM408 Module
The JM408 expansion module provides to an installed system an additional four lines and eight
digital proprietary stations. The default numbering of the expanded lines and stations begin with
the next higher line or station port number from that provided by the host base unit. The
numbering continues sequentially from top module to bottom module if two modules are
installed. For example: The defaulted 8-line, 16-station base unit provides station ports 10
through 25 and lines 1 through 8. When installed, a JM408 expansion module provides station
ports 26 through 33 and lines 9 through 12 thus creating a 12 line by 24 station system.
Each expansion module provides a tip and ring pair as an emergency power failure circuit. This
circuit is connected to the first module-provided line.
Connecting Lines to the JM408 Expansion Module
The expansion module’s line connections are available at two modular jacks. When facing the
jack openings, lines 1 and 2 are provided by the jack on the right and lines 3 and 4 are provided
by the jack on the left.
Line Jack
1
2
Programming the DSU II
Pin Number
1
2
3
4
5
6
1
2
3
4
5
6
Connection
Telephone
Number
No Connection
Line 2M Tip
Line 1M Tip
Line 1M Ring
Line 2M Ring
No Connection
No Connection
Line 4M Tip
Line 3M Tip
Line 3M Ring
Line 4M Ring
No Connection
67
DSU II Digital Telephone System
IMI66–132
Connecting Stations to the JM408 Expansion Module
The station connections are available at a 50-pin connector.
Connecting Stations to the J0408 Expansion Module
25-Pair Connections
Wire Color
White-Blue
Blue-White
White-Orange
Orange-White
White-Green
Green-White
White-Brown
Brown-White
White-Slate
Slate-White
Red-Blue
Blue-Red
Red-Orange
Orange-Red
Red-Green
Green-Red
Red-Brown
Brown-Red
Red-Slate
Slate-Red
Black-Blue
Blue-Black
Black-Orange
Orange-Black
Black-Green
Green-Black
Black-Brown
Brown-Black
Black-Slate
Slate-Black
Yellow-Blue
Blue-Yellow
68
Pair
1
2
3
4
5
6
7
8
9
10
11
12
13
14
15
16
Two-Wire Connections
Pin No.
Clip
Term.
26
1
27
2
28
3
29
4
30
5
31
6
32
7
33
8
34
9
35
10
36
11
37
12
38
13
39
14
40
15
41
16
1
2
3
4
5
6
7
8
9
10
11
12
13
14
15
16
17
18
19
20
21
22
23
24
25
26
27
28
29
30
31
32
Pair
Signal
Path
Signal
Path
Signal
Path
Signal
Path
Signal
Path
Signal
Path
Signal
Path
Signal
Path
Wire
Color
Green
Red
Green
Red
Green
Red
Green
Red
Green
Red
Green
Red
Green
Red
Green
Red
Station Connections
Station
Location
1M
2M
3M
4M
5M
6M
7M
8M
Programming the DSU II
IMI66–132
DSU II Digital Telephone System
Connecting Stations to the J0408 Expansion Module
25-Pair Connections
Wire Color
Yellow-Orange
Orange-Yellow
Green-Yellow
Yellow-Green
Brown-Yellow
Yellow-Brown
Yellow-Slate
Slate-Yellow
Violet-Blue
Blue-Violet
Orange-Violet
Violet-Orange
Green-Violet
Violet-Green
Brown-Violet
Violet-Brown
Violet-Slate
Slate-Violet
Pair
17
18
19
20
21
22
23
24
25
Two-Wire Connections
Pin No.
Clip
Term.
42
17
43
18
44
19
45
20
46
21
47
22
48
23
49
24
50
25
33
34
35
36
37
38
39
40
41
42
43
44
45
46
47
48
49
50
Pair
Signal
Path
Wire
Color
Tip
Ring
Station Connections
Station
Location
Power Fail
Station
Using the JM008 Module
The expansion module provides an interface for a wide variety of industry-standard telephone
(IST) equipment such as 500- and 2500-type telephones, cordless telephones, voice mail systems,
answering machines, FAX machines, and data modems.
Each IST port drives a load with a maximum ringer equivalence number (REN) of 2.0. Check the
REN number of the connected IST equipment so you do not exceed the capacity of the IST port.
Improper operation may result if you exceed the REN maximum.
The default numbering of the expansion module stations begin with the next higher station port
number from that provided by the host base unit. The numbering continues sequentially from top
module to bottom module if two modules are installed. For example: The defaulted 8-line,
16-station base unit provides station ports 10 through 25. When installed, a JM008 expansion
module provides station ports 26 through 33. A second JM008, when installed in the bottom
mounting location, provides station ports 34 through 41.
CAUTION
If you install both a JM408 and a JM008 on the same cabinet, you must install the JM408 at the
upper expansion module location or the lines provided by the JM408 will not function.
When you install the JM008 and connect IST devices to it, there are several programming
requirements that you must consider. Refer to the programming section Industry Standard
Telephone Interface beginning on page 220 for programming details.
Programming the DSU II
69
DSU II Digital Telephone System
IMI66–132
Connecting Stations to the JM008 Module
The station connections are available at a 50-pin connector.
Connecting Stations to the J008 Module
25-Pair Connections
Wire Color
White-Blue
Blue-White
White-Orange
Orange-White
White-Green
Green-White
White-Brown
Brown-White
White-Slate
Slate-White
Red-Blue
Blue-Red
Red-Orange
Orange-Red
Red-Green
Green-Red
Red-Brown
Brown-Red
Red-Slate
Slate-Red
Black-Blue
Blue-Black
Black-Orange
Orange-Black
Black-Green
Green-Black
Black-Brown
Brown-Black
Black-Slate
Slate-Black
Yellow-Blue
Blue-Yellow
70
Pair Pin No.
1
2
3
4
5
6
7
8
9
10
11
12
13
14
15
16
26
1
27
2
28
3
29
4
30
5
31
6
32
7
33
8
34
9
35
10
36
11
37
12
38
13
39
14
40
15
41
16
Two-Wire Connections
Clip
Term.
1
2
3
4
5
6
7
8
9
10
11
12
13
14
15
16
17
18
19
20
21
22
23
24
25
26
27
28
29
30
31
32
Pair
Signal Path
Signal Path
Signal Path
Signal Path
Signal Path
Signal Path
Signal Path
Signal Path
Wire
Color
Tip
Ring
Tip
Ring
Tip
Ring
Tip
Ring
Tip
Ring
Tip
Ring
Tip
Ring
Tip
Ring
Station Connections
Station
Location
1M
2M
3M
4M
5M
6M
7M
8M
Programming the DSU II
IMI66–132
DSU II Digital Telephone System
Connecting Stations to the J008 Module
25-Pair Connections
Wire Color
Pair Pin No.
Yellow-Orange
Orange-Yellow
Green-Yellow
Yellow-Green
Brown-Yellow
Yellow-Brown
Yellow-Slate
Slate-Yellow
Violet-Blue
Blue-Violet
Orange-Violet
Violet-Orange
Green-Violet
Violet-Green
Brown-Violet
Violet-Brown
Violet-Slate
Slate-Violet
Programming the DSU II
17
18
19
20
21
22
23
24
25
42
17
43
18
44
19
45
20
46
21
47
22
48
23
49
24
50
25
Two-Wire Connections
Clip
Term.
Pair
Wire
Color
Station Connections
Station
Location
33
34
35
36
37
38
39
40
41
42
43
44
45
46
47
48
49
50
71
DSU II Digital Telephone System
IMI66–132
Checking Industry-Standard Telephone Connections to the JM008 Module
When you connect industry-standard telephones to the JM008 expansion module, the maximum
distance allowed from the common equipment to the telephone is 1500 feet if you use #24 gauge
or larger, twisted-pair cable.
Check the installation of industry-standard telephones for proper operation by performing the
following voltage measurements under the conditions listed:
• have both the common equipment and the stations connected to the station connector
block,
• have bridging clips installed on the connector block,
• have the system powered and operational.
Measure DC voltage across the tip and ring pair of each installed industry-standard telephone
with a DC voltmeter. You should read: +24 volts DC +/- 2 volts.
Call each industry-standard telephone to stimulate the ring generator assembly, and measure the
AC ringing voltage across the tip and ring pair of each called telephone.
You should read: 55 volts AC +/- 5 volts.
If your measured voltages are different from the values shown above, it could indicate a wiring
error or equipment problem.
Installing an OPX Long Loop Adapter with the JM008
You must use an OPX long loop adapter if you wish to adapt the JM008’s IST station port to
support an off-premise IST application. An OPX long loop adapter connects to a single telephone
line and can greatly extend the line’s loop length (the Proctor Model 46222 adapter*, for
example, can extend line length to 30,000 feet).
*Proctor & Associates Company, Redmond WA
CAUTION
When you connect an OPX long loop adapter to an off-premise extension (OPX), you must install
primary protectors in series with the tip/ring pair of the telephone line that is routed to the OPX.
This action is necessary to protect both the user and the equipment from transient voltage spikes
that can travel through the cable. The telephone company offers basic protection against this
condition; however, that protection is usually designed to safeguard the central office circuits and
you cannot rely upon it to protect common equipment. To help insure that external over-voltage
surges do not damage the system, installation specialists recommend that you install and properly
ground gas discharge tubes or similar primary protection devices on the telephone line that routes
between the adapter and the OPX.
To install the OPX long loop adapter:
1. Follow manufacturer’s instructions for unpacking, inspecting, mounting and
wiring the adapter unit.
2. Plug a modular cable into the system jack on the adapter and connect the opposite
end of the cable to the station port.
3. Plug a modular cord into the telephone jack on the adapter and connect the
opposite end of the cord to the line.
4. Plug the adapter power cord into a standard 117 VAC, 3-wire electrical outlet.
72
Programming the DSU II
IMI66–132
DSU II Digital Telephone System
Installing an Add-on Expansion Module
Each JM408 add-on expansion module measures 15.5" wide x 9.4" high x 1.6" wide and weighs
approximately 4 pounds. The modules are designed so that you can attach them to the base unit
and connect them to it via cabling.
NOTE: If you plan to upgrade the system software at the same time that you add
expansion modules, add the expansion modules first by following steps 1
through 11. Then, after you have installed the expansion modules and
programmed for the new stations and line ports, upgrade the software as
described in the discussion titled, Loading and Upgrading the System
Software.
To install an expansion module to a base unit, follow the procedure detailed in steps 1–11.
CAUTION
You must always connect the first module to the top location on the base unit.
1. Disconnect both AC power and external battery backup power from the system.
2. Remove the nameplate from the base unit and set it aside. This action exposes the
internal cable connector on the base unit’s circuit board.
3. Reach through opening in base unit and mate module cable plug with base unit
circuit board connectors.
4. Push excess cable inside base unit housing through connector opening.
5. Install expansion module in place on all four mounting holes. Be sure excess cable
is not pinched between add-on module and base unit.
6. Pull module down to latch in place.
7. Use appropriate screw driver to tighten module securing screw into base unit
threaded fastener.
8. Snap nameplate into slots on top of module housing.
9. Attach #10 or #12 insulated, solid copper wire between the frame ground stud on
the expansion module and the frame ground stud on the common equipment
cabinet.
10. Reconnect the power to the system.
11. Referring to Chapter 4, perform configuration programming for new station and
line ports.
Programming the DSU II
73
DSU II Digital Telephone System
IMI66–132
Typical Base Unit
(8-Line, 16-Station Base Unit)
Nameplate
(Remove to expose base
unit connectors)
Top
Location
Upper Mounting Holes
(2 Places)
Lower Mounting Holes
(2 Places)
Bottom
Location
cajs111.cdr
Connecting Cable
and Plug
Securing
Screw
Ground
Modules
to Base
Unit
Snap Slots for
Nameplate
Ground Base Cabinet
To Earth Ground.
Typical Add-On Module
Installing the Add-on Expansion Module
74
Programming the DSU II
IMI66–132
DSU II Digital Telephone System
Checking the System Installation
The system operating features are set to default conditions at initial power-up. These conditions
provide a basic operating system with a known set of parameters, and you should check out the
system with the default conditions in place. At any time while the system is operating, you can
reset default conditions from station port 10 or 12 following the instructions provided in Chapter
4, Programming.
Checking the Resistance
Measure the resistance at the station connector blocks under the following conditions.
• AC power cord disconnected from electrical outlet.
• Common equipment connected to station connector blocks.
• Stations wired and wiring punched down on blocks.
• Bridging clips removed from blocks to isolate stations from common equipment.
Measure the resistance of each installed station and wiring from the station side of the connector
blocks. Resistance values will vary with cable length and station type but should be within the
following limits:
• Greater than 700 ohms
Checking the Voltage
Make the following voltage measurements at the station connector blocks under the following
conditions:
• Bridging clips installed
• AC power connected to the common equipment
Measure the voltage across the signal pair. The measured voltage for proprietary telephones must
be within the following limits:
• 28–36
NOTE: Refer to Using the JM008 Module on page 69 for information on testing
industry-standard telephones connected through the expansion module.
Programming the DSU II System
75
DSU II Digital Telephone System
IMI66–132
Checking the General Operating Conditions
1. Check the green light emitting diode (LED) system status indicator. Be sure that it
is on steady. If it is off or flashing, refer to the paragraph below titled Checking
the System Status Indicator.
2. Refer to the user’s guide for operating information and perform a general
operational test of the system by exercising the features from station port 10 or 11.
Operational parameters are per the system default conditions as detailed in
Chapter 5 until class of service programming is performed.
3. Once the basic system is verified as operational, perform the class of service
programming as described in Chapter 4.
Isolating Failures
Loading and Upgrading the System Software on page will help you to find and identify problems
that might occur in the digital telephone system.
Checking the System Status Indicator
A green LED located on the common equipment cabinet is the system status indicator. This
indicator light comes on when power is supplied to the system. If the indicator flashes after power
up, it signals that the processor has failed or that the software is not operating. Unplug and
reconnect the AC power to the power supply and observe the LED indication. If it still shows a
flashing indication, equipment replacement may be necessary.
Testing the Stations
To test the multiline stations for proper operation:
1. Disconnect line cord at station base then reconnect it.
2. On DigiTech telephones, press and hold the MUTE button.
On Impact and Impression telephones, press and hold 1 on the keypad.
Station will automatically perform self test routine.
3. Release test button as soon as test begins. Sequence of test is as follows:
a. indicators will light in sequence,
b. ringer will sound—be sure volume is set to low or high,
c. indicators and ringer will then turn off at the same time.
4. Replace any station that does not pass the self test.
76
Programming the DSU II
IMI66–132
DSU II Digital Telephone System
Loading Software
The DSU II contains flash memory that stores the system operating software. Beginning at the
following common equipment cabinet revisions, the factory pre-loads system software:
• J0408—revision H,
• J0816—revision J,
• J1632—revision J.
Because the software is pre-loaded, you do not need to perform an initial software load as part of
a system installation, nor do you need a software key to make the system software operational.
However, software upgrades require a software key. For information on performing software
upgrades, see IMI89–318, Loading Instructions for DSU II Software Upgrades. It is included in
the software key package.
Programming the DSU II System
77
DSU II Digital Telephone System
IMI66–132
FCC Rules and Regulations
This electronic key system complies with Federal Communications Commission (FCC) Rules,
Part 68. The FCC registration label on the common equipment cabinet contains the FCC
registration number, the ringer equivalence number, the model number, and the serial number or
production date of the system.
Notifying the Telephone Company
Unless a telephone operating company provides and installs the system, the telephone operating
company which provides the lines must be notified before a connection is made to them. Provide
the telephone company with the lines (telephone numbers) involved, the FCC registration
number, the ringer equivalence number, the Facilities Interface Code (FIC), the Universal Service
Ordering Code (USOC), and the USOC jack required. The FCC registration number and the
ringer equivalence number is provided on the label attached to the common equipment. The FIC
and USOC information is provided in the equipment’s general specifications found in equipment
system manual. The user/installer is required to notify the telephone company when final
disconnection of this equipment rom the telephone company line occurs.
Understanding Telephone Network Compatibility
When necessary, the telephone operating company provides information on the maximum
number of telephones or ringers that can be connected to one line, as well as any other applicable
technical information. The telephone operating company can temporarily discontinue service and
make changes which could affect the operation of this equipment. They must, however, provide
adequate notice, in writing, of any future equipment changes that would make the system
incompatible.
Understanding Installation Requirements
Connection of the electronic key system to the telephone lines must be through a universal
service order code (USOC) outlet jack supplied by the telephone operating company. If the
installation site does not have the proper outlet, ask the telephone company business office to
install one. The correct outlet jack for this system is either a type RJ21X or type RJ14C.
Understanding Party Line and Coin Line Limitations
Local telephone company regulations may not permit connections to party lines and coin lines by
anyone except the telephone operating company.
Troubleshooting the Service Problem
If a service problem occurs, first try to determine if the trouble is in the on-site system or in the
telephone company equipment. Disconnect all equipment not owned by the telephone company.
If this corrects the problem, the faulty equipment must not be reconnected to the telephone line
until the problem has been corrected. Any trouble that causes improper operation of the telephone
network may require the telephone company to discontinue service to the trouble site after they
notify the user of the reason.
78
Programming the DSU II
IMI66–132
DSU II Digital Telephone System
Authorizing Repairs
FCC regulations do not permit repair of customer owned equipment by anyone except the
manufacturer, their authorized agent, or others who might be authorized by the FCC. However,
routine repairs can be made according to the maintenance instructions in this publication,
provided that all FCC restrictions are obeyed.
Recognizing Radio Frequency Interference
The electronic key system contains incidental radio frequency generating circuitry and, if not
installed and used properly, may cause interference to radio and television reception. This
equipment has been tested and found to comply with the limits for a Class A computing device
pursuant to Subpart J of Part 15 of FCC Rules. These limits are designed to provide reasonable
protection against such interference when operated in a commercial environment. Operation of
this equipment in a residential area may cause interference to radio and television reception; in
which case the user is encouraged to take whatever measures may be required to correct the
interference. If this equipment does cause interference to radio or television reception, which can
be determined by turning the equipment off and on, the user is encouraged to try to correct the
interference by one or more of the following measures: Reorient the television or radio’s
receiving antenna, and/or relocate the DSU, the individual telephone stations, and the radio or TV
with respect to each other. If necessary, the user should consult the manufacturer or an
experienced radio/television technician for additional suggestions. The user may find the
following booklet prepared by the Federal Communications Commission helpful: “How to
Identify and Resolve Radio-TV Interference Problems.” This booklet is available from the
Government Printing Office, Washington D.C. 20402. Stock No. 004-000-00345-4.
This equipment has been tested and found to comply with the limits of a Class A digital device,
pursuant to Part 15 of the FCC Rules. These limits are designed to provide reasonable protection
against harmful interference when the equipment is operated in a commercial environment. This
equipment generates, uses, and can radiate radio frequency energy and, if not installed and used
in accordance with the instruction manual, may cause harmful interference to radio
communications. Operation of this equipment in a residential area is likely to cause harmful
interference in which case the user will be required to correct the interference at his own expense.
This digital apparatus does not exceed the (Class A) limits for radio noise emissions from digital
apparatus set out in the Radio Interference Regulations of the Canadian Department of
Communications.
Le pre’sent appareil nume’rique n’emet pes de bruits radioe’lectriques de’passant les limites
applicables aux appareils nume’riques (de la class A) prescrites dans le Re’glement sur le
brouillage radioe’lectrique e’dicte’ par le ministe’re des Communications du Canada.
CAUTION
Changes or modifications to this unit not expressly approved by the party
responsible for compliance could void the user’s authority to operate the equipment.
Determining the Ringer Equivalence Number
The REN of each line is 0.4B. The FCC requires the installer to determine the total REN for each
line, and record it at the equipment.
Programming the DSU II
79
Notes
IMI66–132
3
DSU II Digital Telephone System
System Options and Accessories
Installing the Optional Battery Backup Assembly
Preparing the Battery Backup Assembly for Use
The factory ships the battery backup assembly with the harness installed in the enclosure. To
complete the assembly, perform the following operations:
• Remove the lid from the metal enclosure and save the retaining hardware,
• Install the batteries in the metal enclosure and connect the wiring per the schematic shown
below,
• Replace the lid.
You can wall mount the battery backup enclosure if you wish. If you do, follow the same
guidelines and instructions for mounting the common equipment cabinet as set forth at the
beginning of this chapter.
Wiring the Batteries
Programming the DSU II
81
DSU II Digital Telephone System
IMI66–132
Installing the Batteries
82
Programming the DSU II
IMI66–132
DSU II Digital Telephone System
Connecting the Battery Backup Assembly
The common equipment provides an interface connector for the connection of an optional
external battery assembly.
CAUTION
Be sure that the AC power cord is connected to the electrical outlet before connecting an external
battery assembly to the common equipment interface connector. This ensures that internal
protection circuitry is operating to prevent damage that could result from improper connection.
The external battery assembly provides a minimum of one hour of operation should the AC
power to the system be interrupted. The assembly has a 15 ampere-hour current rating and is
fused with the following value: 4A 250V 3AG type.
The external battery assembly may include batteries from either of the following suppliers:
• Model PS-12150 from Power-Sonic Corporation, Redwood City CA, 94032
• Model PE12V15 from GS PORTALAC, City Of Industry CA, 91748
The minimum battery backup time for a fully configured system can be calculated using the
formula:
Backup Time (in hours) = K(15)1 + [(0.1) (N)]
K (Constant) = 0.9 for J0408 with or without an expansion module
0.8 for J0816 with or without expansion modules
0.8 for J1632 with or without expansion modules
15 = ampere-hours
N = total number of stations
Example:
Assume that a J1632 system plus two JM408 modules are installed along with the
optional battery assembly to provide backup power.
Backup time =
Programming the DSU II System
(0.8) (15)
1 + [(0.1) (48)]
=
12
5.8
= 2.1 Hours
83
DSU II Digital Telephone System
IMI66–132
During AC operation, the common equipment provides recharging current to maintain the voltage
potential of the external battery assembly at an operational level. The charging circuit may not
provide an adequate charge if an installed battery assembly has a current rating of greater than 40
ampere-hours. You should measure the battery assembly voltage every three months.
For proper backup capabilities, make sure the batteries meet the following specifications:
• With a fully-charged battery assembly disconnected from the common equipment, the
measured voltage must be greater than 12 VDC but should not exceed 13.5 VDC.
• With a fully-charged battery assembly connected to the common equipment, the measured
voltage should be less than 13.8 VDC. If the voltage measures higher than this limit,
contact your Comdial Technical Services representative.
• The open output of the common equipment battery charger connection measures 13.6-13.8
VDC. If the charging voltage measures higher or lower than this range, contact your
Comdial Technical Services representative
• An optional external battery assembly requires approximately 10 hours to completely
re-charge to full potential after it has been completely discharged and, in some cases,
when initially installed.
Dedicated 117VAC
15 AMP NEMA 5-15R
electrical outlet
with third-wire ground
Plug-in power
line surge
protector (typical)
DSU217
Interface Connector
(For Optional External Battery Assembly)
Frame
Ground
Stud
Optional External
Battery and
Cable Assembly
Typical
Earth
Ground
(BK)
(W)
(G)
(R)
Connecting the Battery Backup Assembly
84
Programming the DSU II System
IMI66–132
DSU II Digital Telephone System
Installing the Analog Terminal Interface
Introducing the Analog Terminal Interface (ATI-D)
The ATI-D is a multipurpose, on-premise accessory for the DSU II digital telephone system. It
has dual circuits that provide the following features:
• INDUSTRY-STANDARD TELEPHONE (IST) INTERFACE—This feature adapts
most industry-standard telephone (IST) devices to the digital telephone system. The
ATI-D will accept both tone (DTMF) and pulse (rotary) dialing from these devices.
• SYSTEM INTERCONNECTION—This feature allows an installer to connect two
digital telephone systems to each other using two ATI-Ds and on-premise wiring. When
interconnected, either telephone system treats the other telephone system as an IST device.
The two telephone systems are not integrated together and do not share features.
• MODEM ADAPTER—This feature allows the flow of switched data between a data
source and a data receiver through the digital telephone system.
• VOICE MAIL/ANSWERING MACHINE INTERFACE—This feature allows an
installer to connect voice mail systems and automated answering devices to the digital
telephone system.
CAUTION
The ATI-D by itself does not support any off-premise service. Never connect the ATI-D to a
telephone company-supplied line unless you have first installed an acceptable OPX long loop
adapter.
The ATI-D is housed in a self-contained metal enclosure that can be wall mounted if desired. The
ATI-D is powered by the digital telephone system through the station port connections and
employs an internal ringing generator to generate a ringing signal for an IST. Dual, high-quality,
low-loss, balanced, telephone transmission circuitry supports two IST inputs.
One 2-pair cable (four-wire) connects the ATI-D to two common equipment station ports. A
single pair of wires connects the external analog IST equipment to the ATI-D. Modular
connectors are provided to allow quick connections.
Each ATI-D circuit drives a load with a maximum ringer equivalence number (REN) of 2.0, thus
allowing more than one IST connection at each interface input. Check the REN number of the
connected IST equipment so as not to exceed the capacity of the ATI-D. Improper operation may
result if the REN maximum of the ATI-D is exceeded.
The ATI-D supports a wide variety of IST equipment such as 500 and 2500-type telephones,
cordless telephones, voice mail systems, answering machines, FAX machines, and data modems.
Programming the DSU II
85
DSU II Digital Telephone System
IMI66–132
Detailing the Analog Terminal Interface Specifications
Power Requirements
Supplied by the Common Equipment
55 VAC Nominal @ 20 Hz
(45 VAC minimum)
Ringing voltage
Power rated to maximum
REN = 2.0
Battery feed voltage
24 VDC nominal
Loop current limits between
20 ma min. at 620 ohms
ATI-D and IST interface
70 ma max. at 0 ohms
620 ohms maximum including interfaced telephony
DC loop limits from ATI-D to
device. (Approximately 4000 feet with #26 AWG
industry standard interface per
twisted-pair cable and 300 ohm device load.)
port
(Approximately 500 feet if two IST devices are connected
in parallel on same tip and ring pair.)
DC loop limits from ATI-D to
Approximately 1000 feet with #26 AWG twisted-pair
voice mail system
cable.
Cable insulation resistance
30,000 ohms minimum
2-pair twisted cable; 25 feet maximum length. (Both
Cable requirement ATI-D to
common equipment station ports must always be
system
connected to the ATI-D for every installation, and they
must be paired in sequence - 12 & 13, 14 & 15, etc.)
Cable terminations
623-type, 4-conductor mini jacks
Industry-standard DTMF or Dial pulse (rotary) with
Dialing
nominal make/break ratio of 40/60 @ 10 PPS
Outside calls = 2 second on 4 seconds off
Ringing cadence
Intercom calls = Two bursts:
1 second on - .5 second off,
1 second on - 3.5 seconds off
Operating temperature
32-122 F (0-50 C)
Humidity
90 % relative, non-condensing
Height
2.375 inches
Width
8.062 inches
Length
11.125 inches
Weight
4 lbs. (plus 2 lbs. for packing material)
FCC registered and listed for safety compliance as part of digital telephone system
FCC certified, Part 15 (class A)
86
Programming the DSU II
IMI66–132
DSU II Digital Telephone System
Mounting the Analog Terminal Interface
Refer to Considering the Mounting Requirements on page 27 for system mounting considerations
that are also applicable to the analog terminal interface.
Mounting Procedure
1. Unpack and carefully inspect the ATI-D for shipping damage. Notify the shipper
immediately of any damage found. Verify that the package contains all parts and
accessories needed for proper installation and operation.
2. If a backboard is required at the mounting location, attach it securely to provide a
stable mounting surface.
3. Use the base of the ATI-D as a template or measure for mounting hole locations
per the dimension details shown in the illustration on the next page.
4. Drill holes of a proper size to accommodate the hardware being used into the
mounting surface. If necessary, prepare these holes with inserts, anchors or other
attachment devices as dictated by the type of mounting surface.
5. Insert the two top screws into the mounting surface and tighten them to within
approximately 1/8-inch of the surface.
6. Hang the ATI-D on the top screws using the mounting holes located on the rear of
the cabinet. Note that these holes are elongated with an enlargement at one end.
This feature allows the cabinet to snap down on the screws to secure the mounting
when the cabinet is hung on them.
7. Insert a third screw through the mounting tab located on the lower edge of the
cabinet and into the mounting surface; tighten it into place.
Programming the DSU II
87
DSU II Digital Telephone System
IMI66–132
Detailing the ATI Dimensions
88
Programming the DSU II
IMI66–132
DSU II Digital Telephone System
Connecting the Analog Terminal Interface
Connect the ATI-D per the diagram on the following page. A grounding wire is not required for
operation; however, one is desirable for decreasing radio frequency interference and electrostatic
discharge susceptibility. The ATI-D housing provides a frame ground stud for this purpose.
Connect a #10 or #12, insulated, solid copper wire between this ground stud and a reliable earth
ground.
NOTE: You must connect both station ports to the ATI-D, even if you plan to use only
one IST device. Connect the first ATI-D port to an even station port. All ATI-D
ports must be paired.
CAUTION
Be careful when connecting the wiring between the common equipment and the ATI-D. Be sure
to connect the common equipment station ports to the COMMON EQUIPMENT (KSU) jack on
the ATI-D. Damage to the ATI-D could occur if this wiring is mistakenly connected to the IST
jack.
Use a voltmeter to check for the presence of voltage on the IST jack.
1. Be sure that you have installed all the wiring between the ATI-D and the common
equipment station ports.
2. Measure for DC voltage on IST jack:
• Measure between TIP leads and common equipment grounding stud.
• Measure between RING leads and common equipment grounding stud.
• Measure between TIP leads and RING leads
The measured voltage must be within following limits:
Measurement
Voltage
Tip to Ground
+3 to +11 VDC
Ring to Ground
-13 to -21 VDC
Tip to Ring
+23 to +25 VDC
(The TIP lead is positive with respect to the RING lead.)
Understanding Analog Terminal Interface Programming Requirements
Once you have connected the ATI-D to the system there are several programming steps that you
should take to make it fully operational. Refer to the section titled, The Industry Standard
Telephone (IST) Interface on page 220 for complete details.
Programming the DSU II
89
DSU II Digital Telephone System
IMI66–132
Installing a Voice Mail Interface
You can use the ATI-D to provide interfacing for a customer-supplied voice processing system.
The ATI-D, using paired station ports (such as 12 and 13, or 14 and 15), will support two voice
mail ports.
To complete the installation, connect the voice mail ports to the IST jacks on the ATI-D.
Typical Station
Connector Block
1
2
3
4
5
6
7
8
9
10
11
12
13
14
15
16
17
18
19
20
21
22
23
24
25
26
27
28
29
30
31
32
33
34
35
36
37
38
39
40
41
42
43
44
45
46
47
48
49
50
Connect to Station Connector Jack
50
26
25
1
CLIP TERMINALS
Common
Equipment
Jack
Line Jack
Line Jack
PIN 1 No Connection
PIN 2 IST 2 (Tip)
PIN 3 IST 1 (Tip)
PIN 4 IST 1 (Ring)
PIN 5 IST 2 (Ring)
PIN 6 No Connection
ATI-D
Common Equipment Jack
PIN 1 No Connection
PIN 2 Odd Station (Tip)
PIN 3 Even Station (Tip)
PIN 4 Even Station (Ring)
PIN 5 Odd Station (Ring)
PIN 6 No Connection
Earth
Ground
(Optional)
6
ATI3
PIN Locations On
Jacks - Front View
5
4
3
2
1
On-Permise IST Jacks 1 and 2
Connecting the ATI-D
90
Programming the DSU II
IMI66–132
DSU II Digital Telephone System
Installing an OPX Long Loop Adapter to
the Analog Terminal Interface for Off-Premise Service
As stated previously, the analog terminal interface is an on-premise device. You must use an
OPX long loop adapter if you wish to adapt the ATI-D to support an off-premise application. An
OPX long loop adapter connects to a single telephone line and can greatly extend the line’s loop
length (the Proctor Model 46222 adapter*, for example, can extend line length to 30,000 feet).
*Proctor & Associates Company, Redmond WA
CAUTION
When you connect an adapter to an off-premise extension (OPX), you must install primary
protectors in series with the tip/ring pair of the telephone line that is routed to the OPX. This
action is necessary to protect both the user and the equipment from transient voltage spikes that
can travel through the cable. The telephone company offers basic protection against this
condition; however, that protection is usually designed to safeguard the central office circuits
and you cannot rely upon it to protect common equipment. To help insure that external
over-voltage surges do not damage the system, installation specialists recommend that you install
and properly ground gas discharge tubes or similar primary protection devices on the telephone
line that routes between the adapter and the OPX.
To install the OPX long loop adapter:
• Follow manufacturer’s instructions for unpacking, inspecting, mounting and wiring the
adapter unit.
• Plug a modular cable into the system jack on the adapter and connect the opposite end of
the cable to the IST jack on the ATI-D.
• Plug a modular cord into the telephone jack on the adapter and connect the opposite end
of the cord to the OPX line.
• Plug the adapter power cord into a standard 117 VAC, 3-wire electrical outlet.
Programming the DSU II
91
DSU II Digital Telephone System
IMI66–132
Typical Station
Connector Block
1
2
3
4
5
6
7
8
9
10
11
12
13
14
15
16
17
18
19
20
21
22
23
24
25
26
27
28
29
30
31
32
33
34
35
36
37
38
39
40
41
42
43
44
45
46
47
48
49
50
Connect to station connector
jack on common equipment.
50
26
25
1
CLIP TERMINALS
Common
Equipment
Jack
IST Jack
ATI-D
Earth
Ground
(Optional)
CAJS106
OPX
Long Loop
Adapter
4
3
2
5
4
3
2
5
On-Premise IST Jack
117 VAC
Off-Premise IST Jack
Installing the Long Loop Adapter
92
Programming the DSU II
IMI66–132
DSU II Digital Telephone System
Installing the Data Interface Unit
Unpack the Data Interface Unit (DIU) and check for the following parts:
• telephone line cord,
• power cable with attached transformer.
Installing the Mechanical Components
You can install the DIU as a free-standing device, or you can mount it on a wall.
When mounting the DIU on a wall:
1. Select a location that is close to a standard 115 VAC electrical wall outlet. The
location you select should also be convenient to the digital telephone and the
Industry Standard Telephone (IST), FAX, or modem-whichever one you will be
connecting to the DIU.
2. Once you have selected the location for mounting the DIU, mark two locations for
the mounting screws as follows:
a. make the first mark,
b. measure 3 13/16 inches horizontally from the first mark and make the second
mark.
Mounting the Data Interface Unit
Programming the DSU II
93
DSU II Digital Telephone System
IMI66–132
3. Install two #8 X 3/4-inch screws in the wall at the locations you marked in step 2.
Tighten the screws until the screw heads are 1/4-inch from the surface of the wall.
4. Place the DIU on the wall with the screw heads inserted into the slots provided on
the bottom surface of the DIU. Slide the DIU onto the screw heads until it is
firmly attached to the screws.
Installing the DIU Mounting Screws
94
Programming the DSU II
IMI66–132
DSU II Digital Telephone System
Making the Data Interface Unit Cable Connections
Four cable connections are required to the DIU-station line cord, digital telephone line cord,
IST/FAX/MODEM line cord, and power cable.
1. Disconnect the line cord on the digital telephone from the digital station port
connector and plug it into the connector labeled PHONE on the DIU.
2. Plug the line cord from the IST device you are installing with the DIU (such as a
FAX machine, or modem) into the DIU connector labeled FAX/MODEM.
3. Plug the transformer attached to one end of the power cable into a 115 VAC
electrical wall outlet. Connect the other end of the power cable into the DIU
connector labeled POWER. The green LED on the DIU will be on to indicate
power is being supplied to the DIU.
4. Plug one end of a standard line cord into the connector labeled LINE on the DIU.
Plug the other end of the line cord into the digital station port connector.
NOTE: DIU power loss creates the same symptoms as disconnecting the DIU from the
digital telephone system. If this occurs, plug the multiline digital telephone
directly into a digital station port connector.
Preparing the DSU II for DIU Operation
Once you have verified that the system contains the correct software, you must program the
system for operation. See Chapter 4, Programming for programming details.
Programming the DSU II
95
DSU II Digital Telephone System
IMI66–132
To KSU
Station Port
Typical Multiline
Digital Telephone
(Impact Model
8012S Illustrated)
Making the DIU Cable Connections
96
Programming the DSU II
IMI66–132
DSU II Digital Telephone System
Supporting DVA Operation
Digital voice announcing uses a hardware peripheral device (product code DVA01) connected to
a digital station port to play announcements and messages during a call. The DVA stores the
messages for recall when needed.
The DVA derives its operating power from the common equipment cabinet’s digital station port;
however, the DVA also has internal connections for a battery. When installed, this battery powers
memory that holds the stored messages should someone disconnect the DVA. Should you need to
replace this battery, use one that meets the following specifications:
• output—8.4 volts, 100 mAh
• type—sealed, rechargeable Ni-Cad battery
• model—Varta V7/8R or equivalent (Varta Batteries Inc., 300 Executive Blvd., Elmsford
NY 10523)
To Install the DVA Device
1. Position the DVA01 in a convenient location.
2. Connect the DVA01 to a digital station port using an RJ14C-configured standard
two-wire line cord.
3. If you need to record messages during programming, use a customer-supplied
audio cable terminated with 3.5mm (1/8 inch) phone plug on one end and
appropriate tape recorder connector on the other end.
4. Referring to Chapter 4 for details, program the system for DVA operation.
Programming the DSU II
97
DSU II Digital Telephone System
DVA003
6
5
4
3
2
1
IMI66–132
Station Jack Pin-Out
Pin 1 No Connection
Pin 2 No Connection
Pin 3 Tip 1
Pin 4 Ring 1
Pin 5 No Connection
Pin 6 No Connection
STATION
DVA01
Typical Station
Connector Block
TAPE IN
PWR IN USE
RESET
{
Audio Tape Recorder
For DSU installations,
connect to DVA01's
tape in jack.
Typical Station
Wall Jack Wiring
STATION
SITE
GREEN
RED
TI
RI
T2
1
2
3
4
5
6
7
8
9
10
11
12
13
14
15
16
17
18
19
20
21
22
23
24
25
26
27
28
29
30
31
32
33
34
35
36
37
38
39
40
41
42
43
44
45
46
47
48
49
50
25-Pair
Male To
Female
Cable
(Typical)
To Common
Equipment
Cabinet
50
26
25
1
CLIP TERMINALS
R2
FRONT
VIEW
OF JACK
654321
1
2
3
4
5
6
NO CONNECTION
NO CONNECTION
RI-RED-VOICE
TI-GREEN-VOICE
NO CONNECTION
NO CONNECTION
Interconnecting the DVA Device
98
Programming the DSU II
IMI66–132
DSU II Digital Telephone System
Installing the Personal Computer Interface Unit
The Personal Computer Interface Unit (PCIU) is a device that you can connect between a digital
station port and its proprietary telephone. The PCIU allows telephone users to initiate telephone
and voice mail related functions from their personal computer (PC).
The PCIU includes Service Provider Interface (SPI) software on computer diskettes. When you
install this SPI software on a PC, the PC users can employ their Telephony Applications
Programming Interface (TAPI), third-party Microsoft* Windows applications programs to control
many useful telephone functions.
When you make the Visual Voice Processing (VVP) Visual Call Manager software option
available, the voice mail system can use the serial data path to the PCIU to send messages to the
telephone’s display and to the SPI on the PC.
*Microsoft is a registered trademark of Microsoft Corporation, Redmond, Washington
Making the PCIU Cable Connections
Four cable connections are required to the PCIU-station line cord, digital telephone line cord, PC
cable, and power cable.
1. Disconnect the line cord on the digital telephone from the digital station port
connector and plug it into the connector labeled PHONE on the PCIU.
2. Connect the supplied serial data cable between the PC’s serial data port (COM
port) and the serial port connector.
3. Plug one end of a standard line cord into the connector labeled LINE on the PCIU.
Plug the other end of the line cord into the digital station port connector.
4. Plug the transformer attached to one end of the power cable into a 115 VAC
electrical wall outlet. Connect the other end of the power cable into the PCIU
connector labeled POWER. The green LED on the PCIU will be on to indicate
power is being supplied to the PCIU.
NOTE: PCIU power loss creates the same symptoms as disconnecting the PCIU from
the digital telephone system. If this occurs, plug the digital telephone directly
into a digital station port connector.
Programming the DSU II
99
DSU II Digital Telephone System
IMI66–132
Making the PCIU Operational
To make the operational, you need only follow the instructions enclosed with the SPI software,
and load it on the user’s PC. There is no programming action required on the DSU II digital
telephone system to make the PCIU operational; however, it does require that the software
revision be at 2A or later. However, if you use the PCIU with the VVP voice mail system, you
must program enable the Visual Voice Mail (VVM) option.
115 VAC Outlet
PCIU
SERIAL PORT
PHONE
LINE
POWER
PCIU
Power
Supply
To System
Station
Connection
Male DB9 Serial
Port Connector
Supplied
Two-Wire
Line Cord
Supplied
Serial Data
Cable
{
Digital Station Port
Female DB9 Serial
Port Connector
GREEN
RED
TI
RI
T2
R2
FRONT
VIEW
OF JACK
654321
pciu04
OPTION
1
GHI
4
PRS
7
2
DEF
JKL
5
MNO
6
TUV
8
WXY
9
ABC
0
OPER
Typical PC
3
#
SPKR
CONF
MUTE
HOLD
TAP
ITCM
1
2
3
4
5
6
NO CONNECTION
NO CONNECTION
RI-RED-VOICE
TI-GREEN-VOICE
NO CONNECTION
NO CONNECTION
1
2
3
4
5
6
7
8
9
10
11
12
13
14
15
16
17
18
19
20
21
22
23
24
25
26
27
28
29
30
31
32
33
34
35
36
37
38
39
40
41
42
43
44
45
46
47
48
49
50
50
25
26
1
CLIP TERMIINALS
Typical Station
Connector Block
Station Jack
Wiring
Typical Comdial Proprietary LCD
Speakerphone with Interactive Buttons
Making the PCIU Cable Connection
100
Programming the DSU II
IMI66–132
DSU II Digital Telephone System
Connecting the Voice Mail System
The voice processing (VP) system provides voice mail and automatic attendant features to the
DSU II digital telephone system. A Comdial proprietary voice board and proprietary software
package installed in a personal computer (PC) provides the VP feature. A separate publication,
which is supplied with the VP equipment, discusses its installation, programming, and operating
details. The information contained below discusses the VP connections to the DSU II.
The VP requires industry-standard telephone (IST) station ports for its interface to the DSU II.
Each VP voice port requires its own IST interface. To provide the necessary IST interfaces, you
must either install a JM008 expansion module or connect an ATI-D (Installing the ATI-D, page
85) to the DSU II common equipment cabinet. Remember, one JM008 expansion module
provides eight IST ports while each ATI-D provides two.
The VP software uses both voice and signaling paths between the DSU II and the voice
processing circuit board. By using an in-band signaling technique, the IST ports handle both of
these paths. The efficiency of in-band signaling is dependent upon the availability of idle paths,
and busy systems that rely on in-band signaling sometimes slow down. Busy systems work more
efficiently when the signaling path is provided through a serial data connection between the VP’s
PC and the DSU II’s common equipment. This arrangement is termed serial integration. You
must provide serial integration if VP includes the optional Visual Voice Mail (VVM) feature or if
you are using the PCIU. See Installing the Personal Computer Interface on page 99 for
installation information.
Connect Voice Board Port To DSU II's
Industry-Standard Telephone Port
(Supplied By Either JM008 Expansion Module
Or ATI-D Analog Terminal Interface Device)
Industry-Standard
Four-Conductor
Line Cord
DSU II Cabinet COM1
and COM2 Serial Data Ports
1
Pin
Pin
Pin
Pin
Pin
Pin
1
2
3
4
5
6
=
=
=
=
=
=
2
3
4
5
6
Serial Data Ports
9-Pin and 25-Pin
Configurations
No Connection
(CTS) Clear to Send
(RD) Receive Data
(TD) Transmit Data
(SG) Signal Ground
No Connection
For Serial Integration
Connect DSU II's
COM1 or COM2 Serial
Data Port To PC's
Serial Data Port
Voice
Board
Ports
Typical
Rear View
Versatitle Voice Processing
Voice Mail Computer
}
Typical
625A2
Modular
Jack
RD
CTS
SG
TD
Typical modular to EIA adapter
wiring shown for reference only.
(Viewed from rear of PC)
4
TD
RD
RTS
3
1
2
3
4
5
6
5
2
654321
Front View
of Jack
Front
View of
Jack
14
15
16
17
18
SG
19
20
21
22
23
Industry Standard
Four-Conductor
Modular Line Cord
24
4
6
8
9
10
11
25
1
2
3
4
5
6
Front
View of
Jack
RTS
6
8
9
4
RD
TD
SG
9-DB to modular
Connect to matching
serial data port on
voice mail computer
as appropriate
25-DB to modular
email004.cdr
Connecting VP to the Digital Telephone System
Programming the DSU II
101
DSU II Digital Telephone System
IMI66–132
FCC Regulatory Rules and Regulations
Federal Communications Commission (FCC)
And Industry Canada (IC) Rules And Regulations
FCC Part 15 RF Emission Information
This equipment contains incidental radio frequency generating circuitry and, if not installed and
used properly, may cause interference to radio and television reception. This equipment has been
tested and found to comply with the limits for a Class A computing device pursuant to Subpart J
of Part 15 of the FCC Rules. These limits are designed to provide reasonable protection against
such interference when operated in a commercial environment. Operation of this equipment in a
residential area may cause interference to radio and television reception; in which case the user is
encouraged to take whatever measures may be required to correct the interference. If this
equipment does cause interference to radio and television reception, which can be determined by
turning the equipment off and on, the user is encouraged to try to correct the interference by one
or more of the following measures: reorient the television or radio receiving antenna, and/or
relocate the system, the individual telephone stations, and the radio or television with respect to
each other. If necessary, the user should consult the manufacturer or an experienced
radio/television technician for additional suggestions. The user may find the following booklet
prepared by the Federal Communications Commission helpful: “How to Identify and Resolve
Radio-TV Interference Problems.” This booklet is available from the Government Printing
Office, Washington, DC, 20402. Stock No. 004-000-00345-4.
FCC Part 68 Information
This equipment complies with Part 68 of the FCC Rules. A label, located on the exterior lower
left side of the cabinet, contains the FCC Registration Number(s) and Ringer Equivalence
Number (REN).
102
Programming the DSU II
IMI66–132
DSU II Digital Telephone System
Notify the local telephone company when you connect the equipment to the network and provide
the information shown in the following table:
Service
Order
Code*
Facilities
Interface
Code*
Loop Start
9.0F
02LS2
Ground Start
(See note)
9.0F
02GS2
DID Lines
9.0F–AS.2
02RV2–T
E&M Lines
9.0F
TL11M
T1 Line
T1/PRI
(ISDN) Line
6.0Y
04DU9–1SN
See Equipment
Specification
Sheet
See Equipment
Specification
Sheet
Not Applicable
See Equipment
Specification
Sheet
Not Applicable
6.0Y
04DU9–1SN
Not Applicable
Line Type
Ringer
Equivalence
Number*
Universal Service
Order Code
Connector
RJ21X
RJ21X
RJ21X
RJ2EX
RJ48C
RJ48C
NOTE: State tariffs do not permit ground start operation for KF
registered equipment (key system operation). Ground start
operation is only permitted for MF registered equipment
(KTS/PBX hybrids with both manual and pooled outgoing and
incoming access to the network). The system must be configured
for MF operation when using ground start operation.
* Refer to the paragraph titled Terms and Definitions for
detailed explanations.
This equipment may not be used on coin service provided by the telephone company. Connection
to party lines is subject to state tariffs.
Should the equipment cause harm to the telephone network, the telephone company may
disconnect your service temporarily. If possible, they will notify you in advance. If advanced
notice is not practical, they will notify you as soon as possible. You will be informed of your
right to file a complaint with the FCC. The telephone company may make changes in its facilities,
equipment, operations or procedures that could affect the proper functioning of your equipment.
If they do so, they will notify you in advance to give you an opportunity to maintain
uninterrupted telephone service. In addition, the telephone company may ask that you disconnect
this equipment from the network until the problem has been corrected or until you are sure that
the equipment is not malfunctioning.
If you experience trouble with this equipment, please contact:
Comdial Corporation
P.O. Box 7266
Charlottesville, VA 22906–7266
Telephone: 1–804– 978–2200
Programming the DSU II
103
DSU II Digital Telephone System
IMI66–132
Terms and Definitions
Service Order Code (SOC) defines type of service and system protection.
9.0F = analog service, full protection to the network from systems using live
voice. Only registered terminal equipment can be connected to station ports.
9.0F-AS.2 = analog service, same as 9.0F above but with system ports which
provide answer supervision (for system types such as CD, KF, MF, PF, VM, etc.).
6.0Y = digital service, provides total protection, including billing protection and
encoded analog content.
Facilities Interface Code (FIC) is a tariff reference used by customers to order correct facilities
to be provided by the telco.
02LS2 = analog service, 2-wire, local switched access, loop-start
02GS2 = analog service, 2-wire, local switched access, ground-start
02RV2-T = analog service, 2-wire, local switched access, reverse-battery
TL11M = analog service, tie line, lossless interface, type 1 transmission-2 wire,
type 1 E&M interface, provides battery on M lead to originate
04DU9-1SN = digital service, 1.544 Mbps ANSI ESF and B8ZS without line
power
Ringer Equivalence Number (REN) is useful to determine the quantity of devices that may be
connected to the telephone line and still have all of those devices ring when the telephone number
is called. In most, but not all areas, the sum of the REN’s of all devices connected to one line
should not exceed five (5.0). To be certain of the number of devices that you may connect to
your line, you may want to contact your local telephone company to determine the maximum
REN for your calling area.
Universal Service Order Code Connector (USOC Con) defines the FCC Part 68 approved
telco provided connector, electrically and mechanically, required to interface with the customer
equipment. To avoid legal, warranty, insurance, and casualty problems, do not pass anything
through the network connector other than those permitted in the FCC Part 68 RJ series
connectors. Definitions of connectors listed above is as follows:
RJ21X is a 25 line, 2-wire, T/R, 50 position connector
RJ2EX is a 12 Tie trunks, 2-wire, T/R, E&M Type 1, 50 position connector
RJ48C is a single line, 4-wire,T/R, T1/R1, 1.544 Mbps, 8 position connector
Industry Canada RF Emission Information
This digital device does not exceed the Class A limits for radio noise emissions from digital
apparatus set out in Radio Interference Regulations of Industry Canada.
Le pre’sent appareil nume’rique n’emet pes de bruits radioe’lectriques de’passant les limits
applicables aux appareils nume’riques de la class A prescrites dans le Re’glement sur le
brouillage radioe’lectrique e’dicte’ par le ministe’re des Industry Canada.
104
Programming the DSU II
IMI66–132
DSU II Digital Telephone System
Industry Canada TELCO Information
NOTICE: The Industry Canada label identifies certified equipment. This certification means that
the equipment meets certain telecommunications network protective, operational and safety
requirements. Industry Canada does not guarantee the equipment will operate to the user’s
satisfaction.
Before installing this equipment, users should ensure that it is permissible to be connected to the
facilities of the local telecommunications company. The equipment must also be installed using
an acceptable method of connection. In some cases, the company’s inside wiring associated with
a single line individual service may be extended by means of a certified connector assembly
(telephone extension cord). The customer should be aware that compliance with the above
condition may not prevent degradation of service in some situations.
Repairs to some certified equipment should be made by an authorized maintenance facility
designated by the supplier. Any repairs or alterations made by the user to this equipment, or
equipment malfunctions, may give the telecommunications company cause to request the user to
disconnect the equipment.
Users should ensure for their own protection that the electrical ground connections of the power
utility, telephone lines and internal metallic water pipe system, if present, are connected together.
This precaution may be particularly important in rural areas.
CAUTION
Users should not attempt to make such connections themselves, but should contact the
appropriate electrical inspection authority, or electrician, as appropriate.
NOTICE: The ringer equivalence number (REN) assigned to each terminal device provides an
indication of the maximum number of terminals allowed to be connected to the telephone
interface. The termination on an interface may consist of any combination of devices subject only
to the requirement that the sum of the ringer equivalence numbers of all the devices does not
exceed 5.
AVIS: L’etiquette de Industrie Canada identifie le materiel homologue. Cette etiquette certifie
que le materiel est conforme a certaines normes de protection, d’exploitation et de securite des
reseaux de telecommunications. Le Ministere n’assure toutefois pas que le materiel functionnera
a la satisfaction de l’utilisateur. Avant d’installer ce materiel, l’utilisateur doit s’assurer quil est
permis de le raccorder aux installations de l’entreprise locale de telecommunication. Le materiel
doit eqalement etre installe en suivant une methode acceptee de raccordement. L’abonne ne doit
pas oublier qu’il est possible que la conformite aux conditions enoncees ci-dessus n’empeche pas
le degradation du service dans certaines situations. Les reparations de materiel homologue
doivent etre effectuees par un centre d’entretien canadien autorise designe par le fournissuer. La
compagnie de telecommunications peut demander a l’utilisateur de debrancher un appareil a la
suite de reparations ou de modifications effectuees par l’utilisateur ou a cause de mauvais
fonctionnement. Pour sa propre protection, l’utilisateur doit s’assurer que tous les fils de mise a
la terre de la source d’energie electrique, des lignes telephoniques et des canalisations d’eau
metalliques, s’il y en a, sont raccorde ensemble. Cette precaution est particulierement importante
dans les regions ruales.
Programming the DSU II
105
DSU II Digital Telephone System
IMI66–132
AVERTISSEMENT
L’utilisateur ne doit pas tenter de faire ces raccordements luimeme; il doit avoir recours a un
service d’inspection des installations d’inspection des installations electriques, ou a un electricien,
selon le cas.
AVIS: L’indice d’equivalence de la sonnerie (IES) asssigne a chaque dispositif terminal indique
le norbre maximal de terminaux qui peuvent etre raccordes a une interface. La terminaison d’une
interface telephonique peut consister en une combinaison de quelques dispositifs, a la seule
condition que la somme d’indices d’equivalence de la sonnerie de tous les dispositifs n’excede
pas 5.
106
Programming the DSU II
IMI66–132
DSU II Digital Telephone System
4
Programming
Understanding System Programming
While the Digital Telephone System offers many functional possibilities, it is your programming
that determines the system’s operation. You can program the system in two ways: using a
telephone, or using a Video Display Terminal (VDT) or personal computer running
communications software. The programming instructions in this manual detail the telephone
programming method. If you wish to employ the VDT programming method, refer to IMI66-094,
Video Display Terminal Programming manual.
Using a Telephone to Program the System
Perform Class of Service (COS) configuration programming from station port 10 or station port
12. The system will not accept programming commands from any other station port in the system.
For best programming results, use an LCD speakerphone and a DSS/BLF console at station port
11 or 13 to see which features are assigned to individual stations. While you can install any
non-LCD digital telephone and use it for programming, visual feedback of the programming
operations will not be available. You must always keep the handset of the LCD speakerphone
on-hook while you use this telephone to program the system.
NOTE: Be sure the system is not in the night transfer (of ringing) mode of operation
when you perform the programming steps.
Supporting Telephones (Revision I and later)
There are several items that you need to consider when connecting Revision I and later DigiTech
telephones to the DSU II digital telephone system:
• Always program station ports to provide ringing line preference to Revision I and later
DigiTech telephones (and to all Impression and Impact telephones) that are connected
there. This action is necessary to activate the orange LED feature on these telephones. The
orange status light indicates a ringing line to distinguish it from lines that are in use or on
hold.
Programming the DSU II System
107
DSU II Digital Telephone System
IMI66–132
Converting Button Designations
When you first power a new DSU II system with no telephones connected, it defaults its station
ports as Impact 24-line speakerphones.
When you connect a telephone to a powered-up system or when you turn on the AC power to a
system after you have connected a telephone to it, the system automatically button maps the
telephone according to the type of software the system has. To change the button mapping
default, install different software and master clear the system.
The buttons on Impact telephones are designated as L buttons; the buttons on DigiTech and
Impression telephones are designated as A and B buttons. The Buttons Designation Conversion
Chart table below lists each A and B button and its equivalent on an Impact telephone. The
programming steps in this manual use A and B button designations; if you are programming from
an Impact telephone, you must use the proper telephone programming overlay with the A and B
designations. Telephone overlays are included with the literature package for the digital telephone
system.
Button Designation Conversion Chart
108
Impression
DigiTech
Impact
A1
A2
A3
A4
A5
A6
A7
A8
A9
A10
A11
A12
A13
A14
A15
A16
B1
B2
B3
B4
B5
B6
A1
A2
A3
A4
A5
A6
A7
A8
A9
A10
A11
A12
A13
A14
B9
B10
B1
B2
B3
B4
B5
B6
B7
B8
L1
L2
L3
L4
L5
L6
L7
L8
L9
L10
L11
L12
L13
L14
L15
L16
L17
L18
L19
L20
L21
L22
L23
L24
Programming the DSU II System
IMI66–132
DSU II Digital Telephone System
When you perform COS programming from stations 10 or 12 and you have placed an Impact
telephone at the programming port, you should place the programming overlay on it.
This makes the button designations match the A and B designations called for in this system
programming manual.
When button mapping using a telephone different from the telephones being programmed
(cross-model button mapping), you will need to use either a programming overlay or the button
designation conversion chart on page 108, depending on the type of telephone installed at the
programming port.
If all system telephones are the same, when you press a button at the programming station, you
select the same button on the telephone that you are mapping. No overlay or conversion chart is
needed.
If you are cross-model mapping, you will need either an overlay or the button designation
conversion chart. The overlay works best when you are using an Impact telephone to button map
an Impression or DigiTech telephone. The chart is more convenient when you are using a
DigiTech or Impression telephone to button map an Impact telephone. In either case, when you
map a line to a selected button, it is best if you choose the line by dialing its code rather than by
pressing a button on the programming station to represent it. To choose lines 1 through 24, you
must dial 01 through 024.
The following examples explain when you need to use conversions.
• To select button L21 for reprogramming on an Impact telephone using another Impact
telephone at station 10 for programming, press button L21 on the station 10 telephone.
(No conversion is required in this example.)
• To select button B5 for reprogramming on an Impression or DigiTech telephone while
using an Impact telephone for programming, press the button designated as B5 by the
programming overlay on the Impact telephone at station 10 (this is actually L21 but the
overlay did the conversion for you).
• To select button L21 for reprogramming on an Impact telephone while using an
Impression or DigiTech telephone for programming, press button B5 on the Impression or
DigiTech telephone at station 10. (You use the conversion chart to convert the B5 button
to an L21 button.)
Using Block Programming
You can program a group of lines or stations to have the same configuration as one that you have
already programmed. This block programming feature eliminates the need to individually
program every line or station that requires the same configuration.
Programming the DSU II System
109
DSU II Digital Telephone System
IMI66–132
Master Clearing the System
After you have completely installed a telephone system for the first time—or if a system that you
previously installed has been turned off and placed out of service for a period of time (several
weeks, for example)—perform a master clear programming procedure before placing it into
service. If you plan to perform a master clear procedure, perform it before performing any other
programming procedure. The master clear procedure clears all memory locations of any
unwanted data that may be stored there. Master clearing also clears any previously programmed
data, such as autodial numbers, and defaults all COS conditions. Therefore, never perform a
master clear procedure on an existing installed system unless data loss and COS default are
acceptable. Refer to the information provided in the procedure titled Master Clear on page 111 for
programming details.
Using Programming Overlays
The literature package with the system includes a programming overlay for use in identifying the
buttons required for programming. The overlay fits over the buttons of the programming station.
The overlays correspond to the programming steps listed for each feature, so when you are
directed to press B1, for example, the overlay details which button is B1 for your telephone.
If you are programming the system from a VDT, it is best to allow the telephones to identify
themselves to the system before you button map them. When you do this, the VDT presents the
proper button designations in its prompt and you will not need an overlay or conversion chart.
The system queries you to designate the telephone type for unoccupied station ports. Upon your
response, the system presents the proper button designations in the prompts for these ports.
110
Programming the DSU II System
IMI66–132
DSU II Digital Telephone System
Master Clearing and Defaulting the System
You can return the entire programming configuration to the factory settings using the master clear
procedure. You can also return the individual system, line, and station class of service
configurations to their factory settings using the system, line, and station default procedures. The
operating parameters and class of service values provided by the factory setting will provide
satisfactory performance in a broad range of site applications.
CAUTION
Not only does the master clear procedure return ALL programmed variables to a known state of
operation, it also clears all currently stored autodial and speed dial numbers.
Master Clearing the System
Description: Returns entire system configuration to factory settings and clears all stored
auto and speed dial numbers.
To Program:
1. Press INTERCOM, dial *#746*.
2. Dial 90.
“CONFIG MODE”
“MASTER CLEAR’’
3. Dial 51684 to clear the entire system. System returns to normal
operation mode automatically.
Defaulting the System
Description: Returns the system configuration features to factory settings.
To Program:
1. Press INTERCOM, dial *#746*.
2. Dial 10.
“CONFIG MODE”
“SYSTEM DEFAULT”
3. Press # to default system features. System returns to configuration mode
automatically.
Defaulting the Lines
Description: Returns the line configuration features to factory settings.
To Program:
1. Press INTERCOM, dial *#746*.
2. Dial 30.
“CONFIG MODE”
“LINE DEFAULT”
3. Press # to default line features. System returns to configuration mode
automatically.
Programming the DSU II System
111
DSU II Digital Telephone System
IMI66–132
Defaulting the Stations
Description: Returns the station configuration features to factory settings.
To Program:
1. Press INTERCOM, dial *#746*.
2. Dial 50.
“CONFIG MODE”
“STATION DEFAULT”
3. Dial 00 to default station ports system-wide
—OR—
Select individual station port to be defaulted:
Station 10–57 = Dial 10–57.
4. Dial * for next station to default
—OR—
Dial ** for configuration mode
—OR—
Press SPEAKER to quit.
Defaulting the Button Assignments
Description: Returns the button mapping of individual stations to its factory setting.
To Program:
1. Press INTERCOM, dial *#746*.
2. Dial 56.
3. Dial 01.
“CONFIG MODE”
“BUTTON MAPPING”
“BUTTON MAPPING”
4. Select station ports to be defaulted
Station 10–57 = Dial 10–57.
5. Dial * for next button mapping feature
—OR—
Dial ** for configuration mode
—OR—
Press SPEAKER to quit.
112
Programming the DSU II System
IMI66–132
DSU II Digital Telephone System
Defaulting the Toll Restriction Tables
Description: The system defaults two toll restriction tables with preprogrammed values
and assigns them to the lines. You need only to assign them the stations to
put them into effect. The preprogrammed values are as follows:
Table 1 (deny)
Table 2 (allow)
Entry 1 = 1
Entry 1 = 1800
Entry 2 = 976
Entry 2 = 911
Entry 3 = 411
Entry 4 = 0
These values will provide satisfactory system performance in a broad range of site applications;
however, they can be changed as needed to meet different toll restriction needs.
To Program:
1. Dial 70.
“DEFAULT TOLL”
2. Press # to default toll tables
3. Dial * for configuration mode
—OR—
Press SPEAKER to quit.
Programming Password Protection
Description: The system provides two different entry levels for programming and allows
for a different password for each entry. You must use the VDT programming
method to change them as needed to provide security against unauthorized
program entries. The two programming entry levels are the installer level and
the administrator level. You enter the installer level, using the installer
password, to perform all programming functions including major changes
such as master clearing or line type programming. Administrators enter the
administrator level, using the administrator password, to perform most
programming functions except those major changes just mentioned. You can
make the two passwords different to limit access to either programming level
to only certain special or authorized people. Additionally, you can construct
a password that will prevent all COS programming entry from station 10.
Default Passwords
The default passwords are detailed in the following list:
VDT Installer
I*nnn* (nnn=746)
VDT Administrator
I*nnn* (nnn=236)
Station 10 Installer
INTERCOM *#nnn* (nnn=746)
Station 10 Administrator
INTERCOM *#nnn* (nnn=236)
Programming the DSU II System
113
DSU II Digital Telephone System
IMI66–132
Customized Passwords
Customized passwords can be alphanumeric or numeric only (no spaces
allowed) and must contain six characters. To retain the ability to enter
programming from station 10, you must maintain the I*nnn* format in the VDT
password and you must enter only numbers in the nnn entry; however, you must
not enter a zero for the leading n.
Once you customize a password, it remains customized and you must use the
new password to gain entry into the system for future programming tasks.
Neither default nor master clear will erase the customized password. It is very
important that you keep a hard copy of the customized password since it
provides the only entry to system COS programming through either the VDT or
station 10. If no one can remember the customized password, Comdial’s
Technical Services department can provide emergency entry but it charges a fee
for this service. Otherwise, you must disconnect all AC power and any battery
backup equipment, wait an extended period of time (up to several weeks) for the
internal memory protection to completely discharge, and reprogram the system
using the default password to gain entry.
NOTE: Password protection programming is a Video Display Terminal feature only.
You cannot customize a password using station 10 programming entry.
To Program:
1. From keyboard, type I*746* for the programming mode.
2. From main COS programming menu.
Type 6 to change installer password
—OR—
Type 7 to change administrator password and press RETURN.
3. At menu prompt, type customized password using any six alphanumeric or
numeric only characters.
NOTE: To retain the ability to enter programming from station 10, you must maintain
the I*nnn* format in the VDT password and you must enter only numbers in
the nnn entry; however, you must not enter a zero for the leading n.
4. As directed by next menu prompt, repeat step 3 to ensure that you entered correct
code.
5. When finished, return to main menu and log out of programming.
114
Programming the DSU II System
IMI66–132
DSU II Digital Telephone System
System Features
Configuring the system means that you are setting the parameters that will be true system-wide.
You should make a record in Chapter 5 of all programming decisions that you make—it will help
you keep track of what you have done and will help you troubleshoot any problem that might
arise later.
NOTE: A lighted LED next to the programming button for the selection indicates the
current configuration. When a single button provides a toggle (on/off) action,
the lighted LED indicates the active feature.
The first step in any programming sequence is to enter the base level. Once in this mode, you can
dial the feature code for any desired configuration. Enter the base level with the following
procedure: press INTERCOM then dial *#746*. When you want to end the
programming, press the SPEAKER button to end the programming procedure and return the
system to normal operation.
Automatic Station Relocation
Description: With this feature, the system will automatically recognize a particular station
should that station be relocated to a different station port. The system will
supply the same COS parameters at this new port as was programmed for the
station at the original port. This feature allows users to relocate their
telephone from one station port location to another yet retain their original
telephone features.
NOTE: If you turn this feature on, be sure to make the station users understand that
their telephone parameters could change if they trade telephones from port to
port. If you want automatic relocation to take place, do nothing until the
message waiting light quits flashing, or press the HOLD button to
immediately accept the relocation.
If you do not want automatic relocation to take place, press the # button
while the message waiting light is flashing.
To Program:
1. Dial 27.
“AUTO STA RELOCAT”
2. Press A1 to toggle between enable and disable (LED On = Enable)
—OR—
Dial 1 to Enable (A1 LED On).
Dial 2 to Disable.
3. Dial * for configuration mode.
To change setting, repeat procedure and make opposite selection.
Programming the DSU II System
115
DSU II Digital Telephone System
IMI66–132
Data Baud Rate
Description: The speed or baud rate of the data bit stream, which carries the SMDR and
configuration data between the system and an external data device, must be
programmed to match the requirements of the data device.
NOTE: If you use XMODEM protocol for data transfer between a PC and the
common equipment, you must use 8-bit data.
To Program:
1. Dial 15.
“BAUD RATE”
2. Dial code for serial data port to be programmed:
Dial 1 for COM 1.
Dial 2 for COM 2.
Dial 3 for COM 3.
Dial 4 for COM 4.
3. Choose baud rate:
Dial 01 or press A1.
Dial 02 or press A2.
Dial 03 or press A3.
Dial 04 or press A4.
Dial 05 or press A5.
Dial 06 or press A8.
Dial 07 or press A9.
Dial 08 or press A10.
Dial 09 or press A11.
“WnD nS 110”
“WnD nS 150”
“WnD nS 300”
“WnD nS 600”
“WnD nS 1200”
“WnD nS 2400”
“WnD nS 4800”
“WnD nS 9600”
“WnD nS 19200”
Dial 10 or press A7 for 7 data bits
and 2 stop bits.
“W 7D 2S ZZZZZ”
Dial 11 or press A14 for 8 data bits
and 1 stop bit.
“W 8D 1S ZZZZZ”
4. Dial * for next data port
—OR—
Dial ** for configuration mode.
To change setting, repeat procedure and make opposite selection.
116
Programming the DSU II System
IMI66–132
DSU II Digital Telephone System
Do Not Disturb (DND)
All of the following features are part of the Do Not Disturb (DND) application.
Do Not Disturb Button
Description: A telephone user can press a button (either one that you have mapped on that
station or one that is provided by an interactive button on an LCD
speakerphone) to set the station to a DND condition.
To Program:
1. Dial 19.
2. Dial 07.
“BUTTON MAPPING”
“ASSIGN DND CODE”
3. Select button to be programmed:
Press A1–A14, B1–B10.
4. Select station ports to be programmed with a DND button.
Station 10–57 = Dial 10–57, or press C10–C57.
5. Dial * for further DND button assignment
—OR—
Dial ** for next button mapping feature
—OR—
Dial *** for configuration mode.
To clear, dial 5604, press button, dial # and repeat steps 4 and 5.
Do Not Disturb Inhibit
Description: You can inhibit the ability to set DND on a system-wide basis.
To Program:
1. Dial 19.
“DND ”
2. Press A1 to toggle between Enable and Disable (LED On = Enable).
—OR—
Dial 1 to Enable (A1 LED On).
Dial 2 to Disable.
“DND ENABLED”
“DND DISABLED”
3. Dial * for configuration mode.
To change setting, repeat procedure and make opposite selection.
Programming the DSU II System
117
DSU II Digital Telephone System
IMI66–132
Do Not Disturb Override Capability
Description: A caller to a DND station can override a DND condition when you program
the calling station to have the DND override feature.
To Program:
1. Dial 53.
2. Dial 03.
“STATION FEATURES”
“DND OVERRIDE”
3. Select station ports to be programmed.
Station 10–57 = Dial 10–57, or press C10–C57.
4. Dial * for next station feature.
—OR—
Dial ** for configuration mode.
To change setting, repeat procedure and make different selection.
Exclusive Hold
Description: This feature prevents a telephone user at one station from picking up a call
that a user placed on hold at another station. You can enable or disable it
system-wide using this procedure.
To Program:
1. Dial 23.
“XXXXXXX EXC HOLD”
2. Press A1 to toggle between enable and disable (LED On = Enable).
—OR—
Dial 1 to Enable (A1 LED On).
Dial 2 to Disable.
“ENABLE EXC HOLD”
“DISABLE EXC HOLD”
3. Dial * for configuration mode.
To change setting, repeat procedure and make opposite selection.
118
Programming the DSU II System
IMI66–132
DSU II Digital Telephone System
Music On Hold
Description: When you connect an external music source to the system, it will provide
music to outside lines that are placed on hold. You can disable the music
using this programming procedure. System attendants also have access to
this feature.
To Program:
1. Press 04.
“MOH XXXXXXXX”
2. Press A1 to toggle between enable and disable (LED On = Enable).
—OR—
Dial 1 to Enable (A1 LED on).
Dial 2 to Disable.
“MOH ENABLED”
“MOH DISABLED”
3. Dial * for configuration mode.
To change setting, repeat procedure and make opposite selection.
LCD Messaging
Description: You can create messages that telephone users can set at their stations to be
displayed by any LCD speakerphone that calls them on the intercom line.
The system provides two standard messages but you can use this
programming procedure to create up to 10 custom messages. System
attendants also have access to this feature, but they must use station 10 or 12
to program messages.
To Program:
1. Dial 05.
2. Dial 1–10 for message number.
“LCD MESSAGES”
“XXXX...”
3. Dial # to clear current message.
4. Refer to the character code table on page 120, and compose message (maximum
16 characters).
5. Dial two-digit codes to create message.
“YYYYYYY...”
—OR—
Dial 10 for preprogrammed message.
“BACK AT”
—OR—
Dial 20 for preprogrammed message.
“CALL”
6. Dial * for next message location and repeat steps 2–5.
—OR—
Dial ** for configuration mode.
Programming the DSU II System
119
DSU II Digital Telephone System
IMI66–132
Character Code Table
120
Character
Code
Character
Code
Character
Code
A
B
C
D
E
F
G
H
I
J
K
L
M
N
O
P
Q
R
S
T
U
V
W
X
Y
Z
21
22
23
31
32
33
41
42
43
51
52
53
61
62
63
71
11
72
73
81
82
83
91
92
93
13
a
b
c
d
e
f
g
h
i
j
k
l
m
n
o
p
q
r
s
t
u
v
w
x
y
z
24
25
26
34
35
36
44
45
46
54
55
56
64
65
66
74
14
75
76
84
85
86
94
95
96
16
Space
;
/
“
.
,
:
1
2
3
4
5
6
7
8
9
0
12
15
17
18
19
27
28
29
01
02
03
04
05
06
07
08
09
00
Programming the DSU II System
IMI66–132
DSU II Digital Telephone System
PA Port Options
The common equipment includes a special paging port that you can use to couple the system to a
customer-supplied external paging amplifier. The following section details the programming
features for the paging port.
Ringing Type
Description: You can assign lines to the PA port for direct ring, delayed ring, or night
transfer (of ringing).
To Program:
1. Dial 60.
“PA OPTIONS”
2. Choose ringing assignment:
Dial 1 for direct ring.
Dial 2 for delay ring.
Dial 3 for night ring.
“DIRECT RING”
“DELAY RING”
“NIGHT RING”
3. Select line ports:
Line port 1–14 = Dial 1–14 or press A1–A14.
Line port 15, 16 = Dial 15, 16 or press B1, B2.
Line port 17–24 = Dial 17–24 or press HOLD then press A1–A8.
NOTE: LEDs turn on when the line is assigned.
4. Dial * for next PA option
—OR—
Dial ** for configuration mode.
To change setting, repeat procedure and make opposite selection.
Programming the DSU II System
121
DSU II Digital Telephone System
IMI66–132
Zone Paging
Description: You can also assign zone or all-call paging to the PA port.
To Program:
1. Dial 60.
2. Dial 4 to assign zone paging.
“PA OPTIONS”
“PA ZONES”
3. Choose zone:
Press A1 or Dial 1 for zone 1.
Press A2 or Dial 2 for zone 2.
Press A3 or Dial 3 for zone 3.
Press A4 or Dial 4 for all-call.
NOTE: A1, A2, A3, or A4 LED turns on when a zone is assigned.
4. Dial * for next PA option.
—OR—
Dial ** for configuration mode.
To change setting, repeat procedure and make different selection.
122
Programming the DSU II System
IMI66–132
DSU II Digital Telephone System
Ringing Relay Tracking
Description: You can select the tracking source for the ringing relay to be either station 17
ringing or the ringing that you have assigned to the paging port. Making it
track the ringing that you have assigned to the PA port provides relay control
for the customer-supplied PA amplifier if needed.
To Program:
1. Dial 60.
2. Dial 5.
“PA PORT”
“RELAY XXXXXXX”
3. Choose relay tracking assignment.
Press A1 to toggle between paging port and station port 17 (LED On = Paging
Port).
—OR—
Dial 1 for station port 17.
Dial 2 for paging port.
“RELAY STA. 17”
“RELAY PA PORT”
4. Dial * for next PA option.
—OR—
Dial ** for configuration mode.
To change setting, repeat procedure and make different selection.
Programming the DSU II System
123
DSU II Digital Telephone System
IMI66–132
Ringing Tones
Description: You can choose between the intercom tone and the DTMF tone for these PA
port ringing tones. The intercom tone provides a soft tone and the DTMF
provides a loud tone.
To Program:
1. Dial 60.
2. Dial 6.
“PA PORT”
“PA XXXX TONE”
3. Choose tone assignment:
Press A1 to toggle between intercom and DTMF tone (LED On = Intercom
Tone).
—OR—
Dial 1 for intercom tone.
Dial 2 for DTMF tone.
“PA ITCM TONE”
“PA DTMF TONE”
4. Dial * for next PA option.
—OR—
Dial ** for configuration mode.
To change setting, repeat procedure and make different selection.
124
Programming the DSU II System
IMI66–132
DSU II Digital Telephone System
Station Monitoring
You can enable two types of station monitoring: visual ring indication and audible monitoring.
Visual Ring Indication
Description: The DSS/BLF at a station provides idle, busy, and ringing status of all of the
monitored stations. If users find the flashing BLF lights distracting, you can
disable the visual indication system-wide using this procedure.
To Program:
1. Dial 20.
“MONITOR XXXXXXX ”
2. Press A1 to toggle between enable and disable (LED On = Enable).
—OR—
Dial 1 to Enable (A1 LED = On).
Dial 2 to Disable.
“MONITOR ENABLED”
“MONITOR DISABLED”
3. Dial * for configuration mode.
To change setting, repeat procedure and make opposite selection.
Programming the DSU II System
125
DSU II Digital Telephone System
IMI66–132
Audible Monitoring (Station Monitoring)
Description: If you enable this visual ring indication, you can also enable audible
indication of both direct and delayed ringing on a per-station basis if you
wish.
To Program:
1. Dial 53.
2. Dial 20.
3. Dial 1 for no audible monitoring.
Dial 2 for direct ring monitoring.
Dial 3 for delayed ring monitoring.
“STATION FEATURES”
“AUDIBLE MONITOR”
“NONE”
“DIRECT RING”
“DELAYED RING”
4. Select stations for programming:
Station 10–57 = Dial 10–57, or press C10–C57.
5. Dial * next monitoring condition.
—OR—
Dial ** for next station feature.
—OR—
Dial *** for configuration mode.
To change setting, repeat procedure and make different selection.
126
Programming the DSU II System
IMI66–132
DSU II Digital Telephone System
System Alarm Reporting
The system can send special codes that convey certain system alarm conditions to selected
stations where they will show on their LCD displays.
System Alarm Report Enabling
Description: Enable the system alarm reporting on a system-wide basis using this feature.
To Program:
1. Dial 28.
“ALARM REPORTS”
2. Press A1 to toggle between enable and disable (LED On = Enable).
—OR—
Dial 1 to Enable.
Dial 2 to Disable.
“MONITOR ENABLED”
“MONITOR DISABLED”
3. Dial * for configuration mode.
To change setting, repeat procedure and make different selection.
System Alarm Report Stations
Description: Enable the system alarm reporting on the desired stations using this feature.
To Program:
1. Dial 53.
2. Dial 28.
“STATION FEATURES”
“ALARM RECEIVE”
3. Select station ports for programming:
Station 10–57 = Dial 10–57, or C10–C57.
4. Dial * for next station feature.
—OR—
Dial ** for configuration mode.
To change setting, repeat procedure and make different selection.
Programming the DSU II System
127
DSU II Digital Telephone System
IMI66–132
System Clock
Description: The system clock maintains current date and time information. The system
provides this information to LCD speakerphones for display. Set the system
time with this feature. The system attendant also has access to this feature.
To Program:
1. Dial 01.
“SET CLOCK”
LONG FORM
SHORT FORM
Dial 00–99 for yr.
Dial 00–23 for hr.
Dial 01–31 for day.
Dial # to assign hrs and mins.
Dial 01–12 for mo.
Dial 00–23 for hr.
Dial 00–59 for min.
Dial 00–59 for min.
2. Dial * for configuration mode.
To change setting, repeat procedure and make different selection.
128
Programming the DSU II System
IMI66–132
DSU II Digital Telephone System
System Speed Dial
Description: The system speed dial is a system-wide list of numbers that all users can
access for automatic dialing. Those users with two-line display LCD
speakerphones can scroll through the list of names that you assign to the
system speed dial numbers using their speakerphone’s display. After
scrolling through the list, they can pick the name they wish to call, and
automatically dial the number assigned to the name. The system scrolls this
index of names in the sequence that you or the attendant sorted the entries;
therefore, be sure to arrange the entries in a sequence that best meets users’
needs.
To Program:
1. Dial 02.
2. Dial 01–99 for storage location.
“SYS SPEED DIAL”
“XXXXXXX...”
3. Dial # to clear current entry.
“LINE:
4. Choose line, line group, or intercom
to be used with speed dial number.
“LINE XX ”
”
Line port 1–14 = Dial 01–14 or press A1–A14.
Line port 15, 16 = Dial 15, 16 or press B1, B2.
Line port 17–24 = Dial 17–24 or press HOLD, A1–A8.
Dial 90 for last line used or prime line.
“PRIME LINE”
Dial 91–94 for line group 1–4.
“LINE GROUP 1”
Press ITCM button for intercom line.
“XXXXX...”
5. Dial number for storage (32 digits max).
If required, press HOLD button to store a pause.
If required, press TAP button to store a hookflash.
6. Press T/C button to program name.
7. Enter digits from character chart on page 130 to spell name (up to 16 characters).
—OR—
Press T/C button to leave name blank.
8. Press T/C button to save the number and name.
9. Repeat steps 2–9 for all speed dial numbers.
—OR—
Press * for configuration Mode.
Programming the DSU II System
129
DSU II Digital Telephone System
IMI66–132
Character Code Table
Upper Case
Characters
130
Lower Case
Characters
Symbol & Number
Characters
Character
Code
Character
Code
Character
Code
A
B
C
D
E
F
G
H
I
J
K
L
M
N
O
P
Q
R
S
T
U
V
W
X
Y
Z
21
22
23
31
32
33
41
42
43
51
52
53
61
62
63
71
11
72
73
81
82
83
91
92
93
13
a
b
c
d
e
f
g
h
i
j
k
l
m
n
o
p
q
r
s
t
u
v
w
x
y
z
24
25
26
34
35
36
44
45
46
54
55
56
64
65
66
74
14
75
76
84
85
86
94
95
96
16
Space
;
/
“
.
,
:
1
2
3
4
5
6
7
8
9
0
12
15
17
18
19
27
28
29
01
02
03
04
05
06
07
08
09
00
Programming the DSU II System
IMI66–132
DSU II Digital Telephone System
Tandem Attendant
Description: When you enable this feature, a recall from an unanswered call transfer or
timed hold recall will ring at both attendant stations. When you disable it,
only the attendant station that transferred the call will ring.
To Program:
1. Dial 24.
“TANDEM ATTN XXX”
2. Press A1 to toggle between enable and disable (LED On = Enable).
—OR—
Dial 1 to Enable (A1 LED is on).
Dial 2 to Disable.
“TANDEM ATTN ON”
“TANDEM ATTN OFF”
3. Dial * for configuration mode.
To change setting, repeat procedure and make different selection.
Tone or Voice Signaling
Description: Intercom calls can be tone signaled or voice signaled. Use this programming
feature to select the system’s signaling choice. With either method set as the
system’s first choice, the user can choose the other method as needed.
To Program:
1. Dial 16.
“XXXXX ANN. FIRST”
2. Press A1 to toggle between Voice to Tone (LED On = Voice Signaling).
—OR—
Dial 1 for Voice First.
Dial 2 for Tone First.
“VOICE ANN. FIRST”
“TONE ANN. FIRST”
3. Dial * for configuration mode.
To change setting, repeat procedure and make different selection.
Inhibiting System Features
Description: You can disable certain features system-wide to prevent unauthorized users
from tampering with the system. You can perform the system default
procedure to re-enable features that you disable with this feature inhibit
procedure.
To Program:
1. Dial 29.
“FEATURE INHIBIT”
2. Select feature:
Dial 01 to disable Line Group 1.
Dial 02 to disable Line Group 2.
Dial 03 to disable Line Group 3.
Programming the DSU II System
131
DSU II Digital Telephone System
IMI66–132
Dial 04 to disable Line Group 4.
Dial 05 to disable Zone 1 Paging.
Dial 06 to disable Zone 2 Paging.
Dial 07 to disable Zone 3 Paging.
Dial 08 to disable All Call.
Dial 09 to disable Meet Me Page.
Dial 10 to Disable Night Transfer.
Dial 11 to disable Background Music.
Dial 12 to disable Voice Announce Block.
Dial 13 to disable Message Waiting.
Dial 14 to disable Call Pickup.
Dial 15 to disable Call Forward.
Dial 16 to disable Automatic Call Back.
Dial 17 to disable Station-to-Station Messaging.
Dial 18 to disable Line Group Queue.
Dial 19 to disable Directed Station Hold.
Dial 20 to disable Call Park orbit 1.
Dial 21 to disable Call Park orbit 2.
Dial 22 to disable Call Park orbit 3.
Dial 23 to disable Call Park orbit 4.
Dial 24 to disable Call Park orbit 5.
Dial 25 to disable Call Park orbit 6.
Dial 26 to disable Call Park orbit 7.
Dial 27 to disable Call Park orbit 8.
Dial 28 to disable Call Park orbit 9.
Dial 29 to disable Call Waiting.
Dial 30 to disable LCD Messaging.
Dial 31 to disable Executive Override/Service Observing.
Dial 32 to disable Account Code.
Dial 33 to disable Personal Call Forward.
Dial 34 to enable all features.
Dial * for next item.
Dial ** for configuration mode.
132
Programming the DSU II System
IMI66–132
DSU II Digital Telephone System
Ringback on Transfer
Description: With Ringback on Transfer enabled, when an outside call is transferred to
another station, the system gives ringback to the outside caller instead of
music on hold. This feature is disabled at default.
To Program:
1. Dial 17 for system features.
2. Dial 17 for ringback of transfer.
“SYSTEM FEATURES”
“RINGBACK XFER XXX”
3. Press A1 to toggle between enabled and disabled (LED On = Enabled).
—OR—
Dial 1 to Enable.
Dial 2 to Disable.
“RINGBACK XFER ON”
“RINGBACK XFER OFF”
4. Dial * for configuration mode.
To change setting, repeat procedure and make different selection.
Call Forward Outside System
Description: Call Forward Outside System (CFOS) gives station users the ability to
forward line calls to a location outside the DSU II Digital Telephone System.
Be sure to set the abandon hold release time on all lines that you use for
CFOS to match the CO abandon hold release time.
To Program:
1. Press ITCM, dial *#746*.
2. Dial 17 for system features.
3. Dial 14 for system CFOS.
“CONFIG MODE”
“SYSTEM FEATURES”
“CFOS XXXXXXX”
4. Press A1 key to toggle between enable and disable (LED On = Enable).
—OR—
Dial 1 to Enable.
Dial 2 to Disable.
“CFOS ENABLED”
“CFOS DISABLED”
5. Dial * for system features.
6. Dial ** for configuration mode.
Programming the DSU II System
133
DSU II Digital Telephone System
IMI66–132
Activating CFOS from Individual Stations
NOTE: CFOS remains in effect in the event of a loss of power or a system reset.
To activate the CFOS feature,
1. Press ITCM, dial *07.
2. Press the speed dial button programmed with the target number.
—OR—
Press a line button.
—OR—
Dial 0 for the Prime line or last used line.
—OR—
Dial 1–4 Line Group number.
3. Dial desired digits 0–9 (max 16 digits).
4. Press HOLD for Pause or press TAP for Flash.
—OR—
Press SPEAKER to end.
To deactivate the CFOS feature,
1. Press INTERCOM, dial #07.
134
Programming the DSU II System
IMI66–132
DSU II Digital Telephone System
System Timing
The digital telephone system has several attributes that control timing aspects of system
operation. The following features set these various timing attributes.
Call Park Recall Time
Description: A call that remains in a parking orbit for a programmed length of time
automatically returns to a timed hold recall conditions at the parking station.
Set the call park recall time with this programming feature.
To Program:
1. Dial 22.
“CP RECALL X”
2. Select recall time (program button LED On = Selected Time)
Dial 1 or press A1 = 1 min.
Dial 2 or press A2 = 2 min.
Dial 3 or press A3 = 3 min.
Dial 4 or press A4 = 4 min.
Dial 5 or press A5 = 5 min.
Dial 6 or press A8 = 6 min.
Dial 7 or press A9 = Never Recall.
“CP RECALL 1”
“CP RECALL 2”
“CP RECALL 3”
“CP RECALL 4”
“CP RECALL 5”
“CP RECALL 6”
“NEVER RECALL”
3. Dial * for configuration mode.
To change setting, repeat procedure and make different selection.
Programming the DSU II System
135
DSU II Digital Telephone System
IMI66–132
Extended DTMF Tones for Automatic Dialing
Description: When a telephone user dials a number automatically (auto dial, saved
number redial, etc), the duration of the generated DTMF tones are as you set
them with this programming option. This feature is useful when
automatically dialed numbers access answering machines, banking
computers, or voice mail, for example, that require DTMF tones that are
longer than standard tones.
To Program:
1. Dial 26.
“DTMF DIALING XXXX ”
2. Choose DTMF tone length:
Dial 01 or press A1 = 60 msec.
Dial 02 or press A2 = 80 msec.
Dial 03 or press A3 = 100 msec.
Dial 04 or press A4 = 120 msec.
Dial 05 or press A5 = 160 msec.
Dial 06 or press A6 = 240 msec.
Dial 07 or press A7 = 320 msec.
Dial 08 or press A8 = 400 msec.
Dial 09 or press A9 = 480 msec.
Dial 10 or press A10 = 560 msec.
Dial 11 or press A11 = 720 msec.
Dial 12 or press A12 = 880 msec.
Dial 13 or press A13 = 1040 msec.
“DTMF DIALING 60”
“DTMF DIALING 80”
“DTMF DIALING 100”
“DTMF DIALING 120”
“DTMF DIALING 160”
“DTMF DIALING 240”
“DTMF DIALING 320”
“DTMF DIALING 400”
“DTMF DIALING 480”
“DTMF DIALING 560”
“DTMF DIALING 720”
“DTMF DIALING 880”
“DTMF DIALING 1040”
3. Dial * for configuration mode.
To change setting, repeat procedure and make different selection.
136
Programming the DSU II System
IMI66–132
DSU II Digital Telephone System
Pause Time
Description: During autodials and speed dials, it is sometimes necessary to delay the
sending of digits to give switching equipment time to prepare for receiving
them. A pause is stored for this purpose whenever the user presses the
HOLD button. You can set the length of the pause with this programming
feature.
To Program:
1. Dial 13.
“PAUSE TIME XXX”
2. Select time:
Dial 1 or press A1.
Dial 2 or press A2.
Dial 3 or press A3.
Dial 4 or press A4.
Dial 5 or press A5.
Dial 6 or press A8.
Dial 7 or press A9.
Dial 8 or press A10.
Dial 9 or press A11.
Dial 0 or press A12.
“PAUSE TIME 0.50”
“PAUSE TIME 1”
“PAUSE TIME 1.50”
“PAUSE TIME 2”
“PAUSE TIME 3”
“PAUSE TIME 5”
“PAUSE TIME 7.50”
“PAUSE TIME 10”
“PAUSE TIME 15”
“PAUSE TIME 20”
3. Dial * for configuration mode.
To change setting, repeat procedure and make different selection.
Programming the DSU II System
137
DSU II Digital Telephone System
IMI66–132
Recall/Flash
Description: The system can generate either a line disconnect (recall) or a host system
feature access signal (flash) depending upon the programmed time.
To Program:
1. Dial 12.
“RECALL/FLSH XXXX”
2. Select time:
Dial 1 or press A1.
Dial 2 or press A2.
Dial 3 or press A3.
Dial 4 or press A4.
Dial 5 or press A5.
Dial 6 or press A8.
Dial 7 or press A9.
Dial 8 or press A10.
Dial 9 or press A11.
Dial 0 or press A12.
“RECALL/FLSH 0.08”
“RECALL/FLSH 0.30”
“RECALL/FLSH 0.50”
“RECALL/FLSH 0.60”
“RECALL/FLSH 0.75”
“RECALL/FLSH 0.88”
“RECALL/FLSH 1”
“RECALL/FLSH 1.50”
“RECALL/FLSH 2”
“RECALL/FLSH 3”
3. Dial * for configuration mode.
To change setting, repeat procedure and make different selection.
138
Programming the DSU II System
IMI66–132
DSU II Digital Telephone System
Timed Hold Recall
Description: After a call has been on hold for a programmed length of time, the system
will recall the station that placed the call on hold.
To Program:
1. Dial 14.
“HOLD RECALL XXX”
2. Select time:
Dial 1 or press A1.
Dial 2 or press A2.
Dial 3 or press A3.
Dial 4 or press A4.
Dial 5 or press A5.
Dial 6 or press A8.
Dial 7 or press A9.
Dial 8 or press A10.
Dial 9 or press A11.
Dial 0 or press A12.
“HOLD RECALL 30”
“HOLD RECALL 60”
“HOLD RECALL 90”
“HOLD RECALL 120”
“HOLD RECALL 180”
“HOLD RECALL 240”
“HOLD RECALL 300”
“HOLD RECALL 360”
“HOLD RECALL 420”
“HOLD RECALL 0”
3. Dial * for configuration mode.
To change setting, repeat procedure and make different selection.
Programming the DSU II System
139
DSU II Digital Telephone System
IMI66–132
Unanswered Call Transfer Recall Time
Description: A transferred call that remains unanswered after a programmed length of
time will return to the transferring station.
To Program:
1. Dial 11.
2. Dial 1 (station transfer recall).
“TRANSFER RECALL”
“STA XFR RCL XXX”
—OR—
Dial 2 (department transfer recall).
“DEPT XFR RCL XXX”
3. Choose transfer time:
Dial 1 or press A1.
Dial 2 or press A2.
Dial 3 or press A3.
Dial 4 or press A4.
Dial 5 or press A5.
Dial 6 or press A8.
Dial 7 or press A9.
Dial 8 or press A10.
Dial 9 or press A11.
Dial 0 or press A12.
“STA XFR RCL 10”
“STA XFR RCL 20”
“STA XFR RCL 25”
“STA XFR RCL 30”
“STA XFR RCL 45”
“STA XFR RCL 60”
“STA XFR RCL 90”
“STA XFR RCL 120”
“STA XFR RCL 180”
“STA XFR RCL 400”
4. Press * for next transfer recall feature.
—OR—
Press ** for configuration mode.
To change setting, repeat procedure and make different selection.
140
Programming the DSU II System
IMI66–132
DSU II Digital Telephone System
Line Programming
By using line configuration, you can program the parameters for individual lines. The
programming decisions you make for a particular line will only be true for that line and not for
the entire telephone system. You should make a record in Chapter 6 of all programming decisions
that you make—it will help you keep track of what you have done and will help you troubleshoot
any problem that might arise later.
NOTE: A lighted LED next to the programming button for the selection indicates the
current configuration. When a single button provides a toggle (on/off) action,
the lighted LED indicates the active feature.
The first step in any programming sequence is to enter the base level. Once in this mode, you can
dial the feature code for any desired configuration. Enter the base level with the following
procedure: press INTERCOM then dial *#746*. The last step is to press the
SPEAKER button to end the programming procedure and return the system to normal operation.
To make a line port selection, press a programming button or dial a selection number on the
keypad as detailed in the following chart.
Line Port Codes
Line
Program Buttons
Keypad
Buttons
1–14
15, 16
17–24
A1–A14
B1, B2
HOLD plus A1-A8
01–14
15, 16
17–24
Abandoned Hold Release
Description: When a distant party abandons a hold condition and disconnects from a line
(hangs up), the central office sends a forward disconnect signal to the digital
telephone system. This signal can be either 50 ms or 350 ms in length. Find
out from the telephone company what the signal length is, and program all of
the central office line ports to match it using this programming procedure.
To Program:
1. Dial 38.
“HOLD RELEASE 50”
2. Select hold release time for line ports (LED On = 50 msecs).
Line port 1–14 = Dial 01–14 or press A1–A14.
Line port 15, 16 = Dial 15, 16 or press B1, B2
Line port 17–24 = Dial 17–24 or press HOLD then press A1–A8.
3. Dial * for configuration mode.
To change setting, repeat procedure and make different selection.
Programming the DSU II System
141
DSU II Digital Telephone System
IMI66–132
Automatic Privacy
You can make a line private or non-private. In the private mode, a station has exclusive use of a
line during a call. Lines are private unless you reprogram them and make them non-private.
Private or Non-Private Lines
Description: Use this programming feature to set which lines are private or non-private.
To Program:
1. Dial 40.
“PRIVACY RELEASE”
2. Select line ports to be non-private (LED On = Non-Private):
Line port 1–14 = Dial 01–14 or press A1–A14.
Line port 15, 16 = Dial 15, 16 or press B1, B2.
Line port 17–24 = Dial 17–24 or press HOLD then press A1–A8.
3. Dial * for configuration mode.
To change setting, repeat procedure and make different selection.
142
Programming the DSU II System
IMI66–132
DSU II Digital Telephone System
Automatic Privacy Release
Description: You can arrange for an individual station to automatically release privacy
while on certain lines. With this arrangement, other stations can join that
particular station whenever it is on the privacy release line.
To Program:
1. Dial 54.
2. Dial 4.
“STA/LINE CONFIG”
“PRIVACY RELEASE”
3. Select line ports:
Line port 1–14 = Dial 01–14 or press A1–A14
Line port 15, 16 = Dial 15, 16 or press B1, B2
Line port 17–24 = Dial 17–24 or press HOLD then press A1–A8.
4. Dial # when all line ports are selected.
5. Select station ports to be programmed:
Station 10–57 = Dial 10–57 or press C10–C57.
6. Dial * when all station ports are selected.
—OR—
Dial ** for next station/line feature.
—OR—
Dial *** for configuration mode.
To change setting, repeat procedure and make different selection.
Line Disable
Description: You can take a line port out of service when necessary (because of defect or
some other reason) using this programming procedure.
To Program:
1. Dial 31.
“DISABLE LINES”
2. Select line ports to be disabled
Line port 1–14 = Dial 01–14 or press A1–A14.
Line port 15, 16 = Dial 15, 16 or press B1, B2.
Line port 17–24 = Dial 17–24 or press HOLD then press A1–A8.
3. Dial * for configuration mode.
To enable a disabled line, use the procedure described in Line Port Functions, and program it
as a central office line.
Programming the DSU II System
143
DSU II Digital Telephone System
IMI66–132
Line Groups
Description: Group outside lines of the same type together for dial-up outgoing access.
Access codes for the line groups are as follows:
Group 1 = Dial 9
Group 2 = Dial 81
Group 3 = Dial 82
Group 4 = Dial 83
NOTE: When you perform this procedure, the system automatically arranges itself for
hybrid operation. Remember, hybrid operation may incur a higher monthly
tariff than what the key system operation incurs. Ask the local telephone
company for details.
To Program:
1. Dial 35.
2. Dial 0 for no groups assigned.
“ASSIGN LINE GRPS”
“NO LINE GROUP”
—OR—
Dial 1 for Line Group 1.
Dial 2 for Line Group 2.
Dial 3 for Line Group 3.
Dial 4 for Line Group 4.
“LINE GROUP 1”
“LINE GROUP 2”
“LINE GROUP 3”
“LINE GROUP 4”
3. Select line ports to be assigned (LED On = Line Assigned).
Line port 1–14 = Dial 01–14 or press A1–A14.
Line port 15, 16 = Dial 15, 16 or press B1, B2.
Line port 17–24 = Dial 17–24 or press HOLD then press A1–A8.
4. Dial * for next group.
—OR—
Dial ** for next feature.
—OR—
Dial *** for configuration mode.
To change the settings, repeat procedure and make different selections.
144
Programming the DSU II System
IMI66–132
DSU II Digital Telephone System
Line Names
Description: You can name lines as to their function to identify them for use. Names such
as WATTS, CO, etc., when appearing on the LCD speakerphone displays,
make locating a line easier. A line name can contain up to five characters.
See the chart on page 146 for the line-name characters.
To Program:
1. Dial 34.
“LINE NAME”
2. Select line ports to be assigned.
Line port 1–14 = Dial 01–14 or press A1–A14.
Line port 15, 16 = Dial 15, 16 or press B1, B2.
Line port 17–24 = Dial 17–24 or press HOLD then press A1–A8.
3. Press # to clear current name.
4. Dial line name character codes (5 characters maximum for each line port from the
character code table shown on page 146—each character is represented by two
digits).
Examples: WATTS = Dial 91
21 81 81 73
0156 = Dial 00, 01, 05, 06
5. Dial * and repeat last three steps for next line.
—OR—
Dial ** for configuration mode.
To change setting, repeat procedure and make different selection.
Programming the DSU II System
145
DSU II Digital Telephone System
IMI66–132
Character Code Table
146
Character
Code
Character
Code
Character
Code
A
B
C
D
E
F
G
H
I
J
K
L
M
N
O
P
Q
R
S
T
U
V
W
X
Y
Z
21
22
23
31
32
33
41
42
43
51
52
53
61
62
63
71
11
72
73
81
82
83
91
92
93
13
a
b
c
d
e
f
g
h
i
j
k
l
m
n
o
p
q
r
s
t
u
v
w
x
y
z
24
25
26
34
35
36
44
45
46
54
55
56
64
65
66
74
14
75
76
84
85
86
94
95
96
16
Space
;
/
“
.
,
:
1
2
3
4
5
6
7
8
9
0
12
15
17
18
19
27
28
29
01
02
03
04
05
06
07
08
09
00
Programming the DSU II System
IMI66–132
DSU II Digital Telephone System
Line Port Functions
You can set individual line ports to function as auxiliary line ports, for an external paging
amplifier, for example, or to function with standard CO lines.
Auxiliary Lines
Description: You can condition a line port to serve as a port for an external paging
amplifier.
To Program:
1. Dial 32.
“AUXILIARY LINES”
2. Select line ports to be assigned (LED On = Assigned).
Line port 1–14 = Dial 01–14 or press A1–A14.
Line port 15, 16 = Dial 15, 16 or press B1, B2.
Line port 17–24 = Dial 17–24 or press HOLD then press A1–A8.
3. Dial * for configuration mode.
To change setting, repeat procedure and make different selection.
Central Office Lines
Description: You can condition line ports to serve as ports for standard telephone
company supplied central office lines.
To Program:
1. Dial 33.
“CO Lines”
2. Select line ports to be assigned
Line port 1–14 = Dial 01–14 or press A1–A14.
Line port 15, 16 = Dial 15, 16 or press B1, B2
Line port 17–24 = Dial 17–24 or press HOLD then press A1–A8.
3. Dial * for configuration mode.
To change setting, repeat procedure and make different selection.
Programming the DSU II System
147
DSU II Digital Telephone System
IMI66–132
Line to Line Port Reassignment
Description: You can reassign the programming attributes for a line that the installer has
connected to a particular line port to a different line port with this
programming action. This feature allows you to automatically exchange all
software attributes for one with those assigned to another at a different line
port without physically relocating the lines or reprogramming any of the
attributes.
To Program:
1. Dial 41.
“ASSIGN LOGICAL/PHYS ”
2. Select currently assigned line port number.
Line port 1–14 = Dial 01–14 or press A1–A14.
Line port 15, 16 = Dial 15, 16 or press B1, B2.
Line port 17–24 = Dial 17–24 or press HOLD then press A1–A8.
3. Dial new line port number (01–24 = line 1–24.) “LOGICAL LINE XX”
4. Dial # to make assignment.
5. Repeat steps 2–4 for another assignment.
—OR—
Dial * for configuration mode.
To change setting, repeat procedure and make different selection or make same port selections in both steps 2 and 3 to match logical to physical assignment.
148
Programming the DSU II System
IMI66–132
DSU II Digital Telephone System
Pulse/Tone Switchable
You can configure individual lines to have tone dialing or pulse dialing at default.
Pulse Dialing
Description: If the installer has connected rotary dial lines to the system, you must
condition those line ports as pulse dial ports.
NOTE: The user can switch from pulse dialing (rotary dial signaling) to tone dialing
(dual tone multiple frequency—DTMF) for accessing special circuits
requiring DTMF tones, such as banking machines, when they need to do so
from a rotary dial line.
To Program:
1. Dial 36.
“PULSE DIAL”
2. Select pulse dial line ports (LED On = Pulse).
Line port 1–14 = Dial 01–14 or press A1–A14.
Line port 15, 16 = Dial 15, 16 or press B1, B2.
Line port 17–24 = Dial 17–24 or press HOLD then press A1–A8.
—OR—
Dial 00 to default all lines to pulse dial.
3. Dial * for configuration mode.
To change setting, repeat procedure and make different selection.
Programming the DSU II System
149
DSU II Digital Telephone System
IMI66–132
Tone Dialing
Description: If the installer has connected tone dial lines to the system, you must
condition those line ports as tone dial ports.
To Program:
1. Dial 37.
“TONE DIAL”
2. Select tone dial line ports (LED On = Tone).
Line port 1–14 = Dial 01–14 or press A1–A14.
Line port 15, 16 = Dial 15, 16 or press B1, B2.
Line port 17–24 = Dial 17–24 or press HOLD then press A1–A8.
—OR—
Dial 00 to default all lines to tone dial.
3. Dial * for configuration mode.
To change setting, repeat procedures and make different selection.
Block Programming
Description: You can use this configuration procedure to assign those features that you
have assigned to any one line (using the procedures detailed beginning on
page 149) to any other line or to an entire block of lines.
To Program:
Line Button Method,
1. Dial 42.
“BLK PROGRAMMING”
2. Select model line port.
“MODEL LINE XX”
Line port 1–14 = press A1–A14.
Line port 15, 16 = press B1, B2.
Line port 17–24 = press HOLD then press A1–A8.
3. Select lines to match model line (as detailed above).
4. Dial * and repeat steps 2 and 3 for next model line.
—OR—
Dial ** for configuration mode.
150
Programming the DSU II System
IMI66–132
DSU II Digital Telephone System
Keypad Method,
1. Dial 42.
“BLK PROGRAMMING”
2. Select model line port.
“MODEL LINE XX”
Line port 1–24 = Dial 01–24.
3. Dial first line port in block (dial 01–24).
4. Dial #.
5. Dial last line port in block (dial 01–24).
6. Dial #.
7. Dial * for next model line.
—OR—
Dial ** for configuration mode.
NOTE: The first, last, and all line ports in between will be block programmed like the
model line port. To block program an individual line port, select the first line
port and last line port to be the same number. For example: 01, 02#, 02#
programs line 02 the same as line port 01 if programmed.
Positive Disconnect Supervision
Description: When a station is on line with an outside caller and the caller hangs up, the
CO may send a positive disconnect signal to the DSU II. You can enable the
positive disconnect supervision feature on a per-line basis. If you enable
positive disconnect supervision, when the system receives the CO’s positive
disconnect signal the system resets the toll restriction, releases the current
call record, and creates a new call record in its place.
To Program:
1. Dial 48.
“DIS. SUPERVISION”
2. Select line ports for disconnect supervision (LED On = Lines Selected to Receive
Tables).
Line port 1–14 = Dial 01–14 or press A1–A14.
Line port 15, 16 = Dial 15, 16 or press B1, B2.
Line port 17–24 = Dial 17–24 or press HOLD then press A1–A8.
3. Dial * for configuration mode.
Programming the DSU II System
151
DSU II Digital Telephone System
IMI66–132
Disconnect Notification
Description: With the Disconnect Notification feature, the system sends a DTMF “A”
digit to the IST station ports whenever the distant party (internal or external)
hangs up. The system also sends a disconnect digit when an IST telephone
signals a hookflash to retrieve a line from hold that has been dropped
through abandon hold release. Installers must enable line disconnect
supervision for this feature to function on outside calls. This feature is
disabled at default. The purpose of this feature is to avoid delays that may
occur on disconnects when the CT Voice application is being used.
To Program:
1. Press ITCM, dial *#746*.
2. Dial 53 for station features.
3. Dial 44 for disconnect notification.
“CONFIG MODE”
“STATION FEATURES”
“DISCONNECT NOTIF”
4. Select station ports (LED On = Feature Assigned):
Station 10–57: Dial 10–57 or press C1–C57.
5. Dial * for next station feature.
—OR—
Dial ** for configuration mode.
152
Programming the DSU II System
IMI66–132
DSU II Digital Telephone System
Station Features
Station programming means that you are programming the functions for one particular station, or
port. While it isn’t necessary, it is a good idea to do station programming after you have done
system and line programming. You should make a record in Chapter 5 of all programming
decisions that you make—it will help you keep track of what you have done and will help you
troubleshoot any problem that might arise later.
NOTE: A lighted LED next to the programming button for the selection indicates the
current configuration. When a single button provides a toggle (on/off) action,
the lighted LED indicated the active feature.
The first step in any programming sequence is to enter the base level. Once in this mode, you can
dial the feature code for any desired configuration. Enter the base level with the following
procedure: press INTERCOM then dial *#746*. The last step is to press the
SPEAKER button to end the programming procedure and return the system to normal operation.
Make station port selection by dialing a selection number on the keypad or pressing the console
button according to the following reference table.
Station Port Codes
Station Ports
Keypad
Buttons
Console
Buttons
10–57
10–57
C10–C57
Programming the DSU II System
153
DSU II Digital Telephone System
IMI66–132
Access Denied
Description: You can deny certain stations access to certain lines. When you do this, a
station user cannot select a denied line.
To Program:
1. Dial 54.
2. Dial 5.
“STA/LINE CONFIG”
“ACCESS DENY”
3. Select line ports (LED On = Access Denied).
Line port 1–14 = Dial 01–14 or press A1–A14.
Line port 15, 16 = Dial 15, 16 or press B1, B2.
Line port 17–24 = Dial 17–24 or press HOLD then press A1–A8.
4. Dial # when all line ports are selected.
5. Select station ports (LED On = Feature Assigned):
Station 10–57 = Dial 10–57 or press C10–C57.
6. Dial * when all station ports are selected.
—OR—
Dial ** for next station/line feature.
—OR—
Dial *** for configuration mode.
To change setting, repeat procedure and make different selection. To clear current setting,
repeat procedure.
154
Programming the DSU II System
IMI66–132
DSU II Digital Telephone System
All-Call and Zone Paging
You can program the system so that the users can make announcements to stations located in
certain areas of the site or to all of the stations. Similarly, you can program a station with
one-button access to the paging feature.
Description: Telephone users can receive voice announcements through their telephone
loudspeakers, or through an external paging amplifier and speaker connected
to a PA port. They can transmit these announcements with their telephone
handsets. You can arrange the programming so that the users can make
announcements to stations located in certain areas of the site or to all of the
stations. By default, All-Call Originate and Receive is available to all
stations.
To Program:
1. Dial 55.
“PAGING”
2. Choose paging assignment:
Dial 1 for zone 1 originate.
Dial 2 for zone 2 originate.
Dial 3 for zone 3 originate.
Dial 4 for all-call originate.
Dial 5 for zone 1 receive.
Dial 6 for zone 2 receive.
Dial 7 for zone 3 receive.
Dial 8 for all-call receive.
Dial 9 to clear all assignments.
“ORIGINATE ZONE 1”
“ORIGINATE ZONE 2”
“ORIGINATE ZONE 3”
“ALL-CALL ORIG.”
“RECEIVE ZONE 1”
“RECEIVE ZONE 2”
“RECEIVE ZONE 3”
“ALL-CALL RECEIVE”
“CLEAR PAGING”
3. Select station ports (LED On = Feature Active):
Station 10–57 = Dial 1057 or press C10–C57.
4. Dial * to assign other paging.
—OR—
Dial ** for configuration mode.
To change setting, repeat procedure and make different selection.
Programming the DSU II System
155
DSU II Digital Telephone System
IMI66–132
Assign All-Call and Zone Paging Button
Description: If you wish, you can assign a paging button to provide a station with
one-button access to the all-call and zone paging feature.
To Program:
1. Dial 56.
2. Dial 09.
“BUTTON MAPPING”
“ASSIGN ZONE”
3. Select button to be programmed (LED On = Paging Button):
Press A1–A14, B1–B8.
4. Dial 1–3 for zone 1–3.
“ASSIGN ZONE X”
—OR—
Dial 4 for all-call.
“ASSIGN ALL CALL”
5. Select station ports (LED On = Button Assigned to Port):
Station 10–57 = Dial 10–57 or press C10–57.
6. Dial * for further paging button assignment.
—OR—
Dial ** for next button mapping feature.
—OR—
Dial *** for configuration mode.
To clear a paging button, dial 5604, press paging button, dial #, and repeat steps 5
and 6.
156
Programming the DSU II System
IMI66–132
DSU II Digital Telephone System
Audible Monitoring
The DSS/BLF at a multiline station provides a visual indication of idle, busy, and ringing status
of the monitored stations. You can also provide audible indication of direct and delayed ringing
for selected stations; however, you must first enable the station monitoring feature on a
system-wide basis.
Enable Audible Monitoring
Description: Enable audible monitoring on a system-wide basis using this feature.
To Program:
1. Dial 20.
“MONITOR XXXXXXX”
2. Press A1 to switch between enable and disable (LED On = Enable).
—OR—
Dial 1 to Enable.
Dial 2 to Disable.
“MONITOR ENABLED”
“MONITOR DISABLED”
3. Dial * for configuration mode.
To change setting, repeat procedure and make opposite selection.
Programming the DSU II System
157
DSU II Digital Telephone System
IMI66–132
Assign Audible Monitoring to Stations
Description: Once you have enabled audible monitoring system-wide, you must select
each station and the type of audible monitoring that you want to program.
To Program:
1. Dial 53.
2. Dial 20.
“STATION FEATURES”
“AUDIBLE MONITOR”
3. Select monitoring type:
Dial 1 for no audible monitoring.
Dial 2 for direct ring monitoring.
Dial 3 for delayed ring monitoring.
“NONE”
“DIRECT RING”
“DELAYED RING”
4. Select station ports (LED On = Feature Assigned):
Station 10–57 = Dial 10–57 or press C10–C57.
5. Dial * next monitoring condition.
—OR—
Dial ** for next station feature.
—OR—
Dial *** for configuration mode.
To change setting, repeat procedure and make different selection.
158
Programming the DSU II System
IMI66–132
DSU II Digital Telephone System
Automatic Hold
You can give station users the ability to place an existing line or intercom call on hold when she
or he presses another line button.
Automatic Hold with Line Calls
Description: When you enable this feature, the telephone user can automatically place an
existing line call on hold when she or he presses another line button to
answer a second call.
To Program:
1. Dial 53.
2. Dial 11.
“STATION FEATURES”
“AUTO HOLD”
3. Select station ports (LED On = Feature Assigned):
Station 10–57 = Dial 10–57 or press C10–C57.
4. Dial * for next station feature.
—OR—
Dial ** for configuration mode.
To clear current setting, repeat procedure.
Automatic Hold with Intercom Calls
Description: If you want the telephone user to also have the automatic hold feature while
he or she is on an existing intercom call and presses another intercom button
or a line button, take this additional programming action.
To Program:
1. Dial 53.
2. Dial 12.
“STATION FEATURES”
“ITCM AUTO HOLD”
3. Select station ports (LED On = Feature Assigned):
Station 10–57 = Dial 10–57 or press C10–C57.
4. Dial * for next station feature.
—OR—
Dial ** for configuration mode.
To clear current setting, repeat procedure.
Programming the DSU II System
159
DSU II Digital Telephone System
IMI66–132
Automatic Privacy
You can make a line private or non-private. In the private mode, a station has exclusive use of a
line during a call. You can arrange for individual stations to automatically release privacy while
on private lines.
Make a Line Private or Non-Private
Description: Use this feature to make a particular line private or non-private.
To Program:
1. Dial 40.
“PRIVACY RELEASE”
2. Select line ports to be non-private (LED On = Non-private Port):
Line port 1–14 = Dial 01–14 or press A1–A14.
Line port 15, 16 = Dial 15, 16 or press B1, B2.
Line port 17–24 = Dial 17–24 or press HOLD then press A1–A8.
3. Dial * for configuration mode.
To clear current setting, repeat procedure.
160
Programming the DSU II System
IMI66–132
DSU II Digital Telephone System
Arrange Station to Automatically Release Privacy on Private Line
Description: You can arrange for individual stations to automatically release privacy
while on private lines. With this arrangement, other stations can join the
programmed station whenever it is on the line that you have assigned as a
privacy release line.
To Program:
1. Dial 54.
2. Dial 4.
“STA/LINE CONFIG”
“PRIVACY RELEASE”
3. Select privacy releases line ports (LED On = Selected Ports).
Line port 1–14 = Dial 01–14 or press A1–A14.
Line port 15, 16 = Dial 15, 16 or press B1, B2.
Line port 17–24 = Dial 17–24 or press HOLD then press A1–A8.
4. Dial # when all line ports are selected.
5. Select station ports (LED On = Feature Assigned):
Station 10–57 = Dial 10–57 or press C10–C57.
6. Dial * when all station ports are selected.
—OR—
Dial ** for next station line feature.
—OR—
Dial *** for configuration mode.
To clear current setting, repeat procedure.
Programming the DSU II System
161
DSU II Digital Telephone System
IMI66–132
Call Forward on Busy/Ring—No Answer
The system can automatically forward busy and/or ring—no answer (RNA) calls to a new station.
The system sends these calls to any idle station associated either by intercom hunt group or by
department with the called station. Use this feature to arrange for calls to cycle rapidly through
such associated stations by testing each one in turn with several rings.
Call Forwarding of RNA Calls
Description: Enable call forward of RNA calls for individual stations using this
programming feature.
NOTE: If you enable this feature, also program the system intercom signaling as tone
for the first choice.
To Program:
1. Dial 53.
2. Dial 21.
3. Dial 0–9 for 0–9 rings before forwarding.
“STATION FEATURES”
“CALL FWD RNA”
“RINGS = X”
4. Select station ports (LED On = Feature Assigned):
Station 10–57 = Dial 10–57 or press C10–C57.
5. Dial * for additional station ring assignments:
—OR—
Dial ** for next station feature:
—OR—
Dial *** for configuration mode.
To remove call forwarding from a station, assign 0 rings.
162
Programming the DSU II System
IMI66–132
DSU II Digital Telephone System
Call Forwarding of Busy Calls
Description: Enable call forward of busy calls for individual stations using this
programming feature.
To Program:
1. Dial 53.
2. Dial 41.
“STATION FEATURES”
“CALL FWD BUSY”
3. Select station ports (LED On = Feature Assigned):
Station 10–57 = Dial 10–57 or press C10–C57.
4. Dial * for next station feature.
—OR—
Dial ** for configuration mode.
Call Forward Outside System for Station Ports
Description: Use this procedure to enable or disable the Call Forward Outside System
(CFOS) feature for the station ports you select.
To Program:
1. Press ITCM, dial *#746*.
2. Dial 53.
3. Dial 42.
“CONFIG MODE”
“STATION FEATURES”
“CFOS STATIONS”
4. Select station ports for programming to toggle status:
Station 10–57 = Dial 10–57
—OR—
Press DSS keys C10–C57 on DSS console to enable or disable (LED On =
Enabled).
5. Dial * for station features.
—OR—
Dial ** for configuration mode.
Programming the DSU II System
163
DSU II Digital Telephone System
IMI66–132
Set Tone First Intercom Signaling
Description: You must set the first choice intercom signaling method to tone first to
ensure forwarding of calls that encounter a busy signal or a ring with no
answer.
To Program:
1. Dial 16.
“XXXXX ANN. FIRST”
2. Press A1 to toggle from Voice to Tone (LED Off = Tone).
—OR—
Dial 2 for Tone First.
“TONE ANN. FIRST”
3. Dial * for configuration mode.
To change setting, repeat procedure and make opposite selection.
Intercom Hunt Group
Description: You can link stations together to form intercom hunt groups. Calls to a busy
station that is in a hunt group will search the group for an idle station to ring.
To Program:
1. Dial 53.
2. Dial 18.
“STATION FEATURES”
“HUNT LINK”
3. Select first linking station:
Station 10–57 = Dial 10–57 or press C10–C57.
4. Select second linking station:
Station 10–57 = Dial 10–57 or press C10–C57.
5. Dial * for another link:
(Example A: 17 to 16, 18 to 16, and 19 to 16)
(Example B: 16 to 17, 17 to 18, and 18 to 16)
—OR—
Dial ** for next station feature.
—OR—
Dial *** for configuration mode.
To clear current setting, hunt link station to itself.
164
Programming the DSU II System
IMI66–132
DSU II Digital Telephone System
Call Origination Denied
Description: You can deny users of selected stations the ability to originate calls on
specified lines. This feature does not prevent the user form answering
incoming calls on these lines.
To Program:
1. Dial 54.
2. Dial 6.
“STA/LINE CONFIG”
“ORIGINATION DENY”
3. Select line ports (LED On = Selected Ports):
Line port 1–14 = Dial 01–14 or press A1–A14.
Line port 15, 16 = Dial 15, 16 or press B1, B2.
Line port 17–24 = Dial 17–24 or press HOLD then press A1–A8.
4. Dial # when all line ports are selected.
5. Select station ports (LED On = Feature Assigned):
Station 10–57 = Dial 10–57 or press C10–C57.
6. Dial * when all station ports are selected.
—OR—
Dial ** for next station/line feature.
—OR—
Dial *** for configuration mode.
To clear current setting, repeat procedure.
Programming the DSU II System
165
DSU II Digital Telephone System
IMI66–132
Central Message Desk
Description: Use this feature to designate one station in the system as the central message
desk. When you do this, the system automatically arranges for the central
message desk station to have message wait originate capability so that it can
control message waiting lights at other stations.
To Program:
1. Dial 53.
2. Dial 08.
“STATION FEATURES”
“MSG DESK”
3. Select station ports (LED On = Feature Assigned):
Station 10–57 = Dial 10–57 or press C10–C57.
4. Dial * for next station feature.
—OR—
Dial ** for configuration mode.
To clear current setting, repeat procedure.
Data Security Port
Description: While port is active on a call, this feature prevents any incoming tones
associated with other system features from interrupting the call.
To Program:
1. Dial 53.
2. Dial 26.
“STATION FEATURES”
“DATA SECURE PORT”
3. Select station port (LED On = Feature Assigned):
Station 10–57 = Dial 10–57 or press C10–C57.
4. Dial * for next station feature.
—OR—
Dial ** for configuration mode.
To clear current setting, repeat procedure.
166
Programming the DSU II System
IMI66–132
DSU II Digital Telephone System
Dual Console Feature
Description: The dual console feature allows users to have two DSS/BLF consoles to
complement one telephone.
To Program:
1. Dial 53.
2. Dial 34.
“STATION FEATURES”
“SECOND CONSOLE”
3. Select console port:
Station 10–57 = Dial 10–57 or press C10–C57.
4. Select station port that console is to complement:
Station 10–57 = Dial 10–57 or press C10–C57.
5. Dial * for next station feature.
—OR—
Dial ** for configuration mode.
To clear second-console assignment, perform the following steps:
(a) Repeat steps 1 through 3 above.
(b) Type console port number twice.
(c) Dial ** for configuration mode.
Programming the DSU II System
167
DSU II Digital Telephone System
IMI66–132
Executive Override
Description: You can provide selected stations with busy override. This feature allows a
station to override a busy condition at another station, sound a warning tone,
and gain access to the existing conversation.
To Program:
1. Dial 53.
2. Dial 02.
“STATION FEATURES”
“EXEC. OVERRIDE”
3. Select station ports (LED On = Feature assigned):
Station 10–57 = Dial 10–57 or press C10–C57.
4. Dial * for next station feature.
—OR—
Dial ** for configuration mode.
To clear current setting, repeat procedure.
168
Programming the DSU II System
IMI66–132
DSU II Digital Telephone System
Flexible Ringing Assignments
You can enable different ringing assignments for individual lines and stations.
Direct/Delayed Ringing
Description: You must program ringing assignments on a per station/per line basis. You
can control ringing for every line that has appearance at a station assigning
immediate, or direct, ringing to some lines and delayed ringing to others.
NOTE: Do not program direct ringing for lines that you assign to the direct
department calling feature.
To Program:
1. Dial 54.
2. Dial 1.
“STA/LINE CONFIG”
“DIRECT RING”
—OR—
Dial 2.
“DELAY RING”
NOTE: For no station ringing, skip step 3 and make no line selection.
3. Select line ports for ringing (LED On = Selected Ports):
Line port 1–14 = Dial 01–14 or press A1–A14.
Line port 15, 16 = Dial 15, 16 or press B1, B2.
Line port 17–24 = Dial 17–24 or press HOLD then press A1–A8.
4. Dial # when all line ports are selected.
5. Select station ports (LED On = Feature Assigned):
Station 10–57 = Dial 10–57 or press C10–C57.
6. Dial * when all station ports are selected.
—OR—
Dial ** for next station/line ringing assignment.
—OR—
Dial *** for configuration mode.
To clear current setting, repeat procedure.
Programming the DSU II System
169
DSU II Digital Telephone System
IMI66–132
Night Transfer (of Ringing)—Line/Station Assignments
Description: You or the system attendant can place the system into the night transfer (of
ringing) mode of operation. While in this mode, the system will activate
special line/station ringing assignments. Use this procedure to program these
assignments.
To Program:
1. Dial 54.
2. Dial 3.
“STA/LINE CONFIG”
“NIGHT RING”
3. Select line ports for night ringing (LED On = Selected Ports):
Line port 1–14 = Dial 01–14 or press A1–A14.
Line port 15, 16 = Dial 15, 16 or press B1, B2.
Line port 17–24 = Dial 17–24 or press HOLD then press A1–A8.
4. Dial # when all line ports are selected.
5. Select station ports (LED On = Feature Assigned):
Station 10–57 = Dial 10–57 or press C10–C57.
6. Dial * when all station ports are selected.
—OR—
Dial ** for next station/line ringing assignment.
—OR—
Dial *** for configuration mode.
To clear current setting, repeat procedure.
170
Programming the DSU II System
IMI66–132
DSU II Digital Telephone System
Night Transfer (of Ringing)—Operation
Description: After you have assigned Night Transfer (of Ringing) to all desired stations
and lines, you must enable the feature operation with this procedure.
To Program:
1. Dial 03.
“NIGHT XFER XXX”
2. Press A1 to toggle between enable and disable (LED On = Enabled):
—OR—
Dial 1 to Enable (A1 LED on).
Dial 2 to Disable.
“NIGHT XFER ON”
“NIGHT XFER OFF”
3. Dial * for configuration mode.
To change setting, repeat procedure and make opposite selection.
Programming the DSU II System
171
DSU II Digital Telephone System
IMI66–132
Delay Ring in Night Mode
Description: This feature adds the option of programming delayed ringing in night mode
(delayed ringing could previously only be assigned to day mode.) This
feature affects station ringing assignments as well as system PA port ringing.
At default, this feature does not allow delayed ringing during night mode.
To Program:
Ringing Assignment,
1. Dial 54.
2. Dial 3.
“STA/LINE CONFIG”
“NITE DIRECT RING”
—OR—
Dial 8.
“NITE DELAY RING”
3. Select line ports for delayed night ringing (LED On = Selected Ports)
Line port 1–14 = Dial 01–14 or press A1–A14.
Line port 15, 16 = Dial 15, 16 or press B1, B2.
Line port 17–24 = Dial 17–24 or press HOLD then press A1–A8.
4. Dial # when all line ports are selected.
5. Select station ports (LED On = Feature Assigned):
Station 10–57 = Dial 10–57 or press C10–C57.
6. Dial * when all station ports are selected.
—OR—
Dial ** for next station/line feature.
—OR—
Dial *** for configuration mode.
To change setting, repeat procedure and make different selection.
172
Programming the DSU II System
IMI66–132
DSU II Digital Telephone System
PA Port Ringing Type,
1. Dial 60.
2. Dial 3.
“PA OPTIONS”
“NITE DIRECT RING”
—OR—
Dial 7.
“NITE DELAY RING”
3. Select line ports (LED On = Line Selected).
Line port 1–14 = Dial 01–14 or press A1–A14.
Line port 15, 16 = Dial 15, 16 or press B1, B2.
Line port 17–24 = Dial 17–24 or press HOLD then press A1–A8.
4. Dial * for next PA option.
—OR—
Dial ** for configuration mode.
Programming the DSU II System
173
DSU II Digital Telephone System
IMI66–132
Delayed Ringing Times
Description: You assign delayed ringing to stations for specific lines, you can also set the
time length of the delay.
To Program:
1. Dial 17.
2. Dial 05.
“SYSTEM FEATURES”
“DELAY RING XX”
3. Select delay time (LED On = Selected Time):
Dial 1 or press A1 = 6 seconds.
Dial 2 or press A2 = 12 seconds.
Dial 3 or press A3 = 18 seconds.
Dial 4 or press A4 = 24 seconds.
Dial 5 or press A5 = 30 seconds.
Dial 6 or press A8 = 36 seconds.
Dial 7 or press A9 = 42 seconds.
Dial 8 or press A10 = 48 seconds.
Dial 9 or press A11 = 54 seconds.
Dial 0 or press A12 = 60 seconds.
“DELAY RING 6”
“DELAY RING 12”
“DELAY RING 18”
“DELAY RING 24”
“DELAY RING 30”
“DELAY RING 36”
“DELAY RING 42”
“DELAY RING 48”
“DELAY RING 54”
“DELAY RING 60”
4. Dial ** for configuration mode.
—OR—
Press SPEAKER to end.
To clear current setting, repeat procedure and make different selection.
174
Programming the DSU II System
IMI66–132
DSU II Digital Telephone System
Allow Ringer Off
Description: With the operating system parameters set to default, the rocker switch
volume control on DigiTech, Impact, and Impression multiline telephones
sets the ringer volume level between off and a maximum level.
You can disable the allow ringer off on a system-wide basis. When you do
this, users can set the ringer volume of their telephones between a minimum
and a maximum level, but cannot completely silence it.
To Program:
1. Dial 17.
2. Dial 04.
“SYSTEM FEATURES”
“RING OFF XXXXXX”
3. Press A1 to toggle between ringer off allow and not allow (LED On = Ringer Off
Allowed).
—OR—
Dial 1 to allow ringer off.
Dial 2 to not allow ringer off.
“RINGER OFF ENABLE”
“RINGER OFF DISABLE”
4. Dial ** for configuration mode.
—OR—
Press SPEAKER to end.
Programming the DSU II System
175
DSU II Digital Telephone System
IMI66–132
Flexible Station Numbering
Description: The system supports a flexible station numbering plan for calling individual
stations and departments. You can program each station port to respond to
the dialing of any available number between 10 and 7999; however, the
system will not allow you to assign the same dialing code at both a station
extension number and a department access code, nor will the system allow
you to assign an extension number or access code conflict such as 15 and
1500.
To Program:
1. Dial 52.
“ACCESS CODE”
2. Dial 1.
“ASSIGN EXT. NUM”
3. Select station port:
“EXT. XXXX”
Station 10–57 = Dial 10–57 or press C10–C57.
4. Dial new extension number.
“EXT. XXXX YYYY”
NOTE: Extension number can be max. of four digits. If less than four digits, leading
zeros must be dialed before number. (Example: for extension number 15, dial
0015.)
5.. Select next station number and assign extension number
—OR—
Dial * for configuration mode.
To change setting, repeat procedure and make a different selection.
176
Programming the DSU II System
IMI66–132
DSU II Digital Telephone System
Group Call Pickup
Description: If a call rings to any station in a prearranged group, a user at another station
in that group can dial a group pickup code and answer the call. Assign the
stations to call pickup groups using this procedure.
To Program:
1. Dial 53.
2. Dial 16.
“STATION FEATURES”
“GRP CALL PICKUP”
3. Dial 0 for no group.
—OR—
Dial 1–4 for group 1–4.
“GROUP X”
4. Select station ports (LED On = Feature Assigned):
Station 10–57 = Dial 10–57 or press C10–C57.
5. Dial * for next group.
—OR—
Dial ** for next station feature.
—OR—
Dial *** for configuration mode.
To remove a station from call pickup group, assign it to group 0.
Programming the DSU II System
177
DSU II Digital Telephone System
IMI66–132
Handset Volume Control on Telephones
Description: All Impact SCS telephones meet the FCC HAC requirements and have 8
handset volume levels. The maximum handset volume step. On Impact SCS
phones, the loudest handset volume (level 8) is similar to that of an original
Impact telephone at level 13. The Handset Volume feature limits the handset
save capability to 5 if disabled or 8 if enabled. All telephones are backward
compatible. Some of the new features require 6A software. See the chart
below for details on volume levels for different models.
The Impact SCS 8201N and the 8212N models have a volume control for the
handset. The Impact SCS 8212S speakerphone has:
Handset Volume Control
Family
Model
8024S
8124S
8012S
8112S
2022S
2122S
2122X
8201N
8212N
8212S
8312S
8324S
8324F
8312SJ
8324SJ
8324FJ
Impact
Impression
Impact SCS
Max Handset
Handset Volume Volume
save level
Range (Maximum) w/o COS
change
Handset Volume
Range
13
8
13
13
8
N/A
13
8
N/A
8
5
N/A
8
8
N/A
8
5
8
To Program:
1. Dial 53.
2. Dial 38.
“STATION FEATURES”
“HANDSET VOLUME”
3. Select station ports (LED On = Feature Assigned):
Station 10–57 = Dial 10–57 or press C10–C57.
4. Dial * for next station feature.
—OR—
Dial ** for configuration mode.
To change setting, repeat procedure and dial the same extension to toggle feature or turn off
the associated LED if console is installed.
178
Programming the DSU II System
IMI66–132
DSU II Digital Telephone System
Programming the Headset Type
Description: You can program the system for a headset type when using an Impact SCS
telephone. Headset types correspond to TX gain with each level increase
representing a 1 dB increase. Use the default setting (0 = none) when using
Comdial-branded headsets. However, for other headsets, the headset type
may need to be set to another value for optimum performance. In those
cases, check with the headset manufacturer to determine the correct headset
type setting.
To Program:
1. Dial 53.
2. Dial 45.
“STATION FEATURES”
“HEADSET TYPE”
“HEADSET TYPE XX”
3. Dial 01–38 to select type (0 = none).
Select station ports (LED On = Type Assigned):
—Station ports 10–57: Dial 10–57 or press C10–C57.
4. Dial * for another headset type.
—OR—
Dial ** for next station feature.
—OR—
Dial *** for configuration mode.
Programming the DSU II System
179
DSU II Digital Telephone System
IMI66–132
Headset Interface
You can program LCD speakerphones equipped with the optional headset jack to use a headset as
well as the handset or speakerphone.
NOTE: The system delivers subdued off-hook voice announcements (SOHVA) to the
headset. Because a headset exhibits a coupling effect between the earpiece
and microphone, it may allow the outside party to hear a SOHVA message.
You should inform the user of this possibility.
Headset Operation as a Class of Service
Description: When employing DigiTech speakerphones (models 7700S, Rev. H and
earlier, and 7016S only) you must use this programming procedure to
arrange for a station port to allow headset operation.
To Program:
1. Dial 53.
2. Dial 13.
“STATION FEATURES”
“HEADSET MODE”
3. Select station ports (LED On = Feature Assigned):
Station 10–57 = Dial 10–57 or press C10–C57.
4. Dial * for next station feature.
—OR—
Dial ** for configuration mode.
To change setting, repeat procedure and make opposite selection.
180
Programming the DSU II System
IMI66–132
DSU II Digital Telephone System
Headset Operation as a User Function
Description: To arrange for headset operation at a user’s telephone (DigiTech models
7700S, Rev. I and later, Impact model 8024S, and Impression models 20nnn
and 21nnn) you must program a headset button at the LCD speakerphone to
activate the headset option.
To Program:
1. Press INTERCOM at the user’s telephone.
2. Dial **1.
3. Select button to be programmed:
Press A1–A14, B1–B10.
4. Dial 94.
5. Press SPEAKER to end.
NOTE: On Impression telephones (models and 21nnn) you must disconnect the
handset and plug the headset cord in its place.
Interactive Buttons
Description: The digital telephone system supports the operation of interactive buttons on
all currently produced Comdial proprietary LCD speakerphones. Interactive
buttons provide users with quick, easy access to system features and an
expanded display that prompts them on feature operation and progress.
DigiTech and Impact LCD speakerphones provide interactive buttons to the
user at all time; however, the DigiTech LCD speakerphones (Revision H and
earlier) do not provide interactive buttons at default and you must take this
programming action to enable them.
To Program:
1. Dial 53.
2. Dial 17.
“STATION FEATURES”
“SOFT KEYS”
3. Select station ports (LED On = Feature Assigned):
Station 10–57 = Dial 10–57 or press C10–C57.
4. Dial * for next station/line feature.
—OR—
Dial ** for configuration mode.
—OR—
Press SPEAKER to end.
Programming the DSU II System
181
DSU II Digital Telephone System
IMI66–132
Idle Line Preference
Description: When you enable idle line preference, a station will automatically connect to
any assigned and idle line that you have programmed for this purpose when
the user takes the station off hook.
To Program:
1. Dial 54.
2. Dial 7.
“STA/LINE CONFIG”
“IDLE LINE PREF”
3. Select line ports (LED On = Selected Port):
Line port 1–14 = Dial 01–14 or press A1–A14.
Line port 15, 16 = Dial 15, 16 or press B1, B2.
Line port 17–24 = Dial 17–24 or press HOLD then press A1–A8.
4. Dial # when all line ports are selected.
5. Select station ports (LED On = Feature Assigned):
Station 10–57 = Dial 10–57 or press C10–C57.
6. Dial * when all sation ports are selected.
—OR—
Dial ** for next station/line feature.
—OR—
Dial *** for configuration mode.
To clear current setting, repeat procedure.
182
Programming the DSU II System
IMI66–132
DSU II Digital Telephone System
Personal Ringing Tones
Description: You can program stations to ring in one of six distinctive tones:
• 666/571 Hz @ 16 Hz warble
• 1000/800 Hz @ 16 Hz warble
• 666/571 Hz @ 23 Hz warble
• 1000/800 Hz @ 23 Hz warble
• 500/444 Hz @ 16 Hz warble
• 500/444 Hz @ 23 Hz warble
To Program:
1. Dial 53.
2. Dial 14.
“STATION FEATURES”
“RINGING TONE”
3. Select ringing tone:
Dial 1 for Tone 1.
Dial 2 for Tone 2.
Dial 3 for Tone 3.
Dial 4 for Tone 4.
Dial 5 for Tone 5.
Dial 6 for Tone 6.
“RINGING TONE 1”
“RINGING TONE 2”
“RINGING TONE 3”
“RINGING TONE 4”
“RINGING TONE 5”
“RINGING TONE 6”
4. Select station ports (LED On = Feature Assigned):
Station 10–57 = Dial 10–57 or press C10–C57.
5. Dial * for next ringing tone assignment.
—OR—
Dial ** for next station feature.
—OR—
Dial *** for configuration mode.
To change setting, repeat procedure and make different selection.
Programming the DSU II System
183
DSU II Digital Telephone System
IMI66–132
Prime Line, Prime Group, and Prime Intercom
Description: If you assign a group of lines, and intercom line, or one individual line to a
particular station for use as its prime line, the station automatically selects it
for use when the user takes it off-hook.
To Program:
1. Dial 53.
2. Dial 15.
3a. Assign prime line
“STATION FEATURES”
“PRIME LINE”
“PRIME LINE XX”
Line port 1–14 = Dial 01–14 or press A1–A14.
Line port 15, 16 = Dial 15, 16 or press B1, B2.
Line port 17–24 = Dial 17–24 or press HOLD then press A1–A8.
3b. Assign prime group, dial 51–54 for groups 1–4. “PRIME LINE GRP X”
3c. Assign prime intercom, dial 50 for intercom line.
“PRIME INTERCOM”
4. Select station ports (LED On = Feature Assigned):
Station 10–57 = Dial 10–57 or press C10–C57.
5. Dial * for next prime line, group, or intercom assignment.
—OR—
Dial ** for next station feature.
—OR—
Dial *** for configuration mode.
To clear current setting, repeat procedure.
184
Programming the DSU II System
IMI66–132
DSU II Digital Telephone System
Message Wait Originate
Description: Any station that you program with this feature can control the message
waiting light at other stations in the system. When a station user observes the
message waiting light turn on, he or she can press INTERCOM and then
HOLD to call the station that controlled the light.
To Program:
1. Dial 53.
2. Dial 06.
“STATION FEATURES”
“MSG. WAIT ORIG”
3. Select station ports (LED On = Feature Selected):
Station 10–57 = Dial 10–57 or press C10–C57.
4. Dial * for next station feature.
—OR—
Dial ** for configuration mode.
To clear current setting, repeat procedure.
Ringing Line Preference
Description: When you assign this feature to a station, it will automatically answer a
ringing line when its user takes it off-hook.
To Program:
1. Dial 53.
2. Dial 09.
“STATION FEATURES”
“RINGING LINE PREF”
3. Select station ports (LED On = Feature Selected).
Station 10–57 = Dial 10–57 or press C10–C57.
4. Dial * for next station feature.
—OR—
Dial ** for configuration mode.
To clear current setting, repeat procedure.
Programming the DSU II System
185
DSU II Digital Telephone System
IMI66–132
Subdued Off-Hook Voice Announcement (SOHVA) Features
With the Subdued Off-Hook Voice Announce feature, a user can make an announcement to
another station that is busy with a call. The station receiving the SOHVA can hear the message,
while the distant party cannot. A station using the speakerphone cannot receive a SOHVA.
SOHVA Disable
Description: The SOHVA feature is standard for every station; however, you can disable it
for selected stations with this programming selection.
To Program:
1. Dial 53.
2. Dial 24.
“STATION FEATURES”
“SOHVA”
3. Select station port (LED On = Feature Assigned):
Station 10–57 = Dial 10–57 or press C10–C57.
4. Dial * for next station feature.
—OR—
Dial ** for configuration mode.
To clear current setting, repeat procedure.
SOHVA Groups
Description: Use this procedure to arrange station ports to originate and/or receive
SOHVA calls by assigning SOHVA calling groups to them. Also provide
selective SOHVA calling to the system by arranging certain station ports
together into groups for SOHVA calling between one another while
excluding other station ports in the system. The system provides eight
different fixed-configuration SOHVA groups.
To Program:
1. Dial 53.
2. Dial 30.
3. Dial 1–8 for group 1–8.
“STATION FEATURES”
“SOHVA GROUP”
“SOHVA GROUP X”
4. Select all station ports to receive SOHVA group (LED On = Feature Assigned):
Station 10–57 = Dial 10–57 or press C10–C57.
5. Dial * and repeat steps 4 and 5 for additional SOHVA group/station
assignments.
—OR—
Dial ** for next station feature.
—OR—
Dial *** for configuration mode.
To remove station from SOHVA group, assign it to group 0.
186
Programming the DSU II System
IMI66–132
DSU II Digital Telephone System
Fixed SOHVA Groups
SOHVA Group
Group 1
Receive From
Originate To
Group 2
Receive From
Originate To
Group 3
Receive From
Originate To
Group 4
Receive From
Originate To
Group 5
Receive From
Originate To
Group 6
Receive From
Originate To
Group 7
Receive From
Originate To
Group 8
Receive From
Originate To
Group Configuration
1
X
X
1
X
2
3
4
5
6
7
8
X
2
X
X
2
X
X
3
X
4
5
6
7
8
X
4
5
6
7
8
X
4
5
6
7
8
6
7
8
7
8
7
X
X
7
8
1
X
2
X
X
3
X
X
3
X
1
2
3
4
1
2
3
4
5
X
X
5
1
2
3
4
5
6
X
X
6
1
2
3
4
5
6
1
X
Programming the DSU II System
8
X
X
187
DSU II Digital Telephone System
IMI66–132
SOHVA Tone Burst Quantities
Description: Use this procedure to set the number of SOHVA tone bursts that sounds at
the system stations. You can choose from one to six tone bursts, and the
choice that you make here affects all stations that receive SOHVA calls.
To Program:
1. Dial 17.
2. Dial 03.
“SYSTEM FEATURES”
“SOHVA TONES n”
3. Select the quantity of tone bursts:
Dial 1–6 or press A1–A5, A8 (LED On = Enabled).
4. Dial * for configuration mode.
—OR—
Press SPEAKER to end.
To change setting, repeat procedure and make a different selection.
Service Observing
You can give selected stations the capability to monitor, in an unannounced manner, an active
call at another station.
Assign Service Observing
Description: Select stations to have the service observe feature using this programming.
NOTE: Since this feature requires the executive override feature to function, the
system automatically enables that feature for the station when you enable
service observing. You can also arrange selected stations so that they cannot
be observed.
To Program:
1. Dial 53.
2. Dial 10.
“STATION FEATURES”
“SERVICE OBSERVE”
3. Select station ports (LED ON = Feature Assigned):
Station 10–57 = Dial 10–57 or press C10–C57.
4. Dial * for next station feature.
—OR—
Dial ** for configuration mode.
To clear current setting, repeat procedure.
188
Programming the DSU II System
IMI66–132
DSU II Digital Telephone System
Block Service Observing
Description: You can block a user’s capability to use service observing.
To Program:
1. Dial 53.
2. Dial 29.
“STATION FEATURES”
“UNOBSERVABLE”
3. Select station ports (LED On = Feature Assigned):
Station 10–57 = Dial 10–57 or press C10–C57.
4. Dial * for next station feature.
—OR—
Dial ** for configuration mode.
To clear current setting, repeat procedure.
Station Disable
Description: You can disable station ports on a per-station basis.
To Program:
1. Dial 59.
“DISABLE STATIONS”
2. Select station ports to be disabled (LED On = Disabled):
Station 10–57 = Dial 10–57 or press C10–C57.
3. Dial * for configuration mode.
To enable station, repeat procedure and make opposite selection.
Programming the DSU II System
189
DSU II Digital Telephone System
IMI66–132
Station Name
Description: You can assign individual names or category names to stations. These names
will then be displayed by LCD speakerphones when they are called by the
named stations. Typical names could be TEC SER, MKT 1, J Smith. System
attendants also have access to this station naming feature.
To Program:
1. Dial 06.
“STATION NAMES”
2. Select station port (LED On = Selected):
“XXXXXX”
Station 10–57 = Dial 10–57 or press C10–C57.
3. Dial # to clear current station name.
4. Refer to character code table on page 191, and compose station name (7 digits
maximum).
5. Dial two-digit codes to form station name.
“XXXXXXX YYYYYYY”
6. Dial * for next station and repeat steps 2–5.
—OR—
Dial ** for configuration mode.
To change setting, repeat procedure and make different selection.
190
Programming the DSU II System
IMI66–132
DSU II Digital Telephone System
Character Code Table
Character
Code
Character
Code
Character
Code
A
B
C
D
E
F
G
H
I
J
K
L
M
N
O
P
Q
R
S
T
U
V
W
X
Y
Z
21
22
23
31
32
33
41
42
43
51
52
53
61
62
63
71
11
72
73
81
82
83
91
92
93
13
a
b
c
d
e
f
g
h
i
j
k
l
m
n
o
p
q
r
s
t
u
v
w
x
y
z
24
25
26
34
35
36
44
45
46
54
55
56
64
65
66
74
14
75
76
84
85
86
94
95
96
16
Space
;
/
“
.
,
:
1
2
3
4
5
6
7
8
9
0
12
15
17
18
19
27
28
29
01
02
03
04
05
06
07
08
09
00
Programming the DSU II System
191
DSU II Digital Telephone System
IMI66–132
Station to Station Port Reassignment
Description: Use this procedure to reassign the programming attributes for a station
connected to a particular station port to a different station port (logical to
physical reassignment). This feature allows you to automatically exchange
all software attributes for a station (logical assignment) connected at one
station port with those attributes assigned to another station at a different
station port without physically relocating the stations (physical assignment)
or reprogramming any of the attributes.
You can use this programming action to reassign the extension number and
all other programmable attributes that you have assigned to one station port
to a different port. This feature allows you to make adds, moves, and changes
without relocating the station wiring.
NOTE: Do not confuse this feature with the automatic station relocation feature
discussed in the system configuration portion of these programming
procedures . Also note that the system will not allow you to reassign the
station 10/station port 10 assignment.
To Program:
1. Dial 57 to reassign station to port.
“ASSIGN STA/PORT”
2. Dial station extension number, 0010–7999. “PHYS PORT XX”
“LOGICAL STA XX”
3. Dial physical port number 10–57.
4. Dial # to make assignment.
—OR—
Dial * for configuration mode.
To change setting, repeat procedures and make different selection.
192
Programming the DSU II System
IMI66–132
DSU II Digital Telephone System
System Alarm Report Stations
You can program the system to report any system alarms to designated stations.
Enable Alarm Reporting
Description: If you arrange the system to report alarms, also use this programming feature
to enable stations to display alarm reports after the station user takes
appropriate action.
To Program:
1. Dial 28.
“ALARM REPORTS”
2. Press A1 to toggle between enable and disable (LED On = Enable).
—OR—
Dial 1 to Enable.
Dial 2 to Disable.
3. Dial * for configuration mode.
To change setting, repeat procedure and make different selection.
Select Alarm Reporting Stations
Description: After you turn on the alarm reporting feature, use this procedure to select the
alarm reporting station.
To Program:
1. Dial 53.
2. Dial 28.
“STATION FEATURES”
“ALARM RECEIVE”
3. Select station ports (LED On = Selected):
Station 10–57 = Dial 10–57 or press C10–C57.
4. Dial * for next station feature.
—OR—
Dial ** for configuration mode.
To clear current setting, repeat procedure.
Programming the DSU II System
193
DSU II Digital Telephone System
IMI66–132
Voice Announce Blocking
Description: This feature allows a station user to block voice-signaled intercom calls.
To Program:
1. Dial 53.
2. Dial 04.
“STATION FEATURES”
“VOICE BLOCK”
3. Select station ports (LED On = Selected):
Station 10–57 = Dial 10–57 or press C10–C57.
4. Dial * for next station feature.
—OR—
Dial ** for configuration mode.
To clear current setting, repeat procedure.
Block Programming
Description: You can use this station configuration procedure to assign those features that
you have assigned to any one station to any other station or to an entire block
of stations. Block programming includes any mapped button attributes (see
Button Mapping the Stations on page 196) that you have assigned to the
model station port.
To Program:
1. Dial 58.
“BLK PROGRAMMING”
2. Select model station port (LED On = Selected): “MODEL STA XX”
Station 10–57 = Dial 10–57 or press C10–C57.
3. Dial first station port in block (dial code as above).
4. Dial #.
5. Dial last station port in block (dial code as above).
6. Dial #.
7. Dial * for further block programming.
—OR—
Dial ** for configuration mode.
NOTE: The first, last and all station ports in between will be block programmed like
the model station port. To block program an individual station port, select the
first and last port to be the same number. (For example: 25, 26# 26#
programs station 26 exactly as 25.)
194
Programming the DSU II System
IMI66–132
DSU II Digital Telephone System
Quick Transfer
Description: The Quick Transfer feature allows users to transfer line calls without having
to press the TRANSFER/CONFERENCE key. When this feature is
enabled, users can transfer calls by pressing the appropriate DSS key (or
INTERCOM + extension number) and then hanging up. This feature is
disabled at default.
To Program:
1. Dial 53.
2. Dial 43.
“STATION FEATURES”
“QUICK TRANSFER”
3. Select station ports (LED On = Selected):
Station 10–57 = Dial 10–57 or press C10–C57.
4. Dial * for next station feature.
—OR—
Dial ** for configuration mode.
To change setting, repeat procedure and make different selection.
Programming the DSU II System
195
DSU II Digital Telephone System
IMI66–132
Button Mapping the Stations
(Non-Square System Configuration)
You can assign (map) every programmable button at each digital station to be line-select buttons so that they
provide access to outside lines; to be direct station select (DSS) buttons so that they provide quick access to
system stations; to be special-purpose buttons so that they provide telephone users with one-button access to
features; or to be idle buttons so that they provide autodial locations for the station user.
Three idle (unmapped) buttons serve as dynamic line buttons. Dynamic line buttons provide a location for the
system to temporarily assign a line appearance to a station that normally does not have that particular line
assigned to it. While a line is in appearance there, the user can perform any normal call handling operations
that he or she wishes to perform. The lines are identified as follows: B1, B2, and B3 on DigiTech telephones
(product codes 7700S, 7714X, and 7114S), B1, B2, and B3 on Impression telephones (product codes 2022S,
2122X, and 2101N), or L1, L2, and L3 on Impact telephones (product codes 8012S, 8024S, 8112S, and
8124S.) Refer to Recording the Station Configuration on page 309 for button illustrations.
When you map a button at a station port, press the corresponding button on the programming station to select
the button to be mapped. If you must map buttons at a station port while using a programming telephone that
does not provide a full complement of buttons, you can dial a 3-digit code to select a button. The table below
lists the 3-digit codes and their corresponding buttons.
Button Codes for Impression, DigiTech, and Impact Telephones
196
Code
Impression
DigiTech
Impact
120
118
116
114
112
110
108
121
119
117
115
113
111
109
122
123
100
101
102
103
104
105
106
107
A1
A2
A3
A4
A5
A6
A7
A8
A9
A10
A11
A12
A13
A14
A15
A16
B1
B2
B3
B4
B5
B6
A1
A2
A3
A4
A5
A6
A7
A8
A9
A10
A11
A12
A13
A14
B9
B10
B1
B2
B3
B4
B5
B6
B7
B8
L1
L2
L3
L4
L5
L6
L7
L8
L9
L10
L11
L12
L13
L14
L15
L16
L17
L18
L19
L20
L21
L22
L23
L24
Programming the DSU II System
IMI66–132
DSU II Digital Telephone System
Account Code Button
Description: Press the account code button and then dial an account code to record a call
into a particular category without interrupting the call.
To Program:
1. Dial 56.
2. Dial 17.
“BUTTON MAPPING”
“ASSIGN ACCT KEY”
3. Select button to be programmed:
Press A1–A14, B1–B10.
4. Select station ports (LED On = Selected):
Station 10–57 = Dial 10–57 or press C10–C57.
5. Dial * for further ACCOUNT CODE button assignment.
—OR—
Dial ** for next button mapping feature.
—OR—
Dial *** for next configuration mode.
To clear assignment, dial 5604, press button, dial # select station, and dial
***.
Programming the DSU II System
197
DSU II Digital Telephone System
IMI66–132
Automatic Call-Back Button
Description: When a user presses this button after they encounter a busy tone, the system
will automatically ring both the called station and the user’s station when the
called station becomes idle.
To Program:
1. Dial 56.
2. Dial 10.
“BUTTON MAPPING”
“ASSIGN CALL BACK”
3. Select button to be programmed:
Press A1–A14, B1–B10.
4. Select station ports (LED On = Selected):
Station 10–57 = Dial 10–57 or press C10–C57.
5. Dial * for next AUTO CALL-BACK button assignment.
—OR—
Dial ** for next button mapping feature.
—OR—
Dial *** for configuration mode.
To clear assignment, dial 5604, press button, dial # select station, and dial
***.
198
Programming the DSU II System
IMI66–132
DSU II Digital Telephone System
Blank Buttons
Description: Assign as “blank” those buttons that you want to be dynamic line buttons or
autodial buttons.
NOTE: When blanking buttons, be sure a previously assigned button is idle (feature
not selected by user) before you blank it.
To Program:
1. Dial 56.
2. Dial 04.
“BUTTON MAPPING”
“BLANK/AUTODIAL”
3. Select all buttons to be programmed.
Press A1–A14, B1–B10.
4. Dial #.
5. Select station ports (LED On = Selected):
Station 10–57 = Dial 10–57 or press C10–C57.
6. Dial * for further BLANK button assignment.
—OR—
Dial ** for further button mapping feature.
—OR—
Dial *** for configuration mode.
Programming the DSU II System
199
DSU II Digital Telephone System
IMI66–132
Call Forward Button
Description: This button provides one-button forwarding of all calls to another extension.
To Program:
1. Dial 56.
2. Dial 11.
“BUTTON MAPPING”
“ASSIGN CALL FWD”
3. Select button to be programmed.
Press A1–A14, B1–B10.
4. Select station ports (LED On = Selected):
Station 10–57 = Dial 10–57 or press C10–C57.
5. Dial * for next CALL FORWARD button assignment.
—OR—
Dial ** for button mapping feature.
—OR—
Dial *** for configuration mode.
To clear assignment, dial 5604, press button, dial # select station, and dial
***.
200
Programming the DSU II System
IMI66–132
DSU II Digital Telephone System
Call Park Orbit Button
Description: The Call Park Orbit button will automatically park an active call in orbit
when the user presses it.
To Program:
1. Dial 56.
2. Dial 12.
“BUTTON MAPPING”
“ASSIGN CALL PK”
3. Select button to be programmed:
Press A1–A14, B1–B10.
4. Dial 1–9 for parking orbit 1–9.
“ASSIGN CALL PK X”
5. Select station ports (LED On = Selected).
Station 10–57 = Dial 10–57 or press C10–C57.
6. Dial * for next CALL PARK ORBIT button assignment.
—OR—
Dial ** for next button mapping feature.
—OR—
Dial *** for configuration mode.
To clear assignment, dial 5604, press button, dial # select station, and dial
***.
Programming the DSU II System
201
DSU II Digital Telephone System
IMI66–132
Do Not Disturb (DND) Button
Description: Pressing the DND button prevents other stations from calling the DND
station.
To Program:
1. Dial 56.
2. Dial 07.
“BUTTON MAPPING”
“ASSIGN DND CODE”
3. Select button to be programmed:
Press A1–A14, B1–B10.
4. Select station ports (LED On = Selected):
Station 10–57 = Dial 10–57 or press C10–C57.
5. Dial * for further DND button assignment.
—OR—
Dial ** for next button mapping feature.
—OR—
Dial *** for configuration mode.
To clear assignment, dial 5604, press button, dial # select station, and dial
***.
202
Programming the DSU II System
IMI66–132
DSU II Digital Telephone System
DSS/BLF Button
Description: DSS/BLF buttons provide quick access to system stations and their lights
and show the busy status of the monitored stations.
To Program:
1. Dial 56.
2. Dial 03.
“BUTTON MAPPING”
“ASSIGN DSS/BLF”
3. Select button to be programmed.
Press A1–A14, B1–B10.
4.. Select station port (LED On = Selected):
Station 10–57 = Dial 10–57 or press C10–C57.
5. Repeat steps 3 and 4 until all ports are assigned.
6. Dial #.
7. Select station ports (LED On = Selected).
Station 10–57 = Dial 10–57 or press C10–C57.
8. Dial * for further DSS/BLF button assignment.
—OR—
Dial ** for next button mapping feature.
—OR—
Dial *** for configuration mode.
To clear assignment, dial 5604, press button, dial #, select station, and dial
***.
Programming the DSU II System
203
DSU II Digital Telephone System
IMI66–132
Intercom Button Programming (SCS Phones)
On model 8324SJ, 8312SJ, and 8212S telephones, you can move the Intercom button from its
default location at the lower right button to any programmable button. If you map a new location
for the Intercom button, the system will restore it to the default location the next time that power
turns off and back on at the telephone. Use the following button-mapping procedure to map the
new Intercom button.
1. At the programming station, press the defaulted Intercom button and dial
*#746* to enter the programming mode.
2. Dial 56.
3. Dial 19.
“BUTTON MAPPING”
“ASSIGN ITCM”
4. Select button to be programmed:
—Press A1–A14, B1–B10.
5. Select station ports (LED On = Selected):
—Station 10–57 = Dial 10–57 or dial C10–C57.
6. Dial * for further intercom button assignment, or dial *** to return to the
configuration mode.
NOTE: To clear a button assignment while in the configuration mode, dial
5604, press the button, dial #, select the station, and dial ***.
7. End the programming session by pressing the Speaker button.
204
Programming the DSU II System
IMI66–132
DSU II Digital Telephone System
Line Button
Description: Line select buttons provide access to outside lines.
To Program:
1. Dial 56.
2. Dial 02.
“BUTTON MAPPING”
“ASSIGN LINE”
3. Select button to be programmed.
Press A1–A14, B1–B10.
4. Select line ports to be assigned:
Line port 1–14 = Dial 01–14 or press A1–A14.
Line port 15, 16 = Dial 15, 16 or press B1, B2.
Line port 17–24 = Dial 17–24 or press HOLD then press A1–A8.
5. Repeat steps 3 and 4 until all lines are assigned.
6. Dial # to finish button mapping.
7. Select station port (LED On = Selected):
Station 10–57 = Dial 10–57 or press C10–C57.
8. Dial * for further LINE/BUTTON assignment.
—OR—
Dial ** for next button mapping feature.
—OR—
Dial *** for configuration mode.
To clear assignment, dial 5604, press button, dial # select station, and dial
***.
Programming the DSU II System
205
DSU II Digital Telephone System
IMI66–132
Line Group Button
Description: This button provides one-button access to a line group.
To Program:
1. Dial 56.
2. Dial 13.
“BUTTON MAPPING”
“ASSIGN LINE GRP”
3. Select button to be programmed:
Press A1–A14, B1–B10.
4. Dial 1–4 for parking orbit 1–4.
“ASSIGN LINE GRP X”
5. Select station ports (LED On = Selected):
Station 10–57 = Dial 10–57 or press C10–C57.
6. Dial * for next LINE GROUP button assignment.
—OR—
Dial ** for next button mapping feature.
—OR—
Dial *** for configuration mode.
To clear assignment, dial 5604, press button, dial #, select station, and dial
***.
206
Programming the DSU II System
IMI66–132
DSU II Digital Telephone System
Line Group Queue Button
Description: A station user can queue for a busy line by pressing a line group queue
button.
To Program:
1. Dial 56.
2. Dial 15.
“BUTTON MAPPING”
“ASSIGN LINE GRP Q”
3. Select button to be programmed:
Press A1–A14, B1–B10.
4. Select station ports (LED On = Selected):
Station 10–57 = Dial 10–57 or press C10–C57.
5. Dial * for further LINE GROUP QUEUE button assignment.
—OR—
Dial ** for next button mapping feature.
—OR—
Dial *** for configuration mode.
To clear assignment, dial 5604, press button, dial # select station, and dial
***.
Programming the DSU II System
207
DSU II Digital Telephone System
IMI66–132
Multiple Intercom Button
Description: You can assign a second intercom button to stations that may make many
intercom calls.
To Program:
1. Dial 56.
2. Dial 05.
“BUTTON MAPPING”
“ASSIGN 2ND INTERCOM”
3. Select button to be programmed:
Press A1–A14, B1–B10.
4. Select station ports (LED On = Selected):
Station 10–57 = Dial 10–57 or press C10–C57.
5. Dial * for further MULTIPLE INTERCOM button assignment.
—OR—
Dial ** for next button mapping feature.
—OR—
Dial *** for configuration mode.
To clear assignment, dial 5604, press button, dial # select station, and dial
***.
208
Programming the DSU II System
IMI66–132
DSU II Digital Telephone System
Privacy Button
Description: A user engaged in a private call can press the privacy button to change a
current call into a non-private one.
To Program:
1. Dial 56.
2. Dial 06.
“BUTTON MAPPING”
“ASSIGN PRIVACY”
3. Select button to be programmed:
Press A1–A14, B1–B10.
4. Select station ports (LED On = Selected):
Station 10–57 = Dial 10–57 or press C10–C57.
5. Dial * for further PRIVACY button assignment.
—OR—
Dial ** for next button mapping feature.
—OR—
Dial *** for configuration mode.
To clear assignment, dial 5604, press button, dial # select station, and dial
***.
Programming the DSU II System
209
DSU II Digital Telephone System
IMI66–132
Save Button
Description: A telephone user can press the SAVE button to store the last dialed number
for later redial.
To Program:
1. Dial 56.
2. Dial 08.
“BUTTON MAPPING”
“ASSIGN SAVE”
3. Select button to be programmed:
Press A1–A14, B1–B10.
4. Select station ports (LED On = Selected).
Station 10–57 = Dial 10–57 or press C10–C57.
5. Dial * for further SAVE button assignment.
—OR—
Dial ** for next button mapping feature.
—OR—
Dial *** for configuration mode.
To clear assignment, dial 5604, press button, dial # select station, and dial
***.
210
Programming the DSU II System
IMI66–132
DSU II Digital Telephone System
Voice Announce Block Button
Description: Telephone users can block voice announced intercom calls and station paging
by pressing this button.
To Program:
1. Dial 56.
2. Dial 14.
“BUTTON MAPPING”
“ASSIGN VAB”
3. Select button to be programmed:
Press A1–A14, B1–B10.
4. Select station ports (LED On = Selected):
Station 10–57 = Dial 10–57 or press C10–C57.
5. Dial * for further VOICE ANNOUNCE BLOCK button assignment.
—OR—
Dial ** for next button mapping feature.
—OR—
Dial *** for configuration mode.
To clear assignment, dial 5604, press button, dial # select station, and dial
***.
Programming the DSU II System
211
DSU II Digital Telephone System
IMI66–132
Zone Page/All-Call Button
Description: This button will provide a station with one-button access to all-call and zone
paging.
To Program:
1. Dial 56.
2. Dial 09.
“BUTTON MAPPING”
“ASSIGN ZONE”
3. Select button to be programmed:
Press A1–A14, B1–B10.
4. Dial 1–3 for zone 1–3.
“ASSIGN ZONE X”
—OR—
Dial 4 for all-call.
“ASSIGN ALL CALL”
4. Select station ports (LED On = Selected):
Station 10–57 = Dial 10–57 or press C10–C57.
5. Dial * for further PAGING button assignment.
—OR—
Dial ** for next button mapping feature.
—OR—
Dial *** for configuration mode.
To clear assignment, dial 5604, press button, dial # select station, and dial
***.
212
Programming the DSU II System
IMI66–132
DSU II Digital Telephone System
Account Codes
The digital telephone system uses account codes to identify calls by category, or by any other
desired grouping, so that it can record the cost of the calls by that category or grouping. The
account code can be either verified or not verified by the system; plus, the system can either force
the users to enter the account codes or make account code use optional. When you enable account
verification, the system compares the account code entered by a station user with the account
entries you have programmed. If the system does not find a match and the account code entry is
optional, the system sounds an error tone through the telephone but does not prevent dialing;
however, if forced entry is enabled, the system prevents further dialing until the user enters a
matching account code.
You should make a record in Chapter 5 of all programming decisions that you make—it will help
you keep track of what you have done and will help you troubleshoot problems.
NOTE: A lighted LED next to the programming button for the selection indicates the
current configuration. When a single button provides a toggle (on/off) action,
the lighted LED indicates the active feature.
The first step in any programming sequence is to enter the base level. Once in this mode, you can
dial the feature code for any desired configuration. Enter the base level with the following
procedure: press INTERCOM then dial *#746*. When you want to end the
programming, press the SPEAKER button to return the system to normal operation.
Programming the DSU II System
213
DSU II Digital Telephone System
IMI66–132
Account Code Length
Length for Verified Account Codes
Description: This feature defines the number of digits that the system will verify before it
accepts the account code as valid. Verified account code length also defines
the number of valid account codes that the system will store (as shown in the
following table.) Be aware that when you change the verified account code
length, the system empties the current list of valid account codes.
Account Code Lengths
Digits
Verified
Number of
Codes
3
4
5, 6
7, 8
9, 10
11, 12
13, 14
15, 16
1000
400
266
200
160
133
114
100
To specify the number of verifiable account code digits,
1. Dial 75.
2. Dial 15.
“SMDA PROGRAMMING”
“DIGITS VALID X”
3. Dial number of digits 3–16 to be verified.
4. Dial ** for configuration mode.
To change setting, repeat procedure and make different selection.
214
Programming the DSU II System
IMI66–132
DSU II Digital Telephone System
Length for Entered Account Codes
Description: This feature defines the number of account code digits that a user must enter
before the system will accept the code. Account code length can range from
3 to 16 digits; however, its length must always be equal to or greater than the
current verified account code length.
To specify the number of entered account code digits,
1. Dial 75.
2. Dial 09.
‘SMDA PROGRAMMING”
“MAX ACCT CODE X”
3. Dial number of digits (3–16) for account code length.
NOTE: The entered digits must be equal to or greater than the verifiable digits
specified under Length of Verified Account Codes but cannot be greater than
16.
4. Dial ** for configuration mode.
To change setting, repeat procedure and make different selection.
Account Code List
Description: Use this programming feature to create the list of account codes for use.
To Program:
1. Dial 75.
2. Dial 05.
“SMDA PROGRAMMING”
“SET ACCT CODE”
3. Dial account code digits. Maximum number of digits must be equal to number of
account code digits specified under Account Code Length.
4. To enter another account code, dial #, then dial its number.
5. Dial ** for configuration mode.
To remove account codes from list,
1. Dial 75.
2. Dial 06.
‘SMDA PROGRAMMING”
“CLEAR ACCT CODE”
3. Dial account code to be removed.
4. To remove another account code, dial #, then dial its number.
5. Dial ** for configuration mode.
Programming the DSU II System
215
DSU II Digital Telephone System
IMI66–132
Enabled or Disabled Account Codes
Description: Use this procedure to enable or disable the account code feature for the
system.
To Program:
1. Dial 75.
2. Dial 07.
“SMDA PROGRAMMING”
“XXXXXXX ACCOUNT”
3. Press A1 for forced account codes on all stations.
—OR—
Dial 1 to Enable.
Dial 2 to Disable.
“ENABLE ACCOUNT”
“DISABLE ACCOUNT”
4. Dial ** for configuration mode.
To change setting, repeat procedure and make opposite selection.
Forced or Optional Entry Account Codes
Description: Use this programming procedure to arrange for the system to either force
users to enter account codes before they can make calls, or to make entering
of account codes optional.
To Program:
1. Dial 53.
2. Dial 35.
“STATION FEATURES”
“FORCE ACCT CODE”
3. Press A1 for forced account codes on all stations.
—OR—
Press A2 for optional account codes on all stations.
4. Select station ports to be exempted (LED On = Forced, Off = Optional):
Dial 10–57 or press C10–C57.
5. Dial ** for configuration mode.
To change setting, repeat procedure and make opposite selection.
216
Programming the DSU II System
IMI66–132
DSU II Digital Telephone System
Forced Account Code Emergency Numbers
Description: Even if you arrange for the system to force account code entries, users can
always dial emergency numbers without first entering an account code. Use
this programming feature to enter up to 10 emergency numbers. Each
number can be a minimum of one digit and a maximum of twelve digits.
To Program:
1. Dial 75.
2. Dial 16.
“SMDA PROGRAMMING”
“SET EMER NUMBER”
3. Dial emergency number (up to 12 digits).
4. To enter another emergency number, dial #, then dial number.
5. Dial ** for configuration mode.
To clear emergency numbers,
1. Dial 53.
2. Dial 17.
“STATION FEATURES”
“CLR EMER NUMBER”
3. Dial emergency number to be cleared (up to 12 digits).
4. To clear another number, dial #, then dial number.
5. Dial ** for configuration mode.
Message Display Time for Account Codes
Description: When you enable the account code feature, LCD speakerphones prompt users
to enter an account code with a displayed message that the system clears at
the end of a programmable display time. Use this procedure to set the length
of time for the display within the range of 1 to 20 seconds. (The default
setting is 5 seconds.) If account codes are forced, the system drops the line if
the user fails to enter a valid account code during the display period. You
also can make this prompting message appear in the telephone display when
the user answers an incoming call. This prompting feature will remind users
to enter account codes for answered calls.
To Program:
1. Dial 75.
“SMDA PROGRAMMING”
“DISPLAY TIME X”
2. Dial 10.
3. Dial 1–20 to select new display time (in seconds).
4. Dial ** for configuration mode.
To change setting, repeat procedure and make different selection.
Programming the DSU II System
217
DSU II Digital Telephone System
IMI66–132
Incoming and Outgoing Call Prompt for Account Code Entries
Description: You must enable or disable the account code message display time for both
incoming and outgoing calls.
To Program:
1. Dial 75.
2. Dial 11.
“SMDA PROGRAMMING”
“XXXXXXX INCOMING”
—OR—
Dial 12.
“XXXXXXX OUTGOING”
3. Press A1 to toggle feature on or off (LED On = Enabled).
—OR—
Dial 1 to Enable.
Dial 2 to Disable.
“ENABLE INCOMING”
“DISABLE INCOMING”
4. Dial ** for configuration mode.
To change setting, repeat procedure and make opposite selection.
Verify Account Code Entry
Description: Use this programming procedure to arrange for the system to either verify or
not verify the account codes that users enter.
To Program:
1. Dial 75.
2. Dial 08.
“SMDA PROGRAMMING”
“VERIFICATION XXX”
3. Press A1 to toggle feature on or off (LED On = Verified).
—OR—
Dial 1 to Enable.
Dial 2 to Disable.
“VERIFICATION ON”
“VERIFICATION OFF”
4. Dial ** for configuration mode.
To change setting, repeat procedure and make opposite selection.
218
Programming the DSU II System
IMI66–132
DSU II Digital Telephone System
Secure Account Code Entry
Description: When system-wide account code entry is enabled, the system prompts users
to enter an account code when they select an incoming or outgoing line. If
the Secure Account Code entry feature is enabled, the digits will be
displayed as “*” characters in the LCD during account code entry. At default,
this feature is disabled.
The Secure Account Code entry status is shown with the toll restriction COS
printout.
To Program:
1. Dial 75.
2. Dial 18.
“SMDA PROGRAMMING”
“SECURE ACC XXX”
3. Press A1 to toggle between enable and disable (LED On = Enable).
—OR—
Dial 1 to Enable.
Dial 2 to Disable.
“SECURE ACC ON”
“SECURE ACC OFF”
4. Dial ** for configuration mode.
To change setting, repeat procedure and make opposite selection.
Programming the DSU II System
219
DSU II Digital Telephone System
IMI66–132
Industry-Standard Telephone (IST) Interface
The JM008 Expansion Module
The JM008 expansion module is an optional accessory cabinet that you mount on the DSU II’s
common equipment cabinet to provide the system with an interface for eight IST devices.
The Analog Terminal Interface
The Analog Terminal Interface device (ATI-D) is a multipurpose on-premise accessory. It has
dual circuits that allow the connection of two IST devices to the DSU II system.
NOTE: Connect the first port to an even station port. All ATI-D ports must be paired.
Understanding the Programming Requirements for the IST Interface
The IST provides basic intercom service coupled with the ability to access outside lines. Through
programming, the IST acts as either an intercom-only telephone or as a full-featured business
telephone. You can program the station port through which the IST interfaces for either Prime
Line Automatic and Idle Line Preference, or for Prime Intercom (default is for Prime Intercom).
You can also program the station port to have distinctive ringing and to match the type of dialing
used by the IST.
You should make a record in Chapter 5 of all programming decisions that you make—it will help
you keep track of what you have done and will help you troubleshoot.
NOTE: A lighted LED next to the programming button for the selection indicates the
current configuration. When a single button provides a toggle (on/off) action,
the lighted LED indicates the active feature.
The first step in any programming sequence is to enter the base level. Once in this mode, you can
dial the feature code for any desired configuration. Enter the base level by pressing
INTERCOM, then dialing *#746*. Press the SPEAKER button to end the
programming procedure and return the system to normal operation.
220
Programming the DSU II System
IMI66–132
DSU II Digital Telephone System
IST Station Port Line Assignment
Description: If you program the port through which the IST is interfaced for Prime
Intercom, the effect on the user is different depending on whether the
system is operating as a key system or as a hybrid system.
• On key-configured systems, proprietary telephone users give the IST access
to outside lines for call origination through the use of the call transfer
feature. You can assign outside line ringing to the station port for IST call
answering purposes by programming the station port for the ringing line
preference feature and enable ringing for all desired lines.
• On hybrid-configured systems, the system gives the IST access to outside
lines through line group access. With line group access, IST users dial the
group access code over the intercom line to access an outside line for use.
The common equipment then selects one of the grouped idle lines for use in
the order from the highest numbered line to the lowest numbered line.
If you program the port through which the IST is interfaced for Prime
Line Automatic and Idle Line Preference, program an outside line as a
prime line at the station port, or program the station port for idle line
preference and then program one of the assigned idle lines as a prime line.
With both the prime line automatic and the idle line preference features, the
IST has outside line dial tone when users lift the handset. You can assign
outside line ringing to the station port for IST call answering purposes or you
can enable the ringing line preference feature for the station port. The
intercom line is available to an IST even though you have arranged it to have
outside line access. After going off-hook, IST users obtain intercom dial tone
by performing a hookflash. This action either drops the outside line (if no
digits are dialed after lifting the handset) or places it on hold (if digits were
dialed) and provides intercom dial tone.
To Program:
1. Dial 53.
2. Dial 15.
3a. Assign prime line:
“STATION FEATURES”
“PRIME LINE”
“PRIME LINE XX”
Line port 1–14 = Dial 01–14 or press A1–A14.
Line port 15, 16 = Dial 15, 16 or press B1, B2.
Line port 17–24 = Dial 17–24 or press HOLD then press A1–A8.
3b. Assign prime group, dial 51–54 for groups 1–4. “PRIME LINE GRP X”
3c. Assign prime intercom, dial 50 for intercom line.
“PRIME INTERCOM”
4. Select station ports (LED On = Feature Assigned):
Station 10–57 = Dial 10–57 or press C10–C57.
5. Dial * for next prime line, group, or intercom assignment:
—OR—
Dial ** for next station feature.
—OR—
Dial *** for configuration mode.
Programming the DSU II System
221
DSU II Digital Telephone System
IMI66–132
To enable idle line preference,
1. Dial 54.
2. Dial 7.
“STA/LINE CONFIG”
“IDLE LINE PREF”
3. Select line ports (LED On = Selected Port).
Line port 1–14 = Dial 01–14 or press A1–A14.
Line port 15, 16 = Dial 15, 16 or press B1, B2.
Line port 17–24 = Dial 17–24 or press HOLD then press A1–A8.
4. Dial # when all line ports are selected.
5. Select station ports (LED On = Feature Assigned):
Station 10–57 = Dial 10–57 or press C10–C57.
6. Dial * when all station ports are selected.
—OR—
Dial ** for next station/line feature.
—OR—
Dial *** for configuration mode.
222
Programming the DSU II System
IMI66–132
DSU II Digital Telephone System
IST Distinctive Ringing
Description: Intercom calls that ring at IST equipment have a different cadence than
outside calls. For the JM008 interface, the intercom ring cadence is: 0.5
seconds on, .1 seconds off, 0.5 seconds on, 4 seconds off, and the outside
call ring cadence is : 2 seconds on, 4 seconds off. For the ATI-D interface,
the intercom ring cadence is 1 second on, .5 seconds off, 1 second on, 3.5
seconds off, and outside the call ring cadence is: 2 seconds on, 4 seconds off.
If needed, you can disable this distinctive ringing feature to make the
intercom ring cadence the same as that for outside calls.
To Program:
1. Dial 53.
2. Dial 33.
“STATION FEATURES”
“DIST RING XX”
3. Press A1 to toggle between enable and disable (LED On = Enable).
—OR—
Dial 1 to Enable (A1 LED = Enable).
Dial 2 to Disable.
“DIST RING ON”
“DIST RING OFF”
4. Dial * for next feature.
—OR—
Dial ** for configuration mode.
To change setting, repeat procedure and make opposite selection.
Programming the DSU II System
223
DSU II Digital Telephone System
IMI66–132
IST through Dialing
Description: With this programming feature enabled, any DTMF signaling tones that are
generated by the IST equipment pass through the JM008 or ATI-D, the
common equipment, and any line connection into the switched network. The
system automatically enables this feature when you connect the JM008 or
ATI-D to the DSU II. Equipment such as the proprietary voice mail systems
and the 2500 tone dial telephone require thru dialing; however, you should
disable this feature for equipment such as model 500 rotary-dial telephones.
To Program:
1. Dial 53.
2. Dial 07.
“STATION FEATURES”
“ATI THRU DIALING”
3. Select station ports (LED On = Selected):
Station 10–57 = Dial 10–57 or press C10–C57.
4. Dial * for next feature.
—OR—
Dial ** for configuration mode.
To clear setting, repeat procedure.
224
Programming the DSU II System
IMI66–132
DSU II Digital Telephone System
Direct Department Calling
Direct department calling allows the system to assign lines to one of four different departments.
Calls received on department lines and calls that are transferred to a department from within the
system search for an idle station in that department.
The system distributes department calls evenly throughout the department stations. It does this by
placing newly received calls, transferred calls, and held calls in a queue for servicing, assigning
these calls a time stamp to ensure that they are serviced in the order of their arrival, and routing
them to the department stations in an orderly manner.
The system allows you to create a maximum of four departments with a maximum of 16 stations
and a minimum of 3 stations (plus one overflow station) in each department. Since you can assign
a station to more than one department, you can add the attendant station to serve as the overflow
station in every department. You can also assign separate access codes (extension numbers) to
each department. The users can use these access codes for making intercom calls or doing call
transfers to the department.
You must assign lines and stations to a department but you do not need to assign department lines
to appear at line buttons on department stations. If a site requires that a particular department line
appear at a particular department station, you can assign it; however, you must disable both direct
and delayed ringing for that line at that station.
Always program the department stations to have a short RNA time to allow a call to search
rapidly through a department for an answer. Further, map a Do Not Disturb (DND) button for
each department station so that users can press it to place their stations in an off-duty condition.
Understand, that the departments that you form for use with this direct department calling feature
are not the same departments that you form for SMDA reporting.
You should make a record in Chapter 5 of all programming decisions that you make—it will help
you keep track of what you have done and will help you troubleshoot any problem that might
arise later.
NOTE: A lighted LED next to the programming button for the selection indicated the
current configuration. When a single button provides a toggle (on/off) action,
the lighted LED indicates the active feature.
The first step in any programming sequence is to enter the base level. Once in this mode, you can
dial the feature code for any desired configuration. Enter the base level with the following
procedure: press INTERCOM then dial *#746*. When you want to end the
programming, press the SPEAKER button to end the programming procedure and return the
system to normal operation.
Programming the DSU II System
225
DSU II Digital Telephone System
IMI66–132
Access Codes for Direct Department Calling
Description: You can program department access codes to be any number between 10 and
7999; however, the system will not allow you to assign the same dialing code
as both a station extension number and a department access code; nor will
the system allow an extension number conflict such as 15 and 1500. Further,
with system defaulted extension numbers, the assigned department access
codes must start at 0058 or larger.
To Program:
1. Dial 52.
2. Dial 2 to assign access codes to departments.
3. Dial 1–4 for department 1–4.
4. Dial new access code.
“ACCESS CODE”
“DEPT CALLING”
“DEPT X YYYY”
“DEPT X YYYY ZZZZ”
NOTE: New code can be maximum of four digits. If less than four digits, leading
zeros must be dialed before the number. Code cannot conflict with station
extension numbers.
5. Dial next department number and program access code.
—OR—
Dial * for next access code feature.
—OR—
Dial ** for configuration mode.
226
Programming the DSU II System
IMI66–132
DSU II Digital Telephone System
Line Ports for Direct Departmental Calling
Description: You can assign outside lines to one of four different departments if you wish.
If you do this, calls received on a line that you have assigned to a department
will hunt for any idle station in that department to ring.
To Program:
1. Dial 39.
“DEPT CALLING”
2. Select department:
Dial 0 for none.
Dial 1 for Department 1.
Dial 2 for Department 2.
Dial 3 for Department 3.
Dial 4 for Department 4.
“NO DEPARTMENT”
“DEPARTMENT 1”
“DEPARTMENT 2”
“DEPARTMENT 3”
“DEPARTMENT 4”
3. Select line ports to be assigned (LED On = Assigned):
Line port 1–14 = Dial 01–14 or press A1–A14.
Line port 15, 16 = Dial 15, 16 or press B1, B2.
Line port 17–24 = Dial 17–24 or press HOLD then press A1–A8.
4. Dial * for next department.
—OR—
Dial ** for configuration mode.
Programming the DSU II System
227
DSU II Digital Telephone System
IMI66–132
Station Ports for Direct Department Calling
Description: You can group stations by department to allow a call to search for an idle
station within a department. This search occurs when a busy or RNA is
encountered at a called department station. The system allows up to four
departments with up to 16 stations and a minimum of three stations in each
one. You can place one additional station in each department to serve as a
termination station. Calls that roll to a termination station will follow a call
forward if it is set at that station.
To Program:
1. Dial 53.
2. Dial 19.
3. Dial 1–4 for department 1–4.
“STATION FEATURES”
“DEPT CALLING”
“DEPARTMENT X”
4. Select department stations:
Station 10–57 = dial 10–57.
5. Dial * to program next department.
6. Dial 5–8 for termination station in department 1–4.
“DEPARTMENT X”
7. Select termination station:
Station 10–57 = Dial 10–57.
8. Dial * to program next department termination station.
—OR—
Dial ** for next station feature.
—OR—
Dial *** for configuration mode.
228
Programming the DSU II System
IMI66–132
DSU II Digital Telephone System
Unanswered Call Transfer Recall Time for Direct Department Calling
Description: A transferred call that remains unanswered in a department after a
programmed length of time will return to the transferring station for
answering. Set the department transfer recall time with this programming
procedure.
To Program:
1. Dial 11.
2. Dial 2.
“TRANSFER RECALL”
“DEPT XFR RCL XXX”
3. Choose transfer time:
Dial 1 or press A1.
Dial 2 or press A2.
Dial 3 or press A3.
Dial 4 or press A4.
Dial 5 or press A5.
Dial 6 or press A8.
Dial 7 or press A9.
Dial 8 or press A10.
Dial 9 or press A11.
Dial 0 or press A12.
“DEPT XFR RCL 10”
“DEPT XFR RCL 20”
“DEPT XFR RCL 25”
“DEPT XFR RCL 30”
“DEPT XFR RCL 45”
“DEPT XFR RCL 60”
“DEPT XFR RCL 90”
“DEPT XFR RCL 120”
“DEPT XFR RCL 180”
“DEPT XFR RCL 400”
4. Press * for next transfer recall feature.
—OR—
Dial ** for configuration mode.
To change setting, repeat procedure and make different selection.
Programming the DSU II System
229
DSU II Digital Telephone System
IMI66–132
Call Forward on Ring—No Answer
The system can automatically forward ring—no answer (RNA) calls to a new station. The system
sends these calls to any idle station associated by department with the called station. Use this
feature to arrange for calls to cycle rapidly through such associated stations by testing each one in
turn with several rings.
Call Forwarding of RNA Calls
Description: Enable call forward of RNA calls for individual stations using this
programming feature.
NOTE: If you enable this feature, also program the system intercom signaling as tone
for the first choice.
To Program:
1. Dial 53.
2. Dial 21.
3. Dial 0–9 for 0–9 rings before forwarding.
“STATION FEATURES”
“CALL FWD RNA”
“RINGS = X”
4. Select all station ports (LED On = Feature Assigned):
Station 10–57 = Dial 10–57 or press C10–C57.
5. Dial * for additional station ring assignments.
—OR—
Dial ** for next station feature.
—OR—
Dial *** for configuration mode.
To remove call forwarding from a station, assign 0 rings.
230
Programming the DSU II System
IMI66–132
DSU II Digital Telephone System
Set Tone First Intercom Signaling
Description: You must set the first choice intercom signaling method to Tone First to
ensure forwarding of calls that encounter a busy signal or ring with no
answer.
To Program:
1. Dial 16.
“XXXXX ANN FIRST”
2. Press A1 to toggle from Voice to Tone (LED Off = Tone).
—OR—
Dial 2 for Tone First.
“TONE ANN FIRST”
3. Dial * for Configuration mode.
To change setting, repeat procedure and make opposite selection.
DCD Type Ring All Stations
Description: Enabling the system-wide ring all DCD feature causes a transferred call to
ring at all idle stations in a department until it is answered. The answering
station gets the call while the remaining stations retain their original status.
Default = Disabled
To Program:
1. Press ITCM, dial *#746*.
2. Dial 17.
3. Dial 15.
“CONFIG MODE”
“SYSTEM FEATURES”
“RING ALL XXX”
4. Press A1 key to toggle between enable and disable (LED On = Enable).
—OR—
Dial 1 to Enable.
Dial 2 to Disable.
“RING ALL ON”
“RING ALL OFF”
5. Dial * for system features.
—OR—
Dial ** for configuration mode.
Programming the DSU II System
231
DSU II Digital Telephone System
IMI66–132
DCD Type Longest Idle Distribution
Description: Enabling the system-wide longest idle DCD feature causes any call to a
department to ring at the station that has been idle for the longest period of
time. If the station is in DND mode, the call rings the next longest idle
station.
Default = Disabled.
To Program:
1. Press ITCM, dial *#746*.
2. Dial 17.
3. Dial 16.
“CONFIG MODE”
“SYSTEM FEATURES”
“LONGEST IDLE XXX”
4. Press A1 key to toggle between enable and disable (LED On = Enable).
—OR—
Dial 1 to Enable.
Dial 2 to Disable.
“LONGEST IDLE ON”
“LONGEST IDLE OFF”
5. Dial * for system features.
—OR—
Dial ** for configuration mode.
232
Programming the DSU II System
IMI66–132
DSU II Digital Telephone System
Direct Inward Station Dialing (DISD)
The DISD feature allows an external party to call an intercom station directly without assistance
by the attendant. The system must receive the DISD call on a line that you have programmed to
allow this feature. You can program any line to be a DISD line for both the normal mode of
operation and the night transfer (of ringing) mode of operation.
You can program the number of rings that the system allows on a DISD line. If you set a large
number of rings, stations that have a line appearance for the DISD line have time to handle the
call in a regular manner before the system takes control of the call. If you wish to dedicate a line
for DISD use, it is a good practice to set it for one ring so that the system can quickly take control
of the call. By setting the number of rings to 0, you can disable the line for DISD use.
You can program the amount of time the system allows for a DISD caller to dial an extension
number. You can also program the DISD assist station that will answer calls not completed
during the dial time limit.
It is a good practice for you to connect a music source to the system to let callers know they have
not been disconnected during a camp-on situation when the feature is controlling the call.
You should make a record in Chapter 5 of all programming decisions that you make—it will help
you keep track of what you have done and will help you troubleshoot any problem that might
arise later.
NOTE: A lighted LED next to the programming button for the selection indicates the
current configuration. When a single button provides a toggle (on/off) action,
the lighted LED indicates the active feature.
The first step in any programming sequence is to enter the base level. Once in this mode, you can
dial the feature code for any desired configuration. Enter the base level with the following
procedure: press INTERCOM then dial *#746*. When you want to end the
programming, press the SPEAKER button to end the programming procedure and return the
system to normal operation.
Programming the DSU II System
233
DSU II Digital Telephone System
IMI66–132
Dial Time Limit
Description: When a caller does not complete extension number dialing within the
programmed dial time limit, the system routes a DISD call to the assist
station if you have programmed one; otherwise, it drops the line.
To Program:
1. Dial 44.
“DISD DIALTIME X”
2. Press program button to select dial time limit (LED On = Enabled):
Dial 1 or press A1 = 6 seconds.
Dial 2 or press A2 = 9 seconds.
Dial 3 or press A3 = 12 seconds.
Dial 4 or press A4 = 15 seconds.
Dial 5 or press A5 = 20 seconds.
Dial 6 or press A8 = 30 seconds.
Dial 7 or press A9 = 40 seconds.
Dial 8 or press A10 = 60 seconds.
Dial 9 or press A11 = 90 seconds.
Dial 0 or press A12 = 0 seconds.
“DISD DIALTIME 6”
“DISD DIALTIME 9”
“DISD DIALTIME 12”
“DISD DIALTIME 15”
“DISD DIALTIME 20”
“DISD DIALTIME 30”
“DISD DIALTIME 40”
“DISD DIALTIME 60”
“DISD DIALTIME 90”
“DISD DIALTIME 0”
3. Dial * for configuration mode.
To change setting, repeat procedure and make different selection.
234
Programming the DSU II System
IMI66–132
DSU II Digital Telephone System
Inhibiting DISD Digit Dialing
Description: You can prevent callers form dialing on the DISD line when the system is in
the Night Transfer (of Ringing) mode.
To Program:
1. Dial 17.
2. Dial 09.
“SYSTEM FEATURES”
“DISD DIALING XX”
3. Press A1 to toggle between enable and disable (LED On = Enable).
—OR—
Dial 1 to Enable (A1 LED is on).
Dial 2 to disable.
“DISD DIALING ON”
“DISD DIALING OFF”
4. Press ** for configuration mode.
To change setting, repeat procedure and make different selection.
Programming the DSU II System
235
DSU II Digital Telephone System
IMI66–132
DISD Assist Station
Description: When a caller does not complete extension number dialing within the
programmed dial time limit, the system routes the call to the DISD assist
station.
To Program:
1. Dial 46.
“DISD ASSIST”
2. Choose operating mode to be programmed.
Dial 1 or press A1 = Normal mode.
“DISD ASSIST DAY X”
Dial 2 or press A2 = Night Transfer (of Ringing) mode. “DISD ASSIST NITE”
3. Select assist station:
Dial 00 for no DISD assist station (line drops after timeout).
Dial 10–57 or press C10–C57 (LED On = Selected).
4. Dial #.
5. Assign line ports to DISD assist station (LED On = Assigned):
Line port 1–14 = Dial 01–14 or press A1–A14.
Line port 15, 16 = Dial 15, 16 or press B1, B2.
Line port 17–24 = Dial 17–24 or press HOLD then press A1–A8.
6. Press * and repeat steps 2 and 3 for further assist station programming.
—OR—
Press ** for configuration mode.
To change setting, repeat procedure and make different selection.
236
Programming the DSU II System
IMI66–132
DSU II Digital Telephone System
DISD Incoming Rings
Description: The number of rings that occur on a DISD line before it is answered is
programmable. Setting a large number of rings allows time for a call to be
serviced in a regular manner by stations that have line appearance for the
DISD line if such action is desired.
To Program:
1. Dial 45.
“DISD RINGS”
2. Press program button to choose operating mode:
Dial 1 or press A1 = Normal Mode.
“DISD RINGS DAY X”
Dial 2 or press A2 = Night Transfer (of Ringing) Mode. “DISD RINGS NITE X”
3. Select rings to occur before line is answered:
Dial 0 for no rings (disables DISD for the line).
Dial 1–9 = rings 1–9.
4. Dial #.
5. Assign line ports to have designated ring (LED On = Assigned):
Line port 1–14 = Dial 01–14 or press A1–A14.
Line port 15, 16 = Dial 15, 16 or press B1, B2.
Line port 17–24 = Dial 17–24 or press HOLD then press A1–A8.
6. Press * and repeat steps 2 and 3 for further DISD ring assignment.
—OR—
Press ** for configuration mode.
To change setting, repeat procedure and make different selection.
Programming the DSU II System
237
DSU II Digital Telephone System
IMI66–132
Enable/Disable Call Waiting Tone
Description: The call waiting tone sent to the called party can be enabled or disabled.
To Program:
1. Dial 17 for system features.
2. Dial 11 for DISD call waiting tone.
“SYSTEM FEATURES”
“DISD CALL WAIT”
3. Press A1 key to toggle between enable and disable:
—OR—
Dial 1 to Enable.
Dial 2 to Disable.
“CALL WAITING TONES ON”
“CALL WAITING TONES OFF”
4. Dial * for further system features.
—OR—
Dial ** for configuration mode.
238
Programming the DSU II System
IMI66–132
DSU II Digital Telephone System
Data Printer Service
When you connect a data printer to the system, the system automatically prints the Station
Message Detail Record (SMDR) for the entire system without any programming or user
intervention.
You can also command the data printer to print partial or complete printouts of the configuration
data for the system. While you are using the printer to print the configuration data or SMDA
information, the system temporarily halts the SMDR printout although it continues to collect the
SMDR data. You should note, however, that if it logs more than two calls for any one line, call
records may be lost.
NOTE: A lighted LED next to the programming button for the selection indicates the
current configuration. When a single button provides a toggle (on/off) action,
the lighted LED indicates the active feature.
The first step in any programming sequence is to enter the base level. Once in this mode, you can
dial the feature code for any desired configuration. Enter the base level with the following
procedure: press INTERCOM then dial *#746*. When you want to end the
programming, press the SPEAKER button to end the programming procedure and return the
system to normal operation.
Enable Data Printer Operation
To Program:
1. Dial 91.
“PRINT CONFIG”
2. Choose configuration:
Dial 1 to print all configuration data.
Dial 2 to print system data.
Dial 3 to print line data.
Dial 4 to print data for all stations.
Dial 5 to print data for selected station.
“PRINT ALL”
“PRINT SYSTEM”
“PRINT LINES”
“PRINT STATIONS”
“PRINT STA”
Select station to be printed:
Dial 10–57 for stations 10–57.
Dial 6 to print toll restriction assignment.
Dial 7 to abort printing.
“PRINT STA XXX”
“PRINT TOLL”
“ABORT PRINT”
3. Dial * for configuration mode.
Programming the DSU II System
239
DSU II Digital Telephone System
IMI66–132
Voice Mail Interface
The digital telephone system supports the use of a voice mail system connected to the common
equipment’s station ports through the JM008 expansion module or the ATI-D analog terminal
interface device. The JM008 is an industry standard telephone station module that supplies eight
IST ports. The ATI-D is a multipurpose on-premise accessory that has dual circuits to allow a
2-port system to interface to two digital station ports. Two ATI-D devices are needed to interface
4-port systems.
In addition to the required programming task of identifying the station ports, there are several
optional programming considerations associated with voice mail operation.
You should make a record in Chapter 5 of all programming decisions that you make—it will help
you keep track of what you have done and will help you troubleshoot.
NOTE: A lighted LED next to the programming button for the selection indicates the
current configuration. When a single button provides a toggle (on/off) action,
the lighted LED indicates the active feature.
The first step in any programming sequence is to enter the base level. Once in this mode, you can
dial the feature code for any desired configuration. Enter the base level with the following
procedure: press INTERCOM then dial *#746*. When you want to end the
programming, press the SPEAKER button to end the programming procedure and return the
system to normal operation.
NOTE: Some features only apply to specific Comdial voice mail systems (that is,
ExecuMail or VVP). If you are using a different voice mail system, you may
have to perform additional programming steps to make these features
operational.
240
Programming the DSU II System
IMI66–132
DSU II Digital Telephone System
Voice Mail Port
Assign the Voice Mail Port
Description: When you connect the voice mail equipment to a common equipment station
port either through an IST interface or directly to the port (depending upon
the type of voice mail equipment you are using), you must use this assign
voice mail port feature to enable the station port as a voice mail port. This
feature only applies to voice mail systems supported by Comdial’s
proprietary DTMF integration. Once you perform this step, the station port
will only emit DTMF tones (it will not emit INTERCOM tones or ring-back
tones).
NOTE: When you are interfacing voice mail equipment through an ATI-D device and
you later replace the ATI-D with a proprietary digital multiline telephone, the
system automatically disables the port as a voice mail port; however, if you
disconnect the voice mail equipment from the ATI-D and replace it with a
model 2500 telephone, you must reprogram the station port so that it is no
longer programmed as a voice mail port.
To Program:
1. Dial 53.
2. Dial 32.
“STATION FEATURES”
“VOICE MAIL PORT”
3. Select all station ports (LED On = Selected):
Station 10–57 = Dial 10–57 or press C10–C57.
4. Dial * for next feature.
—OR—
Dial ** for configuration mode.
Programming the DSU II System
241
DSU II Digital Telephone System
IMI66–132
Assign Ringing for Automatic Attendant Operation
Description: With its automatic attendant feature, the voice mail system automatically
answers any line that is ringing at a voice mail port. As a default, the system
automatically enables ringing line preference for any port that you have
identified as a voice mail port. You must choose a ringing assignment for the
lines that you have assigned to the voice mail ports before the voice mail
system can provide the automatic attendant feature.
To Program:
1. Dial 54.
2. Dial 1.
“LINE CONFIG”
“DIRECT RING”
—OR—
Dial 2.
“DELAY RING”
—OR—
Dial 3.
“NIGHT RING”
3. Select line ports for direct ringing:
Line port 1–14 = Dial 01–14 or press A1–A14.
Line port 15, 16 = Dial 15, 16 or press B1, B2.
Line port 17–24 = Dial 17–24 or press HOLD then press A1–A8.
4. Dial # when all line ports are selected.
5. Select voice mail ports to be programmed (LED On = Selected)
Station 12-57 = Dial 12–57 or press C12–C57.
6. Dial * when all station ports are selected
—OR—
Dial *** for configuration mode.
To change setting, repeat procedure and make different selection. To clear current setting,
repeat procedure.
242
Programming the DSU II System
IMI66–132
DSU II Digital Telephone System
Assign the Voice Mail Stations to Hunt Group
Description: You must assign all voice mail ports to a circular hunt group to take
advantage of that feature’s multiple-port interface capability. Make a circular
hunt group by linking all voice mail ports to one another and then linking the
last voice mail port in the hunt group with the first voice mail port in the
hunt group. For example, with the voice mail system properly connected to
station ports 014, 015, 016, and 017, place port 014 in a hunt group and link
015 in a hunt group and line 016 to it, then place 016 in a hunt group and
link 017 to it, and finally place 017 in a hunt group and link 014 to it to
complete the circle. With this arrangement, a call will first try to ring at port
014, then try port 015 and so forth until it tries all four voice mail ports.
To make this hunt group completely functional, you must also assign call
forwarding for both ring—no answer and busy calls to the voice mail ports.
To assign voice mail ports to a hunt group,
1. Dial 53.
2. Dial 18.
“STATION FEATURES”
“HUNT LINK”
3. Select first voice mail port:
Station 12-57 = Dial 12–57 or press C12–C57.
4. Select second voice mail port:
Station 12-57 = Dial 12–57 or press C12–C57.
5. Dial * for another link:
(Example: 16 to 17, 17 to 18, and 18 to 16)
—OR—
Dial ** for next station feature.
—OR—
Dial *** for configuration mode.
Disable link by repeating procedure and linking station to itself.
Programming the DSU II System
243
DSU II Digital Telephone System
IMI66–132
To enable call forward of RNA calls, busy calls, and to set tone first intercom signaling,
1. Dial 53.
2. Dial 21.
3. Dial 0–9 for 0–9 rings before forwarding.
“STATION FEATURES”
“CALL FWD RNA”
“RINGS = X”
To remove call forwarding from a station, assign 0 rings.
4. Select station ports (LED On = Feature Assigned):
Station 12–57 = Dial 12–57 or press C12–C57.
5. Dial ** for station feature.
6. Dial 41.
“CALL FWD BUSY”
7. Select station ports (LED On = Feature Assigned):
Station 12–57 = Dial 12–57 or press C12–C57.
8. Dial ** for configuration mode.
Automatic Transfer of Voice Mail
Description: Use this programming feature to arrange for an immediate connection of a
transferred line from voice mail to a digital station port.
To Program:
1. Dial 25.
“V MAIL AUTO XFER”
2. Press A1 key to toggle between enable and disable (LED On = Enable).
—OR—
Dial 1 to Enable (A1 LED is on).
Dial 2 to Disable.
4. Dial * for configuration mode.
To change setting, repeat procedure and make different selection.
NOTE: Do not turn on this feature if you turn on the screen and/or confirm options
provided by the voice mail system. These two options provide an immediate
transfer that will prevent the voice mail system from providing any screen or
confirm action.
244
Programming the DSU II System
IMI66–132
DSU II Digital Telephone System
Voice Mail Line ID
Description: You can assign voice mail identification (ID) numbers to the voice mail
lines. A voice mail ID number can contain a maximum of six digits. A voice
mail ID number allows the voice mail equipment to identify which line it is
answering and play the appropriate greeting. The ID numbers that you assign
here must match the ID numbers that you assign when you program the voice
mail equipment.
To Program:
1. Dial 43.
“VOICE MAIL LN ID”
2. Select line port (LED On = Line Assigned):
Line port 1–14 = Dial 01–14 or press A1–A14.
Line port 15, 16 = Dial 15, 16 or press B1, B2.
Line port 17–24 = Dial 17–24 or press HOLD then press A1–A8.
3. Dial # to clear current ID.
4. Dial ID number (6 digit maximum).
5. Dial * for further ID assignment.
—OR—
Dial ** for configuration mode.
Voice Mail Transfer on Busy
Description: Normally, the auto-attendant routes calls from a busy station to that station’s
voice mailbox. Alternately, you can arrange for the system to alert the busy
station when the voice mail system is attempting to transfer a call. You may
need to program the attendant station to have this option.
To Program:
1. Dial 53.
2. Dial 31.
“STATION FEATURES”
“VMAIL XFR ON BSY”
3. Select station ports to be programmed (LED On = Selected):
Station 10–57 = Dial 10–57 or press C10–C57.
4. Dial * for next feature.
—OR—
Dial ** for configuration mode.
To clear current setting, repeat procedure.
Programming the DSU II System
245
DSU II Digital Telephone System
IMI66–132
Transferring Callers to Voice Mail
Description: You can program a Transfer to Voice Mail button to automate the process of
transferring a caller to a voice mailbox. Use this button in conjunction with a
DSS or a voice mailbox extension.
To Program:
1. Press INTERCOM **1.
2. Press the button to which you wish to assign this feature.
3. Press 6 followed by the first voice mail port station number.
4. Press SPEAKER to exit.
NOTE: The same button is used for both the Transfer to Voice Mail and Voice Memo
features.
Send Message Direct to Voice Mail
Description: You can program a Voice Memo button for sending a message directly to a
user’s mailbox. Press this button and then a DSS button, or dial the user’s
extension to leave a voice message in the user’s mailbox.
To Program:
1. Press INTERCOM **1.
2. Press the button to which you wish to assign this feature.
3. Dial 6.
4. Press SPEAKER to exit.
Recording a Conversation in Progress
Description: A user can press the Record button to record a conversation while on a line
call. This button has the same functionality as the interactive buttons offered
on the LCD during a line call. The Record button is useful for ACD agents
since their LCDs display ACD information when they are logged into an
ACD group. Pressing the Record button starts and stops the record feature
while on a call.
To Program:
1. Press INTERCOM **1.
2. Press the button to which you wish to assign the Record feature.
3. Dial 99.
4. Press SPEAKER to exit.
246
Programming the DSU II System
IMI66–132
DSU II Digital Telephone System
Positive Disconnect Supervision
Description: When a voice mail station is on line with an outside caller and the caller
hangs up, the CO may send a positive disconnect signal to the DSU II. You
can enable the positive disconnect supervision feature on a per-line basis. If
you enable positive disconnect supervision, when the system receives the
CO’s positive disconnect signal the system tells the voice mail equipment to
hang up.
To Program:
1. Dial 48.
“DIS SUPERVISION”
2. Select line ports for disconnect supervision (LED On = Lines selected to receive
tables):
Line port 1–14 = Dial 01–14 or press A1–A14.
Line port 15, 16 = Dial 15, 16 or press B1, B2.
Line port 17–24 = Dial 17–24 or press HOLD then press A1–A8.
3. Dial * for configuration mode.
Programming the DSU II System
247
DSU II Digital Telephone System
IMI66–132
Voice Mail Pause
Description: Some voice mail systems allow you to program a pause before they dial an
extension number. You can program the digital telephone system to pause
before receiving digits from a voice mail system. This capability allows the
digital telephone system to match the voice mail system’s pause. If the voice
mail system does not pause before dialing an extension number, you must
disable the fixed one second pause in the digital telephone system.
To Program:
1. Press ITCM *#746*.
2. Dial 17.
3. Dial 13.
“CONFIG MODE”
“SYSTEM FEATURES”
“VM PAUSE XXX”
4. Press A1 to toggle between VM Pause On and VM Pause Off (LED On = Pause
On).
—OR—
Dial 1.
“VM PAUSE ON”
Dial 2.
“VM PAUSE OFF”
7. Dial * for further system features.
—OR—
Dial ** for configuration mode.
248
Programming the DSU II System
IMI66–132
DSU II Digital Telephone System
Versatile Voice Processing
The digital telephone system supports the Versatile Voice Processing (VVP) voice mail system.
In addition to the programming requirements detailed in the Voice Mail Interface section
beginning on page 240, the following sections detail specific procedures for programming the
system to support the VVP voice processing system.
Using the Tracker Paging System with VVP
Description: The Tracker is available for use with the DSU II digital telephone system. To
make effective use of a Tracker paging system used in conjunction with the
VVP voice mail system, program two mailboxes for each person using a
Tracker. The second mailbox will be used to park the caller and track the
called person. When a caller decides to Press 3 for other options, VVP will
place the call in a Park Orbit while paging the called party.
NOTE: If the VVP system includes the Visual Voice Mail option, you cannot use
Tracker and VVM at the same time since they both use the COM 1 serial data
port.
Standard Mailbox
To Program:
1. Leave the Pager Number field blank.
2. Set the Pager Type to Name.
3. In the If caller chooses other options field, select Go to box.
4. In the Box field enter a box number that is defined as a paging box.
Paging Mailbox
To Program:
Set the following parameters for the paging mailbox.
1. Define this box number so that the system can link it to the person’s regular
mailbox but do not choose a number that is another extension or mailbox. For
example, precede the mailbox number with a 7 for all pager boxes.
2. Select Blind Transfer Type.
3. Enter *01 plus the actual mailbox number for Transfer To.
4. Record a name for this box such as, Tracker for Joe Smith or Paging Joe Smith.
Programming the DSU II System
249
DSU II Digital Telephone System
IMI66–132
Using Tracker for Message Notification
Description: You can program the Tracker to notify mailbox users when they have new
messages.
To Program:
• In the Message Delivery field for all mailbox owners with a Tracker, enter the following
code: ,*01,X.
Transferring Callers to Voice Mail
Description: You can program a Transfer to Voice Mail button to automate the process of
transferring a caller to a mailbox. Use this button in conjunction with a DSS
or a mailbox extension number followed by a 2.
To Program:
1. Press INTERCOM **1.
2. Press the button to which you wish to assign this feature.
3. Press 6 followed by the first voice mail port station number.
4. Press SPEAKER to exit.
Auto Station Logon
Description: You can program a button to automatically connect a mailbox owner to his or
her mailbox.
To Program:
1. Press INTERCOM **1.
2. Press the button to which you wish to assign this feature.
3. Press INTERCOM.
4. Press #.
5. Enter the mailbox number.
6. Press SPEAKER to exit.
The Auto Station Logon button will take the mailbox owner to the mailbox password prompt.
The following entries must be added to the TRANS.TXT file for this feature to work
properly:
9#XX=#,,,,,XX
#XX=#,,,,,XX
250
Programming the DSU II System
IMI66–132
DSU II Digital Telephone System
Visual Voice Mail Support
Description: Visual Voice Mail (VVM) support provides proprietary, two-line display
LCD speakerphone stations with visual messages and interactive buttons.
This message and button functionality enhances the station’s use with VVP
voice mail equipment.
NOTE: If the VVP system includes the Visual Voice Mail option, you cannot use
Tracker and VVM at the same time since they both use the COM 1 serial data
port.
To Program:
1. Dial 17.
2. Dial 12.
“SYSTEM FEATURES”
“VVM XXXXXXX”
3. Press A1 key to toggle between enable and disable.
—OR—
Dial 1 to Enable.
Dial 2 to Disable.
“VVM ENABLED”
“VVM DISABLED”
4. Dial * for system features.
—OR—
Dial ** for configuration mode.
Programming the DSU II System
251
DSU II Digital Telephone System
IMI66–132
Integrated Call Costing
Call costing provides a means of establishing costing that the system can apply to outside calls
made from system telephones. Call costing computes charges for a call after it is completed. It
does not restrict dialing as toll restriction does. The system provides several ways of establishing
call costing that are as follows:
• exception tables for local and long distance calls,
• office code band tables for local calls,
• zone call band tables for long distance calls,
• area code band tables for long distance calls,
• call rate tables for local and long distance calls.
With this range of costing methods, it is possible to apply reasonable rates for the entire country.
The system applies call costing to a dialed number as described below. Refer to Call Costing
Flow Diagram Examples on page 253.
You should make a record in Chapter 5 of all programming decisions that you make—it will help
you keep track of what you have done and will help you troubleshoot any problem that might
arise later.
NOTE: A lighted LED next to the programming button for the selection indicates the
current configuration. When a single button provides a toggle (on/off) action,
the lighted LED indicates the active feature.
The first step in any programming sequence is to enter the base level. Once in this mode, you can
dial the feature code for any desired configuration. Enter the base level with the following
procedure: press INTERCOM then dial *#746*. When you are done, press the
SPEAKER button to end the programming procedure and return the system to normal operation.
252
Programming the DSU II System
IMI66–132
DSU II Digital Telephone System
Call Costing Flow Diagram Examples
Example A: Local Dialing Sequence (201-nnn)
For this example, assume that you have installed the digital telephone system in a location where
callers have an opportunity to dial number combinations that contain a common sequence in both
the area and office code.
This illustrated sequence is a local (less than 10 digits) and 201 is the office code. Program call
rate 18 to cost calls of this sequence. Also program the office code band table by assigning office
code 201 into band one. Note that the band tables accept unlimited entries.
Example B: Long Distance with Office Code Dialing Sequence (1-201-201-nnnn)
The illustrated sequence is a long distance call (more than 10 digits) with 201 as both the area
code and the office code. Program call rate table 25 to cost calls of this sequence. Also, program
the zone call band table by adding office code 201 to area code 201 in band one. Add any other
office codes (for example 478) to area code 201 in band one as required.
Example C: Long Distance Dialing Sequence (1-201-nnn-nnnn)
This illustrated sequence is a long distance call (more than 10 digits) with 201 as the area code.
Program call rate table 11 to cost calls in this sequence. Also, program the area code band table
by adding area code 201 to band one.
Example D: Exception Dialing Sequence (nnn-nnnn, 1-nnn-nnnn)
Program call rate table one to cost calls that do not match any other programmed call rate table.
Programming the DSU II System
253
DSU II Digital Telephone System
IMI66–132
Typical SMDR Call Report for the Call Costing Examples
10
10
10
10
10
10
1
1
1
1
1
1
8/28/00
8/28/00
8/28/00
8/28/00
8/28/00
8/28/00
16:05
16:06
16:08
16:11
16:12
16:13
0.9
1.8
1.5
1.5
0.5
1.1
2014567
12017894567
12014785693
2012014563
5551212
2012013
$0.50
$1.35
$1.12
$2.50
$1.00
$0.50
(See Note 1)
(See Note 3)
(See Note 3)
(See Note 2)
(See Note 4)
(See Note 1)
Note 1: Costed by rate table 18
Note 2: Costed by rate table 25
Note 3: Costed by rate table 11
Note 4: Costed by rate table 1
Typical SMDA Call Report for the Call Costing Examples
Station Report for Extension - 10
Date : 8/28/00
Date
Time
8/28
8/28
8/28
8/28
8/28
8/28
16:05
16:06
16:08
16:11
16:12
16:13
Time : 16:15
Cost
I/O
0.9
1.8
1.5
1.5
0.5
1.1
$0.50
$1.35
$1.12
$2.50
$1.00
$0.50
0
0
0
0
0
0
Totals:
5.8
$6.97
Incoming
0
Averages:
0.9
$1.16
Outgoing
6
Total Calls
6
254
Station Account Length
10
10
10
10
10
10
Ring
Line
Number
1
1
1
1
1
1
2014567
12017894567
12014785693
2012014563
5551212
2012013
Programming the DSU II System
IMI66–132
DSU II Digital Telephone System
Exception Tables (Local Calls and Long Distance Calls)
Description: The system compares all calls to entries in four exception tables (one entry
per table.) These tables provide the first priority level of costing. The system
searches these tables on a first-match basis. This means that the first
programmed entry that matches the call is the one that the system uses. It
does not make a search for the best possible match. The system costs the
matched calls using the rates that you program into the call rate tables that
you assign to the exception tables. You can provide very specific exceptions
to a bracket of calls, similar to the following example.
Example: With all calls to area code 804 costed at a particular rate, make an exception
for 804-555-1212 by programming exception table 1 with that number. Since
exception table entries are the highest priority, the values in the call rate
table assigned to exception table 1 are applied to all calls made to the
804-555-1212 number.
To Program:
1. Dial 78.
2. Dial 1–4 for entry 1–4.
3. Dial 1 to assign the call rate table.
4. Dial 01–33 for call rate table number.
“EXCEPTION TBL”
“ENTRY X”
“CALL COST TBL XX”
5. Dial *.
6. Dial 2 to assign matching digits.
“XXXXXXXXXXXXXXXXX”
8. Dial matching digits, 16 digits maximum.
# = match anything.
“XXXXXXXXXXXXXXXX”
7. Dial # to clear current entry.
9. Dial ** for next entry, and repeat steps 2–9 until you have make all entries.
—OR—
Dial *** for configuration mode.
To change setting, repeat procedure and make different selection.
Programming the DSU II System
255
DSU II Digital Telephone System
IMI66–132
Office Code Band Tables (Local Calls)
Description: Use office code band tables to cost calls made to different prefixes within a
single area code. The system measures the number of dialed digits in calls
that do not match exception tables. It compares calls with numbers that have
less than 10 digits (local calls) to entries that you have made in office code
banding tables. Office code band tables are the second priority level of
costing for local calls. They provide a means for you to assign local office
codes into different bands and apply a separate call costing rate table to each
band. Bands 1–7 are associated with call rate tables 18–24 respectively.
Example: A telephone company exchange consists of office codes 976, 977,
and 978. Office code 976 is assigned to an outlying area while office codes
977 and 978 are assigned to the heart of the city. Assign 977 and 978 to one
office code band table and 976 to another one. Program a special call costing
rate for each banding table. Then, the system costs the calls that users make
to 976-nnnn at a different rate than it costs the calls that users make to
977-nnnn or 978-nnnn.
To Program:
1. Dial 75.
2. Dial 01.
3. Dial 1 .
4. Dial 0.
“SMDA PROGRAMMING”
“COSTING BANDS”
“OFFICE CODE BANDS”
“NO BAND”
—OR—
Dial 1–7 for bands 1–7.
“BAND X”
5. Dial 200–999 to assign office code.
6. Dial # and repeat step 5 for additional codes.
7. Dial * and repeat steps 4–6 to program next band.
—OR—
Dial ** for next SMDA feature.
—OR—
Dial *** for configuration mode.
To change setting, repeat procedure and make different selection.
256
Programming the DSU II System
IMI66–132
DSU II Digital Telephone System
Zone Call Band Tables (Long Distance Calls)
Description: In certain heavily populated geographic areas, different area codes exist
within the same geographic distance (zone) from the calling location. In
these cases, use zone call band tables to cost calls based upon the zone, or
geographic distance, from the calling location.
The system measures all calls that do not match exception tables for the
number of digits that the user dials. It then compares those calls with
numbers that have 10 digits or more (long distance calls) to entries that you
make in the zone call band tables. Zone call band tables are the second
priority level of costing for long distance calls. They assign office codes and
corresponding area code into different zones and apply a separate call
costing rate table to each zone. Zone call band tables 1–4 are associated with
call rate tables 25–28. A call must match both the office code and area code
of an entry before the system costs it by a zone call band table.
Example: Zone 1 contains area code 203 with office codes 445 and 456. It
also contains area code 412 with office code 508. Zone 2 contains area code
203 with office code 545. Zone 2 also contains area code 412 with office
code 654. Zone 1 is costed at one rate and zone 2 is costed at another rate. A
call made to 1-203-445-nnnn, 1-203-445-nnnn, or 1-412-508-nnnn is costed
at a different rate than a call made to 1-203-545-nnnn or 1-412-654-nnnn.
To Program:
1. Dial 75.
2. Dial 01.
3. Dial 3.
4. Dial 0.
“SMDA PROGRAMMING”
“COSTING BANDS”
“ZONE BANDS”
“NO ZONE”
—OR—
Dial 1–4 for zones 1–4.
“ZONE X”
5. Dial 200–999 to assign an area code.
6. Dial # and repeat step 5 for additional code.
7. Dial 200–999 to assign an office code.
8. Dial # and repeat step 7 for another office code.
9. Dial * and repeat steps 3–8 to add another area code to same zone or to program
next zone.
—OR—
Dial ** for next SMDA feature.
—OR—
Dial *** for configuration mode.
To change setting, repeat procedure and make different selection.
Programming the DSU II System
257
DSU II Digital Telephone System
IMI66–132
Area Code Band Table (Long Distance Calls)
Description: The system compares the long distance calls that do not match entries in
zone call band tables to entries that you have made in area code band tables.
Area code band tables are the third priority level of costing for long distance
calls. Area code band tables 1–7 are associated with call rate costing tables
11–17. Use area code band tables to cost calls based upon the area code of
the called number. Assign any or all area codes nnn (200–999) to one of
seven different bands. Group area codes into bands based on frequently
called areas, distance from the caller, or any other desired category.
Example: Assign area codes 703 and 804 to area code band table 1. Assign
area code 415 to area code band table 7. Calls made to numbers such as
1-703-nnn-nnnn and 1-804-nnn-nnnn are costed with values assigned to call
rate table 11. Calls made to numbers such as 1-415-nnn-nnnn are costed with
values assigned to call rate table 17.
1. Dial 75.
2. Dial 01.
3. Dial 2.
4. Dial 0.
“SMDA PROGRAMMING”
“COSTING BANDS”
“AREA CODE BANDS”
“NO BAND”
—OR—
Dial 1–7 for bands 1–7.
“BAND X”
5. Dial 200–999 to assign area code.
6. Dial # and repeat step 5 for additional code.
7. Dial * and repeat steps 3–6 to program next band.
—OR—
Dial ** for next SMDA feature.
—OR—
Dial *** for configuration mode.
To change setting, repeat procedure and make different selection.
258
Programming the DSU II System
IMI66–132
DSU II Digital Telephone System
Call Rate Tables (Local and Long Distance Calls)
Description: The system compares local calls and long distance calls that do not match
entries in any exception table, office code band table, zone call band table or
area code band table with the entries that you have made in call rate tables
2–10 and 29–33. It then costs those calls with the rates assigned to the call
rate tables with entries that match the dialed numbers.
Costing by call rate table is the third priority level of costing for local calls
and the fourth priority level of costing for long distance calls. You can use
the call rate tables to cost any calls that require special or extraordinary rates
such as 1-800-555-1212 or 1-900-976-nnnn.
When you make entries to the call rate tables, enter digits that match digits in
the numbers that users dial from their stations. You can program a maximum
of 16 digits into each call rate table. Since a dialed number must match all of
the digits that you have entered into a table before the system recognizes a
match, you can program # characters into a table in place of specific digits to
serve as “match anything” digits. This feature eliminates the need for
entering every number as a series of numbers that you wish to cost at a
special rate (for instance, 1900#######).
If the system cannot match a dialed number with entries that you have made
in the call rate tables, it costs that call with the rate that you have assigned to
call rate table 1 (the table of last resort for costing all calls).
• Office Code Band Tables = Call Rate Tables 18–24
• Zone Call Band Tables = Call Rate Tables 25–28
• Area Code Band Tables = Call Rate Tables 11–17
Call Rate Table Programming Example
Program Step 2
Program Step 5
Program Step 7
Program Step 9
Program Step 11
Program Step 13
Programming the DSU II System
Call Rate Table = 33
Entry Number = 190097625255
Tier 1 Time = 30 (30 minutes)
Tier 1 Rate = 120 ($1.20)
Tier 2 Rate = 75 ($.75)
Surcharge = 50 ($.50)
259
DSU II Digital Telephone System
IMI66–132
To Program:
1. Dial 76.
2. Dial table number (01–33).
3. Dial 1 to enter matching digits.
“CALL COST TBL”
“CALL COST TBL XX”
“XXXXXXXX”
NOTE: Call Cost Table 1 will not accept matching digits.
4. Dial # to clear previous digits.
5. Dial matching digits for costed number.
16 digits maximum, # = match anything.
“XXXXXXXX”
6. Dial * to end matching digits.
NOTE: Dialing a 00 or a 000 as an entry in steps 7, 9, 11, and 13 will clear
the current entry for those steps.
7. Dial 2 then dial 01–99 for Tier 1
time in tenths of minutes.
“TIER 1 TIME XX ”
8. Dial *.
9. Dial 3 then dial 001–999 for Tier 1
rate in cents.
“TIER 1 RATE XXX”
10. Dial *.
11. Dial 4 then dial 001–999 for Tier 2
rate in cents.
“TIER 2 RATE XXX”
12. Dial *.
13. Dial 5 then dial 001–999 for surcharge “SURCHARGE XXX”
rate in cents.
14. Dial ** to program next call cost table and repeat steps 2–13 until all tables
are entered.
—OR—
Dial *** for configuration mode.
To change setting, repeat procedure and make different selection.
260
Programming the DSU II System
IMI66–132
DSU II Digital Telephone System
Discard Digits
Description: When the digital telephone system is installed behind a host system such as a
PBX or CENTREX, users must dial access codes before obtaining an outside
line dial tone. To ensure that the system costs a call on just the actual
telephone number that the user dials, you should arrange for the system to
ignore these access codes. You can program up to six different access code
entries with up to eight digits per entry.
Example: If the system is installed behind a PBX using a 9 as an outside line
access code, program a 9 as the discard digit. When a number such as
9-555-1212 is dialed, the 9 is discarded and the call is costed based on
555-1212.
To Program:
1. Dial 75.
2. Dial 01.
3. Dial 4.
4. Dial 1–6 to select entry 1–6.
“SMDA PROGRAMMING”
“COSTING BANDS”
“DISCARD DIGITS”
“ENTRY X”
5. Dial # for no discard digits.
—OR—
Dial up to eight discard digits and then dial #. “XXXXXXXX ”
6. Dial * and repeat steps 4–5 to program next discard digit entry
—OR—
Dial ** for next SMDA feature.
—OR—
Dial *** for configuration mode.
To change setting, repeat procedure and make different selection.
Programming the DSU II System
261
DSU II Digital Telephone System
IMI66–132
Dialing Time and Answer Time
Dial Time Limit
Description: The system does not include dialing time when it records the time of a call
for costing. You can program the amount of time that the system ignores for
dialing purposes.
To Program:
1. Dial 75.
2. Dial 02.
“SMDA PROGRAMMING”
“DIAL TIME XXX ”
3. Dial time in tenths of a minute (001–999
or dial 000 to clear).
“XXXX ”
4. Dial * for next SMDA feature
—OR—
Dial ** for configuration mode.
To change setting, repeat procedure and make different selection.
Answer Time Limit
Description: You can program the system to wait for a period of time before beginning to
record costs for a call. This answer time allows a call to ring and be
answered by the called party before the system costs it.
To Program:
1. Dial 75.
2. Dial 03.
“SMDA PROGRAMMING”
“ANSWER TIME XXX ”
3. Dial time in tenths of a minute (001–999
or dial 000 to clear).
“XXX ”
4. Dial * for next SMDA feature.
—OR—
Dial ** for configuration mode.
To change setting, repeat procedure and make different selection.
262
Programming the DSU II System
IMI66–132
DSU II Digital Telephone System
LCD Speakerphone Display of Costed Calls
Description: When you arrange the digital telephone system to cost the calls, you should
also arrange for the LCD speakerphones being employed with the system to
display the cost of each call the user makes from that station.
To Program:
1. Dial 53.
2. Dial 27.
“STATION FEATURES”
“LCD CALL COST”
3. Select station ports for programming:
Station 10–57 = Dial 10–57 or press C10–C57.
4. Dial * for next station feature.
—OR—
Dial ** for configuration mode.
To clear current setting, repeat procedure.
Programming the DSU II System
263
DSU II Digital Telephone System
IMI66–132
Specialized Route Access (SRA)
The SRA feature allows the system to select a line group based on the digits the user has dialed.
By doing this, it matches calls with their ideal routes. The feature provides a table-driven routing
scheme where the numbers the users dial cause the system to choose a line group after comparing
the dialed number with entries in an office code table and area code table, or four special area
code tables.
You should make a record in Chapter 5 of all programming decisions that you make—it will help
you keep track of what you have done and will help you troubleshoot any problem that might
arise later.
CAUTION
You can only program the SRA feature from the VDT and not from station 10.
Line group dialing codes 81, 82, and 83 do not provide access to the SRA feature, but they could
provide a means of bypassing SRA, allowing users access to line groups outside of the
specialized routing process. To ensure that the system routes all calls through SRA, use the
feature inhibit programming procedure described in Voice Mail Interface on page 240 to inhibit
dialing codes 81, 82, and 83.
The first step in the VDT programming sequence is to enter password. Do this by typing IS746S.
Once in the programming mode, type a selection number from the main menu and follow the
screen prompts to complete your programming requirements.
Enable the SRA Feature
Description: When you enable the SRA feature, you must clear all assigned prime line,
idle line preference, and direct line appearance to inhibit all direct-line
access for the system stations, and you must assign lines to the line groups
the system will use.
To Program:
1. Type IS746S and press RETURN.
2. From the main menu, type 1 and press RETURN for system COS menu.
3. From the system COS menu, type 16 for specialized access menu and press
RETURN.
4. From specialized route access menu, type 1 for SRA feature and press RETURN.
5. Type 1 to enable or type 0 to disable SRA feature and press RETURN.
6. To return to the main menu, press and hold CTRL and type C.
264
Programming the DSU II System
IMI66–132
DSU II Digital Telephone System
Enable SRA Office Code and Area Code Tables
Description: The office code table matches a dialed office code with one of the office
codes that you have entered in the table, and routes the call over the line
group that you have entered for that office code. The area code table matches
a dialed area code with one of the area codes that you have entered in the
table, and routes the call over the line group that you have entered for that
area code.
NOTE: When programming the tables, note that all table entries are defaulted to line
group 1; therefore, to minimize programming effort, assign area/office codes
with the fewest entries to line groups 2 through 4. For example, if you are
entering area codes 200 through 299 and codes 200 through 209 requires one
line group while codes 210 through 299 require another line group, leave line
group 1 assigned to the larger quantity of entries that require the most
programming effort (210-299) and reprogram the line group for the smaller
quantity of entries.
Office Code Table
To Program:
1. Type IS746S and press RETURN.
2. From the main menu, type 1 and press RETURN for system COS menu.
3. From the system COS menu, type 16 for specialized access menu and press
RETURN.
4. From specialized route access menu, type 2 for office code table menu and press
RETURN.
5. Type 1–4 for line group to match office codes and press RETURN.
6. Type office code(s) for routing over programmed group number and press
RETURN.
(Type nnn or nnn.nnn.nnn.nnn for one code or several codes)
—OR—
Type ALL to assign every office code from 000 through 999.
7. To return to the main menu, press and hold CTRL and type C.
Programming the DSU II
265
DSU II Digital Telephone System
IMI66–132
Area Code Table
To Program:
1. Type IS746S and press RETURN.
2. From the main menu, type 1 and press RETURN for system COS menu.
3. From the system COS menu, type 16 for specialized access menu and press
RETURN.
4. From specialized route access menu, type 3 for area code table menu and press
RETURN.
5. Type 1–4 for line group to match area codes and press RETURN.
6. Type area code(s) for routing over programmed group number and press
RETURN.
(Type nnn or nnn.nnn.nnn.nnn for one code or several codes)
—OR—
Type ALL to assign every area code from 000 through 999.
7. To return to the main menu, press and hold CTRL and type C.
Enable Special SRA Area Code Tables
Description: The four special area code tables must first match a dialed area code and
then match the dialed office code with office code entries in the matched
table. With a complete match found, the system routes the call over the line
group that you have assigned to the matched office code in the matched
special area code table.
NOTE: When programming the special area code tables, note that all office code
entries are defaulted to line group 1; therefore, to minimize programming
effort, assign those codes with the fewest entries to line groups 2 through 4.
For example: if you are programming for code entries 200 through 299, and
codes 200 through 209 require one line group while codes 210 through 299
require another line group, leave line group 1 assigned to the larger quantity
of entries that require the most programming effort (210-299) and reprogram
the line group for the smaller quantity of entries.
266
Programming the DSU II
IMI66–132
DSU II Digital Telephone System
Assigning the Special Area Codes
To Program:
1. Type IS746S and press RETURN.
2. From the main menu, type 1 and press RETURN for system COS menu.
3. From the system COS menu, type 16 for specialized access menu and press
RETURN.
4. From specialized route access menu, type 6 to assign area code to special table
and press RETURN.
5. Type 1–4 to choose special table 1–4 and press RETURN.
6. Type specific area code for table and press RETURN.
7. Repeat steps 4 and 5 for each remaining special table and press RETURN.
8. To clear the special area code tables, if needed:
• Type 7 and press RETURN.
• Type 1–4 for table 1–4.
• Press RETURN, and repeat as necessary.
9. Return to the system COS menu.
Assigning Line groups to the Special Office Code Entries
To Program:
1. From the system COS menu, type 16 for specialized access menu and press
RETURN.
2. From specialized route access menu, type 4 for special area code table menu and
press RETURN.
3. Type 1–4 for special table 1–4 and press RETURN.
4. Type 1–4 to choose line group 1–4 and press RETURN.
5. Type all office code(s) that require call routing over line group that you set in step
4, and press RETURN.
(Type nnn or nnn.nnn.nnn.nnn for one code or several codes.)
—OR—
Type ALL to assign every office code from 000 through 999.
6. Type 4 and repeat steps 3 through 5 to add additional line groups to office codes
in the same table or to program the next special area code table.
7. To return to the main menu, press and hold CTRL and type C.
Programming the DSU II
267
DSU II Digital Telephone System
IMI66–132
Insert Digits for SRA
Description: You may program the system, on a per-line group basis, to insert up to 8
digits before a dialed number. This feature is useful if the dialed number
must match a specific format for the group being used. You may insert
numbers 0–9, S, #, or P for pause.
To Program:
1. Type IS746S and press RETURN.
2. From the main menu, type 1 and press RETURN for system COS menu.
3. From the system COS menu, type 16 for specialized access menu and press
RETURN.
4. Type 8 for Assign Insert Digit menu and press RETURN.
5. Type 1–4 for line group number and press RETURN.
6. Type SRA insert digits. (You may use a maximum of 8 digits. Digits may include
0–9, S, #, and P for pause.) Press RETURN.
7. Repeat steps 4–6 to assign insert digits for each line group.
8. To clear the insert digits, if needed:
• Type 9 and press RETURN.
• Type 1–4 for line group number and press RETURN, and repeat as
necessary.
9. To return to the main menu, press and hold CTRL and type C.
SRA Overflow Line Group
Description: You can assign an overflow line group that the system can route calls over
when no lines are free in the line group assigned to the matching entry;
otherwise, the system will return busy tone to the caller when this condition
exists.
NOTE: If you arrange for the system to insert digits on a particular line group, an
overflow group will take on the characteristics of the line group that is rolling
over to it, including the insert digits.
To Program:
1. Type IS746S and press RETURN.
2. From the main menu, type 1 and press RETURN for system COS menu.
3. From the system COS menu, type 16 for specialized access menu and press
RETURN.
4. From specialized route access menu, type 5 for overflow line group and press
RETURN.
5. Type 1–4 for line group 1–4 or 0 for no line group. Press RETURN.
6. To return to the main menu, press and hold CTRL and type C.
268
Programming the DSU II
IMI66–132
DSU II Digital Telephone System
SRA Wait Time
Description: Use this procedure to select the SRA wait time. Once a caller begins to dial
digits, he or she has a certain period of time in which to dial each new digit.
After the caller has stopped dialing digits and the end of the time-out period
has occurred, the system analyzes the dialed digits and routes the call by
following the table-driven routing scheme.
To Program:
1. Type IS746S and press RETURN.
2. From the main menu, type 1 and press RETURN for system COS menu.
3. From the system COS menu, type 16 for specialized access menu and press
RETURN.
4. Type 10 for assign SRA wait time and press RETURN.
5. Type 2, 3, or 4 for 2, 3, or 4 seconds and press RETURN.
6. To return to the main menu, press and hold CTRL and type C.
SRA Alternate Line Groups
Description: The alternate line groups feature enables the system to try an alternate line
group if no lines are available in the original group. Each line group can
have one alternate line group. No alternate line groups are assigned by
default. SRA alternate line groups are included in database printouts.
If digit insertion is programmed, it will be done for the actual line group the
call is being routed over.
To Program:
1. Type IS746S for Main menu.
2. Type 1 for system COS menu.
3. Type 16 for Specialized Route Access menu.
4. Type 11 for SRA Alternate line group.
5. Type 1–4 for the line group number.
6. Type 1–4 the alternate line group number.
Programming the DSU II
269
DSU II Digital Telephone System
IMI66–132
Station Message Detail Accounting/Reporting
(SMDA/SMDR)
The system produces five different call cost reports for printing:
• Detailed Report of All Stations,
• Detailed Report of All Accounts,
• Trunk Summary Report,
• Department Summary Report,
• All Records.
The system generates reports automatically for printing whenever it detects that its records
storage area is 95 percent full. You can use class of service programming to choose the reports
that you want the system to generate. It generates the reports for printing in the order that you
selected at a certain time each day. You can also take programming action that causes the system
to delete all printed records except for those it collects during the printing operation. It stores
these records for later printing.
You should make a record in Chapter 5 of all programming decisions that you make—it will help
you keep track of what you have done and will help you troubleshoot any problem that might
arise later.
NOTE: A lighted LED next to the programming button for the selection indicates the
current configuration. When a single button provides a toggle (on/off) action,
the lighted LED indicates the active feature.
The first step in any programming sequence is to enter the base level. Once in this mode, you can
dial the feature code for any desired configuration. Enter the base level with the following
procedure: press INTERCOM then dial *#746*. When you want to end the
programming, press the SPEAKER button to end the programming procedure and return the
system to normal operation.
270
Programming the DSU II
IMI66–132
DSU II Digital Telephone System
SMDA Department Numbers
Description: Use this programming feature to define different SMDA department
numbers.
To Program:
1. Dial 75.
2. Dial 04.
3. Dial 1–8 for department 1–8.
“SMDA PROGRAMMING”
“SMDA DEPARTMENTS”
“DEPT X”
4. Dial 0000–9999 for department number. “DEPT X YYYY”
5. Dial * for next department, and repeat steps 3–4 until all departments are
numbered.
—OR—
Dial ** for next SMDA feature.
—OR—
Dial *** for configuration mode.
To change setting, repeat procedure and make different selection.
SMDA Station Assignment
Description: Assign stations to the departments so that SMDA call cost reports will only
include information concerning that specific station arrangement.
To Program:
1. Dial 53.
2. Dial 22.
3. Dial 0.
“STATION FEATURES”
“SMDA DEPARTMENTS”
“DEPARTMENT 0”
—OR—
Dial 1–6 for department 1–8.
“DEPARTMENT X”
5. Select stations for SMDA department (LED On = Selected):
Station 10–57 = Dial 10–57 or press C10–C57.
6. Dial * for additional department/station assignments.
—OR—
Dial ** for next station feature.
—OR—
Dial *** for configuration mode.
To change setting, repeat procedure and make different selection.
Programming the DSU II
271
DSU II Digital Telephone System
IMI66–132
SMDA Printout
Automatic SMDA Reports
Description: Call cost reports, produced by the system for printing, are generated
automatically whenever the system detects that the records storage area is 95
percent full. Program the system to automatically generate these reports for
printing at a certain time each day if desired.
To Program:
1. Dial 75.
2. Dial 13.
“SMDA PROGRAMMING”
“AUTO TIME XXXX”
Dial new time in hours and minutes (HH MM in 24 hour time) or dial * to
accept current time. To clear the time dial 0000.
3. Dial 14.
“AUTO REPORT”
4. Choose reports for printing
Dial 1.
Dial 2.
Dial 3.
Dial 4.
Dial 5.
Dial 6.
Dial 7.
“STATION REPORT”
“ACCOUNT REPORT”
“LINE REPORT”
“DEPT REPORT”
“PRINT RECORDS”
“DELETE RECORDS”
“DCD REPORT”
5. Dial * for next SMDA feature.
—OR—
Dial ** for configuration mode.
To change setting, repeat procedure and make different selection.
272
Programming the DSU II System
IMI66–132
DSU II Digital Telephone System
SMDA Report Printout
Description: You can command the system to print several different types of SMDA
reports and to delete all stored SMDA records.
NOTE: The departmental call distribution report reflects statistics based on current
departmental station assignments. Before you use the previous programming
feature to reassign stations to different departments, it is a good practice to:
(1) print the departmental call report and any other desired SMDA reports,
(2) make any desired reassignments, (3) delete all SMDA records.
To Program:
1. Dial 07.
“SMDA REPORTS”
2. Choose report for printout:
Dial 1# for all stations.
Dial 1, 10–57, # for one station.
Dial 2# for all lines.
Dial 3# for SMDA department.
Dial 4# for account code.
Dial 5# for auto report.
Dial 6# for all records.
Dial 7# to delete records.
Dial 0# for DCD report.
“STATION REPORT”
“STATION REPORT”
“TRUNK REPORT”
“DEPT REPORT”
“ACCOUNT REPORT”
“AUTO REPORT”
“PRINT RECORDS”
“DELETE RECORDS”
“DCD REPORT”
Dial 8 to obtain the number of free records
remaining in system.
“FREE RECS XXXXX”
Dial 9 to abort printout.
“ABORT PRINT”
3. Dial * for configuration mode.
Programming the DSU II System
273
DSU II Digital Telephone System
IMI66–132
SMDR Printout
SMDR Printout as System Collected
Description: With this programming step, SMDR provides continuous printout of
system-wide station call activity as it is collected by the system.
To Program:
1. Dial 77.
2. Dial 2.
“SMDR PRINT”
“SMDR PRINT XXX”
3. Press A1 to toggle between enable and disable (A1 LED On = Enable).
—OR—
Dial 1 to Enable.
Dial 2 to Disable.
“SMDR PRINT ON”
“SMDR PRINT OFF”
4. Dial * for configuration mode.
To change setting, repeat procedure and make opposite selection.
SMDR Cost Reporting
Description: Programming action adds the cost of each reported call to the SMDR
printout.
To Program:
1. Dial 77.
2. Dial 1.
“SMDR PRINT”
“XXXXXXX COSTING”
3. Press A1 to toggle between enable and disable (A1 LED On = Enable).
—OR—
Dial 1 to Enable.
Dial 2 to Disable.
“WITH COSTING”
“WITHOUT COSTING”
4. Dial * for configuration mode.
To change setting, repeat procedure and make opposite selection.
274
Programming the DSU II
IMI66–132
DSU II Digital Telephone System
SMDA Records Deleted by the Attendant
Description: This programming step gives the attendant station the ability to delete
SMDA records. During day-to-day system operation, when SMDA records
exceed storage capacity, the attendant can delete current records to make
room for additional ones if you perform this programming step. Typically the
attendant would do this after he or she has requested the system to print an
SMDA report. If you have set the system to delete the records after it has
generated an automatic report, you usually do not need to give the attendant
this manual deletion feature.
To Program:
1. Dial 18.
“ATTN DELETE XXX”
2. Press A1 to toggle between enable and disable (A1 LED On = Enable).
—OR—
Dial 1 to Enable.
Dial 2 to Disable.
“ATTN DELETE ON”
“ATTN DELETE OFF”
3. Dial * for configuration mode.
To change setting, repeat procedure and make opposite selection.
Programming the DSU II
275
DSU II Digital Telephone System
IMI66–132
Toll Restriction Tables
The toll restriction feature uses entries that you make in 16 different tables to prohibit some or all
stations from calling a wide range of number combinations. In order for toll restriction to take
effect, you must complete the following three-step process:
1. Program entries in one or more toll tables.
2. Assign toll tables to all appropriate lines.
3. Assign toll tables to all appropriate stations.
After you program the toll tables and assign them to both a line and the station that uses that line,
the system activates the programmed toll restriction at the station.
You should make a record in Chapter 5 of all programming decisions that you make—it will help
you keep track of what you have done and will help you troubleshoot any problem that might
arise later.
NOTE: A lighted LED next to the programming button for the selection indicates the
current configuration. When a single button provides a toggle (on/off) action,
the lighted LED indicates the active feature.
The first step in any programming sequence is to enter the base level. Once in this mode, you can
dial the feature code for any desired configuration. Enter the base level with the following
procedure: press INTERCOM then dial *#746*. When you want to end the
programming, press the SPEAKER button to end the programming procedure and return the
system to normal operation.
276
Programming the DSU II
IMI66–132
DSU II Digital Telephone System
Assign Entries to Toll Restriction Tables
Description: Plan and execute system toll restriction in the sequence detailed in the
following steps:
To Program:
1. Determine the types of dialing restrictions that you wish imposed on the system.
Typically, this includes access codes which result in toll charges, and certain local
numbers as desired.
2. If you wish the restricted dialing codes to be imposed consistently on most or all
stations in the system, list them on one or two tables. If you must allow for a wide
variation in the dialing restrictions, spread the listing out across several tables.
3. Strategically group the listings on the tables so that a list of restrictions can be
applied to a particular station or group of stations.
4. Designate each table as a DENY table or as an ALLOW table. The system
prevents the dialing of numbers entered in a DENY table. ALLOW tables take
precedence over DENY tables. Therefore, an entry in an allow table will provide
an explicit exception to an entry in a DENY table. Note that the system always
permits the dialing of any number not explicitly denied. Also, note that the system
will not toll restrict system speed dial numbers unless you specify them to be
restricted with a separate programming step.
Example A: Provide a simple and broad toll restriction format by creating a
DENY table with two entries: ENTRY (1) = 1; ENTRY (2) = 0. This format
prevents all long distance and operator calls.
Example B: Prevent the dialing of all numbers within the (804) area code, while
allowing the dialing of one specific number within that area code by entering
1804 in a DENY table and 18049782200 in an ALLOW table.
5. Press the # button in place of a particular digit to condense a range of numbers
into one entry. The # character is a “match-anything” digit, and can be included in
an entry in either a DENY table or an ALLOW table.
Example A: If 357, 377, 387, and 397 dialing is to be prohibited, list one entry of
3#7 on a DENY table to cover them all.
Example B: Since area codes typically have a 1 or a 0 as a middle digit, prevent
long distance calls to those area codes by entering 1#1# and 1#0# in a DENY
table.
6. Since it is important that emergency numbers never be restricted, always create an
allow table with entries of 911 and 1911 to override any DENY tables that you
have created.
7. If the system is installed behind a PBX, include an access code as part of every
table entry.
(continued on next page)
Programming the DSU II
277
DSU II Digital Telephone System
IMI66–132
8. The system defaults two toll restriction tables with programmed values and
assigns them to the lines. You need only to assign them the stations to put them
into effect. The preprogrammed values are as follows:
Default Toll Restriction
Table 1 = DENY
Table 2 = ALLOW
Entry 1 = 1
Entry 2 = 976
Entry 3 = 411
Entry 4 = 0
Entry 1 = 1800
Entry 2 = 911
Programming Toll Restriction Table Entries
To Program:
1. Dial 71.
2. Dial 01–16.
“TOLL TABLE”
—OR—
Press A1–A14, B1, B2 for toll table 1–16.
“XXXXX TABLE Y”
3. Establish an allow or a deny table (A1 LED On = Allow, A2 LED On = Deny):
Dial 5 or press A1 for allow.
Dial 6 or press A2 for deny.
“ALLOW TABLE Y”
“DENY TABLE Y”
4. Dial 1–4 or press A8–A11 for entry number 1–4. “XXXXXX”
5. Dial # to clear current entry.
6. Dial keypad digits (0–9, #) to enter numbers. “XXXXXX...”
7. Dial * for next entry and repeat steps 4–6 until all table restrictions are entered.
—OR—
Dial ** for next table and repeat steps 2–7 until all tables are entered.
—OR—
Dial *** for configuration mode.
To change setting, repeat procedure and make different selection.
278
Programming the DSU II
IMI66–132
DSU II Digital Telephone System
Assign Toll Restriction Tables to Lines
Description: Once you have created the toll restriction tables, assign them to lines.
To Program:
1. Dial 72.
2. Dial 01–16.
“ASSIGN TOLL-LINE”
—OR—
Press A1–A14, B1, B2 for toll table 1–16.
3. Dial # to finish entry and display lines.
4. Select line ports (LED On = Lines selected to receive tables):
Line port 1–14 = Dial 01–14 or press A1–A14.
Line port 15, 16 = Dial 15, 16 or press B1, B2.
Line port 17–24 = Dial 17–24 or press HOLD then press A1–A8.
5. Dial * and repeat steps 2–4 for next toll table to line assignment.
—OR—
Dial ** for configuration mode.
To clear current setting, repeat procedure.
Programming the DSU II
279
DSU II Digital Telephone System
IMI66–132
Assign Toll Restriction Tables to Stations
Description: Once you have created the toll restriction tables, assign them to stations.
To Program:
1. Dial 73.
2. Dial 01–16.
“ASSIGN TOLL-STA”
—OR—
Press A1–A14, B1, B2 for toll table 1–16 (LED On = Selected Table).
3. Dial # to finish entry.
4. Select station ports (LED On = Station ports to receive tables):
Station 10–57 = Dial 10–57 or press C10–C57.
5. Dial * for next toll table to station assignment.
—OR—
Dial ** for configuration mode.
To clear current setting, repeat procedure.
280
Programming the DSU II
IMI66–132
DSU II Digital Telephone System
Assign Toll Restriction Tables to Stations for Night Transfer (of ringing)
Description: Toll tables assigned with this feature have an effect only when the attendant
places the telephone system in the night transfer (of ringing) mode of
operation.
To Program:
1. Dial 74.
2. Dial 01–16.
“ASSIGN TOLL-NITE”
—OR—
Press A1–A14, B1, B2 for toll table 1–16 (LED On = Selected Table).
3. Dial # to finish entry.
4. Select station ports (LED On = Station ports to receive tables):
Station 10–57 = Dial 10–57 or press C10–C57.
5. Dial * for next toll table to night answer assignment.
—OR—
Dial ** for configuration mode.
To clear current setting, repeat procedure.
Assign Toll Restriction Tables to System Speed Dial Calls
Description: When you enable this feature, the system applies toll restriction tables that
you have assigned to a station to the system speed dial calls made from that
station.
To Program:
1. Dial 53.
2. Dial 05.
“STATION FEATURES”
“SYS SPD TOLL RST”
3. Select station ports (LED On = Station ports assigned):
Station 10–57 = Dial 10–57 or press C10–C57.
4. Dial * for next station feature.
—OR—
Dial ** for configuration mode.
To clear current setting, repeat procedure.
Programming the DSU II
281
DSU II Digital Telephone System
IMI66–132
Assign Toll Restriction Override (TRO) Code
Description: The TRO feature allows users to override the toll restriction that they
encounter at other stations with their own station’s toll restriction
assignments. In programming for this feature, create a four-digit TRO code
that users can dial to override the toll restrictions of any station that they
happen to be using and replace it with a toll restriction that matches their
home station.
NOTE: The system marks outgoing line calls that users make after entering a TRO
code with a (T) in its SMDR/SMDA printouts. The station number that it prints
is that of the overriding station and not the actual station that the call was
made from.
To Program:
1. Dial 53.
2. Dial 25.
“STATION FEATURES ”
“TOLL R OVERRIDE”
NOTE: If you are programming with a DSS/BLF console, notice that it’s status LEDs
turn on to indicate stations that have an assigned TRO code (C10–C57 =
station ports 10–57.
3. Select station port:
Station 10–57 = Dial 10–57 or press C10–C57.
(LED flashes = Selected station ports, display shows TRO if assigned).
4. Type four-digit TRO code.
“NNNN”
5. Repeat steps 3 and 4 for next station port.
6. Dial * for configuration mode.
To remove a TRO code, repeat steps 1–3, select station port, press #.
282
Programming the DSU II
IMI66–132
DSU II Digital Telephone System
Positive Disconnect Supervision
Description: When a station is on-line with an outside caller and the caller hangs up, the
CO may send a positive disconnect signal to the DSU. You can enable the
positive disconnect supervision feature on a per-line basis. If you enable
positive disconnect supervision, when the system receives the CO’s positive
disconnect signal it tells the voice mail equipment to hang up.
To Program:
1. Dial 48.
“DIS SUPERVISION ”
2. Select line ports for disconnect supervision (LED On = Lines selected to receive
tables).
Line port 1–14 = Dial 01–14 or press A1–A14.
Line port 15, 16 = Dial 15, 16 or press B1, B2.
Line port 17–24 = Dial 17–24 or press HOLD then press A1–A8.
3. Dial * for configuration mode.
Programming the DSU II
283
DSU II Digital Telephone System
IMI66–132
The Tracker Paging System
The optional Tracker Paging System allows users to send alphanumeric or numeric-only
messages to Tracker pagers assigned to station extension numbers. The type of message that the
system delivers depends upon the model Tracker Pager being used.
You should make a record in Chapter 5 of all programming decisions that you make—it will help
you keep track of what you have done and will help you troubleshoot.
NOTE: A lighted LED next to the programming button for the selection indicates the
current configuration. When a single button provides a toggle (on/off) action,
the lighted LED indicates the active feature.
The first step in any programming sequence is to enter the base level. Once in this mode, you can
dial the feature code for any desired configuration. Enter the base level with the following
procedure: press INTERCOM then dial *#746*. When you want to end the
programming, press the SPEAKER button to end the programming procedure and return the
system to normal operation.
Enabling the Tracker Paging System
Description: Use this procedure to enable the Tracker Paging System feature as a
system-wide feature.
To Program:
1. Dial 17.
2. Dial 06.
“SYSTEM FEATURES”
“TRACKER XXXXXX”
3. Press A1 to toggle between enable and disable (A1 LED On = Enable).
—OR—
Dial 1 to Enable (A1 LED On).
Dial 2 to Disable.
“TRACKER ENABLED”
“TRACKER DISABLED”
4. Dial ** for configuration mode.
To change setting, repeat procedure and make opposite selection.
284
Programming the DSU II
IMI66–132
DSU II Digital Telephone System
Enabling Tracker Pagers for Stations
Description: After you have enabled the Tracker Paging System as a system-wide feature,
enable the Tracker pagers at individual stations. Station users can disable a
Tracker Pager by pressing INTERCOM #06 or enable a pager by
pressing INTERCOM *06.
To Program:
1. Dial 53.
2. Dial 37.
“STATION FEATURES”
“DISPLAY PAGER ”
3. Enable Tracker pager operation:
Station 10–57 = Dial 10–57 or press C10–C57 (LED On = Enabled).
4. Dial ** for configuration mode.
To clear current setting, repeat procedure.
NOTE: The Pager’s ID must be programmed to correspond to a DSU station number.
Pager programming must be done through the Tracker base station. Refer to
the Program Mode section of Operating Instructions for the Tracker Paging
System.
Setting the Data Parameters
Description: You must set the data parameters of the data port where you connect Tracker
to 9600 baud, eight (8) data bits, one (1) stop bit, and no handshaking to
ensure proper Tracker operation.
NOTE: The Tracker base station must also be programmed for 9600 baud (the default
setting) so that it matches the DSU setting.
To Program:
1. Dial 15.
“BAUD RATE”
2. Dial 1 for port A.
3. Dial 0811 for data parameters.
4. Dial ** for configuration mode.
Programming the DSU II
285
DSU II Digital Telephone System
IMI66–132
Digital Voice Announcing (DVA)
Digital voice announcing uses a hardware peripheral device (product code DVA01) connected to
a digital station port to play recorded announcements and messages during an in-progress call.
The DVA stores the prerecorded messages in its memory for recall when needed. While the DVA
is not automatic, it enhances the following features by providing automated voice prompts and
dialing instructions to callers; direct department call with Department Calling Distribution
(DCD), Direct Inward Station Dialing (DISD), and Tracker Paging System. Before you can
enhance the DCD or DISD features, you must completely program them using instructions earlier
in this chapter. Refer to Programming for DCD Operation, below, for DCD programming
information. Refer to Programming for DISD Operation on page 288 for DISD programming.
You should make a record in Chapter 5 of all programming decisions that you make—it will help
you keep track of what you have done and will help you troubleshoot.
NOTE: A lighted LED next to the programming button for the selection indicates the
current configuration. When a single button provides a toggle (on/off) action,
the lighted LED indicates the active feature.
The first step in any programming sequence is to enter the base level. Once in this mode, you can
dial the feature code for any desired configuration. Enter the base level with the following
procedure: press INTERCOM then dial *#746*. When you want to end the
programming, press the SPEAKER button to end the programming procedure and return the
system to normal operation.
Programming for DCD Operation
Description: When you plan to enhance DCD operation with the DVA, you must first
completely program the system for DCD operation.
To Program:
To enable the system for DCD operation, refer to the instructions in Direct Department
Calling on page 224 and complete the following steps:
1. Assign direct department dialing access code (often referred to as a department
pilot number.)
2. Assign direct department calling line ports.
3. Assign direct department calling station ports.
4. Refer to the instructions in Call Forward on Busy/Ring No-Answer on page 162,
and program the department stations to have Ring—No Answer call forwarding.
5. Use the procedure described immediately below, and program the department
transfers before disconnect.
286
Programming the DSU II
IMI66–132
DSU II Digital Telephone System
DCD Department Transfers before Disconnect
Description: Because the system will continue transferring a call back to a department
after a recall to DVA time-out has occurred, you can set the number of
transfer times that occur before the system drops the call.
To Program:
1. Dial 17.
2. Dial 10.
“SYSTEM FEATURES”
“DEPT XFR X”
3. Choose 1–9 transfer times or set system to always transfer:
Dial 1 or press A1.
Dial 2 or press A2.
Dial 3 or press A3.
Dial 4 or press A4.
Dial 5 or press A5.
Dial 6 or press A8.
Dial 7 or press A9.
Dial 8 or press A10.
Dial 9 or press A11.
Dial 0 or press A12.
“DEPT XFR 1”
“DEPT XFR 2”
“DEPT XFR 3”
“DEPT XFR 4”
“DEPT XFR 5”
“DEPT XFR 6”
“DEPT XFR 7”
“DEPT XFR 8”
“DEPT XFR 9”
“NEVER DISCONNECT”
4. Dial ** for configuration mode.
To change setting, repeat procedure and make different selection.
Programming the DSU II
287
DSU II Digital Telephone System
IMI66–132
Programming for DISD Operation
Description: When you plan to enhance DISD operation with the DVA, you must first
completely program the system for DISD operation.
NOTE: You should set a DISD dial time that is as long as the maximum time needed
to complete the longest DVA message. For example, if the longest DVA
message is 60 seconds, set the DISD dial time to 60 seconds. If the DISD dial
time is longer than the DVA message, the message will repeat itself. If the
DISD dial time is shorter than the DVA message, the message will not finish.
To Program:
To enable the system for DISD operation, refer to Direct Inward Station Dialing Configuration on page 232, and complete the following steps:
1. Program the dial time limit.
2. Assign a DISD assist station.
3. Program the DISD incoming rings.
4. Program inhibit DISD digit dialing.
Enabling/Disabling Digital Voice Announcing (DVA)
Description: You can enable DVA support for both DISD and DCD operation.
To Program:
To assign DVA support for DISD operation,
1. Dial 17.
2. Dial 07.
“SYSTEM FEATURES”
“DISD DVA XXXXXXX ”
3. Press A1 to toggle between enable and disable (LED On = Enable).
—OR—
Dial 1 to Enable (A1 LED On).
Dial 2 to Disable.
“DISD DVA ENABLE”
“DISD DVA DISABLE”
4. Dial ** for configuration mode.
To change setting, repeat procedure and make opposite selection.
288
Programming the DSU II
IMI66–132
DSU II Digital Telephone System
To assign DVA support for DCD operation,
1. Dial 17.
2. Dial 08.
“SYSTEM FEATURES”
“DCD DVA XXXXXXX”
3. Press A1 to toggle between enable and disable (LED On = Enable).
—OR—
Dial 1 to Enable (A1 LED On).
Dial 2 to Disable.
“DCD DVA ENABLE”
“DCD DVA DISABLE”
4. Dial ** for configuration mode.
To change setting, repeat procedure and make opposite selection.
Programming the DVA Messages
Description: You or the system attendant can store the customized messages in the DVA
device in one of two ways: by delivering them from the telephone handset at
station 10 or 12 or by playing the contents of a professional recording into
the DVA memory. The DVA provides up to four unique messages. The total
available message time is two minutes for one message if needed. Because of
the time constraints, it is a good practice to script your messages ahead of
time so that you can read them aloud in a clear and concise manner as you
store them in the DVA memory.
The voice prompt messages fall into four categories:
Day Answer Messages
For Callers—“Welcome to Acme’s sales department, all of our agents are
busy. Please stay on the line and an agent will answer you call as soon as
possible.”
For DISD Callers—“Welcome to Acme’s Company. If you know your
party’s extension, dial it now; otherwise, stay on the line and an attendant
will answer your call.”
Night Answer Messages
For Callers—“Welcome to Acme’s sales department. Our hours are eight to
four-thirty. Please call tomorrow during those hours.”
For DISD Callers—“Welcome to Acme Company. Our hours are eight to
four-thirty. Please call tomorrow during those hours.”
Recall Messages
For Callers—“Please hold. An agent will be with you as soon as possible.”
For DISD Callers to systems that have the Tracker Paging System
installed—“The party you have called is not available. Please dial a new
extension number or dial # plus your call-back number followed by another
# to page your party.”
Drop Message
“Thanks for calling Acme, good bye.”
Programming the DSU II
289
DSU II Digital Telephone System
IMI66–132
To Program:
1. Dial 08.
“DVA TABLE NUM”
2. Choose the message style:
Dial 1 for DISD message style.
Dial 2 for DCD message style.
“PORT NUMBER ”
“PORT NUMBER “
3. Select DVA station ports:
Station 10–57 = Dial 10–57 or press C10–C57 (LED On = Selected).
4. Press # to end DVA station port entry.
“DVA MESSAGES “
5. Press 0 to erase all four messages.
6. Dial code for message type you wish to record.
Dial 5 to record day answer message.
Dial 6 to record night answer message.
Dial 7 to record recall message.
Dial 8 to record drop message.
Dial 9 to stop recording.
7. Record the messages using either step a or step b, described below. Note the
length of time for the message. Remember, the maximum allowed time for
messages is two minutes.
a. Read the message aloud into the telephone handset mouthpiece.
—OR—
b. Start audio tape recorder and play the recorded message.
8. Press 9 and repeat steps 6–7 for each message.
9. Dial code to listen to your recorded messages:
Dial 1 to play day answer message.
Dial 2 to play night answer message.
Dial 3 to play recall message.
Dial 4 to play drop message.
Dial 9 to stop playback.
10. To record or play messages for another DVA, press * and repeat steps 2–8.
11. When finished, press SPEAKER to end.
NOTE: You should set a DISD dial time that is as long as the maximum time needed
to complete the longest DVA message. For example, if the longest DVA
message is 60 seconds, set the DISD dial time to 60 seconds. If the DISD dial
time is longer than the DVA message, the message will repeat itself. If the
DISD dial time is shorter than the DVA message, the message will not finish.
290
Programming the DSU II
IMI66–132
DSU II Digital Telephone System
The Data Interface Unit
The Data Interface Unit (DIU) is a device connected to a digital station port. The DIU provides
connection for a digital multiline telephone and another device such as an Industry Standard
Telephone (IST), FAX, or modem. The DIU switches the voice path from the DSU to either the
digital telephone or the IST when the user presses a button on the digital telephone.
When the DIU is in the digital mode, the digital telephone will function fully and the IST
telephone will not function at all. When the DIU is in the IST mode, the IST functions fully and
the digital telephone will not have a voice path; however, the digital telephone will continue to
receive LED and LCD messages and send certain button messages.
The first step in any programming sequence is to enter the base level. Once in this mode, you can
dial the feature code for any desired configuration. Enter the base level with the following
procedure: press INTERCOM then dial *#746*. When you want to end the
programming, press the SPEAKER button to return the system to normal operation.
Programming Data Buttons
Description: After you install a data interface unit, you must program a data button on the
multiline telephone connected to the DIU.
To Program:
1. Dial 56.
2. Dial 18.
“BUTTON MAPPING”
“ASSIGN DATA”
3. Select button to be programmed with data button:
Press A1–A14, B1–B10.
4. Select station ports to be programmed:
Station 10–57, Dial 10–57 or press C10–C57.
5. Dial * for next data button assignment.
—OR—
Dial ** for next button mapping feature.
—OR—
Dial *** for configuration mode.
Programming the DSU II
291
DSU II Digital Telephone System
IMI66–132
Remote Data Station
Description: Use this procedure to program the system to allow remote control of a DIU
from one or more multiline digital telephones assigned to other station ports.
Remote commands are blocked when the station is busy with a call.
To Program:
1. Dial 53.
2. Dial 39.
“STA FEATURES”
“DATA STATION ”
3. Enter data station number.
4. Select station ports to be programmed:
Station 10–57, Dial 10–57 or press C10–C57.
5. Dial * for next station feature.
—OR—
Dial ** for configuration mode.
Creating Data Security Groups
Description: When using several DIUs, you can create up to three data security groups.
Use a security group to prevent callers outside your group from accessing
IST devices—such as personal computers—within your group. Any number
of stations can be put into one group. Station-to-station calls can still be
made. By default, all stations are assigned to data security group 0 (no
security group).
To Program:
1. Dial 53.
“STATION FEATURES”
2. Dial 40.
“DATA GROUP ”
3. Dial 1–3 for data group 1–3 or dial 0 for none.
4. Select station ports to be programmed:
Station 10–57, Dial 10–57 or press C10–C57.
5. Dial * for next data group assignment.
—OR—
Dial ** for next station feature.
—OR—
Dial *** for configuration mode.
292
Programming the DSU II
IMI66–132
DSU II Digital Telephone System
Caller ID Service Support
When you subscribe to Caller ID service, the CO sends Caller ID data over the lines. After the
Caller ID device deciphers the data, it is displayed on a system LCD speakerphone. You must
program lines and stations for Caller ID service.
NOTE: A lighted LED next to the programming button for the selection indicates the
current configuration. When a single button provides a toggle (on/off) action,
the lighted LED indicates the active feature.
Since the station receives Caller ID data between the first and second rings, you can arrange for
the first ring on Caller ID lines to be either audible or silent. Selecting the silent option ensures
that the Caller ID data is displayed prior to ringing, eliminating the loss of Caller ID data to
premature answering.
A station user may automatically retrieve and dial the last Caller ID number displayed at his or
her station by using a “SAVE” button assigned to the station.
CAUTION
Seven-, eight-, and 11-digit numbers are always dialed while 10-digit numbers must be translated
by the system before they are dialed. To arrange for the system to translate a 10-digit number
into dial format you must use the VDT programming method to program the local area code and
6-digit area/office codes into the system’s memory. You cannot do this from station 10 or 12.
All Caller ID features require that the customer-supplied Caller ID interface (product code
CID08) deliver its data to the system’s RS232 data port B. You must configure this port to match
the output of the decoder device. The recommended configuration is 9600 baud, with eight (8)
data bits and one (1) stop bit.
Programming the DSU II
293
DSU II Digital Telephone System
IMI66–132
The system provides Caller ID information as part of the SMDR printout. An example of this
appears below.
Caller ID Information on SMDR Printout
Call #
Station #
Line #
Date
Time
1
1000
12
10/15/92
04:38
2
12
3
10/15/92
00:56
1
10/15/92
00:56
1
10/15/92
00:56
4
10/15/92
01:00
4
1(D)
1(D)
10/15/92
10/15/92
10/15/92
01:00
04:23
04:19
3
4
10
5
6
7
8
10
10
10
Call
Answer
Length Time
(1) outgoing call
(2) outgoing call
(3) unanswered incoming call, with Caller ID
(4) answered incoming call, with Caller ID
0.1
Called or
Calling #
123456789
0123456
5551212
Call Cost
$0.51
0.2
NOA
.2
/5551234
NS
0.1
.1
/5551234
NOA
.2
NS
0.1
.0
0.2
.1
/5556789
$0.00
0.2
.1
$0.00
(5) unanswered incoming call, without Caller ID
(6) answered incoming call, without Caller ID
(7) answered incoming DISD call, with Caller ID
(8) unanswered incoming DISD call without
Caller ID
If SMDR printout is not already turned on (default), turn it on as follows,
1. Press ITCM and dial *#746*.
2. Dial 772.
3. Dial 1 to enable printout.
“SMDR PRINT XXX ”
“SMDR PRINT ON ”
4. Dial ** for configuration mode.
—OR—
Press SPEAKER to quit.
294
Programming the DSU II
IMI66–132
DSU II Digital Telephone System
As an option, you can arrange for the system to provide Caller ID data distribution through the
RS232 data port B to a personal computer (PC) just as it supplies SMDA data to a data printer.
This data consists of four special-purpose messages and is in the ASCII format suitable for use
with PC-based application programs. The messages are as follows:
Typical Message 1
(sent out as soon as Caller ID data arrives from the CO)
Message ID Line No.
& Identifier (2
bytes)
(3 bytes)
3E 3C 31
> < 1
30 35
0
1
Caller ID Data
(15 bytes)
End of Message
(2 bytes)
31 2D 38 30 34 2D 39 37 38 2D 32 32 30 30 20
1 — 8 0 4 — 9 7 8 — 2 2 0 0
0D
CR
0A
LF
Typical Message 2
(sent when a ringing line with CID is answered or retrieved
from hold)
Message ID Line No.
& Identifier (2
bytes)
(3 bytes)
3E 3C 32
> < 2
31 32
1
2
Station No.
(15 bytes)
End of Message
(2 bytes)
31 30
1
0
0D
CR
0A
LF
Typical Message 3
(sent when CID data is not received from
answered line or when a line is taken off-hook)
Message ID Line No.
& Identifier (2
bytes)
(3 bytes)
3E 3C 33
> < 3
31 35
1
5
Station No.
(15 bytes)
End of Message
(2 bytes)
31 32
1
2
0D 0A
CR LF
Typical Message 4
(sent when line is made idle)
Programming the DSU II
Message ID
& Identifier
(3 bytes)
Line No.
(2 bytes)
3E 3C 34
> < 4
30 35
0
5
End of Message
(2 bytes)
0D
CR
0A
LF
295
DSU II Digital Telephone System
IMI66–132
Assigning Caller ID Lines (required programming)
Description: Programs lines to receive Caller ID service.
To Program:
1. Dial 47.
“CALLER ID LINES”
2. Select line ports (LED On = Selected):
Line port 1–14 = Dial 01–14 or press A1–A14
Line port 15, 16 = Dial 15, 16 or press B1, B2
Line port 17–24 = Dial 17–24 or press HOLD then press A1–A8.
3. Dial * for configuration mode.
Assigning Caller ID Stations (required programming)
Description: Programs stations to receive Caller ID information.
To Program:
1. Dial 53.
2. Dial 36.
“STATION FEATURES”
“CALLER ID STA”
3. Select station ports (LED On = Selected):
Station 10–57, Dial 10–57 or press C10–C57.
4. Dial ** for configuration mode.
296
Programming the DSU II
IMI66–132
DSU II Digital Telephone System
Configuring COM 2 Serial Data Port (required programming)
Description: If the COM 2 serial data port is not currently set at its default values (9600
baud, 3 data bits, and 1 stop bit) program that port to have those values so
that it will receive Caller ID data.
To Program:
1. Dial 15.
“BAUD RATE”
3. Press A10 for 9600 baud.
“W nD nS 9600 ”
2. Dial 2 for COM 2.
4. Dial 11 or press A14 for 8 data bits and 1 stop bit. “W 8D IS ZZZZZ ”
5. Dial ** for configuration mode.
Setting the Audible First Ring Feature (optional programming)
Description: Turns on the Audible First Ring feature for the system.
To Program:
1. Dial 17.
2. Dial 01.
“SYSTEM FEATURES”
“CID FIRST RING”
3. Dial 1 to enable the audible first ring (LED On).
—OR—
Dial 2 to silence the first ring on Caller ID lines.
4. Dial ** for configuration mode.
Setting the Caller ID Distribution (optional programming)
Description: Sends Caller ID information to data port B for access by a PC.
To Program:
1. Dial 17.
2. Dial 02.
“SYSTEM FEATURES”
“CID DISTRIBUTION”
3. Dial 1 to enable Caller ID distribution (LED On).
—OR—
Dial 2 to disable Caller ID distribution.
4. Dial ** for configuration mode.
Programming the DSU II
297
DSU II Digital Telephone System
IMI66–132
Assigning a “SAVE” Button (optional programming)
Description: Selects a “SAVE” button to display and redial the most recent caller ID
number received at a station.
To Program:
1. Dial 56.
2. Dial 08.
“BUTTON MAPPING”
“ASSIGN SAVE”
3. Select button to be programmed:
Press A1–A14, B1–B10.
4. Select station ports to have SAVE button (LED On = Assigned):
Station 10–57, Dial 10–57 or press C10–C57.
5. Dial *** for configuration mode.
298
Programming the DSU II
IMI66–132
5
DSU II Digital Telephone System
System Records
Programming Password Records
Password
Description
VDT Installer
VDT
Administrator
Station 10
Installer
Station 10
Administrator
Default
Password
Customized Password
I*746*
I*236*
INTERCOM *#746*
INTERCOM *#236*
System Configuration Records
Automatic Station Relocation
Enable
Default = Disable
Disable
Do Not Disturb Inhibit System-wide
Enable
Disable
Do Not Disturb Override Stations (10–57)
DND Button (A1–A14, B1–B10)
Default = Inhibit enabled, no override assigned,
no DND button
Exclusive Hold
Enable
Default = Enabled
Programming the DSU II
Disable
299
DSU II Digital Telephone System
IMI66–132
Data Baud Rate
110 Baud
150 Baud
300 Baud
600 Baud
1200 Baud
2400 Baud
4800 Baud
9600 Baud
19200 Baud
7 Data/2 Stop Bits
8 Data/1 Stop Bits
Default = 9600 Baud, 8 Data Bits, 1 Stop Bit
Extended DTMF Tones for Automatic Dialing
60 msec
80 msec
100 msec
120 msec
160 msec
240 msec
320 msec
400 msec
480 msec
560 msec
720 msec
880 msec
1040 msec
Default = 80 msec
System Alarm Reporting
Enable
Default = Disable
Disable
Station Monitoring
Visual Ring Indication
Enable
Disable
Audible Ring Indication Stations (10–57)
Default = Visual Indication Disabled, No Audible Indication Assigned
300
Programming the DSU II
IMI66–132
DSU II Digital Telephone System
Tandem Attendant
Enable
Default = Disable
Disable
Tone or Voice Signaling
Voice
Default = Tone
SOHVA Tone Bursts
Tone
1
2
3
4
5
6
Default = 6
PA Options
Direct Ringing
Lines (1–24)
Delayed
Ringing Lines
(1–24)
Night Ringing
Lines(1–24)
Zone Paging
Zone 1
Zone 2
Zone 3
All-Call
Enabled
Relay Port
Station 17
Paging Port
Relay Tracking
PA Port
Intercom
DTMF
Signal Tone
Default = No Ringing Lines, All-Call Paging, Station 17 Ringing, and Intercom Tone
Allow Ringer Off Option
Enabled
Default = Enabled
Disabled
Call Forward Outside System
Enabled
Default = Disabled
Programming the DSU II
Disabled
301
DSU II Digital Telephone System
IMI66–132
LCD Messages
Msg.
No.
Location
1
2
3
4
5
6
7
8
9
10
1
2
3
4
5
6
7
8
9
10
11
12
13
14
15
Default = Back At , 2 = Call
302
Programming the DSU II
IMI66–132
DSU II Digital Telephone System
System Speed Dial Record
(Be sure to record a line group number with each speed dial number.)
Loc
No.
Name Loc
01
02
03
04
05
06
07
08
09
10
11
12
13
14
15
16
17
18
19
20
21
22
23
24
25
Programming the DSU II
26
27
28
29
30
31
32
33
34
35
36
37
38
39
40
41
42
43
44
45
46
47
48
49
50
No.
Name
Loc
51
52
53
54
55
56
57
58
59
60
61
62
63
64
65
66
67
68
69
70
71
72
73
74
75
No.
Name Loc
No.
Name
76
77
78
79
80
81
82
83
84
85
86
87
88
89
90
91
92
93
94
95
96
97
98
99
303
DSU II Digital Telephone System
IMI66–132
Call Park Recall Time
1 min
2 min
3 min
4 min
Default = 2 minutes
5 min
6 min
7 min
8 min
Pause Time
.5 sec
1.0 sec
1.5 sec
2.0 sec
3.0 sec
Default = 1 second
5.0 sec
7.5 sec
10 sec
15 sec
20 sec
Recall/Flash Time
.08 sec
.30 sec
.50 sec
.60 sec
.75 sec
Default = 2 seconds
.88 sec
1.0 sec
1.5 sec
2.0 sec
3.0 sec
Timed Hold Recall Time
30 sec
60 sec
90 sec
120 sec
180 sec
Default = 60 seconds
240 sec
300 sec
360 sec
420 sec
Never
Unanswered Call Transfer Recall Time
10 sec
20 sec
25 sec
30 sec
45 sec
Default = 20 seconds
304
60 sec
90 sec
120 sec
180 sec
240 sec
For Stations
Programming the DSU II
IMI66–132
DSU II Digital Telephone System
Unanswered Call Transfer Recall Time
10 sec
20 sec
25 sec
30 sec
45 sec
Default = 20 seconds
60 sec
90 sec
120 sec
180 sec
240 sec
For Departments
Delayed Ringing Delay Time
6 sec
12 sec
18 sec
24 sec
30 sec
Default = 18 seconds
Programming the DSU II
36 sec
42 sec
48 sec
54 sec
60 sec
305
DSU II Digital Telephone System
IMI66–132
Feature Inhibit
Feature
Disabled
Enabled
Line Group 1
Line Group 2
Line Group 3
Line Group 4
Zone 1 Paging
Zone 2 Paging
Zone 3 Paging
All Call
Meet Me Page
Night Transfer
Background Music
Voice Announce Block
Message Waiting
Call Pickup
Call Forward
Automatic Call Back
Station-to-Station Msg.
Line Group Queue
Directed Station Hold
Call Park Orbit 1
Call Park Orbit 2
Call Park Orbit 3
Call Park Orbit 4
Call Park Orbit 5
Call Park Orbit 6
Call Park Orbit 7
Call Park Orbit 8
Call Park Orbit 9
Call Waiting
LCD Messaging
Executive Override/Service Observing
Account Code
Personal Call Forward
Enable All Features
Default = All Features Enabled
306
Programming the DSU II
IMI66–132
DSU II Digital Telephone System
Recording the Line Configurations
Line Port
(Write Number, Name, Group, or other data)
Feature
1
2
3
4
5
6
7
8
Abandoned Hold Release (50/350 msec)
Automatic Privacy (On/Off)
Privacy Release Stations (10–57)
Line Port Disable (On/Off)
Line Groups (0, 1–4)
Line Name (5 characters)
Line Port Function (AUX/CO)
Line to Line Port Reassignment (1/1, etc.)
Pulse/Tone Switchable (pulse/tone)
Voice Mail ID (6 digits max)
Default = 50 msec hold release, privacy on all with no station released, no disabled lines, no groups assigned,
no names assigned, all ports co., same line/port, all tone dialing, no VM ID.
Line Port
(Write Number, Name, Group, or other data)
Feature
9
10
11
12
13
14
15
16
Abandoned Hold Release (50/350 msec)
Automatic Privacy (On/Off)
Privacy Release Stations (10–57)
Line Port Disable (On/Off)
Line Groups (0, 1–4)
Line Name (5 characters)
Line Port Function (AUX/CO)
Line to Line Port Reassignment (1/1, etc.)
Pulse/Tone Switchable (pulse/tone)
Voice Mail ID (6 digits max)
Default = 50 msec hold release, privacy on all with no station released, no disabled lines, no groups assigned,
no names assigned, all ports co., same line/port, all tone dialing, no VM ID.
Programming the DSU II
307
DSU II Digital Telephone System
Feature
IMI66–132
Line Port
(Write Number, Name, Group, or other data)
17
18
19
20
21
22
23
24
Abandoned Hold Release (50/350 msec)
Automatic Privacy (On/Off)
Privacy Release Stations (10–57)
Line Port Disable (On/Off)
Line Groups (0, 1–4)
Line Name (5 characters)
Line Port Function (AUX/CO)
Line to Line Port Reassignment (1/1, etc.)
Pulse/Tone Switchable (pulse/tone)
Voice Mail ID (6 digits max)
Default = 50 msec hold release, privacy on all with no station released, no disabled lines, no groups assigned,
no names assigned, all ports co., same line/port, all tone dialing, no VM ID.
Block Programming
Model Line Port
308
Start Line Port
End Line Port
Programming the DSU II
IMI66–132
DSU II Digital Telephone System
Recording the Station Configurations
Use this sheet as an individual station record or as a record for a block of similarly programmed
stations. You can make copies of this blank sheet as needed to meet the system capacity.
Feature
Choice
Access Denied
All-Call & Zone Paging Receive
Originate
Audible Monitoring
Automatic Hold
Automatic Hold—Intercom
Automatic Privacy
Privacy Release
Call Forward on Ring No-Answer
Call Forward on Busy
Call Forward Outside System
Call Origination Denied
Central Message Deck
Data Security Port
Do Not Disturb Override
Dual Console Feature
Executive Override
Direct
Flexible Ringing
Delayed
Night Transfer (of ringing)
Flexible Station Numbering
Group Call Pickup
Headset Interface
High Volume Setting
Idle Line Preference
Intercom Hunt Group
Personal Ring Tones
Line
Prime
Group
Intercom
Message Waiting Originate
Ringing Line Preference
SOHVA Disable
SOHVA Groups
Service Observing
Station Disable
Lines 1–24
All/1–3
All/1–3
None/Dir/Delay
Yes/No
Yes/No
None
All
All
None
No
No
None/1–24
None
No/1–9 Rings
Yes/No
Yes/No
No/1–24
Yes/No
Yes/No
Yes/No
No/10–57
Yes/No
1–24
1–24
1–24
10–7999
1–4
Yes/No
Yes/No
No/1–24
10–57
1–6
1–24
1–4
Itcm.
Yes/No
Yes/No
Yes/No
None/1–8
Yes/No
Yes/No
No
No
No
No
No
No
No
No
No
All (Sta 10, 17)
None
All (Sta 10, 17)
Ext = Port
1
No
No
No
None
1
None
None
None
Yes
No
No
None
No
No
Programming the DSU II
Default
Enter Station Port Numbers
309
DSU II Digital Telephone System
Station-to-Station Port
Reassignment
System Alarm Report
Voice Announce Block
IMI66–132
10/57
Sta = Port
Yes/No
Yes/No
No
No
Block Programming
Model Station Port
First Station Port
Last Station Port
310
Programming the DSU II
IMI66–132
DSU II Digital Telephone System
Button Mapping The DigiTech Telephones (Rev. I and later)
Complete one record sheet for each station.
Copy this blank record sheet as required for additional stations.
BUTTON
BLK . .
Lnn . .
Snn . .
DND . .
PRI . .
IC2 . .
ACC . .
SAV . .
ZPn . .
AC . .
ACB . .
CF . .
CPn . .
TGn . .
VAB . .
TGQ . .
.
.
.
.
.
.
.
.
.
.
.
.
.
.
.
.
.
.
.
.
.
.
.
.
.
.
.
.
.
.
.
.
7700S LCD Speakerphone
DESCRIPTION
Blank
Lines 1 - 24
Stations 10 - 57
Do Not Disturb
Privacy
Second Intercom
Account Code
Save
Zone Page 1 - 3
All-Call Page
Automatic Call Back
Call Forward
Call Park Orbit 1 - 9
Line Group 1 - 4
Voice Announce Block
Line Group Queue
A1
A2
A3
A4
A5
A6
A7
DIGITECH
COMDIAL
T R ANS
CONF
T AP
S P KR
MU T E
BUTTON ASSIGNMENT CHART
A1
A2
A3
A4
A5
A6
A7
A8
A9
A10
A11
A12
A13
A14
B1
B2
B3
B4
B5
B6
B7
B8
B9
B10
H OL D
B1
A8
A9
A10
A11
A12
A13
A14
B5
B6
B7
B8
B9
B10
IT CM
B2
B3
B4
7714S Speakerphone
7714X Monitor Telephone
A1
A2
A3
A4
A5
A6
A7
COMDIAL
T R ANS
CONF
T AP
S P KR
MU T E
DIGITECH
A8
A9
A10
A11
A12
A13
A14
B5
B6
B7
B8
B9
B10
CAJS020
H OL D
PORT NUMBER
INTERCOM NUMBER
STATION NAME
STATION LOCATION
TELEPHONE
B1
IT CM
B2
B3
B4
TYPE
MODEL
DEFAULT SETTINGS:
Programming the DSU II
B1-B10 = Line 1 - Line 10, and A1 = 23, A2 = 21, A3 = 19, A4 = 17, A5 = 15, A6 = 13,
A7 = 11, A8 = 24, A9 = 22, A10 = 20, A11 = 18, A12 = 16, A13 = 14, A14 = 12
311
DSU II Digital Telephone System
IMI66–132
Button Mapping The DigiTech Telephones (Rev. A-H)
Complete one record sheet for each station.
Copy this blank record sheet as required for additional stations.
BUTTON
BLK . .
Lnn . .
Snn . .
DND . .
PRI . .
IC2 . .
ACC . .
SAV . .
ZPn . .
AC . .
ACB . .
CF . .
CPn . .
TGn . .
VAB . .
TGQ . .
.
.
.
.
.
.
.
.
.
.
.
.
.
.
.
.
.
.
.
.
.
.
.
.
.
.
.
.
.
.
.
.
DESCRIPTION
Blank
Lines 1 - 24
Stations 10 - 57
Do Not Disturb
Privacy
Second Intercom
Account Code
Save
Zone Page 1 - 3
All-Call Page
Automatic Call Back
Call Forward
Call Park Orbit 1 - 9
Line Group 1 - 4
Voice Announce Block
Line Group Queue
7700S LCD Speakerphone
A1
A2
A3
A4
A5
A6
A7
COMDIAL
BUTTON ASSIGNMENT CHART
A1
A2
A3
A4
A5
A6
A7
A8
A9
A10
A11
A12
A13
A14
B1
B2
B3
B4
B5
B6
B7
B8
PORT NUMBER
INTERCOM NUMBER
STATION NAME
STATION LOCATION
TELEPHONE
2 ABC
3 DEF
TRANS
CONF
4 GHI
5 JKL
6 MNO
MUTE
7 PRS
8 TUV
9 WXY
SPKR
SYS
0 OPER
#RDL
HOLD
B1
B2
B3
I TCM
7714S Speakerphone
7714X Monitor Telephone
A1
A2
A3
A4
A5
A6
A7
COMDIAL
2 ABC
4 GH I
5 JKL
6 MNO
MUTE
7 PRS
8 TUV
9 WXY
SPKR
SYS
0 OPER
#RDL
TRANS
CONF
B5
B4
B1
DIGITECH
1
TAP
TYPE
MODEL
A8
A9
A0
A11
A12
A13
A14
3 DEF
B6
B7
B8
B2
SHIFT
MW
I TCM
HOLD
DEFAULT SETTINGS:
312
DIGITECH
1
TAP
A8
A9
A10
A11
A12
A13
A14
B3
CAJS021
B1-B8 = Line 1 - Line 8, and A1 = 21, A2 = 19, A3 = 17, A4 = 15, A5 = 13, A6 = 11,
A7 = 9, A8 = 22, A9 = 20, A10 = 18, A11 = 16, A12 = 14, A13 = 12, A14 = 10
Programming the DSU II
IMI66–132
DSU II Digital Telephone System
Button Mapping The Impact Telephones
Complete one record sheet for each station.
Copy this blank record sheet as required for additional stations.
BUTTON
BLK . .
Lnn . .
Snn . .
DND . .
PRI . .
IC2 . .
ACC . .
SAV . .
ZPn . .
AC . .
ACB . .
CF . .
CPn . .
TGn . .
VAB . .
TGQ . .
.
.
.
.
.
.
.
.
.
.
.
.
.
.
.
.
.
.
.
.
.
.
.
.
.
.
.
.
.
.
.
.
8012S 12-Line LCD Speakerphone
DESCRIPTION
Blank
Lines 1 - 24
Stations 10 - 57
Do Not Disturb
Privacy
Second Intercom
Account Code
Save
Zone Page 1 - 3
All-Call Page
Automatic Call Back
Call Forward
Call Park Orbit 1 - 9
Line Group 1 - 4
Voice Announce Block
Line Group Queue
IMP100
L01
L02
L03
L04
L05
L06
L07
L08
L09
L10
L11
L12
COM D IA L
1 QZ
2 ABC 3 DEF
4 GHI 5 JKL 6 MNO
7 PRS 8 TUV 9 WXY
0 OPER #
SHIFT
MUTE
TRNS/CNF
SPEAKER
BUTTON ASSIGNMENT CHART
PROGRAMMED
DigiTech IMPACT
ASSIGNMENT
EQUIV. BUTTON*
A1
L01
A2
L02
A3
L03
A4
L04
A5
L05
A6
L06
A7
L07
A8
L08
A9
L09
A10
L10
A11
L11
A12
L12
*DEFAULT:
L1-L12 = LINE 1 - LINE 12
HOLD
TAP
INTERCOM
8112S 12-Line Speakerphone
IMP100A
L01
L02
L03
L04
L05
L06
L07
L08
L09
L10
L11
L12
COM D IA L
1 QZ
2 ABC 3 DEF
4 GHI 5 JKL 6 MNO
7 PRS 8 TUV 9 WXY
0 OPER #
PORT NUMBER
INTERCOM NUMBER
STATION NAME
STATION LOCATION
TELEPHONE
SHIFT
MUTE
TRNS/CNF
SPEAKER
HOLD
TAP
INTERCOM
TYPE
MODEL
CAJS019
Programming the DSU II
313
DSU II Digital Telephone System
IMI66–132
Button Mapping The Impact Telephones
Complete one record sheet for each station.
Copy this blank record sheet as required for additional stations.
BUTTON
BLK . .
Lnn . .
Snn . .
DND . .
PRI . .
IC2 . .
ACC . .
SAV . .
ZPn . .
AC . .
ACB . .
CF . .
CPn . .
TGn . .
VAB . .
TGQ . .
.
.
.
.
.
.
.
.
.
.
.
.
.
.
.
.
.
.
.
.
.
.
.
.
.
.
.
.
.
.
.
.
DESCRIPTION
Blank
Lines 1 - 24
Stations 10 - 57
Do Not Disturb
Privacy
Second Intercom
Account Code
Save
Zone Page 1 - 3
All-Call Page
Automatic Call Back
Call Forward
Call Park Orbit 1 - 9
Line Group 1 - 4
Voice Announce Block
Line Group Queue
8024S 24-Line LCD Speakerphone
IMP103
L01
L02
L03
L04
L05
L06
L07
L08
L09
L10
L11
L12
BUTTON ASSIGNMENT CHART
PROGRAMMED
DigiTech IMPACT
ASSIGNMENT
EQUIV. BUTTON*
A1
L01
A2
L02
A3
L03
A4
L04
A5
L05
A6
L06
A7
L07
A8
L08
A9
L09
A10
L10
A11
L11
A12
L12
A13
L13
A14
L14
B9
L15
B10
L16
B1
L17
B2
L18
B3
L19
B4
L20
B5
L21
B6
L22
B7
L23
B8
L24
*DEFAULT:
L1-L24 = LINE 1 - LINE 24
PORT NUMBER
INTERCOM NUMBER
STATION NAME
STATION LOCATION
TELEPHONE
314
TYPE
MODEL
COM D IA L
1 QZ
2 ABC 3 DEF
4 GHI 5 JKL 6 MNO
7 PRS 8 TUV 9 WXY
0 OPER #
TRNS/CNF
HOLD
INTERCOM
TAP
SPEAKER
SHIFT
MUTE
L13
L14
L15
L16
L17
L18
L19
L20
L21
L22
L23
L24
8124S 24-Line Speakerphone
L01
L02
L03
L04
L05
L06
L07
L08
L09
L10
L11
L12
COM D IA L
1 QZ
2 ABC 3 DEF
4 GHI 5 JKL 6 MNO
7 PRS 8 TUV 9 WXY
0 OPER #
TRNS/CNF
HOLD
TAP
INTERCOM
SPEAKER
SHIFT
MUTE
L13
L14
L15
L16
L17
L18
L19
L20
L21
L22
L23
L24
CAJS016
Programming the DSU II
IMI66–132
DSU II Digital Telephone System
Button Mapping The Scout 900MX Digital Wireless Telephone
Complete one record sheet for each station.
Copy this blank record sheet as required for additional stations.
BUTTON ASSIGNMENT CHART
L01
L02
L03
L04
Scout 900mx
Digital Wireless
Telephone
TALK
L01
L02
T/C
HOLD
TAP
MEMO
1
2
ABC
3 DEF
4 GH I
5
JKL
6
MNO
7
8
TUV
9
WXY
OPER
#
PRS
0
F1
F1
F2
F2
F3
F4
F3
F4
Default:
L01 = Line 1
L02 = Line 2
L03 = Line 3
L04 = Intercom
PORT NUMBER
INTERCOM NUMBER
STATION NAME
STATION LOCATION
L03
TELEPHONE
L04
TYPE
MODEL
cajs068y.cdr
BUTTON
BLK . .
Lnn . .
Snn . .
DND . .
PRI . .
IC2 . .
ACC . .
SAV . .
ZPn . .
AC . .
ACB . .
CF . .
CPn . .
TGn . .
VAB . .
TGQ . .
Programming the DSU II
.
.
.
.
.
.
.
.
.
.
.
.
.
.
.
.
.
.
.
.
.
.
.
.
.
.
.
.
.
.
.
.
DESCRIPTION
Blank
Lines 1 - 24
Stations 10 - 57
Do Not Disturb
Privacy
Second Intercom
Account Code
Save
Zone Page 1 - 3
All-Call Page
Automatic Call Back
Call Forward
Call Park Orbit 1 - 9
Line Group 1 - 4
Voice Announce Block
Line Group Queue
315
DSU II Digital Telephone System
IMI66–132
Button Mapping The Impression Telephones
Complete one record sheet for each station.
Copy this blank record sheet as required for additional stations.
BUTTON
BLK . .
Lnn . .
Snn . .
DND . .
PRI . .
IC2 . .
ACC . .
SAV . .
ZPn . .
AC . .
ACB . .
CF . .
CPn . .
TGn . .
VAB . .
TGQ . .
.
.
.
.
.
.
.
.
.
.
.
.
.
.
.
.
.
.
.
.
.
.
.
.
.
.
.
.
.
.
.
.
2022S LCD Speakerphone
DESCRIPTION
Blank
Lines 1 - 24
Stations 10 - 57
Do Not Disturb
Privacy
Second Intercom
Account Code
Save
Zone Page 1 - 3
All-Call Page
Automatic Call Back
Call Forward
Call Park Orbit 1 - 9
Line Group 1 - 4
Voice Announce Block
Line Group Queue
A1
B2
B3
A2 A10
B4
B5
B6
A3 A11
1
ABC
2
DEF
3
GHI
4
JKL
5
MNO
6
PRS
7
TUV
8
WXY
9
BUTTON ASSIGNMENT CHART
OPER
A1
A2
A3
A4
A5
A6
A7
A8
A9
A10
A11
A12
A13
A14
A15
A16
B1
B2
B3
B4
B5
B6
T/C
MUTE
HOLD
TAP
ITCM
A5 A13
A6 A14
A7 A15
A8 A16
2122X Monitor Telephone
B1
B2
B3
A1
B4
B5
B6
A2 A10
A9
A3 A11
1
ABC
2
DEF
3
GHI
4
JKL
5
MNO
6
PRS
7
TUV
8
WXY
9
0
#
SPKR
T/C
MUTE
HOLD
TAP
ITCM
A4 A12
A5 A13
A6 A14
A7 A15
A8 A16
TYPE
MODEL
DEFAULT SETTINGS:
316
#
A4 A12
2122S Speakerphone
CAJS108
TELEPHONE
0
SPKR
OPER
PORT NUMBER
INTERCOM NUMBER
STATION NAME
STATION LOCATION
A9
B1
B1-B6 = Line 1 - Line 6, and A1 = 7, A2 = 9, A3 = 11, A4 = 13, A5 = 15, A6 = 17,
A7 = 19, A8 = 21, A9 = 8, A10 = 10, A11 = 12, A12 = 14, A13 = 16, A14 = 18, A15 = 20,
A16 = 22
Programming the DSU II
IMI66–132
DSU II Digital Telephone System
Recording Account Code Configuration
Account Code
Programming the DSU II
Category
Account Code
Category
317
DSU II Digital Telephone System
Account Code Usage
Verification
Usage Status
Enabled
On
Forced
IMI66–132
Displayed
Off
Optional
Station Exceptions
Verified Digits
Account Code Length
Emergency Number 1
Emergency Number 1
Emergency Number 1
Emergency Number 1
Emergency Number 1
Emergency Number 1
Emergency Number 1
Emergency Number 1
Emergency Number 1
Emergency Number 1
LCD Display Time
Display on Incoming
Yes
Default = Account Code Usage: Disabled
Verified Status: On
Usage Status: Forced
Exceptions: None
Verified Digits: Three
Account Code Digits: 3
Display Time: 5 seconds
Incoming Display: On
318
No
Programming the DSU II
IMI66–132
DSU II Digital Telephone System
Recording the Industry-Standard Telephone
Configurations
Distinctive Ringing
Enabled
Disabled
Default = Enabled
Thru Dialing Port
10
11
12
13
14
15
16
17
18
19
20
21
22
23
24
25
Default = Not Enabled
Programming the DSU II
26
27
28
29
30
31
32
33
34
35
36
37
38
39
40
41
42
43
44
45
46
47
48
49
50
51
52
53
54
55
56
57
319
DSU II Digital Telephone System
IMI66–132
Direct Department Calling Records
Enable/Disable DCD Type Ring All Stations
Enabled
Disabled
Enable/Disable DCD Type Longest Idle Distribution
Enabled
Disabled
Department 1
Access Code 10-7999
Line Ports 1-24
Station Ports 10-57
Department 2
Access Code 10-7999
Line Ports 1-24
Station Ports 10-57
320
Programming the DSU II
IMI66–132
DSU II Digital Telephone System
Department 3
Access Code 10–7999
Line Ports 1–24
Station Ports 10–57
Department 4
Access Code 10–7999
Line Ports 1–24
Station Ports 10–57
Default = No access code assigned, no line assigned, and no stations assigned.
Programming the DSU II
321
DSU II Digital Telephone System
IMI66–132
Direct Inward Station Dialing (DISD) Records
Dial Time
Limit
6 sec
9 sec 12 sec 15 sec 20 sec 30 sec 40 sec 60 sec 90 sec 0 sec
Default = 12 seconds
Assist Station
Station Assigned
Lines Assigned
Day Station
Night Station
Default = Station 10 Day and Night
Incoming Ring
Line Port Assigned
0
1
2
3
4
5
6
7
8
9
Default = 0 Rings
322
Programming the DSU II
IMI66–132
DSU II Digital Telephone System
Recording the Voice Mail Interface Configurations
Voice Mail Station Port
10
11
12
13
14
15
16
17
18
19
20
21
22
23
24
25
Default = Not Enabled
Programming the DSU II
26
27
28
29
30
31
32
33
34
35
36
37
38
39
40
41
42
43
44
45
46
47
48
49
50
51
52
53
54
55
56
57
323
DSU II Digital Telephone System
IMI66–132
Automatic Attendant Ringing Lines (1–24)
Station
Direct
Delay
Night
10
11
12
13
14
15
16
17
18
19
20
21
22
23
24
25
26
27
28
29
30
31
32
33
Default = Not Assigned
Station
Direct
Delay
Night
34
35
36
37
38
39
40
41
42
43
44
45
46
47
48
49
50
51
52
53
54
55
56
57
Automatic Transfer Of Voice Mail
Enable
Disable
Default = Disabled
324
Programming the DSU II
IMI66–132
DSU II Digital Telephone System
Voice Mail Line Port Identification
1
2
3
4
5
6
7
8
Default = No ID Assigned
9
10
11
12
13
14
15
16
17
18
19
20
21
22
23
24
Voice Mail Transfer on Busy Station Port
10
11
12
13
14
15
16
17
18
19
20
21
22
23
24
25
Default = Not Enabled
Programming the DSU II
26
27
28
29
30
31
32
33
34
35
36
37
38
39
40
41
42
43
44
45
46
47
48
49
50
51
52
53
54
55
56
57
325
DSU II Digital Telephone System
IMI66–132
Recording the Integrated Call Costing Configurations
Exception Tables
Exception
Table
Cost
Table
Digits
1
2
3
4
5
6
7
8
9
10
11
12
13
14
15
16
1
2
3
4
Default = None Assigned
Office Code Band Tables
Band
Office Code Prefix
1
2
3
4
5
6
7
Default = None Assigned
Zone Call Band Tables
Band
1
2
3
4
Default = None Assigned
326
Programming the DSU II
IMI66–132
DSU II Digital Telephone System
Area Code Band Tables
Band
1
2
3
4
5
6
7
Default = None Assigned
Discard Digits
Entry
Digits
1
2
3
4
5
6
7
8
1
2
3
4
5
6
Default = No Discard Digits Assigned
Dial Time Limit
01-999 seconds
Default = 0 Seconds
Answer Time Limit
01-999 seconds
Default = 0 Seconds
Programming the DSU II
327
DSU II Digital Telephone System
IMI66–132
Call Rate Table 1
Tier 1 Time
Tier 1 Rate
Tier 2 Rate
Surcharge
Call Rate Table 7
Number
Tier 1 Time
Tier 1 Rate
Tier 2 Rate
Surcharge
Call Rate Table 2
Call Rate Table 8
Number
Tier 1 Time
Tier 1 Rate
Tier 2 Rate
Surcharge
Number
Tier 1 Time
Tier 1 Rate
Tier 2 Rate
Surcharge
Call Rate Table 3
Call Rate Table 9
Number
Tier 1 Time
Tier 1 Rate
Tier 2 Rate
Surcharge
Number
Tier 1 Time
Tier 1 Rate
Tier 2 Rate
Surcharge
Call Rate Table 4
Call Rate Table 10
Number
Tier 1 Time
Tier 1 Rate
Tier 2 Rate
Surcharge
Number
Tier 1 Time
Tier 1 Rate
Tier 2 Rate
Surcharge
Call Rate Table 5
Call Rate Table 11
Number
Tier 1 Time
Tier 1 Rate
Tier 2 Rate
Surcharge
Number
Tier 1 Time
Tier 1 Rate
Tier 2 Rate
Surcharge
Call Rate Table 6
Number
Tier 1 Time
Tier 1 Rate
Tier 2 Rate
Surcharge
328
Call Rate Table 12
Number
Tier 1 Time
Tier 1 Rate
Tier 2 Rate
Surcharge
Programming the DSU II
IMI66–132
DSU II Digital Telephone System
Call Rate Table 13
Number
Tier 1 Time
Tier 1 Rate
Tier 2 Rate
Surcharge
Call Rate Table 19
Number
Tier 1 Time
Tier 1 Rate
Tier 2 Rate
Surcharge
Call Rate Table 14
Number
Tier 1 Time
Tier 1 Rate
Tier 2 Rate
Surcharge
Call Rate Table 20
Number
Tier 1 Time
Tier 1 Rate
Tier 2 Rate
Surcharge
Call Rate Table 15
Number
Tier 1 Time
Tier 1 Rate
Tier 2 Rate
Surcharge
Call Rate Table 21
Number
Tier 1 Time
Tier 1 Rate
Tier 2 Rate
Surcharge
Call Rate Table 16
Number
Tier 1 Time
Tier 1 Rate
Tier 2 Rate
Surcharge
Call Rate Table 22
Number
Tier 1 Time
Tier 1 Rate
Tier 2 Rate
Surcharge
Call Rate Table 17
Number
Tier 1 Time
Tier 1 Rate
Tier 2 Rate
Surcharge
Call Rate Table 23
Number
Tier 1 Time
Tier 1 Rate
Tier 2 Rate
Surcharge
Call Rate Table 18
Number
Tier 1 Time
Tier 1 Rate
Tier 2 Rate
Surcharge
Programming the DSU II
Call Rate Table 24
Number
Tier 1 Time
Tier 1 Rate
Tier 2 Rate
Surcharge
329
DSU II Digital Telephone System
IMI66–132
Call Rate Table 25
Number
Tier 1 Time
Tier 1 Rate
Tier 2 Rate
Surcharge
Call Rate Table 31
Number
Tier 1 Time
Tier 1 Rate
Tier 2 Rate
Surcharge
Call Rate Table 26
Number
Tier 1 Time
Tier 1 Rate
Tier 2 Rate
Surcharge
Call Rate Table 32
Number
Tier 1 Time
Tier 1 Rate
Tier 2 Rate
Surcharge
Call Rate Table 27
Number
Tier 1 Time
Tier 1 Rate
Tier 2 Rate
Surcharge
Call Rate Table 33
Number
Tier 1 Time
Tier 1 Rate
Tier 2 Rate
Surcharge
Call Rate Table 28
Number
Tier 1 Time
Tier 1 Rate
Tier 2 Rate
Surcharge
Call Rate Table 29
Number
Tier 1 Time
Tier 1 Rate
Tier 2 Rate
Surcharge
Call Rate Table 30
Number
Tier 1 Time
Tier 1 Rate
Tier 2 Rate
Surcharge
330
Programming the DSU II
IMI66–132
DSU II Digital Telephone System
Station Message Detail Accounting/Reporting Records
Department
Department
Number
Department
Station
1
2
3
4
5
6
7
8
Default = None Assigned
Automatic Report Time
Hours
Minutes
Selected Records
All Stations
One Station
Account Report
Line Report
Department Report
Print All Records
Delete Records
DCD Report
Default = None Assigned
SMDR Cost Reporting
Enabled
Disabled
SMDR Printout
Enabled
Disabled
Default = No Cost Reported, Printout Enabled
Programming the DSU II
331
DSU II Digital Telephone System
IMI66–132
Recording the Specialized Route Access Configurations
Specialized Route Access
Enabled
Disabled
Default = Disabled
Office Code Table
Office Code
332
Line Group
1
2
3
4
Programming the DSU II
IMI66–132
DSU II Digital Telephone System
Area Code Table
Office Code
Programming the DSU II
Line Group
1
2
3
4
333
DSU II Digital Telephone System
IMI66–132
Special Area Code Table 1
Area Code =
Office
Code
000-999
Line Group
1
2
3
4
3
4
Default = Line Group 1
Special Area Code Table 3
Area Code =
Office
Code
000-999
Line Group
1
2
Default = Line Group 1
334
Programming the DSU II
IMI66–132
DSU II Digital Telephone System
Special Area Code Table 2
Area Code =
Office
Code
000-999
Line Group
1
2
3
4
3
4
Special Area Code Table 4
Area Code =
Office
Code
000-999
Line Group
1
2
Default = Line Group 1
Programming the DSU II
335
DSU II Digital Telephone System
IMI66–132
Overflow Line Group
Default = None
Line Group
Alternate Line Group
1
2
3
4
Default = None
SRA Wait Time
2 seconds
3 seconds
4 seconds
Default = 4 Seconds
Line
Group
Insert Digits
1
2
3
4
5
6
7
8
1
2
3
4
Default = None
336
Programming the DSU II
IMI66–132
DSU II Digital Telephone System
Toll Restriction Table 1
Table Type: Allow
Entry
Deny X
Entry Number (16 Digits Max)
1
2
3
4
5
6
7
8
9
10
11
12
13
14
15
16
1
2
3
4
Table Assignment:
Stations: _________________________
Lines _______ALL______
Toll Restriction Table 2
Table Type: Allow X
Entry
Deny
Entry Number (16 Digits Max)
1
2
3
4
5
6
7
8
9
10
11
12
13
14
15
16
1
2
3
4
Table Assignment:
Stations: _________________________
Lines _______ALL______
Toll Restriction Table 3
Table Type: Allow _____ Deny _____
Entry
Entry Number (16 Digits Max)
1
2
3
4
5
6
7
8
9
10
11
12
13
14
15
16
1
2
3
4
Lines ________________
Programming the DSU II
Table Assignment:
Stations: _________________________
337
DSU II Digital Telephone System
IMI66–132
Toll Restriction Table 4
Table Type: Allow _____ Deny _____
Entry
Entry Number (16 Digits Max)
1
2
3
4
5
6
7
8
9
10
11
12
13
14
15
16
1
2
3
4
Table Assignment:
Stations: _________________________
Lines ________________
Toll Restriction Table 5
Table Type: Allow _____ Deny _____
Entry
Entry Number (16 Digits Max)
1
2
3
4
5
6
7
8
9
10
11
12
13
14
15
16
1
2
3
4
Table Assignment:
Stations: _________________________
Lines ________________
Toll Restriction Table 6
Table Type: Allow _____ Deny _____
Entry
Entry Number (16 Digits Max)
1
2
3
4
5
6
7
8
9
10
11
12
13
14
15
16
1
2
3
4
Lines ________________
338
Table Assignment:
Stations: _________________________
Programming the DSU II
IMI66–132
DSU II Digital Telephone System
Toll Restriction Table 7
Table Type: Allow _____ Deny _____
Entry
Entry Number (16 Digits Max)
1
2
3
4
5
6
7
8
9
10
11
12
13
14
15
16
1
2
3
4
Table Assignment:
Stations: _________________________
Lines ________________
Toll Restriction Table 8
Table Type: Allow _____ Deny _____
Entry
Entry Number (16 Digits Max)
1
2
3
4
5
6
7
8
9
10
11
12
13
14
15
16
1
2
3
4
Table Assignment:
Stations: _________________________
Lines ________________
Toll Restriction Table 9
Table Type: Allow _____ Deny _____
Entry
Entry Number (16 Digits Max)
1
2
3
4
5
6
7
8
9
10
11
12
13
14
15
16
1
2
3
4
Lines ________________
Programming the DSU II
Table Assignment:
Stations: _________________________
339
DSU II Digital Telephone System
IMI66–132
Toll Restriction Table 10
Table Type: Allow _____ Deny _____
Entry
Entry Number (16 Digits Max)
1
2
3
4
5
6
7
8
9
10
11
12
13
14
15
16
1
2
3
4
Table Assignment:
Stations: _________________________
Lines ________________
Toll Restriction Table 11
Table Type: Allow _____ Deny _____
Entry
Entry Number (16 Digits Max)
1
2
3
4
5
6
7
8
9
10
11
12
13
14
15
16
1
2
3
4
Table Assignment:
Stations: _________________________
Lines ________________
Toll Restriction Table 12
Table Type: Allow _____ Deny _____
Entry
Entry Number (16 Digits Max)
1
2
3
4
5
6
7
8
9
10
11
12
13
14
15
16
1
2
3
4
Lines ________________
340
Table Assignment:
Stations: _________________________
Programming the DSU II
IMI66–132
DSU II Digital Telephone System
Toll Restriction Table 13
Table Type: Allow _____ Deny _____
Entry
Entry Number (16 Digits Max)
1
2
3
4
5
6
7
8
9
10
11
12
13
14
15
16
1
2
3
4
Table Assignment:
Stations: _________________________
Lines ________________
Toll Restriction Table 14
Table Type: Allow _____ Deny _____
Entry
Entry Number (16 Digits Max)
1
2
3
4
5
6
7
8
9
10
11
12
13
14
15
16
1
2
3
4
Table Assignment:
Stations: _________________________
Lines ________________
Toll Restriction Table 15
Table Type: Allow _____ Deny _____
Entry
Entry Number (16 Digits Max)
1
2
3
4
5
6
7
8
9
10
11
12
13
14
15
16
1
2
3
4
Lines ________________
Programming the DSU II
Table Assignment:
Stations: _________________________
341
DSU II Digital Telephone System
IMI66–132
Toll Restriction Table 16
Table Type: Allow _____ Deny _____
Entry
Entry Number (16 Digits Max)
1
2
3
4
5
6
7
8
9
10
11
12
13
14
15
16
1
2
3
4
Lines ________________
Table Assignment:
Stations: _________________________
Toll Restriction Tables—Line Assignments
Assign Toll Restriction Tables to Lines
Port
Tables
1
2
3
4
5
6
7
8
9
10
11
12
Default = All Tables Assigned to All Ports
342
Port
Tables
13
14
15
16
17
18
19
20
21
22
23
24
Programming the DSU II
IMI66–132
DSU II Digital Telephone System
Toll Restriction Assignments
Toll Table Assignments
Station Port
Transfer
Normal Calls NightCalls
Speed Dial
Calls
Override Code
10
11
12
13
14
15
16
17
18
19
20
21
22
23
24
25
26
27
28
29
30
31
32
33
34
35
36
37
38
39
40
41
42
43
44
45
46
47
Programming the DSU II
343
DSU II Digital Telephone System
IMI66–132
Toll Table Assignments
Station Port
Transfer
Normal Calls NightCalls
Speed Dial
Calls
Override Code
48
49
50
51
52
53
54
55
56
57
Default = None Assigned
344
Programming the DSU II
IMI66–132
DSU II Digital Telephone System
Caller ID Service Support Configuration Chart
Caller ID Lines (List 1-24 for lines)
Default = None Assigned
Caller ID Stations (List 10-57 for stations)
Default = None Assigned
Audible First Ring
Enable
Disable
Default = Disabled
SAVE Button Stations (List 10-57 for stations)
Default = None Assigned
Caller ID Distribution to COM 2
Enable
Disable
Default = Disabled
COM 2 Configuration
Baud Rate
9600
Other (See System Configuration Record)
Data Bits
8 Data/1 Stop
7 Data/2 Stop
Default = 9600 Baud, 8 Data Bits, 1 Stop Bit
Programming the DSU II
345
DSU II Digital Telephone System
IMI66–132
Tracker Paging System Records
Tracker Paging System
Enabled
Disabled
Default = Disabled
Tracker Pager Station Assignments
Station
Port
Enabled
10
11
12
13
14
15
16
17
18
19
20
21
22
23
24
25
Default = Disabled
346
Station
Port
26
27
28
29
30
31
32
33
34
35
36
37
38
39
40
41
Enabled
Station
Port
Enabled
42
43
44
45
46
47
48
49
50
51
52
53
54
55
56
57
Programming the DSU II
IMI66–132
DSU II Digital Telephone System
Digital Voice Announcing Records
Enable/Disable DVA Operation
Feature
Enabled
Disabled
DVA Support for DCD
DVA Support for DISD
Default = Disabled
DCD Department Transfers before Disconnect
DCD Department
Transfers before
Disconnect
1
2
3
4
5
6
7
8
9
Never
Disconnect
Default = Never Disconnect
Inhibit DISD Digit Dialing—During Night Transfer (of Ringing) Operation
DISD Digit Dialing during Night
Transfer (of Ringing) Operation
Enabled
(Dialing On)
Disabled
(Dialing Off)
Default = Enabled
DISD Dial Time Limit
DISD Dial
Time Limit
6 sec
9 sec 12 sec 15 sec 20 sec 30 sec 40 sec 60 sec 90 sec 0 sec
Default = 12 sec.
DVA Messages
(Copy this blank sheet for a record of each DVA)
Message Type
DCD Message
DISD Message
Day Answer Message
(Message 1)
Night Answer Message
(Message 2)
Recall Message
(Message 3)
Drop Message
(Message 4)
Programming the DSU II
347
DSU II Digital Telephone System
IMI66–132
DVA Station Ports
Station Port
10
11
12
13
14
15
16
17
18
19
20
21
22
23
24
25
26
27
28
29
30
31
32
33
Default = None Assigned
348
DVA Assigned
Station Port
DVA Assigned
34
35
36
37
38
39
40
41
42
43
44
45
46
47
48
49
50
51
52
53
54
55
56
57
Programming the DSU II
IMI66–132
DSU II Digital Telephone System
Data Interface Unit Records
Station
DIU Location
Security Group
Station
DIU Location
Security Group
10
34
11
35
12
36
13
37
14
38
15
39
16
40
17
41
18
42
19
43
20
44
21
45
22
46
23
47
24
48
25
49
26
50
27
51
28
52
29
53
30
54
31
55
32
56
33
57
Defaults = No DIUs assigned. Security Groups = 0 (no assignments.)
Example: The following entries show that station 12 has been programmed so that the data button (labeled
“DATA”) on the digital telephone at station 12 will activate the DIU connected at station 29. Also, this
example shows that station 29 is assigned to security group 2.
12
29
29
29
Programming the DSU II
—
2
349
Notes
IMI66–132
A
DSU II Digital Telephone System
Describing the System Features
A
Abandoned Hold Release
If an on-hold party hangs up at the CO/PBX end of a connection, causing an interruption in the
line current, the system will drop the line from the hold condition and return it to service. The
time interval between hang-up and line-drop is programmable in line class of service
programming with choices of either 50 msec or 350 msec. This feature is usually dependent upon
special arrangements that must be made at the CO end of the connection. The line select indicator
will turn off to indicate an idle line after a call on that line has been abandoned.
See also, Hold.
Access Denied
The system programmer can deny access to particular lines at certain stations in the system. A
station user cannot select a denied line for use. This feature is programmable on a per line/per
station basis in station class of service programming.
See also, Line Features.
Account Codes (with Forced Positive Verification)
System users can employ account codes to identify calls by category or by any other desired
grouping so that the system can print reports. The account code entry can be voluntary or the
programmer can arrange the system so that the users are forced to enter an account code before
they can make an outgoing call. The system compares the account code entered by a station user
with a list of programmed account entries.
The programmer must program the system so that it verifies an entered account code as valid. If
he or she enables verification and the system cannot match an account code that a user has dialed
with the programmed account code entries, the system will sound an error tone if account code
entry is voluntary, or it will prevent the user from further dialing until he or she enters a matching
account code if account code entry is forced.
A user must enter an account code either before dialing an outgoing call or after the distant party
on an incoming call has hung up. Additionally, users may enter an account code before they select
a line for an outgoing call if they wish. When they enter an account code without a line selection,
the code will apply to any line they subsequently select at that station. On incoming and outgoing
calls, the user who enters the account code is associated with the call record except when the call
is transferred. On transferred calls, the transferee is associated with the call record.
Programming the DSU II
351
DSU II Digital Telephone System
IMI66–132
As a feature to LCD speakerphone users, the programmer can arrange for a message to appear in
the telephone’s display to prompt the user to enter an account code during incoming or before
outgoing calls. He or she can also assign the length of time that the display appears. The user
must enter account code digits after the message appears. If the programmer has set the system to
verify code entry, it then makes a verification attempt. If the system cannot verify the account
code it causes the display to show an error message. The user may then re-enter the account code
at this point. If the verification attempt is successful (or if the system does not require that the
code be verified), the display will return to its normal date and time message. If the account codes
are forced and the call is outgoing, then the line is dropped at the end of the display time if the
user has not entered a valid account code. The programmable range for the display time is 1 to 20
seconds. When the feature is not enabled, the system inhibits the display prompt.
When a station user activates the last number redial or automatic redial features for outgoing
calls, the system will automatically re-use the last account code the user entered at that station
unless he or she enters a new one before activating the redial feature.
In addition to turning on the account code feature, enabling its verification, and making it either
voluntary or forced, the programmer must set the account code length, specify the number of
digits that the system will verify, and make up the entire list of account codes that the users will
use. Account code length defines the number of digits that a user must enter before the system
will accept the code. The length can range from three to 16 digits but cannot be lower than the
verified account code length. The verified account code length defines the number of digits that
the system will verify before it accepts an account code as valid. As well, verified account code
length defines the number of valid account codes that a programmer can store (as shown in the
following table). A programmer should be aware that when he or she changes the verified account
code length, the system automatically empties the list of valid account codes.
Account Code Length and Valid Account Codes
Digits Verified
3
4
5, 6
7, 8
9, 10
11, 12
13, 14
15, 16
Number of Valid Account Codes
1000
400
266
200
160
133
114
100
Even though a programmer has arranged a system to force users to enter account codes before
making calls, they can always dial certain programmer-defined emergency numbers without an
accompanying account code entry. The system allows a maximum of 10 programmable
emergency numbers. The minimum length of an emergency number is 1 digit and the maximum
length is 12 digits. Users may dial emergency numbers manually, through system speed dial,
personal speed dial, last-number redial, or automatic redial—with or without account code entry.
352
Programming the DSU II
IMI66–132
DSU II Digital Telephone System
Forced Account Code Entry for CENTREX Users
The programmer may set the TAP time so that CENTREX users do not have to re-enter an
account code after pressing the TAP button. The programmer may also set the system so that
non-CENTREX users do have to enter an account code after pressing TAP.
• If the TAP time is set for 1 second or less (the hookflash time), the system will not clear
an account code after a TAP entry. This enables CENTREX users to do host system
transfers without entering an account code a second time.
• If the programmer sets the TAP time for 1.5 seconds or more (the recall time), the system
clears the account code after TAP entry. This forces non-CENTREX users to re-enter an
account code if they press TAP to recall a new dial tone.
Account Code Button
A programmer can use station class of service programming to assign an account code button to
any programmable button location at a station as part of the button mapping procedure. With this
account code button available, the user can press it and then dial an account code without
interrupting the call. Only the user of the Account Code button will hear the DTMF tones when
he or she dials the code. The distant on-line party will not hear the DTMF tones, and the system
will not place the line on hold. The user can hear the distant on-line party while he or she is
dialing an account code. If the telephone does not provide an account code button, the user must
dial an intercom code before he or she dials the account code digits.
All-Call Paging
All-call paging allows all stations to receive announcements through the station speaker at once.
The system can also send all-call paging to the paging port where it applies it to the input of an
external paging amplifier. Origination of announcements must be via the station handset. A
programmer can arrange each station to receive and/or originate all-call page. He or she enables
the ability to receive and originate all-call paging at a station through station class of service
programming.
See also, Paging.
Analog Terminal Interface Support
The digital telephone system supports the operation of the Analog Terminal Interface (ATI-D).
The ATI-D is a multipurpose on-premise accessory with dual circuits that provide an
industry-standard telephone interface. This feature adapts most industry-standard (IST) devices
and voice processing systems to the digital telephone system. The ATI-D accepts both tone and
pulse (rotary) dialing from these devices. Each ATI-D circuit will drive a load with a maximum
ringer equivalence number (REN) of 2.0 thus allowing more than one IST connection at each
ATI-D circuit input. The ATI-D supports a wide variety of IST equipment such as model 500 and
2500 telephones, cordless telephones, answering machines, and FAX machines. The ATI-D is
housed in a metal enclosure and is powered by the telephone system through the station port
connections. It contains a ringing generator to generate a ringing signal for the IST devices.
Area Paging Interface
Any station user can dial a special code number in response to an all-call or zone page and be
connected to the paging party in a private conversation. All-call or zone paging is provided to the
stations through the station class of service programming.
See also, Paging.
Programming the DSU II
353
DSU II Digital Telephone System
IMI66–132
Assist Button
This feature allows a station user to program a button to be used for sending a message to an LCD
speakerphone. Once programmed, the station user can press the ASSIST button at anytime to
sound a tone burst at the called station and present a preprogrammed message in the station
display. The user can send a message while on a call without alerting the distant party. This
feature is useful for requesting assistance while engaging on a call. For example, a customer
service representative could request assistance from a supervisor while talking to a problem
caller. The supervisor, upon receiving the tone and noting the display message, could perform an
executive override or service observing action to join the call or monitor it.
See also, Messaging.
Automatic Callback
If a telephone user encounters a busy tone or a ring no-answer after calling an intercom station,
She or he can dial a special code number that will cause the system to automatically ring both the
user’s telephone and the one that he or she was calling. This automatic callback occurs after the
busy station becomes idle or after the user at the ring no-answer station takes some action at it
that indicates to the system that it is available to be answered. No class of service programming is
required to enable this feature.
See also, Intercom.
Automatic Configuration with Voicemail Systems
The DSU II system automatically configures itself for integration with a Voice Processing (VP)
system. In taking this action, the DSU II automatically arranges station ports that are connected to
the VP system to be voice mail ports. Automatic configuration requires the proper software match
detailed in the following chart.
Component
Microsoft Windows NT- or
2000-based VP System
Microsoft DOS-based VP system
DSU II Communications System
Required Software Level
VP revision 10.3
VP revision 8.5
Revision 7A
There are no new Station 10 or VDT programming steps associated with the feature and it does
not generate any new printouts.
To start the automatic configuration process, installers connect the station port wiring between the
DSU II and the VP system, and turn on the AC power to both systems.
CAUTION
Installers must not connect the serial data connection between the DSU II and the VP system until
after the automatic configuration completes its process.
354
Programming the DSU II
IMI66–132
DSU II Digital Telephone System
Automatic configuration occurs in the following order:
1. Each voice mail port goes off hook and identifies its port number to the DSU II.
The DSU II then identifies an extension number for each voicemail port.
2. The DSU II takes the following actions:
• marks each identifying port as a voice mail port,
• hunt links the voice mail ports together,
• enables the Call Forward Busy feature for the voice mail ports,
• enables the Call Forward Ring No Answer feature for the voice mail ports,
• sets Ring—No Answer to one ring for voice mail ports.
3. The DSU II then identifies any extension that has no hunt link, links those
extensions to a voice mail port, enables the Call Forward Busy and Call Forward
Ring—No Answer features at those extensions, and sets the RNA at those
extensions to three rings.
Once automatic configuration finishes, installers must configure prototype mailbox 9994 on the
VP system (using the instructions found in Section 5 of the VP System Installation and
Maintenance Manual for details). After programming the prototype mailbox, installers make the
serial cable connection between the DSU II and the VP system. With the serial connection
completed, the DSU II and the VP system establish a serial communications link between
themselves that allows the VP system to create mailboxes for every DSU II station port extension
number.
During every startup the VP system identifies itself to the DSU II. If voice mail ports are already
in the correct location, no automatic configuration action occurs.
Automatic Dialing of Stored Numbers
Automatic Dialing
The system supports up to 24 automatic dial (auto dial) numbers per station. auto dial buttons can
store up to 16 digits plus an intercom or line selection. Stored digits include 0–9, and #. The
system stores a pause at any point where the HOLD button is pressed, and stores a hookflash at
any point where the TAP button is pressed. Automatic dialing provides a way to obtain
one-button access to frequently used system features. This feature does not require any class of
service to enable it.
Programmable DSS/BLF
A station user can store one-button, direct station selection (DSS) at any memory button location
to create a DSS memory button. When this button is pressed, any active outside call is
automatically placed on hold and an intercom call is automatically made to that previously stored
station number. The visual indicators of the stations programmed at the button locations form a
busy lamp field (BLF). The BLF conveys station status to the user. An auto dial number can also
be programmed as a secondary function at every DSS/BLF memory location. No class of service
is required.
Station Speed Dial
Each station provides 10 speed dial number locations at the keypad buttons. Station speed dial
numbers can be up to 16 digits in length and can include line or intercom selection, numbers, #, *,
pauses, and hookflash signals. A user can store a pause by pressing the HOLD button and store a
hookflash signal by pressing the TAP button.
Programming the DSU II
355
DSU II Digital Telephone System
IMI66–132
System Speed Dial
The system provides 99 system-wide speed dial numbers. The system speed dial numbers can be
up to thirty-two digits in length, and can include numbers, #, S, pauses, and hookflash signals.
The attendant programs the system speed dial numbers and names at station 10 or 12 for use at
every station in the system. No class of service programming is required.
Automatic Hold for Intercom
If a user selects the second intercom line while a call is active on the first intercom line, this
automatic hold feature lets the system automatically place the first intercom call on hold. Use
station class of service programming to enable this feature.
See also, Hold.
Automatic Hold—Transfer to Line
A programmer can use class of service programming to make this system feature available to
selected stations. When enabled, a user can press any line button and cause an active line to
automatically go on hold. This feature allows a user to move from line to line without having to
press the HOLD button to place any current calls on hold. Use station class of service
programming to enable this feature at the desired stations.
See also, Hold.
Automatic Pause Insertion
When the system stores a dialed number for later redial, it automatically stores a pause whenever
the user waits between digits for at least two seconds. The system inserts the automatic pause in
the stored number sequence at the point where the manual pause in dialing occurred. The length
of the automatic pause is programmable.
See also, Automatic Dialing of Stored Numbers and Redialing.
Automatic Redial (of Busy Number or Unanswered Call)
A user can automatically redial a busy number or unanswered call by activating this feature. Once
the user activates automatic redial, the station will select the line, automatically dial the number,
and wait for a response. It will do this twice unless the user deactivates the feature by pressing
that button or another button or by lifting the handset. The feature cycle is timed and does not
have busy detection circuitry. Because of this, if the user is operating hands-free when the called
party answers, she or he must lift the handset to prevent the caller from being cut off by the
timing cycle. The automatic redial button is a designated programmable button position and the
user must program its location to make it active.
See also, Redialing.
356
Programming the DSU II
IMI66–132
DSU II Digital Telephone System
Automatic Station Relocation
With this feature, the system will automatically recognize a particular station should that station
be relocated to a new station port. When someone places a telephone at a new port location, it
will continue to provide the same class of service parameters and respond to the same extension
numbers as it did at the original station port. A programmer must enable this system feature using
system class of service programming. As an added feature when someone plugs an LCD
speakerphone in a new station port, the system will prompt the user on the display to verify the
relocation of features.
Auxiliary Equipment Interface
An installer can use the auxiliary equipment interface to connect a telephone device or a data
device to an outside line ahead of the common equipment. The system can detect an off-hook
condition in a device that an installer has connected to the auxiliary equipment interface, and turn
on the status light for that line at telephones that have that line appearance. It does this to indicate
that the line is busy and not available for station use. Auxiliary equipment interface connections
provide connections to lines 2 and 4. A user cannot interrupt an external device by pressing the
line button unless the line has been programmed to be non-private.
Auxiliary Ringer Interface
The auxiliary ringer interface provides “dry-contact” relay closures which track the ringing
pattern whenever the system sends ringing to a programmable destination. Programmers can
program relay control to be activated when the system sends ringing to station port 17 or to the
paging port.
When programmed for station port 17 ringing, an installer often uses an external device to
provide loud ringing. When programmed for paging port ringing, an installer often installs an
external paging amplifier to sound the rings. The system supplies ringing tones to the paging port
along with the relay closures. It can send the ringing tones to the input of an external paging
amplifier and the installer can arrange the wiring so that the relay closures energize the paging
amplifier while it is receiving the ringing tone. Use system class of service programming to
choose either the paging port or station port 17 for the ringing port relay control. Also use system
class of service to determine the type of ringing sent to the paging port. Use station class of
service programming to determine the type of ringing that the system sends to station port 17.
Programmers can arrange for the system to send ringing tones for particular lines through the PA
port. They can choose between intercom tone and DTMF signaling tone for the PA port ringing.
They should choose the intercom tone if they desire a soft tone and the DTMF tone if they desire
a loud tone.
See also, Ringing.
B
Background Music
If the installer connects a customer-provided external music source to the system, the music from
that source will sound through the station loudspeakers after the users turn it on at their stations.
They can adjust the loudness of this background music with the loudspeaker volume control. The
system automatically turns the background music off during calls. This feature requires no class
of service programming.
See also, Music Features.
Programming the DSU II
357
DSU II Digital Telephone System
IMI66–132
Basic Key Service (1A2) Emulation
The system provides all of the basic, 1A2-type, key service features. These features are: selective
line pickup, common line pickup, multiline pickup, and hold. No special class of service
programming is required.
Battery Backup
Battery Backup (Chassis, Cable, and Batteries)
The manufacturer offers battery backup assemblies including chassis, cable, fuses, and batteries
as optional kits available through normal distribution channels. The assemblies are designed so
that installers can connect them directly to the uninterruptable power source (UPS) interface
located on the common equipment chassis. The system does not require any action from the
telephone user to make it operate on battery power nor does it require any class of service
programming action on the programmer’s part.
Battery Backup Interface
The common equipment cabinet provides an interface for an optional battery backup kit to give
full uninterrupted system power in case of an AC power loss. The switching and charge circuitry
are in the common equipment, while the batteries, chassis, and cable are packaged as a separate
option. When plugged into an active AC power source the common equipment will constantly
charge the attached batteries. Built-in circuitry automatically switches to battery power when AC
power is lost. With batteries at full charge, a fully loaded system will operate for a minimum of
one hour without AC power.
Block Programming
A programmer can assign a particular line or station’s class of service to an entire block of lines
or stations with one programming action. This feature eliminates the need for him or her to
individually program stations and lines with the same class of service. A programmer can perform
a block programming class of service after he or she has programmed a station class of service or
line class of service for a particular station or line.
See also, Class Of Service.
Boot Loader
Information used by Windows NT during startup to configure the operating system.
358
Programming the DSU II
IMI66–132
DSU II Digital Telephone System
C
Call Announce With Handsfree Answer Back
The internal loudspeaker at each station provides call-announce capability over the intercom link.
A user can make a hands-free response to a call-announce call without lifting the handset.
The user can use the MUTE button to block all hands-free answer back response. This
arrangement will prevent a station user from monitoring another station site using the monitoring
ability of the voice announce feature. When a user presses the MUTE button, all handsfree
answerback is disabled, inhibiting any off-site monitoring. The MUTE light turns on to indicate
that this feature is active.
See also, Intercom.
Call Costing and Station Message Detail Accounting Reports
The system provides built-in, estimated costing of all outside calls. It also provides station
message detail accounting (SMDA) printout reports of all costed calls and displays call costs on
LCD speakerphones.
Call costing, in general, provides a means of establishing costs to be applied to outside calls made
from system telephones. Call costing computes charges for a call after it is completed. It does not
restrict dialing as toll restriction does. Call costs are based on a two-tier time rate and includes a
line surcharge cost. A programmer can program allowances for call set-up and minimum call
duration. The system provides several ways of determining call costing, making it possible to
apply reasonable rates for the entire country.
The system will automatically provide a report whenever the costed call storage reaches 95
percent of capacity. Additionally, the programmer can arrange for these reports to be printed
automatically at a specific time of day.
The system can produce five different SMDA records:
• Detailed report sorted by stations,
• Detailed report sorted by account codes,
• Line summary report,
• Department summary report,
• Department Call Distribution (),
• A general output of all records.
Upon completion of report printing, the telephone attendant can delete all records the system used
for the reports. The system will not delete any call records created between the time the report
printout was started and completed. If the attendant does not delete the reports after they are
printed, a later command to delete records will delete all records at that point and not just the ones
that were printed in the previously generated reports. The programmer can take programming
action to always delete the records after they have been printed. The attendant has the ability to
request particular reports to be printed at any time they are required.
The programmer can establish account codes to allow system users to identify calls by category
or by any other desired grouping so that the system can report costing by that category or
grouping. Further, the programmer can define department numbers and assign stations to different
departments so that the system can produce call cost reports on a department-by-department
basis.
Programming the DSU II
359
DSU II Digital Telephone System
IMI66–132
Programmers must use call costing and SMDA reporting class of service programming to set the
costing features, and assign stations to specific SMDA departments using the station class of
service programming. He or she can also enable the LCD speakerphone display of costed calls
through station class of service programming.
SMDA Reporting Through VDT Programming and Per-Station SMDA
The programmer can use the VDT programming option to request that the system send SMDA
reports to either data port A or data port B for printout. It is also possible to use this feature
remotely through a data communications arrangement to capture SMDA reports. In addition, the
system provides SMDA station reports for individual stations when the attendant requests them
by dialing certain code numbers at station 10 or 12. Note, however, that the system can provide
only one station report at a time.
Station Message Detail Recording (SMDR)
The SMDR feature generates a call record for printing as soon as the system collects the record. It
presents the call record at an RS-232 level as ASCII transmit data in an 80-column format at the
data port available for that purpose.
Call Forwarding
Call Forwarding on All Calls
This feature allows a station user to designate another station or the attendant station as the
recipient of all calls normally directed to ring at his or her station. If the user has call forwarding
enabled when the attendant activates night transfer of ringing, the system forwards the night
ringing assignment of the user’s station. Calls that the system forwards to a recipient station can
be forwarded again by that station user to another station. Thus, two levels of call forwarding on
all calls can occur, first, from station A to station B and then, from station B to station C. As a
reminder that call forwarding is enabled, a short tone burst will occur at the user’s station for each
intercom call that it receives while its calls are forwarded.
When the programmer has assigned a call forward button to a station, its associated LED will
turn on to indicate that the feature is enabled when the user presses it; however, if the call forward
button is programmed as a second level to a DSS/BLF button, the system reserves the LED
indication for BLF indication. On LCD speakerphones that are recipients of call forwarding, the
display will indicate the extension number or station name for the station from which an intercom
call was forwarded.
Call Forwarding—Personal
Call forwarding of personal calls allows a station user to designate another station number (or the
attendant station number) to be the recipient of intercom and prime line calls normally directed to
that user’s station. For each intercom call received while call forward is enabled, a ring reminder
(short tone burst) will be sounded at the forwarding station to remind the user that his or her calls
are being forwarded. On LCD speakerphones that are recipients of call forwarding, the display
will indicate the extension number or station name for the station from which an intercom call
was forwarded.
Call Forwarding of Ring No-Answer (RNA) and/or Busy Calls
With this call forwarding enhancement, the can forward both the RNA and the busy calls that a
station receives or forward just the RNA or just the busy calls that the station receives. Being able
to separate these call forwarding schemes allows users to have forwarding just for the calls that
ring their stations when they are away from their telephones but not burden their hunt-linked
fellows with calls they receive while they are busy on existing calls.
360
Programming the DSU II
IMI66–132
DSU II Digital Telephone System
A RNA call first rings for a programmed number of times at the receiving station then start
ringing at the station that is hunt-linked to the receiving station. If that hunt-linked station is also
hunt-linked to another station, the call will follow that link. A call to a busy station will
immediately start ringing at the station that is hunt-linked to the busy station. If that hunt-linked
station is also hunt-linked to another station, the call will follow that link.
To enable this feature enhancement, programmers must first enable tone first signaling and
arrange an intercom hunt group. Then, they can individually enable call forwarding for RNA
calls and call forwarding for busy calls. They can turn on either call forwarding scheme alone or
turn on both schemes as the site demands dictate.
Ring—No Answer Forwarding of Transferred Calls
This feature enhances the existing automatic RNA call forwarding feature to include forwarding
of transferred lines to individual stations. When a telephone user transfers a line to a station, the
call will ring at the station receiving the transfer for the programmed number of rings. After that,
the call will start ringing at the station that is hunt-linked to the station first receiving the transfer.
If that station is also hunt-linked to another station, the call will follow that link. When the
transfer recall time expires, the call will recall back to the station that initiated the transfer. The
hunt link can be a circular one. The transferred line will circle the hunt link until it recalls.
Alternately, the station can be hunt-linked to voice mail so that a transferred call will forward to
the station’s voice mailbox if it is unanswered. For this feature to work properly, the following
details must be considered:
• you must hunt-link the station receiving a transfer to another station;
• you must program the number of rings to occur before forwarding;
• you must insure that the transfer recall time is larger than the total time of RNA to all hunt
linked stations (if it is not, the transferred call will recall before the call gets to the end of
the hunt link).
For an example of this last consideration, assume station 12 is hunt-linked to station 13 which is
also hunt-linked to station 14. Further assume that station 12 and 13 have their RNA’s set to two
rings. A call that is transferred to station 12 will ring there twice, then it will ring at station 13
twice, then it will ring station 14 until transfer recall time expires. Each transfer ring cycle is
approximately four seconds; therefore, the line will ring the station for approximately eight
seconds before it moves to the next station. Since there are three stations linked together, this
event will require 24 seconds. This means that you should set the transfer recall time for 25
seconds or higher.
You can use this formula to determine minimum transfer recall time:
If:
4 = transfer ring cycle time in seconds
R = how many RNA rings assigned per station
S = how many stations are in hunt list
Then:
4 x R x S = minimum transfer recall time
Call Forward Outside System
The Call Forward Outside System (CFOS) feature allows the system to forward incoming or
transferred line calls to telephone numbers outside the system. The CFOS feature forwards calls
over any available outbound lines or line groups. Since CFOS involves outbound calls, those calls
are subject to all line access, toll restriction, and specialized route access restrictions normally
imposed on the users. Any calls that CFOS cannot service (no outbound line available, toll
restricted, and so forth), ring the system as normal calls. The CFOS feature is useful for
after-hours forwarding of business calls to alternate sites such as home or cellular telephone. To
help system managers keep account of CFOS activity, the system marks CFOS call with a F in
the SMDA records printout.
Programming the DSU II
361
DSU II Digital Telephone System
IMI66–132
Users activate or deactivate CFOS by dialing a feature code or pressing a preprogrammed button.
Once users activate CFOS, they select the outbound line or line group in any of the normal line
selections methods available to them. They also designate the forward destination by dialing the
number or pressing a speed dial button. (If users do not make a line and destination choice, the
system uses the most recently used selections.) Once a user activates CFOS, it remains active and
neither system resets nor power outages will deactivate it. After activation, incoming or
transferred calls to an idle CFOS-enabled station forward outside the system to the CFOS
destination over the selected outbound line or line group.
CFOS remains in effect in the event of loss of power or a system reset. Lines used for CFOS must
have their abandon hold release time set to match the central office. Because CFOS is a powerful
feature with the potential for abuse, several safety features have been added. Programming
safeguards include the ability to enable the feature only on selected stations and master control
ability for enabling and disabling the feature system-wide. Ultimate responsibility for system
integrity, however, lies with the system administrator.
Comdial has taken reasonable steps in the design of all product features, including CFOS, which
protect against unauthorized or fraudulent access to, or use of, a system, or which protect against
unauthorized, fraudulent or unaccounted-for access to, or use of, long distance lines. However, no
system is entirely invulnerable or immune from unauthorized or fraudulent access or use, or
unaccounted-for access or use, and therefore Comdial disclaims any and all liability, and makes
no warranty, express or implied, relating to unauthorized or fraudulent access or use, or
unaccounted -for access or use.
NOTES:
(1) CFOS will not work unless the abandon hold release time on all lines used
for CFOS matches the CO abandon hold release time.
(2) Calls forwarded through CFOS may experience lower audio levels due to
the normal line resistance of CO lines. Low audio level is usually only
noticeable on long line loops. If signal loss is a problem at a particular site,
the installer may need to add a line amplifier (repeater) in the lines.
Call Park
The call park feature is similar to a manual hold condition. A user can park a call a particular
station and retrieve it at any station in the system by dialing the appropriate access code.
NOTE: The retrieving station must have access to the line on which the call appears.
Calls are parked and retrieved within the system through the use of dialing codes. The system
provides nine parking circuits (orbits). Call park, when used with the paging features, allows a
system attendant to direct calls to roving personnel. A call that is left in a parking orbit for
preprogrammed length of time automatically returns to a timed hold recall condition at the station
where the user originally parked the call.
See also, Hold.
Call Pickup
Directed Call Pickup
A station user can dial a code, followed by the extension number of a ringing station, to answer
the ringing call.
362
Programming the DSU II
IMI66–132
DSU II Digital Telephone System
Group Call Pickup
If a call rings to any station in a group and another user in the group wishes to answer the call,
that user may dial the group pickup code and answer the call. Four different groups can exist with
any number of stations in a group. Overlap is provided by allowing stations to be in more than
one group thus enabling those stations to pick up for stations in more than one group. The
programmer must place the system stations in logical answering groups by group them together
using the station class of service programming.
Call Transfer
Screened Call Transfer
Screened call transfer allows station users to transfer outside calls from one station to another, via
the intercom link, in one of two ways. If both stations have access to the line, a user effects a
common line pickup transfer. If the other station does not have access to the incoming line, the
user uses the transfer/conference button to effect the transfer. For a screened transfer, the
transferring user precedes the transfer with an announcement to the party that is to receive the
transferred call.
Unanswered Call Transfer Recall Timing
A transferred call that is unanswered after a programmed length of time will return to the station
that transferred it. The system will return the call to both attendant stations when the tandem
attendant feature is enabled. When LCD speakerphones are employed, the display will show the
station number or name as well as the line number that is being re-called. The system class of
service programming determines the recall time for an unanswered call transfer.
Unscreened Call Transfer
A user can transfer a call to another station without first announcing it. The transferred call will
camp-on to the other station where it will ring and await an answer. The call will automatically
ring back to the transferring station after a programmable recall period. There is no limit as to
how many calls users can camp-on to another station. A transferred call will only ring if the
station is idle. If the station is busy, the call will wait until it is idle before it rings. The
programmer can use the system class of service programming to set the recall time for an
unanswered transferred call.
Call Waiting Tone
A telephone user can signal a busy station with the call waiting tone to indicate that he or she
wishes to contact them. Users dial a special code to activate the call waiting tone.
Caller ID
The central office sends Caller ID data along lines assigned to the Caller ID service. Caller ID
information is displayed at a system LCD speakerphone only if the programmer assigns that
telephone to the Caller ID service, and then only for those Caller ID lines that are assigned to that
station and arranged to perform as follows:
• ring audibly
• can be answered by user pressing button for the ringing line
• are transferred to the station.
Programming the DSU II
363
DSU II Digital Telephone System
IMI66–132
The station receives Caller ID data between the first and second rings. A programmer can enable
the first ring for a line assigned to Caller ID to be either audible or silent. Selecting the “silent”
option ensures that the Caller ID data is displayed prior to ringing, nearly eliminating the loss of
Caller ID data.
Station users may automatically retrieve and dial the last Caller ID number displayed at a station
by using a preprogrammed SAVE recovery button. Because the programmer can store the local
area code and up to 100 6-digit area code and local office codes, ten-digit Caller ID numbers can
automatically be transformed into a format that can be dialed. (seven-, eight-, and eleven-digit
Caller ID numbers are already in a format that can be dialed and do not need to be transformed.)
The system will dial those numbers that are present in the 6-digit table as local calls even if they
are in different area codes.
All Caller ID features require that the Caller ID decoder device (product code CID08) deliver
Caller ID data to the system’s RS-232 data port B. The programmer must configure this port to
match the output of the Caller ID decoder device. The recommended configuration is 9600 baud,
with eight data bits and one stop bit. The programmer must use VDT programming to do this.
Caller ID distribution is in the form of messages which specify the Caller ID data for lines with
incoming calls, and identify the stations answering such lines. The data is in the ASCII format
and is suitable for use with PC-based application programs.
Calling Station Identification on BLF
If a user has stored the station number of a calling station into the direct station select/busy lamp
field (DSS/BLF) of his or her station, the flashing of the corresponding BLF light will identify the
caller. The BLF lights also indicate the status of the DSS telephone using the department pilot
number.
Class of Service
Block Programming
A programmer can assign a particular line or station’s class of service to an entire block of lines
or stations with one programming action. This feature eliminates the need for him or her to
individually program stations and lines with the same class of service. A programmer can perform
a block programming class of service after he or she has programmed a station class of service or
line class of service for a particular station or line.
Class of Service Programming (From Main Station)
Class of service (COS) programming is used by the installer/programmer to configure and assign
all system, line, station, and special purpose operating features. The installer/programmer enters
COS programming by dialing an access code over the intercom line. System administrators can
enter COS programming with another code to reprogram any system, station, or special purpose
operating feature that may require change at a later date. Line reprogramming ability is not
available through system administration programming. The system attendant can reprogram
certain system-wide features that require periodic change by entering COS programming with
another code provided for this purpose. The station user can program individual stations for speed
dial, auto dial and direct station selection (DSS) by entering COS with a code provided for that
purpose. Thus, COS programming is arranged with a hierarchical order from the highest (the
installer/programmer) to the lowest (the station user) level with a higher level programmer having
the ability to do anything a lower level programmer can do without exiting a current
programming mode. However, only the station user can program the speed dial and auto dial
locations at a telephone.
364
Programming the DSU II
IMI66–132
DSU II Digital Telephone System
All class of service (COS) programming is performed from station 10 or 12. Any station and
console combination will function in this mode and provide visual feedback with the LED
associated with the programming button. By employing an LCD speakerphone, however, the
programmer will have the benefit of display prompts and verifications to simplify and clarify the
programming procedures.
Flexible Station and Line Class of Service Control
The extension number of a station and all other programmable attributes that are initially assigned
to a particular station port and the line, along with all programmable line attributes that are
initially connected to a particular line port can be re-assigned to a different port through
programming action. This feature allows adds, moves, and changes without re-locating the station
and line wiring. A programmer can use line and station class of service programming are used to
reassign stations and lines.
Class of Service Programming (From Video Display Terminal)
A programmer can use an asynchronous, serial data terminal with an RS-232 interface to effect
class of service programming through menu-driven procedures. For more information on VDT
programming, refer to IMI66-094, Video Display Terminal Programming.
Class of Service Program Printout
The common equipment provides serial data ports that the installer can use to interface an RS-232
compatible, asynchronous serial data printer to the system. The connected printer will provide a
printout of class of service and toll restriction records. The programmer can use the data printer
service class of service programming procedure to specify the nature and extent of each requested
printout. He or she can use the system class of service programming to specify the bit-length and
baud rate of the data.
Default Functional Program
At initial power-up, the system sets the operating features to a specific group of operating
conditions (default conditions). The default conditions provide a complete operating system for
normal use. The installer can leave the system defaulted or reprogram as desired. After a
programmer has reprogrammed a system, he or she can re-default it by using the system, line, and
station class of service programming or use a master clear to default the entire system and erase
all stored programmable button information.
Remote Programming and Administration
Both remote class of service programming and the transmission of SMDR data for printing are
available through serial data ports. The system supports X-on X-off terminal control codes as
well as a DTR signal for handshaking. The system data communications operates per the popular
XMODEM protocol. The database can be uploaded or downloaded, error free, from or to a
remote computer that is running software that supports the XMODEM protocol. The two serial
data ports allow VDT programming (either local or remote) to be conducted through one port at
the same time that the other port is being used to send SMDR data for printing. VDT
programming of the system is menu driven.
Common Audible Ringer Interface
Connections are available at the common equipment that provides “dry-contact” relay closures
whenever an incoming line rings. These contact closures track the ringing pattern and can be used
to control an external signaling device.
See also, Ringing.
Programming the DSU II
365
DSU II Digital Telephone System
IMI66–132
Conferencing
Add-on Conferencing
With this feature, a user at a station that is operating in a private mode can add up to three other
stations to an outside call.
Multiline Conferencing
This feature will allow one station to access up to four outside lines at the same time resulting in a
conference arrangement. The user employs the transfer/conference button to effect the
conference.
Unsupervised Conferencing
After a user has established a conference between an internal party and a maximum of two
external parties, this feature allows the internal party to drop out of the conference by dialing a
special code. The conference between the two outside parties continues in an unsupervised
condition.
Console Support
The digital telephone system supports the installation and use of a DSS/BLF console at any
available station port. The number of installed consoles is limited only by port availability;
however, since a console complements a companion telephone located in an adjacent station port,
the installer can use up to one-half of the available station ports for consoles. In addition with the
dual console feature (discussed later), a full two-thirds of the total station port capacity is
available for console use.
The installer can assign two consoles (usually two 32-button consoles) to one telephone using one
station port each. This feature is especially useful when used with a system that has one or two
GM408 expansion modules included with it. The installer can place the first console at the station
port that is logic-paired with the station that he or she wishes to complement. The installer can
put the second console at any station port except 10 or 11 and use class of service programming
to assign it to the station port that is logic-paired with the first console.
The installer can put a console at any station port and assign it to a station without first installing
a console at the station’s logic-paired port. This configuration is convenient for adding a console
to an existing telephone installation that already has its logic-paired port occupied; however, one
must not use this configuration for assigning a console to station ports 10 and 12 because the
console buttons will not be usable for programming.
As discussed above, this feature is also useful for adding a second console to a station that already
has a paired console installed with it.
The digital telephone system automatically recognizes a console when it is connected to a station
port and automatically assigns station intercom numbers to the console buttons for direct station
selection (DSS) purposes with associated busy lamp field (BLF) status lights. However, the
console buttons are fully programmable and the station user can customize them as he or she sees
fit by programming them as DSS buttons or as automatic dialing (auto dial) buttons. When the
user programs the buttons for DSS use, auto dial capability is also available at a secondary level
at each DSS button. The first 48 buttons on a 64-button console are programmable for DSS
and/or auto dial use.
While the first console (the one installed at the logic-paired port) extends the autodial buttons of
the paired telephone by 48 and provides DSS/BLF coverage for station ports 10 through 57, the
second console (the one installed at the programmed station port) provides DSS/BLF coverage as
follows:
366
Programming the DSU II
IMI66–132
DSU II Digital Telephone System
• On a 32-station system with two 8-station expansion modules, the first 16 buttons are
automatically assigned (defaulted) to station ports 42 through 57 for DSS purposes.
• On a 32-station system with one 8-station expansion module, the first 8 buttons are
automatically assigned (defaulted) to station ports 42 through 49 for DSS purposes.
• On any other smaller station capacity system, all buttons are unassigned.
When an installer installs a console and programs it to complement a telephone without first
having a console installed at a port that is logic-paired to that telephone, its button assignment is
automatically defaulted, as described above, but the user can reprogram it as required. It is
important to remember that when a programmer programs for a second console, the system sets
the console button mapping to that which is described above. When a programmer clear the
assignment, the system resets the button mapping to match a logic-paired console. This means
that when the second console feature is cleared, the console installed at that port complements the
telephone that is installed at its logic-paired port instead of the telephone that is located at the
program designated port, and its buttons are automatically reassigned to stations 10 through 57.
D
Data Interface Unit
The Data Interface Unit () is a device that provides the capability to plug an Industry Standard
Telephone (IST) or another device (such as a FAX machine or modem) into the digital station
port of a Digital Service Unit (DSU).
The DIU functions as a switch that connects the DSU station voice channel to either the digital
proprietary phone port (connector labeled “PHONE”) or the IST port (connector labeled
“FAX/MODEM”). The IST port can be used to provide a data connection for a FAX or modem. It
can also be used for virtually any IST device such as a cordless telephone or answering machine.
In addition to the power connector, the DIU has a connector for a digital multiline telephone
(Impact or DigiTech), and another connector that you can use for any one of the following
on-premise devices:
• Industry Standard Telephone (IST)
• facsimile machine (FAX), or
• modem.
The user controls the by pressing a preprogrammed DATA button on his/her digital telephone.
The installer can also program a DATA button on a remote telephone that can control the DIU as
well. The DATA LED on the digital telephone provides the user with visual feedback on DIU
status.
The system administrator can program up to three security groups and assign them to work
groups. This safeguards stored data on IST devices such as personal computers by denying access
to users from outside the group. For example, if a caller in security group 1 calls a station in
security group 2, and the IST device on the at the called station is selected, the caller will hear a
busy tone. When the multiline telephone on the DIU is selected instead, the caller can make a
station to station call in the normal manner.
The will operate reliably at baud rates up to 9600 (outside calls) and 14400 (intercom calls).
Programming the DSU II
367
DSU II Digital Telephone System
IMI66–132
Data Security
This data security feature will prevent any type of tone (, camp-on, barge-in, etc.) from
interrupting a call that is active on a port programmed with the feature. This prevents interference
to non-voice communications from occurring when the port is being used as a data port (when
operating a modem through an ATI-D port for, example). The programmer can use station class of
service programming to enable a data security port.
Default Functional Program
At initial power-up, the system sets the operating features to a specific group of operating
conditions (default conditions). The default conditions provide a complete operating system for
normal use. The installer can leave the system defaulted or reprogram as desired. After a
programmer has reprogrammed a system, he or she can re-default it by using the system, line, and
station class of service programming or use a master clear to default the entire system and erase
all stored programmable button information.
See also, Class Of Service.
Default Toll Restriction
The system defaults two toll restriction tables with values assigned to all lines. The programmer
needs only to assign these tables to the stations to put them into effect. He or she can use the toll
restriction table configuration class of service programming to reprogram the defaulted tables
with different information as needed.
See also, Toll Restriction.
Delayed Ringing
Ringing assignments are programmable. A station can be programmed to provide delayed ringing
on some lines while providing immediate ringing on other lines. Delayed ringing is assigned to
certain lines at each station through station class of service programming. When a programmer
assigns delayed ringing to a station for certain lines, he or she can also assign the time length of
the delay.
See also, Ringing.
Departmental Call Distribution
Software 3A contains the following enhancement to the DCD feature:
Ring All on Transferred Line Call
By enabling the system-wide ring all DCD feature, a transferred line call ringing to a department
will ring all idle stations in the department until the call is answered. The answering station gets
the call and remaining stations retain their original status.
The Ring All on Transferred Line Call feature is disabled by default.
Ring Longest Idle Station
The Ring Longest Idle Station feature causes a direct-ringing line call, a transferred line call, or
an intercom call to ring at the longest-idle station in a department. If the longest-idle station is in
Do Not Disturb or Ring No Answer mode, the system routes the call to the next available station
in the group.
368
Programming the DSU II
IMI66–132
DSU II Digital Telephone System
Designated Programmable Buttons
Designated programmable buttons are those that the programmer assigns to a station using the
button mapping procedures that are a part of station class of service programming. These buttons
provide one-button access to a broad range of features. While the programmer must assign most
designated buttons, the station users can assign the auto redial button and the response message
button themselves.
Dial 0 for System Attendant
The system attendant station (station 10) is signaled whenever anyone dials the digit 0 on the
intercom line.
Dial by Name
The Dial By Name feature allows users to employ any two-line display, LCD speakerphone to
search through an index of names and automatically call the located name.
By pressing the option button, users enter the Dial By Name menu. From that menu, they either
press the int button for intercom calling or the ext button for speed dial calling, and then dial
three digits for the first three letters of the name they want to locate. The system displays the first
match to the dialed digits that it finds. The user can then either press the dial button to make the
call to the displayed location or press the next button to display the next name in the index.
The Dial By Name feature uses the seven-character station names associated with the station
ports for searching through the list of stations for intercom calling. 16-character names are used
for searching through the list of system speed dial entries.
When users make a sequential search through the stored index of names, the system searches the
list as it was entered. Programmers or system must arrange the list in the desired sequence as
they store the entries.
Digital Voice Announcing
Digital voice announcing uses a hardware peripheral device (product code ) connected to a digital
station port to play recorded messages during an in-progress call. The DVA stores the messages in
its memory for recall when needed. The system attendant stores messages in the DVA device by
delivering them from the telephone handset of station 10 or 12 or by playing the contents of a
professionally-supplied tape recording into the DVA memory. When enabled by the DSU II, the
DVA provides up to four messages. The total available message time is two minutes. With each
DVA servicing one outside line, the system installer can add several DVAs to enable the digital
telephone system to answer several lines with digital voice announcing.
While the DVA is not an automatic attendant, it enhances the following features: direct
department calling with departmental calling distribution, direct inward station dialing (DISD),
and Tracker Paging System. DVA enhances these features by providing automated voice prompts
and dialing instruction to callers. In general, the voice prompt messages of four categories
illustrated in the following examples:
Day Answer Messages
For callers—“Welcome to Acme’s sales department, all of our agents are busy. Please stay on the
line and an agent will answer your call as soon as possible.”
For DISD callers—“Welcome to Acme Company. If you know your party’s extension, dial it now;
otherwise, stay on the line and an attendant will answer your call.”
Programming the DSU II
369
DSU II Digital Telephone System
IMI66–132
Night Answer Messages
For DCD callers—“Welcome to Acme’s sales department. Our hours are eight to four-thirty.
Please call tomorrow during those hours.”
For DISD callers—“Welcome to Acme Company. Our hours are eight to four-thirty. Please call
tomorrow during those hours.”
Recall Messages
For DCD callers—“Please hold. An agent will be with you as soon as possible.”
For DISD callers—“The party you have called is not available. Please dial a new extension
number.”
For callers in systems that have the Tracker Paging System installed—“The party you have called
is not available. Please dial a new extension number or dial # plus your call-back number
followed by another # to page your party.
Drop Message
—“Thanks for calling Acme, good-bye.”
Typically, the DVA services a call in the following manner:
1. A caller rings a department line.
2. If all department stations are busy, the DSU answers the call and triggers the
DVA to play the day or night answer message. The DSU transfers the line to the
department if the system is in the day mode or drops the line if it is in the night
mode.
3. A transferred line recalls to the DSU after a transfer recall time, and the DVA
plays a recall message to the caller. The DSU transfers the call once more to the
department. This action repeats for a programmed number of times.
4. After the last recall, the DVA plays the drop message and the DSU drops the line.
Typically, the DVA services a call in the following manner:
1. A caller rings a DISD line.
2. After a programmed number of rings, the DSU answers the call and triggers the
DVA to play the day or night answer message.
3. The DSU decodes the digits that the caller dials and rings the station or
department dialed by the caller. Should the caller dial an incorrect extension, the
DSU sends an error tone and asks the caller to dial the code again.
4. A line recalls to the DSU after a transfer recall time, and the DVA plays a recall
message to the caller. The DSU transfers the call once more to the same or
different stations. This action repeats three times.
5. After the last recall, the DVA plays the drop message and the DSU drops the line.
The installer can connect DVA devices to any available digital station ports. The availability of
station ports limits the number of DVA devices that can be connected to the system. The system
programmer arranges the DSU class of service programming to customize the DVA operation for
specific applications.
See also, Digital Voice Announcing
370
Programming the DSU II
IMI66–132
DSU II Digital Telephone System
Direct Department Calling with Departmental Call Distribution
The system enhances direct department calling with departmental call distribution () and provides
a means by which outside lines can be assigned to one of four different departments. Calls
received on department lines and calls that are transferred to a department from within the system
search for an idle station in that department. The system distributes department calls evenly
throughout the department stations for answering with individual stations having the ability to be
taken out of service as necessary. The system places calls received on department lines and calls
that are transferred to a department from within the system in a queue for servicing. It assigns
new calls, transferred calls, and held calls a time stamp so that they will be serviced in the order
of their arrival.
The system allows up to four departments and allows up to 16 stations and a minimum of 3
stations (plus one overflow station) in each one. The programmer can assign a station to more
than one department, if desired. Since the programmer can assign a station to more than one
department, she or he can add the attendant station to serve as the overflow station for all
departments if desired. The programmer can assign separate pilot numbers (extension numbers)
to each department that the users can use for making intercom calls or doing call transfers to the
department.
The direct department calling feature requires that the programmer assign lines and stations to a
department. It does not require that he or she assign department lines to appear at buttons on
department stations. If a site requires that a particular department line must appear at a particular
department station, the programmer can assign it; however, the programmer must ensure that
neither direct nor delayed ringing is enabled for that line at that station.
An incoming call searches for the first station available to answer a call. If all stations in a
department are busy or ring with no answer (RNA call), the call will go to the overflow station in
that department (if one has been programmed). If there is no overflow station programmed, the
call continues to try the department stations until it is answered or dropped by the caller. The
caller continues to receive ringback tone until the call is answered. The overflow station can
service the call or transfer it back to the department using the department pilot number. When the
call is transferred back to the department by an overflow station, it will not return to the overflow
station until that station is idle and has no ringing calls either new or transferred. Instead, the call
will camp-on at the department and wait for a station to become idle. The caller will receive
music while on hold if the system is so equipped. To provide reassurance to the caller during
ringing it is recommended that a music source be connected to the system. The call will remain in
a held state until it is answered or until the department transfer recall timeout period has ended.
When the recall timeout period has ended, the call will return to the transferring station.
Intercom calls that are made to the department will test the department stations for busy or a
RNA. If all stations are busy, a busy tone is returned to the caller. Intercom calls will not camp-on
at the department but will go to the overflow station. Further, the system camp-on feature cannot
be used to camp-on to a department.
Subsequent calls to a department on a particular line always try the next station in the department
from whichever station serviced the last call on that line.
To understand this, assume a department with stations 15, 16, and 12 assigned as department
members 1, 2, and 3. Further assume lines 1, 2, and 3 are programmed to ring in this department.
To create a randomizing effect, the system tracks for each line which department member (1, 2, or
3) serviced it last. When the next call arrives on line 1, for instance, the system makes a search for
the next idle department member after the last one that serviced a call on line 1. Since there are
several lines assigned to the department and conversation times and wrap-up times vary, a natural
random distribution of calls on lines 1, 2, and 3 at stations 15, 16, and 12 will occur. Further,
since the system is keeping track on a per line basis of the servicing stations as department
members instead of station numbers, the programmer could rearrange the department list without
having any effect on call distribution. As the programmer adds more stations to a department, the
randomizing effect improves.
Since the RNA time of a station is a programmable feature, department stations can be set to have
a short RNA time to allow a call to search rapidly through a department for an answer.
Programming the DSU II
371
DSU II Digital Telephone System
IMI66–132
When an outside or transferred call is ringing at a department station, the station user can press
the Do Not Disturb (DND) button to place the station in an off-duty condition. While off-duty,
all outside and transferred calls skip to the next department station. This off-duty condition
remains set until the DND button is pressed again to place the station back in service. When the
overflow station is set to DND, all incoming and transferred calls will return to the department
queue.
A department station can also be taken out of service and placed in a wrap-up mode to provide the
user time for doing such things as follow-up paperwork. While a station is in a wrap-up mode, all
outside and transferred calls skip to the next department station. The station user sets the wrap-up
mode by pressing Hold DND and presses these buttons again to clear the wrap-up mode.
It should be noted that the departments formed for use with this direct department calling feature
are different from those departments used in SMDA reporting. Assign department transfer recall
time (unanswered call transfer recall time feature) using the system class of service programming.
Assign lines for direct department calling using the line class of service programming. Assign
department stations access codes to departments (Flexible Numbering feature), and busy/RNA
timeout (Call Forward—Busy feature) using the station class of service programming.
Departmental Calling Distribution (DCD) Report
The attendant station can request a Departmental Calling Distribution () report that provides a
compilation of department call activity. The statistics that are reported are based on the
department assignments that are active at the time of the report and are extracted from the SMDR
records collected by the system. For a report to be generated, a department must exist. All calls
that are included in the DCD report, must meet the following conditions before they are reported
as department calls:
• They must be incoming calls. Outgoing calls are not reported in the DCD report.
• The port number of the line which received the call must be one that is assigned to a
department.
• The port number of the station which answered the call must be assigned to a department.
A report consists of the following columns of information:
Station Number: The station name or extension number of the station being reported.
Idle Time: The amount of time that the station is on-hook and available to answer a call.
Dept. Calls: The amount of time spent on incoming calls that rang into the department and calls
that were transferred to the department.
Hold Time: The amount of time that department calls spent in an on-hold state at a particular
station.
Avg. Dept. Calls: The average time per call (including on-hold time) that a station spent on a call.
Wrap-Up Time: The time that a station spent in a wrap-up mode doing such things as follow-up
paperwork. While a station is in a wrap-up mode, it does not receive department calls. The station
user sets a wrap-up mode by pressing Hold and DND and repeats the procedure to clear the
wrap-up mode.
Missed Calls: The total number of calls that are not answered at a station and that are cycled by
the system to another station for answering.
Other Calls: This is a summation of the time spent on outgoing call activity, incoming call
activity on non-department lines, plus all intercom call activity.
On-Duty Time: The on-duty time includes a summation of idle time, department call time,
wrap-up time, and other call time.
372
Programming the DSU II
IMI66–132
DSU II Digital Telephone System
Off-Duty Time: The time that a station spent in a do not disturb mode. While in a do-not-disturb
condition, a station is not available to receive calls. The station user sets a do-not-disturb mode by
pressing DND and repeats the procedure to clear the do not disturb mode.
Unanswered Calls: Total number of calls that went unanswered at a department.
Calls Answered After 36 Seconds: Total number of calls that waited at least 36 seconds
(approximately six rings from the CO) before being answered.
Calls Handled by Overflow Station: Total number of calls that were answered and transferred
by the overflow station and then answered and serviced by another station.
Calls Terminated at Overflow Station: Total number of calls that were received by the overflow
station and were either answered but not transferred or were dropped by the caller before being
answered.
If you wish, you can enhance the feature with digital voice announcing.
See also, Digital Voice Announcing.
Direct Inward Station Dialing (DISD)
The DISD feature allows an external party to call an intercom station directly without assistance
by the attendant. The DISD call must be received on a line which has been specially programmed
to allow this feature. Any line can be programmed to be a DISD line for both the normal mode of
operation and the night transfer (of ringing) mode of operation.
The number of rings which occurs on a line before it is answered is programmable. By setting a
large number of rings, time is allowed for a call to be serviced in a regular manner by stations that
have a line appearance for the DISD line. Setting the number of rings to 0 disables the line for
DISD use. If a line is to be dedicated for DISD use, it is a good practice to set it for one ring. The
amount of time allowed for an extension number to be dialed is programmable and a DISD assist
station can be programmed to answer calls that are not completed during this dial time limit.
When a line is called, it rings for a programmed number of rings. If the call is not answered in a
normal manner by a station with the line appearance during this time, the system answers it and,
if the programmer has chosen this feature, presents a DISD dial tone to the caller. The system
then waits for an extension number to be dialed from the calling telephone. Only one DISD line is
serviced at a time; therefore, an incoming call could ring for more than the programmed number
of rings if a DISD call is being serviced when a second DISD call is received.
When a valid extension number is dialed, a confirmation tone is sounded, the system attempts a
transfer, and the called station rings if it is idle. If a called station does not answer within the
transfer recall timeout period, the call is returned to dial tone. If the called station has the call
forward feature set, the forwarded station rings. If a called station is busy, the call is placed on
hold and camped-on at the busy station. The system will send a call waiting tone to the busy party
if the programmer has enabled the call waiting tone feature. If the camp-on is not answered
within the transfer recall timeout period, a busy tone is given followed by DISD dial tone. The
system will return the caller to DISD dial tone two additional times and then drop the line (a total
of three attempts are made).
NOTE: The system routes calls made to busy and ring—no answer stations to an idle
station in the hunt group. If no idle stations are available, the call is
camped-on at the dialed station.
Programming the DSU II
373
DSU II Digital Telephone System
IMI66–132
If an invalid extension number is dialed, an error tone is sounded before the DISD dial tone is
returned. If a mistake in dialing is made, the caller can dial a * for a new DISD dial tone. The
system will return the caller to DISD dial tone two additional times and then drop the line. If
extension number dialing is not completed within the programmed dial time limit, the call is
routed to the DISD assist station if one is programmed; otherwise, the line is dropped. The
programmer may select a DISD dial time limit of 0 seconds, allowing callers to obtain a transfer
to the assist station without having to dial any digits. If the assist station is busy (call will
camp-on at the assist station) or if the assist station does not answer before the transfer recall
timeout period, the system will return the caller to DISD dial tone. If extension number dialing is
not completed within the dial time limit this time, the line is dropped.
The installer should connect a music source to the system so the music can provide a reassurance
to the caller during a camp-on situation when the DISD feature is being used.
See also, Digital Voice Announcing
Direct Station Call Hold (Station Park)
This feature allows a station user to park a call at a specific station where it will be held without
ringing. A feature code plus a station extension number can be dialed over the intercom line to
park the call or a programmable button can be programmed to provide a “directed hold” to a
specific station. The parked call is picked up by directed station by dialing a feature code. It can
be picked up at any station through the use of the call pickup feature. No class of service is
required.
See also, Call Pick-Up—Directed and Call Park.
Direct Station Selection (DSS) Programmable
A station user can store one-button, direct station selection (DSS) at any memory button location
to create a DSS memory button. When this button is pressed, any active outside call is
automatically placed on hold and an intercom call is automatically made to that previously stored
station number. The visual indicators of the stations programmed at the button locations form a
busy lamp field (BLF). The BLF conveys station status to the user. A DSS number can also be
programmed as a secondary function at every DSS/BLF memory location. No class of service is
required.
See also, Automatic Dialing.
Disconnect Notification
Use the disconnect notification feature to reduce delays resulting from disconnects. These delays
occur when using the CT Voice application.
When you enable this feature, it causes the system to send a DTMF “A” digit to IST station ports
whenever the distant party (internal or external) hangs up. The system also sends a disconnect
digit when an IST telephone signals a hookflash to retrieve a line from hold that has been dropped
through abandon hold release.
Installers must enable line disconnect supervision for this feature to function on outside calls.
This feature is disabled at default.
During station class of service data printout, the disconnect notification status is included on the
printout.
374
Programming the DSU II
IMI66–132
DSU II Digital Telephone System
Distinctive Ringing
The ringing cadence of an incoming call is the same as the ringing cadence of the , PBX, or
CENTREX system. The ringing cadence of an intercom call presents two tone bursts sounded
every four seconds.
See also, Ringing.
Do Not Disturb
Any station can be set to a do-not-disturb mode (DND) using the designated DND programmable
button and associated indicator (indicator will light when DND is active). While in the DND
mode, the station will not ring on any incoming call nor will it accept an intercom call. A party
making an intercom call to a station set in the do-not-disturb mode hears a fast busy tone. The
feature cannot be overridden by the calling party unless the override feature is enabled. The DND
feature is used with the departmental calling feature to provide a station wrap-up mode and a
station off-duty mode.
Do Not Disturb Inhibit
The system can be programmed to inhibit any station from entering the DND mode. System class
of service programming is used to program this feature.
Do Not Disturb Override
Stations can be provided with DND override capability which will allow them to call a station
that is set in the DND mode. The Executive/Attendant Override feature must also be active for
DND override feature to function. Station class of service programming is used to assign this
feature.
Dual Intercom
This feature provides for two separate intercom lines at the same station. One intercom line is
fixed and is accessed with the Intercom button. The other intercom line is programmable and is
accessed by a programmable button selected for that purpose by class of service programming.
Calls are handled on the intercom lines in much the same manner as outside calls are handled
using the line buttons.
Special considerations are as follows:
• Distant party hang-up causes intercom link to drop.
• Intercom call to station already busy on intercom rings in subdued fashion and flashes
indicator associated with other intercom button.
• With both intercom lines busy, a third intercom call results in a subdued off-hook voice
announce (if enabled) at busy station.
• Pressing a DSS button while on an active intercom call will drop the distant party unless
the automatic hold feature is enabled for the intercom line through class of service
programming.
The Hold button can be used, however, to place an intercom call on hold before selecting
the other intercom line for use.
• Any action taken on the intercom by a station being observed via the service observing
feature will cause the observing station to return to an idle state.
The station class of service button mapping procedure assigns a programmable button to serve as
the second intercom button.
See also, Intercom.
Programming the DSU II
375
DSU II Digital Telephone System
IMI66–132
Dynamic Line Buttons
Through class of service programming, the programmer can arrange certain idle line buttons to
serve as dynamic line buttons. This feature allows the system to temporarily assign a line to a
station that normally does not have the line assigned to it, and have that line appear on a dynamic
line button. While the call is appearing on the dynamic line button (LED on), any normal call
handling operations can be performed. Station class of service programming allows certain
buttons to be programmed as dynamic line buttons
E
End-to-End Signaling
End-To-End Signaling on Intercom
After an intercom call has been established with an analog telephony device that is connected to
the system through the JM008 expansion module or ATI-D analog terminal interface device, the
system can continue to send dialing signals (DTMF tones) through the intercom path. This feature
can be performed from every station in the system, and is used by peripherals such as voice mail
equipment.
End-to-End Signaling on Lines
After an outside call has been established, the system can continue to send dialing signals (DTMF
tones) through the telco network and have them received at the distant end for inward call
completion (bank by telephone, etc.). This conventional, off-hook dialing feature can be
performed from every station in the system.
Exclusive Hold
Exclusive hold prohibits a held call from being retrieved by any other station. The exclusive hold
condition also links a call on hold to the timed hold recall timeout feature. After timeout, the
system causes audible and visual signaling to occur and reverts the exclusive hold condition to a
normal line hold condition.
See also, Hold.
Exclusive Hold System-Wide Enable/Disable
This feature allows programmers to use system class of service programming to enable or disable
exclusive hold capability on a system-wide basis.
See also, Hold.
Executive/Attendant Override
This feature allows the user of a station, upon encountering a busy signal at another station, to
dial a code that will override the busy signal of a call, sound a warning tone, and allow access to
the existing conversation. This feature is enabled through station class of service programming.
376
Programming the DSU II
IMI66–132
DSU II Digital Telephone System
External Paging Interface
A dedicated paging port or a spare line port can be interfaced with an external paging amplifier.
The paging amplifier can then be dial-accessed by stations in the system. DTMF tones can be
dialed through the line port to provide zone selection if provided by the external paging amplifier.
The dedicated paging port does not support any “talk-back” capability even if such a feature is
provided by the external equipment. The line class of service programming arranges a line port
for external paging interface. The system precedes an announcement through the paging port with
an alerting tone. Programmers can choose between an intercom tone or a DTMF signaling tone
for this paging alert tone. They should choose the intercom tone for a soft alert and choose the
DTMF tone for a loud alert.
See also, Paging.
F
Feature Inhibit
A large array of individual features can be disabled system-wide to provide a basic telephone
system. A basic telephone system is useful for installation environments where a large proportion
of the stations are accessible to unauthorized users or for environments where station users must
be limited as to the variety of features allowed to them. Features are disabled by system class of
service. Once disabled, they can be enabled by turning on all features at once using the system
default programming.
Flexible Ringing Assignments
Ringing assignments are programmable on a per station/per line basis. Ringing can be controlled
for every line that has an appearance at each station. Delayed ringing is assigned to certain lines
at each station through station class of service programming.
See also, Ringing.
Flexible Ringing Assignments of PA Port
The PA port can be programmed for flexible ringing assignments and zone pages. Any desired
lines can be programmed for direct ring, delay ring, or night transfer (of ringing) at this port.
Paging can be programmed zone or to all-call. A speaker can be connected to the PA port to sound
the ringing that is generated by the system and sent to this port and paging announcements when
they are sent to the programmed zone. Using such an arrangement, it is possible for a user to
determine that certain lines are ringing, such as in a night transfer (of ringing) mode, and go to the
nearest telephone and answer the call. The most common use for this arrangement is as a night
bell eliminating the need for external equipment as required with the common ringer and
auxiliary ringer interface. The speaker cannot be used for voice response as the path is one-way
only. Use system class of service programming to assign ringing and paging to a PA port.
See also, Ringing.
Programming the DSU II
377
DSU II Digital Telephone System
IMI66–132
Flexible Station and Line Class of Service Control
The extension number of a station and all other programmable attributes that are initially assigned
to a particular station port and the line, along with all programmable line attributes that are
initially connected to a particular line port can be reassigned to a different port through
programming action. This feature allows adds, moves, and changes without relocating the station
and line wiring. A programmer can use line and station class of service programming to reassign
stations and lines.
See also, Class Of Service.
Flexible Station Numbering Plan
The system supports a flexible station numbering plan for individual stations. Each station can be
programmed to respond to the dialing of any available number between 10 and 7999. This feature
may be used to match the calling number of a station located in a pre-numbered area to that area
number. A combination of two-, three-, or four-digit extension numbers can be assigned as long
as they do not conflict. For example: If 21 is assigned as an extension number, there cannot be
any other extension number assigned that begins with a 21. The system class of service
programming is used to assign extension numbers to individual station ports.
See also, Square/Non-Square Configuration.
Full Button Programmability of Features
A programmer, or in many cases the users themselves, can make most system features available at
programmable buttons merely by storing the specific access codes necessary for dialing the
features. Storable features include those that can utilize lamp (on/off) supervision (e.g., call park
orbits). The system will store all feature access codes except for those requiring
Transfer/Conference button action. It will store continuous strings of digits (including presses of
the intercom button) up to the maximum amount of storable digits (16) allowed in an autodial
entry.
See also, Programmable Buttons.
H
Hands-Free Answer Inhibit
The user can use the MUTE button to block all hands-free answer back response. This
arrangement will prevent a station user from monitoring another station site using the monitoring
ability of the voice announce feature. When a user presses the MUTE button, all hands-free
answer back is disabled thus inhibiting any off-site monitoring. The MUTE light turns on steady
to indicate that this feature is active.
See also, Mute.
Headset Capability
Certain proprietary LCD speakerphones include an auxiliary jack that provides an interface for a
headset. To use a headset, the user merely plugs it into the telephone auxiliary jack and presses
the appropriate button on his or her telephone to enable the headset mode. (In the case of
Impression LCD speakerphones, users disconnect the handset and connect a headset in its place.)
The telephone transfers its speakerphone function to the headset. To enhance the headset
usefulness, the system delivers subdued off-hook voice announce (SOHVA) messages to the
headset when it is in use.
378
Programming the DSU II
IMI66–132
DSU II Digital Telephone System
To increase the usefulness of the headset when used with the 8312SJ, 8324SJ, and 8324FJ
telephones, a headset type feature is provided. There are 38 headset type settings (representing
FX gain levels) that can be programmed for optimum headset operation. Each level increase
represents an increase of 1 dB in the transmitted audio. This arrangement allows a large number
of different headset models to work on Comdial systems.
As a general rule, the receive characteristics of the majority of headsets targeted for business
telephone use are very similar (i.e., the headset loudness is nearly the same at any given volume
setting). Any difference in the receive loudness can be accommodated by using the telephone’s
headset volume control; however, the transmit characteristics (or microphone sensitivity) of these
headsets can vary by more than 20dB from model to model or manufacturer to manufacturer. The
headset type selection provides accommodation for this large variation in microphone sensitivity.
The default setting for the headset type feature matches Comdial headsets. When using another
type of headset, check with the manufacturer to determine the correct setting.
Hold
Abandoned Hold Release
If an on-hold party hangs up at the CO/PBX end of a connection, causing an interruption in the
line current, the system will drop the line from the hold condition and return it to service. The
time interval between hang-up and line-drop is programmable in line class of service
programming with choices of either 50 msec or 350 msec. This feature is usually dependent upon
special arrangements that must be made at the CO end of the connection. The line select indicator
will turn off to indicate an idle line after a call on that line has been abandoned.
Automatic Hold for Intercom
If a user selects the second intercom line while a call is active on the first intercom line, this
automatic hold feature lets the system automatically place the first intercom call on hold. Use
station class of service programming to enable this feature.
Automatic Hold—Transfer to Intercom (Answer Hold)
If a user selects the intercom line while an outside line call is active, this system feature causes
the system to automatically place the outside call on hold. This feature does not require class of
service programming to enable it.
Automatic Hold—Transfer to Line
A programmer can use class of service programming to make this system feature available to
selected stations. When enabled, a user can press any line button and cause an active line to
automatically go on hold. This feature allows a user to move from line to line without having to
press the HOLD button to place any current calls on hold. Use station class of service
programming to enable this feature at the desired stations.
Call Park
The call park feature is similar to a manual hold condition. A user can park a call at one station
and retrieve it at any station in the system by dialing the appropriate access code.
NOTE: The retrieving station must have access to the line on which the call appears.
Programming the DSU II
379
DSU II Digital Telephone System
IMI66–132
Calls are parked and retrieved within the system through the use of dialing codes. The system
provides nine parking circuits (orbits). Call park, when used with the paging features, allows a
system attendant to direct calls to roving personnel. A call that is left in a parking orbit for
preprogrammed length of time automatically returns to a timed hold recall condition at the station
where the user originally parked the call.
Exclusive Hold
Exclusive hold prohibits a held call from being retrieved by any other station. The exclusive hold
condition also links the held call to the timed hold recall timeout feature. After timeout, the
system causes audible and visual signaling to occur reverts the exclusive hold condition to a
normal line hold condition.
Exclusive Hold System-Wide Enable/Disable
This feature allows programmers to use system class of service programming to enable or disable
exclusive hold capability on a system-wide basis.
Manual Hold
A button activated feature at each station will place an outside line on hold. When a user presses
the HOLD button while on a call, the system places the call on hold, provides a distinctive flash
rate of the line button indicator, and allows the user to access other station features. A user at the
holding station or at any other station that has access to the line can retrieve the held call.
Timed Hold Recall
After a call has been on hold for a programmed length of time the system will recall the station
that placed the call on hold. The programmer sets the timed hold recall time period using system
class of service programming.
I
I Hold and I Use Indications
The light associated with a line button provides a visual indication of the status of that line. When
a station user has a line in use or on hold at a station, the light indication provided at that station
is of a different color than the indication provided at the other stations in the system. No class of
service programming is required.
Idle Line Preference
When a station is programmed for idle line preference, it will automatically be connected to the
first assigned idle line. The system can be programmed on a per station basis to enable idle line
preference. When idle line preference is enabled, taking the handset off-hook will automatically
connect the station to any assigned line that is idle and has been arranged for this feature. The line
button will not have to be pressed. If this feature is used in conjunction with prime line automatic,
the user will be given prime line first when going off-hook. An idle line will be given if the prime
line is in use. The station class of service programming enables this feature on a per station/per
line basis.
See also, Line Features.
380
Programming the DSU II
IMI66–132
DSU II Digital Telephone System
Impression Telephone Support
The digital telephone system supports the use of Comdial Impression digital telephones. This new
proprietary digital telephone style is available in the following models:
2022S
2122S
2122X
2101N
DU32X
LCD Speakerphone
Non-LCD Speakerphone
Non-LCD Monitor Telephone
Single Line Proprietary Telephone
32-Button DSS/BLF Console
Impression telephones are completely compatible with all of the features provided by the digital
telephone system and require no unique programming.
Industry-Standard Telephone Support
The digital telephone system supports the use of an industry-standard telephone (IST) such as a
model 2500. It does this through an the JM008 expansion module or ATI-D analog terminal
interface.
An IST provides a full range of system features to the system telephone users and operates in one
of two different modes as determined by the system installer. He or she may program the
telephone to provide an intercom dial tone when a user lifts the handset. This arrangement is
known as “prime intercom.” Alternately, the installer may program the telephone to provide
outside line dial tone instead. This arrangement is known as “prime line automatic” or “idle line
preference.” With prime intercom, users can dial the system feature codes as soon as they lift the
IST’s handset. With prime line automatic or idle line preference, users must obtain intercom dial
tone before dialing the various feature codes. They do this by pressing and releasing the
hookswitch after they hear the outside line dial tone. This action either drops the outside line (if
no digits are dialed after the handset is lifted) or places the outside line on hold (if digits are
dialed) and causes intercom dial tone to return to the IST.
Pressing and releasing the hookswitch is commonly known as flashing the hookswitch or
performing a FLASH. Some ISTs are equipped with a TAP button. Users can press the TAP
button to cause the same effect as performing a FLASH.
The system provides a feature that allows IST users to FLASH an outside line for some purpose
(for example, to access a host system feature). Since flashing the IST while on an outside line
accesses the intercom dial tone, users must dial a code to actually generate the FLASH signal
over the outside line.
Intercom Features
Automatic Callback
If a telephone user encounters a busy tone or a ring no-answer after calling an intercom station,
She or he can dial a special code number that will cause the system to automatically ring both the
user’s telephone and the one that he or she was calling. This automatic callback occurs after the
busy station becomes idle or after the user at the ring no-answer station takes some action at it
that indicates to the system that it is available to be answered. No class of service programming is
required to enable this feature.
Call Announce with Hands-Free Answer Back
The internal loudspeaker at each station provides call-announce capability over the intercom link.
A user can make a hands-free response to a call-announce call without lifting the handset.
Programming the DSU II
381
DSU II Digital Telephone System
IMI66–132
The user can use the MUTE button to block all hands-free answer back response. This
arrangement will prevent a station user from monitoring another station site using the monitoring
ability of the voice announce feature. When a user presses the MUTE button, all hands-free
answer back is disabled thus inhibiting any off-site monitoring. The MUTE light turns on steady
to indicate that this feature is active.
Dual Intercom
This feature provides for two separate intercom lines at the same station. One intercom line is
fixed and is accessed with the Intercom button. The other intercom line is programmable and is
accessed by a programmable button selected for that purpose by class of service programming.
Calls are handled on the intercom lines in much the same manner as outside calls are handled
using the line buttons.
Special considerations are as follows:
• Distant party hang-up causes intercom link to drop.
• Intercom call to station already busy on intercom rings in subdued fashion and flashes
indicator associated with other intercom button.
• With both intercom lines busy, a third intercom call results in a subdued off-hook voice
announce (if enabled) at busy station.
• Pressing a DSS button while on an active intercom call will drop the distant party unless
the automatic hold feature is enabled for the intercom line through class of service
programming.
The hold button can be used, however, to place an intercom call on hold before selecting
the other intercom line for use.
• Any action taken on the intercom by a station being observed via the service observing
feature will cause the observing station to return to an idle state.
The station class of service button mapping procedure assigns a programmable button to serve as
the second intercom button.
Intercom Call Progress Tones
Intercom call progress is marked by special tones. A steady tone is provided for dial tone.
Ring-back tone is one second on and three seconds off. For tone-signaled intercom calls, a
two-tone burst is sounded every four seconds at a called station and returned to the caller as
ring-back. For a voice signaled intercom call, a single tone burst is sounded at a called station.
When a called station is busy, a busy signal of one-half second on and one-half second off is
received at the calling station. The system supplies a fast busy tone when the called station is in
the do not disturb mode. Analog terminal interface ports are only supplied with the regular busy
tone since fast busy tones could interfere with the operation of some accessories that can be
connected to this port.
For more information, see System Ringing Patterns on page 25.
Intercom Hunt Group
Station ports can be assigned to intercom hunt groups. When a station that is assigned to a hunt
group is busy or is a ring—no answer (RNA), a call to it will ring at the next idle station in the
group. A hunt group can be terminal or circular. A call will route down a terminal group from the
called station until it finds an idle station or reaches the end of the group. A call will search
around a circular group until it encounters an idle station or until all stations in the circular group
are searched. The ringing time at any one station is programmable. Hunt groups are created
through station class of service programming.
382
Programming the DSU II
IMI66–132
DSU II Digital Telephone System
Intercom Line Timeout
Should the intercom line be selected with no dialing or other action taking place, the intercom
will timeout after 15 seconds, and return to an idle state.
Tone or Voice Signaling
The system allows intercom calls to be tone signaled or voice signaled as the users desire;
however, the programmer uses system class of service programming procedures to determine
which signaling method the system will employed as the primary method. Regardless of the
programmer’s arrangement, telephone users can take action to use the alternate method when they
need it. See the paragraph titled Intercom Call Progress Tones for a discussion of the intercom
signaling tones.
Voice Announce Blocking
This feature allows station users to block voice announced intercom signaling by dialing a code
or pressing a programmable button programmed for that purpose. The programmable button used
to block voice signaling is enabled by station class of service programming.
K
Key System/Hybrid Configuration
The system can operate as either a key system (KF designation) or as a hybrid system (MF
designation). In the past, this digital telephone system provided a hardware strap that installers
could move to distinguish between hybrid system and key system operation; however, recent
rulings by the FCC have eliminated the need for the hardware strap. Therefore, whenever the
programmer assigns lines to line groups, the system automatically assumes the hybrid mode.
The KF and MF designations are equipment type categories as stipulated in FCC rules and
regulations, Part 68, and appear as part of the FCC Registration Number on the equipment label.
The installer must report the appropriate registration number to the telephone company at the time
of connection along with other FCC mandated information. Operationally, the hybrid
configuration allows dial access to (automatic selection of) outgoing lines. The specific system
feature that is enabled by the multifunction (hybrid) configuration is Line Group (Including Dial
Access). Since this is a PBX type feature, it may incur a higher monthly tariff to the telephone
company.
L
Last Number Redial
Each station is provided with a last number redial feature. This feature will save 32 digits of the
last outside number dialed. A newly dialed number will always automatically replace a previously
dialed number. Upon command, the system will choose a line and redial the saved number. The
system will first choose the prime line if assigned and idle. If it is busy or unavailable, the system
will choose any line assigned to idle line preference. If they are unavailable, the system will chose
the last line used at the station. If it is busy, no further choice is made. No class of service is
required.
See also, Redialing.
Programming the DSU II
383
DSU II Digital Telephone System
IMI66–132
LCD Messaging
Standard and system-supplied custom display messages can be set by dialing a specific code at
any station. Such messages are to be received and displayed by any LCD speakerphone that calls
the station which set the message. When a message is set, the intercom light at the setting station
will flash to indicate that the feature is active.
See also, Messaging.
LCD Support
The system supports the use of digital telephones having a Liquid Crystal Display (LCD). The
display is capable of providing the station user with a visual presentation of: call cost, call
duration, number dialed, name of called station, name of active feature, date and time, and
programming prompts.
Interactive Button Support
The LCD speakerphone provides the user with three interactive buttons and expanded LCD
displays as a standard feature. The interactive buttons provide the user with quick, easy access to
system features and straightforward button programming without dialing codes. The expanded
displays prompt the telephone user on the operation and progress of many of the telephone
features and provides designations for the interactive buttons. Since the interactive buttons
provide many user features, their immediate functions vary with the feature. The button functions
change to match the feature that the user is currently operating. At any given time, the current
button designations show in the display window.
Button Query
Station users who have LCD speakerphones can use their interactive buttons to access the button
query feature. With this feature, the station user can cause his or her LCD speakerphone to show
the function of each of its buttons on its display.
Line Features
Access Denied, Line Access Restriction
The system programmer can deny access to particular lines at certain stations in the system. A
station user cannot select a denied line for use. This feature is programmable on a per line/per
station basis in station class of service programming.
Line Answer from any Station (Night Mode)
When the attendant programs the system for nighttime operation using the night transfer of
ringing feature, the line answer from any station feature is made active. With this feature, a user
can dial an access code over the intercom line to allow him to answer any ringing outside line.
The line need not be ringing at the user’s station for this feature to be used.
384
Programming the DSU II
IMI66–132
DSU II Digital Telephone System
Idle Line Preference
When a station is programmed for idle line preference, it will automatically be connected to the
first assigned idle line. The system can be programmed on a per station basis to enable idle line
preference. When idle line preference is enabled, taking the handset off-hook will automatically
connect the station to any assigned line that is idle and has been arranged for this feature. The line
button will not have to be pressed. If this feature is used in conjunction with prime line automatic,
the user will be given prime line first when going off-hook. An idle line will be given if the prime
line is in use. The station class of service programming enables this feature on a per station/per
line basis.
Line Groups
Outside lines can be grouped together in up to four different groups. Users can program an auto
dial button to select a line group or manually enter a dialing code for access to a line. Grouping
can reserve certain lines for certain clusters of stations as in a tenant-service arrangement. The
assignment of line groups frees station buttons normally used for line selection thus making these
buttons available for use with a feature such as personal DSS/BLF with station-to-station
messaging. Lines are placed in line groups with the line class of service programming.
Line Preselection
A line can be manually selected before lifting the handset (for hands-free dialing) or after the
handset is lifted.
Line and Line Group Queuing
With the line queuing feature, the station user can take action that will place a station in a queue
where it awaits the availability of a line or line group. The station is automatically signaled with
five-ring bursts when the line is available to it for use. Each station can queue one line at a time.
Originating Denied
The ability to originate calls on certain lines can be denied at individual stations through system
programming. The originating denied feature is programmed on a per station/per line basis.
Originating denied does not prevent a user from answering a ringing line, retrieving a held call or
receiving a transferred call. Call origination on a line is denied at a particular station by the
station class of service programming.
Prime Line Automatic
If the programmer uses station class of service programming to enable prime line automatic at a
station, the system will automatically select the designated outside line, intercom line or line
group when the user lifts the handset. A user can pre-empt prime line pickup by preselecting
another line before lifting the handset. If the prime line is ringing, it is automatically answered
when the user lifts the handset.
Ringing Line Preference
The system can be programmed on a per station basis to provide ringing line preference on all
lines programmed for ringing at the station. When ringing line preference is enabled at a station,
taking the handset off-hook automatically connects the station to any outside line that is ringing at
it. A line button will not have to be pressed. With ringing line preference enabled, the telephones
denote a ringing line with an orange colored status light. If a station also has prime line assigned,
the prime line will always be answered first even though it may be the second line to ring. The
ability of a particular station to answer a ringing line without line selection is enabled by the
station class of service programming.
Programming the DSU II
385
DSU II Digital Telephone System
IMI66–132
M
Manual Hold
A button activated feature at each station will place an outside line on hold. When a user presses
the HOLD button while on a call, the system places the call on hold, provides a distinctive flash
rate of the line button indicator, and allows the user to access other station features. A user at the
holding station or at any other station that has access to the line can retrieve the held call.
See also, Hold.
Meet-Me Answer Page
Any station user can dial a special code number in response to an all-call or zone page and be
connected to the paging party in a private conversation. All-call or zone paging is provided to the
stations through the station class of service programming.
See also, Paging.
Memory Retention without Batteries
The system memory is electronically protected during AC power failures by an electronic device
sometimes known as a “super cap.” The stored program data will remain in memory for a
minimum of 60 hours provided that the system has been powered continuously for at least 30
minutes prior to the power failure or disconnection. Also, the system clock will continue to run
and keep time for at least 30 minutes after an AC power failure or disconnection.
Messaging
Assist Button
This feature allows a station user to program a button to be used for sending a message to an LCD
speakerphone. Once programmed, the station user can press the ASSIST button at anytime to ring
the called station and present a preprogrammed message in the station display. The user can send
a message while on a call without alerting the distant party. This feature is useful for requesting
assistance while engaging on a call. For example, a customer service representative could request
assistance from a supervisor while talking to a problem caller. The supervisor, upon receiving the
tone and noting the display message, could perform an executive override or service observing
action to join the call or monitor it.
LCD Messaging
Standard and system-supplied custom display messages can be set by dialing a specific code at
any station. Such messages are to be received and displayed by any LCD speakerphone that calls
the station which set the message. When a message is set, the intercom light at the setting station
will flash to indicate that the feature is active.
Message Waiting
Special feature access codes enable a station user to control the message waiting (MW) light at
other stations in the system. When the message waiting light is turned on at a station, a call can be
automatically placed to the station that turned it on.
386
Programming the DSU II
IMI66–132
DSU II Digital Telephone System
Alternately, one station can be designated by COS programming as the central message desk and
can be arranged for exclusive message waiting control. The central message desk can be used to
control message waiting lights and deliver messages to and from all other stations in the system.
The ability of a station to originate a message waiting signal is enabled by programming action.
Station class of service programming provides a station with the ability to originate a message
waiting signal and is used to create a central message desk. The system defaults the message wait
originate feature as enabled.
Response Messaging
This feature allows a user to reply in a non-verbal manner to a voice announce or tone-signaled
intercom call or to a subdued off-hook voice announce call if the intercom caller is using an LCD
speakerphone. A station user can press a programmable button in response to an intercom call and
send a message to be shown on the display of the calling station. Response messages are
programmed by the attendant and later stored by station users at programmable buttons on their
stations.
Station-to-Station Messaging
If a station has a DSS/BLF appearance at another station, a callback message indication can be
left at that station with the DSS/BLF appearance. The user can dial a special code to turn on the
BLF light at the called station that is assigned to the calling station. This light indicates that a
callback is requested. The light is automatically turned off if a successful callback is made.
If a station number is not programmed for a DSS/BLF appearance at another station, attempting
to place a call back message will cause the central message desk station to ring. If there is no
central message desk assigned, no action will occur.
Modular Wiring and Jacks 2- or 4-Conductor Wire System
The system can be completely interconnected by employing industry standard 50-pin connectors
and modular plug/jack combinations. Station wiring is number 22 or 24 gauge, 2-conductor,
twisted-pair cable throughout the system. If the installer uses 4-conductor twisted-pair cable, it
provides a spare pair for a separate wiring purpose when needed.
Music Features
Background Music
If the installer connects a customer-provided external music source to the system, the music from
that source will sound through the station loudspeakers after the users turn it on at their stations.
They can adjust the loudness of this background music with the loudspeaker volume control. The
system automatically turns the background music off during calls. This feature requires no class
of service programming.
Music Interface
The common equipment cabinet includes an input jack where the installer can connect a
customer-provided music source.
Music-On-Hold
When an installer connects a customer-provided music source to the system through the music
interface jack, the system supplies that music to the outside lines that users place on hold.
Programming the DSU II
387
DSU II Digital Telephone System
IMI66–132
Music-on-Hold System-Wide Enable/Disable
After the installer has arranged for the system to supply customer-provided music to calls that
users place on hold, the attendant can disable the feature on a system-wide basis.
Mute
Every monitor telephone and speakerphone has a MUTE button which, when pressed, will mute
the handset transmitter (or internal microphone on speakerphones) to prevent the user’s voice
from being heard by the distant party. The MUTE light turns on steady to indicate a muted
condition. The MUTE button provides push-on/push-off operation on speakerphones. No class of
service is required.
Hands-Free Answer Inhibit
The user can use the MUTE button to block all hands-free answer back response. This
arrangement will prevent a station user from monitoring another station site using the monitoring
ability of the voice announce feature. When a user presses the MUTE button, all hands-free
answer back is disabled thus inhibiting any off-site monitoring. The MUTE light turns on steady
to indicate that this feature is active.
N
Night Transfer (Of Ringing)
Night transfer (of ringing) is an attendant-controlled feature that transfers the day ringing
program of all incoming calls to a particular station or stations for off-hour or special purpose
answering. The night transfer mode can only be activated from station 10 or 12. The individual
lines at each station that are to be transferred with this feature are selected by station class of
service programming.
See also, Ringing.
O
On-Hook Dialing
Every monitor and speakerphone provides manual and/or automatic dialing while the station
handset is on-hook. The telephone loudspeaker monitors call progress for completion. (The
handset must be taken off-hook to provide the voice link on non-speakerphone stations.)
Originating Denied
The ability to originate calls on certain lines can be denied at individual stations through system
programming. The originating denied feature is programmed on a per station/per line basis.
Originating denied does not prevent a user from answering a ringing line, retrieving a held call or
receiving a transferred call. Call origination on a line is denied at a particular station by the
station class of service programming.
See also, Line Features.
388
Programming the DSU II
IMI66–132
DSU II Digital Telephone System
P
Paging
All-Call Paging
All-call paging allows all stations to receive announcements through the station speaker at once.
The system can also send all-call paging to the paging port where it applies it to the input of an
external paging amplifier. Origination of announcements must be via the station handset. A
programmer can arrange each station to receive and/or originate all-call page. He or she enables
the ability to receive and originate all-call paging at a station through station class of service
programming.
External Paging Interface
A dedicated paging port or a spare line port can be interfaced with an external paging amplifier.
The paging amplifier can then be dial-accessed by stations in the system. DTMF tones can be
dialed through the line port to provide zone selection if provided by the external paging amplifier.
The dedicated paging port does not support any “talk back’ capability even if such a feature is
provided by the external equipment. The line class of service programming arranges a line port
for external paging interface. The system precedes an announcement through the paging port with
an alerting tone. Programmers can choose between an intercom tone or a DTMF signaling tone
for this paging alert tone. They should choose the intercom tone for a soft alert and choose the
DTMF tone for a loud alert.
Meet-Me Answer Page
Any station user can dial a special code number in response to an all-call or zone page and be
connected to the paging party in a private conversation. All-call or zone paging is provided to the
stations through the station class of service programming.
Zone Paging
Zone paging allows groups of stations to receive announcements through the station speakers.
The programming can enable zone paging in up to four different zones. Zone paging can also be
received at the paging port where it can be connected to the input of an external paging amplifier.
The ability of each station to originate and/or receive a page and the arrangement of the paging
into different zones are controlled by station class of service programming. Zone paging through
the paging port is enabled by system class of service programming.
PBX/CENTREX/CO Compatible
System features and programmable buttons support the requirements of most PBXs, Central
Offices, and CENTREX systems. Numbers, #’s, *’s, programmable pauses, and flash signals can
be made a part of every stored number for access to host system feature codes.
Personal Computer Interface Unit (PCIU)
The Personal Computer Interface Unit (PCIU) is a device that you can connect between a digital
station port and its proprietary telephone. The PCIU allows telephone users to initiate telephone
and voice mail related functions from their personal computer (PC).
Programming the DSU II
389
DSU II Digital Telephone System
IMI66–132
The PCIU includes Service Provider Interface (SPI) software on computer diskettes. With this
software installed on the user’s PC, the PC users can employ their Telephony Applications
Programming Interface (TAPI), third-party Microsoft* Windows applications programs to control
many useful telephone functions.
When the Voice Processing (VP) Visual Call Manager (VCM) software option is available, the
voice mail system can use the serial data path to the PCIU to send messages to the telephone’s
display and to the SPI on the PC.
*Microsoft is a registered trademark of Microsoft Corporation, Redmond, Washington
Personalized Ringing Tone
The system provides a group of distinctive tones for station ringing. A station user can choose a
tone from this group to provide a distinctive ring at his or her telephone. Often, when several
telephones are located close to each other, each user chooses a different personal ring tone. The
system provides six distinctive tones for users to choose from.
See also, Ringing.
Pooled Line Access (Line Group Access)
Outside lines can be grouped together in up to four different groups. Users can program an auto
dial button to select a line group or manually enter a dialing code for access to a line. Grouping
can reserve certain lines for certain clusters of stations as in a tenant-service arrangement. The
assignment of line groups frees station buttons normally used for line selection thus making these
buttons available for use with a feature such as personal DSS/BLF with station-to-station
messaging. Lines are placed in line groups with the line class of service programming.
See Line Features.
Power Failure Transfer
An installer can connect an industry-standard telephone such as the model 2500 to a special
connection to serve as a power-fail telephone. If an AC power failure occurs, the system
automatically connects the power-fail telephone directly to an outside line. Users can make
normal origination and reception of calls on a power-fail telephone during an AC power failure.
The system will automatically disconnect the power-fail telephone from the outside line as soon
as AC power returns.
Prime Line Automatic
If the programmer uses station class of service programming to enable prime line automatic at a
station, the system will automatically select the designated outside line, intercom line or line
group when the user lifts the handset. A user can pre-empt prime line pickup by preselecting
another line before lifting the handset. If the prime line is ringing, it is automatically answered
when the user lifts the handset.
See also, Line Features.
390
Programming the DSU II
IMI66–132
DSU II Digital Telephone System
Privacy
Automatic Privacy
A programmer can make a line private or non-private through programming. In the private mode,
a station has exclusive use of the line during a call. No other station can access that line unless the
user of the private line adds another station through the use of the add-on conference feature. In
the non-private mode, another station with that line appearance can gain access at the same time
(sometimes known as common line pickup). A line is specified as private or non-private through
the line class of service programming. Through station class of service programming, a
programmer can make a line non-private at a particular station.
See also, Conferencing.
Privacy—Designated Programmable Button
The programmer can arrange for stations to provide a privacy button. If a line is private, a user
can press the privacy button to change it into a non-private one. If the line is non-private, pressing
the button will have no effect. Station class of service programming is used to program the
programmable button function at the stations.
Privacy Release/Brokerage Service
See the previous paragraph titled Privacy—Designated Programmable Button
Private Lines (Access Denied)
The system programmer can deny access to particular lines at certain stations in the system. A
station user cannot select a denied line for use. This feature is programmable on a per line/per
station basis in station class of service programming.
See also, Line Features.
Programmable DSS/BLF
A station user can store one-button, direct station selection (DSS) at any memory button location
to create a DSS memory button. When this button is pressed, any active outside call is
automatically placed on hold and an intercom call is automatically made to that previously stored
station number. The visual indicators of the stations programmed at the button locations form a
busy lamp field (BLF). The BLF conveys station status to the user. An auto dial number can also
be programmed as a secondary function at every DSS/BLF memory location. No class of service
is required.
See also, Automatic Dialing.
Programmable Buttons
A programmer, or in many cases the users themselves, can make most system features available at
programmable buttons merely by storing the specific access codes necessary for dialing the
features. Storable features include those that can utilize lamp (on/off) supervision (e.g., call park
orbits). The system will store all feature access codes except for those requiring
Transfer/Conference button action. It will store continuous strings of digits (including presses of
the intercom button) up to the maximum amount of storable digits (16) allowed in an auto dial
entry.
Programming the DSU II
391
DSU II Digital Telephone System
IMI66–132
Programming Password Protection
No one can enter a programming mode to reprogram the system without first entering a password.
The system provides two different entry levels for programming and allows for a different
password for each entry. The two programming entry levels are the installer level and the
administrator level. Programmers can enter the installer level, using the installer password, to
perform all programming functions including major changes such as master clearing and line type
programming. They can enter the administrator level, using the administrator password, to
perform most programming functions except those major changes just mentioned. Programmers
can use the VDT programming method to change the passwords from their default values as
needed to provide security against unauthorized program entries. They can do this when the
system is initially installed and programmed, or at any later time as needed. Additionally,
programmers can construct a password that will prevent all COS programming entry from station
10.
Customized passwords can be alpha-numeric or numeric only (no spaces allowed) and must
contain six characters. To retain the ability to enter programming from station 10, programmers
must maintain the In*nnn* format in the VDT password and enter only numbers in the nnn entry;
however, they must not enter a zero for the leading n. Once customized, a password remains
customized. Neither default nor master clear will erase it. Programmers must use the new
password to gain entry into the system for future programming tasks. It is very important that
someone keep a hard copy of the customized password since it provides the only entry to system
COS programming through either the VDT or station 10. If no one can remember the customized
password, the manufacturer can provide emergency entry but there is a charge for this service.
Otherwise, the installer must disconnect all AC power and any battery back up equipment, wait at
for an extended period of time (up to several weeks) for the internal memory protection to
completely discharge, and reprogram the system using the default password to gain entry.
Pulse/Tone Switchable
The programmer can program the system on a per line basis using the line class of service
programming to allow the stations to switch from pulse to DTMF type dialing as needed.
Alternately, she or he can program the system to only allow tone dialing.
R
Redialing
Automatic Redial (of Busy Number or Unanswered Call)
A user can automatically redial a busy number or unanswered call by activating this feature. Once
the user activates automatic redial, the station will select the line, automatically dial the number,
and wait for a response. It will do this twice unless the user deactivates the feature by pressing
that button or another button or by lifting the handset. The feature cycle is timed and does not
have busy detection circuitry. Because of this, if the user is operating hands-free when the called
party answers, she or he must lift the handset to prevent the caller from being cut off by the
timing cycle. The automatic redial button is a designated programmable button position and the
user must program its location to make it active.
Automatic Pause Insertion
When the system stores a dialed number for later redial, it automatically stores a pause whenever
the user waits between digits for at least two seconds. The system inserts the automatic pause in
the stored number sequence at the point where the manual pause in dialing occurred. The length
of the automatic pause is programmable.
392
Programming the DSU II
IMI66–132
DSU II Digital Telephone System
Last Number Redial
Each station is provided with a last number redial feature. This feature will save 32 digits of the
last outside number dialed. A newly dialed number will always automatically replace a previously
dialed number. Upon command, the system will choose a line and redial the saved number. The
system will first choose the prime line if assigned and idle. If it is busy or unavailable, the system
will choose any line assigned to idle line preference. If they are unavailable, the system will chose
the last line used at the station. If it is busy, no further choice is made. No class of service is
required.
Saved Number Redial
This feature enables a button action to save the first 16 digits of the last number manually dialed
from the keypad. The saved number can be redialed at a later time. The saved number is
permanently available for later use until it is replaced with a new number.
When the caller identification feature is active, this saved number redial feature will save the
Caller ID number for redial.
Response Messaging
This feature allows a user to reply in a non-verbal manner to a voice announce or tone-signaled
intercom call or to a subdued off-hook voice announce call if the intercom caller is using an LCD
speakerphone. A station user can press a programmable button in response to an intercom call and
send a message to be shown on the display of the calling station. Response messages are
programmed by the attendant and later stored by station users at programmable buttons on their
stations.
See also, Messaging.
Remote Programming and Administration
Both remote class of service programming and the transmission of SMDR data for printing are
available through serial data ports. The system supports X-on X-off terminal control codes as
well as a DTR signal for handshaking. The system data communications operates per the popular
XMODEM protocol. The database can be uploaded or downloaded, error free, from or to a
remote computer that is running software that supports the XMODEM protocol. The two serial
data ports allow VDT programming (either local or remote) to be conducted through one port at
the same time that the other port is being used to send SMDR data for printing. VDT
programming of the system is menu driven.
See also, Class Of Service.
Ringer Volume Control
DigiTech, Impact, and Impression telephones have a ringer volume control that telephone users
can operate to adjust the loudness of the ringer at his or her station.
Ringing
Auxiliary Ringer Interface
The auxiliary ringer interface provides “dry-contact” relay closures which track the ringing
pattern whenever the system sends ringing to a programmable destination. Programmers can
program relay control to be activated when the system sends ringing to station port 17 or to the
paging port.
Programming the DSU II
393
DSU II Digital Telephone System
IMI66–132
When programmed for station port 17 ringing, an installer often uses an external device to
provide loud ringing. When programmed for paging port ringing, an installer often installs an
external paging amplifier to sound the rings. The system supplies ringing tones to the paging port
along with the relay closures. It can send the ringing tones to the input of an external paging
amplifier and the installer can arrange the wiring so that the relay closures energize the paging
amplifier while it is receiving the ringing tone. Use system class of service programming to
choose either the paging port. or station port 17 for the ringing port relay control. Also use system
class of service to determine the type of ringing sent to the paging port. Use station class of
service programming to determines the type of ringing that the system sends to station port 17.
Programmers can arrange for the system to send ringing tones for particular lines through the PA
port. They can choose between intercom tone and DTMF signaling tone for the PA port ringing.
They should choose the intercom tone if they desire a soft tone and the DTMF tone if they desire
a loud tone.
Common Audible Ringer Interface
Connections are available at the common equipment that provides “dry-contact” relay closures
whenever an incoming line rings. These contact closures track the ringing pattern and can be used
to control an external signaling device.
Delayed Ringing
Ringing assignments are programmable. A station can be programmed to provide delayed ringing
on some lines while providing immediate ringing on other lines. Delayed ringing is assigned to
certain lines at each station through station class of service programming. When a programmer
assigns delayed ringing to a station for certain lines, he or she can also assign the time length of
the delay.
Distinctive Ringing
The ringing cadence of an incoming call is the same as the ringing cadence of the TELCO, PBX,
or CENTREX system. The ringing cadence of an intercom call presents two tone bursts sounded
every four seconds.
Flexible Ringing Assignments
Ringing assignments are programmable on a per station/per line basis. Ringing can be controlled
for every line that has an appearance at each station. Delayed ringing is assigned to certain lines
at each station through station class of service programming.
Flexible Ringing Assignments of PA Port
The PA port can be programmed for flexible ringing assignments and zone pages. Any desired
lines can be programmed for direct ring, delay ring, or night transfer (of ringing) at this port.
Paging can be to programmed zone or to all-call. A speaker can be connected to the PA port to
sound the ringing that is generated by the system and sent to this port and paging announcements
when they are sent to the programmed zone. Using such an arrangement, it is possible for a user
to determine that certain lines are ringing, such as in a night transfer (of ringing) mode, and go to
the nearest telephone and answer the call. The most common use for this arrangement is as a
night bell eliminating the need for external equipment as required with the common ringer and
auxiliary ringer interface. The speaker cannot be used for voice response as the path is one-way
only. Use system class of service programming to assign ringing and paging to a PA port.
394
Programming the DSU II
IMI66–132
DSU II Digital Telephone System
Night Transfer (of Ringing)
Night transfer (of ringing) is an attendant-controlled feature that transfers the day ringing
program of all incoming calls to a particular station or stations for off-hour or special purpose
answering. The night transfer mode can only be activated from station 10 or 12. The individual
lines at each station that are to be transferred with this feature are selected by station class of
service programming.
Night Transfer (of Ringing) Button
A night transfer of ringing, or night mode, button is available at attendant stations. The night
mode button gives attendants at stations 10 and 12 the ability to place the system into the night
transfer of ringing mode of operation by simply pressing one button instead of entering the
multiple keystroke sequence previously required. The night mode button toggles the feature on
and off with one keystroke and the light located above the Intercom button on attendant
telephones flutters to indicate when the night transfer or ringing is active.
Personalized Ringing Tone
The system provides a group of distinctive tones for station ringing. A station user can choose a
tone from this group to provide a distinctive ring at his or her telephone. Often, when several
telephones are located close to each other, each user chooses a different personal ring tone. The
system provides six distinctive tones for users to choose from.
Subdued Ringing
When a station is busy on a call and another call comes to the same station, the system will
automatically subdue the ringing of the second call to a lower volume.
Ringing Line Preference
The system can be programmed on a per station basis to provide ringing line preference on all
lines programmed for ringing at the station. When ringing line preference is enabled at a station,
taking the handset off-hook automatically connects the station to any outside line that is ringing at
it. A line button will not have to be pressed. With ringing line preference enabled, the telephones
denote a ringing line with an orange colored status light. If a station also has prime line assigned,
the prime line will always be answered first even though it may be the second line to ring. The
ability of a particular station to answer a ringing line without line selection is enabled by the
station class of service programming.
See also, Line Features.
S
Saved Number Redial
This feature enables a button action to save the first 16 digits of the last number manually dialed
from the keypad. The saved number can be redialed at a later time. The saved number is
permanently available for later use until it is replaced with a new number.
When the caller identification feature is active, this saved number redial feature will save the
identified number for redial.
See also, Redial.
Programming the DSU II
395
DSU II Digital Telephone System
IMI66–132
Scout Digital Wireless Telephone
The DSU II supports the Scout 900MX Digital Wireless Telephone. The Scout telephone is a 900
megahertz, spread-spectrum, wireless telephone. While the Scout operates much like an Impact
telephone, you should note that a few operational differences do exist. The “Call Announce
Receive” and “All Call Receive” features require that you install and enable a headset. The Scout
does not support the “Autoredial” or “voice response to SOHVA.” It is a good idea to program
any Scout telephone station port with “Delayed Ringing” to an ExecuMail port or attendant
station in case the user is out of range when he or she receives a call.
The Scout does have a range test that the installer or user can perform. Comdial highly
recommends that the installer perform a preliminary on-site range test to make sure the Scout
meets the customer’s needs (for more information on how to use the range-test feature, see
GCA70–308).
There is no limit to the number of Scout telephones that you can install on a system. However,
because of channel restrictions, only nine Scouts can be in use at one time within the same
general area. If all nine channels are in use and a tenth Scout telephone tries to place a call, the
LCD will indicate “System Busy” and deny the call. If you do install more than one Scout
wireless telephone, Comdial recommends that you leave at least 10 feet between adjacent base
units. The range of each Scout telephone is affected by the layout and location of the base unit, so
it is a good idea to install the base unit in an unimpeded area and at desk-level or higher.
The Scout handset has three programmable buttons and one intercom button that give you access
to the telephone system’s features. Depending on the feature, either the end-user or the system
programmer can set these buttons. Scout does not require any additional programming.
Self Diagnostics
Each station can execute a self test when so enabled by anyone who wishes to do so. This test
verifies processor, indicator, and tone functions.
Service Observing
Service observing allows a third party to enter an in-progress call in an unannounced muted mode
to monitor the conversation. The system does not send any warning tones when the call entry is
made. This feature is useful in allowing a supervisor to monitor the performance of an employee
during a phone conversation with a client. For a station to provide the service observing feature, it
must also have the executive override feature enabled. When the programmer enables the service
observing feature, the system automatically enables the executive override feature as well. A
programmer can enable or block service observing (and executive override) at each desired
station using station class of service programming procedures.
Speakerphone Support
The digital telephone system’s speakerphone support enables a speakerphone’s ability to originate
hands-free operation for voice-signaled intercom calls in addition to all of the other features that
it normally provides.
Specialized Route Access
The digital telephone system provides a specialized route access feature that, when enabled,
allows the system to select a line group based on the digits the user has dialed. By doing this, it
matches calls with their best suited routes. The feature provides a table-driven routing scheme
where the numbers that users dial cause the system to chose a line group after comparing the
dialed number with entries that are contained in an office code table, an area code table, and four
special area code look-up tables.
396
Programming the DSU II
IMI66–132
DSU II Digital Telephone System
The specialized route access operates in the following manner: When the caller presses
INTERCOM and dials 9 or presses a preprogrammed button, the system returns a special dial
tone. The caller then has 10 seconds in which to dial some digits; otherwise, the telephone will
return to its idle state. Once a caller begins to dial digits, he or she has a certain period of time in
which to dial each new digit. The system programmer selects this time-out period through
programming. After the caller has stopped dialing digits and the end of the time-out period has
occurred, the system analyzes the dialed digits and routes the call by following the table-driven
routing scheme depending upon how the programmer has arranged the system.
The system routes calls based on comparison matches between the dialed number and the entries
that it finds in either an office code table, an area code table, or four special tables for selected
area codes. These tables contain 1000 entries from 000 to 999 and the programmer can assign one
line group to each entry; therefore, a routing match is always possible.
The system matches dialed digits with table entries in the following manner:
• If the first digit that the caller dials is not a 1 or a 0, and if he or she dials less than 10
digits (such as : nnn-nnnn), the system evaluates the first three digits as an office code,
searches for the office code in the office code table, and finds a line group.
• If the first digit is either a 1 or a 0 (such as: n-nnn-nnnn), the system ignores the first digit
and evaluates the next three digits as an office code, searches for the office code in the
office code table, and finds a line group,
• If the first digit that the caller dials is neither a 1 nor a 0, and if he or she dials 10 digits or
more (such as nnn-nnn-nnnn), the system evaluates the first three digits as an area code
and the following three digits as an office code.
• If the first digit that the caller dials is either a 1 or a 0 (such as n-nnn-nnn-nnnn), the
system ignores the first digit, evaluates the next three digits as an area code, and evaluates
the following three digits as an office code.
• After digit evaluation the system routes the call as per the following discussion: If there is
a special table that matches the dialed area code, the system searches that table for the
dialed office code and finds a line group. If there is not a special table for that area code,
the system just searches the area code table for it and finds a line group.
The following information illustrates the digit evaluation scheme.
Digit Evaluation
Quantity of Digits
Dialed
2
3
4
7
8
10
11
Programming the DSU II
Actual Dialed
Digits
67
118
5123
9782200
19782200
8049782200
18049782200
Digits Evaluated by
System to Find Line
Group
067
118
512
978
978
804, 978
804, 978
397
DSU II Digital Telephone System
IMI66–132
The example below shows how calls to area code 202 are routed using line group 2, calls to office
code 202 are routed using line group 1, calls to office code 973 in area code 716 are routed using
line group 4, and all other calls are routed using line group 1.
Routing Calls Through Different Line Groups
Special Table for Selected Area Codes
(Each table is for office code entries in a specific
area code)
Entries Office Code
000-999
Table
000
001
002
202
212
973
997
998
999
1
1
1
1
1
1
1
1
1
Area Code Area Code 1 Area Code 2 Area Code 3 Area Code 4
Table
(716)
(
)
(
)
(
)
2
1
1
1
1
1
1
4
1
1
1
The programmer can arrange for the system to insert up to eight digits (including * and # as well
as 0–9) ahead of a dialed number for a selected line group. Further, the programmer can enter a
pause of system-determined length as a character in the digit string.
To help understand this digit insertion, review this typical arrangement for transparent
CENTREX operation (this example assumes that the CENTREX extensions do not conflict with
the office codes): With the digital telephone system installed behind a CENTREX system, callers
can make outgoing calls without having to dial 9. Assume that the CENTREX extensions are
3300–3399. Take programming action to assign line group 2 to entries 330–339 in the office code
table. This means that calls on CENTREX extensions will use line group 2 and all other calls will
default to use line group 1. Program the 9 digit as the insertion digit for line group 1. With this set
up, when a caller dials a number other than a CENTREX extension, the system automatically
inserts a 9 ahead of the dialed digits and routes the call over line group 1.
If no lines are free in a selected line group, the system will route the call to an overflow line
group if the programmer has assigned one; otherwise, the system will return busy tone to the
caller.
NOTE: If the programmer has arranged for the system to insert digits on a particular
line group, he or she should consider arranging for the system to insert digits
in the overflow line group as well. This consideration is necessary only if it is
important for the call to route through the same common carrier as was the
original line group.
While line group dialing codes 81, 82, and 83 do not provide access to the SRA feature, they
could provide a means of bypassing SRA by allowing users access to line groups outside of the
SRA process. To insure that the system routes all calls through SRA, programmers should use the
feature inhibit programming procedure to inhibit dialing codes 81, 82, and 83.
398
Programming the DSU II
IMI66–132
DSU II Digital Telephone System
Using Specialized Route Access for Simplified Toll Restriction
In anticipation of the implementation of the revised North American dialing plan, the feature
provides the system with the ability to deny calling to designated area or office codes. The
programmer merely assigns a line group that contains no assigned lines to the designated office or
area code. This prevents the system from routing calls for dialed numbers containing those
particular area or office codes since there is no line available. This action will work only for
manually dialed numbers because automatically dialed numbers, with no line preselect, employ
the last used line and therefore cannot be restricted.
Specialized Route Access Enhancements
Software 3A contains the following enhancements to the SRA feature:
• The system routes speed dial calls through SRA similarly to the way manually dialed calls
are routed. The speed dial location must not have a preselect and must contain at least one
digit. No programming is required to enable this feature.
• The system now routes calls through an alternate line group if no lines are available in the
original line group. If no lines are available in the alternate line group, the system searches
the overflow line group for an available line. Each line group has one alternate line group;
the system will not assign alternate line groups by default.
Square/Non-Square Configuration
A programmer can arrange for a system to be square or non-square as desired. In a square system,
the line 1 buttons of all telephone stations select line 1, the line 2 buttons select line 2, etc. In a
non-square system, each line select button at every station may be assigned individually to select
any line. A programmer can perform unique button mapping for line appearance on each station
using the station class of service programming.
Flexible Station Numbering Plan
The system supports a flexible station numbering plan for individual stations. Each station can be
programmed to respond to the dialing of any available number between 10 and 7999. This feature
may be used to match the calling number of a station located in a pre-numbered area to that area
number. A combination of two, three, or four digit extension numbers can be assigned as long as
they do not conflict. For example: If 21 is assigned as an extension number, there cannot be any
other extension number assigned that begins with a 21. The system class of service programming
is used to assign extension numbers to individual station ports.
Tenant Service
A system programmer can arrange for one telephone system to be used for multiple tenants at a
site location by employing flexible line appearance at each station. The programmer can perform
button mapping for line appearance on each station in the system using the station class of service
programming.
Station Monitoring with DSS Call Pickup
The busy lamp field (BLF) of a station can provide visual indication of the idle, busy, and ringing
status of monitored stations. This monitoring station can also provide audible indication of any
direct and delayed ringing that occurs at the monitored station if the programmer has enabled the
visual ring indication feature. A user at the monitoring station can make a one-button pickup of a
ringing call at a monitored station by pressing the direct station selection (DSS) button associated
with the ringing station.
Programming the DSU II
399
DSU II Digital Telephone System
IMI66–132
The programmer can enable or disable the flashing BLF lights associated with visual ring
indication on a system-wide basis. When the programmer enables the flashing lights, he or she
can then enable the audible indication of ringing on a station-by-station basis.
Station Speed Dial
Each station provides 10 speed dial number locations at the keypad buttons. Station speed dial
numbers can be up to 16 digits in length and can include line or intercom selection, numbers, #, *,
pauses, and hookflash signals. A user can store a pause by pressing the HOLD button and store a
hookflash signal by pressing the TAP button.
See also, Automatic Dialing.
Station-to-Station Messaging
If a station has a DSS/BLF appearance at another station, a callback message indication can be
left at that station with the DSS/BLF appearance. The user can dial a special code to turn on the
BLF light at the called station that is assigned to the calling station. This light indicates that a
callback is requested. The light is automatically turned off if a successful callback is made.
If a station number is not programmed for a DSS/BLF appearance at another station, attempting
to place a call back message will cause the central message desk station to ring. If there is no
central message desk assigned, no action will occur.
See also, Messaging.
Subdued Off-Hook Voice Announce
With the subdued off-hook voice announce (SOHVA) feature, a user can make a voice
announcement from one station to another station that is off-hook and busy on a call. A station
being operated in a hands-free mode cannot receive a SOHVA. With SOHVA, the caller delivers
the call and the user receiving the call responds to it in a secure manner that prevents the distant
party from hearing either the announcement or the response. The system precedes the
announcement with a tone alert that it delivers to the handset receiver of the called telephone. It
also supplies a tone to the announcing caller to alert them that they are making a SOHVA call. A
programmer can set the quantity of tone bursts from one to six. A user can respond to the SOHVA
announcement either verbally or non-verbally. He or she either effects a verbal response by
pressing and holding the MUTE button and speaking into the handset or effects a non-verbal
response by pressing a programmed button to send a message to be shown on the display of the
announcing station (if it is an LCD speakerphone). The system automatically disconnects the
announcing station after it delivers the response message. Stations that have the voice announce
block feature turned on cannot receive a SOHVA. A programmer can use station class of service
programming to disable the SOHVA feature at a station port.
Subdued Off-Hook Voice Announce Originate Button
This feature allows a telephone user to program a button at his or her station that she or he must
press before delivering a SOHVA call. This SOHVA enabled button allows a caller, after hearing
a busy signal, to decide whether to interrupt the called party in a SOHVA manner. If the caller
decides that the called should be interrupted, the caller can press the button and complete the
SOHVA call. This button, along with SOHVA groups, allows system users greater control of the
callers that are allowed to make SOHVA calls and of the situations in which they are allowed to
make them.
400
Programming the DSU II
IMI66–132
DSU II Digital Telephone System
Subdued Off-Hook Voice Announce (SOHVA) Groups
The programmer can program the ability of station ports to originate and/or receive SOHVA calls
by assigning SOHVA calling groups to station ports. This means that he or she can arrange certain
station ports together for SOHVA calling between one another while excluding other station ports
in the system from this group.
The system provides eight different SOHVA groups that are fixed into a variety of SOHVA
receive/originate configurations. A programmer can assign one SOHVA group to each station port
to allow or to deny SOHVA receive and/or originate capability to it. By properly assigning
SOHVA groups to station ports, the programmer can open or block SOHVA paths between
stations.
The system is defaulted with no SOHVA groups assigned. When a station port does not have a
SOHVA group assigned to it, it’s user can originate SOHVA calls to any station port and receive
SOHVA calls from any station port.
SOHVA groups are fixed by the system into the following configurations:
SOHVA Groups and their Configurations
SOHVA Group
Group Configurations
Group 1
Receive from
Originate to
1
X
X
Group 2
Receive from
Originate to
X
1
X
Group 3
Group 5
2
1
X
6
7
8
4
5
6
7
8
4
5
6
7
8
3
4
5
6
7
8
3
4
5
6
7
8
5
6
7
8
6
7
8
7
8
X
X
3
X
X
2
X
1
5
3
2
1
4
X
X
Group 4
3
X
X
X
Receive from
Originate to
Receive from
Originate to
2
X
X
2
Receive from
Originate to
Group 6
X
X
1
2
3
4
Receive from
Originate to
Group 7
X
X
1
2
3
4
5
Receive from
Originate to
Group 8
Receive from
Originate to
Programming the DSU II
X
X
1
2
3
4
5
6
X
X
401
DSU II Digital Telephone System
IMI66–132
Example 1: Allow station port 10 to originate SOHVA messages to all stations in the system and
allow those stations the ability to originate SOHVA messages to each other but not to station port
10. Assign group 1 to station port 10 and assign group 2 to all other station ports.
Example 2: Allow station ports 14 and 15 to receive and originate SOHVA calls between each
other but deny both receive and originate capability from any other system stations. Assign group
8 to both station port 14 and station port 15. Do not assign group 8 to any other station port but be
sure that all station ports have a group assigned to them.
The programmer assigns SOHVA groups using the station class of service programming
procedure.
Subdued Ringing
When a station is busy on a call and another call comes to the same station, the system will
automatically subdue the ringing of the second call to a lower volume.
See also, Ringing.
System Alarm Reports
The programmer can arrange the system to report alarm and status conditions to a particular
station or stations that he or she has enabled to receive them. The alarm receiving station must be
an LCD speakerphone. When a station is enabled to receive alarms, its user can take appropriate
action to cause the alarm codes to be presented on the LCD display. A programmer must use both
system and station class of service programming to enable this feature.
System Speed Dial
The system provides 99 system-wide speed dial numbers. The system speed dial numbers can be
up to thirty-two digits in length, and can include numbers, #, *, pauses, and hookflash signals.
The attendant programs the system speed dial numbers and names at station 10 or 12 for use at
every station in the system. No class of service programming is required.
See also, Automatic Dialing.
T
Tandem Attendant
When the programmer uses system class of service programming to enable the tandem attendant
feature, a recall from an unanswered call transfer or a timed hold recall will ring at the normal
attendant station (station 10) that set the transfer or hold condition, and also ring at the tandem
attendant station (station 12).
402
Programming the DSU II
IMI66–132
DSU II Digital Telephone System
TAP (Flash/Recall)
If the host system provides custom calling features via a hookflash signal, the programmer should
program the system so that the TAP button will generate a “flash” signal when a user presses it. If
custom calling features are not available to digital telephone system users, the programmer should
program the TAP button to function as a positive disconnect, dial tone recall button. The flash and
recall features are mutually exclusive. The programmer uses the system class of service
programming procedures to set the flash or recall TAP time.
Tenant Service
A system programmer can arrange for one telephone system to be used for multiple tenants at a
site location by employing flexible line appearance at each station. The programmer can perform
button mapping for line appearance on each station in the system using the station class of service
programming.
See also, Square/Non-Square Configuration.
Timed Hold Recall
After a call has been on hold for a programmed length of time the system will re-call the station
that placed the call on hold. The programmer sets the timed hold recall time period using system
class of service programming.
See also, Hold.
Toll Restriction
Default Toll Restriction
The system defaults two toll restriction tables with preprogrammed values assigned to all lines.
The programmer needs only to assign these tables to the stations to put them into effect. He or she
can use the toll restriction table configuration class of service programming to reprogram the
defaulted tables with different information as needed.
Flexible Toll Restriction
A system programmer can configure system toll call restriction to prohibit some or all stations
from calling a wide range of number combinations. The restricted numbers are specified on up to
16 tables. The system assigns several broad-range values to two of these tables, and assigns the
tables to all lines as a default condition. The programmer needs only to enable the default tables
on a per station basis to activate the default toll restriction.
In general, toll restriction works as follows:
The programmable tables of restricted numbers can contain up to four entries and each entry can
contain up to 16 digits.
A programmer programs each table of restricted numbers to be an “allow” table or a “deny” table
with entries in an “allow” table overriding entries in a “deny” table. This arrangement allows the
programmer to enable exceptions to toll restriction. For example, he or she can arrange the table
entries so that the system allows the dialing of 1-800-xxx-xxxx numbers even though it denies the
dialing of all 1-xxx-xxx-xxxx numbers. A programmer can store a “match anything” symbol (#)
to represent any digit from 0 to 9 in the individual entries thus providing him or her with a broad
range of number combinations to choose from.
Programming the DSU II
403
DSU II Digital Telephone System
IMI66–132
The programmer can individually assign the programmed toll restriction tables to each
appropriate station and line. Therefore, when an outside call is dialed, the system examines the
dialed number and makes a comparison between it and the toll restriction tables. Any tables that
the programmer assigned to BOTH the station being used and the selected line determine the
restrictions to be imposed. It should be noted that the system will automatically disconnect a line
from a station if its user dials a restricted number on a restricted line from a restricted station.
Night Mode Toll Restriction
A programmer can assign toll restriction tables to any or all stations in the system that will only
take effect when the system is in the night transfer (of ringing) mode. These toll tables replace
any that he or she may have assigned to the station for normal, or day mode, operation. For
example: a programmer can arrange for a station that has no other toll restriction table assignment
to receive a toll restriction table which will restrict everything but local calls and will only take
effect when the system is placed in the night transfer (of ringing) mode. Therefore, even though
users can make toll calls from this station during daytime operation, they can make no toll calls
from it when the attendant programs the system for nighttime operation using the night transfer of
ringing feature.
NOTE: Do not confuse this night mode toll restriction table assignment with the night
transfer (of ringing) feature.
Toll Restriction Override
The toll restriction override (TRO) feature allows users to override the toll restriction that they
encounter at other stations with their own station’s toll restriction assignments. In programming
for this feature, the programmer creates a four-digit TRO code that users can dial to override the
toll restrictions of any station that they happen to be using and replace it with a toll restriction that
matches their home station. After entering a TRO code, a user gets his or her own prime line or
idle line preference and its accompanying toll restriction assignment. They then have 15 seconds
to dial an outgoing call. Once they hang up from a call, they have 15 seconds to make another call
without having to re-enter their TRO code. The system marks outgoing line calls that users make
after entering a TRO code with a (T) in its SMDR/SMDA printouts. The station number that it
prints is that of the overriding station and not the actual station that the call was made from. If a
user transfers a TRO call or places it on hold and picks it up at another station, the call belongs to
the new station.
Positive Disconnect Supervision
When a station is on line with an outside caller and the caller hangs up, the CO may send a
positive disconnect signal to the telephone system. A programmer can enable a positive
disconnect supervision feature on a per line basis. With this feature enabled when the telephone
system detects the CO’s positive disconnect signal, the system resets the toll restriction, releases
the current call record, and creates a new call record in its place.
Tone or Voice Signaling (Intercom)
The system allows intercom calls to be tone signaled or voice signaled as the users desire;
however, the programmer uses system class of service programming procedures to determine
which signaling method the system will employed as the primary method. Regardless of the
programmer’s arrangement, telephone users can take action to use the alternate method when they
need it. See the paragraph titled Intercom Call Progress Tones for a discussion of the intercom
signaling tones.
See also, Intercom.
404
Programming the DSU II
IMI66–132
DSU II Digital Telephone System
Tracker Paging System
The optional Tracker Paging System is a wireless paging system that uses an external base station
connected to the common equipment cabinet and individual portable pagers assigned to the
system station extension numbering plan. The Tracker Paging System allows telephone users to
send alpha/numeric or numeric-only messages to Tracker pagers assigned to station extension
numbers. The type of message that the system delivers is dependent on the model Tracker pager
being used. The Tracker base station requires only one connection to the digital telephone system;
however, the installer will need to take several programming steps to make it operational.
Transferring Calls
See Call Transfer.
Transfer/Conference Button
The telephones provide this fixed button that gives quick, easy transferring and conferencing.
U
Unanswered Call Transfer Recall Timing
A transferred call that is unanswered after a programmed length of time will return to the station
that transferred it. The system will return the call to both attendant stations when the tandem
attendant feature is enabled. When LCD speakerphones are employed, the display will show the
station number or name as well as the line number that is being re-called. The system class of
service programming determines the recall time for an unanswered call transfer.
See also, Call Transfer.
Unscreened Call Transfer
A user can transfer a call to another station without first announcing it. The transferred call will
camp-on to the other station where it will ring and await an answer. The call will automatically
ring back to the transferring station after a programmable recall period. There is no limit as to
how many calls users can camp-on to another station. A transferred call will only ring if the
station is idle. If the station is busy, the call will wait until it is idle before it rings. The
programmer can use the system class of service programming to set the recall time for an
unanswered transferred call.
See also, Call Transfer.
V
Visual Voice Mail
Visual Voice Mail (VVM) support provides proprietary, two-line display LCD speakerphone
stations with visual messages and interactive buttons. This message and button functionality
enhances the stations with visual messages and interactive buttons. This message and button
functionality enhances the station’s use with Comdial Versatile Voice Processing (VVP) voice
mail equipment. To implement VVM support, the system programmer must enable it with class of
service programming action.
Programming the DSU II
405
DSU II Digital Telephone System
IMI66–132
NOTE: On the J0408, VVM requires the same serial data connection to the common
equipment cabinet as does the Tracker Paging System, the Tracker Paging
System is unavailable while VVM is operational.
When enabled, VVM causes the speakerphone to display a VMAIL button that users press to call
the voice mail system. After they press this button, the system prompts them to enter a password.
(This password is one that the programmer assigns to the stations.) Once users enter the
password, the speakerphone’s display shows the VVP’s main menu. From there, users can select
the operation they wish to pursue.
When there is a message waiting, the display shows the message quantity in place of the button
(for example, 5 MSG). Users press the MSG button to play the stored messages. The system
prompts the user to enter a password (if programmed to require one) before it plays the new
messages.
Voice Announce Blocking
This feature allows station users to block voice announced intercom signaling by dialing a code
or pressing a programmable button programmed for that purpose. The programmable button used
to block voice signaling is enabled by station class of service programming.
See Intercom.
Voice Mail Support
The digital telephone system supports the use of voice processing equipment connected to the
system’s station ports through the ATI-D analog terminal interface. The ATI-D is a multipurpose
on-premise accessory for the digital telephone system. It has dual circuits that allow the voice
mail equipment to interface to two station ports. In addition to the required programming task of
identifying the station ports as voice mail ports, there are several other programming
considerations associated with voice mail operation that the programmer can make whenever
their options are wanted. These options include the following features:
ACD Functionality Access from LCD
When a user is logged into an ACD group, the voice mail system will control the LCD on the
telephone. During that period, the telephone system will only update the LCD with messages
from the voice mail system. When the user logs out of the ACD group, the voice mail system
returns control of the LCD to the telephone system and normal operation resumes.
Automatic Attendant
With the automatic attendant feature, the voice mail system automatically answers any line that is
ringing at a voice mail port. As a default, the system automatically enables ringing line preference
for any port the programmer identifies as voice mail ports. The programmer must choose a
ringing assignment for the lines assigned to the voice mail port before the voice mail system can
provide the automatic attendant feature.
Automatic Transfer of Voice Mail
The programmer can choose the immediate transfer mode for voice mail transfers. However, if he
turns on the screen and/or confirm options provided by the voice mail system, he must not choose
the immediate transfer mode because it allows the system to transfer a call as soon as it answers it
precluding any screen and confirm action that the voice mail equipment can provide.
406
Programming the DSU II
IMI66–132
DSU II Digital Telephone System
Busy Lamp Field (BLF) Information Supplied to Voice Mail
This feature gives voice mail the capability to monitor the state of an extension. When an
extension changes state from idle to busy or busy to idle, the digital telephone system notifies the
voice mail system of the change. The system uses this feature when users log into the ACD voice
mail. The programmer should turn on station monitoring to allow voice mail to better interpret
the station status.
Calling Party Digit Collection
When the VP system collects digits from the caller, these digits are passed from the voice mail to
the digital telephone system. This number is treated like the Caller ID information and is
displayed on the telephone’s LCD. The Caller ID feature must be enabled for the feature even
though a Caller ID device may not be physically present.
Database Supplied to Voice Mail System
When voice mail requests the name of an extension from the digital telephone system, the system
replies with the extension number, extension name, and the extension state (idle or busy). This
information is supplied by the digital telephone system to voice mail each time an extension
number changes or whenever voice mail requests the information.
Hunt Groups
When a station port that has been assigned to an intercom hunt group is busy, a call to it will ring
at the next idle station port in the group. A call will try to ring every port in a hunt group and if all
are busy, the telephone system will return a busy tone to the caller. A programmer can assign all
voice mail ports to a circular hunt group to take advantage of its multiple-port interface capability.
With this arrangement, a call will first try to ring at the first port, then try the next one and so
forth until it tries all four ports.
New Incoming Call Message
The new incoming call message includes three elements:
• Personal Greeting Enhancements
• Calling Party ID on incoming calls
• External Caller ID passed to voice mail
When voice mail answers a call, the digital telephone system sends a message to the voice mail,
including the calling party’s internal extension or external caller ID, if available, and the
extension number of the called station and the reason code. (The system plays different greetings
based upon the reason code.) This sent message replaces the in-band DTMF signaling.
Positive Disconnect Supervision
When a station is on line with an outside caller and the caller hangs up, the CO may send a
positive disconnect signal to the digital telephone system. The system passes this signal to the
voice mail equipment thus signaling it also to hang up.
Record Button
This feature allows a user to record a conversation already in process by pressing a programmable
Record button. This is a very convenient feature in ACD applications because the agent’s LCD
will contain ACD information instead of the usual line call information. In non-ACD
applications, the LCD displays RECORD above the appropriate interactive button.
Programming the DSU II
407
DSU II Digital Telephone System
IMI66–132
Transfer a Line Call to Voice Mail
When a station is on-line with an outside caller, and the user presses the Transfer to Voice Mail
button, the line is put on hold and an intercom tone will be heard. At that time, the user can press
a DSS button or dial the desired extension. As soon as this is done, the station will go idle and the
line on hold will be transferred to voice mail and routed to the mailbox entered by the user.
NOTE: The Transfer to Voice Mail button is a dual-purpose button—it is also used
for Voice Memo.
Voice Mail Line ID
The programmer can program the voice mail lines with identification (ID) numbers that allow the
voice mail equipment to identify which line it is answering. The ID numbers that the programmer
assigns here must match the ID numbers that are selected as part of voice mail system
programming.
Voice Mail Pause
Some voice mail systems allow you to program a pause before they dial an extension number.
You can program the digital telephone system to pause before receiving digits from a voice mail
system. This capability allows the digital telephone system to match the voice mail system’s
pause. If the voice mail system does not pause before dialing an extension number, you must
disable the fixed one second pause in the digital telephone system.
Voice Mail Transfer On Busy
The programmer can arrange the telephone system to alert a busy telephone that the voice mail
equipment is attempting to transfer a call to it. Without this programming, the voice mail
equipment will automatically route the call to a voice mailbox when it encounters a busy signal.
With this option, when the voice mail equipment tries to transfer a call to a station that is busy on
a call (outside or intercom call) and the station has an available intercom line (stations can be
programmed to have a second intercom), the intercom will ring subdued. The user can answer the
call by pressing the button of the ringing intercom line. In general, attendants will probably desire
this feature so they can handle multiple calls, while other station users may prefer to have a
message taken when they are already busy on a call.
Voice Memo Feature
This feature allows a user to deposit a voice mail message directly in another user’s mailbox. A
user presses the Voice Memo button and then selects the extension for the mailbox where they
want to deposit the message. The digital telephone system then calls the voice mail, and the call is
routed to the selected mailbox. If there is no mailbox number then the voice mail system prompts
the user to enter one.
NOTE: The Voice Memo button is a dual-purpose button—it is also used for Transfer
to Voice Mail.
408
Programming the DSU II
IMI66–132
DSU II Digital Telephone System
Volume Control
Every Impact, Impression, DigiTech, and Scout telephone has a multipurpose volume control for
adjusting the loudness of the ringer, the speaker, the handset, the headset, and the group listening
mode. LCD speakerphones display the new volume setting whenever the user presses the rocker
switch volume control located on the telephone’s faceplate.
There are four ringer levels (Scout has two plus off). At default system settings, users can set the
ringer loudness at their stations from completely off to maximum. System programmers may
disable the ringer-off feature on a system-wide basis. When programmers take this option, users
can set the ringer volume to a low level but cannot completely silence it.
The number of handset loudness levels is different for each telephone model. DigiTech
telephones have 8 handset volume settings. At default, Impact and Impression telephones have 8
handset volume settings, but the installer may increase the number of volume settings on
individual stations to 13. The maximum volume range for listening is always available to the user,
even when this feature is disabled. Users working in noisy environments and users with hearing
impairments may find the increased number of volume settings useful. Impact SCS telephones
have 8 handset volume settings, providing a range in volume that is similar to Impact models
using 13 steps. The Scout has 2 handset volume levels.
There are 8 headset volume levels on DigiTech telephones, 13 on Impact and Impression
telephones, and 2 on Scout telephones. Impact, Impression, and DigiTech telephones have 8
speaker volume levels. DigiTech telephones have 7 group listening volume levels, Impact and
Impression telephones have 8. Impact SCS telephones have 8 volume levels each for headset,
speaker, and group listening.
Z
Zone Paging (Via Station Speakers)
Zone paging allows groups of stations to receive announcements through the station speakers.
The programming can enable zone paging in up to four different zones. Zone paging can also be
received at the paging port where it can be connected to the input of an external paging amplifier.
The ability of each station to originate and/or receive a page and the arrangement of the paging
into different zones are controlled by station class of service programming. Zone paging through
the paging port is enabled by system class of service programming.
See also, Paging.
Programming the DSU II
409
Notes
IMI66–132
DSU II Digital Telephone System
Index
A
AC Power Connection . . . . . . . . . . . . . . . . . 31
Add-on Expansion Module . . . . . . . . . . . . . 73
Add-on Expansion Modules. . . . . . . . . . . . . 66
Analog Terminal Interface . . . . . . . . . . . . 3, 85
Authorizing Repairs . . . . . . . . . . . . . . . . . . . 79
Auxiliary Equipment Interface. . . . . . . . . . . 54
B
Battery Backup. . . . . . . . . . . . . . . . . . . . . . . . 4
Battery Backup Assembly Installation. . . . . 81
C
Caller ID. . . . . . . . . . . . . . . . . . . . . . . . . . . . . 4
Central Office Limits . . . . . . . . . . . . . . . . . . 21
Checking General Operating Conditions . . . 76
Checking Resistance . . . . . . . . . . . . . . . . . . 75
Checking System Installation. . . . . . . . . . . . 75
Checking the System Status Indicator . . . . . 76
Checking Voltage . . . . . . . . . . . . . . . . . . . . . 75
Common Audible &
Auxiliary Ringing Interface . . . . . . . . . . . . . 56
Common Equipment Data Connections. . . . 61
Common Equipment Description. . . . . . . . . . 6
Common Equipment Dimensions . . . . . . . . 19
Conferencing . . . . . . . . . . . . . . . . . . . . . . . . 20
Connecting a PC for
Remote Programming . . . . . . . . . . . . . . . . . 63
Connecting a Power Failure Station. . . . . . . 53
Connecting Analog Terminal Interface . . . . 89
Connecting Data Devices. . . . . . . . . . . . . . . 59
Connecting Lines . . . . . . . . . . . . . . . . . . . . . 34
Connecting Outside Lines . . . . . . . . . . . . . . 56
Programming the DSU II System
Connecting Selected Ports . . . . . . . . . . . . . . 56
Connecting Stations . . . . . . . . . . . . . . . . . . . 38
J0408. . . . . . . . . . . . . . . . . . . . . . . . . . . . . . . 40
J0816. . . . . . . . . . . . . . . . . . . . . . . . . . . . . . . 42
J1632. . . . . . . . . . . . . . . . . . . . . . . . . . . . . . . 44
D
Data Connections . . . . . . . . . . . . . . . . . . . . . 61
Data Interface Unit Installation . . . . . . . . . . 93
DigiTech Telephones and Consoles . . . . . . . . 2
DIU. . . . . . . . . . . . . . . . . . . . . . . . . . . . . . . . . 4
DSS/BLF Console . . . . . . . . . . . . . . . . . . . . . 4
DVA . . . . . . . . . . . . . . . . . . . . . . . . . . . . . . . . 4
E
Electrostatically Sensitive Components. . . . . 2
External Paging Interface. . . . . . . . . . . . . . . 58
F
FCC Regulatory Rules & Regulations . . . . 102
FCC Rules & Regulations . . . . . . . . . . . . . . 78
Feature Codes. . . . . . . . . . . . . . . . . . . . . . . . 22
Features . . . . . . . . . . . . . . . . . . . . . . . . . . . 351
Fuses. . . . . . . . . . . . . . . . . . . . . . . . . . . . . . . 31
G
Glossary . . . . . . . . . . . . . . . . . . . . . . . . . . . 351
Grounding System . . . . . . . . . . . . . . . . . . . . 32
Grounding Unused Station Cables . . . . . . . . 39
411
DSU II Digital Telephone System
IMI66–132
H
P
Hardware Summary . . . . . . . . . . . . . . . . . . . . 6
Headset Operation . . . . . . . . . . . . . . . . . . . . . 4
PA Port . . . . . . . . . . . . . . . . . . . . . . . . . . . . . 21
Party Line & Coin Line Limitations . . . . . . 78
Power Requirements . . . . . . . . . . . . . . . . . . 20
Programming . . . . . . . . . . . . . . . . . . . . . . . 107
I
Impact Telephones and Consoles . . . . . . . . . . 2
Impression Telephones. . . . . . . . . . . . . . . . . . 3
Installation Requirements. . . . . . . . . . . . . . . 78
Installing Cable Clips. . . . . . . . . . . . . . . . . . 40
Installing DSS/BLF Consoles . . . . . . . . . . . 51
Isolating Failures . . . . . . . . . . . . . . . . . . . . . 76
IST Phones thru ATI-D . . . . . . . . . . . . . . . . . 3
J
JM008 Module . . . . . . . . . . . . . . . . . . . . . . . 69
JM408 Module . . . . . . . . . . . . . . . . . . . . . . . 67
L
Line Port as an External Paging Interface . . 59
M
Making Modular Jack Data Connections. . . 59
Mounting the Analog Terminal Interface . . 87
Music Interface. . . . . . . . . . . . . . . . . . . . 21, 65
N
Notifying the Telephone Company . . . . . . . 78
O
Operating Environment . . . . . . . . . . . . . . . . 20
412
Abandoned Hold Release . . . . . . . . . . . . . . 141
Access Codes . . . . . . . . . . . . . . . . . . . . . . . 226
Access Denied . . . . . . . . . . . . . . . . . . . . . . 154
Account Code Button . . . . . . . . . . . . . . . . . 197
Account Code Length. . . . . . . . . . . . . . . . . 214
Account Code List . . . . . . . . . . . . . . . . . . . 215
Account Code Message Display Time . . . . 217
Account Codes . . . . . . . . . . . . . . . . . . . . . . 213
All Call & Zone Paging . . . . . . . . . . . . . . . 155
Alternate Line Groups . . . . . . . . . . . . . . . . 269
Analog Terminal Interface . . . . . . . . . . . . . 220
Area Code Band Table . . . . . . . . . . . . . . . . 258
Assign Tables to Lines . . . . . . . . . . . . . . . . 279
Assign Tables to Stations . . . . . . . . . . . . . . 280
Assign Toll Restriction Tables
for Night Transfer . . . . . . . . . . . . . . . . . . . . 281
Assign TR Tables to Speed Dial Calls . . . . 281
Audible Monitoring . . . . . . . . . . . . . . . . . . 157
Auto Station Logon . . . . . . . . . . . . . . . . . . 250
Automatic Call-Back Button . . . . . . . . . . . 198
Automatic Hold . . . . . . . . . . . . . . . . . . . . . 159
Automatic Privacy . . . . . . . . . . . . . . . 142, 160
Automatic Station Relocation. . . . . . . . . . . 115
Automatic Transfer of Voice Mail . . . . . . . 244
Blank Buttons . . . . . . . . . . . . . . . . . . . . . . . 199
Block Programming . . . . . . . . . . 109, 150, 194
Button Mapping . . . . . . . . . . . . . . . . . . . . . 196
Call Forward Button . . . . . . . . . . . . . . . . . . 200
Call Forward on Busy/RNA . . . . . . . . . . . . 162
Call Forward on RNA . . . . . . . . . . . . . . . . 230
Call Origination Denied . . . . . . . . . . . . . . . 165
Call Park Orbit Button . . . . . . . . . . . . . . . . 201
Call Park Recall Time. . . . . . . . . . . . . . . . . 135
Call Rate Tables . . . . . . . . . . . . . . . . . . . . . 259
Caller ID . . . . . . . . . . . . . . . . . . . . . . . . . . . 293
Caller ID Distribution. . . . . . . . . . . . . . . . . 297
Caller ID Lines, Assigning . . . . . . . . . . . . . 296
Caller ID Save Button . . . . . . . . . . . . . . . . 298
Caller ID Stations, Assigning . . . . . . . . . . . 296
Caller ID, Audible First Ring . . . . . . . . . . . 297
Caller ID, Configuring COM 2 . . . . . . . . . 297
Central Message Desk . . . . . . . . . . . . . . . . 166
CFOS . . . . . . . . . . . . . . . . . . . . . . . . . . . . . 133
Converting Button Designations . . . . . . . . 108
Programming the DSU II System
IMI66–132
Data Baud Rate . . . . . . . . . . . . . . . . . . . . . . 116
Data Printer Service . . . . . . . . . . . . . . . . . . 239
Data Security Port. . . . . . . . . . . . . . . . . . . . 166
DCD Dept Transfers before Disconnect. . . 287
DCD Operation. . . . . . . . . . . . . . . . . . . . . . 286
DCD Type Longest Idle Distribution . . . . . 232
DCD Type Ring All Stations . . . . . . . . . . . 231
Defaulting Button Assignments . . . . . . . . . 112
Defaulting Lines . . . . . . . . . . . . . . . . . . . . . 111
Defaulting Stations . . . . . . . . . . . . . . . . . . . 111
Defaulting System . . . . . . . . . . . . . . . . . . . 111
Dialing and Answer Time. . . . . . . . . . . . . . 262
Direct Department Calling . . . . . . . . . . . . . 225
Direct Department Calling, Line Ports. . . . 227
Discard Digits. . . . . . . . . . . . . . . . . . . . . . . 261
Disconnect Notification . . . . . . . . . . . . . . . 152
DISD. . . . . . . . . . . . . . . . . . . . . . . . . . . . . . 233
DISD Assist Station . . . . . . . . . . . . . . . . . . 236
DISD Dial Time Limit . . . . . . . . . . . . . . . . 234
DISD Enable/Disable Call Waiting Tone . . 238
DISD Incoming Rings . . . . . . . . . . . . . . . . 237
DISD Operation . . . . . . . . . . . . . . . . . . . . . 288
DIU . . . . . . . . . . . . . . . . . . . . . . . . . . . . . . . 291
DIU Data Buttons . . . . . . . . . . . . . . . . . . . . 291
DIU Security Groups . . . . . . . . . . . . . . . . . 292
DIU, Remote Data Station . . . . . . . . . . . . . 292
Do Not Disturb . . . . . . . . . . . . . . . . . . . . . . 117
Do Not Disturb Button . . . . . . . . . . . . . . . . 202
DSS/BLF Button . . . . . . . . . . . . . . . . . . . . 203
Dual Console Feature . . . . . . . . . . . . . . . . . 167
DVA . . . . . . . . . . . . . . . . . . . . . . . . . . . . . . 286
DVA Messages . . . . . . . . . . . . . . . . . . . . . . 289
DVA, Enabling/Disabling. . . . . . . . . . . . . . 288
Enable Data Printer Operation . . . . . . . . . . 239
Enabled or Disabled Account Codes . . . . . 216
Exception Tables. . . . . . . . . . . . . . . . . . . . . 255
Exclusive Hold . . . . . . . . . . . . . . . . . . . . . . 118
Executive Override. . . . . . . . . . . . . . . . . . . 168
Extended DTMF Tones . . . . . . . . . . . . . . . 136
Flexible Ringing Assignments . . . . . . . . . . 169
Flexible Station Numbering . . . . . . . . . . . . 176
Flow Diagrams . . . . . . . . . . . . . . . . . . . . . . 253
Group Call Pickup . . . . . . . . . . . . . . . . . . . 177
Handset Volume Control . . . . . . . . . . . . . . 178
Headset Interface . . . . . . . . . . . . . . . . . . . . 180
Idle Line Preference . . . . . . . . . . . . . . . . . . 182
Inhibit DISD Digit Dialing. . . . . . . . . . . . . 235
Inhibiting System Features . . . . . . . . . . . . . 131
Insert Digits . . . . . . . . . . . . . . . . . . . . . . . . 268
Integrated Call Costing. . . . . . . . . . . . . . . . 252
Interactive Buttons . . . . . . . . . . . . . . . . . . . 181
Programming the DSU II System
DSU II Digital Telephone System
IST . . . . . . . . . . . . . . . . . . . . . . . . . . . . . . . 220
IST Distinctive Ringing . . . . . . . . . . . . . . . 223
IST Programming Requirements . . . . . . . . 220
IST through Dialing . . . . . . . . . . . . . . . . . . 224
JM008 Expansion Module . . . . . . . . . . . . . 220
LCD Messaging . . . . . . . . . . . . . . . . . . . . . 119
LCD of Costed Calls . . . . . . . . . . . . . . . . . 263
Line Button. . . . . . . . . . . . . . . . . . . . . . . . . 205
Line Disable . . . . . . . . . . . . . . . . . . . . . . . . 143
Line Group Button . . . . . . . . . . . . . . . . . . . 206
Line Group Queue Button . . . . . . . . . . . . . 207
Line Groups . . . . . . . . . . . . . . . . . . . . . . . . 144
Line Names. . . . . . . . . . . . . . . . . . . . . . . . . 145
Line Port Functions . . . . . . . . . . . . . . . . . . 147
Line Programming . . . . . . . . . . . . . . . . . . . 141
Line to Line Port Reassignment . . . . . . . . . 148
Master Clearing. . . . . . . . . . . . . . . . . . 110, 111
Message Wait Originate . . . . . . . . . . . . . . . 185
Multiple Intercom Button . . . . . . . . . . . . . . 208
Music On Hold . . . . . . . . . . . . . . . . . . . . . . 119
Office & Area Code Tables . . . . . . . . . . . . 265
Office Code Band Tables . . . . . . . . . . . . . . 256
Overflow Line Group . . . . . . . . . . . . . . . . . 268
Overlays . . . . . . . . . . . . . . . . . . . . . . . . . . . 110
PA Port Options . . . . . . . . . . . . . . . . . . . . . 121
Password Protection . . . . . . . . . . . . . . . . . . 113
Pause Time . . . . . . . . . . . . . . . . . . . . . . . . . 137
Personal Ringing Tones . . . . . . . . . . . . . . . 183
Positive
Disconnect Supervision . . . . . . . 151, 247, 283
Prime Line, Group, & Intercom . . . . . . . . . 184
Privacy Button . . . . . . . . . . . . . . . . . . . . . . 209
Pulse/Tone Switchable . . . . . . . . . . . . . . . . 149
Quick Transfer . . . . . . . . . . . . . . . . . . . . . . 195
Recall/Flash . . . . . . . . . . . . . . . . . . . . . . . . 138
Ringback on Transfer . . . . . . . . . . . . . . . . . 133
Ringing Line Preference. . . . . . . . . . . . . . . 185
Save Button . . . . . . . . . . . . . . . . . . . . . . . . 210
Secure Account Code Entry . . . . . . . . . . . . 219
Service Observing . . . . . . . . . . . . . . . . . . . 188
SMDA Department Numbers . . . . . . . . . . . 271
SMDA Printout. . . . . . . . . . . . . . . . . . . . . . 272
SMDA Records, Deleted . . . . . . . . . . . . . . 275
SMDA Station Assignment . . . . . . . . . . . . 271
SMDA/SMDR . . . . . . . . . . . . . . . . . . . . . . 270
SMDR Printout. . . . . . . . . . . . . . . . . . . . . . 274
SOHVA Features. . . . . . . . . . . . . . . . . . . . . 186
Special Area Code Tables. . . . . . . . . . . . . . 266
SRA . . . . . . . . . . . . . . . . . . . . . . . . . . . . . . 264
SRA Enable . . . . . . . . . . . . . . . . . . . . . . . . 264
SRA Wait Time. . . . . . . . . . . . . . . . . . . . . . 269
413
DSU II Digital Telephone System
Station Disable . . . . . . . . . . . . . . . . . . . . . . 189
Station Features . . . . . . . . . . . . . . . . . . . . . 153
Station Monitoring . . . . . . . . . . . . . . . . . . . 125
Station Name . . . . . . . . . . . . . . . . . . . . . . . 190
Station Port Line Assignment. . . . . . . . . . . 221
Station Ports for
Direct Department Calling . . . . . . . . . . . . . 228
Station-to-Station Port Reassignment. . . . . 192
Supporting Telephones . . . . . . . . . . . . . . . . 107
System Alarm Report Stations . . . . . . . . . . 193
System Alarm Reporting . . . . . . . . . . . . . . 127
System Clock . . . . . . . . . . . . . . . . . . . . . . . 128
System Features . . . . . . . . . . . . . . . . . . . . . 115
System Speed Dial . . . . . . . . . . . . . . . . . . . 129
System Timing . . . . . . . . . . . . . . . . . . . . . . 135
Tandem Attendant. . . . . . . . . . . . . . . . . . . . 131
Timed Hold Recall . . . . . . . . . . . . . . . . . . . 139
Toll Restriction . . . . . . . . . . . . . . . . . . . . . . 276
Toll Restriction Entries. . . . . . . . . . . . . . . . 277
Toll Restriction Override Code. . . . . . . . . . 282
Toll Restriction Tables . . . . . . . . . . . . 113, 278
Ton or Voice Signaling . . . . . . . . . . . . . . . . 131
Tracker for Message Notification. . . . . . . . 250
Tracker Pager Data Parameters . . . . . . . . . 285
Tracker Pager, Enabling . . . . . . . . . . . . . . . 284
Tracker Pager, Enabling for Stations . . . . . 285
Tracker Paging System . . . . . . . . . . . . . . . . 284
Tracker Paging w/ VVP . . . . . . . . . . . . . . . 249
Transfer on Busy . . . . . . . . . . . . . . . . . . . . 245
Transferring Callers to VM . . . . . . . . . . . . 246
Unanswered Call
Transfer Recall Time . . . . . . . . . . . . . 140, 229
Using a Telephone to Program . . . . . . . . . . 107
Verify Account Code Entry . . . . . . . . . . . . 218
Voice Announce Block Button . . . . . . . . . . 211
Voice Announce Blocking . . . . . . . . . . . . . 194
Voice Mail Interface . . . . . . . . . . . . . . . . . . 240
Voice Mail Line ID . . . . . . . . . . . . . . . . . . . 245
Voice Mail Pause . . . . . . . . . . . . . . . . . . . . 248
Voice Mail Port. . . . . . . . . . . . . . . . . . . . . . 241
VVP . . . . . . . . . . . . . . . . . . . . . . . . . . . . . . 249
VVP Support. . . . . . . . . . . . . . . . . . . . . . . . 251
Zone Call Band Tables . . . . . . . . . . . . . . . . 257
Zone Page/All-Call Button . . . . . . . . . . . . . 212
Protecting Lines . . . . . . . . . . . . . . . . . . . . . . 36
R
Radio Frequency Interference . . . . . . . . . . . 79
Reassigning Line Ports. . . . . . . . . . . . . . . . . 36
414
IMI66–132
Recording a Conversation . . . . . . . . . . . . . 246
Related Publications. . . . . . . . . . . . . . . . . . . . 2
Relocating Stations. . . . . . . . . . . . . . . . . . . . 39
Repair Assistance . . . . . . . . . . . . . . . . . . . . . 26
Resistance. . . . . . . . . . . . . . . . . . . . . . . . . . . 75
Ring Patterns . . . . . . . . . . . . . . . . . . . . . . . . 25
Ringer Equivalence Numbers . . . . . . . . . . . 79
S
SMDA Storage Capacity . . . . . . . . . . . . . . . 20
Specifications, General . . . . . . . . . . . . . . . . 19
Central Office Limits . . . . . . . . . . . . . . . . . . 21
Common Equipment Dimensions. . . . . . . . . 19
Conferencing . . . . . . . . . . . . . . . . . . . . . . . . 20
Feature Codes . . . . . . . . . . . . . . . . . . . . . . . . 22
Industry/Regulatory Standards . . . . . . . . . . . 22
Music Interface. . . . . . . . . . . . . . . . . . . . . . . 21
Operating Equipment . . . . . . . . . . . . . . . . . . 20
PA Port . . . . . . . . . . . . . . . . . . . . . . . . . . . . . 21
Power Requirements. . . . . . . . . . . . . . . . . . . 20
Regulatory Codes . . . . . . . . . . . . . . . . . . . . . 22
SMDA Storage Capacity . . . . . . . . . . . . . . . 20
Station Cable Requirements . . . . . . . . . . . . . 20
Station Message Detail Recording Port . . . . 21
System Capacity . . . . . . . . . . . . . . . . . . . . . . 19
System Ringing Patterns. . . . . . . . . . . . . . . . 25
Terminations . . . . . . . . . . . . . . . . . . . . . . . . . 20
Station Cable Requirements. . . . . . . . . . . . . 20
Station Controls and Indicators . . . . . . . . . . 16
Station Descriptions . . . . . . . . . . . . . . . . . . . . 7
Station Message Detail Recording Port . . . . 21
Supporting DVA Operation . . . . . . . . . . . . . 97
System Capacity. . . . . . . . . . . . . . . . . . . . . . 19
System Features . . . . . . . . . . . . . . . . . . . . . 351
System Options & Accessories . . . . . . . . . . 81
System Records . . . . . . . . . . . . . . . . . . . . . 299
Account Code Configuration . . . . . . . . . . . 317
Caller ID Service Support Configuration . . 345
Configuration Records . . . . . . . . . . . . . . . . 299
Data Interface Unit . . . . . . . . . . . . . . . . . . . 349
Digital Voice Announce . . . . . . . . . . . . . . . 347
Direct Department Calling Records . . . . . . 320
Direct Inward Station Dialing Records . . . 322
Integrated Call Costing Configuration . . . . 326
IST Configurations . . . . . . . . . . . . . . . . . . . 319
Line Configurations . . . . . . . . . . . . . . . . . . 307
Password Records. . . . . . . . . . . . . . . . . . . . 299
Programming the DSU II System
IMI66–132
DSU II Digital Telephone System
SMDA/SMDR Records . . . . . . . . . . . . . . . 331
Specialized Route Access Configuration . . 332
Station Configuration . . . . . . . . . . . . . . . . . 309
Toll Restriction Assignments . . . . . . . . . . . 343
Toll Restriction Line Assignments . . . . . . . 342
Tracker Paging . . . . . . . . . . . . . . . . . . . . . . 346
Voice Mail Interface Configuration . . . . . . 323
T
Telephone Network Compatibility . . . . . . . . 78
Telephone System Installation . . . . . . . . . . . 27
Terminations. . . . . . . . . . . . . . . . . . . . . . . . . 20
Testing Stations . . . . . . . . . . . . . . . . . . . . . . 76
Tracker . . . . . . . . . . . . . . . . . . . . . . . . . . . . . . 4
Troubleshooting Service Problems . . . . . . . 78
U
Unanswered Call Transfer Recall Time . . . 405
Using this Manual . . . . . . . . . . . . . . . . . . . 1, 2
V
Voice Announce Blocking . . . . . . . . . . . . . 405
Voice Memo . . . . . . . . . . . . . . . . . . . . . . . . 246
Voltage . . . . . . . . . . . . . . . . . . . . . . . . . . . . . 75
W
Wall Mounting Telephone Stations . . . . . . . 48
Programming the DSU II System
415
Notes
This manual has been developed by Comdial
Corporation (the “Company”) and is intended for the
use of its customers and service personnel. The
information in this manual is subject to change
without notice. While every effort has been made to
eliminate errors, the Company disclaims liability for
any difficulties arising from the interpretation of the
information contained herein.
The information contained herein does not purport to
cover all details or variations in equipment or to
provide for every possible contingency to be met in
connection with installation, operation, or
maintenance. Should further information be desired,
or should particular problems arise which are not
covered sufficiently for the purchaser’s purposes,
contact Comdial, Inside Sales Department, P.O. Box
7266, Charlottesville, Virginia 22906.
Comdial ® strives to design the features in our communications
systems to be fully interactive with one another. However, this is
not always possible, as the combinations of accessories and
features are too varied and extensive to insure total feature
compatibility. Accordingly, some features identified in this
publication will not operate if some other feature is activated.
Comdial ® disclaims all liability relating to feature
non-compatibility or associated in any way with problems which
may be encountered by incompatible features. Notwithstanding
anything contained in this publication to the contrary, Comdial
makes no representation herein as to the compatibility of
features.