1
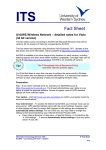
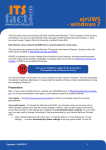
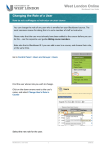
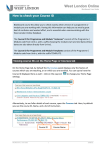
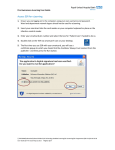
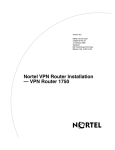
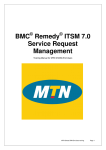
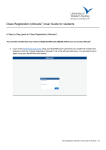
AirUWS Wireless Network – detailed notes for Vista (32 bit
version)
This fact sheet covers connecting to the older AirUWS network with Windows Vista (32 bit version). 64
bit versions of Vista are unsupported by AirUWS. The newer network AirUWS-Lite is recommended
for most users.
This fact sheet was prepared using Windows Vista Enterprise, SP1. Updates to this fact sheet, and
more information, will be available at http://www.uws.edu.au/wireless.
AirUWS is available at no extra charge at key locations on each campus, including teaching spaces
and other areas where students congregate. Coverage maps can be found at http://www.uws.edu.au/
wireless. AirUWS is not available off campus.
Your use of AirUWS is subject to the University’s
IT Acceptable Use of Resources Policy.
You’ll find that there is more than one way to achieve the same result in Windows. This fact sheet does
not attempt to address alternatives. It is assumed that readers will have a basic understanding of using
and navigating Windows Vista.
Preparation:
You – If you haven’t already done so, activate your MyUWSAccount at https://myuwsaccount.uws.
edu.au/. You’ll need administrative user rights on your laptop to install the required software. Almost all
regular users of UWS standard laptops will have sufficient rights.
Your laptop – Visit http://www.uws.edu.au/wireless to confirm your laptop meets the minimum
specifications.
Your web browser – To access the internet via AirUWS, your browser must use our proxy server.
UWS standard laptops come with the correct settings; however, users of other laptops will need to
ensure their browser’s LAN settings are configured to automatically detect settings. For non-UWS
use, you may need to change this setting to that recommended by your Internet Services Provider
(ISP).
• Open Internet Explorer’s Tools menu à Internet Options à Connections tab à LAN settings…
à ensure Automatically detect settings is the only option ticked à click OK.
Updated: 1/09/2011
1
IE 8’s proxy settings (IE 7 is almost identical)
Reusing windows when launching a shortcut (eg, clicking a link in email) means you run the risk of
accidentally leaving the portal page and being disconnected. This setting works on or off campus.
• Open IE’s Tools menu à Internet Options à Advanced tab à scroll to Browser settings à
untick Reuse windows for launching shortcuts à click OK.
You’ll also need to turn off your browser’s pop-up blocker or ensure that pop-ups from *.uws.edu.
au are allowed.
• Open IE’s Tools menu à Pop-up Blocker à Click Turn Off Pop-up Blocker
To reverse this action for non-UWS web access:
• Open IE’s Tools menu à Pop-up Blocker à Click Turn On Pop-up Blocker
Turn off Pop-up Blocker
Updated: 1/09/2011
2
Make certain Reuse windows for launching shortcuts isn’t ticked
Sometimes Internet Explorer won’t start with the AirUWS login screen. This may happen if you have
a blank or complex home page address (URL), or your home page is stored in the browser’s cache.
If you have problems opening the login screen, try clearing the cache by holding down your Shift key
while pressing F5. If that fails, try setting your home page to http://www.uws.edu.au. If the login page
opens, these steps can be ignored.
• Open IE’s Tools menu à Internet options à General tab à Home page à enter the new home
page details à click OK.
Set your home page here
Updated: 1/09/2011
3
Connecting:
Ensure your wireless hardware is turned on. Refer to your laptop’s user manual.
To connect your laptop to
AirUWS, click the Connect To
button in Vista’s start menu.
The next window displays
available wireless networks.
You may find more than one
wireless network available
– select AirUWS and press
Connect. Choose Connect
Anyway when the unsecured
network warning appears.
Click the Connect To button
If both AirUWS and AIRUWS are available, choose
the one with the strongest signal.
Select AirUWS and click Connect
Choose Connect Anyway
Updated: 1/09/2011
4
Wait for the process to show you’re connected. This should take under 30 seconds.
Your hardware is now connected
Your hardware is connected. Click Close before logging in.
If asked, Set Network Location for AirUWS, to set Windows firewall settings. Public is the most secure,
but UWS laptops cannot connect to network shares unless Work is selected. Network settings can be
changed later.
Select a network location
Authenticate (log in)
Open Internet Explorer. You should be automatically redirected to the login portal, where you’ll enter
your MyUWSAccount credentials.
Updated: 1/09/2011
5
The AirUWS login screen
After logging in, Internet Explorer will download and launch TunnelGuard, which checks your laptop
meets the minimum specifications. If TunnelGuard doesn’t start, you probably need to install Java
Runtime Environment (JRE) 1.4.2 or higher (1.6 or later recommended).
Download and install the version linked in the body of the text on the AirUWS login screen (login NOT
required). TunnelGuard should work next time you attempt to connect to AirUWS. Alternatively, use
a networked computer to visit http://www.java.com and download the software to a USB drive for
installation on your computer.
Known Java issue
IT staff have discovered an issue with Java update 18. Changes to improve security made in this
release cause a warning that “The publisher cannot be verified by a trusted source”. Although a button
to dismiss the warning is provided, the warning stays on the screen, and you will not be able to login to
AirUWS.
Workaround: To get past this problem, you will need to make changes to your Java and Internet
Explorer settings. These changes could be considered a security risk, and should be reversed when
you use your computer outside of AirUWS.
Changing these settings is a security risk!
Reverse changes when not using AirUWS
Java: Open Windows Control Panel. Double click the Java icon to open the Java Control Panel.
Choose the Advanced tab, and expand Security.
Untick any option related to certificate validation and revocation.
Updated: 1/09/2011
6
Untick any option related to certificate validation and revocation.
Internet Explorer: From IE’s Tools menu, choose Internet Options à Advanced tab. Scroll down to
the Security section. Untick any option related to certificate validation and revocation.
After installing Java or changing the settings, restart your machine. TunnelGuard should now work
when you attempt to connect to AirUWS.
If TunnelGuard finds your laptop doesn’t comply with the minimum specifications, it will stop the
connection process.
TunnelGuard has found this laptop meets AirUWS specifications
If your laptop complies, the portal window will open and NetDirect (Nortel Networks Virtual Private
Network (VPN) client) will automatically download and run. This software establishes your wireless
connection to the internet and intranet. A window will appear asking if you want to install the device
software. Choose Install. If you tick the box Always trust software from Nortel Networks, this
message should not appear next time you connect to AirUWS. However, users should be aware that
“always trusting” is a potential security risk.
Updated: 1/09/2011
7
Choose Install
After installation, the AirUWS portal will open.
The AirUWS portal screen – don’t close this window!
You’ll also see a banner message welcoming you to the campus Wireless Gateway. You must wait for
this message before going further (it may take a minute or so). Press OK. Now you’re fully connected
to AirUWS.
Note: If you don’t see the banner message, you haven’t connected – close Internet Explorer and start
the authentication process again.
Updated: 1/09/2011
8
Click OK on the welcome message. A Nortel NetDirect icon and bubble
notification will also appear in your system tray
For security reasons, each time you connect you’ll go through the authentication, download and
installation process.
I’m connected – now what?
Don’t close the AirUWS portal window,
or you’ll be disconnected.
Open a new instance of your browser to surf the web. Opening a new instance means that you’ll
need to click the icon used to launch the browser program again – don’t just open a new window or a
new tab. Web based programs such as Internet Explorer and MSN Messenger should work normally.
As in the general purpose computer labs, all users of AirUWS are required to authenticate again, when
they try to access external websites. Enter your MyUWSAccount details when the login box appears,
and press OK to continue. You may be asked to authenticate more than once.
Authenticate with your MyUWSAccount details
Updated: 1/09/2011
9
Note: Use your ISP’s web email portal to access your home email account. UWS cannot provide
assistance with access to non UWS email.
Privately owned computers are not able to connect to network shares, synchronise off-line files or
print, but will have internet access. If you need to print from a privately owned laptop, we recommend
saving your work to a USB drive, which you can take to an on campus computer lab to print as you
normally do in the labs.
How do I log off?
Users of UWS standard computers should save their work, manually synchronise their files, close
open programs (other than the AirUWS portal page), and use the logoff link on the portal page.
Users of privately owned computers should save their work, close open programs (other than the
AirUWS portal page), and use the logoff link on the portal page.
Save your work before logging off!
Help
In the first instance, contact the IT Support Officers located at the general purpose computer labs. Users
can also contact the ITS Service Desk for support.
Tips:
Save often. Wireless is less reliable than wired networks, and you could lose your data
if your network connection is lost. Save often to minimise the risk. In most Windows
programs, you can simulatneously press the ctrl and s keys to quickly save.
Don’t try and connect wirelessly while still running a wired connection – the laptop may get confused
about which connection to use.
You may need to grant exemptions in your firewall for TunnelGuard and NetDirect.
Inactivity timeouts apply. Users are automatically logged off after lengthy inactivity.
Known Issues:
In addition to the Java problem mentioned earlier, Vista may fail compliance tests, even with an
accepted Antivirus product.
Vista comes with a security feature called User Account Control (UAC). When UAC is turned on,
TunnelGuard is unable to detect your Antivirus product, so compliance fails. A work around is to turn
UAC off, but doing so is against Microsoft’s recommendations.
Updated: 1/09/2011
10
Turning off Vista’s User Account Control is a security risk!
To turn off User Account Control, open the Windows control panel.
Click the Classic View option to switch the Control Panel to classic view à Double click User Accounts
à Remove the tick to turn off User Account Control (UAC) à Restart the computer à Retry the login
process.
Click Classic View option to change the control panel to classic view.
Double click User Accounts.
Click Turn User Account Control on or off
Untick Use User Account Control (UAC) to help protect your computer, and click OK.
Updated: 1/09/2011
11
Restart to apply the changes
Reverse the above procedure to restart UAC for normal use.
Network drivers
When AirUWS was released in 2007, there were a number of problems related to the compatibility of
Microsoft Vista network drivers and the AirUWS wireless implementation. These problems appear to
have been resolved with later versions of Vista and drivers. If you have an older Vista machine, you
may find you need to update your network drivers to maintain a reliable connection. Drivers are usually
available at the computer manufacturer’s web site.
IT Service Desk
Phone:
02 9852 5111 (ext 5111)
Email:
itservicedesk@uws.edu.au
Web:
http://www.uws.edu.au/itservicedesk
Self Service job logging:
http://itsm.uws.edu.au
UWS IT Services Catalogue:
http://www.uws.edu.au/its
ITS Fact Sheets
http://www.uws.edu.au/itfactsheets
Updated: 1/09/2011
12