1
MagayaSof
t
war
e
Cust
omi
zat
i
onManual
Gui
det
o
Aut
omat
i
ngAccount
i
ngTr
ansact
i
ons
Cust
omi
zi
ngRat
esandTar
i
f
s
Cr
eat
i
ngCust
om Fi
el
ds
Cust
omi
zi
ngDocument
s
Addi
ngJavaScr
i
ptt
oDocument
s
Magaya Software Customization Manual
Table of Contents
1. How To Use This Manual . . . . . . . . . . . . . . . . . . . . . . . . . . . . . . . . . . . . . . . . . . . . . . . 5
Introduction . . . . . . . . . . . . . . . . . . . . . . . . . . . . . . . . . . . . . . . . . . . . . . . . . . . . . . . 5
How this Manual is Organized . . . . . . . . . . . . . . . . . . . . . . . . . . . . . . . . . . . . . . . . 5
Where to Find Help . . . . . . . . . . . . . . . . . . . . . . . . . . . . . . . . . . . . . . . . . . . . . . . . . 6
2. Automated Accounting . . . . . . . . . . . . . . . . . . . . . . . . . . . . . . . . . . . . . . . . . . . . . . . . . 7
Introduction to Automated Accounting . . . . . . . . . . . . . . . . . . . . . . . . . . . . . . . . . . 7
Automated Creation of Charges . . . . . . . . . . . . . . . . . . . . . . . . . . . . . . . . . . . . . . . 7
Automate Charges per Customer . . . . . . . . . . . . . . . . . . . . . . . . . . . . . . . . . . . . . . . 13
Creating Charges from Routes . . . . . . . . . . . . . . . . . . . . . . . . . . . . . . . . . . . . . . . . . 14
Recurrent Accounting . . . . . . . . . . . . . . . . . . . . . . . . . . . . . . . . . . . . . . . . . . . . . . 14
Introduction to Recurrent Accounting . . . . . . . . . . . . . . . . . . . . . . . . . . . . . . . . . . . 14
Create a Recurring Invoice . . . . . . . . . . . . . . . . . . . . . . . . . . . . . . . . . . . . . . . . . . . 14
Create a Recurring Bill . . . . . . . . . . . . . . . . . . . . . . . . . . . . . . . . . . . . . . . . . . . . . . 22
Create a Recurring Check . . . . . . . . . . . . . . . . . . . . . . . . . . . . . . . . . . . . . . . . . . . . 23
Actions for Recurrent Transactions . . . . . . . . . . . . . . . . . . . . . . . . . . . . . . . . . . . . . 26
Periodic Invoices . . . . . . . . . . . . . . . . . . . . . . . . . . . . . . . . . . . . . . . . . . . . . . . . . . 27
Steps . . . . . . . . . . . . . . . . . . . . . . . . . . . . . . . . . . . . . . . . . . . . . . . . . . . . . . . . . . 27
Periodic Billing for Vendors . . . . . . . . . . . . . . . . . . . . . . . . . . . . . . . . . . . . . . . . 29
Tariffs and Rates: Introduction . . . . . . . . . . . . . . . . . . . . . . . . . . . . . . . . . . . . . . 29
Tariffs . . . . . . . . . . . . . . . . . . . . . . . . . . . . . . . . . . . . . . . . . . . . . . . . . . . . . . . . . 30
How to Set Up Tariffs . . . . . . . . . . . . . . . . . . . . . . . . . . . . . . . . . . . . . . . . . . . . . 32
How to Customize a Tariff . . . . . . . . . . . . . . . . . . . . . . . . . . . . . . . . . . . . . . . . . 38
Rates . . . . . . . . . . . . . . . . . . . . . . . . . . . . . . . . . . . . . . . . . . . . . . . . . . . . . . . . . . . . 40
Rates Overview . . . . . . . . . . . . . . . . . . . . . . . . . . . . . . . . . . . . . . . . . . . . . . . . . . 40
Carrier Rates . . . . . . . . . . . . . . . . . . . . . . . . . . . . . . . . . . . . . . . . . . . . . . . . . . . . . 42
Set Up Carrier Rates . . . . . . . . . . . . . . . . . . . . . . . . . . . . . . . . . . . . . . . . . . . . . . 42
Actions in the Carrier Rates List . . . . . . . . . . . . . . . . . . . . . . . . . . . . . . . . . . . . . 48
Query Rates . . . . . . . . . . . . . . . . . . . . . . . . . . . . . . . . . . . . . . . . . . . . . . . . . . . . . . 49
Query Rates . . . . . . . . . . . . . . . . . . . . . . . . . . . . . . . . . . . . . . . . . . . . . . . . . . . . . 49
Standard Client Rates . . . . . . . . . . . . . . . . . . . . . . . . . . . . . . . . . . . . . . . . . . . . . . 52
Steps to Set Up Standard Client Rates . . . . . . . . . . . . . . . . . . . . . . . . . . . . . . . . 52
Actions in the Standard Client Rates List . . . . . . . . . . . . . . . . . . . . . . . . . . . . . . 55
Custom Rates . . . . . . . . . . . . . . . . . . . . . . . . . . . . . . . . . . . . . . . . . . . . . . . . . . . . . 56
Create Customized Rates . . . . . . . . . . . . . . . . . . . . . . . . . . . . . . . . . . . . . . . . . . 57
Carrier Contracts . . . . . . . . . . . . . . . . . . . . . . . . . . . . . . . . . . . . . . . . . . . . . . . . . 60
Managing Contracts . . . . . . . . . . . . . . . . . . . . . . . . . . . . . . . . . . . . . . . . . . . . . . 60
Add a New Carrier Contract . . . . . . . . . . . . . . . . . . . . . . . . . . . . . . . . . . . . . . . . 63
Add Rates to a Carrier Contract . . . . . . . . . . . . . . . . . . . . . . . . . . . . . . . . . . . . . 66
Amend Rates . . . . . . . . . . . . . . . . . . . . . . . . . . . . . . . . . . . . . . . . . . . . . . . . . . . . . 72
Amend Rates based on GRI . . . . . . . . . . . . . . . . . . . . . . . . . . . . . . . . . . . . . . . . 73
1
Modify a Standard Rate . . . . . . . . . . . . . . . . . . . . . . . . . . . . . . . . . . . . . . . . . . . 80
Modify Rates for Your Customers . . . . . . . . . . . . . . . . . . . . . . . . . . . . . . . . . . . 82
Client Contracts . . . . . . . . . . . . . . . . . . . . . . . . . . . . . . . . . . . . . . . . . . . . . . . . . . . 83
Client Contracts: Add Contracts and Rates . . . . . . . . . . . . . . . . . . . . . . . . . . . . . 84
Salesperson’s Commissions . . . . . . . . . . . . . . . . . . . . . . . . . . . . . . . . . . . . . . . . . . 87
Add a New Salesperson . . . . . . . . . . . . . . . . . . . . . . . . . . . . . . . . . . . . . . . . . . . 87
Freight Commission . . . . . . . . . . . . . . . . . . . . . . . . . . . . . . . . . . . . . . . . . . . . . . 88
Inventory Commissions . . . . . . . . . . . . . . . . . . . . . . . . . . . . . . . . . . . . . . . . . . . 92
Agent Participation . . . . . . . . . . . . . . . . . . . . . . . . . . . . . . . . . . . . . . . . . . . . . . . 94
Reports . . . . . . . . . . . . . . . . . . . . . . . . . . . . . . . . . . . . . . . . . . . . . . . . . . . . . . . . 96
3. Configuration Menu . . . . . . . . . . . . . . . . . . . . . . . . . . . . . . . . . . . . . . . . . . . . . . . . . . . 99
Introduction to the Configuration Menu . . . . . . . . . . . . . . . . . . . . . . . . . . . . . . . . . 99
General . . . . . . . . . . . . . . . . . . . . . . . . . . . . . . . . . . . . . . . . . . . . . . . . . . . . . . . . . . . 101
Company Type . . . . . . . . . . . . . . . . . . . . . . . . . . . . . . . . . . . . . . . . . . . . . . . . . . . . . 102
Document Numbers . . . . . . . . . . . . . . . . . . . . . . . . . . . . . . . . . . . . . . . . . . . . . . . . . 103
Accounting . . . . . . . . . . . . . . . . . . . . . . . . . . . . . . . . . . . . . . . . . . . . . . . . . . . . . . . . 106
Automatic Charge Generation . . . . . . . . . . . . . . . . . . . . . . . . . . . . . . . . . . . . . . . . . 106
Fiscal Printer . . . . . . . . . . . . . . . . . . . . . . . . . . . . . . . . . . . . . . . . . . . . . . . . . . . . . . 107
Denied Party Screening . . . . . . . . . . . . . . . . . . . . . . . . . . . . . . . . . . . . . . . . . . . . . . 109
Configure . . . . . . . . . . . . . . . . . . . . . . . . . . . . . . . . . . . . . . . . . . . . . . . . . . . . . . . . . 109
Form Filling . . . . . . . . . . . . . . . . . . . . . . . . . . . . . . . . . . . . . . . . . . . . . . . . . . . . . . . 112
Labels . . . . . . . . . . . . . . . . . . . . . . . . . . . . . . . . . . . . . . . . . . . . . . . . . . . . . . . . . . . . 114
Measurement Units . . . . . . . . . . . . . . . . . . . . . . . . . . . . . . . . . . . . . . . . . . . . . . . . . 114
Transaction Tracking . . . . . . . . . . . . . . . . . . . . . . . . . . . . . . . . . . . . . . . . . . . . . . . . 115
Customer Setup: For LiveTrack and Account Numbers . . . . . . . . . . . . . . . . . . . . . 116
Incoming Messages . . . . . . . . . . . . . . . . . . . . . . . . . . . . . . . . . . . . . . . . . . . . . . . . . 118
Outgoing Messages . . . . . . . . . . . . . . . . . . . . . . . . . . . . . . . . . . . . . . . . . . . . . . . . . 119
Sales . . . . . . . . . . . . . . . . . . . . . . . . . . . . . . . . . . . . . . . . . . . . . . . . . . . . . . . . . . . . . 120
Purchasing . . . . . . . . . . . . . . . . . . . . . . . . . . . . . . . . . . . . . . . . . . . . . . . . . . . . . . . . 121
Online Bookings . . . . . . . . . . . . . . . . . . . . . . . . . . . . . . . . . . . . . . . . . . . . . . . . . . . 122
Online Payments . . . . . . . . . . . . . . . . . . . . . . . . . . . . . . . . . . . . . . . . . . . . . . . . . . . 122
Online Sales Orders . . . . . . . . . . . . . . . . . . . . . . . . . . . . . . . . . . . . . . . . . . . . . . . . . 124
Online Shipping Orders . . . . . . . . . . . . . . . . . . . . . . . . . . . . . . . . . . . . . . . . . . . . . . 127
US Customs Systems . . . . . . . . . . . . . . . . . . . . . . . . . . . . . . . . . . . . . . . . . . . . . . . . 128
Express Link . . . . . . . . . . . . . . . . . . . . . . . . . . . . . . . . . . . . . . . . . . . . . . . . . . . . . . 128
WMS . . . . . . . . . . . . . . . . . . . . . . . . . . . . . . . . . . . . . . . . . . . . . . . . . . . . . . . . . . . . 129
POD Mobile . . . . . . . . . . . . . . . . . . . . . . . . . . . . . . . . . . . . . . . . . . . . . . . . . . . . . . . 130
Scales . . . . . . . . . . . . . . . . . . . . . . . . . . . . . . . . . . . . . . . . . . . . . . . . . . . . . . . . . . . . 130
Air . . . . . . . . . . . . . . . . . . . . . . . . . . . . . . . . . . . . . . . . . . . . . . . . . . . . . . . . . . . . . . 131
Ocean . . . . . . . . . . . . . . . . . . . . . . . . . . . . . . . . . . . . . . . . . . . . . . . . . . . . . . . . . . . . 135
Ground . . . . . . . . . . . . . . . . . . . . . . . . . . . . . . . . . . . . . . . . . . . . . . . . . . . . . . . . . . . 135
Custom Fields . . . . . . . . . . . . . . . . . . . . . . . . . . . . . . . . . . . . . . . . . . . . . . . . . . . . . 136
JavaScript Code . . . . . . . . . . . . . . . . . . . . . . . . . . . . . . . . . . . . . . . . . . . . . . . . . . . . 139
Transaction Log . . . . . . . . . . . . . . . . . . . . . . . . . . . . . . . . . . . . . . . . . . . . . . . . . . . . 141
Security . . . . . . . . . . . . . . . . . . . . . . . . . . . . . . . . . . . . . . . . . . . . . . . . . . . . . . . . . . 143
2
Maintenance & Performance . . . . . . . . . . . . . . . . . . . . . . . . . . . . . . . . . . . . . . . . . . 145
Task Scheduling . . . . . . . . . . . . . . . . . . . . . . . . . . . . . . . . . . . . . . . . . . . . . . . . . . . . 146
Clauses . . . . . . . . . . . . . . . . . . . . . . . . . . . . . . . . . . . . . . . . . . . . . . . . . . . . . . . . . . . 146
Shipment Documents . . . . . . . . . . . . . . . . . . . . . . . . . . . . . . . . . . . . . . . . . . . . . . . . 147
System Alerts . . . . . . . . . . . . . . . . . . . . . . . . . . . . . . . . . . . . . . . . . . . . . . . . . . . . . . 149
Commodity Types . . . . . . . . . . . . . . . . . . . . . . . . . . . . . . . . . . . . . . . . . . . . . . . . . . 150
Divisions . . . . . . . . . . . . . . . . . . . . . . . . . . . . . . . . . . . . . . . . . . . . . . . . . . . . . . . . . 150
Event Definition . . . . . . . . . . . . . . . . . . . . . . . . . . . . . . . . . . . . . . . . . . . . . . . . . . . . 152
Incoterms . . . . . . . . . . . . . . . . . . . . . . . . . . . . . . . . . . . . . . . . . . . . . . . . . . . . . . . . . 152
Task Types . . . . . . . . . . . . . . . . . . . . . . . . . . . . . . . . . . . . . . . . . . . . . . . . . . . . . . . . 154
XML Transformations . . . . . . . . . . . . . . . . . . . . . . . . . . . . . . . . . . . . . . . . . . . . . . . 154
Email Templates . . . . . . . . . . . . . . . . . . . . . . . . . . . . . . . . . . . . . . . . . . . . . . . . . . . 156
Payment Terms . . . . . . . . . . . . . . . . . . . . . . . . . . . . . . . . . . . . . . . . . . . . . . . . . . . . 156
4. Custom Fields . . . . . . . . . . . . . . . . . . . . . . . . . . . . . . . . . . . . . . . . . . . . . . . . . . . . . . . . . 159
Introduction to Custom Fields . . . . . . . . . . . . . . . . . . . . . . . . . . . . . . . . . . . . . . . . . 159
Step-by-Step Procedure . . . . . . . . . . . . . . . . . . . . . . . . . . . . . . . . . . . . . . . . . . . . . . 161
Custom Fields in Reports . . . . . . . . . . . . . . . . . . . . . . . . . . . . . . . . . . . . . . . . . . . . . 169
Custom Fields in the Advanced Filter . . . . . . . . . . . . . . . . . . . . . . . . . . . . . . . . . . . 171
Add Custom Field to a Document Template . . . . . . . . . . . . . . . . . . . . . . . . . . . . . . 172
5. Magaya Document Designer . . . . . . . . . . . . . . . . . . . . . . . . . . . . . . . . . . . . . . . . . . . . . 173
Introduction to the Magaya Document Designer . . . . . . . . . . . . . . . . . . . . . . . . . . . 173
How to Open Magaya Document Designer . . . . . . . . . . . . . . . . . . . . . . . . . . . . . . . 178
The Magaya Document Designer Interface . . . . . . . . . . . . . . . . . . . . . . . . . . . . . . . 181
Toolbars and Menus . . . . . . . . . . . . . . . . . . . . . . . . . . . . . . . . . . . . . . . . . . . . . . . . . 181
Schema . . . . . . . . . . . . . . . . . . . . . . . . . . . . . . . . . . . . . . . . . . . . . . . . . . . . . . . . . . . 183
Fields . . . . . . . . . . . . . . . . . . . . . . . . . . . . . . . . . . . . . . . . . . . . . . . . . . . . . . . . . . . . 184
Variables . . . . . . . . . . . . . . . . . . . . . . . . . . . . . . . . . . . . . . . . . . . . . . . . . . . . . . . . . 186
Customize an Existing Template . . . . . . . . . . . . . . . . . . . . . . . . . . . . . . . . . . . . . . . 187
Fonts . . . . . . . . . . . . . . . . . . . . . . . . . . . . . . . . . . . . . . . . . . . . . . . . . . . . . . . . . . . . . 190
Tables . . . . . . . . . . . . . . . . . . . . . . . . . . . . . . . . . . . . . . . . . . . . . . . . . . . . . . . . . . . . 192
Add Custom Fields to a Template . . . . . . . . . . . . . . . . . . . . . . . . . . . . . . . . . . . . . . 196
Add an Image or Logo to a Template . . . . . . . . . . . . . . . . . . . . . . . . . . . . . . . . . . . 200
Create a New Custom Template . . . . . . . . . . . . . . . . . . . . . . . . . . . . . . . . . . . . . . . 203
Publish a Template . . . . . . . . . . . . . . . . . . . . . . . . . . . . . . . . . . . . . . . . . . . . . . . . . . 204
6. JavaScript in the Magaya Document Designer . . . . . . . . . . . . . . . . . . . . . . . . . . . . . . 207
Introduction to JavaScript in the Document Designer . . . . . . . . . . . . . . . . . . . . . . . 207
Enter Code into Magaya Document Designer . . . . . . . . . . . . . . . . . . . . . . . . . . . . . 208
The XmlDocument Object . . . . . . . . . . . . . . . . . . . . . . . . . . . . . . . . . . . . . . . . . . . . 210
Examples of JavaScript for Magaya Document Designer . . . . . . . . . . . . . . . . . . . . 211
The Database Object . . . . . . . . . . . . . . . . . . . . . . . . . . . . . . . . . . . . . . . . . . . . . . . . 217
7. Divisions . . . . . . . . . . . . . . . . . . . . . . . . . . . . . . . . . . . . . . . . . . . . . . . . . . . . . . . . . . . . . 223
Introduction to Divisions . . . . . . . . . . . . . . . . . . . . . . . . . . . . . . . . . . . . . . . . . . . . . 223
3
Step-by-Step Procedure: Set Up Divisions . . . . . . . . . . . . . . . . . . . . . . . . . . . . . . . 223
Assign an Employee to a Division . . . . . . . . . . . . . . . . . . . . . . . . . . . . . . . . . . . . . . 226
Using Divisions in Transactions . . . . . . . . . . . . . . . . . . . . . . . . . . . . . . . . . . . . . . . 227
Reports by Division . . . . . . . . . . . . . . . . . . . . . . . . . . . . . . . . . . . . . . . . . . . . . . . . . 228
8. Magaya Database Administration . . . . . . . . . . . . . . . . . . . . . . . . . . . . . . . . . . . . . . . . 231
Introduction . . . . . . . . . . . . . . . . . . . . . . . . . . . . . . . . . . . . . . . . . . . . . . . . . . . . . . . 231
Working with the Magaya Database Server Agent . . . . . . . . . . . . . . . . . . . . . . . . . 232
Backups . . . . . . . . . . . . . . . . . . . . . . . . . . . . . . . . . . . . . . . . . . . . . . . . . . . . . . . . . . 233
Create a Full Backup of Your Magaya Database . . . . . . . . . . . . . . . . . . . . . . . . 234
Create an Incremental Backup . . . . . . . . . . . . . . . . . . . . . . . . . . . . . . . . . . . . . . 236
Automate Database Backups: Overview . . . . . . . . . . . . . . . . . . . . . . . . . . . . . . . 238
Automate Full Backups . . . . . . . . . . . . . . . . . . . . . . . . . . . . . . . . . . . . . . . . . . . . 239
Automate Incremental Backups . . . . . . . . . . . . . . . . . . . . . . . . . . . . . . . . . . . . . 240
Restore Data from a Backup File . . . . . . . . . . . . . . . . . . . . . . . . . . . . . . . . . . . . 242
Database Performance . . . . . . . . . . . . . . . . . . . . . . . . . . . . . . . . . . . . . . . . . . . . . 245
Recycling . . . . . . . . . . . . . . . . . . . . . . . . . . . . . . . . . . . . . . . . . . . . . . . . . . . . . . 246
Extract Heavyweight Data to the Blobs Folder . . . . . . . . . . . . . . . . . . . . . . . . . 248
Shrink the Database . . . . . . . . . . . . . . . . . . . . . . . . . . . . . . . . . . . . . . . . . . . . . . 250
Memory Usage . . . . . . . . . . . . . . . . . . . . . . . . . . . . . . . . . . . . . . . . . . . . . . . . . . 252
Security: Server Authentication . . . . . . . . . . . . . . . . . . . . . . . . . . . . . . . . . . . . . 253
Update Magaya Software . . . . . . . . . . . . . . . . . . . . . . . . . . . . . . . . . . . . . . . . . . 256
Appendix . . . . . . . . . . . . . . . . . . . . . . . . . . . . . . . . . . . . . . . . . . . . . . . . . . . . . . . . . . . . . . . 259
JavaScript Basics . . . . . . . . . . . . . . . . . . . . . . . . . . . . . . . . . . . . . . . . . . . . . . . . . . 261
Variables . . . . . . . . . . . . . . . . . . . . . . . . . . . . . . . . . . . . . . . . . . . . . . . . . . . . . . . 261
Basic Operators . . . . . . . . . . . . . . . . . . . . . . . . . . . . . . . . . . . . . . . . . . . . . . . . . . 262
Assignations . . . . . . . . . . . . . . . . . . . . . . . . . . . . . . . . . . . . . . . . . . . . . . . . . . . . 263
Useful Mathematical Functions . . . . . . . . . . . . . . . . . . . . . . . . . . . . . . . . . . . . . 263
Conditionals . . . . . . . . . . . . . . . . . . . . . . . . . . . . . . . . . . . . . . . . . . . . . . . . . . . . 264
Script Columns . . . . . . . . . . . . . . . . . . . . . . . . . . . . . . . . . . . . . . . . . . . . . . . . . . . . 267
Introduction . . . . . . . . . . . . . . . . . . . . . . . . . . . . . . . . . . . . . . . . . . . . . . . . . . . . . 267
Steps . . . . . . . . . . . . . . . . . . . . . . . . . . . . . . . . . . . . . . . . . . . . . . . . . . . . . . . . . . 267
Customize Reports . . . . . . . . . . . . . . . . . . . . . . . . . . . . . . . . . . . . . . . . . . . . . . . . . 273
Options . . . . . . . . . . . . . . . . . . . . . . . . . . . . . . . . . . . . . . . . . . . . . . . . . . . . . . . . 273
Index
4
1. HOW TO USE THIS MANUAL
INTRODUCTION
1. How To Use This Manual
Introduction
Welcome to the Magaya Software Customization Manual.
This manual is designed to teach you how to customize your Magaya software
to meet the needs of your individual business.
Magaya software is designed for logistics providers, freight forwarders,
NVOCC’s, consolidators, forwarding agents, couriers, warehouse providers
and others in the logistics industry. Magaya software contains many customization options, operations functions, trade documents, and a complete
accounting system that integrates the accounting and operations functions.
How this Manual is Organized
This manual is designed to be task oriented. You can skip to any topic you need
and get step-by-step procedures for the customization options available in
Magaya software. You can also click on any word in the Index to go directly to
that topic in the PDF. This manual is organized into the following sections:
•
Automated Accounting: Customize your software to automate the
creation of charges; set up recurring accounting transactions for invoices,
bills, and checks; create periodic invoices; set up tariffs and rates for
carriers and customers
•
Configuration Menu: Use these options to set up document numbering,
enter custom clauses to use in shipments and other transactions, set up
transaction tracking, define tasks, and many other options
•
Custom Fields: Create your own customized fields to gather information
that is specific to your business and use it in transactions, documents, and
reports
•
Divisions: Enter information about different divisions in your company
and use that information in documents
•
Customize Documents: Customize existing documents such as invoices
and warehouse receipts, or create new, custom documents to display your
company logo, custom fields, and more using the Magaya Document
Designer program that is included with all Magaya software
5
1. HOW TO USE THIS MANUAL
WHERE TO FIND HELP
•
Insert JavaScript into a Template: Customize your software by adding
JavaScript into templates that your company can use
•
Magaya Database Administrator: Access the functions of the Magaya
Database Server Agent to create a backup of your database, create a
custom schedule of backups, and more
•
JavaScript Basics: A resource of basic information on variables, operators, mathematical functions, and conditionals
Where to Find Help
If you have questions or need help, please contact Magaya Corporation:
Phone: (786) 845-9150
Email: support@magaya.com
Video tutorials, how-to tips, and other user manuals such as the Magaya Cargo
System Operations Manual are available to view or download from the Magaya
website: www.magaya.com. Additional tips can be found in the Magaya
Explorer dialog boxes and screens. Videos are also on YouTube.
Use of the Magaya software and its documentation are governed by the terms
set forth in your license.
Copyright © 2015 by Magaya Corporation. All rights reserved.
6
2. AUTOMATED ACCOUNTING
INTRODUCTION TO AUTOMATED ACCOUNTING
2. Automated Accounting
Introduction to Automated Accounting
Magaya Explorer provides options to automate the creation of accounting
transactions. This process is divided into two steps: 1) First, create the transaction, and 2) tell the system how to calculate the prices.
1) Automated creation of accounting transactions is done with the following
features:
•
Automatic creation of charges in operations and when working with
routes
•
Recurring accounting transactions
•
Periodic invoices
2) Calculate the prices or fees for the created transactions with the following
features:
•
Tariffs
•
Rates for carriers and clients (i.e., your customers)
•
Manage contracts
Automated Creation of Charges
Magaya Explorer enables you to add charges and make them appear automatically in operations transactions. If you set up charges and tell the system to add
them to transactions automatically, then the charges will appear each time that
type of transaction or document is created. The charges are also carried over
from one transaction to another when you convert one into another. For
example, charges added to a Pickup Order or Warehouse Receipt are carried
over into a Shipment when the transaction is converted. The created charges
will also be used later in the liquidation to create accounting transactions.
7
AUTOMATED CREATION OF CHARGES
Existing charges in your Magaya system can be automated, or you can create
new ones and automate them.
Set Up:
Go to Maintenance > Configuration > Automatic Charge Generation. Verify
the checkbox is checked to allow automatic generation of charges. The setting is
on by default and set to use the current date. Modify the date setting as needed.
To set up automation on existing charges, follow these steps:
8
1)
Go to the Accounting folder in Magaya Explorer > Items and Services.
2)
Select an item that you want to automate, for example, the Cartage Fee. In
this example we will add a charge to each containerized ocean export shipment for taking the container to the port. Double-click on "Cartage Fee"
(or select it and click the Edit button).
AUTOMATED CREATION OF CHARGES
3)
The “Items and Services” dialog box for the Cartage Fee opens:
9
AUTOMATED CREATION OF CHARGES
Click the “Automatic Creation” tab and follow these steps:
Activate the checkboxes by clicking on the box next to “Enable Automatic
creation for:” and a checkmark will appear in the box (1).
Check Ocean House Shipment (OHE) under the Export Shipments list (2).
Click on the “Modes of Transportation” button (3):
•
10
In the screen that opens, uncheck the box to "Apply this charge to all the
modes of transportation available (1). Then uncheck the other boxes
AUTOMATED CREATION OF CHARGES
"Vessel" and "Barge" so only the “Vessel, Containerized” option is checked
(2):
Click OK in the Appliable (applicable) Modes of Transportation dialog
box to return to the Items and Services dialog box. (Using the Modes of
Transportation button is optional, but for this example we used it because
we want only the “Vessel, Containerized” mode.)
•
To allow the charges to appear in the operations documentation that is
viewable to customers, leave the checkbox blank for “Do not Show in
Documents.” If you do not want the charges to appear in the operations
documents, check the box.
•
If the price for this charge depends on other charges, click this checkbox.
For example, if you include an insurance charge in a transaction, that
charge depends on the freight and value of the cargo (which will be calculated first). The Priority setting only applies to how the charge will be
displayed in documents, LiveTrack and Transaction Tracking. See more
details on these functions in the chapter “Items & Services.”
•
Click the OK button when done.
11
AUTOMATED CREATION OF CHARGES
Result: When you are done, the Items and Services list will show which transactions have charges that will be automatically created.
In this example, when an Ocean House Export (OHE) shipment is created and
"vessel containerized" is selected as the mode of transportation, a charge for
Cartage Service will be added to that house shipment. (Charges created automatically will always be added after you selected the "client to bill" for that transaction.)
The price of the created charge will be calculated based on the tariff or rate set
for that charge. See the section on Tariffs and Rates for details.
Note: In addition to adding the Automatic Creation functionality to an existing
Item or Service, you can also add a new Item or Service and automate charges
for it. For example you may want to automate an Express Shipment Surcharge
for high-priority shipments. Then, each time you create a high-priority shipment, the surcharge will be added. Use the Add button in the Items and Services
list to add a new item and automate the charge, following the same steps above.
Any automated charges you create will be added to online shipping orders as
applicable when your customers create Pickup Orders, Cargo Releases, or Shipments in Magaya LiveTrack.
Note: If you want charges to be automated in online sales orders, enable the
charges you want from the Items & Service list, and then activate this option in
the Configuration > Online Sales Orders > “Generate charges automatically for
online sales orders.” Then customers will see the charges online.
12
AUTOMATE CHARGES PER CUSTOMER
Automate Charges per Customer
You can also automate or override charges per customer on the Charges tab of
the Customer profile dialog box. For example, you can add an income item that
applies to this customer.
1)
Open the Customer profile dialog box, go to the “Charges” tab, and click
“Add.”
2)
Select the charge. You can select income or expense charges.
3)
Enter a fixed price or set a tariff. (For help setting a tariff, see the section
“Customize a Tariff.”)
4)
Optional, depending on the type of accounting transaction you are
creating: Select the vendor to apply the cost to, if this is an expense for you.
This option is useful when you perform work for a customer and incur
expenses that you need to pay to a vendor.
If you do not want the charge to appear in documents, check the box.
If the calculation of this charge depends on other charges in the transaction,
check the box.
If you want to make this charge automatically appear in certain transactions,
click the tab “Automatic Creation” and select the transaction.
Click “OK” to save the charge and again to save it for the customer profile.
13
RECURRENT ACCOUNTING
CREATING CHARGES FROM ROUTES
Creating Charges from Routes
In Magaya software version 9.0 and higher, there is a feature that enables you to
create routes and add charges for them. The routes management feature creates
segments and routes for multimodal shipments.
•
You can add cost charges for routes, and those charges will appear automatically on the Master of a shipment that you create using the route.
•
When you add sales charges to a route, that charge will appear on the
House section of a shipment transaction.
If a shipment does not have a route selected, your Magaya system will create
charges will use the automatic creation of charges setting.
Recurrent Accounting
Introduction to Recurrent Accounting
In Magaya Explorer you can set up recurring accounting transactions for:
•
Invoices
•
Bills
•
Checks
For example, you can create a recurring invoice for your regular customers such
as suppliers who store goods in your warehouse. The recurrent invoice charges
them every month for storage. A wizard walks you through the setup so you do
not have to create the invoice each month or other time period you set.
Set Up:
Go to Maintenance > Configuration > Accounting and check the option “Automatically generate recurrent transactions”.
Create a Recurring Invoice
To create a recurring invoice template in Magaya Explorer, follow these steps:
14
RECURRENT ACCOUNTING
CREATE A RECURRING INVOICE
1) Go to the Invoice List.
2) Click the Actions button and select “Recurrent Invoices”:
15
RECURRENT ACCOUNTING
CREATE A RECURRING INVOICE
When the list of recurrent invoices opens, click the Add button:
A dialog box opens the Recurrent Transaction Wizard. This wizard will create
a template for a new recurring invoice. All future invoices for this customer will
be built on this.
Every month when the system automatically generates the next recurring
invoice for the customer, this template will be used. The date and charge
amounts will be updated each month to reflect the new charges, while the other
elements of the template such as the customer’s address will be the same. You
will not have to re-enter the information. If you need to change something such
as the address in the future, you can edit the recurrent invoice by using the Edit
button.
16
RECURRENT ACCOUNTING
CREATE A RECURRING INVOICE
The first screen in the Recurrent Transaction Wizard contains the following:
•
Enter the transaction number in the “Number” field. This is the number
of this template, not the number of the invoice. The invoice number will
be generated at the moment that the invoice is automatically generated.
•
Click on the “Apply to” dropdown menu to select the customer that will
receive the recurrent invoice. The address displays automatically. To
change it for this transaction, click the Change button. The date is filled in
automatically.
•
Select the Account this transaction will refer to such as Accounts Receivable.
•
The Transaction Date is set automatically to today’s date. Change it as
needed. This is the date that you created this template.
17
RECURRENT ACCOUNTING
CREATE A RECURRING INVOICE
•
18
Click the Add button in the wizard screen to add a charge. A dialog box
opens:
–
a) Select the type of charge such as Storage Fee (this is an income
item).
–
b) Enter a description (optional).
–
c) The quantity, units (such as pounds), and the price will be calculated by the system automatically each time the invoice is generated.
A price can be added if you want to have a set charge not based on
the cargo on hand.
–
d) Click the OK button to return to the wizard screen.
•
Set the “Paid as” option to either Prepaid or Collect based on the terms of
the agreement for this recurring invoice.
•
Click the Next button to go to the next screen in the wizard.
RECURRENT ACCOUNTING
CREATE A RECURRING INVOICE
The next screen in the wizard enables you to set the frequency of the invoice.
•
Select the start date. Today’s date is filled in automatically. Change it as
needed. This is the date that the system will begin generating these
invoices. You may create the invoice template to begin invoicing the
customer starting next week, for example. Next week’s date will be used in
the invoice. You can also set up retroactive recurrent invoices by using a
past date.
•
Set the end date, or check “Never Ends” if the service is continuous.
•
Generate: Select the frequency that you want to generate the invoice: If
you select Monthly, also select the day of the month (1-31) If you select the
31st, the system will default to the 30th for months that do not have 31
days. If you select Weekly, the invoice will be generated on Fridays.
•
You can charge the customer in advance by clicking on the checkbox. If
not, uncheck the box (it is unchecked by default). When charging monthly
in advance, the customer is paying for that whole month in advance.
•
The checkbox for “On Hand” cargo in the warehouse is used for fees. The
box is unchecked by default. Checking the box activates the fields below it.
Use this option to calculate the fee on the invoice based on the amount of
cargo on hand for the client. The price will be calculated based on the tariff
19
RECURRENT ACCOUNTING
CREATE A RECURRING INVOICE
you set up; in this example it is for storage. See the section on “Tariffs and
Rates” for details.
If you want to give a customer some free days before charging for services
such as storage to encourage quick movement of cargo, add the number of
days in the days field “Amount of days before”.
•
Other options are:
Generate a separate charge per line item. The number of charge lines in
the resulting invoice will be the same as the number of cargo lines in the
related warehouse receipt. This is useful to itemize oversized cargo.
Calculate charges based on the smallest packing unit. (If unchecked, the
price will be calculated by pallet.) If the cargo is repacked in pallets, the
price will be calculated based on the items inside the pallet.
You can also disable the recurring transaction by clicking in the Disable
box.
•
Click the “Next” button.
The next screen gives you the option to set up automated payment of the recurrent invoice.
•
20
This feature uses the PaySimple service provider. This service must be
activated in your Maintenance > Configuration menu and activated for
RECURRENT ACCOUNTING
CREATE A RECURRING INVOICE
this customer before doing this step. For details on setting up this service,
please see the Magaya Software Communications Manual.
•
Check the box to enable online payments with PaySimple.
•
Select the account such as a Visa or Master Card that you entered in the
Customer profile.
•
If you want to apply this payment method to invoices that the customer
approved, check this box. Note: Customer approval and dispute permissions can be set up in the Web Track User list in Customers > Actions.
•
Decide the date to apply the payment: Apply it immediately; set the
number of days after the date that the recurrent invoice is created; or set
the number of days before the due date.
•
Click the “Finish” button to save.
Result: The recurring invoice template is added to the list of Recurrent Invoices.
On the first of the month (or preset day), a new invoice will be created for that
customer. The invoice appears in the Invoices List. If you are using the
PayCargo service, you can send the invoice to that service so the customer can
21
RECURRENT ACCOUNTING
CREATE A RECURRING BILL
pay it online; or you can give the customer Magaya LiveTrack permissions to
pay the invoice themselves online.
Note: You can also save an existing invoice as recurring by clicking on the
Actions button when you are in the document view of the invoice:
The wizard opens. Fill in the fields as explained above. (You can also save an
existing invoice as recurring when you are in the Invoices List. Right-click on
the invoice and select “Save as Recurrent” from the pop-up menu.)
You can enable the online payment service from PaySimple by going to the Pmt.
Terms (Payment Terms) tab of the customer’s profile. For details on setting up
this service, please see the Magaya Software Communications Manual.
Create a Recurring Bill
To create a recurring bill:
1) Go to the Bill List in the Accounting folder.
22
RECURRENT ACCOUNTING
CREATE A RECURRING CHECK
2) Click the Actions button and select Recurrent Bills:
The list of recurrent bills opens. If you have not created any recurring bills yet,
the list will be blank.
In the Recurrent Bills list, click the Add button. A dialog box opens the Recurrent Transaction Wizard. This is the same wizard used to make a recurring
invoice. See the section on recurring invoices for details.
You can also create a Recurring Bill from an existing bill: Go to the document
view of the bill and click on the Actions button. The same Recurrent Transaction Wizard opens. Follow the steps above.
Create a Recurring Check
Recurring checks can be created to pay for expenses that you have on a regular
basis such as paying rent or insurance every month.
To create a recurring check:
23
RECURRENT ACCOUNTING
CREATE A RECURRING CHECK
1) Go to the Checks List, click on the Actions button. Select “Recurrent Checks”.
A new list opens. If you have existing recurrent checks in the system, they will
be displayed in the list. If you do not have any, the list will be blank.
24
RECURRENT ACCOUNTING
CREATE A RECURRING CHECK
2) Click the Add button to add a new recurring check. A “Recurrent Transaction
Wizard” dialog box opens.
•
Select the bank account you want to use to pay this recurring check.
•
Select who to pay this check to for the “Pay to the order of” dropdown.
•
Optional: Enter a memo (note) if needed. Select a Division if applicable.
•
Click the “Add” button. A line in the Detail table will be highlighted. Click
in each field to enter information or use the dropdowns as they become
active.
The total will be calculated.
•
Click the “Next” button. The next page of the wizard enables you to set the
frequency of the recurring check. The fields on this screen are the same as
for creating a recurring invoice.
You can also create a recurring check from the document view such as right
after you write a “Check to Expense” type of check. (The other types of checks
25
RECURRENT ACCOUNTING
ACTIONS FOR RECURRENT TRANSACTIONS
cannot be made into recurring checks.) Click on the Actions button. Select
“Save as Recurrent.” The same wizard dialog box will open.
Actions for Recurrent Transactions
In the Recurrent Invoices list (and the Recurrent Bills list), click on the Actions
button to access the following options:
26
•
Generate Recurrent Transactions: If there are transactions due to be
generated, they will be generated when you click the button. Otherwise, a
note will state that there are no transactions to generate at this time. When
you log into the Magaya system, you will receive a notice if there are any
transactions to be generated (if you have accounting permissions). You
can click “Yes” to generate them or “No” to generate them at another time.
•
Update On Hand Cargo to bill: A note pops up to notify you that the
update is in progress. This will link a new recurrent transaction with warehouse receipts previously received for the customer. This is normally done
automatically, but this manual option is available.
•
Choose Columns: As with any list, you can choose the columns and their
arrangement.
PERIODIC INVOICES
STEPS
Periodic Invoices
A Periodic Invoice will gather all the charges for a customer and place them on
one invoice during a week or month.
Steps
1) First, to enable this function for your Magaya system, go to the Maintenance
folder > Configuration menu and select the Accounting section.
•
In the Accounting configuration options, select the time frequency of the
periodic invoices. Use the dropdown menu to choose Weekly (Fridays) or
Monthly (select up to five dates during the month).
Save your settings.
2) To set up Periodic Invoices for specific customers:
•
Go to the Maintenance folder and click on “Customers”.
•
Select the customer that you want to create a periodic invoice for
(double-click on the name to open the Customer dialog box).
27
PERIODIC INVOICES
STEPS
•
Go to the Payment Terms (“Pmt Terms”) tab:
Note: The only items on this tab that will be discussed here are the ones related
to periodic invoicing. (The TSA known shipper is covered in the Magaya Cargo
System Operations Manual.)
You can select how often you want to invoice by clicking the dropdown menu
“Invoice periodically”:
•
Use default: This will use the default you preset in the Maintenance >
Configuration menu that applies to all customers.
•
Never apply: Use this to turn this feature off.
•
Weekly: This customer will be invoiced every week. All the operations
charges during the week will be added to an invoice each Friday.
•
Monthly: When you select this option, additional fields appear so you can
set up to five separate dates to generate invoices. This customer will be
invoiced on the dates you select.
When you are done, click the OK button to save.
28
TARIFFS AND RATES: INTRODUCTION
PERIODIC BILLING FOR VENDORS
Periodic Billing for Vendors
The system provides the option to group all the bills generated for a vendor in a
period (week, month).
To enable this option, go to the Payment Terms (Pmt. Terms) tab of the Vendor
profile.
For example, set up the monthly billing period for a vendor such as an insurance
broker so that every time a new insurance certificate is created, the system adds
the cost charge of the insurance to this monthly bill.
This guarantees that the bill created matches the monthly insurance invoice
generated by the broker for the same month. If this is not done, you will have as
many bills as insurance declarations submitted during the month to match one
invoice.
Tariffs and Rates: Introduction
Introduction to Tariffs and Rates
Tariffs and Rates can be set up in Magaya Explorer to calculate prices for transactions. The difference between Tariffs and Rates is:
•
Tariffs are prices you set for services that you offer. The price depends on
the measurement, value, and storage time of the cargo.
•
Rates are calculated based on the measurement information plus the
mode of transportation, and the origin and destination information for
the cargo.
How to use Tariffs and Rates: Tariffs are most often used for charges that are
static such as storage, insurance, etc. Rates are for freight charges.
29
TARIFFS
TARIFFS: INTRODUCTION
How the system will process the tariffs and rates:
1)
First the system will look in the Customer profile for the rate that is based
on origin, destination, mode of transport, and cargo measurements. If
there isn’t a customer rate, then:
2)
The system will look for a tariff (which is on the Charges tab of the
Customer profile) based on cargo measurements, time, and value. If the
system does not find one, then:
3)
The system will check the Standard Client Rates based on origin, destination, mode of transport, and cargo measurements. If the system does not
find one, then:
4)
The system will check for a tariff in Items and Services based on cargo
measurements, time, and value.
Tariffs
Tariffs: Introduction
Tariffs are prices you set for services you offer such as refrigerated storage. The
price depends on the measurement (pieces, weight, and volume) value of the
cargo, and the time it is in storage. Let’s see how to set up tariffs in Items and
Services under the Accounting folder.
30
TARIFFS
TARIFFS: INTRODUCTION
The Tariff button is available on each Items and Services dialog box.
31
TARIFFS
HOW TO SET UP TARIFFS
How to Set Up Tariffs
Follow the steps below to set up tariffs in your Magaya Explorer.
1)
In the Items & Services folder, open an item or a service and click on the
Tariff button. A dialog box opens:
The tariff will be calculated in the currency that is selected in the Items and
Services screen. The screenshot above shows “Prices in USD”.
Select the option you want in the “Apply by” field:
Weight: This gives you the option to select the weight units (pounds, kilograms, ton, ounce, or Troy ounce).
Min/Max: In the Tariff dialog box, you have the option of entering a
minimum and maximum price: Enter the amount in the fields “Min.” and
“Max.” as needed.
Rate per unit: Set the unit as needed. For example 50 cents for every 2
32
TARIFFS
HOW TO SET UP TARIFFS
pounds (lb).
When charging by weight, the Tariff screen lets you charge a rate that
varies based on the weight (range).
Example: For shipments that weigh more than 1 pound but less than 50
pounds, the rate might be 1.00 per pound. For a shipment weighing 51 to
100 pounds, the rate might be 0.75 per pound.
Click on the Add button. This activates the cells in the table.
Click in the table cells to enter information. Click the OK button to save.
Note: These table cells can be used for entering tariffs by weight, pieces,
volume, time and value.
Pieces: When setting the tariff by Pieces, the weight unit dropdown is not
available because it is not needed.
Volume: This gives you the option to set the units by Cubic meters, Cubic
inches, Cubic centimeters, or by Liter.
Time: This gives you the option to charge by time (Hours, Minutes,
33
TARIFFS
HOW TO SET UP TARIFFS
Seconds, Days, Weeks, or Months).
The Time is calculated based on the time the cargo arrived (based on the
Warehouse Receipt time), and the time the cargo left the warehouse (via
Cargo Release or Shipment).
Value: The value is used to charge based on the value of the merchandise
and it can be used to calculate the amount of the insurance on the cargo.
When selecting “Value”, the unit dropdown is not available.
Calculated: This gives you the option to calculate the tariff based on a
script or a formula:
The “Formula” option gives you buttons for Variables, Operators, and Validate.
The following example shows how to calculate a storage charge of 0.02 per day
per pound.
First, click the Variables button to set the variables for Time (T) to “Days” and
set Weight (W) to “Pounds”.
34
TARIFFS
HOW TO SET UP TARIFFS
The Variables screen shows a list of variables names and codes. These are the
variables you will use in the script or formula and the measurement units that
they will come in.
Enter the formula in the blank field using the Variables and Operators:
Click the “Operators” button to insert operator symbols to multiply, divide, etc.
Click the OK button when you are done. You will be returned to the Tariff
dialog box.
35
TARIFFS
HOW TO SET UP TARIFFS
To create a formula that rounds the days and pounds up to the next integer
(whole number), use the “ceiling” function:
To validate the formula, click the Validate button and enter numbers to test it.
The option to calculate by “Script” shows a screen with a button for variables
(weight, volume, etc.), a button to edit code, and a validation button.
Click the “Edit Code” button to open a screen to type in JavaScript code. This
screen is used to type the body of the JavaScript function to calculate the price.
The function brackets are already included in the header and the closing bracket
is included at the bottom of the screen. The “return” statement is required to
pass the calculated price back to the Magaya system.
This code example shows the storage charge that rounds up to the next number:
In the script code screen, you can call functions by name if you have functions
already created in the Maintenance > Configuration > JavaScript Code library.
36
TARIFFS
HOW TO SET UP TARIFFS
This is covered in detail in the “Configuration Menu” chapter of the Magaya
Software Customizatin Manual. Validate the code to check for errors. Save it.
Tariff by Percent:
To calculate by percent, select the “Percent” option.
Enter a minimum and maximum (optional), enter the percent amount such as
5% and how to apply it: to the cost, income or profit.
This percent option can calculate a percent for a commission. If it is used in
House Shipment, it will only calculate the commission for that House, not the
cost of Master prorated.
Click OK to save and close this screen and the previous one.
Note: The percent option was introduced in Magaya software version 9.8. It was
designed to make it easeir to set the percent of a tariff. If your system has existing
tariffs that calculate a percent with a formula or script, your system will
continue to use those.
Result: Now the tariff is ready for use in transactions.
37
TARIFFS
HOW TO CUSTOMIZE A TARIFF
How to Customize a Tariff
You can customize a tariff for a specific client (customer).
38
1)
Go to the Maintenance folder > Customers.
2)
Select the customer and open their profile. Then click on the Charges tab.
TARIFFS
HOW TO CUSTOMIZE A TARIFF
3)
Click on the Add button.
In the dialog box that opens, set up the custom tariff.
•
Select the Charge that you want to customize from the dropdown.
•
Enter a price or click the Tariff button. (If you select a freight charge,
the Price field will change to a note “Freight Charges Use Rates.”)
39
RATES
RATES OVERVIEW
•
If you want to automate this charge, click “Automatic Creation” tab.
Select the transactions to automate.
•
Click OK when done.
That tariff will now apply to that customer for the transactions you specified.
Rates
Rates Overview
Rates are used to calculate prices for services related to the movement of cargo.
They are calculated based on the measurement information plus the mode of
transportation, and the origin and destination information for the cargo.
The different types of rates are: standard rates for all your customers (clients),
rates from your carriers, and customized rates applied to individual customers:
40
•
Carrier Rates: These are your purchasing rates for freight services, how
much you pay the carrier.
•
Standard Client Rates: These are your standard rates for all customers.
You can make these available on Magaya LiveTrack for your customers to
view.
RATES
RATES OVERVIEW
•
Client Rates: This groups all the rates for all your customers (clients) in
one place. You can customize multiple and single rates for customers
using a wizard that is available in the Client Rates folder.
41
CARRIER RATES
SET UP CARRIER RATES
The Rates folder also contains contracts. See the sections on contracts for
details. The next section will focus on setting up carrier rates.
Carrier Rates
Set Up Carrier Rates
Carrier Rates are your purchasing rates for freight services (how much you pay
the carrier). For each carrier that you use, add the rate information they give you
in your Magaya system. This rate will be used as the Cost in freight charges.
To set up the carrier rates, follow these steps.
•
42
Go to the Accounting folder, expand the Rates subfolder, and click on
Carrier Rates.
CARRIER RATES
SET UP CARRIER RATES
•
Click on the Add button and select the type of rate you want to enter: A
single rate or multiple ones:
This example will illustrate how to add a single rate. Multiple rates is explained
in the section “Add Rates to a Carrier Contract.” The single rate will apply to
one carrier for one transport mode and only for one origin/destination.
In Magaya software there are many options for creating rates:
43
CARRIER RATES
SET UP CARRIER RATES
A dialog box opens. The following example shows an ocean rate:
44
•
On the General tab, select the carrier (or add it if it is not in the list).
•
Select the freight class service. This pulls from the Items and Services of
type “Freight” and “Other Freight”.
•
Enter a description (optional). Use this for Commodities that you want to
classify by type such as electronics. To enter a new commodity, click on
the plus sign in the dropdown menu, enter the information and click OK.
Commodity Types can also be entered in Maintenance > Configuration >
Commodity Types. The Commodity Type can also be specified when you
are entering Inventory Item Definitions: Select the Commodity field on
the General tab.
•
Select the origin and destination cities for this rate (from the ports list).
•
Select the method (mode of transportation) such as “Vessel, Containerized”.
•
Transit Time: Enter the number of days of the voyage. (This information
can be added to the Query Rates screen.)
CARRIER RATES
SET UP CARRIER RATES
•
Select how to apply the rate: This example uses “Container”. When you
make this selection, the screen will change depending on what you select.
•
Minimum and Maximum prices: Set this option as needed.
•
Rate per: Set the rate per unit or per range. Rates per Unit such as pounds
will multiply the rate by the unit.
If the unit is 1 pound and the price is $1 per pound for weights between 1
and 50 pounds, to ship 35 pounds will be calculated as 1 x 35 to equal $35.
If the price is 0.80 per pound for shipments weighing between 51 and 100
pounds, the price for a 70-pound shipment will be calculated as 0.80 x 70
= $56. The price for 90 pounds will be calculated as 0.80 x 90 = $72.
If you set the unit to equal 100 pounds, and the price of $10 per each unit,
then shipping 400 pounds will be calculated as 4 units of 100, which will
cost $40.
Select Rate per Range: Enter the ranges such as 1 to 20 cubic feet, then 21
to 50 cubic feet, etc. For example, a range is set for $10 for any measurement between 1 to 20 cubic feet; your shipment is 15 cubic feet, the price
is calculated at $10. If a shipment is 11 cubic feet, the price is still $10
because it is in the range of 1 through 20.
Rates per range are useful for Roll On Roll Off (RORO) rates. To set a
RORO rate, apply the rate by volume (cubic feet) and select Rate per
Range and enter your numbers.
45
CARRIER RATES
SET UP CARRIER RATES
•
Click the Add button to add a rate. This will activate a line in the Prices
table. Select a container (this example shows a 20-foot and a 40-foot standard container) in the Prices table, and enter the rate for each in the fields.
You can add as many as you need.
If you have a contract with a carrier, click on the Contract tab:
•
Enter the date the contract expires. When the contract expires, the rate
will no longer be used.
•
Enter the contract number.
If you want to add any notes, click on the Notes tab and enter them.
Click the OK button when done.
Result: The rate now displays in the Carrier Rates list and is available to use for
costs in shipments.
46
CARRIER RATES
SET UP CARRIER RATES
Note: You can also set up carrier rates in the Maintenance folder by selecting the
carrier (if they are in the list already). To create a new carrier profile, click on
the Add button and select the type of carrier:
To edit an existing Carrier rate, double-click on it (or select it and click on the
Edit button).
In the dialog box that opens, click the Rates tab. To edit a rate, click on the “Edit”
button. To add a new rate, click on the “Add” button.
This opens the same dialog box explained above.
You can also edit the rates for an existing carrier by right-clicking on the carrier
name in the Carrier List and select “Rates” from the pop-up menu. In the screen
that opens, click on the Add button. Use the wizard to enter the information.
47
CARRIER RATES
ACTIONS IN THE CARRIER RATES LIST
Actions in the Carrier Rates List
Click on the Actions button in the Carrier Rates list to access the following
options:
•
Reports: Use this to create a report of all carrier rates.
•
Other Reports: Use this to create reports by carrier, charge, origin, etc.
Reports can be sent to carriers by clicking on the Email button in the top
toolbar across the top of Magaya Explorer.
•
Create Standard Rate: Use this to create a selling rate based on the rates
your carrier gives you.
Select a rate in the list and click on this option. A dialog box opens. Select
a markup type (percent or flat) and enter an optional markup value (how
much you will add to the price). For discounts, enter a minus sign and the
number. Click the OK button. The Rate dialog box opens. Verify the rate
and click OK.
48
QUERY RATES
QUERY RATES
•
Create a Customer Rate: Use this to create an individual rate to apply to
one specific customer. Click on a rate in the list and select this option. A
dialog box opens.
Select the markup type (percent or flat), enter the markup value
(optional), and select the customer this rate applies to. Click the OK
button. The Rate dialog box opens, showing you the amount the system
just calculated. Verify the rate and click OK. For discounts, enter a minus
sign and the number in the Markup Value field.
•
Modify Rates: Use this to change rates. See details in the section “Modify
Rates for Your Customers”.
•
Query Rates: Use this to perform a query on carrier rates. Enter the information you need for the query in the dialog box that opens. See details on
how to use this screen in the section “Query Rates”.
•
Choose Columns: Rearrange, add, or remove columns from the list view.
•
Import or Export data in XML or CSV formats in or out of your Magaya
database.
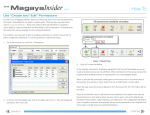
Query Rates
Query Rates
Use the “Query Rates” button to open the query screen when you need to look
up rates for carriers or to query selling rates. The button can be found on the
49
QUERY RATES
QUERY RATES
Rates dialog box for Standard Client Rates and Client Rates. The query dialog
box is also available from the Actions button in Quotations and in the Rates
folder for Carrier Rates, Standard Rates, and Client Rates.
To query carrier rates, go to the Carrier Rates folder. To query selling rates, go
to the Client Rates folder or the Standard Rates folder. The fields in the Selling
Rates query dialog box are the same as in the Query Carrier Rates dialog box.
When the Query Rates dialog box is opened from the Actions button, it can
remain open while you move to other screens in your Magaya system. When
you close the screen, the information you entered will remain available to reuse
or change.
Add multiple types of freight service class by clicking the button with the three
dots that is next to the Freight Service Class dropdown. In the dialog box, check
the types to include in the query.
The date field canbe used to query future rates.
If you want to query other rates or charges such as documentation, you can add
them to the query by using the “Select” button for “Other Charges” and see all
50
QUERY RATES
QUERY RATES
the rates. The query of other charges pulls from the information in your
Accounting folder in your Magaya system.
Select the origin and destination information and method (mode) of transport.
These fields are required.
Enter as much information about the cargo as needed.
Click “Find” to generate a list of rates that match the criteria you enter.
51
STANDARD CLIENT RATES
STEPS TO SET UP STANDARD CLIENT RATES
The best rate will be checkmarked in the results list. You can add columns to the
list by right-clicking on a result. In the “Choose Columns” dialog box, click the
“Add Columns” button to access more choices such as the Transit Time under
Rates.
Create a Quotation from the Query:
To create a Quotation from the selling rate dialog box, click the “Create Quotation” button.
When creating a Quote from the Carriers Query rate screen, you can specify if
you want to include the expense charge in the quote’s Charges. You also have
the option to choose to summarize the income charges in an “All in One”
charge. This will add whatever fee you select in the dropdown.
The Quotation dialog box will open with all the rate query information filled in
automatically. Make any changes or add information in the dialog box to create
the document. Email or print the document.
Standard Client Rates
Standard Client Rates are the rates you charge all your customers.
Steps to Set Up Standard Client Rates
To set up Standard Client Rates:
1) Go to the Rates folder and click “Standard Client Rates”.
52
STANDARD CLIENT RATES
STEPS TO SET UP STANDARD CLIENT RATES
2) Click the Add button and select Single or Multiple Rates from the pop-up
menu:
This example shows you how to enter a single rate. For details on Multiple
Rates, see the section “Client Contracts.” When you use the “Single Rate”
option, the system will create one rate for a service such as priority freight or a
fuel surcharge that will apply for all customers who send freight to the origin
and destination you assign in the Rate dialog box. Let’s look at the Rate dialog
box.
53
STANDARD CLIENT RATES
STEPS TO SET UP STANDARD CLIENT RATES
A dialog box opens with three tabs:
54
•
On the General tab, select the Freight Service Class from the dropdown
menu such as “Air Freight Service”.
•
Enter a description (optional). Use this for Commodities that you want to
classify by type such as electronics. To enter a new commodity, click on
the plus sign in the dropdown menu, enter the information and click OK.
Commodity Types can also be entered in Maintenance > Configuration >
Commodity Types. The Commodity Type can also be specified when you
are entering Inventory Item Definitions: Select the Commodity field on
the General tab.
•
Select the origin and destination cities for this rate.
•
Select the method (mode of transportation) such as Air.
•
Transit Time: Enter the number of days of the voyage. (This information
can be added to the Query Rates screen.)
•
Select how you will apply the rate: by the piece, by weight, volume,
container, or by a calculated rate. When you make this selection, the drop-
STANDARD CLIENT RATES
ACTIONS IN THE STANDARD CLIENT RATES LIST
down menu next to it will change depending on what you select. You can
set the units for weight such as pounds and for volume such as cubic feet.
For more details, see the section on “Tariffs”.
•
Use Gross Weight instead of Volumetric Weight in air and ground rates.
(Previous versions of Magaya software before v8.5 required a formula for
this.)
•
Enter a minimum and/or a maximum rate as needed.
•
Click the Add button to add a rate. This will activate the next line in the
rate table. Click on the table cell under “More than” and “Rate” to edit the
table cells. The example shows the first table cell with a rate of 2.50 for one
pound or more. The next table cell shows 2.00 for weight over 100 pounds.
•
To query a rate, click on the “Query Carrier Rates” button. This will query
previously created Carrier Rates. This is useful when you are creating your
standard client rate; you can look up your purchasing rates for comparison. See the section “Query Rates” for details.
If you have a contract with the client, click on the Contract tab in the Rate dialog
box and enter the dates and contract number.
If you want to add any notes, click on the Notes tab and enter them.
Click the OK button when done.
Result: The rate now displays in the list and is available to use in shipments.
Actions in the Standard Client Rates List
Click on the Actions button to access the following options:
•
Reports: Create a report of all Standard Client Rates
55
CUSTOM RATES
ACTIONS IN THE STANDARD CLIENT RATES LIST
•
Other Reports: Create reports by description, charge, destination, etc.
Reports can be sent to customers by clicking on the Email button in the
top toolbar across the top of Magaya Explorer.
•
To create a Customer Rate, click on a rate in the list and select the option
“Create Customer Rate” from the Actions button. This sets a rate that
applies to one customer. A dialog box opens:
Select the markup type (percent or flat), enter the markup value, and select
the customer that this rate applies to. Click the OK button. The Rate dialog
box opens. Verify the rate and click OK. This will apply the markup to that
one customer.
•
Modify Rates: Use this to change rates. See details in the section “Modify
Rates for Your Customers”. The rate modification will apply to all clients.
If you want to modify a rate for only one client, use the Actions button in
Client Rates.
•
Query Rates: See the section “Query Rates”.
•
Choose Columns: Use this to rearrange columns and add or delete
columns in the rates list.
•
Import or Export data in XML or CSV formats in and out of your Magaya
database.
Custom Rates
56
CUSTOM RATES
CREATE CUSTOMIZED RATES
Create Customized Rates
You can customize a rate for a client by using a wizard or by opening the Rates
dialog box in the Customer’s profile. The rate can be based on the standard one
created for all customers and then changed for a specific customer. This custom
rate will override any standard rate you set up in your Magaya system for that
customer.
The wizard is available from two places in Magaya Explorer: Right-click on the
customer name in the Customer List and select “Rates” from the pop-up menu.
In the list that opens, click on the Add button to use the wizard.
You can also access the wizard by selecting “Client Rates” under the Rates
subfolder in Accounting:
For details on using the wizard, see the section “Modify Rates for Your
Customers.”
The following example shows you how to customize a rate by using the Rates
dialog box in the Customer’s profile:
1)
Go to the Maintenance folder.
2)
Click on Customers.
57
CUSTOM RATES
CREATE CUSTOMIZED RATES
3)
58
In the Customer profile dialog box, click on the Rates tab.
CUSTOM RATES
CREATE CUSTOMIZED RATES
4)
Click on the Add button in the Rates tab. A dialog box opens.
•
On the General tab, select the carrier.
•
Select the freight class service. This pulls from the Items and Services
of type “Freight” and “Other Freight”.
•
Enter a description (optional). Use this for Commodities that you
want to classify by type such as electronics. To enter a new
commodity, click on the plus sign in the dropdown menu, enter the
information and click OK. Commodity Types can also be entered in
Maintenance > Configuration > Commodity Types. The
Commodity Type can also be specified when you are entering Inventory Item Definitions: Select the Commodity field on the General
tab.
•
Select the origin and destination cities for this rate (from the ports
list).
•
Select the method (mode of transportation) such as “Vessel,
Containerized”.
59
CARRIER CONTRACTS
MANAGING CONTRACTS
•
Transit Time: Enter the number of days of the voyage. (This information can be added to the Query Rates screen.)
•
Select how you will apply the rate. The screen will change depending
on what you select.
•
Click the Add button to add a rate. This will activate a line in the
Prices table. Enter information for each in the fields such as weight
and rate. For example, you can charge by weight to calculate the
prices. If cargo weighs more 50 pounds, type on 50 and the rate. Add
the next one as 100 pounds and the rate. You can add as many as you
need. This rate shows a container, the type of container and its rate.
See the section on “Tariffs” for more details on using this table.
5)
Click on the Contracts tab if you have a contract number and expiration
date.
6)
Click on the Notes tab to enter any notes as needed.
7)
Click the OK button to save settings when you are done.
Result: This customized rate is now ready to be used. Your customers with
access to Magaya LiveTrack can view the rates online.
Carrier Contracts
Managing Contracts
When you get a contract from a carrier or you want to create a contract with a
customer, you can enter the rates for those contracts in your Magaya system and
update them in groups.
60
CARRIER CONTRACTS
MANAGING CONTRACTS
Then the rates are available to use in shipments and other transactions, saving
time since they do not need to be entered each time.
The contracts feature is an easy way to create rates and group them in your
Magaya system. You can find the contracts in the Accounting folder:
The Carrier Contracts is the place in the Magaya system that handles your
purchasing rates (your cost to purchase carrier services). This is where you enter
the rates that the carrier gives you.
61
CARRIER CONTRACTS
MANAGING CONTRACTS
The Client Contracts are used to handle the client rates, which are used to
calculate the selling prices.
62
CARRIER CONTRACTS
ADD A NEW CARRIER CONTRACT
Add a New Carrier Contract
When you get a new contract from a carrier for the first time, use this method
to enter the contract into your Magaya system. After you enter the contract
details, then enter the rate information for that carrier.
1)
Go to the Accounting folder.
2)
Expand the Rates subfolder and select “Carrier Contracts”. The screen has
three sections: Contracts, Amendments, and Rates:
3)
Start in the Contracts section: click on the Plus sign. In the dialog box that
opens, enter the following:
•
The contract number.
•
The date the contract will become effective.
63
CARRIER CONTRACTS
ADD A NEW CARRIER CONTRACT
•
The date the contract will expire (the default is one year from today).
•
Select the carrier.
•
Select the contact - the person who is your contact person. Click on
the dropdown to access the Contacts list and make your selection.
This field is optional.
•
The Employee is the person who is adding the contract into the
system. This will be filled in by the system.
•
The Division is optional.
To include a copy of the contract as an Attachment here, scan it and attach
by clicking on the Attachments tab and clicking on the Add button.
Details on attaching via a scanner are explained in the Magaya Cargo
System Operations Manual.
Add any notes as needed on the Notes tab.
4)
Click OK.
The contract is added in the list.
When a new contract is added into the system, the system will create a default
amendment called "Initial" and place it in the Amendments list.
To view the original amendment, double-click on “Initial” in the Amendments
list to open the dialog box.
64
CARRIER CONTRACTS
ADD A NEW CARRIER CONTRACT
The Number field is "Initial". This Initial amendment is the original contract,
with the same effective date as the original contract and all the details.
Now that the carrier contract information is entered in your Magaya system,
you can enter the rates for this contract.
65
CARRIER CONTRACTS
ADD RATES TO A CARRIER CONTRACT
Add Rates to a Carrier Contract
After you add a contract into your Magaya system, select it to add rates to it.
1)
In the Rates section, click on arrow on the Plus sign and select from the
pop-up menu:
Use the “Multiple Rates” option to create carrier rates in batches for many
ports of origin and destination.
Use the “Single Rate” option to open the rates dialog box to enter one rate
for one origin/destination. This is explained in the section “Set Up Carrier
Rates”.
The following example explains how to enter multiple rates.
66
CARRIER CONTRACTS
ADD RATES TO A CARRIER CONTRACT
The wizard that opens contains the following fields:
The carrier name and Effective Date are filled in the first screen of the
wizard based on the contract you are working on. These fields are
Read-Only. To edit them, go to the Contract itself. You can add an expiration date.
2)
Select how you want to create rates:
•
Enter your own rates: With this option, you enter the rates and the
origin and destination from the contract, and the system will create
the rates for you for all the origins and destinations you enter. For
example, if a carrier sends you one rate for a 20-foot container for a
group of ports, use this option.
•
Copy from similar entities rates: Use this option to make amendments, for example by origin and destination or by percentage. (This
option is shown in the section “Amend Rates based on GRI”.) The
advantage of this option is you will not have to recreate the rates
67
CARRIER CONTRACTS
ADD RATES TO A CARRIER CONTRACT
from scratch; it works with the existing data you have previously
entered for this carrier.
When this option is selected, another field appears for you to enter
the details: Select the type of modification (by percentage or flat rate
increase or decrease), and enter the value (the number such as 10 for
10%).
3)
68
Click the Next button in the wizard to go to the next screen. Select the
ports by clicking on the Add button to open the Ports list. Click on the
port names and click the OK button. Do this for origin and destination
ports:
CARRIER CONTRACTS
ADD RATES TO A CARRIER CONTRACT
4)
Click Next to go to the Common Rates screen. In this screen, click on the
Add button to open the Rates dialog box.
•
Select the Freight Service Class. This example shows Priority Freight
Service Cost.
•
The Description/Commodity is optional.
•
Select a Method of transportation for this rate.
•
Select how you want to apply this rate, for example by weight (in
pounds). Click on the dropdowns for other options.
•
Transit Time: Enter the number of days of the voyage. (This information can be added to the Query Rates screen.)
•
Enter a Minimum and Maximum amount (optional).
•
Select a rate by unit or range. Rates per range are useful for Roll On
Roll Off (RORO) rates. To set a RORO rate, apply the rate by volume
(cubic feet) and click Rate per Range. Then enter the ranges such as
1 to 30 cubic feet, then 31 to 50 cubic feet, etc
69
CARRIER CONTRACTS
ADD RATES TO A CARRIER CONTRACT
5)
•
Click on the Add button to enter rates amount per weights.
•
Click the OK button to save the rate information.
Click Next. The system will generate rates for each port based on the information you entered and display the results:
If you want to make an exception for one of the ports shown, select it and
click “Edit”. To exclude that port from this rate, select the line and click
“Remove”.
70
6)
Click Next. The system will show you the rates that will be expired and
replaced with the new ones you just added. If you do not have similar
rates, this screen will be blank. To exclude a rate from expiring, select it
and click “Remove”. Otherwise the system will expire any listed in this
screen as of the day before the effective date for the new rate.
7)
Click Next to go to the last screen in the wizard. Here you can save and
finish, or save and add another rate:
CARRIER CONTRACTS
ADD RATES TO A CARRIER CONTRACT
•
Click Save: The system tells you the processing is completed.
71
AMEND RATES
ADD RATES TO A CARRIER CONTRACT
•
Or click Restart: If you want to add additional rates that use some
information that is similar to the rates you just entered, click the
Restart button.
By clicking Restart, the wizard will return to the screen with the
origin and destination ports.
8)
Click Finish. The wizard closes, and the new rates are displayed in the list.
Extra Info: The same expiration rate can be used when copying a rate. This is
useful when creating sales rates from the cost rates.
If a carrier offers a discount, you can use a negative number.
Amend Rates
Learn how to make changes to rates in your Magaya system when you get a rate
increase from a carrier. Also learn how to change a rate per customer.
72
AMEND RATES
AMEND RATES BASED ON GRI
Amend Rates based on GRI
When you receive a General Rate Increase (GRI) from a carrier, you can enter
the updates in your Magaya system and apply the rate increase to multiple ports
at one time, instead of one at a time.
Make sure you select the correct amendment that you want to make changes to.
1)
In the Amendments screen, click the plus sign. A dialog box opens.
2)
Enter the Amendment Number and Effective Date.
3)
Click OK. The dialog box closes, and the new amendment appears in the
Amendments list. It will show the contract number and the amendment
number.
4)
Select the new Amendment to highlight it.
73
AMEND RATES
AMEND RATES BASED ON GRI
5)
Go to the Rates section of the screen and click on the plus sign. Be sure you
are in the correct amendment before you start to add new rates.
This example illustrates how to enter a 10% rate increase for a group of
ports that have increased by the same amount.
74
6)
From the Add button pop-up menu in the Rates section, select “Multiple
Rates”.
7)
In the wizard, select "Copy from entities rates" for this carrier. If you want
to use another carrier, select it from the dropdown “Select source entity”.
AMEND RATES
AMEND RATES BASED ON GRI
In the additional fields that appear, enter the details of the transformed
rates (such as percent and value of 10).
75
AMEND RATES
AMEND RATES BASED ON GRI
8)
Click Next. The Filter screen will appear. Here you can specify exactly
which rates you want to transform. Filter the rates to find the rates that
you want to apply the change to by specifying the following:
When you set these criteria, the system will search in your Magaya database for any rates that match these criteria and already exist. If you leave a
field blank in this screen, the system will apply the transformation to the
criteria in that field.
76
AMEND RATES
AMEND RATES BASED ON GRI
9)
Make changes such as removing ports that you do not want to apply the
new rate to, and click the Next button.
77
AMEND RATES
AMEND RATES BASED ON GRI
10) In the next screen, “Found rates” the system will display the rates for the
ports you selected. Click the Next button.
11) The system generates the new rates, applying the 10% increase to them all
for you. It will split rates if you have two container sizes (20- and 40-foot)
in the existing rate. For example, if you get an increase for a 20-foot
container but not for a 40-foot container, the system will split the rates and
show them all to you in this screen. Review the information and click
Next.
12) The system will show you the rates that will be expired and replaced with
the new ones you just added. The old rate will expire right before the new
one takes effect. Review the date and time information and click Next.
78
AMEND RATES
AMEND RATES BASED ON GRI
13) Click Save.
When you click the Save button, the system tells you the processing is
completed.
If you want to add additional rates that use some information that is
79
AMEND RATES
MODIFY A STANDARD RATE
similar to the rates you just entered, then click the Restart button.
If you click on the Restart button, the wizard will return to the first screen
and show all your information on each screen so you can make changes.
14) Click Finish. The wizard closes, and the new rates are displayed in the list.
Modify a Standard Rate
When carriers raise their rates, you update the GRI and then apply the increase
to your customers. If you do not want all your customers to have the same
increase, you can give a customer a discount.
For this example, let’s say you already entered the GRI and applied it to all the
customers via the Standard Client Rates. To give a customer a discount, follow
these steps:
80
1)
Go to Client Contracts.
2)
Add a new amendment for the customer.
AMEND RATES
MODIFY A STANDARD RATE
3)
Use the Multiple Rates wizard: click the option to “Transform from
existing standard client rates”. Enter the amount of the change (for
example, by weight and by percent). For this example, let’s modify the
ocean freight for our customer, Jamaica Distribution Center, and only
raise it by 20% instead of 30%.
a. For the field “Transformation Type,” select “Decrease a percentage”.
b. For the field “Value,” enter 10.
c. Specify the conditions such as “Ocean Freight Service Cost” and “Vessel,
Containerized”, etc. according to the GRI.
4)
Complete the wizard by specifying ports, reviewing the rates generated by
the wizard, and save the changes.
The discounted rate for that customer is saved. When a shipment is
created for this customer, the system pulls the rate from this discounted
rate.
For a PDF of this procedure, see the Magaya.com Training page, Tech Tip
for June 2012.
81
AMEND RATES
MODIFY RATES FOR YOUR CUSTOMERS
Modify Rates for Your Customers
To make a change to the rate you charge your customers, follow these steps.
1)
Go to Client Rates > click on the Actions button > select Modify Rates. A
wizard opens. In the first screen of the wizard, do the following:
1. Select the client (customer) that you want to change the rate for.
2. Choose the type of modification: a) To change the expiration date, or b)
to modify the rates. If you are modifying the rates for the customer, select
how you to modify them - what type and the value.
82
2)
Filter the rates in the next screen by service class, method of transport, and
other criteria that apply. Click the Next button.
3)
Select the ports from the list and go to the next screen to see the rates the
system found.
4)
In the last screen click the Save button to save and finish the wizard. If you
want to make other changes with similar criteria, click on the Restart
button.
CLIENT CONTRACTS
MODIFY RATES FOR YOUR CUSTOMERS
Note: This wizard works the same for Carrier Rates and for Client Rates.
When you customize the Standard Client Rates, the first screen in the wizard
does not have a client to select because the modification you make will apply to
all clients.
Client Contracts
Magaya software includes a wizard to help manage contracts you offer your
customers.
83
CLIENT CONTRACTS
CLIENT CONTRACTS: ADD CONTRACTS AND RATES
Client Contracts: Add Contracts and Rates
Use the wizard screens to manage contracts you create for your clients. The
wizard works the same way as the wizard for adding carrier contracts and
carrier rates.
First, add the contract for the client.
The contract for the client is added. Now you can add rates for that client.
84
CLIENT CONTRACTS
CLIENT CONTRACTS: ADD CONTRACTS AND RATES
Select the amendment and click on the Add button in the “Rates for Amendment” part of the Client Contracts screen. A wizard opens. This example shows
you how to enter your own Multiple Rates.
1)
Enter the information in the first screen of the wizard for this client:
•
Enter your own rates: With this option, you enter the rates from the
contract, the origin and destination, and the system will create the
rates for you for all the origins and destinations. For example, if a
carrier sends you the same rate for a 20-foot container for a group of
ports, use this option. This example will show this option.
•
Copy from similar entities rates: Use this option to make amendments, for example by origin and destination or by percentage. You
will not have to recreate the rates from scratch. It works with the
existing data you have previously entered. When this option is
selected, another field appears for you to enter the details: Select the
type of modification (by percentage or flat rate increase or decrease),
and enter the value (the number such as 10 for 10%).
Select source entity: Use a similar rate that you created for a different
customer.
•
Copy from carrier rates: Select the carrier that you want to use that
has similar rates so you can copy those rates here and make changes.
85
CLIENT CONTRACTS
CLIENT CONTRACTS: ADD CONTRACTS AND RATES
•
2)
Copy from standard client rates: This will use the Standard Client
Rates you set up earlier. Then you can make changes to the standard
rates.
Click Next to select the ports. (You will see the filter screen if you are
transforming from existing rates.)
•
Click the Add button to open the Ports list. Click on the port names
and click the OK button. Do this for the origin and destination. Click
Next to go to the next screen in the wizard.
3)
Click the Add button to enter the common rates for the ports you selected
in the previous screen.
4)
Click Next to go to the next screen. This screen will show you the rates that
were generated by the system. You can edit a rate here if needed. Click
Next.
5)
If there are any rates similar to the ones created, the system will set the
expiration dates for them based on the effective date. Click Next.
6)
Click the Save button if you are done.
The rate information is saved. The following note will appear: “The
process has finished successfully.” Click the Finish button if you are done.
7)
86
Click on the Restart button if you want to add more rates and use some of
the same information. The wizard will return to the first screen and show
all your information on each screen so you can make changes.
SALESPERSON’S COMMISSIONS
Salesperson’s Commissions
In your Magaya system, you can add salesperson’s profiles and include commission participation rates for each salesperson when they sell or freight or inventory. The system enables you to enter profiles for sales people who are
employees or outside contractors/vendors:
•
If a salesperson is an outside vendor, enter their details in the Salesperson
profile.
•
If a salesperson is an employee, enter their details in the Employee profile
and a Salesperson profile. The Employee profile includes the User login
and password fields.
Commissions can be set individually for each salesperson or system-wide to
apply to all sales people.
To set a percent commission system-wide to apply to all salespeople for liquidations of shipments, go to Maintenance > Configuration > Accounting and click
“Configure Liquidation Options” button for Outgoing or Incoming. Set the
percent in the dialog box.
Add a New Salesperson
To add a new salesperson to your system, follow these steps:
1)
Go to Maintenance > Salespersons.
2)
Click the Add button.
In the dialog box that opens, you can enter details on any tab. On the
General tab, enter their email, phone number, which division they work
87
SALESPERSON’S COMMISSIONS
FREIGHT COMMISSION
for if applicable, their address, billing address if different, and other
personal information as needed.
The Identification number can be a DUNS, EIN, SSN (Social Security
Number), a Foreign or Other type of number.
Freight Commission
Individual sales people can have their commissions calculated in Magaya
Explorer for any freight they sell. Set the commission amount in their profile,
and the amount will be automatically added to transactions such as shipments.
88
SALESPERSON’S COMMISSIONS
FREIGHT COMMISSION
To add a freight commission (“participation”) for a salesperson, open their
profile in Maintenance > Salespersons. Click on the Participation tab and
perform the following steps:
1)
Click the “Add” button and select “Freight Participation”.
Note: The freight and inventory options are available in the Magaya
Supply Chain Solution and Magaya Commerce System.
2)
In the “Participation per Customer” screen, select a customer to associate
with the commission. This means each transaction that includes this
customer will generate a commission for this salesperson based on the
amount set here.
89
SALESPERSON’S COMMISSIONS
FREIGHT COMMISSION
3)
Click the “Add” button. Select either a charge or a shipment.
An example of a Charge is “Priority Freight Service”.
To choose how you want to calculate the commission, click the “Type”
dropdown and choose the type of commission. This example shows
percentage of profit, but you can also select a flat rate, or set the amount
to calculate by volume, weight, or pieces).
Enter the value such as “5” for five percent of the profit.
An example of a shipment is a percent of a type of shipment such as an
ocean export. Percents can be set individually per type of shipment.
Click OK in each dialog box to save.
When a salesperson sells freight, the commission is generated in the shipment
transaction in the Liquidation screen.
View Columns for Participation:
90
SALESPERSON’S COMMISSIONS
FREIGHT COMMISSION
Click the “Actions” button to see the list of columns you can add to the Liquidation screen. Select the columns for the salesman name, participation, and
profit.
The commission can also be changed in the Liquidation screen by
double-clicking on the line.
When you click the “Generate” button in the Liquidation screen, a dialog box
opens listing all the accounting transactions for the shipment, including the Bill
for the salesperson’s commission.
The bill and other transactions are saved in the Magaya accounting folder.
To see how the commissions are generated in shipments, see the section “Liquidation” in Chapter 14 of the Magaya Cargo System Operations Manual.
91
SALESPERSON’S COMMISSIONS
INVENTORY COMMISSIONS
Inventory Commissions
In the Magaya Commerce System and Magaya Supply Chain Solution, salespersons commissions for inventory sales can be set per item, per category, or
system-wide.
General Inventory Commissions:
To configure a general commission that applies to all inventory sales and to all
salespersons system-wide, follow these steps.
1)
Go to Maintenance > Configuration > Sales
2)
Click the “Commissions” button.
In the dialog box, select the Type and Value of the inventory commission.
This will be applied to all inventory items sold by any sales person. For
example, to add a commission of 5% of the profit, enter “5”. (Do not type
in “0.05” for 5%. Type “5”. Do not type the percent symbol in the field.)
3)
92
Click OK and Save.
SALESPERSON’S COMMISSIONS
INVENTORY COMMISSIONS
Inventory Commission per Item:
To add a commission to an item, go to the Inventory Items Definitions list, open
(or create) an item.
On the Accounting tab, click the “Commissions” button and select the type and
set the value for the commission in the dialog box.
Inventory Commission per Category:
To add a commission to a whole category of items that are sold online in the
Online Sales Orders of Magaya LiveTrack, (for users of the Magaya Supply
Chain Solution), go to the Inventory Organizer in the Warehousing folder.
93
SALESPERSON’S COMMISSIONS
AGENT PARTICIPATION
Open (or create) a category, and select the type and set the value for the commission in the dialog box.
When a customer purchases an item online, the commission amount is added
to the transaction.
When a salesperson sells inventory, the commission can be generated from the
Sales Order by clicking on the Actions button (after creating the Invoice). The
system creates a Bill payable to the salesperson.
Agent Participation
The Magaya system enables you to set agent and sales participation system-wide
or per agent and per salesperson.
94
SALESPERSON’S COMMISSIONS
AGENT PARTICIPATION
Set Globally: To set a percent system-wide to apply to all agents:
1)
Go Maintenance > Configuration > Accounting
2)
Click the button for Outgoing or Incoming for “Configure liquidation
options.” You can set the percent for each type of shipment independently.
3)
Check the box for the agent shipment participation and enter the percent
Note: This is the same configuration dialog box available in the Liquidation screen of a shipment.
Result: The system will process the configuration automatically when a
shipment is created. Changes can be made per line of the shipment liquidation screen if needed.
Set Per Agent: Entering data in your Magaya system for agent participation is
similar to setting salesperson’s commissions.
1)
Go to Maintenance > Forwarding Agents.
2)
Open the Agent’s profile. In the dialog box, go to the Participation tab.
Click the “Add” button and select the type of participation you want:
Charge or Shipment.
95
SALESPERSON’S COMMISSIONS
REPORTS
•
In the Charge Participation dialog box, select the Charge, Type, and
Value. The Type can be a percent, a flat value, or amount per
volume, weight or pieces.
•
In the Shipment Participation dialog box, add the value. The Type
is percent of the shipment profit. Select the modes of transport for
this percent.
The system calculates the shipment participation for a charge participation, if one is set.
3)
Click OK on each dialog box to save.
To see how the agent’s participation is generated in shipments, see the section
“Liquidation” in Chapter 14 of the Magaya Cargo System Operations Manual.
Reports
Reports can be created in your Magaya system to view all commissions:
96
SALESPERSON’S COMMISSIONS
REPORTS
In the Salesperson’s List or Agent’s, go to: Actions > Reports
Additional reports are available from the Reports menu on the top of your
Magaya Explorer. Select “Profit Reports” to see profit by salesperson or agent.
The “Sales Reports” menu option also includes other accounting reports that
show commissions such as the “Sales Reports by Item” report. Also see the
Chart of Accounts to make a report from the Actions button to see accounts by
Type Code (the commissions are grouped under Expenses).
97
SALESPERSON’S COMMISSIONS
REPORTS
98
3. CONFIGURATION MENU
INTRODUCTION TO THE CONFIGURATION MENU
3. Configuration Menu
Introduction to the Configuration Menu
You can customize your Magaya software in many ways. The Configuration
menu in the Maintenance folder provides options to:
•
Set up measurement units and how much detail to display in your documents
•
Set up document numbering for checks, invoices, pickup orders and other
transactions
•
Enter clauses and define events to use in shipments and other transactions
specific to your company
•
Set up Transaction Tracking and customize the email invitation
•
Create custom fields to use in transactions and forms
•
Define Task Types and more
Some options may not be available in your system, depending on the software
program you are using or if a plug-in is activated for your Magaya account. To
activate an option, contact your Magaya Logistics Advisor.
To access the Configuration menu, go to the Maintenance folder:
99
INTRODUCTION TO THE CONFIGURATION MENU
The Configuration menu appears in the viewing pane of your Magaya Explorer.
To see all the options, use the scroll bar.
You can also open the Configuration menu by clicking on “Options” from the
top of your Magaya Explorer screen.
Click the Save button at the bottom to save any changes. If you want to return
to your previous settings, click the Reset button. Any changes made to the
configuration menu options are recorded in the Transaction Log.
The following sections explain each configuration option in detail.
100
GENERAL
General
The “General” option contains the following choices:
•
Create Events Automatically: This box is checked by default. This will
turn on or off the capability to add events automatically to the operations
transactions. To define events for use in your system, go to the Event Definition option in the Configuration menu. For steps how to add events, see
the topic “Events” in Chapter 6 of the Magaya Cargo System Operations
Manual. Events will display in the Events tab of related transactions.
•
Optimize Loading of Entities at Start Up: This will load all the Customer,
Vendor, etc. information when you start your system. Tip: This also
applies to Magaya OnTheGo. If you have a large database, it may load
slowly at start up. If you uncheck this option, the entities lists will load
when you click on them, not at start up.
•
Common options to this computer: This enables the following customizations that can be set per computer (per user):
–
Fill lists in reverse order: This box is checked by default. This will
display lists such as the Warehouse Receipts (WR) List or Pickup
Orders List with the most recent transaction at the top. Unchecking
this box will show the oldest transactions at the top.
–
Limit the quantity of shown items per list to: Set the number as
needed. This is useful when your database grows and you do not
need to view older transactions.
–
Working Date Period: These options allow you to choose between
setting the working date period by dates you specify or by an auto-
101
COMPANY TYPE
matic number of days. When you have a database with several years
of data, you can set a Working Date Period to view only the data
from the current year.
Click the Save button (or Reset button).
Company Type
This option will set the type of company you have. This can also be set in the
Startup Wizard. If you used the Startup Wizard, the type of company you
selected will appear here. If not, it will be blank. You can select a choice in this
screen at any time.
If more than one of the options apply to your company, select all that apply.
•
If your company is an airline carrier, click on the Airline Carrier button.
This enables you to assign Air Waybill numbers to customers (this will be
available under the Maintenance folder). This will treat Masters as Flights,
and Houses as Masters.
The option below “Airline Carrier” will be activated when you check the
Airline Carrier button. You have the option of generating numbers for
house shipments when you create consolidations. By checking the box, the
numbers will be created. Do not check the box if you do not want the
numbers generated.
•
If your company is an Ocean Carrier, select this button to allow different
ports of loading and unloading per voyage. With this option, Masters are
treated as Voyages, and Houses are Masters.
•
If your company has a bonded warehouse, check the box.
Click the Save or Reset button.
102
DOCUMENT NUMBERS
Document Numbers
Document numbers for operations transactions can be customized in your
Magaya system by using this screen:
The Magaya system is set to number all transactions with consecutive numbers.
If you want to change this default, uncheck the box for the transaction you want
to use non-consecutive numbers for. If you uncheck a box, the Set button is
grayed out (inactive):
As a result of unchecking the consecutive numbering setup, each transaction
made will require the user manually enter a transaction number.
103
DOCUMENT NUMBERS
If you uncheck the box “Use shipment numbers”, the message below it will
change to “Shipment numbers will not be used”:
For Exports, activate the numbering formatting for Air, Ocean, and Ground
transactions by checking the box for Export Masters or Straights. The buttons
with the three dots will be activated. Click on a button to open the number
formatting dialog box. (Note: This button opens the same Document
Numbering dialog box as the Set button.)
For Imports, you can make the Import shipment numbers different from the
Exports by checking the box “Different from export”. The Set button will be
activated and the message changes to “One number for Consolidations and
Straight shipments. House shipments have their own numbers.”
104
DOCUMENT NUMBERS
The Document Numbering dialog box has the following options:
Numbers can be formatted as follows:
•
Prefix: This will add numbers or letters to the front of the transaction type
you have clicked the Set button for. For example, if you want all your
Warehouse Receipts to begin with the letters “WR”, enter the letters WR
in the Prefix field. Other examples: The House Air waybill document
numbering has a default prefix of “HAWB”. The Ocean and Ground
formats begin with “HBOL”. This can be changed by typing over the
default letters.
•
Suffix: This will add numbers or letters to the end of any transaction
number.
•
Start number at: Enter a number here to start the numbering of documents. The first document you create will use the next number. Example:
If you enter 0, then next document will start with 1.
•
Do not allow duplicated numbers: Check this box to avoid having any
documents with the same number. If you do not check this box, the system
will ask you if you want to use the same number when you are creating this
type of document. You can choose Yes or No at that time.
•
Lock transaction numbers: Some documents have the option to allow
you to lock the transaction numbers such as Air Waybills or Bills of
Lading. Setting this requires admin rights. This option is off by default.
Click the box to activate it.
•
Click the OK button to save changes and return to the screen.
Click the Save or Reset button in the screen.
105
ACCOUNTING
Accounting
The choices in this configuration screen set up accounting document features
such as:
•
Using consecutive numbers in accounting documents
•
Managing landed costs and average cost of inventory
•
QuickBooks exporting configuration
•
How your system manages Credit Limits for customers
•
Other settings: To generate charges automatically, date to close
accounting, transaction due dates, set currencies, set fiscal year, set up
default accounts, set periodic invoicing, setting sales tax, and set liquidation options
This option is explained in the topic “Advanced Accounting Features” in the
Magaya Software Accounting Manual.
Automatic Charge Generation
This configuration enables your system to include charges automatically on
transactions. See Chapter 2 in the Magaya Software Customization Manual to
learn how to automate charges.
These options are also connected with the Routes feature and enable your
system to generate charges based on the preferences set here such as setting the
date and time for the charge.
This configuration is checkmarked as Enabled by default. It uses the current
date to generate charges. Change as needed. This screen works in combination
with the Automatic Creation tab on the Items & Services dialog box.
106
FISCAL PRINTER
Fiscal Printer
This configuration option is used to set up a fscal printer to print invoices and
credit memos. Fiscal printers are mandatory for Latin American accounting
transactions.
To activate the fiscal printer feature after you install the fiscal printer, check the
box in the Configuration screen to enable the feature:
In the field “Company commercial name” enter your company’s name as you
want it to appear on the documents you print. This is a general system-wide
setting.
•
To tell your Magaya system to use the fiscal printer for invoices by default,
check the box “Print invoices to fiscal printer by default.” This does not
mean that all your documents will print to this printer, only the invoices.
The system can tell which type of document it is printing. If you do not
select this option here, you will have to tell the printer to use this printer
by selecting it from the Print button when in the Invoice document view.
•
The option to allow a user with administrative rights to deleted voided
invoices can be turned on, but it is off by default. It is not recommended
that you allow this option. It is only designed for emergencies to delete an
invoice that was printed and then voided with a credit memo.
107
FISCAL PRINTER
If you want to override the global settings for the printer name, check the box
for “Override global company configuration” and enter a division name or
name for a branch of the company that you want printed on the documents.
Next, select the printer make (manufacturer), model, port and bits per second.
Click the “Test Connection” button to test the settings. The system will either
display an error report or information about the printer, including the tax rates
for this fiscal printer.
Save the settings.
Also: Set the tax rates in your Magaya system to match the tax rates defined by
your fiscal printer. For example, if your fiscal printer includes tax rates of 5, 10
and 15%, then you must have a rate in your Tax Table for 5, 10, and 15%. Go to
the Chart of Accounts > Actions > Tax Table to verify this.
Add the RUC number to any entity involved in a fiscal transaction. Go to the
entity profile, on the General tab, enter the RUC number in the field “Identification Number.” Select “Other” for the type.
108
DENIED PARTY SCREENING
Denied Party Screening
The Magaya Denied Party Screening plug-in helps your company comply with
U.S. government export regulations that require verification of entities to determine if they are included on the list of denied individuals or companies.
Configure
This plug-in needs to be configured to tell the system when you want to screen
because there is a monthly service fee which includes a minimum quantity of
screenings per month. If you go over the minimum, you will be charged per
entity that you screen.
109
CONFIGURE
To configure the Magaya Denied Party Screening plug-in, go to Maintenance >
Configuration > Denied Party Screening.
110
1)
Check the box “Enable Denied Party Screening” to activate the options
below. These options include screening entities against the U.S. government list and screening for banned countries that you configure here.
2)
Configure when the system performs the screening by setting these
options:
•
Screen new entities/contacts when creating them: This option tells
the system to screen any new entity or contact as their profile is
created.
•
Screen entities/contacts when editing them.
CONFIGURE
•
Screen shipments before filing to AES: This option tells the system
to screen the entities in shipments before sending the EEI to AES.
You can also screen manually at any time by right-clicking an entity.
If you want the system to display the results after screening, check the box
“Always confirm screening results.”
Set the “Minimum Threshold Acceptance” to configure how accurate the
system will perform the screenings. If set to “Exact Match” then the system
will only find those entities with exact spelling match. This will not find an
entity spelled one way in your Magaya system but a different spelling in
the government list. For example, if a company spells its name “Cargo de
Miami”, but you enter “Cargo of Miami”, the system will not match this
name. To enable it to search for similar names and avoid missing an entity
due to misspelling or spelling variation, set the threshold to “Fair Match.”
This will result in a larger results list that you can check.
Set “Days to validate since last check” by selecting a number from the
dropdown. This is the number of days the screening will be considered
good, i.e., valid. This setting depends on how often your company exports.
Since the screening service is charged per entity, determine how often you
need the screening performed. If you select 30 days, and you add a new
entity to your system, that entity will be screened but others will not. You
will only be charged for new entities during this time period.
3)
Select banned countries: This setting varies, depending on the country in
which your company is based. In the United States, the U.S. Department
of the Treasury’s Office of Foreign Assets Control (OFAC) determines
which countries are banned. When you add countries to this setting, your
system scans shipments to verify if any entities are in these banned countries. Your Magaya system will scan this list first when you tell the system
to screen entities or screen a shipment. It will notify you if it finds one of
these countries and display that notification in a dialog box.
4)
Save the configuration.
For full details about running the screening process on shipments, entities or
vessels, please see Chapter 16 in the Magaya Software Communications Manual.
111
FORM FILLING
Form Filling
The Form Filling options enable you to set how much detail you want to appear
on the forms listed in this screen:
This Form Filling option is available in the Magaya Supply Chain Solution,
Magaya Cargo System, and the Magaya Commerce System.
Check the following boxes to activate these choices:
•
Expand Air waybill details: This will show one line per item in a shipment.
For this option to work, you must uncheck the option “Fill documents
using accounting info”. If you leave this unchecked, you will only have a
summary of the details that was entered in the “Description of Goods”
field on the General tab of the shipment.
•
Expand Bill of Lading details: This will show a line in the Bill of Lading per
item of the shipment. Checking this box will activate the “Show Container
details” option and then it will show one line per item in the container.
See alsothe “Ocean” configuration setting for more options.
•
112
Expand Cargo Manifest details: This will show complete addresses of entities in the cargo manifest.
FORM FILLING
•
Show Warehouse Receipt numbers in Cargo Manifest: This is unchecked
by default.
•
Fill documents using accounting info: This will use information in charges
to fill operations documents such as the Air Waybill or Bill of Lading.
•
Show items dimensions in Master Air Waybill: This will show a line with
the maximum dimensions of the pieces in the shipment (Pieces x Length
x Width x Height) per IATA specifications. It also has a second option to
show items dimensions detailed, which will show the dimensions per each
line in the shipment on the Air Waybill.
•
Use item notes as ‘Marks and Numbers’ in BL (Bill of Lading). This will
use any notes entered about an item on the Commodity dialog box inside
the Commodities tab. You can use the Notes field or Notes tab while you
are working on a transaction.
Other options in the Configuration menu enable you to set the weight units for
Air Waybills or Bills of Lading. You can choose Kilograms, Pounds, or both.
The default is set to the use “Both”. These units are only for the Air Waybill and
Bill of Lading and has no relation to the Measurement Units for a shipment.
Note: The Form Filling options dialog box is also available in the Shipment
screen by clicking the button “Settings”. The Settings button can be used to
change units per transaction if needed. Otherwise, the units are set globally here
in this Configuration menu.
113
LABELS
Click the Save or Reset button.
Labels
Use this option to set the printer for Magaya Explorer. If you are using a Zebra
(Eltron) printer model 2742, 2842, 2844, you can select the Eltron printer from
this option so the labels will print faster.
This option also enables you to set the information you want printed on labels:
•
Warehouse item description
•
Company information
•
Consignee name
If you do not want tracking numbers created when printing labels with part
numbers, check the box.
When you select the Print Labels options from the Magaya Explorer Print
button, the print dialog box opens and gives you options for label sizes and
quantities. For more details on the print button options, see Chapter 5 of the
Magaya Cargo System Operations Manual.
Measurement Units
With this option, you can set the measurement units for all transactions to use
the metric system or imperial units.
114
TRANSACTION TRACKING
Use the dropdown menus to select the measurement units and the decimal place
for length, area, volume, weight and volume weight. For example, Length can be
set to Inches (in), Feet (ft), Millimeters (mm), Centimeters (cm), or Decimeters
(dm).
Notes: The measurement units set here will be used as the default for all new
transactions. If they are set from the Charges tab in a Pickup Order, Warehouse
Receipt, or Cargo Release, those units will only affect that individual transaction. The Measurement Units options dialog box is also available in the Shipment screen by clicking the “Settings” button. Using the Settings button changes
the units for that transaction only.
Click the Save or Reset button.
Transaction Tracking
The Transaction Tracking plug-in feature enables you to allow your customers
to track their transactions. An email with a link is sent to your customer for each
transaction. The customer clicks on the link and views the current status of the
transaction in real time.
You can configure your Magaya software with options such as to send an email
to a customer automatically whenever a transaction is generated in the Magaya
software, or send an email message only when you want one sent. You can also
customize the message in the email or create a template.
115
CUSTOMER SETUP: FOR LIVETRACK AND ACCOUNT NUMBERS
For more details, see the Magaya Software Communications Manual.
Customer Setup: For LiveTrack and Account Numbers
There are options available to give your customers the choice to register themselves online and to change their passwords themselves, without you having to
do it for them (available in Magaya LiveTrack version 2.0 and higher). This is
especially useful for couriers and others with many customers who want to track
packages online.
Steps to allow customers to register themselves:
1)
Go to Maintenance > Configuration > Customer Setup: Click the
checkbox “Allow clients to register directly on Magaya LiveTrack”.
If you want customers to be able to use LiveTrack as soon as they register,
check this box. If not, you will need to manually enable their access from
the Customer list by right-clicking on their name and selecting “Web
Track User List” and unchecking the “Disable” checkbox in the dialog
box.
2)
116
Specify the permissions by checking the boxes for the functions you want
the users to have access to. Some functions are checked by default. This
sets system-wide preferences; to change it per customer, go to the
Customer list, right-click on their name and select “Allow Tracking.”
CUSTOMER SETUP: FOR LIVETRACK AND ACCOUNT NUMBERS
3)
Allow your customers to be able to update their passwords online themselves by checking the box to “Allow clients to update their password for
Magaya LiveTrack.”
Account Number Options:
•
If you want the system to automatically generate account numbers for new
customers, click the “Set” button. In this dialog box, set the options for a
prefix, suffix, and a starting number. Click OK to save. Go to the
Customer profile to view the number.
Note: When you create a new customer in your Magaya system manually
yourself, an Account Number will be automatically filled in on the
General tab. Then you will need to Allow Tracking for that customer by
right-clicking on their name and creating a password for them. Then
notify them of their access to the system via one of the email templates.
•
If you want the system to automatically generate account numbers for
existing customers who do not have account numbers, check the box.
This process will occur in the background, and you can continue working
while it is being done. How long it will take depends on the quantity of
customers in your Customer List.
Result: The customer can log into LiveTrack with their user name or
account number.
•
If you import customer names via API or other import method, you can
tell the system to generate new account numbers in case there is a conflict.
117
INCOMING MESSAGES
•
If you want your staff to be able to search for customers in your Magaya
system by using the customer’s account number instead of their name,
check this box to “Allow searching for clients by their account numbers.”
For example, this is useful when creating a shipment or other transaction;
when selecting the customer name from the dropdown list, you can type
in the account number also, and the system will find the customer and fill
in the field.
Note: Details on how to use LiveTrack arein the Magaya Software Communications Manual, Chapter 5. To activate the LiveTrack option, contact your Magaya
Logistics Advisor.
Incoming Messages
These options tell the system if you want to automatically save messages and
what folder to place them in. The automated saving function is checked and
active by default. If you uncheck a Save button, the system will prompt the user
if they want to save each document received.
For more details, see Chapter 7 in the Magaya Software Communications
Manual.
118
OUTGOING MESSAGES
Outgoing Messages
The Outgoing Messages screen provides setup options for sending email
messages, shipment, and charges information. Settings made here will affect all
Magaya users of the same database.
The Magaya email client must be used if you use the email templates. This
screen also enables you to set the default email signature for outgoing email
messages. It can connect to any email provider. For details, see Chapter 7 in the
Magaya Software Communications Manual.
119
SALES
Sales
The Sales configuration screen enables you to set up the following options:
120
•
Allow the create sales orders with backordered items: This means sales
orders can be created even when you don’t have items on hand in inventory
•
When the orders are fulfilled, give priority to inventory within the same
location
•
Fulfill orders using inventory in the specific division: If you have more
than one warehouse
•
Allow to create sales orders with clients as sellers: The Seller field can be
the Customer on the Sales Order. This is useful for 3PL companies that are
managing only the orders for their customers.
PURCHASING
•
Do not release items that have not been invoiced: When selecting this,
another option becomes available: the option to not release items that
have not been paid.
Enter general commission for inventory sales: This sets up a commission
amount system-wide for any salesperson who sells any inventory item. To set
commissions per salesperson, go to the Maintenance folder > Salespersons. To
set a commission for one inventory item at a time, go to the Warehousing folder
> Inventory Item Definitions. These options are available in the Magaya Supply
Chain Solution.
Additional configuration options related to selling items:
•
When viewing items in sales orders, select a detailed view or a summarized
view. The Detailed view displays more details about the items in a transaction such as a Sales Order, including an image, if one is saved in the
Inventory Item Definition. See an example in “Chapter 10: Create Sales
Orders” in the Magaya Supply Chain Solution user manual.
•
Locations allowed for Sales Order allocation: Select the locations to make
available when adding items to sales orders
•
Pricing Engine: Check this to enable pricing tiers. For details, see the topic
on “Price Rules and Price Management” in the Magaya Supply Chain
Solution user manual.
•
Allow Drop Ship orders on outgoing shipments: Check this box to allow
your system to place items that are in an “Ordered” status into outgoing
shipments. Learn more about drop shipping in the topics on Sales Orders
and Purchase Orders, available in the Magaya Supply Chain Solution user
manual.
Purchasing
Configure your system to determine when a bill can be created from a PO:
•
Allow to create bills for Purchase Orders without commodities: Checkmark this option to allow users to create Bills for a POs that don’t have any
commodities, but may have other charges. This is useful to keep track of
121
ONLINE BOOKINGS
items such as office supplies purchased. The PO status will be “Open” (not
“Empty”).
•
Allow to create bill for Purchase Orders only after all inventory is received:
The commodities must be On Hand to create the Bill.
Online Bookings
Use “Online Bookings” when you are accepting online bookings from
customers. Here you can determine if you want to assign a booking number to
a booking request or not and if you want to allow bookings even if you do not
have an existing trip set up in your Magaya Explorer.
The Online Bookings feature is available for all Magaya software. Note: This
configuration is one part of the process required to give your customers access
to make their own booking requests online. Additional information about using
the Online Bookings screen is available in the Magaya Software Communications Manual.
Online Payments
There are two ways to manage payments online: via First Data or PayCargo.
To give your customers the option to pay you online by by e-check (ACH)
configure the online payment option for the service provider PayCargo.
122
ONLINE PAYMENTS
To give your customers the option of paying their invoices with a credit card,
configure the First Data section of the screen.
Configure PayCargo:
PayCargo is a service provider which is designed specifically for freight
forwarders and others in the shipping industry.
Check the box on this screen to enable online payments via PayCargo, and select
the accounts you want used for the invoice payments (deposits) and fees:
•
When you select the bank account for the Invoice Payments, then all
payments received will be posted to this account.
•
The Bank Account for the Service Fees is the account that all service
charges will go to.
•
The Expense Account is for the processing expenses. When you create a
Profit & Loss statement, the processing expenses will appear on the report
under this expense account.
•
The Service Provider of PayCargo LLC is set in the system by default.
Next you and your customers must register with www.PayCargo.com.
Configure First Data:
Check the box to enable online payments with First Data.
123
ONLINE SALES ORDERS
If you don’t have a First Data account, click the link to their website to create
one. They will give you the details to enter into the Magaya screen: the Exact ID,
Password, Key ID and Key.
Note: The Test environment is only for testing the system. Leave this box
unchecked.
After you enter the data, the system will test your Magaya account and your
First Data account.
Click the Save button.
Next, you will need to enter the customer’s credit card information in their
Customer profile. Then the credit card can be applied to invoices. For details on
how to use the online payments feature, see the chapter on online payments in
the Magaya Software Communications Manual.
Online Sales Orders
To offer your customers the option to buy inventory from you online, you can
set up your system for online sales orders.
This feature requires this configuration setup and the creation of inventory
categories in the Inventory Organizer (under the Warehousing folder). Each
124
ONLINE SALES ORDERS
customer must have tracking enabled in their profile. See the Magaya Supply
Chain Solution Manual for details.
1)
Check the box to allow online sales orders, and then choose your preferences:
2)
Allow back orders of items. This gives you the option to let your customers
place orders for items that are not currently on hand in your inventory.
The backordered items are added to the “Backordered Items List”. Details
are in the Magaya Supply Chain Solution Operations Manual.
To create a Purchase Order automatically to buy the items from a
preferred vendor, check the box.
3)
Allow client invoice generation automatically: The system will create the
invoice, transferring the details of the sales order into an invoice, and send
it to the Invoices folder in your Magaya system.
125
ONLINE SALES ORDERS
4)
Allow orders to be taken in your home currency only. If you uncheck the
box, your system will accept orders in other currencies. Your system must
be configured for multicurrencies (set in Maintenance > Configuration >
Accounting).
5)
Generate charges automatically for online sales orders: Check this box to
enable the system to include charges on sales orders that customers place
online (which the customer will see). To define which charges to automate, go to the Intems & Services list, and configure the charges there.
6)
Allow your customers to cancel online sales orders: Check this box to activate this. (Available in Magaya software version 9.2+ and LiveTrack 1.0, as
of the date of this documentation, March 2014). The customer can
right-click on a sales order to cancel it. Note, if a Magaya user creates a
S.O. in the Magaya Explorer (not online), the customer cannot cancel that
S.O. (A Magaya user can cancel a S.O. via the Actions button or by
right-clicking.) Any canceled S.O. will have a status of “Canceled” and
display in the S.O. List. The items will be returned to inventory.
Sales Orders that have already been canceled or contain items that have
been canceled from a Purchase Order may not be canceled again. Sales
Orders that have already been invoiced or loaded onto a shipment or
cargo release cannot be canceled.
7)
Automate Job creation in your Magaya system for each sales order posted.
The system will automatically create a Job to track the progress of all transactions related to the job such as invoices, sales orders, etc. This will link
the sales order and the items inside it to the Job.
8)
Allow automatic release of the ordered commodities, and define the type
of release to be created automatically: a Cargo Release or a shipment will
be created in the system.
9)
Save the shipments in a folder you specify when you select the option
“Create a Shipment”. Then click the “Select” button to open a list of
folders so you can navigate to the folder of your choice.
10) Select the modes of transportation for the orders. These modes will be
visible to online users in Magaya LiveTrack.
126
ONLINE SHIPPING ORDERS
Feature a Category: After you create categories for inventory in the Inventory
Organizer (found in the Warehousing folder), you can select a category here to
feature it in the Online Sales Order screen in Magaya LiveTrack. This will
display only this “root” category and its subcategories. This is useful if you
create internal categories such as commissions that you do not want to be visible
to customers online. This is optional and can be changed at any time.
To notify your customers that their online order was received and is being
processed, go to the Email Templates or System Alerts configuration screen to
choose the option you prefer.
Online sales orders is available in the Magaya Supply Chain Solution and the
Magaya Commerce System.
For more details, see the Magaya Software Communications Manual.
Online Shipping Orders
To give your customers the option of sending you shipping instructions online
via Magaya LiveTrack, set up the option in the Configuration menu:
•
Check the box to allow online shipping orders (shipments and cargo
releases).
•
Select the modes of transportation you want to enable.
•
If you want to save the shipments in a different folder in your Magaya
system other than the existing one, click on the “Select” button to navigate
to the folder you want.
This configuration screen also offers options for online pickup orders.
Online shipping orders is available in the Magaya Supply Chain Solution and
the Magaya Cargo System.
127
US CUSTOMS SYSTEMS
Save your settings. Details on how to use the online shipping orders feature are
available in the Magaya Software Communications Manual.
US Customs Systems
The US Customs and Border Protection (CBP) options in Magaya software
provide fields to enter Automated Manifest System (AMS) codes, Automated
Export System (AES) login information, and the Automated Brokers Interface
(ABI) that is integrated with the SmartBorder system.
After you set up your Customs information in the Configuration menu, it will
fill in automatically in shipment documents.
US Customs features are available in the Magaya Supply Chain Solution and the
Magaya Cargo System.
For more details, see the Magaya Software Communications Manual.
Express Link
Magaya Express Link plug-in enables you to request package shipments from
carriers such as UPS and FedEx. It needs to be activated in your Magaya account
and configured in your Magaya system. Full configuration steps are explained
in the Magaya Software Communications Manual.
128
WMS
WMS
The WMS configuration section contains settings to start using the Magaya
WMS Mobile plug-in application. The screen contains the following options:
These details are explained in the Magaya WMS Operations Manual and in the
Magaya Supply Chain Solution Manual.
129
POD MOBILE
POD Mobile
Use the POD Mobile option to configure the settings for the Proof of Delivery
(POD) Mobile application. This application is used by delivery drivers so they
can collect signatures when they deliver goods. The application provides a list
of tasks, a description of the cargo to be delivered, the address and a map. It can
be used on wireless handheld devices and smart phones.
For more details, see the Magaya Software Communications Manual.
Scales
This option is a Magaya Plug-in application called Magaya Scale Integration. It
is designed to connect a scale to your Magaya system so you can weigh and
measure packages quickly.
The CubiScan scales are the only manufacturer that is currently integrated with
Magaya software.
Contact Magaya to activate this plug-in and discuss installing and connecting
the scale to your Magaya system. You will need the IP address to assign to the
scale and the Port.
130
AIR
Check the box to “Use CubiScan”. The other fields will be activated. Enter the
IP address and port that you set when installing the CubiScan software. This
enables the Magaya system to connect with the CubiScan scale and retrieve the
data about the weighed items.
Default Data for New Items: (these fields are not required): The fields for the
default data of new items are used when you receive items and the system will
create the item in the Warehouse Receipt. If you enter a location, then the
system will place the items in “On Hand” status. The Location name can be the
Weigh Station, for example. Then a “Move” Task can be created to move the
items to the racks. These fields are optional.
Options:
To print labels as the items are scanned in, check the box for printing labels. The
system will print a label for every scanned item so the labels can be placed on the
boxes right away.
- Ask for total pieces before scanning items: Check this option to speed up
receiving. This will enable users to print labels that are numbered to indicate the
number of each piece of the total pieces such as Box 1 or 4, Box 2 of 4, etc.
Assign scanned Tracking Number as an external tracking number for items:
This option is useful when receiving items from UPS or FedEx. Then the end
customer can track the item by this tracking number when they use the Magaya
mobile app, Track2Go. This tracking number will also be searchable within
your Magaya database.
Copy scanned Tracking Number to item Notes: This will add the number to the
Notes field. You don’t have to open the item to add it.
Air
To comply with IATA regulations, set the following configuration options as
needed for your company.
Each setting will change the way your system handles Air Waybill (AWB)
numbers. Verify your needs before making changes. Changes will be reflected
131
AIR
in the Carrier's profile (in the Maintenance folder) and/or in the air shipment
wizard as explained below.
•
132
Generate Air Waybill numbers by range: Use this option when an air
carrier sends you a batch of AWB numbers.
a)
Check this box and save this setting.
b)
Go to the Carrier's profile > the "Airline" tab > click the "Add" button
to add AWB numbers. A dialog box opens. The system grays out all
the options except for the setting you made in the Configuration
screen. Enter the beginning and ending range of numbers in the
fields, and click the "OK" button to save. The system will generate the
AIR
numbers in the range for you. They will be displayed in the screen.
The numbers will be available to use in air shipments.
The other option on the dialog box is to "Generate an amount of Air
Waybill Numbers". This allows the system to create the AWB numbers by
starting at the number you define.
•
Enforce Air Waybill numbers to comply with IATA regulations: This
setting will disable a checkbox on the dialog box in the Carrier's profile >
the "Airline" tab which opens when you click the "Add" button. This
133
AIR
checkbox is "Check digits". It will be grayed out. This forces compliance
with IATA regulations.
•
134
Air Waybill numbers assigned in sequential order: When you select this
configuration, it will affect how AWB numbers are used when creating air
shipments by forcing the system to use the next AWB number in the
sequence. You will not be able to select an AWB number from a list. If you
want to allow users to select any AWB number, do not check this box.
OCEAN
Ocean
The following Configuration options are available for ocean shipments:
•
Validate container numbers: Check this option to ensure any container
number entered is valid. The system will not accept invalid numbers.
•
Do not allow duplicate Bill of Lading numbers: Check this option to
ensure a duplicate Bill of Lading number is not entered into the system.
•
To include container waybill notes in the Bill of Lading, select the option
in this configuration screen.
Result: In a Shipment, the Container dialog box has a tab called "Waybill
Notes." Click the button to add notes.
•
If you have the connection with INTTRA, you can configure your Magaya
system to send container waybill notes in INTTRA requests. You can also
tell your Magaya system to send alternate shipment identifiers.
Ground
If you want to configure your Magaya system to prevent duplicating bill of
lading numbers for ground shipments, check the box.
135
CUSTOM FIELDS
Custom Fields
Custom fields can be added to any transaction and used in templates, lists,
reports, combo boxes (dropdown lists), filters, when transmitting or converting
transactions, export/import, and more.
Custom fields become available as a new tab in the transaction you customize,
and appear in lists in Magaya Explorer. You can specify if you want the Custom
Field to be visible to employees internally but not visible to customers.
136
CUSTOM FIELDS
To create a custom field, follow these steps:
1)
In the list of Customizable Elements, select the element you want to
customize such as Cargo Release, Invoice, or Warehouse Receipt.
2)
Click the Add button. A dialog box opens; this is where you will enter the
information for the custom field:
3)
Enter a Display Name, for example, “Keys in Vehicle?” This name will
appear in the reports and in transactions. (The Internal Name is assigned
by the system.)
4)
Enter a description (optional). This will not display on the transaction.
This will explain when and why this question is used.
5)
Select what type of field you want. Different options will display
depending on which type of field you choose. These are the options for the
types of fields:
137
CUSTOM FIELDS
6)
138
•
Text will allow text to be entered in the field. You can set the
maximum number of characters. The default is 100.
•
Integer is used to enter a whole number.
•
Decimal will allow you to specify a number for the amount of
decimal spaces. Use the Precision dropdown to select the decimal
spaces. The default is two spaces.
•
Pick List will create a dropdown list with choices you specify.
•
Yes/No is used to answer yes or no questions.
•
Date can display the date field. To include the time, check the box
“Date and Time.”
•
Money will allow you to specify a currency amount. Use the Precision dropdown to select the decimal spaces. The default is two
spaces.
•
Lookup will allow the user to select from a dropdown list of the entities you set such as Customers, Forwarding Agents, Carriers, etc.
Check the box to “Allow to build reports by this field” to allow this custom
field to be available in reports in Magaya software. Other options are:
•
If you no longer need a field, there are two options: You can delete a
custom field completely, or you keep it in your system but make it
inactive. To deactivate a custom field, check the box “Field is Inactive”.
•
If you want to create a custom field for internal use only, check the
box “Internal Use Only”. This will make the field visible for
employees but not customers.
JAVASCRIPT CODE
You can add as many custom fields as you need. When you are done, the custom
field will appear as a tab in your transaction. This is a Warehouse Receipt dialog
box with the Custom tab and custom fields:
Other options available in the Custom Fields configuration screen include the
option to edit or delete a custom field, to move a field up or down (rearrange the
order of the fields on a tab), or to import or export information in or out of
Magaya Explorer. See Chapter 4 in this manual for more details.
JavaScript Code
JavaScript is a scripting language used in Web pages to add functionality, interactivity, validate forms, detect browsers, and more. It works in all major
browsers. This function in Magaya software enables you to create a library of
139
JAVASCRIPT CODE
scripts that you can use for functions such as calculating rates, customizing
prices for your online store when you define an inventory item, etc.
The following buttons across the top of the JavaScript work area are:
•
My Code: This is the work area where you can type in code.
•
Resources: This is a library of source code of useful functions you can use.
•
Copy, Cut, and Paste: These button work similar to other copy, cut, and
paste buttons to allow you to copy, cut, and paste code.
The Function Name dropdown menu selects from Function names you have
added to the system. If you have not added any, the list will be blank.
The Parameters List is a field that is used to enter the parameters for the function you want to test. Separate the parameters with commas.
Click on the Execute button to test your code.
The Result window at the bottom displays the result of the selected function
executed with the above parameters. If there is an error, an error message will
appear here.
140
TRANSACTION LOG
Transaction Log
Use this option to tell the system to save a record of any changes made to transactions in Magaya Explorer. This will keep a history of what users have modified
or deleted.
•
The Transaction Log is set by default to keep a record of all deletions made
to transactions. You can specify if you want to keep a record of the
creation and/or the modifications.
•
Check the boxes you want and then click Save (or Reset).
Any changes made to the configuration screen of the Transaction Log (or any
configuration menu option) will be recorded in the log.
To view the Transaction Log, go to the Options menu on the top toolbar in
Magaya Explorer. Select “View Transactions Log”.
141
TRANSACTION LOG
The log opens, showing the type of transaction, its Object ID, the name or transaction number, the date, the employee, and more. The date range can be
changed.
To view an individual transaction, select it, click on the Actions button and
choose “View record”. Other options in the Actions menu are Restore record,
View previous state, Clean up Transactions Log, and Choose Columns. When
you select the option to clean up the transaction log, a dialog box opens with
options.
To maintain the Transaction Log, go to the Maintenance & Performance
configuration option. In the “Recycling” section, click the “Configure” button
and set the number of days to keep records in the Transaction Log. This setting
142
SECURITY
will remove the transactions from the log, but they will be saved in your backup
files. This will help keep your database optimized and improve its performance.
Security
The Security configuration screen enables you to set the level of authentication
for users when they log into the database.
•
Application-level authentication: When users log in, they select their user
name from a dropdown menu.
143
SECURITY
•
Database-level authentication: This setting does not show a dropdown list
of user names. This is a higher level of security.
Before performing this configuration, ensure you know your user name
and password. When you log back in, you must type your user name and
password.
All users must be logged off to set this configuration, except for the administrator performing this task. You must also exit from the Magaya
Communication Server.
The Magaya Communication Server will also require user login credentials the first time you make this configuration change. Create a user in
your Employee list for the Magaya Communication Server. Log in and
then restart the Magaya Communication Server.
Then go to the Employee list and view each employee profile > User tab to
see and make a note of the user name that the system created for you. Give
this login information to each employee so they can log in with the new
method.
144
MAINTENANCE & PERFORMANCE
Maintenance & Performance
This configuration screen provides optimization options you can choose as
needed. These options are designed to improve the performance of your
Magaya system.
•
Start up: This option improves performance by pre-loading entities such
as Customers and Vendors. If you have many entities, you can uncheck a
box so that your Magaya Explorer starts faster. The entities unchecked will
load as needed when you use that feature in the system.
•
Attachments & PDF Options: Optimizing an image for the Web will
reduce the file size so it is faster to email or download. If you want the
system to ask about optimizing images first, check the boxes.
The system uses black and white colors for the background of PDFs as a
default.
•
Recycling: These options are explained in detail in Chapter 8, Magaya
Database Administration. Please read all the steps in that chapter carefully
before configuring the Recycling options.
145
TASK SCHEDULING
Task Scheduling
This function is reserved for the system to schedule tasks such as checking with
UPS or other carrier for updates if you are using Magaya Express Link. It also
checks inventory stock levels if you set them up. In the future, other repeating
tasks may be added.
Clauses
You can save clauses in Magaya Explorer for notes that you add frequently to
transactions. For example, you may have a clause such as “Consolidation as per
attached cargo manifest” that you add to master shipments. Save this clause or
any others in your Clauses List and it will be available for use every time you
need it.
Clauses can be added in the Configuration screen or while you are working in a
transaction such as a Warehouse Receipt. This is the Configuration screen:
146
SHIPMENT DOCUMENTS
•
Click on the Add button to open a dialog box where you can create a new
clause.
•
Enter a name for the clause and the Clause Text (a description). Also select
the category from the dropdown. The Category list shows all the transactions you can add the clause to such as Warehouse Receipts, Invoices, Bills
and more. To add a category not listed, click on the button with the three
dots.
Shipment Documents
Use this option to set your system to automatically include specific shipping
documents in shipments when they are created. For example, if you always want
an air waybill included in every air shipment created, assign it here so that the
document will be automatically included.
147
SHIPMENT DOCUMENTS
To select a document and assign it to a shipment, click the “Add” button. In the
dialog box, select the document and set the options:
Each document has options that apply to it such as options for House and
Master for the Bill of Lading.
If you don’t want this document to appear to the customer when they log into
the tracking, click “Exclude from Tracking.”
The shipment documents option is available in the Magaya Cargo System and
Magaya Supply Chain Solution.
148
SYSTEM ALERTS
System Alerts
Use this option to create your own customized alerts. The alerts can be for
employees or others outside the company.
The screenshot shows an example of an alert that will send a Task to the
employee shown. You can also choose to send the alert via email. Customize the
subject line and body of the message according to your needs. There are many
options under the “When” field such as notification that a customer signed up
on LiveTrack, a sales order was placed online, and more. The message is sent
using the template you select.
Check the box to enable to alert.
149
COMMODITY TYPES
Commodity Types
Use this option to add commodity types to your Magaya system.
By entering a commodity type here, it will enable you to assign rates by
commodity type and to receive cargo in the warehouse by commodity type so
the charges for the items will use the rate you assigned.
Divisions
If your company has different divisions, you can set up the divisions in the
Configuration screen. As a result, the division will appear as a dropdown menu
150
DIVISIONS
in transactions. When you select that division, the address of the division will
appear on the documents. Employee permissions can be assigned based on division.
Click the “Add” button to add a new division:
•
On the first tab, “Division”, enter the division name.
•
Enter the phone number, fax number, and email (optional).
•
Select the default company. The default company is the associated
company of the division. The dropdown shows companies you have listed
in the Forwarding Agents subfolder under the Maintenance folder.
•
Check the box if you want the division name to appear in documents such
as Air Waybills or Bills of Lading. Check the other box to assign this division to entities created by its employees.
•
Add any comments as needed.
•
Click on the Address tab and enter the address. This address will appear
in the documents created by this division.
•
Click on the US Customs Codes tab and enter the Air AMS Originator
Code (if needed). This is used when filing AMS from the division.
•
Click the OK button when you are done.
151
EVENT DEFINITION
Event Definition
Magaya software enables you to define events so you have a list ready to select
from and use in the Events tab.
To enter a new event definition, click on the Add button.
•
Enter a name for the event in the Name field of the dialog box.
•
Enter details on the event (optional).
•
Select a location to connect with that event (optional).
•
Select from the dropdown to choose the type of automatic creation for this
event. There are many options: You can make an event appear in a WR or
Cargo Release when it is created, set as “In Transit,” emailed, or liquidated. If you choose “Automatic”, the event will be added to the transaction and will be visible to the customer. Selecting “Manual” will not
automatically create an event. You will have to select it each time for each
WR transaction you are creating such as a WR.
•
Check the box to include the event in tracking.
•
Click OK when finished.
Incoterms
Incoterms are international trading terms that define the point in time in which
the responsibilities and liabilities for cargo switch from the seller to the buyer.
152
INCOTERMS
The Magaya system includes a default list of incoterms. To add new incoterms,
click the Add button and enter the code and description in the dialog box.
153
TASK TYPES
Task Types
The Magaya system includes a default list of Task Types.
The column “System” identifies which Task Types are created by the system. If
they were created by the system, they are marked as “Yes”. This type of task
cannot be deleted. When you create a task, it is marked “No”.
To add new types, click the “Add” button and fill in the information in the
dialog box.
XML Transformations
Users can define a transformation for a specific transaction type. For example,
if there is a third-party accounting system that receives an invoice in a specific
format, you can write a transformation to convert the Invoice to the required
format of that system. Formats can be XML, CSV, or other format.
Then when the transformation entry is ready, the user opens the Invoice List,
selects the range of invoices to be exported, and clicks on the "Export" button to
154
XML TRANSFORMATIONS
select the available transformation (the one you define here). This will create a
new file in the required format.
•
Type a description
•
Choose the source: Local is your computer or network, and Online is a
URL.
•
Choose the format of extension (Import or Export).
•
Select an element type (such as a transaction of an Invoice, Bill, etc.). For
example, if you want to transform a shipment for the CASS system, select
“Shipment” to make it appear in Actions > Export > XML.
•
Click OK to save it.
155
EMAIL TEMPLATES
Email Templates
The system includes some default email templates. You can also add your own
to be used throughout your system by all employees. Images and links can be
added to email templates as well as other customizations.
The Email Templates are explained in detail in Chapter 7 of the Magaya Software Communications Manual.
Payment Terms
Define your own payment terms for entities such as customers and vendors.
With this configuration option, define the due date or a discount for early for
early payment. Then apply it to transactions such as Purchase Orders and more.
156
PAYMENT TERMS
The system includes a set of Payment Terms. You can add more as needed.
Overview of how it works: When the Payment Term is selected in the PO dialog
box (for example), the Due Date field updates automatically. Customer
discounts will be applied automatically and show in Invoices.
Set systemwide Payment Terms and default accounts in Configuration >
Accounting. This configuration option is available in Magaya software 9.3 and
above.
Full details are explained in the Accounts Receivable chapter in the Magaya
Software Accounting Manual.
157
PAYMENT TERMS
158
4. CUSTOM FIELDS
INTRODUCTION TO CUSTOM FIELDS
4. Custom Fields
Introduction to Custom Fields
Magaya software gives you the option to add fields that gather specific, customized information you need. These custom fields can be used in transactions in
Magaya Explorer; in the templates that build documents and forms such as
Warehouse Receipts, Cargo Releases, and others; in lists, reports, combo boxes
(dropdown menus), and filters. Custom fields can also be used when transmitting or converting transactions, importing or exporting information to and
from your Magaya database, and more.
For example if you ship vehicles, you may need to track certain information
about the vehicles and generate a report. With custom fields, you can add any
field you need and answer questions about the vehicle shipments such as:
•
Is the title with the vehicle?
•
Are the keys in the vehicle?
•
Does the vehicle have gas?
•
What is the color of the vehicle?
With the custom fields options, you can create different types of fields:
•
Dropdown lists of choices (you set them or choose from your existing list
of entities such as customers, carriers, vendors, etc)
•
Text fields that can be filled in (you set the character limit)
•
“Yes or No” fields
•
Number fields and currency fields (whole numbers or include a decimal
place)
•
Date and/or time fields
159
INTRODUCTION TO CUSTOM FIELDS
When you add a custom field, it becomes available as a new tab in the transaction, such as this shipment:
You can make the custom field visible for employees internally but not visible
to customers.
Custom fields are also included as a column in any list in Magaya Explorer
(from the Actions button, click on “Choose Columns”):
Custom fields will display in documents you customize with the Magaya Document Designer. For example, if you create a custom field for your Warehouse
Receipts and place the cargo from the WR into a Shipment, the custom field will
appear in the Shipment transaction as well.
160
STEP-BY-STEP PROCEDURE
Step-by-Step Procedure
1)
Go to the Maintenance folder (or the Options menu on the top toolbar).
2)
Click on Configuration.
3)
Select Custom Fields from the menu.
4)
In the list of Customizable Elements, select the element you want to
customize such as Cargo Release, Invoice, or Warehouse Receipt.
This example will use the Warehouse Receipt element and create a custom
field for the following question: Are the keys with the vehicle?
Note: The buttons on the right are grayed out until you select a customizable element. Then the Add button is active. When you add a field, it
161
STEP-BY-STEP PROCEDURE
displays in the list of Custom Fields. When you click on a field, the other
buttons become active.
5)
Click the Add button to create a custom field for the question. A dialog
box opens:
The Field Type is set to “Text” by default. Under the Field Type is
“Maximum Length”; this number is set to 100 by default. This number
applies to the maximum number of characters allowed in the custom field
you are creating: the user must answer with 100 characters or less. The
Maximum Length field only appears when you use the Text field type. You
can select a Field Type before or after entering a Display Name.
6)
162
Enter the following text in the Display Name field (do not include the
quotation marks): “Key in Vehicle?” This is the name that will appear in
the reports and in transactions. (The Internal Name is assigned by the
system. If you make an error such as spell a word incorrectly and you save
the custom field, you can edit the Display Name but not the Internal
STEP-BY-STEP PROCEDURE
Name. If you need to change the Internal Name, you must delete the
custom field and create a new one.)
7)
Enter a description (optional). This will not display on the transaction.
This explains when and why this question is used.
8)
Change the maximum length (optional). This is the maximum number of
characters allowed for the answer.
9)
Select what type of field you want. A dialog box opens, displaying different
options depending on which type of field you choose. These are the
options:
•
Text will allow text to be entered in the answer field. You can set the
maximum number of characters. The default is 100. This option will
give the user a free-form field, so they can type in the answer to the
163
STEP-BY-STEP PROCEDURE
question. This is useful for answering questions such as “What is the
color of the vehicle?”
If the text might fill more than one line, click the “Mulitline”
checkbox.
•
Integer is for whole numbers (no decimal places). Use this option
when you want users to enter a whole number as the answer.
•
Decimal will allow you to specify the number of decimal places. Use
the Precision dropdown to select the decimal places. The default is
two places.
•
Pick List will create a dropdown list with choices you specify
(similar to multiple choice):
Click on the Add button to add to the Pick List. A text box opens:
Enter text in the box and click OK. The text will be added to your
Pick List.
•
164
Yes/No is used to answer yes or no questions.
STEP-BY-STEP PROCEDURE
•
Date can display the date field. To include the time, check the box
“Date and Time.”
The user will see a calendar when they click on the Date and Time
dropdown in the Custom tab of a transaction such as a Warehouse
Receipt:
•
Money will allow you to specify a currency amount. Use the Precision dropdown to select the decimal spaces. The default is two
spaces.
165
STEP-BY-STEP PROCEDURE
•
Lookup will allow the user to select from a dropdown list of the entities you set such as Customers, Forwarding Agents, Carriers, etc.
When you select the Lookup field, the user will have a dropdown list
to choose from such as on this WR dialog box:
166
STEP-BY-STEP PROCEDURE
10) Check the box to “Allow to build reports by this field” to allow this custom
field to be available in reports in Magaya software:
Other options are:
•
If you no longer need a field, there are two options: You can delete a
custom field completely, or you keep it in your system but make it
inactive. To deactivate a custom field, check the box “Field is Inactive”. The inactive field will not appear in filters or lists unless there
is data in that field from a previous transaction.
•
If you want to create a custom field for internal use only, check the
box “Internal Use Only”.
You can add as many custom fields as you need.
167
STEP-BY-STEP PROCEDURE
Custom fields can be edited, deleted, copied, rearranged, imported, or exported
from Magaya Explorer to another program by using the buttons shown:
To move an element up or down, select it and click the button you need. For
example, in this example the element “Key in vehicle” is the first in the list. If
you want to move it down the list, select the element and click the Move Down
button. The element will move down one place.
Select the field to edit, delete, etc. and click the button needed. When you delete
a field, it is deleted from the list in the Custom Fields screen, from the transaction tab, and from the Reports menu. If you delete a field that was used in transactions, you will still see that field in the Advanced Filter. This enables you to
filter by that field for any past transactions that used that field.
The “Copy To” button will open a dialog box so you can copy that field to
another transaction so you do not have to recreate the elements.
168
CUSTOM FIELDS IN REPORTS
Result: After you add a custom field, it becomes available as a new tab in the
transaction. The dropdown fields will display <none> until a selection is made:
The information added into the Custom Fields will be automatically carried
over to any other transactions you create from this Warehouse Receipt such as
to a shipment.
If you add Custom Fields to an Inventory Item Definition, those fields will automatically appear on the Commodity description when you receive those items
in the warehouse.
To include custom fields in your documents such as Warehouse Receipts, Cargo
Releases, etc., you will need to add the same fields to the templates for those
documents by using the Magaya Document Designer. Then you will select that
template to use for those transactions. For details, see the topic “Magaya Document Designer”.
Custom Fields in Reports
After you create custom fields, you can see the information gathered by the
fields and placed in a report. In order to create a report that uses custom fields,
that field must have a checkmark in the box to use in reports.
To generate a report of this information, click on the Actions button in the list
you are working on. For example, if you made a custom field for “Vehicle
Status” and you need to see a report of the vehicle status for all vehicles received
169
CUSTOM FIELDS IN REPORTS
in the warehouse, go to the Warehouse Receipts List and click on the Actions
button.
170
•
Click on “Reports” and select the report you want. In this example, we are
looking for vehicle colors. (When the custom field “Vehicle Color” was
created, the checkbox was activated to allow this field to be used in
reports.)
•
The report opens, showing the colors of all the vehicles in the date range
you want to see in this report.
CUSTOM FIELDS IN THE ADVANCED FILTER
•
The column headings in the report are the ones checkmarked in the
“Choose Columns” dialog box.
The custom fields you can see are the ones created and activated to be
listed in reports.
Custom Fields in the Advanced Filter
When you create custom fields, they will be available in the Advanced Filter.
You can filter a list to see the information that was gathered in the custom fields.
For example, this Advanced Filter screen shows the fields available in the Ware-
171
ADD CUSTOM FIELD TO A DOCUMENT TEMPLATE
house Receipt list, including the custom fields added that gather information
about vehicle color and status:
Steps for using the Advanced Filter are available in the Magaya Cargo System
Operations Manual in Chapter 5.
Add Custom Field to a Document Template
Document templates can be customized to display data from Custom Fields.
These templates can be selected in transactions such as the Warehouse Receipt
document view Actions button. You can copy an existing document template in
that screen; the Magaya Document Designer application opens. For details on
using the designer, see Chapter 5.
172
5. MAGAYA DOCUMENT DESIGNER
INTRODUCTION TO THE MAGAYA DOCUMENT DESIGNER
5. Magaya Document Designer
Introduction to the Magaya Document Designer
What is the Magaya Document Designer?
Magaya Document Designer is a tool you can use to customize existing Magaya
documents or create new ones by creating custom templates. Data available in
Magaya software can be placed in the following types of documents using the
Magaya Document Designer:
•
Quotations and Bookings
•
Pickup Orders, Cargo Releases, Labels, and Packing Slips
•
Purchase Orders and Sales Orders
•
Warehouse Receipts and Warehouse Receipt Labels, and Cargo Moves
•
Shipment Documents, Shipment Master and House Labels
•
Invoices and Bills
•
Payment Receipts, Checks, Deposit Tickets, Journal Entries and Client
Statements of open invoices with applied payments and balances
You can also make these documents available for your customers to see via
Magaya LiveTrack.
Magaya Document Designer is included with all Magaya software and is available from the Document button in Magaya Explorer, or it can be opened from
your computer’s Start menu > All Programs > Magaya software.
To access Magaya Document Designer, you need administrative rights. Only
users with administrative rights can create and publish templates.
How Does the Magaya Document Designer Work?
Magaya Document Designer uses visible elements which include graphic
elements and controls:
173
INTRODUCTION TO THE MAGAYA DOCUMENT DESIGNER
•
Graphic elements are images, text boxes, lines, rectangles, and other
shapes. You can fill the shapes with color, change the border or the font,
etc.
•
The controls are the way that the Magaya Document Designer displays the
data. There are three types of Controls: edit boxes, checkboxes, and grid
(tables). The Controls are linked to fields. The fields store the data, and
Controls display the data.
The following image shows a Control made using the Edit button. When
a Control is created using the Edit button (or using the checkbox or table
buttons), the Control is “unlinked”, meaning it is not associated with any
data source yet.
To link this box with a data source, right-click on it and select “Properties”
from the pop-up menu. On the Data tab, select a field name from the
dropdown:
The field name needs an x-path that will lead to the data source for this
field and populate it.
174
INTRODUCTION TO THE MAGAYA DOCUMENT DESIGNER
You can also create a Control and then drag an element from the Schema list
and place it inside the Control box. The elements in the Schema list already have
data sources associated with them. When you drag and drop an element from
the Schema list, the field name is created automatically and linked to the
Control.
To identify the Controls, add a label such as a text box. For example, if you are
creating a document that a customs agent needs to fill out, you must add fields
and labels so the agent knows where to write the date, etc. This image shows a
shaded text box above the control:
The Control that is associated with a field will gather data and display it. Fields
have a field name, a data source type, and the data source itself. The following
shows the field properties for an element dragged from the Schema list:
Fields can be filled with data in these ways:
•
From an XML element (in a schema list): This takes XML data from the
current transaction such as a WR and fills it into the field.
•
From a Formula: A Formula gets data from other fields through variables.
•
From a Script: The script gets data from the DatabaseObject or the XML
DocumentObject. (For example, you can access an item inside a shipment
175
INTRODUCTION TO THE MAGAYA DOCUMENT DESIGNER
and calculate charges for that item based on the WR for the item.) For
more details about using JavaScript, see the topic on "JavaScript" .
•
From User Input: A user enters text in an empty field that you create. This
option is useful when the element you need is not in the schema list or
when you need the flexibility to allow users to enter information.
Fields can be string fields for entering text, Boolean fields to create checkboxes,
or table fields. When Magaya Explorer fills in a document, it takes all the information entered in the dialog boxes and prepares it in an XML format. The fields
each have their own x-paths (a unique XML path) that leads to this field and no
other. For more, see the section on the . Unused fields can be deleted by
right-clicking on them.
The following diagram identifies the visible elements and the data elements, and
it illustrates the relationship between the controls and the fields: Controls are
filled by fields, and fields are filled by the four data sources.
The following sections will explain how to:
•
176
Open the Magaya Document Designer
INTRODUCTION TO THE MAGAYA DOCUMENT DESIGNER
•
Use the Magaya Document Designer Interface
•
Customize an Existing Template
•
Add an Image or Logo to a Template
•
Create a New Custom Template
•
Publish a Template
177
HOW TO OPEN MAGAYA DOCUMENT DESIGNER
How to Open Magaya Document Designer
There are two ways to open the Magaya Document Designer:
1)
178
Magaya Document Designer can be opened from the server computer’s
Start menu:
HOW TO OPEN MAGAYA DOCUMENT DESIGNER
2)
From Magaya Explorer:
Click on the Document button (“Docum.”) on the toolbar on the top of
the Magaya Explorer, or click on the Add Document button (“Add Doc.”)
on the Shipment Toolbar. A dialog box called “Select Documents” opens.
To open a new document, click on “New”. If you want to copy an existing
document and modify it, click on the document name in the list and click
179
HOW TO OPEN MAGAYA DOCUMENT DESIGNER
on the “Copy” button. If the buttons are grayed out, verify your rights
access to the Forms folder on your computer.
If you are working in the document view of a Pickup Order, WR, or Cargo
Release, click on the Actions button and click on “Select Template”:
A dialog box opens with buttons for you to select the template. Click New,
Edit, or Copy.
The Magaya Document Designer opens:
180
•
If you clicked New, you will see a dialog box with different types of
templates you can choose from to make a new template.
•
If you clicked Copy, you will see the template of the form you
selected such as a WR or Pickup Order.
•
If you selected Edit, the document you selected will open, ready for
you to edit.
THE MAGAYA DOCUMENT DESIGNER INTERFACE
The Magaya Document Designer Interface
The main screen of the Magaya Document Designer contains the Design/Code
pane, toolbars, menus, and schema list.
The Design pane will display the template you are working on. The Code pane
will display any JavaScript code you have created for this document.
Toolbars and Menus
The toolbars on the top of the Design pane have standard buttons such as Save,
Edit, and Zoom.
181
TOOLBARS AND MENUS
To add graphic elements, use the buttons to draw a line, rectangle, circle, text
box, or add an image. To add a Control, use the control buttons to create an Edit
box, a checkbox, or a table. The choice of Control will depend on how the box
will be used in your document.
In addition to the toolbars, the menu commands across the top offer many functions:
•
The Insert menu contains many of the functions that are also available as
buttons on the toolbar such as the line or rectangle buttons. You can insert
an image such as your company logo. You can also add a background
image which will look similar to a watermark.
•
The Script menu option is active when you are working in the Code pane.
It is grayed out when you are working on the Design pane. The Script
menu contains options to check syntax and more.
•
The Window menu has options such as the ability to switch between
viewing different documents if you are working on more than one.
•
On the Layers menu are options to view the layers. There are two layers:
the Drawing Layer and the Control Layer:
The Control Layer is the layer of the template you see in the Design pane
that contains only the Controls and fields from the schema list or any
Controls you added using the Control buttons.
The Drawing Layer shows the text boxes, rectangles, lines, etc. added to a
template. Both layers are displayed and enabled by default. When you
182
SCHEMA
view the Layers menu, you will see a checkmark next to the layer(s) that
are displayed.
On the right side of the Magaya Document Designer interface is a menu with
three tabs: Schema (XML), Fields, and Variables. These are the elements you
will use to create new fields on your custom template.
The schema list is specific to the type of template you are creating, and it shows
all the elements available for that type of transaction. For example, if you want
to create a shipment document, then the list of schema will include all the
elements related to shipments such as the carrier, charges, destination, etc.
These elements can be dragged and dropped from this list to the Design pane.
Let’s look at each in more detail in the following sections.
Schema
These are XML elements used to feed data into fields. When you drag and drop
one of these elements from the list to the Design pane, it creates a control and a
field that will fill with data. (The fields created can be viewed by clicking on the
“Fields” tab on the bottom of the Schema list.)
The schema list shows all the elements available for the type of transaction you
are working on such as a Warehouse Receipt or Shipment. For example, if you
drag the element “Number” from the list and drop it on the Design pane, it
creates a field for the shipment number. When a user enters the shipment
183
FIELDS
number (or name) in the shipment dialog box in Magaya Explorer, it will appear
on the form in the place you specify with Magaya Document Designer.
For specific information on each element in the schema, hover the mouse over
each element to see a pop-up with details.
To expand one of the elements, click on the plus sign. This will show all the
sub-elements inside that element.
Fields
Fields store data. The data can be filled in automatically by linking the field to a
schema element, or the user can fill in the data by typing information into the
control associated with that field.
184
FIELDS
The fields you see in the list are the fields that come with your documents by
default. They can also be created by the system automatically when you drag a
schema element from the Schema list to the Design pane.
You can also add different types of fields if you do not see the one you need.
Click the Add button and select the field type: String, Boolean, or Table:
Other buttons enable you to view properties or delete a field.
The columns in the list show the field name, type, and source type:
185
VARIABLES
Variables
Variables are often used to calculate totals in formulas by gathering data from
other fields such as the total of prepaid charges in an Air Waybill.
When you click the “Add” button in the Variables list, a dialog box opens. In the
dialog box, the dropdown arrow for “Field” will show the fields used in the
custom template you are designing.
The name (alias) is filled in when you select the field. To treat null as zero, check
the box: This will make sure no value is calculated if a field is blank. The Column
field is used if you have a table (or a grid) and want to specify the column for the
variable.
186
CUSTOMIZE AN EXISTING TEMPLATE
For each Control created on the Design pane, you can create a caption or a label
for it by using the text button to add a text box to the template.
You can copy a text box and paste it by right-clicking on the text box and
selecting “Copy” from the pop-up menu. (Alternates: Use “Edit” on the menu
or press the Ctrl + C keys on the keyboard.)
When you select the box, it will have handles (boxes on the edges) that you can
use for resizing.
In addition to the Design pane in Magaya Document Designer, there is a Code
pane that can be used to enter code to create custom fields on a template. The
Code pane is similar to a text editor.
Customize an Existing Template
Existing templates can be modified to your needs. You can add or remove fields,
insert an image or your company logo, and make other changes.
Plan Your Custom Template:
187
CUSTOMIZE AN EXISTING TEMPLATE
To get started with your custom template, evaluate what you need to do. For
example, you may want to add text such as “Hazardous Materials” in bold red
letters across the top of a Warehouse Receipt, or maybe you need to add information into the WR about vehicles that you ship. You can also add information
collected in custom fields that provide more information on the type of
hazardous materials or vehicles in a shipment. These fields can be added to the
WR. The custom WR template can be added to the list of templates users can
choose from.
Getting Started:
To customize a template, open it - either from the Start menu or from within
Magaya Explorer (in a transaction such as a WR document > Actions > Copy).
The Magaya Document Designer will open the template and display it in the
Design pane. Rename the template and save it in the Forms folder inside your
Magaya software installation folder.
Common Functions:
The following will explain some of the more commonly used functions in the
Magaya Document Designer program.
Alignment: To align elements, select them and click on the Align button in the
toolbar. (Alternate method: Select all and right-click, go to “Shape”.)
Resize Multiple Fields:
To change the shape of fields, you can select one or more fields and right-click
on them to access a pop-up menu. The following screenshot shows three fields
188
CUSTOMIZE AN EXISTING TEMPLATE
selected and the pop-up menu with the “Shape” command selected to make the
three fields the same width:
This will make all the selected fields the same width, so you do not have to resize
each one separately. You can also align fields by using the Align buttons on the
toolbar.
189
FONTS
Fonts
To change the font or other properties of the text box, right-click on the text box
and select “Properties”. A dialog box opens:
When you create a text box or drag a schema element to the design pane, you
will need to click on the Selection Tool button (the arrow icon) to access the
right-click menu options such as the Properties.
The Object Properties box contains choices for changing the font, alignment of
the text inside the box, and margins.
190
FONTS
To access the properties of the control, right-click on the control and select
“Properties”. A dialog box opens with three tabs:
•
The General tab shows the name of the object as assigned by the system.
Choices are available for printing and other actions such as “Multiline”
often used for addresses that have more than one line of text. Add page
numbers to templates.
•
The Text tab has the same fields as the Object Properties box such as font
modifications.
191
TABLES
•
The Data tab shows the field name and its properties such as the x-path of
the field (the Data Source). X-path is a unique XML path that leads to this
field and no other.
Tables
To create a table, click on the element you need such as Charges. The element
has a table icon:
Click and drag the Charges element to the Design pane. It will appear as a box
with the word “Charges” inside it.
To add cells to the table, right-click on the field to access a pop-up menu. For
example, if you need a table with the Description, Value, and Currency, then
192
TABLES
create a table with three columns to collect this data. Select “Create Record Definition”.
This will add cells (columns) in the Charges table:
Add text boxes for the column names.
You can click and drag on the column lines to adjust the width of each.
193
TABLES
To add more rows of cells, right-click on a cell and select from the pop-up menu:
For additional table properties, right-click on a table and select “Field Properties” from the pop-up menu. In the dialog box, click on the Columns tab and set
the column properties:
Also available in this Table Field Properties dialog box is the option to add a
dropdown list to a form: Click on the “Selection Type” dropdown.
194
TABLES
To add a table header, click on the Rectangle button on the toolbar.
Draw the rectangle above the table. To access the properties of the rectangle,
click on the Selection tool button (the arrow) and then click on the rectangle.
Next right-click on the rectangle and select “Properties” from the pop-up menu.
Use this menu to choose fill color and border lines.
To add more columns to a table, right-click on an existing column to access a
pop-up menu of choices such as “Add column to the right”, etc.
195
ADD CUSTOM FIELDS TO A TEMPLATE
To add fields to the table such as charges and the information about the charges,
select the schema you want in the table and drag them to the table.
The Magaya Explorer gathers many pieces of information about shipments and
their charges. With the Magaya Document Designer, you can create a custom
form with the shipping charges you want to show in the form.
Add Custom Fields to a Template
If you added Custom Fields in Magaya Explorer, then you can make the data
gathered in those Custom Fields appear in the document. (Custom Fields can
be added in the Maintenance folder > Configuration > Custom Fields.)
Custom fields may be used to gather data on transactions such as a Warehouse
Receipt (WR). If you ship vehicles, for example, you may need to know if the
title or keys are with the vehicle.
First create the custom field in Magaya Explorer, and then add the custom field
to the WR document template. Tip: Remember the “Internal Name” assigned to
196
ADD CUSTOM FIELDS TO A TEMPLATE
the custom field. You will need it when you are working in the Magaya Document Designer.
To add a custom field to a template such as a WR, go to the WR document and
click the “Actions” button.
1)
From the Actions button’s dropdown menu, click “Select Template”.
2)
Select a document template from the list and click the “Copy” button.
3)
Rename the file and save it in the same folder as the other document
templates: the Magaya software Forms folder (in the same place your software is saved, usually).
When the Magaya Document Designer application opens, follow these steps.
•
Make room for the new field in the template by clicking and dragging on
an existing box so there will be a space for the new field.
•
Expand the element “Custom Field” by clicking on the plus sign.
•
Drag the sub-element <new field> to the Design pane into the space you
created on the template. A dialog box opens:
•
Enter the Internal Name of the custom field. The Internal Name is the
name assigned by Magaya Explorer when you created the Custom Field in
197
ADD CUSTOM FIELDS TO A TEMPLATE
the Maintenance folder. (Important: Use the same internal name or the
Magaya system will not find the data.)
This custom field will populate with data from Magaya Explorer. You can add a
caption (or label) to this custom field to identify it. For this example, the label
could be “Is the title with the vehicle?” The answer field can be a dropdown or a
text field to enter Yes or No.
To add text to the text box, click the Arrow button on the toolbar and then
double-click the text box to activate it.
To make the field display the way you want it to, right-click on the field and
select Field Properties > Format > Boolean.
Note: If you have the transaction document open in Magaya Explorer while you
make changes in the Magaya Document Designer, you will need to reload the
data into the form to see the custom field. To reload, right-click on the document name in the folder list in Magaya Explorer. From the pop-up menu, select
“Reload data”:
Page numbers can be added by adding a new Edit Control. In the Properties,
check the option for page numbers. The system will automatically output “Page
1 of 5” for example.
Here is an example of a Cargo Release with a Custom Field added to gather
information required by the TSA (the U.S. Transportation and Security Administration):
198
ADD CUSTOM FIELDS TO A TEMPLATE
1. Create the Custom Field.
2. This is how the Custom Field looks in the CR dialog box (on the Custom tab):
199
ADD AN IMAGE OR LOGO TO A TEMPLATE
3. This is how it looks in the document when you select that template:
Add an Image or Logo to a Template
You can add an image or your logo to a template. This example will show how
to add a company logo for a fictional company named Zoom Logistics. This is
the logo image we will use:
200
ADD AN IMAGE OR LOGO TO A TEMPLATE
While this example will show how to add a company logo, this can be used for
inserting any image.
First, click anywhere on the document to activate it.
1)
Click on the Image button (or click on the Insert menu and select Image):
2)
Draw a box on the document where you want the image to appear. A
dialog box opens.
3)
Select your logo image file from your folder.
4)
Click OK to insert the graphic.
To adjust the size or shape of the box, click on the Selection tool on the toolbar
(the button with the arrow). Squares will appear on the corners of the image
box. Click and drag from any square to resize the image.
The image will be fit into the space of the box, stretching the image if needed.
To turn off this stretch feature, right-click on the image and select “Image” and
select “Stretch” to uncheck the option. Another option in this menu is “Image”
and “Adjust control to image”. This option will display the image in its original,
full size.
To delete the image, click on the Edit menu and select Undo Insert (or select the
image and click the Delete key).
201
ADD AN IMAGE OR LOGO TO A TEMPLATE
Save the template when you are done. (Tip: As with any document you are
working on, it is best to save periodically while you are working.)
202
CREATE A NEW CUSTOM TEMPLATE
Create a New Custom Template
To create a new template when you are working in the Magaya Document
Designer program, click on File > New. A dialog box opens:
•
Select the type of template you want to create.
•
Enter a document name. The “File Name” field will automatically update
with the new name.
•
Save the template in the Forms folder in the Magaya software folder.
•
Select the language.
A blank document opens.
Drag and drop the fields you want from the schema list to the Design pane.
203
PUBLISH A TEMPLATE
Add lines, backgrounds, text boxes, etc. by using the buttons on the toolbars are
explained in the section “Customize an Existing Template”.
Publish a Template
To publish a template, click on File > Publish Document (in the Magaya Document Designer). NOTE: Administrative rights are needed to publish a template.
The dialog box will show your Magaya Network ID and company name automatically. If you are working remotely, the company name will not fill in to the
Publish fields automatically. Type in the data.
To change the document name, click on the Properties button.
Click the Publish button.
204
PUBLISH A TEMPLATE
The template is now available in Magaya Explorer for users. The template can
be used by clicking on the Document button (if you are in a shipment) or by
selecting the template from the Actions button.
Notes: If a document is over 300 KB, the program will not let you publish it. You
will get an error message stating the document is too large and must be resized
to be published. Try resizing images to reduce the file size.
If you are working remotely, you can download the document by going to the
File menu in Magaya Explorer and select Download Document.
205
PUBLISH A TEMPLATE
206
6. JAVASCRIPT IN THE MAGAYA DOCUMENT DESIGNER
INTRODUCTION TO JAVASCRIPT IN THE DOCUMENT DESIGNER
6. JavaScript in the Magaya Document Designer
Introduction to JavaScript in the Document Designer
While the Magaya Document Designer program offers many drag-and-drop
options to customize documents, sometimes you may need to write JavaScript
code for additional functionality.
This topic will explain the tools Magaya provides when you are programming
inside your document. Magaya has chosen the JavaScript language which
includes functions, loops, conditions, and more. In addition, the JavaScript
function in the Magaya Document Designer has two added objects that enable
you to access the data you need: XmlDocument and Database objects:
•
The XmlDocument object contains many properties and methods that
help you code in Magaya Document Designer.
•
The Database object allows you to query the Magaya Database for information not present in the XML transaction. For example, you can use this
object to pull a full warehouse receipt, a shipment, invoice, or any other
transaction from the database with a single call.
207
ENTER CODE INTO MAGAYA DOCUMENT DESIGNER
Enter Code into Magaya Document Designer
To enter JavaScript code in the Magaya Document Designer, click on the Code
button on the taskbar and begin entering code.
Select the Data Source: Right-click on the Control and select Field Properties.
Click on the “Data source” dropdown menu to select a function you made. If
you have not created code yet, you can create a placeholder function by clicking
208
ENTER CODE INTO MAGAYA DOCUMENT DESIGNER
on the “New” button in the dialog box, and type the name of the function. Then
you can fill in the details of the code later.
Check Syntax: To check the syntax of code, click on the Script menu on the top
of the Magaya Document Designer interface. Select “Check Syntax” from the
dropdown menu:
Insert Initialization function: Use this function to load data that will be used
frequently inside the document to optimize speed.
Insert Finalization function: Use this function to clean up any resources allocated at Initialization while working in the document.
Save (File > Save) and publish the document when you are done (File > Publish
Document).
209
THE XMLDOCUMENT OBJECT
The XmlDocument Object
Here is a list of the most common properties and methods of the XmlDocument
object:
Properties:
•
documentElement: This property contains the main or top-most element
of the XML transaction. This can be a WR element of a Pickup Order
element, depending on the document you are working in.
•
attributes: contains the list of attributes of the node.
•
childNodes: contains a node list with the child nodes of the node
•
firstChild: returns the first child of the node.
•
lastChild: returns the last child of the node.
•
length: returns the number of items in a collection.
•
text: represents the text content of the node.
•
value: contains the attribute value.
Methods:
•
getAttribute: gets the value of the attribute. Syntax:
Node.getAttribute(attributeName);
•
item: allows random access to the individual nodes within the collection.
Syntax:
Node.item(index);
See Example 1 below for more on the item method.
•
selectNodes: Applies the specified pattern-matching operation to this
node's context and returns the list of matching nodes. Syntax:
Node.selectNodes(expression);
•
selectSingleNode: Applies the specified pattern-matching operation to
this node's context and returns the first matching node. Syntax:
Node.selectSingleNode(expression);
The above listed properties and methods are the most commonly used and
needed when programming in a Magaya document.
210
EXAMPLES OF JAVASCRIPT FOR MAGAYA DOCUMENT DESIGNER
Examples of JavaScript for Magaya Document Designer
The following presents five code examples that show how to perform common
tasks with code in the Magaya Document Designer.
1. This is an example of the item method:
function GetSecondItem()
{
var result = “”;
var docElement = XmlDocument.documentElement;
var ship_items = docElement.selectNodes(“Items/Item”);
if (ship_items != null && ship_items.length > 1)
{
var second_item = ship_items.item(2);
var name_node = second_item.selectSingleNode(“Name”);
result = name_node.text;
}
return result;
}
2. Example of combining data from your Magaya database and displaying it in
a document. For example, if you want to display the phone number and fax
number of your company, a carrier, or other entity in a form such as a Warehouse Receipt or Cargo Release, you can code the document with JavaScript to
gather those two pieces of separate information and display them together this
way:
Tel: 305-555-3232 / Fax: 305-555-1212
The following code will combine the two pieces of data:
function PhoneFax_GetValue()
{
var docElement = XmlDocument.documentElement;
var phone = docElement.selectSingleNode("IssuedBy/Phone");
var fax = docElement.selectSingleNode("IssuedBy/Fax");
var phone_fax = (phone == null) ? "" : "Tel: " + phone.text;
if (fax != null)
{
if (phone != null)
phone_fax += " / ";
phone_fax += "Fax: " + fax.text;
}
return phone_fax;
}
Note: You can use JavaScript to combine any two pieces of data in your Magaya
database, not just the phone and fax numbers.
211
EXAMPLES OF JAVASCRIPT FOR MAGAYA DOCUMENT DESIGNER
Explanation of the above code example:
First, we got the main node of the XML using the documentElement property of our XmlDocument object and stored it on the docElement variable.
Then, using the selectSingleNode method, the phone and the fax are
pulled out from the IssuedBy entity.
These two nodes are stored in the phone and fax variables. Note these are not
the phone and fax values but the nodes themselves; we still need to get the values
from them.
Next the phone variable is tested to see if it contains something; if so, then we
extract the text in it by calling the phone.text property. We concatenate that
result to the text “Tel: ” and store it in the phone_fax variable. Then we
repeat the same steps with the fax variable: if we have any value in there, we
concatenate it to what we have before in the phone_fax variable.
Then the resulting composed string is returned out of the function using the
keyword return. The resulting string of this function is:
Tel: 305-555-3232 / Fax: 305-555-1212
3. Example of how to display a container number in a document:
function ContainerNumber_GetValue()
{
var result = "";
var docElement = XmlDocument.documentElement;
var ship_items =
docElement.selectNodes("Items/Item[IsContainer = 'true']");
if (ship_items != null && ship_items.length > 0)
{
var container = ship_items.item(0);
if (container != null)
{
var serial_number =
container.selectSingleNode("SerialNumber");
result = serial_number != null ?
serial_number.text : "";
}
}
return result;
}
Explanation of the above code sample:
The documentElement is stored in the docElement variable. Then with
this variable, we query the XML for all the items that have a sub-node named
IsContainer with its value set to ‘true’. This will return a list of all the containers
in the transaction. This list is going to be stored in the ship_items variable.
Next test this variable to know if we obtain at least one container. If so, let’s get
the first of them by calling the ship_items.item(0) method. The param-
212
EXAMPLES OF JAVASCRIPT FOR MAGAYA DOCUMENT DESIGNER
eter set to zero (0) indicates that we want the first one because it’s a zero-based
indexed list. The first container is stored in the container variable.
Calling the selectSingleNode(“SerialNumber”) method in the
context of the container variable, we retrieve the SerialNumber node from
the container. Then we test if the node exists and extract its text by means of the
text property. The result is displayed in the document.
4. Example of Dimensions Code in WR Table:
The following code sample shows how the dimensions of items are displayed in
a Warehouse Receipt (WR). You can use this code sample to display other fields
besides the length, width, and height shown here.
Code sample:
function ItemDimensions_GetValue(base_xpath)
{
var docElement = XmlDocument.documentElement;
var length = docElement.selectSingleNode(base_xpath +
"/Length");
var length_val = length != null ? length.text : 0;
var width = docElement.selectSingleNode(base_xpath + "/Width");
var width_val = width != null ? width.text : 0;
var height = docElement.selectSingleNode(base_xpath +
"/Height");
var height_val = height != null ? height.text : 0;
var unit = docElement.selectSingleNode(base_xpath +
"/Length/@Unit");
var unit_val = unit != null ? unit.text : "";
if (length_val == "") length_val = "0.0";
if (width_val == "") width_val = "0.0";
if (height_val == "") height_val = "0.0";
return length_val + " x " +
width_val + " x " +
height_val + " " +
unit_val;
}
Explanation of the above code:
The selectSingleNode method helps here but with a difference. We are
concatenating the Length, Width and Height to the base_xpath parameter.
We are composing the x-path of the dimensions. The reason for this is that we
are now inside a table, and this portion of code will be called as many times as
items in the warehouse receipt. Magaya Explorer will pass one item at a time and
their x-path comes in this parameter. This fills each cell in the table.
213
EXAMPLES OF JAVASCRIPT FOR MAGAYA DOCUMENT DESIGNER
When Magaya Explorer calls us with the first item, the base_xpath parameter will contain this: “Items/Item[0]”. That’s why we concatenate to it
“/Length” obtaining “Items/Item[0]/Length”, that in turn is nothing more than
the node representing the length of the first item of the warehouse receipt.
Subsequently, Magaya Explorer will call passing “Items/Item[1]”,
“Items/Item[2]” and so on.
The “at” symbol (@) is used to get the unit for our dimensions string. This
symbol is used when you want to reach an attribute instead of a node. In this
specific case, Unit is an attribute of the Length node.
5. Example of Code to Display Vehicles in a Shipment:
The following code sample shows how to find all the vehicles in a shipment and
report their year, make, model, and VIN in a table. This code will gather this
information about the vehicles whether the vehicles are in containers or as loose
cargo.
This technique will code for a whole table and not for a single cell. It will build
and return a single string consisting of the values of each cell separated by tabs.
The only exception is that the last cell of every line will be separated from the
first cell of the next line using a line-feed and a carrier-return character instead
of a tab.
function GetNodeInfo(node)
{
return node == null ? "" : node.text;
}
function GetVehicleInfoLine(aesdata_node)
{
var year =
aesdata_node.selectSingleNode("VehicleData/ModelYear");
var make =
aesdata_node.selectSingleNode("VehicleData/Make");
var model =
aesdata_node.selectSingleNode("VehicleData/Model");
var vin =
aesdata_node.selectSingleNode("VehicleData/VehicleID");
var info_line =
GetNodeInfo(year) + "\t" +
GetNodeInfo(make) + "\t" +
GetNodeInfo(model) + "\t" +
GetNodeInfo(vin) + "\r\n";
return info_line;
}
// entry point
function VehicleList_GetValue()
{
var result = "";
var docElement = XmlDocument.documentElement;
var ship_items = docElement.selectNodes("Items/Item");
if (ship_items != null && ship_items.length > 0)
214
EXAMPLES OF JAVASCRIPT FOR MAGAYA DOCUMENT DESIGNER
{
for (i = 0; i < ship_items.length; i++)
{
var cur_item = ship_items.item(i);
var is_container =
cur_item.selectSingleNode("IsContainer");
if (GetNodeInfo(is_container) == 'true')
{
var container_items =
cur_item.selectNodes("ContainedItems/Item");
if (container_items != null &&
container_items.length > 0)
{
for (j = 0; j < container_items.length; j++)
{
var cur_cont_item =
container_items.item(j);
var is_vehicle =
cur_cont_item.selectSingleNode(
"AESData/VehicleData");
if (is_vehicle != null)
{
var aesdata_node = cur_cont_item.
selectSingleNode("AESData");
var info_line =
GetVehicleInfoLine(aesdata_node);
result += info_line;
}
}
}
}
else
{
var is_vehicle = cur_item.
selectSingleNode("AESData/VehicleData");
if (is_vehicle != null)
{
var aesdata_node = cur_item.
selectSingleNode("AESData");
var info_line =
GetVehicleInfoLine(aesdata_node);
result += info_line;
}
}
}
}
return result;
}
Explanation of the above code:
First, note that we have more than one function. As in the rest of the cases,
Magaya Explorer will call only one of them, the VehicleList_GetValue
function, but we are going to call the other two from inside this one.
215
EXAMPLES OF JAVASCRIPT FOR MAGAYA DOCUMENT DESIGNER
Take the document element node by means of the
XmlDocument.documentElement property. Then we retrieve the list of
all the shipment items by calling
docElement.selectNodes("Items/Item") and store it on the
ship_items variable.
Once we have all the items, we need to iterate through them. For that purpose
we make a loop:
for (i = 0; i < ship_items.length; i++)
{
...
}
This statement will initialize the variable i in zero and will be increasing this
variable at the end of each iteration by means of i++, while the statement i <
ship_items.length is met. In other words, this sentence will repeat what’s
inside its braces as many times as items the shipment has.
Now, in each loop iteration we are will get a new item of the shipment by calling:
var cur_item = ship_items.item(i);
Note that i will be changing its value from zero (0) to the number of items of
the shipment minus one. So, we take the ith item of the shipment in each iteration.
At this point we test if the item is a container by means of
var is_container = cur_item.selectSingleNode("IsContainer");
If that is the case, we need to look inside the container to extract the vehicles
from there. In order to do this we call:
var container_items =
cur_item.selectNodes("ContainedItems/Item");
This statement will extract all the sub-items of the container and place them as
a list in the container_items variable. Note that the selectNodes
method is called in the context of the container itself.
Here, we need to make another loop to get through the items inside the
container and see if any of them is a vehicle. We test if the item is a vehicle as
follows:
var is_vehicle =
cur_cont_item.selectSingleNode("AESData/VehicleData");
If this node exists, then we can be sure that we are dealing with a vehicle. So, we
need to pull out its information. For that purpose we have made the function:
function GetVehicleInfoLine(aesdata_node)
216
THE DATABASE OBJECT
This function receives the AESData node as a parameter, extracts the required
information from there, puts it all together separated by tabs and returns it to
the caller. Once returned, the line is concatenated to the previous ones and
stored in the result variable.
The rest of the code works in a very similar way. It collects the information of
possible vehicles present in the shipment as loose cargo.
The Database Object
The Database Object is a way to access the Magaya Database. It allows you to
query the Magaya Database for information not present in the XML transaction. Using this object, you can pull a full warehouse receipt, a shipment, or any
other transaction from the database and get all the information from it with a
single call. This information can then be put into a custom document.
The following list of methods is used to retrieve a specific transaction from the
database:
GetWarehouseReceipt(number, flags);
GetShipment(number, flags);
GetCargoRelease(number, flags);
GetPickupOrder(number, flags);
GetInvoice(number, flags);
GetItemDefinition(number, flags);
GetBooking(number, flags);
GetQuotation(number, flags);
GetBill(number, flags);
GetJob(number, flags);
GetPurchaseOrder(number, flags);
GetSalesOrder(number, flags);
GetWarehouseItem(number, flags);
Each one has two parameters:
•
The first parameter, number, is the global unique identifier (GUID) of
the transaction. This GUID uniquely identifies a given transaction.
•
The second parameter, flags, is used to customize the call. It allows you
to tell the method what kind of information to retrieve in the call. If you
don’t want to deal with this parameter, just pass a zero (0).
If you want to manipulate what is coming out from this call, here is a list of the
possible values for the flags:
217
THE DATABASE OBJECT
Name
Value
Description
XML_INCLUDE_INC_
CHARGES
0x00000001
process income charges, by
default are not included
XML_EXCLUDE_
ATTACHMENTS
0x00000002
do not process the
attachments
XML_NO_WRITE_
HOUSES
0x00000010
do not process houses
XML_TRANS_EVENTS_
ONLY
0x00000020
do not process events of
related transactions
XML_ATTACH_DOCS_
SUMMARY
0x00000040
transmit only the
attachments/documents
description but not data
XML_INCLUDE_
RELATED_OBJ
0x00000080
included related transaction
like invoices for a shipment
XML_EXCLUDE_
DOCUMENTS
0x00000200
do not include the shipment
documents in the XML
XML_INCLUDE_EXP_
CHARGES
0x00000400
process expense charges, by
default are not included
XML_CREATE_ENTITIES
0x00000800
use entities information in
transaction to add the
entities to the database
XML_EXCLUDE_
SUBITEMS
0x00008000
Exclude subitems inside
items
XML_INCLUDE_
TRANSACTION_URL
0x00020000
Include related transactions
URL to access via
Transaction Tracking
XML_BASIC_FIELDS
0x00080000
Write the basic fields in any
object
Note that you cannot use the name of the flag in your JavaScript code; instead
you have to pass the associated values.
Database Object Example 1:
When working on a Warehouse Receipt Label document, all we have in the
XML is the information related to the warehouse item for which we are printing
the label. If more information is needed, we need to go back to the database and
pick from there what we need such as the name of the issuing company:
218
THE DATABASE OBJECT
function IssuedByName_GetValue()
{
var result = "";
var docElement = XmlDocument.documentElement;
var whr_id =
docElement.selectSingleNode("WarehouseReceiptGUID");
var whr_xml = Database.GetWarehouseReceipt(whr_id.text, 0);
if (whr_xml != null)
{
var whr_doc_elem = whr_xml.documentElement;
var issued_name =
whr_doc_elem.selectSingleNode("IssuedByName");
if (issued_name != null)
{
result = issued_name.text;
}
}
return result;
}
Explanation of the above code:
For this code, we get the document node to start working with our item. Then,
we extract the GUID of the warehouse receipt where the item resides by calling:
var whr_id =
docElement.selectSingleNode("WarehouseReceiptGUID");
Once we have the GUID in the whr_id variable, we can query the database for
the full warehouse receipt transaction:
var whr_xml = Database.GetWarehouseReceipt(whr_id.text, 0);
The resulting variable will contain the XML associated to the specified warehouse receipt, giving us full access to all its data. From here on, the work is
similar to what we have been doing in the other examples. We take the document node for this new XML:
var whr_doc_elem = whr_xml.documentElement;
Then we retrieve the desired data - the name of the issuing entity:
var issued_name =
whr_doc_elem.selectSingleNode("IssuedByName");
Retrieving Related Transactions:
The Database object offers us a couple of functions that are very useful when we
need to know about the cargo operations related to a given accounting transaction or when we want to know about the accounting transactions related to a
given cargo operation.
GetAccountingTransactions(type, number, flags);
GetRelatedTransactions(type, number, flags);
219
THE DATABASE OBJECT
The number and the flags parameters mean just the same as they do in the
methods explained above. That is, the GUID of the transaction and what we
want to be retrieved from the transaction when we call the method. Now,
because we don’t have a method for every type of transaction but one for them
all, we need to specify the type of transaction we are talking about. That’s what
we use the first parameter for.
Here is a list of the possible values that this parameter can take:
Code
Transaction
WH
Warehouse Receipt
SH
Shipment
CR
Cargo Release
PK
Pickup
IN
Invoice
IV
Item Definition
BK
Booking
QT
Quotation
BI
Bill
JB
Job
PO
Purchase Order
SO
Sales Order
WI
Item
If we want to retrieve all the accounting transactions associated with a given
shipment, we can do something like this:
var acc_list = GetAccountingTransactions("SH", shipment_guid,
0);
where “SH” means that we are talking about a shipment and shipment_guid
is the shipment that we are talking about.
These methods return an XML document containing pairs of transaction types
and GUID. So, in the previous example, when retrieving the shipment-associated accounting transactions, if there is an invoice and/or a bill associated with
it, the result will be something like this:
220
THE DATABASE OBJECT
<GUIDItems>
<GUIDItem>
<GUID>746CA237-AEFF-4a65-B0C6-B1E7D876A414</GUID>
<Type>IV</Type>
</GUIDItem>
<GUIDItem>
<GUID>146CA237-AEFF-5c65-B0D6-B1E7D876A414</GUID>
<Type>BI</Type>
</GUIDItem>
</GUIDItems>
Once we have that XML result, we can call the functions GetInvoice and
GetBill to retrieve them from the database using the retrieved GUID.
Database Object Example 2:
This example will retrieve all the accounting transactions associated with a shipment and put it all together in a table field:
function TableField_GetValue()
{
var result = "";
var docElement = XmlDocument.documentElement;
if (docElement)
{
var ship_guid = docElement.selectSingleNode("@GUID").text;
var ship_type = docElement.selectSingleNode("@Type").text;
var xml_doc = Database.GetAccountingTransactions(
ship_type, ship_guid, 0);
if (xml_doc)
{
var guid_list = xml_doc.documentElement;
var guid_nodes = guid_list.selectNodes("GUIDItem");
for (i = 0; i < guid_nodes.length; i++)
{
var item = guid_nodes.item(i);
var trans_guid = item.selectSingleNode("GUID").text;
var trans_type = item.selectSingleNode("Type").text;
var number = 0;
var amount = 0;
if (trans_type == "Invoice" ||
trans_type == "CreditMemo")
{
var ar_xml_doc = Database.GetInvoice(
trans_guid, 0);
var inv_node = ar_xml_doc.documentElement;
if (inv_node)
{
number = inv_node.
selectSingleNode("Number").text;
amount = inv_node.
selectSingleNode("TotalAmount").text;
}
}
221
THE DATABASE OBJECT
else //bill or bill credit
{
var ap_xml_doc =
Database.GetBill(trans_guid, 0);
var bill_node = ap_xml_doc.documentElement;
if (bill_node)
{
number = bill_node.
selectSingleNode("Number").text;
amount = "-" + bill_node.
selectSingleNode("TotalAmount").text;
}
}
result +=
trans_type + "\t" +
number + "\t" +
amount + "\r\n";
}
}
}
return result;
}
The code example above shows the character "\t" means tab to the next cell in a
table. To go to the next line, use "\r\n". To go to the next page, use "\f".
All the elements of this code have been explained previously.
The last code to explain are conversion methods. They are a group of methods
that allow you to convert a value expressed in a given measure unit to another
different unit:
ConvertWeight(source_value, source_unit, target_unit);
ConvertLength(source_value, source_unit, target_unit);
ConvertVolume(source_value, source_unit, target_unit);
ConvertArea(source_value, source_unit, target_unit);
ConvertTime(source_value, source_unit, target_unit);
ConvertVolumeWeight(
source_value, source_unit, target_unit, vol_weight_factor);
All these methods work the same; they take three parameters:
222
•
the value we want to convert,
•
the unit in which this value is expressed, and
•
in what other unit we want the method to return us the resulting value
conversion.
7. DIVISIONS
INTRODUCTION TO DIVISIONS
7. Divisions
Introduction to Divisions
Your company may have different divisions. They can vary based on the type of
shipping done; perhaps you have one division of employees handling exports
and one for imports. Your company many have different divisions in different
cities. Other companies may have a division that handles all the ocean shipments and one that handles all the air shipments.
In Magaya Explorer, you can assign divisions according to your needs. Each
division can have a separate address and contact information. Then these divisions can be used in transactions such as Cargo Releases, Shipments, and more.
Step-by-Step Procedure: Set Up Divisions
Divisions can only be set up by a person with administrative rights.
1) Go to the Maintenance folder in Magaya Explorer.
2) Click on Configuration.
223
STEP-BY-STEP PROCEDURE: SET UP DIVISIONS
3) Select “Divisions” from the vertical menu (you may have to scroll down).
Note: Divisions can also be set up in the Employees subfolder by clicking on the
Actions button and selecting “Divisions”. A list opens. The menu on the list has
an Add button. This is the same list and Add button that are available in the
Configuration subfolder. The Divisions list is also available from the Actions
button in the Chart of Accounts.
224
STEP-BY-STEP PROCEDURE: SET UP DIVISIONS
Click the Add button. A dialog box opens. There are three tabs:
•
On the first tab, “Division”, enter the division name.
•
Enter the phone number, fax number, and email (optional).
•
Select the default company. When you select a default company here, this
company and its address will appear in transactions that use that division.
•
Check the box if you want this division name to appear in documents such
as Air Waybills or Bills of Lading.
•
Add any comments as needed.
•
Click on the Address tab and enter the address. This address will appear
in the documents created by this division.
•
Click on the US Customs Codes tab and enter the Air AMS Originator
Code (if needed). This is used when filing AMS from the division.
•
Click the OK button when you are done.
The Division will be added to the list.
In the Divisions list, you can choose the columns in the list by clicking on the
Actions button.
225
ASSIGN AN EMPLOYEE TO A DIVISION
Assign an Employee to a Division
To assign employees to divisions, go to the Employee subfolder under the Maintenance folder.
Select the employee and double-click on their name (or click on the Edit
button).
In the dialog box, click on the “User” tab.
•
Select a division for this employee. To remove the division, click on the red
x button; this will clear the dropdown field.
•
If you want to restrict this employee’s access so they can only view transactions from this division, place a checkmark in the box “Can only see
transactions from this division.” This can also be changed at any time by
unchecking the box.
•
Click OK when you are done to save the settings.
Result: When the Administrator assigns an employee to a division, the employee
will not see the Division dropdown menu in their transaction screens. The
transactions that employee creates will be automatically assigned to that division; there is no need for them to select the division. Documents created by that
employee will automatically display the division name and address.
226
USING DIVISIONS IN TRANSACTIONS
Using Divisions in Transactions
After divisions have been created, they can be used in transactions such as this
Cargo Release:
The Divisions dropdown is visible to a person who has Administrative rights in
the Magaya System and who is not assigned to a division. When the Administrator assigns an employee to a division, the employee will not see the Division
dropdown menu in their screen. The employee will not be able to change the
division. The transactions that employee creates will be automatically assigned
to that division; there is no need for them to select the division.
If you are an administrator who is not assigned to a division, you will see the
Divisions dropdown on the General tab of transactions such as Pickup Orders
and Warehouse Receipts, or you will see it on the first screen of a shipment
wizard.
Divisions can also be assigned to entities such as Customers, Carriers, Agents,
and Vendors and to warehouse zones in your Magaya system. Employees in a
division will only see entities or warehouse zones in their division.
227
REPORTS BY DIVISION
This Cargo Release document below will show the “Ocean Shipments” division
name and address, not the “Issued By” company name and address in the document:
Reports by Division
To create reports by division, go to the list you need to create a report about such
as the Pickup Orders List or Warehouse Receipts List.
Click on the Actions button, and select “Reports”.
228
REPORTS BY DIVISION
In the pop-up menu, select “By Division”.
All the transactions for that division will appear in the report.
229
REPORTS BY DIVISION
230
8. MAGAYA DATABASE ADMINISTRATION
INTRODUCTION
8. Magaya Database Administration
Introduction
The Magaya Database Server Agent contains all the functions needed to manage
your Magaya database, including tools to optimize your database performance,
to create a backup of the database, and how to set up an automated backup
schedule.
To access the Magaya Database Server Agent, right-click on the taskbar icon for
the Magaya Database Server Agent (or double-click on it).
When you right-click on the icon, a menu pops up.
Select “Open Database Administrator”.
231
WORKING WITH THE MAGAYA DATABASE SERVER AGENT
A dialog box opens:
If the database is not running, click the Start button.
Working with the Magaya Database Server Agent
The dialog box for the Magaya Database Server Agent shows the following
information about your Magaya database:
232
•
The database computer number and the port for this database are listed on
the top.
•
The status of the database is noted on the top, for example, “Running” or
“Stopped”.
•
Database location: Where the data is located. To change the file location,
stop the database first. The “Change” button is grayed out when the database is running.
•
Log File: This is a trace file of events such as who opened sessions and
when, disconnections, etc. To change the file location, stop the database
first. The “Change” button is grayed out when the database is running.
BACKUPS
WORKING WITH THE MAGAYA DATABASE SERVER AGENT
•
Connections: As you click on each tab, the computer name, user name,
number of instances, and the application type that is running are
displayed. The tabs are:
- Local Users
- Remote Users (such as those accessing the database via Magaya
OnTheGo)
- Other Connections such as the Magaya Communication Server Agent
- All Connections
•
Refresh button: To refresh the view of the database by clicking the icon of
the two arrows in a circle.
•
Stop button: To stop the Magaya Database Server Agent. First all users
must log off. If any users are connected when you click the Stop button, a
notice will appear asking if you want to continue while they are open. This
is NOT recommended. It will close their connection and could cause data
to be lost. Do not stop the database while users are logged in.
•
Start button: This will restart the same database.
•
Backup button: To create a back up of your database, either a full backup
or an incremental backup.
•
Restore: To select another database. A window opens. Before using the
Restore button, stop the database first.
•
Options: This button opens a dialog box with options to set up a schedule
to automate the database backup process and set the amount of memory
you want the database to use.
•
Tools: This button opens a dialog box to shrink the database. The database
must be stopped. See the section on Database Performance for steps. The
steps also include some settings needed in the Maintenance > Configuration folder of your Magaya Explorer.
Backups
The Magaya database can be backed up in full or in part (incremental).
233
BACKUPS
CREATE A FULL BACKUP OF YOUR MAGAYA DATABASE
Create a Full Backup of Your Magaya Database
Creating a full backup of your database is recommended before you perform an
online update of your software or any time you want a backup of your data.
The Full Backup process will make a backup all your system data in contrast to
an incremental backup, which creates a partial backup of only the data that has
changed since the last full backup. For more on incremental backups, see the
section “Create an Incremental Backup”.
To create a full manual backup, follow these steps:
234
1)
Open the Magaya Database Server Agent by right-clicking on the Magaya
Database Server Agent icon in your computer’s taskbar. (Alternate:
Double-click on the icon to open it.)
2)
Select “Open Database Administrator” from the pop-up menu.
BACKUPS
CREATE A FULL BACKUP OF YOUR MAGAYA DATABASE
3)
Click the Backup button.
Select “Manual Full Backup” from the pop-up menu.
A dialog box opens, showing your computer files.
235
BACKUPS
CREATE AN INCREMENTAL BACKUP
4)
Navigate to the folder that you want to use as the location to save the
backup (or use the default location).
The full backup file has an extension of .bak added to the end of the file
name. The file name includes the date.
5)
Click “Save”. The length of time required to save it depends on the size of
your database. If the backup is unsuccessful, the system will notify you. If
you need more space, consider deleting old files or placing them on
another hard drive.
Create an Incremental Backup
The Incremental Backups feature enables you to backup only the new transactions and data since the last full backup instead of backing up the entire database, which can take hours, depending on the size of your database. Incremental
backups can be performed in minutes.
To make your system perform an incremental backup now:
236
1)
Open the Magaya Database Server dialog box from the taskbar icon.
2)
Click the “Backup” button and select “Force an incremental backup now”
from the pop-up menu:
BACKUPS
CREATE AN INCREMENTAL BACKUP
3)
The system asks if you want to perform this task. Click “Yes” to confirm it
and proceed.
The backup will be completed. Depending on the size of your database, the time
for this backup will vary. Users can continue working during the backup. You
may see a progress bar in the dialog box for the Magaya Database Server:
The incremental backup is saved in the folder with the most recent automated
full backup.
The most recent, automated full backup is saved in this folder.
237
BACKUPS
AUTOMATE DATABASE BACKUPS: OVERVIEW
Note: A file extension .bk_ means the file is compressed, and .bak is not
compressed.
Remember: You must also make a backup of the Blobs folder by copying it to
another location. This will not be done automatically as of the publication date
of this documentation. The Blobs folder is located in the installation folder for
Magaya software:
The Blobs files are unstructured data such as photographs or attachments. They
are saved in a separate location from your database to help optimize the Magaya
system. For details on optimizing your Magaya system, please see the section
“Database Performance”.
Automate Database Backups: Overview
The Magaya Database Server Agent enables you to schedule automatic backups
to occur when you want them to occur. You can automate full backups and
incremental backups.
IMPORTANT: Set up the schedule on the server computer:
•
Ensure the server computer will be on during the time that the backup
is scheduled to occur.
For example, if you schedule an automated backup for 12:00 AM, then do
not turn off the server computer overnight. It must be running to perform
the backup.
•
238
Ensure all users are logged off.
BACKUPS
AUTOMATE FULL BACKUPS
Automate Full Backups
To set up your database to make a full backup automatically, follow these steps:
1)
Click the “Options” button in the Magaya Database Server Agent dialog
box.
Another dialog box opens called “Database Options”. It has a tab
“Backups” that has the following functions:
•
The checkbox for enabling automatic backups is checked by default. (If
you do not want the backup to happen automatically, uncheck the box.)
•
The Backup Path field shows the locations where the backup file will be
saved. This computer must be on to perform the backup. Do not turn off
this computer. If you want to change the location, click on the button with
the three dots.
239
BACKUPS
AUTOMATE INCREMENTAL BACKUPS
•
Select the frequency of the full backup: Every Day or Weekly (On Sunday);
and set the time of day. 12:00 AM is recommended.
•
Enter a number of the amount of past backups you want to save. The
system will keep the most recent backups and delete the oldest backup file
when it reaches the number set here. If you want to save a backup file for
a longer period of time to keep a longer history, then increase the number
here or copy that file into another file location. This automated process
will not save all backup file indefinitely.
•
Click the OK button to save your settings.
The backup file is saved in a folder with the date of the backup. The folder
is saved in the location that is identified in the dialog box for the Magaya
Database Server. Any incremental backups performed after this full
backup are also saved in this folder.
Remember: You must also make a backup of the Blobs folder. This will not be
done automatically as of the publication date of this documentation.
Automate Incremental Backups
240
1)
Open the Magaya Database Server Agent by right-clicking on the icon in
the taskbar.
2)
Click the Options button in the dialog box.
BACKUPS
AUTOMATE INCREMENTAL BACKUPS
3)
On the “Backup” tab of the Database Options dialog box, click the “Add”
button under the Incremental Backups section of the screen.
In the dialog box, set the time for the incremental backup.
241
BACKUPS
RESTORE DATA FROM A BACKUP FILE
4)
Close the Time dialog box.
Close the Database Options dialog box.
The settings are saved, and the system will perform the incremental
backup daily at the appointed time.
You must also make a backup copy of the Blobs folder. This will not be
done automatically as of the publication date of this documentation.
Restore Data from a Backup File
To restore the data to your Magaya database, follow these steps:
1)
Close your Magaya Explorer.
2)
Right-click on the Magaya Communication Server Agent icon in the
taskbar and select “Stop Communication Server”.
3)
Open the Magaya Database Administrator Agent by right-clicking on the
icon on the taskbar and selecting “Open Database Administrator”.
4)
Click on the “Stop” button.
The “Restore” button will become active. It may take a moment.
5)
242
Click the Restore button.
BACKUPS
RESTORE DATA FROM A BACKUP FILE
6)
Locate the backup file in the dialog box.
Backups are displayed in chronological order and are labeled as Full or
Incremental. You can go back to a desired time, and the system will automatically restore the Full backup and any Incremental backups since that
243
BACKUPS
RESTORE DATA FROM A BACKUP FILE
time. The full and incremental backups work together and depend on each
other.
If files need to be decompressed, the system asks you if you want to
decompress them now:
When the decompression is completed, the system shows you the result
and asks if you want to continue:
Type “Yes” and click the “Finish” button.
If the system does not need to decompress files, a message will ask if you
244
DATABASE PERFORMANCE
are sure you want to restore the data from the specified file. Click “Yes”.
The database will restore and start again automatically.
7)
Start the Magaya Communication Server Agent by right-clicking on the
icon on the taskbar and selecting “Start Communication Server”.
Now you can open your Magaya Explorer.
Database Performance
Magaya software version 8.5 and later includes features designed to help optimize large databases. These are optional processes and not required for all
Magaya customers. These optimizations are recommended if you have a large
database with long lists of customers, carriers, vendors and other entities;
numerous transactions such as Warehouse Receipts and other operations and
accounting transactions; and many photographs or other attachments.
Improving the performance of your Magaya database is a multi-step process
which begins with the following options in the Configuration menu:
•
Recycling records
•
Extracting heavyweight data to save it outside the database in a Blobs
folder
•
Shrinking the database
Please read ALL these steps carefully BEFORE beginning the optimization
processes. The Recycling process is recommended to be done first. If you have
questions, please contact Magaya Technical Support.
If you are updating your Magaya system from a version before 8.5, the update
and optimization processes will require approximately 2.5 times the existing
245
RECYCLING
space. The space will be free after the optimization. Make a backup before these
processes.
Recycling
The Recycling process helps keep the size of your Magaya database small by
allowing you to set the amount of time you want to keep messages or transactions in the database. When the timeframe is met, the items are moved out of
the database. If you need them, they are available in the backup file.
Perform the Recycling step before any other optimization steps.
1)
Go to the Maintenance folder > Configuration menu.
Select “Maintenance and Performance”. This screen has a few sections,
but this topic explains the functions in the “Recycling” section of the
screen.
246
2)
Check the box to “Allow the system to recycle the following records”.
3)
When you check this box, the “Configure” button is activated. Click the
Configure button. A dialog box opens.
4)
In the dialog box, set the number of days you want to keep transactions.
For example, you can set how long to keep transactions in the Transaction
Log. The Transaction Log keeps a record of every transaction, including
deletions. (For example, when an Invoice is deleted from the Invoice List,
RECYCLING
it is still saved in the Transaction Log, where it can be restored by
right-clicking on it.)
When the Transaction Log is cleaned up, the transactions are removed
from the Transaction Log, but they can still be accessed via the backup file
if you need them later. Backup your data before cleaning up the Transaction Log. It is important to clean up the Transaction Log to help reduce the
size of your database. To find the Transaction Log, click the “Options”
button on the top menu of your Magaya Explorer.
5)
When you click the “Save” button, the recycling process begins. The recycling process will run in the background while users are working.
247
EXTRACT HEAVYWEIGHT DATA TO THE BLOBS FOLDER
When the process is completed, the system creates a Task Alert to notify you, as
shown in this example:
Click the “Set Completed” button in the Task Reminder dialog box and close it.
Extract Heavyweight Data to the Blobs Folder
Another way to improve performance is run a process to extract large files from
your database and save them in a “Blobs” folder. The Blobs folder contains all
the attachments such as images and PDFs that are attached to Warehouse
Receipts and other Magaya transactions. These attachments are considered
“unstructured” data and are saved outside the database in the Blobs folder. (The
word “Blobs” refers to binary large object or basic large object.) The folder is
248
EXTRACT HEAVYWEIGHT DATA TO THE BLOBS FOLDER
stored in the Program Files (unless your system is set up differently) in the
Magaya Corp folder > Data. Here is an example:
When you backup your Magaya system, you must backup the Blobs folder separately from the backup process. It is not part of the automated backup process
as of the date of this documentation. To backup the blobs, go to the folder and
copy it and save it in another location.
If you restore your database to another computer and do not copy the Blobs
folder also, then the attachments will not appear in their transactions. If this
happens, copy the folder to the new computer, and the images, etc. will be
restored also.
Steps:
1)
Go to the Maintenance folder and click “Maintenance & Performance”.
2)
Check the box “Allow the system to extract heavy weight data such as
images and data to an external File System Directory”.
This optimization will be applied to every transaction, current, future and
past. The large files will be placed outside the database. The system creates
a folder automatically in the Magaya software data folder.
The result of the unstructured data being stored in the Blobs folder is improved
database performance. This is especially beneficial for companies with large
databases that contain years of transactions and many MBs of photographs.
Backups will also be faster.
249
SHRINK THE DATABASE
Shrink the Database
Another way to improve the database performance is to reduce (shrink) the size
of the database. This process is done in two parts, one in the Maintenance
screen, and another in the Magaya Database Server Agent dialog box.
The best time to perform this database shrink process is after unstructured data
has been moved out of your database into the Blob folder and after you
configure the Maintenance of your system to perform the Recycling processes
as explained in the “Recycling” topic.
Follow these steps to shrink the database and gain performance improvements:
A. Shrink the Historical Data:
1)
Go to the Maintenance folder and click “Maintenance & Performance”.
2)
Check the box “Allow the system to shrink the size of historical data.” This
will reduce the size of all legacy transaction files. This will go back through
old transactions, not just current transactions moving forward from
today.
3)
Click “Save”.
When this process is completed, the system will notify you with a Task.
B. Shrink the Database:
250
1)
Make sure all users are logged off.
2)
Stop the Magaya Communication Server.
3)
Make a backup of your Magaya database.
4)
Stop the Magaya Database.
5)
Open the Magaya Database Server Agent dialog box from the taskbar
6)
Click on the “Tools” button, and select “Shrink Database”. A wizard
opens. In the wizard, the following procedures are checked by default
(ensure they are checked; both processes are recommended):
7)
Make sure the two checkboxes are checked:
•
Garbage Collection: This process will find and clean up files that are
no longer in use
•
Shrink Database: This will run a process to reduce the size of the
database by reusing the space that the Garbage Collection process
freed up. The Shrink process also moves data objects closer together
so it is easier for the system to access them, similar to defragmenting
a hard drive.
SHRINK THE DATABASE
8)
Type “Yes” in the box to proceed.
251
MEMORY USAGE
9)
Click the “Start” button. The length of time this will take depends on the
size of your database.
When the process is completed, a dialog box tells you the size of the database.
10) Click the “Finish” button when the process is completed.
11) Start the Magaya Database.
12) Start the Magaya Communication server.
The system is now optimized to save data more efficiently in the future. You will
not need to perform this task again. The system is ready to use.
Memory Usage
To set how much RAM you want the system to use, follow these steps:
252
1)
Open the Magaya Database dialog box from the taskbar to perform the
next optimization.
2)
Click the Options button. A dialog box opens.
SECURITY: SERVER AUTHENTICATION
3)
Click the “Performance” tab.
On the Performance tab is an option to allocate additional memory for the
Magaya system to use.
If your hardware has more memory, click and move the slide bar to
increase the amount of memory you want the system to use.
4)
Click “OK” to save the setting.
Security: Server Authentication
Administrators can set the level of authentication required by users to log into
the system. This is set in Maintenance > Configuration > Security. There are two
options: Application-level or Database-level authentication.
253
SECURITY: SERVER AUTHENTICATION
The Database-level authentication is stronger than the Application-level
authentication because users must type in their user name and password instead
of select their user name from a list.
The following screenshot shows Application-level authentication:
To change the authentication option for the database level:
In Maintenance > Employees:
1)
Create user names for all employees, including yourself, if you do not have
them already. If you do not create user names, the system will create them
for you during the process.
2)
Create an employee for the Magaya Communication Server.
The Communication Server also logs into the database. You need to create
a user name and a password for the Communication Server so it can
connect to the database.
On the User tab, also create a user name for the Magaya Communication
Server.
3)
Make a note of the user name and password for the Magaya Communication Server, and make sure you know your user name and password. You
will need both to log in again.
Tip: To help keep track of login information, you can export employee
user names via the Actions button in the Employee list view, or create a
report by Name and print or email it.
254
SECURITY: SERVER AUTHENTICATION
Continue with the next steps:
In Maintenance > Configuration > Security:
1)
Click the “Database-level authentication” option.
2)
Click “Save”.
Confirm that you want to perform the operation.
If you do not have user names, the system presents this message:
3)
While this screen is open, stop the Magaya Communication Server. Wait
until it notifies you it has stopped.
The system asks you to confirm your choice:
4)
Restart the Magaya Communication Server.
5)
Close your Magaya Explorer.
6)
Right-click the Magaya Communication Server icon, and select the option
“Database Credentials”. Enter the user name and password of the Magaya
Communication Server. Restart it.
7)
Open Magaya Explorer and log in with your user name and password.
255
UPDATE MAGAYA SOFTWARE
Update Magaya Software
To update your Magaya software, perform the following steps. NOTE: When
updating to a new version, familiarize yourself with the new features, especially
new permissions and roles because these may change how employees access
functions. New features are announced in the newsletter and on Magaya.com.
CAUTION:
Follow these steps in this order.
1)
Ensure all users are logged off the Magaya system.
2)
Backup your data. (via the Magaya Database Server Agent. For details on
backing up data, see the Magaya Software Customization Manual.)
3)
Stop the Magaya Communication Server Agent by right-clicking on the
icon in the taskbar and selecting “Stop Communication Server”.
Then right-click again and select “Exit”.
4)
Right-click on the Magaya Database Server Agent icon and select “Stop
Database Server”.
Then right-click again and select “Exit”.
256
UPDATE MAGAYA SOFTWARE
5)
Go to the Magaya software installation folder and double-click on the
OnlineUpdate.exe file to run the file. This is the icon:
6)
Click “Start” in the Online Update window to start the update.
7)
When the update is complete, the Magaya Database and Magaya Communication services will start.
8)
Restart the computer (or server) to apply the update.
Then the update will be active on all the computers in your company that
run Magaya software. When the user logs in again, the new version will
run.
If you receive a message stating that you need to restart your server, follow these
steps:
1)
Click OK on the message notifying you that the Communication Server
cannot connect to the Database. (It will run in the next step.)
2)
Click on the Magaya Cargo Explorer icon on your desktop.
257
UPDATE MAGAYA SOFTWARE
3)
Type “Yes” in the field that asks if the backup was done. Now the Communication Server will be able to connect to your database.
4)
Click on Start and go to All Programs > Magaya Software > Magaya
Communication Server to manually start the Communication Server. The
server computer has now been updated to the latest version.
If you are running an older version of the software, the system may alert you if
you need the installation of the XML. Click the OK button and the system will
automatically perform the installation. After that process, computer is ready to
use the latest version.
If you have any questions or encounter any problems doing the update, please
contact Technical Support by phone at (786) 845-9150 or online at Magaya.com
Note: There is a video on the Magaya.com Learning Center webpage that shows
you how to perform an online update.
258
259
260
JAVASCRIPT BASICS
VARIABLES
JavaScript Basics
In addition to using formulas to calculate tariffs and rates in Magaya software,
you can use JavaScript.
Variables
You can use variables in your JavaScript code. Make sure you do not declare any
variable with the same name in your functions; this will obscure the variables
that are already defined in the Magaya system.
Here is the list of these variables:
Table 1: Variables
Variable
Name
P
Pieces
W
Chargeable Weight
G
Gross Weight
V
Volume
A
Value
T
Time
L
Volume Weight
The return keyword:
When you are writing a JavaScript function to perform a calculation, you need
to return the calculated value by using the return keyword.
Example:
This function will return 3 times the value of G. The return keyword not only
returns the value, but also ends the flow of the function.
261
JAVASCRIPT BASICS
BASIC OPERATORS
Basic Operators
To perform mathematical operations such as addition and multiplication, the
operations must be represented with operators to get the results you want. Here
are the most useful operators available in JavaScript:
Table 2: Basic Operators
Operation
Operator
Example
Priority
Addition
+
X = V + 5;
Lower
Subtraction
-
X = P - 2;
Lower
Multiplication
*
X = 10 * G;
Higher
Division
/
X = G / 1.5;
Higher
By combining these four basics operators, you will be able to make almost any
mathematical expression you desire.
The evaluation priority of the operators determines the order in which the
expression is evaluated. Multiplication and division are evaluated first, and then
addition and subtraction are evaluated.
To change the evaluation order of an expression, use parenthesis. Parenthesis
increase the evaluation priority of the surrounded portion to the highest
possible priority.
Example:
This example will evaluate the expression in the following order:
262
1)
G + 10
2)
The result of G + 10 will be multiplied by 3.
3)
The result of step 2 will be divided by 4.
JAVASCRIPT BASICS
ASSIGNATIONS
Assignations
Sometimes when writing functions or formulas, we need to hold temporal
values some place. To accomplish this we use variables.
An assignation is the process of making a variable equal to a given expression.
Let’s see an example:
This example shows how assignations work, similar to the previous example but
with differences:
1)
Calculates G + 3 and hold the result in to x.
2)
Calculates 3 * x and then divides it by 4; where x is holding the value of the
previous assignation
3)
Returns the value held in y
Useful Mathematical Functions
There are some mathematical functions that can be used when programming in
JavaScript to help the calculation of more difficult expressions. Here are some
of them:
Table 3: Mathematical Functions
Function
Description
Example
Math.round (x)
Rounds x to the immediate
higher or the immediate
lower integer value using the
approximation rules and
returns the resulting value
y = G * 4; m =
Math.round(y); return m;
Math.floor (x)
Returns the immediate
lower integer value
return Math.floor(4.4);
Math.ceil ()
Return the immediate
higher integer value
return Math.ceil(5.6);
263
JAVASCRIPT BASICS
CONDITIONALS
Function
Description
Example
Math.min (x, y)
Returns the minimum value
between x and y
return Math.min(W, V);
Math.max (x, y)
Return the maximum value
between x and y
retrun Math.max(W, V);
Math.abs (x)
Return the absolute value of
x
return 2 * Math.abs(W - G);
Remember that JavaScript is case sensitive. Functions and variable names must
be written exactly as they were created, using the same upper case and lower case
characters.
Conditionals
Your functions will not always be a trivial sequence of statements executed in
the very same order. Sometimes you will have to take a different path to meet
the desired results. To do that, you will need to control the flow of your
program.
If (condition) :
This construction will allow you to make a decision in your code based on a
given condition.
Example:
Let’s suppose that we want to get a result based on the value of volume. We want
to return twice the value of the volume but it can’t be less than 20. If it’s less than
20 we just want to return 20. Here's how to do it:
In this example, the value of 2 times V will be held on the variable a. Then this
value will be compared to 20, and here the decision is made: if the value is less
than 20, let’s make it 20. Then the resulting calculation is returned.
Comparison Operators:
264
JAVASCRIPT BASICS
CONDITIONALS
To evaluate conditions, we used comparison operators such as less than. The
following are the most commonly used ones:
Table 4: Comparison Operators
Comparison
Operator
Example
Equal to
==
if (G == 2) ...
Different to
!=
if (G != 2) ...
Greater than
>
if (G > 4) ...
Less than
<
if (G < 7) ...
Greater than or equal to
>=
if (G >= 8) ...
Less than or equal to
<=
if (G <= 10) ...
If (condition) ... else ...
This construction works just like the if (condition) construction, but here we
have the possibility to take some action in the case of the evaluated condition is
not met.
Example :
Consider you’d like to calculate the following:
•
If the volume (V) is greater than the weight (W), return the volume times
4.5
•
Otherwise, if the volume is less than or equal to the weight, return the
weight times 5
To accomplish that let’s use the if (condition)… else… construction:
Note that a pair of braces ({}) was used to make a statements group. The purpose
of this is to tell the JavaScript interpreter that not only the first statement
265
JAVASCRIPT BASICS
CONDITIONALS
following the if clause has to be executed when the condition is met, but the
complete block of statements into the braces.
266
USING THE SCRIPT COLUMNS FEATURE
INTRODUCTION
Using the Script Columns Feature
Introduction
Scripts written in JavaScript can be used to calculate information and display it
in lists or reports in your Magaya software.
The Script Columns feature can be found on any “Choose Columns” dialog box
in your system, including lists in the Warehousing folder, the Accounting
folder, Maintenance, and other lists or reports.
An example of a script column is if you need to know the number of days cargo
has been on hand. The script in this example will calculate the number of days
based on the date the cargo arrived and today’s date.
Steps
Go to the Actions button in a list or report (or right-click an item) and select
“Choose Columns”.
267
USING THE SCRIPT COLUMNS FEATURE
STEPS
When the “Column Settings” dialog box opens, click the arrow on the side of the
button “Add Columns” and select the “Add Script Columns” option from the
dropdown:
268
USING THE SCRIPT COLUMNS FEATURE
STEPS
The Script Columns dialog box opens:
When you add scripts for columns to your Magaya system for this transaction
(such as the Warehouse Receipt list), they will appear in this dialog box. This
shows “Days On Hand” as an example script.
Click the “Add” button to create a new script column. In the dialog box that
opens, you will enter your script:
1)
Enter a name for the column in the “Display Name” field. Since this is the
name that all users of the system will see in the list, choose a name that
describes the function of the script. For the example that calculates the
269
USING THE SCRIPT COLUMNS FEATURE
STEPS
number of days cargo is on hand, we entered the Display Name: Days On
Hand. The Internal Name field fills in automatically as you type, using
lower case letters and substituting an underscore line for any spaces. The
Internal Name is used by the Magaya system.
2)
3)
The Type field is used to determine the format of the output (what will
display in the list). The system will use this information to format the data
that will display in the list. The field has a dropdown menu with the
following options:
•
Text
•
Integer (this displays a number)
•
Date
•
Yes/No
Click the “Edit” button to open a window for writing the code:
The function brackets are already included. Enter the code in this screen.
You can also use (refer to) JavaScript functions that you already entered in
the JavaScript library that is located in the Maintenance > Configuration
> JavaScript.
This example uses a function created in the JavaScript library called
DaysInStorage that calculates the days an item has been on hand.
When you complete the script code, click OK to save it and return to the
Script Column dialog box.
270
USING THE SCRIPT COLUMNS FEATURE
STEPS
4)
Click OK to close that box and return to the Script Columns box. The
script code you entered will be displayed in the list.
The script column will also be displayed in the Column Settings dialog box.
Move it to the place in the list that you want it to appear.
When you click OK, the column heading now displays in your list. It can be
displayed in other lists that are related to it by choosing the “Add Related
Columns” option from the Choose Columns dialog box. This column will also
be available to create reports.
271
USING THE SCRIPT COLUMNS FEATURE
STEPS
272
CUSTOMIZE REPORTS
OPTIONS
Customize Reports
You can enhance and customize the format of reports. Change the font, color,
size, etc. of the different elements in the report such as company name, title,
subtitle, columns headers, rows, etc.
Options
Any report that you create opens in a view that includes a toolbar at the bottom
of the report. To customize the report:
1) Click the “Configure” button.
A dialog box opens with three tabs: Header Info, Fonts, and Numbers.
The Header Info tab displays your company name, the report title, and subtitle;
you can change any of these as needed.
273
CUSTOMIZE REPORTS
OPTIONS
2) Click the “Fonts” tab. Select the element you want to customize such as the
Header – Company Name. Make changes to the font and click OK.
3) Click on the “Numbers” tab for the following options:
274
CUSTOMIZE REPORTS
OPTIONS
For example, to display negative numbers in red, select the options above to see
the numbers in your report as follows:
Other options available:
•
Display whole numbers or numbers divided by 1000
•
Output numbers using the thousand separators, for example: 1,000,000.00
•
Display negatives values in red or in parenthesis
Choose Columns:
1) Click the Actions button, and select “Choose Columns”.
2) In the dialog box that opens, select the column you want, or click the “Add
Column” button to open a new dialog box with more choices.
275
CUSTOMIZE REPORTS
OPTIONS
In this “Column Settings” dialog box, you can adjust the width of any column,
move it up or down, or you can type over the name of the column to change it
to a name you want.
If you need to reset a report back to its original columns, click Actions > Set
Default Columns.
The currency of reports can be changed (if you set you system to multicurrency), you can filter information in a report, and export a report from your
Magaya system.
Save Custom Report:
The “Save” button has two options: one saves the report as is; the other allows
you to save the same report by another name (previously the system would
overwrite the report). This feature is especially useful when you want to create
another report that is similar to the first one; now you do not have to start from
scratch to build it.
276
A
Accounting document numbers
set up 106
Administrator task
Server Authentication 253
AES 128
Air waybill numbers 131
Air waybill, expand details 112
Amendment 64
AMS 128
Assign customer account numbers 117
Attachments not visible 249
Authentication levels 143
Automate charges per customer 13
Automated accounting 7
Automatic creation tab 10
B
Backup database 234
automate (overview) 238
automate full backup 239
automate incremental backup 240
full manual 234
incremental 236
Bill of Lading, expand details 112
Bill, create periodic 29
Bill, create recurrent 22
Blobs 238, 248
Bookings Online set up 122
C
Cargo manifest, expand details 112
Carrier Contracts
add a new 63, 66
add multiple rates 66
Carrier rates 42
create reports 48
CASS 155
Charges, automate 7
Charges, dependent 11
Charges, prioroty 11
Charges, show or hide in documents 11
Check, create recurrent 23
Clauses, set up 146
Client Contracts 62, 84
Code, enter JavaScript 139
Commissions
set system-wide 121
Commissions, inventory 92
Commissions, salesperson 87
Commodity Type, in Rates dialog box 59
Commodity Types, set up 150
Company type, set up 102
Configuration menu 99
Configure ocean shipment settings 135
Contract Tab 46
Contracts 60
amendment 64
carriers 63
clients 84
Contracts Manager 61
Control
link with data source 174
Credit Limits, set up 106
Custom Fields
advanced filter 171
deactivate 167
detailed set up steps 161
examples 159
internal name 162
reports 169
set up 136
tab 160
type screenshots 163
types 137
Custom rate 57
Customer registration via Custom LiveTrack 116
Customs, US 128
D
Database
performance 245
Database Object
flags 217
Database server agent 231
Deleting transactions 246
Denied Party Screening 109
configure 110
Discount Payment Terms, configure 156
Divisions 223
assign employees 226
create report 228
1
detailed set up steps 223
set up 150
Document numbers
consecutive order 103
duplicates 105
Prefix, Suffix 105
set up 103
Drop ship configuration 121
E
Email, set up 119
Entities, load at startup 101
Events
add new 152
automate creation of 101
define 152
F
Fields 175
File extension .bak 236
Fiscal printer 107
Fiscal printer RUC number 108
Fiscal printer tax rates 108
Fonts, customize reports 274
Forms
air waybill, expand details 112
Bill of Lading, expand details 112
Cargo manifest, expand details 112
set up form filling 112
show item details 113
G
General configuration options 101
General Rate Increase 73
Generate recurrent transactions 26
GRI 73
I
IATA configuration 131
Incoming messages 118
Incoterms 152
Initial amendment 64
Invoice, create periodic 27
Invoice, create recurrent 15
Itemize charges 20
2
J
JavaScript 207
check syntax 209
comparison operators 265
conditionals 264
Database Object 207, 217
find vehicles in shipment 214
item method 211
mathematical functions 263
operators (basic) 262
table 213
to combine data 211
variables 261
XmlDocument Object 207, 210
JavaScript, add code 139
L
Labels, set up printer 114
Landed cost, configure 106
Lists, set order 101
Lock Air Waybill or Bill of Lading numbers 105
Log file 232
M
Magaya Corporation
contact help 6
Magaya Database Server Agent 231
Magaya Document Designer 173
alignment 188
Code pane 181
controls 174
create new template 203
custom field internal name 197
custom fields 196
Design pane 181
fields 184
file size limit 205
font 190
graphic elements 174
how to open 178
Insert 182
insert image 200
interface 181
JavaScript 207
Layers 182
modify existing templates 187
multiline text 191
publish 204
reload data 198
resize fields 188
Schema 183
tables 192
x-path 192
Measurement units, set up 114
Multiple rates 66
O
Online Bookings 122
Online Payments 122
Online Sales Orders 124
automate charges 126
cancel 126
Online Shipping Orders 127
Online update 256
Outgoing messages 119
P
Page numbers, Magaya Document Designer 198
Participation, agent commissions 95
Participation, salesperson commissions 89
Payment Terms, configure 156
PDF optimization 145
Performance configuration 145
Periodic invoice 27
POD 130
Pricing configuration 121
Print labels, set up 114
Q
Query Rates 49
QuickBooks, set up export options 106
R
Rates
compare purchasing and selling rates 55
create a custom rate 57
discount from carrier 72
enter your own rates 67
expire 70
filter 76
modify 82
multiple 66
RORO 45, 69
set by range 45
transform from existing 74
Rates, query 49
Rates, standard 52
Recurrent accounting transactions 14
Recurrent bill 22
Recurrent check 23
Recurrent invoice 14
Recycling 246
Refresh database 233
Reports, by custom field 169
Reports, choose columns 275
Reports, customize 273
Restore data 242
Roll On Roll Off (RORO) 45, 69
S
Sales Orders, summary or detail view 121
Salesperson commissions 87
Schema
elements 183
Search by customer name or account number 118
Security configuration 143
Selling rate (Standard) 48
Server Authentication 253
Shipment Documents set up 147
Shipment numbers 104
Shrink database 250
Standard client rates 52
create reports 55
Start database 232
Stop database 233
System Alerts 149
System startup 145
T
Tariff 30
create new 32
Task Types 154
Tax rates, fiscal printer 108
Transaction Log 246
clean up 142
Transaction Log, set up 141
Transaction Tracking, set up 115
3
U
Unstructured data 248
Update Magaya software 256
Users connected 233
V
Vendor, periodic bill 29
View transactions, limit list length 101
W
WMS, set up 129
Working Date Period 101
X
XmlDocument Object
methods 210
properties 210
Z
Zebra printer 114
4