1
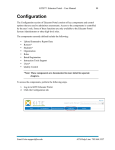
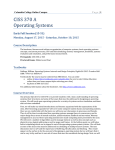
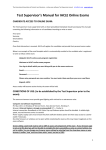
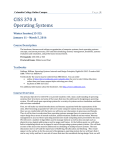
TEST TAKER PREPARATION MANUAL ONLINE PROCTORED EXAMS KRYTERION owns copyright to this document. All rights are reserved. No part of this publication may be reproduced, transmitted, transcribed, stored in a retrieval system, or translated into any language or computer language, in any form by any means including electronic, mechanical, magnetic, optical, chemical, manual, or otherwise, without the prior written permission of KRYTERION at 7776 South Pointe Parkway West, Suite 250, Phoenix, AZ 85044. Copyright © 2008 KRYTERION, Inc. All Rights Reserved. KRYTERION and Webassessor are trademarks of Drake International. All other brand and product names are trademarks or registered trademarks of their respective companies. 7776 S. POINTE PARKWAY WEST, SUITE 250, PHOENIX, AZ 85044 WWW.KRYTERIONONLINE.COM Version 2.9 2/11/2009 -1- TABLE OF CONTENTS INTRODUCTION 3 TESTING WORKSTATION SYSTEM REQUIREMENTS 3 VIDEO AND AUDIO REQUIREMENTS 4 TESTING ENVIRONMENT REQUIREMENTS 4 WEBASSESSOR SENTINEL SECURITY SHIELD™ INSTALLATION 5 ADOBE FLASH PLAYER INSTALLATION 6 BIOMETRIC ENROLLMENT 7 TEST LAUNCH - WINDOWS 10 TEST LAUNCH - MACINTOSH 11 BIOMETRIC AUTHENTICATION 11 CAMERA - FREQUENTLY ASKED QUESTIONS 14 7776 S. POINTE PARKWAY WEST, SUITE 250, PHOENIX, AZ 85044 WWW.KRYTERIONONLINE.COM Version 2.9 2/11/2009 -2- INTRODUCTION This document outlines the requirements and process for a Test Taker to prepare for an Online Proctored Assessment. You will need to download and install all required software on to the computer you will be using to take your test PRIOR to your scheduled test session. This is a one-time download and installation process. Please follow ALL instructions provided in this manual. Failure to configure your testing workstation correctly may result in the rescheduling or cancellation of your test session. If you experience technical difficulties prior to or during your Assessment, please contact KRYTERION Technical Support at 1-877-313-2008 or 1-602-659-4679. Use of telephones or cell phones is not permitted during your Testing Session. However should you need to call for Technical Support, you ARE authorized to utilize a phone at that time. TESTING WORKSTATION SYSTEM REQUIREMENTS Windows Operating System - Windows 2000 Professional (with Service Pack 3 or higher) / Windows XP (with Service Pack 2 or higher) / Vista (32 bit operating systems ONLY) Hard Drive - Minimum 500MB available space Video - Color video display set to 1024x768 resolution Internet Access - Internet access via dedicated ISDN, DSL, T1 or cable connection (dial-up and satellite connections are not acceptable) Installed Hardware - Microsoft compatible mouse, Approved Webcam/Microphone Installed Applications - Internet Explorer 6.0+ OR Mozilla Firefox 2.0+, Flash Player, .NET Framework 2.0, Webassessor Sentinel Security ShieldTM, Windows Installer 3.0 Firewall - ports 80 and 443 open Administrator rights to install Macintosh Operating System - Mac OS X 10.5.3 or later with an Intel processor type Hard Drive - 5GB available space recommended Video - Color video display set to 1024x768 resolution Internet Access - Internet access via dedicated ISDN, DSL, T1 or cable connection (dial-up and satellite connections are not acceptable) Installed Hardware - Macintosh compatible mouse, Approved Webcam/Microphone Installed Applications - Safari version 3.0 or later (3.1.2 or later recommended), Flash Player, Webassessor Sentinel Security ShieldTM Firewall - ports 80 and 443 open Administrator rights to install It is recommended that any scheduled or system/network resident software or hardware that has the capability to interrupt, intercept or otherwise interfere with test delivery be disabled during test sessions. This includes, but is not limited to, the following: Software that has the capability to produce alerts such as contact managers, calendars, email, etc. 7776 S. POINTE PARKWAY WEST, SUITE 250, PHOENIX, AZ 85044 WWW.KRYTERIONONLINE.COM Version 2.9 2/11/2009 -3- Screen and device capture utilities Pop-up blocker Anti-virus software Windows Update Note: To avoid interruption during a Test Session, it is important that all test computer settings for Windows Update be set for manual updates. You can do this by going to the Control Panel on the test computer and clicking Automatic Updates on the menu. Select the option labeled Turn off Automatic Updates. Once you turn off the updates, it will be necessary for you to establish a regular schedule for manually downloading and installing Windows updates. VIDEO AND AUDIO REQUIREMENTS Online Proctored Exams require the use of BOTH video and audio data for real-time monitoring by an Online KRYTERION Certified Proctor. Camera Requirements 640 x 480 resolution Manual focus ring or Auto Focus KRYTERION Approved Cameras KRYTERION has tested the following cameras, which provide an acceptable field of vision with proper placement. Logitech Communicate Deluxe Built-in microphone preferred Logitech QuickCam Ultra Vision USB connection preferred Creative Live! Cam Optia Pro Built-in laptop camera is not acceptable Creative Live! Ultra Clique Communications Hue HD Any type of recording device such as a Digital Camcorder is not acceptable All of KRYTERION's approved cameras have built-in microphone capability. The use of an auxiliary microphone is also acceptable. Our software will detect, and is compatible with, a computer's built-in microphone or auxiliary microphone. Note: Headsets are not acceptable. TESTING ENVIRONMENT REQUIREMENTS Your testing area must meet the following requirements during your test session: The testing area must be free from noise and distractions such as a cell phone, other people, and study materials. Ample lighting is necessary. The camera must provide a view of your keyboard, hands and face. Note: See instructions under the BIOMETRIC AUTHENTICATION AND TEST LAUNCH section of this guide. Do NOT disconnect your camera at anytime during your Test Session. Note: See instructions under the CAMERA - FREQUENTLY ASKED QUESTIONS section of this guide. 7776 S. POINTE PARKWAY WEST, SUITE 250, PHOENIX, AZ 85044 WWW.KRYTERIONONLINE.COM Version 2.9 2/11/2009 -4- WEBASSESSOR SENTINEL SECURITY SHIELD™ INSTALLATION Close all other open software programs before continuing with the installation. You must log on to your computer as an Administrator to install the Webassessor Sentinel Security ShieldTM. Windows To install the Webassessor Sentinel Security ShieldTM on your Windows computer follow each step in the order given: 1. Open your browser and type in the following URL: http://www.webassessor.com/downloads 2. Locate the WEBASSESSOR SENTINEL SECURITY SHIELD installation link in the middle of the page and click on the link to begin the download. 3. When the File Download – Security Warning popup window appears, click Run. 4. When the Internet Explorer – Security Warning popup window appears, click Run (or Continue in Vista). 5. The Webassessor Sentinel Security ShieldTM Setup Wizard will now begin. Click Next. 6. The License Agreement will then appear. Please read and review carefully and select I Agree, and click Next to accept the terms of the License Agreement. 7. The Select Installation Folder screen will then appear, displaying the default directory where and for whom Webassessor Sentinel Security ShieldTM will be installed. We recommend that you install the software in the default folder and choose to install the software to be available for Everyone. When you have confirmed the folder and user selection, click Next. 8. The Confirm Installation screen will appear, click Next to install. 9. The setup process will now install the Webassessor Sentinel Security ShieldTM. Once it has finished installing the Security Shield, you will see an installation completion screen. Click Close when the install is complete. 10. You have successfully installed Webassessor Sentinel Security ShieldTM. 11. A new Webassessor Sentinel icon will appear on your Desktop. Click on this icon to open the Webassessor Sentinel Security ShieldTM when you are ready to begin your assessment. You can also open Webassessor Sentinel Security ShieldTM from the Start Menu. Macintosh To install the Webassessor Sentinel Security ShieldTM on your Macintosh computer follow each step in the order given: 1. Open your browser and type in the following URL: http://www.webassessor.com/downloads 2. Locate the WEBASSESSOR SENTINEL SECURITY SHIELD installation link in the middle of the page and click on the link to begin the download. 3. When a popup appears asking “Are you sure you want to continue?” click Continue. 4. The Webassessor Sentinel Security ShieldTM setup process will now begin. Click Continue. 5. Important Information will then appear. Please read and review carefully, then click Continue. 7776 S. POINTE PARKWAY WEST, SUITE 250, PHOENIX, AZ 85044 WWW.KRYTERIONONLINE.COM Version 2.9 2/11/2009 -5- 6. The License Agreement will then appear. Please read and review carefully, then click Continue. 7. The Agreement part of the License Agreement will appear. Click Agree to accept the terms of the License Agreement. 8. The Choose Users screen will then appear. We recommend that you install the software to be available for all users of the computer. When you have confirmed the user selection, click Continue. 9. The Universal Access screen will appear. You MUST click on Open Universal Access Preferences to show the Universal Access dialog box. 10. Verify that the “Enable access for assistive devices” box is checked on the bottom. Exit out of that screen. Click Continue. 11. The setup process will then display the default volume where you would like the Webassessor Sentinel Security ShieldTM installed. When you have confirmed the volume, click Continue. 12. Click Install to install the Webassessor Sentinel Security ShieldTM. 13. To complete the installation, you must know the administrator’s login and password. Enter the name and password and click OK. 14. The setup process will now install the Webassessor Sentinel Security ShieldTM. Once it has finished installing the Security Shield, you will see a green check mark stating that the install succeeded. Click Close. 15. You have successfully installed Webassessor Sentinel Security ShieldTM. ADOBE FLASH PLAYER INSTALLATION 1. To install the Adobe Flash Player please open your Internet browser and go to http://www.adobe.com/products/flashplayer/ 2. Under Adobe Flash Player click the Get Flash Player button. 3. Click the Agree and install now button. 4. A message may appear in a yellow line either at the top of Internet Explorer saying "This website wants to install the following add-on: 'Adobe Flash Player Installer' from 'Adobe Systems Incorporated.' If you trust the website and the add-on and want to install it, click here…" OR a message will appear in the white box under "Adobe Flash Player" stating "Click here to install the following ActiveX control: 'Adobe Flash Player Installer' from 'Adobe Systems Incorporated'…" 5. Click on either of these messages and select Install ActiveX Control. 6. The page will refresh and a dialog box will appear asking "Do you want to install this software?" 7. Click Install. 8. You have successfully installed the Adobe Flash Player. 7776 S. POINTE PARKWAY WEST, SUITE 250, PHOENIX, AZ 85044 WWW.KRYTERIONONLINE.COM Version 2.9 2/11/2009 -6- BIOMETRIC ENROLLMENT After you have registered for an Online Secured Exam your Test Taker homepage will update and provide information on how to complete the Biometric Enrollment process. If you need assistance registering for your exam, or you do not have access to your homepage, please contact your Test Sponsor. The Biometric Enrollment process will include capturing a photo and may include Keystroke Analytics (repeatedly typing a short phrase); depending on the Exam you are taking. Photo Biometric Enrollment Please ensure your workstation meets all technical requirements and you have correctly installed your webcam and microphone before you begin. Biometric Enrollment should be completed a minimum of 24 hours before your scheduled Testing Session. Log in to your Test Taker homepage using the username and password provided in the email that KRYTERION sent to you when you created your Test Taker account. Upon test registration for your exam, your Test Taker homepage will update to include a Biometric Enrollment section. To complete Photo Biometric Enrollment, click Take Photo. The To Configure your Adobe Flash Player Settings screen displays a live view from your camera to allow for Webassessor to access your camera and microphone. The Adobe Flash Player Settings dialog box, as shown below, should automatically appear over the top of the “Your Live Camera” box . Follow the instructions below to configure the appropriate settings. If the dialog box shown above does not automatically appear, follow the instructions below based on the type of computer you are using for your test session. Windows If the Adobe Flash Player Settings dialog box does not automatically appear, right-click on the “Your Live Camera” box and select “Settings…”. You must also follow the instructions below, under Selecting the Adobe Flash Player Settings, to prepare your computer. Macintosh If the Adobe Flash Player Settings dialog box does not automatically appear, right-click or press the Control button and click on the “Your Live Camera” box and select “Settings”. You must also follow the instructions below, under Selecting the Adobe Flash Player Settings, to prepare your computer. 7776 S. POINTE PARKWAY WEST, SUITE 250, PHOENIX, AZ 85044 WWW.KRYTERIONONLINE.COM Version 2.9 2/11/2009 -7- Configuring the Adobe Flash Player Settings – If you do not completed each of the 5 steps below, your assessment will not launch properly. From the Privacy tab (Monitor icon as identified in red): 1. Click on the Allow radial button. 2. Check the box next to Remember. From the Audio tab (Microphone icon as identified in red): 3. Verify the proper audio is selected (this may represent the name of your camera if you have a built in microphone). From the Camera tab (Camera icon as identified in red): 4. Verify the proper camera is selected (no laptop integrated cameras). 5. Click Close to exit the Adobe Flash Player Settings dialog box. To advance, click on the Next button. By following these steps, your settings will be saved and prevent this message from appearing again. Taking your Photo The Take your Biometric Enrollment Photo page will display.. Please look at your image in the Live Camera view. Position yourself in the Live Camera view so that the image captures your shoulders and head, including your face from the bottom of your chin to the crown of your head. To see examples of a good photo, please click View Examples. You should look directly at the webcam with no hair across your eyes. When you have positioned yourself correctly, click Take Photo. Your computer will save and display the photo in the Current Photo view. You can click Take Photo as many times as necessary to ensure your photo meets the requirements. When you are satisfied with your photo, click Next. Your computer will display your photo confirming you have successfully taken your photo. Click Next to return to your Test Taker homepage. 7776 S. POINTE PARKWAY WEST, SUITE 250, PHOENIX, AZ 85044 WWW.KRYTERIONONLINE.COM Version 2.9 2/11/2009 -8- Example of Acceptable Photo for Biometric Enrollment and Authentication Keystroke Analytics™ Biometric Enrollment Once you have registered for an Online Secured Exam, the Test Taker homepage will update to include a Biometric Enrollment section. To complete your Keystroke AnalyticsTM Biometric Enrollment, click on Keystroke Analytics. Read the instructions and click Next when you are ready to type your short phrase. Webassessor supplies you with a short phrase and the system will prompt you to type it a minimum of nine times. During the Biometric Enrollment process, Webassessor Keystroke AnalyticsTM will create a data file based on how long you pressed down and the time between keys as you typed the phrase. Please type the phrase correctly and type with the same intensity each time you type it. If you type the phrase incorrectly, the phrase will turn red and you will be required to type it again. Also, if you use the backspace key while typing to correct an error, you will need to retype the entire phrase again. Webassessor Keystroke AnalyticsTM may prompt you to type the phrase more than nine times. This is normal. Please continue to type the phrase correctly, and with the same intensity each time you type it, until you receive the Enrollment Confirmation screen. When the Enrollment Confirmation screen appears, click Next to return to your Test Taker homepage. 7776 S. POINTE PARKWAY WEST, SUITE 250, PHOENIX, AZ 85044 WWW.KRYTERIONONLINE.COM Version 2.9 2/11/2009 -9- TEST LAUNCH - WINDOWS On the date and time of your scheduled Testing Session, please complete the following checklist before you begin your Online Secured Exam: Confirm that you have installed Webassessor Sentinel Security Shield™. (A Webassessor Sentinel icon should appear on your Desktop) Confirm that you have installed and configured Adobe Flash Player and Webassessor to access your Camera and Microphone. Close all applications running on your Workstation. Confirm you are in a comfortable location, which meets the Testing Environment Requirements. Do not allow your camera to be disconnected at anytime during your Test Session. Please close all applications prior to opening Webassessor Sentinel Security ShieldTM. If you have other applications running, your computer will prompt you to close the application(s) before you can continue with your Exam. Open the Webassessor Sentinel Security ShieldTM by clicking the icon on your Desktop. You can also open Webassessor Sentinel Security ShieldTM from the Start Menu. If you receive a message advising you to close other application(s), click on the checkbox beside the application(s) and click Terminate to close the application(s). Otherwise, click Quit to quit your Exam. If you choose Quit, you can then manually exit other applications you have running, and click on the Sentinel icon to re-open the software. When Webassessor Sentinel Security ShieldTM runs, the Webassessor login page will appear. Enter your Test Taker username and password to login to your Test Taker homepage. You MUST COMPLETE Biometric Enrollment and schedule the Testing Session for the current date and time for the Launch button to appear. Click on Launch to begin your exam. 7776 S. POINTE PARKWAY WEST, SUITE 250, PHOENIX, AZ 85044 WWW.KRYTERIONONLINE.COM Version 2.9 2/11/2009 -10- TEST LAUNCH - MACINTOSH On the date and time of your scheduled Testing Session, your Test Taker homepage will update to include a Launch button beside your Assessment. If you do not have access to your homepage, please contact your Test Sponsor. You MUST COMPLETE Biometric Enrollment and the Testing Session must be scheduled for the current date and time for the Launch button to appear. You are now ready to begin your Online Secured Assessment. Please complete the following checklist before you begin your Online Secured Exam: Confirm that you have installed Webassessor Sentinel Security Shield™. Confirm that you have installed and configured Adobe Flash Player and Webassessor to access your Camera and Microphone. Close all applications running on your Workstation. Only your Test Taker homepage should be open. Confirm you are in a comfortable location, which meets the Testing Environment Requirements. Do not allow your camera to be disconnected at anytime during your Test Session. Please close all applications prior to launching your Exam. If you have other applications running, Webassessor will prompt you to close the application(s) before you can continue with your Exam. Click on Launch to begin your exam. You may also see a Logging out of Webassessor screen. This is normal behavior when the Webassessor Sentinel Security Shield™ launches your Online Secured Exam. If you receive a message advising you to close other application(s), click on the checkbox beside the application(s) and click Terminate to close the application(s). Otherwise, click Quit to quit your Exam. If you choose Quit, you can then manually exit other applications you have running, and click on the Sentinel icon to re-open the software. BIOMETRIC AUTHENTICATION Our team of Online KRYTERION Certified Proctors will monitor you during your Online Secured Exam. Monitoring begins when you launch your Exam and the Biometric Authentication process begins. Please follow all on-screen instructions, using your mouse to navigate through the Exam, exiting your Exam only where authorized. Use of all system keys including Esc, Function, Ctrl, Alt and Print options, etc., have been disabled and your Online Proctor will be alerted should you use any of these system keys. Use of standard keys for typing question responses is acceptable. Photo Biometric Authentication When you launch your Exam, you must take your photo again. This photo is stored with your Test Session – it is your Biometric Authentication Photo. You will need to retake your photo each time you launch an Exam. 7776 S. POINTE PARKWAY WEST, SUITE 250, PHOENIX, AZ 85044 WWW.KRYTERIONONLINE.COM Version 2.9 2/11/2009 -11- The Take your Biometric Authentication Photo screen displays a live view of your camera so that you can correctly position yourself to take your photo. Please look at your image in the Live Camera view. Position yourself so that the image captures your shoulders and head, including your face from the bottom of your chin to the crown of your head. To see examples of a good photo, please click View Examples. You should be looking directly at the webcam with no hair across your eyes When you have positioned yourself correctly, click Take Photo. The computer will save your photo and display it in the Current Photo view. You can click Take Photo as many times as necessary to ensure your photo meets the requirements. Click Next to continue. Camera Placement for Live Video Feed Utilize the Live Video Feed displayed in the Live Camera box to reposition your camera so it provides the view required by your Online Proctor. You must reposition your camera to incorporate your face and work surface, including your hands and keyboard in the view. To see examples of a good photo, please click View Examples. If you are unable to meet the video and audio requirements, Webassessor cannot provide the Online Proctoring service. VERY IMPORTANT – PLEASE READ CAREFULLY: You can attain the live video feed requirements by placing the camera either the left or right of your laptop/monitor instead of directly in front of you. Refer to the images below. Acceptable Acceptable 7776 S. POINTE PARKWAY WEST, SUITE 250, PHOENIX, AZ 85044 WWW.KRYTERIONONLINE.COM Version 2.9 2/11/2009 -12- When satisfied with the view, click on Next to complete this process. Your camera is now in the proper position. DO NOT MOVE the camera again unless prompted by an Online Proctor to do so. Keystroke Analytics™ Biometric Authentication After you have completed your Photo Biometric Authentication, you may be prompted to complete your Keystroke Analytics™ Biometric Authentication. If you are, simply read the instructions on the screen and click Next when you are ready to type your short phrase. Note: During the Biometric Enrollment process, Webassessor Keystroke Analytics™ created a Biometric Enrollment file based on how long you pressed keys down and the time between keys as you typed the phrase. Please type the phrase correctly and type with the same intensity. Typing patterns that do not match your Biometric Enrollment file will be detected by Webassessor Keystroke Analytics™ fraud detection and it will not authorize you to launch your Exam. You will have three attempts to type your keystroke pattern correctly. Please type the phrase correctly and type with the same intensity each time you type it. If you type the phrase incorrectly, the phrase will turn red and you will be required to type it again. Also, if you use the backspace key while typing to correct an error, you will need to retype the entire phrase again. Test Taker Instructions Once you have successfully completed Biometric Authentication, the Test Taker instructions screen will appear. You may also see instructions from your Testing Sponsor. Test Taker Agreement Once you have read your Test Taker instructions, the Test Taker agreement screen may appear. You will see information from your Testing Sponsor about your Exam, their policies and procedures related to Testing Security. During your Exam Our team of Online Proctors will monitor you during your Exam. You may see messages or instructions from the Online Proctors during your Exam. Please follow all instructions that appear during your Exam. Failure to follow the Online Proctor’s messages or instructions is grounds for cancellation of your Exam. You will see a Test Timer on all pages of your Exam. Please monitor your remaining time and budget your time accordingly. Webassessor will automatically submit your Exam when the Test Timer runs out, even if you have not completed your Exam. Do not click Submit Exam until you have completed the entire Exam. You will not be able to make changes to your responses once you submit the Exam. Depending on your Exam, you may be able to review your responses by clicking Review All. Note: Review All is not available for all Exams. Completing your Exam Click Submit Exam when you have completed the entire Exam. A confirmation of your Exam completion will appear and you will be able to exit the Security Shield. 7776 S. POINTE PARKWAY WEST, SUITE 250, PHOENIX, AZ 85044 WWW.KRYTERIONONLINE.COM Version 2.9 2/11/2009 -13- CAMERA - FREQUENTLY ASKED QUESTIONS 1. My webcam is three years old, but meets the minimum requirements. Can I still use it? Many older webcams do meet the minimum requirements. As long as your camera meets the minimum requirements and provides an adequate field of vision, it is acceptable. 2. My webcam only attaches to the top of my laptop and doesn’t capture my hands and work surface. You will need to attach your webcam to a separate stand and place it at an angle approximately 45 degrees to either the right or left side of your laptop or keyboard. This may require repositioning the camera in order to achieve proper placement. 3. My laptop has a built-in camera. Am I able to use the built in camera? If the image does not show what is required, (the subject's face, hands, and work surface) it will not be acceptable. If this is the case, you must disable the built-in camera so that you can use a stand-alone camera. To disable your built-in camera, refer to your manufacturer’s user manual. 4. My camera does not have a built-in microphone. Do I have to buy a new camera? Our software will detect, and is compatible with, a computer’s built-in microphone or an auxiliary microphone. Note: Headsets are not acceptable. 5. I have plugged my camera in, but it isn’t showing an image. What is the problem? You may not have installed the appropriate drivers for the webcam that you are using. Many webcams use Plug and Play technology, which allows them to run on a generic set of drivers that reside within the Windows operating system. However, if you are unable to see an image, be sure you install the software that your webcam provided or download the driver needed. 6. My camera is working but the image is extremely dark. How do I fix this? A brightly lit background generally causes under-exposed (dark) images. When positioning your camera, make sure that there is no bright light source behind you (i.e. window, light fixture, etc.). Proper camera placement will usually remedy this problem. 7. My camera accidentally became unplugged during my test session. What do I do? If your camera is unplugged during your Testing Session, Webassessor will close your Testing Session and log you out of Webassessor. You need to log back in and find your Exam listed in the “In Progress Exams” section of your Test Taker homepage. Reconnect your camera and click Launch to restart your Exam. 7776 S. POINTE PARKWAY WEST, SUITE 250, PHOENIX, AZ 85044 WWW.KRYTERIONONLINE.COM Version 2.9 2/11/2009 -14-