1
N-06E
N-06E
’13.6
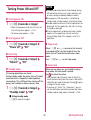
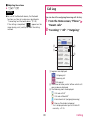
Introduction
Thank you for your purchase of "N-06E".
For proper use of the N-06E, read this manual
before and while you use the N-06E.
Notes When Reading
In this manual, operations are simplified as follows.
Description
Operation
From the Home screen,
"Settings" "Display"
From the Home screen, tap
"Settings" tap "Display"
Please note that "N-06E" is called the "the terminal"
in this manual.
Display examples used in this manual are images for
explanation only and may be different from the actual
display.
The screens shown as examples in this manual are
displayed when "English" is set for application list
screen, " 設定 " (Settings) "言語と入力 "
(Language & input) " 言語 " (Language). Set
"English" for " 言語 " (Language) in advance.
The explanations provided in this manual are based
on the parameters set when the unit is first purchased
(The terminal color is White, the Home App is
"docomo Simple UI".) The operational procedures,
etc., may therefore differ if the home applications are
amended.
The reproduction or reprinting of all or part of this
manual without prior permission is prohibited.
The contents of this manual are subject to change
without prior notice.
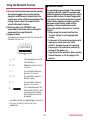
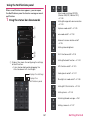
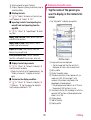
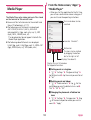
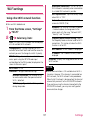
Viewing the operations manual in the
terminal
By performing the following operation, you can
view the instruction manual from the terminal for
details on how to perform various operations.
Some functions can be activated from the screen
explaining about it.
From the Home screen, "Apps" "Instruction
Manual"
■Quick Start Guide (in Japanese only) (terminal
options)
Explains basic operation of the functions.
■User's Manual (PDF file)
Explains detailed information and operation of the
functions.
Download it from docomo homepage
http://www.nttdocomo.co.jp/english/support/trouble/
manual/download/index.html
* The URL and manual contents are subject to
change without prior notice.
N-06E Quick Start Guide (Japanese)
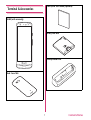
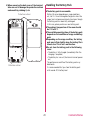
Terminal & Accessories
N-06E (with warranty)
Battery Pack N38
Desktop Holder N44
Back Cover N66
1
Contents/Notes
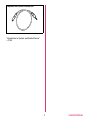
Earphone Cable (with Antenna) N01
"Introduction to Options and Related Devices"
→ P. 184
2
Contents/Notes
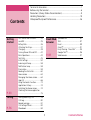
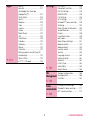
Contents
Contents
Getting
Started
P. 33
Calling
P. 76
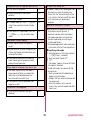
Terminal & Accessories........................................................................1
Before using the terminal....................................................................6
Precautions (Always follow these directions)........................................8
Handling Precautions ........................................................................18
Waterproof/Dustproof Performance ..................................................26
Email/Web sp-mode Mail............................. 87
SMS ........................................... 87
browser
Part Names and Functions...........33
miniUIM .....................................35
Battery Pack................................36
Attaching the Strap ....................37
Charging ....................................38
Turning Power ON and OFF ........42
Basic Operations .........................43
Text Entry ...................................45
Initial Settings .............................52
Incoming call lamp......................58
Notification lamp ........................58
Illumination ................................59
Reading the Status Bar................60
Home screen ..............................63
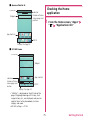
Managing the Home screen........64
Apps list .....................................66
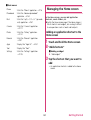
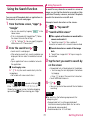
Using the Search Function ..........73
Application History .....................74
Switching the Home screen ........74
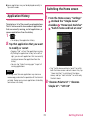
Checking the Home application
..................................................75
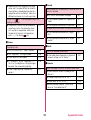
P. 87
Email.......................................... 89
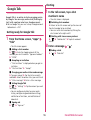
Gmail™ ..................................... 91
Early Warning "Area Mail"......... 95
Google Talk™............................ 96
Web browser ............................. 97
Making/Receiving Calls ...............76
Call Log ......................................80
Record message..........................81
Call Settings/Others ....................82
Phonebook .................................84
3
Contents/Notes
Apps
P. 101
Settings
dmenu......................................101
dmarket....................................101
the Google Play Store app
(Google Play™).........................102
Osaifu-Keitai.............................104
ToruCa .....................................107
Mobacas...................................108
1Seg.........................................112
Camera ....................................117
Gallery......................................121
Media Player.............................122
GPS ..........................................124
Clock/Alarm..............................129
Calendar...................................130
Schedule...................................131
Memo ......................................132
Calculator.................................132
Backing up data and settings (SD
card backup).............................132
Polaris Office ............................133
iD アプリ (iD appli) ...................134
P. 135
My Profile ................................ 135
Home/Lock Switcher ................ 135
LIFE UX Settings ....................... 135
MEDIAS NAVI........................... 136
Call Settings............................. 136
Wi-Fi settings ........................... 137
Bluetooth® Communication..... 139
Tethering ................................. 142
More (Wireless & Networks) ..... 144
Sound/Vibration ....................... 147
Display ..................................... 148
Lamp/Illumination .................... 149
eco mode................................. 150
More (Phone Settings).............. 151
docomo service ........................ 153
docomo cloud.......................... 154
Location access ........................ 154
Security.................................... 155
Language & Input .................... 160
Backup & Reset ........................ 161
Accounts.................................. 161
Date & Time............................. 162
Accessibility.............................. 162
About Phone............................ 163
Storage Configuration.............. 164
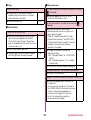
File
Management Managing Files......................... 166
Data Box .................................. 167
P. 164
Infrared Data Exchange ............ 169
Data
Communication Bluetooth Communication ....... 171
NFC Communication................ 172
P. 169
4
Contents/Notes
Connecting
to an External
Device
Connecting to a PC ..................173
Using DLNA-compatible devices 174
Wireless Screen.........................175
MHL™......................................176
P. 173
Using
Overseas
P. 178
Overview of International Roaming
(WORLD WING) ........................178
Services Available Overseas .......178
Checks Before Using the Terminal
Overseas...................................179
Network Settings for Use Overseas
................................................181
Making/Receiving Calls while at
Destination ...............................181
Configuring settings for
international roaming ...............183
Appendix/ Introduction to Options and Related
Devices .....................................184
Index
P. 184
Troubleshooting (FAQs) ............184
Smartphone Remote Support....191
Warranty and After-Sales Service
................................................192
Updating Software ...................194
Upgrade Android™ Software ...197
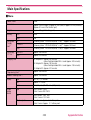
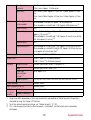
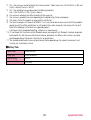
Main Specifications...................200
About Certification and Compliance
................................................203
Specific Absorption Rate (SAR), etc.
of Mobile Phones......................203
Export Administration Regulations
................................................207
Intellectual Property Right .........207
SIM Unlocking ..........................211
Index ........................................212
5
Contents/Notes
• The terminal is the same as a PC. Depending on the
applications or other items that you install, the
operation of the terminal may become unstable and
your location or personal information saved on the
terminal may be disseminated on the Internet and
used improperly. You should therefore thoroughly
check the provider and operation status of an
application before using it.
• Only a miniUIM can be used on the terminal.
Exchange your UIM or FOMA card at a docomo Shop
Service Counter.
• This terminal does not support accessing i-mode sites
(programs), i-αppli, etc.
• Android applications and service content may change
in the future without prior notice.
• The terminal automatically performs communication
for synchronizing data, checking the latest software
version, maintaining connection with the server, etc.
Also, operations such as downloading applications
and viewing videos cause a large volume of packet to
be transmitted and incurs high packet communication
charges. Subscription to a packet flat-rate service is
highly recommended.
• Depending on the application or service being used,
there are cases in which packet communication fees
will be incurred even when communicating via Wi-Fi.
• Public mode (Drive mode) is not supported.
• The shutter sound and alarm tone will not be muted
even when in the silent mode with this terminal.
• The display is manufactured using advanced
technology, but there may be some dead or stuck
pixels. Please note that is not a malfunction, but
rather is a characteristic of displays.
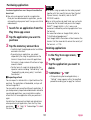
• You can check your phone number with the following
procedure:
From the Home screen, "Settings" "My Profile"
• You can update the software of the terminal. → P. 194
Before using the terminal
• The N-06E supports LTE, W-CDMA, GSM/GPRS, and
wireless LAN connectivity.
• Because this terminal operates using radio
frequencies, it cannot be used inside a tunnel,
underground, in a building or other locations where
radio waves do not reach the terminal, in locations
with weak radio wave condition, outside of the Xi
service area or outside of the FOMA's service area. The
FOMA services may not be available on high upper
floors of high-rise apartments or buildings, even if you
can see no obstructions around you. On occasion,
your calls may become disconnected even in areas
with strong signal, even if you are not moving, or even
if all four antenna icons are displayed.
• Note that because the terminal operates on radio
frequencies, your calls are at risk of being intercepted
by the third party. However, the LTE, W-CDMA, GSM/
GPRS system automatically scrambles all calls through
a private call feature. Therefore, even if the third party
successfully intercepts your call, they will only hear
noise.
• The terminal operates on radio frequencies by
converting voice into digital signals. If the caller moves
into an area of adverse radio wave condition, the
digital signal may not be restored accurately, and the
voice received in the call may differ slightly from the
actual voice.
• The terminal has Xi area, FOMA Plus-Area and FOMA
HIGH-SPEED Area support.
• Please keep a separate record of the information (e.g.,
Phonebook) you have saved in the terminal. Even if
the data may be lost as a result of malfunction, repair,
changing, or other handling of the terminal, under no
condition will DOCOMO be held liable for any lost
data saved in the terminal.
• It is recommended that you save your important data
into microSD cards.
6
Contents/Notes
• Updates for quality improvement of the terminals and
operating system (OS) upgrades may be applied. Such
an update or upgrade may cause applications you are
using to be unusable or have unexpected errors.
• When the memory capacity of the a microSD card or
terminal become nearly full, running applications may
not function correctly. If this happens, delete some of
your saved data.
• Set the screen lock password to ensure the security of
the terminal for its loss. → P. 155
• If the terminal is lost, change your password of each
account using a PC to prevent other persons from
using Google™ services such as Google Talk, Gmail,
Google Play, etc.
• Refer to the Google Inc. terms of usage regarding
services that Google™ provides. Also refer to the
respective terms of usage for other web services.
• As Mobacas is a service linked with communication, a
packet communication fee is required to use the
service. It is recommended that you subscribe to a
packet flat-rate service.
• The terminal does not support service providers other
than sp-mode, mopera U or Business mopera Internet.
• A subscription to sp-mode is required to use tethering.
• Packet communication charges for using tethering
differ depending on your fee plan. The subscription to
a packet flat-rate service is highly recommended.
• For details on charges during use, refer to:
http://www.nttdocomo.co.jp/english/
7
Contents/Notes
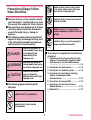
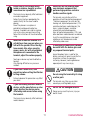
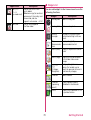
Indicates that it must not be used
near water, which means that you
must not let it become wet.
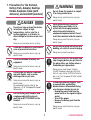
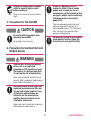
Precautions (Always follow
these directions)
No liquids
Indicates that you must not touch it
with wet hands.
■ To ensure that you use the terminal correctly,
read "Precautions" carefully before use. Keep
this manual after reading for future reference.
■ The precautions must be observed at all times
since they contain information intended to
prevent the bodily injury or damage to
property.
■ The following symbols indicate the different
degrees of injury and damage that may occur
if the information provided is not observed
and the terminal is used incorrectly:
DANGER
Indicates that death or
serious bodily injury may
result directly and
immediately from
improper use.
WARNING
Indicates that death or
serious bodily injury may
result from improper use.
CAUTION
Indicates that minor
injury or property
damage may result from
improper use.
No wet hands
Do
Indicates that it is an instruction
based compulsory conduct (must be
acted).
Indicates that you must unplug the
power cord from the outlet.
Unplug
■ "Precautions" are explained in the following
categories:
1. Precautions for the Terminal, Battery Pack,
Adapter, Desktop Holder, Earphone Cable
(with Antenna), and miniUIM (common)
........................................................................... P. 9
2. Precautions for the Terminal ...................P. 10
3. Precautions for the Battery Pack .............P. 12
4. Precautions for the Adapter, Desktop
Holder, and Earphone Cable
(with Antenna).......................................... P. 13
5. Precautions for the miniUIM....................P. 15
6. Precautions for Use Near Electronic
Medical Devices ........................................P. 15
7. Material list ...............................................P. 16
■ The following symbols indicate specific
directions:
Indicates that it is prohibited.
Don’t
Indicates that it must not be
disassembled.
No disassembly
8
Contents/Notes
1. Precautions for the Terminal,
Battery Pack, Adapter, Desktop
Holder, Earphone Cable (with
Antenna), and miniUIM (common)
WARNING
Do not throw the terminal or subject
it to strong shocks/force.
Don’t
DANGER
Don’t
Don’t
Do not use, keep or leave the devices
in locations subject to high
temperatures, such as near fire, a
heating appliance, in a kotatsu, in
direct sunlight or inside a car on a hot
day.
Don’t
Doing so may cause fire, burns, injury or
electric shock.
Do not put the devices in a microwave
oven or pressurized container.
Do not cover or wrap the devices with
bedding, etc. while in use or charging.
Doing so may cause fire or burns.
Doing so may cause fire, burns, injury or
electric shock.
Don’t
Doing so may cause fire, burns, injury or
Do
No disassembly electric shock.
Make sure to turn off the terminal and
stop charging before you get close to
the places like a gas station where a
flammable gas is generated.
Doing so may cause the gas to ignite.
Turn off the power, when you use OsaifuKeitai at a gas station (if NFC/Osaifu-Keitai
lock is set, turn the power off after the lock
is released).
Do not allow the devices to become
wet with liquids, such as water,
drinking water or pet urine.
Do
Do not place electrically conductive
objects (wires, pencil leads, etc.) in
contact with the charging terminals,
external connector terminal, or
earphone/microphone terminal. Do not
insert those materials inside the terminal.
Doing so may cause fire, burns, or injury.
Do not disassemble or modify the
equipment.
No liquids
Doing so may cause fire, burns, injury or
electric shock.
Doing so may cause fire, burns, injury or
electric shock.
For waterproof function, refer to the
following: → P. 26"Waterproof/Dustproof
Performance"
Do
Use the battery pack, adapter, and
earphone cable (with antenna)
specified by NTT DOCOMO for the
terminal.
Doing so may cause fire, burns, injury or
electric shock.
If something unusual happens, such
as unusual odor, overheating,
discoloration or deformation during
use, charge or storage, be sure to:
a Unplug the power cord from the
power outlet or the cigarette lighter
socket.
a Turn off the power.
a Remove the battery pack from the
terminal.
Doing so may cause fire, burns, injury or
electric shock.
9
Contents/Notes
2. Precautions for the Terminal
CAUTION
Do not leave the devices on a slope or
unstable surface.
WARNING
The devices may fall and cause injury.
Do not direct the infrared data port
towards your or another person's
eyes.
Don’t
Do not leave the devices in humid,
dusty or hot places.
Don’t
Do
Don’t
Doing so may cause fire, burns or electric
shock.
If your child uses the terminal, instruct
him/her on how to use it. Check if he/
she always uses the terminal correctly
as you instruct.
Don’t
Keep the terminal out of young
children's reach.
Don’t
A young child may try to swallow it or suffer
injury.
Do not turn on the light near a
person's eyes. Especially when
photographing infants, maintain at
least 1 m.
The light may affect eyesight. Also, this may
dazzle or surprise him/her and cause injury.
Pay special attention when you use
the terminal connected to the adapter
for a long period.
Do
Do not direct the infrared data port
towards consumer equipment with
infrared devices during Infrared data
exchange.
Doing so may cause malfunction of the
infrared devices and result in an accident.
Improper usage could result in bodily injury.
Do
Doing so may cause eye injury.
If you use a game or watch 1Seg programs
for a long time while charging, the
temperature of the terminal, battery pack or
adapter may rise.
If you touch the warm part of these devices
for a long period of time, it may cause
redness, itch, skin irritation or low
temperature burns depending on your
constitution or physical condition.
Don’t
Do not allow water or other fluids or
substances such as pieces of metal or
flammable materials to make contact
with the miniUIM slot on the terminal
or microSD card slot .
Doing so may cause fire, burns, injury or
electric shock.
Do not turn on the light against the
car drivers, etc.
Don’t
10
Doing so may interfere with driving and
cause a traffic accident.
Contents/Notes
Please turn off the terminal when
inside an airplane, hospital, or other
area where use is prohibited.
Do
Do
Do
The terminal may adversely affect electronic
or medical equipment.
Follow the instructions provided by the
medical facility for the use of mobile
phones.
Use of the phone in an airplane is
prohibited, and be punished by law.
However, to enable use inside an airplane
such as by using a non-emission setting,
follow the instructions of the airline before
using.
The terminal may interfere with the
operation of sensitive electronic equipment.
* Electronic equipment to watch out for:
Hearing aids, implanted pacemakers, ICDs
and other electronic medical devices; fire
alarms, automatic doors, and other
automatically controlled apparatus.
Users of implanted pacemakers, ICDs, and
other electronic medical devices are advised
to ask the manufacturer or sales agent
whether or not these devices can be
affected by radio waves.
Make sure to hold the terminal at a
safe distance from your ear when you
talk with the speaker ON or the ring
tone sounds. Also, when you play
games, music, etc. with an earphone/
microphone etc. connected to the
terminal, adjust the volume properly.
If the display or camera lens is broken,
be careful with the broken glass and
any exposed terminal parts.
Do
Too large a volume may lead to defective
hearing.
Also, hearing difficulties may cause an
accident.
Do
Impact absorbent resin is used for the
display, and a plastic panel is used for the
camera lens surfaces to avoid glass
scattering. However, touching broken or
exposed parts may cause injury.
CAUTION
If you have a weak heart, take
precautions when setting the Vibrator
or Ring volume.
Do
Please turn off the terminal when
near electronic equipment that
performs high-precision control or
handles sensitive signals.
Do not swing the terminal by its strap
or other parts.
Failure to observe this precaution may affect
your heart.
Don’t
If you are wearing electronic medical
devices, ask the manufacturer or sales
agent whether the devices can be
affected by radio waves before using
the terminal.
The terminal may strike you or others
around you, resulting bodily injury.
Do not use the damaged terminal.
Doing so may cause fire, burns, injury or
electric shock.
Don’t
The terminal may adversely affect electronic
medical devices.
11
Contents/Notes
Don’t
When using motion sensor, make sure
you are in a safe place, hold the
terminal securely, and do not shake it
more than necessary.
Failure to observe this precaution may cause
injury.
Don’t
3. Precautions for the Battery Pack
■ Refer to the information shown on the
battery pack label to check the type of battery
pack.
If the display is broken and any
substance leaks from the inside, do
not touch it with your face, hands,
etc.
Don’t
Before using the terminal in a vehicle,
ask the manufacturer or sales agent
whether the operation of the vehicle
can be affected by radio waves.
Don’t
Do not place metal items such as wires
in contact with the charging terminals.
Also, do not carry or store the battery
with metal items such as necklaces.
Check the orientation of the battery pack
before attaching it. If you have difficulty
attaching it to the terminal, do not put
excessive pressure on the battery.
Doing so may cause the battery pack to
ignite, explode, overheat or leak.
Do not throw the battery pack into
fire.
There may be cases where the
customer's physical condition or
predisposition leads to itchiness,
rashes, or sores. If this occurs,
immediately stop using the terminal
and see a doctor.
Don’t
Doing so may cause the battery pack to
ignite, explode, overheat or leak.
Do not puncture the battery pack, hit
it with a hammer or step on it.
Material used in each part → P. 16
"7. Material list"
Don’t
When viewing the display, keep a
proper distance between your eyes
and it in a bright place.
Do
Lithium-ion
Doing so may cause the battery pack to
ignite, explode, overheat or leak.
In some types of vehicle, using the terminal
may interfere with the operation of the
vehicle's electronic equipment. In this case,
stop using the terminal immediately.
Do
Battery type
DANGER
Failure to observe this precaution may cause
loss of eyesight or damage to your skin.
If any substance leaks from the inside which
comes into your eyes or mouth, immediately
rinse with clean water and see a doctor.
If the liquid crystal adheres to your skin or
clothing, immediately wipe it off with
alcohol and wash with soap and water.
Do
Display
Li-ion00
Do
Failure to observe this precaution may
impair your vision.
Doing so may cause the battery pack to
ignite, explode, overheat or leak.
If battery fluid etc. comes into contact
with your eyes, do not rub your eyes
but immediately rinse your eyes with
clean water and see a doctor.
Failure to observe this precaution may result
in loss of eyesight.
12
Contents/Notes
WARNING
If the battery pack leaks, do not touch
battery fluid etc. with your face,
hands, etc.
Never use the battery pack if it has
fallen to have something abnormal
such as deformation and damage.
Don’t
Do
Do
Doing so may cause the battery pack to
ignite, explode, overheat or leak.
If the battery pack leaks or emits an
unusual odor, stop using it
immediately and move it away from
any flame or fire.
4. Precautions for the Adapter,
Desktop Holder, and Earphone
Cable (with Antenna)
The battery fluid is flammable and could
ignite, causing a fire or explosion.
Keep your pets away from the battery
pack as they may accidentally bite it.
Do
WARNING
Doing so may cause the battery pack to
ignite, explode, overheat or leak.
Do not use the adapter or earphone
cable (with antenna) if its cord is
damaged.
CAUTION
Do not dispose of used battery packs
with ordinary garbage.
Don’t
Don’t
Doing so may cause fire and create an
environmental hazard. Put insulation tape
on the terminals of used battery pack and
return it to Service Counter such as docomo
Shop, or dispose of the battery pack in
accordance with your local regulations.
Don’t
Doing so may cause fire, burns or electric shock.
Do not use the AC adapter, desktop
holder or earphone cable (with
antenna) in humid locations such as a
bathroom.
Doing so may cause fire, burns or electric shock.
Do not use or charge the wet battery
pack.
Don’t
Failure to observe this precaution may cause
loss of eyesight or damage to your skin.
If the battery fluid etc. comes into your eyes
or mouth or it adheres to your skin or
clothing, immediately rinse with clean water.
In the case that it comes into contact with
your eyes or mouth, see a doctor
immediately after rinsing.
Doing so may cause the battery pack to
ignite, explode, overheat or leak.
Don’t
The DC adapter must be used only in
vehicles with a negative ground. Do
not use the adapter in vehicles with a
positive ground.
Doing so may cause fire, burns or electric shock.
Do not touch the adapter when you
see lightning or hear thunder.
Doing so may cause electric shock.
Don’t
13
Contents/Notes
Don’t
Do not short-circuit the charging
terminals when the adapter is
plugged into the power outlet or
cigarette lighter socket. Also, do not
let the charging terminals contact
with your body (hand, finger, etc.).
If the fuse in the DC adapter blows,
always replace it with the specified
type of fuse.
Do
Doing so may cause fire, burns or electric
shock.
Wipe off any dust on the power plug
and earphone cable (with antenna).
Do not put heavy objects on the cord
of the adapter or earphone cable
(with antenna).
Don’t
Don’t
Do
Doing so may cause fire, burns or electric
shock.
When plugging the AC adapter into
the power outlet, make sure to insert
it firmly.
Doing so may cause fire, burns or electric
shock.
When plugging/unplugging the AC
adapter into/from the power outlet,
make sure that no metallic straps or
other metallic objects are caught
between the plug and the socket.
Do
Doing so may cause fire, burns or electric
shock.
Do
When your hands are wet, do not
touch the cord of the adapter,
earphone cable (with antenna),
No wet hands desktop holder, or power outlet.
Doing so may cause fire, burns or electric
shock.
Do
Doing so may cause fire, burns or electric
shock. Refer to the respective manuals for
the information on the specified fuse.
Doing so may cause fire, burns or electric
shock.
Always grasp the adapter or plug
when unplugging the plug from the
power outlet or cigarette lighter
socket and removing the earphone
cable (with antenna) from the
terminal. Do not pull on the cord itself
of the adapter, or earphone cable
(with antenna).
Doing so may cause fire, burns or electric
shock.
Use the specified power source and
voltage.
Use the AC Adapter for Global use to
charge the battery overseas.
Unplug
Unplug the adapter from the power
outlet or cigarette lighter socket when
the adapter will be left unused for a
long period.
Doing so may cause fire, burns or electric
shock.
Using the adapters with incorrect voltage
may cause fire, burns or electric shock.
AC Adapter : AC 100V
DC Adapter : DC 12V/24V
(specific to vehicle with negative ground)
AC Adapter for Global Use :
AC 100V to 240V (household AC outlet
only)
Unplug
If water or other liquid gets into the
adapter, immediately unplug it from
the power outlet or cigarette lighter
socket.
Doing so may cause fire, burns or electric
shock.
14
Contents/Notes
Unplug the adapter from the power
outlet or cigarette lighter socket
before cleaning it.
Unplug
Do
Doing so may cause fire, burns or electric
shock.
5. Precautions for the miniUIM
There may be people nearby who have
electronic equipment fitted such as an
implanted pacemaker or ICD. Radio waves
from the terminal can adversely affect
electronic medical devices.
CAUTION
Be careful with sharp edges when
removing the miniUIM.
Do
If there is a possibility that the
terminal is within 15 cm of nearby
people such as when you are in a
crowded area, set the terminal so that
no signal is output (such as switching
to Airplane mode or turning the
power OFF).
For details on the use of this terminal
inside medical facilities, follow the
instructions of each specific facility.
Sharp edges may cause injury.
Do
6. Precautions for Use Near Electronic
Medical Devices
WARNING
Do
A person with an electronic medical
device such as an implanted
pacemaker or ICD should use or carry
the terminal at a distance more than
15 cm from the site of implantation.
Radio waves emitted by the terminal may
adversely affect an electronic medical device
when used in close proximity.
Do
Electronic medical devices other than
implanted pacemakers and ICDs may
also be used outside hospitals. Users
of electronic medical devices are
advised to ask the manufacturer
whether these instruments can be
affected by radio waves.
Radio waves from the terminal can adversely
affect electronic medical devices.
15
Contents/Notes
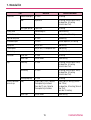
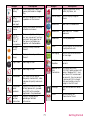
7. Material list
Part
Outer case
Material
Surface treatment
Around the display
PC resin
UV coating
Side
Nylon resin
UV coating (Terminal color: White)
Tin deposition, UV coating
(Terminal color: Pink)
Rear upper portion
Display panel
Nylon resin
UV coating
Reinforced glass
Fluorine coating
Front bottom parts
PC resin
Tin deposition, UV coating
Front bottom panel
PC resin
Hard coating
Infrared data port
PC resin
Dichroic deposition, UV coating
Light panel
Acrylic resin
Hard coating
Camera panel
Acrylic resin, PC composite resin
Hard coating
Camera ring
Aluminum
Alumite treatment
Outer side
PC resin
UV coating
Water stop
Silicon rubber
Silicon coating
Power key
PC resin
UV coating (Terminal color: White)
Tin deposition, UV coating
(Terminal color: Pink)
Volume key
PC resin
UV coating (Terminal color: White)
Tin deposition, UV coating
(Terminal color: Pink)
Wakeup/Sleep key
PC resin
UV coating
Body
Display side: PC resin, Polyester
thermoplasticity elastomer
Rear side: PC resin, Polyester
thermoplasticity elastomer
Display side: UV coating (Terminal
color: White)
Tin deposition, UV coating (Terminal
color: Pink)
Rear side: UV coating
Water stop
Silicon rubber
Silicon coating
Back cover
Keys
External connector
terminal cap
16
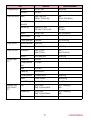
Contents/Notes
Part
Material
Terminals
Resin parts
ABS resin
Battery pack recess
Recess
Sides: Nylon resin
Bottom: Stainless alloy
Sides: Bottom: Nickel plating
microSD card
connector
Stainless alloy
Nickel plating
miniUIM tray
Housing: LCP resin
Metal part: Stainless alloy
Housing: Metal part: -
Screws
Stainless alloy
Black nickel plating
Internal frame
PC resin
Camera upper part
Polyimide
Battery terminal
Battery Pack N38
Desktop Holder
N44
Earphone Cable
(with Antenna)
N01
Stainless alloy
Surface treatment
Charging terminal
Gold plating
-
Black ink coating
Terminal connector
Nylon resin
Terminals
Phosphor bronze
Gold plating
-
Battery pack
Resin: PC resin
Label: PET resin
Resin: Label: UV coating
Terminals
Glass epoxy resin
Gold plating
Exterior case
ABS resin
-
Charging terminal
lever
POM resin
-
Hook
POM resin
-
Rubber leg
Urethane resin
-
Charging terminal
Phosphor bronze
Gold plating
Screws
Ferrous material
Nickel plating
microUSB plug jack
Stainless alloy
Tin coating
Plug
Metal: Nickel
Body: Styrene elastomer
Metal: Gold plating
Body: -
Earphone jack
Metal: Nickel
Body: Styrene elastomer
Metal: Gold plating
Body: -
Cord
Styrene elastomer
17
-
Contents/Notes
Do not place the terminal near an air
conditioning vent.
Condensation may form due to rapid changes in
temperature, and this may cause internal corrosion
and malfunction.
Do not put excessive pressure on the terminal
or battery.
Do not put the terminal in a bag filled with many
objects or sit down with it in a hip pocket.
Excessive pressure may result in malfunction or
damage to the display, internal circuit or the battery
pack, etc.
Also, if an external device is connected to the external
connector terminal (earphone/microphone terminal),
excessive pressure may result in malfunction or
damage to the connector.
Do not scratch the display with metallic objects.
Doing so may cause scratches, malfunction or
damage.
Read the separate manuals supplied with the
options respectively.
Handling Precautions
General Notes
N-06E is waterproof/dustproof, however, do not
allow water to seep in or dust to get in the
terminal. Also, do not allow accessories and
options to get wet or be exposed to dust.
The battery pack, adapter, desktop holder, earphone
cable (with antenna), and the miniUIM are not
waterproof or dustproof. Do not use them in a humid
place such as a bathroom or in the rain. If you carry
the terminal on your body, perspiration may corrode
the internal parts of the terminal and cause
malfunction. Note that if trouble is diagnosed as
exposure to water or other liquid, repair of the
terminal may not be covered by the Warranty or
repair may not be possible. Repair, when possible, is
not covered by warranty and is carried out at cost.
Wipe with a soft, dry cloth (such as an eyeglass
cleaning cloth).
• Rubbing the display of the terminal with a dry cloth
may scratch the display surface.
• The display surface may be stained if moisture or
dirt is left on it for a long period.
• Never use chemicals such as alcohol, thinners,
benzene or detergents as these agents may erase
the printing on the terminal or cause discoloration.
Occasionally clean the connection terminals
with a dry cotton swab, etc.
Soiled connectors may result in poor connections, loss
of power, or incomplete charging. Wipe with dry
cloth or cotton swab.
Take care not to damage the terminals when
cleaning.
18
Contents/Notes
Handling the Terminal
Do not forcefully push or use a pointed object
(nails, ballpoint pen, pin, etc.) on the touch
panel.
Doing so may damage the touch panel.
Avoid using the terminal in extremely high or
low temperatures.
Use in an environment with a temperature in the
range from 5°Cto 35°C and a humidity from 45% to
85%.
Reception may be affected if you use the
terminal near a land-line phone, television, or
radio in use. Use the terminal away from such
devices.
Please keep a separate record of the
information you have registered in the terminal.
Please be aware that DOCOMO bears no obligation
or responsibility in the event that data is altered or
lost.
Do not drop the terminal or expose it to strong
shocks.
Doing so may cause malfunction or damage.
Ensure the terminal does not come near a fire
(stove, etc.) or fall from a tabletop due to the
vibrator.
When connecting an external device to the
external connector terminal or earphone
microphone terminal, do not insert at an angle,
or pull on the cord.
Doing so may cause malfunction or damage.
It is normal for the terminal to become warm
while being used or charged. This is not a
malfunction. Keep using it.
Do not leave the camera exposed to direct
sunlight.
Doing so may discolor or burn the components of the
camera.
Normally, use with the external connector
terminal cap closed when not in use.
Failure to observe this precaution may cause
malfunction due to dust or water getting in.
19
Do not use the terminal with the back cover
removed.
Doing so may cause the battery pack to fall out, or
cause malfunction or damage.
Do not insert hard, sharp objects into earpiece
or speaker.
Doing so may cause malfunction or damage to the
terminal.
Do not remove the microSD card or turn off the
power while in use.
Doing so may cause data loss or malfunction.
Do not let magnetic cards, etc. come close to
terminal parts.
The magnetic data in cash cards, credit cards,
telephone cards, floppy disks, etc. may be erased.
Do not let strong magnetic objects come close
to the terminal parts.
Strong magnetic objects may cause malfunction.
Contents/Notes
When removing the back cover of the terminal,
take care not to damage the protective cushion
underneath by rubbing it, etc.
Handling the Battery Pack
The battery pack is consumable.
Battery life varies depending on usage conditions,
etc., but it is time to change battery packs when the
usage time has become extremely short even though
the battery pack has been fully recharged.
In this case, please purchase a new battery pack.
The ambient temperature of the room should
be 5°C to 35°C.
The available operating time of the battery pack
depends on the conditions of usage and battery
pack.
Depending on the usage condition, the battery
pack may inflate slightly when the battery life is
almost over. This is not a malfunction.
Do not store the battery pack in the following
cases:
• The battery is fully charged (immediately after the
charging is complete)
• The battery has run out (the terminal cannot power
on)
The performance and life of the battery pack may
deteriorate.
It is recommended that you store the battery pack
with around 40% battery level.
Protective cushion
Protective cushion
20
Contents/Notes
Handling the Adapter
Handling the miniUIM
The ambient temperature of the room should
be 5°C to 35°C.
Do not charge the battery pack:
• In a humid, dusty or unstable place
• Near a land-line phone, TV or radio
It is normal that the adapter becomes warm
while charging. Keep using it.
Do not use the DC adapter to charge the battery
when the car engine is not running.
Doing so may drain the car battery.
If you use an electrical outlet with an
unplugging-protection mechanism, follow the
instructions of the manual for the outlet.
Do not expose the adapter to strong shocks. Do
not deform the charging terminal.
Doing so may cause malfunction.
Do not apply excessive force to the miniUIM
when attaching/removing it.
Note that the warranty does not cover damage
caused by inserting the miniUIM into another
type of IC card reader or writer.
Always keep the IC part clean.
Wipe with a soft, dry cloth (such as an eyeglass
cleaning cloth).
Please keep a separate record of the
information you have registered in your
miniUIM.
Please be aware that DOCOMO bears no obligation
or responsibility in the event that data is altered or
lost.
To preserve the environment, bring discarded
miniUIM to Service Counter such as docomo
Shop.
Do not damage, unnecessarily handle, or shortcircuit the IC chip.
Doing so may cause data loss or malfunction.
Do not drop the miniUIM or expose it to strong
shocks.
Doing so may cause malfunction.
Do not bend the miniUIM or place a heavy
object on it.
Doing so may cause malfunction.
Do not put a label or sticker on the miniUIM
when attaching it to the terminal.
Doing so may cause malfunction.
Handling the Earphone Cable (with
Antenna)
Maintain metal terminals in a clean state.
Do not use the earphone cable (with antenna)
to hold or pull the terminal.
When you move an earphone cord closer to the
antenna of the terminal, you may hear a noise.
Read the individual instruction manual attached
to the earphone carefully.
Even when you connect a stereo earphone, the
same sound can be heard from the right and left
earphones for monaural sound such as
conversation. When you connect a monaural
earphone, only the left channel of the stereo
sound can be heard.
21
Contents/Notes
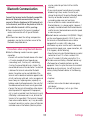
Using the Bluetooth Function
■ Bluetooth cautions
The operating frequency band of the terminal
is used by industrial, scientific, consumer and
medical equipment including microwave ovens,
premises radio stations for identifying mobile
units used in the manufacturing lines of plants
(radio stations requiring a license), specified
low power radio stations (radio stations
requiring no license) and amateur radio
stations (hereinafter referred to as "another
station").
1. Before using the terminal, confirm that
"another station" is not being operated
nearby.
2. In the event of the terminal causing harmful
radio wave interference with "other
stations", promptly change the operating
frequency or stop radio wave emission by
turning off the power, etc.
3. If you have further questions, please contact
General Inquiries on the last page of this
manual.
To secure the Bluetooth communication security,
the terminal supports the security function
compliant with Bluetooth standards, but the
security may not be sufficient depending on the
setting. Concern about the communication
using the Bluetooth function.
Please be aware that DOCOMO is not
responsible for data leak when making data
communications using Bluetooth.
Frequency band
The following are frequency bands that the terminal's
Bluetooth function uses:
① ②③④⑤
2.4 FH 1/XX 4
⑥
①
2.4
: The radio equipment uses the
2400 MHz band.
②
FH
: Modulation scheme is the FHSS system.
③
1
: The estimated interference
distance is 10 m or less.
④
XX
: The modulation scheme is a
different scheme.
⑤
4
: The estimated interference
distance is 40 m or less.
⑥
: The full band between 2400
MHz and 2483.5 MHz is used
and the band of the mobile
identification device cannot
be avoided.
• Available channels vary depending on the country.
• For use in an aircraft, contact the airline
beforehand.
22
Contents/Notes
Frequency band
The frequency band used by the WLAN device is
indicated on a label in the battery pack recess of the
terminal. The following figure explains the indications
on the label.
When Using a Wireless LAN
A wireless LAN (WLAN) uses radio waves for
transmission, and thereby has the benefit of
allowing a LAN connection anywhere in an area
reachable by radio waves. Conversely,
eavesdropping by a third party or wrongful
intrusion are possible if security settings are not
configured. Users are recommended to use
discretion and configure security settings before
using.
Wireless LAN
Do not use wireless LAN near magnetic devices such
as electrical appliances or AV/OA devices, or in radio
waves.
• Magnetism or radio waves may increase noises or
disable communications (especially when using a
microwave oven).
• When used near TV, radio, etc., reception
interference may occur, or channels on the TV
screen may be disturbed.
• If there are multiple wireless LAN access points
nearby and the same channel is used, search may
not work correctly.
① ② ③④
⑤
①
2.4
: This radio equipment uses
the 2400 MHz band.
②
DS
: Modulation scheme is the
DS-SS system.
③
OF
: Modulation scheme is the
OFDM system.
④
4
: The estimated interference
distance is 40 m or less.
⑤
: The full band between 2400
MHz and 2483.5 MHz is used
and the band of the mobile
identification device can be
avoided.
• Available channels vary depending on the country.
• For use in an aircraft, contact the airline
beforehand.
• For use of WLAN in a foreign country, the country
may have limitations on such as frequencies and
locations where you can use it. Before using
WLAN in a foreign country, confirm the available
frequencies, laws, regulations, and other
conditions for use of WLAN of the country.
23
Contents/Notes
5 GHz device usage cautions
The wireless LAN function of this terminal uses the 5
GHz band.
■ 2.4 GHz device cautions
The operating frequency band of this WLAN
device is used by home electrical appliances
such as microwave ovens, as well as industrial,
scientific and medical equipment including
private radio stations on factory premises for
identifying mobile units used in manufacturing
lines (radio stations requiring a license),
specified low power radio stations (radio
stations requiring no license), and amateur
radio stations (radio stations requiring a
license).
1. Before using the device, confirm that private
radio stations for identifying mobile units,
specified low power radio stations and
amateur radio stations are not being
operated nearby.
2. If the device causes harmful radio
interference to private radio stations for
identifying mobile units, immediately
change the frequency band or stop use, and
contact "docomo Information Center"
described on the last page of this manual for
crosstalk avoidance, etc. (e.g. partition
setup).
3. If the device causes radio interference to
specified low power radio stations or
amateur radio stations, contact "General
Inquiries" described on the last page of this
manual.
• J52: 5.170 to 5.230 GHz (channels 34, 38, 42, 46)
cannot be used.
• W52: 5.180 to 5.240 GHz (channels 36, 40, 44, 48,
and channels 38, 46, and channel 42) can be used.
• W53: 5.260 to 5.320 GHz (channels 52, 56, 60, 64,
and channels 54, 62, and channel 58) can be used.
• W56: 5.500 to 5.700 GHz (channels 100, 104, 108,
112, 116, 120, 124, 128, 132, 136, 140, and
channels 102, 110, 118, 126, 134, and channels
106, 122) can be used.
Outdoor use of the 5.2 GHz band and 5.3 GHz band
(W52/W53) is prohibited by the Radio Law of Japan.
The 5 GHz frequency band cannot be used overseas.
24
Contents/Notes
Handling the FeliCa Reader/Writer
Cautions
The FeliCa reader/writer function of the
terminal handles delicate signals that require no
radio station license.
The 13.56 MHz frequency band is used. If there
is another reader/writer near the terminal, keep
enough distance between the terminal and the
reader/writer. Also, make sure that there is no
radio station using the same frequency band
nearby.
Do not use the altered terminal. Using an
altered device is a violation of the Radio Law
and Telecommunications Business Law.
The "Technical Conformity Mark " displayed on this
terminal's electronic nameplate certifies that it meets
technical regulations for specified radio equipment
based on the Radio Law, and that it meets technical
regulations for terminal devices based on the
Telecommunications Business Law. The electronic
nameplate can be checked by performing the
following operation with the terminal.
From the Home screen, "Settings" Uncheck the
"Simple menu" checkbox "About phone"
"Certification information"
If you remove the screws and alter the inside of the
terminal, the technical regulations conformity
certification becomes invalid. Do not use the terminal
with the certification invalid, as it is a violation of the
Radio Law and Telecommunications Business Law.
Be careful when using the terminal while
driving.
A penalty may be imposed for holding a mobile
phone while driving. However, exceptions are made in
case of emergency, such as to safeguard injured
persons or to maintain public safety.
Use the FeliCa reader/writer function only in
Japan.
The FeliCa reader/writer function of the terminal
complies with radio standards of Japan. You may be
punished if you use it overseas.
Do not attempt to alter the basic software.
Repair of malfunction may be refused if the software
is found to be altered.
25
Contents/Notes
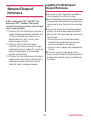
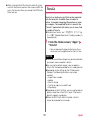
Capability of N-06E Waterproof/
Dustproof Performance
Waterproof/Dustproof
Performance
You can talk or watch 1Seg without an umbrella in
the rain (approx. 20 mm of rain in an hour).
Do not attach/remove the back cover or do not open/
close the external connector terminal cap when your
hands are wet or when the terminal has water drops
on it.
You can rinse the terminal by immersing and slowly
moving in tap water of room temperature filled in a
bowl, or rinse it with hands under light running water
from the faucet.
• Rinse the terminal with the back cover securely
attached while covering the external connector
terminal cap to prevent it from opening.
• Do not use a brush, sponge, soap, or detergent for
washing.
If salt water, sea water, mud or dirt gets on the
terminal, wash off immediately. May be more difficult
to remove when dry/hard, and may scratch/damage
the terminal.
N-06E is waterproof to IPX5*1 and IPX8*2 and
dustproof to IP5X*3 standards if the external
connector terminal cap is closed as well as the back
cover is securely attached.
*1 IPX5 means that the N-06E continues to function as
a phone after being sprayed from all directions with
12.5 liters of water per minute from a 6.3 mm
diameter nozzle for at least 3 minutes, from a
distance of approx. 3 meters.
*2 IPX8 means that the N-06E retains phone
functionality after slowly immersing in still, roomtemperature tap water to a depth of 1.5 meter and
leaving it there for approx. 30 minutes before
bringing it out of the water.
*3 IP5X means that the N-06E continues to function as
a phone and to maintain security after being left in
a device containing dust (diameter of 75 μm or
smaller) for 8 hours, agitated and removed.
26
Contents/Notes
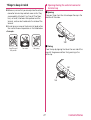
Things to keep in mind
● Opening/closing the external connector
terminal cap
Before use, ensure that you securely close the external
connector terminal cap and back cover so that they
are completely attached. If any fine dirt (fine fibers,
hairs, or sands) is between the cap/cover and the
terminal, water or dust could enter the inside of the
terminal.
Do not spray or immerse the terminal in liquids other
than water of room temperature as illustrated below.
<Example>
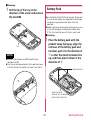
■Opening
Place your finger tip in the slot and open the cap in the
direction of the arrow.
Slot
Soap/Detergent/
Bath powder
Sea water
Hot spring
■Closing
Close the cap by aligning the tab on the rear side of the
cap with the groove and then firmly pressing in the
entire cap.
Slot
Tab
27
Contents/Notes
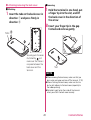
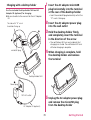
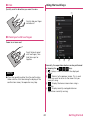
● Attaching/removing the back cover
■Removing
■Attaching
1 Hold the terminal in one hand, put
1 Insert the tabs on the back cover in
a finger tip into the slot, and lift
the back cover in the direction of
the arrow
direction ① and press firmly in
direction ②
2 Insert your finger tip in the gap
formed and remove gently
Tabs
Securely push the areas
illustrated by
and
make sure that there is
no space between the
back cover and the
terminal.
Slot
NOTE
When removing the back cover, make sure that you
drain water and wipe moisture off the terminal. (P. 30)
When attaching the back cover, make sure that no
dust or dirt adheres to the back cover (especially to
the rubber packing).
Water/dust might enter the inside of the terminal
unless you attach the back cover securely.
28
Contents/Notes
When attaching the back cover, make sure that the
Important notices
miniUIM, microSD card and the battery pack are
attached securely. If the miniUIM or microSD card is
not properly inserted, the battery pack sits on the
miniUIM or microSD card which causes a gap between
the terminal and the back cover after the back cover is
attached. This gap may adversely affect waterproof/
dustproof performance.
If the terminal gets wet with water or other liquids
with the external connector terminal cap or the back
cover open, the liquid may get inside the terminal
causing electric shock or malfunction. Stop using the
terminal, turn off the power, remove the battery pack
and contact a repair counter specified by DOCOMO.
Do not insert the earphone plug while the terminal is
wet. This could cause a breakdown of the terminal.
The external connector terminal cap and the rubber
packing of the back cover play an important role in
maintaining waterproof/dustproof function. Do not
remove or scratch them. Also, prevent dust from
adhering to them. If the external connector terminal
cap and the rubber packing of the back cover is
damaged or deformed, replace it at a repair counter
specified by DOCOMO.
Do not insert sharp objects through the gap of the
external connector terminal cap or back cover. Doing
so may damage the rubber packing and allow water/
dust to seep in.
If the back cover is damaged, replace it. Water may
seep into the inside of the terminal through a
damaged section causing electric shock, corrosion of
the battery pack, or other malfunctions.
Do not leave the terminal with water drops. In cold
places, water may freeze and cause malfunction.
Do not apply water flow stronger than allowed (e.g.,
such water flow that gives you pain when applied to
your skin directly from a faucet or shower head).
Doing so may allow water to seep into the inside of
the terminal and cause malfunction though N-06E is
waterproof to IPX5 standard. (P. 26)
Do not wash the terminal in a washing machine etc.
Do not put the terminal in hot water, use it in a sauna
or apply hot air flow (from a hair dryer etc.) to it.
Do not poke the mouthpiece, earpiece, speaker,
second microphone, or earphone/microphone
terminal with sharp objects. The waterproofing and
dustproofing may deteriorate.
To maintain waterproof/dustproof function, replacement
of parts is recommended once every 2 years regardless of
whether the terminal appears normal or abnormal.
DOCOMO replaces the parts as a chargeable service.
Bring the terminal to a repair counter specified by
DOCOMO.
29
Contents/Notes
The terminal does not float on water.
Do not drop the terminal. Scratches may lead to
lowered waterproof/dustproof capability.
DOCOMO does not guarantee all operations under
actual use conditions. Malfunctions deemed to be
caused by inappropriate operation by the customer
are not covered by the warranty.
Even when the back cover is securely attached, the
waterproof performance may be lost if the seals are
removed from the following locations. Therefore, do
not remove these seals.
Seal
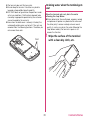
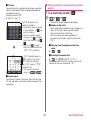
Draining water when the terminal gets
wet
When the terminal gets wet, drain the water
following the steps below.
Water adhering to the mouthpiece, earpiece, second
microphone or speaker may decrease the volume of
the other party's voice or melody or lower sound
quality. In such a case, drain the water following the
steps below and dry the terminal in open air to
recover the function.
1 Wipe the surface of the terminal
with a clean dry cloth, etc.
30
Contents/Notes
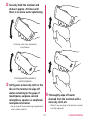
2 Securely hold the terminal and
shake it approx. 20 times until
there is no more water splattering
<Draining water from earpiece or
mouthpiece>
<Draining water from speaker or
second microphone>
3 Softly press a clean dry cloth or the
like on the terminal to wipe off
water remaining in the gaps of
mouthpiece, earpiece, second
microphone, speaker or earphone/
microphone terminal.
4 Thoroughly wipe off water
drained from the terminal with a
clean dry cloth, etc
• Water, if any, remaining in the terminal may leak
out after wiping off.
• Do not wipe off water remaining in gaps directly
with a cotton swab etc.
31
Contents/Notes
When charging the battery
Accessories and options are not waterproof/
dustproof. Check the following before and after
charging.
Check that the terminal and battery pack are dry.
If they become wet, dry thoroughly by wiping with a
clean dry cloth before connecting the terminal to the
supplied desktop holder or opening the external
connector terminal cap.
When the external connector terminal cap is opened
for charging, close the cap securely after charging. It
is recommended that the desktop holder be used for
charging to prevent water from seeping in or dust
from entering through the external connector
terminal.
• Never try to charge the battery pack when the
terminal is wet.
• Do not touch the AC adapter or the desktop holder
with wet hands. Doing so may cause electric shock.
• Use the AC adapter or the desktop holder in a place
free from water splashes. Do not use them in a
bathroom, shower room, kitchen, washroom and
other places subject to water. Otherwise, it may
cause fire or electric shock.
32
Contents/Notes
Getting Started
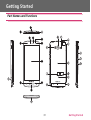
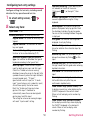
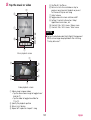
Part Names and Functions
33
Getting Started
1 Inner Camera
• You can use the camera to take videos or photos.
→ P. 117
2 Earpiece (receiver)
3 Proximity/Illuminance sensor
• Hides tappable icons on the touch panel when
your face comes close to the touch panel. This
prevents you from unintentionally activating
functions when you are engaged in a call.
• Detects the brightness around the terminal and
automatically adjusts the illuminance of the
display.
* Do not put labels or stickers on the sensors.
4 Inner light
• This can be turned ON when taking photos with
the inner camera.
5 Notification LED
• Charging → P. 41
• Incoming call (incoming call lamp) → P. 58
• Missed calls, new mail (notification lamp) → P. 58
6 Display (Touch panel)
• Allows you to scroll the screen on the display or
tap to select objects. → P. 43
7 SWakeup/Sleep key → P. 42
8 Aurora Illumination
• This can be set to illuminate when a call is
received, etc. → P. 59
9 Mouthpiece/microphone
a Infrared data port
• Serves for infrared data exchange. → P. 169
b External connector terminal
• Provides connections to the adapters, earphone/
headphone, and PC, etc.
c Earphone/microphone terminal
• The jack opening can be set to illuminate when a
call is received or while talking, etc. (Earphone Jack
Illumination) → P. 59
d Strap slot → P. 37
e Speaker
f Outer Camera
• You can use the camera to take videos or photos.
→ P. 117
g Outer light/Shooting recognition LED
• You can light it for shooting with an outer camera.
• The light blinks in red when the camera is
operating.
• From the Home screen, press and hold u to
turn the outer light ON. Press P , u,
d, or S to turn it OFF.
h Second microphone
• This is used when you are talking to improve
sound quality.
i GPS / Wi-Fi / Bluetooth antenna*
j Back cover
k miniUIM slot
• Insert a miniUIM here. → P. 35
l microSD card slot
• Set the microSD card to the slot. → P. 164
m e mark
• Swipe this mark to use Osaifu-Keitai or to
communicate with devices equipped with NFC
modules → P. 104
n FOMA/Xi antenna*
o Charging terminal
p P Power key
• Powers the terminal on/off or sets it in sleep
mode. → P. 42
q u Volume key (volume up)
r d Volume key (volume down)
* The antennas are built-in. To ensure good signal
quality, avoid covering the antenna section with your
hands.
34
Getting Started
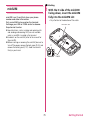
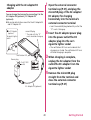
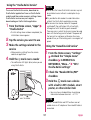
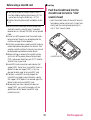
■Attaching
miniUIM
1 With the IC side of the miniUIM
facing down, insert the miniUIM
fully into the miniUIM slot
miniUIM is an IC card that stores your phone
number and other information.
Only a miniUIM can be used on the terminal.
Exchange your UIM or FOMA card at a docomo
Shop Service Counter.
Some functions, such as making and receiving calls
and sending and receiving SMS, are not available
unless a miniUIM is inserted in the terminal.
For details on the miniUIM, refer to the manual for
the miniUIM.
Before inserting or removing the miniUIM, be sure to
turn off the power, remove the back cover (P. 28), and
remove the battery pack (P. 37). Hold the terminal
firmly in your hand.
• Pay attention to the direction of the notch.
miniUIM slot
IC
Notch
35
Getting Started
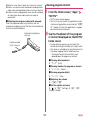
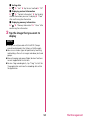
■Removing
Battery Pack
1 Pull the lip of the tray in the
direction of the arrow and remove
the miniUIM
Use the Battery Pack N38 for the terminal. Please note
that we cannot accept any responsibility for damage
caused by using a battery pack other than that
specified.
Before inserting or removing the battery pack, be sure
to turn off the power, and remove the back cover
(P. 28). Also, hold the terminal firmly in your hand.
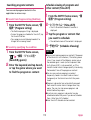
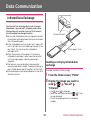
■Attaching
1 Place the battery pack with the
product name facing up, align the
contours of the battery pack and
terminal, push it in the direction of
① so that the metal terminals line
up, and then press it down in the
direction of ②
Lip
NOTE
Do not attach/remove miniUIM forcefully. May
damage miniUIM.
The tray can only be pulled out to the position shown
in the illustration. Be careful not to pull it out too far.
Align contours
Align the metal
terminals on the battery
pack and the terminal
36
Getting Started
NOTE
Attaching the Strap
Do not press forcefully if the contours are not aligned.
Doing so may cause damage to the contours and
metal terminals.
■Removing
1 Hold the "PULL" tab of the battery
1 Remove the back cover (P. 28)
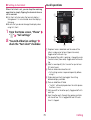
2 Insert the strap through the strap
slot, and hook the strap onto the
knob as shown in the illustration
below
pack, and pull it up in the direction
of the arrow
• Hold the "PULL" tab and pull it up to remove it.
"PULL" tab
Knob
NOTE
When inserting the battery pack, replace the "PULL"
tab back to the position indicated by the dotted line
so that it does not get stuck in the back cover.
Be careful not to break off the "PULL" tab.
Do not use a sharp object such as a screwdriver to
remove the battery pack.
3 Reattach the back cover (P. 28)
NOTE
Make sure that the strap is securely hooked onto the
knob, and is not trapped between the terminal and
back cover. If the strap is trapped between the
terminal and back cover, the resulting gaps will cause
a loss of waterproof/dustproof.
37
Getting Started
Charging
The battery pack is not fully charged at time of
purchase. Be sure to fully charge before use.
Charging time (estimated) → P. 200
Usage time (estimates) when fully charged → P. 200
■Battery charging
• For more details, see the respective manuals of the
AC Adapter 03/04 (optional), the AC Adapter N04
(optional) and the DC Adapter 03 (optional).
• The AC Adapter 03/04, and the AC Adapter N04 are
compatible with AC 100V-240V.
• The AC adapter has an AC 100V plug (Japanese
specification). When using an AC 100-240V adapter
overseas, you will need a converter plug adapter
compatible with local voltage. Do not charge the
terminal using a travel transformer.
• The terminal cannot be charged unless the battery
pack is inserted in the terminal.
• Do not force the connector when inserting/pulling it
out. Instead, insert or pull it out slowly.
• If you start charging when the battery pack is empty,
you may not be able to power ON the terminal for a
while.
• Charging may stop before the remaining capacity of
the battery reaches 100% depending on the status of
use. In that case, terminate all functions in use and
charge the battery again. Remove the AC Adapter 04
or the Micro USB Cable 01 (optional) from the
terminal and attach it again before charging.
■Battery pack life
• The battery pack is a consumable accessory. The
usage time of the battery per 1 charge decreases
gradually each time the battery is recharged.
• When the usage time from 1 charge becomes about
half of a new battery pack, the life of the battery pack
is assumed to be almost over. We recommend that
you replace the battery ahead of time. Depending on
the usage condition, the battery pack may inflate
slightly when the battery life is almost over. This is not
a malfunction.
• If you view 1Seg while charging for a long period, the
life of the battery pack may decrease.
■Waterproof/dustproof capability
• The battery pack, AC adapter, and supplied desktop
holder are not waterproof/dustproof. You must not
charge when the terminal is wet.
• To prevent intrusion of water/dust from the external
connection terminal, charging is recommended using
the desktop holder.
• After charging is completed, securely close the
external connection terminal cap. Otherwise, water/
dust may enter.
38
Getting Started
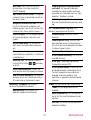
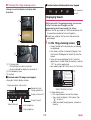
Charging with a desktop holder
1 Insert the AC adapter microUSB
plug horizontally into the terminal
at the rear of the desktop holder
Use the included Desktop Holder N44 and AC
Adapter 04 (optional) for charging.
Be sure to refer to the manuals for the AC Adapter
04.
• Insert the microUSB plug horizontally so that the
"B" mark is facing up.
2 Insert the AC adapter power plug
The side with "B" mark
should be facing up
into the wall outlet
3 Hold the desktop holder firmly,
and completely insert the terminal
in the direction of the arrow
1
• The notification LED turns on to indicate that
charging has started. The notification LED turns
off when charging is complete.
4 When charging is complete, hold
microUSB plug
the desktop holder and remove
the terminal
Notification
LED
Desktop Holder N44
2
Power plug
100V AC outlet
5 Unplug the AC adapter power plug
and remove the microUSB plug
from the desktop holder
AC Adapter 04 (optional)
39
Getting Started
Charging with the AC adapter/DC
adapter
1 Open the external connector
terminal cap (P. 27), and plug the
microUSB plug of the AC adapter/
DC adapter for charging
horizontally into the terminal's
external connector terminal
You can charge the terminal by connecting it to the
AC Adapter 04 (optional), DC Adapter 03
(optional).
Be sure to refer to the manuals for the AC Adapter 04
and DC Adapter 03.
For DC Adapter
(optional)
To cigarette lighter
socket
microUSB plug
* The side with the "B"
mark should be facing up
• Insert the microUSB plug horizontally so that the
"B" mark is facing up.
2 Insert the AC adapter power plug
into the power outlet/the DC
adapter plug into the car's
cigarette lighter socket
• The notification LED turns on to indicate that
charging has started. The notification LED turns
off when charging is complete.
Plug
Notification LED
Power plug
3 When charging is complete,
unplug the AC adapter from the
outlet/the DC adapter from the
cigarette lighter socket
To AC100V
outlet
4 Remove the microUSB plug
straight from the terminal and
close the external connector
terminal cap (P. 27)
AC Adapter 04 (optional)
40
Getting Started
Charging with a PC
You can charge the terminal by connecting it to a
PC using the Micro USB Cable 01 (optional).
microUSB plug
* The side with the "B"
mark should be facing up
• The notification LED turns on to indicate that
charging has started. The notification LED turns
off when charging is complete.
3 When charging is complete,
remove the USB plug horizontally
from the PC USB port
4 Remove the microUSB plug
horizontally from the terminal and
close the external connector
terminal cap (P. 27)
NOTE
Notification LED
USB plug
Micro USB Cable 01 (optional)
If charging starts with power off, it may take some
time for charging to start.
<Notification LED>
The notification LED is red during charging, and the
light turns OFF when charging is complete.
<DC Adaptor>
Make sure the specified fuse is used if the fuse blows.
The fuse is a consumable accessory. Purchase the
specified fuses from your local car accessory dealer
when replacement is required.
1 Open the external connector
terminal cap (P. 27), and plug the
microUSB plug of the microUSB
cable horizontally into the external
connector terminal of the terminal
• Insert the microUSB plug horizontally so that the
"B" mark is facing up.
2 Insert the other USB plug of the
microUSB cable horizontally into
the PC USB port
41
Getting Started
Turning Power ON and OFF
NOTE
Standby mode cannot be set while charging, during
● Turning power OFF
USB connection, during a call, when receiving a call,
or when viewing or recording Mobacas content.
If charging or a USB connection is started during
standby mode, standby mode is automatically exited.
Standby mode cannot be set if certain applications are
being used. Exit the application, and then try setting
to standby mode again.
If certain applications are being used when standby
mode is set, the application may not work after
exiting standby mode. If this happens, restart the
application.
1 P (1 second or longer)
● Sleep mode
● Restarting
When P or S is pressed or the terminal
is not operated for a certain length of time, the
display turns off, and the terminal enters sleep
mode.
Press P or S to exit sleep mode.
● Turning power ON
1 P (2 seconds or longer)
• When turning power on for the first time, the
initial setting screen appears. → P. 52
• The Home screen appears. → P. 63
"Power off" "OK"
1 P (1 second or longer)
"Reboot" "OK"
● Standby mode
All running applications are closed.
During standby mode, the display turns off, and all
communication is stopped for reducing battery
consumption. This is different from turning off the
power, and it enables a shorter recovery time.
1 P (1 second or longer)
"Standby mode" "OK"
● Screen lock
When you turn power on, quit standby mode or
sleep mode, the touch panel is locked.
Tap
to unlock the screen.
• Slide the right side of the lock screen to the left to
cancel the lock and activate the camera. Slide the left
side of the lock screen to the right and tap to paste
a widget to the lock screen.
• If you have set "Touch" for "Screen lock", you can
use the Notifications panel during screen lock (when
standby mode or sleep mode is canceled). → P. 62
■ Exiting standby mode
P (2 seconds or longer)
42
Getting Started
● Tap
Basic Operations
Select or run items.
Operate the terminal by directly touching the
touch panel (display).
■Precautions on using the touch panel
The touch panel has been designed for light finger
touches. Do not press it hard with your finger or with
sharp objects (nail, ballpoint pen, pin etc.).
The following user actions may cause the touch panel
not to work properly. They may also cause
malfunction.
• Touching the screen with gloved hands
• Touching the screen with the tip of a fingernail
• Placing a foreign object on the screen
• Sticking a protective sheet or seal on the screen
• Touching the screen when it is wet
• Touching the screen with sweaty or wet fingers
• Using underwater
Set the terminal to sleep mode before carrying it in
your pocket or bag. Carrying the terminal while not in
sleep mode may cause unintended operation.
Touch the panel then
release your finger.
■Touch and hold
In some screens, continuing to touch the touch panel
displays a menu.
● Slide
Scroll up/down/left/right in direction you want to
view.
Slide your finger while
touching the touch panel.
■Drag
Slide your finger while touching an item (icon, etc.) to
move it.
43
Getting Started
Using the touch keys
● Flick
Quickly scroll in direction you want to view.
①
Quickly slide your finger
and release it
● Pinch/apart with two fingers
Zoom in or zoom out.
Touch the touch panel
with two fingers, then
slide them apart or
together.
NOTE
If you tap something other than the confirmation
screen and the status bar during the display of the
confirmation screen, the operation may stop.
②
③
④
Generally, the operations below can be performed
by tapping the
keys.
1 :Displays a menu available in the displayed
screen.
2
:Returns to the previous screen. This is used
when you want to return to the screen that you
were just using.
3
:Displays the home screen when using a
function.
4
:Displays recently-used applications or
applications currently running.
44
Getting Started
Switching the Screen Display
Orientation
The terminal can automatically switch the display
orientation by sensing the sideway tilt of the body.
The display may not switch depending on the content
being displayed.
Operate on the terminal, setting the display vertically
to the ground. If the display is placed horizontally to
the ground, the display orientation does not switch.
You can disable automatic screen display orientation
in the Notifications panel (P. 62).
Text Entry
Text can be entered using a keyboard or
handwriting on the display. Tap the text box to
enter text.
■10-key keyboard
This is an ordinary keyboard of mobile phones.
⑩
This captures the screen shown on the display as a
screenshot.
1 Open the screen that you want to
capture, and press P and
S simultaneously
⑦
⑤
③
⑥
⑨
⑤
①
②
Screen shot
■QWERTY keyboard
This keyboard uses a PC keyboard layout.
Enter Japanese in romaji.
• It is also possible to take a screenshot by pushing
Pand d at the same time for at least
1 second.
• The screenshot image is automatically saved.
You can browse the screenshot images from the
gallery.
• Some images may not be captured for certain
types of screens.
⑩
⑦
⑥
⑧
②
①⑨③ ④⑪
45
Getting Started
■Handwriting input
You can enter text using handwriting.
This terminal can recognize handwritten kanji, hiragana,
katakana, alphabet characters, numbers, and symbols,
etc.
Tap to select the type of
character to input
②
Toggle the kind of text to enter.
Touch and hold to display the ATOK menu.
[ATOK Menu]
• "ATOK Settings": → P. 50
• "Register Words": Add words. Added
words are usable when converting kana
to kanji.
③
Enter a blank space.
⑩
Convert entered text.
⑨
⑦
④
⑤
⑤
⑤
①
③
②
⑥
Change the keyboard to symbol entry.
/
Enter a line feed or confirm entered text.
⑥
Handwriting input
①
Move the cursor. When converting, change
the conversion range.
Sets the entered characters.
When there is a text entry box such as for
Phonebook data, completes entry and
moves to the next item.
/
/
: Switches between the
10-key keyboard, QWERTY keyboard and
Handwriting input.
: Activates DOCOMO sound input.
→ P. 49
: Registers words. The registered
word can be used when converting
characters.
: Displays ATOK settings. → P. 50
/
⑦
Delete text to the left of the cursor.
For the 10-key keyboard, you can also set
"Character delete key" (P. 50) to delete text
to the right (
).
⑧
Tap once to change the next character to be
entered to upper case (
), tap twice to
lock in upper case (
). Some symbols can
also be entered.
Change text to hiragana/kana/alphabet, etc.
With the 10-key keyboard, changes text to
kana/alphanumeric, etc.
Also toggle half-width/full-width.
46
When entering text for a web page or for
search words, runs the function of the text
box.
Getting Started
Starts up DOCOMO sound input. Functions
can also be assigned. ("Customizable key
setting" → P. 50).
⑨
Displays one character before (reverse).
Erases the previous conversion operation.
⑩
⑪
-
Conversion/prediction candidates are
displayed when entering text, and you can
tap to enter text.
• Slide left/right to display other
conversion/prediction candidates.
• Flick up/down for wider conversion/
prediction candidates display.
● Adjusting the Size of the keyboard
The size of the keyboard can be adjusted when
displayed by marking the checkbox "Adjust
keyboard size" (P. 51).
■Adjusting the height of the keyboard
Drag the
up or down to adjust the height of the
keyboard.
Displays the icon for moving the cursor.
■Adjusting the width of the keyboard
Drag the
or
to the right or left to adjust the
width of the keyboard.
47
Getting Started
● Selecting the 10-key keyboard entry
method
Select a text entry method for the 10-key keyboard.
1 In a text entry screen, "
"
"
" "Input mode"
2 "Numeric keypad input"/"Gesture
input"/"Flick input"/"T9 input"/ "2touch input"
■Gesture input
Keep touching on the key with the desired character;
the associated gesture guide (characters) is displayed
around the key. Slide your finger to the target character
without releasing it from the panel.
You can slide the finger you tapped downward once or
twice to display a gesture guide with a voiced
consonant, unvoiced consonant, or small kana (during
alphabet entry, toggle upper/lower case).
Example: To enter " ぱ "
■Numeric keypad input
Tap the key with the desired character assigned on
repeatedly until you get to the character.
Slide
downward
twice
■Flick input
Keep touching on the key with the desired character;
the associated flick guide (characters) is displayed on the
key. Flick your finger toward the target character
without releasing it from the panel.
After flick input, you can tap
once or twice to enter
a voiced consonant, unvoiced consonant, or small kana.
48
Getting Started
■T9 input
Tap each key with a desired character once, and then
select the desired text from the displayed prediction
candidates to enter it.
Example: To enter " 春 "
Tap " は " then " ら "
● Entering with the smiley/emoticon/symbol
palette
1 In a text entry screen, "
2 " "/" "/" "
"
• The palette for the keyboard is displayed.
Tap "春" displayed in the
prediction candidates.
• If desired text does not appear
in the candidates, tap ---- and
enter the reading.
• To enter a voiced/unvoiced
consonant, tap ---- . To toggle
English and Japanese, tap ---- /
xxx .
• You can tap ---- to toggle
display of candidates between
"漢字/かな" (kanji/kana).
■ Adding to My-Colle
• Touch and hold a candidate of each category to
add it to My-Colle. You can quickly select a
desired character from My-Colle.
You can register your own candidate of
emoticons and symbols using My-Colle utility
(P. 51).
■ Entering from fixed phrases/character
codes
"
"/"
"
■ Quoting Phonebook data
"
" " 電話帳 /ATOKダイレクト "
(Phonebook/ATOK Direct) Tap the Contacts
Checkmark the item to quote "OK"
A "はる" candidate appears in
"変換" (convert) tab, so tap
"春". Prediction candidates
from "はる" appear in "予測"
(prediction) tab.
• To change the conversion
range, tap xxxxxxx / xxxxxxx .
■2-touch input
Tap two keys to enter a character. Tap a line with the
first key and select a character to be entered with the
second key.
49
Getting Started
Configuring text entry settings
Character delete key···When deleting text,
set to delete to the left of the cursor
("Backspace (
)") or the right ("Clear
(
)").
Configure settings for text entry including sound/
vibration for key operation and text size.
1 In a text entry screen, "
"
"
Number type keypad···Set whether to use a
numeric keypad when using the 10-key
keyboard.
"
2 Select any item:
Gesture guide···Set whether the gesture
guide is displayed at entry by gesture. Mark
the checkbox to display the gesture guide.
You can set the time length before the guide
is displayed.
Input mode ···P. 48
Entering auxiliaries···Set entering auxiliaries.
Keypad sound···Set sound for when keys are
tapped.
Flick guide···Set whether the flick guide is
displayed at entry by flicking.
Keypad vibration···Set vibration for when
keys are tapped.
Flick Sensitivity···Set the sensitivity of
character selection for a character input by
flicking.
Customizable key setting···Set an assigned
function to the customizable key (P. 47).
Modifier key flick···Set to enable entry of
dakuon/han-dakuon by flicking
for flick
input.
Memorize keyboard type per character
type···Set whether to remember the type of
keyboard according to the type of text.
Alphabet key flick···Set the characters on
the right side of the flick guide when entering
alphabet characters.
Multi-tap input···Enable numeric keypad
input for both gesture input and flick input.
Check the "Enable auto cursor moving"
checkbox to move the cursor to the right after
a period of no entry when the input method is
numeric keypad input, "T9 input"
(punctuation mark etc. input) or "2-touch
input" (punctuation mark, symbol etc. input).
Also set how quickly the cursor moves.
Mark the "Enable multi-tap input when
gesture / flick input" checkbox to
automatically move the cursor during both
gesture input and flick input.
The setting for auto cursor moving changes
with each "Input mode" setting.
Flick cancel···Set the cancel distance for flick
input.
Direct alphanumeric input···Set to enter
half-width letters only after they are
confirmed in alphabet entry.
Show numeric keys (vertical screen)···Set
to display numeric keys when displaying the
QWERTY keyboard in the vertical screen.
When set not to display, enter numbers by
flicking.
Show numeric keys (horizontal screen)···
Set to display numeric keys when displaying
the QWERTY keyboard in the horizontal
screen. When set not to display, enter
numbers by flicking.
50
Getting Started
Multi-touch···Set to tap shift keys and
character keys at the same time on the
QWERTY keyboard.
Showing prediction candidates before
next input···Set to predict and display
candidates for words to follow confirmed
(converted) text. Selectable when the "Input
prediction" checkbox is marked.
Input frames (vertical screen)···Change the
number of frames to be entered manually on
the vertical screen.
Initializing learning data···Reset learning
data and smiley/emoticon/symbol entry panel
log.
Recognition determination time···Set the
time to fix the character recognition with
handwriting input. You can set the time if the
number of entry frames (vertical screen) is 1.
Dic / Common phrases / My-Colle···Set a
dictionary, common phrases My-Colle.
Default category···Set the category selected
first to enter pictograms, face marks and
symbols.
Dictionary utility···Maintains the user
dictionary.
Common phrase utility···Maintains userregistered fixed phrases. Common phrases
that use smileys are not displayed in text boxes
that do not support smileys.
Use half-width space···Set to enter halfwidth spaces also when entering Japanese
text.
Auto space insert···Set to automatically put
a space following a word after it is confirmed
in alphabet entry.
My-Colle utility···Edit My-Colle.
Delete key flick···Set whether to delete a
string of text by flicking
/
upward or
to the left.
ATOK Sync···Share words registered by
Windows/Mac version ATOK.
ATOK Extended Dictionary···Set the ATOK
extended dictionary.
ATOK Keyword Express···Receive the latest
distributed keywords, and configure so that
the latest keywords can be automatically
displayed as possible candidates. User
registration is required to receive distributed
keywords.
Correct touched position···Corrects the
touch position when the keyboard is touched.
Auto full screen (horizontal)···Set whether
to display the text entry field automatically at
full screen when in the horizontal screen.
Converting / Candidates···Set character
conversion and prediction candidates.
Display···Set the character input screen display.
Theme···Set the design (color) for the
keyboard.
Input prediction···Set to display the
prediction candidates for conversion.
Adjust keyboard size···Sets the display of a
bar so that the size of the keyboard can be
adjusted.
Font size···Set the font size for conversion/
prediction candidates.
51
Getting Started
Number of lines to display (vertical
screen)···Set the number of lines of
conversion/prediction candidates to display in
vertical screen.
Number of lines to display (horizontal
screen)···Set the number of lines of
conversion/prediction candidates to display in
horizontal screen.
Initializing settings···"ATOK Settings" is restored
to the initial condition.
* Learning data, added user dictionary, and
common phrase are not initialized.
JapaneseInputMethod ATOK···Displays version
information for ATOK.
Initial Settings
Settings when power is first turned ON
When the terminal power is first turned ON, the
following settings are required.
1 When the initial setting screen
appears, tap the language
" 次へ " (Next)
2 Check the displayed content
"Next"
3 To configure a Google account,
"Set"
• Follow onscreen instructions to configure a
Google account and back up data, and then tap
"Next".
• Tap "Not set" instead of "Set" to go to
Operation 4 without setting the Google account
and the data backup.
4 To use Google Location Service,
mark the checkbox "Agree"
"Next"
5 Confirm the description related to
sending error data from the
terminal "Next"
6 Check the explanation for
updating software "Next"
52
Getting Started
7 When the DOCOMO Services
initialization screen appears,
"Next"
8 Check the displayed content, and
tap the "Install now" radio button
to install all applications "Next"
9 To initialize Osaifu-Keitai, tap the
Setting an access point
The access points (sp-mode, mopera U) required for
connecting to the Internet are preset. You may add
or change them as required.
The sp-mode is set as the default access point.
● Configuring access point to be used
1 From the Home screen, "Settings"
Uncheck the "Simple menu"
checkbox In WIRELESS &
NETWORKS, "More..." "Mobile
networks" "Access Point Names"
"Set" radio button "Next"
• Follow onscreen instructions to initialize OsaifuKeitai.
10To set a docomo apps password,
"Set"
• Follow onscreen instructions to set a docomo
apps password.
11Check the displayed settings for
providing location, and tap a radio
button to set an item "Next"
2 Tap the radio button for the access
point
● Adding an access point
1 From the Home screen, "Settings"
Uncheck the "Simple menu"
checkbox In WIRELESS &
NETWORKS, "More..." "Mobile
networks" "Access Point Names"
12"OK"
2 " " "New APN"
3 "Name" enter the name of the
new network profile "OK"
4 "APN" enter the access point
name "OK"
53
Getting Started
5 Enter any other items requested by
mopera U
your network operator
6"
mopera U is an NTT DOCOMO ISP. If you have
subscribed to mopera U, you can use the Internet
after making the simple settings.
mopera U is a paid service that requires subscription.
For details about mopera U, refer to the NTT
DOCOMO website.
" "Save"
NOTE
Do not change MCC to anything other than 440, or
MNC to anything other than 10. If you do this,
registered/added access points will no longer display
on the screen. If access points no longer display due to
the MCC and MNC settings being changed, you can
either initialize the access points or manually set the
access points again.
● Setting mopera U
1 From the Home screen, "Settings"
Uncheck the "Simple menu"
checkbox In WIRELESS &
NETWORKS, "More..." "Mobile
networks" "Access Point Names"
● Initializing an access point
When you initialize an access point, it returns to its
default settings.
1 From the Home screen, "Settings"
2 Tap the "mopera U" / "mopera U 設
Uncheck the "Simple menu"
checkbox In WIRELESS &
NETWORKS, "More..." "Mobile
networks" "Access Point Names"
2"
定 " (mopera U settings) radio
button
NOTE
"mopera U 設定 " (mopera U settings) is the access
point for setting mopera U. When you use the access
point for setting mopera U, packet communication
charges for setting do not apply. Note that you can
only connect to the initial setting screen or the setting
change screen for mopera U. For details on mopera U
settings, refer to the mopera U website.
" "Reset to default"
sp-mode
sp-mode is an ISP for NTT DOCOMO smartphones.
In addition to Internet connection, this also
provides an email service that uses the same email
addresses as i-mode (@docomo.ne.jp).
sp-mode is a paid service that requires subscription.
For details about sp-mode, refer to the NTT DOCOMO
website.
54
Getting Started
Wi-Fi settings
● Connecting to a Wi-Fi network using the
easy settings
Wi-Fi is a function that allows you to use email and
the Internet, via access points for household/
corporate networks or public wireless LAN services.
■Radio wave interference with Bluetooth
devices
Since a Bluetooth device and a wireless LAN
(IEEE802.11b/g/n) device use the same frequency ranges
(2.4 GHz), radio wave interference may occur when the
Bluetooth device is used near a device equipped with a
wireless LAN. This may cause deterioration in the
communication speed, noise and connection problems. If
this occurs, take the following measures:
Keep a distance of at the nearest 10 m from a
wireless LAN device when you connect the
Bluetooth device or the terminal.
Turn off the Bluetooth device in case you should
use the Bluetooth device within 10 m from the
wireless LAN device.
When an access point-capable device supports
"WPS", you can easily complete the required settings,
including the Network SSID and security method, for
connecting to the access point.
1 From the Home screen, "Settings"
"Wi-Fi"
2 Tap "OFF" to turn the Wi-Fi to
"ON"
3"
"
• Search for access points begins, so you should
press the push button on an access point itself or
an access point’s setting screen. Continue by
following onscreen instructions.
• When the status bar shows
, you are
accessible to the Wi-Fi network.
• If the security for a WPS-set access point is WEP,
connection is not possible.
● Turning Wi-Fi ON to connect to a network
1 From the Home screen, "Settings"
"Wi-Fi"
2 Tap "OFF" to turn the Wi-Fi to
"ON"
• A scan for Wi-Fi networks begins automatically.
A list of available networks appears.
3 Tap the name of the Wi-Fi network
that you want to connect to
"Connect"
• To connect to a protected Wi-Fi network, enter
the required information and tap "Connect".
55
Getting Started
● Adding a Wi-Fi network manually
For information on using an access point, refer to the
manual for the access point.
1 From the Home screen, "Settings"
"Wi-Fi"
2 Tap "OFF" to turn the Wi-Fi to
"ON"
● Turning Wi-Fi function ON and OFF
automatically
Information from the mobile network base station
can be used to turn the Wi-Fi function ON and OFF
automatically.
■Turning Wi-Fi ON and OFF automatically
1 From the Home screen, "Settings"
"Wi-Fi"
3" "
2 " " "Auto Wi-Fi ON/OFF"
4 Enter the network SSID for the Wi- ■Setting up a Wi-Fi network that turns the Wi-Fi
Fi network to be added, and then
select the security (None, WEP,
WPA/WPA2 PSK, 802.1x EAP)
5 Enter additional security
information as required "Save"
function on and off automatically
The "Auto Wi-Fi ON/OFF" must first be enabled to
enable this setting.
1 From the Home screen, "Settings"
"Wi-Fi"
2 Touch and hold the Wi-Fi network
that you want to connect to and
disconnect from automatically
"Auto ON/OFF"
● Disconnecting a connected Wi-Fi network
1 From the Home screen, "Settings"
"Wi-Fi"
2 Tap the connected Wi-Fi network
"Forget"
NOTE
Packet communication is still available when Wi-Fi is
turned on. However, if the terminal is connected to a
Wi-Fi network, the Wi-Fi network takes precedence.
When the Wi-Fi network is disconnected, the terminal
automatically connects to the LTE/3G/GPRS network.
If you continue using the terminal connected to the
3G/GPRS network, note that you may incur costly
packet communication charges.
56
Getting Started
If an incorrect password (security key) is entered when
selecting and connecting an access point, the
message "Avoided poor Internet connection" or
"Authentication problem" appear. Check the
password (security key). If a message "Avoided poor
Internet connection" appear even though the
password has been entered correctly, the correct IP
address may not be obtained. Check the radio wave
condition and reconnect it.
To access docomo service via Wi-Fi during Wi-Fi access
requires a "Wi-Fi option password" setting.
In the Home screen, select "Settings" Uncheck the
"Simple menu" checkbox "docomo service"
"Wi-Fi settings for docomo apps" to do this.
Setting an Email account
Setting an email account provided by mopera U or
any general providers, you can use email.
Obtain information required for completing settings
from your service provider beforehand.
1 In the Home screen, "Apps"
"Email"
■ To set an additional account
" " "Settings" "ADD ACCOUNT"
2 Enter the email address and
password "Next" Follow
onscreen instructions to set
• For an email account with preset provider
information, settings for the send/receive mail
servers are complete automatically.
• For an email account without preset provider
information, settings must be completed
manually. Contact your provider for settings
information.
Setting a Google or other account
By configuring a Google account, you can use
Gmail, Google Play, and other services.
1 From the Home screen, "Settings"
2 "Add account" Tap the type of
account
3 Follow onscreen instructions to
configure the account
• To set a Google account, follow the instructions
on the screen to confirm and agree to the
Google Terms of Service.
57
Getting Started
Notification lamp
Incoming call lamp
Set the notification LED to light in the set pattern
and color when an incoming call is received.
Set the notification LED to flash for missed calls,
new mail, and new messages.
1 From the Home screen, "Settings"
1 From the Home screen, "Settings"
2 "Incoming call lamp" Tap on a
2 "Notification lamp" to check the
"Lamp/Illumination"
"Lamp/Illumination"
notification LED light pattern
"OK" Tap on a notification LED
light color "OK"
checkbox
NOTE
The notification LED sometimes flashes regardless of
the notification lamp setting, depending on the
application (Gmail, etc.).
If notification of a new call or email occurs, flashing of
the notification LED for the new call or email may take
priority over notification for charging.
58
Getting Started
● Setting Aurora Illumination
Illumination
1 From the Home screen, "Settings"
"Lamp/Illumination"
The Earphone Jack Illumination and Aurora
illumination can be turned ON when P or
S is pressed or when there is an incoming call,
etc.
2 "Aurora Illumination" Select any
item:
Lighting-up···Sets the Aurora Illumination ON.
● Setting Earphone Jack Illumination
Display ON/OFF···Sets the Aurora Illumination to
ON when P or S is pressed.
Tap an illumination light pattern "OK".
• The light color settings are included in the light
pattern settings.
1 From the Home screen, "Settings"
"Lamp/Illumination"
2 "Earphone Jack Illumination"
Incoming call···Sets the Aurora Illumination ON
when a call is received.
Tap an illumination light pattern "OK".
• The light color settings are included in the light
pattern settings.
Select any item:
Lighting-up···Placing a check mark here turns the
Earphone Jack Illumination ON.
Interlock lamp···Sets the Aurora Illumination ON
with the notification lamp.
Display ON/OFF···Sets the Earphone Jack
Illumination to ON when P or S is
pressed.
Tap an illumination light pattern "OK" Tap an
illumination light color "OK".
Start/end charging···Sets the Aurora Illumination
ON when charging starts and finishes.
Incoming call···Sets the Earphone Jack
Illumination ON for when a call is received.
Tap an illumination light pattern "OK" Tap an
illumination light color "OK".
During call···Sets the Earphone Jack Illumination
ON during a call.
Tap an illumination light pattern "OK" Tap an
illumination light color "OK".
Interlock lamp···Sets the Earphone Jack
Illumination to turn ON with the notification lamp.
Start/end charging···Sets the Earphone Jack
Illumination to turn ON when charging starts and
finishes.
59
Getting Started
Icon
Reading the Status Bar
Notification icons for new information and status
icons for the terminal status are displayed in the
status bar.
Notification icons are displayed on the left side,
and the terminal status icons are displayed on the
right side of the status bar.
Description
(Blue)
NFC/Osaifu-Keitai lock is set for
the terminal and miniUIM
(Red)
Omakase Lock is set for the
terminal and miniUIM
(Blue)
NFC/Osaifu-Keitai lock is set for
the terminal or miniUIM
(Red)
Omakase Lock is set for the
terminal or miniUIM
NFC Reader/Writer, P2P function
ON
Status bar
miniUIM not inserted
Alarm is set
● Status icons
Icon
/
Silent mode change (vibration/
mute)
/
Record message ON
Description
/
The battery needs to be charged /
Battery level / The battery is
charging
Original eco Mode ON/Full eco
Mode ON
/
Face detection is activated when
the sleep setting is "Auto"
Signal status
International Roaming in Progress
/
/
Out of service area
/
/
/
/
/
/
Enterable text type
Smileys, Emoticons, symbols, fixed
phrases, character codes
Available data communication
network
* When mobile data is being
sent, (Gray) becomes
(White), and when mobile
data is being received,
(Gray) becomes (White).
T9 input
Airplane mode activated
/
(Gray) /
(Blue)
Connected to Wi-Fi /
Communicating by Wi-Fi
Bluetooth is ON / connected to
compatible device
60
Getting Started
● Notification icons
Icon
Icon
Description
Data download/receive
Description
Update of installed application
available/Application installation
completed
New Recorded message
The free space on the terminal is
not sufficient to record a message
Some notification icons undisplayed
New Gmail
MEDIAS NAVI update notification
New Email
Software update notification
New sp-mode mail
Android upgrade notification
New SMS message
Tap searching
Failed to send SMS
Error/Alert message
New Voice Mail message
The free space on the terminal is
not sufficient
New instant message
Using USB tethering
New Area Mail
Using Wi-Fi tethering
Upcoming calendar event
Using USB and Wi-Fi tethering
Upcoming Schedule event
VPN is connected
Notification Reminder settings
Mobacas signal status
Alarm is snoozed
Omakase Lock is set
Media Player playing music data
During wireless screen output
Unsecured Wi-Fi network "None"
found
Turning the Wi-Fi function ON/OFF
automatically
Newly received file via Bluetooth
communication
GPS is positioning
USB is connected
Missed call
Data upload/send
61
Getting Started
Using the Notifications panel
/
When a notification icon appears, you can open
the Notifications panel to check a message or event
notification.
/
: Silent mode switching (OFF/ON
(Vibrator ON)/OFF (Vibrator OFF))
→ P. 148
1 Drag the status bar downwards
: Setting Manage data communication
→ P. 144
①
: Airplane mode on/off → P. 145
: eco mode on/off → P. 150
②
: Automatic screen rotation on/off
→ P. 45
: Setting screen brightness
③
④
: Wi-Fi function on/off → P. 55
: Setting Bluetooth function → P. 140
1 Displays the screen for configuring the settings
of each function.
• It can also be displayed by dragging the
status bar down with two fingers.
: GPS function on/off → P. 125
Displays the Settings
: Feeling touch on/off → P. 147
Displays the
Notifications panel
: Blue light cut mode on/off → P. 148
: Setting NFC/Osaifu-Keitai → P. 104
: Setting alarms → P. 129
: Activating Record message → P. 81
: Setting surround → P. 147
62
Getting Started
2 Shows the missed call log and other
information such as completion of a download.
3 Shows the name of the network operator you
are connecting to.
4 Shows the name of the network operator that
provides services.
■ Calling from missed calls
Tap "Call" for the missed call
■ Creating an SMS from a missed call
Tap "Send SMS" for the missed call Enter a
message " "
■ Close the Notifications panel
Drag bottom of Notifications panel to the top
Home screen
The Home screen can be opened by tapping
in
the start screen for starting the application.
At the time of purchase, "docomo Simple UI" is set
for the Home screen. You can switch the Home
screen. → P. 74
This manual describes the operating procedures when
"docomo Simple UI" is set as the Home screen. The
operating procedures (such as launching applications
and various functions) when a Home screen other
than "docomo Simple UI" ("docomo Palette UI" or
"LIFE UX") is set may differ from the descriptions in
this manual.
Status bar
Indicator
Number of Home
screen pages and
position
Widgets
Basic menu
■Switching the Home screen page
Flick the Home screen to the left or right
• The outgoing/incoming calls history screen is
displayed on the leftmost page. Tap "Edit (Delete/Add
phonebook)" to Starts the "Phone" application.
63
Getting Started
■Basic menus
Phone
Mail
: Starts the "spモードメール" (sp-mode
mail) application. → P. 87
Camera
: Starts the "Camera" application.
→ P. 117
Photo
: Starts the "Gallery" application.
→ P. 121
Browser
: Starts the "Browser" application.
→ P. 97
Apps
: Displays the "Apps list". → P. 67
Tool
: Displays the "Tools".
: Starts the "Settings" application.
→ P. 135
Settings
Managing the Home screen
: Starts the "Phone" application. → P. 76
Phonebook : Starts the "docomo phonebook"
application. → P. 84
In the Home screen, you can add application
shortcuts, create folders, etc.
Switch the Home screen page if the Home screen is
full of shortcuts and widgets, etc. making it difficult
to use operations such as touch and hold, etc.
Adding an application shortcut to the
Home screen
1 Touch and hold the Home screen
2 "Add shortcuts"
■ Adding a widget
"Add widgets"
3 Tap the shortcut that you want to
add
• An application shortcut is added to the Home
screen.
64
Getting Started
Moving a shortcut, etc.
This shows how to move an application shortcut or
widget.
1 From the Home screen, touch and
hold the shortcut, etc. that you
want to move
2 Drag it to the desired position
• To move a shortcut to another page, drag the
shortcut, etc. to the right or left edge of the
screen, and the Home screen moves to the right
or left page.
Creating a folder on the Home screen
1 Touch and hold the Home screen
2 "Create folders"
● Adding a shortcut to a folder
1 Touch and hold the shortcut you
want to add to a folder
2 Drag the shortcut to the desired
folder
• You can tap a folder to open it and access
shortcuts.
Deleting a shortcut, etc.
1 Touch and hold the shortcut, etc. to
delete
2 "Delete"
Uninstall application and widget
1 From the Home screen, touch and
● Renaming a folder
1 Touch and hold the folder that you
want to rename
2 "Edit name"
3 Enter the new folder name "OK"
hold the application (shortcut) or
widget to uninstall
2 "Uninstall" "OK"
• Some applications or widgets cannot be
uninstalled.
65
Getting Started
Setting wallpaper
Apps list
1 Touch and hold the Home screen
"Change wallpaper" "Gallery" /
"Live Wallpapers" / "Wallpaper
gallery" / "LIFE UX Wallpapers"
Apps list shows a list of applications installed in the
terminal.
2 Tap the image that you want to set
1 From the Home screen, "Apps"
• If you have selected "Gallery", select the image
to set as wallpaper, and then drag the trimming
frame to where wallpaper will be used. Tap
"OK" to set the wallpaper.
• If you have selected "Live Wallpapers", tap
"Settings..." depending on the wallpaper to set
the wallpaper.
Apps
You can rearrange
the order of apps,
and check help and
home application
information.
3 "Set wallpaper"
Adding a Home screen
1 Touch and hold the Home screen
"Add/Delete screens"
• Thumbnails of Home screens appear.
2"
"
■ To delete Home screens
" "
● Add an application shortcut to the Home
screen
1 Touch and hold an application in
the Apps list "Add to Home
screen"
● Uninstalling applications
1 Touch and hold an application in
the Apps list "Uninstall" "OK"
66
Getting Started
● Apps list
Applications
遠隔サポート
(Remote
support)
Applications
Description
This is an application that
realizes the service
"Smartphone remote
support" supported by an
operator of the call center by
checking the status of the
terminal in remote operation.
→ P. 191
Osaifu-Keitai
→ P. 104
Music
Use Music Player to play music
saved to the internal storage
or microSD card.
Camera
→ P. 117
Voice Search
Performs voice recognition
and runs a Google search.
Calendar
→ P. 130
Gallery
→ P. 121
Disaster kit
This is an application that
enables the receipt of earlywarning "Area Mail" to be
checked and set up, and to
register and confirm, etc.,
messages on the disaster
bulletin board.
67
Description
しゃべって
コンシェル
(ShabetteConcierge)
This application recognizes
what you are saying if you tell
your terminal what you are
looking for or what you want
to do, and then it displays the
optimal response.
Schedule
Create and manage schedule
events. This supports iconcierge service. → P. 131
Infrared
Send/receive Phonebook data
by infrared. → P. 169
Settings
→ P. 135
Downloads
You can manage the data
such as images downloaded
from sites.
Data Box
Displays data for images,
videos, music, and other files.
TV
→ P. 112
Calculator
→ P. 132
Phone
→ P. 76
Talk (Google
Talk)
→ P. 96
Clock/Alarm
→ P. 129
docomo
phonebook
→ P. 84
Getting Started
Applications
Description
Applications
This is an application for using
the "Data Security Service",
"Phonebook Backup", or "SD
Card Backup". You can
backup and restore the data
of the phonebook, etc. For
details on docomo backup
(saving to microSD card), see
P. 132.
Email
→ P. 89
Messaging
→ P. 87
Messenger
You can exchange messages
quickly with everyone in the
circle.
Instruction
Manual
The manual for the terminal.
You can also launch functions
directly from the explanations.
Media Player
Play music or movies.
→ P. 122
ToruCa
You can obtain, view, search,
update, etc. ToruCa. → P. 107
Memo
Create/manage memos.
This supports i-concierge
service. → P. 132
Navigation
(Google Maps
with
navigation
beta)
→ P. 128
Reminder
Set to give a notification at a
certain time or location.
Local (Google+
Local™)
→ P. 128
File Manager
→ P. 166
Beam
→ P. 174
フォトコレク
ション
(Photo
Collection)
Enables photos and videos to
be saved and browsed with
the use of storage.
Chrome™
Webpages can be accessed
with the use of Google
Chrome.
Browser
→ P. 97
docomo Wi-Fi
Easy
Connection
Maps (Google
Maps™)
→ P. 127
This allows you to use
DOCOMO’s public wireless
LAN service "docomo Wi-Fi"
and your home Wi-Fi
environment conveniently.
You can connect or
disconnect Wi-Fi network
with one touch by using this
widget in the Wi-Fi area.
ドコモバック
アップ
(docomo
backup)
68
Description
Getting Started
Applications
Description
Applications
Description
dmarket
This is an application to start
dmarket. dmarket allows you
to purchase contents such as
music, video and books. This
also introduces applications
on Google Play. → P. 101
i コンシェル
(i-Concierge)
This is an application to use iConcierge. i-Concierge is a
service to allow your mobile
phone to support your life
similar to a "butler" or
"concierge".
dmenu
A shortcut to "dmenu",
where you can easily search
for contents you used with imode and enjoyable and
useful contents unique to
smartphones. → P. 101
i チャネル
(i-channel)
Access i-channel.
MEDIAS NAVI
Connect to the
manufacturer’s site "MEDIAS
NAVI".
Gmail
→ P. 91
Movie Studio
This is an application to edit
videos.
Google
(Google
Search)
→ P. 73
NOTTV
Google
Settings
This application is for
configuring settings related to
Google.
This allows you to view
Mobacas. You can enjoy
programs and contents of
broadcasting stations such as
"NOTTV". → P. 108
This is a social application to
share information with only
users who have enrolled
themselves in the circle.
Play Store
(Google Play)
→ P. 102
Google+™
Play Books
(Books on
Google Play)
Enables favorite books and
other copyright material to be
read at any time and at any
place.
Play Movies &
TV (Movies
and TV Shows
on Google
Play)
This is an application to rent
movies on Google Play. You
can view rented movies and
the movies on the terminal.
Polaris Office
4.0
→ P. 133
IC Tag/Barcode
Reader
This is an application to read
IC tags and barcodes.
iDアプリ
(iD appli)
Setting application to enable
you to use iD electronic
money. → P. 134
69
Getting Started
Applications
spモード
メール
(sp-mode mail)
YouTube™
Description
You can use a DOCOMO
email address
(@docomo.ne.jp) to send and
receive email. Use smileys and
Deco-mail®, and also
supports auto receive. → P. 87
● Widgets list
You can add widgets to the Home screen to use the
following functions.
Widget
You can watch/upload
YouTube videos.
70
Description
Analog clock
Add an analog clock.
Analog Clock
Add an analog clock.
Setting
manager
Changes all settings to your
customized settings with one
touch.
Play
Recommenda
tions
Displays Google Play
recommended content.
Music (small)
Display a simple music control
panel.
Music (large)
Display a music control panel
that includes album cover
images.
カテゴリ
ナビ
(Category
Navigation)
Category Navigation is a
service that enables you to
search for gourmet restaurants
and stores by category.
Calendar
Add a calendar.
Calendar
(upcoming
events)
Display upcoming events
scheduled in the calendar.
Traffic
Display traffic conditions as far
as your destination.
Getting Started
Widget
Description
Widget
Description
Play - My
Library
Shows applications, books, and
movies purchased on Google
Play.
Personal area
Displays information for My
Profile, My Menu, etc.
診断ツール
アプリ
(Diagnostic
tool Appli)
Use this to diagnose if there is
a problem on the terminal.
Photo Gallery
You can display images of
albums.
Bookmarks
Adds the list of bookmark.
Schedule &
Memo
Display the calendar and check
schedule and memos.
Bookmarks
スマホ
なるほど
ツアーズ
(Tips of
smartphone)
This is a widget by which you
can learn convenient functions
and useful basic operation of
the terminal with pleasure
together with Docomodake.
Adds the list of "Chrome"
bookmark.
Pedometer
Use the pedometer.
Soradas
(small)
Displays the day’s weather
forecast.
Email
You can display the in-box and
display/create e-mails.
Soradas
(large)
Displays a four-day weather
forecast.
Messaging
You can view and create SMS
text messages.
Digital clock
Add a digital clock.
Contents
Headline
Displays docomo store
contents.
Digital Clock
Add a digital clock.
docomo Wi-Fi
Easy
Connection
Phonebook
This allows you to register
frequently used contacts, make
a phone call quickly and send a
mail.
This allows you to use
DOCOMO’s public wireless LAN
service "docomo Wi-Fi" and
your home Wi-Fi environment
conveniently. You can connect
or disconnect Wi-Fi network
with one touch by using this
widget in the Wi-Fi area.
Phonebook
Select
members
Displays the communications
history (phone calls, sp-mode
mail, SMS) with a member
registered in the phonebook.
Flashlight
Turns on the terminal’s outer
light.
Gmail
docomo
location
information
Displays settings/log for
providing of location
information.
You can display the
information of Gmail.
71
Getting Started
Widget
Description
Google Now
Adds the Google Now card.
Google Play
Books
Adds Google Play Books.
Google+
posts
You can post to Google+.
Google
Search
→ P. 73
HOT!channel
A widget that shows you the
popularity of a TV channel by
the number of tweets about
the channel.
This application list is preinstalled at purchase. The
preinstalled applications include some applications
that can be uninstalled. Even if these applications are
uninstalled, you may be able to download them again
from the "Google Play Store app (Google Play)"
(P. 102).
A widget that obtains and
i チャネル
ウィジェット displays information for ichannel.
(i-channel
widget)
NOTTVウィ
ジェット
(NOTTV
widget)
Display the program
information of broadcasting
stations such as "NOTTV".
Play Store
(Google Play)
Display information for Play
Store (Google Play).
Wi-Fi
tethering
Shows the Wi-Fi tethering
settings and turns ON or OFF.
YouTube
Search and view YouTube.
NOTE
Separate subscription (paid) is required for use of
some applications/widgets.
After executing a software update or Android update,
application and widget contents and icon locations
may be changed.
72
Getting Started
● Using Tap search
Using the Search Function
You can search Phonebook data or applications in
the terminal, or search web pages.
1 From the Home screen, "Apps"
"Google"
• You can also search by tapping "
" in the
Home screen.
• If this is displayed with Google Now™, follow
the screens to make the settings.
• " " "Settings" You can specify targeted
information with "Phone search".
2 Enter the search text "
To search for any characters or words in a screen or
image, you can tap the characters or words, or take
a picture of them by a camera, and select the photo
saved in the terminal or microSD card.
<Example: Search characters on the screen>
1 " " "Tap search"
2 "Search within screen"
■ Take a photo of characters or words with a
camera and search it
"Search by camera" Take a photo of
characters or words with a camera to be searched
"
• Search results are displayed.
• After entering search text, search candidates are
displayed. You can select a candidate to search
with.
• Tap an application from a candidate to launch
the application.
■ Search characters or words of the image
data
"Search from image data" Tap an image to
be searched
3 Tap the text you want to search by
on the screen
■ Searching by voice
" " Say the search words clearly into the
microphone
• Not usable with some search items.
NOTE
Dragging
upward will display .
Either "Google" or "しゃべってコンシェル "
(Shabette-Concierge) can be started by dragging
upward from
and then releasing your finger.
• Recognized text will be displayed in the balloon.
• You can copy the text displayed in the balloon
by tapping.
• Drag / to adjust the search text characters.
• Touch and hold to zoom in.
4"
""
"
• You can tap the text box and edit the text before
searching.
NOTE
Tap search has the following requirements for
recognizing text.
• Recognizable text: kanji/hiragana/alphabet/
katakana/numbers/symbols (black text on white
background recommended)
• Recommended size: 20 to 40 dots
73
Getting Started
Some applications may not be displayed correctly in
Tap search mode.
Application History
Switching the Home screen
1 From the Home screen, "Settings"
Uncheck the "Simple menu"
checkbox "Home/Lock Switcher"
"Switch home and lock at once"
This displays a list of the recently used applications.
This list can be used to show and exit applications
that are currently running, restart applications, or
remove applications from the history.
1"
"
• This displays the application history.
2 Tap that application that you want
to modify or restart
• Tapping "End" will exit the application running.
• By flicking the application history to the left or
right, you can exit applications that are currently
running or remove the application from the
history.
• You can tap "End all running apps" to quit all
running applications.
• Tap "Switch home and lock at once" to switch
both the Home screen and lock screen. Also, tap
"Home Switcher" to switch only the Home
screen, and tap "Lock Switcher" to switch only
the lock screen.
NOTE
Running more than one application may consume
more energy and make the operation of the terminal
unstable. Doing so may cause applications to forcibly
terminate or run slowly.
2 "docomo Palette UI" / "docomo
Simple UI" / "LIFE UX"
74
Getting Started
■ docomo Palette UI
Status bar
Indicator
Number of Home
screen pages and
position
Widgets
Checking the Home
application
1 From the Home screen, "Apps"
"
" "Application info"
App shortcuts
DOCK
Displays the Apps list
■ LIFE UX Home
Status bar
Widgets
App shortcuts
Indicator
Number of Home
screen pages and
position
DOCK
Displays the Apps list
• "LifeWay" is displayed on the left side of the
page. Outgoing/incoming calls history, shot
image history, etc., are displayed, and you can
register them to the phonebook, to share
images, and more.
• LIFE UX settings → P. 135
75
Getting Started
Calling
NOTE
Making/Receiving Calls
When using services where you must type in
Making a call
1 From the Home screen, "Phone"
2 "Dial"
■ Changing tabs
"Favorites" (P. 85) / "Recent calls" (P. 80)
• You can set the tabs that are displayed when
"Phone" starts by tapping " " "Set start-up
screen".
* Depending on the home application, "Set startup screen" settings may not be reflected.
3 Enter the phone number
additional numbers during the call, such as for
checking your bank account balance or for using
ticket reservation services, "Add 2-sec pause" (,) or
"Add wait" (;) can be used to enter the main
telephone number and additional number together
beforehand for making the call.
• If you use " " "Add 2-sec pause" after the
main telephone number is dialed, the additional
number is dialed automatically after waiting for 2
seconds.
• If " " "Add wait" is used, after the main
telephone number is dialed, a wait is automatically
added. Then, once a confirmation message for
sending the additional number is displayed, tapping
"Yes" will send the additional number.
■Emergency call
• If you enter a wrong number, tap "
" to
delete the number. Touch and hold to delete all
the entered numbers.
Emergency call
■ Set Caller ID notification manually
" " "Caller ID notification" "Notify"/
"Not notify"
• You can set to notify/not notify your number by
entering "186"/"184" before entering the
number.
* Effective for that call only.
110
Fire brigade/Ambulance
emergency
119
Maritime distress call
118
The terminal supports "Emergency Location Report".
Calls made to emergency service organizations (e.g.
by dialing 110, 119 or 118) disclose information on
the caller's location to the organization receiving the
call. Emergency service organizations may not identify
the correct location depending on the caller’s location
and the receiving condition.
The location information and phone number are not
disclosed when, before each individual call made,
"184" or another blocking prefix is dialed first. If the
information is deemed necessary for the protection of
■ Using Koe-no-Takuhaibin (P. 82)
"Koe-Taku"
4"
"
5 When the call is finished, "
Phone number
Police emergency
"
76
Calling
life, etc., this information may be acquired by the
organization being called.
Locations/timing planned for adoption of this feature
vary according to the status of the preparations by the
relevant emergency service organizations.
When calling 110, 119 or 118 from the terminal, first
say you are calling from a mobile phone, give your
number, and state your location clearly, because the
police or fire department may call you back for
confirmation.
Also, do not move around when making the call. Do
not turn off the power immediately after ending the
call, but leave it turned on for ten minutes or so, so
that you can receive a call.
Depending on the area you are calling from, you may
not be connected with the nearest police or fire
department, etc.
NOTE
Making an international call (WORLD
CALL)
WORLD CALL is an international phone service that
can be used from DOCOMO mobile phones.
Customers who have subscribed to the FOMA
service would also have automatically subscribed to
"WORLD CALL" at the same time (excepting those
who have declined it).
For details on WORLD CALL, refer to DOCOMO
"International Services website".
Using international dial assist → P. 182
1 From the Home screen, "Phone"
2 "Dial"
3 Touch and hold "0"
• A plus sign "+" appears.
When you have locked the screen, you can make an
emergency call without drawing the unlock pattern in
the unlock pattern screen or entering the pass number
in the lock number input screen or encrypted
password input screen. On each screen, tap
"Emergency call". The "Emergency Dialer" screen
appears; you can make phone calls only to the
emergency phone numbers.
In Japan, the 110, 119, and 118 emergency numbers
cannot be dialed when the miniUIM is not installed in
the terminal, from the PIN1 code entry screen, when
the terminal is PIN locked or when the PUK code is
locked.
If an emergency call is made when "Not saved in
Contacts" (P. 83) is set for call rejection, the "Not
saved in Contacts" setting will be canceled.
4 Enter the country code enter the
area code (city code) enter the
recipient's mobile phone number
"
"
• If "+" is converted to an international prefix
when making a call based on the settings in
"Automatic conversion function" (P. 182), tap
"Converted number" in the "International dial
assist" screen.
NOTE
If the area code begins with "0", omit "0".
However, "0" may be required for calling some
countries or areas, such as Italy.
77
Calling
Receiving a call
● Setting to Adaptive step-up ringtone
1 When a call is received, "Activate"
"Accept"
■ Turn off the ring tone and the vibrator.
"u"/"d"
• You can also use Fast silent to turn the ring tone
and vibrator OFF. → P. 79
■ Declining a call
"Activate" "Reject"
■ Declining calls and transmitting by SMS
"Activate" "Reject call with SMS" Tap the
message
• The selected message is sent to the other person
as SMS.
■ Putting an incoming call on hold
" " "On hold"
• The call is connected and immediately placed on
hold.
When Adaptive step-up ringtone is set, the
terminal can determine whether it is in a location
where it is difficult to hear the ring tone such as
inside a pocket or bag and gradually increase the
volume of the ring tone.
The Adaptive step-up ringtone does not operate in
the following cases:
• When the terminal is horizontal
• When the proximity sensor is not covered
• When the ringtone is set to the maximum volume
The Adaptive step-up ringtone may be activated even
when it is not in a location where it is difficult to hear
the ring tone (such as when the proximity sensor is
blocked or the terminal is not horizontal).
1 From the Home screen, "Phone"
"
check the "Adaptive step-up
ringtone" checkbox
■ Record message
"Activate" "Record message"
• Play record message → P. 81
2 When the call is finished, "
" "Call settings"
2 "Sound & Vibration settings"
NOTE
"
When the Adaptive step-up ringtone is operating, the
volume returns to the previous volume if the proximity
sensor becomes uncovered (such as when the
terminal is removed from the pocket or bag).
NOTE
If you decline an incoming call when Voice Mail
service or Call Forwarding service are set to Activate,
the call is forwarded to the Voice Mail service center
or the designated forwarding number.
78
Calling
In-call operations
● Setting to Fast silent
When Fast silent is set, you can stop the receiving
operation by simply flipping the terminal when a
call is received.
Fast silent activates when the terminal display is
facing down. It is not activated when the display is
facing up.
Be sure that you do not damage the display when
using Fast silent.
①
②
③
④
⑥
⑤
⑧
1 From the Home screen, "Phone"
"
" "Call settings"
2 "Sound & Vibration settings"
check the "Fast silent" checkbox
⑦
1 Peripheral noise is detected and the voice of the
caller is made easier to hear (Hyper clear voice).
Toggle on/off with each tap.
2 The speed of the caller's speaking is slowed to make
it easier to hear (Slow voice). Toggle on/off with each
tap.
3 Select a sound quality that is easier for you to hear
(EQ select voice).
4 Place on hold and make other call.
• Call waiting service is required separately before
using it.
5 Display dial pad. Each tap toggles the setting
between display and hide.
6 Place on hold/take off hold.
• "Switch" will be displayed when the catch phone
function is in use.
7 Mute yourself to the other party. Toggle on/off with
each tap.
8 Hear the other party through the speaker and take
calls hands free. This is toggled ON and OFF each
time it is tapped.
79
Calling
■Adjusting the volume
"u"/"d"
Call Log
NOTE
For use of the Bluetooth device, the Bluetooth
function must be set in advance as described in
"Connecting to a Bluetooth device" (P. 140).
If the setting is completed, "
" appears on the
screen during a call, and tap to select the calling
method.
You can check the outgoing/incoming calls history.
1 From the Home screen, "Phone"
"Recent calls"
2 "Incoming" / "All" / "Outgoing"
②
①
③
④
1 Log icons are displayed.
:Outgoing call
:Incoming call
:Missed call
2 The names of other parties to/from which calls
were made are displayed.
3 The following icons are displayed.
:Call and with ID*
:Call and withhold ID*
:International call (outgoing/incoming)
:Koe-no-Takuhaibin (outgoing)
* This is displayed when you set a caller ID
manually. → P. 76
80
Calling
4 Make a call.
■ Adding a phone number from the call log
to Phonebook
Tap the log entry you want to add "Add
Phonebook" "Register new" enter required
items "Save"
• If multiple accounts are registered, select one
from the accounts.
• Tap on the contact and edit the profile to
register contacts that are already registered.
■ Deleting the log
" " "Delete all" "OK"
• To delete individual entries, touch and hold an
entry to delete and then tap "Delete from call
log" "OK".
Record message
The caller can record a message on the terminal
when you cannot answer the phone.
The maximum recording time is 60 seconds, and the
maximum number of storable messages varies
depending on the available space in the terminal
internal storage.
1 From the Home screen, "Phone"
"
" "Call settings"
2 "Record message" check the
"Record message" checkbox
3 "Record message setting" set
the "Set ring time" or "Answer
message" settings
• When a call is received, "Record message"
activates after the time set in the "Set ring time"
elapses, and then the message set as the
"Answer message" is played for the caller.
■ Playing recorded messages
"Play recorded message" Tap the recorded
message that you want to play
81
Calling
Caller ID display request service···Answer a
caller who withholds their number with a
message to inform them that their number is
required. After the message is played, the call
is ended automatically.
Call Settings/Others
1 From the Home screen, "Phone"
"
Second call settings···Informs you during a
call that there is another call. This function is
not required if you are using Call Waiting.
" "Call Settings"
2 Select any item:
Network service···Set network service of docomo.
Koe-no-Takuhaibin···This service allows you
to record a message over the phone and send
it to another party.
Call notification···Informs you by SMS that
there was a call while power was turned off,
when you were out of service range or during
a call.
English guidance···Set language to English
for guidance when configuring network
services (Voice Mail service, etc.) and audio
guidance when out of service range.
Voice mail service···This is a service to
answer a call with a Voice Mail greeting and
records the caller's message.
Remote operation settings···Enable Voice
Mail service and Call Forwarding service to be
operable from a general push-button land-line
phone, pay phone, Docomo mobile phone,
etc.
Call forwarding service···This is a service to
forward a call to a preset forwarding number
if you do not answer the call within the preset
ring time or if the terminal is outside of the
service area or is powered off.
Public mode (power OFF) settings···This is
an auto answering service emphasizing the
manner in highly public place.
Call waiting···When there is a second
incoming call while you are in call, this service
notifies you with a ringtone so you can place
the first call on hold to answer.
Roaming settings···P. 183
Advanced call settings···Configure detailed call
settings.
Caller ID notification···When making a call,
you can display your phone number on the
other party's phone.
Sub address settings···Sets the "*" mark
included in telephone numbers as a separator
so that the number following the "*" mark
can be recognized as sub-addresses.
Nuisance call blocking service···Allows you
to register prank call numbers and other
nuisance calls to prevent them from arriving.
By registering callers to reject, any further calls
are met with a voice message and rejected
automatically.
Prefix settings···Registers overseas access
numbers, area codes and other numbers that
are prefixed onto telephone numbers. These
can be added when making calls.
82
Calling
Sound & Vibration settings···Configures the
beep tone and vibrator settings.
SIP Accounts···Set an account for Internet calls.
Receive incoming calls···Set whether or not
to receive an Internet calling.
Phone ringtone···P. 147
Vibrate on ring···P. 147
Use Internet calling···Set method for Internet
calls.
Adaptive step-up ringtone···P. 78
Open source licenses···Confirm the open source
license.
Fast silent···P. 79
Dialpad touch tones···P. 147
EQ select voice···The caller's voice can be set to a
sound quality that is easier to hear.
Reject SMS···Enables the text message to be
transmitted with "Reject call with SMS" to be
edited.
Record message···P. 81
Call rejection···Rejects calls from designated
numbers.
Not saved in Contacts···Rejects calls from
callers not registered in Contacts.
Unknown···Rejects calls from callers unable
to notify their caller ID.
Payphone···Rejects calls from pay phones.
User unset···Rejects calls from callers who do
not notify their caller ID.
Specified numbers···Rejects calls from
numbers added to the "Call rejection list".
Call rejection list···Displays list of numbers
that are rejected based on "Specified
numbers". Tap "Add phone number" to add a
number. Enter a number directly, or tap
to add a number from Contacts/call log.
Power key ends call···Set to end calls using the
P.
• Press S to exit sleep mode during a call.
83
Calling
Phonebook
3
You can save phone numbers, email addresses, etc.
The docomo phonebook application is required in
order to use the phonebook cloud service.
A screen entitled "Use of Cloud" will be displayed
when the docomo phonebook application is selected
from the list of applications and started up for the
first time (and after the application is initialized back
to the default settings,) and use of the cloud service
will be started.
4
5
1 From the Home screen,
6
"Phonebook"
②
③
④
①
⑤
7
⑥ ⑦ ⑧ ⑨
Contacts list screen
1 Displays the Contacts list screen.
2 Displays the transmission/receipt history for
sent and received calls, SMS transmission and
receipt, sp-mode mail and SNS messages*. To
enable the transmission/receipt history, register
the services you want to receive from " "
"Update setting" in the "Communications" tab.
84
* Only displayed when the personal SNS
functions is in use after use of the cloud
service has been started.
If Cloud is set to ON, the SNS and blog
timelines that were set with the My SNS
function are displayed.
Your profile (My profile) is displayed.
• You can confirm your phone number.
• Tapping "Edit" to edit your profile. → P. 85
• Tapping "Create new" to create your name
card. → P. 86
Displays Contacts details (profile). → P. 85
• Tap the image and then the icon that is
displayed, to make a call or create email.
Displays Contacts by groups.
• Tap
to display the group list. To add a
group, tap " " displayed at the bottom of
the group list. Tap
to close the group.
• Registration to the group/deletion from the
group
To register a contact to a group, touch and
hold the contact, drag it to the desired group
and release your finger. To delete a contact
registered to a group, touch and hold the
contact, drag it to the group where it is
registered and release your finger.
* You can use the group function for the
Contacts created by the docomo account/
Google account.
Makes new Contacts addition.
• Enter required items such as name, number,
and email address, and then tap "Save".
• When several accounts are registered, select
the account to add to.
• The data that is synchronized with the cloud
is contact data registered with the docomo
account.
Calling
8 Enter keywords to search Contacts.
9 Displays Japanese syllabary, and allows jump to
selected syllable.
● Displaying the profile screen
1 Tap the name of the person you
■ Deleting Contacts
" " "Delete" checkmark Contacts you
want to delete "Delete" "OK"
want to display in the Contacts list
screen
• Tap "My profile" to display your profile.
■ Importing Contacts from/exporting to a
microSD card and importing from the
miniUIM
" " "Others" "Import/Export" Select
any item:
Import from SIM card···Load Contacts from the
miniUIM to the terminal.
Import from SD card···Load Contacts from a
microSD card to the terminal.
①
②
④
③
⑥
⑤
⑦
⑧
Export to SD card···Save Contacts from the
terminal to a microSD card.
Share phonebook data···Send all viewable
Contacts via Bluetooth transmission, email, etc.
Profile screen
1 Image and name are displayed.
• Tap the image and then the icon that is
displayed, to make a call or create email.
2 Edit a profile.
3 Display the profile screen.
4 The communications history (phone calls, spmode mail, SMS, SNS messages*) with
members (all members) registered in the
phonebook will be displayed.
* Only displayed when cloud is set at ON and
the personal SNS function is in use.
5 The timeline for the SNS and blogs set with the
personal SNS function will be displayed when
cloud is set at ON.
6 Display groups.
7 Add to Favorites.
8 Display profile.
■ Displays Contacts by accounts.
" " "Others" "Accounts to display"
Tap the account to display
• Display the Contacts of all tapped accounts. Tap
"Display all accounts" to display all contacts
again.
■ Customizes the display condition
" " "Others" "Accounts to display"
"Customize..." Tap the account to display
Tap the display condition "OK"
85
Calling
• Displayed items depend on added content.
• Depending on the added content, you can
tap an item or icon to make a call, send an
email or SMS, launch Google Maps, or
perform other operations.
NOTE
If the same Contacts (same name, reading, etc.) is
registered several times, you can collect (join) the
several instances of Contacts together into one.
In the Profile screen, " " "Join/Separate" tap
the Contacts to join
Use the following procedure to cancel joining.
In the Profile screen, " " "Join/Separate"
"Separate"
● Using name cards
Tap "Create new" in the MyProfile screen to create
name card. By tapping "Exchange this name card",
you can exchange name cards with others via a
network.
You need to tap "Create new" and download the
name card creator application to create a name card.
Flick to select
a name card.
Zoom in on
name card.
Exchange name card.
Delete name card.
Launch name card creator application to edit
an existing card or create a new one.
● Migration and back up phonebook data
You can migrate and backup the phonebook data
using a microSD card with the "SD card backup".
→ P. 132
86
Calling
Email/Web browser
sp-mode Mail
SMS
This allows you to send and receive emails using an
i-mode mail address (@docomo.ne.jp). It allows you
to use smileys and Deco-mail and also supports
auto receive.
For more information on sp-mode mail, refer to "ご利
用ガイドブック (spモード編)" (Mobile Phone User's
Guide [sp-mode], in Japanese only).
You can send and receive text messages consisting
of up to 70 16-bit characters (up to 160 7-bit
characters) with a mobile phone number as the
address.
1 From the Home screen, "Apps"
1 From the Home screen, "Mail"
"Messaging"
• The message screen appears.
■ Creating and sending SMS
"
" Enter the number in "To", and the
message in "Type message" " "
• The first time you launch sp-mode mail,
download the application. The first time you use,
terms of usage need to be agreed.
• Follow the on-screen instructions for all
subsequent procedures.
■ Displaying sent/received SMS
Tap a message thread
■ Replying to SMS
Tap the message thread you want to reply to
Enter the message " "
■ Forwarding SMS
Tap a message thread Touch and hold the
message you want to forward "Forward"
Enter the forwarding phone number in "To"
" "
■ Add an SMS phone number to Phonebook
" " "OK" "Register new" or tap the
Contacts
■ Importing or exporting SMS from/to a
microSD card
" " "Import/Export" "Import from SD
card" / "Export to SD card"
87
Email/Web browser
Deleting SMS
NOTE
" You can use
"Insert smiley" to insert smileys that will be
displayable on any terminal with Android installed.
They are displayed as emoticons while being entered,
but are displayed as smileys once received by an
Android terminal.
You can also send/receive SMS messages to/from
users of overseas network operators. For available
countries/compatible overseas network operators, see
"Mobile Phone User's Guide [International Services]"
or the DOCOMO "International Services website".
To send SMS messages to users of overseas network
operators, enter "+" "Country code" "the
recipient mobile phone number". Omit "0" if the
recipient phone number starts with "0". You can also
send an SMS message by entering "010" "Country
code" "the recipient mobile phone number".
While entering a message, "
1 From the Home screen, "Apps"
"Messaging"
■ Deleting one message
Tap a message thread touch and hold the
message you want to delete "Delete"
"Delete"
■ Deleting a message thread
Touch and hold the message thread you want to
delete " " "Delete"
• All messages in a message thread are deleted.
■ Deleting all message threads
" " "Delete all threads" "Delete"
NOTE
You can protect message with the following
operations.
From the message screen, tap a thread touch and
hold the SMS you want to protect "Lock"
88
Email/Web browser
Setting SMS
1 From the message screen, "
Email
"
"Settings"
2 Tap the item to set
Delete old messages···Configure the setting so
that old messages will be automatically deleted
when the number of stored messages has reached
the upper limit of the limited number.
Text message limit···Set the limited number per
message thread.
By setting an email account provided by mopera U
or any general service providers on the terminal,
you can send and receive emails in the same way as
your PC.
"Setting an Email account" → P. 57
Displaying email
1 From the Home screen, "Apps"
"Email"
Delivery reports···Configure the setting to
confirm the receipt notice of sent messages every
time.
• The inbox screen appears.
■ Refreshing the Inbox
"
"
• The terminal receives any new email, and
displays it in the inbox.
Manage SIM card messages···Manage messages
stored in a miniUIM.
Notifications···Set whether a notification appears
in the status bar for new SMS.
■ Importing or exporting email from/ to a
microSD card
If using the microSD card, emails can be imported
and exported to and from a microSD card.
" " "Import/Export" "Import from SD
card" or "Export to SD card"
Sound···Set a ringtone for notifying new SMS.
Vibrate···Set vibration for notifying new SMS.
2 Tap the email you want to read
■ Replying to email
" " Enter a message "
"
■ Replying to all parties
" " "Reply all" Enter a message "
"
■ Forwarding email
" " "Forward" Enter the forwarding
email address in "To" " "
■ Deleting email
" "
89
Email/Web browser
Creating and sending email
Setting email
1 From the inbox screen, " "
2 Enter the partner email address in
"To"
1 From the inbox screen, "
"
"Settings" "General" or tap the
account to set
2 Tap the item to set
■ Adding a Cc or Bcc
" " "Add Cc/Bcc"
■ Sets all parameters
Select any item:
3 Enter a title in "Subject"
4 Enter a message in "Compose
Auto-advance···Sets a screen to be displayed after
a message has been deleted.
email"
Message text size···Sets the size of the message
characters.
■ Adding an attachment
" " "Attach file" Tap the type of
attachment Tap the attachment
Reply all···Sets "Reply to All" as the default when
replying to e-mail.
5"
Ask to show pictures···Sets images attached to email at non-display.
"
■ Setting the selected account
Select any item:
Opening folder
1 From the inbox screen, "
Account name···Change the account name.
"
Your name···Change the name.
• Tap "Inbox", "Outbox", or other folder to
display the email.
Signature···Register a signature.
Quick responses···Register sentences that are
frequently used when creating an email.
Default account···Set the selected account as an
account to send an email.
90
Email/Web browser
Inbox check frequency···Sets the time interval to
check for new emails automatically from the
terminal to the mail server. You have an option to
stop automatic checking.
* If you set to connect to the server at a certain
interval, and if you are using a pay-as-you-go
plan, you will incur a charge whenever the
terminal checks for new email.
Download attachments···Set to automatically
download file attachments of recent emails when a
Wi-Fi connection is established.
* This can be only used for the IMAP accounts and
Exchange accounts.
Email notifications···Set whether a notification
appears in the status bar for new email.
Gmail
Gmail is an email service provided by Google. You
can use Gmail to send and receive email with the
terminal.
You must configure a Google account to use Gmail.
→ P. 57
Viewing an email
1 From the Home screen, "Apps"
"Gmail"
• The message thread list screen appears.
• In Gmail, email is displayed grouped into a
message thread according to reply. If newly
arrived emails are replies to an existing email,
they will be grouped into the same message
thread. A new thread is created for newly
created email and changes of subject name.
Choose ringtone···Set a ringtone for notifying
new email.
Vibrate···Set vibration for notification of new
email.
Incoming settings···Set the incoming server.
Outgoing settings···Set the outgoing server.
■ Change to the message thread list screen
of the other account
"Inbox" Tap the account you want to display
Remove account···Delete the currently selected
account.
■ Refreshing Gmail
" "
• Synchronize the Gmail on the terminal and on
the website, and refresh the Inbox.
■ Searching email
" " Enter a keyword in the search box
" "
91
Email/Web browser
2 Tap a message thread
• When there are two or more emails in the
thread, tap "Previously read messages X" to
display a list of messages. You can tap the
message you want to read and check it.
■ Replying to email
" " enter a message " "
• To reply to all members, tap " " and tap
"Reply all".
■ Forwarding email
" " "Forward" Enter the forwarding
email address in "To" " "
■ Deleting email
"
"
Creating and sending email
1 From the message thread list
screen, "
"
2 Enter the partner email address in
"To"
■ Adding a Cc and Bcc
" " "Add Cc/Bcc"
3 Enter a title in "Subject"
4 Enter a message in "Compose
email"
■ Adding an attachment
" " "Attach picture"/"Attach video" Tap
the attachment
5"
92
"
Email/Web browser
Managing message threads
1 From the message thread list
screen, touch and hold a thread
● Display message threads by label
You can display only the message threads for which
" " is set.
1 From the message thread list
2 Select any icons:
···Archive (store) message threads. Archived
message threads are not displayed in the Inbox.
screen, "
2 Tap the type of label you want to
display
···Delete a message thread.
• You can also configure settings to only show
message threads with a star , sent email, etc.
···Change the label of a message thread.
/
read.
"
···Designate a message thread as unread/
/ ···Assign/remove a star from a message
thread.
···"Mark important"/"Mark not important",
"Mute" (Hide message threads), "Report spam"
(The message thread is reported to Google as
spam) or "Report phishing" (The message thread is
reported to Google as phishing email) can be
selected.
■ Showing archived or muted message
threads
From the message thread list screen, " " "All
mail"
NOTE
Labels cannot be created on the terminal. Create
labels on the Gmail website.
93
Email/Web browser
Setting Gmail
■ Setting the selected account
Select any item:
1 From the message thread list
Priority Inbox···Set to display the priority tray
(important emails are sorted) of the currently
selected account.
screen, " " "Settings" Tap
"General settings" or the account
to set
Notifications···Set whether a notification appears
in the status bar for a new email.
Inbox sound & vibrate···Sets the ring tone and
vibration type for notifying the user of received email.
2 Tap the item to set
■ Sets all parameters
Select any item:
Signature···Register a signature.
Sync Gmail···Set synchronization.
Confirm before deleting···Sets a confirmation
screen to be displayed when deleting e-mail.
Days of mail to sync···Set the days of mails to
sync.
Confirm before archiving···Sets a confirmation
screen to be displayed when archiving e-mail.
Manage labels···Manage mails using labels.
Confirm before sending···Sets a confirmation
screen to be displayed when sending e-mail.
Download attachments···Set to automatically
download files attached to the recently received
mail during Wi-Fi connection.
Swiping conversation list···Sets so that a
message thread can be deleted or archived by
sliding it to the right or left.
Reply all···Sets "Reply all" as the default when
replying to e-mail.
Auto-fit messages···Sets so that messages not
fitting within the screen width are reduced to fit
the screen size or can be expanded or reduced in
size by double-tapping (tapping twice) or by
widening and narrowing with two fingers.
Auto-advance···Sets a screen to be displayed after
a message has been deleted or archived.
Hide checkboxes···Sets the way to select message
threads either by using a checkbox or by touching
and holding the message thread.
Message actions···Sets whether to continue
displaying operation areas such as
and
when scrolling through an email.
94
Email/Web browser
● Viewing an Area Mail later
Early Warning "Area Mail"
You can receive emergency earthquake and other
reports from the weather bureau and municipal
governments.
Area Mail is a free service available without
subscription.
Area Mail cannot be received in the following
instances.
• Out of service area
• Power is off
• In Standby mode
• Roaming overseas
• In Airplane mode
• Using an other-carrier SIM card
• During a call
Area Mail might not be received in the following
instances.
• During packet communication (during data
transmission)
• During Wi-Fi tethering
• During USB tethering
• During a software update
• During Android version update
• When the terminal has minimal remaining capacity.
Area Mail that you could not receive cannot be
received later.
1 From the Home screen, "Apps"
"Disaster kit" "Early Warning
"Area Mail""
■ Delete an Area Mail
Check the checkbox of the Area Mail that you
want to delete "Delete" "OK"
• Tap "Select all" to check the checkboxes for all
Area Mails.
2 Tap the Area Mail
Configuring early warning "Area Mail"
1 From the Home screen, "Apps"
"Disaster kit" "Early Warning
"Area Mail""
2"
" "Settings" Select any
item:
Receive setting···Sets whether to receive Area
Mail.
Beep tone···Sets the ringing time for the beep
tone and the beep tone operation if Area Mail is
received in silent mode.
● Receiving early warning "Area Mail"
Check screen image and beep tone···Checks
how the terminal operates when Area Mail is
received for an earthquake alert, tsunami
information, and disaster/evacuation information.
A notification screen will appear, and a buzzer
(earthquake alert)/ ringtone (Tsunami information,
disaster/evacuation information) will sound and
the terminal will vibrate and the notification LED
will flash to notify you.
The volume of the buzzer and ringtone cannot be
changed.
Other settings···Registers, edits and deletes
newly-received area mail apart from early
earthquake warnings, tsunami warnings and
disaster/evacuation information.
95
Email/Web browser
Chatting
Google Talk
1 In the talk screen, tap a chat
member's name
Google Talk is an online instant messaging service
by Google. You can enjoy online chat (chatting by
text) with a partner who has a Google account.
To use Google Talk, you must set up a Google account
beforehand. → P. 57
• The chat screen is displayed.
■ Switching chat members
Return to the talk screen and tap the name of
the chat member to be switched.
• You can switch chat members by flicking the
chat screen to the right or left.
Getting ready for Google Talk
■ Chatting with two or more partners
" " "Add to chat" Tap chat member's
names
1 From the Home screen, "Apps"
"Talk"
• The talk screen appears.
■ Adding a chat member
" " Enter the Google account of the
member you want to add to "Type email address"
"DONE"
2 Enter a message "
"
■ Ending a chat
" " "End chat"
■ Accepting an invitation
• "Chat invitation" is displayed when you get an
invitation.
"Chat invitation" "Accept"
■ Changing your online status and message
Tap your account Tap the status currently
selected Select the online status you want to set
"Status message" Enter a status message
■ Setting Google Talk
" " "Settings" Tap the account you want
to change
• You can configure whether to erase search
history, configure ringtone/vibration settings,
notification of invitation, and notification of
video chat.
■ Signing out
" " "Sign out"
96
Email/Web browser
■ Using voice search
Tap the address bar " " Clearly speak the
search words into the microphone
Web browser
You can browse web pages using the browser. The
terminal allows you to browse sites via packet
communication and Wi-Fi.
Launching the browser and displaying
a web page
1 From the Home screen, "Browser"
Address bar
Loupe
Scroll bar
2 Tap the address bar enter a URL
or keywords
• Once you enter a URL or keywords in the
address bar, a list of candidates appears.
• If the address bar is not displayed, slide the
touch panel down.
3 Tap "実行" (Enter) or the web page
that you want to display from the
list of candidates
● Operation while viewing a web page
■Scroll
• Slide in the direction you want to scroll → P. 43
• Drag the scroll bar to the left/right
*Tap " " "Settings" "Accessibility"
"Scrollbar" to toggle between displaying and hiding
the scrollbar.
■Zoom in/out
• Slide two fingers apart/together where you want to
zoom in/out → P. 44
• Double-tap (tap twice) where you want to zoom in,
then double-tap again to return to the original display
■Using the magnifying glass
• Drag
to zoom in on the location you dragged to.
* Tap " " "Use Loupe" to set whether or not to
use the magnifying glass.
■Moving to before/after a web page
• " " to return to the previous page, " " to go to
the next page
* If the icon is not displayed, slide the touch panel
down.
■Refresh a web page
• Tap " "
* If the icon is not displayed, slide the touch panel
down.
97
Email/Web browser
Using bookmarks
● Search text contained in a web page
1 While browsing a web page, "
"
"Find on page"
2 Enter the search text
3 " "/" "
Bookmarking a web page allows you to quickly
access that web page.
● Adding to bookmarks
1 In a web page you want to add,
"
• Matching before/after text is displayed.
4"
"
• End the search.
" "Bookmarks"
• The bookmark appears as a thumbnail.
2"
•
● Copying text contained in a web page
"
is displayed at the end of the bookmark
thumbnails.
1 While browsing a web page, touch 3 Tap either "Add Bookmark" or
"Add manually" "OK"
and hold the text to copy
■ Adding a folder
"Add folder" "OK" "New folder" Enter
folder name "OK"
2 Using "
" and " " to select the
area to copy " "
NOTE
4 Check/change the label and
address of the bookmark "OK"
The copied text can be pasted into other applications,
such as a browser search box or email. Touch and hold
the text box to paste to, and then tap "PASTE".
In certain cases, text cannot be copied from the link
display area and other locations.
98
Email/Web browser
Opening a new browser window
● Displaying web pages added to
bookmarks
1 While browsing a web page, "
You can open up to 16 web pages and switch
between them.
"
"Bookmarks"
1 Touch and hold the link to open
while browsing a web page
"Open in new tab"
■ Displaying web pages from browse history
"HISTORY" Tap one of the following options:
"Today", "Yesterday", or "Last 7 days" Tap the
web page that you want to display
• A new browser window will open and the
webpage will be displayed.
■ Viewing frequently visited web pages
"HISTORY" "Most visited" Tap the web
page you want to view
■ Switching between windows
Display the address bar Tap " " Tap the
tab you want to view
■ Importing/exporting bookmarks to/from
microSD card
" " "Import/Export"
2 Tap the bookmark you want to
view
NOTE
Opening an incognito tab
You can open a web page without leaving any
traces in the browser history or search history.
1 While browsing a web page,
display the address bar "
" "
While "Today", "Yesterday", "Last 7 days" or "Most
visited" is displayed,
appears to the right of the
web page name. You can tap this icon to add to or
delete from bookmarks.
"
2 "New incognito tab"
• Open a new tab, and an explanation of the
incognito mode is displayed.
• Tap the address bar to enter a URL or keyword,
or display a webpage from a bookmark.
NOTE
appears in the address bar when an incognito tab
is used.
Records such as Cookies etc., from webpages viewed
in an incognito tab are also deleted when the tab is
closed. Downloaded files and webpages registered in
the bookmarks are saved.
99
Email/Web browser
Using links in web pages
You can do the following with links appearing in
web pages.
■URL
• Tap to open a web page.
• Touch and hold to copy a URL or display in a new
window.
■Email address
• Tap to create email.
• Touch and hold to copy an email address.
■Phone number
• Tap to make a call.
■Others
• In some cases, a file can be downloaded by tapping
the file link.
Saving images appearing in web pages
1 While browsing a web page, touch
and hold an image you want to
save "Save image"
● Checking a saved image
1 While browsing a web page, "
2 Tap the list
NOTE
Depending on the file format, some downloaded
images cannot be displayed in the Gallery.
NOTE
Setting browser
If the downloaded file cannot be viewed or played
back correctly, changing the file name or extension
can sometimes enable the file to be viewed or played
back correctly.
"
"Downloads"
1 While browsing a web page, "
"
"Settings"
2 Tap the items to set
■ Amount of web page zoom when doubletapped (tap twice)
"Accessibility" Set the scale factor with
"Zoom on double-tap"
■ Changing the text size
"Accessibility" Set the scale factor with "Text
scaling"
■ Setting the homepage
• Set the page that is displayed when you open a
new browser.
"General" "Set homepage" Set a desired
item
100
Email/Web browser
Apps
dmenu
dmarket
You can use dmenu to easily access docomo's
recommended sites and convenient applications.
You can obtain convenient and amusing contents
of your choice in the dmarket.
1 From the Home screen, "Apps"
1 From the Home screen, "Apps"
"dmenu"
"dmarket"
• A browser starts and "dmenu" appears.
NOTE
An internet connection by packet communication
(LTE/3G/GPRS) or Wi-Fi is required to use dmenu.
A packet communication fee is separately charged for
• A screen may be displayed asking you to update
the dmarket software. Once you update, the
message will not be displayed until the next
update is available.
• See the docomo's home page for details of
dmarket.
connection to dmenu and downloading applications
introduced by dmenu. Note that some downloaded
applications automatically perform packet
communication.
Applications introduced by dmenu include paid
applications.
101
Apps
Installing applications
the Google Play Store app
(Google Play)
1 Search for an application from the
Play Store app screen
2 Tap the application you want to
Google Play gives you access to convenient
applications and enjoyable games, and lets you
download movies, books, and more.
You must create a Google account beforehand.
→ P. 57
install
• Carefully check the displayed content and follow
onscreen instructions.
• By installing an application, you accept
responsibility for using the application on the
terminal. Use particular care with applications
that access a large number of functions or large
amounts of data.
1 From the Home screen, "Apps"
"Play Store"
• The Play Store app screen appears.
NOTE
Check the security of applications before installing
them. Applications are installed at your own risk. The
terminal may get infected with a virus and all data on
the terminal may be damaged.
NTT DOCOMO shall not accept liability for any
malfunctions caused by the applications that you have
installed. If a malfunction results, repair will be at cost,
even if within the warranty period.
NTT DOCOMO shall not accept liability for any
disadvantage to you or a third party caused by the
applications that you have installed.
Some applications connect to the Internet and carry
out communication automatically. Note that you may
incur costly packet transmission charges.
If you need information on Google Play, from the Play
Store app screen, " " "Help".
102
Apps
Purchasing applications
NOTE
Fee-based applications must be purchased before
download.
You only make payment once for an application.
Once you have downloaded an application, you do
not need to make payment each time you uninstall or
redownload it.
1 Search for an application from the
Play Store app screen
2 Tap the application you want to
purchase
3 Tap the monetary amount box
• Carefully check the displayed content and follow
onscreen instructions.
• By purchasing an application, you accept
responsibility for using the application on the
terminal. Use particular care with applications
that access a large number of functions or large
amounts of data.
• Tap the terms of usage links displayed for the
important notices including "Refund Policy" and
"Google billing and privacy policy" and check
their content.
■Requesting refund
You can request a refund within a stipulated time after
purchase. The application will be deleted, and you will
not be charged for it.
You may obtain only one refund for each application. If
you have previously requested and obtained a refund for
a purchased application, you cannot obtain another
refund for that same application after you purchase it
again.
For details on the payment methods and refund terms
when purchasing an application, from the Play Store
app screen, " " "Help" "Android Apps" check
the items for "Buys apps".
Customers using sp-mode can also make payment
together with their monthly terminal fees (Content
Payment Service). For details, refer to the NTT
DOCOMO website.
For an initial purchase by credit card, you must enter
information for the credit card you use for Google
Wallet™. Google Wallet is a fast, secure, and
convenient method for purchasing applications from
the terminal.
For more information on Google Wallet, refer to
"http://checkout.google.com/".
Your Google Wallet information will be stored on the
terminal. Set the screen lock to ensure the security of
the terminal. → P. 155
Deleting applications
1 In the Play Store app screen, "
"
"My apps"
2 Tap the application you want to
delete
3 "UNINSTALL" "OK"
103
• After purchasing fee-based applications, a
"Refund" screen appears within the specified
period for enabling you to apply for a refund.
Apps
Osaifu-Keitai
This function enables the use of the "Osaifu-Keitai
Service" that can be used to make payments or use
coupons, etc., simply by waving the terminal over
data readers in stores, etc., and the "Kazashite-Link
Service" that can be used for accessing home
appliance, smart poster and other information. You
can save e-money and point value information to
an IC card or miniUIM. It also allows e-money
transfers, balance and points to be checked with
the use of networks. Also, you can lock the OsaifuKeitai function for security in case you lose the
terminal.
For details on the Osaifu-Keitai function, see " ご利用
ガイドブック (sp モード編 )" (Mobile Phone User's
Guide (sp-mode), in Japanese only).
To use the Osaifu-Keitai service, you need to make
settings on the relevant website or by using the
relevant application.
There are cases in which faults with the terminal may
cause data stored on the IC card*1 and miniUIM*2 to
be lost or changed. (When submitting the terminal for
repair or servicing, all data must be deleted from the
terminal beforehand as a basic rule. The terminal will
not be accepted if it contains any data.)
Contact the Osaifu-Keitai service provider for details
on data reissuance, restoration, temporary storage,
transfer and other forms of support. You are advised
to use the Osaifu-Keitai service for backing up all
important data.
NTT DOCOMO shall not accept liability for any
damages arising in relation to the Osaifu-Keitai
service, including the loss or alterations to data stored
on the IC card*1 and miniUIM*2, in any event
including malfunctions and the transfer of data to a
different terminal.
If you have the terminal stolen or lost, contact your
Osaifu-Keitai service provider immediately for
information about necessary action.
*1 Data (including e-money and point value
information) saved on an IC card in a terminal that
supports Osaifu-Keitai functionality
*2 Data (including e-money and point value
information but not Phonebook or SMS data) saved
on a miniUIM
iC transfer service
Allows you to transfer all Osaifu-Keitai data on an
IC card to a replacement Osaifu-Keitai in such
instances as when changing to a new terminal or
submitting the terminal for repair. miniUIM data
remains unchanged on the card after the iC
transfer service is used.
Visit your nearest docomo Shop to receive iC
transfer Service. For details on iC transfer Service,
refer to " ご利用ガイドブック (sp モード編 )"
(Mobile Phone User's Guide [sp-mode], in Japanese
only).
104
Apps
Using the "Osaifu-Keitai Service"
To use an Osaifu-Keitai service, download an
Osaifu-Keitai application from an Osaifu-Keitai
website and then make necessary settings. Some
Osaifu-Keitai services may not require
downloading an Osaifu-Keitai application.
1 From the Home screen, "Apps"
"Osaifu-Keitai"
• If initial settings have not been completed, the
initialization screen appears.
2 Tap the service you want to use
3 Make the settings related to the
NOTE
Please note that some Osaifu-Keitai services may not
be available to users without a subscription to spmode.
It is possible for data readers to read information
without the Osaifu-Keitai application running.
The terminal can also be used with the power
switched off (the notification LED will not light),
although not with the battery pack removed.
There are cases in which the terminal cannot be used
even with the battery pack attached if the power off
the terminal has not been switched on for a long
period of time, or if the battery pack is running out of
power.
Using the "Kazashite-Link Service"
service
• Make necessary settings from the service
website or application.
1 From the Home screen, "Settings"
Uncheck the "Simple menu"
checkbox In WIRELESS &
NETWORKS, "More..." "NFC/
Osaifu-Keitai settings"
4 Hold the e mark over a reader
• The notification LED lights (blue) when you are
using Osaifu-Keitai.
2 Check the "Reader/Writer,P2P"
checkbox
3 Hold the e mark over a device
with a built-in NFC module, smart
poster, or other similar item
• You can also use Android Beam to exchange
information between terminals. → P. 172
Hold the
mark
over the reader
NOTE
The NFC Reader/Writer and P2P functions are not
usable when an AC adapter or the microUSB cable is
connected.
105
Apps
Points to note when waving the
terminal over data readers, equipment
with built-in NFC module and other
compatible items
Locks the Osaifu-Keitai function
Take note of the following when waving the
terminal over compatible readers:
• Make sure you do not bang the terminal forcibly onto
the reader when waving the e mark over it.
• Wave the e mark over the center of readers while
holding it horizontally in relation to them.
• Bring the e mark gently into proximity with the
readers when waving it over them.
• If the data is not read when waving the e mark over
the center of the reader, raise it slightly higher above
it, or move it forward, backward, or to the left or right
and try again.
• There are cases in which the data cannot be read if a
metal object is located between the e mark and the
reader. Also, note that there is a possibility that cases
or covers covering the e mark may have an adverse
effect on communication performance.
• When using Mobile Suica while moving through
ticket gates, etc., make sure that the e mark on the
terminal is positioned correctly.
• Some functions are not usable when an AC adapter
or the microUSB cable is connected. In this case,
remove the AC adapter or microUSB cable before
waving the terminal.
Lock Osaifu-Keitai to prevent it from being used by
another person without permission.
The NFC/Osaifu-Keitai Lock settings remain in effect
even when you turn off the terminal power.
1 From the Home screen, "Settings"
Uncheck the "Simple menu"
checkbox In WIRELESS &
NETWORKS, "More..." "NFC/
Osaifu-Keitai settings"
2 "NFC/Osaifu-Keitai lock" "OK"
3 Enter your lock password
"Continue"
• This checks the "NFC/Osaifu-Keitai Lock"
checkbox and locks the Osaifu-Keitai function.
• Performing a factory data reset on the terminal
does not affect the lock password. To change
your lock password, you must enter the existing
lock password.
NOTE
When the NFC/Osaifu-Keitai Lock is on, you will see
or
in the status bar.
If the terminal runs out of battery power while the
NFC/Osaifu-Keitai Lock is on, you will not be able to
turn the NFC/Osaifu-Keitai Lock off until the terminal
battery is charged. Make sure to check your battery
level. Should the terminal run out of battery power,
charge it and deactivate the NFC/Osaifu-Keitai Lock.
You need to turn the NFC/Osaifu Keitai Lock off in
order to use the Osaifu Keitai menu.
106
Apps
When turning the NFC/Osaifu-Keitai Lock off, make
sure that the terminal contains the same miniUIM that
was in the terminal when you turned the NFC/OsaifuKeitai Lock on.
ToruCa
ToruCa is an electronic card that can be imported
into the terminal. Available from a reader or
online, it provides shopping information or serves
as a coupon. The imported ToruCa is saved in the
"ToruCa" application that allows you to view, find
or update a ToruCa.
For details on ToruCa, see " ご利用ガイドブック (sp
モード編)" (Mobile Phone User's Guide [sp-mode], in
Japanese only).
1 From the Home screen, "Apps"
"ToruCa"
• You are required to agree to the terms of use
when you use the application for the first time.
NOTE
Packet communication charges may be incurred when
you import, view or update a ToruCa.
You may not be able to import, view or update a
ToruCa that has been provided for an i-mode terminal.
Depending on the settings by the IP (Information
Provider), the following functions may not be
available:
• Import from a reader
• Update
• ToruCa sharing
• Transfer or copy to a microSD card
• Map display
Depending on the IP settings, you may not be able to
display a map from a ToruCa list, even if the ToruCa
(details) supports map display.
When the NFC/Osaifu-Keitai is locked, a ToruCa
cannot be imported from a reader.
107
Apps
When the duplicate check is set to "ON" (checkbox is
checked), you cannot import an identical ToruCa more
than once. To import an identical ToruCa more than
once, set the check to "OFF" (uncheck the checkbox).
When sending a ToruCa by email, it is sent in its preimport state.
You may not be able to save a ToruCa that has been
emailed to you, depending on the email application
that you are using.
Depending on the type of the browser, you may not
be able to import a ToruCa via it.
When moving or copying a ToruCa to a microSD card,
it is moved or copied in its pre-import state.
When the initial setup of the Osaifu-Keitai has not
been performed, a ToruCa cannot be imported from a
reader.
Mobacas
Mobacas is a broadcasting service for smart phones.
You can enjoy two viewing styles: " リアルタイム "
(realtime broadcasting) for viewing programs in
realtime and " シフトタイム" (storage-type
broadcasting) for enjoying comics, novels, music,
and games as well as movies and dramas anywhere
and any time. You can enjoy innovative
broadcasting services including linkage with social
services using the communication function of the
terminal.
See the home page of the Mobacas station
(NOTTV) for details of mobile casting.
NOTTV http://www.nottv.jp/ (in Japanese only)
■Using mobile casting
A pay-TV receiver contract is separately required with
the Mobacas station (NOTTV) to use mobile casting.
Broadcasts can be received and viewed only when a
miniUIM is inserted into the terminal.
Mobacas is a broadcasting service provided in Japan.
Time-shift and recording require use of the microSD
card or internal storage space of the terminal.
(Storage selection can be done in the settings.)
Use a class 4 of higher microSD card.
■Airwave and receiving area
Mobacas operates on radio waves (airwaves) different
from those for the Xi service or the FOMA service.
Therefore, you cannot receive the Mobacas service in
locations that airwaves cannot reach or during hours
when the program is not available, regardless of
whether you are outside or inside the Xi service or
FOMA service area.
Furthermore, the reception may be poor or you may not
be able to receive the Mobacas service in the following
types of location, even if you are inside the Mobacas
broadcast area.
108
Apps
Place far away from a tower that transmits airwaves
Place in a mountain area or behind a building where
radio waves are blocked by land or structural features
Inside a tunnel, underground, inner area of a building
or other place where radio waves are weak or
nonexistent
■Attaching the earphone cable (with antenna)
Insert the earphone cable (with antenna) into the
earphone microphone jack of the terminal to enable the
terminal to receive Mobacas.
Earphone/microphone
terminal
Viewing program/content
1 From the Home screen, "Apps"
"NOTTV"
• NOTTV home screen appears.
• The first time you launch the application, check
the terms of application service and tap " 同意す
る " (Agree). Initialize the application in a good
communication environment.
2 Tap the thumbnail of the program
or content displayed on the NOTTV
home screen
Earphone cable
(with antenna)
• During realtime viewing, you can select the
channel by flicking the screen to the right or left.
• The screen is switched by turning the terminal to
the side or tapping the full screen view key.
* The display format of the content varies
depending on the program or content.
■ Viewing data broadcasts
" データ" (Data)
■ Viewing timeline for program or content
" ソーシャル " (Social)
■ Viewing program details
" インフォ " (Info)
■ Adjusting the volume
"u"/"d"
■ Set the caption and voice
" " "設定 " (Settings) " 表示・音声 "
(Display & Audio)
109
Apps
Searching programs/contents
Schedule viewing of programs and
other content (Time-shift)
You can search programs/contents in the
application in various ways.
1 From the NOTTV home screen, "番
組表 " (Program Listing)
● Search from Program Listing (Realtime)
2 " シフトタイム " (Time-shift)
1 From the NOTTV home screen," 番
• The list of contents broadcast hereafter is
displayed.
組表 " (Program Listing)
• The Realtime program listing is displayed.
• To view the program schedule for time-shift, tap
the time-shift button.
• Tap a program currently being broadcast to
change to the viewing screen.
you want to schedule
• The detailed screen of the content is displayed.
4 " 予約する " (Schedule Viewing)
● Search by specifying the condition
NOTE
1 From the NOTTV home screen,
You may not receive programs or content if the power
" " " 検索・ジャンル別 "
(Search/By genre)
2 Enter the keyword and tap Search,
or tap the genre where you want
to find the program or content
3 Tap the program or content that
of the terminal is not turned on, if the battery power
is low, if you are out of the Mobacas service area or
the received signal is weak (or the Earphone Cable
[with Antenna] N01 is not connected), or if the
microSD card or internal storage capacity is low during
the broadcast time of the program or content.
You can view and use programs or content
temporarily stored in a microSD card or internal
storage only on the terminal on which they were
saved.
Programs and content are automatically removed
from microSD card or internal storage when they
expire. The user can also remove programs and
content before they expire.
In certain cases, programs and content may be
scheduled automatically even if you do not schedule
them. (Auto time-shift schedule)
Auto time-shift schedule can be canceled.
110
Apps
Data may be completed automatically via packet
Setting mobile casting
communication if the terminal cannot completely
receive content due to the signal reception
environment or other factors (Auto time-shift
complete).
Auto time-shift complete can be canceled.
1 From the NOTTV home screen, "
"
"設定 " (Settings)
2 Select any item:
Scheduling realtime viewing/recording
表示・音声 (Display & Audio)··· Set the display
and voice.
1 From the NOTTV home screen, "番
字幕表示 (Subtitles)···Set subtitles.
組表 " (Program Listing)
文字スーパー表示 (Text Info Display)···Set
ON/OFF of text info display.
2 Tap the program that you want to
schedule
• The detailed screen of the program is displayed.
3 Tap " 視聴予約する " (Schedule
Viewing) or " 録画予約する "
(Schedule Recording)
• You can also manually start recording a program
that is currently being aired.
NOTE
You may not be able to view or record the program if
the terminal is not turned on, the battery power is
low, you are out of the Mobacas service area, the
signal is weak (or the Earphone Cable [with Antenna]
N01 is not connected), the microSD card is not in the
terminal, or there is insufficient microSD card/internal
storage capacity when the program is broadcast.
You can view programs or content recorded on a
microSD card or internal storage only on the terminal
from which they were saved.
Some programs cannot be recorded.
111
音声 (Audio)···Set main voice/sub voice
change.
バックグラウンド再生 (Play In
Background)···Set whether or not to
continue playing the content in the
background after you have closed the
application.
自動処理 (Auto Features)··· Set auto features of
programs/contents.
シフトタイムの自動予約 (Auto Time-shift
Schedule)···Set ON/OFF of contents or
programs auto reception.
おすすめのリセット (Recommend Viewing
Reset)···Reset recommend viewing.
番組情報取得 (Program Info Retrieve)···Set
the time zone to retrieve the program info
over the air.
シフトタイムの自動補完 (Auto Time-shift
Complete)···Sets the function for completing
data automatically by packet communication
when content could not be completely
received due to the signal reception
environment or other reasons.
Apps
利用ログ送信 (Usage Log Send)···Set
whether or not to send a utilization log.
1Seg
自動ライセンス取得 (Auto License
Retrieve)···Set if the license of the content is
automatically acquired.
ペアレンタルコントロール (Parental
Control)···Set the restricted use of programs/
contents according to the age.
ブラウザ (Browser)···Set cookie, data
broadcasting display, etc.
履歴 (History)···Display the history of failures of
set reception reservation, automatic deletion of
contents, etc.
ストレージ選択 (Storage Selection)···Select a
destination for saving time-shift, recorded content,
and more. Data is moved when the storage
destination is changed.
ステータスバー (Status Bar)···Sets ON/OFF for
the display of the currently-broadcast program in
the status bar.
シリーズ・キーワード予約 (Series/Keyword
Schedule)···Turn duplicate recording prevention
ON/OFF.
ソーシャル (Social)···Configure the terminal to
link with Twitter.
機種変更 (Change model)···Performs the process
required for changing the model.
1Seg is a terrestrial digital TV broadcasting service
for mobile devices and enables these devices to
receive data broadcasts in addition to video and
audio broadcasts. It also lets users access interactive
services via mobile device communications and
obtain detailed information via communication
routes.
For details on the 1Seg service, refer to the
following website:
The Association for Promotion of Digital
Broadcasting
http://www.dpa.or.jp/english/
■Notes on the use of 1Seg
The 1Seg service is provided by TV broadcasters and
other organizations. You will not be charged for the
video and audio content you receive. For information
about the viewing fees charged by NHK, please
contact the broadcaster.
The data broadcast area displays two types of
information: "Data broadcast" and "Data broadcast
website".
A "Data broadcast" is brought by airwaves, together
with video and audio, and a "Data broadcast
website" is displayed by the mobile device connecting
to a website prepared by a TV broadcaster or other
organization according to data broadcast
information.
Packet communication charges are incurred for
viewing a "Data broadcast website" or other website.
Some websites may charge you for the information
they provide.
The terminal may automatically save ToruCa data
while the user views 1Seg programming. Packet
communication fees apply when obtaining detailed
information from saved ToruCa data.
112
Apps
■Airwaves
1Seg is a broadcasting service that operates on radio
waves (airwaves) different from those for the Xi service
or the FOMA service. Therefore, you cannot receive the
1Seg service in locations that airwaves cannot reach or
during hours when program is not available, regardless
of whether you are outside or inside the Xi service or the
FOMA service area.
Even in areas where the terrestrial digital TV
broadcasting service is available, you may have poor or
no reception in the following places:
• Place far away from a tower that transmits airwaves
• Place in a mountain area or behind a building where
radio waves are blocked by land or structural features
• Inside a tunnel, underground, inner area of a building
or other place where radio waves are weak or
nonexistent
■The antenna
Insert the earphone cable (with antenna) into the
earphone microphone jack of the terminal to enable the
terminal to receive 1Seg.
Attaching the earphone cable (with antenna) → P. 109
Viewing 1Seg
1 From the Home screen, "Apps"
"TV"
• The first time you launch 1Seg, you are required
to set channels. → P. 113
■ Adjusting the volume
"u"/"d"
● Setting channels
1 In the 1Seg viewing screen, "
"
"Settings" "Change area"
2 "Empty" "Auto"
113
• Scan channels and register channel information.
• Select a registered area to switch to that area
and view 1Seg.
■ Setting channels manually
"Area Select" tap the region, prefecture, and
locality successively for the area
Apps
● Viewing the 1Seg viewing screen
■Controls when data broadcast area tapped
Change to vertical display to display data
broadcast.
Data broadcast
controls
Displaying Tweets
①
While you watch 1Seg programming, you can use
Twitter to share your thoughts on the
programming and recommend it to others.
To use Twitter, you need an LTE/3G connection or WiFi connection capable of transmitting data.
Tweets are made by Twitter users and cannot be
guaranteed.
②
③
1 In the 1Seg viewing screen, "
①
1 TV picture area
• Flick left/right to select a channel
• Touch and hold to display the channel list
2 Data broadcast area
3 Controls
■Controls when TV image area tapped
<Example: Vertical display screen>
⑤
①
③
④
②
Display program information
Reception level
(rough guideline)
Display channel list
Display Tweets
Select channel
"
• Tweets related to the channel you are viewing
are displayed.
• The screen switches to horizontal display. Turn
the terminal 90 degrees to the left to view the
screen.
• Terms of use are displayed the first time the
application is started. Read the contents, and tap
"OK" to use the application.
• You need to login to Twitter to use this function.
: Start recording
Tweet display screen
1 Tweet display area
• Flick up and down to scroll the screen.
• Tap a tweet to display it full-screen. (Tap
" " to return.)
• Touch and hold to reply, quote, retweet or
favorite.
: Stop recording
114
Apps
2 Operation area
• Tap
to display search results using the
hash tag of the channel you are watching
• Tap
to display the timelines you are
following
• Tap
to search for tweets or users
• Tap
to return to the 1Seg viewing screen
3
• Displays the number of tweets and HOT
keywords for each channel
4 HOT keyword area
• Flick left and right to scroll the HOT keyword
list
• Tap to search tweets
5
• Tap to display the tweet display menu
● Using the tweet display screen menu
1 From the tweet display screen
(P. 114), "
"
Using the program guide
You can browse a program guide for terrestrial
digital TV and BS digital broadcasting. You can also
search for programs by keyword, genre, etc., and
book programs for viewing or recording are
available.
1 In the 1Seg viewing screen, "
• You need to download the specified application
when you use it for the first time.
• You will see a tutorial the first time you start the
application. After you complete the tutorial and
agree to the terms of service, you will see the
region setup screen.
● Choosing a program to view
1 Tap a program you want to view
on the program guide " ワンセグ
連携 " (1Seg cooperation) "ワン
セグ起動 " (Launch 1Seg)
2 Select any time:
Tweet···Start tweeting.
Add hash tag Settings···Add hash tags.
Search on Twitter site···Search all tweets on
Twitter.
"
"Program guide"
● Booking viewing or recording
Book programs for 1Seg viewing or recording. An
alarm sounds at the time you set for the start of a
program or recording.
1 Tap a program on the program
guide "ワンセグ連携 " (1Seg
cooperation) " ワンセグ録画予約 "
(Book 1Seg recording)/ " ワンセグ
視聴予約 " (Book 1Seg viewing)
2 Check each item "Save" "YES"
115
Apps
Playing back recorded program
1 In the 1Seg viewing screen, "
Setting 1Seg
"
1 In the 1Seg viewing screen, "
"Playback Recorded Program"
2 Tap a program you want to play
2 Select any item:
• The program is played.
• Operate the program in the same manner as the
1Seg viewing screen. → P. 114
Rewind
Data Broadcasting settings···Configure data
broadcasting settings.
Confirm connection···Set a confirmation
message to appear before carrying out
communication.
Use location info···Set to use location
information.
Fast forward
: Play
: Pause
Use phone info···Set to use the terminal
information.
Delete station data···Delete stations from
memory.
Frame-by-frame playback
during pause (
/
)
Sleep Timer···Set the time until 1Seg automatically
ends.
Using a TV link
Subtitle/Sound···Set subtitles and audio.
Depending on the data broadcast, link information
to related sites (TV links) are displayed, and can be
added to allow you to connect to related sites later.
To add TV links, tap an item that allows TV links in the
data broadcast area.
1 In the 1Seg viewing screen, "
"
"Settings"
"
"TV Link"
Change area···"Setting channels" → P. 113
Twitter Option···Set the tweet display.
Auto Scroll···Sets whether or not to use the
scroll function automatically.
Scroll speed setting ···Sets the speed of
scrolling.
Manage accounts···Set up Twitter accounts.
Profile···Display your profile.
2 Tap a link "YES"
■ Deleting a TV link
Touch and hold the TV link you want to delete
"Delete" "Delete one"/"Delete all" "YES"
116
Auto Refresh Interval···Set an interval for
auto update.
Apps
Notification of new tweets···Sets whether
or not to notify the user of newly-arrived
tweets.
Camera
Font size···Set font size.
Downloading the Twitter application
1 In the 1Seg viewing screen, "
"Download Twitter app"
"
■Before using the camera
While the camera is built with high-precision
technology, there may be cases where you see one or
more partially dark or constantly bright points or lines.
Note also that, when you shoot in a dark place, the
camera may have more noise such as white lines.
Before shooting, clean the lens with a soft cloth. A
fingerprint or grease marked on the lens may put the
camera out of focus or result in a blurry photo.
After the terminal is left in a warm place for a long
time, the image quality may degrade.
The brightness and color in your photos and videos
may differ from those of the actual object.
Avoid leaving the lens exposed to direct sunlight for a
long time or directly shooting the sun or a bright
lamp. Doing so may cause malfunction, such as
discoloration of shot images.
When shooting, take care not to have your finger or
hair or the strap block the lens.
Since the camera consumes more battery power
during shooting, you are advised to turn off the
camera as soon as you finish shooting.
If image stabilization is set to "OFF", moving the
terminal during shooting may result in blurry images.
Whenever possible, it is recommended to set image
stabilization to "Auto" when shooting.
If the battery is low, you may not be able to save your
photos and videos.
Even in silent mode, the camera makes the shutter
sound for photo shooting and the video recording
start/end sound. You cannot change the volume of
these sounds or turn them off.
117
Apps
The screen may flicker due to the effect of a
fluorescent light when you take a photo indoors. In
this case, you may reduce flickering by setting "Antiflicker" to your local power frequency.
The shooting recognition LED blinks during the
operation of the camera.
Copyright and portrait rights
Avoid copyright infringements when copying or
editing photos and videos that have been shot on
the terminal. You should also avoid infringing the
portrait rights of other people by using or modifying
their portraits without their consent. Note that the
shooting or recording of stage performances, shows
or exhibitions may be prohibited, even for personal
use.
If your use of the terminal is inappropriate and a
noticeable public annoyance, you may be subject to
punishment according to federal or local legislation
(public nuisance ordinances, etc.).
Please be considerate of the privacy of
individuals around you when shooting and
sending photos using camera-equipped
mobile phones.
Viewing the camera screen
■Photos
① ②
③
④
⑤
⑭⑬ ⑫ ⑪⑩⑨ ⑧ ⑦ ⑥
Camera
menu
1 Display shot photos
2 Status of location information acquisition / storage
destination / maximum number of photos
3 Focus frame
4 Photo/Video switch
5 Shutter
• The preset application icon will be displayed if
"Camera" for "SNS share" is activated when
tapping. → P. 121
Flick still images taken with the terminal across to
the application on which they are to be shared to
allow them to be shared.
6 Show/hide the camera menu
7 Outer Camera/Inner Camera switching
8 Turn the light ON/OFF
9 Brightness
a Common Settings: (Selftimer, Quality, Image
Stabilization, SNS Share (P. 121), and other settings)
b Size (image size)
c Auto focus
d Scene
118
Apps
e Camera Mode
• Standard: This is the mode in which you take a
photo giving high priority to image quality
according to various scenes.
• Quick Shot: Shoot rapidly in a short time frame by
giving high priority to speed. To shoot more
stunning photos, set the camera mode to
"Standard".
• HDR: This is the mode in which you take a photo
by preventing flared highlights and blocked up
shadows.
• Panorama: Slowly move the terminal from one
side to the other to take a panoramic shot. Only
available with the outer camera.
• Set Application 1/ Set Application 2: You can
register your favorite application. Touch and hold
to change or reset the registered application.
* Tap " " to access settings ⑦ to ⑭ .
* For settings ⑩ to ⑭, touch and hold an item to bring
up the guide screen.
■Videos
6
7
8
9
Outer Camera/Inner Camera switching
Turn the light ON/OFF
Brightness
Common Settings: (Selftimer, Quality, Image
Stabilization, and other settings)
a Size (image size)
b Auto focus
c Scene
d Camera Mode
• Standard: You can record video according to
various scenes.
• Set Application 1/ Set Application 2: You can
register your favorite application. Touch and hold
to change or reset the registered application.
* Tap " " to access settings ⑥ to ⑬ .
* For settings ⑨ to ⑬, touch and hold an item to bring
up the guide screen.
* Only ⑦ and ⑧ are displayed during recording.
NOTE
The displayed number of photos that can be shot and
video recording time are a rough indication. The
displayed information may not change depending on
the shooting conditions.
① ②
③
④
⑬⑫ ⑪ ⑩⑨⑧ ⑦ ⑥ ⑤
Camera
menu
1 Display recorded videos
2 Status of location information acquisition / storage
destination / recording time (time elapsed during
recording)
3 Photo/Video switch (Tap " " during recording to
shoot a still image)
4 Start/end recording
5 Show/hide the camera menu
119
Apps
Shooting with the camera
NOTE
Photos and videos shot on the camera are saved to
the "Phone" or "SD Card" (microSD card) that are
set in "Common Settings" (P. 118, P. 119).
● Shooting photos
1 From the Home screen, "Camera"
2 Point the camera at a subject
Even if the addition of location information is turned
on, the location information is not set to images taken
before completing the acquisition of the location
information.
White and Blue areas are displayed in the zoom bar. If
zooming in up to the Blue area and shooting, the
image may be deteriorated.
If there is a notification sound during video shooting,
it may also be recorded.
■ Zoom in/out
u / d or pinch two fingers together/
apart
3"
"
• The camera shoots a photo with a shutter
sound.
● Shooting videos
1 From the Home screen, "Camera"
2" "
3 Point the camera at a subject
■ Zoom in/out
u / d or pinch two fingers together/
apart
4"
"
• Recording starts with a recording start sound.
5"
"
• Recording ends with a recording end sound.
120
Apps
Setting SNS share
Gallery
This allows you to view or play photos and video
that were saved to the internal storage or microSD
card from a camera or downloaded from a site.
The photo file formats that can be viewed are shown
below.
JPEG (jpeg, jpg), GIF (gif), animated GIF (gif), BMP
(bmp), PNG (png), WEBP (webp)
For details on video file formats can be played:
→ P. 122
If SNS share is enabled, you can quickly share
photos and movies from the Gallery and photos
taken by the camera using SNS, email, Bluetooth,
or other communication links.
1 From the Home screen, "Photo"
2 Tap a category
3 " " "Set SNS share"
• From the camera menu on the still image
shooting screen, you can also select it by
tapping " " "SNS Share."
1 From the Home screen, "Photo"
• Shot images or downloaded images, etc. are
displayed in categories.
4 Select any item:
2 Tap a category
Camera···Inserting a check mark here enables
usage by flicking in the direction of the application
that you want to share with when a photo is taken.
■ Using a camera
" "
Gallery···Inserting a check mark here enables
usage by touching and holding a photo or movie in
the Gallery and dragging it to the icon of the
application that you want to share with.
3 Tap the photo/video you want to
view
■ Send data by Bluetooth communication or
mail
Touch and hold a category or tap a photo/video
" " tap an icon you want to operate
SNS share Menu···Sets the applications used with
SNS share.
■ Delete photo/video
" " "Delete" "OK"
NOTE
If you have many photos saved, Gallery may take time
to read all the photos when it is activated.
You cannot "Share" contents protected by Digital
Rights Management (DRM) with other terminals.
Contents protected under Digital Rights Management
(DRM) can no longer be played back after initiating
"Factory data reset".
121
Apps
1 From the Home screen, "Apps"
Media Player
"Media Player"
The Media Player plays video and music files stored
on the terminal or the microSD card.
Save music files to the terminal or the microSD card
from a PC beforehand. → P. 173
The following music file formats can be played.
AAC LC/ELD, HE-AACv1 (AAC+), HE-AACv2
(enhanced AAC+) (3gp, mp4, m4a, aac, ts), MP3
(mp3), MIDI*, WMA9 (wma, asf)
*Can be played, but do not appear listed with the
Media Player application.
The following video file formats can be played.
H.263 (3gp, mp4), H.264 (3gp, mp4, ts), MPEG-4 SP
(3gp), WMV9 (wmv, asf), VP8 (webm, mkv)
• When you start the application for the first time,
you will see a confirmation screen asking you if
you want to see the operating instructions.
Music and videos can be
searched.
Launches "dmarket".
Bottom bar
The icons can be scrolled
by dragging the bottom
bar to the right or left.
Displays the video list.
Displays a music list based on
the tapped information.
■ Setting music as a ringtone
" " "Settings" "Ringtone settings"
tap the item to set tap the music you want to set
"Set"
■ Deleting music and videos
" " "Delete contents" tap
for the
music/video you want to delete to turn it red
"Del" "OK" "OK"
■ Changing the placement of bottom bar
icons
" " "Settings" "Arrange icons" Drag
of the icon to reposition where you want to
move it "Apply"
122
Apps
2 Tap the music or video
5 Shuffle off / shuffle on
6 Return to start of music/video or skip to
previous song / rewind / playback or pause /
fast forward / skip to next song
7 Adjust volume
8 Toggle automatic screen rotation on/off
9 Setting / Contents information / Help /
Application termination, etc.
a Contents title / Artist name / Album name
b Contents title / Artist name / Talent name
②
③
①
NOTE
⑩
④
⑤
⑥
③
Contents protected under Digital Rights Management
(DRM) can no longer be played back after initiating
"Factory data reset".
⑦
Music playback screen
②
⑪
⑨
①
⑧
③
⑥
⑦
Video playback screen
1 Album cover image or video
• Tap the album cover image to toggle show/
hide for ② .
• Tap the video to toggle show/hide for
② to ⑨ .
2 Specify the playback position
3 Return to list display
4 Repeat off / repeat on / repeat 1 song
123
Apps
Creating playlists
GPS
Use playlists to play back music in a preferred
sequence.
1 From the Home screen, "Apps"
"Media Player"
2 From the bottom bar icons, "Play
list"
3 "Add" Tap Playlist name Enter
a playlist name "OK"
4 Tap the music you want to add
• You can also select music from "Artists" and
"Albums".
•
turns red for selected music. Each time you
tap it, it is added to the playlist.
5 "Apply"
■ Changing the sequence
Drag
to the position you want
■ Deleting music from a playlist
Tap
to turn it red "Delete selected songs"
6 "Save" "OK"
You can use the terminal's GPS function and
compatible software to check your present
location, find directions to a destination, etc.
DOCOMO shall not accept liability for any damage
caused by a malfunction of the GPS system.
DOCOMO shall not accept liability for any purely
economic damages caused by missed opportunities to
check the measurement (communication) results due
to external factors, such as a failure or malfunction of
the terminal, or a power failure (including the battery
running down).
You cannot use the terminal as a navigation device for
an aircraft, vehicle or person. DOCOMO shall
therefore not accept any liability for damages caused
by navigation using the location information.
You cannot use the terminal as a high-accuracy
measurement GPS.
DOCOMO shall therefore accept no liability for
damages caused by measurement error.
GPS is operated by the U.S. Department of Defense.
GPS signals are subject to control adjustments
(reduced accuracy, stoppage of signal, etc.) at the
discretion of the Department.
Some wireless communications products (mobile
phones, data detectors, etc.) block satellite signals
and cause instability of signal reception.
The display of some maps based on location
information (latitude/longitude information) may be
inaccurate due to the regulations of some countries or
regions.
124
Apps
You may find it impossible or difficult to receive the
GPS signal in the following conditions because GPS
uses radio waves from a satellite.
• Inside or immediately underneath a building
• In a basement or tunnel, underground, or
underwater
• In a bag or box
• In a built-up or residential area
• In or under thick trees
• Near a high-voltage cable
• Inside cars or trains
• In heavy rain, snow, or other bad weather
• When there are obstructions (people or objects)
near the terminal
• When the GPS antenna section of the terminal is
covered with a hand
Enabling the Location access
To use the Location Service, you must enable the
GPS function beforehand. You can also configure
the terminal to find approximate location
information based on information from Wi-Fi and
mobile network base stations.
● Enabling the GPS function
1 From the Home screen, "Settings"
"Location access"
2 Tap "OFF" for "Access to my
location" to set to "ON"
3 When the agreement confirmation
screen for the GPS function is
displayed, tap "Agree"
• To also enable "Wi-Fi & mobile network
location", tap "Agree" in the agreement
confirmation screen for the position information.
125
Apps
Using the location information in
Google applications
● Enabling search of current location by WiFi or mobile network
1 From the Home screen, "Settings"
"Location access"
2 Tap "OFF" for "Access to my
location" to set to ON When the
agreement confirmation screen for
the GPS function is displayed, tap
"Agree" or "Disagree"
You can set to enable use of the location
information in Google Maps and other Google
applications.
You must have a Google account in order to
configure Google application location information.
→ P. 57
1 From the Home screen, "Settings"
2 Uncheck the "Simple menu"
checkbox "Google" "Location
settings"
3 When the agreement confirmation
screen for the position information
is displayed, tap "Agree"
3 Tap "OFF" for "Let Google apps
NOTE
If the current position search is enabled in Wi-Fi or the
access your location" to set it to
"ON"
mobile network (check mark is inserted for "Wi-Fi &
mobile network location"), when you agree to the
user agreement for position information on the
screen, position information is collected by the Google
position information service in a way that is not
personally identifiable. Gathering of location
information occurs regardless of whether an
application is launched.
126
Apps
Using Google Maps
■ Displaying layers
• You can display information such as traffic
conditions overlaid on a map, or switch to an
aerial photograph.
" " tap the item you want to view
• Traffic conditions and railway lines are provided
for limited regions.
You can use Google Maps to display your current
location, search other locations, search directions,
etc.
To use Google Maps, an LTE/3G/GPRS or Wi-Fi
connection enabling data communication is required.
Set beforehand so that location information access is
enabled (P. 125), and set to allow use of location by
Google applications (P. 126).
Google Maps does not cover all countries and cities.
■ Clearing a map
• Clear all displayed layers and directions search
results.
" " "Clear Map"
1 From the Home screen, "Apps"
■ Using Google+ Local, Google Maps with
navigation beta, and Google Latitude™
"Maps " "Local" / "Navigation" /
"Latitude"
"Maps"
• If a confirmation of whether to improve the
current location function appears, tap
"Settings" to configure the settings.
■ Zooming in/out on the map
• Zoom in: Pinch two fingers apart, or double-tap
(tap twice)
• Zoom out: Pinch two fingers together, or tap
with your two fingers
■ Displaying current location
" "
■ Searching a location
" " enter a location to search "
tap a search candidate
• You can tap a balloon to check details.
● Looking up directions
You can view directions to the arriving point.
1 While viewing a map " "
2 Enter the starting point in the
textbox above
3 Enter the arriving point in the
" or
textbox below
■ Viewing Street View
Touch and hold a point you want to view in
Street View tap a balloon " "
• Some regions are not supported for Street View.
• You can tap " " to specify a Contacts address,
a map location, etc.
4 Tap travel preference ("
"
" public transport/ "
foot) "GET DIRECTIONS"
" car/
" on
• When several sets of directions are found, tap
the desired directions.
127
Apps
Using Google Maps with navigation
beta
Using Google+ Local
You can search for shops and facilities near your
current location and display information. Shops
and other locations that were found can be
displayed in the Google Maps screen.
You can use audio guidance to the destination.
1 From the Home screen, "Apps"
"Navigation"
1 From the Home screen, "Apps"
• The first time you launch this application, a
description of Google Maps with navigation
beta is displayed. Tap "Accept".
2 Tap "
" or "
preference
"Local"
2 Tap the facility, etc. you want to
" to select travel
find
• A list of search results is displayed.
3 Tap the desired facility, etc.
3 Flick the screen right/left to select
• Detailed information is displayed.
a destination selection from
"STARRED", "SHORTCUTS", or
"CONTACTS", etc.
Using Google Latitude
Launch Google Latitude™ to display the shared
screen of the current location and register the
contact address and mail address of your friend.
After registration, you and your friends can check
each others' locations on maps and share status
messages with each other. It also enables you to
send email and SMS messages, make calls and
search for directions to friends' locations.
Location information is not shared automatically. You
must first join Google Latitude and then invite friends
to provide their locations, or accept invitations from
friends to share your location.
4 Specify a destination according to
the screen
• Navigation starts.
■ Starting from the latest destination
Tap a history item of the destination
■ Exiting navigation
" " "Exit navigation"
NOTE
If driving a car, be sure someone other than the driver
operates the navigation.
1 From the Home screen, "Apps"
"Maps" "Maps
" "Latitude"
• For details on Google Latitude, use the operation
below to view the mobile Help.
From the Google Latitude screen, " "
"Help"
128
Apps
7
8
9
a
Clock/Alarm
● Setting to Fast silent
Displaying the clock
1 From the Home screen, "Apps"
"Clock/Alarm"
• Here, you can use a count-down stopwatch (on
the left page) or a count-up stopwatch (on the
right page).
Setting the alarm
1 From the Home screen, "Apps"
"Clock/Alarm" "Alarms"
①
④
When Fast silent is set, you can shut off the alarm
by simply flipping the terminal over when the
alarm starts ringing.
Fast silent (the operation that occurs when the
terminal is flipped over) activates when the terminal
display is facing down. It is not activated when the
display is facing up.
When using Fast silent (the operation that occurs
when the terminal is flipped over), be sure that the
display is not damaged when the terminal is flipped
over.
1 From the Home screen,"Apps"
"Clock/Alarm" "Alarms"
②
③
⑤
2 " " "Settings" "Fast silent"
3 "Action when key is pressed" /
"Action when facing down"
Configure operations
⑥
⑦
⑧
1
2
3
4
5
6
Configure repeating alarms (days)
Set the alarm sound
Turn the vibration setting ON/OFF
Show/hide settings ⑥ to ⑨ above
⑨
⑩
Return to the clock display
Create a new alarm
Access the clock/alarm menu
Set the alarm time
Turn the alarm ON/OFF
Edit the label name
129
Apps
● Setting the Adaptive step-up alarm
With the Adaptive step-up alarm set, the terminal
determines whether it is in a location where it is
difficult to hear the alarm, such as inside a pocket
or bag, and gradually increases the volume of the
alarm.
The Adaptive step-up alarm is not activated in the
following cases:
• When the terminal is horizontal
• When the proximity sensor is not covered
• When the alarm sound is set to the maximum
volume
The Adaptive step-up alarm may be activated even
when the terminal is not in a location where it is
difficult to hear the alarm (such as when the proximity
sensor is blocked or the terminal is not horizontal).
Calendar
You can manage your schedule by synchronizing
the terminal calendar with an online calendar
provided by Google or other service.
• You must configure a Google account beforehand.
→ P. 57
1 From the Home screen, "Apps"
"Calendar"
■ Switching the calendar display
Tap "Month, Year " at the top left of the
screen "Day"/"Week"/"Month"/"Agenda"
1 From the Home screen,"Apps"
Creating a schedule
"Clock/Alarm" "Alarms"
1 While viewing the calendar, touch
2"
" "Settings" Check the
"Adaptive step-up alarm"
checkbox
and hold the day to enter an event
in "New event"
2 Set each item "DONE"
NOTE
NOTE
When the Adaptive step-up alarm is operating, the
volume returns to the previous volume if the proximity
sensor becomes uncovered (such as when the
terminal is removed from the pocket or bag).
130
appears in the status bar when the set time
arrives. You can open the Notifications panel and
check the details. Tap "Snooze" for the notifications
to appear again in 5 minutes.
Apps
Setting calendar
1 While viewing the calendar, "
Schedule
"
"Settings"
2 "General settings" change
1 From the Home screen,"Apps"
"Schedule"
settings as needed
• The schedule screen appears.
• You can set the schedule's notification method,
sound/vibration selection, and the reminder's
prior notification.
■ Synchronizing with Google Calendar™ or
other data
Tap the account of the calendar to display
Insert a check mark
• Synchronization will not be performed if
synchronization with the calendar is not set in
"Accounts" (P. 161). Tap on "Accounts & sync"
and set the parameter to synchronize the
account with the calendar.
Adding events
1 From the schedule screen, touch
and hold a date you want to add
an event to "Add" enter items
"Save"
● Checking your schedule
1 From the schedule screen, tap the
date you want to check
• Added events are displayed below the calendar.
Tap an event to view details.
• Touch and hold an added event to edit/delete,
etc.
■ Checking your schedule in the Memo list
screen
• You can check information for added events
with "Memo".
" " "To memo list" check events in the
Memo list screen (P. 132)
■ Setting schedule
• Set an alarm, change your account, etc.
" " "Settings"
131
Apps
Memo
Backing up data and settings
(SD card backup)
1 From the Home screen,"Apps"
You can use a microSD card or other external media
to move or back up phonebook, sp-mode mail,
bookmark and other data.
"Memo"
• The Memo list screen appears.
• Tap registered information to view details.
• Touch and hold registered information to edit,
delete, or prioritize it.
1 From the Home screen, "Apps"
" ドコモバックアップ " (docomo
backup) "microSDカードへ保存 "
(Save to microSD card)
■ Creating a new memo
" 新規作成 " (New) enter items "Save"
■ Checking memos in the schedule screen
• You can check memos with "ToDo" and " い
つ? " (When?) information with "Schedule".
" " "To schedule" check memo in the
schedule screen (P. 131)
• When "microSD カードへ保存 " (Save to
microSD card) is selected for the first time, a
Terms of Service agreement is displayed. Confirm
the details, and tap "Agree".
■ Backing up phonebook, sp-mode mails,
bookmarks data, etc.
"Backup" tap data to backup "Start
backup" "Backup" enter a docomo apps
password "OK"
Calculator
1 From the Home screen,"Apps"
"Calculator"
• Flick to left/right to switch between "Advanced
panel" and "Basic panel".
• Formulas can be copied, cut, and pasted by
touching and holding the formula box. However,
numbers only can be pasted.
• Tap "DELETE" to delete entered digits and
operators, or touch and hold to delete all of a
formula.
• You can tap
and
to display the
formula history.
132
■ Restoring phonebook, sp-mode mails,
bookmarks data, etc.
"Restore" tap "Select" of the data type to be
restored tap the data to be restored "Select"
"Start restore" "Restore" Enter a docomo
apps password "OK"
• Select a restoring method for the phonebook,
bookmarks, etc.
■ Copying the phonebook of Google
accounts to a docomo account
"Phonebook account copy" tap "Select" of
the Google accounts phonebook to be copied
"Overwrite"/"Add" "OK"
Apps
NOTE
Polaris Office
The terminal is configured so that all image, video and
other data is saved onto the built-in memory when a
microSD card has not been inserted. Only the image,
video and other data saved on the terminal is backed
up with this application. Data stored on microSD cards
is not backed up.
The phonebook of the main docomo account is
backed up.
Bookmarks may be restored to a different folder from
the original one.
Do not remove the battery pack or the microSD card
while backing up or restoring terminal data. The data
of the terminal could become corrupted.
If phonebook item names (such as phone numbers) of
other terminals differ from those of the terminal, item
names may be changed or deleted. Since the number
of characters that can be registered differ with the
terminal, entries may be deleted by the destination
terminal.
In backing up phonebook data to a microSD card,
data without a registered name will not be backed up.
If there is not enough free space on the microSD card,
it may not be possible to back up the data. If this
happens, delete data you no longer need from the
microSD card to free up space.
You may not backup or restore the data if the battery
power is low. In that case, charge the terminal and
backup and restore the data again.
It is not possible to copy the terminal’s phonebook
even when "Phone contacts" has been selected when
copying Google account phonebooks across to
docomo accounts.
For the detail of SD card backup, on the SD card
backup screen, " " "Help"
You can use Polaris Office to create new documents
(Excel, Word, PowerPoint) or view and edit
documents that have been saved to the internal
storage or microSD card. The following files are
supported.
• Excel (Excel 97 ∼ Excel 2010): xls, xlsx, xlt*, xltx*, csv*
• Word (Word 97∼Word 2010): doc, docx, dot*, dotx*
• PowerPoint (PowerPoint 97 ∼ PowerPoint2010): ppt,
pptx, pps*, ppsx*, pot*, potx*
• Adobe PDF 1.2 ∼ 1.7: pdf*
• HWP 97 ∼ 3.0, 2002 ∼ 2010: hwp*
• Text: txt, asc*, rtf*
• Zip: zip*
* Uneditable
New Excel files (xls, xlsx), Word files (doc, docx),
PowerPoint files (ppt, pptx) and text files (txt) can be
created.
1 From the Home screen, "Apps"
"Polaris Office 4.0"
• You will see the user registration screen the first
time you start the application. Read through the
information and follow the on-screen prompts.
NOTE
The data containing a format not supporting Polaris
Office and complicated design may not be correctly
displayed.
Some contents of the data may be displayed
133
differently from what is displayed on other devices
including a PC.
Apps
iDアプリ (iD appli)
"iD" is convenient e-money that uses a credit
system. You can shop easily and conveniently by
simply waving an Osaifu-Keitai or an iD-enabled
card with credit card information over the reader
unit. You can register up to two credit cards on an
Osaifu-Keitai. This allows you to use your credit
cards appropriately for privileges, etc.
Depending on the credit card issuer, you can
withdraw cash.
If using iD with an Osaifu-Keitai, you will need to
apply to a credit card issuer compatible with iD, as
well as make configurations with iD appli.
Expenses (annual fees etc.) for using iD services differ
by the credit card issuer.
Overseas usage charges for packet communication
are different from those in Japan.
For more information on iD, see the iD site (http://idcredit.com/) (in Japanese only).
1 From the Home screen, "Apps"
"iD アプリ " (iD appli)
• A screen may be displayed asking you to update
the "iD アプリ " (iD appli). If you upgrade it, it
will not be displayed until the next version
upgrade.
134
Apps
Settings
"Settings" can also be accessed from "Settings" in
the Apps list.
You can toggle between the Simple menu and
detailed menu by checking or unchecking the "Simple
menu" checkbox.
My Profile
LIFE UX Settings
Configure "LIFE UX Home" or "LIFE UX Lock"
settings for when LIFE UX is set for the Home
screen and screen lock screen.
1 From the Home screen, "Settings"
Uncheck the "Simple menu"
checkbox
Confirm your phone number and other settings.
1 From the Home screen, "Settings"
2 Select any item:
"My Profile"
LIFE UX Home Settings···Configure "LifeWay"
settings displayed on the leftmost page when "LIFE
UX Home" is set for the Home screen.
Home/Lock Switcher
Use LifeWay···Sets whether "LifeWay" is
displayed.
Configure settings for the Home screen and screen
lock screen (when "Screen lock" is "Touch").
1 From the Home screen, "Settings"
Uncheck the "Simple menu"
checkbox "Home/Lock Switcher"
2 Select any item:
Switch home and lock at once···P. 74
LifeWay Display Settings···Sets the
contents that are displayed for "LifeWay".
Weather Forecast Settings···Sets whether
to display the weather forecast and the area.
Simple Message Transfer Function···Sets
whether to send a message to the other party
when "Call back later" is registered from the
"LifeWay" incoming history.
Account Settings···Configure the settings of
the account used for LifeWay.
aGoogle accounts with 2-step verification
cannot be authenticated with the standard
Google account password. You can configure
settings by issuing and entering a dedicated
password for the LifeWay application on the
Google site.
Home Switcher···Set the Home screen.
Lock Switcher···Sets the lock screen shown when
"Screen lock" is set to "Touch".
135
Settings
LifeWay data delete confirmation···
Configures settings for whether confirmation
is performed when deleting the displayed data
from "LifeWay".
MEDIAS NAVI
Configure to receive update notifications from
MEDIAS NAVI.
Activate linked application···Configures
settings for whether the Schedule and
Reminder applications are activated when
Schedule and Reminder displays are deleted
from "LifeWay". When "Always confirm" is
set, you can select whether to activate the
application every time an item is deleted.
1 From the Home screen, "Settings"
Uncheck the "Simple menu"
checkbox Switch "MEDIAS
NAVI" ON/OFF
LIFE UX Lock Screen Settings···Configure the
screen settings displayed when "Life UX Lock" is
set for the screen lock screen.
Call Settings
Display Home Screen Wallpaper···Sets
whether the Home screen wallpaper is
displayed.
1 From the Home screen, "Settings"
LIFE UX Lock Wallpaper Settings···Sets the
wallpaper to be displayed when "Display
Home Screen Wallpaper" is set to "OFF".
Uncheck the "Simple menu"
checkbox "Call Settings"
Animation Display Settings···Sets whether
the Lock Wallpaper is animated.
Shortcut Display Settings···Sets the
shortcut menu that is displayed when "
set to touch and hold.
• For details on "Call Settings", see P. 82.
" is
NOTE
The wallpaper set in "LIFE UX Lock Wallpaper
Settings" is not displayed on the screen lock screen
when charging with the desktop holder. The
wallpaper set for the Home screen is displayed.
136
Settings
Avoid poor connections···This sets so that a
Wi-Fi network is used only when a connection
to a stable Wi-Fi network is possible.
Wi-Fi settings
Wi-Fi optimization···Optimizes battery usage
when Wi-Fi is "ON".
Using other Wi-Fi network functions
Automatic···Sets whether to enable Wi-Fi
automatic ON/OFF (P. 56)
Turn on Wi-Fi beforehand.
Handover···Set whether to enable handover.
aEnable handover to change over to the
access point with the same "Network SSID",
"Security" and "Password".
1 From the Home screen, "Settings"
"Wi-Fi"
2"
" Select any item:
Frequency band/Channel setting···Selects
the frequency band or channel used for Wi-Fi
connections. This can be set when the Wi-Fi
function is set to OFF.
Scan···This starts a Wi-Fi network scan and displays
a list of available Wi-Fi networks.
Change priority···Change the priority of Wi-Fi
networks to be used. Touch and hold the name of a
network you want to change to switch its priority.
MAC address···A MAC address is displayed.
IP address···The IP address currently used is
displayed.
WPS Pin Entry···A connection is made to the
access point using the WPS PIN code input
method.Register the PIN (number) displayed on the
screen to the access point.
Attention···Displays the usage precautions for the
Wi-Fi function.
NOTE
Wi-Fi Direct···P. 138
Advanced···Configure advanced settings.
Packet communication is still available when Wi-Fi is
turned on. However, if the terminal is connected to a
Wi-Fi network, the Wi-Fi network takes precedence.
When the Wi-Fi network is disconnected, the terminal
automatically connects to the LTE/3G/GPRS network.
If you continue using the terminal connected to the
LTE/3G/GPRS network, you may incur costly packet
communication charges.
Network notification···Set whether or not
to send a notice when the open network of
Wi-Fi is detected.
Wi-Fi sleep policy···Sets the Wi-Fi operation
during sleep mode.
137
Settings
If an incorrect password (security key) is entered when
selecting and connecting an access point, the
message "Avoided poor Internet connection" or
"Authentication problem" appears. Check the
password (security key). If a message "Avoided poor
Internet connection" appear even though the
password has been entered correctly, the correct IP
address may not be obtained. Check the radio wave
condition and reconnect it.
To access docomo service via Wi-Fi during Wi-Fi access
requires a "Wi-Fi option password" setting.
In the Home screen, select "Settings" uncheck the
"Simple menu" checkbox "docomo service"
"Wi-Fi settings for docomo apps" to do this.
Using Wi-Fi Direct
This terminal supports Wi-Fi direct to easily use WiFi. Use Wi-Fi direct to connect Wi-Fi to other
devices without going through access points and
the Internet.
1 From the Home screen, "Settings"
"Wi-Fi"
2 Tap "OFF" to set Wi-Fi to "ON"
• Tap "OK" when "Wi-Fi tethering" and "USB
tethering" is ON.
3"
" "Wi-Fi Direct"
• This automatically scans for compatible devices
and displays a list of available devices.
4 Tap the name of the device you
want to connect to
• If the connection setting request is accepted at
the device that you want to connect to, a
connection is established by Wi-Fi Direct.
■ Disconnecting the Wi-Fi Direct connection
Tap the name of the device that you want to
disconnect "OK"
NOTE
You are required to download and install applications
supporting data exchange of Wi-Fi Direct to exchange
data such as video and still images using Wi-Fi Direct.
Some applications allow you to connect to other
compatible devices such as printers.
If Wi-Fi and Wi-Fi Direct are set to different channels,
they cannot be used at the same time.
138
Settings
Bluetooth Communication
Connect the terminal and a Bluetooth-compatible
device via Bluetooth communication. You can
connect a Wireless Earphone Set 02 (optional), etc.
to the terminal, and talk on the phone or listen to
music while the terminal is still in your bag.
There is no guarantee that the terminal is capable of
wireless communication with all types of Bluetooth
devices.
For information about the settings and operation
procedures, see also the instruction manual of the
Bluetooth-compatible device.
Precautions when using Bluetooth devices
Note the following in order to ensure a good
connection.
• Connect with another Bluetooth device within about
a 10-meter viewable distance. Depending on
surroundings (walls, furniture, etc.) and building
structure, the connectable distance is shorter. The
connectable distance will also be shorter if an obstacle
is between the terminal and another Bluetooth
device. Connection may be unestablishable if the
terminal and the device are located on opposite sides
of walls containing metal rods, such as on upper and
lower storeys or in adjoining rooms, especially in a
building made of reinforced concrete. Also note that
the above connection distances are not guaranteed.
• Connect the terminal distanced from other devices
(electric products/AV equipment/OA equipment,
etc.) as much as possible (since the terminal is easily
affected by a microwave oven in use, distance the
terminal as far as possible). If the terminal is brought
closer when another device is on, it may be unable
to connect normally or may be a cause of television
and radio noise or interference (television picture
may be unclear for particular UHF or satellite
channels).
• If you cannot connect normally due to a nearby
broadcasting station, wireless transmitter, etc.
change the location of the partner Bluetooth device.
You may not be able to connect normally if
surrounding radio waves are too strong.
• You can establish a wireless connection while a
Bluetooth device is in a bag or pocket. However, if
you body is located between the Bluetooth device
and the terminal, decreased communication speed
or noise may occur.
Bluetooth devices and wireless LAN (IEEE802.11b/g/n)
use the same frequency band (2.4 GHz). If you use
the terminal or Bluetooth device near a device
equipped with a wireless LAN, radio wave
interference may occur and can result in decreased
communication speed, noise, a poor connection, etc.
If this happens, do the following.
• Keep the terminal and a Bluetooth device in wireless
connection at least 10 m from a wireless LAN.
• Turn off a wireless LAN when used within 10 m.
The radio waves emitted by a Bluetooth device may
affect operation of medical electronics or other
equipment. Since it may be the cause of an accident
depending on circumstances, turn off the terminal
and any nearby Bluetooth devices in the following
places.
• Trains
• Airplanes
• Hospitals
• Locations near automatic doors and emergency
alert devices
• Places with ignitable gas, such as gas station
139
Settings
Connecting to a Bluetooth device
■ Selecting the connection type
Tap
of a paired Bluetooth device Mark the
checkbox of the desired connection type
• Only supported Bluetooth devices are selectable.
To connect the terminal with another Bluetooth
device and exchange data, first carry out pairing
(connection setting) with the other Bluetooth
device and then connect.
Some Bluetooth devices only pair, and some
Bluetooth devices proceed all the way to connection.
Turn on the partner's Bluetooth function and check
that it is connectable beforehand.
■ Change the name of the Bluetooth device
Tap
of a paired Bluetooth device
"Rename" Enter name "OK"
● Change the name of the terminal
displayed on other devices
1 From the Home screen, "Settings"
Turn on Bluetooth beforehand.
Uncheck the "Simple menu"
checkbox "Bluetooth"
1 From the Home screen, "Settings"
Uncheck the "Simple menu"
checkbox "Bluetooth"
2 Tap "OFF" to turn the Bluetooth
"ON"
2"
" "Rename phone" Tap the
name entry field to enter a name
"Rename"
• A scan for devices starts and a list of available
Bluetooth devices is displayed.
• Tap "SEARCH FOR DEVICES" if the desired
device is not displayed.
3 Tap the Bluetooth device you want
to Pair
• Connection may be established with this
procedure, depending on the Bluetooth device.
● Change the time after which detection
times out
Turn on Bluetooth beforehand.
4 Tap the Bluetooth device you want 1 From the Home screen, "Settings"
Uncheck the "Simple menu"
checkbox "Bluetooth"
to connect
■ Canceling the Bluetooth device connection
Tap the Bluetooth device to disconnect "OK"
• To cancel pairing, tap
of the Bluetooth device
you want to disconnect, and tap "Unpair".
2"
" "Visibility timeout" Tap
the set item
• Select "Never time out" to automatically disable
Non-detectable.
140
Settings
3 Select any item:
● Check the file received through Bluetooth
communication
Alert Notification···Sets to send notification to
the BLE device about calls or emails received.
1 From the Home screen, "Settings"
Find Me···Sets to use the BLE device to ring the
terminal.
Uncheck the "Simple menu"
checkbox "Bluetooth"
Proximity···Select "OFF/Mild alert/High alert" as
the connection status notification setting for the
terminal and BLE devices.
2"
" "Show received files"
Tap the file
Time···Sets whether the clock of the BLE device is
synchronized with the clock of the terminal.
• Hereafter, conduct operation according to the
instruction on the screen.
NOTE
NOTE
The applications that can be linked with the BLE
When not using the Bluetooth function, turn off the
device are shown below.
• Phone
• sp-mode mail
• Email
• Gmail
• Messaging
• Pedometer
• Clock/Alarm
• Calendar
The "Proximity" setting notification method differs
depending on the connected BLE device.
If setting a phone number in the "Alert Notification"
settings to serve as the contact identifier when an
email from that contact is received, register the phone
number directly instead of referring to docomo
phonebook.
Bluetooth function to prevent battery consumption.
If the Bluetooth device is not SCMS-T-compliant,
sound cannot be heard regardless of the audio data
type.
● Making detailed settings when connected
to a BLE device
When connected to a BLE (Bluetooth Low Energy)
device (such as G-SHOCK), information in this
terminal about calls and emails received can be
sent to the BLE device, and the BLE device can be
synchronized with the clock of the terminal. The
settings are made here for which information is
sent.
Turn on Bluetooth beforehand.
1 From the Home screen, "Settings"
Uncheck the "Simple menu"
checkbox "Bluetooth"
2"
" "Bluetooth Smart settings"
141
Settings
Configuring Wi-Fi hotspot
Tethering
1 From the Home screen, "Settings"
Uncheck the "Simple menu"
checkbox "Tethering"
Using USB tethering
2 "Wi-Fi tethering settings"
Connect the terminal to a USB-supported PC, etc.
and access the Internet by using mobile network
communication. Use the Micro USB Cable 01
(optional) to connect the terminal and the PC or
other device.
"Configure hotspot" set
"Network SSID", "Security", and
"Password" "Save"
1 Connect the terminal to a PC with
• "Network SSID" is set to "N-06E-XXXXXX" by
default.
microUSB cable
2 Open the Notifications panel and
tap the notification for the
currently connected USB options
"USB Tethering"
3 From the Home screen, "Settings"
Uncheck the "Simple menu"
checkbox "Tethering"
4 "USB tethering" Confirm details
of notices "OK"
■ Removing the microUSB cable → P. 174
NOTE
A special driver is required for performing data
transmission via USB tethering. Refer to the following
site for more information about downloading drivers
and computer hardware requirements (compatible
OS).
http://www.n-keitai.com/guide/download/
(in Japanese only)
142
Settings
2 "Wi-Fi tethering settings"
Using Wi-Fi tethering
"Hotspot easy setting" "WPS"
You can use the tethering function via Wi-Fi
connection. Using the terminal as an access point
(main device), you can use a Wi-Fi-compatible
device (sub device) to connect to the Internet or
enjoy gaming services.
3 Select the Configuration method
■ Push button
From the Configuration Method, "Push button"
"Set"
• Press the push button for the Wi-Fi-compatible
device (sub device).
1 From the Home screen, "Settings"
Uncheck the "Simple menu"
checkbox "Tethering"
■ PIN of the connected device
From the Configuration Method, "PIN of peer
device" Enter the PIN code displayed on the WiFi-compatible device (sub device) to the terminal
"Set"
2 "Wi-Fi tethering" Confirm details
of notices "OK"
3 Set the same network SSID and
■ Hotspot PIN
From the Configuration Method, "PIN of access
point" Enter the PIN code displayed in "PIN code
of access point" to the Wi-Fi-compatible device
(sub device) "Set"
security on the Wi-Fi-compatible
device (sub device) as on the
terminal
• The Wi-Fi-compatible device (sub device)
connects to the terminal (main device).
NOTE
Up to 10 Wi-Fi-compatible devices can connect at the
● Accessing Wi-Fi hotspots using the hotspot
connection easy setting
If the Wi-Fi-compatible device (sub device) supports
"WPS", you can easily complete the required
settings such as for the network SSID and
connection security methods.
Turn "Wi-Fi tethering" ON in advance.
same time.
Tethering is only compatible with IEEE802.11b/g/n
(2.4 GHz).
The default setting for "Security" is "WPA2 PSK", but
a random value is set for the password. Change the
setting if necessary.
The channel sets automatically to one of 1ch to 11ch.
1 From the Home screen, "Settings"
Since a Wi-Fi-compatible device (sub device) may not
be able to connect depending on its settings, be sure
to check settings on sub device you want to connect.
Uncheck the "Simple menu"
checkbox "Tethering"
143
Settings
● Set mobile data limit
More (Wireless & Networks)
1 From the Home screen, "Settings"
Uncheck the "Simple menu"
checkbox In WIRELESS &
NETWORKS, "More..." "Manage
data communication"
Manage data communication and airplane mode,
and configure VPN settings, etc.
Manage data communication
This can be used to switch communication by
mobile data on and off. Also, the use of mobile
data can be restricted and warnings can be
displayed based on the data usage amounts that
are used during a preset period.
2 "Set mobile data limit" Check
the message information "OK"
• Drag the right edge of the horizontal line (red) of
the graph to set the upper limit of the amount
of data use (The amount of data use is a rough
indication).
• When the data use reaches this upper limit, the
mobile data automatically turns off and disables
normal operation of many functions of the
terminal.
● Enable the mobile data
1 From the Home screen, "Settings"
Uncheck the "Simple menu"
checkbox In WIRELESS &
NETWORKS, "More..." "Manage
data communication"
■ Configure the details of the warning that
occurs when nearing the mobile data limit.
Drag the right edge of the horizontal line
(orange) of the graph
• The amount of data use is a rough indication.
2 Tap "OFF" to turn the mobile data
"ON"
■ Turn off the mobile data
"ON" "OK"
■ Show Wi-Fi usage status
" " "Show Wi-Fi usage"
• Change the tab to display it.
● Set the period to reset the amount of data
usage
1 From the Home screen, "Settings"
Uncheck the "Simple menu"
checkbox In WIRELESS &
NETWORKS, "More..." "Manage
data communication"
2 Tap the date of "Data usage cycle"
"Change cycle..." Select the
reset date "Set"
144
Settings
Setting to Airplane mode
● Detail setting of data usage
1 From the Home screen, "Settings"
When Airplane mode is set, all wireless functions of
the terminal (phone calls, packet communication,
etc.) are disabled.
Uncheck the "Simple menu"
checkbox In WIRELESS &
NETWORKS, "More..." "Manage
data communication"
2"
1 From the Home screen, "Settings"
Uncheck the "Simple menu"
checkbox In WIRELESS &
NETWORKS, "More..."
" Select any item:
Data roaming···Check this to enable packet
communication overseas and increase the packet
communication charge. You may not connect to
the Internet unless you set this function depending
on the location.
Restrict background data···If you check this,
some applications and services may not function
when the Wi-Fi network is not connected.
2 Check the "Airplane mode"
checkbox
NOTE
Checking the "Airplane mode" checkbox also turns
off the Wi-Fi, Bluetooth, NFC function Reader/Writer
and P2P function but they can be turned on again in
Airplane mode.
Auto-sync data···Set if an application
automatically synchronizes the data.
Show Wi-Fi usage···P. 144
Mobile hotspots···Sets the Wi-Fi network where
the mobile data restrictions and warnings are
applied.
NOTE
Drag the vertical line (white) of the graph to change
the period in the use cycle. The range displayed in this
line determines the used amount displayed under the
graph.
<Auto-sync data>
Depending on this setting, you may incur packet
communication fees. The battery also depletes faster
compared to "OFF" state.
145
Settings
Connecting to a VPN (Virtual Private
Network)
● Disconnecting from a VPN
1 Open the Notifications panel and
A VPN (Virtual Private Network) is technology that
enables external connection to information on a
protected local network such as in a corporation or
university. When configuring a VPN connection
from the terminal, obtain security information
from the network administrator.
VPN (PPTP) is unavailable if the access point is set to
sp-mode.
You need to set a lock No. or a password to unlock
the screen in advance.
tap the notification for the VPN
connection "Disconnect"
NFC/Osaifu-Keitai lock settings
For details about "NFC/Osaifu-Keitai lock settings",
refer to P. 104.
Mobile networks
Setting about data communication.
● Adding a VPN
1 From the Home screen, "Settings"
1 From the Home screen, "Settings"
2"
2 Select any item:
Uncheck the "Simple menu"
checkbox In WIRELESS &
NETWORKS, "More..." "Mobile
networks"
Uncheck the "Simple menu"
checkbox In WIRELESS &
NETWORKS, "More..." "VPN"
" Set each VPN setting item
according to the instructions of the
network administrator "Save"
Data enabled···Enable/Disable data
communication.
Data roaming···P. 181
● Connecting to a VPN
Access Point Names···P. 53
1 From the Home screen, "Settings"
Network Mode···P. 181
Uncheck the "Simple menu"
checkbox In WIRELESS &
NETWORKS, "More..." "VPN"
Network operators···P. 181
2 Tap the connection VPN Enter
required information "Connect"
146
Settings
Sound/Vibration
This allows you to configure various sound settings,
such as volumes and ringtones.
Option settings···Set the number of times
Notification Reminders are to be issued,
selection of applications using reminders, and
the notification method by reminder tone or
vibration according to the instructions on the
screen.
Dialpad touch tones···Set dial pad operation
sound on/off when entering a phone number, etc.
1 From the Home screen, "Settings"
"Sound/Vibrate"
Touch sounds···Set operation sound on/off when
selecting from a menu.
2 Select any item:
Screen lock sound···Set operation sound on/off
when locking/unlocking the screen.
Volumes···Set the volume for ringtones, media
playback sound, alarm sound, etc.
Feeling touch settings···Set to vibrate
interlocking sounds or operation of the terminal.
Media volume in silent···Sets whether or not to
sound tones at the media volume when in the
silent mode.
Feeling touch···Set to vibrate when
operating the terminal.
Phone ringtone···Set the ringtone.
Theme···Set a vibration type.
Vibrate on ring···Set on/off of vibrator.
Reverb···Set to vibrate interlocking sounds of
the terminal. Vibration intensity can also be
set.
Adaptive step-up ringtone···P. 78
Fast silent···P. 79
Surround···Switch the surround effect.
Default notification sound···Set a notification
sound for mail, etc.
Speaker Setting···Set ON/OFF of speaker
correction. Check this to adjust the sound from the
speaker for easy listening.
Notification Reminder settings···Sets the
terminal to recognize lulls in operations and issues
reminders that calls, e-mail, etc., have been
received.
Earphone Setting···Select the shape of the
earphone to adjust the sound for easy listening.
Use Notification Reminder···Sets the
Notification Reminder to ON or OFF.
Show standby icon···Sets whether or not to
display the icon when the Notification
Reminder is starting up.
147
Use connected device as input/output target···
Sets whether audio input/output is performed from
a device connected to the earphone microphone
jack.
Settings
Confirm when connected···Sets whether the
audio input/output device check screen is displayed
when a device is connected to the earphone
microphone jack.
Display
Set brightness and other screen settings including
fonts.
NOTE
<Feeling touch settings>
The terminal may vibrate even if it is not operating
during execution of some applications.
Setting to silent mode
1 From the Home screen, "Settings"
"Display"
2 Select any item:
Brightness···Adjust the brightness of the display.
Mark the "Automatic" checkbox to detect
surrounding brightness and adjust automatically. If
a check mark is inserted for "Optimize display for
viewing outdoors", the screen is further adjusted
automatically for use in bright locations such as
when outdoors during daytime.
Set the terminal not to emit sound, etc. for
etiquette when in a public or similar place.
1 P (1 second or longer)
"
"
■ Setting so that vibration is enabled when
silent mode is on
" "
Wallpaper···Change the wallpaper. → P. 66
Sleep···Set the time until the sleep mode comes
on. When this is set to "Auto", the inner camera
detects whether there is a face in front of the
screen and does not start sleep mode when a face
is detected. In some cases, detection may not be
accurate (such as when in a dark environment or
when the user is wearing a mask or sunglasses), or
it may not operate properly due to the way that the
terminal is held.
■ Exiting silent mode
" "
High definition display···Sets to automatically
optimize the resolution based on the video scene
for delivering sharper images.
Energy-saving mode···Adjusts the color scheme
on the screen to conserve battery power.
Blue light cut mode···Sets to reduce the highenergy blue lights in the display lighting.
Auto-rotate screen···Set whether the display
switches automatically according to the orientation
of the terminal.
148
Settings
Daydream···Sets whether the screensaver operates
while charging. You can set the screen displayed as
the screensaver. The screensaver is not activated
when sleep mode is set manually.
Select Font···Set the font for displayed text.
Lamp/Illumination
Configure settings for Notification LED and
illumination lighting.
Font size···Set the font size for displayed text.
Use Desktop holder menu···The Desktop holder
menu can be used while charging with the desktop
holder.
1 From the Home screen, "Settings"
"Lamp/Illumination"
2 Select any item:
NOTE
<Brightness>
Even if you check "Automatic", you can adjust the
brightness of the display manually.
<Use Desktop holder menu>
Each time
is tapped, the screen switches between
the Desktop holder menu screen and home screen.
149
Incoming call lamp···P. 58
Notification lamp···P. 58
Earphone Jack Illumination···P. 59
Aurora Illumination···P. 59
Key backlight···Sets the color of the key backlight
that turns on according to the brightness.
Settings
Stop sync···Stops synchronization with
applications.
eco mode
Stop live wallpapers···Sets a still image as
wallpaper when live wallpaper is set.
You can set eco mode to reduce power
consumption.
Stop LIFE UX Lock animation···Sets the
"Animation Display Settings" to "OFF" when "LIFE
UX Lock" is set for the screen lock screen.
1 From the Home screen, "Settings"
Uncheck the "Simple menu"
checkbox "eco mode"
■ Setting to Full eco mode
Check the "Full eco mode" checkbox.
• Tap " " to confirm the setting contents for Full
eco mode.
■ Turning eco mode OFF
Check the "OFF" checkbox.
■ Auto eco mode → P. 151
■ Setting to Original eco mode
Check the "Original eco mode" checkbox.
• Tap " " to configure the settings for Original
eco mode.
Brightness···Dims the display.
Auto-rotate screen···Turns off automatic screen
rotation.
Screen timeout···Sets the time until the backlight
turns off.
Energy-saving mode···Sets whether energysaving mode is used.
Stop illumination···Sets it so that illumination
does not turn ON.
Stop feeling touch···Turns the feeling touch
function off.
Turn off Bluetooth···Turns the Bluetooth function
off.
Turn off Wi-Fi···Turns the Wi-Fi function off.
Unuse GPS satellites···Turns the GPS function off.
150
Settings
Auto eco mode
More (Phone Settings)
Set the eco mode to "Auto" to set the battery
power and the time to automatically turn on the
original eco mode and the full eco mode. This
allows you to automatically change the eco mode
setting according to your lifestyle (time/day of the
week).
Manage storage, confirm the battery usage status,
manage applications and perform other functions.
Manage Storage
1 From the Home screen, "Settings"
You can check the capacity of the microSD card and
the terminal, or format the microSD card.
Uncheck the "Simple menu"
checkbox "eco mode"
1 From the Home screen, "Settings"
2 Place a check mark for "Auto"
3 Select any item:
Uncheck the "Simple menu"
checkbox In PHONE SETTINGS,
"More..." "Manage Storage"
Time setting···Tap "Add time setting" to set the
start/end time, repetition and the type of eco
mode, check "Time setting on" and tap "OK". You
can set the end time to the time of the next day.
2 Select any item:
■ INTERNAL STORAGE
Total space···Check the capacity of the terminal.
• You can check the breakdown of the memory
usage conditions.
Battery level···Set the battery level.
Original eco mode···Set the battery level to
switch to original eco mode.
Available···Check the free space on the
terminal.
Full eco mode···Set the battery level to
switch to full eco mode.
■ SD CARD
NOTE
Total space···Check the capacity of a microSD
card.
• You can check the breakdown of the memory
usage conditions.
<Time setting>
Touch and hold the set item to select enable/disable
and edit/delete the setting.
Available···Check the free space of a microSD
card.
151
Settings
Application Management
Unmount SD card···Cancel recognition by the
terminal so that the microSD card can be removed
safely. "Mount SD card" is displayed if the card
needs to be mounted to ensure the microSD card
can be recognized by the terminal.
You can check the name and the version of an
application and the status of memory use, force it
to stop and delete it.
Erase SD card···Format a microSD card. Note that
formatting erases all content on a microSD card.
1 From the Home screen, "Settings"
Uncheck the "Simple menu"
checkbox In PHONE SETTINGS,
"More..." "Apps"
NOTE
To change the USB connection option, "
" tap
"USB computer connection".
Battery
Check the battery status of use.
1 From the Home screen, "Settings"
Uncheck the "Simple menu"
checkbox In PHONE SETTINGS,
"More..." "Battery"
2 Tap the item to be checked
2 Tap the tab Tap applications
● Disabling the applications
You can disable some applications to stop the
operation.
Disabled applications are not displayed on the Apps
list and are not executed. However, they are not
uninstalled. This is available for some applications and
services that cannot be uninstalled.
1 From the Home screen, "Settings"
Uncheck the "Simple menu"
checkbox In PHONE SETTINGS,
"More..." "Apps"
2 Tap the tab Tap the Application
"Disable" "OK"
■ Enable application
Tap the disabled application "Enable"
NOTE
If you disable an application, other applications linked
with the disabled application may not operate
properly. Enable the application to operate it again
properly.
152
Settings
Wireless Screen
docomo service
For details about "Wireless Screen", refer to P. 175.
MHL settings
For details about "MHL settings", refer to P. 176.
Configure settings such as a docomo application
password and AUTO-GPS.
1 From the Home screen, "Settings"
Uncheck the "Simple menu"
checkbox "docomo service"
2 Select any item:
Application manager···Set regular checks for
updates, etc.
docomo Wi-Fi Easy Connection···Set so as to use
docomo Wi-Fi and your home Wi-Fi environment
easily and conveniently.
Wi-Fi settings for docomo apps···Sets for usage
of docomo services over a Wi-Fi connection.
docomo apps password···Set a password to use
with docomo applications.
The default is set to "0000" (four zeros).
AUTO-GPS···Configure AUTO-GPS function
settings, etc.
docomo location information···Set the location
information service function for Imadoco search,
Imadoco easy search and mobile search service.
Data usage check···Sets the calculation interval,
measurement start/stop, and other settings for the
data communication traffic.
SD card backup···Backups and restores data
stored in the terminal.
153
Settings
Send device error information···Configures the
settings for sending error data to DOCOMO
servers.
Open source licenses···Confirm open source
licenses.
NOTE
Items displayed in docomo service may not appear
when an application is disabled (P. 152).
Items displayed in docomo service may be added
when an application provided by DOCOMO is
downloaded.
Location access
Set how to obtain location information.
1 From the Home screen, "Settings"
"Location access"
2 Select any item:
Access to my location···Sets whether use of
position information is enabled or disabled.
GPS satellites···P. 125
Wi-Fi & mobile network location ···P. 126
docomo cloud
NOTE
Connect to the docomo cloud homepage.
Turning on "Access to my location" allows you to set
"GPS satellites" and "Wi-Fi & mobile network
location". When the check mark for "GPS satellites"
and "Wi-Fi & mobile network location" is removed,
"Access to my location" is set to OFF.
1 From the Home screen, "Settings"
Uncheck the "Simple menu"
checkbox "docomo cloud"
154
Settings
Owner info···Set whether or not to display the
owner information on the screen unlock screen.
Check "Show owner info on lock screen" and
enter a text (owner information) to be displayed.
Security
Configure settings such as for security lock.
Call notification settings···Configure the setting
to change the incoming operation for a voice
calling from a certain caller.
1 From the Home screen, "Settings"
Uncheck the "Simple menu"
checkbox "Security"
Do not display the name···Configure the
setting not to display names and images
registered on the Contacts.
2 Select any item:
The LED is not lit···Configure the setting not
to light the incoming lamp, Aurora
Illumination and Earphone Jack Illumination.
Screen lock···Configure unlock security codes for
unlocking the screen.
• Depending on preset unlock security code, item
display of "Improve face matching", "Liveness
check", "Make pattern visible", "Automatically
lock", "Power button instantly locks", "Owner
info" may vary.
Ringtone is not lit···Configure the setting
not to sound a ring tone and vibrator.
History does not record···Configure the
setting not to leave an incoming history.
Outgoing history is also not recorded.
Improve face matching···You can shoot faces
again to improve face matching.
Liveness check···Sets whether blinking is required
when unlocking by face unlock.
Make pattern visible···Set whether to display the
unlocking pattern when unlocking the screen lock.
Automatically lock···Set the time from the start of
sleep mode to the time when the screen is locked.
Power button instantly locks···Set so as to
activate the screen lock right after pushing
P or S.
Registered numbers···Display the list of
phone numbers to be set as a specified
number notification.
Tap "ADD PHONE NUMBER" to enter required
items and tap "OK" to add it to the list (Only
the phone number is displayed when the
name is not registered). You can register a
phone number by referencing the Contacts
and the calling history. Touch and hold an item
in the list to call the contact, send an SMS, or
edit or delete the contact.
Set up SIM card lock···P. 159
Make passwords visible···Set to display
characters when entering a password.
Device administrators···Enable/disable
administrators for the terminal.
155
Settings
• If "Factory data reset" is performed while the
microSD card is encrypted, the encrypted data
within the microSD card will no longer be able to
be read. If this happens, the encrypted data
cannot be read even by another terminal, and so
be sure to remove this setting before performing
"Factory data reset".
Unknown sources···Set whether or not to permit
installing an application obtained from mails and
sites other than the Play Store.
• Download applications only from reliable
publishers to protect the terminal and your
private data.
Verify apps···Set whether to prohibit the
installation of applications that may damage the
terminal or whether an alert is given before
installation.
Trusted credentials···Display a reliable CA
certificate.
Security policy settings···Set security policy of
the terminal for security administrator.
• Security administrator password must be set
beforehand to activate the device administrator.
• The activated device administrator is registered
in the "Device administrators" of "Settings".
However, the administrator cannot be
deactivated.
• If this is used together with other device
management applications or services, the
changes may not be applied to this setting in
certain cases. Also, if the same restrictions are
set from multiple device administrators, the
strictest setting is the one that is applied.
* The URL history retrieved by the log setting is
standard browser history.
Install from SD card···Installs an encrypted
certificate from a microSD card.
Clear credentials···Delete all credentials
information.
• Clearing the credentials also deletes all VPN
settings and Wi-Fi settings.
Encryption···You can encrypt the data of the
terminal and the microSD card.
• Character-string password is required for
encryption. Therefore, the unlock security code
other than "Lock Number" and "Password"
cannot be set.
• If you update data from another application
while encrypting the microSD card/ decrypting
the microSD, the terminal may no longer
function properly.
156
Settings
Setting screen lock
Setting up unlock security
If you leave the terminal unattended for a certain
period, the display goes out and into sleep mode
and becomes locked. The touch panel will be
disabled and protected from incorrect operation.
Press P or S during operation to set
screen lock.
If you set unlocking security, you are required to
enter a password and make special operations such
as face authentication to unlock the screen lock.
You can improve the security.
1 From the Home screen, "Settings"
Uncheck the "Simple menu"
checkbox "Security" "Screen
lock"
● Unlocking the screen
The following describes the unlocking operation
when you purchase the product (when unlock
security is "Touch"). The same operation is required
whenever turning on the power or exiting standby
mode.
2 Select any item
None···Set not to lock the screen when the display
goes out. Operation 3 is not available.
1 Press P or S during the
Touch···Tap
available.
sleep mode
• The sleep mode is canceled.
2 Tap "
to set unlocking. Operation 3 is not
Face Unlock···Set to unlock with face
authentication.
"
Pattern···Set to unlock by tracing a pattern with a
finger.
• The screen lock is unlocked.
• Unlock the screen according to the instructions
on the screen when an unlocking security other
than "Touch" is set.
Lock Number···Set to unlock with a lock No. Enter
a number from 4 to 16 digits.
Password···Set to unlock with a password. Enter a
number from 4 to 16 digits. You need to enter at
least one letter of the alphabet for a password.
NOTE
If you make incorrect unlocking entries 5 times
continuously, you will be unable to make an unlocking
entry for 30 seconds. Wait for 30 seconds and try
again.
3 Follow the screen to continue
setting
NOTE
If you set an option other than "None" and "Touch",
you need to tap "Screen lock" and perform the
unlocking operation.
157
Settings
Security codes used with the terminal
● Network security code
Some features of the terminal require security
codes, to make various functions more convenient.
These include a password for locking the terminal
and a network security code for network services.
By using different codes for different purposes, you
can get the most out of the terminal.
Precautions for all security codes
Avoid setting security codes using your birthday, part
of your phone number, your address or room number,
"1111" or "1234" that can be easily guessed by
others. Be sure to write down the security codes and
store them in a safe location.
Do not reveal your security codes to others. DOCOMO
is not responsible for damage caused by misuse of
your revealed security codes by others.
If you forget your security codes, you need to bring
your identification document (driver's license, etc.),
the terminal and the miniUIM to a docomo Shop
Service Counter. For details, contact "General
Inquiries" provided on the last page of this manual.
Your PIN unblocking key is written in the application
form (copy for subscriber) given at the time of
contract. If you have subscribed at a place other than
a docomo Shop, bring your identification document
(driver's license, etc.) and the miniUIM to a docomo
Shop Service Counter, or contact "General Inquiries"
provided on the last page of this manual.
The network security code is a 4-digit number
necessary for using the docomo Network Services
or verifying your identity when placing an order in
docomo Shop, at docomo Information Center or
through "お客様サポート " (User support). It can be
set any number at the subscription and also
changed later by yourself.
You can change your network security code to the
new one from your PC if you have a "docomo ID/
Password" for General support site for PC "My
docomo". "dmenu" " お客様サポート " (User
support) " 各種お申込・お手続き " (Various
Applications/ Procedures) (Japanese), you can
change the security code by yourself.
For information about "My docomo" and " お客様サ
ポート " (User support), see P. 215 of this manual.
● PIN1 code
The miniUIM has a settable security code, PIN1
code. It is set to "0000" (four zeros) at the time of
subscription, but you may subsequently change it.
A PIN1 code is a 4- to 8-digit number (code) that is
entered to confirm the user when the miniUIM is
inserted in the terminal or the terminal power is
turned on. It is intended to prevent unauthorized
use of the miniUIM by a third party. Entering PIN1
code makes the terminal operable.
If you want to use a miniUIM that has been used on a
different terminal, use the same PIN1 code that had
been set on the different terminal. The code is
"0000" if the default setting has not been changed.
If you enter the incorrect PIN1 code 3 times in
succession, the PIN1 code is locked. Unlock using
"PUK code".
158
Settings
● Enabling the miniUIM's PIN
● PIN unblocking key
Set to require entry of the PIN1 code when power
is turned on.
The PIN unblocking key (PUK code) is an 8-digit
number used to unblock the PIN1 code. You cannot
change the key yourself.
If you enter the incorrect PUK code 10 times in
succession, the miniUIM is locked. If this happens,
please contact a docomo Shop.
■Unblocking the PIN1 locked miniUIM
• If a message is displayed that PIN1 is locked, enter the
"PUK code", "desired PIN1 code", and "confirm
desired PIN1 code" after the message appears.
1 From the Home screen, "Settings"
Uncheck the "Simple menu"
checkbox "Security" "Set up
SIM card lock"
2 "Lock SIM card" enter the PIN1
code "OK"
● To change the PIN1 code
• The "SIM card lock" must first be enabled.
1 From the Home screen, "Settings"
Uncheck the "Simple menu"
checkbox "Security" "Set up
SIM card lock"
2 "Change PIN1 code" enter the
current PIN1 code "OK" enter
the new PIN1 code "OK" enter
the new PIN1 code again "OK"
159
Settings
Speech output···Set when to output search
results using audio as "Always", "Informative
only" or "Hands-free only".
Language & Input
This allows you to change the language and
configure keyboard settings for using the terminal.
Set voice search and the function to convert from
texts to voice.
1 From the Home screen, "Settings"
Block offensive words···Set this to block the
display of inappropriate results of voice
recognition.
Hotword detection···Say Google to launch
voice search.
Download offline speech recognition···
Downloads voice recognition data to enable
usage of voice input when offline.
Uncheck the "Simple menu"
checkbox "Language & input"
Bluetooth headset···Records audio with the
Bluetooth headset.
2 Select any item:
Text-to-speech output···Set information about
text reading.
Language···Change the language used on the
terminal.
Spell checker···Set whether or not to check
spelling during entry. Tap
to set the operation of
the spell checker.
Default···Set an entry method used.
Pico TTS···Set the installed voice synthesis
engine. Tap
to set the operation of the
voice synthesis engine.
Speech rate···Set the speed to read texts.
Listen to an example···Play synthesized
voice samples.
Android keyboard (AOSP)···Set the Android
keyboard. Tap
to set Android keyboard
operation.
ATOK···P. 50
Google voice typing···Set whether or not to use
Google voice entry. Tap
to set the operation of
voice entry.
Moji-Henshu···Sets whether docomo character
editing is used. Tapping
enables confirmation of
application information.
Voice Search···Set voice search.
Language···Set a language to recognize the
entered voice.
160
Settings
Backup & Reset
Accounts
Set backup of Android applications and delete the
data.
You can configure accounts for online services such
as Google and Microsoft® Exchange ActiveSync® to
synchronize data and exchange data between the
terminal and servers for the various services. If set
to synchronize automatically, the terminal is
automatically updated with update information via
the web.
Adding an account → P. 57
Auto-sync data → P. 145
1 From the Home screen, "Settings"
Uncheck the "Simple menu"
checkbox "Backup & reset"
2 Select any item:
Backup my data···Backs up the application
settings and data to the Google server.
Setting accounts
Backup account···Display Google accounts for
which information is backed up.
Set synchronize, delete accounts.
1 From the Home screen, "Settings"
Automatic restore···Configure the setting to
restore backup setting and the data when you
reinstall an application.
Phone refresh···Turns the power off and on again
to enable fresh usage of the terminal. This function
can sometimes be used to improve operation when
it becomes slow.
Uncheck the "Simple menu"
checkbox Tap the account type
2 Tap the account setting item
Factory data reset···The data in the terminal is
deleted and restored to the initial condition. If a
check mark is inserted for "Erase SD card", the
data contained in the microSD card is also erased.
• The setting item varies depending on the
account type.
■ Start synchronization manually
Tap that account that you want to synchronize
" " "Sync now"
Data transfer mode···Set the mode to use the "iC
transfer service".
161
■ Deleting an account
Tap the account you want to delete " "
"Remove account" "Remove account"
• It is not possible to delete a docomo account.
Settings
Date & Time
Accessibility
You can set the terminal's clock.
Configure user-aide applications which react with
sound or vibration when operated.
Accessibility applications are not registered at time of
purchase. You must download and install compatible
applications beforehand from Play Store or other sites
before you can set "Accessibility".
1 From the Home screen, "Settings"
Uncheck the "Simple menu"
checkbox "Date & time"
2 Select any item:
1 From the Home screen, "Settings"
Uncheck the "Simple menu"
checkbox "Accessibility"
Automatic date & time···Set the time to be
adjusted automatically.
Automatic time zone···Set whether or not to use
the time zone provided by the network.
NOTE
Because the text readout engine that is preset at
Set date···Set the date manually.
purchase does not support Japanese, a Japanesecompatible engine must be downloaded and installed
on Google Play or other source.
Set time···Set the time manually.
Select time zone···Configure the time zone
manually.
Use 24-hour format···Set the clock to 12-hour
display or 24-hour display.
Choose date format···Set the date display format.
NOTE
In order to set the date, time and time zone manually,
remove check mark from "Automatic date & time"
and "Automatic time zone".
162
Settings
About Phone
You can check the terminal's state, update
software, or upgrade the OS.
1 From the Home screen, "Settings"
Uncheck the "Simple menu"
checkbox "About phone"
2 Select any item:
Software Update···P. 194
Upgrade Android software···Installs a new
version of the terminal’s operating system. → P. 197
Status···Check battery level, your phone number,
etc.
Legal information···Check the open source
license and Google usage agreement.
Certification information···Shows credentials.
Model number···Check the terminal's model
number.
Android version···Check the Android version.
Baseband version···Check the baseband version.
Kernel version···Check the kernel version.
Build number···Check the build number.
163
Settings
File Management
microSD Card (External storage)
Storage Configuration
Terminal (Internal storage)
Folders are configured in the terminal as shown
below.
The folder configuration can be confirmed by
connecting to a computer (P. 173), and using file
manager (P. 167), etc.
Alarms
Stores alarm sound data.
Android
Stores data used for each
application.
DCIM
Stores photos and videos taken
using the camera.
Download
Stores data downloaded from the
browser.
Movies
Stores video data transferred from
a computer via MTP mode.
Music
Stores music data transferred from
a computer via MTP mode.
Notifications
Stores notification sound data.
Pictures
Stores screenshot image data.
Podcasts
Stores podcast data.
Ringtones
Stores ring tone data.
You can save data in the terminal to microSD card
or transfer data on a microSD card to the terminal.
The N-06E supports a microSD card of up to 2 GB, a
microSDHC card of up to 32 GB, and a microSDXC
card of up to 64 GB (as of June 2013).
Refer to the following website for information on the
latest operation check information, including microSD
card manufacturers and card capacities.
http://www.n-keitai.com/guide/faq/ (in Japanese only)
(Select the model name in the " よくある質問 "
(Frequently Asked Questions) screen, and select
" データ管理 " (Data Management).)
Given information is the result of operation checks,
and is not a guarantee of operation. For microSD
cards other than those given, inquire with the
manufacturer of each microSD card.
The terminal supports microSD cards rated at speed
classes up to class 10.
164
File Management
Before using a microSD card
■Inserting
1 Push the microSD card into the
You may be unable to use your microSD card if it
was formatted by another terminal or by a PC. Be
sure to format using the N-06E only. → P. 152
Note that formatting the microSD card deletes all data
in it.
microSD card slot until a "click"
sound is heard
Be sure to make a backup or otherwise separately
store data saved to a microSD card. If saved data
becomes lost or is altered, DOCOMO will not be held
liable.
Do not turn off the power while the microSD card is
being accessed. The data may be destroyed or the
card may no longer function properly.
Data from another device saved to microSD card may
not be displayable or playable on the terminal. Data
saved to microSD card from the terminal may also not
be displayable or playable on another device.
Before inserting or removing the microSD card, be
sure to turn off the power, remove the back cover
(P. 28), and remove the battery pack (P. 37). Hold the
terminal firmly in your hand.
microSDXC cards can only be used in devices that
support SDXC. Do not insert a microSDXC card in a
device that does not support SDXC, as this may
damage the data saved to the microSDXC card.
If data on a microSDXC card is damaged, the
microSDXC card needs to be initialized in a device
that supports SDXC before it can be used again (this
deletes all data on the microSDXC card).
To copy data to or from a device that does not
support SDXC, use a card that complies with the
specifications of that device (microSDHC card,
microSD card, etc.).
165
• Insert the microSD card with the metal terminals
facing down, and be sure to insert it straight and
slowly. Lock the card in place by pushing it in
until a "click" sound is heard.
microSD card slot
File Management
■Removing
Managing Files
1 Push and release the microSD card
in the direction of the arrow
• The microSD card will protrude slightly. Please
note that the microSD card may spring out
quickly when released.
• Remove the microSD card straight and slowly.
Still images, video, music, documents or other data
stored in internal storage or microSD card can be
displayed, played back and managed.
Viewing and playing files
1 From the Home screen, "Apps"
"File Manager"
2 Tap the folder you want to use
■ Viewing or playing back files or folders in
the microSD card
"sdcard1"
■ Viewing or playing back files or folders in
the internal storage
"sdcard0"
3 Tap the file that you want to view
or play back
• The file is opened or played back.
■ When multiple applications are displayed
Select the application "Always" / "Just once"
• The file is opened or played back using the
selected application.
■ To close the opened file or playback
"
"
166
File Management
Using File Manager
Data Box
1 From the Home screen, "Apps"
"File Manager"
You can display and manage images, videos, music
and other files by type. You can copy or move them
to or delete them from microSD cards, etc., change
their names or sort them into groups (folders). You
can also start 1Seg.
<Example: Displaying image data>
2 Move to the file or folder you
want to use
• Tapping
opens the "sdcard1" folder,
"sdcard0" folder, or other folder.
• Tapping
moves to a folder that is one level
higher.
3"
1 From the Home screen, "Apps"
"Data Box"
" Select any item:
2 "Pictures"
Create folder···Creates a new folder.
■ Copying or moving data
" " "Copy" or "Move" Tap the data you
want to copy or move "Copy" or "Move" Tap
the place you want to copy or move it to "OK"
Copy···Copies files or folders.
Check the files or folders you want to copy
"Copy" Move to copy destination "Paste"
Move···Moves files or folders.
Check the files or folders you want to move
"Move" Move to destination "Paste"
■ Deleting data
" " "Delete" Tap the data you want to
delete " Delete" "OK"
Delete···Deletes files or folders.
Check the files or folders you want to delete
"Delete" "OK"
Rename···Change the names of files and folders.
Tap the file and folder whose name you want to
change Enter the name "OK"
Detail info···Check detailed file and folder
information.
Tap the file or folder you want detailed
information on "OK"
■ Changing the name of data
" " "Rename" Tap the data for which
you want to change the name Enter a name
"OK"
■ Sorting data into a group (folder)
" " "Arrange by group" "OK" Tap the
data you want to sort into a group "Arrange by
group" Tap the group
• To create a new group, tap "Create a new
group".
■ Displaying data in the file manager
" " "View in File Manager"
167
File Management
■ Sorting data
" " "Sort" Tap the sort method "OK"
■ Displaying content information
" " "Content information" Tap the data
whose information you want to display "Close"
after confirming the information
■ Displaying memory information
" " "Memory information" "Close" after
confirming the information
3 Tap the image that you want to
display
NOTE
Groups can only be used with Data BOX (Groups
cannot be displayed in the Gallery or File Manager).
You can use various types of operation by touching
and holding a file such as images and videos, data and
groups.
Name changing and group (folder) division functions
are not supported for music data.
To view 1Seg recording data, tap "1Seg" to start the
1Seg application and view the recording data within
the application.
168
File Management
Data Communication
Infrared Data Exchange
The terminal can exchange data such as images,
Phonebook, sp-mode mail, schedule, and memo
information with another terminal that features
the infrared data exchange function.
Be sure the infrared data ports are aligned in parallel.
Do not place anything between the terminals or block
their infrared data ports.
If the infrared data port has any dirt on it, wipe it off
with a soft cloth so as not to damage the port. If the
port is dirty, this may cause the infrared data
exchange to fail.
Place the terminals within approx. 20 cm during
infrared data exchange. Do not move the terminals
until a message appears indicating exchange is
complete.
The terminals may not be able to communicate
normally under direct sunlight, fluorescent lighting, or
near infrared devices due to the effects of such light.
Data exchange may not be possible due to issues with
the other terminal.
Infrared data port
15°
15°
Within approx. 20 cm
Sending an entry by infrared data
exchange
<Example: Sending a Gallery image>
1 From the Home screen, "Photo"
2 Display the image you want to
send " " "See all"
"Infrared"
• Tap
when
is displayed.
• Touch the touch panel to display
/
if they
are not displayed.
• Switch the receiving terminal to reception
standby.
169
Data Communication
3 "OK"
Receiving an entry by infrared data
exchange
• Point the infrared data port at the other
terminal.
1 From the Home screen, "Apps"
4 "OK"
"Infrared"
Sending all entries by infrared data
exchange
2 "Receive"
• Prepare the sending terminal to send.
<Example: Sending Phonebook entries>
3 "OK"
1 From the Home screen, "Apps"
• Point the infrared data port at the other
terminal.
"Infrared"
4 "OK" "OK"
2 "Send all" "Phonebook"
■ Sending sp-mode mail
"sp-mode mail" "Inbox" / "Sent" / "Unsent"
■ Sending schedule and memo
"Schedule&Memo"
3 "Start" Enter your docomo apps
password "OK" Enter your
authentication password "OK"
• Switch the receiving terminal to reception
standby.
Receiving all the entries by infrared
data exchange
1 From the Home screen, "Apps"
"Infrared"
2 "Receive all"
3 Enter your docomo apps password
"OK" Enter your
authentication password "OK"
4 "OK"
• Point the infrared data port at the other
terminal.
5 "OK"
• Prepare the sending terminal to send.
4 "OK"
• Point the infrared data port at the other
terminal.
5 "OK" "Save"
170
Data Communication
Receiving by Bluetooth communication
Bluetooth Communication
1 Send the file from the sending
You can use the Bluetooth communication function
for wireless exchange of data with another
Bluetooth device.
Connecting to a Bluetooth device → P. 140
terminal
•
2 Open the Notifications panel and tap
the notification for the received
Bluetooth file "Accept"
Sending by Bluetooth communication
• Check that the file is received from the
Notifications panel, and save the file.
<Example: Sending a Gallery image>
1 From the Home screen, "Photo"
2 Display the image you want to
send "
NOTE
When exchanging data with a device that has a
different Bluetooth profile may prevent exchange of
data.
" "Bluetooth"
• Tap
when
is displayed.
• Touch the touch panel to display
are not displayed.
/
appears in the status bar.
if they
3 Tap the Bluetooth device you are
sending to
171
Data Communication
2 "Android Beam" Tap "Off" to
turn the function "On"
NFC Communication
• Enable the Android Beam function on the
destination terminal.
NFC (Near Field Communication) is an international
standard set of short-range wireless data
communication technologies defined by ISO
(International Organization for Standardization).
The terminal supports contactless IC card
functionality, reader/writer functionality, peer to
peer (P2P) functionality, and other NFC features.
Data can be exchanged with other supported
devices using the NFC function.
Points to note when waving the terminal over
compatible items. → P. 106
3 Display the content (website, map,
etc.) that you want to transfer
4 Touch the e marks of the
terminals together
• When the source terminal detects the
destination terminal, you will hear a notification
sound and see a "Touch to beam" message.
5 Tap the transfer screen
Android Beam
• The content is transferred to the recipient
terminal.
Check the "Reader/Writer,P2P" (P. 105) checkbox
lets you send/receive data to/from other terminals
using the NFC function. Android Beam makes it
possible to transfer open websites, maps, and other
contents between terminals by simply touching
their e marks together.
This feature is available only when there is a check
mark in the "Reader/Writer,P2P" checkbox.
Some applications may not support Android Beam. The
data that terminals can send/receive also varies
according to the application in use.
The terminal may not be able to communicate with all
NFC-compatible terminals.
It may take some time to transfer large files.
NOTE
The NFC Reader/Writer and P2P functions are not
usable when an AC adapter or the microUSB cable is
connected.
1 From the Home screen, "Settings"
Uncheck the "Simple menu"
checkbox In WIRELESS &
NETWORKS, "More..." "NFC/
Osaifu-Keitai settings"
172
Data Communication
Connecting to an External Device
Using data in the internal storage or
microSD card
Connecting to a PC
The Micro USB Cable 01 (optional) can be used to
connect the terminal and a PC to enable loading of
the data in the internal storage or microSD card
from a PC.
Connecting the terminal and a PC
Connect the terminal and a PC with the Micro USB
Cable 01 (optional).
Check the orientation of the USB plug (front/back)
carefully, and insert/remove the microUSB cable
horizontally. → P. 41
1 Connect the terminal to a PC using
the microUSB cable
• If the USB mass storage screen is displayed, tap
"Turn on USB storage". Operations 2 to 4 are
not required. Use the PC to view the data on the
microSD card.
NOTE
Connect the USB plug of the microUSB cable directly
to the USB port of the PC. If the cable is connected via
a USB HUB or USB extension cable, a malfunction may
occur.
Do not unplug the microUSB cable while data is being
transferred. Doing so may damage the data.
2 From the Home screen, "Settings"
Uncheck the "Simple menu"
checkbox In PHONE SETTINGS,
"More..." "Manage storage"
3"
" "USB computer
connection"
4 "USB Mass Storage" Open the
Notifications panel, "USB
connected" "Turn on USB
storage"
• Use the PC to view the data on the microSD
card.
■ Connecting with media devices (MTP)
"Media device (MTP)"
• Enables data stored on the terminal memory and
microSD card to be copied or moved.
173
Connecting to an External Device
■ Connecting with cameras (PTP)
"Camera (PTP)"
• Enables images and other camera data taken
with the terminal to be copied, moved and
transferred to a PC.
Safely removing the microUSB cable
1 Check that no operations on the
terminal's files are being
performed at a PC
2 Remove the microUSB cable
■ When USB mass storage is activated
Open the Notifications panel, "Turn off USB
storage" "Turn off USB storage"
• Execute "Safety Remove Hardware" (Safe
uninstallation of the hardware) on your PC.
Using DLNA-compatible
devices
You can play images, videos, and music content
data saved in the terminal or microSD card on a
DLNA (Digital Living Network Alliance) compatible
TV, PC, or other device. You can also play data from
a DLNA- compatible PC, BD recorder, or network
attached storage (NAS), etc., using the terminal.
The terminal must be connected to the same Wi-Fi
network as the DLNA-compatible devices in order to
communicate with the devices. → P. 55
See the instruction manual for your DLNA-compatible
device for information on how to configure the
device.
If you are starting "Beam" for the first time, please
download "Twonky Beam."
Playing contents data from the
terminal on a DLNA-compatible device
1 From the Home screen, "Apps"
"Beam"
2"
" "Settings" "Configure
Media Sharing Settings" Check
the checkbox for the contents that
you want to share "Save"
• Check the "Device Access Settings" checkbox to
select "Configure Media Sharing Settings".
3 Control the data of the terminal
from a DLNA-compatible device
174
Connecting to an External Device
Playing contents on the terminal or a
DLNA-compatible device
1 From the Home screen, "Apps"
"Beam"
2 Slide left and tap the terminal or
the player that you want to use
3 Select the contents that you want
to play
Wireless Screen
Configure the terminal to output on-screen
information and audio on a Wi-Fi Miracastcompatible external device.
1 Configuring an external device to
connect to the terminal
2 From the Home screen, "Settings"
Uncheck the "Simple menu"
checkbox In PHONE SETTINGS,
"More..."
• You can tap
or search for contents from the
Beam home screen.
3 "Wireless Screen" Read through
the precautions and tap "OK"
• A list of external devices that you can connect to
is displayed.
4 Tap the external device that you
want to connect to Read
through the data communication
precautions and tap "OK"
■ Disconnecting
Tap the connected external device "OK"
NOTE
Radio wave interference may affect your terminal's
video performance when there are many Wi-Fi access
points in the vicinity, or there is a wireless device using
the same frequency nearby. If you think that your
terminal may be experiencing some radio wave
interference, try moving it closer to the target device
or away from other Wi-Fi access points.
175
Connecting to an External Device
Using Wireless Screen when a Bluetooth device is also
in use may affect audio/video performance and
prevent pairing. Users are recommended to turn off
Bluetooth devices when using Wireless Screen.
Move away from the device causing the interference
(computer, microwave, etc.).
Device-to-device distance, interference-causing
obstacles, device types in use, signal quality, line
congestion, and other factors may affect video
performance and/or disrupt communication.
Wireless Screen may not be compatible with all
applications.
* Wireless Screen will disconnect if it encounters an
incompatible application or content type.
* Non-preinstalled applications may not output
correctly.
* Wireless Screen may not output video content with
a resolution higher than 1280 × 720 (HD size)
correctly.
* The TV application is not compatible with Wireless
Screen.
MHL
The terminal can output audio and on-screen
content to an external device via an MHL cable
(optional).
● Configuring MHL
1 From the Home screen, "Settings"
Uncheck the "Simple menu"
checkbox In PHONE SETTINGS,
"More..."
2 "MHL settings"
• Tap "Precautions for use of MHL" and read
through the usage notes.
3 Configure the appropriate settings
accordingly
NOTE
The terminal does not support a resolution of
720 dots (W) × 576 dots (H) at 50 Hz.
Connection and use of MHL may affect reception
depending on the usage environment.
Depending on the usage environment, the terminal
may not be able to charge fully while using the MHL
feature.
MHL may not be compatible with all applications.
* MHL output will stop if it encounters an
incompatible application or content type.
* Non-preinstalled applications may not output
correctly.
* The TV application is not compatible with MHL
output.
The MHL cable can only be connected to external
devices with an MHL In terminal.
176
Connecting to an External Device
External output is also possible with an HDMI
conversion cable. An external device with an HDMI In
terminal is required when using an HDMI conversion
cable.
177
Connecting to an External Device
Using Overseas
Overview of International
Roaming (WORLD WING)
Services Available Overseas
Communication
service
The WORLD WING international roaming service
allows you to use the same domestic phone
number and email address in the service areas of
overseas operators affiliated with DOCOMO. You
can use the call and SMS functions without
changing settings.
■Available network
The terminal is classified in Class 4. It can be used in 3G
network and GSM/GPRS network service areas, as well
as in countries and areas supporting 3G850MHz/
GSM850MHz network. Check the areas where the
terminal can be used.
Use 3G or GPRS network overseas as Xi is out of the
area.
Before usage overseas, see the following items.
• "Mobile Phone User's Guide [International
Services]"
• DOCOMO "International Services website"
3G
3G850
GSM/
GPRS
Calling
○
○
○
SMS
○
○
○
Email*
○
○
○
Browser*
○
○
○
( ○ : Available)
* To use data communication during roaming, insert a
check mark for "Data roaming". → P. 181
NOTE
Some services are not available depending on the
overseas operator or network being used.
NOTE
For a country code, international call access code,
universal number international prefix, and information
about countries, regions, overseas operators that you
can access, see "Mobile Phone User's Guide
[International Services]" or the DOCOMO
"International Services website".
178
Using Overseas
Preliminary Settings
Checks Before Using the
Terminal Overseas
Checks to do before departure
Before use overseas, check the following while you
are still in Japan.
■Your contract
Check whether you have applied for WORLD WING. For
more details, contact "General Inquiries" at the last
page of this manual.
■Charging
To charge your phone when traveling overseas, use the
AC Adapter 03, AC Adapter 04 or AC Adapter N04 (all
optional).
■Charges
Overseas usage charges (call and packet
communication) are different from those in Japan.
Some applications make communications
automatically and may incur high communication
charges. Please confirm the application's behavior
with its suppliers.
■About network services
If you are subscribed to the network services, you can
operate the Voice mail service, Call forwarding service,
and Caller ID display request service, etc. overseas.
However, some network services are unavailable.
To use network services overseas, you must set
"Remote operation settings" (P. 82) to "Activate
service". You can also set "Remote operation
settings" once reaching your destination.
From the Home screen, "Settings" Uncheck the
"Simple menu" checkbox "Call Settings"
"Roaming settings" "Network service" "Remote
operation(charged)"
For more information, see "Mobile Phone User's
Guide [International Services]".
The network services, even if they can be set on/off,
may not be available depending on the overseas
operator you connect.
179
Using Overseas
Checks to do in the country you stay
When you arrive overseas, the terminal
automatically connects to an available network
operator when it is powered on.
■About connections
The terminal automatically selects the optimal network
when you enable "Choose automatically" for "Network
operators" in the "Mobile networks" setting.
If using a communication provider that provides fixedrate services in the country or region, an upper limit is
set on the amount off packet communication charges
that you can use when overseas. To use the packet flatrate service, you are required to subscribe to the
domestic packet communication service. For details, see
"Mobile Phone User's Guide [International Services]" or
the DOCOMO "International Services website".
■About screen display
indicating international
The status bar displays
roaming.
The name of network operator you are connecting is
shown on Notifications panel.
■The date and time
When ticks have been added to "Automatic date &
time" and "Automatic time zone", the terminal will
receive information on the time and time difference
from the overseas operator's network and correct this
data within the terminal. → P. 162
Automatic date and time setting may not work
properly depending on the network of the overseas
operator. Set manually in such a case.
The timing of these changes varies depending on the
overseas operator.
■Inquiries
• If the terminal or miniUIM is lost or stolen overseas,
contact DOCOMO immediately from your current
location and carry out the procedure to suspend
usage. For contact information, refer to the end of
this manual. Please note that you are liable for any
call or communication charges incurred after the loss
or theft of the terminal.
• You will need the country's international call access
code or universal number international prefix if calling
from a land-line phone from overseas.
After returning to Japan
When you return to Japan, the terminal
automatically connects to the DOCOMO network.
If it is unable to connect, change the following
settings.
• Set "Network Mode" to "LTE/3G/GSM (Auto)".
→ P. 181
• In the settings of "Network operators", set to
"Choose automatically". → P. 181
180
Using Overseas
Network Settings for Use
Overseas
Making/Receiving Calls while
at Destination
The terminal is configured to automatically detect
and switch the network mode, operator, etc. by
default, but you can also manually switch.
Making calls to other countries
(including Japan) while overseas
1 From the Home screen, "Settings"
"More..." Uncheck the "Simple
menu" checkbox In WIRELESS &
NETWORKS, "More..." "Mobile
networks"
■ Configuring Network Mode
"Network Mode" "LTE/3G/GSM (Auto)"/
"LTE/3G"/"GSM"
■ Setting an operator
"Network operators"
• Search and view the available networks.
• The operator names that are displayed may vary
depending on the setting of the "Network
Mode".
• If an error occurs in a network search, remove
the check mark from "Data enabled", and try
again. → P. 146
• At purchase, "Choose automatically" is set.
• To set manually, select the network for the
displayed communication provider.
You can use the international roaming service to
make calls to other countries while overseas.
1 From the Home screen, "Phone"
2 "Dial"
3 Enter + (touch and hold "0")
enter the country code enter the
area code (city code) enter the
number
• If the area code starts with a "0", omit the first
"0" when entering the number.
You may need to dial "0" at the beginning of
the number for calls to some countries and
regions, such as Italy.
4"
"
■ Activate data roaming
Mark the "Data roaming" checkbox Check
the information in the notification screen, and
select "OK"
181
Using Overseas
Making domestic calls while overseas
● Using international dial assist
You can easily make an international call to a
country registered with "International dial assist",
when calling from your destination to another
country, using the international roaming service.
You must set "International dial assist" beforehand.
→ P. 182
Only enabled when a number begins with "0".
Dial the other party's land-line phone number or
mobile phone number in the same way as in Japan.
→ P. 76
Making calls to WORLD WING users
overseas
1 From the Home screen, "Phone"
2 "Dial" enter the number
"
When the other party that you are calling is a
WORLD WING user, make an international call to
Japan, even if the other party is in the country in
which you are staying.
Dial "+" and "81" (country code of Japan) first and
then dial the mobile phone number omitting the "0"
at the beginning, as when you make an international
call to Japan, because the call is routed through Japan
regardless of where the other party is.
"
3 "Converted number"
• "+" and "Country code" are added and the
international call is made.
■Setting international dial assist
1 From the Home screen, "Settings"
Uncheck the "Simple menu"
checkbox "Call Settings"
"Roaming settings"
"International dial assist"
2 Select any item:
Automatic conversion function···Set whether to
make an international call using the international
dial assist setting.
Country code···Register the country/region name
and country code used when using the
international dial assist setting.
International prefix···Register the international
prefix to use with international dial assist.
182
Using Overseas
Receiving calls while overseas
Configuring settings for
international roaming
You can receive calls overseas in the same way as
when in Japan.
NOTE
When you receive a call while using the international
roaming service, the call is forwarded internationally
from Japan, regardless of the country from which the
call is made. The caller incurs call charges for the call
to Japan of the country from which the call is made,
and the receiver incurs incoming call charges.
● Procedure for the other party to make a
call to you
You might not be able to configure settings
depending on the overseas operator.
1 From the Home screen, "Settings"
Uncheck the "Simple menu"
checkbox "Call Settings"
"Roaming settings"
2 Select any item:
■Having the other party call you overseas from
Japan
Have the other party call you simply by dialing your
number in the same way as when you are in Japan.
■Having the other party call you overseas from
outside Japan
You need to have the other party dial the international
access code + "81" (Japan country code) regardless of
the destination.
International access code-81-90 (or 80) -xxxx-xxxx
183
Restricting incoming calls···Restrict calls from
arriving overseas.
Incoming notification while roaming···SMS
notifies you of missed calls overseas.
Roaming guidance···Informs callers that you are
overseas.
International dial assist···P. 182
Network service···When you select the following
services, a call is made to connect to the voice
guidance. You can set information according to the
voice guidance.
• Remote operation (charged)
• Caller ID notification request service (charged)
• Roaming call notification (charged)
• Roaming guidance (charged)
• Voice mail (charged)
• Call forwarding (charged)
Using Overseas
Appendix/Index
Introduction to Options and
Related Devices
Troubleshooting (FAQs)
Troubleshooting
You can expand the range of the terminal's uses, in
both the personal and business realms, by
combining it with various optional devices. Some
products may not be available in certain areas.
For more details, please contact a service counter
such as a docomo Shop.
For details on optional devices, see the related
instruction manuals.
• Battery Pack N38
• Back Cover N66
• Desktop Holder N44
• Earphone Cable (with Antenna) N01
• AC Adapter 03/04
• AC Adapter N04
• AC Adapter Converter Plug TypeC 01
• Carry Case 02
• DC Adapter 03
• Wireless Earphone Set 02/03
• DriveNetCradle 01
• Micro USB Cable 01
• Bone conduction microphone/receiver 02
• Pocket Charger 01/02
• L-03E*
• HDMI Conversion Cable SC01
• HDMI Conversion Cable L01
* It supports the charger function for supplying power
to the terminal.
First, check whether a software update is required by
connecting to the network. If required, update the
software. → P. 194
If a symptom does not improve after its cause has
been identified, contact "Repairs" (in Japanese only)
at the last page of this manual or a repair counter
specified by DOCOMO.
■Power supply
Power does not turn ON
Is the battery pack inserted correctly?
P. 36
Is the battery pack charged?
P. 38
■Charging
184
Cannot charge (Notification LED does not light or blinks)
Is the battery pack inserted correctly?
Is the adapter power plug or cigarette
lighter plug securely connected to an
electric outlet or cigarette lighter socket ?
P. 36
-
Appendix/Index
Make sure that the microUSB plug is
properly connected to the terminal when
using the AC Adapter 04 (optional). If
you are using the included desktop
holder, is the microUSB plug properly
connected to the desktop holder?
P. 40
P. 39
If you are using the included desktop
holder, are the charging terminals of the
charger dirty? If they are dirty, use a dry
cotton swab to clean the terminals.
P. 39
Check the following points if using a PC
to perform charging.
• Is the PC power turned on?
• Disconnect all other USB devices.
• Connect the USB cable directly to the
USB port of a PC that is receiving
power.
• Has the terminal battery depleted?
Connect to a PC after charging for a
while with an AC adapter, etc.
• Are the USB plug of the Micro USB
Cable 01 (optional) and microUSB plug
firmly inserted?
• The terminal cannot be charged using
the included desktop holder.
P. 41
If you make a call, perform data
communication, or use some other
function for a long time while charging,
the terminal may become hot and
charging may be stopped. In this case,
charge again after the terminal cools
down.
■Operation of the terminal
Becomes hot during operations or charging
The terminal, battery pack, or adapter
may become hot during operation or
charging, or if you use the camera
function or view/record 1Seg programs
for a long time while charging. This is not
an operation problem, and so you can
continue to use them.
-
If you use the camera function or view/
record 1Seg programs for a long time,
the terminal may become hot and the
camera function or 1Seg may shut off.
Wait a while before restarting to use the
camera function or 1Seg.
-
Battery usage time is short
Has the terminal been out of the network
service area for a long time?
As the terminal searches for radio waves
in order to enable communication when
out of the network service area, more
electricity is consumed than usual.
-
-
The battery pack usage time varies
depending on the usage conditions and
the degradation level.
P. 38
The battery pack is a consumable. The
available usage time shortens every time
the battery pack is recharged.
If the usage time significantly reduces
compared to the time of purchase even if
the battery pack is fully charged,
purchase the specified battery pack.
P. 38
Power turns off or automatic restart occurs
If the battery pack terminal is dirty, the
contact may become poor and the power
may be turned off.
If dirty, wipe the battery pack terminals
with, for example, a dry cotton swab.
185
-
Appendix/Index
No operation occurs by tapping or pressing a key
The clock shows wrong time
Is the terminal turned off?
P. 42
Are you touching the touch panel
correctly?
P. 43
Is the screen locked?
P. 42
Is standby mode set? Press P for
at least two seconds to cancel standby
mode.
P. 42
If power is kept on for a prolonged time,
the clock may show the wrong time.
Check that the "Automatic date & time"
is set, and turn the terminal off then back
on in a location with good signal
reception.
Is the terminal in sleep mode? Press the
P or S key to cancel sleep
mode.
P. 42
Operation of the terminal is unstable
May be due to an application installed
after purchasing the terminal. If
operation improves after launching in
safe mode, operation can sometimes
then be improved by uninstalling an
installed application.
* Safe mode applications to be launched in
a state close to that of time of purchase.
■Launching safe mode
1 While the power is ON, press and hold
P (at least 2 seconds)
2 Touch and hold "Power off"
3 "OK"
* "Safe mode" appears at lower left when
safe mode is launched.
* To end safe mode, turn power off and
then back on.
• Back up important data beforehand
before using safe mode.
• Widgets that you have created yourself
may be erased.
• Since safe mode is not a normally
launch state, end safe mode to enable
normal use.
Tapping does not work properly
Do you tap the screen with gloved
hands?
P. 43
Do you tap with the tip of a fingernail, or
is there any foreign matter between your
hand and the screen?
P. 43
Is the display covered with a protective
sheet? Some types of protective sheets
prevent correct operation.
P. 43
Screen response to tapping or key press is slow
The screen response may slow down if
large amounts of data are saved in the
terminal or transferred between the
terminal and the microSD card.
-
Is the proximity sensor blocked by your
fingers or a seal?
P. 34
The miniUIM is not recognized
Is the miniUIM inserted in the right
direction?
P. 162
-
P. 35
186
Appendix/Index
The character entry field disappears on the horizontal
display during character entry
Have you set "Adjust keyboard size" and
"Font size" to larger values? Adjust them
by setting smaller values.
P. 51
Have you unchecked "Auto full screen
(horizontal)"? Check it to display the
character entry field.
P. 51
■Telephone call
Cannot make a call with
shown
Are you out of the service area or in a
place with poor signal status?
P. 60
Cannot make calls
Check whether the terminal is in airplane
mode.
P. 145
The application does not start. The data is corrupt
The ringtone does not sound
You might have attached/removed the
battery pack without turning off the
power. Uninstall the application and
reinstall it or perform "Factory data
reset".
Is the ringtone volume set to its
minimum?
P. 147
Is the terminal in silent mode?
P. 148
Is call rejection set?
P. 82
P. 83
Is the ring time for the Voice mail service
or Call forwarding service set to "0
sec."?
P. 82
Is the ring time for the Record message
set to "0 sec."?
P. 83
"Call notification settings" set to
"Ringtone is not lit"?
P. 155
P. 161
An application does not properly operate (does not start,
causes errors frequently)
Has any application been disabled?
Enable the disabled application and try
again.
P. 152
Cannot make a call (
does not disappear when you
move, or calls cannot be made or received even when
the signal is strong enough)
Turn the power off and then on, or
remove and reinsert the battery pack or
miniUIM.
You may not be able to make or receive
calls, depending on the type of radio
signal, even when
is shown. Move to
another place and call again.
Is call rejection set?
187
P. 35
P. 36
P. 42
-
P. 82
P. 83
Appendix/Index
Depending on how congested the radio
waves are, it may be difficult to establish
a connection in crowded places due to a
congestion of calls and emails. Move to a
different location or try to call again later.
-
■Sound
During a voice call, the other party's voice is difficult to
hear or is too loud
During a call,
etc. is not displayed/During a call,
nothing is displayed
The proximity sensor may be covered by
something such as the protective sheet,
or it may be in sleep mode. Make sure
the proximity sensor is not covered, or
press S to display
, etc.
P. 34
Has the call volume been changed?
P. 80
Is the earpiece covered with a protective
sheet?
P. 34
Is the earpiece held correctly to your ear?
P. 34
The other party cannot hear / has difficulty hearing me
■Screen
Is the mouthpiece covered with fingers,
etc?
P. 34
Is the mouthpiece held correctly to your
mouth?
P. 34
■Email
The display is dim
Has the time set with "Sleep" elapsed?
P. 148
Email is not received automatically
Has "Brightness" setting changed?
P. 148
Is the terminal in eco mode?
P. 150
Is the inbox check frequency in the email
account settings set to "Never"?
Is "Automatic" set for "Brightness"? If
this is set, the brightness setting changes
based on the surrounding lighting.
P. 148
Is your finger covering the proximity
sensor?
P. 34
P. 91
■Camera
Photos and videos shot with the camera are blurred
Check whether the lens is cloudy or has
dirt on it.
188
-
Is image stabilization set to "OFF"?
P. 118
Is auto focus set to "AF OFF"?
P. 118
When shooting a person, switch auto
focus to "Face detection AF".
P. 118
Appendix/Index
■Using overseas
■1Seg
Cannot view 1Seg
Are you out of the terrestrial digital TV
broadcasting service area or in a place
where airwaves are weak?
Are the channels set?
The terminal becomes unusable while overseas (although
is displayed)
-
P. 113
■Osaifu-Keitai
Cannot use the Osaifu-Keitai
You may not be able to use the OsaifuKeitai function regardless of the NFC/
Osaifu-Keitai lock setting if the battery
pack is removed from the terminal or the
Omakase Lock is set.
-
Is NFC/Osaifu-Keitai lock set?
P. 106
Do you wave the terminal over a reader
with the e mark facing the reader?
P. 106
Have you applied for WORLD WING?
Check the subscription status.
-
The terminal becomes unusable while overseas (
displayed)
is
Are you outside the international
roaming service area or in a place with
poor signal strength?
Refer to "Mobile Phone User's Guide
[International Services]" and DOCOMO
"International Services website" to check
whether a service area or network
operator is available.
-
Change the network settings and
operator settings.
• Set "Network Mode" to "LTE/3G/GSM
(Auto)".
• Set "Network operators" to "Choose
automatically".
P. 181
The terminal may be usable by rebooting.
-
Data communication is not available while overseas
Activate "Data roaming".
P. 181
Suddenly the terminal becomes unusable while overseas
Have you exceeded your maximum call
charge limit?
A maximum call charge limit is preset in
the WORLD WING international roaming
service. If you have exceeded your
maximum call charge limit, you can
restart the services by paying the
accumulated call charges.
189
-
Appendix/Index
■Bluetooth function
Cannot receive calls while overseas
Is "Restricting incoming calls" set to
"Activate restricting"?
P. 183
The terminal cannot find or be connected to a Bluetooth
enabled device
Put the Bluetooth enabled device
(commercial) on standby and register it
on the terminal. If you want to delete a
registered device and register it again as a
new device, you must delete the
registered device from both the
Bluetooth enabled device (commercial)
and the terminal before you register it
again.
No caller ID is displayed/A notified caller ID is different
from that of the caller/Functions that use Contacts data
or caller ID notifications do not work
Even when a caller notifies the caller ID, it
is not displayed on the terminal unless
notified from the network or network
operator used. And, a notified caller ID
may be different from that of the caller
by some networks or networks operators
you use.
Is the "Call notification settings"
set ?
-
Cannot make calls from the terminal when it is
connected to a car navigation, handsfree, or other
external device.
P. 155
If you try calling someone multiple times,
such as when you are out of the service
range or the person does not answer,
calling to that number may be disabled in
certain cases.If this happens, turn the
power of the terminal off and then on
again.
■Data management
Data transfer is not working
Are you using a USB HUB?
If you use a USB HUB, data transfer may
not work properly.
P. 173
P. 165
The AUTO-GPS service information cannot be set
P. 38
P. 153
P. 151
Is the battery power low, or is the AUTOGPS function stopped?
If the AUTO-GPS function is stopped by
the "Low-power operation settings", it
may not be possible to set the AUTO-GPS
service information. In this case, either set
"Low-power operation settings" to "Not
suspend", or enable setting by charging
the battery.
Is the check mark removed from "AUTOGPS"?
P. 153
■Infrared data exchange
Cannot receive all Phonebook data
Is there available space in the main
terminal?
In case of space shortage while receiving
data, data reception is stopped.
-
■Map and GPS functions
Data saved in the microSD card is not displayed
Is the microSD card inserted correctly?
P. 140
190
Appendix/Index
Error message
Smartphone Remote Support
The PIN1 is blocked.
This is displayed when the PIN1 code is
locked. Enter the PIN unblocking key, the
new PIN1 code, and enter the same PIN1
code again for confirmation.
P. 159
SIM card is PUK-locked
This is displayed when the PIN unblocking
key is locked. Contact the docomo Shop
Service Counter.
P. 159
Low on memory
There is insufficient free space in the
terminals. If you continue to use the
terminal in this condition some functions
or applications may not be operable.
Delete data such as unnecessary
applications and media content to ensure
there is sufficient free space.
-
1 Call the Smartphone remote
support center
■ Smartphone remote support center
0120-783-360
Business hours: 9:00 a.m. to 8:00 p.m. (open
all year round)
Please wait for a while (Voice service)
The voice line network is extremely busy.
Wait for a moment and then try the call
once again.
You can receive operation support for terminal
operation and setting by sharing screens on your
terminal with DOCOMO. (in Japanese only)
It is not available if the miniUIM is not inserted, during
international roaming or airplane mode.
Smartphone remote support is a paid service that
requires subscription.
Some operations and settings are not supported.
For detailed information about smartphone remote
support, see the NTT DOCOMO website.
-
2 From the Home screen, "Apps"
" 遠隔サポート " (Remote support)
• When you first use remote support, you need to
accept a " ソフトウェア使用許諾書 "(License
agreement).
Packet communication restricted
Please wait for a while (Data service)
The packet communication network is
extremely busy. Wait for a moment and
then try again.
-
3 Enter the connection number
guided by DOCOMO
• Remote support will start when the connection
has been made.
191
Appendix/Index
After-sales service
Warranty and After-Sales
Service
● For problems with the terminal
Warranty
Be sure to receive a warranty at the time of purchase
of the terminal. Read contents of the warranty,
confirm information such as the "Shop name and
date of purchase" and keep it in a safe place. If
necessary items are not described, immediately
contact the shop of purchase. The warranty for free
repair is valid for one year from the date of purchase.
This product and its accessories are subject to be
modified, in part or whole, for improvement without
prior notice.
Data saved in your contacts, etc. may be modified or
lost due to the malfunction, repair or other handling
of the terminal. You should therefore make a copy of
your contacts data, etc. as a precautionary measure.
*You can save phonebook data, etc. from the
terminal to a microSD card.
*By using Data Security Service (subscription
required), data including phonebook data, etc. can
be backed up.
Before requesting repairs, read "Troubleshooting"
in this instruction manual. If the problem still
persists, contact "Repairs" (in Japanese only) at the
last page of this manual.
● For repairs after inquiry
Bring the terminal to a repair counter specified by
DOCOMO. Repairs are accepted during business
hours of a repair counter. Also, you must bring the
warranty. Note that it may take some days to repair
the terminal depending on the malfunction state.
■During the warranty period
• The terminal is repaired at no charge under the
conditions of the warranty.
• Make sure to bring the warranty for repair. You will be
charged even during the warranty period if the
warranty is not presented or the trouble or damage is
caused by your inappropriate handling (such as
damage to display or connector, etc.).
• You will be charged even during the warranty period
if malfunction is caused by the use of devices and
consumables other than those specified by
DOCOMO.
■Repair may not be possible in the following
cases:
• When inspection finds corrosion due to exposure to
moisture or that an internal board is damaged or
deformed (repair also may not be possible if the case
is cracked or the external connector terminal,
earphone/microphone terminal, or display is
damaged).
* Since these conditions are outside the scope of the
warranty, any repairs, if at all possible, will be
charged.
192
Appendix/Index
■After expiration of the warranty
All repairs that are requested are charged.
■Replacement parts
Replacement parts (parts required to maintain functions)
will in principle be kept in stock for 4 years after
termination of production. However, depending on the
malfunctioning part, repair may not be possible due to a
lack of replacement parts. Even after the stock period
has expired, the repair of some malfunctioning parts
may be possible. You should therefore contact
"Repairs" (in Japanese only) at the last page of this
manual.
Precautions
Never modify the terminal or accessories.
• Doing so may result in fire, injuries or malfunctions.
• The modified terminal may be repaired only if the
owner agrees on that all the modified parts are
restored to the original conditions. However, repairs
may be refused depending on the modifications.
The following cases may be considered as
modifications.
• Put a sticker on portions such as of the display or
keys.
• Glued decorations on the terminal using adhesion
bond, etc.
• Change the parts such as exterior to other than
DOCOMO standard parts.
• Malfunction and damage due to modifications will
be repaired at the owner's expense, even if the
warranty period is still effective.
The model plate must not be removed from the
terminal.
The model plate certifies that the terminal satisfies
technical standards.
It should be noted that if the plate is removed or is
replaced with a different plate, and the original model
plate cannot be verified, it may disqualify the unit
from repairs due to not being able to determine the
technical standards of that particular phone.
Note that the settings and other information may be
reset (cleared) as a result of malfunction, repair or
other handling of the terminal. In this case, make the
settings again.
When the repair is executed, MAC address of Wi-Fi/
Bluetooth address in the terminal may be changed
regardless of repaired part.
Magnetic components are used in the parts of the
terminal that are described below. Do not allow cash
cards or other devices that are vulnerable to
magnetism to come into contact with the phone.
Parts where magnetic components are used: Earpiece
(receiver), near speakers, outer camera
The terminal has waterproof capability, however, if
the inside of the terminal has gotten wet or moist,
immediately power off the terminal and remove the
battery pack from it, and then bring it to the repair
counter as soon as possible. However, note that we
may not repair the terminal depending on the extent
of the damage.
Memory dial (Contacts function) and
downloaded data
When you change the model or repair the terminal,
data that has been imported, downloaded or created
by you may be changed or lost. DOCOMO shall have
no liability for any change or loss of any kind. Under
some circumstances, DOCOMO may replace the
terminal with its equivalent instead of repairing it. The
data stored in the terminal will not be transferred to
the new terminal (some of the data may be able to be
transferred).
193
Appendix/Index
Updating Software
Software Update is a function that connects to the
network to check whether the software on the N06E needs to be updated, downloads update files
when required, and updates the software.
The NTT DOCOMO website provides information
about required software updates.
There are three ways to update the software.
• Auto update: Automatically download update files,
and overwrite it at a preset time.
• Immediate update: Update right away.
• Booked update: The software is updated
automatically at the booked time.
Before updating software
Do not remove the battery pack while updating
software. This may result in a failed update.
Fully charge the battery pack before updating
software. We recommend that the charging cable is
connected while updating software.
Software cannot be updated in the following
circumstances.
• During a call
• Out of service area*
• In Standby mode
• During international roaming*
• Airplane mode*
• During Android version update
• When the date and time are not correctly set
• When the battery level is insufficient for software
update
• When the free space on the terminal is not sufficient
for software update
*You cannot update software during international
roaming or when outside the service area, even if
the Wi-Fi network is connected.
Software update (download, overwrite) may take a
long time.
During a software update, you cannot make or
receive calls, use any communication function, or use
any functions. However, calls can be received during
downloads.
During the update, we recommend that you stay at a
location with a good reception. The software update
may be suspended if reception is poor.
If no update is needed, the message "No update is
needed." appears.
During international roaming or when outside the
service area, a message "When docomo network is
not available, or during roaming, software update is
not available even if Wi-Fi is connected." appears.
SMS messages sent to you during a software update
are stored at the SMS center.
During a software update, information specific to the
customer's N-06E (such as the model and serial
number) is sent to a software update server managed
by DOCOMO. DOCOMO shall not use this
information for any purpose other than software
update.
If the software update fails, the terminal does not
turn on, a message "Software update: Rewrite failed.
Please consult with a repair counter." appears to
inform you, and no further operation may be
possible. In this case, please take the terminal to a
repair counter specified by DOCOMO.
If a PIN code has been set, you will need to enter the
PIN code when you restart the terminal after the
update has been installed.
Do not start any other applications during a software
update.
194
Appendix/Index
● When an update is required
NOTE
You can update software while still retaining data
(such as Phonebook, camera images, email, and
downloaded data, etc.) on the N-06E. However, such
data may not be protected, depending on the state of
the terminal (malfunction, damage, exposure to
water, etc.). It is recommended to back up necessary
data. Please note that some data, such as
downloaded data, cannot be backed up.
(Software update is available) appears in the
status bar once update files are automatically
downloaded.
When the overwrite time arrives while
(Software
update is available) is displayed, the old software is
automatically overwritten, and
(Software update is
available) is no longer displayed.
1 Open the Notifications panel, "
2 Execute the operation
Automatically download update files, and
overwrite it at a preset time.
• "OK": The display returns to the Home screen.
Overwriting starts when the set time arrives.
• "Set time": Booked update → P. 196 "Booked
software update"
• "Start update": Updating immediately → P. 196
"Updating software immediately"
● Configuring automatic software update
The auto update setting is set to "Automatic Update"
by default.
1 From the Home screen, "Settings"
Uncheck the "Simple menu"
checkbox "About phone"
"Software Update"
2 "Configure the software update"
3 "Automatic Update" / "Manual
Update"
"
• The overwrite time is displayed.
Automatically updating software
NOTE
(Software update is available) appears in the status
bar if the software update was not able to launch
when you received the update notice.
If software cannot be overwritten at the time of
overwrite, overwriting starts at the same time on the
next day.
If "Manual update" is set or if the Immediate Update
is running, the software cannot be updated
automatically.
195
Appendix/Index
Updating software immediately
● Display after a software update is
completed
Software updating starts immediately.
There are two methods to start software update:
starting from the overwriting prior notice screen or
starting from the menu.
appears in the status bar. Open the
Notifications panel and tap the notification. A
message notifying you that the software update is
completed appears.
1 From the Home screen, "Settings"
Booked software update
Uncheck the "Simple menu"
checkbox "About phone"
"Software Update"
If you want to book a different time for installing
update files, you can set a time for updating
software beforehand.
2 "Start the software update"
1 Show overwrite start time "Set
"Yes"
• Starting from the overwriting prior notice screen:
Display the overwriting prior notice screen
"Update immediately"
3 "Ready for update. Please refrain
When the booked time arrives, "Ready for update"
screen shows up and the software update starts
automatically in approx. 10 seconds.
NOTE
• Tap "OK" to start overwriting immediately.
• All key operations are disabled during an
update. You also cannot cancel the update.
• When a software update is completed, it restarts
and then, the Home screen appears.
NOTE
appears.
2 Enter the desired time "OK"
● When the booked time arrives
from starting other application.
Estimated time for update: XX mins"
appears. After approx. 10 seconds,
overwriting starts automatically
If an update is not required, "No update is needed."
Time"
All key operations are disabled during an update.
You also cannot cancel the updating process.
If software cannot be updated at the time of
overwrite, software is updated at the same time on
the next day.
Software is not updated at the booked time during a
OS version update.
Even if the start time is specified at the same time as
an alarm, etc., software can be updated.
If the N-06E is turned off at the start time, the
software will be updated when the booked time is
reached the next time after the power is turned on.
196
Appendix/Index
If the message "Software update was suspended
Please check the status of the handset and retry."
appears during a software update, check that the
terminal is not in the following conditions and then
update the software again.
• Out of service area
• During international roaming
• Battery pack is removed
• When the battery level is insufficient for software
update
• Conflict with other functions
If the message "
Software update was suspended
Please check the remaining internal storage capacity
and retry." appears on the status bar during a
software update, check that the capacity of an
internal storage and then update the software again.
Upgrade Android Software
About upgrading Android software
This function checks whether an upgrade of the
terminal’s Android version is required by
connecting to the network. If required, an upgrade
file is downloaded and the Android software is
upgraded. If an upgrade to the Android software is
required, the notification icon on the status bar
( ) and the NTT DOCOMO website provide
information.
The following are applied to the terminal in a
software upgrade:
• Improvement and addition of functions
• Improvement of operability
• Improvement of quality
• Updating of security patches
Always upgrade to the latest version to ensure the
safety of the terminal and make it easier to use.
NOTE
You can upgrade the Android software while still
retaining data saved on the terminal. However, such
data may not be protected depending on the state of
the terminal (malfunction, damage, exposure to
water, etc.). It is recommended that you back up
necessary data beforehand. Please note that some
data cannot be backed up.
197
Appendix/Index
Before upgrading Android software
The previous Android software cannot be restored
after the software upgrade.
Make sure that the battery of the terminal is full
before upgrading.
A miniUIM is required for version upgrades. An spmode contract is required if using packet
communication.
Close all applications before starting the software
upgrade. The Android software upgrade may be
suspended if another application is started during the
upgrade.
Do not power off the terminal or remove the battery
pack during the version upgrade.
No other functions of the terminal can be used during
the software upgrade, including making or receiving
calls.
Software cannot be upgraded in the following cases:
• During a call
• Out of service area
• During international roaming
• In Airplane mode
• When using tethering
• When the date and time are not correctly set
• When the battery level is insufficient
• When the free space in the internal storage is
insufficient
The software upgrade may take a long time.
"Move to a strong signal area and retry upgrading."
is displayed if international roaming is being used or
you are out of the service area.
Some settings are initialized during software
upgrades. Configure these again after the upgrade.
During a software upgrade, information specific to
the terminal (such as the model and serial number) is
automatically sent to DOCOMO’s server. DOCOMO
shall not use this information for any purpose other
than Android software upgrades.
If a PIN code has been set, you will need to enter the
PIN code in the displayed entry screen when you
restart the terminal after the upgrade has been
installed.
If the software upgrade fails and no further operation
is possible, please inquire at a repair counter specified
by DOCOMO.
Downloading the upgrade file
1 From the Home screen, "Settings"
Uncheck the "Simple menu"
checkbox "About phone"
"Upgrade Android software"
2 "Start upgrading"
• Download now (only via Wi-Fi): Downloads the
upgrade file immediately via a Wi-Fi connection.
• Download later (via Wi-Fi or Xi): Downloads the
upgrade file at an automatically set time via a
Wi-Fi connection or packet communication.
• Download later (only via Wi-Fi): Downloads the
upgrade file at a booked time via a Wi-Fi
connection. This is displayed if the upgrade file
cannot be downloaded via packet
communication.
• Do not upgrade: Closes the Android software
upgrade without upgrading the version.
NOTE
"No upgrade is needed." is displayed if the software
on the terminal is the latest version.
If the download is canceled before it finishes, the data
198
downloaded up to that point is retained. The
download can be resumed from the Notifications
panel.
Appendix/Index
If "Download later" is selected, the download time is
automatically set and the start time cannot be
changed. If you do not want the upgrade file to be
downloaded at the automatically set time, download
the upgrade file using the following operations:
From the Home screen, "Settings" Uncheck the
"Simple menu" checkbox "About phone"
"Upgrade Android software" "Cancel"
"Download now (only via Wi-Fi)"
After upgrading the Android software
After upgrading the software, check the upgrade
status of each application as follows: From the Home
screen, "Apps" "Play Store" " " "My
apps", etc. If there is an upgrade for an application
and the application is not upgraded, operation may
become unstable or the functions may not operate
properly.
Check with the provider of each application for
details on supported operating system versions.
Installing the upgrade file
When the upgrade file has finished downloading, it
can be installed on the terminal.
• Install now: Installs the upgrade file immediately.
• Install later: Installs the upgrade file at a booked
time.
The terminal is restarted when the installation is
completed.
NOTE
If "Install later" is selected, the installation time is
automatically set. The start time can be changed using
the following operations:
From the Home screen, "Settings" Uncheck the
"Simple menu" checkbox "About phone"
"Upgrade Android software"
199
Appendix/Index
Main Specifications
■Phone
Product name
N-06E
Dimensions
Approx. 138 mm (height) × approx. 67 mm (width) × approx. 8.5 mm (thickness)
(Approx. 9.5 mm at the thickest part)
Weight
Memory
Continuous
standby
time*1
Continuous
call time*1
Approx. 136 g (with battery pack)
ROM
32GB
RAM
2GB
LTE
Stationary (when "LTE/3G/GSM(Auto)" is set)*2: Approx. 450 hours
FOMA/3G
Stationary (when "LTE/3G/GSM(Auto)" is set)*2: Approx. 550 hours
GSM
Stationary (when "LTE/3G/GSM(Auto)" is set)*2: Approx. 430 hours
FOMA/3G
Approx. 580 minutes
GSM
Approx. 610 minutes
Charging time*3
AC Adapter 03: Approx. 200 minutes
(when Desktop Holder N44 is used: Approx. 200 minutes)
AC Adapter 04: Approx. 190 minutes
(when Desktop Holder N44 is used: Approx. 180 minutes)
DC Adapter 03: Approx. 210 minutes
1Seg viewing time*1
Approx. 360 minutes
Mobacas viewing time*1
Approx. 340 minutes
Display
Type
OEL 16,777,216 colors
Size
Approx. 4.7 inches
Pixels
921,600 pixels (W: 720 × H: 1,280 pixels)
Type
Inner Camera: CMOS
Outer Camera: BSI CMOS
Size
Inner Camera: 1/6.0 inch
Outer Camera: 1/3.0 inch
Effective pixels
Inner Camera: Approx. 1.3 million pixels
Outer Camera: Approx. 13.1 million pixels
Image
pickup
device
200
Appendix/Index
Camera
Recorder
Recorded pixels
(maximum)
Inner Camera: Approx. 1.3 million pixels
Outer Camera: Approx. 13 million pixels
Digital zoom
Inner Camera: Photos: Approx. 4.0 times max. / Videos: Approx. 4.0 times
max.
Outer Camera: Photos: Approx. 6.3 times max. / Videos: Approx. 6.3 times
max.
Number of photos that
can be recorded
When recorded in the terminal: Approx. 160,000 photos max.*4
When recorded on a microSD card (1 GB): Approx. 6,092 photos max.*4
Photo file format
JPEG
Video recording time
When recorded in the terminal: Approx. 175 minutes max. per file, Max. total
approx. 2,272 minutes*5*6
When recorded on a microSD card (1 GB): Approx. 81 minutes max. per file,
Max. total approx. 81 minutes*5*6
Video file format
MP4
1Seg recording time
When recorded on a microSD card (1 GB): Approx. 300 minutes (total) max.*7
When recorded on a microSDXC card (64 GB): Approx. 19,200 minutes max.
(up to approx. 600 minutes per item)*7
Audio
Compatible with WMA and MP3 files
Wireless LAN*8
IEEE802.11b/g/n (2.4 GHz band) compliant
IEEE802.11a/n/ac*9 (5 GHz band) compliant
Bluetooth
Bluetooth Specification Version 4.0 compliant*10
Compliant version
Power
Bluetooth Specification Power Class 2
Line-of-sight
communication
distance*11
Up to approx. 10 m
Compliant profile
HSP, HFP, HID, A2DP, AVRCP, OPP, PBAP, SPP, ANP, PASP, FMP, TIP, PXP
Display language
Japanese, English
Input language (Text entry)
Japanese, English
Earphone
microphone
terminal
Standard
3.5ϕ earphone jack
Number of connectors
4
*1 Usage time differs depending on the usage environment and condition of the battery pack. Usage time is
shortened by using the 1Seg or GPS functions.
*2 To set the network connection change, use "Mobile networks". (P. 181)
*3 This is the charging time when the terminal power is switched off, and the battery pack is completely
discharged.
201
Appendix/Index
*4 This is the maximum number of photos that can be saved to 1 folder, when Size = VGA (W: 640 × H: 480) and
Quality = Normal (file size = 160 KB).
*5 This is the recording time per video under the following conditions:
Size = VGA (W: 640 × H: 480), Quality = Normal
*6 The maximum recording time differs according to the image size.
*7 The maximum recording time varies depending on the broadcasting station and program.
*8 The wireless LAN of this product has received Wi-Fi certification.
*9 The terminal complies with the draft of IEEE802.11ac. It may not be able to communicate with future products
complying with the official specifications or with products from other companies that comply with the draft.
Refer to the following site for details on supported products.
http://www.n-keitai.com/guide/faq/wifi5g_n-06e.html (in Japanese only)
*10 It is confirmed that the terminal and all Bluetooth devices are compliant with Bluetooth standards designated
by Bluetooth SIG, and they are authenticated. However, procedures may differ or data transfer may not be
possible depending on the device's characteristics or specifications.
*11 The available connection distance may be extremely shorter depending on the ambient environment (wall,
furniture, etc.) or building structure.
■Battery Pack
Product name
Battery Pack N38
Battery type
Lithium ion battery
Nominal voltage
3.8 V DC
Nominal capacity
2,300 mAh
202
Appendix/Index
About Certification and
Compliance
Specific Absorption Rate
(SAR), etc. of Mobile Phones
You can confirm details related to the unique
certifications and compliance marks of the terminal
(including certification/certification No.) by
performing the following operation on the
terminal.
From the Home screen, "Settings" Uncheck the
"Simple menu" checkbox "About phone"
"Certification information"
Specific Absorption Rate (SAR) of
Mobile Phones
This model N-06E mobile phone complies with
Japanese technical regulations and international
guidelines regarding exposure to radio waves.
This mobile phone was designed in observance of
Japanese technical regulations regarding exposure
to radio waves*1 and limits to exposure to radio
waves recommended by a set of equivalent
international guidelines. This set of international
guidelines was set out by the International
Commission on Non-Ionizing Radiation Protection
(ICNIRP), which is in collaboration with the World
Health Organization (WHO), and the permissible
limits include a substantial safety margin designed
to assure the safety of all persons, regardless of age
and health condition.
The technical regulations and international
guidelines set out limits for radio waves as the
Specific Absorption Rate, or SAR, which is the value
of absorbed energy in any 10 grams of tissue over a
6-minute period. The SAR limit for mobile phones is
2.0 W/kg. The highest SAR value for this mobile
phone when tested for use at the ear is 0.664 W/kg.
There may be slight differences between the SAR
levels for each product, but they all satisfy the limit.
The actual SAR of this mobile phone while
operating can be well below that indicated above.
This is due to automatic changes to the power level
of the device to ensure it only uses the minimum
required to reach the network. Therefore in
general, the closer you are to a base station, the
lower the power output of the device.
This mobile phone can be used in positions other
than against your ear. This mobile phone satisfies
the international guidelines when used with a
203
Appendix/Index
carrying case or a wearable accessory approved by
NTT DOCOMO, INC.*2 In case you are not using the
approved accessory, please use a product that does
not contain any metals, and one that positions the
mobile phone at least 1.5 cm away from your body.
The World Health Organization has stated that to
discern whether mobile phones bring about any
hidden health risks, an abundance of research has
been carried over the past 20 years. Until present,
no effects at all on health have been found that
can be deemed attributable to mobile phone use.
Please refer to the WHO website if you would like
more detailed information.
http://www.who.int/docstore/peh-emf/publications/
facts_press/fact_english.htm
Please refer to the websites listed below if you
would like more detailed information regarding
SAR.
Ministry of Internal Affairs and Communications
Website:
http://www.tele.soumu.go.jp/e/sys/ele/index.htm
Association of Radio Industries and Businesses
Website:
http://www.arib-emf.org/index02.html (in Japanese
only)
NTT DOCOMO, INC. Website:
http://www.nttdocomo.co.jp/english/product/sar/
NEC CASIO Mobile Communications, Ltd. Website:
http://www.n-keitai.com/lineup/sar/ (in Japanese
only)
*1 Technical regulations are defined by the Ministerial
Ordinance Related to Radio Law (Article 14-2 of
Radio Equipment Regulations).
*2 Regarding the method of measuring SAR when
using mobile phones in positions other than against
the ear, international standards (IEC62209-2) were
set in March of 2010.
The information communication sectional
committee of the information communication
council partly submitted a report on consultation
No. 118 in October, 2011 for the Japanese technical
standard.
Radio Frequency (RF) Signals
THIS MODEL PHONE MEETS THE U.S.
GOVERNMENT'S REQUIREMENTS FOR EXPOSURE
TO RADIO WAVES.
Your wireless phone contains a radio transmitter
and receiver. Your phone is designed and
manufactured not to exceed the emission limits for
exposure to radio frequency (RF) energy set by the
Federal Communications Commission of the U.S.
Government. These limits are part of
comprehensive guidelines and establish permitted
levels of RF energy for the general population. The
guidelines are based on standards that were
developed by independent scientific organizations
through periodic and thorough evaluation of
scientific studies.
The exposure standard for wireless mobile phones
employs a unit of measurement known as the
Specific Absorption Rate (SAR). The SAR limit set by
the FCC is 1.6 W/kg.* Tests for SAR are conducted
using standard operating positions accepted by the
FCC with the phone transmitting at its highest
certified power level in all tested frequency bands.
Although the SAR is determined at the highest
certified power level, the actual SAR level of the
phone while operating can be well below the
maximum value. This is because the phone is
designed to operate at multiple power levels so as
to use only the power required to reach the
network. In general, the closer you are to a wireless
base station antenna, the lower the output.
Before a phone model is available for sale to the
public, it must be tested and certified to the FCC
that it does not exceed the limit established by the
U.S. government-adopted requirement for safe
exposure. The tests are performed on position and
locations (for example, at the ear and worn on the
body) as required by FCC for each model. The
highest SAR value for this model phone as reported
to the FCC when tested for use at the ear is 0.54 W/
204
Appendix/Index
kg, and when worn on the body, is 0.66 W/kg.
(Body-worn measurements differ among phone
models, depending upon available accessories and
FCC requirements). While there may be differences
between the SAR levels of various phones and at
various positions, they all meet the U.S.
government requirement.
The FCC has granted an Equipment Authorization
for this model phone with all reported SAR levels
evaluated as in compliance with the FCC RF
exposure guidelines. SAR information on this
model phone is on file with the FCC and can be
found under the Display Grant section at http://
www.fcc.gov/oet/ea/fccid/ after search on FCC ID
A98-HDN2538.
For body worn operation, this phone has been
tested and meets the FCC RF exposure
guidelines.** Please use an accessory designated
for this product or an accessory which contains no
metal and which positions the handset a minimum
of 1.5 cm from the body.
Non-compliance with the above restrictions may
result in violation of FCC RF Exposure guidelines.
---------------------------------------------------------------------*
**
In the United States, the SAR limit for wireless mobile
phones used by the public is 1.6 watts/kg (W/kg)
averaged over one gram of tissue. SAR values may
vary depending upon national reporting requirements
and the network band.
For devices which include "WiFi hotspot" functionality,
SAR is measured at a distance of 1.0 cm for operation
of data calls as required by FCC, and this product is
shown to be in compliance with the FCC RF exposure
guidelines.
FCC Regulations
This mobile phone complies with part 15 of the FCC
Rules. Operation is subject to the following two
conditions: (1) This device may not cause harmful
interference, and (2) this device must accept any
interference received, including interference that
may cause undesired operation.
This mobile phone has been tested and found to
comply with the limits for a Class B digital device,
pursuant to Part 15 of the FCC Rules. These limits
are designed to provide reasonable protection
against harmful interference in a residential
installation.
This equipment generates, uses and can radiate
radio frequency energy and, if not installed and
used in accordance with the instructions, may cause
harmful interference to radio communications.
However, there is no guarantee that interference
will not occur in a particular installation; if this
equipment does cause harmful interference to
radio or television reception, which can be
determined by turning the equipment off and on,
the user is encouraged to try to correct the
interference by one or more of the following
measures:
205
Appendix/Index
• Reorient or relocate the receiving antenna.
• Increase the separation between the equipment and
receiver.
• Connect the equipment into an outlet on a circuit
different from that to which the receiver is connected.
• Consult the dealer or an experienced radio/TV
technician for help.
Changes or modifications not expressly approved
by the party responsible for compliance could void
the user’s authority to operate the equipment.
Declaration of Conformity
Hereby, NEC CASIO Mobile Communications, Ltd.
declares that this product is compliance with the
essential requirements and other relevant provisions of
Directive 1999/5/EC.
Declaration of Conformity can be found on http://
www.n-keitai.com/lineup/index.html
(Japanese only).
This mobile phone complies with the EU
requirements for exposure to radio waves.Your
mobile phone is a radio transceiver, designed and
manufactured not to exceed the SAR* limits** for
exposure to radio-frequency (RF) energy, which
SAR* value, when tested for compliance against
the standard was 0.712 W/kg. While there may be
differences between the SAR* levels of various
phones and at various positions, they all meet***
the EU requirements for RF exposure.
*
The exposure standard for mobile phones employs a
unit of measurement known as the Specific
Absorption Rate, or SAR.
** The SAR limit for mobile phones used by the public is
2.0 watts/kilogram (W/kg) averaged over ten grams of
tissue, recommended by The Council of the European
Union. The limit incorporates a substantial margin of
safety to give additional protection for the public and
to account for any variations in measurements.
*** Tests for SAR have been conducted using standard
operating positions with the phone transmitting at its
highest certified power level in all tested frequency
bands. Although the SAR is determined at the highest
certified power level, the actual SAR level of the phone
while operating can be well below the maximum
value. This is because the phone is designed to
operate at multiple power levels so as to use only the
power required to reach the network. In general, the
closer you are to a base station antenna, the lower the
power output.
Important Safety Information
Warning: To prevent possible hearing
damage, do not listen to high volume levels
for long periods.
206
Appendix/Index
Export Administration
Regulations
Intellectual Property Right
Copyright and portrait rights
This product and its accessories may be under
coverage of the Export Administration Regulations
of Japan ("Foreign Exchange and Foreign Trade
Control Laws" and the related laws and
regulations). When exporting this product and its
accessories, take necessary procedures on your
responsibility and expense.
For details, contact Ministry of Economy, Trade and
Industry of Japan.
You have no right to copy, modify, or distribute
contents such as text, images, music, or software
downloaded from websites on the Internet, or
images captured by the camera of this product
without permission from the copyright holder
except when the copy or quote is for personal use
that is allowed under Copyright Law.
Note that it may be prohibited to capture or record
live performances or exhibitions even for personal
use.
Refrain from taking portraits of other people and
uploading such portraits to websites using this
product without their consent, as this violates
portrait rights.
207
Appendix/Index
Trademarks
• "FOMA", "i-mode", "i-αppli", "Deco-mail",
"ToruCa", "mopera", "mopera U", "WORLD CALL",
"iD", "WORLD WING", "sp-mode", and "ToruCa"
logo, "Osaifu-Keitai" logo, "iD" logo, "sp-mode"
logo are trademarks or registered trademarks of NTT
DOCOMO, INC.
• "Catch Phone (Call waiting service)" is a registered
trademark of Nippon Telegraph and Telephone
Corporation.
• Powered by emblend™ Copyright 2010-2013 Aplix
Corporation. All Rights Reserved.
emblend and emblend-related trademarks are
trademarks or registered trademarks of Aplix
Corporation in Japan and other countries.
• e is a registered trademark of FeliCa Networks, Inc.
• QR code is a registered trademark of Denso Wave Inc.
• microSDHC logo is a trademark of SD-3C, LLC.
• Rovi, G-GUIDE, G-GUIDE MOBILE and G-Guide
related logos are trademarks or registered trademarks
of Rovi Corporation and/or its subsidiaries in Japan.
• Microsoft®, Windows®, Windows Media® and
Windows Vista® are trademarks or registered
trademarks of Microsoft Corporation in the United
States and/or other countries.
• Microsoft® Exchange ActiveSync® is a trademark or
registered trademark of Microsoft Corporation in the
United States and/or other countries.
• T9® is a trademark or registered trademark of Nuance
Communications, Inc. and its affiliates in the United
States and other countries.
• PhotoSolid®, MovieSolid® and their logos are
trademarks or registered trademarks of Morpho Inc.
in Japan and other countries.
• Android, Gmail, Google, Google Play, Google Talk,
Google Voice Search, Google Maps, Google Calendar,
Google+, Google Latitude, YouTube and other marks
are trademarks of Google Inc.
• The Wi-Fi CERTIFIED Logo is a certification mark of
the Wi-Fi Alliance.
• The Wi-Fi Logo is a certification mark of the Wi-Fi
Alliance.
• The Wi-Fi Protected Setup Mark is a mark of the Wi-Fi
Alliance.
• MEDIAS® and its logo are registered trademarks of
NEC CASIO Mobile Communications, Ltd.
• "PictMagic", "MEDIAS NAVI", "Tap search", "Quick
Shot", "SNS Share", "Aurora Illumination", "LIFE
UX" and "LifeWay" are trademarks or registered
trademarks of NEC CASIO Mobile Communications,
Ltd.
208
Appendix/Index
• Wi-Fi®, Wi-Fi CERTIFIED™, Wi-Fi Protected Setup™,
WPA™, WPA2™, Wi-Fi Direct™ and Miracast™ are
marks or registered marks of the Wi-Fi Alliance.
•
• "ATOK" is a registered trademark of JustSystems
Corporation.
• "ついっぷる" is a trademark or registered trademark
of NEC BIGLOBE, Ltd.
• "Soradas" is a registered trademark of MTI Ltd.
• G-SHOCK is a registered trademark of CASIO
COMPUTER CO., LTD.
• This product uses "FontAvenue" of NEC Corporation.
• TouchSense® Technology and TouchSense® System
3000 Series Licensed from Immersion Corporation.
TouchSense® System 3000 Series and other
Immersion software contained herein are protected
under one or more of the U.S. Patents found at the
following address www.immersion.com/patentmarking.html and other patents pending.
and
are trademarks of SRS Labs, Inc.
WOW HD and CS Headphone technologies are
incorporated under license from SRS Labs, Inc.
WOW HD™ significantly improves the playback
quality of audio, delivering a dynamic 3D
entertainment experience with deep, rich bass and
high frequency clarity for crisp detail.
SRS CS Headphone™ delivers a 5.1 surround sound
experience over standard headphones or earbuds
when listening to multichannel content, such as DVD
movies.
• Manufactured under license from Audyssey
Laboratories. U.S. and foreign patents pending.
Audyssey Premium Mobile is a trademark of Audyssey
Laboratories.
Audyssey Premium Mobile™ fixes the audio problems
found in mobile phones. It corrects the speaker and
headphone response problems caused by the
enclosure, extends the bass to lower frequencies,
eliminates large volume variations across and within
content and allows louder playback by blocking
distortion.
• " きせかえ touch" is a registered trademark of
Acrodea, Inc.
• Copyright© 2010 FUJISOFT Inc. All rights reserved
• "Mobile Suica" is a registered trademark of East
Japan Railway Company.
• "Morpho HDR™", the high dynamic range
technology product, is a product of Morpho, Inc.
"Morpho HDR™" is a trademark of Morpho, Inc.
• The N Mark is a trademark or registered trademark of
NFC Forum, Inc. in the United States and in other
countries.
• Other company names or product names described in
this manual are trademarks or registered trademarks
of those companies.
209
Appendix/Index
Others
• THIS PRODUCT IS LICENSED UNDER THE MPEG-4
VISUAL PATENT PORTFOLIO LICENSE FOR THE
PERSONAL AND NON-COMMERCIAL USE OF A
CONSUMER FOR (i) ENCODING VIDEO IN
COMPLIANCE WITH THE MPEG-4 VISUAL STANDARD
("MPEG-4 VIDEO") AND/OR (ii) DECODING MPEG-4
VIDEO THAT WAS ENCODED BY A CONSUMER
ENGAGED IN A PERSONAL AND NON-COMMERCIAL
ACTIVITY AND/OR WAS OBTAINED FROM A VIDEO
PROVIDER LICENSED BY MPEG LA TO PROVIDE
MPEG-4 VIDEO. NO LICENSE IS GRANTED OR SHALL
BE IMPLIED FOR ANY OTHER USE. ADDITIONAL
INFORMATION INCLUDING THAT RELATING TO
PROMOTIONAL, INTERNAL AND COMMERCIAL USES
AND LICENSING MAY BE OBTAINED FROM MPEG LA,
L.L.C. SEE HTTP://WWW.MPEGLA.COM.
• THIS PRODUCT IS LICENSED UNDER THE AVC PATENT
PORTFOLIO LICENSE FOR THE PERSONAL USE OF A
CONSUMER OR OTHER USES IN WHICH IT DOES NOT
RECEIVE REMUNERATION TO (i) ENCODE VIDEO IN
COMPLIANCE WITH THE AVC STANDARD ("AVC
VIDEO") AND/OR (ii) DECODE AVC VIDEO THAT WAS
ENCODED BY A CONSUMER ENGAGED IN A
PERSONAL ACTIVITY AND/OR WAS OBTAINED FROM
A VIDEO PROVIDER LICENSED TO PROVIDE AVC
VIDEO. NO LICENSE IS GRANTED OR SHALL BE
IMPLIED FOR ANY OTHER USE. ADDITIONAL
INFORMATION MAY BE OBTAINED FROM MPEG LA,
L.L.C. SEE HTTP://WWW.MPEGLA.COM.
• FeliCa is a contactless IC card technology developed
by Sony Corporation. FeliCa is a registered trademark
of Sony Corporation.
• Bluetooth and the Bluetooth logo are registered
trademarks of Bluetooth SIG, Inc. NEC CASIO Mobile
Communications, Ltd. is granted a license for their
use from Bluetooth SIG, Inc. Other trademarks and
names belong to their respective owners.
• Content owners use Microsoft PlayReady™ content
access technology to protect their intellectual
property, including copyrighted content. This device
uses PlayReady technology to access PlayReadyprotected content and/or WMDRM-protected
content. If the device fails to properly enforce
restrictions on content usage, content owners may
require Microsoft to revoke the device’s ability to
consume PlayReady-protected content. Revocation
should not affect unprotected content or content
protected by other content access technologies.
Content owners may require you to upgrade
PlayReady to access their content. If you decline an
upgrade, you will not be able to access content that
requires the upgrade.
• ©MTI Ltd.
• ©Acrodea, Inc.
210
Appendix/Index
Notational conventions for Windows
SIM Unlocking
• The abbreviations of operating systems (Japanese
versions) below are used in this manual.
• Windows 7 stands for Microsoft® Windows® 7
(Starter, Home Basic, Home Premium, Professional,
Enterprise and Ultimate).
• Windows Vista stands for Windows Vista® (Home
Basic, Home Premium, Business, Enterprise and
Ultimate).
• Windows XP indicates the Microsoft® Windows®
XP Professional operating system or Microsoft®
Windows® XP Home Edition operating system.
GPL/LGPL-applicable software
• This product contains software licensed complying
with GNU General Public License (GPL) or GNU Lesser
General Public License (LGPL). You can obtain the
source code for the software and reproduce,
redistribute, or modify the software in accordance
with the GPL or LGPL.
For information on GPL and LGPL, from the Home
screen "Settings" Uncheck the "Simple menu"
checkbox "About phone" "Legal information"
"Open source licenses"
■Obtaining source code
For information on obtaining source code, see the
following website.
http://www.n-keitai.com/guide/download/ (in Japanese
only)
Inquiries regarding the content of source code cannot
be responded to.
The terminal supports SIM unlocking.
Unlocking the SIM enables use of other-brand SIM
cards.
SIM unlocking can be requested at any docomo Shop.
Separate charges apply for SIM unlocking.
If you are using SIM cards of other-brand, note that
LTE system is not compatible. Services, functions, etc.
are limited when using SIM cards of other-brand.
DOCOMO does not guarantee operation under such
conditions.
For details on SIM unlocking, refer to the NTT
DOCOMO website.
211
Appendix/Index
Index
Index
KAlphabets
About Phone .................................. 163
Access point ......................................53
Accessibility (Settings) .................... 162
Account .............................................57
Email account ................................57
Settings ....................................... 161
Adaptive step-up alarm.................. 130
Adaptive step-up ringtone ................78
After-sales service ........................... 192
Airplane mode................................ 145
Alarm .............................................. 129
Alarm volume ................................. 147
Android Beam................................. 172
Application History ............................74
Applications .......................................66
Installing...................................... 102
list...................................................67
List Screen ......................................66
Purchasing................................... 103
Settings ....................................... 152
Shortcut .........................................64
Uninstalling ....................................66
Area Mail ...........................................95
Attaching/removing the back cover ....28
Aurora Illumination ...........................59
Backup & Reset (Settings) .............. 161
Battery Pack .......................................36
Beam............................................... 174
Bluetooth ........................................ 139
Communication .......................... 171
Settings ........................................140
Booking recording...........................115
Booking viewing .............................115
Booking (1Seg)................................115
Bookmarks ........................................ 98
Brightness (screen) ..........................148
Browser .............................................97
Calculator ........................................132
Calendar ..........................................130
Call forwarding service ..................... 82
Call Log .............................................80
Call rejection (Settings) ..................... 83
Call Settings ...................................... 82
Call volume ....................................... 80
Call waiting ....................................... 82
Caller ID notification service ............. 82
Camera............................................117
Changing wallpaper ......................... 66
Channel setting...............................113
Charging ........................................... 38
Adapter.......................................... 40
Desktop Holder.............................. 39
PC................................................... 41
Charging with a DC adapter ............ 40
Charging with a desktop holder ...... 39
Charging with a PC...........................41
Charging with an AC adapter ..........40
Charging with the adapter ............... 40
Chatting ............................................96
Clock setting ...................................162
Clock (application) ..........................129
Confirm phone number (yourself).... 84
212
Connecting to a PC ........................ 173
Data roaming (overseas)................. 181
Declining a call.................................. 78
Display (Settings) ............................ 148
DLNA ............................................... 174
dmarket........................................... 101
dmenu............................................. 101
docomo apps password ................. 153
Drag .................................................. 43
Draining water when the terminal
gets wet ............................................ 30
Earphone Jack Illumination .............. 59
eco mode ........................................ 150
Email.................................................. 87
Area Mail ....................................... 95
Email .............................................. 89
Email account................................ 57
Gmail ............................................. 91
SMS ............................................... 87
sp-mode Mail ................................ 87
Emergency call .................................. 76
Entering emoticons........................... 49
Entering smileys ................................ 49
Entering symbols............................... 49
Entering text ..................................... 45
EQ select voice .................................. 79
Error messages................................ 191
Export Administration Regulations ... 207
Exporting........................................... 99
Bookmarks .................................... 99
Contacts ........................................ 85
Email .............................................. 89
Appendix/Index
SMS ................................................87
Factory data reset ........................... 161
FAQs................................................ 184
Fast silent (Alarm) ........................... 129
Fast silent (Incoming call) ..................79
Feeling touch .................................. 147
File Manager ................................... 167
Flick ....................................................44
Flick input ..........................................48
Folder (Home screen) ........................65
Format (microSD card).................... 152
Gガイド番組表 (G-GUIDE EPG) .... 115
Gallery............................................. 121
Gesture input.....................................48
Gmail .................................................91
Google Latitude.............................. 128
Google Maps .................................. 127
Google Maps with navigation
beta................................................. 128
Google Play..................................... 102
Google Talk........................................96
Google+ Local ................................ 128
GPS ................................................. 124
Handling Precautions ........................18
Home screen......................................63
Hyper clear voice ...............................79
iC transfer Service .......................... 104
iD appli............................................ 134
Importing ...........................................99
Bookmarks .....................................99
Contacts.........................................85
Email...............................................89
SMS ................................................87
Incognite tab .....................................99
Incoming call lamp ...................58, 149
Incoming calls history ........................80
Infrared data exchange...................169
Initial Settings....................................52
Installing (applications) ...................102
Intellectual property right ...............207
International dial assist ...................182
International roaming .....................178
Keyboard ........................................... 45
QWERTY ........................................ 45
Settings ........................................160
10-key ............................................45
Koe-no-Takuhaibin............................ 82
Language & input (Settings) ...........160
Location access ...............................125
Location access (Settings) ...............154
Lock SIM card..................................159
Main Specifications .........................200
Making a call..................................... 76
Making a call overseas....................181
WORLD CALL................................. 77
Making a call (overseas)..................181
WORLD CALL................................. 77
Making an international call...........181
WORLD CALL................................. 77
Manage data communication ........144
Media playback volume ..................147
Media Player....................................122
microSD card ...................................164
Attaching/removing.....................165
Capacity .......................................151
Format .........................................152
Use the PC ...................................173
miniUIM.............................................35
Mobacas ..........................................108
Mobile data .....................................144
Mobile networks .............................146
Mobile networks (overseas)............181
213
mopera U .......................................... 54
MyProfile ........................................... 84
Name card......................................... 86
Network Mode (overseas) .............. 181
Network operators (overseas) ........ 181
Network security code.................... 158
Network service ................................ 82
NFC Communication ...................... 172
NFC/Osaifu-Keitai lock.................... 106
Notification icons.............................. 61
Notification lamp .............................. 58
Notification sound .......................... 147
Notifications panel............................ 62
NOTTV............................................. 108
Nuisance call blocking service .......... 82
Numeric keypad input ...................... 48
Opening/closing the external
connector terminal cap .................... 27
Options ........................................... 184
Osaifu-Keitai ................................... 104
Outgoing calls history....................... 80
Part Names and Functions................ 33
Phonebook........................................ 84
PIN unblocking key ......................... 159
PIN1 code........................................ 158
Place on hold .................................... 79
Playback .......................................... 121
Media Player................................ 122
photos ......................................... 121
Videos.......................................... 121
1Seg............................................. 116
Polaris Office ................................... 133
Precautions (Always follow these
directions) ........................................... 8
Profile ................................................ 85
Program guide ................................ 115
Appendix/Index
Public mode (power OFF) settings ....82
PUK code ........................................ 159
Purchasing (applications)................ 103
QWERTY keyboard ............................45
Receive calls (overseas)................... 183
Receiving a call ..................................78
Receiving a call overseas ................ 183
Receiving an international call ....... 183
Record message.................................81
Related Devices............................... 184
Remote support.............................. 191
Reset (Terminal) .............................. 161
Restarting...........................................42
Ring volume.................................... 147
Ringtone ......................................... 147
Call .............................................. 147
Email...............................................91
Gmail..............................................94
SMS ................................................89
SAR (Specific Absorption Rate) ...... 203
Screen ............................................. 148
Brightness.................................... 148
Display orientation.........................45
Screen lock.....................................42
Settings ....................................... 148
Zoom in or zoom out ....................44
Screen lock ..................................... 155
Screen shot ........................................45
Search ................................................73
Google Search ...............................73
Within web page ...........................98
Security codes................................. 158
Security (Settings) ........................... 155
Select Font ...................................... 149
Set date........................................... 162
Set time........................................... 162
Set up SIM card lock .......................159
Settings menu .................................135
Shooting photos .............................120
Shooting videos...............................120
Silent mode .....................................148
Sleep mode ....................................... 42
Slide ................................................... 43
Slow Voice......................................... 79
Smartphone Remote Support.........191
SMS ................................................... 87
Sound (Settings)..............................147
Specific Absorption Rate (SAR).......203
sp-mode ............................................54
sp-mode Mail ....................................87
Standby mode...................................42
Status Bar .......................................... 60
Status icons ....................................... 60
Street View......................................127
Synchronizes (Settings) ...................145
Tap .....................................................43
Tap search.......................................... 73
Toggling entry modes (text) .............. 48
ToruCa .............................................107
Touch and hold ................................. 43
Touch panel operation ...................... 43
Trademarks ......................................208
Troubleshooting ..............................184
Turning Power ON and OFF .............. 42
TV ....................................................112
TV Link.............................................116
T9 input .............................................49
Uninstalling (Applications) ................ 66
Updating Software..........................194
Upgrade Android software.............197
USB tethering ..................................142
Using overseas ................................178
214
Vibration ......................................... 147
Email .............................................. 91
Gmail ............................................. 94
Incoming call ............................... 147
SMS ............................................... 89
Voice mail service.............................. 82
Volume ............................................ 147
VPN.................................................. 146
Warranty ......................................... 192
Waterproof/Dustproof Performance ... 26
Widgets............................................. 70
List ................................................. 70
Shortcut......................................... 64
Wi-Fi Direct ..................................... 137
Wi-Fi settings .................................... 55
Other ........................................... 137
Wi-Fi tethering ................................ 143
WORLD CALL.................................... 77
WORLD WING................................. 178
KNumerals
1Seg ................................................ 112
10-key keyboard ............................... 45
Appendix/Index
Using mobile phone with good manners!
You can view/change your contract contents, subscribe to services, and request information materials
on the Internet.
From sp-mode dmenu "お客様サポート " (User support) "各種お申込・お手続き" (Various Applications/
Procedures) (Japanese) (Packet communications free of charges)
From PC My docomo (http://www.mydocomo.com/) ⇒ 各種お申込・お手続き (Various Applications/Procedures) (Japanese)
*
*
*
*
*
*
"Network security code" is required for use from sp-mode.
Some services may be charged when using from sp-mode.
"docomo ID/Password" is required for use from your PC.
Contact "General Inquiries" if you lost "Network security code" or "docomo ID/Password" at the last page of this manual.
You may not be able to access the site depending on the content of your subscription.
You may not be able to access the site due to system maintenance, etc.
Using mobile phone with good manners!
Please be considerate of others around you when using the terminal.
Always turn OFF the terminal in the following
situations
■ In a place where the use of mobile phones is prohibited
When on an airplane or in a hospital, follow the
instructions given by the airline company or medical
facility. In locations where usage is prohibited, turn
the terminal power OFF.
Set the terminal to Public mode in the following
situations
■ While driving
Using the mobile phone in your hand while driving is
subject to punishment. However, this excludes
situations when the use of a mobile phone is
unavoidable, such as the rescue of the sick and
injured or the maintenance of public safety.
■ When you are in a public place such as a theater,
movie theater, or museum Using the terminal in a
public place, where you need to be quiet, annoys
people around you.
Be considerate of where you use the terminal
and keep your voice and ringtone down
■ Keep your voice down when using the terminal in a
quiet place such as a restaurant or hotel lobby.
■ If you are in an outdoor public place, make sure you
do not disturb others.
Respect privacy
Please be considerate of the privacy of individuals
around you when shooting and sending photos
using camera-equipped mobile phones.
The following functions will help you to keep good manners in public
There are useful functions you can use to set the terminal not to answer incoming calls, and to silence all sounds.
■ Airplane mode: enables/disables the function to emit radio waves. → P. 145
■ Record message: Record a caller’s message on the terminal when you cannot answer the phone. → P. 83
■ Manner (Silent) mode: Silences the ringtone and other sounds from the terminal. → P. 148
* Note that you cannot silence the shutter sound.
■ Public mode (Power off): A message plays notifying callers that you are where you have to power off the phone and
cannot answer, and the phone automatically hangs up. → P. 82
■ Vibrator: Notifies incoming calls by vibration. → P. 147
Other optional services such as Voice Mail service (P. 82) and Call Forwarding service (P. 82) are also available.
215
For loss, theft, malfunction, and inquiries while overseas (24-hour reception)
ڦFrom DOCOMO mobile phones
International call access code
for the country you stay
-81-3-6832-6600*(toll free)
* You are charged a call fee to Japan when calling from a land-line phone, etc.
※ If you use N-06E, you should dial the number +81-3-6832-6600 (to enter '+', touch and hold the '0' key for at least one second).
ڦFrom land-line phones <Universal number>
Universal number
international prefix
-8000120-0151*
* You might be charged a domestic call fee according to the call rate for the country you stay.
※ For international call access codes for major countries and universal number international prefix, refer to DOCOMO International Services website.
● If you lose the terminal or have it stolen, immediately take the steps necessary for suspending the use of the terminal.
● If the terminal you purchased is damaged, bring the terminal to a repair counter specified by DOCOMO after returning
to Japan.
Bring unwanted mobile phones to your nearest
docomo Shop as we collect both our own products
and those of competitors.
* Collectable goods: mobile phones, PHS, battery
packs, chargers, desktop holders (we collect both
our own products and those of competitors)
General Inquiries
<docomo Information Center>
Repairs
0120-005-250 (toll free)
ڦFrom DOCOMO mobile phones (In Japanese only)
(No prefix) 113 (toll free)
* Service available in: English, Portuguese, Chinese, Spanish.
* Unavailable from part of IP phones.
* Unavailable from land-line phones, etc.
(Business hours : 9:00 a.m. to 8:00 p.m.)
ڦFrom DOCOMO mobile phones (In Japanese only)
(No prefix)
ڦFrom land-line phones (In Japanese only)
0120-800-000 (toll free)
151 (toll free)
* Unavailable from part of IP phones.
* Unavailable from land-line phones, etc.
(Business hours : 24 hours (open all year round))
ڦFrom land-line phones (In Japanese only)
0120-800-000 (toll free)
* Unavailable from part of IP phones.
(Business hours : 9:00 a.m. to 8:00 p.m. (open all year round))
ەPlease confirm the phone number before you dial.
ەFor Applications or Repairs and After-Sales Service, please contact the above-mentioned information center or the docomo Shop etc. near you
on the NTT DOCOMO website.
NTT DOCOMO website http://www.nttdocomo.co.jp/english/
Don’t forget your mobile phone … or your manners!
When using your mobile phone in a public place, don't forget to show
common courtesy and consideration for others around you.
Sales: NTT DOCOMO, INC.
Manufacturer:
2013.6 (1st Edition)