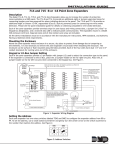
1
Clarity Lighting and Media Control OPERATOR MANUAL Issue 2 Desktop (MAC/PC) LX300 LX600 LX900 Covering software Version 2.0 February 2013 Document number: LX-T01U-A2 LSC Lighting Systems (Aust) Pty. Ltd. ABN 21 090 801 675 Building 3, 66-74 Micro Circuit Dandenong South, Victoria 3175 Australia Tel: +61 3 9702 8000 Fax:+61 3 9702 8466 email: info@lsclighting.com web: www.lsclighting.com DISCLAIMER Both LSC Lighting Systems (Aust) Pty. Ltd. and OpenClear Pty. Ltd. have a corporate policy of continuous improvement, covering areas such as product design and documentation. To achieve this goal, we undertake to release software updates for all products on a regular basis. In light of this policy, some detail contained in this manual may not match the exact operation of your product. Information contained in this manual is subject to change without notice. In any event, neither LSC Lighting Systems (Aust) Pty. Ltd. nor OpenClear Pty. Ltd. can be held liable for any direct, indirect, special, incidental, or consequential damages or loss whatsoever (including, without limitation, damages for loss of profits, business interruption, or other pecuniary loss) arising out the use or the inability to use this product for its intended purpose as expressed by the manufacturer and in conjunction with this operating manual. Servicing of this product is recommended to be carried out by LSC Lighting Systems (Aust) Pty. Ltd. or its authorized service agents. No liability will be accepted whatsoever for any loss or damage caused by service, maintenance or repair by unauthorized personnel. In addition servicing by unauthorized personnel may void your warranty. LSC Lighting Systems’ products must only be used for the purpose for which they were intended. Clarity LX products are manufactured in Australia. Clarity Operator Manual V2.0 Contents Contents 1 Introduction/Models 1 1.1 1.2 1.3 1.4 1.5 1 1 1 1 2 Overview _________________________ Desktop Version____________________ Console Models ____________________ Features __________________________ Help _____________________________ 2 Latest Features 2.1 2.2 2.2.1 2.2.2 2.2.3 2.2.4 2.2.5 2.2.6 2.2.7 2.2.8 2.2.9 2.2.10 2.2.11 2.2.12 2.2.13 2.2.14 2.2.15 2.2.16 2.2.17 Rig Mode __________________________ OSC ______________________________ Page Bookmarks ____________________ User Definable Keyboard Shortcuts _____ Date/Time Scheduler. ________________ Audio Control Device_________________ Intensity Levels windows _____________ Touch Screen Input Support ___________ Touch Mode________________________ Redesigned Record Dialogue Box _______ Out Timing ________________________ Console Emulation __________________ Show Files _________________________ New User preferences ________________ New Cue-list Options_________________ Minor Changes _____________________ User Manual _______________________ 3 Desktop (PC or MAC) Clarity 3.1 3 Overview _________________________ 3 Version 2 _________________________ 3 3 3 3 3 3 3 3 3 4 4 4 4 4 4 4 5 5 6 Overview _________________________ 6 3.1.1 Software __________________________ 6 3.2 3.3 Installing Clarity on a PC _____________ 6 Installing Clarity on a Mac ____________ 8 3.4 3.5 3.6 3.7 3.8 3.9 HASP Diagnostics___________________ 9 Demo Mode ______________________ 10 Desktop DMX Output _______________ 10 Desktop ArtNet Output _____________ 10 VX10 Playback Wing _______________ 10 VX20 Programming & Playback Wing __ 11 3.3.1 3.9.1 3.9.2 3.9.3 3.9.4 3.9.5 HASP Installation for Mac _____________ 9 USB Indicator _____________________ DMX Indicators ____________________ Desklamp ________________________ Kensington Lock Slot________________ USB Slot _________________________ 11 11 12 12 12 3.10 Starting Clarity____________________ 12 3.11 Loading a Show ___________________ 12 3.11.1 Show Tab ________________________ 13 3.12 Modes Of OPeration ________________ 13 3.12.1 Console Window ___________________ 14 3.13 Basic Desktop Operation ____________ 16 3.14 Patching _________________________ 18 3.15 Programming _____________________ 19 3.15.1 3.15.2 3.15.3 3.15.4 Attribute Controls __________________ Attribute Quick Menus_______________ Universal Controller_________________ Creating a Lighting Look _____________ 19 20 20 20 3.16 Playback_________________________ 21 3.16.1 3.16.2 3.16.3 Control Booth _____________________ 21 Adding a Virtual VX Wing ____________ 21 Selecting a Virtual VX Wing __________ 21 3.17 Adding a Cue-list to a VX Wing _______ 22 3.18 Wing Playback Pages _______________ 22 3.18.1 Locking a Playback _________________ 23 3.18.2 3.18.3 Page Bookmarks ___________________ 23 Managing VX Pages _________________ 23 3.19 3.20 3.21 3.22 Wing Playbacks ____________________ 23 Wing Group Masters ________________ 24 Extended Wing Controls _____________ 25 Programming with the VX20 Wing _____ 27 3.23 3.24 3.25 3.26 External Control Inputs______________ 29 VX20 MIDI _______________________ 29 Desklamp Intensity_________________ 30 Free Mode ________________________ 30 3.22.1 3.22.2 3.22.3 Trackball _________________________ 27 Programmer Buttons ________________ 27 VX20 Soft Menus ___________________ 28 4 LX Consoles 4.1 31 Overview _________________________ 31 5 LX300 Console 32 5.1 5.2 Overview _________________________ 32 LX300 Rear Panel __________________ 32 5.3 5.4 Switching On/Off___________________ 34 LX300 Front Panel__________________ 35 5.2.1 5.2.2 5.2.3 5.2.4 5.2.5 5.2.6 5.2.7 5.2.8 5.2.9 5.2.10 5.4.1 Power Input and Mains Switch _________ 33 DMX Outputs ______________________ 33 Ethernet __________________________ 33 DVI Video Out _____________________ 33 USB _____________________________ 33 MIDI _____________________________ 33 Audio In/Out ______________________ 33 LED Desk Lamps ___________________ 33 External Inputs ____________________ 33 Reset ____________________________ 34 LX300 Playbacks ___________________ 35 6 LX600 Console 6.1 6.2 6.2.1 6.2.2 6.2.3 6.2.4 6.2.5 6.2.6 6.2.7 6.2.8 6.2.9 6.2.10 6.2.11 6.2.12 6.3 6.4 Power Input and Mains Switch _________ 38 Mains Outputs _____________________ 38 DMX Outputs ______________________ 38 Ethernet __________________________ 38 DVI Video Out _____________________ 38 USB _____________________________ 39 MIDI _____________________________ 39 SPMTE Timecode ___________________ 39 Audio In/Out ______________________ 39 LED Desk Lamps ___________________ 39 External Inputs ____________________ 39 Reset ____________________________ 39 Switching On/Off___________________ 39 LX600 Front Panel__________________ 40 7 LX900 Console 7.1 7.2 37 Overview _________________________ 37 LX600 Rear Panel __________________ 38 41 Overview _________________________ 41 LX900 Rear Panel __________________ 41 7.2.1 7.2.2 7.2.3 7.2.4 7.2.5 7.2.6 7.2.7 7.2.8 7.2.9 Power Input and Mains Switch _________ 42 Mains Outputs _____________________ 42 DMX Outputs ______________________ 42 DMX Input ________________________ 42 Ethernet __________________________ 42 DVI Video Out _____________________ 42 USB _____________________________ 42 MIDI _____________________________ 42 SPMTE Timecode ___________________ 42 Contents 7.2.10 7.2.11 7.2.12 7.2.13 7.3 7.4 7.5 Clarity Operator Manual V2.0 Audio In/Out ______________________ LED Desk Lamps ___________________ External Inputs ____________________ Reset ___________________________ Switching On/Off___________________ 43 LX900 Front Panel__________________ 43 LX900 Split Cross Fade ______________ 44 8 LX Console Controls 8.1 8.2 8.3 8.4 42 42 43 43 46 Overview _________________________ 46 Grand Master _____________________ 46 Encoder Wheel Touch Screen _________ 46 Encoder Wheels and Buttons _________ 47 8.4.1 8.4.2 8.4.3 8.4.4 8.4.5 8.4.6 8.4.7 8.4.8 8.4.9 8.4.10 8.4.11 8.4.12 Rig _____________________________ Universal_________________________ Direct ___________________________ Expand __________________________ Virtual Wheels_____________________ Intensities________________________ Graphical ________________________ Timing___________________________ Dynamics ________________________ Matrix ___________________________ Media ___________________________ Palettes__________________________ 48 49 50 50 50 51 51 52 53 53 53 53 8.5 Keypad and Command Centre ________ 54 8.6 Playbacks ________________________ 56 8.5.1 8.5.2 8.5.3 8.5.4 8.6.1 8.6.2 8.6.3 8.6.4 8.6.5 8.6.6 8.6.7 8.6.8 8.6.9 8.6.10 8.6.11 8.6.12 8.6.13 8.6.14 8.6.15 8.6.16 8.6.17 8.6.18 8.7 LX300 Button Playbacks _____________ Fader Playbacks ___________________ Playback Controls __________________ Playback Touch Screens _____________ Assign or Clear a Playback ___________ Configuring a Playback ______________ Playback Pages ____________________ Locking a Playback _________________ Managing Pages ___________________ Page Bookmarks ___________________ Page Groups ______________________ Extended Playback Controls __________ Releasing a Playback _______________ Releasing ALL Playbacks _____________ Clearing a Playback ________________ Edit _____________________________ Group Masters ____________________ Playback Contents Indicator __________ Touch Screen(s) ___________________ 66 10.1 10.2 10.3 10.4 10.5 10.6 68 Overview _________________________ 68 Patching _________________________ 68 Programming _____________________ 69 Playback _________________________ 69 9.4.1 10 56 57 57 58 58 58 59 60 60 60 61 61 63 63 63 63 63 64 Action Button Pages ________________ 65 Assigning an Action Button ___________ 65 Clearing an Action Button ____________ 66 9 Basic Operation 9.1 9.2 9.3 9.4 54 54 54 54 Action Buttons ____________________ 65 8.7.1 8.7.2 8.7.3 8.8 User Buttons ______________________ Intensity Wheel ___________________ Numeric Keypad ___________________ Command Centre __________________ Performance Window _______________ 69 Customizing Clarity 70 Overview _________________________ 70 LX Tools _________________________ 70 Touch Screen Operation _____________ 70 Dockable Windows _________________ 70 Resizing Panes ____________________ 70 Rig Mode Icons ____________________ 70 10.7 Universal and Direct _______________ 10.8 Attribute Control Size ______________ 10.9 Preferences ______________________ 10.10 Keyboard Shortcuts ________________ 11 Patching Fixtures 70 70 72 72 74 11.1 Overview ________________________ 74 11.2 Spreadsheet View _________________ 75 11.3 Patching Fixtures __________________ 75 11.3.1 11.3.2 11.3.3 Drag and Drop Patching _____________ 75 Patching Dimmers __________________ 75 Clarity Universes ___________________ 75 11.4 Clone from other fixture(s) __________ 76 11.4.1 Cloning Example ___________________ 77 11.5 Keypad Patching __________________ 77 11.5.1 Patching Commands:________________ 77 11.6 Multi-Patch _______________________ 77 11.6.1 11.6.2 11.6.3 Keypad Multi-Patch _________________ 77 Copy Multi-Patch ___________________ 78 Removing Multi-Patches _____________ 78 11.7 Selecting Fixtures _________________ 11.8 Inverting/Swapping Attributes________ 11.9 Intensity Fade Profiles ______________ 11.10 Minimum and Maximum Intensity _____ 11.11 Custom Fixtures___________________ 11.12 Connecting Output Devices __________ 11.13 Configuring ArtNet Outputs __________ 11.14 Editing the Patch __________________ 11.14.1 11.14.2 11.14.3 11.14.4 11.14.5 12 12.1 12.2 12.3 12.4 12.5 Editing a Fixtures Address ____________ 82 Editing a Fixtures Name or Number ____ 82 Deleting Fixtures ___________________ 82 Un-Patching Fixtures ________________ 82 Exporting the Patch _________________ 82 Rig Overview ________________________ Arranging Fixtures _________________ Aligning Fixtures __________________ Fixture Icons _____________________ Multiple Views ____________________ 12.5.1 78 78 79 80 81 81 81 81 83 83 83 84 84 85 Creating a new View ________________ 85 12.6 Configuring a View_________________ 85 12.6.1 Background Image _________________ 86 12.7 Selecting Fixtures In Rig View _______ 86 13 Universal 88 13.1 Overview ________________________ 88 13.2 Universal Mode Pages ______________ 88 14 Direct 90 14.1 Overview ________________________ 90 15 Intensities 91 15.1 Overview ________________________ 91 15.2 Channel Controller Mode ____________ 91 15.2.1 15.2.2 16 Settings for Channel Controller Mode ___ 92 Operating in Channel Controller Mode___ 92 Timing 93 16.1 Overview ________________________ 93 16.1.1 16.1.2 16.1.3 Cue Times ________________________ 93 Intensity Fade Out times. ____________ 93 Playback Times ____________________ 93 16.2 Cue Times _______________________ 93 16.2.1 Timing Mode ______________________ 93 Clarity Operator Manual V2.0 16.2.2 Contents Timing Tab _______________________ 94 16.3 Setting Times_____________________ 94 16.3.1 Setting Times by Direct Entry _________ 95 16.4 Fade Curves ______________________ 95 16.5 Filtering Times ____________________ 96 16.5.1 16.5.2 Combining Filters __________________ 97 Complex Timing ___________________ 97 16.6 Wait Time________________________ 16.7 Previewing Times __________________ 16.8 Recording Times __________________ 16.9 Reset Timing _____________________ 16.10 Time Presets _____________________ 97 98 98 98 98 16.10.1 Recording Time Presets______________ 98 16.10.2 Applying Time Presets_______________ 99 17 Dynamics (real time effects) 100 17.1 Overview _______________________ 100 17.2 Applying Dynamics _______________ 100 17.3 Controlling Dynamics ______________ 101 17.3.1 17.3.2 Waveform Control _________________ 101 Dynamics Attribute Controls _________ 102 17.4 Multiple Attribute Dynamics_________ 102 17.4.1 17.4.2 17.4.3 18 18.1 18.2 18.3 18.4 18.5 Stopping Dynamics ________________ 103 Resync__________________________ 103 Attribute Control Dynamics Indicators _ 103 Matrix 104 Overview _______________________ Terminology _____________________ Patching a LED Matrix _____________ Creating a Matrix _________________ Editing a Matrix __________________ 18.5.1 104 104 104 104 105 Deleting a Matrix__________________ 105 18.6 Matrix Control ___________________ 106 18.7 Transforms______________________ 106 18.8 Adding Media to a Pixel Source ______ 107 18.9 Selecting Media in a Pixel Source ____ 107 18.10 Adding and Deleting Pixel Sources ___ 108 18.11 Viewer _________________________ 108 18.12 Activating a PixelSource ___________ 108 18.13 Activating Selected Cells ___________ 108 18.14 Pixel Source Layering and Transparency109 18.15 PixelSource Transitions ____________ 109 18.16 Dynamics _______________________ 109 18.17 Recording Matrix Settings __________ 110 19 19.1 19.2 19.3 19.4 Media 111 Overview _______________________ Patching Media servers ____________ Network Connection_______________ Configuration ____________________ 19.4.1 111 111 111 111 Reload __________________________ 111 19.5 Media Server Operation ____________ 111 19.5.1 19.5.2 Browser _________________________ 112 Controls_________________________ 112 19.6 Recording Cues __________________ 112 19.7 Supported Media Servers___________ 113 20 20.1 20.2 20.3 20.4 20.5 20.6 Palettes 114 Overview _______________________ Arranging Palettes and Groups ______ Groups _________________________ Colour Presets ___________________ Beam Presets ____________________ Favourites ______________________ 114 115 115 115 116 116 20.7 Presets _________________________ 116 20.7.1 20.7.2 Fixture Specific Presets _____________ 117 Fixture Type Presets _______________ 117 20.8 Freesets ________________________ 117 20.8.1 20.8.2 Permutating Freesets _______________ 117 Scaling Freesets ___________________ 117 20.9 Dynamic Presets __________________ 118 20.10 Recording a Preset or Freeset________ 118 20.11 Palette Icons _____________________ 119 20.11.1 Group Icons ______________________ 119 20.11.2 Preset & Freeset Icons ______________ 119 20.11.3 Preset and Freeset Shortcuts _________ 119 20.12 Applying Presets and Freesets _______ 120 20.12.1 20.12.2 20.12.3 20.12.4 20.12.5 20.12.6 20.12.7 Keyboard Commands _______________ 120 Apply in Palettes Mode ______________ 120 Apply in the Palettes window _________ 121 Build Mode _______________________ 121 Live Times _______________________ 121 Apply Palettes in the Programmer window122 Masking _________________________ 122 20.13 Applying Dynamic Presets __________ 123 20.13.1 Masking Dynamic Presets ___________ 123 20.13.2 Base ____________________________ 123 20.13.3 Preserve Dynamics_________________ 124 20.14 Controlling Dynamics ______________ 124 20.15 Deactivate a Preset or Freeset _______ 124 20.16 Recording Cues with Presets & Freesets.125 20.17 Updating a Preset During Programming 125 20.18 Updating a Preset During Playback____ 125 21 21.1 21.2 21.3 21.4 Programmer 127 Overview ________________________ 127 Programmer Attributes Tab _________ 127 Selection Sidebar _________________ 128 Selecting Fixtures _________________ 128 21.4.1 21.4.2 21.4.3 21.4.4 21.4.5 21.4.6 Selection phase vs. Programming phase 128 Selecting Multiple Types of Fixtures____ 128 Deselecting Fixtures________________ 128 Selection Order ___________________ 129 Attribute Quick Menus ______________ 129 Programmer Toolbar Fixture Buttons ___ 129 21.5 Individual Fixture Control ___________ 130 21.6 Groups _________________________ 130 21.6.1 21.6.2 21.6.3 21.6.4 21.6.5 21.6.6 21.6.7 Editing Groups ____________________ 130 Sort ____________________________ 131 Subgroups _______________________ 131 Buddying ________________________ 131 Ctrl Tab _________________________ 132 Intensity and Colour Icons ___________ 132 Position Icons_____________________ 132 21.7 Session Control ___________________ 133 21.7.1 21.7.2 21.7.3 21.7.4 21.7.5 Altered Fixture Indication____________ 133 Blind Programming_________________ 134 Clearing a Programmer _____________ 134 Clearing a Fixture from a Programmer _ 134 Clearing an Attribute from a Programmer134 21.8 Programmer Toolbar _______________ 134 21.8.1 21.8.2 21.8.3 21.8.4 21.8.5 21.8.6 21.8.7 21.8.8 21.8.9 21.8.10 21.8.11 21.8.12 Undo / Redo ______________________ 134 None, Prev, All, Next _______________ 134 Grab ____________________________ 135 Preview _________________________ 135 To Preset ________________________ 135 Record/Save______________________ 135 Append last/Save As _______________ 135 Update __________________________ 135 Highlight_________________________ 137 Highlight and Lowlight settings _______ 137 Blind ____________________________ 137 Clear/Close_______________________ 137 21.9 Programmer Toolbox ______________ 137 Contents 21.9.1 21.9.2 21.9.3 21.9.4 21.9.5 21.9.6 21.9.7 21.9.8 21.9.9 21.9.10 Clarity Operator Manual V2.0 Show Undo View __________________ Trim (knock out remainder) _________ Remainder Dim ___________________ Controls ________________________ Renumber Fixtures ________________ Grab DMX _______________________ Copy ___________________________ Paste___________________________ Flip ____________________________ Personalizing the Toolbar ___________ 138 138 138 138 138 138 138 138 139 139 21.10 DMX Input_______________________ 139 21.11 Parking Fixtures __________________ 139 21.12 Universal Control Panel_____________ 140 21.13 Attribute Controls _________________ 140 21.13.1 21.13.2 21.13.3 21.13.4 Attribute Quick Menus _____________ Fixture Quick Menus _______________ Attribute Control Size ______________ Attribute Control Order_____________ 141 141 141 142 21.14 Fanning Attributes ________________ 142 21.14.1 Offset Fanning ___________________ 142 21.14.2 Fanning Selection Order ____________ 143 21.14.3 Fanning in the Universal Control Panel _ 143 22 22.1 22.2 22.3 22.4 22.5 22.6 Command Line Programming144 Overview ________________________ 144 Fixture Selection __________________ 144 Intensity Entry ___________________ 144 Intensity Wheel___________________ 145 Fade Time Entry __________________ 145 Fixture Numbering for Keypad Entry __ 145 22.6.1 23 Changing Fixture Unit Numbers ______ 145 Record 146 23.1 Overview ________________________ 146 23.2 Recording a Cue __________________ 146 25.2 Editing a Cue ____________________ 164 25.3 Editing Follow or Wait Times ________ 164 25.3.1 25.4.1 25.5 25.6 25.7 25.8 26.1 26.2 26.3 26.4 26.5.1 26.5.2 24 Control Booth 151 24.1 Overview ________________________ 151 24.2 Cue-list Playback Settings __________ 151 24.2.1 24.2.2 24.2.3 Cue-list Playback Options ___________ 152 Cue-list Chase Options _____________ 155 Cue-list Priority Settings____________ 156 24.3 Playback Control Panel _____________ 156 24.4 Manipulating cues and cue-lists ______ 157 24.4.1 24.4.2 24.4.3 24.4.4 24.4.5 Cue-list Folders___________________ Copying and Merging Cues __________ Copy Full State ___________________ Undo Redo ______________________ Cue Notes _______________________ 157 157 158 158 158 24.5 Sync FX _________________________ 159 24.6 Mark Cues (Move in Black) __________ 159 24.7 Audio Playback ___________________ 159 24.7.1 Audio Fixture ____________________ 160 24.8 Simple SCRIPT language (Macros) ____ 161 24.9 Learn new cue-list_________________ 162 24.10 Bookmark _______________________ 163 25 Editing Cues and Cue-lists 164 25.1 Overview ________________________ 164 168 168 169 169 169 Sync FX _________________________ 169 Copying Active Cells to a Common Row 170 Cell Properties ____________________ 170 26.6 The Metronome __________________ 172 26.6.1 Metronome Settings _______________ 173 26.7 Performance Freesets/Groups _______ 173 27 27.1 27.2 27.3 27.4 27.5 27.6 27.7 Levels Window 174 Overview _______________________ DMX Values _____________________ Output Values ___________________ Programmer Values _______________ Cue List Values __________________ Customizing The Display ___________ New Window ____________________ 28 29.1 29.2 29.3 29.4 Undo Redo ______________________ 150 Performance Window Overview _______________________ Previewing Cue-lists_______________ The Grid ________________________ Adapting Existing Programming _____ 26.4.1 23.3 Editing Cues _____________________ 149 23.3.1 167 167 167 167 26.5 Managing the Grid ________________ 170 28.1 28.2 28.3 28.4 New Cue-list _____________________ Cue-list Playback Settings and Options Cue Options _____________________ Existing Cue-list __________________ Contents Options _________________ Keep Settings ____________________ Clear recorded values ______________ “Cue Only” Indication ______________ 166 Live Edit Indication _______________ Block Cue _______________________ Undo Redo Edits _________________ Exporting a Cue to the Programmer __ 26 146 147 147 147 148 149 149 23.2.1 23.2.2 23.2.3 23.2.4 23.2.5 23.2.6 23.2.7 Saving the Edit ___________________ 166 25.4 Editing Channels to be “Cue Only” ___ 166 Intensity Levels 176 Overview _______________________ View Setings ____________________ Console View ____________________ Follow View _____________________ 29 Show Files and Packages MIDI 176 176 177 177 178 Overview _______________________ Saving and Loading Shows _________ Importing and Exporting Shows _____ Desktop Clarity local media libraries __ 30 174 174 174 175 175 175 175 178 178 178 178 180 30.1 Overview _______________________ 180 30.2 MIDI Control of Selected Playback ___ 180 30.2.1 30.2.2 30.2.3 30.2.4 30.2.5 MIDI Settings ____________________ 180 MIDI Channel_____________________ 180 MIDI Note On Messages ____________ 180 MIDI Control Function ______________ 181 Learn Midi _______________________ 181 30.3 MIDI Timecode___________________ 181 30.3.1 30.3.2 30.3.3 30.3.4 30.3.5 30.3.6 30.3.7 30.3.8 30.3.9 31 Automatic Entry of Events ___________ 182 Manual Entry of Events _____________ 182 Editing Events ____________________ 182 Managing Playlists _________________ 183 MIDI Timecode Playback ____________ 183 Recede __________________________ 183 Skip Intervening Events ____________ 183 Big Time ________________________ 183 Simulator ________________________ 183 Remote Control 185 31.1 Overview _______________________ 185 Clarity Operator Manual V2.0 Contents 31.2 Controlling Clarity via an IPhone _____ 185 31.3 Controlling Other Devices From Clarity 185 31.4 Scheduler _______________________ 186 32 Tracking Backup 188 32.1 Overview _______________________ 188 32.2 Setting up Tracking Backup _________ 188 32.3 Operating From The Slave __________ 189 33 Preferences and About 190 33.1 User Preferences _________________ 190 33.1.1 New Show Preferences _____________ 193 33.2 About Clarity ____________________ 194 34 LX Tools 195 34.1 Overview _______________________ 195 34.2 Starting LX Tools _________________ 195 34.2.1 34.2.2 34.2.3 34.2.4 34.2.5 34.2.6 34.2.7 34.2.8 34.2.9 34.2.10 Brightness _______________________ Software Management _____________ Help____________________________ Configure Monitors ________________ Networking ______________________ Calibrate Touch Screens ____________ Clock ___________________________ Diagnostics ______________________ System Information _______________ Restart GUI ______________________ 195 196 196 196 196 198 198 198 198 198 35 Technical Support 199 36 Fixture Editor 200 36.1 Overview _______________________ 200 36.2 Fixture Request Service ____________ 200 36.3 Fixture Editor ____________________ 200 37 37.1 37.2 37.3 37.4 37.5 Operating Concepts and Terminology 201 Overview _______________________ Programmer / Playback ____________ Priority Control___________________ Attribute Default Values____________ Programmer Control ______________ 201 201 201 201 201 37.6 Playback Control __________________ 202 37.7 Recording and Playback Concepts ____ 202 37.7.1 37.7.2 37.7.3 37.7.4 37.7.5 Tracking Playback _________________ 202 Typical Tracking Operations __________ 202 Advantages of Tracking _____________ 203 Disadvantages of Tracking ___________ 203 Cue Only Playback _________________ 204 37.8 Recording Cues ___________________ 204 37.8.1 37.8.2 37.8.3 Content Options ___________________ 205 Cue Only (recording) _______________ 206 Mark Cues (Move in Black) __________ 207 37.9 DMX 512 ________________________ 207 37.10 DMX Universes ___________________ 207 37.10.1 DMX Slot ________________________ 207 37.10.2 Attribute. ________________________ 207 37.11 HTP (HIGHEST TAKES PRECEDENCE)__ 207 37.12 LTP (LATEST TAKES PRECEDENCE) ___ 207 37.13 RDM ___________________________ 207 38 Hints and Tips 209 38.1 Simple Cue Playback_______________ 209 38.2 Parked channels __________________ 209 38.3 One Shot Chase __________________ 209 38.4 Performance Window Tips___________ 210 38.5 Flashing a cue ____________________ 210 38.6 Quick Record_____________________ 210 38.7 Snapping Forwards or Backwards_____ 210 38.8 Operate Clarity Like a Manual Desk ___ 210 38.9 Programmer Override ______________ 210 38.10 Media Server Thumbnails ___________ 210 38.11 Audio Playback ___________________ 211 38.12 Automated Follow Spot Audio Cues ___ 211 38.13 Simple RGB Mixing ________________ 211 38.14 Recording Only Pan (or Tilt) _________ 212 38.15 Time Presets _____________________ 212 38.16 Sorting, Buddying & SubGroups ______ 212 38.17 Universal Control. _________________ 212 38.18 Copy And Paste___________________ 212 38.19 Fans Buttons _____________________ 213 38.20 Multiple Programmers______________ 213 39 COMPLIANCE STATEMENTS 214 Clarity Operator Manual V2.0 Conventions Used in this Manual Throughout this manual, certain conventions have been used to make the meaning clearer. 1) A word in Bold test represents a button, a Tab, an area or label on the GUI (Graphical User Interface). 2) The terms “Click” “Select” and “Touch” are interchangeable. 3) Emphasis is indicated by underlining. 4) Notes or Hints are displayed in italic font Copyright Notices Clarity application software is developed by OpenClear Pty. Ltd. www.openclear.com.au Copyright © 2009 OpenClear Pty. Ltd. All rights reserved. USB and RDM software modules and LX products are developed by LSC Lighting Systems (Aust) Pty. Ltd. www.lsclighting.com Copyright © 2009 LSC Lighting Systems (Aust) Pty. Ltd. All rights reserved. Contents of this manual, Copyright © 2012 OpenClear Pty. Ltd. and LSC Lighting Systems (Aust) Pty. Ltd. All rights reserved. Clarity Operator Manual V2.0 Introduction/Models 1 1.1 Introduction/Models OVERVIEW Clarity lighting and media control is available as a Desktop software package for PC or MAC (with USB connected peripherals) or in three console models, LX300, LX600 and LX900. There are separate sections in this manual for the Desktop version (with it’s optional peripherals) and for each of the console models. The software is common to all platforms however there are small differences that are particular to each platform due to the different hardware controls of each platform. The common operating system is described in detail with separate sections for of the various operations that can be performed. The screen shots used in these sections of the manual are all from the LX600. There might be slight variations in the screen layout in other modes of operation. The Desktop version can be configured to run in desktop mode or to emulate any of the console platforms. Emulating a console is most useful for pre-programming a show for a console when the console is not available. 1.2 DESKTOP VERSION Clarity Desktop shown with optional VX20 wing and external monitors. The desktop version is described in its own section of this manual. A range of USB accessories are available for desktop operation. 1.3 CONSOLE MODELS There are three models in the LX range of consoles…. LX300 LX600 LX900 Each console is described in its own section of this manual. 1.4 FEATURES The desktop and LX consoles all run the renowned Clarity software with many years of proven reliability on thousands of shows. Some of the main features of Clarity are: Full Drag and Drop Patching, with intelligent fixture Cloning. Rig View with 2D simulation and easy fixture selection. Seamless fixture substitution, brand to brand, model to model, type to type, etc, from the world's most comprehensive Fixture Library. Multiple programmers, each with independent unlimited Undo/Redo. Page 1 Introduction/Models Media Server Integration with clip thumbnails (supports Arkaos VJ DMX, ArKaos Media Master, Catalyst, Green Hippo’s Hippotizer, Pandora’s Box, ROBE Digispots). LED pixel mapping with picture and video playback – maximum size limited only by available DMX slots. Full Dynamics Editor and Effects Engine with smooth cross-fading of effects. Freesets – just like Presets, but independent of fixture type and quantity. Time Presets and Live Time Busking interface. Unlimited Groups, Presets, Freesets, Cues and Chases. Audio playback and time-code synchronization. Full tracking cue-lists with Macro scripts and Undo/Redo of cue record/delete. Unique Performance window live interface. Performance Grid, a very powerful ad-lib playback matrix grid. 1.5 Clarity Operator Manual V2.0 HELP The desktop installation includes a copy of this manual that can be found in the LSC folder. The LX consoles contain a copy of this manual that can be viewed on screen and on-board video tutorials of common operations. They are contained in the LX Tools utility. To start LX Tools from the console press Function+Fine+Fine at the same time. To start LX Tools from the keyboard press Ctrl+Alt+L at the same time. If you are experiencing problems with Clarity either contact your local LSC agent or post a message on the LSC forum at http://www.lsclighting.com/forums/ Page 2 Clarity Operator Manual V2.0 Latest Features 2 2.1 Latest Features OVERVIEW Both LSC Lighting Systems (Aust) Pty. Ltd. and OpenClear Pty. Ltd. have a corporate policy of continuous improvement covering areas such as product design and documentation. To achieve this goal, we undertake to release software updates for all products on a regular basis. The latest features to be added to this version of Clarity are listed below. 2.2 VERSION 2 Clarity Version 2 contains the following new or enhanced features. 2.2.1 Rig Mode Rig mode is a fixture selection tool and two dimensional visualiser. It shows a geographical view of the patched fixtures (and groups) which you can arrange so that they are positioned as they actually are in your rig. This allows you to rapidly find and select fixtures for programming by clicking on them or touching them. A background image of your stage or venue can be added to aid selection and multiple views can be created. The intensity, colour and position of the fixtures are also displayed. See section 12 for more details. 2.2.2 OSC OSC stands for “Open Sound Control” and was developed as a protocol to replace MIDI. It has evolved to the point where it is used for many types of devices other than audio devices or synthesizers and Clarity now has both OSC client and OSC server functionality. This allows Clarity to control OSC devices and also to be controlled by OSC devices. See section 31 for more details. 2.2.3 Page Bookmarks Page bookmarks allow instant recall of pages on all connected control surfaces (LX console or VX wings on the desktop version). See sections 8.6.10 for details. 2.2.4 User Definable Keyboard Shortcuts You can now define your own keyboard shortcuts for a wide variety of Clarity functions. See section 10.10 for details. 2.2.5 Date/Time Scheduler. You can define various playback actions to occur at specific dates or times, with optional repeats for “n” repeats or forever. This function is intended for scenarios where Clarity operates unattended. See section 31.4 for details. 2.2.6 Audio Control Device You can now add virtual fixtures that can be assigned to specific audio slots to control individual playback volume or start/pause/stop playback of specific audio slots. See section 24.7.1 for details. 2.2.7 Intensity Levels windows The Intensity Levels view complements the normal “Levels” views by providing intensity specific information with optional auto-compression (hiding levels that are at zero). This makes it much easier to see all of the channels in use when there a large quantity of fixtures. The window provides two default views: Console Output which (by default) shows the source of each fixtures level. Cue-list contents which (by default) follows the current cue-list. You can add more custom views and undock individual views to locate them on external monitors etc. See section 28 for details. 2.2.8 Touch Screen Input Support Several GUI sections have been redesigned to be more suitable to touch input, such as the record dialog, control booth cue-list settings pane, sort controls etc. Page 3 Latest Features 2.2.9 Clarity Operator Manual V2.0 Touch Mode Enabling the option “Show, Settings, Control widget touch mode” optimizes operations on touch screens so that the cursor is not hidden and makes it easier to make larger changes by flicking any parameter control so that the value will continue moving with inertia (similar to scrolling on an iPhone). 2.2.10 Redesigned Record Dialogue Box The record dialogue has been redesigned to incorporate recording cues, groups, presets/freesets and page bookmarks all from one central dialogue. 2.2.11 Out Timing You can now specify an optional out delay and out fade time for intensities in the Control Booth window. 2.2.12 Console Emulation The desktop version of Clarity now operates in either the standard desktop mode or in console emulation modes to mimic the software configuration and control layouts on a LX300, LX600 or LX900 console. See section 3.12 for details. 2.2.13 Show Files Clarity has a new method of saving/exporting and loading/importing shows and handling media files. See section 29 for details. 2.2.14 New User preferences Close edit session when saved. Pressing Save when editing a cue or cue-list will close the edit session as well. Default fade time. Defines the default fade time for new parameter values in the programmer. On level. Defines the intensity level applied by pressing the On/Full button (LX) or F key on the keyboard. A double-tap of this button will set the intensity to 100%. HTP override priority. LTP playbacks at this priority or higher will override HTP playbacks, otherwise HTP takes precedence over LTP. Run ‘lamp on’ macros in parallel. Normally the ‘Lamp on’ command is executed sequentially for each fixture to avoid overloading the rig, but in some cases this is unnecessary so this option causes all selected fixtures to be “lamped-on” at the same time so that the operation completes quicker. Invert flash button operation on rate faders. If a cue-list is loaded on a playback and there are un-used (clear) playbacks to the right of the loaded playback, then the unused playbacks can be linked to the loaded playback to provide greater live control of Chase Rate, Playback Rate, FX Rate and FX Amplitude. Normally you need to hold the Flash button while moving the rate/amplitude fader to adjust the value. If you reach a fader end-stop but you need to more range, you can release the flash button and move the fader to the opposite end, then hold flash and move fader to continue adjusting the value. This is known as “scooting” the fader. This new user preference “Invert flash button operation on rate faders” that means you just move the fader without holding flash to adjust the value, then (if you reach the fader end stop) hold flash to reposition the fader. So the fader is always connected giving you get instant control but you can hold the Flash button down to 'scoot' the fader! See sections 3.21 and 8.6.12 for more details. 2.2.15 New Cue-list Options Solo on flash. When this is enabled for a playback, pressing it’s flash button will set all other playbacks to 0% intensity unless they have ‘Solo safe’ enabled. Solo safe. Prevents an active playback from being set to 0% by other “Solo on flash” playbacks. Release on pause/back. Causes the pause/back button to release the playback instead of stepping back (useful for chases). Page 4 Clarity Operator Manual V2.0 Latest Features Action button toggle. When a cue-list is assigned to an LX600 or LX900 Action button, pressing the Action button will play the cue-list. If this option is ticked, pressing the Action button will play the cue-list and pressing the Action button again will release the cue-list. This option is used with cue-lists that contain a single cue allowing you to fade the cue up and down using just the one button. 2.2.16 Minor Changes Added ability to re-order and name pages. Added a confirmation dialog before deleting any palettes. Allow drag n drop of multiple cues and cue-lists in control booth. Add cue-list folders to control booth. Added 'UNPATCHED FIXTURES' area to patch window, plus ability to unpatch and re-patch fixtures. Unpatched fixtures do not count towards your license limit. Add Patched slot count to About dialogue. Redesigned sort controls so they pop-in at the bottom of the programmer window. Palette window's Remove menu item now called De-activate. Solo can trigger Button playbacks that have been configured as “Go on fader up”. Ability to switch to fixture editor from Show menu. Implement Function + Release to do Release all and Function + double-tap Release to ignore the “ignore release all” preference. Added ability to change extension type on VX wings. 2.2.17 User Manual The individual user manuals for the desktop and console models have been merged into a single user manual that covers all versions of Clarity. Page 5 Desktop Clarity Clarity Operator Manual V2.0 3 3.1 Desktop (PC or MAC) Clarity OVERVIEW Desktop The desktop version of Clarity consists of a software application and optional control surfaces and interfaces. In its simplest form, Clarity can be run with just a computer where control is via a Graphical User Interface (GUI) or Command Line input and output is via ArtNet (DMX over Ethernet). Hardware can be added in the form of USB to DMX adaptors and USB Playback and Programming wings that also include DMX outputs. The desktop version of Clarity is available for both PC and MAC operating systems. Purchased versions of Clarity desktop include a USB dongle (HASP) that you plug into a USB port of the same computer that is running Clarity or into the secure compartment in the rear of a VX10 or VX20 wing. When you start Clarity, it reads the license from the dongle and automatically enables the channel capability that you have purchased. Multiple dongles can be plugged in at the same time to increase your available DMX channels. Your Clarity USB Hasp Dongle is a valuable item. Without it, Clarity will operate in “Demo Mode” as described below. Therefore you should care for it as you would any other valuable piece of equipment. LSC recommends that you insure your USB Hasp Dongle against loss, theft or damage as LSC cannot supply a replacement in these circumstances. 3.1.1 Software The Clarity software contained on the Clarity CD is also available as a download from the LSC website, www.lsclighting.com. Both the CD and downloaded versions are identical although both LSC Lighting Systems (Aust) Pty. Ltd. and OpenClear Pty. Ltd. have a corporate policy of continuous improvement. To achieve this goal, we undertake to release software updates for all products on a regular basis. In light of this policy, the website might contain a later version of Clarity than the version on your CD. Please check the web site for the latest version of Clarity software. 3.2 INSTALLING CLARITY ON A PC LSC recommends running Clarity on Windows Vista ©, Windows 7 ©, or Windows 8 © operating systems. Note: The Clarity software and device drivers must be installed before connecting any QX DMX nodes or VX wings to your computer. Install the software by double-clicking on the Clarity installation file supplied on the CD or downloaded from the LSC website (www.lsclighting.com). Note: The name of the Clarity installation file will be different depending on which version of software you are loading but will be of the form Clarity-PC-x.y.z.exe where x.y.z is the version number of the software. Windows will ask you if you want to allow Clarity to make changes to your computer. Click Yes and the “LSC Clarity Setup” dialog box appears. Page 6 Clarity Operator Manual V2.0 Desktop Clarity Components are selected for installation by checking there box. Position your mouse over a component to see its description. A new installation of Clarity requires all 3 components to be installed. Clarity LSC QX/VX USB Driver Aladdin HASP SRM The Aladdin HASP SRM software is for the USB Dongle that contains your Clarity license. An upgrade to a new version of Clarity only requires 2 components to be installed. Clarity LSC QX/VX USB Driver Continue the installation by clicking Next, then follow the on screen instructions. The QX/VX drivers are certified 64 bit drivers, however you may be asked to confirm their installation. Installation of the “Aladdin HASP SRM” software can take several minutes. You can check the operation as described in “HASP Diagnostics” below. When the installation is complete, click Close. If you accept the defaults, Clarity will be installed in C:\Program Files\LSC\Clarity. You can now plug in a QX DMX node, VX wing or USB license dongle (Hasp). The first time that you do this, windows automatically installs their device drivers. This takes a few moments and windows will inform you that “Your device is ready to use”. To run Clarity, click on Start\All Programs\LSC\Clarity where you will see all of the installed files. Click on Clarity to run the program. The above steps are for installation on Windows 7. The process for Windows Vista will be similar. Page 7 Desktop Clarity 3.3 Clarity Operator Manual V2.0 INSTALLING CLARITY ON A MAC To mount the installation package, double click on Clarity-Mac.x.y.z.dmg. Note: The name of the Clarity installation file will be different depending on which version of software you are loading but will be of the form Clarity-Mac-x.y.z.dmg where x.y.z is the version number of the software. Double click LSC Clarity.mpkg to install the Clarity application. Click Continue. LSC highly recommends that you do not change the install location. The amount of space that will be taken on your computer depends on whether you are installing or upgrading Clarity. Click Install. You might be required to enter your password to allow the installer to continue. Once the installation is complete you will get a successful confirmation. Page 8 Clarity Operator Manual V2.0 3.3.1 Desktop Clarity HASP Installation for Mac If you have purchased a Clarity license you will need to install the HASP SRM Runtime. Double click HASP SRM RTE Installer.pkg Follow the on screen instructions to install the HASP SRM Runtime. If you have previously installed the HASP SRM Runtime (possibly from a previous version of Clarity) then you might see an error message telling you that the software cannot be installed. This only means that the version already on your computer is the same as the version you tried to install so it was not required. Click Close. 3.4 HASP DIAGNOSTICS You can verify that the HASP SRM Runtime is correctly installed by navigating to http://localhost:1947 to view the “HASP SRM Admin Control Centre”. Make sure you USB license dongle is plugged into a USB port then click on HASP Keys to verify that your key is recognized. You might have to refresh the page if you are too quick. Page 9 Desktop Clarity 3.5 Clarity Operator Manual V2.0 DEMO MODE If Clarity is run without a USB dongle it will run in Demo mode. Demo mode has full functionality but the intensity of all fixtures will black out and all non-fadable channels will freeze for a short period on a regular basis. It is therefore not suitable for running a show, however it is ideal for training and demonstrations or to create off line shows that can be run on a purchased version of Clarity or on a LX console. 3.6 DESKTOP DMX OUTPUT DMX512 output is obtained by connecting any of the following devices to the USB port of your computer. Multiple devices can be connected. LSC Clarity QX1 interface provides 1 universe of DMX output. LSC Clarity QX2 interface provides up to 2 universes of DMX output. LSC Clarity VX10 wing provides up to 2 universes of DMX output. LSC Clarity VX20 wing provides up to 4 universes of DMX output. QX1 Provides 1 universe of DMX output QX2 Provides 2 universes of DMX output The QX1 and QX2 interfaces are powered directly from the computer’s USB connector. Connect your DMX controlled equipment to the relevant DMX universe connectors. The DMX outputs are fully isolated from the USB input. Note that the DMX output has to be patched in Clarity before it will work. See section 11.12 for details. 3.7 DESKTOP ARTNET OUTPUT ArtNet is a protocol that is transmitted over Ethernet LAN (Local Area Network) or WAN (Wide Area Network) and supports up to 255 DMX Universes on a single cable. To use ArtNet it must be connected to the internal universes within Clarity in the Patch window. See section 11.13 for details. 3.8 VX10 PLAYBACK WING Control of Playback on a computer can be augmented by adding an LSC Clarity VX10 playback wing. This provides 10 fader Playbacks with LCD displays and multiple page selection, a Grand Master and DBO (Dead Black Out), two DMX512 universe outputs, remote trigger inputs and a secure compartment for installing your license dongle and a front panel USB port. Page 10 Clarity Operator Manual V2.0 Desktop Clarity Connect the VX10 wing to a USB port of your computer using the cable provided. The VX10 is powered directly from the computer’s USB connector. A separate power supply is required when your computer’s USB connector cannot supply sufficient power for the VX10. 2 DMX Universe Outputs Kensington Lock slot USB to Computer LED Desk Lamp Socket Power Input Remote Trigger Inputs VX10 Rear Panel USB dongle compartment The rear panel is described in detail below. 3.9 VX20 PROGRAMMING & PLAYBACK WING Programming controls on a computer can be augmented by adding an LSC Clarity VX20 wing. This has all of the features of the VX10 but adds 10 button Playbacks with LCD displays and multiple page selection, Programmer controls (including trackball), MIDI in and out and includes four DMX512 universe outputs. Connect the VX20 wing to a USB port of your computer using the cable provided. The VX20 is designed to operate off USB power, however for some computers and when using a LED gooseneck light, there may be insufficient USB power to operate the VX20. To cater for this, the VX20 is fitted with an internal universal mains power supply. We recommend connecting the VX20 using the supplied IEC cable to a source of 85 to 264 Volts AC mains power wherever possible. The backlight for the LCD screen only works when external power is connected. Mains Input Kensington Lock slot 4 DMX Universe Outputs MIDI In MIDI Out DMX Indicator LED Desk Lamp Socket USB dongle compartment USB to Computer Remote Trigger Inputs USB Indicator VX20 Rear Panel 3.9.1 USB Indicator The LED beside the USB connector shows the status: Flashing RED = No USB connected. (The DBO button also flashes) Steady RED = USB connected but Clarity not running on computer. Green = USB data is OK. 3.9.2 DMX Indicators The LED beside each DMX connector shows the status: Green = DMX data is OK. Page 11 Desktop Clarity 3.9.3 Clarity Operator Manual V2.0 Desklamp The Desklamp socket provides 12volts power for a LED. Pins 1 and 2 are ground and pin 3 is +12 Volts. The brightness control is accessed by holding down Function and Select together. 3.9.4 Kensington Lock Slot The Kensington Lock slot allows you to secure your VX10 or VX20 wing using a commercially available tethering device. 3.9.5 USB Slot The top panel of the VX10 and VX20 wings has a standard USB connector allowing you to connect other USB devices such as memory devices to store your shows. Multiple VX10 and VX20 wings can be connected to your computer. Note: The QX and VX products are designed to be powered from the USB port on our computer. However due to the design of some computers or your particular configuration, there may not be enough power to operate the VX products. If you experience problems in the installation process, first try a different USB port on your computer or try powering the VX10 with an external power supply or if you have a VX20, plug it into the mains supply. If you still experience problems, check the LSC website or contact your local dealer. Note that the DMX output has to be patched in Clarity before it will work. See section 11.12 for details. 3.10 STARTING CLARITY If you are running a purchased copy of Clarity, please ensure that your USB license dongle is plugged into a USB port on the PC or in the secure rear port your VX10 or VX20 wing before you start Clarity. To start Clarity, double click on the Clarity icon on your desktop or browse to the LSC menu from your Start button. 3.11 LOADING A SHOW When you start Clarity, it prompts you to load a show. The Mode: function allows you to run Clarity as a normal desktop version or to emulate a console version of Clarity (LX300, LX600 or LX900) on your computer. If “Mode” is left as Auto, then the mode is determined from the show file that is loaded. For example, if you load a show saved on a LX600 then Clarity will start up in LX600 emulation mode. Clicking the dropdown box allows you to make a selection. Page 12 Clarity Operator Manual V2.0 Desktop Clarity Selecting a console mode is particularly useful when you are creating or editing a show on the desktop version that will be loaded onto a console version of Clarity. Once you have made your selection……… Clicking Last Show loads the last show to be saved. Clicking Open shows a standard file navigator allowing you to select any show. Clicking Recent opens a drop down box containing your most recent shows. Clicking New Show starts a new show. 3.11.1 Show Tab You can always start a new show, change to an existing show, save or rename a show from the Show tab on the top toolbar. Selecting “Change show…” allows you to also change the “Mode” as described above and below. 3.12 MODES OF OPERATION Clarity's top toolbar is available in all modes of operation and has tabs allowing you to switch between the main windows of: Patch, Rig, Programmer, Palettes, Control Booth, Performance, Levels and Intensity Levels. Desktop Mode When Clarity is started in a LX console emulation mode (described above), the main window is contained within a special ‘wrapper’ window which can be scrolled to navigate the main window. This allows the main window to remain at the original size it would be on the console to preserve graphical layouts and positions. LX300 emulation Mode LX600 emulation Mode Page 13 Desktop Clarity Clarity Operator Manual V2.0 LX900 emulation Mode The wrapper window’s toolbar provides several options: Fullscreen. The wrapper is set to full screen mode and the wrapper’s toolbar is hidden. Resizable. The main window’s size will follow the size of the wrapper window and the scrollbars are hidden, unless the wrapper window is smaller than the main window’s minimum size. Hide toolbar. This option replaces the window wrapper’s toolbar with a small yellow disc on the top right of the wrapper window. Clicking on this presents the toolbar options as a drop-down menu. Click here for display options Split/Join (LX900 mode only). The LX900 has two internal monitors. This splits the wrapper into two separate wrapper windows. If this is running on a system with two or more monitors then the other wrapper window will be presented on the other monitor and will appear full screen if the original wrapper was full screen. Left/Right (LX900 mode only). This switches the view between the LX900’s left or right internal monitors (unless the wrapper has been split). Playback display mode (LX600 or LX900 modes). The LX600 and LX900 have playback displays positioned at the bottom of the main screen(s) and this controls how they are presented in the wrapper: o Auto. If the main window size is normal (1280x1024) then the playback display is positioned at the bottom as usual. If the Resizable option is enabled then the playback display is only displayed if the main window size is 1280x1024. For example, if running on a 1280x1024 host system in full screen mode. o Always Hidden Playback displays are never shown. o Always Visible Playback displays are always shown at the bottom of the main window even if the main window size is not 1280x1024. Note that if the main window width is less than 1280 then the playback display will be truncated. 3.12.1 Console Window When running in an emulation mode, a top-level Console tab is provided to show the console’s internal encoder wheel touch screen and includes tabs for displaying the virtual control surfaces of the relevant LX console. For example, the LX600 Console tab allows you to select the LX Programmer, LX Action Buttons and LX600 Playbacks controls: Page 14 Clarity Operator Manual V2.0 Desktop Clarity LX Controls LX Programmer LX Action Buttons Page 15 Desktop Clarity Clarity Operator Manual V2.0 LX600 Playbacks The buttons and faders all work as if they were on the actual console. If you need to press two buttons at the same time, pressing and holding a button for 1 second will latch that button down. For example, if you wanted to hold the Function modifier or one of the wheel modifier buttons you latch it by holding it for one second. Press it again to un-latch it. The playbacks on the LX600 and LX900 do not have dedicated contents displays as in the LX300 but show their contents on the touch screen located above them on the console. These displays are emulated at the bottom of the screen on your computer. Depending upon the screen resolution of your computer you might have to scroll to the bottom to see the playback displays. Display scrolled to see Playback contents Playback contents LX600 Playbacks with main screen scrolled down to see the playback displays. The playback controls work in exactly the same manner as in the actual consoles. See the playback sections of the consoles for details. When hovering over an emulated LCD screen, a zoomed version of the LCD is presented to aid readability. This is also configurable via the tool menu. The emulation views also snap to screen boundaries and to each other to aid layout. 3.13 BASIC DESKTOP OPERATION The tabbed windows of the main menu bar follow the same order as the basic steps used in control lighting fixtures. 1. Patch allows you to select your fixtures from a fully integrated fixture library of over 2000 fixture personalities supplied by Carallon, an independent supplier of fixture libraries. You patch a fixture to its DMX slot by drag and drop. 2. Rig, Programmer and Palettes allow you to select fixtures and control their attributes to create (and edit) looks, effects, cue lists and palettes. Page 16 Clarity Operator Manual V2.0 Desktop Clarity 3. Control Booth and Performance provide extensive methods of playback. 4. Levels shows you what is happening on the output. All of these operations are described in detail in their relevant sections of this manual. The right end of the top toolbar has buttons for Clear All, Release All and DBO. Clear All clears all fixtures from all Programmers. Release All releases all fixtures from all Playbacks. See the Programmer and Control Booth sections for more details on Clearing and Releasing. DBO (Dead Black Out) instantaneously blacks out all fixtures and dimmers. This is a momentary action. When the button is released, all output is instantly restored. GM (Grand Master). When you hover the mouse over the DBO button, the Grand Master (GM) appears. You can click on 0 (Black Out) or 100 (Full level) or drag the virtual fader to set an overall intensity level. The DBO button flashes red if the Grand Master is set to any level below 100%. It stays red when the Grand Master is set to 0%. Page 17 Desktop Clarity Clarity Operator Manual V2.0 3.14 PATCHING Clicking on the Patch tab reveals the patch window. Patch Field Library Information on selected fixture Connections To patch a fixture: In the Library, click on the fixture manufacturers name to show all of their models then select your model of fixture. Dimmers are located in the “Generic” listing. Drag the fixture name and drop it into the desired DMX slot in the Patch Field or double click the fixture name to patch it to the next available slot. Enter the quantity of fixtures in the pop up “Add Devices” dialog then click Patch. Continue to select fixtures and patch them as above. In the “Connections” Pane, click the down arrow beside the Universe that you have patched your fixtures to and then select the output DMX connector to use. Page 18 Clarity Operator Manual V2.0 Desktop Clarity 3.15 PROGRAMMING Clicking on the Programmer tab reveals the programmer window. Click on Fixtures to select them Selection Sidebar Attribute Controls Fixture type and Group Tabs Universal Controller All patched fixtures are available in the Selection sidebar, organized in tabs of patched fixture types and groups. Select the tab for the fixtures to control then click on the fixtures to select them. Click and drag to quickly select multiple fixtures. Clicking on a selected fixture de-selects it. When a fixture(s) is selected, its attribute controls appear. Fixtures can also be selected in the Rig view. See section 12 for details. 3.15.1 Attribute Controls Clarity uses Attribute Controls in many of its windows to control the values of fixture attributes, dynamic effects and timing controls. Specific Attribute Controls automatically appear when required for the fixtures or objects that you select. Attribute Controls are adjusted by clicking and dragging with a mouse anywhere within each attributes window. A single Attribute Control for controlling one dimmer looks like this: To adjust the intensity of the dimmer, click and drag anywhere in the bar below the attribute name “Intensity”. If seven dimmers are selected the Attribute Control looks like this: To adjust the intensity of all 7 dimmers, click and drag anywhere inside the bar. All these dimmers are set to 50%. Page 19 Desktop Clarity Clarity Operator Manual V2.0 When you select different fixtures that have multiple attributes, Attribute Controls automatically appear for each type of fixture and each attribute of each fixture type. Attribute Name 3.15.2 Attribute Quick Menus To access the “Attribute Quick Menus, either click on the name of an Attribute Control or right click in the Attribute Control area. Each individual Attribute Control has its own specific quick menu, offering rapid access to common settings relevant to that attribute. For example: Gobo Colour Typical Attribute Quick Menus 3.15.3 Universal Controller The Universal controller at the bottom of the Programmer window can also be used to control the attributes of all selected fixtures. These controls work with any type of fixture that has been selected and are especially useful to simultaneously control selections of mixed fixture types. Clicking and dragging in these controls uses low mouse gearing for accurate control, but can be made even finer by holding down [Shift] whilst dragging. 3.15.4 Creating a Lighting Look Select the fixture(s) to be controlled. Use the Attribute Controls or the Universal Controller to get the desired look. To record the look as the first cue in a cue-list click Record. In the Record dialog that opens accept the defaults and click Record. Page 20 Clarity Operator Manual V2.0 Desktop Clarity Select fixtures and adjust attributes to set the next look. To record this look as the next cue in the Cue-list click Append Last. Repeat until all cues in the cue-list have been recorded. Click Clear to clear all attributes from the Programmer. 3.16 PLAYBACK Desktop Clarity provides several means of playing back the cues that you have recorded. 3.16.1 Control Booth Clicking on the Control Booth tab reveals the Control booth window. Hardware Cue-lists Controls for Selected Cuelist Playbacks Pane Drag and drop cue-lists to create Playbacks Clicking on a Cue-list (that you have recorded) allows it to be controlled by the buttons in the “Control” pane. Dragging a Cue-list to the Playbacks pane creates a new Playback with buttons and a fader to control the Cue-list. Multiple pages of Playbacks are available. The function buttons of your computer keyboard (F1 through F7) act as “Go” buttons for playbacks 1 to 7 respectively. 3.16.2 Adding a Virtual VX Wing Cue-lists are assigned to the playbacks on VX wings in the Control Booth window by drag and drop onto a virtual copy of the selected wing on the Clarity screen. When a wing is plugged into the computer running Clarity, the real and virtual wings both operate simultaneously. Move a fader on the real wing and the same fader on the virtual wing also moves. Click a button on the virtual wing and both it and the real wing button light. To add a virtual wing you must be running in “Desktop Mode”. In the Control Booth window click Hardware, Manage and in the Hardware dialog box select add virtual wing.... From the Add new device box drop down list select your model of playback wing or DMX node and click OK then Close. 3.16.3 Selecting a Virtual VX Wing To select a Virtual Wing, in the Control Booth window click Hardware, then click on the name of the Wing (Clarity VX10 or Clarity VX20). The selected wing appears on the screen. The virtual wing is fully functional except that the Grand Master is not activated until a hardware USB wing is connected. Page 21 Desktop Clarity Clarity Operator Manual V2.0 Virtual VX20 Wing VX20 Virtual Wing Display 3.17 ADDING A CUE-LIST TO A VX WING To add a cue-list to a playback on a wing, in the Control Booth window, drag it from the cue-list column onto the LCD window of the virtual wing playback. If the actual wing is connected, the cue-list also appears in the same playback as on the virtual wing. Cue-lists already on a wing playback can be moved to a different playback by dragging them on the virtual wing. To copy a cue-list to another playback, hold [Ctrl] (PC) or [Cmd] (Mac) whilst dragging on the virtual wing. 3.18 WING PLAYBACK PAGES The playbacks on the Clarity VX10 and VX20 wings can have up to 99 pages of cue-lists. On the VX10 wing, the Page Buttons select the current page for all 10 playbacks. Playbacks Page buttons and display Playbacks and Page Buttons on a VX10 Wing On the VX20 wing, playbacks are divided into 2 separate banks. Playbacks 1 to 5 and 11 to 15 are in the left bank and playbacks 6 to 10 and 16 to 20 are in the right bank and each bank has separate Page Buttons. Left Bank Page buttons and display Left Bank Playbacks Right Bank Page buttons and display Right Bank Playbacks Playbacks and Page Buttons on a VX20 Wing Page 22 Clarity Operator Manual V2.0 Desktop Clarity When you start a new show, only page one exists. When a cue-list is dropped onto any playback on a page of a virtual wing, the next higher page is automatically created. You can manually create any page number (up to 99) by directly selecting that number as described below. This also automatically creates all of the in between pages up to the selected page number. The page number display beside the page buttons shows a ▲ or ▼ symbol when a higher or lower page exists. Pressing [Page ▲] or [Page ▼] selects the next higher or lower page number. To directly select any page number, hold either [Page ▲] or [Page ▼] and use the numbered [flash] buttons below the faders to enter the page number. Use the [10] button as a 0. For example, to go to page 21, hold either [Page ▲] or [Page ▼] and tap [2], [1]. Holding [Function] and pressing [Page ▲] or [Page ▼] increments or decrements the page number by 10. 3.18.1 Locking a Playback A playback on a VX wing can be locked so it is unaffected by page changes. On the virtual wing, right click on the playback and select Lock this playback. 3.18.2 Page Bookmarks Page bookmarks allow instant recall of pages. See section 8.6.10 for details. 3.18.3 Managing VX Pages Pages can be re-ordered and named. See section 8.6.9 for details. 3.19 WING PLAYBACKS 11-20 Play LCD screen 11-20 Pause Right Bank Page Left Bank Page Function DBO Select 1-10 Play Release 1-10 Pause Edit Grand Master Record Pause/Go Back 1-10 Intensity Faders Master Go 1-10 Intensity Flash VX20 Playback masters The area of the LCD screen adjacent to each playback shows the name of any cue-list that is on the playback and also the names of the current cue and the next two cues in the cue-list. GM (Grand master): controls the overall intensity of all fixtures on the output. If more than one VX wing is connected, the Grand Masters work on a Lowest Takes Precedence basis. Page 23 Desktop Clarity Clarity Operator Manual V2.0 DBO (Dead Black Out): Whilst held down, it blacks out all intensity of all fixtures on the output. Intensity fader: that controls the overall intensity of all fixtures on the output of its playback (Playbacks 1 to 10 only). Flash button: Instantly flashes the intensity of all fixtures on the playback to full level (Playbacks 1 to 10 only). (Go): Plays the next cue in the cue-list or restarts a paused fade. Pressing will start the fade to the next cue even if the current fade has not finished. Press Function+ to snap to the next cue. o The indicator in the button lights during the transition to the next cue. o The indicator in the button slowly flashes if any of the attributes in the cue have been overridden. If the playback contains a chase, pressing will start the chase. If you continue tapping (to the beat of the music) it will automatically adjust the chase speed to the beat. II I Pauses any fades in progress. If no fades are in progress, if fades back to the previous step. Press Function+ II I to snap to the previous cue. o The indicator in the button lights when the fade to the next cue has completed. Select: Selecting a playback allows it to be controlled by the Master and Master II I buttons and also selects the playbacks cue-list in the Control Booth window allowing you to see and or change the playback settings of the cue-list. o To select a playback tap Select then tap any button of the desired playback. o The cue-list name of the “currently selected cue” is displayed in reverse video (black text on white background). (Master Go): Plays the next cue or restarts a paused fade of the selected playback. See Select above. II I (Master Pause /Go Back): Pauses the fade of the selected playback. If no fade is in progress, if fades back to the previous step. See Select above. Release: To release a playback, tap Release. All buttons of all playbacks flash. Tap any button of the playback to be released. To clear (remove) a cue-list from a playback, right click on the name of the cue-list on the virtual playback then click Clear. Edit: To edit a cue on a playback, tap Edit. All buttons of all playbacks flash. Tap any button of the playback to be edited. Record: opens the Record Cue dialog box. To append a cue to the last recorded cue-list, press Record twice. To record the cue on a playback on a VX wing, press the flash button of that playback. Page: the Page buttons are described earlier in this section. 3.20 WING GROUP MASTERS You can configure any of the VX wing fader playbacks (or Control Booth playbacks) as fixture “Group Masters”. When a playback is converted into a Group Master, it no longer controls its previous cue-list (if any) but instead controls the intensity of the selected group as determined by your choice of either “Additive, Scale+, Inhibiting or Limiting” mastering as described below. To create a Group Master on a wing, in the Control Booth window, Right click on the LCD window of the virtual wing playback and select Set as Group Master... Page 24 Clarity Operator Manual V2.0 Desktop Clarity See above for details on how to display the virtual wing. On the “Create Group Master Dialog” select the required fixture Group to master then choose the Master Type to use: Additive. The fader level is added to the current intensity level of all fixtures in the group. For example, if the fader is at 50% each fixture would get 50% added onto its current level. So fixtures at 25, 50 and 75% would end up at 75, 100 and 100 percent. Scale +. This scales each intensity level between its current level and full. For example, if the fader is at 50%, a fixture at 25 would be set half way (50%) between 25 and full which is 62.5%. A fixture at 50 would be set half way (50%) between 50 and full which is 75% and a fixture at 75 would be half way between 75 and full which is 87.5%. Inhibitive. This is the default, and operates in the same way as a fader assigned to a cuelist. For example, if the fader is at 50%, fixtures at 25, 50 and 75% would be at 12.5, 25 and 37.5%. Limiting. The intensity level of each fixture is capped to the fader level. For example, if the fader is at 50%, fixtures at 25, 50 and 75% would be at 25, 50 and 50%. If the actual wing is connected, the LCD shows the status of the fader as a Group Master. A group master on a wing will be deactivated when it is not on the currently selected page. You can change this by un-ticking Deactivate group masters while paged out in the “User Preferences”. When a playback on a VX wing has been programmed as a Group master, it’s (Go) and II I buttons now act as Group select and Group deselect buttons. Therefore, pressing the button of that Group Master on the VX wing will select all of the fixtures in that group in the Programmer. 3.21 EXTENDED WING CONTROLS Unused playbacks on a VX10 or VX20 wing can be used as extra control buttons and faders for another playback on that wing that contains a cue-list. The playbacks on a wing are arranged in groups of 5: A VX 10 wing has 2 groups of playbacks, 1 to 5 and 6 to 10. Page 25 Desktop Clarity Clarity Operator Manual V2.0 A VX 20 wing has 4 groups of playbacks, 1 to 5, 6 to 10, 11 to 15 and 16 to 20. If a cue-list is loaded on a playback and there are un-used (clear) playbacks to the right of the loaded playback in the same group of 5, then the unused playbacks can now be linked to the loaded playback to provide greater live control. The previously unused playback’s buttons and faders can now be used for live control of Chase Rate, Playback Rate, FX Rate and FX Amplitude. To create extended controls on a wing, in the Control Booth window, Right click on the loaded playback’s LCD window of the virtual wing playback and choose either single, 2, 3, 4 or 5 columns. The number of columns that are available depends upon the number of clear playbacks to the right and in the same group of five playbacks. The 4 playbacks to the right are clear so up to 5 columns can be selected. The 2 playbacks to the right are clear so up to 3 columns can be selected. Each column represents a playback on the wing. The first (single) column is the playback loaded with the cue-list. If you choose 2 columns then the playback to its right controls that cue-lists Chase Rate. If you choose 3 columns then the next playback to the right controls that cue-lists Playback Rate. If you choose 4 columns then the next playback to the right controls that cue-lists FX (Effects)Rate. If you choose 5 columns then the next playback to the right controls that cue-lists FX (Effects) Amplitude. Cue-list being controlled Controls Chase Rate Controls Playback Rate Controls Effects Rate Controls Effects Amplitude The buttons and fader on each of these playbacks (columns), now perform the following functions: Pressing Play or Pause steps the values up or down respectively. If you hold the button it will auto-repeat after a delay. Holding the Flash button when pressing Play or Pause makes them step in larger increments. Pressing both Play and Pause together resets to the default value. Holding the Flash button allows you to use the fader to make fine adjustments to the value. If you reach a fader end-stop but you need to more range, you can release the flash button and move the fader to the opposite end, then hold flash and move fader to continue adjusting the value. This is known as “scooting” the fader. The user preference “Invert flash button operation on rate faders” changes this operation so that you just move the fader without holding flash to adjust the value, then (if you reach the fader Page 26 Clarity Operator Manual V2.0 Desktop Clarity end stop) hold flash to reposition the fader. So the fader is always connected giving you instant control but you can hold the Flash button down to 'scoot' the fader. See section 33.1 for User Preferences. 3.22 PROGRAMMING WITH THE VX20 WING The VX20's programmer section assists programming by providing hard controls for the main programming functions. Blind Release All HiLite Clear All Intensity Beam Position Colour None Trackball All Prev Fine / Right Mouse Button Next Mouse Mode 3.22.1 Ortho / Left Mouse Button Fan Trackball The trackball is multi-purpose and can be used for Programming and as a computer mouse. Pressing either Intens (Intensity), Position, Colour or Beam turns the track ball blue and causes the trackball to vary the Intensity, Position, Colour or Beam values of the selected fixtures in the current programming session. Pressing the (mouse) button green and causes it to act as a mouse for the computer running Clarity. When (mouse) is selected the Ortho and Fine buttons act as the Left and Right mouse buttons respectively. The Intensity, Position, Colour, Beam and Mouse buttons are all interlocked so that selecting any one button deselects the previous button. 3.22.2 Programmer Buttons The programmer buttons have the following functions: Next, All, Prev, None, HiLit (Highlight), Blind, Clear All, Release All: Perform identical functions to the same buttons on the Programmer window's toolbar in the GUI (Graphical User Interface). See section 21Error! Reference source not found. for details. o The Clr All button lights when any attributes have been grabbed in either programmer. o The Rel All button lights when any playbacks are active on the output. Hint: Inadvertently pressing Rel All will blackout all Playback. To prevent this you can set a “User Preference” to require both Function and Rel All to be pressed together to release all playbacks. Ortho: (Orthogonal) Holding Ortho whilst moving the trackball restricts the trackball output to only horizontal or vertical movements, whichever occurs first. When in mouse mode (above) it acts as a Left mouse button. Fan: When multiple fixtures are selected, holding Fan whilst moving the trackball will fan the values of those attributes. (The same as holding [Ctrl] (PC) or [Cmd] (Mac) when dragging with the mouse in the GUI). Page 27 Desktop Clarity Clarity Operator Manual V2.0 Fine: Holding Fine whilst moving the trackball gives finer control. (The same as holding Shift when dragging with the mouse in the GUI). When in mouse mode (above) it acts as a Right mouse button. Record: opens the Record Cue dialog box and all playback buttons on VX wings flash. To record the programmer contents to a VX20 playback, press any (flashing) playback button. If the playback is empty a new cue-list will be created. If the playback already contains a cue-list, the new cue will be appended to the end of that cue-list. To append a cue to the last recorded cue-list, press Record a second time. 3.22.3 VX20 Soft Menus The top row of playback buttons can be toggled to become additional programming buttons acting as shortcuts for some common operations. To switch the buttons between normal playback operation and soft functions, right-click on the VX20’s virtual wing display and select Toggle soft menus. There is only a single row of functions, and both buttons above each label will trigger the same function as shown on the LCD display. Soft Menu Functions Undo Prog Undoes the last operation in the current Programmer. Left Bank Soft Menus Auto Clear Prog Update Undoes the last See Removes all attributes from the operation in the section current Programmer. Control Booth. 21.8.8 Undo Ctrl Right Bank Soft Menus Prog 1 Grab Active Rem Dim Grabs all attributes that are active on the output into the current Programmer. Unselected fixtures currently grabbed in the programmer have their intensity in the Programmer set to zero. Page 28 Selects Programmer 1 as the current session. Save All Saves all currently open edit sessions. Prog 2 Esc Selects Programmer 2 as the current session. Closes any open dialog boxes Clarity Operator Manual V2.0 Desktop Clarity 3.23 EXTERNAL CONTROL INPUTS The 9-pin D-SUB connector on the back of the VX10 and VX20 wing can be used to remotely control several of the “Go Next” buttons on the playbacks. The connector is wired to accept 6 inputs in the form of contact closures. VX10 VX20 The external inputs control GO buttons 5 to 10 The external inputs control GO buttons 15 to 20 The pin assignments on the 9 pin D-SUB connector are: Pin 1 2 3 4 5 6 9 VX 10 Button Go 5 Go 6 Go 7 Go 8 Go 9 Go 10 Common VX20 Button Go 15 Go 16 Go 17 Go 18 Go 19 Go 20 Common To remotely operate a Go button, provide a contact closure (short circuit) from its control pin to the common pin. Pin 1 Pin 9 Circuit to operate Go button 5 on a VX10 or Go button 15 on a VX20 3.24 VX20 MIDI A MIDI signal connected to a VX20 wing can be used to remotely control the playback of the “selected” playback that wing. A playback is selected on a wing by pressing Select then any of the flashing buttons of that playback. The cue-list name of the currently selected playback is displayed in black text on a white background. MIDI “Note ON” messages can be assigned to trigger the Go, Pause/Back, Release and Jump functions of the selected playback on a VX20 wing. MIDI “Control Change” messages can be used to pre-select a cue in the cue-list of the selected playback that will be triggered by the next “Note on” message to be received that is assigned to the “Jump” function. See section 30 for details on the VX20’s MIDI functions. Page 29 Desktop Clarity Clarity Operator Manual V2.0 3.25 DESKLAMP INTENSITY The brightness of the LED desk light on the VX wing control can be controlled by holding down [Function] and [Select] together. 3.26 FREE MODE Early versions of Clarity will run in free mode. Clarity will only run in free mode if it was downloaded as version 1.3 or earlier and registered for free mode prior to April 8, 2011. To continue running the free version it must be upgraded to version 1.3.2 and cannot be upgraded further. The following restrictions are applied to the free mode of Clarity: Limited to a single universe output of 32 fixtures and 128 channels. The VX10 and VX20 wings have the front panel controls (LCDs, faders and buttons) and the remote trigger inputs disabled. However the DMX outputs on the rear and the USB port on the top still work. MIDI functionality is disabled. Media Servers functionality is disabled. Matrix functionality is disabled. RDM functionality is disabled. Tracking Backup is disabled. The template request service is not provided to users of the free version, however Clarity does have a built-in fixture editor which can be used instead. Technical support for the free version is via the user forums only. Page 30 Clarity Operator Manual V2.0 LX Consoles 4 4.1 LX Consoles OVERVIEW There are three models in the Clarity LX range of consoles…. LX300 LX600 LX900 The following three sections of this manual describe each model respectively including the rear panel connections and the front panel control surfaces. There are several areas on the consoles that are common to all models. These common controls are described in section 8, following the individual console descriptions. The software is common to all platforms however there are small differences that are particular to each platform due to the different hardware controls of each platform. The common operating system is described in detail with separate sections for of the various operations that can be performed. The screen shots used in these sections of the manual are all from the LX600. There might be slight variations in the screen layout in other modes of operation. The Desktop version of Clarity can be configured to run in desktop mode or to emulate any of the console platforms. Emulating a console is most useful for pre-programming a show when the console is not available. Page 31 LX300 Clarity Operator Manual V2.0 5 5.1 LX300 Console OVERVIEW LX300 with External Monitor The LX300 has the following features: One 10.4 inch “encoder wheel touch screen”. 15 Fader Playbacks. Each playback has a fader with RGB mode indicator plus Select, Go and Pause/Back buttons. 99 pages of memory. 15 Button only playbacks. Each playback has Select, Go and Pause/Back buttons. 99 pages of playback memory split into left and right pages. Individual full color screens for each playback. Four DMX512/A output connectors (XLR5). DMX capacity up to 2,048 DMX slots. External USB alphanumeric Keyboard. One DVI monitor output. MIDI In, Out, Thru. Audio In & Out via 3.5mm sockets. Dual Gb Ethernet ports. IEC Power Input. 160GB Shock protected disc storage system. 5.2 LX300 REAR PANEL Reset Button LED Desk lamp socket External Inputs MIDI In, Thru & Out 4 DMX Outputs, A, B, C & D Audio IN Audio OUT LED Desk lamp socket DVI Video Out Mains Input Mains Switch Page 32 DMX Active LED 4 USB sockets Ethernet 1 Ethernet 2 Clarity Operator Manual V2.0 5.2.1 LX300 Power Input and Mains Switch An IEC mains input socket and mains switch connects to the LX300 universal power supply that operates on input voltages between 100 volts and 240 volts, 50-60 Hertz AC. The maximum power consumption is 450 watts. 5.2.2 DMX Outputs Four DMX universes (A, B, C and D) are available. To use these outputs they must be connected in the Patch window to the internal universes within Clarity. The LED below each DMX connector lights when it is connected. See section 11 for details. 5.2.3 Ethernet Two identical Ethernet connectors provide DMX output via ArtNet. ArtNet is a protocol that is transmitted over Ethernet LAN (Local Area Network) or WAN (Wide Area Network) and supports up to 255 DMX Universes on a single cable. If an internal DMX universe is connected to ARTNet (in the Patch window) then it appears on both Ethernet connectors. See section 11.13 for details. Hint: When using ArtNet, you can connect both Ethernets and use them as main and back up into two independent (dual redundant) networks. The two networks can be connected into an LSC Nexus (ArtNet to DMX converter) which can accept both networks and will automatically change over in the event of a loss of a network. The Ethernet connectors can also be used to connect the LX300 to a network or wireless access point for remote control. See section 31 for details. 5.2.4 DVI Video Out An external monitor with a minimum resolution of 1280x1024 is required to operate the LX300. The monitor must be connected before switching on the console. Connect the monitor or touch screen to the Video Out connector using a DVI cable. A HDMI monitor can be connected via a DVI to HDMI converter plug. (Not supplied). Note: The LX300 will not start correctly if an external monitor is not plugged in. See section 34 (LX Tools) for details on how to setup the external monitor. Only compatible external touch screens can be used. Contact LSC or your local LSC dealer for compatible touch screen models. 5.2.5 USB Four USB connectors are provided for connecting a keyboard, mouse, external touch screen or memory device (or charging your phone). A single USB connector is also provided on the front panel below the power switch. 5.2.6 MIDI MIDI In, MIDI Thru and MIDI Out connectors are provided. See section 30 for details on the LX300’s MIDI functions. 5.2.7 Audio In/Out Two 6.5mm Stereo jacks are provided for audio. See section 24.7 for details on Audio playback. 5.2.8 LED Desk Lamps Two 3 pin XLR connectors are provided for LED desk lamps. Pins 1 and 2 are ground and pin 3 is +12 Volts. The brightness of the LED desk light can be controlled from the “LX Tools” utility. See section 34 for details on LX Tools. 5.2.9 External Inputs The 9-pin D-SUB connector can be used to remotely control six of the “Go” buttons on the button playbacks. The connector is wired to accept 6 inputs in the form of contact closures. Page 33 LX300 Clarity Operator Manual V2.0 The pin assignments on the 9 pin D-SUB connector are: Pin 1 2 3 4 5 6 9 Button Playback Go 10 Go 11 Go 12 Go 13 Go 14 Go 15 Common To remotely operate a Go button, provide a contact closure (short circuit) from its control pin to the common pin. Pin 1 Pin 9 Circuit to operate button playback 10 5.2.10 Reset The Reset button should only be used if instructed by LSC technical support. The LX300 GUI (Graphical User Interface) can be reset from the LX tools utility. See section 34 5.3 SWITCHING ON/OFF There is a mains power switch located on the rear. There is also a Power switch on the front panel. To switch on the console, switch on the rear panel power switch then press the front POWER button. To shut down Clarity, press and hold the front Power button for 5 seconds. To re-set Clarity, tap the front Power button. On the touch screen select Restart. If power has not been disconnected or switched off at the rear since the last use, tap the Power button on front panel to start Clarity. Page 34 Clarity Operator Manual V2.0 5.4 LX300 LX300 FRONT PANEL The main areas of the LX 300 are: 1. Grand Master and DBO (Dead Black Out) button. 2. 10.4 inch multi function encoder wheel touch screen. 3. Encoder wheels and modifier buttons. 4. Keypad and command centre. 5. 15 fader playbacks. 6. 15 button playbacks. 7. External monitor External Monitor Power Button & USB socket Encoder wheel Touch screen 15 Button Playbacks Encoder wheels and modifier buttons Playback’s touch screens Keypad and Command centre 15 Fader Playbacks Grand Master + DBO LX300 See section 8 for descriptions of the Encoder Wheel Touch Screen, Encoder wheels and modifier buttons, Keypad and Command centre and the Grand Master. 5.4.1 LX300 Playbacks The LX300 has 15 fader playbacks and 15 button playbacks that are used for playing back cuelists. Between the fader playbacks and button playbacks are individual Playback touch screens that show the contents of each of the 30 playbacks and also allow you to assign cuelists and configure the playbacks by double tapping on a touch screen. LX300 Playback Touch Screens Page 35 LX300 Clarity Operator Manual V2.0 See section 8.6 for details on how to assign cuelists and configure playbacks. Go 15 Button Playbacks Pause/ Back 30 Playback touch screens Go Pause/ Back Right Page Up Left Page Up Right Page Down Left Page Down 15 Fader Playbacks Fader Contents Indicator Release Main Pause/ Back Main Go Edit Function Flash LX300 Playbacks Each Fader playback has a Flash button below the fader and (Go), II I(Pause/Back) buttons, a coloured contents/function indicator and a LCD touch screen above it. Each Button playback has a (Go) and a II I (Pause/Back) button and LCD touch screen below it. See section 8.6 for descriptions of the Playback operations. Page 36 Clarity Operator Manual V2.0 LX600 6 6.1 LX600 Console OVERVIEW LX600 The LX600 has the following features: Pivoting monitor panel. One 10.4 inch “encoder wheel touch screen”. One 17″ touch screen. 15 motorized Fader Playbacks. Each playback has a fader with integral RGB “mode” indicator plus Select, Go and Pause/Back buttons. 99 pages of playback memory split into left and right pages. 60 Action Buttons for Group/Palette/Preset/Cue, each with LCD touch screen for labelling and advanced control. 4 pages of memory. Any pair of faders can be assigned into Split mode for crossfade playback. (future feature). Four DMX512/A output connectors (XLR5). DMX capacity up to 4,096 DMX slots. Slide Out alphanumeric Keyboard. Two DVI monitor outputs. MIDI In, Out, Thru. SMPTE LTC (Linear Time Code) input. Motorized Grand Master. Stereo Audio In & Out on balanced XLR3. Dual Gb Ethernet ports. PowerCon power input. Two IEC power outputs. 160GB Shock protected disc storage system. Page 37 LX600 6.2 Clarity Operator Manual V2.0 LX600 REAR PANEL LED Desk lamp socket LED Desk lamp socket External Inputs Fuse Mains Switch MIDI In, Thru & Out 4 DMX Outputs, A, B, C & D Audio IN Audio OUT 4 USB sockets Reset Power Con Mains Input 6.2.1 IEC Mains Outputs and fuse 2 DVI Video Out Ethernet 1 DMX Active LED SMPTE Timecode In Ethernet 2 Power Input and Mains Switch A Power Con mains input socket and mains switch connects to the LX300 universal power supply that operates on input voltages between 100 volts and 240 volts, 50-60 Hertz AC. The maximum power consumption is 450 watts. 6.2.2 Mains Outputs Two IEC mains outputs are provided for external monitors. 6.2.3 DMX Outputs Four DMX universes (A, B, C and D) are available. To use these outputs they must be connected in the Patch window to the internal universes within Clarity. The LED below each DMX connector lights when it is connected. See section 11.12 for details. 6.2.4 Ethernet Two identical Ethernet connectors provide DMX output via ArtNet. ArtNet is a protocol that is transmitted over Ethernet LAN (Local Area Network) or WAN (Wide Area Network) and supports up to 255 DMX Universes on a single cable. If a DMX output is connected to ARTNet, then it appears on both Ethernet connectors. To use these outputs they must be connected in the Patch window to the internal universes within Clarity. See section 11.13 for details. Hint: When using ArtNet, you can connect both Ethernets and use them as main and back up into two independent (dual redundant) networks. The two networks can be connected into an LSC Nexus (ArtNet to DMX converter) which can accept both networks and will automatically change over in the event of a loss of a network. The Ethernet connectors can also be used to connect the LX300 to a network or wireless access point for remote control. See section 31 for details. 6.2.5 DVI Video Out Two external monitors can be connected to the DVI connectors. A HDMI monitor can be connected via a DVI to HDMI converter plug. (Not supplied). (Touch screens are not currently supported). See section 34 (LX Tools) for details on how to setup the external monitors. Displays on the inbuilt touch screen can be undocked and dragged onto the external monitors. Page 38 Clarity Operator Manual V2.0 6.2.6 LX600 USB Four USB connectors are provided for connecting a keyboard, mouse or memory device (or charging your phone). A single USB connector is also provided on the front panel below the power switch. 6.2.7 MIDI MIDI In, MIDI Thru and MIDI Out connectors are provided. See section 30 for details on the LX300’s MIDI functions. 6.2.8 SPMTE Timecode A female 3 pin XLR socket is provided for SMPTE Timecode input. 6.2.9 Audio In/Out Two XLR connectors are provided for audio input and two for audio output. See section 24.7 for details on Audio playback. 6.2.10 LED Desk Lamps Two 3 pin XLR connectors are provided for LED desk lamps. Each connector provides 12volts power for a LED. Pins 1 and 2 are ground and pin 3 is +12 Volts. The brightness of the LED desk light can be controlled from the “LX Tools” utility. See section 34 for details on LX Tools. 6.2.11 External Inputs The 9-pin D-SUB connector can be used to remotely control six of the “Go” buttons on the button playbacks. The connector is wired to accept 6 inputs in the form of contact closures. The pin assignments on the 9 pin D-SUB connector are: Pin Button Playback 1 Go 10 2 Go 11 3 Go 12 4 Go 13 5 Go 14 6 Go 15 9 Common To remotely operate a Go button, provide a contact closure (short circuit) from its control pin to the common pin. Pin 1 Pin 9 Circuit to operate button playback 10 6.2.12 Reset The Reset button should only be used if instructed by LSC technical support. The LX600 GUI (Graphical User Interface) can be reset from the LX tools utility. See section 34 6.3 SWITCHING ON/OFF There is a mains power switch located on the rear. There is also a Power switch on the front panel. To switch on the console, switch on the rear panel power switch then press the front POWER button. To shut down Clarity, press and hold the front Power button for 5 seconds. To re-set Clarity, tap the front Power button. On the touch screen select Restart. If power has not been disconnected or switched off at the rear since the last use, tap the Power button on front panel to start Clarity . Page 39 LX600 6.4 Clarity Operator Manual V2.0 LX600 FRONT PANEL The main areas of the LX 600 are: Grand Master and DBO (Dead Black Out) button. 10.4 inch multi function encoder wheel touch screen. Encoder wheels and modifier buttons. Keypad and command centre. 15 fader playbacks. 60 Button Playbacks for Group/Palette/Preset/Cue, each with LCD touch screen. 4 pages of memory. Power Button & USB socket Action Pages Touch screen 40 Action Buttons Encoder wheel Touch screen Playback contents and status at bottom of touch screen Encoder wheels and modifier buttons Grand Master + DBO Main Go and Pause buttons Screen Tilt Lock 15 Fader Playbacks 20 Action Buttons Slide out Keyboard Keypad and Command centre LX600 See section 8 for descriptions of the Encoder Wheel Touch Screen, Encoder wheels and modifier buttons, Keypad and Command centre and the Grand Master. There are 15 motorised fader playbacks each with a Flash button below the fader and (Go), II I (Pause/Back) and Select button above the fader. A coloured contents/function indicator surrounds the fader and the playback status/contents is shown on the touch screen above it. There are 99 pages of Playbacks available split into left and right banks with an adjustable bank divider. See section 8.6 for descriptions of the Playbacks. There are 60 Action Buttons, each with a touch screen beside it. There are 4 pages of Action buttons for a total of 240 actions. See section 1.1 for descriptions of the Action buttons. Page 40 Clarity Operator Manual V2.0 LX900 7 7.1 LX900 Console OVERVIEW LX900 The LX900 has the following features: Pivoting monitor panel. One 10.4 inch “encoder wheel touch screen”. Two 17″ touch screens. 30 motorized Fader Playbacks in two banks of 15 playbacks. Each playback has a fader with integral RGB mode indicator plus Select, Go and Pause/Back buttons. 99 pages of playback memory for each bank split into left and right pages. 60 Action Buttons for Group/Palette/Preset/Cue, each with LCD touch screen for labelling and advanced control. 4 pages of memory. Dedicated split crossfade motorised fader pair with 2.4″ full colour LCD display. Select, Go and Pause/Back buttons. Six DMX512/A output connectors (XLR5). Two DMX512/A input connectors (XLR5). DMX capacity up to 8,192 DMX slots. Slide Out alphanumeric Keyboard. Two DVI monitor outputs. MIDI In, Out, Thru. SMPTE LTC (Linear Time Code) input. Motorized Grand Master. Stereo Audio In & Out on balanced XLR3 connectors. Dual Gb Ethernet ports. PowerCon power input. Two IEC power outputs. Dual 160GB RAID 1 disc storage system. 7.2 LX900 REAR PANEL LED Desk lamp socket Audio IN Audio OUT LED Desk lamp socket Fuse Power Con Mains Input Mains Switch 2 DVI Video Out IEC Mains Outputs and fuse MIDI In, Thru & Out External Inputs Reset 6 DMX Outputs 2 DMX Inputs DMX Active LED SMPTE Timecode In 4 USB sockets Ethernet 1 & 2 Page 41 LX900 7.2.1 Clarity Operator Manual V2.0 Power Input and Mains Switch A Power Con mains input socket and mains switch connects to the LX300 universal power supply that operates on input voltages between 100 volts and 240 volts, 50-60 Hertz AC. The maximum power consumption is 450 watts. 7.2.2 Mains Outputs Two IEC mains outputs are provided for external monitors. 7.2.3 DMX Outputs Six DMX universes (A, B, C and D) are available. To use these outputs they must be connected in the Patch window to the internal universes within Clarity. The LED below each DMX connector lights when it is connected. See section 11.12 for details. 7.2.4 DMX Input Two DMX512/A input connectors. Not currently active. 7.2.5 Ethernet Two identical Ethernet connectors provide DMX output via ArtNet. ArtNet is a protocol that is transmitted over Ethernet LAN (Local Area Network) or WAN (Wide Area Network) and supports up to 255 DMX Universes on a single cable. If a DMX output is connected to ARTNet, then it appears on both Ethernet connectors. To use these outputs they must be connected in the Patch window to the internal universes within Clarity. See section 11.13 for details. Hint: When using ArtNet, you can connect both Ethernets and use them as main and back up into two independent (dual redundant) networks. The two networks can be connected into an LSC Nexus (ArtNet to DMX converter) which can accept both networks and will automatically change over in the event of a loss of a network. The Ethernet connectors can also be used to connect the LX300 to a network or wireless access point for remote control. See section 31 for details. 7.2.6 DVI Video Out Two external monitors can be connected to the DVI connectors. A HDMI monitor can be connected via a DVI to HDMI converter plug. (Not supplied). (Touch screens are not currently supported). See section 34 (LX Tools) for details on how to setup the external monitors. Displays on the inbuilt touch screens can be undocked and dragged onto the external monitors. 7.2.7 USB Four USB connectors are provided for connecting a keyboard, mouse or memory device (or charging your phone). A single USB connector is also provided on the front panel below the power switch. 7.2.8 MIDI MIDI In, MIDI Thru and MIDI Out connectors are provided. See section 30 for details on the LX300’s MIDI functions. 7.2.9 SPMTE Timecode A female 3 pin XLR socket is provided for SMPTE Timecode input. 7.2.10 Audio In/Out Two XLR connectors are provided for audio input and two for audio output. See section 24.7 for details on Audio playback. 7.2.11 LED Desk Lamps Two 3 pin XLR connectors are provided for LED desk lamps. Each connector provides 12volts power for a LED. Pins 1 and 2 are ground and pin 3 is +12 Volts. The brightness of the LED desk light can be controlled from the “LX Tools” utility. See section 34 for details on LX Tools. Page 42 Clarity Operator Manual V2.0 7.2.12 LX900 External Inputs The 9-pin D-SUB connector can be used to remotely control six of the “Go” buttons on the button playbacks. The connector is wired to accept 6 inputs in the form of contact closures. The pin assignments on the 9 pin D-SUB connector are: Pin 1 2 3 4 5 6 9 Button Playback Go 10 Go 11 Go 12 Go 13 Go 14 Go 15 Common To remotely operate a Go button, provide a contact closure (short circuit) from its control pin to the common pin. Pin 1 Pin 9 Circuit to operate button playback 10 7.2.13 Reset The Reset button should only be used if instructed by LSC technical support. The LX600 GUI (Graphical User Interface) can be reset from the LX tools utility. See section 34 7.3 SWITCHING ON/OFF There is a mains power switch located on the rear. There is also a Power switch on the front panel. To switch on the console, switch on the rear panel power switch then press the front POWER button. To shut down Clarity, press and hold the front Power button for 5 seconds. To re-set Clarity, tap the front Power button. On the touch screen select Restart. If power has not been disconnected or switched off at the rear since the last use, tap the Power button on front panel to start Clarity . 7.4 LX900 FRONT PANEL The main areas of the LX 600 are: Grand Master and DBO (Dead Black Out) button. 10.4 inch multi function encoder wheel touch screen. Encoder wheels and modifier buttons. Keypad and command centre. 15 fader playbacks. 60 Action buttons for Group/Palette/Preset/Cue, each with LCD touch screen. 4 pages of memory. Page 43 LX900 Clarity Operator Manual V2.0 Touch screen Power Button & USB socket Split Crossfade Touch screen 40 Action Buttons Touch screen Encoder wheel Touch screen Playback contents and status at bottom of touch screens Encoder wheels and modifier buttons Grand Master + DBO Main Go and Pause buttons 15 Fader Playbacks Split Crossfade 20 Action Buttons 15 Fader Playbacks Keypad and Command centre Slide out Keyboard Screen Tilt Lock LX900 See section 8 for descriptions of the Encoder Wheel Touch Screen, Encoder wheels and modifier buttons, Keypad and Command centre and the Grand Master. There are 30 motorised fader playbacks (arranged in two banks of 15 each). Each playback has a Flash button below the fader and (Go), II I(Pause/Back) and Select button above the fader. A coloured contents/function indicator surrounds the fader and the playback status/contents is shown on the touch screen above it. Each bank of 15 playbacks has 99 pages of Playbacks available split into left and right banks with an adjustable bank divider. See section 8.6 for descriptions of the Playbacks. There are 60 Action Buttons, each with a touch screen beside it. There are 4 pages of Action buttons for a total of 240 actions. See section 1.1 for descriptions of the Action buttons. 7.5 LX900 SPLIT CROSS FADE The LX900 has a “theatre style” split crossfade. It has individual motorised faders for the incoming (up) fade and outgoing (down fade), Go and Pause/back buttons plus a dedicated touch screen for status and configuration. Page 44 Clarity Operator Manual V2.0 LX900 Touch screen Select In Fader Out Fader Pause/ Back Go LX900 Split Playback To quickly assign a cuelist to the split playback, double tap the touch screen then press the select button of playback containing the cuelist. Currently the split playback is an extension of the master playback, so is only assignable from an existing physical fader assignment. To configure the split playback (or assign a cuelist) hold its Select button. The LCD shows….. Assign. Press a select button on a playback to assign that playback to the split playback. Join. The In fader controls both the In fade and the Out fade. The Out fader does nothing. Auto advance. When enabled, the cuelist will automatically advance to the next cue when the in fade and out fade both reach 100%. Auto loop. When the cuelist reaches the last cue it will start again at the first cue. Clear. Clears the current cuelist from the split playback. The buttons have the following functions: . Plays the next cue. II I(Pause/Back). Pauses a fades in progress. If no fade is in progress, if fades back to the previous step. Function+ II I. Snap to the previous cue. Function+ . Snap to the next cue. Normally the manual faders become active when the cuelist is active and paused. However pressing II I(Pause/Back) when the cuelist is inactive or already paused will cause it to play the previous cue. Taping the split playbacks Select button will “arm” the playback which will always pause the cuelist at the current position, even if it’s inactive. It will pause at cue:1 0s. Page 45 LX Console Controls Clarity Operator Manual V2.0 8 8.1 LX Console Controls OVERVIEW The following controls on the LX consoles that are common to all models. 8.2 GRAND MASTER The Grand Master and DBO (Dead Black Out) button only affects the intensity of your fixtures. The DBO is a momentary action and the button lights when active or flashes if the Grand Master is set to any level below 100%. The LX600 and LX900 both have motorized Grand Masters. When multiple consoles are networked, the Grand Masters are all synchronized, so adjusting the GM on any console moves the GM on all consoles to ensure that all operators have the correct visual feedback from the position of the faders The grand master and DBO can be disabled in the “Preferences” menu. See section 33.1 for details. 8.3 ENCODER WHEEL TOUCH SCREEN The 10.4 inch encoder wheel touch screen has multiple modes of operation. There are 10 virtual buttons across the top of the screen that select the different operational modes for the screen. These 10 buttons are duplicated by the 10 real buttons directly above them. You can use either the virtual button or the real button to select each mode. Pressing and HOLDING a button momentarily displays its mode. When the button is released the previous mode returns. There are also 10 virtual buttons across the bottom of the screen that provide different functions for the current mode. These 10 buttons are duplicated by the 10 real buttons directly below them. You can use either the virtual button or the real button to make a selection. Right Mouse Button modifier Virtual Button Real Button Right Mouse Button modifier Real Button Virtual Button 3 Mouse Buttons Track Pad Encoder Wheel Labels Encoder Wheels Page 46 Virtual Button Real Button Clarity Operator Manual V2.0 LX Console Controls The 2 outside buttons at the top act as right mouse button modifiers for the touch screen. When either button is held down, a single tap on the touch screen acts as a right click. Right clicking opens a drop down context menu for the item or object that you right click on. These usually provide shortcuts to often used values or allow items to renamed, deleted, etcetera. The 4 buttons on the right of the touch screen perform the following functions from top to bottom. Next Screen. (Not applicable to the LX300). Right Click. Left Click. Trackpad Mode. Trackpad mode makes the touch screen act as a touch pad (as found on a laptop) to control the cursor on the other monitor(s). Press and hold for momentary use or double press to latch into track pad mode. Press again to return to normal touch screen operation. 8.4 ENCODER WHEELS AND BUTTONS Current functions of Encoder Wheels Encoder Wheels Above the bottom row of virtual buttons on the touch screen are four labels that show the current functions of the four encoder wheels. These functions change as different modes or attribute rows are selected. For finer control, hold either Fine button whilst turning a wheel. Double press Fine to latch it on. Press again to un-latch. The 9 round buttons above the encoder wheels are used together with the wheels. They are ergonomically placed above the wheels so that you can tap them without letting go of a wheel. The wheel modifier functions are: KO (Knock Out). Hold the button and turn a wheel to knockout (remove) the attribute(s) being controlled from the programmer. Home Hold the button and turn a wheel to send the attribute(s) being controlled to it’s home position. Fan Centre Hold the button and turn a wheel to fan the attributes being controlled. The centre is fanned symmetrically about the ends. Turn the wheel in the opposite direction to reverse the fan. Double press Fan Centre to latch it on. Press again to unlatch. Fan End Hold the button and turn a wheel to fan the attributes being controlled. The ends are fanned symmetrically about the centre. Turn the wheel in the opposite direction to reverse the fan. Double press Fan End to latch it on. Press again to unlatch. Prev Step through the attribute(s) being controlled, one attribute at a time. Next Step through the attribute(s) being controlled, one at a time in the opposite direction. To reselect ALL fixtures press Prev and Next at the same time. See section 21.5 for more information. Page 47 LX Console Controls Clarity Operator Manual V2.0 Spread Hold the button and turn a wheel to snap the attribute(s) being controlled into a spread from maximum to minimum values. Turn it in the opposite direction to reverse the spread. <> Hold the button and turn a wheel to mirror the values. The attributes have a range from -100% to +100%. This button inverts the values. Positive values become negative values and negative values become positive. The 10 touch screen modes as selected by the top buttons are: Rig Universal Direct Intensities Graphical Timing Dynamics Matrix Media Palettes These modes allow you to control the attributes of the selected fixture in the current programmer as selected in the Programmer window. There are 2 programmers available and programmer 1 is selected by default. 8.4.1 Rig Rig mode is a fixture selection tool and 2 dimensional visualiser. Rig It shows a geographical view of the patched fixtures (and groups) which you can arrange so that they are positioned as they actually are in your rig. This allows you to rapidly find and select fixtures for programming by touching them. Selected fixtures have a blue border. Touch again to de-select a fixture. If you touch a fixture then drag over multiple fixtures, Clarity draws a line showing the drag path and selects each fixture that you drag over. If you touch on the background area then drag a box, all fixtures within the box are selected. When selecting fixtures, every fixture or group that you select is added to the current selection. This allows you to build up complex selections of fixtures. Re-selecting a currently selected fixture or group removes it from the current selection. Clarity calls this the “selection phase”. As soon as you change any values of any of the selected fixtures (using the other modes of the touch screen) Clarity changes to the “programming phase”. When the next fixture or group selection is made, Clarity changes back to selection phase and clears all previous selections. You can now build up your next selection of fixtures or groups to be programmed. The selections from the previous selection phase can be retained by holding the Function button (near the Playback faders) when making new selection. The fixture icons show the intensity, colour and positions settings of the fixtures. Page 48 Clarity Operator Manual V2.0 LX Console Controls To aid selection, a background image of your stage or venue can be added and multiple views can be created. See section 12 for more details on Rig Mode. 8.4.2 Universal Universal mode provides a means of controlling the attributes of the selected fixture(s). In Universal (and Direct) mode, the screen is divided horizontally into 4 rows. Selected Row Attribute Control Encoder Wheel Labels Each row shows the attributes of the selected fixture(s) that you can control by dragging the attribute control on the touch screen. Attribute controls can also be flicked to “scroll” the value in either direction. If you tap a “scrolling” attribute control it will stop at the current value. The four attributes in any row can also be controlled with the encoder wheels if that row is selected. Rows are selected by taping in any of the green sections on the left of the screen. The 4 real buttons on the left of the screen duplicate the green touch selection areas on the screen. You can use either the virtual button or the real button to make a selection. The currently selected row is blue. Repeatedly tapping a button at the bottom of the screen will also step through and select the rows of its page. Above the bottom row of virtual buttons are four labels that show the current functions of the four encoder wheels. These functions change as different modes or attribute rows are selected. When you have selected a fixture(s), universal mode provides universal attribute controls that are always in the same locations on the screen and operate in exactly the same way, regardless of which fixture types you have selected. This not only allows multiple types of fixtures to be controlled simultaneously but also simplifies the control of complex fixtures that might use multiple attributes to control an effect or fixtures that use one attributes to change the mode of another attributes. Universal mode automatically interprets these attributes and presents a single control for each effect. If a listed attribute does not exist on any of the selected fixtures, then that attribute control is still visible but disabled (it’s name is crossed out and the background is grey). Universal controls are arranged in 4 main pages that are selected by the 4 buttons at the bottom left of the screen. The main pages are: General Colour Beam Media Server For example, selecting “General” provides controls for…… Intensity Pan Tilt Shutter Strobe Gobo Wheel 1 Red Green Blue Focus Zoom Frost Iris Gobo wheel 2 Colour Wheel 1 Taping the button on the left of a row connects the encoder wheels to the 4 attributes in that row. The Colour, Beam and Media Servers are arranged in a similar manner but they also have additional sub pages that can be selected by either holding a Colour, Beam or Media Server Page 49 LX Console Controls Clarity Operator Manual V2.0 button and selecting from the sub pages that appear or using their page buttons at the bottom of the screen. See section 13 for more details on Universal Mode. 8.4.3 Direct Direct mode provides another means of controlling the attributes of the selected fixture(s). When you have selected a fixture(s), direct mode provides attribute controls for the selected fixture as specified for that fixture in the fixture library. Only one type of fixture can be controlled at a time. The controls are divided into groups of: Intensity/Position Colour Gobo/Effects Beam Groups and rows are selected and connected to the encoder wheels in the same way as in Universal mode above. Direct mode also allows you to control any unusual attributes that a fixture might have that aren’t covered by the controls in Universal mode. See section 14 for more details on Direct Mode. 8.4.4 Expand When either Universal or Direct mode is selected you can expand the display to show only the currently selected row by selecting the Expand button at the bottom of the screen. This makes it easier to see individual fixtures when many fixtures have been selected and gives easier control of attributes when dragging on the touch screen. Expand Expand 8.4.5 Virtual Wheels When either Universal, Direct or Graphical Gobo mode is selected, you can display Virtual Wheels (instead of control widgets) by selecting the V Wheels button at the bottom of the screen. Virtual Wheel V Wheels Virtual Wheels Expanded V Wheels Touch anywhere within the wheel to get control then drag a circle shape. You can drag a circle to the extremities of the screen to get finer control. Page 50 Clarity Operator Manual V2.0 8.4.6 LX Console Controls Intensities Intensity mode is a fixture selection, intensity control and visualiser tool. Intensity Fixtures are selected by touching them. Selected fixtures have a yellow border. Touch again to de-select a fixture. If you touch a fixtures number then drag over multiple fixtures, Clarity draws a line showing the drag path and selects each fixture that you drag over. If you touch on the background area then drag a box, all fixtures within the box are selected. To set the intensity of the selected fixtures, touch on the intensity bargarph and drag or use the intensity wheel. See section 15 for more details on Intensity mode. 8.4.7 Graphical When you have selected a fixture(s), graphical mode provides a visual display for controlling attributes. Graphical controls are arranged in 3 main pages that are selected by the 3 buttons at the bottom left of the screen. The main pages are: Position Colour Gobo The Position page allows you to move the selected fixtures by touching and dragging. Position The Colour page allows you choose a colour for the selected fixture(s) by touching a colour. It has two sub pages; Hue/Sat and Swatch. Swatch view can be viewed in Chromatic order or by gel swatch manufacturer. Touch the manufacturer’s name to see the available choices. Page 51 LX Console Controls Clarity Operator Manual V2.0 Hue/Sat Swatch The Gobo page allows you choose a gobo for the selected fixture(s) by touching a gobo shape. It also has additional sub pages for controlling gobo indexing and gobo rotation by touch and drag using the widgets at the bottom or with the encoder wheels. Gobo 8.4.8 Timing If an attribute or multiple attributes have been altered, timing mode provides a means of altering its fade times. Menu Fade Curves Times can be individually set at the bottom of the screen for the attribute groups of Intensity, Position, Colour and Beam or All times can be selected. Attribute times can be further filtered by touching Choose and then selecting the attributes to be included. Use the encoder wheels or touch and drag to set the times. Touching the “Fade Curves” box reveals a range of fade curves to choose from. Touching the “Menu” box reveals a range of choices to set, reset, align and straighten times and to recall preset times or save preset times. See section 16 for information on times. Page 52 Clarity Operator Manual V2.0 8.4.9 LX Console Controls Dynamics Dynamics mode provides real time effects for the attributes of selected fixtures by adding modulation (variation) to any attribute or combination of attributes. See section 17 for more details. 8.4.10 Matrix Matrix mode allows you to place fixtures on a two dimensional grid and then display static or moving imagery on them. This is typically used with LED arrays. Therefore, the fixtures output can be tightly integrated into a complete lighting and visual show. Clarity allows you to control and program the imagery just like any another lighting fixture. See section 18 for details. 8.4.11 Media Media mode allows you to control media servers that provide video and graphics playback for visual projection on video screens or LED walls. Clarity allows you to control media servers and program them just as if they were another lighting fixture. Therefore, their output can be tightly integrated into a complete lighting and visual show. See section 19 for more details. 8.4.12 Palettes Palettes mode is the home of groups, presets and freesets that you create and also for Clarity’s in-built library of groups, presets and freesets ready for you to use. Freesets are fixture independent and store values that can be generically applied to any selected fixtures, no matter what the type. See section 20 for more details. Page 53 LX Console Controls 8.5 Clarity Operator Manual V2.0 KEYPAD AND COMMAND CENTRE Command Centre Escape Numeric Keypad Intensity Wheel 5 User buttons Command Centre User Pages 8.5.1 User Buttons The 5 user buttons (U1 to U5) on the right are used to save and recall your favourite screens and attribute selections on the “encoder wheel touch screen”. To save a screen setting, make your selections on the encoder wheel touch screen then press and hold one of the user buttons for 2 seconds. Confirm by pressing OK on the dialogue box that pops up on the encoder wheel touch screen. To recall a screen setting, tap it’s user button. For example, you might be regularly selecting the “Universal” mode then selecting the “Beam” group then the “Gobo Wheels 1-4” page and controlling the third row of attributes. If you save this to one of the user buttons you can recall the entire selection with one push. 8.5.2 Intensity Wheel The intensity wheel always controls the intensity of the selected fixtures. 8.5.3 Numeric Keypad The keypad is used for fixture number selection and command line programming and patching. 8.5.4 Command Centre The Command Centre has a touch screen divided into 8 virtual buttons with dynamic labels. These 8 buttons are duplicated by the 8 real buttons on either side of the screen. You can use either the virtual button or the real button to make a selection. The functions of these buttons will change dynamically as you perform various functions on Clarity. For example, when you start to program a cue-list the Record button will create a new cue-list and record the first cue. It then changes to show the name of that cue-list and that it ready to save the second cue in the cue-list. There are 4 pages of command buttons for the Command Centre touch screen, the default page and 3 momentary user pages. The 3 buttons below the command centre touch screen are used to momentarily select the user pages by holding down the desired page button. You can configure the buttons on the 3 user pages with your favorite commands. To configure the buttons on a user page, press and hold all 3 page buttons at the same time. A dialogue box appears where you can select a function and assign it to a button. The default page cannot be changed. Page 54 Clarity Operator Manual V2.0 LX Console Controls The buttons on the default page are: Clear or Close as appropriate for the current programmer. The label also displays the name of current programmer session (e.g. “Programmer 1” or “Name (of cue-list being edited”). (Programmers are selected in the Programmer tab on the monitor). Record or Save (Save will also display the list/cue name). Undo last programmer action (displays action to be undone, e.g. “Undo clear position”). Append last (displays the name of the cue-list that will be appended to). Undo last control booth action (e.g. “Undo delete cue”). Name displays last item to be named, e.g. “Name [new group]”. Select (all or contents) (shows Select all or Select contents as appropriate). Preview a fade transition (displays the cue name that will be previewed in edit mode). See section 21.8.4 The 10 buttons between the touch screen and the keypad are: Highlight (lights RED when active) This is a toggle (on/off) action. See section 21.8.9. This is a toggle (on/off) action. See section 21.8.11 Blind When pressed after the Record button it records a Preset. Also used to Preset apply a preset. For example, pressing Preset, 2, applies preset number 2 to the selected fixture(s). Update Group When pressed after the Record button it records a Group. Used in conjunction with a group number to select a group. For example, pressing Group, 2, selects group 2. GoTo When followed by a cue number it makes the current Playback go directly to that cue number. Command section 22. Opens the command line window for command line programming. See Time line. When followed by a number (seconds) it enters times in the command Rem Opens the command line window with the command “Remainder” entered for you. The “Remainder” command is used to so set the level of all unselected fixtures that are currently grabbed in the programmer to a level that you specify. This is usually used to dim out the unselected fixtures so that the selected fixture(s) can be easily identified and focused. For example, turn on fixtures 1 through 10 at 80%. Now select fixture 1 and press Dim, Off. Fixtures 2 through 10 turn off and fixture 1 is still selected. To reverse the Remainder Dim command, use the programmer Undo button. You can also specify a level for the Rem command. For example, turn on fixtures 1 through 10 at 80%. Now select fixture 2 and press Dim, @ 25. Fixtures 1 and 3 through 10 are set to 25%. Clear Sel Clears all fixture selections in the current programmer. It lights red when any fixtures are selected. See section 21.8.8 Page 55 LX Console Controls Clarity Operator Manual V2.0 The 5 buttons to the right if the Intensity wheel are: Copy Copies the attribute values of the currently selected fixture or multiple fixtures to the clipboard. Paste Pastes the attribute values of the clipboard to the currently selected fixture or multiple fixtures. Delete Knocks out the selected fixtures from the programmer (either on its own or as part of a command line string). Grab Single tap for grab active, double tap for grab active + default. See section 21.8.3. Off Sets the intensity of the selected fixtures to zero. Hint: Copy and Paste is a powerful function. It allows you to duplicate attribute settings between different types of fixtures with just a few keystrokes. For example, you have 12 fixtures that use Red, Green, Blue (additive) colour mixing and 12 fixtures that use Cyan, Magenta, Yellow (subtractive) colour mixing. Select the RGB fixtures and set them to a colour (or even fan a range of colours) then press Copy. Select the CMY fixtures then press Paste. All 24 fixtures are now set to matching colours. Clarity’s fixture translation engine is very comprehensive and will attempt to convert all programming for all attribute types. The Esc button flashes whenever there is a modal dialogue box open that requires your attention. Press Esc to close any dialogue box without making changes. 8.6 PLAYBACKS The quantity and type of playbacks varies with the model of LX console. The LX300 has 15 fader playbacks and 15 button playbacks. The LX600 has 15 motorised fader playbacks and 60 Action Buttons for Groups, Palettes, Presets or Cuelists. The LX900 has 30 motorised fader playbacks and 60 Action Buttons for Groups, Palettes, Presets or Cuelists. The LX600 & LX900 consoles both include high resolution motorized faders on all playbacks as well as the Grand Master. With 99 pages of playbacks, the LX600 provides 1,485 simultaneous playbacks and the LX900 doubles this number to 2,970. Managing this many playbacks is easy with motorised faders, as they instantly slide to the correct position as soon as the new page is selected. This provides instant visual feedback and allows the level to be manually overridden just by touching the fader. 8.6.1 LX300 Button Playbacks See section 5.4.1 Page 56 Clarity Operator Manual V2.0 8.6.2 LX Console Controls Fader Playbacks Select Go Pause/ Back Right Page Up Left Page Up Right Page Down Left Page Down 15 Fader Playbacks Fader Contents Indicator Release Edit Function Main Go Main Pause/ Back Solo LX600 and LX900 Fader Playbacks The LX600 and LX900 use the lower part of the large touch screen(s) above the playbacks for assigning and configuring the playbacks and to show their contents and status. Playback touch screens Fader Contents Indicator LX 300 Fader Playbacks The LX300 playbacks are similar to the LX600 and 900 except that they are not motorized and do not have dedicated Select buttons. You “select” a playback by touching on its dedicated small touch screens above it. 8.6.3 Playback Controls . Plays the next cue. II I(Pause/Back). Pauses a fades in progress. If no fade is in progress, if fades back to the previous step. Function+ II I. Snap to the previous cue. Page 57 LX Console Controls Clarity Operator Manual V2.0 Function+ . Snap to the next cue. Select. Connects that playback to the main play button and main II I(Pause/Back) button. Also used to select a playback when editing etcetera. The Main Go and Main II I (Pause/Back) buttons control the currently selected playback. A Playbacks is selected by touching it’s touch screen. The currently selected playback has its name displayed in reverse video (white text on a black background). 8.6.4 Playback Touch Screens Page Divider Selected Playback Each screen shows the name of the assigned cue-list. Cue-lists that have been configured as a chase have their name displayed in italics. The vertical yellow line shows the division between left (green bar) and right (blue bar) pages (see below). 8.6.5 Assign or Clear a Playback To assign a cue-list or chase to a playback, double tap anywhere on an empty playback’s touch screen. The Playbacks window opens on the touch screen. The “Cue-lists” tab at the bottom of the window shows all of the available cue-lists and chases. Cue-lists tab Clear Playback To assign a Playback, tap the Cue-list name or Chase name (italics) to be assigned. All of the playback touch screens flash red. Tap the playback’s touch screen to which the cue-list or chase is to be assigned. To clear a Playback, tap Clear Playback. All of the playback touch screens flash red. Tap a playback’s touch screen to clear it. 8.6.6 Configuring a Playback To configure a cue-list or chase already assigned to a playback, double tap on that playback’s touch screen and the “Configure Playbacks” screen appears. Page 58 Clarity Operator Manual V2.0 LX Console Controls This screen allows you to change the cue-list into a chase or vice versa and to alter all of its playback settings. These settings are also available and fully described in the “Control Booth” window. See section 24.2 for details. 8.6.7 Playback Pages Each bank of 15 playbacks has 99 pages of Playbacks available split into left and right banks with an adjustable bank divider. The LX900 has 30 playbacks and each bank of 15 playbacks has separate left and right pages. The left/right division of the playback pages playbacks is shown as a yellow vertical line with a green bar above the left section and a blue bar above the right section. Left/Green Pages Right/Blue Pages Left/Right Page Divider Pages are changed using either the virtual page buttons on the playback’s touch screen or the real buttons below the playback’s touch screen. The right (page up) and (page down) buttons step through the right pages. The left (page up) and (page down) buttons step through the left pages. To go directly to a page number on a side, press and HOLD either page button on that side then enter the page number using the numbered playback flash buttons. For example, Holding and pressing 6 = page 6. Holding and pressing 2, 2 = page 22. There are 99 pages available. The division between the left and right sides can be moved by double taping the touch screen of any playback and selecting the “Configure Paging” tab. Page 59 LX Console Controls Left/Right page divider Clarity Operator Manual V2.0 Tap to move the page divider The yellow vertical line and green/blue bars show the left/right page division. The division between left and right can be moved by touching the screen at the desired position. There are two 2 banks of 15 playbacks each on the LX900 and the left/right page division can be individually configured for each bank. 8.6.8 Locking a Playback You can lock a playback so that it is unaffected by page changes. To lock a playback, double tap on that playback’s touch screen and in the “Configure Playbacks” dialogue tick the box for “Lock playback (prevent page change)”. The letter “L” is displayed on the playbacks screen. Locked Playback 8.6.9 Managing Pages Pages can be re-ordered and named. At the bottom of the “Configure Paging” window (above), tap “Re-order/rename pages…” Enter a name for the page Tapping in the “Name” field allows you to enter a name for each page. To change the order of a page, tap and drag the page to a new position in the order. The page numbers are automatically updated when you “Apply” the changes. 8.6.10 Page Bookmarks Page bookmarks allow instant recall of pages on all connected control surfaces (LX console or VX wings). You create a page bookmark by switching to the desired page(s) on the control surface(s) and then either pressing Bookmark in Control Booth or pressing Record to bring up the record dialog where you can switch to Page Bookmark mode. To record a Page Bookmark, select the required left and/or right pages then either: In the Control Booth press Bookmark. Press Record. Using the buttons at the bottom of the touch screen select Page Bookmark. Page 60 Clarity Operator Manual V2.0 LX Console Controls Page Bookmark Record after making your selections below The “Create Page Bookmark” dialogue appears: It allows you to: Name the bookmark. Give it a number. Tick or un-tick the page groups that you want included in the bookmark. A page group is the left or right side of a VX10 or VX20 wing, or a split page section on an LX console. See below for more details on page groups. Add the bookmark to your favourites. Choose to “Restore activity” to the playbacks when the bookmark is recalled. Cue-lists can be restored from their start or from their last position. To record the Bookmark touch Record at the bottom of the touch screen. Page Bookmarks are stored in the Palettes window under the “Page Bookmarks” tab. Touch a Page Bookmark to recall it. To delete a Page Bookmark, right click on it and select Delete. 8.6.11 Page Groups The Clarity software has to preserve show data between different models of console and the desktop version. Therefore there are there are 6 built-in paging groups that are generally referred to as pairs A, B or C. Here’s how they map to the different variants of Clarity: Desktop LX300 LX600 LX900 A LHS/RHS N/A Fader (bottom) row LHS/RHS Screen 1:LHS/RHS B LHS/RHS N/A N/A N/A Screen 2:LHS/RHS C LHS/RHS N/A Button (top) row N/A N/A The need for the ‘C’ bank is because the LX300 split position is the same for the fader playbacks and the button playbacks whereas on the LX900 the two playback pairs can each have different split positions. This means that playback assignments on the LX300’s main row will map to the LX600 and to the LX900’s first playback section, but the LX300’s button playback assignments will not map to the LX900’s second playback section (and vice versa). 8.6.12 Extended Playback Controls If a cue-list is loaded on a playback and there are un-used (clear) playbacks to the right of the loaded playback, then the unused playbacks can be linked to the loaded playback to provide greater live control of Chase Rate, Playback Rate, FX Rate and FX Amplitude. To create extended controls, double tap on the touch screen of the playback to be controlled and the “Configure Playbacks” screen appears. Page 61 LX Console Controls Clarity Operator Manual V2.0 Columns At the top right of the screen choose either “single column”, 2, 3, 4 or 5 columns. The number of columns that are available depends upon the number of clear playbacks to the right of the playback containing the cuelist. Each column represents a playback. The first (single) column is the playback loaded with the cue-list. If you choose 2 columns then the playback to its right controls that cue-lists Chase Rate. If you choose 3 columns then the next playback to the right controls that cue-lists Playback Rate. If you choose 4 columns then the next playback to the right controls that cue-lists FX (Effects)Rate. If you choose 5 columns then the next playback to the right controls that cue-lists FX (Effects) Amplitude. Cue-list being controlled Controls Chase Rate Controls Playback Rate Controls Effect Rate Controls Effect Amplitude The buttons and fader on each of these playbacks (columns), now perform the following functions: Pressing Go or Pause steps the values up or down respectively. If you hold the button it will auto-repeat after a delay. Holding the Flash button when pressing Go or Pause makes them step in larger increments. Pressing both Go and Pause together resets to the default value. On fader playbacks, holding the Flash button allows you to use the fader to make fine adjustments to the value. If you reach a fader end-stop but you need to more range, you can release the flash button and move the fader to the opposite end, then hold flash and move fader to continue adjusting the value. This is known as “scooting” the fader. The user preference “Invert flash button operation on rate faders” changes this operation so that you just move the fader without holding flash to adjust the value, then (if you reach the fader end stop) hold flash to reposition the fader. So the fader is Page 62 Clarity Operator Manual V2.0 LX Console Controls always connected giving you instant control but you can hold the Flash button down to 'scoot' the fader. See section 33.1 for User Preferences. On LX consoles, the color of the fader contents indicators of any faders set as “extended playback controls” are “Cyan”. See below for fader contents indicators color codes. 8.6.13 Releasing a Playback To release a playback, tap Release. All buttons of all playbacks flash. Tap any button of the playback to be released. The Release button lights RED when any cue is still active. 8.6.14 Releasing ALL Playbacks To release ALL playbacks, HOLD Function, tap Release. Holding Function and double tapping Release will release all playbacks including those set to “ignore release all”. 8.6.15 Clearing a Playback To clear (remove) a cue-list from a playback, double tap the playback’s touch screen. From the “Assign” tab tap Clear Playback. All of the playback touch screens flash red. Tap the touch screen of the playback to be cleared. 8.6.16 Edit To edit a cue on a playback, press Edit. All buttons of all playbacks flash. Press any button of the playback to be edited. See section 23.3 for details on editing a cue. 8.6.17 Group Masters Playback faders can also be configured as either “Inhibitive” “Additive”, Scale +” or “Limiting” group masters. When a playback is converted into a Group Master, it replaces its previous cuelist (if any) and instead controls the intensity of the selected group as determined by your choice of either “Additive, Scale+, Inhibiting or Limiting” mastering as described below. To create a Group Master, double tap the playback’s touch screen. In the “Assign” tab, tap the “Groups” tab at the bottom of the window. Groups tab Select the required Group then select the “Master Type” drop down box and choose the Master Type: Additive. The fader level is added to the current intensity level of all fixtures in the group. For example, if the fader is at 50% each fixture would get 50% added onto its current level. So fixtures at 25, 50 and 75% would end up at 75, 100 and 100 percent. Scale +. This scales each intensity level between its current level and full. For example, if the fader is at 50%, a fixture at 25 would be set half way (50%) between 25 and full which is 62.5%. A fixture at 50 would be set half way (50%) between 50 and full which is 75% and a fixture at 75 would be half way between 75 and full which is 87.5%. Page 63 LX Console Controls Clarity Operator Manual V2.0 Inhibitive. This is the default, and operates in the same way as a fader assigned to a cuelist. For example, if the fader is at 50%, fixtures at 25, 50 and 75% would be at 12.5, 25 and 37.5%. Limiting. The intensity level of each fixture is capped to the fader level. For example, if the fader is at 50%, fixtures at 25, 50 and 75% would be at 25, 50 and 50%. A group master will be deactivated when it is not on the currently selected page. You can change this globally by un-ticking Deactivate group masters while paged out in the “User Preferences” or individually by ticking the “Lock Playback (prevent page change)” box when configuring the group master. When a playback has been programmed as a Group master, it’s (Go) and II I buttons now act as Group select and Group deselect buttons respectively. For example, pressing the button of that Group Master will select all of the fixtures in that group in the Programmer. On LX consoles, the color of the fader contents indicators of any faders set as “group masters” show the type of master as listed below. 8.6.18 Playback Contents Indicator On the LX600 and LX900, there is a back bezel around each fader. On the LX300 there is a backlit indicator above the fader. The colour of the LED bezel/indicator shows the current contents or function of the fader. LX600/LX900 indicators Colour Red Green Yellow Blue Magenta White Cyan Page 64 Contents/Function Cue-list Chase “Limiting” Group Master “Additive” Group Master “Scale +” Group Master “Inhibitive” Group Master Extended Playback Control. (Chase or Playback Rate, Effects Rate or Amplitude) Clarity Operator Manual V2.0 8.7 LX Console Controls ACTION BUTTONS The LX600 and LX900 both have 60 Action Buttons arranged in 6 banks of 10 buttons with 4 pages of memory. Each of these banks comprises a 3.2" LCD touch screen with 10 physical buttons located around its peripheral. LX600/LX900 Action Buttons Any Action button can be configured to control either a: Group Preset Freeset Cuelist You can put any type of action on any button in any bank, mixing and matching as you please. You can press either the button or the touch screen to “action” the function. The buttons are divided into 6 banks to assist you in organizing your shows. For example, one bank might be used for selecting groups, another to select positions, another for colours, another for effects or freesets etc. Hint: When a cuelist containing a single cue is assigned to an Action button, setting the “Action button toggle” user preference allows you to play and release the cuelist using the same button. The first press plays the cue. Pressing the button while the cue is active will release it. 8.7.1 Action Button Pages Action Buttons have 4 pages of memory that are selected by pressing the A, B C or D buttons located between the banks. Action page buttons Having a dedicated button for each page means that any of the 240 actions is no more than two button pushes away. 8.7.2 Assigning an Action Button To assign a group, preset or freeset to an Action button, select the page (A, B C, or D) then select the Palettes window (large touch screen on LX600 or LX900) (external monitor on the LX300). Page 65 LX Console Controls Clarity Operator Manual V2.0 Assign Action button Clear Action button Select Assign Action Button. The Palettes window changes to grey. Select a group, preset or freeset by touching it. The borders around all Action button touch screens flash red. Touch an Action touch screen or press its button to make the assignment. Continue to select and assign to other buttons. You can use the A, B C or D buttons to change pages. When finished either press Assign Action Button again or press Cancel or select another screen. To assign a Cuelist to an Action button, select the page (A, B C, or D) then select the Control Booth window. Assign Action button Clear Action button Select Assign Action Button. The Palettes window changes to grey. Select a group, preset or freeset by touching it. The borders around all Action button touch screens flash red. Touch an Action touch screen or press its button to make the assignment. Continue to select and assign to other buttons. You can use the A, B C or D buttons to change pages. When finished either press Assign Action Button again or press Cancel or select another screen. 8.7.3 Clearing an Action Button To clear an Action button, select the page (A, B C, or D) then select the Palettes window or the Control Booth window. Select Clear Action Button. The borders around all Action button touch screens flash red. Touch an Action touch screen or press its button to clear it. You can use the A, B C or D buttons to change pages. When finished either press Clear Action Button again or press Cancel or select another screen. 8.8 TOUCH SCREEN(S) On the touch screens (or external monitors), the tabbed main windows of Patch, Programmer, Palettes, Control Booth, Performance and Levels are un-dockable to suit multi-monitor set-ups or multiple windows. Double clicking on a tab or button will un-dock the window allowing it to be either re-sized and repositioned or dragged to another screen. Closing an un-docked window or double pressing its button above the touch screen will automatically re-dock it. In the “Levels” and “Intensity Levels” tabs, you can create multiple new un-docked “levels” windows of the currently selected Level window by clicking New. The top toolbar has tabs allowing you to switch between the main windows of: Patch, Programmer, Palettes, Control Booth, Performance and Levels. All of these windows are fully described in their own sections of this manual. Page 66 Clarity Operator Manual V2.0 LX Console Controls Programmer Tab The right end of the top toolbar on the desktop version has buttons for Clear All, Release All and DBO. Clear All clears all fixtures from all Programmers. Release All releases all fixtures from all Playbacks. See the Programmer and Control Booth sections for more details on Clearing and Releasing. DBO (Dead Black Out) instantaneously blacks out all fixtures and dimmers. This is a momentary action. When the button is released, all output is instantly restored. When you hover the mouse over the DBO button, the Grand Master (GM) appears. You can click on 0 (Black Out) or 100 (Full level) or drag the virtual fader to set an overall intensity level. The DBO button flashes red if the Grand Master is set to any level below 100%. It stays red when the Grand Master is set to 0%. Page 67 Basic Operation Clarity Operator Manual V2.0 9 9.1 Basic Operation OVERVIEW Clarity is a “programmer and playback” lighting controller and uses tracking playback by default. If you are unfamiliar with these terms it is recommended that you read the “Operating Concepts and Terminology” section at the end of this manual before proceeding. The basic steps in controlling lighting fixtures are: Patching the fixtures to the DMX slots/Universes that will control them. Programming. The basic principles of programming are: Select a fixture or multiple fixtures. Adjust the fixtures attributes to get the desired look. Record the fixture attributes values to a Preset or a Cue/Cue-list. Playback of the Cues, Chases, etc. 9.2 PATCHING Clicking on the Patch tab of the monitor reveals the patch window. Patch Field Library Add Devices Dialog Information on selected fixture Connections To patch a fixture: In the Library, click on the fixture manufacturers name to show all of their models then select your model of fixture. Dimmers are located in the “Generic” listing. Drag the fixture name and drop it into the desired DMX slot in the Patch Field or double click the fixture name to patch it to the next available slot. Enter the quantity of fixtures in the pop up “Add Devices” dialog then click Patch. Continue to select fixtures and patch them as above. In the “Connections” Pane, click the down arrow beside the Universe that you have patched your fixtures to and then select the output DMX connector or Artnet universe to use. See section 11 for more details. Page 68 Clarity Operator Manual V2.0 9.3 Basic Operation PROGRAMMING Clarity provides many methods of selecting your fixtures. Touching fixtures or groups in Rig mode. See section 12 for details. Clicking on fixtures or groups in the Programmer window Selection sidebar. Touching groups in Palettes or the LX600/LX900 Action buttons. Typing a fixture(s) number on the keypad and pressing Enter. Typing a group(s) number on the keypad and pressing Enter. Clarity provides many methods of programming your selected fixtures. On the LX console’s encoder wheel touch screen: Universal or Direct modes using the encoder wheels. Graphical mode using the touch screen . The Programmmer tab on the touch screen or external monitor. Adjust the attributes of the fixtures to get the desired look. To record the look as the first cue in a cue-list press Record on the LX command centre or in the Programmer. To record this new cue-list directly to a playback, press any button on that playback. To record this new cue-list to memory press Record again. Select fixtures and adjust attributes to set the next look. To record this look as the next cue in the Cue-list on the same playback press any button on that playback. To record it to the cue-list in memory press Append Last in the Programmer. Repeat until all cues in the cue-list have been recorded. Press Clear to clear all attributes from the Programmer. The Programmer is fully described in section 21. 9.4 PLAYBACK If you recorded your cues directly to a playback, you can see them on the playback touch screens where they were recorded. If you recorded them directly into memory you can double tap an empty playback touch screen then touch a cue-list from the Assign and Cue-lists tabs. Touch a playback to assign the selected cue list to it. The Control Booth window tab provides extensive controls for managing, manipulating and analyzing the contents of your cue lists. Right click on a cue list to see the available options. See section 24 for details. Clarity provides several means of playing back the cues that you have recorded. See section 8.6 for details on the operation of the playbacks. 9.4.1 Performance Window The Performance window tab provides a unique and intuitive method of playback especially designed for busking or improvising a show. It is fully described in section 26. Page 69 Customising Clarity Clarity Operator Manual V2.0 10 Customizing Clarity 10.1 OVERVIEW You can control the look and feel of Clarity to suit your individual requirements. Windows and panes can be un-docked, moved and re-sized and attribute controls can be expanded or compressed as described below. “User Preferences” can be selected for many settings and controls as described in section 33. Default settings for new cue-lists can be selected as described in section 24.2. 10.2 LX TOOLS The LX Tools utility provides tools for setting up the monitors, calibrating the touch screens and setting the intensity of the LED’s, screens and desk lamps. It also contains the Help section documents and video tutorials. See section 34 for details. 10.3 TOUCH SCREEN OPERATION Normally Clarity uses ‘mouse scaling’ to get continuous fine-level control for parameter controls. What this means is that behind the scenes when you drag on any parameter control Clarity hides the mouse cursor, scales the actual mouse move by some factor, then repositions the mouse cursor back to its original position. The enables parameter changes and ensures that the logical mouse cursor position never reaches the screen boundary (otherwise it would hit an invisible end-stop). The drawback is that this only works in cases where the system can actually reposition the mouse, which excludes touch screen input devices or virtual machines. Enabling the settings preference: “Show/Settings/Control widget touch mode”, changes this so that the mouse move is still scaled but the cursor is not hidden and the logical position is not changed. This also makes it easier to make larger changes without having to 'scoot' the mouse because you can flick any parameter control and the value will continue moving with inertia (similar to scrolling on an iPhone). 10.4 DOCKABLE WINDOWS The tabbed main windows of Patch, Programmer, Palettes, Control Booth, Performance, Levels and Intensity Levels are un-dockable to suit multi-monitor set-ups or multiple windows. Double clicking on a tab or double pressing the button above the touch screen will un-dock the window allowing it to be either re-sized and repositioned or dragged to another screen. Closing an un-docked window (double pressing the same button above the touch screen) will automatically re-dock it to the main display. In the “Levels” and “Intensity Levels” tabs, you can create multiple new un-docked “levels” windows of the currently selected Level window by clicking New. 10.5 RESIZING PANES Windows have their various areas organized into “panes”. A pane can be identified by its double line borders. Most panes can be re-sized by clicking and dragging on the double line border. 10.6 RIG MODE ICONS In Rig mode you can choose detailed or compact/combined Icons to optimize the display. See section 12.4 10.7 UNIVERSAL AND DIRECT In universal and direct modes you can Expand the display for finer control when using the touch screen and also select virtual encoder wheels. See section 8.4.4 10.8 ATTRIBUTE CONTROL SIZE On the Programmer window tab, when multiple fixtures with multiple attributes are selected, the Attribute Control area can become quite large. Scroll bars automatically appear when required but you can also control the size and detail of the Attribute Controls to reduce screen clutter. Page 70 Clarity Operator Manual V2.0 Customising Clarity In the top right corner of the Attribute Control window, are buttons that allow you to control the size of the Attribute Controls for all of the selected fixtures. Clicking Compact, Capped or Expanded allows a trade off between screen area and detail as described below. “All Attribute” Controls Display Selector Each different type of fixture also has its own set of individual size controls. When multiple fixtures are selected you can use these controls to expand the Attribute Controls of the fixture that you are currently controlling. Individual Fixture Attribute Controls Display Selector The symbols on these size buttons match those used on the All Attribute Controls buttons above. Selecting Compact displays an attribute control that is only one line high for each type of device, irrespective of how many of that type of device are selected. Compact Display (1 line per device type) Selecting Capped displays an attribute control that is only five lines high for each type of device, irrespective of how many of that type of device are selected. Capped Display (max 5 lines per device) Selecting Expanded displays an attribute control that shows all selected device of that type. Page 71 Customising Clarity Clarity Operator Manual V2.0 Expanded Display (All selected devices shown) 10.9 PREFERENCES You can customize many of Clarity’s features in the “User Preferences” settings. Click on “Show, Settings, Preferences” then make your selections. User Preferences are described in section 33. 10.10 KEYBOARD SHORTCUTS Keyboard shortcuts allow you to perform certain functions on Clarity by simply pressing a keyboard key or combination of keys. Clarity comes with some pre-programmed shortcuts but you can change the required keystrokes and also add your own shortcuts. To open the keyboard shortcuts, select Show, Settings, Keyboard shortcuts. To change a current shortcut, select it by clicking on it then click in the “Shortcut” box. Press your new key or combination of keys. To add a new shortcut click +, and the “Choose Function” dialogue appears: Page 72 Clarity Operator Manual V2.0 Customising Clarity Select a function from the list and press OK. Now press your new key or combination of keys for the shortcut for this function. To delete a shortcut, select it by clicking on it then click -. Page 73 Patching Fixtures Clarity Operator Manual V2.0 11 Patching Fixtures 11.1 OVERVIEW Clicking on the Patch window tab reveals the patch window. The Library sidebar lists fixtures by manufacturer and model. If you click on a fixture, additional information for the selected fixture is shown at the bottom of the patch window. The right side shows the 512 patch slots for each internal universe as selected by the Universe # tabs. The Connections pane allows you to connect Clarity's internal universes to the DMX universes on the rear panel and also to ArtNet. If any universes are connected to the Ethernet outputs, they can be temporarily disabled by clicking Disable Network DMX. You can enable touch patching by ticking the box at the bottom of the patch field. Universe Tabs Fixture Library Patch Field Connections Page 74 Information on selected fixture Clarity Operator Manual V2.0 Patching Fixtures 11.2 SPREADSHEET VIEW Clicking on the Spreadsheet View button displays the patch information in a spreadsheet view. Spreadsheet View The columns can be re-arranged by dagging a column name. The order in a column can be sorted by clicking on the column’s name. Click again to reverse the order. 11.3 PATCHING FIXTURES Fixtures and dimmers can be patched by using your mouse to drag and drop or by using the keypad to enter your patching commands. Keypad patching is described below. 11.3.1 Drag and Drop Patching To patch a fixture: Click on the fixture manufacturers name in the Library side bar to reveal the available fixture models. Hints: To quickly jump to a manufacturer, click on any manufacturer then type in the first letter of the required manufacturer's name or type their name in the search field. Recently patched fixtures can also be found at the top of the Library. Click on a fixture name then drag and drop it into the desired DMX slot on the “Universe View” or double click the fixture name to patch it to the next available slot. 11.3.2 Patching Dimmers To Patch a dimmer, in the Library select Generic then Dimmer then double click or drag and drop as described above. 11.3.3 Clarity Universes You can patch fixtures to a new universe by dragging them and hovering over the New tab for a second or so. You can also click on the New tab to create a new universe. Clarity calls its internal universes A, B, C etc. Later, in the connections pane, you connect Clarity’s universes to hardware universes. When you drop a fixture into the patch or double click a fixture, the Add devices dialog box opens. For example, if patching Mac250's….. Page 75 Patching Fixtures Clarity Operator Manual V2.0 Quantity: allows you to enter the quantity of fixtures to patch. Location: sets the Universe (A, B etc) and starting DMX slot number. Use custom interval: when ticked, quantities of fixtures greater than 1 will be spaced apart in the patch by the number slots that you enter in the box. Unit #: sets the unique identifying number for each fixture, shown in front of the fixture name. It is used to select a fixture when using “command line programming” and to identify fixtures in the Programmer’s “Intensities” tab. Name: The name of the fixture from the library is used by default. To change the name, click in the box then enter your own name. Clarity automatically appends a number after each name to aid identification. Flow onto empty/new universes: When ticked, if the selected fixtures require more DMX slots than there are available on the current universe, then the fixtures will be patched to the next empty universe or a new (empty) universe will be created. 11.4 CLONE FROM OTHER FIXTURE(S) Cloning is an advanced feature of Clarity. If you are reading this manual for the first time or just want to patch some fixtures you can skip this section. Cloning allows you to substitute different fixtures in a show or to add more fixtures of the same type without the need to reprogram the show. An example of cloning is described below. In the Add devices dialog box above, if you click in the Clone from other fixtures check box, the Patch button becomes a Next button and clicking it allows you to clone the programming (presets and cues) of any patched fixture(s) to the new fixture(s) that you are patching. Clicking Next reveals the clone dialog box. The new fixtures being patched are automatically selected as the Destination Devices. All existing patched fixtures are available in the Available Devices pane. Choose the source device(s) by selecting them in the Available Devices pane, then transfer your selection to the Source Devices pane by clicking >>. Incorrectly selected Source Devices can be moved back to the Available Devices pane by selecting them and clicking <<. Page 76 Clarity Operator Manual V2.0 Patching Fixtures Presets will be automatically cloned for the new fixtures however you can choose whether or not to clone cues buy using the Clone Cues check box. To clone the programming of the source devices to the destination devices click Finish. 11.4.1 Cloning Example Program a show with 10 “scanA” (fictitious) fixtures. Move show to new venue that does not have any “scanA” fixtures but has “yokeB” fixtures instead. Patch same quantity of “yokeB” fixtures (possibly on a different universe) and clone them from “scanA” fixtures. All presets (and cues if checked in clone box) are updated to include both types of fixtures. The show runs in new venue with no need to reprogram the whole show, possibly just trim and update the position presets. 11.5 KEYPAD PATCHING Fixtures can be patched using the numeric keypad when Patch window has been selected. In the Patch window, select the required fixture from the Library. If you don’t select a fixture type from the library, a generic dimmer will be automatically selected for you. On the numeric keypad or a keyboard, type in a fixture unit number and the “command line” automatically appears at the bottom of the screen showing the fixture type and the unit number you have entered. Type @ then a DMX slot number and press Enter to make the patch. The patch(s) will be made to the current universe as selected by the tab at the top of the Patch window. Additional patching commands are listed below. 11.5.1 Patching Commands: The patching commands are: # (unit number) @ # (slot number) Enter. Patches a single fixture unit at the given DMX slot number. For example: 1 @ 1 Enter, will patch fixture 1 to DMX slot 1. # (unit number) Enter. Patches a single fixture at the next available patch slot number. For example: 1 Enter, will patch fixture 1 to the next available DMX slot. @ # (slot number) Enter. Patches the next available fixture unit number at the given patch slot number. For example: @ 1 Enter, will patch the next available fixture number to slot 1. A range of fixture unit numbers can be selected by using either the Thru/ key and you can also combine and subtract ranges using the + and - keys. For example: 1 Thru/ 50 + 100 Thru/ 120, enters fixture unit numbers 1 through 50 and 100 through 120. 1 Thru/50 - 25, enters fixture unit numbers 1 through 24 and 26 through 50. The order of number entry is respected so that …..... 5 Thru/ 1 + 6 Thru/ 10 Enter, will get a fixture selection order of 5, 4, 3, 2, 1, 6, 7, 8, 9, 10. Also see Multi-Patch below for additional commands. 11.6 MULTI-PATCH You can patch the same fixture unit number to multiple DMX locations. This allows you to use a single fixture unit number to control multiple fixtures. Multiple patches can be made by using either keypad patching or by copying a patched fixture to another DMX slot as described below. 11.6.1 Keypad Multi-Patch Use the keypad to specify the multiple DMX slot numbers. Page 77 Patching Fixtures Clarity Operator Manual V2.0 For example: # (unit number) @ # (slot number) + # (slot number) Enter. This command patches a fixture unit number to two DMX slot numbers. When patching dimmers only you can supply a range of DMX slot numbers. For example: # (unit number) @ # (slot number) > # (slot number) Enter. Patches the unit number to a range of DMX slot numbers. # (unit number) @ # (slot number) + # (slot number) + # (slot number) Enter. Patches the unit number to the DMX slot numbers. 11.6.2 Copy Multi-Patch Copy a patched fixture to another DMX slot by holding Function and clicking and dragging the patch to another DMX slot number. 11.6.3 Removing Multi-Patches You can remove multi-patch locations by clicking on their slot number(s) then right clicking and selecting “Unpatch selected”. 11.7 SELECTING FIXTURES Fixtures are selected in the patch window by clicking on them. Selected fixtures have a black border. Multiple fixtures can be selected. You can select all fixtures of the same type by right clicking on any one of the type and choosing “Select all of this type” from the drop down menu. Right clicking on a fixture or selecting multiple fixtures then right clicking reveals a drop down box from which you can choose: These functions are described below. To deselect a fixture, click on it again. To de-select all fixtures click [Select None] on the menu bar or click on an un-patched DMX slot. 11.8 INVERTING/SWAPPING ATTRIBUTES Inverting or swapping pan and or tilt is used to counter the effects of hanging some fixtures in different orientations, so that they all respond in the same direction when controlled by Clarity. The alignment status of each fixture is shown in the patch window by the PT (Pan Tilt) icons at the end of each fixture. PT shows normal pan and Tilt If the bar is above the P or T then that attribute is inverted. If Pan and Tilt have been swapped then TP is shown instead of PT. Page 78 Clarity Operator Manual V2.0 Patching Fixtures Normal Inverted Pan Inverted Tilt Inverted Pan & Tilt Swapped Pan & Tilt To change the alignment status of a fixture, right-click on the fixture then select either: invert pan, invert tilt or swap pan & tilt. Note: This action affects all currently selected fixtures. See also section 21.9.9 “Flip”. Flip will alter the current pan and tilt values of the selected moving yoke fixture(s) to the other possible combination of values that achieves the same position on stage. 11.9 INTENSITY FADE PROFILES Intensity Fade Profiles are the relationship or “transfer characteristic” between input control signal and intensity output of a fixture or dimmer. Clarity provides several intensity fade profiles from which to choose to suit the application of your fixture or dimmer. To select an Intensity Fade Profile for a fixture(s), in the Patch window, right click on the selected fixture(s) then choose “Set fade profile” from the drop down box. Fade curves Current curve Click on the “Fade curve” drop down box and select the required curve. Page 79 Patching Fixtures Clarity Operator Manual V2.0 Available curves 11.10 MINIMUM AND MAXIMUM INTENSITY You can set minimum and maximum intensity values for a fixture or dimmer. These values are applied “proportionately” throughout the dimming range. Setting a maximum value for a fixture will reduce the intensity value on the output relative to the intensity value that you have programmed. For example. If you set a maximum of 80%, then when you program an intensity value of 100%, the fixture intensity will be 80%. If you dim the fixture to 50%, its intensity will be 40%. A “Minimum” value is often used with incandescent lamps to “pre-heat” the filament. This can increase lamp life by reducing the surge of current that flows through a cold filament. It also speeds up a lamps response when it is instantly flashed to full power. A minimum value of between 5% to 10% usually provides enough heating effect without producing noticeable light to an audience. To set a minimum or maximum values, select the “Intensity fade profile” as described above and enter your required values in the minimum and maximum boxes. The current curve shows the minimum and maximum values and the proportional level of the fade. Maximum = 80% Page 80 Clarity Operator Manual V2.0 Patching Fixtures 11.11 CUSTOM FIXTURES Clarity's contains a fully integrated fixture library of over 2000 fixture personalities supplied by Carallon, an independent supplier of fixture libraries. However, if you have a fixture that is not in the library you can either use the Clarity fixture editor described later in this manual or request a fixture file from LSC. Please supply all details of the fixture including brand, model, version number, operating modes and a DMX chart or list. Submit your request including this information at: http://www.lsclighting.com/help-centre/clarity-templates LSC will email you a Clarity fixture file for your new fixture. To add a new fixture to the library, in the Patch window click Manage custom fixtures. In the “User Fixtures” dialog box, click the symbol then navigate to the new fixture file on your computer (*.cfx) and click Open. 11.12 CONNECTING OUTPUT DEVICES Clarity's internal DMX universes are labelled A, B, C, etc. When patches have been made, you use the Connections pane to connect these internal universes to external universes 1, 2, 3 or 4 on the rear panel or to ArtNet subnets/universes. Clicking on the drop-down arrow for each internal universe will list the available connections. Select the required device / DMX universe to make the connection. Note also that universe connections are only presented for internal universes that have one or more devices patched – empty universes are not listed. 11.13 CONFIGURING ARTNET OUTPUTS Selecting ArtNet (above) will take you to a configuration dialog specific for that connection type. ArtNet supports 256 DMX universes. These are arranged in 16 sub-nets each containing 16 universes. Select the required ArtNet Subnet and ArtNet Universe for this output then click OK. 11.14 EDITING THE PATCH Select the fixture(s) to be edited. Patched fixtures can be selected by clicking on them. The fixture’s border will become highlighted when it is selected. Page 81 Patching Fixtures Clarity Operator Manual V2.0 To deselect a fixture, click on it again. To select all fixtures, right-click on any fixture then click Select all. To deselect all fixtures, click on an un-patched DMX slot. Selected fixtures have a black border. 11.14.1 Editing a Fixtures Address Selected fixtures can be dragged and dropped onto any DMX slot or universe. If any of the destination DMX slots are already occupied by an existing patch then those slots will turn red and the patch will not be permitted. If you exceed the number of licensed channels for the dongle that you are using (or exceed 128 channels or 32 fixtures for the free version) a red warning banner will be displayed at the top of the screen to alert you to this. 11.14.2 Editing a Fixtures Name or Number Select a single fixture and right-click on it and then select Properties. In the dialog box that opens you can alter its unit number and name. Fixture unit numbers can also be changed in the Programmer’s toolbox. See section 21.9.5 for details. 11.14.3 Deleting Fixtures Select the fixture(s) to be deleted by clicking on them, then right-click and select Delete selected fixtures. 11.14.4 Un-Patching Fixtures Select the fixture(s) to be un-patched by clicking on them, then right-click and select Unpatch selected. When any fixtures have been un-patched, an “UNPATCHED FIXTURES” pane appears showing those fixtures allowing them to easily be re-patched when required. Un-patched fixtures do not count towards your license limit. 11.14.5 Exporting the Patch The Export Patch button in the Patch Window allows you to save the patch information as a CSV file and then open it in a spreadsheet program. Page 82 Clarity Operator Manual V2.0 Rig 12 Rig 12.1 OVERVIEW Rig mode is a fixture selection tool and two dimensional visualiser. It shows a geographical view of the patched fixtures (and groups) which you can arrange so that they are positioned as they actually are in your rig. This allows you to rapidly find and select fixtures for programming by clicking on them or touching them or by dragging the mouse cursor through multiple fixtures. This will remember the order in which you drag though the fixtures or you can click in whitespace to draw a selection rectangle. A background image of your stage or venue can be added to aid selection and multiple views can be created using the toolbar at the top. Each view can be configured with various options: Icon style: detailed (separate areas for intensity, position and gobo/colour) or combined. Whether or not to auto-add new fixtures or new groups. Background image & background image zoom. The intensity, colour and position of the fixtures are also displayed. All of the patched fixtures and all of the groups are shown in patched order. The display is zoomable using the toolbar, mouse wheel or by right clicking on the screen. When arranging icons in Safe (arrange) mode you can also define a grid and optionally enable snap-to-grid. 12.2 ARRANGING FIXTURES You can arrange the fixtures geographically as they are rigged on stage and therefore make them much quicker to find and select. If you click Safe (arrange), a grid appears on the background indicating “Safe” mode. Page 83 Rig Clarity Operator Manual V2.0 You can now move and organize the fixtures and groups by dragging and dropping them. Selected items have a yellow border Click a fixture or group then drag it to its new position. Multiple items can be moved by clicking each one the dragging. If you click on the background area then drag a box, all items within the box are selected. To de-select an item, click it again. To de-select all items click on the background area. 12.3 ALIGNING FIXTURES Multiple fixtures and groups can also be accurately aligned by selecting them then right clicking and choosing from the menu that appears. You can align them to the top, to the left, snap them to a grid of either 5, 10 20 or 50 pixels. The “Arrange selected” option opens the “Arrange Items” dialogue box which allows you to accurately space the selected fixtures in horizontal or vertical columns, specify the number of columns and the spacing of the fixtures. If you make a mistake when arranging fixture or groups you can click Undo or Redo from the Menu button in the bottom right of the touch screen. To re-activate normal fixture selection mode click Safe (arrange) again (toggle action). Note that the fixtures can also be aligned when not in Safe (arrange) mode. 12.4 FIXTURE ICONS Two different styles of icons are available for displaying fixtures: Detailed. Separate areas for Intensity/Colour, Position and Beam are shown. Combined/Compact. All attributes combined into a compact display. Page 84 Clarity Operator Manual V2.0 Rig Position Intensity + Colour Intensity + Colour + Beam + Position Beam Fixture unit number Detailed Icon Combined/Compact Icon Fixture icons can be individually set by selecting the fixture(s) and right clicking then selecting either Detailed or Combined/Compact. You can also choose which type of icon will be used as the default icon for each view in the “Configure View” dialogue described below. The “Fixture Unit Number” displayed in the icon is the fixture’s number used in command line programming. Screen size can be varied with the – , + and 100% or fit (to screen) buttons on the menu bar. It can also be zoomed with the mouse wheel. 12.5 MULTIPLE VIEWS You can create multiple views. In each view you can name the view, delete or add fixtures and groups, change the arrangement of the fixtures and groups, display the fixtures as either “detailed” icons or “combined/compact” icons and select a different background image. For example: A “Stage View” might show a plan of the stage with the stage fixtures positioned on the lighting battens. A “FOH View” might show a plan of the auditorium with of the Front Of House fixtures in their positions around the auditorium. In a television studio, the selection of fixtures can be greatly simplified by creating an individual view for each set or performance area that only contains the fixtures to be used in that set. 12.5.1 Creating a new View To add a new view click either: Add View (opens a new blank view without any fixtures) or: Copy View (creates a copy of the currently selected view that you can configure to your requirements. To delete a view, select that view by clicking on its name tab then click “Del View” from the menu bar. 12.6 CONFIGURING A VIEW When a view has been selected (by clicking on its name tab), that view can be configured by either clicking Configure on the menu bar or right clicking in the view pane and selecting “Configure View”. This opens the “Rig Schematic View Settings” dialogue….. Page 85 Rig Clarity Operator Manual V2.0 Assign Selected Un-assign Selected Assign All Un-assign All The “Contents” pane allows you to select either Fixtures or Groups tabs and then make you selection by clicking on the fixture or group names. You can then assign or un-assign them from the current view by clicking on the arrow buttons. At the top you can enter a name for the view and also select the type of fixture icon to be used as the default icon for this view. The options pane allows you to “Auto add newly patched fixtures” and “Auto add newly created groups”. 12.6.1 Background Image At the bottom of the “Rig Schematic View Settings” dialogue (above) you can select and load a background image over which your fixtures will be displayed. Click on the … button and navigate to your image. The “Background zoom” controls allow you to scale your image to suite you screen size on the rig view. To remove a background image click on the X button. Examples of Rig mode with background image. 12.7 SELECTING FIXTURES IN RIG VIEW Fixtures to be programmed can be selected by clicking on them. Selected fixtures have a blue border. Click again to de-select a fixture. If you click on a fixture then drag over multiple fixtures, Clarity draws a line showing the drag path and selects each fixture that you drag over. Page 86 Clarity Operator Manual V2.0 Rig If you click on the background area then drag a box, all fixtures within the box are selected. When multiple fixtures are selected, the selection order numbers are shown on the selected icons. You can select multiple fixtures from different views. The order in which you select the fixtures is used for certain effects (such as fans and dynamics) and can be also utilized by the Programmers “sort” function. Your fixture selection including its order can be saved to a group by clicking To Group in the menu bar and giving the group a name.. Group icons have a dotted blue border when some fixtures in group are selected and a solid blue border when all of the fixtures in the group are selected. To de-select all fixtures, click on the background area of the window. Page 87 Universal Clarity Operator Manual V2.0 13 Universal 13.1 OVERVIEW When you have selected a fixture(s), Universal mode (on the consoles encoder touch screen) provides universal attribute controls that are always in the same locations on the screen and operate in exactly the same way, regardless of which fixture types you have selected. This not only allows multiple types of fixtures to be controlled simultaneously but also simplifies the control of complex fixtures that might use multiple attributes to control an effect or fixtures that use one attribute to change the mode of another attribute. Universal mode automatically interprets these attributes and presents a single control for each effect. For example, the fixture being controlled might have a gobo mode attribute and a gobo index/rotate attribute or it may use a single gobo index/rotate attribute that has index from 0 to 127 and rotate from 128 to 255. When you use the Universal mode you don’t need to care about these modes because Clarity automatically interprets these attributes and always provides a control for gobo rotate and a control for gobo index. If a listed attribute does not exist on any of the selected fixtures, then that attribute control is still visible but disabled. 13.2 UNIVERSAL MODE PAGES Universal controls are arranged in 4 main pages that are selected by the buttons at the bottom of the screen. The main pages are: General Colour Beam Media Server Each page has rows of controls that you connect to the encoder wheels by using the buttons to the left of that row. The Colour, Beam and Media Servers have sub pages that can be selected by either holding their button and selecting from the sub pages that appear or by using the next two buttons to the right. General (One page) Intensity Shutter Red Focus Pan Strobe Green Zoom Tilt Gobo Wheel 1 Blue Frost Iris Gobo wheel 2 Colour Wheel 1 Colour (Two pages) Intensity Red Colour Wheel 1 Colour Wheel Spin 1 Colour, Page 1 Cyan Magenta Green Blue Colour Wheel 2 Colour Wheel 3 Colour Wheel Spin 2 Colour Wheel Spin 3 Red Intensity Scroller 1 Green Hue Scroller 2 Beam (Five pages) Gobo Wheel 1 Gobo Wheel 2 Effect Wheel 1 Effect Wheel 2 Page 88 Colour, Page 2 Blue Saturation Scroller 3 Beam, Gobo + Effect Gobo Wheel Spin 1 Gobo Index 1 Gobo Wheel Spin 2 Gobo Index 2 Effect Wheel Spin 1 Effect Index 1 Effect Wheel Spin 2 Effect Index 2 Yellow Amber Colour Wheel 4 Colour Wheel Spin 4 White Amber Scroller 4 Gobo Rotate 1 Gobo Rotate 2 Effect Rotate 1 Effect Rotate 2 Clarity Operator Manual V2.0 Universal Gobo Gobo Gobo Gobo Wheel 1 Wheel Spin 1 Index 1 Rotate 1 Gobo Gobo Gobo Gobo Beam, Gobo Wheel 2 Wheel Spin 2 Index 2 Rotate 2 (whls 1-4) Gobo Wheel 3 Gobo Wheel Spin 3 Gobo Index 3 Gobo Rotate 3 Gobo Gobo Gobo Gobo Wheel 4 Wheel Spin 4 Index 4 Rotate 4 Effect Effect Effect Effect Wheel 1 Wheel Spin 1 Index 1 Rotate 1 Effect Effect Effect Effect Beam, Effect (whls 1-4) Wheel 2 Effect Wheel 3 Wheel Spin 2 Effect Wheel Spin 3 Index 2 Effect Index 3 Rotate 2 Effect Rotate 3 Effect Effect Effect Effect Wheel 4 Wheel Spin 4 Index 4 Rotate 4 Focus Animation Wheel 1 Beam, (Beam) Zoom Frost Animation 1 <> Animation Wheel 2 Iris Animation 2 <> Frame Frame Frame Frame Beam, Framing Zoom Frost Animation 1 <> Animation Wheel 2 Frame 1B Frame 3A Frame 2B Frame 4A Iris Animation 2 <> Frame 3A Frame 4A Depth 1 Depth 2 1A 2A Media Server (Two Pages) Output Level Intensity X Zoom Object Directory Media Server, General X Position Y Position Red Adjust Green Adjust Y Zoom Playback Speed Object File Effect Z Position Blue Adjust Rotate Z Effect Parameter Keystone X#1 Keystone X#3 Media Server, Keystone Keystone Y #1 Keystone X#2 Keystone Y #3 Keystone X#4 Keystone Y #2 Keystone Y #4 The following shortcuts are available if you right click on any control on the screen: You can save a shortcut to a page and row allowing you to navigate to it with a single key press. See section 8.5.1 for details. See also section 8.3 for more information on Universal mode. Page 89 Direct LX300 Operator Manual V1 14 Direct 14.1 OVERVIEW When you have selected a fixture(s), Direct mode provides attribute controls for the selected fixture as specified for that fixture in the fixture library. For example, the fixture being controlled might have a colour wheel with a colour mode attribute and a colour index/spin attribute. When you use the Direct mode, you control these attributes directly so if you want to spin the colour wheel you would need to set both attributes to the appropriate values. This is different to Universal mode where you only need to set a single control and Clarity sends the appropriate values to both attributes. Direct mode also allows you to control any unusual attributes that a fixture might have that aren’t covered by the controls in Universal mode. The Direct controls are divided into groups of: Intensity/Position Colour Gobo/Effects Beam Groups and rows are selected and connected to the encoder wheels in the same way as in Universal mode (described in the previous section). You can save a shortcut to a page and row allowing you to navigate to it with a single key press. See section 8.5.1 for details. Page 90 Clarity Operator Manual V2.0 Intensities 15 Intensities 15.1 OVERVIEW The Programmer’s Intensities tab displays the intensity channel of every patched fixture represented by two separate vertical bars. The left bar shows the programmer level (if any) and the right bar shows the output level. The numbers below each channel are the fixture “unit numbers” as set in the patch. The cells are colour coded to indicate the following: “Inactive”. The channel has no intensity value in an active playback or in a live programmer. “Active Playback”. The channel has an intensity value in an active playback. “Main Playback”. The channel has an intensity value in the main (selected) playback and the playback is active. “Programmer - changed”. The channel has an intensity value in a live Programmer. “Programmer - unchanged”. A cue containing the channel is being edited live and the channel value has not been changed by the programmer. Touch the Legend button to display the colour code. Select channels by clicking on them. A range of channels can be selected by touching and dragging on the unit numbers. The intensity level of the selected fixtures can be varied by clicking and dragging on the bar area. When editing blind you can see at a glance the difference between the on stage values on the right and the blind programmer levels on the left. 15.2 CHANNEL CONTROLLER MODE “Channel Controller Mode” is a method of lighting control commonly used in television production. Channel controller mode differs from “Programmer Mode” in that when a cue is edited the edits are live and the cue including its edited values remains under the overall level control of its playback master. Therefore if the playback master is at 100% then editing is live to stage, if the fader is at zero, the edits cannot be seen on the output. If the fader is at 50%, it is live to stage, but dimmed to half levels. In Channel Controller mode, the edit session can remain open and the edited cue can be used without necessarily updating the original cue. This is useful for a “one off” edit that might not Page 91 Intensities Clarity Operator Manual V2.0 be required when the same cue is used again at a later time or on another day. The playback’s master still fades the cue up and down and if the cue-list is advanced to the next cue the edit session automatically keeps track. If the edit is to be kept, the changes are saved back to the original cue. If the edits are not to be kept the edit session is closed and the changes are discarded. 15.2.1 Settings for Channel Controller Mode Channel controller mode of operation is achieved by the selection of certain user preferences and by the method in which Clarity is operated. On the main menu click Show, Preferences and set the following User Preferences: Start cue-list edit blind. Not ticked. Now when you edit a cue-list, the edit session will be live <on stage>. Connect fader for cue-list edit. Ticked. If a cue-list on a playback is edited, the playbacks intensity fader controls the output level of its edit session. Programmer follow selected playback. Ticked. If multiple edit sessions are open, the current session being edited will follow the selected playback. Show unit number instead of fixture name. Ticked. This preference is not essential for Channel Control mode but it aids its operation because it shows the “unit number” of the selected fixtures name in the programmer attributes tab. The unit number is used when selecting fixtures using “command line” programming. Command line programming can speed up fixture selection. See section 22 for details. 15.2.2 Operating in Channel Controller Mode When playing your show you can basically forget about the programmer. If you playback cues and you want to make changes, you edit the cue by pressing Edit and then any flashing button of the playback to be edited. The edit session opens in live mode. Select channels (use number keypad entry for speed) and change levels using the intensity wheel. “Intensities” mode gives you an instant picture of the output intensity levels. The cue can still be faded up or down with the playback’s master. Multiple cue-lists can be edited at the same time and the edit sessions will follow the selected playback and the active cue on that playback. To keep the changes click Save (updates to the current playback) or to revert to the original cue values on the playback click Close / Discard. Hint: If you record several cue-lists that only contain one cue each and load them onto playbacks, set the “Go on fader up” option for each cue-list. Now each playback will always be active when it is faded up. Page 92 Clarity Operator Manual V2.0 Timing 16 Timing 16.1 OVERVIEW Clarity provides comprehensive controls for the timing of your Playbacks and Cues. 16.1.1 Cue Times Every attribute in every cue can have individual values for: Delay. The time from when the cue starts until the attribute(s) begin to change. The default delay time is 0 seconds. Fade. The time taken for the attribute(s) to change to the value in the cue. The default fade time is 2 seconds. Cue times as fully described below. 16.1.2 Intensity Fade Out times. Out Delay. If any Intensity values are about to decrease when the cue fades out they will wait for the “Out Delay” time to expire before they start to fade. Increasing intensity values and all other attributes ignore this setting. The default delay time is 0 seconds. Fade Out. If any Intensity values are set to decrease when the cue fades out they will use the Fade Out time. Increasing intensity values and all other attributes ignore this setting. The default Fade Out time is 0 seconds. 16.1.3 Playback Times In addition, each cue-list can be programmed with the following settings: Activate (fade in) time. Default time = 0 seconds. This is the time taken for a Cue-list to fade in when the first cue is played. Normally this would be left at 0, and the affected fixtures in cue 1 would fade in over their programmed time for that cue. However, you can enter an activate time to scale the fade in over time. Release (fade out) time. Default time = 2 seconds. This the time taken for the Cue-list to fade out when released from a Playback. Playback Rate. Proportionally changes all of the timing information in a cue-list. By default it is set to 100%. The range is 1 to 1000. For Example: If Rate is set to 50% it slows all of the fades (all times are doubled). 100% = no change to rates. The way that each cue in the cue-list is played can be set as either: Halt. The cue is manually played by its GO button Follow. The cue is automatically played after the previous cue finishes. Wait time. The cue is automatically played after a wait time after the previous cue finishes. Playback times are described in section 24. 16.2 CUE TIMES Clarity provides several methods for setting the delay and fade times for each attribute in a cue. Timing mode on the encoder wheel touch screen The Timing tab in the Programmer window. Command line programming. See section 22. Timing mode and the Timing tab provide similar controls for setting times. 16.2.1 Timing Mode Timing mode, on the encoder wheel touch screen, displays the timing of the attributes that are grabbed in the Programmer and provides a means of altering the times. Page 93 Timing Clarity Operator Manual V2.0 Menu Fade Curves The buttons at the bottom of the screen allow you to filter your selection by the attribute groups of ALL, Intensity, Position, Colour or Beam. You can select them individually or they are multi-selectable by holding Function when you select. Attribute groups can be further filtered to individual attributes by selecting Choose and then selecting the attributes to be included. Use the encoder wheels or touch and drag to set the times. Selecting the Fade Curves box reveals a range of fade curves to choose from as described below. Selecting the Menu box reveals a range of choices to set, reset, align and straighten times and to recall preset times or save preset times as described below. 16.2.2 Timing Tab The Programmer timing tab displays the timing of the attributes that are grabbed in the Programmer and provides a means of altering the times. Timing Control Fade Curves Icon The “Filter Attribute” buttons allow you to filter your selection by the attribute groups of Intensity, Position, Colour and Beam. Attribute groups can be further filtered to individual attributes by clicking the attributes to be included.You can select them individually or they are multi-selectable with Function + click. Below the filter attributes are the Timing Controls. The detail shown in the Timing Control can be varied by clicking on either: Compact: one line is used for all devices of that type Capped: the height of the Timing Control is limited to a maximum of 5 lines – the individual value rectangles are compressed to fit into the available space. Expanded: the Timing Control is expanded to suit the number of selected devices. See section 10.8 for more details. Clicking on the Fade Curves icon reveals a range of fade curves to choose from as described below. Clicking on Menu reveals a range of choices to set, reset, align and straighten times and to recall preset times or save preset times as described below. 16.3 SETTING TIMES The delay time, fade time and total time (delay + fade) are shown in the Timing Control. When times are altered the display automatically zooms to show the entire duration. Page 94 Clarity Operator Manual V2.0 Timing Delay Time(s) Fade Time(s) Total Time(s) (duration) The Timing Control is divided into a grid of 9 time boxes as indicated by the dotted lines in the Timing Control. As you move over each time box, the cursor changes to indicate how the timing will be affected if you drag in each section. Touching (or clicking) and dragging in one the relevant box performs the following actions: Skew delay time from top to bottom without changing duration. Change delay time without changing duration. Skew delay from bottom to top without changing duration. Skew delay time top to bottom. Skew fade from top to bottom. Change delay time. Change fade time. Skew delay time bottom to top. Skew fade from time bottom to top. Double clicking and holding Function or holding [Shift] on an the keyboard whilst dragging gives finer control. 16.3.1 Setting Times by Direct Entry Double-clicking in the left, middle or right centre boxes of a Timing Control brings up an entry box where you can key in either the delay, fade or duration times respectively on the numeric keypad, then press Enter. Right-clicking in the left column displays a menu where you can choose to: Set delay times. Align delay times that have been skewed. Equalize uneven skewed delay times. Right-clicking in the centre column displays a menu where you can choose to: Set fade times. Align delay times that have been skewed and shift fade times accordingly. Equalize unevenly skewed delay times and shift fade times accordingly. Right-clicking in the right column displays a menu where you can choose to: Set duration times. Align duration times. Equalize unevenly skewed duration times. 16.4 FADE CURVES Fade curves determine the way that attributes move during the times entered in the cue. The curve icon shows its current path setting. Clicking on the icon reveals the available curves and allows you to select a curve by clicking on it. Page 95 Timing Clarity Operator Manual V2.0 The available curves are: Current Curve Icon If multiple attributes are selected and they have different timing paths selected then ··· is shown as the curve. 16.5 FILTERING TIMES Every attribute of every fixture can have its own individual set of times. It is common practice to set different times for different attribute groups. For example: When a cue is played back, the colour might instantly go to the desired setting but the position might wait for a second then move for 2 seconds. The delay and fade times shown in the Timing Control below are the same for all of the attributes of the fixtures. This is indicted by “IPCB” (Intensity, Position, Colour and Beam) beside the fixture names. Timing Control sets times for IPCB attribute groups Filters are used to select different attributes so that individual times can be set. The Timing pane contains filters for the attribute groups of Intensity, Position, Colour and Beam. Selecting a filter's name will result in a new Timing Control appearing, showing potential timing information for the filtered attributes of the selected fixtures. Position filter has been selected. The lower Timing Control still controls IPCB (Intensity, Position, Colour, Beam) but the new Timing Control above it has been filtered for P (Position) information only. No change has yet been made and the new Timing Control is only temporary as indicated by the paler colour and the menu button on the Timing mode changing to “Confirm” or presence of the “?” button in Page 96 Clarity Operator Manual V2.0 Timing the top left corner of the Timing tab. Selecting Confirm or the “?” button or dragging in the new Timing Control to change the time will “lock in” the timing. The right Timing Control now only controls ICB and the left Timing Control has taken control of P (Position) timing. You can now set the Position timing independently of the ICB timing. 16.5.1 Combining Filters Combinations of the Filters Attribute groups of Intensity, Position, Colour and Beam groups can be selected by using Function + click to select and or de-select them. Individual attributes within a group can be selected by selecting Choose then selecting the attributes. Combinations of individual attributes can be selected by using Function + click to select and or de-select them. Position and Beam have been filtered. Pan only from the Position group has been filtered. 16.5.2 Complex Timing The separate Timing Controls allow you to see a lot of timing information at a glance, even if attribute times are at very different orders of magnitude. The above complex example has the following timing. Intensity (I) is delayed for 0.2 seconds then fades up over 1 second. Colour and gobo wheels (C B) snap to their settings instantly (0 seconds), before the fade up begins. Pan and Tilt (P) are delayed for 1.2 seconds (until the fade up is complete) then the position fans in over 10 seconds. 16.6 WAIT TIME In addition to the delay and fade times that can be set for every attribute, a cue also has a “Wait” time setting. By default, this is set to “Halt” so that at the conclusion of the previous cue, the cue-list will wait until the “Halt” cue is manually played. If you want a cue to be automatically played at the conclusion of the previous cue then set the “Wait” time to be either “Follow” (immediately follows the previous cue) or enter a wait time. Page 97 Timing Clarity Operator Manual V2.0 Wait times can be set in the “Record Cue” dialogue box or by double clicking on a cues ”Wait” setting in the Control Booth or Performance windows and selecting either “Halt”, “Follow” or entering a time. 16.7 PREVIEWING TIMES You can preview (rehearse) your time settings before recording them in a cue. See “Preview” in section 21.8.4 for details. 16.8 RECORDING TIMES The times that you set are included when you record a cue. See “Record” in section 23 for details. 16.9 RESET TIMING To reset the times for all attributes to the default values of delay = 0 and fade = 2 seconds click Reset Timing (located in the Menu button at the bottom right of the encoder wheel touch screen). 16.10 TIME PRESETS Time Presets and Freesets allow you to create building blocks of timing patterns for use in programming or to use them in live playback from the Palettes window. 16.10.1 Recording Time Presets Select a fixture(s) and alter an attribute value. Alter the times to the values that you require then click To Time Preset which is located under the Menu button of the Timing mode screen or the Programmer’s Timing tab. The Record Time Preset dialog box opens and various options exist to control how these times are recorded and how they apply. The Source pane allows you to filter the timing data that will be recorded by Intensity, Position, Colour and Beam. It also allows you to record the time data of the “Selected fixtures only”. The Options pane allows you to name the Time Preset and to specify the: “Application mode”. Choose either: “Permutate”. If the Time Preset was recorded using 3 fixtures and it is then applied to 12 fixtures, it will apply the Time Preset to the first 3, then apply it again to the next 3, the next 3 and so on. Permutate is the default setting. “Scale”. A scaling Time Preset is created by selecting only two fixtures and setting one's attribute values to the start value and the other’s attribute value to the end value. When this Time Preset is applied to a quantity of destination fixtures, the start value is applied to the first fixture in the selection and the end value is applied to the last fixture in the selection. All of the other selected fixtures gets an intermediate value that is graduated between the start and end values. Page 98 Clarity Operator Manual V2.0 Timing “IPCB”. Choose either “Common” or “Separate IPCB”. This determines whether the Time preset will apply to any attribute type or to specific attribute types. The Preview pane shows a graphical preview of the resultant timing that will be saved in the Time Preset. 16.10.2 Applying Time Presets Select a fixture(s) and alter an attribute value. Time presets can be applied from either: On the Programmer window select the timing tab and you will see the default times applied. To apply a Time Preset, either click From time preset or click the MENU button on a specific timing group and select From time preset. On the encoder wheel touchscreen’s Timing mode, you will see the default times applied. To apply a Time Preset, select the MENU button on a specific timing group then select From time preset. Select on the required Time Preset to apply it. Time Presets are also used by the “Live Times” dialog in the Palettes window to control the timing for Presets and Freesets that you apply. Page 99 Dynamics Clarity Operator Manual V2.0 17 Dynamics (real time effects) 17.1 OVERVIEW Dynamics can save you hours of programming time by creating movement from an otherwise static cue. Dynamics mode (on the encoder touch screen) allows you to add modulation (variation) to any attribute or combination of attributes. When a cue has been played back, the attribute values will normally be steady on the recorded values in that cue. Dynamics add movement by continuously varying the (selected) attribute values. These varying values are created by waveforms. Different waveforms (such a sine wave, a ramp or a square wave etc) have different shapes and therefore cause different movements. Varying the rate, phase, duty cycle etc of a waveform will cause a corresponding change in the attributes that it controls. 17.2 APPLYING DYNAMICS On the encoder touch screen, select the required fixtures (in Rig Mode) then select Dynamics mode and at the bottom of the screen tap New. The Add New Effect dialog box appears: Selected attributes Channel Sets The Channel Sets pane on the left provides quick-access to some predefined attribute combinations. Touch on a channel set to select it. The channel set selected in the left pane can be further filtered in the right pane by touching Intensity, Position, Colour or Beam or on the individual attributes. Combinations of attributes can be selected by using by dragging. If you select a channel set, then alter the selection of attributes in that channel set, you can save your new selections by either updating the current channel set or saving your selections as a new channel set. To update an existing channel set, make your new attribute selection then click on Update. To add your own channel set, click on the name box below Channel Sets and type a new name then click Add. The Update button changes between Add or Update depending whether the name entered matches a name in the list. When you have selected the attributes to which dynamics are to be applied, click OK. A separate set of Offset, Centre, Amplitude, Top and Bottom dynamics Attribute Controls will appear for each attribute. Page 100 Clarity Operator Manual V2.0 Dynamics 17.3 CONTROLLING DYNAMICS Current waveform Selected Attributes Waveform selection and modifiers Pan Attribute controls Tilt Attribute controls The list at the top-left of the pane shows the attributes that you selected for dynamics to be applied to and at the bottom are the sets of dynamic Attribute Controls, one set per attribute. The controls in the centre allow you to select a waveform and to modify various aspects of that waveform. The current waveform including the effects of the selected modifiers is shown on the right. 17.3.1 Waveform Control The following selections control the waveform: Waveshape: Select the waveshape used to modulate the selected attribute(s) by clicking on the drop down arrow. The available waveshapes are: Sine, Triangle, Square, Ramp-up, Ramp-down, Hump, Random (slow, med or fast), Random (Slow snap, Medium snap or Fast snap). Phase shift : when working with multiple attribute types (e.g. pan & tilt) each attribute can have its own phase offset from the others. The -25% and +25% buttons provide rapid phase shift alterations. For example, if a sine wave is used to modulate Pan and Tilt, selecting only the Pan and setting its offset to 25% will achieve a circle. Duty factor: this controls how much of the total time is spent 'within' the waveform itself. For example, if duty factor is set to 1, the waveform runs continuously. If duty factor is set to 2, the waveform runs for half of the time then waits for the other half of the time before it runs again. You can use this in conjunction with offset (see below) to establish chase type effects. Rate: Sets the rate of the modulation in bpm (Beats per minute). Mirror check box: Doubles the waveform and reflects it about the middle. Metro. Sync: Synchronizes the stepping of the waveform to the Performance window’s metronome. Buttons at the bottom of the screen provide quick variations. Page 101 Dynamics 17.3.2 Clarity Operator Manual V2.0 Dynamics Attribute Controls The dynamics Attribute Controls allow you to modify the values that are applied to each individual fixture attribute being modulated by the selected waveform. The values can be directly changed by dragging with the mouse in their respective Attribute Control and they work in the same way as regular Attribute Controls. Dynamics Attribute Controls The Offset, Centre, and Amplitude Attribute Controls control how the waveform is applied to the attributes. Amplitude: sets the size of the waveform and hence the size of the effect. Offset: defines the starting position on the overall waveform. Offset is commonly used to spread the spacing of an effect between several fixtures. For example, a sine wave is applied to the position attributes of 4 fixtures. Pan is filtered and phase shifted by 25%. This produces a circle effect with all 4 fixtures focused on the same point as they move around the circle. Select both Pan and Tilt then fully fan the “Offset” values. The beams of all 4 fixtures are now evenly spaced apart as they move around the circle. Hint: To fully fan the Offset, right click on Offset then select “Full Fan”. Hint: You can use Duty Factor in conjunction with the offset control to create interesting chasetype effects. The Centre, Top and Bottom Attribute Controls can be used in different ways depending upon the selection of the Standard, Ranged, Scaled or Pile-add buttons. Standard: uses just the Centre value with Amplitude, so that the centre value is modulated with an amount controlled by the amplitude. Ranged: uses the Top and Bottom values together with Amplitude, so that the attribute moves between the top and bottom extents. Amplitude controls how far the output value travels towards the top and bottom value. Scaled: is the same as ranged, except that there is also a Centre value so that the output value can be asymmetrical. Pile-add: in this mode no base attribute values are specified, so that the current attribute value (e.g. from another cue-list) is modulated by the waveform. For example, this would allow you to create a cue that defines a circle effect that could be played over the top of any other cue-list, such as a cue-list that moves the circle position between points on the stage. Link offset and link amplitude: are for multi-attribute operation so that all attributes can be adjusted simultaneously. For example, when adjusting the size of a circle effect, clicking Link amplitude allows you to adjust the amplitude of both Pan and Tilt simultaneously by adjusting only Pan's Amplitude Attribute Control. Invert: this check box inverts the waveform for the selected fixtures. For example, to achieve a can-can effect, set a row of fixtures to tilt up and down. Next, select only the odd fixtures and tick Invert. 17.4 MULTIPLE ATTRIBUTE DYNAMICS To control another attribute by dynamics click New. The “Add New Effect” dialog box opens and you can select another attribute or multiple attributes as described at the start of this section. When multiple attributes are being controlled by dynamics you can select which attributes to alter by touching them. Combinations of attributes can be selected by dragging. Page 102 Clarity Operator Manual V2.0 Dynamics Selected Attributes Each selected attribute(s) can have its own waveform and modifiers selected. For example, select the pan and tilt attributes of a fixture and set them to a sin waveshape running at 15 cycles/min. Click on pan (only) select a different waveform and double the pan speed to 30 cycles/min. You now have a figure of eight effect. 17.4.1 Stopping Dynamics To remove the current dynamics from an attribute, select the attribute then select Stop. 17.4.2 Resync Selecting Resync (Re-synchronize) forces all current attribute waveforms to the same starting offset. Resync is useful if different waveforms are being used and you have adjusted the rate of one of them, causing it to get out of sync. If you then set it back to the original rate it will possibly still be out of sync with the other waveforms. Selecting Resync will restore the synchronization of the waveforms. 17.4.3 Attribute Control Dynamics Indicators In the Universal, Direct or in the Programmers Attribute tab, any grabbed attributes that are currently being modulated by a Dynamic effect have a sine wave symbol on the left of their Attribute Control. Dynamics Indicator ~ Page 103 Matrix Clarity Operator Manual V2.0 18 Matrix 18.1 OVERVIEW The encoder touch screens Matrix mode allows you to place fixtures on a two dimensional grid and then display static or moving imagery on them. Therefore, the fixtures output can be tightly integrated into a complete lighting and visual show. Clarity allows you to control and program the imagery just like any another lighting fixture. The imagery can be displayed in colour on RGB, RGBA and RGBW (Red, Green Blue, Amber, White) LED fixtures or in monochrome on any fixtures that have an intensity channel. When you patch LED arrays, Clarity automatically sub-divides them so that you can either work with the entire array or access the individual cells. For LED types that don't have dedicated intensity channels, virtual intensity channels are automatically created. 18.2 TERMINOLOGY Pixel Matrix This is the physical mapping of lighting fixtures onto a rectangular area. Pixel Source Each Pixel Matrix contains one or more Pixel Sources. You can add Pixel Sources to a Pixel Matrix by clicking New Source. Media Each Pixel Source can contain one or more media files. You can add media to each Pixel Source by selecting that Pixel Source and clicking Add Media. Virtual Fixture Clarity creates a virtual fixture for each Pixel Source. Virtual fixtures appear in the Selection Sidebar in the PixSrc tab as PixelSource.1, PixelSource.2 etc. This allows Clarity to treat each Pixel Source just like a regular lighting fixture. It can be manipulated in the programmer (media selection, size, position, shape, speed etc), recorded into cues and it can also be controlled by Presets and Dynamics (real-time effects). 18.3 PATCHING A LED MATRIX In the Patch window, select your manufacturer/model of LED matrix and patch the appropriate quantity to the DMX locations (addresses) that match the addresses of the fixtures. See section 11, “Patch” for details. 18.4 CREATING A MATRIX In Matrix mode, select New Matrix to create a new Pixel Matrix and display the Matrix Settings dialog box: Use the controls at the top to select the appropriate width and height of the matrix to suit your physical array. You can enter a descriptive name for the matrix in the Name box. Page 104 Clarity Operator Manual V2.0 Matrix The available (patched) devices are listed on the left-hand side and are divided into two categories: RGB(AW). All fixtures that use Red Green Blue colour channels including those with Amber or White. Typically these are LED arrays. Intensity. All fixtures with an intensity channel. To setup a matrix select the category that matches your type of fixture then select your fixtures then drag them into place on the matrix. Multiple fixtures can be selected by using Function + click. You can rotate the device by 180° by holding Function whilst dragging. Double tapping Function rotates it by 90°. You can also rotate the device whilst dragging, by using an external keyboard and holding the [Shift] key (90°) or [Ctrl] (180°) or both (270°). If you use fixtures from the Intensity tab, the resultant output from the matrix will be in monochrome. When multiple fixtures are selected and dragged onto the matrix the Assign multiple fixtures to matrix dialog will appear and allow you to specify in what order you would like the selected fixtures to be laid out in the matrix. The default order is left to right, top to bottom. Click on the desired ordering icon then click OK. When fixtures are on the matrix they can be dragged to reposition them. To remove a fixture from the matrix, drag it back to the device list. When all fixtures are correctly placed on the matrix, click OK. A PixSrc tab is automatically created in the Selection Sidebar. It contains the virtual fixtures that are associated with each Pixel Source as described above. 18.5 EDITING A MATRIX To edit or check the settings of an existing matrix click Matrix Settings on the Matrix tab's toolbar. Editing a matrix uses the same methods as “Creating a Matrix” described above. 18.5.1 Deleting a Matrix To delete a matrix, select the tab for the matrix to be deleted then click Delete Matrix on the Matrix tab's toolbar. Page 105 Matrix Clarity Operator Manual V2.0 18.6 MATRIX CONTROL The left hand image is a view of the source media for the selected Pixel Source and its cursor shows where the source areas transforms will be applied. In the example above, the cursor is full screen. The right hand image shows you a preview of how the various transformations will affect the output image. The transformations to the image are controlled by sliders in the centre section of the screen. A default media “place holder” image (coloured swirls) is shown until you add your own media files. At the bottom of the view are the available Pixel Sources for the selected Pixel Matrix. Each Pixel Matrix can have one or more Pixel Sources assigned to it. 18.7 TRANSFORMS In the middle of the screen are the transformation controls: Source transform options allow you to isolate sections of the source area, change the source aspect ratio, apply rotation and control moving image playback. Click and drag anywhere within each slider box to vary the setting. Source Area. Adjusts the size of the source area window allowing you to select all or only some of the source image. Source X. Adjusts the horizontal position of the source area window. Source Y. Adjusts the vertical position of the source area window. You can also click on the actual source window and drag its position. Rotation. Rotates the source image about the Z axis. Source Aspect. Adjusts the aspect ratio of the source image. Seek. Sets the current (still) frame of a movie, but only when the “Run / Stop” control is paused (at 0). Run/Stop. If the current media is a movie file, then this starts, stops or restarts the movie. When set to zero, playback is paused, and above zero, playback is running. If the control is moved to full, then the movie restarts from the beginning. Speed. Set the playback speed. The remaining controls affect how the selected Pixel Source image is mapped onto the matrix. Output transformations allow you to scale and position the resultant image and apply rotation in the x, y and z planes. Perspective adds perceived depth to x and y rotations. Page 106 Clarity Operator Manual V2.0 Matrix Output Zoom. Sets the size of the output image. Output X. Adjusts the horizontal position of the output image. Output Y. Adjusts the vertical position of the output image. You can also click on the actual output image and drag its position. X Rotation. Rotates the output image about the X axis. Y Rotation”. Rotates the output image about the Y axis. Z Rotation. Rotates the output image about the Z axis. Perspective. For X & Y rotation this controls the apparent perspective, and is more noticeable with larger matrices and/or higher anti-alias values (see below). To see the effect of this, zoom the output image out a little and set Perspective to full. When you then apply X or Y rotation you will notice that the image has a pronounced '3D' quality to it. Op. Aspect. Adjusts the aspect ratio of the output image. Intensity. Adjusts the intensity of the output image Opacity. Adjusts the opacity of the output image Anti-Alias x is not a recordable attribute. This effectively multiplies the size of the output image so that each LED gets an average of a number of pixel values, rather than just mapping to a single colour. Generally this achieves smoother movement on the LED with higher values, but at the expense of some computer processing speed. This is automatically set to an appropriate value when the matrix size is set. Reset sets all source image and output image controls to their default values. 18.8 ADDING MEDIA TO A PIXEL SOURCE Multiple media (still images or movies) can be added to a pixel source and then any one of the media can be selected. Many common static and FFmpeg image formats are supported. To add media to a Pixel Source either: Select the Pixel Source (by clicking on it) then click Add Media..., or Right click on the Pixel Source and select Add/Remove Media... The Add Media dialog box appears: The media files currently assigned to the Pixel Source (if any) are shown on the left. To add media click Add... then select the file. Clicking on a file in the Current Media pane shows a preview in the Preview pane. To delete media, select the file then click Remove. When finished click OK. 18.9 SELECTING MEDIA IN A PIXEL SOURCE To select any one of the loaded media for a Pixel Source, select the Pixel Source by clicking on it then click on the drop down box at the bottom of the transform controls and select the required media. Select Media for Pixel Source Page 107 Matrix Clarity Operator Manual V2.0 18.10 ADDING AND DELETING PIXEL SOURCES To create a new Pixel Source click New Source. The new pixel source appears at the bottom of the pane and it is automatically selected. Media is added to the new source as describe above. Clicking on a pixel source selects that pixel source. Click on a PixelSource to select it To delete a Pixel Source click on that Pixel Source then click Delete Source or right click on the Pixel Source and select Delete. 18.11 VIEWER Clicking Viewer activates the viewer window which allows you to see exactly what will be sent out to the pixel matrix. Images will not be shown on the output until the Pixel Source has been activated. See below for details. 18.12 ACTIVATING A PIXELSOURCE Up to this point, all of your media selections and image transforms have been applied to the Pixel Sources (virtual fixtures) and grabbed in the current programmer session. No intensity information (media images) has been grabbed by the current programmer or sent to the output. When you select a Pixel Source and click Activate, the relevant channels of the actual LED fixtures that make up your matrix are grabbed into the current programmer session so they can be recorded to the desired cue. The transformed image is sent to the LED matrix and you can also see it in the viewer (see above). The LED cells of your matrix array are sent intensity values that are calculated based on the current transforms (if any) and the current media data. This media data might be constantly changing if the media is a movie file. If you record a cue without clicking Activate, the cue will only contain any transformations and media selections that you have made. If you record a cue after clicking Activate, the cue will also contain the relevant channels of the actual LED fixtures to which the media data will be sent. These choices allows you to create cues that only control the transforms or cues that only select the media or cues that control both the transforms and media. For example: Program a chase that only varies the image transformations of Pixel Source 1 Program a cue-list that performs transitions between Pixel Source 1 and Pixel Source 2 but does not contain any transforms. 18.13 ACTIVATING SELECTED CELLS Selecting Menu then Activate selected cells allows you to activate a selected range of cells. You select a range of cells by dragging on the right hand preview image with the right mouse button. Only the selected cells are included when a cue is recorded. This allows you to isolate selectable areas of the matrix so that you could have different Pixel Sources applied to the different areas or you might want to control some areas of the matrix by conventional programming using the Attributes tab. You can right click (without dragging) to clear the selection rectangle. Page 108 Clarity Operator Manual V2.0 Matrix 18.14 PIXEL SOURCE LAYERING AND TRANSPARENCY If you use multiple Pixel Sources you can blend the media files from each Pixel Source. Each Pixel Source can have any other Pixel Source set as its Background. If you vary the Opacity of the foreground image, then the background can blend into the foreground. If the foreground PixelSource image file contains transparency, then the background image will be visible through the transparent parts of the foreground image. To select a background for a Pixel Source, select that Pixel Source then click in the Background combobox and select another Pixel Source as the background. Note: The background calculation is only performed one level deep - it is not possible to cascade backgrounds through more that one level. 18.15 PIXELSOURCE TRANSITIONS You can transition between different Pixel Sources (and hence between different media) by recording them into successive cues in a cue-list. This transition is in the form of a timed wipe. For example, add another Pixel Source (above) and add some media files to it. Select the required media for the next look on the new Pixel Source. Click Activate then click Set Timing. The Matrix Timing dialog box appears. Timing profile is a graphical representation of the direction of the wipe. Click the drop down arrow to select other wipes. In the example above, the wipe goes from left to right (from dark to light). Invert reverses the direction of the wipe. Rotation allows simple rotation of the wipe. Click the drop down arrow to select 90, 180 or 270 degrees. Wipe duration controls the speed of the wipe. Blend time controls how long each pixel takes to transition. In the above example, the total crossfade time would be 2 seconds. With the wipe selected, append this to the cue-list as the next cue (remember to Activate the Pixel Source). You can add additional wipes as simple monochrome images that you can easily create with any paint program. Contact LSC for details. 18.16 DYNAMICS You can add continuous dynamic effects to any of the transforms by using dynamics tab. Select the Dynamics tab then click New. Select the attribute(s) to which you want to add dynamic effects then click OK. See “Dynamics (real time effects)”, section 17 for more details. Page 109 Matrix Clarity Operator Manual V2.0 18.17 RECORDING MATRIX SETTINGS Matrix Settings are recorded as a cue in a cue-list, just like recording cues for regular lighting fixtures. The values that you set are grabbed in the current programmer (together with any timing values that you might set in the timing tab) and are included in any cues by clicking on the Record button. See “Record”, section 23 for details. Page 110 Clarity Operator Manual V2.0 Media 19 Media 19.1 OVERVIEW Media servers provide video and graphics playback for visual projection on video screens or LED walls. Clarity allows you to control media servers and program them just as if they were another lighting fixture. Therefore, their output can be tightly integrated into a complete lighting and visual show. 19.2 PATCHING MEDIA SERVERS Media servers that you control from Clarity must be patched just like you would patch a lighting fixture. Many media servers use a “master” fixture that controls global aspects of the server such as brightness, contrast, mask, keystone etc. Each layer of the media server is also patched as a separate fixture. Servers usually require that the master and layers are patched in a contiguous fashion. This means that the last DMX channel used by the first fixture of the server must be immediately followed by the first channel of its next fixture, etc. In the Patch window's Library pane, select the manufacturer then the model of the media server. Drag and drop the media servers “master fixture” and each “layer fixture” onto the required DMX universe and starting slots (as set in the media server). Refer to your Media Servers documentation for details on its DMX control and set-up. 19.3 NETWORK CONNECTION Media servers broadcast their presence over Ethernet. If Clarity is on the same network, it picks-up these broadcasts and automatically connects to supported media servers. Clarity will then download the available thumbnails of the media in the server. Usually these are just media thumbnails but some will also supply effect thumbnails. Most media servers also broadcast their configuration, including their number of available layers and patch status. Once thumbnails are downloaded they are saved to a cache file so that they are available for (off line) programming without the physical media server being connected. When the show is loaded, if the media server is not physically present, cached is shown on the relevant media. 19.4 CONFIGURATION To configure a media server, in the encoder wheel touch screen’s Media mode select Menu, Configure, Auto Configure, OK. When a new media server is discovered on the network, its identity (name and IP address) is compared to the existing cached servers. If the identity of the new media server exactly matches that of an existing cached media server then it is automatically used. If the new media server has not been used before, a Configuration Wizard is displayed to walk you through some configuration choices. These choices include whether to replace another existing cached media server and whether to patch new matching devices or re-use some existing patched devices that are suitable for this media server. 19.4.1 Reload The thumbnails for the selected media server can be updated by reloading them from the server. Select the tab of the media server to be reloaded (described below), then on the toolbar click Reload. A progress bar shows the status of the reload operation. 19.5 MEDIA SERVER OPERATION In the Programmer window, the Media Servers tab allows you to control a media server in the same manner as you would program the attributes of a lighting fixture and then to record your settings as cues in a cue-list. You can of course include Timing values and Dynamics in the cues that you record. See the “Timing” and “Dynamics” sections for details. The available media servers are organized into individual tabs at the bottom of the screen and each server has two sub-tabs, the Browser tab and the Controls tab. Page 111 Media Clarity Operator Manual V2.0 Browser Controls Selected Layer Selected Server Tab Layer Controls Level Control Media Server Browser tab 19.5.1 Browser The Browser tab shows the available folders in the left hand pane and the contents (media items) of the selected folder in the right hand pane. At the bottom are the “Layer Control” Attribute Controls, one for each patched media layer of the selected server. Select a Layer Attribute Control by clicking on it. The selected Layer has a yellow border. Clicking on a media item in the browser selects that item and sends it to the selected layer. The output Level control at the bottom of each Layer Control Attribute Control can be varied by dragging with the mouse. 19.5.2 Controls The Controls tab shows all of the attributes of the selected layer including the media selection and Level attributes controlled from the Browser tab. Media Server Controls tab Click on a layer to select it then use the Attribute Controls to adjust that layers settings. The available attributes will vary depending upon the type of Media Server that has been patched. Typical attributes are: effects, rotation, zoom, copy mode, masks, transitions etc. etc. These are varied by dragging in the Attribute Controls, just like controlling lighting fixtures. 19.6 RECORDING CUES Media server settings are recorded as a cue in a cue-list, just like recording cues for lighting fixtures. The values that you set are grabbed in the current programmer together with any Page 112 Clarity Operator Manual V2.0 Media timing values that you might set in the Timing tab and dynamics set in the Dynamics tab and are included in a cue by clicking on the red Record button. See section 23, “Record” for details. 19.7 SUPPORTED MEDIA SERVERS Clarity currently supports the open-standard CITP/MSEX protocol as well as the Hippotizer HMAP protocol for thumbnail exchange. The following media servers are supported by Clarity. Green Hippo’s Hippotizer. ArKaos VJ DMX. ArKaos Media Master. Pandoras Box. Catalyst. ROBE Digispots. Page 113 Palettes Clarity Operator Manual V2.0 20 Palettes 20.1 OVERVIEW Palettes is the home of groups, presets and freesets that you record and also for Clarity’s inbuilt library of groups, presets and freesets ready for you to use. (Freesets are a special type of preset described below). Palettes can be found in Palettes window and also on the on the encoder wheel touch screen’s Palettes mode. Both displays show the same palettes but they vary slightly in their presentation and features. The displays can be viewed in the following categories: 1. All 2. Groups 3. Colours 4. Positions 5. Beam 6. Dynamics 7. Favourites 8. Page Bookmarks When All is clicked the screen is divided into five panes of Groups, Position, Beam, Colour and Dynamics. The panes can be freely re-sized by clicking and dragging on the pane dividers. Palette’s Window with “All” tab selected Page 114 Clarity Operator Manual V2.0 Palettes Encoder touch screen Palettes with “All” tab selected When you record a group it will appear in the Groups category and when you record your own presets and freesets they are automatically sorted into the appropriate category of Position, Colour or Beam, depending upon the attribute(s) that they will affect. Note that a single preset can exist in multiple panes, e.g. a preset that contains colour and position will appear in both the colour and position panes, but there is still only a single preset Automatically generated (library) Groups are identified by the word “auto” in their box. Library items cannot be edited, renamed or deleted, however they can be duplicated and the copy can then be edited, renamed or deleted by right clicking on it. 20.2 ARRANGING PALETTES AND GROUPS If you click Safe (arrange), all presets, favourites and groups become inactive. This allows you to re-arrange and organize the individual presets or group icons by dragging and dropping them without activating them. To re-activate the window click Safe (arrange) (toggle action). The icons in each pane can be automatically arranged at any time by right-clicking in a blank area of the pane and selecting auto-arrange. 20.3 GROUPS A group is a selection of fixtures. Groups can be created by selecting the required fixtures in the required order and selecting Record then Group and entering a name. The selection order in the group is used by Clarity when applying effects and freesets. Groups can also be recorded in the programmer by selecting the fixtures and clicking To Group. 20.4 COLOUR PRESETS The Colour Presets pane shows the colour presets and also has a configurable standard swatch colour picker. You can select between Lee, GAM and various Rosco colour swatches and can display the colours in either chromatic or numeric order. Right-click to configure the display. Page 115 Palettes Clarity Operator Manual V2.0 Hover the mouse over a colour to see a larger view preview of that colour. 20.5 BEAM PRESETS The Beam Presets pane shows the beam presets and also shows the gobos for the currently selected fixtures. Hover the mouse over a gobo to see a larger view preview of that gobo. 20.6 FAVOURITES Right clicking on any individual preset or group and selecting Favourite makes this preset or group also available under the Favourites tab. The same process can be used to remove a preset or group from the favourite’s window. The Favourites tab contains the Favourite Groups and Favourite Presets panes which can also be freely re-sized by clicking and dragging on the pane dividers. Favourite presets are also available in a Favourites tab in the Programmer window for quick access to favourite palettes without selecting the Palettes window. 20.7 PRESETS A preset is a special type of memory that can be recorded and recalled. It is stored with specific fixtures numbers or fixture types and usually with only specifically selected attributes (for example, only focus values). When a preset is applied to selected fixtures, they will change to the attribute values recorded in that preset. If a cue is then recorded, a reference to the preset is included in the cue, not the actual attribute values. When the cue is played back, it will automatically recall the values from the preset. Multiple cues can include a link to the same preset. If a preset is updated, any cue that contains a reference to that preset will use the updated information. For example: Some Fixtures are focused onto the centre rostrum on stage and their focus (position) is recorded as a preset (named centre rostrum). You now record the cues for your show by creating different looks and recording each look as a cue. If a cue is to include the fixtures focused on the centre rostrum, you select the fixtures then apply the centre rostrum preset and record the cue. You might program 20 different cues that include the centre rostrum preset. The centre rostrum is now moved down stage by 2 meters so those 20 cues will no longer light the rostrum. You grab the centre rostrum preset in the programmer and adjust the position of the fixtures to the new down stage position and update the preset. All of the 20 cues that include the centre rostrum preset will now automatically recall the new position. Page 116 Clarity Operator Manual V2.0 Palettes Presets can also be nested. That is, a new preset can be constructed from other presets. Presets can also contain dynamic (real time effects) values. See section 17, Dynamics for more details. 20.7.1 Fixture Specific Presets If you record a preset that contains multiple fixtures with different values for each fixture, then that preset will be applicable only to the specific fixtures used to record the preset. 20.7.2 Fixture Type Presets If you record a preset that contains a single value or if all values of the selected fixtures are the same, then the preset is recorded against the fixture type. The preset will then be applicable to all fixtures of that type, even ones added afterwards. 20.8 FREESETS Freesets are fixture independent and store values that can be generically applied to any selected fixtures, no matter what the type. When freesets are used to set fixture attribute values and the look is recorded in a cue, the current value from the Freeset is translated to suit the destination fixtures and stored in the cue. Note that because values are translated when the Freeset is applied, Freeset updates won’t affect existing cues. The advantage of freesets is that the values in a Freeset are automatically re-interpreted to suit the destination fixture. For example: Select a dimmer and set its intensity to 100% then record it as a Freeset. Select a Clay Paky Stage Scan then apply that Freeset to it. The Freeset interprets the value and knows that a Stage Scan's intensity attribute must be set to 128 for it to output full intensity. If the same Freeset is applied to a dimmer it will set its intensity to 255. The same applies to all attribute groups. Record a blue Freeset and apply it to any fixture that has colour ability and it will output blue. Record a chase Freeset and apply it to any type and quantity of fixtures and they will chase. Record a fanned tilt Freeset and apply it to any type and quantity of moving fixtures and they will fan their tilts. Freesets can also contain dynamic (real time effects) values. See section 17, “Dynamics” for more details. 20.8.1 Permutating Freesets Freesets “permutate” their values onto the destination fixtures. If the Freeset was recorded using 3 fixtures and it is then applied to 12 fixtures, it will apply the Freeset to the first 3 then apply it again to the next 3, the next 3 and so on. Permutate is the default setting. For example: A Freeset is created from 4 fixtures at 25%, 50%, 75% and 100% intensity. When it's applied to 4 fixtures they will be set to 25, 50, 75 and 100%. When it's applied to 8 fixtures the first 4 will get 25, 50, 75 and 100 and the next 4 will also get 25, 50, 75 and 100%. 20.8.2 Scaling Freesets A scaling Freeset has only two values, a start value and an end value. When this Freeset is applied to a greater quantity of destination fixtures, the start value is applied to the first fixture in the selection and the end value is applied to the last fixture in the selection. All of the other selected fixtures gets an intermediate value that is graduated between the start and end values. A scaling Freeset is created by selecting only two fixtures, and setting the first fixtures attribute values to the start value and the other fixtures attribute value to the end value. It is then recorded with the “Scale” option selected in the Create Preset dialog box (below). For example: Select 2 fixtures and set them to different colours. Record this as a Freeset and select the “Scale” option in the record dialog box. When this Freeset is applied, it will use the two colours Page 117 Palettes Clarity Operator Manual V2.0 as the start and end values thus creating an evenly spread rainbow across any quantity of selected fixtures. 20.9 DYNAMIC PRESETS Dynamic presets are presets or freesets that contain dynamics (real time effects). See section 17, “Dynamics” for more information on dynamics. Clarity includes many dynamic presets in its inbuilt library, ready for you to use or you can create your own as described below. When a dynamic preset is applied, the selected attributes will be modulated by the dynamic effect. 20.10 RECORDING A PRESET OR FREESET To record a Preset or Freeset, select the fixtures to which the Preset or Freeset will apply then using the programming controls (or other presets) set the attributes to the desired values or apply dynamics. Either: Press Record, Preset. In the Programmer tab, click To Preset and the Record Preset dialog box appears. The Contents pane automatically includes any attribute types that have been grabbed by the programmer by enabling the appropriate mask (Intensity, Position, Colour or Beam). You can change the attribute masks by clicking on them. When an attribute mask is Green, it is included. A name for the preset can be entered in the name box. Note that Intensity is excluded by default unless you are recording an intensity only preset. Selected Fixtures only. When this check box is ticked, the attribute values that are recorded into a preset are only those of the selected fixtures in the programmer. Un-tick the box to record all grabbed attributes in the programmer. If you applied any dynamics to the attributes, the Preset or Freeset that you recorded will automatically be placed in the Dynamics pane of the Palettes window. Clicking the drop down arrow beside the name box and selecting one of the existing preset or Freeset names allows you to choose the appropriate Update option to either Merge with, Remove or Replace an existing preset or Freeset. To record as a Freeset, tick the Record as a free preset (Freeset) check box. When this option is selected, you can also select the Freeset Application mode: as either Permutate or Scale. Scale is available when only 2 fixtures have been selected. See “Scaling Freesets” above for more details. Activate recorded preset. When this check box is ticked, the preset will be automatically activated in the programmer. Set as Favourite. When this check box is ticked, the preset will be automatically added to the “Favourites” tab in the Palettes and Programmer windows. Page 118 Clarity Operator Manual V2.0 Palettes 20.11 PALETTE ICONS 20.11.1 Group Icons Group Icons Each group icon displays its name and a number. auto indicates groups that have been automatically created. Clarity automatically creates a group for every different type of fixture that has been patched. Auto groups cannot be edited or deleted. When the icon has a Yellow border, the group is selected. If the border is dotted, only some of the fixtures in the group are selected, possibly by another group or by the current programmer. Clicking on an icon selects that group (refer to “Selection phase vs. Programming phase” earlier in this manual). If you right click on a Group icon you can choose... Activate. This is the same as clicking on the group. Activate (replace). Selects this group ONLY and removes other selections. De-actvate. Deselects this group. Rename. Delete. Update. Updates the group with the current fixture selection. Favourite. Adds/removes this group in the Favourites tab. 20.11.2 Preset & Freeset Icons Preset & Freeset Icons At the top of each icon is the name of the preset or freeset and its number. “free” indicates a freeset, otherwise it is a preset. The bottom right shows the attribute group(s) contained in the preset or freeset. I (Intensity), P (Position), C (Colour) and B (Beam). If the attribute group letters are bright green, then the preset or freeset contains dynamics (real time effects). A green background indicates that the preset or freeset can be applied to the currently selected fixture(s). A grey background indicates that the preset or freeset cannot be applied to the selected fixture(s). Clicking on a (green) icon applies that preset or freeset, subject to the masking rules described below. A yellow border indicates that the preset is currently in use. Since freesets are applied using hard values, there is no concept of ‘in use’ for freesets. Hence they only flash their border yellow as they are applied. 20.11.3 Preset and Freeset Shortcuts If you right click on a Preset or Freeset you can choose the following shortcuts... Activate This is the same as just clicking on the preset or Freeset. Activate (replace) This activates this preset or freeset and removes all other programming from the selected fixtures. Activate (unmask) This activates this preset or freeset and applies it to all attributes in the preset (momentarily turning off auto mask, see below). Page 119 Palettes Clarity Operator Manual V2.0 Combine Dynamics Only available for presets. Allows a dynamic preset to be combined with any existing dynamics that have been applied. The resulting combined effect can also be recorded as another preset. De-activate. Clears all programming from the affected attributes. Rename. Enter a new name. Delete. The preset or freeset is instantly deleted. No undo. Replace. Only available for freesets. Freesets cannot be updated, but can be replaced with a new version. Previously recorded cues are not affected by the replaced freeset. Duplicate. Only available for freesets. Makes a duplicate that you can edit to create a variation of the original freeset. Update. Only available for presets. Updates the preset with the current programmer’s settings for the attributes in the preset. The updated preset will be used when any cue with a link to that preset is played back. 20.12 APPLYING PRESETS AND FREESETS Preset and freeset can be applied from the Palettes, Programmer or Performance windows or directly by keyboard command. See section 25, “Performance Window” for details on how to use presets and freesets in the Performance Window. 20.12.1 Keyboard Commands Every preset and freeset has a number. You can apply a preset or freeset number to the currently selected fixtures or to a group or to a playback. For example: To apply a preset to the currently selected fixtures press: Preset, # (enter a number on the keypad), Enter. To apply multiple presets to the currently selected fixtures press: Preset, #, Preset, #, Preset, #, Enter. To apply a preset to a group press: Group, #, Preset, #, Enter. 20.12.2 Apply in Palettes Mode The encoder wheel touch screens Palettes mode allows you to apply select fixture groups and apply presets or freesets by touching them. Select the fixtures in the Groups pane and then select the presets or freesets to apply them to the selected fixtures. When fixtures are selected, any applicable presets or freesets turn green Page 120 Clarity Operator Manual V2.0 Palettes to show that they are available. Masking rules apply (see below) to presets or freesets in the Position Presets, Beam Presets and Colour Presets panes. 20.12.3 Apply in the Palettes window The presets or freesets in the Palettes window can be applied to selected fixtures in either Programmer 1 or Programmer 2. Select the required programmer from the drop down selector. Select where to apply. If you select “Current” (default setting) the presets or freesets will automatically be applied to the programmer that is currently active in the Programmer window. Select the fixtures in the Groups pane and then click on the presets or freesets to apply them to the selected fixtures. When fixtures are selected, any applicable presets or freesets turn green to show that they are available. Masking rules apply (see below) to presets or freesets in the Position Presets, Beam Presets and Colour Presets panes. Also see “Build Mode” below for details on how to apply multiple presets simultaneously. 20.12.4 Build Mode In the Palettes window, Build allows you to select combinations of groups/preset/freesets (with individual live timing as described below) and then trigger them all in one go. When you click Build, a command line appears at bottom of the encoder touch screen. Now you can select a group or groups, select a time, select a preset (and repeat for any further combination of groups, times and presets as you wish) then press [Enter] to trigger them all in one go. For example, you can “Build” a complex combination on the fly such as odd fixtures to the drummer and even fixtures to the guitar over 2 seconds with a fanned colour change over 5 seconds and a gobo snap after 10 seconds and then trigger it with a single press of the [Enter] key. 20.12.5 Live Times In the Palettes window, Presets and Freesets are usually applied instantly when they are selected. When you are busking or Ad-libbing a show, you can use Clarity’s “Live Times” feature to apply Presets or Freesets over time and hence make smooth changes as you select each Preset or Freeset. Selecting the Time button on the Palette window toolbar displays the “Live Times” dialog. Time shortcut buttons Fade time box Previously recorded Time Presets Page 121 Palettes Clarity Operator Manual V2.0 There are 3 methods of time selection: 1. Enter a time in the “Fade time” box (see below). 2. Select one of the time shortcut buttons. 3. Select a previously recorded Time Preset. The entry in the “Fade time” box can type a simple fade time, a fade time range or a delay and fade time (with optional range). Use / to specify a range, d to specify a delay time and f to specify a fade time. For example, Fade Time Entry Result 5 5 second fade 1/5 1 sec to 5 sec fade time spread across the selected fixtures d2f2 Delay of 2 seconds then a fade of 2 seconds d1/5f5/1 Delay of 1 to 5 seconds spread across the selected fixtures then a fade of 5 to 1 sec spread across the selected fixtures The current entry in the “Fade time” box can be added to the shortcuts by clicking +. To delete a shortcut time, select it then press -. Once a time is set or selected, the next Preset or Freeset that is activated will use the selection in the Live Times dialog. By default, the Live Time value will be automatically reset every time that it is used. To retain the Live Time setting for continual use, un-tick the “Auto reset live time” checkbox. By default, the dialog will close once a Preset or Freeset is triggered. You can keep it open by ticking the “Keep open when undocked” checkbox. You can also keep it open by docking it on the left or right edge of the palette window by dragging it to either side of the screen or by double clicking on its header to maximise it. 20.12.6 Apply Palettes in the Programmer window On the Programmer tab, only “Favourites” palettes are available. To place palettes in the favourites tab, in either Palettes screen, right click on the palette and select “Favourite”. Then, in the Programmer window, select the Favourites tab then click on the presets or freesets to apply them to the selected fixtures. 20.12.7 Masking When you record a preset, Clarity automatically places it in the appropriate categories in the Palettes window according to the P (Position), C (Colour) and B (Beam) attributes that it contains. Intensity does not have a separate pane and is included in the Position pane. If a preset contains two categories (say C, B), it appears in both the Colour and Beam panes and if it contains all 3 categories (PCB) it will be in all 3 panes. When Auto Mask is ON, (under Options on the encoder touch screens Palettes mode) activating a Preset from a Position, Beam or Colour pane, only applies the preset to that pane’s type of attribute. Auto Mask Encoder touch screen Palettes mode, Auto Mask. Page 122 Clarity Operator Manual V2.0 Palettes Auto Mask Palettes tab, Auto Mask. For example: A “CB preset” appears in both the Colour Presets and in the Beam Presets. When “Auto mask” is ON, applying the “CB preset” from the Colour Presets pane only applies the preset to Colour attributes of the selected fixtures. Applying the “CB preset” from the Beam Presets pane only applies the preset to Beam attributes. When "Auto Mask" is OFF, activating a Preset from a category pane applies the preset to all types of attributes contained in that preset. Hint: You can achieve the same result as Auto Mask OFF by right-clicking and selecting ‘Activate (unmasked)’. Presets and freesets in Favourites panes are applied to all of the attributes shown in their individual icons. 20.13 APPLYING DYNAMIC PRESETS Presets and freesets in the Dynamic Presets pane are applied in the same manners as other Presets and Freesets (above) but you can also choose the following options that affect how the dynamics are applied and maintained. 20.13.1 Masking Dynamic Presets If a Dynamic Preset or Freeset controls multiple IPCB (Intensity, Position, Colour, Beam) attribute groups, the IPCB filters in the Palettes window allow you to activate only the selected (IPCB) aspect of the effect. When an IPCB button is green, the dynamic will be applied to that attribute group. Click either I, P, C or B to select only that attribute group. Hold Function whilst clicking to select multiple groups. The IPCB selectors also allow you to simplify your selection choices because only those Presets or Freesets that affect the selected (IPCB) attributes of the effect are available. 20.13.2 Base When a dynamic is applied, there is a base value plus a waveform that is applied over that base. Therefore, if you apply some programming to a fixture then apply a dynamic, the programming will be replaced by the base value plus the waveform. For example, you position some fixtures to the right then apply a circle dynamic preset. The dynamic moves the fixtures to the centre (its base position) then causes them to circle around the base. If you want to use your programming as the base for a dynamic effect you can do so by deselecting the Base button. The Base filter masks the base values from dynamic Presets and Freesets when they are applied. For example, you position some fixtures to the right, de-select Base, then apply a circle dynamic preset. The circle will be added to the existing position values instead of replacing your position values with its base values. Page 123 Palettes Clarity Operator Manual V2.0 20.13.3 Preserve Dynamics Selecting a preset or freesets will usually replace any existing programming. There are times when you might want to apply a dynamic effect then apply a non dynamic preset or freeset to position the dynamic effect. To preserve any existing dynamics click Preserve Dynamics then apply the non-dynamic presets or freesets. Preserve Dynamics Encoder touch screen Palettes mode, Preserve Dynamics Palettes tab, Preserve Dynamics 20.14 CONTROLLING DYNAMICS The settings of the dynamics can then be varied by either: Selecting the Dynamics mode on the encoder wheel touch screen and adjusting the controls as described in the Dynamics section. Using the playback faders in “extended fader controls” mode. See section 8.6.12 for details. Using the “Rate” and “Amp” controls in the Palettes window. Rate Click for Spin Box Roller Amp To vary the rate you can either enter a value, click the up and down arrows or move the “spin box” roller which provides smooth variable control. Just click then drag with the mouse to activate a virtual spin roller wheel that adjusts the box values. When adjusting the value, you can drag over the entire height of the screen. If you hold [Ctrl] and click and drag, then when your mouse pointer moves above or below the virtual wheel it continues to spin with inertia. When a dynamic effect is active in the rate control in the encoder wheel touch screen Dynamics mode will either display a “bpm” (beats per minute) value if all effects are at the same rate or a percentage change value if the rates are different. The amp (amplitude) control always displays a percentage change value. 20.15 DEACTIVATE A PRESET OR FREESET To deactivate a preset or Freeset that you have applied, either: Press Undo immediately after applying the preset or Freeset Right-click on the Preset or Freeset and select De-activate. This removes all programming from the affected attributes. Page 124 Clarity Operator Manual V2.0 Palettes 20.16 RECORDING CUES WITH PRESETS & FREESETS. When you have created the desired look, record it as a cue using the Record or Append last buttons in the command centre. Cues containing a preset, only include a link to the preset so that if the preset is updated, the cue will use the updated values. 20.17 UPDATING A PRESET DURING PROGRAMMING Attributes that have had a preset applied will display the name of the preset in their respective Attribute Controls as shown on the Encoder touch screen (Universal and Direct) and on the Programmer tab. If you adjust the attributes and want to update the preset to use these new values then either... Right click on the preset and select Update item Press Record, Preset then select the existing preset from the drop down box. Drop down box To update the preset click Record. 20.18 UPDATING A PRESET DURING PLAYBACK Playback a cue that contains the preset. Press Grab. Attributes that have had a preset applied will display the name of the preset in their respective Attribute Controls as shown on the Encoder touch screen (Universal and Direct) and on the Programmer tab. Adjust the attributes to the new values. On the programmer toolbar, click Update and the Auto Update dialog box appears: Page 125 Palettes Click Update and the changes will be tracked back to the preset. See section 21.8.8 “Update” in the Programmer for more details. Page 126 Clarity Operator Manual V2.0 Clarity Operator Manual V2.0 Programmer 21 Programmer 21.1 OVERVIEW The Programmer window allows you to: Select Fixtures. Select Groups. Create new Groups. Control fixture attributes. Adjust timing and preview moves. Record cues and presets. Renumber fixtures. Grab the values of a DMX input. Flip selected attributes. 21.2 PROGRAMMER ATTRIBUTES TAB The “Selection Sidebar” is where you select fixtures. “Session Control” is where you select a Programmer (2 available) in which to create your looks. The Programmer Tabs are where you select what you want to control, Attributes, Timing or Favorites. When the Attributes tab is selected, the Attribute Controls that appear for the selected fixtures allow all attributes of those fixtures to be controlled. The “Universal Control Panel” at the bottom the programmer can be used to control any type of selected fixture and provides basic controls. Just like Universal mode on the encoder wheel touch screen it allows you to control different types of fixtures at the same time. The To Preset, Record and Append Last buttons allow you to record your programming. Programmer Tab Selection Programmer Toolbar Recording Attribute Controls Selection Sidebar Session Control Universal Control Panel Programmer Window with Attribute tab selected Page 127 Programmer Clarity Operator Manual V2.0 21.3 SELECTION SIDEBAR All patched fixtures are available in the “Selection Sidebar”. Patched fixtures are automatically organized into tabs of each fixture type and the Groups tab automatically contains a group for every type of patched fixture. You can create your own groups and add them to the groups tab. The Sort tab provides additional fixture sorting. Fixture tabs can be renamed by right-clicking on them. Groups and Sort are described below. 21.4 SELECTING FIXTURES Clicking on a fixture type tab reveals a list of all of the patched fixtures of that type. Current Fixture type tab Selection Sidebar Select: All, None, Odd or Even to select relevant fixtures of that type. Selecting Odd or Even multiple times will create pairs, triples etcetera. The All, Odd and Even buttons are also available in the Sort tab below. Individual fixtures can be selected by clicking on them and deselected by clicking on them again. See “Selection phase vs. Programming phase” below. A range of fixtures can be selected by clicking the first fixture and dragging to the last fixture. A range of fixtures can also be selected by clicking on the first fixture then using [Shift]+clicking to select the last fixture in the range. [Ctrl]+ [A] selects all fixtures in the current tab. 21.4.1 Selection phase vs. Programming phase When selecting fixtures, every fixture or group that you select is added to the current selection. This allows you to build up complex selections of fixtures. Re-selecting a currently selected fixture or group removes it from the current selection. Clarity calls this the “selection phase”. As soon as you change any values of any of the selected fixtures Clarity changes to the “programming phase”. When the next fixture or group selection is made, Clarity changes back to selection phase and clears all previous selections. You can now build up your next selection of fixtures or groups to be programmed. The selections from the previous selection phase can be retained by holding the [Ctrl] key when making new selection. 21.4.2 Selecting Multiple Types of Fixtures Select a different fixture type tab and select your fixtures as described above. Previously selected fixtures are retained as long as Clarity is in selection phase (see above). 21.4.3 Deselecting Fixtures Individual fixtures can be de-selected by clicking on them. To deselect all fixtures in the current type tab click None in the Selection Sidebar. Page 128 Clarity Operator Manual V2.0 Programmer To deselect all selected fixtures in all type tabs click None in the Programmer Toolbar. Keyboard shortcut = [Space-bar] To clear all programmers and deselect all fixtures click Clear All twice. 21.4.4 Selection Order The order in which you select the fixtures is used for certain effects (such as fans and dynamics) and can be also utilized by the sort function described below. Selection order can be saved in a group (see below). 21.4.5 Attribute Quick Menus As an aid to quick programming, the name of each Attribute Control can be clicked or the Attribute Control area itself right-clicked to access the Attribute Control Quick Menus. These menus provide rapid access to common settings. Each individual Attribute Control has its own specific quick menu, offering functions relevant to that attribute. For example: Intensity 21.4.6 Gobo Typical Attribute Quick Menus Colour Programmer Toolbar Fixture Buttons Programmer toolbar fixture selection buttons The All button on the Programmer Toolbar has multiple functions: If Next or Prev has been used to control individual fixtures from a selection of fixtures, clicking All restores control of all selected fixtures. See “Individual Fixture Control” below for more details. If any fixtures have attributes grabbed in the current programmer session, clicking All will select all of those fixtures. Further clicks of All will cycle between selecting all patched fixtures and selecting programmer contents. Page 129 Programmer Clarity Operator Manual V2.0 If the current programmer is empty, clicking All will select all patched fixtures. 21.5 INDIVIDUAL FIXTURE CONTROL When more than one fixture is selected, you can use the Programmer Toolbar buttons (or the Prev and Next buttons above the Encoder wheels to refine your control to an individual fixture whilst still maintaining your multiple selections. Programmer Toolbar 8 Fixtures (devices) are selected. Each Attribute Control controls all 8 fixtures. Pressing Next will refine control to a single fixture within the current selection. Fixture being controlled 8 fixtures (devices) are selected but control has been refined to a single fixture (StuCl575.1) allowing its attributes to be individually controlled. Step through the selected fixtures by pressing Next. Pressing Prev will step back to the previous fixture. This function is especially useful when focusing fixtures one at a time, particularly when combined with the Highlight function. See Highlight in the Programmer Toolbar later in this section for details. Pressing All will restore control to all selected fixtures. Hint: You can also use the keyboard's [Cursor down] and [Cursor up] to select the next and prev fixtures. [Cursor left] restores control to all selected fixtures. 21.6 GROUPS The Group tab shows all of the available groups of fixtures. Clarity automatically creates a group from each type of fixture that has been patched. Selected fixtures can be saved as a new group by clicking To Group, entering a name and pressing Record. The order in which the fixtures were selected is saved in the group. This order is used by Clarity when performing effects such as fans and dynamics. The group is automatically assigned a number. The number can be used to select the group. 21.6.1 Editing Groups To edit a group that you have created: Select the group then use the fixture selection methods described above to alter the fixture selection. In the Palettes window, click on the group and select Update item... “Auto” groups cannot be edited. Page 130 Clarity Operator Manual V2.0 21.6.2 Programmer Sort Clicking on the Sort tab shows the currently selected fixtures and automatically opens the “Sorting/Grouping:” pane. Clicking on one of the following buttons allows you to re-order the selected fixtures to suit the following criteria: By ID – by Unit ID order. By Name – Name in alphanumeric order. Selection order – by original selection order. Random – in random order. Mirror – in mirror order. Re-orders the current selection as first, last, second, second last, etcetera. For ID, Name and Selection order, clicking the button a second time will reverse the sort order. Clicking the Mirror button again will mirror the mirror. Clicking the Random button again will re-randomize the sequence. Hint: For a quick symmetrical effect, select some fixtures in the order that they are rigged on stage. Mir (mirror) the selection. Set buddying to 2. Right click on an attribute control and select Full Fan. 21.6.3 Subgroups In the Sort tab, entering a number in the Subgroups box will split the fixture selection into multiple parts. These subgroup parts can be used when performing fans and applying dynamics (real time effects). See Fanning and Dynamics for more details. In this example subgroups is set to 1, so when the intensity is fanned, the intensity fanning is performed across all of the fixture selection. 21.6.4 In this example subgroups is set to 2, so when the intensity is fanned, the fixtures are split into 2 subgroups and the fanning is performed separately on each subgroup. Buddying In the Sort tab, entering a number in Buddying will group the fixture selection into buddies of 2, 3 or 4 etc. Buddy groups are used when performing fans and applying dynamics (real time effects). See Fanning and Dynamics for more details. Page 131 Programmer Clarity Operator Manual V2.0 In this example, buddying is set to 2 and the In this example, buddying is set to 3 and the intensity has been fanned, so that each pair intensity has been fanned, so that each trio of fixtures gets fanned by the same amount. of fixtures gets fanned by the same amount. Subgroups and Buddying can be re-set to 1 by pressing Reset Grouping. 21.6.5 Ctrl Tab The Ctrl tab is available when any suitable fixture tab is selected in the selection sidebar. Clicking on the Ctrl (Control) tab provides easy access to fixture-specific Control functions (Lamp on, Reset etc) for the selected fixtures. These will typically execute a pre-defined sequence as defined within the fixture library. The duration of these commands can be set in the user preferences. Control Tab 21.6.6 Intensity and Colour Icons Each fixture has an icon showing its current intensity and colour at the output. The icon's area varies from all black (0% intensity) through to all white or colour (100% intensity) depending upon the intensity of the fixture. The colour changes to match the output of the fixture. If the current programmer is set to Blind, the icon shows the fixtures intensity and colour in the programmer, even though the Programmer does not contribute any intensity to the output. See Blind for more details. No Intensity Intensity 50%, Color Blue Intensity 100%, Color yellow In the above example there are a range of colours and fixture1 is at 0% (black), 2 & 3 are at 25%, 4 & 5 are at 50%, 6 & 7 are at 75% and fixture 8 is at 100%. 21.6.7 Position Icons Each fixture has an icon with a white dot showing its current position of its beam at the output. Page 132 Clarity Operator Manual V2.0 Programmer Position panned right Position tilted up In the above example, fixtures 1 and 2 are panned to the right, 3, 4 and 5 are centred, and 6, 7 and 8 are tilted up. 21.7 SESSION CONTROL The area at the bottom of the Programmer screen is called the Session Control. It contains two programmers and also any cue-lists that you have selected to edit. See “Editing Cues” for more details on editing cue-lists. When you want to create a new look and record it into a cue, you do so by adjusting fixture attributes in a Programmer. Clicking on a Programmer (or a cue-list being edited) makes it the current session. The current session programmer (or cue being edited) is coloured green. Clarity's uses Programmer 1 by default but you can use either programmer when you are creating looks to record as cues or presets. The programmers have priority over all other controls except for the GM (Grand Master), DBO (Dead Black Out) and Highlight buttons (you can set the priority of cue-lists to be higher than the programmer in the “Configure playbacks” dialogue or in the control booth). The current session programmer grabs (takes control of) a fixture attribute as soon as you alter that attribute. If a programmer has grabbed any attributes from any fixture then its name turns yellow and <on stage> or BLIND is displayed on that programmer. 21.7.1 Altered Fixture Indication If a fixture has any of its attributes grabbed in the current session, an * is displayed beside the fixture name in the Selection Sidebar. If any attribute of a fixture in any of the unselected fixture type tabs is grabbed in the current programmer a * is displayed on that fixture tab. In the above example, Studio Colours 9 to 16 are not currently selected but they have had some or all of the attributes grabbed (altered) in the current session because they have an * Page 133 Programmer Clarity Operator Manual V2.0 beside their names. Studio Colours 17 and 18 are selected but none of their attributes have been altered. The * on the “T Beam F” tab indicates that some (or all) of these fixtures are also grabbed in the current session. If the same attributes are grabbed in both programmers, the current session programmer has control of the attributes and the other programmer indicates “Overridden”. If only some of its attributes have been overridden by the current programmer it shows “Part OVR”. When you record a cue, Clarity only records the contents of the currently selected programmer. Typically this is only the attributes that you have altered but there are options available. 21.7.2 Blind Programming There are times when you might need to program or edit a cue without affecting the current look on stage. This is known as blind programming. To make the current session programmer blind, click Blind on the Programmer Toolbar or press Blind in the Command Centre. To make any programmer blind, right click on that programmer then select Blind. When a programmer is blind, it has no effect on the output but any attributes that are in that programmer are still recorded as usual. 21.7.3 Clearing a Programmer Clearing a programmer removes all attributes from that programmer. To clear the current programmer session, click Clear on the Programmer Toolbar. To clear any programmer, right click on that programmer then select Clear. To clear all programmers, click Clear All on the toolbar. Pressing Clear All a second time clears the fixture selection. 21.7.4 21.7.5 Clearing a Fixture from a Programmer To clear a fixture from a programmer, in the programmers Attribute tab, click the Menu button beside the fixture's Attribute Controller then select Clear Fixture. Clearing an Attribute from a Programmer To clear a single attribute from a programmer, in Universal or Direct mode, select that attribute then hold KO whilst rotating it’s encoder wheel or, in the programmers Attribute tab, click the name of the Attribute Control or right-click anywhere on the Attribute Control then select Clear ### (where “###” is the actual attribute name) 21.8 PROGRAMMER TOOLBAR At the top of the Programmer window is the Programmer Toolbar. It provides additional functions that you can use as you program as listed below: Programmer Toolbar 21.8.1 Undo / Redo You can undo and redo all operations that you have performed in the Programmer window. A separate undo history is maintained for Programmer 1, Programmer 2 and any edit sessions. Repeatedly click Undo or Redo to step through the programming that you have performed. Hint: The Control Booth window has separate undo and redo commands for every cue-list that is saved or edited. Clicking Toolbox, Show Undo View, reveals the history list of all of the programming commands. You can instantly undo or redo to any step in the list by clicking on that step. 21.8.2 None, Prev, All, Next When more than one fixture is selected, you can refine your control to an individual fixture whilst still maintaining you multiple selection by pressing Prev or Next. Clicking All restores control to all selected fixtures. Clicking None deselects all fixtures. See “Selecting Fixtures” above for more details. Page 134 Clarity Operator Manual V2.0 Programmer Hint: Use the “Highlight” function (below) to identify the fixture being controlled. 21.8.3 Grab The Grab function automatically selects active fixtures. Clicking Grab offers two selections: Grab Active. Grabs all attributes that are active on the output of Clarity into the current programmer. Grab Active + Default. Grabs all attributes that are active on the output of Clarity PLUS all the other attributes of those fixtures that are at their “Default” level, into the current programmer. In other words, it grabs every attribute of any fixture that currently has any of its attributes active on the output of Clarity. 21.8.4 Preview Preview allows you to rehearse the transition from the previous state to the cue that you are creating before you actually record it. Clicking Preview pops up the Preview Cue dialog and the fixtures revert (in 0.5 second) to their original attribute settings prior to being altered by the current Programmer session (if you are editing a cue-list, then they will revert to the state of the preceding cue). Click Go to see the fixtures change back to the current programmer state (the cue that you are currently creating) using the times that you have set in the Timing tab. To see the move again click Reset then Go. Click Close to finish. If the new look or the timing is not satisfactory adjust the attributes or timing then preview the move again. See section 16, “Timing” for more details. If the programmer settings are satisfactory, then record the cue. 21.8.5 To Preset Clicking To Preset records a new Preset or Freeset, or updates an existing one. See section 20, “Palettes” for more information on Presets and Freesets. 21.8.6 21.8.7 Record/Save Clicking Record opens the Record Cue dialog box allowing you to record the current programmer settings as a cue in a cue-list. If the current session is editing a cue-list, this button becomes Save. Append last/Save As Clicking Append last provides a one-click method of automatically recording a cue as the next cue in the last recorded cue list. If you hover over the button with the mouse pointer, a tool tip will tell you which cue-list will be appended to. If the current session is editing a cue-list, this button becomes Save As. 21.8.8 Update When you are playing back a show, the look on stage may be built up from several cues from different playbacks at the same time. You might decide to change the look on stage by using the programmer to override the attribute values from the cues or possibly add new attribute values. When you want to save the changes that you have made to the look, it can be difficult to know into which cue to record each altered values because the current look is made up of Page 135 Programmer Clarity Operator Manual V2.0 several cues plus the programmer output. The cues might also have been linked to presets and the cues might include tracked values from previous cues. Clarity's Update function can guide you through this operation by showing you which cues and presets have been overridden by the programmer. It offers you options to update the current cues or if the cue-list was in tracking mode you can select Trackback so that the changes are made to the earlier cue containing the hard values for the altered attributes. If a preset has been used you can choose to update the preset or to update the cue that linked to the preset. If some values in the programmer are new attributes and not overridden from a cue, you can either ignore them or select one of the cues contributing to the current look and merge the new attributes with that cue. To update cues that are currently on stage, make your changes in the programmer then click Update. The Auto Update dialog box appears: The Destinations pane shows the cue-lists, cues and palettes that are contributing to the look on stage that have been overridden by the programmer. Each cue-list is ticked by default. If you don't want to update a particular cue-list, deselect its tick box. Each cue-list has a Trackback option ticked by default. This means that if this is a tracking cue-list, Clarity will, if necessary, trackback through the cues and update the cue with the hard value that has been tracked through to the current cue. If you deselect Trackback, the updated attribute values will only be applied to the current cue. Any presets that have been overridden are shown and ticked by default. This means that the changes in the programmer will update the preset. After the preset is updated, any remaining changes in the programmer will either be tracked back or applied to the current cue according to your selection. If the programmer also contains some new attributes that are not present in any of the cues currently contributing to the output, then these will, by default, not be stored. If you want to store this new information, select a location for it by clicking the drop down list near the bottom of the Auto Update dialog box. You can choose to add this new information to any of the cues currently contributing to the output. The preferred method of adding new information into an existing cue is to create the new attribute values in the programmer, click Record then select the existing cue and click Merge, Record. In addition to all of these choices, the top of the Auto Update dialog box allows you to: Mask any of the Intensity, Position, Colour and Beam attribute groups Only include selected fixtures. Page 136 Clarity Operator Manual V2.0 Programmer Preserve existing timing (trackback only). Finally, you can choose to Clear stored information from programmer when finished by ticking the box – any information that wasn’t stored remains in the programmer. To update all of the selected cues and/or presets click Update. 21.8.9 Highlight Clicking Highlight toggles the highlight function on or off. There is also a Highlight button on the command centre. When more than one fixture is selected, clicking Next or Prev cycles through the currently selected fixtures one at a time. If Highlight is on, the single fixture that is selected by Next or Prev is set to the highlight settings and the remainder of the selection is set to the lowlight settings. The default highlight setting is an open clear beam at 100% intensity. The default lowlight setting is an open clear beam at 50% intensity. This provides an easy means of identify the single fixture that is currently under control. See also “Individual Fixture Control” earlier in this section for more details. Hint: Use the [Home] key to toggle highlight on or off. Use cursor up [] or down [] arrows to select individual fixtures within your selection. You can also load the current highlight/lowlight values into the programmer by clicking either the Menu Button (for an entire fixture) or clicking an Attribute Control name and selecting either “Load from Highlight” or “Load from Lowlight” from the pop up menu. Menu Button 21.8.10 Highlight and Lowlight settings You can set your own highlight and lowlight values for every attribute. In the Programmers Attribute tab, select and adjust the attribute to the required value then right click on the Attribute Control. From the menu that appears, select either Set as Highlight or Set as Lowlight. 21.8.11 Blind Clicking Blind toggles blind on or off for the currently selected programmer or cue-list being edited. When a session is blind, it will have no effect on the output. When a cue-list is selected for editing it is blind by default. This can be changed in the user preferences. 21.8.12 Clear/Close If the current session is in either Programmer 1 or Programmer 2, this button reads Clear. Clicking Clear, clears the current programmer. If the current session is editing a cue-list, this button becomes Close. Clicking Close, closes the current cue-list being edited. You will be prompted to save your changes if you have edited a cue. 21.9 PROGRAMMER TOOLBOX Clicking Toolbox access further advanced functions as described below: Page 137 Programmer 21.9.1 Clarity Operator Manual V2.0 Show Undo View Show Undo View shows the entire undo history for the current session. Clicking on a line in the history instantly jumps to that undo level. A separate history is saved for each programmer and each cue-list being edited. 21.9.2 Trim (knock out remainder) Trim (knock out remainder), clears all unselected fixtures in the current Programmer session. 21.9.3 Remainder Dim When Remainder Dim is clicked, all unselected fixtures that are currently grabbed in the programmer have their intensity in the programmer set to zero. To reverse the Remainder Dim command, use the Undo button. 21.9.4 Controls Controls shows or hides the Universal Control Panel controls at the bottom of the Programmer window. 21.9.5 Renumber Fixtures Renumber Fixtures opens a dialog box allowing you to change the unit number (Unit #'s) of selected fixtures. See section 22, “Command Line Programming” for more details. 21.9.6 Grab DMX Grab DMX opens a dialog box allowing you to grab DMX values from an external universe and apply them to the selected fixtures in Clarity's current programmer. See “DMX Input” below for more details. 21.9.7 Copy Copy copies the attribute values of the currently selected fixture or multiple fixtures to the clipboard. 21.9.8 Paste Paste pastes the attribute values from the clipboard to the currently selected fixture or multiple fixtures. Hint: There are also Copy and Paste buttons on the front panel command centre. Copy and Paste is a powerful function. It allows you to duplicate attribute settings between different types of fixtures with just a few clicks or keystrokes. For example, you have 12 fixtures that use Red, Green, Blue (additive) colour mixing and 12 fixtures that use Cyan, Magenta, Yellow (subtractive) colour mixing. Select the RGB fixtures and set them to a colour (or even fan a range of colours) then press Copy. Select the CMY fixtures then press Paste. All 24 fixtures are now set to matching colours. Clarity’s fixture translation engine is very comprehensive and will attempt to convert all programming for all attribute types. Page 138 Clarity Operator Manual V2.0 21.9.9 Programmer Flip Flip will alter the current pan and tilt values of the selected moving yoke fixture(s) to the other possible combination of values that achieves the same position on stage. Moving yoke fixtures typically have 2 combinations of pan & tilt values that can aim the fixture at the same location. When a cue-list transitions from one position to another, it might be that the yoke does an undesired ‘twirl’ because it current pan and tilt values cause it to take the indirect route to the new position. If this occurs, edit the cue containing the starting position and select the fixture that is taking the wrong path, then from the programmer's Toolbox click Flip, then save the edit. The fixture will now transition to the next cue via the opposite route. 21.9.10 Personalizing the Toolbar The Programmer Toolbar can be personalized by moving any button from the main toolbar to the Toolbox and vice versa. Right-click on any toolbar button and select Move to toolbox. Right-click on any toolbox item and select Move to toolbar. 21.10 DMX INPUT DMX data from other DMX devices can be grabbed by the current programmer. Click on the programmer's Toolbox menu and select Grab DMX.... In the Input devices/universes pane on the left, select an available DMX input. At the time of writing only ArtNet input is supported. In the Clarity universes pane on the right, select the Clarity universe to which the input DMX is to be applied. In the current programmer, select the fixtures to which the input DMX levels are to be applied. Click Grab, to apply the current input DMX levels to the selected fixtures in the current programmer. Click Close when finished. 21.11 PARKING FIXTURES Fixtures (or just some attributes of fixtures) sometimes need to be isolated from regular programming and playback. For example, you want some work lights that always stay on at low level or a fixture has become faulty and you don’t want it moving and making a noise during a show. When you isolate a fixture for these purposes it is commonly known as being “parked”. Clarity provides a several methods of parking fixtures: 1. Select Programmer 2 then select the fixture(s) and set them as required. Now switch back to Programmer 1. You can now continue to programme the show using Programmer 1. The contents of Programmer 2 remain on but will not be recorded in your new cues. 2. If you want some channels to always be on whenever you start your show (such as those that control DMX power racks for moving lights) then you can do this by: Page 139 Programmer Clarity Operator Manual V2.0 Recording a Cue-list with the channels you want set to 100% intensity. Set the Priority of the Cue-list to be higher than the programmer (use 150). Set the "Ignore Release All" option (found under the More button). Set the Preferences in the Show Menu to "Restore Playback State". Activate the cue and save the show. Whenever you load the show this cue will automatically run and stay on for the duration of the show. 21.12 UNIVERSAL CONTROL PANEL The bottom of the screen contains the Universal Control Panel which has generic controls for Intensity, Position, Colour and Beam. These controls work with any type of fixture that has been selected and are especially useful to simultaneously control selections of mixed fixture types. Clicking and dragging in these controls uses low mouse gearing for accurate control, but can be made even finer by holding down [Shift]. In the Intensity box you can click on a preset value (0, 25, 50, 75 or 100%, Closed or Open) or drag in the Dimmer or Strobe areas. In the Position box you can drag to vary pan and tilt. In the Colour box you can drag to vary the colour. If the fixture only has limited colour selections (not full colour mixing) available, these will be indicated by small dotted boxes. Click on (or near) a box to select that colour. In the Beam box, you can drag to vary iris, focus and zoom. If the fixture has specific gobos, click on the gobo or Open Gobo to select it. 21.13 ATTRIBUTE CONTROLS The area below each attributes name is known as an Attribute Control. The individual attribute values can be varied by dragging with the mouse in their respective area. You can also hold [Shift] when dragging for finer control. Intensity Attribute Control Tilt Attribute Control In this example, the intensity of 5 fixtures has been dragged to 80%. Page 140 Clarity Operator Manual V2.0 Programmer 21.13.1 Attribute Quick Menus The name of each Attribute Control can be clicked or the Attribute Control itself right-clicked to access the attribute quick menus. These menus provide rapid access to common attribute settings. Specific menus are available for each individual attribute. For example: Typical Pan Attribute Quick Menu Typical Gobo Attribute Quick Menu 21.13.2 Fixture Quick Menus The Menu button in the top corner each fixture type can be clicked to access the fixture quick menus. These menus provide rapid access to common attribute settings for all selected fixtures of the same type. For example: Fixture quick menu selector Clicked quick menu showing options 21.13.3 Attribute Control Size The Attribute Controls can be re-sized to allow you to trade off between screen area and detail by clicking either: Compact: One line is used for all devices of that type Capped: The height of the Attribute Control is limited to a maximum of 5 lines. Expanded: The Attribute Control is expanded to suit the number of selected devices. See section 10.8 for more details. Page 141 Programmer Clarity Operator Manual V2.0 21.13.4 Attribute Control Order The order in which the Attribute Controls appear can be sorted by clicking the left-hand toolbar button: Logical: This uses standardized attribute ordering grouped into Intensity, Position, Colour and Beam Common: When multiple fixture types are selected, only the attributes that are common to all selected types are displayed. It uses the same ordering as for Logical. Natural: Each fixture type has the attributes arranged in the order they appear in the fixture itself. 21.14 FANNING ATTRIBUTES Fanning attribute values of multiple fixtures is a common procedure to achieve symmetrical looks on stage. Fanning spreads the values between the selected fixtures. For example, fanning the pan of several fixtures might spread their beams evenly across the stage. Pressing and holding [Ctrl] on the keyboard activates the Fanning function and a vertical bar with three nubs appears on each Attribute Control. Fan Bar with 3 nubs Whilst holding [Ctrl], move the mouse cursor over the top or bottom nub, (it changes to a double headed arrow) then click and drag (whilst holding [Ctrl]) the nub left or right to fan the values. [Ctrl] + dragging the top or bottom nub rotates the bar around the centre nub and fans the values accordingly. [Ctrl] + dragging the centre nub fans from the middle out to the ends. 21.14.1 Offset Fanning Whilst holding [Ctrl], move the mouse cursor over the centre nub (it changes to a four headed arrow) then click and drag the nub up or down to move the fanning point off centre. Whilst still holding [Ctrl], click and drag the top or bottom nubs left or right to create an offset fan. Page 142 Clarity Operator Manual V2.0 Programmer 21.14.2 Fanning Selection Order Fanning uses the order in which the fixtures were selected. You can change the look of the fan by changing the selection order. You can manually select fixtures in a specific order or your selection order can be stored as a group. See Groups above. Selection order can also be varied by using the Sort tab. See 21.6.2 Sort, for details. 21.14.3 Fanning in the Universal Control Panel Selected fixtures can also have their attributes fanned by holding [Ctrl] and dragging in the Universal Control Panel. Universal Control Panel showing Intensity, Strobe, Position and Colour all fanned Page 143 Command Line Programming Clarity Operator Manual V2.0 22 Command Line Programming 22.1 OVERVIEW You can use command line programming to directly select fixtures and set intensity levels and fade times. If you type in a (fixture unit) number on the keypad, the “command line” automatically appears at the bottom of the encoder wheel touch screen. You can select multiple fixtures and enter intensity and fade time values as described below. 22.2 FIXTURE SELECTION A Fixture can be selected by keying in a fixture unit number (see fixture unit numbering below) followed by Enter. For example: 22 Enter selects fixture 22. A range of fixture unit numbers can be selected by using either the Thru/ key and you can also combine and subtract ranges using + and -. For example: 1 Thru/ 10 Enter (selects fixtures 1 through 10). 1 Thru/10 + 20 Thru/ 30 Enter (selects fixtures 1 through 10 plus 20 through 30). 1 Thru/ 30 - 11 Thru/ 19 Enter (selects fixtures 1 through 30 except 11 through 19). The order of number entry is respected so that …..... 5 Thru/ 1 + 6 Thru/ 10 Enter, will get a fixture selection order of 5, 4, 3, 2, 1, 6, 7, 8, 9, 10. If you omit the end of the range, then Clarity defaults to the highest fixture unit number. For example: 1 Thru/ Enter will select all fixtures. 10 Thru/ Enter will select fixture 10 and all higher numbered fixtures. 22.3 INTENSITY ENTRY You can follow you fixture selection entry (above) with @ (used as the command “AT”) and specify a percentage intensity level, On/Full for full or just Enter to default to full. For example: 1 Thru/ 10 @ 100 Enter 1 Thru/ 10 @ On/Full Enter 1 Thru/ 10 @ Enter …..all of these commands set fixtures 1 through 10 at 100% intensity. You can also specify a range or a set of intensity levels. For example: 1 Thru/ 10 @ 50 Thru/ 100 (1 through 10 at 50 through 100), will result in an intensity fan from 50% to 100% over fixtures 1 through 10. 1 Thru/ 10 @ 50 + 70 (1 through 10 at 50 plus 70) will set alternate fixtures at 50% and 70% (50,70,50,70 etc.). Single digit values are also accepted as a shortcut value. For example: 1 Thru/ 10 @ 5 Enter will set fixtures 1 through 10 at 50%. Previously selected fixtures can be given an intensity. Page 144 Clarity Operator Manual V2.0 Command Line Programming For example, if some fixtures is already selected, to set them all at full intensity press: @ Enter To set them all to 0% press: @ 0 Enter Hint: You can alleviate the need to press Enter when entering 2 digit intensity values by ticking the box for “Auto-enter commandline after 2nd digit after AT” in the “User Preferences” located in the “Show” tab. 22.4 INTENSITY WHEEL You can follow you fixture selection entry (above) by rotating the intensity wheel to set a level. 22.5 FADE TIME ENTRY You can specify a fade time by pressing Time after the intensity followed by a time value in seconds. For example: 1 @ 50 Time 3.5 Enter sets fixture 1 to an intensity of 50% and a fade time of 3.5s (only fade times are accepted and delay is set to 0s) 22.6 FIXTURE NUMBERING FOR KEYPAD ENTRY Keypad entry uses the fixture “unit number” to select fixtures. The unit number is allocated in the patch and shown beside each fixture in the programmer’s Selection sidebar. The attributes tab shows the fixture name by default. You can change this to show the Unit number by clicking Show, Preferences and ticking: “Show unit number instead of fixture name”. Fixture unit 25 Fixture name Fixture unit 25 Fixture unit number 22.6.1 Changing Fixture Unit Numbers Fixture (unit) numbers can be easily changed to assist programming via keypad number entry. Select the fixtures to be renumbered in the order that you want to renumber them. In the Programmer window, click on the Toolbox and from the drop down menu select Renumber Fixtures... Use the dialog box to set the new Start Unit # number. The End Unit # number is automatically shown. The OK button is disabled if the currently specified range clashes with existing unit numbers. Alternately, individual fixtures can have their unit numbers changed in the Patch window. See section 11 for details. Page 145 Record Clarity Operator Manual V2.0 23 Record 23.1 OVERVIEW The looks that you create with the programmer can be recorded into Cue-lists for later playback. A cue-list can contain any quantity of individual cues. The transition from one cue to the next in the list can be set to be either manually started or automatically started at the completion of the previous cue. Each cue can have its own in and out delay and fade times. A cue-list can be set to automatically chase through the cues at a set rate. Chases can be synchronized to a common tempo (Metronome) or to a tapped beat that you enter. The cues that you record can also include dynamics (real time effects). They might also contain values that you have created for Matrices (LED arrays) or Media Servers. Times, Dynamics, Matrices and Media Servers are all described in their relevant sections. 23.2 RECORDING A CUE There are many options to consider when recording a cue. These options control exactly what is recorded in each cue and its suitability to different modes of playback. When you have selected and programmed your fixtures for the desired look you press Record (or click the red Record button on the monitors Programmer window). The Record Cue dialog box appears: Record New Cue-list The tabs on the top left allow you to choose to record a New Cue-list or to add a cue to Existing Cue-lists. 23.2.1 New Cue-list To create a new cue-list and record the first cue select the New Cue-list tab. To accept the default settings and record the first cue press Record. The default settings are: Cue-list name = New Cue-list Playback Mode = Tracking Cue name = Cue Page 146 Clarity Operator Manual V2.0 Record Fade in = 0 seconds Fade out = 2 seconds Prior to pressing Record, you can enter your own names and settings as described below. 23.2.2 Cue-list Playback Settings and Options When recording a New Cue-list, setting “Playback” to either “Tracking” (Default) or “Cue Only” is very important as it will automatically select the appropriate options in the “Contents Options” pane for playback in that mode. However you can change these options if you desire or select exactly which attribute groups you want to include in the cue. See section 23.2.5 Many playback options can be selected in the Mode, Chase, lock to Tempo and Priority panes and also by ticking your required Options. Selecting these settings and options is not essential when recording a new cue-list because these panes and options are also available when you configure a Playback and in the Control Booth window. You can save programming time by ignoring all of these settings and configuring them later (if needed), prior to playback. If you do change any of these settings they can be restored back to their default values by pressing Reset…. Red boxes flash around the various sections of the screen. Touch a box to reset the values within the box. These Playback settings are described in section 24.2 Playback. 23.2.3 Cue Options The Cue Options pane offers the following options…… Halt. The cue is manually played by its GO button Follow. The cue is automatically played immediately after the previous cue finishes. Wait time. The cue is automatically played after a wait time after the previous cue finishes. Delay Time. The time from when the cue starts until the selected attribute(s) begin to change. The default delay time is 0 seconds. Fade Time. The time taken for the attribute(s) to change to the value in the cue. The default fade time is 2 seconds. 23.2.4 Existing Cue-list When recording a cue to an existing cue-list, the new cue is usually appended to the end of the cue-list. In the Record Cue dialog box, select Existing Cue-list allows you to select either Recent or All. Tap on a cue-list to select it. The Cues pane lists all of the existing cues in the cue-list. The default setting is to append the new cue to the end of the existing cue-list (at the position of the green bar as shown below). To insert the new cue between any existing cues, touch a cue and the new cue will be inserted before that cue. It will be automatically given an appropriate (decimal point) cue number. To Merge or Replace and existing cue touch either Merge or Replace then touch the existing cue to be affected. Cue Only (changes revert on next cue) is an advanced function. When you are playing back in tracking mode, there might be occasions where you want to playback a “one off” cue and you do not want the values in that cue to track into later cues in the cue-list. This is achieved by recording a cue as “cue only”. Ticking the Cue only (changes revert on next cue) will record a cue that contains all of the touched values in the programmer and tag those channels for playback as “q only”. When a cue-list is played back in tracking mode, any channels that are tagged as “q only” will only affect the output state for that cue. When the next cue is played back, the state from the most recent (non cue only) cue is restored automatically plus any new values in the incoming cue are used. See section 37.7.5 for more details. Merging a “cue only” cue into a non “cue only” cue, will only tag the merged values as “q only”. See section 25.4 for more details. Page 147 Record Clarity Operator Manual V2.0 Record to Existing Cue-list 23.2.5 Contents Options When recording a New Cue-list, setting “Playback” to either “Tracking” (Default) or “Cue Only” will automatically select the appropriate “Contents Options” for playback in that mode. However you can change these options if you desire or select exactly which attribute groups you want to include in the cue. You can choose which attribute groups (Intensity, Position, Colour and Beam) are included in each cue by clicking on them. When an attribute group is Green, it is included. Clarity includes all attribute groups by default. If you are merging a new cue into an existing cue you can choose to Preserve existing timing of the existing cue. Selected Fixtures only check box. The fixture attribute information that is recorded into a cue is usually dependent on the settings of 4 Radio Buttons listed below. It doesn't matter if the fixtures are still selected in the current programmer session or not. However, by placing a tick in the check box, you can further filter the recorded information by limiting it to include Selected Fixtures only. The following four Radio Buttons are mutually exclusive. Selecting one deselects all others. Exclude redundant state (changes only). This only records the changes that have been made in the programmer since the last cue was recorded. All other grabbed values in the programmer are considered as redundant and are excluded from the cue. This cue is suitable for tracking playback and is automatically selected if you set a new cue-list to ‘Tracking’ playback mode in the Record Cue dialog box. For example, if intensity is set to 100% in cue 1 and you record the same intensity into cue 2, then the intensity information will not be recorded since it would already exist in the cue-list and will track forward from cue 1 when cue 2 is played back in tracking mode. Page 148 Clarity Operator Manual V2.0 Record Include unchanged information. This records all grabbed values in the current programmer session. This cue is suited to playback in Cue Only mode and is automatically selected if you set a new cue-list to ‘cue only’ playback mode in the Record Cue dialog box. Blocking – incoming fixtures only. This records hard values for all attributes of all fixtures that are in the cue-list. This includes: All grabbed attributes in the programmer. All of the tracked values that would exist if the cue-list had been played back. Current output values for all other attributes of the fixtures in the cue. If this cue is played back in a tracking cue-list, it will Block any tracked values from affecting any attributes of the fixtures in the cue-list. This type of cue is often recorded part way through a tracking cue-list at the end of a theatrical scene or the end of a musical item so that subsequent edits to earlier cues will not track through into the next scene or song. Blocking – all fixtures. This records hard values for all attributes of all patched fixtures. It effectively takes a snapshot of Clarity’s output. If this cue is played back in a tracking cue-list, it will Block any tracked values from affecting any fixtures. 23.2.6 Keep Settings The selections that you make can be retained for future recording by selecting the Keep Settings box. 23.2.7 Clear recorded values Selecting Clear recorded values will clear the programmer every time that a new cue is recorded. When cues are to be played back in tracking mode, clearing the programmer after every recording can give unexpected results. For example, you turn on fixture 1 and record it as cue 1. If “clear recorded values” is ticked, the programmer is automatically cleared so fixture 1 goes off. Turn on fixture 2. You see only fixture 2 on stage and you record it as cue 2. The programmer is automatically cleared so fixture 2 goes off. Now playback cue 1 and fixture 1 comes on. Playback cue 2 and fixture 2 comes on but fixture 1 stays on (due to tracking). So the look on stage when cue 2 is played back is not the same as the look on stage when cue 2 was recorded. Clearing the programmer after every recording is often used when cues are to be played back in Cue only mode. This is because what you see on stage from the programmer is what will be reproduced when the cue is played back, irrespective of whether you choose to exclude or include unchanged information when you record the cue. 23.3 EDITING CUES When a cue-list that you have recorded is selected for editing (see section 25), the cue-list appears in the Programmer window Session Control showing the Cue-list name (beside the Programmers) and the individual cues within the cue-list above. This cue-list becomes the “current session” and by default it Blind (not seen or affecting the output). Cue-list containing 5 cues. You can click on any of the cues in the list to edit them. When a cue is selected, the attributes in that cue can be altered in exactly the same manner as when creating a cue. If you want to Page 149 Record Clarity Operator Manual V2.0 see the changes that you are making on the output click Blind on the Programmer toolbar to toggle the current session to <on stage>. Hint: You can always open an edit session <on stage> by un-ticking “Start cue-list edit blind” in the Show/Preferences dialog box. Multiple cue-lists can be in the session control at the same time. Clicking on a cue-list shows the cues in that list and makes it the “current session”. If a cue-list has had any of its cues edited, then the cue-list name turns yellow and so does the name of the individual cue(s) that have been edited. When finished editing, either right-click on the cue-list and select Close or click Close on the Programmer toolbar. If you have made any changes to the cue-list, a dialog box will ask........... Selecting Save as.... allows you to keep the original cue-list and save the edited cue-list with a new name. 23.3.1 Undo Redo Any recording or editing of cues in the Programmer can be by pressing the Control Booth’s Undo (on the Command Centre) or they can be undone or redone by clicking on Undo or Redo at the top of the Control Booth window. Page 150 Clarity Operator Manual V2.0 Control Booth 24 Control Booth 24.1 OVERVIEW The Control Booth window is the location of all cue-lists and provides controls to set the playback modes and settings of cue-lists, organise cue-lists in folders and to arrange the order of cue-lists and cues. When a Cue-list has been selected, clicking List allows you to manage the selected cue-lists from the drop down menu. If a long cue-list is selected, Follow (active by default) causes the cue-list to automatically scroll to keep the latest active cue on the screen. Learn allows you to capture (and time stamp) the button presses that you make when you playback cues over time. Audio resources can be added and synchronized to playback. Bookmark allows you to record a page bookmark for rapid recall of a Playback pages. All Cue-lists Cues in selected Cue-list Contents of Selected Cue Controls for selected Cuelist The central right pane is divided into 3 columns which display from left to right: All cue-lists. Cues within the selected cue-list, Contents of the selected cue. This column is usually hidden. You can drag this column into view to see the contents of a cue. Clicking on a cue-list in the first column shows the cues of that cue-list in the second column. Clicking on a cue in the second column shows the contents in that cue in the right column. The order of the cue-lists can be re-arranged by dragging and dropping a cue-list or multiple cue-lists. The left-hand side has 5 panes that provide controls for the currently selected cue-list. These settings can also be accessed on console models by double clicking on a Playback’s touch screen. 24.2 CUE-LIST PLAYBACK SETTINGS To see or alter the playback settings of a cue-list, select the cue-list in the cue-list column then use the Chase, Playback, Tempo and Priority controls on the left hand side to set the required options as described in the following three sub-sections. All selected settings are automatically saved with the selected cue-list. Each group of settings can be reset to the “standard” settings by clicking on a cue-list and selecting “Reset”. Flashing red boxes appear around each group of settings. Click inside a red box to reset those controls. Page 151 Control Booth Clarity Operator Manual V2.0 Hint: The current settings that you choose for a cue-list can be used as the defaults for all new cue-lists by right clicking on a cue-list and selecting “Use Current options as default”. 24.2.1 Cue-list Playback Options These options affect the way a cue-list will playback. Clicking the Mode drop down box allows you to select the way that the information in the incoming cue is applied: Tracking. (Default setting). When a cue is played back, the attribute values in the cue are applied to the output. Any attribute information from previous cues that has not been updated by the new cue is retained on the output. Therefore, the cue-list will track unchanged information from previous cues to the current cue until overridden by a new value. For example: Cue 1 = fixtures 1 & 2 to 100% Cue 2 = fixture 1 to 50%. When cue 2 is played back, fixture 2 stays at 100% because it has no new value in cue 2. Fixture 2 levels have tracked through. A random jump in Tracking mode from one cue to a later cue will collect all the intervening value changes so that the destination cues exact state is achieved as if the playback had stepped through all cues up to that point. For example: Jumping over (missing) a cue that changes colour will still get the colour change at the completion of the jump. Tracking (Not jumps). Tracking applies as above, but if you jump out of order to a later cue in the list, then the values in the jumped cues are NOT tracked forward to the current cue. For example: Cue 1 = intensity to 100%. Cue 2 = colour to green. Cue 3 = intensity to 50%. If you play cue 1 then jump to cue 3, you do not collect the values in cue 2. That is, the lights don’t go green. Cue Only. The entire cue-list does not track. The next cue replaces the previous cue. When a cue is played back, its recorded attribute values are applied to the output and any attributes from the previous cue that are not present in the current cue will be released from the playback. For example: Page 152 Clarity Operator Manual V2.0 Control Booth Cue 1 = intensity to 100% and colour to green. Cue 2 = Colour to red. When you transition from cue 1 to cue 2, the intensity attributes will be released. Activate (fade in) time. Default time = 0 seconds. This is the time taken for a Cue-list to fade in when the first cue is played. Normally this would be left at 0, and the affected fixtures in cue 1 would fade in over their programmed time for that cue. However, you can enter an activate time to scale the fade in over time. This is most useful with chases or when cues are set to automatically follow each other. For example: If you had a fast chase that moved between the 4 corners of the stage you may not want the fixtures to jump to the full extent of the first corner in the time of the first chase step, but for the 4 corners to gradually enlarge, like a spiral, over several chase steps. If the chase rate is set to 120 BPM, each step takes 0.5 seconds, so the fixtures would go from default to the full extent of the first corner in 0.5 seconds and then continue from corner to corner. If you set the activate time to 2 seconds, the fixtures would go 25% of the way to the first corner, 50% of the way to the second corner, 75% to the third and then 100% to the fourth. Release (fade out) time. Default time = 2 seconds. This the time taken for the Cue-list to fade out when released from a Playback. The Activate and Release settings can both be altered by either entering a value in their respective boxes or by moving their wheel which provides smooth variable control. Playback Rate. Proportionally changes all of the timing information in a cue-list. By default it is set to 100%. The range is 1 to 1000. For Example: If Rate is set to 50% it slows all of the fades (all times are doubled). 100% = no change to rates. The Rate % can be altered by either entering a value in its box, clicking the up and down arrows or by clicking and moving the “spin box” roller which provides smooth variable control. The Playback Rate setting can both be altered by either entering a value in the box, clicking the up and down arrows or by moving the wheel which provides smooth variable control. HTP intensities (check box). If the intensity value for a fixture is contained in several active cue-lists and HTP (Highest Takes Precedence) is ticked, the intensity will come from the play back with the highest intensity level. The default setting (HTP not ticked) is known as LTP (Latest Takes Precedence). In LTP mode, the latest cue to be played back will take control of the intensity. Options Clicking Options, offers more playback options. Tick a settings box to activate the option. Page 153 Control Booth Clarity Operator Manual V2.0 Playback Options Release at end. When the last cue has completed its fade, the cue-list is automatically released. If not set to release at end, it will loop back to the first cue. Loop at end. (Default setting) When the last cue has completed its fade and the cuelist is not set to release at end, it will loop back to the first cue. If not ticked it will remain on the last cue. Go on fader up. The first cue of the cue-list is automatically started and faded up when the playback fader is raised above zero. Subsequent fader movement only controls intensity. Release on fader down. The cue-list is automatically released when the playback fader is lowered to zero. Release on pause/back. Causes the pause/back button to release the playback instead of stepping back (useful for chases). Action button toggle. When a cue-list is assigned to an LX600 or LX900 palette button, pressing that button while the cue-list is active will release it. Release when fully overridden. (Default setting) The cue-list is automatically released if all of its channels/fixture attributes have been overridden by another playback. Ignore release all. The cue-list is not released by the Release All button. Ignore grand master. The cue will not be affected by the grand master. Useful for cues such as work lights or providing constant power to fixtures. Release intensity first. (Default setting) When released, intensity fades out (in the release time) then other attributes snap release. This prevents unwanted fixture movements being seen. Fader affects all attributes. The playback fader normally only affects intensity. When ticked, the playback fader acts as a master over all attribute levels, in the same way as the manual fader on the playback control panels. Restart from last active cue. When a cue-list is released, then restarted, it will go immediately to the last active cue. Normally, when a cue-list is released, it will start from the first cue. Solo on flash. When a playback is set to “Solo on flash”, it will black out the intensity of all other playbacks’ intensity levels when it is flashed. If multiple playbacks are set to “Solo on flash” they will not black out each other if flashed at the same time. Solo safe. When a playback is set to “Solo safe”, it will not be affected by the solo action of any other playbacks. Page 154 Clarity Operator Manual V2.0 24.2.2 Control Booth Cue-list Chase Options Clicking the drop down box in the Chase pane allows you to select the chase mode for the currently selected Cue-list. The 5 choices are: Off. The cue-list does not chase and behaves like a normal cue-list. It will use the Delay and Fade times and Halt or Follow settings of each step. This is the Default setting. Forwards. The cue-list will run as a Chase in the forwards direction. It ignores the Delay, Fade, Halt and Follow settings of each step and uses the BPM and Xfade scale % settings (below). Backwards. As for Forwards but in the reverse direction. Bounce. The cue-list will run as a Chase and will automatically change direction when it reaches the first or last step. Random. The cue-list will run as a Chase with random step selection. Note: When a cue-list is set to any of the chase modes above, its name will be displayed in Italics. If any of the chase options above are selected, the following settings affect the chase. Chase Rate: Sets the chase RATE in Beats Per Minute. Chase Xfade: Sets the transition between steps. When set to 0, the chase snaps from step to step. When set to any other value the chase Xfades (Cross-fades) from step to step. The duration of the Xfade is a percentage of the step time. For example: BPM = 60 (1 step per sec). Xfade scale % = 50. Therefore, Xfade time = 0.5 sec. (50% of 1 sec) The Chase BPM and Xfade settings can both be altered by either entering a value in their respective boxes, clicking the up and down arrows or by moving the wheel which provides smooth variable control. Hint: You can also set the rate of a chase by tapping the go button of the playback to which the chase is assigned. This is known as “Tap to Tempo”. Chase during release. If ticked, when the chase is released, the cues keep stepping and the intensities will fade out in the release time. If not ticked, when the chase is released, the chase will immediately stop on the current step and the intensities will fade out in the release time. Lock to tempo: When ticked, this causes the cue-list/chase to use the metronome timing as set at the top of the Performance window. The cue-list is scaled to fit into a predetermined musical duration (bars and beats). The initial length is calculated automatically based on the number of cues in the cue-list. Chases are scaled so that each cue maps to a single beat (¼ note). Cue-lists are scaled so that each cue maps to a single bar. Page 155 Control Booth Clarity Operator Manual V2.0 You can manually change the length by entering a length value in the form “bars.beats”. For example: 2.0 for 2 bars duration. The X button returns the length to the automatically calculated value. For more information see “Metronome” in section 26.6 “Performance Window”. 24.2.3 Cue-list Priority Settings Priority. Default value = 0. When fixtures are being controlled by multiple cue-lists, attributes are normally controlled on a LTP (Latest Takes Precedence) basis. However, you can override the LTP action by entering a priority value for each cue-list. Higher numbers have priority over lower numbers. The value can be set as a positive or negative number (+150 to -150). Preset values for priority can be easily applied by clicking: Prog Sets LTP priority to Programmer (100) High Sets LTP priority to High (50). Normal Sets No LTP priority (0). Low Sets LTP priority to Low (-50). Manually setting a priority higher than 100 prevents a Programmer grabbing control of the fixtures in the cue-list. 24.3 PLAYBACK CONTROL PANEL Clicking on a cue-list allows you to control it from the Control panel. Intensity Fader Manual Fader Rate & Amplitude controls for any FX (dynamics) in the cue Reset The I (Intensity) fader controls the overall intensity of the fixtures in the cue-list. The Mnl (Manual) fader controls the overall level of all attribute values in the cue-list. It is normally set at full, but can be used to manually fade the entire cue-list in and out. > (Go) Plays the next cue in the cue-list or restarts a paused fade. Pressing > will start the fade to the next cue even if the current fade has not finished. II< Pauses any fades in progress. If no fades are in progress, if fades back to the previous cue. >> Snaps to the next cue in the cue-list, ignoring all times. << Snaps to the previous cue in the cue-list, ignoring all times. Jump Allows you to jump out of order and fade directly to any cue that you select in the cue-list. Select the cue by clicking on it then press the Jump button to perform the jump. Inhibit. If Inhibit is active (green), no output from the selected cue-list is permitted and an X is displayed beside the cue-list name. This setting is retained by the cue-list until “Inhibit” is de-selected. Release. Releases the cue-list from the output. If the cue contains any dynamics then the Fx Rate/Amp controls become active and can be used to vary the dynamics by either entering a value in their respective boxes, clicking the up and down arrows or by moving the wheel which provides smooth variable control. Page 156 Clarity Operator Manual V2.0 Control Booth 24.4 MANIPULATING CUES AND CUE-LISTS In the Control Booth window, click on a cue-list to select it. Clicking (Back) or (Forward) lets you step through your previous selections. The order of the cue-lists can be re-arranged by dragging and dropping a cue-list. Right-clicking on a cue-list offers the Right-clicking on a cue offers the following following options: options: Rename cue-list Rename Delete cue-list Sync Fx Insert new cue-list Delete cue Edit cue-list Insert new cue Duplicate cue-list Insert mark cue Reset options to standard Edit cue Use current options as default Change cue only Add to folder Export to current Programmer. 24.4.1 Cue-list Folders Cue-lists can be organized in folders. Select one or more cue-lists and click List on the menu bar and select Add to folder (or right-click and select Add to folder) to move the selected cue-list(s) into a new or existing folder. If the selected lists are already in a folder you can also remove them this way. Alternatively if there is an existing folder you can drag and drop onto the folder itself. You can drag and drop multiple cue-lists. 24.4.2 Copying and Merging Cues When a cue-list is selected (above), clicking on a cue allows it to be dragged and dropped to different locations within that cue-list or to another cue-list. This can be performed as a move or a copy. The selected cue can also be merged with or can replace an existing cue. Dragging a cue to a new location will show the drop point as either an insert (a green arrow points to a line between the two cues) or as a merge (a green arrow points to the selected cue). Long cue-lists and cues will auto-scroll when dragging by holding the mouse pointer over the small arrow boxes at the end of the lists. When the cue is dropped in its new location the “Copy/Move Options” dialog box opens: Page 157 Control Booth Clarity Operator Manual V2.0 The options to insert or merge will be automatically pre-set by where you drop the cue. Dropping a cue on a cue selects the “Merging” options. Dropping a cue between two cues selects the “Inserting” options. Holding Function whilst dragging and dropping between two cues selects the “Copy” option. You can change any of the pre-set options (if applicable) by clicking on them. If you are copying or replacing a cue you can enter a name for the new cue. The settings of the state of the resultant cue (Tracking or Cue only) will be automatically set by Clarity, depending upon the playback setting of the destination cue-list. Include tracked information from source cue check box. When checked, the copy contains the hard values in the source cue and any tracked values from previous cues in the cue-list. When unchecked, the copy only contains the hard values in the source cue. The four Radio Buttons are mutually exclusive. Selecting one deselects all others. Exclude redundant state (changes only/tracking). Hard values from the source cue will be copied or merged into the destination cue with the exception that Clarity will exclude any hard values from the source cue that are not required (redundant) because they would exist in the destination cue due to tracking from an earlier cue. Include unchanged information (non-tracking). Hard values from the source cue will be copied or merged into the destination cue. Blocking – incoming fixtures only. The cue contains hard values for all attributes of all fixtures in the cue-list. Blocking – all fixtures. The cue contains hard values for all attributes of all patched fixtures. 24.4.3 Copy Full State If you have a cue that you want to use again later in a show and you want it to look exactly the same next time you use it then you must ensure that you copy the full state of the playback. The default settings of the copy cue function in a tracking cue-list will copy the tracked and hard values of a cue but it might not include a value for every attribute of the fixtures in the cue-list. Therefore, the copy might not produce the identical output because some attributes might take on tracked values from earlier cues. To copy the full state of the source cue, drag the source cue and drop it in its new location as described above. In the “Copy/Move options” dialog box that opens, select “Blocking - incoming fixtures only”. Click OK. Tip: If you are plotting a theatre show, it might be a good idea to record your first cue with every fixture having a value. This ensures that when you are copying full states later in your cue list, the state of your source cue will always be reproduced correctly. To do this, select every fixture in your show and then in the Programmer click Grab then select Grab Active + Default and record this in your cue list as cue 0.1 and make it a follow cue so that it will automatically advance to Cue 1 (which could be your curtain warmers or walk in look for example). 24.4.4 Undo Redo All copies and merges as well as any recording or editing of cues in the Programmer can be undone or redone by clicking on Undo or Redo at the top of the Control Booth window and in the command centre. 24.4.5 Cue Notes Notes can be added to any cue by clicking on the cue then double clicking on the cue’s Notes cell and entering your text. Page 158 Clarity Operator Manual V2.0 Control Booth 24.5 SYNC FX If a cue contains dynamic effects (created in the dynamics tab of the programmer or applied by a dynamic preset or freeset), the “rate” of the effect can be kept “relative” to the performance window’s metronome. Right clicking on a cue that contains dynamic effects and selecting Sync FX toggles whether the effects are synchronized to the metronome or not. Sync FX is active (ticked). ~ indicates that the Channel contains a Dynamic Effect If “Sync FX” is not active, the dynamic effect will run at its recorded rate. If “Sync FX” is active, the effect will run at a rate that is normalized to a metronome rate of 60BPM (Beats Per Minute). Therefore, when “Sync FX” is active, the run rate of the effect will be equal to its recorded rate divided by 60 then multiplied by the metronome rate. Run rate = Recorded rate 60 X Metronome rate For example, Recorded Rate 60 30 60 30 60 30 Metronome Rate 60 60 120 120 30 30 Run Rate with Sync FX ON 60 30 120 60 30 15 24.6 MARK CUES (MOVE IN BLACK) To insert a Mark cue in a cue-list, right click on the cue that needs the mark cue to precede it and select Insert mark cue. A Mark cue is a special type of cue that you can insert in a cue-list. Mark cues are also known as “move in black” and are used to pre-position fixture attributes without their movements or changes being seen on stage. When you insert a Mark cue, Clarity looks at the previous cue and selects any fixtures that have an intensity of zero. Then, using that fixture selection, it looks at the following cue and copies all the attributes of those fixtures, except intensity, from the following cue and inserts them into the new Mark cue which is placed between the two cues. When the cue-list is played back and the cue prior to the mark cue finishes its fade, the Mark cue is automatically executed. It will move all of the attributes (except intensity) to their settings in the following cue. They therefore “move in black”. When the next cue is executed, the fixtures fade up, but nothing else changes because all other attributes were pre-set by the Mark cue. Mark cues have a default fade time of 0.5 seconds. 24.7 AUDIO PLAYBACK You can include an MP3 music file that will be played when a cue is triggered. All MP3 files that need to be played must be loaded into the Audio Resources dialog box. In the Control Booth window, selecting Audio will open the Audio Resources dialog. Page 159 Control Booth Clarity Operator Manual V2.0 Audio tracks can be added by clicking Add and navigating to the required audio file. Each audio file is given a slot number. Later, when you are programming your cues, these slot numbers can be used as a quick reference to the file instead of entering the file name. Slot Number You can add multiple files whilst the dialog box is open. You can also clear individual slots by clicking on the red X. There are several methods of playing audio files: Audio file can be played by ether entering a command in the script column of a cue as described below in the “Simple Script Language” section. Audio files can be played as part of a “Master Cue-list” as described below in the “Learn New Cue-list” section. Audio files can be played by creating an audio fixture and controlling that fixture as if it was a lighting fixture. 24.7.1 Audio Fixture Clarity has an inbuilt “Audio Fixture” available. This “fixture” has two attributes, Volume (Intensity) and Play Mode (Play/Pause/Stop). This allows you to program Audio as if it was a lighting fixture. You can set the level on a cue by cue basis, give it fade times (with wait, delay, etc) and do anything else that you can do with a normal dimmer channel. You can even change the fade curve via the timings tab, or use the fader to control the level. The lower section of the “Audio Resources” dialogue box (above) allows you to add “Audio Control Devices” by clicking on the + sign. Page 160 Clarity Operator Manual V2.0 Control Booth Select the previously loaded audio file from the drop down box. If you tick the “Use slot number” check box, the new audio fixture will be assigned a slot number (described above) instead of using the track name. If it refers to a slot number, then you can change the file assigned to the slot at a later date and keep the audio control device’s assignments. This fixture now appears in the Patch, Programmer, Rig view etcetera as if it was a normal fixture. It has two parameters: Audio Volume Media Run Stop You can create cues using these attributes and record them in cuelists. 24.8 SIMPLE SCRIPT LANGUAGE (MACROS) Scripts are instructions that you can insert in each step of a cue-list. When that cue is played, the instructions in the script are automatically executed. For example, when a cue is played, its script can automatically play another cue-list or even a specific cue from a cue-list or it might play an audio file (see above). To enter script instructions in a cue, in the Control Booth window, click on the cue-list then click on the cue that is to contain the script. Either double click on the script cell or right click on it and select “Edit Script”. Script instructions The simple instructions that you can enter in a script are described in the following table. All spaces and punctuation marks as listed in the table must be included in your script. Names of cues and cue-lists are case sensitive. Script Instruction play audio:# pause audio:# stop audio:# pause stop play go listname jump listname,cuenumber snapjump listname,cuenumber goprev listname goend listname pauseback listname Description Plays (or resumes if paused) the specified audio file. Audio files must be pre loaded in the “Audio Resources” dialog via the Audio button. # is either the “slot” number from the Audio Resources dialog. e.g. play audio:1 or the name of the file preceded by a / (forward slash). e.g. play audio /prettyfly or play audio /prettyfly.mp3 (There is no need to include the path). Pauses the specified audio file. Stops the specified audio file. Pauses the last played audio file. Stops the last played audio file. Resume the last played/paused audio file. Plays the named cue-list. e.g. go StdColPos Plays the specified cue number in the named cue-list. e.g. jump StdColPos,2 Snaps to the specified cue number in the named cue-list. Plays the previous cue in the named cue-list. Plays the last cue in the named cue-list. Pauses the last cue in the named cue-list. If the cue-list is Page 161 Control Booth Clarity Operator Manual V2.0 already paused, it steps it backwards. skipnext listname skipprev listname inhibit listname,1 inhibit listname,0 release listname reinstate listname Activates “Inhibit” on the named cue-list. No output from the cue-list is permitted and an X is displayed beside the cue-list name. De-activates “Inhibit” on the named cue-list. Releases the named cue-list. Gives the named cue-list “latest” (LTP) priority. Multiple instructions can be included in the one script by separating them with a ; (semi-colon). For example: play audio:2;go band When the cue containing this script is played, it will play the audio file listed in slot 2 (of the audio resources) and also play a cue-list named “band”. 24.9 LEARN NEW CUE-LIST The “Learn Master cue-list” function allows you to capture (and time stamp) the button presses that you make when you playback cues over time. This can be in time with an audio track that you can optionally select. When you playback the Master cue-list your cues will be automatically played back exactly as you played them. In the Control Booth window, pressing the Learn button opens the “Learn Master Cue-list” dialog. Select Audio Resources Clicking the drop down box for “Use audio” reveals a list of all audio files that you have loaded in the “Audio Resources” dialog. If you the audio file you require has not been loaded you can click the small box beside the drop box to swap to the “Audio Resources” dialog and load the file. The new master cue-list will start learning your playback commands when you press any cuelists Go button or when you press the Start button. If an audio file has been selected it will automatically start at the same time. Playback your lighting cues (in time with the optional audio file) and Clarity will capture your playback commands as time stamped script events. Press Finish & Create Cue List to create the new master cue-list. If you selected an audio file then the name of the audio file will be used for the name of the master cue-list. Press Release all then playback the master cue-list that you have just created. The cues (and optional audio) will be played back with the same timing as when you manually played them. If Page 162 Clarity Operator Manual V2.0 Control Booth your original playback timing was not correct you can select any cue in the master cue-list and edit the timing to suit. 24.10 BOOKMARK Bookmark allows you to record a page bookmark for rapid recall of a Playback pages. Select the required pages on the left and/or right playbacks. Tick the boxes for the LHS (Left Hand Side) and/or RHS (Right Hand Side) to be recorded in the bookmark. You can also name the bookmark. To record click Create PageBookmark. The bookmark can be recalled from either the encoder wheel touch screen’s Palettes mode or the Palettes window. Page 163 Editing Clarity Operator Manual V2.0 25 Editing Cues and Cue-lists 25.1 OVERVIEW Playback settings, times and names can be changed in the Control Booth window (Section 24) and in the Playback configuration (Section 8.6.6). The selected settings are automatically saved with the cue-list. To change the contents of a cue you Edit the cue. When the selected cue or cue-list is edited, it automatically opens an edit session in the Programmer window and that session becomes the “current session” meaning that the encoder wheel touch screen and controls can be used to perform the editing. 25.2 EDITING A CUE To edit the contents of a playback, press Edit then press any flashing button on the playback to be edited. To edit the contents of a cue-list, in the Control Booth window, select the cue-list by clicking on it then click List, Edit cue-list. You can also edit cues and cue-lists by right-clicking on the cue or cue-list in the Control Booth or the Performance windows and selecting Edit Cue-list or Edit Cue. Editing a cue or a cue-list will load the cue-list into a new edit session at the bottom of the programmer window and pre-select the relevant cue in the list. Click on a cue to edit it Cue being edited Cue-list being edited Clicking Auto Select will automatically select all of the fixtures in the cue allowing them to be edited by the programmer session. Alternatively you can select individual fixtures or multiples or groups and use the Programmer controls to edit the cues. You can click on any of the cues in the edit session to edit them. The Record button changes its name to Save and the button below to Save As. Edited cue-lists and cues can be identified by their different coloured attribute controls that show if the attribute’s value has been altered by the programmer. Brown The attribute is in the cue but has not been edited by the programmer Light Grey The attribute is not included in the cue Yellow/Green The attribute is in the cue and has been edited by the programmer 25.3 EDITING FOLLOW OR WAIT TIMES Any cues that you edit that are set to immediately follow or wait for a specified time and then follow, will display a timeline above those cues in the edit session. Page 164 Clarity Operator Manual V2.0 Editing Programmer Window The time line shows the actual time when each cue will play, counting from the first cue from which the others will automatically follow. For example, if you want to know when cue 4 will be played you can read it directly from the time line rather that adding up all of the fade and wait times from the preceding cues. In the example above, cue 4 will be automatically played 7 seconds after cue 1 is played. Note: If the cue-list only has halt cues then you won’t see the timeline. There must be a follow-on or a wait time to see the timeline. You can change the timing of a follow or wait cue by dragging its cue box and this will move the cue with respect to its predecessor as shown on the timeline. If Ripple is selected, then when a cue is dragged, all following cues (up to the next halt) will also move by the same amount. When Ripple is deselected then only the cue being dragged is affected. The timeline handles complex timings by auto-breaking the timeline into separate sections so that you can see the detail. If you turn off Auto Break then you will see a continuous timeline. You can also change the “Follow-on/Halt/Wait” settings for a cue by right clicking on the cue, selecting “Set Follow time” and choosing from Halt, Follow-on or Wait time. If you select “Wait time….” a dialogue box opens allowing you to enter a specific time. Note: If you edit the levels in a cue it can alter the times. Clarity will attempt to apply suitable timing derived from the current cue contents by examining the timing of existing parameter types and falling back to less-filtered types. For example, if you Page 165 Editing Clarity Operator Manual V2.0 touch RGB, it will use existing RGB timing if there is any, otherwise it will use any pre-existing colour timing, else if will use overall cue timing, else it will use 2s. Clarity also tries to match ranged timing. For example, if you have fanned delay or fade values, it will try and apply the same fan on the incoming fixtures. 25.3.1 Saving the Edit When finished editing there are several choices: To save the edited cue press Save on the command centre or click Save on the Programmer toolbar (instantly saved without warning). To save the edited cue with a new name click Save As on the Programmer toolbar and enter a name. Click Close on the Programmer toolbar or right click on the cue-list in session control and click Close. You can then choose either Save, Save as or Discard. To Record as a new cue or in a new cue-list, press Save As on the command centre then name the new cue or click the drop down box beside Save As on the Programmer toolbar. Choosing Record opens the Record Cue dialog box. 25.4 EDITING CHANNELS TO BE “CUE ONLY” There might be occasions where you do not want the values in a cue to track into later cues in the cue-list. This is achieved by changing the status of the required channels to “cue only”. When a cue containing “cue only” channels is played back in tracking mode, the cue only channels values are hard values in the cue. When the next cue is played back, the state from the most recent (non cue only) cue is restored automatically plus any new values in the incoming cue. In other words, when the next cue is played back, the output tracks the values as if the “cue only” channels did not exist. You can select individual channels in a cue and make them “cue only” by right-clicking on the cue in the control booth and selecting “Change cue only”. This will bring up the “Edit cue only channels” dialog box. All of the channels in the cue are listed in the “Device” column and their status as a “cue only” channel is set by ticking their box. The boxes at the top allow you to select either all channels, specific groups of channels (Intensity, Colour, Position or Beam). Clicking Revert will restore the settings from the cue. Click OK to save the settings. You can also access this dialog from the programmer when editing a cue, by right-clicking on the relevant cue in the edit session and selecting “Change cue only…”. 25.4.1 “Cue Only” Indication You can see the “cue only” status of any channels in a cue by clicking on that cue in the Control Booth window. Channels that are “cue only” are shown as “q only” beside their value. Page 166 Clarity Operator Manual V2.0 Editing Cue only channels 25.5 LIVE EDIT INDICATION In the Control Booth any cue-lists being edited live <on stage> have a red E beside their name. E = Cue-list being LIVE edited (on stage) 25.6 BLOCK CUE Cues that are recorded to be used in tracking playback mode only contain the changes that are required when the cue is played back. In tracking playback, any unchanged values from previous cues will track through to the present state. If you want to prevent values from tracking through to a cue, you can edit the cue and change it into a Block cue. When you do this, Clarity takes all of the tracked values that would exist on the output of the playback (as if the cue-list had been played back) and converts them into hard values then adds them to the cue. See Operating Concepts and Terminology at the end of this manual for more details. To change a cue into a blocking cue, edit the cue as described above then in the edit session in the programmer window, right-click on the cue and select Block cue. All Block cues in a cue-list can be unblocked. When you unblock a cue-list, Clarity compares each cue to the cue that preceded it and removes any duplicated values. Therefore, each cue in the cue-list will only contain changes. To remove all blocking cues from a cue-list, edit the cue-list as described above then in the edit session in the programmer window, right-click on the cue-list and select Unblock cue-list. 25.7 UNDO REDO EDITS Edits can be undone or redone by clicking Undo on the Control Centre or Undo or Redo in the Control Booth window. 25.8 EXPORTING A CUE TO THE PROGRAMMER When you edit a cue (above) it opens a separate cue-list session in session control. If you want to build a new cue-list based on the contents of an existing cue, you can export the cue directly into the current programmer session. In the Control Booth window, select the cue-list by clicking on it then right-click on the cue and select Export to current programmer. If the current programmer is not empty, you can choose to either replace or merge with the current contents. Page 167 Performance Window Clarity Operator Manual V2.0 26 Performance Window 26.1 OVERVIEW The performance window provides a unique and intuitive method of playback especially designed for busking or improvising a show. The grid area of the performance window is arranged as a grid of playable items. The top row is fixed and provides column master stop buttons. The left column is also fixed and provides row master go buttons. Existing cue-lists are dragged from the cue-list browser and dropped onto locations on the grid providing one-click triggering of a large and expandable number of playbacks. The columns are designed to contain looks that are to be mutually exclusive, so that playback swaps between each look as it is triggered. Playing a cell in a column releases any previously active cue in that same column. For example: one column might contain different positions for a certain type of fixture whilst another row might contain different colours for the same fixtures. Unlimited rows and columns with copy, drag and drop allow you to create extremely versatile playback variations. Clicking in a playable cell shows the properties of that cell in the Properties pane at the bottom of the screen where you can select ranges, filter attributes and generally modify the cue-list in that cell to achieve unlimited combinations and permutations, all without duplicating or changing the original cue-lists. Clicking the Properties tab at the top of the window will close the Properties pane allowing you to see a larger grid. Cue-list browser Column Masters Preview Selected Cell Row Masters Properties of selected cell Playable cells and can be freely moved, copied or swapped to any cell of the grid. Each cell displays concise activity information including cue and overall list progress, as well as time-torelease and time-to-start. There is no fixed limit to the number of columns or rows that are available and the grid is automatically expanded whenever an item is dropped on a cell in the last row or column. Page 168 Clarity Operator Manual V2.0 Performance Window 26.2 PREVIEWING CUE-LISTS The selected cue-list in the cue-lists browser can be previewed without having to drop it onto a cell by using the preview ► (play) and ■ (stop) controls at the bottom of the browser. Selecting another cue-list automatically stops the previous preview. The Auto Preview check-box causes the preview to start automatically whenever a cue-list is clicked. 26.3 THE GRID The grid consists of Columns and Rows. Each column plays one cell. Playing another cell in that column will release any other currently active cell in that column. Each row can play multiple cells. Playing another cell in that row has no effect on any other currently active cell. The various cell types in the grid are: Stop All: Top left. A fixed stop button for the entire grid. Column Masters: Top button of each column. A fixed stop button for the whole column and a place to label a column. Row Masters: Left button of each row. A fixed play button for the whole row and a place to label a row. Cue-list: a cell with a play button that will run the cue-list in that cell using its current properties. Stop button: an empty cell with a button that stops any other active cell in the same column. Blank cell: a non-functional empty cell. 26.4 ADAPTING EXISTING PROGRAMMING The real power and creative potential of the performance window comes from the arrangement of Row Masters and the ability to quickly adapt and re-use existing cue-lists without duplicating them. When an existing list or chase is dropped onto a cell, the cue-list is referenced instead of being duplicated, so that any future edits to that cue-list will propagate to any cells where it is being used. Most importantly, each cell can be optionally configured to have different playback characteristics from the source cue-list and to only use a selected range of cues from within the cue-list. For example, you may have a cue-list that has a nice sequence of position moves between cues 11 to 14 that you would like to re-use as a separate chase. You can drop this cue-list onto a new cell and change the cell properties to operate as a chase and to limit the range of cues to start at 11 and end at 14. You can also restrict the cell to only use fixtures from a specific fixture group and to ignore all colour and beam information. These changes do not affect the source cue-list in any way. In fact the same source cue-list can be used on multiple different cells, all with different playback/chase options, ranges of cues, IPCB (Intensity, Position, Colour, Beam) filtering and fixture groups. 26.4.1 Sync FX If a cue contains dynamic effects (created in the dynamics tab of the programmer or applied by a dynamic preset or freeset), the “rate” of the effect can be kept “relative” to the performance window’s metronome. Page 169 Performance Window Clarity Operator Manual V2.0 Right clicking on a cue that contains dynamic effects (in the Properties pane above) and selecting Sync FX toggles whether the effects are synchronized to the metronome or not. See section 24.5 for more details on Sync Fx. 26.5 MANAGING THE GRID To manage columns, Right-Click in the top cell of the column and select either: Insert blank column. Delete selected column To move a column, click and drag the top cell of the column. Dropping a cue-list anywhere in the right column of the grid will automatically add a new column. To manage rows, Right-Click in the left cell of the row and select either: Insert blank row. Delete selected row. Clear selected row. (Sets entire row to stop buttons). Capture to new row. (Copies active cells to selected row – see below). To move a row, click and drag the left cell of the row. Dropping a cue-list anywhere in the bottom row of the grid will automatically add a new row. 26.5.1 Copying Active Cells to a Common Row If you have played some cells from different rows and you find a combination on stage that you like, you can copy all of the active cells to a single row. To record all active cells into a blank row of your choice, hold Function and the Row Masters of all blank rows turn into a red record button. Whilst holding Function, click on a red record button. Scattered active cells and blank row Record buttons. Active cells copied to row 6 The previously scattered combination of cells can be simultaneously played with a single Row Master (Play) button. 26.5.2 Cell Properties Clicking in an active cell reveals the properties of that cell in the Properties pane at the bottom of the screen. The Properties pane provides a comprehensive set of options that apply to each individual cell. Page 170 Clarity Operator Manual V2.0 Performance Window Source. This allows you to select the source for the cell or to make a deep copy of the current cue-list. A deep copy duplicates the cue-list and sets the new copy as the current source. Trigger. These options are used in conjunction with the metronome (at the top of the Performance window, see below for details) and rely on the concept of a boundary which is given by the metronome's Quantize setting. For example: if quantize is set to 1 bar, then the next boundary is when the song position reaches the start of the next bar. If quantize is set to ¼ note then the boundary is the next down beat. The available options are: Immediate: the cell is triggered as soon as it (or it's Row Master) is pressed. Immediate-adjusted: the cell is triggered immediately, but jumps forward to suit the quantize setting so that it's at the same position it would have been if it had been triggered on the boundary. For example: if quantize is set to 1 bar and a chase is triggered on the second beat of the bar, then the cell will trigger immediately but will jump forward to the point that corresponds to the second beat as if it had been triggered at the start of the bar and will continue from there as normal. Next boundary: the cell will wait until the next boundary is reached before triggering. For example: if Quantize is set to 1 bar, then the pressed cell will trigger at the start of the next bar. This allows you to easily pre-trigger one or more cells that will start at exactly the same moment, in time with the music. Time-to-trigger The time-to-trigger is indicated by a green dot moving from right-to-left. Special action. Ticking Special action will provide a degree of automated variation by taking the action that you select after an adjustable number of loops. The available actions are: Release will release the cell. GoNext will trigger the cell below this cell. GoPrev will trigger the cell above this cell. Use local player. By default, each cue-list cell in the Performance window uses its own local player playback options that are entirely separate from the source cue-list. Changing these won't affect how the cue-list behaves in the Control Booth window. Page 171 Performance Window Clarity Operator Manual V2.0 The Chase and Playback controls are identical to those in the Control Booth window. See section 24.2.1 “Cue-list Playback Options” in the Control Booth for details. Lock to tempo: When ticked, this causes the cue-list/chase to use the metronome timing as set at the top of the Performance window. The cue-list is scaled to fit into a predetermined musical duration (bars and beats). The initial length is calculated automatically based on the number of cues in the cue-list. Chases are scaled so that each cue maps to a single beat (¼ note). Cue-lists are scaled so that each cue maps to a single bar. You can manually change the length by entering a length value in the form bars.beats. For example: 2.0 for 2 bars duration. The X button returns the length to the automatically calculated value. Mask: when enabled, allow you to selectively ignore parts of the cue-list. You can choose to ignore any combinations of I (Intensity), P (Position), C (Colour) or B (Beam). Clicking in the Detail box opens the Set mask box that allows you to or drill down for a custom selection of specific attribute types. For example: you could choose Position and then select Pan only. Restrict: when enabled, allows you to restrict playback to a specified group of fixtures. Clicking the drop down arrow allows you to select any fixture group so that playback will only affect fixtures that are both in the cue-list and in the selected group. Range: when enabled, allows you to specify a limited range of cues to playback from the cue-list. Clicking the Start drop down box allows you to select any cue from the cue-list. Clicking the End drop down arrow allows you to select any later cue from the cue-list. The bottom right of the properties window shows the cues of the currently selected cell. 26.6 THE METRONOME The metronome toolbar at the top of the Performance window provides control over Clarity's internal musical time base. Cue-lists and chases can be locked to tempo and the Programmer's Dynamics (real time effects) can be synchronized to the metronome so that the playback rates keep a uniform time and achieve perfect synchronization. Cue-lists in the Performance window can use the metronome to synchronize triggering to the next boundary which is given by the metronome's Quantize setting. For example: if quantize is set to 1 bar, then the next boundary is when the song position reaches the start of the next bar. If quantize is set to ¼ note then the boundary is the next down beat. Stop, Pause, Play Page 172 Song position. Bars.Beats Clarity Operator Manual V2.0 26.6.1 Performance Window Metronome Settings Time sig: Time signature allows you to select the number of beats within a bar, 2/4, 3/4, or 4/4. BPM: (Beats Per Minute) is the tempo of the metronome. Set the tempo by either entering a BPM number or by using the <tap> button to set the tempo rhythmically. The first tap sets the down beat and subsequent taps will modify the tempo. The more taps in succession the more accurate the tempo will be. You can also use the keyboard's Ins (insert) key to tap the tempo Stop: Metronome stops and the song position will start from 0.0 the next time that the play button is pressed. Pause: Metronome pauses and retains the song position count. Play: Starts the metronome. Song position: Displays the current bar and beat Quantize: Controls the boundary to provide exact trigger timing. This can be used in conjunction with the cell's Trigger options (Immediate, Next Boundary or Immediate Adjusted) to synchronize stepping of multiple cells. For example, if quantize is set to 1 bar, then the next boundary is when the song position reaches the start of the next bar. If quantize is set to ¼ note then the boundary is the next down beat. 26.7 PERFORMANCE FREESETS/GROUPS The Freesets/Groups tab at the top left of the performance window offers a rapid method of putting together clips by combining freesets and groups and playing them from a cell in the Performance grid. Select a group of fixtures from the Groups pane and a Freeset from the Freesets pane. Drag either the selected group or Freeset and drop it on the desired cell in the grid. The selection that you drag will take the other selection with it. The I,P,C,B (Intensity Position, Colour, Beam) buttons can be used to filter the attribute of the selected Freeset that you want to apply to this clip. The cells containing these clips can be manipulated in exactly the same ways as cells containing cue-lists as described above. Page 173 Intensity Levels Window Clarity Operator Manual V2.0 27 Levels Window 27.1 OVERVIEW The Levels window provides comprehensive monitoring of levels and activity within Clarity. The selection tabs allow you to view: DMX. Output. Programmer. The levels of all attributes controlled by either programmer. Cue-list. The contents of any cue in any cue-list 27.2 DMX VALUES The DMX tab at the top left allows you to select any of Clarity's DMX Universes via the drop down box and to view the levels in Percent, Decimal, or in Hexadecimal. 27.3 OUTPUT VALUES The Output tab allows you to view either the values or the source of control for every attribute of every fixture via the drop down box. Values sent to each fixture Source of control for each fixture If the source is a playback, each Attribute Control shows you the name of the cue-list plus the cue number and name. Page 174 Clarity Operator Manual V2.0 Levels Window 27.4 PROGRAMMER VALUES The Programmer tab allows you to view the output of either Programmer or any edit sessions that ere open by clicking on the drop down box or you can tick the Follow current check box to show the contents of the current programmer. 27.5 CUE LIST VALUES Selecting the Cue List button allows you to view the output of any Cue List by clicking on the drop down box and selecting from the Cue List box. Recently viewed cue-lists are also listed in the drop down selection. Click on a cue to see its contents Follow active cue Click on a cue to see its contents. Tick the Follow active cue check box to automatically see the contents of the active cue in the selected cue-list. 27.6 CUSTOMIZING THE DISPLAY Clicking the icons in the top right corner of each type of fixture type allows a trade off between screen area and detail. Minimized, Compact, Capped or Expanded Minimized only displays a heading for the type of fixture. Compact uses a one line display for the type of fixture. Capped uses a maximum of 5 lines for the type of fixture. Expanded shows all fixtures of that type. 27.7 NEW WINDOW To create a new un-docked window of the currently selected Level window click New. Multiple windows can be opened and each window can be set to any of the available display tabs. Multiple windows are most useful when using large monitors or multi-screen set-ups. Page 175 Intensity Levels Window Clarity Operator Manual V2.0 28 Intensity Levels 28.1 OVERVIEW The Intensity Levels view complements the normal Levels views by providing intensity specific information with optional auto-compression (hiding levels that are at zero). This makes it much easier to see all of the channels in use when there a large quantity of fixtures. The window provides two default views: “Console” which (by default) shows the source of each fixtures level and hides zero levels. “Follow” which (by default) follows the current cue-list and shows its contents. You can open “New” windows and set them to show either of the above views and also customize their settings to your requirements as described below. Views can be undocked and dragged onto other monitors. 28.2 VIEW SETINGS To configure an intensity view on the Intensity Levels tool bar click Settings or right click on a view and click “Configure”. The options for each view are: View Mode: If you are configuring a new window you can set it to display either: Playback contents (with additional options to follow current playback, follow current cue and show fader level of the playback). Console Output. Values: (only for playback contents mode) Stored values only. Always display the values stored in the current cue, irrespective of whether the cue is active or under edit. Stored values or edit session. Same as above but channels being edited are shown in red. Live values. Only values from the current cue are shown if they are active. Zero levels: Show zero levels. All levels are shown. Hide zero levels. Zero levels are removed from the view and all non-zero levels shuffled up to avoid empty space. Shade zero levels. This also hides zero levels by making them appear very faint, but doesn’t shuffle non-zero levels so all channels always appear in the same place. Page 176 Clarity Operator Manual V2.0 Intensity Levels Window Animate Activity changes. If ticked, the channel number will be highlighted in yellow whenever its level is changing. The Detail pane allows you to select the detail that is displayed for each channel number: Unit number. Fixture name. Source Playback. Source Cue-list. Source Cue. Graphical Level. The font size can also be set. 28.3 CONSOLE VIEW The “Console” view in the Intensity Levels window shows all intensity levels on the output of the console. The channel displays can be configured as described above. Channels shown in red are under Programmer control. 28.4 FOLLOW VIEW The “Follow” view shows the contents of the selected cue-list (or current cue-list as selected in the views configuration) as described above. Pressing the Select button of a playback will show its contents on the “Follow” view. Page 177 Show Files Clarity Operator Manual V2.0 29 Show Files and Packages 29.1 OVERVIEW Version 2 of Clarity has changed the way that show files are handled. Clarity “Shows” can still be saved and loaded but you can also Export or Import “Clarity Show Packages” that contain the show as well as (optionally) any media, backups and fixtures associated with the show. 29.2 SAVING AND LOADING SHOWS Show save & load only operates on the Clarity/shows folder and uses just the show name without an extension or file location. Note: Any “old” Clarity shows that are not in the new clarity/shows folder (created prior to Version 2) can only be opened by “importing” them. Once you have imported them you can save them again they will now reside in the clarity/shows folder as a show. You can also export them as described below. 29.3 IMPORTING AND EXPORTING SHOWS Shows are imported or exported as a Clarity Show Package file. This file contains the show file plus optionally any of the following: Audio files. Pixel mapping files. Rig view background images. Media servers thumbnail cache. Extracted fixture personalities. The “extracted fixture personalities” will generate a standalone fixture library (.sfl) file that contains just the personalities used by the show. When the show is imported on another system, if any fixture types are not found in that system’s fixture library then this “sfl” file is also searched. Show backup files. These are just the backup_*.cls files that exist in the show’s data directory that are automatically created by Clarity. The “Show” menu allows you to Export a show and you can choose which elements go into the show package file. When you load or change a show you can choose to either a “Load” regular Clarity show file (.cls) or “Import” a previously exported Clarity Show Package (.csp). If you import a show, all the media files are copied to the Clarity media folder. 29.4 DESKTOP CLARITY LOCAL MEDIA LIBRARIES When adding media to a show (rig background, audio files, pixel mapping) desktop versions will ask if you want to copy the media the Clarity media folder. If you agree then a copy will be placed there and that will be the file added to the show. This allows you to use a local media library that already exists on your computer. Page 178 Clarity Operator Manual V2.0 Show Files If you use existing media libraries that are not in the Clarity media folder and you export your show to another computer running Clarity, save it on this machine and then import it back to the original machine, you need to be aware that the second machine will place the media in its Clarity media folder. When you import the show back on the original machine you will end up with a copy in the Clarity media folder (as well as the original file) but the show will now be referencing the Clarity media folder and not the original file. In this case it would be best if you declined to either include the media files when exporting the show or un-tick the media files when importing onto the target machine. You will get the usual warnings that the media files can’t be found but the media paths won’t be changed by the export/import/export/import process. Page 179 MIDI Clarity Operator Manual V2.0 30 MIDI 30.1 OVERVIEW MIDI (Musical Instrument Digital Interface) is an international standard for data communication between musical instruments, computers and other equipment such as lighting controllers. The MIDI IN connector on the rear panel receives signals from a MIDI device such as a keyboard, MIDI sequencer or computer with MIDI output and uses the signals for various functions. Clarity uses MIDI in two ways: 1. MIDI Control of Selected Playback (Simple MIDI). 2. MIDI Timecode can be used to playback cues at specific times. 30.2 MIDI CONTROL OF SELECTED PLAYBACK A MIDI signal can be used to remotely control the playback of the “selected” playback. A playback is selected by touching it touch screen. The cue-list name of the currently selected playback is displayed in black text on a white background. MIDI “Note ON” messages can be assigned to trigger the Go, Pause/Back, Release and Jump functions of the selected playback. MIDI “Control Change” messages can be used to pre-select a cue in the cue-list of the selected playback that will be triggered by the next “Note on” message to be received that is assigned to the “Jump” function. 30.2.1 MIDI Settings To enable and setup Simple MIDI, select Show, Settings, MIDI. The “Simple MIDI Setup” dialog box appears: To enable MIDI, tick the “Enable Simple MIDI” box. 30.2.2 MIDI Channel MIDI signals are sent and received on 16 separate channels on the one cable. Use the MIDI channel drop down box to select the MIDI channel on which your MIDI transmitting device is sending its messages. Selecting “Omni” receives on all 16 channels simultaneously. 30.2.3 MIDI Note On Messages The MIDI protocol uses many different types of messages. “Note on” is one type of MIDI message. Each note on the MIDI keyboard has a number assigned to it and when that note is played, MIDI sends a “note on” message for that note. You can assign any note’s “note on” message to control the Go next, Pause/Back, Release and Jump buttons of the selected playback. Clicking on the drop down box beside each button name allows you to select the note that will activate it. The currently assigned note is shown beside each button. See also “Learn MIDI” below. When Clarity receives a MIDI “note on” message that is assigned to a playback function button, it triggers that function on the selected playback. Page 180 Clarity Operator Manual V2.0 30.2.4 MIDI MIDI Control Function “Control Change” is a type of MIDI message. This message consists of a function and a value. The value that is sent with that message is used by Clarity to “pre-select” a cue in the currently selected cue-list. Then, when the next MIDI note on message assigned to the Jump button is received, Clarity will jump (cross-fade) to that “pre-selected” cue. Clicking on the drop down box beside “Control Function” allows you to select the control change that will activate it. The currently assigned control change is shown in the box. See also “Learn MIDI” below. The Control change value pre-selects a cue number in the cue-list by counting up from zero. Therefore, a value of 0 pre-selects the first cue, a value of 1 pre-selects the second cue, 2 preselects the third cue and so on. This system is used because cue numbers do not always count up in units and can have decimal notation such as cue 1.5 etc. Control change values can consist of either one byte (7 bit) or two bytes (14 bit) of data. Clarity automatically determines the resolution of the values it receives. If the “Display jump cue popup hint” is ticked, then when a Control change message is received, a popup hint box will appear showing the cue-list name and the cue number and name of the pre-selected cue. For example, If Clarity has just received the selected MIDI control change message with a value of 5, the jump cue popup hint appears: The next time Clarity receives the midi note on message that is currently assigned to the jump function it will jump to cue 6 (Closer). 30.2.5 Learn Midi If you are unsure of the actual MIDI note number or Control Function that you will be sending from the MIDI device, clicking the Learn button beside each “Note on” or “Control Function” selector turns that button green. Clarity now listens for the next MIDI message to be sent and automatically assigns it to that function. The learn button automatically turns off in 5 seconds if no MIDI signal is detected. 30.3 MIDI TIMECODE MIDI Timecode information can be received by Clarity and used to control the playback of cues at specific times. This allows Clarity’s playback to be perfectly synchronized with other elements of a production that are also locked to MIDI Timecode. To configure MIDI Timecode, select Show/Timecode/Configuration. Page 181 MIDI Clarity Operator Manual V2.0 The “Timecode Configuration” dialog box opens: Playlists Playlist Contents Event Details There are three main panes, “Playlists”, “Playlist Contents” and “Event Details”. Each Playlist contains a list of events (Playlist Contents). Each event specifies a time that a cue in a cue-list will be played. Events can be added to a Playlist either automatically, as a show is played back, or manually by selecting a cue-list, cue number and time for each event. 30.3.1 Automatic Entry of Events If MIDI Timecode is being received by Clarity, events can be automatically entered into a Playlist as they are manually played back in real time. To create a new Playlist, click on the symbol in the Playlists pane. At the bottom of the Playlist Contents pane, click Learn. The Learn button turns green. If Clarity is receiving MIDI Timecode, the box beside the Learn button will flash red and automatic entry of events is possible. Playback your show using any of Clarity’s playbacks. Each time a cue is played back a new event is automatically created containing the cue-list, cue number and the current Timecode when the cue is played. When finished click Learn to de-select it. If necessary you can edit any of the events and their times as described below. 30.3.2 Manual Entry of Events To create a new Playlist, click on the symbol in the Playlists pane. Clicking on that new Playlist will enable the “Playlist Contents” pane. In the Playlists Contents pane, clicking on symbol will add a new Event (no set cue). Clicking on that Event will enable the “Event Details” pane. In the Event Details pane, clicking on the Cue-list box allows you to select a cue-list (that you have previously recorded) then clicking on the Cue box allows you to select a cue in that cue-list. See also “Recede” below. The time for an event can be set by clicking in the time boxes and either entering a number or using the mouse wheel. Press [Tab] to advance to the next time field. Timecode is entered in Hours, Minutes, Seconds and Frames. To add another event, click on the symbol in the Playlists Contents pane. Clicking on that Event allows you to select a Cue-list, Cue and Time for that event. 30.3.3 Editing Events The contents of any event including its Timecode value can be edited by clicking on the its Playlist then clicking on the event and altering the Event Details as described in the manual entry of events above. Page 182 Clarity Operator Manual V2.0 30.3.4 MIDI Managing Playlists Multiple Playlists can be created by clicking on symbol in the Playlists pane. To delete a Playlist, click on the Playlist then click the ▬ symbol in the Playlists pane. To delete an Event in a Playlist, click on the Playlist then click on the Event in the Playlist Contents pane, then click the ▬ symbol. Deleted Playlists and Events can undone or redone by clicking Undo Del Event or Redo Del Event. 30.3.5 MIDI Timecode Playback To enable MIDI Timecode playback, tick the “Global Enable” box. To enable a Playlist to be controlled by MIDI Timecode, tick that Playlists “Enable” box. When Clarity is receiving MIDI Timecode, any “enabled” Playlist will play each event when the time in the Event Details box matches the Timecode being received by Clarity. See also “Recede” below. 30.3.6 Recede There are two Recede options, Global Recede and Event Recede and they work together. If Global Recede is not ticked, no Event Recedes will work. An event needs both its own recede and the global recede enabled for it to recede. When Recede is enabled (default), events will follow the absolute value of the MIDI Timecode in both directions of time. If the Timecode jumps back in time, the events will follow. When “Recede” is NOT enabled, events will only follow forward changes in MIDI Timecode. For example, if recede is enabled, an event to trigger cue 2 at 0:0:10:0 will trigger cue 2 when the Timecode first becomes later than 0:0:10:0 and will trigger cue 1 when the Timecode first becomes earlier than 0:0:10:0. Receding from the first cue in a cue-list will release the cue-list. 30.3.7 Skip Intervening Events If the incoming Timecode suddenly skips to a new point in time, you can choose whether or not to skip any events that would have been triggered in that missing time period. 30.3.8 Big Time Clicking Big Time opens a time code reader box that displays the current Timecode and is persistent over all Clarity windows. “Big Time” can also be accessed directly from the Show/Timecode menu. 30.3.9 Simulator Clicking Simulator opens a Timecode generator that provides Timecode for testing time code controlled playback when an external feed of Timecode is not available. Click Run to start or stop the clock. Click Reset to set the time to zero. Page 183 MIDI Clarity Operator Manual V2.0 Clicking in the Format box allows you to select your required Timecode format from the drop down box. 24 Frames. For film projection rate. 25 Frames. For PAL video rate. 30 Frames – non drop. Non-drop Timecode for NTSC video rate. 30 Frames – drop frame. Drop-frame Timecode for NTSC video rate. The “Simulator” can also be accessed directly from the Show/Timecode menu. Page 184 Clarity Operator Manual V2.0 Remote Control 31 Remote Control 31.1 OVERVIEW Clarity uses OSC (Open Sound Control) which is a protocol for real time control between computers and multimedia devices. This allows Clarity to control OSC devices and also to be controlled by OSC devices. Clarity can also be configured to playback cues at a specific date and time. 31.2 CONTROLLING CLARITY VIA AN IPHONE Clarity can be controlled by an iPhone running the “TouchOSC” app and a dedicated Clarity “touchosc” template. The LX300 needs to be connected to a Wireless access point via one of it’s Ethernet ports. To setup the phone; Purchase and install the “TouchOSC” app from the app store. Go to HEXLER.net…..download and install the TouchOSC editor. Go to lsclighting.com…..download the ClarityiphoneTemplate.touchosc file and load it into the ToucOSCeditor. Press “Sync”, then browse from the TouchOSC app to install the template. Open Clarity’s OSC server from the “Show/Settings/OSC settings” menu and tick the “Enable OSC server”. Setup the “Outgoing port:” to match the Incoming port on the Iphone. Setup the “Incoming port:” to match Outgoing the port on the Iphone. “New Clients:” can be set to either “Reject”, “Ask” or “Allow”. If it is set to “Ask”, then any newly detected OSC client will cause a pop up screen to appear to confirm the operation. If you enter your Iphone address in the “Predefine client IP address”, then it will bypass the confirmation. If “New Clients:” is set to “Allow” then it will automatically connect but beware that unwelcome users might connect without your knowledge. Detailed instructions for downloading and installing TouchOSC and setting up the LX console can be found on the LSC website. www.lsclighting.com 31.3 CONTROLLING OTHER DEVICES FROM CLARITY Open Clarity’s OSC server from the “Show/OSC settings” menu and tick the “Enable OSC client”. OSC messages can be defined in the “Script” fields of cues. See section 24.8 for information on the script field. When the cue containing the script is played, the message is sent to the device. Page 185 Remote Control Clarity Operator Manual V2.0 For example: The script “osc(192.168.1.7):/audio/volume 50” sends the value 50 to the OSC address /audio/volume at OSC endpoint IP address 192.168.1.7 The script “osc(192.168.1.7):/message/label “ha ha” sends the string “ha ha” to /message/label. The script “osc(cdplayer):$play sends the predefined OSC message play to the pre-defined OSC endpoint called cdplayer. You can pre-define endpoints and messages in the OSC setting dialogue box. 31.4 SCHEDULER You can define various playback actions to occur at specific dates or times, with optional repeats for “n” repeats or forever. This function is intended for scenarios where Clarity operates unattended. To schedule an event, from the menu select “Show/Time date scheduler”. To add an event click on the + button. In the “Start time” pane, select the date and time for the action to occur. The action can be repeated by ticking the “Repeat” box and selecting how often the action will repeat. The drop down box allows you to choose from “seconds, minutes, hours, days, weeks, months or years. The number of repeats can also be set. Setting “Repeat count” to “0” will make the action repeat forever. The “Target” pane Page 186 Clarity Operator Manual V2.0 Remote Control The playback actions cover running a specific cue-list, jumping to a cue, releasing a cue-list or releasing all... Page 187 Tracking Backup Clarity Operator Manual V2.0 32 Tracking Backup 32.1 OVERVIEW Tracking Backup allows another LX console to track a master instance of Clarity on the LX console so that the playback state and show contents are kept in sync on both sessions via a network connection. If the master fails for any reason then the slave can be used to keep the show running. Tracking Backup automatically tracks: Playback state Cues/cue-lists Groups Presets/freesets And keeps them up to date on the back-up computer. Any other changes in the master will require a manual back-up to the slave. When this is required, a red warning banner will inform you. A single button click will complete the back-up. The prompt is necessary because these back-ups can cause a couple of seconds of interruption to the operation of Clarity. This allows you to choose an appropriate moment that does not affect your show. 32.2 SETTING UP TRACKING BACKUP Both master and slave must exist on the same network segment and subnet. On the master ensure that your show is loaded or your current show is saved. You cannot start tracking backup on an empty show or on a modified show. On the slave console, run Clarity then select close on the load show dialog box to leave a blank new show. On both master and slave click Show, Preferences, and ensure that the user preferences on the slave match those of the master. On the master select Show > Tracking Backup > Connect to master... On the slave select Show > Tracking Backup > Connect to slave... On the master, once the connection is established, Close the “Tracking Backup Master” dialog. You can reshow it at any time by selecting Show > Tracking Backup > Status... On the slave, the “Tracking Backup Slave Dialog” must remain open whilst tracking backup is active. This is to prevent any inadvertent changes to the slave show whilst it is tracking the master. Page 188 Clarity Operator Manual V2.0 Tracking Backup Although the “Tracking Backup Slave” dialog box must remain open on the slave computer, you can still observe the operation of the slave’s windows in the background by clicking on the Patch, Programmer, Palettes, Control Booth, Performance or Levels buttons in the dialog box. The slave operates on the same show file name as the master, but with “_tb” (tracking backup) appended to the name. This alerts you as to which show file is the master and which is the slave, preventing you from inadvertently operating the backup computer and tracking in reverse thus overwriting any changes to the proper master show. As the master show is modified, the items listed above are automatically tracked by the slave show which is also automatically saved whenever the master show is saved. As mentioned above, anything that modifies the master show that is not automatically tracked will cause a warning banner message to be displayed on the master. This tells you that tracking is suspended and a resync is needed and a button is presented for that purpose. When you resync, the master sends the show data over the network to the slave which will load the data (via a restart) and reconnect with the master. Click on “Tracking Backup Slave” and Clarity will start and automatically connect to the master. The slave will auto-reconnect if the connection is lost. 32.3 OPERATING FROM THE SLAVE In the event of a main system crash, Close the “Tracking Backup Slave” dialog box on the slave and the slave back-up will already have the same looks running live. Page 189 Preferences Clarity Operator Manual V2.0 33 Preferences and About 33.1 USER PREFERENCES Selecting Show, Settings, Preferences, from the main menu, allows you to customize the operation of Clarity. The default settings for new cue-lists can also be customized or reset to standard. See section 24.2 for details. When a show is saved, the user preferences and new cue-list default settings are always saved as part of the show file. When an existing show is loaded: • If “Store Preferences Globally” is ticked, the user preferences as set in the dialog box and the new cue-list defaults are retained. • If “Store Preferences Globally” is NOT ticked the user preferences and new cue-list defaults in the show file are loaded. When a NEW show is loaded: • If “Store Preferences Globally” is ticked, the user preferences as set in the dialog box and the new cue-list defaults are retained. • If “Store Preferences Globally” is NOT ticked the default preferences and standard cue-list settings are loaded. To reset the user preferences to their default settings (shown above), click Show, Settings, Preferences, Reset. "Auto load last show". Default = un-ticked. If ticked, when Clarity is started it will automatically load the last used show. "Save/Restore playback state". Default = ticked. If ticked, Clarity will include currently active playback states when saving a show so that loading that show restores its exact playback state. "Snap-restore playback". Default = un-ticked. If ticked, all playbacks will snap to their saved values when Clarity loads. Page 190 Clarity Operator Manual V2.0 Preferences If not ticked they will fade to their values using the fade times recorded in the cues. Only available if “Save/Restore playback” is ticked. See also “DMX holdoff after load” below. "Programmer release intensity first". Default = ticked. If ticked, when a Programmer is cleared, all intensity attributes will fade out before any other attributes are cleared. This prevents unwanted movements and colour changes being seen on the output. If not ticked, all attributes are cleared at the same time. "Start cue-list edit blind”. Default = ticked. If ticked, when a cue-list is edited, Clarity will open a blind edit session to edit the selected cue. De-selecting blind on the edit session will cause the edit session to jump to the current cue if the cue-list is active. If un-ticked, when a cue-list is edited, it will open a live edit session so that the changes (edits) that you make will be seen on the output. If a playback advances the cue-list to the next cue, the edit session keeps track so that the current cue can be instantly edited by the Programmer. If you release the cue-list then the edit session is automatically sent to blind. See “Channel Controller Mode” below for more details. ”Connect fader for cue-list edit”. Default = ticked. If ticked, the level fader of any playback whose cue-list is being edited live <on stage> will control the output level of the live edit session. See “Channel Controller Mode” below for more details. “Programmer follow selected playback”. Default = un-ticked. If ticked and if multiple cue-lists are being edited at the same time, you can automatically switch the programmer to any playbacks edit session by selecting that playback. Press Select, and then press any of the required playbacks flashing buttons. See “Channel Controller Mode” below for more details. “Mask intensity when recording presets”. Default = ticked. A preset is usually recorded with only specifically selected attributes (for example, only focus values or only colour values). If ticked, intensity will not be included when a preset is recorded. You can temporarily override this by clicking on the intensity button when recording the preset. “Show unit number instead of fixture label”. Default = un-ticked. Each fixture has a unique “Unit # (number)” and a “Name” as set in patch. The unit number is used to select fixtures when using “command line programming”. If un-ticked, fixture names are displayed in the programmer and the levels windows. If ticked, fixture unit numbers are displayed in the programmer and the levels windows. “Programmer operates at normal priority". Default = un-ticked. If ticked, the Programmer has the same priority as a normal playback and therefore can be overridden by a playback on a Latest Take Precedence basis. “Auto-enter commandline on 2nd digit after AT”. Default = ticked. If ticked, this alleviates the need to press [Enter] after entering an 2-digit intensity value when using command line programming. “Swap programmer window side buttons (LX)”. Default = un-ticked. This only applies to the console models of Clarity. If ticked, it swaps the buttons on the side of the encoder wheel touch screen. “Close edit session when saved”. Default = un-ticked. If ticked, any edit session in the programmer will be automatically closed when the edit session is saved. Page 191 Preferences Clarity Operator Manual V2.0 "Ignore GM/DBO". Default = un-ticked. If ticked, the GM (Grand Master) and DBO (Dead Black Out) functions are disabled. “Deactivate group masters while paged out”. Default = ticked. When ticked, a playback configured as a group master will be deactivated when it is not on the currently selected page. “Only allow Rel All together with Function”. Default = un-ticked. Applies to VX20 wing only. When ticked, the Release All button will only operate if the Function button is pressed at the same time. This is a safety mechanism to prevent the inadvertent releasing of all playbacks. “Run “lamp on” macros in parallel”. Default = un-ticked. Normally the ‘Lamp on’ command is executed sequentially for each fixture to avoid overloading the rig, but in some cases this is unnecessary so this option causes all selected fixtures to be lamped-on at the same time so that the operation completes quicker. “Invert flash button operation on rate faders”. Default = un-ticked. If a cue-list is loaded on a playback and there are un-used (clear) playbacks to the right of the loaded playback, then the unused playbacks can be linked to the loaded playback to provide greater live control of Chase Rate, Playback Rate, FX Rate and FX Amplitude. Normally you need to hold the Flash button while moving the rate/amplitude fader to adjust the value. If you reach a fader end-stop but you need to more range, you can release the flash button and move the fader to the opposite end, then hold flash and move fader to continue adjusting the value. If “Invert flash button operation on rate faders” is ticked you just move the fader without holding flash to adjust the value, then (if you reach the fader end stop) hold flash to reposition the fader. "Enable logging to file" Default = un-ticked. When ticked, many of Clarity’s actions are logged to a file called clarity.log and stored in a public documents location. These log files can be used by LSC to check the operation of Clarity. Only tick this box if instructed to by LSC. If the box is ticked it has no effect on the operation of Clarity but if the log files are not required they can accumulate over time. "Trackball & mouse divisor settings". These setting adjust the sensitivity of the mouse or trackball movements. The fine mouse setting is used when the “Shift” button is held whilst the mouse is dragged. The fine trackball setting is used when the “Fine” button is held whilst the trackball is moved. “VX Sticky timeout (s)” Default = 5 seconds. When you press either Select, Release or Edit, all of the playback buttons flash waiting for you to select a playback. If you do not immediately make a selection, sticky timeout sets how long they wait before they stop flashing. “VX Trackball timeout (ms)” Default = 200 ms. Unlike a mouse where you click, drag then release, a trackball does not have a button to click and release. Therefore, a trackball movement cannot be “finalized” by a release of a button so this time sets the delay from when the trackball stops moving to when the move is finalized. A finalized move can be undone by clicking on the Undo button. “Max movie pixels” Default = 10800 pixels. Movies are pre-processed by Clarity before being sent to the matrix display. If the movie is of a much higher resolution than the matrix can display, then a lot of processing power can be wasted on unseen resolution. This preference limits the resolution to be pre-processed and thus saves processing power. “Default fade time”. Default = 2000 ms (2 seconds). Page 192 Clarity Operator Manual V2.0 Preferences Set the default fade time that will be used for new parameter values in the programmer when recording a cue. "Blind time". Default = 1000 ms. The fade time that the programmer uses to go in and out of blind mode, entered in ms (milliseconds). For example 2 seconds = 2000ms. "Clear Time". Default = 1000 ms. The fade out time that the programmer uses when it is cleared, entered in ms (milliseconds). For example 2 seconds = 2000ms. "DMX holdoff after load (s)" Default = 2 seconds. All output is delayed for n (the time you set) seconds after loading a show. In the unlikely event that Clarity stops responding and needs to be restarted, the playbacks will hold the last DMX state and the Grand Master and DBO still control all intensity channels. When the show is reloaded, any active cues will fade up using their recorded fade times. Therefore there could be a dip in intensity between the held state in the playback and the fade up of the restored playback. If you set the DMX holdoff time to be slightly longer than the cue fade up time, the intensity levels will not dip on the output. This setting can be made redundant enabling the “Snap-restore playback” setting above. "Default lamp ctrl hold time". Default = 4000 ms. The duration of the “Lamp on” command that is sent when using the Ctrl button on the Programmers Selection window. "Number of audio streams". Default = 16. The maximum number of audio streams that can be running at one time . “HTP override priority”. Default = 100. LTP playbacks at this priority or higher will override HTP playbacks, otherwise HTP takes precedence over LTP. “On level”. Default = 100%. Sets the intensity level that a selected fixture(s) will be set to when the On button is pressed on an LX console or F is pressed on a keyboard . If an On level other than 100% is set, then the first press of the On or F button will turn on the fixture at that level and a second press will set it to 100%. 33.1.1 New Show Preferences When a new show is opened, Clarity allows you to use either your preferred default settings or the standard default settings (factory defaults). This includes the settings in the “User Preferences” and the playback settings for a new cue-list in the control booth. To open a new show with your preferred default settings click Show, Settings, Preferences then tick the “Store preferences globally” check box. Set your required preferences in the “User Preferences” dialog box and also set your playback preferences in the control booth. Re-start Clarity, then when “Load show?” appears, click Close. To open a new show with the standard default settings click Show, Settings, Preferences then un-tick the “Store preferences globally” check box. Re-start Clarity, then when “Load show?” appears, click Close. Page 193 Preferences Clarity Operator Manual V2.0 33.2 ABOUT CLARITY Selecting, Show, About LSC Clarity…, displays the About LSC Clarity dialog box. Version number Here you can find information about your version of the Clarity software. Page 194 Clarity Operator Manual V2.0 LX Tools 34 LX Tools 34.1 OVERVIEW LX Tools is a utility program that provides access to hardware configuration, help files and software upgrades on the LX consoles. 34.2 STARTING LX TOOLS To start LX Tools from the console press Function+Fine+Fine at the same time. To start LX Tools from the keyboard press Ctrl+Alt+L at the same time. The LX Tools utility appears on the encoder wheel touch screen…… There are two pages of options. Press More to select the other page. 34.2.1 Brightness The LX Tools Brightness button allows you to independently adjust the brightness of the backlit buttons, touch screen monitor, mini-screens and the LED desk lamp. There are five settings of “Bright” (fixed), “User 1”, “User 2”, “User 3” and “Dark” (fixed). Page 195 Technical Support 34.2.2 Clarity Operator Manual V2.0 Software Management The LX Tools Software Management button pprovides tools for upgrading the software. 34.2.3 Help The LX Tools Help button, pprovides a copy of this manual and video tutorials. 34.2.4 Configure Monitors The LX Tools Configure Monitors button allows you to optimise the displays for the physical position(s) of the external monitor so that moving the mouse off the inbuilt monitor(s) moves it onto the correct external monitor(s). LX300 Monitor Configuration 34.2.5 Networking The LX Tools Networking button allows you to setup the network connection of the two Ethernet ports. Page 196 Clarity Operator Manual V2.0 LX Tools See also section 35 for details on how to allow LSC to connect to your console via the internet to resolve problems. Page 197 Technical Support 34.2.6 Clarity Operator Manual V2.0 Calibrate Touch Screens The LX Tools Calibrate Touch Screens button allows you to calibrate the inbuilt touch screens. 34.2.7 Clock The LX Tools Clock button allows you to set the Clock that is displayed beside the Playbacks. 34.2.8 Diagnostics The LX Tools Diagnostics should only be run when instructed by LSC technical support. It requires a password. 34.2.9 System Information The LX Tools System Information button provides system information such as ….. Software versions. Bootloaders. Hardware. 34.2.10 Restart GUI The LX Tools Restart GUI provides a quick re-start for the GUI. Page 198 Clarity Operator Manual V2.0 LX Tools 35 Technical Support If you are experiencing problems with Clarity either contact your local LSC agent or post a message on the LSC forum at http://www.lsclighting.com/forums/ LSC technical support staff can remotely interrogate any LX console that is connected to the internet. This is accomplished using a Remote Desktop application called TeamViewer that is pre-installed on LX consoles. To use this facility: Connect a network cable from your network (with internet access) to the console's “Ethernet 2” connector. Start LX Tools by pressing Function+Fine+Fine at the same time. Select the “Networking” page and ensure “Ethernet 2” (right panel) is configured as “DHCP”. Select the “System Information” page and select Remote Support. This will start TeamViewer. When TeamViewer connects to the internet it will populate “Your ID” field with a 9 digit number and “Password” field with a 4 digit number. Send “Your ID” 9-digit number to LSC. Leave the console running and connected to the internet until contacted by LSC. Page 199 Fixture Editor LX300 Operator Manual V1 36 Fixture Editor 36.1 OVERVIEW Clarity's contains a fully integrated fixture library of over 2000 fixture personalities supplied by Carallon, an independent supplier of fixture libraries. However, if you have a fixture that is not in the library you can either request a fixture personality file from LSC or use the Clarity fixture editor to create your custom fixture personality. 36.2 FIXTURE REQUEST SERVICE To request a fixture file from LSC, please supply all details of the fixture including the brand, model, version number, operating modes and a DMX chart or list. Submit your request including this information at: http://www.lsclighting.com/help-centre/clarity-templates LSC will email you a Clarity fixture file for your new fixture. See section 11.11 for details on how to add the custom fixture file to Clarity. 36.3 FIXTURE EDITOR To start the fixture editor, from the Show tab select….. Switch to fixture editor. The easiest method of creating a new fixture is to load an existing fixture that has similar functions to that of the new fixture then edit the attributes to match those of the new fixture. When you have made the edits, click “Save as…” and enter the new fixtures name. Page 200 Clarity Operator Manual V2.0 Operating Concepts & Terminology 37 Operating Concepts and Terminology 37.1 OVERVIEW The operation of Clarity is easily understood when you know the meaning of certain key terms that are frequently used by Clarity. These terms have been adopted by LSC as the best descriptions for functions and operations performed on Clarity and may not be terms adopted on similar equipment. These key terms are printed in underlined text below. 37.2 PROGRAMMER / PLAYBACK Clarity uses a programmer and playback method of controlling fixtures. In a programmer, you create lighting looks and record them as cues in a cue-list. In a playback, you playback the cue-list. There are many options available for you to choose what is recorded in each cue as well as how each cue-list is played back. Clarity is, by default, a tracking controller which means that Clarity usually only records and plays back the changes that you make between each cue that you record. You can also choose to record everything that is grabbed in the programmer (not just the changes since the last recording) and to playback cues that include the entire look. This is known as cue only playback mode. The various options are described below. See also the Record and Control Booth sections for more details on tracking and cue only. 37.3 PRIORITY CONTROL Fixtures have attributes (intensity, pan, tilt, colour etc) and Clarity controls those attributes by outputting values on the DMX slot associated with each attribute. Attributes can be controlled by many different sources from within Clarity. The source of control could be a programmer, a playback (of which there are many), or possibly no source is currently controlling an attribute. When multiple sources are attempting to control an attribute, Clarity uses a priority system to determine which source has control. A higher priority source will override a lower priority on the output. The priority order is: Grand Master and DBO (Dead Black Out) control intensity only. Highlight function. Programmers. Playbacks. In addition to this priority order, individual playbacks operate on the LTP (Latest Take Precedence) principle. The latest cue to be played back will output its attribute values and will override any previous playback that contained the same attributes. (The priority of each cuelist can also be manually altered if required). 37.4 ATTRIBUTE DEFAULT VALUES When an attribute is not under control of a programmer or playback, Clarity's DMX output for that attribute will be its default values contained in Clarity's fixture library. These values differ for each type of fixture but typically will have the intensity attribute set to zero, pan and tilt set to mid range and other attributes set to obtain an open clear beam. 37.5 PROGRAMMER CONTROL When a fixture attribute is controlled by a programmer, the attribute is said to have been grabbed by the programmer (indicated by an * beside its name in the selection side bar). If the programmer is used to vary the value of the attribute, the attribute is said to have been touched by the programmer. If the touched value is recorded into a cue-list, then that the attribute is no longer touched. If it is varied after being recorded it is again touched. When an attribute is no longer controlled by a programmer it is said to be cleared from the programmer. Page 201 Operating Concepts & Terminology Clarity Operator Manual V2.0 37.6 PLAYBACK CONTROL When a cue is played back, any fixture attribute values in that cue appear on the output (subject to priority rules above). When a playback no longer controls any attributes, the playback is said to be released. 37.7 RECORDING AND PLAYBACK CONCEPTS When you record a cue, there are several options that control exactly which attribute values will be recorded. The options that you choose determine the suitability of the cue for the style of playback that you choose to use. Each cue-list can be individually set for its own mode of playback. In its simplest form there are two modes of playback, Tracking and Cue Only. These playback modes determine how the output of a playback will change when a cue is played back. The default settings in Clarity will record cues that are suitable for playback in tracking mode and play them back in tracking mode. Let’s firstly look at how the different modes of playback work and then see how to record cues that are best suited to the selected playback mode. 37.7.1 Tracking Playback When a cue-list is set to Tracking mode and the first cue is played back, the fixture attribute values in the first cue appear on the output of the playback. When the next cue is played back, its recorded values appear and any values from previous cues that were not changed by this latest cue will remain on the output of the playback. The unchanged values from previous cues are said to track through to the current state. The values in the current cue are known as hard values and any values from previous cues are known as tracked values. Therefore, in tracking mode, when a cue is played back, the current state on the output of the playback will be the hard values in the current cue plus any tracked values from previous cues. For example: Here are 3 cues played back in tracking mode. Cue 1 sets the look on stage and then cues 2 and 3 only contain hard values for the changes that need to occur on stage. attribute 1 attribute 2 attribute 3 Cue 1 100 50 25 Output 100 50 25 Cue 2 80 Output 80 50 25 Cue 3 Output 25 80 25 25 Cue 1 contains hard values for attributes 1, 2 and 3 so when it is played back, the attributes go to 100%, 50% and 25% respectively. Cue 2 only contains a hard value for channel 1 so when it is played back attribute 1 changes to 80% and attributes 2 and 3 track through and remain at 50% and 25%. Cue 3 only contains a hard value for attribute 2 so when it is played back attribute 2 changes to 25% and attributes 1 and 3 track through and remain at 80% and 25%. 37.7.2 Typical Tracking Operations Typical operations using the default record and playback settings (tracking) will be: Select fixtures and grab them in a programmer by adjusting their attributes for the desired look. All of these attributes have now been touched. Record the look as a cue in a new cue-list. The first cue in the cue-list will contain the values of all attributes that have been touched by the programmer. After the cue is recorded, no attributes have been touched. Page 202 Clarity Operator Manual V2.0 Operating Concepts & Terminology Adjust attributes in the programmer for the next look. Now only these varied attributes have been touched. Record the look as the next cue in the cue-list. With the default record settings, this cue will only contain the touched values. Repeat until all cues are recorded. Clear the programmer. Playback the cue-list. Release playback when finished. 37.7.3 Advantages of Tracking The major advantage of tracking is that if a change (edit) has to be made, only the initial cue that contained the hard values has to be changed and the change will then track through to all subsequent cues. For example: A cue-list containing 50 cues is recorded. The first cue sets the colour of the cyclorama (cyc) to red and it remains unchanged for the entire cue-list. Cues 2 to 50 make other changes but never affect the colour of the cyc. You now want to change the cyc colour to blue. This is quickly achieved by editing cue 1 and changing the colour. There is no need to edit the other 49 cues because the values in cue 1 will track through to cue 50. You then decide that half way through the cue-list you want to change the cyclorama to green. You edit cue 25 and change the colour. When the cue-list is played back, cue 1 sets the cyc to red and it remains unchanged until cue 25 where it changes to green. It then remains green right through to cue 50. Tracking also saves memory space because only changes are saved. 37.7.4 Disadvantages of Tracking Tracking can be confusing and frustrating unless it is fully understood. Remember that tracking does not necessarily give you a “what you see is what you get” result. The cues that you record only contain changes and not the entire look. For example, the look on stage when you record a cue might not be coming entirely from the programmer. It might be that certain fixtures are getting their colour values from a playback. When the cue-list is played back, the colour that you saw on stage when the cue was recorded might not be reproduced when the cue is played back. A common mistake is to create a look, record it as a cue and then clear the programmer. The next look is then created in the programmer and recorded as the next cue in the cue-list. The programmer is cleared again and the process repeated. The problem with this method is that the sequence of events that you observed on stage as you recorded the cue-list will not necessarily be reproduced when the cue-list is played back in tracking mode. This is because every time you cleared the programmer, you set all selected fixtures to their default values (or to a playbacks value if they were previously controlled by a playback). Typically you will see the fixtures blackout when the programmer is cleared. When you create and record the next cue, you are not recording new values for the previously cleared fixtures unless you specifically grab them in the programmer and set a value. They go off on stage but this off state is not in the programmer so it will not be recorded in the next cue. When the cue-list is played back in tracking mode, each cue does not replace the attribute values from the previous cues unless there are specific values for those attributes in the new cue. Therefore, a fixture that has intensity in a cue will stay on when the next cue is played back unless it has been told to turn off (or go to a different level) in that cue. For example: Record a simple cue-list of 3 cues with a single dimmer turned on in each cue. Select dimmer 1 and set to 100%. Record cue 1. Clear programmer, dimmer 1 fades off. Select dimmer 2 and set to 100%. Record cue 2. Clear programmer, dimmer 2 fades off. Select dimmer 3 and set to 100%. Page 203 Operating Concepts & Terminology This is Clarity Operator Manual V2.0 Record cue 3. Clear programmer, dimmer 3 fades off. Playback cue-list in tracking mode. Playback cue 1, dimmer 1 fades on. Playback cue 2, dimmer 2 fades on, dimmer 1 stays on because of tracking. Playback cue 3, dimmer 3 fades on, dimmers 1 and 2 stay on because of tracking. not the same as seen on stage when the cues were recorded. However, if the same cue-list was changed to Cue Only playback mode (below), the playback will be the same as seen on stage when the cues were recorded: Playback cue 1, dimmer 1 fades on. Playback cue 2, dimmer 2 fades on, dimmer 1 fades off. Playback cue 3, dimmer 3 fades on, dimmer 2 fades off 37.7.5 Cue Only Playback When a cue-list is set to playback in “Cue only” mode and the first cue is played back, the fixture attribute values in the first cue appear on the output of the playback. When the next cue is played back, its values replace all values from the previous cue and any attributes that do not have values in the new cue are released. The output of the playback is the latest cue only. Therefore, in Cue only mode, when a cue is played back, the current state on the output of the playback is only the hard values in that cue. Note: Cue Only playback should not be confused with “Cue Only” recording. A cue that is recorded as “Cue only” is intended to be used as a “one off” cue in a cue-list set for tracking playback. See section 37.8.2 below. For example: Here are the same 3 cues used in the previous example but this time they are played back in cue only mode. Cue 1 sets the look on stage and then cues 2 replaces cue 1 and cue 3 replaces cue 2. Attributes that do not have a value in a cue are released and go to their default values. Channel 1 Channel 2 Channel 3 Cue 1 100 50 25 Output 100 50 25 Cue 2 80 Output 80 0 0 Cue 3 Output 25 0 25 0 Cue 1 contains hard values for attributes 1, 2 and 3 so when it is played back, the attributes go to 100%, 50% and 25% respectively. Cue 2 only contains a hard value for attribute 1 so when it is played back attribute 1 changes to 80% and channels 2 and 3 are released. Cue 3 only contains a hard value for attribute 2 so when it is played back attribute 2 changes to 25% and channels 1 and 3 are released. 37.8 RECORDING CUES When you record a cue, you need to take into account the playback mode of the cue-list that will be used when the cue is played back. The default setting of Clarity are for tracking playback and therefore Clarity will, by default, record only touched values. That is, it records changes that have been made in the programmer since the previous cue in the cue-list was recorded. These cues are suitable for playback in tracking mode. Page 204 Clarity Operator Manual V2.0 Operating Concepts & Terminology If you intend to playback the cue-list in Cue only mode, then you should include any unchanged information in the cue and not just the changes. In other word, you should record all grabbed values, not just the touched values. When you click the Record button, the Record Cue dialog box allows you to choose what will be included in the cue. Setting “Playback” to either “Tracking” or “Cue Only” will automatically select the appropriate option in the “Contents Options” pane. Tracking Contents 37.8.1 Content Options Exclude redundant state (changes only/tracking). This option records cues that are suitable for tracking playback. The recorded cue excludes any redundant values from the previous state. The cue only contains the touched (altered since last recording) attribute values. When this cue is played back in a cue-list set for tracking playback, the output will be the hard values of this new cue plus the redundant values tracked through from previous cues. Include unchanged information (non-tracking). This option records cues that are suitable for cue only playback. The recorded cue includes all grabbed values in the current programmer session, the entire look in the programmer. When this cue is played back in a cue-list set for cue only playback, the values in this cue will totally replace the output from the previous cue. Blocking Cues There are times when you are using tracking playback that you might want to prevent changes from tracking through to the next cue. Typically this might be a change of scene in a theatrical production or the next song in a musical performance. This is achieved by using a Block Cue in the cue-list. Just like a cue recorded using the “Include unchanged information (non-tracking)” option, it contains hard values for all attributes that have been touched (changed) since the previous cue in the cue-list was recorded, but it also takes all of the tracked values that would exist on the output of the playback (as if the cue-list had been played back) and converts them into hard values then automatically adds them to the cue. When a Block Cue exists in a cue list, subsequent edits that are made to previous steps in the cue list will not track through and affect the Block Cue or the cues following it. For example: Here is a cue-list played back in Tracking mode. Cue 3 is a Block cue that contains hard values for all attributes so it blocks any tracked values. Page 205 Operating Concepts & Terminology Clarity Operator Manual V2.0 Channel 1 Channel 2 Channel 3 Cue 1 100 50 25 Output 100 50 25 Cue 2 80 Output 50 50 25 Cue 3 BLOCK 50 75 25 Output 50 75 25 Cue 4 25 Output 25 75 25 Cue 1 contains hard values for attributes 1, 2 and 3 so when it is played back, the attributes go to 100%, 50% and 25% respectively. Cue 2 only contains a hard value for attribute 1 so when it is played back attribute 1 changes to 80% and attributes 2 and 3 track through and remain at 50% and 25%. Cue 3 is a block cue so it contains hard values for all attributes. Cue 4 only contains a hard value for attribute 1 so when it is played back attribute 1 changes to 25% and attributes 2 and 3 track through and remain at 75% and 25%. Clarity can record two types of Block cue. Blocking – incoming fixtures only. This option records a cue that contains hard values for all attributes of all fixtures that are in the cue-list. This includes: All grabbed attributes in the programmer. All of the tracked values that would exist if the cue-list had been played back. Current output values for all other attributes of the fixtures in the cue. If this cue is played back in a tracking cue-list, it will Block any tracked values from affecting every attribute of all fixtures in the cue. This type of cue is often recorded part way through a tracking cue-list at the end of a theatrical scene or the end of a musical item so that subsequent edits to earlier cues will not track through into the next scene or song. Blocking – all fixtures. This records hard values for all attributes of all patched fixtures. It effectively takes a snapshot of Clarity’s output. If this cue is played back in a tracking cue-list, it will Block any tracked values from affecting any fixtures. Any cue in an existing cue-list can be changed into Block cue by editing the cue-list, selecting the cue then right clicking and selecting Block cue. 37.8.2 Cue Only (recording) When you are operating in tracking mode, there might be occasions where you want to playback a “one off” cue and you do not want the values in that cue to track into later cues in the cue-list. This is achieved by recording a cue as “cue only”. The channels in the cue are tagged by Clarity as “q only”. When a cue containing “q only” channels is played back in tracking mode, the current state on the output of the playback is the hard values of the “q only” channels plus any tracked values from the previous cues. When the next cue is played back, the state from the most recent (non q only) values is restored automatically plus any new values in the incoming cue are used. In other words, when the next cue is played back, the output tracks the values as if the “cue only” values did not exist. You can also edit existing cues or channels within a cue to be “cue only”. Page 206 Clarity Operator Manual V2.0 37.8.3 Operating Concepts & Terminology Mark Cues (Move in Black) A Mark cue is a special type of cue that you can insert in a cue-list. Mark cues are also known as “move in black” and are used to pre-position fixture attributes without their movements or changes being seen on stage. When you insert a Mark cue, Clarity looks at the previous cue and selects any fixtures that have an intensity of zero. Then, using that fixture selection, it looks at the following cue and copies all the attributes of those fixtures, except intensity, from the following cue and inserts them into the new Mark cue which is placed between the two cues. When the cue-list is played back and the cue prior to the mark cue finishes its fade, the Mark cue is automatically executed. It will move all of the attributes (except intensity) to their settings in the following cue. They therefore move in black. When the next cue is executed, the fixtures fade up, but nothing else changes because all other attributes were pre-set by the Mark cue. Mark cues have a default fade time of 0.5 seconds. Mark cues are inserted by right clicking on a cue in the Control Booth window and selecting “Insert mark cue”. 37.9 DMX 512 DMX512 is the industry standard for the transmission of digital control signals between lighting equipment. It utilizes just a single pair of wires on which is transmitted the level information for the control of up to 512 DMX slots. As the DMX512 signal contains the level information for all slots, each piece of equipment needs to be able to read the level(s) of the slots(s) that apply only to that piece of equipment. To enable this, each piece of DMX512 receiving equipment has an address that you can set. This address is set to the first slot number to which the equipment is to respond. The end of the DMX line is terminated (120 Ω) to prevent the signal reflecting back up the line and causing possible errors. 37.10 DMX UNIVERSES If more than 512 DMX slots are required, then more DMX outputs are used. The slot numbers on each DMX output are always 1 to 512. To differentiate between each DMX output they are called Universe1, Universe 2 etc. Clarity’s internal DMX universes are designated as Universe A, B etc. 37.10.1 DMX Slot A moving light, colour scroller, dimmer or any other DMX controlled device is known as a fixture. Every Fixture has a selectable DMX starting slot and this is patched to that same DMX SLOT number on Clarity. Clarity will then automatically patch all of the remaining DMX slots for that Fixture according to the information in the library for that particular Fixture. 37.10.2 Attribute. Each brand and model of Fixture has a specified number and order of control channels. An attribute is one or two DMX control channels (two channels used for higher resolution) that uniquely controls one of the physical motions of the Fixture. The manufacturer’s specification of a Fixture lists each attribute and its control channel number(s). 37.11 HTP (HIGHEST TAKES PRECEDENCE) If the value for an attribute is emanating from several places at the same time then the highest of all those values will be the value at the output. HTP is typically used for intensity control. 37.12 LTP (LATEST TAKES PRECEDENCE) The value on the output will always be the value from the place where the latest action took place. LTP is typically used for movement control. 37.13 RDM RDM stands for Remote Device Management. It is an “extension” to DMX. Since the inception of DMX it has always been a ‘one way' control system. Data only ever flows in one direction, from the lighting controller outwards to whatever it may be connected to. The Page 207 Operating Concepts & Terminology Clarity Operator Manual V2.0 controller has no idea what it is connected to, or even if what it's connected to is working, switched on, or even there at all! RDM changes all that allowing the equipment to answer back! An RDM enabled moving light, for example, can tell you many useful things about its operation - the DMX address it is set to, the operating mode it is in, whether its pan or tilt is inverted and how many hours since the lamp was last changed. But RDM can do more than that. It isn't limited to just reporting back, it can change things as well. As its name suggests, it can remotely manage your device. RDM has been designed to work with existing DMX systems. It does this by interleaving its messages with the regular DMX signal over the same wires. There is no need to change any of your cables but because RDM messages now go in two directions, any in-line DMX processing you have needs to be changed for new RDM hardware. This will most commonly mean that DMX splitters and buffers will need to be upgraded to RDM capable devices. Page 208 Clarity Operator Manual V2.0 Hints and Tips 38 Hints and Tips 38.1 SIMPLE CUE PLAYBACK If you are a novice and are having trouble understanding tracking the following settings will make Clarity operate in Cue Only mode with the cues automatically playing and releasing when a fader is raised or lowered. 1) Set the Playback mode to "Cue Only". 2) Open Options and select the 2 options highlighted in red. 3) Select the "Keep Settings" option at the bottom so that Clarity will use the new settings each time you record a new cue. 38.2 PARKED CHANNELS If you want some channels to always be on whenever you start your show (such as those that control DMX power racks for moving lights) then you can do this by: Recording a Cue-list with the channels you want set at 100% intensity. Set the Priority of the Cue-list to be higher than the programmer (use 150). Set the "Ignore Release All" box (found under the Options button). Set the Preferences in the Show Menu to "Restore Playback State". Activate the cue and save the show. Whenever you load the show this cue will automatically run and stay on for the duration of the show. 38.3 ONE SHOT CHASE You can do a one-shot chase by setting the “Release at end” option and setting the release time to 0 seconds. Setting “Go on fader up” will make the chase run automatically when the fader is raised. Release Time Page 209 Hints and Tips Clarity Operator Manual V2.0 38.4 PERFORMANCE WINDOW TIPS Allocate the Performance Window to an external touch screen monitor (if supported) and set the monitor resolution really low in order to get make the executor buttons large and easy to press. In the Performance Window create rows that just contain "looks". You can fire an entire row with just one button push which might contain for example a media clip and also a colour cue for your movers. You can just fire a blank row to effectively release all columns. If there are some columns you don't want to release, then on the blank row, right-click the relevant cells and choose “replace with blank cell”. 38.5 FLASHING A CUE You can achieve toggle on/off very easily by recording a cue-list containing a single “halt” cue and then setting the cue-list to “release at end”. Set the fade time and release times to 0 seconds. Pressing the Go button will turn on the cue on the first press and release it on the second press. 38.6 QUICK RECORD When you press record, you can press the flash button of a playback to record the cue on that playback. 38.7 SNAPPING FORWARDS OR BACKWARDS Press Function+ to snap to the next cue. Press Function+ II I to snap to the previous cue. 38.8 OPERATE CLARITY LIKE A MANUAL DESK If you want to work in the same fashion as an LSC maXim console or other similar manual console then you can simply record each of your looks to separate playback. Now use the faders to playback your looks and set the level of each one live on stage for a combined look. To record the current on stage look, press Record and select the "Blocking All Fixtures" option at the bottom right of the pop-up box. This records a snapshot of the lights on stage, just like a maXim does, complete with the proportional levels. 38.9 PROGRAMMER OVERRIDE If you are not familiar with a “Programmer” type of lighting controller you might often get caught out when a playback does not do what you expect it to do because you have some (or all) of its channels still being controlled by the programmer. This is because the programmer has a higher priority than a playback so it prevents the playback from controlling the channels. You can overcome this problem by setting the programmer to the same priority as a playback. Select “Show/Preferences” and tick the “Programmer operates at normal priority” check box. Now the programmer can be overridden by a playback on a Latest Take Precedence basis. 38.10 MEDIA SERVER THUMBNAILS The most common tech support issue we get with Clarity is how to make Media Server thumbnails work. The great part is that with Clarity it is all automatic, so there is nothing to set up in the Clarity software. However there are a few tricks with the computer and/or the Media Server itself. Firstly check that you can control the Media Server via Art-Net. If not then you have a major network issue that needs to be resolved first. This is outside the scope of this article. If you have Art-Net control but no thumbnails then read on. Page 210 Clarity Operator Manual V2.0 Hints and Tips 1) IP addresses. For thumbnail exchange to work both the Clarity computer and the Media Server must be on the same IP address ranges. We suggest using the 2.xxx.xxx.xxx range. If you are not familiar with how to define IP addresses here are some settings to try. Clarity Computer IP Addr: 2.0.0.101 Subnet : 255.0.0.0 Gateway 2.0.0.201 Media Server IP Addr: 2.0.0.201 Subnet : 255.0.0.0 Gateway:2.0.0.101 2) Do you have Sun VirtualBox installed on your computer? If so, then by default it re-routes all the network traffic and stops thumbnail exchange from working. In this scenario please disable the VirtualBox Host-Only Ethernet Adapter from within the device manager to resolve the problem. 3) If you are using Pandora's Box then you need to go into the preferences and Tick the 'Enable Thumbnails' and 'CITP' checkboxes. 38.11 AUDIO PLAYBACK Clarity allows Audio playback to be programmed as part of a lighting show. MP3 files can be loaded into the console and then patched as an Audio 'fixture' for inclusion in a show. This fixture has two attributes, “Volume” and “Play/Pause/Stop”. To play audio is a simple matter of selecting the audio fixture, adjusting the volume and selecting Play. It can be saved as part of a cue in a cuelist or operated live and because Clarity treats it as a fixture it can be given fade, wait and delay times and the volume can be controlled via a fader if desired. This feature can be used in many different ways. One common method is to play a song, and have the lighting cues automatically synchronise to the track making Clarity ideal for Christmas light displays and themed environments. In theatrical shows it can be used to trigger sound effects at the same time as lighting cues (so the lightning flash occurs in sync with the sound). 38.12 AUTOMATED FOLLOW SPOT AUDIO CUES You can use the audio output of Clarity to accurately cue you follow spot operators. Record your voice with the cue as an audio file then load it onto Clarity. Then, for each upcoming follow spot cue, place a script command in the cue list and Clarity plays back the audio file containing the follow spot instructions. Because these instructions are in the cue list, delay times can be used to ensure that upcoming instructions are issued at an appropriate time. Audio out from Clarity is fed into the follow spot's communications system and this set-up saves saying the same thing over again for each show for those spot operators who somehow fail to take their own notes, nor can remember their cues. Total flexibility and it takes only seconds to implement with Clarity. Thanks Andrei. This technique can also be used when touring in foreign countries where they don't speak the same language as you. Get an interpreter to record all the commands in several different languages then load up whichever language is needed based on the country in which you are operating. 38.13 SIMPLE RGB MIXING Sometimes you may want to assign 3 faders to give live control of the Red, Green and Blue colours in the fixtures. If the LED fixture does not have a real dimmer channel, then Clarity uses a Virtual Dimmer, which works as a type of Grand master over the RGB channels. This is OK, but makes the above task a little tricky. Page 211 Hints and Tips Clarity Operator Manual V2.0 Here is what to do….. 1) Record a cue with the Intensity at 100% and all the colours at 0%. Set the priority to Low (50) and set the Options to "Ignore Release All". Play this cue and leave it on. 2) Record a Blue cue with the Blue at 100%, and then right click on the Red and Green attributes and select the 'Clear' option. Set the Options to "Go on fader up" and "Fader affects all attributes". Set the Fade Time to 0. 3) Do the same for the Red and Green cues. Now you can use the Red, Green and Blue cues to have live colour mixing of the RGB fixtures. 38.14 RECORDING ONLY PAN (OR TILT) When you only adjust Pan, Clarity automatically selects Tilt as well (as usually a position needs both). The same applies when you only adjust Tilt, Clarity automatically selects Pan as well. To record a Pan only cue or palette, on the encoder wheel touch screen select the Tilt attribute, Hold KO (Knock Out) and move the Tilt encoder wheel or, in the monitors Programmer window, right click on Tilt and select the 'Clear Tilt' item. Now you can record just the Pan information into a cue or Palette. 38.15 TIME PRESETS Every console provides the ability to create Presets and Palettes for Colours, Gobos, Positions, etc. Clarity extends this functionality to include Time Presets. Any timing information, no matter how simple or complex, can be saved to a Time Preset for instant recall when programming or busking live. Time Presets can include Fanned times, allowing the action to be delayed across multiple fixtures. In addition, using the unique Freeset ability of Clarity a fanned delay can be recorded once and later recalled across 2, 5, 7, 21 or any number of fixtures. 38.16 SORTING, BUDDYING & SUBGROUPS The Sort, Buddying and SubGroup controls allow you to quickly alter the way fixtures are controlled in the programmer. Sorting can be ordered by Selection, Numeric, Mirrored or Random. Buddying and Subgroups can be adjusted as required, allowing Effects, Fans and Freesets, Positions and Colours to be patterned across a range of fixtures. The Buddying control allows you to apply the same value or effect across pairs, triples or any number of fixtures. The Subgroup control repeats the pattern every 2,3,4 or more fixtures. Even more creativity can be quickly achieved with the combinations of these controls, as well as the Odd/Even selection buttons. 38.17 UNIVERSAL CONTROL. One of the most powerful features of Clarity is the Universal Control function. This presents every lighting fixture in a uniform manner. So no matter what weird and wonderful things the manufacturer does (such as share the dimmer and strobe on a single channel, or put the Reset commands at the end of the strobe channel) the LX console makes it easy to use the fixture. The dimmer encoder will only ever control the dimmer, and the strobe encoder will never accidentally reset the fixture. You can also grab a multiple different fixture types (e.g. mirrors with 90 degree pan and yokes with 540 degree pan) and then adjust the Pan and Tilt in degrees rather than DMX values so they will actually move together as if they were the same fixture. Clarity is even smart enough to switch the gobo between indexing and rotating modes as soon as you alter the rotation or indexing controls, just to make your life easier and save you precious minutes when under pressure. Of course there is also the ability to switch to direct IFCB mode, if you want to have full manual control, so Clarity offers you the best of both worlds. 38.18 COPY AND PASTE Clarity allows Copy and Paste between completely different fixture types. Page 212 Clarity Operator Manual V2.0 Hints and Tips For example, if you create a nice color fan and ballyhoo across a dozen LED moving wash lights and then paste it to a group of CMY moving mirror profile spots, Clarity will use real word values (Pan and Tilt in degrees) and do automatic RGB to CMY colour conversion so that the same look is reproduced in the different fixtures. The whole process takes a few seconds and 2 to 3 button presses to complete. You can even copy between fixtures with different feature sets and Clarity will simply ignore the missing functions. For example, you can also paste the above look into 200 RGB LED pars and Clarity will look after the color conversion whilst ignoring the Pan/Tilt parameters that don't exist on the par cans. 38.19 FANS BUTTONS The LX consoles provide dedicated Fan End and Fan Centre buttons, located right next to the encoders, to allow quick one handed fanning of any parameter. So Pan/Tilt fans take mere seconds to create and adjust to perfection. You can even use the fan buttons in the graphical colour picker to enable almost instant colour fans. When used in conjunction with the quick sort controls it is easy to do Mirrored, Selected Order, Random and other fan orders without taking your eyes off the stage. The Buddying and Subgroup controls allow the fans to be repeated across specific numbers of fixtures or in pairs, triplets, or whatever combination you require. 38.20 MULTIPLE PROGRAMMERS Clarity has the ability to have an unlimited number of programmers in operation. This allows you to quickly jump between different tasks without needing to save things to temporary cuelists. It is ideal for parking some work lights. Just switch to the next programmer, adjust the Pan/Tilt and intensity then switch back to the default programmer. The lights will stay where they are and any cues recorded whilst working in the default programmer will ignore the lights in the other programmer sessions. Another common scenario is where the you are busy working on a complex cue and you need to put this aside and work on a different part of the show. By putting the current Programmer into Blind mode and selecting a different programmer you can work on the other part of the show, saving and editing cues, then when you are finished it takes just 3 button presses to return to the original programmer, un-blind it and you are back exactly where you left off. Even the Undo information is unaffected, as each programmer has its own Undo/Redo history. Page 213 Compliance Statements LSC Clarity Operator Manual V1 39 COMPLIANCE STATEMENTS Declaration of Conformity This is to certify that the LX, QX and VX products are approved for use in Europe and Australia/New Zealand and conform to the following standards: European Norms EN55103-1 EN55103-2 EN60950 Australian / New Zealand Standards AS/NZS 4251.1 AS/NZS 4252.1 AS/NZS60950 To ensure compliance with EMC Directive 89/336 and the Australian Radio communications Act 1992, the following conditions (outside of LSC’s control) must be met. The computer on which Clarity and the QX or VX peripherals are connected to must itself be compliant to the above standards. High quality data cables with continuous shield must be used; Connectors with conductive back shells must be used. Federal Communications Commission (FCC) Declaration of Conformity LSC Lighting Systems (Aust) declares that the LX, QX and VX products comply with Part 15 of the FCC Rules. Operation is subject to the following two conditions: (1) This device may not cause harmful interference, and (2) This device must accept any interference received, including interference that may cause undesired operation. This equipment has been tested and found to comply with the limits for a Class B digital device, pursuant to Part 15 of the FCC Rules. These limits are designed to provide reasonable protection against harmful interference in a residential installation. This equipment can radiate radio frequency energy and, if not properly installed and used in accordance with the instructions, may cause harmful interference to radio communications. However, there is no guarantee that interference will not occur in a particular installation. If this equipment does cause harmful interference to radio or television reception, which can be determined by turning the equipment off and on, the user is encouraged to try to correct the interference by one or more of the following measures: reorient or relocate the receiving antenna; increase the separation between the equipment and receiver; connect the equipment into an outlet on a different circuit from that to which the receiver is connected; consult your local LSC dealer or an experienced radio/television technician for help - END - Page 214