1
grandMA 3D
Operating Manual
Version 6.0.4.0
Operating Manual grandMA 3D V 6.0.4.0
Content
1
Introduction .................................................................................................................... 5
2
System Requirements .................................................................................................... 6
3
Installation ...................................................................................................................... 6
4
3.1
Version of grandMA desk or grandMA onPC ........................................................... 6
3.2
IP Addresses ........................................................................................................... 7
3.3
Connection with the grandMA desk ......................................................................... 8
3.4
grandMA 1 or grandMA 2 mode .............................................................................. 9
Data Management .......................................................................................................... 9
4.1
Master / Slave ......................................................................................................... 9
4.2
Coordinate system .................................................................................................10
5
Quick Start ....................................................................................................................11
6
Program Surface ...........................................................................................................12
6.1
Menu Bar ...............................................................................................................13
6.2
Tool Bar .................................................................................................................15
6.3
Main Windows (Stage View, 3D Objects View) .......................................................17
6.3.1
Stage View ......................................................................................................17
6.3.2
Mouse + Keyboard Actions .............................................................................18
6.3.3
Arrangement of Objects (Align Objects) ..........................................................20
6.3.4
Duplicate (copy 3D Objects) ............................................................................21
6.3.5
3D Objects ......................................................................................................22
6.4
Assets (Information Window) ..................................................................................22
6.5
Properties...............................................................................................................23
6.6
Media Database .....................................................................................................23
6.7
Materials ................................................................................................................23
6.8
Moving Pathes .......................................................................................................24
6.9
Sessions ................................................................................................................26
6.10
Status Bar ..............................................................................................................26
7
Fixture Types ................................................................................................................27
8
3D Modeling and Import ................................................................................................32
8.1
3D Models Principles ..............................................................................................32
8.2
Parameters ............................................................................................................33
8.2.1
Axes ................................................................................................................34
8.2.2
Rotation Axes ..................................................................................................35
8.2.3
Linear Axes .....................................................................................................35
8.2.4
Beam of Light ..................................................................................................35
MA Lighting Technology GmbH Dachdeckerstr. 16 D-97297 Waldbüttelbrunn www.malighting.de
Page 2
Operating Manual grandMA 3D V 6.0.4.0
8.3
Automated Import ...................................................................................................36
8.4
Assigning of Models to Fixture Types .....................................................................37
8.5
Checklist for 3D Modeling.......................................................................................38
8.6
Creation of a 3D Model ..........................................................................................39
9
Video Creation ..............................................................................................................44
10
FAQ ...........................................................................................................................44
11
Keyboard Shortcuts ...................................................................................................45
12
Index..........................................................................................................................46
MA Lighting Technology GmbH Dachdeckerstr. 16 D-97297 Waldbüttelbrunn www.malighting.de
Page 3
Operating Manual grandMA 3D V 6.0.4.0
Copyright 2002-2009 MA Lighting Technology GmbH
The reproduction and distribution of the documentation and software and the use of its
contents is subject to written authorization from MA Lighting Technology GmbH.
Trademarks
Windows XP ®, Windows Vista ®, and Microsoft ® are registered trademarks of Microsoft,
Corp. All other names mentioned may be trademarks or registered trademarks of their
respective owners.
Thank you for placing your trust in this product.
This manual will provide all the necessary information for you to get the best out of your
visualization software.
The ‚grandMA 3D‘software is subject to continual development. It is therefore possible that
the entire information printed in this manual is out-of-date.
Up-to-date information can always be found in the current readme.txt file on the CD or the
downloaded medium.
For the current software version refer to www.malighting.com
We need your help!
If you have wishes or suggestions please send us an e-mail (tech.support@malighting.de ) .
Looking forward for a good cooperation
Your grandMA 3D team
MA Lighting Technology GmbH Dachdeckerstr. 16 D-97297 Waldbüttelbrunn www.malighting.de
Page 4
Operating Manual grandMA 3D V 6.0.4.0
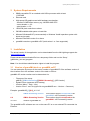
1 Introduction
grandMA 3D is a unique new user interface, created for the visualization of three dimensional
stage layouts to be utilized in conjunction with the grandMA product range. Series I and
series II desks are supported.
The software is designed as a pre-programming tool for light designers. It simplifies the
process of creating shows to save time and money.
grandMA 3D includes a library of basic graphical elements. Multiple windows with
front/side/top view can be opened and updated at the same time. All the stage elements can
be positioned in x/y/z directions and may also be rotated around the various axes. Custom
textures for the surface of these elements can be imported in a bitmap format or may be
chosen from a library.
The setup of lanterns, luminaries or moving lights can be simply retrieved from the grandMA
console’s or grandMA onPC show file per electronic transfer. There is no need to set DMX
lines, DMX addresses or operation modes for the single fixtures, as these details are already
pre-adjusted in the grandMA.
When switching to 3D rendering mode, the grandMA 3D software becomes an extremely
powerful visualizer with real time rendering facilities. All drawing elements, fixtures and
lanterns are shown with surface textures, as a kind of virtual reality. All functions of the
installed lights are remotely controlled by a connected grandMA desk and onPC and
displayed with realistic movements, colors and images. At the same time the viewing angle
can be changed by just moving the virtual camera around with full control of zoom, position
and rotation. Or just switch to another pre-defined camera position and start a new
movement from there.
Several optical fixture parameters, like beam angle, color (even color mixing) and gobos can
be displayed. Custom gobos can be inserted by simply assigning a color bitmap file to the
gobo position of the related fixture.
All the show data can later be received "online" from the grandMA desk or onPC and
displayed in real time rendering. It may also be recorded live and converted into one of the
standard video compression formats. These files can be easily viewed on any personal
computer or MAC with standard media player software and may even be sent by e-mail.
MA Lighting Technology GmbH Dachdeckerstr. 16 D-97297 Waldbüttelbrunn www.malighting.de
Page 5
Operating Manual grandMA 3D V 6.0.4.0
2 System Requirements
IBM® compatible PC or notebook with 2GHz processor with at least
1 GB RAM
Ethernet card
High-speed 3D graphics card with hardware acceleration:
- at least 512 MB video memory e.g. NVIDEA 9800 GTX
- vertex shader >= 3.0
- pixel shader >= 3.0
1024x768 pixel resolution or above
500 MB available disk space on hard disk
Microsoft Windows® XP (recommended) or Windows Vista® operation system with
latest service pack
Microsoft DirectX® version 9 or above
grandMA console or grandMA onPC (both series 1 or 2 are supported)
3 Installation
The actual version of the application can be downloaded from the MA Lighting support site:
www.malighting.de
TU
UTH
Please extract the downloaded file into a temporary folder and run the ‘Setup’
(gMAvideo_xxx.exe) program.
Note: You should have administration rights to install the program.
3.1 Version of grandMA desk or grandMA onPC
You can determine by means of the version number of grandMA 3D if the software version of
the visualizer fits to the software version of the desk or off-line.
grandMA 3D version number can be determined via:
-
Filename of the setup:
gMA3D_[{GMA2-Streaming}][{GMA1-Streaming}]_v{3D-Version}
Splash screen (apperars while startup)
Info box (Menu – Help – Info)
Version info of ‘.exe’ file (right click on grandMA3D.exe – Version – Comment)
Example: grandMA3D_[1][6.0]_v6.1.0.0
1
GMA2-Streaming Version
6.0
GMA1-Streaming Version
v6.1.0.0
Version of grandMA 3D
This number should correspond to the
grandMA 2 onPC streaming version
This number should correspond to the
grandMA 1 onPC streaming version
The grandMA onPC software can run on the same PC or on an external PC connected via
Ethernet.
MA Lighting Technology GmbH Dachdeckerstr. 16 D-97297 Waldbüttelbrunn www.malighting.de
Page 6
Operating Manual grandMA 3D V 6.0.4.0
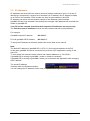
3.2 IP Addresses
IP addresses are what allow the internet and most modern networks to work. It’s a way of
identifying a computer by a unique set of numbers (an IP address). An IP address is made
up of a set of four numbers. Each number can have a value between 0 and 255.
IP adresses can be set via the network settings of the Windows system settings.
grandMA 3D has to be restarted if the settings are changed. New adresses are read with the
restart of grandMA 3D.
Your PC and the console must have their respective IP addresses set up correctly.
The first three sets of numbers must be the same and the last set must be different.
For example:
GrandMA console IP address:
192.168.0.5
PC with grandMA 3D IP address:
192.168.0.10
To setup the IP address of the desk, please refer to the desk user’s manual.
Note:
The default IP address of grandMA 3D is 127.0.0.1 (the local host address of the PC).
In this case grandMA 3D can be connected only with the onPC application running on the
same PC.
To work within the external network choose the network address e.g. 192.168.0.x.
If grandMA 3D is working in grandMA 1 mode no restart is necessary.
If grandMA 3D is working in grandMA 2 mode you must restart the application after changing
the IP address.
The actual IP address
is shown within the Sessions window:.
You can change the IP address via the menu entry: ‘File – Settings – Network’.
MA Lighting Technology GmbH Dachdeckerstr. 16 D-97297 Waldbüttelbrunn www.malighting.de
Page 7
Operating Manual grandMA 3D V 6.0.4.0
3.3 Connection with the grandMA desk
Please make sure, that the program version of the grandMA desk meets the specifications
described in: Version of grandMA desk or grandMA onPC .
For communication you have to connect the PC with the grand MA console or another PC
running the grandMA onPC.
You can do this directly with a patch crossover cable with two RJ-45 connectors or via a
network switch.
grandMA II Console
RJ 45 Cable or Switch
grandMA 3D Computer
If you use a network with a switch, connect the PC with a regular patch network cable to the
switch.
Connect the cable to the desk.
Start the desk and load a show
Start a new session at the desk
Start the grandMA 3D application and join the session or invite the 3D from the desk
The application connects to the desk and receives the data of the current show. The received
show will be visualized.
If you do not get a connection to the desk, make sure that grandMA 3D has the right IP
address as described in ‘3.2 IP Addresses’ and that the corresponding mode: grandMA 1 or
grandMA 2 set accurate.
MA Lighting Technology GmbH Dachdeckerstr. 16 D-97297 Waldbüttelbrunn www.malighting.de
Page 8
Operating Manual grandMA 3D V 6.0.4.0
3.4 grandMA 1 or grandMA 2 mode
grandMA 3D supports series 1 and series 2 consoles. To switch between these modes it has
to be restarted in the desired mode. This can be done via the menu entry ‘File – Restart in
series x Mode’. The actual mode is displayed in the Stage view, the session window and the
Info Box (Menu – Help – Info).
Note: Show files of series 1 grandMA3D (.sl_ files) cannot be imported!
To visualize a grandMA series 1 show connect with the desk and the fixtures and their
positions will be visualized. The environment must be re-imported via the import function as
.3ds file (menu ‘File Import’) or rebuilt if no .3ds file exists.
4 Data Management
This section describes how data is managed by the desk and the 3D visualizer.
Desk and visualizer software can work independently. Each package can be operated
standalone. If they are connected in a MA network session the desk gets the master and 3D
becomes the slave of a session. Data changed within 3D is transferred to the desk and vice
versa. 3D and the desk use the same file format for show files (.gz files) in grandMA 2 mode.
Note:
In grandMA 1 mode (series 1 desk and .3d1 showfile) the environment (stage equipment like
trusses, people…) is stored within the 3D only.
4.1 Master / Slave
The MA console or onPC is always the master of a session.
Only if 3D is started as standalone it will be the master. If a desk is connected and a session
is started within the 3D the 3D show file will be transferred to the desk and then this becomes
the master. So the synchronization of desk and 3D data is guaranteed.
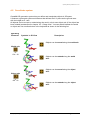
The three possible states of the connection are indicated by the heart in the status bar. The
blinking of the heart indicates the communication between the desk and grandMA 3D.
Heart is broken and red:
No connection to a session established
Heart is blinking green:
grandMA 3D has joined a session as slave
Heart is blinking blue:
GrandMA 3D has the Master function of a session. The creation of a session
with grandMA 3D can be used to transfer all data of a show to a desk or onPC. If
the loading is completed, the desk automatic becomes the master and grandMA
3D gets the slave.
ATTENTION: With the start of a new session (Create) the session founder overwrites all data
of the other members. I.e. if a new session is founded by the grandMA 3D all data in the
desk will be overwritten!
Because the 3D file contains all data it may be helpful to use the 3D as backup. Therefore
the 3D is started with the backup show as master and the desk is invited to the session.
MA Lighting Technology GmbH Dachdeckerstr. 16 D-97297 Waldbüttelbrunn www.malighting.de
Page 9
Operating Manual grandMA 3D V 6.0.4.0
4.2 Coordinate system
GrandMA 3D geometric system lets you define and manipulate objects in 3D space.
It features a geometric system architecture that defines the X-Y plane as the ground area
with the height as Z –axis.
All objects can be moved or rotated along the world- or their own object axis (if the object has
been rotated) as described in chapter ‘6.3.1 Stage View’. You can switch between the world
or object axis via a toolbar button or the keyboard as shown in the following list:
Operating
Elements
Symbols in 3D View
Description
Objects can be moved along the world axis.
World axis
or
Ctrl + W
Objects can be rotated along the world
axis.
Objects can be moved along the object
axis.
Object axis
or
Ctrl + O
Objects can be rotated along the object
axis.
MA Lighting Technology GmbH Dachdeckerstr. 16 D-97297 Waldbüttelbrunn www.malighting.de
Page 10
Operating Manual grandMA 3D V 6.0.4.0
5 Quick Start
This chapter is a quick tutorial how to start a session at the desk and connect the 3D.
Coming soon.
MA Lighting Technology GmbH Dachdeckerstr. 16 D-97297 Waldbüttelbrunn www.malighting.de
Page 11
Operating Manual grandMA 3D V 6.0.4.0
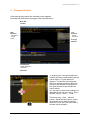
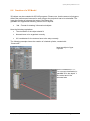
6 Program Surface
After starting the program the following screen appears.
Normally the windows are arranged in the following layout:
Menu Bar
Tool Bar
Main
Windows
3D Objects
Stage
Views
Tool
Windows
Assets
Cameras
…
Property
Window
Tool Windows
Media Database
Materials
…
Status Bar
To arrange your own layout select the
window and drag it while holding the left
mouse button. A ‘guide diamond’
appears. The arrows of the diamond
show the possible positions. Move the
pointer to the desired new position of
the ‘guide diamond’ and release the
mouse button.
You can save or load these settings in a
separate file via the menu entry: ‘View –
Window Layout – Save… / Load…’.
The menu entry: ‘View – Window
Layout - Reset Window Layout’ resets
all windows to their default positions.
When not in use you can ‘Auto Hide’ a
Window via the pushpin.
MA Lighting Technology GmbH Dachdeckerstr. 16 D-97297 Waldbüttelbrunn www.malighting.de
Page 12
Operating Manual grandMA 3D V 6.0.4.0
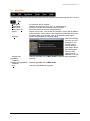
6.1 Menu Bar
Underlined characters mark the keyboard shortcuts pressed simultaneously with the ‘Alt’ key.
File
New Show
Load Show…
Save Show
Save Show as…
Import …
Settings…
Restart with
grandMA1
Network
Restart with grandMA2
Network
Exit
A new show will be created.
Load an existing show from file e.g. ‘showname.gz’.
Saves the current show with the given filename.
Save the current show with a new filename.
Import a 3D model. This model for example a venue will be added
to the showfile. At the moment the .3ds format (3ds Max known as
3D Studio Max) is supported. See: 8 3D Modeling and Import.
Opens the grandMA 3D Settings dialog.
Within this dialog
you can vary the
settings for the
several output
modes and get
information about
the used plugins.
Also you can
change the IP
address of the 3D.
Restarts grandMA 3D in MA1 mode to connect with a grandMA 1
network
Restarts grandMA 3D in MA2 mode.
Leave the grandMA 3D program.
MA Lighting Technology GmbH Dachdeckerstr. 16 D-97297 Waldbüttelbrunn www.malighting.de
Page 13
Operating Manual grandMA 3D V 6.0.4.0
Edit
Oops: (Undo)
Cut
Copy
Paste
Delete: selected elements
Reset selected Objects
Select All
Select Parent
Select Children
Select Next Object
Select Previous Object
Simple Duplicate
Add Group Object
Group Selected Objects
Rename
Move (Mode)
Rotate (Mode)
Follow (Mode)
Object Axis (Mode)
World Axis (Mode)
Previous
Next
Last action is undone.
Cuts the selected object (to clipboard).
Copies the selected object to clipboard (expect 3D objects).
Pastes the object from clipboard into the view.
Deletes the actual selected elements.
Sets the selected elements to the origin, 0,0,0.
Selects all objects in view.
Selects the parent object.
Selects only the children of the selected object.
Select the next object.
Selects the previous object.
Makes a simple duplicate of the selected object.
Adds a new object to build a group.
Creates a new object and adds all selected objects.
Rename the selected object.
Switch to move mode.
Switch to rotation mode.
Switch to follow spot mode
Move or rotate along the axis of the object.
Move or rotate along the world axis.
Selects the previous selected object.
If Previous was pressed the next object will be selected.
Functions
Arrangement
Duplicate
Change Model…
Opens the arrangement window to arrange objects in several
orders as described in chapter: ‘6.3.3 Arrangement of Objects
(Align Objects)’.
Opens the duplicate window to clone objects as described in
chapter: ‘6.3.4 Duplicate (copy 3D Objects)’.
Opens a dialog to change an existing 3D model.
Tools
Change user
Create Session
Join Session
Leave Session
Allow Invite
Sync Selection
Follow Into Blind
Take Simple Screenshot…
Diagnostics
Diagnostics Window
Opens a dialog to change the user of the session.
Creates a new session in MA network.
Joins to a session in MA network.
The session has to be selected in the ‘Sessions’ window
described in ‘6.9 Sessions’
Leaves the running session in MA network.
Allows the master of the MA session to do an automatic
invitation of the 3D to the session.
If this function is switched on, the selection of fixtures
between desk and 3D is synchronized. I.e. if fixtures are
selected within 3D the selection is also highlighted at the
desk and vice versa.
If selected 3D follows into the blind mode.
Opens a dialog to take a screenshot of the Stage View.
Images can be saved as .png files.
Several diagnostic options if problems occur.
You can save the diagnostics output and mail it to the MA
MA Lighting Technology GmbH Dachdeckerstr. 16 D-97297 Waldbüttelbrunn www.malighting.de
Page 14
Operating Manual grandMA 3D V 6.0.4.0
Tools
Save Diagnostics As…
Mail Diagnostics
Refresh Diagnostics
customer support to solve the problems.
View
Fullscreen
Open New Stage View
Assets Window
3D Objects Window
Materials Window
Media Database Window
Cameras
Add Front Camera
Add…
Add Front 2D View (2D)
Add at Current Position
Use Selected
Cameras Visible
Camera Spanning
Cameras Window
Properties Window
Sessions Window
Diagnostics Window
Screenshots
Open GMA2 Commandline
Render Info
Help Elements Visible
Window Layout
Load Window Layout…
Save Window Layout…
Reset Window Layout
Optimize Columns
Lock
Refresh Element
Go To
Previous
Next
Switch to the full screen view (Toggle with ‘Alt + Enter’)
Opens a new view for a stage window
Opens the Assets Window (tree view of objects)
Switch to the 3D Objects window
Opens the Materials window
Opens the Media Database window.
Several options for camera settings to:
- Add new 3D cameras
- Same with other camera…
- Add new 2D cameras
- Add new camera at the current position
- Switch to the currently selected camera
- Make the cameras visible as 3D objects
- Span cameras in Stage Views see:
chapter 6.2 Tool Bar – Camera Spanning
- Open a property window for the cameras
Opens Property windows for Assets, Cameras etc..
Opens Session window.
Opens Diagnostics window to analyze problems.
Opens a window to take screenshots.
Opens a window to enter desk commands via command line.
Switches the render information in the Stage View on/off
Help elements in Stage View like X,Y,Z axis on/off
Load or save a personalized window layout from / to file
or reset the layout to the default setting.
Set the columns in the 3D Objects grid to optimal size.
Lock / unlock the current window
Refresh the elements in the view.
Select the previous (last selected) or next (if previous was
selected before) element.
Help
Documentation
Info
Opens a document with the help file.
Opens an information window with version numbers of 3D
and desk streaming version.
6.2 Tool Bar
Previous, Next
Select the previous or next object.
MA Lighting Technology GmbH Dachdeckerstr. 16 D-97297 Waldbüttelbrunn www.malighting.de
Page 15
Operating Manual grandMA 3D V 6.0.4.0
Load Show
Save Show
Oops
Fullscreen
New Stage
Open a dialog to load a new show.
Saves the current show with the given filename.
(Undo, Redo) Recovers the previous action or vice versa
Switch to the full screen view. Toggle with ‘Alt + Enter’ key.
Opens a new Stage View window.
Window
Camera
Sets the cameras to visible in the 3D view.
Visible
Span the camera view
over several Stage View
windows. So you can
space a view from one
camera on several
monitors.
Camera
Spanning
Rendering
Settings for 3D renderings:
MA Lighting Technology GmbH Dachdeckerstr. 16 D-97297 Waldbüttelbrunn www.malighting.de
Set the parameters for the
3D rendering output.
Choose your preferred
settings by shifting the
sliders. The results can
be checked immediately
in the Stage View
window.
Page 16
Operating Manual grandMA 3D V 6.0.4.0
6.3 Main Windows (Stage View, 3D Objects View)
Main windows are represented as tabbed windows:
6.3.1
Stage View
The Stage View Window offers a photorealistic view from any camera perspective
or a 2D draft view:
Stage View 3D
Stage View2D
If the menu entry ‘View – Render Info’ is selected
information about the frame rate (in Frames Per
Second), the window size (in pixels) and the selected
camera are shown.
MA Lighting Technology GmbH Dachdeckerstr. 16 D-97297 Waldbüttelbrunn www.malighting.de
Page 17
Operating Manual grandMA 3D V 6.0.4.0
6.3.2
Mouse + Keyboard Actions
Generally:
left mouse button actions for objects,
right mouse button actions for camera
+
Left Mouse Button:
World axis
Ctrl + W
Object axis
Ctrl + O
Moving and Rotating of Objects
Objects can be moved or rotated along the worldor their own axis. Hold the left mouse button
down to change between Move and Rotate and
vice versa.
- Select the object
- Move ore rotate it along the selected axis
Left mouse button down to
move object
along world or object axis
Left mouse button down to
rotate object
around world or object axis
MA Lighting Technology GmbH Dachdeckerstr. 16 D-97297 Waldbüttelbrunn www.malighting.de
Page 18
Operating Manual grandMA 3D V 6.0.4.0
Right Mouse Button:
Context Menu + Camera Actions
Short right mouse click
Menu for selecting, renaming deleting duplicating
or grouping selected object
Right mouse button down
Select action with scroll wheel or ‘Shift + Ctrl’
Middle Mouse Button:
Select Camera or Zoom
Mouse wheel click
After that
Set camera for this view via the mouse wheel
turn
or keyboard space or 1…9..0 button
Mouse wheel turn
Zoom in or out
MA Lighting Technology GmbH Dachdeckerstr. 16 D-97297 Waldbüttelbrunn www.malighting.de
Page 19
Operating Manual grandMA 3D V 6.0.4.0
6.3.3
Arrangement of Objects (Align Objects)
grandMA 3D allows automatic arrangement of 3D objects. Therefore select the objects to
arrange via ‘Ctrl + mouse click’ or multiple selections in the assets tree. Via the menu entry
‘Functions – Arrangement’ the Arrangement Window opens:
Objects can be arranged in several ways like:
- Moved along the X,Y,Z axis
- Moved along a circle line in X,Y,Z space
- Arrange in a 2D matrix
Corresponding to the desk alignment function objects
can be arranged in relation to the origin object like:
- <, >, ><, and <>
If the ‘Relative’ flag is set every push of the ‘Apply’
button increments the arrangement by the given value.
Note: The origin is 0,0,0 if the ‘Relative’ flag is off.
Otherwise it is the own position.
Example:
Several objects inserted into the Stage View
at the origin (0,0,0).
Objects aligned via ‘Move’ and ‘Align <’ function
along the X-axis.
Objects aligned as a matrix via ‘Matrix (2D)’ function.
MA Lighting Technology GmbH Dachdeckerstr. 16 D-97297 Waldbüttelbrunn www.malighting.de
Page 20
Operating Manual grandMA 3D V 6.0.4.0
6.3.4
Duplicate (copy 3D Objects)
You can duplicate objects via a mechanism in a comfortably way. Therefore do a multi
selection in any view via left mouse button + ‘Ctrl or Shift’ and select the menu entry
‘Functions – Duplicate’. The Duplicate window appears:
You can set the number of desired copies.
If the objects contain sub-objects select if these are
copied too.
Note:
It is not possible to create new fixtures within
grandMA 3D!
If fixtures are selected to duplicate it is possible to select
‘Use other Fixtures’. Select the ‘First Destination Fixture’
inside the list box. After pressing the ‘Duplicate’ button
the ‘First Destination Fixture’ will be moved to the X,Y,Z
position of the source fixture and so on.
This mechanism is useful to create symmetrical stage
sets. For example you have to setup the number of all
used fixtures inside the set. Do the setup for the left side
of trusses and lanterns. After that you can duplicate the
left side and mirror it to the right side.
MA Lighting Technology GmbH Dachdeckerstr. 16 D-97297 Waldbüttelbrunn www.malighting.de
Page 21
Operating Manual grandMA 3D V 6.0.4.0
6.3.5
3D Objects
This view offers information
about all used objects in a
grid view.
All used 3D objects and
fixtures are listed in this
grid. Single or multiple
objects can be selected for
manipulation or duplicating.
The objects can be sorted
by a left mouse click into
the headline of a column.
The symbols inside the grid have the following meanings:
Name
Meaning
3D object
Fixture object
Grouping object
Property
Meaning
Object is visible or hidden in Stage View
Sunshade is on or off
Followspot is active or inactive on object surface
6.4 Assets (Information Window)
The Assets window lists all used objects and fixtures in a
tree. Select an object in the tree and the object will be
marked in the Stage View and 3D Object grid too and
vice versa. Additionally the properties of the object are
shown in the Property window if this is switched on.
You can build groups of objects by
meaning of the toolbar buttons.
The followspot icon informs if Followspot is
activated for the object.
The visible icon shows if the object is visible in the
Stage view.
MA Lighting Technology GmbH Dachdeckerstr. 16 D-97297 Waldbüttelbrunn www.malighting.de
Page 22
Operating Manual grandMA 3D V 6.0.4.0
6.5 Properties
The Property window informs about the properties of the
actual selected object like fixtures or 3D objects.
If several objects are selected e.g. via ‘Ctrl + mouse’
only the fields with equal information are filled, other
fields are cross striped.
You can change the settings of one or all selected
objects here.
6.6 Media Database
The Media Database offers lots of 3D
objects ordered by their type in a tree
view.
You can drag the objects from the
database with the left mouse button
into the Stage View window and place
it to the desired position. All objects are
scalable and the properties of the
different materials can be changed in
the Materials window if the object is
selected.
If the showfile is stored the 3D objects
are included in the showfile.
6.7 Materials
If an object is selected the
Materials window shows all used
materials (texture images) of the
object. Select the material in the
Material window and you can
change its properties (diffuse
color, emissive color, specular
power, texture) in the property
window. The results can be
viewed directly in the Stage View
window.
MA Lighting Technology GmbH Dachdeckerstr. 16 D-97297 Waldbüttelbrunn www.malighting.de
Page 23
Operating Manual grandMA 3D V 6.0.4.0
6.8 Moving Pathes
Moving Pathes allow the movement of objects like trusses with their attached sub objects like
fixtures, trusses etc..
Moving Pathes are managed like fixture types in the desk. To setup a Moving Path, create a
new fixture in the desk from the library. Choose the Manufacturer ‘MA Lighting’ and the type
‘Moving Path…’.
There are several types of Moving Pathes. The type (Rotate, Scale…) specifies the
parameters controlled by the desk:
The object rotates once around the axes of the Moving Path.
The object is scaled in X,Y and Z dimensions.
The object rotates continuously around the axes of the Moving Path.
The rotation speed can be set in rotations per minute at the desk.
The object can be moved in X, Y and Z direction.
Combined Moving Path of Translation, Rotation and Scale.
This type is more easy to use instead of concatenating the single types.
Controlling of the position is always done relative to the origin coordinates. I.e. if an object
with moving pathes is moved manually, the tracks of the Moving Pathes are always moved
parallel to the new object coordinates.
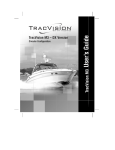
You can attach an object to a Moving Path via dragging
the object in the tree. Drop it onto the desired Moving
Path.
The pictured example shows a truss with 4 moving
head fixtures (1000A 1…4) mounted on a truss (FS34400 1…2).
MA Lighting Technology GmbH Dachdeckerstr. 16 D-97297 Waldbüttelbrunn www.malighting.de
Page 24
Operating Manual grandMA 3D V 6.0.4.0
The example shows a
‘Translation’ Moving Path
controlled in Z-direction.
The truss moves up and
down controlled by the
desk.
MA Lighting Technology GmbH Dachdeckerstr. 16 D-97297 Waldbüttelbrunn www.malighting.de
Page 25
Operating Manual grandMA 3D V 6.0.4.0
6.9 Sessions
The Session window gives an overview
about all running sessions in MA net.
Name, ID and the state of the sessions are
displayed. The streaming version is
important for the compatibility see chapter
‘Version of grandMA desk or grandMA
onPC’.
6.10 Status Bar
The Status Bar informs about the actual Network Type (grandMA1 or grandMA2 net), the
Connection State (Master, Slave or Sniffer) and the name of the session. Also the name of
the show file and the number of selected items are displayed:
MA Lighting Technology GmbH Dachdeckerstr. 16 D-97297 Waldbüttelbrunn www.malighting.de
Page 26
Operating Manual grandMA 3D V 6.0.4.0
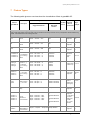
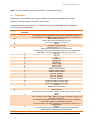
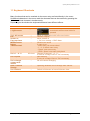
7 Fixture Types
The following table gives an overview about the visualization effects in grandMA 3D.
grandMA Series 1
Effect in
grandMA 3D
Description
Visualizer
Effect/Sub
function
Suggested Attribute
grandMA
Series 2
Physical
Phys.
Value in
Example
Function Set
Axis (axis of fixtures or moving pathes)
Note: Unlike other effects all of these axes must be included in the basing 3d-model. This a prerequisite for fixtures and moving
pathes. If the model has no axis nothing will move.
Pan
Pan-axis of
fixtures
Pan/Tilt → Pan/Tilt → Pan
Pan
Angle range
in degrees
-180 thru
180
Tilt
Tilt-axis of
fixtures
Pan/Tilt → Pan/Tilt → Tilt
Tilt
Angle range
in degrees
-80 thru
80
Roll
Roll-axis of
fixtures
Pan/Tilt → Pan/Tilt → Roll
Roll
Angle range
in degrees
-80 thru
80
Translation X
Translation Y
Translation Z
Translation in x-,
Control → MP Trans → X
y- or z-direction,
Control → MP Trans → Y
e.g. for moving
Control → MP Trans → Z
pathes
Position/X
Position/Y
Position/Z
Translation
range in
meter
-5 thru 5
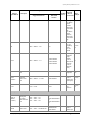
Scaling X
Scaling Y
Scaling Z
Scaling of
objects in x-, yor z-direction,
e.g. for moving
pathes
Control → MP Scale → X
Control → MP Scale → Y
Control → MP Scale → Z
Scale/X
Scale/Y
Scale/Z
Scaling factor -0.1 thru
(must be >0!) 2
Rotation X
Rotation Y
Rotation Z
Rotation around
x-, y- or z-axis,
e.g. for moving
pathes
Control → MP Rot → X
Control → MP Rot → Y
Control → MP Rot → Z
Rotation/X
Rotation/Y
Rotation/Z
Angle range
in degrees
-180 thru
180
Spin X
Spin Y
Spin Z
Continuous
rotation around
x-, y- or z-axis
Control → MP Spin → X
Control → MP Spin → Y
Control → MP Spin → Z
Rotate Animation/X
Rotate Animation/Y
Rotate Animation/Z
Rotation
speed in
rotations per
minute (rpm)
-15 thru
15
Clamp
Pitch of the
clamp
Control → MP Rot → Clamp
Clamp
Angle range
in degrees
-90 thru
90
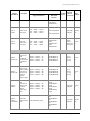
Shaper → Barndoor → DB1
Shaper → Barndoor → DB2
Shaper → Barndoor → DB3
Shaper → Barndoor → DB4
Barndoor/Barndoor
1
Barndoor/Barndoor
2
Barndoor/Barndoor
3
Barndoor/Barndoor
4
Angle range
in degrees
0° = barndoor
is in same
0 thru 90
position like
in model
> 0° = close
barndoor
Barndoor 1
Barndoor 2
Barndoor 3
Barndoor 4
Shaper
Rotation
Pitch of
barndoors in
front of the lens
Rotation of
visible blades in
front of the lens
Shapers → Shaper2 → Shaper Rot Shaper Rotation
MA Lighting Technology GmbH Dachdeckerstr. 16 D-97297 Waldbüttelbrunn www.malighting.de
Angle range
in degrees
-90 thru
90
Page 27
Operating Manual grandMA 3D V 6.0.4.0
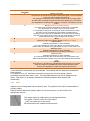
grandMA Series 1
Effect in
grandMA 3D
Description
Visualizer
Effect/Sub
function
Suggested Attribute
grandMA
Series 2
Physical
Phys.
Value in
Example
Function Set
e.g. barndoors
Light Output
Strobe/Strobe
grandMA1:
0 = Shutter
closed
65535 =
Shutter
opened
Strobe/Strobe
Strobe/Random
Strobe/Pulse
Strobe/Pulse Open
Strobe/Pulse Close
Strobe/Pulse
Random
Strobe/Pulse
Random Open
Strobe/Pulse
Random Close
Strobe
frequency in
Hz (bigger
than 0)
0.5 thru
10
Strobe/Ratio
Slice of 1.
0.5 means
that the
shutter is
opened half
the strobe
interval.
0.2 thru
0.8
Dimmer
Factor on the
fixture type
intensity
0.0 throw
0.0 = off
1.0
1.0 =
maximum
Color
Color → Color1 → C1
Color → Color2 → C2
Color of beam or
Color → Color3 → C3
led surfaces
Color → Color Mix → [Color]
Color → RGB → [Color]
Color Wheel
Color Mix/[Color]
Color
-
Color Wheel
Rotate
[Not yet
implemented]
Continuous
rotation of the
color wheel
Color → Color1 → C1 rot
Color → Color2 → C2 rot
Color → Color3 → C3 rot
Color
Rotate/Wheel 1
Color
Rotate/Wheel 2
Color
Rotate/Wheel 3
Rotation
speed in
rotations per
minute (rpm)
-15 thru
15
Focus → Zoom
Zoom
Dimmer → Strobe
Shutter
Strobe effects
with random and
Strobe/Strobe
soft
Dimmer → Strobe
Frequency
opening/closing
option
Beam → Beam1 → Strobe R
Strobe Ratio
Dimmer
Intensity of the
light source
Dimmer → Dim
Light Effects
Zoom
MA Lighting Technology GmbH Dachdeckerstr. 16 D-97297 Waldbüttelbrunn www.malighting.de
Factor on the
0 thru 1
beam angle
range of the
Page 28
Operating Manual grandMA 3D V 6.0.4.0
grandMA Series 1
Effect in
grandMA 3D
Description
Visualizer
Effect/Sub
function
Suggested Attribute
grandMA
Series 2
Physical
Phys.
Value in
Example
Function Set
fixture type
0.0 = Beam
has the
minimum
beam angle
of the fixture
type.
1.0 = Beam
has the
maximum
beam angle
of the fixture
type.
Iris
Factor
0.0 = iris
completely
closed
1.0 = iris
opened
Beam → Beam1 → P1
Prism/2 Beams
Prism/3 Beams
Prism/4 Beams
Prism/5 Beams
Prism angle
in degrees
(angle
between
center of
30
beam without
prism and
center of
beam with
prism)
Beam → Beam1 → P1 Pos
Prism Position
Angle range
in degrees
-180 thru
180
Beam → Beam1 → P1 Rot
Prism Rotation
Rotation
speed in
rotations per
minute (rpm)
-15 thru
15
Focus → Frost
Frost
0.0 = no frost
0.0 thru
1.0 =
1.0
maximum
Gobo X
(Wheel
Position)
Selects gobo
from values
inside functional
block
Gobo → Gobo → G1
Gobo → Gobo → G2
Gobo → Gobo → G3
Gobo Wheel/Wheel
1
Gobo Wheel/Wheel
2
Gobo Wheel/Wheel
3
-
-
Gobo X Wheel
Continuous
rotation of the
Gobo → Gobo → G1 Wheel Rot
Gobo → Gobo → G2 Wheel Rot
Gobo Wheel
Rotate/Wheel 1
Gobo Wheel
Rotation
speed in
rotations per
-15 thru
15
Beam → Beam1 → Iris
Iris
Prism
Prism Position
Rotation of the
prism
Prism
Rotation
continuous
rotation of the
prism
Frost
0.2 thru
1.0
Gobo (3 Wheels Maximum)
MA Lighting Technology GmbH Dachdeckerstr. 16 D-97297 Waldbüttelbrunn www.malighting.de
Page 29
Operating Manual grandMA 3D V 6.0.4.0
grandMA Series 1
Effect in
grandMA 3D
Description
Visualizer
Effect/Sub
function
Suggested Attribute
Rotation
gobo wheel
Gobo → Gobo → G3 Wheel Rot
Rotate/Wheel 2
Gobo Wheel
Rotate/Wheel 3
grandMA
Series 2
Physical
Phys.
Value in
Example
Function Set
minute (rpm)
Gobo → G-Rot. → G1 Pos
Gobo → G-Rot. → G2 Pos
Gobo → G-Rot. → G3 Pos
Gobo Angle/Wheel
1
Gobo Angle/Wheel
2
Gobo Angle/Wheel
3
Angle range
in degrees
-180 thru
180
Gobo → G-Rot. → G1 Rot
Gobo → G-Rot. → G2 Rot
Gobo → G-Rot. → G3 Rot
Gobo
Rotate/Wheel 1
Gobo
Rotate/Wheel 2
Gobo
Rotate/Wheel 3
Rotation
speed in
rotations per
minute (rpm)
-15 thru
15
Blade X Insertion (A)
Insertion of the
Blade into the
beam
This Attribute
must be present
to visualize any
blade.
Shapers → Shaper1 → 1A
Shapers → Shaper1 → 2A
Shapers → Shaper1 → 3A
Shapers → Shaper1 → 4A
Shutter/Blade 1A
Shutter/Blade 2A
Shutter/Blade 3A
Shutter/Blade 4A
0.0 = no
insertion
1.0 = full
covering
0.0 thru
0.5
Blade X Insertion (B)
Second insertion
range for every
blade for rotating
If this option is
used you must
not use the
"Blade X Rotation"-option.
Shapers → Shaper1 → 1B
Shapers → Shaper1 → 2B
Shapers → Shaper1 → 3B
Shapers → Shaper1 → 4B
Shutter/Blade 1B
Shutter/Blade 2B
Shutter/Blade 3B
Shutter/Blade 4B
0.0 = no
insertion
1.0 = full
covering
0.0 thru
0.5
Blade X Rotation
Rotation of the
blade
If this option is
used you must
not use the
"Blade X Insertion (B)"option.
Shapers → Shaper1 → 1B
Shapers → Shaper1 → 2B
Shapers → Shaper1 → 3B
Shapers → Shaper1 → 4B
Shutter/Blade 1
Angle
Shutter/Blade 2
Angle
Shutter/Blade 3
Angle
Shutter/Blade 4
Angle
Angle range
in degrees
-45 thru
45
Shutter/Blade 1
Rot
Shutter/Blade 2
Rot
Shutter/Blade 3
Rot
Shutter/Blade 4
Rot
Angle range
in degrees
-180 thru
180
Gobo X Position
Gobo X Rotation
Rotation of the
current gobo
Continuous
rotation of the
current gobo
Blades (4 Blades Maximum)
Blade X Rotation of a
Rotation
blade around the [must be defined by user]
around Beam beam
MA Lighting Technology GmbH Dachdeckerstr. 16 D-97297 Waldbüttelbrunn www.malighting.de
Page 30
Operating Manual grandMA 3D V 6.0.4.0
grandMA Series 1
Effect in
grandMA 3D
Description
Visualizer
Effect/Sub
function
Suggested Attribute
Rotation of all
Blades
Shapers → Shaper2 → Sh Rot
Shaper Rotation
MA Lighting Technology GmbH Dachdeckerstr. 16 D-97297 Waldbüttelbrunn www.malighting.de
grandMA
Series 2
Physical
Phys.
Value in
Example
Function Set
Angle range
in degrees
-180 thru
180
Page 31
Operating Manual grandMA 3D V 6.0.4.0
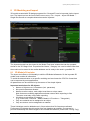
8 3D Modeling and Import
3D models created with 3D design programs like ‘Cinema 4D’ can be imported via the import
tool. The import tool can be found via the menu entry: ‘File – Import – Import 3D Model…’.
Single files as well as complete directories can be imported.
The imported model can be viewed in the ‘Model Test Area’ window that can be operated
similar to the 3D ‘Stage View’. Properties like ‘Name’; ‘Category’ etc. can be edited. After that
the model can be stored in the media database and is ready to be used in grandMA 3D.
8.1 3D Models Principles
The import tool offers no functionality to edit the 3D-Model afterwards. So the imported 3D
model must contain all information.
To avoid the determination on a specific modeling tool we choose the ‘3DS’ file format that
can be exported by most applications.
All parameters can be referred to by the names of the simple objects.
Important restrictions for 3D objects:
Names of objects max. 8 characters (incl. parameter)
No special characters allowed
Names must be unique, each object must have a unique name.
Note that some modeling applications shorten names while exporting to 3ds.
The name must stay unique after exporting
All objects must consist of triangles
(e.g. Cinema 4D ‘Functions – Make Editable’ & ‘Functions – Triangulate’)
Only one material can be assigned to an object
Only one texture can be assigned to a material
These limitations must be abided even in future when other file formats are allowed.
Furthermore 3D objects should consist of as few triangles as possible. Curves can be
pictured realistically with little triangles if the normals simulate this (Cinema 4D: ‘Phong Tag’).
MA Lighting Technology GmbH Dachdeckerstr. 16 D-97297 Waldbüttelbrunn www.malighting.de
Page 32
Operating Manual grandMA 3D V 6.0.4.0
Note: The max. angle for curves is set to 89.5° in Cinema 4D (in 3ds)
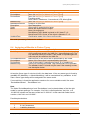
8.2 Parameters
Parameters can be added to the names of objects to set further properties of the object.
Example: The object name ‚Test_XAP‘ is a pan-axis.
A parameter block must start with ‘_X’ followed by the (sub) parameters without separators
as shown in the following table:
Parameter
V
SubParameter
-
N
-
D
-
A
P
T
R
X
Y
Z
U
V
W
J
K
L
1
2
3
4
G
H
I
C
S
N
R
Description
Available for user
The Object can be manipulated by the user. Per default the top object in
the tree structure can always be manipulated by the user, sub objects not.
Not available for the user.
Object cannot be manipulated by the user.
(Can only be used for sub objects.)
Delete
Object will not be imported.
Axis (also see: 8.2.1 Axes)
Object will be transformed to a movement axis.
The parameter is only valid in association with one of the following sub
parameters. The sub parameter specifies the type of axis.
Pan axis
Tilt axis
Roll
Shift (X axis)
Shift (Y axis)
Shift (Z axis)
Scale (X axis)
Scale (Y axis)
Scale (Z axis)
Rotation (round X axis)
Rotation (round Y axis)
Rotation (round Z axis)
Axis of 1. barndoor
Axis of 2. barndoor
Axis of 3. barndoor
Axis of 4. barndoor
Continuous rotation round (X axis)
Continuous rotation round (Y axis)
Continuous rotation round (Z axis)
Clamp
Rotation axis of the clamp
Sunshade type
Specifies how the object casts a shadow or how gobos are shown on the
object.
None
Has no influence on the object. Neither the beam is affected nor gobos are
projected on the object.
For example the object is a lens of a fixture. The lens does not balk the
beam, and no gobos are projected on the lens.
The lens is fixed in the case so it doesn’t cast a shadow if it is hit by an
external beam.
Regular
The object casts a shadow and gobos are projected on the object.
Default setting if nothing else is parameterized.
MA Lighting Technology GmbH Dachdeckerstr. 16 D-97297 Waldbüttelbrunn www.malighting.de
Page 33
Operating Manual grandMA 3D V 6.0.4.0
Parameter
SubParameter
X
G
B
I
E
J
C
Description
Exclude own beam
Compared to other fixtures the object behaves like option ‚R‘ and compared
to the own source of light like option ‘N’.
This parameter should be set for example for the body of moving heads
and the clamp, meaning the parts that are never lighted by the own beam.
This simplifies the rendering and avoids the casting of a shadow by the own
beam.
Ghost (Currently not implemented)
The object casts a shadow and gobos are projected on the object.
The object itself is not visible, only if it is hit by a beam.
For example an LED panel consisting of several LEDs with one body.
The LEDs can be excluded from the shadow via parameter ‘N’.
The body for the LEDs has the parameter ‘G’ for the common shadow.
Note that color mixing will only work correctly if the diffuse color of the
ghost object and of the covered objects is the same.
Beam
Marks the origin of the beam. (See:8.2.4 Beam of Light)
Diffuse Inking *
Extension parameter for other materials.
The color specifies the ratio of the diffuse color to the fixture color.
White means: the diffuse color gets brighter by 100% of the fixture color.
Emissive Color *
Extension parameter for other materials.
Specifies the color/texture of the object’s self shine.
Emissive Inking *
Extension parameter for other materials.
The color specifies the ratio of the emissive color to the fixture color.
White means that the emissive color gets 100% brighter with the fixture
color.
Children
Sub controls, to be placed in grandMA 3D below the object of a model.
Other sub objects in grandMA 3D will be inserted below this item.
Used for moving paths to create sub objects below an axis.
*This parameter can be used only for materials. The material with the parameter extends the
other material.
For example ‘Lens_XJ’ describes the emissive inking color for the material (without
parameter) with the same name ‘Lens’. The extended material must not be assigned to an
object. This detour is necessary because the modeling software does support this
functionality.
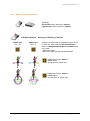
8.2.1
Axes
Objects can be configurated with movement axes. The position of the axis is marked with an
auxiliary object.
Objects ordered below the auxiliary object in the tree structure can be moved in the
appropriate manner:
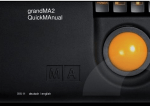
The image shows an object tree of a moving head fixture.
The object ‘VL1000’ is the root of the fixture.
‘_XAP’ is the pan axis of the model.
All objects below are rotated around this axis.
MA Lighting Technology GmbH Dachdeckerstr. 16 D-97297 Waldbüttelbrunn www.malighting.de
Page 34
Operating Manual grandMA 3D V 6.0.4.0
8.2.2
Rotation Axes
Rotation axes are marked with a square (consisting of two triangles). The name of this object
must contain the appropriate parameter for the desired axis see Parameter. Furthermore all
normals of this object should point in the same direction.
When importing the object it is converted into an axis. It is aligned along the direction of the
normals (vertical on the square) positioned in the center of the square.
In case of movement the right-hand rule is applicable: Thumb shows into direction of
normals, objects will rotate into the direction of the fingers (with positive values).
The image shows the tilt axis of a moving head fixture.
The normals of the square show to the left direction.
The lens will move away from the viewer if the tilt axis is driven with
values bigger than 0°.
8.2.3
Linear Axes
Linear axes are marked in the same manner as rotation axes.
The normal of the square shows the direction of movement.
8.2.4
Beam of Light
Similar to the rotation axes the position of the beam (cone) is marked with a square. The
center of the square marks the origin of the cone. The normals mark the direction.
The position inside the fixture body can be determined with an auxiliary cone that is placed
temporarily into the body.
The radius (r) of the cone can be calculated with the following formula:
r = tan([max. open radius / 2]) * [height of the cone]
Normally the cone uses the complete lens hole of the fixture. The square is placed at the top
of the cone:
Placement of the cone 2D
MA Lighting Technology GmbH Dachdeckerstr. 16 D-97297 Waldbüttelbrunn www.malighting.de
Placement of the cone 2D
Page 35
Operating Manual grandMA 3D V 6.0.4.0
8.3 Automated Import
Meta data of a 3D model can be left appropriately for the import. Later editing with the import
tool is not required.
The placeholder [file] stands for the filename (without extension) that has to be imported. For
example if the file ‘test.3ds’ has to be imported, ‘[file] stands for ‘test’:
File
_global.import.xml
[file].import.xml
[file].import.png
[file].png
[file].tif
[file].bmp
[file].jpg
Description
Global import setting valid for the complete directory. Structure like
[file].import.xml.
XML file with meta data for the model. If this file does not exist, it
will be created automatically to store the model key.
Preview image of the model. Size is 32x32 pixel (32 Bit RGBA).
Will be created if not exists.
If no preview image exists the import tool tries to create it. It
searches in the given order on the side.
The image should be exempted via alpha channel.
Boarders are cut automatically when the thumbnails are created.
Example for an ‘*.import.xml’ file:
<?xml version="1.0"?>
<GrandMA3DImportSettings xmlns:xsi="http://www.w3.org/2001/XMLSchema-instance"
xmlns:xsd="http://www.w3.org/2001/XMLSchema"
xmlns="http://schemas.malighting.de/GrandMA3D/GrandMA3DImportSettings/1.0">
<Name>Generic - Head Mover</Name>
<Category>Fixtures/Head Mover</Category>
<ModelKey>cc6464b5-c992-4b9e-8a96-31691d9cdd90</ModelKey>
<DeviceManufacturer>*</DeviceManufacturer>
<DeviceName>*</DeviceName>
<DeviceClass>Headmover</DeviceClass>
<ModelPriority>-100000</ModelPriority>
<ModelManufacturer>MA Lighting</ModelManufacturer>
<Description>Default Head Mover Model</Description>
<Scale>0.01</Scale>
<Move>MoveBottomToZ0</Move>
<AmbientFlare>0.02</AmbientFlare>
</GrandMA3DImportSettings>
Field
Name
Category
ModelKey
Description
Name of the model
‘/filename‘ will be replaced with the filename of the import file
(without extension)
Category in the ‘Media Database’
Sub categories can be separated with a ‘/’.
e.g. ‘Fixtures/Head Mover’
[see: 8.4 Assigning of Models to Fixture Types]
MA Lighting Technology GmbH Dachdeckerstr. 16 D-97297 Waldbüttelbrunn www.malighting.de
Page 36
Operating Manual grandMA 3D V 6.0.4.0
Field
DeviceManufacturer
DeviceName
DeviceClass
ModelPriority
ModelManufacturer
Description
Scale
Move
AmbientFlare
Description
[see: 8.4 Assigning of Models to Fixture Types]
[see: 8.4 Assigning of Models to Fixture Types]
[see: 8.4 Assigning of Models to Fixture Types]
Possible values:
None, Mirror, Headmover, Conventional, LED, MovingPath
[see: 8.4 Assigning of Models to Fixture Types]
Designer of the model.
Short description.
Object will be scaled by this factor.
Moves the object after the import.
None: No movement
MoveBottomToZ0: Model is placed on XY plane Z = 0
MoveCenterToZ0: Center of the object is placed to Z = 0
Clarification grade of the fixture environment.
Not used (necessary) fields can be omitted.
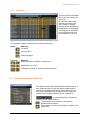
8.4 Assigning of Models to Fixture Types
Field
ModelKey
DeviceManufacturer
DeviceName
DeviceClass
ModelPriority
Description
Unique key of the model. This key is created with the first importing
of the model and saved in the XML file (*.ImportSettings.xml). The
key identifies exactly the model. If the model is imported again the
same key will be used from the XML file.
Manufacturer of the fixture that is represented by the model.
Name of the fixture that is represented by the model.
Type of the model if it represents a fixture. E.g. ‘Headmover’
Priority for selecting this model. High numbers are more probable.
The standard value ‘0’ should only be used if the meaning is clear,
see description below.
At best the fixture type of a device is left in the data base. If the very same type is found by
grandMA 3D (ModelKey == Model.ModelKey) it will be used without any validation. In this
case a fixture type always will be assigned to the same model.
If no model key is found the application searches for a more suitable model, like same
‘DeviceManufacturer’ , ‘DeviceName’ etc..
Note:
The fields ‘DeviceManufacturer’ and ‘DeviceName’ can be placeholders to find the right
model for variant spellings. For example: ‘Vari*Lite‘ is often spelled as ‚Vari-Lite‘, or a
‚VL1000 AS’ should use the same model as ‘VL1000 AI’. In this case both fields should
contain a ‚Vari?Lite’ and ‘VL1000*’.
Possible placeholders:
*
+
?
#
0-n any characters
1-n any characters
0-1 any characters
1 arbitrary character
MA Lighting Technology GmbH Dachdeckerstr. 16 D-97297 Waldbüttelbrunn www.malighting.de
Page 37
Operating Manual grandMA 3D V 6.0.4.0
Often there are several variants of fixture types in a model range. So the attachment of a ‘*’
is recommended – for example: ‘VL1000*’. The spelling is not case sensitive.
If a special 3D object shall be used for a model even though a model with the notation exists
the ‘ModelPriority’ can be increased (in steps of 100). For example a ‘VL1000AS’ with the
priority of 100 would be preferred instead of ‘VL1000*’ with a standard priority of 0.
grandMA 3D is delivered with standard models for every ‘DeviceClass’ type. The standard
model has the following setting: DeviceManufacturer = ’*’, DeviceName = ‘*’ and
ModelPriority = -100000. These models have a low priority and are used only if no other
model with higher priority is found.
8.5 Checklist for 3D Modeling
Sunshade type settings for all objects are correct?
For example shadow calculations for the own source of light of the fixture body,
clamp and head are excluded?
Names of objects don’t exceed 8 characters (.3ds files)?
Names of object are unique?
Objects exclusively are composed of triangles?
No information has been lost while exporting? To check this, open the exported file
with the modeling tool.
MA Lighting Technology GmbH Dachdeckerstr. 16 D-97297 Waldbüttelbrunn www.malighting.de
Page 38
Operating Manual grandMA 3D V 6.0.4.0
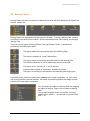
8.6 Creation of a 3D Model
3D objects can be created with 3D CAD programs. Please note, that the amount of polygons
affects the performance because for each polygon the projection has to be calculated. The
lower the number of polygons the better is the frame rate.
grandMA 3D supports the following formats for 3D objects:
.3ds – Format for drawing 3 dimensional objects
Note the following regulations:
The orientation of the object should fit
Normals have to be organized correctly
UV coordinates for the textures have to be setup correctly
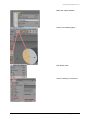
The following example shows the creation of a halved cylinder, created with
‘Cinema 4D’:
Insert an object of type
‘Cylinder’
Set the orientation to ‘Y+’.
For a correct visualization in
grandMA 3D is the depth, Y
the vertical and X the
horizontal axis
MA Lighting Technology GmbH Dachdeckerstr. 16 D-97297 Waldbüttelbrunn www.malighting.de
Page 39
Operating Manual grandMA 3D V 6.0.4.0
Make the object editable
Select not used polygons…
and delete them.
Set the visibility of normal on.
MA Lighting Technology GmbH Dachdeckerstr. 16 D-97297 Waldbüttelbrunn www.malighting.de
Page 40
Operating Manual grandMA 3D V 6.0.4.0
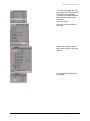
The next copy steps are only
necessary if the object should
be visible from both sides.
Therefore it is duplicated and
the normals are set in both
directions.
Copy the object…
And reverse the normals of
the copy.
Select both cylinder objects
and connect them to one new
cylinder.
The old cylinder objects can
be deleted.
MA Lighting Technology GmbH Dachdeckerstr. 16 D-97297 Waldbüttelbrunn www.malighting.de
Page 41
Operating Manual grandMA 3D V 6.0.4.0
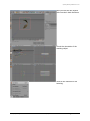
Now you can see two objects
with normals in both directions
Check the orientation of the
resulting object.
Insert a new material for the
texturing.
MA Lighting Technology GmbH Dachdeckerstr. 16 D-97297 Waldbüttelbrunn www.malighting.de
Page 42
Operating Manual grandMA 3D V 6.0.4.0
Assign an image to the texture
and the material to the object.
(Mind the restriction of max. 8
characters + extension for the
image name!)
Adjust the texture mapping
parameter.
Assign the UV coordinates for
the texture mapping.
Export the object to 3D Studio
format (.3ds).
Objects created in this way
can be added via the import
tool.
MA Lighting Technology GmbH Dachdeckerstr. 16 D-97297 Waldbüttelbrunn www.malighting.de
Page 43
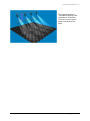
Operating Manual grandMA 3D V 6.0.4.0
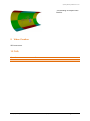
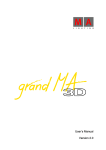
The resulting 3D Object looks
like this.
9 Video Creation
Will come soon.
10 FAQ
Question
Answer
MA Lighting Technology GmbH Dachdeckerstr. 16 D-97297 Waldbüttelbrunn www.malighting.de
Page 44
Operating Manual grandMA 3D V 6.0.4.0
11 Keyboard Shortcuts
Many functions that can be reached via the menu entry are listed directly in the menu.
Underlined characters in the menu mark the shortcuts that can be reached by pressing the
‘Alt’ + ‘underlined character’ simultaneously.
Depending on the window the keyboard shortcuts have different effects:
Shortcut
Shift + Ctrl
+ right mouse
Ctrl+ left mouse
Esc
Arrows or
Page up-down
Middle mouse
button
- Mouse wheel
Window
Stage View
Ctrl + Space
::
Ctrl + change
camera with
mouse
Shift + camera
change
Ctrl + Return
::
Move or rotate object with left mouse button
Deselect objects
Move camera or
+ ‘Ctrl’ turn camera + ‘Shift’ faster
Wheel menu on/off
If menu is on:
- select entry via mouse wheel
- 1…9…0 select menu entry
- ‘Space’ next menu entry
- ‘Shift + Space’ one menu entry back
Change to camera 1…9…0
If focus is in Stage View no ‘Ctrl’ necessary
Next camera.
If focus is in Stage View no ‘Ctrl’ necessary
No soft camera changing
::
Spanning windows will not change their camera
::
Switch to fullscreen or leave fullscreen view
Ctrl + 1…9…0
::
::
::
Effect
Several combinations of camera
movements while mouse button is
pressed
::
All views
MA Lighting Technology GmbH Dachdeckerstr. 16 D-97297 Waldbüttelbrunn www.malighting.de
Page 45
Operating Manual grandMA 3D V 6.0.4.0
12 Index
.
.3D1 ................................................................................. 9
.3ds file ............................................................................ 9
.gz 9
.gz files ............................................................................. 9
.png files ........................................................................ 14
.sl_ files ............................................................................ 9
3
fullscreen ...................................................................... 45
Fullscreen ...................................................................... 16
G
grandMA I or grandMA II mode ...................................... 9
I
3D Modeling ...................................................... 13, 32, 38
3D Objects ..................................................................... 22
Import ........................................................................... 32
Import a 3D model ........................................................ 13
Installation ...................................................................... 6
IP address .................................................................. 7, 13
A
K
Align Objects ........................................................... 14, 20
arrange windows ........................................................... 12
Arrangement of Objects .......................................... 14, 20
Assets ............................................................................ 22
Assigning of Models to Fixture Types ............................ 37
Automated Import ........................................................ 36
Keyboard Actions ......................................................... 18
Keyboard Shortcuts ....................................................... 45
B
backup ............................................................................. 9
blind mode .................................................................... 14
C
Camera Spanning .......................................................... 16
Change Model ............................................................... 14
Change user ................................................................... 14
Commandline ................................................................ 15
Connection with the grandMA desk ................................ 8
Coordinate system ........................................................ 10
copy 3D Objects....................................................... 14, 21
Creation of a 3D Model ................................................. 39
M
MA1 mode .................................................................... 13
Master ............................................................................. 9
Materials ....................................................................... 23
Matrix............................................................................ 20
Media Database ............................................................ 23
Menu Bar ...................................................................... 13
Modeling ................................................................. 13, 32
Mouse Actions .............................................................. 18
Moving Pathes .............................................................. 24
P
Program Surface ........................................................... 12
Properties ..................................................................... 23
R
D
Rendering ...................................................................... 16
Reset Window Layout ................................................... 12
Data Management .......................................................... 9
Duplicate objects + fixtures ..................................... 14, 21
S
F
Fixture Types ................................................................. 27
frame rate ..................................................................... 17
Screenshot .................................................................... 14
Slave ................................................................................ 9
Status Bar ...................................................................... 26
System Requirements ..................................................... 6
MA Lighting Technology GmbH Dachdeckerstr. 16 D-97297 Waldbüttelbrunn www.malighting.de
Page 46
Operating Manual grandMA 3D V 6.0.4.0
V
X
Version of grandMA desk or off-line ........................... 6, 8
xml file .......................................................................... 36
W
window layout ............................................................... 12
MA Lighting Technology GmbH Dachdeckerstr. 16 D-97297 Waldbüttelbrunn www.malighting.de
Page 47