1
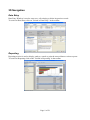
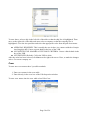
3D User Manual
3D is a comprehensive repository for shipboard inspections and observations. 3D allows a
consolidated reporting of CDI, SIRE, Port State Control Inspections, Internal Audits, External
audits and other shipboard events such as incidents, accidents, Near Miss reports, customer
complaints etc. The results are shown in reports and graphs and are a useful tool for measurement
and improvement of QSE (Quality Safety and Environment). 3D helps ship managers to follow
OCIMF's TMSA (Tanker Management and Self Assessment) Guidelines.
Additional Help is available via 3D Online Help
This 3D user manual will be updated continuously. It can be started soon directly out of the
database or via http://3dhelp.chemserve.eu
ChemServe 02.01.2008
Page 1 of 56
Page 2 of 56
Table of Content
3D User Manual...................................................................................................................................1
Additional Help is available via 3D Online Help ...........................................................................1
Installation............................................................................................................................................6
Getting Started.................................................................................................................................7
Recommended sequence of activities.........................................................................................7
Windows Vista (Vista workarround)....................................................................................................7
Login.....................................................................................................................................................8
Access Rights...................................................................................................................................8
Read Only or Read & Write........................................................................................................8
3D Navigation......................................................................................................................................9
Data Entry........................................................................................................................................9
Reporting.........................................................................................................................................9
Toolbar................................................................................................................................................10
File.................................................................................................................................................10
Import of ..................................................................................................................................10
Export of ..................................................................................................................................10
Edit.................................................................................................................................................10
Tools...............................................................................................................................................10
Inspections..........................................................................................................................................11
Inspection Window........................................................................................................................11
Filtering inspection records............................................................................................................11
Sorting and arranging inspection records......................................................................................11
Changing inspection records..........................................................................................................11
Entering Names..............................................................................................................................12
Inspector name and crew name.................................................................................................12
Viewing Inspection records...........................................................................................................13
Observations.......................................................................................................................................13
Observations window....................................................................................................................13
Question tree..................................................................................................................................13
Comments......................................................................................................................................14
Inspector Comment & Owner Comment..................................................................................14
Actions...........................................................................................................................................16
Root Cause Investigation..........................................................................................................16
Repetitions.....................................................................................................................................16
Repetitive Deficiencies.............................................................................................................16
SIRE stored locally.............................................................................................................................17
OCIMF Requirement: SIRE Reports may not be stored on the ChemServe 3D Server...............17
SIRE observations sharing.............................................................................................................17
Ship Managers may share the SIRE observations within their organisation............................17
Export/Import ................................................................................................................................18
Manual exchange of locally stored SIRE data..........................................................................18
Follow Up...........................................................................................................................................19
Target Date and Close Out Date....................................................................................................19
Analysis..............................................................................................................................................20
Severity, Cause, Responsibility and General References..............................................................20
Root Cause Factors.............................................................................................................................21
Basic Risk Factors & Root Cause Types.......................................................................................21
Page 3 of 56
General Reference Categories............................................................................................................24
General References........................................................................................................................24
SIRE...................................................................................................................................................25
Import (SIRE inspection reports can be imported automatically into 3D)....................................25
Manual entry of new records or editing of existing records..........................................................26
Entry or Editing of Observations...................................................................................................26
SIRE Download..................................................................................................................................26
Instructions for downloading SIRE Reports as xml file................................................................26
CDI.....................................................................................................................................................27
CDI Import from ISIS Web7..........................................................................................................27
CDI Import from ISIS Triple3.......................................................................................................27
Edit CDI Inspections......................................................................................................................28
CDI Observations..........................................................................................................................29
Download CDI form ISIS Web7.........................................................................................................29
Download ISIS XML Report.........................................................................................................29
Port State Control...............................................................................................................................30
Enter Port State Control Inspection...............................................................................................30
PSC Observations..........................................................................................................................30
Inspection by Other............................................................................................................................31
Inspection that has been executed by another Oil Major than the one evaluating the report. . .31
Terminal Inspections...........................................................................................................................32
Creating and editing.......................................................................................................................32
Terminal Inspection Observations ................................................................................................32
External Audit.....................................................................................................................................32
Creating and editing.......................................................................................................................32
Internal Audit......................................................................................................................................32
HSE Events.........................................................................................................................................33
Non Conformities..........................................................................................................................33
HSE Events (Health Safety Environmental and other Events)......................................................33
List of available Events......................................................................................................................33
Standard list of events. (Some customers have their cutomized list)............................................33
Data Tables.........................................................................................................................................36
Companies (Oil Majors)................................................................................................................36
Ships...............................................................................................................................................36
New Ship and changing existing ships.....................................................................................36
Ship acceptance.........................................................................................................................37
Crew...............................................................................................................................................38
Responsible (Names for Follow Up and Close Out).....................................................................39
Reporting............................................................................................................................................40
Navigation (Switch to Reporting and Switch back to Data Entry)................................................40
Export of Reports...........................................................................................................................40
Print Report....................................................................................................................................40
Refresh...........................................................................................................................................41
Standard Reports................................................................................................................................41
Selecting Reports...........................................................................................................................41
Zoom (Adjust the size of the report in the main reporting window).............................................42
Browse (Navigate through report pages).......................................................................................42
Subreports......................................................................................................................................42
Overdue Items Report.........................................................................................................................44
Deficiencies that require Close Out...............................................................................................44
Page 4 of 56
Overdue Items Subreport (Details)................................................................................................44
Vetting Status Report..........................................................................................................................45
Reports by Date..................................................................................................................................46
Subreport (Observation details).....................................................................................................46
Reports by Ship..................................................................................................................................47
Observations by Question No.............................................................................................................47
All observation details...................................................................................................................47
Relative Deficiencies..........................................................................................................................48
Relative deficiencies as graph (deficiencies divided by inspections)............................................48
Relative deficiencies as table (calculation example SIRE) ..........................................................48
Marine Injury Report (Safety Performance Report)...........................................................................49
Report acc. to OCIMF Marine Injury Reporting Guidelines.........................................................49
General Reference Analysis...............................................................................................................50
Most frequent observations............................................................................................................50
Grouped by report type..................................................................................................................51
Filter...................................................................................................................................................52
Filter setting (Example Ship Name is ...).......................................................................................52
Save Settings (Example Select by List).........................................................................................53
Full Text Search..................................................................................................................................53
Global Filter........................................................................................................................................54
Customized Reports............................................................................................................................54
Training..............................................................................................................................................55
On-line Presentation......................................................................................................................55
Informations.......................................................................................................................................56
3D Database supports....................................................................................................................56
3D helps to analyse........................................................................................................................56
3D improves...................................................................................................................................56
Page 5 of 56
Installation
Insert the 3D CD in your CD drive. 3D installation will start automatically. After installation you
will find the 3D icon on your desktop. Double-click this icon to start 3D. The login information for
the 3D Demo database can be found in chapter LOGIN
System requirements:
● In some company networks must be authorized for IP 85.214.39.173 by your system
administrator
● Windows 2000/XP. For Windows Vista pls see below.
● Some 300 MB free disk space
● User needs full access rights (read/write/execute) to his program's directory
"C:\Programs\Chemserve\3D"). Otherwise the OnlineUpdate will always fail, because it
could not update your outdated Version of ChemServe3D to the new one.
Following software components are required and will automatically be installed, if not available on
the client workstation:
● MS .NET framework 2.0 (will be automatically installed if not available)
● Crystal Reports Reporting Engine (will be automatically installed if not available)
3D is a client/server database.
This means the data are stored on a central server and the access to the server works by means of a
database client, which is installed on a local computer.
The server is located in a computing centre that provides professional service and infrastructure.
This results in high reliability and high data security. The database runs on a MS SQL 2005 server.
The client must be installed on the users computer. The access to the server requires an internet
connection.
The amount of data exchanged between the client and the server is minimized by intelligent
programming. Fast response is achieved even with conventional internet connections..
Since 3d is a client/server database we recommend installation of the database client on all
workstations that shall work regularly with 3D.
The database can be accessed by all authorized employees (those which have the password)
regardless where they are located, provided they have an Internet connection.
Multi user access is possible.
Page 6 of 56
Getting Started
Recommended sequence of activities
1. First installation
2. Login
3. Setup of SIRE shared folder.
4. Ensure that SIRE shared folder is backed up regularly
5. Setup of Table Ships and Table Responsible
6. Get access to OCIMF's SIRE Reports as xml
7. Import xml Reports
8. Define all 3D users in your organisation. Review their Acces Rights.
9. Install at all required workstations. Connect workstations to SIRE shared folder.
10.Review training needs and arrange internally and if req., get training from ChemServe
Windows Vista (Vista workaround)
3D is yet not fully VISTA compatible. However there is a workaround that enables installation on
VISTA operating system:
1. Download 3D from www.chemserve-marine.com Pls don't execute but select save in the
download window!
2. In your VISTA Download folder locate the zip file Chemserve3D and unzip that.
3. Click with right mouse on the setup file (not the 3D setup) and select "Run as Administrator".
The installation will start.
4. Click in all windows that appear during the installation "next" or "yes" and it will be installed
into the default directory.
5. Locate the installation directory usually C:/programs/Chemserve/3D and click with the right
mouse on the file 3D Database. Select the Compatibility tab and set a tick mark at "Run as
Administrator" and click OK
6. Start 3D via the icon on your desktop and enter your access data. Than click OK.
7. After first Start 3D will crash. Ignore that and start again via your 3D Icon on the desktop.
Page 7 of 56
Login
Type following login data into the login-box:
Server:
Database:
User:
Password:
chemserve.eu
demo3d
demo
demo3d
If you want to log into your private database, use the login
information that has been provided by us.
Remember these values box should be tick marked.
Offline Reporting
Offline Reporting is a function for user that have a reporting
need but no internet connection. Database should be updated
before leaving the office by clicking on Update Local Data
button. Data will be stored in the local cache. Later the data
from the cache will be used to generate the reports if no connection to the server is available.
Offline reporting cannot be used for entering data!
Access Rights
Read Only or Read & Write
2 different access levels can be provided:
1. Read & Write (Standard) - User can enter and change information and can see the
information
2. Read only - User can only see the information but cannot make any entries. Just contact
ChemServe in case you have also users that may have just read access. ChemServe provides
a different username and password for users with just read access, if required.
Page 8 of 56
3D Navigation
Data Entry
Data Entry Window is used to enter new ,edit existing or delete inspection records.
To switch to Data Entry click on "Switch to Data Entry" in the toolbar.
Reporting
Reporting section is used to display, analyse, search or print the entered data as various reports.
To switch to Reporting click on the "Switch to Reporting" in the toolbar.
Page 9 of 56
Toolbar
File
Import of
●
●
●
●
CDI reports
SIRE Reports
Crew Data
Locally stored SIRE files
Export of
● Locally stored Sire Files
Edit
Edit Data Tables
●
●
●
●
Companies
Crew
Ships
Responsible Persons
Other tables can only be edited by Database Administrator
Tools
Rebuild Cache:
Database administration tool. Under certain circumstances (e.g. database changes) a refresh of
cache data is required for proper operation of 3D.
In this case click on Rebuild Cache.
Page 10 of 56
Inspections
Inspection Window
All inspections which have been entered are displayed as a table in the inspection window (the
upper half of the data entry window).
Filtering inspection records
The inspection records displayed in the table can be limited by using the filter buttons located on
top of the inspection table. The Report Type, the Ship Name and the Company Name can be
selected to reduce the displayed records.
Sorting and arranging inspection records
The records can be sorted by clicking into the desired column head. Clicking again will change the
sort order from ascending to descending.
If sorting has not been changed as described above the records are sorted by inspection date in
descending order, so that the newest records are listed first.
The displayed columns can be changed, if desired. To change the columns, click with the right
mouse on an inspection record and select in the menu that opens the line Columns Visible. Another
menu opens that allows to select or deselect the displayed columns. Also the sequence of the
columns can be changed. Just select the column that you want to change and drag it into the desired
position.
Pls note that all these changes will not be permanently. If 3D is restarted, the default settings will be
used to display the columns and the sort order.
Changing inspection records
Changing inspection records implies new records, editing existing records and deleting existing
records.
Page 11 of 56
To access the inspection records either select "New Report" in the bar located on top of the
inspection table
or select the record that needs to be modified and either doubleclick this record or click with the
right mouse onto the selected line. Another window will open that allows to select the desired
action: New Report, Edit Report or Delete Report. Pls note that all modification regardless if it is a
new inspection or a change to an existing inspection must be saved before closing the edit report
window. If changes are not saved, they will be lost.
Both actions will result in opening of the "Edit Report" window.
This window allows accessing the inspection record fields. If the filter has been set, the filter values
are inserted automatically and the respective fields cannot be changed, indicated by a grey shade,
contrary to the white shade of the fields that can be edited.
Entering Names
Inspector name and crew name
The names are listed in tables. If the name you want to enter is not yet in the table it can be entered
directly.
Type into the respective box in the following format:
Surname, Firstname
Example you want to enter Woody Allen. Type into the box: Allen,Woody
Crew names can be entered also via Edit>Crew
Page 12 of 56
Viewing Inspection records
If it is desired to have a quick view on the selected inspection record, the quick view window can be
opened by clicking onto the grey line between the Inspection table and the questions table. This line
divides the upper and the lower half of the report entry window. The quick view window is grey
shaded and displays all the relevant inspection record fields. This window is just for viewing.
Editing the fields is not possible here. If another inspection line is selected, the values in the quick
view window are changing accordingly.
To close the quick view window just click the grey line again.
Observations
Observations window
All observations must be edited in the observations window, the lower half of the Data Entry
Window.
Observations are all entries from an inspector either positive or negative. Positive observations are
not counted as deficiencies but as an observation. In case of SIRE these are the entries with answer
"Y" or "NA" (blue) and the additional comments at the end of each chapter (green). In case of CDI
these are non scoring questions (green).
Deficiencies are negative observations. In case of SIRE inspection entry the answer is "N". In case
of CDI inspections these are the Answer types Statutory (red), Recommended (orange) and Desired
(blue).
Question tree
Once an inspection record is selected in the upper part of the Data Entry Window the question tree
of the related questionnaire is displayed in the left part of the observations window.
Page 13 of 56
It shows the chapters of the questionnaire.
Each chapter can be opened by clicking on the little cross in front of the chapter.
The chapters displayed in bold are those were observations have been entered.
The displayed questions can be limited to those were observations have been entered. this is done
by clicking with the right mouse on the question tree. The menu that opens allows to hide empty
questions. Click on Hide Empty to do this. This results in that only questions with observations are
displayed or with other words empty questions are hidden.
If Hide Empty is selected, the setting is permanent until hide empty is deselected or 3D is restarted.
This is indicated by the highlighted magnifying glass.
If the right mouse is used again on the tree and the option Expand All is selected, the tree is opened
automatically and shows all questions containing observations. The reverse action can be executed
by selecting Collapse to Definitions.
The questions can be limited to those containing only deficiencies. To do this click with the right
mouse on the question tree and select Hide Comments & Empty
Comments
Inspector Comment & Owner Comment
If a question is selected in the question tree, the related informations are displayed. There are 2
tabulators. One for the Comments and
Page 14 of 56
one for the Actions. The information can be entered by typing, copy and paste or drag and drop.
The Comments tabulator shows the Inspector Comment and the Owner Comment.
After entering information into these boxes the information must be saved! Click on SAVE
Otherwise the information is lost!
Page 15 of 56
Actions
Root Cause Investigation
Clicking the Action tabulator changes the view to 3 other sections: Root Cause, Immediate Action
and Suggested Corrective Action.
In case of a more severe deficiency that requires a Root Cause Analysis these boxes should be used
to capture the information.
After entering information into these boxes the information must be saved! Click on SAVE
Otherwise the information is lost!
Repetitions
Repetitive Deficiencies
Repetitive deficiencies are deficiencies that occurred more than once on the same ship under the
same inspection questionnaire. The database indicates
the occurrence of a repetition, by displaying an additional tabulator called Repetitions
next to the Comments and Action tabulator. If this tabulator is clicked the repetitions are listed by
showing on line with ship name, Inspection Date and Inspection Port for each repetition. Clicking
on the line opens a yellow comments box displaying the inspector and owner comment belonging to
the repetition.
Page 16 of 56
SIRE stored locally
OCIMF Requirement: SIRE Reports may not be stored on the
ChemServe 3D Server
OCIMF has enforced local storage of the SIRE reports. OCIMF were concerned about SIRE reports
on our ChemServe 3D Database server. We have decided to disconnect SIRE reports from the
server and store them locally in the customers Intranet. Pls note that this change affects SIRE
reports only!
SIRE disconnected from 3D Server after June 2006
Using 3D client after June, 2006 leads to disconnection of SIRE report storage from our server.
SIRE Reports entered after this date are stored locally on the user workstation.
SIRE observations sharing
Ship Managers may share the SIRE observations within their
organisation
To enable exchange of this information across all users in the ship managers Intranet the reports
must be stored on a shared folder.
SIRE on shared folder in ship managers Intranet.
A shared folder should be identified and created in ship managers Intranet that can be accessed by
all users working with 3D and needing to see SIRE reports. Review data security before selecting
this folder and ensure appropriate backup procedures. ChemServe cannot control any more SIRE
report data security.
Once the path to this folder has been identified select in the 3D client Tools > Enable Direct Link.
A dialogue window asks “Enable direct link for SIRE Reports stored locally?” Click Yes.
Page 17 of 56
Select the path to the shared folder in the folder search window that opens now. Click OK. Sire
reports that have been entered before enabling the direct link on this workstation will be moved to
the shared folder automatically.
The path to the shared folder will be saved on the server. 2 files will be created in this folder. One
with the extension .exc and another one called mastercsm.exs.
Repeat this procedure on every 3D client installation that needs access to the SIRE reports. After
Enable Direct Link on the other workstations the stored path to the shared folder will be proposed
automatically.
From now on all users linked with the shared folder will see every change to SIRE reports executed
by another user.
Export/Import
Manual exchange of locally stored SIRE data
Export/Import SIRE reports manually
In case SIRE reports must be exported to a workstation/user that has no access to the shared folder,
use the following procedure:
Select File > Export > Locally stored SIRE reports. Select folder where the file should be stored in
the window that opens. Forward folder to the receiver.
Receiver should select File > Import > Sire Reports file.
Receiver should select location where he keeps the received file. Click OK.
Important notice:
Ship manager must keep SIRE reports in his organisation. Not doing so will result in breach
of SIRE programme rules. ChemServe cannot be hold liable for this.
Page 18 of 56
Follow Up
Target Date and Close Out Date
In case a deficiency requires follow up a Target Date and a Responsible can be selected. Many
deficiencies are not closed out on the
spot. Sometimes the corrective action can be implemented only during the next dry dock. In this
case the target date should be the expected dry dock date for that ship. The responsible
persons/functions must be edited in the table Responsible. Setting of the target date without setting
of a close out date results in counting this deficiency as an Open Observation.
Open Observations will be listed in the Overdue Items Report. In the inspections table of the Data
Entry Window the Open Observation count will be increased by one. All entries must be saved to
become effective. Otherwise the information is lost.
After the deficiency has been corrected the Close Out Date and the Responsible should be entered.
Setting of a close out date will
result in that the observation is not counted any more as an open observation. It will not be listed
any more in the overdue items report. Also the open observations count in the inspections table will
be decreased by one. All entries must be saved to become effective. Otherwise the information is
lost.
Page 19 of 56
Analysis
Severity, Cause, Responsibility and General References
A set of attributes can be allocated to each questions in order to enable more meaningful analysis
and reports. In the right section of the observations window is a box with 4 Pull Down Menus called
Analysis. The 4 attributes that can be selected are:
Severity shall distinguish severe deficiencies from less severe deficiencies. As a standard we
distinguish 3 severity classes: High Risk, Medium Risk and Low Risk. Pls note that the underlying
table can be adapted to customer requirements. Will say we can define other severity classes if
desired.
Cause allows to allocate an underlying root cause factor from a list. Click here for the list of Root
Cause Factors
Responsibility allows to allocate an area on board of a ship to each question.
General Reference allows to allocate each deficiency to a set of General Categories.
Click here to view the list of General References. The questions from Industry Questionnaires such
as SIRE, CDI and PSC are linked already to these Categories. If a deficiency is entered manually or
imported automatically into a SIRE, CDI or PSC question number, the General Reference is filled
automatically. The automatic proposal can be changed manually.
The General Reference must be selected manually, if the used report type does not have a
questionnaire that is linked to the categories. If General References are thoroughly applied for all
deficiencies, meaningful results can be obtained from the Reports General Reference Analysis.
Even if the Industry Questionnaires such as SIRE and CDI will be changed, the concept of the
General References allows a uninterrupted reporting.
Page 20 of 56
Root Cause Factors
Basic Risk Factors & Root Cause Types
Hardware
Bad condition (circumstances)
Hardware
Bad condition (wear/corrosion)
Hardware
Not suitable for purpose
Hardware
Procurement and stock management
Hardware
Insufficiently delivered
Hardware
Unavailable due to theft
Design
No standardisation
Design
Not ergonomic
Design
No indication of condition
Design
Badly accessible
Design
Illogic lay-out
Design
Practical use unknown to designer
Maintenance
Management
Insufficient supervision on maintenance
Maintenance
Management
No feedback of condition
Maintenance
Management
No specialised maintenance staff
Maintenance
Management
No relevant documentation
Maintenance
Management
Insufficient planning of maintenance
Procedures
Author insufficiently knowledgeable
Procedures
Lack of feedback on usability
Procedures
Rules difficult to find
Procedures
Need insufficiently inventorised
Procedures
"Political" reason
Procedures
Important rules missing
Procedures
Area of scope unclear
Procedures
Design of rules unstructured
Error Enforcing
Conditions
Human physical constraints
Page 21 of 56
Error Enforcing
Conditions
External influences
Error Enforcing
Conditions
Socially determined circumstances
Error Enforcing
Conditions
Personality circumstances
Error Enforcing
Conditions
Abuse or addiction
Housekeeping
Insufficient means
Housekeeping
Lack of management commitment
Housekeeping
Wrong image to management
Housekeeping
No field visits by management
Housekeeping
Difficult due to environmental circumstances
Housekeeping
Unclear responsibility
Housekeeping
Bad planning of housekeeping
Incompatible Goals
Progress of production
Incompatible Goals
Financial constraints
Incompatible Goals
Discrepancy between social and individual factors
Incompatible Goals
Time pressure
Incompatible Goals
Discrepancy between formal and informal practices
Incompatible Goals
Discrepancy between short and long term goals
Incompatible Goals
Indistinctness with management
Communication
Language problems
Communication
Inadequate structure of communication
Communication
Erroneously transferred messages
Communication
Low ratio of signal versus rustle
Communication
Incorrect or ambiguous information
Communication
Inconsistently provided information
Communication
Loss of information
Communication
Overflow of information
Communication
Physically or mentally inaccessible
Organisation
Badly defined departments
Organisation
Unclear delegation of responsibilities
Organisation
Discrepancy between policy and execution
Organisation
Bad planning or co-ordination
Organisation
Much bureaucracy / low flexibility
Organisation
Corrupted management of business
Page 22 of 56
Organisation
Frequent reorganisations
Organisation
Safety a goal instead a medium
Organisation
Curing instead of reforming
Organisation
No or unclear tasks, authorities and responsibilities
Training
Insufficient management commitment
Training
Inadequate management training
Training
Education inconsistent with requirements
Training
Human resource selection inadequate
Training
No structured training plan
Training
No assessment of training
Training
Training not provided or ineffective
Training
Discrepancy between training requirements and rules
Training
Varying quality requirements
Training
Not tuned to targeted population
Training
No test of acquaintance and skill
Training
Targeted population not identified
Defences
Insufficiently ready for emergencies
Defences
Inadequate personal protective equipment
Defences
Unsuitable detection systems
Defences
No emergency procedures or instructions
Defences
Insufficient trained on emergency procedures
Defences
Detection difficult to recognise
Defences
Insufficient awareness of risks
Defences
Incapable to restrict consequence
Defences
Irreversible situation
Page 23 of 56
General Reference Categories
General References
Ship Certificates & Documentation
ISM System, Manuals & Procedures
Class Documentation & Surveys
Publications
Appearance & Structural Condition
Crew Management & Qualification
Drug & Alcohol Management
Communication Equipment
Communication Management & Operation
Communication Maintenance & Testing
Navigation Equipment
Navigation Management & Operation
Charts & Nautical Publications
Bridge Maintenance & Testing
Mooring Equipment
Mooring Management & Operation
Mooring Maintenance & Testing
Cargo Equipment
Cargo Management & Operation
Cargo Maintenance & Testing
Engine Equipment
Engine Management & Operation
Engine Maintenance & Testing
Health & Safety Equipment
Health & Safety Management & Training
Health & Safety Maintenance & Testing
Firefighting Equipment
Firefighting Management & Training
Firefighting Maintenance & Testing
Lifesaving Equipment
Lifesaving Management & Training
Lifesaving Maintenance & Testing
Pollution Prevention Equipment
Pollution Management & Training
Pollution Maintenance & Testing
Security Management & Training
Page 24 of 56
SIRE
Import (SIRE inspection reports can be imported automatically into 3D)
First of all the SIRE report that shall be imported into 3D must be downloaded from a certain
OCIMF Site. Click here to get instructions for this procedure
Click File>Import>SIRE XML and select the path to the folder were the downloaded SIRE Report
is located in the window that opens now. Click Open.
Multiple selection of xml files is possible. Just click on additional files. Though a set of reports can
be downloaded from the OCIMF site and they can all be imported by selecting all the downloaded
files.
A couple of data which are not available from the OCIMF database
have to be added:
OCIMF member
Inspector name
Ship Type is automatically proposed according to the ship type laid down in the ship table
Inspection Status
In case an inspection record is already existing for this inspection this record is identified by the
database and listed. Decide whether existing record must be updated or the inspection should be
added as a new inspection. Click the respective button. The import will start. After successful
import the imported record is inserted in the Data Entry window and the respective line is
highlighted. In case of multiple file import the window described above will open before each
inspection record.
Page 25 of 56
Manual entry of new records or editing of existing records
SIRE Reports can be entered manually. There are 2 possible ways of doing that: Click on New
Report or click with the right mouse on the inspection records and select New Report. The Edit
Report window will open. Fill in the respective fields and select Save. In order to avoid undesired
duplication of SIRE Report records the database performs a series of checks before the record can
be saved:
● Vessel Name, Template(Questionnaire), Company, Inspection Date, Inspection Port and
Inspection Status must be filled.
● There may be only one SIRE inspection on the same day on the same Ship by the same Oil
Major.
● If there is already a record for the same ship and the same company 3 days before or after
the inspection date, a warning is triggered.
Entry or Editing of Observations
Once an inspection record has been saved the respective questionnaire tree opens automatically in
the observations section. Entering and editing observations is already explained in
Navigation>Observations
SIRE Download
Instructions for downloading SIRE Reports as xml file.
Finalized SIRE Reports can be downloaded from OCIMF
●
●
●
●
●
●
●
●
●
●
●
http://www.ocimf-sire.com/
Select vessels>Vessels Index.
Click View for desired vessel name.
Click on download icon of desired report (not view!). Don't be surprised that you get no
response. The download is added to your shopping basket in the background.
Repeat this for other reports and if required, also for other vessels.
After all reports are selected, select mySIRE>My Downloads (like shopping basket)
Deselect PDF and select XML.
Click on download.
Select Save and specify path.
Unzip the file.
Start 3D and import one report after the other into 3D. File>Import> SIRE XML>Select
Path of downloaded and unzipped files.
Page 26 of 56
CDI
CDI Import from ISIS Web7
First of all the inspection report must be downloaded from the ISIS Website.
See instructions for the download of the xml file here
.
Select file>Import>ISIS XML and a new window will open
Select the xml file that has been downloaded before and click Open.
Multiple selection of xml files is possible. Just click on additional files. Though a set of reports can
be downloaded from ISIS Web7 and they can all be imported by selecting all the downloaded files.
The progress of the import will be displayed ending with an indication
which file has been imported and how many inspections and observations have been imported. If
applicable, error messages will be indicated.
CDI Import from ISIS Triple3
Until March 31st 2007 ISIS inspections that have been downloaded were saved in a local Database.
In case it is intended to import these inspections, the Database has to be located. Usually it is kept in
the standard installation folder C:/Programs/CDI/ISISTriple3. In this folder should be a file called
ISISTriple3.mdb.
Page 27 of 56
To import the ISISTriple3 records select File>Import>ISIS
Select the ISISTriple3.mdb file in the window that opens next.
Select your preferences and click on import. Statutaory Recommended and Desirable are tick
marked by default.
Edit CDI Inspections
Editing of CDI inspections is not allowed to a great extend. Just a few field (the white boxes) can be
modified. Select the record by double clicking or right mouse and Edit Report. The Edit Report
window will open.
The next inspection date can be modified according to existing company vetting rules. Inspection
cost and crew names can be inserted. All other values are imported automatically. Click Save before
changing to next operation.
Page 28 of 56
CDI Observations
Once an inspection record has been saved the respective questionnaire tree opens automatically in
the observations section. Entering and editing observations is already explained in
Navigation>Observations
Download CDI form ISIS Web7
Download ISIS XML Report
Start ISIWeb7 and select ship that you want to import. Click in the box Inspection Reports on
VIEW.
Don't click on View VPQ! The VPQ file cannot be imported into 3D.
Another window opens and a new icon with a globe (xml file icon) will be added right to the pdficon in the View Inspection Report line.
Click on this icon to start the download of the xml document. A new window displaying the xml file
will appear on the screen.
Page 29 of 56
Wait until the download is complete and save the xml document for example on the
Port State Control
Enter Port State Control Inspection
PSC Inspection have to be entered manually. Select New Report or click with right mouse on
inspection record and select New Report. The Edit Inspection Window will open.
Select PSC Organisation and select next the Authority. The underlying tables are linked so that only
the Authorities belonging to the selected Organisation will be shown. The inspection date must be
entered and the inspection port. If there was a detention set the tick mark and type the number of
days into the box right of the tick mark. Optionally the number of deficiencies can be entered. The
deficiency count will be based on the number of deficiencies entered in the observations window.
Enter crew names if desired. Click Save. There will be a couple of checks performed by the
database before the record can be saved:
● Ship Name, Inspection Date and Inspection Port must be entered.
● There may be only one PSC inspection on the same ship in the same port.
● In case there is another inspection is on the same ship in the same port 3 days before or after
a warning is triggered.
PSC Observations
After editing and saving the inspection record the observations belonging to that record can be
entered.
Page 30 of 56
PSC Observations can be selected from a questionnaire in the database by clicking the pull down
arrow under the box Question Code. If the right question has been selected click the Add Question
button and the question number will be inserted. If the question number on the PSC form is not in
the list, just type the number into the Question Code box and click the Add Question button. The
question will be added as user defined - without question text. Thereafter continue with entering
inspector comment and owner comment, follow up, and severity etc. like described under
Navigation>Observations
Inspection by Other
Inspection that has been executed by another Oil Major than the one
evaluating the report
This report type should only be used to record evaluation results from Oil Majors that have
evaluated an inspection carried out by another oil major.
Inspection by other can only take place if there is already an inspection record for a specific ship
from another oil major. There is a possibility to create an inspection by other record based on the
SIRE inspection record. Assume following case. Shell evaluates and approves Vessel EC based on
an inspection carried out by BP. Prerequisite for entering the inspection by other is that the BP
inspection is already in the database.
Select the BP inspection record click with the right mouse on this record and select " Use Report for
Inspection by Other". You will be asked whether you want to create the record. Click Yes.
The Display will change to inspection by other records and the new record has been inserted
already.
A confirmation is required. Click OK
The new record needs some modification. The name of the evaluating oil major , in our case Shell
has to be entered. Though change BP to Shell. The next inspection might need modification.
Page 31 of 56
Shell usually gives a date indicating when the ship needs a new inspection. This is your next
inspection date in this case. A text is inserted automatically telling that the ship has been approved
based on the BP inspection in.....from....Finally the inspection status must be updated. Save before
next operation.
The inspection by other record is mainly used in the Vetting Status Report
Terminal Inspections
Creating and editing
This Report Type should be used for inspections of loading ports. Usually these inspections are
carried out according to a questionnaire that has not been published. Though a questionnaire is not
available in the database. Subsequently the template used is called unformatted and there is no
question tree that can be shown. Still it may be very important to record these observations because
the oil major uses these records for his performance measurement. Follow up and close out could be
required for the observations from the terminal inspection. Also a ship could be disapproved as a
consequence of a terminal inspection.
Entering the inspection record is very similar to the
manual SIRE record entry
.
Terminal Inspection Observations
The entry of observations without questionnaire is very similar to
PSC observation entry
.
Type any name (text or digits) into the Create Question No. field and click the button Add
Question. There will be no question text displayed. The question is called user defined. Enter all
other info like inspector comment, owner comment, follow up etc. just as described in
Navigation>Observations
External Audit
Creating and editing
Following external audit types are existing in 3D
● Class Audit
● Flag State Audit
● ISM Audit
● ISPS Audit
Only ISM audit has a questionnaire.
Internal Audit
The standard 3D Internal Audit has no questionnaire, because these questionnaire are company
specific. If you have an internal audit questionnaire, this can be imported into 3D and is only
available for your internal audits. Just contact ChemServe for this.
Page 32 of 56
If no questionnaire is used, the internal audit observations are just added as user defined questions.
Creating these observations is described under terminal inspections
HSE Events
Non Conformities
This Report Types has been used up to November 2007 to record all events that are not related to
inspections. Non Conformities comprises all sorts of shipboard events. Non Conformities will be
replaced in the near future by the new Report Type HSE Events (see below). Non Conformities are
divided into Types and Subtypes. The Type Accident or Marine Injury and related Subtypes are
linked to the Marine Injury Report.
For the time being just one observation can be entered for one Non Conformity Report.
HSE Events (Health Safety Environmental and other Events)
This new Report Type comprises a wide variety of shipboard events. Major groups are Accidents
(Marine Injuries), Incidents, Customer Complaints and Near Misses. A complete List of all Events
that are available can be found here. The events listed in the group Personal Injury are linked to the
Marine Injury Report (Safety Performance Report).
List of available Events
Standard list of events. (Some customers have their customized list)
1.0 Personal Injury
1.1 Medical Treatment Case > Safety Performance Report
1.2 First Aid Case
1.3 Restricted Work Case > Safety Performance Report > Total Recordable Cases
1.4 Lost Workday Case > Safety Performance Report > LTI
1.5 Permanent Total Disability > Safety Performance Report > LTI
1.6 Permanent Partial Disability > Safety Performance Report > LTI
1.7 Fatality > Safety Performance Report > LTI
1.99 Others
2.0 Vessel Casualty
2.1 Collision with other Vessel
2.2 Grounding
2.3 Contact damage Dock/Pier/Shore equipment
2.4 Fire/Explosion
2.5 Heavy Weather Damage
2.6 Loss of Stability, Capsize
2.7 Ice damage
2.8 Flooding, Water Ingress
2.99 Others
3.0 Cargo Related Damage
3.1 Cargo Contamination
3.2 Tank rejection
3.3 Damage to Cargo
Page 33 of 56
3.4 Dead Freight
3.5 Cargo Loss/Shortage
3.99 Others
4.0 Environmental Pollution
4.1 Oil Pollution
4.2 Pollution from Chemicals / Noxious Substances
4.3 Pollution from Garbage / Waste
4.4 Pollution from Sewage
4.5 Air Pollution
4.99 Others
5.0 Machinery Equipment Failure
5.1 Main Propulsion Machinery
5.2 Motor Aggregates for Main Electric Power
5.3 Other Machinery
5.4 Deck Machinery & Equipment
5.5 Equipment for cargo
5.6 Anchor-handling equipment
5.7 Boilers, Steam and Gas Generators
5.8 Incinerator
5.99 Others
6.0 Navigational Equipment Failure
6.1 ECDIS
6.2 Radar
6.3 Gyro Compass
6.4 Echo Sounder
6.5 Doppler Log
6.6 Communication equipment
6.99 Others
7.0 Non Conformity
7.1 Charterer's Instructions
7.2 Environment Procedures
7.3 Shipboard Safety Management Procedures
7.4 Management Non-Conformity
7.5 Lack of Vessel Specific Procedures
7.6 3rd Party Non-Conformity
7.7 Specification/Quantity of Spares
7.8 Specification/Quantity of Stores
7.9 Specification/Quantity of Provisions
7.10 Specification/Quantity of Bunkers
7.11 Pilot / Tug boat etc
7.12 Non Compliance of Legislative rules and regs.
7.99 Others
8.0 Illegal Event
8.1 Piracy / Sabotage / Bombing
8.2 Criminal Offence / Smuggling / Drug Abuse
8.3 Detainment / Arrest / Confiscation
8.4 Vandalism / Theft
8.5 Stowaway
8.99 Others
Page 34 of 56
Page 35 of 56
Data Tables
The database will deliver meaningful results only, if the underlying tables are thoroughly
maintained. The preferred solution is to assign an individual as responsible for maintaining the
database. A couple of tables must be maintained by the user.
Companies, Crew, Ships and Responsible (For follow up and close out). Many other tables are filled
automatically via entries or imports into the database.
Companies (Oil Majors)
After database has been setup for new customers there is a list of standard values in the company
table. If a company is missing the table must be opened to enter a new company.
Selet Edit>Companies to open the table. The Company Setup window will open. To enter a new
company select New. Enter the name of the company into the window that appears and and click
OK.
The name of the new company will now be displayed in the table. Click the tick box next to the
company to make the company active. Click the Save button to make changes active. The sequence
of the companies in the table can be changed. This controls the sequence of the companies in the
Vetting Status Report. To change the sequence select a company and move the line up or down by
clicking on the arrows on the right side of the Company Setup window. Click the Save button to
make the changes active
Ships
New Ship and changing existing ships
To enter new ships open the table ships via File>Ships.
Page 36 of 56
The table ships opens. Click button New Ship and enter data.
● IMO Nr may only by used once in 3D. If there is a warning upon save the IMO Nr is
probably already existing via other customer. In this case contact ChemServe
● Ship Name and if desired Ex Name (previous name)
● Ship Type to be selected from pull down menu
● Ship Mgr must only be entered if there is more than one ship manager under the same
customer.
● Delivery Optional
● Marine Injury Report
● Managed from Date
● Managed to date to be entered if the ship leaves the management. Also important for the
Marine Injury Report.
Pls note that the number of active ships are the basis for the quarterly invoiced amount. If a ship
leaves the management, the ship must get an managed to date and the active flag must be removed.
(click tick mark in the box Active away). After all entries have been done click Save button next to
>New Ship to make changes active.
Ship acceptance
For each ship so called oil major acceptance criteria can be assigned. Theses criteria are used in the
VSR Vetting Status Report
.
Page 37 of 56
To enter those, select a ship in the left side of the table so that the ship line is highlighted. Than
move to the right side of the table and enter select a company so that the company line is
highlighted. Go to the Accepted box and select the appropriate value from the pull down menu.
● APPROVAL REQUIRED- This is usually the case it there is a contract with the oil major
involving this ship. Causes a green shade in the box of the VSR
● NOT MEETING OIL MAJORS ACCEPTANCE CRITERIA. Causes a black shade in the
boy of the VSR
● NOT DEFINED (Default). Cell in the VSR is white.
After the value has been selected, click Save on the right side next to Close, to make the changes
active. Go to next company etc.
Crew
To enter new crew names there 2 possible methods:
1. Enter crew names in the crew table.
2. Enter directly in the crew box of the Edit Inspection window
To enter crew names into the crew table select Edit>Crew.
Page 38 of 56
The Crew Setup window will open. If you want to enter a new crew member click the New button.
Enter the First name and the Surname in the respective boxes and click OK. The name will be
added at the end of the list. Click Save to make changes active.
Responsible (Names for Follow Up and Close Out)
The Responsible is is saved in a separate table. Responsible can be persons or functions which are
responsible for the follow up and the close out of corrective actions from observations. It is
recommended to use functions such as Master; Vetting Manager rather than names, because names
are changing more frequently.
To enter responsible names into the responsible table select Edit>Responsible.
The Responsible Setup window will open. If you want to enter a new responsible click the
New button. Enter the name into the box and click OK. The name will be added at the end of the
list. Click Save to make changes active.
Page 39 of 56
Reporting
Navigation (Switch to Reporting and Switch back to Data Entry)
3D uses Crystal Reports as a reporting engine. This is automatically installed during the 3D
installation process. After data have been entered via the Data Entry section of 3D, the reports can
be seen in the reporting section. To switch to reporting click on the "Switch to Reporting" button
in the toolbar of 3D client.
The 3D Reporting Engine will start and you get a new window.
On the left side is the list of standard reports that can be opened. In the top there is a set of icons for
certain actions related to the reports.
Export, Print; Filter and Refresh.
To navigate back to the Data Entry section click on the button Switch to Data Entry
Export of Reports
Any report can be exported to the standard MS Office tools and to PDF.
Once the report is on the screen in the form yo want to export, click the button
Export Report.
In the window that opens indicate the path to the folder where you want to save the report and
indicate the file format Excel, Word or PDF and click OK.
Print Report
Any report can be printed directly to any printer that is available form your workstation.
Just click on Print Report button. Select printer and click OK
Page 40 of 56
Refresh
Entries into the data entry section that have been made after last start of 3D will not be shown in the
reports, unless the reports are refreshed.
Do do that click the Refresh button.
Report data will be retrieved form the server and the progress bar will show you the status of the
update. Once finished all reports have the newest status.
Standard Reports
Selecting Reports
It is very difficult to anticipate the customers reporting requirements. In order to make the database
easy to understand we have defined just some 15 so called Standard Reports.
They are listed on the left hand side of the Reporting window. Click on the desired report and the
report will open in the Main Reporting Window. In the standard selection settings, will say without
filtering, all standard reports comprise all data entered into the database. Sometimes it will be
Page 41 of 56
necessary to narrow the report. This depends on the subject that has to be investigated. In this case
the filter must be used. A detailed description of the filter function can be found here.
Zoom (Adjust the size of the report in the main reporting window)
In case the size of the report needs adjustment, click on the magnifying glass and adjust the size by
selecting from the percentage scale.
Browse (Navigate through report pages)
Many reports consist of several pages. The count of pages is shown in the footer of the reporting
window. To browse through the report use the blue navigation arrows. The number between the
arrows indicates the current page.
Subreports
Some reports have a link to a subreport. This looks like a hyperlink (blue and underlined).
Click on this hyperlink to go to the subreport that opens than in the main reporting window. The
example shows a report that lists the overdue items. Every line has a hyperlink that leads to the
details (inspector observation and owners comment).
Toggling between main and subreport can be done by clicking the respective buttons.
Page 42 of 56
Overdue Items Report
Deficiencies that require Close Out
This report lists all observations that have a follow up target date and yet no close out date. Thus
these are items that need close out. There is one line per item (observation). The items are listed by
overdue days (="""" today - target date) in descending order. Though the must urgent item is listed
first. If the target date is still in the future ( > today), the line is green. Whereas the line becomes red
when the target date is already in the past.
For each item there is a link to the details which can be displayed as subreport.
Overdue Items Subreport (Details)
Page 43 of 56
Vetting Status Report
The Vetting Status Report (VSR) delivers an overview of the oil major vetting results. Each cell has
4 lines: Inspection Date, Inspection Port, Status, Next Inspection Date. The VSR consists of 2 parts:
1. The left 3 columns are a summary indicating the latest CDI, SIRE and PSC inspection. CDI text
becomes red if the next inspection date is older than 13 month or yellow if will become red within
the next 6 weeks. SIRE becomes red if the next inspection date is older than 6 month and yellow if
it becomes red within the next 6 weeks. PSC box becomes red if the ship was detained and yellow if
the inspection had deficiencies.
2. The company columns show the latest oil major vetting result. The boxes become red if the next
inspection date lies in the past and yellow if it will become red within the next 6 weeks. The cells
are green if there the company is set to Approval Required in the ship acceptance table and black if
is not meeting the Acceptance Criteria. The boxes remain white, if nothing is defined in that table.
The oil majors sequence (column sequence) is the sequence of the oil majors in the companies table
The ship row header contains the ship name, the abbreviation for ship type and the ship manager.
The ships are grouped by Ship Manager and Ship Type. Within the groups they are listed in
alphabetical order. The VSR lists only ship types that are exposed to vetting inspections (Chemical
Tankers C, Gas Tankers G, Chemical/Product Tankers C/P, Crude Oil Carriers CO).
Important note: The Filter does not work on the VSR! The VSR can be printed but Export Report
works not with the VSR.
The arrows in the report header can used to hide the first 3 columns. Left arrows hides, right arrow
brings them back
Page 44 of 56
Reports by Date
This report lists all inspections grouped by month of the inspection date in descending order. The
observation details can be seen by clicking on the link after each line. The subreport that opens
upon clicking this link lists all observation details related to the inspection record in the main report.
Filter use is strongly recommended in combination with this report.
Subreport (Observation details)
Page 45 of 56
Reports by Ship
This report is very similar to the report by date. The inspection records are grouped by ship in
alphabetical order. Subreport again lists the details of all observation related to the inspection.
Also here the use of the filter is recommended.
Observations by Question No.
All observation details
This report lists all inspector and owner comments grouped by Report Type and Question No. The
number of occurrences is indicated for every question . Since this lists already the details no
subreport is required.
Use of filter is strongly recommended to narrow this report.
Page 46 of 56
Relative Deficiencies
Relative deficiencies as graph (deficiencies divided by inspections)
This report shows a trend of the fleet performance regarding vetting inspections. The sum of
deficiencies id divided by the sum of inspections for each year and grouped by report types CDI,
SIRE and PSC. There are more pages behind showing the calculation of the relative deficiencies in
tables.
Relative deficiencies as table (calculation example SIRE)
The table groups the inspection by report type, in this example SIRE and by year. Each vessel
represents one line. Each line shows the sum of observations for the year (column
Observations ) and the sum of inspections for the year (column Inspections). Observation column
is dived by the inspection column (Observations/Inspections). The summary for all ships can be
found in the Total for the year. These yearly values are shown in the graph (see above).
Page 47 of 56
Marine Injury Report (Safety Performance Report)
Report acc. to OCIMF Marine Injury Reporting Guidelines
Marine Injury Reporting is defined in a OCIMF Guideline. The incident types are Fatality or
Permanent Total or Partly Disability or Lost Workdays; these summarized as Lost Time Injuries
(LTI). LTI's, Restricted Work Cases and Medical Treatment Cases are summarized as Total
Recordable Cases.
The recommended way of reporting is not just counting the incidents but relating them to the risk
expressed as so called Exposure Hours. The daily exposure hours are the number of people on
board * 24 hours. 3D calculates the exposure hours automatically provided the number of crew is
defined in the Ship Table. Also the managed from date and managed to date must be maintained in
the ship table to deliver correct results. Incidents entered as Non Conformities with the type Marine
Injuries and the respective subtypes Fatality, LWC, RWC, MTC are displayed in the Safety
Performance Report. The reporting is done on a quarterly basis. The table shows the details of the
calculation; incident count and exposure hours resulting in LTI frequency and Total Recordable
Case frequency expressed in Sum of Incidents per million hours. The graph shows the LTI
Frequency and the TRC's as a trend.
Page 48 of 56
General Reference Analysis
Most frequent observations
This report consolidates all questionnaires. Every question is referenced to one of the 36 general
categories. This allows to run analysis across the various report types. This potential problem
clusters or potential improvement areas. The key advantage of this referencing is that it allows
continuous reporting also after change of questions after new releases of vetting questionnaires.
Page 49 of 56
Grouped by report type
This page shows that the observations in each category stem form different questionnaires. In this
example from CDI and SIRE
Page 50 of 56
Filter
Filter setting (Example Ship Name is ...)
Usually the standard reports from 3D must be narrowed by setting a filter. To set a filter a report
must be loaded.
Click in the toolbar on Filter and the Choose Filters window will open.
On the left side is the Add Filter box. These are all the report fields that can be set as a filter. In the
beginning is a selection of fields called Quick Select. These are fields that are deemed as the most
common filter fields for that report. You can find many more, if you scroll down. They are grouped
into Ship Details, Crew, Inspection, Report, Follow up, Analysis and others. To set a filter, select a
filter field such as ship name and double-click that field. The Add Filter Window will open and asks
you to define the filter operation and the filter values.
Depending on the field type, there are different Operations you can select from.
Operations that are available are "is" , "is not", "Select by list" and "Full Text Search".
Let's assume we want reports with Vessel A only. We select the Operation "is" and must now define
a value (the name of the ship). What we tell the reporting engine is that we want a report where the
ship name is Vessel A.
After selecting the vessel name the filter setting is finished by clicking the OK button. Thereafter
the filter setting appears in the filter window. The filter will be applied to all reports by clicking the
button Apply. After a couple of seconds the report that was in the reporting window, is changed
according to the filter settings.
As long as the filter is not changed any more it remains active with the recent settings. This is
indicated by the highlighted blue Filter button in the toolbar. Even if other reports are selected, they
are filtered according to these settings. To modify the settings double click on the highlighted Filter
button again.
Page 51 of 56
The Choose Filters window opens again. Existing settings (our ship name) can be modified by
double clicking the line or by selecting the line and clicking the Edit button. Other settings can be
added by clicking another field from the Add Filter list. To delete a filter setting select the line and
click the Delete button. To clear all settings click the Clear All button. As always the settings listed
in the Choose Filters window are applied after clicking the Apply button
Save Settings (Example Select by List)
To explain the Save Settings function we select an example: Vessel A, B, C, D and E are sister
ships. the user will often run reports about just these 5 ships. It would be useful to save these
settings rather than set the filter every time again. The desired filter setting must be entered once.
After adding all the ship names to the list we click OK and the filter setting will appear in the
Choose Filter window. Than the button Save Preset must be clicked.
The save Preset window will open and asks for defining a name. To recall the saved preset, a
meaningful name should be selected (such as XYZ Class Ships). By clicking OK the Preset will be
saved. It can be used now any time again by just opening the Presets pulldown menu and selecting
it from the list, followed by Apply
Full Text Search
A special filter function is the so called full text search. It allows to search in your text fields for a
Page 52 of 56
certain text string. As an example you want to search for all inspector comments that deal with
"mooring". To start this search the report Observations by Question No should be selected because
this displays the inspector comments and owner comments. Than select and in the Choose Filter
window click in the Add Filter box on the left side, the line Inspector Comment. You will find this
under the group Inspection. The Full Text Search is already as default displayed in the Operation
field. Type the text that you look for and click OK button. Then click Apply button. If you type
more than one word (e.g. mooring winches), the filter will treat these as "mooring" AND "winches".
This filter will be used mainly on text fields. It can be applied however for all other fields as well.
For example it could be used to filter all Deficiencies from Questions that have the string
"certificate" in the Question Text.
Global Filter
A special type of Filter is the so called Global Filter. There is for the time being just one global filter
available. This is called Active Ships Only. This filter is on if 3D is started (button highlighted). To
switch this off click on the button. To switch it on again click the button again. This filter will limit
your reports to the ships which are active in the table Ships
Customized Reports
Basically any report dealing with the information in 3D can be developed. It is impossible to
anticipate the various reporting requirements from many different customers. In case you need a
special report that is not available yet in the database, don't assume it can't be delivered. Just contact
ChemServe and tell us what is required. Most probably we will find a solution for this.
Page 53 of 56
Training
On-line Presentation
ChemServe can provide On-line Training if required. All that has to be done is fixing a date with
ChemServe and setting up a workstation for the training. ChemServe can run an On-line
Presentation on any workstation that is connected to the internet. For multi-user training consider a
PC with beamer in the conference room.
Download of the PCVisit4 guest module form www.pcvisit.de. This file has to be present on the
workstation and must be executed prior to the training session. You will be provided with a session
number and a password before the training commences. These data have to be entered into the guest
module. Thereafter the session will start on your screen.
Voice communication preferred via SKYPE. If SKYPE not available, call ChemServe +49 4135
808630 before session commences.
Page 54 of 56
Informations
3D Database supports
● Answering of inspection deficiencies
Check for repetitive questions on same vessel
Check for repetitive question in fleet
Ensure consistency in answers over fleet and time
● Preparation of new inspections
History of inspections from invited inspector
History of inspection defciencies of vessel
● Invitation for inspections
Pre-warning via next inspection date
● Overview of fleet approval status
On one sheet for every vessel
Latest inspection of every scheme (CDI, SIRE, PSC)
Latest inspection of every oil major
● Sharing of learning experience
Mgr wants to send report about inspection deficiencies to entire fleet
This used to be a massive task for an office clerk
With just one click the Vetting Mgr has a report from the database that he sends to PDF printer.
Distribution to fleet via mail attachment.
3D helps to analyse
●
●
●
●
●
●
●
●
●
●
●
●
Crew Performance
Fleet performance
Vessel performance
Oil Major related performance
Inspection scheme related performance (CDI, PSC, SIRE)
Vessel type related performance (oil tanker, product tanker etc.)
Most frequent deficiencies
Most severe deficiencies (high risk)
Health Safety Environmental (HSE) performance
Injury reporting acc to OCIMF guidelines
Close out of deficiencies
Etc, etc……
3D improves
●
Preparation of audits
Printout of recent inspection reports from that major
Preparation of all performance trends (def/insp) for that major
All other things reports recorded eg. Customer complaints, Letter of protest, terminal Letter of
protest etc will be available with one click.
● Preparation of management reports
Usually annually a massive task to collect all the information for management report required by
ISM and now also TMSA
With Vetting Inspection Database you have the info on your fingertips
● TMSA compliance
Page 55 of 56
fulfils requirements as stipulated in TMSA section 12
Enables continuous improvement by meaningful measurements
Page 56 of 56