1
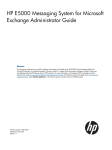
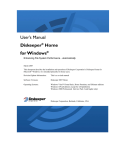
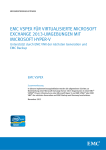
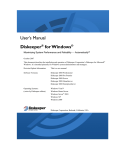
Virtual Platform Disk Optimizer
Performance
Testing Guide
Performance Testing Guide
A Note to Product Testers
The aim of this testing guide is to assist you in documenting the performance gains obtained from V-locity® 3 virtual
platform disk optimizer and to publish a factually accurate and well-informed recommendation of its benefits. In addition,
we encourage you to use the V-locity 3 User’s Manual accompanying the product to familiarize yourself with all facets of
V-locity 3. We hope you’ll find this guide useful and would like your feedback.
Understanding Fragmentation
The problem of file system fragmentation has been with us for decades. Direct-attached storage systems were plagued
by it first, and then administrators of NAS solutions had to contend with it. Now SAN infrastructures are suffering its
effects, inherited from the overlying file systems.
The nature of a decoupled storage model precludes the operating system from being aware of the type of storage
it’s using. This greatly limits the operating system’s ability to optimize for a particular storage model. One of the most
significant potential issues, and probably the most unrecognized, is fragmentation in a storage system. With the
implementation of a SAN in their storage environments, many Windows Server® administrators believe that file system
fragmentation, which they accepted and dealt with when using DASD (Direct Attached Storage Device) storage, has
gone away.
Testing V-locity 3 (Simple)
1. Install V-locity 3 Host for Hyper-V (Microsoft Hyper-V®) or V-locity 3 Host Agent (VMware ESX™/ESXi™ 4.0+).
a. Hyper-V Installation: The V-locity 3 Host for Hyper-V installs on the Microsoft Hyper-V Hypervisor
b. ESX/ESXi 4.0+ Installation: The V-locity 3 Host Agent installs on any Windows OS system which can
communicate with both the VMware Host/vCenter and the V-locity 3 Guests. This can also be a VM (Virtual
Machine).
2. Install V-locity 3 Guest on several VMs hosted by the server.
3. Run a Manual Analysis on each volume on all guest VMs and save both the Volume Map and Job Report for each
volume. Save these files as part of your testing.
4. Verify that V-locity 3 works correctly and successfully removes fragmentation on the guest VMs.
5. In the V-locity 3 Guest Dashboard, verify that V-locity 3 Guests running in VMs synchronize their resource usage with
the Host.
6. Verify that InvisiTasking® technology is working properly and that there is no negative impact on the performance of
the Host or any of the VMs from defragmentation.
7. Verify that V-Aware™ and CogniSAN™ technologies in the V-locity 3 Guests on VMs are aware of the resource usage
at the virtual host and shared storage layers. For example, heavy CPU or disk I/O activity in one VM over the same
host/storage should affect defragmentation on V-locity 3 Guests on other VMs.
8. Open the V-locity 3 Host for Hyper-V or V-locity 3 Host Agent and connect to the Host Service. Review the list of
VMs synchronizing resource usage with the Host and verify that it includes all VMs in which V-locity 3 Guests are
installed.
9. V-locity 2 Host: (This test step would only be employed if you have installed the V-locity 2 Host on a Hyper-V or ESX
hypervisor) Go to the list of virtual disks and perform disk compaction (the disks may not be in use by running VMs
to perform compaction). Verify that compaction succeeds and the unused space is reclaimed.
1
Performance Testing Guide
10. DAILY – Perform a Manual Analysis to see that the volumes are in fact being defragmented automatically. Save the
Volume Maps (both File Performance and File Structure views) and Job Reports for each volume.
11. DAILY – Copy the log file named ControllerLog.txt (located at C:\Program Files\Diskeeper Corporation\V-locity on
each VM), Volume Maps, Job Reports and Job Logs.
12. Please report any problems with detailed information on how to reproduce them.
Feature Testing
System Performance Testing
1. Create fragmentation on 40GB volume with moderate fragments.
2. Copy a large-size file (2 GB in size) and note down the time taken to copy the file.
3. Using the readfile.exe tool, measure the read time to read the above large file.
4. Delete the copied file and reboot the VM.
5. Repeat steps 2-4.
6. Install V-locity 3 Guest and defragment the volume.
7. Repeat steps 2-4 twice and tabulate the readings.
InvisiTasking Testing
1. Create fragmentation on 40GB volume with moderate fragments.
2. Copy a large-size file (2 GB in size) and note down the time taken to copy the file.
3. Delete the copied file and reboot the machine.
4. Repeat steps 2-3.
5. Install V-locity 3 Guest and enable Automatic Defragmentation.
6. Repeat steps 2-4 twice and tabulate the readings.
V-Aware and CogniSAN Testing
1. This test involves two separate test VMs, labeled A & B, each provisioned with 40GB volumes and running over the
same physical data store.
2. Create fragmentation on 40GB volumes of test VMs A & B with moderate fragments.
3. Copy a large-size file (2 GB in size) on test VM A and note down the time taken to copy the file.
4. Delete the copied file and reboot the machine.
5. Repeat steps 3-4.
6. Install V-locity 3 Guest on test VM B and enable automatic defragmentation.
7. Repeat steps 3-4 twice and tabulate the readings.
2
Performance Testing Guide
Space Reclamation Testing
1. Create fragmentation on 40GB volume with moderate fragments and record virtual disk size.
2. Delete a significant portion of the files on the disk and record size of deleted files.
3. Install V-locity 3 Guest and enable Automatic Optimization.
4. Perform a Quick Storage Migration (Hyper-V) or Storage VMotion™ (ESX/ESXi) of the test VM and afterwards record
virtual disk size.
5. Repeat steps 1-4 on a 10GB max provisioned size volume.
Dynamic/Thin Disk Growth Testing
1. Create a volume with moderate fragmentation in a Dynamic (Hyper-V)/Thin (ESX/ESXi) Disk.
2. Note the disk size.
3. Enable Automatic Defragmentation and let it finish.
4. Note the size of the disk. Growth should be minimal.
Testing V-locity 3 (Advanced)
This document describes test procedures for evaluating performance improvements from using V-locity 3 in a SAN
environment. These tests will take 4-6 hours of actual hands-on involvement for a test engineer, spread out over a couple
of days (allowing for time to create the environment, let the benchmark job complete, etc.)
The tests outlined in this document are proof of concept_ and are not intended to directly replicate a real-world
environment. The performance benefit of virtual platform disk optimization is always proportionate to the amount of file
fragmentation and the frequency that fragmented data is accessed.
The first set of tests demonstrates performance improvements from handling fragmentation in a SAN environment.
Specifically, the tests show that a system affected by fragmentation performs less efficiently than a system on which
fragmentation has been handled by V-locity 3.
The second set of tests evaluates IntelliWrite® fragmentation prevention technology, involving comparing a system
with V-locity 3 and without V-locity 3 under the same workload. This test demonstrates that IntelliWrite is effective in
preventing the vast majority of fragmentation, which is a much more efficient way of handling fragmentation compared to
reactive fragmentation removal. More importantly, it demonstrates full compatibility with block-based CDP (Continuous
Data Protection), provisioning and de-duplication solutions.
The tests described in this section rely on using a couple of industry-standard benchmark tools. The first such tool
is Iometer I/O measurement and characterization tool to measure system performance. The tool, as well as relevant
documentation, can be obtained from the following location.
http://www.iometer.org/
Diskeeper Corporation has a number of methods for creating fragmented data in a testing capacity. In order for Iometer
tests to represent the impact of fragmentation the Iometer test file (iobw.tst) must be fragmented. FragmentFile.exe is one
such method to ensure that the file is fragmented.
There are additional methods and benchmarking tools that can be used to measure the impact of fragmentation. So
long as the file(s) used by the benchmarking tool (e.g., SQLIOSim, Jetstress, etc.) can be fragmented, a before-and-after
comparison can be evaluated.
3
Performance Testing Guide
Test Environment Setup
The test should be performed on a VM installed over a new SAN LUN (Logical Unit Number).
Install Iometer and the V-locity 3 Guest on the test VM. During V-locity 3 installation, disable Automatic Defragmentation
and Automatic Space Reclamation (both are enabled by default). This is detailed with graphics below:
Figure 1 Uncheck the “Enable Automatic Defragmentation” and “Enable Automatic Space Reclamation”
options during installation.
After installation, open V-locity 3 and disable IntelliWrite. Right-click on the test volume and select “IntelliWrite” from the
dropdown menu:
Figure 2 Select “IntelliWrite…” from the volume dropdown menu.
4
Performance Testing Guide
Figure 3 Uncheck the option to “Prevent fragmentation on this volume,”
disabling IntelliWrite.
Disabling these automatic real-time operating features of V-locity 3 is done so that a steady state of the disk can be
analyzed, as a baseline, before running V-locity 3.
After completing all installation steps, make sure to save the image of the test volume for repeated tests (using an
imaging product like Norton Ghost™). Full-volume, block-based imaging software must be used so true comparisons can
be made.
Test #1 – Fragmentation Impact on SAN Disk Performance
The first few steps involve measuring file performance on a fragmented file. The procedure is then repeated on a
non-fragmented file. At the end, these results will be compared.
The test procedure is as follows:
1. Run Iometer. The test file need not be larger than 10-20GB.
5
Performance Testing Guide
2. While Iometer is creating the test file, use the FragmentFile.exe utility. This will fragment the Iometer test file, and can
be done by running the following command from the command line prompt:
FragmentFile e:\iobw.tst 1
The use of “1” in the parameters is to ensure significant fragmentation of the file, which in turn will ensure that
Iometer is accessing fragments of its test file.
3. Once Iometer is complete, perform a manual analysis of the test volume from V-locity 3. Save the Job Report which
shows the state of fragmentation of the volume and the degradation it is causing on the read access times on the volume.
4. Optional: Run any SAN optimization routines (such as reallocate), and then rerun the Iometer benchmarks. These
operations will not affect the degree of fragmentation of the iobw.tst file.
5. Delete the LUN and clear the SAN cache; otherwise the comparison result (when a non-fragmented file is tested) will
be skewed.
6. Create a new LUN that maps to the same location (as best as possible).
7. Re-run Iometer with the same settings. This time do not run the file fragmentation utility.
8. Once Iometer testing is complete run a manual fragmentation analysis and save the Job Report again. This is done
to validate that little to no fragmentation exists on the iobw.tst file.
9. Now compare the before-and-after data from Iometer and the V-locity 3 fragmentation analyses.
Figure 4 Example Fragmented File Report
Figure 5 Example Non-Fragmented File Report
6
Performance Testing Guide
Test #2 – Fragmentation Prevention
This test demonstrates the effectiveness of IntelliWrite in preventing fragmentation, largely offsetting the need to run afterthe-fact defragmentation. This technology was developed in order to ensure compatibility with SAN features such as
de-duplication, snapshots, Thin provisioning, etc. The purpose of this test is to validate that IntelliWrite does not incur any
unwanted side effects associated with SAN advanced functionality. For the purposes of this test, enable any and all SAN
features that are believed to experience unwanted side effects from defragmentation of SAN-attached Windows systems
(e.g., growth of a Thin-provisioned VM).
This procedure involves running a workload script that simulates typical disk activity on the system (i.e., web browsing,
downloading and creating mail, editing documents, downloading and deleting media files, etc.). It may include installing
several system updates. The workload needs to be scripted so that it is repeatable and it should reflect typical system
activity over a substantial amount of time (i.e., a week).
Attached here is a sample workload for SQL Server® (requires that application be installed on the test system):
SQL Workload.zip
We can provide additional sample workload scripts for other processes (e.g., Microsoft Office activity). Please contact us
if we can provide any alternate workload scripts.
Here is the procedure to test IntelliWrite:
1. Use the test volume(s) image created in the Test Environment Setup stage.
2. Run the workload script. The three SQL scripts are; SQLQuery4a.sql – adds data to TestlabDB1, SQLQuery4b.sql
– adds data to TestlabDB2, SQLQuery4c.sql – adds data to TestlabDB3. The SQL scripts are copies of the same
script, but used concurrently they will cause fragmentation to occur much faster, speeding up this test.
Here is the procedure to execute the workload script on a freshly formatted 40GB Thin-provisioned VM.
a) Rename the extension to.vbs and then run Create_Folder.vbs. This VB (Visual Basic®) script will create SQL_
Data and SQL_Log folders in the 40GB test volume. When SQL scripts are running, the data and logs will get
stored in these folders.
b) Run DropCreateDB.sql. This script will delete the databases from the server if it exists and create new
databases (TestlabDB1, TestlabDB2, TestlabDB3).
c) Rename the extension to.cmd and then run ScriptBatch.cmd. This Batch file will select all three SQL scripts
and run them simultaneously. NOTE: Before running this script, you need to modify the location of below SQL
scripts in this batch file.
3. Perform a Volume Analysis with V-locity 3 and save the Job Report.
4. Evaluate snapshot, deduplication, Thin provisioning, etc., growth via SAN management tools/mechanisms.
5. Restore the test image.
6. As applicable, restore the LUN to its original state (e.g., reclaim space, etc.)
7. Enable IntelliWrite in V-locity 3.
8. Run the workload script again.
9. Open the V-locity 3 Guest and observe statistics in the Dashboard. Notice the number of fragments prevented by
IntelliWrite.
7
Performance Testing Guide
Figure 6 Real-time Fragmentation Prevention in the V-locity 3 Dashboard.
10. Perform Volume Analysis and save the Job Report. Compare with the report obtained in Test Step #3. The test
phase with IntelliWrite will have far fewer fragments.
11. Evaluate snapshot, deduplication, Thin provisioning, etc., growth via SAN management tools/mechanisms. The
increase in activity/space for these SAN solutions should be identical to their activity in the first (IntelliWrite-disabled)
phase. Equal activity/storage growth for the two phases of the test (with and without IntelliWrite) would validate that
the technology is able to eliminate the majority of potential fragmentation without any negative side effects.
Conclusion
Thank you for testing V-locity 3. We hope that you found this Performance Testing Guide useful, and we would like your
feedback. Should you have any questions, please contact us directly. We look forward to reading all about your results
and recommendations.
If you are interested in participating in a joint Case Study utilizing your performance test results with V-locity 3, please let
us know.
© 2011 Diskeeper Corporation. All Rights Reserved. The Diskeeper Corporation logo, V-locity logo, V-locity, InvisiTasking, V-Aware, CogniSAN, and
IntelliWrite are registered trademarks or trademarks owned by Diskeeper Corporation in the United States and/or other countries. All other trademarks are
the property of their respective owners.
8