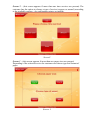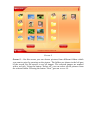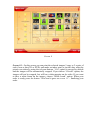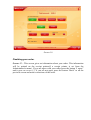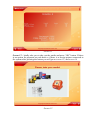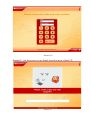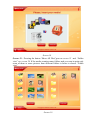
1
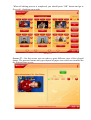
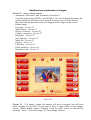
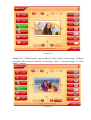
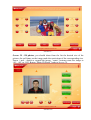
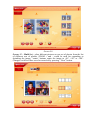
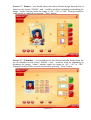
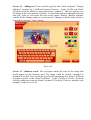
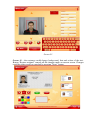
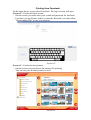
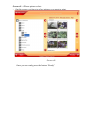
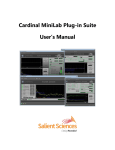
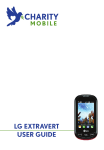
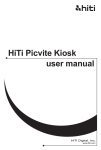
ODESSOS COLOUR LTD.
PICTURE MAKER
User Manual
Description and Functioning of Customers’ Menues
Software Description.
Picture maker is an unique software, available to a wide range of customers,
completely user-friendly, especially for customers with no computer skills.
Working with PM software is based on customer intuition, touch screen makes
menu management easier, icons and buttons are large and handy. The display
supports 1024/768 dpi which makes the product suitable for people with sight
problems. The Help menu is situated on the upper corner of each screen, as well as
the “Start over” button, that takes the customer back to menu 1 - Screen 1.
Basic software menues.
Screen 1 – animation screen, demonstrating kiosk functions. At its lower part you
may find 5 language icons. Pressing the button with the language preferred would
take you to Screen 2, where all menus would be in the chosen language. For
additional information how to switch languages at start up (and chose from 20
languages), please refer to “Operator and Administrator Manual”.
Screen 1
Screen 2 – (this screen appears if more than one time services are present) The
customer has the option to choose a type of service (express or normal) according
to the available printers - dye-sublimation printer or minilab.
Screen2
Screen 3 – (this screen appears if more than one paper sizes are present)
Depending of the selected service the customer can choose type and format of
paper.
Screen 3
Screen 4 – Choose the media – memory cards, CD, USB flash, pictures from
facebook, printing from iPhone via USB cable, wireless connection (Bluetooth,
WiFi), scanner or local folder (depending on the installed devices). Choosing
media opens screen 5 (if both optiopns “Jet“ and “Advance“ are switched on form
the administrator's menu) .and after that wireless connection opens screen 6,
memory cards, CD/DVD and USB – screen 7 and local folders – screen 8.
Note: If you want to print from your Android smart phone first mount the SD card
and than use USB input button.
Screen 4
Screen 5 – This screen appears if both options “Jet“ and “Advance“ are switched
on form the administrator's menu.
− “Jet“ function is just to make a quick copies and CD/DVD burning of the
pictures with several steps only. - Screen 7
− “Advance“ function is to make copies of the images using the all available
services for CD/DVD burning, colour corrections, ID photos, sets of photos,
frames, calendars, adding text and business cards creation.
Screen 5
“Jet” mode
Screen 6 – contains short instructions for sending images from a mobile phone to
the kiosk via Bluetooth and Wi-Fi. The software allows multiple images to be
transferred to the kiosk. When the selected images are sent and received, you
should press the “Ready” button, which would redirect you to screen 8.
Screen 6
Screen 7– On this screen the customer should insert his media - memory card,
CD/DVD or USB. Pressing the button “Show All Files”goes on screen 10,
“Folder view” on screen 9 and “Back“ on the previous screen. If the media
contains many folders and you want to print only some of them or some pictures
from different folders is better to choose “Folder view”.
Screen 7
Screen 8 – Pressing the button “Show All Files”goes on screen 10 and “Folder
view” on screen 9. If the media contains many folders and you want to print only
some of them or some pictures from different folders is better to choose “Folder
view”.
Screen 8
Screen 9 – On this screen you can choose pictures from different folders which
you want to print by pressing on the picture. The folders are shown in the left part
of the screen.Use the arrows to see all images. The selected images are marked
with a red tick. Using the button “Select all“ you can select all the pictures from
the selected folder. Pressing the button “Next” goes on screen 10.
Screen 9
Screen 10 – On this screen you can print the selected images(1 copy or 2 copies of
each), burn a disc(CD or DVD) and make an index print or put the date when the
picture was taken by using the relevant buttons. “Cut“ option is pressed by default
and the images will be automatically cropped. If you choose “Overall“ option, the
images will not be cropped, but will have white margins on the sides. If you want
to have a white frame on the images, choose “White board“ option. When your
order is ready press the button “Next”and it goes on screen 11. - finalizing your
order.
Screen 10
Finalizing your order.
Screen 11 – This screen gives an information about your order. This information
will be printed on the receipt printer(if a receipt printer is set from the
Administrator's menu). If you are agree with your order press the button “I agree”
and it goes on screen 12, if you are not agree press the button “Back” to on the
previous screen and make corrections of the order.
Screen 11
Screen 12 – kindly asks you to take out the media and press “OK” button. If there
is an option for payment on cash desk or if there is a receipt printer connected to
the system after pressing the button you will go on screen 13, and screen 14
Screen 12
Screen 13 – kindly invite to pay at the cash register..
At the same time, the receipt printer is printing a receipt with the total amount and
a special code of the order.
Screen 13
Screen 14 – After depositing the amount due at the cash register, you receive the
receipt with order number and code and should enter them.
Only after entering the right order number and code, the software allows
printing/burning a CD. After pressing “OK” if you have disk burning you will be
automatically redirected to Screen 15, if you do not have to Screen 17
Screen 14
Screen 15 – On this screen you are kindly invited to insert a blank CD.
Screen 15
Screen 16 – After finishing the order program automatically goes on Screen 16
Screen 16
“Advanced” mode
Screen 17 – contains short instructions for sending images from a mobile phone to
the kiosk via Bluetooth and Wi-Fi. The software allows multiple images to be
transferred to the kiosk. When the selected images are sent and received, you
should press the “Ready” button, which would redirect you to screen 19.
Screen 17
Screen 18– On this screen the customer should insert his media - memory card,
CD/DVD or USB. Pressing the button “Show All Files”goes on screen 21,
“Folder view” on screen 20 and “Back“ on the previous screen. If the media
contains many folders and you want to print only some of them or some pictures
from different folders is better to choose “Folder view”.
Screen 18
Screen 19 – Pressing the button “Show All Files”goes on screen 21 and “Folder
view” on screen 20. If the media contains many folders and you want to print only
some of them or some pictures from different folders is better to choose “Folder
view”.
Screen 19
Screen 20 – On this screen you can choose pictures from different folders which
you want to print by pressing on the picture. The folders are shown in the left part
of the screen.Use the arrows to see all images. The selected images are marked
with a red tick. Using the button “Select all“ you can select all the pictures from
the selected folder. Pressing the button “OK” goes on screen 21.
Screen 20
Screen 21 – displays the previously selected images (6 images on each screen).
Buttons “Next screen”, “ Previous screen”, “First screen” and “Last screen” allow
easy and fast browsing through screens of the images. At the upper left corner of
Screen21 is shown what is the total number of screens and which screen is the
present screen.
At the right part of Screen21 there are three yellow buttons for managing all the
images at once – for printing all the images, for copying them to CD/DVD and for
printing an Index Print .
Buttons “–” and “+“ are used for determining the number of copies for each
image. CD/DVD burning and Index print are available for each image. The button
“Size” is active if more than one paper sizes are installed for the selected time
service. Pressing on “Size” is going on Screen22. After ordering a different size
the button “Size” goes on green.
CD/DVD could be burned according to the installed devices. At the upper right
corner (at the yellow square) is shown what is the total size of the information
which would be recorded (in MBs) and how many CD/DVDs are needed.
The red rectangle that marks the picture shows the area that will be printed. It
could be moved to the desired direction by dragging with a finger on the screen.
For additional editing of each image, you should press the button “Edit” – and
would be directed to Screen23.
When all editing process is completed, you should press “OK” button and go to
Screen36 - finalizing your order.
Screen 21
Screen 22 – On this screen you can order to print different sizes of the selected
image. The present formats and types depend of paper sizes which are installed for
the selected time service
Screen 22
Additional personalization of images:
Screen 23 – image editing options:
− Automatic Correction 1 and Automatic Correction 2
− Crop the image using ZOOM – and ZOOM + .The red rectangle that marks the
picture shows the area that will be printed. It can be moved to the desired
direction with the direction arrows or dragged with a finger on the screen.
− Rotate image
− Fit image– Screen 24
− White board – Screen 25
− Red-eye removal – Screen 26
− Colours correction – Screen 27
− ID photos – Screen 28
− Set of photos – Screen 30
− Multi Set – Screen 31
− Frames – Screen 32
− Calendars – Screen 33
− Photo with text – Screen 34
− Business cards – Screen 35
Screen 23
Screen 24 – “Fit Image“ option, the images will not be cropped, but will have
white margins on the sides. If you want to have a white frame on the images,
choose “White board“ option. Changes could be either saved or canceled by
pressing “ Next” , “Previous image” or “Next image” buttons.
Screen 24
Screen 25 – “White board“ option makes a white frame on the image. Changes
could be either saved or canceled by pressing “ Next”, “Previous image” or “Next
image” buttons.
Screen 25
Screen 26 – Red-eye removal – just point the aware cursor over the red eye and
press “Clear”. If it is necessary use the buttons ZOOM – and ZOOM +. Changes
could be either saved or canceled by pressing “ Next” button.
Screen 26
Screen 27 – Colour correction. Possible colour corrections of the image are
colours – buttons Y+,Y-,M+,M-,C+,C-; density; contrast; saturation; Black&White
effect; Sepia effect. Changes could be either saved or canceled by pressing “ Next”
button
Screen 27
Screen 28 – ID photos, you should chose from the list the desired size of the
picture; the red frame on the image mark the restrictions of the corresponding size.
Zoom + and – shrink or expand the image, “rotate“ buttons rotate the image to
-90°, +90° or -180°.Button “Make ID Photo” leads to Screen 29.
Screen 28
Screen 29– on the left side of this screen is the new set of ID photos. “Restore
original” button cancels all the changes made on current screen. Changes could be
either saved or canceled by pressing “ Next” button .
Screen 29
Screen 30 – Sets of Photos – you should choose one set of photos from the list of
different sets of photos. ZOOM + and – could be used for expanding or shrinking
the image, “rotate“ buttons rotate the image to -90°, +90° or -180°. Changes could
be either saved or canceled by pressing “ Next” button.
Screen 30
Screen 31 – Multi Set – place diferent pictures on one set of photos from the list
of different sets of photos. ZOOM + and – could be used for expanding or
shrinking the image, “rotate“ buttons rotate the image to -90°, +90° or -180°.
Changes could be either saved or canceled by pressing “ Next” button.
Screen 31
Screen 32 – Frames – you should choose the desired frame design from the list of
frames on the screen. ZOOM + and – could be used for expanding or shrinking the
image, “rotate“ buttons rotate the image to -90°, +90° or -180°. Changes could be
either saved or canceled by pressing “ Next” button.
Screen 32
Screen 33 – Calendars – you should choose the desired calendar design from the
list of calendars on the screen. ZOOM + and – could be used for expanding or
shrinking the image, “rotate“ buttons rotate the image to -90°, +90° or -180°.
Changes could be either saved or canceled by pressing “ Next” button.
Screen 33
Screen 34 – Adding text. Text could be typed by the virtual keyboard. “Change
alphabet” switches the 3 different keyboard layouts – Latin, Cyrillic and Greek
(Symbols could be added too using the button “symbols”). The text appears over
the image at the very moment of typing. You have the option of changing font size
and type, color, as well rotate the text on the picture. Button “Restore original”
cancels all the changes made on current screen. Changes could be either saved or
canceled by pressing “ Next” button.
Screen 34
Screen 35 – Business cards. The red square marks the zone of the image that
would appear on the business card. The image could be rotated, expanded or
shrinked if needed. Text should be typed at the appropriate box using 3 different
keyboard layouts of the virtual keyboard – Latin, Cyrillic or Greek. (Symbols
could be added too using the button “symbols”) Pressing “Choose a business card
template” leads to Screen 36
Screen 35
Screen 36 – the customer could change background, font and colour of the text.
Button “Restore original” cancels all the changes made on current screen. Changes
could be either saved or canceled by pressing “Next” button.
Screen 36
Finalizing your order.
Screen 37 – This screen gives an information about your order. This information
will be printed on the receipt printer(if a receipt printer is set from the
Administrator's menu). If you are agree with your order press the button “I agree”
and it goes on screen 38, if you are not agree press the button “Back” to on the
previous screen and make corrections of the order.
Screen 37
Screen 38 – kindly asks you to take out the media and press “OK” button. If there
is an option for payment on cash desk or if there is a receipt printer connected to
the system after pressing the button you will go on screen 39, othervise on screen
40
Screen 38
Screen 39 – kindly invite to pay at the cash register..
At the same time, the receipt printer is printing a receipt with the total amount and
a special code of the order.
Screen 39
Screen 40 – After depositing the amount due at the cash register, you receive the
receipt with order number and code and should enter them.
Only after entering the right order number and code, the software allows
printing/burning a CD. After pressing “OK” if you have disk burning you will be
automatically redirected to Screen 40, if you do not have to Screen 42
Screen 40
Screen 40 – On this screen you are kindly invited to insert a blank CD.
Screen 40
Screen 41 – After finishing the order program automatically goes on Screen 42
Screen 41
Printing from Facebook:
On the input device screen select Facebook. The log in screen will open.
Screen 42 – Facebook log in screen:
− On this screen you must enter your e-mail and password for facebook.
− First time you use Picture maker to enter the facebook you must allow
“Picturemaker Fbk” to use your pictures.
Screen 42
Screen 43 – Facebook user pictures:
− On this screen you can choose the pictures for printing.
− You can use your friends pictures as well.
Screen 43
Printing from iPhone :
On the input device screen select iPnone - USB. The following screen will open.
Screen 44 – iPhone screen:
− On this screen you must connect your iPhone via USB cable.
Screen 44
Screen 45 – iPhone folder tree:
− On this screen you have to select folder that contains pictures you want to print.
Screen 45
Screen 46 – iPhone picture select:
− On this screen you have to select pictures you want to print.
Screen 46
Once you are ready press the button “Ready”