1
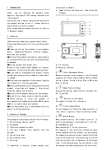
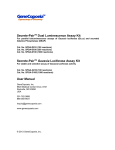
Operating Manual
■ Table of Contents
Safety Precautions……………………………………………………… 1
1. Parts Designations………………………………………………… 3
2. Explanation of LCD Screen Information… …………………… 4
3. Before Using………………………………………………………… 5 3-1. Inserting the Battery…………………………………………… 5
3-2 Power ON/OFF… ……………………………………………… 5
3-3. Checking the Battery Capacity… …………………………… 6
3-4. Replacing Battery during Measurement… ………………… 6
3-5. Automatic Power OFF Function……………………………… 7
4. Basic Operation……………………………………………………… 8
4-1. Basic Operation Flowchart and Setting
the Measuring Mode……………… 8
5. Measurement… …………………………………………………… 9
5-1. Continuous Measuring Mode………………………………… 9
5-2. Single Measuring Mode… …………………………………… 9
5-3. Timer Measuring Mode… ………………………………… 10
6. Other Setting… …………………………………………………… 11
7. Specifications……………………………………………………… 12
■ Safety Precautions
Before using this product, please read this "Safety Precautions" for
proper operation.
The warning symbol indicates the possibility of death of
serious injury if the product is not used properly.
The caution symbol indeicates the possibility of minor to
moderate personal injury or product damage if the product is
not used properly.
The note symbol indicates cautions or restrictions when using
the product. Please read all notes to avoid errors in operation.
The reference symbol indicates additional information
about the controls or related functions. Reading these is
recommended.
● Do not place batteries in open flame, attempt to short them,
disassemble them, apply heat to them, or recharge them
(except rechargeable batteries). They may burst and cause
fire, serious injury, or damage to the environment.
● Do not handle this product with wet hands, or leave it in the
rain or in a location where it may be splashed with water or
come into contact with moisture. This may result in damage
to the product.
● Do not attempt to disassemble the product for modification or
parts replacement.
■ Safety Precautions
● Be sure not to drop the meter or subject it to sudden impact,
as the meter will be damaged,
● Do not store the meter in areas of high temperature or high
humidity, as the meter will be damaged.
● Be careful of condensation caused by sudden changes
in temperature. It will cause damage or malfunction of the
meter.
● If the temperature goes below -10°C, the response of the
liquid crystal display will slow down greatly and the display
will become difficult to read. Between 0~10°C, the liquid
crystal display response will slow down somewhat but the
meter will not be harmed. Also, if the temperature exceeds 50
°C, the liquid crystal display will darken and become difficult
to read, but when it return to room temperature it will return
to its normal condition.
● If the meter is left in direct sunlight or near a heater, the
temperature of unit’s surface will rise and may result in
damage. Please be careful when using the meter in these
types of locations.
● If the meter will not be used for an extended period of time,
it is recommended to remove the batteries to avoid possible
damage caused by battery leaking.
Maintenance Notes
●
●
Be careful not to allow the light receptor to become dusty,
dirty or scratched as this may affect the accuracy of the
reading.
Do not use organic solvents such as benzene or paint
thinner to clean the surface of the light receptor.
1. Parts Designations
① Power Button
② Light Receptor
③ Mode Button
④ Measuring Button
⑤ LCD Screen
⑥ Up Button
⑦ Down Button
⑧Timer
Button
⑨ Battery Cover
2. Explanation of LCD Screen Information
Display of the i-346
*This diagram is for explanation purpose.
① Battery Capacity Indicator (See page 6)
② Measuring Mode Display
Displayed at the continuous measuring mode. (See page 9)
Displayed at the single measuring mode. (See page 9)
Displayed at the custom setting mode. (See page 11)
③ Illumination Value/ Timer Display
Measured illuminance is displayed.
Display example
Set timer second is displayed. (See page 10)
Display example
3. Before Using
3-1. Inserting the Battery
1) Requires type-AA 1.5-volt battery.
2) Slide the battery cover in the
direction of the arrow to remove.
Slide down Battery Cover ⑨ in the
direction of the allow to move.
3) Insert the battery observing the
polarity with the +, - marks in the
battery compartment.
4) Align Battery Cover ⑨ with main
unit and slide shut.
Make sure that the cover is properly
in place and closed.
⑨Battery
Cover
● Do not place batteries in open flame, attempt to short them,
disassemble them, apply heat to them, or recharge them
(except rechargeable batteries). They may burst and cause
fires, serious injury, or damage to the environment.
Please insert the battery minus "-" side first. When removing
the battery, remove it plus ”+” side first.
● If the meter will not be used for an extended period of time,
it is recommended to remove the battery to avoid possible
damage caused by battery leaking.
●
3-2. Power ON/OFF
Power ON :Press the Power Button ① .
Power OFF : Press and hold the Power Button ① for 1 second or longer and the meter will turn off.
●
A three second pause between power ON and OFF is
recommended to avoid damage to the meter.
●
If the LCD does not light, check that the battery capacity is
sufficient, and check that the battery positive and negative
terminals are not reversed.
3. Before Using
3-3 Checking the Battery Capacity
When the Power Button ① is ON, the battery power indicator
on the LCD Screen ⑤ is displayed.
(Displayed) Sufficient battery power remaining.
(Displayed) Low battery power remaining. Have a spare battery ready.
(Blinking)
When the indicator blinks, replace the battery immediately.
The LCD screen will appear and immediately switch off, when
the battery power is very low. The battery should be replaced
immediately. Having a spare battery is recommended.
● A fresh battery is capable of continuous readings of;
Manganese 10 hours
Alkaline
20 hours (based on Sekonic measuring.)
● Due to temperature and length of time stored, the battery
included with this meter may have a shorter live span.
●
3-4 Replacing Battery during Measurement
1) Always turn the power OFF before replacing battery. If
battery is removed with the power ON, the setting can no
longer be recalled.
2) If an unexpected display, i.e. settings other than selected, appears on the LCD after battery replacement or while
operating the meter, or the meter does not respond when
a button is pressed, remove the battery, wait at least 10
seconds, and then re-install them.
3. Before Using
3-5 Automatic Power OFF Function
To save battery capacity, the meter will be automatically turned
off about 4 minutes after the last button is pressed.
●
●
●
Even if automatic power off function works or the power is
turned off by pressing the Power Button ① , the setting of
timer is memorized.
Automatic power OFF function is not available while
continuous measuring mode.
If the Power Button ① is pressed and held when the power is
off, the meter will turn ON for about 1 minute, and then turn
OFF automatically.
(Battery capacity can be saved even if the Power button is
pressed during transport.)
4. Basic Operation
4-1. Basic Operation Flowchart and Setting the Measuring Mode
1) To enter the Custom Setting to select either Lux or FC, hold
the Mode Button ③ and press the Power Button ① .
2) Select the measurement mode by pressing the Mode Button
③ or Timer Button ⑧ . Measuring modes are switched
according to the chart below.
Continuous
Measuring Mode
Power ON
(See page 9)
Mode Button ③ to select
Single
Measuring Mode
(See page 9)
Timer Button ⑧ to select
Timer Measuring
Mode
(See page 10)
Hold Mode Button ③ and press
Power Button ① to enter
Custom Setting
①Power
Button
MODE
④Measuring
Button
③Mode
Button
TIMER
⑧ Timer Button
(See page 11)
5. Measurement
5-1. Continuous Measuring Mode
Press the Measuring Button ④ , and the measured value is displayed
according to the Illuminance change.
1) Press the Mode Button ③ and enter the Continuous Measuring
Mode.
(“C” is displayed at the upper right corner of the LCD.)
2) Press the Measuring Button ④ and read the measured value after
confirming that it becomes stable. Press the Measuring Button ④ again to hold the illuminance value at the time.
● Try to minimize the influence of the person taking the
measurement or other to the light receptor.
● Collimate the light receptor against the light source when
taking measurements.
● Auto power off function doesn’t work in continuous measuring
mode.
● It is not possible to enter the timer measuring mode even
if the Timer Button ⑧ is pressed while measurement in
continuous measuring mode.
It is possible to take a measurement without the influence of
surroundings if the person taking measurements move away
and using the timer measuring function. (See Page 10.)
● When brightness (or darkness) exceeds the measuring range
of the product, “OVER” (or “UNDER”) will blink to indicate that
measuring is not possible.
●
5-2. Single Measuring Mode
Measured value is displayed when the Measuring Button is
pressed.
1) Press the Mode Button ③ and enter the Single Measuring Mode.
(“S” is displayed in the upper right corner of the LCD.)
2) Press the Measuring Button ④ and display the illuminance at
the time.
When brightness (or darkness) exceeds the measuring range
of the product, “OVER” (or “UNDER”) will blink to indicate that
measuring is not possible.
●
5. Measurement
5-3. Timer Measuring Mode
Measurement (single measurement)
is made after counting the set timer
seconds in advance.
MODE
1) Press the Timer Button ⑧ , and
the set timer seconds in advance
appears at the upper right corner
of the LCD to enter the timer
measuring mode.
⑥Up
Button
TIMER
2) Press the Up Button ⑥ or Down
Button ⑦ to set the timer seconds
used.
④Measuring
Button
⑦Down Button
⑧Timer Button
Available setting range: 1 to 60 seconds.
3) Press the Measuring Button ④ to start counting.
Measurement is made after counting the set timer seconds. (Single
measurement).
Display example
The setting range for the timer is from 1 to 10 seconds (in 1
second step) and from 10 to 60 seconds (in 10 seconds step).
● The set timer seconds is changed continuously by keeping
pressing the Up Button ⑥ or Down Button ⑦.
●
10
6. Other Setting
6-1. Custom Setting
Unit of illuminance (Lux or Foot-candle) can be switched by
custom setting.
1) To enter the custom setting, the meter must first be turned off.
Press Mode Button ③ and turn the power on.
“CS” is displayed at the upper right corner of the LCD.
2) Lux (“lx”) or Foot-candle (“fc”) will change each time the Mode
Button ③ is pressed.
Turn off the power after selecting the desired unit.
Display example
11
7. Specifications
Type
●
Illuminometer
Light receptor element
●
Silicon photo diode
Measurement cycle
●
0.5 seconds
Measurement range
●
2.50 lx to 200,000 lx
●
0.23 fc to 18,600 fc
Display
●
Unit: Lux (lx), Foot-candle (fc)
●
Significant digits: 3 digits
Linearity
●
+/-5% (23°C +/- 2°C)
Other functions
●
●
●
Battery use
Out of measurement range: UNDER or OVER warning display
Battery power indicator display
Automatic power OFF function (About 4 minutes after last operation)
●
AA battery 1.5V x 1 (Alkaline, manganese, lithium, NiMH)
Operating temperature
●
0°C ~ 40°C
Storage temperature
●
−20°C ~ 60°C
Dimensions
●
Approx. 63 (width) ×110 (height) ×22 (depth) mm
Weight
●
Approx. 95 g (with battery)
Included accessories
●
Soft case, AA battery x 1 (manganese)
Features and specifications are subject to change without notice.
12
SEKONIC CORPORATION
7-24-14, Oizumi-Gakuen-cho, Nerima-ku Tokyo178-8686 JAPAN
TEL +81-3-3978-2335 FAX +81-3-3978-5229
http://www.sekonic.co.jp
JJ109756