1
PythonProgrammingforArduino
TableofContents
PythonProgrammingforArduino
Credits
AbouttheAuthor
AbouttheReviewers
www.PacktPub.com
Supportfiles,eBooks,discountoffers,andmore
Whysubscribe?
FreeaccessforPacktaccountholders
Preface
Whatthisbookcovers
Whatyouneedforthisbook
Whothisbookisfor
Conventions
Readerfeedback
Customersupport
Downloadingtheexamplecode
Downloadingthecolorimagesofthisbook
Errata
Piracy
Questions
1.GettingStartedwithPythonandArduino
IntroductiontoPython
WhyweusePython
Whendoweuseotherlanguages
InstallingPythonandSetuptools
InstallingPython
Linux
Ubuntu
FedoraandRedHat
Windows
MacOSX
InstallingSetuptools
Linux
Windows
MacOSX
Installingpip
InstallingPythonpackages
ThefundamentalsofPythonprogramming
Pythonoperatorsandbuilt-intypes
Operators
Built-intypes
Datastructures
Lists
Tuples
Sets
Dictionaries
Controllingtheflowofyourprogram
Theifstatement
Theforstatement
Thewhilestatement
Built-infunctions
Conversions
Mathoperations
Stringoperations
IntroductiontoArduino
History
WhyArduino?
Arduinovariants
TheArduinoUnoboard
InstallingtheArduinoIDE
Linux
MacOSX
Windows
GettingstartedwiththeArduinoIDE
WhatisanArduinosketch?
Workingwithlibraries
UsingArduinoexamples
Compilinganduploadingsketches
UsingtheSerialMonitorwindow
IntroductiontoArduinoprogramming
Comments
Variables
Constants
Datatypes
Conversions
Functionsandstatements
Thesetup()function
Theloop()function
ThepinMode()function
Workingwithpins
Statements
Summary
2.WorkingwiththeFirmataProtocolandthepySerialLibrary
ConnectingtheArduinoboard
Linux
MacOSX
Windows
Troubleshooting
IntroducingtheFirmataprotocol
WhatisFirmata?
UploadingaFirmatasketchtotheArduinoboard
TestingtheFirmataprotocol
GettingstartedwithpySerial
InstallingpySerial
PlayingwithapySerialexample
BridgingpySerialandFirmata
Summary
3.TheFirstProject–Motion-triggeredLEDs
Motion-triggeredLEDs–theprojectdescription
Theprojectgoal
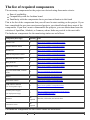
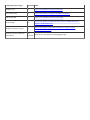
Thelistofcomponents
Thesoftwareflowdesign
Thehardwaresystemdesign
IntroducingFritzing–ahardwareprototypingsoftware
Workingwiththebreadboard
Designingthehardwareprototype
Testinghardwareconnections
Method1–usingastandaloneArduinosketch
Theprojectsetup
TheArduinosketch
Thesetup()function
Theloop()function
WorkingwithcustomArduinofunctions
Testing
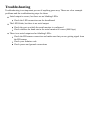
Troubleshooting
Method2–usingPythonandFirmata
Theprojectsetup
WorkingwithPythonexecutablefiles
ThePythoncode
WorkingwithpyFirmatamethods
WorkingwithPythonfunctions
Testing
Troubleshooting
Summary
4.DivingintoPython-ArduinoPrototyping
Prototyping
WorkingwithpyFirmatamethods
SettinguptheArduinoboard
ConfiguringArduinopins
Thedirectmethod
Assigningpinmodes
Workingwithpins
Reportingdata
Manualoperations
Thewrite()method
Theread()method
Additionalfunctions
Upcomingfunctions
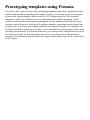
PrototypingtemplatesusingFirmata
Potentiometer–continuousobservationfromananaloginput
Connections
ThePythoncode
Buzzer–generatingsoundalarmpattern
Connections
ThePythoncode
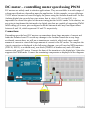
DCmotor–controllingmotorspeedusingPWM
Connections
ThePythoncode
LED–controllingLEDbrightnessusingPWM
Connections
ThePythoncode
Servomotor–movingthemotortoacertainangle
Connections
ThePythoncode
PrototypingwiththeI2Cprotocol
ArduinoexamplesforI2Cinterfacing
ArduinocodingfortheTMP102temperaturesensor
ArduinocodingfortheBH1750lightsensor
PyMataforquickI2Cprototyping
InterfacingTMP102usingPyMata
InterfacingBH1750usingPyMata
UsefulpySerialcommands
Connectingwiththeserialport
Readingalinefromtheport
Flushingtheporttoavoidbufferoverflow
Closingtheport
Summary
5.WorkingwiththePythonGUI
LearningTkinterforGUIdesign
YourfirstPythonGUIprogram
TherootwidgetTk()andthetop-levelmethods
TheLabel()widget
ThePackgeometrymanager
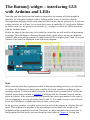
TheButton()widget–interfacingGUIwithArduinoandLEDs
TheEntry()widget–providingmanualuserinputs
TheScale()widget–adjustingthebrightnessofanLED
TheGridgeometrymanager
TheCheckbutton()widget–selectingLEDs
TheLabel()widget–monitoringI/Opins
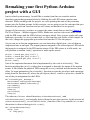
RemakingyourfirstPython-ArduinoprojectwithaGUI
Summary
6.StoringandPlottingArduinoData
WorkingwithfilesinPython
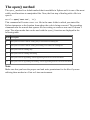
Theopen()method
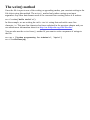
Thewrite()method
Theclose()method
Theread()method
Thewithstatement–Pythoncontextmanager
UsingCSVfilestostoredata
StoringArduinodatainaCSVfile
Gettingstartedwithmatplotlib
ConfiguringmatplotlibonWindows
ConfiguringmatplotlibonMacOSX
Upgradingmatplotlib
Troubleshootinginstallationerrors
SettingupmatplotlibonUbuntu
Plottingrandomnumbersusingmatplotlib
PlottingdatafromaCSVfile
Plottingreal-timeArduinodata
IntegratingplotsintheTkinterwindow
Summary
7.TheMidtermProject–aPortableDIYThermostat
Thermostat–theprojectdescription
Projectbackground
Projectgoalsandstages
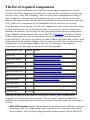
Thelistofrequiredcomponents
Hardwaredesign
Softwareflowforuserexperiencedesign
Stage1–prototypingthethermostat
TheArduinosketchforthethermostat
Interfacingthetemperaturesensor
Interfacingthehumiditysensor
Interfacingthelightsensor
UsingArduinointerrupts
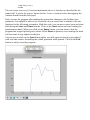
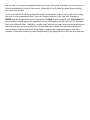
DesigningtheGUIandplotinPython
UsingpySerialtostreamsensordatainyourPythonprogram
DesigningtheGUIusingTkinter
Plottingpercentagehumidityusingmatplotlib
Usingbuttoninterruptstocontroltheparameters
Changingthetemperatureunitbypressingabutton
SwappingbetweentheGUIandtheplotbypressingabutton
Troubleshooting
Stage2–usingaRaspberryPiforthedeployablethermostat
WhatisaRaspberryPi?
InstallingtheoperatingsystemandconfiguringtheRaspberryPi
WhatdoyouneedtobeginusingtheRaspberryPi?
PreparinganSDcard
TheRaspberryPisetupprocess
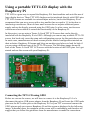
UsingaportableTFTLCDdisplaywiththeRaspberryPi
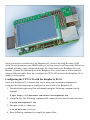
ConnectingtheTFTLCDusingGPIO
ConfiguringtheTFTLCDwiththeRaspberryPiOS
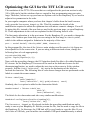
OptimizingtheGUIfortheTFTLCDscreen
Troubleshooting
Summary
8.IntroductiontoArduinoNetworking
Arduinoandthecomputernetworking
Networkingfundamentals
ObtainingtheIPaddressofyourcomputer
Windows
MacOSX
Linux
NetworkingextensionsforArduino
ArduinoEthernetShield
ArduinoWiFiShield
ArduinoYún
ArduinoEthernetlibrary
TheEthernetclass
TheIPAddressclass
TheServerclass
TheClientclass
Exercise1–awebserver,yourfirstArduinonetworkprogram
DevelopingwebapplicationsusingPython
Pythonwebframework–web.py
Installingweb.py
YourfirstPythonwebapplication
Essentialweb.pyconceptsfordevelopingcomplexwebapplications
HandlingURLs
TheGETandPOSTmethods
Templates
Forms
Exercise2–playingwithweb.pyconceptsusingtheArduinoserialinterface
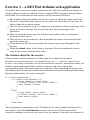
RESTfulwebapplicationswithArduinoandPython
DesigningREST-basedArduinoapplications
WorkingwiththeGETrequestfromArduino
TheArduinocodetogeneratetheGETrequest
TheHTTPserverusingweb.pytohandletheGETrequest
WorkingwiththePOSTrequestfromArduino
TheArduinocodetogeneratethePOSTrequest
TheHTTPserverusingweb.pytohandlethePOSTrequest
Exercise3–aRESTfulArduinowebapplication
TheArduinosketchfortheexercise
Theweb.pyapplicationtosupportRESTrequests
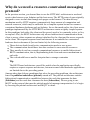
Whydoweneedaresource-constrainedmessagingprotocol?
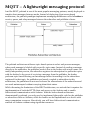
MQTT–Alightweightmessagingprotocol
IntroductiontoMQTT
Mosquitto–anopensourceMQTTbroker
SettingupMosquitto
GettingfamiliarwithMosquitto
GettingstartedwithMQTTonArduinoandPython
MQTTonArduinousingthePubSubClientlibrary
InstallingthePubSubClientlibrary
DevelopingtheArduinoMQTTclient
MQTTonPythonusingpaho-mqtt
Installingpaho-mqtt
Usingthepaho-mqttPythonlibrary
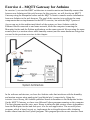
Exercise4–MQTTGatewayforArduino
DevelopingArduinoastheMQTTclient
DevelopingtheMQTTGatewayusingMosquitto
ExtendingtheMQTTGatewayusingweb.py
TestingyourMosquittoGateway
Summary
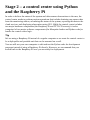
9.ArduinoandtheInternetofThings
GettingstartedwiththeIoT
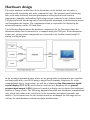
ArchitectureofIoTwebapplications
Hardwaredesign
TheIoTcloudplatforms
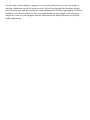
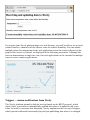
Xively–acloudplatformfortheIoT
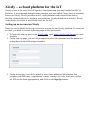
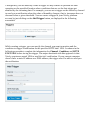
SettingupanaccountonXively
WorkingwithXively
AlternativeIoTplatforms
ThingSpeak
Carriots
DevelopingcloudapplicationsusingPythonandXively
InterfacingArduinowithXively
UploadingArduinodatatoXively
DownloadingdatatoArduinofromXively
AdvancedcodetouploadanddownloaddatausingArduino
Python–uploadingdatatoXively
Thebasicmethodforsendingdata
Uploadingdatausingawebinterfacebasedonweb.py
Python–downloadingdatafromXively
ThebasicmethodforretrievingdatafromXively
Retrievingdatafromtheweb.pywebinterface
Triggers–customnotificationsfromXively
YourowncloudplatformfortheIoT
GettingfamiliarwiththeAmazonAWSplatform
SettingupanaccountonAWS
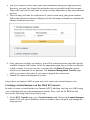
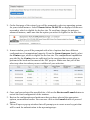
CreatingavirtualinstanceontheAWSEC2service
Loggingintoyourvirtualinstance
CreatinganIoTplatformontheEC2instance
InstallingthenecessarypackagesonAWS
Configuringthesecurityofthevirtualinstance
Testingyourcloudplatform
TestingtheMosquittoservice
Configuringandtestingbasicsecurity
Uploadingandtestingaprojectontheinstance
Summary
10.TheFinalProject–aRemoteHomeMonitoringSystem
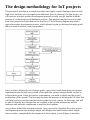
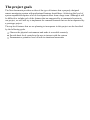
ThedesignmethodologyforIoTprojects
Projectoverview
Theprojectgoals
Theprojectrequirements
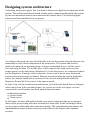
Designingsystemarchitecture
Themonitoringstation
Thecontrolcenter
Thecloudservices
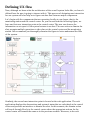
DefiningUXflow
Thelistofrequiredcomponents
Definingtheprojectdevelopmentstages
Stage1–amonitoringstationusingArduino
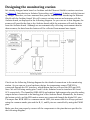
Designingthemonitoringstation
TheArduinosketchforthemonitoringstation
Publishingsensorinformation
Subscribingtoactuatoractions
Programminganinterrupttohandlethepressofabutton
Testing
Stage2–acontrolcenterusingPythonandtheRaspberryPi
Thecontrolcenterarchitecture
ThePythoncodeforthecontrolcenter
CreatingtheGUIusingTkinter
CommunicatingwiththeMosquittobroker
Calculatingthesystem’sstatusandsituationawareness
CommunicatingwithXively
Checkingandupdatingthebuzzer’sstatus
Testingthecontrolcenterwiththemonitoringstation
SettingupthecontrolcenterontheRaspberryPi
Stage3–awebapplicationusingXively,Python,andAmazoncloudservice
Architectureofthecloudservices
PythonwebapplicationhostedonAmazonAWS
Testingthewebapplication
Testingandtroubleshooting
Extendingyourremotehomemonitoringsystem
Utilizingmultiplemonitoringstations
Extendingsensorycapabilities
ImprovingUX
Expandingcloud-basedfeatures
Improvingintelligenceforsituationawareness
Creatinganenclosureforhardwarecomponents
Summary
11.Tweet-a-PowerStrip
Projectoverview
Projectrequirements
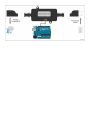
Systemarchitecture
Requiredhardwarecomponents
Relays
PowerSwitchTail
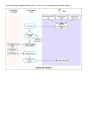
Userexperienceflow
Developmentanddeploymentstages
Stage1–asmartpowerstripwithArduinoandrelays
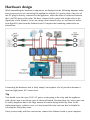
Hardwaredesign
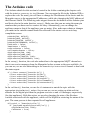
TheArduinocode
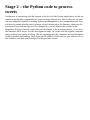
Stage2–thePythoncodetoprocesstweets
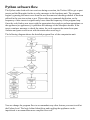
Pythonsoftwareflow
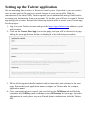
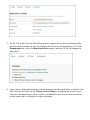
SettinguptheTwitterapplication
ThePythoncode
Testingandtroubleshooting
Extendingtheprojectwithadditionalfeatures
Summary
Index
PythonProgrammingforArduino
PythonProgrammingforArduino
Copyright©2015PacktPublishing
Allrightsreserved.Nopartofthisbookmaybereproduced,storedinaretrievalsystem,
ortransmittedinanyformorbyanymeans,withoutthepriorwrittenpermissionofthe
publisher,exceptinthecaseofbriefquotationsembeddedincriticalarticlesorreviews.
Everyefforthasbeenmadeinthepreparationofthisbooktoensuretheaccuracyofthe
informationpresented.However,theinformationcontainedinthisbookissoldwithout
warranty,eitherexpressorimplied.Neithertheauthor,norPacktPublishing,andits
dealersanddistributorswillbeheldliableforanydamagescausedorallegedtobecaused
directlyorindirectlybythisbook.
PacktPublishinghasendeavoredtoprovidetrademarkinformationaboutallofthe
companiesandproductsmentionedinthisbookbytheappropriateuseofcapitals.
However,PacktPublishingcannotguaranteetheaccuracyofthisinformation.
Firstpublished:February2015
Productionreference:1230215
PublishedbyPacktPublishingLtd.
LiveryPlace
35LiveryStreet
BirminghamB32PB,UK.
ISBN978-1-78328-593-8
www.packtpub.com
Credits
Author
PratikDesai
Reviewers
JuanRamónGonzález
MarcoSchwartz
JoshVanderLinden
CommissioningEditor
SaleemAhmed
AcquisitionEditor
JamesJones
ContentDevelopmentEditor
PriyankaShah
TechnicalEditor
AnkitaThakur
CopyEditors
JasmineNadar
VikrantPhadke
ProjectCoordinator
MiltonDsouza
Proofreaders
SafisEditing
MariaGould
AmeeshaGreen
PaulHindle
Indexer
MariammalChettiyar
Graphics
AbhinashSahu
ProductionCoordinator
ManuJoseph
CoverWork
ManuJoseph
AbouttheAuthor
PratikDesai,PhD,isthePrincipalScientistandcofounderofaconnecteddevicesstartup,ImbueLabs,wherehedevelopsscalableandinteroperablearchitectureforwearable
devicesandInternetofThings(IoT)platformsduringtheday.Atnight,heleadsthe
developmentofanopensourceIoTinitiative,theSemanticRepositoryofThings.Pratik
has8yearsofresearchanddesignexperienceinvariouslayersoftheIoTandits
predecessortechnologiessuchaswirelesssensornetworks,RFID,andmachine-tomachine(M2M)communication.HisdomainsofexpertisearetheIoT,SemanticWeb,
machinelearning,robotics,andartificialintelligence.
PratikcompletedhisMSandPhDfromWrightStateUniversity,Ohio,andcollaborated
withtheOhioCenterofExcellenceinKnowledge-enabledComputing(Kno.e.sis)during
hisdoctoralresearch.Hisdoctoralresearchwasfocusedondevelopingsituation
awarenessframeworksforIoTdevices,enablingsemanticweb-basedreasoningand
handlingtheuncertaintyassociatedwithsensordata.
Inhispersonallife,PratikisanavidDIYjunkieandlikestogethands-onexperienceon
upcomingtechnologies.Heextensivelyexpresseshisviewsontechnologyandshares
interestingdevelopmentsonTwitter(@chheplo).
Iwouldliketodedicatethebooktomyparents,whowereresponsibleforbuildingthe
foundationofwhatIamtoday.Thebookwouldnothavebeenpossiblewithoutthe
patience,support,andencouragementfrommybelovedwife,Sachi.Iwouldalsoliketo
thankherforlandingherphotographyskillsthatwereusedindevelopmentofsomeofthe
importantimagesusedinthebook.Iwouldalsoliketoextendmysinceregratitudetothe
editorsfortheirvaluablefeedbacks.
AbouttheReviewers
JuanRamónGonzálezisatechnicalengineerofcomputersystemsandlivesinSeville
(Andalusia,Spain).Forthepast9years,hehasbeenworkingonfreesoftware-based
projectsfortheregionalMinistryofEducationbyusingPython,C++,andJavaScript,
amongotherprogramminglanguages.
HeisoneofthemainmembersoftheCGAprojectinAndalusia(CentrodeGestión
AvanzadoorAdvancedManagementCenter),whichmanagesanetworkwithmorethan
4,000serverswithDebianand500,000clientcomputersthatrunGuadalinex,a
customizedUbuntu-basedoperatingsystemforAndalusianschools.
Asasoftwaredeveloperwhohasapassionforelectronicsandastronomy,hestartedone
ofthefirstprojectstocontrolatelescopewiththeArduinomicrocontrollerbyusinga
computerwiththeStellariumsoftwareandadriverdevelopedwithPythonto
communicatewiththetelescope.Thisproject’ssourcesarepublishedonthecollaborative
platformGitHub.Youcanseethewholecodeandtheprototypeat
https://github.com/juanrmn/Arduino-Telescope-Control.
MarcoSchwartzisanelectricalengineer,entrepreneur,andblogger.Hehasamaster’s
degreeinelectricalengineeringandcomputersciencefromSupélec,France,anda
master’sdegreeinmicroengineeringfromEPFL,Switzerland.
Marcohasmorethan5yearsofexperienceworkinginthedomainofelectrical
engineering.Hisinterestsgravitatearoundelectronics,homeautomation,theArduinoand
theRaspberryPiplatforms,opensourcehardwareprojects,and3Dprinting.
HerunsseveralwebsitesaroundArduino,includingtheOpenHomeAutomationwebsite
thatisdedicatedtobuildinghomeautomationsystemsusingopensourcehardware.
MarcohaswrittenabookonhomeautomationandArduinocalledArduinoHome
AutomationProjects,PacktPublishing.Hehasalsowrittenabookonhowtobuild
InternetofThingsprojectswithArduinocalledInternetofThingswiththeArduinoYun,
PacktPublishing.
JoshVanderLindenisalifelongtechnologyenthusiastwhohasbeenprogrammingsince
theageof10.Heenjoyslearningandbecomingproficientwithnewtechnologies.Hehas
designedandbuiltsoftware,rangingfromsimpleshellscriptstoscalablebackendserver
softwaretointeractivewebanddesktopuserinterfaces.Joshhasbeenwritingsoftware
professionallyusingPythonsince2007,andhehasbeenbuildingpersonalArduino-based
projectssince2010.
www.PacktPub.com
Supportfiles,eBooks,discountoffers,and
more
Forsupportfilesanddownloadsrelatedtoyourbook,pleasevisitwww.PacktPub.com.
DidyouknowthatPacktofferseBookversionsofeverybookpublished,withPDFand
ePubfilesavailable?YoucanupgradetotheeBookversionatwww.PacktPub.comandas
aprintbookcustomer,youareentitledtoadiscountontheeBookcopy.Getintouchwith
usat<service@packtpub.com>formoredetails.
Atwww.PacktPub.com,youcanalsoreadacollectionoffreetechnicalarticles,signup
forarangeoffreenewslettersandreceiveexclusivediscountsandoffersonPacktbooks
andeBooks.
https://www2.packtpub.com/books/subscription/packtlib
DoyouneedinstantsolutionstoyourITquestions?PacktLibisPackt’sonlinedigital
booklibrary.Here,youcansearch,access,andreadPackt’sentirelibraryofbooks.
Whysubscribe?
FullysearchableacrosseverybookpublishedbyPackt
Copyandpaste,print,andbookmarkcontent
Ondemandandaccessibleviaawebbrowser
FreeaccessforPacktaccountholders
IfyouhaveanaccountwithPacktatwww.PacktPub.com,youcanusethistoaccess
PacktLibtodayandview9entirelyfreebooks.Simplyuseyourlogincredentialsfor
immediateaccess.
Preface
IntheeraoftheInternetofThings(IoT),ithasbecomeveryimportanttorapidlydevelop
andtestprototypesofyourhardwareproductswhilealsoaugmentingthemusingsoftware
features.TheArduinomovementhasbeenthefront-runnerinthishardwarerevolution,
andthroughitssimpleboarddesignsithasmadeitconvenientforanyonetodevelopDIY
hardwareprojects.Thegreatamountofsupportthatisavailablethroughtheopensource
communityhasmadethedifficultiesthatareassociatedwiththedevelopmentofa
hardwareprototypeathingofthepast.Onthesoftwarefront,Pythonhasbeenthecrown
jeweloftheopensourcesoftwarecommunityforasignificantamountoftime.Pythonis
supportedbyahugeamountoflibrariestodevelopvariousfeatures,suchasgraphicaluser
interfaces,plots,messaging,andcloudapplications.
Thisbooktriestobringyouthebestofbothhardwareandsoftwareworldstohelpyou
developexcitingprojectsusingArduinoandPython.Themaingoalofthebookistoassist
thereadertosolvethedifficultproblemofinterfacingArduinohardwarewithPython
libraries.Meanwhile,asasecondarygoal,thebookalsoprovidesyouwithexercisesand
projectsthatcanbeusedasblueprintsforyourfutureIoTprojects.
Thebookhasbeendesignedinsuchawaythateverysuccessivechapterhasincreasing
complexityintermsofmaterialthatiscoveredandalsomorepracticalvalue.Thebook
hasthreeconceptualsections(gettingstarted,implementingPythonfeatures,andnetwork
connectivity)andeachsectionconcludeswithapracticalprojectthatintegratesthe
conceptsthatyoulearnedinthatsection.
ThetheoreticalconceptsandexercisescoveredinthebookaremeanttogiveyouhandsonexperiencewithPython-Arduinoprogramming,whiletheprojectsaredesignedtoteach
youhardwareprototypingmethodologiesforyourfutureprojects.However,youwillstill
needextensiveexpertiseineachdomaintodevelopacommercialproduct.Intheend,I
hopetoprovideyouwithsufficientknowledgetojump-startyourjourneyinthisnovel
domainoftheIoT.
Whatthisbookcovers
Chapter1,GettingStartedwithPythonandArduino,introducesthefundamentalsofthe
ArduinoandPythonplatforms.Italsoprovidescomprehensiveinstallationand
configurationstepstosetupthenecessarysoftwaretools.
Chapter2,WorkingwiththeFirmataProtocolandthepySerialLibrary,discussesthe
interfacingoftheArduinohardwarewiththePythonprogrambyexplainingtheFirmata
protocolandtheserialinterfacinglibrary.
Chapter3,TheFirstProject–Motion-triggeredLEDs,providescomprehensiveguidelines
tocreateyourfirstPython-Arduinoproject,whichcontrolsdifferentLEDsaccordingto
thedetectedmotion.
Chapter4,DivingintoPython-ArduinoPrototyping,takesyoubeyondthebasic
prototypingthatweperformedinthepreviousprojectandprovidesanin-depthdescription
ofprototypingmethods,withappropriateexamples.
Chapter5,WorkingwiththePythonGUI,beginsourtwo-chapterjourneyintodeveloping
graphicalinterfacesusingPython.ThechapterintroducestheTkinterlibrary,which
providesthegraphicalfrontendfortheArduinohardware.
Chapter6,StoringandPlottingArduinoData,coversPythonlibraries,CSVand
matplotlibthatareusedtostoreandplotthesensordatarespectively.
Chapter7,TheMidtermProject–aPortableDIYThermostat,containsapracticaland
deployableprojectthatutilizesthematerialthatwecoveredinpreviouschapterssuchas
serialinterfacing,agraphicalfrontend,andaplotofthesensordata.
Chapter8,IntroductiontoArduinoNetworking,introducescomputernetworkingfor
ArduinowhileutilizingvariousprotocolstoestablishEthernetcommunicationbetween
thePythonprogramandArduino.Thischapteralsoexploresamessagingprotocolcalled
MQTT,withbasicexamples.ThisprotocolisspecificallydesignedforresourceconstrainedhardwaredevicessuchasArduino.
Chapter9,ArduinoandtheInternetofThings,discussesthedomainoftheIoTwhile
providingstep-by-stepguidelinestodevelopcloud-basedIoTapplications.
Chapter10,TheFinalProject–aRemoteHomeMonitoringSystem,teachesadesign
methodologyforthehardwareproduct,followedbyacomprehensiveprojectthat
interfacesthecloudplatformwithArduinoandPython.
Chapter11,Tweet-a-PowerStrip,containsanotherIoTprojectthatisbasedoneverything
thatwelearnedinthebook.Theprojectexploresauniqueapproachtointegrateasocial
network,Twitter,withthePython-Arduinoapplication.
Whatyouneedforthisbook
Tobeginwith,youwilljustneedacomputerwithoneofthesupportedoperatingsystems,
Windows,MacOSX,orLinux.Thebookrequiresvariousadditionalhardware
componentsandsoftwaretoolstoimplementprogrammingexercisesandprojects.Alist
ofrequiredhardwarecomponentsandlocationstoobtainthesecomponentsareincluded
ineachchapter.
Intermsofsoftware,thebookitselfprovidesstep-by-stepguidelinestoinstalland
configureallthenecessarysoftwarepackagesanddependentlibrariesthatareutilized
throughoutthebook.Notethattheexercisesandprojectsincludedinthebookare
designedforPython2.7andtheyhavenotbeentestedagainstPython3+.
Whothisbookisfor
Ifyouareastudent,ahobbyist,adeveloper,oradesignerwithlittleornoprogramming
andhardwareprototypingexperienceandyouwanttodevelopIoTapplications,thenthis
bookisforyou.
Ifyouareasoftwaredeveloperandinterestedingainingexperiencewithhardware
domain,thisbookwillhelpyoutogetstarted.Ifyouareahardwareengineerwhowants
tolearnadvancesoftwarefeatures,thisbookcanhelpyoutobeginwith.
Conventions
Inthisbook,youwillfindanumberoftextstylesthatdistinguishbetweendifferentkinds
ofinformation.Herearesomeexamplesofthesestylesandanexplanationoftheir
meaning.
Codewordsintext,databasetablenames,foldernames,filenames,fileextensions,
pathnames,dummyURLs,userinput,andTwitterhandlesareshownasfollows:“While
assigningthevaluetotheweightvariable,wedidn’tspecifythedatatype,butthePython
interpreterassigneditasanintegertype,int.”
Ablockofcodeissetasfollows:
/*
Blink
TurnsonanLEDonforonesecond,thenoffforonesecond,repeatedly.
Thisexamplecodeisinthepublicdomain.
*/
//Pin13hasanLEDconnectedonmostArduinoboards.
//giveitaname:
intled=13;
//thesetuproutinerunsoncewhenyoupressreset:
voidsetup(){
//initializethedigitalpinasanoutput.
pinMode(led,OUTPUT);
}
//thelooproutinerunsoverandoveragainforever:
voidloop(){
digitalWrite(led,HIGH);//turntheLEDon(HIGHisthevoltagelevel)
delay(1000);//waitforasecond
digitalWrite(led,LOW);//turntheLEDoffbymakingthevoltageLOW
delay(1000);//waitforasecond
}
Anycommand-lineinputoroutputiswrittenasfollows:
$sudoeasy_installpip
Newtermsandimportantwordsareshowninbold.Wordsthatyouseeonthescreen,
forexample,inmenusordialogboxes,appearinthetextlikethis:“IntheSystem
window,clickontheAdvancedsystemsettingsintheleftnavigationbartoopena
windowcalledSystemProperties.”
Note
Warningsorimportantnotesappearinaboxlikethis.
Tip
Tipsandtricksappearlikethis.
Readerfeedback
Feedbackfromourreadersisalwayswelcome.Letusknowwhatyouthinkaboutthis
book—whatyoulikedordisliked.Readerfeedbackisimportantforusasithelpsus
developtitlesthatyouwillreallygetthemostoutof.
Tosendusgeneralfeedback,simplye-mail<feedback@packtpub.com>,andmentionthe
book’stitleinthesubjectofyourmessage.
Ifthereisatopicthatyouhaveexpertiseinandyouareinterestedineitherwritingor
contributingtoabook,seeourauthorguideatwww.packtpub.com/authors.
Customersupport
NowthatyouaretheproudownerofaPacktbook,wehaveanumberofthingstohelp
youtogetthemostfromyourpurchase.
Downloadingtheexamplecode
Youcandownloadtheexamplecodefilesfromyouraccountathttp://www.packtpub.com
forallthePacktPublishingbooksyouhavepurchased.Ifyoupurchasedthisbook
elsewhere,youcanvisithttp://www.packtpub.com/supportandregistertohavethefilesemaileddirectlytoyou.
Downloadingthecolorimagesofthisbook
WealsoprovideyouwithaPDFfilethathascolorimagesofthescreenshots/diagrams
usedinthisbook.Thecolorimageswillhelpyoubetterunderstandthechangesinthe
output.Youcandownloadthisfilefrom:
http://www.packtpub.com/sites/default/files/downloads/5938OS_ColoredImages.pdf.
Errata
Althoughwehavetakeneverycaretoensuretheaccuracyofourcontent,mistakesdo
happen.Ifyoufindamistakeinoneofourbooks—maybeamistakeinthetextorthe
code—wewouldbegratefulifyoucouldreportthistous.Bydoingso,youcansaveother
readersfromfrustrationandhelpusimprovesubsequentversionsofthisbook.Ifyoufind
anyerrata,pleasereportthembyvisitinghttp://www.packtpub.com/submit-errata,
selectingyourbook,clickingontheErrataSubmissionFormlink,andenteringthe
detailsofyourerrata.Onceyourerrataareverified,yoursubmissionwillbeacceptedand
theerratawillbeuploadedtoourwebsiteoraddedtoanylistofexistingerrataunderthe
Erratasectionofthattitle.
Toviewthepreviouslysubmittederrata,goto
https://www.packtpub.com/books/content/supportandenterthenameofthebookinthe
searchfield.TherequiredinformationwillappearundertheErratasection.
Piracy
PiracyofcopyrightedmaterialontheInternetisanongoingproblemacrossallmedia.At
Packt,wetaketheprotectionofourcopyrightandlicensesveryseriously.Ifyoucome
acrossanyillegalcopiesofourworksinanyformontheInternet,pleaseprovideuswith
thelocationaddressorwebsitenameimmediatelysothatwecanpursuearemedy.
Pleasecontactusat<copyright@packtpub.com>withalinktothesuspectedpirated
material.
Weappreciateyourhelpinprotectingourauthorsandourabilitytobringyouvaluable
content.
Questions
Ifyouhaveaproblemwithanyaspectofthisbook,youcancontactusat
<questions@packtpub.com>,andwewilldoourbesttoaddresstheproblem.
Chapter1.GettingStartedwithPython
andArduino
ThischapterintroducesthePythonprogramminglanguageandtheopensourceelectronic
prototypingplatformArduino.ThefirstsectionofthechapterfocusesonPythonand
brieflydescribesthebenefitsofPythonalongwithinstallationandconfigurationsteps.
TheremainingpartofthechapterdescribesArduinoandArduino’sdevelopment
environment.
Attheendofthischapter,youwillhaveconfiguredaprogrammingenvironmentforboth
PythonandArduinoforyourfavoriteoperatingsystem.Ifyouareabeginnerwitheither
orbothplatforms(thatis,PythonandArduino),itisadvisablethatyoufollowthegiven
stepsinthischapter,asthelaterchapterswillassumethatyouhavetheexact
configurationdescribedhere.Ifyouhavepreviousexperienceofworkingwiththese
platforms,youcanskiptothenextchapter.
IntroductiontoPython
SinceitsintroductionbyGuidovanRossumin1991,Pythonhasgrownintooneofthe
mostwidelyusedgeneral-purpose,high-levelprogramminglanguages,andissupported
byoneofthelargestopensourcedevelopercommunities.Pythonisanopensource
programminglanguagethatincludesalotofsupportinglibraries.Theselibrariesarethe
bestfeatureofPython,makingitoneofthemostextensibleplatforms.Pythonisa
dynamicprogramminglanguage,anditusesaninterpretertoexecutecodeatruntime
ratherthanusingacompilertocompileandcreateexecutablebytecodes.
ThephilosophybehindthedevelopmentofPythonwastocreateflexible,readable,and
clearcodetoeasilyexpressconcepts.Theemphasisonusingwhitespaceindentationina
uniquewaydifferentiatesPythonfromotherpopularhigh-levellanguages.Python
supportsfunctional,imperative,andobject-orientedprogrammingwithautomaticmemory
management.
WhyweusePython
Pythonisconsideredtobeoneoftheeasiestlanguagestolearnforfirst-time
programmers.Comparedtootherpopularobject-orientedlanguagessuchasC++and
Java,Pythonhasthefollowingmajorbenefitsforprogrammers:
Itiseasytoreadandunderstand
Itenablesrapidprototypingandreducesdevelopmenttime
Ithasahumongousamountoffreelibrarypackages
Pythonhasahugeopensourcecommunitythatdrivesforththeeffortforcontinuous
improvementofPythonasaprogramminglanguage.ThePythoncommunityisalso
responsibleforthedevelopmentofalargeamountofopenlibrarypackages,whichcanbe
usedtobuildapplicationsthatspanfromdynamicwebsitestocomplexdataanalysis
applications,aswellasthedevelopmentofsimpleGUI-basedapplicationstoplotcharts
fromcomplexmathfunctions.ThemajorityofPythonlibrarypackageshave
systematicallymaintainedthecodethatwasobtainedfromthecommunitywithregular
updates.ThedefactorepositorythatindexesthelargestnumberofPythonpackagesis
PyPI(http://pypi.python.org).PyPIalsoprovidessimplewaystoinstallvariouspackages
onyouroperatingsystem,whichwillbecoveredintheupcomingsection.
Whileworkingwiththehardwareplatform,itisnecessarytohavesomemeansof
communicationbetweenthehardwareandthecomputerthatyouareusingfor
development.Amongthecommoncomputertohardwareinterfacingmethods,serial-portbasedcommunicationisthemostpopular,anditisreallysimpletoestablish,especially
fortheArduinoplatform.PythonprovidesalibrarycalledpySerialthatisreallyeasyto
useandquicktoimplementtointerfaceaserialport.Itisreallysimpletousesimilar
librariesandPython’sinteractiveprogrammingabilitiestorapidlytestandimplementyour
projectideas.
Nowadays,complexInternetofThings(IoT)applicationsnotonlyrequireserial
communicationsupport,buttheyalsoneedadditionalhigh-levelfeaturessuchas
graphicaluserinterfaces(GUIs)foroperatingsystems,webinterfacesforremote
access,plotsfordatavisualization,toolsfordataanalysis,interfacesfordatastorage,and
soon.UsinganyotherprogramminglanguagesuchasC++orJava,thedevelopmentof
thesefeatureswouldrequirealargeamountofprogrammingeffortduetothedistributed
andunorganizednatureofthesupportingtools.Thankfully,Pythonhasbeenvery
successfulatprovidingsupportforthesetypesofapplicationsforyears.Pythonhasa
numberoflibrariestosupportthedevelopmentofeachofthefeaturesmentionedhere,
whichareavailablethroughPyPI.Theselibrariesareopensource,easytouse,andwidely
supportedbythecommunity.ThismakesPythonalanguageofchoiceforIoT
applications.Additionally,Pythonalsohassupporttocreateandshipyourcustom-built
applicationsaslibrariessothateveryoneelsecanalsoutilizethemintheirprojects.Thisis
ahelpfulfeatureifyouaredevelopingcustomprotocols,APIs,oralgorithmsforyourown
hardwareproducts.
Whendoweuseotherlanguages
So,whenshouldwenotusePythonforourprojects?Asmentionedearlier,Pythonisa
dynamiclanguagethatreducesdevelopmenttime,butitalsomakestheexecutionofyour
codeslowerascomparedtootherstatichigh-levellanguagessuchasC,C++,andJava.
Thesestaticlanguagesuseacompilertocompilethecodeandcreatebinariesthatget
executedduringruntime,therebyincreasingtheruntimeperformance.Whenthe
performanceofthecodeismoreimportantthanalongerdevelopmenttimeandhigher
cost,youshouldconsiderthesestaticlanguages.SomeotherdrawbacksofPythoninclude
beingmemoryheavy,nothavingthepropersupportforthreading,andlackingdata
protectionfeatures.Inshort,wecansaythateventhoughPythonprovidesquickerand
easierwaysforquickprototyping,weshouldconsiderotherstatichigh-levellanguagesfor
developmentafterwearedonetestingourprototypeandwearereadytoshipourproduct.
Nowadays,thisscenarioischangingrapidlyandcompanieshavestartedutilizingPython
fortheirindustrialproducts.
Note
YoucanobtainmorePython-relatedinformationfromtheofficialwebsiteat
http://www.python.org.
InstallingPythonandSetuptools
Pythoncomesintwoversions:Pythonv2.xandPythonv3.x.(Here,xrepresentsan
appropriateversionnumber.)WhilePythonv2.xisalegacybranchandhasbetterlibrary
support,Pythonv3.xisthefutureofPython.MostLinuxdistributionsandMacOSX
operatingsystemsareequippedwithPython,andtheyhavev2.xastheirpreferredand
defaultversionofPython.WewillbeusingPythonv2.7asthedefaultversionofPython
fortherestofthebookduetothefollowingreasons:
ItisthemostcurrentversionofthePythonv2.xbranch
Ithaslargecommunitysupportandsolutionsforitsknownissuesareavailable
throughsupportforums
ItissupportedbymostofthemajorPythonlibraries
Eventhoughthecodesamples,exercises,andprojectsprovidedinthisbookshouldwork
inanyvariantofPython2.7.x,it’sbettertohavethelatestversion.
InstallingPython
Yourfondnessforanoperatingsystemisdevelopedduetomultiplefactors,andyoucan
neverignoresomeone’sbiastowardsaparticularOS.Thus,thisbookprovidesinstallation
andconfigurationguidelinesforthreeofthemostpopularoperatingsystems:Linux,Mac
OSX,andWindows.Let’sbeginbyconfiguringPythonforaLinuxcomputer.
Linux
ThemajorityofLinuxdistributionscomewithPythonpreinstalled.Tocheckthelatest
versionoftheinstalledPython,usethefollowingcommandattheterminalwindow:
$python-V
MakesurethatyouareusinganuppercaseVastheoptionforthepreviouscommand.
Onceyouexecuteitontheterminal,itwillprintthecompleteversionnumberofyour
currentPythoninstallation.Iftheversionis2.7.x,youaregoodtogoandyourLinuxis
updatedwiththelatestversionofPythonthatisrequiredforthisbook.However,ifyou
haveanyversionthatislessthanorequalto2.6.x,youwillneedtofirstupgradePythonto
thelatestversion.Thisprocesswillrequirerootprivileges,asPythonwillbeinstalledasa
systemcomponentthatwillreplacethepreviousversions.
Ubuntu
IfyouareusingUbuntu11.10orlaterversions,youshouldalreadyhavePythonv2.7.x
installedonyourmachine.YoucanstillupgradePythontothelatestrevisionofv2.7.x
usingthefollowingcommand:
$sudoapt-getupdate&&sudoapt-get--only-upgradeinstallpython
IfyouarerunninganolderversionofUbuntu(suchas10.04orolder),youshouldhave
2.6asthedefaultversion.Inthiscase,youwillneedtorunthefollowingsetofcommands
toinstallversion2.7:
$sudoadd-apt-repositoryppa:fkrull/deadsnakes
$sudoapt-getupdate
$sudoapt-getinstallpython2.7
ThefirstcommandwilladdanexternalUbunturepository,whichwillallowyoutoinstall
anyversionofPython.Thenextcommandwillupdateandindexthelistofavailable
packages.ThelastcommandwillinstallthelatestversionofPython2.7.
FedoraandRedHat
FedoraandRedHatLinuxalsoshipswithPythonasanin-builtpackage.Ifyouwantto
upgradetheversionofPythontothelatestone,runthefollowingcommandatthe
terminal:
$sudoyumupgradepython
Tip
Downloadingtheexamplecode
Youcandownloadtheexamplecodefilesfromyouraccountathttp://www.packtpub.com
forallthePacktPublishingbooksyouhavepurchased.Ifyoupurchasedthisbook
elsewhere,youcanvisithttp://www.packtpub.com/supportandregistertohavethefilesemaileddirectlytoyou.
Windows
InstallationandconfigurationofPythononWindowsisnotasstraightforwardasitisfor
Linux.Firstofall,you’llneedtodownloadacopyofPythonfrom
http://www.python.org/getit.
YouneedtobecarefulabouttheversionofPythonthatyouaredownloading.Fromthe
systempropertiesofyourWindowsOS,checkwhethertheoperatingsystemisof32bitor
64bit.Atthetimethisbookwasbeingwritten,thelatestversionofPythonwas2.7.6.So,
downloadthelatestavailableversionofPython,butmakesurethatitis2.7.xandnot3.x.
Formanythird-partyPythonlibraries,theinstallationbinaryfilesforWindowsare
compiledforthe32-bitversion.Duetothisreason,wewillrecommendthatyouinstallthe
32-bitversionofPythonforyourWindowsOS.
IfyouarereallyfamiliarwithPythonandknowyourwayaroundinstallinglibraries,you
caninstallthe64-bitversionofPython.Selectandrunthedownloadedfiletoinstall
Python.Althoughyoucaninstallittoanycustomlocation,itisadvisabletousethe
defaultinstallationlocationastheupcomingconfigurationstepsusethedefaultlocation.
Oncetheinstallationiscomplete,youcanfindthePythoncommand-linetoolandIDLE
(PythonGUI)fromtheStartmenu.
AlthoughyoucanalwaysopenthesetoolsfromtheStartmenuforbasicscripting,we
willmodifytheWindowssystemparameterstomakePythonaccessiblethroughthe
Windowscommandprompt.Toaccomplishthis,wewillhavetosetupPATHin
environmentvariablesforthelocationofthePythoninstallationdirectory.Let’sopen
SystemPropertiesbyright-clickingonMyComputerandthenselectingProperties.
Otherwise,youcanalsonavigatetoStart|ControlPanel|SystemandSecurity|
System.
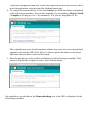
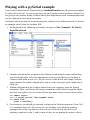
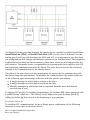
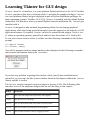
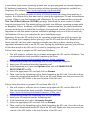
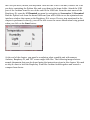
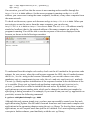
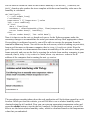
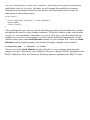
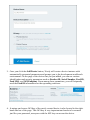
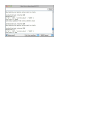
Youwillbeabletoseeawindowsimilartotheonethatisdisplayedinthefollowing
screenshot.TheSystemwindowshowsyouthebasicinformationaboutyourcomputer,
includingthetypeofWindowsoperatingsystemthatyouareusing(suchasthe32-bitor
the64-bitversion):
IntheSystemwindow,clickonAdvancedsystemsettingsintheleftnavigationbarto
openawindowcalledSystemProperties.ClickontheEnvironmentVariables…button
intheSystemPropertieswindow,whichislocatedatthebottomofthewindow.Thiswill
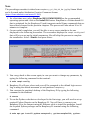
openaninterfacesimilartotheoneshowninthefollowingscreenshot.InEnvironment
Variables,youneedtoupdatethePATHsystemvariabletoaddPythontothedefault
operatingsystem’spath.
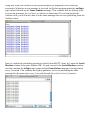
ClickonthePATHoptionasdisplayedinthefollowingscreenshot,whichwillpopupan
EditSystemVariablewindow.AddC:\Python27orthefullpathofyourcustomPython
installationdirectoryattheendofyourexistingPATHvariable.Itisrequiredtoputa
semicolon(;)beforethePythoninstallationpath.IfyoualreadyseePython’slocationin
thePathvariable,yoursystemissetupforPythonandyoudon’tneedtoperformany
changes:
ThemainbenefitofaddingPythontotheenvironmentvariablesistoenableaccesstothe
Pythoninterpreterfromthecommandprompt.Incaseyoudon’tknow,theWindows
commandpromptcanbeaccessedbynavigatingtoStart|Programs|Accessories|
CommandPrompt.
MacOSX
MacOSXshipswithapreinstalledcopyofPython,butduetothelongreleasecycleof
theoperatingsystem,thefrequencyofupdatesforthedefaultPythonapplicationisslow.
ThelatestversionofMacOSX,whichis10.9Maverick,comesequippedwithPython
2.7.5,whichisthelatestversion:
Tests-Mac:~test$python
Python2.7.5(default,Aug252013,00:04:04)
[GCC4.2.1CompatibleAppleLLVM5.0(clang-500.0.68)]ondarwin
Type"help","copyright","credits"or"license"formoreinformation.
>>>
PreviousversionssuchasMacOSX10.8MountainLionandMacOSX10.7Lion
includedPython2.7.2andPython2.7.1respectively,whicharealsocompatibleversions
forthisbook.IfyouareanexperiencedPythonuserorsomeonewhowantstoworkwith
thelatestversionofPython,youcandownloadthelatestversionfrom
http://www.python.org/getit.
OlderversionsofMacOSXsuchasSnowLeopardandlater,whichcamewithanolder
versionofPython,canbeupdatedtothelatestversionbydownloadingandinstallingit
fromhttp://www.python.org/getit.
InstallingSetuptools
Setuptoolsisalibrarycontainingacollectionofutilitiesforbuildinganddistributing
Pythonpackages.Themostimportanttoolfromthiscollectioniscalledeasy_install.It
allowsausertolookintoPyPI,thePythonpackagerepositorythatwementioned
previously,andprovidesasimpleinterfacetoinstallanypackagebyname.The
easy_installutilityautomaticallydownloads,builds,installs,andmanagespackagesfor
theuser.Thisutilityhasbeenusedinthelaterpartofthisbooktoinstallthenecessary
packagesrequiredfortheupcomingprojectsofPythonandArduino.Although
easy_installhasbeenusedasasimplewayofinstallingPythonpackages,itmissesout
onafewusefulfeaturessuchastrackingactions,supportforuninstallation,andsupport
forotherversioncontrolsystems.Inrecentyears,thePythoncommunityhasstarted
adoptinganothertoolcalledpipovereasy_installthatsupportsthesefeatures.Asboth
easy_installandpiputilizethesamePyPIrepository,goingforward,youcanuseanyof
theseutilitiestoinstalltherequiredPythonpackages.
Justtonarrowdownthescope,wewillbefocusingonmethodstoinstallSetuptoolsand
thedefaultutilitiesthatgetinstalledwithit,thatis,easy_install.Laterinthissection,
wewillalsoinstallpip,justincaseyouwanttouseittoo.Let’sfirstbeginbyinstalling
Setuptoolsforthevariousoperatingsystems.
Linux
InUbuntu,Setuptoolsisavailableinthedefaultrepositoryanditcanbeinstalledusingthe
followingcommand:
$sudoapt-getinstallpython-setuptools
ForFedora,itcanbeinstalledusingthedefaultsoftwaremanageryum:
$sudoyuminstallpython-setuptools
ForotherLinuxdistributions,itcanbedownloadedandbuiltusingthefollowingsinglelinescript:
$wgethttps://bitbucket.org/pypa/setuptools/raw/bootstrap/ez_setup.py-O-
|sudopython
OnceitisinstalledonyourLinuxdistribution,easy_installcanbedirectlyaccessed
fromtheterminalasabuilt-incommand.
Windows
InstallationofSetuptoolsisnotthatstraightforwardforWindowsascomparedtoLinux.It
requirestheusertodownloadtheez_setup.pyfilefromtheWindowssectionat
https://pypi.python.org/pypi/setuptools.
Oncethisisdownloaded,pressShiftandright-clickinthefolderwhereyoudownloaded
theez_setup.pyfile.SelectOpencommandwindowhereandexecutethefollowing
command:
>pythonez_setup.py
ThiswillinstallSetuptoolsintheScriptsfolderofyourdefaultPythoninstallationfolder.
UsingthesamemethodthatweusedwhenweaddedPythontoEnvironmentVariables,
nowincludeSetuptoolsbyaddingC:\Python27\ScriptstoPATH,followedbythe
semicolon(;).
ThiswillenabletheinstallationofvariousPythonpackagesusingeasy_installtoyour
PythonpackagesfoldercalledLibs.Onceyouhaveaddedthepackagemanagertothe
environmentvariables,youneedtocloseandreopenthecommandpromptforthese
changestotakeeffect.
MacOSX
SetuptoolscanbeinstalledinMacOSXusinganyofthefollowingmethods.Itis
advisableforbeginnerstousethefirstmethod,asthesecondmethodrequirestheexternal
packagemanagerHomebrew.
IfyouhaveneverworkedwithHomebrewbefore,youwillneedtofollowthesestepsto
installSetuptoolsonyourMac:
1. Downloadez_setup.pyfromtheUnix/Macsectionat
https://pypi.python.org/pypi/setuptools.
2. Opentheterminalandnavigatetothedirectorywhereyoudownloadedthisfile.For
mostbrowsers,thefilegetssavedtotheDownloadfolder.
3. RunthefollowingcommandintheterminaltobuildandsetupSetuptools:
$sudopythonez_setup.py
IfyouarefamiliarwithHomebrew-basedsoftwareinstallation,justfollowthesequick
stepstoinstallSetuptools:
1. First,installwgetfromHomebrewifyoudon’thaveitalready:
$brewinstallwget
2. Onceyouhaveinstalledwget,runthefollowingcommandintheterminal:
$wgethttps://bitbucket.org/pypa/setuptools/raw/bootstrap/ez_setup.py
-O-|python
Note
MoreinformationregardingtheHomebrewutilitycanbeobtainedfrom
http://brew.sh.
YoucaninstallHomebrewonyourMacbyrunningthefollowingsimplescriptinthe
terminal:
ruby-e"$(curl-fsSL
https://raw.githubusercontent.com/Homebrew/install/master/install)"
Installingpip
AsyouhavesuccessfullyinstalledSetuptools,let’suseittoinstallpip.ForLinuxorMac
OSX,youcanrunthefollowingcommandintheterminaltoinstallpip:
$sudoeasy_installpip
ForWindows,openthecommandpromptandexecutethefollowingcommand:
>easy_install.exepip
Ifyouhavealreadyinstalledpiponyourcomputer,pleasemakesurethatyouupgradeit
tothelatestversiontoovercomethefewbugsthatareassociatedwiththeupgrade.You
canupgradepipusingthefollowingcommandattheterminal:
$sudoeasy_install--upgradepip
Sinceyouhavealreadyusedeasy_installtoinstallaPythonpackage,let’sgetourselves
morefamiliarwithPythonpackagemanagement.
InstallingPythonpackages
Withtheinstallationofpip,youhavetwodifferentoptionstoinstallanythird-party
PythonpackagelistedonthePyPirepository(http://pypi.python.org).Thefollowingare
thevariousproceduresthatyouneedtoknowtoworkwiththeinstallationofPython
packages.Inthefollowingexamples,thetermPackageNameisapseudonamethatisused
foraPythonpackagethatyouwanttoworkwith.Foryourpackageofchoice,identifythe
appropriatepackagenamefromthePyPiwebsiteandputitsnameinplaceof
PackageName.Insomecases,youwillneedroot(superuser)privilegestoinstallor
uninstallapackage.Youcanusesudofollowedbyanappropriatecommandforthese
cases.
ToinstallaPythonpackage,executethefollowingcommandattheterminal:
$easy_installPackageName
Otherwise,youcanalsoexecutethefollowingcommand:
$pipinstallPackageName
Ifyouwanttoinstallaspecificversionofapackage,youcanusethefollowingcommand:
$easy_install"PackageName==version"
Ifyouarenotawareoftheexactversionnumber,youcanalsousecomparisonoperators
suchas>,<,>=,or<=tospecifyarangefortheversionnumber.Botheasy_installand
pipwillselectthebestmatchingversionofthepackagefromtherepositoryandinstallit:
$easy_install"PackageName>version"
Meanwhile,forpip,youcanusethefollowingidenticalcommandstoperformsimilar
operations:
$pipinstallPackageName==version
$pipinstall"PackageName>=version"
Asanexample,ifyouwanttoinstallaversionbetween1.0and3.0,youwillneedtouse
thefollowingcommand:
$pipinstall"PackageName>=0.1,<=0.3"
Itisreallyeasytoupgradeapackageusingeithereasy_installorpip.Thecommand
optionsusedbybotharealsoverysimilar:
$easy_install--upgradePackageName
$pipinstall--upgradePackageName
Althougheasy_installdoesn’tsupportcleanuninstallationofapackage,youcanusethe
followingcommandtomakesurethatPythonstopssearchingforthespecifiedpackage.
Later,carefullyremovethepackagefilesfromtheinstallationdirectory:
$easy_install-mxNPackageName
Amuchbetterwaytoperformacleanuninstallationofthemajorityofpackagesistouse
pipinsteadofeasy_install:
$pipuninstallPackageName
AdetailedlistofthePythonpackagessupportedbySetuptoolscanbefoundatthePyPI
websiteathttps://pypi.python.org/.
ThefundamentalsofPython
programming
Ifyouhavepreviousexperienceofworkingwithanyotherprogramminglanguage,
Pythonisveryeasytogetstartedwith.Ifyouhaveneverdoneprogrammingbefore,this
sectionwillwalkyouthroughsomeofthebasicsofPython.Ifyouhavealreadyworked
withPython,youshouldskipthissectionandmoveontothenextone.
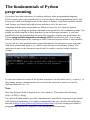
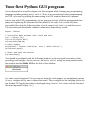
Assumingthatthesetupinstructionsarefollowedcorrectly,let’sopenthePython
interpreterbyexecutingthePythoncommandattheterminalorthecommandprompt.You
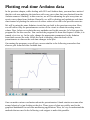
shouldgetresultssimilartothosedisplayedinthefollowingscreenshot.Ifyouhave
installedPythonbydownloadingthesetupfilesfromthewebsite,youshouldhavethe
Pythonintegrateddevelopmentenvironment(IDLE)installedaswell.Youcanalso
startthePythoninterpreterbyopeningitsIDLEfromthelocationwhereitwasinstalled.
Asyoucansee,afterprintingsomesysteminformation,theinterpreteropensaprompt
withthreegreater-thansigns(>>>),whichisalsoknownastheprimaryprompt.The
interpreterisnowintheinteractivemodeanditisreadytoexecutescriptsfromthe
prompt.
ToclosetheinteractivemodeofthePythoninterpreter,runtheeitherexit()orquit(),at
theprimaryprompt.Anothermethodtoexitfromtheinteractivemodeistousethe
keyboardshortcutCtrl+D.
Note
NotethatPython’sbuilt-infunctionsarecasesensitive.Thismeansthefollowing:
exit()≠EXIT()≠Exit()
TheofficialPythonwebsiteprovidescomprehensivetutorialsforbeginnerstogetstarted
withPythonprogramming.ItishighlyrecommendedthatyouvisittheofficialPython
tutorialsathttps://docs.python.org/2/tutorial/index.htmlifyouarelookingfordetailed
programmingtutorialsascomparedtotheupcomingbriefoverviews.
Pythonoperatorsandbuilt-intypes
NowthatyouhaveabriefidearegardingthePythonprompt,let’sgetyoufamiliarwith
someofthebasicPythoncommands.Fortheseexercises,wewillbeusingthePython
IDLE,whichalsoopenswiththePythoninteractiveprompt.Youwillrequireamethodto
describethecodesegments,tasks,andcommentswhenwritinglargeandcomplexcode.
Non-executablecontentiscalledcommentsinanyprogramminglanguage,andinPython,
theystartwiththehashtagcharacter(#).Likecomments,youwillbefrequentlyrequired
tochecktheoutputbyprintingonthepromptusingtheprintcommand:
>>>#FundamentalofPython
>>>#Myfirstcomment
>>>name="John"#Thisismyname
>>>printname
John
Note
InsteadofIDLE,youcanalsoaccessthePythoninteractivepromptfromtheterminal.
WhenusingPythonfromtheterminal,makesurethatyouaretakingcareofthe
indentationproperly.
Operators
Pythonsupportstheusageofbasicmathematicaloperatorssuchas+,-,*,and/,directly
fromtheinterpreter.Usingtheseoperators,youcanperformbasiccalculationsinthe
prompt,asshowninthefollowingexamples.Trytheseoperationsinyourpromptinorder
tostartusingthePythoninterpreterasacalculator:
>>>2+2
4
>>>(2*3)+1
7
>>>(2*3)/5
1
Note
WhenworkingwiththePythoninterpreter,itisrecommendedthatyoufollowtheStyle
GuideforPythonCode,whichisalsopopularlyknownasPEP-8orpep8.Formore
informationaboutPEP-8,visithttps://www.python.org/dev/peps/pep-0008/.
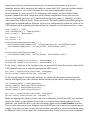
Built-intypes
Pythonisadynamicallytypedlanguage,whichmeansthatyoudon’thavetoexplicitly
declarethetypeofthevariableswheninitializingthem.Whenyouassignavaluetoa
variable,thePythoninterpreterautomaticallydeducesthedatatype.Forexample,let’s
declarethefollowingvariablesintheinteractivemodeoftheinterpreter:
>>>weight=height=5
>>>weight*height
25
>>>type(weight)
<type'int'>
Whileassigningthevaluetotheweightvariable,wedidn’tspecifythedatatype,butthe
Pythoninterpreterassigneditasanintegertype,int.Theinterpreterassignedtheinttype
duetothereasonthatthenumericalvaluedidn’tcontainanydecimalpoints.Let’snow
declareavariablewithavaluecontainingadecimalpoint.Thebuilt-infunctiontype()
thatcanbeusedtofindoutthedatatypeofaspecifiedvariable:
>>>length=6.0
>>>weight*height*length
150.0
>>>type(length)
<type'float'>
Asyoucansee,theinterpreterassignsthedatatypeasfloat.Theinterpretercanalso
deducethetypeofcomplexnumbers,asshowninfollowingexamples.Youcanaccessthe
realandimaginaryvalueofacomplexnumberusingthedot(.)operatorfollowedbyreal
andimag:
>>>val=2.0+3.9j
>>>val.real
2.0
>>>val.imag
3.9
Justtoplaymorewithcomplexnumbers,let’strytheabs()andround()functionsas
displayedinthefollowingexamples.Theyarebuilt-inPythonfunctionstoobtainthe
absolutevalueandtheroundednumberrespectively:
>>>abs(val)
4.382921400162225
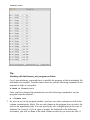
>>>round(val.imag)
4.0
Likenumbers,thePythoninterpretercanalsoautomaticallyidentifythedeclarationof
stringdatatypes.InPython,stringvaluesareassignedusingsingleordoublequotes
aroundthevalue.Whentheinterpreterseesanyvalueenclosedwithinquotes,itconsiders
ittobeastring.Pythonsupportstheusageofthe+operatortoconcatenatestrings:
>>>s1="Hello"
>>>s2="World!"
>>>s1+s2
'HelloWorld!'
>>>s1+""+s2
'HelloWorld!'
Acharactertypeisastringofsizeoneandtheindividualcharactersofastringcanbe
accessedbyusingindexnumbers.Thefirstcharacterofastringisindexedas0.Playwith
thefollowingscriptstounderstandindexing(subscripting)inPython:
>>>s1[0]
'H'
>>>s1[:2]
'He'
>>>s1+s2[5:]
'Hello!'
Note
Similartotheprimarypromptwithdefaultnotation>>>,thePythoninteractiveinterpreter
alsohasasecondarypromptthatusesthreedots(…)whenitisbeingusedfromthe
terminal.Youwon’tbeabletoseethethreedotsinIDLEwhenyouusethesecondary
prompt.Thesecondarypromptisusedforamultilineconstruct,whichrequirescontinuous
lines.Executethefollowingcommandsbymanuallytypingthemintheinterpreter,anddo
notforgettoindentthenextlineaftertheifstatementwithatab:
>>>age=14
>>>ifage>10orage<20:
...print"teen"
teen
Datastructures
Pythonsupportsfourmaindatastructures(list,tuple,set,anddictionary)andthere
areanumberofimportantbuilt-inmethodsaroundthesedatastructures.
Lists
Listsareusedtogrouptogethervaluesofsingleormultipledatatypes.Theliststructure
canbeassignedbystatingvaluesinsquarebracketswithacomma(,)asaseparator:
>>>myList=['a',2,'b',12.0,5,2]
>>>myList
['a',2,'b',12.0,5,2]
Likestrings,valuesinalistcanbeaccessedusingindexnumbers,whichstartsfrom0.A
featurecalledslicingisusedbyPythontoobtainaspecificsubsetorelementofthedata
structureusingthecolonoperator.Inastandardformat,slicingcanbespecifiedusingthe
myList[start:end:increment]notation.Hereareafewexamplestobetterunderstand
thenotionofslicing:
Youcanaccessasingleelementinalistasfollows:
>>>myList[0]
'a'
Youcanaccessalltheelementsinthelistbyhavingemptystartandendvalues:
>>>myList[:]
['a',2,'b',12.0,5,2]
Youcanprovidestartandendindexvaluestoobtainaspecificsubsetofthelist:
>>>myList[1:5]
[2,'b',12.0,5]
Useoftheminussymbolwithanindexnumbertellstheinterpretertousethatindex
numberbackwards.Inthefollowingexample,-1backwardsactuallyrepresentsthe
indexnumber5:
>>>myList[1:-1]
[2,'b',12.0,5]
Youcanobtaineveryotherelementofthelistbyprovidingtheincrementvaluewith
startandendvalues:
>>>myList[0:5:2]
['a','b',5]
Youcancheckthelengthofalistvariableusingthelen()method.Theusageofthis
methodwillbehandyintheupcomingprojects:
>>>len(myList)
6
Youcanalsoperformvariousoperationstoaddordeleteelementsintheexistinglist.
Forexample,ifyouwanttoaddanelementattheendofthelist,usetheappend()
methodonthelist:
>>>myList.append(10)
>>>myList
['a',2,'b',12.0,5,2,10]
Toaddanelementataspecificlocation,youcanusetheinsert(i,x)method,
whereidenotestheindexvalue,whilexistheactualvaluethatyouwanttoaddto
thelist:
>>>myList.insert(5,'hello')
>>>myList
['a',2,'b',12.0,5,'hello',2,10]
Similarly,youcanusepop()toremoveanelementfromthelist.Asimplepop()
functionwillremovethelastelementofthelist,whileanelementataspecific
locationcanberemovedusingpop(i),whereiistheindexnumber:
>>>myList.pop()
10
>>>myList
['a',2,'b',12.0,5,'hello',2]
>>>myList.pop(5)
'hello'
>>>myList
['a',2,'b',12.0,5,2]
Tuples
TuplesareimmutabledatastructuressupportedbyPython(differentfromthemutable
structuresoflists).Animmutabledatastructuremeansthatyoucannotaddorremove
elementsfromthetupledatastructure.Duetotheirimmutableproperties,tuplesarefaster
toaccesscomparedtolistsandaremostlyusedtostoreaconstantsetofvaluesthatnever
change.
Thetupledatastructureisdeclaredlikelist,butbyusingparenthesesorwithoutany
brackets:
>>>tupleA=1,2,3
>>>tupleA
(1,2,3)
>>>tupleB=(1,'a',3)
>>>tupleB
(1,'a',3)
Justlikeinalistdatastructure,valuesintuplecanbeaccessedusingindexnumbers:
>>>tupleB[1]
'a'
Astuplesareimmutable,listmanipulationmethodssuchasappend(),insert(),and
pop()don’tapplyfortuples.
Sets
ThesetdatastructureinPythonisimplementedtosupportmathematicalsetoperations.
Thesetdatastructureincludesanunorderedcollectionofelementswithoutduplicates.
Withitsmathematicalusecases,thisdatastructureismostlyusedtofindduplicatesin
lists,asconversionofalisttoasetusingtheset()functionremovesduplicatesfromthe
list:
>>>listA=[1,2,3,1,5,2]
>>>setA=set(listA)
>>>setA
set([1,2,3,5])
Dictionaries
Thedictdatastructureisusedtostorekey-valuepairsindexedbykeys,whicharealso
knowninotherlanguagesasassociativearrays,hashes,orhashmaps.Unlikeotherdata
structures,dictvaluescanbeextractedusingassociatedkeys:
>>>boards={'uno':328,'mega':2560,'lily':'128'}
>>>boards['lily']
'128'
>>>boards.keys()
['lily','mega','uno']
Note
YoucanlearnmoreaboutPythondatastructuresandassociatedmethodsat
https://docs.python.org/2/tutorial/datastructures.html.
Controllingtheflowofyourprogram
Justlikeanyotherlanguage,Pythonsupportscontrollingtheprogramflowusing
compoundstatements.Inthissection,wewillbrieflyintroducethesestatementstoyou.
YoucangetdetailedinformationaboutthemfromtheofficialPythondocumentationat
https://docs.python.org/2/reference/compound_stmts.html.
Theifstatement
Theifstatementisthemostbasicandstandardstatementusedtosetupconditionalflow.
Tobetterunderstandtheifstatement,executethefollowingcodeinthePythoninterpreter
withdifferentvaluesoftheagevariable:
>>>age=14
>>>ifage<18andage>12:
print"Teen"
elifage<13:
print"Child"
else:
print"Adult"
ThiswillresultinTeenbeingprintedontheinterpreter.
Theforstatement
Python’sforstatementiteratesovertheelementsofanysequenceaccordingtotheorder
oftheelementsinthatsequence:
>>>celsius=[13,21,23,8]
>>>forcincelsius:
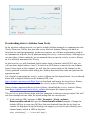
print"Fahrenheit:"+str((c*1.8)+32)
ThiswillresultinthePythoninterpretergeneratingthefollowingoutputthatwilldisplay
thecalculatedFahrenheitvaluesfromthegivenCelsiusvalues:
Fahrenheit:55.4
Fahrenheit:69.8
Fahrenheit:73.4
Fahrenheit:46.4
Thewhilestatement
ThewhilestatementisusedtocreateacontinuousloopinaPythonprogram.Awhile
loopkeepsiteratingoverthecodeblockuntiltheconditionisprovedtrue:
>>>count=5
>>>while(count>0):
printcount
count=count-1
Thewhilestatementwillkeepiteratingandprintingthevalueofthevariablecountand
alsoreduceitsvalueby1untilthecondition,thatis(count>0),becomestrue.Assoon
asthevalueofcountislowerthanorequalto0,thewhileloopwillexitthecodeblock
andstopiterating.
TheothercompoundstatementssupportedbyPythonaretry/catchandwith.These
statementswillbeexplainedindetailintheupcomingchapters.Pythonalsoprovidesloop
controlstatementssuchasbreak,continue,andpassthatcanbeusedwhilealoopis
beingexecutedusingthecompoundstatementsmentionedearlier.Youcanlearnmore
aboutthesePythonfeaturesfromhttps://docs.python.org/2/tutorial/controlflow.html.
Built-infunctions
Pythonsupportsanumberofusefulbuilt-infunctionsthatdonotrequireanyexternal
librariestobeimported.Wehavedescribedafewofthesefunctionsasacollectionofa
respectivecategory,accordingtotheirfunctionalities.
Conversions
Conversionmethodssuchasint(),float(),andstr()canconvertotherdatatypesinto
integer,float,orstringdatatypesrespectively:
>>>a='a'
>>>int(a,base=16)
10
>>>i=1
>>>str(i)
'1'
Similarly,list(),set(),andtuple()canbeusedtoconvertonedatastructureinto
another.
Mathoperations
Pythonalsosupportsbuilt-inmathematicalfunctionsthatcanfindtheminimumand/or
maximumvaluesfromalist.Checkoutthefollowingexamplesandplayaroundwiththe
differentdatastructurestounderstandthesemethods:
>>>list=[1.12,2,2.34,4.78]
>>>min(list)
1.12
>>>max(list)
4.78
Thepow(x,y)functionreturnsthevalueofxtothepowerofy:
>>>pow(3.14159,2)
9.869587728099999
Stringoperations
Pythonprovideseasyaccesstostringmanipulationthroughbuilt-infunctionsthatare
optimizedforperformance.Let’stakealookatthefollowingexamples:
Codetoreplaceoccurrencesofastringorsubstringwithadifferentone:
>>>str="HelloWorld!"
>>>str.replace("World","Universe")
'HelloUniverse!'
Codetosplitastringwithaseparatingcharacterwherethedefaultcharacterisspace:
>>>str="HelloWorld!"
>>>str.split()
['Hello','World!']
Codetosplitastringfromaseparatingcharacterforanyothercharacter:
>>>str2="John,Merry,Tom"
>>>str2.split(",")
['John','Merry','Tom']
Codetoconvertanentirestringvalueintouppercaseorlowercase:
>>>str="HelloWorld!"
>>>str.upper()
'HELLOWORLD!'
>>>str.lower()
'helloworld!'
Note
ThePythondocumentationontheofficialwebsitecoverseverybuilt-infunctionin
detailwithexamples.ForbetterunderstandingofPythonprogramming,visit
https://docs.python.org/2/library/functions.html.
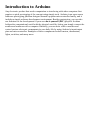
IntroductiontoArduino
Anyelectronicproductthatneedscomputationorinterfacingwithothercomputersfirst
requiresaquickprototypingoftheconceptusingsimpletools.Arduinoisanopensource
hardwareprototypingplatformdesignedaroundapopularmicrocontrollerfamily,andit
includesasimplesoftwaredevelopmentenvironment.Besidesprototyping,youcanalso
useArduinoforthedevelopmentofyourowndo-it-yourself(DIY)projects.Arduino
bridgesthecomputationalworldwiththephysicalworldbylettingyousimplyconnectthe
sensorsandactuatorswithacomputer.Basically,youcanwritecodetomonitorand
controlvariouselectroniccomponentsinyourdailylifebyusingArduino’sinput/output
pinsandmicrocontroller.Examplesofthesecomponentsincludemotors,thermostats,
lights,switches,andmanymore.
History
In2005,MassimoBanzi,theItaliancofounderofArduino,developedthetechnologyfor
hisstudentsatInteractionDesignInstituteIvrea(IDII).Sincethen,Arduinohas
developedintooneofthelargestopensourcehardwareplatforms.Allsoftware
componentsandschematicsoftheArduinodesignareopensource,andyoucanbuythe
hardwareataverylowcost—approximately30dollars—oryoucanevenmakeit
yourself.
WhyArduino?
ThemajorgoaloftheArduinocommunityistocontinuouslyimprovetheArduino
platformwiththefollowingobjectivesinmind:
TheArduinoplatformshouldbeanaffordableplatform
Itshouldbeeasytouseandeasytocode
Itshouldbeanopensourceandextensiblesoftwareplatform
Itshouldbeanopensourceandextensiblehardwareplatform
Itshouldhavecommunity-supportedDIYprojects
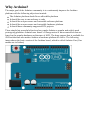
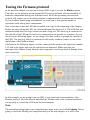
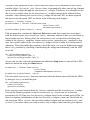
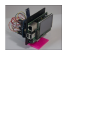
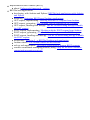
ThesesimplebutpowerfulobjectiveshavemadeArduinoapopularandwidelyused
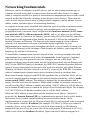
prototypingplatform.ArduinousesAtmel’sATmegaseriesofmicrocontrollersthatare
basedonthepopularhardwarearchitectureofAVR.Thehugesupportthatisavailablefor
AVRarchitecturealsomakesArduinoahardwareplatformofchoice.Thefollowing
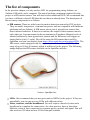
imageshowsthebasicversionoftheArduinoboard,whichiscalledArduinoUno(Uno
meansoneinItalian):
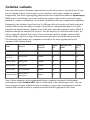
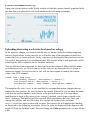
Arduinovariants
Likeanyotherproject,hardwarerequirementsaredrivenbyprojectspecifications.Ifyou
aredevelopingaprojectthatrequiresyoutointerfacewithalargenumberofexternal
components,youneedaprototypingplatformthathasasufficientnumberofinput/output
(I/O)pinsforinterfacing.Ifyouareworkingonaprojectthatneedstoperformahuge
amountofcomplexcalculations,yourequireaplatformwithmorecomputationcapability.
Fortunately,theArduinoboardexistsin16differentofficialversions,andeachversionof
Arduinodiffersfromtheothersintermsofformfactor,computationalpower,I/Opins,
andotheron-boardfeatures.ArduinoUnoisthebasicandmostpopularversion,whichis
sufficientenoughforsimpleDIYprojects.Forthemajorityofexercisesinthisbook,we
willbeusingtheArduinoUnoboard.Youcanalsouseanotherpopularvariantcalled
ArduinoMega,whichisalargerboardwithextrapinsandapowerfulmicrocontroller.
Thefollowingtableshowsthecomparisonofsomeofthemorepopularandactive
variantsoftheArduinoboard:
Name
Processor
Processor
frequency
Digital
I/O
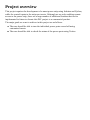
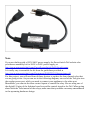
DigitalI/Owith
PWM
Analog
I/O
ArduinoUno
ATmega328
16MHz
14
6
6
Arduino
Leonardo
ATmega32u4
16MHz
14
6
12
ArduinoMega
ATmega2560
16MHz
54
14
16
ArduinoNano
ATmega328
16MHz
14
6
8
ArduinoDue
AT91SAM3X8E
84MHz
54
12
12
LilyPadArduino
ATmega168vor
ATmega328v
8MHz
14
6
6
Anyofthesevariantscanbeprogrammedusingacommonintegrateddevelopment
environmentcalledArduinoIDE,whichisdescribedintheupcomingsection.Youcan
selectanyoneoftheseArduinoboardsaccordingtoyourprojectrequirements,andthe
ArduinoIDEshouldbeabletocompileanddownloadtheprogramtotheboard.
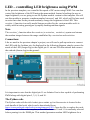
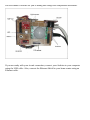
TheArduinoUnoboard
AsUnoisgoingtobethedefactoboardforthemajorityoftheprojectsinthisbook,let’s
getourselvesfamiliarwiththeboard.ThelatestrevisionoftheUnoboardisbasedon
Atmel’sATmega328microcontroller.TheboardextendstheI/Opinsofthe
microcontrollertotheperipheral,whichcanthenbeutilizedtointerfacecomponentsusing
wires.Theboardhasatotalof20pinstointerface,outofwhich14aredigitalI/Opinsand
6areanaloginputpins.Fromthe14digitalI/Opins,6pinsalsosupportpulse-width
modulation(PWM),whichsupportsthecontrolleddeliveryofpowertoconnected
components.
Theboardoperateson5V.ThemaximumcurrentratingofthedigitalI/Opinsis40mA,
whichissufficienttodrivemostoftheDIYelectroniccomponents,excludingmotorswith
highcurrentrequirements.
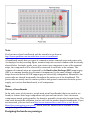
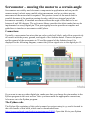
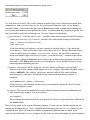
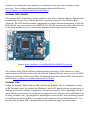
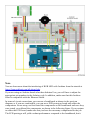
WhilethepreviousimageprovidedanoverviewoftheUnoboard,thefollowingdiagram
describesthepinsontheUnoboard.Asyoucansee,thedigitalpinsarelocatedonone
sideoftheboardwhiletheanalogpinsareontheoppositeside.Theboardalsohasa
coupleofpowerpinsthatcanbeusedtoprovide5Vand3.3Vofpowertoexternal
components.Theboardcontainsgroundpinsonbothsidesoftheboardaswell.Wewill
beextensivelyusing5Vofpowerandgroundpinsforourprojects.DigitalpinsD0and
D1supportserialinterfacingthroughtheTx(transmission)andRx(receiver)interfaces
respectively.TheUSBportontheboardcanbeusedtoconnectArduinowithacomputer.
NowthatwearefamiliarwiththeArduinohardware,let’smoveontoprogrammingthe
Arduinoboard.
InstallingtheArduinoIDE
ThefirststeptostartgettingfamiliarwithArduinoistoinstalltheArduinointegrated
developmentenvironment(IDE).Accordingtotheoperatingsystemthatyouselectedat
thebeginningofthePythoninstallationsection,followtheappropriatesubsectionto
installthecorrectIDE.
Linux
TheinstallationoftheArduinoIDEisreallysimpleinUbuntu.TheUbunturepository
alreadyincludestheArduinoIDEwiththerequireddependencies.
ForUbuntu12.04oranewerversion,executethefollowingcommandintheterminalto
installArduino:
$sudoapt-getupdate&&sudoapt-getinstallarduinoarduino-core
ThelatestversionoftheArduinoIDEintheUbunturepositoryis1.0.3.Youcanobtain
moreinformationregardingotherUbuntu-relatedquestionsat
http://playground.arduino.cc/Linux/Ubuntu.
ForFedora17oranewerversionofRedHatLinux,executethefollowingscriptinthe
terminal:
$sudoyuminstallarduino
AnswerstoadditionalinstallationquestionsforFedoracanbeobtainedat
http://playground.arduino.cc/Linux/Fedora.
MacOSX
ToinstalltheArduinoIDEonMacOSX(10.7ornewer),performthefollowingsteps:
1. Fromhttp://arduino.cc/en/Main/Software,downloadthelatestversionoftheArduino
IDEforMacOSX,whichwas1.0.5whenthisbookwasbeingwritten.
2. UnzipanddragArduinototheapplicationfolder.
TheArduinoIDEisbuiltinJavaandrequiresthatyourcomputerisequippedwiththe
appropriateversionofJava.OpentheIDEfromyourapplications.Ifyoudon’thaveJava
installedonyourMac,theprogramwillpromptyouwithapop-upwindowandaskyouto
installJavaSE6runtime.GoaheadandinstallJava(aspertherequest)astheOSXwill
automaticallyinstallitforyou.
Windows
InstallationofArduinoforWindowsisverysimple.Downloadthesetupfilefrom
http://arduino.cc/en/Main/Software.SelectthemostrecentversionoftheArduinoIDE,
thatis,1.0.xoranewerversion.
MakesureyoudownloadtheappropriateversionoftheArduinoIDEaccordingtoyour
operatingsystem,thatis,32bitor64bit.InstalltheIDEtothedefaultlocationas
specifiedintheinstallationwizard.Onceinstalled,youcanopentheIDEbynavigatingto
Start|Programs.
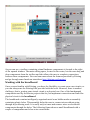
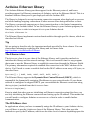
GettingstartedwiththeArduinoIDE
TheArduinoIDEisacross-platformapplicationdevelopedinJavathatcanbeusedto
develop,compile,anduploadprogramstotheArduinoboard.OnlaunchingtheArduino
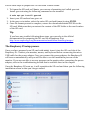
IDE,youwillfindaninterfacesimilartotheonedisplayedinthefollowingscreenshot.
TheIDEcontainsatexteditorforcoding,amenubartoaccesstheIDEcomponents,a
toolbartoeasilyaccessthemostcommonfunctions,andatextconsoletocheckthe
compileroutputs.AstatusbaratthebottomshowstheselectedArduinoboardandtheport
namethatitisconnectedto,asshownhere:
WhatisanArduinosketch?
AnArduinoprogramthatisdevelopedusingtheIDEiscalledasketch.Sketchesare
codedinArduinolanguage,whichisbasedonacustomversionofC/C++.Onceyouare
donewithwritingthecodeinthebuilt-intexteditor,youcansaveitusingthe.ino
extension.Whenyousavethesesketchfiles,theIDEautomaticallycreatesafolderto
storethem.Ifyouareusinganyothersupportingfilesforasketch,suchasheaderfilesor
libraryfiles,theyareallstoredatthislocation(whichisalsocalledasketchbook).
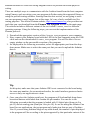
Toopenanewsketchbook,opentheArduinoIDEandselectNewfromtheFilemenu,as
showninthefollowingscreenshot:
Youwillbepromptedwithanemptytexteditor.Thetexteditorsupportsstandardfeatures
(thatis,copy/paste,select,find/replace,andsoon).BeforewegoaheadwithanArduino
program,let’sexploretheothertoolsprovidedbytheIDE.
Note
TheArduinoIDEversionpriorto1.0usedthe.pdeextensiontosavesketchbooks.
Startingfrom1.0,theyaresavedwiththe.inoextension.Youcanstillopenfileswiththe
.pdeextensioninthelatestIDE.Later,theIDEwillconvertittothe.inoextensionwhen
yousavethem.
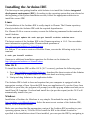
Workingwithlibraries
TheArduinoIDEuseslibrariestoextendthefunctionalitiesofexistingsketches.Libraries
areasetoffunctionscombinedtoperformtasksaroundaspecificcomponentorconcept.
Themajorityofthebuilt-inArduinolibrariesprovidemethodstostartworkingwith
externalhardwarecomponents.YoucanimportanylibrarybynavigatingtoSketch|
ImportLibrary…,asshowninthefollowingscreenshot:
Youcanalsousealibraryforyoursketchbyjustspecifyingthelibrarywiththe#include
statementatthebeginningofthesketch,thatis,#include<Wire.h>.
TheArduinoIDEalsoprovidesthecapabilitytoaddanexternallibrarythatsupportsa
specifichardwareorprovidesadditionalfeatures.Intheupcomingchapters,wewillbe
dealingwithsomeoftheseexternallibraries,andwewillgothroughtheprocessof
importingthematthattime.
Youcanlearnmoreaboutbuilt-inArduinolibrariesfrom
http://arduino.cc/en/Reference/Libraries.
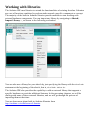
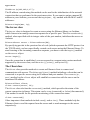
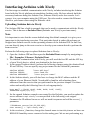
UsingArduinoexamples
TheArduinoIDEcontainsalargenumberofbuilt-inexamplesketches.Theseexamples
aredesignedtogettheuserfamiliarwithbasicArduinoconceptsandbuilt-inArduino
libraries.TheexamplesarewellmaintainedbytheArduinocommunitysincetheyhave
comprehensivesupportforeachexamplethroughtheArduinowebsite
(http://arduino.cc/en/Tutorial/HomePage).IntheArduinoIDE,youcanaccessthese
examplesbynavigatingtoFile|Examples,asshowninthefollowingscreenshot:
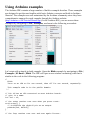
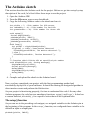
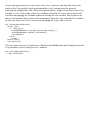
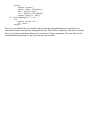
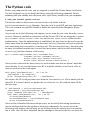
Let’sstartwithasimplein-builtexample.OpentheBlinkexamplebynavigatingtoFile|
Examples|01.Basics|Blink.TheIDEwillopenanewwindowcontainingcodethatis
similartothecodeinthefollowingprogram:
/*
Blink
TurnsonanLEDonforonesecond,thenoffforonesecond,repeatedly.
Thisexamplecodeisinthepublicdomain.
*/
//Pin13hasanLEDconnectedonmostArduinoboards.
//giveitaname:
intled=13;
//thesetuproutinerunsoncewhenyoupressreset:
voidsetup(){
//initializethedigitalpinasanoutput.
pinMode(led,OUTPUT);
}
//thelooproutinerunsoverandoveragainforever:
voidloop(){
digitalWrite(led,HIGH);//turntheLEDon(HIGHisthevoltagelevel)
delay(1000);//waitforasecond
digitalWrite(led,LOW);//turntheLEDoffbymakingthevoltageLOW
delay(1000);//waitforasecond
}
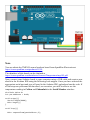
ThisArduinosketchisdesignedtoblinkanLEDondigitalpin13.Youmustbe
wonderingwhywedidn’tdiscussoraskyoutobringanyhardware.That’sbecausethe
ArduinoUnoboardisequippedwithanon-boardLEDthatisconnectedtodigitalpin13.
Now,insteadofdivingdeeperintotheArduinocode,wearegoingtofocusontheprocess
ofdealingwiththeArduinoboardthroughtheIDE.
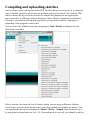
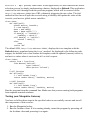
Compilinganduploadingsketches
OnceyouhaveyourcodeopenedintheIDE,thefirstthingyouneedtodoistoselectthe
typeofArduinoboardonwhichyouaregoingtouploadyoursketch.TheArduinoIDE
needstoknowthetypeofboardinordertocompiletheprogramfortheappropriate
microcontroller,asdifferentArduinoboardscanhavedifferentAtmelmicrocontrollers.
Therefore,youneedtoperformthisstepbeforeyougoaheadwiththecompilingor
uploadingoftheprogramtotheboard.
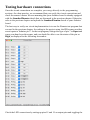
YoucanselecttheArduinoboardbynavigatingtoTools|Board,asdisplayedinthe
followingscreenshot:
SelectArduinoUnofromthelistofboards,unlessyouareusingadifferentArduino
board.Onceyouhaveselectedtheboard,youcangoaheadandcompilethesketch.You
cancompilethesketchbynavigatingtoSketch|Verify/Compilefromthemenubaror
byusingthekeyboardshortcutCtrl+R.Ifeverythingissetupwell,youshouldbeableto
compilethecodewithoutanyerror.
Aftersuccessfullycompilingthesketch,itistimetouploadthecompiledcodetothe
Arduinoboard.Todothis,youneedtomakesurethatyourArduinoIDEisproperly
connectedtoyourcomputer.Ifitisnotalreadyconnected,connectyourArduinoboardto
yourcomputerusingaUSBport.Now,itistimetoletyourIDEknowtheserialporton
whichtheboardisconnected.NavigatetoTools|SerialPortsandselecttheappropriate
serialport.
Note
InthecaseofsomeLinuxdistributions,youmaynotbeabletoseeoruploadtheArduino
programtotheboardduetopermissionrestriction(s)ontheserialport.Runningthe
followingcommandontheterminalshouldsolvethatproblem:
$sudousermod-a-Guucp,dialout,lock<username>
YoucannowuploadthecompiledsketchtoyourArduinoboardbynavigatingtoFile|
Upload.Thisprocesswillusetheserialconnectiontoburnthecompiledfirmwareinthe
microcontroller.PleasewaitforsometimeoruntiltheLEDs(TxandRxLEDs)onthe
boardstopflashing.Now,youhaveyourArduinoboardreadywithyourfirstsketch.You
canobservetheperformanceoftheblinkingLEDneardigitalpin13.
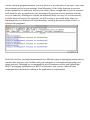
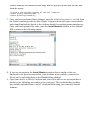
UsingtheSerialMonitorwindow
Inthepreviousprocess,weusedaUniversalSerialBus(USB)cabletoconnectyour
ArduinoboardtoaUSBportofyourcomputer.TheUSBportisanindustrialstandardto
provideaninterfaceforconnectingvariouselectroniccomponentstoacomputerusingthe
serialinterface.WhenyouconnectanArduinoboardusingUSB,thecomputeractually
interfacesitasaserialperipheraldevice.Throughoutthebook,wearegoingtorefertothe
connectionsmadeusingaUSBasserialconnections.TheSerialMonitorwindowisa
built-inutilityoftheArduinoIDE.TheSerialMonitorwindowcanbeaccessedby
navigatingtoTools|SerialMonitororbyusingtheCtrl+Shift+Mkeyboardshortcut.It
canbeconfiguredtoobservedatathatisbeingsentorreceivedontheserialportthatis
usedtoconnecttheArduinoboardtothecomputer.Youcanalsosetthebaudrateforthe
serialcommunicationusingthedrop-downmenuoption.Thisutilityisgoingtobevery
useful(furtheroninthebook)whentestingyourprototypesandtheirperformances.
IntroductiontoArduinoprogramming
TheArduinoplatformwasintroducedtosimplifyelectronichardwareprototypingfor
everyone.Forthisreason,Arduinoprogrammingwasintendedtobeeasytolearnby
nonprogrammerssuchasdesigners,artists,andstudents.TheArduinolanguageis
implementedinC/C++,whilethefundamentalsofthesketchandprogramstructuresare
derivedfromanopensourceprogramminglanguagecalledProcessingandanopensource
electronicprototypinglanguagecalledWiring.
Comments
ArduinofollowsacommentingformatthatisadoptedfromCanditissimilartohigherlevellanguages;however,itisdifferentfromthePythoncommentformatthatwelearned
earlierinthischapter.Therearevariousmethodsofcommenting,whichareasfollows:
Blockcomment:Thisisdonebycoveringthecommentedtextbetween/*and*/:
/*Thisisacomment.
*Arduinowillignoreanytexttillitfindsuntiltheendingcomment
syntax,whichis,
*/
Single-lineorinlinecomment:Thisisdonebyusing//beforetheline:
//Thissyntaxonlyappliestooneline.
//Youhavetouseitagainforeachnextlineofcomment.
intpin=13;//Selectedpin13
Usually,ablockcommentatthebeginningofthesketchismostlyusedtodescribethe
programasawhole.Single-linecommentsareusedtodescribespecificfunctionsorto-do
notes,suchasthefollowingone:
//TODO:explainvariablesnext.
Variables
Likeanyotherhigh-levellanguage,avariableisusedtostoredatawiththreecomponents:
aname,avalue,andatype.Forexample,considerthefollowingstatement:
intpin=10;
Here,pinisthevariablenamethatisdefinedwiththetypeintandholdsthevalue10.
Laterinthecode,alloccurrencesofthepinvariablewillretrievedatafromthe
declarationthatwejustmadehere.Youcanuseanycombinationofalpha-numeric
characterstoselectthevariablenameaslongasthefirstcharacterisnotanumber.
Constants
IntheArduinolanguage,constantsarepredefinedvariablesthatareusedtosimplifythe
program:
HIGH,LOW:WhileworkingwithdigitalpinsontheArduinoboard,onlytwodistinct
voltagestagesarepossibleatthesepins.Ifapinisbeingusedtoobtainaninput,any
measureabove3VisconsideredaHIGHstate.Ifyouareusingapinforoutput,then
theHIGHstatewillsetthepinvoltageto5V.Theoppositevoltagelevelsare
consideredasLOWstates.
false,true:Theseareusedtorepresentlogicaltrueandfalselevels.falseis
definedas0andtrueismostlydefinedas1.
INPUT,OUTPUT:TheseconstantsareusedtodefinetherolesoftheArduinopins.If
yousetthemodeofanArduinopinasINPUT,theArduinoprogramwillpreparethe
pintoreadsensors.Similarly,theOUTPUTsettingpreparesthepinstoprovidea
sufficientamountofcurrenttotheconnectedsensors.
Wewillutilizetheseconstantslaterinthebookandwewillalsoexplainthemwith
examplecode.
Datatypes
Thedeclarationofeachcustomvariablerequirestheusertospecifythedatatypethatis
associatedwiththevariable.TheArduinolanguageusesastandardsetofdatatypesthat
areusedintheClanguage.Alistofthesedatatypesandtheirdescriptionsareasfollows:
void:Thisisusedinthefunctiondeclarationtoindicatethatthefunctionisnotgoing
toreturnanyvalue:
voidsetup(){
//actions
}
boolean:Variablesdefinedwiththedatatypebooleancanonlyholdoneoftwo
values,trueorfalse:
booleanledState=false;
byte:Thisisusedtostorean8-bitunsignednumber,whichisbasicallyanynumber
from0to255:
byteb=0xFF;
int:Thisisshortforintegers.Itstores16-bit(ArduinoUno)or32-bit(ArduinoDue)
numbersanditisoneoftheprimarynumberstoragedatatypesfortheArduino
language.Althoughintwillbeusedtodeclarenumbersthroughoutthebook,the
Arduinolanguagealsohaslongandshortnumberdatatypesforspecialcases:
intvarInt=2147483647;
longvarLong=varInt;
shortvarShort=-32768;
float:Thisdatatypeisusedfornumberswithdecimalpoints.Thesearealsoknown
asfloating-pointnumbers.floatisoneofthemorewidelyuseddatatypesalong
withinttorepresentnumbersintheArduinolanguage:
floatvarFloat=1.111;
char:Thisdatatypestoresacharactervalueandoccupies1byteofmemory.When
providingavaluetochardatatypes,characterliteralsaredeclaredwithsingle
quotes:
charmyCharacater='P';
array:Anarraystoresacollectionofvariablesthatisaccessiblebyanindex
number.IfyouarefamiliarwitharraysinC/C++,itwillbeeasierforyoutoget
started,astheArduinolanguageusesthesameC/C++arrays.Thefollowingare
someofthemethodstoinitializeanarray:
intmyIntArray[]={1,2,3,4,5};
inttempValues[5]={32,55,72,75};
charmsgArray[10]="hello!";
Anarraycanbeaccessedusinganindexnumber(wheretheindexstartsfromnumber
0):
myIntArray[0]==1
msgArray[2]=='e'
Conversions
Conversionfunctionsareusedtoconvertanydatatypevalueintotheprovideddatatypes.
TheArduinolanguageimplementsthefollowingconversionfunctionsthatcanbeutilized
duringprogramming:
char():Thisconvertsthevalueofanydatatypetothecharacterdatatype
byte():Thisconvertsthevalueofanydatatypetothebytedatatype
int():Thisconvertsthevalueofanydatatypetotheintegerdatatype
float():Thisconvertsthevalueofanydatatypetothefloating-pointnumberdata
type
Asademonstrationofusingthesefunctions,checkoutthefollowingexample:
intmyInt=10;
floatmyfloat=float(myInt);
Implementationoftheprecedingcodewillcreateafloating-pointvariable,myFloat,with
value10.0usingtheintegervalueinitializedbythemyIntvariable.
Functionsandstatements
Functions,alsocalledsubroutinesorprocedures,areapieceofcodeimplementedtodo
specifictasks.TheArduinolanguagehassomepredefinedfunctionsandtheusercanalso
writecustomfunctionstoimplementcertainprogramlogic.Thesecustomfunctionscan
thenbecalledfromanypartofthesketchtoperformaspecifictask.Functionshelp
programmerstosimplifydebugging,toreducechancesforerror,andtoorganizecoding
concepts:
voidblinkLED(){
//actionA;
//actionB;
}
TheArduinolanguagehasasetoflibraryfunctionstosimplifytheprogramming
experience.AlthoughnotalloftheselibraryfunctionsarerequiredbyanArduinosketch,
setup()andloop()aremandatoryfunctionsandtheyarerequiredtosuccessfully
compilethesketch.
Thesetup()function
WhenArduinorunsasketch,itfirstlooksforthesetup()function.Thesetup()function
isusedtoexecuteimportantprogrammingsubroutinesbeforetherestoftheprogram,such
asdeclaringconstants,settinguppins,initializingserialcommunication,orinitializing
externallibraries.WhenArduinorunstheprogram,itexecutesthesetup()functionsonly
once.IfyoucheckouttheBlinksketchthatweusedintheprevioussection,youcansee
theinitializationofthesetup()function,asdisplayedinthefollowingcodesnippet:
voidsetup(){
//initializethedigitalpinasanoutput.
pinMode(led,OUTPUT);
}
Asyoucanseeinourexample,weusedthepinMode()functiontoassigntheroleofthe
LEDpininthesetup()function.
Theloop()function
OnceArduinohasexecutedthesetup()function,itstartsiteratingtheloop()function
continuously.Whilesetup()containstheinitializationparameters,loop()containsthe
logicalparametersofyourprogram:
voidloop(){
digitalWrite(led,HIGH);
delay(1000);
digitalWrite(led,LOW);
delay(1000);
}
AsyoucanseeintheprecedingcodesnippetfromtheBlinksketch,theloop()function
executesthemaincodethatblinkstheLEDandrepeatstheprocessiteratively.
ThepinMode()function
ThepinMode()functionisusedtosetthebehaviorofArduino.Aswesawinthesetup()
functionoftheBlinksketch,thepinMode()functionconfigurestheLEDpinforOUTPUT:
pinMode(led,OUTPUT)
Here,theledvariableisassignedtodigitalpin13,whosemodewillbechangedbythe
pinMode()function.
Workingwithpins
Onceyouaredoneconfiguringthepinsthatwillbeusedbyyourprogram,youalsoneed
helpinreadingtheinputfromthesepinsorforsendingsignalstothem.Arduinoprovides
afewspecificfunctionstohandlethesescenarios:
digitalWrite():ThiswasdevelopedfordigitalI/Opins.Thisfunctionsetsthepin
toHIGH(5V)orLOW(0V),whicharealreadyconfiguredasOUTPUTusingpinMode().
Forexample,thefollowinglineofcodesetsdigitalpin13toHIGH:
digitalWrite(13,HIGH);
digitalRead():SimilartodigitalWrite(),thisfunctionhelpsyoutoreadthestate
ofadigitalpinthatisconfiguredasINPUT:
value=digitalRead(13);
analogRead():Thisfunctionreadsthevaluefromaspecificanalogpin.Thevalueis
linearlymappedbetweentheintegervalueof0and1023torepresentthevoltage
from0Vto5V:
value=analogRead(0);
analogWrite():Thisfunctionisusedtoprovideanalogoutputresultsatadigitalpin.
ThetechniqueiscalledPWM,andthiswillbeexplainedinChapter4,Divinginto
Python-ArduinoPrototyping.Itisstillimportanttonotethatthisfunctionisnot
designedforalldigitalpins,butitisonlyforpinsthataredesignatedasPWMpins.
Statements
Ifyouarefamiliarwithanyotherobject-orientedprogramminglanguage,youmusthave
usedstatementsextensivelyforyourprograms.TheArduinolanguageusestraditional
C/C++statementssuchasif/else,while,switch/case,andfortocontroltheflowof
yourprogram.Insteadofdivingdeepintothesestatementsrightnow,theyaredescribed
laterinthebookwithpracticalexamples.
Summary
Alright!Youhavesuccessfullycompletedthecomparativelymundanetasksofinstalling
andconfiguringPythonandtheArduinoIDE.Yoursystem,whetheritisaMacOSX,
Linux,orWindowssystem,isnowreadyfortheupcomingchapters.Inthischapter,we
wentthroughthehistoryandbuildingblocksofArduino.Wealsolearnedthebasicsof
PythonprogrammingandtheArduinolanguage.Now,youarereadytogetyourhandson
realhardwareandstartexploringcomputertohardwareinterfacing.Inthenextchapter,
wewillgothroughthefirststepofinterfacing,thatis,connectingArduinotothecomputer
usingaserialinterface.
Chapter2.WorkingwiththeFirmata
ProtocolandthepySerialLibrary
Inthepreviouschapter,youlearnedthefundamentalsofthePythonprogramming
languageandtheArduinohardwareplatformsothatyoucouldgetstarted.Ifyouare
readingthischapterdirectlywithoutgoingthroughthepreviouschapter,itisassumedthat
youhavesomelevelofexpertiseorworkingexperiencewiththesetechnologies.This
chapterdescribestwoimportantcomponentsthatarerequiredtobridgeArduinowith
Python:
TheArduinoFirmataprotocol
Python’sseriallibrarycalledpySerial
AlthoughtheFirmataprotocolisusefultointerfaceArduinowithPython,itcanalsobe
usedasanindependenttooltodevelopalargevarietyofapplications.
ItistimetotakeyourArduinohardwareoutandstartgettingyourhandsdirty.Duringthe
courseofthischapter,youwillrequireanLED,abreadboard,anda1kilo-ohmresistoras
wellasthecomponentsthatyoualreadyusedinthepreviouschapter,thatis,ArduinoUno
andaUSBcable.
Note
IfyouareusinganyothervariantofArduino,youcanobtainfurtherinformationaboutit
fromhttp://arduino.cc/en/Guide/HomePageorthecommunity-supportedArduinoforum
thatislocatedathttp://forum.arduino.cc/.
ConnectingtheArduinoboard
Asmentionedinthepreviouschapter,thisbooksupportsallmajoroperatingsystems,and
thissectionwillprovideyouwithstepstoconnectandconfiguretheArduinoboardfor
theseoperatingsystems.Inthepreviouschapter,weutilizedexamplecodetogetstarted
withtheArduinoIDE.IfyouwereunabletosuccessfullycommunicatewithArduinoby
followingtheinformationgiveninthepreviouschapter,followtheinstructionsprovided
inthissectiontoestablishaconnectionbetweenyourcomputerandyourArduino.First,
connectyourArduinoboardtoyourcomputer’sUSBportusingaUSBcableandfollow
thestepsaccordingtoyouroperatingsystem.
Linux
IfyouareusingthelatestversionofUbuntuLinux,onceyouconnecttheArduinoboard
andopentheArduinoIDE,youwillbeaskedtoaddyourusernametothedailoutgroup,
asdisplayedinthefollowingscreenshot.ClickontheAddbuttonandlogoutfromthe
system.Youdon’tneedtorestartthecomputerforthechangestotakeeffect.Loginwith
thesameusernameandopentheArduinoIDE.
Ifyoudon’tseethisdialogbox,checkwhetheryoucanseetheSerialPortoptioninthe
ToolsmenuoftheArduinoIDE.Itispossiblethattheinstallationofotherprogramsmight
haveaddedyourusernametothedailoutgroupalready.Ifyoudon’tgetthedialogboxand
don’thaveanyoptionstoselectinSerialPort,executethefollowingscriptinthe
terminal,where<username>isyourLinuxusername:
$sudousermod-a-Gdialout<username>
Thisscriptwilladdyourusernametothedialoutgroup,anditshouldalsoworkforother
Linuxversions.InLinux,theArduinoboardmostlygetsconnectedas/dev/ttyACMx,
wherexistheintegervalueanddependsonyourphysicalportaddress.Ifyouareusing
anyotherdistributionofLinuxotherthanUbuntu,youmightwanttocheckouttheproper
groupsassociatedwiththeArduinoserialportfromtheLinuxinstallationpage
(http://playground.arduino.cc/Learning/Linux)oftheArduinowebsite.
Note
FortheFedoraLinuxdistribution,addtheuucpandlockgroupswiththedialoutgroup
tocontroltheserialport:
$sudousermod-a-Guucp,dialout,lock<username>
MacOSX
InMacOSX,whenyouconnectyourArduinothroughaserialport,theOSconfiguresit
asanetworkinterface.InOSXMavericks,oncetheArduinoboardisconnected,open
NetworkfromSystemPreferences.Adialogboxshouldappearthatstatesthatanew
networkinterfacehasbeendetected.ClickonOKforThunderboltBridgeandthenclick
onApply.Thefollowingscreenshotdisplaysthedialogboxtoaddanewnetwork
interface:
ForOSXLionorlaterversions,onconnectingtheArduinoboard,adialogboxwill
appearthatwillaskyoutoaddanewnetworkinterface.Inthiscase,youwillnothaveto
navigatetoyournetworkpreferences.IfyouseethenetworkinterfacewiththestatusNot
connectedandhighlightedinred,don’tworryaboutitasitshouldworkjustfine.
OpentheArduinoIDEandnavigatetoSerialPortfromtheToolsmenu.Youshouldbe
abletoseeoptionssimilartothosedisplayedinthefollowingscreenshot.Theserialport
onwhichtheArduinoboardisconnectedmightvaryaccordingtoyourOSXversionand
thephysicalporttowhichitisconnected.Makesurethatyouselectattyinterfacefora
USBmodem.Asdisplayedinthefollowingscreenshot,theArduinoboardisconnectedto
theserialport/dev/tty.usbmodemfd121:
Windows
TheconfigurationoftheArduinoserialportisverystraightforwardifyouareusing
Windows.WhenyouconnectyourArduinoboardtheveryfirsttime,theoperatingsystem
willautomaticallyinstallthenecessarydriversbyitself.Oncethisprocessiscomplete,
selectanappropriateCOMportfromtheSerialPortoptioninthemenubar.Fromthe
mainmenu,navigatetoTools|SerialPortandselecttheCOMport.
Troubleshooting
Evenafterfollowingthestepsmentionedearlier,ifyoustilldon’tseethehighlighted
SerialPortoptionasdisplayedinthefollowingscreenshot,thenyouhavegotaproblem.
Therecanbetwomainreasonsforthis:theserialportisbeingusedbyanotherprogramor
theArduinoUSBdriversarenotinstalledproperly.
IfanyprogramotherthantheArduinoIDEisusingthespecificserialport,terminatethat
programandrestarttheArduinoIDE.SometimesinLinux,thebrlttylibraryconflicts
withtheArduinoserialinterface.Removethislibrary,logout,andlogbackin:
$sudoapt-getremovebrltty
InWindows,reinstallingtheArduinoIDEalsoworks,asthisprocessinstallsand
configurestheArduinoUSBdriveragain.
Tip
TheArduinoboardcanbeusedbyonlyoneprogramatatime.Itisveryimporttomake
surethatanypreviouslyusedprogramorotherservicesarenotusingtheserialportor
ArduinowhenyoutrytousetheArduinoIDE.Thischeckwillbecomeveryimportant
whenwestartusingmultipleprogramstocontrolArduinointhenextsection.
AssumingthatyoucannowselecttheserialportintheArduinoIDE,wecangoahead
withcompilinganduploadingsketchestoyourArduinoboard.TheArduinoIDEships
withpreinstalledexamplesketcheswithwhichyoucanplayaround.However,beforewe
goaheadandstartplayingwithcomplexexamples,let’sgothroughthenextsection,
whichexplainstheFirmataprotocolandalsoguidesyouthroughstep-by-stepinstructions
tocompileanduploadasketch.
IntroducingtheFirmataprotocol
BeforeArduino,thedomainofmicrocontroller-basedapplicationswaslimitedto
hardwareprogrammers.Arduinomadeitsimplefordevelopersthatcamefromother
softwarefieldsandevenforthenon-codingcommunitytodevelopmicrocontroller-based
hardwareapplications.Arduinoconsistsofasimplehardwaredesignwitha
microcontrollerandI/Opinstointerfaceexternaldevices.IfonecanwriteanArduino
sketchthatcantransferthecontrolofthemicrocontrollerandthesepinstoanexternal
softwaremechanism,thenitwillreduceone’seffortstouploadArduinosketchesforevery
modification.ThisprocesscanbeperformedbydevelopingsuchanArduinoprogramthat
canthenbecontrolledusingaserialport.ThereexistsaprotocolcalledFirmata,which
doesexactlythat.
WhatisFirmata?
Firmataisagenericprotocolthatallowscommunicationbetweenthemicrocontrollerand
thesoftwarethatishostedonacomputer.Anysoftwarefromanycomputerhostthatis
capableofserialcommunicationcancommunicatewiththemicrocontrollerusingFirmata.
FirmatagivescompleteaccessofArduinodirectlytothesoftwareandeliminatesthe
processesofmodifyinganduploadingArduinosketches.
ToutilizetheFirmataprotocol,adevelopercanuploadasketchthatsupportstheprotocol
totheArduinoclientasaonetimeprocess.Afterwards,thedevelopercanwritecustom
softwareonthehostcomputerandperformcomplextasks.Thissoftwarewillprovide
commandsviaaserialporttotheArduinoboardthatisequippedwithFirmata.Heorshe
cankeepalteringthelogiconthehostcomputerwithoutinterruptingtheArduino
hardware.
ThepracticeofwritingcustomArduinosketchesisstillvalidforstandaloneapplications
wheretheArduinoboardhastoperformatasklocally.Wewillexploreboththeseoptions
intheupcomingchapters.
Note
YoucanlearnmoreabouttheFirmataprotocolanditslatestversionfromtheofficial
websiteathttp://www.firmata.org.
UploadingaFirmatasketchtotheArduinoboard
ThebestwaytostarttestingtheFirmataprotocolistouploadastandardFirmataprogram
totheArduinoboardandusethetestingsoftwarefromthehost.Inthissection,weare
goingtodemonstrateamethodtouploadanArduinosketch,whichhasthisstandard
Firmataprogram,totheboard.Thisisgoingtobethedefaultmethodtouploadanysketch
inthefuture.
ImplementationoftheFirmataprotocolrequiresthelatestversionoftheFirmatafirmware
andyoudon’thavetoworryaboutwritingit.ThelatestArduinoIDEshipswithastandard
versionoftheFirmatafirmware,andwerecommendthatyouusethelatestIDEtoavoid
anyconflict.Now,followthefollowingstepstouploadtheprogramtoyourArduino
board:
1. Asshowninthefollowingscreenshot,opentheStandardFirmatasketchby
navigatingtoFile|Examples|Firmata|StandardFirmataintheArduinoIDE:
2. Thisactionwillopenanothersketchbookinanewwindowwiththe
StandardFirmatasketchloadedintheeditor.Donotmodifyanythinginthesketch
andgoaheadwiththecompilingprocessthatisdescribedinthenextstep.Itis
importantnottomodifyanythinginthecodeasthetestsoftwarethatwearegoingto
usecomplieswiththelatestunchangedfirmware.
3. OncetheStandardFirmatasketchisopened,thenextstepistocompileitforyour
Arduinoboard.Intheprevioussection,wealreadyconnectedtheArduinoboardto
thecomputerandselectedtheproperserialport.However,ifthenewsketchbookhas
adifferentconfigurationthanthat,followthestepsfromtheprevioussection,thatis,
selecttheappropriateserialportandtheArduinoboardtype.
4. Tocompilethecurrentsketch,clickontheVerifyiconfromthetoolbarasdisplayed
inthefollowingscreenshot.YoucanalsocompileitbynavigatingtoSketch|Verify
/CompileorclickingonCtrl+R(command+RifyouareusingMacOSX):
Thecompilationprocessshouldcompletewithoutanyerrorsasweareusingdefault
examplecodefromtheIDEitself.Nowit’stimetouploadthesketchtotheboard.
Makesurethatyouhaveconnectedtheboard.
5. Presstheuploadiconinthetoolbarasdisplayedinthefollowingscreenshot.This
actionwilluploadthecompiledcodetoyourArduinoboard:
Oncompletion,youshouldseetheDoneuploading.textintheIDE,asdisplayedinthe
followingscreenshot:
YourArduinoboardisnowreadywiththelatestFirmatafirmwareandiswaitingfora
requestfromyourcomputer.Let’smoveontothenextsectionandstarttestingtheFirmata
protocol.
TestingtheFirmataprotocol
Inthepreviouschapter,weusedanon-boardLEDatpin13totesttheBlinkprogram.
Thistime,wearegoingtouseanexternalLEDtogetyoustartedwiththeassemblyof
hardwarecomponentsusingyourArduinoboard.Asalltheupcomingexercisesand
projectswillrequireyoutointerfacehardwarecomponentssuchassensorsandactuators
toyourArduinoboardusingabreadboard,wewantyoutostartgettinghands-on
experiencewithwiringthesecomponents.
NowisthetimetousetheLEDthatweaskedyoutogetatthebeginningofthechapter.
BeforewestartwiringtheLED,let’sfirstunderstandthephysicsofit.TheLEDthatyou
obtainedshouldhavetwolegs:ashortoneandalongone.Theshortlegisconnectedto
thecathodeoftheLEDanditneedstobeconnectedtothegroundviaaresistor.Asyou
canseeinthefollowingfigure,weareusinga1k-ohmresistortogroundthecathodeof
theLED.Thelongleg,whichisconnectedtotheanode,needstoconnecttooneofthe
digitalpinsoftheArduinoboard.
Asshowninthefollowingfigure,wehaveconnectedtheanodetothedigitalpinnumber
13.Lookatthefigureandwiretheconnectionasdisplayed.Makesurethatyou
disconnecttheArduinoboardfromthehostcomputertoavoidanykindofdamagefrom
staticelectricity.
Inthisexample,wearegoingtouseanLEDtotestsomebasicfunctionalitiesofthe
Firmataprotocol.WehavealreadyuploadedtheFirmatacodetotheArduinoboardand
wearereadytocontroltheLEDfromthehostcomputer.
Note
TheprecedingwiringfigurewascreatedusinganopensourcetoolcalledFritzing.Weare
goingtocovertheFritzingtoolcomprehensivelyinthenextchapter,asitwillbeour
standardsoftwaretocreatethewiringdiagrambeforeweperformtheactualphysical
wiring.
TherearemultiplewaystocommunicatewiththeArduinoboardfromthehostcomputer
usingFirmata,suchaswritingyourownprograminPythonusingthesupportedlibraryor
usingtheprebuilttestingsoftware.Startingfromthenextsection,wearegoingtowrite
ourownprogramstouseFirmata,butatthisstage,let’suseafreelyavailabletoolfor
testingpurposes.TheofficialFirmatawebsite,http://www.firmata.org,alsoprovidestest
toolsthatyoucandownloadfromtheFirmataTestProgramsectiononthemainpage.
Thewebsiteincludesadifferentvariantofthetoolcalledfirmata_testfordifferent
operatingsystems.Usingthefollowingsteps,youcantesttheimplementationofthe
Firmataprotocol:
1. Downloadtheappropriateversionofthefirmata_testprogramtoyourcomputer.
2. Now,connectyourArduinoboardwiththeLEDtothehostcomputerusingtheUSB
cableandrunthedownloadedfirmata_testprogram.Youwillbeabletoseean
emptywindowonthesuccessfulexecutionoftheprogram.
3. Asdisplayedinthefollowingscreenshot,selecttheappropriateportfromthedropdownmenu.MakesuretoselectthesameportthatyouusedtouploadtheArduino
sketch.
Tip
Atthispoint,makesurethatyourArduinoIDEisnotconnectedtotheboardusing
thesameportnumber.Aswementionedearlier,theserialinterfacegrantsexclusive
accesstoonlyoneapplicationatatime.
4. OnceyouselecttheArduinoserialport,theprogramwillloadmultipledrop-down
boxesandbuttonswithlabelsthatcontainthepinnumber.Youcanseeinthe
followingscreenshotthattheprogramisloadedwith12digitalpins(frompin2to
pin13)andsixanalogpins(frompin14topin19).AsweareusingtheArduinoUno
boardforourapplications,thetestprogramonlyloadspinsthatarepartofArduino
Uno.IfyouareusingArduinoMegaoranyotherboard,thenumberofpinsdisplayed
intheprogramwillbeaccordingtothepinssupportedbythatparticularvariantofthe
Arduinoboard.
Tip
Workingwiththefirmata_testprogramonLinux
OnaLinuxplatform,youmighthavetomodifythepropertyofthedownloadedfile
andmakeitexecutable.Fromthesamedirectory,runthefollowingcommandinthe
terminaltomakeitexecutable:
$chmod+xfirmata_test
Onceyouhavechangedthepermissions,usethefollowingcommandtorunthe
programfromtheterminal:
$./firmata_test
5. Asyoucanseeintheprogramwindow,youhavetwoothercolumnsaswellasthe
columncontainingthelabels.Thesecondcolumnintheprogramletsyouselectthe
rolefortheappropriatepins.Youcanspecifytheroleofdigitalpins(inthecaseof
ArduinoUno,from2to13)asinputoroutput.Asdisplayedinthefollowing
screenshot,youwillseeLowinthethirdcolumnassoonasyouselecttheroleof
pins2and3asinputpins.Thisiscorrect,aswedon’thaveanyinputconnectedto
thesepins.Youcanplaywiththeprogrambychangingtherolesandvaluesof
multiplepins.
AswehaveconnectedtheLEDtodigitalpin13,wearenotexpectinganyphysical
changesontheboardwhileyouareplayingaroundwiththeotherpins.
6. Now,selectpin13asanoutputpinandpresstheLowbutton.Thiswillchangethe
button’slabeltoHighandyouwillseethattheLEDisturnedon.Byperformingthis
action,wehavechangedthelogicofthedigitalpin13to1,thatis,High,which
translatesto+5voltsatthepin.ThispotentialwillbesufficienttolighttheLED.You
canchangethelevelofpin13backto0byclickingonthebuttonagainandturningit
toLow.Thiswillchangethepotentialbackto0volts.
Theprogramthatweusedhereisperfecttotestthefundamentals,butitcannotbeusedto
writecomplexapplicationsusingtheFirmataprotocol.Inreal-worldapplications,we
reallyneedtoexecutetheFirmatamethodsusingcustomcode,whichinadditionto
switchingtheLEDstatusalsoincludestheimplementationofsmartlogicandalgorithms,
interfacingothercomponents,andsoon.WearegoingtousePythonforthese
applications,startingfromthenextsection.
GettingstartedwithpySerial
YoulearnedabouttheFirmataprotocolintheprevioussection.Thisisaneasyandquick
waytostartworkingwithArduino.AlthoughtheFirmataprotocolhelpsyoutodevelop
complexapplicationsfromyourcomputerwithoutmodifyingtheArduinosketch,weare
notreadytostartcodingtheseapplications.
Thefirststeptowardswritingthesecomplexapplicationsistoprovideaninterface
betweenyourprogrammingenvironmentandtheArduinoviaaserialport.Inthisbook,
youwillberequiredtoestablishaconnectionbetweenthePythoninterpreterandArduino
foreveryprojectthatwedevelop.
Writingyourownlibrary,whichincludesimplementationoffunctionsandspecifications
toenablecommunicationonaserialprotocol,isaninconvenientandtimeconsuming
process.Wearegoingtoavoidthatbyusinganopensource,wellmaintainedPython
librarycalledpySerial.
ThepySeriallibraryenablescommunicationwithArduinobyencapsulatingtheaccess
fortheserialport.ThismoduleprovidesaccesstotheserialportsettingsthroughPython
propertiesandallowsyoutoconfiguretheserialportdirectlythroughtheinterpreter.
pySerialwillbethebridgeforanyfuturecommunicationbetweenthePythonand
Arduino.Let’sstartbyinstallingpySerial.
InstallingpySerial
WeinstalledthepackagemanagerSetuptoolsinChapter1,GettingStartedwithPython
andArduino.Ifyouhaveskippedthatchapterandarenotsureaboutit,thenpleasego
throughthatsection.IfyoualreadyknowhowtoinstallandconfigurePythonlibrary
packages,skiptheseinstallationsteps.
Fromthisstage,wearegoingtouseonlypip-basedinstallationcommandsduetotheir
obviousadvantagesthatweredescribedinChapter1,GettingStartedwithPythonand
Arduino:
1. Openaterminalorcommandpromptandexecutethefollowingcommand:
>pipinstallpyserial
TheWindowsoperatingsystemdoesnotrequireadministrator-leveluseraccessto
executethecommand,butyoushouldhaverootprivilegestoinstallPythonpackages
inUnix-basedoperatingsystems,asfollows:
$sudopipinstallpyserial
IfyouwanttoinstallthepySeriallibraryfromsource,downloadthearchivefrom
http://pypi.python.org/pypi/pyserial,unpackit,andfromthepySerialdirectory,run
thefollowingcommand:
$sudopythonsetup.pyinstall
2. IfPythonandSetuptoolsareinstalledproperly,youshouldseethefollowingoutput
atthecommandlineaftertheinstallationiscomplete:
.
.
Processingdependenciesforpyserial
Finishedprocessingdependenciesforpyserial
ThismeansthatyouhavesuccessfullyinstalledthepySeriallibraryandyouare
goodtogotothenextsection.
3. Now,tocheckwhetherornotpySerialissuccessfullyinstalled,startyourPython
interpreterandimportthepySeriallibraryusingthefollowingcommand:
>>>importserial
PlayingwithapySerialexample
YourArduinoboardhastheFirmatasketchStandardFirmatafromthepreviousexample.
ToplaywithpySerial,wearenotgoingtousetheFirmataprotocolanymore.Instead,we
aregoingtouseanothersimpleArduinosketchthatimplementsserialcommunicationthat
canbecapturedonthePythoninterpreter.
StickingwiththepromiseofnotperforminganycodingfortheArduinosketch,let’sselect
anexamplesketchfromtheArduinoIDE:
1. Asdisplayedinthefollowingscreenshot,navigatetoFile|Examples|01.Basics|
DigitalReadSerial.
2. CompileanduploadtheprogramtotheArduinoboardusingthesamemethodthat
wasdescribedearlier.SelecttheappropriateserialportonwhichyourArduinois
connectedandmakeanoteofit.Asyoucanseeinthesketch,thissimpleArduino
codetransmitsthestatusofdigitalpin2thatisontheserialportwithabaudrateof
9600bps.
3. WithoutdisconnectingtheArduinoboardfromyourcomputer,openthePython
interpreter.Then,executethefollowingcommandsonthePythoninterpreter.Make
surethatyoureplace/dev/ttyACM0withtheportnamethatyounoteddownearlier:
>>>importserial
>>>s=serial.Serial('/dev/ttyACM0',9600)
>>>whileTrue:
prints.readline()
4. Onexecution,youshouldgetrepeated0valuesinthePythoninterpreter.PressCtrl+
Ctoterminatethiscode.Asyoucansee,theArduinocodewillkeepsending
messagesduetotheloopfunctionthatwasusedinthesketch.Wedon’thave
anythingconnectedtopin2,andbecauseofthis,wearegettingthestatus0,thatis,
Low.
5. Ifyouknowwhatyouaredoing,youcanconnectanydigitalsensortopin2andrun
thescriptagaintoseethechangedstatus.
IntheprecedingPythonscript,theserial.Serialmethodinterfacesandopensthe
specifiedserialport,whilethereadline()methodreadseachlinefromthisinterface,
terminatedwith\n,thatis,thenewlinecharacter.
Note
Thenewlinecharacterisaspecialcharacterthatsignifiestheendofalineoftext.Itisalso
knownasEndofLine(EOL)orLinefeed+CarriageReturn(LF+CR).Learnmore
aboutthenewlinecharacterathttp://en.wikipedia.org/wiki/Newline.
BridgingpySerialandFirmata
IntheFirmatasection,wealreadylearnedhowusefulitistousetheFirmataprotocol
insteadofconstantlymodifyingtheArduinosketchanduploadingitforsimpleprograms.
pySerialisasimplelibrarythatprovidesabridgebetweenArduinoandPythonviaa
serialport,butitlacksanysupportfortheFirmataprotocol.Asmentionedearlier,the
biggestbenefitofPythoncanbedescribedinonesentence,“Thereisalibraryforthat.”
So,thereexistsaPythonlibrarycalledpyFirmatathatisbuiltonpySerialtosupportthe
Firmataprotocol.ThereareafewotherPythonlibrariesthatalsosupportFirmata,butwe
willonlybefocusingonpyFirmatainthischapter.Wewillbeextensivelyusingthis
libraryforvariousupcomingprojectsaswell:
1. Let’sstartbyinstallingpyFirmatajustlikeanyotherPythonpackagebyusing
Setuptools:
$sudopininstallpyfirmata
Intheprevioussection,whiletestingpySerial,weuploadedtheDigitalSerialRead
sketchtotheArduinoboard.
2. TocommunicateusingtheFirmataprotocol,youneedtouploadthe
StandardFirmatasketchagain,justaswedidintheUploadingaFirmatasketchto
theArduinoboardsection.
3. Onceyouhaveuploadedthissketch,openthePythoninterpreterandexecutethe
followingscript.Thisscriptimportsthepyfirmatalibrarytotheinterpreter.Italso
definesthepinnumberandtheport.
>>>importpyfirmata
>>>pin=13
>>>port='/dev/ttyACM0'
4. Afterthis,weneedtoassociatetheportwiththemicrocontrollerboardtype:
>>>board=pyfirmata.Arduino(port)
Whileexecutingthepreviousscript,twoLEDsontheArduinowillflickerasthe
communicationlinkbetweenthePythoninterpreterandtheboardgetsestablished.In
theTestingtheFirmataprotocolsection,weusedaprebuiltprogramtoturnanLED
onandoff.OncetheArduinoboardisassociatedtothePythoninterpreter,these
functionscanbeperformeddirectlyfromtheprompt.
5. YoucannowstartplayingwithArduinopins.TurnontheLEDbyexecutingthe
followingcommand:
>>>board.digital[pin].write(1)
6. YoucanturnofftheLEDbyexecutingthefollowingcommand.Here,inboth
commands,wesetthestateofdigitalpin13bypassingvalues1(High)or0(Low):
>>>board.digital[pin].write(0)
7. Similarly,youcanalsoreadthestatusofapinfromtheprompt:
>>>board.digital[pin].read()
Ifwecombinedthisscriptinanexecutablefilewitha.pyextension,wecanhavea
PythonprogramthatcanberundirectlytocontroltheLEDratherthanrunningthese
individualscriptsonaterminal.Later,thisprogramcanbeextendedtoperformcomplex
functionswithoutwritingorchangingtheArduinosketch.
Note
AlthoughwearerunningindividualscriptsatthePythonprompt,wewillbegoing
throughtheprocessofcreatingPythonexecutablefilesinthenextchapter.
Summary
ByintroducingtheFirmatalibrary,weavoidedwritinganycustomArduinosketchesin
thischapter.Wewillcontinuethispracticeduringtheremainingpartofthisbookandwill
onlyuseormakecustomsketcheswhenrequired.Inthischapter,youinteractedwiththe
ArduinoboardbymakingtheLEDblink,whichistheeasiestwaytogetstartedona
hardwareproject.Nowit’stimeforyourfirstproject,wherewearealsogoingtomake
somemoreLEDsblink.Onemightaskthequestionthatifwehavealreadydoneit,then
whydoweneedanotherprojecttomakeLEDsblink?Let’sfindout.
Chapter3.TheFirstProject–MotiontriggeredLEDs
Intheprecedingchapter,youlearnedthebasicsofPython-Arduinointerfacing.Wewent
throughsomeexercisestoprovidehands-onexperiencewithausefulArduinoprotocol,
Firmata,andthePythonlibrary.Now,it’stimeforyourfirst‘Python+Arduino’project.
Wewillstartthischapterbydiscussingtheprojectgoalsandtherequiredcomponentsto
designthesoftwareflowandthehardwarelayoutfortheproject.Justlikeanyother
microcontroller-basedhardwareproject,youcanusecodeandimplementtheentirelogic
ofyourprojectonArduinoitself.However,thegoalofthisbookistohelpyoutoutilize
Pythoninsuchawaythatyoucansimplifyandextendyourhardwareprojects.Although
wewillbeusingahybridapproachwithaPythonprogramassistedbyanArduinosketch
intheupcomingchapters,wewouldlikeyoutogetfamiliarwithbothwaysof
programming.Asthisisyourfirstexperienceofbuildingahardwareproject,thechapter
providesyouwithtwodifferentprogrammingmethodsfortheproject:justusingan
ArduinosketchandusingaPythonprogramwiththeFirmataprotocolonArduino.The
methodwiththeArduinosketchisincludedsothatyougetthecompleteexperiencewith
theArduinocomponentssuchasI/Opinsandserialcommunication.
Motion-triggeredLEDs–theproject
description
Whenyoustartlearninganyprogramminglanguage,inmostcases,youwillbewriting
codetoprint‘HelloWorld!’.Meanwhile,inhardwareprojects,themajorityoftutorials
beginbyhelpingausertowritethecodetoblinkanLED.Theseexercisesorprojectsare
usefulfordeveloperstogetstartedwiththelanguage,butmostly,theydonotcarryany
importancetowardsreal-worldapplications.However,wedon’twanttooverwhelmyou
withacomplexandsophisticatedprojectthatmightrequireyoutohaveagoodamountof
domainknowledge.
WhileworkingwiththeFirmataprotocolinthepreviouschapter,wealreadyblinkedan
LEDontheArduinoboard.Tokeepthetraditionalive(ofhavingablinkingLEDasafirst
majorproject)andalsobuildexcitementtowardstheproject,let’sputatwistinthe
blinkingLEDproject.Inthisproject,wewillblinktwodifferentLEDs,butinsteadof
performingtheseactionsinarandommanner,wewilldoitforeventsthataremeasured
usingamotionsensor.Althoughthedifficultlyleveloftheprojectissimplesinceitis
yourfirstproject,itcarriesreal-worldapplicationvalueandcanbeusedasasimple
applicationinyourday-to-daylife.
Theprojectgoal
Theprojectgoalcanbedescribedinonesentenceasfollows:“Generateanalertusinga
redLEDforanydetectedmotionanddisplaythenormalconditionusingagreenLED.”In
comprehensivelistofgoals,youwillhavetoperformthefollowingtaskstosatisfythe
mentionedprojectgoal:
Detectanymotionintheenvironmentasaneventusingapassiveinfrared(PIR)
sensor
PerformablinkactionusingaredLEDforthisevent
Otherwise,performablinkactionusingagreenLED
Keepthesysteminloopaftertheactionhasbeenperformedandwaitforthenext
event
TheprojectcanbeimplementedasaDIYapplicationoraspartofotherprojectswith
minormodifications.Thefollowingaresomeexampleswheretheconceptsfromthis
projectcanbeutilized:
AsaDIYsecuritysystem,tomonitormovementinaroom
(http://www.instructables.com/id/PIR-Sensor-Security/)
Insmarthomeapplications,itcanbeusedtoautomaticallyturnofflightsifnooneis
present(http://www.instructables.com/id/Arduino-Home-Monitor-System/)
Itcanbeusedinautomaticgaragedooropenerapplicationswiththesupportof
additionalhardwarecomponentsandappropriatecode
InDIYwildliferecordingprojects,itcanbeusedtotriggeracamerainsteadofan
LEDwhenanymotionisdetected(http://www.instructables.com/id/Motiontriggered-camera/)
Thelistofcomponents
Inthepreviouschapter,weonlyusedanLEDforprogrammingusingArduino,an
ArduinoUSBcable,andacomputer.Themajorhardwarecomponentrequiredforthis
projectisaPIRmotionsensor.YouwillalsoneedanadditionalLED.Werecommendthat
youhaveadifferentcoloredLEDthantheonethatyoualreadyhave.Thedescriptionof
thenecessarycomponentsisasfollows:
PIRsensors:ThesearewidelyusedasmotiondetectionsensorsforDIYprojects.
Theyaresmall,inexpensive,consumelesspower,andarecompatiblewithhardware
platformssuchasArduino.APIRsensorusesapairofpyroelectricsensorsthat
detectinfraredradiation.Ifthereisnomotion,theoutputofthesesensorscancels
eachotherout.Anymovementintheenvironmentwillproducedifferentlevelsof
infraredradiationbythesepyroelectricsensorsandthedifferencewilltriggeran
outputthatisHIGH(+5volts).WewillbeusingthePIRsensorthatissoldby
SparkFun,andyoucanobtainitfromhttps://www.sparkfun.com/products/8630.The
PIRsensorcomesequippedwiththerequiredprintedcircuitboard(PCB).Ithas
rangeofupto20feet(6meters),whichissufficientfortheproject.Thefollowing
imagedisplaysthePIRsensoravailableontheSparkFunwebsite:
Source:SparkfunInc.
LEDs:WerecommendthatyouusegreenandredLEDsfortheproject.Iftheyare
unavailable,youcanuseanytwoLEDswithdifferentcolors.
Wires,resistors,andthebreadboard:Youwillrequireabunchofwiresanda
breadboardtocompletetheconnections.Asabestpractice,haveatleastthree
differentcolorsofwireconnectorstorepresentpower,ground,andsignal.Youwill
alsoneedtwo220ohmandone10kilo-ohmpullresistors.
TheArduinoboard:TheArduinoUnoboardissufficientfortheproject
requirements.YoucanalsouseArduinoMegaoranyotherArduinoboardforthis
project.TheprojectrequiresonlythreeI/OpinsandanyavailableArduinoboardis
equippedwithmorethanthreeI/Opins.
AUSBcable:YouwillneedaUSBcabletouploadtheArduinocodeandperform
serialcommunicationwiththeArduinoboard.
Acomputer:WehavealreadyconfiguredacomputerwithPythonandtheArduino
IDEforyourfavoriteoperatingsysteminthepreviouschapters.Youwillneedthis
computerfortheproject.Makesurethatyouhaveallthesoftwarecomponentsthat
weinstalledandconfiguredinthepreviouschapters.
Thesoftwareflowdesign
Thefirststep,beforejumpingtoworkonanyhardwaresystem,istodesigntheproject
flowusinglogic.Werecommendthatyouhaveyourprojectsketchedasaflowchartto
betterunderstandthelayoutofthecomponentsandtheflowofthecode.Thefollowing
diagramshowstheflowoftheprojectwhereyoucanseethattheprojectrunsinloops
oncemotionisdetectedandtheappropriateLEDactionsareperformed:
Asyoucansee,theprogramlogicstartsbydetectingthestateofthePIRsensorand
performstheappropriateactionsaccordingly.WithasingleArduinoinstruction,youcan
onlyturntheLEDonoroff.Toperformtheblinkingoperation,wewillneedtorepeatedly
performtheturning-onandturning-offactionswithatimedelaybetweentheactions.We
willalsoinsertadelaybetweentheexecutionofeachsuccessiveloopsothatthePIR
sensoroutputcansettledown.Notethatwewillusethesameflowwhenwritingthecode
forboththeprogrammingmethods.
Thehardwaresystemdesign
Designingadiagramforyoursoftwareflowhelpsyoutowritetheprogramandalso
assistsyouinidentifyingactionsandeventsfortheproject.Theprocessofhardware
systemdesignincludescircuitconnections,schematicdesign,simulation,verification,and
testing.Thisdesignprocessprovidesadetailedunderstandingoftheprojectandthe
hardwarecomponents.Italsohelpsinpreliminaryverificationandtestingoftheproject
architecture.Beforewejumptothehardwaredesignprocessofthisproject,let’sget
ourselvesfamiliarwiththehelpfultools.
IntroducingFritzing–ahardwareprototypingsoftware
Youarenotrequiredtodesignthehardwaresystemforthisproject.Byandlarge,inthis
book,thehardwaresystemdesignswillbeprovided,astheprimaryfocusofthebookis
onprogrammingratherthanhardwaredesign.
Ifyouareinterestedinsystemdesignorrapidprototypingofthehardwarecomponents,
theopensourcesoftwaretoolusedforthispurposeiscalledFritzing.Theschematicsfor
yourprojectscanbedesignedusingFritzinganditcanbeobtainedfrom
http://fritzing.org/download/.
Fritzingisacommunity-supportedelectronicdesignautomationsoftwareinitiativefor
designers,artists,andhobbyists.Itletsyouconvertyourhardwaresketchfrompaperto
softwareasacircuitdiagram.FritzingalsoprovidesyouwithatooltocreatePCBlayouts
fromyourdesigns.FritzingextensivelysupportsArduinoandotherpopularopensource
DIYhardwareplatforms.YoucanexploreFritzingviabuilt-inexampleprojects.
InstallandrunFritzing.Thefollowingscreenshotshowsoneofthedefaultprojectsthat
aredisplayedafteropeningFritzing:
Asyoucansee,atoolboxcontainingvirtualhardwarecomponentsislocatedtotheright
oftheopenedwindow.Themaineditingspace,locatedinthecenter,letstheuserdragand
dropcomponentsfromthetoolboxandalsoallowstheusertocompleteconnections
betweenthesecomponents.YoucanlearnmoreaboutthefeaturesprovidedbyFritzing
andgothroughsomehands-ontutorialsathttp://fritzing.org/learning/.
Workingwiththebreadboard
OnceyouarefamiliarwithFritzing,youhavetheflexibilitytocreateyourowncircuits,or
youcanalwaysusetheFritzingfilesprovidedwiththebook.However,thereisanother
challenge,thatis,portingyourvirtualcircuittoaphysicalone.Oneofthefundamental
componentsusedbyelectronicsprojectsthatletyouimplementconnectionsandbuildthe
physicalcircuitisthebreadboard.
Thebreadboardcontainsintelligentlyorganizedmetalrowshiddenunderanassembly
containingplasticholes.Thisassemblyhelpstheusertoconnectwireswithoutgoing
throughanysolderingwork.Itisreallyeasytoinsertandremovewiresorelectronics
componentsthroughtheholes.Thefollowingfigureshowsasmallbreadboardwitha
coupleofcomponentsandafewwireconnections:
Note
Findoutmoreaboutbreadboardsandthetutorialstousethemat
http://learn.sparkfun.com/tutorials/how-to-use-a-breadboard.
Abreadboardmostlyhastwotypesofconnectionstrips:terminalstripsandpowerrails.
Asdisplayedintheprecedingfigure,terminalstripsareverticalcolumnswithelectrically
shortedholes.Insimplewords,onceyouconnectanycomponenttooneoftheterminal
strips,thecomponentwillbeelectricallyconnectedtoeachholeinthecolumn.The
columnsofterminalstripsareseparatedbytheDualin-linePackage(DIP)supportgap.
(DIPisacommonhousingforelectronicscomponents.)Inthesamecolumn,terminal
stripsaboveandbelowtheDIPsupportgapareelectricallyindependent.Meanwhile,the
powerrailsareshortedhorizontallythroughouttheentirerowofthebreadboard.The
powerrailsaremostlyusedtoconnectpositiveandgroundconnectionsfromthepower
supply,soitcanbedistributedeasilytoallcomponents.
Note
Historyofbreadboards
Intheearlyyearsofelectronics,peopleusedactualbreadboards(thatwereusedtocut
bread)toconnecttheirlargecomponentswithjustnailsandwires.Onceelectronics
componentsstartedgettingsmaller,theboardtoassemblecircuitsalsobecamebetter.The
termstuckthroughthisevolution,andwestillcallthemodernboardsbreadboards.Ifyou
areinterested,youcancheckouthttp://www.instructables.com/id/Use-a-real-BreadBoard-for-prototyping-your-circui/,whichprovidesinstructionstoassembleacircuit
usingtheoriginalbreadboards.
Designingthehardwareprototype
It’stimetocollectthehardwarecomponentsmentionedearlierandstartbuildingthe
system.Thenextfigureshowsthecircuitfortheprojectthathasbeendevelopedusing
Fritzing.Ifyouhavepriorexperienceofworkingwithcircuitassembly,goaheadand
connectthecomponentsasdisplayedinthefigure:
Ifthisisyourfirstexperienceofworkingwithsensorsandthebreadboard,usethe
followingstepstocompletethecircuitassembly:
1. ConnectVCC(+5V)andgroundfromtheArduinotothebreadboard.
2. Connecttheanode(longlead)oftheredLEDtodigitalpin12oftheArduinoboard.
Connectthecathode(shortlead)oftheredLEDtogroundwith220ohmresistors.
3. Connecttheanode(longlead)ofthegreenLEDtodigitalpin13oftheArduino
board.Connectthecathode(shortlead)ofthegreenLEDtogroundwith220ohm
resistors.
4. ConnectVDDofthePIRsensortoVCConthebreadboard.Usethesamewirecolor
torepresentthesamecategoryofconnections.Thiswillgreatlyhelpin
troubleshootingthecircuit.
5. Connectthesignal(middlepin)ofthePIRsensortoArduinodigitalpin7witha10
kilo-ohmpull-upresistor.
Themajorityofexpertspreferaschematicdiagraminsteadoftheprototypediagramthat
weusedpreviously.Schematicdiagramsareusefulwhenyouareusingcompatible
componentsinsteadoftheexactcomponentsfromtheprototypediagram.Thefollowingis
aschematicdiagramoftheelectronicscircuitthatwedesignedearlier.Thisdiagramis
alsoobtainedusingFritzing:
YoursystemisnowreadytoruntheArduinoprogram.Aswewillbeusingthesame
hardwareforboththeprogrammingmethods,youarealmostdoneworkingwith
electronicsunlessyouencounteraproblem.Justtomakesurethateverythingisconnected
perfectly,let’scheckouttheseconnectionsinthenextsection.
Note
Notethatpull-upresistorsareusedtomakesurethattheoutputsignalfromaPIRsensor
settlesattheexpectedlogiclevel.
Testinghardwareconnections
Oncethecircuitconnectionsarecomplete,youcangodirectlytotheprogramming
sections.Asabestpractice,werecommendthatyouverifythecircuitconnectionsand
checkthesensor’sstatus.WeareassumingthatyourArduinoboardisalreadyequipped
withtheStandardFirmatasketchthatwediscussedinthepreviouschapter.Otherwise,
refertothepreviouschapteranduploadtheStandardFirmatasketchtoyourArduino
board.
ThebestwaytoverifyourcircuitimplementationistousetheFirmatatestprogramthat
weusedinthepreviouschapter.Accordingtotheprojectsetup,thePIRsensorprovides
eventinputstoArduinopin7.Inthetestprogram,changethetypeofpin7toInputand
waveyourhandoverthesensor,andyoushouldbeabletoseethestatusofthepinas
High,asdisplayedinthefollowingscreenshot:
ChecktheLEDconnectionsbysettinguppins12and13asoutputpinsandtogglingthe
buttonstosetthestatusofthepins.IfyouseetheLEDsblinkingwhileyouaretoggling
thebutton,thenyourconnectionsareworkingperfectly.
Ifyoucannotsuccessfullyperformthesechecks,verifyandrepeatthedesignsteps.
Method1–usingastandaloneArduino
sketch
Aswediscussedinthepreviouschapters,aprojectcanbeimplementedbycreating
project-specificnativeArduinocodeorbyusingaPython-Arduinohybridapproach.
ThenativeArduinosketchesareusefulinapplicationswherenegligibleorno
communicationwithacomputersystemisrequired.Althoughthistypeofstandalone
projectenablescontinuousoperationintheabsenceofserialconnectivity,itisdifficultto
keepupdatinganduploadinganArduinosketchforminormodifications.
Ifyoulookatthevariousapplicationsofthisproject,youwillnoticethatonlyafewof
themrequiretheprojecttobeimplementedasastandalonesystemthatjustdetectsmotion
andblinksLEDs.ThistypeofsystemcanbeeasilyimplementedbyasimpleArduino
sketch.
Theprojectsetup
Beforewegoaheadwiththeproject,makesurethatyouhavethefollowingthingsin
place:
Thehardwarecomponentsaresetupandarefunctioningcorrectly
YourArduinoisconnectedtothecomputerusingaUSBcable
YourcomputerhastheArduinoIDEandyoucanaccesstheconnectedArduinoboard
throughtheIDE
TheArduinosketch
ThissectiondescribestheArduinocodefortheproject.Beforewegetintoastep-by-step
descriptionofthecode,let’sfirstfollowthesestepstoruntheproject:
1. OpentheArduinoIDE.
2. FromtheFilemenu,openanewsketchbook.
3. CopythefollowingArduinocodetothesketchandsaveit:
intpirPin=7;//PinnumberforPIRsensor
intredLedPin=12;//PinnumberforRedLED
intgreenLedPin=13;//PinnumberforGreenLED
voidsetup(){
Serial.begin(9600);
pinMode(pirPin,INPUT);
pinMode(redLedPin,OUTPUT);
pinMode(greenLedPin,OUTPUT);
}
voidloop(){
intpirVal=digitalRead(pirPin);
if(pirVal==LOW){//wasmotiondetected
blinkLED(greenLedPin,"Nomotiondetected.");
}else{
blinkLED(redLedPin,"Motiondetected.");
}
}
//FunctionwhichblinksLEDatspecifiedpinnumber
voidblinkLED(intpin,Stringmessage){
digitalWrite(pin,HIGH);
Serial.println(message);
delay(1000);
digitalWrite(pin,LOW);
delay(2000);
}
4. CompileanduploadthesketchtotheArduinoboard.
Now,youhavecompletedyourprojectwiththefirstprogrammingmethodand
successfullydeployedittoyourhardware.Itshouldberunningthedesignedalgorithmto
detectmotioneventsandperformtheblinkaction.
Asyourprojectisfunctioningproperly,it’stimetounderstandthecode.Likeanyother
Arduinoprogram,thecodehastwomandatoryfunctions:setup()andloop().Italsohas
acustomfunction,blinkLED(),foraspecificactionthatwillbeexplainedlater.
Thesetup()function
Asyoucanseeintheprecedingcodesnippet,weassignedvariablestotheArduinopinat
thebeginningoftheprogram.Inthesetup()function,weconfiguredthesevariablestobe
definedasinputoroutputpins:
pinMode(pirPin,INPUT);
pinMode(redLedPin,OUTPUT);
pinMode(greenLedPin,OUTPUT);
Here,pirPin,redLedPin,andgreenLedPinaredigitalpins7,12,and13respectively.In
thesamefunction,wealsoconfiguredtheArduinoboardtoprovideserialconnectivelyat
thebaudrateof9600bps:
Serial.begin(9600);
Theloop()function
Intheloop()function,wearerepeatedlymonitoringtheinputfromthepirPindigitalpin
todetectmotion.TheoutputofthispinisHIGHwhenmotionisdetectedandLOW
otherwise.Thislogicisimplementedusingasimpleif-elsestatement.Whenthis
conditionissatisfied,thefunctioncallsauser-definedfunction,blinkLED(),toperform
theappropriateactionontheLEDs.
User-definedfunctionsareaveryimportantaspectofanyprogramminglanguage.Let’s
spendsometimelearninghowyoucancreateyourownArduinofunctionstoperform
variousactions.
WorkingwithcustomArduinofunctions
Functionsareusedwhenasegmentofcodeisrepeatedlyexecutedtoperformthesame
action.Ausercancreateacustomfunctiontoorganizethecodeorperformreoccurring
actions.Tosuccessfullyutilizeacustomfunction,auserneedstocallthemfrom
mandatoryArduinofunctionssuchasloop(),setup(),oranyotherfunctionthatleadsto
thesemandatoryfunctions:
return-typefunction_name(parameters){
#Actiontobeperformed
Action_1;
Action_2;
Returnexpression;
}
IntheprecedingArduinofunctionframework,return-typecanbeanyArduinodatatype
suchasint,float,string,andsoon,orvoidifthecodeisnotreturninganything.The
followingisthecustomfunctionthatweusedinourprojectcode:
voidblinkLED(intpin,Stringmessage){
digitalWrite(pin,HIGH);
Serial.println(message);
delay(1000);
digitalWrite(pin,LOW);
delay(2000);
}
Inourproject,theblinkLED()functionisnotretuninganyvaluewhenitiscalledfrom
theloop()function.Hence,return-typeisvoid.Whencallingthefunction,wepassthe
pinnumberandamessageasparameters:
blinkLED(greenLedPin,"Nomotiondetected.");
Theseparametersarethenutilizedintheperformedaction(writingamessageonaserial
portandsettinguptheLEDstatus)bytheblinkLED()function.Thisfunctionalso
introducesadelaytoperformtheblinkactionbyusingthedelay()function.
Testing
WeverifiedthedesignedsystemintheTestinghardwareconnectionsectionusingmanual
inputsviatheFirmatatestprogram.Aswehavenowimplementedthesoftwaredesign,we
needtoverifythattheprojectisperformingobjectivetasksautonomouslyandrepeatedly.
WiththeUSBportconnectedtothecomputer,opentheserialmonitoringtoolfromthe
ArduinoIDEbynavigatingtoTools|SerialMonitororbypressingCtrl+Shift+M.You
shouldstartseeingamessagesimilartotheonedisplayedinthefollowingscreenshoton
theSerialMonitorwindow:
WhilewritingtheblinkLED()functiontoperformactions,weincludedanactiontowrite
astringviaaserialport.MoveyourhandoverthePIRsensorinsuchawaythatthePIR
sensorcandetectmotion.ThiseventshouldtriggerthesystemtoblinktheredLEDand
displayastring,Motiondetected,ontheserialmonitor.Onceyoustaysteadyandavoid
anymotionforawhile,youwillbeabletoseethegreenLEDblinkinguntilthenext
movementgetsdetectedviathePIRsensor.
Troubleshooting
Troubleshootingisanimportantprocessifanythinggoesawry.Theseareafewexample
problemsandthetroubleshootingstepsforthem:
Serialoutputiscorrect,buttherearenoblinkingLEDs:
ChecktheLEDconnectionsonthebreadboard
TheLEDblinks,butthereisnoserialoutput:
Checktheportonwhichtheserialmonitorisconfigured
Checkwhetherthebaudrateintheserialmonitoriscorrect(9600bps)
ThereisnoserialoutputandnoblinkingLEDs:
CheckthePIRsensorconnectionandmakesurethatyouaregettingsignalfrom
thePIRsensor
CheckyourArduinocode
Checkpowerandgroundconnections
Method2–usingPythonandFirmata
Inthepreviouschapter,wediscussedthebenefitsofusingPythonprogrammingthatis
assistedbyFirmataoverusingnativeArduinosketches.ThePython-basedprogramming
approachprovidestangibleexperiencewhenperforminganyalgorithmicorparametric
changes.Inthissection,wearegoingtoexplorethesebenefitsandalsolearnimportant
Pythonprogrammingparadigms.
Theprojectsetup
Let’smakesurethatyouhavedonethefollowingbeforewegoaheadwithPython
programming:
Madesurethatthehardwarecomponentsaresetup,asdescribedinthesystemdesign
ConnectedtheArduinotoyourcomputerusingaUSBcable
UploadedtheStandardFirmatasketchbacktoArduino
MadesurethatyouhavePythonandthePythonpackages(pySerialandpyFirmata)
installedonyourcomputer
ObtainedatexteditortowritePythoncodes
WorkingwithPythonexecutablefiles
Inthepreviouschapters,weexploredPythonprogrammingusingtheinteractivePython
interpreter.However,whenworkingwithlargeprojects,itisverydifficulttokeepusing
thePythoninteractiveinterpreterforrepetitivetasks.Likeotherprogramminglanguages,
thepreferredmethodistocreatePythonexecutablefilesandrunthemfromtheterminal.
Pythonexecutablefilescarrythe.pyextensionandareformattedasplaintext.Anytext
editorcanbeusedtocreatethesefiles.ThepopulareditorsusedtocreateandeditPython
filesareNotepad++,nano,vi,andsoon.Thislistalsoincludesthedefaulteditorthatis
shippedwiththePythonsetupfilescalledIDLE.Youcanusetheeditorofyourchoice,
butmakesurethatyousavethefileswiththe.pyextension.Let’scopythefollowinglines
ofcodeinanewfileandsaveitastest.py:
#!/usr/bin/python
a="Python"
b="Programming"
printa+""+b
Torunthisfile,executethefollowingcommandontheterminalwherethetest.pyfileis
saved:
$pythontest.py
YoushouldbeabletoseethetextPythonProgrammingprintedontheterminal.Asyou
cansee,thefilestartswith#!/usr/bin/python,whichisthedefaultPythoninstallation
location.ByaddingthislineinyourPythoncode,youcandirectlyexecuteaPythonfile
fromtheterminal.InUnix-basedoperatingsystems,youneedtomakethetest.pyfile
executablethroughthefollowingcommand:
$chmod+xtest.py
Now,asyourfileisexecutable,youcandirectlyrunthefileusingthefollowing
command:
$./test.py
Note
ForUnix-basedoperatingsystems,analternativewaytoprovidethePythoninterpreter
locationistousethefollowinglineofcodeinsteadoftheonethatweused:
#!/usr/bin/envpython
InWindowsoperatingsystems,Pythonfilesautomaticallybecomeexecutablebecauseof
the.pyextension.Youcanjustruntheprogramfilesbydouble-clickingandopening
them.
ThePythoncode
AsyounowknowhowtocreateandrunPythoncode,let’screateanewPythonfilewith
thefollowingcodesnippetandrunit.Makesuretochangethevalueoftheportvariable
accordingtoyouroperatingsystem,asdescribedinthepreviouschapter:
#!/usr/bin/python
#Importrequiredlibraries
importpyfirmata
fromtimeimportsleep
#DefinecustomfunctiontoperformBlinkaction
defblinkLED(pin,message):
printmessage
board.digital[pin].write(1)
sleep(1)
board.digital[pin].write(0)
sleep(1)
#AssociateportandboardwithpyFirmata
port='/dev/ttyACM0'
board=pyfirmata.Arduino(port)
#Useiteratorthreadtoavoidbufferoverflow
it=pyfirmata.util.Iterator(board)
it.start()
#Definepins
pirPin=board.get_pin('d:7:i')
redPin=12
greenPin=13
#CheckforPIRsensorinput
whileTrue:
#IgnorecasewhenreceivingNonevaluefrompin
value=pirPin.read()
whilevalueisNone:
pass
ifvalueisTrue:
#PerformBlinkusingcustomfunction
blinkLED(redPin,"MotionDetected")
else:
#PerformBlinkusingcustomfunction
blinkLED(greenPin,"NomotionDetected")
#Releasetheboard
board.exit()
YouhavesuccessfullycreatedandexecutedyourfirstArduinoprojectusingPython.
Therearetwomainprogrammingcomponentsinthiscode:pyFirmatamethodsandthe
Pythonfunctiontoperformtheblinkingaction.Theprogramrepeatedlydetectsthemotion
eventsandperformstheblinkingaction.Intheprevioussection,thisproblemwassolved
byusingthedefaultArduinofunctionloop().Inthismethod,wehaveimplementedthe
whilestatementtokeeptheprograminloopuntilthecodeismanuallyterminatedbythe
user.YoucanterminatethecodeusingthekeyboardcombinationCtrl+C.
WorkingwithpyFirmatamethods
AspartofworkingwiththeArduinoboardandtheFirmataprotocol,youhavetostartby
initializingtheArduinoboardasavariable.ThepyFirmatamethodthatletsauserassign
theboardtoaPythonvariableisasfollows:
board=pyfirmata.Arduino(port)
Oncethevalueofthevariableisassigned,youcanperformvariousactionssuchas
readingapinorsendingasignaltothepinusingthatvariable.Toassignaroletoapin,
theget_pin()methodisused.Inthefollowinglineofcode,drepresentsthedigitalpin,7
isthepinnumber,andirepresentsthatthetypeofpinisaninputpin:
pirPin=board.get_pin('d:7:i')
Onceapinanditsroleareassignedtoavariable,thatvariablecanbeusedtoreadorwrite
valuesonthepin:
Value=pirPin.read()
Onecandirectlywritedatatoaspecificpin,asdescribedinfollowingcode:
board.digital[pin].write(1)
Here,thewrite(1)methodsendsaHIGHsignaltothepin.Wewillbelearningadditional
pyFirmatamethodsintheupcomingchapters.
WorkingwithPythonfunctions
APythonfunctionbeginswiththedefkeywordfollowedbythefunctionnameandthe
inputparametersorarguments.Thefunctiondefinitionendswithacolon(:)anditis
indentedafterwards.Thereturnstatementterminatesthefunction.Italsopassesthe
expressiontotheplacewherethefunctioniscalled.Ifthereturnstatementiskept
withoutanexpression,itisconsideredtopassthereturnvalueNone:
deffunction_name(parameters):
action_1
action_2
return[expression]
Theprecedingframeworkcanbeusedtocreatecustomfunctionstoperformrecurring
tasks.Inourproject,wehavetheblinkLED(pin,message)functiontoperformthe
blinkingLEDaction.Thisfunctionsends1(HIGH)and0(LOW)valuetothespecified
digitalpinwhilealsoprintingmessageontheterminal.Italsointroducesdelaytosimulate
theblinkingaction:
defblinkLED(pin,message):
printmessage
board.digital[pin].write(1)
sleep(1)
board.digital[pin].write(0)
sleep(1)
Testing
YoucanstarttestingtheprojectassoonasyourunthePythoncodeontheterminal.If
everythinggoesaccordingtodesign,youshouldbeabletoseethefollowingoutputinthe
terminal:
YoushouldbeabletoseetheMotionDetectedstringontheterminalwhenanymotionis
detectedbythePIRsensor.Ifyoufindanyabnormalbehaviorintheoutput,thenplease
checkthePythoncode.
AbenefitofusingPythonisthatminormodificationssuchaschangingtheblinkingspeed
orswappingrolesoftheLEDscanbeperformedbyjustchangingthePythoncode,
withoutdealingwiththeArduinoortheelectricalcircuit.
Troubleshooting
Whenyouruntheproject,youmightrequiretroubleshootingforthefollowingprobable
problems:
Serialoutputiscorrect,buttherearenoblinkingLEDs:
ChecktheLEDconnectionsonthebreadboard
TheLEDblinks,butthereisnoserialoutput:
CheckwhetheryouhavesuccessfullyinstalledthestandardFirmatasketchto
theboard
ThereisnoserialoutputandnoblinkingLEDs:
CheckwhetheranyprogramotherthanPythonisusingtheserialport.Closeany
programthatmightbeusingthatserialport,includingtheArduinoIDE.
Verifyallthecircuitconnections.
MakesurethattheportnamespecifiedinthePythoncodeiscorrect.
Summary
Betweenthetwoprogrammingmethodsthatyoulearnedinthischapter,themethodthat
usesjustanArduinosketchrepresentsthetraditionalparadigmofprogramminga
microcontroller.Whilethismethodissimpletoimplement,itlackstheextensivenessthat
isachievedbyPython-Arduinointerfacing.AlthoughwewilluseextensiveArduino
codinginalltheprojectsbeginningfromnow,exercisesandprojectswillhavePythonArduinointerfacingastheprimarywayofprogramming.
Startingfromthenextchapter,wearegoingtoexploretheadditionalaspectsofPython
programmingthatcanextendtheusabilityofanArduino-basedhardwareprojectwhile
keepingtheprogrammingdifficultylevelstoaminimum.WewillbeginwithPythonArduinoprototypingandthencreategraphicalinterfacesforuserinteraction,before
stoppingforthesecondprojectthatutilizestheseconcepts.
Chapter4.DivingintoPython-Arduino
Prototyping
Onthecompletionofthefirstproject,yousuccessfullystartedPython-Arduino
interfacing.Wealsointerfacedmultiplehardwarecomponents,thatis,motionsensorand
LEDswithArduinoviadigitalpins.Duringtheproject,youlearnedmoreaboutthe
FirmataprotocolwhileutilizingsimplePythonmethodsthathelpedyoutoestablisha
connectionbetweenyourArduinoboardandthePythonprogram.Whenyouareworking
oncomplexprojects,youneedmorethanbasicmethodstoimplementthedifferent
featuresthatarerequiredbytheprojectsandtheirassociatedelectronicscomponents.This
chapterisdesignedtogiveyouacomprehensiveexperienceofinterfacingsothatyoucan
startworkingonhardproblemsfromthenextchapteronwards.Wehavedescribedvarious
interfacingprotocolsatthePython-ArduinoandArduino-to-componentslevels.This
chapteralsoincludespracticalexamplesfortheseprotocolswithappropriatecodeand
circuitdiagrams.Inthischapter,wearegoingtocoverthefollowingmaintopics:
IntroductiontoPrototyping
DetaileddescriptionofvariouspyFirmatamethodstoportArduinofunctionalities
intoPython
Python-ArduinointerfacingexamplesusingFirmataforbasicelectroniccomponents
suchasthepotentiometer,thebuzzer,theDCmotor,andtheservomotor
Introductiontotheinter-integratedcircuit(I2C)protocolandprototypingexamples
fortheI2Ccomponentssuchasthetemperaturesensor(TMP102)andthelight
sensor(BH1750)
Prototyping
Justforamoment,let’sstepbackandlookattheprojectthatwebuiltintheprevious
chapter.Theprojecthadaverysimplegoalandwewereabletodevelopitquite
comfortably.However,theprojectiscertainlynotreadytobeaconsumerproductsinceit
doesn’thavesignificantfunctionalitiesandmostimportantly,itisnotarobustproductthat
canberepeatedlyproducedasitis.Whatyoucantellaboutyourcurrentprojectisthatit
isaDIYprojectforpersonaluseorjustamodelthatcanbedevelopedfurthertobeagreat
product.
Now,ifyouarelookingtodevelopacommercialproductorjustaDIYprojectthatis
reallyrobustandscalable,youmustconsiderstartingitbymakingamodelfirst.Atthis
stage,youneedtoenvisiontheproductwiththerequiredfeaturesthatneedtobe
developedandthenumberofcomponentsthatarerequiredtodeploythesefeatures.
Prototypingisbasicallyarapidwaytocreateaworkingmodelofyourenvisionedidea
beforedevelopingitintoafullyfunctionalprojectorproduct.Theproofofconcept
prototypethatisdevelopedduringthisprototypingprocessletsyoutoidentifythe
feasibilityofyouridea,andinsomecases,ithelpsyoutoexplorethepotentialofyour
project.Theprototypingorfunctionalmodel-makingprocessisessentialforanyindustry
andnotjustforelectronics.
Intheelectronicsdomain,prototypingcanbeusedattheveryfirststageofinterfacing
componentstoacomputer,insteadofdirectlyspendingasignificantamountofresources
fortheschematicdesign,PCBmanufacturing,anddevelopingthecompletecodebase.
Thisstagehelpsyoutoidentifymajorflawsinyourcircuitdesignandcheckthemutual
compatibilityoftheselectedcomponents.
Fortunately,ArduinoandtheexistingsoftwaresupportaroundArduinohavereally
simplifiedelectronics’prototyping.Intheupcomingsections,wewillgothroughvarious
helperfunctionsandinterfacingexercisestohelpyouproceedwithyourownprojects.
Theseexamplesortemplatesaredesignedinsuchafashionthattheycanbeusedasa
blueprintforlargerprojects.
Beforedivingintotheseprototypingexamples,let’sunderstandtwodifferentabstractions
ofinterfacingthatwearegoingtoexploreinthischapter:
InterfacingArduinowithPython:WehavelearnedtheeasiestmethodofPythonArduinointerfacingusingtheFirmataprotocol.OntheArduinoboard,theFirmata
protocolisimplementedusingtheStandardFirmatafirmware,whileonthePython
end,weusedtheFirmatalibraries,pyFirmataorpyMata,forPython.Another
Python-Arduinointerfacingmethodincludestheuseofsimplebutnonstandardserial
commandsusingthecustomArduinosketchandthepySeriallibraryinthePython
program.Itisalsopossibletouseacomputernetworktoestablishcommunication
betweenPythonandArduino,whichiscoveredlaterinthebook.
InterfacingelectroniccomponentswithArduino:Thesecondinterfacing
abstractionisassociatedwithArduinoandthephysicalcomponents.Aswealready
did,variouselectronicscomponentscanbesimplyinterfacedwiththeArduinoboard
usingdigitaloranalogpins.Thesecomponentsdealwitheitherdigitaloranalog
signals.AfewdigitalpinsontheArduinoboardsupportPWMcommunicationfor
specifichardwaredevices.TheotheralternativeinterfacingmethodsincludeI2Cand
serialperipheralinterface(SPI)communication.TheI2Cmethodis
comprehensivelyexplainedinthefinalsectionofthischapter.
WorkingwithpyFirmatamethods
ThepyFirmatapackageprovidesusefulmethodstobridgethegapbetweenPythonand
Arduino’sFirmataprotocol.Althoughthesemethodsaredescribedwithspecific
examples,youcanusetheminvariousdifferentways.Thissectionalsoprovidesa
detaileddescriptionofafewadditionalmethodsthatwerenotusedinthepreviousproject
andliststhemissingfeatures.
SettinguptheArduinoboard
TosetupyourArduinoboardinaPythonprogramusingpyFirmata,youneedto
specificallyfollowthestepsthatwehavecovered.Wehavedistributedtheentirecodethat
isrequiredforthesetupprocessintosmallcodesnippetsineachstep.Whilewritingyour
code,youwillhavetocarefullyusethecodesnippetsthatareappropriateforyour
application.YoucanalwaysrefertotheexamplePythonfilescontainingthecomplete
code.Beforewegoahead,let’sfirstmakesurethatyourArduinoboardisequippedwith
thelatestversionoftheStandardFirmataprogramandisconnectedtoyourcomputer:
1. DependingupontheArduinoboardthatisbeingutilized,startbyimportingthe
appropriatepyFirmataclassestothePythoncode.Currently,theinbuiltpyFirmata
classesonlysupporttheArduinoUnoandArduinoMegaboards:
frompyfirmataimportArduino
InthecaseofArduinoMega,usethefollowinglineofcode:
frompyfirmataimportArduinoMega
2. Beforewestartexecutinganymethodsthatareassociatedwithhandlingpins,you
needtoproperlysetuptheArduinoboard.Toperformthistask,wehavetofirst
identifytheUSBporttowhichtheArduinoboardisconnectedandassignthis
locationtoavariableintheformofastringobject.ForMacOSX,theportstring
shouldapproximatelylooklikethis:
port='/dev/cu.usbmodemfa1331'
ForWindows,usethefollowingstringstructure:
port='COM3'
InthecaseoftheLinuxoperatingsystem,usethefollowinglineofcode:
port='/dev/ttyACM0'
Theport’slocationmightbedifferentaccordingtoyourcomputerconfiguration.You
canidentifythecorrectlocationofyourArduinoUSBportbyusingtheArduino
IDE,asdescribedinChapter2,WorkingwiththeFirmataProtocolandthepySerial
Library.
3. OnceyouhaveimportedtheArduinoclassandassignedtheporttoavariableobject,
it’stimetoengageArduinowithpyFirmataandassociatethisrelationshiptoanother
variable:
board=Arduino(port)
Similarly,forArduinoMega,usethis:
board=ArduinoMega(port)
4. ThesynchronizationbetweentheArduinoboardandpyFirmatarequiressometime.
Addingsleeptimebetweentheprecedingassignmentandthenextsetofinstructions
canhelptoavoidanyissuesthatarerelatedtoserialportbuffering.Theeasiestway
toaddsleeptimeistousetheinbuiltPythonmethod,sleep(time):
fromtimeimportsleep
sleep(1)
Thesleep()methodtakessecondsastheparameterandafloating-pointnumbercan
beusedtoprovidethespecificsleeptime.Forexample,for200milliseconds,itwill
besleep(0.2).
Atthispoint,youhavesuccessfullysynchronizedyourArduinoUnoorArduinoMega
boardtothecomputerusingpyFirmata.Whatifyouwanttouseadifferentvariant(other
thanArduinoUnoorArduinoMega)oftheArduinoboard?
AnyboardlayoutinpyFirmataisdefinedasadictionaryobject.Thefollowingisa
sampleofthedictionaryobjectfortheArduinoboard:
arduino={
'digital':tuple(xforxinrange(14)),
'analog':tuple(xforxinrange(6)),
'pwm':(3,5,6,9,10,11),
'use_ports':True,
'disabled':(0,1)#Rx,Tx,Crystal
}
ForyourvariantoftheArduinoboard,youhavetofirstcreateacustomdictionary
object.Tocreatethisobject,youneedtoknowthehardwarelayoutofyourboard.
Forexample,anArduinoNanoboardhasalayoutsimilartoaregularArduinoboard,
butithaseightinsteadofsixanalogports.Therefore,theprecedingdictionaryobject
canbecustomizedasfollows:
nano={
'digital':tuple(xforxinrange(14)),
'analog':tuple(xforxinrange(8)),
'pwm':(3,5,6,9,10,11),
'use_ports':True,
'disabled':(0,1)#Rx,Tx,Crystal
}
AsyouhavealreadysynchronizedtheArduinoboardearlier,modifythelayoutofthe
boardusingthesetup_layout(layout)method:
board.setup_layout(nano)
ThiscommandwillmodifythedefaultlayoutofthesynchronizedArduinoboardto
theArduinoNanolayoutoranyothervariantforwhichyouhavecustomizedthe
dictionaryobject.
ConfiguringArduinopins
OnceyourArduinoboardissynchronized,itistimetoconfigurethedigitalandanalog
pinsthataregoingtobeusedaspartofyourprogram.ArduinoboardhasdigitalI/Opins
andanaloginputpinsthatcanbeutilizedtoperformvariousoperations.Aswealready
know,someofthesedigitalpinsarealsocapableofPWM.
Thedirectmethod
Nowbeforewestartwritingorreadinganydatatothesepins,wehavetofirstassign
modestothesepins.IntheArduinosketch-basedapproachthatweusedintheprevious
chapter,weusedthepinModefunction,thatis,pinMode(11,INPUT)forthisoperation.
Similarly,inpyFirmata,thisassignmentoperationisperformedusingthemodemethodon
theboardobjectasshowninthefollowingcodesnippet:
frompyfirmataimportArduino
frompyfirmataimportINPUT,OUTPUT,PWM
#SettingupArduinoboard
port='/dev/cu.usbmodemfa1331'
board=Arduino(port)
#Assigningmodestodigitalpins
board.digital[13].mode=OUTPUT
board.analog[0].mode=INPUT
ThepyFirmatalibraryincludesclassesfortheINPUTandOUTPUTmodes,whichare
requiredtobeimportedbeforeyouutilizedthem.Theprecedingexampleshowsthe
delegationofdigitalpin13asanoutputandtheanalogpin0asaninput.Themode
methodisperformedonthevariableassignedtotheconfiguredArduinoboardusingthe
digital[]andanalog[]arrayindexassignment.
ThepyFirmatalibraryalsosupportsadditionalmodessuchasPWMandSERVO.ThePWM
modeisusedtogetanalogresultsfromdigitalpins,whiletheSERVOmodehelpsadigital
pintosettheangleoftheshaftbetween0to180degrees.ThePWMandSERVOmodesare
explainedwithdetailedexampleslaterinthischapter.Ifyouareusinganyofthesemodes,
importtheirappropriateclassesfromthepyFirmatalibrary.Oncetheseclassesare
importedfromthepyFirmatapackage,themodesfortheappropriatepinscanbeassigned
usingthefollowinglinesofcode:
board.digital[3].mode=PWM
board.digital[10].mode=SERVO
Note
Inelectronics,PWMisasignalmodulationtechniquethatisgreatlyusedtoprovide
controlledamountofpowertocomponents.Whiledealingwithdigitalsignals,thePWM
techniqueisusedtoobtainanalogresultsbyutilizingsquarewavesandcontrollingthe
widthofthesignal.
Aswealreadyknow,thedigitalpinsoftheArduinoboardcanonlyhavetwostates,5V
(HIGH)and0V(LOW).Onecangeneratesquarepulsesbycontrollingtheswitching
patternbetweenHIGHandLOWandthusgeneratethepulse.Bychangingthewidthof
thesepulses,youcansimulateanyvoltagebetween0Vand5V.Asyoucanseeinthe
followingdiagram,wehaveasquarewavewith25percentwidthofthedutycycle.It
meansthatwearesimulating0.25*5V=1.25Vfortheperiodofthatdutycycle:
TheArduinolanguagesupportsPWMusingtheanalogWrite()function,wherethe
voltagerangebetween0Vand5Vislinearlyscaledforvaluesbetween0and255.For
example,50percentdutycycle(simulationof2.5V)translatestoavalueof127,which
canbecodedinArduinoasanalogWrite(13,127).Here,thenumber13representsthe
digitalpinthatsupportsPWMontheArduinoUnoboard.Similarly,a20percentduty
cycle(1V)translatestoanalogWrite(13,64).
Assigningpinmodes
Thedirectmethodofconfiguringpinsismostlyusedforasinglelineofexecutioncalls.In
aprojectcontainingalargecodeandcomplexlogic,itisconvenienttoassignapinwith
itsroletoavariableobject.Withanassignmentlikethis,youcanlaterutilizetheassigned
variablethroughouttheprogramforvariousactions,insteadofcallingthedirectmethod
everytimeyouneedtousethatpin.InpyFirmata,thisassignmentcanbeperformedusing
theget_pin(pin_def)method:
frompyfirmataimportArduino
port='/dev/cu.usbmodemfa1311'
board=Arduino(port)
#pinmodeassignment
ledPin=board.get_pin('d:13:o')
Theget_pin()methodletsyouassignpinmodesusingthepin_defstringparameter,
'd:13:o'.Thethreecomponentsofpin_defarepintype,pinnumber,andpinmode
separatedbyacolon(:)operator.Thepintypes(analoganddigital)aredenotedwitha
anddrespectively.Theget_pin()methodsupportsthreemodes,iforinput,oforoutput,
andpforPWM.Inthepreviouscodesample,'d:13:o'specifiesthedigitalpin13asan
output.Inanotherexample,ifyouwanttosetuptheanalogpin1asaninput,the
parameterstringwillbe'a:1:i'.
Workingwithpins
NowyouhaveconfiguredyourArduinopins,it’stimetostartperformingactionsusing
them.Twodifferenttypesofmethodsaresupportedwhileworkingwithpins:reporting
methodsandI/Ooperationmethods.
Reportingdata
Whenpinsgetconfiguredinaprogramasanaloginputpins,theystartsendinginput
valuestotheserialport.Iftheprogramdoesnotutilizethisincomingdata,thedatastarts
gettingbufferedattheserialportandquicklyoverflows.ThepyFirmatalibraryprovides
thereportinganditeratormethodstodealwiththisphenomenon.
Theenable_reporting()methodisusedtosettheinputpintostartreporting.This
methodneedstobeutilizedbeforeperformingareadingoperationonthepin:
board.analog[3].enable_reporting()
Oncethereadingoperationiscomplete,thepincanbesettodisablereporting:
board.analog[3].disable_reporting()
Intheprecedingexample,weassumedthatyouhadalreadysetuptheArduinoboardand
configuredthemodeoftheanalogpin3asINPUT.
ThepyFirmatalibraryalsoprovidestheIterator()classtoreadandhandledataoverthe
serialport.Whileworkingwithanalogpins,werecommendthatyoustartaniterator
threadinthemainlooptoupdatethepinvaluetothelatestone.Iftheiteratormethodis
notused,thebuffereddatamightoverflowyourserialport.Thisclassisdefinedinthe
utilmoduleofthepyFirmatapackageandneedstobeimportedbeforeitisutilizedin
thecode:
frompyfirmataimportArduino,util
#SettinguptheArduinoboard
port='COM3'
board=Arduino(port)
sleep(5)
#StartIteratortoavoidserialoverflow
it=util.Iterator(board)
it.start()
Manualoperations
AswehaveconfiguredtheArduinopinstosuitablemodesandtheirreporting
characteristic,wecanstartmonitoringthem.ThepyFirmatalibraryprovidesthewrite()
andread()methodsfortheconfiguredpins.
Thewrite()method
Thewrite()methodisusedtowriteavaluetothepin.Ifthepin’smodeissettoOUTPUT,
thevalueparameterisaBoolean,thatis,0or1:
board.digital[pin].mode=OUTPUT
board.digital[pin].write(1)
Ifyouhaveusedanalternativemethodofassigningthepin’smode,youcanusethe
write()methodasfollows:
ledPin=board.get_pin('d:13:o')
ledPin.write(1)
InthecaseofthePWMsignal,theArduinoacceptsavaluebetween0and255that
representsthelengthofthedutycyclebetween0and100percent.ThepyFirmatalibrary
providesasimplifiedmethodtodealwiththePWMvaluesasinsteadofvaluesbetween0
and255,youcanjustprovideafloatvaluebetween0and1.0.Forexample,ifyouwanta
50percentdutycycle(2.5Vanalogvalue),youcanspecify0.5withthewrite()method.
ThepyFirmatalibrarywilltakecareofthetranslationandsendtheappropriatevalue,that
is,127,totheArduinoboardviatheFirmataprotocol:
board.digital[pin].mode=PWM
board.digital[pin].write(0.5)
Similarly,fortheindirectmethodofassignment,youcanusesomecodesimilartothe
followingsnippet:
pwmPin=board.get_pin('d:13:p')
pwmPin.write(0.5)
IfyouareusingtheSERVOmode,youneedtoprovidethevalueindegreesbetween0and
180.Unfortunately,theSERVOmodeisonlyapplicablefordirectassignmentofthepins
andwillbeavailableinfutureforindirectassignments:
board.digital[pin].mode=SERVO
board.digital[pin].write(90)
Theread()method
Theread()methodprovidesanoutputvalueatthespecifiedArduinopin.Whenthe
Iterator()classisbeingused,thevaluereceivedusingthismethodisthelatestupdated
valueattheserialport.Whenyoureadadigitalpin,youcangetonlyoneofthetwo
inputs,HIGHorLOW,whichwilltranslateto1or0inPython:
board.digital[pin].read()
TheanalogpinsofArduinolinearlytranslatetheinputvoltagesbetween0and+5Vto0
and1023.However,inpyFirmata,thevaluesbetween0and+5Varelinearlytranslated
intothefloatvaluesof0and1.0.Forexample,ifthevoltageattheanalogpinis1V,an
Arduinoprogramwillmeasureavaluesomewherearound204,butyouwillreceivethe
floatvalueas0.2whileusingpyFirmata’sread()methodinPython.
Additionalfunctions
Besidesthemethodthathasalreadybeendescribed,thepyFirmatalibraryalsoprovides
someutilityfunctionsforadditionalcustomization,whichareasfollows:
servo_config(pin,min_pulse=544,max_pulse=2400,angle=0):Thismethodhelps
tosetuptheSERVOmodewithfurthercustomizationsuchastheminimumpulse
value,maximumpulsevalue,andstartingangle.Onecansettheinitialangleofthe
servomotorusingtheangleparameter.
pass_time(seconds):Thismethodprovidesafunctionalitysimilartothatfoundin
thedefaultPython’sdefaultmethodsleep()thatisprovidedbythetimemodule.
However,thepass_timefunctionprovidesanon-blockingtimeoutinseconds.
get_firmata_version():Thisfunctionreturnsatuplethatcontainstheversionof
theFirmataprotocolfromtheArduinoboard:
board.get_firmata_version()
exit():WerecommendthatyoudisconnecttheArduinoboardfrompyFirmataonce
youhavecompletedrunningyourcode.Thiswillfreetheserialport,whichcanbe
thenutilizedbyotherprograms:
board.exit()
Upcomingfunctions
ThepyFirmatalibraryiscurrentlyunderdevelopmentanditcontinuouslyreceives
updatestoaddandimprovevariousmethods.AlthoughmostofthenativeArduino
methodsareavailableinthepyFirmatalibraryviatheFirmataprotocol,therearefew
functionsthatarestillmissingorunderdevelopmentandtheyareasfollows:
pulseIn/pulseOut:ThesenativeArduinofunctionswaitfortheArduinopinto
achievethespecifiedvalue.Thewaitingperiodisreturnedinmicroseconds.This
methodiswidelyusedbyPing(ultrasonicdistancemeasurement)sensors.
ImplementationofthismethodusingpyFirmatarequiresmajorchangestothe
standardFirmataprotocol.
shiftIn/shiftOut:Thesefunctionsshiftabyteofdatainorout,onebitatatime.
ThepyFirmatalibrarylackssupportsforthesefunctionsandcanbeimplemented
usingthevariousPythonprogrammingtricks.
PrototypingtemplatesusingFirmata
Thegoalofthissectionistoprovideprototypingtemplateswhilealsoexplainingvarious
Pythonmethodsandprogrammingtechniques.Ittriestocoversomeofthemostpopular
sensorswithcodingexamplesthatareusedbyDIYArduinoprojects.Thissectionis
designedtoutilizetheFirmataprotocoltoimplementthesePythonprograms.Italso
includesvariousPythonprogrammingparadigmssuchasworkingwithindefiniteloops,
creatingcustomfunctions,workingwithrandomnumbers,acquiringmanualinputsfrom
prompt,andsoon.Theseprototypingtemplatesaredesignedinsuchawaythattheycan
beeasilyincludedinlargeprojectsortheycanbeblueprintsforalargerprojectthatcanbe
developedaroundthem.YoulearnedaboutthepyFirmatapackagecomprehensivelyinthe
previoussectionandwewillonlyutilizethosepyFirmatafunctionsintheupcoming
examples.AnalternativePythonlibrarythatsupportstheFirmataprotocoliscoveredlater
inthechapter.
Potentiometer–continuousobservationfroman
analoginput
Apotentiometerisavariableresistorthatcanbecontrolledusingaknob.Ithasthree
terminalsoutofwhichtwoofthemareVrefandground,whilethethirdoneprovidesa
variableoutput.Theoutputofthepotentiometervariesbetweenthesuppliedvoltages,
accordingtothepositionoftheknob.InArduino,youcanconnectthepotentiometerwith
+5Vandthegroundpinsoftheboardtoprovidethesupplyvoltage.Whenthevariable
terminalisinterfacedwiththeArduinoanaloginput,thisvoltagevaluestranslatesbetween
0and1023respectively.InthecaseofpyFirmata,thevalueoftheanalogobservation
translatesbetween0and1.
Thiscodingtemplatecontainingthepotentiometercanbeappliedtoprojectsinwhich
externalmanualcontroltoasystemisrequired.Thepotentiometeroutputthattranslatesto
theanaloginputofArduinocanbeusedtocontrolanactuatorsuchasamotororanLED.
Insomecases,theinputcanalsobeusedtocontroltheflowoftheprogrambyapplying
itsvaluestoavariable.
Connections
ConnecttheoutputofthepotentiometertoanalogpinA0asshowninthefollowing
diagram.CompletethecircuitbyconnectingVrefandthegroundterminalsofthe
potentiometersto+5VandthegroundoftheArduinoboardrespectively:
ThePythoncode
AssumingthatyoualreadyhavetheStandardFirmatafirmwareuploadedtotheArduino
board,youarerequiredtorunaPythoncodeonyourcomputertocompleteitsinterfacing
withthepotentiometer.APythoncodetemplatewiththenamepotentiometer.pytohelp
yougetstartedwiththisexampleislocatedinthecodebundleofthisbook,whichcanbe
downloadedfromhttps://www.packtpub.com/books/content/support/1961.Let’sopenthis
filetounderstandtheprogram.Asyoucansee,weareusingthepyFirmatalibrarywith
otherPythonmodulessuchastimeandos:
frompyfirmataimportArduino,util
fromtimeimportsleep
importos
Inthesecondstepoftheprogram,weareinitializingtheArduinoboardandstartingthe
Iterator()functionoverit:
port='COM3'
board=Arduino(port)
sleep(5)
it=util.Iterator(board)
it.start()
Oncetheboardhasbeeninitialized,weneedtoassignaroletotheanalogpin,0,asitis
goingtobeusedasaninputpin.Weareusingtheget_pin()methodtoassignaroleto
theanalogpin,0:
a0=board.get_pin('a:0:i')
Now,aspartofthemainprogram,weneedtocontinuouslymonitortheoutputofthe
potentiometeratthepin,a0,thatwejustdefined.Weareusingthewhilestatementto
createanindefiniteloopforthescriptthatwillreadandprinttheanaloginput.The
problemwiththisindefinitewhileloopisthattheprogramwillnotcloseproperlywhenit
isinterruptedanditwillnotreleasetheboardbyexecutingtheboard.exit()method.To
avoidthis,wewilluseanothercontrolstatementfromthePythonprogrammingparadigm,
calledtry/except:
try:
whileTrue:
p=a0.read()
printp
exceptKeyboardInterrupt:
board.exit()
os._exit()
Usingthisstatement,theprogramwillkeeprunningthewhileloopuntilthekeyboard
interruptionoccurs,whichisCtrl+C,andtheprogramwillexecutethescriptunderthe
exceptstatement.Thisincludesreleasingtheboardusingboard.exit()andexistingthe
programusingtheos._exit()method.Insummary,theprogramwillkeepprintingthe
outputofthepotentiometeruntilsomeonepressesCtrl+Ctointerrupttheprogram.
Note
Thetry/exceptstatementprovidesaveryefficientwaytocaptureexceptionsinPython.
Itisadvisabletoutilizethisstatementthroughoutthedevelopmentprocesstocleverly
debugyourprograms.YoucanlearnaboutPythonerrorsandexceptionsfromthe
followinglinks:
https://docs.python.org/2/reference/compound_stmts.html#try
https://docs.python.org/2/tutorial/errors.html
Buzzer–generatingsoundalarmpattern
Digitalbuzzersensorsareusedinvariousapplicationsthatrequirealarmnotifications.
ThesesensorsproducesoundwhentheyaresuppliedwithadigitalHIGHvalue(thatis,
+5V),whichcanbeprovidedbyusingArduinodigitalpins.SimilartotheLEDexample
inthepreviouschapter,theyareveryeasytointerfacewithArduino.However,ratherthan
performingasimpledigitaloutput,weareimplementingPythonprogrammingtricksto
generatedifferentsoundpatternsandproducevarioussoundeffects.Thesamecode
templatecanbealsousedtoproducedifferentLEDblinkpatterns.
Note
Ananalogdigitalbuzzercanbefoundathttp://www.amazon.com/Arduino-CompatibleSpeaker-arduino-sensors/dp/B0090X0634.
Connections
Asdisplayedinthefollowingcircuitdiagram,connecttheVCCandthegroundofthe
sensorboardto5VandthegroundpinoftheArduinoboardrespectively.Connectthe
signalpinofthesensortothedigitalpin2viathe220-ohmresistor.Youcanuseany
digitalpintoconnectthebuzzer.JustmakesurethatyouupdatethePythoncodetoreflect
thepinthatyouhaveselected.
ThePythoncode
Inthecodeexample,twodifferentsoundpatternsaregeneratedusingarraysoftime
delays.Toperformtheseactions,wearegoingtoimplementacustomPythonfunction
thatwilltakethepinnumber,therecurrencetime,andthepatternnumberasinput.Before
wejumptoexplainthecode,let’sopentheprogramfile,buzzerPattern.py,fromthe
codefolder.Inthebeginningofthecode,youcanfindthePythonfunction,
buzzerPattern()thatwillbecalledfromthemainprogramwithappropriateoptions.As
thisfunctionisthecoreoftheentireprogram,let’strytounderstandit.Thefunction
containstwohardcodedpatternarrays,pattern1andpattern2.Eachcontainstheonand
offtimeforthebuzzerforasecond,whichisthedutycycleofthepattern.Forexample,in
pattern1,0.8representsthetimethebuzzerneedstobeonand0.2representsthe
opposite.Thefunctionwillrepeatthisbuzzerpatternforrecurrencetimesthatis
specifiedbythefunctionargument.Oncetheforloopwiththevalueofrecurrenceis
started,thefunctionwillcheckforthepatternnumberfromthefunctionargumentand
executethepattern.Weareusingtheflagvariabletoalternativelyuseelementsofthe
patternarraytocontrolthebuzzer.Oncetheentirerecurrenceloopiscomplete,wewill
turnoffthebuzzercompletelyagain,ifitison,andsafelydisengagetheboardusingthe
exit()method:
defbuzzerPattern(pin,recurrence,pattern):
pattern1=[0.8,0.2]
pattern2=[0.2,0.8]
flag=True
foriinrange(recurrence):
ifpattern==1:
p=pattern1
elifpattern==2:
p=pattern2
else:
print"Pleaseentervalidpattern.1or2."
exit
fordelayinp:
ifflagisTrue:
board.digital[pin].write(1)
flag=False
sleep(delay)
else:
board.digital[pin].write(0)
flag=True
sleep(delay)
board.digital[pin].write(0)
board.exit()
Tip
Ifyouwanttochangethetimedelaysorimplementatotallydifferentpattern,youcan
playaroundwiththepatternarrays.
Theremainingpartoftheprogramisrelativelysimpleasitcontainscodeforimporting
librariesandinitializingtheArduinoboard.Oncetheboardisinitialized,wewillexecute
thebuzzerPattern()functionwiththeinputargument,(2,10,1).Thisargumentwill
askthefunctiontoplaypattern110timesonthepinnumber2:
frompyfirmataimportArduino
fromtimeimportsleep
port='/dev/cu.usbmodemfa1331'
board=Arduino(port)
sleep(5)
buzzerPattern(2,10,1)
DCmotor–controllingmotorspeedusingPWM
DCmotorsarewidelyusedinroboticsapplications.Theyareavailableinawiderangeof
voltagespecifications,dependingupontheapplication.Inthisexample,weareutilizinga
5VDCmotorbecausewewanttosupplythepowerusingtheArduinoboarditself.Asthe
Arduinodigitalpincanonlyhavetwostates,thatis,HIGH(+5V)orLOW(0V),itis
impossibletocontrolthespeedofthemotorusingjusttheOUTPUTmode.Asasolution,we
aregoingtoimplementthePWMmodeviadigitalpinsthatarecapableofsupportingPWM.
WhileusingpyFirmata,pinsconfiguredwiththePWMmodetakeanyfloatinputvalues
between0and1.0,whichrepresent0Vand5Vrespectively.
Connections
Dependingupontheload,DCmotorscansometimesdrawlargeamountsofcurrentand
harmtheArduinoboard.ToavoidanydamagetotheArduinoboardduetoanylarge
accidentalcurrentdraw,wewilluseatransistorasaswitch,whichonlyusesasmall
amountofcurrenttocontrolthelargeamountofcurrentintheDCmotor.Tocompletethe
circuitconnectionasdisplayedinthefollowingdiagram,youwillneedanNPNtransistor
(TIP120,N2222,orasimilarone),onediode(1N4001orsimilarone)anda220-ohm
resistorwithyourDCmotor.Connectthebaseofthetransistortothedigitalpin3thatalso
supportsthePWMmode.Connecttheremainingcomponentsasdisplayedinthediagram:
Note
Tofindoutmoreabouttransistorterminals(collector,emitter,andbase)andtoassociate
transistorpinswiththeirrespectiveterminals,youcanrefertotheirdatasheetsorthe
followingwebsites:
http://en.wikipedia.org/wiki/Transistor
http://www.onsemi.com/pub/Collateral/TIP120-D.PDF
http://www.mouser.com/ds/2/68/PN2221-2222A-11964.pdf
ThePythoncode
ThePythonrecipewiththenamedcMotorPWM.pyforaDCmotorislocatedinthecode
bundleofthisbook,whichcanbedownloadedfrom
https://www.packtpub.com/books/content/support/1961.OpenthePythonfiletofurther
understandtheusageofPWMtocontrolthespeedoftheDCmotor.Thecustomfunction,
dcMotorControl(),takesmotorspeedandtimedurationasinputparametersasdescribed
inthefollowingcodesnippet:
defdcMotorControl(r,deltaT):
pwmPin.write(r/100.00)
sleep(deltaT)
pwmPin.write(0)
Justlikethepreviousexamples,weareusingasimilarcodetoimportthenecessary
libraryandinitializetheArduinoboard.Afterinitialization,weareassigningthemodeof
thedigitalpin3asPWM,whichcanbeseenfromtheutilizationoftheget_pin('d:3:p')
method.Thiscodereflectstheindirectmodeofpinmodeassignmentthatwelearnedin
theprevioussection:
#Setmodeofpin3asPWM
pwmPin=board.get_pin('d:3:p')
Aspartofcollectingmanualinputsfromtheuser,wearerunningacombinationofthe
try/exceptstatement(toreleasetheboardonexit)andthewhilestatement(toobtain
continuousinputsfromtheuser).Thecodetemplateintroducestheinput()methodto
obtaincustomvalues(motorspeedanddurationtorunthemotor)fromPython’s
interactiveterminal.Oncethesevaluesareobtainedfromtheuser,theprogramcallsthe
dcMotorControl()functiontoperformthemotoraction:
try:
whileTrue:
r=input("Entervaluetosetmotorspeed:")
if(r>100)or(r<=0):
print"Enterappropriatevalue."
board.exit()
break
t=input("Howlong?(seconds)")
dcMotorControl(r,t)
exceptKeyboardInterrupt:
board.exit()
os._exit
LED–controllingLEDbrightnessusingPWM
Intheprevioustemplate,wecontrolledthespeedofDCmotorusingPWM.Onecanalso
controlthebrightnessoftheLEDusingthesamemethod.Insteadofaskingtheuserto
inputbrightness,wearegoingtousethePythonmodulerandominthistemplate.Wewill
usethismoduletogeneratearandomnumberbetween1and100,whichwillbelaterused
towritethatvalueonthepinandrandomlychangethebrightnessoftheLED.This
randint()functionisareallyusefulfeatureprovidedbytherandommoduleanditis
widelyusedintestingprototypesbyrapidlysendingrandomsignals.
Note
Therandint()functiontakestherandint(startValue,endValue)syntaxandreturns
therandomintegerbetweentherangeestablishedbystartValueandendValue.
Connections
Likeweusedinthepreviouschapter’sproject,wewillneedapull-upresistortoconnect
theLEDwiththeArduinopin.Asdisplayedinthefollowingdiagram,simplyconnectthe
anodeoftheLED(longerleg)tothedigitalpin11viaone220-ohmresistorandconnect
thecathode(shorterleg)totheground:
Itisimportanttonotethatthedigitalpin11onArduinoUnoisalsocapableofperforming
PWMalongwithdigitalpins3,5,6,9,and10.
ThePythoncode
ThePythoncodewiththetitleledBrightnessPWM.pyforthisexerciseislocatedinthe
codebundleofthisbook,whichcanbedownloadedfrom
https://www.packtpub.com/books/content/support/1961.Openthefiletoexplorethecode.
Asyoucanseeinthiscodetemplate,afloatvaluebetween0and1.0israndomlyselected
beforepassingittothePWMpin.ThismethodgeneratesrandomLEDbrightnessfora
givenamountoftime.Thispracticecanbeusedtogeneraterandominputsamplesfor
variousothertestingprojects.
Asyoucansee,thefirstfewlinesofthecodeimportthenecessarylibrariesandinitialize
theboard.Althoughtheboardvariable,/dev/cu.usbmodemfa1311,isselectedforMacOS
X,youcanuseyouroperatingsystem’sspecificvariablenameinthefollowingcode
snippet.Youcanobtainmoreinformationaboutchoosingthisvariablenamefromthe
SettinguptheArduinoboardsectionatthebeginningofthischapter.
frompyfirmataimportArduino,INPUT,PWM
fromtimeimportsleep
importrandom
port='/dev/cu.usbmodemfa1311'
board=Arduino(port)
sleep(5)
Inthisexample,weareutilizingthedirectmethodofpinmodeassignment.Asyoucan
seeinthefollowingcodesnippet,thedigitalpin11isbeingassignedtothePWMmode:
pin=11
board.digital[pin].mode=PWM
Oncethepinmodeisassigned,theprogramwillrunaloopusingtheforstatementwhile
randomlygeneratinganintegernumberbetween0and100,andthensendtheappropriate
PWMvaluetothepinaccordingtothegeneratednumber.Withtheexecutionofthis,you
willbeabletoseetheLEDrandomlychangingitsbrightnessforapproximately10
seconds:
foriinrange(0,99):
r=random.randint(1,100)
board.digital[pin].write(r/100.00)
sleep(0.1)
Onceyouaredonewiththeloop,youneedtosafelydisengagetheArduinoboardafter
turningofftheLEDonelasttime.ItisagoodpracticetoturnofftheLEDorany
connectedsensorattheendoftheprogrambeforeexitingtheboard,topreventanysensor
fromrunningaccidentally:
board.digital[pin].write(0)
board.exit()
Note
IfyouwanttohomogenouslyglowtheLEDinsteadofrandomlychangingitsbrightness,
replacethecodeintheforloopwiththefollowingcodesnippet.Here,wearechanging
thePWMinputtotheincrementingvariable,i,insteadoftherandomvariable,r:
foriinrange(0,99):
board.digital[pin].write(i/100.00)
sleep(0.1)
Servomotor–movingthemotortoacertainangle
Servomotorsarewidelyusedelectroniccomponentsinapplicationssuchaspan-tilt
cameracontrol,roboticarms,mobilerobotmovements,andsoonwhereprecise
movementofthemotorshaftisrequired.Thisprecisecontrolofthemotorshaftis
possiblebecauseofthepositionsensingdecoder,whichisanintegralpartofthe
servomotorassembly.Astandardservomotorallowstheangleoftheshafttobeset
between0and180degrees.ThepyFirmatalibraryprovidestheSERVOmodethatcanbe
implementedoneverydigitalpin.Thisprototypingexerciseprovidesatemplateand
guidelinestointerfaceaservomotorwithPython.
Connections
Typically,aservomotorhaswiresthatarecolor-codedred,black,andyellowrespectively
toconnectwiththepower,ground,andsignaloftheArduinoboard.Connectthepower
andthegroundoftheservomotorto5VandthegroundoftheArduinoboard.As
displayedinthefollowingdiagram,connecttheyellowsignalwiretothedigitalpin13:
Ifyouwanttouseanyotherdigitalpin,makesurethatyouchangethepinnumberinthe
Pythonprograminthenextsection.Onceyouhavemadetheappropriateconnections,
let’smoveontothePythonprogram.
ThePythoncode
ThePythonfileconsistingofthiscodeisnamedservoCustomAngle.pyandislocatedin
thecodebundleofthisbook,whichcanbedownloadedfrom
https://www.packtpub.com/books/content/support/19610.OpenthisfileinyourPython
editor.Likeotherexamples,thestartingsectionoftheprogramcontainsthecodetoimport
thelibrariesandsetuptheArduinoboard:
frompyfirmataimportArduino,SERVO
fromtimeimportsleep
#SettinguptheArduinoboard
port='COM5'
board=Arduino(port)
#NeedtogivesometimetopyFirmataandArduinotosynchronize
sleep(5)
NowthatyouhavePythonreadytocommunicatewiththeArduinoboard,let’sconfigure
thedigitalpinthatisgoingtobeusedtoconnecttheservomotortotheArduinoboard.We
willcompletethistaskbysettingthemodeofpin13toSERVO:
#Setmodeofthepin13asSERVO
pin=13
board.digital[pin].mode=SERVO
ThesetServoAngle(pin,angle)customfunctiontakesthepinsonwhichtheservomotor
isconnectedandthecustomangleasinputparameters.Thisfunctioncanbeusedasapart
ofvariouslargeprojectsthatinvolveservos:
#CustomangletosetServomotorangle
defsetServoAngle(pin,angle):
board.digital[pin].write(angle)
sleep(0.015)
Inthemainlogicofthistemplate,wewanttoincrementallymovethemotorshaftinone
directionuntilitachievesthemaximumachievableangle(180degrees)andthenmoveit
backtotheoriginalpositionwiththesameincrementalspeed.Inthewhileloop,wewill
asktheusertoprovideinputtocontinuethisroutine,whichwillbecapturedusingthe
raw_input()function.Theusercanenterthecharacterytocontinuethisroutineorenter
anyothercharactertoaborttheloop:
#Testingthefunctionbyrotatingmotorinbothdirection
whileTrue:
foriinrange(0,180):
setServoAngle(pin,i)
foriinrange(180,1,-1):
setServoAngle(pin,i)
#Continueorbreakthetestingprocess
i=raw_input("Enter'y'tocontinueorEntertoquit):")
ifi=='y':
pass
else:
board.exit()
break
Whileworkingwithalltheseprototypingexamples,weusedthedirectcommunication
methodbyusingdigitalandanalogpinstoconnectthesensorswithArduino.Now,let’s
getfamiliarwithanotherwidelyusedcommunicationmethodbetweenArduinoandthe
sensors,whichiscalledI2Ccommunication.
PrototypingwiththeI2Cprotocol
Intheprevioussection,sensorsoractuatorsweredirectlycommunicatingwithArduino
viadigital,analog,orPWMpins.Thesemethodsareutilizedbyalargenumberofbasic,
low-levelsensorsandyouwillbewidelyusingtheminyourfutureArduinoprojects.
Besidethesemethods,thereisawidevarietyofpopularsensorsthatarebasedon
integratedcircuit(IC),whichrequiredifferentwaysofcommunication.TheseIC-based
advancedsensorsutilizeI2C-orSPIbus-basedmethodstocommunicatewiththe
microcontroller.AswearegoingtouseI2C-basedsensorsintheupcomingprojects,the
sectionwillonlycovertheI2Cprotocolandpracticalexampletounderstandtheprotocol
inabetterway.OnceyouunderstandthefundamentalsoftheI2Cprotocol,youcanlearn
theSPIprotocolveryquickly.
Note
YoucanlearnmoreaboutSPIprotocolandthesupportedArduinoSPIlibraryfromthe
followinglinks:
http://arduino.cc/en/Reference/SPI
http://www.instructables.com/id/Using-an-Arduino-to-Control-or-Test-an-SPIelectro/
In1982,thePhilipscompanyneededtofindoutasimpleandefficientwaytoestablish
communicationbetweenamicrocontrollerandtheperipheralchipsonTVsets,whichled
tothedevelopmentoftheI2Ccommunicationprotocol.TheI2Cprotocolconnectsthe
microcontrollerortheCPUtoalargenumberoflow-speedperipheraldevicesusingjust
twowires.ExamplesofsuchperipheraldevicesorsensorsincludeI/Odevices,A/D
converters,D/Aconverters,EEPROM,andmanysimilardevices.I2Cusestheconceptof
master-slavedevices,wherethemicrocontrolleristhemasterandtheperipheralsarethe
slavedevices.ThefollowingdiagramshowsanexampleoftheI2Ccommunicationbus:
Asdisplayedintheprecedingdiagram,themasterdevicecontainstwobidirectionallines:
SerialDataLine(SDA)andSerialClockLine(SCL).InthecaseofArduinoUno,the
analogpins4and5provideinterfacesforSDAandSCL.Itisimportanttonotethatthese
pinconfigurationswillchangewithdifferentvariantsoftheArduinoboard.Theperipheral
sensorsthatareworkingasslavesconnecttotheselines,whicharealsosupportedbythe
pullresistors.ThemasterdeviceisresponsibleforgeneratingtheclocksignalontheSCL
andinitializingcommunicationwiththeslaves.Theslavedevicesreceivetheclockand
respondtothecommandssentbythemasterdevice.
Theorderoftheslavedevicesisnotimportantasthemasterdevicecommunicateswith
theslavesusingtheirpartaddress.Toinitializethecommunication,themastersendsone
ofthefollowingtypesofmessageonthebuswiththespecificpartaddress:
Asinglemessageinwhichdataiswrittenontheslave
Asinglemessageinwhichdataisreadfromtheslave
Multiplemessagesinwhichfirstdataisrequestedfromtheslaveandthenthe
receiveddataisread
TosupportI2CprotocolinArduinoprogramming,theArduinoIDEcomesequippedwith
adefaultlibrarycalledWire.ThislibrarycanbeimportedtoyourArduinosketchby
addingthefollowinglineofcodeatthebeginningofyourprogram:
#include<Wire.h>
ToinitializeI2Ccommunication,theWirelibraryusesacombinationofthefollowing
functionstowritedataontheslavedevice:
Wire.beginTransmission(0x48);
Wire.write(0);
Wire.endTransmission();
Theseslavedevicesaredifferentiatedusinguniquepartaddresses.Asyoucanseeinthe
precedingexample,0x48isthepartaddressofaconnectedslavedevice.
TheWirelibraryalsoprovidestheWire.read()andWire.requestFrom()functionsto
readandrequestdatafromtheslavedevices.Thesefunctionsareexplainedindetailinthe
nextsection.
Note
YoucanlearnmoreabouttheI2CprotocolandtheWirelibraryfromthefollowinglinks:
http://www.instructables.com/id/I2C-between-Arduinos/
http://arduino.cc/en/reference/wire
ArduinoexamplesforI2Cinterfacing
InordertopracticeprototypingexercisesfortheI2Cprotocol,let’sutilizetwopopular
I2Csensorsthatdetecttemperatureandambientlightintheenvironment.Asthefirststep
towardsunderstandingI2Cmessaging,wewillworkwithArduinosketchesforI2C
interfacing,andlater,wewilldevelopsimilarfunctionalitiesusingPython.
ArduinocodingfortheTMP102temperaturesensor
TMP102isoneofthewidelyuseddigitalsensorstomeasureambienttemperature.
TMP102providesbetterresolutionandaccuracycomparedtotraditionalanalog
temperaturesensorssuchasLM35orTMP36.ThefollowingisanimageofTMP102:
ThepreviousimageshowsabreakoutboardwiththeavailablepinsfortheTMP102
sensor.PleasekeepinmindthattheTMP102sensorthatyouobtainmighthaveadifferent
pinlayoutcomparedtotheonedisplayedintheimage.Itisalwaysadvisabletocheckthe
datasheetofyoursensorbreakoutboardbeforemakinganyconnections.Asyoucanseein
theimage,theTMP102sensorsupportstheI2CprotocolandisequippedwithSDAand
SCLpins.Connectanalogpins4and5ofyourArduinoUnoboardtotheSDAandSCL
pinsoftheTMP102sensor.Also,connect+5Vandthegroundasdisplayedinthe
followingdiagram.Inthisexample,weareusingtheArduinoUnoboardasthemasterand
TMP102astheslaveperipheral,wherethepartaddressofTMP102is0x48inhex:
Note
YoucanobtaintheTMP102sensorbreakoutboardfromSparkFunElectronicsat
https://www.sparkfun.com/products/11931.
Thedatasheetofthisboardcanbeobtainedat
https://www.sparkfun.com/datasheets/Sensors/Temperature/tmp102.pdf.
Now,connectyourArduinoboardtoyourcomputerusingaUSBcableandcreateanew
sketchintheArduinoIDEusingthefollowingcodesnippet.Onceyouhaveselectedthe
appropriateserialportandtypeofboardintheArduinoIDE,uploadandrunthecode.If
allthestepsareperformedasdescribed,onexecution,youwillbeabletoseethe
temperaturereadinginCelsiusandFahrenheitintheSerialMonitorwindow:
#include<Wire.h>
intpartAddress=0x48;
voidsetup(){
Serial.begin(9600);
Wire.begin();
}
voidloop(){
Wire.requestFrom(partAddress,2);
byteMSB=Wire.read();
byteLSB=Wire.read();
intTemperatureData=((MSB<<8)|LSB)>>4;
floatcelsius=TemperatureData*0.0625;
Serial.print("Celsius:");
Serial.println(celsius);
floatfahrenheit=(1.8*celsius)+32;
Serial.print("Fahrenheit:");
Serial.println(fahrenheit);
delay(500);
}
Intheprecedingcodesnippet,theWire.requestFrom(partAddress,2)functionrequests
twobytesfromtheslaveTMP102.Theslavesendsdatabytestothemaster,whichget
capturedbytheWire.read()functionandarestoredastwodifferentbits:most
significantbit(MSB)andleastsignificantbit(LSB).Thesebytesareconvertedintoan
integervalue,whichisthenconvertedintotheactualCelsiusreadingbymultiplyingthe
incrementalfractionoftheTMP102sensorthatisobtainedfromthedatasheet.TMP102is
oneoftheeasiestI2CsensorstointerfacewithArduinoasthesensorvaluescanbe
obtainedviaasimpleI2Crequestmethod.
ArduinocodingfortheBH1750lightsensor
BH1750isadigitallightsensorthatmeasurestheamountofvisiblelightinagivenarea.
AlthoughvariousDIYprojectsutilizesimplephotocellsasacheapalternative,the
BH1750sensorisknownforhigherresolutionandaccuracyinawiderangeof
applications.Theambientlight,alsocalledluminousfluxorlux,ismeasuredinunit
lumen.TheBH1750sensorsupportsI2Ccommunicationwithpartaddress0x23,with
0x5CasthesecondaryaddressifyouareusingmultipleBH1750sensors.Thefollowingis
animageofatypicalbreakoutboardconsistingofBH1750:
ConnecttheSDAandSCLpinsoftheBH1750breakoutboardtoanalogpins4and5of
theArduinoUnoboard,asdisplayedinthefollowingcircuitdiagram.Also,completethe
+5Vandgroundconnectionsasdisplayedinthefollowingdiagram:
Inthepreviousexample,weusedfunctionsfromtheWirelibrarytocompletetheI2C
communication.AlthoughBH1750isasimpleandconvenientI2Csensor,inthecaseofa
sensorwithmultiplemeasurementcapabilities,itisnotconvenienttocodedirectlyusing
theWirelibrary.Inthissituation,youcanusesensor-specificArduinolibrariesthatare
developedbythemanufacturerortheopensourcecommunity.ForBH1750,wewill
demonstratetheuseofsuchalibrarytoassisttheI2Ccoding.Beforewecanusethis
library,wewillhavetoimportittotheArduinoIDE.Itisreallyimportanttoknowthe
processofimportinglibrariestoyourArduinoIDEasyouwillberepeatingthisprocessto
installotherlibrariesinfuture.ExecutethefollowingstepstoimporttheBH1750libraryto
yourArduinoIDE:
1. DownloadandextractChapter7,TheMidtermProject–aPortableDIYThermostat,
codeexamplesinafolder.
2. OpentheArduinoIDEandnavigatetoSketch|ImportLibrary…|Add
Library….
3. Whenyouareaskedforadirectory,gototheBH1750folderinthedownloadedfile
andclickonSelect.
4. Tocheckifyourlibraryisinstalled,navigatetoSketch|ImportLibrary…andlook
forBH1750inthedrop-downlist.
5. Finally,restarttheArduinoIDE.
Tip
IfyouareusinganArduinoIDEwithversion1.0.4oranolderversion,youmightnot
beabletofindtheImportLibrary…optionfromthemenu.Inthiscase,youneedto
followthetutorialathttp://arduino.cc/en/Guide/Libraries.
TheBH1750libraryhasamethodtodirectlyobtainambientlightvalues.Let’stestthis
libraryusingabuilt-incodeexample.
AfterrestartingyourArduinoIDE,navigatetoFile|Examples|BH1750andopenthe
BH1750testArduinosketch.ThisshouldopenthefollowingcodesnippetintheArduino
IDE.SetupanappropriateserialportanduploadthecodetoyourArduinoboard.Once
thecodeisexecuted,youwillbeabletochecktheluminousflux(lux)valuesusingthe
serialmonitoroftheArduinoIDE.Makesurethattheserialmonitorisconfiguredto9600
baud:
#include<Wire.h>
#include<BH1750.h>
BH1750lightMeter;
voidsetup(){
Serial.begin(9600);
lightMeter.begin();
Serial.println("Running…");
}
voidloop(){
uint16_tlux=lightMeter.readLightLevel();
Serial.print("Light:");
Serial.print(lux);
Serial.println("lx");
delay(1000);
}
Asyoucanseefromtheprecedingcodesnippet,wehaveimportedtheBH1750libraryby
includingBH1750.hfilewithWire.h.ThislibraryprovidesthereadLightLevel()
function,whichwillfetchtheambientlightvaluefromthesensorandprovideitasan
integer.AstheArduinocoderunsinaloopwithadelayof1000milliseconds,thelux
valueswillbefetchedfromthesensorandsenttotheserialporteverysecond.Youcan
observethesevaluesintheSerialMonitorwindow.
PyMataforquickI2Cprototyping
WehavebeenusingpyFirmataasourdefaultPythonlibrarytointerfacetheFirmata
protocol.ThepyFirmatalibraryisaveryusefulPythonlibrarytogetstartedwiththe
Firmataprotocol,asitprovidesmanysimpleandeffectivemethodstodefinetheFirmata
portsandtheirroles.Duetothesereasons,weextensivelyusedpyFirmataforrapid
prototypingintheprevioussection.AlthoughpyFirmatasupportsanalog,digital,PWM,
andSERVOmodeswitheasy-to-usemethods,itprovideslimitedsupporttotheI2C
protocol.
Inthissection,wearegoingtouseadifferentPythonFirmatalibrarycalledPyMatatoget
familiarwithPython-basedprototypingofI2Csensors.ThePyMatalibrarysupports
regularFirmatamethodsandalsoprovidesfullsupportfortheI2Cmessagingprotocol.
PyMatacanbeeasilyinstalledusingSetuptools,whichweusedinthepreviouschaptersto
installotherPythonlibraries.WeareassumingthatyoualreadyhaveSetuptoolsandpip
onyourcomputer.Let’sstartperformingthefollowingsteps:
1. ToinstallPyMataonaWindowscomputer,executethefollowingcommandinthe
commandprompt:
C:\>easy_install.exepymata
2. IfyouareusingLinuxorMacOSX,usethefollowingcommandintheterminalto
installthePyMatalibrary:
$sudopipinstallpymata
3. Ifeverythingissetupproperly,thisprocesswillcompletewithoutanyerror.Youcan
confirmPyMatabyopeningPython’sinteractivepromptandimportingPyMata:
>>>importPyMata
4. Iftheexecutionoftheprecedingcommandfails,youneedtochecktheinstallation
processforanyerror.Resolvetheerrorandrepeattheinstallationprocess.
InterfacingTMP102usingPyMata
InordertoutilizePyMatafunctionalities,youwillneedyourArduinoboardtobeequipped
withthestandardfirmatafirmwarejustlikethepyFirmatalibrary.Beforeweproceedto
explainthePyMatafunctions,let’sfirstrunthefollowingcodesnippet.Connectyour
TMP102temperaturesensorasexplainedintheprevioussection.UsingtheArduinoIDE,
navigatetoFile|Examples|FirmataanduploadthestandardFirmatasketchfromthere
toyourArduinoboard.Now,createaPythonexecutablefileusingthefollowingcode
snippet.Changethevalueofport(COM5),ifneeded,toanappropriateportnameas
requiredbyyouroperatingsystem.Finally,runtheprogram:
importtime
fromPyMata.pymataimportPyMata
#InitializeArduinousingportname
port=PyMata("COM5")
#ConfigureI2Cpin
port.i2c_config(0,port.ANALOG,4,5)
#Oneshotreadaskingperipheraltosend2bytes
port.i2c_read(0x48,0,2,port.I2C_READ)
#Waitforperipheraltosendthedata
time.sleep(3)
#Readfromtheperipheral
data=port.i2c_get_read_data(0x48)
#Obtaintemperaturefromreceiveddata
TemperatureSum=(data[1]<<8|data[2])>>4
celsius=TemperatureSum*0.0625
printcelsius
fahrenheit=(1.8*celsius)+32
printfahrenheit
firmata.close()
Ontheexecutionoftheprecedingcodesnippet,youwillbeabletoseethetemperature
readinginFahrenheitandCelsius.Asyoucanseefromtheinlinecommentsinthecode,
thefirststeptoutilizeArduinousingPyMataistoinitializetheportusingthePyMata
constructor.PyMatasupportstheconfigurationofI2Cpinsviathei2c_config()function.
PyMataalsosupportssimultaneousreadingandwritingoperationsviathei2c_read()and
i2c_write()functions.
InterfacingBH1750usingPyMata
InthecaseofBH1750,thepreviousPyMatacodesnippetcanbeutilizedwithminor
modificationstoobtainambientlightsensordata.Asthefirstchange,youwanttoreplace
thepartaddressofTMP102(0x48)withtheoneofBH1750(0x23)inthefollowingcode
snippet.Youwillalsohavetoconverttherawvaluesreceivedfromthesensorintothelux
valueusingthegivenformula.Afterthesemodifications,runthefollowingprogramfrom
theterminal:
importtime
fromPyMata.pymataimportPyMata
port=PyMata("COM5")
port.i2c_config(0,port.ANALOG,4,5)
#RequestBH1750tosend2bytes
port.i2c_read(0x23,0,2,port.I2C_READ)
#WaitforBH1750tosendthedata
time.sleep(3)
#ReaddatafromBH1750
data=port.i2c_get_read_data(0x23)
#Obtainluxvaluesfromreceiveddata
LuxSum=(data[1]<<8|data[2])>>4
lux=LuxSum/1.2
printstr(lux)+'lux'
firmata.close()
Onrunningtheprecedingcodesnippet,youwillbeabletoseetheambientlightsensor
readinginluxattheterminal.ThisprocesscanbeusedinalargenumberofI2Cdevices
toreadtheregisteredinformation.IncomplexI2Cdevices,youwillhavetofollowtheir
datasheetorexamplestoorganizethereadandwritecommandsoftheI2C.
UsefulpySerialcommands
ThestandardFirmataprotocolandPython’sFirmatalibrariesareveryusefulfortestingor
quickprototypingoftheI2Csensors.Althoughtheyhavemanyadvantages,Firmatabasedprojectsfacethefollowingdisadvantages:
Delayinreal-timeexecution:Firmata-basedapproachesrequireaseriesofserial
communicationmessagestoreceiveandsenddata,whichaddsadditionaldelayand
reducesthespeedofexecution.
Unwantedspace:TheFirmataprotocolcontainsalargeamountofadditionalcodeto
supportvariousotherArduinofunctions.Inawell-definedproject,youdon’treally
needthecompletesetoffunctions.
Limitedsupport:AlthoughaversionofFirmataincludesI2Csupport,itisquite
difficulttoimplementcomplexI2Cfunctionswithoutaddingdelay.
Insummary,youcanalwaysuseFirmata-basedapproachestoquicklyprototypeyour
projects,butwhenyouareworkingonproduction-leveloradvancedprojects,youcanuse
alternativemethods.Inthesescenarios,youcanusecustomArduinocodethatis
supportedbyPython’sseriallibrary,pySerial,toenablecommunicationforveryspecific
functionalities.Inthissection,wearegoingtocoverafewhelpfulpySerialmethodsthat
youcanuseifyouhavetoutilizethelibrarydirectly.
Connectingwiththeserialport
OnceyouhaveconnectedyourArduinotoaUSBportofyourcomputer,youcanopenthe
portinyourPythoncodeusingtheSerialclassasdisplayedinthefollowingcode
example:
importserial
port=serial.Serial('COM5',9600,timeout=1)
Inadditiontoportnameandbaudrate,youcanalsospecifyanumberofserialport
parameterssuchastimeout,bytesize,parity,stopbits,andsoonusingSerial().Itis
necessarytoinitializetheserialportbeforeexecutinganyothercommandfromthe
pySeriallibrary.
Readingalinefromtheport
Oncetheserialportisopened,youcanstartreadingtheportusingreadline().The
readline()functionrequiresthetimeouttobespecifiedwhileinitializingtheport,
otherwisethecodecanterminatewithanexception:
line=port.readline()
Thereadline()functionwillprocesseachlinefromtheportthatisterminatedwiththe
endlinecharacter\n.
Flushingtheporttoavoidbufferoverflow
WhileworkingwithpySerial,itisnecessarytoflushtheinputbuffertoavoidbuffer
overflowandmaintainreal-timeoperations:
port.flushInput()
Iftheport’sbaudrateishighandtheprocessingoftheinputdataisslow,bufferoverflow
mayoccur,reducingthespeedofexecutionandmakingtheexperiencesluggish.
Closingtheport
Itisagoodcodingpracticetoclosetheserialportoncetheprocessiscomplete.This
practicecaneliminatetheport-blockingproblemoncethePythoncodeisterminated:
port.close()
Summary
Inthischapter,youlearnedimportantmethodsthatarerequiredtosuccessfullyinterface
theArduinoboardwithPython.Youwerealsointroducedtovariousprototypingcode
templateswithpracticalapplications.Theseprototypingtemplateshelpedustolearnnew
PythonprogramingparadigmsandFirmatamethods.Laterinthechapter,wedivedfurther
intoprototypingbylearningmoreaboutthedifferentwaysofestablishingcommunication
betweensensorsandtheArduinoboard.Althoughwecoveredavastamountof
programmingconceptswiththeseprototypingexamples,thegoalofthechapterwasto
makeyoufamiliarwiththeinterfacingproblemsandprovidequickrecipesforyour
projects.
Weareassumingthatbynowyouarecomfortabletestingyoursensorsorproject
prototypesusingPythonandArduino.It’stimetostartworkingtowardscreatingyour
applicationsthathavecomplexPythonfeaturessuchasusercontrols,charts,andplots.In
thenextchapter,wearegoingtodevelopcustomgraphicaluserinterfaces(GUIs)foryour
Python-Arduinoprojects.
Chapter5.WorkingwiththePythonGUI
Inthefirstfourchapters,weusedthePythoninteractivepromptorArduinoserialmonitor
toobservetheresults.Themethodofusingtext-basedoutputonpromptmaybeusefulfor
basicandquickprototyping,butwhenitcomestoanadvancedlevelofprototypingand
demonstratingyourprototypeorfinalproduct,youneedtohaveanicelookinganduserfriendlyinterface.GUIhelpsuserstounderstandvariouscomponentsofyourhardware
projectandeasilyinteractwithit.Itcanalsohelpyoutovalidatetheresultsfromyour
project.
PythonhasanumberofwidelyusedGUIframeworkssuchasTkinter,wxPython,PyQt,
PySide,andPyGTK.Eachoftheseframeworkspossessesanalmostcompletesetoffeatures
thatarerequiredtocreateprofessionalapplications.Duetothecomplexityinvolved,these
frameworkshavedifferentlevelsoflearningcurvesforfirst-timePythonprogrammers.
Now,asthisbookisdedicatedtoPythonprogrammingforArduino-basedprojects,we
can’tspendalargeamountoftimelearningthenitty-grittyofaspecificframework.
Instead,wewillchooseourinterfacelibrarybasedonthefollowingcriteria:
Easetoinstallandgetstarted
Easetoimplementwithnegligiblelearningefforts
Useofminimumcomputationalresources
TheframeworkthatsatisfiesalltheserequirementsisTkinter
(https://wiki.python.org/moin/TkInter).TkinterisalsothedefaultstandardGUIlibrary
deployedwithallPythoninstallations.
Note
AlthoughTkinteristhede-factoGUIpackageforPython,youcanlearnmoreaboutother
GUIframeworksthatwerementionedearlierfromtheirofficialwebsites,whichareas
follows:
wxPython:http://www.wxpython.org/
PyGTK:http://www.pygtk.org/
PySide:http://qt-project.org/wiki/PySide
PyQt:http://sourceforge.net/projects/pyqt/
LearningTkinterforGUIdesign
Tkinter,shortforTkinterface,isacross-platformPythoninterfacefortheTkGUItoolkit.
TkinterprovidesathinlayeronPythonwhileTkprovidesthegraphicalwidgets.Tkinter
isacross-platformlibraryandgetsdeployedaspartofPythoninstallationpackagesfor
majoroperatingsystems.ForMacOSX10.9,TkinterisinstalledwiththedefaultPython
framework.ForWindows,whenyouinstallPythonfromtheinstallationfile,Tkintergets
installedwithit.
Tkinterisdesignedtotakeminimalprogrammingeffortsfordevelopinggraphical
applications,whilealsobeingpowerfulenoughtoprovidesupportforthemajorityofGUI
applicationfeatures.Ifrequired,Tkintercanalsobeextendedwithplugins.Tkintervia
Tkoffersanoperatingsystem’snaturallookandfeelafterthereleaseofTkVersion8.0.
TotestyourcurrentversionoftheTktoolkit,usethefollowingcommandsonthePython
prompt:
>>>importTkinter
>>>Tkinter._test()
Youwillbepromptedwithanimagesimilartothatdisplayedinthefollowingscreenshot
thatcontainsinformationaboutyourTkversion:
Ifyoufaceanyproblemingettingthiswindow,checkyourPythoninstallationand
reinstallit,asyouwon’tbeabletomovefurtheraheadinthischapterwithouttheTkinter
libraryandtheTktoolkit.
TheTkinterinterfacesupportsvariouswidgetstodevelopGUIs.Thefollowingtable
describesafewoftheimportantwidgetsthatwewillbeusinginthischapter:
Widget
Description
Tk()
Thisistherootwidgetthatisrequiredbyeachprogram
Label()
Thisshowsatextoranimage
Button()
Thisisasimplebuttonthatcanbeusedtoexecuteactions
Entry()
Thisisatextfieldtoprovideinputstotheprogram
Scale()
Thisprovidesanumericvaluebydraggingtheslider
Checkbox()
Thisenablesyoutotogglebetweentwovaluesbycheckingthebox
Note
AdetaileddescriptionoftheTkinterfunctionsandmethodstoimplementthemajorityof
functionalitiesprovidedbytheTktoolkitcanbeobtainedfrom
https://docs.python.org/2/library/tk.html.
YourfirstPythonGUIprogram
Aswediscussedinanearlierchapter,thefirstprogramwhilelearninganyprogramming
languageincludesprintingHelloWorld!.Now,aswearestartingPythonprogramming
forGUI,let’sstartbyprintingthesamestringinaGUIwindowinsteadofaprompt.
JusttostartwithGUIprogramming,wearegoingtoexecuteaPythonprogramandthen
jumpintoexplainingthestructureandthedetailsofthecode.Let’screateaPython
executablefileusingthefollowinglinesofcode,nameithelloGUI.py,andthenrunit.
Theexecutionprocessshouldcompletewithoutanydependencyerrors:
importTkinter
#Initializemainwindowswithtitleandsize
top=Tkinter.Tk()
top.title("HelloGUI")
top.minsize(200,30)
#Labelwidget
helloLabel=Tkinter.Label(top,text="HelloWorld!")
helloLabel.pack()
#Startandopenthewindow
top.mainloop()
Youshouldbepromptedwiththefollowingwindowonthesuccessfulexecutionofthe
precedingcodesnippet.Asyoucansee,theHelloWorld!stringhasbeenprintedinside
thewindowandhasHelloGUIasthetitleofthewindow:
So,whatexactlyhappened?Asyoucanseefromthecodesnippet,weinstantiatedvarious
Tkinterwidgetsonebyonetoobtainthisresult.Thesewidgetsarethebuildingblocksfor
anyPythonGUIapplicationthatisdevelopedusingTkinter.Let’sstartwiththefirstand
themostimportantwidget,Tk().
TherootwidgetTk()andthetop-levelmethods
TheTk()widgetinitializesamainemptywindowwithatitlebar.Thisisarootwidget
anditisrequiredbyeachprogramonlyonce.Themainwindowgetsitsdecorationand
stylesfromtheoperatingsystem’senvironment.Therefore,whenyourunthesame
Tkintercodeondifferentoperatingsystems,youwillgetthesamewindowandtitlebar
butinadifferentstyle.
Onceyoucreatearootwidget,youcanperformsometop-levelmethodstodecorate,
describe,orresizethiswindow.Incode,weareusingthetitle()methodtosetthetitle
ofthemainwindow.Thistitle()methodtakesastringasaninputargument:
Top=Tkinter.Tk()
top.title("HelloGUI")
Next,wecalltheminsize()methodonthemainwindowtosettheminimumsizeofthe
windowwiththeargument(width,height):
top.minsize(200,30)
Similarly,youcanalsousethemaxsize()methodtospecifythemaximumsizethatthe
mainwindowshouldhave.Intheminsize()andmaxsize()methods,thevaluesofwidth
andheightareprovidedinthenumberofpixels.
Oncetheentireprogramhasbeeninstantiated,themainloop()functionisrequiredtostart
theeventloop:
top.mainloop()
Youwon’tbeabletoseeanyotherwidgets,includingthemainwindow,ifthecodedoes
notenterinthemaineventloop.Theeventloopwillbealiveuntilthewindowismanually
closedorthequitmethodiscalled.
Youmighthavevariousquestionsaboutupdatingthewindow,programmaticallyclosing
it,arrangingwidgetsinthegrid,andsoon.Therearedefinitelyalotmoretop-level
methodsthantheonesspecifiedearlier.
TheLabel()widget
TheotherwidgetusedinthecodebesideTk()isLabel().TheTkinterwidgetsarepart
ofthewidgethierarchy,whereLabel()isthechildoftherootwidget,Tk().Thiswidget
cannotbecalledwithoutspecifyingtherootwidgetorthemainwindowonwhichthe
labelneedstobedisplayed.Themajoruseofthiswidgetistodisplaytextorimageinthe
mainwindow.Inthefollowinglineofcode,weuseittodisplaytheHelloWorld!string:
helloLabel=Tkinter.Label(top,text="HelloWorld!")
Here,wecreatedandinitializedalabelobjectcalledhelloLabel,whichhastwoinput
parameters:thetopvariablethatspecifiestherootwidgetandatextstring.TheLabel()
widgetishighlycustomizableandacceptsvariousconfigurationparametersforadjusting
thewidth,border,background,andjustificationasoptions.Examplesinvolvingthese
customizationsarecoveredintheupcomingsections.Youcanlearnmoreaboutthe
supportedinputargumentsathttp://effbot.org/tkinterbook/label.htm.
ThePackgeometrymanager
ThePackgeometrymanagerorganizeswidgetsinrowsandcolumns.Tousethis,Tkinter
requiresthepack()methodtobecalledforeachwidgettomakethewidgetvisibleonthe
mainwindow:
helloLabel.pack()
ThePackgeometrymanagercanbeusedbyallTkinterwidgets,exceptroot,toorganize
thewidgetintherootwindow.Inthecaseofmultiplewidgets,ifthepositionsforthe
widgetsarenotspecified,thePackmanagerarrangestheminthesamerootwindow.The
Packmanagerissimpletoimplement,butithasalimitationintermsofitsdegreeof
customization.Analternativegeometrymanagerthatishelpfultocreateacomplexlayout
iscalledGrid,whichisexplainedintheupcomingsections.
Wewillcoveradditionalwidgetsandtheirassociatedmethodsintheupcomingcoding
exercises.Intheseexercises,wewillexplaineachindividualwidgetwithpractical
applicationstogiveyouabetterunderstandingoftheusecases.
TheButton()widget–interfacingGUI
withArduinoandLEDs
Nowthatyouhavehadyourfirsthands-onexperienceincreatingaPythongraphical
interface,let’sintegrateArduinowithit.Pythonmakesiteasytointerfacevarious
heterogeneouspackageswithineachotherandthatiswhatyouaregoingtodo.Inthenext
codingexercise,wewilluseTkinterandpyFirmatatomaketheGUIworkwithArduino.
Inthisexercise,wearegoingtousetheButton()widgettocontroltheLEDsinterfaced
withtheArduinoboard.
Beforewejumptotheexercises,let’sbuildthecircuitthatwewillneedforallupcoming
programs.ThefollowingisaFritzingdiagramofthecircuitwhereweusetwodifferent
coloredLEDswithpullupresistors.ConnecttheseLEDstodigitalpins10and11onyour
ArduinoUnoboard,asdisplayedinthefollowingdiagram:
Note
Whileworkingwiththeprogramsprovidedinthisandupcomingsections,youwillhave
toreplacetheArduinoportthatisusedtodefinetheboardvariableaccordingtoyour
operatingsystem.TofindoutwhichportyourArduinoboardisconnectedto,followthe
detailedinstructionsprovidedinChapter2,WorkingwiththeFirmataProtocolandthe
pySerialLibrary.Also,makesurethatyouprovidethecorrectpinnumberinthecodeif
youareplanningtouseanypinsotherthan10and11.Forsomeexercises,youwillhave
tousethePWMpins,somakesurethatyouhavecorrectpins.
Inthepreviousexercise,weaskedyoutousetheentirecodesnippetasaPythonfileand
runit.Thismightnotbepossibleintheupcomingexercisesduetothelengthofthe
programandthecomplexityinvolved.Therefore,wehaveassembledtheseexercisesin
theprogramfilesthatcanbeaccessedfromthecodefolderofChapter4,Divinginto
Python-ArduinoPrototyping,whichcanbedownloadedfrom
https://www.packtpub.com/books/content/support/1961.FortheButton()widget
exercise,opentheexampleButton.pyfilefromthecodefolderofChapter4,Divinginto
Python-ArduinoPrototyping.Thecodecontainsthreemaincomponents:
ThepyFirmatalibraryandArduinoconfigurations
TheTkinterwidgetdefinitionsforabutton
TheLEDblinkfunctionthatgetsexecutedwhenyoupressthebutton
Asyoucanseeinthefollowingcodesnippet,wehavefirstimportedlibrariesand
initializedtheArduinoboardusingpyFirmatamethods.Forthisexercise,weareonly
goingtoworkwithoneLEDandwehaveinitializedonlytheledPinvariableforit:
importTkinter
importpyfirmata
fromtimeimportsleep
port='/dev/cu.usbmodemfa1331'
board=pyfirmata.Arduino(port)
sleep(5)
ledPin=board.get_pin('d:11:o')
Note
AsweareusingthepyFirmatalibraryforalltheexercisesinthischapter,makesurethat
youhaveuploadedthelatestversionofthestandardFirmatasketchonyourArduino
board.
Inthesecondpartofthecode,wehaveinitializedtherootTkinterwidgetastopand
providedatitlestring.Wehavealsofixedthesizeofthiswindowusingtheminsize()
method.Inordertogetmorefamiliarwiththerootwidget,youcanplayaroundwiththe
minimumandmaximumsizeofthewindow:
top=Tkinter.Tk()
top.title("BlinkLEDusingbutton")
top.minsize(300,30)
TheButton()widgetisastandardTkinterwidgetthatismostlyusedtoobtainthe
manual,externalinputstimulusfromtheuser.LiketheLabel()widget,theButton()
widgetcanbeusedtodisplaytextorimages.UnliketheLabel()widget,itcanbe
associatedwithactionsormethodswhenitispressed.Whenthebuttonispressed,
Tkinterexecutesthemethodsorcommandsspecifiedbythecommandoption:
startButton=Tkinter.Button(top,
text="Start",
command=onStartButtonPress)
startButton.pack()
Inthisinitialization,thefunctionassociatedwiththebuttonisonStartButtonPressand
the"Start"stringisdisplayedasthetitleofthebutton.Similarly,thetopobjectspecifies
theparentortherootwidget.Oncethebuttonisinstantiated,youwillneedtousethe
pack()methodtomakeitavailableinthemainwindow.
Intheprecedinglinesofcode,theonStartButonPress()functionincludesthescriptsthat
arerequiredtoblinktheLEDsandchangethestateofthebutton.Abuttonstatecanhave
thestateasNORMAL,ACTIVE,orDISABLED.Ifitisnotspecified,thedefaultstateofany
buttonisNORMAL.TheACTIVEandDISABLEDstatesareusefulinapplicationswhen
repeatedpressingofthebuttonneedstobeavoided.AfterturningtheLEDonusingthe
write(1)method,wewilladdatimedelayof5secondsusingthesleep(5)function
beforeturningitoffwiththewrite(0)method:
defonStartButtonPress():
startButton.config(state=Tkinter.DISABLED)
ledPin.write(1)
#LEDisonforfixamountoftimespecifiedbelow
sleep(5)
ledPin.write(0)
startButton.config(state=Tkinter.ACTIVE)
Attheendoftheprogram,wewillexecutethemainloop()methodtoinitiatetheTkinter
loop.Untilthisfunctionisexecuted,themainwindowwon’tappear.
Torunthecode,makeappropriatechangestotheArduinoboardvariableandexecutethe
program.Thefollowingscreenshotwithabuttonandtitlebarwillappearastheoutputof
theprogram.ClickingontheStartbuttonwillturnontheLEDontheArduinoboardfor
thespecifiedtimedelay.Meanwhile,whentheLEDison,youwillnotbeabletoclickon
theStartbuttonagain.Now,inthisparticularprogram,wehaven’tprovidedsufficient
codetosafelydisengagetheArduinoboardanditwillbecoveredinupcomingexercises.
TheEntry()widget–providingmanual
userinputs
Inthepreviousexercise,youusedabuttontoblinktheLEDontheArduinoboardfora
fixedamountoftime.Let’ssaythatyouwanttochangethisfixedtimedelayandspecifya
valueaccordingtoyourapplication’srequirement.Toperformthisoperation,youwill
needawidgetthatacceptscustomvaluesthatcanthenbeconvertedintothedelay.Just
likeanyotherGUIframework,Tkinterprovidestheinterfaceforasimilarwidgetcalled
Entry()andwewillutilizethisinthenextexercise.
KeepthesameArduinoandLEDconfigurationsthatyouusedforthepreviousexercise
andopentheexampleEntry.pyfile.Inthebeginningofthecode,youwillfindthesame
configurationfortheArduinoboardandtheLEDpinthatweusedintheprevious
exercise.Movingontothenextstage,youwillbeabletoseethefollowingcodesnippet
thatdefinestherootwidget.Inthiscodesnippet,wehavechangedthetitleofthemain
windowtoreflectthepremiseoftheexercise.Theuseofuniquestringsforthetitleofthe
windowwillhelpyoutodifferentiatethesewindowsaccordingtotheirproperties,when
youaredealingwithmultiplewindowsinoneapplication:
top=Tkinter.Tk()
top.title("SpecifytimeusingEntry")
AlthoughtheEntry()widgetcanbeeasilyinitializedbyspecifyingtheparentwidgetas
theonlyparameter,italsosupportsalargenumberofparameterstocustomizethewidget.
Forexample,inourexercise,weareusingthebdparametertospecifythewidthofthe
widgetborderandwidthtoprovidetheexpectedwidthofthewidget.Youcanlearnmore
abouttheavailableoptionsathttp://effbot.org/tkinterbook/entry.htm:
timePeriodEntry=Tkinter.Entry(top,
bd=5,
width=25)
timePeriodEntry.pack()
timePeriodEntry.focus_set()
startButton=Tkinter.Button(top,
text="Start",
command=onStartButtonPress)
startButton.pack()
Intheprecedinglinesofcode,wehaveinitializedtwowidgetobjectsinourmainwindow:
timePeriodEntryfortheEntry()widgetandstartButtonthatweusedintheprevious
exercisefortheButton()widget.ThePackgeometrymanageralwayssetsthegraphical
pointertothelastwidgetthathasbeenaddedtothemainwindow.Wecanmanuallyshift
thefocusofthegraphicalpointertothetimePeriodEntrywidgetusingthefocus_set()
method.
ContrarytotheonStartButtonPress()functioninthepreviousexercise,thisfunction
doesn’tusethetimedelayfix.It,instead,obtainsthevaluefromthetimePeriodEntry
object.Youcanusetheget()methodtoobtaintheenteredvaluefromthe
timePeriodEntryobjectandconvertitintoafloatingvalueusingthefloat()function.
Asyoucanseeinthefollowingcodesnippet,weusethisfloatvalueasthetimedelay
betweenswitchingtheLEDofffromtheonstate:
defonStartButtonPress():
#ValuefordelayisobtainedfromtheEntrywidgetinput
timePeriod=timePeriodEntry.get()
timePeriod=float(timePeriod)
startButton.config(state=Tkinter.DISABLED)
ledPin.write(1)
sleep(timePeriod)
ledPin.write(0)
startButton.config(state=Tkinter.ACTIVE)
OnceyouhaveunderstoodtheprocessofinitializingtheEntry()widgetandthemethod
toobtainacustomvaluefromit,let’sexecutethecode.
Whenyourunthisexercise,youshouldbeabletoseeawindowsimilartotheone
displayedinthefollowingscreenshot.Enteratimedelayvalueinsecondsandclickon
StarttoseetheresultsontheLED.Basically,whenthebuttonispressed,theprogram
willcalltheonStartButtonPress()functionanditwillutilizethisvaluetoproducethe
timedelay.
TheScale()widget–adjustingthe
brightnessofanLED
Inthissection,wewilldevelopsomecodetochangeanLED’sbrightnessusingthe
PythonGUI.Previously,welearnedthatyoucanuseadigitalpinofArduinotoproduce
ananalogoutputusingPWM.AlthoughyoucanusetheEntry()widgettoprovideone
timevalueforthePWMsignal,itwillbeusefultohaveawidgetthatcandynamically
providethisvalue.Asbrightnesscanbefluctuatedbetween0and100percent,itmakes
sensetouseasliderthatvariesbetween0and100.TheTkinterlibraryprovidesthiskind
ofslidinginterfaceusingtheScale()widget.
AsweareworkingtochangethebrightnessoftheLEDandsupplyanaloginput,wewill
beusingadigitalpinwiththePWMsupport.Inthepreviousexercise,weuseddigitalpin
11,whichalreadysupportsPWM.Ifyouareusingacustomversionofthecircuitdifferent
totheoneprovidedearlier,werecommendthatyouchangeittoapinthatsupportsPWM.
Nowitistimetoopentheprogramfile,exampleScale.py,forthisexercise.
Thefirststageoftheprogramthatinvolvesimportingthenecessarylibrariesand
initializingtheArduinoboardusingpyFirmataisalmostthesameasintheprevious
exercise.Changethestringthatisusedtospecifytheappropriatevaluefortheport
variableaccordingtotheoperatingsystemandtheportthatyouareusing.Wewillalso
instantiatetherootwindowwiththeuniquetitleforthisexercise,aswedidintheprevious
exercises.Thispartoftheprogramwilloftenreoccurforalargenumberofexercisesand
youcanrefertothepreviousexerciseformoreinformation.
Inthenextstage,wewillcontinuebuildingthecodethatwedevelopedearliertoprovidea
manualtimedelayfortheLED.WewillalsousethesameEntry()widgettoobtainthe
timeintervalasaninput:
timePeriodEntry=Tkinter.Entry(top,
bd=5,
width=25)
timePeriodEntry.pack()
timePeriodEntry.focus_set()
TheScale()widgetoffersasliderknobthatcanbemovedoverafixedscaletoprovidea
numericvalueasanoutput.Thestartingandtheendingvaluesforthisscaleareprovided
usingthefrom_andtooptions.Theorientationofthisslidercanalsobeconfiguredusing
theorientoption,wheretheacceptablevaluesfortheorientationareHORIZONTALand
VERTICAL.However,youwillhavetoimportHORIZONTALandVERTICALconstantsfromthe
Tkinterlibrarybeforeutilizingthemhere.
Ifnooptionsareprovided,thedefaultwidgetusesthescalefrom0to100andthevertical
orientation.Inourprogram,wehaveusedthehorizontalorientationasademonstrationof
theorientoption.Onceyouhavedefinedthewidgetobject,brightnessScale,youwill
havetoaddittothePackgeometrymanagerusingpack():
brightnessScale=Tkinter.Scale(top,
from_=0,to=100,
orient=Tkinter.HORIZONTAL)
brightnessScale.pack()
Inordertostarttheprocessandreusethepreviouscode,wehavekepttheinstantiationof
thestartButtonwidgetandtheonStartButtonPressfunctionasitis.However,the
propertyofthefunctionischangedtoaccommodatetheScale()widget:
startButton=Tkinter.Button(top,
text="Start",
command=onStartButtonPress)
startButton.pack()
InthisversionoftheonStartButtonPress()function,wewillobtaintheledBrightness
valuebyusingtheget()methodonthebrightnessScalewidgetobject,wheretheget()
methodwillreturnthevalueofthecurrentlocationoftheslider.AsthePWMinput
requiresvaluesbetween0and1,andtheobtainedslidervalueisbetween0and100,we
willconverttheslidervalueintotheappropriatePWMinputbydividingitwith100.This
newvaluewillthenbeusedwiththewrite()methodandthiswillultimatelyturnonthe
LEDwiththeappliedbrightnessforthetimeperiodthatisprovidedbythe
timePeriodEntryvalue:
defonStartButtonPress():
timePeriod=timePeriodEntry.get()
timePeriod=float(timePeriod)
ledBrightness=brightnessScale.get()
ledBrightness=float(ledBrightness)
startButton.config(state=Tkinter.DISABLED)
ledPin.write(ledBrightness/100.0)
sleep(timePeriod)
ledPin.write(0)
startButton.config(state=Tkinter.ACTIVE)
ForinformationabouttheScale()widget,youcanreferto
http://effbot.org/tkinterbook/scale.htm.Now,runtheexampleScale.pyfile.Youwillbe
abletoseethefollowingscreenshotwiththeEntry()andScale()widgets.Enterthetime
delay,dragtheslidertothebrightnessthatyouwant,andthenclickontheStartbutton:
YouwillbeabletoseetheLEDlightupwiththebrightnesssetbytheScale()widget.
OncetheLEDisturnedoffafterthegiventimedelay,youcanresettheslidertoanother
positiontodynamicallyvarythevalueforthebrightness.
TheGridgeometrymanager
Inthepreviousexercise,weaddedthreedifferentwidgetstotherootwindowusingthe
Packgeometrymanagerandthepack()method.Wedidn’tactivelyorganizethese
widgetsbutthePackmanagerautomaticallyarrangedthemintheverticalposition.While
designingameaningfulinterface,youneedtoarrangethesewidgetsintheappropriate
order.Ifyoulookatthepreviousoutputwindow,itisreallydifficulttoidentifythe
functionofeachwidgetortheirassociationwithothers.Inordertodesignanintuitive
GUI,youalsoneedtodescribethesewidgetsusingtheappropriatelabels.Asasolution,
TkinterprovidesanalternativewaytoorganizeyourwidgetsthatiscalledGrid
geometrymanager.
TheGridgeometrymanagerprovidesatwo-dimensional(2D)tableinterfacetoarrange
widgets.Everycellthatresultsfromtherowandcolumnofthe2Dtablecanbeusedasa
placeforthewidgets.Youwilllearnthevariousoptionsthatareprovidedbythegrid()
classtoorganizewidgetsinthenextprogrammingexercise.Openthe
exampleGridManager.pyfilefromthecodefolderofthischapter.Intermsof
functionalities,thisfilecontainsthesameprogramthatwebuiltinthepreviousexercise.
However,wehaveaddedmoreLabel()widgetsandorganizedthemusingtheGrid
geometrymanagertosimplifytheGUIandmakeitmoreuseful.
Asyoucanobserveinthecode,thetimePeriodEntryobject(anEntry()widget)now
usesthegrid()methodinsteadofthepack()method.Thegrid()methodisinitialized
withthecolumnandrowoptions.Thevaluessuppliedfortheseoptionsdeterminethe
positionofthecellwherethetimePeriodEntryobjectwillbeplaced.
Ontheotherhand,wehavealsocreatedalabelobjectusingtheLabel()widgetand
placeditbesidetheEntry()widgetinthesamerow.Thelabelcontainsadescription
stringthatisspecifiedusingthetextoption.Afterplacingitinacellusingthegrid()
method,widgetsarearrangedinthecenterinthatcell.Tochangethisalignment,youcan
usethestickyoptionwithoneormorevaluesfromN,E,S,andW,thatis,north,east,
south,andwest:
timePeriodEntry=Tkinter.Entry(top,bd=5)
timePeriodEntry.grid(column=1,row=1)
timePeriodEntry.focus_set()
Tkinter.Label(top,text="Time(seconds)").grid(column=2,row=1)
Wehaverepeatedthispracticeofplacingthewidgetinacellanddescribingitusinga
Label()widgetfortheobjectsoftheScale()andButton()widgetsaswell:
brightnessScale=Tkinter.Scale(top,from_=0,to=100,
orient=Tkinter.HORIZONTAL)
brightnessScale.grid(column=1,row=2)
Tkinter.Label(top,text="Brightness(%)").grid(column=2,row=2)
startButton=Tkinter.Button(top,text="Start",command=onStartButtonPress)
startButton.grid(column=1,row=3)
Asyoucanseeintheprecedingcodesnippet,weareusingdifferentrowvaluesforthe
widgetswhilehavingsimilarcolumnvalues.Asaresult,ourwidgetswillbeorganizedin
thesamecolumnandtheywillhavetheirdescriptionlabelsinthenextcolumnofthesame
row.Youcanskiptotheoutputwindowifyouwanttocheckthisorganizationpattern.
Sofar,wewererelyingontheusertomanuallyclosethemainwindow.However,youcan
createanotherButton()widgetandthroughthat,callthemethodtoclosethiswindow.In
thiscodingexercise,wehaveanadditionalbuttoncomparedtothepreviousexercisethat
iscalledexitButton.Thecommandparameterassociatedwiththisbuttonisquit,which
endstheloopstartedbytheTkintermethodtop.mainloop()andclosestheGUI:
exitButton=Tkinter.Button(top,
text="Exit",
command=top.quit)
exitButton.grid(column=2,row=3)
Inthiscodesample,thequitmethodisinitializedasacommandoptionanditcanbealso
becalledasamethod:
top.quit()
Beforewegoaheadtothenextstep,performtheappropriatechangesinthecodeandrun
theprogram.Youwillbepromptedwithawindowsimilartotheonedisplayedinthe
followingscreenshot:
Thereddottedlinesareinsertedlatertohelpyouidentifythegridandtheywon’tappear
inthewindowthatisopenedbyrunningtheprogram.Youcannowclearlyidentifythe
roleofeachwidgetduetothepresenceofthedescriptionlabelbesidethem.Intheopened
window,playaroundwiththetimeandbrightnessvalueswhileusingtheStartandExit
buttonstoperformtheassociatedactions.Fromthenextexercise,wewillstartusingthe
grid()methodregularlytoarrangethewidgets.
TheCheckbutton()widget–selecting
LEDs
Whiledevelopingcomplexprojects,youwillencounterscenarioswhereyouhaveto
dependontheusertoselectsingleormultipleoptionsfromagivensetofvalues.For
example,whenyouhavemultiplenumbersofLEDsinterfacedwiththeArduinoboard
andyouwanttheusertoselectanLEDorLEDsthatneedtobeturnedon.Thislevelof
customizationmakesyourinterfacemoreinteractiveanduseful.TheTkinterlibrary
providesaninterfaceforastandardwidgetcalledCheckbutton()thatenablesthemanual
selectionprocessfromthegivenoptions.
Inthisexercise,wearegoingtoworkwithboththeLEDs,greenandred,thatyou
connectedtotheArduinoboardatthebeginning.TheentirePythonprogramforthis
exerciseislocatedinthecodefolderwiththenameexampleCheckbutton.py.Openthe
filewiththesameeditorthatyouhavebeenusingallalong.Thisprogramimplementsthe
Checkbutton()widgetforuserstoselecttheredand/orgreenLEDwhentheStartbutton
isclicked.
Tounderstandtheentireprogramlogic,let’sstartfromtheinitializationandimportingof
thelibraries.Asyoucansee,nowwehavetwopinassignmentsfordigitalpins10and11
asredPinandgreenPinrespectively.ThecodefortheinitializationoftheArduinoboard
isunchanged:
port='/dev/cu.usbmodemfa1331'
board=pyfirmata.Arduino(port)
sleep(5)
redPin=board.get_pin('d:10:o')
greenPin=board.get_pin('d:11:o')
InourutilizationoftheCheckbutton()widget,weareusingaveryusefulTkinter
variableclassthatiscalledIntVar().TheTkintervariablecantellthesystemwhenthe
valueofthevariableischanged.TobetterunderstandtheTkintervariableclassandits
specificutilizationinourexercise,takealookatthefollowingcodesnippetfromthe
program:
redVar=Tkinter.IntVar()
redCheckBox=Tkinter.Checkbutton(top,
text="RedLED",
variable=redVar)
redCheckBox.grid(column=1,row=1)
TheCheckbutton()widgetletsauserselectbetweentwodifferentvalues.Thesevalues
areusually1(on)or0(off),makingtheCheckbutton()widgetaswitch.Tocapturethis
selection,thevariableoptionisrequiredinthewidgetdefinition.Avariablecanbe
initializedusingoneoftheTkintervariableclass,IntVar().
Asyoucansee,theredVarvariableobjectthatisinstantiatedusingtheIntVar()classis
usedforthevariableoptionwhiledefiningtheCheckbutton()widget,redCheckButton.
Therefore,anyoperationontheredCheckButtonobjectwillbetranslatedtotheredVar
variableobject.AsIntVar()isaTkinterclass,itautomaticallytakescareofanychanges
inthevariablevaluesthroughtheCheckbutton()widget.Therefore,itisadvisabletouse
theTkintervariableclassfortheCheckbutton()widgetinsteadofthedefaultPython
variables.AfterdefiningtheCheckbutton()widgetfortheredLED,wehaverepeated
thisprocessforthegreenLED,asshowninthefollowingcodesnippet:
greenVar=Tkinter.IntVar()
greenCheckBox=Tkinter.Checkbutton(top,
text="GreenLED",
variable=greenVar)
greenCheckBox.grid(column=2,row=1)
ThisprogramalsocontainstheStartandExitbuttonsandtheirrespectiveassociation
withtheonStartButtonPressandtop.quit()functions,similartohowweusedthemin
thepreviousexercise.Whencalled,theonStartButtonPressfunctionwillobtainthe
valuesoftheIntVar()variables,redVarandgreenVar,usingtheget()method.Inthis
case,thevariablevalueoftheCheckbutton()widgetwillbe1whenitischeckedand0
otherwise.Thiswillenabletheprogramtosendthevalue1or0totheArduinopinusing
thewrite()methodbycheckingoruncheckingthewidgetandultimately,turntheLED
onoroff:
defonStartButtonPress():
redPin.write(redVar.get())
greenPin.write(greenVar.get())
Asyoucansee,thecodealsoimplementsanadditionalStopbuttontoturnofftheLEDs
thatwereturnedonusingtheStartbutton:
stopButton=Tkinter.Button(top,
text="Stop",
command=onStopButtonPress)
stopButton.grid(column=2,row=2)
TheonStopButtonPrerss()functionassociatedwiththisbuttonturnsoffboththeLEDs
byusingwrite(0)onboththepins:
defonStopButtonPress():
redPin.write(0)
greenPin.write(0)
SinceyouhavenowlearnedabouttheTkintervariablesandtheCheckbutton()widget,
let’srunthePythonprogram,exampleCheckbutton.py.Asyoucanseeinthenext
screenshot,theGUIhastwoCheckbutton()widgetseachfortheredandgreenLEDs.As
thereisaseparateinitializationoftheCheckbutton()widgets,ausercancheckboththe
redandgreenLEDs.TkinteralsoprovidessimilarwidgetssuchasRadiobutton()and
Listbox()forcaseswhereyouwanttoselectonlyasinglevaluefromthegivenoptions.
Note
YoucanlearnmoreabouttheRadiobutton()andListbox()widgetsfromthefollowing
webpages:
http://effbot.org/tkinterbook/radiobutton.htm
http://effbot.org/tkinterbook/listbox.htm
TheLabel()widget–monitoringI/Opins
Arduinoprojectsoftendealwithreal-timesystemsandarerequiredtocontinuously
monitorinputvaluesfromdigitalandanalogpins.Therefore,ifthesevaluesarebeing
displayedonagraphicalinterface,theyneedtobeupdatedperiodicallyorwhenthestate
ofapinchanges.
IfyouobservethepreviousGUIexercises,youwillnoticethatweinitializedtheroot
windowusingmainloop()attheendofthecode,whichstartedtheTkinterloopand
initializedallthewidgetswiththeupdatedvalues.Oncethemainloop()wasinitialized,
wedidnotuseanyotherTkinterclassormethodtoperiodicallyupdatethewidgetswith
thelatestvalues.
Inthisexercise,wewilluseapotentiometertoprovidevariableinputtotheanalogpin0,
whichwillbereflectedbyTkinter’sLabel()widget.Toupdatethelabelanddisplaythe
valuesoftheanaloginput,wearegoingtoimplementafewPythonandTkintertricks.
Asweareusingapotentiometertoprovideinput,youwillneedtochangethecircuitas
displayedinthefollowingdiagram,beforejumpingtothePythonprogram:
ThePythonfileforthisexerciseislocatedinthecodefolderasthe
workingWithLabels.pyfile.Forthisexercise,let’srunthecodefirsttounderstandthe
premiseoftheexercise.MakesurethatyouhavetheappropriatestringfortheArduino
boardwhenyoudefinetheportvariable.Onsuccessfulexecution,theprogramwill
displaythefollowingscreenshotandyoucanclickontheStartbuttontoinitiatethe
continuousupdateofthepotentiometer’sinputvalue:
So,howdidwedothis?Thiscodecontainscomplexlogicandadifferentprogramflow
comparedtowhatwehavedonesofar.Asyoucanseefromthecode,weareusinga
variablecalledflagtotrackthestateoftheExitbuttonwhilecontinuouslyrunningthe
whileloopthatmonitorsandupdatesthevalue.Tounderstandtheprogramproperly,let’s
firstgetfamiliarwiththefollowingnewTkinterclassesandmethods:
BooleanVar():JustliketheIntVar()variableclassthatweusedtotracktheinteger
values,BooleanVar()isaTkintervariableclassthattrackschangesinBoolean:
flag=Tkinter.BooleanVar(top)
flag.set(True)
Intheprecedingcodesnippet,wehavecreatedavariableobject,flag,usingthe
BooleanVar()classandsetthevalueoftheobjectasTrue.BeingaBooleanobject,
flagcanonlyhavetwovalues,TrueorFalse.Tkinteralsoprovidesclassesfor
stringanddoubletypewiththeStringVar()andDoubleVar()classesrespectively.
Duetothis,whentheStartbuttonisclicked,thesystemstartsupdatingtheanalog
readvalue.TheExitbuttonsetstheflagvariabletofalse,breaksthewhileloop,
andstopsthemonitoringprocess.
update_idletasks:WhileusingtheTkinterlibraryinPython,youcanlinka
PythoncodetoanychangesthathappeninaTk()widget.ThislinkedPythoncodeis
calledacallback.Theupdate_idletasksmethodcallsallidletaskswithout
processinganycallbacks.Thismethodalsoredrawsthegeometrywidgets,if
required:
AnalogReadLabel.update_idletasks()
Inourexercise,thismethodcanbeusedtocontinuouslyupdatethelabelwiththe
latestpotentiometervalue.
update:Thistop-levelmethodprocessesallthependingeventsandcallbacksand
alsoredrawsanywidget,ifitisnecessary:
top.update()
Weareusingthismethodwiththerootwindowsothatitcanperformthecallbackfor
theStartbutton.
Nowlet’sgobacktotheopenedPythonprogram.Asyoucansee,besidesassigningan
analogpinthroughtheget_pin()methodandinitializingtheIterator()classoverthe
Arduinoboard,thecodecontainssimilarprogrammingpatternsthatweusedinthe
exercisesfortheotherTkinterwidgets.Inthiscode,weareperformingthereadoperation
fortheanalogpininsidetheonStartButtonPress()functionThisfunctionchecksthe
statusoftheflagvariablewhileperformingtheread()operationonthepinand
subsequentlyupdatesthevalueoftheanalogReadLabel()widgetifthevalueoftheflag
variableisTrue.IfthevalueoftheflagvariableisfoundtobeFalse,thefunctionwill
exitafterdisengagingtheArduinoboardandclosingtherootwindow.Duetotheuseof
thewhilestatement,thisprocesswillcontinuouslychecktheflagvalueuntilitisbroken
bytheonExitButtonPress()functionbychangingtheflagvaluetoFalse:
defonStartButtonPress():
whileTrue:
ifflag.get():
analogReadLabel.config(text=str(a0.read()))
analogReadLabel.update_idletasks()
top.update()
else:
break
board.exit()
top.destroy()
TheonExitButtonPress()functioniscalledfromtheExitbuttonanditsimplyresetsthe
flagvariabletoFalseusingtheset()method:
defonExitButtonPress():
flag.set(False)
RemakingyourfirstPython-Arduino
projectwithaGUI
Justtorefreshyourmemory,Iwouldliketoremindyouthatwecreatedamotion
detectionsystemthatgeneratedalertsbyblinkingtheredLEDwhenamotionwas
detected.Whileworkingwiththeproject,wewereprintingthestateoftheproximity
sensorontothePythonprompt.Inthisexercise,wearegoingtousetheconceptsthatyou
learnedinthepreviousexercisesandwewillcreateaninterfaceforourproject.
Aspartofthisexercise,youhavetoconnectthesamecircuitthatweusedinChapter3,
TheFirstProject–Motion-triggeredLEDs.Makesureyouhavetheexactsamecircuit
withthePIRsensorandtheLEDsbeforeyoumoveahead.Onceyouarereadywithyour
hardware,openthefirstProjectWithGUI.pyfilefromthecodefolderofthischapter.In
thecode,changetheappropriateportvaluesandruntheGUIfortheproject.
Asyoucanseeinthepinassignments,wenowhavethreedigitalpins—twoofthemas
outputsandoneasaninput.TheoutputpinsareassignedtotheredandgreenLEDswhile
theinputpinisassignedtothePIRmotionsensor.IfthePIRsensorisinidlemode,we
willperformaonetimeread()operationtowakeupthesensor:
pirPin=board.get_pin('d:8:i')
redPin=board.get_pin('d:10:o')
greenPin=board.get_pin('d:11:o')
pirPin.read()
OneoftheimportantfunctionsthatisimplementedbythecodeisblinkLED().This
functionupdatestheLabel()widgetthatisassignedtodescribethestatusofthemotion
sensor.ItalsoblinksthephysicalLEDsusingthewrite()methodandtheinsertedtime
delay.Asinputparameters,theblinkLED()functionacceptsthepinobjectandamessage
stringfromthefunctioncall,wherethepinobjects,thatis,redPinorgreenPin,shouldbe
oneofthepinassignmentfortheLEDs:
defblinkLED(pin,message):
MotionLabel.config(text=message)
MotionLabel.update_idletasks()
top.update()
pin.write(1)
sleep(1)
pin.write(0)
sleep(1)
TheothertwoTkinterrelatedfunctions,onStartButtonPress()and
onExitButtonPress(),arebasicallyderivedfromthepreviousexercise.Inthisversionof
onStartButtonPress(),wecalltheblinkLED()functioniftheflagvariableisTrueand
themotionisdetectedusingpinPir.read():
defonStartButtonPress():
whileTrue:
ifflag.get():
ifpirPin.read()isTrue:
blinkLED(redPin,"MotionDetected")
else:
blinkLED(greenPin,"NomotionDetected")
else:
break
board.exit()
top.destroy()
Theprogramalsoinstantiatestwobuttons,StartandExit,andonelabelusingthe
methodssimilartothoseweusedinthepreviousexercises.
Asyoucanobservefromthecode,thelogicbehindthemotiondetectionsystemisstillthe
same.Weareonlyaddingalayerofgraphicalinterfacetodisplaythestateofthedetected
motioncontinuouslyusingaLabel()widget.WehavealsoaddedtheStartandExit
buttonstocontroltheprojectexecutioncycle.Onceyourunthecode,youwillbeableto
seeawindowsimilartotheonedisplayedinthefollowingscreenshot.ClickontheStart
buttonandwaveinfrontofthemotionsensor.Ifthesensordetectsthemotion,thelabel
willchangefromNomotiondetectedtoMotiondetected.
Summary
Nowyouhavehands-onexperienceofbuildingabasicGUItohandleArduinoprojects.
Withminormodificationstotheincludedexercises,youcanusethemtocreateaGUIfor
alargevarietyofArduinoprototypingprojects.Intheprevioustwoexercises,we
displayedthesensoroutputsasstringsinlabelwidgets.Itwillbemoremeaningfulifthese
numericalvaluesareplottedasagraphandstoredforfurtheranalysis.Thisiswhatyou
aregoingtoperforminthenextchapter.
Chapter6.StoringandPlottingArduino
Data
SensorsthatareconnectedtoArduinoproducelotsofanaloganddigitaldata.Analog
sensorsproducedatapointsasnumericalinformationwhiledigitalsensorsproduce
Booleanvalues,thatis,1(on)or0(off).Untilnow,weprintedthisdataasastringonthe
commandpromptordisplayeditinaGUI.Thedatawasbeingprintedinrealtimeandit
wasnotbeingsavedforanyfurtheranalysis.Insteadofusingthestringformat,ifthedata
isprintedasaplotorgraph,itwillprovideusefulinformationforustorapidlyunderstand
itandderiveconclusions.Plotsareevenmoreusefulforreal-timeapplicationsastheycan
provideinformationregardingthesystem’sbehaviorforbetterunderstandingofthedata.
Thischapterisorganizedaroundtwomajorsections:storingtheArduinosensordataand
plottingthisdata.WewillstartbycreatingandmanipulatingfilesusingPython.Afterthat,
wewillworkwithmethodsforstoringArduinodataintheCSVfileformat.Inthesecond
section,youwillbeintroducedtothePythonplottinglibrary,matplotlib.Then,wewill
workwithexamplesthatdealwithplottingdatafromasavedfileandalsofromreal-time
sensorreadings.Intheend,wewilltrytointegratethematplotlibplotswiththeTkinter
windowthatwecreatedinthepreviouschapter.
Intermsofhardwarecomponents,wewillbeworkingwithfamiliarsensorssuchasa
potentiometerandthePIRmotionsensor,whichweusedinthepreviouschapters,so,you
willnothavetolearnorbuyanyadditionalsensorsforthischapter.
WorkingwithfilesinPython
Pythonprovidesbuilt-inmethodstocreateandmodifyfiles.File-relatedPython
operationsareusefulinalargenumberofprogrammingexercises.Thesemethodsare
providedbystandardPythonmodulesanddonotrequireinstallationofadditional
packages.
Theopen()method
Theopen()methodisadefaultmethodthatisavailableinPythonanditisoneofthemost
widelyusedfunctionstomanipulatefiles.Now,thefirststepofdealingwithafileisto
openit:
>>>f=open('test.txt','w')
Thiscommandwillcreateatest.txtfileinthesamefolderinwhichyoustartedthe
Pythoninterpreterorthelocationfromwherethecodeisbeingexecuted.Thepreceding
commandusesthewmodethatopensafileforwritingorcreatesanewoneifitdoesn’t
exist.Theothermodesthatcanbeusedwiththeopen()functionaredisplayedinthe
followingtable:
Mode Description
w
Thisopensorcreatesafileforwritingonly.Itoverwritesanexistingfile.
w+
Thisopensorcreatesafileforwritingandreading.Itoverwritesanexistingfile.
r
Thisopensafileforreadingonly.
r+
Thisopensafileforreadingandwriting.
a
Thisopensafileforappending.Itstartsappendingfromtheendofthedocument.
a+
Thisopensafileforappendingandreading.Itstartsappendingfromtheendofthedocument.
Note
Makesurethatyouhavetheproperreadandwritepermissionsforthefilesifyouare
utilizingthesemodesinaUnixorLinuxenvironment.
Thewrite()method
Oncethefileisopeninoneofthewritingorappendingmodes,youcanstartwritingtothe
fileobjectusingthismethod.Thewrite()methodonlytakesastringasaninput
argument.Anyotherdataformatneedstobeconvertedintoastringbeforeitiswritten:
>>>f.write("HelloWorld!\n")
Inthisexample,wearewritingtheHelloWorld!stringthatendswithanewline
character,\n.Thisnewlinecharacterhasbeenexplainedinthepreviouschapterandyou
canobtainmoreinformationaboutitathttp://en.wikipedia.org/wiki/Newline.
Youcanalsousethewritelines()methodifyouwanttowriteasequenceofstringsto
thefile:
>>>sq=["PythonprogrammingforArduino\n","Bye\n"]
>>>f.writelines(sq)
Theclose()method
Theclose()methodclosesthefileandfreesystemresourcesthatareoccupiedbythefile.
Oncetheyareclosed,youcan’tusethefileobjectasithasbeenflushedalready.Itisa
goodpracticetoclosethefileonceyouaredoneworkingwithafile:
>>>f.close()
Theread()method
Thisread()methodreadsthecontentofanopenedfilefromthebeginningtotheend.To
usethismethod,youneedtoopenthefilewithoneofthereadingcompatiblemodessuch
asw+,r,r+,ora+:
>>>f=open('test.txt','r')
>>>f.read()
'HelloWorld!\nPythonprogrammingforArduino\nBye\n'
>>>f.close()
Astheread()methodgrabstheentirecontentsofthefileintomemory,youcanuseit
withtheoptionalsizeparametertoavoidanymemorycongestionwhileworkingwith
largefiles.Asanalternativemethod,youcanusethereadlines()methodtoreadthe
contentofanopenedfilelinebyline:
>>>f=open('test.txt','r')
>>>l=f.readlines()
>>>printl
['HelloWorld!\n','PythonprogrammingforArduino\n','Bye\n']
>>>f.close()
Asyoucanseeintheprecedingexample,eachstringisprintedasanelementofalistthat
youcanaccessindividually.Youcanplayaroundwiththesemethodstogetfamiliarwith
creatingandmodifyingfiles.Theseexerciseswillbehandyfortheupcomingcoding
exercises.
Thewithstatement–Pythoncontextmanager
Althoughthewithstatementcanbeusedtocovertheexecutionofacodeblockthatis
definedbyacontextmanager,itiswidelyusedinPythontodealwithfiles.Executethe
followingcommandonthePythoninteractiveprompt,assumingthatyouhavealready
executedthepreviouscommandsandhavethetest.txtfilewithsomedata:
>>>withopen('test.txt','r')asf:
lines=f.readlines()
forlinlines:
printl
Onexecution,youwillbeabletoseeeachlineofthefileprintedonthecommandprompt.
Thewithstatementwhileusedwiththeopen()methodcreatesacontextmanager,which
executesthewrappedcodewhileautomaticallytakingcareofclosingthefile.Thisisthe
recommendedmethodtoworkwithfilesinPythonandwewillbeutilizingitinallofour
exercises.YoucanlearnmoreaboutthePythoncontextmanageronthefollowing
websites:
https://docs.python.org/2/reference/compound_stmts.html#with
http://preshing.com/20110920/the-python-with-statement-by-example/
UsingCSVfilestostoredata
Nowyouknowmethodstoopen,manipulate,andclosefilesusingPython.Intheprevious
examples,weusedthePythoninterpreterandstringdatatogetfamiliarwiththese
methods.Butwhenitcomestosavingalargenumberofnumericalvaluesfromsensor
data,thecommaseparatedvalues(CSV)fileformatisoneofthemostwidelyusedfile
formatsotherthantext.Asthenamestates,valuesareseparatedandstoredusingcommas
orotherdelimiterssuchasaspaceortab.Pythonhasabuilt-inmoduletodealwithCSV
files.
Tobeginwith,usethefollowingcodesnippettocreateaPythonfileandrunyourfirst
CSVprogram:
importcsv
data=[[1,2,3],['a','b','c'],['Python','Arduino','Programming']]
withopen('example.csv','w')asf:
w=csv.writer(f)
forrowindata:
w.writerow(row)
YoucanalsoopenthecsvWriter.pyfilefromthischapter’scodefolder,whichcontains
thesamecode.Afterexecutingthecode,youwillbeabletofindafilenamed
example.csvinthesamelocationasthisfile,whichwillcontainthedataseparatedwith
commas.
Asyoucanseeinthecode,theCSVmoduleoffersthewriter()functionontheopened
filethatinitializesawriterobject.Thewriterobjecttakesasequenceorarrayofdata
(integer,float,string,andsoon)asinputandjoinsthevaluesofthisarrayusingthe
delimitercharacter:
w=csv.writer(f)
Intheprecedingexample,sincewearenotusingadelimiteroption,theprogramwilltake
thedefaultcharactercommaasthedelimiter.Ifyouwanttousespaceasthedelimiter
character,youcanusethefollowingwriter()option:
w=csv.writer(f,delimiter='')
Towriteeachelementofalisttoanewlineofthiswriterobject,weusethewriterow()
method.
Similarly,PythonCSVmodulealsoprovidesthereader()functiontoreadaCSVfile.
Checkoutthefollowingexampletolearnmoreaboutthisfunction,oryoucanopenthe
csvReader.pyfilefromthenextchapter’scodefolder:
importcsv
withopen('example.csv','r')asfile:
r=csv.reader(file)
forrowinr:
printrow
Thereader()functioncreatesareaderobjecttoiterateoverlinesintheopenedCSVfile.
Thereaderobjectretrieveseachelementofarowbysplittingitusingthedelimiter.You
canaccesseachlineofthefilebyiteratingovertheobjectusingtheforloopasdisplayed
intheprecedingcodesnippet,orusethenext()methodeverytimeyouwanttoaccessthe
nextline.Onexecutionofthepreviouscode,youwillbeabletoseethreeseparatearray
liststhatareprintedwiththreeindividualelements.
Tip
ToopentheCSVfilesexternally,youcanuseaspreadsheetprogramsuchasMicrosoft
Excel,OpenOfficeCalc,orAppleNumbers.
StoringArduinodatainaCSVfile
Intheprevioustwosections,youlearnedmethodstostorevaluesinaCSVfile.Although
thedatarequiredforthefilewasalreadyinitializedinthecode,thesamecodecouldbe
modifiedtostoreArduinoinputdata.
TobeginwithstoringArduinodata,let’screateacircuitthatproducesthesevaluesforus.
WeusedamotionsensorintheprojectofChapter3,TheFirstProject–Motion-triggered
LEDs,andapotentiometerintheexerciseofChapter4,DivingintoPython-Arduino
Prototyping.Wewillbeusingthesetwosensorstoprovideuswithdigitalandanalog
inputvaluesrespectively.Todevelopthecircuitrequiredforthisexercise,connectthe
potentiometertotheanalogpin0andthePIRmotionsensortodigitalpin11,asdisplayed
inthefollowingdiagram:
ConnectotherArduinopinssuchas5Vandtheground,asshownintheprecedingFritzing
diagram.AswearegoingtousepyFirmatatointerfacePythonwiththeArduinoboard,
youwillhavetouploadtheStandardFirmatasketchtotheArduinoboardusingthe
methoddescribedinChapter3,TheFirstProject–Motion-triggeredLEDs.
Note
Whenyouareworkingwithprototyping,youreallydon’tneedlarge,powerful,and
computation-intensivedatabasestodealwithinformation.Theeasiestandquickestwayto
workwithsensordatainthisphaseisbyusingCSVfiles.
OnceyouhaveyourArduinoboardreadywiththeappropriateconnections,usethe
followingcodesnippettocreateaPythonfileandrunit.Youcanalsoopenthe
csvArduinoStore.pyfilefromthischapter’scodefolder:
importcsv
importpyfirmata
fromtimeimportsleep
port='/dev/cu.usbmodemfa1331'
board=pyfirmata.Arduino(port)
it=pyfirmata.util.Iterator(board)
it.start()
pirPin=board.get_pin('d:11:i')
a0=board.get_pin('a:0:i')
withopen('SensorDataStore.csv','w')asf:
w=csv.writer(f)
w.writerow(["Number","Potentiometer","Motionsensor"])
i=0
pirData=pirPin.read()
potData=a0.read()
whilei<25:
sleep(1)
ifpirDataisnotNone:
i+=1
row=[i,potData,pirData]
w.writerow(row)
print"Done.CSVfileisready!"
board.exit()
Whilethecodeisrunning,rotatetheknobofthepotentiometerandwaveyourhandin
frontofthemotionsensors.Thisactionwillhelpyoutogenerateandmeasuredistinct
valuesfromthesesensors.Meanwhile,theprogramwilllogthisdatainthe
SensorDataStore.csvfile.Whencomplete,opentheSensorDataStore.csvfileusing
anytextviewerorspreadsheetprogramandyouwillbeabletoseethesesensorvalues
storedinthefile.Now,let’strytounderstandtheprogram.
Asyoucanobservefromthecode,wearenotutilizinganewmoduletointerfacethe
Arduinoboardorstoresensorvaluestothefile.Instead,wehaveutilizedthesame
methodsthatweusedinthepreviousexercises.Thecodehastwodistinctcomponents:
Python-ArduinointerfacingandstoringdatatoaCSVfile.Byskippingtheexplanationof
pyFirmatamethodstointerfacetheArduinoboard,let’sfocusonthecodethatis
associatedwithstoringthesensordata.ThefirstlinethatwewillwritetotheCSVfile
usingwriterow()istheheaderlinethatexplainsthecontentofthecolumns:
w.writerow(["Number","Potentiometer","Motionsensor"])
Later,wewillobtainthereadingsfromthesensorsandwritethemtotheCSVfile,as
showninthefollowingcodesnippet.Wewillrepeatthisprocess25timesasdefinedby
thevariable,i.Youcanchangethevalueofiaccordingtoyourrequirements.
whilei<25:
sleep(1)
ifpirDataisnotNone:
i+=1
row=[i,potData,pirData]
w.writerow(row)
Thenextquestionishowcanyouutilizethiscodingexerciseinyourcustomprojects?The
programhasthreemainsectionsthatcanbecustomizedtoaccomplishyourproject
requirements,whichareasfollows:
Arduinopins:YoucanchangetheArduinopinnumbersandthenumberofpinsto
beutilized.Youcandothisbyaddingadditionalsensorvaluestotherowobject.
TheCSVfile:Thenameofthefileanditslocationcanbechangedfrom
SensorDataStore.csvtotheonethatisspecifictoyourapplication.
Thenumberofdatapoints:Wehavecollected25differentpairsofdatapoints
whilerunningthewhileloopfor25iterations.Youcanchangethisvalue.Youcan
alsochangethetimedelaybetweeneachsuccessivepointfromonesecond,asused
intheprogram,tothevaluethatyouneed.
Gettingstartedwithmatplotlib
ThematplotliblibraryisoneofthemostpopularandwidelysupportedPythonplotting
libraries.AlthoughmatplotlibisinspiredbyMATLAB,itisindependentofMATLAB.
SimilartootherPythonlibrariesthatwehavebeenusing,itisanopensourcePython
library.Thematplotliblibraryassistsincreating2Dplotsfromsimplelinesofcodefrom
easytousebuilt-infunctionsandmethods.Thematplotliblibraryisextensivelyusedin
Python-basedapplicationsfordatavisualizationandanalysis.ItutilizesNumPy(theshort
formofnumericalPython)andSciPy(shortformofscientificPython)packagesfor
mathematicalcalculationsfortheanalysis.Thesepackagesaremajordependenciesfor
matplotlibincludingfreetypeandpyparsing.Makesurethatyouhavethesepackages
preinstalledonyoursystemifyouareusinganyotherinstallationmethodsbesidesthe
onesmentionedinthenextsection.Youcanobtainmoreinformationaboutthe
matplotliblibraryfromitsofficialwebsite(http://matplotlib.org/).
ConfiguringmatplotlibonWindows
BeforeweinstallmatplotlibonWindows,makesurethatyouhaveyourWindows
operatingsystemwiththelatestversionofPython2.xdistribution.InChapter1,Getting
StartedwithPythonandArduino,weinstalledSetuptoolstodownloadandinstall
additionalPythonpackages.MakesurethatyouhaveSetuptoolsinstalledandconfigured
properly.Beforeweadvancefurther,wewillhavetoinstalldependenciesformatplotlib.
Openthecommandpromptandusethefollowingcommandtoinstallthedateutiland
pyparsingpackages:
>easy_install.exepython_dateutil
>easy_install.exepyparsing
Onceyouhavesuccessfullyinstalledthesepackages,downloadandinstallthe
precompiledNumPypackagefromhttp://sourceforge.net/projects/numpy/.Makesurethat
youchoosetheappropriateinstallationfilesforPython2.7andthetypeofyourWindows
operatingsystem.
Now,yourcomputershouldhavesatisfiedalltheprerequisitesformatplotlib.Download
andinstalltheprecompiledmatplotlibpackagefrom
http://matplotlib.org/downloads.html.
Inthisinstallationprocess,wehaveavoidedtheusageofSetuptoolsforNumPyand
matplotlibbecauseofsomeknownissuesrelatedtomatplotlibintheWindows
operatingsystem.IfyoucanfigureoutwaystoinstallthesepackagesusingSetuptools,
thenyoucanskiptheprecedingmanualsteps.
ConfiguringmatplotlibonMacOSX
InstallationofmatplotlibonMacOSXcanbedifficultdependingupontheversionof
MacOSXandtheavailabilityofdependencies.MakesurethatyouhaveSetuptools
installedasdescribedinChapter1,GettingStartedwithPythonandArduino.Assuming
thatyoualreadyhaveSetuptoolsandpip,runthefollowingcommandontheterminal:
$sudopipinstallmatplotlib
Executingthiscommandwillleadtooneofthefollowingthreepossibilities:
Successfulinstallationofthelatestmatplotlibversion
Notificationthattherequirementsarealreadysatisfiedbuttheinstalledversionis
olderthanthecurrentversion,whichis1.3atthemoment
Errorwhileinstallingthematplotlibpackage
Ifyouencounterthefirstpossibility,thenyoucanadvancetothenextsection;otherwise
followthetroubleshootinginstructions.Youcancheckyourmatplotlibversionusingthe
followingcommandsonthePythoninteractiveprompt:
>>>importmatplotlib
>>>matplotlib.__version__
Upgradingmatplotlib
Ifyouencounterthesecondpossibility,whichstatesthattheexistingversionofthe
matplotlibisolderthanthecurrentversion,usethefollowingcommandtoupgradethe
matplotlibpackage:
$sudopipinstall–-upgradematplotlib
Gothroughthenextsectionincaseyouendupwitherrorsduringthisupgrade.
Troubleshootinginstallationerrors
Ifyouencounteranyerrorsduringthematplotlibinstallationviapip,itismostlikely
thatyouaremissingsomedependencypackages.Followthesestepsonebyoneto
troubleshoottheerrors.
Tip
Aftereverystep,useoneofthefollowingcommandstocheckwhethertheerroris
resolved:
$sudopipinstallmatplotlib
$sudopipinstall–-upgradematplotlib
1. InstallXcodefromApple’sAppStore.OpenXcodeandnavigatetotheDownload
tabinPreferences….DownloadandinstallCommandLineToolsfrom
Preferences….Thisstepshouldsolveanycompilation-relatederrors.
2. Installhomebrewusingthefollowingcommandintheterminal:
$ruby-e"$("$(curl-fsSL
https://raw.github.com/Homebrew/homebrew/go/install)")"
3. Installthefollowingpackagesusinghomebrew:
$brewinstallfreetype
$brewinstallpkg-config
Ifyoustillreceiveanerrorwiththefreetypepackage,trytocreatealinkfor
freetypeusingthefollowingcommand:
$brewlinkfreetype
$ln-s/usr/local/opt/freetype/include/freetype2
/usr/local/include/freetype
Ifyoureceiveanyfurthererrorsafterperformingtheprecedingsteps,gotothe
matplotlibforumsathttp://matplotlib.1069221.n5.nabble.com/forthosespecific
errors.
Note
IfyouusematplotlibinMacOSX,youneedtosetuptheappropriatedrawing
backendasshowninthefollowingcodesnippet:
importmatplotlib
matplotlib.use('TkAgg''')
Youcanlearnmoreaboutdrawingbackendsformatplotlibat
http://matplotlib.org/faq/usage_faq.html#what-is-a-backend.
SettingupmatplotlibonUbuntu
Theinstallationofmatplotlibandtherequireddependenciesisaverystraightforward
processonUbuntu.WecanperformthisoperationwithoutusingSetuptoolsandwiththe
helpoftheUbuntupackagemanager.Thefollowingsimplecommandshoulddothetrick
foryou:
$sudoapt-getinstallpython-matplotlib
Whenpromptedtoselectdependencies,clickonYestoinstallthemall.Youshouldbe
abletofindthematplotlibpackageinotherpopularLinuxdistributionstoo.
Plottingrandomnumbersusing
matplotlib
Thematplotliblibraryprovidesacollectionofbasicplotting-relatedfunctionsand
methodsviathepyplotframework.Thepyplotframeworkcontainsfunctionsforcreating
figures,drawingplots,settinguptitles,settingupaxes,andmanyadditionalplotting
methods.Oneoftheimportfunctionsprovidedbypyplotisfigure().Thisinitializesan
emptyfigurecanvasthatcanbeselectedforyourplotorasetofplots:
fig1=pyplot.figure(1)
Youcansimilarlycreatemultiplefiguresbyspecifyinganumberastheparameter,thatis,
figure(2).Ifafigurewiththisnumberalreadyexists,themethodactivatestheexisting
figurethatcanthenbefurtherusedforplotting.
Thematplotliblibraryprovidestheplot()methodtocreatelinecharts.Theplot()
methodtakesalistoranarraydatastructurethatismadeupofintegerorfloatingpoint
numbersasinput.Iftwoarraysareusedasinputs,plot()utilizesthemasvaluesforthex
axisandtheyaxis.Ifonlyonelistorarrayisprovided,plot()assumesittobethe
sequencevaluesfortheyaxisandusesauto-generatedincrementalvaluesforthexaxis:
pyplot.plot(x,y)
Thethirdoptionalparameterthatissupportedbytheplot()methodisfortheformat
string.Theseparametershelpuserstochangethestyleoflineandmarkerswithdifferent
colors.Inourexample,weareusingthesolidlinestyle.So,theplot()functionforour
plotlookslikethis:
pyplot.plot(x,y,'-')
Theplot()functionprovidesaselectionfromalargecollectionofstylesandcolors.To
findmoreinformationabouttheseparameters,usePython’shelp()functiononthe
plot()functionofmatplotlib:
>>>importmatplotlib
>>>help(matplotlib.pyplot.plot)
Thishelp()functionwillprovidethenecessaryinformationtocreateplottingstyleswith
differentmarkers,linestyles,andcolors.Youcanexitthishelpmenubytypingqatthe
prompt.
Now,aswehaveexploredplottingsufficiently,let’screateyourfirstPythonplotusingthe
followingcodesnippet.Theprogramcontainingthiscodeisalsolocatedinthischapter’s
codefolderwiththenameplotBasic.py:
frommatplotlibimportpyplot
importrandom
x=range(0,25)
y=[random.randint(0,100)forrinrange(0,25)]
fig1=pyplot.figure()
pyplot.plot(x,y,'-')
pyplot.title('FirstPlot-Randomintegers')
pyplot.xlabel('XAxis')
pyplot.ylabel('YAxis')
pyplot.show()
Inthepreviousexercise,werandomlygeneratedadatasetfortheyaxisusingthe
randint()method.Youcanseeaplotdepictingthisdatawiththesolidlinestyleinan
openedwindowafterrunningtheprogram.Asyoucanseeinthecodesnippet,weused
theadditionalpyplotmethodssuchastitle(),xlabel(),ylabel(),andplot().These
methodsareself-explanatoryandtheyarelargelyusedtomakeyourplotsmore
informativeandmeaningful.
Atendoftheexample,weusedoneofthemostimportantpyplotmethodscalledshow().
Theshow()methoddisplaysthegeneratedplotsinafigure.Thismethodisnotmandatory
todisplayfigureswhenrunningfromPython’sinteractiveprompt.Thefollowing
screenshotillustratestheplotofrandomlygeneratedvaluesusingmatplotlib:
PlottingdatafromaCSVfile
Atthebeginningofthechapter,wecreatedaCSVfilefromArduinodata.Wewillbe
usingthatSensorDataStore.csvfileforthissection.Ifyourecall,weusedtwodifferent
sensorstologthedata.Hence,wehavetwoarraysofvalues,onefromadigitalsensorand
anotherfromtheanalogone.Now,inthepreviousexample,wejustplottedonesetof
valuesfortheyaxis.So,howarewegoingtoplottwoarraysseparatelyandina
meaningfulway?
Let’sstartbycreatinganewPythonprogramusingthefollowinglinesofcodeorby
openingtheplotCSV.pyfilefromthischapter’scodefolder:
importcsv
frommatplotlibimportpyplot
i=[]
mValues=[]
pValues=[]
withopen('SensorDataStore.csv','r')asf:
reader=csv.reader(f)
header=next(reader,None)
forrowinreader:
i.append(int(row[0]))
pValues.append(float(row[1]))
ifrow[2]=='True':
mValues.append(1)
else:
mValues.append(0)
pyplot.subplot(2,1,1)
pyplot.plot(i,pValues,'-')
pyplot.title('Lineplot-'+header[1])
pyplot.xlim([1,25])
pyplot.xlabel('XAxis')
pyplot.ylabel('YAxis')
pyplot.subplot(2,1,2)
pyplot.bar(i,mValues)
pyplot.title('Barchart-'+header[2])
pyplot.xlim([1,25])
pyplot.xlabel('XAxis')
pyplot.ylabel('YAxis')
pyplot.tight_layout()
pyplot.show()
Inthisprogram,wehavecreatedtwoarraysofsensorvalues—pValuesandmValues—by
readingtheSensorDataStore.csvfilerowbyrow.Here,pValuesandmValuesrepresent
thesensordataforthepotentiometerandthemotionsensorrespectively.Oncewehad
thesetwolists,weplottedthemusingthematplotlibmethods.
Thematplotliblibraryprovidesvariouswaystoplotdifferentarraysofvalues.Youcan
individuallyplotthemintwodifferentfiguresusingfigure(),thatis,figure(1)and
figure(2),orplotbothinasingleplotinwhichtheyoverlayeachother.Thepyplot
methodalsooffersathirdmeaningfulalternativebyallowingmultipleplotsinasingle
figureviathesubplot()method:
pyplot.subplot(2,1,1)
Thismethodisstructuredassubplot(nrows,ncols,plot_number),whichcreatesgrids
onthefigurecanvasusingrowandcolumnnumbers,thatis,nrowsandncols
respectively.Thismethodplacestheplotonthespecificcellthatisprovidedbythe
plot_numberparameter.Forexample,throughsubplot(2,1,1),wecreatedatableof
tworowsandonecolumnandplacedthefirstsubplotinthefirstcellofthetable.
Similarly,thenextsetofvalueswasusedforthesecondsubplotandwasplacedinthe
secondcell,thatis,row2andcolumn1:
pyplot.subplot(2,1,2)
Inthefirstsubplot,wehaveusedtheplot()methodtocreateaplotusingtheanalog
valuefromthepotentiometer,thatis,pValues.Whileinthesecondsubplot,wecreateda
barchartinsteadofalinecharttodisplaythedigitalvaluesfromthemotionsensor.The
barchartfunctionalitywasprovidedbythebar()method.
Asyoucanseeinthecodesnippet,wehaveutilizedanadditionalpyplot()methodcalled
xlim().Thexlim([x_minimum,x_maximum])orylim([y_minimum,y_maximum])
methodsareusedtoconfinetheplotbetweenthegivenmaximumandminimumvaluesof
theparticularaxes.
Beforewedisplayedthesesubplotsinthefigureusingtheshow()method,weusedthe
tight_layout()functiontoorganizethetitleandlabeltextsinthefigure.The
tight_layout()functionisaveryimportantmatplotlibmodulethatnicelyfitthe
subplotparametersinonefigure.Youcanchecktheeffectsofthismodulebycommenting
thatlineandrunningthecodeagain.Thefollowingscreenshotshowsthesesubplotswith
labelsandatitleinonefigureobject:
Plottingreal-timeArduinodata
Inthepreviouschapter,whiledealingwithGUIandArduinodata,youmusthavenoticed
thatthecodewasupdatingtheinterfacewitheverynewvaluethatwasobtainedfromthe
Arduinosensors.Similarly,inthisexercise,wewillberedrawingtheploteverytimewe
receivenewvaluesfromArduino.Basically,wewillbeplottingandupdatingareal-time
chartinsteadofplottingtheentiresetofsensorvaluesaswedidinthepreviousexercise.
WewillbeusingthesameArduinocircuitthatyoubuiltinthepreviousexercises.Here,
wewillutilizeonlythepotentiometersectionofthecircuittoobtaintheanalogsensor
values.Now,beforeweexplainthenewmethodsusedinthisexercise,let’sfirstopenthe
programfileforthisexercise.Youcanfindtheprogramfilefromthischapter’sfolder;itis
namedplotLive.py.Inthecode,changetheappropriateparametersfortheArduino
boardandexecutethecode.Whilethecodeisrunning,rotatetheknobofthe
potentiometertoobservethereal-timechangesintheplot.
Onrunningtheprogram,youwillgetascreensimilartothefollowingscreenshotthat
showsaplotfromreal-timeArduinodata.
Onecanmakevariousconclusionsaboutthepotentiometer’sknobrotationorsomeother
sensorbehaviorbyjustlookingattheplot.Thesetypesofplotsarewidelyusedinthe
graphicaldashboardforreal-timemonitoringapplications.Now,let’strytounderstandthe
methodsthatareusedinthefollowingcodesnippettomakethispossible.
importsys,csv
frommatplotlibimportpyplot
importpyfirmata
fromtimeimportsleep
importnumpyasnp
#AssociateportandboardwithpyFirmata
port='/dev/cu.usbmodemfa1321''
board=pyfirmata.Arduino(port)
#Usingiteratorthreadtoavoidbufferoverflow
it=pyfirmata.util.Iterator(board)
it.start()
#Assignaroleandvariabletoanalogpin0
a0=board.get_pin(''a:0:i'')
#Initializeinteractivemode
pyplot.ion()
pData=[0]*25
fig=pyplot.figure()
pyplot.title(''Real-timePotentiometerreading'')
ax1=pyplot.axes()
l1,=pyplot.plot(pData)
pyplot.ylim([0,1])
#real-timeplottingloop
whileTrue:
try:
sleep(1)
pData.append(float(a0.read()))
pyplot.ylim([0,1])
delpData[0]
l1.set_xdata([iforiinxrange(25)])
l1.set_ydata(pData)#updatethedata
pyplot.draw()#updatetheplot
exceptKeyboardInterrupt:
board.exit()
break
Thereal-timeplottinginthisexerciseisachievedbyusingacombinationofthepyplot
functionsion(),draw(),set_xdata(),andset_data().Theion()methodinitializesthe
interactivemodeofpyplot.Theinteractivemodehelpstodynamicallychangethexandy
valuesoftheplotsinthefigure:
pyplot.ion()
OncetheinteractivemodeissettoTrue,theplotwillonlybedrawnwhenthedraw()
methodiscalled.
JustlikethepreviousArduinointerfacingexercises,atthebeginningofthecode,we
initializedtheArduinoboardusingpyFirmataandthesetuppinstoobtainthesensor
values.Asyoucanseeinthefollowinglineofcode,aftersettinguptheArduinoboard
andpyplotinteractivemode,weinitializedtheplotwithasetofblankdata,0inourcase:
pData=[0]*25
Thisarrayforyvalues,pData,isthenusedtoappendvaluesfromthesensorinthewhile
loop.Thewhileloopkeepsappendingthenewestvaluestothisdataarrayandredrawsthe
plotwiththeseupdatedarraysforthexandyvalues.Inthisexample,weareappending
newsensorvaluesattheendofthearraywhilesimultaneouslyremovingthefirstelement
ofthearraytolimitthesizeofthearray:
pData.append(float(a0.read()))
delpData[0]
Theset_xdata()andset_ydata()methodsareusedtoupdatethexandyaxesdatafrom
thesearrays.Theseupdatedvaluesareplottedusingthedraw()methodoneachiteration
ofthewhileloop:
l1.set_xdata([iforiinxrange(25)])
l1.set_ydata(pData)#updatethedata
pyplot.draw()#updatetheplot
Youwillalsonoticethatweareutilizinganxrange()functiontogeneratearangeof
valuesaccordingtotheprovidedlength,whichis25inourcase.Thecodesnippet,[ifor
iinxrange(25)],willgeneratealistof25integernumbersthatstartincrementallyat0
andendat24.
IntegratingplotsintheTkinterwindow
DuetothepowerfulintegrationcapabilitiesofPython,itisveryconvenienttointerface
theplotsgeneratedbythematplotliblibrarywiththeTkintergraphicalinterface.Inthe
lastexerciseofthepreviouschapter,weintegratedTkinterwithpyFirmatatoimplement
theprojectofChapter3,TheFirstProject–Motion-triggeredLEDs,withtheGUI.Inthis
exercise,wewillextendthisintegrationfurtherbyutilizingmatplotlib.Wewillperform
thisactionbyutilizingthesameArduinocircuitthatwehavebeenusinginthischapter
andexpandthecodethatweusedinthepreviousexercise.Meanwhile,wearenot
introducinganynewmethodsinthisexercise;insteadwewillbeutilizingwhatyou
learneduntilnow.OpentheplotTkinter.pyfilefromthischapter’scodefolder.
Asmentionedearlier,theprogramutilizesthreemajorPythonlibrariesandinterfacesthem
witheachothertodevelopanexcellentPython-Arduinoapplication.Thefirstinterfacing
pointisbetweenTkinterandmatplotlib.Asyoucanseeinthefollowinglinesofcode,
wehaveinitializedthreebuttonobjects,startButton,pauseButton,andexitButton,for
theStart,Pause,andExitbuttonsrespectively:
startButton=Tkinter.Button(top,
text="Start",
command=onStartButtonPress)
startButton.grid(column=1,row=2)
pauseButton=Tkinter.Button(top,
text="Pause",
command=onPauseButtonPress)
pauseButton.grid(column=2,row=2)
exitButton=Tkinter.Button(top,
text="Exit",
command=onExitButtonPress)
exitButton.grid(column=3,row=2)
TheStartandExitbuttonsprovidecontrolpointsformatplotliboperationssuchas
updatingtheplotandclosingtheplotthroughtheirrespectiveonStartButtonPress()and
onExitButtonPress()functions.TheonStartButtonPress()functionalsoconsistsof
theinterfacingpointbetweenthematplotlibandpyFirmatalibraries.Asyoucanobserve
fromthefollowingcodesnippet,wewillstartupdatingtheplotusingthedraw()method
andtheTkinterwindowusingtheupdate()methodforeachobservationfromtheanalog
pina0,whichisobtainedusingtheread()method:
defonStartButtonPress():
whileTrue:
ifflag.get():
sleep(1)
pData.append(float(a0.read()))
pyplot.ylim([0,1])
delpData[0]
l1.set_xdata([iforiinxrange(25)])
l1.set_ydata(pData)#updatethedata
pyplot.draw()#updatetheplot
top.update()
else:
flag.set(True)
break
TheonExitButtonPress()functionimplementstheexitfunctionasdescribedbythe
nameitself.ItclosesthepyplotfigureandtheTkinterwindowbeforedisengagingthe
Arduinoboardfromtheserialport.
Now,executetheprogramaftermakingtheappropriatechangestotheArduinoport
parameter.Youshouldbeabletoseeawindowonyourscreenthatissimilartotheone
displayedinthefollowingscreenshot.Withthiscode,youcannowcontrolyourreal-time
plotsusingtheStartandPausebuttons.ClickontheStartbuttonandstartrotatingthe
potentiometerknob.WhenyouclickonthePausebutton,youcanobservethatthe
programhasstoppedplottingnewvalues.WhilePauseispressed,evenrotatingtheknob
willnotresultinanyupdatestotheplot.
AssoonasyouclickontheStartbuttonagain,youwillagainseetheplotgetupdated
withreal-timevalues,discardingthevaluesgeneratedwhilepaused.ClickontheExit
buttontosafelyclosetheprogram:
Summary
Inthischapter,weintroducedtwomajorPythonprogrammingparadigms:creating,
reading,andwritingfilesusingPythonwhilealsostoringdataintothesefilesandplotting
sensorvaluesandupdatingplotsinrealtime.Wealsoexploredmethodstostoreandplot
real-timeArduinosensordata.BesideshelpingyouinyourArduinoprojects,these
methodscanalsobeusedinyoureverydayPythonprojects.Throughoutthechapter,using
simpleexercises,weinterfacedthenewlylearnedCSVandmatplotlibmoduleswiththe
TkinterandpyFirmatamodulesthatwelearnedinthepreviouschapters.Inthenext
chapter,youwillbeintroducedtoyoursecondproject—aportableunitthatmeasuresand
displaysenvironmentaldatasuchastemperature,humidity,andambientlight.Wewillbe
utilizingtheconceptsthatwehavelearnedsofartobuildthisproject.
Chapter7.TheMidtermProject–a
PortableDIYThermostat
AfterthefirstPython-Arduinoproject,youlearnedtheprocessofprototypingvarious
sensors,developinguserinterfaces,andplottingsensordata.Theconceptsthatyou
learnedinthepreviouschapterscanbeutilizedtocreateawidevarietyofArduino-based
hardwareprojects.Theinceptionofagoodapplicationconceptalwaysbeginswitharealworldnecessityandendsupasapracticalprojectifitisexecutedproperly.Inthischapter,
wewilldemonstratethisproject-buildingprocesswithanexampleofaportablesensor
unit.Asyoucanestimatefromthechaptertitle,wewillbebuildingasimpleandportable
DIYthermostatthatcanbedeployedwithoutadesktopcomputeroralaptop.
Tobeginwith,wewilldescribetheproposedthermostatwithspecificgoalsandprocesses
toachievethem.Oncethestrategytoachievethesegoalshasbeenlaiddown,youwillbe
introducedtothetwosuccessiveprogrammingstagestodevelopthedeployableand
portableunit.Inthefirststage,wewillutilizeatraditionalcomputertosuccessfully
developtheprogramtointerfaceArduinowithPython.Inthesecondstage,wewill
replacethiscomputerwithaRaspberryPitomakeitportableanddeployable.
Thermostat–theprojectdescription
Fromthemultipleprojectsthatwecanbuildusingthethingsthatyoulearned,aproject
thathelpsyoutomonitoryoursurroundingenvironmentreallystandsoutasanimportant
real-worldapplication.Fromthevariousenvironment-monitoringprojectssuchasweather
station,thermostat,andplantmonitoringsystem,wewillbedevelopingthethermostatas
itfocusesonindoorenvironmentandcanbepartofyourdailyroutine.
Thethermostatisoneofthemostimportantcomponentsofanyremotehomemonitoring
systemandhomeautomationsystem.Apopularcommercialexampleofaconnected
thermostatistheNestThermostat(https://www.nest.com),whichprovidesintelligent
remotemonitoringandschedulingfeaturesforyourexistinghome’sheatingandcooling
system.Beforewethinkaboutafull-stackproductsuchasNest,weneedfirstneedto
buildaDIYthermostatwiththebasicsetoffeatures.Later,wecanbuilduponthisproject
byaddingfeaturestoimprovetheDIYthermostatexperience.Let’sfirstoutlinethe
featuresthatweareplanningtoimplementinthisversionofthethermostatproject.
Projectbackground
Temperature,humidity,andambientlightarethethreemainphysicalcharacteristicsthat
wewanttomonitorusingthethermostat.Intermsofuserexperience,wewanttohavean
elegantuserinterfacetodisplaythemeasuredsensordata.Theuserexperiencecanbe
moreresourcefulifanyofthissensordataisplottedasalinegraph.Inthecaseofa
thermostat,thevisualrepresentationofthesensordataprovidesamoremeaningful
comprehensionoftheenvironmentthanjustdisplayingplainnumericalvalues.
Oneofthemajorobjectivesoftheprojectistomakethethermostatportableand
deployablesothatitcanbeusedinyourday-to-daylife.Tosatisfythisrequirement,the
thermostatdisplayneedstobechangedfromaregularmonitortosomethingsmalland
moreportable.Toensureitsreal-worldandmeaningfulapplication,thethermostatshould
demonstratereal-timeoperation.
Itisimportanttonotethatthethermostatwillnotbeinterfacingwithanyactuatorssuchas
homecoolingandheatingsystems.Astheinterfacingofthesesystemswiththethermostat
projectrequireshigh-levelunderstandingandexperienceofworkingwithheatingand
coolingsystems,itwilldeviatetheflowofthechapterfromitsoriginalgoalofteaching
youArduinoandPythonprogramming.
Projectgoalsandstages
Inordertodescribethefeaturesthatwewanttohaveinthethermostat,let’sfirstidentify
thegoalsandmilestonestoachievetheseobjectives.Themajorgoalsfortheprojectcan
bedeterminedasfollows:
Identifythenecessarysensorsandhardwarecomponentsfortheproject
Designandassemblethecircuitforthethermostatusingthesesensorsandthe
Arduinoboard
Designaneffectiveuserexperienceanddevelopsoftwaretoaccommodatetheuser
experience
Developandimplementcodetointerfacethedesignedhardwarewiththesoftware
components
Thecodedevelopmentprocessofthethermostatprojectisdividedintotwomajorstages.
Theobjectivesofthefirststageincludesensorinterfacing,thedevelopmentofthe
Arduinosketch,andthedevelopmentofthePythoncodeonyourregularcomputerthat
youhavebeenusingallalong.Thecodingmilestoneforthefirststagecanbefurther
distributedasfollows:
DeveloptheArduinosketchtointerfacesensorsandbuttonswhileprovidingoutput
ofthesensordatatothePythonprogramviatheserialport
DevelopthePythoncodetoobtainsensordatafromtheserialportusingthe
pySeriallibraryanddisplaythedatausingGUIthatisdesignedinTkinter
Createaplottodemonstratethereal-timehumidityreadingsusingthematplotlib
library
Inthesecondstage,wewillattachtheArduinohardwaretoasingle-boardcomputeranda
miniaturedisplaytomakeitmobileanddeployable.Themilestonetoachieveobjectiveof
thesecondstageareasfollows:
Installandconfigureasingle-boardcomputer,RaspberryPi,torunthePythoncode
fromthefirststage
InterfaceandconfiguretheminiaturescreenwiththeRaspberryPi
OptimizetheGUIandplotwindowtoadjusttothissmallscreen’sresolution
Inthefollowingsubsectionofthissection,youwillbenotifiedaboutthelistofrequired
componentsforboththestages,followedbythehardwarecircuitdesignandthesoftware
flowdesign.Theprogrammingexercisesforthesestagesareexplainedinthenexttwo
sectionsofthechapter.
Thelistofrequiredcomponents
Insteadofgoingthroughtheprocessofidentifyingtherequiredcomponents,wehave
alreadyselectedthecomponentsforthisprojectbasedontheirutilizationintheprevious
exercises,easeofuse,andavailability.Youcanreplacethesecomponentsaccordingto
theiravailabilityatthetimeyouarebuildingthisprojectoryourfamiliaritywithother
sensors.Justmakesurethatyoutakecareofmodificationsinthecircuitconnectionsand
code,ifthesenewcomponentsarenotcompatiblewiththeonesthatweareusing.
Inthefirststageofprototyping,wewillneedcomponentstodeveloptheelectroniccircuit
forthethermostatunit.Aswementionedearlier,wearegoingtomeasuretemperature,
humidity,andambientlightthroughourunit.Wealreadylearnedaboutthetemperature
sensorTMP102andtheambientlightsensorBH1750inChapter4,DivingintoPythonArduinoPrototyping.Wewillbeusingthesesensorsforthisprojectwiththehumidity
sensorHIH-4030.TheprojectwillutilizethesameArduinoUnoboardthatyouhavebeen
usingthroughoutthepreviouschapterswiththenecessarycables.Wewillalsoneedtwo
pushbuttonstoprovidemanualinputstotheunit.Thesummaryoftherequired
componentsforthefirststageisprovidedinthefollowingtable:
Component(firststage)
Quantity
Website
ArduinoUno
1
https://www.sparkfun.com/products/11021
USBcableforArduino
1
https://www.sparkfun.com/products/512
Breadboard
1
https://www.sparkfun.com/products/9567
TMP102temperaturesensor 1
https://www.sparkfun.com/products/11931
HIH-4030humiditysensor
https://www.sparkfun.com/products/9569
1
BH1750ambientlightsensor 1
http://www.robotshop.com/en/dfrobot-light-sensor-bh1750.html
Pushbuttonswitch
2
https://www.sparkfun.com/products/97
1kilo-ohmresistor
2
10kilo-ohmresistor
2
Connectionwires
Asrequired Althoughthetableprovideslinksforfewspecificwebsite,youcanobtainthese
componentsfromyourpreferredproviders.ThetwomajorcomponentsHIH-4030
humiditysensorandpushbuttonswitchthatwehaven’tusedpreviouslyaredescribedas
follows:
HIH-4030humiditysensor:Thismeasuresandprovidesrelativehumidityresultsas
ananalogoutput.Theoutputofthesensorcanbedirectlyconnectedtoanyanalog
pinofArduino.ThefollowingimageshowsthebreakoutboardwiththeHIH-4030
sensorthatissoldbySparkFunElectronics.YoucanlearnmoreabouttheHIH-4030
sensorfromitsdatasheet,whichcanbeobtainedfrom
https://www.sparkfun.com/datasheets/Sensors/Weather/SEN-09569-HIH-4030datasheet.pdf:
Pushbuttonswitch:Pushbuttonswitchesaresmallswitchesthatcanbeusedona
breadboard.Whenpressed,theswitchoutputchangesitsstatustoHIGH,whichis
LOWotherwise.
Inthesecondstage,wearegoingtomakethesensorunitmobilebyreplacingyour
computerwithaRaspberryPi.Forthat,youwillneedthefollowingcomponentstoget
started:
Component(secondstage)
Quantity Image
RaspberryPi
1
https://www.sparkfun.com/products/11546
MicroUSBcablewithapower
adapter
1
http://www.amazon.com/CanaKit-Raspberry-Supply-AdapterCharger/dp/B00GF9T3I0/
8GBSDcard
1
https://www.sparkfun.com/products/12998
TFTLCDscreen
1
http://www.amazon.com/gp/product/B00GASHVDU/
AUSBhub
Optional Furtherexplanationsofthesecomponentsareprovidedlaterinthechapter.
Hardwaredesign
Theentirehardwarearchitectureofthethermostatcanbedividedintotwounits,a
physicalworldinterfacingunitandacomputationunit.Thephysicalworldinterfacing
unit,asitsnameindicates,monitorsphenomenonofthephysicalworldsuchas
temperature,humidity,andambientlightusingsensorsconnectedtotheArduinoboard.
Thephysicalworldinterfacingunitisinterchangeablymentionedasthethermostatsensor
unitthroughoutthechapter.Thecomputationalunitisresponsiblefordisplayingthe
sensorinformationviatheGUIandplots.
Thefollowingdiagramshowsthehardwarecomponentsforthefirststagewherethe
thermostatsensorunitisconnectedtoacomputerusingtheUSBport.Inthethermostat
sensorunit,varioussensorcomponentsareconnectedtotheArduinoboardusingI2C,
analog,anddigitalpins:
Inthesecondprogrammingstagewherewearegoingmakeourthermostatintoamobile
anddeployableunit,youwillbeusingasingle-boardcomputer,RaspberryPi,asthe
computationaldevice.Inthisstage,wewilluseaminiaturethin-filmtransistorliquidcrystaldisplay(TFTLCD)screenthatisconnectedtoaRaspberryPiviageneralpurposeinput/output(GPIO)pinsandisusedasadisplayunittoreplacethetraditional
monitororlaptopscreen.Thefollowingdiagramshowsthisnewthermostatcomputational
unit,whichtrulyreducestheoverallsizeofthethermostatandmakesitportableand
mobile.CircuitconnectionsfortheArduinoboardareunchangedforthisstageandwe
willusethesamehardwarewithoutanymajormodifications.
Asthecommonunitforbothstagesoftheproject,theArduino-centricthermostatsensor
unitrequiresslightlymorecomplexcircuitconnectionscomparedtootherexercisesthat
youhavebeenthrough.Inthissection,wearegoingtointerfacethenecessarysensorsand
pushbuttonstotheirrespectivepinsontheArduinoboardandyouwillneedabreadboard
tomaketheseconnections.IfyouarefamiliarwithPCBprototyping,youcancreateyour
ownPCBboardbysolderingthesecomponentsandavoidthebreadboard.PCBboardsare
morerobustcomparedtobreadboardsandlesspronetolooseconnections.Usethe
followinginstructionsandtheFritzingdiagramtocompletethecircuitconnections:
1. Asyoucanseeinthefollowingdiagram,connecttheSDAandSCLpinsofTMP102
andBH1750toanalogpins4and5oftheArduinoboardandcreateanI2Cbus.To
maketheseconnections,youcanusemultiplecolor-codedwirestosimplifythe
debuggingprocess.
2. Usetwo10kilo-ohmpull-upresistorswiththeSDAandSCLlines.
3. ContrarytotheseI2Csensors,theHIH-4030humiditysensorisasimpleanalog
sensorandcanbedirectlyconnectedtotheanalogpin.ConnecttheHIH-4030tothe
analogpinA0.
4. ConnectVCCandthegroundofTMP102,BH1750,andHIH-4030to+5Vandthe
groundoftheArduinoboardusingpowerstripsofthebreadboard,asdisplayedinthe
diagram.Werecommendthatyouuseredandblackwirestorepresentthe+5Vand
groundlinesrespectively.
5. ThepushbuttonprovidestheoutputasHIGHorLOWstateandinterfacedusing
digitalpins.Asdisplayedinthecircuit,connectthesepushbuttonstodigitalpins2
and3usingtwo1kilo-ohmresistors.
6. Completetheremainingconnectionsasdisplayedinthefollowingdiagram.Make
surethatyouhavefirmlyconnectedallthewiresbeforepoweringuptheArduino
board:
Note
MakesurethatyoualwaysdisconnectyourArduinoboardfromthepowersourceora
USBportbeforemakinganyconnections.Thiswillpreventanydamagetotheboarddue
toshortcircuiting.
Completealltheconnectionsforthethermostatsensorunitbeforeheadingtothenext
section.Asthisunitisbeingusedinboththeprogrammingstages,youwon’tbe
performinganyfurtherchangestothethermostatsensorunit.
Softwareflowforuserexperiencedesign
Oneofthecriticalcomponentsofanyprojectisitsusabilityoraccessibility.Whenyouare
workingonmakingyourprojectprototypeintoaproduct,itisnecessarytohavean
intuitiveandresourcefuluserinterfacesothattheusercaneasilyinteractwithyour
product.Hence,itisnecessarytodefinetheuserexperienceandsoftwareflowofaproject
beforeyoustartcoding.Thesoftwareflowincludestheflowchartandthelogical
componentsoftheprogramthatarederivedfromtheprojectrequirements.Accordingto
thegoalsthatwehavedefinedforthethermostatproject,thesoftwareflowcanbe
demonstratedinthefollowingdiagram:
Intheimplementation,thesoftwareflowoftheprojectbeginsbymeasuringthe
temperature,humidity,andambientlightfromArduinoandprintingthemonaserialport
linebyline.ThePythonprogramobtainsthesensordatafromArduinoviatheserialport
beforepresentingthedataonthescreen.Meanwhile,thePythonprogramkeepslooking
foranewlineofdata.
Ausercaninteractwiththethermostatusingapushbutton,whichwilllettheuserchange
theunitforthetemperaturedata.Oncethebuttonispressed,theflaggetschangedto
HIGHandthetemperatureunitischangedtoCelsiusfromitsdefaultunit,Fahrenheit.If
thebuttonispressedagain,theoppositeprocesswillhappenandtheunitwillbechanged
backtoitsdefaultvalue.Similarly,anotheruserinteractionpointisthesecondpushbutton
thatallowsausertoopenaplotforreal-timehumidityvalues.Thesecondpushbutton
alsoutilizesasimilarmethodofusingflagstocapturetheinputandopensanewplot
window.Ifthesamebuttonispushedsequentially,theprogramwillclosetheplotwindow.
Stage1–prototypingthethermostat
Inthisprototypingstage,wewilldeveloptheArduinoandPythoncodeforourthermostat,
whichwillbelaterusedinthesecondstagewithminorchanges.Beforeyoustartthe
codingexercise,makesurethatyouhavethethermostatsensorunitreadywiththe
Arduinoboardandtheconnectedsensors,asdescribedintheprevioussection.Forthis
stage,youwillbeusingyourregularcomputerwhichisequippedwiththeArduinoIDE
andthePythonprogrammingenvironment.Theprototypingstagerequirestwolevelsof
programming,theArduinosketchforthethermostatsensorunitandthePythoncodefor
thecomputationalunit.Let’sgetstartedwithcodingforourthermostat.
TheArduinosketchforthethermostat
ThegoalofthisArduinoprogramistointerfacesensors,getmeasurementsfromthe
sensors,andprintthemontheserialport.Aswediscussedearlier,ratherthanusingthe
standardFirmatasketchthatweusedinthepreviousproject,wearegoingtodevelopa
customArduinosketchinthisproject.Togetstarted,opentheThermostat_Arduino.ino
sketchfromthischapter’scodefolder,whichispartofthesourcecodethatyoureceived
forthebook.
ConnecttheUSBportoftheArduinoboard,whichisnowpartofthethermostatsensor
unit,toyourcomputer.SelecttheappropriateboardandportnamesintheArduinoIDE
andverifythecode.UploadthecodetoyourArduinoboardandopentheSerialMonitor
windowoncethecodeissuccessfullyuploaded.Youshouldbeabletoseetextsimilarto
thatdisplayedinthefollowingscreenshot:
TheArduinocodestructureandbasicdeclarationsarealreadyexplainedinvarious
sectionsthroughoutthebook.Insteadofexplainingtheentirecodelinebyline,wewill
focushereonthemaincomponentsofthesoftwareflowthatwedescribedearlier.
Interfacingthetemperaturesensor
IntheArduinosketch,thetemperaturedataisobtainedfromtheTMP102sensorusingthe
getTemperature()function.ThefunctionimplementstheWirelibraryontheI2Caddress
ofTMP102toreadthesensordata.Thisisthenconvertedintopropertemperaturevalues:
floatgetTemperature(){
Wire.requestFrom(tmp102Address,2);
byteMSB=Wire.read();
byteLSB=Wire.read();
//it'sa12bitint,usingtwo'scomplimentfornegative
intTemperatureSum=((MSB<<8)|LSB)>>4;
floatcelsius=TemperatureSum*0.0625;
returncelsius;
}
ThegetTemperature()functionreturnsthetemperaturevaluesinCelsius,whichisthen
senttotheserialport.
Interfacingthehumiditysensor
Althoughthehumiditysensorprovidestheanalogoutput,itisnotstraightforwardto
obtainrelativehumiditysinceitalsodependsuponthetemperature.ThegetHumidity()
functioncalculatestherelativehumidityfromtheanalogoutputprovidedbytheHIH4030sensor.Theformulastocalculatetherelativehumidityareobtainedfromthe
datasheetandreferenceexamplesofthesensor.Ifyouareusingadifferenthumidity
sensor,pleasemakesurethatyouchangetheformulasaccordingly,astheymaychange
theresultssignificantly:
floatgetHumidity(floatdegreesCelsius){
//caculaterelativehumidity
floatsupplyVolt=5.0;
//Getthesensorvalue:
intHIH4030_Value=analogRead(HIH4030_Pin);
//converttovoltagevalue
floatvoltage=HIH4030_Value/1023.*supplyVolt;
//convertthevoltagetoarelativehumidity
floatsensorRH=161.0*voltage/supplyVolt-25.8;
floattrueRH=sensorRH/(1.0546-0.0026*degreesCelsius);
returntrueRH;
}
Aswearecalculatingrelativehumidity,thereturnedhumidityvaluesaresenttotheserial
portwithpercentageastheunit.
Interfacingthelightsensor
TointerfacetheBH1750lightsensor,wewillusetheBH1750Arduinolibrary,whichwe
usedearlier.Usingthislibrary,theambientlightvaluecanbedirectlyobtainedusingthe
followinglineofcode:
uint16_tlux=lightMeter.readLightLevel();
Thislineprovidestheluminancevaluesintheunitoflux.Thesevaluesarealsosentto
theserialportsothePythonprogramcanutilizeitfurther.
UsingArduinointerrupts
UntilnowyouusedtheArduinoprogramtoreadthephysicalstateofanI/Opinusingthe
DigitalRead()orAnalogRead()functions.Howwouldyouautomaticallyobtainthestate
changeinsteadofperiodicallyreadingthepinsandwaitingforthestatetochange?
ArduinointerruptsprovideaveryconvenientwayofcapturingsignalsfortheArduino
board.Interruptsareaverypowerfulwayofautomaticallycontrollingvariousthingsin
Arduino.ArduinosupportsinterruptsusingtheattachInterrupt()method.Intermsof
thephysicalpins,ArduinoUnoprovidestwointerrupts:interrupt0(ondigitalpin2)and
interrupt1(ondigitalpin3).VariousArduinoboardshavedifferentspecificationsfor
interruptpins.IfyouareusinganyboardotherthanUno,pleaserefertoArduino’swebsite
tofindoutabouttheinterruptpinforyourboard.
TheattachInterrupt()functiontakesthreeinputarguments(pin,ISR,andmode).In
theseinputarguments,pinreferstothenumberoftheinterruptpin,ISR(whichstandsfor
InterruptServiceRoutine)referstothefunctionthatgetscalledwhentheinterruptoccurs,
andmodedefinestheconditionwhentheinterruptshouldbetriggered.Wehaveutilized
thisfunctioninourArduinoprogram,asdescribedinthefollowingcodesnippet:
attachInterrupt(0,button1Press,RISING);
attachInterrupt(1,button2Press,RISING);
ThesupportedmodeforattachInterrupt()areLOW,CHANGE,RISING,andFALLING.Inour
case,theinterruptsaretriggeredwhenthemodeisRISING,thatis,thepingoesfromlow
tohigh.Forinterruptsdeclaredat0and1,wecallthebutton1Pressandbutton2Press
functionsthatwillchangeflagTemperatureandflagPlotrespectively.When
flagTemperatureissettoHIGH,ArduinosendsthetemperatureinCelsius,otherwiseit
sendsthetemperatureinFahrenheit.WhenflagPlotisHIGH,Arduinowillprinttheflag
ontheserialport,whichwillbeusedbythePythonprogramlatertoopentheplot
window.YoucanlearnmoreaboutArduinointerruptsfromthetutorialat
http://arduino.cc/en/Reference/attachInterrupt.
DesigningtheGUIandplotinPython
Onceyourthermostatsensorunitstartssendingsensordatatotheserialport,itistimeto
executethesecondpartofthisstage,thePythoncodefortheGUIandtheplot.Fromthis
chapter’scodefolder,openthePythonfilecalledThermostat_Stage1.py.Inthefile,go
tothelinethatcontainstheSerial()functionwheretheserialportisdeclared.Change
theserialportnamefromCOM5totheappropriateone.Youcanfindthisinformationfrom
theArduinoIDE.Savethechangeandexittheeditor.Fromthesamefolder,runthe
followingcommandontheterminal:
$pythonThermostat_Stage1.py
ThiswillexecutethePythoncodeandyouwillbeabletoseetheGUIwindowonthe
screen.
UsingpySerialtostreamsensordatainyourPythonprogram
Asdescribedinthesoftwareflow,theprogramreceivesthesensordatafromtheArduino
usingthepySeriallibrary.ThecodethatdeclarestheserialportinthePythoncodeisas
follows:
Importserial
port=serial.Serial('COM5',9600,timeout=1)
ItisveryimportanttospecifythetimeoutparameterwhileusingthepySeriallibrary,as
thecodemayhaveanerroriftimeoutisnotspecified.
DesigningtheGUIusingTkinter
TheGUIforthisprojectisdesignedusingtheTkinterlibrarythatweusedearlier.Asa
GUI-buildingexercise,threecolumnsoflabels(labelstodisplaythesensortype,the
observationvalues,andobservationunits)areprogrammedasshowninthefollowing
codesnippet:
#Labelsforsensorname
Tkinter.Label(top,text="Temperature").grid(column=1,row=1)
Tkinter.Label(top,text="Humidity").grid(column=1,row=2)
Tkinter.Label(top,text="Light").grid(column=1,row=3)
#Labelsforobservationvalues
TempLabel=Tkinter.Label(top,text="")
TempLabel.grid(column=2,row=1)
HumdLabel=Tkinter.Label(top,text="")
HumdLabel.grid(column=2,row=2)
LighLabel=Tkinter.Label(top,text="")
LighLabel.grid(column=2,row=3)
#Labelsforobservationunit
TempUnitLabel=Tkinter.Label(top,text="")
TempUnitLabel.grid(column=3,row=1)
HumdUnitLabel=Tkinter.Label(top,text="%")
HumdUnitLabel.grid(column=3,row=2)
LighUnitLabel=Tkinter.Label(top,text="lx")
LighUnitLabel.grid(column=3,row=3)
OnceyouinitializethecodeandbeforeyouclickontheStartbutton,youwillbeableto
seethefollowingwindow.Theobservationlabelsarepopulatedwithoutanyvaluesatthis
stage:
OncetheStartbuttonisclicked,theprogramwillengagethethermostatsensorunitand
startreadingthesensorvaluesfromtheserialport.Usingthelinesthatareobtainedfrom
theserialport,theprogramwillpopulatetheobservationlabelswiththeobtainedvalues.
Thefollowingcodesnippetupdatesthetemperaturevaluesintheobservationlabeland
alsoupdatesthetemperatureunit:
TempLabel.config(text=cleanText(reading[1]))
TempUnitLabel.config(text="C")
TempUnitLabel.update_idletasks()
Intheprogram,weareusingsimilarmethodsforhumidityandambientlighttoupdate
theirlabelsrespectively.Asyoucanseeinthefollowingscreenshot,theGUInowhasthe
valuesforthetemperature,humidity,andambientlightreadings:
TheStartandExitbuttonsareprogrammedtocalltheonStartButtonPress()and
onExitButtonPress()functionswhentheyareclickedbytheuser.The
onStartButtonPress()functionexecutesthecodenecessarytocreatetheuserinterface,
whiletheonExitButtonPress()functionclosesalltheopenedwindows,disconnectsthe
thermostatsensorunit,andexitsthecode:
StartButton=Tkinter.Button(top,
text="Start",
command=onStartButtonPress)
StartButton.grid(column=1,row=4)
ExitButton=Tkinter.Button(top,
text="Exit",
command=onExitButtonPress)
ExitButton.grid(column=2,row=4)
YoucanplaywiththeStartandExitbuttonstoexplorethePythoncode.Toobservethe
changesinthesensorreadings,trytoblowairorplaceanobstacleoverthethermostat
sensorunit.Iftheprogramdoesn’tbehaveappropriately,checktheterminalforerror
messages.
Plottingpercentagehumidityusingmatplotlib
Wewillusethematplotliblibrarytoplottherelativehumidityvaluesinrealtime.We
willplottherelativehumidityvaluesinthisproject,astherangeofthedataisfixed
between0and100percent.Usingasimilarmethod,youcanalsoplottemperatureand
ambientlightsensorvalues.Whiledevelopingthecodetoplottemperatureandambient
lightsensordata,makesurethatyouareusingappropriaterangestocoverthesensordata
inthesameplot.Now,aswehavespecifiedintheonStartButtonPress()function,a
windowsimilartothefollowingscreenshotwillpopuponceyoupressthepushbuttonfor
theplot:
Thefollowingcodesnippetisresponsibleforplottingthelinechartusingthehumidity
sensorvalues.Thevaluesarelimitedbetween0and100ontheyaxis,wheretheyaxis
representstherelativehumidityrange.Theplotisupdatedeverytimetheprogram
receivesanewhumidityvalue:
pyplot.figure()
pyplot.title('Humidity')
ax1=pyplot.axes()
l1,=pyplot.plot(pData)
pyplot.ylim([0,100])
Usingbuttoninterruptstocontroltheparameters
Thepushbuttoninterruptsareacriticalpartoftheuserexperience,astheusercancontrol
thetemperatureunitandtheplotusingtheseinterrupts.ThePythonfeaturesimplemented
usingthepushbuttoninterruptsareasfollows.
Changingthetemperatureunitbypressingabutton
TheArduinosketchcontainsthelogictohandleinterruptsfrompushbuttonsandusethem
tochangethetemperatureunit.Whenaninterruptoccurs,insteadofprintingthe
temperatureinFahrenheit,itsendsthetemperatureinCelsiustotheserialport.Asyoucan
seeinthefollowingscreenshot,thePythoncodejustprintstheobtainednumericvalueof
thetemperatureobservationandtheassociatedunitofmeasurementwithit:
Asyoucanseeinthefollowingcodesnippet,ifthePythoncodereceivesthe
Temperature(C)string,itprintsthetemperatureinCelsius,andifitreceivesthe
Temperature(F)string,itprintsthetemperatureinFahrenheit:
if(reading[0]=="Temperature(C)"):
TempLabel.config(text=cleanText(reading[1]))
TempUnitLabel.config(text="C")
TempUnitLabel.update_idletasks()
if(reading[0]=="Temperature(F)"):
TempLabel.config(text=cleanText(reading[1]))
TempUnitLabel.config(text="F")
TempUnitLabel.update_idletasks()
SwappingbetweentheGUIandtheplotbypressingabutton
IfthePythoncodereceivesthevalueoftheflagfromtheserialportas1(HIGH),it
createsanewplotanddrawsthehumidityvaluesasalinechart.However,itclosesany
openplotsifitreceives0(LOW)asthevalueoftheflag.Asyoucanseeinthefollowing
codesnippet,theprogramwillalwaystrytoupdatetheplotwiththelatestvaluesfor
humidityreadings.Iftheprogramcan’tfindanopenedplottodrawthisvaluefrom,itwill
createanewplot:
if(reading[0]=="Flag"):
printreading[1]
if(int(reading[1])==1):
try:
l1.set_xdata(np.arange(len(pData)))
l1.set_ydata(pData)#updatethedata
pyplot.ylim([0,100])
pyplot.draw()#updatetheplot
except:
pyplot.figure()
pyplot.title('Humidity')
ax1=pyplot.axes()
l1,=pyplot.plot(pData)
pyplot.ylim([0,100])
if(int(reading[1])==0):
try:
pyplot.close('all')
l1=None
except:
Bynow,youshouldhaveacompleteideaabouttheprogramsthatarerequiredbythe
thermostatsensorunitandthecomputationunit.Duetothecomplexityinvolved,youmay
faceafewknownproblemsduringtheexecutionoftheseprograms.Youcanrefertothe
Troubleshootingsectionincaseyourunintoanytrouble.
Troubleshooting
Herearesomeoftheerrorsthatyoumayfind,andtheirfixes:
I2Csensorreturnstheerrorstring:
ChecktheconnectionstotheSDAandSCLpins.
Confirmthatyouareprovidingenoughdelaybetweenthereadingcyclesofthe
sensor.Checkthedatasheetforthedelayandmessagesequence.
Theplotwindowflickersinsteadofstayingonwhenthebuttonispressed:
Don’ttrytopressitmultipletimes.Holdandletgoquickly.Makesurethatyour
buttonisconnectedproperly.
AdjustthedelayintheArduinosketch.
Stage2–usingaRaspberryPiforthe
deployablethermostat
WehavenowcreatedathermostatthatexistsasanArduinoprototypewhilethePython
programrunsfromyourcomputer.Thisprototypeisstillnowherenearadeployableor
mobilestateduetotheconnectedcomputer,andthedisplaymonitorifyouareusinga
desktopcomputer.Areal-worldthermostatdeviceshouldhaveasmallfootprint,portable
size,andminiaturedisplaytoshowlimitedinformation.Thepopularandpracticalwayto
achievethisgoalistouseasmallsingle-boardcomputerthatiscapableofhostingan
operatingsystemandhenceprovidingtheessentialPythonprogramminginterface.For
thisstageoftheproject,wewillbeutilizingasingle-boardcomputer—aRaspberryPi—
withasmallLCDdisplay.
Note
Notethatthisstageoftheprojectisoptionalunlessyouwanttoextendthepreviousstage
oftheprojecttoadevicethatcanbeusedonaregularbasis.Ifyouarereferringtothe
projecttojustlearnPythonprogramming,youcanskipthisentiresection.
ThefollowingisanimageoftheRaspberryPiModelB:
Ifyouhaven’tworkedwithasingle-boardcomputerbefore,youmayhavealotof
unansweredquestions,suchas“WhatexactlydoesaRaspberryPiconsistsof?”,“What
arethebenefitsofusingaRaspberryPiinourproject?”,and“Can’twejustuseArduino
forthat?”.Thesearelegitimatequestionsandwewilltrytoanswertheminthefollowing
section.
WhatisaRaspberryPi?
TheRaspberryPiisasmall(almostthesizeofacreditcard)single-boardcomputerthat
wasdevelopedwiththeinitialaimofhelpingstudentslearnthebasicsofcomputer
science.Today,theRaspberryPimovement,guidedbytheRaspberryPiFoundation,has
turnedintoaDIYphenomenonandcapturedtheattentionofenthusiastsanddevelopers
aroundtheworld.ThecapabilitiesandfeaturesshippedwithaRaspberryPiatanominal
cost($35)haveboostedthepopularityofthedevice.
Thetermsingle-boardcomputerisusedfordevicesthathaveallthenecessary
componentstorunanoperatingsystemononeboard,suchasaprocessor,RAM,graphics
processor,storagedevice,andbasicadaptorsforexpansion.Thismakesasingle-board
computeranappropriatecandidateforportableapplications,astheycanbepartofthe
portablehardwaredevicethatwearetryingtocreate.Althoughtherewereanumberof
single-boardcomputersinthemarketbeforetheintroductionoftheRaspberryPi,theopen
sourcenatureofthehardwareandtheeconomicalpricearethemainreasonsbehindthe
popularityandrapidadoptionoftheRaspberryPi.Thefollowingfigureshowsthe
RaspberryPiModelBwithitsmajorcomponents:
ThecomputationalcapabilitiesoftheRaspberryPiareadequateforrunningatrimmed
downversionofLinuxOS.Althoughpeoplehadtriedtousemanytypesofoperating
systemsonaRaspberryPi,wewillbeusingthedefaultandrecommendedoperating
systemcalledRaspbian.RaspbianisaDebiandistribution-basedopensourceLinuxOS,
whichisoptimizedfortheRaspberryPi.TheRaspberryPiusesanSDcardasthestorage
device,whichwillbeusedtostoreyourOSandprogramfiles.InRaspbian,youcanavoid
runningtheunnecessaryOScomponentsthatareshippedwithtraditionalOSes.These
includetheInternetbrowser,communicationapplication,andinsomecaseseventhe
graphicalinterface.
Afteritsintroduction,theRaspberryPihasgonethroughafewmajorupgrades.The
earlierversion,calledModelA,didnotincludetheEthernetportandonlyhadamemory
of256MB.Inourproject,weareusingtheRaspberryPi’sModelBthathasadedicated
Ethernetport,512MBmemory,anddualUSBports.ThelatestversionsofRaspberryPi,
ModelB+,canbealsousedasitisalsoequippedwithanEthernetport.
Installingtheoperatingsystemandconfiguringthe
RaspberryPi
AlthoughtheRaspberryPiisacomputer,itisdifferentthantraditionaldesktopcomputers
whenitcomestointerfacingperipheraldevices.InsteadofsupportingtraditionalVGAor
DVIdisplayports,theRaspberryPiprovidesaRCAvideoportforTVsandanHDMIport
forthelatestgenerationofmonitorsandTVs.Inaddition,theRaspberryPihasonlytwo
USBportsthatneedtobeutilizedforconnectingvariousperipheraldevicessuchasthe
mouse,thekeyboard,theUSBwirelessadapter,andtheUSBmemorystick.Let’sget
startedbycollectingcomponentsandcablestostartworkingwithaRaspberryPi.
WhatdoyouneedtobeginusingtheRaspberryPi?
ThehardwarecomponentsrequiredtogetstartedwithaRaspberryPiareasfollows:
ARaspberryPi:Forthisstageoftheproject,youwillneedaRaspberryPiversion
ModelBorlatest.YoucanbuytheRaspberryPifrom
http://www.raspberrypi.org/buy.
Apowercable:TheRaspberryPirunson5VDCandrequiresatleast750mA
current.ThepowerisappliedthroughthemicroUSBportthatislocatedonthe
board.Inthisproject,youwillneedamicroUSBpowersupply.Optionally,youcan
useamicroUSB-basedphonechargertosupplypowertotheRaspberryPi.
Adisplaycable:IfyouhaveanHDMImonitororaTV,youcanuseanHDMIcable
toconnectittoyourRaspberryPi.IfyouwanttouseyourVGAorDVI-based
monitor,youwillneedaVGAtoHDMIorDVItoHDMIadapterconverter.Youcan
buytheseadapterconvertersfromAmazonorBestBuy.
AnSDcard:Youarerequiredtohaveatleastan8GBSDcardtogetstarted.Itis
preferabletouseanSDcardthathasaqualityofclass4orbetter.Youcanalsobuy
anSDcardwiththepreinstalledOSat
http://swag.raspberrypi.org/collections/frontpage/products/noobs-8gb-sd-card.
Note
TheRaspberryPiModelB+requiresamicroSDcardinsteadofaregularSDcard.
Amouseandkeyboard:YouwillneedastandardUSBkeyboardandaUSBmouse
toworkwiththeRaspberryPi.
AUSBhub(optional):SincetheModelBhasjusttwoUSBports,youwillhaveto
removeexistingdevicesfromtheUSBportstomakespaceforanotherdeviceifyou
wanttoconnectaWi-Fiadapterormemorysticktoit.AUSBhubcanbehandyto
attachmultipleperipheralcomponentstoyourRaspberryPi.Werecommendthatyou
useaUSBhubwithexternalpowersupply,astheRaspberryPicandrivealimited
numberofperipheraldevicesthroughtheUSBportsduetopowerlimitations.
PreparinganSDcard
ToinstallandconfiguresoftwarecomponentssuchasPythonandtherequiredlibraries,
firstweneedanoperatingsystemfortheRaspberryPi.ARaspberryPiofficiallysupports
Linux-basedopensourceoperatingsystemsthatarepreconfiguredforcustomRaspberry
Pihardwarecomponents.Variousversionsoftheseoperatingsystemsareavailableon
RaspberryPi’swebsite(http://www.raspberrypi.org/downloads).
RaspberryPi’swebsiteprovidesavarietyofOSesforuserswhorangefromnewbiesto
experts.Itisdifficultforafirst-timeusertoidentifytheappropriateOSanditsinstallation
process.IfthisisyourfirstattemptwithaRaspberryPi,werecommendthatyouusethe
NewOutOfBoxSoftware(NOOBS)package.DownloadthelatestversionofNOOBS
fromthepreviouslink.TheNOOBSpackageincludesfewdifferentoperatingsystemssuch
asRaspbian,Pidora,Archlinux,andRaspBMC.NOOBSstreamlinestheentireinstallation
processandhelpsyoutoinstallandconfigureyourpreferredversionoftheOSeasily.Itis
importanttonotethatNOOBSisjustaninstallationpackageandyouwillbeleftwithonly
theRaspbianOSonceyoucompletethegiveninstallationsteps.
RaspberryPiusestheSDcardtohosttheoperatingsystemandyouneedtopreparethe
SDcardfromyourcomputerbeforeplacingitintotheSDcardslotoftheRaspberryPi.
InsertyourSDcardintoyourcomputerandmakesurethatyouhaveabackupofany
importantinformationthatisontheSDcard.Duringtheinstallationprocess,youwilllose
allthedatastoredontheSDcard.Let’sstartbypreparingyourSDcard.
FollowthesestepstoprepareanSDcardfromWindows:
1. YouwillrequireasoftwaretooltoformatandpreparetheSDcardforWindows.You
candownloadthefreelyavailableformattingtoolfrom
https://www.sdcard.org/downloads/formatter_4/eula_windows/.
2. DownloadandinstalltheformattingtoolonyourWindowscomputer.
3. InsertyourSDcardandstarttheformattingtool.
4. Intheformattingtool,opentheOptionsmenuandsetFORMATSIZE
ADJUSTMENTtoON.
5. SelecttheappropriateSDcardandclickonFormat.
6. Then,waitfortheformattingtooltofinishformattingtheSDcard.Oncethisisdone,
extractthedownloadedNOOBSZIPfiletotheSDcard.Makesurethatyouextractthe
contentoftheZIPfoldertotherootlocationoftheSDcard.
FollowthesedirectionstoprepareSDcardfromMacOSX:
1. YouwillrequireasoftwaretooltoformatandpreparetheSDcardforMacOSX.
Youcandownloadthefreelyavailableformattingtoolfrom
https://www.sdcard.org/downloads/formatter_4/eula_mac/.
2. Downloadandinstalltheformattingtoolonyourmachine.
3. InsertyourSDcardandruntheformattingtool.
4. Intheformattingtool,selectOverwriteFormat.
5. SelecttheappropriateSDcardandclickonFormat.
6. Then,waitfortheformattingtooltofinishformattingtheSDcard.Oncethisisdone,
extractthedownloadedNOOBSZIPfiletotheSDcard.Makesurethatyouextractthe
contentoftheZIPfoldertotherootlocationoftheSDcard.
FollowthesestepstopreparetheSDcardfromUbuntuLinux:
1. ToformattheSDcardonUbuntu,youcanuseaformattingtoolcalledgparted.
Installgpartedusingthefollowingcommandontheterminal:
$sudoapt-getinstallgparted
2. InsertyourSDcardandrungparted.
3. Inthegpartedwindow,selecttheentireSDcardandformatitusingFAT32.
4. Oncetheformatprocessiscomplete,extractthedownloadedNOOBSZIPfiletothe
SDcard.MakesurethatyouextractthecontentoftheZIPfoldertotherootlocation
oftheSDcard.
Tip
Ifyouhaveanytroublefollowingthesesteps,youcanrefertotheofficial
documentationforpreparingtheSDcardforaRaspberryPiat
http://www.raspberrypi.org/documentation/installation/installing-images/.
TheRaspberryPisetupprocess
OnceyouhavepreparedyourSDcardwithNOOBS,insertitintotheSDcardslotofthe
RaspberryPi.Connectyourmonitor,mouse,andkeyboardbeforeconnectingthemicro
USBcableforthepoweradapter.Onceyouconnectthepoweradapter,theRaspberryPi
willturnonautomaticallyandyouwillbeabletoseetheinstallationprocessonthe
monitor.Ifyouarenotabletoseeanyprogressonthemonitorafterconnectingthepower
adapter,refertothetroubleshootingsectionthatisavailablelaterinthischapter.
OncetheRaspberryPibootsup,itwillrepartitiontheSDcardandshowyouthefollowing
installationscreensothatyoucangetstarted:
Note
Theprecedingscreenshotistakenfromraspberry_pi_F01_02_5a.jpgbySimonMonk
andislicensedunderAttributionCreativeCommonslicense
(https://learn.adafruit.com/assets/11384).
1. Asafirst-timeuser,selectRaspbian[RECOMMENDED]astherecommended
operatingsystemandclickontheInstallOSbutton.RaspbianisaDebian-basedOS
thatisoptimizedfortheRaspberryPianditsupportsusefulLinuxcommandsthatwe
havealreadylearnedinthepreviouschapters.Theprocesswilltakeabout10to20
minutestocomplete.
2. Onsuccessfulcompletion,youwillbeabletoseeascreensimilartotheone
displayedinthefollowingscreenshot.Thescreenshotdisplaystheraspi-configtool
thatwillletyousetuptheinitialparameters.Wewillskipthisprocesstocomplete
theinstallation.Select<Finish>andpressEnter:
3. Youcangobacktothisscreenagain,incaseyouwanttochangeanyparameter,by
typingthefollowingcommandintheterminal:
$sudoraspi-config
4. RaspberryPiwillnowrebootandyouwillbepromptedtothedefaultloginscreen.
Loginusingthedefaultusernamepiandpasswordraspberry.
5. YoucanstartthegraphicaldesktopoftheRaspberryPibytypingthefollowing
commandintheterminal:
$startx
6. TorunthePythoncodethatwedevelopedinthefirststage,youwillneedtosetup
requiredPythonlibrariesontheRaspberryPi.Youwillhavetoconnectyour
RaspberryPitotheInternetusingtheEthernetcabletoinstallthepackages.Install
therequiredPythonpackagesontheRaspberryPiterminalusingthefollowing
command:
$sudoapt-getinstallpython-setuptools,python-matplotlib,python-
numpy
7. InstallpySerialusingSetuptools:
$sudoeasy_installpyserial
Now,yourRaspberryPiisreadywithanoperatingsystemandthenecessarycomponents
tosupportPython-Arduinoprogramming.
UsingaportableTFTLCDdisplaywiththe
RaspberryPi
TFTLCDisagreatwaytoexpandtheRaspberryPi’sfunctionalitiesandavoidtheuseof
largedisplaydevices.TheseTFTLCDdisplayscanbeinterfaceddirectlywithGPIOpins.
TFTLCDscreensareavailableinvariousshapesandsize,butfortheRaspberryPiwe
recommendthatyouuseascreenwithasizesmallerthanorequalto3.2inchesdueto
interfacingconvenience.Mostofthesesmallscreensdonotrequireadditionalpower
supplyandcanbedirectlypoweredusingtheGPIOpins.Inafewcases,touchscreen
versionsarealsoavailabletoextendthefunctionalityoftheRaspberryPi.
Inthisproject,weareusingaTontec2.4inchTFTLCDscreenthatcanbedirectly
interfacedwiththeRaspberryPiviaGPIO.AlthoughyoucanuseanyavailableTFTLCD
screen,thisbookonlycoverthesetupandconfigurationprocessforthisparticularscreen.
Inmostcases,manufacturersofthesescreensprovidedetailedconfigurationtutorialson
theirwebsites.RaspberryPiforumsandblogsareanothergoodplacestolookforhelpif
youareusingadifferenttypeoftheTFTLCDscreen.Thefollowingimageshowsthe
backoftheTontec2.4inchTFTLCDscreenwiththelocationoftheGPIOpins.Let’sget
startedandusethisscreenwithyourRaspberryPi:
ConnectingtheTFTLCDusingGPIO
Beforewecanusethescreen,wewillhavetoconnectittotheRaspberryPi.Let’s
disconnectthemicroUSBpoweradapterfromtheRaspberryPiandlocatetheGPIOmale
pinsneartheRCAvideoportontheRaspberryPi.GetyourTFTscreenandconnectthe
GPIOpinsassuchyoucanseeRaspberryPiandthescreenasdisplayedinthefollowing
image.Inhandfulcases,thenotationsonthescreenwillbemisleading,andthereforewe
suggestthatyoufollowtheguidelinesfromthemanufacturertomaketheconnections:
OnceyourscreenisconnectedtotheRaspberryPi,poweritupusingthemicroUSB
cable.DonotdisconnectyourHDMIcableyet,asyourscreenisstillnotready.Beforewe
goaheadwithanyoftheconfigurationsteps,let’sfirstconnecttheRaspberryPitothe
Internet.ConnecttheEthernetportoftheRaspberryPitoyourhomeorofficenetwork
usinganEthernetcable.Now,let’sconfiguretheTFTLCDscreenintheRaspbianOSto
makeitworkproperly.
ConfiguringtheTFTLCDwiththeRaspberryPiOS
OnceyourRaspberryPiispoweredup,loginusingyourusernameandpassword.
CompletethefollowingstepstoconfigurethescreenwithyourRaspberryPi:
1. Downloadthesupportingfilesandmanualusingthefollowingcommandonthe
terminal:
$wgethttps://s3.amazonaws.com/tontec/24usingmanual.zip
2. Unzipthefile.Thefollowingcommandwillextractthefilesintothesamedirectory:
$unzip24usingmanual.zip
3. Navigatetothesrcdirectory:
$cdcdmztx-ext-2.4/src/
4. Enterfollowingcommandtocompilethesourcefiles:
$make
5. Openthebootconfigurationfiles:
$sudopico/boot/config.txt
6. Intheconfig.txtfile,locateanduncommentthefollowinglinesofcode:
framebuffer_width=320
framebuffer_height=240
7. Saveandexitthefile.
8. Now,everytimetheRaspberryPirestartsweneedtoexecuteacommandtostartthe
TFTLCDscreen.Todothis,opentherc.localfileusingthefollowingcommand:
$sudopico/etc/rc.local
9. Addthefollowinglineofcodetothefilethatstartsthescreen:
sudo/home/pi/mztx-ext-2.4/src/mztx06a&
10. Saveandexitthefile.Then,reboottheRaspberryPiusingthefollowingcommand:
$sudoreboot
YoucanremoveyourHDMImonitornowandstartworkingwithyourTFTLCDscreen.
Onethingthatyouwillhavetokeepinmindisthatthescreenresolutionisverysmalland
itisnotoptimizedforcoding.WeprefertousetheHDMImonitortoperformthemajor
codemodificationsthatarerequiredinthenextsection.TheutilizationoftheTFTLCD
screeninthisprojectistoaccommodatethemobilityandportabilityrequirementsofthe
thermostat.
OptimizingtheGUIfortheTFTLCDscreen
TheresolutionoftheTFTLCDscreenthatweconfiguredintheprevioussectionisonly
320x240pixels,butthewindowsthatwecreatedinfirstprogrammingstagearequite
large.Therefore,beforewecopyandrunourPythoncodeontheRaspberryPi,weneedto
adjustafewparametersinthecode.
Inyourregularcomputerwhereyouhavethischapter’sfolderfromthebook’ssource
code,opentheThermostat_Stage2.pyfile.Thisfilecontainsthedetailsofthe
modificationrequiredtoobtaintheoptimumsizewithminorcosmeticchanges.Youwill
beusingthisfile,insteadoftheonethatweusedinthepreviousstage,onyourRaspberry
Pi.Theseadjustmentsinthecodeareexplainedinthefollowinglinesofcode.
Thefirstmajoralterationisintheportname.FortheRaspberryPi,youneedtochangethe
nameoftheArduinoportfromthatyouwereusinginthefirststageto/dev/ttyACM0,
whichistheaddressassignedtoArduinointhemajorityofthecases:
port=serial.Serial('/dev/ttyACM0',9600,timeout=1)
Inthisprogramfile,thesizeoftheTkintermainwindowandthematplotlibfigureare
alsoadjustedtofitthescreensize.Ifyouareusingadifferent-sizedscreen,changethe
followinglinesofcodeappropriately:
top.minsize(320,160)
pyplot.figure(figsize=(4,3))
Now,withtheprecedingchanges,theGUIwindowshouldbeabletofitwithinRaspberry
Pi’sscreen.AstheRaspberryPi’sscreenwillbeusedasthededicatedscreenforthe
thermostatapplication,weneedtoadjustthetextsizeonthescreentofitthewindow
properly.Addthefont=("Helvetica",20)textinthedeclarationofthelabelsto
increasethefontsize.Thefollowinglineofcodeshowschangesthatareperformedonthe
labelstocontainthesensornames:
Tkinter.Label(top,
text="Humidity",
font=("Helvetica",20)).grid(column=1,row=2)
Similarly,thefontoptionisaddedtotheobservationlabels:
HumdUnitLabel=Tkinter.Label(top,
text="%",
font=("Helvetica",20))
Thelabelsfortheobservationunitalsocarrysimilarmodifications:
HumdLabel.config(text=cleanText(reading[1]),
font=("Helvetica",20))
TheThermostat_Stage2.pyfilealreadyincludestheprecedingmodificationsandis
readytorunonyourRaspberryPi.Beforeyourunthefile,firstweneedtocopythefileto
theRaspberryPi.Atthisstage,theUSBhubwillbeveryhandytocopythefiles.Ifyou
don’thaveaUSBhub,youcanutilizetwoavailableUSBportssimultaneouslytoattach
theUSBpendrive,mouse,andkeyboard.WiththeuseoftheUSBhub,connecttheUSB
pendrivecontainingthePythonfilesandcopythemtothehomefolder.AttachtheUSB
portoftheArduinoboardtooneoftheendsoftheUSBhub.Fromthestartmenuofthe
RaspberryPi,opentheLXTerminalprogrambynavigatingtoAccessories|LXterminal.
RunthePythoncodefromthehomefolderandyouwillbeabletoseetheoptimizeduser
interfacewindowthatopensontheRaspberryPi’sscreen.Ifeverystepmentionedinthe
chapterisperformedcorrectly,youwillbeabletoseethesensorobservationbeingprinted
whenyouclickontheStartbutton:
Attheendofthechapter,youmustbewonderingwhatamobileunitwithsensors,
Arduino,RaspberryPi,andTFTscreenmightlooklike.Thefollowingimageshowsa
samplethermostatthatwasdevelopedusingtheinstructionsgiveninthischapter.Weused
anacrylicsheettoholdtheRaspberryPiandtheArduinoboardtogetherandcreateda
compactformfactor:
Troubleshooting
Thereareafewknownproblemsthatyoumayfaceinthisstageoftheproject.The
followingsectiondescribestheseproblemsandtheirquickfixes:
TheRaspberryPiisnotbootingup:
MakesurethattheSDcardisformattedproperlywiththespecifiedtools.The
RaspberryPiwon’tbootiftheSDcardisnotpreparedproperly.
ChecktheHDMIcableandthemonitortoseewhethertheyareworkingfine.
MakesurethatthepoweradapteriscompatiblewiththeRaspberryPi.
TheTFTLCDscreendoesn’tturnon:
MakesurethatthescreenisproperlyconnectedtotheGPIOpinsofthe
RaspberryPi.
IfyouareusinganyotherTFTLCDscreen,makesurefromitsdatasheetthat
yourscreendoesn’trequireadditionalpower.
Checkwhetherthescreenisproperlyconfiguredusingthestepsdescribedinthe
OptimizingtheGUIfortheTFTLCDscreensection.
ThereisaslowrefreshrateofthesensordataontheRaspberryPi:
TrydecreasingthedelaybetweeneachserialmessagethatissentbyArduino.
Terminateanyotherapplicationthatisrunninginthebackground.
Summary
Withthisproject,wesuccessfullycreatedaportableanddeployablethermostatusing
Arduino,whichmonitorstemperature,humidity,andambientlight.Duringthisprocess,
weassembledthethermostatsensorunitusingthenecessarycomponentsanddeveloped
customArduinoprogramtosupportthem.WealsoutilizedPythonprogrammingmethods
includingGUIdevelopmentandplotsusingTkinterandmatplotliblibraries
respectively.Laterinthechapter,weutilizedtheRaspberryPitoconvertamereproject
prototypeintoapracticalapplication.Henceforth,youshouldbeabletodevelopsimilar
projectsthatrequireyoutoobserveandvisualizereal-timesensorinformation.
Goingforward,wewillbeexpandingthisprojecttoaccommodateupcomingtopicssuch
asArduinonetworking,cloudcommunication,andremotemonitoring.Inthenextlevelof
thethermostatproject,wewillintegratetheseadvancedfeaturesandmakeitareally
resourcefulDIYprojectthatcanbeusedineverydaylife.Inthenextchapter,wearegoing
tostartthenextstageofourjourneyfrommakingsimplePython-Arduinoprojectsto
Internet-connectedandremotelyaccessibleIoTprojects.
Chapter8.IntroductiontoArduino
Networking
Sofar,weusedahardwiredserialconnectiontointeractwithArduino,aserialmonitorto
observetheArduinoserialdata,andaPythonseriallibrary(pySerial)totransferdata
betweentheArduinoandPythonapplications.Duringthisentireexchange,therangeof
communicationwaslimitedduetothehardwiredserialconnection.Asasolution,youcan
useawirelessprotocolsuchasZigBee,Bluetooth,orotherRFchannelstoestablisha
communicationchannelforaremoteserialinterface.Thesewirelessprotocolsare
extensivelyusedinremotehardwareapplications,andtheyusetheserialinterfaceto
transferdata.Duetotheiruseofserialcommunication,theseprotocolsrequireverylittle
tonoadditionalprogrammingchangesontheArduinoorPythonside.Youmayrequire
additionalhardwaretoenabletheseprotocols,however.Themajorbenefitofthese
protocolsisthattheyarereallyeasytoimplement.However,theyarerestrictedwithonly
asmallgeographicalcoverageareaandlimiteddatabandwidth.
Besidesserialcommunicationmethods,theotherwaytoremotelyaccessyourArduino
deviceistouseacomputernetwork.Today,computernetworksarethemostprolificway
ofcommunicatingbetweencomputingunits.Inthenexttwochapters,wewillexplore
variousnetworkingtechniquesusingArduinoandPython,whichrangefromestablishing
verybasicEthernetconnectivitytodevelopingcomplex,cloud-basedwebapplications.
Inthischapter,wewillcoverthefollowingtopics:
Thefundamentalsofnetworkingandhardwareextensionsthatenablenetworkingfor
Arduino
PythonframeworksusedtodevelopHypertextTransferProtocol(HTTP)web
serversonyourcomputer
InterfacingArduino-basedHTTPclientswiththePythonwebserver
IoTmessagingprotocolMQTT(wewillinstallamiddlewaretoolcalledMosquitto
toenableMQTTonourcomputer)
Utilizingthepublisher/subscriberparadigm,usedbyMQTT,todevelopArduinoPythonwebapplications
Arduinoandthecomputernetworking
Computernetworkingisahugedomain,andcoveringeveryaspectofnetworkingisnot
themainobjectiveofthisbook.Wewill,however,trytoexplainafewfundamentalsof
computernetworkingwhereverthisknowledgewillneedtobeapplied.Unliketheserial
interfaceapproach,whereapoint-to-pointconnectionisrequiredbetweendevices,the
network-basedapproachprovidesdistributedaccesstoresources.Specificallyinhardware
applicationswhereasinglehardwareunitisrequiredtobeaccessedbymultipleendpoints
(forexample,inapersonalcomputer,mobilephone,orremoteserver),thecomputer
networkstandssuperior.
Inthissection,wewillcoverthebasicsofnetworkingandhardwarecomponentsthat
enablenetworkinginArduino.Laterinthischapter,wewillusetheArduinolibraryanda
built-inexampletodemonstratehowremoteaccesstoArduinousingyourlocalnetwork
works.
Networkingfundamentals
Wheneveryouseeacomputerormobiledevice,youarealsolookingatsometypeof
computernetworkbeingusedtoconnectthosedeviceswithotherdevices.Insimple
terms,acomputernetworkisagroupofinterconnectedcomputationaldevices(alsocalled
networknodes)thatallowtheexchangeofdatabetweenthesedevices.Thesenetwork
nodesincludevariousdevicessuchasyourpersonalcomputers,mobilephones,servers,
tablets,routers,andotherpiecesofnetworkinghardware.
Acomputernetworkcanbeclassifiedintonumeroustypesaccordingtoparameterssuch
asgeographicallocation,networktopology,andorganizationalscope.Intermsof
geographicalscale,anetworkcanbecategorizedintolocalareanetwork(LAN),home
areanetwork(HAN),wideareanetwork(WAN),andsoon.Whenyouareutilizing
yourhomeroutertoconnecttotheInternet,youareusingtheLANcreatedbyyourrouter.
Withregardstotheorganizationthathandlesthenetwork,LANcanbeconfiguredas
Intranet,Extranet,andInternet.TheInternetisthelargestexampleofanycomputer
network,asitinterconnectsalltypesofnetworksdeployedglobally.Inyour
implementationofvariousprojectsthroughoutthisbook,youwillmostlybeusingyour
LANandtheInternetfortheexchangeofdatabetweenanArduino,yourcomputer,the
RaspberryPi,andthecloudservices.
Tostandardizecommunicationbetweennetworknodes,variousgoverningbodiesand
organizationshavecreatedasetofrulescalledprotocols.Inthelargelistofstandard
protocols,thereareafewprotocolsthatyourcomputerusesonadailybasis.The
examplesofthoseprotocolsassociatedwiththelocalareanetworkincludeEthernetand
Wi-Fi.IntheIEEE802familyofstandards,theIEEE802.3standarddescribesdifferent
typesofwiredconnectivitybetweennodesinalocalareanetwork,alsocalledEthernet.
Similarly,WirelessLAN(alsoreferredtoasWi-Fi),ispartoftheIEEE802.11standard,
whereacommunicationchanneluseswirelessfrequencybandstoexchangedata.
MostnetworknodesdeployedwithIEEE802standards(thatis,Ethernet,Wi-Fi,andso
on)haveauniqueidentifierassignedtothenetworkinterfacehardware,calledamedia
accesscontrol(MAC)address.Thisaddressisassignedbythemanufacturerandis
mostlyfixedforeachnetworkinterface.WhileusingArduinofornetworkconnectivity,
wewillneedtheMACaddresstoenablenetworking.AMACaddressisa48-bitaddress,
andinhuman-friendlyformitcontainssixgroupsoftwohexadecimaldigits.Forexample,
01:23:45:67:89:abisthehuman-readableformofa48-bitMACaddress.
WhiletheMACaddressisassociatedwiththehardware-level(thatis,“physical”)
protocols,theInternetProtocol(IP)isacommunicationprotocolthatiswidelyusedat
theInternetleveltoenableinternetworkingbetweennetworkednodes.Inthe
implementationofversion4oftheIPprotocolsuite(IPv4),eachnetworknodeisassigned
a32-bitnumbercalledtheIPaddress(forexample,192.168.0.1).Whenyouconnecta
computer,phone,oranyotherdevicetoyourlocalhomenetwork,anIPaddressis
assignedtothatdevicebyyourrouter.OneofthemostpopularIPaddressesis127.0.0.1,
whichisalsocalledthelocalhostIPaddress.ApartfromtheIPaddressassignedtoa
computerbythenetwork,eachcomputeralsohasthelocalhostIPaddressassociatedwith
it.ThelocalhostIPaddressisveryusefulwhenyouwanttointernallyaccessorcallyour
computerfromthesamedevice.Inthecaseofaremote-accessapplication,youneedto
knowtheIPaddressassignedbythenetwork.
ObtainingtheIPaddressofyourcomputer
Arduinoisaresource-constraineddevice,andthereforeitcanonlydemonstratealimited
amountofnetworkcapability.WhileworkingwithArduino-basedprojectsthatincludethe
utilizationofacomputernetwork,youwillrequireaserverorGatewayinterface.These
interfacesinclude,butarenotlimitedto,adesktopcomputer,alaptop,theRaspberryPi,
andotherremotecomputinginstances.Ifyouareusingtheseinterfacesaspartofyour
hardwareproject,youwillneedtheirIPaddresses.Ensurethattheyareunderthesame
networkasyourArduino.ThefollowingarethetechniquestoobtainIPaddressesinmajor
operatingsystems.
Windows
InmostversionsoftheWindowsOS,youcanobtaintheIPaddressfromtheNetwork
ConnectionutilityinControlPanel.NavigatetoControlPanel|NetworkandInternet
|NetworkConnectionsandopentheLocalAreaConnectionStatuswindow.Clickon
theDetailsbuttontoseethedetailsoftheNetworkConnectionDetailswindow.Asyou
canseeinthisscreenshot,theIPaddressofthenetworkinterfaceislistedasIPv4
Addressintheopenedwindow:
YoucanalsoobtaintheIPaddressofyourcomputerusingthebuilt-inipconfigutility.
OpentheCommandPromptandenterthefollowingcommand:
>ipconfig
Asyoucanseeinthefollowingscreenshot,theIPaddressofyourcomputerislistedunder
theEthernetadapter.Ifyouareusingawirelessconnectiontoconnecttoyournetwork,
theEthernetadapterwillbereplacedbythewirelessEthernetadapter.
MacOSX
IfyouareusingMacOSX,youcanobtaintheIPaddressfromthenetworksettings.Open
SystemPreferencesandclickontheNetworkicon.Youwillseeawindowsimilarto
whatisshowninthenextscreenshot.Intheleftsidebar,clickontheinterfaceyouare
lookingtoobtaintheIPaddressof.
IfyouwanttogettheIPaddressusingtheterminal,youcanusethefollowingcommand.
Thiscommandwillrequireyoutoenterthesystemnameoftheinterface,en0:
$ipconfiggetifaddren0
Ifyouareconnectedtomultiplenetworksandarenotawareofthenetworkname,youcan
findthelistofIPaddressesassociatedwithyourcomputer,usingthecommandshown
here:
$ifconfig|grepinet
Asyoucanseeinthisscreenshot,youwillgetallthenetworkaddressesassociatedwith
yourMaccomputerandothernetworkparameters:
Linux
OntheUbuntuOS,youcanobtaintheIPaddressofyourcomputerfromtheNetwork
Settingsutility.Toopenit,navigatetoSystemSettings|Networkandclickonthe
adapterthroughwhichthecomputerisconnectedtoyourhomenetwork.Youcanselectan
appropriateadaptertoobtaintheIPaddress,asdisplayedinthefollowingscreenshot:
InaLinux-basedsystem,therearemultiplewaysofobtainingtheIPaddressfromthe
commandline.Youcanusethesamecommand(ifconfig)thatweusedinMacOSXin
theLinuxenvironmenttoobtaintheIPaddressofyourcomputer:
$ifconfig
YoucanobtaintheIPaddressfromtheinetaddrfieldoftheappropriateadapter,as
displayedinthisscreenshot:
Ifsupportedbyyouroperatingsystem,anothercommandthatcanbeutilizedtoobtainthe
IPaddressishostname:
$hostname–I
BecarefulwhenusingthisutilitytoobtaintheIPaddress,asyoumayendupgettingthe
IPaddressofadifferentadapterifyouarenotfamiliarwiththesupportedcommand
optionsoftheutility.
Note
IfyouaregoingtoconnectyourArduinotothesamelocalareanetworkasyourcomputer,
makesureyouarechoosingtheproperIPaddressthatiscoveredbythesamedomainas
thatofyourcomputer.AlsoensurethatnoothernetworkdeviceisusingthesameIP
addressthatyouhaveselectedforyourArduino.ThispracticewillhelpyouavoidIP
addressconflictswithinthenetwork.
NetworkingextensionsforArduino
TherearevarioushardwaredevicesavailableintheArduinocommunitythatenable
networkingfortheArduinoplatform.Amongthesedevices,afewcanbeusedas
extensionsforyourexistingArduinoboard,whileothersexistasstandaloneArduino
moduleswithnetworkingcapabilities.Themostpopularextensionsusedtoenable
networkingaretheArduinoEthernetShieldandArduinoWiFiShield.Similarly,Arduino
YúnisanexampleofastandaloneArduinoplatformthatincludesbuilt-innetworking
capabilities.Inthisbook,wearegoingtodevelopvariousnetworkingapplicationsaround
theArduinoEthernetShield.Therearealsoafewotherextensions(ArduinoGSMShield)
andstandaloneArduinoplatforms(ArduinoEthernet,ArduinoTre,andsoon),butweare
notgoingtocoverthemindetail.Let’sgetfamiliarwiththefollowingArduinoextensions
andboard.
ArduinoEthernetShield
TheArduinoEthernetShieldisanofficiallysupportedandopensourcenetworkextension
designedtoworkwithArduinoUno.TheEthernetShieldisequippedwithanRJ45
connectortoenableEthernetnetworking.TheEthernetShieldisdesignedtomountontop
ofArduinoUnoanditextendsthelayoutofthepinsfromyourArduinoUnotothetopof
theboard.TheEthernetShieldisalsoequippedwithamicroSDcardslottostore
importantfilesoverthenetwork.Justlikemostoftheseshieldextensions,theEthernet
ShieldispoweredbytheArduinoboarditisattachedto.
Source:http://arduino.cc/en/uploads/Main/ArduinoEthernetShield_R3_Front.jpg
EveryEthernetShieldboardisequippedwithauniquehardware(MAC)address.Youcan
seeitonthebackoftheboard.Youmaywanttonotedownthishardwareaddress,asit
willberequiredfrequentlyintheupcomingexercises.Alsomakesurethatyouget
familiarwithmountingtheArduinoEthernetShieldforthoseexercises.BuyanArduino
EthernetShieldmodulefromSparkFunorAmazonbeforeyourstartworkingonany
exercises.YoucanobtainadditionalinformationaboutthisShieldat
http://arduino.cc/en/Main/ArduinoEthernetShield.
ArduinoWiFiShield
TheArduinoWiFiShieldhasalayoutsimilartothatoftheArduinoEthernetShieldasfar
asmountingontopoftheArduinoboardisconcerned.InsteadoftheEthernetRJ45
connector,theWiFiShieldcontainscomponentstoenablewirelessnetworking.Usingthe
WiFiShield,youcanconnecttotheIEEE802.11(Wi-Fi)wirelessnetworks,whichisone
ofthemostpopularwaysofconnectingcomputerstothehomenetworknowadays.
Source:http://arduino.cc/en/uploads/Main/A000058_front.jpg
TheArduinoWiFiShieldrequiresadditionalpowerthroughaUSBconnector.Italso
containsamicroSDslottosavefiles.JustliketheEthernetShield,youcanviewtheMAC
addressonthebackoftheboard.MoreinformationabouttheArduinoWiFiShieldcanbe
foundathttp://arduino.cc/en/Main/ArduinoWi-FiShield.
ArduinoYún
UnliketheEthernetShieldandtheWiFiShield,theArduinoYúnisastandalonevariant
oftheArduinoboard.ItincludesbothEthernet-andWi-Fi-basednetworkconnectivity,in
additiontothebasicArduinocomponent—themicrocontroller.Yúnisequippedwiththe
latestandmorepowerfulprocessingunitscomparedtoUno.Insteadofthetraditionalway
ofusingArduinocode,YúnsupportsalightweightversionoftheLinuxoperatingsystem,
providingfunctionalitysimilartoasingle-boardcomputersuchastheRaspberryPi.You
canuseyourArduinoIDEtoprogramYúnevenwhilerunningUnixshellscripts.
Source:http://arduino.cc/en/uploads/Main/ArduinoYunFront_2.jpg
YoucanfindmoreinformationaboutYúnattheArduinoofficialwebsite,at
http://arduino.cc/en/Main/ArduinoBoardYun.
ArduinoEthernetlibrary
TheArduinoEthernetlibraryprovidessupportfortheEthernetprotocol,andhence
providessupportforEthernetextensionsofArduino,suchastheEthernetShield.Thisisa
standardArduinolibraryanditgetsdeployedwiththeArduinoIDE.
Thelibraryisdesignedtoacceptincomingconnectionrequestswhendeployedasaserver
andwhilemakingoutgoingconnectionstootherserverswhenbeingutilizedasaclient.
Thelibraryconcurrentlysupportsuptofourconnectionsduetothelimitedcomputation
capabilityoftheArduinoboard.TousetheEthernetlibraryinyourArduinoprogram,the
firststepyouhavetotakeistoimportitintoyourArduinosketch:
#include<Ethernet.h>
TheEthernetlibraryimplementsvariousfunctionalitiesthroughspecificclasses,whichare
describedasfollows.
Tip
Wearegoingtodescribeonlytheimportantmethodsprovidedbytheseclasses.Youcan
obtainmoreinformationregardingthislibraryanditsclassesfrom
http://arduino.cc/en/Reference/Ethernet.
TheEthernetclass
TheEthernetclassisacoreclassoftheEthernetlibrary,anditprovidesmethodsto
initializethislibraryandthenetworksettings.Thisisanessentialclassforanyprogram
thatwantstousetheEthernetlibrarytoestablishconnectionsthroughtheEthernetShield.
TheprimaryinformationrequiredtoestablishthisconnectionistheMACaddressofthe
device.You’llneedtocreateavariablethathastheMACaddressasanarrayof6bytes,as
describedhere:
bytemac[]={0xDE,0xAD,0xBE,0xEF,0xFE,0xED};
TheEthernetlibrarysupportstheDynamicHostControlProtocol(DHCP),whichis
responsiblefordynamicallyassigningIPaddressestonewnetworknodes.Ifyourhome
networkisconfiguredtosupportDHCP,youcanestablishtheEthernetconnectionusing
thebegin(mac)methodfromtheEthernetclass:
Ethernet.begin(mac);
KeepinmindthatwhenyouareinitializinganEthernetconnectionusingthisclass,you
areonlyinitializingtheEthernetconnectionandsettinguptheIPaddress.Thismeansthat
youstillneedtoconfigureArduinoasaserveroraclientinordertoenablefurther
communication.
TheIPAddressclass
InapplicationswhereyouhavetomanuallyassigntheIPaddresstoyourArduinodevice,
youwillhavetousetheIPAddressclassoftheEthernetlibrary.Thisclassprovides
methodstospecifytheIPaddress,whichcanbeeitherlocalorremotedependinguponthe
application:
IPAddressip(192,168,1,177);
TheIPaddresscreatedusingthismethodcanbeusedintheinitializationofthenetwork
connectionthatweperformedintheprevioussection.IfyouwanttoassignamanualIP
addresstoyourArduino,youcanusethebegin(mac,ip)methodwiththeMACandIP
addresses:
Ethernet.begin(mac,ip);
TheServerclass
TheServerclassisdesignedtocreateaserverusingtheEthernetlibraryonArduino,
whichlistenstoincomingconnectionrequestsforaspecificport.TheEthernetServer()
method,whenspecifiedwithinintegervalueoftheportnumber,initializestheserveron
Arduino:
EthernetServerserver=EthernetServer(80);
Byspecifyingport80inthepreviouslineofcode(whichrepresentstheHTTPprotocolon
theTCP/IPsuite),wehavespecificallycreatedawebserverusingtheEthernetlibrary.To
startlisteningtotheincomingconnectionrequests,youhavetousethebegin()method
ontheserverobject:
server.begin();
Oncetheconnectionisestablished,youcanrespondtoarequestusingvariousmethods
supportedbytheserverclass,suchaswrite(),print(),andprintln().
TheClientclass
TheClientclassprovidesmethodstocreateanEthernetclienttoconnectand
communicatewithservers.TheEthernetClient()methodinitializesaclientthatcanbe
connectedtoaspecificserverusingitsIPaddressandportnumber.Theconnect(ip,
port)methodontheclientobjectwillestablishaconnectionwiththeserveronthe
mentionedIPaddress:
EthernetClientclient;
client.connect(server,80);
TheClientclassalsohastheconnected()method,whichprovidesthestatusofthe
currentconnectioninbinary.Thisstatuscanbetrue(connected)orfalse(disconnected).
Thismethodisusefulfortheperiodicmonitoringoftheconnectionstatus:
client.connected()
Otherimportantclientmethodsincluderead()andwrite().Thesemethodshelpthe
Ethernetclienttoreadtherequestfromtheserverandtosendmessagestotheserver
respectively.
Exercise1–awebserver,yourfirstArduino
networkprogram
ThebestwaytotesttheArduinoEthernetlibraryandtheEthernetShieldisbyusingthe
built-inexamplesthataredeployedwiththeArduinoIDE.Ifyouareusingversion1.xof
theArduinoIDE,youcanfindabunchofEthernetexamplesbynavigatingtoFile|
Examples|Ethernet.Byutilizingoneoftheseexamples,wearegoingtobuildaweb
serverthatdeliversthesensorvalueswhenrequestedbyawebbrowser.AsArduinowill
beconnectedtoyourhomenetworkthroughtheEthernet,youwillbeabletoaccessit
fromanyothercomputerconnectedtoyournetwork.Themajorgoalsforthisexerciseare
listedhere:
UsetheArduinoEthernetlibrarywiththeArduinoEthernetShieldextensionto
createawebserver
RemotelyaccessArduinousingyourhomecomputernetwork
UtilizeadefaultArduinoexampletoprovidehumidityandmotionsensorvalues
usingawebserver
Toachievethesegoals,theexerciseisdividedintothefollowingstages:
DesignandbuildhardwarefortheexerciseusingyourArduinoandtheEthernet
Shield
RunadefaultexamplefromtheArduinoIDEasthestartingpointoftheexercise
Modifytheexampletoaccommodateyourhardwaredesignandredeploythecode
ThefollowingisaFritzingdiagramofthecircuitrequiredforthisexercise.Thefirstthing
youshoulddoismounttheEthernetShieldontopofyourArduinoUno.Ensurethatall
thepinsoftheEthernetShieldarealignedwiththecorrespondingpinsoftheArduino
Uno.Thenyouneedtoconnectthepreviouslyusedhumiditysensor,HIH-4030,andthe
PIRmotionsensor.
Note
WhiledeployingtheArduinohardwareforremoteconnectivitywithoutUSB,youwill
havetoprovideexternalpowerfortheboard,asyounolongerhaveaUSBconnectionto
powertheboard.
NowconnectyourArduinoUnotoacomputerusingaUSBcable.Youwillalsoneedto
connectArduinotoyourlocalhomenetworkusinganEthernetcable.Todothat,usea
straightCAT5orCAT6cableandconnectoneendofthecabletoyourhomerouter.This
routershouldbethesamedevicethatprovidesnetworkaccesstothecomputeryouare
using.ConnecttheotherendoftheEthernetcabletotheEthernetportoftheArduino
EthernetShieldboard.Ifthephysical-levelconnectionhasbeenestablishedcorrectly,you
shouldseeagreenlightontheport.
Nowit’stimetostartcodingyourfirstEthernetexample.OpentheWebServerexample
bynavigatingtoFile|Examples|Ethernet|WebServerinyourArduinoIDE.Asyou
cansee,theEthernetlibraryisincludedwiththeotherrequiredlibrariesandthesupported
code.Inthecode,youwillneedtochangetheMACandIPaddressestomakeitworkfor
yourconfiguration.WhileyoucanobtaintheMACaddressoftheEthernetShieldfrom
thebackoftheboard,youwillhavetoselectanIPaddressaccordingtoyourhome
networkconfiguration.AsyouhavealreadyobtainedtheIPaddressofthecomputeryou
areworkingwith,selectanotheraddressintherange.Ensurethatnoothernetworknodeis
usingthisIPaddress.UsetheseMACandIPaddressestoupdatethefollowingvaluesin
yourcode.Youwillneedtorepeatthesestepsforeveryexercisewhenyouaredealing
withArduinoEthernet:
bytemac[]={0x90,0xA2,0xDA,0x0D,0x3F,0x62};
IPAddressip(10,0,0,75);
Tip
IntheIPnetwork,thevisiblerangeofIPaddressesforyournetworkisafunctionof
anotheraddresscalledsubnetworkorsubnet.ThesubnetofyourLANIPnetworkcan
helpyouselecttheappropriateIPaddressfortheEthernetShieldintherangeoftheIP
addressofyourcomputer.Youcanlearnaboutthebasicsofthesubnetat
http://en.wikipedia.org/wiki/Subnetwork.
Beforeventuringfurtherintothecode,compilethecodewiththesemodificationsand
uploadittoyourArduino.Oncetheuploadingprocessiscompletedsuccessfully,opena
webbrowserandentertheIPaddressthatyouhadspecifiedintheArduinosketch.If
everythinggoesfine,youshouldseetextdisplayingthevaluesoftheanalogpins.
Tobetterunderstandwhathappenedhere,let’sgobacktothecode.Asyoucansee,atthe
beginningofthecodeweinitializetheEthernetserverlibraryonport80usingthe
EthernetServermethodfromtheEthernetlibrary:
EthernetServerserver(80);
Duringtheexecutionofsetup(),theprograminitializestheEthernetconnectionthrough
theEthernetShieldusingtheEthernet.being()methodwiththemacandipvariables
thatyoudefinedearlier.Theserver.begin()methodwillstarttheserverfromhere.Both
ofthesestepsaremandatorytostartaserverifyouareusingtheEthernetlibraryfor
servercode:
Ethernet.begin(mac,ip);
server.begin();
Intheloop()function,weinitializeaclientobjecttolistentoincomingclientrequests
usingtheEthernetClientmethod.Thisobjectwillrespondtoanyrequestcomingfrom
connectedclientsthattrytoaccesstheEthernetserverthroughport80:
EthernetClientclient=server.available();
Onreceivingtherequest,theprogramwillwaitfortherequestpayloadtoend.Thenitwill
replytotheclientwithformattedHTMLdatausingtheclient.print()method:
while(client.connected()){
if(client.available()){
charc=client.read();
Serial.write(c);
#Responsecode
}
IfyoutrytoaccesstheArduinoserverfromthebrowser,youwillseethatthewebserver
repliestotheclientswiththeanalogpinreadings.Now,toobtainthepropervaluesofthe
humidityandPIRsensorsthatweconnectedinthehardwaredesign,youwillhaveto
performthefollowingmodificationtothecode.Youwillnoticeherethatwearereplying
totheclientswiththecalculatedvaluesofrelativehumidity,insteadofrawreadingsfrom
alltheanalogpins.Wehavealsomodifiedthetextthatwillbeprintedinthewebbrowser
tomatchthepropersensortitle:
if(c=='\n'&¤tLineIsBlank){
//sendastandardhttpresponseheader
client.println("HTTP/1.1200OK");
client.println("Content-Type:text/html");
client.println("Connection:close");
client.println("Refresh:5");
client.println();
client.println("<!DOCTYPEHTML>");
client.println("<html>");
floatsensorReading=getHumidity(analogChannel,temperature);
client.print("RelativeHumidityfromHIH4030is");
client.print(sensorReading);
client.println("%<br/>");
client.println("</html>");
break;
}
Inthisprocess,wealsoaddedanArduinofunction,getHumidity(),thatwillcalculatethe
relativehumidityfromthevaluesobservedfromtheanalogpins.Wehavealreadyuseda
similarfunctiontocalculaterelativehumidityinoneofthepreviousprojects:
floatgetHumidity(intanalogChannel,floattemperature){
floatsupplyVolt=5.0;
intHIH4030_Value=analogRead(analogChannel);
floatanalogReading=HIH4030_Value/1023.0*supplyVolt;
floatsensorReading=161.0*analogReading/supplyVolt-25.8;
floathumidityReading=sensorReading/(1.0546-0.0026*temperature);
returnhumidityReading;
}
YoucanimplementthesechangestotheWebServerArduinoexampleforthetesting
phase,orjustopentheWebServer_Custom.inosketchfromtheExercise1-Web
Serverfolderofyourcodedirectory.Asyoucanseeintheopenedsketchfile,wehave
alreadymodifiedthecodetoreflectthechanges,butyouwillstillhavetochangethe
MACandIPaddressestotheappropriateaddresses.Onceyouaredonewiththeseminor
changes,compileanduploadthesketchtoArduino.
Ifeverythinggoesasplanned,youshouldbeabletoaccessthewebserverusingyourweb
browser.OpentheIPaddressofyourrecentlypreparedArduinointhewebbrowser.You
shouldbeabletoreceiveasimilarresponseasdisplayedinthefollowingscreenshot.
Althoughweareonlydisplayinghumidityvaluesthroughthissketch,youcaneasily
attachmotionsensorvaluesusingadditionalclient.print()methods.
Justlikethemechanismweimplementedinthisexercise,awebserverrespondstothe
requestmadebyawebbrowseranddeliversthewebpagesyouarelookingfor.Although
thismethodisverypopularanduniversallyusedtodeliverwebpages,thepayload
containsalotofadditionalmetadatacomparedtotheactualsizeofthesensorinformation.
Also,theserverimplementationusingtheEthernetserverlibraryoccupiesalotofthe
Arduino’sresources.Arduino,beingaresource-constraineddevice,isnotsuitablefor
runningaserverapplication,astheArduino’sresourcesshouldbeprioritizedtohandlethe
sensorsratherthancommunication.Moreover,thewebservercreatedusingtheEthernet
librarysupportsaverylimitedamountofconnectionsatatime,makingitunusablefor
large-scaleapplicationsandmultiusersystems.
ThebestapproachtoovercomethisproblemisbyusingArduinoasaclientdevice,orby
usinglightweightcommunicationprotocolsthataredesignedtoworkwithresourceconstrainedhardwaredevices.Inthenextfewsections,youaregoingtolearnand
implementtheseapproachesforArduinocommunicationontheEthernet.
DevelopingwebapplicationsusingPython
Byimplementingthepreviousprogram,youhaveenablednetworkingonArduino.Inthe
precedingexample,wecreatedanHTTPwebserverusingmethodsavailablefromthe
Ethernetlibrary.BycreatinganArduinowebserver,wemadetheArduinoresources
availableonthenetwork.Similarly,Pythonalsoprovidesextensibilitybywayofvarious
librariestocreatewebserverinterfaces.ByrunningthePython-basedwebserveronyour
computerorotherdevicessuchastheRaspberryPi,youcanavoidusingArduinotohost
thewebserver.Webapplicationscreatedusinghigh-levellanguagessuchasPythoncan
alsoprovideadditionalcapabilitiesandextensibilitycomparedtoArduino.
Inthissection,wewillusethePythonlibrary,web.py,tocreateaPythonwebserver.We
willalsousethislibrarytocreateinteractivewebapplicationsthatwillenablethetransfer
ofdatabetweenanArduinoclientandawebbrowser.Afteryouhavelearnedthebasicsof
web.py,wewillinterfaceArduinowithweb.pyusingserialportstomakeArduino
accessiblethroughthePythonwebserver.ThenwewillupgradetheArduino
communicationmethodfromtheserialinterfacetoHTTP-basedmessaging.
Pythonwebframework–web.py
AwebservercanbedevelopedinPythonusingvariouswebframeworkssuchasDjango,
bottle,Pylon,andweb.py.Wehaveselectedweb.pyasthepreferredwebframeworkdue
toitssimpleyetpowerfulfunctionalities.
Theweb.pylibrarywasinitiallydevelopedbythelateAaronSwartzwiththegoalof
developinganeasyandstraightforwardapproachtocreatewebapplicationsusingPython.
Thislibraryprovidestwomainmethods,GETandPOST,tosupporttheHTTP
RepresentationStateTransfer(REST)architecture.Thisarchitectureisdesignedto
supporttheHTTPprotocolbysendingandreceivingdatabetweenclientsandtheserver.
Today,theRESTarchitectureisimplementedbyahugenumberofwebsitestotransfer
dataoverHTTP.
Installingweb.py
Togetstartedwithweb.py,youneedtoinstalltheweb.pylibraryusingSetuptools.We
installedSetuptoolsforvariousoperatingsystemsinChapter1,GettingStartedwith
PythonandArduino.OnLinuxandMacOSX,executeeitherofthesecommandsonthe
terminaltoinstallweb.py:
$sudoeasy_installweb.py
$sudopipinstallweb.py
OnWindows,opentheCommandPromptandexecutethefollowingcommand:
>easy_install.exeweb.py
IfSetuptoolsissetupcorrectly,youshouldbeabletoinstallthelibrarywithoutany
difficulty.Toverifytheinstallationofthelibrary,openthePythoninteractivepromptand
runthiscommandtoseewhetheryouhaveimportedthelibrarywithoutanyerrors:
>>>importweb
YourfirstPythonwebapplication
Implementingawebserverusingweb.pyisaverysimpleandstraightforwardprocess.
Theweb.pylibraryrequiresthedeclarationofamandatorymethod,GET,tosuccessfully
startthewebserver.Whenaclienttriestoaccesstheserverusingawebbrowseror
anotherclient,web.pyreceivesaGETrequestandreturnsdataasspecifiedbythemethod.
Tocreateasimplewebapplicationusingtheweb.pylibrary,createaPythonfileusingthe
followinglinesofcodeandexecutethefileusingPython.Youcanalsorunthe
webPyBasicExample.pyfilefromthecodefolderofthischapter:
importweb
urls=(
'/','index'
)
classindex:
defGET(self):
return"Hello,world!"
if__name__=="__main__":
app=web.application(urls,globals())
app.run()
Onexecution,youwillseethattheserverisnowrunningandaccessiblethroughthe
http://0.0.0.0:8080address.Astheserverprogramisrunningonthe0.0.0.0IP
address,youcanaccessitusingthesamecomputer,localhost,oranyothercomputerfrom
thesamenetwork.
Tocheckouttheserver,openawebbrowserandgotohttp://0.0.0.0:8080.Whenyou
aretryingtoaccesstheserverfromthesamecomputer,youcanalsouse
http://127.0.0.1:8080orhttp://localhost:8080.The127.0.0.1IPaddressactually
standsforlocalhost,thatis,thenetworkaddressofthesamecomputeronwhichthe
programisrunning.Youwillbeabletoseetheresponseoftheserverdisplayedinthe
browser,asshowninthefollowingscreenshot:
Tounderstandhowthissimplecodeworks,checkouttheGETmethodinthepreviouscode
snippet.Asyoucansee,whenthewebbrowserrequeststheURL,theGETmethodreturns
theHello,world!stringtothebrowser.Meanwhile,youcanalsoobservetwoother
mandatoryweb.pycomponentsinyourcode:theurlsandweb.application()methods.
Theweb.pylibraryrequiresinitializationoftheresponselocationinthedeclarationofthe
urlsvariable.Everyweb.py-basedwebapplicationrequirestheapplication(urls,
global())methodtobecalledtoinitializethewebserver.Bydefault,theweb.py
applicationsrunonportnumber8080,whichcanbechangedtoanotherportnumberby
specifyingitduringexecution.Forexample,ifyouwanttorunyourweb.pyapplicationon
port8888,executethefollowingcommand:
$pythonwebPyBasicExample.py8888
Althoughthisonlyreturnssimpletext,youhavenowsuccessfullycreatedyourfirstweb
applicationusingPython.Wewilltakeitforwardfromhereandcreatemorecomplexweb
applicationsintheupcomingchaptersusingtheweb.pylibrary.Todevelopthesecomplex
applications,wewillrequiremorethanjusttheGETmethod.Let’sstartexploringadvance
conceptstofurtherenhanceyourfamiliaritywiththeweb.pylibrary.
Essentialweb.pyconceptsfordevelopingcomplex
webapplications
Theweb.pylibraryhasbeendesignedtoprovideconvenientandsimplemethodsto
developdynamicwebsitesandwebapplicationsusingPython.Usingweb.py,itisreally
easytobuildcomplexwebsitesbyutilizingjustafewadditionalPythonconceptsalong
withwhatyoualreadyknow.Duetothislimitedlearningcurveandeasy-to-implement
methods,web.pyisoneofthequickestwaystocreatewebapplicationsinany
programminglanguage.Let’sbeginwithunderstandingtheseweb.pyconceptsindetail.
HandlingURLs
Youmighthavenoticedthatinourfirstweb.pyprogram,wedefinedavariablecalled
urlsthatpointstotherootlocation(/)oftheIndexclass:
urls=(
'/','index'
)
Intheprecedingdeclaration,thefirstpart,'/',isaregularexpressionusedtomatchthe
actualURLrequests.Youcanuseregularexpressionstohandlecomplexqueriescoming
toyourweb.pyserverandpointthemtotheappropriateclass.Inweb.py,youcan
associatedifferentlandingpagelocationswithappropriateclasses.Forexample,ifyou
wanttoredirectthe/datalocationtothedataclassinadditiontotheIndexclass,youcan
changetheurlsvariableasfollows:
urls=(
'/','index',
'/data','data',
)
Withthisprovision,whenaclientsendsarequesttoaccessthehttp://<ipaddress>:8080/dataaddress,therequestwillbedirectedtowardsthedataclassandthen
theGETorPOSTmethodofthatclass.
TheGETandPOSTmethods
Inexercise1,wherewecreatedanArduino-basedwebserverrunningonport80,weused
awebbrowsertoaccessthewebserver.Webbrowsersareoneofthemostpopulartypes
ofwebclientsusedtoaccessawebserver;cURL,Wget,andwebcrawlersaretheother
types.AwebbrowserusesHTTPtocommunicatewithanywebservers,includingthe
Arduinowebserverthatweused.GETandPOSTaretwofundamentalmethodssupported
bytheHTTPprotocoltoaddressserverrequestscomingfromawebbrowser.
WheneveryouaretryingtoopenawebsiteinyourbrowseroranyotherHTTPclient,you
areactuallyrequestingtheGETfunctionfromthewebserver;forexample,whenyouopen
awebsiteURL,http://www.example.com/,youarerequestingthatthewebserverthat
hoststhiswebsiteservesyoutheGETrequestforthe'/'location.IntheHandlingURLs
section,youlearnedhowtoassociatetheweb.pyclasseswithURLlandinglocations.
UsingtheGETmethodprovidedbytheweb.pylibrary,youcanassociatetheGETrequest
withindividualclasses.OnceyouhavecapturedtheGETrequest,youneedtoreturn
appropriatevaluesastheresponsetotheclient.Thefollowingcodesnippetshowshowthe
GET()functionwillbecalledwhenanyonemakesaGETrequesttothe'/'location:
defGET(self):
f=self.submit_form()
f.validates()
t=75
returnrender.test(f,t);
ThePOSTfunctionoftheHTTPprotocolismainlyusedtosubmitaformoranyotherdata
tothewebserver.Inmostcases,POSTisembeddedinawebpage,andarequesttothe
serverisgeneratedwhenausersubmitsthecomponentcarryingthePOSTfunction.The
web.pylibraryalsoprovidesthePOST()function,whichiscalledwhenawebclienttries
tocontacttheweb.pyserverusingthePOSTmethod.Inmostimplementationsofthe
POST()function,therequestincludessomekindofdatasubmittedthroughforms.Youcan
retrieveindividualformelementsusingf['Celsius'].valuewhichwillgiveyouavalue
associatedwiththeformelementcalledCelsius.OncethePOST()functionhasperformed
theprovidedactions,youcanreturnappropriateinformationtotheclientinresponseto
thePOSTrequest:
defPOST(self):
f=self.submit_form()
f.validates()
c=f['Celsius'].value
t=c*(9.0/5.0)+32
returnrender.test(f,t)
Templates
NowyouknowhowtoredirectanHTTPrequesttoanappropriateURL,andalsohowto
implementmethodstorespondtotheseHTTPrequests(thatis,GETandPOST).Butwhat
aboutthewebpagethatneedstoberenderedoncetherequestisreceived?Tounderstand
therenderingprocess,let’sstartwithcreatingafoldercalledtemplatesinthesame
directorywhereourweb.pyprogramisgoingtobeplaced.Thisfolderwillstorethe
templatesthatwillbeusedtorenderthewebpageswhenrequested.Youhavetospecify
thelocationofthistemplatefolderintheprogramusingthetemplate.render()function,
asdisplayedinthefollowinglineofcode:
render=web.template.render('templates')
Onceyouhaveinstantiatedtherenderingfolder,itistimetocreatetemplatefilesforyour
program.Accordingtotherequirementsofyourprogram,youcancreateasmany
templatefilesasyouwant.AlanguagecalledTempletorisusedtocreatethesetemplate
filesinweb.py.Youcanlearnmoreaboutitathttp://webpy.org/templetor.Eachtemplate
filecreatedusingTempletorneedstobestoredintheHTMLformatwiththe.html
extension.
Let’screateafilecalledtest.htmlinthetemplatesfolderusingatexteditorandpaste
thefollowingcodesnippetintothefile:
$defwith(form,i)
<formmethod="POST">
$:form.render()
</form>
<p>Valueis:$:i</p>
Asyoucanseeintheprecedingcodesnippet,thetemplatefilebeginswiththe$def
with()expression,whereyouneedtospecifytheinputargumentsasvariableswithinthe
brackets.Oncethetemplateisrendered,thesewillbetheonlyvariablesyoucanutilizefor
thewebpage;forexample,inthepreviouscodesnippet,wepassedtwovariables(form
andi)asinputvariables.Weutilizedtheformobjectusing$:form.render()torenderit
insidethewebpage.Whenyouneedtorendertheformobject,youcandirectlypassthe
othervariablebysimplydeclaringit(thatis,$:i).TempletorwillrendertheHTMLcode
ofthetemplatefileasitis,whileutilizingthevariablesintheinstanceswheretheyare
beingused.
Nowyouhaveatemplatefile,test.html,readytobeusedinyourweb.pyprogram.
WheneveraGET()orPOST()functionisexecuted,youarerequiredtoreturnavaluetothe
requestingclient.Althoughyoucanreturnanyvariablefortheserequests,includingNone,
youwillhavetorenderatemplatefilewheretheresponseisassociatedwithloadingaweb
page.Youcanreturnthetemplatefileusingtherender()function,followedbythe
filenameofthetemplatefileandinputarguments:
returnrender.test(f,i);
Asyoucanseeintheprecedinglineofcode,wearereturningtherenderedtest.html
pagebyspecifyingtherender.test()function,wheretest()isjustthefilenamewithout
the.htmlextension.Thefunctionalsoincludesaformobject,f,andvariable,i,thatwill
bepassedasinputarguments.
Forms
Theweb.pylibraryprovidessimplewaysofcreatingformelementsusingtheForm
module.ThismoduleincludesthecapabilitytocreateHTMLformelements,obtaininputs
fromusers,andvalidatetheseinputsbeforeutilizingtheminthePythonprogram.Inthe
followingcodesnippet,wearecreatingtwoformelements,TextboxandButton,usingthe
Formlibrary:
submit_form=form.Form(
form.Textbox('Celsius',description='Celsius'),
form.Button('submit',type="submit",description='submit')
)
BesidesTextbox(whichobtainstextinputfromusers)andButton(whichsubmitsthe
form),theFormmodulealsoprovidesafewotherformelements,suchasPasswordto
obtainhiddentextinput,Dropboxtoobtainamutuallyexclusiveinputfromadrop-down
list,Radiotoobtainmutuallyexclusiveinputsfrommultipleoptions,andCheckboxto
selectabinaryinputfromthegivenoptions.Whilealloftheseelementsareveryeasyto
implement,youshouldselectformelementsonlyaccordingtoyourprogram
requirements.
Intheweb.pyimplementationofForm,thewebpageneedstoexecutethePOSTmethod
everytimetheformissubmitted.Asyoucaninseeinthefollowingimplementationofthe
forminthetemplatefile,weareexplicitlydeclaringtheformsubmissionmethodasPOST:
$defwith(form,i)
<formmethod="POST">
$:form.render()
</form>
Exercise2–playingwithweb.pyconceptsusingthe
Arduinoserialinterface
Nowyouhaveageneralideaofthebasicweb.pyconceptsusedtobuildawebapplication.
Inthisexercise,wewillutilizetheconceptsyoulearnedtocreateanapplicationtoprovide
theArduinowithsensorinformation.Asthegoalofthisexerciseistodemonstratethe
web.pyserverforArduinodata,wearenotgoingtoutilizetheEthernetShieldfor
communication.Instead,wewillcapturetheArduinodatausingtheserialinterface,while
usingtheweb.pyservertorespondtotherequestscomingfromdifferentclients.
Asyoucanseeinthefollowingdiagram,weareusingthesamehardwarethatyou
designedforexercise1,butwithoututilizingtheEthernetconnectiontoourhomerouter.
Yourcomputerrunningtheweb.pyserver,whichisalsoapartofyourhomenetwork,will
servetheclientrequests.
Inthefirststep,wearegoingtocodeArduinotoperiodicallysendthehumiditysensor
valuetotheserialinterface.FortheArduinocode,openthe
WebPySerialExample_Arduino.inosketchfromtheExercise2folderofyourcode
directory.AsyoucanseeinthefollowingcodesnippetoftheArduinosketch,weare
sendingrawvaluesfromtheanalogporttotheserialinterface.Nowcompileandupload
thesketchtoyourArduinoboard.OpentheSerialMonitorwindowfromtheArduino
IDEtoconfirmthatyouarereceivingtherawhumidityobservations.Onceyouhave
confirmedit,closetheSerialMonitorwindow.Youwon’tbeabletorunthePythoncode
iftheSerialMonitorwindowisusingtheport:
voidloop(){
intanalogChannel=0;
intHIH4030_Value=analogRead(analogChannel);
Serial.println(HIH4030_Value);
delay(200);
}
OncetheArduinocodeisrunningproperly,itistimetoexecutethePythonprogram,
whichcontainstheweb.pyserver.ThePythonprogramforthisexerciseislocatedinthe
WebPySerialExample_Pythondirectory.OpenthewebPySerialExample.pyfileinyour
codeeditor.ThePythonprogramisorganizedintwosections:capturingsensordatafrom
theserialinterfaceusingthepySeriallibrary,andusingtheweb.pyserver-basedserverto
respondtotherequestsfromtheclients.
Inthefirststageofthecode,weareinterfacingtheserialportusingtheSerial()method
fromthepySeriallibrary.Don’tforgettochangetheserialportnameasitmaybe
differentforyourcomputer,dependingontheoperatingsystemandphysicalportthatyou
areusing:
importserial
port=serial.Serial('/dev/tty.usbmodemfa1331',9600,timeout=1)
Oncetheportobjectfortheserialportiscreated,theprogramstartsreadingthetext
comingfromthephysicalport,usingthereadline()method.Usingthe
relativeHumidity()function,weconverttherawhumiditydatatoappropriaterelative
humidityobservations:
line=port.readline()
ifline:
data=float(line)
humidity=relativeHumidity(line,25)
Onthewebserverside,wewillbeusingallthemajorweb.pycomponentsyoulearnedin
theprevioussectiontocompletethisgoal.Aspartofit,weareimplementinganinput
formforthetemperaturevalue.Wewillcapturethisuserinputandutilizeitwiththeraw
sensordatatocalculaterelativehumidity.Therefore,weneedtodefinetherenderobject
tousethetemplatedirectory.Inthisexercise,weareonlyusingthedefaultlandingpage
location('/')forthewebserver,whichisdirectedtowardstheIndexclass:
render=web.template.render('templates')
AsyoucanseeintheWebPySerialExample_Pythonfolder,wehaveadirectorycalled
templates.Thisdirectorycontainsatemplatewiththebase.htmlfilename.Asthisisan
HTMLfile,itislikelythatifyoujustclickonthefile,itopensinawebbrowser.Make
surethatyouopenthefileinatexteditor.Intheopenedfile,you’llseethatweare
initializingthetemplatefilewith$defwith(form,humidity).Inthisinitialization,form
andhumidityareinputvariablesthatarerequiredbythetemplateduringtherendering
process.Thetemplatedeclarestheactual<form>elementwiththe$:form.render()
method,whiledisplayingthehumidityvalueusingthe$humidityvariable:
<formmethod="POST">
$:form.render()
</form>
<h3>RelativeHumidityis:</h3>
<pname="temp">$humidity</p>
Althoughthetemplatefilerenderstheformvariable,wehavetodefinethisvariableinthe
Pythonprogramfirst.Asyoucanseeinthefollowingcodesnippet,wehavedeclareda
variablecalledsubmit_formusingtheform.Form()methodoftheweb.pylibrary.The
submit_formvariableincludesaTextboxelementtocapturethetemperaturevalueanda
Buttonelementtoenablethesubmitaction:
submit_form=form.Form(
form.Textbox('Temperature',description='Temperature'),
form.Button('submit',type="submit",description='submit')
)
Whenyouwanttoaccessthecurrentsubmittedvaluesofthesubmit_formvariable,you
willhavetovalidatetheformusingthevalidates()method:
f=self.submit_form()
f.validates()
Nowwehavetheuser-facingwebpageandinputcomponentsdesignedfortheexercise.It
istimetodefinethetwomainmethods,GETandPOST,torespondtotherequestcoming
fromthewebpage.Whenyoulaunchorrefreshthewebpage,theweb.pyservergenerates
theGETrequest,whichisthenhandledbytheGETfunctionoftheIndexclass.Soduring
theexecutionoftheGETmethod,theprogramobtainsthelatestrawhumidityvaluefrom
theserialportandcalculatestherelativehumidityusingtherelativeHumidity()method.
Note
IntheprocessofdealingwiththeGETrequest,wearenotsubmittinganyformwiththe
userinput.Forthisreason,intheGETmethod,wewillusethedefaultvalueoftemperature
(25)fortherelativeHumidity()method.
Oncethehumidityvalueisderived,theprogramwillrenderthebasetemplateusingthe
render.base()function,asdisplayedinthefollowingcodesnippet,wherebase()refers
tothebasetemplate:
defGET(self):
f=self.submit_form()
f.validates()
line=port.readline()
ifline:
data=float(line)
humidity=relativeHumidity(line,25)
returnrender.base(f,humidity);
else:
returnrender.base(f,"Notvaliddata");
ContrarytotheGETmethod,thePOSTmethodisinvokedwhentheformissubmittedtothe
webpage.Thesubmittedformincludesthetemperaturevalueprovidedbytheuser,which
willbeusedtoobtainthevalueoftherelativehumidity.LiketheGET()function,the
POST()functionalsorendersthebasetemplatewiththerecenthumidityvalueoncethe
humidityiscalculated:
defPOST(self):
f=self.submit_form()
f.validates()
temperature=f['Temperature'].value
line=port.readline()
ifline:
data=float(line)
humidity=relativeHumidity(line,float(temperature))
returnrender.base(f,humidity);
else:
returnrender.base(f,"Notvaliddata");
Nowitistimetoruntheweb.py-basedwebserver.InthePythonprogram,makethe
necessarychangestoaccommodatetheserialportnameandanyotherappropriatevalues.
Ifeverythingisconfiguredcorrectly,youwillbeabletoexecutetheprogramfromthe
terminalwithoutanyerrors.Youcanaccessthewebserver,whichisrunningonport8080,
fromawebbrowseronthesamecomputer,thatis,http://localhost:8080.Nowthe
goaloftheexerciseistodemonstratetheremoteaccessibilityofthewebserverfromyour
homenetwork,andyoucandothisbyopeningthewebsitefromanothercomputerinyour
network,thatis,http://<ip-address>:8080,where<ip-address>referstotheIP
addressofthecomputerthatisrunningtheweb.pyservice.
Theprecedingscreenshotshowshowthewebapplicationwilllookwhenopenedinaweb
browser.Whenyouloadthewebsite,youwillbeabletoseearelativehumidityvalue
obtainedusingtheGETmethod.Nowyoucanenteranappropriatetemperaturevalueand
pressthesubmitbuttontoinvokethePOSTmethod.Onsuccessfulexecution,youwillbe
abletoseethelatestrelativehumidityvalue,whichiscalculatedbasedonthetemperature
valuethatyousubmitted.
RESTfulwebapplicationswithArduino
andPython
Inthepreviousexercise,weimplementedtheGETandPOSTrequestsusingtheweb.py
library.Theserequestsareactuallypartofthemostpopularcommunicationarchitectureof
theWorldWideWeb(WWW)calledREST.TheRESTarchitectureimplementsaclientserverparadigmusingtheHTTPprotocolforoperationssuchasPOST,READ,andDELETE.
TheGET()andPOST()functions,implementedusingweb.py,arefunctionalsubsetsof
thesestandardHTTPRESToperations,thatis,GET,POST,UPDATE,andDELETE.TheREST
architectureisdesignedfornetworkapplications,websites,andwebservicestoestablish
communicationthroughHTTP-basedcalls.Ratherthanbeingjustasetofstandardrules,
theRESTarchitectureutilizesexistingwebtechnologiesandprotocols,makingitacore
componentofthemajorityofthewebsitesweusetoday.Duetothisreason,theWWW
canbeconsideredtobethelargestimplementationofREST-basedarchitecture.
DesigningREST-basedArduinoapplications
TheRESTarchitectureusesaclient-servermodel,wheretheserveractsasacentralized
nodeinthenetwork.Itrespondstotherequestsmadebythedistributednetworknodes
(calledclients)thatqueryit.Inthisparadigm,theclientinitiatesarequestforthestate
directedtowardstheserver,whiletheserverrespondstothestaterequestwithoutstoring
theclientcontext.Thiscommunicationisalwaysone-directionalandalwaysinitiatedfrom
theclientside.
TofurtherexplainthestatetransferfortheGETandPOSTrequests,checkouttheprevious
diagram.WhenaclientsendsaGETrequesttoaserverusingaURL,theserverresponds
withrawdataastheHTTPresponse.Similarly,inthePOSTrequest,theclientsendsdataas
payloadtotheserver,whiletheserverrespondswithsimplya“receivedconfirmation”
message.
RESTmethodsarerelativelysimpletoimplementanddevelopusingsimpleHTTPcalls.
WearegoingtostartdevelopingArduinonetworkingapplicationsusingREST-based
requests,astheyareeasytoimplementandunderstandandaredirectlyavailablethrough
examples.WewillbeginbyindividuallyimplementingREST-basedArduinoclientsfor
HTTP-basedGETandPOSTmethods.Laterinthischapter,wewillgothroughanexercise
tocombinetheGETandPOSTmethodsthroughthesameArduinoRESTclient,while
developingtheHTTPserverusingweb.py.
WorkingwiththeGETrequestfromArduino
Inthisexercise,wewillimplementtheHTTPGETclientonArduino,whileusinganHTTP
serverthatwasdevelopedusingweb.py.Thepremiseofthisprogrammingexerciseisto
usetheEthernetShieldextensionandtheEthernetlibrarytodevelopaphysicalArduino
HTTPclientthatsupportstheGETrequest.
TheArduinocodetogeneratetheGETrequest
TheArduinoIDEshipswithafewbasicexamplesthatutilizetheEthernetlibrary.Oneof
theseexamplesisWebClient,whichcanbefoundbynavigatingtoFile|Examples|
Ethernet|WebClient.ItisdesignedtodemonstratetheGETrequestbyimplementingthe
HTTPclientonArduino.OpenthissketchintheArduinoIDE,aswearegoingtousethis
sketchandmodifyittoaccommodatetheArduinohardwarewecreated.
ThefirstthingyouneedtochangeintheopenedsketchistheIPaddressandtheMAC
addressofyourArduinoEthernetShield.Replacethefollowingvariableswiththe
variablesappropriateforyoursystem.ThefollowingcodesnippetshowstheIPaddress
andtheMACaddressforourhardware,andyouneedtochangeittoaccommodateyours:
bytemac[]={0x90,0xA2,0xDA,0x00,0x47,0x28};
IPAddressip(10,0,0,75);
Asyoucansee,theexampleusesGoogleasaservertogetaresponse.Youneedtochange
thisaddresstoreflecttheIPaddressofyourcomputer,whichwillhosttheweb.pyserver:
charserver[]="10.0.0.20";
Inthesetup()function,youwillhavetochangetheserverIPaddressagain.Alsochange
thedefaultHTTPport(80)totheportusedbyweb.py(8080):
if(client.connect(server,8080)){
Serial.println("connected");
//MakeaHTTPrequest:
client.println("GET/dataHTTP/1.1");
client.println("Host:10.0.0.20");
client.println("Connection:close");
client.println();
}
Onceyouhavemadeallofthesechanges,gototheArduino_GET_Webpy\ArduinoGET
folderandopentheArduinoGET.inosketch.Compareyourmodifiedsketchwiththis
sketchandperformtheappropriatechanges.Nowyoucansaveyoursketchandcompile
yourcodeforanyerrors.
Atthisstage,weareassumingthatyouhavetheArduinoEthernetShieldmountedon
yourArduinoUno.ConnecttheEthernetShieldtoyourlocalnetworkusinganEthernet
cable,andconnectUnowithyourcomputerusingaUSBcable.Uploadthesketchtothe
ArduinoboardandopentheSerialMonitorwindowtochecktheactivity.Atthisstage,
Arduinowouldnotbeabletoconnecttotheserverbecauseyourweb.pyserverisstillnot
running.Youcanclosetheserialmonitorfornow.
TheHTTPserverusingweb.pytohandletheGETrequest
Inyourfirstweb.pyapplication,youdevelopedaserverthatreturnedHello,world!
whenrequestedfromawebbrowser.Despitealltheadditionaltasksitcanperform,your
webbrowserisanHTTPclientatitscore.Thismeansthatifyourfirstweb.pyservercode
wasabletorespondtotheGETrequestmadebythewebbrowser,itshouldalsobeableto
respondtotheArduinowebclient.Tocheckthisout,openyourfirstweb.pyprogram,
webPyBasicExample.py,andchangethereturnstringfromHelloWorld!totest.Weare
performingthisstringchangetodifferentiateitfromtheotherinstancesofthisprogram.
ExecutethePythonprogramfromtheterminalandopentheSerialMonitorwindowin
theArduinoIDEagain.Thistime,youwillbeabletoseethatyourArduinoclientis
receivingaresponsefortheGETrequestitsenttotheweb.pyserver.Asyoucanseeinthe
followingscreenshot,youwillbeabletoseetheteststringprintedintheSerialMonitor
window,whichisreturnedbytheweb.pyserverfortheGETrequest:
AlthoughinthisexamplewearereturningasimplestringfortheGETrequest,youcan
extendthismethodtoobtaindifferentuser-specifiedparametersfromthewebserver.This
GETimplementationcanbeusedinalargenumberofapplicationswhereArduinorequires
repeatedinputfromtheuserorotherprograms.Butwhatifthewebserverrequiresinput
fromtheArduino?Inthatcase,wewillhavetousethePOSTrequest.Let’sdevelopan
ArduinoprogramtoaccommodatetheHTTPPOSTrequest.
WorkingwiththePOSTrequestfromArduino
SincewehavenowimplementedtheGETrequest,wecanuseasimilarapproachto
exercisethePOSTrequest.Insteadofaskingtheservertoprovidearesponseforastate
request,wewillsendsensordataaspayloadfromArduinointheimplementationofthe
POSTrequest.Similarly,ontheserverside,wewillutilizeweb.pytoacceptthePOST
requestanddisplayitthroughawebbrowser.
TheArduinocodetogeneratethePOSTrequest
OpentheArduinosketchArduinoPOST.inofromtheArduino_POST_Webpy\ArduinoPOST
folderofthecoderepository.Asinthepreviousexercise,youwillfirsthavetoprovidethe
IPaddressandtheMACaddressofyourArduino.
Onceyouhavecompletedthesebasicchanges,observethefollowingcodesnippetforthe
implementationofthePOSTrequest.Youmightnoticethatwearecreatingpayloadforthe
POSTrequestasthevariabledatafromthevaluesobtainedfromanalogpin0:
Stringdata;
data+="";
data+="Humidity";
data+=analogRead(analogChannel);
InthefollowingArduinocode,we’llfirstcreateaclientobjectusingtheEthernetlibrary.
Intherecurringloop()function,we’llusethisclientobjecttoconnecttotheweb.py
serverrunningonourcomputer.YouwillhavetoreplacetheIPaddressintheconnect()
methodwiththeIPaddressofyourweb.pyserver.Onceconnected,we’llcreateacustom
POSTmessagewiththepayloaddatawecalculatedpreviously.TheArduinoloop()
functionwillperiodicallysendtheupdatedsensorvaluegeneratedbythiscodesampleto
theweb.pyserver:
if(client.connect("10.0.0.20",8080)){
Serial.println("connected");
client.println("POST/dataHTTP/1.1");
client.println("Host:10.0.0.20");
client.println("Content-Type:application/x-www-form-urlencoded");
client.println("Connection:close");
client.print("Content-Length:");
client.println(data.length());
client.println();
client.print(data);
client.println();
Serial.println("Datasent.");
}
Onceyouhaveperformedthechanges,compileanduploadthissketchtotheArduino
board.Astheweb.pyserverisyetnotimplemented,thePOSTrequestthatoriginatedfrom
Arduinowillnotbeabletoreachitsdestinationsuccessfully,solet’screatetheweb.py
servertoacceptPOSTrequests.
TheHTTPserverusingweb.pytohandlethePOSTrequest
InthisimplementationofthePOSTmethod,werequiretwoweb.pyclasses,indexand
data,toindividuallyserverequestsfromthewebbrowserandArduinorespectively.As
wearegoingtousetwoseparateclassestoupdatecommonsensorvalues(thatis,
humidityandtemperature),wearegoingtodeclarethemasglobalvariables:
globaltemperature,humidity
temperature=25
AsyoumayhavenoticedintheArduinocode(client.println("POST/data
HTTP/1.1")),weweresendingthePOSTrequesttotheURLlocatedat/data.Similarly,
wewillusethedefaultrootlocation,'/',tolandanyrequestcomingfromtheweb
browser.Theserequestsfortherootlocationwillbehandledbytheindexclass,justaswe
coveredinexercise2:
urls=(
'/','index',
'/data','data',
)
ThedataclasstakescareofanyPOSTrequestoriginatingfromthe/datalocation.Inthis
case,thesePOSTrequestscontainpayloadthathassensorinformationattachedbythe
ArduinoPOSTclient.Onreceivingthemessage,themethodsplitsthepayloadstringinto
sensor-typeandvalue,updatingtheglobalvalueofthehumidityvariableinthisprocess:
classdata:
defPOST(self):
globalhumidity
i=web.input()
data=web.data()
data=data.split()[1]
humidity=relativeHumidity(data,temperature)
returnhumidity
EachPOSTrequestreceivedfromArduinoupdatestherawhumidityvalue,whichis
representedbythedatavariable.Weareusingthesamecodefromexercise2toobtain
manualtemperaturevaluesfromtheuser.Therelativehumidityvalue,humidity,is
updatedaccordingtothetemperaturevalueyouupdatedusingthewebbrowserandthe
rawhumidityvalueisobtainedfromyourArduino.
TocheckoutthePythoncode,opentheWebPyEthernetPOST.pyfilefromthecode
repository.Aftermakingtheappropriatechanges,executethecodefromtheterminal.If
youdon’tstartgettinganyupdatesfromtheArduinoontheterminal,youshouldrestart
Arduinotoreestablishtheconnectionwiththeweb.pyserver.Onceyoustartseeing
periodicupdatesfromtheArduinoPOSTrequestsattheterminal,openthelocationofthe
webapplicationinyourbrowser.Youwillbeabletoseesomethingsimilartothe
precedingscreenshot.Here,youcansubmitthemanualtemperaturevalueusingtheform,
whilethebrowserwillreloadwiththeupdatedrelativehumidityaccordingtothe
temperaturevalueentered.
Exercise3–aRESTfulArduinowebapplication
ThegoalofthisexerciseistosimplycombinetheGETandPOSTmethodsyoulearnedin
theprevioustwosectionsinordertocreateacompleteRESTexperienceusingArduino
andPython.Thearchitectureforthisexercisecanbedescribedasfollows:
TheArduinoclientperiodicallyusestheGETrequesttoobtainthesensortypefrom
theserver.Itusesthissensortypetoselectasensorforobservation.Inourcase,itis
eitherahumidityormotionsensor.
ThewebserverrespondstotheGETrequestbyreturningthecurrentsensortypeofthe
sensorselectedbytheuser.Theuserprovidesthisselectionthroughaweb
application.
Afterreceivingthesensortype,theArduinoclientutilizesPOSTtosendsensor
observationtotheserver.
ThewebserverreceivesthePOSTdataandupdatesthesensorobservationforthat
particularsensortype.
Ontheuserside,thewebserverobtainsthecurrentsensortypethroughtheweb
browser.
Whenthesubmitbuttoninthebrowserispressed,theserverupdatesthesensor
valueinthebrowserwiththelatestvalue.
TheArduinosketchfortheexercise
UsingthesameArduinohardwarewebuilt,opentheArduinosketchnamed
WebPyEthernetArduinoGETPOST.inofromtheExercise3-RESTfulapplication
Arduinoandwebpycodefolder.Aswedescribedintheexercise’sarchitectureearlier,the
ArduinoclientshouldperiodicallysendGETrequeststotheserverandgetthe
correspondingvalueofthesensortypeintheresponse.Aftercomparingthesensortype,
theArduinoclientfetchesthecurrentsensorobservationfromtheArduinopinsandsends
thatobservationbacktotheserverusingPOST:
if(client.connected()){
if(client.find("Humidity")){
#Fetchhumiditysensorvalue
if(client.connect("10.0.0.20",8080)){
#Posthumidityvalues
}
}
else{
#Fetchmotionsensorvalue
if(client.connect("10.0.0.20",8080)){
#Postmotionvalues
}
}
#Adddelay
}
Afterchangingtheappropriateserver’sIPaddressinthecode,compileanduploaditto
theArduino.OpentheSerialMonitorwindow,whereyouwillfindunsuccessful
connectionattempts,asyourweb.pyserverisnotyetrunning.Closeanyotherinstanceor
programoftheweb.pyserverrunningonyourcomputer.
Theweb.pyapplicationtosupportRESTrequests
OpentheWebPyEthernetGETPOST.pyfilefromtheExercise3-RESTfulapplication
Arduinoandwebpycodefolder.Asyoucansee,theweb.pybasedwebserverimplements
twoseparateclasses,indexanddata,tosupporttheRESTarchitecturefortheweb
browserandtheArduinoclient,respectively.Weareintroducinganewconceptforthe
Formelement,calledDropdown().UsingthisFormmethod,youcanimplementthedropdownselectionmenuandasktheusertoselectoneoptionfromthelistofoptions:
form.Dropdown('dropdown',
[('Humidity','Humidity'),('Motion','Motion')]),
form.Button('submit',
type="submit",description='submit'))
Inthepreviousweb.pyprogram,weimplementedtheGETandPOSTmethodsfortheindex
classandonlythePOSTmethodforthedataclass.Movingforwardinthisexercise,we’ll
alsoaddtheGETmethodtothedataclass.Thismethodreturnsthevalueofthe
sensorTypevariablewhentheGETrequestismadeforthe/datalocation.Fromtheuser
side,thevalueofthesensorTypevariableisupdatedwhentheformgetssubmittedwith
anoption.ThisactionsendsaselectedvaluetothePOSTmethodoftheindexclass,
ultimatelyupdatingthesensorTypevalue:
classdata:
defGET(self):
returnsensorType
defPOST(self):
globalhumidity,motion
i=web.input()
data=web.data()
data=data.split()[1]
ifsensorType=="Humidity":
humidity=relativeHumidity(data,temperature)
returnhumidity
else:
motion=data
returnmotion
BeforeyourunthisPythonprogram,makesureyouhavecheckedeverycomponentofthe
codeandupdatedthevalueswhereneeded.Thenexecutethecodefromtheterminal.Your
webserverwillnowrunonyourlocalcomputerontheportnumber8080.Power-cycle
yourArduinodeviceincasetheconnectionattemptfromArduinofails.Totestyour
system,openthewebapplicationfromyourwebbrowser.Youwillseeawebpageopenin
yourbrowser,asdisplayedinthefollowingscreenshot:
Youcanchoosethesensortypefromthedropdownmenu(HumidityorMotion)before
pressingtheSubmitbutton.Onsubmission,youwillbeabletoseethepageupdatedwith
theappropriatesensortypeanditscurrentvalue.
Whydoweneedaresource-constrainedmessaging
protocol?
Intheprevioussection,youlearnedhowtousetheHTTPRESTarchitecturetosendand
receivedatabetweenyourArduinoandthehostserver.TheHTTPprotocolwasoriginally
designedtoservetextualdatathroughwebpagesontheInternet.Thedatadelivery
mechanismusedbyHTTPrequiresacomparativelylargeamountofcomputationand
networkresources,whichmaybesufficientforacomputersystembutnotforresourceconstrainedhardwareplatformssuchasArduino.Aswediscussedearlier,theclient-server
paradigmimplementedbytheHTTPRESTarchitecturecreatesatightlycoupledsystem.
Inthisparadigm,bothsides(theclientandtheserver)needtobeconstantlyactive,orlive,
torespond.Also,theRESTarchitectureonlyallowsunidirectionalcommunicationfrom
clienttoserver,whererequestsarealwaysinitializedbytheclientandtheserverresponds
totheclient.Thisrequest-response-basedarchitectureisnotsuitableforconstrained
hardwaredevicesbecauseof(butnotlimitedto)thefollowingreasons:
Thesedevicesshouldavoidactivecommunicationmodetosavepower
Thecommunicationshouldhavelessdataoverhaultosavenetworkresources
Theyusuallydonothaveenoughcomputationalresourcestoenablebidirectional
RESTcommunication,thatis,implementingbothclientandservermechanismson
eachside
Thecodeshouldhaveasmallerfootprintduetostorageconstraints
Tip
TheREST-basedarchitecturecanstillbeusefulwhentheapplicationspecifically
requiresarequest-responsearchitecture,butmostsensor-basedhardwareapplications
arelimitedduetotheprecedingpoints.
Amongotherdatadeliveryparadigmsthatsolvetheprecedingproblems,thearchitecture
basedonpublisher/subscriber(pub/sub)standstall.Thepub/subarchitectureenables
bidirectionalcommunicationcapabilitiesbetweenthenodethatgeneratesthedata
(Publisher)andthenodethatconsumesthedata(Subscriber).Wearegoingtouse
MQTTastheprotocolthatusesthepub/submodelofmessagetransportation.Let’sbegin
bycoveringthepub/subarchitectureandMQTTindetail.
MQTT–Alightweightmessagingprotocol
JustlikeREST,pub/subisoneofthemostpopularmessagingpatterns,mostlydeployedto
transfershortmessagesbetweennodes.Insteadofdeployingclient-server-based
architecture,thepub/subparadigmimplementsmessagingmiddlewarecalledabrokerto
receive,queue,andrelaymessagesbetweenthesubscriberandpublisherclients:
Thepub/subarchitectureutilizesatopic-basedsystemtoselectandprocessmessages,
whereeachmessageislabeledwithaspecifictopicname.Insteadofsendingamessage
directlytothesubscriber,thepublishersendsitfirsttothebrokerwithatopicname.Ina
totallyindependentprocess,thesubscriberregistersitssubscriptionforparticulartopics
withthebroker.Intheeventofreceivingamessagefromthepublisher,thebroker
performstopic-basedfilteringonthatmessagebeforeforwardingittothesubscribers
registeredforthattopic.Aspublishersarelooselycoupledtosubscribersinthis
architecture,thepublishersdonotneedtoknowthewhereaboutsofthesubscribersand
canworkuninterruptedwithoutworryingabouttheirstatus.
WhilediscussingthelimitationsoftheRESTarchitecture,wenoticedthatitrequiresthe
implementationofboththeHTTPclientandserverontheArduinoendtoenable
bidirectionalcommunicationwithArduino.Withthebroker-basedarchitecture
demonstratedbypub/sub,youonlyneedtoimplementlightweightcodeforthepublisher
orsubscriberclientonArduino,whilethebrokercanbeimplementedonadevicewith
morecomputationresources.Henceforth,youwillhavebidirectionalcommunication
enabledonArduinowithoutusingsignificantresources.
IntroductiontoMQTT
MessageQueueTelemetryTransport(MQTT)isaverysimple,easy,andopen
implementationofthepub/subparadigm.IBMhasbeenworkingonstandardizingand
supportingtheMQTTprotocol.Thedocumentationforthelatestspecificationofthe
MQTTprotocol,v3.1,canbeobtainedfromtheofficialMQTTwebsiteat
http://www.mqtt.org.
Asastandardformachinemessaging,MQTTisdesignedtobeextremelylightweightand
withasmallerfootprintforcode,whilealsousingalowernetworkbandwidthfor
communication.MQTTisveryspecificallydesignedtoworkonembeddedsystems—like
hardwareplatformssuchasArduinoandotherappliances—thatcarrylimitedprocessor
andmemoryresources.WhileMQTTisatransportlayermessagingprotocol,ituses
TCP/IPfornetwork-levelconnectivity.AsMQTTisdesignedtosupportthepub/sub
messagingparadigm,theimplementationofMQTTonyourhardwareapplicationprovides
supportforone-to-manydistributedmessaging,eliminatingthelimitationofunidirectional
communicationdemonstratedbyHTTPREST.AsMQTTisagnosticofthecontentofthe
payload,thereisnorestrictiononthetypeofmessageyoucanpassusingthisprotocol.
Duetoallthebenefitsassociatedwiththepub/subparadigmanditsimplementationinthe
MQTTprotocol,wewillbeusingtheMQTTprotocolfortherestoftheexercisestohave
messagescommunicatedbetweenArduinoanditsnetworkedcomputer.Toachievethis,
wewillbeusingtheMQTTbrokertoprovidethegroundworkformessage
communicationandhosttopics,whiledeployingtheMQTTpublisherandsubscriber
clientsattheArduinoandPythonends.
Mosquitto–anopensourceMQTTbroker
Aswedescribed,MQTTisjustaprotocolstandard,anditstillrequiressoftwaretoolsso
thatitcanbeimplementedinactualapplications.Mosquittoisanopensource
implementationofthemessagebroker,whichsupportsthelatestversionoftheMQTT
protocolstandard.TheMosquittobrokerenablesthepub/subparadigmimplementedby
theMQTTprotocol,whileprovidingalightweightmechanismtoenablemessaging
betweenmachines.DevelopmentofMosquittoissupportedthroughcommunityefforts.
MosquittoisoneofthemostpopularMQTTimplementations,freelyavailableandwidely
supportedontheInternet.Youcanobtainfurtherinformationregardingtheactualtooland
communityfromitswebsite,athttp://www.mosquitto.org.
SettingupMosquitto
TheinstallationandconfigurationofMosquittoareverystraightforwardprocesses.Atthe
timeofwritingthisbook,thelatestversionofMosquittois1.3.4.Youcanalsoobtainthe
latestupdatesandinstallationinformationregardingMosquittoat
http://www.mosquitto.org/download/.
OnWindows,youcansimplydownloadthelatestversionoftheinstallationfilesfor
Windows,whichismadeforWin32orWin64systems.Downloadandruntheexecutable
filetoinstalltheMosquittobroker.TorunMosquittofromthecommandprompt,youwill
havetoaddtheMosquittodirectorytothePATHvariablesintheenvironmentvariablesof
thesystemproperties.InChapter1,GettingStartedwithPythonandArduino,we
comprehensivelydescribedtheprocessofaddingaPATHvariabletoinstallPython.Using
thesamemethod,addthepathoftheMosquittoinstallationdirectoryattheendofthe
PATHvalue.Ifyouareusinga64-bitoperatingsystem,youshoulduseC:\ProgramFiles
(x86)\mosquitto.Fora32-bitoperatingsystem,youshoulduseC:\Program
Files\mosquittoasthepath.Onceyouaredonewithaddingthisvalueattheendofthe
PATHvalue,closeanyexistingcommandpromptwindowsandopenanewCommand
Promptwindow.Youcanvalidatetheinstallationbytypingthefollowingcommandinthe
newlyopenedwindow.Ifeverythingisinstalledandconfiguredcorrectly,thefollowing
commandshouldexecutewithoutanyerrors:
C:\>mosquitto
ForMacOSX,thebestwaytoinstallMosquittoistousetheHomebrewtool.Wealready
wentthroughtheprocessofinstallingandconfiguringHomebrewinChapter1,Getting
StartedwithPythonandArduino.InstalltheMosquittobrokerbysimplyexecutingthe
followingscriptontheterminal.ThisscriptwillinstallMosquittowiththeMosquitto
utilitiesandalsoconfigurethemtorunfromtheterminalascommands:
$brewinstallmosquitto
OnUbuntu,thedefaultrepositoryalreadyhastheinstallationpackageforMosquitto.
DependingontheversionofUbuntuyouareusing,thisMosquittoversioncouldbeolder
thanthecurrentversion.Inthatcase,youmustaddthisrepositoryfirst:
$sudoapt-add-repositoryppa:mosquitto-dev/mosquitto-ppa
$sudoapt-getupdate
NowyoucaninstalltheMosquittopackagesbysimplyrunningthefollowingcommand:
$sudoapt-getinstallmosquittomosquitto-clients
GettingfamiliarwithMosquitto
Duetothemultipleinstallationmethodsinvolvedfordifferentoperatingsystems,the
initializationofMosquittomaybedifferentforyourinstance.Insomecases,Mosquitto
mightalreadyberunningonyourcomputer.ForaUnix-basedoperatingsystem,youcan
checkwhetherMosquittoisrunningornotwiththiscommand:
$psaux|grepmosquitto
Unlessyoufindarunninginstanceofthebroker,youcanstartMosquittobyexecutingthe
followingcommandintheterminal.Afterexecutingit,youshouldbeabletoseethe
brokerrunningwhileprintingtheinitializationparametersandotherrequestscomingtoit:
$mosquitto
WhenyouinstalledtheMosquittobroker,theinstallationprocesswouldalsohave
installedafewMosquittoutilities,whichincludetheMQTTclientsforthepublisherand
thesubscriber.TheseclientutilitiescanbeusedtocommunicatewithanyMosquitto
broker.
Tousethesubscriberclientutility,mosquitto_sub,usethefollowingcommandatthe
terminalwiththeIPaddressoftheMosquittobroker.Aswearecommunicatingtothe
Mosquittobrokerrunningonthesamecomputer,youcanavoidthe–h<Broker-IP>
option.Thesubscriberutilityusesthe–toptiontospecifythenameofthetopicthatyou
areplanningtosubscribe.Asyoucansee,wearesubscribingtothetesttopic:
$mosquitto_sub-h<Broker-IP>-ttest
Similartothesubscriberclient,thepublisherclient(mosquitto_pub)canbeusedto
publishamessagetothebrokerforaspecifictopic.Asdescribedinthefollowing
command,youarerequiredtousethe–moptionfollowedbyamessagetosuccessfully
publishit.Inthiscommand,wearepublishingaHellomessageforthetesttopic:
$mosquitto_pub-h<Broker-IP>-ttest-mHello
OtherimportantMosquittoutilitiesincludemosquitto_passwordandmosquitto.conf,
whichcanbeusedtomanagetheMosquittopasswordfilesandthesetupbroker
configuration,respectively.
GettingstartedwithMQTTonArduino
andPython
NowthatyouhavetheMosquittobrokerinstalledonyourcomputer,itmeansthatyou
haveaworkingbrokerthatimplementstheMQTTprotocol.Ournextgoalistodevelop
theMQTTclientsinArduinoandalsoinPythonsothattheywillworkaspublishersand
subscribers.AfterimplementingtheMQTTclients,wewillhaveafully-functionalMQTT
system,wheretheseclientscommunicatethroughtheMosquittobroker.Let’sbeginwith
deployingMQTTontheArduinoplatform.
MQTTonArduinousingthePubSubClientlibrary
AsMQTTisanetwork-basedmessagingprotocol,youwillalwaysneedanEthernet
Shieldtocommunicatewithyournetwork.Forthefollowingexercise,wewillcontinue
usingthesamehardwarethatwehavebeenusingthroughoutthischapter.
InstallingthePubSubClientlibrary
TouseArduinoforpub/subandenablesimpleMQTTmessaging,youneedtheArduino
clientlibraryforMQTT,alsoknownasthePubSubClientlibrary.ThePubSubClient
libraryhelpsyoudevelopArduinoasanMQTTclient,whichcanthencommunicatewith
theMQTTserver(Mosquittobrokerinourcase)runningonyourcomputer.Asthelibrary
providesmethodstocreateonlyanMQTTclientandnotabroker,thefootprintofthe
Arduinocodeisquitesmallcomparedtoothermessagingparadigms.ThePubSubClient
libraryextensivelyutilizesthedefaultArduinoEthernetlibraryandimplementsthe
MQTTclientasasubclassoftheEthernetclient.
TogetstartedwiththePubSubClientlibrary,you’llfirstneedtoimportthelibrarytoyour
ArduinoIDE.DownloadthelatestversionofthePubSubClientArduinolibraryfrom
https://github.com/knolleary/pubsubclient/.Onceyouhavethefiledownloaded,importit
toyourArduinoIDE.
WewillbeusingoneoftheexamplesinstalledwiththePubSubClientlibrarytoget
started.ThegoaloftheexerciseistoutilizeabasicexampletocreateanArduinoMQTT
client,whileperformingminormodificationstoaccommodatethelocalnetwork
parameters.WewillthenusetheMosquittocommandsyoulearnedintheprevioussection
totesttheArduinoMQTTclient.Meanwhile,ensurethatyourMosquittobrokeris
runninginthebackground.
DevelopingtheArduinoMQTTclient
Let’sstartwithopeningthemqtt_basicexamplebynavigatingtoFile|Examples|
PubSubClientinourArduinoIDEmenu.Intheopenedprogram,changetheMACandIP
addressvaluesforArduinobyupdatingthemac[]andip[]variables,respectively.Inthe
previoussection,yousuccessfullyinstalledandtestedtheMosquittobroker.UsetheIP
addressofthecomputerrunningMosquittotoupdatetheserver[]variable:
bytemac[]={0x90,0xA2,0xDA,0x0D,0x3F,0x62};
byteserver[]={10,0,0,20};
byteip[]={10,0,0,75};
Asyoucanseeinthecode,weareinitializingtheclientusingtheIPaddressoftheserver,
Mosquittoportnumber,andEthernetclient.Beforeusinganyothermethodforthe
PubSubClientlibrary,youwillalwayshavetoinitializetheMQTTclientusingasimilar
method:
EthernetClientethClient;
PubSubClientclient(server,1883,callback,ethClient);
Furtheroninthecode,weareusingthepublish()andsubscribe()methodsonthe
clientclasstopublishamessagefortheoutTopictopicandsubscribetotheinTopic
topic.Youcanspecifythenameoftheclientusingtheclient.connect()method.Asyou
canseeinthefollowingcodesnippet,wearedeclaringarduinoClientasthenamefor
thisclient:
Ethernet.begin(mac,ip);
if(client.connect("arduinoClient")){
client.publish("outTopic","helloworld");
client.subscribe("inTopic");
}
Asweareusingthiscodeinthesetup()function,theclientwillonlypublishthehello
worldmessageonce—duringtheinitializationofthecode—whilethesubscribemethod
willkeeplookingfornewmessagesforinTopicduetotheuseoftheclient.loop()
methodintheArduinoloop()function:
client.loop();
Now,whilerunningMosquittointhebackground,openanotherterminalwindow.Inthis
terminalwindow,runthefollowingcommand.Thiscommandwilluseacomputer-based
MosquittoclienttosubscribetotheoutTopictopic:
$mosquitto_sub-t"outTopic"
CompileyourArduinosketchanduploadit.Assoonastheuploadprocessiscomplete,
youwillbeabletoseethehelloworldstringprinted.Basically,assoonastheArduino
codestartsrunning,theArduinoMQTTclientwillpublishthehelloworldstringtothe
MosquittobrokerfortheoutTopictopic.Ontheotherside,thatis,onthesideofthe
Mosquittoclient,you’vestartedusingthemosquitto_subutilityandwillreceivethis
message,asitissubscribedtooutTopic.
AlthoughyouranthemodifiedArduinoexample,mqtt_basic,youcanalsofindthecode
forthisexercisefromthischapter’scodefolder.Inthisexercise,theArduinoclientisalso
subscribedtoinTopictoreceiveanymessagethatoriginatesforthistopic.Unfortunately,
theprogramdoesn’tdisplayordealwithmessagesitobtainsasasubscriber.Totestthe
subscriberfunctionalitiesoftheArduinoMQTTclient,let’sopenthemqtt_advance
Arduinosketchfromthischapter’scodefolder.
Asyoucanseeinthefollowingcodesnippet,wehaveaddedcodetodisplaythereceived
messageinthecallback()method.Thecallback()methodwillbecalledwhenthe
clientreceivesanymessagefromthesubscribedtopics.Therefore,youcanimplementall
typesoffunctionalityonthereceivedmessagefromthecallback()method:
voidcallback(char*topic,byte*payload,unsignedintlength){
//handlemessagearrived
Serial.print(topic);
Serial.print(':');
Serial.write(payload,length);
Serial.println();
}
Inthismqtt_advanceArduinosketch,wehavealsomovedthepublishingstatementof
outTopicfromsetup()totheloop()function.Thisactionwillhelpustoperiodically
publishthevalueforoutTopic.Infuture,wewillexpandthismethodtousesensor
informationasmessagessothattheotherdevicescanobtainthosesensorvaluesby
subscribingtothesesensortopics:
voidloop()
{
client.publish("outTopic","FromArduino");
delay(1000);
client.loop();
}
Afterupdatingthemqtt_advancesketchwiththeappropriatenetworkaddresses,compile
anduploadthesketchtoyourArduinohardware.TotesttheArduinoclient,usethesame
mosquitto_subcommandtosubscribetooutTopic.Thistime,youwillperiodicallyget
updatesforoutTopicontheterminal.Tocheckoutthesubscriberfunctionalityofyour
Arduinoclient,openyourSerialMonitorwindowinyourArduinoIDE.OncetheSerial
Monitorwindowbeginsrunning,executethefollowingcommandintheterminal:
$mosquitto_pub–t"inTopic"–m"Test"
YoucanseeintheSerialMonitorwindowthattheTesttextisprintedwiththetopic
nameasinTopic.Henceforth,yourArduinowillserveasbothanMQTTpublisherandan
MQTTsubscriber.Nowlet’sdevelopaPythonprogramtoimplementtheMQTTclients.
MQTTonPythonusingpaho-mqtt
Inthepreviousexercise,wetestedtheArduinoMQTTclientusingcommand-lineutilities.
UnlessthepublishedandsubscribedmessagesarecapturedinPython,wecannotutilize
themtodevelopalltheotherapplicationswe’vebuiltsofar.Totransfermessagesbetween
theMosquittobrokerandthePythoninterpreter,weuseaPythonlibrarycalledpahomqtt.Thislibraryusedtobecalledmosquitto-pythonbeforeitwasdonatedtothePaho
project.IdenticaltotheArduinoMQTTclientlibrary,thepaho-mqttlibraryprovides
similarmethodstodeveloptheMQTTpub/subclientusingPython.
Installingpaho-mqtt
LikeallotherPythonlibrariesweused,paho-mqttcanalsobeinstalledusingSetuptools.
Toinstallthelibrary,runthiscommandintheterminal:
$sudopipinstallpaho-mqtt
FortheWindowsoperatingsystem,useeasy_install.exetoinstallthelibrary.Onceitis
installed,youcancheckthesuccessfulinstallationofthelibraryusingthefollowing
commandinthePythoninteractiveterminal:
>>>importpaho.mqtt.client
Usingthepaho-mqttPythonlibrary
Thepaho-mqttPythonlibraryprovidesverysimplemethodstoconnecttoyourMosquitto
broker.Let’sopenthemqttPython.pyfilefromthischapter’scodefolder.Asyoucansee,
wehaveinitializedthecodebyimportingthepaho.mqtt.clientlibrarymethod:
importpaho.mqtt.clientasmq
JustliketheArduinoMQTTlibrary,thepaho-mqttlibraryalsoprovidesmethodsto
connecttotheMosquittobroker.Asyoucansee,wehavenamedourclient
mosquittoPythonbysimplyusingtheClient()method.Thelibraryalsoprovides
methodsforactivities,forexample,whentheclientreceivesamessage,on_message,and
publishesamessage,on_publish.Onceyouhaveinitializedthesemethods,youcan
connectyourclienttotheMosquittoserverbyspecifyingtheserverIPaddressandthe
portnumber.
Tosubscribetoorpublishforatopic,yousimplyneedtoimplementthesubscribe()and
publish()methodsontheclient,respectively,asdisplayedinthefollowingcodesnippet.
Inthisexercise,weareusingtheloop_forever()methodfortheclienttoperiodically
checkthebrokerforanynewmessages.Asyoucanseeinthecode,weareexecutingthe
publishTest()functionbeforethecontrolenterstheloop:
cli=mq.Client('mosquittoPython')
cli.on_message=onMessage
cli.on_publish=onPublish
cli.connect("10.0.0.20",1883,15)
cli.subscribe("outTopic",0)
publishTest()
cli.loop_forever()
Itisveryimportanttorunalltherequiredfunctionsorpiecesofcodebeforeyouenterthe
loop,astheprogramwillentertheloopwiththeMosquittoserveronceloop_forever()is
executed.Duringthisperiod,theclientwillonlyexecutetheon_publishandon_message
methodsforanyupdateonthesubscribedorpublishedtopics.
Toovercomethissituation,weareimplementingthemultithreadingparadigmofthe
Pythonprogramminglanguage.Althoughwearenotgoingtodivedeepinto
multithreading,thefollowingexamplewillteachyouenoughtoimplementbasic
programminglogic.TounderstandmoreaboutthePythonthreadinglibraryandsupported
methods,visithttps://docs.python.org/2/library/threading.html.
Tobetterunderstandourimplementationofthethreadingmethod,checkoutthefollowing
codesnippet.Asyoucanseeinthecode,weareimplementingrecursionforthe
publishTest()functionevery5seconds,usingtheTimer()threadingmethod.Usingthis
method,theprogramwillstartanewthreadthatisseparatefromthemainprogramthread
thatcontainstheloopforMosquitto.Every5seconds,thepublishTest()functionwillbe
executed,recursivelyrunningthepublish()method,andultimatelypublishingamessage
forinTopic:
importthreading
defpublishTest():
cli.publish("inTopic","FromPython")
threading.Timer(5,publishTest).start()
Now,inthemainthread,whentheclientgetsanewmessagefromthesubscribedtopics,
thethreadinvokestheonMessage()function.Inthecurrentimplementationofthis
function,wearejustprintingthetopicandmessagefordemonstrationpurposes.Inreal
applications,thisfunctioncanbeusedtoimplementanykindofoperationonthereceived
message,forexample,writingamessagetoadatabase,runninganArduinocommand,
selectinganinput,callingotherfunctions,andsoon.Inshort,thisfunctionistheentry
pointofanyinputyoureceivethroughtheMosquittobrokerfromyoursubscribedtopics:
defonMessage(mosq,obj,msg):
printmsg.topic+":"+msg.payload
Similarly,everytimeyoupublishamessagefromthesecondthread,theonPublish()
functionisexecutedbytheprogram.Justlikethepreviousfunction,youcanimplement
variousoperationswithinthisfunction,whilethefunctionbehavesastheexitpointofany
messagepublishedusingthisPythonMQTTclient.Inthecurrentimplementationof
onPublish(),wearenotperforminganyoperations:
defonPublish(mosq,obj,mid):
pass
IntheopenedPythonfile,mqttPython.py,youwillonlyneedtochangetheIPaddressof
theserverrunningtheMosquittobroker.IfyouarerunningtheMosquittobrokeronthe
samecomputer,youcanuse127.0.0.1astheIPaddressofthelocalhost.Beforeyou
executethisPythonfile,ensurethatyourArduinoisrunningwiththeMQTTclientwe
createdinthepreviousexercise.Onceyourunthiscode,youcanstartseeingthemessages
beingsentfromyourArduinointhePythonterminal,asdisplayedinthefollowing
screenshot.Wheneveranewmessageisreceived,thePythonprogramprintstheoutTopic
topicnamefollowedbytheFromArduinomessage.ThisconfirmsthatthePythonclient
isreceivingmessagesforoutTopic,towhichitissubscribed.Ifyoulookbackatthe
Arduinocode,youwillnoticethatitisthesamemessagethatwewerepublishingfromthe
Arduinoclient.
Now,toconfirmthepublishingoperationofthePythonMQTTclient,let’sopentheSerial
MonitorwindowfromyourArduinoIDE.AsyoucanseeintheSerialMonitorwindow,
textthatcontainstheinTopictopicnameandtheFromPythonmessageisbeingprinted
every5seconds.ThisvalidatesthePythonpublisher,aswearepublishingthesame
messageforthesametopicevery5secondsthroughthepublishTest()function.
Exercise4–MQTTGatewayforArduino
Inexercise3,weusedtheRESTarchitecturetotransfermotionandhumiditysensordata
betweenourArduinoandthewebbrowser.Inthisexercise,wewilldevelopanMQTT
GatewayusingtheMosquittobrokerandtheMQTTclientstotransfersensorinformation
fromourArduinotothewebbrowser.Thegoaloftheexerciseistoreplicatethesame
componentsthatweimplementedintheRESTexercise,butwiththeMQTTprotocol.
Asyoucanseeinthearchitecturalsketchofthesystem,wehaveArduinowiththe
EthernetShieldconnectedtoourhomenetwork,whilethecomputerisrunningthe
MosquittobrokerandthePythonapplicationsonthesamenetwork.Weareusingthesame
sensors(thatis,amotionsensorandahumiditysensor)andthesamehardwaredesignthat
weusedinthepreviousexercisesinthischapter.
Inthesoftwarearchitecture,wehavetheArduinocodethatinterfaceswiththehumidity
andmotionsensorsusinganalogpin0anddigitalpin3,respectively.Usingthe
PubSubClientlibrary,theArduinopublishessensorinformationtotheMosquittobroker.
OntheMQTTGateway,wehavetwodifferentPythonprogramsrunningonthecomputer.
Thefirstprogramusesthepaho-mqttlibrarytosubscribeandretrievesensorinformation
fromtheMosquittobrokerandthenpostittothewebapplication.ThesecondPython
program,whichisbasedonweb.py,implementsthewebapplicationswhileobtaining
sensorvaluesfromthefirstPythonprogram.Thisprogramprovidesauserinterfacefront
fortheMQTTGateway.
AlthoughbothoftheprecedingPythonprogramscanbepartofasingleapplication,we
aredelegatingthetasksofcommunicatingwithMosquittoandservinginformationusing
thewebapplicationtoseparateapplicationsforthefollowingreasons:
Wewanttodemonstratethefunctionsofbothlibraries,paho-mqttandweb.py,in
separateapplications
Ifyouwanttorunroutinesbasedonpaho-mqttandweb.pyinthesameapplication,
youwillhavetoimplementmultithreading,asbothoftheseroutinesneedtoberun
independently
WealsowanttodemonstratethetransferofinformationbetweenthetwoPython
programsusingPython-basedRESTmethodswiththehelpofthehttpliblibrary
Inthisexercise,wearelabelinghumidityandmotionsensorinformationwiththetopic
labelsArduino/humidityandArduino/motion,respectively.TheArduino-basedMQTT
publisherandthePython-basedMQTTsubscriberwillbeutilizingthesetopicnamesif
theywanttotransferinformationthroughtheMosquittobroker.Beforewebeginwith
implementingtheMQTTclientonourArduino,let’sstarttheMosquittobrokeronour
computer.
DevelopingArduinoastheMQTTclient
ThegoaloftheArduinoMQTTclientistoperiodicallypublishthehumidityandmotion
datatotheMosquittobrokerrunningonyourcomputer.OpentheStep1_Arduino.ino
sketchfromtheExercise4-MQTTgatewayfolderinyourcoderepository.Likeallthe
otherexercises,youfirstneedtochangetheMACaddressandtheserveraddressvalue,
andassignanIPaddressforyourArduinoclient.Onceyouaredonewiththese
modifications,youcanseethesetup()functionthatwearepublishingasaone-time
connectionmessagetotheMosquittobrokertochecktheconnection.Youcanimplement
asimilarfunctiononaperiodicbasisifyouhaveaproblemwithkeepingyourMosquitto
connectionalive:
if(client.connect("Arduino")){
client.publish("Arduino/connection","Connected.");
}
Intheloop()method,weareexecutingthepublishData()functionevery5seconds.It
containsthecodetopublishsensorinformation.Theclient.loop()methodalsohelpsus
keeptheMosquittoconnectionaliveandavoidstheconnectiontimeoutfromthe
Mosquittobroker.
voidloop()
{
publishData();
delay(5000);
client.loop();
}
Asyoucanseeinthefollowingcodesnippet,thepublishData()functionobtainsthe
sensorvaluesandpublishesthemusingtheappropriatetopiclabels.Youmighthave
noticedthatweareusingthedtostrf()functioninthisfunctiontochangethedataformat
beforepublishing.Thedtostrf()functionisafunctionprovidedbythedefaultArduino
librarythatconvertsadoublevalueintoanASCIIstringrepresentation.Wearealso
addingadelayofanother5secondsbetweenthesuccessivepublishingofsensordatato
avoidanydatabufferingissues:
voidpublishData()
{
floathumidity=getHumidity(22.0);
humidityC=dtostrf(humidity,5,2,message_buff2);
client.publish("Arduino/humidity",humidityC);
delay(5000);
intmotion=digitalRead(MotionPin);
motionC=dtostrf(motion,5,2,message_buff2);
client.publish("Arduino/motion",motionC);
}
Completeanyothermodificationyouwanttoimplement,andthencompileyourcode.If
yourcodeiscompiledsuccessfully,youcanuploadittoyourArduinoboard.Ifyour
Mosquittoisrunning,youwillbeableseethatanewclientisconnectedasArduino,
whichistheclientnameyouspecifiedintheprecedingArduinocode.
DevelopingtheMQTTGatewayusingMosquitto
YoucanhavetheMosquittobrokerrunningonthesamecomputerastheMosquitto
Gateway,oronanyothernodeinyourlocalnetwork.Forthisexercise,let’srunitonthe
samecomputer.OpentheprogramfilenamedmosquittoGateway.pyforthisstagefrom
theStep2_Gateway_mosquittofolder,whichisinsidetheExercise4-MQTTgateway
folder.ThefirststageoftheGatewayapplicationincludesthepaho-mqttbasedPython
program,whichsubscribestotheMosquittobrokerfortheArduino/humidityand
Arduino/motiontopics:
cli.subscribe("Arduino/humidity",0)
cli.subscribe("Arduino/motion",0)
WhenthisMQTTsubscriberprogramreceivesamessagefromthebroker,itcallsthe
onMessage()function,aswe’vealreadydescribedinthepreviouscodingexercise.This
methodthenidentifiestheappropriatesensortypeandsendsthedatatotheweb.py
programusingthePOSTmethod.WeareusingthedefaultPythonlibrary,httplib,to
implementthePOSTmethodinthisprogram.Whileusingthehttpliblibrary,youhaveto
usetheHTTPConnection()methodtoconnecttothewebapplicationrunningonport
number8080.
Note
Althoughthisprogramrequiresthatyourwebapplication(secondstage)mustrunin
parallel,wearegoingtoimplementthiswebapplicationintheupcomingsection.Make
surethatyoufirstrunthewebapplicationfromthenextsectionbeforeexecutingthis
program;otherwiseyouwillendupwitherrors.
Theimplementationofthislibraryrequiresthatyoufirstimportthelibraryintoyour
program.Beingabuilt-inlibrary,httplibdoesnotrequireanadditionalsetupprocess:
importhttplib
Oncetheconnectionisestablishedwiththewebapplication,youhavetopreparethedata
thatneedstobesentinthePOSTmethod.Thehttplibmethodusestherequest()method
ontheopenedconnectiontopostthedata.Youcanalsousethesamemethodinother
applicationstoimplementtheGETfunction.Onceyouaredonewithsendingthedata,you
canclosetheconnectionusingtheclose()method.Inthecurrentimplementationofthe
httpliblibrary,wearecreatingandclosingtheconnectiononeachmessage.Youcanalso
declaretheconnectionoutsidetheonMessage()functionandcloseitwhenyouterminate
theprogram:
defonMessage(mosq,obj,msg):
printmsg.topic
connection=httplib.HTTPConnection('10.0.0.20:8080')
ifmsg.topic=="Arduino/motion":
data="motion:"+msg.payload
connection.request('POST','/data',data)
postResult=connection.getresponse()
printpostResult
elifmsg.topic=="Arduino/humidity":
data="humidity:"+msg.payload
connection.request('POST','/data',data)
postResult=connection.getresponse()
printpostResult
else:
pass
connection.close()
Onceyouhaveperformedtheappropriatemodifications,suchaschangingtheIPaddress
oftheMosquittobrokerandtheweb.pyapplication,gotothenextexercisebeforerunning
thecode.
ExtendingtheMQTTGatewayusingweb.py
TheMQTTGatewaycodeprovidestheuserinterfacewiththesensorinformationusing
theweb.pybasedwebapplication.Thecodeisquitesimilartowhatyouimplementedin
exercise3.TheprogramfileisnamedGatewayWebApplication.pyandlocatedinyour
Exercise4-MQTTgatewaycodefolder.Inthisapplication,wehaveremovedthesensor
selectionprocessbysimplyimplementingabutton,displayedasRefresh.Thisapplication
waitsforthePOSTmessagefromthepreviousprogram,whichwillbereceivedonthe
http://<ip-address>:8080/dataURL,ultimatelytriggeringthedataclass.ThePOST
methodinthisclasswillsplitthereceivedstringtoidentifyandupdatethevalueofthe
humidityandmotionglobalsensorvariables:
classdata:
defPOST(self):
globalmotion,humidity
i=web.input()
data=web.data()
data=data.split(":")
ifdata[0]=="humidity":
humidity=data[1]
elifdata[0]=="motion":
motion=data[1]
else:
pass
return"Ok"
ThedefaultURL,http://<ip-address>:8080/,displaysthebasetemplatewiththe
Refreshbutton,populatedusingtheForm()method.Asdisplayedinthefollowingcode
snippet,thedefaultindexclassrendersthetemplatewiththeupdated(current)humidity
andmotionvalueswhenitreceivestheGETorPOSTrequest:
classindex:
submit_form=form.Form(
form.Button('Refresh',
type="submit",
description='refresh')
)
#GETfunction
defGET(self):
f=self.submit_form()
returnrender.base(f,humidity,motion)
#POSTfunction
defPOST(self):
f=self.submit_form()
returnrender.base(f,humidity,motion)
Runtheprogramfromthecommandline.Makesurethatyouarerunningbothprograms
fromseparateterminalwindows.
TestingyourMosquittoGateway
Youhavetofollowthesestepsinthespecifiedordertosuccessfullyexecuteandtestall
thecomponentsofthisexercise:
1. RuntheMosquittobroker.
2. RuntheArduinoclient.Ifitisrunningalready,restarttheprogrambypoweringoff
theArduinoclientandpoweringitonagain.
3. ExecutethewebapplicationinyourterminalorfromtheCommandPrompt.
4. Runthepaho-mqttGatewayprogram.
Ifyoufollowthissequence,allofyourprogramswillstartwithoutanyerrors.Ifyouget
anyerrorswhileexecuting,makesurethatyoufollowalltheinstructionscorrectly,while
alsoconfirmingtheIPaddressesinyourprograms.TocheckoutyourArduinoMQTT
client,opentheSerialMonitorwindowinyourArduinoIDE.Youwillbeabletoseethe
periodicpublicationofthesensorinformation,asdisplayedinthisscreenshot:
NowopenawebbrowseronyourcomputerandgototheURLofyourwebapplication.
Youshouldbeabletoseeawindowthatlookslikewhatisshowninthefollowing
screenshot.YoucanclickontheRefreshbuttontocheckouttheupdatedsensorvalues.
Note
Wehavesetadelayof5secondsbetweensuccessivesensorupdates.Henceforth,you
won’tbeabletoseetheupdatedvaluesifyourapidlypresstheRefreshbutton.
OntheGatewayprogramterminal,youwillbeabletoseethelabelofthetopiceverytime
theprogramreceivesanewmessagefromMosquitto.Ifthedelaybetweensuccessive
sensorupdatesisnotsufficientandhttplibdoesn’thaveenoughtimetogettheresponse
backfromtheweb.pyapplication,theprogramwillgenerateanerrormessagewiththe
httplibfunction.Althoughwerequireanadditionaldelayforhttplibtosuccessively
sendthedataandreceivetheresponse,wewillbeabletoavoidthisdelaywhenwe
implementthecorePythoncodewiththreading,avoidingtheentirenotionofPOSTin
betweentheprograms:
Withthisexercise,youhaveimplementedtwodifferenttypesofmessagingarchitectureto
transferdatabetweenyourArduinoandyourcomputerorwebapplicationsusingyour
homenetwork.Althoughwerecommendtheuseofhardware-centricandlightweight
MQTTmessagingparadigmsoverRESTarchitecture,youcanuseeitherofthese
communicationmethodsaccordingtotheapplication’srequirements.
Summary
Connectivitytocomputernetworkscanreallyopenuplimitlesspossibilitiesforfuture
applicationdevelopmentusingArduino.Westartedthechapterbyexplainingimportant
computernetworkfundamentals,whilealsocoveringhardwareextensionsthatenable
computernetworkingforArduino.Regardingthevariousmethodsofenabling
networking,webeganthechapterbyestablishingawebserverforArduino.Weconcluded
thatthewebserveronArduinoisnotthebestwayfornetworkcommunicationduetothe
limitednumberofconnectionsofferedbythewebserver.Thenwedemonstratedtheuse
ofArduinoasawebclienttoenableHTTP-basedGETandPOSTrequests.Althoughthis
methodisusefulforrequest-basedcommunicationandrequiresfewerresourcescompared
toawebserver,itisstillnotthebestwayforsensorcommunicationduetotheadditional
dataoverhead.Inthelaterpartofthechapter,wedescribedalightweightmessaging
protocol,MQTT,designedspecificallyforsensorcommunication.Wedemonstratedits
superioritytoHTTP-basedprotocolsusingafewexercises.
WiththehelpofeachmethodofArduinoEthernetcommunication,youlearnedabout
compatiblePythonlibrariesusedtosupportthesecommunicationmethods.Weusedthe
web.pylibrarytodevelopawebserverusingPython,anddemonstratedtheuseofthe
librarywithmultipleexamples.TosupporttheMQTTprotocol,weexploredanMQTT
broker,Mosquitto,andemployedthePythonlibrary,paho_mqtt,toservetheMQTT
requests.
Overall,wecoveredeverymajoraspectofArduinoandPythoncommunicationmethods
throughoutthischapter,anddemonstratedthemwithsimpleexercises.Intheupcoming
chapters,wewillbuilduponthebasicsyoulearnedinthischapter,inordertodevelop
advancedArduino-PythonprojectsthatwillenableremoteaccesstoourArduinohardware
throughtheInternet.
Chapter9.ArduinoandtheInternetof
Things
Inthepreviouschapter,welearnedhowtoaccessArduinousingEthernetfromaremote
location.ThemainobjectivewastogetyoustartedwithdevelopingArduino-based
networkapplicationsusingPython.Wewereabletoaccomplishthisusingvarioustools
suchastheweb.pyPythonlibrary,MosquittoMQTTbroker,andtheArduinoEthernet
library.RemoteaccesstosensordataviaaPython-likeextensiblelanguagecanopenup
limitlesspossibilitiesforsensor-basedwebapplications.Inrecentyears,therapidgrowth
oftheseapplicationshasenabledthedevelopmentofadomaincalledtheInternetof
Things(IoT).
Inthelastchapter,weworkedonArduinonetworking.However,itwaslimitedtoLAN
andthepremiseoftheexerciseswaslimitedtoyourhomeoroffice.Wedidn’teven
involvetheInternettoenableglobalaccessinourexercises.TraditionalIoTapplications
requireArduinotobeaccessedremotelyfromanypartoftheworldviatheInternet.Inthis
chapter,wewillextendtheArduinonetworkingconceptsbyinterfacingArduinowith
cloud-basedplatforms.Wewillalsodevelopwebapplicationstoaccessthesensordata
fromthesecloudplatforms.Laterinthechapter,wewillgothroughtheprocessofsetting
upyourcloud-basedmessagingplatformtoservesensordata.Attheendofthischapter,
youshouldbeabletodesignanddevelopfull-stackIoTapplications,usingArduino,
Python,andthecloud.
GettingstartedwiththeIoT
LongbeforetheInternet,sensor-andactuator-basedelectroniccontrolsystemsexistedin
high-techautomationsystems.Inthosesystems,sensorswereinterfacedtothe
microcontrollerviahard-wiredconnections.Duetoextensibilitylimitations,thecoverage
areaofthesesystemswasgeographicallyrestricted.Examplesofthesehigh-techsystems
includedfactoryautomation,satellitesystems,weaponsystems,andsoon.Inmostcases,
thesensorsusedinthesesystemswerehugeandthemicrocontrollerswerealsolimitedby
theirlowcomputationalcapabilities.
Withrecentadvancementsintechnology,especiallyinthesemiconductorindustry,the
physicalsizeofsensorsandmicrocontrollershassignificantlyreduced.Ithasalsobeen
madepossibletomanufacturelow-costandhighlyefficientelectroniccomponents,hence
todayitisrelativelyinexpensivetodevelopsmallandefficientsensor-basedhardware
products.ArduinoandRaspberryPiaregreatexamplesoftheseachievements.These
sensor-andactuator-basedhardwaresystemsinterfacewiththephysicalworldthatwelive
in.Thesensorsmeasurevariouselementsfromthephysicalenvironment,whilethe
actuatorsmanipulatethephysicalenvironment.Thesetypesofhardware-basedelectronic
systemsarealsoknownasphysicalsystems.
Ontheotherfront,advancementsinthesemiconductorindustryalsoenabledthe
developmentofhighlyefficientcomputationunits,empoweringpersonalcomputerand
networkingindustries.Thismovementledtotheworldwidenetworkofconnected
computerscalledCyberWorldortheInternet.Everyday,petabytesofdatagetgenerated
andtransferredacrosstheInternet.
ThedomainofIoTstandsatthecrossroadsoftheseprogressesinphysicalandcyber
systems,whereancienthardwiredsensor-basedsystemsarereadytogetupgradedtomore
powerfulandefficientsystemsthatarealsohighlyconnectedthroughtheInternet.Dueto
thelargenumberofsensorsinvolved,thesesystemsgenerateandsendanavalancheof
data.Thedatageneratedbythesesensorshasalreadyeclipsedthedatageneratedby
humans.
TheIoThasstartedtobecomeasignificantdomaininrecentyearsafteralargenumberof
consumerIoTproductshavestartedenteringthemarket.Theseproductsinclude
applicationsinhomeautomation,healthcare,activitytracking,smartenergy,andsoon.
OneofthemajorreasonsbehindtherapidgrowthoftheIoTdomainistheintroductionof
thesevisiblesolutions.Inalargenumberofcases,thiswasmadepossibleduetofastand
inexpensiveprototypingthatwasenabledbyArduinoandotheropensourcehardware
platforms.
Uptothispointinthebook,wehavelearnedvariousmethodsofinterfacingsensorsand
thendevelopingapplicationsusingtheseconnectedsensors.Inthischapter,wewilllearn
thelaststepinthedevelopmentofafull-stackIoTapplication—enablingaccessforyour
Python-ArduinoapplicationthroughtheInternet.Now,let’strytofirstunderstandthe
architectureoftheIoT.
ArchitectureofIoTwebapplications
Inthisbook,wehavecoveredthreemajorconceptsinthefirsteightchapters:
Physicallayer:WeusedvarioussensorsandactuatorswiththeArduinoboardto
dealwiththephysicalenvironment.Thesensorssuchasthetemperaturesensor,
humiditysensor,andmotionsensorwereusedmeasuredthephysicalphenomenon,
whiletheactuatorssuchasLEDswereutilizedtoalterorproducephysicalelements.
Computationlayer:WeusedArduinosketchesandPythonprogramstoconvert
thesephysicalelementsintonumericaldata.Wealsoutilizedthesehigh-level
languagestoperformvariouscomputationssuchascalculatingrelativehumidity,
developinguserinterfaces,plottingdata,andprovidingwebinterfaces.
Interfacinglayer:Throughoutthematerialthatwecovered,wealsoutilizedvarious
interfacingmethodstoestablishcommunicationbetweenArduinoandPython.For
interfacingpartoftheinterfacinglayerbetweenthephysicalandcomputationlayers,
weusedserialportlibraries,establishednetwork-basedcommunicationusingthe
RESTandMQTTprotocol,anddevelopedwebapplications.
Asyoucansee,wehavedevelopedapplicationswithtightly-coupledphysical,
computation,andinterfacinglayers.Intheresearchdomain,thesetypesofapplicationsare
alsoknownascyber-physicalsystems.Oneofthewidelyusedandpopulartermsforthe
domainofcyber-physicalsystemistheIoT.Althoughthecyber-physicaldomainis
thoroughlydefinedcomparedtotheIoT,theIoThasrecentlygainedmorepopularitydue
tothelargenumberofsubdomains—industrialInternet,wearabledevices,connected
devices,smartgrid,andsoon—thatarecoveredunderthisumbrellaterm.Insimple
terms,anapplicationcanqualifyasanIoTapplicationifitconsistsofhardwaredevices
thatdealwiththephysicalworldandhavesufficientcomputationalcapabilitieswith
Internetconnectivity.Let’strytounderstandthearchitectureoftheIoTfromthematerial
thatwehavealreadycovered.
Onthephysicalside,thefollowingfigureshowsthehardwarecomponentsthatweutilized
todealwiththephysicalenvironment.Thesensorsandactuatorsthatinterfacewiththe
actualphysicalworldcanbeconnectedtoArduinousingmultiplelow-levelprotocols.
ThesecomponentscanbeconnectedusingGPIOpinsandusingtheI2CorSPIprotocols.
ThedataacquiredfromthesecomponentsgetsprocessedontheArduinoboardusingthe
codethatisuploadedbytheuser.AlthoughtheArduinocodecanbemadeself-reliantto
executetaskswithoutanyexternalinputs,theseinputsfromusersorotherapplicationsare
requiredinadvancedapplications.
Aspartofthecommunicationlayer,Arduinocanbeconnectedlocallytoothercomputers
usingUSB.OnecanextendthecoveragerangebyutilizingEthernet,Wi-Fi,oranyother
radiocommunicationmethod.
Asillustratedinthefollowingfigure,thesensordataiscollectedusingcomputationunits
foradvanceprocessing.Thesecomputationunitsarepowerfulenoughtohostoperating
systemsandprogrammingplatforms.Inthisbook,weutilizedPythontodevelopvarious
featuresatthecomputationlayer.Atthislevel,weperformedhigh-levelcomputationtasks
suchasdevelopinggraphicaluserinterfacesusingtheTkinterlibrary,plottingcharts
usingthematplotliblibrary,anddevelopingwebapplicationsusingtheweb.pylibrary.
Inallthecodingexercisesthatweperformedpreviously,thephysicalcoverageareasof
theprojectswerelimitedbecauseofhardwiredserialinterfacesorlocalEthernetnetwork,
asdisplayedinthefollowingfigure:
Todevelopfull-stackIoTapplications,weneedtoremotelyaccessArduinoorhostthe
computationlayerontheInternet.Inthischapter,wearegoingtoworkonthismissing
linkanddevelopvariousapplicationstoprovideInternetconnectivitytotheexercises.To
performthisoperation,wearegoingtoutilizeacommercialcloudplatforminthefirst
sectionanddevelopourcustomizedplatforminthelatersection.
Asthefocusofthischapterisgoingtobeoncloudconnectivity,wearenotgoingto
developahardwarecircuitforeachexercise.Wewillgothroughthehardwaredesign
exerciseonlyonceandkeepusingthesamehardwareforalltheprogrammingexercises.
Similarly,wewillalsoreusetheweb.pyprogramsthatwedevelopedintheprevious
chaptertofocusoncodesnippetsthatareassociatedwithPythonlibrariestodevelop
cloudapplications.
Hardwaredesign
Let’sbeginbydevelopingstandardhardwareforalltheupcomingexercises.Wewillneed
theArduinoboardthatisattachedtotheEthernetShieldtousetheEthernetprotocolfor
networkconnectivity.Intermsofcomponents,youwillbeusingsimplesensorsand
actuatorsthatyoualreadyusedinthepreviouscodingexercises.WewillusethePIR
motionsensorandtheHIH-4030humiditysensortoprovidedigitalandanalogoutputs,
respectively.WewillalsohaveanLEDaspartofthehardwaredesignandthiswillbe
usedincodingexercisesasanactuator.Formoreinformationregardingthepropertiesand
detailedexplanationsofthesesensors,youcanrefertopreviouschapters.
Tobeginassemblyofthehardwarecomponents,firstattachtheEthernetShieldontopof
theArduinoboard.Connectthesensorsandactuatorstotheappropriatepins,asdisplayed
inthefollowingfigure.Onceyouhavethehardwareassembled,youcanconnectthe
EthernetShieldtoyourhomerouterusingtheEthernetcable.Youwillneedtopowerthe
boardusingtheUSBcabletouploadtheArduinocodefromyourcomputer.Incaseyou
wanttodeploytheArduinoboardtoaremotelocation,youwillneedanexternal5V
supplytopowerArduino.
TheIoTcloudplatforms
ThetermIoTcloudplatformisusedforthecloudplatformsthatprovideveryspecific
services,protocolsupport,andweb-basedtoolsforIoTapplications.Inmoreinformal
terms,thesecloudIoTplatformscanbeusedtouploadyoursensordataandaccessthem
fromanywhereusingtheInternet.Withthesebasicfeatures,theyalsoprovidetoolsto
access,visualize,andprocessyoursensordataonvariousplatformssuchascomputers
andsmartphones.ExamplesofsimilarIoTcloudplatformsincludeXively
(http://www.xively.com),2lemetry(http://www.2lemetry.com),Carriots
(http://www.carriots.com),ThingSpeak(http://thingspeak.com),andsoon.
ThefollowingfigureshowsthearchitectureofanIoTsystemwithanArduino-based
sensorsystemthatissendingdatatoacloudplatform,whileacomputationunitis
accessingthedataremotelyfromthecloud:
Xively,beingtheoldestandmostpopularIoTplatform,hasalargeamountofcommunitybasedonlinehelpthatisavailableforbeginners.Thisisoneofthemajorreasonswhywe
havechosenXivelyasourplatformofchoicefortheupcomingexercises.Recently,
Xivelyhaschangedtheirpolicyofcreatingfreedeveloperaccountsandauserhasto
requestaccesstothisfreeaccountinsteadofobtainingonefreely.Incaseyouwanttouse
anotherplatformotherthanXively,wehavebrieflycoveredafewsimilarplatformsatthe
endofthissection.
Xively–acloudplatformfortheIoT
XivelyisoneoftheveryfirstIoT-specificcloudplatformsthatwasfoundedin2007as
Pachube.Itwentthroughmultiplenamechanges,asitwascalledCosm,butitiscurrently
knownasXively.XivelyprovidesanIoTcloudplatformwithtoolsandservicesto
developconnecteddevices,products,andsolutions.Asmentionedonitswebsite,Xively
isthepubliccloudthatisspecificallybuiltfortheIoT.
SettingupanaccountonXively
Now,wecangoaheadandsetupanewuseraccountfortheXivelyplatform.Tosetupan
account,youneedtoexecutefollowingstepsinthegivenorder:
1. TobeginthesignupprocessonXively.com,openhttps://xively.com/signupinaweb
browser.
2. Onthesignuppage,youwillbepromptedtoselecttheusernameandthepassword,
asdisplayedinthefollowingscreenshot:
3. Onthenextpage,youwillbeaskedtoentersomeadditionalinformationthat
includesyourfullname,organization’sname,country,zipcode,timezone,andso
on.FillouttheformappropriatelyandclickontheSignUpbutton:
4. Xivelywillsendanactivatione-mailtothee-mailaccountthatyouspecifiedinthe
form.Openthee-mailandclickontheactivationlink.Checkyourspamfolderifyou
don’tseethee-mailinyourinbox.
5. Onceyouclickontheactivationlink,youwillberedirectedtothewelcomepageon
Xively’swebsite.Weadviseyoutogothroughthetutorialsprovidedonthewelcome
page,asitwillhelpyoutogetfamiliarwiththeXivelyplatform.
6. Aftercompletingthetutorials,youcancomebacktothemainuserscreenfromthe
pageusingthehttps://xively.com/loginlink.
Ifyouarenotalreadyloggedin,youwillrequireyoure-mailaddressastheusername
andanappropriatepasswordtologintotheXivelyplatform.
WorkingwithXively
TheXivelyplatformletsyoucreateclouddeviceinstancesthatcanbeconnectedtothe
actualhardwaredevice,app,orservice.Performthefollowingstepsinordertoworkwith
Xively:
1. TobeginworkingwiththeXivelyplatform,addadevicefromthemainpage,as
displayedinthefollowingscreenshot:
2. OnceyouclickontheAddDevicebutton,itwillpromptyoutothefollowing
windowwhereyouwillbeaskedtoprovidethedevicename,description,and
privacystatusofthedevicethatyouaregoingtoassign.Intheform,selectadevice
namethatyouwantyourdevelopmentdevicetobecalled,provideabrief
description,andselectPrivateDeviceastheprivacystatus:
3. OnceyouclicktheAddDevicebutton,Xivelywillcreateadeviceinstancewith
automatically-generatedparametersandpromptyoutothedevelopmentworkbench
environment.Onthepageofthedevicethatyoujustadded,youcanseevarious
identificationandsecurityparameterssuchasProductID,SerialNumber,FeedID,
FeedURL,andAPIEndpoint.Fromamongtheseparameters,youwillfrequently
needtheFeedIDinformationfortheupcomingexercises:
4. AuniqueandsecureAPIkeyofthenewlycreateddeviceisalsolocatedintherighthandsidebarofthepage.ThisAPIkeyisveryimportantandneedstobesecured
justlikeyourpassword,asanyonewiththeAPIkeycanaccessthedevice.
5. Now,toremotelyaccessthisdevice,opentheterminalandusethecURLcommand
tosenddatatoit.Inthefollowingcommand,changethe<Your_Feed_ID>and
<Your_API_key>valueswiththeonesavailableforyourdevice:
$curl--requestPUT--data"0,10"--header"X-ApiKey:<Your_API_key"
https://api.xively.com/v2/feeds/<Your_Feed_ID>.csv
6. Asyoucansee,thepreviouscommandsentthevalueof10onchannel0ofyour
deviceonXively.Afterexecutingthepreviouscommand,youwillnoticethatthe
XivelyworkbenchisupdatedwiththeinformationthatyoujustsentusingcURL:
7. Trysendingmultiplevaluesonchannel0usingthepreviouscommand.Onthe
Xivelyworkbench,youwillbeabletoseeaplotbeinggeneratedbythesevaluesin
realtime.Accesstheplotbyclickingonchannel0intheworkbench:
Usingthemethodthatweusedinthisexample,wecanalsoconfigureArduinotosend
sensorvaluesautomaticallytotheXivelyplatform.Thiswillenablethestorageand
visualizationofArduinodataonXively.
AlternativeIoTplatforms
Inthissection,wehaveprovidedimportantlinksfortheThingSpeakandCarriots
platforms.Aswearenotcoveringtheseplatformsindetail,theselinkswillhelpyouto
findsimilarexamplestointerfaceArduinoandPythonwithThingSpeakandCarriots.
ThingSpeak
ThetutorialsinthefollowinglinkswillhelpyoutogetfamiliarwiththeThingSpeak
platformifyouchosetouseitinsteadofXively:
Theofficialwebsite:https://thingspeak.com/
UsingArduinoandEthernettoupdateaThingSpeakchannel:
http://community.thingspeak.com/tutorials/arduino/using-an-arduino-ethernet-shieldto-update-a-thingspeak-channel/
ArduinoexamplesforThingSpeak:https://github.com/iobridge/ThingSpeakArduino-Examples
CommunicatingwithThingSpeakusingPython:
http://www.australianrobotics.com.au/news/how-to-talk-to-thingspeak-with-pythona-memory-cpu-monitor
UsingArduinoandPythontotalktoaThingSpeakchannel:
http://vimeo.com/19064691
SeriesofThingSpeaktutorials:http://community.thingspeak.com/tutorials/
ThingSpeakisanopensourceplatformandyoucancreateyourowncustomizedversion
ofThingSpeakusingthefilesprovided.Youcanobtainthesefilesandtheassociated
guidelinefromhttps://github.com/iobridge/ThingSpeak.
Carriots
Carriotsalsoprovidesafree,basicaccountfordevelopers.IfyouwanttouseCarriotsas
analternativetoXively,usethetutorialsinthefollowinglinkstogetstarted:
Theofficialwebsite:https://www.carriots.com/
SettingupanaccountonCarriots:https://learn.adafruit.com/wireless-gardeningarduino-cc3000-wifi-modules/setting-up-your-carriots-account
TheCarriotslibraryforArduino:https://github.com/carriots/arduino_library
ACarriotsexampleforArduino:https://github.com/carriots/arduino_examples
ConnectCarriotstothePythonwebapplication:
http://www.instructables.com/id/Connect-your-Carriots-Device-to-Panics-Status-Boa/
Developingcloudapplicationsusing
PythonandXively
Now,youhaveabasicideaabouttheavailablecommercialIoTplatformsandyoucan
selectoneaccordingtoyourcomfortlevelandrequirements.Itwillbeverydifficultto
comprehensivelyexplaineverycloudplatformwithpracticalexamples,astheobjectiveof
thischapteristomakeyoufamiliarwithintegratingthecloudplatformwithPythonand
Arduino.Forthisreason,wearegoingtouseXivelyasthedefactoIoTcloudplatformfor
therestoftheintegrationexercises.
NowthatyouknowhowtocreateanaccountonXivelyandworkwiththeXively
platform,itistimetostartinterfacingrealhardwarewiththeXivelyplatform.Inthis
section,wewillgothroughmethodstouploadanddownloaddatafromXively.Wewill
combinetheArduinohardwarethatwebuiltwiththePythonprogramstoshowyoubasic
methodsofcommunicatingwithXively.
InterfacingArduinowithXively
ThefirststagetoestablishcommunicationwithXivelyincludesinterfacingtheArduino
boardwiththeXivelyplatformviastandaloneArduinocode.Wehavealreadybuiltthe
necessaryhardwareusingtheArduinoUno,EthernetShield,andafewsensors.Let’s
connectittoyourcomputerusingtheUSBport.YoualsoneedtoconnecttheEthernet
ShieldtoyourhomerouterusingtheEthernetcable.
UploadingArduinodatatoXively
TheArduinoIDEhasabuilt-inexamplethatcanbeusedtocommunicatewiththeXively
service.ThisisknownasPachubeClient(PachubewasXively’spreviousname).
Note
Itisimportanttonotethatthereasonbehindusingthisdefaultexampleistogiveyoua
jump-startintheinterfacingexercises.Thisparticularsketchisratheroldandmayget
droppedasadefaultexerciseintheupcomingreleasesoftheArduinoIDE.Inthatcase,
youcandirectlyjumptothenextexerciseordevelopyourcustomsketchtoperformthe
sameexercise.
PerformthefollowingstepstouploadArduinodatatoXively:
1. OpentheArduinoIDEandthenopenthePachubeClientexamplebynavigatingto
File|Examples|Ethernet|PachubeClient.
2. ToestablishcommunicationwithXively,youwillneedthefeedIDandtheAPIkey
ofyourXivelydevice,whichyouobtainedinthelastsection.
3. IntheopenedArduinosketch,performthefollowingchangesusingtheobtainedfeed
IDandAPIkey.YoucanspecifyanyprojectnamefortheUSERAGENTparameter:
#defineAPIKEY"<Your-API-key>"
#defineFEEDID<Your-feed-ID>
#defineUSERAGENT"<Your-project-name>"
4. IntheArduinosketch,youwillalsohavetochangetheMACaddressandtheIP
addressofyourEthernetShield.Youshouldbefamiliarwithobtainingthese
addressesfromtheexercisethatyouperformedinthepreviouschapter.Usethese
valuesandmodifythefollowinglinesofcodeappropriately:
bytemac[]={0x90,0xA2,0xDA,0x0D,0x3F,0x62};
IPAddressip(10,0,0,75);
5. AstheopenedArduinoexamplewascreatedforthePachube,youneedtoupdatethe
serveraddresstoapi.xively.comasspecifiedinthefollowingcodesnippet.
CommenttheIPaddresslineaswewillnotneeditanymoreandaddtheserver[]
parameter:
//IPAddressserver(216,52,233,122);
charserver[]="api.xively.com";
6. InthesendData()function,changethechannelnametoHumidityRawaswehaveour
HIH-4030humiditysensorconnectedtotheanalogport.Wearenotperformingany
relativehumiditycalculationsatthisstageandaregoingtouploadjusttherawdata
fromthesensor:
//here'stheactualcontentofthePUTrequest:
client.print("HumidityRaw,");
client.println(thisData);
7. Onceyouhaveperformedthesechanges,opentheXivelyClientBasic.inofilefrom
thefoldercontainingcodesforthischapter.Comparethemwithyourcurrentsketch
andcompile/uploadthesketchtotheArduinoboardifeverythingseemssatisfactory.
Onceyouhaveuploadedthecode,opentheSerialMonitorwindowintheArduino
IDEtoobservethefollowingoutput:
8. IfyouseeanoutputintheSerialMonitorwindowthatissimilartotheone
displayedinthepreviousscreenshot,yourArduinoissuccessfullyconnectedto
XivelyandisuploadingdataontheHumidityRawchannel.
9. OpenyourdeviceinXively’swebsiteandyouwillbeabletoseeanoutputthatis
similartothefollowingscreenshotonthewebpage.Thisconfirmsthatyouhave
successfullyuploadeddatatoanIoTcloudplatformusingyourremotely-located
Arduino:
DownloadingdatatoArduinofromXively
Inthepreviouscodingexercise,weusedadefaultArduinoexampletocommunicatewith
Xively.However,XivelyalsoprovidesaveryefficientArduinolibrarywithbuilt-in
functionsforrapidprogramming.Inthenextexercise,wewilluseanalternativemethod
tocommunicatewiththeXivelyplatformusingtheXively-Arduinolibrary.Althoughyou
canuseeitherofthesemethods,werecommendthatyouusetheXively-Arduinolibrary
asitisofficiallymaintainedbyXively.
Inthisexercise,wewilldownloaddigitalvaluesfromachannelcalledLED.Later,we
willusethesedigitalvalues,0and1,toswitchanLEDthatisconnectedtoourArduino
board.Asaninputtothischannel,wewillalterthecurrentvalueofthechannelonthe
Xivelyplatform’swebsitewhilelettingtheArduinodownloadthatvalueandperformthe
appropriatetask.
Let’sbeginbyimportingtheXively-Arduinolibraryanditsdependencies.Asyoualready
knowhowtoimportlibrariesintheArduinoIDE,visit
https://github.com/amcewen/HttpClienttodownloadandimporttheHttpClientlibrary.
ThisisadependencythatisrequiredbytheXively-Arduinolibrarytofunction.
OnceyouhaveimportedtheHttpClientlibrary,downloadtheXively-Arduinolibrary
fromhttps://github.com/xively/xively_arduinoandrepeattheimportprocess.
TheXively-Arduinolibraryshipswithfewexamplessothatyoucangetstarted.Wewill
usetheirexampleasbasecodefordownloadingdataforourexercise.
1. IntheArduinoIDE,navigatetoFile|Examples|Xively_arduino|
DatastreamDownloadandopentheDatastreamDownloadexample.Changethe
defaultAPIkeytoyourownAPIkeythatwasobtainedfromthedevicethatyou
created.Asdisplayedinthefollowingcodesnippet,youneedtoalsoidentifyyour
channelname,whichisLEDinthiscase:
charxivelyKey[]="<Your-API-key>";
charledId[]="LED";
2. TheXively-ArduinolibraryrequiresyoutodefinetheXivelyDatastreamvariable
asanarray.Youcanalsospecifymultipledatastreamsaccordingtoyourapplication:
XivelyDatastreamdatastreams[]={
XivelyDatastream(ledId,strlen(ledId),DATASTREAM_FLOAT),
};
3. YoualsoneedtodeclareavariablecalledfeedusingtheXivelyFeedfunction.As
displayedinthefollowinglineofcode,replacethedefaultfeedIDwiththe
appropriateone.Intheinitializationofthefeedvariable,thevalue1representsthe
numberofdatastreamsintheXivelyDatastreamarray:
XivelyFeedfeed(<Your-feed-ID>,datastreams,1);
4. Inourexercise,wewanttoperiodicallyretrievethevalueoftheLEDchanneland
turntheactualLEDonoroffaccordingly.Inthefollowingcodesnippet,weobtain
thefloatvaluefromfeed[0],where0specifiesthedatastreamlocatedatthe0
positioninthedatastreamsarray:
Serial.print("LEDvalueis:");
Serial.println(feed[0].getFloat());
if(feed[0].getFloat()>=1){
digitalWrite(ledPin,HIGH);
}
else{
digitalWrite(ledPin,LOW);
}
5. Asyounowknowthattheparametersneedtobechangedforthisexercise,openthe
XivelyLibBasicRetrieveData.inoArduinosketchfromthecodefolder.Thissketch
containstheexactcodethatyouneedtousefortheexercise.Althoughthissketch
includesthenecessarymodifications,youwillstillhavetochangethevaluesfor
account-specificparameters,thatis,theAPIkey,feedID,andsoon.Beforeyougo
aheadanduploadthissketch,gototheXivelyplatformandcreateachannelcalled
LEDwithCurrentValueas1,asdisplayedinthefollowingscreenshot:
6. Now,compileanduploadthecodetoyourArduino.
7. OnceyouhaveuploadedthecompiledcodetoyourArduino,opentheSerial
Monitorwindowandwaitforanoutputthatissimilartotheonedisplayedin
followingscreenshot.YouwillnoticethattheLEDontheArduinohardwareis
turnedon:
8. YoucangobacktotheXivelyLEDchannelandchangetheCurrentValuefieldto
0.Withinafewseconds,youwillnoticethattheLEDontheArduinohardwareis
turnedoff.Withthisexercise,youhavesuccessfullyestablishedtwo-way
communicationbetweenArduinoandtheXivelyplatform.
AdvancedcodetouploadanddownloaddatausingArduino
IntheprevioustwoArduinoexercises,weindividuallyperformedtheuploadingand
downloadingtasks.Inthisexercise,wewanttocreateanArduinoprogramwherewecan
uploaddatafromtheconnectedsensors(thePIRmotionsensorandtheHIH-4030
humiditysensor)whileretrievingthevaluetocontroltheLED.OpentheArduinosketch,
XivelyLibAdvance.ino,whichcontainsthecodethatdemonstratesboththe
functionalities.Asyoucanseeinthefollowingcodesnippet,wehavedefinedthree
separatechannelsforeachcomponentwhilehavingindependentXivelyDatastream
objectsforupload(datastreaU[])anddownload(datastreamD[]).Similarly,wehave
alsocreatedtwodifferentfeeds,feedUandfeedD.Themainreasonbehinddelegatingthe
uploadanddownloadtaskstodifferentobjectsistoindependentlyupdatethevalueofthe
LEDchannelwhileuploadingthedatastreamforchannels,HumidityRawandMotionRaw:
charledId[]="LED";
charhumidityId[]="HumidityRaw";
charpirId[]="MotionRaw";
intledPin=2;
intpirPin=3;
XivelyDatastreamdatastreamU[]={
XivelyDatastream(humidityId,strlen(humidityId),DATASTREAM_FLOAT),
XivelyDatastream(pirId,strlen(pirId),DATASTREAM_FLOAT),
};
XivelyDatastreamdatastreamD[]={
XivelyDatastream(ledId,strlen(ledId),DATASTREAM_FLOAT),
};
XivelyFeedfeedU(<Your-feed-ID>,datastreamU,2);
XivelyFeedfeedD(<Your-feed-ID>,datastreamD,1);
Intheloop()functionoftheArduinocode,weperiodicallyfetchthecurrentvalueofthe
LEDchannelfromfeedDandthenperformtheLEDaction:
intretD=xivelyclient.get(feedD,xivelyKey);
Serial.print("xivelyclient.getreturned");
Inthesecondstageoftheperiodicfunction,weobtaintherawsensorvaluesfromthe
analoganddigitalpinsoftheArduinoboardandthenuploadthosevaluesusingfeedU:
inthumidityValue=analogRead(A0);
datastreamU[0].setFloat(humidityValue);
intpirValue=digitalRead(pirPin);
datastreamU[1].setFloat(pirValue);
intretU=xivelyclient.put(feedU,xivelyKey);
Serial.print("xivelyclient.putreturned");
MaketheappropriatechangesinthecodetoaccommodatefeedIDandAPIkeyandthen
uploadthesketchtotheArduinoboard.OnceyouuploadthisArduinosketchtoyour
platform,youshouldbeabletoseethefollowingoutputontheSerialMonitorwindow.
YoucannowdisconnectyourArduinofromtheUSBportandconnecttheexternalpower
supply.NowthatyouhaveconnectedyourArduinoassemblytoyourlocalnetworkusing
anEthernetcable,youcanplacetheArduinoassemblyatanylocationinyourworkplace.
Python–uploadingdatatoXively
SimilartohowweinterfacedArduinotoXively,wewillnowexploremethodstoconnect
theXivelyplatformviaPythonandthuscompletetheloop.Inthissection,wewillfocus
ondifferentwaysofuploadingdatatoXivelyusingPython.Wewillstartwithabasic
methodofcommunicatingwithXivelyandextenditfurtherwithweb.pytoimplementthe
interfaceusingawebapplication.
Tobeginwith,let’sfirstinstallXively’sPythonlibrary,xively-python,onyourcomputer
usingthefollowingcommand:
$sudopipinstallxively-python
Thebasicmethodforsendingdata
Onceagain,youwillneedtheAPIkeyandfeedIDofyourvirtualdevicethatyoucreated
ontheXivelyplatform.Python,assistedbythexively-pythonlibrary,providesvery
simplemethodstoestablishacommunicationchannelwiththeXivelyplatform.From
yourcodefolder,opentheuploadBasicXively.pyfile.Asspecifiedinthecode,replace
theFEED_IDandAPI_KEYvariableswiththeappropriatefeedIDandAPIkey:
FEED_ID="<Your-feed-ID>"
API_KEY="<Your-API-key>"
UsingtheXivelyAPIClientmethod,createanapiinstanceandcreatethefeedvariable
byusingtheapi.feeds.get()method:
api=xively.XivelyAPIClient(API_KEY)
feed=api.feeds.get(FEED_ID)
JustaswedidintheArduinoexercises,youwillneedtocreatedatastreamsforeach
channelfromthefeeds.Asspecifiedinthefollowingcodesnippet,trytogetthespecified
channelfromthefeedorcreateoneifitisnotpresentontheXivelyvirtualdevice.You
canalsospecifytagsandothervariableswhilecreatinganewchannel:
try:
datastream=feed.datastreams.get("Random")
exceptHTTPErrorase:
print"HTTPError({0}):{1}".format(e.errno,e.strerror)
datastream=feed.datastreams.create("Random",tags="python")
print"Creating'Random'datastream"
Onceyouhaveopenedthedatastreamforachannel,youcanspecifythecurrentvalue
usingthedatastream.cuurent_valuemethodandupdatethevalue,whichwillupload
thisvaluetothespecifiedchannel:
datastream.current_value=randomValue
datastream.at=datetime.datetime.utcnow()
datastream.update()
OnceyouhaveperformedthespecifiedmodificationstotheuploadBasicXively.pyfile,
executeitusingthefollowingcommand:
$pythonuploadBasicXively.py
OpenyourvirtualdeviceontheXivelywebsitetofindtheRandomchannelpopulatedwith
thedatathatyouuploaded.Itwilllooksimilartothefollowingscreenshot:
Uploadingdatausingawebinterfacebasedonweb.py
Inthepreviouschapter,weworkedwiththeweb.pylibrarywhiledevelopingtemplates
andwebapplications.Inthisexercise,wewillutilizeoneoftheprogramsinwhichwe
createdtheweb.pyformswiththeXivelycodethatwedevelopedinthepreviousexercise.
ThegoalofthisexerciseistosenddatatotheLEDchannelusingawebapplicationwhile
observingtheLED’sbehaviorontheArduinohardware.
YoucanfindthePythonprogramforthisexerciseinthischapter’sfolderwiththename
uploadWebpyXively.py.Asyoucanseeinthecode,weareusingtheweb.pyformsto
obtaintwoinputs,ChannelandValue.Wewillusetheseinputstomodifythecurrent
valueoftheLEDchannel:
submit_form=form.Form(
form.Textbox('Channel',description='Channel'),
form.Textbox('Value',description='Value'),
form.Button('submit',type="submit",description='submit')
)
Thetemplatefile,base.html,isalsomodifiedtoaccommodateminorchangesthatare
requiredbythisexercise.AsyoucanseeintheopenedPythonfile,weareusingthesame
codethatweusedtointerfacewithXivelyinthepreviousexercise.Theonlymajor
modificationisdonetothedatastream.update()method,whichisnowplacedinthe
POST()function.Thismethodwillbeexecutedwhenyousubmittheform.Onceyou
changetheAPIkeyandfeedIDinthisfile,executethePythoncodeandopen
http://localhost:8080inyourwebbrowser.Youcanseethewebapplicationrunning,
asdisplayedinthefollowingscreenshot.Enterthevalueasdisplayedinthefiguretoturn
ontheLEDontheArduinoboard.YoucanchangetheValueparameterto0toturnoffthe
LED.
Python–downloadingdatafromXively
TheprocessofdownloadingdatafromXivelyincludesrequestingtheCurrentValue
parameterforthespecifiedchannel.Inthenextexercise,wewilldevelopareferencecode
thatwillbeusedinthenextdownloadingexercise.Inthatexercise,wewilldevelopan
advancedwebapplicationtoretrievedatafromaspecificXivelychannel.
AsweareusingfunctionsbasedontheRESTprotocoltocommunicatewithXively,
Xivelywillnotsimplynotifyyouaboutanynew,availableupdate,insteadyouwillhave
torequestit.Atthispoint,itisimportanttonotethatwewillhavetoperiodicallyrequest
datafromXively.However,Xivelyprovidesanalternativemethodcalledtriggersto
overcomethisproblem,whichisexplainedlaterinthissection.
ThebasicmethodforretrievingdatafromXively
Justliketheuploadingexercises,thedownloadingexercisesalsorequireasimilarcodeto
instantiatetheXivelyAPIClient()andapi.feeds.get()methods.Asweareretrieving
thedatainsteadofsendingit,wewillonlyusethefeed.datastreams.get()methodand
avoidthefeed.datastreams.create()method.Thedownloadprocessrequiresthe
channeltobealreadypresentandthisisthemainreasonwhyweonlyhavetousethe
get()method:
try:
datastream=feed.datastreams.get("Random")
exceptHTTPErrorase:
print"HTTPError({0}):{1}".format(e.errno,e.strerror)
print"Requestedchanneldoesn'texist"
Oncethedatastreamobjectisinitialized,thelatestavailablevaluefromthechannelcan
beobtainedusingthedatastream.current_valuemethod:
latestValue=datastream.current_value
Toenablethecompletecodetoperformthisexercise,openthedownloadXivelyBasic.py
codeandchangethevaluesforthefeedIDandAPIkeytotheappropriateones.Inthis
exercise,weareworkingwiththeRandomchannelthatwecreatedintheuploading
exercise.BeforeyouexecutethisPythoncode,youneedtoexecutethe
uploadXivelyBasic.pyfilethatwillcontinuouslyproviderandomdatatotheRandom
channel.Now,youcanexecutethedownloadXivelyBasic.pyfilethatwillfetchthe
currentvalueoftheRandomchannelperiodically(withadelayspecifiedbythesleep()
function).Asyoucanseeinthefollowingscreenshot,wearegettinganewvalueforthe
Randomchannelevery10seconds:
Retrievingdatafromtheweb.pywebinterface
ThisisanadvancedexercisewherewewilluploaddatatooneXivelychannelafter
fetchingdatafromanotherXivelychannel,andprocessitbyusingthedataenteredviathe
webform.Asyouknow,theanalogpinonwhichtheHIH-4030sensorisconnected
providesyouwithrawsensorvalue,whereastherelativehumiditydependsuponthevalue
ofthecurrenttemperature.Inthisexercise,wewilldevelopawebapplicationsothatthe
usercanmanuallyenterthetemperaturevalueandwewillusethistocalculaterelative
humidityfromtherawsensordata.
Beforewebeginwiththedetailsofthecode,let’sfirstopentheuploadWebpyXively.py
file,changetheappropriateparameters,andexecutethefile.Now,inawebbrowser,open
thehttp://localhost:8080location.Youwillbeabletoseefollowingwebapplication,
askingyoutoprovideitwiththecurrenttemperaturevalue.Meanwhile,uploadthe
XivelyLibAdvance.inosketchtotheArduinoboardaftermakingtheappropriatechanges.
Withthisprogram,Arduinowillstartsendingrawmotionandhumidityvaluestothe
MotionRawandHumidityRawchannels.Inthewebapplicationthatisrunning,submitthe
formwiththecustomtemperaturevalueandyouwillbeabletoseethewebapplication
loadthecurrentrelativehumidityinpercentageunits.Internally,whenyousubmittedthe
form,thewebapplicationretrievedthecurrentrawhumidityvaluefromtheHumidityRaw
channel,executedtherelativeHumidity(data,temperature)function,uploadedthe
calculatedhumidityvaluetoanewchannelcalledHumidity,andthendisplayedthatvalue
inthewebapplication.
IfyouopenyourXivelyplatformpageonawebbrowser,youwillbeabletoseeanewly
createdHumiditychannelwiththecurrentvalueforrelativehumidity.Youcansubmit
multiplevaluesfortemperatureinthewebapplicationtoseetheresultsreflectedonthe
graphoftheHumiditychannel,asdisplayedinthefollowingscreenshot.Althoughthis
exercisedemonstratesasingleusecase,thiswebapplicationcanbeextendedinmultiple
waystocreatecomplexapplications.
Triggers–customnotificationsfromXively
TheXivelyplatformprimarilydeploysservicesbasedontheRESTprotocol,which
doesn’thaveaprovisiontoautomaticallypublishdatawhenitisupdatedwithanew
value.Inordertoovercomethislimitation,Xivelyimplementstheconceptoftriggers,
whichprovideadditionalfunctionalitybeyondjustpublishingdatawhenitischanged.
Throughthis,youcanbasicallycreateatriggerforanychanneltoperformthePOST
operationonthespecifiedlocationwhenconditionsthataresetforthattriggerget
satisfiedbytheincomingdata.Forexample,youcansetatriggerontheHumiditychannel
tosendyouanotificationwhenthevalueofhumiditychanges,thatis,increasesaboveor
decreasebelowagiventhreshold.YoucancreateatriggerinyourXivelyplatform
accountbyjustclickingontheAddTriggerbutton,asdisplayedinthefollowing
screenshot:
Whilecreatingatrigger,youcanspecifythechannelyouwanttomonitorandthe
conditiontotriggeranotificationonthespecifiedHTTPPOSTURL.Asshowninthe
followingscreenshot,completetheinformationforChannel,Condition,andHTTP
POSTURLbeforesavingthetrigger.Themajordrawbackwiththisapproachisthat
XivelyrequiresanactualURLtosendthePOSTnotification.Ifyourcurrentcomputer
doesn’thaveastaticIPaddressoraDNSaddress,thetriggerwon’tbeabletosendyou
thenotification:
YourowncloudplatformfortheIoT
Intheprevioussection,weworkedwithacommercialIoTplatformthatalsoprovides
restricted,freeaccesstobasicfunctionalities.Wealsolearnedvariouswaysto
communicatewithXivelythatisbasedontheRESTprotocol.Foranysmallprojectsor
prototypes,XivelyandothersimilarIoTplatformsprovideasufficientsolutionandare
thereforerecommendedbyus.However,thelimitedfreeserviceprovidedbyXivelymay
notsatisfyallofyourrequirementstodevelopafull-stackIoTproduct.Thefollowingare
afewcaseswhereyoumaywanttoconfigureordevelopyourownIoTplatform:
DevelopyourowncommercialIoTplatform
Developcustomfeaturesthatareexclusivetoyourproduct
Addmorecontrolfeaturesandcommunicationprotocolswhilealsosecuringyour
data
Requireaninexpensivesolutionforlarge-scaleprojects
Thissectionwillguideyouthroughthestep-by-stepprocessofcreatinganelementary
small-levelIoTcloudplatform.Thegoalofthesectionistomakeyoufamiliarwiththe
requirementsandtheprocessofcreatinganIoTplatform.Todevelopalarge-scale,
diverse,andfeature-richplatformsuchasXively,youwillneedasignificantamountof
knowledgeandexperienceinthedomainsofcloudanddistributedcomputing.
Unfortunately,cloudanddistributedcomputingareoutofscopeofthisbookandwewill
stickwiththeimplementationofthebasicfeatures.
TodevelopacloudplatformthatisaccessiblethroughtheInternet,youwillatleast
requireacomputationalunitwithInternetconnectionandastaticIPorDNSaddress.
Today,themajorityofconsumer-orientedInternetServiceProviders(ISPs)donot
providestaticIPswiththeirInternetservice,makingitdifficulttohostaserverathome.
However,variouscompaniessuchasAmazon,Google,andMicrosoft,providefreeor
cost-effectivecloudcomputingservices,whichmakeiteasiertohostyourcloudontheir
platforms.Theseservicesarehighlyscalableandtheyareequippedwithalargeamountof
featurestosatisfythemajorityofconsumerrequirements.Inthefollowingsection,you
willbecreatingyourfirstcloudcomputinginstanceonAmazonWebServices(AWS).
Laterinthischapter,wewillinstallandconfiguretheappropriatesoftwaretoolssuchas
Python,Mosquittobroker,andsoon,toutilizethisAmazoninstanceasanIoTcloud
platform.
Note
Themajorreasonbehinddevelopingorconfiguringapersonalcloudplatformistohave
accesstoyourIoThardwarethroughtheInternet.DuetothelackofastaticIPaddressfor
yourhomenetwork,youmaynotbeabletoaccessyouprototypesorprojectsfroma
remotelocation.Acloudplatformcanbeusedasthedefactocomputationunitforyour
network-basedprojects.
GettingfamiliarwiththeAmazonAWSplatform
AWSisacollectionofvariouscloudservicesofferedbyAmazon,whichtogethermakeup
acloudcomputingplatform.Oneoftheoriginalandmostpopularservicesofferedby
AWSisitsElasticComputerCloud(EC2)service.TheEC2serviceletsausercreate
instancesofavirtualmachinewithdifferentcombinationsofcomputationpowerand
operatingsystemsfromtheirlargecloudinfrastructure.Itisalsoreallyeasytochangethe
computationalpropertiesofthesevirtualinstancesatanytime,makingthemhighly
scalable.WhenyouaretryingtocreateyourownIoTplatformusingEC2,thisscalability
featuregreatlyhelpsyouasyoucanexpandorcompressthesizeofyourinstances
accordingtodemand.IfyouarenotfamiliarwiththeconceptofcloudcomputingorAWS
asaparticularproduct,youcanlearnmoreaboutthemfromhttp://aws.amazon.com.
TheEC2cloudplatformisdifferentfromXivelyasitprovidesgeneral-purposecloud
instances,virtualmachines,withcomputationpowerandstoragethatcanbeconvertedto
anyfeature-specificplatformbyinstallingandconfiguringplatform-specificsoftware.Itis
importanttonotethatyoureallydonothavetobeanexpertincloudcomputingtofurther
advanceinthischapter.Theupcomingsectionsprovideanintuitiveguidetoperformbasic
tasks,suchassettingupanaccount,creatingandconfiguringyourvirtualmachines,and
installingsoftwaretoolstocreateIoTplatforms.
SettingupanaccountonAWS
Amazonprovidesoneyearoffreeaccesstothebasicinstanceofthecloud-basedvirtual
machine.Thisinstanceincludes750hoursoffreeusagetimepermonthandthisisgreater
thanthenumberofhoursinanymonth,therebymakingitfreefortheentiremonth.The
datastoragecapacityandbandwidthoftheAWSaccountaresufficientforbasicIoTor
Arudinoprojects.TocreateafreeaccountforayearonAmazon’sAWScloudplatform,
performthefollowingsteps:
1. Openhttp://aws.amazon.comandclickonthebuttonthatasksyoutotryAWSfor
freeorsomeothersimilartext.
2. ThisactionwillleadyoutoaSignInorCreateanAWSAccountpageasdisplayed
inthefollowingscreenshot.Enterthee-mailaddressthatyouwanttouseforthis
accountwhenyouselecttheIamanewuser.optionandclickontheSigninusing
oursecureserverbutton.IfyoualreadyhaveanAWSaccountandyouknowhowto
createanaccountonAmazonAWS,youcanusethosecredentialsandskiptothe
nextsection:
Note
Amazononlyallowsonefreeinstanceforeachaccount.IfyouareanexistingAWS
userandyourfreeinstanceisalreadyoccupiedwithanotherapplication,youcanuse
thesameinstancetoaccommodatetheMQTTbrokerorbuyanotherinstance.
3. Onthenextpage,youwillbepromptedtoenteryourname,e-mailaddress,anda
password,asdisplayedinthefollowingscreenshot.Fillintheinformationto
continuewiththesignupprocess:
4. Youwillbeaskedtoenteryourcreditcardinformationduringthesignupprocess.
However,youwon’tbechargedforusingtheservicesincludedinthefreeaccount.
Yourcreditcardwillbeonlyusedifyouexceedanylimitationsorbuyanyadditional
services.
5. Thenextstageincludestheverificationofyouraccountusingyourphonenumber.
Followtheinstructionsthataredisplayedinthefollowingscreenshottocompletethe
identityverificationprocess:
6. Onceyouhaveverifiedyouridentity,youwillberedirectedtothepagethatliststhe
availableAmazonAWSplans.Selecttheappropriateplanthatyouwanttosubscribe
toandcontinue.Ifyouarenotsure,youcanselecttheBasic(Free)planoption,
whichwerecommendforourpurpose.TheAmazonManagementConsolepage
willletyouselectotherplansifyouwanttoupgradethecurrentone.
7. LaunchtheAmazonmanagementconsole.
AsyouhaveanAmazonAWSaccountnow,let’screateyourvirtualinstanceonit.
CreatingavirtualinstanceontheAWSEC2service
InordertocreateavirtualinstanceonAmazon’sEC2platform,firstlogintoAWSusing
yourcredentialsandopenthemanagementconsole.Next,clickontheEC2taband
executethefollowinginstructionsstepbystep:
1. OntheEC2Consolepage,gotoCreateInstanceandclickontheLaunchInstance
button.Thiswillopenawizardtocreateaninstancethatwillguideyouthroughthe
setupprocess:
2. Onthefirstpageofthewizard,youwillbepromptedtoselectanoperatingsystem
foryourvirtualinstance.SelectUbuntuServer14.04LTSasdisplayedinthenext
screenshot,whichiseligibleforthefreetier.Toavoidanychargesforusingan
advancedinstance,makesurethattheoptionyouselectiseligibleforthefreetier:
3. Innextwindow,youwillbepromptedwithalistofoptionsthathavedifferent
configurationsofcomputationalcapacity.FromtheGeneralpurposefamily,select
thet2.microtype,whichiseligibleforthefreetier.Thecomputationalcapabilities
providedbythet2.microtieraresufficientfortheexercisesthatwearegoingto
performinthebookandformostoftheDIYprojects.Makesurethatyoudonot
selectanyothertierunlessyouareconfidentofyourselection.
4. Onceyouhaveselectedthespecifiedtier,clickontheReviewandLaunchbuttonto
reviewthefinalconfigurationoftheinstance.
5. Reviewtheconfigurationandmakesurethatyouhaveselectedtheappropriate
options,asmentionedearlier.YoucannowclickontheLaunchbuttontoproceed
further.
6. Thiswillopenapop-upwindowthatwillpromptyoutocreateanewkeypairthat
willbeusedforauthenticationintheupcomingsteps:
7. Asshowninthepreviousscreenshot,selectCreateanewkeypairfromthefirst
drop-downmenuwhileprovidinganameforthekeypair.ClickontheDownload
KeyPairbuttontodownloadthekey.Thedownloadedkeywillhavethenamethat
youprovidedinthepreviousoptionwiththe.pemextension.Ifyoualreadyhavean
existingkey,youcanselecttheappropriateoptionsfromthefirstdrop-downmenu.
Youwillneedthiskeyeverytimeyouwanttologintothisinstance.Savethiskeyin
asafeplace.
8. Onceagain,clickontheLaunchInstancesbuttontofinallystarttheinstance.Your
virtualinstanceislaunchedonAWSnowanditisrunningintheEC2.
9. Now,clickontheViewInstancebuttonthatwilltakeyoubacktotheEC2console
window.Youwillbeabletoseeyourrecentlycreatedt2.microinstanceinthelist.
10. Tofindoutmoredetailsaboutyourvirtualinstance,selectitfromthelist.Assoonas
youselectyourinstance,youwillbeabletoseeadditionalinformationinthebottom
tab.ThisinformationincludesthepublicDNS,privateDNS,publicIPaddress,and
soon.
11. Savethisinformation,asyouwillneedittologintoyourinstance.
Now,youhavesuccessfullycreatedandturnedonavirtualcloudinstanceusingAmazon
AWS.However,thisinstanceisrunningintheAmazonEC2andyouwillhaveto
remotelyauthenticateintothisinstancetoaccessitsresources.
Loggingintoyourvirtualinstance
Inreality,yourvirtualinstanceisavirtualcomputeronacloudwithcomputation
resourcesthataresimilartoyourregularcomputer.Younowneedtologintotherunning
virtualinstancetoaccessfiles,runscripts,andinstalladditionalpackages.Toestablisha
secureauthenticationandaccessprocedure,youneedtousetheSecureShell(SSH)
protocolandtherearemultiplewaystouseSSHfromyourcomputer.Ifyouareusing
MacOSXorUbuntu,anSSHclientprogramalreadyexistswithinyouroperatingsystem.
ForWindows,youcandownloadthePuTTYSSHclientfromhttp://www.putty.org/.
FromtheEC2managementwindow,retrievethepublicIPaddressofyourinstance.To
usethedefaultSSHclientintheLinuxorMacenvironment,opentheterminaland
navigatetothefolderwhereyouhavesavedyourkeyfilewiththe.pemextension.Inthe
terminalwindow,executethefollowingcommandtomakeyourkeyaccessible:
$chmod400test.pem
Onceyouhavechangedpermissionforyourkeyfile,runthefollowingcommandtologin
tothevirtualinstance.Inthecommand,youwillhavetoreplace<key-name>withthefile
nameofyourkeyand<public-IP>withthepublicIPthatyouretrievedfromthe
managementconsole:
$ssh–i<key-name>.pemubuntu@<public-IP>
Onceyouexecutethiscommand,youwillbeaskedtocontinuewiththeconnection
processifyouareauthenticatingtheinstancefortheveryfirsttime.Attheprompt,write
yesandpressEntertocontinue.Onsuccessfulauthentication,youwillbeabletoseethe
commandpromptofyourvirtualinstanceinthesameterminalwindow.
IncaseyouareusingtheWindowsoperatingsystemandarenotsureaboutthestatusof
yourSSHclient,selectyourinstanceintheEC2windowandclickontheConnectbutton
inthetopnavigationbar,whichisdisplayedinthefollowingscreenshot:
Thisactionwillopenapop-upwindowwithashorttutorialthatexplainstheconnection
process.Thistutorialisalsolinkedtothestep-by-stepauthenticationguideforPuTTY.
CreatinganIoTplatformontheEC2instance
AsyouhavesuccessfullysetupanAmazonEC2instance,youhaveavirtualcomputer
thatisrunninginthecloudandhasastaticIPaddresstoenableremoteaccess.However,
thisinstancecannotbecategorizedasanIoTplatform,asitonlycontainsaplainoperating
system(UbuntuLinuxinourcase)andlacksthenecessarysoftwarepackagesand
configurations.
TherearetwodistinctwaysofsettingupacustomIoTcloudplatformonyourvirtual
instance:
SettingupanopensourceIoTplatformsuchasThingSpeak
Separatelyinstallingandconfiguringtherequiredsoftwaretools
KeepthefollowingpointsinmindwhensettingupanopensourceIoTplatform:
ThingSpeakisoneoftheopensourceIoTplatformsthatprovidessupportingfilesto
createandhostyourownreplicaoftheThingSpeakplatform.
SettingupthisplatformonyourAWSinstanceisquitesimpleandyoucanobtainthe
necessaryfilesandguidelinestoinstallitvia
https://github.com/iobridge/ThingSpeak.
AlthoughthispersonalizedversionoftheThingSpeakplatformwillprovide
sufficienttoolstostartdevelopingIoTapplications,thefunctionalitiesoftheplatform
willbeconfinedtothesuppliedfeatureset.Tohavecompletecontrolover
customization,youmayhavetousethenextoption.
Ifyouwanttoseparatelyinstallandconfigurethenecessarysoftwaretools,here’swhat
youneedtoremember:
Thisoptionincludesfurnishingproject-specificsoftwaretoolssuchasPythonandthe
MosquittobrokerwiththerequiredPythonlibrariessuchasweb.pyandpaho_mqtt.
Wehavealreadyworkedwithexercisesthatimplementedapplicationswhichwere
basedontheMosquittobrokerandweb.py.ThisversionofthecustomIoTcloud
platformcanreducethecomplexityofinstallingadditionalopensourceplatform
toolsandstillprovidethenecessarysupporttohostapplications.
TheArduinoprogramcandirectlycommunicatewiththiscustomplatformusing
RESTorMQTTprotocols.Itcanalsobehaveastheremotecomputationunitto
communicatewithXivelyorotherthird-partyIoTcloudplatforms.
Inthenextsection,wewillbegintheplatformdeploymentprocessbyinstallingthe
Mosquittobrokerandthenecessarypackagesonyourvirtualinstance.Thiswillbe
followedbytheconfigurationofthevirtualinstancetosupporttheMQTTprotocol.Once
yourIoTcloudplatformisupandrunning,youcanjustrunthePython-basedMosquitto
codefromthelastchapterfromtheinstancewithminorornomodifications.Infuture,this
IoTplatformthatcontainstheMosquittobrokerandthePythonprojectcanbeextendedto
accommodateadditionalfeatures,protocols,andextrasecurity.
InstallingthenecessarypackagesonAWS
UsingtheSSHprotocolandthekeypair,logintoyourvirtualinstance.Onceyouareat
theCommandPrompt,thefirsttaskthatyouneedtoperformistoupdatealltheoutdated
packagesinUbuntu,theoperatingsystemofyourvirtualinstance.Successivelyexecute
thefollowingcommands:
$sudoapt-getupdate
$sudoapt-getupgrade
UbuntualreadycomeswiththelatestversionofPython.However,youwillstillneedto
installSetuptoolstoinstalltheadditionalPythonpackages:
$sudoapt-getinstallpython-setuptools
Ubuntu’spackagerepositoryalsohostsMosquittoanditcanbedirectlyinstalledusingthe
followingcommand.Withthiscommand,wewillinstalltheMosquittobroker,Mosquitto
client,andallotherdependenciestogether.Duringtheinstallation,youwillbeaskedto
confirmtheinstallationofadditionalpackages.EnterYesattheterminalandproceedwith
theinstallation:
$sudoapt-getinstallmosquitto*
NowyouhaveinstalledtheMosquittobrokeronyourvirtualinstanceandyoucanrunit
byexecutingtheMosquittocommand.TodevelopPython-basedMosquittoapplications,
weneedthePythonMosquittolibraryonourinstance.Let’sinstallthelibraryusing
Setuptools,throughthefollowingcommands:
$sudoeasy_installpip
$sudopipinstallpaho_mqtt
Inthepreviouschapter,wedevelopedawebapplicationbasedonweb.pythatutilizesthe
paho_mqttlibrarytosupporttheMQTTprotocol.Aswiththefirstproject,wearegoingto
deploythesamewebapplicationontheEC2-basedvirtualinstancetodemonstrateyour
customIoTcloudplatform.Asadependencyofthisproject,youfirstneedtheweb.py
Pythonlibrary,whichyoucaninstallusingthefollowingcommand:
$sudopipinstallweb.py
NowyouhaveallthenecessarysoftwarepackagestoruntheIoTapplication.Tomake
yourwebapplicationaccessibleviatheInternet,youneedtoconfigurethesecurityofyou
virtualinstance.
Configuringthesecurityofthevirtualinstance
First,wewillconfigurethevirtualinstancetosecurelyhosttheMosquittobroker.Later,
wewillgothroughthemethodstosetupbasicsecuritytopreventtheabuseofyour
Mosquittoserverbyautomatedbotsorspammingattempts.
Tochangeanyparametersonyourvirtualinstance,youwillhavetousetheSecurity
GroupstoolsfromtheNetwork&SecuritysectionofyourAWSManagementConsole
page.OpentheSecurityGroupssection,asdisplayedinthefollowingscreenshot:
Eachvirtualinstancehasadefaultsecuritygroupthatisgeneratedautomaticallytoallow
accesstoyourinstancethroughtheSSHport22.Thissecurityconfigurationisresponsible
forlettingyouaccessyourvirtualinstancethroughtheSSHclientfromyourcomputer.
TheMosquittobrokerusestheTCPportnumber1883toestablishcommunicationwith
publishersandsubscriberclients.ToallowincomingaccessfromthisMosquittoport,you
willhavetoeditthecurrentinboundrulesandaddanentryforport1883:
OnceyouclickontheEditbutton,thewebsitewillopenapop-upwindowtoaddnew
rulesandedittheexistingrules.ClickontheAddRulebuttontocreateanadditionalrule
toaccommodatetheMosquittobroker:
Asdisplayedinthefollowingscreenshot,entertheTCPport’snumberas1883and
completetheotherinformationintheform.Onceyouhavecompletedtheformwiththe
givenvalues,savetherulesandexitthewindow:
Now,withthisconfiguration,port1883isaccessiblebyotherdevicesandenablesremote
communicationwiththeMosquittobroker.Youcanusethesamemethodtoaddarulefor
port8080toallowaccesstoPython’swebapplicationsthatweredevelopedusingweb.py.
Infuture,youcanaddanyadditionalportstoallowaccesstovariousservices.Althoughit
isveryeasytochangethesecurityrulesonyourvirtualinstance,makesurethatyou
refrainfromopeningexcessiveportstoavoidanysecurityrisk.
Testingyourcloudplatform
Inthistestingsection,wewillfirstperformchecksfortheMosquittobrokerfromyour
computerandthensetupauthenticationparametersfortheMosquittobroker.Later,we
willuploadfilesandfolderscontainingthePythoncodetoourvirtualinstanceusingthe
SSHfiletransferprotocol.
TestingtheMosquittoservice
ThefirstthingthatwearegoingtocheckonourIoTplatformistheaccessibilityofthe
Mosquittobroker.Opentheterminalonyourcomputerandexecutethefollowing
command,afterreplacing<Public-IP>withthepublicIPorpublicDNSaddressofyour
virtualinstance:
$mosquitto_pub-h<Public-IP>-ttest-m3
Thiscommandwillpublishthemessagevalue3forthetesttopicfortheMosquitto
brokerthatisspecifiedatthegivenIPaddress;inourcase,thisisthevirtualinstance.
Now,openaseparateterminalwindowandexecutethefollowingcommandtosubscribe
tothetesttopiconourbroker:
$mosquitto_sub-h<Public-IP>-ttest
Ontheexecutionofthiscommand,youwillbeabletoseethelatestvaluethatispublished
forthistopic.Usethemosquitto_pubcommandtopostmultiplemessagesandyoucan
seetheoutputofthesemessagesintheotherterminalwindowthatisrunningthe
mosquitto_subcommand.
Configuringandtestingbasicsecurity
Asyousawinthepreviousexample,thepublishingandsubscribingcommandsjustused
theIPaddresstosendandreceivedatawithoutusinganyauthenticationparameters.This
isamajorsecurityloophole,asanyoneontheInternetcansenddatatoyourMosquitto
broker.Toavoidunauthorizedaccesstoyourbroker,youhavetoestablishauthentication
credentials.Youcanspecifytheseparametersbyfollowingthesestepsinthegivenorder:
1. IfyouhavenotalreadyloggedintoyourinstancethroughSSH,openaterminal
windowandloginusingSSH.Onceyouareloggedin,navigatetotheMosquitto
directoryandcreateanewfilecalledpasswdusingthefollowingsetofcommands.
Wewillusethisfiletostoretheusernamesandpasswords:
$cd/etc/mosquitto
$sudonanopasswd
2. Inthefile,entertheusernameandpasswordinformationseparatedbyusingthecolon
operator(:).Fortestingpurposes,wewillusethefollowingcredentials,whichcanbe
changedanytimeonceyouaremorefamiliarwiththeMosquittoconfiguration:
user:password
3. PressCtrl+Xtosaveandexitthefilefromthenanoeditor.Whenyouareprompted
toconfirmthesaveoperation,selectYandpressEnter.
4. Inthesamefolder,opentheMosquittoconfigurationfileusingthenanoeditor:
$sudonanomosquitto.conf
5. Intheopenedfile,scrolldownthetextcontentuntilyoureachthesecuritysection.In
thissection,findthe#allow_anonymoustruelineofthecodeandreplaceitwith
allow_anonymousfalse.Makesurethatyouhaveremovedthe#symbol.Withthis
operation,wehavedisabledtheanonymousaccesstotheMosquittobrokerandonly
thoseclientswithpropercredentialscanaccessit.
6. Afterperformingthepreviouschanges,scrollfurtherdowninthefile,uncomment
theline#password_file,andreplaceitwiththis:
password_file/etc/mosquitto/passwd
7. Nowthatyouhaveconfiguredthebasicsecurityparametersforyourbroker,you
mustrestarttheMosquittoserviceforthechangestotakeeffect.InUbuntu,
Mosquittoisinstalledaspartofthebackgroundserviceandyoucanrestartitusing
thefollowingcommand:
$sudoservicemosquittorestart
8. Totesttheseauthenticationconfigurations,openanotherterminalwindowinyour
computerandexecutethefollowingcommandwiththepublicIPaddressofyour
instance.Ifyouareabletosuccessfullypublishyourmessagewithoutanyerrors,
yourMosquittobrokernowhasasecurityconfiguration:
$mosquitto_pub-uuser-Ppassword-h<Public-Ip>-ttest-m3
9. Also,checkyourMosquittosubscriberusingthefollowingcommand:
$mosquitto_sub-uuser-Ppassword-h<Public-Ip>-ttest
Uploadingandtestingaprojectontheinstance
Aswediscussedinthepreviouschapters,youcanalwaysuseyourcomputerfor
developmentpurposes.Onceyouarereadyfordeployment,youcanutilizethisnewly
configuredvirtualinstanceasthedeploymentunit.Youcancopyyourfilesfromyour
localcomputertothevirtualinstanceusingautilitycalledPuTTY
(https://docs.aws.amazon.com/AWSEC2/latest/UserGuide/putty.html)orusingtheSCP
(SSHcopy)command.
Nowitistimetouploadtheprojectfilesfromthefinalcodingexerciseoftheprevious
chapter,whichimplementedtheMQTTprotocolusingPythonandtheMosquittolibrary.
Asareminder,thefinalexerciseislocatedinthefoldernamedExercise4-MQTT
gatewayofthepreviouschapter’scoderepository.WewillbeusingtheSCPutilityto
uploadthesefilestoyourvirtualinstance.Beforeweusethisutility,let’sfirstcreatea
directoryonyourvirtualinstance.Logintoyourvirtualinstanceandgototheuser
directoryofthevirtualinstancebyusingthefollowingcommand:
$ssh–i<key-name>.pemubuntu@<public-ip>
$cd~
Usingthecharactertilde(~)withthecdcommandwillchangethecurrentdirectorytothe
homedirectory,unlessyouareplanningtouseanyotherlocationonyourvirtualinstance.
Atthislocation,createanewemptydirectorynamedprojectbyusingfollowing
command:
$mkdirproject
Now,onthecomputeryouareworkingon(MacOSXorLinux),openanotherterminal
windowandusethefollowingcommandtocopytheentiredirectorytotheremote
instance:
$scp-v-itest.pem-r<project-folder-path>ubuntu@<your-ec2-static-
ip>:~/project
Onceyouhavesuccessfullycopiedthefilestothislocation,youcangobacktothe
terminalthatisloggedintoyourvirtualinstanceandchangethedirectorytoproject:
$cdproject
Beforerunninganycommands,makesurethatyouhavechangedtheappropriateIP
addressesintheArduinosketchandthePythonprograms.Youwillhavetoreplacethe
previousIPaddresswiththeoneofyourvirtualinstance.Nowthatyouhavemadethese
changes,youcanexecutethePythoncodecontainingtheMosquittoGatewayandweb
applicationtostarttheprogram.Openyourwebbrowserfromthehttp://<PublicIp>:8080locationtoseeyouwebapplicationrunningonthecustomIoTplatform.From
nowon,youshouldbeabletoaccessthisapplicationfromanyremotelocationthrough
theInternet.
Tip
DonotforgettochangetheIPaddressoftheMosquittobrokerintheArduinosketchand
uploadthesketchtotheArduinoboardagain.Youmaynotbeabletoobtainthesensor
dataiftheappropriateIPaddresschangesarenotapplied.
Summary
Attheendofthischapter,andhencetheendofthecontextualpartofthebook,youshould
beabletodevelopyourownInternetofThingsprojects.Inthischapter,weuseda
commercialIoTcloudplatformtohandleyoursensordata.Wealsodeployedacloud
instancetohostopensourceIoTtoolsandcreatedourownversionofthecustomizedIoT
cloudplatform.Certainly,thecontentthatyoulearnedisnotsufficienttodevelopscalable
andfully-stackedcommercialproducts,butitisreallyhelpfultogetyoustartedwith
them.Inalargenumberofcases,thismaterialissufficienttodevelopDIYprojectsand
productprototypesthatwillultimatelyleadyoutothefinalproduct.Inthenexttwo
chapters,wewillputthematerialthatwelearnedtothetestanddeveloptwocompleteIoT
hardwareprojects.Wearealsogoingtolearnaprojectdevelopmentmethodologythatis
specifictohardware-basedIoTproducts,whichcanbeappliedtoconvertyourprototypes
intorealproducts.
Chapter10.TheFinalProject–aRemote
HomeMonitoringSystem
Itisnowtimetocombineeverytopicthatwelearnedinthepreviouschaptersintoa
projectthatcombinesArduinoprogramming,PythonGUIdevelopment,MQTT
messagingprotocol,andaPython-basedcloudapplication.Asyoumighthavealready
figuredoutfromthechaptertitle,wearegoingtodeveloparemotehomemonitoring
systemusingthesecomponents.
Thefirstsectionofthechaptercoverstheprojectdesignprocess,includinggoals,
requirements,architecture,andUX.Oncewearedonewiththedesignprocess,wewill
jumpintotheactualdevelopmentoftheproject,whichisdividedintothreeseparate
stages.Next,wewillcovercommontroubleshootingtopicsthatareusuallyfacedwhile
workingwithlargeprojects.InoureffortstodeveloputilizableDIYprojects,thelater
sectioncoverstipsandfeaturestoextendtheproject.Asthisisquitealargeproject
comparedtootherprojectsinthebook,wearenotgoingtojumpstraightintotheactual
developmentprocesswithouthavinganystrategy.Let’sstartbygettingourselvesfamiliar
withthestandarddesignmethodologyforhardwareprojects.
ThedesignmethodologyforIoTprojects
Theprocessofdevelopingacomplexproductthattightlycoupleshardwaredeviceswith
high-levelsoftwareservicesrequiresanadditionallevelofplanning.Forthisproject,we
willexerciseaproperproductdevelopmentapproachtohelpyougetfamiliarwiththe
processofcreatingreal-worldhardwareprojects.Thismethodcanthenbeusedtoplan
yourownprojectsandtakethemtothenextlevel.Thefollowingdiagramdescribesa
typicalprototypedevelopmentprocess,whichalwaysbeginsbydefiningthemajorgoals
thatyouwanttoachievewithyourproduct:
Onceyouhavedefinedthesetofmajorgoals,youneedtobreakthemdownintoproject
requirementsthatincludeeverydetailofthetasksthatyourprototypeshouldexecuteto
achievethesegoals.Usingtheprojectrequirements,youneedtosketchouttheoverall
architectureofthesystem.ThenextstepincludestheprocessofdefiningtheUXflowthat
willhelpyoutolayouttheuserinteractionpointsforyoursystem.Atthisstage,youwill
beabletoidentifyanychangesthatarerequiredinthesystemarchitectureandthe
hardwareandsoftwarecomponentstostartthedevelopment.
Asyouhavedefinedtheinteractionpoints,nowyouneedtodistributetheentireproject
developmentprocessintomultiplestagesanddelegatethetasksbetweenthesestages.
Onceyouhavecompletedthedevelopmentofthesestages,youwillhavetointerface
thesestageswitheachotheraccordingtoyourarchitectureanddebugthecomponentsifit
isneeded.Attheend,youwillhavetotestyourprojectasawholesystemand
troubleshootminorproblems.Inhardwareprojects,itisverydifficulttoworkonyour
electriccircuitsagainafterthecompletionofcomplexdevelopmentprocesses,asthe
changescanhaverecurringeffectsonallothercomponents.Thisprocesswillhelpyouto
minimizeanyhardwarereworkandsubsequentsoftwaremodifications.
Nowthatyouhavelearnedaboutthemethodology,let’sbeginwiththeactual
developmentprocessforourremotehomemonitoringsystem.
Projectoverview
Thesmarthomeisoneofthemostwell-definedandpopularsubdomainsoftheIoT.The
mostimportantfeatureofanysmarthomeisitscapabilitytomonitorthephysical
environment.Fortunately,theexercisesandprojectsthatwecoveredintheprevious
chaptersincludecomponentsandfeaturesthatcanbeusedforthesamepurpose.Inthis
chapter,wearegoingtodefineaprojectthatwillutilizetheseexistingcomponentsand
programmingexercises.InthemidtermprojectofChapter7,TheMidtermProject–a
PortableDIYThermostat,wecreatedadeployablethermostatwiththeabilitytomeasure
temperature,humidity,andambientlight.Ifwewanttoutilizethismidtermproject,the
nearestIoTprojectthatwecanbuildontopofitistheremotehomemonitoringsystem.
TheprojectwillhaveArduinoasthemainpointofinteractionbetweenthephysical
environmentandthesoftware-basedservices.WewillhaveaPythonprogramasthe
middlelayer,whichwillbridgethesensorinformationcomingfromArduinowiththe
user-facinggraphicalinterface.Let’sstartbydefiningthegoalsthatwewanttoachieve
andtheprojectrequirementstosatisfythesegoals.
Theprojectgoals
TheNestthermostatprovidesanideaofthetypeoffeaturesthataproperlydesigned
remotemonitoringsystemwithprofessionalfeaturesshouldhave.Achievingthislevelof
systemcapabilitiesrequiresalotofdevelopmenteffortfromalargeteam.Althoughitwill
bedifficulttoincludeeachofthefeaturesthataresupportedbyacommercialsystemin
ourproject,wewillstilltrytoimplementthecommonfeaturesthatcanbeincorporatedby
aprototypeproject.
Thetop-levelfeaturesthatweareplanningtoincorporateinthisprojectcanbedescribed
bythefollowinggoals.
Observethephysicalenvironmentandmakeitaccessibleremotely
Providebasiclevelcontrolstotheusertointeractwiththesystem
Demonstrateaprimitivelevelofbuilt-insituationalawareness
Theprojectrequirements
Nowthatwehavedefinedthemajorgoals,let’sconvertthemintodetailedsystem
requirements.Onthecompletionoftheproject,thesystemshouldbeabletosatisfythe
followingrequirements:
Itmustbeabletoobservephysicalphenomenonsuchastemperature,humidity,
motion,andambientlight.
Itshouldprovidelocalaccesstosensorinformationandcontroloveractuatorssuch
asabuzzer,abuttonswitch,andanLED.
Themonitoringshouldbedonebyaunitthatisdevelopedusingtheopensource
hardwareplatform,Arduino.
Themonitoringunitshouldbelimitedtocollectsensorinformationandcommunicate
ittothecontrolunit.
Thecontrolunitshouldnotcompriseofadesktopcomputerorlaptop.Instead,it
shouldbemadedeployableusingaplatformsuchasaRaspberryPi.
Thecontrolunitshoulddemonstrateaprimitivelevelofsituationawareness
capabilitybyutilizingthecollectedsensorinformation.
Thecontrolunitshouldhaveagraphicalinterfacetoprovidethesensor’sobservation
andthecurrentstateofthesystem.
ThesystemmustbeaccessibleviatheInternetusingcloud-basedservices.
Thewebapplicationthatprovidesremoteaccessshouldhavethecapabilitytodisplay
thesensor’sobservationsthroughawebbrowser.
Thesystemshouldalsoprovidebasiccontroloftheactuatorstocompletetheremote
accessexperiencebyusingthewebapplication.
Asthemonitoringunitcanbeconstrainedbycomputationresources,thesystem
shouldusehardware-orientedmessagingprotocolstotransferinformation.
Althoughtherearemanyotherminorrequirementsthatcanbepartofourproject,they
havebeenskippedinthisbook.Ifyouhaveanyadditionalplansforyourremotehome
monitoringsystem,thisisthetimethatyoumustdefinetheserequirementsbeforeyou
jumpintodesigningthearchitecture.Anyfuturechangestotherequirementscan
significantlyaffectthedevelopmentstageandmakehardwareandsoftwaremodification
difficult.Inthelastsectionofthechapter,wehavelaiddownanumberofadditional
featuresthatyoumaywanttoconsiderimplementingforyourfutureprojects.
Designingsystemarchitecture
Continuingfromprojectgoals,first,youneedtosketchoutahigh-levelarchitectureofthe
system.Thisarchitecturalsketchshouldincludemajorcomponentsthatenablethesystem
topassoninformationbetweenthesensorsandtheremoteusers.Thefollowingfigure
showsanarchitecturalsketchforourproject:
Accordingtothegoals,theusershouldbeabletoaccessthesystemusingtheInternet;this
meansthatweneedcloudcomponentsinthearchitecture.Thesystemalsoneedsto
monitorthephysicalenvironmentusingaresource-constraineddevice,andthiscanbe
executedusingArduino.Themiddlelayer,whichconnectsthecloudserviceandthe
sensorsystem,canbebuiltusingaRaspberryPi.Inthelastproject,weconnectedArduino
andtheRaspberryPiusingaserialconnection,butwewanttomoveawayfromserial
connectionsandstartusingourhome’sEthernetnetworktomakethesystemdeployable.
Hence,theArduino-basedunitisconnectedtothenetworkusingEthernetwhilethe
RaspberryPiusesWi-Fitoconnecttothesamenetwork.
Inordertolayouttheoverallsystemarchitecture,let’sutilizethesketchthatwedesigned,
whichcanbeseenintheprecedingfigure.Asyoucanseeinthenextfigure,wehave
convertedtheoverallsystemintothreemainarchitecturalunits:
Monitoringstation
Controlcenter
Cloudservice
Inthisfigure,wehaveaddressedeachandeverymajorcomponentthatwearegoingto
utilizeintheprojectalongwiththeirassociationtoeachother.Inthefollowingsections,
wearegoingtodefinethesethreemainunitsbriefly.Thecomprehensivedescriptionand
implementationstepsfortheseunitsareprovidedlaterinthechapterunderseparate
sections.
Themonitoringstation
Weneedaresource-constrainedandrobustunitthatwillcommunicatewiththephysical
environmentperiodically.ThismonitoringunitcanbebuiltusingArduinosincelow-level
microcontrollerprogrammingcanprovideuninterruptedstreamofsensordata.Theusage
ofArduinoatthisstagewillalsohelpustoavoidthedirectinterfacingofbasiclow-level
sensorswithcomputersthatarerunningoncomplexoperatingsystems.Thesensorsand
theactuatorsareconnectedtoArduinousingdigital,analog,PWM,andI2Cinterfaces.
Thecontrolcenter
Thecontrolcenterbehavesasthemainuserinteractionpointbetweenthesensor
informationandtheuser.Itisalsoresponsibleforconveyingthesensorinformationfrom
themonitoringstationtothecloudservices.Thecontrolcentercanbedevelopedusing
yourregularcomputerorasingle-boardcomputersuchasaRaspberryPi.Wearegoingto
utilizeaRaspberryPisinceitcanbeeasilydeployedasahardwareunitanditisalso
capableenoughathostingPythonprograms.Wewillreplaceacomputerscreenwitha
smallTFTLCDscreenfortheRaspberryPitodisplaytheGUI.
Thecloudservices
ThemainpurposeofthecloudservicesistoprovideanInternet-basedinterfaceforthe
controlcentersothattheusercanaccessitremotely.Beforewehostawebapplicationto
performthisoperation,wewillneedanintermediatedatarelay.Thissensordatarelay
worksasahostbetweenthecloud-basedwebapplicationandthecontrolcenter.Inthis
project,wewillbeusingXivelyastheplatformtocollectthissensordata.Theweb
applicationcanbehostedonanInternetserver;inourcase,wearegoingtouseAmazon
AWSduetoourfamiliaritywithit.
DefiningUXflow
Now,althoughweknowwhatthearchitectureoftheoverallsystemlookslike,wehaven’t
definedhowtheuserisgoingtointeractwithit.Thisprocessofdesigninguserinteraction
foroursystemwillalsohelpustofigureoutdataflowbetweenmajorcomponents.
Let’sbeginwiththecomponentsthatareoperatinglocallyatyourhouse,thatis,the
monitoringstationandthecontrolcenter.Asyoucanseefromthefollowingfigure,we
haveourfirstuserinteractionpointatthecontrolcenter.Theusercanobservethe
informationoractuponitifthesystem’sstatusisanalert.Theuseractiontodismissthe
alertpromptsmultipleoperationstotakeplaceatthecontrolcenterandthemonitoring
station.Werecommendyouthoroughlyexaminethefiguretobetterunderstandtheflow
ofthesystem.
Similarly,theseconduserinteractionpointislocatedatthewebapplication.Theweb
applicationdisplaystheobservationsandsystem’sstatusthatwecalculatedatthecontrol
centerandprovidesaninterfacetodismissthealert.Inthisscenario,thedismissaction
willtravelthroughXivelytothecontrolcenterwheretheappropriateactionsforthe
controlcenterwillremainthesameasinthepreviousscenario.However,intheweb
application,theuserhastoloadthewebbrowsereverytimetorequestthedata,whichwas
happeningautomaticallyatthecontrolcenter.Takealookatthefollowingfigureto
understandtheUXflowforthewebapplication:
Thelistofrequiredcomponents
Thenecessarycomponentsfortheprojectarederivedusingthreemaincriteria:
Easeofavailability
CompatibilitywiththeArduinoboard
Familiaritywiththecomponentsduetopreviousutilizationinthisbook
Thisisthelistofthecomponentsthatyouwillneedtostartworkingontheproject.Ifyou
havecompletedthepreviousexercisesandprojects,youshouldalreadyhavemostofthe
components.Ifyoudon’twanttodisassembletheprojects,youcanobtainthemfromthe
websitesofSparkFun,Adafruit,orAmazon,whoselinksareprovideinthenexttable.
Thehardwarecomponentsforthemonitoringstationareasfollows:
Component(firststage)
Quantity Link
ArduinoUno
1
https://www.sparkfun.com/products/11021
ArduinoEthernetShield
1
https://www.sparkfun.com/products/9026
Breadboard
1
https://www.sparkfun.com/products/9567
TMP102temperaturesensor
1
https://www.sparkfun.com/products/11931
HIH-4030humiditysensor
1
https://www.sparkfun.com/products/9569
Miniphotocell
1
https://www.sparkfun.com/products/9088
PIRmotionsensor
1
https://www.sparkfun.com/products/8630
Super-fluxRGBLED,common
anode
1
http://www.adafruit.com/product/314
Buzzer
1
http://www.adafruit.com/products/160
Pushbuttonswitch
1
https://www.sparkfun.com/products/97
1
https://www.sparkfun.com/products/512
1
http://www.amazon.com/Arduino-9V-1A-PowerAdapter/dp/B00CP1QLSC/
Resistors
As
required
220ohm,1kilo-ohm,and10kilo-ohm
Connectionwires
As
required
USBcableforArduino
(fordevelopmentstage)
Arduinopowersupply
(fordeploymentstage)
Thehardwarecomponentsforthecontrolcenterareasfollows:
Component(firststage)
Quantity Link
RaspberryPi
1
https://www.sparkfun.com/products/11546
TFTLCDscreen
1
http://www.amazon.com/gp/product/B00GASHVDU/
SDcard(8GB)
1
https://www.sparkfun.com/products/12998
Wi-Fidongle
1
http://www.amazon.com/Edimax-EW-7811Un-150Mbps-RaspberrySupports/dp/B003MTTJOY
RaspberryPipowersupply
1
http://www.amazon.com/CanaKit-Raspberry-Supply-AdapterCharger/dp/B00GF9T3I0
Keyboard,mouse,USBhub,
andmonitor
As
Requriedfordevelopmentanddebuggingstages
required
Definingtheprojectdevelopmentstages
Asperthesystemarchitecture,wehavethreemainunitsthatcollaborativelycreatethe
remotehomemonitoringproject.Theoverallhardwareandsoftwaredevelopmentprocess
isalsoalignedwiththesethreeunitsandcanbedistributedasfollows:
Monitoringstationdevelopmentstage
Controlcenterdevelopmentstage
Webapplicationdevelopmentstage
Thesoftwaredevelopmentforthemonitoringstationstageincludesdevelopingthe
Arduinocodetomonitorsensorsandperformactuatoractionsononeside,while
publishingthisinformationtothecontrolcenterontheotherside.Themiddlelayerofthe
developmentstage,thatis,theRaspberryPi-basedcontrolcenter,hoststheMosquitto
broker.ThisstagealsocontainsthePythonprogramthatcontainstheGUI,situation
awarenesslogic,andsubroutinestocommunicatewiththeXivelycloudservice.Thelast
stage,thecloudservices,includestwodistinctcomponents,sensordatarelayandaweb
application.WewillbeusingtheXivelyplatformasoursensordatarelayandtheweb
applicationwillbedevelopedinPythonontheAmazonAWScloudinstance.Now,let’s
jumpintotheactualdevelopmentprocessandourfirststopwillbetheArduino-based
monitoringstation.
Stage1–amonitoringstationusing
Arduino
Aswediscussed,themaintasksofthemonitoringsystemsaretointerfacesensor
componentsandcommunicatetheinformationgeneratedbythesesensorstotheobservers.
YouwillbeusingArduinoUnoasthecentralmicrocontrollercomponenttointegratethese
sensorsandactuators.WealsoneedameansofcommunicationbetweentheArduinoUno
andthecontrolcenterandwewillbeutilizingtheArduinoEthernetShieldforthis
purpose.Let’sdiscussthehardwarearchitectureofthemonitoringstationandits
components.
Designingthemonitoringstation
WealreadydesignedunitsbasedonArduinoandtheEthernetShieldinvariousexercises
inChapter8,IntroductiontoArduinoNetworking,andChapter9,ArduinoandtheInternet
ofThings.Therefore,wehaveassumedthatyouarefamiliarwithinterfacingtheEthernet
ShieldwiththeArduinoboard.Wewillconnectvarioussensorsandactuatorswiththe
Arduinoboard,asdisplayedinthefollowingdiagram.Asyoucanseeinthisdiagram,the
sensorswillprovidethedatatotheArduinoboardwhiletheactuatorswillseekthedata
fromtheArduinoboard.Althoughweareautomaticallycollectingenvironmentdatafor
thesesensors,thedatafromthebuttonwillbecollectedfrommanualuserinputs.
CheckoutthefollowingFritzingdiagramforthedetailedconnectionsinthemonitoring
station.Asyoucanseeinourhardwaredesign,thetemperaturesensorTMP102is
connectedthroughtheI2Cinterface,whichmeansthatwewillneedtheSDAandSCL
lines.Wewillbeusinganalogpins5and6oftheArduinoboardtointerfaceSDAand
SCLrespectively.Thehumidity(HIH-4030)andambientlightsensorsalsoprovideanalog
outputandareconnectedtotheanalogpinsoftheArduinoboard.Meanwhile,thebuzzer,
thebuttonswitch,andthePIRmotionsensorareconnectedthroughthedigitalI/Opins.
Thesuper-fluxRGBLEDisacommonanodeLED;thismeansthatitisalwayspowered
usingthecommonanodepinsandtheR,G,andBpinsarecontrolledbyusingthePWM
pins.
Makesurethatyouproperlyconnectallthecomponentstothepinsthatarespecifiedin
thefollowingdiagram:
Note
YoucanlearnmoreabouttheinterfacingofRGBLEDwithArduinofromthetutorialat
https://learn.adafruit.com/all-about-leds.
IfyouareusinganArduinoboardotherthanArduinoUno,youwillhavetoadjustthe
appropriatepinnumbersintheArduinocode.Inaddition,makesurethatthisArduino
boardiscompatiblewiththeEthernetShield.
Intermsofcircuitconnections,youcanuseabreadboardasshownintheprevious
diagram,orifyouarecomfortable,youcanuseaPCBprototypeboardandsolderthe
components.Inoursetup,wefirsttestedthecomponentsonthebreadboardandoncethey
weretested,wesolderedthecomponents,asshowninthefollowingfigure.Ifyouventure
tosolderthePCBboard,makesurethatyouhavethenecessarycomponentsforthejob.
ThePCBprototypewillyieldarobustperformancecomparedtothebreadboard,butit
willalsomakeitdifficultforyoutodebugandchangethecomponentsafterwards.
Ifyouarereadywithyourcircuitconnection,connectyourArduinotoyourcomputer
usingtheUSBcable.Also,connecttheEthernetShieldtoyourhomerouterusingan
Ethernetcable.
TheArduinosketchforthemonitoringstation
Beforejumpingintothecodingstage,makesurethatyouhavecollectedtheprebuilt
Arduinocodefortheproject.Youcanfinditinthecodefolderofthischapterwiththe
filenameArduino_monitoring_station.ino.Thecodeimplementsthenecessarylogicto
supporttheoverallUXflowatthemonitoringstation,whichwediscussedintheprevious
section.Inthefollowingsections,wewillgothroughthemajorareasoftheprogramso
thatyoucanbetterunderstandthesecodesnippets.Now,openthissketchintheArduino
IDE.YouarealreadyfamiliarwithsettinguptheIPaddressforArduino.Youalsolearned
howtousetheArduinoMQTTlibraryPubSubClientinthepreviouschapter,which
meansthatyourArduinoIDEshouldalreadyhavethePubSubClientlibraryinstalledon
it.Atthebeginningofthecode,wehavealsodeclaredfewconstants,suchastheIP
addressesoftheMQTTserverandArduinoandthepinnumbersofvarioussensorand
actuators.
Note
YouwillhavetochangetheIPaddressofthemonitoringstationandthecontrolcenter
accordingtoyournetworksetup.Makesurethatyouperformthesemodificationsbefore
uploadingtheArduinocode.
Inthecodestructure,wehavetwomandatoryArduinofunctions,setup()andloop().In
thesetup()function,wewillsetuptheArduinopintypesandtheMQTTsubscriber
channels.Inthesamefunction,wewillalsoattachaninterruptforthepressofthebutton
whilesettingupthetimerforthepublishData()function.
Publishingsensorinformation
ThepublishData()functionreadsthesensorinputsandpublishesthisdatatothe
Mosquittobrokerthatislocatedonthecontrolcenter.Asyoucanseeinthefollowing
codesnippet,wearemeasuringsensorsvaluesonebyoneandpublishingthemtothe
brokerusingtheclient.publish()method:
voidpublishData(){
Wire.requestFrom(partAddress,2);
byteMSB=Wire.read();
byteLSB=Wire.read();
intTemperatureData=((MSB<<8)|LSB)>>4;
floatcelsius=TemperatureData*0.0625;
temperatureC=dtostrf(celsius,5,2,message_buff2);
client.publish("MonitoringStation/temperature",temperatureC);
floathumidity=getHumidity(celsius);
humidityC=dtostrf(humidity,5,2,message_buff2);
client.publish("MonitoringStation/humidity",humidityC);
intmotion=digitalRead(MotionPin);
motionC=dtostrf(motion,5,2,message_buff2);
client.publish("MonitoringStation/motion",motionC);
intlight=analogRead(LightPin);
lightC=dtostrf(light,5,2,message_buff2);
client.publish("MonitoringStation/light",lightC);
}
Ifyoucheckoutthesetup()function,youwillnoticethatwehaveusedalibrarycalled
SimpleTimertosetupatimermethodforthisfunction.Thismethodexecutesthe
publishData()functionperiodicallywithoutinterruptingandblockingtheactualflowof
theArduinoexecutioncycle.Inthefollowingcodesnippet,thenumber300000represents
thetimedelayinmilliseconds,thatis,5minutes:
timer.setInterval(300000,publishData);
Note
YouwillneedtodownloadandimporttheSimpleTimerlibrarytocompileandrunthe
codesuccessfully.Youcandownloadthelibraryfrom
https://github.com/infomaniac50/SimpleTimer.
Subscribingtoactuatoractions
Youcanseeinthesetup()functionthatweareinitializingthecodebysubscribingtothe
MonitoringStation/ledandMonitoringStation/buzzerchannels.The
client.subscribe()methodwillmakesurethatwhenevertheMosquittobrokergetsany
updatesforthesechannels,theArduino-basedmonitoringsystemgetsnotified:
if(client.connect("MonitoringStation")){
client.subscribe("MonitoringStation/led");
client.subscribe("MonitoringStation/buzzer");
}
Programminganinterrupttohandlethepressofabutton
Wehavetakencareofthepublishingandsubscribingfunctionsofthemonitoringstation.
Now,wewillneedtointegratethebuttonswitchthatiscontrolledbyinputsfromtheuser.
IntheArduinoprogrammingroutines,werunaperiodiclooptocheckthestatusofthe
pins.However,thismaynotbeusefulifthebuttonispressedsinceitrequiresimmediate
action.ThisactionofpressingthebuttonishandledusingtheArduinointerrupts,as
showninthefollowinglineofcode:
attachInterrupt(0,buttonPress,RISING);
Theprecedinglineofcodeassociatesaninterruptatpin0(digitalpin2)withthe
buttonPress()function.Thisfunctionsetsoffthebuzzerswheneverthestateofthe
interruptischanged.Inotherwords,whenthebuttonispressedbytheuser,thebuzzer
willbeinstantaneouslyturnedoffirrespectiveofthecurrentstatusofthebuzzer:
voidbuttonPress(){
digitalWrite(BUZZER,LOW);
Serial.println("Setbuzzeroff");
}
Testing
ThecurrentArduinocodecommunicateswiththecontrolcenterforpublishingand
subscribingthedata,butwehaven’tyetsetuptheMosquittobrokertohandlethese
requests.YoucanstillgoaheadanduploadtheArduinosketchtoyourmonitoringstation
usingtheUSBcable.Thiswillnotresultinanyfruitfulactionsfromthemonitoring
stationandyouwillonlybeabletousetheSerial.prinln()commandtoprintvarious
sensormeasurements.Therefore,wewilldevelopthecontrolcenternextsothatwecan
startaddressingcommunicationrequestsfromthemonitoringstation.
Stage2–acontrolcenterusingPython
andtheRaspberryPi
Inordertodeliverthestatusofthesystemandothersensorobservationstotheuser,the
controlcenterneedstoperformvariousoperationsthatincludeobtainingrawsensordata
fromthemonitoringstation,calculatingthestatusofthesystem,reportingthisdatatothe
cloudservices,anddisplayingobservationusingGUI.Whilethecontrolcenterincludes
twomajorhardwarecomponents(theRaspberryPiandTFTLCDscreen),itisalso
comprisedoftwomajorsoftwarecomponents(theMosquittobrokerandPythoncode)to
handlethecontrolcenterlogic.
Tip
WeareusingaRaspberryPiinsteadofaregularcomputeraswewantthecontrolcenterto
beadeployableandportableunitthatcanbemountedonawall.
YoucanstilluseyourowncomputertoeditandtestthePythoncodefordevelopment
purposesinsteadofusingaRaspberryPidirectly.However,werecommendthatyou
switchbacktotheRaspberryPionceyouarereadyfordeployment.
Thecontrolcenterarchitecture
TheRaspberryPiisthemaincomputationunitofthecontrolcenterandworksasthebrain
oftheentiresystem.SincetheRaspberryPiisusedasareplacementforaregular
computer,thearchitectureofthecontrolcentercaninterchangeablyuseacomputerin
placeoftheRaspberryPi.Asyoucanseeinthefollowingdiagram,thecontrolcenteris
connectedtothehomenetworkusingWi-Fiandthiswillmakeitaccessibletothe
monitoringstation.ThecontrolcenterincludestheMosquittobroker;thisisusedasthe
communicationpointbetweenthemonitoringstationandthePythonprogramforthe
controlcenter.ThePythonprogramutilizestheTkinterlibraryforGUIandthe
paho_mqttlibrarytocommunicatewiththeMosquittobroker.Byutilizingthesetwo
libraries,wecanconveysensorinformationfromthemonitoringstationtotheuser.
However,wewillneedaseparatearrangementtoestablishcommunicationbetweenthe
controlcenterandcloudservices.Inouroverallsystemarchitecture,thecontrolcenteris
designedtocommunicatewiththeintermediatedatarelay,Xively.ThePythoncodeuses
thexively-pythonlibrarytoenablethiscommunication.
InChapter8,IntroductiontoArduinoNetworking,wealreadyprovidedyouwithmethods
toinstalltheMosquittobroker,thePython-mosquittolibrary,andthexively-python
library.WealsolearnedtheprocessofsettinguptheTFTLCDscreenwiththeRaspberry
PiinChapter7,TheMidtermProject–aPortableDIYThermostat.Pleaserefertothose
tutorialsincaseyouhaven’tcompletedthoseexercisesyet.Assumingthatyouhave
configuredtheMosquittobrokerandtherequiredPythonlibraries,youcanmoveontothe
nextsection,whichincludestheactualPythonprogramming.
ThePythoncodeforthecontrolcenter
BeforeyoustartinterfacingtheselibrariesinthePythoncode,startyourMosquittobroker
firstfromthecommandlineusingthissimplecommand:
$mosquitto
Makesurethatyourestartyourmonitoringstationeverytimeyoustartorrestartthe
Mosquittobroker.Thisactionwillmakesurethatyourmonitoringstationisconnectedto
theMosquittobroker,sincetheprocessofestablishingtheconnectiononlygetsexecuted
onceinourArduinocode,thatis,atthebeginningofthesetupprocess.
ThePythoncodeforthecurrentprojectislocatedinthecodefolderofthischapterwith
thenamecontrolCenter.py.OpenthisfileusingyourPythonIDEandmodifythevalues
oftheappropriateparametersbeforeexecutingit.TheseparametersincludetheIPaddress
oftheMosquittobrokeralongwiththefeedIDandtheAPIkeyoftheXivelyvirtual
device.YoushouldalreadyhavethefeedIDandtheAPIkeyofyourXivelyvirtualdevice
fromthepreviouschapter:
cli.connect("10.0.0.18",1883,15)
FEED_ID="<feed-id>"
API_KEY="<api-key"
IfyouareusingalocalinstanceoftheMosquittobroker,youcanreplacetheIPaddress
with127.0.0.1.Otherwise,replacethe10.0.0.18addresswiththeappropriateIPaddress
ofthecomputerthatishostingtheMosquittobroker.Let’strytounderstandthecodenow.
Note
SometimesonMacOSX,youwon’tbeabletorunTkinterwindowandPythonthreads
inparallelduetoanunknownbug.Youshouldbeabletoexecutetheprogram
successfullyinWindowsandLinuxenvironments.Thisprogramhasbeentestedwiththe
RaspberryPi,whichmeansyouwon’tencounterthesamebugwhiledeployingthecontrol
center.
CreatingtheGUIusingTkinter
Inthepreviousexercises,wealwaysusedasinglePythonthreadtoruntheprogram.This
practicewillnothelpustoperformmultipletasksinparallelsuchasobtainingsensor
observationfromthemonitoringstationandsimultaneouslyupdatingtheGUIwiththat
information.Asasolution,wehaveintroducedmultithreadinginthisexercise.Aswe
needtwoseparateloops,oneeachforTkinterandpaho-mqtt,wewillberunningthem
independentlyinseparatethreads.Themainthreadwillrunmethodsthatarerelatedto
Mosquittoandthecloudservices,whilethesecondthreadwillhandletheTkinterGUI.In
thefollowingcodesnippet,youcanseethatwehaveinitializedthe
controlCenterWindow()classwiththethreading.threadparameter.Therefore,when
weexecutewindow=controlCenterWindow()inthemainprogram,itwillcreateanother
threadforthisclass.Basically,thisclasscreatestheGUIwindowwhilepopulatinglabels
andotherGUIcomponents.Thelabelsneedtobeupdatedwhennewsensorobservations
arrive,aredeclaredasclassvariables,andareaccessiblefromtheclassinstant.Asyoucan
seeinthefollowingcodesnippet,wehavedeclaredthelabelsfortemperature,humidity,
light,andmotionasclassvariables:
classcontrolCenterWindow(threading.Thread):
def__init__(self):
#Tkintercanvas
threading.Thread.__init__(self)
self.start()
defcallback(self):
self.top.quit()
defrun(self):
self.top=Tkinter.Tk()
self.top.protocol("WM_DELETE_WINDOW",self.callback)
self.top.title("ControlCenter")
self.statusValue=Tkinter.StringVar()
self.statusValue.set("Normal")
self.tempValue=Tkinter.StringVar()
self.tempValue.set('-')
self.humdValue=Tkinter.StringVar()
self.humdValue.set('-')
self.lightValue=Tkinter.StringVar()
self.lightValue.set('-')
self.motionValue=Tkinter.StringVar()
self.motionValue.set('No')
#Begincodesubsection
#DeclaresTkintercomponents
#Includedinthecodesampleofthechapter
#Endcodesubsection
self.top.mainloop()
Thepreviouscodesnippetdoesn’tcontaintheportionwherewedeclaredtheTkinter
components,asitissimilartowhatwecodedinthemidtermproject.Ifyouhave
questionsregardingTkinter-relatedissues,pleaserefertoChapter6,StoringandPlotting
ArduinoData,andChapter7,TheMidtermProject–aPortableDIYThermostat.
CommunicatingwiththeMosquittobroker
Atthecontrolcenterlevel,wesubscribetotopicsthatarepublishedfromthemonitoring
station,thatis,MonitoringStation/temperature,MonitoringStation/humidity,andso
on.IfyouhaveperformedanymodificationtotheArduinocodetochangetheMQTT
topics,youneedtoreflectthosechangesinthissection.Ifthetopicspublishedbythe
monitoringstationdonotmatchthetopicsinthecontrolcenter’scode,youwillnotget
anyupdates.AsyoucanseeinthePythoncode,weareassociatingtheon_messageand
on_publishmethodswithveryimportantfunction.Wheneveramessagearrivesfromthe
subscriber,theclientwillcallthefunctionsassociatedwiththeon_messagemethod.
However,everytimeamessagegetspublishedfromthePythoncode,theonPublish()
functionwillgetcalled:
cli=mq.Client('ControlCenter')
cli.on_message=onMessage
cli.on_publish=onPublish
cli.connect("10.0.0.18",1883,15)
cli.subscribe("MonitoringStation/temperature",0)
cli.subscribe("MonitoringStation/humidity",0)
cli.subscribe("MonitoringStation/motion",0)
cli.subscribe("MonitoringStation/light",0)
cli.subscribe("MonitoringStation/buzzer",0)
cli.subscribe("MonitoringStation/led",0)
Calculatingthesystem’sstatusandsituationawareness
Thecontrolcenterisassignedwiththetaskofcalculatingthestatusoftheoverallsystem.
ThecontrolcentercalculatesthestatusofthesystemasAlert,Caution,orNormalusing
thecurrentvaluesoftemperatureandhumidity.Tocalculatethestatus,thecontrolcenter
executesthecalculateStatus()functioneverytimeitgetsanupdateforthetemperature
orhumidityfromthemonitoringstation.Accordingtothecurrentsituationawareness
logic,ifthetemperatureismeasuredabove45degreeCelsiusorbelow5degreeCelsius,
wecallthesystem’sstatusasAlert.Similarly,youcanidentifytherangeoftemperature
andhumidityvaluesforCautionandNormalstatusesfromthefollowingcodesnippet:
defcalculateStatus():
if(tempG>45):
if(humdG>80):
status="HighTemperature,HighHumidity"
elif(humdG<20):
status="HighTemperature,LowHumidity"
else:
status="HighTemperature"
setAlert(status)
elif(tempG<5):
if(humdG>80):
status="LowTemperature,HighHumidity"
elif(humdG<20):
status="LowTemperature,LowHumidity"
else:
status="LowTemperature"
setAlert(status)
else:
if(humdG>80):
status="HighHumidity"
setCaution(status)
elif(humdG<20):
status="LowHumidity"
setCaution(status)
else:
status="Normal"
setNormal(status)
CommunicatingwithXively
ThecontrolcenterisalsorequiredtocommunicatewithXivelywhenitreceivesa
messagefromthesubscribedtopics.Wearealreadyfamiliarwiththeprocessofsettingup
virtualdevicesanddatastreamsonXively.OpenyourXivelyaccountandcreateavirtual
devicecalledControlCenter.NotedownthefeedIDandAPIkeyforthisdeviceand
replacetheminthecurrentcode.Onceyouhavethesevalues,createtheTemperature,
Humidity,Light,Motion,Buzzer,andStatuschannelsinthisvirtualdevice.
LookingatthePythoncode,youcanseethatwehavedeclaredtheindividualdatastream
foreachtopicandassociatedthemwiththeappropriateXivelychannel.Thefollowing
codesnippetshowsthedatastreamforjustthetemperatureobservation,butthecodealso
containsasimilarconfigurationforalltheothersensorobservations:
try:
datastreamTemp=feed.datastreams.get("Temperature")
exceptHTTPErrorase:
print"HTTPError({0}):{1}".format(e.errno,e.strerror)
datastreamTemp=feed.datastreams.create("Temperature",tags="C")
print"Creatingnewchannel'Temperature'"
Oncethecontrolcenterreceivesamessagefromthemonitoringstation,itupdatesthedata
streamwiththelatestvaluesandpushesthesechangestoXively.Atthesametime,we
willalsoupdatetheappropriatelabelintheTkinterGUIusingtheonMessage()function.
Wewillusethesamecodesnippetforallthesubscribedchannels:
ifmsg.topic=="MonitoringStation/temperature":
tempG=float(msg.payload)
window.tempValue.set(tempG)
datastreamTemp.current_value=tempG
try:
datastreamTemp.update()
exceptHTTPErrorase:
print"HTTPError({0}):{1}".format(e.errno,e.strerror)
Thecontrolcenteralsoimplementsthefunctiontosetthesystem’sstatusacrossthe
system,onceitiscalculatedusingthecalculateStatus()function.Therearethree
differentfunctionstoperformthistaskusingamethodthatissimilartowhatwedescribed
inthepreviouscodesnippet.ThesefunctionsincludesetAlert(),setCaution(),and
setNormal()andtheseareassociatedwithAlert,Caution,andNormalrespectively.
Whileupdatingthesystem’sstatus,thesefunctionsalsoperformbuzzerandLEDactions
bypublishingtheLEDandbuzzervaluestotheMosquittobroker:
defsetAlert(status):
window.statusValue.set(status)
datastreamStatus.current_value="Alert"
try:
datastreamStatus.update()
exceptHTTPErrorase:
print"HTTPError({0}):{1}".format(e.errno,e.strerror)
cli.publish("MonitoringStation/led",'red')
cli.publish("MonitoringStation/buzzer",'ON')
Checkingandupdatingthebuzzer’sstatus
Inthecontrolcenter,wesetthebuzzer’sstatustoONifthesystem’sstatusisdeterminedas
Alert.IfyoulookbackattheUXflow,youwillnoticethatwealsowanttoincludea
featurefortheusertomanuallyturnoffthebuzzer.ThecheckBuzzerFromXively()
functionkeepstrackofthebuzzer’sstatusfromXivelyandiftheusermanuallyturnsoff
thebuzzerusingthewebapplication,thisfunctionsetsoffthebuzzer.
TocontinuethisprocessindependentlyfromtheGUIandsituationawarenessthreads,we
willneedtocreateanotherthreadforthisfunction.Thetimeronthisthreadwill
automaticallyexecutethefunctionevery30seconds:
defcheckBuzzerFromXively():
try:
datastreamBuzzer=feed.datastreams.get("Buzzer")
buzzerValue=datastreamBuzzer.current_value
buzzerValue=str(buzzerValue)
cli.publish("MonitoringStation/buzzer",buzzerValue)
exceptHTTPErrorase:
print"HTTPError({0}):{1}".format(e.errno,e.strerror)
print"Requestedchanneldoesn'texist"
threading.Timer(30,checkBuzzerFromXively).start()
Withthisfunctionrunninginaseparatethreadevery30seconds,thecontrolcenterwill
checkthestatusoftheXivelychannelandstopthebuzzerifthestatusissettoOFF.We
willexplainhowtheusercanupdatetheXivelychannelforthebuzzerinthenextsection.
Testingthecontrolcenterwiththemonitoring
station
AssumingyourMosquittobrokerisrunning,executethecontrolCenter.pycodewiththe
changedparameters.Then,startthemonitoringstation.Afterafewmoments,youwillsee
ontheterminalthatthecontrolcenterhasalreadystartedgettingmessagesfromthe
publishersthatareinitializedonthemonitoringstation.Theupdateintervalforthe
messagesfromthepublisheratthecontrolcenterdependsupontheconfiguredpublishing
intervalatthemonitoringstation.
Note
TheArduinocodeexecutestheprocessofconnectingtotheMosquittobrokeronlyonce
afterpoweringon.IfyoustartyourMosquittobrokerafterthat,itwon’tbeableto
communicatewiththebroker.So,youneedtomakesurethatyoustarttheMosquitto
brokerbeforepoweringonthemonitoringstation.
IfyouneedtorestarttheMosquittobrokerforanyreason,removeandrestartthe
monitoringstationfirst.
Onexecutionoftheprogram,youwillbeabletoseeasmallGUIwindow,asshowninthe
followingscreenshot.Thiswindowdisplaysthesensor’svaluesfortemperature,humidity,
ambientlight,andmotion.Alongwiththesevalues,theGUIalsodisplaysthestatusofthe
system,whichisNormalinthisscreenshot.Youcanalsoobservethateverytimethe
controlcentergetsupdatesfromthemonitoringstation,thesystem’sstatusandsensor
observationschangeinrealtime:
Ifthissetupisworkingcorrectlyonyourcomputer,let’smoveontodeploythecontrol
centerontheRaspberryPi.
SettingupthecontrolcenterontheRaspberryPi
TheprocessofinstallingtheRaspbianoperatingsystemisexplainedinChapter7,The
MidtermProject–aPortableDIYThermostat.Youcanusethesamemodulethatyou
usedintheMidtermprojectorsetupanewone.OnceyouhaveinstalledRaspbianand
configuredtheTFTscreen,connecttheWi-FidonglethroughaUSBport.Atthisstage,
weassumethatyourRaspberryPiisconnectedwithamonitor,akeyboard,andamouse
toperformthebasicchanges.Althoughwewon’trecommendit,youcanalsousetheTFT
screenforthefollowingoperations,ifyouarecomfortablewithit:
1. StartyourRaspberryPiandlogin.Atthecommandprompt,executethefollowing
commandtoenterthevisualdesktopmode:
$startx
2. Onceyourgraphicaldesktopstarts,youwillbeabletoseetheiconoftheWiFi
configutility.Double-clickonthisiconandopentheWiFiconfigutility.Scanfor
wirelessnetworksandconnecttotheWi-Finetworkthathasthemonitoringstation.
Whenasked,enterthepasswordofyournetworkintheformwindowcalledPSK,
andconnecttoyournetwork.
3. Now,yourRaspberryPiisconnectedtothelocalhomenetworkandtotheInternet
throughit.It’stimetoupdatetheexistingpackagesandinstalltherequiredones.To
updatetheRaspberryPi’sexistingsystem,executethefollowingcommandsinthe
terminal:
$sudoapt-getupdate
$sudoapt-getupgrade
4. Onceyoursystemisupdatedwiththelatestversion,it’stimetoinstalltheMosquitto
brokeronyourRaspberryPi.TheRaspbianOShasMosquittointhedefault
repository,butitdoesn’thavethecurrentversionthatweneed.Toinstallthelatest
versionofMosquitto,executefollowingcommandsintheterminal:
$curl-Ohttp://repo.mosquitto.org/debian/mosquitto-repo.gpg.key
$sudoapt-keyaddmosquitto-repo.gpg.key
$rmmosquitto-repo.gpg.key
$cd/etc/apt/sources.list.d/
$sudocurl-Ohttp://repo.mosquitto.org/debian/mosquitto-repo.list
$sudoapt-getupdate
$sudoapt-getinstallmosquitto,mosquitto-clients
5. ToinstallotherPythondependencies,let’sfirstinstalltheSetuptoolspackageusing
apt-get:
$sudoapt-getinstallpython-setuptools
6. UsingSetuptools,wecannowinstallalltherequiredPythonlibrariessuchas
paho_mqtt,xively-python,andweb.py:
$sudoeasy_installpip
$sudopipinstallxively-pythonweb.pypaho_mqtt
Nowthatwehaveinstalledallthenecessarysoftwaretoolsthatarerequiredtorunour
controlcenterontheRaspberryPi,itistimetoconfiguretheRaspberryPisothatitcan
provideuninterruptedoperationforacriticalsystemsuchasaremotehomemonitoring
system:
1. InthecurrentconfigurationoftheRaspberryPi,thescreenoftheRaspberryPiwill
gotosleepaftersometimeandtheWi-Ficonnectionwillbeterminatedwhenthis
happens.Toavoidthisproblemandforcethescreentoremainactive,youwillneed
toperformthefollowingchanges.Openthelightdm.conffileusingthefollowing
command:
$sudonano/etc/lightdm/lightdm.conf
2. Inthefile,navigatetotheSetDefaultssectionandeditthefollowingline:
xserver-command-X–s0dpms
3. NowthatyourRaspberryPiissetup,itistimetocopytheprogramfilefromyour
computertotheRaspberryPi.YoucanuseSCP,PuTTY,orjustaUSBdriveto
transferthenecessaryfiletotheRaspberryPi.
Ifyouinstallandconfigureeverythingasspecified,yourprogramshouldrunwithoutany
errors.YoucanrunthePythonprogramconstantlyinthebackgroundusingthefollowing
command:
$nohuppythoncontrolCenter.py&
ThelastthingthatwewanttosetupontheRaspberryPiistheTFTLCDscreen.The
installationandconfigurationprocessesoftheTFTLCDscreenaredescribedinChapter
7,TheMidtermProject–aPortableDIYThermostat.Pleasefollowthestepsinthegiven
ordertosetupthescreen.ThecontrolcentermodulealongwiththeRaspberryPiandthe
TFTscreencannowbedeployedinanypartofyourhouse.
Stage3–awebapplicationusingXively,
Python,andAmazoncloudservice
Thecloudservicesmoduleoftheoverallsystemenablesremoteaccesstoyourmonitoring
stationthroughtheInternet.Theunitinteractswiththeuserviaawebapplicationasan
extendedversionofthecontrolcenter.Withtheuseofthiswebapplication,theusercan
observethesensorinformationfromthemonitoringstationandthesystem’sstatus
calculatedbythecontrolcenterwhilehavingremotecontroltoturnoffthebuzzer.So,
whatdoesthearchitectureofthecloudserviceslooklike?
Architectureofthecloudservices
Thearchitectureofthecloudservicesmodulewithitsassociatedcomponentsisdisplayed
inthefollowingdiagram.Inthecloudservicesarchitecture,weareusingXivelyasthe
intermediatedatarelaybetweenthewebapplicationandthecontrolcenter.Thecontrol
centerpushestheobservationsobtainedfromthemonitoringstationtotheXively
channels.Xivelystoresandrelaysthedatatothewebapplicationthatishostedonthe
AmazonAWS.TheserverinstanceontheAmazonAWSisusedtomaketheweb
applicationaccessiblethroughtheInternet.TheserverinstancerunstheUbuntuoperating
systemandthewebapplicationthatisdevelopedusingtheweb.pylibraryinPython.
Inthepreviousstage,wealreadycoveredtheprocessofsettingupXivelyandthe
channelstoaccommodatesensordata.Inthecontrolcentercode,wealsoexplainedhow
wecanpushtheupdatedobservationstotheappropriateXivelychannels.Therefore,we
reallydonothaveanygroundtocoverfortheXivelyplatformatthisstageandwecan
moveontothewebapplication.
PythonwebapplicationhostedonAmazonAWS
Inthepreviouschapter,wesetupanAmazonAWScloudinstancetohostaweb
application.Youcanusethesameinstancetohostthewebapplicationfortheremote
homemonitoringsystemtoo.However,makesurethatyouhaveinstalledtheweb.py
libraryonyourserver.
1. Inyourcomputer,opentheWeb_Applicationfolderandthenthe
RemoteMonitoringApplication.pyfileinyoureditor.
2. Inthecode,youwillbeabletoseethatwejustexpandthewebapplicationprogram
thatwecreatedinChapter9,ArduinoandtheInternetofThings.Weusethe
templatesbasedonweb.pyandtheGET()andPOST()functionstoenabletheweb
application.
3. Intheapplication,wefetchinformationfromeachXivelychannelandprocessitvia
aseparatefunction.Forexample,thefetchTempXively()functionobtainsthe
temperatureinformationfromXively.EverytimethePOST()functionisexecuted,
thefetchTempXively()functionfetchesthelatestvalueoftemperaturereadingfrom
Xively.Thisalsomeansthatthewebapplicationdoesnotpopulateandrefreshthe
latestinformationautomaticallyandwaitsforPOST()toexecutetheappropriate
functions:
deffetchTempXively():
try:
datastreamTemp=feed.datastreams.get("Temperature")
exceptHTTPErrorase:
print"HTTPError({0}):{1}".format(e.errno,e.strerror)
print"Requestedchanneldoesn'texist"
returndatastreamTemp.current_value
4. Thewebapplicationalsoprovidesaccesstocontrolthebuzzerfromtheuser
interface.ThefollowingcodesnippetaddstheBuzzerOffbuttonwithotherForm
components.Whentheformissubmittedafterthisbuttonispressed,theweb
applicationexecutesthesetBuzzer()function:
inputData=web.input()
ifinputData.btn=="buzzerOff":
setBuzzer("OFF")
5. ThesetBuzzer()functionaccesstheXivelychannel,Buzzer,andsendstheoffvalue
iftheBuzzerOffbuttonispressed.Thecurrentwebapplicationdoesn’tincludethe
BuzzerOnbutton,butyoucaneasilyimplementthisfunctionalitybyreusingthe
codethatwedevelopedfortheBuzzerOffbutton.Thisfunctionprovidesthe
referencecodeforothercontrolpoints,whichyoucanreusewithminor
modifications:
defsetBuzzer(statusTemp):
try:
datastream=feed.datastreams.get("Buzzer")
exceptHTTPErrorase:
print"HTTPError({0}):{1}".format(e.errno,e.strerror)
datastream=feed.datastreams.create("Buzzer",
tags="buzzer")
print"CreatingnewChannel'Buzzer"
datastream.current_value=statusTemp
try:
datastream.update()
exceptHTTPErrorase:
print"HTTPError({0}):{1}".format(e.errno,e.strerror)
6. Inthecode,youwillalsohavetomodifytheXivelyfeedIDandtheAPIkeyand
replacethemwiththevaluesthatyourobtainedfromyourvirtualdevice.Onceyou
haveperformedthismodification,runthefollowingcommand.Ifeverythinggoesas
planned,youwillbeabletoopenthewebapplicationinyourwebbrowser.
$pythonRemoteMonitoringApplication.py
IfyouarerunningthePythoncodeonyourcomputer,youcanopen
http://127.0.0.1:8080toaccesstheapplication.Ifyouarerunningtheapplicationon
thecloudserver,youneedtoentertheIPaddressordomainnameofyourservertoaccess
thewebapplication,http://<AWS-IP-address>:8080.Ifthewebapplicationisrunning
fromthecloud,itcanbeaccessedfromanywhereusingtheInternet,whichwasoneofthe
originalprojectrequirements.Withthislaststep,youhavesuccessfullycompletedthe
developmentoftheremotehomemonitoringsystemthatisbasedonArduinoandPython.
Testingthewebapplication
Whenyouopenthewebapplicationinabrowser,youwillbeabletoseeasimilaroutput
asshowninthefollowingscreenshot.Asyoucansee,thewebapplicationdisplaysthe
temperature,humidity,light,andmotionvalues.TheRefreshbuttonfetchesthesensor
datafromXivelyagainandloadstheapplicationoncemore.TheBuzzerOffbuttonsets
thevalueoftheXively’sBuzzerchanneltoOFF,whichthengetpickedupbythecontrol
center,anditturnsoffthebuzzeratthemonitoringstationsubsequently:
Testingandtroubleshooting
Duetothenumberofcomponentsinvolvedandcomplexprogrammingassociatedwith
them,theoverallprojectisacomplexsystemtotestanddebug.Beforeyoujumpinto
troubleshooting,makesurethatyouhaveproperlyfollowedthestepsthatweredescribed
intheprevioussectionsinorder.Thefollowingareafewsolutionstopossibleproblems
thatcanoccurduringtheexecutionoftheproject:
Troubleshootindividualsensorperformance:
Ifyoursensormeasurementsarewayofftheexpectedvalues,thefirstthingthat
youwanttoevaluateistheconnectionofthesensorpinstotheArduinoboard.
Makesurethatyouhaveconnectedthedigital,analog,andPWMpinscorrectly.
CheckwhetheryourEthernetShieldboardisproperlyconnectedtoArduino
Uno.
Evaluatetheconnectionsofthe5Vpowersupplyandgroundforeach
component.
AvoidXively’supdatelimit
Xivelyimposesalimitonthemaximumnumberoftransactionsthatyoucan
performinalimitedamountoftime.Whilerunningyourcontrolcentercode,if
youencounteranerrorforexceedingthelimit,waitfor5minutesbeforeyour
accesslimitgetslifted.
IncreasethedelaybetweenconsecutiveXivelyupdatesatthecontrolcenter
level:
threading.Timer(120,checkBuzzerFromXively).start()
Reducethefrequencyofpublishedmessagesatthemonitoringstation:
timer.setInterval(600000,publishData);
YoucanalsocombinevariousXivelychannelsbyformattingdataintoJSONor
XML.
WorkingwiththemaximumcurrentdrawlimitationofArudino:
The+5VpowerpinanddigitalpinofArduinocanprovideamaximumcurrent
of200mAand40mArespectively.Whenrunningsensorsdirectlyfromthe
Arduinoboard,makesurethatyoudonotexceedtheselimits.
Makesurethecombinedcurrentrequirementofallthesensorsislessthan200
mA.Otherwise,thecomponentswon’tbeabletogetenoughpowertorunand
thiswilltranslateintofaultysensorinformation.
Youcanprovideexternalpowertothecomponentsthatrequirelargeamountsof
currentandcontrolthispowermechanismviaArduinoitself.Youwillneeda
transistorthatisactingasaswitchthatcanthenbecontrolledusingthedigital
pinsofArduino.Thetutorialathttps://learn.adafruit.com/adafruit-arduinolesson-13-dc-motors/transistorsshowsasimilarexampleforaDCmotor.
Solvenetworkproblems:
Insomescenarios,yourmonitoringstationwon’tbeabletocommunicatewith
thecontrolcenterduetonetworkproblems.
ThisproblemcanbesolvedbyusingmanualIPaddressesforboth,Arduinoand
theRaspberryPi.Inourproject,weuseamanualIPaddressfortheArduino,but
theRaspberryPiisconnectedusingtheWi-Finetwork.Inmostcases,whenyou
areusingyourhomeWi-Finetwork,Wi-Firoutersaresetuptoprovidedynamic
IPaddressestothedeviceeverytimetheyreconnecttotherouter.
YoucansolvethisbyconfiguringyourWi-FiroutertoafixedIPaddressforthe
RaspberryPi.AsthetypeandmodeloftheWi-Firouterisdifferentforevery
scenario,youwillhavetouseitsusermanualoronlinehelpforumsforsettingit
up.
Workingwithbuzzer-relatedissues:
Sometimesthebuzzersoundcanbetooloudortooquiet,dependinguponthe
sensorthatyouareusing.YoucanusePWMtoconfiguretheintensityofthe
buzzer.Inourproject,weusedtheArduinodigitalpin9toconnectthebuzzer.
ThispinalsosupportsPWM.InyourArduinocode,modifythelinetoreflect
changesforthePWMpin.ReplacethedigitalWrite(BUZZER,HIGH);line
withanalogWrite(BUZZER,127);.
Thisroutinewillreducetheintensityofthebuzzerbyhalffromtheoriginal
level.YoucanalsochangethePWMvaluefrom0to255andsettheintensityof
thebuzzersoundfromlowesttohighest.
ControlcenterGUIcalibration:
DependinguponthesizeoftheTFTLCDscreenthatyouareusing,youwill
havetoadjustthesizeofthemainwindowofTkinter.
First,runthecurrentcodeonyourRaspberryPiandifyouseethattheGUI
windowdoesnotmatchthescreen,addthefollowinglineofcodeafter
initializingthemainwindow:
top.minsize(320,200)
Thiscodewillfixtheproblemwiththesizefora2.8inchTFTLCDscreen.In
thepreviouscodesnippet,320and200representthepixelsizesforwidthand
lengthrespectively.Forotherscreensizes,changethepixelsizeaccordingly.
TesttheLED:
Incurrentcodeconfiguration,theLEDisturnedononlywhenthesystem
changestoAlertorCaution.Thatmeansyouwon’tbeabletotesttheLEDs
unlessthesesituationsoccur.Tocheckwhethertheyareworkingcorrectly,
executethefollowingcommandatthecontrolcenter:
$mosquitto_pub–t"MonitoringStation/led"–m"red"
ThiscommandwilllightuptheLEDinred.ToturnofftheLED,justuseoff
insteadofredinthepreviouscode.
Ifnothinglightsup,youshouldchecktheconnectionwiresoftheLEDs.In
addition,checkfornetwork-relatedissuesastheMosquittoitselfmightnotbe
working.
Ifyouseeanycolorotherthanred,thismeansthatyouhaven’tconnectedthe
LEDcorrectlyandyouneedtointerchangethepinconfigurationofyourLED.
IfyouareusinganLEDdifferentthansuper-fluxRGB,youshouldcheckout
thepinlayoutinthedatasheetandreorganizetheconnections.
Extendingyourremotehomemonitoring
system
TosuccessfullycreatecommercialproductsfromDIYprojectprototypes,youwillneedan
additionallayeroffeaturesontopofbasicfunctionalities.Thesefeaturesactuallymake
thingsconvenientforauserwhentheyinteractwiththesystem.Theotherdistinguishable
featureisthetangibilityofthesystem,whichmakeslarge-scaleproductionandsupport
possible.Althoughthereareplentyoffeaturesthatyoucanimplement,werecommendthe
followingmajorimprovementstoelevatethelevelofthecurrentproject.
Utilizingmultiplemonitoringstations
Inthisproject,wedevelopedamonitoringstationasaprototypewitharangeof
functionalitythatisdemonstratedbyaremotehomemonitoringsystem.Aremote
monitoringsystemcanhavemultiplenumbersofmonitoringstationstocovervarious
geographicallocations,suchasdifferentroomsinsideahouse,ordifferentofficecubicles.
Basically,alargenumberofmonitoringstationscancoveranextendedareaandprovide
efficientsurveillanceofthedomainthatyouaretryingtomonitor.Ifyouwanttoextend
thecurrentprojectwithanarrayofmonitoringstations,youwillrequiresomeofthe
followingmodifications:
Eachmonitoringstationcanhaveitsowncontrolcenteroracentralizedcontrol
centerforallofthem,dependingupontheapplicationrequirements.
YouwillhavetoupdatethePythoncodeforthecontrolcentertoaccommodatethe
changes.ExamplesofthesechangesincludemodifyingtopictitlesforMQTT,
coordinatingbetweenthesemonitoringstations,updatingdatamodelsforXively
updates,andsoon.
ThefreeXivelyaccountmaynotbeabletohandlethelargeamountsofdatacoming
fromthemonitoringstations.Inthiscase,youcaneitheroptimizetheupdaterate
and/orpayloadsizeorupgradeyourXivelyaccounttocomplywiththerequirements.
YoucanalsoresorttootherfreeservicessuchasThingSpeak,Dweet.io,andCarriots,
butyouwillhavetomakesubstantialmodificationstotheexistingcodestructure.
Youcanalsoupdatethewebapplicationtoprovideyouwithaselectionmenuforthe
monitoringstationsordisplayallofthematonce.Youwillalsohavetochangethe
codetoyieldthemodifieddatamodels.
Extendingsensorycapabilities
Intermofsensors,weareonlyinterfacingtemperature,humidity,ambientlight,and
motionsensors.However,theactuationislimitedtothebuzzerandLED.Youcan
implementthefollowingchangestoimprovethesensorycapabilitiesoftheproject.
Inarealscenario,aremotehomemonitoringsystemshouldbeabletointerfacewith
otherexistingsensorssuchasthesecuritysystem,monitoringcameras,refrigerator
sensors,doorsensors,andgaragesensorsthroughoutahome.
Youcanalsointerfacethisprojectwithotherappliancessuchastheairconditioner,
heater,andsecurityalarm,whichcanhelpyoutocontroltheenvironmentthatyou
arealreadymonitoring.Asatrial,thesecomponentscanbeinterfacedusingasetof
relaysandswitches.
Youcanupgradethecurrentsensorsatthemonitoringstationwithmorepowerful,
efficient,andaccuratesensors.However,themonitoringstationwiththeupgraded
sensorsmayrequireamorepowerfulversionofArduinowithmoreI/Opinsand
computationcapabilities.
Youcanalsouseadditionalsensorsotherthanthoseusedinthisprojectatthe
monitoringstation.Therearelargeamountofheterogeneous,Arduino-supportedDIY
sensorsthatyoucanbuyofftheshelf.ExamplesofthesesensorsincludetheAlcohol
GasSensor(MQ-3),LPGGasSensor(MQ-6),CarbonMonoxideSensor(MQ-7),
MethaneGasSensor(MQ-4),andsoon.Thesesensorscanbesimplyinterfacedwith
theArduinojustliketheothersensorsthatweconnectedearlier.
Toaccommodatethesechanges,youwillberequiredtochangethecontrolcenter
logicandalgorithms.Ifyouareinterfacingathird-partycomponent,youmayalso
havetorevisitthesystemarchitectureandadjustit.
Similarly,youwillalsohavetorunfrequentupdatestoXivelyfortheadditional
numberofsensors,makingthefreeversioninadequate.Toresolvethis,youcanpay
forthecommercialversionofaXivelyaccountorusealimitednumberofrequests
usingaJSONfileformatsimilartotheonedisplayedinthefollowingcodesnippet:
{
"version":"1.0.0",
"datastreams":[
{
"id":"example",
"current_value":"333"
},
{
"id":"key",
"current_value":"value"
},
{
"id":"datastream",
"current_value":"1337"
}
]
}
ImprovingUX
Whenwedesignedtheuserexperienceforthisproject,ourgoalwastodemonstratethe
usefulnessofaUXdesignindevelopingthesoftwareflow.InthecurrentUXdesign,the
controlcenterandthewebapplicationhavelimitedcontrolandfeaturesforauser.The
followingareafewchangesthatyouneedtoimplementtoimprovetheUXoftheproject:
Addtooltipsandpropernamingconventionsforthevariousdescriptions.Implement
aproperlayouttodifferentiatebetweenthevariousinformationcategories.
AddbuttonsforthebuzzerandtheLEDcontrolonthecontrolcenterGUI.
Inthewebapplication,useaJavaScriptandAjax-basedinterfacetoautomatically
refreshthechangesinsensorvalues.
ProvideaUImechanismsothattheusercanchangetheupdateintervalatthecontrol
centerandthewebapplication.Oncethesechangesaremade,propagatethem
througheachprogramsothatthemonitoringstationcanstartpublishingmessagesat
thenewinterval.
Expandingcloud-basedfeatures
Inthecurrentsetup,weareusingtwostagestoprovidecloud-basedcapabilitiesand
enableremotemonitoring.WehaveXivelyasadatarelayandAmazonAWStohostthe
webapplication.Ifyouareworkingonacommercial-gradeproductandwanttoreduce
thecomplexityofthearchitecture,youcanimplementthefollowingchanges:
Youcandevelopyourowndatarelayonyourcloudinstanceusingopensourcetools
suchasThingSpeak.Yourcontrolcenterwillthencommunicatedirectlytoyour
serverandeliminatedependencyonthird-partyIoTservices.
IfXivelyisyourplatform,youcanalsouseadditionalfeatures,suchasgraphson
yoursmartphone,whichareprovidedbyXively.Onceyourphoneispairedwith
Xively,youcanaccessthisfeaturedirectly.
Alternatively,youcanuseothercloudservicessuchasMicrosoftAzureandGoogle
AppengineinsteadofAmazonAWS.Youcanalsosetupyourowncloudserver,
dependinguponyourfamiliaritywithcloudcomputing.Althoughhavingyourown
cloudwillgiveyoucompletecontroloftheserver,third-partyservicessuchas
Amazoncanbemorecosteffectiveandrequirelessmaintenancecomparedtoselfhostedservers.
Ifyouareplanningtodevelopalarge-scalesystemthatisbasedonthecurrent
architecture,youcanincreasethecomputingcapabilityofyourexistingcloud
instance.Youcanalsoimplementadistributedserversystemtoaccommodatethe
largenumberofremotemonitoringsystemsthatcanbeaccessedbyanevengreater
numberofusers.
Improvingintelligenceforsituationawareness
Inthisproject,wehaveusedfourdifferentsensorstomonitorthephysicalenvironment—
eachsensorobtainsuserinputswithtwotypesofactuatorsfornotification.Althoughwe
areusingagoodamountofinformationsources,oursituationawarenessalgorithmis
limitedtoidentifyingout-of-rangetemperatureandhumidityvalues.Youcanimplementa
fewextendedfeaturestomakeyoursystemmoreversatileanduseful:
Implementdifferentlogicfordayandnightscenarios,whichcanhelpyoutoavoid
unwarrantedfalsealarmsatnight.
Implementanintruderdetectionalgorithmusingthemotionsensorforwhenyouare
notathome.
Utilizeacombinationofambientlightsensorvalueswithmotionsensorstoidentify
energywastage.Forexample,ascenarioinwhichmorelightisrecordedduringthe
nightwhenthemotionsaresignificantlylowexplainsthatyoumayhaveforgottento
turnoffthelightsduringthenight.
Creatinganenclosureforhardwarecomponents
Justlikesoftware-basedfeatures,thehardwarecomponentsalsorequireamajorrevampif
youdevelopacommercial-gradeproduct.Nowadays,3Dprintershavebecomeviableand
itisreallyeasytodesignandprintplastic3Dcomponents.Youcanalsouseprofessional
3DprintingservicessuchasShapeways(http://www.shapeways.com),Sculpteo
(http://www.sculpteo.com),ormakexyz(http://www.makexyz.com)foryourenclosures.
Youcanevenusealasercutterorothermeansofmodelmakingtocreatethehardware
enclosures.Theseareafewhardwareimprovementsthatyoucanimplement:
Thesensorandactuatorsthatareassembledonaprototypeboardcanbeorganizedon
aPCBandpermanentlyfixedforstableandrobustoperation.
Ahardwareenclosureforthemonitoringstationcanmakeitportableandeasily
deployableinanyenvironment.Whendesigningthisenclosure,youshouldalso
considertheproperplacementofthemotionsensorandtheambientlightsensor,
alongwithabuttontomakethemaccessibletotheuser.
TheRaspberryPiandTFTLCDscreen,whichmakeupthecontrolcenterhardware,
canalsobeenclosedinamountablepackage.
AddingtouchscreencapabilitiestotheTFTLCDscreencanenableadditional
controloverthesystem,expandingtheUXusecases.
Summary
Inthischapter,wedevelopedaworkingprototypeofaremotehomemonitoringsystem
andalsolearnedtheprocessofhardwareproductdevelopmentsimultaneously.Inthe
project,weutilizedmostofthehardwarecomponentsandsoftwaretoolsthatweused
throughoutthebook.Webeganbydesigningthesystemarchitecturesothatwecould
coordinatetheutilizationofthesetools.Later,weventuredintotheactualdevelopment
stages,whichincludeddesigningthehardwareunitsanddevelopingprogramstorunthese
units.Intheend,weprovidedalistofimprovementstomakethisprototypeintoareal
commercialproduct.Youarewelcometousethismethodologytodevelopyourfuture
projectsandproducts,asyounowhaveexperienceworkingwiththisone.
Inthelastchapter,wearegoingtoutilizethesameprojectdevelopmentmethodologyto
createaninterestingprojectthatutilizesyourmessagesfromasocialnetworkwebsiteto
giveyoucontroloveryourhardware.
Chapter11.Tweet-a-PowerStrip
SmartpowermanagementunitsorstripsarepartofsomeofthemostpopularIoT
subdomains,smarthomesandsmartgrids.Nowadays,smartpowerstripsare
commerciallyavailableandprovidealargenumberoffeatures,suchasremoteaccess,
smartpowerusage,andpowermanagement.Inthisproject,wearegoingtocreateasmart
DIYpowerstripthatcanbecontrolledremotelyusingstatusmessagespostedonTwitter,
thepopularsocialmediawebsite(http://www.twitter.com).Thesemessagesarealso
knownastweets.Basically,justlikeyoucancontrolsensorsremotelyusingaweb
browser,youcancontrolthembysendingatweet.We’vealreadyworkedwithlow-power
sensorsinthepreviousproject,solet’sworkwithACappliancesinthisproject.Wewill
beimplementingthesameprojectdevelopmentmethodsthatweutilizedintheprevious
project.Thischapteravoidsadditionalexplanationsabouttheprocessandsticksonlyto
thedetailsassociatedwiththeproject.
Projectoverview
ThisprojectrequiresthedevelopmentofasmartpowerstripusingArduinoandPython,
whilethecontrolinputstothestripsaretweets.Althoughweareonlyenablingremote
accesstothepowerstrip,therearealargenumberofadditionalfeaturesthatcanbe
implementedinfuturetoelevatethisDIYprojecttoacommercialproduct.
Themajorgoalswewanttoachieveinthisprojectareasfollows:
Theusershouldbeabletoturntheindividualpowerportsonandoffusing
customizedtweets
TheusershouldbeabletocheckthestatusofthepowerportsusingTwitter
Projectrequirements
Herearetheinitialprojectrequirements,derivedfromthegoals:
Thesystemshouldhave110V(or220V)ACpowerportsinterfacedwithrelays.
AnArduino-basedunitshouldbeabletocontroltheserelays,ultimatelycontrolling
theapplianceconnectedthroughthepowerports.
Thesystemshouldbeabletodecodethetweetssentbytheuserandconvertthem
intoappropriatecontrolmessagesforArduino.
ThePython-basedprogramthatprocessesthetweetsshouldthenpublishthese
messagessothatArduinocancompletethoseactionsusingtherelays.
Tosumup,therelaysshouldbecontrolledinanearreal-timemannerusingthe
tweetssentbytheuser.
Thesystemshouldalsounderstandkeywordstocheckthestatusoftherelaysand
automaticallytweetthestatus.Thesystemshouldprocessatweetonlyonceand
shouldbeabletorememberthelasttweetprocessed.
Note
110Vversus220VACpower
Dependingonthecountry,yourACpowersupplymayhavevoltageratingsof
110/120Vor220/240V.Althoughthecircuitdiagramusedbythisprojectmentionsa
110VACpowersupply,thesamecircuitshouldalsoworkfora220Vpowersupply.
Ifyouareusinga220Vsupply,checkoutthefollowingnotesbeforemoving
forward:
Ensurethattheappliancesyouaretryingtooperate,suchasfans,lights,andso
on,areratedforsimilarACpower
Youhavetoensurethattherelaysusedbytheprojectarecompatiblewithyour
ACpowersupply
ArduinoworksonaDCpowersupply,anditisnotaffectedbyanyvariationin
ACpower
Systemarchitecture
Fromtheprecedingrequirements,let’ssketchthearchitectureoftheTweet-a-PowerStrip
system.Thesystemarchitecturetriestoutilizethehardwarecomponentsandsoftware
toolsyoulearnedinthepreviouschapters,whilehavingarelaycomponentastheonly
exceptionalcomponent.Asyoucanseeinthearchitectureinthefollowingdiagram,we
areemployingtherelaytocontrolvarioushomeappliances.Theseappliancesareusually
poweredbyacommon110VACpowersupplyavailableineachhome.Insteadof
controllingasingleappliance,weareimplementingafour-channelrelaytocontrolatleast
fourappliances,suchasalamp,afan,atoaster,andacoffeemachine.
TherelayiscontrolledusingthedigitalpinsoftheArduinoUnoboard,whichutilizesthe
EthernetShieldtoconnecttoyourhomenetwork.Acomputationunitthatmayconsistof
acomputer,aRaspberryPi,oraserver,usesPythonanditssupportinglibrariestoaccess
tweets.ThecomputationunitalsodeploysaMosquittobroker.Thisbrokerhandlesthe
topicsfromthePythonprogramandArduinotocontroltherelays.Theusercanpost
tweetscontainingkeywordsfromanyplatform,suchasaphoneorabrowser,andthe
tweetsareultimatelycapturedbythecomputationunit.
Requiredhardwarecomponents
Thisprojectwillrequirethefollowinghardwarecomponentsthroughoutthedevelopment
andthedeploymentstages:
Component
Amount
Website/note
ArduinoUno
1
https://www.sparkfun.com/products/11021
ArduinoEthernetShield
1
https://www.sparkfun.com/products/9026
Relay(four-channel,Arduinocompatible)
1
http://www.amazon.com/JBtek-Channel-Module-ArduinoRaspberry/dp/B00KTEN3TM/
PowerSwitchTail
4
Powerstrip
Optional
Breadboard
1
Fordevelopmentstage
USBcableforArduino
1
Fordevelopmentstage
Arduinopowersupply
1
Fordeploymentstage
Electrictape
Asper
requirements
Connectionwires
Asper
requirements
http://www.powerswitchtail.com/
Alternativetorelay
Relays
Asyoucanseeinthefollowingimage,weareintroducinganewhardwarecomponent
thatwasnotutilizedinanyofthepreviouschapters—arelay:
Thisisanelectromagneticdevicethatuseselectricitytobeoperatedasaswitch.Atypical
relaycontainsthreecontactsonthehigh-powerside,normallyconnected(NC),common
(C),andnormallyopen(NO).Theotherside(thecontrolside)oftherelayrequiresan
activationvoltagetotoggletheconnectionfromcommon-NCtocommon-NO.Thisaction
demonstratestheswitchfunctionalitiesfortheconnectiononthehigh-powerside.We’ll
useArduino-compatiblerelaysfrommanufacturerssuchasKeyesorSainSmart.These
relaysareavailableinsingle-,two-orfour-channelconfigurations.Onthehigh-power
side,therelayssupportupto250V,10AACpoweror30V,10ADCpower.Therelaysare
controlledusing5VDConthelow-powerside,whichisprovidedusingthedigitalI/O
pinsoftheArduinoboard.
PowerSwitchTail
WorkingwithACpowercanbehazardousifyouhaven’tdealtwithitpreviouslyorifyou
arenotfamiliarwiththenecessaryprecautionsandmeasurements.Ifyouarenot
comfortablewithworkingwithopenrelaysorconnectingACpowertothem,thereis
anotherdevicethatyoucanusetoreplacetherelay—thePowerSwitchTail,asafely
enclosedboxthatcontainsopticallyisolatedsolid-staterelaysandprovidesaconvenient
waytointerfaceyourACappliancewiththeArduinoboard.Thefollowingisanimageof
thePowerSwitchTail,whichcanbeobtainedfromitsofficialwebsite
(http://www.powerswitchtail.com/):
Note
Ifyouaredealingwitha220V/240Vpowersupply,thePowerSwitchTailwebsitealso
providesanassemblykitfor200Vto240Vpowersupply,at
http://www.powerswitchtail.com/Pages/PowerSwitchTail240vackit.aspx.
Itisreallyeasytoassemblethekitfromtheguidelinesprovidedat
http://www.powerswitchtail.com/Documents/PSSRTK%20Instructions.pdf.
Forthisproject,youwillneedfourofthesedevicestoreplacethefour-channelrelaythat
wearegoingtouse.Asyoucanseeinthefollowingdiagram,oneendoftheTailgoesinto
theregularpowerport,whileyouneedtoconnectyourappliancetotheotherport.
Meanwhile,youcanusethethreecontrolinputstocontroltherelay.Weareusingoneof
thedigitalI/OpinsoftheArduinoboardtosendthecontrolsignaltotheTail.Whengoing
aheadwiththeTailsinsteadoftherelays,makesurethatyoumakenecessaryamendments
totheupcominghardwaredesign.
Userexperienceflow
Fromthesystemarchitecturewehavecreated,whatshouldtheuserexperience(UX)
flowwhileworkingwiththeTweet-a-PowerStripbe?WehavedividedtheUXintotwo
separatesections:controllingthepowertotheappliances,andcheckingthestatusofthe
powerstrip.
InthefirstUXflowdesign,asdisplayedinthefollowingdiagram,theuserbeginsby
sendingatweetcontainingthenameoftheappliance(#fan,#lamp,#toaster,or#coffee)
andthecontrolcommand(#onor#off).Thesystemshouldbeabletohandlethetweet
fromthepointofparsinguntiltheappliancehasbehavedasaskedfor.Thesystemshould
alsoprovideahassle-freeexperiencefortheuser,wheretheuserdoesn’thavetoperform
anyfurtheractionsthansimplysendingtweets.
Similarly,theusershouldbeabletopost#status#checktweetsandsimplyobtainthe
statusreportpostedbackbythesystem.Thesystemshouldhandlecheckingthestatusof
thepowerports,publishingittothecomputationunit,andpostingatweetwiththe
messagewithoutanyadditionalinputfromtheuser.
ThefollowingdiagramshowstheUXflowforcheckingthesystemstatus:
Developmentanddeploymentstages
Accordingtothearchitecture,werequiretwomaindevelopmentstagestocompletethe
project.Thefirststage,whichinteractswiththeappliancethroughtherelays,isdeveloped
usingArduino.Thisunitsubscribestothetopicsassociatedwiththeappliances,andonce
itreceivesanappropriatemessage,itexecutestheactionontherelaylevel.Inthesecond
stage,wedealwiththeindividualtweets,whereweparsethetweetsfromtheTwitter
account,checkforduplicates,decodeactionsfromthemessages,andalsoposttweetswith
statusreports.Duringthesedevelopmentstages,wearegoingtouseabreadboardand
jumperwirestotesttheArduinoandPythonprograms.Atthisstage,theprojectisstillnot
readytodeployasaportableunitfordailyusage.
ThedeploymentstagecontainstasksofcreatingaPCBforthebreadboardconnections
andinsulatingwirestoavoidanyelectrichazard.Youcanalsobuyorcreateanenclosure
boxtoisolatetheopenhardwarefromphysicalcontact.Asthedevelopmentstagecontains
everythingthatisrequiredtoconverttheprojectintoitsworkingstate,wearenotgoingto
divedeepintothedeploymentstage.Youcanperformadditiondeploymenttasks
accordingtoyourpersonalrequirements.
Let’sstartfromthehardwaredesignstageanddevelopthephysicalsectionofthesmart
powerstripusingArduino.
Stage1–asmartpowerstripwith
Arduinoandrelays
ThehardwareofTweet-a-PowerStripcontainsArduinoasthemaincontrollerunitthat
interfaceswiththerelaysandtheEthernetShieldtocommunicatewiththecomputation
unit.TheArduinocodeimplementstheMQTTclient,usingthePubSubClientlibraryto
publishandsubscribetothetopics.Althoughweareusingsomeexampleappliancesto
controltheuseoftherelay,youcanselectanyotherapplianceyouown.Youcanalsouse
acommercialpowerstripinsteadofanindividualpowerplug.
Hardwaredesign
Whileassemblingthehardwarecomponents,asdisplayedinthefollowingdiagram,make
sureyouarepreciseinconnectingtheapplianceswiththeACpowerplugs.Onewireof
theACplugisdirectlyconnectedtotheappliance,whiletheotherisconnectedbetween
theCandNOportsoftherelay.Wehaveconnectedthecontrolsideoftherelaytothe
digitalpinofourArduino.Asweareusingafour-channelrelay,wewillhavetoutilize
fourdigitalIOpinsfromtheArduinoboard.Completetheremainingconnectionsas
shownhere:
Connectingthehardwareunitisfairlysimple,butrequiresalotofprecisionbecauseit
involveshigh-powerACconnections.
Tip
Youshouldcovertheopen110VACpowercordsgoingtotherelayandtheappliance
withelectrictapetoavoidanytypeofelectricalhazard.Keepingtheselivewiresopencan
bereallydangerousduetothelargeamountofcurrentbeingcarriedbythem.Inthe
deploymentstage,aplasticcoveroraboxaroundtherelayunitcanalsobehelpfulin
coveringthelivepowerwires.
Onceyouarereadywiththeconnections,connecttheArduinoboardtoyourcomputer
usingaUSBport,asshowninthefollowingimage:
TheArduinocode
TheArduinosketchforthissectionislocatedinthefoldercontainingthechaptercode
withtheArduino_powerstrip.inofilename.YoucanopenthefileintheArduinoIDEto
explorethecode.Asusual,youwillhavetochangetheIPaddressesofthedeviceandthe
MosquittoservertotheappropriateIPaddresses,whilealsochangingtheMACaddressof
theEthernetShield.ThefollowingcodesnippetshowsthedeclarationoftheArduinopins
andtheirrolesinthemainfunction,setup().Makesurethatyouareusingthesamepin
numbersthatyouhaveusedtoconnecttherelay.Alternatively,youcanchangethe
appliancenametothatoftheapplianceyouareusing.Also,makesurewhateverchanges
youmakeinthevariablenamesshouldbereflectedintheentirecodetoavoidany
compilationerrors:
pinMode(FAN,OUTPUT);
pinMode(LAMP,OUTPUT);
pinMode(TOASTER,OUTPUT);
pinMode(COFFEEMAKER,OUTPUT);
fanStatus=false;
lampStatus=false;
toasterStatus=false;
coffeemakerStatus=false;
digitalWrite(FAN,LOW);
digitalWrite(LAMP,LOW);
digitalWrite(TOASTER,LOW);
digitalWrite(COFFEEMAKER,LOW);
Inthesetup()function,thecodealsosubscribestotheappropriateMQTTchannelsso
thatitcanreceivemessagesfromtheMosquittobrokerassoonastheyareavailable.As
youcansee,wearealsosubscribingtothePowerStrip/statuscheckchanneltodealwith
thestatusreport:
if(client.connect("PowerStrip")){
client.subscribe("PowerStrip/fan");
client.subscribe("PowerStrip/lamp");
client.subscribe("PowerStrip/toaster");
client.subscribe("PowerStrip/coffeemaker");
client.subscribe("PowerStrip/statuscheck");
}
Inthecallback()function,weusetheifstatementtomatchthetopicwiththe
appropriatedigitalWrite()action.Asyoucansee,wearesettingupHIGHandLOW
statusesforthedigitalpinwhentheprogramreceivesonandoffmessages,respectively
(forthatappliance).Withthisaction,wearealsochangingthestateoftheBoolean
variableassociatedwiththeappliance,whichwillbehelpfulinretrievingthestatusofthe
port.Thesameprocessisthenrepeatedforallappliances:
if(topicS=="PowerStrip/fan"){
if(payloadS.equalsIgnoreCase("on")){
digitalWrite(FAN,HIGH);
fanStatus=true;
}
if(payloadS.equalsIgnoreCase("off")){
digitalWrite(FAN,LOW);
fanStatus=false;
}
}
Whenthesystemreceivesagetmessagethatisassociatedwiththestatuscheck,the
programcreatesamessageusingtheBooleanvariablesthatwetoggledearlier.The
programthenpublishesthestatustothePowerStrip/statusreportchannel:
if(topicS.equals("PowerStrip/statuscheck")){
if(payloadS.equalsIgnoreCase("get")){
Stringreport="";
if(fanStatus)report+="Fan:on,";
elsereport+="Fan:off,";
if(lampStatus)report+="Lamp:on,";
elsereport+="Lamp:off,";
if(toasterStatus)report+="Toaster:on,";
elsereport+="Toaster:off,";
if(coffeemakerStatus)report+="Coffeemaker:on";
elsereport+="Coffeemaker:off";
report.toCharArray(reportChar,100);
client.publish("PowerStrip/statusreport",reportChar);
}
}
Justaswedidinthepreviousproject,youcansetupthecodetoperiodicallysendkeep
alivemessagestoavoidtheterminationoftheconnectionwiththeMosquittobroker.
Onceyouarereadywiththecode,connecttheEthernetcable,compilethecode,andthen
uploadittoyourArduino.YourArduinoshouldbeinreceivingmodenow,anditwillwait
forthemessagefromthesubscribedchannels.Aswediscussedintheprevioustheproject,
youneedtoensurethatyourMosquittobrokerisrunningontheserverIPaddressyou
specifiedintheArduinocode.
Stage2–thePythoncodetoprocess
tweets
AstheuserisinteractingwiththesystemattheleveloftheTwitterapplication,wedonot
requireadeployablecomputationorcontrolunitforthisproject.Duetothis,wecanjust
useanycomputercapableofhostingPythonandMosquittoasthecomputationunit.You
stillneedtoensurethattheunitisalwaysonandconnectedtotheInternet,otherwisethe
systemwillnotworkasexpected.Forsimplicity,youcandeploythesystemonthe
Raspberry-Pi-basedcontrolcenterthatyoudevelopedinthepreviousproject,orevenon
theAmazonAWSserver.Forthedevelopmentstage,let’sstartwiththeregularcomputer
thatyouhavebeenusingallalong.WeareassumingthatthiscomputerhastheMosquitto
brokerinstalledandrunning.NotedowntheIPaddressofthisunit,asyouwillneeditin
theArduinocodethatyoudevelopedintheprevioussection.
Pythonsoftwareflow
ThePythoncodedealswithtwoservicesduringexecution,theTwitterAPItogetorpost
tweetsandtheMosquittobrokertorelaymessagestothehardwareunit.Theprogram
beginsbyparsingthelatesttweetfromtheuseraccountandcheckingwhetherithasbeen
utilizedinthepreviousactionornot.Thisavoidsanycommandduplication,asthe
frequencyofnewtweetsissignificantlylowerthanthefrequencyoftheprogramloop.
Oncethecodefindsanewtweetwiththeappropriatekeywordstoperformoperationson
theappliance(orappliances),itpublishesthemessagetotheMosquittobroker.Ifthe
tweetcontainsamessagetocheckthestatus,thecoderequeststhestatusfromyour
Arduinoandpostsanewtweetwiththestatusafterreceivingit.
Thefollowingdiagramshowsthedetailedprogramflowofthecomputationunit:
Youcanchangetheprogramflowtoaccommodateanyotherfeatureyouwanttoaddat
thePythonlevel.Thelogicbehindidentifyingandtogglingtheappliancecanbe
improvisedtoaccommodatemorecomplextweettext.
SettinguptheTwitterapplication
WeareassumingthatyouhaveaTwitteraccountbynow.Ifyoudon’t,youcancreatea
newaccountjustforthisprojecttoavoidchangestoyourownprofile.Withthe
introductionofthelatestAPIs,TwitterrequiresyoutoauthenticateusingOAuthbefore
accessinganyinformationfromyouraccount.Todothat,youwillhavetocreateaTwitter
appusingyouraccount.ExecutethefollowingstepsinordertocreateanewTwitterapp
forthisproject:
1. LogintoyourTwitteraccountandopenthehttps://apps.twitter.comaddressinyour
webbrowser.
2. ClickontheCreateNewAppicononthepage,andyouwillbedirectedtoapage
askingforyourapplicationdetails,asdisplayedinthefollowingscreenshot:
3. Fillinalltherequireddetails(markedwithredasterisks)andcontinuetothenext
page.Ensurethatyourapplicationnameisunique,asTwitterasksforaunique
applicationname.
4. Onceyourapplicationiscreated,youcanclickontheAPIKeystabandfindthe
consumerkey(APIkey)andconsumersecret(APIsecret)foryourapp.Savethis
informationinasafeplace,asyouwillneedthemtoauthenticatewiththeTwitter
API.
5. AstheUXoftheTweet-a-PowerStripprojectrequiresthesystemtoautomatically
sendthesystemstatus,weneedread-and-writeaccesstoourapplication.Gotothe
Permissionstab,selecttheReadandWriteoption,andsaveitforthechangesto
takeeffect.
6. Onceyouaredonewithsettingupthepermissionsfortheapplication,gobacktothe
APIkeystabandclickontheCreateAccessTokenicontogenerateanewaccess
tokenforthisapplication.Afterawhile,youshouldbeabletoseetheaccesstoken
onthesamepage,asdisplayedinthisscreenshot:
7. SavetheAccesstokenandAccesstokensecretinformation.Yourapplicationisnow
readyforuseandcanhelpyoutoauthenticatewiththeTwitterAPI.
Nowlet’smoveontothePythoncode.
ThePythoncode
Beforeyoujumpintothecode,youarerequiredtoinstalltheTwitterlibraryforPython.
UsetheSetuptoolsorpiptoinstallthelibraryusingthefollowingcommand.Weare
assumingthatyoualreadyhavethelatestpaho_mqttlibraryinstalledonyourcomputer:
$sudopipinstallpython-twitter
ThePythoncodeforthissectionislocatedinthecodefolderwiththe
PythonTweetAPowerStrip.pyfilename.OpenthecodeinyourIDEandstartexploringit.
ThecodecontainstwoparallelthreadstohandlethetweetsandtheMosquittolibrary
separately.
Asyoucanseeinthefollowingcodesnippet,weareusingtheApiclassfromthepythontwitterlibrarytoestablishaconnectionwiththeTwitterAPI.Weareusingtheconsumer
key,consumersecret,accesstokenkey,andaccesstokensecretvaluesforthis
authentication.Oncetheauthenticationisestablished,theApiclasscanbeusedtogetthe
lateststatusfromthetimelineusingtheGetHomeTimeline()functioncall,andtopostthe
newstatususingthePostUpdate()functioncall.TheGetHomeTimeline()functiongives
anarrayofstatusesfromtheuser;weneedthelateststatus,whichcanbefetchedusing
statuses[0](thefirstelementofthearray):
api=twitter.Api(consumer_key='<consumer-key>',
consumer_secret='<consumer-secret>',
access_token_key='<access-token-key>',
access_token_secret='access-token-secret>')
Oncewehaveretrievedthelatesttweet,weneedtomakesurethatwehaven’tusedthat
tweetalready.SowesavethelatesttweetIDinaglobalvariable,aswellasinafilein
caseweneedtorunthecodeagain:
withopen('lastTweetID.txt','w+')asfh:
lastTweetId=fh.readline()
print"InitializingwithID:"+lastTweetId
WeretrievetheIDoftheprevioustweetfromthelastTweetID.txtfiletomatchwiththe
latestID.Ifitdoesn’tmatch,weupdatethelastTweetID.txtfilewiththelatestIDfor
thenextloop:
iflastTweetId!=str(currentStatus.id):
lastTweetId=str(currentStatus.id)
print"UpdatedfilewithID:"+lastTweetId
withopen('lastTweetID.txt','w+')asfh:
fh.write(lastTweetId)
currentStatusText=currentStatus.text
printcurrentStatusText
Oncewehaveidentifiedthelatestuniquetweet,weusethePythonstringoperationto
decodethekeywordsfortheapplianceandpowercommands.Asyoucanseeinthe
followingcodesnippet,thekeywordwearelookingforinthetweetedtexttoaccessthe
fanis#fan.Oncewehaveidentifiedthatthemessageisdirectedtothefan,wecheckfor
actionkeywordssuchas#onand#off,andthentaketheassociatedactionofpublishing
themessagetotheMosquittobroker.Werepeatthisactionforalltheappliancesconnected
tothesystem.YourArduinotakesanactionusingthepublishedmessage,andcompletes
theUXflowforthecontrolledappliances:
if"#fan"incurrentStatusText.lower():
if"#on"incurrentStatusText.lower():
cli.publish("PowerStrip/fan","on")
if"#off"incurrentStatusText.lower():
cli.publish("PowerStrip/fan","off")
Similarly,whenthecodereceivesanupdatefromthePowerStrip/statusreporttopic,it
obtainsthestatusfromthemessagepayloadandpostsitasanewtweettotheuser
timelineofthatTwitteraccount.ThiscompletestheUXflowforthestatuscheckusing
Twitter:
defonMessage(mosq,obj,msg):
ifmsg.topic=="PowerStrip/statusreport":
printmsg.payload
api.PostUpdate(msg.payload)
Testingandtroubleshooting
Testingcansimplybeperformedbypostingthe#fan#onstatustotheTwitteraccount
usedinthisproject.Youshouldbeabletoseethefanturningonbyusingthecommand
shownhere:
Similarly,sendthe#fan#offstatustoturnoffthefan.Youmayfindsomelagging,asthe
loopusedtoretrievethetweetsissetwithadelayofaminute.
Toaccessthestatusofthesystem,postthe#status#getstatustotheaccount,andyou
willbeabletoseethesystemstatusautomaticallypostedbythecomputationunit.
ThetweetshowninthefollowingscreenshotisgeneratedusingtheTweet-a-PowerStrip
unit.Itdisplaysthestatusofalltheconnectedappliances.
Whileworkingwiththesystem,youwillwanttoeitheravoidthefollowingscenariosor
troubleshootthem:
'Twitterratelimitexceed'error:Twitterimposesalimitonthenumberof
requestsyoucanmaketotheirpublicAPI.IfyouarerequestingtheAPItoooften
(thisoftenoccurswhenyoureducethesleeptimebetweenconsecutivequeries),your
applicationwillexitwithanexception.Toavoidthis,setalongersleeptimeinthe
PythonprogramloopbeforerequestingtheAPIagain.Thereisatrade-offbetween
thefrequencyofrequestsandtheresponsetimeofyourappliances.Youcanlearn
aboutthislimitationathttp://dev.twitter.com/rest/public/rate-limitingandadjustyour
requestintervalaccordingly.Onceyouhavereceivedthiserror,youwillhavetowait
forsometime(approximately10to15minutes)beforemakingrequeststothe
TwitterAPIagain.
'Read-onlyapplicationcannotpost'error:Thiserrorwillonlyoccurifyou
forgottochangethepermissionsonyourapplicationtoReadandWritefromRead
only.Makesurethatyouhaveperformedthischange.Also,Twittertakessometime
forthechangestotakeeffect.
Extendingtheprojectwithadditional
features
Thecurrentsystemcanbeexpandedtoincludemultiplefeatures:
Youcanstartsavingthetimedurationinwhichaparticularappliancewasonoroff,
andthenprovideadetailedanalysistotheuser.Youcanalsousethisinformationto
calculatetheenergybeingexpendedbytheseappliances.
Youcanutilizethecurrentmeasurementsensorstocalculatethepowerloadateach
port.Combiningitwiththetimethedevicewason,youcancalculatevery
comprehensivepowerusagetofurtherimprovepowermanagement.
Youcanusethesystemclockwiththemotionsensortointelligentlyturnoffthe
applianceduringnightsandperiodsofnoactivity.
TheTweet-a-PowerStripprojectcanbeinterfacedwiththeremotehomemonitoring
systemthatwedevelopedinthepreviousproject,inordertoobtainuseful
informationfromothersensorsbeingusedinthesamehouse.
OneofthemodificationsyoucaneasilyimplementistoutilizeTwitter’sprivate
messagesinsteadofitstweetstocontroltheappliances.Thiswillextendtheaccess
permissionsofyoursystemtoothertrustedTwitteraccounts.Forsecurityreasons,
youshouldtightentheaccesslevelandonlyletapprovedpeoplepostsuchmessages
toyouraccount.
Summary
YouhavenowsuccessfullycompletedtwodifferentIoTprojectsusingjusttwobase
technologies,ArduinoandPython.Withthecurrentproject,itisobviousthatitisvery
easytointerfaceanyothertechnology,tool,orAPIwithArduinoandPython.Theproject
developmentmethodologyweusedinthesetwoprojectswillalsohelpyouwithyourDIY
projectsandotherfutureproducts.Happyprototyping!Andhappycoding!
Index
A
AmazonAWSplatform
about/GettingfamiliarwiththeAmazonAWSplatform
URL/GettingfamiliarwiththeAmazonAWSplatform
account,settingup/SettingupanaccountonAWS
analogdigitalbuzzer
URL/Buzzer–generatingsoundalarmpattern
architecture,IoTwebapplications
about/ArchitectureofIoTwebapplications
physicallayer/ArchitectureofIoTwebapplications
computationlayer/ArchitectureofIoTwebapplications
interfacinglayer/ArchitectureofIoTwebapplications
Arduino
about/IntroductiontoArduino
history/History
objectives/WhyArduino?
variants/Arduinovariants
Unoboard/TheArduinoUnoboard
URL,forinstallationonLinux/Linux
interfacing,withPython/Prototyping
computernetworking/Arduinoandthecomputernetworking
Arduino,interfacingwithXively
about/InterfacingArduinowithXively
Arduinodata,uploading/UploadingArduinodatatoXively
data,downloadingtoArduino/DownloadingdatatoArduinofromXively
advancedcode,fordatauploadanddownload/Advancedcodetouploadand
downloaddatausingArduino
Arduinoboard
StandardFirmatasketch,uploading/UploadingaFirmatasketchtotheArduino
board
settingup,pyFirmatamethodsused/SettinguptheArduinoboard
Arduinoboardconnection
establishing/ConnectingtheArduinoboard
establishing,onLinux/Linux
establishing,onMacOSX/MacOSX
establishing,onWindows/Windows
troubleshooting/Troubleshooting
Arduinocode,Tweet-a-PowerStrip/TheArduinocode
Arduinodata
storing,inCSVfile/StoringArduinodatainaCSVfile
plotting,fromCSVfile/PlottingdatafromaCSVfile
ArduinoEthernetlibrary
about/ArduinoEthernetlibrary
URL/ArduinoEthernetlibrary
Ethernetclass/TheEthernetclass
IPAddressclass/TheIPAddressclass
Serverclass/TheServerclass
Clientclass/TheClientclass
ArduinoEthernetShield
about/ArduinoEthernetShield
URL/ArduinoEthernetShield
ArduinoIDE
about/Arduinovariants,GettingstartedwiththeArduinoIDE
installing/InstallingtheArduinoIDE
installing,onLinux/Linux
URL,forinstallationonUbuntu/Linux
URL,forinstallationonFedora/Linux
installing,onMacOSX/MacOSX
installing,onWindows/Windows
URL,forsetupfile/Windows
sketch/WhatisanArduinosketch?
libraries/Workingwithlibraries
examples,using/UsingArduinoexamples
URL,forbuilt-inexamples/UsingArduinoexamples
sketch,compiling/Compilinganduploadingsketches
sketch,uploading/Compilinganduploadingsketches
serialmonitor,using/UsingtheSerialMonitorwindow
Arduinointerrupts
about/UsingArduinointerrupts
using/UsingArduinointerrupts
referencelink/UsingArduinointerrupts
Arduinopins
configuring/ConfiguringArduinopins
configuring,withdirectmethod/Thedirectmethod
pinmodes,assigning/Assigningpinmodes
workingwith/Workingwithpins
data,reporting/Reportingdata
monitoring/Manualoperations
write()method,using/Thewrite()method
read()method,using/Theread()method
Arduinoprogramming
about/IntroductiontoArduinoprogramming
comments/Comments
variables/Variables
constants/Constants
datatypes/Datatypes
conversionfunctions/Conversions
statements/Functionsandstatements
functions/Functionsandstatements
Arduinosketch,monitoringstation
about/TheArduinosketchforthemonitoringstation
sensorinformation,publishing/Publishingsensorinformation
actuatoractions,subscribingto/Subscribingtoactuatoractions
interrupt,programming/Programminganinterrupttohandlethepressofa
button
ArduinoWiFiShield
about/ArduinoWiFiShield
URL/ArduinoWiFiShield
ArduinoYún
about/ArduinoYún
URL/ArduinoYún
arraydatatype
about/Datatypes
B
BH1750lightsensor
interfacing,Arduinoused/ArduinocodingfortheBH1750lightsensor
interfacing,PyMatalibraryused/InterfacingBH1750usingPyMata
booleandatatype
about/Datatypes
breadboard
using/Workingwiththebreadboard
URL/Workingwiththebreadboard
history/Workingwiththebreadboard
referencelink/Workingwiththebreadboard
broker
about/MQTT–Alightweightmessagingprotocol
built-infunctions
about/Built-infunctions
conversionmethods/Conversions
mathoperations/Mathoperations
stringoperations/Stringoperations
URL/Stringoperations
built-intypes
about/Pythonoperatorsandbuilt-intypes,Built-intypes
datastructures/Datastructures
Button()widget
about/LearningTkinterforGUIdesign,TheButton()widget–interfacingGUI
withArduinoandLEDs
using/TheButton()widget–interfacingGUIwithArduinoandLEDs
buzzer
using/Buzzer–generatingsoundalarmpattern
connections/Connections
Pythoncode/ThePythoncode
bytedatatype
about/Datatypes
C
callback
about/TheLabel()widget–monitoringI/Opins
Carriots
about/Carriots
chardatatype
about/Datatypes
Checkbox()widget
about/LearningTkinterforGUIdesign
Checkbutton()widget
about/TheCheckbutton()widget–selectingLEDs
used,forselectingLEDs/TheCheckbutton()widget–selectingLEDs
Clientclass
about/TheClientclass
close()method
used,forclosingfile/Theclose()method
comments
about/Comments
blockcomment/Comments
single-lineorinlinecomment/Comments
computernetworking
about/Arduinoandthecomputernetworking
IPaddress,obtaining/ObtainingtheIPaddressofyourcomputer
networkingextensions,forArduino/NetworkingextensionsforArduino
ArduinoEthernetlibrary/ArduinoEthernetlibrary
webserver,buildingwithArduino/Exercise1–awebserver,yourfirst
Arduinonetworkprogram
constants
about/Constants
controlcenter,remotehomemonitoringsystem
about/Stage2–acontrolcenterusingPythonandtheRaspberryPi
architecture/Thecontrolcenterarchitecture
Pythoncode/ThePythoncodeforthecontrolcenter
GUI,creatingwithTkinter/CreatingtheGUIusingTkinter
Mosquittobroker,communicatingwith/CommunicatingwiththeMosquitto
broker
systemstatus,calculating/Calculatingthesystem’sstatusandsituation
awareness
Xively,communicatingwith/CommunicatingwithXively
buzzerstatus,checking/Checkingandupdatingthebuzzer’sstatus
buzzerstatus,updating/Checkingandupdatingthebuzzer’sstatus
testing,withmonitoringstation/Testingthecontrolcenterwiththemonitoring
station
settingup,onRaspberryPi/SettingupthecontrolcenterontheRaspberryPi
conversionfunctions
char()/Conversions
byte()/Conversions
int()/Conversions
float()/Conversions
about/Conversions
CSVfile
about/UsingCSVfilestostoredata
used,forstoringdata/UsingCSVfilestostoredata
Arduinodata,storing/StoringArduinodatainaCSVfile
data,plotting/PlottingdatafromaCSVfile
customcloudplatform,IoT
configuring/YourowncloudplatformfortheIoT
AmazonAWSplatform/GettingfamiliarwiththeAmazonAWSplatform
cyber-physicalsystems/ArchitectureofIoTwebapplications
D
datastructures
about/Datastructures
list/Lists
tuples/Tuples
sets/Sets
dictionaries/Dictionaries
URL/Dictionaries
datatypes
about/Datatypes
void/Datatypes
boolean/Datatypes
byte/Datatypes
int/Datatypes
float/Datatypes
char/Datatypes
array/Datatypes
DCmotors
using/DCmotor–controllingmotorspeedusingPWM
connections/Connections
Pythoncode/ThePythoncode
deploymentstage,Tweet-a-PowerStrip
about/Developmentanddeploymentstages
designmethology,IoTprojects
about/ThedesignmethodologyforIoTprojects
developmentstage,Tweet-a-PowerStrip
about/Developmentanddeploymentstages
developmentstages,remotehomemonitoringsystem
defining/Definingtheprojectdevelopmentstages
do-it-yourself(DIY)projects
about/IntroductiontoArduino
Dualin-linePackage(DIP)
about/Workingwiththebreadboard
DynamicHostControlProtocol(DHCP)
about/TheEthernetclass
E
EC2service
about/GettingfamiliarwiththeAmazonAWSplatform
electroniccomponents
interfacing,withArduino/Prototyping
EndofLine(EOL)
about/PlayingwithapySerialexample
Entry()widget
about/LearningTkinterforGUIdesign,TheEntry()widget–providingmanual
userinputs
used,forprovidingmanualuserinputs/TheEntry()widget–providingmanual
userinputs
Ethernetclass
about/TheEthernetclass
ez_setup.pyfile
URL,fordownloading/Windows,MacOSX
F
Fedora/RedHatLinux
Python,installing/FedoraandRedHat
files
workingwith/WorkingwithfilesinPython
manipulating,withopen()method/Theopen()method
write()method,using/Thewrite()method
closing,close()methodused/Theclose()method
read()method,using/Theread()method
withstatement,using/Thewithstatement–Pythoncontextmanager
Firmata
about/IntroducingtheFirmataprotocol
URL/WhatisFirmata?,TestingtheFirmataprotocol
StandardFirmatasketch,uploadingtoArduinoboard/UploadingaFirmata
sketchtotheArduinoboard
testing/TestingtheFirmataprotocol
andpySeriallibrary,bridging/BridgingpySerialandFirmata
Firmatalibraries
disadvantages/UsefulpySerialcommands
floatdatatype
about/Datatypes
formattingtool,SDcard
URL,fordownloading/PreparinganSDcard
forstatement
about/Theforstatement
Fritzing
about/TestingtheFirmataprotocol
using/IntroducingFritzing–ahardwareprototypingsoftware
URL/IntroducingFritzing–ahardwareprototypingsoftware
functions
about/Functionsandstatements
setup()function/Thesetup()function
loop()function/Theloop()function
pinMode()function/ThepinMode()function
functions,pins
digitalWrite()function/Workingwithpins
digitalRead()function/Workingwithpins
analogRead()function/Workingwithpins
analogWrite()function/Workingwithpins
G
general-purposeinput/output(GPIO)pins
about/Hardwaredesign
graphicaluserinterfaces(GUIs)
about/WhyweusePython
Grid
about/ThePackgeometrymanager
Gridgeometrymanager
about/TheGridgeometrymanager
GUI,thermostat
designing/DesigningtheGUIandplotinPython
pySerial,usedforstreamingsensordata/UsingpySerialtostreamsensordata
inyourPythonprogram
designing,Tkinterused/DesigningtheGUIusingTkinter
percentagehumidity,plottingwithmatplotlib/Plottingpercentagehumidity
usingmatplotlib
buttoninterrupts,using/Usingbuttoninterruptstocontroltheparameters
buttoninterrupts,usedforchangingtemperatureunit/Changingthetemperature
unitbypressingabutton
buttoninterrupts,usedforswappingbetweenGUIandplot/Swappingbetween
theGUIandtheplotbypressingabutton
H
hardwarecomponents,RaspberryPi
RaspberryPi/WhatdoyouneedtobeginusingtheRaspberryPi?
powercable/WhatdoyouneedtobeginusingtheRaspberryPi?
displaycable/WhatdoyouneedtobeginusingtheRaspberryPi?
SDcard/WhatdoyouneedtobeginusingtheRaspberryPi?
mouse/WhatdoyouneedtobeginusingtheRaspberryPi?
keyboard/WhatdoyouneedtobeginusingtheRaspberryPi?
USBhub(optional)/WhatdoyouneedtobeginusingtheRaspberryPi?
hardwarecomponents,remotehomemonitoringsystem
about/Thelistofrequiredcomponents
hardwarecomponents,Tweet-a-PowerStrip
about/Requiredhardwarecomponents
relays/Relays
PowerSwitchTail/PowerSwitchTail
hardwaredesign,IoT
about/Hardwaredesign,TheIoTcloudplatforms
hardwaredesign,Tweet-a-PowerStrip
about/Hardwaredesign
hardwaresystemdesign,motion-triggeredLEDs
Fritzing,using/IntroducingFritzing–ahardwareprototypingsoftware
breadboard,using/Workingwiththebreadboard
hardwareprototype,designing/Designingthehardwareprototype
help()function
about/Plottingrandomnumbersusingmatplotlib
HIH-4030humiditysensor
using/Thelistofrequiredcomponents
homeareanetwork(HAN)
about/Networkingfundamentals
Homebrew
URL,/MacOSX
installing/MacOSX
I
I2Cprotocol
referencelink/PrototypingwiththeI2Cprotocol
ifstatement
about/Theifstatement
input/output(I/O)pins
about/Arduinovariants
installation,ArduinoIDE
onLinux/Linux
onMacOSX/MacOSX
onWindows/Windows
installation,paho-mqttlibrary/Installingpaho-mqtt
installation,pip
about/Installingpip
installation,PubSubClientlibrary/InstallingthePubSubClientlibrary
installation,pySeriallibrary
about/InstallingpySerial
installation,Python
about/InstallingPythonandSetuptools
onLinux/Linux
onUbuntu/Ubuntu
onFedora/RedHatLinux/FedoraandRedHat
onWindows/Windows
onMacOSX/MacOSX
installation,Pythonpackages
about/InstallingPythonpackages
installation,Setuptools
about/InstallingSetuptools
onLinux/Linux
onWindows/Windows
onMacOSX/MacOSX
installation,web.py
about/Installingweb.py
intdatatype
about/Datatypes
integratedcircuit(IC)
about/PrototypingwiththeI2Cprotocol
integrateddevelopmentenvironment(IDE)
about/InstallingtheArduinoIDE
integrateddevelopmentenvironment(IDLE)
about/ThefundamentalsofPythonprogramming
InternetofThings(IoT)applications
about/WhyweusePython
InternetProtocol(IP)
about/Networkingfundamentals
IoT
gettingstartedprocess/GettingstartedwiththeIoT
hardwaredesign/Hardwaredesign,TheIoTcloudplatforms
cloudapplications,developingwithPythonandXively/Developingcloud
applicationsusingPythonandXively
customcloudplatform/YourowncloudplatformfortheIoT
IoTcloudplatform,onEC2instance
creating/CreatinganIoTplatformontheEC2instance
necessarypackages,installingonAWS/Installingthenecessarypackageson
AWS
virtualinstancesecurity,configuring/Configuringthesecurityofthevirtual
instance
testing/Testingyourcloudplatform
Mosquittoservice,testing/TestingtheMosquittoservice
basicsecurity,configuring/Configuringandtestingbasicsecurity
basicsecurity,testing/Configuringandtestingbasicsecurity
project,uploadingoninstance/Uploadingandtestingaprojectontheinstance
project,testingoninstance/Uploadingandtestingaprojectontheinstance
IoTcloudplatforms
Xively/TheIoTcloudplatforms,Xively–acloudplatformfortheIoT
2lemetry/TheIoTcloudplatforms
Carriots/TheIoTcloudplatforms,Carriots
ThingSpeak/TheIoTcloudplatforms,ThingSpeak
IoTprojects
designmethodology/ThedesignmethodologyforIoTprojects
IoTwebapplications
architecture/ArchitectureofIoTwebapplications
IPaddress
about/Networkingfundamentals
obtaining/ObtainingtheIPaddressofyourcomputer
obtaining,forWindows/Windows
obtaining,forMacOSX/MacOSX
obtaining,forLinux/Linux
IPAddressclass
about/TheIPAddressclass
L
Label()widget
about/LearningTkinterforGUIdesign,TheLabel()widget,TheLabel()
widget–monitoringI/Opins
used,formonitoringI/Opins/TheLabel()widget–monitoringI/Opins
leastsignificantbit(LSB)
about/ArduinocodingfortheTMP102temperaturesensor
LED
brightness,controllingwithPWM/LED–controllingLEDbrightnessusing
PWM
connections/Connections
Pythoncode/ThePythoncode
libraries,ArduinoIDE
about/Workingwithlibraries
URL/Workingwithlibraries
Linefeed+CarriageReturn(LF+CR)
about/PlayingwithapySerialexample
Linux
Python,installing/Linux
Setuptools,installing/Linux
ArduinoIDE,installing/Linux
Arduinoboardconnection,establishing/Linux
IPaddress,obtaining/Linux
Listbox()widget
about/TheCheckbutton()widget–selectingLEDs
URL/TheCheckbutton()widget–selectingLEDs
localareanetwork(LAN)
about/Networkingfundamentals
localhostIPaddress
about/Networkingfundamentals
loop()function
about/Theloop()function
using/Theloop()function
M
MacOSX
Python,installing/MacOSX
Setuptools,installing/MacOSX
ArduinoIDE,installing/MacOSX
Arduinoboardconnection,establishing/MacOSX
matplotlib,configuring/ConfiguringmatplotlibonMacOSX
SDcard,preparing/PreparinganSDcard
IPaddress,obtaining/MacOSX
matplotlib
about/Gettingstartedwithmatplotlib
URL/Gettingstartedwithmatplotlib,ConfiguringmatplotlibonWindows
configuring,onWindows/ConfiguringmatplotlibonWindows
configuring,onMacOSX/ConfiguringmatplotlibonMacOSX
upgrading/Upgradingmatplotlib
installationerrors,troubleshooting/Troubleshootinginstallationerrors
referencelink/Troubleshootinginstallationerrors
settingup,onUbuntu/SettingupmatplotlibonUbuntu
used,forplottingrandomnumbers/Plottingrandomnumbersusingmatplotlib
mediaaccesscontrol(MAC)address
about/Networkingfundamentals
monitoringstation,remotehomemonitoringsystem
defining/Stage1–amonitoringstationusingArduino,Designingthe
monitoringstation
Arduinosketch/TheArduinosketchforthemonitoringstation
Mosquitto
about/Mosquitto–anopensourceMQTTbroker
URL/Mosquitto–anopensourceMQTTbroker
settingup/SettingupMosquitto
initialization/GettingfamiliarwithMosquitto
mostsignificantbit(MSB)
about/ArduinocodingfortheTMP102temperaturesensor
motion-triggeredLEDs
developing/Motion-triggeredLEDs–theprojectdescription
projectgoals/Theprojectgoal
examples/Theprojectgoal
onlineresources/Theprojectgoal
softwareflowdesign/Thesoftwareflowdesign
hardwaresystemdesign/Thehardwaresystemdesign
hardwareconnections,testing/Testinghardwareconnections
motion-triggeredLEDs,components
PIRsensors/Thelistofcomponents
LEDs/Thelistofcomponents
wires/Thelistofcomponents
resistors/Thelistofcomponents
breadboard/Thelistofcomponents
Arduinoboard/Thelistofcomponents
USBcable/Thelistofcomponents
computer/Thelistofcomponents
motion-triggeredLEDs,usingArduinosketch
developing/Method1–usingastandaloneArduinosketch
projectsetup/Theprojectsetup
coding/TheArduinosketch
setup()function,using/Thesetup()function
loop()function,using/Theloop()function
customArduinofunctions,using/WorkingwithcustomArduinofunctions
testing/Testing
troubleshooting/Troubleshooting
motion-triggeredLEDs,usingPythonandFirmata
developing/Method2–usingPythonandFirmata
projectsetup/Theprojectsetup
Pythonexecutablefiles,using/WorkingwithPythonexecutablefiles
coding/ThePythoncode
pyFirmatamethods,using/WorkingwithpyFirmatamethods
Pythonfunctions,using/WorkingwithPythonfunctions
testing/Testing
troubleshooting/Troubleshooting
MQTT
about/MQTT–Alightweightmessagingprotocol
URL/IntroductiontoMQTT
Mosquitto/Mosquitto–anopensourceMQTTbroker
MQTT,onArduino
PubSubClientlibrary,using/MQTTonArduinousingthePubSubClientlibrary
ArduinoMQTTclient,developing/DevelopingtheArduinoMQTTclient
MQTT,onPython
paho-mqttlibrary,using/MQTTonPythonusingpaho-mqtt,UsingthepahomqttPythonlibrary
MQTTGateway
developing,forArduino/Exercise4–MQTTGatewayforArduino
Arduinodeveloping,asMQTTclient/DevelopingArduinoastheMQTTclient
developing,Mosquittoused/DevelopingtheMQTTGatewayusingMosquitto
extending,web.pyused/ExtendingtheMQTTGatewayusingweb.py
testing/TestingyourMosquittoGateway
N
NestThermostat
URL/Thermostat–theprojectdescription
networking
fundamentals/Networkingfundamentals
localareanetwork(LAN)/Networkingfundamentals
homeareanetwork(HAN)/Networkingfundamentals
wideareanetwork(WAN)/Networkingfundamentals
protocols/Networkingfundamentals
mediaaccesscontrol(MAC)address/Networkingfundamentals
InternetProtocol(IP)/Networkingfundamentals
IPaddress/Networkingfundamentals
localhostIPaddress/Networkingfundamentals
networkingextensions,forArduino
about/NetworkingextensionsforArduino
ArduinoEthernetShield/ArduinoEthernetShield
ArduinoWiFiShield/ArduinoWiFiShield
ArduinoYún/ArduinoYún
newlinecharacter
about/PlayingwithapySerialexample
URL/PlayingwithapySerialexample
NewOutOfBoxSoftware(NOOBS)
about/PreparinganSDcard
NumPypackage
URL/ConfiguringmatplotlibonWindows
O
open()method
used,formanipulatingfiles/Theopen()method
modes/Theopen()method
operators
about/Pythonoperatorsandbuilt-intypes,Operators
P
Packgeometrymanager
about/ThePackgeometrymanager
paho-mqttlibrary
about/MQTTonPythonusingpaho-mqtt
installing/Installingpaho-mqtt
using/Usingthepaho-mqttPythonlibrary
passiveinfrared(PIR)sensor
about/Theprojectgoal
using/Thelistofcomponents
URL/Thelistofcomponents
PEP-8
URL/Operators
physicalsystems/GettingstartedwiththeIoT
pinMode()function
about/ThepinMode()function
pip
installing/Installingpip
plot()function
about/Plottingrandomnumbersusingmatplotlib
portableTFTLCDdisplay
using/UsingaportableTFTLCDdisplaywiththeRaspberryPi
connecting,GPIOused/ConnectingtheTFTLCDusingGPIO
configuring,withRaspberryPiOS/ConfiguringtheTFTLCDwiththe
RaspberryPiOS
GUI,optimizing/OptimizingtheGUIfortheTFTLCDscreen
potentiometer
connections/Connections
Pythoncode/ThePythoncode
PowerSwitchTail
URL/PowerSwitchTail
Processing
about/IntroductiontoArduinoprogramming
protocols
about/Networkingfundamentals
prototyping
about/Prototyping
prototyping,thermostat
about/Stage1–prototypingthethermostat
Arduinosketch/TheArduinosketchforthethermostat
temperaturesensor,interfacing/Interfacingthetemperaturesensor
humiditysensor,interfacing/Interfacingthehumiditysensor
lightsensor,interfacing/Interfacingthelightsensor
troubleshooting/Troubleshooting
prototyping,withI2Cprotocol
about/PrototypingwiththeI2Cprotocol
Arduinoexamples/ArduinoexamplesforI2Cinterfacing
TMP102temperaturesensor,usingArduino/ArduinocodingfortheTMP102
temperaturesensor
BH1750lightsensor,usingArduino/ArduinocodingfortheBH1750light
sensor
PyMatalibrary,using/PyMataforquickI2Cprototyping
TMP102temperaturesensor,usingPyMatalibrary/InterfacingTMP102using
PyMata
BH1750lightsensor,usingPyMatalibrary/InterfacingBH1750usingPyMata
pySerialcommands,using/UsefulpySerialcommands
prototypingtemplates,usingFirmata
about/PrototypingtemplatesusingFirmata
potentiometer/Potentiometer–continuousobservationfromananaloginput
buzzer,using/Buzzer–generatingsoundalarmpattern
DCmotor,using/DCmotor–controllingmotorspeedusingPWM
LED/LED–controllingLEDbrightnessusingPWM
servomotors,using/Servomotor–movingthemotortoacertainangle
PubSubClientlibrary
using/MQTTonArduinousingthePubSubClientlibrary
installing/InstallingthePubSubClientlibrary
URL/InstallingthePubSubClientlibrary
pulse-widthmodulation(PWM)
about/TheArduinoUnoboard
pushbuttonswitch
using/Thelistofrequiredcomponents
pyFirmatamethods
workingwith/WorkingwithpyFirmatamethods
used,forsettingupArduinoboard/SettinguptheArduinoboard
used,forconfiguringArduinopins/ConfiguringArduinopins
used,forworkingwithArduinopins/Workingwithpins
servo_config(pin,min_pulse=544,max_pulse=2400,angle=0)/Additional
functions
pass_time(seconds)/Additionalfunctions
get_firmata_version()/Additionalfunctions
exit()/Additionalfunctions
pulseIn/pulseOut/Upcomingfunctions
shiftIn/shiftOut/Upcomingfunctions
PyPI
URL/WhyweusePython,InstallingPythonpackages
about/WhyweusePython
pyplotframework
about/Plottingrandomnumbersusingmatplotlib
figure()function/Plottingrandomnumbersusingmatplotlib
show()method/Plottingrandomnumbersusingmatplotlib
pySerialcommands
using/UsefulpySerialcommands
used,forconnectingwithserialport/Connectingwiththeserialport
used,forreadingalinefromport/Readingalinefromtheport
used,forflushingporttoavoidbufferoverflow/Flushingtheporttoavoid
bufferoverflow
used,forclosingport/Closingtheport
pySeriallibrary
about/GettingstartedwithpySerial
installing/InstallingpySerial
URL/InstallingpySerial
example/PlayingwithapySerialexample
andFirmata,bridging/BridgingpySerialandFirmata
Python
about/IntroductiontoPython
benefits/WhyweusePython
usageconsiderations/Whendoweuseotherlanguages
URL/Whendoweuseotherlanguages
installing/InstallingPythonandSetuptools
installing,onLinux/Linux
installing,onUbuntu/Ubuntu
installing,onFedora/RedHatLinux/FedoraandRedHat
installing,onWindows/Windows
URL,fordownloading/Windows,MacOSX
installing,onMacOSX/MacOSX
pip,installing/Installingpip
URL,fordocumentation/Controllingtheflowofyourprogram
Pythoncode,Tweet-a-PowerStrip
about/ThePythoncode
Pythoncontextmanager
referencelink/Thewithstatement–Pythoncontextmanager
Pythondata,downloadingtoXively
about/Python–downloadingdatafromXively
basicmethod,forretrievingdata/Thebasicmethodforretrievingdatafrom
Xively
dataretrieving,fromweb.pywebinterface/Retrievingdatafromtheweb.py
webinterface
customnotifications,fromXively/Triggers–customnotificationsfromXively
triggers/Triggers–customnotificationsfromXively
Pythondata,uploadingtoXively
about/Python–uploadingdatatoXively
basicmethod,forsendingdata/Thebasicmethodforsendingdata
webinterfaceused/Uploadingdatausingawebinterfacebasedonweb.py
Pythonexecutablefiles
using/WorkingwithPythonexecutablefiles
Pythonfunctions
using/WorkingwithPythonfunctions
defkeyword/WorkingwithPythonfunctions
PythonGUI
Tkinter/LearningTkinterforGUIdesign
firstprogram/YourfirstPythonGUIprogram
Python-Arduinoproject,remaking/RemakingyourfirstPython-Arduino
projectwithaGUI
Pythonpackages
installing/InstallingPythonpackages
installing,$pipinstall*PackageName>=version*commandused/Installing
Pythonpackages
Pythonprogramming
fundamentals/ThefundamentalsofPythonprogramming
operators/Pythonoperatorsandbuilt-intypes,Operators
built-intypes/Pythonoperatorsandbuilt-intypes,Built-intypes
comments/Pythonoperatorsandbuilt-intypes
programflow,controlling/Controllingtheflowofyourprogram
ifstatement/Theifstatement
forstatement/Theforstatement
whilestatement/Thewhilestatement
Pythonsoftwareflow,Tweet-a-PowerStrip
about/Pythonsoftwareflow
Pythonthreadinglibrary
URL/Usingthepaho-mqttPythonlibrary
Pythontutorials
URL/ThefundamentalsofPythonprogramming,Thewhilestatement
R
Radiobutton()widget
about/TheCheckbutton()widget–selectingLEDs
URL/TheCheckbutton()widget–selectingLEDs
RaspberryPi
about/WhatisaRaspberryPi?
Raspbian/WhatisaRaspberryPi?
versions/WhatisaRaspberryPi?
configuring/InstallingtheoperatingsystemandconfiguringtheRaspberryPi
operatingsystem,installing/Installingtheoperatingsystemandconfiguringthe
RaspberryPi
hardwarecomponents/WhatdoyouneedtobeginusingtheRaspberryPi?
URL/WhatdoyouneedtobeginusingtheRaspberryPi?,PreparinganSD
card
SDcard,preparing/PreparinganSDcard
setupprocess/TheRaspberryPisetupprocess
read()method
using/Theread()method
real-timeArduinodata
plotting/Plottingreal-timeArduinodata
remotehomemonitoringsystem
projectoverview/Projectoverview
projectgoals/Theprojectgoals
projectrequirements/Theprojectrequirements
systemarchitecture,designing/Designingsystemarchitecture
UXflow,defining/DefiningUXflow
hardwarecomponents/Thelistofrequiredcomponents
developmentstages,defining/Definingtheprojectdevelopmentstages
monitoringstation,Arduinoused/Stage1–amonitoringstationusingArduino
testing/Testing,Testingandtroubleshooting
controlcenter,using/Stage2–acontrolcenterusingPythonandtheRaspberry
Pi
webapplication/Stage3–awebapplicationusingXively,Python,and
Amazoncloudservice
troubleshooting/Testingandtroubleshooting
extending/Extendingyourremotehomemonitoringsystem
multiplemonitoringstations,utilizing/Utilizingmultiplemonitoringstations
sensorycapabilities,extending/Extendingsensorycapabilities
UX,improving/ImprovingUX
cloud-basedfeatures,expanding/Expandingcloud-basedfeatures
improvedintelligence,forsituationawareness/Improvingintelligencefor
situationawareness
hardwareenclosures,creating/Creatinganenclosureforhardwarecomponents
RepresentationStateTransfer(REST)
about/Pythonwebframework–web.py
RESTfulwebapplications
developing,withArduinoandPython/RESTfulwebapplicationswithArduino
andPython
designing/DesigningREST-basedArduinoapplications
GETrequest,implementing/WorkingwiththeGETrequestfromArduino
GETrequest,generating/TheArduinocodetogeneratetheGETrequest
GETrequest,handlingwithweb.py/TheHTTPserverusingweb.pytohandle
theGETrequest
POSTrequest,implementing/WorkingwiththePOSTrequestfromArduino
POSTrequest,generating/TheArduinocodetogeneratethePOSTrequest
POSTrequest,handlingwithweb.py/TheHTTPserverusingweb.pytohandle
thePOSTrequest
architecture/Exercise3–aRESTfulArduinowebapplication
Arduinosketch/TheArduinosketchfortheexercise
web.pywebapplication/Theweb.pyapplicationtosupportRESTrequests
resource-constrainedmessagingprotocol,using/Whydoweneedaresourceconstrainedmessagingprotocol?
S
Scale()widget
about/LearningTkinterforGUIdesign,TheScale()widget–adjustingthe
brightnessofanLED
used,foradjustingbrightnessofLED/TheScale()widget–adjustingthe
brightnessofanLED
SDcard
referencelink/WhatdoyouneedtobeginusingtheRaspberryPi?,Preparing
anSDcard
preparing/PreparinganSDcard
preparing,fromWindows/PreparinganSDcard
preparing,fromMacOSX/PreparinganSDcard
preparing,fromUbuntuLinux/PreparinganSDcard
SecureShell(SSH)protocol/Loggingintoyourvirtualinstance
SerialClockLine(SCL)
about/PrototypingwiththeI2Cprotocol
SerialDataLine(SDA)
about/PrototypingwiththeI2Cprotocol
serialmonitor
using/UsingtheSerialMonitorwindow
serialperipheralinterface(SPI)
about/Prototyping
Serverclass
about/TheServerclass
servomotors
using/Servomotor–movingthemotortoacertainangle
connections/Connections
Pythoncode/ThePythoncode
setup()function
using/Thesetup()function
Setuptools
installing/InstallingSetuptools
about/InstallingSetuptools
installing,onLinux/Linux
installing,onWindows/Windows
installing,onMacOSX/MacOSX
sketch
about/WhatisanArduinosketch?
compiling/Compilinganduploadingsketches
uploading/Compilinganduploadingsketches
sketchbook
about/WhatisanArduinosketch?
slicing
about/Lists
StandardFirmatafirmware
using/Prototyping
statements
about/Functionsandstatements,Statements
subnetwork/subnet
about/Exercise1–awebserver,yourfirstArduinonetworkprogram
referencelink/Exercise1–awebserver,yourfirstArduinonetworkprogram
systemarchitecture,remotehomemonitoringsystem
designing/Designingsystemarchitecture
monitoringstation/Themonitoringstation
controlcenter/Thecontrolcenter
cloudservices/Thecloudservices
systemarchitecture,Tweet-a-PowerStrip
about/Systemarchitecture
T
Templetor
about/Templates
URL/Templates
thermostat
building/Thermostat–theprojectdescription
projectdescription/Thermostat–theprojectdescription
projectbackground/Projectbackground
projectstages/Projectgoalsandstages
projectgoals/Projectgoalsandstages
requiredcomponents,identifying/Thelistofrequiredcomponents
hardwaredesign/Hardwaredesign
softwareflow,foruserexperiencedesign/Softwareflowforuserexperience
design
prototyping/Stage1–prototypingthethermostat
GUI,designing/DesigningtheGUIandplotinPython
plot,designing/DesigningtheGUIandplotinPython
deploying,RaspberryPiused/Stage2–usingaRaspberryPiforthedeployable
thermostat
thermostat,prototyping
Arduinointerrupts,using/UsingArduinointerrupts
thermostat,usingRaspberryPi
deploying/Stage2–usingaRaspberryPiforthedeployablethermostat
portableTFTLCDdisplay,using/UsingaportableTFTLCDdisplaywiththe
RaspberryPi
TFTLCDconnection,usingGPIO/ConnectingtheTFTLCDusingGPIO
TFTLCD,configuring/ConfiguringtheTFTLCDwiththeRaspberryPiOS
GUI,optimizingforTFTLCDscreen/OptimizingtheGUIfortheTFTLCD
screen
troubleshooting/Troubleshooting
thin-filmtransistorliquid-crystaldisplay(TFTLCD)
about/Hardwaredesign
ThingSpeak
about/ThingSpeak
Tk()widget
about/LearningTkinterforGUIdesign,TherootwidgetTk()andthetop-level
methods
Tkinter
about/LearningTkinterforGUIdesign
Packgeometrymanager/ThePackgeometrymanager
Gridgeometrymanager/TheGridgeometrymanager
plots,integrating/IntegratingplotsintheTkinterwindow
Tkinter,widgets
Tk()/LearningTkinterforGUIdesign
Label()/LearningTkinterforGUIdesign
Button()/LearningTkinterforGUIdesign
Entry()/LearningTkinterforGUIdesign
Scale()/LearningTkinterforGUIdesign
Checkbox()/LearningTkinterforGUIdesign
Tkinterclass
about/TheLabel()widget–monitoringI/Opins
BooleanVar()method/TheLabel()widget–monitoringI/Opins
update_idletasksmethod/TheLabel()widget–monitoringI/Opins
updatemethod/TheLabel()widget–monitoringI/Opins
TMP102temperaturesensor
interfacing,Arduinoused/ArduinocodingfortheTMP102temperaturesensor
interfacing,PyMatalibraryused/InterfacingTMP102usingPyMata
transistorterminals
referencelink/Connections
troubleshooting
Tweet-a-PowerStrip/Testingandtroubleshooting
troubleshooting,Arduinoboardconnection
about/Troubleshooting
Tweet-a-PowerStrip
projectoverview/Projectoverview
projectrequirements/Projectrequirements
systemarchitecture/Systemarchitecture
hardwarecomponents/Requiredhardwarecomponents
userexperienceflow/Userexperienceflow
developmentstage/Developmentanddeploymentstages
deploymentstage/Developmentanddeploymentstages
smartpowerstripwithArduino/Stage1–asmartpowerstripwithArduinoand
relays
hardwaredesign/Hardwaredesign
Arduinocode/TheArduinocode
Pythoncode/Stage2–thePythoncodetoprocesstweets,ThePythoncode
Pythonsoftwareflow/Pythonsoftwareflow
Twitterapplication,settingup/SettinguptheTwitterapplication
testing/Testingandtroubleshooting
troubleshooting/Testingandtroubleshooting
multiplefeatures,adding/Extendingtheprojectwithadditionalfeatures
Twitterapplication,Tweet-a-PowerStrip
settingup/SettinguptheTwitterapplication
U
Ubuntu
Python,installing/Ubuntu
matplotlib,settingup/SettingupmatplotlibonUbuntu
UbuntuLinux
SDcard,preparing/PreparinganSDcard
UniversalSerialBus(USB)
about/UsingtheSerialMonitorwindow
Unoboard
about/TheArduinoUnoboard
userexperience(UX)flow,Tweet-a-PowerStrip
about/Userexperienceflow
V
variables
about/Variables
virtualinstance,onAWSEC2service
creating/CreatingavirtualinstanceontheAWSEC2service
logginginto/Loggingintoyourvirtualinstance
voiddatatype
about/Datatypes
W
web.py
used,fordevelopingwebapplications/Pythonwebframework–web.py
installing/Installingweb.py
basicconcepts/Essentialweb.pyconceptsfordevelopingcomplexweb
applications
URL,handling/HandlingURLs
GETmethods/TheGETandPOSTmethods
POSTmethods/TheGETandPOSTmethods
templates/Templates
forms/Forms
withArduinoserialinterface/Exercise2–playingwithweb.pyconceptsusing
theArduinoserialinterface
webapplication,remotehomemonitoringsystem
about/Stage3–awebapplicationusingXively,Python,andAmazoncloud
service
architecture/Architectureofthecloudservices
Pythonwebapplication,hostedonAmazonAWS/Pythonwebapplication
hostedonAmazonAWS
testing/Testingthewebapplication,Testingandtroubleshooting
webapplications
developing,withPython/DevelopingwebapplicationsusingPython
developing,web.pyused/Pythonwebframework–web.py
implementing,web.pyused/YourfirstPythonwebapplication
whilestatement
about/Thewhilestatement
wideareanetwork(WAN)
about/Networkingfundamentals
Windows
Python,installing/Windows
Setuptools,installing/Windows
ArduinoIDE,installing/Windows
Arduinoboardconnection,establishing/Windows
matplotlib,configuring/ConfiguringmatplotlibonWindows
SDcard,preparing/PreparinganSDcard
IPaddress,obtaining/Windows
Wirelibrary
about/PrototypingwiththeI2Cprotocol
URL/PrototypingwiththeI2Cprotocol
Wiring
about/IntroductiontoArduinoprogramming
withstatement
using/Thewithstatement–Pythoncontextmanager
WorldWideWeb(WWW)
about/RESTfulwebapplicationswithArduinoandPython
write()method
used,forworkingwithfiles/Thewrite()method
X
Xively/Architectureofthecloudservices
Xively,IoTcloudplatforms
about/Xively–acloudplatformfortheIoT
account,settingup/SettingupanaccountonXively
workingwith/WorkingwithXively
Adruino,interfacingwith/InterfacingArduinowithXively