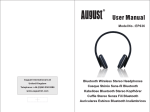
1
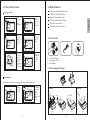
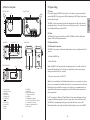
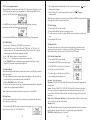
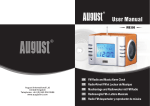
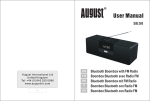
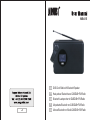
MB415
EN
DAB Clock Radio with Bluetooth Speaker
FR
Haut-parleur Bluetooth avec DAB/DAB+/FM Radio
DE
Bluetooth Lautsprecher mit DAB/DAB+/FM Radio
IT
Altoparlante Bluetooth con DAB/DAB+/FM Radio
ES
Altavoz Bluetooth con Radio DAB/DAB+/FM Radio
User Manual
Safety
To ensure the safety of you and others, please read the Safety Instructions before
using this device.
Please do not disassemble the MB415, it can be unsafe and will invalidate the
manufacturer's warranty.
Disposal
Please ensure the product and accessories are disposed in compliance with WEEE
(Waste Electrical and Electronic Equipment) Directive and other regulations in your
country. Always check with the environment agency and any other relevant
authorities for current disposal regulations.
Customer Service
You can contact us by phone on: +44 (0) 845 250 0586 or by email at:
service@augustint.com should you require further technical support or customer
service.
English
Thank you for purchasing the August MB415 DAB Clock Radio with Bluetooth
Speaker. This user manual is designed to familiarize you with all the features of this
device. Please take time to read this user manual carefully, even if you are already
familiar with a similar product.
Quick Start Guide
MB415
Please fully charge the MB415 before first use. To charge, use the power cable
to connect the MB415 to a plug socket. Whilst charging, the LED lights red
and turns off once fully charged.
DAB Radio Setup
1. Switch the MB415 on.
2. Select DAB mode.
3. Wait whilst channel scan is progressing.
4. Use arrow keys to select a station.
Bluetooth Setup
1. Switch the MB415 on.
2. Select BT mode.
Contents
1. Safety Instructions
1
2. Features
2
3. Accessories
2
4. Device Layout
3
5. Operating
4
5.1 Power
4
5.2 Mode
4
5.3 Bluetooth Mode
4
5.4 DAB Mode
5
Note: The MB415 will automatically enter pairing mode if it is unable to find
the last paired Bluetooth device. To disconnect a paired device and return to
pairing mode press and hold OK for 3 seconds.
5.5 FM Mode
8
5.6 USB/SD Mode
9
3. Pair your source device to “MB415”
5.7 Audio-in Mode
9
Note: If you are unfamiliar with the Bluetooth feature of your source
device, please refer to its user manual for detailed instructions.
5.8 Sleep Timer
9
5.9 Clock Setting
10
5.10 Alarm Clock
10
5.11 System Settings
11
Setting the Alarm
1. Press and hold OK to enter standby.
2. Press and hold SNOOZE to enter alarm setup.
3. Press SNOOZE to select Alarm 1 or Alarm 2.
4. Press OK to enter Alarm Wizard.
5. Use arrow keys to edit the values and enter to move through the settings.
Note: The alarm can be set only when the clock time has been set. The clock
time is set automatically when DAB channels are found. If DAB is not
available, see 5.9 to manually set the time.
6. Specifications
12
7. Troubleshooting
13
8. Warranty
14
1. Safety Instructions
2. Main Features
Keep this
device away
from
extreme
temperatures.
Keep the
device away
from wet or
damp
environment.
Never expose
the device
to moisture,
dust, oil or
smoke.
Avoid
dropping or
exposing to
impacts.
English
Wireless speaker for Bluetooth devices
DAB/DAB+ and FM Radio Tuner
Standard 3.5mm audio-in socket
MP3 Player with USB and SD card
NFC ready - tap to connect
Dual alarm with snooze function
Storage and Use
3. Accessories
M
B4
15
EN
DA
FR
B Cl
Ha
ock
ut
Blue -parleu Radio
with
r Bl
Alto tooth
ue
La
pa
toot Blue
ut
rla
Alta
to
voz nte Bl sprech h avec oth
Sp
Blue
er
ue
DA
ea
toot tooth mit DA B/DA ker
h co
co
B/DA B+
/F
n Ra n DA
B/DA B+/F M Ra
dio
M
dio
B+
DA
B/DA /FM Radio
Ra
B+
dio
/FM
Ra
dio
DE
IT
ES
When carrying
this device as
part of your
luggage please
ensure it is
securely stored
to avoid
impact damage.
Never strike
or scratch this
device with
any sharp
object.
1. AC Power Adaptor
2. 3.5mm Audio Cable
3. User Manual
3.1 Interchangeable Plugs
Maintenance
Please ensure all cables are unplugged before cleaning this device.
Wipe the
device and
buttons with
a soft cloth.
Alcohol
Never wipe this
device with an
abrasive cloth
or apply
detergent,
alcohol or
chemical based
cleaning
products.
UK
EU
Insertion
Release
2.pull
push
push push
1.push
hole
1
-1-
2
3
-2-
4
5. Operating
4. Device Layout
FRONT VIEW
6
15
4
3
DAB Clock Radio
With Bluetooth Speaker
Model No.: MB415
Power Input: DC 5V
1.5A
Made in China
2
1
16
TOP VIEW
7
8 9 10 11 12
17 18 19
SIDE VIEW
13
The MB415 can be powered using either the supplied power cable or the internal
rechargeable battery. To switch the device on, use the power switch. To enter and
leave Standby Mode press and hold OK.
5.2 Mode
The Mode Dial is used to select between DAB, FM Radio, Audio-In, Bluetooth
Speaker, USB and SD playback modes.
5.3 Bluetooth Mode
5.3.1 Bluetooth Connection
The MB415 can connect to Bluetooth enabled source devices to playback audio. To
connect:
1. Switch the MB415 on.
14
BOTTOM VIEW
2. Select BT mode.
20
21
Note: The MB415 will automatically enter pairing mode if it is unable to find the
last paired Bluetooth device. To disconnect a paired device and return to pairing
mode press and hold OK for 3 seconds.
3. Pair your source device to "MB415"
12. PRESET
13. SNOOZE
14. Built-in Microphone
15. Telescopic Antenna
16. USB Port
17. SD/MMC Card Reader
18. DC 5V Micro USB Power Socket
19. 3.5mm Audio-In Socket
20. Battery Compartment Lock
21.NFC Sensor
1. Power Switch
2. Backlight Switch
3. Mode Dial
4. Volume Dial
5. Charging LED
6. LCD Display
7. /OK
8. < Arrow Key
9. > Arrow Key
10. MENU
11. INFO
-3-
Note: If you are unfamiliar with the Bluetooth feature of your source device, please
refer to its user manual for detailed instructions. If your source device does not have
Bluetooth and you would like to connect to it wirelessly, we recommend using an
August Bluetooth transmitter (compatibility with other Bluetooth transmitters can
not be guaranteed).
For PC connections, Windows XP and Windows Vista require third party software
to connect to Bluetooth speakers. If you are using a later version of Windows and
the MB415 is not outputting audio, please check that the drivers for your PCs
Bluetooth module are up to date and that the Audio Output source is set to MB415.
-4-
English
5.1 Power
Please fully charge the MB415 before first use. To charge, use the power cable to
connect the MB415 to a plug socket. Whilst charging, the LED lights red and turns
off once fully charged.
BACK VIEW
5
5.3.2 Remote control
The MB415 is able to control the music playing on either a mobile phone or a
computer with a Bluetooth connection.
Press
to pause or resume playing music.
Use the volume dial to increase or decrease the volume. Press “<” or “>” to select
the previous or next track.
5.3.3 Hands-free Calling
Whilst connected to your mobile phone, the MB415 will act as a hands-free system
for calls.
Press OK button to pick up or hang up a call.
5.4 DAB Mode
DAB mode allows you to listen to Digital Audio Broadcasts, DAB radio stations
have a higher sound quality and less interference than their FM equivalent.
5.4.1 Auto Scan
When you enter DAB mode for the first time, or if there are no channels saved on
the device, a channel scan will begin automatically. To scan for additional channels
or to scan when you change location:
1. Fully extend the telescopic antenna.
2. Press the OK button to exit standby mode.
3. Turn the Mode Dial to DAB.
5. Once the scan has completed. The channels will be saved and the device will
begin playing the first channel found.
6. Press “<” or “>” to scroll through the list of saved stations then press the OK
button to tune to the displayed station.
7. If no stations are detected during the scan the LCD will display “Service not
available”.
Note: DAB radio reception is not universal, you can check the signal strength
inyour postcode here: www.ukdigitalradio.com/coverage/postcodesearch/
Having stations available in your area does not guarantee reception as thick
walls, distance from the transmitter and other environmental factors can all
influence the reception at a specific location.
5.4.2 Manual Scan
To search specific frequencies for additional stations, or to fine tune your reception,
you can perform a manual scan of a specific frequency. This will search for and
save any stations found on the broadcast frequency that you set.
Press Menu then use “>” and OK to select Manual tune from the submenu.
Use “<” or “>” to set the frequency which you would like to tune to and then press
OK to confirm. The LCD will show the signal strength on the selected frequency.
Any change in signal strength made by adjusting the aerial will be reflected on the
signal strength bar.
Note: The solid blocks on the signal strength bar represent the required signal
strength for a clear signal. The larger clear block represents the current signal
strength.
5.4.3 Dynamic range compression (DRC)
DRC balances the differences in volume between the loudest and quietest audio
being broadcast. This can reduce the need to adjust volume when the sound being
broadcast changes volume.
Note: DRC is managed by the broadcaster and may not be utilized by all stations.
4. Press the MENU button and then press OK to select Full Scan.
-5-
-6-
English
-NFC
1. Enable Bluetooth and NFC on your source device.
2. Switch on the MB415 and enter pairing mode.
3. Touch the NFC area of your source device against the NFC area on the left side
of the MB415. They will automatically pair with each other.
4. Confirm Bluetooth pairing if prompted. “MB415” will now be listed in your
source device's Bluetooth device list.
5. To disconnect your device, touch the NFC area of your device against the NFC
area on the left side of the MB415. Touch again to reconnect.
5.4.3.1 Change the DRC Setting
1. Press Menu then use “>” and OK to select DRC from the submenu
2. Press “>” or “<” to select the available options: DRC off, DRC high, DRC low.
5.4.4 Prune
The Prune function can be used to remove any stations that are saved to your DAB
radio list but not available. This function will remove all stations that are listed with
a “?” in front of the station name.
1. Press Menu then use “>” or “<”and OK to select Prune from the submenu.
2. Press “>” to select “Yes” and then press OK button to confirm.
Pressing INFO cycles through DLS text, DL Plus information (this is only
displayed if broadcast by the station), signal strength, program type, ensemble
name, channel number/frequency, signal error rate, bit rate, codec/DAB variant,
time and date. Press and hold the INFO button to return to the Now Playing screen.
Note: DL Plus presents additional information that can be broadcast by stations
andstored temporarily on your radio.
5.5 FM Mode
FM radio mode allows you to listen to FM broadcasting (87.5-108MHz) and view
RDS (Radio Data System) information.
5.5.1 Scan
1. Fully extend the telescopic antenna.
2. Turn the Mode Dial to FM mode.
3. Press and hold the “<”/ “>” button to scan for a station, the radio will tune to the
next station found.
5.4.5 DAB Station Presets
The MB415 allows you to store up to 20 DAB stations for quick tuning.
4. Press “<” or “>” button to tune the radio up or down in 50 KHz steps for fine
tuning.
5. To improve radio reception, you can reposition the aerial or radio if necessary.
5.4.5.1 Save a station
1.Whilst the station you would like to save is playing, press and hold the PRESET
button until the Preset Store displays on the LCD.
5.5.2 FM Station presets
The unit allows you to store up to 20 FM stations for quick tuning.
2. Press “<” or “>”to choose the preset memory position then press OK to confirm.
5.5.2.1 Save a station
1. Whilst the station you would like to save is playing, press and hold the PRESET
button until Preset Store displays on the LCD.
2. Press “<” or “>” button to choose the preset memory position, press the OK
button to confirm the settings.
5.4.5.2 Recall a station
1. Press PRESET whilst in DAB mode to open the list of preset stations.
2. Press “>” or “<” button to select the preset station.
3. Press OK to confirm.
-7-
5.5.2.2 Recall a station
1. Press PRESET whilst in FM mode and Preset Recall displays on the LCD to
open the list of preset stations.
2. Press “>” or “<” button to select the preset station.
3. Press OK button to confirm.
-8-
English
DRC off: DRC is switched off
DRC high: DRC is switched on (default setting)
DRC low: DRC is set to 50%
5.4.6 Station Information
To access additional information broadcast by a DAB radio station, press INFO,
this will cycle through all the DLS (Dynamic Label Segment) being broadcast.
5.5.3 Now playing information
When available, the station name and ‘Radio Text’ information will display on the
LCD for the playing station. If no information is available through RDS, just the
frequency and ‘No Radio Text’ message will display.
2. The setting confirms automatically after 10 seconds, the sleep icon "
" stops
flashing on the display.
3. Select "Sleep off" to cancel sleep mode. the sleep icon "
" disappears
simultaneously.
Press INFO to cycle through: RDS Radio Text, program type, frequency,
mono/stereo and time and date for the current station.
Press and hold the INFO button to return to the default Now Playing screen.
5.6 USB/SD Mode
1. Connect your USB device or SD/MMC card to the unit.
2. Turn Mode Dial to select USB or SD mode, “USB Stick” or “SD Card” will
appear on the screen. The music stored on the USB or SD card will be played
automatically once the content scanning is finished.
3. Press “ OK” button to pause or resume playback.
4. Press “<“ or“ > “button to skip to the previous or next track.
5. Press “PRESET” button to change the repeat mode between Repeat-1 and
Repeat All. The default repeat mode is Repeat All.
5.7 Audio-in Mode
Audio-in mode plays audio from an external source such as an MP3 player, mobile
phone or computer.
1. Use the 3.5mm audio cable to connect from the headphone or line out socket of
your source device to the Audio-In socket on the MB415.
2. Turn the Mode Dial to select AUX mode.
3. Press play on your source device, any sound that would normally play through its
speaker will now play through the MB415.
Note: Volume can be adjusted on either the source device or the MB415.
5.8 Sleep Timer
The Sleep timer function allows you to set the device to automatically shut down
after a specific period of time.
1. Press and hold the MENU button to choose the sleep delay
time, in minutes, from: off /1/20/30/60/90/120.
-9-
5.9 Clock Setting
1. Press and hold OK to enter standby.
2. Press and hold MENU until the year begins to flash.
3. Use the arrow keys to edit the values and OK to move through the settings and
save.
4. Press and hold OK to exit.
5.10 Alarm Clock
The alarm clock can be set with two separate wake up times, each alarm can be
configured to buzzer, last active station or preset FM or DAB station. An active
alarm is indicated by a bell icon on the left side of the LCD screen.
5.10.1 Set the Alarm Clock
1. Press and hold OK to enter standby.
2. Press and hold SNOOZE to enter alarm setup.
3. Press SNOOZE to select Alarm 1 or Alarm 2.
4. Press OK to enter Alarm Wizard.
5. Use arrow keys to edit the values and OK to
move through the settings and save.
On time – Hours and minutes
Duration: 15/30/45/60/75/90 minutes. The alarm will automatically stop after the
selected time.
Source – Buzzer / DAB / FM / USB / SD, If DAB or FM is chosen as the audio
source you will also be prompted to select the last played station or one of the
preset stations. If USB or SD are selected, the last played song will be used as the
alarm tone.
Daily / Once / Weekends / Weekdays, set the repeat mode. If Once is selected, you
will be asked to set the date of this alarm.
Alarm: On/Off
Note: When the alarm sounds, it begins quietly and gradually increases in volume
up to the current volume of the radio. To stop the alarm, press and hold the
SNOOZE or Standby button for 3 seconds.
-10-
English
Note: When the sleep timer is active, press and hold the MENU button to show the
remaining time before the device shuts down.
Note: The alarm can be set only when the clock time has been set. The clock time
is set automatically when DAB channels are found. If DAB is not available,
see 5.9 to manually set the time.
5.11 System Settings
You can set the system’s language, reset Factory default setting, and display the
Software version on LCD
1. Press MENU button during DAB or FM mode
2. Press “>” or “<” button” to select System setting submenu
3. Press / OK to enter the System setting submenu.
4. Press “>” or “<” button” to select & press / OK button the subdirectory.
5.11.1 Language Setting
The language used for display messages can be selected from: English/ Français /
Deutsch/Italiano/ Español
Bluetooth Version
V2.1+EDR
Bluetooth Profile
A2DP 1.2
Bluetooth Working Range
Up to 10m
DAB Radio Frequency
174.928-239.2MHz
FM Radio Frequency
87.5-108MHz
Frequency Response
50HZ-18KHz
Speaker
5W RMS
Power Adaptor
Input AC 100-240V~50/60Hz; Output DC 5V 1.5A
Batteries
1,050 mAh
USB Port
Supports USB memory stick in FAT format and up to 16GB
Max Play Time(with Battery)
3.5 Hours
Transmission Frequency
2.4 GHz
SD Card
Supports SD/MMC card up to 16GB
Standby Power Consumption
<1W
Power Consumption
7.5W
Working Temperature
0℃~+ 35℃
Working Humidity
20%~80%
Dimensions
216x98x128mm
Net Weight
890g
Press “>” or “<” button to select & press OK button to confirm the setting.
5.11.2 Factory Reset
A factory reset clears all user defined settings, replacing them with the original
default values, so time/date, DAB/FM station list and preset stations are all lost.
If you select Reset, you are asked to confirm by selecting “Yes”.
-11-
-12-
English
5.10.2 Snooze
When the alarm sounds, press the SNOOZE button to snooze
the alarm for 10 minutes. During the snooze period, the Snooze icon will show on
the display.
6. Specifications
7. Troubleshooting
8. Warranty
Solutions
Problem
Increase the volume
Poor sound quality in Radio mode
Adjust aerial.
Hiss in FM mode or intermittent
cut-out in DAB.
Adjust aerial.
Relocate radio.
Rescan for channels.
No audio in Bluetooth mode.
Check Bluetooth connection to source.
Delete Bluetooth connection from source and repair.
Increase MB415 volume.
Increase source volume.
Bluetooth does not connect.
Check that source is switched on.
Check that Bluetooth is enabled on source.
Poor or intermittent sound via
Bluetooth
Move source device closer to MB415
This warranty is subject to the following conditions:
The warranty is only valid within the country where the product is purchased.
The product must be correctly installed and operated in accordance to the
instructions given in this user manual.
The product must be used solely for domestic purposes.
The warranty only covers the main unit, and does not cover the accessories.
The warranty does not cover the damage caused by misuse, negligence, accident
and natural disaster.
The warranty will be rendered invalid if the product is resold or has been
damaged by inexpert repairs. The manufactures disclaim any liability for
incidental or consequential damages.
Please consult our customer adviser before returning any product; we are not
responsible for any unexpected product returns.
Any faulty product must be kept and returned in the original packaging with all
the accessories and the original copy of the purchase receipt.
The warranty is in addition to, and does not diminish, your statutory or legal rights.
Customer Service:
Telephone: +44 (0) 845 250 0586
Email: service@augustint.com
This product is in compliance with the essential requirements and other relevant
provisions of Directive 1999/5/EC. The declaration of conformity may be consulted
at August International Ltd, Unit
5 Swains Mill, Crane Mead, Ware SG12 9PY, England.
-13-
-14-
English
No sound
This product is guaranteed for twelve months from the date of the original purchase.
In the unlikely event of any defect arising due to faulty materials or workmanship,
the unit will be either replaced or repaired free of charge (where possible) during
this period. An alternative product will be offered in case the product is no longer
available or repairable.