1
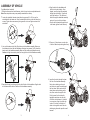
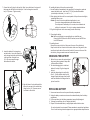
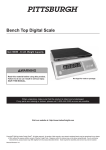
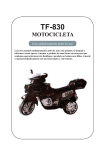
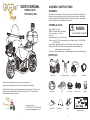
USER’S MANUAL
ITEM# GT00761
NYPD Motor Bike
ASSEMBLY INSTRUCTIONS
WARNING:
Assembly should be performed by adults only. Never allow children to play with the
small parts or the plastic bag the vehicle is placed in. Injury may occur. Small parts
could be a choking hazard! Polybags could be a suffocation hazard to small children.
Dispose of these bags in appropriate refuse container.
TECHNICAL DATA
W WARNING:
Speed: 2 MPH, 2.5 km/hr
Battery: 6V4AH sealed dry cell battery
ADULT ASSEMBLY REQUIRED!
Time for charging: 8 – 12 hours
Ages: 2 – 4
Load Max capacity: 66 pounds/ 30 kgs.
Charger: Input 120 - 240Volt, depending on local voltage; Output – DC 6.5V500mA
or 8.5V1000mA
Life of Battery: Approximately 200 hours, 300 charges. Depending on usage.
Working time: About 40 to 90 minutes, depending on rider,road surface and
whether battery was fully charged.
Functions: Forward,backward,stop, working headlight.Police sound and flashing light.
PARTS LIST
Vehicle body
Handlebar Assembly
Header set
Box holder
Illustrations are representative only, design and style may vary.
Please carefully read this manual before use and keep for future reference.
All New York City logos and marks depicted herein are property of the City of New York
and may not be reproduced without prior written consent. © 2014. City of New York.
All rights reserved. Used under license.
Storage Box
Seat
Front Wheel
Wheel Covers
Front axle
Customer Service:
1-855-GIGGOTY (1-855-444-4689)
customerservice@giggotoys.com
1
Nut
Front Fender
Windshield
Charger
2
Top Light
Metal cap
Bushing
Steering rod
4 x 12
3 x10
2.6 x 12
Hardware Bag
(Spare metal cap 1pc)
2.6 x 10
ASSEMBLY OF VEHICLE
Tools Needed (not included):
1 Phillips head screwdriver, small hammer, a block of wood and one adjustable wrench.
Note: Some steps below may come partially assembled from factory.
1. Locate the windshield, header set and three long screws(2.6 x 10). Line up the
windshield with the header set. Once the windshield is lined up, insert the three long
screws. Tighten the screws securely, being careful not to over tighten and crack the
windshield.
4. Align the hole in the handlebars with
the hole in the vehicle body. Once
aligned, insert the long bolt completely
through the vehicle body. Press down
on the bolt and turn. This will thread
the bolt through the handlebar assembly
and on to the nut on the front fender.
After the bolt is threaded through the nut
in the fender, tighten the bolt securely.
2.6 x 10
2. Line up the header set with the (2)two holes on the handlebar assembly. Make sure
the header set is level with the handlebars. Using two long screws (3 x10) attach the
header set to the handlebar assembly. Make sure the screws are tightened securely.
Caution: the light wire must be pulled out through the hole of the handlebar assembly.
5. Place one (1) wheel cover on each side
of the front wheel and push together firmly.
3 x 10
3. Snap front fender (front facing out) to the front flat side of the handlebar. Align the hole
in the fender with the hole on the back of the handlebar assembly.
3
6. Insert the front axle through the lower
left fork of the handlebar assembly.
Next, place a bushing on the axle
and continue to push the axle through
the front wheel. As the axle exits the
wheel place another bushing on the
axle, then continue through the fork.
Finally, secure the front wheel by
tapping the metal cap onto the end
of the axle with a hammer. It is helpful
to use a piece of tape to hold the cap
in place. For safety, hold a block of
wood on the opposite end of the axle
while tapping the metal cap with a small
hammer.
4
7. Connect the two (2) plugs for the top light. Next, line up the holes in the top part of
the storage box with those in the lower part. From the storage box insert the
two (3 x 10) screws. Tighten securely.
10. Installing the battery for the police sound and light
A. Locate the battery compartment in the upper part of the storage box, push and
remove the battery cover. Install two (2) 1.5V (AA) size alkaline batteries
(not included) as instructed (+ to + and – to -).
B. After checking the buttons for the correct operation of the police sound and lights,
reinstall the battery cover.
Caution: Do not mix old and new batteries together when in use..
Do not mix rechargeable batteries and alkaline batteries.
Do not dispose of used battery in fire or water, to avoid hazard and
pollution of environment. Do not try to recharge standard batteries.
11. Plug the front light wire into the wire coming from the vehicle body.
12. Connecting the battery.
Note: Make sure the battery is connected before you install the seat.
Connect the BLACK wire to the BLACK terminal; connect the RED wire
to the RED terminal.
3 x 10
13. Installing the seat
Remove the screw on the hole of the screw in the rear of the vehicle body.
Snap the tab at the front of seat into the location at the rear of the gas tank, then
insert the tab on the back of the seat into the hole of the screw in the rear of the
vehicle body. Using a screwdriver secure the seat with screw.
8. Locate the bottom of the storage box
and box holder. Line up the three holes
on the storage box bottom with the holes
in the box holder. Using the three
(2.6 x 10) screws secure storage
box bottom to the holder.
4 x 12
CHARGING THE BATTERY
1.
Before first use, remove the seat and attach
the wires to battery terminals. Always Red
to Red and Black to Black.
2. The vehicle charging jack is on the back
bottom of the body. Plug the charger into
the jack.
3. Insert the charger plug into a wall outlet.
After 8 - 12 hours vehicle should be fully
charged. Unplug the charger from the wall
outlet and disconnect the charger from the
jack on the vehicle.
9. Align the holes in the box holder with the
holes in the rear part of the vehicle body.
Using the four (4 x 12) screws, secure
box holder to the vehicle.
REPLACING BATTERY
1. Unscrew and remove the seat to expose the battery compartment.
2. Unplug the battery connectors and remove the exhausted battery from the battery
compartment.
3. Put the new battery into the battery compartment as specifically designed.
4. To charge the new battery refer to “charging the battery”
5. Dispose of the exhausted battery in an appropriate waste collection center.
You can help protect the environment! Please remember to respect local regulations:
Turn in the non-working electrical equipment to an appropriate waste disposal center.
5
6
RECHARGING PRECAUTIONS AND WARNING
1. The charger is not a toy. The battery should be charged by adults only.
2. Do not allow children to play with the charger or to recharge the battery.
3. Before the first use, you should fully charge the battery for 8 -12 hours. Do not
charge the battery for more than 15 hours to avoid overheating the charger.
4. To recharge the battery, plug the charger into vehicle then into household wall
outlet,the battery will begin charging. After the battery is fully charged, unplug
the charger from the battery and wall outlet.
5. It is normal for the charger to feel warm during charging, but if the charger
feels very hot, stop charging and check the battery and charger for damage.
6. When the vehicle begins to run slowly, recharge the battery.
7. To lengthen the life of the battery, always recharge the battery before storing
and at least every three months thereafter.
8. Use only battery and charger of the same type as recommended by the
manufacturer.
9. Do not connect the battery terminals together or the vehicle will short circuit.
10. If charger should be examined regularly for damage to the cord, plug and
other parts. If any damage is found,charger should be repaired or replaced
immediately.
11. Do not use a damaged charger.
IMPORTANT:
To prolong battery life, you must recharge the battery after each use.
You must also charge your battery if it has not been used for 30 days or more.
CAUTION:
1. The battery compartment is located under the seat. Remove the seat to check the
battery terminals and wire connections.
2. Please note never try to connect Red to Black or Black to Red or a short
circuit will occur!
3. For long term storage, disconnect the wires from the battery terminals.
Do not store battery in extreme temperatures.
OPERATION
1.
•
•
•
2.
3.
To change the direction of the vehicle, set the direction switch to:
“Forward” position, step on the accelerator, the vehicle moves forward,
“Reverse” position, step on the accelerator, the vehicle moves in reverse.
Middle position “Neutral”, step on the accelerator, the vehicle will not move.
Headlight comes on when vehicle is moving forward.
On the storage box, press the sound/light button down. It will stay depressed.
Once down, your child will hear police sounds and see flashing light. To turn the
police sound and lights off, simply press button again.
OVERLOAD PROTECTION
This vehicle ( battery) is equipped with an auto - recovery device. If the vehicle is
overloaded, operated incorrectly, or power current is greater than the electrical
system is designed to accept, the device will shut off power automatically. The
vehicle will stop working. After (2) two minutes, the device will reset itself and
the vehicle will work normally.
7
WARNING:
NEVER change the direction by pressing the Forward/Backward switch while the
vehicle is moving. You must always come to a stop before changing direction.
IMPORTANT!
• Adults should read this manual carefully before allowing a child to use the vehicle.
Vehicle should be assembled by an adult.
• Child should always be supervised by an adult when operating the vehicle.
• Do not overload,maximum weight 66LBS/30kgs.
• Only 1 child should ride on this vehicle at a time.
• Do not operate vehicle on sandy, muddy, or rugged surfaces to avoid damage
to the vehicle.
• Do not ride the vehicle in dangerous places such as busy streets, roads, or highways.
• Never ride in hilly areas or on steep slopes.
• Never ride the toy near swimming pools or other bodies of water.
• Never ride in the dark or in dimly lit areas.
• Use the toy only on flat surfaces, such as inside your house, sidewalks, or playground.
• Use only battery recommended by the manufacturer.
• Use only charger specified by the manufacturer.
• Do not clean the vehicle while the charger is attached.
• Clean the vehicle only with a damp cloth—never submerge vehicle in water or spray
vehicle with water from a hose.
• Dispose of all batteries and non-working electrical equipment in appropriate waste
disposal centers.
ELECTRICAL AND ELECTRONIC EQUIPMENT
THAT ARE SUPPLIED WITH BATTERIES
(INCLUDING INTERNAL BATTERIES)
WEEE Directive & Product Disposal
At the end of its serviceable life, this product should not be
treated as household or general waste. It should be handed
over to the applicable collection center for the recycling of
electrical and electronic equipment.
Internal / Supplied Batteries
Notice to customers
This symbol on the battery indicates that the battery is to
be collected separately.
The following applies only to users in European countries.
This battery is designed for separate collection at an appropriate
collection center.
Do not dispose of as household waste.
For more information, contact the retailer or local authorities in
charge of waste management.
8
TROUBLE SHOOTING
1. If the vehicle fails to move.
• Make sure the direction switch is not set to the middle position.
• Make sure the battery wires are connected properly.
• Recharge battery, if necessary.
• Check to see if overload,relay triped.
• Check the battery. If it is damaged or exhausted, replace it.
2. If the vehicle runs slowly: Recharge the battery.
3. If the battery cannot be recharged: Battery or charger may need to be replaced.
4. If the headlight does not work, check to see if the wires are loose.
5. If the vehicle still fails to operate,
contact our customer service center at the number below.
W WARNING:
W WARNING:
CHOKING HAZARD - Small parts
Protective equipment should be
worn,Not to be used in traffic!
not for children under 3 years !
WARNING:
TO REDUCE THE RISK OF INJURY, ADULT SUPERVISION IS REQUIRED. NEVER USE
IN ROADWAYS,NEAR MOTOR VEHICLES,ON OR NEAR STEEP INCLINES OR STEPS,
SWIMMING POOLS OR OTHER BODIES OF WATER;USE THE TOY ONLY ON FLAT
SURFACES, SUCH AS INSIDE YOUR HOUSE, SIDEWALKS, OR PLAYGROUND.
ALWAYS WEAR SHOES, AND NEVER ALLOW MORE THAN 1 RIDER.
Customer Service:
1-855-GIGGOTY (1-855-444-4689)
customerservice@giggotoys.com
9