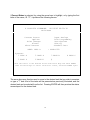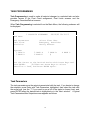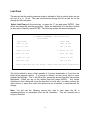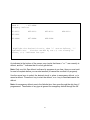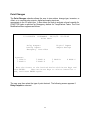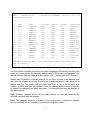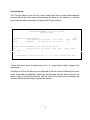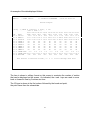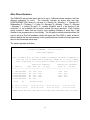
1
COM-5002
USER MANUAL
1
MCS-5002 USERS MANUAL
INDEX
(Items in red linked to text)
PAGE
INTRODUCTION
1
HARDWARE
2
SOFTWARE
3
CONNECTING & LOGON PROCEDURE
3
MENU STRUCTURES & REPORTS
6
INITIAL SETUP
9
CURRENT STATUS
11
INPUT ANALOGS
14
OPTIONS
TASK PROGRAMING
TASK PARAMETERS
SELECT FLOAT CIRCUITS
LIMIT FLOAT
EMERGENCY OVERRIDES
15
16
16
18
19
20
POINT CHANGES
RELAY OUTPUTS
DIGITAL INPUT
ANALOG INPUT
ANALOG OUTPUT
22
22
24
25
26
DESCRIPTION
SYSTEM & TASKS
RELAY OUTPUTS
DIGITAL INPUTS
ANALOG INPUTS
ANALOG OUTPUTS
27
28
29
30
31
32
ALARMS
CURRENT ALARMS
TIMING NOW
HISTORY
DISPLAY ACTIVES
33
34
35
36
37
2
ALTER ACTIVES
PRORITY CHANGES
ACKNOWLEDGE
38
39
40
HISTORY
ALTER SAMPLING
REVIEW SAMPLES
LOGGED RUNTIMES
UTILITY DATA
EDIT UTILITY DATA
PULLBACK HISTORY
41
42
45
48
49
50
50
MISCELLANEOUS
SET COM TIME
MODIFY PASSWORDS
ALTER PHONE NUMBERS
EDIT SITE INFO
CLEAR BOX FAILURES
PAGER SETUP
51
52
52
54
56
57
57
SCHEDULE DATA
ALTER SCHEDULES
REASSIGN GROUP
CHANGE HOLIDAYS
STORE HOUR CHANGES
59
60
62
62
64
Q MONITOR
BACKUP NAMES
RESTORE NAMES
BACKUP 5K DATA
RESTORE 5K DATA
BACKUP 4K DATA
RESTORE 4K DATA
66
66
66
66
66
66
67
Z MONITOR
DISPLAY MEMORY
ALTER MEMORY
BUBBLE DUMP
MODIFY BUBBLE
CONFIGURE ONE & CONFIGURE ALL
67
68
68
68
68
68
APPENDIX
MENU TREE
COM-5001/2 – ISOMETRIC
CPU BOARD
RAM EXPANSION BOARD
71
72
73
74
3
COM-5002 USERS MANUAL
For
MCS-4000 EZ-SET CONTROLLERS
VERSION 3.3XX SOFTWARE
INTRODUCTION
Central communications is provided for the MCS-4000 Series Controllers by the
COM-5002. The COM-5002 Communications/Host Controller gives the 4000
Series EZ-SET Controllers, the capabilities of COM-NET global bus (RS-485),
one local terminal (RS-232), local printer, and remote 2400 OR 14.4K Baud
modem communications. The COM-NET global bus provides central
communication for all 4000 EZ-SET controlle rs and one point tie-in for the local
alarms, alarm acknowledge, and time synchronization. It provides basic
centralized reports and control functions consisting of alarm status and logging,
current I/O status, names and descriptions, passwords, additional history logging,
detailed status reports, utility reports, program viewing and changing, with cursor
control supported for a variety of terminals.
Figure 1 illustrates the basic communications set-up for 4000 Series controllers
with a COM-5002 and its a vailable ports.
COM5002
-- Local Alarm
-- Printer
-- Modem/Phone
n Terminal
Global Bus
MCS4000
More 4000
Max. 16
MCS4000
MCS4000
LOCAL BUS
I/O BOARD
I/O BOARD
I/O BOARD
I/O BOARD
I/O BOARD
I/O BOARD
I/O BOARD
I/O BOARD
I/O BOARD
I/O BOARD
I/O BOARD
I/O BOARD
MORE I/O BOARDS
1
HARDWARE
The COM-5002 consists of a processor board, an optional ram storage board, and a
half card modem housed in an enclosure. The microprocessor board utilizes a Hitachi
64180 running at 12 Mhz. 256k of EPROM is provided for program storage and 256k
for temporary data storage. 512k of battery backed ram is provided on the processor
board.. An interface to the battery-backed ram storage board and internal 2400-baud
modem is also provided as standard, with 14.4K baud optional. It also has three
communications ports; 1- terminal (300 to 9600 baud), 2-printer (300 to 9600 baud), and
3-Global COM-NET communications bus (19.2K baud). A reset switch is provided to
re-boot the system.
Two alarm outputs are provided to drive a remote audible (SONALERT) alarm and a
visual alarm (flashing light). A separate source of power (i.e. transformer is required to
power the horns/lights). One alarm input is provided for remote reset of the audible
output.
Power requirements are 1.5 amp @ 10VDC provided by a 115/230 to 10 VDC
transformer. The environmental limitations are 0 to 50 C, 95 % RH non-condensing.
The battery-backed ram can be purchased in 512k increments, with a maximum of
1024k (using 32k chips) or 4096k using 128k chips. The ram expansion board piggy
backs on to the processor board and connects to it by means of a 50-pin
connector/ribbon cable. The ram storage board and processor board mount to the back
of the enclosure door.
The 2400/14.4 baud half-card modem(s), IBM compatible, plug into the
processor board.
Two RS-232 port connectors (9 pin) are provided on the right side of board; one for the
local terminals, and one for the local printer.
A dipswitch is located on the processor board to set baud rates and other COM-5002
features. The switch settings are as follows:
2
Switch Function
------ ---------1 local port baud rate
2
"
"
"
"
3
"
"
"
"
4
5
6
7
8
---
300 600 1200 2400 4800 9600*option Standard
--- ---- ---- ---- ---- ------ ---------Left R
L
R
L
R
right
Right R
L
L
R
R
right
Left L
R
R
R
R
right
Alarm messages to printer port
Satellite Communications
re-initialize battery ram
8 or 16 system configuration
ram storage board
left
left
left
left
left
=
=
=
=
=
yes right = no
yes right = no
yes right = no
16
right = 8
present right = none
right
right
right
right
left
* The optional setting is taken from the Misc./Alter Phone Numbers Screen.
See Appendix A for drawings of COM-5002.
SOFTWARE
GENERAL
The software is menu driven with cursor control capability from a dumb terminal. All
necessary software is contained within the COM-5002; a P/C is not required (except for
file transfers/graphing/graphics) but may be used with terminal emulation software
(Cross Talk, Access, etc.). The terminals that are supported are shown on the initial
screen. Com-Trol provides a communication package called EZCOM that is required
for file transfers, graphics and graphing.
CONNECTING TO THE COM-5002 & LOGON PROCEDURE
The COM-5002 can be accessed by a local terminal directly connected to the
COM-5002's RS-232 port, or from a remote location through the 2400-baud
modem or optional 14.4K baud IBM compatible modem. The data format must
be set as follows:
Data Bits: 8
Parity: none
Stop Bits: 1
Auto Line Feed: no
3
When accessed locally/direct connection (cable part #50TB171G01), or remotely via
modem, the initial screen will appear as follows:
1 --2 --3 --4 --5-9 -
ANSI Std, Color CRT
ANSI Std, Mono CRT
TELEVIDEO 905 & emulation
LINK 125 with attribute char
Unused
Select Terminal Model:
The user then has 30 seconds in which to select the proper terminal or the system will
automatically hang up. "ANSI Std" applies to communications programs such as Xtalk
Mark4, Access, Bitcomm, etc. that use ANSI standards. Com-Trol will supply the
necessary key files/translation programs to enable these programs to work properly.
After typing the terminal selection number, the following screen will appear (without
pressing ENTER):
4
4 LUCKY034 LIVERMORE
08/16/95 09:29:18
Password Entry
Copyright 1995, Universal Enterprises, Inc
Password Entry
(Three incorrect logs off system)
Enter Password : ______
The user then types in their password (4 TO 6 characters) and presses ENTER.
Asterisks are displayed rather than the actual password to prevent others from viewing
the password. As indicated, three tries are permitted to enter a valid password, after
which the user is disconnected.
The COM-5002 is shipped with a standard PASSWORD. At a new installation, the
person responsible for security should:
1. Gain access to the system using the standard Password (COM5k2 at level 8).
2. Add Passwords as required for the installation.
3. Remove the standard password.
5
MENU STRUCTURES AND REPORTS
To quickly familiarize yourself with the Menu Structure of the COM-5002, refer to the
MENU TREE located in Appendix B.
After the password is entered correctly, the following screen will appear:
4 LUCKY034 LIVERMORE
Main Menu
Current Status
Options
Point Changes
Alarms
Miscellaneous
Systems:
1 HVAC A
5 RACK D
08/16/95 09:29:32
Input Analogs
Task Programming
Descriptions
History
Schedule Data
2 RACK A
6 RACK E
3 RACK B
@
4 RACK C
Move the Cursor to the Desired Action with Arrow Keys and
Press ENTER.
Then use Arrow Keys to Select Controller &
Task, and Press ENTER again.
This is the Main/Home Menu. The location name is displayed at the top along with the
current time and date, continuously updated. There is also a number that ranges from 0
to 15 at the center of the top line. This is a timer that starts at 15 minutes and counts
down to 0. If an alarm occurs, this timer is set to 2 minutes regardless of where it was.
When it reaches 1 minute, it will cause a beep every 6 seconds until it reaches 0, at
which time it will perform the dial-out. If yo u wish to delay this action, you can type in
"Ctrl R" and add 5 minutes to the timer for each time you type it, up to a maximum of 30
minutes (6 "Ctrl R's"). If another alarm occurs however, the timer again goes to 2
minutes and no additional time is permitted until the dial-out is attempted. If the dial-out
was unsuccessful (busy line, etc.), then the timer will go to 15 minutes and start
counting down again. Any unsuccessful alarms waiting in the queue are also delivered
when a new alarm occurs and is dialed-out.
6
This screen is composed of two areas: the selection menu for the desired function, and
the System menu that indicates the number and name of the 4000’s present and the
alarm state on each. If more than four system/4ks are present, a second line of system
names will appear beneath the first four, etc.
The function is selected first by using either the arrow keys to move to the desired entry
(as prompted at the bottom of the screen) then pressing ENTER, or the user may press
the key that corresponds to the first letter of the desired function: i.e. "A" for "Alarm",
and then press ENTER. The next menu will then appear, or if the menu selection made
requires the selection of the 4K you want the requested information from, a window will
pop-up below the menu indicating the current 4000 controller /task you are on, as
depicted below:
4 LUCKY034 LIVERMORE
08/16/95 09:29:38
Main Menu
Current Status
Options
Point Changes
Alarms
Miscellaneous
Input Analogs
Task Programming
Descriptions
History
Schedule Data
NEXT: HVAC A
Systems:
1 HVAC A
5 RACK D
- SALES-50%
2 RACK A
6 RACK E
3 RACK B
@
4 RACK C
Move the Cursor to the Desired Action with Arrow Keys and Press
ENTER.
Then use Arrow Keys to Select Controller & Task, and Press ENTER
again.
The controller/task that is displayed in the window (after the word NEXT) can be
changed by pressing the up and down or left and right arrow keys to move to the
controller desired or to the task on that controller that the information is desired, then
press ENTER.
7
Note: For information that is applicable to a 4K, such as Input Analogs, you may be
on any task in that controller when ENTER is pressed and get the requested
information. For information that is specific to a task, such as Current Status, you
need to move to the specific task.
Note: All of the prompts given at the bottom of any of the screens will not always apply
to the specific screen being viewed.
If you want to see a list of the tasks that are on each 4K, type ?, after selecting Current
Status, and the following screen will appear:
4 LUCKY034 LIVERMORE
08/16/95 09:29:50
Main Menu
Current Status
NEXT: HVAC A
- SALES-50%
A 1Li2Li3Li4Li5Li6Li7Li8Li9Li10Li11Li12Cp13Ad14Cp15Ad16As-
HVAC A
SALES-50%
SALES-50%
STOCKROOM
BAKERY/DELI
OUTSIDE/SIGN
SECURITY
DECORATIVE
CASE
CASE
RECEIVE HEAT
AC#2 SHUTOFF
MAIN HVAC 1
BYPASS HVAC1
HVAC #2
BYPASS HVAC2
ANTISWEATS
B - RACK A
1Rf- COMPR LTA-25
2Ad- SUBCOOLER A
3Ad- HOT WATER
4Ad- HW LOCKOUT
5Ad- ALARM
6Ad- SENSCO
7Ad- BYPASS
8Fn- VS EVAP COND
9Tm- A01-RIIC
10Tm- A02-RIIC
11Tm- A03-RIIC
12Tm- A04-RIIC
13Tm- A05-DTFF
14Tm- A06-MDFM
15Tm- A07-BFBX
16Tm- A08-FFBX
C - RACK B
1Rf- COMPR LTB2Ad- SUBCOOLER B
3Ad- HEAT REC B
4Ad- HT REC LOCK
5Ad- ALARM B
6Ad- SENSCO B
7Ad- BYPASS B
8Ad- DROP LEG B
9Ad-FREON SNIF B
10Ad- MOISTURE B
11Tm- B01-RIFF
12Tm- B02-RIFF
13Tm- B03-RIFF
14Tm- B04-RIFF
15Tm- B05-RIFF
16Tm- B06-RIFF
D - RACK C
1Rf- COMP C +10
2Ad- SUBCOOL C
3Ad- HEAT REC C
4Ad- HR LOCKOUT
5Ad- ALARM C
6Ad- SENSCO C
7Ad- BYPASS C
8Ad- RUPTURE DSK
9Ad- DROPLEG C
10Ad- FREON SNIF C
11Ad- MOISTURE C
12Tm- C01-MDMT
13Tm- C02-MDMT
14Tm- C03-MDMT
15Tm- C04-PKDL
16Tm- C05-PKDL
Then use Arrow Keys to Select Controller & Task, and Press ENTER again.
Move to the desired controller/task with the arrow keys; the window at the top will
display the task that is currently highlighted. Press ENTER when the desired task is
displayed in the window. If there are more than 16 tasks on the controller, they will be
scrolled into view when the cursor reaches the bottom of the screen.
8
When initially brought up, Dip switch number 6 must be set to the left to initialize the
system. The switch is returned to the right when the instructions on the screen so
indicate (if you have terminal hooked up). The screen/menu as shown previously will
then be displayed. The actual configuration may then be obtained by going into the
Monitor (press 'Z' on the Main Menu) and selecting Configure All and pressing ENTER.
The Z Monitor screen appears as follows:
15 LUCKY034 LIVERMORE
08/16/95 09:48:49
Monitor Menu
Display Memory
Bubble Dump
Configure One
Restart 5K
Systems:
1 HVAC A
5 RACK D
2 RACK A
6 RACK E
Alter Memory
Modify Bubble
Configure All
Modem Setup
3 RACK B
@
4 RACK C
Move the Cursor to the Desired Action with Arrow Keys and
Press ENTER. Then use Arrow Keys to Select Controller &
Task, and Press ENTER again.
9
When ‘Configure All’ is selected, the 5K will start at address/Box 1 and see if it gets a
response. If it does, it will poll for all tasks and all task and I/O names.
The screen will appear as follows:
Reconfigure One System
Attempt A, HVAC A
TskA 1 SALES-50%
TskA 5 OUTSIDE/SIGN
TskA 9 CASE
TskA12 MAIN HVAC 1
TskA13 BYPASS HVAC1
TskA15 BYPASS HVAC2
TskA17 VS FAULT MON
TskA 2 SALES-50% TskA 3 STOCKROOM TskA 4 BAKERY/DELI
TskA 6 SECURITY TskA 7 DECORATIVE TskA 8 CASE
TskA10 RECEIVE HEAT TskA11 AC#2 SHUTOFF
TskA14 HVAC #2
TskA16 ANTISWEATS
TskA18 AMBIENT XFER
SALES #2
Unused
Unused
Unused
It will then go to Box 2 and repeat this sequence. If any two consecutive
4K’s do not respond; the process will be terminated.
Check the box addresses/address switch if any controllers present do not respond.
The System/controller menu will then reflect the actual controller/system configuration
with their appropriate names. The description/names may be modified through the
Description menu (see 3.2).
This completes the procedures that only need to be performed on a new installation, or
when the COM-5002 is replaced, or tasks are added to any 4K setup/program.
10
The other Z menu commands will be covered later. If an * (asterisk) follows any System
designation, it indicates that the COM-5002 has lost communications with this particular
4000. The COM-5002 communicates with each MCS-4000 every 6 seconds. If it fails to
get the proper response after 10 consecutive tries, it waits 5 minutes, then again tries
10 times, Again it waits 5 minutes and tries 10 times. If it fails this third time, it places
the asterisk after the name, logs the event, and initiates an alarm. At this point the
COM-5002 will not try to communicate with this controller(s) until 1 hour has expired. It
will then repeat this procedure again. If communications is successful the asterisk will
be removed and the alarm will be cleared. If it is not successful, it will wait another hour
and try again, etc. The user can force the COM-5002 to try and communicate with the
controller(s) through the Misc. sub-menu selection of Clear Box Failures.
If a "+" follows any System designation, it is indicating that an alarm condition(s) is
present on that controller that has not yet been successfully dialed-out. The + overrides
the *.
An "@” indicates that an alarm has been dialed-out, but has not yet cleared/returned
inside alarm settings.
An “M” indicates that the 4000 has been placed in the Monitor mode; no control actions
will take place until it is placed back in the Running mode. Mode may be
accessed/changed from the Task Programming Menu.
An “S” indicates that the 4000 has been placed in the Stopped mode. The 4000 is
neither monitoring inputs or controlling outputs in this mode. It will automatically return
to the Running mode after 1 hour. Mode may be accessed/changed from the Task
Programming Menu
CURRENT STATUS
Current Status provides information for a selected task, which includes some setpoint
information as well as the current values for the appropriate inputs and outputs
associated with the task. Runtimes and cycles are also displayed.
This information is automatically updated every 6 seconds.
Note: The software version number for the 5K is shown on the top line next to the 5k
date and time and the 4k version and date and time are shown directly underneath.
11
If Current Status is selected, by using the arrow keys to highlight, or by typing the first
letter of the name; I.E. "C", it produces the following screen:
4 LUCKY034 LIVERMORE
08/16/95 09:29:38
Main Menu
Current Status
Options
Point Changes
Alarms
Miscellaneous
Input Analogs
Task Programming
Descriptions
History
Schedule Data
NEXT: HVAC A
- SALES-50%
Systems:
1 HVAC A
2 RACK A
3 RACK B
5 RACK D
6 RACK E
@
4 RACK C
Move the Cursor to the Desired Action with Arrow Keys and Press ENTER.
Then use Arrow Keys to Select Controller & Task, and Press ENTER again.
The arrow keys may then be used to move to the desired task that you wish to examine,
or type a ”?” and a list of the tasks will be presented as previously illustrated, and the
desired task can be selected from the list. Pressing ENTER will then produce the status
screen/report for the desired task.
12
The following is an example of a Compressor task status report:
RACK A - COMPR LTA- 3 LUCKY034 LIVERMORE
08/16/95 09:30:12
Task Status
V1.324A 08/16/95 09:30:01
Category: Compressors
Name: COMPR LTA-25
Mode: Normal Run
Suction PSI
11.8 P2
Sat Suction -26.4
Initial Tgt 13.9
Current Tgt
10.9
Float TmpAv -14.4
Float Tgt -15.0
Float Ckt
A01-RIIC
Current Acc 100.0%
Head Pres 171.5 P5
Head Safety
325.0
Freeze Prot -----
Ckt Name
COMP1-1
COMP2-1
COMP3-1
Part
Run Time Record
Status Monitor of Grp
Today
On
On
25.5%
09:22
On
On
31.9%
09:27
On
On
42.5%
09:30
Percent Cyc
98.5%
3
99.4%
1
100.0%
0
Ystday Percent Cyc
23:47
99.0%
10
23:55
99.6%
7
23:58
99.8%
3
P= Program, S= Status, O= Options, I= Input Analogs, R= Runtimes, ESC= Prev
See Appendix C for examples of all 4000 Task Status screens.
Once the Status screen of any task has been selected from the Main Menu, the user
may move to any other Task Status screen without returning to the Main Menu by using
the arrow keys. For example, if you were on the Status screen for the compressor tasks
for Rack A, pressing a right arrow would pop-up a window at the upper left show the
matching task number on the next controller. Pressing additional arrows in the desired
direction will show the names of the other Tasks on the additional controllers. When the
desired task’s name is indicated, simply press ENTER and that status screen will
appear. The up/down arrows can be used in the same manner. This provides a quick
way to move from 4K to 4K and task to task.
When you have completed viewing the status screen of any task, you may return to the
previous screen, (in this case Main Menu), by pressing the escape “Esc” key, or in the
case of making a program/setpoint change, after pressing “End” key to save/transmit
the change(s), you will automatically be returned to the previous screen.
Note: You may also go directly to the Main Menu from any other Menu, by pressing the
“@” key.
13
INPUT ANALOGS
The Input Analogs screen shows 32 analog inputs on a selected 4K at one time.
Pressing the page down (PgDn) key provides the next 32 inputs, and so on. This
screen may be reached either from the Main Menu selection, or directly from a Task
status screen, as indicated in the instructions at the bottom of the screen, by pressing
the “I” key. The Input Analog screen appears as follows:
RACK A
- COMPR LTA-25
2 LUCKY034 LIVERMORE
08/16/95 09:31:02
Current Analog Values
V1.324A 08/16/95 09:30:57
# task name
1-1 COMPR LTA-25
1-2 COMPR LTA-25
1-3 HEAD A XFER
1-4 COMPR LTA-25
1-5 COMPR LTA-25
1-6 SUBCOOLER A
1-7 DROP LEG A
1-8 FREON SNIF A
2-1 Unused
2-2 MOISTURE A
2-3 A01-RIIC
2-4 A02-RIIC
2-5 A02-RIIC
2-6 A02-RIIC
2-7 A03-RIIC
2-8 A03-RIIC
current
#
SUCT A
12.0
HEAD A
171.5
DISCH A 1 71.5
HTEMP A
67.0
HR LOCK
15.6
LIQUID
78.3
DROPLEG
78.4
SNIF A
80.0
Unused
0.0
MOISTURE 18.4
RIIC1-01 -14.4
RIIC1-02 -17.2
RIIC2-02 -19.0
RIIC3-02 -19.8
RIIC1-03 -15.0
RIIC2-03 -14.4
task name
current
P2 3-1 A04-RIIC RIIC1-04-16.6
P5 3-2 A05-DTFF DTFF1-05-15.0
P5 3-3 A05-DTFF DTFF2-05-15.6
F
3-4 A06-MDFM MDFM1-06 -1.6
%
3-5 A06-MDFM MDFM2-06 -3.0
f
3-6 A07-BFBX BFBX1-07 41.9
f
3-7 A08-FFBX FFBX1-08 2.0
ppm 3-8 Unused
Unused
0.0
ue 4-1 Unused
Unused
0.0
%
4-2 Unused
Unused
0.0
f
4-3 Unused
Unused
0.0
f
4-4 Unused
Unused
0.0
f
4-5 Unused
Unused
0.0
f
4-6 Unused
Unused
0.0
f
4-7 Unused
Unused
0.0
f
4-8 Unused
Unused
0.0
f
f
f
f
f
f
f
ue
ue
ue
ue
ue
ue
ue
ue
ue
P= Program, S= Status, O= Options, I= Input Analogs, R= Runtimes, ESC= Prev
The board and point number is shown in the first column, followed by the Task name,
point name, and the current value. The current value is updated every six seconds.
Again, note that as indicated on the bottom line instructions, you may go directly from
this screen to the other indicated items.
Pressing “Esc” on this screen will return you to the Main Menu.
14
OPTIONS
The Options Screen shows how the various Setup options were selected when the 4K
was setup/programmed. They can either be reached by selecting Options on the Main
Menu, then selecting the desired task with the arrow keys, then pressing ENTER. Or, if
you are already on a Task Status screen, simply pressing an “O” will take you to the
Option Screen for that task. Press “S” to return to the status screen if using this method
as indicated at the bottom of the screen.
A typical Option screen appears as follows:
RACK
- COMPR LTA-25
Category: Comp
3 LUCKY034 LIVERMORE
08/16/9 09:30:38
View Options
Name: COMPR LTA-25
Compressor Options
Compr Monitors
Low Refrig Inp
Compr Oil FailureDischarge Temp
Compressor Rotat Demand Cooling
-
Extra Options
Equipped
Analog
Unequipped
Rack, Alarm Only
Unequipped
Unequipped
DeSupHt/Liq Inject
Freeze Protect
MultiCkt Condensor
Night Setup Temp
Oil Level Switch
Digital Inhibits
-
Unequipped
Unequipped
Unequipped
Unequipped
Unequipped
Unequipped
P= Program, S= Status, O= Options, I= Input Analogs, R=
Runtimes, ESC= Prev
Note: Options may not be changed through the 5K. You must alter the program file with
EZSET2 and download it, or do it directly from the front panel. Most option changes
require that the task be deleted and re-added since they often affect the I/O
configuration.
15
TASK PROGRAMMING
Task Programming is used to make all setpoint changes to a selected task and also
provides access to the Float Circuit assignment, Float Limits screens, and the
Emergency Overrides/Defrost screens.
When Task Programming is selected from the Main Menu, the following submenu will
be displayed:
1 LUCKY034 LIVERMORE
08/16/95 09:32:55
Task Menu
Task Parameters
Limit Float
Priorities
Systems:
1 HVAC A
5 RACK D
Select Float Ckts
Emergency Overrides
Hourly Offsets
2 RACK A
6 RACK E
3 RACK B
@
4 RACK C
Move the Cursor to the Desired Action with Arrow Keys and
Press ENTER.
[6;1Then use Arrow Keys to Select
Controller & Task, and Press ENTER again.
Task Parameters
The task parameters are the setpoints associated with the task. If you desire to change
the setpoints, press Enter with Task Parameters highlighted, then select the task with
the arrow keys (use the “?” if you need to see a list of the tasks to choose from), and
press ENTER when the desired task is highlighted or in the “Next: window”. A typical
Task Parameters/Alter Setpoints screen appears as follows:
16
RACK A - COMPR LTA-25
Alter Setpoints
Category: Compres
Tmp
-25.0
PSI
13.9
PSI
1.0
Sens
7
Number----Setp ----Number-----
3 LUCKY034 LIVERMORE
Suction Temperature Trgt
Suction Pressure Target
Low Suction Safety
Sensitivity Level(0-10)
Schedule Group
Night Offset
Circuit Number
PSI
325.0 Head Safety Limit
PSI
25.0 Head Safety Deadband
Pct
50.0 Variable Speed Minimum
PSI
----- First Fan Stage Target
PSI ----- Second Fan Stage Target
PSI ----- Heat Reclaim Offset
08/16/95 09:30:20
Name: COMPR LTA-25
PSI
Secs
Secs
Count
Tmp
Secs
-------------------------
Oil PSI Trip Level
Oil Time Delay
Oil Inhibit Delay
Oil Retry Count
Disc Temp Cutout
Oil Level Delay
Tmp
Tmp
Tmp
-------------
DeSuperheater Setpoint
Desuperheater Deadband
Freeze Protect Setpoint
COMPR LTA-25 Task Name
Arrow Keys select item, '<' & '>' edits Names, '+' rotates types,
ENTER enters new data, ESC exits W/O saving data, END saves data on screen
Note: As indicated on the prompt line at the bottom of the Task Status screen, by
pressing the "P" key, the user can view the Program screen for this task.
If the user has logged-on to the system with a password that has program change
authority, the arrow keys may be used to move to the desired value/entry to change,
then type in the desired value and press ENTER.
Note: ENTER must be pressed to change the value on the screen; arrows may not be
used for this action. The arrow keys can then be used to move to the next item, etc. until
all changes are made. Pressing the "END" key at this point will then save the changes
(or ESC to void and leave screen) and return you to the status screen, or the Task
Programming Menu depending upon how you got to this screen.
See Appendix C for examples of all 4000 Task Program screens.
17
Select Float Circuits
Select Float Circuits allows the user to assign or change the circuits that are being used
to float the suction pressure target. Use the arrow keys to highlight Select Float
Circuits, or press “S” key, then press ENTER. Select the desired 4K by using the
left/right arrows to move it into the Next: window and press ENTER again. The
following is an example the screen that will appear:
14 LUCKY034 LIVERMORE
Float Circuit Selection
08/16/95 09:34:02
9 A01-RIIC
10 A02-RIIC
Sec1 11 A03-RIIC
12 A04-RIIC
14 A06-MDFM
15 A07-BFBX
16 A08-FFBX
13 A05-DTFF
Pri1
Select circuit with Curso keys
Category for selected circuit:
(1 - 20 = Pri1 - Pri20,
21 - 40 = Sec1 - Sec20)
Use the arrow keys to move to the desired circuit to be used for floating, then type in the
appropriate number, as indicated in the instructions at the bottom of the screen, and
press ENTER. The numbers are defined as follows:
1-20 = the primary float circuit for the compressor group number. Used to float
the suction at all times except when this circuit is in defrost.
21-40 = the secondary float circuit for the compressor group number, that is only
used for float when the primary circuit is in defrost.
When all float circuits have been identified, press End key to save/transmit.
18
Limit Float
The amount that the suction pressure target is allowed to float up and/or down can be
set from 0 to +/- 10 psi. This can be performed through the 5K as well as on site
through the 4K front panel.
Select Limit Float with the arrow key, or press the “L” key and press ENTER. Next
select the desired 4K with the arrow keys. When the desired 4K is in the Next: window
(or any task on that 4k), press ENTER. The following screen will then be displayed.
12 LUCKY034 LIVERMORE
Float Limits
08/16/95 09:36:06
Upper Limit
Zero (0) PSI
Lower Limit
Zero (0) PSI
+One (+1) PSI
-One (-1) PSI
+Three (+3) PSI
=> -Three (-3) PSI
-Five (-5)
=> +Five (+5) PSI
PSI
+Seven (+7) PSI
-Seven (-7) PSI
+Ten (+10) PSI
-Ten (-1) PSI
Select limit with Up, Down Arrows, change sides with Left, Right Arrows
The Limits default to allow a float upwards of 5 psi and downwards of 3 psi from the
initial target pressure setting. If a change is desired, use the arrow keys to move
up/down and left/right. The => will follow your movement and the float limit value will be
highlighted. When you are on the desired float limit press ENTER.
Any further
movement in this column will cause the float limit to move with it, so either move to the
other column or press End, when the values are set as desired, to save/transmit the
change.
Note: You will see the following screen from time to time when the 5K is
requesting/waiting on information from the 4K controllers. This will normally last a
couple of seconds.
19
Communications Wait
Working: Waiting on Communications: Please be Patient
Emergency Overrides
Emergency Overrides is used to place temp/defr circuits into defrost for
unscheduled/emergency defrosts. Select Emergency Overrides by highlighting with the
arrow keys or pressing the “E” key, and press ENTER. Then select the 4K with the
arrow keys and press ENTER. If the controller select is RACK, SINGLES or CSTR
library, the Emergency Defrost screen will appear as follows:
20
RACK A
- D11-MTBX
Emergency Defrost
A01-RIIC
A05-DTFF
A02-RIIC
A03-RIIC
A06-MDFM
A07-BFBX
A08-FFBX
A04-RIIC
Highlight the desired circuit, then '+' starts defrost, '-'
terminates one.
Circuits marked by one (*) are already in
defrost, (**) indicates hot-gas.
As indicated at the bottom of the screen, any circuits that have a * or ** are currently in
defrost, and the ** indicates that it is a hot gas defrost.
Note: Only one Hot Gas defrost is allowed in progress at one time; thus you must wait
for one to complete before you can start another (or cancel the one that’s in progress).
Use the arrow keys to select the desired circuit to place in emergency defrost, or to
cancel a defrost. Press the + key to start the defrost, or a - key to terminate/cancel the
defrost.
Note: An emergency defrost runs to the failsafe time, then goes through the drip time, if
programmed. Termination of any type is ignored for emergency defrost through the 5K.
21
Point Changes
The Point Changes selection allows the user to view status, change type, inversion, or
offset, or to override relay outputs, digital and analog inputs as
appropriate to the I/O point type. It also allows the user to activate a timed override for
HVAC/TOD tasks or perform an Emergency defrost for Temp/Defrost Tasks. The Point
Modification Menu appears as follows:
12 LUCKY034
LIVERMORE
08/16/95
Point Menu
Relay Outputs
Analog Inputs
Emergency Overrides
Systems:
1 HVAC A
5 RACK D
2 RACK A
6 RACK E
09:36:49
Digital Inputs
Output Analogs
3 RACK B
@
4 RACK C
Move the Cursor to the Desired Action with Arrow Keys and
Press ENTER.
Then use Arrow Keys to Select Controller &
Task, and Press ENTER again.
The user may then select the type of point desired. The following screen appears if
Relay Outputs is selected:
22
RACK A - COMPR LTA-25
RO Modifications
#
1
2
3
4
5
6
7
8
9
10
11
12
13
14
15
16
pnt
NONE
1-1
1-2
1-3
4-8
1-4
1-6
1-5
1-8
4-7
4-3
4-4
4-5
2-1
2-2
2-3
name
Unused
COMP1-1
COMP2-1
COMP3-1
SUBCL-A
HOT WTR
HW LOCK
ALARM A
SENSCO A
BYPASS A
VS FAN
VSRESET
VSBYPAS
REFR-1
DEFR-1
REFR-2
11 LUCKY034 LIVERMORE
current
Off
On
On
On
On
Off
Off
On
Off
On
On
Off
On
On
Off
On
switch
Com
Com
Com
Com
Com
Com
Com
Com
Com
Com
Com
Com
Com
Com
Com
Com
08/16/95 09:37:02
manual
On
Com
Com
Com
Com
Com
Com
Com
Com
Com
Com
Com
Com
Com
Com
Com
inversion
Inverted
Normal
Normal
Normal
Normal
Inverted
Normal
Inverted
Inverted
Inverted
Normal
Inverted
Inverted
Normal
Inverted
Normal
ENTER enters new data, ESC exits W/O saving data, END saves
data on screen
The first column indicates the board and point assignment, followed by the RO point
name, the current status, the hardware switch status (if RO board is so equipped), the
Manual/software override value, and the inversion (N.C. = normal and N.O. = inverted).
Relays may be placed in software override On or Off by moving to the desired relay
point with the up/down arrow keys (PgDn to get to additional relays), then typing a + to
change from the Com mode. This will rotate from Com, to On, to Off as each + is
entered. ENTER must then be pressed to enter the change, and End must be pressed
to transmit the change(s) and leave the screen. The Inversion state may be changed in
the same manner.
Note: Software overrides should not be made casually, as they will remain in the
selected state until they are removed.
Note: The hardware switches (if present on the relay boards) override the software
function and may only be changed by physically moving them on site.
23
The Digital Input point modification screen appears as follows:
RACK A
- COMPR LTA-25
11 LUCKY034 LIVERMORE 08/16/95 09:37:13
DI Modifications
#
1
2
3
4
5
6
7
8
9
10
11
12
13
14
15
16
pnt
NONE
NONE
NONE
NONE
1-1
1-2
1-3
1-5
1-4
NONE
2-7
2-8
NONE
1-7
1-8
2-1
name
Unused
Unused
Unused
Unused
CMMN1-1
CMMN2-1
CMMN3-1
HT REC
ALARM A
Unused
VSFN
IVPRF
Unused
TERM-1
TERM-2
TERM-3
current
On
On
On
On
On
On
On
Off
On
On
On
On
On
Off
Off
Off
manual
Com
Com
Com
Com
Com
Com
Com
Com
Com
Com
Com
Com
Com
Com
Com
Com
inversion
Normal
Normal
Normal
Normal
Normal
Normal
Normal
Normal
Normal
Normal
Normal
Normal
Normal
Normal
Normal
Normal
ENTER enters new data, ESC exits W/O saving data, END saves data on screen
The first column indicates the board and point assignment, followed by the DI point
name, the current status, the Manual/software override value, and the inversion (Closed
= On, normal and Open = On, inverted).
Digital inputs may be put in manual 'On' or 'Off' by moving to the desired input with the
arrow keys, then typing a '+' where 'Com' appears. This will rotate to On and Off and
back to Com with each '+' entered. Enter must then be pressed to enter the change,
and END must be pressed to leave the screen to make the change(s) take effect.
24
The Analog Input point modification screen appears as follows:
RACK A -COMPR LTA-25 11 LUCKY034 LIVERMORE08/16/95 09:37:25
AI Modifications
#
1
2
3
4
5
6
7
8
9
10
11
12
13
14
15
16
pnt
NONE
1-2
NONE
17-1
1-6
1-7
1-5
NONE
NONE
NONE
1-1
1-4
1-5
NONE
21-1
17-2
name
Unused
HEAD A
Unused
AMBIENT
LIQUID
DROPLEG
LIQ LVL
Unused
Unused
Unused
SUCT A
HTEMP A
LIQ LVL
SENSCO
HEAD A
HEAD B
current
0.0
170.5
0.0
77.2
78.0
78.0
15.6
0.0
0.0
0.0
11.8
166.0
50.0
50.0
170.5
176.5
offset
0.0
0.0
0.0
0.0
0.0
0.0
0.0
0.0
0.0
0.0
0.0
0.0
0.0
0.0
0.0
0.0
manual
Com
Com
Com
Com
Com
Com
Com
Com
Com
Com
Com
Com
On
Com
Com
Com
value
type
0.0
Unused
0.0
PSI 500
0.0
Unused
0.0
Reg Tmp f
0.0
Reg Tmp f
0.0
Reg Tmp f
0.0
% of 5V
0.0
Unused
0.0
Unused
0.0
Unused
0.0
PSI 200
0.0
Hi Temp F
50.0
% of 5V
0.0
Reg Tmp f
0.0
PSI 500
0.0
PSI 500
ENTER enters new data, ESC exits W/O saving data, END saves data on
screen.
This feature is handy for testing and to temporarily 'fix' a sensor until it can be replaced.
The first column indicates the board and point assignment, followed by the AI point
name, the current status, the offset value, the Manual/software override state, the
override value, and the sensor type.
Analog inputs may be offset by a +/- value moving to the offset column and the desired
point with the arrow keys, then typing in the desired offset value. This value will be
added/subtracted from the actual analog input value before it is used/displayed.
Each analog input may also be set to a manual value by moving to the desired point
and the manual column. Use the '+' to rotate to the 'On', press Enter, then move to the
Value column and enter the desired manual value, press Enter, and then End to Exit the
screen and save the changes.
The last column on the analog input point modification screen allows the Type of sensor
to be changed. The sensor type is automatically assigned by the MCS-4000 at initial
setup time. However, if a different type of sensor was used, such as a 0 to 100 psi
transducer for suction pressure, instead of the standard 0-200 psi transducer, this
25
sensor type may be changed to accommodate this. The type may be changed by using
the '+' key to rotate through all the possible sensors types, until the desired type comes
into view. Again, remember to press Enter and End.
Note: Any sensor that has been placed in the manual mode will have an 'M' placed next
to it on the Status screen.
The Analog Output point modification screen appears as follows:
RACK A
09:37:37
- COMPR LTA-25
11 LUCKY034 LIVERMORE
08/16/95
AO Modifications
# pnt
1 NONE
2 1-1
3 21-1
4 NONE
5 NONE
6 NONE
7 NONE
8 NONE
9 NONE
10 NONE
11 NONE
12 NONE
13 NONE
14 NONE
15 NONE
16 NONE
name
Unused
VSFAN
HEAD AX
Unused
Unused
Unused
Unused
Unused
Unused
Unused
Unused
Unused
Unused
Unused
Unused
Unused
current offset
0.0
0.0
100.0
0.0
170.5
0.0
0.0
0.0
0.0
0.0
0.0
0.0
0.0
0.0
0.0
0.0
0.0
0.0
0.0
0.0
0.0
0.0
0.0
0.0
0.0
0.0
0.0
0.0
0.0
0.0
0.0
0.0
manual
On
Com
Com
Com
Com
Com
Com
Com
Com
Com
Com
Com
Com
Com
Com
Com
value
0.0
0.0
0.0
0.0
0.0
0.0
0.0
0.0
0.0
0.0
0.0
0.0
0.0
0.0
0.0
0.0
inversion
Inverted
Normal
Normal
Normal
Normal
Normal
Normal
Normal
Normal
Normal
Normal
Normal
Normal
Normal
Normal
Normal
ENTER enters new data, ESC exits W/O saving data, END saves data on
screen
The first column indicates the board and point assignment, followed by the AO point
name, the current status, the offset value, the Manual/software override state, the
override value, and the inversion state.
Analog outputs may be offset by a +/- value moving to the offset column and the desired
point with the arrow keys, then typing in the desired offset value. This value will be
added/subtracted from the actual analog input value before it is used/displayed.
26
Each analog output may also be set to a manual value by moving to the desired point
and the manual column. Use the '+' to rotate to the 'On', press Enter, then move to the
Value column and enter the desired manual value, press Enter, and then End to Exit the
screen and save the changes. This feature is handy for testing and to temporarily 'fix' a
bad output until it can be replaced.
The inversion for an analog output changes the voltage ramp from 0 to 10 for normal, to
10 to 0 for inverted. This may be necessary to achieve the desired operation of certain
valves or dampers.
DESCRIPTION
Description allows the user to setup/edit custom names for the 4K’s, all Tasks and I/O
points, and to enter descriptions for each point and task, that are kept in the 5K only.
Highlight Description on the Main Menu with the arrow keys or by typing a “D” and then
press Enter. The following screen will appear:
10 LUCKY034 LIVERMORE
08/16/95 09:38:08
Description Menu
Digital Inputs
Output Analogs
Systems:
1 HVAC A
5 RACK D
System & Tasks
Analog Inputs
2 RACK A
6 RACK E
Relay Outputs
3 RACK B
@
4 RACK C
Move the Cursor to the Desired Action with Arrow Keys and Press ENTER.
Then use Arrow Keys to Select Controller & Task, and Press ENTER again.
27
System & Tasks
This selection allows the user to establish the names for the systems/4K’s and tasks
that are displayed on all the system selection menus and at the top of the various status
and program screens. These names will be placed in the 4K’s as well. The description
portion will only reside in the 5K.
After System & Tasks has been selected, the user then selects the desired 4K system
with the arrow keys and presses ENTER. The desired names may then be typed in,
using the arrow keys to move to the desired location and the Enter key to secure the
change. The “<” and “>”(with shift key) will move you within the name or description
field for editing. An example of a System & Tasks screen follows:
RACK A
09:38:18
- COMPR LTA-25
#
Rack
1
2
3
4
5
6
7
8
9
10
11
12
13
14
15
16
ENTER enters new data,
screen
10 LUCKY034 LIVERMORE
08/16/95
System-Task Descriptions
Name
Description
RACK A
RACK A
COMPR LTA-25
Task 01
SUBCOOLER A
Task 02
HOT WATER
Task 03
HW LOCKOUT
Task 04
ALARM
Task 05
SENSCO
Task 06
BYPASS
Task 07
VS EVAP COND
Task 08
A01-RIIC
Task 09
A02-RIIC
Task 10
A03-RIIC
Task 11
A04-RIIC
Task 12
A05-DTFF
Task 13
A06-MDFM
Task 14
A07-BFBX
Task 15
A08-FFBX
Task 16
ESC exits W/O saving data,
END saves data on
Task names may be up to 12 characters in length and Descriptions may be up to 25
characters in length. When all names have been entered, pressing End will save the
data and return you to the Description Menu. Use the PgDn key or down arrow key to
get to additional pages.
28
In the same manner, select the desired I/O type (Relays, Digital Inputs, Analog Inputs
and Analog Outputs), then select the 4K, and proceed as previously described. The
following are examples of each of the I/O description screens.
Relay Outputs
RACK A - COMPR LTA-25
10 LUCKY034 LIVERMORE
08/16/95 09:38:26
RO Descriptions
#
1
2
3
4
5
6
7
8
9
10
11
12
13
14
15
16
Name
NONE
1-1
1-2
1-3
4-8
1-4
1-6
1-5
1-8
4-7
4-3
4-4
4-5
2-1
2-2
2-3
COMP1-1
COMP2-1
COMP3-1
SUBCL-A
HOT WTR
HW LOCK
ALARM A
SENSCO A
BYPASS A
VS FAN
VSRESET
VSBYPAS
REFR-1
DEFR-1
REFR-2
Description
R.O. 01
R.O. 02
R.O. 03
R.O. 04
R.O. 05
R.O. 06
R.O. 07
R.O. 08
R.O. 09
R.O. 10
R.O. 11
R.O. 12
R.O. 13
R.O. 14
R.O. 15
R.O. 16
ENTER enters new data, ESC exits W/O saving data, END saves data on screen
The number is given in the first column (1 to 64), followed by the board and point
assignment, the relay point name and the description.
Use the up/down arrow keys to move to the desired name, type in the desired text, and
press Enter. This will move you to the description field. Type in the description as
desired and press Enter. The < and > keys can be used to move within a name or
description field.
Press PgDn to get to other pages as required.
save/transmit the data and Exit the screen.
29
Remember to press End to
Digital Inputs
RACK A
- COMPR LTA-25
10 LUCKY034 LIVERMORE
DI Descriptions
#
1
2
3
4
5
6
7
8
9
10
11
12
13
14
15
16
Name
NONE
NONE
NONE
NONE
1-1
1-2
1-3
1-5
1-4
NONE
2-7
2-8
NONE
1-7
1-8
2-1
PHASELOS
Unused
Unused
CMMN1-1
CMMN2-1
CMMN3-1
HT REC
ALARM A
Misc01
VSFN
IVPRF
IVBYPAS
TERM-1
TERM-2
TERM-3
08/16/95 09:38:26
Description
D.I. 01
D.I. 02
D.I. 03
D.I. 04
D.I. 05
D.I. 06
D.I. 07
D.I. 08
D.I. 09
D.I. 10
D.I. 11
D.I. 12
D.I. 13
D.I. 14
D.I. 15
D.I. 16
ENTER enters new data, ESC exits W/O saving data, END saves data on screen
The number is given in the first column (1 to 64), followed by the board and point
assignment, the relay point name and the description.
Use the up/down arrow keys to move to the desired name, type in the desired text, and
press Enter. This will move you to the description field. Type in the description as
desired and press Enter. The < and > can be used to move within a name or
description field.
Press PgDn to get to other pages as required.
save/transmit the data and Exit the screen.
30
Remember to press End to
Analog Inputs
RACK A
- COMPR LTA-25
#
1
2
3
4
5
6
7
8
9
10
11
12
13
14
15
16
NONE
1-2
NONE
17-1
1-6
1-7
1-5
NONE
NONE
NONE
1-1
1-4
1-5
NONE
21-1
17-2
9 LUCKY034 LIVERMORE
AI Descriptions
Name
Unused
HEAD A
Unused
AMBIENT
LIQUID
DROPLEG
HR LOCK
Unused
Unused
Unused
SUCT A
HTEMP A
HR LOCK
SENSCO
HEAD A
HEAD B
08/16/95 09:39:06
Description
A.I.001
A.I.002
A.I.003
A.I.004
A.I.00
A.I.006
A.I.007
A.I.008
A.I.009
A.I.010
A.I.011
A.I.012
A.I.013
A.I.014
A.I.015
A.I.016
ENTER enters new data, ESC exits W/O saving data, END saves data on screen
The number is given in the first column (1 to 128), followed by the board and point
assignment, the relay point name and the description.
Use the up/down arrow keys to move to the desired name, type in the desired text, and
press Enter. This will move you to the description field. Type in the description as
desired and press Enter. The < and > can be used to move within a name or
description field.
Press PgDn to get to other pages as required.
save/transmit the data and Exit the screen.
31
Remember to press End to
Analog Outputs
RACK A
- COMPR LTA-25
AO Descriptions
#
1
2
3
4
5
6
7
8
9
10
11
12
13
14
15
16
NONE
1-1
21-1
NONE
NONE
NONE
NONE
NONE
NONE
NONE
NONE
NONE
NONE
NONE
NONE
NONE
9 LUCKY034 LIVERMORE
Name
Unused
VSFAN
HEAD XFR
Unused
Unused
Unused
Unused
Unused
Unused
Unused
Unused
Unused
Unused
Unused
Unused
Unused
08/16/5 09:39:18
Description
A.O. 01
A.O. 02
A.O. 03
A.O. 04
A.O. 05
A.O. 06
A.O. 07
A.O. 08
A.O. 09
A.O. 10
A.O. 11
A.O. 12
A.O. 13
A.O. 14
A.O. 15
A.O. 16
ENTER enters new data, ESC exits W/O saving data, END saves data on screen
The number is given in the first column (1 to 32), followed by the board and point
assignment, the relay point name and the description.
Use the up/down arrow keys to move to the desired name, type in the desired text, and
press Enter. This will move you to the description field. Type in the description as
desired and press Enter. The < and > can be used to move within a name or
description field.
Press PgDn to get to other pages as required.
save/transmit the data and Exit the screen.
32
Remember to press End to
ALARMS
The COM-5002 continuously polls all the 4000 controllers for current alarms and can
deliver them to a remote location via modem, if dial-out phone numbers are
programmed, and/or sound a local Sonalert. If a printer is connected to the local printer
port, all alarms can be delivered to the printer as well, where hard copy is desired. It
can also retrieve various alarm reports and allow the user to change the alarm
parameters.
Selecting Alarms from the Main Menu will produce the following sub-menu:
9 LUCKY034 LIVERMORE
08/16/95 09:39:25
Alarm Menu
Current Alarms
History
Alter Actives
Acknowledge
Systems:
1 HVAC A
5 RACK D
2 RACK A
6 RACK E
Timing Now
Display Actives
Priority Changes
3 RACK B
@
4 RACK C
Move the Cursor to the Desired Action with Arrow Keys and Press ENTER.
Then use Arrow Keys to Select Controller & Task, and Press ENTER again.
Use the arrow keys or type the first letter of the desired item and press Enter.
33
Current Alarms
The "Current Alarms" report lists all current alarms that have not been acknowledged
and any alarms that have been acknowledged but have not yet cleared i.e. returned
back inside the alarm value/state. A sample of this report follows:
9 LUCKY034 LIVERMORE
08/16/95 09:39:38
Current Alarms
Alarmed but not Acknowledged..
Rack
Point Name & Loc Alarm Type
RACK E
ALARM E
1-4 Misc Di Alm
...............
Date Time
08/10 12:56
Alarmed and Acknowledged but not inside Alarm Limits..
Rack
Point Name & Loc Alarm Type
Date Time
......end......
Value
Off
Value
Page 1
Count
1
Count
ESC returns to Previous Screen, '+' & '-' scroll through more Data
If more than one screen of alarms exists, the + & - keys may be used to page to the
next screen.
The Rack or 4K that the alarm is on is displayed in the first column followed by the point
name, board and point address, alarm type, the date and time the alarm occurred, the
value or state of the input at that time, and the count of how many times this alarm has
occurred since the alarm history log was last cleared.
34
Timing Now
The "Timing Now" alarms report indicates any inputs that have exceeded their
programmed alarm limit(s) but are still within the guard/delay time for the selected
controller. The Alarm Type, Value Now, Trip Value, Count (number of times has
occurred since last time count was reset), the time that the alarm started timing, and the
time that the alarm will occur/trip are indicated. An example of this report follows:
RACK A
- COMPR LTA-25
Point
Name & Location
BFBX1-07
3-6
Alarm
Type
High Temp
9 LUCKY034 LIVERMORE
Pending Alarms
Value High
Low
Now
Trip
Trip
42.5
20.0 -18.0
08/16/95 09:39:58
Out of Limits Will Trip
Cnt
Time
Time
24
01:13
03:13
......end......
ESC = Previous Screen, Arrow Keys = next controller, '+' & '-' = More
Data
The "Count" is a running total of the number of times this alarm has occurred since the
count was last reset. (The count will be re-settable in future release.) +/- may be used
to view additional pages of the report.
35
History (Alarm History)
Each 4000 controller keeps a running log of its last 40 alarms. The Alarm
"History" selection allows the user to view this log for any 4000 controller.
You may move from the alarm history on one 4k to another simply by pressing the
left/right arrows and then pressing return.
An example of a History log for a selected 4000 follows:
RACK A
09:40:12
- COMPR LTA-25
8 LUCKY034 LIVERMORE
08/16/95
Alarm History
Point
Alarm
Occurred
Acknowledged Cleared
Value
Name & Location Type
Date Time Date Time
Date Time Then Count
FFBX1-08 3-7 High Temp
08/12 09:59 ----- ----- 08/12 10:11 27.6
42
FFBX1-08 3-7 High Temp
08/07 18:52 ----- ----- 08/07 19:09 25.9
41
FFBX1-08 3-7 High Temp
08/02 16:33 ----- ----- 08/02 16:46 22.2
40
FFBX1-08 3-7 High Temp
08/01 15:59 ----- ----- 08/01 16:04 20.3
39
FFBX1-08 3-7 High Temp
07/31 09:59 ----- ----- 07/31 10:55 35.1
38
FFBX1-08 3-7 High Temp
07/30 19:35 ----- ----- 07/30 20:08 43.0
37
1
Power Up
07/28 14:46 07/28 14:46 07/28 14:46
0.0
0
1
Power Down 07/28 14:45 07/28 14:45 07/28 14:45
0.0
0
FFBX1-08 3-7 High Temp
07/28 03:59 ----- ----- 07/28 04:18 313.6
36
FFBX1-08 3-7 High Temp
07/27 14:27 ----- ----- 07/27 17:40 13.4
35
FFBX1-08 3-7 High Temp
07/23 01:27 07/27 11:16 07/23 01:57 15.4 34-7
FFBX1-08
3-7 High Temp
07/22 20:13 07/27 11:16 07/22 21:31 15.0
33
FFBX1-08 3-7 High Temp
07/22 15:59 07/27 11:16 07/22 16:59 12.0
32
FFBX1-08 3-7 High Temp
07/22 13:16 07/27 11:16 07/22 13:41 17.6
31
BFBX1-07 3-6 High Temp
07/22 10:17 07/22 10:36 07/22 11:18 62.4 111
ESC = Previous Screen, Arrow Keys = next controller, '+' & '-' = More Data
As indicated, the + & - keys may be used to view additional pages of the report.
The "Acknowledged Date & Time" indicates when the alarm was acknowledged, either
from the front panel or remotely by some pressing the "CANCEL" key on the front panel
or selecting "Acknowledge" from the Alarm menu in the COM-5002.
The " Cleared Date/Time " indicates when the input value moved back inside its
programmed alarm limits.
"Value Then" indicates the value of the input/output at the time it occurred.
The "Count" is a running total of the number of times this alarm has occurred since the
count was last reset. The count will be re-settable in a future release.
36
Display Actives
This report displays the current status of all programmed alarms in the selected 4000.
Those that are in alarm will show "In Alarm" in the "Current State" column. An example
of this report follows:
RACK A - COMPR LTA-25
8 LUCKY034 LIVERMORE
08/16/95 09:40:38
Active Alarm Values
Point
Alarm
Value
Name & Location Type
Now
SUCT A
1-1
High Suct
11.8
HEAD A
1-2
High Head 170.0
CMMN1-1 1-1
Mon Proof
On
HTEMP A 1-4
Disch Temp 165.6
CMMN2-1 1-2
Mon Proof
On
CMMN3-1 1-3
Mon Proof
On
LIQ LVL 1-5
Ai Low Gas
15.6
PHASELOS NONE Phase Loss
On
LIQUID
1-6
High Temp
SHORT
LIQ LVL 1-5
High Temp
0.1
SENSCO
NONE High Temp
0.0
VSFN
2-7
Mon Proof
On
HEAD A
21-1 High Head
170.0
HEAD B
17-2 High Head
176.5
HEAD C
17-3 High Head
193.0
High
Trip
28.9
350.0
On
250.0
On
On
10.0
On
150.0
100.0
250.0
On
350.0
350.0
350.0
High
Delay
00:30
05:00
00:05
00:03
00:05
00:05
01:00
00:00
00:30
00:30
00:30
00:01
00:00
00:00
00:00
Low
Trip
1.0
50.0
Off
0.0
Off
Off
0.0
Off
32.0
10.0
30.0
Off
50.0
50.0
50.0
Low
Delay
00:30
05:00
00:05
00:03
00:05
00:05
01:00
00:00
00:30
00:30
00:30
00:01
00:00
00:00
00:00
Cnt
1
2
11
0
28
23
517
1
259
5
0
49
43
1
3
Current
State
Clear
Clear
Clear
Clear
Clear
Clear
Clear
Clear
Clear
Clear
Clear
Clear
Clear
Clear
Clear
ESC = Previous Screen, Arrow Keys = next controller, '+' & '-' = More Data
An explanation of the columns on this screen follows:
'Value Now' is the current value of the input associated with the event/alarm.
'High Trip/Low Trip' is the value at which the guard delay will begin timing.
'Count' is a running total of the number of times the event/alarm has occurred since the
count was last reset.
'High/Low Delay' is the time that the input or state must be above or below the
'Trip Value' before an event/alarm is created.
'Current State' indicates the state of the event/alarm clear, timing, or in alarm.
37
Alter Actives
The "Alter Actives" report enables the user to modify the alarm settings that
were generated automatically by the 4000 during its Initial Setup. An example of this
screen for a selected 4000 follows:
RACK A
- COMPR LTA-25
Alter Alarm Values
Point
Alarm
High
Name & Location Type
Trip
SUCT A
1-1 High Suct
HEAD A
1-2 High Head
CMMN1-1
1-1 Mon Proof
HTEMP A
1-4 Disch Temp
CMMN2-1
1-2 Mon Proof
MMN3-1
1-3 Mon Proof
LIQ LVL
1-5 Ai Low Gas
PHASELOS
NONE Phase Loss
LIQUID
1-6 High Temp
LIQ LVL
1-5 High Temp
SENSCO
NONE High Temp
VSFN
2-7 Mon Proof
HEAD A
21-1 High Head
HEAD B
17-2 High Head
HEAD C
17-3 High Head
High
Delay
28.9
350.0
On
250.0
On
On
10.0
On
150.0
100.0
250.0
On
350.0
350.0
350.0
High
123L
00:30
05:00
00:05
00:03
00:05
00:05
01:00
00:00
00:30
00:30
00:30
00:01
00:00
00:00
00:00
Low
Trip
ANNA
ANNA
ANNA
ANNA
ANNA
ANNA
ANNA
ANNA
NNNN
NNNN
ANNA
ANNA
ANNA
ANNA
ANNA
Low
Delay
1.0
50.0
Off
0.0
Off
Off
0.0
Off
32.0
10.0
30.0
Off
50.0
50.0
50.0
Low
123L
00:30
00:10
00:00
00:00
00:00
00:00
00:00
00:00
00:30
01:00
00:30
00:00
00:10
00:10
00:10
Dsab
Time
ANNA
ANNA
NNNN
NNNN
NNNN
NNNN
NNNN
NNNN
NNNN
NNNN
ANNA
NNNN
ANNA
ANNA
ANNA
Rpt
Cnt
00:00
00:00
00:00
00:00
00:00
00:00
00:00
00:00
00:00
00:00
00:00
00:00
00:00
00:00
00:00
0
0
0
0
0
0
0
0
0
0
0
0
0
0
0
ENTER enters new data, ESC exits W/O saving data, END saves data on screen
An explanation of the columns on this screen follows:
The 'HighTrip/Low Trip' is the value or state at which the delay time will begin timing.
This value is limited to a maximum of 8 hours.
The 'High/Low Delay' is the time that the input or state must be above or below the 'Trip’
value before an event/alarm is created.
'Repeat Count' is the number of times that the user desires the event to be re-alarmed
at one-hour intervals, if the point is still in an alarm condition. The maximum is 9 times.
An alarm may be inhibited temporarily for up to 48 hours by setting the 'Disable Time' to
the desired value. This value counts down until the time has expired and it returns to
the normal routine.
38
The 'Class' indicates how each event is to be treated. The choices are “N” for do
nothing, “L” for Log only, “M” for dial-out once a day (no longer used), and “A” for Alarm.
The numbers 1, 2, & 3 stand for the 3 different phone numbers that may be setup for
dial-out and L stands for the local alarm outputs on the COM-5002.
Priority Changes
This screen enables the user to select for each type of alarm displayed how it is to be
treated; the choices being “N” for do nothing, “L” for log only, “M” for dial out once a day
(no longer used), and “A” dial-out upon occurrence. Again, the event/alarm may be
directed individually to each of the three possible phone numbers and the local alarm
ports on the COM-5002.
SW Override refers to the 3-position switch on the relay output board. I/O Override
refers to the software overrides that may be activated through the MCS-4000 keyboard
or via the COM-5002.
An example of this screen follows:
RACK A
- COMPR LTA-25
Callout Priority List
8 LUCKY034 LIVERMORE
08/16/95 09:40:59
Type of Alarm
1 2 3 L
Type of Alarm
1 2 3 L
Lost Boards
A N N A
Sensor Failure
A N N A
Oil Failure
A N N A
Discharge Temp
A N N A
Abnormal Term
N N N N
Sw Override
N N N N
Sw Overtime
N N N N
IO Override
N N N N
ENTER enters new data, ESC exits W/O saving data, END saves data on screen
39
Note: Lost Boards and Sensor Failures are the only two items that default to ‘A’. Thus,
it is important on a new installation to set the desired alarm functions, after the system is
up and on-line.
Lost Boards - 5K is not receiving communication with I/O boards.
Sensor Failure - reports open and shorted sensors.
Oil Failure - reports oil failure events, but only applies if the 4K is doing direct oil failure
control.
Discharge Temp - reports high discharge temp/compressor shutdown only if 4K is doing
direct discharge temperature control.
Abnormal Term - indicates that any temp/defr circuit that is set-up for defrost termination
control, has terminated at the minimum defrost time, failsafe time, or was overridden.
SW Override - reports any movement of the 3 position override switches on the relay
boards (if so equipped) from Com to On or Off, or from On or Off to Com.
SW Overtime - not used
I/O Override - indicates when any relay has been placed in manual On or Off through
the software.
Acknowledge
All current/active alarms can be acknowledged with this menu selection simply by
moving to this item and pressing Enter. The date/time will then be posted in the alarm
history report.
40
HISTORY
History consists of runtime information that is stored in each 4000, utility data/electrical
consumption that is stored in the COM-5002 and requires the use of a PMA (pulse
meter adapter) than can handle up to eight separate meters, and custom history data
from input and outputs that is setup and stored in the COM-5002. This is separate
history data from that which is stored in each 4000.
Selection of the "History" function on the main menu produces the following
sub-menu:
8 LUCKY034 LIVERMORE
08/16/95 09:40:59
History Menu
Alter Sampling
Review Samples
Logged Runtimes
Utility Data
Edit Utility Setup
Pullback History
Systems:
1 HVAC A
5 RACK D
2 RACK A
3 RACK B
6 RACK E
4 RACK C
@
Move the Cursor to the Desired Action with Arrow Keys and Press ENTER.
Then use Arrow Keys to Select Controller & Task, and Press ENTER again.
Use the arrow keys or the first letter of the desired item to select your choice then press
Enter.
41
Alter Sampling
The COM-5002 can also be used to collect history data and store it in its battery-backed
ram. The amount of data that can be stored depends upon the amount of ram
purchased by the customer (see Hardware). The user can set-up logging groups for
any input/output on a 4000 controller. A group may contain up to 12 elements
(inputs/outputs). The elements in a group must all be from the same 4000 controller. A
maximum of 32 groups may be set-up with a maximum of 16 groups for any one 4000
controller. The logging interval and duration is programmable for each group. The
duration must be selected in blocks; a block is 256 entries. The minimum interval is 6
seconds and the maximum interval is 60 minutes. A maximum of 8192 entries is
permitted for each element (requires a maximum of 4 megabytes of ram storage).
Selection of "Alter Sampling" produces the following screen:
6 LUCKY034 LIVERMORE
08/16/95 09:42:02
Alter Point Sampling
1
5
9
13
17
21
25
29
RACK A
RACK E
TEMPS B-1
TEMPC-3
DEFR A
HVAC 1
TEST
2
6
10
14
18
22
26
30
RACK B
EVAP
TEMPS B-2
TEMPD-1
DEFR B
HVAC 2
3
7
11
15
19
23
27
31
RACK C
TEMPS A-1
TEMPC-1
TEMPD-2
DEFR C
LIGHTS
4 RACK D
8 TEMPS A-2
12 TEMPC-2
16 TEMPD-3
20 DEFR D
24 ANTI SWEAT
28
32
Group Number 25
ESC = Previous Screen, Arrow Keys to next group, or enter group number
This screen shows the 32 possible groups with the 10-character name that has been
entered when the group was defined. To enter a new group, select the next blank
group number by using the arrow keys or by entering the number and press ENTER.
42
To modify an existing group, select/enter the appropriate group number and press
ENTER. The following screen will then appear:
6 LUCKY034 LIVERMORE
08/16/95 09:42:14
Alter Point Sampling
Group 26,
,
Interval
0 Mins, 0 Secs,
Type #
Circuit
UE ---- -------UE ---- -------UE ---- -------UE ---- -------UE ---- -------UE ---- --------
0 Blocks
(
UE
UE
UE
UE
UE
UE
System 0, ---------1 Remain Unused)
Type #
Circuit
---- ----------- ----------- ----------- ----------- ----------- --------
(Intervals rounded down by 6 Sec, One Block equals 256 Samples)
(Zero Entry for Interval, Blocks, System or Box WILL erase group)
ENTER enters new data, ESC exits W/O saving data, END saves data on screen
If this group already exists, the rest of the data set-up information will be
displayed. If not, then the user enters the desired name for the group (max. of 10
characters). The System Number/4K, 1 to 32, from which the i/o points will come from
for this group is then selected by using the '+' key to toggle through the choices present.
The System/Rack name will appear as it was entered on the Rack-Box description
screen. Pressing ENTER when the desired choice is displayed enters the selection.
The desired logging "interval" may then be typed in. The time between the samplings
may range from 60 minutes down to 6 seconds.
Note: If several groups are set-up with short intervals, 6 to 30 seconds, the system may
slow down due to the amount of communications that are being transmitted over the
global bus. Thus, groups should only be assigned to "seconds" intervals when
absolutely necessary. As noted at the bottom of the screen, the entered interval is
divided by 6 seconds and rounded down. For example, an entry of 45 seconds would
end up with an interval of 42 seconds. The number of "blocks” sets up the
length/duration of the log. The user may enter from 1 to 16 blocks, where each block
contains 256 entries (8192 bytes per block). The number of blocks remaining in the
43
battery backed ram storage is also indicated. If a sampling interval of 15 minutes were
selected along with 1 block, then the log would contain data covering a period of 64
hours (2.67 days). The newest entry is added to the front of the log and the oldest entry
(when the log is full) is discarded. An example of a completed group follows:
8 LUCKY034 LIVERMORE
08/16/95 09:40:59
Alter Point Sampling
Group 1, RACK A
Interval
5 Mins,
Type #
AI 1-1
AI 1-3
RO 1-2
DI 1-1
DI 1-3
E2 1-1
,
0 Secs,
2 Blocks
Circuit
SUCT A
DISCH A
COMP2-1
CMMN1-1
CMMN3-1
COMPR LTA-25
System 2, RACK A
(
1 Remain Unused)
Type #
AI 1-2
RO 1-1
RO 1-3
DI 1-2
E1 1-1
RO 1-4
Circuit
HEAD A
COMP1-1
COMP3-1
CMMN2-1
COMPR LTA-25
HOT WTR
(Intervals rounded down by 6 Sec, One Block equals 256 Samples)
(Zero Entry for Interval, Blocks, System or Box WILL erase group)
ENTER enters new data, ESC exits W/O saving data, END saves data on screen
As indicated, if a "0" is entered for the System, Interval, or Blocks, the group and all its
data will be erased. So when modifying an existing group, be careful not to
inadvertently enter a "0" in any of these fields.
44
Review Samples
The contents of any logging group can be viewed by selecting "Review Samples" on the
History Menu. The 32 possible logging groups are then displayed as follows:
8 LUCKY034 LIVERMORE
08/16/95 09:40:59
Review Samples
1
5
9
13
17
21
25
29
RACK A
RACK E
TEMPS B-1
TEMPC-3
DEFR A
HVAC 1
TEST
2
6
10
14
18
22
26
30
RACK B
EVAP
TEMPS B-2
TEMPD-1
DEFR B
HVAC 2
3
7
11
15
19
23
27
31
Group Number
RACK C
TEMPS A-1
TEMPC-1
TEMPD-2
DEFR C
LIGHTS
4
8
12
16
20
24
28
32
RACK D
TEMPS A-2
TEMPC-2
TEMPD-3
DEFR D
ANTI SWEAT
1
ESC = Previous Screen, Arrow Keys to next group, or enter group number
This screen shows that there are currently 25 groups present and the name of each
group.
45
The user may then select a group by typing in the number of the desired group or by
using the arrow keys and then pressing ENTER. The screen then looks as follows:
8 LUCKY034 LIVERMORE
08/16/95 09:40:59
Review Samples
1
5
9
13
17
21
25
29
RACK A
RACK E
TEMPS B-1
TEMPC-3
DEFR A
HVAC 1
TEST
2
6
10
14
18
22
26
30
RACK B
EVAP
TEMPS B-2
TEMPD-1
DEFR B
HVAC 2
3
7
11
15
19
23
27
31
Group Number
Samples Back (
RACK C
TEMPS A-1
TEMPC-1
TEMPD-2
DEFR C
LIGHTS
4
8
12
16
20
24
28
32
RACK D
TEMPS A-2
TEMPC-2
TEMPD-3
DEFR D
ANTI SWEAT
1
0) (0 <= X <
512) ?
The user then types in the desired starting point of the data by entering the
number of samples back from the current interval. This can range from 0, which would
start at the most recent entry, to 1 less than the total indicated, which would start with
the next to the last entry. The log is circular, i.e. rolls
around to the beginning/starting point after the last/oldest entry. An asterisk,*, marks
the requested starting entry.
46
An example of the data displayed follows:
RACK A
- COMPR LTA-25
10 LUCKY034 LIVERMORE
08/23/95 08:23:50
Review Samples
Group
Ckt
AI 1-1
AI 1-2
AI 1-3
RO 1-1
RO 1-2
RO 1-3
DI 1-1
DI 1-2
DI 1-3
E1 1-1
E2 1-1
RO 1-4
1, RACK A
Interval 5 mins, 0
Date & Time --->
08/23 08/23 08/23 08/23
Name
0821* 0816 0811 0806
SUCT A
12.8 13.4 14.0 14.0
HEAD A
177.0 178.0 178.0 177.0
DISCH A
173.5 174.0 174.0 172.0
COMP1-1
On
On
On
On
COMP2-1
On
On
On
On
COMP3-1
On
On
On
On
CMMN1-1
On
On
On
On
CMMN2-1
On
On
On
On
CMMN3-1
On
On
On
On
COMPR LTA- 0.6
0.9
1.2
1.2
COMPR LTA-100.0 100.0 100.0 100.0
HOT WTR
Off
Off
Off
Off
sec
08/23
0801
12.8
222.0
215.5
On
On
On
On
On
On
0.7
100.0
Off
08/23
0756
13.2
271.0
287.5
On
On
On
On
On
On
0.8
100.0
Off
08/23
0751
13.2
248.5
265.0
On
On
On
On
On
On
0.8
100.0
Off
08/23
0746
12.8
224.5
242.0
On
On
On
On
On
On
0.6
100.0
Off
08/23
0741
12.2
201.0
218.5
On
On
On
On
On
On
0.4
100.0
Off
08/23
0736
11.6
177.0
192.5
On
On
On
On
On
On
0.1
100.0
Off
ESC returns to Previous Screen, '+' & '-' scroll through more Data
The time is shown in military format on this screen to maximize the number of entries
that can be displayed on the screen. As indicated, the + and - keys are used to move
back or forward in time by 5 entries at a time.
The I/O type is shown in the first column followed by the board and point,
the point name then the values/state.
47
Logged Runtimes
The COM-5002 can retrieve the runtime history logs from the selected 4000 controllers
by selecting Logged Runtimes, which gives total accumulated runtime and one month of
daily runtimes for all relay outputs and digital inputs.
An example of the runtime history log for a selected 4000 follows:
RACK B
- COMPR LTB-25
5 LUCKY034 LIVERMORE
08/16/95 09:43:50
Logged Runtimes
Date & Day
R.O. Pnt 8-16 Wed 8-15 Tue 8-14 Mon 8-13 Sun 8-12 Sat 8-11 Fri 8-10 Thu
00:00
0 00:00
0 00:00
0 00:00
0 00:00
0 00:00
0 00:00
0
COMP1-1 09:43
0 24:00
0 24:00
0 23:59
0 24:00
0 24:00
0 24:00
0
COMP2-1 09:43
0 24:00
0 24:00
0 23:59
0 24:00
0 24:00
0 24:00
0
COMP3-1 09:43
0 24:00
0 24:00
0 23:59
0 24:00
0 24:00
0 24:00
0
SUBCLR B09:43
0 24:00
0 24:00
0 23:59
0 24:00
0 24:00
0 24:00
0
HT RECB 00:00
0 00:00
0 00:00
0 00:00
0 00:00
0 00:00
0 00:00
0
HR LOCK 05:14 11 15:47 17 17:34 19 17:48 28 14:59 55 12:56 36 11:18 38
ALARM B 00:00
0 00:00
0 00:00
0 00:00
0 00:00
0 00:00
0 12:55
0
SENSCOB 00:00
0 00:00
0 00:00
0 00:00
0 00:00
0 00:00
0 00:00
0
BYPASS 09:43
0 24:00
0 24:00
0 23:59
0 24:00
0 24:00
0 24:00
0
REFR-1 09:13
1 22:59
2 22:59
2 22:59
2 22:59
2 22:59
2 22:59
2
DEFR-1 00:28
1 00:56
2 00:56
2 00:56
2 00:56
2 00:56
2 00:56
2
REFR-2 09:13
1 22:58
2 22:58
2 22:58
2 22:59
2 22:59
2 22:59
2
DEFR-2 00:28
1 00:56
2 00:56
2 00:56
2 00:56
2 00:56
2 00:56
2
REFR-3 09:12
1 22:58
2 22:58
2 22:58
2 22:58
2 22:58
2 22:58
2
DEFR-3 00:28
1 00:56
2 00:56
2 00:56
2 00:56
2 00:56
2 00:56
2
P= Program, S= Status, O= Options, I= Input Analogs, R= Runtimes, ESC= Prev
Again, additional time periods may be viewed by pressing the left/right arrow keys to
move over one day, or the + or - keys to move one week at a time.
The relay point name is given in the first column followed by the runtime and cycles so
far for today and the runtimes and cycles for each previous day following that.
48
Utility Data
The COM-5002 can store utility history data from up to eight meters, if a PMA
(pulse meter adapter) is present and connected to the global bus. The PMA
takes the raw pulse signal(s) from the utility company meter pulse generator or from
CT's and watt/hour transformer and transmits them to the COM-5002 over the global
bus. The COM-5002 then generates the following utility report for each meter:
Meter Circuit: 1
5 LUCKY034 LIVERMORE
08/16/95 09:43:5
Utility Data
Multiplier:
AM
Hour
0000
0100
0200
0300
0400
0500
0600
0700
0800
0900
1000
1100
0.000
Today
0
0
0
0
0
0
0
0
0
0
0
0
Peaks
0
15 Min Window:
Daily
Yesterday
0
0
0
0
0
0
0
0
0
0
0
0
0
PM
Hour
Noon
0100
0200
0300
0400
0500
0600
0700
0800
0900
1000
1100
Total
Today
0
0
0
0
0
0
0
0
0
0
0
0
0
00:00
Yesterday
0
0
0
0
0
0
0
0
0
0
0
0
0
00:00
MTD
Peak
at
Date
Sun
Mon
Tue
Wed
Thu
Fri
Sat
YTD
ESC = Previous Screen, '+' & '-' to next meter, or enter
0
Monthly
This
Last
0
0
0
0
00:00
00:00
00/00
00/00
Weekly
0
0
0
0
0
0
0
0
0
0
0
0
0
0
Yearly
0
0
meter number
This report gives the kWh by hour, for today and yesterday, along with the hourly peak
KW and time of occurrence (at the bottom). The month to date (MTD) and last months
kWh, as well as the peak KW and time & date of occurrence are given at the upper
right. Below this, the weekly kWh by day of the week for this week and last is shown. At
the bottom right, the year to date and last years-total kWh are provided.
The +/- keys can be used to move from meter to meter.
49
Edit Utility Setup
Each meter must have its name, the appropriate multiplier, and the Demand
Window/interval entered to produce the correct KW value from the raw pulse. This is
done on the Edit Utility Setup screen which looks like the following:
4 LUCKY034 LIVERMORE
08/16/95 09:44:07
Edit Utility Setup
#
1
2
3
4
5
6
7
8
Circuit
Multiplier
(KWH per pulse)
0.000
0.000
0.000
0.000
0.000
0.000
0.000
0.000
Demand Window
(15 - 30 Minutes)
15
15
15
15
15
15
15
15
Demand
Limit Start
0000
Demand
Limit Max
0000
ENTER enters new data, ESC exits W/O saving data, END saves data on screen
If demand control is being used, the Demand Limit Start and Demand Limit Maximum
values are also entered on this screen. Demand control can only be done on meter #1.
Pullback History
This command enables the user to retrieve a history group in condensed format,
through the EZCOM software program. Another software program, EZgraph is then
used to graph the data on or off-line.
Select the group you want to pullback by using the arrow keys or typing in the group
number, press Enter. Next, edit the from/to day and time information, or accept it as is
(defaults to the last 24 hours) and press End.
The logged data will be retrieved and stored on your computer with the file name based
upon the information entered in EZCOM. See EZCOM manual for further information.
50
MISCELLANEOUS
Selecting "Miscellaneous" on the Main Menu will produce the following sub-menu
screen:
3 LUCKY034 LIVERMORE
08/16/95 09:45:31
Misc Menu
Set COM Time
Alter Phone Numbers
Clear Box Failures
Systems:
1 HVAC A
5 RACK D
2 RACK
Modify Passwords
Edit Site Info
Pager Setup
3 RACK B
6 RACK E
4 RACK C
@
Move the Cursor to the Desired Action with Arrow Keys and Press ENTER.
Then use Arrow Keys to Select Controller & Task, and Press ENTER again.
Note: The System selection menu is not used with any of the Miscellaneous Menu
selections.
51
Set COM Time
The COM-5002 synchronizes all the 4000 controller clocks every hour at 5 minutes past
the hour. Anytime that the COM-5002 Clock is set, all 4000 controller clocks will be set.
The controller time is also shown at the upper right on any of the status screens and
should always match the COM-5002 time at the top right, within a few seconds. The
Set Com Time screen appears as follows:
3 LUCKY034 LIVERMORE
08/16/95 09:45:38
Set COM5002 Time
Enter New Time. Enter ESC to avoid change or END to set time.
Please remember to set the time ahead by a few seconds and wait
for your watch to catch up before entering END, to synchronize.
08/16/95 09:45:35
Move the cursor with the left right arrow keys to the element of the date and time you
want to change, type in the change, and then press End to save.
Modify Passwords
The COM-5002 has can have up to 8 different passwords and each can be assigned an
authority level. A password must be 6 characters long; can be padded with spaces if
desired. There are 9 authority levels that determine what that user can do within the
system. A password at a higher level contains all the capabilities of the passwords at
lower levels plus its additional described feature. The levels are currently defined as
follows:
52
Level
9 access and change to everything ; Option restrictions do not apply.
8 access and change to everything; except file transfers/downloads
and reconfigure, and option restrictions apply.
7 access to all program change screens; option restrictions apply.
6 - same as 7.
5 - access to controller status and description screens w/ no change
4 - same as 5.
3 - special purpose, yet to be defined
2 - special purpose, yet to be defined
1 - special purpose, yet to be defined
An example of the Modify Password selection follows:
3 LUCKY034 LIVERMORE
08/16/95 09:45:44
Modify Password List
Password
1 UEI450
2 AOM5K2
3 COM5K2
4 xxxxxx
5 xxxxxx
6 xxxxxx
7 xxxxxx
8 xxxxxx
Auth
9
8
7
0
0
0
0
0
OptionsA. Full Edit
B. Task Edit
C. Alarm Edit
D. Defrost Ovrd
E.
F.
G.
H.
Edit Options
ABCDEFGHIJKLMN
ABCDEFGHIJKLMN
ABCDEFGHIJKLMN
ABCDEFGHIJKLMN
ABCDEFGHIJKLMN
ABCDEFGHIJKLMN
ABCDEFGHIJKLMN
ABCDEFGHIJKLMN
ABCDEFGHILKLMN
Schedule Ovrd
History Edit
Point Edit
Schedule Edit
I.
J.
K.
L.
All Boxes
RACK Box
HVAC Box
SNGL Box
M. CMPR Box
N. TEMP Box
ENTER enters new data, ESC exits W/O saving data, END saves data on screen
The Edit Options provide further flexibility and definition as to what each password can
do. Letters A - H can provide restrictions as to what type of things may be changed
(levels 8 and below) and letters I - N let you restrict access as to the type of 4K/library.
Full access would be provided with letters A and I.
To change the Edit Options, use the letter keys to toggle to the desired options.
Press Enter after making changes in each field, then press End to save and transmit.
53
Alter Phone Numbers
The COM-5002 can provide alarm dial-out to up to 4 different phone numbers, with two
different schedules for each. The schedule includes an active time and day,
(XSMTWRFABC12N), where X = all days, S = Sunday, M = Monday, T = Tuesday, W =
Wednesday, R = Thursday, F = Friday, A = Saturday, B = Monday - Friday, C = Monday
- Saturday, 1 = Holiday Group#1, 2 = Holiday Group#2, and N = the inverse of the
schedule; i.e. the schedule will be active outside the times specified. Each Holiday
group contains 4 dates that are from/to, thus enabling Holidays of more than 1-day
duration to be programmed on one Holiday. The 5th phone number/schedule allows the
user to set-up a Test-Call schedule, which will cause the Com-5002 to make a dial-out
call and deliver the test call message to the specified phone number at the programmed
time on the Scheduled active days.
The screen appears as follows:
3 LUCKY034 LIVERMORE
08/16/95 09:45:50
Alter Phone Numbers
Note: If number #2 or #3 fails 5 times or schedules out while attempting to
call, the call is redirected to number #1. Number #4 is a only a dummy,
and is redirected to a local printer. Number #5 is only for Test Calls.
Alarm Call Schedules
Morning Call Schedules
#
phone #
Type From To
On Days
From To
On Days
--------------------------------------------------------------------------1
2
3
4
5
-xxx-xxx-xxxx
x-xxx-xxx-xxxx
x-xxx-xxx-xxxx
x-xxx-xxx-xxxx
x-xxx-xxx-xxxx
From
#1
#2
To
00/00 00 00/00
00/00 00 00/00
300
300
300
300
300
0000
0000
0000
0000
0000
0000
0000
0000
0000
0000
0000
0000
0000
0000
0000
0000
0000
Holiday Groups
00/00 00 00/00
00/00 00 00/00
00/00 00 00/00
00/00 00 00/00
00/00 00 00/00
00/00 00 00/00
ENTER enters new data, ESC exits W/O saving data, END saves data on screen
54
As indicated, if phone numbers 2 and 3 cannot be reached after 5 attempts during its
scheduled time/days, the alarm(s) will be dialed out to phone number 1. Phone number
4 is only used to direct alarms to the local printer port on the 5k2. Phone number 5 is
only used to indicate when/if a daily test call is to take place.
The FROM and TO columns provide the schedule when the number is to be active.
This must be entered. If 24 hours is desired, use 0000 to 2359.
Putting a space (or any character other than 1 to 9) in the first space may temporarily
disable a phone number.
The modem type defaults to 300 Baud. By using the +/-keys, 1200, 2400, 4800, 9600,
19.2K, SFAX, and Page can be selected. Normally 300 baud/103A is recommended for
alarm dial-out, as it is the most reliable/noise immune. SFAX sets up the number to dial
out to a fax machine. PAGE sets up the number to call a digital pager. There is
another setup screen required for the pager, see Pager Setup.
The standard editing instructions are given at the bottom of the screen.
The dial out phone number may be preceded by a “T” for tone dialing and a “P” for
pulse dialing as required. The default is pulse dialing. Tone dialing is required by some
of the PBX/ in-store phone systems.
55
Edit Site Info
Selection of this item produces the following screen:
2 LUCKY034
LIVER
Edit Site Information
Store Name
Address
City
Office Phone #
Logoff Timing
All Menus
Status Screens
Change Screens
Level
5
15
3
LUCKY034 LIVERMORE
Typical store
Anywhere, USA
1-xxx-xxx-xxxx
8-9
mins
mins
mins
Lower
5
15
3
Levels
mins
mins
mins
ENTER enters new data, ESC exits W/O saving data, END saves data on screen
The Store Data is entered on this screen. The data entered here will appear in the
alarm report delivered to the local printer or remote alarm printer. The Store Name
entry at the top, will also be printed on alarm reports as well as on each screen.
The COM-5002 has automatic time-out, "log-off timing", features that prevent someone
from accidentally leaving the system connected to the phone line for long periods of
time. The log-off settings are adjustable. Password levels 8 & 9 can have one set of
timings and all other password levels another set. The timing setting for menus
determines how long you can stay on a menu without making a selection before the
system will back you out to the next menu (if you're in a sub-menu). The system will
continue to back out menu by menu, after each log-off time-out until it disconnects at
the terminal select screen. The viewing of status screens has a separate log-off timing
setting and change screens have another.
56
Clear Box Failures
This selection causes the COM-5002 to try and establish communications with any
4000 controller(s) that are currently not being polled due to their failure to communicate
10 consecutive times for 3 consecutive 5 minutes periods, the asterisk, “*”, indicating
this on the Main Menu.
If the problem was a transient condition, and communication is successful, the asterisk
will not return and normal polling will resume. If a hard failure has taken place, then the
system must be serviced to determine and fix the problem.
Pager Setup
The Pager Setup screen appears as follows:
2 LUCKY034 LIVERMORE
08/16/95 09:46:20
Pager Setup
Pager
1 to
#1
#2
#3
#4
#5
Delay
999 sec.
0
0
0
0
0
Pager Repeat Count
0 to 5
0
0
0
0
0
Pager Code
Max 12 char.
ENTER enters new data, ESC exits W/O saving data, END saves data on screen
The first column specifies the phone number to be used.
57
The Pager Delay is the amount of time after dialing to wait before sending
the message. This may be different for various brands of pagers/services.
You can determine by calling with a regular phone and timing it manually.
The Pager Repeat Count lets you set the number of times you want the message
delivered.
Note: Pagers do not supply any indication that they have received the message, so a
few repeats may be in order.
The Pager Code is the message you want to be delivered. This can be numbers and
letters, up to 12 characters.
58
SCHEDULE DATA
The 'Schedule Data' selection on the Main Menu allows you to change the schedule for
a task/group, to re-assign a task to another schedule group, to change the store hours
(for relative schedules), and to change/program Holidays. The following screen
appears after 'Schedule Data' is selected:
2 LUCKY034 LIVERMORE
08/16/95 09:46:47
Schedule Menu
Alter Schedules
Change Holidays
Reassign Group
Store Hour Changes
Systems:
1 HVAC A
5 RACK D
2 RACK A
6 RACK E
3 RACK B
4 RACK C
@
Move the Cursor to the Desired Action with Arrow Keys and Press ENTER.
Then use Arrow Keys to Select Controller & Task, and Press ENTER again.
Follow the instructions at the bottom of the screen to make your selection.
59
Alter Schedules
ALTER SCHEDULES is used to program or change the On/Off scheduling of any task.
The following screen will appear after ALTER SCHEDULE is selected:
1 LUCKY034 LIVERMORE
08/16/95 09:47:13
Schedule Time & Days
Schedule Group #1
Tasks using this group:
# 1
SALES-50%
On Days
From
From
To
To
On Days
XSMTWRFABC1234NZ
XSMTWRFABC1234NZ
ENTER enters new data, ESC exits W/O saving data, END saves data on screen
All tasks using the particular schedule group displayed will be listed. If a
different schedule group is desired, use the up/down arrows to toggle through the
groups. When the desired task is found, press Enter to display the schedule(s) for that
group.
60
A sample schedule appears as follows:
1 LUCKY034 LIVERMORE
08/16/95 09:47:19
Schedule Time & Days
Schedule Group #1
Tasks using this group
# 1
SALES-50%
On Days
From
From
0600
To
To
2400
On Days
XSMTWRFABC1234NZ
XSMTWRFABC1234NZ
X
0000
0000
New Schedule
ENTER enters new data, ESC exits W/O saving data, END saves data on screen
This is an absolute schedule. Use the arrow keys to move to the desired field to
enter/edit. To enter the times, type in the four digits, in 24 hour format, then press Enter.
To select the “On Days”, type in letter for the day(s) that you want, then press Enter.
When all values are entered, press End to save the data.
If a relative schedule is used, it is selected by the 'Z' at the end of the On Days list. A
relative schedule operates off the Store Hours Schedule; where the time under the
From/To represents the hours and minutes to be added or subtracted from the Store
Hour Schedule time to determine the actual time it will turn on/off.
The letters listed under 'On Days' are defined as follows:
X = all days, S = Sunday, M = Monday, T = Tuesday, W = Wednesday, R = Thursday, F
= Friday, A = Saturday, B = Mon - Fri, C = Mon - Sat., 1 = Holiday Class 1, 2 = Holiday
Class 2, 3 = Holiday Class 3, N = the inverse of the schedule, and Z = relative schedule.
To add a schedule, go to the ‘New Schedule’ entry, and enter the desired schedule.
Another new 'New Schedule' will automatically be created.
61
Reassign Group
Tasks are assigned to groups automatically at start-up with each task getting a separate
group. The tasks may be re-assigned to another group, where all tasks in that group
follow the same schedule(s). To reassign a task to another group, use the ‘Reassign
Group’ selection. The following screen will then be displayed:
1 LUCKY034 LIVERMORE
08/16/95 09:47:43
Reassign Tasks to Groups
Schedule Group #1
Tasks using the current group:
# 1
SALES-50%
New Group Number ?
0
ENTER enters new data, ESC exits W/O saving data, END saves data on screen
Use the up/down arrows to get the desired group/task, then enter the number of the
group you wish to change it to as indicated, and press Enter. Press END to
save/transmit the changes.
Change Holidays
Four different Holiday Classes may be setup and each Group/task assigned to the
desired Holiday Class. Holidays are setup on a Begin to End basis, thus enabling
holidays of longer duration than 24 hours to be accommodated with one entry. If the
holiday is only one day, make sure to enter the same date in the Begin and End dates.
Dates are entered with a slash,"/" separating the day and month.
Note: The group must be entered first, before the year, day and month may be entered.
62
The Change Holidays screen appears as follows:
1 LUCKY034 LIVERMORE
08/16/95 09:47:52
Holiday List
Class Begin
0
00/00
0
00/00
0
00/00
0
00/00
0
00/00
0
00/00
0
00/00
Year
End Class Begin Year
00 00/00
0
00/00 00
00 00/00
0
00/00 00
00 00/00
0
00/00 00
00 00/00
0
00/00 00
00 00/00
0
00/00 00
00 00/00
0
00/00 00
00 00/00
0
00/00 00
End
00/00
00/00
00/00
00/00
00/00
00/00
00/00
Class
0
0
0
0
0
0
Begin Year End
00/00 00 00/00
00/00 00 00/00
00/00 00 00/00
00/00 00 00/00
00/00 00 00/00
00/00 00 00/00
ENTER enters new data, ESC exits W/O saving data, END saves data on screen
Note: If you want a Holiday to repeat on the same month and day each year, enter
the year as “80".
63
Store Hour Changes
Where relative scheduling is used, it operates on the basis of store hours. The store
hours may be set up in the 4000 as part of the Initial Set-up procedure. They may be
altered through the Com-5002 by selecting Store Hour Changes. The Store Hours
Change screen appears as follows:
Store Hours List
Open
Sunday
Monday
Tuesday
Wednesday
Thursday
Friday
Saturday
(S)
(M)
(T)
(W)
(R)
(F)
(A)
Close
0000
0000
0000
0000
0000
0000
0000
2400
2400
2400
2400
2400
2400
2400
ENTER enters new data, ESC exits W/O saving data, END saves data on screen
Use the cursor to move to the desired day and open/close entry, then type in the hour in
24 hour format.
64
Q MONITOR
The Q Monitor contains commands that should only be used by trained personnel to
perform specific functions within the COM-5002 and MCS-4000 system. By typing in a
“Q” at the Main Menu, if a level 9 password is active, the following screen is obtained:
13 LUCKY034 LIVERMORE
08/16/95 09:50:02
Backup Menu
Backup Names
Backup 4K Data
Backup 5K Data
Backup All
Restore
Restore
Restore
Copy 5K
Names
4K Data
5K Data
to 4K
Systems:
1 HVAC A
2 RACK A
5 RACK D
6 RACK E
3 RACK B
4 RACK C
@
Move the Cursor to the Desired Action with Arrow Keys and Press ENTER.
Then use Arrow Keys to Select Controller & Task, and Press ENTER again.
Move the cursor to the desired selection and press "Enter".
Note: The first letter cannot be used to select the entry due to duplicates.
65
Backup Names
Backup Names allows the user to retrieve the names & descriptions that are stored in
the COM-5002 and store them to a disk file. This selection must be used in conjunction
with the Com-Trol EZCOM communications program. Refer to the EZCOM manual for
further information.
Restore Names
Allows the user to download the names and description file from a PC to the
COM-5002. The EZSET2 editor allows the creation of this file on the PC. This selection
must be used in conjunction with the Com-Trol EZCOM communications program. Refer
to the EZCOM manual for further information.
This function requires a level 9
password.
Backup 5K Data
Backup 5K Data allows the user to retrieve the data that is stored in the COM-5002 and
stores it to a disk file. This includes the passwords, alarm dial-out/phone numbers,
store info, utility setup, and history logging setup. This selection must be used in
conjunction with the Com-Trol EZCOM communications program. Refer to the EZCOM
manual for further information.
Restore 5K Data
Restore 5K Data allows the user to transmit the 5k setup data to the COM-5002 from a
disk file. This includes the passwords, alarm dial-out/phone numbers, store info, utility
setup, and history logging setup. This selection must be used in conjunction with the
Com-Trol EZCOM communications program. Refer to the EZCOM manual for further
information. Requires level 9 password.
Backup 4K Data
Allows the user to retrieve the setpoints/setup data from the selected 4000
controller and store it to a disk file. This selection must be used in conjunction with the
Com-Trol EZCOM communications program. Refer to the EZCOM manual for further
information.
66
Restore 4K Data
Allows the user to download the setpoints/setup data from a PC to the COM-5002 then
to the 4K. This selection must be used in conjunction with the Com-Trol EZCOM
communications program. Refer to the EZCOM manual for further information.
Requires a level 9 password.
Z MONITOR
The Z Monitor contains commands that should only be used by trained personnel to
perform specific functions within the COM-5002/4000 system. By typing in a Z at the
Main Menu, if a level 9 password is active, the following screen is obtained:
15 LUCKY034 LIVERMORE
08/16/95 09:48:49
Monitor Menu
Display Memory
Bubble Dump
Configure One
Restart 5K
Alter Memory
Modify Bubble
Configure All
Modem Setup
Systems:
1 HVAC A
2 RACK A
5 RACK D
6 RACK E
3 RACK B
4 RACK C
@
Move the Cursor to the Desired Action with Arrow Keys and Press ENTER.
Then use Arrow Keys to Select Controller & Task, and Press ENTER again.
67
Display Memory
The contents of the memory of the COM-5002 can be viewed with this command. The
user selects the desired starting address, and 256 bytes at a time will be displayed on
the screen. PgUp/PgDn will move you to the next 256 bytes.
Alter Memory
As in Display Memory, the memory of the COM-5002 can be altered/patched with this
command. Only those that are completely versed with the software should ever attempt
to use this command.
Bubble Dump
This command allows the user to select/examine two 64-byte sectors of the batterybacked ram at a time by entering the desired starting sector address. PgUp/PgDn will
move you two sectors at a time and arrow up/down will move you one sector at a time.
Modify Bubble
Like Dump bubble, this command allows the user to select and modify two 64-byte
sectors of the battery-backed ram at a time by entering the desired starting sector
address. PgUp/PgDn will move you two sectors at a time and arrow up/down will move
you one sector at a time.
Configure One & Configure All
After the system is brought on-line or after any new controller is added to the system,
the Configure One or All selection causes the COM-5002 to go out and poll the global
bus to determine which controllers are connected to it (or are responding) and uses this
information to set-up the System/Controller selection menu. This command should only
be used after everything is up and on-line, prior to entering the descriptions, since this
data is stored sequentially, and would be lost if a controller "appeared" within the
address sequence after the configuration was initially activated.
The first 4000 controller address must start at 01, and the rest must follow
consecutively. Once two addresses are tried and no response is received, the process
is automatically terminated.
68
The Configure screen will look like this as it is polling a 4K.
Reconfigure One System
Attempt A, HVAC A
TskA 1 SALES-50%
TskA 2 SALES-50
TskA 3 STOCKROOM
TskA 4 BAKERY/DELI
TskA 5 OUTSIDE/SIGN
TskA 6 SECURITY
TskA 7 DECORATIVE
TskA 8 CASE
TskA 9 CASE
TskA10 RECEIVE HEAT TskA11 AC#2 SHUTOFF TskA12 MAIN HVAC 1
TskA13 BYPASS HVAC1
TskA14 HVAC #2
TskA17 VS FAULT MON
TskA18 AMBIENT XFER
TskA15 BYPASS HVAC2 TskA16 ANTISWEATS
SALES #2
Unused
Unused
Unused
Modem Setup
The modem setup screen appears as follows:
14 LUCKY034 LIVERMORE
08/16/95 09:49:49
Modem Setup
Modem Type
L19K
Extended Alarm Info
Modem Setup
ATV0Q1E0&C1&D2S0=2S7=30\N3+FCLASS=0
Modem Dial AT\N0
Disabled
Local Alarm Receiver Disabled
ENTER enters new data, ESC exits W/O saving data, END saves data on screen
69
The Modem Type is displayed first. This is automatically detected if
supported modems is used. The Modem Setup string and Modem
Those well versed in modem technology should only modify these
COM-5002 will take care of these items as long as COM-TROL
modem.
one of Com-Trol’s
Dial string follow.
three items. The
has supplied the
Extended Alarm Info provides a second line of descriptive information that will be
delivered with each alarm. This descriptive information is taken from the task
description field (See Descriptions). “Disable” may be toggled to “Enabled” by pressing
the “+” key.
Local Alarm Receiver activates an additional alarm receiver that is based upon MCS4000 hardware but has software that is centered around alarm data only. “Disable” may
be toggled to “Enabled” by pressing the “+” key. Do not enable this device if it is not
present, as it will produce communications errors that will slow down the response of
the 5K dramatically.
70
COM-TROL COM-5002 COMMUNICATION CONTROLLER MENU TREE
1 – ANSI Std. Color CRT
2 – ANSI Std. Mono CRT
3 – Televideo 905 & Emulation
4 – LINK 125 with attribute char.
5 – 9 unused
Select Terminal Model: ____
|
Password Entry
| <----------
Password Attempt #1
Three Incorrect logs off system
Enter Password : ***** ------- > --Version 2.501
|
Current Status
Options
Point Changes
Alarms
Miscellaneous
|
Misc. Menu
Set COM Time
Alter Phone Numbers
|
|
Point Changes
>------------------>--------------->--------------->------------->-----
| < -----
---------------- < Input Analogs
-------------- < Task Programming
------------ < Descriptions
------- < History
---- < Schedule Data
| < ---------------------
-------- > |
Modify Passwords
Edit Site Info
Alarms Menu
Current Alarms
History
Alter Actives
Acknowledge
Main Menu
Schedules Menu
|
Alter Schedules
Reassign Group
Change Holidays Store Hour Changes
|<
> |
Timing Now
Display Actives
Priority Changes
History Menu
Alter Sampling
Logged Runtimes
Edit Utility Setup
|<
> |
Relay Outputs
Digital Inputs
Analog Inputs
Analog Outputs
Emergency Overrides
Review Samples
Utility Data
Pullback History
Description Menu
System & Tasks
Digital Inputs
Output Analogs
>|
|
|
Relay Outputs
Analog Inputs
Task Programming
|
Task Parameters
Select Float Ckts
Limit Float
Emergency Overrides
----------------------------------- Systems: --------< ------------------------------------------ > A – SYSTEM A
With “?”
1R – Compr A01
2C – Fans A01
3T – TmpDfrA01
4T - TmpDfrA02
5T – TmpDfrA03
6T – TmpDfrA04
7T – TmpDfrA04
8T – TmpDfrA06
B – SYSTEM B
1R – Compr B01
2T – Fans B01
3T – TmpDfrB01
4T - TmpDfrB02
5T – TmpDfrB03
6T – TmpDfrB-4
7T – TmpDfrB04
8T – TmpDfrB04
C - SYSTEM C
1R – Compr C01
2C – Fans C01
3T – TmpDfrC01
4T - TmpDfrC02
5T – TmpDfrC03
6T – TmpDfrC04
7T – TmpDfrC04
8T – TmpDfrC04
71
D – SYSTEM D
1R - Compr D01
2C – Fans D01
3T - TmpDfrD01
4T - TmpDfrD02
5T – TmpDfrD03
6T – TmpDfrD04
7T – TmpDfrD04
8T – TmpDfrD04
72
1
2