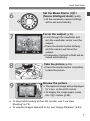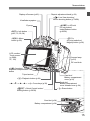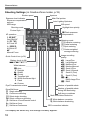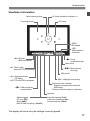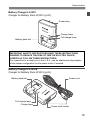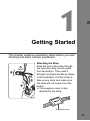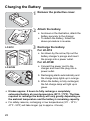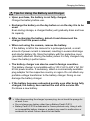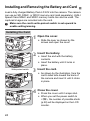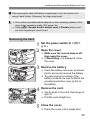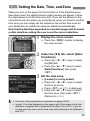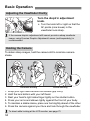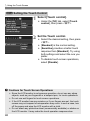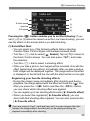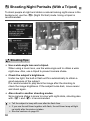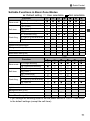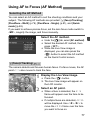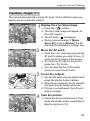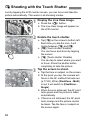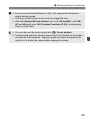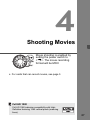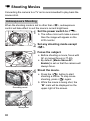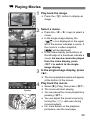
1
Basic Instruction Manual
This basic manual covers only the most basic operations.
For other features and more details, see the
Camera Instruction Manual
pdf file in the CD-ROM.
E
Introduction
The EOS REBEL SL1/EOS 100D is a digital single-lens reflex camera
featuring a fine-detail CMOS sensor with approx. 18.0 effective
megapixels, DIGIC 5, high-precision and high-speed 9-point AF,
approx. 4 fps continuous shooting, Live View shooting, and Full HighDefinition (Full HD) movie shooting.
Before Starting to Shoot, Be Sure to Read the Following
To avoid botched pictures and accidents, first read the “Safety
Precautions” (p.110-112) and “Handling Precautions” (p.12-13).
Refer to This Manual while Using the Camera to Further
Familiarize Yourself with the Camera
While reading this manual, take a few test shots and see how they
come out. You can then better understand the camera.
Testing the Camera Before Use and Liability
After shooting, play images back and check whether they have been
properly recorded. If the camera or memory card is faulty and the
images cannot be recorded or downloaded to a computer, Canon
cannot be held liable for any loss or inconvenience caused.
Copyrights
Copyright laws in your country may prohibit the use of your recorded
images or copyrighted music and images with music in the memory
card for anything other than private enjoyment. Also be aware that
certain public performances, exhibitions, etc., may prohibit photography
even for private enjoyment.
2
Compatible Cards
The camera can use the following cards regardless of capacity:
• SD memory cards
• SDHC memory cards*
• SDXC memory cards*
* UHS-I cards supported.
Cards that Can Record Movies
When shooting movies, use a large-capacity SD card rated SD
Speed Class 6 “
” or higher.
If you use a slow-writing card when shooting movies, the movie may
not be recorded properly. Also, if you play back a movie on a card
with a slow reading speed, the movie may not play back properly.
If you want to shoot still photos while shooting a movie, you will need
an even faster card.
To check the card’s reading/writing speed, refer to the card
manufacturer’s Web site.
In this manual, “card” refers to SD memory cards, SDHC memory
cards, and SDXC memory cards.
* The camera does not come with a card for recording images/
movies. Please purchase it separately.
3
Item Check List
Before starting, check that all the following items have been included
with your camera. If anything is missing, contact your dealer.
Camera
(with eyecup and body cap)
Wide Strap
Battery Pack
LP-E12
(with protective cover)
Battery Charger
LC-E12/LC-E12E*
Interface Cable
* Battery Charger LC-E12 or LC-E12E is provided. (The LC-E12E comes with a
power cord.)
The Instruction Manuals and CD-ROMs provided are listed on the next page.
If you purchased a Lens Kit, check that the lenses are included.
Depending on the Lens Kit type, lens instruction manuals may also be
included.
Be careful not to lose any of the above items.
4
Instruction Manual and CD-ROMs
The instruction manual consists of a booklet and PDF manuals in
electronic form (provided in the CD-ROM disc).
Camera Basic
Instruction Manual
(this booklet)
The Basic Instruction Manual explains the basic procedures and features.
For detailed instructions, see the Camera Instruction Manual CD-ROM.
Camera Instruction Manual CD-ROM
Contains the following instruction manuals in PDF:
• Camera Instruction Manual (Detailed version)
• Quick Reference Guide
• Lens Instruction Manual
Instructions for viewing the Camera Instruction Manual
CD-ROM are on page 102.
EOS DIGITAL Solution Disk (Software CD-ROM)
Contains software such as image-editing software and
software instruction manuals in PDF format.
For more information and installation procedures of the
software, see pages 106-107.
Instructions for viewing the Software Instruction Manual
are on page 108.
5
Quick Start Guide
1
Insert the battery (p.24).
2
Insert a card (p.24).
3
To charge the battery, see page 22.
With the card’s label facing toward
the back of the camera, insert it into
the card slot.
White index
Red index
Attach the lens (p.32).
Align the lens’ white or red index
with the camera’s index in the
matching color.
4
Set the lens focus mode switch
to <AF> (p.32).
5
Set the power switch to <1>
(p.27).
6
When the LCD monitor displays the
date/time/zone setting screens, see
page 29.
Quick Start Guide
6
Set the Mode Dial to <A>
(Scene Intelligent Auto) (p.48).
7
Focus the subject (p.35).
8
Take the picture (p.35).
9
All the necessary camera settings
will be set automatically.
Look through the viewfinder and
aim the viewfinder center over the
subject.
Press the shutter button halfway,
and the camera will focus the
subject.
If necessary, the built-in flash will be
raised automatically.
Press the shutter button completely
to take the picture.
Review the picture.
The captured image will be displayed
for 2 sec. on the LCD monitor.
To display the image again, press
the <x> button (p.94).
To shoot while looking at the LCD monitor, see “Live View
Shooting” (p.73).
To view the images captured so far, see “Image Playback” (p.94).
7
Conventions Used in this Manual
Icons in this Manual
<6>
: Indicates the Main Dial.
<W><X><Y><Z>
: Indicates the <S> cross keys.
<0>
: Indicates the Setting button.
0, 9, 7, 8
: Indicates that the corresponding function
remains active for 4 sec., 6 sec., 10 sec., or
16 sec. respectively after you let go of the
button.
* In this manual, the icons and markings indicating the camera’s buttons, dials,
and settings correspond to the icons and markings on the camera and on the
LCD monitor.
3
: Indicates a function that can be changed by pressing the
<M> button and changing the setting.
M
: When shown on the upper right of a page, it indicates that
the function is available only in the Creative Zone modes
(p.18).
(p.**)
: Reference page numbers for more information.
: Warning to prevent shooting problems.
: Supplemental information.
: Tips or advice for better shooting.
: Problem-solving advice.
Basic Assumptions
All operations explained in this manual assume that the power switch
is <1> (p.27).
It is assumed that all the menu settings and Custom Functions are
set to their defaults.
The illustrations in this manual show the camera attached with the
EF-S18-55mm f/3.5-5.6 IS II lens as an example.
8
Contents
Introduction
2
Compatible Cards .............................................................................3
Item Check List .................................................................................4
Instruction Manual and CD-ROMs ....................................................5
Quick Start Guide.............................................................................. 6
Conventions Used in this Manual .....................................................8
Contents............................................................................................ 9
Handling Precautions...................................................................... 12
Nomenclature..................................................................................14
1
Getting Started
21
Charging the Battery .......................................................................22
Installing and Removing the Battery and Card ............................... 24
Turning on the Power...................................................................... 27
Setting the Date, Time, and Zone ...................................................29
Selecting the Interface Language ...................................................31
Attaching and Detaching a Lens ..................................................... 32
Basic Operation ..............................................................................34
Q Quick Control for Shooting Functions........................................36
3 Menu Operations .................................................................. 38
Formatting the Card ........................................................................40
Switching the LCD Monitor Display................................................. 42
Feature Guide ................................................................................. 43
d Using the Touch Screen .............................................................44
9
Contents
2
Basic Shooting
47
A Fully Automatic Shooting (Scene Intelligent Auto)................... 48
A Full Auto Techniques (Scene Intelligent Auto)......................... 51
7 Disabling Flash......................................................................... 53
C Creative Auto Shooting ............................................................ 54
2 Shooting Portraits...................................................................... 58
3 Shooting Landscapes............................................................... 59
4 Shooting Close-ups ................................................................... 60
5 Shooting Moving Subjects........................................................ 61
8: Special Scene Mode............................................................. 62
C Shooting Children...................................................................... 63
P Shooting Food............................................................................ 64
x Shooting Candlelight Portraits................................................... 65
6 Shooting Night Portraits (With a Tripod).................................... 66
F Shooting Night Scenes (Handheld) ........................................... 67
G Shooting Backlit Scenes ........................................................... 68
Q Quick Control ............................................................................ 70
3
Shooting with the LCD Monitor (Live View Shooting) 73
A Shooting with the LCD Monitor ................................................ 74
Using AF to Focus (AF Method)..................................................... 77
x Shooting with the Touch Shutter .............................................. 84
10
Contents
4
Shooting Movies
87
k Shooting Movies .......................................................................88
Setting the Movie Recording Size...................................................91
Image Playback
5
93
x Image Playback ........................................................................94
H I Searching for Images Quickly .............................................. 95
u/y Magnified View ..................................................................... 96
d Playing Back with the Touch Screen .......................................... 97
k Playing Movies.......................................................................... 99
6
Viewing the CD-ROM Instruction Manuals /
Downloading Images to Your Computer
101
Viewing the Camera Instruction Manual CD-ROM ....................... 102
Downloading Images to a Computer.............................................104
Software Overview....................................................................... 106
Installing the Software................................................................... 107
Software Instruction Manual ......................................................... 108
Safety Precautions........................................................................ 110
Certification Logo
Under the [54] tab, if you select [Certification Logo Display] and press
<0>, some of the logos of the camera’s certifications will appear. Other
certification logos can be found in this Instruction Manual, on the camera
body, and on the camera’s package.
11
Handling Precautions
Camera Care
This camera is a precision instrument. Do not drop it or subject it to physical
shock.
The camera is not waterproof and cannot be used underwater. If you
accidentally drop the camera into water, promptly consult the nearest Canon
Service Center. Wipe off any water droplets with a dry and clean cloth. If the
camera has been exposed to salty air, wipe it with a well-wrung wet cloth.
Never leave the camera near anything having a strong magnetic field such
as a magnet or electric motor. Also avoid using or leaving the camera near
anything emitting strong radio waves, such as a large antenna. Strong
magnetic fields can cause camera misoperation or destroy image data.
Do not leave the camera in excessive heat, such as in a car in direct
sunlight. High temperatures can cause the camera to malfunction.
The camera contains precision electronic circuitry. Never attempt to
disassemble the camera yourself.
Do not block the mirror operation with your finger, etc. Doing so may cause a
malfunction.
Use a blower to blow away dust on the lens, viewfinder, reflex mirror, and
focusing screen. Do not use cleaners that contain organic solvents to clean
the camera body or lens. For stubborn dirt, take the camera to the nearest
Canon Service Center.
Do not touch the camera’s electrical contacts with your fingers. This is to prevent
the contacts from corroding. Corroded contacts can cause camera misoperation.
If the camera is suddenly brought in from the cold into a warm room,
condensation may form on the camera and internal parts. To prevent
condensation, first put the camera in a sealed plastic bag and let it adjust to
the warmer temperature before taking it out of the bag.
If condensation forms on the camera, do not use the camera. This is to avoid
damaging the camera. If there is condensation, remove the lens, card and
battery from the camera, and wait until condensation has evaporated before
using the camera.
If the camera will not be used for an extended period, remove the battery
and store the camera in a cool, dry, well-ventilated location. Even while the
camera is in storage, press the shutter button a few times once in a while to
check that the camera is still working.
Avoid storing the camera where there are chemicals that result in rust and
corrosion such as in a chemical lab.
If the camera has not been used for an extended period, test all its functions
before using it. If you have not used the camera for some time or if there is
an important shoot such as a foreign trip coming up, have the camera
checked by your Canon dealer or check the camera yourself and make sure
it is working properly.
12
Handling Precautions
LCD Monitor
Although the LCD monitor is manufactured with very high precision
technology with over 99.99% effective pixels, there may be a few dead pixels
displaying only black or red, etc. among the remaining 0.01% or less pixels.
Dead pixels are not a malfunction. They do not affect the images recorded.
If the LCD monitor is left on for a prolonged period, screen burn-in may occur
where you see remnants of what was displayed. However, this is only
temporary and will disappear when the camera is left unused for a few days.
The LCD monitor display may seem slow in low temperatures, or look black
in high temperatures. It will return to normal at room temperature.
Cards
To protect the card and its recorded data, note the following:
Do not drop, bend, or wet the card. Do not subject it to excessive force,
physical shock, or vibration.
Do not touch the card’s electronic contacts with your fingers or anything
metallic.
Do not affix any stickers, etc., on the card.
Do not store or use the card near anything having a strong magnetic field,
such as a TV set, speakers, or magnet. Also avoid places prone to having
static electricity.
Do not leave the card in direct sunlight or near a heat source.
Store the card in a case.
Do not store the card in hot, dusty, or humid locations.
Lens
After detaching the lens from the camera, put down the lens
with the rear end up and attach the lens caps to avoid
scratching the lens surface and electrical contacts.
Contacts
Cautions regarding Prolonged Use
If you use continuous shooting, Live View shooting, or
movie shooting for a prolonged period, the camera may
become hot. This is not a malfunction.
Smudges Adhering to the Front of the Sensor
Besides dust entering the camera from outside, in rare cases lubricant from the
camera’s internal parts may adhere to the front of the sensor. If visible spots still
remain after the automatic sensor cleaning, having the sensor cleaned by a
Canon Service Center is recommended.
13
Nomenclature
Built-in flash/AF-assist beam
EF Lens mount index (p.32)
EF-S Lens mount index (p.32)
Mode Dial (p.18)
Flash sync contacts
Power switch (p.27)
Hot shoe
<i> ISO speed
setting button
<D> Flash button
<6> Main Dial
<V> Focal plane
mark (p.60)
Speaker (p.99)
Shutter button
(p.35)
Strap mount
(p.21)
Microphone
(monaural)
(p.88)
Remote control
sensor
Red-eye
reduction/
Self-timer
lamp
Grip
Mirror
Contacts (p.13)
Lens mount
Lens lock pin
<Y> External microphone
IN terminal
<F> Remote control terminal
Body cap (p.32)
<q/C>
Audio/video OUT/
Digital terminal
<D> HDMI mini OUT
terminal
14
Lens release button
(p.33)
Depth-of-field preview
button
Nomenclature
Display-off sensor (p.42)
Dioptric adjustment knob (p.34)
<A> Live View shooting/
Movie shooting button (p.74/88)
Viewfinder eyepiece
<A/Hy> AE lock/
FE lock button/
Index/Reduce button
(p.95/96)
Eyecup
<B> Info button
(p.42, 76, 90, 94)
<S/u>
AF point selection/
Magnify button (p.96)
<M> Menu
button (p.38)
LCD monitor/
Touch screen
(p.38/44,
97, 100)
Access lamp
(p.25)
DC cord hole
<O> Aperture/
Exposure compensation
button
Tripod socket
Card slot/
Battery compartment
cover (p.24)
<x> Playback button (p.94)
<W> <X> <Y> <Z>: <S> Cross keys (p.38)
Card slot/
Battery compartment
cover release lever (p.24)
<L> Erase button
<Q/0> Quick Control button/
Setting button (p.36/38)
Card slot (p.24)
Battery compartment (p.24)
15
Nomenclature
Shooting Settings (in Creative Zone modes, p.18)
Shutter speed
Exposure level indicator
Exposure compensation
amount
AEB range
Aperture
Main Dial pointer
Auto Lighting Optimizer
ISO speed
Highlight tone priority
Shooting mode
Picture Style
y Flash exposure
compensation
AF operation
X
One-Shot AF
9
AI Focus AF
Z
AI Servo AF
MF
Manual Focus
Metering mode
q Evaluative metering
w Partial metering
r Spot metering
e Center-weighted
average metering
Image-recording
quality
73 Large/Fine
83 Large/Normal
74 Medium/Fine
84 Medium/Normal
7a Small 1/Fine
8a Small 1/Normal
b Small 2 (Fine)
c Small 3 (Fine)
1+73
RAW+Large/Fine
1 RAW
Quick Control icon (p.36)
Battery check (p.28)
zxcn
White balance
Q Auto
W Daylight
E Shade
R Cloudy
Y Tungsten light
U White fluorescent light
I Flash
O Custom
Eye-Fi transmission status
Drive/Self-timer
u Single shooting
i Continuous shooting
B Silent single shooting
M Silent continuous shooting
Q Self-timer:10 sec/Remote control
l Self-timer:2 sec
q Self-timer:Continuous
Number of possible shots
Number of possible shots
during WB bracketing
Self-timer countdown
Multi Shot Noise Reduction
u White balance correction
B White balance bracketing
GPS connection indicator
The display will show only the settings currently applied.
16
Nomenclature
Viewfinder Information
Spot metering circle
AF point activation indicator <•>
Focusing screen
AF points
<i>
ISO speed
<u>
White balance
correction
<A> AE lock/
AEB in-progress
<o> Focus
confirmation light
Max. burst
<D> Flash-ready
Improper FE lock warning
<0> Monochrome
shooting
ISO speed
<e> High-speed sync
(FP flash)
<d> FE lock/FEB in-progress
<y> Flash exposure
compensation
<A> Highlight tone priority
Exposure level indicator
Exposure compensation amount
AEB range
Red-eye reduction lamp-on indicator
Aperture
Shutter speed
FE lock (FEL)
Busy (buSY)
Built-in flash recycling (D buSY)
Card full warning (FuLL)
Card error warning (Card)
No card warning (Card)
The display will show only the settings currently applied.
17
Nomenclature
Mode Dial
The Mode Dial includes the Basic Zone modes and Creative Zone
modes.
Creative Zone
These modes give you more control for
shooting various subjects.
d
: Program AE
s
: Shutter-priority AE
f : Aperture-priority AE
a
: Manual exposure
Basic Zone
All you do is press the shutter button.
The camera sets everything to suit the
subject or scene.
A : Scene Intelligent Auto (p.48)
7 : Flash Off (p.53)
C : Creative Auto (p.54)
2 : Portrait (p.58)
3 : Landscape (p.59)
4 : Close-up (p.60)
5 : Sports (p.61)
8 : Special scene (p.62)
C : Kids (p.63)
P : Food (p.64)
x : Candlelight (p.65)
6 : Night Portrait (p.66)
F : Handheld Night Scene (p.67)
G : HDR Backlight Control (p.68)
18
Nomenclature
Battery Charger LC-E12
Charger for Battery Pack LP-E12 (p.22).
Power plug
Charge lamp
Full-charge lamp
Battery pack slot
IMPORTANT SAFETY INSTRUCTIONS-SAVE THESE INSTRUCTIONS.
DANGER-TO REDUCE THE RISK OF FIRE OR ELECTRIC SHOCK,
CAREFULLY FOLLOW THESE INSTRUCTIONS.
For connection to a supply not in the U.S.A., use an attachment plug adapter
of the proper configuration for the power outlet, if needed.
Battery Charger LC-E12E
Charger for Battery Pack LP-E12 (p.22).
Battery pack slot
Power cord
Full-charge lamp
Charge lamp
Power cord socket
19
1
Getting Started
This chapter explains preparatory steps before you start
shooting and basic camera operations.
Attaching the Strap
Pass the end of the strap through
the camera’s strap mount eyelet
from the bottom. Then pass it
through the strap’s buckle as shown
in the illustration. Pull the strap to
take up any slack and make sure
the strap will not loosen from the
buckle.
The eyepiece cover is also
attached to the strap.
Eyepiece cover
21
Charging the Battery
1
Remove the protective cover.
the battery.
2 Attach
As shown in the illustration, attach the
battery securely to the charger.
To detach the battery, follow the
above procedure in reverse.
LC-E12
the battery.
3 Recharge
For LC-E12
As shown by the arrow, flip out the
battery charger’s prongs and insert
the prongs into a power outlet.
For LC-E12E
LC-E12E
Connect the power cord to the
charger and insert the plug into a
power outlet.
X Recharging starts automatically and
the charge lamp lights up in orange.
X When the battery is fully recharged,
the full-charge lamp will light up in
green.
It takes approx. 2 hours to fully recharge a completely
exhausted battery at room temperature (23°C / 73°F). The time
required to recharge the battery will vary greatly depending on
the ambient temperature and the battery’s remaining capacity.
For safety reasons, recharging in low temperatures (5°C - 10°C /
41°F - 50°F) will take longer (up to approx. 4 hours).
22
Charging the Battery
Tips for Using the Battery and Charger
Upon purchase, the battery is not fully charged.
Charge the battery before use.
Recharge the battery on the day before or on the day it is to be
used.
Even during storage, a charged battery will gradually drain and lose
its capacity.
After recharging the battery, detach it and disconnect the
charger from the power outlet.
When not using the camera, remove the battery.
If the battery is left in the camera for a prolonged period, a small
amount of power current is released, resulting in excess discharge
and shorter battery life. Store the battery with the protective cover
(provided) attached. Storing the battery when it is fully charged may
lower the battery’s performance.
The battery charger can also be used in foreign countries.
The battery charger is compatible with a 100 V AC to 240 V AC 50/
60 Hz power source. If necessary, attach a commercially-available
plug adapter for the respective country or region. Do not attach any
portable voltage transformer to the battery charger. Doing so can
damage the battery charger.
If the battery becomes exhausted quickly even after being fully
charged, the battery has reached the end of its service life.
Purchase a new battery.
After disconnecting the charger’s power plug, do not touch the prongs for
at least 3 sec.
Do not charge any battery other than a Battery Pack LP-E12.
Battery Pack LP-E12 is dedicated to Canon products only. Using it with
an incompatible battery charger or product may result in malfunction or
accidents for which Canon cannot be held liable.
23
Installing and Removing the Battery and Card
Load a fully charged Battery Pack LP-E12 into the camera. The camera
can use an SD, SDHC, or SDXC memory card (sold separately). UHS-I
Speed Class SDHC and SDXC memory cards can also be used. The
captured images are recorded onto the card.
Make sure the card’s write-protect switch is set upward to
enable writing/erasing.
Installing the Card
1
Open the cover.
Slide the lever as shown by the
arrows and open the cover.
the battery.
2 Insert
Insert the end with the battery
contacts.
Insert the battery until it locks in
place.
Write-protect switch
the card.
3 Insert
As shown by the illustration, face the
card’s label side toward the back of
the camera and insert it until it clicks
in place.
the cover.
4 Close
Press the cover until it snaps shut.
When you set the power switch to
<1>, the number of possible shots
(p.28) will be displayed on the LCD
monitor.
24
Installing and Removing the Battery and Card
After opening the card slot/battery compartment cover, be careful not to
swing it back further. Otherwise, the hinge may break.
The number of possible shots depends on the remaining capacity of the
card, image-recording quality, ISO speed, etc.
Setting [z1: Release shutter without card] to [Disable] will prevent
you from forgetting to insert a card.
Removing the Card
the power switch to <2>
1 Set
(p.27).
the cover.
2 Open
Make sure the access lamp is off,
then open the cover.
If [Recording...] is displayed, close
the cover.
the battery.
3 Remove
Press the battery lock lever as shown
by the arrow and remove the battery.
To prevent short circuiting of the
battery contacts, be sure to attach the
provided protective cover (p.22) to
the battery.
the card.
4 Remove
Gently push in the card, then let go to
eject it.
Pull the card straight out.
the cover.
5 Close
Press the cover until it snaps shut.
25
Installing and Removing the Battery and Card
When the access lamp is lit or blinking, it indicates that images are
being written to or read by the card, being erased, or data is being
transferred. Do not open the card slot/battery compartment cover.
Also, never do any of the following while the access lamp is lit or
blinking. Otherwise, it can damage the image data, card, or camera.
• Removing the card.
• Removing the battery.
• Shaking or banging the camera around.
If the card already contains recorded images, the image number may not
start from 0001.
If a card-related error message is displayed on the LCD monitor, remove
and reinsert the card. If the error persists, use a different card.
If you can transfer all the images on the card to a computer, transfer all
the images and then format the card with the camera (p.40). The card
may then return to normal.
Do not touch the card’s contacts with your fingers or metal objects.
26
Turning on the Power
If you turn on the power switch and the date/time/zone setting
screen appears, see page 29 to set the date/time/zone.
<k>
<1>
<2>
: The camera turns on. You can
shoot movies (p.87).
: The camera turns on. You can
shoot still photos.
: The camera is turned off and
does not operate. Set to this
position when not using the
camera.
Automatic Sensor Cleaning
Whenever you set the power switch to <1> or <2>, sensor
cleaning will be executed automatically. (A small sound may be
heard.) During the sensor cleaning, the LCD monitor will display
<f>.
You can still shoot during sensor cleaning by pressing the shutter
button halfway (p.35) to stop the sensor cleaning and take a picture.
If you repeatedly turn the power switch <1>/<2> at a short
interval, the <f> icon may not be displayed. This is normal and
not a malfunction.
3 Auto Power Off
To save battery power, the camera turns off automatically after
approx. 30 seconds of non-operation. To turn on the camera again,
just press the shutter button halfway (p.35).
You can set the auto power off time with [52: Auto power off].
If you set the power switch to <2> while an image is being recorded to
the card, [Recording...] will be displayed and the power will turn off after the
card finishes recording the image.
27
Turning on the Power
z Checking the Battery Level
When the power is turned on, the battery level will be indicated in one of
four levels.
z : Battery level is sufficient.
x : Battery level is low, but the
camera can still be used.
c : Battery will be exhausted soon.
(Blinks)
n : Recharge the battery.
Number of Possible Shots
[Approx. number of shots]
Temperature
Room Temperature
(23°C / 73°F)
Low Temperatures
(0°C / 32°F)
No Flash
480
420
50% Flash Use
380
350
The figures above are based on a fully-charged Battery Pack LP-E12, no Live
View shooting, and CIPA (Camera & Imaging Products Association) testing
standards.
The number of possible shots will decrease with any of the following
operations:
• Pressing the shutter button halfway for a prolonged period.
• Activating the AF frequently without taking a picture.
• Using the lens Image Stabilizer.
• Using the LCD monitor often.
The number of possible shots may decrease depending on the actual
shooting conditions.
The lens operation is powered by the camera’s battery. Depending on
the lens used, the number of possible shots may be lower.
For the number of possible shots with Live View shooting, see page 75.
28
3 Setting the Date, Time, and Zone
When you turn on the power for the first time or if the date/time/zone
have been reset, the date/time/zone setting screen will appear. Follow
the steps below to set the time zone first. If you set the camera to the
correct time zone for where you currently live, when you travel to another
time zone you can simply set the camera to the correct time zone for
your destination to update the camera’s date/time automatically.
Note that the date/time appended to recorded images will be based
on this date/time setting. Be sure to set the correct date/time.
1
Display the menu screen.
Press the <M> button to display
the menu screen.
the [52] tab, select [Date/
2 Under
Time/Zone].
Press the <Y> <Z> keys to select
the [52] tab.
Press the <W> <X> keys to select
[Date/Time/Zone], then press
<0>.
the time zone.
3 Set[London]
is set by default.
Press the <Y> <Z> keys to select
the time zone box.
Press <0> so <r> is displayed.
Press the <W> <X> keys to select
the time zone, then press <0>.
(Returns to <s>.)
The menu setting procedure is explained on pages 38-39.
In step 3, the time displayed on the upper right of the screen is the time
difference compared with Coordinated Universal Time (UTC). If you do
not see your time zone, set the time zone while referring to the difference
with UTC.
29
3 Setting the Date, Time, and Zone
the date and time.
4 SetPress
the <Y> <Z> keys to select
the number.
Press <0> so <r> is displayed.
Press the <W> <X> keys to set the
number, then press <0>. (Returns
to <s>.)
saving time.
5 SetSettheit ifdaylight
necessary.
Press the <Y> <Z> keys to select
[Y].
Press <0> so <r> is displayed.
Press the <W> <X> keys to select
[Z], then press <0>.
When the daylight saving time is set
to [Z], the time set in step 4 will
advance by 1 hour. If [Y] is set, the
daylight saving time will be canceled
and the time will go back by 1 hour.
the setting.
6 ExitPress
the <Y> <Z> keys to select
[OK], then press <0>.
X The date/time/zone and daylight
saving time will be set and the menu
will reappear.
If you store the camera without the battery or if the camera’s battery
becomes exhausted, the date/time/zone may be reset. If this happens, set
the time zone and date/time again.
The date/time that was set will start from when you press <0> in step 6.
After changing the time zone, check that the correct date/time has been
set.
30
3 Selecting the Interface Language
1
Display the menu screen.
Press the <M> button to display
the menu screen.
the [52] tab, select
2 Under
[LanguageK].
Press the <Y> <Z> keys to select
the [52] tab.
Press the <W> <X> keys to select
[LanguageK], then press <0>.
the desired language.
3 SetPress
the <S> cross keys to select
the language, then press <0>.
X The interface language will change.
31
Attaching and Detaching a Lens
The camera is compatible with all Canon EF and EF-S lenses. The
camera cannot be used with EF-M lenses.
Attaching a Lens
1
Remove the caps.
Remove the rear lens cap and the
body cap by turning them as shown
by the arrows.
the lens.
2 Attach
Align the lens’ red or white index with
White index
the camera’s index matching the
same color. Turn the lens as shown
by the arrow until it clicks in place.
Red index
the lens focus mode switch to
3 Set
<AF>.
<AF> stands for autofocus.
If it is set to <MF> (manual focus),
autofocus will not operate.
4 Remove the front lens cap.
Minimizing Dust
When changing lenses, do it quickly in a place with minimal dust.
When storing the camera without a lens attached, be sure to attach the
body cap to the camera.
Remove dust on the body cap before attaching it.
32
Attaching and Detaching a Lens
Zooming
To zoom, turn the zoom ring on the lens
with your fingers.
If you want to zoom, do it before
focusing. Turning the zoom ring after
achieving focus may throw off the
focus.
Detaching the Lens
While pressing the lens release
button, turn the lens as shown by
the arrows.
Turn the lens until it stops, then
detach it.
Attach the rear lens cap to the
detached lens.
Do not look at the sun directly through any lens. Doing so may cause
loss of vision.
When attaching or detaching a lens, set the camera’s power switch to
<2>.
If the front part (focusing ring) of the lens rotates during autofocusing, do
not touch the rotating part.
If you use a TS-E lens, certain shift and rotation functions may be
restricted, and attaching or detaching the lens may also be restricted.
Image Conversion Factor
Since the image sensor size is
smaller than the 35mm film
format, it will look like the lens
focal length is increased by
approx. 1.6x.
Image sensor size (Approx.)
(22.3 x 14.9 mm / 0.88 x 0.59 in.)
35mm image size
(36 x 24 mm / 1.42 x 0.94 in.)
33
Basic Operation
Adjusting the Viewfinder Clarity
Turn the dioptric adjustment
knob.
Turn the knob left or right so that the
AF points (nine boxes) in the
viewfinder look sharp.
If the camera dioptric adjustment still cannot provide a sharp viewfinder
image, using E-series Dioptric Adjustment Lenses (sold separately) is
recommended.
Holding the Camera
To obtain sharp images, hold the camera still to minimize camera
shake.
Horizontal shooting
1.
2.
3.
4.
5.
6.
Vertical shooting
Wrap your right hand around the camera grip firmly.
Hold the lens bottom with your left hand.
Rest your hand’s right index finger lightly on the shutter button.
Press your arms and elbows lightly against the front of your body.
To maintain a stable stance, place one foot slightly ahead of the other.
Press the camera against your face and look through the viewfinder.
To shoot while looking at the LCD monitor, see page 73.
34
Basic Operation
Shutter Button
The shutter button has two steps. You can press the shutter button
halfway. Then you can further press the shutter button completely.
Pressing halfway
This activates autofocusing and the
automatic exposure system that sets the
shutter speed and aperture.
The exposure setting (shutter speed and
aperture) is displayed in the viewfinder
(0).
Pressing completely
This releases the shutter and takes the
picture.
Preventing Camera Shake
Hand-held camera movement during the moment of exposure is called
camera shake. It can cause blurred pictures. To prevent camera shake,
note the following:
• Hold and steady the camera as shown on the preceding page.
• Press the shutter button halfway to autofocus, then slowly press the
shutter button completely.
If you press the shutter button completely without pressing it halfway first,
or if you press the shutter button halfway and then press it completely
immediately, the camera will take a moment before it takes the picture.
Even during menu display, image playback, or image recording, you can
instantly go back to shooting-ready by pressing the shutter button
halfway.
35
Q Quick Control for Shooting Functions
You can directly select and set the shooting functions displayed on the
LCD monitor. This is called the Quick Control screen.
1
Press the <Q> button.
X The Quick Control screen will appear
(7).
the desired function.
2 SetPress
the <S> cross keys to select a
function.
X The selected function and Feature
guide (p.43) will appear.
Turn the <6> dial to change the
setting.
Basic Zone modes
Creative Zone modes
the picture.
3 TakePress
the shutter button completely to
take the picture.
X The captured image will be displayed.
For the functions settable in Basic Zone modes and the setting
procedure, see page 70.
In steps 1 and 2, you can also use the LCD monitor’s touch screen
(p.44).
36
Q Quick Control for Shooting Functions
Sample Quick Control Screen
White balance correction
Shutter speed
Shooting mode* (p.18)
Exposure compensation/
AEB setting
Picture Style
White balance
Aperture
Highlight tone priority*
ISO speed
Flash exposure
compensation
Metering mode
Image-recording quality
Auto Lighting Optimizer
AF operation
Return
Drive/self-timer
White balance bracketing
* These functions cannot be set with the Quick Control screen.
Function Setting Screen
Ð <0>
Select the desired function and press
<0>. The function’s setting screen
will appear.
Press the <Y><Z> keys or turn the
<6> dial to change some of the
settings. Also, some functions can be
set by pressing the <B> button.
Press <0> to finalize the setting
and return to the Quick Control
screen.
37
3 Menu Operations
You can set various settings with the menus such as the imagerecording quality, date/time, etc. While looking at the LCD monitor, use
the <M> button, <S> cross keys, and <0> button on the back of
the camera to operate the menus.
<M> button
<0> button
<S> cross keys
LCD monitor
Menu Screen
The menu tabs and items displayed will differ depending on the shooting mode.
Basic Zone modes
Movie shooting
Creative Zone modes
3 Playback
A Live View shooting
z Shooting
5 Set-up
9 My Menu
Tab
Menu settings
Menu items
38
3 Menu Operations
Menu Setting Procedure
1
Display the menu screen.
Press the <M> button to display
the menu screen.
a tab.
2 Select
Press the <Y> <Z> keys to select a
tab (group of functions).
For example, in this manual, “the [z3]
tab” refers to the screen displayed
when the third z (Shooting) tab from
the left [
] is selected.
the desired item.
3 Select
Press the <W> <X> keys to select
the option, then press <0>.
the setting.
4 Select
Press the <W> <X> or <Y> <Z> keys
to select the desired setting. (Some settings
require you to press either the <W> <X>
or <Y> <Z> keys to select it.)
The current setting is indicated in blue.
the desired setting.
5 SetPress
<0> to set it.
the setting.
6 ExitPress
the <M> button to return to
the shooting function settings display.
In step 2, you can also turn the <6> dial to select a menu tab.
In steps 2 to 5, you can also use the LCD monitor’s touch screen (p.44).
The explanation of menu functions hereinafter assumes that you have
pressed the <M> button to display the menu screen.
To cancel, press the <M> button.
39
3 Formatting the Card
If the card is new or was previously formatted by another camera or
computer, format the card with the camera.
When the card is formatted, all images and data in the card will
be erased. Even protected images will be erased, so make
sure there is nothing you need to keep. If necessary, transfer
the images and data to a computer, etc., before formatting the
card.
1
Select [Format card].
Under the [51] tab, select [Format
card], then press <0>.
the card.
2 Format
Select [OK], then press <0>.
X The card will be formatted.
X When the formatting is completed,
the menu will reappear.
For low-level formatting, press the
<L> button to append [Low level
format] with a checkmark <X>, then
select [OK].
40
3 Formatting the Card
Execute [Format card] in the following cases:
The card is new.
The card was formatted by a different camera or a computer.
The card is full with images or data.
A card-related error is displayed.
Low-level Formatting
Perform low-level formatting if the card’s recording or reading speed seems
slow or if you want to totally erase data in the card.
Since low-level formatting will format all recordable sectors in the card, the
formatting will take slightly longer than normal formatting.
You can stop the low-level formatting by selecting [Cancel]. Even in this
case, normal formatting will be completed and you can use the card as
usual.
When the card is formatted or data is erased, only the file management
information is changed. The actual data is not completely erased. Be
aware of this when selling or discarding the card. When discarding the
card, execute low-level formatting or destroy the card physically to
prevent the personal data from being leaked.
Before using a new Eye-Fi card, the software in the card must be
installed in your computer. Then format the card with the camera.
The card capacity displayed on the card format screen may be smaller
than the capacity indicated on the card.
This device incorporates exFAT technology licensed from Microsoft.
41
Switching the LCD Monitor Display
The LCD monitor can display the shooting settings screen, menu
screen, captured images, etc.
Shooting Settings
When you turn on the power, the
shooting settings will be displayed.
When your eye is near the viewfinder
eyepiece, the display-off sensor
(p.15) will turn off the LCD monitor to
prevent glare. When your eye leaves
the viewfinder eyepiece, the LCD
monitor will turn on again.
By pressing the <B> button, you
can switch the LCD monitor screen as
follows: Display the shooting settings
screen, turn off the LCD monitor screen,
or display the camera settings screen.
Menu Functions
Appears when you press the
<M> button. Press the
button again to return to the
shooting settings screen.
Captured Image
Appears when you press the
<x> button. Press the button
again to return to the shooting
settings screen.
With [52: LCD auto off], you can prevent the LCD monitor from turning
off automatically.
Even when the menu screen or captured image is displayed, pressing
the shutter button will enable you to shoot immediately.
42
Feature Guide
The Feature guide appears when you change the shooting mode or set
a shooting function, Live View shooting, movie shooting, or Quick
Control for playback, and displays a brief description of that mode,
function or option. It also displays a description when you select a
function or option on the Quick Control screen. The Feature guide turns
off when you tap the description or proceed with the operation.
Shooting mode (Sample)
Quick Control (Sample)
Shooting settings
Live View shooting
Playback
3 Disabling the Feature Guide
Select [Feature guide].
Under the [53] tab, select [Feature
guide], then press <0>.
Select [Disable], then press <0>.
43
d Using the Touch Screen
The LCD monitor is a touch-sensitive panel that you can operate with
your fingers.
Tap
Quick Control (Sample display)
Use your finger to tap (touch briefly
and then remove your finger from) the
LCD monitor.
By tapping, you can select menus,
icons, etc., displayed on the LCD
monitor.
When touch-screen operation is
possible, a frame will appear around
the icon (except on menu screens).
For example, when you tap [Q], the
Quick Control screen appears. By
tapping [2], you can return to the
preceding screen.
Operations possible by tapping the screen
Setting menu functions after pressing the <M> button
Quick Control
Setting functions after pressing the <i> or <S> button
Setting functions during Live View shooting
Setting functions during movie shooting
Playback operations
44
d Using the Touch Screen
Drag
Menu screen (Sample display)
Slide your finger while touching the
LCD monitor.
Scale display (Sample display)
Operations possible by dragging your finger on the screen
Selecting a menu tab or item after pressing the <M> button
Setting a scale control
Quick Control
Setting functions during Live View shooting
Setting functions during movie shooting
Playback operations
3 Silencing the Beep during Touch Operations
If [z1: Beep] is set to [Touch to
beep will not sound during touch
operations.
], the
45
d Using the Touch Screen
3 Setting the Touch Control
1
Select [Touch control].
Under the [53] tab, select [Touch
control], then press <0>.
the Touch control.
2 SetSelect
the desired setting, then press
<0>.
[Standard] is the normal setting.
[Sensitive] provides a better touch
response than [Standard]. Try using
both settings and select the one you
prefer.
To disable touch-screen operations,
select [Disable].
Cautions for Touch Screen Operations
Since the LCD monitor is not pressure sensitive, do not use any sharp
objects, such as your fingernail or a ballpoint pen, for touch operations.
Do not use wet fingers for touch screen operations.
If the LCD monitor has any moisture or if your fingers are wet, the touch
screen may not respond or misoperation may occur. In such a case, turn
off the power and wipe the LCD monitor with a cloth.
Do not attach any protective sheet (commercially available) or sticker on
the LCD monitor. It may make the touch operation response slow.
46
2
Basic Shooting
This chapter explains how to use the Basic Zone modes
on the Mode Dial for best results.
With Basic Zone modes, all you do is point and shoot while the
camera sets everything automatically (p.71). Also, to prevent
botched pictures due to mistaken operations, advanced
shooting function settings cannot be changed.
e
Basic Zon
If you set the Mode Dial to <8> while the LCD monitor is off,
press the <Q> button to check the shooting mode before shooting
(p.62).
47
A Fully Automatic Shooting (Scene Intelligent Auto)
<A> is a fully automatic mode. The camera analyzes the scene
and sets the optimum settings automatically. It also adjusts focus
automatically by detecting whether the subject is still or moving (p.51).
1
AF point
Set the Mode Dial to <A>.
any AF point over the
2 Aim
subject.
All the AF points will be used to focus,
and generally the closest object will
be focused.
Aiming the center AF point over the
subject will make focusing easier.
the subject.
3 Focus
Press the shutter button halfway, and
the lens focusing ring will rotate to
focus.
X The dot inside the AF point achieving
focus flashes briefly in red. At the
same time, the beeper will sound and
the focus confirmation light <o> in
the viewfinder will light up.
X If necessary, the built-in flash will be
raised automatically.
Focus confirmation light
48
A Fully Automatic Shooting (Scene Intelligent Auto)
the picture.
4 TakePress
the shutter button completely to
take the picture.
X The captured image will be displayed
for 2 sec. on the LCD monitor.
After you finish shooting, push down
the built-in flash with your fingers.
The <A> mode makes the colors look more impressive in nature, outdoor,
and sunset scenes. If the desired color tone is not obtained, use a Creative
Zone mode and select a Picture Style other than <D> and shoot.
FAQ
The focus confirmation light <o> blinks and focus is not
achieved.
Aim the AF point over an area with good contrast, then press the
shutter button halfway (p.35). If you are too close to the subject,
move away and try again.
Multiple AF points flash simultaneously.
This indicates that focus is achieved at all those AF points. When the
AF point covering the desired subject flashes, take the picture.
The beeper continues to beep softly. (The focus confirmation
light <o> does not light up.)
It indicates that the camera is focusing continuously on a moving
subject. (The focus confirmation light <o> does not light up.) You
can take sharp pictures of a moving subject.
Note that focus lock (p.51) will not work in this case.
Pressing the shutter button halfway does not focus the subject.
If the focus mode switch on the lens is set to <MF> (manual focus),
set it to <AF> (autofocus).
49
A Fully Automatic Shooting (Scene Intelligent Auto)
The flash fired even though it was daylight.
For a backlit subject, the flash may fire to help lighten the subject’s
dark areas. There are two ways to disable the flash:
• Set the flash setting to [b] (Flash off). If you change the shooting
mode or set the power switch to <2>, the setting will revert back
to [a] (Auto flash) (p.71).
• Set the Mode Dial to <7> (Flash Off) (p.53).
The flash fired and the picture came out extremely bright.
Move further from the subject and shoot. When shooting flash
photography, if the subject is too close to the camera, the picture
may come out extremely bright (overexposure).
In low light, the built-in flash fired a series of flashes.
Pressing the shutter button halfway may trigger the built-in flash to
fire a series of flashes to assist autofocusing. This is called AF-assist
beam. Its effective range is approx. 4 meters/13.1 feet.
When flash was used, the bottom part of the picture came out
unnaturally dark.
The shadow of the lens barrel was captured in the picture because
the subject was too close to the camera. Move further from the
subject and shoot. If a hood is attached to the lens, remove it before
taking the flash picture.
50
A Full Auto Techniques (Scene Intelligent Auto)
Recomposing the Shot
Depending on the scene, position the subject toward the left or right to
create a balanced background and good perspective.
In the <A> mode, while you press the shutter button halfway to focus
a still subject, the focus will be locked. You can then recompose the
shot and press the shutter button completely to take the picture. This is
called “focus lock”. Focus lock is also possible in other Basic Zone
modes (except <5><C>).
Shooting a Moving Subject
In the <A> mode, if the subject moves (distance to camera changes)
while or after you focus, AI Servo AF will take effect to focus the subject
continuously. (The beeper will continue beeping softly.) As long as you
keep aiming the AF point on the subject while pressing the shutter
button halfway, the focusing will be continuous. When you want to take
the picture, press the shutter button completely.
51
A Full Auto Techniques (Scene Intelligent Auto)
A Live View Shooting
You can shoot while viewing the image on the LCD monitor. This is
called “Live View shooting”. For details, see page 73.
1
Display the Live View image on
the LCD monitor.
Press the <A> button.
X The Live View image will appear on
the LCD monitor.
the subject.
2 Focus
Press the shutter button halfway to
focus.
X When focus is achieved, the AF point
will turn green and the beeper will
sound.
the picture.
3 TakePress
the shutter button completely.
X The picture will be taken and the
captured image is displayed on the
LCD monitor.
X After the image review ends, the
camera will return to Live View
shooting automatically.
Press the <A> button to end the
Live View shooting.
52
7 Disabling Flash
The camera analyzes the scene and sets the optimum settings
automatically. In places where flash photography is prohibited such as
in a museum or an aquarium, use the <7> (Flash Off) mode.
Shooting Tips
Prevent camera shake if the numeric display in the viewfinder
blinks.
Under low light when camera shake is prone to occur, the
viewfinder’s shutter speed display will blink. Hold the camera steady
or use a tripod. When using a zoom lens, use the wide-angle end to
reduce blur caused by camera shake even while handholding the
camera.
Take portraits without flash.
In low-light conditions, tell the subject to keep still until the picture is
taken. Any movement by the subject during shooting may result in
the subject being blurred in the picture.
53
C Creative Auto Shooting
In the <C> mode, you can set the following functions before shooting:
(1) Extra Effect Shot, (2) Ambience-based shots, (3) Background blur,
(4) Drive/self-timer mode, and (5) Flash firing. The default settings are
the same as the <A> mode.
* CA stands for Creative Auto.
1
Set the Mode Dial to <C>.
the <Q> button. (7)
2 Press
X The Quick Control screen will appear.
the desired function.
3 SetPress
the <S> cross keys to select
the function.
X The selected function and Feature
guide (p.43) will appear.
Press <0> to set the function.
For the setting procedure and details
on each function, see page 55.
the picture.
4 TakePress
the shutter button completely to
take the picture.
54
C Creative Auto Shooting
(1)
Shutter speed
Aperture
ISO speed
(2)
(3)
(5)
(4)
Pressing the <Q> button enables you to set the following: If you
set (1), (2) or (3) when the camera is set for Live View shooting, you can
see the effect on the screen before you start shooting.
(1) Extra Effect Shot
• You can select any of the following effects before shooting:
Creative filters, Picture Styles, and Ambience-based shots.
• Turn the <6> dial to select [ : Enable]. Tap on [2] to return to
the Quick Control screen. You can also press <0> and make
the selection.
• Turn the <6> dial to select a shooting effect.
• When you take a picture, two images will be recorded. One with the
effect applied and one without. Immediately after you take a picture,
both images will be displayed together. The image without the effect
is displayed on the left and the one with the effect will be on the right.
Registering your favorite shooting effects
• During the image review immediately after shooting and during
playback, the image applied with the effect will have the < > icon.
After you press the <O> button and then the <B> button,
you can check which shooting effect was applied.
• You can register up to two shooting effects under [9:Favorite effect].
• When you select the registered [9:Favorite effect], you can
shoot with that shooting effect applied. You can also overwrite the
[9:Favorite effect].
If you are using an Eye-Fi card and have set it to erase images after their
transfer, the image without the effect will not be displayed during the
playback immediately after shooting.
55
C Creative Auto Shooting
(2) Ambience-based shots
• You can choose the ambience you want to convey in your images.
• Turn the <6> dial to select the ambience. You can also select it
from a list by pressing <0>.
(3) Background blur
• If [OFF] is set, the degree of background blur will change
depending on the brightness.
• If it is set to other than [OFF], you can adjust the background blur
regardless of brightness.
• If you turn the <6> dial to move the cursor to the right, the
background will look sharper.
• Turning the <6> dial to move the cursor to the left will blur the
subject’s background. Note that depending on the lens’ maximum
aperture (f/number), certain slider adjustments may not be
selectable (indicated by •).
• If you use Live View shooting, you can see how the image is
blurred in front of and behind the point of focus. While you turn the
<6> dial, [Simulating blur] will be displayed on the LCD
monitor.
• If you want to blur the background, see “Shooting Portraits” on
page 58.
• Depending on the lens and shooting conditions, the background
may not look so blurred.
• This function cannot be set if you use flash. If <a> has been set
and you set Background blur, <b> will be set automatically.
If [Simulating blur] is effective during Live View shooting, the image
shown while <g> (p.76) is blinking may have more noise than the
actual image being recorded or it may look dark.
You cannot set both (1) Extra Effect Shot and (2) Ambience-based shots
at the same time.
You cannot set both (1) Extra Effect Shot and (3) Background blur at the
same time.
56
C Creative Auto Shooting
(4) Drive/self-timer mode: Use the <6> dial to make the selection.
You can also select it from a list by pressing <0>.
<u> Single shooting:
Shoot one image at a time.
<i> Continuous shooting:
While you hold down the shutter button completely,
shots will be taken continuously. You can shoot up to
approx. 4 shots per second.
<Q> Self-timer: 10sec./remote control:
The picture is taken 10 seconds after you press the
shutter button. A remote controller can also be used.
<l>Self-timer: 2 sec.:
The picture is taken 2 seconds after you press the
shutter button.
<q>Self-timer: Continuous:
Press the <W> <X> keys to set the number of
multiple shots (2 to 10) to be taken with the self-timer.
10 seconds after you press the shutter button, the set
number of multiple shots will be taken.
(5) Flash firing: Turn the <6> dial to select the desired setting. You
can also select it from a list by pressing <0>.
<a> Auto flash : The flash fires automatically when necessary.
<I> Flash on : The flash fires at all times.
<b> Flash off : The flash is disabled.
When using <b>, see “Disabling Flash” on page 53.
If you have set Extra Effect Shot, <i> <q> cannot be set.
If you have set Background blur, you cannot use flash.
57
2 Shooting Portraits
The <2> (Portrait) mode blurs the background to make the human
subject stand out. It also makes skin tones and hair look softer.
Shooting Tips
The further the distance between the subject and background,
the better.
The further the distance between the subject and background, the
more blurred the background will look. The subject will also stand
out better against an uncluttered dark background.
Use a telephoto lens.
If you have a zoom lens, use the telephoto end to fill the frame with
the subject from the waist up. Move in closer if necessary.
Focus the face.
Check that the AF point covering the face flashes. For close-ups of
the face, focus on the eyes.
The default setting is <i> (Continuous shooting). If you hold down the
shutter button, you can shoot continuously to capture subtle changes in the
subject’s pose and facial expression (max. approx. 4 shots/sec.).
58
3 Shooting Landscapes
Use the <3> (Landscape) mode for wide scenery or to have
everything in focus from near to far. For vivid blues and greens, and
very sharp and crisp images.
Shooting Tips
With a zoom lens, use the wide-angle end.
When using the wide-angle end of a zoom lens, objects near and far
will be in focus better than at the telephoto end. It also adds breadth
to landscapes.
Shooting night scenes.
The <3> mode is also good for night scenes because it disables
the built-in flash. Use a tripod to prevent camera shake.
The flash will not fire even in backlit or low-light conditions.
59
4 Shooting Close-ups
When you want to shoot flowers or small things up close, use the <4>
(Close-up) mode. To make small things appear much larger, use a
macro lens (sold separately).
Shooting Tips
Use a simple background.
A simple background makes small objects such as flowers stand out
better.
Move as close as possible to the subject.
Check the lens for its minimum focusing distance. Some lenses
have indications such as <40.25m/0.8ft> on them. The lens
minimum focusing distance is measured from the <V> (focal
plane) mark on the top of the camera to the subject. If you are too
close to the subject, the focus confirmation light <o> will blink.
If you use flash and the bottom of the picture looks unusually dark,
move away from the subject.
With a zoom lens, use the telephoto end.
If you have a zoom lens, using the telephoto end will make the
subject look larger.
60
5 Shooting Moving Subjects
Use the <5> (Sports) mode to shoot a moving subject, such as a
running person or a moving vehicle.
Shooting Tips
Use a telephoto lens.
The use of a telephoto lens is recommended for shooting from a
distance.
Use the center AF point to focus.
Aim the center AF point over the subject, then press the shutter
button halfway to autofocus. During autofocusing, the beeper will
continue beeping softly. If focus cannot be achieved, the focus
confirmation light <o> will blink.
The default setting is <i> (Continuous shooting). When you want
to take the picture, press the shutter button completely. If you hold
down the shutter button, you will be able to maintain autofocusing
during continuous shooting of the subject’s movement (max. approx.
4 shots per sec.).
Under low light when camera shake is prone to occur, the viewfinder’s
shutter speed display on the bottom left will blink. Hold the camera steady
and shoot.
61
8: Special Scene Mode
The camera will automatically choose the appropriate settings when
you select a shooting mode for your subject or scene.
1
Set the Mode Dial to <8>.
the <Q> button. (7)
2 Press
X The Quick Control screen will appear.
a shooting mode.
3 Select
Press the <S> cross keys to select
the desired shooting mode’s icon.
Turn the <6> dial to select a
shooting mode.
You can also select the shooting
mode icon and press <0> to
display a selection of shooting modes
from which you can select one.
Available Shooting Modes in the <8> Mode
Shooting Mode
Shooting Mode
Page
6
Night Portrait
Page
p.66
p.64
F
Handheld Night Scene
p.67
p.65
G
HDR Backlight Control
p.68
C
Kids
p.63
P
Food
x
Candlelight
62
C Shooting Children
When you want to continuously focus and shoot children running
around, use <C> (Kids). Skin tones will look healthy.
Shooting Tips
Use the center AF point to focus.
Aim the center AF point over the subject, then press the shutter
button halfway to autofocus. During autofocusing, the beeper will
continue beeping softly. If focus cannot be achieved, the focus
confirmation light <o> will blink.
Shoot continuously.
The default setting is <i> (Continuous shooting). When you want
to take the picture, press the shutter button completely. If you hold
down the shutter button, you will be able to maintain autofocusing
during continuous shooting of the subject’s changing facial
expressions and movement (max. approx. 4 shots per sec.).
While the flash is recycling, “DbuSY” is displayed in the viewfinder, and a
picture cannot be taken. Take the picture after this display turns off.
63
P Shooting Food
When shooting food, use <P> (Food). The photo will look bright and
vivid, making the food look delicious.
Shooting Tips
Change the color tone.
You can change [Color tone]. Food photos with a reddish tinge
usually make the food look more delicious. To increase the food’s
reddish tinge, set it toward [Warm tone]. Set it toward [Cool tone] if
it looks too red.
Avoid using flash.
If you use flash, the light may reflect off the dish or food and results
in unnatural shadows. By default, <b> (Flash off) is set. Try to
prevent camera shake when shooting in low-light conditions.
Since this mode sets the color tone to make food look delicious, human
subjects may be shot in an unsuitable skin tone.
If you use flash, the [Color tone] setting will switch to the default setting.
64
x Shooting Candlelight Portraits
When shooting a human subject in candlelight, use <x> (Candlelight).
The candlelight color tones will be retained in the photo.
Shooting Tips
Use the center AF point to focus.
Aim the center AF point in the viewfinder over the subject, then shoot.
Prevent camera shake if the shutter speed in the viewfinder
blinks.
Under low light when camera shake is prone to occur, the
viewfinder’s shutter speed display will blink. Hold the camera steady
or use a tripod. When using a zoom lens, use the wide-angle end to
reduce blur caused by camera shake even while handholding the
camera.
Change the color tone.
You can change [Color tone]. To increase the candlelight’s reddish
tinge, set it toward [Warm tone]. Set it toward [Cool tone] if it looks
too red.
Live View shooting cannot be used.
Flash shooting is not possible. In low light, the AF-assist beam may be
emitted.
65
6 Shooting Night Portraits (With a Tripod)
To shoot people at night and obtain a natural-looking night scene in the
background, use the <6> (Night Portrait) mode. Using a tripod is
recommended.
Shooting Tips
Use a wide-angle lens and a tripod.
When using a zoom lens, use the wide-angle end to obtain a wide
night view. Also, use a tripod to prevent camera shake.
Check the subject’s brightness.
Under low light, the built-in flash will fire automatically to obtain a
good exposure of the subject.
It is recommended to play back the image after the shooting to
check the image brightness. If the subject looks dark, move nearer
and shoot again.
Also shoot in another shooting modes.
Since camera shake is prone to occur with night shots, shooting also
with <A> and <F> is recommended.
Tell the subject to keep still even after the flash fires.
If you use the self-timer together with flash, the self-timer lamp will light
up briefly after the picture is taken.
See the cautions on page 69.
66
F Shooting Night Scenes (Handheld)
Using a tripod when shooting a night scene gives the best results.
However, the <F> (Handheld Night Scene) mode enables you to shoot
night scenes even while handholding the camera. Four shots are taken
continuously for each picture, and the resulting image with reduced
camera shake is recorded.
Shooting Tips
Hold the camera firmly.
While shooting, hold the camera firmly and steadily. In this mode,
four shots are aligned and merged into a single image. However, if
there is significant misalignment in any of the four shots due to
camera shake, they may not align properly in the final image.
For shots of people, turn on the flash.
If you want to include people in the night scene shot, press the <Q>
button to set <D> (Flash on). To take a nice portrait, the first shot will
use flash. Tell the subject not to move until all four continuous shots
are taken.
See the cautions on page 69.
67
G Shooting Backlit Scenes
When shooting a scene having both bright and dark areas, use the
<G> (HDR Backlight Control) mode. When you take one picture in this
mode, three continuous shots are taken at different exposures. This
results in one image, with a wide tonal range, that has minimized the
blocked-up shadows caused by backlighting.
Shooting Tips
Hold the camera firmly.
While shooting, hold the camera firmly and steadily. In this mode,
three shots are aligned and merged into a single image. However, if
there is significant misalignment in any of the three shots due to
camera shake, they may not align properly in the final image.
Flash shooting is not possible. In low light, the AF-assist beam may be
emitted.
See the cautions on page 69.
HDR stands for High Dynamic Range.
68
Cautions for both <6> (Night Portrait) and <F> (Handheld Night Scene)
During Live View shooting, it may be difficult to focus dots of light such as
in a night scene. In such a case, you should set the AF method to [Quick
mode] and shoot. If it is still difficult to focus, set the lens’ focus mode
switch to <MF> and focus manually.
Cautions for <F> (Handheld Night Scene)
When shooting flash photography, if the subject is too close to the
camera, the picture may come out extremely bright (overexposure).
If you use flash to shoot a night scene with few lights, the shots may not
align correctly. This can result in a blurry photo.
If you use flash and the human subject is close to the background that is
also illuminated by the flash, the shots may not align correctly. This can
result in a blurry photo. Unnatural shadows and unsuitable colors may
also appear.
External flash coverage:
• When using a Speedlite with automatic flash coverage setting, the zoom
position will be fixed to the wide end, regardless of the lens’ zoom position.
• If you have to set the flash coverage manually, set it to the wide-angle end.
Cautions for <G> (HDR Backlight Control)
Note that the image may not be rendered with a smooth gradation and
may look irregular or have significant noise.
HDR Backlight Control may not be effective for excessively backlit
scenes or extremely high-contrast scenes.
Cautions for both <F> (Handheld Night Scene) and <G> (HDR
Backlight Control)
Compared with other shooting modes, the shooting area will be smaller.
1+73 or 1 cannot be selected. If 1+73 or 1 has been set,
73 will be set.
If you shoot a moving subject, the subject’s movement may leave afterimages
or the surrounding area of the subject may become dark.
The image alignment may not function properly with repetitive patterns
(lattice, stripes, etc.), flat or single-tone images, or images significantly
misaligned due to camera shake.
Recording the image to the card will take longer than with normal
shooting. During the processing of the images, “BUSY” will be displayed
and you cannot take another picture until the processing is completed.
If the shooting mode is set to <F> or <G>, direct printing is not possible.
69
Q Quick Control
In Basic Zone modes when the shooting function settings screen is
displayed, you can press the <Q> button to display the Quick Control
screen. The table on the next page shows the functions that can be set
with the Quick Control screen in each Basic Zone mode.
Example: Portrait mode
the Mode Dial to a Basic Zone
1 Set
mode.
the <Q> button. (7)
2 Press
X The Quick Control screen will appear.
the functions.
3 SetPress
the <S> cross keys to select a
function. (This step is not necessary
in the 7 mode.)
X The selected function and Feature
guide (p.43) will appear.
Press the <Y> <Z> keys or turn the
<6> dial to change the setting.
In the <P> and <x> modes, you can set [Color tone]. To suit the light
source, set it toward [Warm tone] to increase the reddish tinge. Set it
toward [Cool tone] if the color tone looks too red.
70
Q Quick Control
Settable Functions in Basic Zone Modes
o:
Default setting k: User selectable
Function
Drive mode
u: Single shooting
i: Continuous shooting
Q (10 sec.)
Self-timer
l (2 sec.)
q (Continuous)
a: Automatic firing
Flash firing
D: Flash on (Fires at all times)
b: Flash off
A
o
k
k
k
k
o
k
k
7
o
k
k
k
k
o
Ambience-based shots
C
o
k
k
k
k
o
k
k
k
Light/scene-based shots
2
k
o
k
k
k
o
k
k
k
k
: Not selectable
3
o
k
k
k
k
o
k
k
4
o
k
k
k
k
o
k
k
k
k
5
k
o
k
k
k
o
k
k
k
Background blur (p.56)
Color tone
k
Extra Effect Shot (p.55)
Function
Drive mode
u: Single shooting
i: Continuous shooting
Q (10 sec.)
Self-timer
l (2 sec.)
q (Continuous)
a: Automatic firing
Flash firing
D: Flash on (Fires at all times)
b: Flash off
Ambience-based shots
Light/scene-based shots
C
k
o
k
k
k
o
k
k
k
k
P
o
k
k
k
k
8
x
6
o
o
k
k
k
k
k
k
k
k
o
k
o
k
o
k
k
k
k
F
o
k
k
k
k
G
o
k
k
k
k
k
o
k
o
Background blur (p.56)
Color tone
Extra Effect Shot (p.55)
* If you change the shooting mode or set the power switch to <2>, it will revert
to the default settings (except the self-timer).
71
3
Shooting with the LCD Monitor
(Live View Shooting)
You can shoot while viewing the picture on the camera’s
LCD monitor. This is called “Live View shooting”.
If you handhold the camera and shoot while viewing the
LCD monitor, camera shake can cause blurred images.
Using a tripod is recommended.
Remote Live View Shooting
With EOS Utility (provided software, p.106) installed in your
computer, you can connect the camera to the computer and shoot
remotely while viewing the computer screen. For details, refer to
the EOS Utility Instruction Manual (p.108).
73
A Shooting with the LCD Monitor
1
Display the Live View image.
Press the <A> button.
X The Live View image will appear on the
LCD monitor. In the <A> mode, the
scene icon for the scene detected by the
camera is displayed on the upper left.
By default, Continuous AF will take
effect.
The Live View image will closely
reflect the brightness level of the
actual image you capture.
the subject.
2 Focus
When you press the shutter button
halfway, the camera will focus with
the current AF method (p.77).
the picture.
3 TakePress
the shutter button completely.
X The picture will be taken and the captured
image is displayed on the LCD monitor.
X After the image review ends, the camera will
return to Live View shooting automatically.
Press the <A> button to exit the
Live View shooting.
The image’s field of view is approx. 100% (with the image-recording
quality set to JPEG 73).
In Creative Zone modes, you can check the depth of field by pressing the
depth-of-field preview button.
During continuous shooting, the exposure set for the first shot will also
be applied to subsequent shots.
You can also tap the subject on the LCD monitor to focus (p.77-83) and
shoot (p.84).
You can also use a remote controller (sold separately) for Live View shooting.
74
A Shooting with the LCD Monitor
Enabling Live View Shooting
Set [A: Live View shoot.] to [Enable].
Number of Possible Shots with Live View Shooting
[Approx. number of shots]
Temperature
Shooting Conditions
No Flash
50% Flash Use
Room temperature (23°C / 73°F)
160
150
Low temperatures (0°C / 32°F)
150
140
The figures above are based on a fully-charged Battery Pack LP-E12 and CIPA
(Camera & Imaging Products Association) testing standards.
With a fully-charged Battery Pack LP-E12, continuous Live View shooting is
possible for approx. 1 hr. 20 min. at room temperature (23°C / 73°F).
In the <x> mode, Live View shooting is not possible.
In the <F> and <G> shooting modes, the shooting area will be smaller
than with other shooting modes.
Do not point the camera toward an intense light source, such as the sun
on a sunny day or an intense artificial light source. Doing so may
damage the image sensor or the camera’s internal components.
When flash is used, there will be two shutter sounds, but only one shot
will be taken. Also, the time it takes to take the picture after you press the
shutter button completely will be slightly longer than with viewfinder
shooting.
If the camera is not operated for a prolonged period, the power will turn
off automatically after the time set in [52: Auto power off]. If [52: Auto
power off] is set to [Disable], Live View shooting will end automatically
after 30 min. (camera power remains on).
With the stereo AV cable AVC-DC400ST (sold separately) or HDMI cable
HTC-100 (sold separately), you can display the Live View image on a TV.
75
A Shooting with the LCD Monitor
Information Display
Each time you press the <B> button, the information display will change.
AF point (Quick mode)
Battery check
Possible shots
Histogram display
Auto Lighting
Optimizer
Quick Control
Shooting mode
White
balance
AF method
Drive/self-timer
Picture Style
Metering mode
Image-recording
quality
Creative filters
Eye-Fi card
transmission status
Switch to auto
selection
(AF point)
Exposure
simulation
Touch shutter
Magnified view
AE lock
Flash-ready/Flash off
Shutter speed
Flash exposure compensation
Aperture
Exposure level indicator/AEB range
AEB/FEB/ Multi Shot
Noise Reduction
ISO speed
Highlight tone priority
GPS connection indicator
Digital compass
When <g> is displayed in white, it indicates that the Live View image
brightness is close to what the captured image will look like.
If <g> is blinking, it indicates that the Live View image is displayed at
a brightness that differs from the actual shooting result because of lowor bright-light conditions. However, the actual image recorded will reflect
the exposure setting. Note that noise may be more noticeable than the
actual image recorded.
If you use the <F> or <G> shooting mode, use flash, or set a bulb
exposure, the <g> icon and histogram will be grayed out (for your
reference). The histogram may not be properly displayed in low- or
bright-light conditions.
76
Using AF to Focus (AF Method)
Selecting the AF Method
You can select an AF method to suit the shooting conditions and your
subject. The following AF methods are provided: [u(face)+Tracking],
[FlexiZone - Multi] (p.79), [FlexiZone - Single] (p.81), and [Quick
mode] (p.82).
If you want to achieve precise focus, set the lens focus mode switch to
<MF>, magnify the image, and focus manually.
Select the AF method.
Under the [A] tab, select [AF method].
Select the desired AF method, then
press <0>.
While the Live View image is
displayed, you can also press the
<Q> button to select the AF method
on the Quick Control screen.
u(face)+Tracking:c
The camera detects and focuses human faces. If a face moves, the AF
point <p> also moves to track the face.
1
Display the Live View image.
Press the <A> button.
X The Live View image will appear on
the LCD monitor.
an AF point.
2 Select
When a face is detected, the <p>
frame will appear over the face to be
focused.
If multiple faces are detected, <q>
will be displayed. Use <Y> <Z> to
move the <q> frame over the face
you want to focus on.
77
Using AF to Focus (AF Method)
You can also tap the LCD monitor
screen to select the face or subject. If
the subject is not a face, < > will be
displayed.
If no faces can be detected, or if you
tap the LCD monitor but do not select
any face or subject, the camera will
switch to [FlexiZone - Multi] with
automatic selection (p.79).
the subject.
3 Focus
Press the shutter button halfway to
focus.
X When focus is achieved, the AF point
will turn green and the beeper will
sound.
X If focus is not achieved, the AF point
will turn orange.
the picture.
4 TakeCheck
the focus and exposure, then
press the shutter button completely to
take the picture (p.74).
If the subject’s face is significantly out of focus, face detection will not be
possible. You can prevent this by setting [Continuous AF] to [Enable].
An object other than a human face may be detected as a face.
Face detection will not work if the face is very small or large in the
picture, too bright or too dark, or partially hidden.
The <p> may cover only part of the face.
78
Using AF to Focus (AF Method)
If you press the <L> button, the AF point < > will appear at the center
and you can use the <S> cross keys to move the AF point.
Since AF is not possible with a face detected near the edge of the
picture, the <p> will be grayed out. If you press the shutter button
halfway, the subject will be focused in FlexiZone - Multi method with
automatic selection.
FlexiZone - Multi:o
You can use up to 31 AF points for wide-area focusing (automatic
selection). This wide area can also be divided into 9 zones for focusing
(zone selection).
1
Display the Live View image.
Press the <A> button.
X The Live View image will appear on
the LCD monitor.
Area frame
the AF point.N
2 Select
Pressing the <L> button will toggle
between automatic selection and
zone selection. In Basic Zone modes,
automatic selection is set
automatically.
Use the <S> cross keys to select a
zone. To return to the center zone,
press the <L> button again.
You can also tap the LCD monitor
screen to select a zone. When a zone
is selected, tap [
] on the screen
to switch to automatic selection.
79
Using AF to Focus (AF Method)
the subject.
3 Focus
Aim the AF point over the subject and
press the shutter button halfway.
X When focus is achieved, the AF point
will turn green and the beeper will
sound.
X If focus is not achieved, the area
frame will turn orange.
the picture.
4 TakeCheck
the focus and exposure, then
press the shutter button completely to
take the picture (p.74).
When the camera does not focus the desired target subject with
automatic AF point selection, switch the AF method to zone selection or
[FlexiZone - Single], and refocus.
Depending on the [A: Aspect ratio] setting, the number of AF points
will differ. At [3:2], there will be 31 AF points. At [1:1] and [4:3], there will
be 25 AF points. And at [16:9], 21 AF points. Also, at [16:9], there will be
only three zones.
For movie shooting, there will be 21 AF points (or 25 AF points if
[640x480] is set) and three zones (or 9 zones if [640x480] is set).
80
Using AF to Focus (AF Method)
FlexiZone - Single: d
The camera focuses with a single AF point. This is effective when you
want to focus a particular subject.
the Live View image.
1 Display
Press the <A> button.
AF point
X The Live View image will appear on
the LCD monitor.
X The AF point < > will appear.
During movie shooting, if [Movie
Servo AF] is set to [Enable], the AF
point will be displayed in a larger size.
the AF point.
2 Move
Press the <S> cross keys to move the
AF point to where you want to focus. (It
cannot go to the edges of the picture.)
To return the AF point to the center,
press the <L> button.
You can also tap the LCD monitor
screen to move the AF point.
the subject.
3 Focus
Aim the AF point over the subject and
press the shutter button halfway.
X When focus is achieved, the AF point will
turn green and the beeper will sound.
X If focus is not achieved, the AF point
will turn orange.
the picture.
4 TakeCheck
the focus and exposure, then
press the shutter button completely to
take the picture (p.74).
81
Using AF to Focus (AF Method)
Quick Mode:f
The dedicated AF sensor is used to focus in One-Shot AF mode, using
the same AF method as with viewfinder shooting.
Although you can focus the target subject quickly, the Live View image
will be interrupted momentarily during the AF operation.
You can use nine AF points to focus (automatic selection). You can also
select one AF point to focus and focus only the area covered by that AF
point (manual selection).
AF point
1
Display the Live View image.
Press the <A> button.
X The Live View image will appear on
the LCD monitor.
The small boxes are the AF points.
the AF point.N
2 Select
Pressing the <L> button will toggle
between automatic selection and
manual selection. In Basic Zone
modes, automatic selection is set
automatically.
Use the <S> cross keys to select an
AF point. To return the AF point to the
center, press the <L> button again.
You can also tap the LCD monitor
screen to select the AF point. During
manual selection, tap [
] on the
screen to switch to automatic
selection.
82
Using AF to Focus (AF Method)
the subject.
3 Focus
Aim the AF point over the subject and
press the shutter button halfway.
X The Live View image will turn off, the
reflex mirror will go back down, and
AF will be executed. (No picture is
taken.)
X When focus is achieved, the AF point
that achieved focus will turn green
and the Live View image will
reappear.
X If focus is not achieved, the AF point
will turn orange and blink.
the picture.
4 TakeCheck
the focus and exposure, then
press the shutter button completely to
take the picture (p.74).
When [Quick mode] is set, [Continuous AF] cannot be set.
The [Quick mode] cannot be set for movie shooting.
You cannot take a picture during autofocusing. Take the picture while the
Live View image is displayed.
83
x Shooting with the Touch Shutter
Just by tapping the LCD monitor screen, you can focus and take the
picture automatically. This works in all shooting modes.
1
Display the Live View image.
Press the <A> button.
X The Live View image will appear on
the LCD monitor.
the touch shutter.
2 Enable
Tap [y] on the screen’s bottom left.
Each time you tap the icon, it will
toggle between [y] and [x].
[x] (Touch shutter: Enable)
You can focus and shoot by tapping
the screen.
[y] (Touch shutter: Disable)
You can tap to select where you want
to focus. Press the shutter button
completely to take the picture.
to shoot.
3 TapTapthethescreen
face or subject on the screen.
X At the point you tap, the camera will
focus in the AF method that was set
(p.77-83). When [FlexiZone - Multi]
is set, it will switch to [FlexiZone Single].
X When focus is achieved, the AF point
turns green and the picture is taken
automatically.
If focus is not achieved, the AF point
turns orange and the picture cannot
be taken. Tap the face or subject on
the screen again.
84
x Shooting with the Touch Shutter
Even if you set Drive/self-timer to <i>, the camera will still shoot in
single shooting mode.
The touch shutter does not work with the magnified view.
When [6: Shutter/AE lock button] is set to [1: AE lock/AF] or [3: AE/
AF, no AE lock] under [54: Custom Functions (C.Fn)], autofocusing
does not take effect.
You can also set the touch shutter with [A: Touch shutter].
To take a bulb exposure, tap the screen twice. The first tap on the screen
will start the bulb exposure. Tapping it again will stop the exposure. Be
careful not to shake the camera when tapping the screen.
85
Do not hold the camera in the same posture for long periods of times.
Even if the camera does not feel too hot, prolonged contact with the same
body part may cause skin redness, blistering or low-temperature contact
burns. The use of a tripod is recommended for people with circulation
problems or very sensitive skin, or when using the camera in very hot
places.
86
4
Shooting Movies
Movie shooting is enabled by
setting the power switch to
<k>. The movie recording
format will be MOV.
For cards that can record movies, see page 3.
Full HD 1080
Full HD 1080 indicates compatibility with HighDefinition featuring 1080 vertical pixels (scanning
lines).
87
k Shooting Movies
Connecting the camera to a TV set is recommended to play back the
movies shot.
Autoexposure Shooting
When the shooting mode is set to other than <a>, autoexposure
control will take effect to suit the scene’s current brightness.
1
Set the power switch to <k>.
X The reflex mirror will make a sound,
then the image will appear on the
LCD monitor.
any shooting mode except
2 Set
<a>.
the subject.
3 Focus
Before shooting a movie, focus with
AF or manual focus (p.77-83).
By default, [Movie Servo AF:
Enable] is set so that the camera will
always focus.
the movie.
4 Shoot
Press the <A> button to start
Recording movie
Microphone
88
shooting a movie. To stop movie
shooting, press <A> again.
X While the movie is being shot, the
“o” mark will be displayed on the
upper right of the screen.
k Shooting Movies
Do not hold the camera in the same posture for long periods of times.
Even if the camera does not feel too hot, prolonged contact with the same
body part may cause skin redness, blistering or low-temperature contact
burns. The use of a tripod is recommended for people with circulation
problems or very sensitive skin, or when using the camera in very hot
places.
In Basic Zone modes, the shooting result will be the same as with <A>.
Also, the scene icon for the scene detected by the camera is displayed
on the upper left.
In the <f> and <s> shooting modes, the settings will be the same
as in the <d> mode.
Settable menu functions will differ between Basic Zone modes and
Creative Zone modes.
The ISO speed (100-6400), shutter speed, and aperture are set
automatically.
In Creative Zone modes, you can press the <A> button to lock the
exposure (AE lock). The exposure setting will be displayed for the
number of seconds set with [Z1: Metering timer]. After applying AE
lock during movie shooting, you can cancel it by pressing the <S>
button. (AE lock setting is retained until you press the <S> button.)
In Creative Zone modes, you can hold down the <O> button and turn
the <6> dial to set the exposure compensation.
Pressing the shutter button halfway displays the shutter speed and ISO
speed on the screen’s bottom. This is the exposure setting for taking a
still photo (p.90). The exposure setting for movie shooting is not
displayed. Note that the exposure setting for movie shooting may differ
from that for still photo shooting.
If you shoot a movie with autoexposure, the shutter speed and aperture
will not be recorded in the image information (Exif).
Using an EX-series Speedlite (Sold Separately)
Equipped with an LED Light
With autoexposure (modes other than a) movie shooting, the camera
will automatically turn on the Speedlite’s LED light under low-light
conditions. For details, refer to the Speedlite’s instruction manual.
89
k Shooting Movies
Information Display
Each time you press the <B> button, the information display will change.
AF method
• c : u+Tracking
• o : FlexiZone - Multi
• d : FlexiZone - Single
Movie shooting mode
: Autoexposure
(Basic Zone
modes)
: Autoexposure
(Creative Zone
modes)
: Manual exposure
Possible shots
Movie shooting remaining time* /
Elapsed time
Battery check
AF point (FlexiZone - Single)
Drive/
self-timer
Quick Control
White balance
Image-recording
quality
Movie recording size
Picture Style
Auto Lighting Optimizer
Miniature effect
movie
Eye-Fi card
transmission status
Frame rate
Video snapshots
Movie Servo AF
Exposure mode
L: Autoexposure
K: Manual
exposure
AE lock
LED light
Shutter speed
Aperture
GPS connection indicator
Digital compass
Exposure level indicator
Magnified view
Recording level: Manual
ISO speed
Attenuator
Highlight tone priority
Wind filter
* Applies to a single movie clip.
When movie shooting starts, the movie shooting remaining time will change
to the elapsed time.
90
3 Setting the Movie Recording Size
The menu option [Z2: Movie rec. size]
enables you to select the movie’s image
size [****x****] and frame rate [9]
(frames recorded per second). The 9
(frame rate) switches automatically
depending on the [52: Video system]
setting.
Image Size
A [1920x1080] : Full High-Definition (Full HD) recording quality.
The aspect ratio will be 16:9.
B [1280x720] : High-Definition (HD) recording quality. The
aspect ratio will be 16:9.
C [640x480]
: Standard-definition recording quality. The aspect
ratio will be 4:3.
Frame Rate (fps: frames per second)
6/8 : For areas where the TV format is NTSC (North America,
Japan, Korea, Mexico, etc.).
5/7 : For areas where the TV format is PAL (Europe, Russia,
China, Australia, etc.).
4
: Mainly for motion pictures.
91
3 Setting the Movie Recording Size
Total Movie Recording Time and File Size Per Minute
Movie Recording
Size
Total Recording Time (approx.)
4 GB Card
8 GB Card
16 GB Card
File Size
(approx.)
11 min.
22 min.
44 min.
330 MB/min.
11 min.
22 min.
44 min.
330 MB/min.
46 min.
1 hr. 32 min.
3 hr. 4 min.
82.5 MB/min.
6
[1920x1080]
5
4
[1280x720]
[640x480]
8
7
6
5
Movie Files Exceeding 4 GB
Even if you shoot a movie exceeding 4 GB, you can keep shooting
without interruption.
During movie shooting, approx. 30 sec. before the movie reaches
the 4 GB file size, the elapsed shooting time displayed in the movie
shooting screen will start blinking. If you keep shooting until the
movie file size exceeds 4 GB, a new movie file will be created
automatically and the elapsed shooting time or time code will stop
blinking.
When you play back the movie, you will have to play each movie file
individually. Movie files cannot play back consecutively
automatically. After the movie playback ends, select the next movie
to be played.
Movie Shooting Time Limit
The maximum recording time of one movie clip is 29 min. 59 sec. If
the movie shooting time reaches 29 min. 59 sec., the movie shooting
will stop automatically. You can start shooting a movie again by
pressing the <A> button. (A new movie file starts being recorded.)
An increase of the camera’s internal temperature may cause movie shooting
to stop before the maximum recording time shown in the table above.
92
5
Image Playback
This chapter explains basic procedures to play back
images and movies.
Images shot and saved with another device
The camera may not be able to properly display images captured
with a different camera, edited with a computer, or that have had their
file names changed.
93
x Image Playback
1
Play back the image.
Press the <x> button.
X The last captured image or last image
played back will appear.
an image.
2 Select
To view images starting with the last
image, press the <Y> key.
To view images starting with the first
(oldest) image, press the <Z> key.
Each time you press the <B>
button, the display format will change.
No information
With basic information
Histogram
Shooting information display
the image playback.
3 ExitPress
the <x> button to exit the
image playback and return to the
shooting settings display.
To erase an image, press the <L> button, select [Erase] and press <0>.
94
x Searching for Images Quickly
H Display Multiple Images on One Screen (Index Display)
Search for images quickly with the index display showing 4, 9, 36, or
100 images on one screen.
1
Play back the image.
When you press the <x> button, the
last image captured will be displayed.
to the index display.
2 Switch
Press the <Hy> button.
X The 4-image index display will
appear. The selected image is
highlighted in an orange frame.
Pressing the <Hy> button will
switch the display from 9 images to
36 images and then to 100 images.
Pressing the <u> button will switch
the display from 100 images to 36
images to 9 images to 4 images and
then to 1 image.
Î
Î
Î
Î
an image.
3 Select
Press the <S> cross keys to move
the orange frame to select an image.
Turning the <6> dial will display
image(s) on the next or previous
screen.
Press <0> in the index display to
display the selected image as a
single image.
95
u/y Magnified View
You can magnify a captured image by approx. 1.5x to 10x on the LCD
monitor.
1
Magnify the image.
Press the <u> button during image
playback.
X The image will be magnified.
If you hold down the <u> button, the
image will be magnified until it
reaches the maximum magnification.
Press the <Hy> button to reduce
the magnification. If you hold down
the button, the magnification will be
reduced to the single-image display.
Magnified area position
around the image.
2 Scroll
Use the <S> cross keys to scroll
around the magnified image.
To exit magnified view, press the
<x> button and the single-image
display will reappear.
In magnified view, you can turn the <6> dial to view another image at
the same magnification.
The image cannot be magnified during the image review immediately
after shooting.
A movie cannot be magnified.
96
d Playing Back with the Touch Screen
The LCD monitor is a touch-sensitive panel that you can touch with your
fingers for playback operations. Press the <x> button to play back
images.
Browsing Images
Swipe with one finger.
With single-image display, touch the
LCD monitor with one finger. You
can browse to the next or previous
image by swiping your finger to the
left or right.
Swipe to the left to see the next
(newer) image or swipe to the right to
see the previous (older) image.
With index display, also touch the
LCD monitor with one finger. You can
browse to the next or previous screen
by swiping your finger up or down.
Swipe up to see the next (newer)
images or swipe down to see the
previous (older) images.
When you select an image, the
orange frame will appear. Tap the
image again to display it as a single
image.
Jumping through Images (Jump Display)
Swipe with two fingers.
Touch the LCD monitor with two fingers.
When you swipe two fingers to the left or
right, you can jump through images with
the method set in [Image jump w/6]
under the [x2] tab.
97
d Playing Back with the Touch Screen
Reducing Image (Index Display)
Pinch two fingers.
Touch the screen with two fingers spread
apart, and pinch your fingers together on
the screen.
Each time you pinch your fingers, the
single-image display will change to
the index display.
When you select an image, the
orange frame will appear. Tap the
image again to display it as a single
image.
Magnifying Image
Spread two fingers apart.
Touch the screen with two fingers
together, then spread your fingers apart
on the screen.
As you spread your fingers, the
image will be magnified.
The image can be magnified up to
10x.
You can scroll around the image by
dragging your finger.
To reduce the image, pinch your
fingers together on the screen.
Tapping the [2] icon will return to the
single-image display.
Touch screen operations on the camera’s LCD monitor are also possible
while playing back images on a TV set connected to your camera.
98
k Playing Movies
1
Play back the image.
Press the <x> button to display an
image.
a movie.
2 Select
Press the <Y> <Z> keys to select a
movie.
In the single-image display, the
<
1> icon displayed on the upper
left of the screen indicates a movie. If
the movie is a video snapshot,
[
] will be displayed.
In the index display, perforations at
the left edge of a thumbnail indicate a
movie. As movies cannot be played
from the index display, press
<0> to switch to the singleimage display.
the single-image display, press
3 In<W>.
X The movie playback panel will appear
at the bottom of the screen.
back the movie.
4 PlaySelect
[7] (Play), then press <0>.
Speaker
X The movie will start playing.
You can pause the movie playback by
pressing <0>.
You can adjust the sound volume by
turning the <6> dial even during
movie playback.
For more details on the playback
procedure, see the next page.
99
k Playing Movies
Movie Playback Panel
Operation
7 Play
Playback Description
Pressing <0> toggles between play and stop.
Adjust the slow motion speed by pressing the <Y> <Z> keys.
The slow-motion speed is indicated at the upper right of the screen.
5 First frame
Displays the movie’s first frame.
Each time you press <0>, the previous frame is
3 Previous frame
displayed. If you hold down <0>, it will rewind the movie.
Each time you press <0>, the movie will play frame-by6 Next frame
frame. If you hold down <0>, it will fast forward the movie.
4 Last frame
Displays the movie’s last frame.
8 Slow motion
Background music* Plays back a movie with the selected background music.
X Edit
Displays the editing screen.
Playback position
mm’ ss”
Playback time (minutes:seconds)
You can adjust the built-in speaker’s (p.99) volume by
turning the <6> dial.
32
Pressing the <M> button returns to the single-image display.
* When background music is set, the movie’s sound will not be played.
9 Volume
Playback with the Touch Screen
Tap [7] at the center of the screen.
X The movie will start playing.
To display the movie playback panel,
tap [
1] or [
] on the upper
left of the screen.
If you tap the screen during movie
playback, the movie pauses and the
movie playback panel will appear.
With a fully-charged Battery Pack LP-E12, the continuous playback time
at room temperature (23°C/73°F) will be as follows: approx. 2 hr. 30 min.
If you connect the camera to a TV set to play a movie, adjust the sound volume
with the TV set. (Turning the <6> dial will not change the sound volume.)
If you took a still photo while you shot the movie, the still photo will be
displayed for approx. 1 sec. during the movie playback.
100
6
Viewing the CD-ROM Instruction Manuals /
Downloading Images to Your Computer
This chapter explains how to view the Camera
Instruction Manual CD-ROM on your computer,
download images from the camera to your computer,
gives an overview of the software in the EOS DIGITAL
Solution Disk (CD-ROM), and explains how to install the
software on your computer. It also explains how to view
the software instruction manuals.
Camera
Instruction Manual
EOS DIGITAL Solution Disk
(Software/Software Instruction Manuals)
101
Viewing the Camera Instruction Manual CD-ROM
The Camera Instruction Manual CD-ROM contains the
following instruction manuals (PDF):
Camera Instruction Manual
Explains all the camera functions and procedures, including basic
content.
Quick Reference Guide
Explains basic camera functions settings and basic shooting and
playback procedures.
Lens Instruction Manual
If you purchased the lens kit, read this manual before use.
Viewing the Camera Instruction Manual on the CD-ROM
To view the instruction manuals (PDF files), Adobe Reader 6.0 or higher
must be installed in your computer. Adobe Reader can be downloaded
free from the Internet. After installing Adobe Reader, follow the
procedure below.
the “CAMERA INSTRUCTION
1 Insert
MANUAL” CD-ROM into your computer.
the CD-ROM icon.
2 Double-click
For Windows, the icon is displayed in [(My)
Computer].
For Macintosh, the icon is displayed on the
desktop.
The icon displayed will differ depending on your
computer’s operating system.
102
Viewing the Camera Instruction Manual CD-ROM
the START file.
3 Double-click
The icon displayed will differ depending on your
computer’s operating system.
4 Click your language.
the instruction manual you want to
5 Click
read.
X The instruction manual will be displayed.
You can save the PDF file to your computer.
To learn how to use Adobe Reader, refer to Adobe Reader’s Help
section.
103
Downloading Images to a Computer
You can use the provided software to download the images in the
camera to your computer. There are two ways to do this.
Downloading by Connecting the Camera to the Computer
1
Install the software (p.107).
the provided interface cable
2 Use
to connect the camera to your
computer.
Use the interface cable provided with
the camera.
Connect the cable to the camera’s
<C> terminal with the cable
plug’s <D> icon facing the front of
the camera.
Connect the cord’s plug to the
computer’s USB terminal.
EOS Utility to download the
3 Use
images.
For details, refer to the EOS Utility
Instruction Manual (p.108).
104
Downloading Images to a Computer
Downloading Images with a Card Reader
You can also use a card reader to download images to your computer.
Install the software (p.107).
1
the card into the card
2 Insert
reader.
Canon software to download
3 Use
the images.
X Use Digital Photo Professional.
X Use ImageBrowser EX.
For details, refer to the Software
Instruction Manual (p.108).
When downloading images from the camera to your computer using a card
reader without using Canon software, copy the DCIM folder on the card to
your computer.
105
Software Overview
EOS DIGITAL Solution Disk
Various software for EOS DIGITAL cameras are contained
on the EOS DIGITAL Solution Disk.
EOS Utility
With the camera connected to a computer, EOS Utility enables you to
transfer still photos and movies shot with the camera to the computer.
You can also use this software to set various camera settings and shoot
remotely with the computer connected to the camera. Also, you can copy
background music tracks, such as EOS Sample Music*, to the card.
* You can use the background music as the soundtrack for a video snapshot
album, movie, or slide show played on your camera.
Digital Photo Professional
This software is recommended for users who mainly shoot RAW images.
You can quickly view, edit, process and print RAW images. You can also
edit JPEG images while retaining the original images.
Picture Style Editor
You can edit Picture Styles and create and save original Picture Style
files. This software is aimed at advanced users who are experienced in
processing images.
ImageBrowser EX
Connect to the Internet to download and install the software*.
This software is recommended for users who mainly shoot JPEG images.
You can easily view and play back still photos, MOV movies, and video
snapshot albums and also print JPEG images.
* EOS DIGITAL Solution Disk is necessary for downloading and installing
ImageBrowser EX.
Note that the software ZoomBrowser EX/ImageBrowser provided with previous
cameras does not support still photos and movie files shot with this camera (it is
not compatible). Use ImageBrowser EX.
106
Installing the Software
Do not connect the camera to your computer before you install the
software. The software will not be installed correctly.
When downloading and installing ImageBrowser EX, follow the steps
below as with other EOS software included on the EOS DIGITAL
Solution Disk. Note that Internet connection is necessary. Downloading
or installing software is not possible in environments with no Internet
connection.
Even if your computer already has ImageBrowser EX installed, follow the
steps below to reinstall ImageBrowser EX. It will be updated to the latest
version with features optimized for your camera. Also, the latest
functions may be added with the auto update feature.
For software other than ImageBrowser EX, if a previous version is
installed, follow the steps below to reinstall the software. (The newer
version will overwrite the previous version.)
1
Insert the EOS DIGITAL Solution Disk into your
computer.
For Macintosh, double-click to open the CD-ROM icon displayed
on the desktop, then double-click on [setup].
2 Click [Easy Installation] and follow the on-screen
instructions to install.
If the “Microsoft Silverlight” installation prompt is displayed during
installation, install “Microsoft Silverlight”.
3 Click [Restart] and remove the CD-ROM after the
computer restarts.
When the computer has restarted, the installation is complete.
107
Software Instruction Manual
Software Instruction Manuals are contained on the EOS
DIGITAL Solution Disk. You can copy and view the
software instruction manual (PDF files) as follows:
1
Insert the EOS DIGITAL Solution Disk into your
computer.
2 Close the install screen.
When the EOS DIGITAL Solution Disk install screen appears,
close the install screen.
3 Open the CD-ROM.
4 Open the [Manual] folder.
5 Copy the [English] folder to your computer.
Instruction Manual PDFs with the names below are copied.
Windows
Macintosh
EUx.xW_E_xx
EUx.xM_E_xx
Digital Photo Professional
DPPx.xW_E_xx
DPPx.xM_E_xx
Picture Style Editor
PSEx.xW_E_xx
PSEx.xM_E_xx
EOS Utility
Instruction manual for ImageBrowser EX (ImageBrowser EX
User Guide) is included in the software.
6 Double-click the copied PDF file.
Adobe Reader (most recent version recommended) must be
installed on your computer.
Adobe Reader can be downloaded free from the Internet.
108
Trademarks
o Adobe is a trademark of Adobe Systems Incorporated.
o Microsoft and Windows are trademarks or registered trademarks of Microsoft
Corporation in the United States and/or other countries.
o Macintosh and Mac OS are trademarks of Apple Inc., registered in the U.S.
and other countries.
o SDXC logo is a trademark of SD-3C, LLC.
o HDMI, HDMI logo, and High-Definition Multimedia Interface are trademarks or
registered trademarks of HDMI Licensing LLC.
o All other trademarks are the property of their respective owners.
About MPEG-4 Licensing
“This product is licensed under AT&T patents for the MPEG-4 standard and may be
used for encoding MPEG-4 compliant video and/or decoding MPEG-4 compliant video
that was encoded only (1) for a personal and non-commercial purpose or (2) by a
video provider licensed under the AT&T patents to provide MPEG-4 compliant video.
No license is granted or implied for any other use for MPEG-4 standard.”
* Notice displayed in English as required.
Use of genuine Canon accessories is recommended
This product is designed to achieve excellent performance when used with
genuine Canon accessories.
Canon shall not be liable for any damage to this product and/or accidents such
as fire, etc., caused by the malfunction of non-genuine Canon accessories (e.g.,
a leakage and/or explosion of a battery pack). Please note that this warranty
does not apply to repairs arising out of the malfunction of non-genuine Canon
accessories, although you may request such repairs on a chargeable basis.
109
Safety Precautions
The following precautions are provided to prevent harm or injury to
yourself and others. Make sure to thoroughly understand and follow
these precautions before using the product.
If you experience any malfunctions, problems, or damage to the
product, contact the nearest Canon Service Center or the dealer
from whom you purchased the product.
Warnings:
Follow the warnings below. Otherwise, death or
serious injuries may result.
To prevent fire, excessive heat, chemical leakage, explosions, and electrical shock,
follow the safeguards below:
• Do not use any batteries, power sources, or accessories not specified in the
Instruction Manual. Do not use any home-made or modified batteries.
• Do not short-circuit, disassemble, or modify the battery. Do not apply heat or
solder to the battery. Do not expose the battery to fire or water. Do not subject the
battery to strong physical shock.
• Do not insert the battery’s plus and minus ends incorrectly.
• Do not recharge the battery in temperatures outside the allowable ambient
temperature range. Also, do not exceed the recharging time indicated in the
Instruction Manual.
• Do not insert any foreign metallic objects into the electrical contacts of the camera,
accessories, connecting cables, etc.
When disposing of a battery, insulate the electrical contacts with tape to prevent
contact with other metallic objects or batteries. This is to prevent a fire or an explosion.
If excessive heat, smoke, or fumes are emitted when recharging the battery,
immediately unplug the battery charger from the power outlet to stop recharging.
Otherwise, it may cause a fire, heat damage or electrical shock.
If the battery leaks, changes color, deforms, or emits smoke or fumes, remove it
immediately. Be careful not to get burned in the process. It may cause a fire,
electrical shock or skin burn if you keep using it.
Prevent any battery leakage from contacting your eyes, skin, and clothing. It can
cause blindness or skin problems. If the battery leakage contacts your eyes, skin, or
clothing, flush the affected area with lots of clean water without rubbing it. See a
physician immediately.
Do not leave any cords near a heat source. It can deform the cord or melt the
insulation and cause a fire or electrical shock.
Do not hold the camera in the same position for long periods of time. Even if the
camera does not feel too hot, prolonged contact with the same body part may cause
skin redness, blistering or low-temperature contact burns. Using a tripod is
recommended for people with circulation problems or very sensitive skin, or when
using the camera in very hot places.
Do not fire the flash at anyone driving a car or other vehicle. It may cause an accident.
Do not fire the flash near a person’s eyes. It may impair the person’s vision. When
using flash to photograph an infant, keep at least 1 meter/3.3 feet away.
110
Safety Precautions
When the camera or accessories are not in use, make sure to remove the battery
and disconnect the power plug from the equipment before storing. This is to prevent
electrical shock, excessive heat, fire, or corrosion.
Do not use the equipment where there is flammable gas. This is to prevent an
explosion or a fire.
If you drop the equipment and the casing breaks open to expose the internal parts,
do not touch the internal parts. There is a possibility of an electrical shock.
Do not disassemble or modify the equipment. High-voltage internal parts can cause
electrical shock.
Do not look at the sun or an extremely bright light source through the camera or
lens. Doing so may damage your vision.
Keep equipment out of the reach of children and infants, including when in use. Straps
or cords may accidentally cause choking, electrical shock, or injury. Choking or injury
may also occur if a child or infant accidentally swallows a camera part or accessory. If
a child or infant swallows a part or accessory, consult a physician immediately.
Do not store the equipment in dusty or humid places. Likewise, store the battery with
its protective cover attached to prevent short-circuit. This is to prevent a fire,
excessive heat, electrical shock, or burn.
Before using the camera inside an airplane or hospital, check if it is allowed.
Electromagnetic waves emitted by the camera may interfere with the plane’s
instruments or the hospital’s medical equipment.
To prevent a fire and electrical shock, follow the safeguards below:
• Always insert the power plug all the way in.
• Do not handle a power plug with wet hands.
• When unplugging a power plug, grasp and pull the plug instead of the cord.
• Do not scratch, cut, or excessively bend the cord or put a heavy object on the
cord. Also do not twist or tie the cords.
• Do not connect too many power plugs to the same power outlet.
Do not use a cord whose wire is broken or insulation is damaged.
Unplug the power plug periodically and clean off the dust around the power outlet
with a dry cloth. If the surrounding is dusty, humid, or oily, the dust on the power
outlet may become moist and short-circuit the outlet, causing a fire.
Do not connect the battery directly to an electrical outlet or a car’s cigarette lighter
outlet. The battery may leak, generate excessive heat or explode, causing a fire,
burns or injuries.
A thorough explanation of how to use the product by an adult is required when the
product is used by children. Supervise children while they are using the product.
Incorrect usage may result in electrical shock or injury.
Do not leave a lens or lens-attached camera in the sun without the lens cap
attached. Otherwise, the lens may concentrate the sun’s rays and cause a fire.
Do not cover or wrap the product with a cloth. Doing so may trap heat within and
cause the casing to deform or catch fire.
Be careful not to get the camera wet. If you drop the product in the water or if water
or metal get inside the product, promptly remove the battery. This is to prevent a fire
and an electrical shock.
Do not use paint thinner, benzene, or other organic solvents to clean the product.
Doing so may cause fire or a health hazard.
111
Safety Precautions
Cautions:
Follow the cautions below. Otherwise physical injury
or property damage may result.
Do not use or store the product inside a car under the hot sun or near a heat source.
The product may become hot and cause skin burns. Doing so may also cause
battery leakage or explosion, which will degrade the performance or shorten the life
of the product.
Do not carry the camera around when it is attached to a tripod. Doing so may cause
injury. Also make sure the tripod is sturdy enough to support the camera and lens.
Do not leave the product in a low-temperature environment for an extended period of
time. The product will become cold and may cause injury when touched.
Never play the provided CD-ROM in a drive that is not compatible with the CD-ROM.
If you use it in a music CD player, you may damage the speakers and other
components. When using headphones, there is also a risk of injury to your ears from
excessively loud volume.
112
Digital Camera Model DS126441 Systems
This device complies with Part 15 of the FCC Rules. Operation is subject to the
following two conditions: (1) This device may not cause harmful interference,
and (2) this device must accept any interference received, including
interference that may cause undesired operation.
Note: This equipment has been tested and found to comply with the limits for
class B digital devices, pursuant to Part 15 of the FCC Rules. These
limits are designed to provide reasonable protection against harmful
interference in a residential installation. This equipment generates, uses
and can radiate radio frequency energy and, if not installed and used in
accordance with the instructions, may cause harmful interference to
radio communications. However, there is no guarantee that interference
will not occur in a particular installation. If this equipment does cause
harmful interference to radio or television reception, which can be
determined by turning the equipment off and on, the user is encouraged
to try to correct the interference by one or more of the following
measures:
— Reorient or relocate the receiving antenna.
— Increase the separation between the equipment and receiver.
— Connect the equipment into an outlet on a circuit different from
that to which the receiver is connected.
— Consult the dealer or an experienced radio/TV technician for help.
The cable with the ferrite core provided with the digital camera must be used
with this equipment in order to comply with Class B limits in Subpart B of Part
15 of the FCC rules.
Do not make any changes or modifications to the equipment unless otherwise
specified in the manual. If such changes or modifications should be made, you
could be required to stop operation of the equipment.
Canon U.S.A. Inc.
One Canon Plaza, Lake Success, NY 11042, U.S.A.
Tel No. (516)328-5600
This Class B digital apparatus complies with Canadian ICES-003.
When connecting to and using a household power outlet, use only AC
Adapter Kit ACK-E15 (rated input: 100-240 V AC 50/60 Hz, rated
output: 7.4 V DC). Using anything else can cause fire, overheating, or
electrical shock.
113
USA and Canada only:
The Lithium ion/polymer battery that powers the product is
recyclable. Please call 1-800-8-BATTERY for information on
how to recycle this battery.
For CA, USA only
Included lithium battery contains Perchlorate Material – special handling may
apply. See www.dtsc.ca.gov/hazardouswaste/perchlorate/ for details.
CAUTION
RISK OF EXPLOSION IF BATTERY IS REPLACED BY AN INCORRECT TYPE.
DISPOSE OF USED BATTERIES ACCORDING TO LOCAL REGULATION.
114
MEMO
115
The descriptions in this Instruction Manual are current as of October 2014. For
information on the compatibility with any products introduced after this date,
contact any Canon Service Center. For the latest version Instruction Manual,
refer to the Canon Web site.
CPH-E061-005
© CANON INC. 2014