1
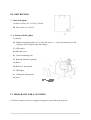
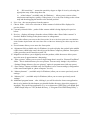
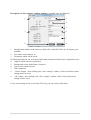
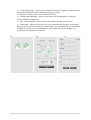
Manual
Table of contents
I.IMPORTANT.........................................................................................................................................2
II.CONTENTS..........................................................................................................................................2
III.DESCRIPTION....................................................................................................................................3
IV.PREPARATIN FOR LAUNCHING.....................................................................................................3
V.SOFTWARE DESCRIPTION................................................................................................................6
VI.LUNCHING......................................................................................................................................12
VII.PREPARING CAMERA..................................................................................................................12
VIII.OPERATING DEVICE WITHOUT ROTATING PLATFORM (M40 MODEL)............................13
IX.OPERATING DEVICE WITH ROTATING PLATFORM (FA40 MODEL)......................................14
X.CENTRING. (available only for Windows) .......................................................................................14
XI.TAKING PHOTO..............................................................................................................................15
XII.DEVICE CALIBRATION. (available only for Windows) ...............................................................16
XIII.3D ROTATE TOOL FLEXI.............................................................................................................18
XIV.UPLOADING PRESENTATION TO THE SERVER......................................................................25
XV.TROUBLESHOOTING....................................................................................................................26
XVI.ADDITIONAL INFORMATION....................................................................................................28
1|Page
I. IMPORTANT
Power supply
When starting the device, ensure the power supply of 230 V, according to the information
stated on a data plate. Grounded power source is a requirement for proper and safe operation
of the device.
Power cord
Do not use the “Photo Composer” mini studio if the power cord is damaged. If the cord is
damaged, replace it with another with the same parameters as the cable supplied with the
device. Do not place the power cord at sharp edges or on very hot surfaces and protect it
against flooding.
Storage
The device must be stored and used in a room at room temperature and low humidity. Do not
leave children with the device without adult supervision.
Repair
In case of any defects or mechanical damage, please, contact the service indicated by the seller.
In case of activities carried out independently or by other services, the manufacturer declines
all responsibility for possible damages.
Anti-fire protection
In case of fire use CO2 or dry powder extinguishers. Do not use water.
II. CONTENTS
1. The "Photo Composer" device (body).
2. Reflective side shields.
3. Rotating Platform (optional).
4. Power cord.
5. USB cable.
6. Software CD.
7. Laser.
8. Centring chart
2|Page
III. DESCRIPTION
1. Back side (plan)
A) Power socket (AC 110-230 V, 50 Hz).
B) Fuse socket (2 A, 250 V).
2. 2. Front and side (plan)
A) Switch.
B) Additional lighting socket (9.5 V, mini jack socket – 3.5 mm, maximum power 4W –
lighting can be bought in specialist shops).
C) USB socket.
D) Movable cover.
E) Camera mounting arm.
F) Rotating Platform (optional).
G) Brake.
H) Reflective side shields.
I) LED lights.
J) Changeable background.
K) Laser
K
IV. PREPARATIN FOR LAUNCHING
For Photo Composer device we suggest using power strip with surge protector.
3|Page
1. Compatible cameras:
Photo Composer works with following Canon SLR cameras:
•
•
•
•
•
•
•
•
•
•
•
•
•
•
•
EOS-1D Mark III
EOS-1D Mark IV
EOS-1Ds Mark III
EOS 5D Mark II
EOS 5D Mark III
EOS 7D
EOS 40D
EOS 50D
EOS 60D
EOS DIGITAL REBEL Xsi / 450D / Kiss X2
EOS DIGITAL REBEL XS / 1000D / KISS F
EOS Kiss X3 / EOS REBEL T1i / EOS 500D
EOS Kiss X4 / EOS REBEL T2i / EOS 550D
EOS Kiss X5 / EOS REBEL T3i / EOS 600D/ EOS 650D
EOS Kiss X50 / EOS REBEL T3 / EOS 1100D
Photo Composer works with following Nikon SLR cameras:
•
•
•
•
D90
D300
D5100
D7000
ATTENTION!
Exposure simulation allows you to view on the screen how the picture will look like before
taking it. However, this option is only available in Canon SLR cameras. In some camera
models this function must be explicitly turned on (please check the camera manual for more
information).
2. System requirements.
To work with the Photo Composer, prepare a computer with the following parameters:
•
System:
WINDOWS (XP SP3/Vista/7/8), MAC OS X 10.6 or newer
•
Processor:
min. 1.7 GHz RAM; Pentium or similar*
•
Graphics:
min. 1GB VGA 1024 x 768 True Color
•
Port:
2 x USB 2.0
•
CD drive:
CD/DVD
4|Page
•
Hard drive :
min. 50MB free space on hard drive
*
ATTENTION!
It is possible to work on computer with AMD processor but it may cause the Photo Editor
software to slow down.
Install and see the possibilities of the software included on the CD-ROM for "Photo Composer"
system.
3. Easy Photo 2.1 – installation.
In order to install the Easy Photo 2.1 software, run the „Easy Photo Canon install.exe” or „Easy
Photo Nikon install.exe” file. English version of the software can be found on CD in
„PL\Canon” lub „PL\Nikon” folder. Go through the installation process following the
instructions on the screen. Photo Editor software, which is used to edit pictures, is an integral
part of the Easy Photo software and does not require extra installation.
ATTENTION!
Photo Editor software is available ONLY for Windows.
The software may also be downloaded from www.mode360.eu webside from Support\Download
section. If this is your first visit on our webside you have to register first. To do so click on the
link, go to “Create new account” tab and register by using of serial number of the device.
What is a serial number:
It's a series of digits and characters unique for every device. It can be found on the CD package.
It's also send via e-mail along with information about shipment.
4. Drivers – installation.
Photo Composer drivers can be found on the CD. To install them run “instal_driver.exe”
file from „EN\Drivers\Drivers x32” or „EN\Drivers\Drivers i x64” folder (denepnding
on system architecture. To find out whether your system is 32 or 64 bit right click on
My Computer icon on desktop and choose Properties. In “System” section there is
“System Type” field – there you can find information about architecture of your system.
5|Page
5. 3D Rotate Tool Flexi – installation.
The installation of 3D Rotate Tool Flexi requires the presence of Adobe ® AIR ® Runtime. In
order to install Adobe ® AIR ® Runtime, open the "Adobe AIR" folder, which is located on the
CD and run the "AdobeAIRInstaller.exe" file. Go through the installation process following the
instructions on the screen.
Next, install 3D Rotate Tool Flexi. Run the "3drtflexi-setuputility.exe" file, which is located on
the CD (in order to find it, go back one level up in the hierarchy of the directories from "Adobe
AIR" folder on the CD) then go through the installation process following the instructions on
the screen.
V. SOFTWARE DESCRIPTION
1. Easy Photo 2.1
The Easy Photo 2.1 software enables you to control the Canon EOS and Nikon SLR camera
parameters and use the Live View function. When using Canon camera the software will show
exposure simulation – brightness of the live view reflects brightness of the real photo. It also
allows you to control the lighting and the rotation platform of „Photo Composer”.
Language is chosen when the software is launched for the first time or after selecting
“Settings/Change language” option”.
Description of window elements – Easy Photo 2.1.
1. Connection status panel:
a) Green indicates connection to the "Photo Composer” device/camera;
b) Red indicates no connection to the "Photo Composer” device/camera.
(Attention! If there is no connection check cables and make sure you have successfully
install device drivers).
2.
Program selection panel:
a) „continuous rotation” – rotation of the platform in one direction at a constant speed
b) „free rotation” – rotation of the platform to the left or to the right using the arrow
keys (see point no. 6)
c) „series” – choice of number of shots in series
17
18
19
6|Page
7
3
4
5
8
2
15
6
14
12 13
9
16
11
1
10
3. Clicking the START button near “series” begins a sequence of shots chosen. This button is
active only when all conditions listed below are met:
• Camera is connected to the computer and is turned on (indicated by green light in leftbottom corner of the application window)
• Photo Composer device is connected to the computer and turned on (indicated by green
light in left-bottom corner of the application window)
The creation of sequence of shots can be paused by clicking “pause” button to the right of
START button. Pressing this button again continues the process of creating sequence.
4. Clicking the STOP button will stop the process of taking a sequence of images.
5. The arrows are displayed after starting the ‘free rotation’ program. They enable the rotation
of platform to the left and to the right. The arrows are also displayed after starting 'continuous
rotation' program, however, they will animate the move of the rotating plate and you won't be
able to click on them.
6. Control panel for camera settings.
a) „image quality” – means the quality and size of a picture, which is set by selecting
the appropriate entry in the drop-down list.
b) „time” – means the shutter speed. The shutter speed is set by selecting the
appropriate option in the drop-down list.
c) „aperture” – means the degree of opening of the aperture. The degree of opening
of the aperture is set by selecting the appropriate option in the drop-down list.
7|Page
8.
9.
10.
11.
12.
d) „ISO sensitivity” – means the sensitivity degree to light. It is set by selecting the
appropriate entry in the drop-down list.
e) „white balance” (available only for Windows) – allows you to correct colour
temperature and improve qualiity of the picture, it is set by first clicking on the colour
map and then dragging the marker to the desired position.
Live view – the current picture from the camera.
Choose folder – click it for selection of folder content of which will be displayed in
preview below.
Currently selected folder – path to folder content which is being displayed in preview
below.
Preview – displays all images from the selected folder when “Show folder content” is
checked. Double clicking on the photo causes its enlargement.
Focus slider allows you to move the focus point. To move the focus point move and hold the
slider. Further displacement will cause faster move of the lens. Releasing the slider stops the lens
move.
13. Focus buttons allows you to move the focus point.
14. Alignment field (available only for Windows) is used to display the symbol in the middle
15.
16.
17.
18.
19.
20.
of the frame, which helps centre the object on the Photo Composer platform. Description
of the procedure can be found in section VII.
Magnifier tool allows you to digitally zoom the product, while the arrows allow you to
move the area of approximation / sharpening.
“Take a picture” allows you to create a single image that is saved in „Pictures\EasyPhoto”
folder. This is default directory for new pictures. You can easily change it by selection
“Settings/Change directory for new pictures” option in program menu (left-top corner).
“Save settings” button (available only for Windows) saves current settings (configuration
of the camera and lights in “photo composer” device).
“Memory buttons” – (available only for Windows) allow you to restore previously saved
settings.
“Memory list” – (available only for Windows) allow you to restore previously saved
settings.
Additional program button – after clicking it you will be asked to choose an application
that is to be lunched by this button (you should find the directory where this program is
installed). This can be any application. E.g. to set shortcut to 3DRT Flexi you should find
„3DRT-SetupUtility.exe” file (default directory „C:\Program Files\3DRT-SetupUtility”).
8|Page
Description of “Save settings” window elements. (available only for Windows)
1
2
4
5
3
6
7
8
8
1.
Identification number of the memory which will be modified. There are 20 memory sets
available.
2. New name of the memory set.
3. Parameters which will be saved.
In following fields you can write notes about other parameters which may be important to you.
4. Angle at which camera is positioned.
5. Background colour inside Photo Composer.
6. Type of lens which are used.
7. Your comments.
8. “Cancel” button – after clicking it the “Save settings” window will be closed but current
settings won't be saved.
9. “Ok” button - after clicking it the “Save settings” window will be closed and current
settings will be saved.
Every saved settings can be overwritten. This way you can easily modify them.
9|Page
2. Photo Editor. (available only for Windows)
Photo Editor software lets you crop, rotate, add text or a watermark, correct colours and whiten
background. To lunch it double click on chosen picture (from preview).
ATTENTION!
First time you start Photo Editor you will be asked to activate it. A window will pop up where
you have to write device number and serial number (these information can be found on nthe
CD package). To show this window you can also choose “Settings/Activate” option from Easy
Photo menu.
Description of window elements – Photo Editor
1. Preview of the edited photos along with marked changes.
2. The area of tool for editing selection (Fig. 5 on next page).
3.
"Apply to all" button allows you to apply your changes to a whole series of images.
After clicking the button you will be asked whether you want to overwrite old pictures or
save new pictures in different directory. For a proper operation, folder containing the
modified images should not be open in the time of their modification!
2
1
3
Tools:
a) Rotate – enables image rotation by 90 and 180 degrees.
b) Crop – allows you to cut off any part of a photo as well as to determine its final
dimensions (in pixels). – size can be selected from the list or you can write your own
dimensions. Picture can be rotated by any angle (given in degrees).
10 | P a g e
c) Colour corrections – allows you to change the contrast, brightness, saturation and
modify the individual colour components (red, green, blue).
d) Retouch – allows you to erase small deficiencies.
e) Background whitening – allows you to remove the background by setting its
colour to white or transparent.
f) Text - the possibility to place relevant descriptions directly in the picture.
g) Watermark – allows you to load your own watermark and placing it in the edited
image. You can use JPG and PNG (recommended). We recommend to use watermarks
of small size (in pixels, recommended size up to 1000x1000 pixels), though, it is
possible to use watermarks of any size.
a)
11 | P a g e
b)
c)
d)
f)
e)
g)
Among tools mentioned above two (Retouch and Background Whitening with object detection)
may require additional description. They are described below.
12 | P a g e
Retouch:
To erase small deficiencies on the picture user must firstly choose colour (after clicking
“Choose colour” button choose colour by clicking on the picture). After choosing colour click
“Retouch” button and correct the picture. Area of correction may be changed by using mouse
wheel.
Removing background with object detection:
To remove the background with this method application firstly detects borders of the object and
then cuts the background with respect to detected borders.
To detect borders program searches for changes in colour. By using slider you can specify
sensitivity. Additionally borders can be modified with use of two buttons: „Mark background”
and „Mark object”. After selecting one of those you can mark some parts of the photo as object
or as background. Rotating mouse wheel changes size of the area which is being marked. When
borders are detected you can preview the effect of cutting background (button “Preview”) or
cut the background permanently (button “Apply”).
“Choose background” button is used for selecting part of the background which is to be cut
(e.g. inside a ring or necklace).
There is possibility to magnify part of the photo. To do this press “Zoom” button and mark area
which you want to magnify. Press the button again to zoom out.
Saving file with transparent background:
1. To remove the background go to “Background Whitening\Manual” option.
2. You can use basic or advanced background whitening: in basic mode simply place the
slider in position that gives satisfactory effect.
3. In advanced mode you are given a histogram. Usually there will be high peak on the write
side – setting border just behind it should (but does not have to) give good results.
Additionally in advanced mode you can choose whoch colour should be taken into account
while removing background.
3. To save the picture with transparent background choose “.png” format while saving it.
13 | P a g e
VI. LUNCHING
1. Attach your camera or camcorder to the mounting arm on the movable cover of the device
2.
3.
4.
5.
6.
7.
8.
(can be installed outside as well as inside the dome).
Release the brake and set the slope angle of the camera with respect to the photographed
object.
Connect your camera to your computer via the USB cable. Set the camera to the
MANUAL mode and turn it on. Make sure the camera has the Live View function (and
exposure simulation) turned on (details in camera manual). Apply the appropriate lenses
depending on the distance from the object and its dimensions. Using the lens ring set
manually the appropriate approximation to the desired size of the objects within the frame.
Connect the device with its power cable to a power source (AC 110-230 V).
Turn on the "Power" button.
Start your computer.
Install the driver used for communication between the "Photo Composer" system and
Windows system running on your computer. If your computer is connected to the Internet,
your system will connect to the Windows Update site and automatically install the correct
driver. If the Internet connection is not available, install the driver manually. Drivers are
available on a CD in “Drivers” folder. (more information in section IV. PREPARATION
FOR LUNCHING).
Connect the device via the USB cable to your computer.
VII. PREPARING CAMERA.
1. Set camera in manual mode.
2. Turn on Auto Focus function (both in camera and lens)
3. For better results we recommend set White Balnce by using reference picture. You may achieve
good results by using picture of small background of appriopriate colour (White Balance Charts –
available with the device for additional fee), however, this is not necessary. In order to do so place
the background on platform inside Photo Composera and mount the camera on dedicated arm and
take a photo. Then choose this photo as a reference picture (more information in camera manual –
white balance).
14 | P a g e
VIII. OPERATING DEVICE WITHOUT ROTATING PLATFORM (M40
MODEL)
1. Place your object in the middle of the rotating platform (maximum dimensions of the
photographed object: 15 x 15 x 15 cm).
2. Run the Easy Photo 2.1 software (you will hear the camera's mirror raising, the Live View
window shows preview).
3. Check the status of communication with the Photo Composer device and camera (green
colour is required).
4. Using the lighting control window, switch the illumination that suits your needs
(individually controlled corner lights, central light of platform illumination and 2 top lights).
5. In the “DIGITAL CAMERA” window adjust the camera settings.
6. Using the “Magnifying glass” tool, approximate the object in order to optionally move the
focusing area.
7. Focus the object by means of the arrow keys – indicators. ATTENTION! Auto Focus must
be turned ON (both in camera and lens).
8. Take a picture (this picture will appear in “Folder contents” window and will be saved in
“Pictures\EasyPhoto” directory).
IX. OPERATING DEVICE WITH ROTATING PLATFORM (FA40
MODEL)
1. Place your object in the middle of the rotating platform (maximum dimensions of the
photographed object: 15 x 15 x 15 cm).
15 | P a g e
2. Run the Easy Photo 2.1 software (you will hear the camera's mirror raising, the Live View
window shows preview).
3. Check the status of communication with the Photo Composer device and camera (green
colour is required).
4. Perform centring process (described in section X).
5. Using the lighting control window, switch the illumination that suits your needs
(individually controlled corner lights, central light of platform illumination and 2 top lights).
6. In the “DIGITAL CAMERA” window adjust the camera settings.
7. Using the “Magnifying glass” tool, approximate the object in order to optionally move the
focusing area.
8. Focus the object by means of the arrow keys – indicators. ATTENTION! Auto Focus must
be turned ON (both in camera and lens).
9. In the “Platform” window click START button for “Free rotation” in order to obtain the
desired setting for the object with respect to the camera. To stop the rotation click STOP button.
X. CENTRING. (available only for Windows)
Centring is needed when presentation 360 or spherical are not regular. The process is described on
instructional video on CD (minute: 7, second: 45). To start the calibration process connect the camera
and the Photo Composer to computer, turn them on and lunch Easy Photo. The camera should be on
mounting arm of Photo Composer.
1. Place centring chart on Photo Composer platform.
2. Press “Centring” button in Easy Photo – additional mark will show up on live view.
3. Move the camera to the vertical position (90o).
16 | P a g e
4. Using camera mount screw (see video, 8:25) and vertical adjustment knob set the camera position to
converge its axis with the chart centre mark.
5. Remove centring chart from the platform.
6. Precisely place the object in the centre with live view.
7. Set desired camera view angle.
8. Align optical axis to the centre of the object.
9. Push “Centring” button again to turn the centring mark off.
10.Centring finished.
XI. TAKING PHOTO.
1. Taking single photo:
1. Default directory for saving new photos is „Pictures / EasyPhoto”. To change this choose „Settings /
Change folder for picture saving” from Easy Photo menu.
2. To take a photo push “Take Photo” button in right-bottom corner.
3. New photo will show up in folder preview. Double click no it to open it in Photo Editor.
2. Creating series of photos:
1. Default directory for saving new photos is „Pictures / EasyPhoto”. To change this choose „Settings /
Change folder for picture saving” from Easy Photo menu.
2. Choose number of photos in series
3. After setting focus point we recommend tu turn the Auto Focus off because it may slow down or
even stop the process of creating the series.
4. Click START button near label „Series” to start the process of creating the series.
5. In folder mentioned in point 1. a folder will be created. Its name will consist of word „series”,
number describing No. of the series in current folder and information about number of photos in
series. E.g. series of 32 photos for presentation 360 may have following name: seria001_h32v1. For
spherical series (described later) consisting of 16 photos and 5 vertical levels exemplary name may
be: seria005_h16v5.
6. To convert series to presentation use 3DRT Flexi software (see section XI).
17 | P a g e
3. Creating spherical series of photos: (available only for Windows)
1. Repeat steps 1 and 2 from “2. Creating series of photos” section.
2. From Easy Photo menu choose: Tools\Presentation type\Spherical. If you want to create series for
presentation 360 again choose: Tools\Presentation type\360.
3. In window that pops up choos number of vertical steps. This is number of positions in vertical from
which the presentation can be watched. Confirm your choice by pressing „OK” button. Total number
of photos to be taken equals chosen number of photos in series times number of vertical steps. E.g.
for 32 photos in series and 5 vertical steps presentation will consist of 160 photos.
4. Click START button near label “Series” to start the process of creating the series. New folder will be
created (see “2. Creating series of photos”, point 4.).
5. After finishing each step user will be asked to move the camera to the next step. After moving the
camera and pressing “OK” button the process will be continued.
6. To convert series to presentation use 3DRT Flexi software (see section XI, mind the part concerning
spherical presentations).
XII. DEVICE CALIBRATION. (available only for Windows)
After some time the Photo Composer device may need to be calibrated. This will be indicated by lack of
continuity in rotation of the presentation – if during rotation there will be a noticeable jump in one point
18 | P a g e
of presentation then it is possible that device needs to be calibrated. This is done with use of attached
laser.
ATTENSION!
Every device is calibrated before it is send to our client, therefore, there is no need to do it with new
device.
Calibration process:
1. In order to calibrate the Photo Composer device, Easy Photo software must be connected to it. The
connection is marked by green indicator in the left bottom corner of the application.
2. From menu choose: Settings\Calibrate
3. A calibration window will pop up. Follow all displayed instructions.
4. After finishing calibration process, the Photo Composer device must be restarted.
XIII. 3D ROTATE TOOL FLEXI.
3D Rotate Tool Flexi software allows you to create animated presentation from a sequence of
photos taken with the use of “Photo Composer”.
When you use the 3D Rotate Flexi software for the first time, it is needed to choose the
“License” folder and write your license number.
Description of window elements – 3D Rotate Tool Flexi.
19 | P a g e
1
2
4
3
6
5
1.
2.
3.
4.
Choice of the folder where the sequence of images is saved.
Final 3D presentation preview.
Setting a 3D presentation size in the viewer window.
Selecting the "Use extra set for not resized images for zoom view" option allows you to
use in a 3D presentation some additional enlarged photos, which will ensure a better
quality when zooming an image.
5. Selecting the appearance of the presentation (skin).
6. The "Create" button generates a 3D presentation from the selected photos. After pressing
this button, select the folder where you save your presentation.
3DRT Flexi Setup Utility – manual.
The Setup Utility is an application using which you can create and configure your 3D Object
presentation. It accepts also large image files and re-sizes them to fit desired output size.
Start screen:
20 | P a g e
21 | P a g e
Please enter your license key, or click to “Use free version”. The internet connection is required.
Please wait until the player files download.
The Images.
To create a 3D Object presentation, you need the product images. For a good looking presentation
minimum 64 images for a full 360 product view are recommended.
Size of the images
The Setup Utility re-sizes the images to the desired output size you enter in the Setup Utility. If your
source images are 2000px in width and you specify the output size 600px in width, the final images size
will be 600px in width.
A favorite feature of the 3D Rotate tool is the zoom. You can select that the original images will be
loaded when the user zooms in. In this case, please keep the size of the original images size down to a
22 | P a g e
reasonable value, e.g. 2000px maximum. If you use product images that are 4000px pixels in width,
please resize them prior to loading to the Setup Utility to e.g. 1600px or 1200px.
Load the images.
You can:
1. Drag and drop the images, or the folder with images into the 3DRT Setup Utility
2. Click on the “Drop images or whole folder” text and select the directory with your images
Supported file types are: jpg, png
After the 3DRT Setup Utility successfuly loads and initializes the images, it will display the first five
thumbs of the loaded images, and also loads the images into the preview window:
If the rotation of the images is “out of order”, please try to change the sort order of the images, either
by:
• filename
23 | P a g e
• date
Adjust settings.
Duration of one full turn – you specify how fast the object rotates. The smaller the value, the faster it
rotates.
Include original images for HI-RES zoom – If checked, the tool exports two sets of images:
1. one for “normal” view, resized to specified output size
2. second for “zoom view”, which are displayed when the user zooms in
Advanced settings let you specify many different options supported by the 3D Rotate Tool. E.g. you can
set here:
- which icons will be shown
- specify full 3d rotation (horizontal + vertical axis)
- limit mouse control
To create 3D spherical presentation go to advanced settings, choose “Player” tab and then choose
“Rotation” tab below. In “Multi Level Rotation” section mark “Enable” option and set appropriate
vertical and horizontal steps.
24 | P a g e
Select skin and output size.
Create!
After you press Create!, your presentation will be generated to the output folder you specify.
Presentation formats:
–
Flash + HTML5 Fallback – requires Adobe Flash Player installed on a computer to watch the
presentation.
–
HTML5 – does not require Adobe Flash Player
–
animated GIF – creates single GIF file. It offers worse quality of the presentation byt can be
used in some situations where above two can't, e.g. internet auctions. It does not require Adobe
Flash Player.
Upload the output folder.
You need to upload the output folder to an online location using FTP. For example, you named your
output folder product01. You can upload it to your site www.example.com and acces it under
www.example.com/product01
25 | P a g e
In the image above you can see a sample content of the output folder.
License Dashboard
In the License Dashboard you have the options to:
1. Remove License - removes the license from the computer where the SetupUtility is installed
2. Redownload Files - if anything went wrong during files download, here you can force to
download the player files again
26 | P a g e
3. Authorize domains - unless you use the Enterprise version, the tool runs only on domains you
have specified here
XIV. UPLOADING PRESENTATION TO THE SERVER.
To upload the presentation you need to use an FTP client. Although any can be used we recommend
Total Commander. Its use is described below:
–
After lunching Total Commander choose “Network/FTP Connection...” . You can also use a
button placed on the menu panel. (see below).
–
In new window press „New connection...” and then configure connection with the server.
Exemplary configuration is shown below (ATTENTION! This is only an example! –
configuration will differ depending on the server).
27 | P a g e
–
Confirm new configuration by pressing „OK” button, then choose new connection on the list
and press „Connect” button.
–
You can copy elements (files and folders) by first selecting them and the pressing F5 button.
–
When file transfer is finished click „Disconnect” to close the connection witch server.
XV. TROUBLESHOOTING
Easy Photo doesn't connect with Photo Composer. Check if Photo Composer is connected to power
supply and to computer and check if the device is
turned on. Make sure that you have successfully
installed device drivers (you can find drivers on
CD). Make sure that cables are not damaged.
Easy Photo doesn't connect with the camera.
Check is the camera is turned on and connected to
the computer. Make sure that the cable is not
destroyed and than camera you are using is
supported by Easy Photo software (lista of
compatible cameras can be found in section “II –
PREPARING TO LUNCHING”).
Can't turn on the Photo Composer.
Check power supply – make sure that the power
supply cable is not destroyed and that is is plugged
into working socket.
Can't change camera settings
Set the camera in manual mode.
28 | P a g e
Can't move focus point.
Turn on Auto focus both in camera and lens. If you
use macro rings these must be AF macro rings.
Can't focus on an object.
Make sure that the distance between the object and
lens is appropriately large. If the mounting arm is
fixed in a way that the camera is inside Photo
Composer then try changing its position so that
camera is outside of the Photo Composer.
Live View shows no reaction on changing camera
settings (no exposure simulation)
Exposure simulation is available only in Canon
EOS SLRs. In some Canon cameras this funtion
must be explicitly turned on, e.g. 60D (for more
information see camera manual).
During background whitening there is some noise
remaining.
Increase contrast of the photo or take the photo
again in such a way to ensure higher contrast
between the object and the background.
Photo Editor software is inactive.
Photo Editor is available only for Windows. What
is more to use it you have to firstly activate it by
using device number and serial number (found on
CD package and in e-mail concerning shipment).
Object shown in the presentation does not rotate
regularly (there are jumps).
Check if appropriate number of photos was taken.
If yes the calibrate Photo Composer.
The Photo Composer platform made two full turns Calibrate Photo Composer.
while creating series of photos or the object rotates
twice as fast as it should.
Process of creating series stopped before it
finished.
Turn of Auto Focus in camera. Make sure that
cables used for connecting camera and Photo
Composer are not destroyed.
A single light inside Photo Composer does not
work.
Contact with service in order to replace lighting
element.
Software hangs or crushes while editing photos.
Make sure that the amount of memory (in
computer) is sufficient and that the computer is not
overloaded with other programs. If it's possible
turn off spare applications. Current memory usage
and processor usage can be checked in Task
Manager.
Photo Composer makes loud noise during rotation. Check if the rotating plate of Photo Composer is
holding tightly to elements that it lays on. In case
of any anomaly contact with service.
29 | P a g e
XVI. ADDITIONAL INFORMATION
The manufacturer is not liable for any damages resulting from:
• inaccurate and inconsistent with the intended purpose use;
• repairs that were not carried out by an authorized service centre;
• mechanical damage to any component of the device;
• use of non-original spare parts and accessories;
• storage at the temperature below 0 ° C;
In such cases, the guarantee expires.
30 | P a g e