1
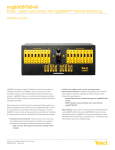
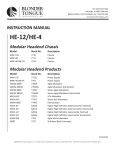
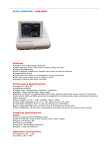
User Manual for Fetal Doppler Instructions to User Dear Users, Thank you very much for purchasing our product. Please read the manual very carefully before using this device and follow these instructions to operate this device. No part of this manual may be photocopied, reproduced or translated into another language without the prior written consent Version of the Manual: Ver1.7 Revised date: October 9, 2011 All rights reserved. Notes: The contents contained in this manual are subject to change without notice, and they can not be regarded as our guarantee. Information furnished by our company is believed to be accurate and reliable. However, no responsibility is assumed by us for its use, or any infringements of patents or other rights of third parties that may result from its use. Instructions for Safe Operations Check the device to make sure that there is no visible damage that may affect user’s safety and measurement performance about the main unit and probe. When there is obvious damage, stop using the device. 3502-2500001 Necessary service must be performed by qualified service engineers ONLY. Users are not permitted to repair it by themselves. I User Manual for Fetal Doppler The Doppler cannot be used together with the devices not specified in User Manual. Cautions Explosive hazard—DO NOT use the Doppler in the environment with inflammable gas such as some ignitable anesthetic agents. DO NOT use the Doppler while the testee is under MRI or CT scanning. Do NOT throw the battery into fire, or explosion will occur. To dispose the device or its accessories, the local law must be followed. It is recommended that the device is operated by or under the guidance of professional personnel such as nurse and midwife etc. Attentions High temperature or autoclave sterilization to the Doppler is not permitted. Refer to related chapter for instructions of cleaning and disinfection. The intended use of this device is not for therapy purpose. Caution: U.S. federal law restricts this device to sale by or on the order of a physician. Table of Contents 1. OVERVIEW ................................................................................ 1 II User Manual for Fetal Doppler 1.1 APPEARANCE ............................................................................ 1 1.2 MODEL AND NAME.................................................................... 3 1.3 STRUCTURE .............................................................................. 3 1.4 INTENDED USE .......................................................................... 3 1.5 FEATURES ................................................................................. 3 3 OPERATION ............................................................................... 7 3.1 START THE FETAL DOPPLER ..................................................... 7 3.1.1 Numerical Value Display Mode ........................................ 7 3.1.2 Trend Curve Display Mode .............................................. 8 3.2 PROBE PLACEMENT .................................................................. 9 3.3 SETUP MENU............................................................................ 11 3.3.1 Setup ................................................................................. 12 3.3.2 Send to PC ....................................................................... 13 3.3.3 Delete All Data ................................................................. 14 3.4 SOUND RECORDING ................................................................ 14 3.5 RECALL LIST .......................................................................... 15 5 DIMENSIONS AND WEIGHT ................................................ 20 6 WORKING PRINCIPLE .......................................................... 21 7 MAINTENANCE AND SERVICE ........................................... 22 7.1 MAINTENANCE ....................................................................... 22 III User Manual for Fetal Doppler 7.2 CLEANING AND DISINFECTING INSTRUCTION ......................... 23 7.3 STORAGE AND TRANSPORTATION ........................................... 23 8 TROUBLESHOOTING ............................................................ 24 APPENDIX-KEY OF SYMBOLS ............................................... 26 IV 1. Overview 1.1 Appearance Figure 1 Fetal Doppler (Front View) Key Introduction There are 5 keys on the front panel Definitions: Long-pressed: some keys pressed for longer than 2 seconds Short-pressed: some keys pressed for no longer than 2 seconds FHR display mode: including numerical value display mode and curve display mode User Manual for Fetal Doppler 1. 2. (Power/Back): Power on/off the device by longtime pressing; short time press it to return to upper level operation. (Recall/Backlight): short time press it to turn on/turn off the backlight; the backlight will be off in 3 seconds after pressing this key. 3. (Mode/OK): press this key, the screen can be shifted between numerical value display mode and curve display mode; longtime press it, the menu setup screen will be displayed, and then when you finish parameter setting press this key to confirm. 4. Navigation Key (Up/Left/Increase): in the numerical value display mode, press this key, the fetal heart beat volume will be turn up; on menu screen, press this key to shift cursor. (Down/Right/Decrease): in the numerical value display mode, press this key, the fetal heart beat volume will be turn down; on menu screen, press this key to shift cursor. 5. Display screen: display FHR curve and parameter values. 6. Data Interface: used for uploading data. 7. Earphone jack: fetal heartbeat sound can be also output to an ear phone by this jack 8. Doppler probe: ultrasound transducer for detecting FHR. 9. Probe connector:connecting the detachable doppler probe. 2 User Manual for Fetal Doppler 1.2 Model and Name Name: Fetal Doppler Model: PC-860A / PC-860B 1.3 Structure The Fetal Doppler comprises two main parts: probe and main unit, connected by a retractile cable. 1.4 Intended Use The Fetal Doppler is intended for detecting and recording the Fetal Heart Rate (FHR). It is applicable for use in clinics and homes, and convenient to operate by the patients themselves. This Fetal Doppler is a handheld device which is used for spot-checking the fetal heart rate. It can NOT be a substitute of the regular fetal monitor. 1.5 Features Fetal Doppler is a handheld portable device for FHR detection. Its operation is easy and convenient for pregnant women to use in daily examination LCD display with LED backlight. Handheld device, small in size and convenient for hand-carry Built-in speaker and audio output. Auto power off if no signal is detected in one minute. 3 User Manual for Fetal Doppler Audible & visual alarms and the alarm limits can be set. For easier maintenance, ultrasonic probe is detachable. Low battery voltage indication. Can be powered by rechargeable batteries or AC-DC adapter (optional). Can be used as a portable easy fetal monitor with optional 1.0 MHz Fetal Monitor probe (only for PC-860A) Up to 15 hours data memory and trend curve recall (only for PC-860A). Data upload to a PC for further storage and analysis (only for PC-860A, optional). 50-seconds real-time doppler sound recording and replay (only for PC-860A). 4 User Manual for Fetal Doppler 2 Installations of Battery and Holder 1) Open the rear panel with coin or an ordinary flat screwdriver, as shown in Figure 2. Figure 2 2) According to the polarity mark, insert three AA batteries into battery compartment, as shown in Figure 3. Figure 3 5 User Manual for Fetal Doppler 3) Close the battery cover and lock it. 4) Fixing Holder Figure 4 Fixing Holder Note: Do NOT insert batteries with their polarities reversed. 6 User Manual for Fetal Doppler 3 Operation 3.1 Start the Fetal Doppler 3.1.1 Numerical Value Display Mode Connect the doppler probe to the probe connector. Press the power button “ ” (lasting for 2 seconds or longer) to start the device, and then it enters numerical value display screen (see the figure 5). Figure 5 Numerical Value Display Screen Screen Description “FHR”: Fetal Heart Rate icon. “158”: the fetal heart rate value (unit: bpm, beats per minute), it will shows‘---’ when no signals. “ ”: the speaker volume, 8 levels, “0~7” eight levels adjustable. “Nov. 08, 07”: date displayed by MM. dd, yy pattern “10:05:25”: time displayed by hh-mm-ss pattern. “ ”: battery power indicator. Note: After power on, the display mode will be the same as the mode displayed when power off last time. 7 User Manual for Fetal Doppler 3.1.2 Trend Curve Display Mode In numerical value display mode, press the mode button “ ” to enter into the trend curve display mode as shown in the figure below. Figure 6 Trend Curve Display Mode Screen Description “ ”: FHR scale; “21”: when starting doppler sound recording, the recording time will be shown. “21” indicates the recording has been activated for 21 seconds. “∣”: Vertical cursor, shift to right once a minute. “ ”: Alarm icon; it will appear when the device alarms. “FHR”: Fetal Heart Rate; “142” is the current FHR. It will shows‘---’ when no signals “10:05:25”: the current time. 8 User Manual for Fetal Doppler 3.2 Probe Placement 1. To find the position of fetal heart Feel out the fetal contour with hand to find the approximate position of fetal heart. Generally, fetal heart is at a location 1/3 of the lower abdomen (below the navel) during short pregnant weeks, and along with the pregnant weeks increasing, it moves upwards and lean to right or lean to left. Refer to Figure 7A and Figure 7B for proper use method. Note: It is recommended that the device is operated by or under the guidance of professional personnel such as nurse or midwife etc. Figure 7A Standing Posture Before locating the position of fetal heart, you may daub the acoustics surface of the probe with drinking water instead of ultrasonic gel, and then choose the proper posture for the optimal probe location. Figure 7B Lying Posture 9 User Manual for Fetal Doppler 2. Daub ultrasonic gel Daub the acoustic surface of Doppler probe uniformly with the appropriate ultrasonic gel, and then put the probe on pregnant woman’s abdomen (a location near fetal heart). Make sure that probe contacts surface completely. (If there is no ultrasonic gel, you can use drinking water to replace it temporarily.) 3. Adjust the location of probe Change probe location and adjust its angle to obtain optimal FHR sound signal (clear sound and less noise). When hear the regular sound of fetal heartbeat, the numeral value of FHR displays on LCD at the same time. Operating Instruction Navigation key (Up/Left/Increase): press it one time to adjust the volume of doppler sound and turn it up. Longtime press it for doppler sound recording (only for PC-860A). (Down/Right/Decrease): press it one time to adjust the volume of doppler sound and turn it down (Recall/Backlight): press it to turn on/turn off the backlight; the backlight will be off in 3 seconds after pressing this key. ☞ Long time press it for entering into recall list screen (only for PC-860A). 10 User Manual for Fetal Doppler ☞ (Mode/OK): Press it to shift the display modes; longtime press this key to enter into setup menu screen (as shown in Figure 8). 3.3 Setup Menu On the numerical value or trend curve display mode, press “ (the mode key) to enter into menu screen as shown in Figure 8. ” Figure 8 Menu Screen Operating Instruction Press Navigation key to select “SETUP”, “SEND TO PC” or “ERASE ALL DATA”, and then press “ into corresponding submenu. Press “ ” to exit from MENU. 11 ” (the mode key) to enter User Manual for Fetal Doppler 3.3.1 Setup Figure 9 Setup Screen (A) Figure 9 Menu Setup Screen (B) Operating Instruction 1. DATE: Date setting 1) When cursor stays on the Month of the date, press “ ” key to activate Month option, the cursor flashes on the Month of the date. 2) Press Navigation key to adjust Month. 3) Press “ ” key to confirm and exit from date setting. 4) The procedures of adjusting Day value and Year value are the same with Month adjustment. Date Format: mm, dd, yy. 12 User Manual for Fetal Doppler Note: The setting operations of other parameters (such as TIME, CONTRAST, ALARM etc.) are the same with date setting. 2. TIME: Time setting 3. CONTRAST: LCD Contrast setting 4. ALARM: When the setting is “ON”, the device stays in alarm status and the alarm icon displays on the upper right display screen. 5. ALARM HI/LO: Alarm High/Low limit setting When the detected FHR value exceeds the alarm high/low limit, the Doppler will alarm (if alarm setting is “ON”) and there will be an alarm icon “ ” below the waveform. 6. Press “ ” to back to menu screen. 3.3.2 Send to PC When upload data to your computer, please let the device stay in “SEND TO PC” status. Figure 10 “SEND TO PC” status 13 User Manual for Fetal Doppler 3.3.3 Delete All Data Figure 11 Delete All Data Press Navigation key to select “Yes”, and then press “ mode key) to delete all the records. ” (the 3.4 Sound Recording On the numerical value or trend curve display mode, long time press key, the to enter into menu screen as shown in Figure 8. Figure 12 Press Navigation key to select “Yes”, and then press “ ” (the mode key) to confirm your selection. The 50-seconds doppler sound recording will start and the previous sound recording will be overwritten by the new recording. 14 User Manual for Fetal Doppler 3.5 Recall List On the numerical value or trend curve display mode, longtime press “ ” for entering into recall list screen. If the record is accompanying with doppler sound recording, there will be a sound recall icon before the record. Figure 13 Recall list Operating Instructions: Press navigation key to choose a piece of record in the record list (herein choose the fourth record as an example) and press “ ” (the mode key) to confirm the selection, the display screen will display the recalled trend curve, as shown in Figure 14. 15 User Manual for Fetal Doppler Figure 14 Recall Screen Press the navigation key to move displayed trend graph on screen in order to view different parts of them. Short time press “ ” to back to recall list screen. If this record is accompanying with doppler sound recording ,short time press “ ” to play recorded doppler sound. The display screen is shown below. Figure 15 16 User Manual for Fetal Doppler Screen Description: : sound recall icon. :23 the replay time is 23 seconds. 12:50:35: initial time of trend graph displayed on this screen. 004: Record No. Short time press “ ” to stop playing sound. When the sound is played over, short time press “ ” to back to recall list screen. 17 User Manual for Fetal Doppler 4 Technical Specification 1. FHR FHR measuring range: 50~210bpm FHR resolution: 1bpm FHR accuracy: ±1bpm or 1%, whichever is greater. 2. Doppler probe Working mode: Pulse wave Doppler Ultrasonic working frequency: 2.0 MHz; accuracy: ±2% 3. Acoustic Output According to the requirement of standard IEC 1157:1992 and IEC 61266:1994, the parameters of acoustic output should be declared in the following by the manufacturer: Nominal acoustic working frequency: 2.0MHz; Overall sensitivity: ≥90dB (measured at the distance of 200mm away from the surface of probe with Doppler shift frequency of 333Hz and the velocity of target at 12.5cm/s) Maximal peak negative pressure (P_max): < 1MPa Output intensity of acoustic beam (Iob): <20mW/cm2 Spatial-peak time-average acoustic intensity (Ispta): < 100mW/cm2 Effective area of the ultrasonic transducer active element: ≥ 400mm2 4. Power Supply Requirement Power supply: 3 x AA size batteries Supply voltage range: 3.6VDC~4.8VDC Operating current: <150mA 18 User Manual for Fetal Doppler 5. Loudspeaker output power: 1W 6. Auto Power-off Function: Power off automatically if no FHR signal is detected for longer than 1 minute. 7. Classification The type of protection against electric shock: Internally powered equipment The degree of protection against electric shock: With Type BF applied parts The degree of protection against harmful ingress of liquid: Ordinary equipment without protection against ingress of water. Electro-Magnetic Compatibility: Group I, Class B 8. Environmental Operating Temperature: 5℃ to 40℃ Relative Humidity: 30% to 80% non-condensing Atmospheric Pressure: 70~106kPa 19 User Manual for Fetal Doppler 5 Dimensions and Weight 1. 2. Overall Dimensions and Weight Dimension: 230 mm (L) × 160 mm (W) × 70 mm (H) Weight: 310g±10g (including batteries) Accessories AA battery Three pieces Detachable ultrasonic probe One piece Holder One piece Ultrasonic gel One bottle User Manual One copy Note: The accessories are subject to change. Detailed items and quantity see the Packing List. 20 User Manual for Fetal Doppler 6 Working Principle This Doppler tests the fetal heart rate through non-invasive ultrasonic Doppler Effect. As is known, ultrasonic wave propagating at a given frequency will be reflected when encountering an obstacle. If it is still an obstacle, the back wave will share the same frequency with the transmitted wave. Once the obstacle moves, the frequency of the back wave will be changed. The higher rate the object moves at, the bigger frequency change will take place. This is the so-called Doppler Effect. With the apparatus, the ultrasonic probe is placed on the abdomen of the pregnant woman. The ultrasonic probe can perceive the fetal heartbeat. When the transmitted wave encounters the fetal heart, the back wave will develop offset frequency. With the offset frequency, the fetal heart rate and frequency can be worked out. 21 User Manual for Fetal Doppler 7 Maintenance and Service 7.1 Maintenance The service life (not a warranty) of this device is 5 years. In order to ensure its long service life, please pay attention to the use of maintenance. 1. The acoustics surface of Doppler probe is extremely precise and must be placed carefully. Wipe off the superfluous coupling liquid on the probe. This can prolong the use life. Please take out the batteries if the unit is not to be used for a long time. 2. Check the device (especially for the Doppler probe, probe cable and probe connector) before use to make sure that there is no crack or visible damage that may affect measurement performance. If there is crack on the probe or visible damage on the device, please stop using and change the damaged part before use. 3. DO NOT operate the button on front panel with sharp materials. 4. Keep the Doppler away from dust, vibration, corrosive substances, explosive materials, high temperature and moisture. 5. If the Doppler gets wet, please stop using it. When it is carried from cold environment to warm and humid environment, please do not use it immediately. 22 User Manual for Fetal Doppler 7.2 Cleaning and Disinfecting Instruction Always keep Doppler clean and away from dust. Surface-clean sensor with a soft cloth by wetting with a solution such as 75% isopropyl alcohol, if low-level disinfection is required, use a 1:10 bleach solution. Then surface-clean by a dampened cloth and let it air dry or wipe it with a cloth. Caution Do NOT perform autoclave sterilization to the Doppler. Do NOT let any liquid cleaner flow into the device and let any part of device immerge into the liquid. Do NOT use electron beam or γ-ray to disinfect. 7.3 Storage and Transportation Storage environment: Ambient temperature: -20℃~60℃ Relative humidity: 10%~95% Pneumatic pressure: 50~107.4kPa Transportation: This Doppler should be transported by land (vehicle or railway) or air in accordance with the contractual terms. Do not hit or drop it with force. 23 User Manual for Fetal Doppler 8 Troubleshooting No Display on the Screen 1. Press the power button for two seconds to turn on the power, if no display on the screen or the Doppler can not turn on, please open the battery cover, and then check whether the lithium batteries are installed or inserted properly. If there are no batteries or the batteries do not make good contact with metal spring patch, please reinstall them. Abnormal FHR 2. Neither the sound of fetal heartbeat nor the FHR graph can be obtained, please check the probe whether it is in the right position or at the right angle and check whether there is ultrasonic gel; 3. The sound of fetal heartbeat can be heard, but the FHR graph is disordered or just sometimes displays well, maybe the probe is located at the side of fetus’s abdomen. Please adjust the position of probe. 4. The FHR graph presents abnormal curve after quickening or the posture change of pregnant woman. Due to the position of fetal heart changes, the position of probe deviates from the position of fetal heart. 5. Ultrasonic gel becomes less after a long time used, which leads that the probe can not work well. Please add ultrasonic gel timely. 24 User Manual for Fetal Doppler 6. Sometimes the fetus goes down and circumrotates, and the fetus will in occiput posterior position. It is more difficult to monitor because the back of fetus moves to the backside of mother’s body. Naturally, the probe can not move to the fetal back, so sometimes place the probe at the position bellow navel and in the middle of abdomen will be better. 7. If there is a disconnection phenomenon occurs on the screen and it occurs quite frequently, which reflects the probe is not located at the optimal position. 8. If FHR is low or inaccurate after a period monitor, there are two main reasons: 1) the pregnant woman moves during the detection period, the Doppler probe excursion occurs, therefore the probe is not located at the optimal position.2) the fetus moves. The detected FHR value is deemed to be invalid. 9. During the detection procedure if FHR can be obtained, but no regular sound of fetal heartbeat, maybe you don’t find the proper position. The detected at this moment is the movement of pulse or umbilical cord bloodstream. If an optimal position still can not be found after detecting carefully, then the further examinations should be done by doctor, thus to observe whether the fetus is in good condition. 25 User Manual for Fetal Doppler Appendix-Key of Symbols Symbol Description Attention-See User Manual Battery Indicator Sound Volume Icon with Type BF applied part Alarm Icon Power/Back Key Mode/OK Key Recall/Backlight Key Data interface Earphone jack / Navigation key CE mark Serial number Date of manufacture 26 User Manual for Fetal Doppler Authorised representative in the European community Manufacturer (including address and date) Disposal of this device according to WEEE regulations 27