1
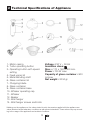
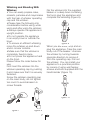
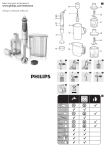
BKK 2262 Y
Hand Blender Set
User Manual
Read this manual prior to initial operation of the product!
Dear Customer,
We hope that your product, which has been manufactured in
modern facilities and passed through a strict quality control
procedure, will give you very good results.
We advise you to read through this manual carefully before
using your product and keep it for future reference.
The User Manual will help you use your machine in a
fast and safe way.
• Read the User Manual before installing and starting your
product.
• In particular, follow the instructions related to safety.
• Keep this User Manual within easy reach for future reference.
• Also read all additional documents supplied with this
product.
Remember that this User Manual is also applicable for several
other models. Differences between models will be identified in
the manual.
This product has been produced in environmentally friendly, modern facilities
CONTENTS
1 Safety Warnings
2
2 Technical Specifications of Appliance
3
3 Operating the Appliance
4 Cleaning and Care
4-7
8
1
1 Safety Warnings
• Please read the user guide before installing parts and operating
the appliance.
• Your appliance is intended for
only household use. It is not a
professional appliance.
• Keep the appliance out of reach
of children.
• Unplug the appliance during
cleaning and when it is not in use.
• Chopping blade is very sharp.
Hold it carefully from the plastic
part while unpacking, during use,
after use and while cleaning.
• Before the first use, please read
cleaning and care section of this
user guide and clean your appliance.
• Do not operate you appliance's
accessories when the appliance is
empty or when there is no material
in it.
• Your appliance is only compatible with the supplied accessories.
Never use accessories of other
appliances.
• Do not operate your appliance
for a long time, operate it with
short intervals.
• If power cable is damaged, it
should be replaced by authorized
service.
2
• Your appliance must not be
used by persons (including children) with reduced physical (aural
or visual), sensory or mental capabilities, or lack of experience and
knowledge, unless they have been
given supervision by a person
responsible for their safety.
• Children must be supervised
when they are using the appliance
and they should not be allowed to
tamper with it.
Caution!
Before replacing the accessories
or reaching the movable parts
when the appliance is in use, you
must remove your hand from the
operating button of the appliance,
wait for the motor to stop completely and unplug the appliance.
Read the user guide completely
and thoroughly including warranty
section before starting to use your
appliance.
Please keep the original invoice
and its copy for future reference
regarding warranty issues.
This appliance is intended for
domestic
use.
2 Technical Specifications of Appliance
1- Motor casing
2- Turbo operating button
3- Operating button with speed
setting
4- Fixed upper lid
5- Metal blending shaft
6- Glass container lid
7- Chopping blade
8- Glass container
9- Glass container base
10- Whisker operating cap
11- Whisker
12- Beaker
13- Wall hanger
14- Wall hanger screws and bolts
Voltage: 230 V ~ 50 Hz
Insulation class:
Size: ø 170 x 180 x 400 mm.
Power : 700 W max.
Capacity of glass container : 900
ml.max.
Net weight : 2034 gr.
Markings on the appliance or the values stated in print documents supplied with the appliance are
values obtained under laboratory conditions as per relevant standards. These values may vary according to the usage of the appliance and ambient conditions.
3
3 Using the Appliance
Chopping and Blending with
Chopping Blade in Glass
Container:
Caution!
Take the following into consideration before, during and after using
the chopper;
• Never operate the chopping
blade outside of the glass container; it is dangerous.
• When you need to lift the motor casing in blending process
(to check if the food is chopped
enough or after finishing the
blending), wait for the motor
to stop completely; unplug the
appliance and remove the motor
casing from container together
with the glass container's lid.
Make sure that the blade stays in
the glass container.
• Never use the glass container
on flaming surfaces such as gas
hobs, electrical hobs and etc.;
otherwise, centering pin may
come loose and cause failure.
• Do not chop frozen food or
frozen bread directly; let them
thaw before putting in the glass
container and chopping.
• Do not attempt to chop nuts
with their shells on.
• Make sure that the meat is not
bony.
Usage:
Please follow the order below.
Place the glass container base on
a flat surface and put the glass
container on the base. Seat the
blade on the centering pin
(Figure 1).
• Do not operate your appliance
on a wet surface or when it is
empty.
• Do not put more than recommended food in the glass container; otherwise you may damage
the plastic blade carrier.
• If you wish to cook the food with
the glass container, you may cook
it only in microwave. Gas, electric
or other type of ovens may damage centering pin.
4
Figure 1
Put the food to be chopped or
blended in the container. Place
the lid on the glass container as
shown in the figure and ensure
that tabs are locked in the glass
(Figure 2a-2b).
Figure 2a
Figure 2b
If you start the appliance before
locking the tabs in the glass, blade
may get damaged. Make sure
that the lid is safely fixed on the
glass container before starting the
motor.
Before plugging in the appliance,
place motor casing on the glass
container's lid and turn it in the
direction of arrow until it is seated
securely. Stop screwing when it
is seated (Figure 3). Do not force
the motor casing. This may cause
abrasion in screw threads. Plug
in the appliance, press TURBO
operating button or regular operating button to start the appliance
(Figure 4).
We recommend:
Do not operate your appliance for
a long time; operating it with short
intervals will have better results.
The food will be chopped in more
or less equal-size parts and will get
mixed better. If unchopped food
remains after blending, you may
mix it with a spatula and operate
the appliance again.
When you finish blending, please
unplug the appliance, remove the
main body from the blending shaft,
separate the lid off the glass container, hold the blade's plastic part
to remove it and finally take the
material from the glass container.
Note: Recommended values
for chopping and blending are
obtained in our laboratory testing.
You may also determine blending
methods and times for your own
taste.
Caution!
Never operate your appliance on
a wet surface or when it is empty.
Do not operate your appliance for
a long time, operate it with short
intervals.
Chopping and Blending With
Metal Blending Shaft:
Figure 3
Caution!
Please take the following into
consideration before using, while
using and after using the blending
shaft; Operate the metal shaft in a
container and only when there is
Figure 4
5
FOOD TYPE
CAPACITY
SOPERATING TIME
Garlic / Onion
(chopped into 8
pieces)
150-250 gr.
5-10 times pulse
Soup
200-300 gr.
10-30 times pulse
Parsley
40-50 gr.
10-15 times pulse
Meat (lean)
100-150 gr.
10-20 times pulse
Cheese
100-150 gr.
5-10 times pulse
Hazelnut / Almond
(without shells)
100-200 gr.
5-10 times pulse
Fruits (chopped into 8
pieces)
250-300 gr.
5-15 times pulse
Infant formula
250-300 gr.
5-15 times pulse
Butter and honey
mixture
300 gr. butter and 400 5 sec turbo
gr. honey
food in the container. It is dangerous to operate it outside of container or with an empty container.
Please follow the order below for
use. Before plugging in the appliance, fix the metal blending shaft
to the motor casing by turning it
towards the direction of arrow.
Figure 5
Figure 6
6
Stop turning when the metal
blending shaft's upper edge is
fixed to the motor casing; if you
tighten more, this may cause
abrasion in screw threads. To get
better results with metal blending shaft, please use the supplied
beaker or a deep bowl (Figure 6).
Cut the food into pieces before
placing them in the beaker. Dip
the metal blending shaft into the
beaker, plug and operate the
appliance. Do not operate your
appliance for a long time, operate
it with short intervals. When operating, you may move the metal
shaft upwards and downwards to
ensure better blending. When you
finish blending, unplug the appliance and remove the metal shaft
from the main body.
Whisking and Blending With
Whisker:
• You can easily prepare cake,
omelets, pancake and mayonnaise
with the help of whisker operating
cap and the whisker.
• Please take the following into
consideration before using, while
using and after using the whisker;
• Always operate the appliance in
upright position.
• Do not operate the appliance
in an empty bowl or outside the
bowl.
• To ensure an efficient whisking,
move the whisker up and down
and in circular motions.
• Make sure that the whisker is
completely fixed in place.
• Do not press the appliance hard
on the food.
Please follow the order below for
use;
First insert the whisker into the
whisker operating cap by pushing
it and make sure that it is securely
fastened.
Screw the whisker operating cap
on the main body; do not tighten
too much to avoid abrasion in
screw threads.
Dip the whisker into the supplied
beaker or a deep bowl containing
the food, plug the appliance and
complete the whisking (Figure 9).
Figure 9
When you are done, stop and unplug the appliance. Take the main
body out of the beaker. Unscrew
the whisker by turning towards
opposite direction to remove it
from the operating cap. Pull out
the whisker. You can install your
appliance to a practical position
by means of using wall hanger,
screws and bolts supplied with the
hand blender (Figure 10).
Figure 10
Figure 7
Figure 8
7
4 Cleaning and Care
• Always unplug the appliance
before cleaning.
• For easy cleaning, it is recommended to wash and dry the accessories immediately after use.
• Particularly, wash and dry the
chopping blade immediately after
the use.
• Do not immerse motor casing,
glass container lid and whisker operating cap into water and do not
wash them under running water
or dishwasher. Wipe them with a
lukewarm damp cloth (recommended washing up liquids might
be used) and dry (Figure 11).
• You can wash the glass container, blade and whisker on the
upper shelf of dishwasher.
• You may wash metal blending shaft in lukewarm detergent
water or wipe it with a damp cloth.
However, you have to avoid water
getting into the inner part of blending shaft. In such a case, turn the
shaft upside down and shake and
dry it up; do not wash the shaft in
dishwasher.
• Wash and replace glass container lid's seal (Figure 11). This
seal must be fixed correctly to
ensure sealing.
8
Figure 11
www.beko.com