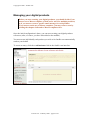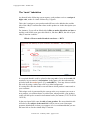
1
Copyright © 2006 – OusKe.com
User Manual for the module « Automated Delivery of
Digital Products»
Version 2.10 – February 2006
Also available in French – disponible également en Français
Table of contents
User Manual for the module « Automated Delivery of Digital Products» ....................1
Table of contents............................................................................................................1
Introduction....................................................................................................................2
Before you can start using this module..........................................................................2
The Automated Delivery menus ....................................................................................3
“Manage your digital products” menu.....................................................................3
“Manage Master templates” menu...........................................................................3
“Module options” menu...........................................................................................3
Managing your digital products .....................................................................................4
The “main” tabulation..............................................................................................5
The “own email template” tabulation ......................................................................7
The “Master email template” tabulation ..................................................................8
The “Options” tabulation .........................................................................................9
Buy-It-Now price ...............................................................................................9
Accepted currencies and minimum purchase prices..........................................9
Using Master templates................................................................................................11
Setting module options ................................................................................................13
Upselling ................................................................................................................13
Using the Automated Delivery module to deliver products sold on your website ......14
How to defeat Spam filters?.........................................................................................15
Annex 1 – The Key generator explained .....................................................................16
Key generation .......................................................................................................16
With programming...........................................................................................16
Without programming......................................................................................16
The key generator in details...................................................................................17
Using a mask....................................................................................................17
Using VbScript code ........................................................................................18
Interaction with your website.................................................................................19
Changing the key generation method ....................................................................21
Modifying already implemented VbScript code....................................................21
Annex 2 – Description of the dynamic codes usable in your email messages ............22
Version 2.10 – February 2006 – page 1 of 23
Copyright © 2006 – OusKe.com
Introduction
Welcome in the User Manual for the « Automated Delivery of Digital Products »
module.
As the name says, this module allows sellers of digital products (software, e-Books,
license keys for software, unlock keys, access codes to a website, auction templates,
development tools – DLL, OCX,…) to give their customers an instant, customized
and professional service.
Upon reception of a payment through PayPal™, an email message you have
previously defined will be sent to your buyer, completed - if you want - with a range
of dynamic information coming from your user profile on OusKe.com or from your
buyer’s PayPal™ profile.
This email shall need to include, depending on the circumstances, a download link
your buyer will use to download the product he bought or a key (license or unlock
key) generated based on your instructions by the OusKe.com server.
Before you can start using this module
In order for you to be able to use this module, you will of course
need a PayPal™ account to receive the payments sent to you. If
you don’t have a PayPal™ account yet, you can create one easily
and free of charge on the PayPal™ website at address http://www.paypal.com
There are three different types of PayPal™ accounts: personal, Premier and
Business. If a personal account is sufficient in order to use the « Automated
Delivery » module, it will not allow you to receive payments originating from a credit
card. We advice you to go for a Premier type of account.
Once your PayPal™ account is created and verified, you will have to register your
main PayPal™ email address in your profile page on OusKe.com and verify this
address (this verification process is not the same as the one required by PayPal™)
This will allow the OusKe.com server to know an incoming payment notification is
meant for you and no one else.
The last step you’ll have to go through is to configure PayPal™ so that a notification
will be sent by the PayPal™ server to the OusKe.com server when a payment for you
is registered. This step of course is indispensable for OusKe.com to react upon
payment of a product purchased from you.
Note: you will find all the details about this procedure at the following address:
http://www.ouske.com/en/help.asp?topic=PAYPALIPN
Version 2.10 – February 2006 – page 2 of 23
Copyright © 2006 – OusKe.com
The Automated Delivery menus
The new version of the Automated Delivery module has brought some changes to the
way you manage your products.
Let’s take a look at the menus at your disposition.
“Manage your digital products” menu
This is, as it was previously, the main component where you will create, edit and
manage your digital products.
The product screen has been divided into 4 tabulations to make editing easier:
•
•
•
•
Main
Own email template
Master email template
Options
These 4 sections will be discussed in details later on.
“Manage Master templates” menu
This new feature allows you to use one same email template for as many
products as you wish.
This means that you don’t have to create an individual email message for each
new product you create: you can now just specify which Master template you
want to use.
In this menu, you can manage (create, edit, delete) your Master templates.
“Master templates” will be examined in details later on.
“Module options” menu
This new screen lets you specify options that will apply to the whole Automated
delivery module.
“Module options” will be examined later on.
Version 2.10 – February 2006 – page 3 of 23
Copyright © 2006 – OusKe.com
Managing your digital products
Before you start creating your digital products, you should decide if you
want to use a Master template (which can be used for multiple products)
or if you want to create a specific email message for each product.
If you want to make use of Master templates, you may want to start by
reading the chapter dedicated to Master templates first.
Once the initial configuration is done, you can start creating your digital products
references (after, of course, you have subscribed to the module).
You must create individually each product you wish to let OusKe.com automatically
send on your behalf.
To create an entry, click the « add an item » link in the OusKe.com interface.
Version 2.10 – February 2006 – page 4 of 23
Copyright © 2006 – OusKe.com
The “main” tabulation
As showed in the following screen capture, each product receives a unique 4
digits code, made of a letter followed by 3 figures.
This code is unique to your product and will have to be added at the end the
title of the eBay™ auction that relates to this product or in the description (see
further).
For instance, if you sell an eBook titled «How to make friends in one hour »
and the code OusKe.com gave this eBook is, like here, B271, the title of your
eBay™ auction could be:
EBook « How to make friends in one hour » - B271
It is required that this code be placed at the very end of your auction title OR
anywhere in your auction’s description. In the latter case, the code must be
preceded with the ouske# prefix (e.g. ouske#B271 ). You may choose to hide
this code by using a white font color on a white background.
It is using this code that OusKe.com will know which product it must send to
your customer.
This unique code is generated by the system at the very moment you create a
new product, you cannot choose it yourself but, when possible, your product
codes will always be created in incremental order (for instance, X123 Æ X124
Æ X125).
In the next input field, enter the title of your product. Be aware that this title
will also be the subject of the email that will be sent to your client upon
payment, think about it when you compose it. It is recommended that you use
the same title as for the related eBay™ auction.
Version 2.10 – February 2006 – page 5 of 23
Copyright © 2006 – OusKe.com
The next line shows the status of the key generator. Key generation will be
explained in full details further on in this document and has been given its own
chapter (see Annex 2).
At this time, just be aware that if the status reads NO, the link next to it allows
you to activate – or request the activation of – the key generation.
If the status reads YES, showing that key generation is currently active for this
product, the link next to it allows you to modify the key generation
parameters.
The next field allows you to choose whether you want to enter a specific email
message for this product or if you want to use a Master template (see the
related chapter for more information). If you have not created any Master
template yet, the “Master template” checkbox is disabled and cannot be
selected. If the “Master template” checkbox is disabled, the “master email
template” tabulation is disabled as well.
The last field of the “main” tabulation, when set to yes, will let you receive an
exact copy of the email that is sent to your buyers upon purchase. The only
difference will be a header that indicates it is a “seller copy”.
This option allows you to control that your digital products are distributed
correctly.
Note: You can switch to another tabulation without saving your
product every time.
Version 2.10 – February 2006 – page 6 of 23
Copyright © 2006 – OusKe.com
The “own email template” tabulation
If, in the first tabulation screen, you selected to use an “own template” for this
product, this is where you can enter the text of the email message that will be
sent to your customers upon purchase of your product.
The editor window is a full online HTML editor with all the functions you
have come to expect from such an editor.
Play around a little with the editor functions to get used to it.
Here is a description of the main functions:
A.
B.
C.
D.
E.
F.
G.
H.
I.
J.
K.
Select Font Type
Select Font Size
Bold
Italic
Underline
Align left
Center
Align right
Numbered list
Bullet list
Decrease indentation
L. Increase indentation
M. Text color
N. Background color
O. Insert horizontal line
P. Insert link
Q. Insert picture
R. Insert table
S. View HTML code
T. Switch to full-screen
editor
On the left-hand side of the editor window, you will notice a list of clickable
tags.
Click any of these tags to insert them in your email message at the cursor
location.
These are dynamic tags that will be replaced automatically, when your email
is sent, with data coming from the Paypal payment or from your user profile.
For an explanation of these tags, please see Annex 1 in this document.
At the bottom of the screen, the “Preview” button lets you see what your
message will look like. If you’re using dynamic tags in your email, the
unavailable information (customer data) will be replaced in preview mode
with sample data.
Version 2.10 – February 2006 – page 7 of 23
Copyright © 2006 – OusKe.com
The “Master email template” tabulation
Note: this tabulation will be enabled (and clickable) only if you
have already created at least one Master template. For information
on how to create Master templates, please view the corresponding
chapter in this User Manual.
If, in the first tabulation screen, you selected to use a “master template” for
this product, this is where you can select the Master template that will be used
as the text of the email message that will be sent to your customers upon
purchase of your product.
All the Master templates you have created will appear in the drop-down list.
Just select the template you want to use in the list.
Because a Master template can potentially be used for hundreds of different
products and because you’ll probably want to include a specific download
link for each product, we have introduced a new dynamic tag:
@DOWNLOADLINK@
You can use this powerful function as follows:
•
•
Insert the @DOWNLOADLINK@ tag in your Master template
For every product that uses this master template and requires a
download link, specify the actual download link that will dynamically
take the place of the @DOWNLOADLINK@ tag when your email is
sent.
Note: you will be reminded of this by the system when you try to save
a product that can potentially miss useful information like a download
link.
Version 2.10 – February 2006 – page 8 of 23
Copyright © 2006 – OusKe.com
The “Options” tabulation
This tabulation offers brand new features that will allow you to protect your
products against theft and to define a Buy-It-Now price for your products.
Buy-It-Now price
The Buy-It-Now price needs to be defined only if you have enabled
the “Upselling” function in the “Module options” menu (see this
chapter for more information).
Define the price and currency your customers will have to pay if they
want to buy this product from the OusKe.com interface.
By default, the price is set to “0.00” which means that this product will
not be offered as a Buy-It-Now product.
Accepted currencies and minimum purchase prices
It would be quite easy for an ingenious thief to obtain your $29.95
digital product for as low as $0.01 if they know your product code and
your primary Paypal email address.
To address this issue, we’ve introduced the concept of “Accepted
currencies” and “Minimum purchase prices”.
Using the checkboxes next to the 6 currencies supported by Paypal,
you can specify whether or not you want to accept these currencies. In
the screen capture above, USD, CAD, GBP and EUR are accepted.
Any Paypal payment formulated in AUD or in JPY will be rejected.
Version 2.10 – February 2006 – page 9 of 23
Copyright © 2006 – OusKe.com
By default, all currencies are accepted.
In the input fields next to the respective currencies checkboxes, you
can define a minimum purchase price for your product. In the same
screen capture, the minimum price in USD is 4.99 , 4.99 in CAD, 3.19
in GBP and 3.99 in EUR.
Because the AUD and JPY currencies are not accepted (checkbox
unchecked), you cannot enter a minimum price.
By default, all minimum prices are set to 0.00 which means there is no
minimum price set.
If you don’t want to use the Buy-It-Now function or the
Accepted Currencies and Minimum purchase prices
features, just leave the values by default.
By using these features, you will prevent an ill intentioned person from
getting your 29.95 USD product for 0.01 JPY
Note: if you specify a Buy-It-Now price, the system will
warn you if this price is set below the Minimum purchase
price (if enabled) for the specified currency.
Version 2.10 – February 2006 – page 10 of 23
Copyright © 2006 – OusKe.com
Using Master templates
Master templates are a very powerful way to create lots of digital products in no time.
Instead of defining a specific email message for each product, which is time
consuming to say the least, you could ultimately write just one message and use if for
hundreds of different products.
To manage your Master templates, select the “manage Master templates” menu entry.
To create a Master template, just click the “add a master template” link in the
interface. To edit an existing master template, click its name.
The figure at the right-hand side of the template name indicates in how many products
it is used. As soon as a Master template is used in at least one product, you cannot
delete it anymore (the trashcan icon does not appear next to the template name).
You will first need to modify all the products in which this master template is used
and have them use another master template or their own template before you can
delete it.
You can, however, edit and change the name of a Master template even if it is in use.
Let’s take a look at the screen that lets you create and edit your master templates.
Version 2.10 – February 2006 – page 11 of 23
Copyright © 2006 – OusKe.com
As you can see, the edition screen is quite simple.
You basically have one field to define the name of the Master template and the online
HTML editor that lets you enter your message.
You can use the same dynamic tags in Master templates as you do in an own template
(see Annex 1 for a description of these Tags and page 7 for details about the online
HTML editor)
Note: if your customers need to use a download link to get their
purchased product, don’t forget to insert the @DOWNLOADLINK@ tag
in your Master templates. For each product that uses this Master
template, you can specify the actual download URL for your product. The
@DOWNLOADLINK@ will be dynamically replaced with the actual
URL when your email is sent.
Using the “Preview” button, you can see what the message received by your
customers will look like.
Once you have created at least one Master template, the “master email template”
tabulation will become available in the product creation interface.
Version 2.10 – February 2006 – page 12 of 23
Copyright © 2006 – OusKe.com
Setting module options
At this time, there is only one setting available in the “module options” menu.
Upselling
When you enable the “Upselling” setting (it is disabled by default), a link to
your
5 best selling products will be added at the bottom of the emails sent
to your customers upon purchase of any of your products.
When your buyers click on any of these links, they will be redirected to a page
on the OusKe.com website where they will be able to buy your product.
Naturally, the money they pay for this will go directly to your Paypal account.
They will then receive exactly the email you defined for this product.
Note: only the products for which you have defined a Buy-It-Now
price will be taken into account by the “Upselling” feature (see
page 9).
Version 2.10 – February 2006 – page 13 of 23
Copyright © 2006 – OusKe.com
Using the Automated Delivery module to deliver
products sold on your website
Did you know that our Automated Delivery module can also deliver the digital
products you sell on your website?
As long as you use Paypal as your payment provider, we can take care of the
delivery.
Of course, both the “Buy Now” Paypal buttons and the Paypal Shopping cart are
supported!
How does it work?
It’s very easy!
When you create “Buy Now” buttons or define products that can be added to the
Shopping cart, you can specify an item number. Just use the 4 digits code of your
digital product as the item number and it will be processed by OusKe.com.
If your Shopping cart contains multiple items, your customer will receive one email
per product purchased.
Version 2.10 – February 2006 – page 14 of 23
Copyright © 2006 – OusKe.com
How to defeat Spam filters?
Some email providers, mainly AOL, MSN and HoTMaiL, have the bad habit of
blocking legitimate emails like the ones we send to your customers upon purchase of
one of your digital products.
Unfortunately, there’s nothing we can do about that but we’ve devised a way of
making sure your customers do get the purchased products whatever happens!
There is a page on the OusKe.com website where your customers can connect and,
provided they enter their Paypal email address, your Paypal email address (they
can find it in the Paypal receipt email or on the Paypal website, in the Transaction
details) and a control code, they will get a list of all the products they purchased from
you in the last 48 hours (if these products were delivered by OusKe.com, of course).
The page they can connect to is
http://www.ouske.com/en/get_digitalproduct.asp
CAUTION
eBay does not allow the presence of links to external websites in your auctions
(they will remove your auctions if you try). So don’t put this link anywhere in your
eBay auctions.
BUT eBay does allow such a link from your eBay ME page.
So here’s what we suggest:
•
In your auctions, include a statement like this:
”This product will be delivered instantly upon payment with Paypal.
However, Spam filters may block our email before it reaches your mailbox.
If you don't receive our email within 15 minutes, click here.”
The “click here” is actually a link to your eBay ME page.
•
On your eBay ME page, you may want to repeat the same statement but this
time, link to the url listed above. Your customer will then be directed to the
OusKe.com website where the purchased product(s) can be retrieved.
Version 2.10 – February 2006 – page 15 of 23
Copyright © 2006 – OusKe.com
Annex 1 – The Key generator explained
Key generation
The Automated Delivery module not only allows you to send « finished
products » like e-Books, software or templates!
It also allows you to sell on eBay™ the unlock code or license key for the
software you created as well as access codes or passwords giving access to
the private areas of your website.
To achieve this, you will use the key generation function.
The key generator can work in two ways: with or without programming
from your part.
With programming
Do you master the VbScript language? If the answer is yes, it is then possible
to let OusKe.com dynamically generate a 100% customized key based on
your buyer’s email address or any other available information (see further).
This technique is of course ideal where a software unlock key is concerned.
Without programming
To generate an access code to a website, for instance, or if you’re not a
programming wizard, you can let OusKe.com generate a « standard » key,
which will be based anyway on parameters you specify. OusKe.com can
generate a key similar to the ones I show here as examples:
XC459877
6558-0247-6441
XWJJ-J568P-ZSSGT45
Or any other format you will define with the help of a mask (see further).
In the case of a standard key, and to remain in the example of an access code
for a website, it is evident that your website will need to be « notified » of the
creation of this new key so that it can allow access to the key’s owner.
Version 2.10 – February 2006 – page 16 of 23
Copyright © 2006 – OusKe.com
No problem: when the key is created, OusKe.com can call a web page you’ll
specify and pass a bunch of data to it, among which the newly created key
(more info later).
The key generator in details
By default, no key will be created. This is made clear in the interface by the
mention « Generate a key NO (modify) ».
To activate the key generation, click the link labeled « modify ».
You will be presented with a page where you can choose between the key
generation based upon a mask you define or based upon VbScript code you
can submit using that same page.
Using a mask
The easiest and fastest way to generate a key is to specify a mask that will be
used to create the key.
A mask is a character string that defines the format of your key.
A mask can contain fixed characters and other ones that will be dynamically
replaced by the OusKe.com key generator.
Those variable characters are represented in your mask by the following
special characters:
&
@
#
?
will be replaced by a lower case letter
will be replaced by an upper case letter
will be replaced by a figure between 0 and 9
will be replaced by any of the 3 previous types of characters
Any other character present in your mask will remain as is.
Here are a few examples of masks and the resulting key as it could be
generated by OusKe.com
Mask
### -###
EVAL###-@RC
&&ABC@@XYZ
????- ????- ????
Resulting key
955 -107
EVAL547-DRC
fbABCKLXYZ
s2HP-62Jn-O5g3
Version 2.10 – February 2006 – page 17 of 23
Copyright © 2006 – OusKe.com
In the case of a key generated using a mask, the sole generation of the key
may not be sufficient: if it is meant to be the access code to a website, the
website in question will have to be “informed” of the existence of this new
key. To achieve that goal, OusKe.com can, the moment the key is created, call
a page on your website and pass it a bunch of parameters, among which the
newly created key. You will find all the information about this subject further
in this chapter.
Key generation using a mask is effective immediately.
Using VbScript code
If the key you wish to generate must serve as an unlock key for a piece of
software or a license key, it can be interesting to customize the key using
some data that is particular to the user, like her email address or last name.
This is quite possible but you will need to write your own key generation
VbScript code.
If you’re fluent with VbScript, no problem! Please note that, to be accepted,
your VbScript (VBS from now on) code must respect a few rules. These rules
are:
•
•
•
•
•
•
•
The code must be written in pure VbScript code,
No server objects creation (FileSystemObject, ADODB…),
All the variables used must be declared at the beginning of your code,
All the variables used must start with the letter ‘k’,
Your code must not be longer than 60 lines,
You must have tested your code thoroughly and it must not generate
any errors,
At the very end of your code, the created key must be placed into the
‘generateKey’ variable.
Here is a sample of acceptable code:
Dim
Dim
Dim
Dim
kStrAllowed
kNewStr
kNewChar
kBoucle
Randomize Timer
kStrAllowed = «ABCDEFGHIJKLMNOPQRSTUVWXYZ»
for kBoucle = 1 to 8
kNewChar = Mid(kStrAllowed, Int(Rnd * Len(kStrAllowed)) + 1, 1)
kNewStr = kNewStr & kNewChar
next
generateKey = kNewStr
To customize your key and make it unique to each of your customers, you can
use different constants, each holding a piece of your customer’s data:
Version 2.10 – February 2006 – page 18 of 23
Copyright © 2006 – OusKe.com
strBuyerEbayPseudo
contains your buyer’s eBay™ ID,
strBuyerEmail
contains your buyer’s PayPal™ email address,
strBuyerLastName
contains your buyer’s last name,
strBuyerFirstName
contains your buyer’s first name,
strEbookCode
product.
contains the 4 digits code of the purchased
You can use these constants (in read-only mode) in your key generating VBS
code.
Please note that, to the contrary of a key generated using a mask, the key
generation using VBS code will not be effective immediately. Your code will
first be reviewed and, if it respects the rules featured on the previous page, it
will be implemented.
You will receive an email when activation is effective.
Until then, the following status will show for your product:
Interaction with your website
Once your key is created, it can of course be automatically integrated in the
email your customer will receive (see the previously discussed @KEY@
keyword).
If this key must give access to a website, you will probably need to create an
entry in your website database to make the new key usable.
OusKe.com makes this possible. You can specify a URL that will
automatically be called by OusKe.com when the key is created.
Different parameters will be passed along to the specified web page,
parameters you can use to update your site’s databases where needed.
Here are the parameters that will be passed to your page:
key
contains the newly created key
buyerebaypseudo
contains your buyer’s eBay™ ID
Version 2.10 – February 2006 – page 19 of 23
Copyright © 2006 – OusKe.com
buyeremail
contains your buyer’s PayPal email address
buyerfirstname
contains your buyer’s first name
buyerlastname
contains your buyer’s last name
ebookcode
contains the 4 digits code of the purchased product
datetime
contains the date and time of creation (CMT) in the
format YYYYMMDDhhmm
password
contains a password you can specify to check whether
the page request is genuinely originating from
OusKe.com
There are two ways you can call your page:
•
•
POST – parameters are sent as if they were entered in a form
if you are an ASP (Active Server Pages) developer, you can retrieve these
values using the Request.Form(«variable_name») method
GET – parameters are added to the called page URL
if you are an ASP developer, you can retrieve these values using the
Request.QueryString(«variable_name») method.
These 3 elements, URL of the page to be called, call method and password can
be specified whether you will use a mask of VBS code for the generation of
your key.
Just fill in the three fields:
Version 2.10 – February 2006 – page 20 of 23
Copyright © 2006 – OusKe.com
Changing the key generation method
It is absolutely possible, if necessary, to change the method used to generate
your key. For instance, you can decide to use the mask method to generate a
key that is currently being generated with VBS code.
To do just that, when in edit view for the concerned product, click the
“modify” link next to the key generation status.
If you change from the VBS method to the Mask method, the change applies
immediately. In the reverse case, do not forget there’s a reviewing and
implementation delay before the activation of your VBS code will be
effective. In both cases, you will have to deactivate before you can switch to
the other generation method.
Modifying already implemented VbScript code
In some cases, it can be necessary to modify the currently active VbScript
code.
To do that, click the “modify” link next to the key generation status of the
concerned product.
In the text box present on the page, you can paste and submit your new
VbScript code.
CAUTION
•
•
•
This new code will also have to be reviewed and implemented and
must of course obey the rules we enumerated a few pages above.
A review and implementation delay will be necessary before your new
code becomes active. You will receive an email as soon as activation is
effective.
Until the new code becomes active, the old one remains effective. If
you do not want the old code to remain active, you will have to
deactivate the key generation first and, then only, submit your new
code.
Version 2.10 – February 2006 – page 21 of 23
Copyright © 2006 – OusKe.com
Annex 2 – Description of the dynamic codes usable in
your email messages
Here is a list of all available codes and an explanation:
@BUYEREBAYPSEUDO@ - the eBay™ ID of your buyer as it is communicated
by PayPal™. This code will be dynamically replaced when your email is sent; it is not
available in preview mode.
@BUYEREMAIL@ - Your buyer’s PayPal™ email address as communicated by
PayPal™. This code will be dynamically replaced when your email is sent; it is not
available in preview mode.
@BUYERFIRSTNAME@ - your buyer’s first name as communicated by
PayPal™. This code will be dynamically replaced when your email is sent; it is not
available in preview mode.
@BUYERLASTNAME@ - your buyer’s last name as transmitted by PayPal™.
This code will be dynamically replaced when your email is sent; it is not available in
preview mode.
@DOWNLOADLINK@ - the download URL of your product. This code can only
be inserted in a Master template; it is not available in preview mode.
@EBOOKTITLE@ - the title of your product as you defined it. The value of this
code is available in preview mode.
@KEY@ - the key created by the key generation module. This code will only appear
in the list if the key generation is activated for this product. The value of this code is
available in preview mode.
@GREETING_FR@ - a greeting in French matching the time when your email is
sent to the buyer. Between 04:00 and 17:59, this code will be replaced by
« Bonjour ». Between 18:00 and 03:59, « Bonsoir ». The value of this code is
available in preview mode.
@GREETING_EN@ - a greeting in English. Whatever the time of the day when
your email is sent, this code will always be replaced by « Hello ». The value of this
code is available in preview mode.
@GREETING_NL@ - a greeting in Dutch matching the time when your email is
sent to the buyer. Between 04:00 and 17h59, this code will be replaced by « Dag ».
Between 18:00 and 03:59, « Goeienavond ». The value of this code is available in
preview mode.
@SELLEREBAYPSEUDO@ - your eBay™ ID as defined in your OusKe.com
profile page. The value of this code is available in preview mode.
Version 2.10 – February 2006 – page 22 of 23
Copyright © 2006 – OusKe.com
@SELLEREMAIL@ - your email address as defined in your OusKe.com profile
page. The value of this code is available in preview mode.
@SELLERPAYPALEMAIL@ - your PayPal™ email address as defined in your
OusKe.com profile page. The value of this code is available in preview mode.
@SELLERFIRSTNAME@ - your first name as defined during your registration on
OusKe.com. The value of this code is available in preview mode.
@SELLERLASTNAME@ - your last name as defined during your registration on
OusKe.com. The value of this code is available in preview mode.
@SELLEREBAYSTORENAME@ - the name of your eBay™ Store, as defined
in your OusKe.com profile page. The value of this code is available in preview mode.
@SELLEREBAYSTOREURL@ - the url (Internet address) of your eBay™
Store as defined in your OusKe.com profile page. The value of this code is available
in preview mode.
The use of these dynamic codes is extremely powerful as it allows you to write only
one email that will look as it has been written specially for a particular customer as it
can be customized with their first and last names, eBay™ ID,…
Note: depending on the mail software your customer uses, the layout of your email
can vary. Yahoo! Mail, for instance, uses Style Sheets that can modify, among other
things, the color used for hyperlinks, headers…
Version 2.10 – February 2006 – page 23 of 23