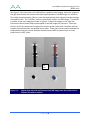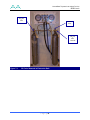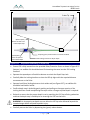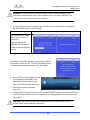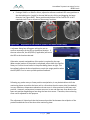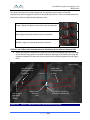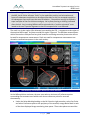
1
Instructions for Use NeuroBlate® System Instructions for Use 80331 Rev D I NSTRUCTIONS FOR U SE CAUTION – Federal (U.S.A.) law restricts this device to sale by or on the order of a physician. Carefully read all instructions prior to use. Observe all contraindications, warnings and cautions noted in these directions. Failure to do so may result in patient complications. TABLE OF CONTENTS TABLE OF CONTENTS.............................................................................................................................................. 1 1. SYSTEM DESCRIPTION ................................................................................................................................... 6 1.1. NEUROBLATE® SYSTEM DESCRIPTION..................................................................................................................6 1.2. LASER DELIVERY PROBE (LDP) & PROBE DRIVER DESCRIPTIONS .............................................................................12 1.2.1. Laser Delivery Probes (LDP) .................................................................................................................12 1.2.2. SideFire™ and SideFire™ Select Directional Laser Probe ......................................................................13 1.2.3. FullFire™ and FullFire™ Select Diffusing Tip Laser Probe .....................................................................14 1.2.4. Laser Delivery Probe Selection .............................................................................................................14 1.2.5. Advanced Probe Driver (APD) and Robotic Probe Driver (RPD) ...........................................................15 1.3. OPERATING MODES .......................................................................................................................................18 2. INDICATIONS FOR USE ................................................................................................................................ 19 3. CONTRAINDICATIONS ................................................................................................................................. 20 4. WARNINGS, CAUTIONS, & SAFETY REQUIREMENTS .................................................................................... 21 4.1. IDENTIFICATION LABELS ..................................................................................................................................21 4.2. GENERAL WARNINGS .....................................................................................................................................22 4.2.1. Electronics Rack Warnings ...................................................................................................................23 4.2.2. Advanced Probe Driver, Robotic Probe Driver and LDP Warnings .......................................................24 4.3. GENERAL CAUTIONS .......................................................................................................................................25 4.3.1. NeuroBlate® System.............................................................................................................................25 4.3.2. Laser Delivery Probes, Advanced Probe Driver and Robotic Probe Driver ...........................................25 4.4. GENERAL SAFETY REQUIREMENTS .....................................................................................................................26 4.5. LASER SAFETY ...............................................................................................................................................26 4.6. INSPECTION, CLEANING, DISINFECTION, STERILIZATION .........................................................................................27 4.7. OPERATING CONDITIONS ................................................................................................................................27 4.8. STORAGE CONDITIONS....................................................................................................................................27 5. MRI CONDITIONAL STATUS ......................................................................................................................... 28 5.1. MR IMAGE ARTIFACT ................................................................................................................................31 Page |1 NeuroBlate® System Instructions for Use 80331 Rev D 6. POTENTIAL HARMS OR HAZARDS ............................................................................................................... 33 7. NEUROBLATE® SYSTEM SETUP .................................................................................................................... 34 7.1. MRI PROTOCOLS AND DICOM IMAGE TRANSFER SETUP ......................................................................................34 7.2. CO2 TANKS ..................................................................................................................................................38 7.3. NEUROBLATE SYSTEM CONTROL WORKSTATION: ................................................................................................40 7.4. NEUROBLATE SYSTEM M·VISION™ SOFTWARE APPLICATION .................................................................................41 7.4.1. M·Vision™ Software Concepts .............................................................................................................41 7.4.2. M·Vision Graphic User Interface (GUI) Layout .....................................................................................41 7.4.3. Software Boot Up and Launch Screen ..................................................................................................42 7.4.4. Main Menu Bar Options .......................................................................................................................44 7.4.5. Toolbar Description ..............................................................................................................................45 7.4.6. Hardware Interfaces ............................................................................................................................47 7.4.7. MR Thermal Data Transfer ..................................................................................................................47 7.4.8. Initiating Data Transfer Interface ........................................................................................................47 7.4.9. Thermal Monitoring Slice Planes .........................................................................................................48 8. NEUROBLATE® SYSTEM PROCEDURE WORKFLOW ...................................................................................... 50 8.1. PROCEDURE PRE-PLANNING ............................................................................................................................50 8.1.1. M·Vision Software Start Screen ...........................................................................................................50 8.1.2. Load and Register Image Data within Plan Register Task ...................................................................52 8.1.3. Create Region of Interest (ROI) Volumes within the Plan Volumes Task .............................................55 8.1.4. Create Intended Trajectories within the Plan Trajectory Task .............................................................60 8.1.5. Saving a Plan ........................................................................................................................................62 8.1.6. Opening a Saved Plan ..........................................................................................................................62 8.2. OPERATING ROOM: PRE-PROCEDURE PREPARATION ............................................................................................64 8.2.1. Sterile Probe Delivery Platform ............................................................................................................64 8.2.2. Anesthesia ............................................................................................................................................64 8.2.3. Head Fixation .......................................................................................................................................64 8.2.4. Image-Guided Surgery (IGS) System Registration (Non-Sterile) ..........................................................64 8.2.5. Prepping and Sterile Draping for Trajectory Guidance Devices ...........................................................65 8.2.6. IGS Registration (Sterile) ......................................................................................................................65 8.2.7. LDP Delivery Platform Attachment ......................................................................................................65 8.2.7.1. Skull-Mounted Trajectory Devices such as AXiiiS Stereotactic Miniframe ......................................65 8.2.7.2. Skull Bone Anchor............................................................................................................................65 8.2.8. Create a Pathway to the Intended Target ...........................................................................................66 8.2.9. LDP Depth Determination – IGS (Skull Bone Anchor Procedures) ........................................................67 8.3. PREP FOR TRANSFER TO MRI ...........................................................................................................................70 8.4. INTERFACE PLATFORM (IP) ATTACHMENT/DETACHMENT–TABLE OR ATAMA STABILIZATION SYSTEM ............................70 8.5. TRAJECTORY CONFIRMATION AND BEAM FIDUCIAL MARKER DETECTION ..................................................................80 8.5.1. Scan and Register Data in M·Vision using Plan Register Task .............................................................81 8.5.2. Create Region of Interest (ROI) Volumes within Plan Volumes Task....................................................82 8.5.3. Create Trajectories within Plan Trajectories Task - AXiiiS ....................................................................82 8.5.4. Create Trajectories within Plan Trajectories Task – without AXiiiS ......................................................82 8.5.5. Identify Beam Fiducial Marker within the Treat Align Task .................................................................83 8.6. SELF-TEST, PROBE DRIVER ATTACHMENT AND LDP INSERTION...............................................................................85 8.6.1. Final Trajectory Adjustment in Treat Insert – AXiiiS workflow .............................................................85 8.6.1.1. Final Trajectory Adjustment in Treat Insert – Non-AXiiiS Workflow ...............................................86 8.6.2. Probe Driver (APD and RPD) Attachment and Connections (if Applicable) ..........................................88 8.6.3. Laser Delivery Probe (LDP) Size Selection and Insertion.......................................................................94 8.7. MRI CONFIRMATION OF LDP INSERTION .........................................................................................................104 8.8. THERMAL DELIVERY AND MONITORING............................................................................................................107 Page |2 NeuroBlate® System Instructions for Use 80331 Rev D 8.8.1. 8.8.2. 8.8.3. 8.8.4. ENABLE THE MRI FOR REAL TIME TRANSFER .....................................................................................107 Position Thermal Monitoring Planes in M·Vision ...............................................................................114 Thermal Sequence Prescription on the MRI .......................................................................................118 Initiate Thermal Monitoring in M·Vision ............................................................................................130 9. ELECTRICAL RACK REQUIREMENTS AND TECHNICAL DATA ....................................................................... 142 10. TECHNICAL SUPPORT ................................................................................................................................ 147 11. CONTACT INFORMATION .......................................................................................................................... 148 11.1. 11.2. 12. DISTRIBUTOR/REP CONTACT: ........................................................................................................................148 MANUFACTURED BY: ...................................................................................................................................148 TIPS AND TROUBLESHOOTING .................................................................................................................. 149 Patent Notice under 35 U.S.C. §287(a): Monteris Medical products and associated processes are subject to the United States patents and pending applications identified at www.monteris.com/patent NeuroBlate, Monteris Medical, AXiiiS, AtamA, AutoLITT, the M Logo, the N Logo, the A Logo and M·Vision are trademarks of Monteris Medical. © Copyright Monteris Medical 2010. All rights reserved. Page |3 NeuroBlate® System Instructions for Use 80331 Rev D MANUFACTURER’S DECLARATION OF CONFORMITY Monteris Medical™ declares Conformity to the following Recognized Standards: Standards No. Standards Organization Standards Title Version Date 10993 ISO Biological evaluation of medical devices – Part 1: Evaluation and Testing 2003 2003 60601-1 IEC Medical electrical equipment – Part 1: General requirements for basic safety and essential performance 3rd Ed 2005 60825-1 IEC Safety of laser products – Part 1: Equipment classification and requirements 2nd Ed 2007 11135-1 AAMI/ANSI/ Sterilization of health care products – Ethylene oxide – Part 1: Requirements for the development, validation, and routine control of a sterilization process for medical devices 2007 2007 Medical electrical equipment – Part 12: General requirements for safety – Collateral standard: Electromagnetic compatibility – Requirements and tests 3.0 Ed 2007 ISO 60601-1-2 IEC Page |4 NeuroBlate® System Instructions for Use 80331 Rev D Anesthesia Move APD – Probe Linear Travel Volume Definition Trajectory Definition Draping / Sterile Field Delivery Platform AXiiiS Attachment Attachment AXiiiS Trajectory Delivery Platform Alignment Alignment MRI Trajectory Confirm (Wand) Next Probe Movement - Linear AtamA (Head Fixation Setup) (Pre) Planning Load Image Data MRI Real Time Transfer Setup Begin Real Time Measurements Load Image Data and Registration Temperature Calculation Setup (Ref Points) AXiiiS (Fiducial Marker) Detection Thermal Dose Monitoring Set Maximum Probe Depth (PDP) Move APD – Probe Rotation Set Initial Probe Insertion Depth End Lasing System Self Test Move Patient from MRI Bore Patient Placement in MRI NeuroBlate Procedure Overview Laser Foot Pedal Check Adv. Probe Driver (APD) Attach and Check Remove Probe and APD Remove RemoveDelivery AXiiiS Platform Probe Attach, Check and Insertion Next Trajectory Close Patient MRI Scan for Probe Placement Load Image Data Adjust SW Rendered Probe to Artifact Manipulation of a Monteris Device MRI Image Acquisition Procedure Flowchart Surgical Team Patient Management Software Worflow Steps Color Key Flowchart 1: NeuroBlate® System Procedure Overview Page |5 NeuroBlate® System Instructions for Use 80331 Rev D 1. System Description 1.1. NEUROBLATE® SYSTEM DESCRIPTION The Monteris NeuroBlate® System enables MRI-guided neurosurgical ablation. The NeuroBlate System hardware and disposable accessories are outlined in Table 1.1. Table 1.1: NeuroBlate System Product List Component NeuroBlate System Catalog Number NB102-SI NB102-IM NB102-GE NB102-PH Interface Platform System Electronics Rack and Components Control Workstation containing M·Vision Software NeuroBlate Advanced Probe Driver (APD) NBD-01 NeuroBlate Robotic Probe Driver (RPD) RPD-01 Description For use with Siemens MRI For use with IMRIS MRI For use with GE MRI For use with Philips MRI Resides behind the patient head during MR thermal imaging to manage the electronic connections for the Probe Driver and Laser Delivery Probe as well as the cooling connection. A rolling cabinet which resides in an equipment area adjacent to the MRI containing the system control computers, electronic hardware, laser light source and CO2 cooling components. A system workstation which resides in the MRI control area and includes a laser foot pedal, keyboard, mouse and display for the graphic user interface Control device to manage linear translation and rotational manipulation of the Laser Probe during the NB procedure. Attaches to the Interface Platform and AXiiiS. Lower profile Control device to manage linear translation and rotational manipulation of the Laser Probe during the NB procedure. Attaches to the Interface Platform and appropriate bone anchors. Page |6 Other Information MRI Conditional (1.5T/3.0T) MR Unsafe MR Unsafe MRI Conditional (1.5T/3.0T) Sterile Single Use Only MRI Conditional (1.5T/3.0T) Sterile Single Use Only NeuroBlate® System Instructions for Use 80331 Rev D Component SideFire™ Directional Laser Probe #000 (133mm) #00 (154mm) #1 (175mm) #2 (196mm) #3 (217mm) #4 (238mm) #5 (259mm) FullFire™ Diffusing Tip Laser Probe #000 (133mm) #00 (154mm) #1 (175mm) #2 (196mm) #3 (217mm) #4 (238mm) #5 (259mm) SideFire™ Select Directional Laser Probe #000 (133mm) #00 (154mm) #1 (175mm) #2 (196mm) #3 (217mm) #4 (238mm) #5 (259mm) FullFire™ Select Diffusing Tip Laser Probe #000 (133mm) #00 (154mm) #1 (175mm) #2 (196mm) #3 (217mm) #4 (238mm) #5 (259mm) Catalog Number NBP-000-01 NBP-001-01 NBP-101-01 NBP-201-01 NBP-301-01 NBP-401-01 NBP-501-01 DTP-000-01 DTP-001-01 DTP-101-01 DTP-201-01 DTP-301-01 DTP-401-01 DTP-501-01 SFS000-01 SFS001-01 SFS122-01 SFS222-01 SFS322-01 SFS422-01 SFS522-01 FFS000-01 FFS002-01 FFS122-01 FFS222-01 FFS322-01 FFS422-01 FFS522-01 Description Other Information Gas-cooled, directional laser delivery probe (LDP) used to deliver controlled energy to the intended target zone. The appropriate probe length is determined by the M·Vision software. 3.3mm Outside Diameter MRI Conditional (1.5T/3.0T) Sterile Single Use Only Gas-cooled, diffusing laser delivery probe (LDP) used to deliver thermal energy in all directions from the probe tip to the intended target zone. The appropriate probe length is determined by the M·Vision software. 3.3mm Outside Diameter MRI Conditional (1.5T/3.0T) Sterile Single Use Only Smaller Diameter, Gas-cooled, directional laser delivery probe (LDP) used to deliver controlled energy to the intended target zone. The appropriate probe length is determined by the M·Vision software. 2.2mm Outside Diameter MRI Conditional (1.5T/3.0T) Sterile Single Use Only Smaller Diameter, Gas-cooled, diffusing laser delivery probe (LDP) used to deliver thermal energy in all directions from the probe tip to the intended target zone. The appropriate probe length is determined by the M·Vision software. 2.2mm Outside Diameter MRI Conditional (1.5T/3.0T) Sterile Single Use Only Page |7 NeuroBlate® System Instructions for Use 80331 Rev D Monteris Medical also offers an array of optional disposable and reusable devices (Table1.2) which can be used for Laser Probe delivery and skull anchoring as well as head stabilization. These devices are not required for the use of the NeuroBlate System, but have been validated to work properly with the NeuroBlate System. Table 1.2: Optional Products Validated for Use with the NeuroBlate System Item Catalog Number AX300-1 Description Other Information MRI Visible, Stereotactic Mini-Frame for trajectory alignment, and guidance of NeuroBlate Laser Delivery Probe. MRI Conditional (1.5T/3.0T) Sterile Single Use Only Instrument Adapter IA300-01 MRI Safe Sterile Single Use Only MRI Trajectory Wand MW300-01 Set of three reducing tubes (1.9, 2.2, and 2.6mm) designed to guide neurosurgical devices (Example: a biopsy needle) through the AXiiiS Stereotactic Miniframe Directional Interface. MRI visible, fluid-filled tube, which when placed into the AXiiiS Stereotactic Miniframe allows confirmation of AXiiiS alignment to target along the intended trajectory. Cranial Bolt CBT-033 MRI Conditional (1.5T/3.0T) Provided Non-Sterile Up to 5 Uses Cranial Bolt Accessory Adapters for CRW Stereotactic Frame CBT-033-CW Cranial Bolt Accessory Adapters for Leksell Stereotactic Frame CBT-033-LK MRI Compatible, reusable, and rigid skull fixation device to provide a stable platform to deliver neurosurgical devices or instruments. Includes a telescoping bushing which can provide linear adjustment. Includes: Host Adapter for CRW Instrument Guide 8 mm Insert Adapter for 6 mm Instrument 8 mm Insert Adapter for 3.3 mm Alignment Mandrel Includes: Host Adapter for Leksell Instrument Guide 8 mm Insert Adapter for 6 mm Instrument AXiiiS Stereotactic Miniframe Page |8 MRI Safe Sterile Single Use Only MR Unsafe Provided Non-Sterile MR Unsafe Provided Non-Sterile NeuroBlate® System Instructions for Use 80331 Rev D Item Catalog Number Cranial Bolt Accessory Adapters for ImageGuided Articulated Arm CBT-033-AA Mini-Bolt CMB033 CMB022 Mini-Bolt, 3.3mm, Accessory Kit CMB033-AA Mini-Bolt, 2.2mm, Accessory Kit Description 8 mm Insert Adapter for 3.3 mm Alignment Mandrel Includes: 8 mm Insert Adapter for 6 mm Instrument 8 mm Insert Adapter for 3.3 mm Alignment Mandrel Other Information MR Unsafe Provided Non-Sterile Monteris Mini-Bolt, includes 1 – Mini-Bolt, 3.3mm ID (CMB033) 2.2mm ID (CMB022) 2 - Probe Shaft Thumbscrews 1 - Collar Adapter for RPD 2 - Attachment Thumbscrews for RPD Kit includes: - 3.3 mm Alignment Mandrel - Insert Adapter for 3.3 mm Alignment Mandrel - Insert Adapter for 4.5 mm Instrument - T-Handle and 3.3 mm Mini-Bolt Driver Kit includes: - 2.2 mm Alignment Mandrel - Insert Adapter for 2.2 mm Alignment Mandrel - Insert Adapter for 4.5 mm Instrument - T-Handle and 2.2 mm Mini-Bolt Driver Includes Host Adapter for the CRW stereotactic frame’s instrument guide MRI Conditional (1.5T/3.0T) Provided Non-Sterile Single Use Only CMB-LK Includes Host Adapter for Leksell stereotactic frame’s instrument guide MR Unsafe Provided Non-Sterile CMB022-AA MR Unsafe Provided Non-Sterile MR Unsafe Provided Non-Sterile Accessory Host Adapter for CRW Stereotactic Frame Accessory Host Adapter for Leksell Stereotactic Frame Accessory Host Adapter for Compass Stereotactic Frame CMB-CW CMB-CS Includes Host Adapter for the Compass stereotactic frame’s instrument guide MR Unsafe Provided Non-Sterile AtamA Head Coil and Stabilization System AT151-XX AT301-XX MR compatible head fixation device for patient immobilization and transfer with optional 8-channel receive-only MRI Head Coil. MRI Conditional (1.5T/3.0T) Page |9 MR Unsafe Provided Non-Sterile NeuroBlate® System Instructions for Use 80331 Rev D Item AtamA Stabilization System Catalog Number ATB01-XX ATB02-XX Description Other Information MR compatible head fixation device for patient immobilization and transfer. MRI Conditional (1.5T/3.0T) The NeuroBlate System is compatible with following 1.5T or 3.0T MRI systems: Siemens Avanto or Espree with Syngo VB17/VB19 software Siemens Trio or Verio with VB17/VB19 software Siemens Aera or Skyra with VD13 or higher; or with VE11 or higher software IMRIS NEURO II Intra-Operative MRI Suite (1.5T Siemens Espree MRI with VB17/VB19 software) IMRIS NEURO III System (3.0T Siemens Verio MRI with VB17/VB19 software) GE MRI systems on these models: o 1.5T &3 T Signa having software version 12.X o 1.5T &3 T Signa (HDx/HDxT) having software version 15.X or higher o 1.5 T Optima MR450/450W having software version 15.X or higher o 3 T Discovery MR750/750W having software version 15.X or higher Philips Achieva (1.5T and 3T) with R3 or R5 software Philips Ingenia (1.5T and 3T) with R4 or R5 software P a g e | 10 NeuroBlate® System Instructions for Use 80331 Rev D Figures 1.1 and 1.2 below depict the set-up of NeuroBlate System within the MRI suite. MRI Scan Room Interface Platform Control Workstation Electronics Rack MRI Equipment Room MRI Control Room Figure 1.1: Typical Layout of the NeuroBlate System within the MRI Suite Head Stabilized in AtamA System Laser Delivery Probe inserted into AXiiiS Stereotactic Mini-Frame Probe Driver Mounted on Interface Platform Figure 1.2: NeuroBlate Components in the MRI Environment P a g e | 11 NeuroBlate® System Instructions for Use 80331 Rev D 1.2. LASER DELIVERY PROBE (LDP) & PROBE DRIVER DESCRIPTIONS 1.2.1. Laser Delivery Probes (LDP) The NeuroBlate System family of LDP’s are single-use (disposable) patient interface components used to deliver laser interstitial thermal therapy. They are composed of MR compatible materials allowing for gas cooling during simultaneous laser application and thermal imaging. The LDP’s are available in multiple lengths and configurations in two outside diameters: 2.2 and 3.3 mm. The smaller diameter is referred to as the Select series. The appropriate length is determined during clinical use by the NeuroBlate M·Vision software. The appropriate probe configuration and diameter is determined by the physician depending on the clinical need. Probe Interface / Depth Stop Adjustment Probe Connectors Probe Tip Figure 1.3: NeuroBlate Laser Delivery Probe Probe Ruler/ Protective Cover Figure 1.4: Laser Delivery Probe; Inside Ruler/Protective Cover The LDP assembly (see Figures 1.3 and 1.4) is comprised of: 1) Ruler/Protective Cover 2) LDP Tip 3) Probe Interface and Depth Stop Adjustment 4) LDP Connector P a g e | 12 NeuroBlate® System Instructions for Use 80331 Rev D Depth Stop Lock Locking Interface Figure 1.5: LDP Interface The Laser Delivery Probe Locking Interface attaches to the Advanced Probe Driver Follower, the Robotic Probe Driver Follower, or an appropriate skull anchoring device The Locking Interface (see Figure 1.5) is adjustable (see double arrow in Figure 1.5) to allow the LDP Tip to manage depth settings when placed in the brain. The Depth Stop Lock is used to fix the Locking Interface at the selected depth. 1.2.2. SideFire™ and SideFire™ Select Directional Laser Probe Probe Lens Fiber Line Tip (laser beam exit) Cooling Tube Thermocouple Probe Shaft Figure 1.6: Detail of the SideFire™ and SideFire™ Select Directional Laser Probe Tip (SFP) The SideFire™ and smaller diameter SideFire™ Select Directional Laser Probe tip (Figure 1.6) is comprised of a clear sapphire lens and the LDP Shaft. The internal components of the LDP can be visualized through the LDP lens. An optical fiber terminates inside the lens at the Fiber Line tip and emits controlled laser energy in a uniform direction at approximately 78 degrees from the long axis of the SFP. An integrated cooling line circulates CO2 gas inside the LDP tip to cool during laser delivery. P a g e | 13 NeuroBlate® System Instructions for Use 80331 Rev D A thermocouple measures the temperature of the LDP tip and delivers this information to the M∙Vision software. 1.2.3. FullFire™ and FullFire™ Select Diffusing Tip Laser Probe Figure 1.7: Detail of the Distal End of the FullFire™ Diffusing Tip Laser Probe The FullFire™ and smaller diameter FullFire™ Select Diffusing Tip Laser Probe is comprised of the same components and mechanical interfaces as the SideFire™ Directional Laser Probe. The FullFire™ and FullFire™ Select Probe is differentiated by laser energy dispersion in all directions/dimensions (see representative red arrows in Figure 1.7) and emanating from a 6mm long emission area (Figure 1.7). 1.2.4. Laser Delivery Probe Selection Selection of the SideFire™ Directional Laser Probe (SFP) versus the FullFire™ Diffusing Tip Laser Probe should be determined by the size and shape of the intended ablation area. The SideFire™ probe provides support for the ablation of irregular shapes based on its ability to selectively ablate with a directional beam. If the safest trajectory does not place the LDP near the center of the target area but closer to one edge, SideFire™ may be the best choice for focal energy delivery to prevent unwanted heating outside of the target region. The FullFire™ Probe provides support for the ablation of symmetrical areas with a diffuse beam. The SideFire™ Probe allows conformal control of the ablation area. FullFire™ Probe may create a concentric ablation area. If the target and path to target demands a smaller diameter probe, the SideFire™ Select or the FullFire™ Select are suitable LDP ablation tools. The selection of a FullFire™ or SideFire™ Select LDP follows the same considerations noted above. The Reduced Diameter Select series of P a g e | 14 NeuroBlate® System Instructions for Use 80331 Rev D probes achieve target accuracy only if the pathway is first created to the target with an alignment mandrel. There may be situations in which both LDP energy emission types (Sidefire and FullFire) will be used in succession to achieve optimal thermal dose conformance to the target area. The FullFire™ Probe may be used to ablate initially, followed by insertion of the SideFire™ Probe to ablate additional areas. 1.2.5. Advanced Probe Driver (APD) and Robotic Probe Driver (RPD) Both the (single use) Advanced Probe Driver (APD) and (single use) Robotic Probe Driver (RPD) are mounted to the NeuroBlate System Interface Platform (IP). The APD follower is designed to be mounted onto a skull-mounted stereotactic anchoring device. The RPD follower is a lower profile version of the APD follower designed to adapt to an appropriate skull bone anchor. Other than the follower assembly, the functionality of APD and RPD is the same. The APD and RPD Position Feedback Plug (Figure 1.8) connects to the Interface Platform to communicate the Laser Delivery Probe’s position in the brain to the system user interface. The APD/RPD rotates or translates (extends or retracts) the NeuroBlate Laser Delivery Probe. The APD/RPD provides linear translation of up to 40 mm and total rotation of 340°. The APD and RPD is comprised of two components: the Commander and the Follower (Figure 1.8), connected by an umbilical cable. The RPD uses a shortened version of the Follower as shown in Figure 1.9. A Rotary Test Adapter is included with the APD and RPD, to be used during Self-Test to simulate the attachment of Laser Delivery Probe during the procedure. 3 Thermal Monitoring Planes (red) Rotary Test Adapter Figure 1.8: Advanced Probe Driver Components P a g e | 15 NeuroBlate® System Instructions for Use 80331 Rev D Shortened Follower Figure 1.9: Robotic Probe Driver (RPD) with shortened follower stem The APD and RPD Commander can be used to manipulate the Laser Probe (translation and rotation) during the procedure in two ways: o Manual - the knobs can be manipulated by pressing them in toward the main body of the Commander and turning (knobs will not turn unless pressed in) blue knob controls linear translation green knob controls rotation o Remote – the knobs can be managed from the Control Workstation by manipulating the software rendered LDP in the graphical user interface (GUI) of the M·Vision software. P a g e | 16 NeuroBlate® System Instructions for Use 80331 Rev D The APD Follower (Figure 1.10) can be mounted to a stereotactic miniframe such as but not limited to the AXiiiS® Stereotactic Miniframe (see Section 8.6.2 Attach Advanced Probe Driver (APD) to Interface Platform and AXiiiS) and provides supportive interface to the Laser Probe during use. ± 170 Rotation Locking Interface for Laser Probe 40mm Translation (Linear Travel) Fully advanced or (0 mm) position shown Mounting Interface for AXiiiS® Interface for AXiiiS® Figure 1.10: Detail of APD Follower The RPD requires the use of a locking sleeve for attachment to an appropriate skull anchoring device. Figure 1.11 illustrates how the RPD and the locking sleeve accessory attach to a skull bone anchor. RPD with shortened Follower stem Locking Collar accessory Figure 1.11: Bone Anchor Details of RPD Follower and its attachment to a skull bone anchor P a g e | 17 NeuroBlate® System Instructions for Use 80331 Rev D 1.3. OPERATING MODES The NeuroBlate System has 2 modes of operation, Active and Standby. These modes are defined by 5 essential functions the system can provide and more specifically, the state of each function. The system is in Active mode if at least one Essential Function is activated (or “in operation”). The five essential functions are: 1. DICOM file transfer from MRI (receive) 2. Probe cooling 3. Probe (Probe Driver) linear and rotary travel 4. Laser Ready (enable to fire) 5. Emergency Stop a. Disables Probe Cooling, Probe linear and rotary Travel and Laser b. Sounds alarm The system is in Active mode if at least one essential function is activated, or at least one of the following: Receiving files through the Ethernet connection Probe is cooling Probe (via APD or RPD) is in motion (linear or rotary) Laser is in “Ready” mode (enabled to fire) Emergency Stop has been pressed/engaged The system is in Standby mode if the system is fully turned on but none of the Essential Functions are in active mode, meaning: Not receiving any files through Ethernet connections Probe is not cooling (or not commanded to cool) Probe is not in motion (or not commanded to move in either linear or rotary axis) Laser is in “Standby” mode (or disabled) Emergency Stop has not been engaged P a g e | 18 NeuroBlate® System Instructions for Use 80331 Rev D 2. Indications for Use The Monteris Medical NeuroBlate System is indicated for use to ablate, necrotize, or coagulate soft tissue through interstitial irradiation or thermal therapy in medicine and surgery in the discipline of neurosurgery with 1064 nm lasers. The Monteris Medical NeuroBlate System is intended for planning and monitoring thermal therapies under MRI visualization. It provides MRI-based trajectory planning assistance for the stereotaxic placement of MRI compatible (conditional) NeuroBlate Laser Delivery Probes. It also provides real-time thermographic analysis of selected MRI images. When interpreted by a trained physician, this System provides information that may be useful in the determination or assessment of thermal therapy. Patient management decisions should not be made solely on the basis of the NeuroBlate System analysis. P a g e | 19 NeuroBlate® System Instructions for Use 80331 Rev D 3. Contraindications None known or reported. P a g e | 20 NeuroBlate® System Instructions for Use 80331 Rev D 4. Warnings, Cautions, & Safety Requirements 4.1. IDENTIFICATION LABELS Naming Conventions: CAUTION: Alerts you to situations that could result in system or equipment damage, failure in a procedure, or incorrect results. WARNING: Alerts you to situations that could result in bodily harm or irreparable damage to the system or equipment. Symbols displayed on or in the NeuroBlate System and its documentation are: MRI Unsafe - item is NOT MRI compatible and is known to pose a hazard in MR environments. This equipment should not be taken into the MRI room within the 5 Gauss perimeter line. MR Conditional - the item poses NO known hazards in a specified MRI Environment (e.g. 1.5T to 3.0 T) or MRI Safe - the item poses NO known hazards in ALL MR environments. High Voltage present. Electrical hazard. Authorized personnel only. Caution followed by text message. Consult instructions for use. Keep away from sunlight. Manufacturer Equipotentiality Protective earth Serial Number Batch code Do not re-sterilize Do not reuse Type BF Applied Part P a g e | 21 NeuroBlate® System Instructions for Use 80331 Rev D 4.2. GENERAL WARNINGS The following are general warnings that apply to the NeuroBlate System as a whole; please consult the complete NeuroBlate System IFU for device specific instructions for all accessories used (such as the Dornier Laser, Monteris AtamA, Monteris AXiiiS, and system MRI) for warnings specific to those devices. WARNING: The system must be operated by trained personnel under the direct supervision of a trained physician. Color perception is extremely important during temperature monitoring. Operators who are color blind or have impaired color perception may not be able to monitor temperature during the procedure, which could result in patient injury or death. Laser eye protection provided with the NeuroBlate system must be worn in the MRI Scanner room during operation of the laser. Using eye protection other than what was specifically provided with the NeuroBlate system may not provide adequate protection for the NeuroBlate laser wavelength. Use only the eye protection that was specifically provided with the NeuroBlate system as others may affect color perception and the interpretation of thermal images and indicators. Use only Monteris Medical approved (MRI compatible) accessories with this equipment. Failure to do so may result in improper performance and/or damage to the equipment with potential to cause harm. Only use Monteris Medical approved MRI sequences for thermal imaging in conjunction with this equipment. Failure to do so may result in improper thermal monitoring which could lead to patient injury. Ensure that all loaded image data contains the correct patient identification and image orientation markers prior to the commencement of the NeuroBlate® procedure to ensure an unintended area of the brain is not targeted for thermal delivery which can lead to patient injury. Use extreme care when determining patient baseline core body temperature by using an MRI compatible patient monitoring system with an internally placed temperature monitoring probe. Failure to determine an accurate value will result in improper performance of temperature monitoring software with the potential to cause patient injury. P a g e | 22 NeuroBlate® System Instructions for Use 80331 Rev D The NeuroBlate system is contraindicated for patients with certain metallic, electronic or mechanical implants, devices or objects that must not enter the MRI scan room or serious injury may result. Follow institution guidelines in making this determination. As part of the operation of the NeuroBlate System, the user must beware of the strong magnetic field in the MRI room. Extreme caution must be used before bringing in any equipment into the MR environment. Only items identified as: or MR Safe as denoted by the symbol or: MR Conditional as denoted by the symbol can be brought into the MR room. Any item marked by the symbol: should NOT be brought into the MR suite within the 5 Gauss line. Serious injury can result if any equipment which is MR unsafe is brought into the MRI suite. 4.2.1. Electronics Rack Warnings The following are specific warnings that apply to the NeuroBlate Electronics Rack and Electrical Power Inputs. WARNING: Potential hazards may occur from modification of the NeuroBlate System. Do not position the Electronics Rack to make it difficult to access electrical outlets or to disconnect the system from the power outlet. P a g e | 23 NeuroBlate® System Instructions for Use 80331 Rev D 4.2.2. Advanced Probe Driver, Robotic Probe Driver and LDP Warnings The following are specific warnings that apply to the NeuroBlate Probe Drivers (APD and RPD) and Laser Delivery Probe (LDP). WARNING: For single use only. Do not reuse, reprocess or re-sterilize. Reuse, reprocessing or re-sterilization may compromise the structural integrity of the device and/or lead to device failure which in turn may result in patient injury, illness or death. Reuse, reprocessing or re-sterilization may also create a risk of contamination of the device and/or cause patient infection or cross-infection, including, but not limited to, the transmission of infectious disease(s) from one patient to another. Contamination of the device may lead to injury, illness or death of the patient. Ensure that all cables and umbilical in the vicinity of the MRI bore do not form loops as this may result in heating and RF interference. The reduced diameter Select series of LDP achieve target accuracy only if the pathway is first created to the target with an appropriate dilator probe such as a biopsy needle or stylet. P a g e | 24 NeuroBlate® System Instructions for Use 80331 Rev D 4.3. GENERAL CAUTIONS 4.3.1. NeuroBlate® System CAUTION: Follow the general guidelines for neurosurgery involving the insertion of electrodes, instruments, or devices into the brain or nervous system. Follow all MRI safety guidelines concerning the suitability of subjects undergoing MRI procedures. System Not User Serviceable: Follow specified maintenance and calibration schedules for non-disposable equipment. Calibration and maintenance activities must be performed by trained Monteris representatives. Failure to do so may result in improper performance and/or damage to the equipment with potential to cause harm. Replace damaged equipment. If damage is found, call your Monteris Medical representative. Do NOT power ON the Interface Platform during MR imaging. Image quality may be compromised Refer to the MRI manufacturer’s instructions for use to ensure proper use of hearing protection during operation of the MRI scanner. NeuroBlate System should be connected to a power outlet with >=15 A circuit breakers. This outlet is to be used by the NeuroBlate system only. Failure to comply may result in power failure during the procedure. Do not attempt to re-use single use, disposable patient interface items. 4.3.2. Laser Delivery Probes, Advanced Probe Driver and Robotic Probe Driver CAUTION: After use, dispose of product and packaging in accordance with hospital, administrative and/or local government policy. P a g e | 25 NeuroBlate® System Instructions for Use 80331 Rev D 4.4. GENERAL SAFETY REQUIREMENTS The Laser Safety Officer (or employee with appropriate training and authority) must ensure that local safety regulations are observed when the laser is used. The system must only be installed and serviced by Monteris Medical employees or by persons authorized by Monteris Medical. Promptly report accidents and personal injuries to Monteris Medical at 1-866-799-7655 or reporting@monteris.com. 4.5. LASER SAFETY WARNING: The NeuroBlate System utilizes a Class 4 laser product in accordance with EN60825-1:2003. Irreversible injury can occur. Under no circumstances may the retina of the eye or the skin be subjected to direct or reflected laser radiation. Each person inside the laser area (as described below) must wear protective eyewear. Two sets of protective eyewear are provided with every NeuroBlate System. Contact Monteris Medical for additional protective eyewear. Ensure the laser fiber connections are made correctly. Improper connections can lead to fire or operator injury. Ensure the LDP laser connector is fully seated in the connector receptacle on the IP by gently pulling back on the connector. Failure to do so can cause the receptacle to heat, reduce thermal energy deposition, cause equipment damage and cause operator or patient injury. Laser Area: For this laser, the Nominal Ocular Hazard Distance (NOHD) is 2.8 m from the laser output at the LDP tip (when connected) or the extension fiber output on the Interface Platform. Outside of this region, laser safety eyewear is not required. P a g e | 26 NeuroBlate® System Instructions for Use 80331 Rev D 4.6. INSPECTION, CLEANING, DISINFECTION, STERILIZATION Use Germicidal Wipes to remove soil from the Interface Platform. Fully cover IP arms with film of Germicidal liquid from the wipes. Allow to sit for at least three minutes. Wipe dry with paper towels. If excessive soiling of surface of the IP occurs, use paper towels dampened with Conflikt Disinfecting Detergent to clean. Allow liquid film to remain on surface for 3-5 minutes. Wipe detergent off using tap water dampened paper towels, followed by dry paper towels. WARNING: Do Not Sterilize! Protect Device from Fluids! Do Not Submerge! Do Not Spray to Clean! 4.7. 4.8. Prior to Use: Carefully inspect the Laser Delivery Probe and Advanced Probe Driver packages for any breach of sterile barrier or damage to the contents. DO NOT USE if the sterile barrier integrity is compromised or contents appear damaged; contact your Monteris Medical representative for replacement items. The Laser Delivery Probe, Advanced Probe Driver and Robotic Probe Driver are for single use only. Dispose properly after use. Do not reprocess or re-sterilize. OPERATING CONDITIONS Temperature: 15° C (59° F) to 30° C (86° F) Relative Humidity: < 70% STORAGE CONDITIONS Temperature: 10° C (50° F) to 40° C (104° F) Relative Humidity: < 60% Keep out of direct sunlight P a g e | 27 NeuroBlate® System Instructions for Use 80331 Rev D 5. MRI Conditional Status Non-clinical testing has demonstrated the NeuroBlate System Probe Driver, Laser Delivery Probe and Interface Platform are MR Conditional. They can be used under the following conditions: The Laser Delivery Probe should NOT be moved linearly during any MR imaging acquisition The NeuroBlate System is compatible with the following 1.5 T or 3.0 T MRI systems: o Siemens 1.5T Avanto or Espree with SyngoVB17/VB19 software, o Siemens 3T Trio or Verio with VB17/VB19 software, o Siemens 1.5T Aera or 3T Skyra with VD13 or higher; or with VE11 or higher software, o IMRIS NEURO II Intra-Operative MRI Suite (1.5T Siemens Espree MRI with VB17/VB19 software), or o IMRIS NEURO III System (3.0 T Siemens Verio MRI with VB17/VB19 software); o GE MRI systems on these models: 1.5 & 3 T Signa with software version 12.X 1.5 & 3 T Signa (HDx/HDxT) with software version 15.X or higher 1.5 T Optima MR450/450W with software version 15.X or higher 3 T Discovery MR750/750W with software version 15.X or higher o Philips Achieva (1.5T and 3T) with R3 or R5 software o Philips Ingenia (1.5T and 3T) with R4 or R5 software Spatial Gradient field of 700 Gauss/cm or less Scan only with a maximum whole-body-averaged specific absorption rate (SAR) of 2 W/kg. Advanced/Robotic Probe Driver rotary motion can be commanded by the user while the MRI is scanning using the Thermal Sensitive GRE pulse sequence. Advanced/Robotic Probe Driver linear motion cannot be commanded by the user via software while the MRI is scanning using the Thermal Sensitive GRE pulse sequence. Use only whole body transmitting coils and compatible local receiving coil. Image quality is NOT affected while the interface platform display is OFF. Image quality can be affected if the interface platform display is powered ON during acquisition, potentially causing image artifacts. Probe Driver position is NOT affected by routine clinical RF pulse sequences including Gradient Echo (GRE), Spin Echo, Turbo(Fast) Spin Echo, MPRAGE (a 3D fast GRE scan) and Echo Planar Imaging (EPI). P a g e | 28 NeuroBlate® System Instructions for Use 80331 Rev D No testing has been conducted to demonstrate MR conditional behavior using MR sequences not described above. P a g e | 29 NeuroBlate® System Instructions for Use 80331 Rev D The following table outlines acceptable operation with respect to NeuroBlate System modes of operation (see section 1.3) and the MRI: MRI DICOM File Transfer Probe Cooling Active NeuroBlate Standby Probe Travel Linear Rotary Laser Ready Emergency Stop Engaged No Scanning (Idle Mode) GRE Sequence for Thermometry Diagnostic Imaging Sequences* Allowed NA Disabled Allowed Allowed Disabled Allowed NA Allowed Allowed Disabled Allowed Allowed Allowed Allowed Allowed Disabled Not Allowed Not Allowed Disabled Allowed * Diagnostic Imaging Sequences tested include Gradient Echo (GRE), Spin Echo, Turbo(Fast) Spin Echo, MPRAGE (a 3D fast GRE scan) and EPI P a g e | 30 NeuroBlate® System Instructions for Use 80331 Rev D 5.1. MR IMAGE ARTIFACT MR image quality may be compromised if the area of interest overlaps with the artifact created by the NeuroBlate System SideFire™ Directional Laser Probe or the FullFire™ Diffusing Tip Laser Probe. The image artifact extends approximately 2.6 mm from the NeuroBlate LDP when scanned in non-clinical testing using spin echo and gradient echo sequences as specified in ASTM F2119-01 using a 1.5 Tesla, Siemens Magnetom Symphony, with version Syngo MR30A software, MR system with body radiofrequency transmit coil (essentially equivalent results were obtained using 3.0 T systems). Therefore, it may be necessary to optimize MR imaging parameters to adjust for the presence of the NeuroBlate Laser Delivery Probe. The image artifact can extend approximately as much as 2.6 mm from the device in both parallel and perpendicular image planes. Figure 5.1 and Figure 5.2 demonstrate this artifact. Images were derived as follows: the probe was aligned with B0 and was scanned in nonclinical testing using the gradient echo pulse sequence in a Siemens 1.5 T Magnetom Symphony (software version Syngo MR30A ) MR scanner with the CP Head Array coil. Tip effectartifact Capsule Slice Plane Probe shaft 2.6mm Artifact Gradient Echo Figure 5.1: Parallel (top row) and perpendicular (bottom row) MR images near the probe which is location of maximum artifact. P a g e | 31 NeuroBlate® System Instructions for Use 80331 Rev D See Figure 5.2 for illustrations of the MR artifact in gradient echo imaging, where the images on the right side illustrate the actual probe shape superimposed on the MR images for reference. The artifact shown extending 2.6mm is near the capsule/probe shaft material interface having a susceptibility shift. The “tip effect” artifact is also clearly visible in the GRE images. The artifact is smaller in spin echo imaging as shown in Figure 5.2, where the images on the right side illustrate the actual probe shape superimposed on the MR images for reference. Turbo Spin Echo (or Spin Echo) sequences are optimal for minimal probe artifact and, if possible, with the frequency encode direction anti-parallel to the probe. These type of scans used to evaluate the probe position within the tissue should be executed on the MRI only when linear or rotary probe motion is NOT active. Spin Echo Figure 5.2: Sagittal (top row) and axial (bottom row) MR images near the probe which is location of maximum artifact. P a g e | 32 NeuroBlate® System Instructions for Use 80331 Rev D 6. Potential Harms or Hazards Laser Delivery Probe advancement into, or laser delivery in cerebral vasculature can result in hemorrhage. Laser Delivery Probe trajectories which transect critical cortical-spinal pathways or overdosing with thermal energy can result in patient injury and permanent neurological deficits. Protracted patient immobilization can cause deep venous thrombosis (DVT). P a g e | 33 NeuroBlate® System Instructions for Use 80331 Rev D 7. NeuroBlate® System Setup 7.1. MRI PROTOCOLS AND DICOM IMAGE TRANSFER SETUP MRI Sequence Protocols It is recommended to create a NeuroBlate specific sequence protocol folder or list on the MR user interface software so the operator can easily identify, load, and execute the required MR acquisitions. It may also be beneficial to include routine radiology pulse sequences for easy access during the case. Fast 3D spoiled GRE sequences such as FSPGR or MPRAGE can be used for laser delivery probe artifact identification as well as T1/T2 weighted turbo (or fast) spin echo sequences (due to their minimal image artifact in the presence of non-conductive materials). These types of scans should be executed on the MRI only when linear or rotary probe motion is NOT active. During system installation, the NeuroBlate Thermal Sequence, a Gradient Recalled Echo (GRE) pulse sequence, will be configured to the exact specifications required by the NeuroBlate System. The following parameters for the given MRI system MUST be used for temperature monitoring: Note: The only parameters which can be adjusted are slice position/orientation and phase encode direction. Siemens MRI - 2D FLASH TR TE Flip Angle Number of Averages Pixel Bandwidth FOV Slice Thickness Slice Gap Slice Spacing Matrix Resolution Phase Partial Fourier Slices per measurement Number of measurements Measurement acquisition time Delay between measurements Reconstruction Fat and Water Suppression Phase oversampling Auto Align (VB19 only) *GE MRI - 2D FSPGR 81msec 19.1msec 30deg. 1 100 Hz/pixel 256x256mm 5mm 5% or 0.25mm 5.25mm 128x128 6/8 3 512 7.78sec 0.0sec Phase AND Mag None 0 Disabled *TR 27 msec *TE 19.1 msec Flip Angle 30deg. Bandwidth FOV Slice Thickness Slice Gap Slice Spacing *Matrix Resolution NEX Slices per measurement Multi Phase Measurement acquisition time Delay between measurements *Reconstruction Fat and Water Suppression Phase oversampling Options 6.41 kHz 256 5mm 0.2mm 5.20mm 128x128 0.75 3 170 8.2 sec Minimum Mag, Re, Im None 0 *ASSET, MPh, Seq * Several of these GE parameters noted above cannot initially be changed to the values shown in the GE MR user interface. On GE MRI using v15.X or higher software, the final parameters are set just prior to acquisition by the NeuroBlate system using the GE LAIS communication interface. See workflow step 8.8.1 ENABLE THE MRI FOR REAL TIME TRANSFER. P a g e | 34 NeuroBlate® System Instructions for Use 80331 Rev D *For GE Signa MRI systems running v12.X software, these parameters noted must have the following USER_CV values: 2D FSPGR Parameter TR – Repetition Time TE – Echo time Matrix Resolution Reconstruction ASSET Factor USER_CV name act_tr act_te rhimsize rhrcctrl opphasset_factor Value 27000 19100 128 29 1 Philips MRI – FFE Scan type Scan Mode Technique Contrast enhancement TR TE Flip Angle NSA Water Fat shift (3T) / BW (Hz) Water Fat shift (1.5T) / BW (Hz) FOV RL FOV AP FOV FH Acq Matrix Slice Thickness Slice Gap Stacks Stacks type Slice Scan Order Slices Reconstruction Matrix Recon Voxel size Slices per measurement Number of measurements Dyn Scan times Fast Next Scan Images Fat and Water Suppression Phase oversampling Dynamic Stabilization (on 3T) Coil Selection Dual coil CLEAR Shim Imaging MS* FFE T1 81msec* 19.1msec 30 deg. 1 4.346 pixels / 99.9Hz 2.175 pixels / 99.9Hz 256mm 192mm 16mm 128x196 5mm 0.25mm 1 Parallel Interleaved 3 128 2 mm 3 512 (maximum >10000) 7.8 sec* (shortest) No 1: M 2: P 3: no None 0 Enabled SENSE-Flex-L No No Volume Summary Panel: *Alternate config includes Scan Mode=M2D with TR=27ms → Dyn Scan Time is then 8.2s P a g e | 35 NeuroBlate® System Instructions for Use 80331 Rev D Note: With Philips Flex L coils plugged in, use the default Coil selection on Philips R5 systems (Ingenia) normally set with the “Smart Select” feature. This will select both Flex L coils and may also set the Posterior and Q-Body coil as shown below: DICOM Image Transfer Setup The MRI System should be configured with the NeuroBlate System as a remote DICOM node to allow image data transfer. Consult the MRI System documentation for MRI specific details. Siemens Syngo Interface: listed as Monteris in the drop down list of the Send To function. GE Interface: listed as the Monteris node under the Database function. Philips Interface: Two DICOM Nodes are configured. One (having an ‘RTT’ label) is dedicated for real time transfer as part of the “Auto-Push” Configuration. The other is reserved for normal, manual DICOM pushes from MRI to NeuroBlate. This one is typically named MONTERIS. Constraints: o Localizers or Surveys - these are not needed for NeuroBlate setup and should not be transferred. o Dual Echo sequences - these sequences produce two image data sets within the same series folder (T2 and Proton Density weighted) at identical positions and orientations. If these are used for T2 weighted images, only copy the desired image subset. MRI scan execution should only be done when linear or rotary probe motion is NOT active. Currently, the NeuroBlate System software does not handle a full series containing both image types properly. P a g e | 36 NeuroBlate® System Instructions for Use 80331 Rev D WARNING: On GE Signa MRI’s running v12.X software only, the patient MUST be newly registered including a unique patient ID on the MRI on the day of procedure prior to MR acquisition. If the same patient previously existed on the MRI and is simply re-registered, real time data transfer to NeuroBlate will not occur. Delete preexisting patient from MRI if it exists to ensure new registration is unique. P a g e | 37 NeuroBlate® System Instructions for Use 80331 Rev D 7.2. CO2 TANKS WARNING: Medical grade CO2 size “E” tanks, unless otherwise labeled, are MR UNSAFE and should not be brought into the MR suite within the 5 Gauss line. Use caution when replacing tanks. WARNING: Tank valves must be closed before replacing. Serious operator injury can occur. The NeuroBlate System uses medical grade CO2 gas coolant for the Laser Probe (Figure 7.1). The Electronics Rack is designed to hold two “E” size tanks. The system user is required to supply the tanks. To Replace CO2 tanks prior to each System use: Slide the CO2 Line Yoke over the Tank Valve and align the two “fingers” protruding from the inside of the Yoke with the two holes on the Tank Valve. Tighten the CO2 Line Yoke T-Handle clockwise using the Tank Valve Wrench attached to the wire tank holders on the Electronics Rack to ensure an airtight connection. Again using the Tank Valve Wrench attached to the wire tank holders on the Electronics Rack, open both CO2 tank valves (counter clockwise). Ensure pressure gauges for each tank read >4500 kPa ( >650 psi). CO2 Tank removal: o Using the tank valve adapter attached to the rack, close both CO2tank valves (clockwise). o Carefully loosen the CO2 Line Yoke T-Handle counter clockwise. WARNING: Tank valves must be closed before replacing otherwise serious operator injury can result! P a g e | 38 NeuroBlate® System Instructions for Use 80331 Rev D CO2Line Yoke Tank Valve CO2Line Yoke T-Handle Figure 7.1 CO2Tanks Mounted to Electronics Rack P a g e | 39 NeuroBlate® System Instructions for Use 80331 Rev D 7.3. NEUROBLATE SYSTEM CONTROL WORKSTATION: System Power On The Control Workstation is equipped with an Emergency Stop switch located on the front of the monitor (see Figure 7.2) which intended to disable the system in an emergency. Check that the E-Stop switch is released (red light should NOT be on). If it is, twist the red knob clockwise to release. Turn on the power switch at the side of the monitor (see Figure 7.2). Monitor will display NeuroBlate System logo launch screen. Double-click on the M·Vision for NeuroBlate System icon to launch the software application. Refer to the User Manual for complete software workflows. CAUTION: The user must perform a Shut down under at the Start menu of the Windows operating software before using the power switch to power down the system. Failure to do so may result in software failure at restart. CAUTION: Full power shutdown of the system takes 2 minutes. After system shutdown wait 3 minutes to restart power or the system may fail to start up. Power Switch Emergency -Stop Figure 7.2: Control Workstation P a g e | 40 NeuroBlate® System Instructions for Use 80331 Rev D 7.4. NEUROBLATE SYSTEM M·VISION™ SOFTWARE APPLICATION 7.4.1. M·Vision™ Software Concepts M·Vision Software in the NeuroBlate System works with and augments current neurosurgical practices and workflows, a User mode may be selected to describe high-level objective for neurosurgical use. Once in selected mode, M·Vision provides appropriate tasks, suggests workflows (sequences of actions) and provides appropriate tools to accomplish such actions. M·Vision constantly saves the Profile/Plan (the collection of input data, user decisions, instrument conditions and thermal dosing data currently being worked on or executed) with minimal user intervention. However, should the user’s actions result in overwriting existing information or potential injury to the patient (such as firing the laser or moving the LDP within the patient), M·Vision requires the user to confirm change before proceeding. Additionally M·Vision provides specific interactions with the NeuroBlate System Hardware, assisting the user in selecting and setting Hardware parameters, all while providing key safety controls, data collection, and feedback to the user. 7.4.2. M·Vision Graphic User Interface (GUI) Layout The M·Vision graphic user interface is organized into workflow tasks. Each task has multiple views, dependent on current workflow step. These workflow tasks are visible once a preexisting patient Profile/Plan or new Digital Imaging and Communications in Medicine (DICOM) data is loaded. A sample view of the opening screen is shown in Figure 7.4. There are three main software operating modes: Plan, Treat and Admin (as shown by tabs in the upper right screen). In each mode, there are task screens that follow standard workflow steps required for the NeuroBlate procedure. Plan Mode task screens: Start, Register, Volumes and Trajectory Treat Mode task screens: Start, Register, Align, Insert and Treat. Admin Mode: Provides a procedure report which includes procedure details and allows the user to type notes or comments. There is also a menu containing saved screenshots. P a g e | 41 NeuroBlate® System Instructions for Use 80331 Rev D 7.4.3. Software Boot Up and Launch Screen The LCD monitor in the Control Workstation will display the boot up sequence after system power-on. When completed, the login display will appear (Figure 7.3 left). Click the icon labeled Site User. Type in the password: mmi Confirm workstation PC time and date displayed on lower right side of the display matches the current time and date of the MRI host PC to ensure patient data is properly saved in the system. - Contact Monteris Technical Support if changes to the time setting are required. Double-click the M▪Vision for NeuroBlate icon to launch the software application (Figure 7.3 right) Site User Figure 7.3: Boot Up Display (left) and Desktop Display (right) NOTE: The M∙Vision™ software must be running before any DICOM data can be sent to the Control Workstation from the MRI. Upon start up, M·Vision launches in the Plan Mode (see Figure 7.4 next page). The default task within Plan is the Start task, requiring user selection of the MRI system being used before proceeding. In the Start mode, the user can move between the workflow tasks as noted by the icons in the lower right corner of the screen (Figure 7.4). P a g e | 42 NeuroBlate® System User Manual 80331 Rev B “Mode” Selection Tabs Menu Bar Workflow Area Status Bar Figure 7.4: Tool Bar Area Main User Interface Layout P a g e | 43 Task Selection Buttons NeuroBlate® System Instructions for Use 80331 Rev D 7.4.4. Main Menu Bar Options Table 7.1: Main Menu Bar Dropdown Menu Options File Open Profile– Load an existing patient plan from a folder Close Profile– Close and Save an active patient profile Import Profile- Import patient Plan/Profile from a hard drive folder in Windows explorer and move to local Plan directory. Export Profile – Export a patient Plan to a folder Load Images – Load DICOM data (accepts DICOM standard only) Exit - Close Plan if active and exit View Show Navigation Lines– Allows the user to hide the cross reference navigation lines displayed in the image view panes Show Annotations– Allows the user to hide the annotations Reset View Settings – Resets the viewport settings to the default setting Patient Orientation – Orients patient data to either: -Default Orientation: Shows data accordingly to MRI default orientation -Aligned to Acquired Stack: Shows data in the orientation in which the master series was acquired Tools Compare Series – Compares two different image data sets Customize Toolbar – Allows the user to select which tools are displayed on the main toolbar Disable DMAX- Allows the user to remove controls which monitor incoming thermal imaging data for RF noise and anatomical motion which will stop laser delivery when detected. When selected the dialogue box (image right) will be displayed requiring the user acknowledge DMAX is disabled. WARNING: With DMAX disabled, the software will no longer detect RF Noise nor anatomical motion that may affect the contour lines. Proceed with caution. P a g e | 44 NeuroBlate® System Instructions for Use 80331 Rev D Help About M·Vision for the NeuroBlate System 7.4.5. Toolbar Description All M·Vision workflow tasks use a common toolbar (Figure 7.5), found at the lower edge of the display screen. Figure 7.5: Main Toolbar System status information is constantly updated, and is displayed on the left side of the toolbar (Status Bar). Information may include the last step completed, prompts regarding the next step to be performed or system errors. The user should monitor the displayed information. Left clicking the ˄symbol to the left of the Status Bar provides a displayed menu of all status updates. Error messages that appear should be acknowledged by right clicking on the Status Bar and selecting Dismiss in the context menu that appears. If they are not acknowledged they will stay on the status bar indefinitely. The Toolbar icons apply to functions used for selection, image manipulation or image adjustment within the image view panes using the left mouse button (unless otherwise noted in table 4). Table 7.2: Appearance Tools Available on Main Toolbar (context sensitive) Name and Function Default Arrow Tool used for default manipulation/selection for the GUI Window Width/Level (image contrast and brightness) drag horizontally for width, drag vertically for level Drag and Drop Images between panes moves images from one image view pane to the next P a g e | 45 NeuroBlate® System Instructions for Use 80331 Rev D Appearance Name and Function Draw and Manipulate Measurement Lines click and drag to show distance measurements in millimeters Magnifying Glass Tool Displays a magnified area inside the magnification glass wherever mouse is moved Zoom All click and drag vertically to zoom all view pane Pan Images within the viewport click and hold to pan an image within the current view pane Zoom Click and drag vertically to zoom a single viewport about its center Zoom to Region zoom to display a rectangular area of interest Zoom to Point click and drag vertically to zoom to a specific point on an image in a view pane Add, Edit Move or Delete Text controls text box manipulation Show/Hide Annotations displays or hides annotations on the screen Show/Hide Crosshair displays or hides visible crosshairs Invert grayscale of all images converts greyscale to a negative of an image Toggle single viewport / multi viewport display changes from single image display to multiple image display Reset All Viewports changes display settings back to original form Save the current screen to file captures a screenshot of the current display to the saved patient profile P a g e | 46 NeuroBlate® System Instructions for Use 80331 Rev D 7.4.6. Hardware Interfaces M·Vision workflow can only proceed if the system is properly configured and connected to the Picture Archiving and Communications System(PACS), which links the target MRI and the NeuroBlate System. Patient data in the form of (DICOM) image files must be available on the NeuroBlate System to create a new patient plan. This data is transferred from the MRI to M·Vision using the standard DICOM send (or push) mechanism on the MRI console. There is NO ability to query the target MR system for patient image files and initiate the download from M·Vision. The NeuroBlate System is configured as a remote DICOM node on the target MRI at the time of installation in order to transfer data from the MR system. 7.4.7. MR Thermal Data Transfer Temperature sensitive MR data is not sent to the NeuroBlate System using the routine DICOM push mechanism from the MRI. A direct technique of automated data transfer with minimal latency must be used. Depending on the MR vendor, an additional LAN connection may be needed between the NeuroBlate System and the MRI internal private LAN in order to receive real time MRI temperature sensitive data necessary for thermometry calculations. Only qualified Monteris service personnel should complete these connections and configure the parameters on both the NeuroBlate System and the target MRI (this is part of the system installation procedure). 7.4.8. Initiating Data Transfer Interface For some MRI vendors (eg. Siemens), in advance of each NeuroBlate System procedure the data transfer interface must be enabled following patient registration on the MRI system. Note: The MRI system reverts to the default configuration at the end of the NeuroBlate System procedure when the patient exam is closed on the MRI. Other MRI types do not requires any specific instruction prior to the procedure. See workflow step 8.8.1 ENABLE THE MRI FOR REAL TIME TRANSFER. P a g e | 47 NeuroBlate® System Instructions for Use 80331 Rev D 7.4.9. Thermal Monitoring Slice Planes Software Rendered LDP 13 11 9 7 6 5 3 1 PDP Figure 7.6: Main User Interface Layout The NeuroBlate System M∙Vision Software monitors three, 5 mm thick slice planes simultaneously during thermal delivery (see Figure 7.6). Each slice plane is separated by a 0.25mm slice gap. There are 13 slice plane locations available for thermal imaging along the set trajectory. The center of each slice plane is described by the parallel white dotted lines above. The position of the slice planes are determined when the user sets the Probe Deepest Penetration (PDP) during trajectory planning. The PDP point is identified by the center of the orange circle at the tip of the LDP when the probe position is at 0mm. The three active thermal monitoring planes to be displayed during thermal delivery are described by solid red lines superimposed over the dotted lines. The default position for the middle (second) slice of the three active monitoring planes is centered directly over the laser exit position of a SideFire or SideFire Select Probe (SFP) which is ~3mm superior to the distal tip of the SFP. The software rendered LDP can be manipulated in the linear direction to rest between the outer two thermal slice planes based on the user’s preference for slice positioning with respect to the laser exit for the SideFire. SF Probe SF Probe Laser Exit location (x) Figure 7.7: SFP Thermal Monitoring Setup P a g e | 48 NeuroBlate® System Instructions for Use 80331 Rev D The FullFire™ or FullFire™ Select LDP requires a slightly different positional setup compared to the SideFire™ LDP to ensure the central monitoring slice captures the maximum heating. The FullFire has a larger laser emission profile than the SFP along a 6mm length of fiber back from the tip of the fiber. The fiber tip location is identical to the SFP tip location within the outer probe clear capsule identified by the X in Figure 7.7 (the sapphire outer capsule of the probe tip is identified by the blue portion of the probe rendering in these images). Therefore, the 3-plane position with respect to the probe must be shifted proximal manually by the physician, or automatically by the software ~3mm to align the central monitoring plane to the midpoint of the FullFire fiber emission region as shown in Error! Reference source not found.7.8. This can be done by positioning the FullFire to ensure the probe tip capsule (denoted by blue region of the virtual FullFire shown in Figure 7.8) is positioned at the most distal monitoring plane. Sagittal View Each MR thermal imaging plane is 5mm thick FullFire 3 Slice stack shifted proximal by 3mm Proximal Slice Center Distal Slice Total imaging coverage is ~15mm Probe tip at distal slice FullFire fiber laser emission region ~6mm within clear sapphire probe capsule tip Figure 7.8: FullFire and FullFire Select Thermal Monitoring Setup WARNING: The ability to monitor ablation progression is limited to a zone that is 15mm in depth along the axis of the probe separated in three, 15mm MR acquisition planes and 60mm in diameter within each acquisition plane perpendicular to the probe and centered at the probe axis intersection of each plane. The 3 plane thermal monitoring slice acquisition should have its midpoint at ~6mm proximal to the FullFire or FullFire Select tip to ensure optimal coverage of the expanding thermal dose radiating from the midpoint of the diffuse optical fiber tip within the probe capsule. Expansion of the thermal ablation beyond these zones must be carefully considered since it is not being actively monitored. P a g e | 49 NeuroBlate® System Instructions for Use 80331 Rev D 8. NeuroBlate® System Procedure Workflow 8.1. PROCEDURE PRE-PLANNING 8.1.1. M·Vision Software Start Screen Select MRI scanner type here Figure 8.1: Plan - Start Plan Start Screenshot The NeuroBlate System is configured for the host MRI during installation. If the NeuroBlate System is set up for more than one host MRI, the user must define the scanner to be used for the procedure within the Plan tab at the Start task -select the appropriate scanner in the drop down menu bar in the middle of the screen (Figure 8.1). P a g e | 50 NeuroBlate® System Instructions for Use 80331 Rev D If the workflow involves the use of a trajectory device or bone anchor without the Probe Driver, select the manual probe movement choice in the drop list below MR selection as shown in Figure 8.2 below. Default selection assumes use of the Advanced/Robotic Probe Driver. Figure 8.2: Plan Start Drop List Selections – MRI type and APD use Proceed to the next task by selecting the next icon after Plan Start on the bottom right menu bar (see Figure 8.1). Load and co-register pre-treatment DICOM image data using M·Vision software. Create intended treatment Region of Interest (ROI)(s) and establish initial trajectory(s) as desired. P a g e | 51 NeuroBlate® System Instructions for Use 80331 Rev D 8.1.2. Load and Register Image Data within Plan Register Task Figure 8.3: Loading DICOM Data in Plan Register Plan Register allows image data pushed from the host MRI scanner to be received to M·Vision from the hospital PACS system or a USB drive. In this task, loaded images can be anatomically co-registered. To load imaged data from a USB drive (see Figure 8.3): Select the FILE menu > Load Images (DICOM standard format only) Once the Load DICOM Data box pops up on the screen, Browse can be selected and the windows drive selection menu will show up. Use Windows Explorer Browse For Folder menu to find the desired data folder to load. o Click the desired data folder and click OK. o The data will automatically load to the M-Vision Software. If multiple image datasets are loaded, all sets used for planning must be registered to a Master Data Set (default will always be the first image dataset loaded). P a g e | 52 NeuroBlate® System Instructions for Use 80331 Rev D Any of the image sets loaded in Plan Register can be designated as the Master series by right clicking on the corresponding image thumbnail (to the right) and selecting Set As Master. Any data set can be erased from the software by right clicking on the image thumbnail and selecting Clear. Figure 8.4: Image Co-Registration in Plan Register Click the corresponding thumbnail view on the right side of the display screen of desired image dataset to be registered (highlighted green in Figure 8.4. Select Auto-Register from the menu and the software will attempt to register a “best fit” of the two anatomical data sets, based on pre-determined thresholds within the anatomy. If Auto-Registration seems inaccurate to the user or if a manual registration is desired by the user, use the Rotate or Pan icons under Registration Tools in the right menu to adjust the secondary image over the Master. o The Rotate button allows the secondary image to rotate around its center o The Pan button allows the secondary image to translate to the desired location. o In manual mode, the views appear in a bi-color configuration where red is assigned to the master series and green is applied to the selected series being registered. See Figure 8.5. When images have been aligned, they appear in a yellow hue as shown in Figure 8.6. P a g e | 53 NeuroBlate® System Instructions for Use 80331 Rev D o While in manual registration mode, the shift key can be used to switch from Pan and Rotate mode quickly while editing. If the Rotate button is selected on right, holding Shift key applies Pan function and vice versa. o The Undo button (circled red in Figure 8.4) undoes any Pan, Rotate or AutoRegistration action previously completed. Figure 8.5: Bi-color appearance in manual Image Co-Registration in Plan Register Figure 8.6: Aligned images appear with a yellow hue when the red and green individual colors align correctly. Use the Blend slider bar in the right menu bar to blend the imported data set into or out of the Master series. This tool is to be used to verify the registration accuracy of each image set registered to the Master. The blend function is disabled while in manual registration mode. P a g e | 54 NeuroBlate® System Instructions for Use 80331 Rev D The user must confirm accurate registration of all image sets to the Master Series. Once an imported image set is registered appropriately to the Master series, the Verify Registration icon must be selected to confirm the user has registered the image sets to the Master Series. WARNING: Extreme care should be exercised during visual verification of image registration. If an image series cannot be accurately registered to the Master series, it should be deleted before proceeding to treatment planning or thermal monitoring. Inaccurately registered image data sets can result in improper identification of the intended thermal treatment area, which may lead to patient injury. 8.1.3. Create Region of Interest (ROI) Volumes within the Plan Volumes Task Figure 8.7: Create an ROI Volume in Plan Volumes task The Plan Volumes task allows the user to generate up to ten ROI volume annotations within the data set in different (pre-set) colors. An ROI can be defined using software tools within the MVision software as described below. NeuroBlate System users should create at least one ROI volume over the intended treatment area. P a g e | 55 NeuroBlate® System Instructions for Use 80331 Rev D Figure 8.8: "Interactive" Method of Generating a 2D Contour ROI Volumes can be generated by creating contours on the 2D images by outlining the selected region and then generating a volume from these contours (see Figure 8.8): Press the Interactive icon in the right menu under the Draw heading Left click and hold while dragging the mouse across the selected region to quickly outline a contour (highlighted arrow in Figure 8.8 red line). P a g e | 56 NeuroBlate® System Instructions for Use 80331 Rev D Figure 8.9: Using the Push Tool to Adjust a Contour To generate a ROI volume: Create an ROI volume contour in each of the orthogonal views in the left image view panes or draw two or more contours at the intended location within the 2D view on right image viewport. Edit the created contours with the Push Tool (see Figure 8.9). To adjust the boundaries of the initially defined contour - left click and hold while touching the boundaries of the contour with the Push Tool. Note: The size of the push tool can be changed with the middle mouse button to accommodate larger or smaller manipulations. Note: All contour lines can be removed by selecting the Clear All button. P a g e | 57 NeuroBlate® System Instructions for Use 80331 Rev D Figure 8.10: Using the Generate Tool to Create a Volume from Defined Contours When all intended contours have been created, click the Generate icon. Name the newly created volume in the pop-up dialog window. Note: Volumes can be Edited, Deleted or Renamed using the icons under the Volumes heading in the right menu. P a g e | 58 NeuroBlate® System Instructions for Use 80331 Rev D Push from the inside or outside of the contour to edit its shape. Figure 8.11: Use of the Push tool to Adjust and ROI Volume NeuroBlate System user may edit an ROI volume to provide adjustment of contour lines in the original acquisition plane. The editing task view is shown in Figure 8.11. Click Complete under the named lesion in the right menu to finalize any edits to the volume. To create additional ROI volumes for additional lesions, anatomical structures or safety zones, follow the same steps to select the Interactive Tool, followed by the Push Tool. P a g e | 59 NeuroBlate® System Instructions for Use 80331 Rev D 8.1.4. Create Intended Trajectories within the Plan Trajectory Task Figure 8.12: Trajectory Creation in Plan Trajectory The Plan Trajectory task is used to define an initial access trajectory(s) while in Plan mode. The final trajectory used for treatment can be modified later in the workflow. A new trajectory is defined by manipulating the “grab-handles” (defined as the two white circular points within the LDP Trajectory view panes seen in Figure 8.12). The Point of Deepest Penetration (PDP) is defined by the setting the center of the deepest grab-handle to the deepest point of Laser Probe insertion. The image view panes are oriented to show three orthogonal planes reconstructed along the current, active trajectory. This includes two parallel and one perpendicular (Probes Eye) alignment to the trajectory. These reconstructed oblique image planes are represented by green navigation lines overlaid on the images. A 3D surface rendering is also provided in the lower right view pane. Note: A treatment strategy should be determined during surgical pre-planning. A “top-down” treatment strategy can be considered starting at the superior-most tumor location and ending at the inferior-most location. Alternatively, a bottom up approach may be more appropriate. P a g e | 60 NeuroBlate® System Instructions for Use 80331 Rev D Figure 8.13: Initial Trajectory Displayed by M·Vision An initial trajectory, using the center of a created ROI volume as the target, can be easily created. Select Go To: Under the Volume heading in the right menu (see red outline in Figure 8.13). This will snap the trajectory target point to the center of the volume selected. Trajectory modifications can be made by clicking on the grab-handles and dragging them to new locations. o Set the center of outer-most grab-handle to the desired entry point at outer table of skull. o Set the center of the deepest grab-handle to the desired PDP. Once trajectory has been defined, select the Save icon, found under the Trajectory heading in the right menu (light blue outlined region in Figure 8.13). Name the saved trajectory in the pop-up window that appears after selecting Save. To create additional trajectories, adjust the grab handles to the desired locations, and then click New under the Trajectory heading. Follow the steps to create multiple trajectories. P a g e | 61 NeuroBlate® System Instructions for Use 80331 Rev D 8.1.5. Saving a Plan M·Vision continuously saves all treatment planning profiles. If the system shuts down or is turned off during the planning phases, the plan profile will be saved using the patient name embedded within the DICOM image data loaded into the system during planning. Figure 8.14 illustrates how to determine the name given to the plan, as well where the data will be stored when it is saved. The plan profile can be located using Windows Explorer under D:\MMI\AppData\AutoLITT\data\archive\plan folder. Within this folder, a subfolder is first defined by the patient name-patient ID number. Within this patient folder is a subfolder having a date-time string (YYYY-MM-DD_HH-MM) defining the specific plan profile for the patient. Patent Name One_ID number Patent Name Two_ID number Figure 8.14: Plan Saving Hierarchy 8.1.6. Opening a Saved Plan Figure 8.15: File Menu To Open a Plan P a g e | 62 NeuroBlate® System Instructions for Use 80331 Rev D If a plan has been created and saved prior to treatment, this data can be loaded into M·Vision software using the following steps: At the Plan Register workflow task, select the File menu in the top menu bar of the software. Select Open Profile from the drop down bar under the File menu (see Figure 8.15). Patent Name One_ID number Patent Name Two_ID number Figure 8.16: Finding the Saved Plan Browse the open Explorer window which points to the “plan” folder within the system. Select the saved plan by clicking the patient name followed by the correct treatment profile number defined by the date/time string (see Figure 8.16). Note: Plans can be opened if stored on USB drive by using the Import Profile selection under File and then following the same steps detailed in section 8.1.6 Opening a Saved Plan. USB data will now be in the plan folder. Once the patient data is selected, the plan is loaded in Plan Register. P a g e | 63 NeuroBlate® System Instructions for Use 80331 Rev D 8.2. OPERATING ROOM: PRE-PROCEDURE PREPARATION 8.2.1. Sterile Probe Delivery Platform Each of the laser delivery probe (LDP) shall be handled in a sterile field; various delivery platforms are suitable with options to allow probes be mounted with or without APD or RPD. The appropriate skull anchoring device and APD/ RPD should all be sterile and MRI safe. 8.2.2. Anesthesia The patient may be placed under general anesthesia following standard hospital procedure. During, or immediately following anesthesia administration, the following should be verified: A medically tested and MR compatible temperature probe should be inserted into the nasopharynx of the patient for accurate temperature readings throughout the procedure; Ensure patient has ear plugs in both ears in preparation for MRI scanning. 8.2.3. Head Fixation The patient’s head must be fixated with an appropriate Stabilization System and MRI imaging coil. Refer to Instructions for Use for the head coil and fixation system used. WARNING: The patient head must be secured with a Head Fixation Device and remain fixed within magnet space for entire imaging portion of the outlined NeuroBlate System workflow. WARNING: If the patient head position changes relative to the head fixation device or the initial MRI position set during the landmark procedure at any point during the NeuroBlate System procedure, new imaging must be acquired and set as the master series or thermal energy may be delivered in an unintended area causing patient injury. 8.2.4. Image-Guided Surgery (IGS) System Registration (Non-Sterile) Follow Instructions for Use of the Image Guided Navigation System selected to perform Registration of image space to physical space based off pre-operative imaging. Use the IGS system to define an entry point on the anatomy as well as the planned incision. Perform visual and manual checks to ensure the desired head coil will fit appropriately about the head with respect to the intended attachment of the selected position of the laser probe delivery platform. P a g e | 64 NeuroBlate® System Instructions for Use 80331 Rev D 8.2.5. Prepping and Sterile Draping for Trajectory Guidance Devices Depending on the trajectory device used to guide the laser delivery probe to target, please refer to the specific Instruction for use included with each device for preparation and sterile draping procedures. Refer to manufacturer’s Instructions for Use included with the selected intended laser probe delivery platform 8.2.6. IGS Registration (Sterile) The image-guided navigation system registration task is performed using sterile technique based on pre-operative imaging. Once the IGS system is accurately registered, the previously identified entry point and incision plan is confirmed. 8.2.7. LDP Delivery Platform Attachment Follow Instructions for Use to attach the selected LDP Delivery Platform to the skull. 8.2.7.1. Skull-Mounted Trajectory Devices such as AXiiiS Stereotactic Miniframe Attach the device at or about the desired entry location on the skull. Align the device to the intended trajectory. Trefenate the skull along the desired trajectory using a 4.5 mm twist drill bit. Follow step 8.6.3 Laser Delivery Probe (LDP) Size Selection and Insertion for probe size and depth stop determination. 8.2.7.2. Skull Bone Anchor Skull bone anchors appropriate for delivery of the NeuroBlate laser delivery probes must be manufactured from materials that are MRI conditional at 1.5 T and/or 3.0 T. The internal diameter of the anchor must accommodate either of the two available 2.2 mm or 3.3 mm laser probe diameters. The outer diameter cannot exceed 7.95 mm for attachment of the Robotic Probe Driver. Drill an appropriately sized twist drill hole at the desired entry location on the skull along the intended trajectory. Fix the bone anchor within the created twist drill hole along the intended trajectory P a g e | 65 NeuroBlate® System Instructions for Use 80331 Rev D 8.2.8. Create a Pathway to the Intended Target Use standard surgical technique to open the Duramater to ensure clear passage for the LDP into the brain. Insert an appropriately sized, rigid dilator probe through the delivery platform to ensure proper clearance for the LDP through skull and dura (image right). It may be desired to insert the dilator probe all the way to the intended probe deepest penetration (PDP) point to open a pathway for the LDP through brain tissue. Mark or set a depth stop on the shaft of the dilator probe o This step is optional for the standard 3.3 mm diameter LDP. o This step is required for the 2.2 mm Select Probes to ensure accurate LDP placement along the intended trajectory. o Depth from the proximal end of the skull bone anchor to the PDP should be assessed using image-guided navigation or via the stereotactic frame planning software in order to mark a stopping point or set a depth stop on the shaft of the dilator probe. WARNING: The reduced diameter Select series of LDP achieve target accuracy only if the pathway is first created to the target with a rigid dilator probe. Remove the dilator probe from the delivery platform prior to transporting the patient to the MRI. Create a sterile field around the delivery platform using off the shelf draping for transport to the MRI. P a g e | 66 NeuroBlate® System Instructions for Use 80331 Rev D 8.2.9. LDP Depth Determination – IGS (Skull Bone Anchor Procedures) The LDP size and depth stop setting will require confirmation during the OR preparation stage if a skull bone anchor instead of AXiiiS is to be used for the procedure. In this case, a PDP (Point of Deepest Penetration) depth is found using IGS or other stereotactic means in the OR from the proximal surface of the skull bone anchor. The following figures describe how distance, L, is used to compute the depth stop (or ruler) setting on the LDP when using appropriate skull bone anchors. The depth stop setting assumes the LDP is fully inserted and locked to the bone anchor. The depth stop calculation makes the following assumptions: o For the telescoping anchors, the telescopic insert is assumed to be fully inserted or seated at 0mm extension o For standard anchors, the linear drive mechanism is assumed to be bottomed out at 0mm or fully inserted. Telescoping Bone Anchor Telescopic insert fully seated Standard Bone Anchor Target Volume L mm PDP x PDP x L mm Probe Depth Stop Setting = L - 82mm Figure 8.19a: Depth Stop Calculation P a g e | 67 NeuroBlate® System Instructions for Use 80331 Rev D The depth stop setting (or LDP ruler setting) on the LDP is derived from its use with the AXiiiS device where the depth of the LDP is measured from the top most point of the beam direction fiducial marker (BDM) within the AXiiiS central ball joint. This marker (shown in green in Figure 8.19b) is visible in an MR image. When a skull bone anchor is in use, this offset must be subtracted from L to determine the depth stop. This profile on APD follower which accepts a probe connection is identical on all skull anchoring devices. PDP x Figure 8.19b: Source of Depth Stop Setting Offset (82mm) The following table defines the LDP size needed to achieve the desired depth stop setting computed for the various configurations: LDP Size Depth Stop, Min Depth Stop, Max 000 51mm 71mm 00 72mm 92mm 1 93mm 113mm 2 114mm 134mm 3 135mm 155mm 4 156mm 176mm 5 177mm 197mm When a RPD is intended for use with a skull anchoring device, the depth stop calculation is different due to the longer offset the RPD adds to the bone anchor when attached. Figure 8.19c below illustrates this issue and notes the alternate computation of depth stop (or LDP ruler setting) needed to achieve maximum target depth (PDP). The assumption here is that the distance, L, is measured from the skull anchoring device before the RPD is attached and NOT measured from the RPD itself which is not available in the OR during this IGS based measurement. P a g e | 68 NeuroBlate® System Instructions for Use 80331 Rev D OR Preparation Step illustration with RPD and a standard bone anchor PDP x L mm Probe Depth Stop Setting = L - 27mm Figure 8.19c: Example of RPD Depth Stop Calculation with a Skull Bone Anchor The following table helps identify the target depth range for the probe sizes available when used with a skull bone anchor with/without Robotic Probe Driver. The depths shown assume the bone anchor is fully threaded into the skull and the top of the bone anchor (where IGS derived depth is measured from) is ~30mm from skull’s outer surface. MIN Depth to MAX Depth to PDP using an PDP using an bone bone anchor anchor only from only from outer outer skull skull MIN depth with an bone anchor + RPD from outer skull MAX depth with an bone anchor + RPD from outer skull Probe Size Depth Stop, Min Depth Stop, Max 000 51mm 71mm 103mm 123mm 8mm 68mm 00 72mm 92mm 124mm 144mm 29mm 89mm 1 93mm 113mm 145mm 165mm 50mm 110mm 2 114mm 134mm 166mm 186mm 71mm 131mm 3 135mm 155mm 187mm 207mm 92mm 152mm 4 156mm 176mm 208mm 228mm 113mm 173mm 5 177mm 197mm 229mm 249mm 134mm 194mm If using trajectory guidance/anchoring devices other than those available from Monteris Medical please refer to the respective manufacturer’s Instructions for Use. P a g e | 69 NeuroBlate® System Instructions for Use 80331 Rev D 8.3. PREP FOR TRANSFER TO MRI For NeuroBlate procedures performed in a Diagnostic MRI the sterile field created around the LDP delivery platform must be maintained throughout the entire procedure. Drape the patient head for transfer to the MRI according to hospital procedure. A sterile bag may be placed around the patient head and sterile field. For NeuroBlate procedures performed in an intra-operative MRI, the sterile field created around the LDP delivery platform must be maintained throughout the entire procedure following hospital procedure. For IMRIS surgical suites, ensure the table height is set to center the head at the MRI bore isocenter as well as ensure that the table is level. 8.4. INTERFACE PLATFORM (IP) ATTACHMENT/DETACHMENT–TABLE OR ATAMA STABILIZATION SYSTEM Refer to the Monteris Medical AtamA Stabilization System Instructions for Use as needed. Depending on the site-specific workflow, the Interface Platform may be attached before or after MRI trajectory confirmation. The order of these steps may be determined with the MRI or Surgical Support Team during on-site training, led by the Monteris Clinical Team. CAUTION: Every attempt should be made to keep fluids away from the IP by creating a plastic draping barrier. Fluid contact may interfere with the IP operation or cause failure of the device. The method of attachment of the Interface Platform depends on the MRI type and system provided. All possible connection types are reviewed below. If multiple arm configurations are present, the method of IP to arm connect/disconnect is highlighted below. Always ensure Interface Platform and Arms are securely fastened before attaching both to the MRI table. Use of Siemens Aera and Skyra MRI Prior to use of the AtamA Stabilization System and NeuroBlate Interface Platform, a fluid barrier must be placed over the coil connections and connectors on the MR couch. Plastic drapes should be placed over the coil connections (when not plugged in) and over the coil connectors when plugged in. P a g e | 70 NeuroBlate® System Instructions for Use 80331 Rev D MRI Coil Connectors MRI Coil Connections Figure 8.20: MR Coil Connections for Siemens Aera and Skyra MRI WARNING: Fluids must not come in contact with the MR coil connections at the head end of the MRI table. A fluid barrier must be placed over the coil connections to prevent patient or operator injury and damage to the MRI system. P a g e | 71 NeuroBlate® System Instructions for Use 80331 Rev D Attachment Method 1– AtamA Attachment Interface 1. Ensure AtamA patient board is fully installed and secure on the MRI table. 2. Slide the arm ends (furthest away from the interface platform) into the IP Arm interface completely until the “stop rings” touch the IP arm interface. (Note: A thumb screw is provided on each side to lock the arms in place. Do not over tighten these screws as they can damage the arm.) APD / RPD Attachment Location AtamA Board IP Arm Interface IP Arm “Stop Rings” IP Arm Interface IP Arm IP Power Button Figure 8.21: Interface Platform (IP) to AtamA Connection Attachment Method 2 – IMRIS Table Receptacle 1. Remove the IMRIS OR table headrest if not needed for procedure. If needed for procedure, attachment method 3 should be used in conjunction with a different arm set. 2. Insert the IP arm’s brass posts into the headrest receptacles (the receptacles may be square or circular depending on model). Ensure they are fully inserted and the white plastic portion of the IP arms rest against the table. 3. Tighten the IMRIS OR table’s Mounting Knob to lock the IP arm brass posts to the table (Figure 8.22 e). For the square configuration, tighten the retaining thumbscrew into the side of the table after full insertion (Figure 8.22 f). P a g e | 72 NeuroBlate® System Instructions for Use 80331 Rev D b c d e Retaining Thumbscrew f Figure 8.22 b-f: Interface Platform to IMRIS Head Rest Mounting Holes P a g e | 73 NeuroBlate® System Instructions for Use 80331 Rev D Attachment Method 3 – IMRIS Side Rail Attachment 1. Place both clamp pieces on each side rail by screwing clamp knobs in from bottom. Ensure clamps are flush with end of table. If IMRIS clamp is in the way, slide further down rail as to not interfere with the NeuroBlate attachment or procedure. 2. Insert arms through side holes and tighten clamp knob onto the arm shaft. Note: Do not over tighten the screw as this may damage the plastic. Upper Clamp Piece g h Figure 8.23 g,h: Interface Platform to IMRIS Side Rail Arm Mounting Attachment Method 4 – Siemens Table Slot Attachment 1. Place both Table Blocks on the MRI table as shown. Note: There are two different arm anchor types depending on table. The figures below highlight the differences. 2. Slide the Table Anchors up through the second MRI Table Slot on each side. Insert thumbscrews though the anchors and into the Table Blocks. 3. Slide the IP Arm Tabs into the Table Block Slots (red arrows). 4. Insert the Pivot Pins though the Table blocks and into the Interface Platform Arms (green arrows). P a g e | 74 NeuroBlate® System Instructions for Use 80331 Rev D Connecting Blocks (2) Pivot Pin (2) MRI Table Slots Thumbscrews (4 each side) Table Anchor (2) i Connecting Blocks (2) Pivot Pin (2) MRI Table Slots Figure 8.24 i, j : Thumbscrews (2 each side) Table Anchor (2) Interface Platform to Siemens Table P a g e | 75 j NeuroBlate® System Instructions for Use 80331 Rev D Attachment Method 5 – Philips Ingenia MR table 1. The Philips “DStream” coil connection interface must be inserted into the head end of the MR and connected in order to use the Philips SENSE Flex coils (See Figure 8.25 k) 2. Ensure AtamA patient board is fully installed and secured on the MRI table in a position which does not interfere with the “DStream” coil connector interface (See Figure 8.25 l). 3. Plug the Philips flex coils into the “DStream” interface before installing the interface platform. The position of the interface platform arms may interfere with coil connection if the arms are installed first. 4. Slide the arm ends (furthest away from the interface platform) into the IP Arm interface completely until the “stop rings” touch the IP arm interface. Pay attention to the coil connectors and other components of the “DStream” interface as the arms are installed to prevent damage. (Note: A thumb screw is provided on each side to lock the arms in place. Do not over tighten these screws as they can damage the arm.) 5. If it is necessary to remove the Flex coils, it may require adjustment of the IP arm position within the arm interface temporarily to prevent interference with coil connector removal. Simply loosen thumb screw and partially slide out arms as needed. DSTREAM coil interface SENSE Flex Coils Figure 8.25 k: k Philips Ingenia MR Table with “DStream” coil interface Flex coil connection Potential interference if IP arms connected first IP Arms Figure 8.25 l: IP Arm attachment to Philips Ingenia MR Table P a g e | 76 NeuroBlate® System Instructions for Use 80331 Rev D Interface Platform to Arm Connection Connect/Disconnect 1. The interface platform can be attached and detached quickly from the arms by attaching and removing the brass thumbscrews shown in Figure 8.25 l l Figure 8.25 l: Interface Platform to Arm Connect/Disconnect Connector Module Attachment Connector Module Disconnected Figure 8.26: Connector Module Lock Connector Module Connected IP Connector Module The interface platform has a detachable connector module (Figure 8.26) that accepts the Laser Probe extension lines. Lock the Connector Module in place by twisting the Connector Module Lock 90˚counterclockwise. For GE MR systems ,the connector module is rotated to allow a more angular exit of the cables (Figure 8.26b) P a g e | 77 NeuroBlate® System Instructions for Use 80331 Rev D Connector Module Lock Connector Module Disconnected Figure 8.26b: IP Connector Module - GE MRI Connector Module Connected CAUTION: Ensure that excessive strain is not placed on the LDP or Probe Connectors. Attach the IP Power and Motor Plugs (see Figure 8.33). WARNING: Do NOT lower the MRI table after the IP is attached to the AtamA Board. Doing so can lead to patient injury or equipment damage. P a g e | 78 NeuroBlate® System Instructions for Use 80331 Rev D Waveguide Adapter Interface Panel Attachment In MRI configurations where a Waveguide will be used for connector module attachment access, it may be necessary to attach/remove the panel assembly if the waveguide is used in other applications. The below instructions highlight the steps to do so. 1. Insert tube through Waveguide and fasten nut on either end. (The tube adapter may be left on permanently depending on the needed size access of the Waveguide) 2. Disconnect front of panel and separate from panel box. 3. Insert connector module cable ends through tube and connect into back of panel. Reconnect front of panel. 4. Insert Panel into tube adapter and tighten knob. 5. Reverse steps for detachment. P a g e | 79 NeuroBlate® System Instructions for Use 80331 Rev D 8.5. TRAJECTORY CONFIRMATION AND BEAM FIDUCIAL MARKER DETECTION Trajectory confirmation and Beam Fiducial Marker Detection workflow is defined by the type of trajectory guide being used for the procedure: The established trajectory of the AXiiiS Stereotactic Miniframe should be evaluated using MRI prior to inserting the Laser Probe into the brain. Volumetric imaging is recommended, to include the entire head and AXiiiS. These images will also identify the Beam Direction Fiducial Marker (BDM) located within the AXiiiS device. Use of a delivery platform other than AXiiiS requires LDP insertion to PDP in order to identify the trajectory via the LDP signal void within an MR image. A BDM is not relevant in this case since these devices, on their own, cannot direct a probe in any specific angular rotation. The MRI wand cannot be used to evaluate the trajectory and the user must be satisfied with the trajectory plan defined by the IGS system in the OR. In this case, it is necessary to proceed in the workflow and create an arbitrary trajectory and BDM in the following steps in order to be capable of proceeding to the self-test step necessary for LDP insertion. Once the self-test step is complete, the LDP is inserted and only then can a suitable MR image be acquired to identify the LDP signal void within the MR image as a means for defining the correct trajectory within M-vision. The user must then repeat the trajectory and BDM steps described in this section to correctly define the true trajectory within M-vision. If an appropriate skull bone anchor is to be used with the RPD, then an MR wand is used to act as a BDM. The MRI wand cannot be used to evaluate the trajectory and the user must be satisfied with the trajectory plan defined by the IGS system in the OR. The MR wand, for use as a BDM, is attached to the RPD by the user and described further in the self-test procedure in Sec 8.6.2 when the RPD is ready for use. In this case, it is necessary to proceed in the workflow and create an arbitrary trajectory and BDM in the following steps in order to be capable of proceeding to the self-test step necessary to attach the RPD and test the LDP prior to insertion. Once the RPD is attached and the MR wand is affixed to the RPD, the LDP is inserted and only then can a suitable MR image be acquired to both identify the BDM and use the LDP signal void within the MR image as a means to define the correct trajectory within M-Vision. The user must then repeat the trajectory and BDM steps described in this section to correctly define the setup in M-vision. P a g e | 80 NeuroBlate® System Instructions for Use 80331 Rev D 8.5.1. Scan and Register Data in M·Vision using Plan Register Task Ensure linear or rotary LDP motion is NOT active and acquire a 3-plane 2D localizing scan. Acquire a 3D Volumetric MRI scan with 1mm thick slices through head to include the entire extent of the MRI Trajectory Wand within AXiiiS device. o If not using AXiiiS, acquisition of this initial MR scan is required but its quality and type is not relevant until the LDP is inserted later during the self-test procedure. This initial scan is only needed to advance in the workflow and will be replaced when this step is repeated. Once a probe is inserted, acquire a 3D Volumetric MRI scan with 1mm thick slices through head to include the entire extent of the MR wand attached to RPD (if applicable). Set this new scan as the Master Series (see below). Ensure the M·Vision software is set to the Plan Register workflow task. Push the acquired image data to the Monteris Control Workstation via the DICOM node set up on the MRI system. Once data is pushed from the MRI to NeuroBlate workstation, the data automatically loads into the M-Vision software when in the Plan Register or Treat Register workflow task. If multiple images are sent to the system, all data sets need to be registered to the Master Data Set. Any of the image sets brought into Plan Register or Treat Register can be made the Master series by right clicking on the image tab to the right and selecting Set As Master. Any data set can be erased from the software by right clicking on the image and selecting Clear. Co-register the acquired image data with previously loaded pre-planning image data (if any) as described previously in section 8.1.2 Load and Register Image Data. o If co-registration is required, visually inspect registration accuracy, and if needed, use the manual correction described in 8.1.2 Load and Register Image Data. o Select the Verify Registration to continue. P a g e | 81 NeuroBlate® System Instructions for Use 80331 Rev D 8.5.2. Create Region of Interest (ROI) Volumes within Plan Volumes Task Using the M·Vision Plan Volumes workflow task, define treatment ROI(s) (if not already defined) following the steps described in section 8.1.3 Create Region of Interest Volumes. 8.5.3. Create Trajectories within Plan Trajectories Task - AXiiiS Using the M·Vision Plan Trajectories workflow step, establish/adjust the software rendered Laser Probe trajectory(s) along the imaged position of the MRI Trajectory Wand following steps described in section 8.1.4 Create Intended Trajectory. Figure 8.28: Trajectory Based off Trajectory Wand Image To create multiple trajectories, the user can move the white circles to the desired entry and target and click New under the Trajectory heading to create as many trajectories as needed. Align the two white circular points to match Trajectory Wand orientation to the lesion with the PDP set to the deepest point of allowed LDP penetration (see Figure 8.28). 8.5.4. Create Trajectories within Plan Trajectories Task – without AXiiiS NOTE: If the LDP has not been inserted yet and the MR image does include a LDP signal void, select an arbitrary trajectory to the target. This step is only necessary to continue in workflow and will be repeated once RPD with BDM is attached, the PDO is inserted and a new MR scan is acquired. P a g e | 82 NeuroBlate® System Instructions for Use 80331 Rev D The MR wand is not used to confirm a trajectory prior to insertion. The trajectory creation step in this case occurs by aligning the M·Vision trajectory (see Section 8.1.4) to the signal void of the probe position visible on the MR images. Create a new trajectory if an arbitrary one exists from earlier steps. 8.5.5. Identify Beam Fiducial Marker within the Treat Align Task Once the trajectory has been adjusted and saved within the Plan Trajectory step, the beam direction fiducial marker (BDM) within the AXiiiS or attached to the RPD device needs to be defined to establish the depth setting (AXiiiS only) and laser firing direction (AXiiiS and RPD) within M·Vision software. Any BDM points selected must NOT fall directly on the trajectory. Identify AXiiiS BDM: Move to M·Vision workflow step Treat Align to identify the AXiiiS Beam Fiducial Marker. Click the Auto-Detect icon under the Marker Selection heading in the right menu once a scan with the trajectory wand is loaded and named the active series (see Figure 8.29). Set Top and Bottom Beam Direction Marker points before continuing to the Treat Insert workflow task. Figure 8.29: Treat Align – AXiiiS device attached to skull P a g e | 83 NeuroBlate® System Instructions for Use 80331 Rev D If the auto-detection is not used or fails to identify the marker correctly, the user must manually select the top and the bottom of the fiducial marker. o Drag the cross hairs of image view navigation lines to the top of the marker and select set under the “Top” heading. o Drag the cross hairs of image view navigation lines to the bottom of the marker and select set under the “Bottom” heading. Once the center of each orange circle is set appropriately on the fiducial top and bottom, continue to the next software task. Identify BDM attached to RPD: NOTE: If the RPD device has not been attached yet, select an arbitrary BDM position outside of the skull within 3-5cm of the estimated skull entry point near the trajectory. This step is only necessary to continue in workflow and will be repeated once RPD with BDM is attached and new MR scan acquired. Move to M·Vision workflow step Treat Align to identify the Beam Fiducial Marker (MR Wand in this case) attached to RPD. The MR wand attached to RPD shall be visible in an orientation perpendicular to LDP trajectory above the skull. The probe’s eye view pane best illustrates its appearance as shown below in Figure 8.30. Ensure Trajectory View and Ball Marker is selected and align view planes to visualize BDM as shown below. The BDM fluid filled interior has a cross sectional dimension of ~6.9mm and can be confirmed in image to ensure view is showing complete cross section. Top LDP Signal Bottom Void Figure 8.30: Treat Align – RPD device with BDM (MR wand) attached P a g e | 84 NeuroBlate® System Instructions for Use 80331 Rev D Set the Top Bottom “Ball Marker” point at most proximal edge of visible MR wand before continuing to the Treat Insert workflow Set the Bottom “Ball Marker” point at most distal edge of visible MR wand closest to skull. 8.6. Self-Test, Probe Driver Attachment and LDP Insertion 8.6.1. Final Trajectory Adjustment in Treat Insert – AXiiiS workflow The selected trajectory should align to the MR visible wand if the AXiiiS is properly aligned to the intended trajectory (Figure 8.31). If there is misalignment within this task, the selected trajectory should be adjusted to align to the MR wand using the white grab handles as was done in the Plan Trajectories workflow step. This will ensure that the software rendered LDP will align to the intended path during LDP insertion. During final adjustment of the trajectory, the Point of Deepest Penetration (PDP) location must be set to define the deepest allowable point for delivery into the brain. CAUTION: PDP LOCATION -This position defines the depth setting of the LDP and thus the deepest point of penetration of the probe tip during probe insertion. During MR guided probe insertion, the probe can begin treatment from any depth setting along trajectory. The PDP must be defined at a safe depth location since probe linear motion can extend to this point. Wand PDP PDP Select Start Under System Self-Test Figure 8.31: Treat Insert using the SFP and Self-Test Initiation P a g e | 85 NeuroBlate® System Instructions for Use 80331 Rev D Probe Deepest Penetration Considerations for FullFire™ Diffusing Tip Laser Probe The user should take care in the setting of PDP as the FullFire™ and FullFire™ Select emits laser energy in all directions (including forward from its tip). Thermal energy emanates from the FullFire™ and FullFire™ Select equally in both radial and longitudinal directions centered at the midpoint of the FullFire fiber which is approximately 6 mm proximal from the distal tip of the FullFire™ and FullFire™ Select (Figure 8.32). PDP Depth ---Intended Ablation Area -------------------7.5mm------------------- Figure 8.32: Probe Deepest PenetrationPosition using theFullFire™ probe For example (Figure 8.32), if an ablation area of 7.5mm in the radial direction is created the user can expect a 7.5mm ablation margin in the longitudinal direction as well. This would result in an ablation margin extending ~2-3mm beyond the FullFire™ and FullFire™ Select tip. In Figure 8.32, PDP is set inside of the intended ablation area to prevent thermal damage from extending beyond the intended ablation area. WARNING: Creating a greater than 7.5mm radial ablation area may exceed the NeuroBlate System’s ability to monitor thermal dose in the longitudinal direction. The final probe size required is confirmed in this step now that the beam fiducial marker has been selected in the previous alignment step. 8.6.1.1. Final Trajectory Adjustment in Treat Insert – Non-AXiiiS Workflow The trajectory creation step in sec 8.5.4 should capture the final trajectory adjustment in this case since it was aligned to the probe signal void. No further adjustment should be needed but ensure that the software rendered LDP aligns to the LDP signal void when applicable. P a g e | 86 NeuroBlate® System Instructions for Use 80331 Rev D CAUTION: Final insertion to PDP should always be done by hand, under full user control where tactile feedback is important. Ensure the Interface Platform is properly attached to the AtamA system. Ensure the IP Power and Motor Plugs are inserted into proper receptacles on the Interface Platform as shown in Figure 8.33 on page 89. Initiate Self-Test in the M·Vision software by selecting the Start button under the System Self-Test heading on the right menu bar (See Figure 8.31). This mode directs the user to hook up the Advanced Probe Driver (or RPD) / Laser Delivery Probe and test functionality and then deliver the probe to the established pre-insertion depth in the brain. Depress the Laser Foot Pedal in the MRI control room for two seconds prior to moving to Self-Test. Note: Interface Platform Display will display the initiation of Self-Test (see image right) prior to depressing (activating) Foot Pedal. Display will automatically advance to the next step after activation of foot pedal. Self-test Initiated… Press the Foot Pedal for 2 Seconds The balance of the Self-Test is completed within the MRI scan room at the Interface Platform. Display will guide the user through the required steps. If manual probe movement was selected at the start of the workflow step, the Self-Test mode will skip any functions of the APD or RPD. Note: Self-Test may be skipped upon subsequent trajectories by selecting the Skip Additional Self-Test icon(see image right). It is highly recommended to perform a Self-Test any time a new Laser Delivery Probe is introduced during a given procedure. A dialog box (below) will display the following upon selecting Skip Additional Self-Test. P a g e | 87 NeuroBlate® System Instructions for Use 80331 Rev D 8.6.2. Probe Driver (APD and RPD) Attachment and Connections (if Applicable) Upon entering the MRI scan room, press the Next button on the Interface Platform (IP) to proceed and follow instructions on the IP display screen (image right). This only applies if Advanced Probe Driver (or RPD) use was selected initially (see section 8.1.1) Attach and latch the Probe Driver Commander to the Interface Platform Using aseptic technique, peel the Tyvek® covering back from sterile package corner. Remove cover, then remove plastic lid from sterile tray. Pass the APD/RPD Commander out of the sterile field. Attach the Commander to the IP and engage the Latch to lock the Commander in place by twisting the Latch to the centered position (see Figure 8.33). Workflow using AXiiiS and APD Self-Test Steps ( AXiiiS and APD selected for procedure) Person in sterile field should carefully slide the sterile APD Follower into the AXiiiS Directional Interface until the Directional Interface Tabs are oriented and fully seated (see figure 8.34). Note: Align the APD Follower Directional Interface Tabs (1 and 2) with the AXiiiS Directional Interface Notches (1 and 2) (see figure 8.34). Lock the Follower in place with the AXiiiS Directional Interface Thumbscrew - finger tight. Press the Next button when task is complete. Interface Platform Display Attach the Probe Driver Follower to AXiiiS. WARNING: Exercise care when attaching the APD Follower to the AXiiiS to prevent unintended trajectory deviation. This could lead to patient injury or death. P a g e | 88 NeuroBlate® System Instructions for Use 80331 Rev D Commander Position Feedback Plug Next Button Figure 8.33: IP Motor Plug Interface Platform: Commander, Position Feed Back and Line Attachments Connect the Position Feedback Plug (cable) as shown in Figure 8.33. When aligning and connecting the APD follower, confirm that the position displayed on the IP is correct to ensure laser energy delivery direction is accurate. CAUTION: Ensure the cable for the Position Feedback Plug does not rest on the patient during imaging. P a g e | 89 NeuroBlate® System Instructions for Use 80331 Rev D Dashed line indicates alignment of Directional Interface Tab 1 to Directional Interface Notch 1. Directional Interface Notch 2 Directional Interface Locking Thumbscrew Directional Interface Tab 2 Figure 8.34: Attaching the Follower to AXiiiS P a g e | 90 NeuroBlate® System Instructions for Use 80331 Rev D Workflow using a Skull Bone Anchor and RPD If an RPD is to be used affixed to a bone anchor, the MR wand must be attached to the RPD follower at this point in the self-test workflow. The MR wand must be taped beneath the RPD as shown in Figure 8.34b to act as the BDM. The BDM identifies and orients the software to the physical direction of the SideFire or SideFire Select LDP beam exit direction. Figure 8.34b: RPD showing MR wand taped to underside of guide rail Self-Test Steps (bone anchor and RPD) Interface Platform Display Person in sterile field should carefully slide the locking sleeve onto the sterile RPD Follower aligning the Directional Interface Tabs and fully seating the locking sleeve (see Figure 8.35). Slide the RPD Follower onto the bone anchor and tighten brass thumbscrew securing RPD to bone anchor (See Figure 8.35). Ensure the MR wand attached beneath the follower remains intact. Press the Next button when task is complete. Connect the Position Feedback Plug (cable) as shown in Figure 8.33. When aligning and connecting the RPD follower, confirm that the position displayed on the IP is correct to ensure laser energy delivery direction is accurate. P a g e | 91 Attach the Probe Driver Follower to AXiiiS. NeuroBlate® System Instructions for Use 80331 Rev D CAUTION: Ensure the cable for the Position Feedback Plug does not rest on the patient during imaging. Figure 8.35: Attaching the RPD to a Standard Bone anchor P a g e | 92 NeuroBlate® System Instructions for Use 80331 Rev D Self-Test Steps (only if APD/ RPD selected for use) Connect the Position Feedback Plug (cable) as shown in Figure 8.33. Press the Next button when task is complete. Attach the Rotary Test Adapter to the APD/RPD Follower. This will provide position feedback for the system to allow the APD/RPD Self-Test. Interface Platform Display Connect the Probe Driver cable to Interface Platform. Attach the Rotary Test Adapter to the Probe Driver Follower The rotary position value should now be displayed. Press the Next button to begin a self-diagnostic on the APD and controller. APD/RPD – Advanced/Robotic Probe Driver The APD/RPD will complete the test with the linear and rotary positions at the pre-insertion settings. Visually confirm that the Follower / Rotary Test Adapter is properly translating and rotating to correspond with the proper APD/RPD knob motions. Replace the APD/RPD if it fails to actuate the follower properly. If automation of the APD/RPD or Follower fails, a manual movement of the knobs can pass Self-Test or a new APD/RPD can be installed. Once the Self-Test is complete, the IP screen will advance to the next step. P a g e | 93 APD Test will begin in 5 seconds NeuroBlate® System Instructions for Use 80331 Rev D Self-Test Steps (only if APD/ RPD selected for use) Carefully remove the Rotary Test Adapter by depressing the green release button and pulling back from Follower Upon removal of the test adapter, the IP rotary position displayed will no longer be valid and will read “Unset” until the Laser Probe is placed into position. Press the Next Button to continue. Interface Platform Display Remove the test adapter from the Probe Driver Follower 8.6.3. Laser Delivery Probe (LDP) Size Selection and Insertion The NeuroBlate LDPs are provided in multiple lengths for lesions of varying depths. For workflows using a skull bone anchor and 2.2 mm Select probes, refer back to section 8.2.9. LDP Depth Determination – IGS (Skull Bone Anchor Procedures). For workflows using the 3.3 mm LDP’s and AXiiiS device, the M∙Vision software calculates the required LDP length the same way for both the SideFire and FullFire based on trajectory planning and the intended target and Probe Deepest Penetration (PDP). The software displays LDP size for the user in two ways in the Treat-Insert workflow step: 1. Figure 8.36 - Left: On the Interface Platform Display while performing the system Self-Test steps. 2. Figure 8.36 - Right: In the menu bar on the right side of the M∙Vision software display under the Probe heading. Obtain Depth Stop setting number from the IP display during system (see Figure 8.36 - Left). Figure 8.36: Left: Illustrates Required LDP Size and Depth Stop Setting on IP Display Right: Illustrates Required LDP Size on the M▪Vision Software P a g e | 94 NeuroBlate® System Instructions for Use 80331 Rev D WARNING: If the desired workflow does not include using AXiiiS, see section 8.2.7 LDP Depth Determination for probe size and depth stop setting description. IGNORE PROBE SIZE AND DEPTH STOP SETTING REPORTED BY M-VISION OR THE IP DISPLAY – THESE ARE NOT CORRECT WHEN NOT USING AXIIIS. • Remove the selected Probe tray from the sterile pouch and place in the sterile field. WARNING: Use aseptic technique when handling the contents of the sterile package. • Peel the Tyvek® covering starting from corner to remove it from the LDP tray. • Remove the main section of the Probe from the tray by gently pulling up on the Probe Interface (See Figure 36b (a) ). • Remove the Clamp Shell from the tray by gently pulling up on its plastic body (see Figure 36b (b) ). • Remove each of the three LDP Connectors Plugs (laser, cooling and thermocouple) from the tray by gently pulling up on their thickest sections (See Figure 36b (c), (d), (e) ). For the laser connector (Figure 36b (d)), as the connector is pulled up from the tray, also slide it out to prevent bending of the fiber near the connector. • CAUTION: Never pull on the thinner tubular or cable sections of the laser, cooling and thermocouple lines, as this may damage the components. P a g e | 95 NeuroBlate® System Instructions for Use 80331 Rev D a b c d e Figure 36b: a,b,c,d,e: Remove the LDP from the tray. CAUTION: The Laser Delivery Probe is fragile. Handle with care. • Follow the steps below to set and lock the LDP Depth Stop. P a g e | 96 NeuroBlate® System Instructions for Use 80331 Rev D Probe Tip 145 140 135 130 Squeeze (blue) buttons at wider end to lock Depth Stop Squeeze (blue) buttons at tapered end to unlock Depth Stop Figure 8.37: Depress (green) release button to remove the Ruler Slide Locking Interface to adjust depth Adjustment and Setting of Depth Stop Ensure LDP is fully inserted into the provided Ruler/Protective Cover as shown in Figure 8.37 (bottom) -an audible click should be heard if reinserting the cover into the LDP Locking Interface. Squeeze the tapered part of both blue buttons to unlock the Depth Stop Lock. Carefully slide the Locking Interface so that the LDP tip aligns with the required distance measurement on the Ruler. Squeeze both (blue) locking buttons at their wider end (see Figure 8.37); an audible click should be heard when locked. Confirm depth stop is locked by gently pushing and pulling on the upper portion of the Locking Interface. Avoid manipulating the stops unless a change to probe depth is required. Recheck to ensure that the proper depth is set by matching the LDP tip to Ruler graduations and that the depth stop is locked prior to inserting the LDP into the brain. WARNING: An improperly set depth stop can allow the LDP tip to be delivered beyond the intended target which may lead to patient injury. Carefully remove the Ruler by depressing the (green) release button. P a g e | 97 NeuroBlate® System Instructions for Use 80331 Rev D Self-Test Steps Interface Platform Display Connect the LDP Connectors Plugs (laser, cooling and thermocouple) to the Interface Platform as described below (see Figure 8.38). Probe Connector Line Bracket Thermocouple Plug Laser Plug Cooling Plug Figure 8.38: Location of LDP Connections on NeuroBlate System Interface Platform Hand the LDP Connector Plugs out of sterile field and insert plugs into the associated receptacles on Interface Platform (see Figure 8.38). o Insert the Cooling Plug into the mating receptacle (labeled CO2) by pushing in until the sleeve on the receptacle moves. It will click and lock when fully inserted. P a g e | 98 NeuroBlate® System Instructions for Use 80331 Rev D o Align the arrow on the Thermocouple Plug with the arrow on the receptacle marked THERMOCOUPLE. Push the plug into the receptacle until it clicks and locks. o Insert the Laser Plug into the mating receptacle (labeled LASER). Two clicks should be heard; one at partial (half) insertion and one at full insertion. With medium force, pull back on the connector to ensure it is securely seated and cannot be disconnected. Retain the three Connector Lines in the Connector Line Bracket as shown in Figure 8.38. This will ensure that the lines remain fixed to the IP if the user site workflow requires disconnect of the connector lines. WARNING: The LDP fiber connector must be completely engaged into the corresponding Interface Platform receptacle. Failure to do so can cause receptacle heating and reduce the energy delivered. This may result in fire or injury to user or patient. WARNING: The three LDP Connector lines must be retained in the LDP Connector Line Bracket to ensure force during disconnection of LDP is not transferred to the LDP after insertion into the Brain. Force applied to the LDP after insertion can lead to patient injury. WARNING: The three LDP Connector lines must never be bent or kinked. Kinked lines may result in LDP operation failure or may reduce laser energy delivered to the target tissue. Kinked portions of laser fiber lines may interrupt heating and may result in fire or injury to the user or patient. Continue to follow the instructions shown on the Interface Platform display to complete Laser aiming beam test. Note: The laser is disabled by the M·Vision software until the appropriate workflow step has been reached. The laser shall remain locked throughout the workflow until treatment monitoring begins. However, the visible pilot laser beam will be enabled. The visible pilot laser light is a class 2 laser product according to IEC 60825-1, having a maximum power of 1 mW. The laser will NOT emit higher energy when the foot pedal is pressed during Self-Test. P a g e | 99 NeuroBlate® System Instructions for Use 80331 Rev D Self-Test Step Interface Platform Display Perform the Laser aiming beam test. A bright, red laser light exiting the LDP tip in the correct orientation from the LDP must be visible. Aiming the SideFire™ or SideFire™ Select beam at a surgical glove should produce a bright, red spot (see Figure 8.39).The FullFire™ or FullFire™ Select should exhibit a bright red light emanating from the effective focal area on the probe tip. A bright red, visible laser spot should exit the SideFire™ or SideFire™ Select in same direction as the protrusion on the Probe Locking Interface. Figure 8.39: Laser Aiming Beam Test (SideFire™ or SideFire™ Select) Figure 8.40: Laser Beam Test (FullFire™ or FullFire™ Select) Note: If the physician does not see a strong, visible red aiming laser beam exiting the SideFire™ or SideFire™ Select Probe (Figure 8.39) tip or emanating from fiber tip within the FullFire™ or FullFire™ Select probe tip’s clear capsule (Figure 8.40), ensure that LDP Laser Plug is fully inserted into its connector on the IP. If the connected probe doesn’t produce a laser beam, disconnect the LDP and select a second LDP of the same size and configuration. Set the depth stop to the correct setting and repeat the Laser Aiming Beam Test. If a failure occurs again, contact Monteris service for diagnosis. P a g e | 100 NeuroBlate® System Instructions for Use 80331 Rev D WARNING: A non-existent or weak visible laser beam can be an indication of an improperly connected laser fiber. If this condition occurs, DO NOT CONTINUE as it could result in fire or injury of the user or patient. If the aiming beam test is successful, press the Next button and continue to follow the workflow steps shown on the IP display. Self-Test Steps Interface Platform Display The Cooling test will begin within 5sec as noted on the display. A gas cooling test will begin and the LDP will be cooled in steps throughout the test. Cooling Test in progress… Following a successful cooling test, the physician will be instructed to insert the LDP. The Self-Test display will be automatically powered down within 30 - 40 seconds. Self-test successful. Insert the Probe and lock into Probe Driver Follower. Resetting Device… Once a LDP has been plugged into the IP, a dialog box will appear on the workstation display indicating the type of LDP that has been detected. Select OK to continue software operation. Carefully insert the tip of the sterile LDP into the APD/RPD Follower and into the brain until the LDP Locking Interface comes in contact with the Mating Adapter on the Follower (see Figure 8.41). CAUTION: Final insertion to PDP should always be done by hand, under full user control where tactile feedback is important. P a g e | 101 NeuroBlate® System Instructions for Use 80331 Rev D WARNING: To prevent inadvertent unlocking or slipping of the LDP Depth Stop during insertion, hold the LDP at the bottom-most portion of the Locking Interface while inserting into the brain as shown in Figure 8.42 to prevent potential injury. While gently pressing the LDP toward the Follower, twist the LDP until it fully locks onto the Follower; an audible click will be heard when locked into position Ensure that the LDP is fully engaged to the Probe Driver follower prior to manipulating LDP in tissue. Confirm by gently pulling back on the LDP to ensure it is properly locked in place. Figure 8.41: Laser Delivery Probe Inserted Into APD/RPD Follower P a g e | 102 NeuroBlate® System Instructions for Use 80331 Rev D Figure 8.42: Left: Correct LDP Insertion Technique Middle/Right: Incorrect LDP Insertion Technique WARNING: Do not force the probe through the Probe Driver Follower or into the brain if any amount of resistance is encountered upon insertion. WARNING: Ensure there is a clear opening through the skull and dura to allow the probe to pass without resistance or trajectory deflection. Forcing the probe into the brain when resistance is felt can lead to Laser Probe tip fracture and result in patient injury. P a g e | 103 NeuroBlate® System Instructions for Use 80331 Rev D 8.7. MRI CONFIRMATION OF LDP INSERTION Once Self-Test is complete and the LDP has been inserted, the software rendered LDP must be adjusted to match to the actual LDP position as placed in brain. At this point a new MRI scan must be acquired and sent to the M-Vision software. WARNING: Insertion of the LDP must be confirmed using MRI guidance to ensure accurate probe placement. This must be followed by adjustment of the software rendered LDP to match the LDP artifact shown. Failure to complete the procedure steps may result in improperly positioned thermal monitoring with respect to laser exit position, potentially leading to patient injury. Non-AXiiiS Workflow: The new MRI image must be used to define the actual trajectory as described in section 8.5. Following MR acquisition with LDP inserted, return to the PlanTrajectory task and follow the steps described in section 8.5 to create a new and valid probe trajectory (Plan-Trajectory) and BDM location (Treat-Align). Acquire a new MR image set and load into the views to indicate verification of LDP insertion. It is recommended that either a volumetric scan or parallel images aligned to the probe trajectory be acquired and loaded. These confirm the M*Vision software defined probe linear position with the probe artifact evident in the MR images. Note: The MRI sequence parameters necessary to define parallel orientation is found by clicking the Trajectory Sagittal icon under the Scan Plane Parameters heading. A dialog window will appear showing the MR specific orientation and position parameters for the host MR as shown below: Siemens/IMRIS MRI GE MRI P a g e | 104 NeuroBlate® System Instructions for Use 80331 Rev D Philips MRI Philips MRI Entry Note: For Philips position and orientation entry, the base plane is also needed for entry on Philips MRI. This is given by the slice orientation label (e.g. CORONAL shown above by red box). Entering orientation values on Philips requires the following steps in this order to ensure final entry is correct: 1. Enter the required slice orientation (coronal/ sagittal/ transverse) 2. Enter zero for all angles (AP, RL, FH) to reset entry 3. Enter prescribed angles in the following order: First enter AP angle, then RL and finally FH angle. MR Image Guidance Note: Although probe insertion can be monitored on the MR console, appropriate images can be sent to the software to load into the views in order to compare the probe artifact evident during insertion with expected final probe linear position rendered in the software. The measurement tool is useful to quantify the progress of insertion. Probe Depth: If the actual probe depth position within the tissue as shown by the image artifact is deemed to be at an ideal location but it does not align with software rendered probe, adjust the depth position. MR Image Loading: Turbo (or Fast) Spin Echo sequences are optimal for minimal probe artifact distortion and, if possible, with the frequency encode direction opposite of parallel (anti-parallel) to the probe. These type of scans used to evaluate the probe position within the tissue should be executed on the MRI only when linear or rotary probe motion is NOT active. P a g e | 105 NeuroBlate® System Instructions for Use 80331 Rev D PDP Figure 8.43: Trajectory Confirmation Adjust the software rendered LDP image by manipulating the white grab handles to match to the LDP artifact on the acquired image (see Figure 8.43). When the software rendered LDP image matches the LDP artifact on the screen, click Yes under the heading “Confirm Trajectory” on the right M·Vision menu bar (image right). CAUTION: To avoid inadvertent LDP linear position change while adjusting the target probe, ONLY adjust the software rendered LDP by the white grab handles, NOT by adjusting target probe position. P a g e | 106 NeuroBlate® System Instructions for Use 80331 Rev D 8.8. THERMAL DELIVERY AND MONITORING 8.8.1. ENABLE THE MRI FOR REAL TIME TRANSFER Siemens or IMRIS MRI Prior to thermal delivery and monitoring, the data transfer interface for any Siemens MRI must be enabled following patient registration and immediately preceding thermal monitoring. Note: The MRI system will revert to the default configuration at the end of the NeuroBlate procedure. CAUTION: Do not enable the real time data transfer interface prior to this point in the workflow. To prevent unintended application exit of the host MRI system control software. In Advanced User Mode, Launch Command Tool Shell and Enable Data Transfer Type: Ctrl/Esc Select: Run Type: cmd and click OK Type: ideacmdtool<enter> Type: 5 (Switches…) Type in the site specific password if requested. The “Switches” Menu should appear in its default mode as shown in Figure 8.44: Figure 8.44: IDEA Command Tool Switches Menu (on MR host PC) P a g e | 107 NeuroBlate® System Instructions for Use 80331 Rev D At the Switches> prompt, Type: 8and then Enter - This toggles the SendIMA Switches from OFF to ON At the Switches> prompt, type: 12and then Enter - This toggles the SendBuffered from ON to OFF The Switches Menu shown in for items 8. - 12. shown in Figure 8.44 should now read: 8. 9. 10. 11. 12. SendIMA SendRAW SendRHP SendMeasData SendBuffered ON OFF OFF OFF OFF CAUTION: Do not modify any other settings within menus, including5 (Switches)menu. Type: q (to exit Switches Menu) Type: q (to exit ideacmdtool) Special Instruction for Siemens Aera/Skyra running software VD13; VE11 or higher Before real time data transfer begins, the Siemens MRI must be disconnected from the PACS network and directly connected to the NeuroBlate Main PC forming a direct peer-to-peer network connection. In this case, both the NeuroBlate system and the Siemens MRI will be disconnected from the hospital PACS network temporarily during treatment monitoring. The MRI connection to the PACS network can be restored following treatment monitoring once real time data transfer is no longer necessary. This step can occur before the case begins or just before treatment monitoring since it will not disrupt normal DICOM data transfer between the MRI and NeuroBlate. For Siemens or IMRIS MRI, proceed to step 8.8.2 Position Thermal Monitoring Planes in M•Vision P a g e | 108 NeuroBlate® System Instructions for Use 80331 Rev D Special Instruction for GE MRI running software v15.x or higher only: Check if SVAT hosts is activated 1. Open a Command Window (TOOLS Icon Dropdown Menu-> Command Window) 2. Type ‘cd /w/config’ then press Enter 3. Type ‘lssvat_hosts.cfg*’ then press Enter 4. The following should be displayed: Note:If ‘svat_hosts.cfg.inactive’ appears, the host is inactive. Type ‘mv svat_hosts.cfg.inactivesvat_hosts.cfg’ in the command window, then press Enter. Check if SVAT host has become active by repeating steps 1 - 4 above. 5. In the command window, type ‘cat svat_hosts.cfg’ then press Enter to display the contents of the file 6. The following should be displayed: Check if ILT server is already enabled 1. Open a Command Window (TOOLS Icon Dropdown Menu-> Command Window) 2. Type ‘cd /w/init’ then press Enter 3. Type ‘lsilt.init*’ then press Enter 4. The following should be displayed: Note: If ‘ilt.init.inactive’ appears, the server is inactive. Type ‘mv ilt.init.inactive ilt.init’ in the command window, then press Enter. Check if ILT server has become enabled by repeating steps 1 - 4 above. P a g e | 109 NeuroBlate® System Instructions for Use 80331 Rev D Check if LAIS server is already enabled 1. Open a Command Window (TOOLS Icon Dropdown Menu-> Command Window) 2. Type ‘cd /w/init’ then press Enter 3. Type ‘ls lais.init*’ then press Enter 4. The following should be displayed: Note: If ‘lais.init.inactive’ appears, the server is inactive. Type ‘mv lais.init.inactive lais.init’ in the command window, then press Enter. Check if LAIS server has become enabled by repeating steps 1 - 4 above If SVT Host, ILT server, or LAIS server were initially inactive, a reboot is required. 1. Click Tools Icon 2. Click on Service Desktop Manager page 3. Click System Restart to restart the scanner 4. This will take 5-10 minutes. When prompted to log in as the system reboots, enter the following username/password: Username: sdc Password: adc2.0 NOTE: All three files (svat_hosts.cfg, ilt.init, and lais.init) must be correctly configured to set CVs remotely. Check if LAIS is running properly: 1. Open a Command Window (TOOLS Icon Dropdown Menu-> Command Window) 2. Type ‘pgrep lais’ then press Enter 3. Ensure that there are two processes running: P a g e | 110 NeuroBlate® System Instructions for Use 80331 Rev D If LAIS is not properly running (0 or 1 active process), manually restart LAIS: 1. Open a Command Window (TOOLS Icon Dropdown Menu-> Command Window) 2. Type ‘killall lais’ then press Enter 3. Wait one or two minutes 4. Type ‘pgrep lais’ then press Enter 5. Ensure no processes are running: 6. Type ‘setenv LAIS_ENABLE_ALL_CMDS_YES’ then press Enter 7. Wait 3 minutes then type ‘lais &’ then press Enter 8. Type ‘pgrep lais’ then press Enter 9. Ensure there are now two processes running: Special Instruction for GE Signa MRI running software v12.x : Ensure the Samba service is running: 1. Open a Command Window (Right click on main screen to display Root Menu. Select Service Tools -> Command Window) P a g e | 111 NeuroBlate® System Instructions for Use 80331 Rev D 2. Become a superuser on the GE LINUX based MR system. Type su in the command window then press <enter>. Enter the su password at prompt. The prompt turns to a # sign with root user name indicating su access. 3. Start the samba service by typing service smb start then press <enter> 4. The following should be displayed indicating smb and nmb services are running: 5. Type exit then <enter> to leave su mode and then type exit again to close the command window. Special Instruction for all GE MRI’s : Acquire the Calibration Scan from the Monteris protocol list on MR user interface to enable ASSET. o Use the default scan parameters o Prescribe enough axial slices to cover the entire field of view to be imaged during thermometry (e.g. 50 slices x 6 mm slice thickness = 30 cm of coverage). Philips MRI No special configuration of the Philips MR software is required to enable real time data transfer. Any configuration required is completed during installation of the NeuroBlate system and no further software configuration is needed prior to any case. Special Instruction for Philips MRI regarding LAN connectivity Before real time data transfer begins, the Philips MRI must be disconnected from the PACS or Hospital network and directly connected to the NeuroBlate Main PC forming a direct peer-toP a g e | 112 NeuroBlate® System Instructions for Use 80331 Rev D peer network connection. In this case, both the NeuroBlate system and the Philips MRI will be disconnected from the hospital PACS network during treatment monitoring. The MRI connection to the PACS network can be restored following treatment monitoring once real time data transfer is no longer necessary. This step will not disrupt normal DICOM data transfer between the MRI and NeuroBlate. P a g e | 113 NeuroBlate® System Instructions for Use 80331 Rev D 8.8.2. Position Thermal Monitoring Planes in M·Vision IMPORTANT NOTE: Tissue thermal interactions (such as coagulation) are not governed by the temperature of the tissue alone. The duration for which the tissue is exposed to any given temperature is also of critical consequence. The NeuroBlate System uses non-invasive, near real time MRI thermometry to monitor temperature change and duration. Together, temperature and duration are used to calculate a thermal dose which is defined by the boundary line as expressed in the thermographic analysis software. WARNING: If the patient head position changes relative to the head fixation device or the initial MRI position set during the landmark procedure at any point during the NeuroBlate procedure, the user must either register the patient in the MRI system as a new exam or use the MRI positioning lights to “re-landmark” the patient into magnet space center position. The entire head must be re-scanned to include the AXiiiS (if applicable) using a 3D volumetric scan. This scan must be set as the master series with all other scans coregistered to the new master series. Failure to reset master series may result in thermal dose delivery to an unintended area potentially causing patient injury. NOTE: If errors are encountered during the Treat Treat workflow task the user should back up to the Treat Insert step, then return to Treat Treat task. The user may now proceed to the M∙Vision Treat Treat workflow step for thermal delivery. Adjust the software rendered LDP depth by clicking on and dragging light blue tip image to the desired linear position for thermal delivery (Figure 8.45). Figure 8.45:Adjustment of LDP Linear Position As these target LDP positions are adjusted by the user, the position is indicated in the Probe Dialog on right of screen. Following user confirmation, the APD/RPD system (if in use) will always attempt to match the actual probe position to the target position. If manual probe motion was initially selected (see Sec 8.1), the user must enter MRI suite and physically manipulate probe position to match target setting. P a g e | 114 NeuroBlate® System Instructions for Use 80331 Rev D If using a SideFire or SideFire Select, adjust the software rendered LDP rotary position to the desired direction (angle) for thermal delivery by clicking and dragging the beam direction line (Figure 8.46). Rotary position adjustment for the FullFire LDP is NOT required since it has no impact on laser energy emission. Figure 8.46: Adjustment of LDP Rotation (SideFire and SideFire Select Only) A software dialog box will appear asking the user to confirm movement of the LDP to the desired location. If the user selects OK, the APD/RPD (if applicable) will move the LDP to the location selected. Otherwise, manual manipulation of the probe is required by the user. When manual motion of the probe is completed, select either the Confirm Rotary or Confirm Linear button in the probe dialog shown at right. This immediately adjusts the Actual position to match the target position when the APD/RPD is not in use to provide position feedback.. Following any probe rotary or linear position manipulation, it may be desirable to shift the monitoring planes to position the laser exit in a slice other than the center slice (the default). In many situations, temperature elevations do not occur in slices proximal to the beam exit position. However, temperature increases can occur in one and even two slices distal to the beam exit position depending on how long the laser shot occurs. Therefore, the monitoring slices can be adjusted for this purpose. The adjustment is limited such that the beam exit position lies between the midpoint of the proximal and distal slice of the three slice monitoring view. P a g e | 115 NeuroBlate® System Instructions for Use 80331 Rev D The three slice plane lines shown above (red arrow) indicate the location of the MR thermometry monitoring planes relative to the probe tip position. These can be adjusted from the buttons within the Monitoring Preference area. Center: Aligns slice planes centered on laser exit position. Deep: Aligns slice planes distal to laser exit position. Shallow: Aligns slice planes proximal to laser exit. FullFire™ and FullFire Select Considerations for Positioning of the Software Rendered LDP Adjust the software rendered LDP depth by clicking on and dragging light blue tip image to the desired linear position for thermal delivery making sure to position the tip of the software rendered LDP even with the red, distal-most monitoring plane line (see Figure 8.47). Sagittal View Each MR thermal imaging plane is 5mm thick Total imaging coverage is ~15mm Figure 8.47: FullFire 3 Slice stack shifted proximal by 3mm Position for tip of the software rendered LDP FullFire Laser Emission Area FullFire™ and FullFire Select Thermal Monitoring Setup P a g e | 116 NeuroBlate® System Instructions for Use 80331 Rev D WARNING: The thermal monitoring planes must be centered at the middle of the FullFire or FullFire Select laser emission area to adequately capture thermal dose. WARNING: Creating a greater than 7.5mm radial ablation may exceed the NeuroBlate System’s ability to monitor thermal dose in the longitudinal direction. P a g e | 117 NeuroBlate® System Instructions for Use 80331 Rev D 8.8.3. Thermal Sequence Prescription on the MRI CAUTION: MR Thermometry Data The MR data must use the NeuroBlate System defined sequence parameters for temperature measurement. This includes use of a specific GRE sequence preinstalled on the target MRI system. The only modifications allowed are position, orientation and phase encode direction depending on the location. Failure conditions will result if parameters are changed or the position/orientation is not aligned with the required treatment planes. If in-plane panning is required, the FOV must include the treatment areas. Careful attention must be made so that in plane panning is done correctly and the resulting acquisition plane is still aligned with the prescribed treatment planes. FOV position adjustment (in plane panning) can only be made for the first treatment slice. Thereafter, the software shall lock onto the 4 corner positions of the images and only allow images along the probe trajectory aligned to these. Siemens or IMRIS MRI Proceed to the Treat Treat workflow task in M·Vision. Select the Scan Plane icon under the Monitoring Preferences heading on the right menu. Enter the displayed scan plane geometry parameters for the thermometry sequence protocol into MRI control software prior to starting the thermometry scan. Figure 8.48: Scan Plane Parameters for Siemens or IMRIS MRI Select the Scan Plane under the Monitoring Preferences on the M·Vision the right menu bar. o Cue the NeuroBlate Thermal Monitoring Sequence from the MRI system’s sequence protocol list. o Enter the displayed scan plane parameters into the NeuroBlate Thermal Monitoring Sequences protocol’s geometry parameters in the MRI. For Siemens or IMRIS MRI, proceed to step 8.8.4 Initiate Thermal Monitoring in M·Vision. P a g e | 118 NeuroBlate® System Instructions for Use 80331 Rev D GE Thermal Sequence Prescription Procedure While in the Treat Treat task within M·Vision, select the Scan Plane icon from the task menu on the right. 1. Acquire Start Point Localizer (3-4 sec scan), using values from Treat-Treat All Planes o Perform an Erase All to allow for you to do a keyboard prescription o Make sure that you have only a single image in each orientation (Spacing: 0.0) Position entry dialog on v12.X and v15.X systems o Enter Center Position corresponding to Scanning Range – Start in All Planes View o Note: If position not allowed entry, Gradient Mode made need to be changed to allow slice position outside optimal FOV (Grad Mode: Wide rather than Grad Mode: Zoom ) 2. Acquire End Point Localizer (3-4 sec scan), using values from Treat-Treat All Planes o Perform an Erase All to allow for you to do a keyboard prescription o Make sure that you have only a single image in each orientation (Spacing: 0.0) o Enter Center Position corresponding to Scanning Range – End in All Planes View P a g e | 119 NeuroBlate® System Instructions for Use 80331 Rev D Portion of Scan Plane Parameter Dialog showing information for start and end localizer center position 3. Prescribe Parallel FSPGR single image scan: o Copy/Paste/DoubleClick Parallel FSPGR Make it active to begin prescription Load the following series into MRI Console views (using the “OK” and NOT the “OK ALL” button) o Start Point Localizer in top left view o End Point Localizer in top right view Set the number of Images (or slices) to 1 Note: Both top views should show image 2 of 3 of the localizer which is the sagittal view of each localizer in order to correctly display the next step. o Setup View Options Clear ALL or Erase All (mandatory) Display Normal (mandatory) Disable “Update ALL” (mandatory) Enable “Cursors” or “Report Cursor” (mandatory) – this displays the center yellow cross hair in view and reports its position in yellow text in lower right of view. Disable Ref Loc Lines (optional) o Check to make sure that the yellow text in lower right hand corner of each of the two top views displays values that correspond to the values from the Treat-Treat All Planes Dialog (those same values entered for the Start and Endpoint localizers). P a g e | 120 NeuroBlate® System Instructions for Use 80331 Rev D If the cursor values do not match it is possible that a GE MRI Console problem is in effect; to work around the problem you must load a different series into the view; and then reload the series that are indicated in the above “Copy/Paste/DoubleClick Parallel FSPGR” step forcing a reload into the view containing a different series. Note: To safely select a view or pan a view, use the right mouse button which will not accidentally manipulate a graphical element. Use left mouse only to select a graphical element (eg. grab handles) o Left – mouse click in End Point (top right) view near the yellow cursor; but not on it as you may accidentally move the cursor. This displays a single slice plane line as a means of graphical prescription. If you move the yellow cursor just disable/enable the cursors to return them to their default location. o Using ONLY the End Point (top right) view; perform a coarse adjustment of the Graphical prescription by panning and rotating the Graphical prescription blue line so that the: Center Cross hair intersects the default yellow cursor location that is displayed in End Point (top right) view o Zoom in both top right and left views to full zoom o By interacting with the End Point (top right) view ONLY; perform any fine tuning needed to ensure that: The blue cross hair in the End Point (top right) view intersects the default yellow cursor location, and more importantly that the displayed slice positional information on the MRI console (Start: ) match the values of the End Point displayed in the Treat-Treat All Planes Dialog EXACTLY. It is critical at this step the Start position of the slice being prescribed in this step EXACTLY matches the End Point Localizer Center Position P a g e | 121 NeuroBlate® System Instructions for Use 80331 Rev D Move slice plane cross hair until it intersects the yellow cross hair which simply acts as a guide at this step MOST importantly move crosshair until the Start position shown in GE Start dialog exactly matches the end point localizer position shown by yellow text in top right view Using the in plane rotation grab handles in the End Point (top right), rotate the Graphical prescription until the projection as seen in the Start Point (top left) view passes through the center of the default cursor location. Top Left View “Startpoint cursor” Top Right View “Endpoint cursor” Click on rotation grab handle and swing line while monitoring line intersection with cursor in left view 4. Acquire Parallel FSPGR Scan (1 sec) 5. Prescribe NeuroBlate Thermal Sequence (or a “template” version of it having a single slice and single phase to start) o Load the parallel (or stack) scan into all views. Use the “OK All” button when loading series to ensure all views are populated with single parallel series o Perform an Erase All to allow for you to do a keyboard prescription o Setup View Options Clear ALL or Erase All (mandatory) Display Normal (mandatory) Disable “Update ALL” (mandatory) Enable “Cursors” or “Report Cursor” (mandatory) - in this case, ALL views should now report the same cursor location. Disable Ref Loc Lines (optional) P a g e | 122 NeuroBlate® System Instructions for Use 80331 Rev D o Similar to Step 3, Left mouse click in top right view near to the cursor; but not on it as you may accidentally move the cursor (similar to previous step). o Pan Graphical prescription cross hair to default yellow cursor location that is displayed; zoom in to maximum setting as necessary to ensure that the displayed positional information on the MRI console match the values of the End Point displayed in the Treat-Treat All Planes Dialog exactly. No mismatch can be tolerated at this step. Note: The value of the yellow cursor reported in each view should be identical to the required value needed in the Start: positional information on the MRI console for the scan being prescribed. Use this as a guide to help pan cross hair to exact location. Again, this step MUST ensure the cross hair Start: position matches the center of the parallel slice as reported by the yellow cursor. o Change number of slices from 1 to 25 through manual entry o Using top right view rotate Graphical prescription stack of slices via grab handle (zooming in/out as needed) until you match the start point positional information on the MRI console to the values in the Treat-Treat All Planes (slice 1 should be the most proximal point, slice 25 should be the deepest point). Use rotation grab handle on stack to rotate 25 slice stack Rotate stack until Start: position matches Start point defined for All planes in M-Vision dialog Thermal or Template scan expanded to 25 slices. P a g e | 123 NeuroBlate® System Instructions for Use 80331 Rev D o Collapse 25 slices down to 13 graphically by dragging slice 25 up to 13 from the bottom. This MUST be done graphically and NOT by changing the # of Slices entry on GE GUI. 6. Set the number of phases (measurements) to 1 and acquire the 13 slice sequence. This acquisition will be used as a template to continue in case an accidental in-plane pan is performed later in the procedure. This scan includes ALL potential slices that MVision could monitor for this trajectory. 7. Copy and paste the previously acquired thermal sequence into the MRI sequence queue OR if step 6 used a Template thermal seq (GRE) scan, load the NeuroBlate thermal seq (GRE) scan and Copy the parameters from the Template scan using the “Copy Rx” feature (using the Copy FOV, thickness and spacing feature). o Change the number of slices to 3 by grabbing the center square at either the top or bottom of the stack and dragging up or down. Note: Ensure the desired 3 slice planes are prescribed within 0.1mm in the GE user interface by comparing the Start and End Point Parameters within M·Vision’s Current Acquisition Planes in the Scan Plane Parameter dialog with the geometric scan plan parameters displayed on the GE user interface. o Change Number of phases to 170 (maximum). CAUTION: GE only allows for a maximum of 170 thermal measurements which allows for a maximum of ~23 minutes of thermal delivery before the MRI thermal sequence and thermal monitoring within M·Vision have to be restarted. 8. Click Save Series then download the sequence. o For GE v12.X systems, ensure sequence has all settings correct including USER_CV’s as appropriate AFTER download. Select Prep Scan. o DV systems (v20.X and up): Click the dropdown arrow within the Scan icon on the GE user interface and select Auto Pre-Scan. o Signa HDx/HDxT systems running v15.X and up: Click Prep Scan 9. Select Start Acquisition within M-Vision and confirm the dialog message if present. 10. Select the Scan icon in the GE user interface which triggers the acquisition. o Proceed with thermal monitoring in the M·Vision Treat Treat workflow step. 11. To continue with thermal delivery in different slice planes, repeat Step 7-10, moving the stack up or down as needed, comparing the parameters with the M-Vision displayed Start and End Point parameters. P a g e | 124 NeuroBlate® System Instructions for Use 80331 Rev D o For GE v12.X systems, ensure sequence has all settings correct including USER_CV’s as appropriate AFTER download. CAUTION: Auto Pre-Scan must be initiated before proceeding to Start Acquisition to prevent an error condition which will not allow thermal monitoring to proceed. P a g e | 125 NeuroBlate® System Instructions for Use 80331 Rev D Philips MRI Thermal Sequence Prescription Procedure Proceed to the Treat Treat workflow task in M·Vision. Select the Scan Plane icon under the Monitoring Preferences heading on the right menu. Enter the displayed scan plane geometry parameters for the thermometry sequence protocol into MRI control software prior to starting the thermometry scan. Figure 8.49: Scan Plane Parameters for Philips MRI Entering orientation values on Philips also requires the following steps in this order to ensure final entry is correct: 1. Enter the required slice orientation (coronal/ sagittal/ transverse) 2. Enter zero for all angles (AP, RL, FH) to reset entry 3. Enter the prescribed orientation angles (AP, RL, FH) Select the Scan Plane under the Monitoring Preferences on the M·Vision the right menu bar. o Philips requires a 2 step scan process to accomplish real time thermal data transfer. This process must be followed for any new thermal MR acquisition for M-Vision. P a g e | 126 NeuroBlate® System Instructions for Use 80331 Rev D Select the Start Acquisition under the Monitoring Status on the M·Vision the right menu bar. Step 1: Run the NeuroBlate sequence with dynamics=1 and configure scan to “AutoPush” to DICOM node dedicated for this purpose (‘RTT’ in DICOM node label). This is also known as the “header scan” and presets M-Vision with important information. This is the default setting for the NeuroBlate Thermal Seq stored within the NeuroBlate Exam card. This scan must be completed and data sent before step 2 can begin. o To begin any new thermal acquisition, step 1 requires first loading the NeuroBlate Thermal Monitoring Sequence from the MRI system’s sequence protocol list. It will be labeled NeuroBlate Thermal Seq (GRE). o Ensure the thermal sequence is properly configured to accomplish Step 1: Dyn scans = 1 (Set in the Dyn/Ang tab) Ensure “Push Nodes” for the NeuroBlate Exam Card property is set to send data ONLY to MONTERIS_RTT Dicom node (all others are ‘No’). On R3 or R4 MR software: Enable “Push to Workstation” for thermal scan. This is done by selecting the NeuroBlate Thermal Seq, right click mouse to show menu options shown below and ensuring “Push to Workstation” is checked as shown (does not apply to R5 software). P a g e | 127 NeuroBlate® System Instructions for Use 80331 Rev D o Enter the displayed scan plane parameters into the NeuroBlate Thermal Monitoring Sequences protocol’s geometry parameters in the MRI. This will be in the Offc/Ang tab of the sequence exam card as shown below. The Base plane or slice orientation is modified in the geometry tab as noted. Slice position and orientation is set in offc/ang tab Dyn Scans Set in Dyn/Ang tab P a g e | 128 NeuroBlate® System Instructions for Use 80331 Rev D Slice Orientation is set here in geometry tab Shim Box notification: Center Green Shim box over center of three thermal images Incorrect Placement of Shim Box Correct Placement of Shim Box Step 2: Copy the same scan from step 1 to ensure all parameters are the same except for DynScans and Auto-Push feature. Set the Dyn Scans = 512 (or more measurements than may be needed) and disable Auto-Push feature by: R5 Software: Ensure ‘RTT’ dicom node is set to NO in ‘Push Nodes’ list of NeuroBlate Exam card properties to disable Auto-Push. Note: On R5, the menu option labeled “Enable Autopush to DICOM Node” in the System Menu at top menu bar does NOT accomplish this task and should not be set. R3 or R4 Software: Ensure “Push To Workstation” setting is disabled or unchecked in menu list. This scan provides the thermal data to M-Vision in real time and must have the exact same parameters as step 1. P a g e | 129 NeuroBlate® System Instructions for Use 80331 Rev D 8.8.4. Initiate Thermal Monitoring in M·Vision For Philips MRI (for Siemens, IMRIS and GE MRI - skip to page 133): o Begin the “Header Scan” as define in Step 1 noted on previous page. o Once this “Header Scan” is complete, the data will be automatically pushed over the network to M-Vision. It is important to monitor the status of that transfer to ensure that it completes successfully prior to starting the next scan (step 2). Use the Queue Manager to monitor the transfer completion. On R3 or R4 MR software: Click on System menu option and then on Queue Manager… On R5 MR software: Click on System menu option and then on Manage Job Queue… OR, click on Patient ->Administration, and then on the Queue Manager button shown by the red arrow below (similar feature on R3, R4, R5 software). P a g e | 130 NeuroBlate® System Instructions for Use 80331 Rev D A finished transfer would be listed as Finished, and a pending one would be listed as Executing in the status column. o Once this “header” scan is complete, Copy the same scan and prepare it for a 2nd acquisition. Modify only the following two settings. This ensures all other parameters, such as position and orientation, are not affected : o Dyn Scans = 512 o Enable Auto-Push feature (see instructions previously noted) o Start this second scan (step 2) which triggers thermal data receipt at MVision P a g e | 131 NeuroBlate® System Instructions for Use 80331 Rev D WARNING: On Philips MRI, the treatment slice orientation and position of the second Philips scan (step 2) MUST match the first “header” scan. The ONLY parameters that should change between each scan is the # dynamics and the Auto-Push feature. Use the sequence copy feature to “rerun” scan 1 with only these two parameters changed to ensure all other parameters match. Failure to ensure position and orientation are identical may cause thermal monitoring to be misaligned with the desired heating location. Note: It is recommended that to stop thermal acquisition on Philips, the scan should be stopped first on the Philips MR console and then stop the acquisition receipt on M-Vision (i.e. Select “Stop Acquisition” on M-Vision) in this order. P a g e | 132 NeuroBlate® System Instructions for Use 80331 Rev D For all MRI Types Start acquiring the NeuroBlate Thermal Monitoring Sequence WARNING: Treatment slice orientation and position must match the treatment planes shown in the views. The MR pulse sequence parameters other than orientation and position must not be changed and must adhere to the requirements for NeuroBlate treatment. WARNING: Do NOT power ON the Interface Platform during MR imaging. Image quality may be compromised. Figure 8.50: Noise Mask Once MR images begin arriving from the MRI, the initialization phase will compute a noise mask and allow for reference point selection. The software receives data and updates the view with a solid colored, orange overlay indicating mask component pixels as shown above. P a g e | 133 NeuroBlate® System Instructions for Use 80331 Rev D Note: For any given trajectory, upon successful receipt of the very first measurement from the MRI, the M-Vision software “locks” in the acquisition position and orientation and forces all subsequent acquisitions to be aligned precisely to this first accepted acquisition. All subsequent scans must have the same orientation ; the position can only be shifted in equal multiples of the slice thickness and gap. No in-plane panning or shifting is allowed after the lock. Any incoming MR data will be rejected with a “position mismatch” error issued to the user if precise alignment to the first accepted scan is not followed. The mask is a circular region (6cm diameter) surrounding the LDP. It represents a sub region of the acquired MR images. Any data outside this region is ignored. The MR data measurements within the mask are analyzed and any pixel locations containing excessive phase noise will not be used for temperature measurement. Pixels not used for temperature measurement are cleared or rendered transparent in the mask overlay. Figure 8.51: Thermometry Initialization: Reference Points Selection As the MR acquisition continues, the user must select a minimum of 8 reference points surrounding the treatment area within each view as reference points for accurate thermometry. Under the Noise Masking heading on the M·Vision the right menu bar, select Set Points and select 8 reference point at the periphery of the overlaid, orange Noise Mask in each of the three displayed image monitoring view-panes. These view-planes surround the P a g e | 134 NeuroBlate® System Instructions for Use 80331 Rev D intended thermal delivery area (Figure 8.51). Ensure the points are picked only within actual brain tissue (grey or white matter) avoiding sulci, blood vessels, ventricles and bone. To delete a reference point, right click on the reference point and click “delete”. Note: Selecting the Reset Mask button will clear any masked regions and begin the noise and temperature masking stage upon the next measurement. It’s similar to beginning at measurement 1 in a new acquisition but does not require a reset of the current MR acquisition. This should only be used in cases where a significant noise event may have corrupted the data in a large portion of the view masking out key areas for treatment monitoring. Following the reset, 8 new measurements must be received before transition to temperature monitoring can occur. If regions of the view have been masked due to a poor reference point location selection, it is preferable to simply delete existing points and/or select new points since this forces a retroactive calculation of the data stability on the last 8 measurements and does not need new additional measurements. CAUTION: Reference Point Selection is critical to accurate MR thermal imaging. Reference points are used to compensate for normal phase drift of the MR system and thus their location is critical to accurate temperature monitoring. They should be selected within the brain tissue and outside the region of expected temperature increase using the following guidelines: proximity to the probe should be greater than 15 mm and, depending on the case, at least 3 mm beyond the treatment area boundary (visual guideline – red beam line is 10 mm in length) points should surround the probe, as much as possible, in a single concentric ring points should be located at least 2 mm from any potential anatomical influences (e.g. sulci, ventricles, midline gap, edge of brain, etc.) In addition to reference points, a minimum of 8 measurements must be acquired before the user can proceed to temperature and thermal dosage monitoring. P a g e | 135 NeuroBlate® System Instructions for Use 80331 Rev D Under the Monitoring Status heading on the M·Vision the right menu bar, Click Start Temperature. Prior to the display of color coded temperature data within the mask region, user must confirm patient core body temperature before proceeding to temperature monitoring. This value should be found from a MR compatible sensor monitoring the current core body temperature. Do not assume the default value of 37°C is correct. Patient core body temperature accuracy must be assured as a reference point for thermal dose monitoring. Enter the current core body temperature in the new dialog box. CAUTION: Patient Body Temperature Entry - This value should be found through direct measurement, not assumed. Core body temperatures exceeding 39ºC can affect the accuracy of the thermal dosage computation resulting in a poor prediction of thermal dose. WARNING: The temperature value indicated from the NeuroBlate laser probe is not an accurate measurement of core body temperature. Do NOT use this value. One source for the core body temperature is the use of the Medrad Veris® fiber optic temperature probe positioned to be in contact with the mucosa of the nasopharynx (not in the airway). Refer to the manufacturer’s instructions on configuring and handling the temperature probe Contact Monteris Medical for identification of other methods of core body temperature monitoring. P a g e | 136 NeuroBlate® System Instructions for Use 80331 Rev D Figure 8.52: Thermal Dosage Monitoring Display BeforeLasing The color overlay changes to green which represents the typical baseline body temperature (37 C) which corresponds to the colored temperature scale at the top of screen. LDP gas cooling is activated following system entry of body temperature reading. The pixels in the vicinity of the LDP will begin to shift from green to blue scale as the tissue cools around the LDP. Confirm that the LDP temperature falls to range of 0 to 5° C for the SideFire™ or SideFire Select and 10 to 15° C for the FullFire™ or FullFire Select. Contact Monteris Service if failure of LDP cooling prevents treatment. Expand the Laser dropdown menu and click Mode when laser is in Standby mode. Laser status is shown as follows: The mode button is used to switch laser from Standby to Ready mode in preparation for energy delivery. The foot pedal is active only when laser is in Ready mode. Once the LDP has cooled to its target range, the laser interlock switch will be released and status switches from Not Ready to Standby. The mode button becomes enabled and when pressed, status switches to Ready allowing foot pedal to control energy delivery. When laser foot pedal is depressed, mode will be set to Laser which indicates that laser energy is being delivered. If the foot pedal is released, the laser mode will revert to Ready. The properties tab will update current values when laser is operational. P a g e | 137 NeuroBlate® System Instructions for Use 80331 Rev D Once Ready is displayed under Laser – Status, depress foot pedal to deliver thermal energy. CAUTION: Do not fire the laser if the LDP is not inserted in tissue or before the LDP connections are made. CAUTION: Ensure the desired LDP trajectory does not interfere with the MR bore or NeuroBlate equipment prior to the insertion of LDP into tissue. CAUTION: Immediately release the laser footswitch upon the display of any error condition. Continue delivering thermal energy while monitoring thermal dose contours overlaid onto thermal monitoring view-panes on the M·Vision display screen. M·Vision monitors operating conditions including LDP cooling to define when laser can enter Standby mode. When operating conditions are normal and LDP has reached set-point cooling level, system will release the laser interlock allowing Standby mode activation. The user must enable energy delivery by switching to Ready mode via Mode button. Laser energy delivery is controlled by user depression of foot pedal. WARNING: Do not mechanically clamp down the laser footswitch during laser energy delivery. CAUTION: During treatment: If there is concern for cranial bleeding, the user may consider acquiring blood-sensitive (GRE) MRI imaging in between laser shots at intervals throughout the procedure. This type of scan should be executed on the MRI only when linear or rotary probe motion is NOT active. CAUTION: During treatment of neurological tissues adjacent to critical brain structures: as with all thermal procedures there is a risk of injuring adjacent structures. Careful planning should be done for targets that require treatment in these regions. Consideration should be given to limiting the development of the thermal dosage contour line adjacent to these structures because this also indicates increased temperature near the contour line boundary. P a g e | 138 NeuroBlate® System Instructions for Use 80331 Rev D Figure 8.53: Thermal Monitoring Display During Lasing During lasing, temperature maps overlaid on selected monitoring images should show elevated temperature near the LDP (represented by red color scale). Areas receiving a measured thermal dose will be depicted with a contour line boundary of the thermal isodose region. Under the Contouring Level heading in right menu, a threshold can be selected using the radio buttons labeled (1, 2 and 3) which correspond to three unique thermal dose levels displayed as: 1. Yellow Thermal Dose Threshold: Contained tissue has been exposed to the thermal equivalent of 43°C for 2 minutes duration. Tissue outside the yellow contour lines has a higher probability of receiving no thermal damage. 2. Blue Thermal Dose Threshold: Contained tissue has been exposed to the thermal equivalent of 43°C for 10 minutes duration. 3. White Thermal Dose Threshold: Contained tissue has been exposed to the thermal equivalent of 43°C for 60 minutes duration. Preclinical studies indicated that all tissue within this boundary died in ≤48 hours. Note: Flashing pixels during treatment monitoring indicates that the Max/Min pixel temperature has been achieved within the flashing pixel area. If this condition is noted, the user should proceed with caution. P a g e | 139 NeuroBlate® System Instructions for Use 80331 Rev D CAUTION: During treatment near the brain surface, near bone, near large volumes of CSF, or near large blood vessels: Due to the non-homogenous conduction of heat in this type of anatomy, as well as the increased variability of MRI thermometry in areas of dissimilar tissues, there is a risk of damage to these adjacent tissues. Careful planning should be done for targets that require treatment adjacent to these tissues. Consideration should be given to limiting the development of the thermal dosage contour line adjacent to these structures. When using the SideFire or SideFire Select, Laser Probe angular orientation can be changed while delivering laser energy by clicking the laser direction arrow and dragging it to a new orientation. This is not relevant to the FullFire given that the FullFire is not directional. If a new linear position is desired for continuing thermal treatment, the following steps should be followed: Stop thermal delivery by releasing the laser foot pedal. Allow MRI to continue to acquiring the NeuroBlate Thermal Monitoring Sequence until the tissue returns to baseline body temperature. Stop acquiring the NeuroBlate Thermal Monitoring Sequence on the MRI and select Stop Acquisition under the Monitoring Status heading on the M·Vision right menu bar. WARNING: Failure to allow heated tissue to return to baseline body temperature prior to the continuation of thermal delivery can result in inaccurate calculation of thermal dose levels which may lead to patient injury. To continue treatment at a new linear position, user must stop the MRI acquisition and select Stop Acquisition in M-Vision. CAUTION: It is recommended that to stop thermal acquisition on Siemens MRI, first stop the scan on the MR console and then stop acquisition receipt on M-Vision (i.e. Select “Stop Acquisition” on M-Vision) in this order. Confirming Probe Position: MR imaging may be used to confirm that the actual probe linear position within the tissue aligns to the software rendered target probe position following any translation of probe position. Acquire new MR images either parallel to the probe, transfer to M*Vision and load into the views to confirm actual position within the tissue. Again, Turbo Spin Echo (or Spin Echo) sequences are optimal for minimal probe artifact distortion and, if possible, with the frequency encode direction anti-parallel to the probe. These type of scans used to evaluate the probe position within the tissue should be executed on the MRI only when linear or rotary probe motion is NOT active. The image below illustrates the appearance of the probe artifact in a T2W TSE pulse sequence. P a g e | 140 NeuroBlate® System Instructions for Use 80331 Rev D Figure 8.54: Pixel Temperature Query Use the pixel temperature query tool under the Temperature Point heading in the right menu (see Figure 8.54) to assess brain temperature in the area of thermal monitoring. o Select the Pick icon then double click on the desired point in the image view pane. o Temperature at the selected pixel will be displayed under the Temperature Point heading next to the Pick icon (Figure 8.54). Repeat the steps listed in this section until desired thermal dose is delivered to the intended tissue volume. Note: If the LDP is changed to a new size or type, the Laser and Cooling protocols will be updated accordingly upon connection of the new LDP. Any time a LDP is changed within the Treat-Treat step, a self-test is recommended to ensure the efficacy of the LDP To ablate a new area along a new trajectory, repeat workflow steps starting at section 8.5 Trajectory Confirmation (excluding the volume definition if treating the same lesion). Once all desired treatment slices and angular positions of the probe have been used to optimize the desired coagulation result, the user can select end treatment at any time. Any running MRI acquisition should be stopped. The probe can then be removed and the patient can be prepared for burr hole closure. Post treatment MR imaging such as blood sensitive GRE imaging may be used to identify any immediate effect. P a g e | 141 NeuroBlate® System Instructions for Use 80331 Rev D 9. Electrical Rack Requirements and Technical Data Class1 , with protective earth, protection against electric shock Type CF degree of protection against electric shock Input voltage: 120 V AC, 10 A, single phase, 50/60 Hz through a medical grade power cord. IPX0 degree of protection against ingress of water Laser class 4 Inlet CO2 pressure gauges for each tank read >4500 kPa (>650 psi) to max 6000 kPa (880 psi) The Electronics Rack provides continuous power to all internal rack components, to the external Workstation (24 volts DC, medical grade) and to the Interface Platform (48 volts DC and 12 volts DC, medical grade). Table 9.1: Electronics Rack Data Electrical Connection Data Voltage Current Number of Phases Frequency Class International Protection rating UPS time out Table 9.2: 120 VAC 10 A 1 50/60 Hz Class I Equipment IPX0 After 8 minutes operating on battery power Control Workstation Data Electrical Connection Data Class International Protection rating Power Source Class I Equipment IPX0 Electronics Rack P a g e | 142 NeuroBlate® System Instructions for Use 80331 Rev D Table 9.3: IEC 60601-1:2007 Tables P a g e | 143 NeuroBlate® System Instructions for Use 80331 Rev D P a g e | 144 NeuroBlate® System Instructions for Use 80331 Rev D P a g e | 145 NeuroBlate® System Instructions for Use 80331 Rev D P a g e | 146 NeuroBlate® System Instructions for Use 80331 Rev D 10. Technical Support Contact Monteris Medical Customer Support to request service or to report an adverse event: Monteris Medical Toll Free Customer Support: 1-866-799-7655 Callers may choose to be connected directly to a Technical Services Representative, to leave a message requesting service or product sales, or be connected to the Monteris Medical operator for further assistance. Monteris Medical Email Reporting System: reporting@monteris.com Contact Monteris via email to request service, make product improvement suggestions, report system issues, or register complaints. P a g e | 147 NeuroBlate® System Instructions for Use 80331 Rev D 11. Contact Information 11.1. DISTRIBUTOR/REP CONTACT: Monteris Medical Corporation 16305 36th Avenue North Suite 200 Plymouth, MN 55446 (763) 253-4710/(866) 799-7655 reporting@monteris.com 11.2. MANUFACTURED BY: Monteris Medical Corporation 16305 36th Avenue North Suite 200 Plymouth, MN 55446 (204) 253-4710 / (866) 799-7655 www.monteris.com P a g e | 148 NeuroBlate® System Instructions for Use 80331 Rev D 12. Tips and Troubleshooting Contact your local Monteris Medical Representative for system troubleshooting information or contact: Monteris Medical Customer Support: 1-866-799-7655 Callers may be connected to a Technical Services Representative, to leave a message requesting service or product sales, or be connected to the Monteris Medical operator for further assistance. Table12.1: Software Tips Tips Plug in the interface platform as early as possible (including IMRIS, as appropriate). When rebooting the Interface platform; allow 5 seconds before plugging it back in or restarting. Make sure that clocks between MRI and Main PC are synchronized. Perform a PACS network connection prior to starting the procedure. When closing a profile; always close the application before reopening a profile. Allow the images and renderings in all view panes to be completely refreshed before interacting with them. Refresh the displays by selecting the currently highlighted thumbnail; or the Master if none selected. Don't import CT image data via PACS. Load CT DICOM files from a CD using the File-Load menu option. Don't select a profile for import that is already in your plan directory. Don't use Auto Register if you have a “slab” image dataset (image set that does not include the entire head). Only switch the Master dataset if you have a different frame of reference. When creating a trajectory in Plan mode, always move it into the approximate location; don't just leave it in the default location. Don't Auto-Detect the AXiiiS if you do not have an MR Wand visible within the viewed images. Make sure IP is powered off FOLLOWING self-test COMPLETION. After clicking the Self-Test icon, count to 10; then press and release the laser foot pedal. Just before starting the MRI Acquisition in which you're going to capture a partially inserted LDP, note the current linear position. When you're aligning the software rendered probe to the LDP signal void; ensure that the software rendered linear position matches the recorded value. Change the length of the LDP by dragging the grab handles away from one another while the Modify Depth Stop selector is set. If the group box becomes disabled, it is because you have dragged the grab handles too close or too far apart. Increase/decrease the length of the trajectory to enable group box once inside of the valid range for LDPs. Don’t turn on IP screen while an APD move is in progress, or an Interface Platform Communication Error is possible. Don't adjust the LDP linear and/or rotary position while an adjustment is already in progress. Don't change the zoom/pan level when waiting for RTT data import. Don't make linear positional changes in Treat-Treat Avoid any interaction with the software during thermal image refresh (end of each 8 sec acquisition to the point where the TDT lines are updated). P a g e | 149 Workflow Task IP IP NA NA All All All Plan-Register Treat-Register Plan-Register Treat-Register Plan-Register Treat-Register Plan-Register Treat-Register PlanTrajectory Treat-Align Treat-Insert Treat-Insert Treat-Insert Treat-Insert Treat-Insert Treat-Treat Treat-Insert Treat-Treat Treat-Treat Treat-Treat Treat-Treat NeuroBlate® System Instructions for Use 80331 Rev D Table 12.2: Troubleshooting Problem The Commander does not lock in place The Position Feedback Plug does not connect to its receptacle on the IP The Interface Platform Display does not show Follower positions The Interface Platform Display shows unexpected characters The APD Follower cannot reach the AXiiiS due to Umbilical interference or their length The Follower does not move (linearly or rotationally) when the knob on the Commander is turned The knobs on the Commander resist turning The APD Follower does not lock to AXiiiS SM The LDP Cooling Connector Plug does not insert into its receptacle on the IP Connector Box or will not stay retained The APD has difficulty achieving the desired position Check / Action Ensure that the mounting holes on the bottom of the Commander are positioned properly over the IP Mounting Posts (See Figure 35) Ensure alignment markers on the outside of the plug and receptacle are properly aligned Ensure the display is turned on. If the Display reads, “Error: Check Connection”, ensure the Position Feedback Plug is properly connected If the Display reads “Error: CRC”, replace the APD Press the power button once to turn OFF the display - Press the button one more time to turn the display ON again Ensure that the IP arms are fully inserted into the AtamA board Ensure the head coil is correctly mounted and is not interfering with Follower attachment Ensure the Umbilicals are not coiled or snagged on equipment Confirm the Locking Interface on the Follower is not at one of its limits: - Linear position at 0 or 40 mm o - Rotational position of 10 or 350 Recourse If the problem persists, replace the APD and contact Monteris Ensure the knob is being pressed in while turning to unlock Ensure that the two tabs on the bottom surface of the follower are aligned with the two Directional Interface Notches on the AXiiiS SM Ensure there are no burrs or defects on the Cooling Connector. Ensure proper insertion of plug into the receptacle. Replace the APD and contact Monteris Rotate the follower to align the tabs with the notch Carefully remove the APD Commander from the IP, twist it 360 degrees in a direction that reduces any twisting strain on the umbilicals and reattach to IP P a g e | 150 If the problem persists, replace the APD and contact Monteris Press the IP power button Unplug and re-plug the Feedback Plug - If the problem persists, replace the APD and contact Monteris Replace the APD and contact Monteris If the problem persists, contact Monteris Fully insert the IP arms into the AtamA board Assess the other AtamA head coil top option for better clearance and switch as needed Reroute the Umbilicals if needed Rotate the knob in the opposite direction. If the situation persists replace the APD and contact Monteris If there are any defects, replace the LDP and contact Monteris Push in until receptacle sleeve moves and then confirm plug clicks and locks. If the problem persists, replace the LDP and contact Monteris If the problem persists, use manual manipulations or replace the APD