1
2015
O P E R AT I N G I N F O R M AT I O N
15D491-126-ARA-AA
Challenger
Table of Contents
1
INTRODUCTION
2
THINGS TO KNOW BEFORE STARTING YOUR VEHICLE
3
UNDERSTANDING THE FEATURES OF YOUR VEHICLE
4
UNDERSTANDING YOUR INSTRUMENT PANEL
5
STARTING AND OPERATING
6
WHAT TO DO IN EMERGENCIES
7
MAINTAINING YOUR VEHICLE
8
MAINTENANCE SCHEDULES
9
IF YOU NEED CONSUMER ASSISTANCE
10
INDEX
.....................................................................3
.............................................9
. . . . . . . . . . . . . . . . . . . . . . . . . . . . . . . . . . . . . . . . . . . . . 59
. . . . . . . . . . . . . . . . . . . . . . . . . . . . . . . . . . . . . . . . . . . . . . . . . 117
. . . . . . . . . . . . . . . . . . . . . . . . . . . . . . . . . . . . . . . . . . . . . . . . . . . . . . . . . . . . 181
. . . . . . . . . . . . . . . . . . . . . . . . . . . . . . . . . . . . . . . . . . . . . . . . . . . . . . . . . . 243
. . . . . . . . . . . . . . . . . . . . . . . . . . . . . . . . . . . . . . . . . . . . . . . . . . . . . . . . . . . 267
. . . . . . . . . . . . . . . . . . . . . . . . . . . . . . . . . . . . . . . . . . . . . . . . . . . . . . . . . . . . 311
. . . . . . . . . . . . . . . . . . . . . . . . . . . . . . . . . . . . . . . . . . . . . . . . . . . . . 313
. . . . . . . . . . . . . . . . . . . . . . . . . . . . . . . . . . . . . . . . . . . . . . . . . . . . . . . . . . . . . . . . . . . . . . . . . 317
1
2
1
INTRODUCTION
•
•
•
•
•
•
INTRODUCTION . . . . . . . . . . . . . . . .
IMPORTANT NOTICE . . . . . . . . . . . . .
HOW TO USE THIS MANUAL . . . . . . . .
WARNINGS AND CAUTIONS . . . . . . . .
VEHICLE IDENTIFICATION NUMBER . . .
VEHICLE MODIFICATIONS/ALTERATIONS
.
.
.
.
.
.
.
.
.
.
.
.
.
.
.
.
.
.
.
.
.
.
.
.
.
.
.
.
.
.
.
.
.
.
.
.
.
.
.
.
.
.
.
.
.
.
.
.
.
.
.
.
.
.
.
.
.
.
.
.
.
.
.
.
.
.
.
.
.
.
.
.
.
.
.
.
.
.
.
.
.
.
.
.
.4
.4
.5
.7
.7
.7
3
INTRODUCTION
Congratulations on selecting your new Chrysler
Group LLC vehicle. Be assured that it represents precision workmanship, distinctive styling, and high quality - all essentials that are
traditional to our vehicles.
Before you start to drive this vehicle, read the
Owner’s Manual and all the Supplements. Be
sure you are familiar with all vehicle controls,
particularly those used for braking, steering,
and transmission shifting. Learn how your vehicle handles on different road surfaces. Your
driving skills will improve with experience, but
as in driving any vehicle, take it easy as you
begin. Always observe local laws wherever you
drive.
Failure to operate this vehicle correctly may
result in loss of control or a collision.
Operating this vehicle at excessive speeds may
result in loss of control, collision with other
vehicles or objects, going off the road, or overturning; any of which may lead to serious injury
or death. Also, failure to use seat belts subjects
the driver and passengers to a greater risk of
injury or death.
4
To keep your vehicle running at its best, have
your vehicle serviced at recommended intervals
by an authorized dealer who has the qualified
personnel, special tools, and equipment to perform all service.
various customer-oriented documents. You are
urged to read these publications carefully. Following the instructions and recommendations in
this Owner’s Manual will help assure safe and
enjoyable operation of your vehicle.
The manufacturer and its distributors are vitally
interested in your complete satisfaction with this
vehicle. If you encounter a service or warranty
problem, which is not resolved to your satisfaction, discuss the matter with your authorized
dealer’s management.
After you have read the Owner’s Manual, it
should be stored in the vehicle for convenient
reference and remain with the vehicle when
sold.
IMPORTANT NOTICE
The manufacturer reserves the right to make
changes in design and specifications, and/or to
make additions to or improvements in its products without imposing any obligations upon
itself to install them on products previously
manufactured.
ALL MATERIAL CONTAINED IN THIS PUBLICATION IS BASED ON THE LATEST INFORMATION AVAILABLE AT TIME OF PUBLICATION APPROVAL. THE RIGHT IS RESERVED
TO PUBLISH REVISIONS AT ANY TIME.
The Owner’s Manual illustrates and describes
the features that are standard or available as
extra cost options. Therefore, some of the
equipment and accessories in this publication
may not appear on your vehicle.
Your authorized dealer will be happy to assist
you with any questions about your vehicle.
This Owner’s Manual has been prepared with
the assistance of service and engineering specialists to acquaint you with the operation and
maintenance of your new vehicle. It is supplemented by a Warranty Information Booklet and
NOTE:
Be sure to read the Owner’s Manual first
before driving your vehicle and before attaching or installing parts/accessories or
making other modifications to the vehicle.
In view of the many replacement parts and
accessories from various manufacturers available on the market, the manufacturer cannot be
certain that the driving safety of your vehicle will
not be impaired by the attachment or installation
of such parts. Even if such parts are officiallyapproved (for example, by a general operating
permit for the part or by constructing the part in
an officially approved design), or if an individual
operating permit was issued for the vehicle after
the attachment or installation of such parts, it
cannot be implicitly assumed that the driving
safety of your vehicle is unimpaired. Therefore,
neither experts nor official agencies are liable.
The manufacturer only assumes responsibility
when parts, which are expressly authorized or
recommended by the manufacturer, are attached or installed at an authorized dealer. The
same applies when modifications to the original
condition are subsequently made on the manufacturer’s vehicles.
the factory-trained technicians and genuine
MOPAR® parts, and is interested in your satisfaction.
Your warranties do not cover any part that the
manufacturer did not supply. Nor do they cover
the cost of any repairs or adjustments that might
be caused or needed because of the installation
or use of non-manufacturer parts, components,
equipment, materials, or additives. Nor do your
warranties cover the costs of repairing damage
or conditions caused by any changes to your
vehicle that do not comply with the manufacturers specifications.
HOW TO USE THIS MANUAL
Original MOPAR® parts and accessories and
other products approved by the manufacturer,
including qualified advice, are available at your
authorized dealer.
When it comes to service, remember that your
authorized dealer knows your vehicle best, has
Copyright © 2014 Chrysler International.
Consult the Table of Contents to determine
which section contains the information you desire.
Since the specification of your vehicle depends
on the items of equipment ordered, certain
descriptions and illustrations may differ from
your vehicle’s equipment.
The detailed index at the back of this Owner’s
Manual contains a complete listing of all subjects.
Consult the following table for a description of
the symbols that may be used on your vehicle or
throughout this Owner’s Manual:
5
6
WARNINGS AND CAUTIONS
This Owners Manual contains WARNINGS
against operating procedures that could result
in a collision or bodily injury. It also contains
CAUTIONS against procedures that could result in damage to your vehicle. If you do not
read this entire Owners Manual, you may miss
important information. Observe all Warnings
and Cautions.
VEHICLE IDENTIFICATION
NUMBER
The Vehicle Identification Number (VIN) is on
the left front corner of the instrument panel. The
VIN is visible from outside of the vehicle through
the windshield.
Vehicle Identification Number (VIN) Location
The vehicle identification number (VIN) is also
located on the right front strut tower inside the
engine compartment.
Stamped Vehicle Identification Number
Location (VIN)
VEHICLE MODIFICATIONS/
ALTERATIONS
WARNING!
Any modifications or alterations to this vehicle could seriously affect its roadworthiness and safety and may lead to a collision
resulting in serious injury or death.
7
8
2
THINGS TO KNOW BEFORE STARTING
YOUR VEHICLE
• A WORD ABOUT YOUR KEYS . . . .
• Keyless Ignition Node (KIN) . . . .
• Key Fob . . . . . . . . . . . . . . . .
• Ignition Or Accessory On Message
• SENTRY KEY®. . . . . . . . . . . . . .
• Replacement Keys . . . . . . . . .
• Customer Key Programming . . . .
• General Information . . . . . . . . .
• VEHICLE SECURITY ALARM . . . .
• Rearming Of The System . . . . . .
• To Arm The System . . . . . . . . .
• To Disarm The System . . . . . . .
• Security System Manual Override .
• ILLUMINATED ENTRY . . . . . . . . .
• REMOTE KEYLESS ENTRY (RKE) .
• To Unlock The Doors . . . . . . . .
• To Lock The Doors . . . . . . . . .
• To Unlatch The Trunk . . . . . . . .
.
.
.
.
.
.
.
.
.
.
.
.
.
.
.
.
.
.
.
.
.
.
.
.
.
.
.
.
.
.
.
.
.
.
.
.
.
.
.
.
.
.
.
.
.
.
.
.
.
.
.
.
.
.
.
.
.
.
.
.
.
.
.
.
.
.
.
.
.
.
.
.
.
.
.
.
.
.
.
.
.
.
.
.
.
.
.
.
.
.
.
.
.
.
.
.
.
.
.
.
.
.
.
.
.
.
.
.
.
.
.
.
.
.
.
.
.
.
.
.
.
.
.
.
.
.
.
.
.
.
.
.
.
.
.
.
.
.
.
.
.
.
.
.
.
.
.
.
.
.
.
.
.
.
.
.
.
.
.
.
.
.
.
.
.
.
.
.
.
.
.
.
.
.
.
.
.
.
.
.
.
.
.
.
.
.
.
.
.
.
.
.
.
.
.
.
.
.
.
.
.
.
.
.
.
.
.
.
.
.
.
.
.
.
.
.
.
.
.
.
.
.
.
.
.
.
.
.
.
.
.
.
.
.
.
.
.
.
.
.
.
.
.
.
.
.
.
.
.
.
.
.
.
.
.
.
.
.
.
.
.
.
.
.
.
.
.
.
.
.
.
.
.
.
.
.
.
.
.
.
.
.
.
.
.
.
.
.
.
.
.
.
.
.
.
.
.
.
.
.
.
.
.
.
.
.
.11
.11
.11
.12
.13
.14
.14
.14
.14
.14
.15
.15
.16
.16
.16
.16
.17
.17
9
•
•
•
•
•
•
•
•
10
• Using The Panic Alarm . . . . . . . . . . . . . . . . . . . . . . . .
• Programming Additional Transmitters . . . . . . . . . . . . . . .
• Transmitter Battery Replacement . . . . . . . . . . . . . . . . . .
• General Information . . . . . . . . . . . . . . . . . . . . . . . . . .
DOOR LOCKS . . . . . . . . . . . . . . . . . . . . . . . . . . . . . . .
• Manual Door Locks. . . . . . . . . . . . . . . . . . . . . . . . . . .
• Power Door Locks . . . . . . . . . . . . . . . . . . . . . . . . . . .
KEYLESS ENTER-N-GO™ . . . . . . . . . . . . . . . . . . . . . . .
WINDOWS . . . . . . . . . . . . . . . . . . . . . . . . . . . . . . . . .
• Power Windows . . . . . . . . . . . . . . . . . . . . . . . . . . . .
• AUTO-Down Feature — If Equipped . . . . . . . . . . . . . . . .
TRUNK LOCK AND RELEASE . . . . . . . . . . . . . . . . . . . . .
TRUNK SAFETY WARNING . . . . . . . . . . . . . . . . . . . . . . .
• Trunk Emergency Release . . . . . . . . . . . . . . . . . . . . . .
OCCUPANT RESTRAINT SYSTEMS . . . . . . . . . . . . . . . . .
• Important Safety Precautions . . . . . . . . . . . . . . . . . . . .
• Seat Belt Systems . . . . . . . . . . . . . . . . . . . . . . . . . . .
• Supplemental Restraint System (SRS) . . . . . . . . . . . . . . .
• Child Restraints . . . . . . . . . . . . . . . . . . . . . . . . . . . .
• Transporting Pets . . . . . . . . . . . . . . . . . . . . . . . . . . .
ENGINE BREAK-IN RECOMMENDATIONS . . . . . . . . . . . . .
SAFETY TIPS . . . . . . . . . . . . . . . . . . . . . . . . . . . . . . .
• Transporting Passengers . . . . . . . . . . . . . . . . . . . . . . .
• Exhaust Gas . . . . . . . . . . . . . . . . . . . . . . . . . . . . . .
• Safety Checks You Should Make Inside The Vehicle . . . . . . .
• Periodic Safety Checks You Should Make Outside The Vehicle
.
.
.
.
.
.
.
.
.
.
.
.
.
.
.
.
.
.
.
.
.
.
.
.
.
.
.
.
.
.
.
.
.
.
.
.
.
.
.
.
.
.
.
.
.
.
.
.
.
.
.
.
.17
.18
.18
.19
.19
.19
.20
.20
.23
.23
.23
.24
.24
.24
.25
.25
.26
.32
.41
.53
.53
.55
.55
.55
.55
.57
A WORD ABOUT YOUR KEYS
Your vehicle uses a keyless ignition system.
This system consists of a Key Fob with Remote
Keyless Entry (RKE) transmitter and a Keyless
Ignition Node (KIN).
Keyless Enter-N-Go™ Feature
This vehicle is equipped with the Keyless EnterN-Go™ feature, (refer to "Keyless Enter-NGo™" in "Things To Know Before Starting Your
Vehicle" for further information).
Keyless Ignition Node (KIN)
This feature allows the driver to operate the
ignition switch with the push of a button, as long
as the Remote Keyless Entry (RKE) transmitter
is in the passenger compartment.
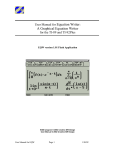
The Keyless Ignition Node (KIN System) has
four operating positions, three of which are
labeled and will illuminate when in position. The
three positions are: OFF, ACC, and ON/RUN.
The fourth position is START. During start, RUN
will illuminate.
NOTE:
In case the ignition switch does not change
with the push of a button, the RKE transmitter (Key Fob) may have a low or dead battery. In this situation a back up method can
be used to operate the ignition switch. Put
the nose side (side opposite of the emergency key) of the Key Fob against the ENGINE START/STOP button and push to operate the ignition switch.
Keyless Ignition Node (KIN System)
1 — OFF
2 — ACC (ACCESSORY)
3 — ON/RUN
Key Fob
The Key Fob also contains the Remote Keyless
Entry (RKE) transmitter and an emergency key,
which stores in the rear of the Key Fob.
The emergency key allows for entry into the
vehicle should the battery in the vehicle or the
Key Fob go dead. The emergency key is also
11
NOTE:
With the Uconnect® system, the power window
switches, radio, power sunroof (if equipped),
and power outlets will remain active for up to 10
minutes after the ignition is cycled to the OFF
position. Opening either front door will cancel
this feature. The time for this feature is programmable. Refer to “Uconnect® Settings” in
“Understanding Your Instrument Panel” for further information.
for locking/unlocking the glove compartment.
You can keep the emergency key with you when
valet parking.
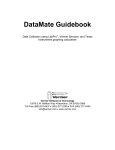
To remove the emergency key, slide the mechanical latch on the back of the Key Fob
sideways with your thumb and then pull the key
out with your other hand.
Emergency Key Removal
NOTE:
You can insert the double-sided emergency
key into the lock cylinders with either side
up.
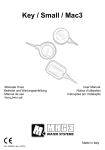
Ignition Or Accessory On Message
Mechanical Latch On The Back Of The Key
Fob
Opening the driver’s door when the ignition is in
ACC or ON (engine not running), a chime will
sound to remind you to cycle the ignition to OFF.
In addition to the chime, the ignition or accessory on message will display in the cluster.
WARNING!
• When leaving the vehicle, always remove
the Key Fob from the vehicle and lock your
vehicle.
• Never leave children alone in a vehicle, or
with access to an unlocked vehicle.
• Allowing children to be in a vehicle unattended is dangerous for a number of reasons. A child or others could be seriously
or fatally injured. Children should be
warned not to touch the parking brake,
brake pedal or the gear selector.
(Continued)
12
WARNING! (Continued)
• Do not leave the Key Fob in or near the
vehicle, or in a location accessible to children, and do not leave the ignition of a
vehicle equipped with Keyless Enter-NGo™ in the ACC or ON/RUN mode. A child
could operate power windows, other controls, or move the vehicle.
• Do not leave children or animals inside
parked vehicles in hot weather. Interior
heat build-up may cause serious injury or
death.
CAUTION!
An unlocked car is an invitation to thieves.
Always remove the Key Fob from vehicle,
cycle the ignition OFF and lock all doors
when leaving the vehicle unattended.
SENTRY KEY®
The Sentry Key® Immobilizer system prevents
unauthorized vehicle operation by disabling the
engine. The system does not need to be armed
or activated. Operation is automatic, regardless
of whether the vehicle is locked or unlocked.
The system uses a Key Fob with a factorymated Remote Keyless Entry (RKE) transmitter,
a Keyless Ignition Node (KIN) and a RF receiver
to prevent unauthorized vehicle operation.
Therefore, only Key Fobs that are programmed
to the vehicle can be used to start and operate
the vehicle. The system will not allow the engine
to crank if an invalid Key Fob is used to start and
operate the vehicle. The system will shut the
engine off in two seconds if an invalid Key Fob
is used to start the engine.
After placing the ignition to the ON/RUN position, the Vehicle Security Light will turn on for
three seconds for a bulb check. If the light
remains on after the bulb check, it indicates that
there is a problem with the electronics. In addition, if the light begins to flash after the bulb
check, it indicates that someone used an invalid
Key Fob to start the engine. Either of these
conditions will result in the engine being shut off
after two seconds.
If the Vehicle Security Light turns on during
normal vehicle operation (vehicle running for
longer than 10 seconds), it indicates that there
is a fault in the electronics. Should this occur,
have the vehicle serviced as soon as possible
by an authorized dealer.
CAUTION!
The Sentry Key® Immobilizer system is not
compatible with some aftermarket remote
starting systems. Use of these systems may
result in vehicle starting problems and loss of
security protection.
All of the Key Fobs provided with your new
vehicle have been programmed to the vehicle
electronics.
13
Replacement Keys
NOTE:
Only Key Fobs that are programmed to the
vehicle electronics can be used to start and
operate the vehicle. Once a Key Fob is
programmed to a vehicle, it cannot be programmed to any other vehicle.
CAUTION!
• Always remove the Key Fobs from the
vehicle and lock all doors when leaving the
vehicle unattended.
• For vehicles equipped with Keyless EnterN-Go™, always remember to place the
ignition in the OFF position.
At the time of purchase, the original owner is
provided with a four-digit Personal Identification
Number (PIN). Keep the PIN in a secure location. This number is required for authorized
dealer replacement of Key Fobs.
Duplication of Key Fobs may be performed at
an authorized dealer, this procedure consists of
programming a blank Key Fob to the vehicle
14
electronics. A blank Key Fob is one that has
never been programmed.
NOTE:
When having the Sentry Key® Immobilizer
System serviced, bring all vehicle Key Fobs
with you to the authorized dealer.
Customer Key Programming
Programming Key Fobs or RKE transmitters
may be performed at an authorized dealer.
General Information
The Sentry Key® operates on a carrier frequency of 433.92 MHz. The Sentry Key® Immobilizer system is subject to the following
conditions:
• This device may not cause harmful interference.
• This device must accept any interference
that may be received, including interference
that may cause undesired operation.
VEHICLE SECURITY ALARM
The Vehicle Security Alarm monitors the vehicle
doors and trunk for unauthorized entry and the
ignition switch for unauthorized operation.
While the Vehicle Security Alarm is armed,
interior switches for door locks and decklid
release are disabled. If something triggers the
alarm, the Vehicle Security Alarm will provide
the following audible and visible signals: the
horn will pulse, the headlights will turn on, park
lamps and/or turn signals will flash, and the
Vehicle Security Light in the instrument cluster
will flash.
Rearming Of The System
If something triggers the alarm, and no action is
taken to disarm it, the system will turn off the
horn after approximately 29 seconds, turn off all
of the visual signals after 5 seconds, and then
the system will rearm itself up to 8 times.
To Arm The System
Follow these steps to arm the Vehicle Security
Alarm:
1. Make sure the vehicles ignition is cycled to
the “OFF” position (refer to "Starting Procedures" in "Starting And Operating" for further
information).
• For vehicles equipped with Keyless Enter-NGo™, make sure the vehicle ignition system
is OFF.
• For vehicles not equipped with Keyless
Enter-N-Go™, make sure the vehicle ignition
system is OFF and the key is physically
removed from the ignition.
2. Perform one of the following methods to lock
the vehicle:
• Push LOCK on the interior power door lock
switch with the driver and/or passenger door
open.
• Push the LOCK button on the exterior Passive Entry Door Handle with a valid Key Fob
available in the same exterior zone (refer to
"Keyless Enter-N-Go™" in "Things To Know
Before Starting Your Vehicle" for further
information).
• Push the LOCK button on the Remote Keyless Entry (RKE) transmitter.
3. If any doors are open, close them.
To Disarm The System
The Vehicle Security Alarm can be disarmed
using any of the following methods:
• Push the UNLOCK button on the Remote
Keyless Entry (RKE) transmitter.
• Grasp the Passive Entry Unlock Door Handle
(if equipped, refer to “Keyless Enter-N-Go™”
in "Things To Know Before Starting Your
Vehicle" for further information).
• Advance the vehicle ignition system out of
the OFF position.
NOTE:
• The driver’s door key cylinder and the
Trunk button on the RKE transmitter cannot arm or disarm the Vehicle Security
Alarm.
• The Vehicle Security Alarm remains
armed during power trunk entry. Pushing
the trunk button will not disarm the Vehicle Security Alarm. If someone enters
the vehicle through the trunk and opens
any door the alarm will sound.
• When the Vehicle Security Alarm is
armed, the interior power door lock
switches will not unlock the doors.
The Vehicle Security Alarm is designed to protect your vehicle; however, you can create
conditions where the system will give you a
false alarm. If one of the previously described
arming sequences has occurred, the Vehicle
Security Alarm will arm regardless of whether
you are in the vehicle or not. If you remain in the
vehicle and open a door, the alarm will sound. If
this occurs, disarm the Vehicle Security Alarm.
If the Vehicle Security Alarm is armed and the
battery becomes disconnected, the Vehicle Security Alarm will remain armed when the battery
is reconnected; the exterior lights will flash, the
horn will sound. If this occurs, disarm the Vehicle Security Alarm.
15
Tamper Alert
If something has triggered the Vehicle Security
Alarm in your absence, the horn will sound three
times and the exterior lights will blink three
times when you disarm the Vehicle Security
Alarm. Check the vehicle for tampering.
Security System Manual Override
The Vehicle Security Alarm will not arm if you
lock the doors using the manual door lock
plunger.
ILLUMINATED ENTRY
The courtesy lights will turn on when you use
the Remote Keyless Entry (RKE) transmitter to
unlock the doors or open any door.
This feature also turns on the approach lighting
in the outside mirrors — if equipped. Refer to
“Mirrors” in “Understanding The Features Of
Your Vehicle” for further information.
The lights will fade to off after approximately 30
seconds or they will immediately fade to off
once the ignition switch is turned to ON/RUN
from the OFF position.
16
NOTE:
• The front courtesy overhead console and
door courtesy lights do not turn on if the
dimmer control is in the “Dome defeat”
position (extreme bottom position).
• The Illuminated Entry system will not operate if the dimmer control is in the
“Dome defeat” position (extreme bottom
position).
REMOTE KEYLESS ENTRY
(RKE)
Key Fob With RKE Transmitter
The RKE system allows you to lock or unlock
the doors, open the trunk, or activate the Panic
Alarm from distances up to approximately 66 ft
(20 m) using a hand-held Key Fob with RKE
transmitter. The RKE transmitter does not need
to be pointed at the vehicle to activate the
system.
To Unlock The Doors
NOTE:
Driving at speeds 5 mph (8 km/h) and above
disables the system from responding to all
RKE transmitter buttons for all RKE transmitters.
If the vehicle is equipped with Passive Entry,
refer to “Keyless Enter-N-Go™” under “Things
To Know Before Starting Your Vehicle” for further information.
Push and release the UNLOCK button on the
RKE transmitter once to unlock the driver’s door
or twice within five seconds to unlock all doors.
The turn signal lights will flash to acknowledge
the unlock signal. The illuminated entry system
will also turn on.
1st Push Of Key Fob Unlocks
This feature lets you program the system to
unlock either the driver’s door or all doors on the
first push of the UNLOCK button on the RKE
transmitter. To change the current setting, refer
to “Uconnect® Settings” in “Understanding Your
Instrument Panel” for further information.
Flash Lights With Lock
This feature will cause the turn signal lights to
flash when the doors are locked with the RKE
transmitter. This feature can be turned on or
turned off. To change the current setting, refer to
“Uconnect® Settings” in “Understanding Your
Instrument Panel” for further information.
Headlight Illumination On Approach
This feature activates the headlights for up to 90
seconds when the doors are unlocked with the
RKE transmitter. The time for this feature is
programmable on vehicles equipped through
Uconnect®. To change the current setting, refer
to “Uconnect® Settings” in “Understanding Your
Instrument Panel” for further information.
To Lock The Doors
Using The Panic Alarm
Push and release the LOCK button on the RKE
transmitter to lock all doors. The turn signal
lights will flash and the horn will chirp to acknowledge the signal.
To turn the Panic Alarm feature on or off, push
and hold the PANIC button on the RKE transmitter for at least one second and release.
When the Panic Alarm is activated, the turn
signals will flash, the horn will pulse on and off,
and the interior lights will turn on.
If the vehicle is equipped with Passive Entry,
refer to “Keyless Enter-N-Go™” under “Things
To Know Before Starting Your Vehicle” for further information.
Sound Horn With Lock
This feature will cause the horn to chirp when
the doors are locked with the RKE transmitter.
This feature can be turned on or turned off. To
change the current setting, refer to “Uconnect®
Settings” in “Understanding Your Instrument
Panel” for further information.
To Unlatch The Trunk
Push the TRUNK button on the RKE transmitter
two times within five seconds to unlatch the
trunk.
If the vehicle is equipped with Passive Entry,
refer to “Keyless Enter-N-Go™” under “Things
To Know Before Starting Your Vehicle” for further information.
The Panic Alarm will stay on for three minutes
unless you turn it off by either pushing the
PANIC button a second time or drive the vehicle
at a speed of 15 MPH (24 km/h) or greater.
NOTE:
• The interior lights will turn off if you cycle
the ignition switch to the ACC or ON/RUN
position while the Panic Alarm is activated. However, the exterior lights and
horn will remain on.
• You may need to be less than 35 ft (11 m)
from the vehicle when using the RKE
transmitter to turn off the Panic Alarm due
to the radio frequency noises emitted by
the system.
17
Programming Additional
Transmitters
Programming Key Fobs or RKE transmitters
may be performed at an authorized dealer.
Transmitter Battery Replacement
The recommended replacement battery is one
CR2032 battery.
NOTE:
• Perchlorate Material — special handling
may
apply.
See
www.dtsc.ca.gov/
hazardouswaste/perchlorate
• Do not touch the battery terminals that
are on the back housing or the printed
circuit board.
1. Remove the emergency key by sliding the
mechanical latch on the back of the RKE
transmitter sideways with your thumb and
then pull the key out with your other hand.
18
Emergency Key Removal
2. Separating RKE halves requires screw removal – if equipped, and gently prying the
two halves of the RKE transmitter apart.
Make sure not to damage the seal during
removal.
Separating Keyless Ignition Node (KIN)
Transmitter Case
3. Remove the battery by turning the back
cover over (battery facing downward) and
tapping it lightly on a solid surface such as a
table or similar, then replace the battery.
When replacing the battery, match the + sign
on the battery to the + sign on the inside of
the battery clip, located on the back cover.
Avoid touching the new battery with your
fingers. Skin oils may cause battery deterioration. If you touch a battery, clean it with
rubbing alcohol.
4. To assemble the RKE transmitter case, snap
the two halves together, reposition and secure the screw as shown in step #2 for
removal.
General Information
Transmitter and receivers operate on a carrier
frequency of 433.92 MHz. Operation is subject
to the following conditions:
DOOR LOCKS
Manual Door Locks
To lock each door, push the door lock knob on
each door trim panel downward. To unlock each
door, pull the door lock knob on each door trim
panel upward.
• This device may not cause harmful interference.
• This device must accept any interference
received, including interference that may
cause undesired operation. If your RKE
transmitter fails to operate from a normal
distance, check for these two conditions:
1. A weak battery in the transmitter. The expected life of the battery is a minimum of
three years.
2. Closeness to a radio transmitter such as a
radio station tower, airport transmitter, and
some mobile or CB radios.
Door Lock Knob
If the door lock knob is down when you shut the
door, the door will lock. Therefore, make sure
the Key Fob is not inside the vehicle before
closing the door.
WARNING!
• For personal security and safety in the
event of a collision, lock the vehicle doors
before you drive as well as when you park
and leave the vehicle.
• When leaving the vehicle, remove the Key
Fob from the vehicle and lock your vehicle.
• Never leave children alone in a vehicle, or
with access to an unlocked vehicle. Allowing children to be in a vehicle unattended
is dangerous for a number of reasons. A
child or others could be seriously or fatally
injured. Children should be warned not to
touch the parking brake, brake pedal or the
gear selector.
• Do not leave the Key Fob in or near the
vehicle, or in a location accessible to children, and do not leave the ignition of a
vehicle equipped with Keyless Enter-NGo™ in the ACC or ON/RUN mode. A child
could operate power windows, other controls, or move the vehicle.
19
Power Door Locks
The power door lock switch is located on each
door trim panel. Use this switch to lock or unlock
the doors.
Turning off the ignition or closing the door will
allow the locks to operate. If a door is open, the
ignition is either cycled to ACC or RUN (engine
not running), a chime will sound as a reminder.
Automatic Door Locks — If Equipped
The auto door lock feature default condition is
enabled. When enabled, the door locks will lock
automatically when the vehicle’s speed exceeds 15 mph (24 km/h). The auto door lock
feature can be enabled or disabled by your
authorized dealer or through the Uconnect®
Settings in your radio.
Automatic Unlock Doors On Exit
The doors will unlock automatically if:
Power Door Lock Switch
The doors can also be locked and unlocked with
the Keyless Enter-N-Go™ (Passive Entry) system. For further information, refer to “Keyless
Enter-N-Go™” in “Things To Know Before Starting Your Vehicle”.
If you push the power door lock switch while the
ignition is on, and either door is open, the power
locks will not operate. This prevents you from
accidentally locking the Key Fob in the vehicle.
20
1. The Automatic Unlock Doors On Exit feature
is enabled.
2. The transmission was in gear and the vehicle speed returned to 0 mph (0 km/h).
3. The transmission is in PARK.
4. The driver door is opened.
5. The doors were not previously unlocked.
6. The vehicle speed is 0 mph (0 km/h).
Automatic Unlock Doors On Exit
Programming
The Automatic Unlock Doors On Exit feature
can be enabled or disabled. Refer to
“Uconnect® Settings” in “Understanding Your
Instrument Panel” for further information.
NOTE:
Use the Automatic Unlock Doors On Exit
feature in accordance with local laws.
KEYLESS ENTER-N-GO™
The Passive Entry system is an enhancement
to the vehicle’s Remote Keyless Entry (RKE)
system and a feature of Keyless Enter-N-Go™.
This feature allows you to lock and unlock the
vehicle’s door(s) without having to push the
RKE transmitter lock or unlock buttons.
NOTE:
• Passive Entry may be programmed ON/
OFF; refer to “Uconnect® Settings” in
“Understanding Your Instrument Panel”
for further information.
• If wearing gloves on your hands, or if it
has been raining on the Passive Entry
door handle, the unlock sensitivity can be
affected, resulting in a slower response
time.
• If the vehicle is unlocked by Passive Entry
door handle and no door goes ajar within
60 seconds, the vehicle will re-lock and if
equipped will arm the security alarm.
To Unlock From The Driver’s Side:
With a Passive Entry RKE transmitter within 5 ft
(1.5 m) of the driver door handle, grab the front
driver door handle to unlock the driver’s door
automatically. The interior door panel lock knob
will raise when the door is unlocked.
NOTE:
If “Unlock All Doors 1st Press” is programmed all doors will unlock when you
grab hold of the front driver’s door handle.
To select between “Unlock Driver Door 1st
Press” and “Unlock All Doors 1st Press”,
refer to “Uconnect® Settings” in “Understanding Your Instrument Panel” for further
information.
To Unlock From The Passenger Side:
With a Passive Entry RKE transmitter within 5 ft
(1.5 m) of the passenger door handle, grab the
front passenger door handle to unlock both
doors automatically. The interior door panel lock
knob will raise when the door is unlocked.
NOTE:
All doors will unlock when the front passenger door handle is grabbed regardless of the
driver’s door unlock preference setting
(“Unlock Driver Door 1st Press” or “Unlock
All Doors 1st Press”).
Grab The Door Handle To Unlock
Preventing Inadvertent Locking Of Passive
Entry RKE Transmitter In Vehicle
To minimize the possibility of unintentionally
locking a Passive Entry RKE transmitter inside
your vehicle, the Passive Entry system is
equipped with an automatic door unlock feature
which will function if the ignition switch is in the
OFF position.
If one of the vehicle doors is open and the door
panel switch is used to lock the vehicle, once all
open doors have been closed the vehicle
checks the inside and outside of the vehicle for
any Passive Entry RKE transmitters. If one of
the vehicle’s Passive Entry RKE transmitters is
detected inside the vehicle, and no other valid
Passive Entry RKE transmitters are detected
outside the vehicle, the Passive Entry System
automatically unlocks all vehicle doors and
chirps the horn three times (on the third attempt
ALL doors will lock and the Passive Entry RKE
transmitter can be locked in the vehicle).
To Enter The Trunk:
With a Passive Entry RKE transmitter within 5 ft
(1.5 m) of the deck lid, push the button located
on the center of the light bar which is located on
the deck lid above the license plate.
21
Trunk Passive Entry Button
Push The Door Handle Button To Lock
NOTE:
If you inadvertently leave your vehicle’s
Passive Entry RKE transmitter in the trunk
and try to close the deck lid, the deck lid will
automatically unlatch, unless another one of
the vehicle’s Passive Entry RKE transmitters is outside the vehicle and within 5 ft
(1.5 m) of the deck lid.
Do NOT grab the door handle, when pushing
the door handle button. This could unlock the
door(s).
To Lock The Vehicle’s Doors:
With one of the vehicle’s Passive Entry RKE
transmitters within 5 ft (1.5 m) of the driver or
passenger front door handles, push the door
handle LOCK button to lock both doors.
22
Do NOT Grab The Handle When Locking
NOTE:
• After pushing the door handle button, you
must wait two seconds before you can
lock or unlock the doors, using either
Passive Entry door handle. This is done
to allow you to check if the vehicle is
locked by pulling the door handle, without
the vehicle reacting and unlocking.
• The Passive Entry system will not operate
if the RKE transmitter battery is dead.
The vehicle doors can also be locked by using
the RKE transmitter lock button or the lock
button located on the vehicle’s interior door
panel.
WINDOWS
Power Windows
The window controls on the driver’s door control
both of the door windows.
will operate only when the ignition switch is in
the ON/RUN or ACC position.
NOTE:
• The Key Off Power Delay feature will allow
the power windows to operate for up to 10
minutes after the ignition is turned OFF.
This feature is cancelled when either front
door is opened. The time for this feature
is programmable. Refer to “Uconnect®
Settings” in “Understanding Your Instrument Panel” for further information.
• The door window will lower slightly if it is
closed completely when opening the
door. The window will return to its fully
closed position after closing the door.
This action allows the door to open without resistance and prevents window and
seal damage.
Power Window Switches
There is a single window control on the passenger’s door trim panel that operates the window
on the passenger’s door. The window controls
WARNING!
Never leave children unattended in a vehicle,
and do not let children play with power
WARNING! (Continued)
windows. Do not leave the Key Fob in or
near the vehicle, or in a location accessible
to children, and do not leave the ignition of a
vehicle equipped with Keyless Enter-N-Go™
in the ACC or ON/RUN mode. Occupants,
particularly unattended children, can become entrapped by the windows while operating the power window switches. Such entrapment may result in serious injury or
death.
AUTO-Down Feature — If Equipped
The driver’s door power window switch and
passenger door power window switch have an
AUTO-down feature. Push the window switch to
the second detent, release, and the window will
go down automatically.
To open the window part way, push the window
switch to the first detent and release it when you
want the window to stop.
(Continued)
23
To stop the window from going all the way down
during the AUTO-down operation, pull up on the
switch briefly.
The power window switches will remain active
for up to 10 minutes after the ignition switch is
turned OFF. Opening either door will cancel this
feature. The time for this feature is programmable. Refer to “Uconnect® Settings” in “Understanding Your Instrument Panel” for further
information.
TRUNK LOCK AND RELEASE
The trunk lid can be released from inside the
vehicle by pushing the Trunk Release button.
The button is located on the instrument panel to
the left of the steering wheel.
NOTE:
The transmission must be in PARK before
the button will operate. If equipped with a
manual transmission, the vehicle speed
must be under 5 mph (8 km/h) before the
button will operate.
24
The trunk lid can
be released from
outside the vehicle
by pushing the
Trunk
Release
button on the Remote Keyless Entry (RKE) transmitter twice within five
seconds or by using the external reTrunk Release Button
lease switch located
on
the
underside of the decklid overhang. The release
feature will function only when the vehicle is in
the unlock condition.
Refer to “Keyless Enter-N-Go™” in “Things To
Know Before Starting Your Vehicle” for more
information on trunk operation with the Passive
Entry feature.
TRUNK SAFETY WARNING
WARNING!
Do not allow children to have access to the
trunk, either by climbing into the trunk from
outside, or through the inside of the vehicle.
Always close the trunk lid when your vehicle
is unattended. Once in the trunk, young
children may not be able to escape, even if
they entered through the rear seat. If trapped
in the trunk, children can die from suffocation
or heat stroke.
With the ignition switch in the ON/RUN position,
the Trunk Open symbol will display in the instrument cluster indicating that the trunk is open.
The odometer display will reappear once the
trunk is closed.
Trunk Emergency Release
With the ignition switch in the OFF position or
the key removed from the ignition switch, the
Trunk Open symbol will display until the trunk is
closed.
As a security measure, a Trunk Internal Emergency Release lever is built into the trunk
latching mechanism. In the event of an individual being locked inside the trunk, the trunk
can be opened by activating the glow-in-thedark handle attached to the trunk latching
mechanism.
Important Safety Precautions
Please pay close attention to the information in
this section. It tells you how to use your restraint
system properly, to keep you and your passengers as safe as possible.
Here are some simple steps you can take to
minimize the risk of harm from a deploying air
bag:
1. Children 12 years old and under should
always ride buckled up in a vehicle with a
rear seat.
Trunk Emergency Internal Release
3. Children that are not big enough to wear the
vehicle seat belt properly (Refer to "Child
Restraints") should be secured in a vehicle
with a rear seat in child restraints or beltpositioning booster seats. Older children
who do not use child restraints or beltpositioning booster seats should ride properly buckled up in a vehicle with a rear seat.
4. Never allow children to slide the shoulder
belt behind them or under their arm.
OCCUPANT RESTRAINT
SYSTEMS
5. You should read the instructions provided
with your child restraint to make sure that
you are using it properly.
Some of the most important safety features in
your vehicle are the restraint systems:
• Seat Belt Systems
• Supplemental Restraint Systems (SRS) Air
Bags
2. If a child from 2 to 12 years old (not in a
rear-facing child restraint) must ride in the
front passenger seat, move the seat as far
back as possible and use the proper child
restraint. (Refer to “Child Restraints”)
Warning Label On Front Passenger Sun Visor
6. All occupants should always wear their lap
and shoulder belts properly.
• Child Restraints
25
7. The driver and front passenger seats should
be moved back as far as practical to allow
the Advanced Front Air Bags room to inflate.
8. Do not lean against the door or window. If
your vehicle has side air bags, and deployment occurs, the side air bags will inflate
forcefully into the space between you and
the door and you could be injured.
9. If the air bag system in this vehicle needs to
be modified to accommodate a disabled
person, contact the Customer Center. Phone
numbers are provided under "If You Need
Assistance."
WARNING!
• Never place a rear-facing child restraint in
front of an air bag. A deploying Passenger
Advanced Front Air Bag can cause death
or serious injury to a child 12 years or
younger, including a child in a rear-facing
child restraint.
(Continued)
26
WARNING! (Continued)
• Only use rear-facing child restraint in a
vehicle with a rear seat.
Seat Belt Systems
is active whenever the ignition switch is in the
START or ON/RUN position. If the driver or
outboard front seat passenger is unbelted, the
Seat Belt Reminder Light will turn on and remain on until both outboard front seat belts are
buckled.
Research has shown that seat belts save lives,
and they can reduce the seriousness of injuries
in a collision. Some of the worst injuries happen
when people are thrown from the vehicle. Seat
belts reduce the possibility of ejection and the
risk of injury caused by striking the inside of the
vehicle. Everyone in a motor vehicle should be
belted at all times.
The BeltAlert warning sequence begins after
the vehicle speed is over 5 MPH (8 km/h) by
blinking the Seat Belt Reminder Light and
sounding an intermittent chime. Once the sequence starts, it will continue for the entire
duration or until the respective seat belts are
buckled. After the sequence completes, the
Seat Belt Reminder Light remains illuminated
until the respective seat belts are buckled. The
driver should instruct all other occupants to
buckle their seat belts. If an outboard front seat
belt is unbuckled while traveling at speeds
greater than 5 MPH (8 km/h), BeltAlert will
provide both audio and visual notification.
Enhanced Seat Belt Use Reminder System
(BeltAlert)
BeltAlert is a feature intended to remind the
driver and outboard front passenger (if
equipped with outboard front passenger
BeltAlert) to buckle their seat belts. The feature
The outboard front passenger seat BeltAlert is
not active when the outboard front passenger
seat is unoccupied. BeltAlert may be triggered
when an animal or heavy object is on the
outboard front passenger seat or when the seat
is folded flat (if equipped). It is recommended
Buckle up even though you are an excellent
driver, even on short trips. Someone on the
road may be a poor driver and could cause a
collision that includes you. This can happen far
away from home or on your own street.
that pets be restrained in the rear seat (if
equipped) in pet harnesses or pet carriers that
are secured by seat belts, and cargo is properly
stowed.
BeltAlert can be activated or deactivated by
your authorized dealer. Chrysler Group LLC
does not recommend deactivating BeltAlert.
NOTE:
If BeltAlert has been deactivated, the Seat
Belt Reminder Light will continue to illuminate while the driver’s or outboard front
passenger’s (if equipped with BeltAlert) seat
belt remains unbuckled.
Lap/Shoulder Belts
All seating positions in your vehicle are
equipped with lap/shoulder belts.
The seat belt webbing retractor will lock only
during very sudden stops or collisions. This
feature allows the shoulder part of the seat belt
to move freely with you under normal conditions. However, in a collision the seat belt will
lock and reduce your risk of striking the inside of
the vehicle or being thrown out of the vehicle.
WARNING!
• Relying on the air bags alone could lead to
more severe injuries in a collision. The air
bags work with your seat belt to restrain
you properly. In some collisions, the air
bags won’t deploy at all. Always wear your
seat belt even though you have air bags.
• In a collision, you and your passengers
can suffer much greater injuries if you are
not properly buckled up. You can strike the
interior of your vehicle or other passengers, or you can be thrown out of the
vehicle. Always be sure you and others in
your vehicle are buckled up properly.
• It is dangerous to ride in a cargo area,
inside or outside of a vehicle. In a collision,
people riding in these areas are more likely
to be seriously injured or killed.
• Do not allow people to ride in any area of
your vehicle that is not equipped with seats
and seat belts.
WARNING! (Continued)
• Be sure everyone in your vehicle is in a
seat and using a seat belt properly.
• Wearing your seat belt incorrectly could
make your injuries in a collision much
worse. You might suffer internal injuries, or
you could even slide out of the seat belt.
Follow these instructions to wear your seat
belt safely and to keep your passengers
safe, too.
• Two people should never be belted into a
single seat belt. People belted together
can crash into one another in a collision,
hurting one another badly. Never use a
lap/shoulder belt or a lap belt for more than
one person, no matter what their size.
• A lap belt worn too high can increase the
risk of injury in a collision. The seat belt
forces won’t be at the strong hip and pelvic
bones, but across your abdomen. Always
wear the lap part of your seat belt as low as
possible and keep it snug.
(Continued)
(Continued)
27
WARNING! (Continued)
• A twisted seat belt may not protect you
properly. In a collision, it could even cut
into you. Be sure the seat belt is flat
against your body, without twists. If you
can’t straighten a seat belt in your vehicle,
take it to your authorized dealer immediately and have it fixed.
• A seat belt that is buckled into the wrong
buckle will not protect you properly. The
lap portion could ride too high on your
body, possibly causing internal injuries.
Always buckle your seat belt into the
buckle nearest you.
• A seat belt that is too loose will not protect
you properly. In a sudden stop, you could
move too far forward, increasing the possibility of injury. Wear your seat belt snugly.
(Continued)
28
WARNING! (Continued)
• A seat belt that is worn under your arm is
dangerous. Your body could strike the inside surfaces of the vehicle in a collision,
increasing head and neck injury. A seat
belt worn under the arm can cause internal
injuries. Ribs aren’t as strong as shoulder
bones. Wear the seat belt over your shoulder so that your strongest bones will take
the force in a collision.
• A shoulder belt placed behind you will not
protect you from injury during a collision.
You are more likely to hit your head in a
collision if you do not wear your shoulder
belt. The lap and shoulder belt are meant
to be used together.
(Continued)
WARNING! (Continued)
• A frayed or torn seat belt could rip apart in
a collision and leave you with no protection. Inspect the seat belt system periodically, checking for cuts, frays, or loose
parts. Damaged parts must be replaced
immediately. Do not disassemble or modify
the seat belt system. Seat belt assemblies
must be replaced after a collision.
Lap/Shoulder Belt Operating Instructions
1. Enter the vehicle and close the door. Sit
back and adjust the seat.
2. The seat belt latch plate is above the back of
the front seat, and next to your arm in the
rear seat (for vehicles equipped with a rear
seat). Grasp the latch plate and pull out the
seat belt. Slide the latch plate up the webbing as far as necessary to allow the seat
belt to go around your lap.
3. When the seat belt is long enough to fit,
insert the latch plate into the buckle until you
hear a “click.”
Positioning The Lap Belt
Inserting Latch Plate Into Buckle
Pulling Out The Latch Plate
4. Position the lap belt so that it is snug and lies
low across your hips, below your abdomen.
To remove slack in the lap belt portion, pull
up on the shoulder belt. To loosen the lap
belt if it is too tight, tilt the latch plate and pull
on the lap belt. A snug seat belt reduces the
risk of sliding under the seat belt in a collision.
5. Position the shoulder belt across the shoulder and chest with minimal, if any slack so
that it is comfortable and not resting on your
neck. The retractor will withdraw any slack in
the shoulder belt.
6. To release the seat belt, push the red button
on the buckle. The seat belt will automatically retract to its stowed position. If necessary, slide the latch plate down the webbing
to allow the seat belt to retract fully.
29
Lap/Shoulder Belt Untwisting Procedure
Use the following procedure to untwist a twisted
lap/shoulder belt.
that it does not come across the abdomen. That
way the strong bones of the hips will take the
force if there is a collision.
1. Position the latch plate as close as possible
to the anchor point.
Seat Belt Pretensioner
The front seat belt system is equipped with
pretensioning devices that are designed to remove slack from the seat belt in the event of a
collision. These devices may improve the performance of the seat belt by removing slack
from the seat belt early in a collision. Pretensioners work for all size occupants, including
those in child restraints.
2. At about 6 to 12 inches (15 to 30 cm) above
the latch plate, grasp and twist the seat belt
webbing 180° to create a fold that begins
immediately above the latch plate.
3. Slide the latch plate upward over the folded
webbing. The folded webbing must enter the
slot at the top of the latch plate.
4. Continue to slide the latch plate up until it
clears the folded webbing and the seat belt
is no longer twisted.
NOTE:
These devices are not a substitute for
proper seat belt placement by the occupant.
The seat belt still must be worn snugly and
positioned properly.
Seat Belts And Pregnant Women
We recommend that pregnant women use the
seat belts throughout their pregnancy. Keeping
the mother safe is the best way to keep the baby
safe.
The pretensioners are triggered by the Occupant Restraint Controller (ORC). Like the air
bags, the pretensioners are single use items. A
deployed pretensioner or a deployed air bag
must be replaced immediately.
Pregnant women should wear the lap part of the
seat belt across the thighs and as snug across
the hips as possible. Keep the seat belt low so
30
Energy Management Feature
This vehicle has a seat belt system with an
Energy Management feature in the front seating
positions that may help further reduce the risk of
injury in the event of a collision. This seat belt
system has a retractor assembly that is designed to release webbing in a controlled manner.
Automatic Locking Retractor (ALR) — If
Equipped
The seat belts in the passenger seating positions may be equipped with a Switchable Automatic Locking Retractor (ALR) which is used to
secure a child restraint system. For additional
information, refer to “Installing Child Restraints
Using The Vehicle Seat Belt” under the “Child
Restraints” section of this manual. The table
below defines the type of feature for each
seating position.
In Automatic Locking Mode, the shoulder belt is
automatically pre-locked. The seat belt will still
retract to remove any slack in the shoulder belt.
Use the Automatic Locking Mode anytime a
child restraint is installed in a seating position
that has a seat belt with this feature. Children 12
years old and under should always be properly
restrained in a vehicle with a rear seat.
• ALR = Switchable Automatic Locking Retractor
If the passenger seating position is equipped
with an ALR and is being used for normal
usage, only pull the seat belt webbing out far
enough to comfortably wrap around the occupant’s mid-section so as to not activate the ALR.
If the ALR is activated, you will hear a clicking
sound as the seat belt retracts. Allow the webbing to retract completely in this case and then
carefully pull out only the amount of webbing
necessary to comfortably wrap around the occupant’s mid-section. Slide the latch plate into
the buckle until you hear a "click."
WARNING!
• Never place a rear-facing child restraint in
front of an air bag. A deploying Passenger
Advanced Front Air Bag can cause death
or serious injury to a child 12 years or
younger, including a child in a rear-facing
child restraint.
• Only use rear-facing child restraint in a
vehicle with a rear seat.
How To Engage The Automatic Locking
Mode
1. Buckle the combination lap and shoulder
belt.
2. Grasp the shoulder portion and pull downward until the entire seat belt is extracted.
3. Allow the seat belt to retract. As the seat belt
retracts, you will hear a clicking sound. This
indicates the seat belt is now in the Automatic Locking Mode.
How To Disengage The Automatic Locking
Mode
Unbuckle the combination lap/shoulder belt and
allow it to retract completely to disengage the
Automatic Locking Mode and activate the vehicle sensitive (emergency) locking mode.
WARNING!
• The seat belt assembly must be replaced if
the switchable Automatic Locking Retractor (ALR) feature or any other seat belt
function is not working properly when
checked according to the procedures in
the Service Manual.
(Continued)
31
WARNING! (Continued)
• Failure to replace the seat belt assembly
could increase the risk of injury in collisions.
• Do not use the Automatic Locking Mode to
restrain occupants who are wearing the
seat belt or children who are using booster
seats. The locked mode is only used to
install rear-facing or forward-facing child
restraints that have a harness for restraining the child.
Supplemental Restraint System
(SRS)
Air Bag System Components
Your vehicle may be equipped with the following
air bag system components:
• Occupant Restraint Controller (ORC)
• Air Bag Warning Light
• Steering Wheel and Column
• Instrument Panel
32
• Knee Impact Bolsters
• Advanced Front Air Bags
• Supplemental Side Air Bags
• Front and Side Impact Sensors
• Seat Belt Pretenioners
• Seat Belt Buckle Switch
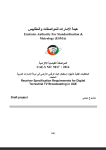
Advanced Front Air Bags
This vehicle has Advanced Front Air Bags for
both the driver and front passenger as a supplement to the seat belt restraint systems. The
driver’s Advanced Front Air Bag is mounted in
the center of the steering wheel. The passenger’s Advanced Front Air Bag is mounted in the
instrument panel, above the glove compartment. The words “SRS AIRBAG” or “AIRBAG”
are embossed on the air bag covers.
Advanced Front Air Bags And Knee Impact
Bolster Locations
1 — Driver And Passenger Advanced Front Air
Bags
2 — Driver And Passenger Knee Impact Bolsters
WARNING!
• Being too close to the steering wheel or
instrument panel during Advanced Front
Air Bag deployment could cause serious
injury, including death. Air bags need room
to inflate. Sit back, comfortably extending
your arms to reach the steering wheel or
instrument panel.
• Never place a rear-facing child restraint in
front of an air bag. A deploying Passenger
Advanced Front Air Bag can cause death
or serious injury to a child 12 years or
younger, including a child in a rear-facing
child restraint.
• Only use a rear-facing child restraint in a
vehicle with a rear seat.
Advanced Front Air Bag Features
The Advanced Front Air Bag system has multistage driver and front passenger air bags. This
system provides output appropriate to the severity and type of collision as determined by the
Occupant Restraint Controller (ORC), which
may receive information from the front impact
sensors or other system components.
The first stage inflator is triggered immediately
during an impact that requires air bag deployment. A low energy output is used in less severe
collisions. A higher energy output is used for
more severe collisions.
This vehicle may be equipped with a driver
and/or front passenger seat belt buckle switch
that detects whether the driver or front passenger seat belt is buckled. The seat belt buckle
switch may adjust the inflation rate of the Advanced Front Air Bags.
WARNING!
• No objects should be placed over or near
the air bag on the instrument panel or
steering wheel, because any such objects
could cause harm if the vehicle is in a
collision severe enough to cause the air
bags to inflate.
(Continued)
WARNING! (Continued)
• Do not put anything on or around the air
bag covers or attempt to open them manually. You may damage the air bags and you
could be injured because the air bags may
no longer be functional. The protective
covers for the air bag cushions are designed to open only when the air bags are
inflating.
• Relying on the air bags alone could lead to
more severe injuries in a collision. The air
bags work with your seat belt to restrain
you properly. In some collisions, air bags
won’t deploy at all. Always wear your seat
belts even though you have air bags.
Advanced Front Air Bag Operation
Advanced Front Air Bags are designed to provide additional protection by supplementing the
seat belts. Advanced Front Air Bags are not
expected to reduce the risk of injury in rear,
side, or rollover collisions. The Advanced Front
Air Bags will not deploy in all frontal collisions,
including some that may produce substantial
33
vehicle damage — for example, some pole
collisions, truck underrides, and angle offset
collisions.
On the other hand, depending on the type and
location of impact, Advanced Front Air Bags
may deploy in crashes with little vehicle frontend damage but that produce a severe initial
deceleration.
Because air bag sensors measure vehicle deceleration over time, vehicle speed and damage
by themselves are not good indicators of
whether or not an air bag should have deployed.
Bags fully inflate in less time than it takes to
blink your eyes. The air bags then quickly
deflate while helping to restrain the driver and
front passenger.
Knee Impact Bolsters
The Knee Impact Bolsters help protect the
knees of the driver and front passenger, and
position the front occupants for improved interaction with the Advanced Front Air Bags.
Seat belts are necessary for your protection in
all collisions, and also are needed to help keep
you in position, away from an inflating air bag.
WARNING!
• Do not drill, cut, or tamper with the knee
impact bolsters in any way.
• Do not mount any accessories to the knee
impact bolsters such as alarm lights, stereos, citizen band radios, etc.
When the ORC detects a collision requiring the
Advanced Front Air Bags, it signals the inflator
units. A large quantity of non-toxic gas is generated to inflate the Advanced Front Air Bags.
Supplemental Side Air Bags
Your vehicle is equipped with two types of side
air bags:
The steering wheel hub trim cover and the
upper right side of the instrument panel separate and fold out of the way as the air bags
inflate to their full size. The Advanced Front Air
1. Supplemental Seat-Mounted Side Air Bags
(SABs): Located in the outboard side of the
front seats. The SABs are marked with a
“SRS AIRBAG” or “AIRBAG” label sewn into
the outboard side of the seats.
34
Front Supplemental Seat-Mounted Side Air
Bag Label
The SABs may help to reduce the risk of
occupant injury during certain side impact and
certain rollover events, in addition to the injury
reduction potential provided by the seat belts
and body structure.
When the SAB deploys, it opens the seam on
the outboard side of the seatback’s trim cover.
The inflating SAB deploys through the seat
seam into the space between the occupant and
the door. The SAB moves at a very high speed
and with such a high force that it could injure
you if you are not seated properly, or if items are
positioned in the area where the SAB inflates.
Children are at an even greater risk of injury
from a deploying air bag.
the area where the SABICs inflate. Children are
at an even greater risk of injury from a deploying
air bag.
WARNING!
Do not use accessory seat covers or place
objects between you and the Side Air Bags;
the performance could be adversely affected
and/or objects could be pushed into you,
causing serious injury.
The SABICs may help reduce the risk of partial
or complete ejection of vehicle occupants
through side windows in certain rollover or side
impact events.
2. Supplemental Side Air Bag Inflatable Curtains (SABICs): Located above the side windows. The trim covering the SABICs is labeled “SRS AIRBAG” or “AIRBAG.”
Supplemental Side Air Bag Inflatable Curtain
(SABIC) Label Location
SABICs may help reduce the risk of head injury
to front and rear seat outboard occupants.
SABICs may reduce the risk of injuries in certain
side impact and vehicle rollover events, in addition to the injury reduction potential provided
by the seat belts and body structure.
The SABICs deploy downward, covering the
side windows. An inflating SABIC pushes the
outside edge of the trim out of the way and
covers the window. The SABICs inflate with
enough force to injure you if you are not belted
and seated properly, or if items are positioned in
WARNING!
• Your vehicle is equipped with left and right
Supplemental Side Air Bag Inflatable Curtains (SABICs). Do not stack luggage or
other cargo up high enough to block the
deployment of the SABICs. The trim covering above the side windows where the
SABIC and its deployment path are located should remain free from any obstructions.
• Your vehicle is equipped with SABICs. In
order for the SABICs to work as intended,
do not install any accessory items in your
vehicle which could alter the roof. Do not
(Continued)
35
WARNING! (Continued)
add an aftermarket sunroof to your vehicle.
Do not add roof racks that require permanent attachments (bolts or screws) for installation on the vehicle roof. Do not drill
into the roof of the vehicle for any reason.
The SABICs and SABs (“Side Air Bags”) are
designed to activate in certain side impacts and
certain rollover events. The Occupant Restraint
Controller (“ORC”) determines whether the deployment of the Side Air Bags in a particular
side impact or rollover event is appropriate,
based on the severity and type of collision.
Vehicle damage by itself is not a good indicator
of whether or not Side Air Bags should have
deployed.
Side Air Bags are a supplement to the seat belt
restraint system. Side Air Bags deploy in less
time than it takes to blink your eyes. Occupants,
including children, who are up against or very
close to Side Air Bags can be seriously injured
or killed. Occupants, including children, should
never lean on or sleep against the door, side
36
windows, or area where the Side Air Bags
inflate, even if they are in an infant or child
restraint.
Seat belts (and child restraints where appropriate) are necessary for your protection in all
collisions. They also help keep you in position,
away from inflating Side Air Bags. To get the
best protection from the Side Air Bags, occupants must wear their seat belts properly and sit
upright with their backs against the seats. Children must be properly restrained in a child
restraint or booster seat that is appropriate for
the size of the child.
WARNING!
• Side Air Bags need room to inflate. Do not
lean against the door or window. Sit upright in the center of the seat.
• Being too close to the Side Air Bags during
deployment could cause you to be severely injured or killed.
(Continued)
WARNING! (Continued)
• Relying on the Side Air Bags alone could
lead to more severe injuries in a collision.
The Side Air Bags work with your seat belt
to restrain you properly. In some collisions,
Side Air Bags won’t deploy at all. Always
wear your seat belt even though you have
Side Air Bags.
NOTE:
Air bag covers may not be obvious in the
interior trim, but they will open during air
bag deployment.
Side Impacts
In side impacts, the side impact sensors aid the
ORC in determining the appropriate response to
impact events. The system is calibrated to deploy
the Side Air Bags on the impact side of the vehicle
during impacts that require Side Air Bag occupant
protection. In side impacts, the Side Air Bags
deploy independently; a left side impact deploys
the left Side Air Bags only and a right side impact
deploys the right Side Air Bags only.
The Side Air Bags will not deploy in all side
collisions, including some collisions at certain
angles, or some side collisions that do not
impact the area of the passenger compartment.
The Side Air Bags may deploy during angled or
offset frontal collisions where the Advanced
Front Air Bags deploy.
Rollover Events
Side Air Bags are designed to activate in certain
rollover events. The ORC determines whether
the deployment of the Side Air Bags in a particular rollover event is appropriate, based on
the severity and type of collision. Vehicle damage by itself is not a good indicator of whether or
not Side Air Bags should have deployed.
The Side Air Bags will not deploy in all rollover
events. The rollover sensing-system determines if a rollover event may be in progress and
whether deployment is appropriate. A slowerdeveloping event may deploy the seat belt
pretensioners on both sides of the vehicle. A
faster-developing event may deploy the seat
belt pretensioners as well as the SABs and
SABICs on both sides of the vehicle. The rollover sensing-system may also deploy the seat
belt pretensioners, with or without the SABs and
SABICs, on both sides of the vehicle if the
vehicle experiences a near rollover event.
If A Deployment Occurs
The Advanced Front Air Bags are designed to
deflate immediately after deployment.
NOTE:
Front and/or side air bags will not deploy in
all collisions. This does not mean something is wrong with the air bag system.
If you do have a collision, which deploys the air
bags, any or all of the following may occur:
• The air bag material may sometimes cause
abrasions and/or skin reddening to the occupants as the air bags deploy and unfold. The
abrasions are similar to friction rope burns or
those you might get sliding along a carpet or
gymnasium floor. They are not caused by
contact with chemicals. They are not permanent and normally heal quickly. However, if
you haven’t healed significantly within a few
days, or if you have any blistering, see your
doctor immediately.
• As the air bags deflate, you may see some
smoke-like particles. The particles are a normal by-product of the process that generates
the non-toxic gas used for air bag inflation.
These airborne particles may irritate the skin,
eyes, nose, or throat. If you have skin or eye
irritation, rinse the area with cool water. For
nose or throat irritation, move to fresh air. If
the irritation continues, see your doctor. If
these particles settle on your clothing, follow
the garment manufacturer’s instructions for
cleaning.
Do not drive your vehicle after the air bags have
deployed. If you are involved in another collision, the air bags will not be in place to protect
you.
WARNING!
Deployed air bags and seat belt pretensioners cannot protect you in another collision.
Have the air bags, seat belt pretensioners,
and the seat belt retractor assemblies replaced by an authorized dealer immediately.
Also, have the Occupant Restraint Controller
System serviced as well.
37
NOTE:
• Air bag covers may not be obvious in the
interior trim, but they will open during air
bag deployment.
• After any collision, the vehicle should be
taken
to
an
authorized
dealer
immediately.
Enhanced Accident Response System
In the event of an impact, if the communication
network remains intact, and the power remains
intact, depending on the nature of the event, the
ORC will determine whether to have the Enhanced Accident Response System perform the
following functions:
• Cut off fuel to the engine.
• Flash hazard lights as long as the battery has
power or until the ignition switch is turned to
the “OFF” position.
• Turn on the interior lights, which remain on as
long as the battery has power or until the
ignition switch is turned to the “OFF” position.
• Unlock the doors automatically.
38
System Reset Procedure
In order to reset the Enhanced Accident Response System functions after an event, the
ignition switch must be changed from ignition
START or ON/RUN to ignition OFF.
Air Bag Warning Light
The air bags must be ready to
inflate for your protection in a collision. The Occupant Restraint Controller (ORC) monitors the internal
circuits and interconnecting wiring
associated with air bag system
electrical components.
The ORC monitors the readiness of the electronic parts of the air bag system whenever the
ignition switch is in the START or ON/RUN
position. If the ignition switch is in the OFF
position or in the ACC position, the air bag
system is not on and the air bags will not inflate.
The ORC contains a backup power supply
system that may deploy the air bags even if the
battery loses power or it becomes disconnected
prior to deployment.
The ORC turns on the Air Bag Warning Light in
the instrument panel for approximately four to
eight seconds for a self-check when the ignition
switch is first turned to the ON/RUN position.
After the self-check, the Air Bag Warning Light
will turn off. If the ORC detects a malfunction in
any part of the system, it turns on the Air Bag
Warning Light, either momentarily or continuously. A single chime will sound to alert you if
the light comes on again after initial startup.
The ORC also includes diagnostics that will
illuminate the instrument panel Air Bag Warning
Light if a malfunction is detected that could
affect the air bag system. The diagnostics also
record the nature of the malfunction. While the
air bag system is designed to be maintenance
free, if any of the following occurs, have an
authorized dealer service the air bag system
immediately.
• The Air Bag Warning Light does not come on
during the four to eight seconds when the
ignition switch is first turned to the ON/RUN
position.
• The Air Bag Warning Light remains on after
the four to eight-second interval.
• The Air Bag Warning Light comes on intermittently or remains on while driving.
NOTE:
If the speedometer, tachometer, or any engine related gauges are not working, the
Occupant Restraint Controller (ORC) may
also be disabled. In this condition the air
bags may not be ready to inflate for your
protection. Have an authorized dealer service the air bag system immediately.
WARNING!
Ignoring the Air Bag Warning Light in your
instrument panel could mean you won’t have
the air bags to protect you in a collision. If the
light does not come on as a bulb check when
the ignition is first turned on, stays on after
you start the vehicle, or if it comes on as you
drive, have an authorized dealer service the
air bag system immediately.
Redundant Air Bag Warning Light
If a fault with the Air Bag Warning
Light is detected, which could affect the Supplemental Restraint
System (“SRS”), the Redundant Air
Bag Warning Light will illuminate
on the instrument panel. The Redundant Air Bag Warning Light will stay on until
the fault is cleared. In addition, a single chime
will sound to alert you that the Redundant Air
Bag Warning Light has come on and a fault has
been detected. If the Redundant Air Bag Warning Light comes on intermittently or remains on
while driving have an authorized dealer service
the vehicle immediately. For additional information regarding the Redundant Air Bag Warning
Light refer to the “Instrument Panel” section of
this manual.
Maintaining Your Air Bag System
WARNING!
• Modifications to any part of the air bag
system could cause it to fail when you
need it. You could be injured if the air bag
system is not there to protect you. Do not
modify the components or wiring, including
adding any kind of badges or stickers to
the steering wheel hub trim cover or the
upper right side of the instrument panel.
Do not modify the front bumper, vehicle
body structure, or add aftermarket side
steps or running boards.
• It is dangerous to try to repair any part of
the air bag system yourself. Be sure to tell
anyone who works on your vehicle that it
has an air bag system.
(Continued)
39
WARNING! (Continued)
• Do not attempt to modify any part of your
air bag system. The air bag may inflate
accidentally or may not function properly if
modifications are made. Take your vehicle
to an authorized dealer for any air bag
system service. If your seat, including your
trim cover and cushion, needs to be serviced in any way (including removal or
loosening/tightening of seat attachment
bolts), take the vehicle to your authorized
dealer. Only manufacturer approved seat
accessories may be used. If it is necessary
to modify the air bag system for persons
with disabilities, contact your authorized
dealer.
Event Data Recorder (EDR)
This vehicle is equipped with an event data
recorder (EDR). The main purpose of an EDR is
to record, in certain crash or near crash-like
situations, such as an air bag deployment or
hitting a road obstacle, data that will assist in
understanding how a vehicle’s systems performed. The EDR is designed to record data
related to vehicle dynamics and safety systems
for a short period of time, typically 30 seconds
or less. The EDR in this vehicle is designed to
record such data as:
NOTE:
EDR data are recorded by your vehicle only
if a non-trivial crash situation occurs; no
data are recorded by the EDR under normal
driving conditions and no personal data
(e.g., name, gender, age, and crash location)
are recorded. However, other parties, such
as law enforcement, could combine the EDR
data with the type of personally identifying
data routinely acquired during a crash investigation.
• How various systems in your vehicle were
operating.
To read data recorded by an EDR, special
equipment is required, and access to the vehicle or the EDR is needed. In addition to the
vehicle manufacturer, other parties, such as law
enforcement, that have the special equipment,
can read the information if they have access to
the vehicle or the EDR.
• Whether or not the driver and passenger
safety belts were buckled/fastened.
• How far (if at all) the driver was pushing the
accelerator and/or brake pedal.
• How fast the vehicle was traveling.
These data can help provide a better understanding of the circumstances in which crashes
and injuries occur.
40
Child Restraints
Everyone in your vehicle needs to be buckled
up at all times, including babies and children.
Children 12 years or younger should ride properly buckled up in a rear seat, if available.
According to crash statistics, children are safer
when properly restrained in the rear seats
rather than in the front.
WARNING!
In a collision, an unrestrained child can become a projectile inside the vehicle. The
force required to hold even an infant on your
lap could become so great that you could not
hold the child, no matter how strong you are.
The child and others could be badly injured.
Any child riding in your vehicle should be in a
proper restraint for the child’s size.
There are different sizes and types of restraints
for children from newborn size to the child
almost large enough for an adult seat belt.
Always check the child seat Owner’s Manual to
make sure you have the correct seat for your
child. Carefully read and follow all the instructions and warnings in the child restraint Owner’s
Manual and on all the labels attached to the
child restraint.
Before buying any restraint system, make sure
that it has a label certifying that it meets all
applicable Safety Standards. You should also
make sure that you can install it in the vehicle
where you will use it.
41
Summary Of Recommendations For
Restraining Children In Vehicles
Child Size, Height, Weight Or Age
Recommended Type Of Child Restraint
Infants and Toddlers
Children who are two years old or younger
and who have not reached the height or
weight limits of their child restraint
Either an Infant Carrier or a Convertible Child
Restraint, facing rearward in the rear seat of
the vehicle
Small Children
Children who are at least two years old or
who have out-grown the height or weight limit
of their rear-facing child restraint
Forward-Facing Child Restraint with a fivepoint Harness, facing forward in the rear seat
of the vehicle
Larger Children
Children who have out-grown their forwardfacing child restraint, but are too small to
properly fit the vehicle’s seat belt
Belt Positioning Booster Seat and the vehicle
seat belt, seated in the rear seat of the vehicle
Children Too Large for Child Restraints
Children 12 years old or younger, who have
out-grown the height or weight limit of their
booster seat
Vehicle Seat Belt, seated in the rear seat of
the vehicle
Infants And Child Restraints
Safety experts recommend that children ride
rear-facing in the vehicle until they are two
years old or until they reach either the height or
weight limit of their rear-facing child restraint.
Two types of child restraints can be used rearfacing: infant carriers and convertible child
seats.
42
The infant carrier is only used rear-facing in the
vehicle. It is recommended for children from
birth until they reach the weight or height limit of
the infant carrier. Convertible child seats can be
used either rear-facing or forward-facing in the
vehicle. Convertible child seats often have a
higher weight limit in the rear-facing direction
than infant carriers do, so they can be used
rear-facing by children who have outgrown their
infant carrier but are still less than at least two
years old. Children should remain rear-facing
until they reach the highest weight or height
allowed by their convertible child seat.
WARNING!
• Never place a rear-facing child restraint in
front of an air bag. A deploying passenger
Advanced Front Air Bag can cause death
or serious injury to a child 12 years or
younger, including a child in a rear-facing
child restraint.
• Only use a rear-facing child restraint in a
vehicle with a rear seat.
Older Children And Child Restraints
Children who are two years old or who have
outgrown their rear-facing convertible child seat
can ride forward-facing in the vehicle. Forwardfacing child seats and convertible child seats
used in the forward-facing direction are for
children who are over two years old or who have
outgrown the rear-facing weight or height limit
of their rear-facing convertible child seat. Children should remain in a forward-facing child
seat with a harness for as long as possible, up
to the highest weight or height allowed by the
child seat.
All children whose weight or height is above the
forward-facing limit for the child seat should use
a belt-positioning booster seat until the vehicle’s
seat belts fit properly. If the child cannot sit with
knees bent over the vehicle’s seat cushion while
the child’s back is against the seatback, they
should use a belt-positioning booster seat. The
child and belt-positioning booster seat are held
in the vehicle by the seat belt.
WARNING! (Continued)
• When your child restraint is not in use,
secure it in the vehicle with the seat belt or
LATCH anchorages, or remove it from the
vehicle. Do not leave it loose in the vehicle.
In a sudden stop or accident, it could strike
the occupants or seatbacks and cause
serious personal injury.
WARNING!
• Improper installation can lead to failure of
an infant or child restraint. It could come
loose in a collision. The child could be
badly injured or killed. Follow the child
restraint manufacturer’s directions exactly
when installing an infant or child restraint.
• After a child restraint is installed in the vehicle, do not move the vehicle seat forward or
rearward because it can loosen the child
restraint attachments. Remove the child restraint before adjusting the vehicle seat position. When the vehicle seat has been adjusted, reinstall the child restraint.
Children Too Large For Booster Seats
Children who are large enough to wear the
shoulder belt comfortably, and whose legs are
long enough to bend over the front of the seat
when their back is against the seatback, should
use the seat belt in a rear seat. Use this simple
5-step test to decide whether the child can use
the vehicle’s seat belt alone:
1. Can the child sit all the way back against the
back of the vehicle seat?
2. Do the child’s knees bend comfortably over
the front of the vehicle seat – while they are
still sitting all the way back?
(Continued)
43
3. Does the shoulder belt cross the child’s
shoulder between their neck and arm?
4. Is the lap part of the seat belt as low as
possible, touching the child’s thighs and not
their stomach?
5. Can the child stay seated like this for the
whole trip?
If the answer to any of these questions was
“no,” then the child still needs to use a booster
seat in this vehicle. If the child is using the
lap/shoulder belt, check seat belt fit periodically
and make sure the seat belt buckle is latched. A
child’s squirming or slouching can move the
seat belt out of position. If the shoulder belt
contacts the face or neck, move the child closer
to the center of the vehicle, or use a booster
seat to position the seat belt on the child
correctly.
44
WARNING!
Never allow a child to put the shoulder belt
under an arm or behind their back. In a
crash, the shoulder belt will not protect a
child properly, which may result in serious
injury or death. A child must always wear
both the lap and shoulder portions of the seat
belt correctly.
Recommendations For Attaching Child Restraints
Restraint Type
Combined Weight
of the Child + Child
Restraint
Rear-Facing Child
Restraint
Up to 65 lbs
(29.5 kg)
Rear-Facing Child
Restraint
More than 65 lbs
(29.5 kg)
Forward-Facing Child
Restraint
Up to 65 lbs
(29.5 kg)
Forward-Facing Child
Restraint
More than 65 lbs
(29.5 kg)
Use any attachment method shown with an “X” Below
LATCH – Lower Anchors Only
Seat Belt Only
X
X
LATCH – Lower Anchors + Top Tether
Anchor
Seat Belt + Top
Tether Anchor
X
X
X
X
45
Lower Anchors And Tethers For Children
(LATCH) Restraint System
used with the top tether anchorage to install the
child restraint. Please see the following table for
more information.
LATCH Positions For Installing Child
Restraints In This Vehicle
Your vehicle is equipped with the child restraint
anchorage system called LATCH, which stands
for Lower Anchors and Tethers for CHildren.
The LATCH system has three vehicle anchor
points for installing LATCH-equipped child
seats. There are two lower anchorages located
at the back of the seat cushion where it meets
the seatback and one top tether anchorage
located behind the seating position. These anchorages are used to install LATCH-equipped
child seats without using the vehicle’s seat
belts. Some seating positions may have a top
tether anchorage but no lower anchorages. In
these seating positions, the seat belt must be
46
•
•
Lower Anchorage Symbol 2 anchorages
per seating position
Top Tether Anchorage Symbol
What is the weight limit (child’s weight + weight of the child
restraint) for using the LATCH anchorage system to attach the
child restraint?
65 lbs
(29.5 kg)
Use the LATCH anchorage system until the combined weight of
the child and the child restraint is 65 lbs (29.5 kg). Use the seat
belt and tether anchor instead of the LATCH system once the
combined weight is more than 65 lbs (29.5 kg).
Can the LATCH anchorages and the seat belt be used together
to attach a rear-facing or forward-facing child restraint?
No
Do not use the seat belt when you use the LATCH anchorage
system to attach a rear-facing or forward-facing child restraint.
Can two child restraints be attached using a common lower
LATCH anchorage?
No
Never “share” a LATCH anchorage with two or more child restraints. If the center position does not have dedicated LATCH
lower anchorages, use the seat belt to install a child seat in the
center position next to a child seat using the LATCH anchorages in an outboard position.
Can the rear-facing child restraint touch the back of the front
passenger seat?
Yes
The child seat may touch the back of the front passenger seat if
the child restraint manufacturer also allows contact. See your
child restraint owner’s manual for more information.
Can the head restraints be removed?
Yes
Center only may be removed.
47
Locating The LATCH Anchorages
Locating The Upper Tether Anchorages
The lower anchorages are round
bars that are found at the rear of
the seat cushion where it meets the
seatback, below the anchorage
symbols on the seatback. They are
just visible when you lean into the
rear seat to install the child restraint. You will
easily feel them if you run your finger along the
gap between the seatback and seat cushion.
There are tether strap anchorages
behind each rear seating position
located in the panel between the
rear seatback and the rear window.
They are found under a plastic
cover with the tether anchorage
symbol on it.
Tether Strap Anchorages
LATCH Anchorages
48
LATCH-compatible child restraint systems will
be equipped with a rigid bar or a flexible strap
on each side. Each will have a hook or connector to attach to the lower anchorage and a way
to tighten the connection to the anchorage.
Forward-facing child restraints and some rearfacing child restraints will also be equipped with
a tether strap. The tether strap will have a hook
at the end to attach to the top tether anchorage
and a way to tighten the strap after it is attached
to the anchorage.
Center Seat LATCH
If a child restraint installed in the center position
blocks the seat belt webbing or buckle for the
outboard position, do not use that outboard
position. If a child seat in the center position
blocks the outboard LATCH anchors or seat
belt, do not install a child seat in that outboard
position.
WARNING!
Never use the same lower anchorage to
attach more than one child restraint. Please
refer to “Installing The LATCH-Compatible
Child Restraint System” for typical installation instructions.
Always follow the directions of the child
restraint manufacturer when installing your
child restraint. Not all child restraint systems will be installed as described here.
To Install A LATCH-Compatible Child
Restraint
If the selected seating position has a Switchable
Automatic Locking Retractor (ALR) seat belt,
stow the seat belt, following the instructions
below. See the section “Installing Child Restraints Using the Vehicle Seat Belt” to check
what type of seat belt each seating position has.
1. Loosen the adjusters on the lower straps
and on the tether strap of the child seat so
that you can more easily attach the hooks or
connectors to the vehicle anchorages.
2. Place the child seat between the lower anchorages for that seating position. For some
second row seats, you may need to recline
the seat and/or raise the head restraint to get
a better fit. If the rear seat can be moved
forward and rearward in the vehicle, you
may wish to move it to its rear-most position
to make room for the child seat. You may
also move the front seat forward to allow
more room for the child seat.
3. Attach the lower hooks or connectors of the
child restraint to the lower anchorages in the
selected seating position.
4. If the child restraint has a tether strap, connect it to the top tether anchorage. See the
section “Installing Child Restraints Using the
Top Tether Anchorage” for directions to attach a tether anchor.
5. Tighten all of the straps as you push the child
restraint rearward and downward into the
seat. Remove slack in the straps according
to the child restraint manufacturer’s instructions.
6. Test that the child restraint is installed tightly
by pulling back and forth on the child seat at
the belt path. It should not move more than 1
inch (25.4 mm) in any direction.
How To Stow An Unused ALR Seat Belt:
When using the LATCH attaching system to
install a child restraint, stow all ALR seat belts
that are not being used by other occupants or
being used to secure child restraints. An unused
belt could injure a child if they play with it and
accidentally lock the seat belt retractor. Before
installing a child restraint using the LATCH
system, buckle the seat belt behind the child
restraint and out of the child’s reach. If the
buckled seat belt interferes with the child restraint installation, instead of buckling it behind
the child restraint, route the seat belt through
the child restraint belt path and then buckle it.
Do not lock the seat belt. Remind all children in
the vehicle that the seat belts are not toys and
that they should not play with them.
WARNING!
• Improper installation of a child restraint to
the LATCH anchorages can lead to failure
of the restraint. The child could be badly
injured or killed. Follow the child restraint
manufacturer’s directions exactly when installing an infant or child restraint.
(Continued)
49
WARNING! (Continued)
• Child restraint anchorages are designed to
withstand only those loads imposed by
correctly-fitted child restraints. Under no
circumstances are they to be used for
adult seat belts, harnesses, or for attaching other items or equipment to the vehicle.
50
Installing Child Restraints Using The
Vehicle Seat Belt
The seat belts in the passenger seating positions are equipped with a Switchable Automatic
Locking Retractor (ALR) that is designed to
keep the lap portion of the seat belt tight around
the child restraint so that it is not necessary to
use a locking clip. The ALR retractor can be
“switched” into a locked mode by pulling all of
the webbing out of the retractor and then letting
the webbing retract back into the retractor. If it is
locked, the ALR will make a clicking noise while
the webbing is pulled back into the retractor. For
additional information on ALR, refer to the “Automatic Locking Mode” description under “Occupant Restraints.”
Lap/Shoulder Belt Systems for Installing
Child Restraints in this Vehicle
What is the weight limit (child’s weight + weight of the child
restraint) for using the Tether Anchor with the seat belt to attach a
forward facing child restraint?
Weight limit
of the Child
Restraint
Always use the tether anchor when using the seat belt to install
a forward facing child restraint, up to the recommended weight
limit of the child restraint.
Can the rear-facing child restraint touch the back of the front
passenger seat?
Yes
Contact between the front passenger seat and the child restraint is allowed, if the child restraint manufacturer also allows
contact.
Can the head restraints be removed?
Yes
Center Only may be removed
Can the buckle stalk be twisted to tighten the seat belt against
the belt path of the child restraint?
No
Do not twist the buckle stalk in a seating position with an ALR
retractor.
Installing A Child Restraint With A
Switchable Automatic Locking Retractor
(ALR)
1. Place the child seat in the center of the
seating position. For some second row
seats, you may need to recline the seat
and/or raise the head restraint to get a better
fit. If the rear seat can be moved forward and
rearward in the vehicle, you may wish to
move it to its rear-most position to make
room for the child seat. You may also move
the front seat forward to allow more room for
the child seat.
2. Pull enough of the seat belt webbing from
the retractor to pass it through the seat belt
path of the child restraint. Do not twist the
belt webbing in the seat belt path.
back into the retractor. As the webbing retracts, you will hear a clicking sound. This
means the seat belt is now in the Automatic
Locking mode.
3. Slide the latch plate into the buckle until you
hear a “click”.
6. Try to pull the webbing out of the retractor. If
it is locked, you should not be able to pull out
any webbing. If the retractor is not locked,
repeat step 5.
4. Pull on the webbing to make the lap portion
tight against the child seat.
5. To lock the seat belt, pull down on the
shoulder part of the seat belt until you have
pulled all the seat belt webbing out of the
retractor. Then, allow the webbing to retract
7. Finally, pull up on any excess webbing to
tighten the lap portion around the child restraint while you push the child restraint
rearward and downward into the vehicle
seat.
51
8. If the child restraint has a top tether strap
and the seating position has a top tether
anchorage, connect the tether strap to the
anchorage and tighten the tether strap. See
the section “Installing Child Restraints Using
the Top Tether Anchorage” for directions to
attach a tether anchor.
9. Test that the child restraint is installed tightly
by pulling back and forth on the child seat at
the seat belt path. It should not move more
than 1 inch (25.4 mm) in any direction.
Any seat belt system will loosen with time, so
check the seat belt occasionally, and pull it tight
if necessary.
Installing Child Restraints Using The Top
Tether Anchorage
WARNING!
Do not attach a tether strap for a rear-facing
car seat to any location in front of the car
seat, including the seat frame or a tether
anchorage. Only attach the tether strap of a
(Continued)
52
WARNING! (Continued)
rear-facing car seat to the tether anchorage
that is approved for that seating position,
located behind the top of the vehicle seat.
See the section “Lower Anchors and Tethers
for CHildren (LATCH) Restraint System” for
the location of approved tether anchorages
in your vehicle.
1. Look behind the seating position where you plan to install the
child restraint to find the tether
anchorage. You may need to
move the seat forward to provide better access to the tether anchorage. If
there is no top tether anchorage for that
seating position, move the child restraint to
another position in the vehicle if one is
available.
2. Rotate or lift the cover to access the anchor
directly behind the seat where you are placing the child restraint.
3. Route the tether strap to provide the most
direct path for the strap between the anchor
and the child seat. If your vehicle is equipped
with adjustable rear head restraints, raise
the head restraint, and where possible, route
the tether strap under the head restraint and
between the two posts. If not possible, lower
the head restraint and pass the tether strap
around the outboard side of the head restraint.
Tether Strap Mounting
1 — Cover
3 — Attaching Strap
A — Tether Strap Hook
B — Tether Anchor
WARNING!
• An incorrectly anchored tether strap could
lead to increased head motion and possible injury to the child. Use only the anchorage position directly behind the child
seat to secure a child restraint top tether
strap.
• If your vehicle is equipped with a split rear
seat, make sure the tether strap does not
slip into the opening between the seatbacks as you remove slack in the strap.
Transporting Pets
4. Attach the tether strap hook of the child
restraint to the top tether anchorage as
shown in the diagram.
5. Remove slack in the tether strap according
to the child restraint manufacturer’s instructions.
Air Bags deploying in the front seat could harm
your pet. An unrestrained pet will be thrown
about and possibly injured, or injure a passenger during panic braking or in a collision.
Pets should be restrained in the rear seat in pet
harnesses or pet carriers that are secured by
seat belts.
ENGINE BREAK-IN
RECOMMENDATIONS
For vehicles equipped with the 3.6L or 5.7L
use the following engine break-in recommendations:
A long break-in period is not required for the
drivetrain (engine, transmission, clutch, and
rear axle) in your new vehicle.
Drive moderately during the first 300 mi
(500 km). After the initial 60 mi (100 km),
speeds up to 50 or 55 mph (80 or 90 km/h) are
desirable.
While cruising, brief full-throttle acceleration
within the limits of local traffic laws contributes
to a good break-in. However, wide-open throttle
acceleration in low gear can be detrimental and
should be avoided.
The engine oil, transmission fluid, and axle
lubricant installed at the factory is high-quality
and energy-conserving. Oil, fluid, and lubricant
changes should be consistent with anticipated
climate and conditions under which vehicle operations will occur. For the recommended vis53
cosity and quality grades, refer to “Maintenance
Procedures” in “Maintaining Your Vehicle”.
wearing in occurs mainly during the first 500
miles (805 km) and continues through the first
oil change interval.
CAUTION!
Never use Non-Detergent Oil or Straight
Mineral Oil in the engine or damage may
result.
It is recommended for the operator to observe
the following driving behaviors during the new
vehicle break-in period:
NOTE:
A new engine may consume some oil during
its first few thousand miles (kilometers) of
operation. This should be considered a normal part of the break-in and not interpreted
as an indication of difficulty. Please check
your oil level with the engine oil indicator
often during the break in period. Add oil as
required.
For vehicles equipped with the 6.4L use the
following engine break-in recommendations:
Despite modern technology and World Class
manufacturing methods, the moving parts of the
vehicle must still wear in with each other. This
54
0 to 100 miles (0 to 161 km):
• Do not allow the engine to operate at idle for
an extended period of time.
• Push the accelerator pedal slowly and not
more than halfway to avoid rapid
acceleration.
• Avoid aggressive braking.
• Drive with the engine speed less than 3,500
RPM.
• Maintain vehicle speed below 55 mph
(88 km/h) and observe local speed limits.
100 to 300 miles (161 to 483 km):
• Push the accelerator pedal slowly and not
more than halfway to avoid rapid acceleration in lower gears (1st to 3rd gears).
• Avoid aggressive braking.
• Drive with the engine speed less than 5,000
RPM.
• Maintain vehicle speed below 70 mph
(112 km/h) and observe local speed limits.
300 to 500 miles (483 to 805 km):
• Exercise the full engine rpm range, shifting
manually (paddles or gear shift) at higher
rpms when possible.
• Do not perform sustained operation with the
accelerator pedal at wide open throttle.
• Maintain vehicle speed below 85 mph
(136 km/h) and observe local speed limits.
For the first 1500 mi (2414 km):
• Do not participate in track events, sport driving schools, or similar activities during the
first 1500 mi (2414 km).
NOTE:
Check engine oil with every refueling and
add if necessary. Oil and fuel consumption
may be higher through the first oil change
interval.
SAFETY TIPS
Transporting Passengers
NEVER TRANSPORT PASSENGERS IN THE
CARGO AREA.
WARNING!
• Do not leave children or animals inside
parked vehicles in hot weather. Interior
heat build-up may cause serious injury or
death.
• It is extremely dangerous to ride in a cargo
area, inside or outside of a vehicle. In a
collision, people riding in these areas are
more likely to be seriously injured or killed.
• Do not allow people to ride in any area of
your vehicle that is not equipped with seats
and seat belts.
• Be sure everyone in your vehicle is in a
seat and using a seat belt properly.
Exhaust Gas
WARNING!
Exhaust gases can injure or kill. They contain carbon monoxide (CO), which is colorless and odorless. Breathing it can make you
unconscious and can eventually poison you.
To avoid breathing (CO), follow these safety
tips:
• Do not run the engine in a closed garage
or in confined areas any longer than
needed to move your vehicle in or out of
the area.
• If you are required to drive with the trunk/
liftgate/rear doors open, make sure that all
windows are closed and the climate control BLOWER switch is set at high speed.
DO NOT use the recirculation mode.
• If it is necessary to sit in a parked vehicle
with the engine running, adjust your heating or cooling controls to force outside air
into the vehicle. Set the blower at high
speed.
The best protection against carbon monoxide
entry into the vehicle body is a properly maintained engine exhaust system.
Whenever a change is noticed in the sound of
the exhaust system, when exhaust fumes can
be detected inside the vehicle, or when the
underside or rear of the vehicle is damaged,
have a competent mechanic inspect the complete exhaust system and adjacent body areas
for broken, damaged, deteriorated, or mispositioned parts. Open seams or loose connections
could permit exhaust fumes to seep into the
passenger compartment. In addition, inspect
the exhaust system each time the vehicle is
raised for lubrication or oil change. Replace as
required.
Safety Checks You Should Make
Inside The Vehicle
Seat Belts
Inspect the seat belt system periodically, checking for cuts, frays, and loose parts. Damaged
parts must be replaced immediately. Do not
disassemble or modify the system.
55
Front seat belt assemblies must be replaced
after a collision. Rear seat belt assemblies must
be replaced after a collision if they have been
damaged (i.e., bent retractor, torn webbing,
etc.). If there is any question regarding seat belt
or retractor condition, replace the seat belt.
Air Bag Warning Light
The light should come on and remain on for four to eight seconds
as a bulb check when the ignition
switch is first turned ON. If the light
is not lit during starting, see your
authorized dealer. If the light stays
on, flickers, or comes on while driving, have the
system checked by an authorized dealer.
Defroster
Check operation by selecting the defrost mode
and place the blower control on high speed. You
should be able to feel the air directed against
the windshield. See your authorized dealer for
service if your defroster is inoperable.
Floor Mat Safety Information
Always use floor mats designed to fit the footwell of your vehicle. Use only floor mats that
56
leave the pedal area unobstructed and that are
firmly secured so that they cannot slip out of
position and interfere with the pedals or impair
safe operation of your vehicle in other ways.
WARNING!
Pedals that cannot move freely can cause
loss of vehicle control and increase the risk
of serious personal injury.
• Always make sure that floor mats are
properly attached to the floor mat fasteners.
• Never place or install floor mats or other
floor coverings in the vehicle that cannot
be properly secured to prevent them from
moving and interfering with the pedals or
the ability to control the vehicle.
• Never put floor mats or other floor coverings on top of already installed floor mats.
Additional floor mats and other coverings
will reduce the size of the pedal area and
interfere with the pedals.
(Continued)
WARNING! (Continued)
• Check mounting of mats on a regular
basis. Always properly reinstall and secure
floor mats that have been removed for
cleaning.
• Always make sure that objects cannot fall
into the driver footwell while the vehicle is
moving. Objects can become trapped under the brake pedal and accelerator pedal
causing a loss of vehicle control.
• If required, mounting posts must be properly installed, if not equipped from the
factory.
Failure to properly follow floor mat installation or mounting can cause interference with
the brake pedal and accelerator pedal operation causing loss of control of the vehicle.
Periodic Safety Checks You Should
Make Outside The Vehicle
Tires
Examine tires for excessive tread wear and
uneven wear patterns. Check for stones, nails,
glass, or other objects lodged in the tread or
sidewall. Inspect the tread for cuts and cracks.
Inspect sidewalls for cuts, cracks and bulges.
Check the wheel nuts for tightness. Check the
tires (including spare) for proper cold inflation
pressure.
Lights
Have someone observe the operation of brake
lights and exterior lights while you work the
controls. Check turn signal and high beam
indicator lights on the instrument panel.
Door Latches
Check for positive closing, latching, and locking.
Fluid Leaks
Check area under vehicle after overnight parking for fuel, engine coolant, oil, or other fluid
leaks. Also, if gasoline fumes are detected or if
fuel, power steering fluid (if equipped), or brake
fluid leaks are suspected, the cause should be
located and corrected immediately.
57
58
3
UNDERSTANDING THE FEATURES OF YOUR
VEHICLE
• MIRRORS . . . . . . . . . . . . . . . . . . . . . . . . . . .
• Automatic Dimming Mirror — If Equipped . . . . . . .
• Outside Mirrors . . . . . . . . . . . . . . . . . . . . . .
• Outside Mirrors Folding Feature . . . . . . . . . . . .
• Power Mirrors . . . . . . . . . . . . . . . . . . . . . . .
• Heated Mirrors — If Equipped . . . . . . . . . . . . . .
• Vanity Mirrors . . . . . . . . . . . . . . . . . . . . . . . .
• Illuminated Vanity Mirrors . . . . . . . . . . . . . . . .
• “Slide-On-Rod” And Extender Features Of Sun Visor
• BLIND SPOT MONITORING (BSM) — IF EQUIPPED . .
• Rear Cross Path — If Equipped . . . . . . . . . . . . .
• Modes Of Operation . . . . . . . . . . . . . . . . . . . .
• SEATS . . . . . . . . . . . . . . . . . . . . . . . . . . . . .
• Power Seats . . . . . . . . . . . . . . . . . . . . . . . .
• Front Heated Seats — If Equipped . . . . . . . . . . .
• Front Ventilated Seats — If Equipped . . . . . . . . .
• Manual Forward Or Rearward Adjustment . . . . . . .
• Manual Front Seatback Recline . . . . . . . . . . . . .
.
.
.
.
.
.
.
.
.
.
.
.
.
.
.
.
.
.
.
.
.
.
.
.
.
.
.
.
.
.
.
.
.
.
.
.
.
.
.
.
.
.
.
.
.
.
.
.
.
.
.
.
.
.
.
.
.
.
.
.
.
.
.
.
.
.
.
.
.
.
.
.
.
.
.
.
.
.
.
.
.
.
.
.
.
.
.
.
.
.
.
.
.
.
.
.
.
.
.
.
.
.
.
.
.
.
.
.
.64
.64
.64
.65
.65
.65
.65
.65
.66
.66
.69
.70
.71
.71
.72
.73
.73
.74
59
• Passenger Seat Easy Entry . . . . . . . . . . . . . . . . . .
• Head Restraints . . . . . . . . . . . . . . . . . . . . . . . .
• Folding Rear Seat . . . . . . . . . . . . . . . . . . . . . . .
• TO OPEN AND CLOSE THE HOOD . . . . . . . . . . . . . .
• LIGHTS . . . . . . . . . . . . . . . . . . . . . . . . . . . . . . .
• Headlight Switch . . . . . . . . . . . . . . . . . . . . . . . .
• Automatic Headlights — If Equipped . . . . . . . . . . . .
• Headlights On With Wipers (Available With Automatic
Headlights Only) . . . . . . . . . . . . . . . . . . . . . . . .
• Automatic High Beam Headlamp Control — If Equipped
• Headlight Time Delay . . . . . . . . . . . . . . . . . . . . .
• Daytime Running Lights (DRL) — If Equipped . . . . . .
• Lights-On Reminder . . . . . . . . . . . . . . . . . . . . . .
• Fog Lights — If Equipped . . . . . . . . . . . . . . . . . .
• Multifunction Lever . . . . . . . . . . . . . . . . . . . . . .
• Turn Signals . . . . . . . . . . . . . . . . . . . . . . . . . .
• Lane Change Assist . . . . . . . . . . . . . . . . . . . . . .
• High/Low Beam Switch . . . . . . . . . . . . . . . . . . . .
• Flash-To-Pass . . . . . . . . . . . . . . . . . . . . . . . . .
• Map/Reading Lights . . . . . . . . . . . . . . . . . . . . . .
• Interior Lights . . . . . . . . . . . . . . . . . . . . . . . . .
• WINDSHIELD WIPERS AND WASHERS . . . . . . . . . . .
• Intermittent Wiper System . . . . . . . . . . . . . . . . . .
• Mist Feature . . . . . . . . . . . . . . . . . . . . . . . . . . .
• Windshield Washers . . . . . . . . . . . . . . . . . . . . . .
• Headlights On With Wipers (Available With Automatic
Headlights Only) . . . . . . . . . . . . . . . . . . . . . . . .
60
.
.
.
.
.
.
.
.
.
.
.
.
.
.
.
.
.
.
.
.
.
.
.
.
.
.
.
.
.
.
.
.
.
.
.
.
.
.
.
.
.
.
.74
.74
.75
.76
.77
.77
.78
.
.
.
.
.
.
.
.
.
.
.
.
.
.
.
.
.
.
.
.
.
.
.
.
.
.
.
.
.
.
.
.
.
.
.
.
.
.
.
.
.
.
.
.
.
.
.
.
.
.
.
.
.
.
.
.
.
.
.
.
.
.
.
.
.
.
.
.
.
.
.
.
.
.
.
.
.
.
.
.
.
.
.
.
.
.
.
.
.
.
.
.
.
.
.
.
.
.
.
.
.
.
.78
.78
.79
.79
.80
.80
.80
.80
.81
.81
.81
.81
.81
.82
.83
.83
.83
. . . . . . .83
• Rain Sensing Wipers — If Equipped . . . . . . . . . . .
• TILT/TELESCOPING STEERING COLUMN . . . . . . . .
• POWER TILT/TELESCOPING STEERING COLUMN —
IF EQUIPPED . . . . . . . . . . . . . . . . . . . . . . . . . .
• HEATED STEERING WHEEL — IF EQUIPPED . . . . . .
• ELECTRONIC SPEED CONTROL — IF EQUIPPED . . .
• To Activate . . . . . . . . . . . . . . . . . . . . . . . . . .
• To Set A Desired Speed . . . . . . . . . . . . . . . . . . .
• To Deactivate . . . . . . . . . . . . . . . . . . . . . . . . .
• To Resume Speed . . . . . . . . . . . . . . . . . . . . . .
• To Vary The Speed Setting . . . . . . . . . . . . . . . . .
• To Accelerate For Passing . . . . . . . . . . . . . . . . .
• ADAPTIVE CRUISE CONTROL (ACC) — IF EQUIPPED
• Adaptive Cruise Control (ACC) Operation . . . . . . . .
• Activating Adaptive Cruise Control (ACC) . . . . . . . .
• To Activate/Deactivate . . . . . . . . . . . . . . . . . . . .
• To Set A Desired ACC Speed . . . . . . . . . . . . . . . .
• To Cancel . . . . . . . . . . . . . . . . . . . . . . . . . . .
• To Turn Off . . . . . . . . . . . . . . . . . . . . . . . . . .
• To Resume . . . . . . . . . . . . . . . . . . . . . . . . . .
• To Vary The Speed Setting . . . . . . . . . . . . . . . . .
• Setting The Following Distance In ACC. . . . . . . . . .
• Overtake Aid . . . . . . . . . . . . . . . . . . . . . . . . .
• Adaptive Cruise Control (ACC) Menu . . . . . . . . . . .
• Display Warnings And Maintenance . . . . . . . . . . . .
• Precautions While Driving With ACC . . . . . . . . . . .
• Normal (Fixed Speed) Electronic Speed Control Mode .
. . . . . .84
. . . . . .84
.
.
.
.
.
.
.
.
.
.
.
.
.
.
.
.
.
.
.
.
.
.
.
.
.
.
.
.
.
.
.
.
.
.
.
.
.
.
.
.
.
.
.
.
.
.
.
.
.
.
.
.
.
.
.
.
.
.
.
.
.
.
.
.
.
.
.
.
.
.
.
.
.
.
.
.
.
.
.
.
.
.
.
.
.
.
.
.
.
.
.
.
.
.
.
.
.
.
.
.
.
.
.
.
.
.
.
.
.
.
.
.
.
.
.
.
.
.
.
.
.85
.86
.86
.87
.87
.87
.87
.87
.88
.89
.90
.90
.91
.91
.91
.92
.92
.92
.93
.95
.95
.96
.97
.99
61
• FORWARD COLLISION WARNING (FCW) — IF EQUIPPED . . . . .101
• Forward Collision Warning (FCW) Operation . . . . . . . . . . . . . .101
• Turning FCW ON Or OFF. . . . . . . . . . . . . . . . . . . . . . . . . .102
• Changing FCW Status . . . . . . . . . . . . . . . . . . . . . . . . . . .102
• Service FCW Warning . . . . . . . . . . . . . . . . . . . . . . . . . . .103
• PARKSENSE® REAR PARK ASSIST — IF EQUIPPED . . . . . . . . .103
• ParkSense® Sensors . . . . . . . . . . . . . . . . . . . . . . . . . . . .103
• ParkSense® Warning Display . . . . . . . . . . . . . . . . . . . . . . .103
• ParkSense® Display . . . . . . . . . . . . . . . . . . . . . . . . . . . .103
• Enabling And Disabling ParkSense®. . . . . . . . . . . . . . . . . . .106
• Service The ParkSense® Rear Park Assist System . . . . . . . . . .106
• Cleaning The ParkSense® System . . . . . . . . . . . . . . . . . . . .106
• ParkSense® System Usage Precautions . . . . . . . . . . . . . . . .107
• PARKVIEW® REAR BACK UP CAMERA — IF EQUIPPED . . . . . .108
• OVERHEAD CONSOLE . . . . . . . . . . . . . . . . . . . . . . . . . . .109
• Courtesy/Reading Lights . . . . . . . . . . . . . . . . . . . . . . . . .109
• Sunglasses Storage . . . . . . . . . . . . . . . . . . . . . . . . . . . .109
• POWER SUNROOF — IF EQUIPPED . . . . . . . . . . . . . . . . . . .109
• Opening Sunroof — Express . . . . . . . . . . . . . . . . . . . . . . .110
• Opening Sunroof — Manual Mode . . . . . . . . . . . . . . . . . . . .110
• Closing Sunroof — Express . . . . . . . . . . . . . . . . . . . . . . . .110
• Closing Sunroof — Manual Mode . . . . . . . . . . . . . . . . . . . . .110
• Pinch Protect Feature. . . . . . . . . . . . . . . . . . . . . . . . . . . .110
• Venting Sunroof — Express . . . . . . . . . . . . . . . . . . . . . . . .111
• Sunshade Operation . . . . . . . . . . . . . . . . . . . . . . . . . . . .111
• Wind Buffeting . . . . . . . . . . . . . . . . . . . . . . . . . . . . . . .111
62
•
•
•
•
• Sunroof Maintenance . . . . . . .
• Ignition Off Operation . . . . . .
ELECTRICAL POWER OUTLETS
CUPHOLDERS . . . . . . . . . . . .
• Front Cupholders . . . . . . . . .
• Rear Cupholders . . . . . . . . .
STORAGE . . . . . . . . . . . . . . .
• Glove Compartment . . . . . . .
• Console Storage . . . . . . . . .
REAR WINDOW FEATURES . . .
• Rear Window Defroster . . . . .
.
.
.
.
.
.
.
.
.
.
.
.
.
.
.
.
.
.
.
.
.
.
.
.
.
.
.
.
.
.
.
.
.
.
.
.
.
.
.
.
.
.
.
.
.
.
.
.
.
.
.
.
.
.
.
.
.
.
.
.
.
.
.
.
.
.
.
.
.
.
.
.
.
.
.
.
.
.
.
.
.
.
.
.
.
.
.
.
.
.
.
.
.
.
.
.
.
.
.
.
.
.
.
.
.
.
.
.
.
.
.
.
.
.
.
.
.
.
.
.
.
.
.
.
.
.
.
.
.
.
.
.
.
.
.
.
.
.
.
.
.
.
.
.
.
.
.
.
.
.
.
.
.
.
.
.
.
.
.
.
.
.
.
.
.
.
.
.
.
.
.
.
.
.
.
.
.
.
.
.
.
.
.
.
.
.
.
.
.
.
.
.
.
.
.
.
.
.
.111
.111
.111
.113
.113
.113
.114
.114
.114
.115
.115
63
MIRRORS
Outside Mirrors
Automatic Dimming Mirror — If
Equipped
To receive maximum benefit, adjust the outside
mirror(s) to center on the adjacent lane of traffic
and a slight overlap of the view obtained from
the inside mirror.
A single ball joint mirror is provided in the
vehicle. It is a twist on mirror that has a fixed
position at the windshield. The mirror installs on
the windshield button with a counterclockwise
rotation and requires no tools for mounting. The
mirror head can be adjusted up, down, left, and
right for various drivers. The mirror should be
adjusted to center on the view through the rear
window.
This mirror automatically adjusts for headlight
glare from vehicles behind you.
NOTE:
• The Automatic Dimming Mirror feature is
disabled when the vehicle is in reverse
gear to improve rear view viewing.
• The Automatic Dimming Mirror feature
can be turned on or off using the
Uconnect® System, refer to “Uconnect®
Settings” in “Understanding Your Instrument Panel” for further information.
64
NOTE:
The passenger side convex outside mirror
will give a much wider view to the rear, and
especially of the lane next to your vehicle.
Automatic Dimming Mirror
CAUTION!
To avoid damage to the mirror during cleaning, never spray any cleaning solution directly onto the mirror. Apply the solution onto
a clean cloth and wipe the mirror clean.
WARNING!
Vehicles and other objects seen in the passenger side convex mirror will look smaller
and farther away than they really are. Relying too much on your passenger side convex
mirror could cause you to collide with another vehicle or other object. Use your inside
mirror when judging the size or distance of a
vehicle seen in the passenger side convex
mirror.
Outside Mirrors Folding Feature
Heated Mirrors — If Equipped
The mirrors are equipped with a rotational
hinge. The mirrors have one detent (clockwise)
towards the rear of the vehicle and three detent’s (counterclockwise) towards the front of
the vehicle.
These mirrors are heated to melt frost
or ice. This feature can be activated
whenever you turn on the rear window
defroster (if equipped). Refer to “Rear
Window Features” in “Understanding The Features Of Your Vehicle” for further information.
Vanity Mirrors
Power Mirror Controls
The power mirror controls consist of mirror
select buttons and a four-way mirror control
switch. To adjust a mirror, press either the L
(left) or R (right) to select the mirror that you
want to adjust.
Folding Mirrors
Power Mirrors
The power mirror controls are located on the
driver-side door trim panel.
NOTE:
A light in the selected button will illuminate
indicating the mirror is activated and can be
adjusted.
A vanity mirror is located on the sun visor. To
use the mirror, rotate the sun visor downward
and swing the mirror cover upward.
Illuminated Vanity Mirrors
An illuminated vanity mirror is on the sun visor.
To use the mirror, rotate the sun visor downward
and swing the mirror cover upward. The light
turns on automatically. Close the mirror cover to
turn off the light.
Using the mirror control switch, press on any of
the four arrows for the direction that you want
the mirror to move.
65
Illuminated Vanity Mirror
“Slide-On-Rod” And Extender
Features Of Sun Visor
To use the “Slide-On-Rod” feature of the sun
visor, rotate the sun visor downward and swing
the sun visor so it is parallel to the side window,
grabbing the sun visor with your left hand pull
rearwards until the sun visor is in the desired
position. To use the extender feature of the sun
visor, grab the extender which is located at the
rear of the visor and pull rearward.
66
Slide-On-Rod Extender
BLIND SPOT MONITORING
(BSM) — IF EQUIPPED
The Blind Spot Monitoring (BSM) system uses
two radar-based sensors, located inside the
rear bumper fascia, to detect highway licensable vehicles (automobiles, trucks, motorcycles, etc.) that enter the blind spot zones from
the rear/front/side of the vehicle.
Rear Detection Zones
When the vehicle is started, the BSM warning
light will momentarily illuminate in both outside
rear view mirrors to let the driver know that the
system is operational.
Automatic Transmission Vehicles
The BSM system sensors operate when the
vehicle is in any forward gear or REVERSE and
enters stand-by mode when the vehicle is in
PARK.
Manual Transmission Vehicles
The BSM system sensors operate when the
vehicle is in any gear and enters stand-by mode
when the Park Brake is engaged, the vehicle is
not in REVERSE, and the vehicle is stationary.
BSM Warning Light
The BSM detection zone covers approximately
one lane width on both sides of the vehicle (12
ft or 3.8 m). The zone length starts at the
outside rear view mirror and extends approximately 10 ft (3 m) beyond the rear bumper of the
vehicle. The BSM system monitors the detection zones on both sides of the vehicle when the
vehicle speed reaches approximately 6 mph
(10 km/h) or higher and will alert the driver of
vehicles in these areas.
NOTE:
• The BSM system does NOT alert the
driver about rapidly approaching vehicles
that are outside the detection zones.
• The BSM system detection zone DOES
NOT change if your vehicle is towing a
trailer. Therefore, visually verify the adjacent lane is clear for both your vehicle
and trailer before making a lane change. If
the trailer or other object (i.e., bicycle,
sports equipment) extends beyond the
side of your vehicle, this may result in the
BSM warning light remaining illuminated
the entire time the vehicle is in a forward
gear.
The BSM system notifies the driver of objects in
the detection zones by illuminating the BSM
warning light located in the outside mirrors in
addition to sounding an audible (chime) alert
and reducing the radio volume. Refer to “Modes
Of Operation” for further information.
The BSM system monitors the detection zone
from three different entry points (side, rear,
front) while driving to see if an alert is necessary. The BSM system will issue an alert during
these types of zone entries.
The area on the rear fascia where the radar
sensors are located must remain free of snow,
ice, and dirt/road contamination so that the
BSM system can function properly. Do not block
the area of the rear fascia where the radar
sensors are located with foreign objects (bumper stickers, bicycle racks, etc.).
67
Entering From The Side
Entering From The Rear
Overtaking Traffic
Vehicles that move into your adjacent lanes
from either side of the vehicle.
Vehicles that come up from behind your vehicle
on either side and enter the rear detection zone
with a relative speed of less than 30 mph
(48 km/h).
If you pass another vehicle slowly (with a relative speed of less than 10 mph (16 km/h) and
the vehicle remains in the blind spot for approximately 1.5 seconds, the warning light will be
illuminated. If the difference in speed between
the two vehicles is greater than 10 mph
(16 km/h), the warning light will not illuminate.
Side Monitoring
Rear Monitoring
Overtaking/Approaching
The BSM system is designed not to issue an
alert on stationary objects such as guardrails,
posts, walls, foliage, berms, etc. However, occasionally the system may alert on such
68
objects. This is normal operation and your vehicle does not require service.
Stationary Objects
WARNING!
The Blind Spot Monitoring system is only an
aid to help detect objects in the blind spot
zones. The BSM system is not designed to
detect pedestrians, bicyclists, or animals.
Even if your vehicle is equipped with the
BSM system, always check your vehicle’s
mirrors, glance over your shoulder, and use
your turn signal before changing lanes. Failure to do so can result in serious injury or
death.
Overtaking/Passing
Rear Cross Path — If Equipped
The BSM system will not alert you of objects
that are traveling in the opposite direction of the
vehicle in adjacent lanes.
Opposing Traffic
The Rear Cross Path (RCP) feature is intended
to aid the drivers when backing out of parking
spaces where their vision of oncoming vehicles
may be blocked. Proceed slowly and cautiously
out of the parking space until the rear end of the
vehicle is exposed. The RCP system will then
have a clear view of the cross traffic and if an
oncoming vehicle is detected, alert the driver.
69
When RCP is on and the vehicle is in REVERSE, the driver is alerted using both the
visual and audible alarms, including reducing
the radio volume.
RCP Detection Zones
RCP monitors the rear detection zones on both
sides of the vehicle, for objects that are moving
toward the side of the vehicle with a minimum
speed of approximately 3 mph (5 km/h), to
objects moving a maximum of approximately
20 mph (32 km/h), such as in parking lot situations.
NOTE:
In a parking lot situation, oncoming vehicles
can be obscured by vehicles parked on
either side. If the sensors are blocked by
other structures or vehicles, the system will
not be able to alert the driver.
70
WARNING!
RCP is not a Back Up Aid system. It is
intended to be used to help a driver detect an
oncoming vehicle in a parking lot situation.
Drivers must be careful when backing up,
even when using RCP. Always check carefully behind your vehicle, look behind you,
and be sure to check for pedestrians, animals, other vehicles, obstructions, and blind
spots before backing up. Failure to do so can
result in serious injury or death.
Modes Of Operation
Three selectable modes of operation are available in the Uconnect® System. Refer to
“Uconnect® Settings” in “Understanding Your
Instrument Panel” for further information.
Blind Spot Alert Lights Only
When operating in Blind Spot Alert mode, the
BSM system will provide a visual alert in the
appropriate side view mirror based on a detected object. However, when the system is
operating in Rear Cross Path mode, the system
will respond with both visual and audible alerts
when a detected object is present. Whenever
an audible alert is requested, the radio volume
is reduced.
Blind Spot Alert Lights/Chime
When operating in Blind Spot Alert Lights/
Chime mode, the BSM system will provide a
visual alert in the appropriate side view mirror
based on a detected object. If the turn signal is
then activated, and it corresponds to an alert
present on that side of the vehicle, an audible
chime will also be sounded. Whenever a turn
signal and detected object are present on the
same side at the same time, both the visual and
audio alerts will be issued. In addition to the
audible alert the radio (if on) volume will be
reduced.
NOTE:
SEATS
• Whenever an audible alert is requested by
the BSM system, the radio volume is reduced.
Seats are a part of the Occupant Restraint
System of the vehicle.
• If the hazard flashers are on, the system
will request the appropriate visual alert
only.
WARNING!
• It is dangerous to ride in a cargo area,
inside or outside of a vehicle. In a collision,
people riding in these areas are more likely
to be seriously injured or killed.
• Do not allow people to ride in any area of
your vehicle that is not equipped with seats
and seat belts. In a collision, people riding
in these areas are more likely to be seriously injured or killed.
• Be sure everyone in your vehicle is in a
seat and using a seat belt properly.
When the system is in RCP, the system shall
respond with both visual and audible alerts
when a detected object is present. Whenever
an audible alert is requested, the radio volume
is reduced. Turn/hazard signal status is ignored;
the RCP state always requests the chime.
Blind Spot Alert Off
When the BSM system is turned off there will be
no visual or audible alerts from either the BSM
or RCP systems.
NOTE:
The BSM system will store the current operating mode when the vehicle is shut off.
Each time the vehicle is started the previously stored mode will be recalled and used.
Power Seats
The power seat switches are located on the
outboard side of the front seat cushions. The
power seat switches are used to control the
position of the seat.
Power Seat Switch
Adjusting The Seat Forward Or Rearward
The seat can be adjusted both forward and
rearward. Push the seat switch forward or rearward, the seat will move in the direction of the
switch. Release the switch when the desired
position has been reached.
Adjusting The Seat Up Or Down
The height of the seats can be adjusted up or
down. Pull upward or push downward on the
seat switch, the seat will move in the direction of
the switch. Release the switch when the desired
position is reached.
71
Tilting The Seat Up Or Down
The angle of the seat cushion can be adjusted
in four directions. Pull upward or push downward on the front or rear of the seat switch, the
front or rear of the seat cushion will move in the
direction of the switch. Release the switch when
the desired position is reached.
Power Lumbar — If Equipped
Vehicles equipped with power driver or passenger seats are also equipped with power lumbar.
The power lumbar switch is located on the
outboard side of the power seat. Push the
switch forward to increase the lumbar support.
Push the switch rearward to decrease the lumbar support. Pushing upward or downward on
the switch will raise and lower the position of the
support.
WARNING! (Continued)
• Do not ride with the seatback reclined so
that the shoulder belt is no longer resting
against your chest. In a collision you could
slide under the seat belt, which could
result in serious injury or death.
Power Lumbar Switch
WARNING!
• Adjusting a seat while driving may be
dangerous. Moving a seat while driving
could result in loss of control which could
cause a collision and serious injury or
death.
• Seats should be adjusted before fastening
the seat belts and while the vehicle is
parked. Serious injury or death could result
from a poorly adjusted seat belt.
(Continued)
72
CAUTION!
Do not place any article under a power seat
or impede its ability to move as it may cause
damage to the seat controls. Seat travel may
become limited if movement is stopped by an
obstruction in the seat’s path.
Front Heated Seats — If Equipped
The front heated seats control buttons are located within the Uconnect® system. You can
gain access to the control buttons through the
climate screen or the controls screen.
• Press the heated seat button
the High setting ON.
once to turn
• Press the heated seat button
time to turn the Low setting ON.
a second
a third time
• Press the heated seat button
to turn the heating elements OFF.
If the HI-level setting is selected, the system will
automatically switch to LO-level after approximately 60 minutes of continuous operation. At
that time, the display will change from HI to LO,
indicating the change. The LO-level setting will
turn OFF automatically after approximately 45
minutes.
NOTE:
The engine must be running for the heated
seats to operate.
This feature can be programmed through the
Uconnect® system. Refer to “Uconnect® Settings” in “Understanding Your Instrument Panel”
for further information.
WARNING!
• Persons who are unable to feel pain to the
skin because of advanced age, chronic
illness, diabetes, spinal cord injury, medication, exhaustion or other physical condition must exercise care when using the
seat heater. It may cause burns even at
low temperatures, especially if used for
long periods of time.
• Do not place anything on the seat or
seatback that insulates against heat, such
as a blanket or cushion. This may cause
the seat heater to overheat. Sitting in a
seat that has been overheated could
cause serious burns due to the increased
surface temperature of the seat.
Front Ventilated Seats — If
Equipped
Located in the seat cushion and seat back are
small fans that draw the air from the passenger
compartment and move air through fine perforations in the seat cover to help keep the driver
and front passenger cooler in higher ambient
temperatures. The fans operate at two speeds,
HIGH and LOW.
The front ventilated seats control buttons are
located within the Uconnect® system. You can
gain access to the control buttons through the
climate screen or the controls screen.
• Press the ventilated seat button
choose HIGH.
• Press the ventilated seat button
time to choose LOW.
once to
a second
a third
• Press the ventilated seat button
time to turn the ventilated seat OFF.
NOTE:
The engine must be running for the ventilated seats to operate.
Manual Forward Or Rearward
Adjustment
The adjusting bar is located at the front of the
seat, near the floor. Pull the bar upward to move
the seat forward or rearward. Release the bar
once the seat is in the desired position. Using
body pressure, move forward and rearward on
73
from the guide loop on the seat and allow the
seat belt to retract out of the way. This allows for
easier access to the rear seat. To return the seat
to a normal seating position, first return the
seatback to its original recline location and then
slide the entire seat back to the pre-set lock
position.
the seat to be sure that the seat adjusters have
latched.
WARNING!
Adjusting a seat while the vehicle is moving
is dangerous. The sudden movement of the
seat could cause you to lose control. The
seat belt might not be properly adjusted and
you could be injured. Adjust the seat only
while the vehicle is parked.
Manual Front Seatback Recline
To adjust the seatback, lift the lever located on
the outboard side of the seat, lean back to the
desired position and release the lever. To return
the seatback, lift the lever, lean forward and
release the lever.
Recline Lever
WARNING!
Do not ride with the seatback reclined so that
the shoulder belt is no longer resting against
your chest. In a collision you could slide
under the seat belt, which could result in
serious injury or death.
Easy Entry Lever
Head Restraints
Passenger Seat Easy Entry
On the passenger seat, pull forward on the lever
located on the side of the seatback in order to
dump the seatback and slide the seat forward.
You can also temporarily remove the seat belt
74
Head restraints are designed to reduce the risk
of injury by restricting head movement in the
event of a rear impact. Head restraints should
be adjusted so that the top of the head restraint
is located above the top of your ear.
WARNING!
The head restraints for all occupants must be
properly adjusted prior to operating the vehicle or occupying a seat. Head restraints
should never be adjusted while the vehicle is
in motion. Driving a vehicle with the head
restraints improperly adjusted or removed
could cause serious injury or death in the
event of a collision.
Active Head Restraints — Front Seats
The front driver and passenger seats are
equipped with Active Head Restraints (AHR). In
the event of a rear impact the AHRs will automatically extend forward minimizing the gap
between the back of the occupants head and
the AHR.
The AHRs will automatically return to their normal position following a rear impact. If the AHRs
do not return to their normal position see your
authorized dealer immediately.
press the push button, located at the base of the
head restraint and push downward on the head
restraint.
WARNING!
Do not place items over the top of the Active
Head Restraint, such as coats, seat covers
or portable DVD players. These items may
interfere with the operation of the Active
Head Restraint in the event of a collision and
could result in serious injury or death.
Folding Rear Seat
Push Button
NOTE:
The head restraints should only be removed
by qualified technicians, for service purposes only. If either of the head restraints
require removal, see your authorized dealer.
The rear seatbacks can be folded forward to
provide an additional storage area. Pull on the
loops located on the upper part of the rear
seatback to fold down either or both seatbacks.
These loops can be tucked away when not in
use.
To raise the head restraint, pull upward on the
head restraint. To lower the head restraint,
75
When the seatback is folded to the upright
position, make sure it is latched by strongly
pulling on the top of the seatback above the
seat strap.
Folding Rear Seat
Folded Rear Seat
76
WARNING!
• Be certain that the seatback is securely
locked into position. If the seatback is not
securely locked into position, the seat will
not provide the proper stability for child
seats and/or passengers. An improperly
latched seat could cause serious injury.
• The cargo area in the rear of the vehicle
(with the rear seatbacks in the locked-up
or folded down position) should not be
used as a play area by children when the
vehicle is in motion. They could be seriously injured in a collision. Children should
be seated and using the proper restraint
system.
TO OPEN AND CLOSE THE
HOOD
Two latches must be released to open the hood.
1. Pull the hood release lever located under the
left side of the instrument panel.
Hood Release Lever
2. Move to the outside of the vehicle, the safety
catch is located under the center front edge
of the hood.
WARNING!
Be sure the hood is fully latched before
driving your vehicle. If the hood is not fully
latched, it could open when the vehicle is in
motion and block your vision. Failure to
follow this warning could result in serious
injury or death.
Hood Safety Catch
Hood Safety Catch Location
3. Push the safety catch to the left.
CAUTION!
To prevent possible damage, do not slam the
hood to close it. Lower the hood until it is
open approximately 6 in (15 cm), and then
drop it. This should secure both latches.
Never drive your vehicle unless the hood is
fully closed, with both latches engaged.
LIGHTS
Headlight Switch
The headlight switch is located on the
left side of the instrument panel. This
switch controls the operation of the
headlights, parking lights, instrument
panel lights, instrument panel light dimming,
interior lights and fog lights.
77
the ignition into the OFF position. To turn the
automatic system off, move the headlight switch
out of the AUTO position.
NOTE:
The engine must be running before the
headlights will come on in the automatic
mode.
Headlight Switch
Headlights On With Wipers
(Available With Automatic
Headlights Only)
Automatic Headlights — If Equipped
When this feature is active, the headlights will
turn on after the wipers are turned on if the
headlight switch is placed in the AUTO position
and programmable feature is set to ON. In
addition, the headlights will turn off when the
wipers are turned off if they were turned on by
this feature.
This system automatically turns the headlights
on or off according to ambient light levels. To
turn the system on, rotate the headlight switch
counterclockwise to the AUTO position. When
the system is on, the headlight time delay
feature is also on. This means the headlights
will stay on for up to 90 seconds after you place
NOTE:
The Headlights On with Wipers feature can
be turned on or off using the Uconnect®
System. Refer to “Uconnect® Settings/
Customer Programmable Features” in “Understanding Your Instrument Panel” for further information.
Rotate the headlight switch clockwise to the first
detent for parking light and instrument panel
light operation. Rotate the headlight switch to
the second detent for headlight, parking light
and instrument panel light operation.
78
Automatic High Beam Headlamp
Control — If Equipped
The Automatic High Beam Headlamp Control
system provides increased forward lighting at
night by automating high beam control through
the use of a digital camera mounted on the
inside rearview mirror. This camera detects
vehicle specific light and automatically switches
from high beams to low beams until the approaching vehicle is out of view.
NOTE:
• The Automatic High Beam Headlamp Control can be turned on or off using the
Uconnect® System. Refer to “Uconnect®
Settings” in “Understanding Your Instrument Panel” for further information.
• Broken, muddy, or obstructed headlights
and taillights of vehicles in the field of
view will cause headlights to remain on
longer (closer to the vehicle). Also, dirt,
film, and other obstructions on the windshield or camera lens will cause the system to function improperly.
• To opt out of the Advanced Auto HighBeam Sensitivity Control (default) and enter Reduced High-Beam Sensitivity Control (not recommended), toggle highbeam
lever 6 full on/off cycles within 10 seconds of ignition ON. System will return to
default setting upon ignition off.
If the windshield or Automatic High Beam Headlamp Control mirror is replaced, the mirror must
be re-aimed to ensure proper performance. See
your local authorized dealer.
To Activate
1. Turn the headlight switch to the AUTO headlight position.
2. Push the multifunction lever away from you
(toward front of vehicle) to engage the high
beam mode.
NOTE:
This system will not activate until the vehicle is at or above 15 mph (24 km/h).
To Deactivate
1. Pull the multifunction lever toward you (or
rearward in car) to manually deactivate the
system (normal operation of low beams).
2. Push back on the multifunction lever once
again to reactivate the system.
Headlight Time Delay
This feature provides the safety of headlight
illumination for up to 90 seconds when leaving
your vehicle in an unlit area.
To activate the delay feature, turn OFF the
ignition switch while the headlights are still on.
Then, turn off the headlights within 45 seconds.
The delay interval begins when the headlight
switch is turned off.
NOTE:
The lights must be turned off within 45
seconds of turning the ignition OFF to activate this feature.
If you turn the headlights, park lights or ignition
switch ON again, the system will cancel the
delay.
If you turn the headlights off before the ignition,
they will turn off in the normal manner.
NOTE:
The Headlight Time Delay is programmable
using the Uconnect® System, refer to
“Uconnect® Settings” in “Understanding
Your Instrument Panel” for further information.
Daytime Running Lights (DRL) — If
Equipped
The Daytime Running Lights will turn On when
the engine is started and remain On unless the
headlamps are turned ON, the parking brake is
applied, or the engine is shut Off.
NOTE:
If allowed by law in the country in which the
vehicle was purchased the Daytime Running
Lights can be turned on and off using the
Uconnect® System, refer to “Uconnect®
Settings” in “Understanding Your Instrument Panel” for further information.
79
Lights-On Reminder
If the headlights or parking lights are on after the
ignition is placed in the OFF position, a chime
will sound to alert the driver when the driver’s
door is opened.
Fog Lights — If Equipped
The front fog light switch is built into the headlight switch.
press the headlight switch a second time or turn
off the headlight switch.
An indicator light in the instrument cluster illuminates when the fog lights are turned on.
NOTE:
The fog lights will operate with the low beam
headlights or parking lights on. However,
selecting the high beam headlights will turn
off the fog lights.
Multifunction Lever
Multifunction Lever
The multifunction lever controls the operation of
the turn signals, headlight beam selection and
passing lights. The multifunction lever is located
on the left side of the steering column.
Turn Signals
Move the multifunction lever up or down and the
arrows on each side of the instrument cluster
flash to show proper operation of the front and
rear turn signal lights.
NOTE:
Fog Light Switch
To activate the front fog lights, turn on
the parking lights or the low beam
headlights and press the headlight
switch. To turn off the front fog lights, either
80
• If either light remains on and does not
flash, or there is a very fast flash rate,
check for a defective outside light bulb. If
an indicator fails to light when the lever is
moved, it would suggest that the indicator
bulb is defective.
• A “Turn Signal On” message will appear
in the Drivers Information Display (DID)
and a continuous chime will sound if the
vehicle is driven more than 1 mi (1.6 km)
with either turn signal on.
Lane Change Assist
Tap the lever up or down once, without moving
beyond the detent, and the turn signal (right or
left) will flash three times then automatically turn
off.
High/Low Beam Switch
Push the multifunction lever away from you to
switch the headlights to high beam. Pull the
multifunction lever toward you to switch the
headlights back to low beam.
Flash-To-Pass
You can signal another vehicle with your headlights by lightly pulling the multifunction lever
toward you. This will turn on the high beam
headlights until the lever is released.
NOTE:
If the multifunction lever is held in the
flash-to pass position for more than 20 seconds, the high beams will shut off.
Map/Reading Lights
These lights are mounted between the sun
visors on the overhead console. Each light is
turned on by pressing the lens. Press the lens a
second time to turn off the light. These lights
also turn on when a door is opened, or when the
UNLOCK button on the Remote Keyless Entry
(RKE) transmitter is pressed, or when the dimmer control is turned fully upward, past the
second detent.
Overhead Console
Interior Lights
The interior lights come on when a door is
opened.
To protect the battery, the interior lights will turn
off automatically 10 minutes after the ignition is
moved to the LOCK position. This will occur if
the interior lights were switched on manually or
are on because a door is open. This includes
the glove box light, but not the trunk light. To
restore interior light operation, either place the
ignition in the ON/RUN position or cycle the light
switch.
81
Information Display (DID), and radio when the
position lights or headlights are on.
Dimmer Controls
The dimmer control is part of the headlight
switch and is located on the left side of the
instrument panel.
WINDSHIELD WIPERS AND
WASHERS
Instrument Panel Dimmer
Dimmer Controls
With the parking lights or headlights on, rotating
the left dimmer control upward will increase the
brightness of the instrument panel lights and
lighted cupholders (if equipped).
Dome Light Position
Rotate the left dimmer control completely upward to the second detent to turn on the interior
lights. The interior lights will remain on when the
dimmer control is in this position.
Interior Light Defeat (OFF)
Rotate the left dimmer control to the extreme
bottom “OFF” position. The interior lights will
remain off when the doors are open.
Parade Mode (Daytime Brightness Feature)
Rotate the instrument panel dimmer control
upward to the first detent. This feature brightens
all text displays such as the odometer, Driver
82
The multifunction lever operates the
windshield wipers and washer when
the ignition is placed in the ON/RUN or
ACC position. The multifunction lever
is located on the left side of the steering column.
Windshield Wiper/Washer Lever
Rotate the end of the multifunction lever to the
first detent past the intermittent settings for
low-speed wiper operation, or to the second
detent past the intermittent settings for highspeed wiper operation.
CAUTION!
Turn the windshield wipers off when driving
through an automatic car wash. Damage to
the windshield wipers may result if the wiper
switch is left in any position other than off.
Intermittent Wiper System
Use the intermittent wiper when weather conditions make a single wiping cycle with a variable
pause between cycles desirable. Rotate the
end of the multifunction lever to the first detent
position, and then turn the end of the lever to
select the desired delay interval. There are four
delay settings, which allow you to regulate the
wipe interval from a minimum of one cycle every
second to a maximum of approximately 36
seconds between cycles. The delay intervals
will double in duration when the vehicle speed is
10 mph (16 km/h) or less.
Mist Feature
Rotate the end of the lever downward to the
Mist position to activate a single wipe cycle to
clear off road mist or spray from a passing
vehicle. The wipers will continue to operate until
you release the multifunction lever.
NOTE:
The mist feature does not activate the
washer pump; therefore, no washer fluid will
be sprayed on the windshield. The wash
function must be used in order to spray the
windshield with washer fluid.
If you activate the washer while the windshield
wiper is turned off, the wipers will operate for
several wipe cycles and then turn off.
WARNING!
Sudden loss of visibility through the windshield could lead to a collision. You might not
see other vehicles or other obstacles. To
avoid sudden icing of the windshield during
freezing weather, warm the windshield with
the defroster before and during windshield
washer use.
Windshield Washers
To use the washer, push the multifunction lever
inward (toward the steering column) and hold it
for as long as washer spray is desired.
If you activate the washer while the windshield
wiper control is in the delay range, the wipers
will operate for several wipe cycles after releasing the multifunction lever and then resume the
intermittent interval previously selected.
Headlights On With Wipers
(Available With Automatic
Headlights Only)
When this feature is active, the headlights will
turn on approximately 10 seconds after the
wipers are turned on if the headlight switch is
placed in the A (AUTO) position. In addition, the
headlights will turn off when the wipers are
turned off if they were turned on by this feature.
83
NOTE:
For vehicle equipped with rain sensor (auto
wipes), please note that in addition to the 10
seconds, the headlights can also turn on if
the Rain Sensing feature is ON, and the front
wipers complete a minimum of 5 wipe cycles
within 60 seconds.
position 4 is the most sensitive. Setting 3 should
be used for normal rain conditions. Settings 1
and 2 can be used if the driver desires less
wiper sensitivity. Setting 4 can be used if the
driver desires more sensitivity. Place the wiper
switch in the OFF position when not using the
system.
In this case (auto wipes) the headlights will turn
off if no wipes occurs in 240 Seconds.
NOTE:
The Headlights On with Wipers feature can be
turned on and off using the Uconnect® System,
refer to “Uconnect® Settings” in “Understanding
Your Instrument Panel” for further information.
Rain Sensing Wipers — If Equipped
This feature senses moisture on the windshield
and automatically activates the wipers for the
driver. The feature is especially useful for road
splash or overspray from the windshield washers of the vehicle ahead. Rotate the end of the
multifunction lever to one of four settings to
activate this feature.
The sensitivity of the system can be adjusted
with the multifunction lever. Wiper delay position 1 is the least sensitive, and wiper delay
84
• The Rain Sensing feature will not operate
when the wiper switch is in the low or
high-speed position.
0 mph (0 km/h), or the outside temperature is
greater than 32°F (0°C).
• Transmission In NEUTRAL Position —
When the ignition is ON, and the transmission is in the NEUTRAL position, the Rain
Sensing system will not operate until the
wiper switch is moved, vehicle speed is
greater than 3 mph (5 km/h), or the shift lever
is moved out of the NEUTRAL position.
• The Rain Sensing feature may not function properly when ice, or dried salt water
is present on the windshield.
NOTE:
Rain Sensing can be turned on and off using
the Uconnect® System, refer to “Uconnect®
Settings” in “Understanding Your Instrument Panel” for further information.
• Use of Rain-X® or products containing
wax or silicone may reduce Rain Sensing
performance.
TILT/TELESCOPING STEERING
COLUMN
The Rain Sensing system has protection features for the wiper blades and arms, and will not
operate under the following conditions:
This feature allows you to tilt the steering column upward or downward. It also allows you to
lengthen or shorten the steering column. The
tilt/telescoping lever is located below the steering wheel at the end of the steering column.
• Low Ambient Temperature — When the
ignition is first turned ON, the Rain Sensing
system will not operate until the wiper switch
is moved, vehicle speed is greater than
WARNING!
Do not adjust the steering column while
driving. Adjusting the steering column while
driving or driving with the steering column
unlocked, could cause the driver to lose
control of the vehicle. Failure to follow this
warning may result in serious injury or death.
Tilt/Telescoping Control Handle
To unlock the steering column, pull the lever
downward. To tilt the steering column, move the
steering wheel upward or downward as desired.
To lengthen or shorten the steering column, pull
the steering wheel outward or push it inward as
desired. To lock the steering column in position,
push the lever upward until fully engaged.
POWER TILT/TELESCOPING
STEERING COLUMN — IF
EQUIPPED
This feature allows you to tilt the steering column upward or downward. It also allows you to
lengthen or shorten the steering column. The
power tilt/telescoping steering column lever is
located below the multifunction lever on the
steering column.
Power Tilt/Telescoping Switch
To tilt the steering column, move the lever up or
down as desired. To lengthen or shorten the
steering column, pull the lever toward you or
push the lever away from you as desired.
WARNING!
Do not adjust the steering column while
driving. Adjusting the steering column while
driving or driving with the steering column
unlocked, could cause the driver to lose
control of the vehicle. Failure to follow this
warning may result in serious injury or death.
85
HEATED STEERING WHEEL —
IF EQUIPPED
The steering wheel contains a heating element
that helps warm your hands in cold weather.
The heated steering wheel has only one temperature setting. Once the heated steering
wheel has been turned on it will operate for up
to 80 minutes before automatically shutting off.
The heated steering wheel can shut off early or
may not turn on when the steering wheel is
already warm.
The heated steering wheel control button is
located within the Uconnect® system. You can
gain access to the control button through the
climate screen or the controls screen.
WARNING!
• Persons who are unable to feel pain to the
skin because of advanced age, chronic
illness, diabetes, spinal cord injury, medication, exhaustion, or other physical conditions must exercise care when using the
steering wheel heater. It may cause burns
even at low temperatures, especially if
used for long periods.
• Do not place anything on the steering
wheel that insulates against heat, such as
a blanket or steering wheel covers of any
type and material. This may cause the
steering wheel heater to overheat.
ELECTRONIC SPEED
CONTROL — IF EQUIPPED
When engaged, the Electronic Speed Control
takes over accelerator operations at speeds
greater than 25 mph (40 km/h).
The Electronic Speed Control buttons are located on the right side of the steering wheel.
• Press the heated steering wheel button
once to turn the heating element ON.
a
• Press the heated steering wheel button
second time to turn the heating element OFF.
NOTE:
The engine must be running for the heated
steering wheel to operate.
86
Electronic Speed Control Buttons
1 — ON/OFF
2 — SET+/ACCEL
3 — RESUME
4 — SET-/DECEL
5 — CANCEL
NOTE:
In order to ensure proper operation, the Electronic Speed Control System has been designed to shut down if multiple Speed Control
functions are operated at the same time. If this
occurs, the Electronic Speed Control System
can be reactivated by pushing the Electronic
Speed Control ON/OFF button and resetting the
desired vehicle set speed.
To Activate
Push the ON/OFF button to activate the electronic speed control. CRUISE CONTROL
READY will appear on the instrument cluster to
indicate the electronic speed control is on. To
turn the system off, push the ON/OFF button a
second time. CRUISE CONTROL OFF will appear on the instrument cluster to indicate the
electronic speed control is off. The system
should be turned off when not in use.
WARNING!
Leaving the Electronic Speed Control system on when not in use is dangerous. You
(Continued)
WARNING! (Continued)
could accidentally set the system or cause it
to go faster than you want. You could lose
control and have an accident. Always leave
the system OFF when you are not using it.
To Set A Desired Speed
Turn the Electronic Speed Control ON. When
the vehicle has reached the desired speed,
press the SET (+) or SET (-) button and release.
Release the accelerator and the vehicle will
operate at the selected speed. Once a speed
has been set a message CRUISE CONTROL
SET TO MPH (km/h) will appear indicating what
speed was set. A CRUISE indicator lamp, along
with set speed will also appear and stay on in
the instrument cluster when the speed is set.
To Deactivate
A soft tap on the brake pedal, pushing the
CANCEL button, or normal brake pressure
while slowing the vehicle will deactivate the
Electronic Speed Control without erasing the
set speed from memory.
Pressing the ON/OFF button or turning the
ignition switch OFF erases the set speed from
memory.
To Resume Speed
To resume a previously set speed, push the
RES (+) button and release. Resume can be
used at any speed above 20 mph (32 km/h).
To Vary The Speed Setting
To Increase Speed
When the Electronic Speed Control is set, you
can increase speed by pushing the SET +
button.
The drivers preferred units can be selected
through the instrument panel settings if
equipped. Refer to “Understanding Your Instrument Panel” for more information. The speed
increment shown is dependant on the chosen
speed unit of U.S. (mph) or Metric (km/h):
U.S. Speed (mph)
• Pressing the SET + button once will result in
a 1 mph increase in set speed. Each subsequent tap of the button results in an increase
of 1 mph.
87
• If the button is continually pressed, the set
speed will continue to increase until the button is released, then the new set speed will
be established.
U.S. Speed (mph)
Metric Speed (km/h)
• Pressing the SET - button once will result in
a 1 mph decrease in set speed. Each subsequent tap of the button results in a decrease
of 1 mph.
• Pressing the SET + button once will result in
a 1 km/h increase in set speed. Each subsequent tap of the button results in an increase
of 1 km/h.
• If the button is continually pressed, the set
speed will continue to decrease until the
button is released, then the new set speed
will be established.
• If the button is continually pressed, the set
speed will continue to increase until the button is released, then the new set speed will
be established.
Metric Speed (km/h)
To Decrease Speed
When the Electronic Speed Control is set, you
can decrease speed by pushing the SET button.
The drivers preferred units can be selected
through the instrument panel settings if
equipped. Refer to “Understanding Your Instrument Panel” for more information. The speed
decrement shown is dependant on the chosen
speed unit of U.S. (mph) or Metric (km/h):
88
• Pressing the SET - button once will result in
a 1 km/h decrease in set speed. Each subsequent tap of the button results in a decrease of 1 km/h.
• If the button is continually pressed, the set
speed will continue to decrease until the
button is released, then the new set speed
will be established.
To Accelerate For Passing
Press the accelerator as you would normally.
When the pedal is released, the vehicle will
return to the set speed.
Using Electronic Speed Control On Hills
The transmission may downshift on hills to
maintain the vehicle set speed.
NOTE:
The Electronic Speed Control system maintains speed up and down hills. A slight
speed change on moderate hills is normal.
On steep hills, a greater speed loss or gain may
occur so it may be preferable to drive without
Electronic Speed Control.
WARNING!
Electronic Speed Control can be dangerous
where the system cannot maintain a constant speed. Your vehicle could go too fast
for the conditions, and you could lose control
and have an accident. Do not use Electronic
Speed Control in heavy traffic or on roads
that are winding, icy, snow-covered or slippery.
ADAPTIVE CRUISE CONTROL
(ACC) — IF EQUIPPED
Adaptive Cruise Control (ACC) increases the
driving convenience provided by cruise control
while traveling on highways and major roadways. However, it is not a safety system and not
designed to prevent collisions. Electronic
Speed Control function performs differently.
Please refer to the proper section within this
chapter.
ACC will allow you to keep cruise control engaged in light to moderate traffic conditions
without the constant need to reset your cruise
control. ACC utilizes a radar sensor designed to
detect a vehicle directly ahead of you.
NOTE:
• If the sensor does not detect a vehicle
ahead of you, ACC will maintain a fixed
set speed.
• If the ACC sensor detects a vehicle ahead,
ACC will apply limited braking or acceleration (not to exceed the original set
speed) automatically to maintain a preset
following distance, while matching the
speed of the vehicle ahead.
The Cruise Control system has two control
modes:
• Adaptive Cruise Control mode for maintaining an appropriate distance between vehicles.
• Normal (fixed speed) cruise control mode is
for cruising at a constant preset speed. For
additional information, refer to “Normal
(Fixed Speed) Cruise Control Mode” in this
section.
NOTE:
The normal (fixed speed) cruise control will
not react to preceding vehicles. Always be
aware of the mode selected.
You can change the mode by using the Cruise
Control buttons. The two control modes function
differently. Always confirm which mode is selected.
WARNING!
• Adaptive Cruise Control (ACC) is a convenience system. It is not a substitute for
active driving involvement. It is always the
driver’s responsibility to be attentive of
road, traffic, and weather conditions, vehicle speed, distance to the vehicle ahead;
and, most importantly, brake operation to
ensure safe operation of the vehicle under
all road conditions. Your complete attention is always required while driving to
maintain safe control of your vehicle. Failure to follow these warnings can result in a
collision and death or serious personal
injury.
• The ACC system:
• Does not react to pedestrians, oncoming vehicles, and stationary objects
(e.g., a stopped vehicle in a traffic jam
or a disabled vehicle).
(Continued)
89
WARNING! (Continued)
• Cannot take street, traffic, and weather
conditions into account, and may be
limited upon adverse sight distance
conditions.
• Does not always fully recognize complex driving conditions, which can result
in wrong or missing distance warnings.
You should switch off the ACC system:
• When driving in fog, heavy rain, heavy
snow, sleet, heavy traffic, and complex
driving situations (i.e., in highway construction zones).
• When entering a turn lane or highway off
ramp; when driving on roads that are winding, icy, snow-covered, slippery, or have
steep uphill or downhill slopes.
• When towing a trailer up or down steep
slopes.
• When circumstances do not allow safe
driving at a constant speed.
90
Adaptive Cruise Control (ACC)
Operation
The speed control buttons (located on the right
side of the steering wheel) operates the ACC
system.
NOTE:
Any chassis/suspension or tire size modifications to the vehicle will effect the performance of the Adaptive Cruise Control and
Forward Collision Warning System.
Activating Adaptive Cruise Control
(ACC)
You can only engage ACC if the vehicle speed
is above 19 mph (30 km/h).
The system will cancel when the vehicle speed
drops below 15 mph (24 km/h).
The minimum Set Speed for the ACC system is
19 mph (30 km/h).
Adaptive Cruise Control Buttons
1 — NORMAL (FIXED SPEED) CRUISE CONTROL ON/OFF
2 — SET+/ACCEL
3 — RESUME
4 — SET-/DECEL
5 — DISTANCE SETTING — INCREASE
6 — ADAPTIVE CRUISE CONTROL (ACC) ON/OFF
7 — DISTANCE SETTING — DECREASE
8 — CANCEL
When the system is turned on and in the
READY state, the Driver Information Display
(DID) displays “ACC Ready.”
When the system is OFF, the DID displays
“Adaptive Cruise Control (ACC) Off.”
NOTE:
You cannot engage ACC under the following
conditions:
• When you apply the brakes.
• When the parking brake is set.
• When the automatic transmission is in
PARK, REVERSE or NEUTRAL.
again. At this time, the system will turn off and
the DID will display “Adaptive Cruise Control
(ACC) Off.”
• When the Vehicle speed is outside of the
speed range.
When the vehicle reaches the speed desired,
push the SET + button or the SET - button and
release. The DID will display the set speed.
If the system is Set when the vehicle speed is
above 19 mph (30 km/h), the Set Speed shall
be the current speed of the vehicle.
• When the brakes are overheated.
Remove your foot from the accelerator pedal. If
you do not, the vehicle may continue to accelerate beyond the set speed. If this occurs:
To Activate/Deactivate
Push and release the Adaptive Cruise Control
(ACC) ON/OFF button. The ACC menu in the
DID displays “ACC Ready.”
• The message “DRIVER OVERRIDE” will display in the DID.
Adaptive Cruise Control Off
Adaptive Cruise Control Ready
To Set A Desired ACC Speed
WARNING!
Leaving the Adaptive Cruise Control (ACC)
system on when not in use is dangerous. You
could accidentally set the system or cause it
to go faster than you want. You could lose
control and have a collision. Always leave
the system off when you are not using it.
• The system will not be controlling the distance between your vehicle and the vehicle
ahead. The vehicle speed will only be determined by the position of the accelerator
pedal.
To Cancel
The following conditions cancel the system:
• The brake pedal is applied.
• The CANCEL button is pressed.
To turn the system OFF, push and release the
Adaptive Cruise Control (ACC) ON/OFF button
91
• The vehicle speed goes below 15 mph
(24 km/h).
• An Anti-Lock Brake System (ABS) event
occurs.
• The shift lever/gear selector is removed from
the Drive position.
• The Electronic Stability Control/Traction Control System (ESC/TCS) activates.
• The vehicle parking brake is applied.
• A Trailer Sway Control (TSC) event occurs.
• The driver switches ESC to full-off mode.
To Turn Off
The system will turn off and erase the set speed
in memory if:
• The Normal (Fixed Speed) Electronic Speed
Control ON/OFF button is pressed.
• The ignition is turned off.
• The Adaptive Cruise Control (ACC) On/Off
button is pressed.
92
To Resume
If there is a set speed in memory press the RES
(resume) button and then remove your foot from
the accelerator pedal. The DID will display the
last set speed.
WARNING!
The Resume function should only be used if
traffic and road conditions permit. Resuming
a set speed that is too high or too low for
prevailing traffic and road conditions could
cause the vehicle to accelerate or decelerate
too sharply for safe operation. Failure to
follow these warnings can result in a collision
and death or serious personal injury.
To Vary The Speed Setting
To Increase Speed
While ACC is set, you can increase the set
speed by pressing the SET + button.
The drivers preferred units can be selected
through the instrument panel settings if
equipped. Refer to “ Understanding Your Instru-
ment Panel” for more information. The speed
increment shown is dependant on the chosen
speed unit of U.S. (mph) or Metric (km/h):
U.S. Speed (mph)
• Pressing the SET + button once will result in
a 1 mph increase in set speed. Each subsequent tap of the button results in an increase
of 1 mph.
• If the button is continually pressed, the set
speed will continue to increase in 5 mph
increments until the button is released. The
increase in set speed is reflected in the DID.
Metric Speed (km/h)
• Pressing the SET + button once will result in
a 1 km/h increase in set speed. Each subsequent tap of the button results in an increase
of 1 km/h.
• If the button is continually pressed, the set
speed will continue to increase in 10 km/h
increments until the button is released. The
increase in set speed is reflected in the DID.
To Decrease Speed
Metric Speed (km/h)
While ACC is set, the set speed can be decreased by pressing the SET - button.
• Pressing the SET - button once will result in
a 1 km/h decrease in set speed. Each subsequent tap of the button results in a decrease of 1 km/h.
The drivers preferred units can be selected
through the instrument panel settings if
equipped. Refer to “ Understanding Your Instrument Panel” for more information. The speed
decrement shown is dependant on the chosen
speed unit of U.S. (mph) or Metric (km/h):
• If the button is continually pressed, the set
speed will continue to decrease in 10 km/h
increments until the button is released. The
decrease in set speed is reflected in the DID.
U.S. Speed (mph)
• Pressing the SET - button once will result in
a 1 mph decrease in set speed. Each subsequent tap of the button results in a decrease
of 1 mph.
• If the button is continually pressed, the set
speed will continue to decrease in 5 mph
increments until the button is released. The
decrease in set speed is reflected in the DID.
NOTE:
• When you override and push the SET +
button or SET - buttons, the new Set
Speed will be the current speed of the
vehicle.
• When you use the SET - button to decelerate, if the engine’s braking power does
not slow the vehicle sufficiently to reach
the set speed, the brake system will automatically slow the vehicle.
• The ACC system maintains set speed
when driving up hill and down hill. However, a slight speed change on moderate
hills is normal. In addition, downshifting
may occur while climbing uphill or descending downhill. This is normal operation and necessary to maintain set speed.
When driving up hill and down hill, the
ACC system will cancel if the braking
temperature exceeds normal range
(overheated).
Setting The Following Distance In
ACC
The specified following distance for ACC can be
set by varying the distance setting between four
bars (longest), three bars (long), two bars (medium) and one bar (short). Using this distance
setting and the vehicle speed, ACC calculates
and sets the distance to the vehicle ahead. This
distance setting displays in the DID.
• The ACC system applies the brake down
to 15 mph (24 km/h) when following a
target vehicle.
93
To increase the distance setting, press the
Distance Setting — Increase button and release. Each time the button is pressed, the
distance setting increases by one bar (longer).
To decrease the distance setting, press the
Distance Setting — Decrease button and release. Each time the button is pressed, the
distance setting decreases by one bar (shorter).
Distance Setting 4 Bars (Longest)
Distance Setting 2 Bars (Medium)
If there is no vehicle ahead, the vehicle will
maintain the set speed. If a slower moving
vehicle is detected in the same lane, the DID
displays the “Sensed Vehicle Indicator” icon,
and the system adjusts vehicle speed automatically to maintain the distance setting, regardless of the set speed.
The vehicle will then maintain the set distance
until:
• The vehicle ahead accelerates to a speed
above the set speed.
• The vehicle ahead moves out of your lane or
view of the sensor.
Distance Setting 3 Bars (Long)
94
Distance Setting 1 Bar (Short)
• The distance setting is changed.
• The system disengages. (Refer to the information on ACC Activation).
Overtake Aid is active only when passing on the
left hand side of the Target vehicles.
The maximum braking applied by ACC is limited; however, the driver can always apply the
brakes manually, if necessary.
When a vehicle goes from a location with left
hand drive traffic to a location with right hand
drive traffic, the ACC system will automatically
detect traffic direction. In this condition, Overtake Aid is active only when passing on the right
side of the Target vehicle. This additional acceleration is triggered when the driver utilizes the
right turn signal. In this condition the ACC
system will no longer provide Overtake Aid on
the left side until it determines that the vehicle
has moved back to a location with left hand
drive traffic.
NOTE:
The brake lights will illuminate whenever the
ACC system applies the brakes.
A Proximity Warning will alert the driver if ACC
predicts that its maximum braking level is not
sufficient to maintain the set distance. If this
occurs, a visual alert “BRAKE” will flash in the
DID and a chime will sound while ACC continues to apply its maximum braking capacity.
Brake Alert
NOTE:
The “Brake!” Screen in the DID is a warning
for the driver to take action and does not
necessarily mean that the Forward Collision
Warning system is applying the brakes autonomously.
Overtake Aid
Adaptive Cruise Control (ACC) Menu
The DID displays the current ACC system settings. The DID is located in the center of the
instrument cluster. The information it displays
depends on ACC system status.
When driving with ACC engaged and following
a target vehicle, the system will provide an
additional acceleration to assist in passing vehicles in front. This additional acceleration is
triggered when the driver utilizes the left turn
signal. In locations with left hand drive traffic,
95
Press the ADAPTIVE CRUISE CONTROL (ACC)
ON/OFF button (located on the steering wheel)
until one of the following displays in the DID:
Adaptive Cruise Control Off
When ACC is deactivated, the display will read
“Adaptive Cruise Control Off.”
Adaptive Cruise Control Ready
When ACC is activated but the vehicle speed
setting has not been selected, the display will
read “Adaptive Cruise Control Ready.”
Press the SET + or the SET- button (located on
the steering wheel) and the following will display
in the DID:
ACC SET
When ACC is set, the set speed will display in
the instrument cluster.
The ACC screen may display once again if any
ACC activity occurs, which may include any of
the following:
• System Cancel
• Driver Override
96
• System Off
• ACC Proximity Warning
• ACC Unavailable Warning
• The DID will return to the last display selected after five seconds of no ACC display
activity
Display Warnings And Maintenance
“Wipe Front Radar Sensor In Front Of
Vehicle” Warning
The “ACC/FCW Unavailable Wipe Front Radar
Sensor” warning will display and also a chime
will indicate when conditions temporarily limit
system performance.
This most often occurs at times of poor visibility,
such as in snow or heavy rain. The ACC system
may also become temporarily blinded due to
obstructions, such as mud, dirt or ice. In these
cases, the DID will display “ACC/FCW Unavailable Wipe Front Radar Sensor” and the system
will deactivate.
The “ACC/FCW Unavailable Wipe Front Radar
Sensor” message can sometimes be displayed
while driving in highly reflective areas (i.e. tun-
nels with reflective tiles, or ice and snow). The
ACC system will recover after the vehicle has
left these areas. Under rare conditions, when
the radar is not tracking any vehicles or objects
in its path this warning may temporarily occur.
NOTE:
If the “ACC/FCW Unavailable Wipe Front
Radar Sensor” warning is active Normal
(Fixed Speed) Cruise Control is still available. For additional information refer to
“Normal (Fixed Speed) Cruise Control
Mode” in this section.
If weather conditions are not a factor, the driver
should examine the sensor. It may require
cleaning or removal of an obstruction. The
sensor is located in the center of the vehicle
behind the lower grille.
To keep the ACC System operating properly, it
is important to note the following maintenance
items:
• Always keep the sensor clean. Carefully wipe
the sensor lens with a soft cloth. Be cautious
not to damage the sensor lens.
• Do not remove any screws from the sensor.
Doing so could cause an ACC system malfunction or failure and require a sensor
realignment.
• If the sensor or front end of the vehicle is
damaged due to a collision, see your authorized dealer for service.
• Do not attach or install any accessories near
the sensor, including transparent material or
aftermarket grilles. Doing so could cause an
ACC system failure or malfunction.
When the condition that deactivated the system
is no longer present, the system will return to
the “Adaptive Cruise Control Off” state and will
resume function by simply reactivating it.
NOTE:
• If the “ACC/FCW Unavailable Wipe Front
Radar Sensor” message occurs frequently (e.g. more than once on every
trip) without any snow, rain, mud, or other
obstruction, have the radar sensor realigned at your authorized dealer.
• Installing a snow plow, front-end protector, an aftermarket grille or modifying the
grille is not recommended. Doing so may
block the sensor and inhibit ACC/FCW
operation.
Service ACC/FCW Warning
If the system turns off, and the DID displays
“ACC/FCW Unavailable Service Required” or
“Cruise/FCW Unavailable Service Required”,
there may be an internal system fault or a
temporary malfunction that limits ACC functionality. Although the vehicle is still drivable under
normal conditions, ACC will be temporarily unavailable. If this occurs, try activating ACC
again later, following a key cycle. If the problem
persists, see your authorized dealer.
Precautions While Driving With ACC
In certain driving situations, ACC may have
detection issues. In these cases, ACC may
brake late or unexpectedly. The driver needs to
stay alert and may need to intervene.
Towing A Trailer
Towing a trailer is not advised when using ACC.
Offset Driving
ACC may not detect a vehicle in the same lane
that is offset from your direct line of travel, or a
vehicle merging in from a side lane. There may
not be sufficient distance to the vehicle ahead.
The offset vehicle may move in and out of the
line of travel, which can cause your vehicle to
brake or accelerate unexpectedly.
Offset Driving Condition Example
Turns And Bends
When driving on a curve with ACC engaged, the
system may decrease the vehicle speed and
acceleration for stability reasons, with no target
vehicle detected. Once the vehicle is out of the
curve the system will resume your original Set
Speed. This is a part of normal ACC system
functionality.
97
NOTE:
On tight turns ACC performance may be
limited.
Using ACC On Hills
When driving on hills, ACC may not detect a
vehicle in your lane. Depending on the speed,
vehicle load, traffic conditions, and the steepness of the hills, ACC performance may be
limited.
Lane Changing
ACC may not detect a vehicle until it is completely in the lane in which you are traveling. In
the illustration shown, ACC has not yet detected
the vehicle changing lanes and it may not detect
the vehicle until it’s too late for the ACC system
to take action. ACC may not detect a vehicle
until it is completely in the lane. There may not
be sufficient distance to the lane-changing vehicle. Always be attentive and ready to apply the
brakes if necessary.
Turn Or Bend Example
ACC Hill Example
Lane Changing Example
98
To change between the different control modes,
press the ADAPTIVE CRUISE CONTROL
(ACC) ON/OFF button which turns the ACC and
the NORMAL (Fixed Speed) ELECTRONIC
SPEED CONTROL OFF. Pressing of the NORMAL (Fixed Speed) ELECTRONIC SPEED
CONTROL ON/OFF button will result in turning
ON (changing to) the Normal (Fixed Speed)
Electronic Speed Control mode.
Narrow Vehicles
Some narrow vehicles traveling near the outer
edges of the lane or edging into the lane are not
detected until they have moved fully into the
lane. There may not be sufficient distance to the
vehicle ahead.
Stationary Object And Stationary Vehicle
Example
Normal (Fixed Speed) Electronic
Speed Control Mode
Narrow Vehicle Example
Stationary Objects And Vehicles
ACC does not react to stationary objects and
stationary vehicles. For example, ACC will not
react in situations where the vehicle you are
following exits your lane and the vehicle ahead
is stopped in your lane. Always be attentive and
ready to apply the brakes if necessary.
In addition to Adaptive Cruise Control mode, a
Normal (Fixed Speed) Electronic Speed Control
mode is available for cruising at fixed speeds.
The Normal (Fixed Speed) Electronic Speed
Control mode is designed to maintain a set
cruising speed without requiring the driver to
operate the accelerator. Electronic Speed Control can only be operated if the vehicle speed is
above 19 mph (30 km/h).
WARNING!
In the normal Cruise Control mode, the system will not react to vehicles ahead. In
addition, the proximity warning does not activate and no alarm will sound even if you are
too close to the vehicle ahead since neither
the presence of the vehicle ahead nor the
vehicle-to vehicle distance is detected. Be
sure to maintain a safe distance between
your vehicle and the vehicle ahead. Always
be aware which mode is selected.
99
To Set A Desired Speed
Turn the Normal (Fixed Speed)
Electronic Speed Control ON.
When the vehicle has reached the
desired speed, press the SET (+)
or SET (-) button and release. Release the accelerator and the vehicle will operate at the selected speed. Once a
speed has been set a message (CRUISE CONTROL SET TO MPH/KM) will appear indicating
what speed was set. This light will turn on when
the electronic speed control is SET.
To Vary The Speed Setting
To Increase Speed
When the Normal (Fixed Speed) Electronic
Speed Control is set, you can increase speed
by pressing the SET + button.
The drivers preferred units can be selected
through the instrument panel settings if
equipped. Refer to “Understanding Your Instrument Panel” for more information. The speed
increment shown is dependant on the speed of
U.S. (mph) or Metric (km/h) units:
100
U.S. Speed (mph)
U.S. Speed (mph)
• Pressing the SET + button once will result in
a 1 mph increase in set speed. Each subsequent tap of the button results in an increase
of 1 mph.
• Pressing the SET - button once will result in
a 1 mph decrease in set speed. Each subsequent tap of the button results in a decrease
of 1 mph.
• If the button is continually pressed, the set
speed will continue to increase in 5 mph
increments until the button is released. The
increase in set speed is reflected in the DID
display.
• If the button is continually pressed, the set
speed will continue to decrease in 5 mph
increments until the button is released. The
decrease in set speed is reflected in the DID
display.
To Decrease Speed
Metric Speed (km/h)
When the Normal (Fixed Speed) Cruise Control
is set, you can decrease speed by pressing the
SET - button.
• Pressing the SET - button once will result in
a 1 km/h decrease in set speed. Each subsequent tap of the button results in a decrease of 1 km/h.
The drivers preferred units can be selected
through the instrument panel settings if
equipped. Refer to “Understanding Your Instrument Panel” for more information. The speed
decrement shown is dependant on the speed of
U.S. (mph) or Metric (km/h) units:
• If the button is continually pressed, the set
speed will continue to decrease in 10 km/h
increments until the button is released. The
decrease in set speed is reflected in the DID
display.
To Cancel
The following conditions will cancel the Normal
(Fixed Speed) Electronic Speed Control without
clearing the memory:
• The ignition is turned off.
• The brake pedal is applied.
FORWARD COLLISION
WARNING (FCW) — IF
EQUIPPED
• The CANCEL button is pressed.
• The Electronic Stability Control/Traction Control System (ESC/TCS) activates.
• The vehicle parking brake is applied.
• The braking temperature exceeds normal
range (overheated).
• The shift lever/gear selector is removed from
the Drive position.
To Resume Speed
To resume a previously set speed, push the
RES button and release. Resume can be used
at any speed above 19 mph (30 km/h).
To Turn Off
The system will turn off and erase the set speed
in memory if:
• The Normal (Fixed Speed) Electronic Speed
Control ON/OFF button is pressed.
• The Adaptive Cruise Control (ACC) On/Off
button is pressed.
NOTE:
FCW monitors the information from the forward looking sensors as well as the Electronic Brake Controller (EBC), to calculate
the probability of a forward collision. When
the system determines that a forward collision is probable, the driver will be provided
with audible and visual warnings.
Forward Collision Warning (FCW)
Operation
The Forward Collision Warning (FCW) system
provides the driver with audible warnings, visual
warnings (within the DID), to warn the driver
when it detects a potential frontal collision. The
warnings are intended to provide the driver with
enough time to react, avoid or mitigate the
potential collision.
FCW Message
When the system determines a collision with
the vehicle in front of you is no longer probable,
the warning message will be deactivated.
101
NOTE:
Turning FCW ON Or OFF
Changing FCW Status
• The minimum speed for FCW activation is
5 mph (10 km/h).
NOTE:
The default status of FCW is “On”, this
allows the system to warn you of a possible
collision with the vehicle in front of you.
The forward collision button is located on the
switch panel below the Uconnect® display.
The FCW Sensitivity Settings are programmable through the Uconnect® System. Refer to
“Uconnect® Settings” in “Understanding Your
Instrument Panel” for further information.
• The FCW alerts may be triggered on objects other than vehicles such as guard
rails or sign posts based on the course
prediction. This is expected and is a part
of
normal
FCW
activation
and
functionality.
• The FCW system is intended for on-road
use only. If the vehicle is taken off-road,
the FCW system should be deactivated to
prevent unnecessary warnings to the
surroundings.
WARNING!
Forward Collision Warning (FCW) is not intended to avoid a collision on its own, nor
can FCW detect every type of potential collision. The driver has the responsibility to
avoid a collision by controlling the vehicle via
braking and steering. Failure to follow this
warning could lead to serious injury or death.
102
To turn the FCW system OFF, press the forward
collision button once to turn the system OFF
(led turns on).
To turn the FCW system back ON, press the
forward collision button again to turn the system
ON (led turns off).
Changing the FCW status to “Off” prevents the
system from warning you of a possible collision
with the vehicle in front of you.
NOTE:
The FCW system state is kept in memory
from one key cycle to the next. If the system
is turned OFF, it will remain off when the
vehicle is restarted.
The default status of FCW is the “Far” setting is
the “On” setting, this allows the system to warn
you of a possible collision with the vehicle in
front of you when you are farther away. This
gives you the most reaction time to avoid a
possible collision.
Changing the FCW status to the “Near” setting,
allows the system to warn you of a possible
collision with the vehicle in front of you when
you are much closer. This setting provides less
reaction time than the “Far” setting, which allows for a more dynamic driving experience.
NOTE:
• The system will retain the last setting
selected by the driver after ignition shut
down.
• FCW may not react to irrelevant objects
such as overhead objects, ground reflections, objects not in the path of the car,
stationary objects that are far away, oncoming traffic, or leading vehicles with
the same or higher rate of speed.
• FCW will be disabled like ACC, with the
unavailable screens.
Service FCW Warning
If the system turns off, and the DID displays:
• ACC/FCW Unavailable Service Required
• Cruise/FCW Unavailable Service Required
This indicates there is an internal system fault.
Although the vehicle is still drivable under normal conditions, have the system checked by an
authorized dealer.
PARKSENSE® REAR PARK
ASSIST — IF EQUIPPED
The ParkSense® Rear Park Assist system provides visual and audible indications of the distance between the rear fascia and a detected
obstacle when backing up, e.g. during a parking
maneuver. Refer to “ParkSense® System Usage Precautions” in this section for limitations of
this system and recommendations.
ParkSense® will retain the last system state
(enabled or disabled) from the last ignition cycle
when the ignition is changed to the ON/RUN
position.
ParkSense® can be active only when the shift
lever is in REVERSE. If ParkSense® is enabled
at this shift lever position, the system will remain
active until the vehicle speed is increased to
approximately 7 mph (11 km/h) or above. The
system will become active again if the vehicle
speed is decreased to speeds less than approximately 6 mph (9 km/h).
ParkSense® Sensors
The four ParkSense® sensors, located in the
rear fascia/bumper, monitor the area behind the
vehicle that is within the sensors’ field of view.
The sensors can detect obstacles from approximately 12 in (30 cm) up to 79 in (200 cm) from
the rear fascia/bumper in the horizontal direction, depending on the location, type and orientation of the obstacle.
ParkSense® Warning Display
The ParkSense® Warning screen will only be
displayed if Sound and Display is selected from
the Uconnect® System. Refer to "Uconnect®
Settings” in “Understanding Your Instrument
Panel” for further information.
The ParkSense® Warning screen is located
within the Driver Information Display (DID). It
provides visual warnings to indicate the distance between the rear fascia/bumper and the
detected obstacle. Refer to “Driver Information
Display (DID)” in “Understanding Your Instrument Panel” for further information.
ParkSense® Display
When the vehicle is in REVERSE, the warning
display will turn ON indicating the system status.
The system will indicate a detected obstacle by
showing a single arc in one or more regions
based on the obstacle’s distance and location
relative to the vehicle.
If an obstacle is detected in the center rear
region, the display will show a single solid arc in
the center rear region and will produce a onehalf second tone. As the vehicle moves closer to
the obstacle, the display will show the single arc
103
moving closer to the vehicle and the sound tone
will change from slow, to fast, to continuous.
If an obstacle is detected in the left and/or right
rear region, the display will show a single flashing arc in the left and/or right rear region and will
produce a fast sound tone. As the vehicle
moves closer to the obstacle, the display will
show the single arc moving closer to the vehicle
and the sound tone will change from fast, to
continuous.
Slow Tone/Solid Arc
Single 1/2 Second Tone/Solid Arc
Fast Tone/Flashing Arc
104
Continuous Tone/Flashing Arc
The vehicle is close to the obstacle when the
warning display shows one flashing arc and
sounds a continuous tone. The following chart
shows the warning alert operation when the
system is detecting an obstacle:
WARNING ALERTS
Rear Distance
(in/cm)
Greater than
79 in (200 cm)
79-59 in
(200-150 cm)
59-47 in
(150-120 cm)
47-39 in
(120-100 cm)
39-25 in
(100-65 cm)
25-12 in
(65-30 cm)
Less than
12 in (30 cm)
Audible Alert
Chime
None
Single 1/2Second Tone
(for rear center
only)
Slow
(for rear center
only)
Slow
(for rear center
only)
Fast
(for rear center
only)
Fast
Continuous
Arc — Left
Rear
None
None
None
None
None
2nd Flashing
1st Flashing
Arc — Center
Rear
None
6th Solid
5th Solid
4th Solid
3rd Flashing
2nd Flashing
1st Flashing
Arc — Right
Rear
None
None
None
None
None
2nd Flashing
1st Flashing
Radio Volume
Reduced
No
Yes
Yes
Yes
Yes
Yes
Yes
105
Enabling And Disabling ParkSense®
ParkSense® can be enabled and disabled with
the ParkSense® switch, located on the switch
panel below the Uconnect® display.
will display the “PARKSENSE OFF” message
for as long as the vehicle is in REVERSE.
The ParkSense® switch LED will be ON when
ParkSense® is disabled or defective. The
ParkSense® switch LED will be OFF when the
system is enabled. If the ParkSense switch is
pressed and the system is disabled or requires
service, the ParkSense switch LED will blink
momentarily and then the LED will be ON.
Service The ParkSense® Rear Park
Assist System
ParkSense® Switch
When the ParkSense® system is
disabled, the Drivers Information
Display (DID) will display the
“PARKSENSE OFF” message for
approximately five seconds. Refer
to “Drivers Information Display (DID)” in “Understanding Your Instrument Panel” for further information. When the shift lever is moved to
REVERSE and the system is disabled, the DID
106
During vehicle start up, when the ParkSense®
Rear Park Assist System has detected a faulted
condition, the instrument cluster will actuate a
single chime, once per ignition cycle and it will
display the “PARKSENSE UNAVAILABLE
WIPE REAR SENSORS” or “PARKSENSE UNAVAILABLE SERVICE REQUIRED” message
for five seconds. Refer to “Driver Information
Display (DID)” in “Understanding Your Instrument Panel” for further information.
When the shift lever is moved to REVERSE and
the system has detected a faulted condition, the
Driver Information Display (DID) will display the
“PARKSENSE UNAVAILABLE WIPE REAR
SENSORS” or “PARKSENSE UNAVAILABLE
SERVICE REQUIRED” message for as long as
the vehicle is in REVERSE. Under this condition, ParkSense® will not operate.
If “PARKSENSE UNAVAILABLE WIPE REAR
SENSORS” appears in the Driver Information
Display (DID), make sure the outer surface and
the inside of the rear fascia/bumper is clean and
clear of snow, ice, mud, dirt or other obstruction,
and then cycle the ignition. If the message
continues to appear see an authorized dealer.
If “PARKSENSE UNAVAILABLE SERVICE REQUIRED” appears in the DID, see an authorized dealer.
Cleaning The ParkSense® System
Clean the ParkSense® sensors with water, car
wash soap and a soft cloth. Do not use rough or
hard cloths. Do not scratch or poke the sensors.
Otherwise, you could damage the sensors.
ParkSense® System Usage
Precautions
NOTE:
• Ensure that the rear bumper is free of
snow, ice, mud, dirt and debris to keep the
ParkSense® system operating properly.
• Jackhammers, large trucks, and other vibrations could affect the performance of
ParkSense® or render the system temporarily unavailable.
• When you turn ParkSense® off in DRIVE,
the instrument cluster will display
ⴖPARKSENSE OFFⴖ for five seconds. Furthermore, once you turn ParkSense® off,
it remains off until you turn it on again,
even if you cycle the ignition key.
• When you move the shift lever to the
REVERSE position and ParkSense® is
turned off, the Driver Information Display
(DID) will display “PARKSENSE OFF”
message for as long as the vehicle is in
REVERSE.
• ParkSense® will reduce the volume of the
radio when it is sounding an audio tone.
• Clean the ParkSense® sensors regularly,
taking care not to scratch or damage
them. The sensors must not be covered
with ice, snow, slush, mud, dirt or debris.
Failure to do so can result in the system
not working properly. The ParkSense®
system might not detect an obstacle behind the fascia/bumper, or it could provide a false indication that an obstacle is
behind the fascia/bumper.
• Ensure the ParkSense® system is OFF if
objects such as bicycle carriers, trailer
hitches, etc., are placed within 12 inches
30 (cm) from the rear fascia/bumper. Failure to do so can result in the system
misinterpreting a close object as a sensor
problem, causing the “PARKSENSE UNAVAILABLE SERVICE REQUIRED” message to be displayed in the Driver Information Display (DID).
CAUTION!
• ParkSense® is only a parking aid and it is
unable to recognize every obstacle, including small obstacles. Parking curbs might
be temporarily detected or not detected at
all. Obstacles located above or below the
sensors will not be detected when they are
in close proximity.
• The vehicle must be driven slowly when
using ParkSense® in order to be able to
stop in time when an obstacle is detected.
It is recommended that the driver looks
over his/her shoulder when using
ParkSense®.
WARNING!
Drivers must be careful when backing up
even when using the Rear Park Assist system. Always check carefully behind your
vehicle, and be sure to check for pedestri(Continued)
107
WARNING! (Continued)
ans, animals, other vehicles, obstructions, or
blind spots before backing up. You are responsible for the safety of your surroundings
and must continue to pay attention while
backing up. Failure to do so can result in
serious injury or death.
PARKVIEW® REAR BACK UP
CAMERA — IF EQUIPPED
Your vehicle may be equipped with the
ParkView® Rear Back Up Camera that allows
you to see an on-screen image of the rear
surroundings of your vehicle whenever the shift
lever/gear selector is put into REVERSE. The
ParkView® camera is located on the rear of the
vehicle above the rear license plate. The image
will be displayed in the touchscreen display
along with a caution note to “check entire surroundings” across the top of the screen. After
five seconds this note will disappear.
NOTE:
The ParkView® Rear Back Up Camera has
programmable modes of operation that may
be selected through the Uconnect® System.
Refer to “Uconnect® Settings” in “Understanding Your Instrument Panel” for further
information.
If your vehicle is equipped with the Camera
Delay feature and it is turned ON, the rear
camera image will be displayed for up to 10
seconds when the vehicle is shifted out of
REVERSE unless the forward vehicle speed
exceeds 8 mph (13 km/h), the transmission is
shifted into "PARK" or the vehicle’s ignition is
cycled to the OFF position.
When the Vehicle is shifted out of Reverse (with
camera delay turned OFF) the rear camera
mode is exited and the last touchscreen appears again.
When enabled, active guide lines are overlaid
on the image to illustrate the width of the vehicle
and its projected backup path based on the
steering wheel position.
Different colored zones indicate the distance to
the rear of the vehicle.
The following table shows the approximate distances for each zone:
Zone
Distance to the rear
of the vehicle
Red
0 - 1 ft (0 - 30 cm)
Yellow
1 ft - 6.5 ft
(30 cm - 2 m)
Green
6.5 ft or greater
(2 m or greater)
WARNING!
Drivers must be careful when backing up
even when using the ParkView® Rear Back
Up Camera. Always check carefully behind
your vehicle, and be sure to check for pedestrians, animals, other vehicles, obstructions,
or blind spots before backing up. You are
responsible for the safety of your surroundings and must continue to pay attention while
(Continued)
108
WARNING! (Continued)
backing up. Failure to do so can result in
serious injury or death.
CAUTION!
• To avoid vehicle damage, ParkView®
should only be used as a parking aid. The
ParkView® camera is unable to view every
obstacle or object in your drive path.
• To avoid vehicle damage, the vehicle must
be driven slowly when using ParkView® to
be able to stop in time when an obstacle is
seen. It is recommended that the driver
look frequently over his/her shoulder when
using ParkView®.
NOTE:
If snow, ice, mud, or any foreign substance
builds up on the camera lens, clean the lens,
rinse with water, and dry with a soft cloth. Do
not cover the lens.
OVERHEAD CONSOLE
The overhead console contains courtesy/
reading lights and sunglass storage. Power
sunroof switch may also be included, if
equipped.
mote Keyless Entry (RKE) transmitter is
pressed, or when the dimmer control is turned
fully upward past the second detent.
Sunglasses Storage
At the rear of the console, a compartment is
provided for the storage of a pair of sunglasses.
The storage compartment access is a "push/
push" design. Push on the raised bar on the
compartment door to open. Push on the raised
bar to close.
POWER SUNROOF — IF
EQUIPPED
Overhead Console
The power sunroof switch is located between
the sun visors on the overhead console.
Courtesy/Reading Lights
At the forward end of the overhead console are
two courtesy/reading lights.
Press the lens to turn on the light. Press it a
second time to turn off the light.
These lights also turn on when a door is
opened, when the UNLOCK button on the Re109
Power Sunroof Switch
WARNING!
• Never leave children unattended in a vehicle, or with access to an unlocked vehicle. Never leave the Key Fob in or near
the vehicle, or in a location accessible to
children. Do not leave the ignition of a
vehicle equipped with Keyless Enter-NGo™ in the ACC or ON/RUN mode. Occupants, particularly unattended children,
can become entrapped by the power sun(Continued)
110
WARNING! (Continued)
roof while operating the power sunroof
switch. Such entrapment may result in
serious injury or death.
• In a collision, there is a greater risk of
being thrown from a vehicle with an open
sunroof. You could also be seriously injured or killed. Always fasten your seat belt
properly and make sure all passengers are
also properly secured.
• Do not allow small children to operate the
sunroof. Never allow your fingers, other
body parts, or any object, to project
through the sunroof opening. Injury may
result.
Opening Sunroof — Express
Press the switch rearward and release it within
one-half second. The sunroof and sunshade will
open automatically from any position. The sunroof and sunshade will open fully and stop
automatically. This is called “Express Open”.
During Express Open operation, any movement
of the sunroof switch will stop the sunroof.
Opening Sunroof — Manual Mode
To open the sunroof, press and hold the switch
rearward to full open. Any release of the switch
will stop the movement. The sunroof and sunshade will remain in a partially opened condition
until the switch is pushed and held rearward
again.
Closing Sunroof — Express
Press the switch forward and release it within
one-half second and the sunroof will close
automatically from any position. The sunroof will
close fully and stop automatically. This is called
“Express Close”. During Express Close operation, any movement of the switch will stop the
sunroof.
Closing Sunroof — Manual Mode
To close the sunroof, press and hold the switch
in the forward position. Any release of the
switch will stop the movement and the sunroof
will remain in a partially closed condition until
the switch is pushed and held forward again.
Pinch Protect Feature
This feature will detect an obstruction in the
opening of the sunroof during Express Close
operation. If an obstruction in the path of the
sunroof is detected, the sunroof will automatically retract. Remove the obstruction if this
occurs. Next, press the switch forward and
release to Express Close.
NOTE:
If three consecutive sunroof close attempts
result in Pinch Protect reversals, the fourth
close attempt will be a Manual Close movement with Pinch Protect disabled.
Venting Sunroof — Express
Press and release the Vent button within one
half second and the sunroof will open to the
vent position. This is called “Express Vent” and
it will occur regardless of sunroof position. During Express Vent operation, any movement of
the switch will stop the sunroof.
Sunshade Operation
The sunshade can be opened manually. However, the sunshade will open automatically as
the sunroof opens.
NOTE:
The sunshade cannot be closed if the sunroof is open.
Wind Buffeting
Wind buffeting can be described as the perception of pressure on the ears or a helicopter-type
sound in the ears. Your vehicle may exhibit wind
buffeting with the windows down, or the sunroof
(if equipped) in certain open or partially open
positions. This is a normal occurrence and can
be minimized. If the buffeting occurs with the
front windows open, open the front windows
together to minimize the buffeting. If the buffeting occurs with the sunroof open, adjust the
sunroof opening to minimize the buffeting or
open any window.
Sunroof Maintenance
Use only a nonabrasive cleaner and a soft cloth
to clean the glass panel.
Ignition Off Operation
The power sunroof switch will remain active for
up to approximately ten minutes after the ignition switch is turned to the LOCK position.
Opening either front door will cancel this feature.
NOTE:
Ignition Off time is programmable through
the
Uconnect®
System.
Refer
to
“Uconnect® Settings/Customer Programmable Features” in “Understanding Your Instrument Panel” for further information.
ELECTRICAL POWER
OUTLETS
Your vehicle is equipped with two 12 Volt (13
Amp) power outlets that can be used to power
cellular phones, small electronics and other low
powered electrical accessories.
The 12 Volt power outlets have power available
at all times. These power outlets can also
operate a conventional cigar lighter unit.
NOTE:
To ensure proper operation, a MOPAR® cigar knob and element must be used.
The front power outlet is located next to the
storage area on the integrated center stack of
the instrument panel.
111
NOTE:
All accessories connected to these powered
outlets should be removed or turned off
when the vehicle is not in use to protect the
battery against discharge.
Power Outlet — Integrated Center Stack Front
Power Outlet Fuse Locations
1 — #12 Fuse 20A Yellow Power Outlet Integrated
Center Stack
2 — #38 Fuse 20A Yellow Power Outlet Center
Console
Power Outlet — Center Console
CAUTION!
• Do not exceed the maximum power of 160
Watts (13 Amps) at 12 Volts. If the 160
Watt (13 Amp) power rating is exceeded
the fuse protecting the system will need to
be replaced.
• Power outlets are designed for accessory
plugs only. Do not insert any other object in
the power outlets as this will damage the
outlet and blow the fuse. Improper use of
the power outlet can cause damage not
covered by your New Vehicle Limited Warranty.
WARNING!
To avoid serious injury or death:
• Only devices designed for use in this type
of outlet should be inserted into any 12 Volt
outlet.
• Do not touch with wet hands.
(Continued)
112
WARNING! (Continued)
• Close the lid when not in use and while
driving the vehicle.
• If this outlet is mishandled, it may cause an
electric shock and failure.
CAUTION!
• Many accessories that can be plugged in
draw power from the vehicle’s battery,
even when not in use (i.e., cellular phones,
etc.). Eventually, if plugged in long enough,
the vehicle’s battery will discharge sufficiently to degrade battery life and/or prevent the engine from starting.
• Accessories that draw higher power (i.e.,
coolers, vacuum cleaners, lights, etc.), will
degrade the battery even more quickly.
Only use these intermittently and with
greater caution.
CAUTION! (Continued)
• After the use of high power draw accessories, or long periods of the vehicle not
being started (with accessories still
plugged in), the vehicle must be driven a
sufficient length of time to allow the alternator to recharge the vehicle’s battery.
• Power outlets are designed for accessory
plugs only. Do not hang any type of accessory or accessory bracket from the plug.
Improper use of the power outlet can
cause damage.
CUPHOLDERS
Front Cupholders
The front cupholders are located in the center
console.
Front Cupholders
Rear Cupholders
The rear seat cupholders are located in the
center armrest between the rear seats. The
cupholders are positioned forward in the armrest and side-by-side to provide convenient
access to beverage cans or bottles while maintaining a resting place for the rear occupant’s
elbows.
(Continued)
113
Console Storage
Rear Cupholders
Glove Compartment
The center console has a storage compartment
located underneath the armrest. The compartment contains a 12 Volt power outlet, and a
molded-in coin holder (designed to hold various
size coins). The center console may also be
equipped with a Universal Consumer Interface
(UCI). UCI supports Mini, 4G, Photo, Nano, 5G
iPod® and iPhone® devices. Refer to “Universal Consumer Interface (UCI) — If Equipped” in
“Understanding Your Instrument Panel” for further information.
STORAGE
Glove Compartment
The glove compartment is located on the passenger side of the instrument panel.
Opened Glove Compartment
114
Center Console
WARNING!
Do not operate this vehicle with a console
compartment lid in the open position. Driving
with the console compartment lid open may
result in injury in a collision.
REAR WINDOW FEATURES
Rear Window Defroster
The rear window defroster button is
located on the climate control (Mode)
knob. Press this button to turn on the
rear window defroster and the heated
outside mirrors (if equipped). An indicator in the
button will illuminate when the rear window
defroster is on. The rear window defroster automatically turns off after approximately 10 minutes. For an additional five minutes of operation, press the button a second time.
NOTE:
To prevent excessive battery drain, use the
rear window defroster only when the engine
is operating.
CAUTION!
Failure to follow these cautions can cause
damage to the heating elements:
• Use care when washing the inside of the
rear window. Do not use abrasive window
cleaners on the interior surface of the
window. Use a soft cloth and a mild washing solution, wiping parallel to the heating
elements. Labels can be peeled off after
soaking with warm water.
• Do not use scrapers, sharp instruments, or
abrasive window cleaners on the interior
surface of the window.
• Keep all objects a safe distance from the
window.
115
116
4
UNDERSTANDING YOUR INSTRUMENT
PANEL
•
•
•
•
•
INSTRUMENT PANEL FEATURES . . . . . . . . . . . . . . . .
INSTRUMENT CLUSTER — BASE . . . . . . . . . . . . . . .
INSTRUMENT CLUSTER — PREMIUM . . . . . . . . . . . . .
INSTRUMENT CLUSTER DESCRIPTIONS . . . . . . . . . . .
DRIVER INFORMATION DISPLAY (DID) . . . . . . . . . . . .
• Engine Oil Life Reset . . . . . . . . . . . . . . . . . . . . . .
• DID Selectable Menu Items . . . . . . . . . . . . . . . . . . .
• Uconnect® SETTINGS . . . . . . . . . . . . . . . . . . . . . . .
• Buttons On The Faceplate. . . . . . . . . . . . . . . . . . . .
• Buttons On The Touchscreen . . . . . . . . . . . . . . . . . .
• Customer Programmable Features — Uconnect® 5.0 Settings
• Customer Programmable Features — Uconnect® 8.4 Settings
• Performance Pages — If Equipped . . . . . . . . . . . . . .
• Performance Control — If Equipped . . . . . . . . . . . . .
• Uconnect® RADIOS — IF EQUIPPED . . . . . . . . . . . . .
• iPod®/USB/MP3 CONTROL — IF EQUIPPED . . . . . . . . .
. . .119
. . .120
. . .121
. . .122
. . .127
. . .128
. . .129
. . .135
. . .135
. . .136
. . .136
. . .144
. . .154
. . .159
. . .166
. . .166
117
• STEERING WHEEL AUDIO CONTROLS — IF EQUIPPED
• Radio Operation . . . . . . . . . . . . . . . . . . . . . . . .
• Media Mode . . . . . . . . . . . . . . . . . . . . . . . . . .
• RADIO OPERATION AND MOBILE PHONES . . . . . . .
• CLIMATE CONTROLS . . . . . . . . . . . . . . . . . . . . .
• General Overview . . . . . . . . . . . . . . . . . . . . . . .
• Climate Control Functions . . . . . . . . . . . . . . . . . .
• Automatic Temperature Control (ATC) . . . . . . . . . .
• Operating Tips . . . . . . . . . . . . . . . . . . . . . . . .
• Uconnect® VOICE RECOGNITION QUICK TIPS . . . . .
• Introducing Uconnect®. . . . . . . . . . . . . . . . . . . .
• Get Started . . . . . . . . . . . . . . . . . . . . . . . . . . .
• Basic Voice Commands . . . . . . . . . . . . . . . . . . .
• Radio . . . . . . . . . . . . . . . . . . . . . . . . . . . . . .
• Media . . . . . . . . . . . . . . . . . . . . . . . . . . . . . .
• Phone . . . . . . . . . . . . . . . . . . . . . . . . . . . . . .
• Climate (8.4A/8.4AN) . . . . . . . . . . . . . . . . . . . . .
• Navigation (8.4A/8.4AN) . . . . . . . . . . . . . . . . . . .
• Additional Information . . . . . . . . . . . . . . . . . . . .
118
.
.
.
.
.
.
.
.
.
.
.
.
.
.
.
.
.
.
.
.
.
.
.
.
.
.
.
.
.
.
.
.
.
.
.
.
.
.
.
.
.
.
.
.
.
.
.
.
.
.
.
.
.
.
.
.
.
.
.
.
.
.
.
.
.
.
.
.
.
.
.
.
.
.
.
.
.
.
.
.
.
.
.
.
.
.
.
.
.
.
.
.
.
.
.
.
.
.
.
.
.
.
.
.
.
.
.
.
.
.
.
.
.
.
.166
.167
.167
.167
.167
.167
.171
.172
.173
.175
.175
.175
.176
.176
.177
.178
.178
.179
.179
INSTRUMENT PANEL FEATURES
1
2
3
4
— Air Outlets
— Instrument Cluster
— Glove Box
— Media Center
5 — Keyless Start/Stop Button
6 — Trunk Release Button
7 — Headlight Switch
119
INSTRUMENT CLUSTER — BASE
Instrument Cluster For 3.6L or 5.7L
120
INSTRUMENT CLUSTER — PREMIUM
Instrument Cluster For 6.4L
121
INSTRUMENT CLUSTER
DESCRIPTIONS
1. Tachometer
The red segments indicate the maximum permissible engine revolutions per minute (RPM x 1000)
for each gear range. Ease up on the accelerator
before reaching the red area.
2. Malfunction Indicator Light (MIL)
The Malfunction Indicator Light (MIL) is
part of an onboard diagnostic system
called OBD. The OBD system monitors
engine and automatic transmission control systems. The MIL will turn on when the ignition
is in the ON/RUN position before engine start. If the
MIL does not come on when turning the key from
OFF to ON/RUN, have the condition checked
promptly.
Certain conditions, such as a loose or missing gas
cap, poor fuel quality, etc., may illuminate the MIL
after engine start. The vehicle should be serviced if
the MIL stays on through several of your typical
driving cycles. In most situations, the vehicle will
drive normally and will not require towing.
122
CAUTION!
Prolonged driving with the Malfunction Indicator Light (MIL) on could cause damage to
the engine control system. It also could affect
fuel economy and driveability. If the MIL is
flashing, severe catalytic converter damage
and power loss will soon occur. Immediate
service is required.
WARNING!
A malfunctioning catalytic converter, as referenced above, can reach higher temperatures than in normal operating conditions.
This can cause a fire if you drive slowly or
park over flammable substances such as dry
plants, wood, cardboard, etc. This could result in death or serious injury to the driver,
occupants or others.
3. Vehicle Security Light — If Equipped
This light will flash at a fast rate for
approximately 15 seconds, when
the vehicle security alarm is arming, and then will flash slowly until
the vehicle is disarmed.
4. Turn Signal Indicators
The arrow will flash with the exterior turn signal when the turn signal
lever is operated.
NOTE:
• A continuous chime will sound if the vehicle is driven more than 1 mile (1.6 km)
with either turn signal on.
• Check for an inoperative outside light
bulb if either indicator flashes at a rapid
rate.
5. Anti-Lock Brake (ABS) Light
This light monitors the Anti-Lock Brake
System (ABS). The light will turn on
when the ignition switch is placed in the ON/
RUN position and may stay on for as long as
four seconds.
If the ABS light remains on or turns on while
driving, then the Anti-Lock portion of the brake
system is not functioning and service is required. However, the conventional brake system will continue to operate normally if the
BRAKE warning light is not on.
If the ABS light is on, the brake system should
be serviced as soon as possible to restore the
benefits of Anti-Lock Brakes. If the ABS light
does not turn on when the ignition switch is
placed in the ON/RUN position, have the light
inspected by an authorized dealer.
6. Driver Information Display (DID) Area
The odometer display shows the total distance
the vehicle has been driven. The trip odometer
shows individual trip mileage.
NOTE:
The DID features an interactive display, for
further information refer to “Driver Information
Display (DID) ”.
7. Gear Status Indicator — Automatic
Transmission Only
The Gear Status Indicator is self-contained
within the instrument cluster. It displays the gear
position of the automatic transmission.
8. Seat Belt Reminder Light
This light will turn on for four to eight
seconds as a bulb check when the
ignition switch is first placed in ON/
RUN. A chime will sound if the driver’s
seat belt is unbuckled during the bulb check.
The Seat Belt Warning Light will flash or remain
on continuously if the driver’s seat belt remains
unbuckled after the bulb check or when driving.
Refer to “Occupant Restraints” in “Things To
Know Before Starting Your Vehicle” for further
information.
9. Brake Warning Light
This light monitors various brake functions, including brake fluid level and
parking brake application. If the brake
light turns on it may indicate that the parking
brake is applied, that the brake fluid level is low,
or that there is a problem with the anti-lock
brake system reservoir.
If the light remains on when the parking brake
has been disengaged, and the fluid level is at
the full mark on the master cylinder reservoir, it
indicates a possible brake hydraulic system
malfunction. In this case, the light will remain on
until the condition has been corrected.
The dual brake system provides a reserve
braking capacity in the event of a failure to a
portion of the hydraulic system. A leak in either
half of the dual brake system is indicated by the
Brake Warning Light which will turn on when the
brake fluid level in the master cylinder has
dropped below a specified level.
The light will remain on until the cause is
corrected.
NOTE:
The light may flash momentarily during
sharp cornering maneuvers which change
fluid level conditions. The vehicle should
have service performed, and the brake fluid
level checked.
123
If brake failure is indicated, immediate repair is
necessary.
The light also will turn on when the parking
brake is applied with the ignition switch in the
ON/RUN position.
WARNING!
Driving a vehicle with the brake light on is
dangerous. Part of the brake system may
have failed. It will take longer to stop the
vehicle. You could have a collision. Have the
vehicle checked immediately.
NOTE:
This light shows only that the parking brake
is applied. It does not show the degree of
brake application.
Vehicles equipped with the Anti-Lock Brake
System (ABS), are also equipped with Electronic Brake Force Distribution (EBD). In the
event of an EBD failure, the Brake Warning
Light will turn on along with the ABS Light.
Immediate repair to the ABS system is required.
Operation of the Brake Warning Light can be
checked by turning the ignition switch from the
OFF position to the ON/RUN position. The light
should illuminate for approximately two seconds. The light should then turn off unless the
parking brake is applied or a brake fault is
detected. If the light does not illuminate, have
the light inspected by an authorized dealer.
124
10. Air Bag Warning Light
This light will turn on for four to
eight seconds as a bulb check
when the ignition switch is first
turned to the ON/RUN position. If
the light is either not on during
starting, stays on, or turns on while driving, have
the system inspected at an authorized dealer as
soon as possible. Refer to “Occupant Restraints” in “Things To Know Before Starting
Your Vehicle” for further information.
11. Speedometer
Indicates vehicle speed.
NOTE:
A chime will sound once if the vehicle exceeds 120 km/h (75mph) .
12. Front Fog Light Indicator — If Equipped
This indicator will illuminate when the
front fog lights are on.
13. High Beam Indicator
This indicator will turn on when the
high beam headlights are on. Push the
multifunction lever away from the
steering wheel to switch the headlights to high
beam.
14. Park/Headlight ON Indicator
This indicator will illuminate when
the park lights or headlights are
turned on.
15. Fuel Gauge
The pointer shows the level of fuel in the fuel
tank when the ignition switch is placed in the
ON/RUN position.
16. Temperature Gauge
The temperature gauge shows engine coolant
temperature. Any reading within the normal
range for a fully warm vehicle should be 200 F
- 230 F which indicates that the engine cooling
system is operating satisfactorily.
The gauge pointer will likely indicate a higher
temperature when driving in hot weather, up
mountain grades, or when towing a trailer. It
should not be allowed to exceed the upper limits
of the normal operating range.
CAUTION!
Driving with a hot engine cooling system
could damage your vehicle. If the temperature gauge reads “H,” pull over and stop the
vehicle. Idle the vehicle with the air conditioner turned off until the pointer drops back
into the normal range. If the pointer remains
on the “H,” and you hear a chime, turn the
engine OFF immediately and call for service.
WARNING!
A hot engine cooling system is dangerous.
You or others could be badly burned by
steam or boiling coolant. You may want to
call a service center if your vehicle overheats. If you decide to look under the hood
yourself, refer to “Maintaining Your Vehicle”
and follow the warnings under the Cooling
System Pressure Cap paragraph.
System (TPMS) that illuminates a low tire pressure telltale when one or more of your tires is
significantly under-inflated. Accordingly, when
the low tire pressure telltale illuminates, you
should stop and check your tires as soon as
possible, and inflate them to the proper pressure. Driving on a significantly under-inflated
tire causes the tire to overheat and can lead to
tire failure. Under-inflation also reduces fuel
efficiency and tire tread life, and may affect the
vehicle’s handling and stopping ability.
17. Tire Pressure Monitoring Telltale Light
Please note that the TPMS is not a substitute for
proper tire maintenance, and it is the driver’s
responsibility to maintain correct tire pressure,
even if under-inflation has not reached the level
to trigger illumination of the TPMS low tire
pressure telltale.
Each tire, including the spare (if
provided), should be checked
monthly when cold and inflated to
the inflation pressure recommended by the vehicle manufacturer on the vehicle placard or tire inflation
pressure label. (If your vehicle has tires of a
different size than the size indicated on the
vehicle placard or tire inflation pressure label,
you should determine the proper tire inflation
pressure for those tires).
As an added safety feature, your vehicle has
been equipped with a Tire Pressure Monitoring
Your vehicle has also been equipped with a
TPMS malfunction indicator to indicate when
the system is not operating properly. The TPMS
malfunction indicator is combined with the low
tire pressure telltale. When the system detects
a malfunction, the telltale will flash for approximately one minute and then remain continuously illuminated. This sequence will continue
125
upon subsequent vehicle start-ups as long as
the malfunction exists. When the malfunction
indicator is illuminated, the system may not be
able to detect or signal low tire pressure as
intended. TPMS malfunctions may occur for a
variety of reasons, including the installation of
replacement or alternate tires or wheels on the
vehicle that prevent the TPMS from functioning
properly. Always check the TPMS malfunction
telltale after replacing one or more tires or
wheels on your vehicle, to ensure that the
replacement or alternate tires and wheels allow
the TPMS to continue to function properly.
CAUTION!
The TPMS has been optimized for the original equipment tires and wheels. TPMS pressures and warning have been established for
the tire size equipped on your vehicle. Undesirable system operation or sensor damage may result when using replacement
equipment that is not of the same size, type,
and/or style. Aftermarket wheels can cause
(Continued)
126
CAUTION! (Continued)
sensor damage. Do not use tire sealant from
a can or balance beads if your vehicle is
equipped with a TPMS, as damage to the
sensors may result.
18. Electronic Stability Control (ESC) OFF
Indicator Light — If Equipped
This light indicates the Electronic
Stability Control (ESC) is off.
With Drive Modes the ESC OFF
indicator will be lit any time the
Traction modes is set to Sport,
Track or Full OFF.
19. Electronic Stability Control (ESC)
Activation/Malfunction Indicator Light — If
Equipped
The “ESC Activation/Malfunction
Indicator Light” in the instrument
cluster will come on when the ignition switch is turned to the ON/
RUN position. It should go out with
the engine running. If the “ESC Activation/
Malfunction Indicator Light” comes on continuously with the engine running, a malfunction
has been detected in the ESC system. If this
light remains on after several ignition cycles,
and the vehicle has been driven several miles
(kilometers) at speeds greater than 30 mph
(48 km/h), see your authorized dealer as soon
as possible to have the problem diagnosed and
corrected.
NOTE:
• The “ESC Off Indicator Light” and the
“ESC Activation/Malfunction Indicator
Light” will come on momentarily each
time the ignition switch is turned to ON/
RUN.
• Each time the ignition is turned to ON/
RUN, the ESC system will be ON, even if it
was turned off previously.
• The ESC system will make buzzing or
clicking sounds when it is active. This is
normal; the sounds will stop when ESC
becomes inactive following the maneuver
that caused the ESC activation.
DRIVER INFORMATION
DISPLAY (DID)
• Driver Assist — If Equipped
The Driver Information Display (DID) features
an interactive display which is located in the
instrument cluster.
• Trip
• Fuel Economy
• Audio
Up And Down Arrow Buttons:
Using the Up or Down arrows allows you to cycle through the Main
Menu Items.
Changes the Main Screen area
and Menu Title area.
• Messages
• Screen Setup
• Speed Warning — If Equipped
• Diagnostics
The system allows the driver to select information by pushing the following buttons mounted
on the steering wheel:
Driver Information Display (DID) Display
Left And Right Arrow Buttons:
Using the Left or Right arrow buttons allows you to cycle through
the submenu items of the Main
menu item.
This system conveniently allows the driver to
select a variety of useful information by pushing
the arrow buttons located on the left side of the
steering wheel. The DID Menu Items consists of
the following:
• Speedometer
• Vehicle Info
DID Controls
127
NOTE:
• Holding the Up/Down or Left/Right arrow
buttons will loop the user through the
currently selected menu or options presented on the screen.
• Main menu and submenu’s wrap for continuous scrolling.
• Upon returning to a main menu, the last
submenu screen viewed within that main
menu will be displayed.
• Pushing the OK button makes the selection
and a confirmation screen will appear (returning the user to the 1st page of the
submenu).
• Pushing the left arrow button will exit each
submenu layer and return to the main menu.
For the Trip and Fuel Economy menus (and
new Performance Timers):
• Information is reset by pushing and holding
the OK button.
OK Button:
Engine Oil Life Reset
For Digital Speedometer
Oil Change Required
• Pushing the OK button changes units (MPH
or km/h).
Your vehicle is equipped with an engine oil
change indicator system. The “Oil Change Required” message will display in the DID for five
seconds after a single chime has sounded, to
indicate the next scheduled oil change interval.
The engine oil change indicator system is duty
cycle based, which means the engine oil
change interval may fluctuate, dependent upon
your personal driving style.
For Screen Setup and Vehicle Settings:
• OK button allows user to enter menu and
submenus.
• Within each submenu layer, the up/down
arrows will allow the user to select the item of
interest.
Unless reset, this message will continue to
display each time you turn the ignition switch to
128
the ON/RUN position or cycle the ignition to the
ON/RUN position if equipped with Keyless
Enter-N-Go™. To turn off the message temporarily, push and release the OK button. To reset
the oil change indicator system (after performing the scheduled maintenance) refer to the
following procedure.
Vehicles Equipped With Keyless Enter-NGo™
1. Without pushing the brake pedal, push the
ENGINE START/STOP button and place the
ignition to the ON/RUN position (do not start
the engine).
2. Fully push the accelerator pedal, slowly,
three times within 10 seconds.
3. Without pushing the brake pedal, push the
ENGINE START/STOP button once to return
the ignition to the OFF/LOCK position.
NOTE:
If the indicator message illuminates when
you start the vehicle, the oil change indicator system did not reset. If necessary, repeat
this procedure.
Secondary Method Of Navigating To The Oil
Life Screen In The DID And Holding Ok
Your vehicle is equipped with an engine oil
change indicator system. The “Oil Change Required” message will flash in the DID display for
approximately 10 seconds after a single chime
has sounded, to indicate the next scheduled oil
change interval. The engine oil change indicator
system is duty cycle based, which means the
engine oil change interval may fluctuate, dependent upon your personal driving style.
Use the steering wheel DID controls for the
following procedure(s):
1. Without pushing the brake pedal, cycle the
ignition to the ON/RUN position (do not start
the engine).
2. Push and release the DOWN arrow button to
scroll downward through the main menu to
“Vehicle Info”.
3. Push and release the RIGHT arrow button to
access the ”Oil Life” screen.
5. Push and release the DOWN arrow button to
select “Yes”, then push and release the OK
button to select reset of the Oil Life.
6. Push and release the Up arrow button to exit
the submenu screen.
NOTE:
If the indicator message illuminates when
you start the vehicle, the oil change indicator system did not reset. If necessary, repeat
this procedure.
Vehicle Info
Press and release the UP or DOWN arrow
button until the Vehicle Info menu is highlighted
in the DID. Push and release the RIGHT arrow
buttons to enter the submenu items of Vehicle
Info. Follow the directional prompts to access or
reset any of the following Vehicle Info submenu
items:
Tire Pressure Monitor
Coolant Temp
Trans Temp
DID Selectable Menu Items
Oil Temp
Push and release the UP or DOWN arrow
buttons until the desired Selectable Menu item
is displayed in the DID.
Oil Pressure
Follow the Menu or submenu prompts as desired.
Battery Voltage
Speedometer
Push and release the LEFT or RIGHT arrow
button to toggle between the Speedometer display type.
Engine Torque
Oil Life
Intake Air Temp
Engine Power
4. Push and hold the OK button until the ”Oil
Life” screen displays.
129
Performance Features
WARNING!
Measurement of vehicle statistics with the
Performance Features is intended for offhighway or off-road use only and should not
be done on any public roadways. It is recommended that these features be used in a
controlled environment and within the limits
of the law. The capabilities of the vehicle as
measured by the performance pages must
never be exploited in a reckless or dangerous manner, which can jeopardize the user’s
safety or the safety of others. Only a safe,
attentive, and skillful driver can prevent accidents.
Refer to “Driver Information Display (DID)” in “
Understanding Your Instrument Panel” for Main
Menu/Sub-Menu
selectable
items
and
navigation.
130
The Performance
following:
Features
• 0-60 mph (0-100 km/h) Timer
– Best
– Last
– Current
– Reaction Timer
• 0-100 mph (0-160 km/h) Timer
– Best
– Last
– Current
– Reaction Timer
• 1/8 Mile Timer
– Best
– Last
– Current
– Reaction Timer
• 1/4 Mile Timer
– Best
– Last
– Current
include
the
– Reaction Timer
• Braking Distance
– Distance
– From Speed
• Current G-Forces
• Peak G-Forces
• Lap Timer
• Lap History
– Will list the last 5 lap with the best lap
highlighted in green.
• Top Speed
The following describes each feature and its
operation:
0-60 mph (0-100 km/h)
When selected, this screen displays the time it
takes for the vehicle to go from 0 to 60 mph (0
to 100 km/h) within 10 seconds.
• The feature will “ready” when the vehicle
speed is at 0 mph (0 km/h). The word
“READY” will flash when conditions are met
for the event to begin.
• Dashes will display if the vehicle fails to
reach 60 mph (100 km/h) in less then 10
seconds.
• The time will continue to display until the OK
button is pushed.
• The time will continue to display until the OK
button is pushed.
• Pushing the OK button will clear the current
run time and display the vehicle’s best 0 to
100 mph (0 to 161 km/h) time.
• Pushing the OK button will clear the current
run time and display the vehicle’s best
0-60 mph (0-100 km/h) time.
• To clear the vehicle’s best 0 to 100 mph (0 to
161 km/h) time, push and hold the OK button
for five seconds.
• To clear the vehicle’s best 0-60 mph
(0-100 km/h) time, push and hold the OK
button for five seconds.
1/8 Mile
0 to 100 mph (0 to 161 km/h)
When selected, this screen displays the time it
takes for the vehicle to go from 0 to 100 mph (0
to 161 km/h) within 20 seconds.
• The feature will “ready” when the vehicle
speed is at 0 mph (0 km/h). The word
“READY” will flash when conditions are met
for the event to begin.
• Dashes will display if the vehicle fails to
reach 0 to 100 mph (0 to 161 km/h) in less
then 20 seconds.
When selected, this screen displays the time it
takes the vehicle to travel 1/8 mile within 15
seconds and the vehicle’s speed when it
reaches 1/8 mile.
• The feature will “ready” when the vehicle is at
0 mph (0 km/h). The word “READY” will flash
when conditions are met for the event to
begin.
• Dashes will display if the vehicle fails to
reach 1/8 mile in less then 15 seconds.
• The time and speed will continue to display
until the OK button is pushed.
• Pushing the OK button will clear the current
run and display the vehicle’s best 1/8 mile
run.
• To clear the vehicle’s best 1/8 mile run, push
and hold the OK button for five seconds.
1/4 Mile
When selected, this screen displays the time it
takes the vehicle to travel 1/4 mile within 25
seconds and the vehicle’s speed when it
reaches 1/4 mile.
• The feature will “ready” when the vehicle is at
0 mph (0 km/h). The word “READY” will flash
when conditions are met for the event to
begin.
• Dashes will display if the vehicle fails to
reach 1/4 mile in less then 25 seconds.
• The time and speed will continue to display
until the OK button is pushed.
• Pushing the OK button will clear the current
run and display the vehicle’s best 1/4 mile
run.
• To clear the vehicle’s best 1/4 mile run, push
and hold the OK button for five seconds.
131
Braking Distance
Current G-Force
When selected, this screen displays the vehicle’s braking distance and the speed at which
the brake pedal was depressed.
When selected, this screen displays the current
G-Force (lateral and longitudinal) that displays
the directions of the forces.
• This feature will only function when applying
the brakes at speeds above 30 mph
(48 km/h).
Peak G-Force
• Engaging the parking brake will disable this
feature.
• The word “READY” will display when conditions are met for the event to begin.
• The distance and speed measurements display while the event is taking place.
• The distance measurement will be aborted if
the brake pedal is released before the vehicle comes to a complete stop.
• The distance and speed measurements will
continue to display until the OK button is
pushed.
• Pushing the OK button will clear the current
run and prepare the cluster to record a new
run.
132
When selected, this screen displays all four
G-Force values (two lateral and two longitudinal).
• As soon as the driver exits the Lap Timer
pages the “current” timer will stop and the
time will be reset to 0:00.00
• If the driver stays on the Lap Timer pages the
“current” timer will reset to 0:00.0 when ignition is placed in the off position, or ignition
placed in the ON position (or will roll over at
59:59.99 if ever possible).
• When a force greater than zero is measured,
the display will update the value as it climbs.
As the G-Force falls, the peak forces will
continue to display.
• Each time the driver pushes OK for a Lap
that current time populates the Last time and
also populates the 1st (top) space on the
Timer History page the current time resets to
0:00.0 at every push of the OK button.
• Pushing the OK button will clear the peak
force values.
• The timer will stop when the driver navigates
away from this page.
Lap Timer
Lap History
When selected the Lap Timer page will show
the timer always at 0:00.00 with the previous
Best and Last time data (unless the driver has
cleared it via hold to Reset).
When selected, this screen displays the Lap
History, and will color highlight the time that is
the best time from the Timer Page.
• Pushing OK will start “current” timer from
0:00.0
• When OK is pushed the times are updated
accordingly.
• Each time the driver presses the OK button
(while on the Lap Timer page) the current
Lap Time populates the 1st spot and the rest
of the data shifts down.
• Color will indicate the time that is the best
time from the Timer Page.
• Holding the OK button only resets the page
you are on.
• Lap History page is a static display of lap
times only.
Top Speed
When selected, this screen displays the Top
Speed since last reset:
• Populates a top speed from first drive cycle
and every time that speed is exceeded that
number is stored here unless/until the driver
resets the screen.
• Latching over ignition cycles.
• Units will change with the global change in
units.
Driver Assist
Adaptive Cruise Control (ACC) Menu
The DID displays the current ACC system settings. The information displayed depends on
ACC system status.
Push the ADAPTIVE CRUISE CONTROL
(ACC) ON/OFF button (located on the steering
wheel) until one of the following displays in the
DID:
• Driver Override
Adaptive Cruise Control Off
• ACC Unavailable Warning
When ACC is deactivated, the display will read
“Adaptive Cruise Control Off.”
• The DID will return to the last display selected after five seconds of no ACC display
activity.
Adaptive Cruise Control Ready
When ACC is activated but the vehicle speed
setting has not been selected, the display will
read “Adaptive Cruise Control Ready.”
Push the SET + or the SET- button (located on
the steering wheel) and the following will display
in the DID:
ACC SET
When ACC is set, the set speed will display in
the instrument cluster.
The ACC screen may display once again if any
ACC activity occurs, which may include any of
the following:
• Distance Setting Change
• System Cancel
• System Off
• ACC Proximity Warning
For further information, refer to “Adaptive
Cruise Control (ACC) — If Equipped” in “Understanding The Features Of Your Vehicle”.
LaneSense — If Equipped
The DID displays the current LaneSense system settings. The information displayed depends on LaneSense system status and the
conditions that need to be met. For further
information, refer to “LaneSense — If
Equipped” in “Understanding The Features Of
Your Vehicle”.
Fuel Economy
Push and release the UP or DOWN arrow
button until the Fuel Economy Menu item is
highlighted in the DID.
133
• Two sub menu pages one with Current value
displayed and one without the Current Value
displayed:
– Current MPG (or L/100 km)
– Range (miles or km)
– Average MPG (or L/100 km)
– The Max and Min values will correspond
to the particular engine requirements
Trip Info
Push and release the UP or DOWN arrow
button until the Trip Menu item is highlighted in
the DID (Toggle left or right to select Trip A or
Trip B). The Trip information will display the
following:
• Lower end of gauge will be displayed in an
amber color and turn green as Fuel Economy
improves.
• Elapsed Time
Hold the OK button to reset feature information.
• Push OK to have the 1st code in the stack
sent
• MPG will have the gauge fill from the left
(clockwise).
Audio
Push and release the UP or DOWN arrow
button until the Audio Menu displays in the DID.
• There is a delay when the next diagnostic
code is requested during which the following
message is displayed:
Stored Messages
Push and release the UP or DOWN arrow
button until the Messages Menu item is highlighted in the DID. This feature shows the
number of stored warning messages. Pushing
the RIGHT arrow button will allow you to see
what the stored messages are.
• “Checking System for Diagnostic Codes”
Screen Setup
Push and release the UP or DOWN arrow
button until the Screen Setup Menu displays in
• Faults are displayed from oldest to the
newest.
• L/100 km will have the gauge fill from the
right (counter clockwise).
• Hold OK to reset average fuel economy
information.
134
• Distance
• Average Fuel Economy
the DID. Push and release the OK button to
enter the sub-menus. The Screen Setup feature
allows you to change what information is displayed in the instrument cluster as well as the
location that information is displayed.
Diagnostics — If Equipped
Push and release the UP or DOWN arrow
button until the diagnostic Menu where the
Driver is able to view certain vehicle faults.
• Driver must push the OK button again to see
the next Pcode otherwise current message
remains displayed.
• Driver exits when they cycle to another submenu (up or down).
• If the menu is exited before the end of codes
is reached - when the driver re-enters the list
will be restarted from the beginning.
• When no codes are present or the last code
is reached = (P000) and this message is
displayed:
Uconnect® SETTINGS
The Uconnect® system uses a combination of
buttons on the touchscreen and buttons on the
faceplate located on the center of the instrument panel that allows you to access and
change the customer programmable features.
• “No Further or End of Diagnostic Codes”
Uconnect® 8.4 Buttons
1 — Uconnect® Main Menu Buttons On The
Touchscreen
Buttons On The Faceplate
Uconnect® 5.0 Buttons On Touchscreen And
Buttons On Faceplate
1 — Uconnect® Buttons On The Touchscreen
2 — Uconnect® Buttons On The Faceplate
Buttons on the faceplate are located below the
Uconnect® system in the center of the instrument panel. In addition, there is a Scroll/Enter
control knob located on the right side. Turn the
control knob to scroll through menus and
change settings (i.e., 30, 60, 90), push the
center of the control knob one or more times to
select or change a setting (i.e., ON, OFF).
135
Your Uconnect® system may also have a
Screen Off and Back buttons on the faceplate.
Push the Screen Off button on the faceplate to
turn off the Uconnect® screen. Push the Screen
Off button on the faceplate a second time to turn
the screen on.
Push the Back button on the faceplate to exit
out of a Menu or certain option on the
Uconnect® system.
Buttons On The Touchscreen
Buttons on the touchscreen are accessible on
the Uconnect® display.
Customer Programmable Features
— Uconnect® 5.0 Settings
Push the + MORE button on the faceplate and
then press the “Settings” button on the touchscreen to display the menu setting screen. In
this mode the Uconnect® system allows you to
access programmable features that may be
equipped such as Display, Units, Voice, Clock,
Safety/Assistance, Lights, Doors & Locks,
Auto-On Comfort, Engine Off Options, Com-
pass Settings, Audio, Phone/Bluetooth®, Restore Settings, Clear Personal Data and System
Information.
NOTE:
Only one touchscreen area may be selected
at a time.
When making a selection, press the button on
the touchscreen to enter the desired mode.
Once in the desired mode, select the preferred
setting. Once the setting is complete, either
press the Back Arrow/Done button on the touchscreen or the Back button on the faceplate to
return to the previous menu or press the “X”
button on the touchscreen to close out of the
settings screen. Pressing the Up or Down Arrow
buttons on the right side of the screen will allow
you to toggle up or down through the available
settings.
Display
After pressing the “Display” button on the touchscreen the following settings will be available:
• Display Mode
When in this display you may select the Auto or
Manual display settings. To change Mode sta-
136
tus, press and release the “Auto” or “Manual”
button on the touchscreen. Press the back
arrow/Done button on the touchscreen to return
to the previous menu.
• Set Language
When in this display, you may select one of
multiple languages (Brasileiro/Deutsch/English/
Español/Français/Italiano/Nederlands/Polski/
Português/Türk/Pусский) for all display nomenclature, including the trip functions and the
navigation system (if equipped). Press the Set
Language button on the touchscreen, then
press the desired language button. Press the
back arrow button on the touchscreen to return
to the previous menu.
• Touchscreen Beep
When in this display, you may turn on or shut off
the sound heard when a touchscreen button is
pressed. To change the Mode status, press and
release the “On” or “Off” button on the touchscreen. Press the back arrow/Done button on
the touchscreen to return to the previous menu.
Units
After pressing the “Units” button on the touchscreen the following settings will be available:
• Temperature
• Show Command List
Select from: “°C,” or “°F.”
• Units
• Power
When in this display, you may select each unit
of measure independently displayed in the
Driver Information Display (DID), and navigation system (if equipped). The following selectable units of measure are listed below:
Select from: “HP” (US), “HP” (UK), and “kW.”
When in this display, you may change the Show
Command List settings. To change the mode
status, press and release the “Always,” “With
Help,” or “Never” button on the touchscreen.
Press the back arrow/Done button on the touchscreen to return to the previous menu.
• Speed
Select from: “MPH” or “km/h.”
• Distance
Select from: “mi” or “km.”
• Fuel Consumption
Select from: “MPG” (US), “MPG” (UK), “L/100
km” or “km/L.”
• Capacity
Select from: “gal” (US), “gal” (UK), or “L.”
• Pressure
Select from: “psi,” “kPa,” or “bar.”
• Torque
Select from: “lb-ft” or “Nm.”
• After the desired setting has been selected,
press the back arrow/Done button on the
touchscreen to return to the previous menu.
Voice
After pressing the “Voice” button on the touchscreen the following settings will be available:
• Voice Response Length
When in this display, you may change the Voice
Response Length settings. To change mode
status, press and release the “Brief” or “Long”
button on the touchscreen. Press the back
arrow/Done button on the touchscreen to return
to the previous menu.
Clock & Date
After pressing the “Clock & Date” button on the
touchscreen the following settings will be available:
• Set Time
When in this display, you may set the time and
format manually. Press the “Set Time” button
then choose from a 12 hour or 24 hour format.
Press the corresponding arrow above and below the current time to adjust, then select “AM”
or “PM.” Press the back arrow/Done button on
the touchscreen to return to the previous menu.
• Show Time Status
When in this display, you may turn on or shut off
the digital clock in the status bar. To change the
Show Time Status setting press the “Show Time
137
Status” button on the touchscreen and select
from “ON” or “OFF.” Press the back arrow/Done
button on the touchscreen to return to the
previous menu.
• Set Date
When in this display, you may set the date
manually. Press the “Set Date” button on the
touchscreen then press the corresponding arrows above and below the current date to
adjust. Press the back arrow button/Done on
the touchscreen to return to the previous menu.
Safety/Assistance
After pressing the “Safety/Assistance” button on
the touchscreen the following settings will be
available:
• Forward Collision Warning — If
Equipped
The Front Collision Warning (FCW) feature provides an audible and/or visual warning to potential forward collisions. The feature can be can
be set to Far, or set to Near. The default status
of FCW is the Far setting. This means the
system will warn you of a possible collision with
138
the vehicle in front of you when you are farther
away. This gives you the most reaction time. To
change the setting for more dynamic driving,
select the Near setting. This warns you of a
possible collision when you are much closer to
the vehicle in front of you. To change the FCW
status, press and release the “Near” or “Far”
button. Press the back arrow/Done button on
the touchscreen to return to the previous menu.
For further information, refer to “Adaptive
Cruise Control (ACC)” in “Understanding The
Features Of Your Vehicle.”
• Steering Feel Options — If Equipped
When your vehicle is not equipped with Performance Control, the Steering Feel Options feature will allow you to adjust the steering effort
and feel. Press the “Sport” button on the touchscreen to provide the greatest amount of steering feel, requiring the highest amount of steering effort. Press the “Normal” button on the
touchscreen to provide greater steering feel,
requiring greater steering effort. Press the
“Comfort” button on the touchscreen to provide
a balance of steering feel and steering effort.
Press the back arrow/Done button on the touchscreen to return to the previous menu.
• ParkSense®
The ParkSense® system will scan for objects
behind the vehicle when the transmission shift
lever/gear selector is in REVERSE and the
vehicle speed is less than 11 mph (18 km/h). It
will provide an alert (audible and/or visual) to
indicate the proximity to other objects. The
system can be enabled with Sound Only, or
Sound and Display. To change the ParkSense®
status, press and release the “Sound Only” or
“Sound and Display” button. Then press the
back arrow/Done button on the touchscreen.
Refer to “ParkSense®” in “Understanding The
Features Of Your Vehicle” for system function
and operating information.
• Rear ParkSense® Chime Volume
The Rear ParkSense® Chime Volume settings
can be selected from the DID or Uconnect®
System — if equipped. The chime volume settings include LOW, MEDIUM, and HIGH. The
factory default volume setting is MEDIUM. To
make your selection, press the “Rear
ParkSense® Volume” button on the touchscreen, then select from “Low,” “Med,” or “High.”
Press the back arrow/Done button on the touchscreen to return to the previous menu.
ParkSense® will retain its last known configuration state through ignition cycles.
• Blind Spot Alert
When this feature is selected, the Blind Spot
Alert feature Provides alerts, visual and/or audible, to indicate objects in your blind spot. The
Blind Spot Alert feature can be activated in
Lights mode. When this mode is selected, the
Blind Spot Monitor (BSM) system is activated
and will only show a visual alert in the exterior
mirrors. When Lights & Chime mode is activated, the Blind Spot Monitor (BSM) will show a
visual alert in the exterior mirrors as well as an
audible alert when the turn signal is on. When
Off is selected, the Blind Spot Monitor (BSM)
system is deactivated. To change the Blind Spot
Alert status, press the “Off,” “Lights,” or “Lights
& Chime” button on the touchscreen. Then
press the back arrow/Done button on the touchscreen.
NOTE:
If your vehicle has experienced any damage
in the area where the sensor is located, even
if the fascia is not damaged, the sensor may
have become misaligned. Take your vehicle
to an authorized dealer to verify sensor
alignment. Having a sensor that is misaligned will result in the BSM not operating
to specification.
• ParkView® Backup Camera Active
Guidelines
Your vehicle may be equipped with the
ParkView® Rear Back Up Camera Active
Guidelines that allows you to see active guidelines over the ParkView Back up camera display
whenever the shift lever/gear selector is put into
REVERSE. The image will be displayed on the
radio touchscreen display along with a caution
note to “check entire surroundings” across the
top of the screen. After five seconds, this note
will disappear. To enable or disable, press the
“ParkView® Backup Camera Active Guidelines”
button on the touchscreen, and select “On” or
“Off.” Press the back arrow/Done button on the
touchscreen to return to the previous menu.
• ParkView® Backup Camera Delay
When the vehicle is shifted out of REVERSE
(with camera delay turned OFF), the rear camera mode is exited and the navigation or audio
screen appears again. When the vehicle is
shifted out of REVERSE (with camera delay
turned ON), the rear view image with dynamic
grid lines will be displayed for up to 10 seconds
after shifting out of “REVERSE” unless the
forward vehicle speed exceeds 8 mph
(12 km/h), the transmission is shifted into PARK
or the ignition is switched to the OFF position.
To set the ParkView® Backup Camera Delay
press the “Controls” button on the touchscreen,
the “settings” button on the touchscreen, then
the “Safety & Assistance” button on the touchscreen. Press the “Parkview Backup camera
Delay” button on the touchscreen and select
from “ON” or “OFF.”
• Rain Sensing Auto Wipers
When this feature is selected, the system will
automatically activate the windshield wipers if it
139
senses moisture on the windshield. To enable or
disable, press the “Rain Sensing” button on the
touchscreen, and select “On” or “Off.” Press the
back arrow/Done button on the touchscreen to
return to the previous menu.
• Hill Start Assist — If Equipped
When this feature is selected, the Hill Start
Assist (HSA) system is active. Refer to “Electronic Brake Control System” in “Starting And
Operating” for system function and operating
information. To enable or disable, press the “Hill
Start Assist” button on the touchscreen, and
select “On” or “Off.” Press the back arrow/Done
button on the touchscreen to return to the
previous menu.
Lights
After pressing the “Lights” button on the touchscreen, the following settings will be available:
• Headlight Off Delay
When this feature is selected, it allows the
adjustment of the amount of time the headlights
remain on after the engine is shut off. To change
the Headlight Off Delay setting, press the
“Headlight Off Delay” button on the touchscreen
140
and choose either “0,” “30,” “60,” or “90” buttons
on the touchscreen to select your desired time
interval. Press the back arrow/Done button on
the touchscreen to return to the previous menu.
• Headlight Illumination On Approach
When this feature is selected, it allows the
adjustment of the amount of time the headlights
remain on when the doors are unlocked with the
Remote Keyless Entry (RKE) transmitter. To
change the Illuminated Approach status, press
the “Illuminated Approach” button on the touchscreen and choose either “0,” “30,” “60,” or “90”
buttons on the touchscreen to select your desired time interval. Press the back arrow/Done
button on the touchscreen to return to the
previous menu.
• Headlights With Wipers — If Equipped
When this feature is selected, and the headlight
switch is in the AUTO position, the headlights
will turn on approximately 10 seconds after the
wipers are turned on. The headlights will also
turn off when the wipers are turned off, if they
were turned on by this feature. To make your
selection, press the “Lights w/Wipers” button
and select from “On” or “Off.” Press the back
arrow/Done button on the touchscreen to return
to the previous menu.
• Auto Dim High Beams — If Equipped
When this feature is selected, the high beam
headlights will activate/deactivate automatically
under certain conditions. To make your selection, press the “Auto High Beams” button on the
touchscreen, and select from “On” or “Off.”
Press the back arrow/Done button on the touchscreen to return to the previous menu. Refer to
”Automatic High Beam — If Equipped” in “Understanding The Features Of Your Vehicle” for
further information.
• Daytime Running Lights — If Equipped
When this feature is selected, the headlights will
turn on whenever the engine is running. To
make your selection, press the “Daytime Running Lights” button on the touchscreen, and
select from “On” or “Off.” Press the back arrow/
Done button on the touchscreen to return to the
previous menu.
• Flash Lights With Lock
• Sound Horn With Lock
• Passive Entry
When this feature is selected, the exterior lights
will flash when the doors are locked or unlocked
with the Remote Keyless Entry (RKE) transmitter. This feature may be selected with or without
the sound horn on lock feature selected. To
make your selection, press the “Flash Lights
w/Lock” button on the touchscreen, and select
from “On” or “Off.” Press the back arrow/Done
button on the touchscreen to return to the
previous menu.
When this feature is selected, the horn will
sound when the door locks are activated. To
make your selection, press the “Horn w/Lock”
Button and choose “Off,” “1st Press” or “2nd
Press.” Press the back arrow/Done button on
the touchscreen to return to the previous menu.
This feature allows you to lock and unlock the
vehicle’s door(s) without having to push the
Remote Keyless Entry (RKE) transmitter lock or
unlock buttons. It automatically unlocks the
doors when the outside door handle is grabbed.
To make your selection, press the “Passive
Entry” button on the touchscreen and select
from “On” or “Off.” Press the back arrow/Done
button on the touchscreen to return to the
previous menu. Refer to “Keyless Enter-NGo™” in “Things To Know Before Starting Your
Vehicle” for further information.
Doors & Locks
After pressing the “Doors & Locks” button on
the touchscreen, the following settings will be
available:
• Auto Unlock On Exit
When this feature is selected, all doors will
unlock when the vehicle is stopped, the transmission is in the PARK or NEUTRAL position
and the driver’s door is opened. To make your
selection, press the “Auto Unlock On Exit” button on the touchscreen and select from “On” or
“Off.” Press the back arrow/Done button on the
touchscreen to return to the previous menu.
• Remote Door Unlock
This feature will allow you to program your
remote door locks to open “All doors” or only the
“Driver door” with the first push of the Remote
Keyless Entry (RKE) transmitter or grabbing the
Passive Entry door handle. To make your selection, press the “Remote Door Unlock” button on
the touchscreen and choose from “All” or
“Driver.” Press the back arrow/Done button on
the touchscreen to return to the previous menu.
NOTE:
If “Driver Door” is selected, the (RKE) transmitter will have to be pushed two times in
order to unlock all doors.
• Flash Lights With Lock
When this feature is selected, the exterior lights
will flash when the doors are locked or unlocked
with the Remote Keyless Entry (RKE) transmitter. This feature may be selected with or without
the sound horn on lock feature selected. To
make your selection, press the “Flash Lights
w/Lock” button on the touchscreen, and select
from “On” or “Off.” Press the back arrow/Done
button on the touchscreen to return to the
previous menu.
141
Auto Comfort Systems — If Equipped
After pressing the “Auto-On Comfort & Remote
Start” button on the touchscreen the following
settings will be available:
• Auto-On Driver Heated/Ventilated Seat &
Steering Wheel With Vehicle Start — If
Equipped
When this feature is selected the driver’s heated
seat and heated steering wheel will automatically
turn ON when temperatures are below 40° F (4.4°
C). When temperatures are above 80° F (26.7° C)
the driver vented seat will turn ON. To make your
selection, press the “Auto Heated Seats” button
on the touchscreen then select either “Off,” “Remote Start” or “All Starts.” Press the back arrow/
Done button on the touchscreen to return to the
previous menu.
Engine Off Options
After pressing the “Engine Off Options” button
on the touchscreen the following settings will be
available.
142
• Headlight Off Delay
When this feature is selected, the driver can
choose to have the headlights remain on for 0,
30, 60, or 90 seconds when exiting the vehicle.
To change the Headlight Off Delay status press
the “Headlight Off Delay” button on the touchscreen and select from “0,” “30,” “60,” or “90”
buttons on the touchscreen to select your desired time interval. Press the back arrow/Done
button on the touchscreen to return to the
previous menu.
• Engine Off Power Delay
When this feature is selected, the power window switches, radio, Uconnect® phone system
(if equipped), DVD video system (if equipped),
power sunroof (if equipped), and power outlets
will remain active for up to 10 minutes after the
ignition is cycled to OFF. Opening either front
door will cancel this feature. To change the
Engine Off Power Delay status press the “Engine Off Power Delay” button and select from “0
seconds,” “45 seconds,” “5 minutes” or “10
minutes” buttons on the touchscreen. Press the
back arrow/Done button on the touchscreen to
return to the previous menu.
Compass Setting — If Equipped
After pressing the “Compass Settings” button
on the touchscreen the following settings will be
available.
• Variance
Compass Variance is the difference between
Magnetic North and Geographic North. To compensate for the differences the variance should
be set for the zone where the vehicle is driven,
per the zone map. Once properly set, the compass will automatically compensate for the differences, and provide the most accurate compass heading.
NOTE:
Keep magnetic materials away from the top
of the instrument panel, such as iPod’s,
Mobile Phones, Laptop Computers and Radar Detectors. This is where the compass
module is located, and it can cause interference with the compass sensor, and it may
give false readings.
finished, a message on the screen will show it
was done successfully. The compass will now
function normally.
Audio
After pressing the “Audio” button on the touchscreen the following settings will be available:
• Balance/Fade
Compass Variance Map
• Perform Compass Calibration
Press the “Calibration” button on the touchscreen to change this setting. This compass is
self-calibrating, which eliminates the need to
manually reset the compass. When the vehicle
is new, the compass may appear erratic and
may need to be calibrated. You may calibrate
the compass by selecting the “Calibration” button on the touchscreen, a pop menu will appear
asking you to finish calibrating process by completing one or more 360-degree turns (in an
area free from large metal or metallic objects).
Once the calibrating process is successfully
This feature allows you to adjust the Balance
and Fade settings. Press and drag the speaker
icon or use the arrows to adjust, tap the “C” icon
to readjust to the center. Press the back arrow/
Done button on the touchscreen to return to the
previous menu.
• Equalizer
When in this display you may adjust the Bass,
Mid and Treble settings. Adjust the settings with
the “+” and “–” buttons on the touchscreen or by
selecting any point on the scale between the “+”
and “–” buttons on the touchscreen. Press the
back arrow/Done button on the touchscreen to
return to the previous menu.
• Speed Adjusted Volume
This feature increases or decreases volume
relative to vehicle speed. To change the Speed
Adjusted Volume press the “Speed Adjusted
Volume” button on the touchscreen and select
from “Off,” “1,” “2” or “3” buttons on the touchscreen. Press the back arrow/Done button on
the touchscreen to return to the previous menu.
• Surround Sound — If Equipped
This feature provides simulated surround sound
mode. To make your selection, press the “Surround Sound” button on the touchscreen, select
“On” or “Off.” Press the back arrow/Done button
on the touchscreen to return to the previous
menu.
• AUX Volume Offset — If Equipped
This feature provides the ability to tune the
audio level for portable devices connected
through the AUX input. To make your selection,
press the “AUX Volume Offset” button on the
touchscreen, select “On” or “Off.” Press the
back arrow/Done button on the touchscreen to
return to the previous menu.
143
• Loudness — If Equipped
This feature improves sound quality at lower
volumes. To make your selection, press the
“Loudness” button on the touchscreen, select
“On” or “Off.” Press the back arrow/Done button
on the touchscreen to return to the previous
menu.
Phone/Bluetooth®
After pressing the “Phone/Bluetooth®” button
on the touchscreen the following settings will be
available:
• Paired Phones
This feature shows which phones are paired to
the Phone/Bluetooth® system. For further information, refer to the Uconnect® Supplement
Manual.
• Paired Audio Sources
This feature shows which audio devices are
paired to the Phone/Bluetooth® system. For
further information, refer to the Uconnect®
Supplement Manual.
144
Restore Settings
After pressing the “Restore Settings” button on
the touchscreen the following settings will be
available:
• Restore Settings
When this feature is selected it will reset the
Display, Clock, Audio, and Radio Settings to
their default settings. To restore the settings to
their default setting, press the “Restore Settings” button and select from “Yes” or “No.” If
“Yes” is selected a pop-up will appear asking
"Are you sure you want to reset your settings to
default?” select “Yes” to restore, or “Cancel” to
exit. Press back arrow/Done button to return to
the previous menu.
Clear Personal Data
After pressing the “Clear Personal Data Settings” button on the touchscreen the following
settings will be available:
• Clear Personal Data
When this feature is selected it will remove all
personal data including Bluetooth® devices and
presets. To remove all personal information,
press the “Clear Personal Data” button and
select from “Yes” or “No.” If “Yes” is selected a
pop-up will appear asking "Are you sure you
want to clear all personal data?” select “Yes” to
Clear, or “Cancel” to exit. Press the back arrow/
Done button on the touchscreen to return to the
previous menu.
Customer Programmable Features
— Uconnect® 8.4 Settings
Press the “Settings” button on the touchscreen
to display the menu setting screen. In this mode
the Uconnect® system allows you to access
programmable features that may be equipped
such as Display, Clock, Safety/Assistance,
Lights, Doors & Locks, Auto-On Comfort, Engine Off Operation, Compass Settings, Audio
and Phone/Bluetooth®.
NOTE:
Only one touchscreen area may be selected
at a time.
When making a selection, press the button on
the touchscreen to enter the desired mode.
Once in the desired mode press and release the
preferred setting until a check-mark appears
next to the setting, showing that setting has
been selected. Once the setting is complete
either press the Back Arrow button on the
touchscreen or the Back button on the faceplate
to return to the previous menu or press the “X”
button on the touchscreen to close out of the
settings screen. Pressing the “Up” or “Down”
Arrow buttons on the touchscreen on the right
side of the screen will allow you to toggle up or
down through the available settings.
• Display Brightness With Headlights ON
Display
After pressing the “Display” button on the touchscreen the following settings will be available:
NOTE:
To make changes to the ⴖDisplay Brightness
with Headlights ONⴖ setting, the headlights
must be on and the interior dimmer switch
must not be in the ⴖpartyⴖ or ⴖparadeⴖ positions.
• Display Mode
When in this display you may select one of the
auto display settings. To change Mode status,
press and release the “Manual” or “Auto” button
on the touchscreen. Then press the back arrow
button on the touchscreen.
NOTE:
When Day or Night is selected for the Display Mode, the usage of the Parade Mode
feature will cause the radio to activate the
Display Brightness Day control even though
the headlights are on.
When in this display, you may select the brightness with the headlights on. Adjust the brightness with the “+” and “–” setting buttons on the
touchscreen or by selecting any point on the
scale between the “+” and “–” buttons on the
touchscreen. Then press the back arrow button
on the touchscreen.
• Display Brightness With Headlights OFF
When in this display, you may select the brightness with the headlights off. Adjust the brightness with the “+” and “–” setting buttons on the
touchscreen or by selecting any point on the
scale between the “+” and “–” buttons on the
touchscreen. Then press the back arrow button
on the touchscreen.
NOTE:
To make changes to the ⴖDisplay Brightness
with Headlights OFFⴖ setting, the headlights
must be off and the interior dimmer switch
must not be in the ⴖpartyⴖ or ⴖparadeⴖ positions.
• Set Theme — If Equipped
This feature will allow you to choose a theme for
the display screen. The theme will change the
background color, highlight color, and button
color of the display screen.
• Set Language
When in this display, you may select one of
multiple languages (Brasileiro/Deutsch/English/
Español/Français/Italiano/Nederlands/Polski/
Português/Türk/Pусский) for all display nomenclature, including the trip functions and the
navigation system (if equipped). Press the Set
Language button on the touchscreen, then
press the desired language button on the touchscreen until a check-mark appears next to the
language, showing that setting has been selected. Press the back arrow button on the
touchscreen to return to the previous menu.
145
• Touchscreen Beep
vehicle approaches a designated turn within a
programmed route. To make your selection,
press the “Navigation Turn-By-Turn In Cluster”
button on the touchscreen, until a check-mark
appears next to the setting, showing that setting
has been selected. Press the back arrow button
on the touchscreen to return to the previous
menu.
• Fuel Consumption
Units
After pressing the “Units” button on the touchscreen the following settings will be available:
Select from: “psi,” “kPa,” or “bar.”
When this feature is selected, the Controls
Screen will stay open for five seconds before
the screen times out. With the feature deselected, the screen will stay open until it is
manually closed. Press the Control Screen
Time-Out button on the touchscreen until a
check-mark appears next to the setting, showing that setting has been selected. Press the
back arrow button on the touchscreen to return
to the previous menu.
• Units
Select from: “°C,” or “°F.”
When in this display, you may select each unit
of measure independently displayed in the
Driver Information Display (DID), and navigation system (if equipped). The following selectable units of measure are listed below:
• Power
• Navigation Turn-By-Turn In Cluster — If
Equipped
• Distance
When in this display, you may turn on or shut off
the sound heard when a touchscreen button
(button on the touchscreen) is pressed. Press
the “Touchscreen Beep” button on the touchscreen until a check-mark appears next to the
setting, showing that setting has been selected.
Press the back arrow button on the touchscreen
to return to the previous menu.
• Control Screen Time-Out — If Equipped
When this feature is selected, the turn-by-turn
directions will appear in the display as the
146
• Speed
Select from: “MPH” or “km/h.”
Select from: “mi” or “km.”
Select from: “MPG” (US), “MPG” (UK), “L/100
km” or “km/L.”
• Capacity
Select from: “gal” (US), “gal” (UK), or “L.”
• Pressure
• Temperature
Select from: “HP” (US), “HP” (UK), and “kW.”
• Torque
Select from: “lb-ft” or “Nm.”
• After the desired setting has been selected,
press the back arrow button on the touchscreen to return to the previous menu.
Voice
After pressing the “Voice” button on the touchscreen the following settings will be available:
• Voice Response Length
When in this display, you may change the Voice
Response Length settings. To change the Voice
Response Length, press the “Brief” or “Detailed” button on the touchscreen until a checkmark appears next to the setting, showing that
setting has been selected. Press the back arrow
button on the touchscreen to return to the
previous menu.
• Show Command List
When in this display, you may change the Show
Command List settings. To change the Show
Command List settings, press the “Always,”
“With Help” or “Never” button on the touchscreen until a check-mark appears next to the
setting, showing that setting has been selected.
Press the back arrow button on the touchscreen
to return to the previous menu.
Clock
After pressing the “Clock” button on the touchscreen the following settings will be available:
• Sync Time With GPS
• Time Format
This feature will allow you to automatically have
the radio set the time. To change the Sync Time
setting, press the “Sync time with GPS” button
on the touchscreen until a check-mark appears
next to the setting, showing that setting has
been selected. Press the back arrow button on
the touchscreen to return to the previous menu.
This feature will allow you to select the time
format display setting. Press the “Time Format”
button on the touchscreen until a check-mark
appears next to the 12hrs or 24hrs setting,
showing that setting has been selected. Press
the back arrow button on the touchscreen to
return to the previous menu.
• Set Time Hours
• Show Time In Status Bar — If Equipped
This feature will allow you to adjust the hours.
The “Sync time with GPS” button on the touchscreen must be unchecked. To make your selection, press the “+” or “–” buttons on the
touchscreen to adjust the hours up or down.
Press the back arrow button on the touchscreen
to return to the previous menu.
This feature will allow you to turn on or shut off
the digital clock in the status bar. To change the
Show Time Status setting press the “Show Time
in Status Bar” button on the touchscreen until a
check-mark appears next to setting, indicating
that the setting has been selected. Press the
back arrow button on the touchscreen to return
to the previous menu or press the “X” button on
the touchscreen to close out of the settings
screen.
• Set Time Minutes
This feature will allow you to adjust the minutes.
The “Sync time with GPS” button on the touchscreen must be unchecked. To make your selection, press the “+” or “–” buttons on the
touchscreen to adjust the minutes up or down.
Press the back arrow button on the touchscreen
to return to the previous menu.
Safety & Driving Assistance
After pressing the “Safety & Driving Assistance”
button on the touchscreen the following settings
will be available:
147
• Forward Collision Warning — If
Equipped
The Front Collision Warning (FCW) feature provides an audible and/or visual warning to potential forward collisions. The feature can be can
be set to Far, or set to Near. The default status
of FCW is the Far setting. This means the
system will warn you of a possible collision with
the vehicle in front of you when you are farther
away. This gives you the most reaction time. To
change the setting for more dynamic driving,
select the Near setting. This warns you of a
possible collision when you are much closer to
the vehicle in front of you. To change the FCW
status, press and release the “Near” or “Far”
button. Then press the back arrow button on the
touchscreen.
For further information, refer to “Adaptive
Cruise Control (ACC)” in “Understanding The
Features Of Your Vehicle”.
• Steering Feel Options — If Equipped
When your vehicle is not equipped with Performance Control, the Steering Feel Options feature will allow you to adjust the steering effort
148
and feel. Press the “Sport” button on the touchscreen to provide the greatest amount of steering feel, requiring the highest amount of steering effort. Press the “Normal” button on the
touchscreen to provide greater steering feel,
requiring greater steering effort. Press the
“Comfort” button on the touchscreen to provide
a balance of steering feel and steering effort.
Press the back arrow button on the touchscreen
to return to the previous menu.
• ParkSense®
The ParkSense® system will scan for objects
behind the vehicle when the transmission shift
lever is in REVERSE and the vehicle speed is
less than 11 mph (18 km/h). It will provide an
alert (audible and/or visual) to indicate the proximity to other objects. The system can be enabled with Sound Only, or Sound and Display.
To change the ParkSense® status, press and
release the “Sound Only” or “Sound and Display” button. Then press the back arrow button
on the touchscreen. Refer to “ParkSense®” in
“Understanding The Features Of Your Vehicle”
for system function and operating information.
• Rear ParkSense® Chime Volume
The Rear ParkSense® Chime Volume settings
can be selected from the DID or Uconnect®
System — if equipped. The chime volume settings include LOW, MEDIUM, and HIGH. The
factory default volume setting is MEDIUM. To
make your selection, press the “ParkSense®
Rear Chime Volume” button on the touchscreen, until a check-mark appears next to
setting, indicating that the setting had been
selected. Press the back arrow button on the
touchscreen to return to the previous menu.
ParkSense® will retain its last known configuration state through ignition cycles.
• Blind Spot Alert
When this feature is selected, the Blind Spot
Alert feature Provides alerts, visual and/or audible, to indicate objects in your blind spot. The
Blind Spot Alert feature can be activated in
“Lights” mode. When this mode is selected, the
Blind Spot Monitor (BSM) system is activated
and will only show a visual alert in the exterior
mirrors. When “Lights & Chime” mode is activated, the Blind Spot Monitor (BSM) will show a
visual alert in the exterior mirrors as well as an
audible alert when the turn signal is on. When
“Off” is selected, the Blind Spot Monitor (BSM)
system is deactivated. To change the Blind Spot
Alert status, press the “Off,” “Lights” or “Lights &
Chime” button on the touchscreen. Then press
the back arrow button on the touchscreen.
NOTE:
If your vehicle has experienced any damage
in the area where the sensor is located, even
if the fascia is not damaged, the sensor may
have become misaligned. Take your vehicle
to an authorized dealer to verify sensor
alignment. Having a sensor that is misaligned will result in the BSM not operating
to specification.
• ParkView® Backup Camera Active
Guidelines
Your vehicle may be equipped with the
ParkView® Rear Back Up Camera Active
Guidelines that allows you to see active guidelines over the ParkView Back up camera display
whenever the shift lever is put into REVERSE.
The image will be displayed on the radio touchscreen display along with a caution note to
“check entire surroundings” across the top of
the screen. After five seconds, this note will
disappear. To make your selection, press the
“ParkView Backup Camera Active Guidelines”
button on the touchscreen, until a check-mark
appears next to setting, indicating that the setting had been selected. Press the back arrow
button on the touchscreen to return to the
previous menu.
• ParkView® Backup Camera Delay
When the vehicle is shifted out of REVERSE
(with camera delay turned OFF), the rear camera mode is exited and the navigation or audio
screen appears again. When the vehicle is
shifted out of REVERSE (with camera delay
turned ON), the rear view image with dynamic
grid lines will be displayed for up to 10 seconds
after shifting out of “REVERSE” unless the
forward vehicle speed exceeds 8 mph
(12 km/h), the transmission is shifted into
“PARK” or the ignition is switched to the OFF
position. To set the ParkView® Backup Camera
Delay press the “Controls” button on the touchscreen, the “settings” button on the touchscreen, then the “Safety & Driving Assistance”
button on the touchscreen. Press the “Parkview
Backup camera Delay” button on the touchscreen to turn the ParkView® Delay ON or OFF.
• Rain Sensing Auto Wipers
When this feature is selected, the system will
automatically activate the windshield wipers if it
senses moisture on the windshield. To make
your selection, press the “Rain Sensing” button
on the touchscreen, until a check-mark appears
next to setting, indicating that the setting had
been selected. Press the back arrow button on
the touchscreen to return to the previous menu.
• Hill Start Assist — If Equipped
When this feature is selected, the Hill Start
Assist (HSA) system is active. Refer to “Electronic Brake Control System” in “Starting And
Operating” for system function and operating
information. To make your selection, press the
“Hill Start Assist” button on the touchscreen,
until a check-mark appears next to setting,
indicating that the setting had been selected.
Press the back arrow button on the touchscreen
to return to the previous menu.
149
Lights
After pressing the “Lights” button on the touchscreen the following settings will be available.
button on the touchscreen to return to the
previous menu, or push the back button on the
faceplate.
• Headlight Off Delay
• Headlights With Wipers — If Equipped
When this feature is selected, it allows adjustment of the amount of time the headlights
remain on after the engine is shut off. To change
the Headlights Off Delay setting, press the “+”
or “-” button on the touchscreen to select your
desired time interval, and choose either 0 sec,
30 sec, 60 sec or 90 seconds. Press the back
arrow button on the touchscreen to return to the
previous menu, or push the back button on the
faceplate.
When this feature is selected, and the headlight
switch is in the AUTO position, the headlights
will turn on approximately 10 seconds after the
wipers are turned on. The headlights will also
turn off when the wipers are turned off if they
were turned on by this feature. To make your
selection, press the “Headlights With Wipers”
button on the touchscreen, until a check-mark
appears next to setting, indicating that the setting has been selected. Press the back arrow
button on the touchscreen to return to the
previous menu, or push the back button on the
faceplate.
• Headlight Illumination On Approach
When this feature is selected, the headlights will
activate and remain on for 0, 30, 60, or 90
seconds when the doors are unlocked with the
Remote Keyless Entry (RKE) transmitter. To
change the Illuminated Approach status, press
the “+” or “-” button on the touchscreen to select
your desired time interval. Press the back arrow
150
• Auto Dim High Beams — If Equipped
When this feature is selected, the high beam
headlights will activate/deactivate automatically
under certain conditions. To make your selection, press the “Auto High Beams” button on the
touchscreen, until a check-mark appears next
to setting, indicating that the setting has been
selected. Press the back arrow button on the
touchscreen to return to the previous menu, or
push the back button on the faceplate. Refer to
“Lights — If Equipped” in “Understanding The
Features Of Your Vehicle” for further
information.
• Daytime Running Lights — If Equipped
When this feature is selected, the headlights will
turn on whenever the engine is running. To
make your selection, press the “Daytime Running Lights” button on the touchscreen, until a
check-mark appears next to setting, indicating
that the setting has been selected. Press the
back arrow button on the touchscreen to return
to the previous menu, or push the back button
on the faceplate.
• Flash Lights With Lock
When this feature is selected, the hazard lights
will flash when the doors are locked or unlocked
with the Remote Keyless Entry (RKE) transmitter, or when using the passive entry feature.
This feature may be selected with or without the
sound horn on lock feature selected. To make
your selection, press the “Flash Lights with
Lock” button on the touchscreen, until a checkmark appears next to setting, indicating that the
setting has been selected. Press the back arrow
button on the touchscreen to return to the
previous menu, or push the back button on the
faceplate.
Doors & Locks
After pressing the “Doors & Locks” button on
the touchscreen the following settings will be
available:
• Auto Unlock On Exit
When this feature is selected, all doors will
unlock when the vehicle is stopped, the transmission is in the PARK or NEUTRAL position
and the driver’s door is opened. To make your
selection, press the “Auto Unlock On Exit” button on the touchscreen, until a check-mark
appears next to the setting, showing that the
setting has been selected. Press the back arrow
button on the touchscreen to return to the
previous menu.
• Flash Lights With Lock
• Sound Horn With Remote Start
When this feature is selected, the exterior lights
will flash when the doors are locked or unlocked
with the Remote Keyless Entry (RKE) transmitter, or when using the passive entry feature.
This feature may be selected with or without the
sound horn on lock feature selected. To make
your selection, press the “Flash Lights with
Lock” button on the touchscreen, until a checkmark appears next to setting, indicating that the
setting has been selected. Press the back arrow
button on the touchscreen to return to the
previous menu.
When this feature is selected, the horn will
sound when the remote start is activated. To
make your selection, press the “Sound Horn
with Remote Start” button on the touchscreen
until a check-mark appears next to setting,
showing that setting has been selected. Press
the back arrow button on the touchscreen to
return to the previous menu.
• Sound Horn With Lock
When this feature is selected, the horn will
sound when the door locks are activated. To
make your selection, press either the “Off,” “1st
Press,” or “2nd Press” button on the touchscreen, until a check-mark appears next to
setting, showing that setting has been selected.
Press the back arrow button on the touchscreen
to return to the previous menu.
• 1st Press Of Key Fob Unlocks
When "Driver Door" is selected with 1st Press
Of Key Fob Unlocks, only the driver’s door will
unlock with the first press of the Remote Keyless Entry (RKE) transmitter UNLOCK button.
You must press the RKE transmitter UNLOCK
button twice to unlock the passenger’s doors.
When "All Doors" is selected for 1st Press Of
Key Fob Unlocks, all doors will unlock on the
first press of the RKE transmitter UNLOCK
button.
151
NOTE:
If the vehicle is programmed 1st Press Of
Key Fob Unlocks “All Doors,” all doors will
unlock no matter which Passive Entry
equipped door handle is grasped. If 1st
Press Of Key Fob Unlocks “Driver Door” is
programmed, only the driver’s door will unlock when the driver’s door is grasped. With
Passive Entry, if 1st Press Of Key Fob Unlocks “Driver Door” is programmed, touching the handle more than once will only
result in the driver’s door opening. If “Driver
Door” is selected, once the driver door is
opened, the interior door lock/unlock switch
can be used to unlock all doors (or use RKE
transmitter).
• Passive Entry
This feature allows you to lock and unlock the
vehicles door(s) without having to push the
Remote Keyless Entry (RKE) transmitter LOCK
or UNLOCK buttons. To make your selection,
press the “Passive Entry” button on the touchscreen, until a check-mark appears next to the
setting, showing that the setting has been se152
lected. Press the back arrow button on the
touchscreen to return to the previous menu.
Refer to “Keyless Enter-N-Go™” in “Things To
Know Before Starting Your Vehicle”.
Engine Off Options
After pressing the “Engine Off Options” button
on the touchscreen the following settings will be
available:
Auto-On Comfort
After pressing the “Auto-On Comfort” button on
the touchscreen the following settings will be
available.
• Easy Exit Seats — If Equipped
• Auto-On Driver Heated/Ventilated Seat &
Steering Wheel With Vehicle Start — If
Equipped
When this feature is selected the driver’s
heated seat and heated steering wheel will
automatically turn ON when temperatures are
below 40° F (4.4° C). When temperatures are
above 80° F (26.7° C) the driver vented seat will
turn ON. To make your selection, press the
“Auto Heated Seats” button on the touchscreen,
until a check-mark appears next to setting,
showing that setting has been selected. Press
the back arrow button on the touchscreen to
return to the previous menu.
When this feature is selected, the Driver’s seat
will automatically move rearward once the engine is shut off. To make your selection, press
the “Easy Exit Seats” button on the touchscreen, until a check-mark appears next to
setting, showing that setting has been selected.
Press the back arrow button on the touchscreen
to return to the previous menu.
• Engine Off Power Delay
When this feature is selected, the power window switches, radio, Uconnect® Phone system
(if equipped), DVD video system (if equipped),
power sunroof (if equipped), and power outlets
will remain active for up to 10 minutes after the
ignition is cycled to OFF. Opening either front
door will cancel this feature. To change the
Engine Off Power Delay setting, press the “+” or
“-” button on the touchscreen to select your
desired time interval, and choose from “0 sec-
onds,” “45 seconds,” “5 minutes” or “10 minutes.” Press the back arrow button on the
touchscreen to return to the previous menu.
Audio
After pressing the “Audio” button on the touchscreen the following settings will be available.
• Balance/Fade
This feature allows you to adjust the Balance
and Fade settings. Press and drag the speaker
icon, use the arrows to adjust, or tap the ‘C’ icon
to readjust to the center. Press the back arrow
button on the touchscreen to return to the
previous menu.
• Equalizer
This feature allows you to adjust the Bass, Mid
and Treble settings. Adjust the settings with the
“+” and “–” setting buttons on the touchscreen
or by selecting any point on the scale between
the “+” and “–” buttons on the touchscreen.
Press the back arrow button on the touchscreen
to return to the previous menu.
NOTE:
Bass/Mid/Treble allow you to simply slide
your finger up or down to change the setting
as well as press directly on the desired
setting.
• Speed Adjusted Volume
This feature increases or decreases volume
relative to vehicle speed. To change the Speed
Adjusted Volume press the “Off,” “1,” “2” or “3”
button on the touchscreen. Press the back
arrow button on the touchscreen to return to the
previous menu.
• Surround Sound — If Equipped
This feature provides simulated surround sound
mode. To make your selection, press the “Surround Sound” button on the touchscreen, select
“On” or “Off.” Press the back arrow button on
the touchscreen to return to the previous menu.
• AUX Volume Offset — If Equipped
touchscreen, choose a level from –3 to +3.
Press the back arrow button on the touchscreen
to return to the previous menu.
• Loudness — If Equipped
Loudness improves sound quality at lower volumes. To make your selection, press the “Loudness” button on the touchscreen, then choose
“Yes” or “No.” Press the back arrow button on
the touchscreen to return to the previous menu.
Phone/Bluetooth®
After pressing the “Phone/Bluetooth®” button
on the touchscreen the following settings will be
available:
• Paired Phones
This feature shows which phones are paired to
the Phone/Bluetooth® system. For further information, refer to the Uconnect® Supplement
Manual.
This feature provides the ability to tune the
audio level for portable devices connected
through the AUX input. To make your selection,
press the AUX Volume Match button on the
153
• Paired Audio Sources
• Clear Personal Data
This feature shows which audio devices are
paired to the Phone/Bluetooth® system. For
further information, refer to the Uconnect®
Supplement Manual.
When this feature is selected it will remove
personal data including Bluetooth® devices and
presets. To remove personal information, press
the “Clear Personal Data” button and a pop-up
will appear asking "Are you sure you want to
clear all personal data?” select “OK” to Clear, or
“Cancel” to exit. Once the data has been
cleared, a pop up appears stating "Personal
data cleared”. Press the back arrow button on
the touchscreen to return to the previous menu.
Restore Settings
After pressing the “Restore Settings” button on
the touchscreen the following settings will be
available:
• Restore Settings
When this feature is selected it will reset the
Display, Clock, Audio, and Radio Settings to
their default settings. To restore the settings to
their default setting, press the Restore Settings
button. A pop-up will appear asking "Are you
sure you want to reset your settings to default?”
select “Yes” to restore, or “Cancel” to exit. Once
the settings are restored, a pop up appears
stating "settings reset to default." Press the
okay button on the touchscreen to exit.
Clear Personal Data
After pressing the “Clear Personal Data Settings” button on the touchscreen the following
settings will be available:
154
System Information
After pressing the “System Information” button
on the touchscreen the following information will
be available:
• System Information
When System Information is selected, a System
Information screen will appear displaying the
system software version.
Performance Pages — If Equipped
Performance Pages is an application that provides a display for performance indicators, as
received from the Instrument Cluster, that will
help you gain familiarity with the capabilities of
your vehicle in real-time.
To access the Performance Pages, press the
“Apps” button on the touchscreen then press
the “Performance Pages” button on the touchscreen. Press the desired button on the touchscreen to access that specific Performance
Page.
WARNING!
Measurement of vehicle statistics with the
Performance Pages is intended for offhighway or off-road use only and should not
be done on any public roadways. It is recommended that these features be used in a
controlled environment and within the limits
of the law. The capabilities of the vehicle as
measured by the Performance Pages must
never be exploited in a reckless or dangerous manner, which can jeopardize the user’s
safety or the safety of others. Only a safe,
attentive, and skillful driver can prevent accidents.
The Performance Pages include the following:
• Home
• Timers
• Gauges 1
• Gauges 2
• G-Force
• Engine
The following describes each feature and its
operation:
When Home is selected, the following options
will be available:
When the Timers Page is selected you will be
able to select from following “Tickets”:
• A series of six images which can be selected
by the user.
• Current
• A left and right arrow to allow the user to
scroll through vehicle images.
• A short-cut to the Performance Control
feature.
Timers
Pressing the “Current” button displays a “real
time” summary of performance timers.
• Last
Pressing the “Last” button displays the last
recorded run of performance timers.
• Best
Pressing the “Best” button displays the best
recorded run of performance timers, except for
braking data.
Home
• Save
Pressing the “Save” button will let you save the
last run. Any saved run over 10, will overwrite
the last saved run for Uconnect® System storage. The operation of the Save feature is listed
below:
Performance Pages — Timers
Performance Pages — Home
155
Performance Pages — Save
• With a USB jump drive installed, press the
“USB” button to save to the jump drive.
• With an SD Card installed, press the “SD
Card” to save runs to the SD Card.
• Press the “Uconnect” button to save the runs
to the Owner web page.
• Press the “Cancel” button to view the last
timer “Ticket.”
The “Tickets” contain the timers listed below:
156
• Reaction Time
• ¼ Mile (400 meter)
Measures the driver’s reaction time for launching the vehicle against a simulated a drag strip
timing light (behavior modeled after 500 Sportsman Tree) displayed in the Driver Information
Display (DID).
Displays the time it takes for the vehicle to go an
¼ mile (400 meters).
NOTE:
The Reaction Time, MPH, ⅛ and ¼ Mile
timers will be “ready” when the vehicle is at
0 MPH (0 km/h)
• Brake Distance
Displays the distance it takes the vehicle to
make a full stop.
• 0-60 MPH (0-100 km/h)
NOTE:
The distance measurement will be aborted if
the brake pedal is released before the vehicle comes to a complete stop, or if the
emergency brake is applied.
Displays the time it takes for the vehicle to go
from 0 to 60 mph (0 to 100 km/h).
• Brake Speed
• 0-100 MPH (0-160 km/h)
Displays the speed the vehicle is traveling when
the brake pedal is depressed.
Displays the time it takes for the vehicle to go
from 0 to 100 mph (0 to 160 km/h).
• ⅛ Mile (200 meter)
Displays the time it takes for the vehicle to go an
⅛ mile (200 meters).
NOTE:
Brake Distance and Speed timers will only
display ⴖreadyⴖ when vehicle is traveling at
greater than 30 MPH (48 km/h).
Gauges 1
Gauges 2
Performance Pages — Gauges 2 (Manual
Transmission)
Performance Pages — Gauges 1
When selected, this screen displays the following values:
Performance Pages — Gauges 2 (Automatic
Transmission)
When selected, this screen displays the following values:
• Battery Voltage
• Coolant Temperature
Shows the actual battery voltage.
Shows the actual coolant temperature.
• Intake Air Temperature
• Oil Pressure
Shows the actual intake air temperature.
Shows the actual oil pressure.
• Transmission Temperature (Automatic
Transmission Only)
• Oil Temperature
Shows the actual oil temperature.
Shows the actual transmission temperature.
157
G-Force
• Longitudinal G-Force Fore and Aft
Engine
The longitudinal g-force measures the acceleration and braking force of the vehicle.
• Peak G-Forces Fore Aft, Left and Right
This shows the maximum g-forces that have
been achieved since the last reset from the DID.
Peak values are maintained through ignition
cycles by the DID until they are cleared by the
driver.
• Vehicle Speed
Performance Pages — G-Force
When selected, this screen displays all four
G-Force values (two lateral and two longitudinal) as well as steering angle.
When G-Force is selected, the following features will be available:
• Lateral G-Force Left and Right
The lateral g-force measures the (sideways) left
and right force of the vehicle.
158
Vehicle Speed measures the current speed of
the vehicle in either mph or km/h, starting at 0
with no maximum value.
• Steering Wheel Angle
Steering Wheel Angle utilizes the steering angle
sensor to measure the degree of the steering
wheel relative to zero. The zero degree measurement indicates a steering wheel straight
ahead position. When the steering angle value
is negative, this indicates a turn to the left, and
when the steering angle value is positive, a turn
to the right.
Performance Pages — Engine
When selected, this screen displays the following values:
• Vehicle Speed
Shows the actual vehicle speed.
• Instantaneous Horsepower/Kilowatts
Shows the instantaneous horsepower.
• Instantaneous Torque
Shows the instantaneous torque.
• Oil Pressure
Shows the actual engine oil pressure.
• Gear (Automatic Transmission Only)
Shows the current (or pending) operating gear
of the vehicle.
Performance Control — If Equipped
Your vehicle is equipped with a Performance
Control feature which allows for coordinating
the operation of various vehicle systems depending upon the type of driving behavior desired. The Performance Control feature is controlled through the Uconnect® radio and may be
accessed by performing any of the following:
• Pushing the Super Track Pack button on the
instrument panel switch bank.
• Selecting “Performance Control” from the
“Apps” menu.
• Selecting “Performance Control” from within
the Performance Pages menu.
You will be able to enable, disable, and customize the functionality of the Launch Control and
Drive Mode Set-Up features within Performance Control.
Descriptions of these features are provided
below. To access information about the functionality of these features through the
Uconnect® system, press the “Info” button on
the touchscreen.
Launch Mode
Launch Mode
WARNING!
Launch Mode is intended for off-highway or
off-road use only and should not be used on
any public roadways. It is recommended that
this feature be used in a controlled environment, and within the limits of the law. The
capabilities of the vehicle as measured by
the performance pages must never be exploited in a reckless or dangerous manner,
which can jeopardize the user’s safety or the
safety of others. Only a safe, attentive, and
skillful driver can prevent accidents.
This vehicle is equipped with a Launch Control
system that is designed to allow the driver to
achieve maximum vehicle acceleration in a
straight line. Launch Control is a form of traction
control that manages tire slip while launching
the vehicle. This feature is intended for use
during race events on a closed course where
consistent quarter mile and zero to sixty times
are desired. The system is not intended to
compensate for lack of driver experience or
familiarity with the race track. Use of this feature
in low traction (cold, wet, gravel, etc.) conditions
may results in excess wheel slip outside this
systems control resulting in an aborted launch.
159
NOTE:
• Launch control should not be used on
public roads. Always check track conditions and the surrounding area.
• Launch Control is not available for the
first 500 miles of the vehicle’s life.
• Launch Control should only be used
when the engine and transmission are at
operating temperature.
• Launch Control is intended to be used on
dry, paved road surfaces only. Use on
slippery or loose surfaces may cause
damage to vehicle components and is not
recommended.
Automatic Transmission — If Equipped
Launch Control is only available when the following procedure is followed:
1. Press the “Apps” button on the touchscreen,
select “Performance Control”, and press the
“Launch Control” button on the touchscreen
or push the Super Track Pak button on the
integrated center stack switch bank.
160
2. If desired, press the “Launch RPM Set-Up”
button on the touchscreen. This screen will
allow you to adjust your launch RPM for
optimum launch/traction. To adjust the
Launch RPM, press and drag the slider bar,
or press the arrows on the touchscreen, to
adjust the holding RPM. Press the back
arrow button on the touchscreen when finished. The setting will be saved.
4. Ensure the vehicle is not moving and the
steering wheel is pointing straight.
NOTE:
The default RPM for launch control is a
preset factory value. Optimal launch RPM
will depend on the engine and tires on the
vehicle, as well as the road and weather
conditions. Not all RPM settings will be
usable in all configurations and scenarios. If
requested launch RPM is not attainable in a
given scenario, the engine will provide the
maximum amount of torque possible to get
as close as possible to the requested RPM.
NOTE:
Messages will appear in the Driver Information Display (DID) to inform the driver if one
or more of the above conditions have not
been met.
3. Press the “Activate Launch Mode” button on
the touchscreen.
5. Hold the brake pedal and verify the vehicle is
in “Drive.”
6. While holding the brake, rapidly apply the
accelerator pedal to wide open throttle. The
engine speed will hold at the RPM that was
set in the “Launch RPM Set-up” screen.
7. When conditions four through six have been
met, the DID will read “Launch Ready Release Brake.” Release the brake and continue to hold wide open throttle to launch.
8. Keep the vehicle pointed straight. Launch
Control will be active until the vehicle
reaches 62 MPH (100 km/h).
Launch Control will abort before launch completion and display “Launch Aborted” in the DID for
any the following conditions:
• The accelerator pedal is released during
launch.
• The ESC system detects that the vehicle is
no longer moving in a straight line.
• The “ESC OFF” button is pressed to change
the system to another mode if Launch Control is enabled.
NOTE:
Launch mode is not available within the first
500 miles of engine break-in.
Manual Transmission — If Equipped
Launch Control is only available when the following procedure is followed:
1. Press the “Apps” button on the touchscreen,
select Performance Control, and press the
“Launch Control” button on the touchscreen
or push the Super Track Pak button on the
center stack switch bank.
2. Press the “Launch RPM Set-Up” button on
the touchscreen. This screen will allow you
to adjust your launch RPM for optimum
launch/traction. To adjust the Launch RPM,
press and drag the slider bar or press the
arrows on the touchscreen to adjust the
holding RPM. Press the back arrow button
when finished. The setting will be saved.
NOTE:
The default for launch control is 3000 RPM.
Optimal launch RPM will depend on the
engine and tires on the vehicle, as well as
road and weather conditions. Not all RPM
settings will be usable in all configurations
and scenarios. If requested launch RPM is
not attainable in a given scenario, the engine will provide the maximum amount of
torque possible to get as close as possible
to the requested RPM.
3. Press the “Activate Launch Mode” button on
the touchscreen.
4. Ensure the vehicle is not moving and the
steering wheel is pointing straight.
5. Fully depress the clutch pedal and verify the
vehicle is in first gear.
6. While holding the clutch depressed, rapidly
apply the accelerator pedal to wide open
throttle. The engine speed will hold at the
RPM that was set in the “Launch RPM
Set-up” screen.
NOTE:
Messages will appear in the Driver Information Display (DID) to inform the driver if one
or more of the above conditions have not
been met.
7. When conditions four through six have been
met, the DID will read “Launch Ready Release Clutch.” Release the clutch quickly
and continue to hold wide open throttle to
launch. Execute shifts as described in the
section “Manual Transmission – Shifting.”
8. Keep the vehicle pointed straight. Launch
control will be active until the vehicle
reaches 62 MPH (100 km/h).
161
Launch Control will abort before launch completion and display “Launch Aborted” in the DID for
any the following conditions:
• The brake is applied during launch.
• The ESC system detects that the vehicle is
no longer moving in a straight line.
NOTE:
Do not attempt to shift when the drive
wheels are spinning and do not have traction. Damage to the transmission may occur.
Drive Mode Set-Up
• The “ESC OFF” button is pressed to change
the ESC system to another mode if Launch
Control is enabled.
Pressing the “Drive Mode Set-Up” button on the
touchscreen within the Performance Control
screen indicates the real-time status of the
various systems. Pressing the “Sport Mode
Set-Up” or “Default Mode Set-Up” buttons on
the touchscreen, the driver can configure their
individual drive modes and see how those configurations affect the performance of the vehicle.
NOTE:
Not all of the options listed in this manual
are available on every vehicle, below is a
chart with all available Drive Mode vehicle
configurations.
NOTE:
Launch mode is not available within the first
500 miles of engine break-in.
Drive Mode Set-Up
Available Mode Configurations
Transmission
Auto
Manual
162
Engine
Engine/Trans
Steering
Paddle Shifters
Traction Control
N/A
X
X
N/A
X
X
X
X
N/A
X
Refer to the Sport and Default modes for their
detailed operation.
NOTE:
These settings will remain in effect when
using the Launch Control feature.
Default Mode
The vehicle will always start in Default Mode.
This mode is for typical driving conditions. While
in Default Mode, the Engine, Transmission and
Traction will operate in their Normal settings
and cannot be changed. The Steering assist
may be configured to Normal, Sport, or Comfort
by pressing the corresponding buttons on the
touchscreen. The Paddle Shifters may be enabled or disabled while in this mode.
Sport Mode
Sport Mode
Default Mode
Default Mode Set-Up
Sport Mode is a configuration set-up for typical
enthusiast driving. The Transmission and Steering are both set to their Sport settings. The
steering wheel paddle switches are enabled.
The Traction Control defaults to Normal. Any of
these four settings may be changed to the
driver’s preferences by pressing the buttons on
the touchscreen. Push the Sport button on the
instrument panel switch bank to put the vehicle
in Sport Mode and activate these settings. The
customized settings will only be active when the
Sport button is active.
163
Engine
Engine/Trans
Sport Mode Set-Up
Possible Drive Mode configurations are listed
below with accompanying descriptions. The information contained in the list below can also be
accessed from within the mode Set-Up menus.
To access the information, press the “Info”
button on the touchscreen from the mode
Set-Up menu, and use the left / right arrows to
toggle through available descriptions. The title
for each system in the Set-Up menu can be
pressed, which provides the descriptions for
each function of that system.
164
Engine
Engine/Trans
• Sport
• Sport
Press the “Sport” button on the touchscreen for
improved throttle response for an enhanced
driving experience.
Press the “Sport” button on the touchscreen for
improved throttle response and modified shifting for an enhanced driving experience.
• Normal
• Normal
Press the “Norm” button on the touchscreen for
standard throttle response for normal driving.
Press the “Norm” button on the touchscreen for
a balance of throttle response, shift comfort and
economy for normal driving.
Paddle Shifters
Traction
Paddle Shifters
Steering
Traction
Steering
• ON
• SPORT
• Sport
Press the “ON” button on the touchscreen to
enable steering wheel Paddle Shifters.
Press the “SPORT” button on the touchscreen
to turn off traction control and reduce stability
control.
Press the “Sport” button on the touchscreen to
provide the greatest amount of steering feel,
requiring the highest amount of steering effort.
• NORMAL
• Normal
Press the “NORM” button on the touchscreen to
provide full traction control and full stability
control.
Press the “Norm” button on the touchscreen to
provide greater steering feel, requiring greater
steering effort.
• OFF
Press the “OFF” button on the touchscreen to
disable steering wheel Paddle Shifters.
• Comfort
165
Press the “Comf” button on the touchscreen to
provide a balance of steering feel and steering
effort.
STEERING WHEEL AUDIO
CONTROLS — IF EQUIPPED
The remote sound system controls are located
on the rear surface of the steering wheel. Reach
behind the wheel to access the switches.
Uconnect® RADIOS — IF
EQUIPPED
For detailed information about your Uconnect®
radio, refer to your Uconnect® Supplement
Manual.
iPod®/USB/MP3 CONTROL —
IF EQUIPPED
This feature allows an iPod® or external USB
device to be plugged into the USB port.
Located in the front storage area of the center
console, this feature allows an iPod®/MP3
player, or an external USB device, to be connected to the audio system.
USB/AUX/SD Card Ports
1 — Aux Jack
2 — USB Port
3 — SD Card
iPod® control supports Mini, 4G, Photo, Nano,
5G iPod® and iPhone® devices. Some iPod®
software versions may not fully support the
iPod® control features. Please visit Apple’s
website for software updates.
For further information, refer to the Uconnect®
User’s Manual.
166
Remote Sound System Controls (Back View Of
Steering Wheel)
The right-hand control is a rocker-type switch
with a push-button in the center and controls the
volume and mode of the sound system. Pushing the top of the rocker switch will increase the
volume, and pushing the bottom of the rocker
switch will decrease the volume.
Pushing the center button will make the radio
switch between the various modes available
(AM/FM/AUX etc.).
current track, or to the beginning of the previous
track if it is within eight seconds after the current
track begins to play.
The left-hand control is a rocker-type switch
with a push-button in the center. The function of
the left-hand control is different depending on
which mode you are in.
If you push the switch up or down twice, it plays
the second track; three times, it will play the
third, etc.
The following describes the left-hand control
operation in each mode.
RADIO OPERATION AND
MOBILE PHONES
Radio Operation
Pushing the top of the switch will “Seek” up for
the next listenable station and pushing the
bottom of the switch will “Seek” down for the
next listenable station.
The button located in the center of the left-hand
control will tune to the next preset station that
you have programmed in the radio preset button.
Media Mode
Pushing the top of the switch once will go to the
next track on the selected media (AUX,
Bluetooth®, SD Card). Pushing the bottom of
the switch once will go to the beginning of the
Under certain conditions, the mobile phone
being on in your vehicle can cause erratic or
noisy performance from your radio. This condition may be lessened or eliminated by relocating the mobile phone antenna. This condition is
not harmful to the radio. If your radio performance does not satisfactorily “clear” by the
repositioning of the antenna, it is recommended
that the radio volume be turned down or off
during mobile phone operation when not using
Uconnect® (if equipped).
CLIMATE CONTROLS
The air conditioning and heating system is
designed to make you comfortable in all types
of weather. This system can be operated
through either the controls on the instrument
panel or through the Uconnect® system display.
When the Uconnect® system is in different
modes (Radio, Player, Settings, More, etc.) the
driver and passenger temperature settings will
be indicated at the top of the display.
General Overview
Buttons On The Faceplate
The buttons on the faceplate are located below
the Uconnect® screen.
Automatic Climate Controls — Buttons On The
Faceplate
167
Buttons On The Touchscreen
2. A/C Button
Buttons on the touchscreen are accessible on
the Uconnect® system screen.
Press and release to change the current setting,
the indicator illuminates when A/C is ON. Performing this function again will cause the A/C
operation to switch into manual mode and the
A/C indicator will turn off.
3. Recirculation Button
Press and release to change the current setting,
the indicator illuminates when ON.
Uconnect® 8.4 Automatic Temperature
Controls — Buttons On The Touchscreen
Uconnect® 5.0 Automatic Temperature
Controls — Buttons On The Touchscreen
Button Descriptions (Applies To Both Buttons On The Faceplate And Buttons On The
Touchscreen)
1. MAX A/C Button
Press and release to change the current setting,
the indicator illuminates when MAX A/C is ON.
Performing this function again will cause the
MAX A/C operation to switch into manual mode
and the MAX A/C indicator will turn off.
168
4. AUTO Operation Button
Automatically controls the interior cabin temperature by adjusting airflow distribution and
amount. Performing this function will cause the
system to switch between manual mode and
automatic modes. Refer to “Automatic Operation” for more information.
5. Front Defrost Button
Press and release to change the current airflow
setting to Defrost mode. The indicator illuminates when this feature is ON. Air comes from
the windshield and side window demist outlets.
When the defrost button is selected, the blower
level will increase. Use Defrost mode with maxi-
mum temperature settings for best windshield
and side window defrosting and defogging. Performing this function will cause the ATC to
switch into manual mode. If the front defrost
mode is turned off the climate system will return
the previous setting.
6. Rear Defrost Button
Press and release this button to turn on the rear
window defroster and the heated outside mirrors (if equipped). An indicator will illuminate
when the rear window defroster is on. The rear
window defroster automatically turns off after 10
minutes.
CAUTION!
Failure to follow these cautions can cause
damage to the heating elements:
• Use care when washing the inside of the
rear window. Do not use abrasive window
cleaners on the interior surface of the
window. Use a soft cloth and a mild washing solution, wiping parallel to the heating
(Continued)
CAUTION! (Continued)
elements. Labels can be peeled off after
soaking with warm water.
• Do not use scrapers, sharp instruments, or
abrasive window cleaners on the interior
surface of the window.
• Keep all objects a safe distance from the
window.
7. Passenger Temperature Control Up Button (Uconnect® 8.4 Only)
Provides the passenger with independent temperature control. Push the button on the faceplate for warmer temperature settings or on the
touchscreen, press and slide the temperature
bar button towards the red arrow for warmer
temperature settings.
NOTE:
Pressing this button while in Sync mode will
automatically exit Sync.
8. Passenger Temperature Control Down
Button (Uconnect® 8.4 Radio Only)
Provides the passenger with independent temperature control. Push the button on the faceplate for cooler temperature settings or on the
touchscreen, press and slide the temperature
bar button towards the blue arrow for cooler
temperature settings.
NOTE:
Pressing this button while in Sync mode will
automatically exit Sync.
9. SYNC
Press the Sync button on the touchscreen to
toggle the Sync feature On/Off. The Sync indicator is illuminated when this feature is enabled.
Sync is used to synchronize the passenger
temperature setting with the driver temperature
setting. Changing the passenger temperature
setting while in Sync will automatically exit this
feature.
10. Blower Control
Blower control is used to regulate the amount of
air forced through the climate system. There are
169
seven blower speeds available. Adjusting the
blower will cause automatic mode to switch to
manual operation. The speeds can be selected
using either the blower control knob on the
faceplate or the buttons on the touchscreen as
follows:
Blower Control Knob On The Faceplate
The blower speed increases as you turn the
blower control knob clockwise from the lowest
blower setting. The blower speed decreases as
you turn the blower control knob counterclockwise.
Button On The Touchscreen
Use the small blower icon to reduce the blower
setting and the large blower icon to increase the
blower setting. Blower can also be selected by
pressing the blower bar area between the icons.
11. Modes
The airflow distribution mode can be adjusted
so air comes from the instrument panel outlets,
floor outlets and demist outlets. The Mode settings are as follows:
170
• Panel Mode
Air comes from the outlets in the instrument panel. Each of these outlets
can be individually adjusted to direct
the flow of air. The air vanes of the
center outlets and outboard outlets can be
moved up and down or side to side to regulate
airflow direction. There is a shut off wheel
located below the air vanes to shut off or adjust
the amount of airflow from these outlets.
• Bi-Level Mode
Air comes from the instrument panel
outlets and floor outlets. A slight
amount of air is directed through the
defrost and side window demister
outlets.
NOTE:
BI-LEVEL mode is designed under comfort
conditions to provide cooler air out of the
panel outlets and warmer air from the floor
outlets.
• Floor Mode
Air comes from the floor outlets. A
slight amount of air is directed through
the defrost and side window demister
outlets.
• Mix Mode
Air comes from the floor, defrost and
side window demist outlets. This mode
works best in cold or snowy conditions.
12. Climate Control OFF Button
Press and release this button to turn the Climate Control ON/OFF.
13. Driver Temperature Control Down Button (Uconnect® 8.4 Only)
Provides the driver with independent temperature control. Push the button on the faceplate
for cooler temperature settings or on the touchscreen, press and slide the temperature bar
button towards the blue arrow for cooler temperature settings.
NOTE:
In Sync mode, this button will also automatically adjust the passenger temperature setting at the same time.
14. Driver Temperature Control Up Button
(Uconnect® 8.4 Only)
Provides the driver with independent temperature control. Push the button on the faceplate
for warmer temperature settings or on the
touchscreen, press and slide the temperature
bar button towards the red arrow for warmer
temperature settings.
NOTE:
In Sync mode, this button will also automatically adjust the passenger temperature setting at the same time.
15. Temperature Control (Uconnect® 5.0
Radio Only)
Press the temperature button on the touchscreen to regulate the temperature of the air
inside the passenger compartment. Moving the
temperature bar into the red area, indicates
warmer temperatures. Moving the temperature
bar into the blue area indicates cooler temperatures.
Climate Control Functions
A/C (Air Conditioning)
The Air Conditioning (A/C) button allows the
operator to manually activate or deactivate the
air conditioning system. When the air conditioning system is turned on, cool dehumidified air
will flow through the outlets into the cabin. For
improved fuel economy, press the A/C button to
turn off the air conditioning and manually adjust
the blower and airflow mode settings. Also,
make sure to select only Panel, Bi-Level or
Floor modes.
NOTE:
• For Manual Climate Controls, if the system is in Mix, Floor or Defrost Mode, the
A/C can be turned off, but the A/C system
shall remain active to prevent fogging of
the windows.
• If your air conditioning performance
seems lower than expected, check the
front of the A/C condenser (located in
front of the radiator), for an accumulation
of dirt or insects. Clean with a gentle
water spray from behind the radiator and
through the condenser. Fabric front fascia protectors may reduce airflow to the
condenser, reducing air conditioning performance.
MAX A/C
MAX A/C sets the control for maximum cooling
performance.
Press and release to toggle between MAX A/C
and the prior settings. The button on the touchscreen illuminates when MAX A/C is ON.
In MAX A/C, the blower level and mode position
can be adjusted to desired user settings. Pressing other settings will cause the MAX A/C
operation to switch to the prior settings and the
MAX A/C indicator will turn off.
• If fog or mist appears on the windshield or
side glass, select Defrost mode and adjust blower speed if needed.
171
Recirculation
When outside air contains smoke,
odors, or high humidity, or if rapid
cooling is desired, you may wish to
recirculate interior air by pressing
the Recirculation control button.
The recirculation indicator will illuminate when
this button is selected. Press the button a
second time to turn off the Recirculation mode
and allow outside air into the vehicle.
NOTE:
In cold weather, use of Recirculation mode
may lead to excessive window fogging. The
recirculation feature may be unavailable
(button on touchscreen greyed out) if conditions exist that could create fogging on the
inside of the windshield. On systems with
Manual Climate Controls, the Recirculation
mode is not allowed in Defrost mode to
improve window clearing operation. Recirculation will be disabled automatically if this
mode is selected. Attempting to use Recirculation while in this mode will cause the
LED in the control button to blink and then
turn off.
172
Automatic Temperature Control
(ATC)
Automatic Operation
1. Push the AUTO button on the faceplate or
press the “AUTO” button on the touchscreen.
2. Next, adjust the temperature you would like
the system to maintain by adjusting the
driver and passenger temperature buttons
on the faceplate or buttons on the touchscreen. Once the desired temperature is
displayed, the system will achieve and automatically maintain that comfort level.
3. When the system is set up for your comfort
level, it is not necessary to change the
temperature. You will experience the greatest efficiency by simply allowing the system
to function automatically.
NOTE:
• It is not necessary to move the temperature settings. The system automatically
adjusts the temperature, mode, and
blower speed to provide comfort as
quickly as possible.
• The temperature can be displayed in U.S.
or Metric units by selecting the
Uconnect® customer-programmable feature. Refer to the “Uconnect® System
Settings” in this section of the manual.
To provide you with maximum comfort in the
Automatic mode, during cold start-ups the
blower fan will remain on low until the engine
warms up. The blower will increase in speed
and transition into Auto mode.
Manual Operation Override
The system allows for manual selection of
blower speed, air distribution mode, A/C status
and recirculation control.
The blower fan speed can be set to any fixed
speed by adjusting the blower control. The fan
will now operate at a fixed speed until additional
speeds are selected. This allows the front occupants to control the volume of air circulated in
the vehicle and cancel the Auto mode.
The operator can also select the direction of the
airflow by selecting one of the available mode
settings. A/C operation and Recirculation control can also be manually selected in Manual
operation.
mended. Refer to “Maintenance Procedures” in
“Maintaining Your Vehicle” for proper coolant
selection.
NOTE:
Each of these features operates independently from each other. If any feature is
controlled manually, temperature control
will continue to operate automatically.
Winter Operation
Use of the air Recirculation mode during winter
months is not recommended because it may
cause window fogging.
Operating Tips
NOTE:
Refer to the chart at the end of this section
for suggested control settings for various
weather conditions.
Summer Operation
The engine cooling system must be protected
with a high-quality antifreeze coolant to provide
proper corrosion protection and to protect
against engine overheating. A solution of 50%
OAT (Organic Additive Technology) coolant that
meets the requirements of Chrysler Material
Standard MS.90032 and 50% water is recom-
Vacation Storage
Any time you store your vehicle or keep it out of
service (i.e., vacation) for two weeks or more,
run the air conditioning system at idle for about
five minutes in the fresh air and high blower
setting. This will ensure adequate system lubrication to minimize the possibility of compressor
damage when the system is started again.
Window Fogging
Interior fogging on the windshield can be quickly
removed by turning the mode selector to Defrost. The Defrost/Floor mode can be used to
maintain a clear windshield and provide sufficient heating. If side window fogging becomes
objectionable, increase blower speed to improve airflow and clearing of the side windows.
Vehicle windows tend to fog on the inside in mild
but rainy or humid weather.
NOTE:
• Recirculate without A/C should not be
used for long periods, as fogging may
occur.
• Automatic Temperature Controls (ATC)
will automatically adjust the climate control settings to reduce or eliminate window fogging on the front windshield.
When this occurs, recirculation will be
unavailable.
Outside Air Intake
Make sure the air intake, located directly in front
of the windshield, is free of obstructions such as
leaves. Leaves collected in the air intake may
reduce airflow, and if they enter the plenum,
they could plug the water drains. In winter
months, make sure the air intake is clear of ice,
slush, and snow.
A/C Air Filter
The climate control system filters outside air
containing dust, pollen and some odors. Strong
odors cannot be totally filtered out. Refer to
“Maintenance Procedures” in “Maintaining Your
Vehicle” for filter replacement instructions.
173
Control Setting Suggestions For Various Weather Conditions
174
Introducing Uconnect®
3. Speak clearly at a normal pace and volume
while facing straight ahead. The microphone
is positioned on the rearview mirror and
aimed at the driver.
Start using Uconnect® Voice Recognition with
these helpful quick tips. It provides the key
Voice Commands and tips you need to know to
control your Uconnect® 5.0 or 8.4A/8.4AN system.
4. Each time you give a Voice Command, you
must first push either the VR or Phone
button, wait until after the beep, then say
your Voice Command.
Uconnect® VOICE
RECOGNITION QUICK TIPS
Uconnect® 8.4
Get Started
5. You can interrupt the help message or system prompts by pushing the VR or Phone
button and saying a Voice Command from
current category.
All you need to control your Uconnect® system
with your voice are the buttons on your steering
wheel.
Uconnect® 5.0
Key Features:
• 5 inch touchscreen
• Three buttons on either side of the display
1. Visit UconnectPhone.com to check mobile device and feature compatibility and to
find phone pairing instructions.
2. Reduce background noise. Wind and passenger conversations are examples of noise
that may impact recognition.
175
Push the VR button
. After the beep, say…
• Cancel to stop a current voice session
• Help to hear a list of suggested Voice
Commands
• Repeat to listen to the system prompts again
Notice the visual cues that inform you of your
voice recognition system’s status. Cues appear
on the touchscreen.
Uconnect® Voice Command
Uconnect® 8.4
1 — Push To Initiate Or To Answer A Phone Call,
Send Or Receive A Text
2 — For all radios: Push To Begin Radio or Media
functions. For 8.4A/8.4AN only: Push to begin
Navigation, Apps And Climate Functions
3 — Push To End Call
Radio
Use your voice to quickly get to the AM, FM or
MW/LW (if equipped) radio stations you would
like to hear.
Push the VR button
• Tune to ninety-five-point-five FM
Basic Voice Commands
The basic Voice Commands below can be given
at any point while using your Uconnect®
system.
176
. After the beep, say…
Uconnect® 5.0
TIP: At any time, if you are not sure of what to
say or want to learn a Voice Command, push
and say “Help.” The systhe VR button
tem will provide you with a list of commands.
Media
Uconnect® offers connections via USB, SD,
Bluetooth® and auxiliary ports (If Equipped).
Voice operation is only available for connected
USB and iPod® devices. (Remote CD player
optional and not available on all vehicles.)
. After the beep, say
Push the VR button
one of the following commands and follow the
prompts to switch your media source or choose
an artist.
Uconnect® 5.0 Radio
• Change source to Bluetooth®
Uconnect® 5.0 Media
• Change source to iPod®
• Change source to USB
• Play artist Beethoven; Play album Greatest
Hits; Play song Moonlight Sonata; Play
genre Classical
Uconnect® 8.4 Radio
TIP: Press the Browse button on the touchscreen to see all of the music on your iPod® or
USB device. Your Voice Command must match
exactly how the artist, album, song and genre
information is displayed.
Uconnect® 8.4 Media
177
Phone
Climate (8.4A/8.4AN)
Making and answering hands-free phone calls
is easy with Uconnect®. When the Phonebook
button is illuminated on your touchscreen, your
system is ready. Check UconnectPhone.com
for mobile phone compatibility and pairing instructions.
Too hot? Too cold? Adjust vehicle temperatures
hands-free and keep everyone comfortable
while you keep moving ahead. (If vehicle is
equipped with climate control.)
. After the beep, say
Push the Phone button
one of the following commands…
• Set driver temperature to 70 degrees
• Call John Smith
. After the beep, say
Push the VR button
one of the following commands:
• Set passenger temperature to 70 degrees
Uconnect® 5.0 Phone
• Dial 123-456-7890 and follow the system
prompts
• Redial (call
number)
previous
outgoing
TIP: Voice Command for Climate may only be
used to adjust the interior temperature of your
vehicle. Voice Command will not work to adjust
the heated seats or steering wheel if equipped.
phone
• Call back (call previous incoming phone
number)
TIP: When providing a Voice Command,
and say “Call,”
push the Phone button
then pronounce the name exactly as it appears in your phone book. When a contact
has multiple phone numbers, you can say
“Call John Smith work.”
178
Uconnect® 8.4 Phone
• For the 8.4AN Uconnect® System, say:
“Navigate to 800 Chrysler Drive Auburn
Hills, Michigan.”
2. Then follow the system prompts.
TIP: To start a POI search, push the VR button
. After the beep, say: “Find nearest coffee
shop.”
Additional Information
© 2014 Chrysler Group LLC. All rights reserved.
Mopar and Uconnect are registered trademarks
and Mopar Owner Connect is a trademark of
Chrysler Group LLC. Android is a trademark of
Google Inc. Yelp, Yelp logo, Yelp burst and
related marks are registered trademarks of
Yelp.
Uconnect® System Support:
• DriveUconnect.com
Uconnect 8.4 Climate
Mon. – Fri., 7:00 am – 12:00 am, ET
Navigation (8.4A/8.4AN)
Sat., 8:00 am – 10:00 pm, ET
The Uconnect® navigation feature helps you
save time and become more productive when
you know exactly how to get to where you want
to go. (Navigation is optional on the Uconnect®
8.4A system. See your dealer to activate navigation at any time.)
1. To enter a destination, push the VR button
. After the beep, say:
Sun., 9:00 am – 5:00 pm, ET
Uconnect® 8.4 Navigation
• For the 8.4A Uconnect® System, say: “Enter
state.”
179
180
5
STARTING AND OPERATING
• STARTING PROCEDURES . . . . . . . . . . . . . . . . .
• Manual Transmission — If Equipped. . . . . . . . . . .
• Automatic Transmission — If Equipped . . . . . . . .
• Keyless Enter-N-Go™ . . . . . . . . . . . . . . . . . . .
• Normal Starting . . . . . . . . . . . . . . . . . . . . . . .
• Extreme Cold Weather (Below –20°F Or −29°C) . . . .
• If Engine Fails To Start . . . . . . . . . . . . . . . . . .
• After Starting . . . . . . . . . . . . . . . . . . . . . . . .
• ENGINE BLOCK HEATER — IF EQUIPPED . . . . . . .
• MANUAL TRANSMISSION — IF EQUIPPED . . . . . . .
• Six-Speed Manual Transmission . . . . . . . . . . . . .
• Shifting . . . . . . . . . . . . . . . . . . . . . . . . . . . .
• Recommended Shift Speeds . . . . . . . . . . . . . . .
• 1–4 Skip Shift . . . . . . . . . . . . . . . . . . . . . . . .
• Downshifting. . . . . . . . . . . . . . . . . . . . . . . . .
• AUTOMATIC TRANSMISSION . . . . . . . . . . . . . . .
• Key Ignition Park Interlock . . . . . . . . . . . . . . . .
• Brake/Transmission Shift Interlock System . . . . . .
• Eight-Speed Automatic Transmission — If Equipped .
.
.
.
.
.
.
.
.
.
.
.
.
.
.
.
.
.
.
.
.
.
.
.
.
.
.
.
.
.
.
.
.
.
.
.
.
.
.
.
.
.
.
.
.
.
.
.
.
.
.
.
.
.
.
.
.
.
.
.
.
.
.
.
.
.
.
.
.
.
.
.
.
.
.
.
.
.
.
.
.
.
.
.
.
.
.
.
.
.
.
.
.
.
.
.
.185
.185
.185
.186
.186
.188
.188
.189
.189
.189
.189
.190
.190
.191
.191
.192
.192
.193
.193
181
• AUTOSTICK . . . . . . . . . . . . . . . . . . . . . . . . . . . . . .
• Operation . . . . . . . . . . . . . . . . . . . . . . . . . . . . . . .
• SPORT MODE — WITHOUT PERFORMANCE CONTROL . . .
• DRIVING ON SLIPPERY SURFACES . . . . . . . . . . . . . . .
• Acceleration . . . . . . . . . . . . . . . . . . . . . . . . . . . . .
• Traction . . . . . . . . . . . . . . . . . . . . . . . . . . . . . . . .
• DRIVING THROUGH WATER . . . . . . . . . . . . . . . . . . . .
• Flowing/Rising Water . . . . . . . . . . . . . . . . . . . . . . . .
• Shallow Standing Water . . . . . . . . . . . . . . . . . . . . . .
• ELECTRIC POWER STEERING . . . . . . . . . . . . . . . . . . .
• FUEL SAVER TECHNOLOGY 5.7L/6.4L ENGINES ONLY — IF
EQUIPPED. . . . . . . . . . . . . . . . . . . . . . . . . . . . . . . .
• PARKING BRAKE . . . . . . . . . . . . . . . . . . . . . . . . . . .
• Manual Transmission — If Equipped . . . . . . . . . . . . . . .
• Automatic Transmission — If Equipped . . . . . . . . . . . . .
• BRAKE SYSTEM . . . . . . . . . . . . . . . . . . . . . . . . . . .
• ELECTRONIC BRAKE CONTROL SYSTEM . . . . . . . . . . .
• Anti-Lock Brake System (ABS) . . . . . . . . . . . . . . . . . .
• Traction Control System (TCS) . . . . . . . . . . . . . . . . . .
• Brake Assist System (BAS) . . . . . . . . . . . . . . . . . . . .
• Hill Start Assist (HSA) . . . . . . . . . . . . . . . . . . . . . . .
• Electronic Stability Control (ESC) . . . . . . . . . . . . . . . .
• ESC Activation/Malfunction Indicator Light And ESC OFF
Indicator Light . . . . . . . . . . . . . . . . . . . . . . . . . . .
• Synchronizing ESC . . . . . . . . . . . . . . . . . . . . . . . . .
• TIRE SAFETY INFORMATION . . . . . . . . . . . . . . . . . . . .
• Tire Markings . . . . . . . . . . . . . . . . . . . . . . . . . . . .
182
.
.
.
.
.
.
.
.
.
.
.
.
.
.
.
.
.
.
.
.
.
.
.
.
.
.
.
.
.
.
.197
.197
.198
.198
.198
.199
.199
.199
.199
.200
.
.
.
.
.
.
.
.
.
.
.
.
.
.
.
.
.
.
.
.
.
.
.
.
.
.
.
.
.
.
.
.
.
.201
.201
.201
.202
.203
.203
.203
.205
.205
.205
.206
.
.
.
.
.
.
.
.
.
.
.
.
.208
.209
.209
.209
•
•
•
•
•
• Tire Identification Number (TIN) . . . . . . . .
• Tire Terminology And Definitions. . . . . . . .
• Tire Loading And Tire Pressure . . . . . . . .
TIRES — GENERAL INFORMATION . . . . . .
• Tire Pressure . . . . . . . . . . . . . . . . . . .
• Tire Inflation Pressures . . . . . . . . . . . . .
• Tire Pressures For High Speed Operation . .
• Radial Ply Tires . . . . . . . . . . . . . . . . . .
• Tire Types . . . . . . . . . . . . . . . . . . . . .
• Run Flat Tires — If Equipped . . . . . . . . . .
• Spare Tires — If Equipped . . . . . . . . . . .
• Tire Spinning . . . . . . . . . . . . . . . . . . .
• Tread Wear Indicators . . . . . . . . . . . . . .
• Life Of Tire . . . . . . . . . . . . . . . . . . . .
• Replacement Tires . . . . . . . . . . . . . . . .
TIRE CHAINS (TRACTION DEVICES) . . . . . .
TIRE ROTATION RECOMMENDATIONS . . . .
TIRE PRESSURE MONITOR SYSTEM (TPMS)
• Premium System . . . . . . . . . . . . . . . . .
• TPMS Deactivation — If Equipped . . . . . . .
FUEL REQUIREMENTS . . . . . . . . . . . . . .
• 3.6L Engine . . . . . . . . . . . . . . . . . . . .
• 5.7L Engine (With Automatic Transmission) .
• 5.7L Engine (With Manual Transmission) . . .
• 6.4L Engine . . . . . . . . . . . . . . . . . . . .
.
.
.
.
.
.
.
.
.
.
.
.
.
.
.
.
.
.
.
.
.
.
.
.
.
.
.
.
.
.
.
.
.
.
.
.
.
.
.
.
.
.
.
.
.
.
.
.
.
.
.
.
.
.
.
.
.
.
.
.
.
.
.
.
.
.
.
.
.
.
.
.
.
.
.
.
.
.
.
.
.
.
.
.
.
.
.
.
.
.
.
.
.
.
.
.
.
.
.
.
.
.
.
.
.
.
.
.
.
.
.
.
.
.
.
.
.
.
.
.
.
.
.
.
.
.
.
.
.
.
.
.
.
.
.
.
.
.
.
.
.
.
.
.
.
.
.
.
.
.
.
.
.
.
.
.
.
.
.
.
.
.
.
.
.
.
.
.
.
.
.
.
.
.
.
.
.
.
.
.
.
.
.
.
.
.
.
.
.
.
.
.
.
.
.
.
.
.
.
.
.
.
.
.
.
.
.
.
.
.
.
.
.
.
.
.
.
.
.
.
.
.
.
.
.
.
.
.
.
.
.
.
.
.
.
.
.
.
.
.
.
.
.
.
.
.
.
.
.
.
.213
.214
.215
.218
.218
.219
.219
.220
.220
.221
.221
.223
.223
.223
.224
.225
.225
.226
.227
.229
.230
.230
.230
.231
.231
183
• ADDING FUEL . . . . . . . . . . . . . . . . . . . . . . . . . . . .
• Fuel Filler Cap (Gas Cap) . . . . . . . . . . . . . . . . . . . .
• Loose Fuel Filler Cap Message . . . . . . . . . . . . . . . . .
• TRAILER TOWING . . . . . . . . . . . . . . . . . . . . . . . . .
• Common Towing Definitions . . . . . . . . . . . . . . . . . .
• Trailer Hitch Classification . . . . . . . . . . . . . . . . . . .
• Trailer Towing Weights (Maximum Trailer Weight Ratings)
• Trailer And Tongue Weight . . . . . . . . . . . . . . . . . . .
• Towing Requirements . . . . . . . . . . . . . . . . . . . . . .
• Towing Tips . . . . . . . . . . . . . . . . . . . . . . . . . . . .
• RECREATIONAL TOWING (BEHIND MOTORHOME, ETC.) .
• Towing This Vehicle Behind Another Vehicle . . . . . . . . .
184
.
.
.
.
.
.
.
.
.
.
.
.
.
.
.
.
.
.
.
.
.
.
.
.
.
.
.
.
.
.
.
.
.
.
.
.
.
.
.
.
.
.
.
.
.
.
.
.
.232
.232
.233
.233
.233
.235
.236
.236
.237
.240
.241
.241
STARTING PROCEDURES
Before starting your vehicle, adjust your seat,
adjust the inside and outside mirrors, fasten
your seat belt, and if present, instruct all other
occupants to buckle their seat belts.
WARNING!
• When leaving the vehicle, always make
sure the ignition is in the OFF position,
remove the Key Fob from the vehicle, and
lock the vehicle.
• Never leave children alone in a vehicle, or
with access to an unlocked vehicle. Leaving children in a vehicle unattended is
dangerous for a number of reasons. A child
or others could be seriously or fatally injured. Children should be warned not to
touch the parking brake, brake pedal or the
transmission gear selector.
(Continued)
WARNING! (Continued)
• Do not leave the Key Fob in or near the
vehicle (or in a location accessible to children), and do not leave the ignition (of a
vehicle equipped with Keyless Enter-NGo™) in the ACC or ON/RUN mode. A
child could operate power windows, other
controls, or move the vehicle.
Manual Transmission — If Equipped
Apply the parking brake, place the shift lever in
NEUTRAL and press the clutch pedal before
starting vehicle. This vehicle is equipped with a
clutch interlocking ignition system. It will not
start unless the clutch pedal is pressed to the
floor.
Normal Starting With Integrated Key —
Manual Transmission
Normal starting of either a cold or a warm
engine does not require pumping or pressing
the accelerator pedal. Press the clutch pedal
fully to the floor, and cycle the ignition switch to
the START position and release when the engine starts. If the engine fails to start within 15
seconds, place the ignition in the OFF position,
wait 10 to 15 seconds, then repeat the “Normal
Starting” procedure.
WARNING!
Do not attempt to push or tow your vehicle to
get it started. Unburned fuel could enter the
catalytic converter and once the engine has
started, ignite and damage the converter and
vehicle. If the vehicle has a discharged battery, booster cables may be used to obtain a
start from another vehicle. This type of start
can be dangerous if done improperly, so
follow the procedure carefully. Refer to
“Jump Starting” in “What To Do In Emergencies” for further information.
Automatic Transmission — If
Equipped
The shift lever must be in the NEUTRAL or
PARK position before you can start the engine.
Apply the brakes before shifting into any driving
gear.
185
CAUTION!
Damage to the transmission may occur if the
following precautions are not observed:
• Do not shift from REVERSE, PARK, or
NEUTRAL into any forward gear when the
engine is above idle speed.
• Shift into PARK only after the vehicle has
come to a complete stop.
• Shift into or out of REVERSE only after the
vehicle has come to a complete stop and
the engine is at idle speed.
• Before shifting into any gear, make sure
your foot is firmly on the brake pedal.
the engine is running. If the engine fails to start,
the starter will disengage automatically in 10
seconds. If this occurs, place the ignition in the
LOCK/OFF position, wait 10 to 15 seconds,
then repeat the “Normal Starting” procedure.
Keyless Enter-N-Go™
This feature allows the
driver to operate the ignition switch with the
push of a button, as long
as the ENGINE START/
STOP button is installed
and the Remote Start/
Keyless Enter-N-Go™
Key Fob is in the passenger compartment.
Using Fob With Integrated Key (Tip Start)
NOTE:
Normal starting of either a cold or a warm
engine is obtained without pumping or
pressing the accelerator pedal.
Do not press the accelerator. Use the Fob with
Integrated Key to briefly place the ignition in the
START position and release it as soon as the
starter engages. The starter motor will continue
to run, and it will disengage automatically when
186
Normal Starting
Using The ENGINE START/STOP Button —
Automatic Transmission Only
1. The transmission must be in PARK or NEUTRAL.
2. Press and hold the brake pedal while pressing the ENGINE START/STOP button once.
3. The system takes over and attempts to start
the vehicle. If the vehicle fails to start, the
starter will disengage automatically after 10
seconds.
4. If you wish to stop the cranking of the engine
prior to the engine starting, press the button
again.
NOTE:
Normal starting of either a cold or a warm
engine is obtained without pumping or
pressing the accelerator pedal.
Using The ENGINE START/STOP Button —
Manual Transmission Only
1. Press and hold the clutch pedal while pressing and holding the ENGINE START/STOP
button.
2. Release the button when the engine starts. If
the vehicle fails to start within 15 seconds,
release the button, wait 10 to 15 seconds,
then repeat the “Normal Starting” procedure.
3. If you wish to stop the cranking of the engine
prior to the engine starting, release the button.
NOTE:
Normal starting of either a cold or a warm
engine is obtained without pumping or
pressing the accelerator pedal.
To Turn Off The Engine Using ENGINE
START/STOP Button — Automatic
Transmission Only
1. Place the shift lever in PARK, then press and
release the ENGINE START/STOP button.
2. The ignition switch will return to the OFF
position.
3. If the shift lever is not in PARK, the ENGINE
START/STOP button must be held for two
seconds and vehicle speed must be above
5 mph (8 km/h) before the engine will shut
off. The ignition switch position will remain in
the ACC position until the shift lever is in
PARK and the button is pressed twice to the
OFF position. If the shift lever is not in PARK
and the ENGINE START/STOP button is
pressed once, the Driver Information Display
(DID) will display a “VEHICLE NOT IN
PARK” message and the engine will remain
running. Never leave a vehicle out of the
PARK position, or it could roll.
NOTE:
If the ignition switch is left in the ACC or
RUN (engine not running) position and the
transmission is in PARK, the system will
automatically time out after 30 minutes of
inactivity and the ignition will switch to the
OFF position.
To Turn Off The Engine Using ENGINE
START/STOP Button — Manual
Transmission Only
1. With the vehicle stopped, place the shift
lever in NEUTRAL, then press and release
the ENGINE START/STOP button.
2. The ignition switch will return to the OFF
position.
3. Place the shift lever in first gear or REVERSE and then apply the parking brake.
NOTE:
• If the ignition switch is left in the ACC
position, the system will automatically
time out after 30 minutes of inactivity and
the ignition will switch to the OFF position.
• If the ignition switch is left in the RUN
position, the system will automatically
time out after 30 minutes of inactivity if
the vehicle speed is 0 mph (0 km/h) and
the engine is not running.
• If the vehicle speed is above 5 mph
(8 km/h), the ENGINE START/STOP button
must be held for two seconds before the
engine will shut off. The ignition switch
position will remain in the ACC position
until the vehicle is stopped and the button
is pressed twice to the OFF position.
Keyless Enter-N-Go™ Functions — With
Driver’s Foot OFF The Brake Pedal/Clutch
Pedal (In PARK Or NEUTRAL Position)
The Keyless Enter-N-Go™ feature operates
similar to an ignition switch. It has three positions, OFF, ACC and RUN. To change the
ignition switch positions without starting the
187
vehicle and use the accessories follow these
steps starting with the ignition switch in the OFF
position:
1. Press the ENGINE START/STOP button
once to change the ignition switch to the
ACC position,
2. Press the ENGINE START/STOP button a
second time to change the ignition switch to
the RUN position,
3. Press the ENGINE START/STOP button a
third time to return the ignition switch to the
OFF position.
Extreme Cold Weather (Below –20°F
Or −29°C)
To ensure reliable starting at these temperatures, use of an externally powered electric
engine block heater (available from your authorized dealer) is recommended.
188
If Engine Fails To Start
WARNING!
• Never pour fuel or other flammable liquids
into the throttle body air inlet opening in an
attempt to start the vehicle. This could
result in a flash fire causing serious personal injury.
• Do not attempt to push or tow your vehicle
to get it started. Vehicles equipped with an
automatic transmission cannot be started
this way. Unburned fuel could enter the
catalytic converter and once the engine
has started, ignite and damage the converter and vehicle.
• If the vehicle has a discharged battery,
booster cables may be used to obtain a
start from a booster battery or the battery
in another vehicle. This type of start can be
dangerous if done improperly. Refer to
“Jump Starting” in “What To Do In Emergencies” for further information.
Clearing A Flooded Engine (Using ENGINE
START/STOP Button) — Automatic
Transmission Only
If the engine fails to start after you have followed
the “Normal Starting” or “Extreme Cold
Weather" procedures, it may be flooded. To
clear any excess fuel, press and hold the brake
pedal, push the accelerator pedal all the way to
the floor and hold it, then press and release the
ENGINE START/STOP button once. The starter
motor will engage automatically, run for 10
seconds, and then disengage. Once this occurs, release the accelerator pedal and the
brake pedal, wait 10 to 15 seconds, then repeat
the “Normal Starting” procedure.
Clearing A Flooded Engine (Using ENGINE
START/STOP Button) — Manual
Transmission Only
If the engine fails to start after you have followed
the “Normal Starting” or “Extreme Cold
Weather" procedures, it may be flooded. To
clear any excess fuel, press and hold the clutch
pedal, push the accelerator pedal all the way to
the floor and hold it, then press and hold the
ENGINE START/STOP button for no more than
15 seconds. Release the accelerator pedal and
the clutch pedal, wait 10 to 15 seconds, then
repeat the “Normal Starting” procedure.
After Starting
The idle speed is controlled automatically and it
will decrease as the engine warms up.
ENGINE BLOCK HEATER — IF
EQUIPPED
The engine block heater warms the engine, and
permits quicker starts in cold weather. Connect
the cord to a standard 110-115 Volt AC electrical
outlet with a grounded, three-wire extension
cord.
The engine block heater must be plugged in at
least one hour to have an adequate warming
effect on the engine.
The engine block heater cord is routed under
the hood on the driver side of the vehicle. It has
a removable cap that is located near the air box.
WARNING!
Remember to disconnect the engine block
heater cord before driving. Damage to the
110-115 Volt electrical cord could cause
electrocution.
MANUAL TRANSMISSION — IF
EQUIPPED
Six-Speed Manual Transmission
WARNING!
You or others could be injured if you leave
the vehicle unattended without having the
parking brake fully applied. The parking
brake should always be applied when the
driver is not in the vehicle, especially on an
incline.
CAUTION!
• Never drive with your foot resting on the
clutch pedal, or try to hold the vehicle on a
hill with the clutch pedal partially engaged,
as this will cause abnormal wear on the
clutch. Refer to “Electronic Brake Control
System/Hill Start Assist” in “Starting And
Operating” for further information.
• Failure to press the clutch pedal fully to the
floor may cause increased shift efforts, and
may result in damage to the clutch and
transmission.
• Do not rest your hand on the shift lever
while driving, as this may result in transmission synchronizer damage.
• Do not attempt to shift the transmission if
the rear wheels are spinning due to loss of
traction. Damage to the transmission may
occur.
189
NOTE:
During cold weather, you may experience
increased effort in shifting until the transmission fluid warms up. This is normal.
Shifting
Fully press the clutch pedal and lift your foot off
the accelerator pedal before shifting gears. As
you release the clutch pedal, lightly press the
accelerator pedal. Damage to the transmission
or clutch may occur if you do not fully press the
clutch pedal and lift off of the accelerator pedal
when shifting.
The six-speed manual transmission has a
spring that centers the shift lever near third and
fourth gear. This spring helps you know which
gear you are in when you are shifting. Be careful
when shifting from first to second or downshifting from sixth to fifth.
The spring will try to pull the shift lever toward
third and fourth gear. Make sure you move the
shift lever into second or fifth gear. If you let the
shift lever move in the direction of the pulling,
Manual Shifter
you may end shifting from first to fourth or from
sixth to third gear.
CAUTION!
Always make sure the vehicle comes to a
complete stop before shifting into REVERSE. Failure to do so may result in transmission damage.
You must always use first gear (or REVERSE)
when starting from a standing position.
Recommended Shift Speeds
To utilize your manual transmission efficiently
for fuel economy, it should be upshifted as listed
in recommended shift speed chart.
MANUAL TRANSMISSION RECOMMENDED SHIFT SPEEDS
Axle Ratio
3.90
190
1-4
4-5
mph
20
37
5-6
48
(km/h)
(32)
(59)
(77)
Earlier upshifts during cruise conditions (relatively steady speeds) may result in increased
fuel economy.
Higher upshift speeds may be used to obtain a
desired acceleration rate.
driving at low engine RPM. Also, this may
be more noticeable when the transmission is warm. This is a normal condition
and is not an indication of a problem with
your clutch or transmission.
NOTE:
1–4 Skip Shift
• Your vehicle is equipped with a transmission reverse inhibitor system. When vehicle speed is greater than 3 mph
(5 km/h), the reverse inhibitor activates to
help prevent shifts into REVERSE. When
at a complete stop, you may notice lighter
shift efforts into REVERSE with the ignition switch in the ON position (RUN position for Keyless Enter-N-Go™), as compared to the ignition LOCK position (OFF
position for Keyless Enter-N-Go™). This
is normal operation of the transmission
reverse inhibitor system.
There are times when you must shift the transmission directly from first gear to fourth gear
instead of from first gear to second gear. This is
to help you get the best possible fuel economy
from your vehicle. This occurs when the engine
coolant (antifreeze) is higher than 106°F (41°C),
vehicle speed is greater than 19 mph (30 km/h)
but less than 21 mph (34 km/h), and the transmission is in first gear, and the accelerator is at
¼ throttle or less.
• Due to the high performance nature of
your drivetrain, you may hear your transmission. This can be most noticeable
when the vehicle is idling in NEUTRAL
with the clutch engaged (clutch pedal
released), but it may also be heard when
After you shift the transmission to fourth gear,
you can press the clutch in and shift to another
forward gear.
Downshifting
To maintain a safe speed and prolong brake life,
downshift to maintain a safe speed when descending a steep grade.
WARNING!
Skipping more than one gear while downshifting, could cause you to lose control of
your vehicle. You could have a collision.
CAUTION!
• If you skip more than one gear while
downshifting or downshift at too high an
engine speed, you could damage the engine, transmission, or clutch.
• Do not downshift into first gear when the
vehicle is moving faster than 15 mph (24
km/h), as you could damage the engine
and/or clutch.
191
AUTOMATIC TRANSMISSION
WARNING!
• It is dangerous to shift out of PARK or
NEUTRAL if the engine speed is higher
than idle speed. If your foot is not firmly
pressing the brake pedal, the vehicle could
accelerate quickly forward or in reverse.
You could lose control of the vehicle and
hit someone or something. Only shift into
gear when the engine is idling normally
and your foot is firmly pressing the brake
pedal.
• Unintended movement of a vehicle could
injure those in or near the vehicle. As with
all vehicles, you should never exit a vehicle while the engine is running. Before
exiting a vehicle, always apply the parking
brake, shift the transmission into PARK,
turn the engine OFF, and remove the Key
Fob. When the ignition is in the OFF
position, the transmission is locked in
(Continued)
192
WARNING! (Continued)
PARK, securing the vehicle against unwanted movement.
• When leaving the vehicle, always make
sure the ignition is in the OFF position,
remove the key fob from the vehicle, and
lock the vehicle.
• Never leave children alone in a vehicle, or
with access to an unlocked vehicle. Allowing children to be in a vehicle unattended
is dangerous for a number of reasons. A
child or others could be seriously or fatally
injured. Children should be warned not to
touch the parking brake, brake pedal or the
transmission gear selector.
• Do not leave the Key Fob in or near the
vehicle (or in a location accessible to children), and do not leave the ignition in the
ACC or ON/RUN position. A child could
operate power windows, other controls, or
move the vehicle.
CAUTION!
Damage to the transmission may occur if
the following precautions are not observed:
• Shift into or out of PARK or REVERSE only
after the vehicle has come to a complete
stop.
• Do not shift between PARK, REVERSE,
NEUTRAL, or DRIVE when the engine is
above idle speed.
• Before shifting into any gear, make sure
your foot is firmly pressing the brake pedal.
NOTE:
You must press and hold the brake pedal
while shifting out of PARK.
Key Ignition Park Interlock
This vehicle is equipped with a Key Ignition Park
Interlock which requires the transmission to be
in PARK before the engine can be turned off.
This helps the driver avoid inadvertently leaving
the vehicle without placing the transmission in
PARK. This system also locks the transmission
in PARK whenever the ignition switch is in the
OFF position.
Brake/Transmission Shift Interlock
System
the vehicle is stopped or moving at low speeds
(refer to “Brake/Transmission Shift Interlock
System” in this section). Select the DRIVE
range for normal driving.
vehicle is stopped. Be sure to keep your foot on
the brake pedal when shifting between these
gears.
Automatic Transmission Shifter
NOTE:
If the shift lever cannot be moved to the
PARK, REVERSE, or NEUTRAL position
(when pushed forward) it is probably in the
MANUAL (AutoStick, +/-) position (beside
the DRIVE position). In MANUAL (AutoStick)
mode, the transmission gear is displayed in
the instrument cluster (as M1, M2, M3, etc.).
Move the shift lever to the right (into the
DRIVE [D] position) for access to PARK,
REVERSE, and NEUTRAL.
This vehicle is equipped with a Brake Transmission Shift Interlock system (BTSI) that holds the
shift lever in PARK unless the brakes are applied. To shift the transmission out of PARK, the
engine must be running and the brake pedal
must be pressed.
The brake pedal must also be pressed to shift
from NEUTRAL into DRIVE or REVERSE when
the vehicle is stopped or moving at low speeds.
Eight-Speed Automatic
Transmission — If Equipped
The transmission gear range (PRNDM) is displayed both on the shift lever and in the Driver
Information Display (DID).
To select a gear range, press the lock button on
the shift lever and move the lever rearward or
forward. You must also press the brake pedal to
shift the transmission out of PARK, or to shift
from NEUTRAL into DRIVE or REVERSE when
The electronically-controlled transmission provides a precise shift schedule. The transmission
electronics are self-calibrating; therefore, the
first few shifts on a new vehicle may be somewhat abrupt. This is a normal condition, and
precision shifts will develop within a few hundred miles (kilometers).
Only shift from DRIVE to PARK or REVERSE
when the accelerator pedal is released and the
The transmission shift lever has PARK, REVERSE, NEUTRAL, DRIVE, and MANUAL
(Autostick) shift positions. Manual shifts can be
made using the Autostick shift control (refer to
“AutoStick” in this section for further information). Toggling the shift lever forward (-) or
rearward (+) while in the MANUAL (AutoStick)
position (beside the DRIVE position) will manually select the transmission gear, and will display the current gear in the instrument cluster as
M1, M2, M3, etc.
193
Gear Ranges
DO NOT race the engine when shifting from
PARK or NEUTRAL into another gear range.
NOTE:
After selecting any gear range, wait a moment to allow the selected gear to engage
before accelerating. This is especially important when the engine is cold.
PARK (P)
This range supplements the parking brake by
locking the transmission. The engine can be
started in this range. Never attempt to use
PARK while the vehicle is in motion. Apply the
parking brake when leaving the vehicle in this
range.
When parking on a level surface, you may shift
the transmission into PARK first, and then apply
the parking brake.
When parking on a hill, apply the parking brake
before shifting the transmission to PARK. As an
added precaution, turn the front wheels toward
the curb on a downhill grade and away from the
curb on an uphill grade.
WARNING!
• Never use the PARK position as a substitute for the parking brake. Always apply
the parking brake fully when parked to
guard against vehicle movement and possible injury or damage.
• Your vehicle could move and injure you
and others if it is not in PARK. Check by
trying to move the shift lever out of PARK
with the brake pedal released. Make sure
the transmission is in PARK before leaving
the vehicle.
• It is dangerous to shift out of PARK or
NEUTRAL if the engine speed is higher
than idle speed. If your foot is not firmly
pressing the brake pedal, the vehicle could
accelerate quickly forward or in reverse.
You could lose control of the vehicle and
hit someone or something. Only shift into
gear when the engine is idling normally
and your foot is firmly pressing the brake
pedal.
(Continued)
194
WARNING! (Continued)
• Unintended movement of a vehicle could injure those in or near the vehicle. As with all
vehicles, you should never exit a vehicle while
the engine is running. Before exiting a vehicle, always apply the parking brake, shift the
transmission into PARK, turn the engine OFF,
and remove the key fob. When the ignition is
in the OFF position, the transmission is
locked in PARK, securing the vehicle against
unwanted movement.
• When leaving the vehicle, always make
sure the ignition is in the OFF position,
remove the key fob from the vehicle, and
lock the vehicle.
• Never leave children alone in a vehicle, or
with access to an unlocked vehicle. Allowing
children to be in a vehicle unattended is
dangerous for a number of reasons. A child or
others could be seriously or fatally injured.
Children should be warned not to touch the
parking brake, brake pedal or the shift lever.
(Continued)
WARNING! (Continued)
• Do not leave the key fob in or near the
vehicle (or in a location accessible to children), and do not leave the ignition in the
ACC or ON/RUN position. A child could
operate power windows, other controls, or
move the vehicle.
CAUTION!
• Before moving the shift lever out of PARK,
you must start the engine and also press
the brake pedal. Otherwise, damage to the
shift lever could result.
• DO NOT race the engine when shifting
from PARK or NEUTRAL into another gear
range, as this can damage the drivetrain.
The following indicators should be used to
ensure that you have engaged the transmission
into the PARK position:
• When shifting into PARK, press the lock
button on the shift lever and firmly move the
lever all the way forward until it stops and is
fully seated.
• Look at the transmission gear position display and verify that it indicates the PARK
position (P).
• With brake pedal released, verify that the
shift lever will not move out of PARK.
REVERSE (R)
This range is for moving the vehicle backward.
Shift into REVERSE only after the vehicle has
come to a complete stop.
NEUTRAL (N)
Use this range when the vehicle is standing for
prolonged periods with the engine running. Apply the parking brake and shift the transmission
into PARK if you must leave the vehicle.
WARNING!
Do not coast in NEUTRAL and never turn off
the ignition to coast down a hill. These are
unsafe practices that limit your response to
changing traffic or road conditions. You might
lose control of the vehicle and have a collision.
CAUTION!
Towing the vehicle, coasting, or driving for
any other reason with the transmission in
NEUTRAL can cause severe transmission
damage. Refer to “Recreational Towing” in
“Starting And Operating” and “Towing A Disabled Vehicle” in “What To Do In Emergencies” for further information.
DRIVE (D)
This range should be used for most city and
highway driving. It provides the smoothest upshifts and downshifts, and the best fuel
economy. The transmission automatically up195
shifts through all forward gears. The DRIVE
position provides optimum driving characteristics under all normal operating conditions.
When frequent transmission shifting occurs
(such as when operating the vehicle under
heavy loading conditions, in hilly terrain, traveling into strong head winds, or while towing
heavy trailers), use the AutoStick shift control
(refer to "AutoStick" in this section for further
information) to select a lower gear. Under these
conditions, using a lower gear will improve
performance and extend transmission life by
reducing excessive shifting and heat buildup.
During extremely cold temperatures (-22°F
[-30°C] or below), transmission operation may
be modified depending on engine and transmission temperature as well as vehicle speed.
Normal operation will resume once the transmission temperature has risen to a suitable
level.
MANUAL (M)
The MANUAL (M, +/-) position (beside the
DRIVE position) enables full manual control of
transmission shifting (also known as AutoStick
mode; refer to “AutoStick” in this section for
196
further information). Toggling the shift lever forward (-) or rearward (+) while in the MANUAL
(AutoStick) position will manually select the
transmission gear, and will display the current
gear in the instrument cluster as M1, M2, M3,
etc.
NOTE:
In cases where the instrument cluster message indicates the transmission may not
re-engage after engine shutdown, perform
this procedure only in a desired location
(preferably, at your authorized dealer).
Transmission Limp Home Mode
1. Stop the vehicle.
Transmission function is monitored electronically for abnormal conditions. If a condition is
detected that could result in transmission damage, Transmission Limp Home Mode is activated. In this mode, the transmission may operate only in certain gears, or may not shift at
all. Vehicle performance may be severely degraded and the engine may stall. In some
situations, the transmission may not re-engage
if the engine is turned off and restarted. The
Malfunction Indicator Light (MIL) may be illuminated. A message in the instrument cluster will
inform the driver of the more serious conditions,
and indicate what actions may be necessary.
2. Shift the transmission into PARK, if possible.
If not, shift the transmission to NEUTRAL.
In the event of a momentary problem, the
transmission can be reset to regain all forward
gears by performing the following steps.
3. Press and hold the ignition switch until the
engine turns OFF.
4. Wait approximately 30 seconds.
5. Restart the engine.
6. Shift into the desired gear range. If the
problem is no longer detected, the transmission will return to normal operation.
NOTE:
Even if the transmission can be reset, we
recommend that you visit your authorized
dealer at your earliest possible convenience. Your authorized dealer has diagnostic equipment to determine if the problem
could recur.
If the transmission cannot be reset, authorized
dealer service is required.
AUTOSTICK
AutoStick is a driver-interactive transmission
feature providing manual shift control, giving
you more control of the vehicle. AutoStick allows you to maximize engine braking, eliminate
undesirable upshifts and downshifts, and improve overall vehicle performance. This system
can also provide you with more control during
passing, city driving, cold slippery conditions,
mountain driving, trailer towing, and many other
situations.
Operation
When the shift lever is in the DRIVE (D) position,
the transmission will operate automatically, shifting
between the eight available gears. To activate
AutoStick, move the shift lever into the MANUAL
(M) position (beside the DRIVE position). The
current transmission gear will be displayed in the
instrument cluster, along with a highlighted "M"
(Manual) indication. When the shift lever is in the
MANUAL (M) position, tap the shift lever forward (-)
(or tap the (-) shift paddle on the steering wheel, if
equipped) to downshift the transmission to the next
lower gear, or tap the lever rearward (+) (or tap the
(+) shift paddle, if equipped) to command an upshift.
NOTE:
Tapping one of the steering wheel-mounted
shift paddles (+/-), if equipped, while the
shift lever is in DRIVE, will activate a temporary AutoStick mode. Tapping (-) to enter
AutoStick mode will downshift the transmission to the next lower gear, while using (+) to
enter AutoStick mode will retain the current
gear. The current gear will be displayed in
the instrument cluster, but the ⴖMⴖ will not be
highlighted. The transmission will revert
back to normal operation (if the shift lever
remains in DRIVE) after a period of time,
depending on accelerator pedal activity.
In AutoStick mode, the transmission will shift up
or down when (+/-) is manually selected by the
driver (using the shift lever, or the shift paddles
[if equipped]), unless an engine lugging or overspeed condition would result. It will remain in
the selected gear until another upshift or downshift is chosen, except as described below.
• In temporary AutoStick mode (shift lever in
DRIVE), the transmission will automatically
shift up when maximum engine speed is
reached. If the accelerator is fully depressed,
the transmission will downshift when possible (based on current vehicle speed and
gear). Lack of accelerator pedal activity will
cause the transmission to revert to automatic
operation.
• If normal AutoStick mode is engaged (shift
lever in MANUAL position), manual gear
selection will be maintained until the shift
lever is returned to DRIVE, or as described
below. The transmission will not upshift automatically at redline in this mode, nor will
downshifts be obtained if the accelerator
pedal is pressed to the floor.
197
• The transmission will automatically downshift
as the vehicle slows (to prevent engine lugging) and will display the current gear.
• The system may revert to automatic shift
mode if a fault or overheat condition is
detected.
• The transmission will automatically downshift
to first gear when coming to a stop. After a
stop, the driver should manually upshift (+)
the transmission as the vehicle is
accelerated.
To disengage AutoStick mode, return the shift
lever to the DRIVE position, or press and hold
the (+) shift paddle (if equipped, and the shift
lever is already in DRIVE) until “D” is once again
indicated in the instrument cluster. You can shift
in or out of the AutoStick mode at any time
without taking your foot off the accelerator
pedal.
• You can start out, from a stop, in first or
second gear. Tapping (+) (at a stop) will allow
starting in second gear. Starting out in second gear can be helpful in snowy or icy
conditions.
• If a requested downshift would cause the
engine to over-speed, that shift will not occur.
• The system will ignore attempts to upshift at
too low of a vehicle speed.
• Holding the (-) paddle depressed (if
equipped), or holding the shift lever in the (-)
position, will downshift the transmission to
the lowest gear possible at the current
speed.
• Transmission shifting will be more noticeable
when AutoStick is engaged.
198
WARNING!
Do not downshift for additional engine braking on a slippery surface. The drive wheels
could lose their grip and the vehicle could
skid, causing a collision or personal injury.
SPORT MODE — WITHOUT
PERFORMANCE CONTROL
Your vehicle is equipped with a Sport Mode
feature. This mode is a configuration set up for
typical enthusiast driving. The engine, transmis-
sion (when equipped with automatic transmission), and steering systems are all set to their
SPORT settings. Sport Mode will provide improved throttle response and modified shifting
for an enhanced driving experience, as well the
greatest amount of steering feel. This mode
may be activated and deactivated by pressing
the Sport button on the instrument panel switch
bank.
For vehicles equipped with Drive Modes, Refer
to “Performance Control — If Equipped” within
“Uconnect Settings” in “Understanding Your Instrument Panel” chapter for further information.
DRIVING ON SLIPPERY
SURFACES
Acceleration
Rapid acceleration on snow covered, wet, or
other slippery surfaces may cause the driving
wheels to pull erratically to the right or left. This
phenomenon occurs when there is a difference
in the surface traction under the rear (driving)
wheels.
WARNING!
Rapid acceleration on slippery surfaces is
dangerous. Unequal traction can cause sudden pulling of the rear wheels. You could lose
control of the vehicle and possibly have a
collision. Accelerate slowly and carefully
whenever there is likely to be poor traction
(ice, snow, wet mud, loose sand, etc.).
Traction
When driving on wet or slushy roads, it is
possible for a wedge of water to build up
between the tire and road surface. This is
known as hydroplaning and may cause partial
or complete loss of vehicle control and stopping
ability. To reduce this possibility, the following
precautions should be observed:
• Keep tires properly inflated.
• Maintain sufficient distance between your
vehicle and the vehicle in front of you to avoid
a collision in a sudden stop.
Your vehicle may be equipped with a Limited
Slip Differential (LSD) that reduces, but does
not eliminate, the amount of wheel slip across a
given axle for improved handling.
DRIVING THROUGH WATER
Shallow Standing Water
Driving through water more than a few inches/
centimeters deep will require extra caution to
ensure safety and prevent damage to your
vehicle.
Although your vehicle is capable of driving
through shallow standing water, consider the
following Cautions and Warnings before doing
so.
Flowing/Rising Water
• Slow down if the road has standing water or
puddles.
WARNING!
Do not drive on, or cross, a road or a path
where water is flowing and/or rising (as in
storm run-off). Flowing water can wear away
the road or path’s surface and cause your
• Replace tires when tread wear indicators first
become visible.
(Continued)
• Slow down during rainstorms or when the
roads are slushy.
WARNING! (Continued)
vehicle to sink into deeper water. Furthermore, flowing and/or rising water can carry
your vehicle away swiftly. Failure to follow
this warning may result in injuries that are
serious or fatal to you, your passengers, and
others around you.
WARNING!
• Driving through standing water limits your
vehicle’s traction capabilities. Do not exceed 5 mph (8 km/h) when driving through
standing water.
(Continued)
199
WARNING! (Continued)
• Driving through standing water limits your
vehicle’s braking capabilities, which increases stopping distances. Therefore, after driving through standing water, drive
slowly and lightly press on the brake pedal
several times to dry the brakes.
• Failure to follow these warnings may result
in injuries that are serious or fatal to you,
your passengers, and others around you.
CAUTION!
• Always check the depth of the standing
water before driving through it. Never drive
through standing water that is deeper than
the bottom of the tire rims mounted on the
vehicle.
• Determine the condition of the road or the
path that is under water and if there are
any obstacles in the way before driving
through the standing water.
(Continued)
200
CAUTION! (Continued)
• Do not exceed 5 mph (8 km/h) when
driving through standing water. This will
minimize wave effects.
• Driving through standing water may cause
damage to your vehicle’s drivetrain components. Always inspect your vehicle’s fluids (i.e., engine oil, transmission, axle,
etc.) for signs of contamination (i.e., fluid
that is milky or foamy in appearance) after
driving through standing water. Do not
continue to operate the vehicle if any fluid
appears contaminated, as this may result
in further damage. Such damage is not
covered by the New Vehicle Limited Warranty.
• Getting water inside your vehicle’s engine
can cause it to lock up and stall out, and
cause serious internal damage to the engine. Such damage is not covered by the
New Vehicle Limited Warranty.
ELECTRIC POWER STEERING
The electric power steering system will give you
good vehicle response and increased ease of
maneuverability in tight spaces. The system will
vary its assist to provide light efforts while
parking and good feel while driving. If the electric steering system experiences a fault that
prevents it from providing assist, you will still
have the ability to steer the vehicle manually.
Alternate electric power steering efforts can be
selected through the Uconnect® System. Refer
to ”Customer Programmable Features” or “Performance Control — If Equipped” within
“Uconnect Settings” in “Understanding Your Instrument Panel” chapter for further information.
WARNING!
Continued operation with reduced assist
could pose a safety risk to yourself and
others. Service should be obtained as soon
as possible.
If the Steering icon is displayed
and the “SERVICE POWER
STEERING” or the “POWER
STEERING ASSIST OFF – SERVICE SYSTEM” message is displayed within the Driver Information Display
(DID), this indicates the vehicle needs to be
taken to the dealer for service. Refer to “Driver
Information Display (DID)” in “Understanding
Your Instrument Panel” for further information.
NOTE:
• Even if the power steering assistance is
no longer operational, it is still possible to
steer the vehicle. Under these conditions
there will be a substantial increase in
steering effort, especially at low speeds
and during parking maneuvers.
• If the condition persists, see your authorized dealer for service.
FUEL SAVER TECHNOLOGY
5.7L/6.4L ENGINES ONLY — IF
EQUIPPED
This feature offers improved fuel economy by
shutting off four of the engine’s eight cylinders
during light load and cruise conditions. The
system is automatic with no driver inputs or
additional driving skills required.
NOTE:
This system may take some time to return to
full functionality after a battery disconnect.
PARKING BRAKE
Before leaving the vehicle, make sure that the
parking brake is fully applied and place the shift
lever in the PARK or REVERSE (manual transmission only) position.
When the parking brake is applied and the
ignition switch is in the ON position (RUN
position with Keyless Enter-N-Go™), the “Brake
Warning Light” in the instrument cluster will
illuminate.
NOTE:
• When the parking brake is applied and the
transmission is placed in gear, the “Brake
Warning Light” will flash. If vehicle speed
is detected, a chime will sound to alert the
driver. Fully release the parking brake
before attempting to move the vehicle.
• This light only shows that the parking
brake is applied. It does not show the
degree of brake application.
When parking on a hill, it is important to turn the
front wheels toward the curb on a downhill
grade and away from the curb on an uphill
grade. For vehicles equipped with an automatic
transmission, apply the parking brake before
placing the shift lever in PARK, otherwise the
load on the transmission locking mechanism
may make it difficult to move the shift lever out
of PARK. The parking brake should always be
applied whenever the driver is not in the vehicle.
Manual Transmission — If Equipped
The foot operated parking brake is positioned
below the lower left corner of the instrument
panel. To release the parking brake, pull the
201
parking brake release handle.
Automatic Transmission Parking Brake
Manual Transmission Parking Brake Release
Automatic Transmission — If
Equipped
The foot operated parking brake is located
below the lower left corner of the instrument
panel. To apply the park brake, firmly push the
park brake pedal fully. To release the parking
brake, press the park brake pedal a second
time and let your foot up as you feel the brake
disengage.
WARNING!
• Never use the PARK position as a substitute for the parking brake. Always apply
the parking brake fully when parked to
guard against vehicle movement and possible injury or damage.
• When leaving the vehicle, always remove
the Key Fob from the ignition and lock your
vehicle.
(Continued)
202
WARNING! (Continued)
• Never leave children alone in a vehicle, or
with access to an unlocked vehicle. Allowing children to be in a vehicle unattended
is dangerous for a number of reasons. A
child or others could be seriously or fatally
injured. Children should be warned not to
touch the parking brake, brake pedal or the
shift lever.
• Do not leave the Key Fob in or near the
vehicle (or in a location accessible to children), and do not leave the ignition of a
vehicle equipped with Keyless Enter-NGo™ in the ACC or ON/RUN mode. A child
could operate power windows, other controls, or move the vehicle.
• Be sure the parking brake is fully disengaged before driving; failure to do so can
lead to brake failure and a collision.
(Continued)
WARNING! (Continued)
• Always fully apply the parking brake when
leaving your vehicle, or it may roll and
cause damage or injury. Also be certain to
leave the transmission in PARK. Failure to
do so may allow the vehicle to roll and
cause damage or injury.
effectiveness. This may be evident by increased
pedal travel during application, greater pedal
force required to slow or stop, and potential
activation of the “Brake Warning Light.”
CAUTION!
If the “Brake Warning Light” remains on with
the parking brake released, a brake system
malfunction is indicated. Have the brake
system serviced by an authorized dealer
immediately.
NOTE:
Your vehicle is equipped with a high performance braking system. The brake pads are a
semi-metallic compound, which offer superior fade resistance for consistent operation. A compromise to using this type of
brake pad is that the brakes may produce
more brake dust and may squeal slightly
under certain weather and operating conditions (.i.e., during light brake applications)
this is considered normal conditions.
BRAKE SYSTEM
Your vehicle is equipped with dual
hydraulic brake systems. If either
of the two hydraulic systems loses
normal capability, the remaining
system will still function. There will
be some loss of overall braking
In the event power assist is lost for any reason
(for example, repeated brake applications with
the engine OFF) the brakes will still function.
The effort required to brake the vehicle will be
much greater than that required with the power
system operating.
ELECTRONIC BRAKE
CONTROL SYSTEM
Your vehicle is equipped with an advanced
electronic brake control system commonly referred to as ESC. This system includes the ABS
(Anti-Lock Brake System), the TCS (Traction
Control System), the BAS (Brake Assist System), and the ESC (Electronic Stability Control).
These systems work together to enhance both
vehicle stability and control in various driving
conditions.
An additional electronic brake control feature
called Hill Start Assist (HSA) is standard on all
models.
Anti-Lock Brake System (ABS)
The Anti-Lock Brake System (ABS) provides
increased vehicle stability and brake performance under most braking conditions. The system automatically “pumps” the brakes during
severe braking conditions to prevent wheel
lock-up.
The Electronic Brake Force Distribution (EBD)
prevents the rear wheels from over-braking and
203
provides greater control of available braking
forces applied to the rear axle.
When the vehicle is driven over 7 mph
(11 km/h), you may also hear a slight clicking
sound as well as some related motor noises.
These noises are the system performing its self
check cycle to ensure that the ABS system is
working properly. This self check occurs each
time the vehicle is started and accelerated past
7 mph (11 km/h).
ABS is activated during braking under certain
road or stopping conditions. ABS-inducing conditions can include ice, snow, gravel, bumps,
railroad tracks, loose debris, or panic stops.
You also may experience the following when the
brake system goes into anti-lock:
• The ABS motor running (it may continue to
run for a short time after the stop)
• The clicking sound of solenoid valves
• Brake pedal pulsations
• A slight drop or fall away of the brake pedal at
the end of the stop
204
These are all normal characteristics of ABS.
WARNING!
• The Anti-Lock Brake System (ABS) contains sophisticated electronic equipment
that may be susceptible to interference
caused by improperly installed or high
output radio transmitting equipment. This
interference can cause possible loss of
anti-lock braking capability. Installation of
such equipment should be performed by
qualified professionals.
• Pumping of the Anti-Lock Brakes will diminish their effectiveness and may lead to
a collision. Pumping makes the stopping
distance longer. Just press firmly on your
brake pedal when you need to slow down
or stop.
(Continued)
WARNING! (Continued)
• The Anti-Lock Brake System (ABS) cannot
prevent the natural laws of physics from
acting on the vehicle, nor can it increase
braking or steering efficiency beyond that
afforded by the condition of the vehicle
brakes and tires or the traction afforded.
• The Anti-Lock Brake System (ABS) cannot
prevent collisions, including those resulting from excessive speed in turns, following another vehicle too closely, or hydroplaning.
• The capabilities of an Anti-Lock Brake System (ABS) equipped vehicle must never be
exploited in a reckless or dangerous manner, that could jeopardize the user’s safety
or the safety of others.
All vehicle wheels and tires must be the same
size and type and tires must be properly inflated
to produce accurate signals for the computer.
Anti-Lock Brake Warning Light
The “Anti-Lock Brake System (ABS)
Warning Light” monitors the Anti-Lock
Brake System. The light will come on
when the ignition switch is turned to
the ON position and may stay on for as long as
four seconds.
If the “ABS Warning Light” remains on or comes
on while driving, it indicates that the anti-lock
portion of the brake system is not functioning
and that service is required. However, the conventional brake system will continue to operate
normally if the “Brake Warning Light” is not on.
If the “ABS Warning Light” is on, the brake
system should be serviced as soon as possible
to restore the benefits of anti-lock brakes. If the
“ABS Warning Light” does not come on when
the ignition switch is turned to the ON position,
have the bulb repaired as soon as possible.
If both the “Brake Warning Light” and the “ABS
Warning Light” remain on, the ABS and EBD
systems are not functioning. Immediate repair
to the ABS system is required.
Traction Control System (TCS)
This system monitors the amount of wheel spin
of each driven wheel. If wheel spin is detected,
brake pressure is applied to the slipping
wheel(s) and engine power is reduced to provide enhanced acceleration and stability.
A feature of the TCS system, Brake Limited
Differential (BLD), controls the wheel spin
across a driven axle. If one wheel on a driven
axle is spinning faster than the other, the system will apply the brake of the spinning wheel.
This will allow more engine torque to be applied
to the wheel that is not spinning. This feature
remains active even if TCS and ESC are in the
“Partial Off” or "Full Off" mode. Refer to “Electronic Stability Control (ESC)” in this section for
more information.
Brake Assist System (BAS)
This system complements the ABS by optimizing the vehicle braking capability during emergency braking maneuvers. This system detects
an emergency braking situation by sensing the
rate and amount of brake application and then
applies optimum pressure to the brakes. This
can help reduce braking distances.
Applying the brakes very quickly results in the
best BAS assistance. To receive the benefits of
this system, you must apply continuous brake
pedal pressure during the stopping sequence.
Do not reduce brake pedal pressure unless
braking is no longer desired. Once the brake
pedal is released, the BAS is deactivated.
WARNING!
The BAS cannot prevent the natural laws of
physics from acting on the vehicle, nor can it
increase the traction afforded by prevailing
road conditions. The BAS cannot prevent
collisions, including those resulting from excessive speed in turns, driving on very slippery surfaces, or hydroplaning. The capabilities of a BAS-equipped vehicle must never
be exploited in a reckless or dangerous
manner that could jeopardize the user’s
safety or the safety of others.
Hill Start Assist (HSA)
The HSA system is designed to assist the driver
when starting a vehicle from a stop on a hill.
205
HSA will maintain the level of brake pressure
the driver applied for a short period of time after
the driver takes their foot off of the brake pedal.
If the driver does not apply the throttle during
this short period of time, the system will release
brake pressure and the vehicle will roll down the
hill. The system will release brake pressure in
proportion to amount of throttle applied as the
vehicle starts to move in the intended direction
of travel.
WARNING!
There may be situations on minor hills with a
loaded vehicle, or while pulling a trailer,
when the system will not activate and slight
rolling may occur. This could cause a collision with another vehicle or object. Always
remember the driver is responsible for braking the vehicle.
The ESC uses sensors in the vehicle to determine the path that the driver intends to steer the
vehicle and compares it to the actual path of the
vehicle. When the actual path does not match
the intended path, the ESC applies the brake of
the appropriate wheel to assist in counteracting
the condition of oversteer or understeer.
HSA Activation Criteria
The following criteria must be met in order for
HSA to activate:
HSA Off
If you wish to turn off the HSA system, it can be
done in the Uconnect® settings. Refer to
"Uconnect® Settings" in "Understanding Your
Instrument Panel" for further information.
• Understeer - when the vehicle is turning less
than appropriate for the steering wheel position.
• Vehicle must be stopped.
• Vehicle must be on a 3% (approximate) for
manual transmission and 6% (approximate)
for automatic transmissions.
• Gear selection matches vehicle uphill direction (i.e., vehicle facing uphill is in forward
gear; vehicle backing uphill is in REVERSE
gear).
206
Electronic Stability Control (ESC)
This system enhances directional control and
stability of the vehicle under various driving
conditions. The ESC corrects for oversteering
and understeering the vehicle by applying the
brake of the appropriate wheel. Engine power
may also be reduced to assist in counteracting
the condition of oversteer or understeer and
help the vehicle maintain the desired path.
• Oversteer - when the vehicle is turning more
than appropriate for the steering wheel position.
WARNING!
The Electronic Stability Control System
(ESC) cannot prevent the natural laws of
physics from acting on the vehicle, nor can it
increase the traction afforded by prevailing
road conditions. ESC cannot prevent all accidents, including those resulting from excessive speed in turns, driving on very slip(Continued)
WARNING! (Continued)
pery surfaces, or hydroplaning. ESC also
cannot prevent accidents resulting from loss
of vehicle control due to inappropriate driver
input for the conditions. Only a safe, attentive, and skillful driver can prevent accidents.
The capabilities of an ESC equipped vehicle
must never be exploited in a reckless or
dangerous manner which could jeopardize
the user’s safety or the safety of others.
ESC Operating Modes
The ESC system has two or three available
operating modes:
ESC On
This is the normal operating mode for the ESC.
Whenever the vehicle is started, the ESC system will be in this mode. This mode should be
used for most driving situations. The ESC
should only be turned OFF for specific reasons
as noted in the following paragraphs.
Partial Off
The “Partial Off” mode is intended for times
when a more spirited driving experience is
desired. It is also intended for driving in deep
snow, sand, or gravel. This mode disables the
TCS portion of the ESC and raises the threshold for ESC activation, which allows for more
wheel spin than what ESC normally allows. The
“ESC Off” switch is located in the switch bank
near the bottom center of the instrument panel
or in the touchscreen radio . To enter the “Partial
Off” mode, momentarily press the “ESC Off”
switch and the “ESC Off Indicator Light” will
illuminate. To turn the ESC ON again, momentarily press the “ESC Off” switch and the “ESC
Off Indicator Light” will turn off.
NOTE:
To improve the vehicle’s traction when driving with snow chains, or when starting off in
deep snow, sand, or gravel, it may be desirable to switch to the “Partial Off” mode by
momentarily pressing the “ESC Off” switch.
Once the situation requiring “Partial Off”
mode is overcome, turn the ESC ON again
by momentarily pressing the “ESC Off”
switch. This may be done while the vehicle
is in motion.
WARNING!
When in “Partial Off” mode, the TCS portion
of ESC, except for the limited wheel spin
feature described in the TCS section, has
been disabled and the “ESC Off Indicator
Light” will be illuminated. When in “Partial
Off” mode, the enhanced vehicle stability
offered by the ESC system is reduced.
Full Off — If Equipped
This mode is intended for off-highway or offroad use only and should not be used on any
public roadways. In this mode, all TCS and ESC
stability features are turned OFF. To enter the
“Full Off” mode, press and hold the “ESC Off”
switch for five seconds while the vehicle is
stopped with the engine running. After five
seconds, a chime will sound, the “ESC OFF
Indicator Light” will illuminate, and the “ESC Off”
message will display in the vehicle odometer.
The “ESC off” message may appear in the
207
Driver Information Display (DID). Refer to
“Driver Information Display (DID)” in “Understanding Your Instrument Panel” for further information. To turn ESC ON again, momentarily
press the “ESC Off” switch.
NOTE:
The ⴖESC offⴖ message will display and the
audible chime will sound when the shift
lever is moved into the PARK position from
any position other than PARK and then
moved out of the PARK position. This will
occur when the message was previously
cleared.
WARNING!
In the ESC “Full Off” mode, the engine
torque reduction and stability features are
disabled. Therefore, the enhanced vehicle
stability offered by ESC is unavailable. In an
emergency evasive maneuver, the ESC system will not engage to assist in maintaining
stability. "ESC Off" mode is intended for
off-highway or off-road use only.
208
NOTE:
When the ESC is switched OFF, a feature of
the system remains active. This feature controls wheel spin across an axle quite similarly to a limited slip differential. If one wheel
on an axle is spinning faster than the other,
the system will apply the brake of the spinning wheel and allow more engine torque to
be applied to the wheel that is not spinning.
To improve the vehicle’s traction when driving with tire chains, or when starting off in
deep snow, sand, or gravel, it may be desirable to switch to the “Partial Off” mode by
momentarily pressing the “ESC Off” switch.
ESC Activation/Malfunction Indicator
Light And ESC OFF Indicator Light
The “ESC Activation/Malfunction
Indicator Light” in the instrument
cluster will come on when the ignition switch is cycled to the ON/
RUN position. It should go out with
the engine running. If the “ESC
Activation/Malfunction Indicator Light” comes
on continuously with the engine running, a
malfunction has been detected in the ESC
system. If this light remains on after several
ignition cycles, and the vehicle has been driven
several miles (kilometers) at speeds greater
than 30 mph (48 km/h), see your authorized
dealer as soon as possible to have the problem
diagnosed and corrected.
The “ESC Activation/Malfunction Indicator
Light” (located in the instrument cluster) starts
to flash as soon as the tires lose traction and the
ESC system becomes active. The “ESC
Activation/Malfunction Indicator Light” also
flashes when TCS is active. If the “ESC
Activation/Malfunction Indicator Light” begins to
flash during acceleration, ease up on the accelerator and apply as little throttle as possible. Be
sure to adapt your speed and driving to the
prevailing road conditions.
NOTE:
• The “ESC Off Indicator Light” and the
“ESC Activation/Malfunction Indicator
Light” come on momentarily each time
the ignition switch is turned to the ON/
RUN position.
• Each time the ignition is cycled to the
ON/RUN position, the ESC system will be
ON even if it was cycled off previously.
• The ESC system will make buzzing or
clicking sounds when it is active. This is
normal; the sounds will stop when ESC
becomes inactive following the maneuver
that caused the ESC activation.
The “ESC OFF Indicator Light” indicates the Electronic Stability
Control (ESC) is partially off or full
off.
Synchronizing ESC
TIRE SAFETY INFORMATION
If the power supply is interrupted
(battery disconnected or discharged), the “ESC Activation/
Malfunction Indicator Light” may illuminate with the engine running. If
this should occur, turn the steering
wheel completely to the left and then to the
right. The “ESC Activation/Malfunction Indicator
Light” should go out. However, if the light remains on, have the ESC and BAS checked at
your authorized dealer as soon as possible.
Tire Markings
1 — U.S. DOT Safety
4 — Maximum Load
Standards Code (TIN)
2 — Size Designation
5 — Maximum Pressure
3 — Service Description 6 — Treadwear, Traction and Temperature
Grades
NOTE:
• P (Passenger) — Metric tire sizing is
based on U.S. design standards. P-Metric
tires have the letter “P” molded into the
209
sidewall preceding the size designation.
Example: P215/65R15 95H.
• European — Metric tire sizing is based on
European design standards. Tires designed to this standard have the tire size
molded into the sidewall beginning with
the section width. The letter ⴖPⴖ is absent
from this tire size designation. Example:
215/65R15 96H.
• LT (Light Truck) — Metric tire sizing is
based on U.S. design standards. The size
designation for LT-Metric tires is the same
as for P-Metric tires except for the letters
“LT” that are molded into the sidewall
preceding the size designation. Example:
LT235/85R16.
• Temporary spare tires are designed for
temporary emergency use only. Temporary high pressure compact spare tires
have the letter “T” or “S” molded into the
sidewall preceding the size designation.
Example: T145/80D18 103M.
210
• High flotation tire sizing is based on U.S.
design standards and it begins with the
tire diameter molded into the sidewall.
Example: 31x10.5 R15 LT.
Tire Sizing Chart
EXAMPLE:
Example Size Designation: P215/65R15XL 95H, 215/65R15 96H, LT235/85R16C, T145/80D18 103M, 31x10.5 R15 LT
P = Passenger car tire size based on U.S. design standards, or
ⴖ....blank....ⴖ = Passenger car tire based on European design standards, or
LT = Light truck tire based on U.S. design standards, or
T or S = Temporary spare tire or
31 = Overall diameter in inches (in)
215, 235, 145 = Section width in millimeters (mm)
65, 85, 80 = Aspect ratio in percent (%)
– Ratio of section height to section width of tire, or
10.5 = Section width in inches (in)
R = Construction code
– "R" means radial construction, or
– "D" means diagonal or bias construction
15, 16, 18 = Rim diameter in inches (in)
211
EXAMPLE:
Service Description:
95 = Load Index
– A numerical code associated with the maximum load a tire can carry
H = Speed Symbol
– A symbol indicating the range of speeds at which a tire can carry a load corresponding to its load index under certain
operating conditions
– The maximum speed corresponding to the speed symbol should only be achieved under specified operating conditions
(i.e., tire pressure, vehicle loading, road conditions, and posted speed limits)
Load Identification:
Absence of the following load identification symbols on the sidewall of the tire indicates a Standard Load (SL) tire:
• XL = Extra load (or reinforced) tire, or
• LL = Light load tire or
• C, D, E, F, G = Load range associated with the maximum load a tire can carry at a specified pressure
Maximum Load – Maximum load indicates the maximum load this tire is designed to carry
Maximum Pressure – Maximum pressure indicates the maximum permissible cold tire inflation pressure for this tire
212
Tire Identification Number (TIN)
The TIN may be found on one or both sides of
the tire, however, the date code may only be on
one side. Tires with white sidewalls will have the
full TIN, including the date code, located on the
white sidewall side of the tire. Look for the TIN
on the outboard side of black sidewall tires as
mounted on the vehicle. If the TIN is not found
on the outboard side, then you will find it on the
inboard side of the tire.
EXAMPLE:
DOT MA L9 ABCD 0301
DOT = Department of Transportation
– This symbol certifies that the tire is in compliance with the U.S. Department of Transportation tire safety standards and is approved
for highway use
MA = Code representing the tire manufacturing location (two digits)
L9 = Code representing the tire size (two digits)
ABCD = Code used by the tire manufacturer (one to four digits)
03 = Number representing the week in which the tire was manufactured (two digits)
– 03 means the 3rd week
01 = Number representing the year in which the tire was manufactured (two digits)
– 01 means the year 2001
– Prior to July 2000, tire manufacturers were only required to have one number to represent the year in which the tire was manufactured. Example: 031 could represent the 3rd week of 1981 or 1991
213
Tire Terminology And Definitions
214
Term
Definition
B-Pillar
The vehicle B-Pillar is the structural member of the body located behind the front door.
Cold Tire Inflation Pressure
Cold tire inflation pressure is defined as the tire pressure after the vehicle has not
been driven for at least three hours, or driven less than 1 mile (1.6 km) after sitting for
a minimum of three hours. Inflation pressure is measured in units of PSI (pounds per
square inch) or kPa (kilopascals).
Maximum Inflation Pressure
The maximum inflation pressure is the maximum permissible cold tire inflation pressure
for this tire. The maximum inflation pressure is molded into the sidewall.
Recommended Cold Tire Inflation Pressure
Vehicle manufacturer’s recommended cold tire inflation pressure as shown on the tire
placard.
Tire Placard
A label permanently attached to the vehicle describing the vehicle’s loading capacity,
the original equipment tire sizes and the recommended cold tire inflation pressures.
This placard tells you important information
about the:
Tire Loading And Tire Pressure
Tire And Loading Information Placard
Location
1. Number of people that can be carried in the
vehicle.
NOTE:
The proper cold tire inflation pressure is
listed on the driver’s side B-Pillar or the rear
edge of the driver’s side door.
2. Total weight your vehicle can carry.
3. Tire size designed for your vehicle.
4. Cold tire inflation pressures for the front,
rear, and spare tires.
Example Tire Placard Location (B-Pillar)
Tire And Loading Information Placard
Loading
The vehicle maximum load on the tire must not
exceed the load carrying capacity of the tire on
your vehicle. You will not exceed the tire’s load
carrying capacity if you adhere to the loading
conditions, tire size, and cold tire inflation pressures specified on the Tire and Loading Information placard and in the “Vehicle Loading”
section of this manual.
Example Tire Placard Location (Door)
Tire And Loading Information Placard
215
NOTE:
Under a maximum loaded vehicle condition,
gross axle weight ratings (GAWRs) for the
front and rear axles must not be exceeded.
For further information on GAWRs, vehicle
loading, and trailer towing, refer to “Vehicle
Loading” in this section.
To determine the maximum loading conditions
of your vehicle, locate the statement “The combined weight of occupants and cargo should
never exceed XXX lbs or XXX kg” on the Tire
and Loading Information placard. The combined
weight of occupants, cargo/luggage and trailer
tongue weight (if applicable) should never exceed the weight referenced here.
Steps For Determining Correct Load Limit
1. Locate the statement “The combined weight
of occupants and cargo should never exceed XXX lbs or XXX kg” on your vehicle’s
placard.
216
2. Determine the combined weight of the driver
and passengers that will be riding in your
vehicle.
3. Subtract the combined weight of the driver
and passengers from XXX lbs or XXX kg.
4. The resulting figure equals the available
amount of cargo and luggage load capacity.
For example, if “XXX” amount equals
1,400 lbs (635 kg) and there will be five 150
lb (68 kg) passengers in your vehicle, the
amount of available cargo and luggage load
capacity is 650 lbs (295 kg) (since 5 x
150 lbs (68 kg) = 750 lbs (340 kg), and
1400 lbs (635 kg) – 750 lbs (340 kg) =
650 lbs [295 kg]).
5. Determine the combined weight of luggage
and cargo being loaded on the vehicle. That
weight may not safely exceed the available
cargo and luggage load capacity calculated
in step 4.
NOTE:
• If your vehicle will be towing a trailer, load
from your trailer will be transferred to
your vehicle. The following table shows
examples on how to calculate total load,
cargo/luggage, and towing capacities of
your vehicle with varying seating configurations and number and size of occupants. This table is for illustration purposes only and may not be accurate for
the seating and load carry capacity of
your vehicle.
• For the following example, the combined
weight of occupants and cargo should
never exceed 865 lbs (392 kg).
217
WARNING!
Overloading of your tires is dangerous. Overloading can cause tire failure, affect vehicle
handling, and increase your stopping distance. Use tires of the recommended load
capacity for your vehicle. Never overload
them.
TIRES — GENERAL
INFORMATION
Tire Pressure
Proper tire inflation pressure is essential to the
safe and satisfactory operation of your vehicle.
Four primary areas are affected by improper tire
pressure:
• Safety and Vehicle Stability
• Economy
• Tread Wear
• Ride Comfort
218
Safety
WARNING!
• Improperly inflated tires are dangerous
and can cause collisions.
• Under-inflation increases tire flexing and
can result in overheating and tire failure.
• Over-inflation reduces a tire’s ability to
cushion shock. Objects on the road and
chuckholes can cause damage that result
in tire failure.
• Overinflated or under-inflated tires can affect vehicle handling and can fail suddenly,
resulting in loss of vehicle control.
• Unequal tire pressures can cause steering
problems. You could lose control of your
vehicle.
• Unequal tire pressures from one side of
the vehicle to the other can cause the
vehicle to drift to the right or left.
• Always drive with each tire inflated to the
recommended cold tire inflation pressure.
Both under-inflation and over-inflation affect the
stability of the vehicle and can produce a feeling
of sluggish response or over responsiveness in
the steering.
NOTE:
• Unequal tire pressures from side to side
may cause erratic and unpredictable
steering response.
• Unequal tire pressure from side to side
may cause the vehicle to drift left or right.
Economy
Underinflated tires will increase tire rolling resistance resulting in higher fuel consumption.
Tread Wear
Improper cold tire inflation pressures can cause
abnormal wear patterns and reduced tread life,
resulting in the need for earlier tire replacement.
Ride Comfort And Vehicle Stability
Proper tire inflation contributes to a comfortable
ride. Over-inflation produces a jarring and uncomfortable ride.
Tire Inflation Pressures
The proper cold tire inflation pressure is listed
on the driver’s side B-Pillar or rear edge of the
driver’s side door.
At least once a month:
• Check and adjust tire pressure with a good
quality pocket-type pressure gauge. Do not
make a visual judgement when determining
proper inflation. Tires may look properly inflated even when they are under-inflated.
• Inspect tires for signs of tire wear or visible
damage.
CAUTION!
After inspecting or adjusting the tire pressure, always reinstall the valve stem cap.
This will prevent moisture and dirt from entering the valve stem, which could damage
the valve stem.
Inflation pressures specified on the placard are
always “cold tire inflation pressure.” Cold tire
inflation pressure is defined as the tire pressure
after the vehicle has not been driven for at least
three hours, or driven less than 1 mile (1.6 km)
after sitting for a minimum of three hours. The
cold tire inflation pressure must not exceed the
maximum inflation pressure molded into the tire
sidewall.
Check tire pressures more often if subject to a
wide range of outdoor temperatures, as tire
pressures vary with temperature changes.
Tire pressures change by approximately 1 psi (7
kPa) per 12°F (7°C) of air temperature change.
Keep this in mind when checking tire pressure
inside a garage, especially in the winter.
Example: If garage temperature = 68°F (20°C)
and the outside temperature = 32°F (0°C) then
the cold tire inflation pressure should be increased by 3 psi (21 kPa), which equals 1 psi (7
kPa) for every 12°F (7°C) for this outside temperature condition.
Tire pressure may increase from 2 to 6 psi (13
to 40 kPa) during operation. DO NOT reduce
this normal pressure build up or your tire pressure will be too low.
Tire Pressures For High Speed
Operation
The manufacturer advocates driving at safe
speeds and within posted speed limits. Where
speed limits or conditions are such that the
vehicle can be driven at high speeds, maintaining correct tire inflation pressure is very important. Increased tire pressure and reduced vehicle loading may be required for high-speed
vehicle operation. Refer to your authorized tire
dealer or original equipment vehicle dealer for
recommended safe operating speeds, loading
and cold tire inflation pressures.
WARNING!
High speed driving with your vehicle under
maximum load is dangerous. The added
strain on your tires could cause them to fail.
You could have a serious collision. Do not
drive a vehicle loaded to the maximum capacity at continuous speeds above 75 mph
(120 km/h).
219
Radial Ply Tires
WARNING!
Combining radial ply tires with other types of
tires on your vehicle will cause your vehicle
to handle poorly. The instability could cause
a collision. Always use radial ply tires in sets
of four. Never combine them with other types
of tires.
Tire Repair
If your tire becomes damaged, it may be repaired if it meets the following criteria:
• The tire has not been driven on when flat.
• The damage is only on the tread section of
your tire (sidewall damage is not repairable).
• The puncture is no greater than a ¼ of an
inch (6 mm).
Consult an authorized tire dealer for tire repairs
and additional information.
Damaged Run Flat tires, or Run Flat tires that
have experienced a loss of pressure should be
replaced immediately with another Run Flat tire
220
of identical size and service description (Load
Index and Speed Symbol).
Tire Types
All Season Tires — If Equipped
All Season tires provide traction for all seasons
(spring, summer, fall and winter). Traction levels
may vary between different all season tires. All
season tires can be identified by the M+S, M&S,
M/S or MS designation on the tire sidewall. Use
all season tires only in sets of four; failure to do
so may adversely affect the safety and handling
of your vehicle.
Summer Or Three Season Tires — If
Equipped
Summer tires provide traction in both wet and
dry conditions, and are not intended to be
driven in snow or on ice. If your vehicle is
equipped with summer tires, be aware these
tires are not designed for winter or cold driving
conditions. Install winter tires on your vehicle
when ambient temperatures are less than 40°F
(5°C) or if roads are covered with ice or snow.
For more information, contact an authorized
dealer.
Summer tires do not contain the all season
designation or mountain/snowflake symbol on
the tire sidewall. Use summer tires only in sets
of four; failure to do so may adversely affect the
safety and handling of your vehicle.
WARNING!
Do not use summer tires in snow/ice conditions. You could lose vehicle control, resulting in severe injury or death. Driving too fast
for conditions also creates the possibility of
loss of vehicle control.
Snow Tires
Some areas of the country require the use of
snow tires during the winter. Snow tires can be
identified by a “mountain/snowflake” symbol on
the tire sidewall.
If you need snow tires,
select tires equivalent in
size and type to the original equipment tires. Use
snow tires only in sets of
four; failure to do so may
adversely affect the
safety and handling of
your vehicle.
Snow tires generally have lower speed ratings
than what was originally equipped with your
vehicle and should not be operated at sustained
speeds over 75 mph (120 km/h). For speeds
above 75 mph (120 km/h) refer to original
equipment or an authorized tire dealer for recommended safe operating speeds, loading and
cold tire inflation pressures.
While studded tires improve performance on
ice, skid and traction capability on wet or dry
surfaces may be poorer than that of nonstudded tires. Some states prohibit studded
tires; therefore, local laws should be checked
before using these tire types.
Run Flat Tires — If Equipped
Run Flat tires allow you the capability to drive 50
miles (80 km) at 50 mph (80 km/h) after a rapid
loss of inflation pressure. This rapid loss of
inflation is referred to as the Run Flat mode. A
Run Flat mode occurs when the tire inflation
pressure is of/or below 14 psi (96 kPa). Once a
Run Flat tire reaches the run flat mode it has
limited driving capabilities and needs to be
replaced immediately. A Run Flat tire is not
repairable.
It is not recommended driving a vehicle loaded
at full capacity or to tow a trailer while a tire is in
the run flat mode.
See the tire pressure monitoring section for
more information.
Spare Tires — If Equipped
NOTE:
For vehicles equipped with Tire Service Kit
instead of a spare tire, please refer to “Tire
Service Kit” in “What To Do In Emergencies”
for further information.
CAUTION!
Because of the reduced ground clearance,
do not take your vehicle through an automatic car wash with a compact or limited-use
temporary spare installed. Damage to the
vehicle may result.
Spare Tire Matching Original Equipped Tire
And Wheel — If Equipped
Your vehicle may be equipped with a spare tire
and wheel equivalent in look and function to the
original equipment tire and wheel found on the
front or rear axle of your vehicle. This spare tire
may be used in the tire rotation for your vehicle.
If your vehicle has this option, refer to an
authorized tire dealer for the recommended tire
rotation pattern.
Compact Spare Tire — If Equipped
The compact spare is for temporary emergency
use only. You can identify if your vehicle is
equipped with a compact spare by looking at
the spare tire description on the Tire and Loading Information Placard located on the driver’s
side door opening or on the sidewall of the tire.
Compact spare tire descriptions begin with the
221
letter “T” or “S” preceding the size designation.
Example: T145/80D18 103M.
T, S = Temporary Spare Tire
Since this tire has limited tread life, the original
equipment tire should be repaired (or replaced)
and reinstalled on your vehicle at the first opportunity.
Do not install a wheel cover or attempt to mount
a conventional tire on the compact spare wheel,
since the wheel is designed specifically for the
compact spare tire. Do not install more than one
compact spare tire and wheel on the vehicle at
any given time.
WARNING!
Compact spares are for temporary emergency use only. With these spares, do not
drive more than 50 mph (80 km/h). Temporary use spares have limited tread life. When
the tread is worn to the tread wear indicators,
the temporary use spare tire needs to be
replaced. Be sure to follow the warnings,
(Continued)
222
WARNING! (Continued)
which apply to your spare. Failure to do so
could result in spare tire failure and loss of
vehicle control.
use spare tire affects vehicle handling. Since it
is not the same as your original equipment tire,
replace (or repair) the original equipment tire
and reinstall on the vehicle at the first opportunity.
Full Size Spare — If Equipped
The full size spare is for temporary emergency
use only. This tire may look like the originally
equipped tire on the front or rear axle of your
vehicle, but it is not. This spare tire may have
limited tread life. When the tread is worn to the
tread wear indicators, the temporary use full
size spare tire needs to be replaced. Since it is
not the same as your original equipment tire,
replace (or repair) the original equipment tire
and reinstall on the vehicle at the first opportunity.
WARNING!
Limited-use spares are for emergency use
only. Installation of this limited-use spare tire
affects vehicle handling. With this tire, do not
drive more than the speed listed on the
limit-use spare wheel. Keep inflated to the
cold tire inflation pressures listed on your
Tire and Loading Information Placard located on the driver’s side B-Pillar or the rear
edge of the driver’s side door. Replace (or
repair) the original equipment tire at the first
opportunity and reinstall it on your vehicle.
Failure to do so could result in loss of vehicle
control.
Limited-Use Spare — If Equipped
The limited-use spare tire is for temporary
emergency use only. This tire is identified by a
label located on the limited-use spare wheel.
This label contains the driving limitations for this
spare. This tire may look like the original
equipped tire on the front or rear axle of your
vehicle, but it is not. Installation of this limited-
Tire Spinning
Tread Wear Indicators
Life Of Tire
When stuck in mud, sand, snow, or ice conditions, do not spin your vehicle’s wheels above
30 mph (48 km/h) or for longer than 30 seconds
continuously without stopping.
Tread wear indicators are in the original equipment tires to help you in determining when your
tires should be replaced.
The service life of a tire is dependent upon
varying factors including, but not limited to:
• Tire pressure - Improper cold tire inflation
pressures can cause uneven wear patterns
to develop across the tire tread. These abnormal wear patterns will reduce tread life,
resulting in the need for earlier tire
replacement.
Refer to “Freeing A Stuck Vehicle” in “What To
Do In Emergencies” for further information.
WARNING!
Fast spinning tires can be dangerous.
Forces generated by excessive wheel
speeds may cause tire damage or failure. A
tire could explode and injure someone. Do
not spin your vehicle’s wheels faster than
30 mph (48 km/h) for more than 30 seconds
continuously when you are stuck, and do not
let anyone near a spinning wheel, no matter
what the speed.
• Driving style.
• Distance driven.
1 — Worn Tire
2 — New Tire
These indicators are molded into the bottom of
the tread grooves. They will appear as bands
when the tread depth becomes a 1/16 of an inch
(2 mm). When the tread is worn to the tread
wear indicators, the tire should be replaced.
Refer to “Replacement Tires” in this section for
further information.
• Performance tires, tires with a speed rating of
V or higher, and summer tires typically have
a reduced tread life. Rotation of these tires
per the vehicle’s Service and Warranty Handbook is highly recommended.
WARNING!
Tires and the spare tire should be replaced
after six years, regardless of the remaining
tread. Failure to follow this warning can
result in sudden tire failure. You could lose
(Continued)
223
WARNING! (Continued)
control and have a collision resulting in serious injury or death.
Keep dismounted tires in a cool, dry place with
as little exposure to light as possible. Protect
tires from contact with oil, grease, and gasoline.
Replacement Tires
The tires on your new vehicle provide a balance
of many characteristics. They should be inspected regularly for wear and correct cold tire
inflation pressures. The manufacturer strongly
recommends that you use tires equivalent to the
originals in size, quality and performance when
replacement is needed. Refer to the paragraph
on “Tread Wear Indicator.” Refer to the Tire and
Loading Information placard or the Vehicle Certification Label for the size designation of your
tire. The Load Index and Speed Symbol for your
tire will be found on the original equipment tire
sidewall. See the Tire Sizing Chart example
found in the Tire Safety Information section of
this manual for more information relating to the
Load Index and Speed Symbol of a tire.
It is recommended to replace the two front tires
or two rear tires as a pair. Replacing just one tire
can seriously affect your vehicle’s handling. If
you ever replace a wheel, make sure that the
wheel’s specifications match those of the original wheels.
It is recommended you contact your authorized
tire dealer or original equipment dealer with any
questions you may have on tire specifications or
capability. Failure to use equivalent replacement tires may adversely affect the safety,
handling, and ride of your vehicle.
WARNING!
• Do not use a tire, wheel size or rating other
than that specified for your vehicle. Some
combinations of unapproved tires and
wheels may change suspension dimensions and performance characteristics, resulting in changes to steering, handling,
and braking of your vehicle. This can
cause unpredictable handling and stress
to steering and suspension components.
(Continued)
224
WARNING! (Continued)
You could lose control and have a collision
resulting in serious injury or death. Use
only the tire and wheel sizes with load
ratings approved for your vehicle.
• Never use a tire with a smaller load index
or capacity, other than what was originally
equipped on your vehicle. Using a tire with
a smaller load index could result in tire
overloading and failure. You could lose
control and have a collision.
• Failure to equip your vehicle with tires
having adequate speed capability can result in sudden tire failure and loss of vehicle control.
CAUTION!
Replacing original tires with tires of a different size may result in false speedometer and
odometer readings.
TIRE CHAINS (TRACTION
DEVICES)
Use of traction devices require sufficient tire-tobody clearance. Follow these recommendations to guard against damage.
• Traction device must be of proper size for the
tire, as recommended by the traction device
manufacturer.
• Install on Rear Tires Only.
• Due to limited clearance, use reduced size
snow chains or traction devices with a maximum projection of 6 mm beyond the tire
profile on P235/55R18 99V tires.
WARNING!
Using tires of different size and type (M+S,
Snow) between front and rear axles can
cause unpredictable handling. You could
lose control and have a collision.
CAUTION!
To avoid damage to your vehicle or tires,
observe the following precautions:
• Because of restricted traction device clearance between tires and other suspension
components, it is important that only traction devices in good condition are used.
Broken devices can cause serious damage. Stop the vehicle immediately if noise
occurs that could indicate device breakage. Remove the damaged parts of the
device before further use.
• Install device as tightly as possible and
then retighten after driving about ½ mile
(0.8 km).
• Do not exceed 30 mph (48 km/h).
• Drive cautiously and avoid severe turns
and large bumps, especially with a loaded
vehicle.
• Do not drive for a prolonged period on dry
pavement.
(Continued)
CAUTION! (Continued)
• Observe the traction device manufacturer’s instructions on the method of installation, operating speed, and conditions for
use. Always use the suggested operating
speed of the device manufacturer’s if it is
less than 30 mph (48 km/h).
• Do not use traction devices on a compact
spare tire.
TIRE ROTATION
RECOMMENDATIONS
Tires on the front and rear axles of vehicles
operate at different loads and perform different
steering, driving, and braking functions. For
these reasons, they wear at unequal rates.
These effects can be reduced by timely rotation
of tires. The benefits of rotation are especially
worthwhile with aggressive tread designs such
as those on all season type tires. Rotation will
increase tread life, help to maintain mud, snow
and wet traction levels, and contribute to a
smooth, quiet ride.
225
Refer to the “Service and Warranty Handbook”
for the proper maintenance intervals. The reasons for any rapid or unusual wear should be
corrected prior to rotation being performed.
The suggested rotation method is the “forward
cross” shown in the following diagram. This
rotation pattern does not apply to some directional tires that must not be reversed.
Tire Rotation
TIRE PRESSURE MONITOR
SYSTEM (TPMS)
The Tire Pressure Monitor System (TPMS) will
warn the driver of a low tire pressure based on
the vehicle recommended cold placard pressure.
The tire pressure will vary with temperature by
about 1 psi (7 kPa) for every 12°F (6.5°C). This
means that when the outside temperature decreases, the tire pressure will decrease. Tire
pressure should always be set based on cold
inflation tire pressure. This is defined as the tire
pressure after the vehicle has not been driven
for at least three hours, or driven less than 1
mile (1.6 km) after a three hour period. The cold
tire inflation pressure must not exceed the maximum inflation pressure molded into the tire
sidewall. Refer to “Tires – General Information”
in “Starting and Operating” for information on
how to properly inflate the vehicle’s tires. The
tire pressure will also increase as the vehicle is
driven - this is normal and there should be no
adjustment for this increased pressure.
The TPMS will warn the driver of a low tire
pressure if the tire pressure falls below the
226
low-pressure warning limit for any reason, including low temperature effects and natural
pressure loss through the tire.
The TPMS will continue to warn the driver of low
tire pressure as long as the condition exists,
and will not turn off until the tire pressure is at or
above the recommended cold placard pressure.
Once the low tire pressure warning (Tire Pressure Monitoring [TPM] Telltale Light) illuminates, you must increase the tire pressure to
the recommended cold placard pressure in order for the “TPM Telltale Light” to turn off. The
system will automatically update and the “TPM
Telltale Light” will turn off once the system
receives the updated tire pressures. The vehicle
may need to be driven for up to 20 minutes
above 15 mph (24 km/h) in order for the TPMS
to receive this information.
For example, your vehicle may have a recommended cold (parked for more than three hours)
placard pressure of 30 psi (207 kPa). If the
ambient temperature is 68°F (20°C) and the
measured tire pressure is 27 psi (186 kPa), a
temperature drop to 20°F (-7°C) will decrease
the tire pressure to approximately 23 psi (158
kPa). This tire pressure is sufficiently low
enough to turn ON the “TPM Telltale Light.”
Driving the vehicle may cause the tire pressure
to rise to approximately 27 psi (186 kPa), but
the “TPM Telltale Light” will still be ON. In this
situation, the “TPM Telltale Light” will turn OFF
only after the tires are inflated to the vehicle’s
recommended cold placard pressure value.
CAUTION!
• The TPMS has been optimized for the
original equipment tires and wheels. TPMS
pressures and warning have been established for the tire size equipped on your
vehicle. Undesirable system operation or
sensor damage may result when using
replacement equipment that is not of the
same size, type, and/or style. Aftermarket
wheels can cause sensor damage. Using
aftermarket tire sealants may cause the
Tire Pressure Monitoring System (TPMS)
sensor to become inoperable. After using
an aftermarket tire sealant it is recommended that you take your vehicle to your
CAUTION! (Continued)
local dealer to have your sensor function
checked.
• After inspecting or adjusting the tire pressure, always reinstall the valve stem cap.
This will prevent moisture and dirt from
entering the valve stem, which could damage the TPM sensor.
NOTE:
• The TPMS is not intended to replace normal tire care and maintenance or to provide warning of a tire failure or condition.
• The TPMS should not be used as a tire
pressure gauge while adjusting your tire
pressure.
• The TPMS is not a substitute for proper
tire maintenance, and it is the driver’s
responsibility to maintain correct tire
pressure using an accurate tire pressure
gauge, even if under-inflation has not
reached the level to trigger illumination of
the “TPM Telltale Light.”
• Seasonal temperature changes will affect
tire pressure, and the TPMS will monitor
the actual tire pressure in the tire.
Premium System
The Tire Pressure Monitor System (TPMS)
uses wireless technology with wheel rim
mounted electronic sensors to monitor tire pressure levels. Sensors mounted to each wheel as
part of the valve stem transmit tire pressure
readings to the receiver module.
• Driving on a significantly under-inflated
tire causes the tire to overheat and can
lead to tire failure. Under-inflation also
reduces fuel efficiency and tire tread life,
and may affect the vehicle’s handling and
stopping ability.
(Continued)
227
Tire Pressure Monitoring Low Pressure
Warnings
Tire Pressure Monitor Display
NOTE:
It is particularly important for you to check
the tire pressure in all of the tires on your
vehicle monthly and to maintain the proper
pressure.
The TPMS consists of the following components:
• Receiver module,
• Four TPM sensors,
• Various TPMS messages, which display in
the Driver Information Display (DID), and
• TPM Telltale Light
228
The “TPM Telltale Light” will illuminate
in the instrument cluster and a chime
will sound when tire pressure is low in
one or more of the four active road
tires. In addition, the DID will display a “LOW
TIRE” message and a graphic showing the
pressure values of each tire with the low tire
pressure values shown in a different color. An
"Inflate Tire to XX" message will also be displayed in the DID display.
Should this occur, you should stop as soon as
possible and inflate all of the tires with a low
pressure condition (those shown in a different
color in the DID graphic) to the vehicle’s recommended cold placard pressure inflation value as
shown in the "Inflate Tire to XX" message. Once
the system receives the updated tire pressures,
the system will automatically update, the
graphic display in the DID will return the pressure values shown to their original color, and
the “TPM Telltale Light” will turn off. The vehicle
may need to be driven for up to 20 minutes
above 15 mph (24 km/h) in order for the TPMS
to receive this information.
Service TPMS Warning
If a system fault is detected, the “TPM Telltale
Light” will flash on and off for 75 seconds and
then remain on solid. The system fault will also
sound a chime. In addition, the DID will display
a "SERVICE TPM SYSTEM" message for a
minimum of five seconds and then display
dashes (- -) in place of the pressure value to
indicate which sensor is not being received.
If the ignition switch is cycled, this sequence will
repeat, providing the system fault still exists. If
the system fault no longer exists, the “TPM
Telltale Light” will no longer flash, and the
"SERVICE TPM SYSTEM" message will no
longer display, and a pressure value will display
in place of the dashes. A system fault can occur
due to any of the following:
1. Signal interference due to electronic devices
or driving next to facilities emitting the same
radio frequencies as the TPM sensors.
2. Installing aftermarket window tinting that
contains materials that may block radio
wave signals.
3. Accumulation of snow or ice around the
wheels or wheel housings.
4. Using tire chains on the vehicle.
5. Using wheels/tires not equipped with TPM
sensors.
The DID will also display a "SERVICE TPM
SYSTEM" message for a minimum of five seconds when a system fault related to an incorrect
sensor location fault is detected. In this case,
the "SERVICE TPM SYSTEM" message is then
followed with a graphic display with pressure
values still shown. This indicates that the pressure values are still being received from the
TPM sensors but they may not be located in the
correct vehicle position. The system still needs
to be serviced as long as the "SERVICE TPM
SYSTEM" message is displayed.
Vehicles With Compact Spare
1. The compact spare tire does not have a TPM
sensor. Therefore, the TPMS will not monitor
the pressure in the compact spare tire.
2. If you install the compact spare tire in place
of a road tire that has a pressure below the
low-pressure warning limit, upon the next
ignition switch cycle, the “TPM Telltale Light”
will remain ON and a chime will sound. In
addition, the graphic in the DID will still
display the low pressure values in a different
color and the "Inflate Tire to XX" message.
3. After driving the vehicle for up to 20 minutes
above 15 mph (24 km/h), the “TPM Telltale
Light” will flash on and off for 75 seconds and
then remain on solid. In addition, the DID will
display a "SERVICE TPM SYSTEM" message for a minimum of five seconds and then
display dashes (- -) in place of the pressure
value.
4. For each subsequent ignition switch cycle, a
chime will sound, the “TPM Telltale Light” will
flash on and off for 75 seconds and then
remain on solid, and the DID will display a
"SERVICE TPM SYSTEM" message for a
minimum of five seconds and then display
dashes (- -) in place of the pressure value.
5. Once you repair or replace the original road
tire and reinstall it on the vehicle in place of
the compact spare, the TPMS will update
automatically. In addition, the “TPM Telltale
Light” will turn OFF and the graphic in the
DID will display a new pressure value instead of dashes (- -), as long as no tire
pressure is below the low-pressure warning
limit in any of the four active road tires. The
vehicle may need to be driven for up to 20
minutes above 15 mph (24 km/h) in order for
the TPMS to receive this information.
TPMS Deactivation — If Equipped
The TPMS can be deactivated if replacing all
four wheel and tire assemblies (road tires) with
wheel and tire assemblies that do not have
TPMS Sensors, such as when installing winter
wheel and tire assemblies on your vehicle To
229
deactivate the TPMS, first, replace all four
wheel and tire assemblies (road tires) with tires
not equipped with Tire Pressure Monitoring
(TPM) Sensors. Then, drive the vehicle for 20
minutes above 15 mph (24 km/h). The TPMS
will chime, the “TPM Telltale Light” will flash on
and off for 75 seconds and then remain on and
the Driver Information Display (DID) will display
the “SERVICE TPM SYSTEM” message and
then display dashes (--) in place of the pressure
values. Beginning with the next ignition switch
cycle, the TPMS will no longer chime or display
the “SERVICE TPM SYSTEM” message in the
DID but dashes (--) will remain in place of the
pressure values.
To reactivate the TPMS, replace all four wheel
and tire assemblies (road tires) with tires
equipped with TPM sensors. Then, drive the
vehicle for up to 20 minutes above 15 mph
(24 km/h). The TPMS will chime, the “TPM
Telltale Light” will flash on and off for 75 seconds and then turn off, and the Driver Information Display (DID) will display the “SERVICE
TPM SYSTEM” message. The DID will also
display pressure values in place of the dashes.
On the next ignition switch cycle the “SERVICE
230
TPM SYSTEM” message will no longer be
displayed as long as no system fault exists.
durability for your vehicle. The manufacturer
recommends the use of gasoline that meets the
WWFC specifications if they are available.
FUEL REQUIREMENTS
Besides using unleaded gasoline with the
proper octane rating, gasolines that contain
detergents, corrosion and stability additives are
recommended. Using gasolines that have these
additives may help improve fuel economy, reduce emissions, and maintain vehicle performance.
3.6L Engine
These engines are designed to meet all emissions regulations and provide excellent fuel
economy and performance when using highquality unleaded gasoline with a minimum Research Octane Number (RON) of 91.
Light spark knock at low engine speeds is not
harmful to your engine. However, continued
heavy spark knock at high speeds can cause
damage, and immediate service is required.
Poor quality gasoline can cause problems such
as hard starting, stalling, and hesitations. If you
experience these symptoms, try another brand
of gasoline before considering service for the
vehicle.
Over 40 auto manufacturers worldwide have
issued and endorsed consistent gasoline specifications (the Worldwide Fuel Charter, WWFC)
which define fuel properties necessary to deliver enhanced emissions, performance, and
Poor quality gasoline can cause problems such
as hard starting, stalling and stumble. If you
experience these problems, try another brand
of gasoline before considering service for the
vehicle.
5.7L Engine (With Automatic
Transmission)
The 5.7L engine (with automatic transmission)
is designed to meet all emissions regulations
and provide satisfactory fuel economy and performance when using high-quality unleaded
gasoline having an Research Octane Number
(RON) of 91 to 95. The manufacturer recommends the use of a 95 Research Octane Number for optimum performance.
Light spark knock at low engine speeds is not
harmful to your engine. However, continued
heavy spark knock at high speeds can cause
damage, and immediate service is required.
Poor quality gasoline can cause problems such
as hard starting, stalling, and hesitations. If you
experience these symptoms, try another brand
of gasoline before considering service for the
vehicle.
Over 40 auto manufacturers worldwide have
issued and endorsed consistent gasoline specifications (the Worldwide Fuel Charter, WWFC)
which define fuel properties necessary to deliver enhanced emissions, performance, and
durability for your vehicle. The manufacturer
recommends the use of gasoline that meets the
WWFC specifications if they are available.
Besides using unleaded gasoline with the
proper octane rating, gasoline that contain detergents, corrosion and stability additives are
recommended. Using gasolines that have these
additives may help improve fuel economy, reduce emissions, and maintain vehicle performance.
Poor quality gasoline can cause problems such
as hard starting, stalling and stumble. If you
experience these problems, try another brand
of gasoline before considering service for the
vehicle.
which define fuel properties necessary to deliver enhanced emissions, performance, and
durability for your vehicle. The manufacturer
recommends the use of gasoline that meets the
WWFC specifications if they are available.
5.7L Engine (With Manual
Transmission)
Besides using unleaded gasoline with the
proper octane rating, gasoline that contain detergents, corrosion and stability additives are
recommended. Using gasolines that have these
additives may help improve fuel economy, reduce emissions, and maintain vehicle performance.
The 5.7L enginer (with a manual transmission)
is designed to meet all emissions regulations
and provide satisfactory fuel economy and performance when using high-quality unleaded
gasoline having an Research Octane Number
(RON) of 95 or higher.
Light spark knock at low engine speeds is not
harmful to your engine. However, continued
heavy spark knock at high speeds can cause
damage, and immediate service is required.
Poor quality gasoline can cause problems such
as hard starting, stalling, and hesitations. If you
experience these symptoms, try another brand
of gasoline before considering service for the
vehicle.
Over 40 auto manufacturers worldwide have
issued and endorsed consistent gasoline specifications (the Worldwide Fuel Charter, WWFC)
Poor quality gasoline can cause problems such
as hard starting, stalling and stumble. If you
experience these problems, try another brand
of gasoline before considering service for the
vehicle.
6.4L Engine
The 6.4L engine is designed to meet all emissions regulations and provide excellent fuel
economy and performance when using highquality unleaded gasoline having an Research
Octane Number (RON) of 95 or higher
231
Light spark knock at low engine speeds is not
harmful to your engine. However, continued
heavy spark knock at high speeds can cause
damage and immediate service is required.
Poor quality gasoline can cause problems such
as hard starting, stalling, and hesitations. If you
experience these symptoms, try another brand
of gasoline before considering service for the
vehicle.
Over 40 auto manufacturers worldwide have
issued and endorsed consistent gasoline specifications (the Worldwide Fuel Charter, WWFC)
which define fuel properties necessary to deliver enhanced emissions, performance, and
durability for your vehicle. The manufacturer
recommends the use of gasolines that meet the
WWFC specifications if they are available.
ADDING FUEL
Fuel Filler Cap (Gas Cap)
The gas cap is located behind the fuel filler door
on the left side of the vehicle. Use a finger to pull
open the door. If the gas cap is lost or damaged,
be sure the replacement cap is for use with this
vehicle.
232
CAUTION! (Continued)
• A poorly fitting fuel filler cap may cause the
“Malfunction Indicator Light (MIL)” to turn
on.
• To avoid fuel spillage and overfilling, do not
“top off” the fuel tank after filling. When the
fuel nozzle “clicks” or shuts off, the fuel
tank is full.
Fuel Filler Cap
NOTE:
When removing the fuel filler cap, lay the
cap tether in the hook, located on the fuel
filler door.
CAUTION!
• Damage to the fuel system or emissions
control system could result from using an
improper fuel tank filler tube cap.
• A poorly fitting fuel filler cap could let
impurities into the fuel system.
(Continued)
WARNING!
• Never have any smoking materials lit in or
near the vehicle when the gas cap is
removed or the tank is being filled.
• Never add fuel to the vehicle when the
engine is running.
• A fire may result if gasoline is pumped into
a portable container that is inside of a
vehicle. You could be burned. Always
place gas containers on the ground while
filling.
NOTE:
• When the fuel nozzle “clicks” or shuts off,
the fuel tank is full.
• Tighten the gas cap until you hear a
“clicking” sound. This is an indication
that the gas cap is tightened properly. The
MIL in the instrument cluster may turn on
if the gas cap is not secured properly.
Make sure that the gas cap is tightened
each time the vehicle is refueled.
Loose Fuel Filler Cap Message
If the vehicle diagnostic system determines that
the fuel filler cap is loose, improperly installed,
or damaged, a ”gASCAP” message will display
in the odometer or a “Check Gascap” message
will display in the Driver Information Display
(DID). If this occurs, tighten the fuel filler cap
properly and press the TRIP ODOMETER button to turn off the message. If the problem
continues, the message will appear the next
time the vehicle is started.
A loose, improperly installed, or damaged fuel
filler cap may also turn on the MIL. Refer to
“Onboard Diagnostic System” in “Maintaining
Your Vehicle” for further information.
TRAILER TOWING
In this section, you will find safety tips and
information on limits to the type of towing you
can reasonably do with your vehicle. Before
towing a trailer, carefully review this information
to tow your load as efficiently and safely as
possible.
To maintain warranty coverage, follow the requirements and recommendations in this
manual concerning vehicles used for trailer
towing.
Manual Transmission — If Equipped
Trailer towing with this vehicle is not recommended.
Common Towing Definitions
The following trailer towing related definitions
will assist you in understanding the following
information:
Gross Vehicle Weight Rating (GVWR)
The GVWR is the total allowable weight of your
vehicle. This includes driver, passengers, cargo
and tongue weight. The total load must be
limited so that you do not exceed the GVWR.
Refer to “Vehicle Loading/Vehicle Certification
Label” in “Starting and Operating” for further
information.
Gross Trailer Weight (GTW)
The GTW is the weight of the trailer plus the
weight of all cargo, consumables and equipment (permanent or temporary) loaded in or on
the trailer in its "loaded and ready for operation"
condition. The recommended way to measure
GTW is to put your fully loaded trailer on a
vehicle scale. The entire weight of the trailer
must be supported by the scale.
Gross Combination Weight Rating (GCWR)
The GCWR is the total permissible weight of
your vehicle and trailer when weighed in combination.
Gross Axle Weight Rating (GAWR)
The GAWR is the maximum capacity of the front
and rear axles. Distribute the load over the front
and rear axles evenly. Make sure that you do
233
not exceed either front or rear GAWR. Refer to
“Vehicle Loading/Vehicle Certification Label” in
“Starting and Operating” for further information.
WARNING!
It is important that you do not exceed the
maximum front or rear GAWR. A dangerous
driving condition can result if either rating is
exceeded. You could lose control of the
vehicle and have a collision.
Tongue Weight (TW)
The tongue weight is the downward force exerted on the hitch ball by the trailer. The recommended tongue weight is 10% to 15% for a
conventional hitch. You must consider this as
part of the load on your vehicle.
Frontal Area
The frontal area is the maximum height multiplied by the maximum width of the front of a
trailer.
Trailer Sway Control
The trailer sway control can be a mechanical
telescoping link that can be installed between
234
the hitch receiver and the trailer tongue that
typically provides adjustable friction associated
with the telescoping motion to dampen any
unwanted trailer swaying motions while traveling.
If equipped, the electronic Trailer Sway Control
(TSC) recognizes a swaying trailer and automatically applies individual wheel brakes and/or
reduces engine power to attempt to eliminate
the trailer sway.
Weight-Carrying Hitch
A weight-carrying hitch supports the trailer
tongue weight, just as if it were luggage located
at a hitch ball or some other connecting point of
the vehicle. These kinds of hitches are the most
popular on the market today and they are
commonly used to tow small and medium sized
trailers.
Weight-Distributing Hitch
A weight-distributing system works by applying
leverage through spring (load) bars. They are
typically used for heavier loads to distribute
trailer tongue weight to the tow vehicle’s front
axle and the trailer axle(s). When used in accordance with the manufacturer’s directions, it
provides for a more level ride, offering more
consistent steering and brake control thereby
enhancing towing safety. The addition of a
friction/hydraulic sway control also dampens
sway caused by traffic and crosswinds and
contributes positively to tow vehicle and trailer
stability. Trailer sway control and a weight distributing (load equalizing) hitch are recommended for heavier Tongue Weights (TW) and
may be required depending on vehicle and
trailer configuration/loading to comply with
Gross Axle Weight Rating (GAWR) requirements.
WARNING!
• An improperly adjusted Weight Distributing
Hitch system may reduce handling, stability, braking performance, and could result
in a collision.
• Weight Distributing Systems may not be
compatible with Surge Brake Couplers.
Consult with your hitch and trailer manufacturer or a reputable Recreational Vehicle dealer for additional information.
Trailer Hitch Classification
The following chart provides the industry standard for the maximum trailer weight a given
trailer hitch class can tow and should be used to
assist you in selecting the correct trailer hitch for
your intended towing condition.
Trailer Hitch Classification Definitions
Class
Max. Trailer Hitch Industry Standards
Class I - Light Duty
2,000 lbs (907 kg)
Class II - Medium Duty
3,500 lbs (1 587 kg)
Class III - Heavy Duty
5,000 lbs (2 268 kg)
Class IV - Extra Heavy Duty
10,000 lbs (4 540 kg)
Refer to the “Trailer Towing Weights (Maximum Trailer Weight Ratings)” chart for the Maximum Gross Trailer Weight (GTW) towable for your given
drivetrain.
All trailer hitches should be professionally installed on your vehicle.
235
Trailer Towing Weights (Maximum
Trailer Weight Ratings)
The following chart provides the maximum
trailer weight ratings towable for your given
drivetrain.
Engine/Transmission
Frontal Area
Max. GTW (Gross Trailer Wt.)
Max. Tongue Wt.
3.6L Automatic
12 sq ft (1.11 sq m)
1,000 lbs (454 kg)
100 lbs (45 kg)
5.7L Automatic
12 sq ft (1.11 sq m)
1,000 lbs (454 kg)
100 lbs (45 kg)
Refer to local laws for maximum trailer towing speeds.
Trailer And Tongue Weight
Always load a trailer with 60% to 65% of the
weight in the front of the trailer. This places 10%
to 15% of the Gross Trailer Weight (GTW) on
the tow hitch of your vehicle. Loads balanced
over the wheels or heavier in the rear can cause
the trailer to sway severely side to side which
will cause loss of control of the vehicle and
trailer. Failure to load trailers heavier in front is
the cause of many trailer collisions.
Never exceed the maximum tongue weight
stamped on your bumper or trailer hitch.
236
Consider the following items when computing
the weight on the rear axle of the vehicle:
• The tongue weight of the trailer.
• The weight of any other type of cargo or
equipment put in or on your vehicle.
• The weight of the driver and all passengers.
NOTE:
Remember that everything put into or on the
trailer adds to the load on your vehicle. Also,
additional factory-installed options or
dealer-installed options must be considered
as part of the total load on your vehicle.
Refer to the “Tire and Loading Information”
placard for the maximum combined weight
of occupants and cargo for your vehicle.
Towing Requirements
To promote proper break-in of your new vehicle
drivetrain components the following guidelines
are recommended:
CAUTION!
• Do not tow a trailer at all during the first
500 miles (805 km) the new vehicle is
driven. The engine, axle or other parts
could be damaged.
(Continued)
CAUTION! (Continued)
• Then, during the first 500 miles (805 km)
that a trailer is towed, do not drive over
50 mph (80 km/h) and do not make starts
at full throttle. This helps the engine and
other parts of the vehicle wear in at the
heavier loads.
WARNING!
Improper towing can lead to a collision. Follow these guidelines to make your trailer
towing as safe as possible:
• Make certain that the load is secured in the
trailer and it will not shift during travel.
When trailering cargo that is not fully secured, dynamic load shifts can occur that
may be difficult for the driver to control. You
could lose control of your vehicle and have
a collision.
WARNING! (Continued)
• When hauling cargo or towing a trailer, do
not overload your vehicle or trailer. Overloading can cause a loss of control, poor
performance, or damage to brakes, axle,
engine, transmission, steering, suspension, chassis structure, or tires.
• Safety chains must always be used between your vehicle and trailer. Always connect the chains to the frame or hook retainers of the vehicle hitch. Cross the
chains under the trailer tongue and allow
enough slack for turning corners.
• Vehicles with trailers should not be parked
on a grade. When parking, apply the parking brake on the tow vehicle. Put the tow
vehicle automatic transmission in PARK.
Always, block or "chock" the trailer wheels.
• GCWR must not be exceeded.
(Continued)
(Continued)
237
WARNING! (Continued)
• Total weight must be distributed between the tow vehicle and the trailer
such that the following four ratings are
not exceeded:
1. Max loading as defined on the “Tire and
Loading Information” placard.
2. GTW
3. GAWR
4. Tongue weight rating for the trailer hitch
utilized.
Towing Requirements — Tires
• Do not attempt to tow a trailer while using a
compact spare tire.
• Proper tire inflation pressures are essential
to the safe and satisfactory operation of your
vehicle. Refer to “Tires – General Information” in “Starting And Operating” for proper
tire inflation procedures.
238
• Check the trailer tires for proper tire inflation
pressures before trailer usage.
• Check for signs of tire wear or visible tire
damage before towing a trailer. Refer to
“Tires – General Information” in “Starting And
Operating” for the proper inspection
procedure.
• When replacing tires, refer to “Tires – General Information” in “Starting And Operating”
for the proper tire replacement procedures.
Replacing tires with a higher load carrying
capacity will not increase the vehicle’s
GVWR and GAWR limits.
Towing Requirements — Trailer Brakes
• Do not interconnect the hydraulic brake system or vacuum system of your vehicle with
that of the trailer. This could cause inadequate braking and possible personal injury.
• An electronically actuated trailer brake controller is required when towing a trailer with
electronically actuated brakes. When towing
a trailer equipped with a hydraulic surge
actuated brake system, an electronic brake
controller is not required.
• Trailer brakes are recommended for trailers
over 1,000 lbs (454 kg) and required for
trailers in excess of 2,000 lbs (907 kg).
WARNING!
• Do not connect trailer brakes to your vehicle’s hydraulic brake lines. It can overload
your brake system and cause it to fail. You
might not have brakes when you need
them and could have a collision.
• Towing any trailer will increase your stopping distance. When towing you should
allow for additional space between your
vehicle and the vehicle in front of you.
Failure to do so could result in a collision.
CAUTION!
If the trailer weighs more than 1,000 lbs
(454 kg) loaded, it should have its own
brakes and they should be of adequate
(Continued)
CAUTION! (Continued)
capacity. Failure to do this could lead to
accelerated brake lining wear, higher brake
pedal effort, and longer stopping distances.
Towing Requirements — Trailer Lights And
Wiring
Whenever you pull a trailer, regardless of the
trailer size, stoplights and turn signals on the
trailer are required for motoring safety.
The Trailer Tow Package may include a fourand seven-pin wiring harness. Use a factory
approved trailer harness and connector.
NOTE:
Do not cut or splice wiring into the vehicles
wiring harness.
Four-Pin Connector
1 — Female Pins
2 — Male Pin
3 — Ground
4 — Park
5 — Left Stop/Turn
6 — Right Stop/Turn
Seven-Pin Connector
1
2
3
4
—
—
—
—
Battery
Backup Lamps
Right Stop/Turn
Electric Brakes
5 — Ground
6 — Left Stop/Turn
7 — Running Lamps
The electrical connections are all complete to
the vehicle but you must mate the harness to a
trailer connector. Refer to the following illustrations.
239
Towing Tips
Electronic Speed Control — If Equipped
Before setting out on a trip, practice turning,
stopping, and backing up the trailer in an area
located away from heavy traffic.
• Do not use in hilly terrain or with heavy loads.
Automatic Transmission — If Equipped
The DRIVE range can be selected when towing.
The transmission controls include a drive strategy to avoid frequent shifting when towing.
However, if frequent shifting does occur while in
DRIVE, you can use the AutoStick® shift control
to manually select a lower gear.
NOTE:
Using a lower gear while operating the vehicle under heavy loading conditions will
improve performance and extend transmission life by reducing excessive shifting and
heat build up. This action will also provide
better engine braking.
240
• When using the speed control, if you experience speed drops greater than 10 mph
(16 km/h), disengage until you can get back
to cruising speed.
• Use speed control in flat terrain and with light
loads to maximize fuel efficiency.
Cooling System
To reduce potential for engine and transmission
overheating, take the following actions:
City Driving
When stopped for short periods, shift the transmission into NEUTRAL and increase engine
idle speed.
Highway Driving
AutoStick
Reduce speed.
• When using the AutoStick shift control, select
the highest gear that allows for adequate
performance and avoids frequent downshifts.
For example, choose “4” if the desired speed
can be maintained. Choose “3” or “2” if
needed to maintain the desired speed.
Air Conditioning
• To prevent excess heat generation, avoid
continuous driving at high RPM. Reduce
vehicle speed as necessary to avoid extended driving at high RPM. Return to a
higher gear or vehicle speed when grade and
road conditions allow.
Turn off temporarily.
RECREATIONAL TOWING
(BEHIND MOTORHOME, ETC.)
Towing This Vehicle Behind Another
Vehicle
Towing Condition
Wheels OFF The Ground
Manual Transmission
Automatic Transmission
None
• Transmission in NEUTRAL
• 65 mph (105 km/h) maximum
speed
NOT ALLOWED
Front
Not Recommended
NOT ALLOWED
Rear
Not Recommended
Not Recommended
All
OK
OK
Flat Tow
Dolly Tow
On Trailer
NOTE:
When recreationally towing your vehicle,
always follow applicable state and provincial laws. Contact state and provincial Highway Safety offices for additional details.
Automatic Transmission — If Equipped
Recreational towing (with rear wheels on the
ground) is NOT ALLOWED. The only accept-
able method for towing this vehicle (behind
another vehicle) is on a vehicle trailer with all
four wheels OFF the ground.
Use of a towing dolly (with rear wheels on the
ground) is NOT ALLOWED, as severe transmission damage will occur. Use of a towing dolly
(with front wheels on the ground) is not recommended, as vehicle damage may occur.
CAUTION!
Towing this vehicle in violation of the above
requirements can cause severe transmission
damage. Damage from improper towing is
not covered under the New Vehicle Limited
Warranty.
241
Manual Transmission — If Equipped
Vehicles with a manual transmission may be flat
towed (with all four wheels on the ground) under
the following conditions:
• The transmission must be in NEUTRAL.
• The towing speed must not exceed 65 mph
(105 km/h).
• There is no limitation on towing distance.
Manual transmission vehicles may also be
towed using a vehicle trailer (with all four wheels
off the ground).
Use of a towing dolly is not recommended, as
vehicle damage may occur.
CAUTION!
Towing this vehicle in violation of the above
requirements can cause severe engine
and/or transmission damage. Damage from
improper towing is not covered under the
New Vehicle Limited Warranty.
242
6
WHAT TO DO IN EMERGENCIES
• HAZARD WARNING FLASHERS . . . . . . . . .
• IF YOUR ENGINE OVERHEATS . . . . . . . . .
• TIRE SERVICE KIT — IF EQUIPPED . . . . . .
• Tire Service Kit Storage . . . . . . . . . . . . .
• Tire Service Kit Components And Operation .
• Tire Service Kit Usage Precautions . . . . . .
• Sealing A Tire With Tire Service Kit . . . . . .
• WHEEL AND TIRE TORQUE SPECIFICATIONS
• Torque Specifications . . . . . . . . . . . . . .
• JACKING AND TIRE CHANGING . . . . . . . .
• Jack Location/Spare Tire Stowage . . . . . .
• Preparations For Jacking . . . . . . . . . . . .
• Jacking And Changing A Tire . . . . . . . . .
• Road Tire Installation. . . . . . . . . . . . . . .
• JUMP-STARTING PROCEDURES . . . . . . . .
• Preparations For Jump-Start . . . . . . . . . .
• Jump-Starting Procedure . . . . . . . . . . . .
• FREEING A STUCK VEHICLE . . . . . . . . . .
.
.
.
.
.
.
.
.
.
.
.
.
.
.
.
.
.
.
.
.
.
.
.
.
.
.
.
.
.
.
.
.
.
.
.
.
.
.
.
.
.
.
.
.
.
.
.
.
.
.
.
.
.
.
.
.
.
.
.
.
.
.
.
.
.
.
.
.
.
.
.
.
.
.
.
.
.
.
.
.
.
.
.
.
.
.
.
.
.
.
.
.
.
.
.
.
.
.
.
.
.
.
.
.
.
.
.
.
.
.
.
.
.
.
.
.
.
.
.
.
.
.
.
.
.
.
.
.
.
.
.
.
.
.
.
.
.
.
.
.
.
.
.
.
.
.
.
.
.
.
.
.
.
.
.
.
.
.
.
.
.
.
.
.
.
.
.
.
.
.
.
.
.
.
.
.
.
.
.
.
.245
.245
.246
.246
.246
.247
.249
.252
.252
.253
.253
.254
.255
.257
.258
.258
.259
.260
243
• TOW EYE USAGE . . . . . . . . . . . . .
• Front Tow Eye Installation . . . . . . .
• Rear Tow Eye Installation . . . . . . .
• MANUAL PARK RELEASE — 8 SPEED
• TOWING A DISABLED VEHICLE . . . .
• Automatic Transmission . . . . . . . .
• Manual Transmission . . . . . . . . . .
244
. . . . . . . . . . .
. . . . . . . . . . .
. . . . . . . . . . .
TRANSMISSION
. . . . . . . . . . .
. . . . . . . . . . .
. . . . . . . . . . .
.
.
.
.
.
.
.
.
.
.
.
.
.
.
.
.
.
.
.
.
.
.
.
.
.
.
.
.
.
.
.
.
.
.
.
.
.
.
.
.
.
.
.261
.262
.263
.263
.265
.266
.266
HAZARD WARNING FLASHERS
IF YOUR ENGINE OVERHEATS
The Hazard Warning flasher switch is located
on the instrument panel, below the radio.
In any of the following situations, you can
reduce the potential for overheating by taking
the appropriate action.
Press the switch to turn on the Hazard
Warning flasher. When the switch is
activated, all directional turn signals
will flash on and off to warn oncoming traffic of
an emergency. Press the switch a second time
to turn off the Hazard Warning flashers.
This is an emergency warning system and it
should not be used when the vehicle is in
motion. Use it when your vehicle is disabled and
it is creating a safety hazard for other motorists.
When you must leave the vehicle to seek assistance, the Hazard Warning flashers will continue to operate even though the ignition is
placed in the OFF position.
NOTE:
With extended use the Hazard Warning
flashers may wear down your battery.
• On the highways — slow down.
• In city traffic — while stopped, place the
transmission in NEUTRAL, but do not increase the engine idle speed.
NOTE:
There are steps that you can take to slow
down an impending overheat condition:
• If your air conditioner (A/C) is on, turn it
off. The A/C system adds heat to the
engine cooling system and turning the
A/C off can help remove this heat.
• You can also turn the temperature control
to maximum heat, the mode control to
floor and the blower control to high. This
allows the heater core to act as a supplement to the radiator and aids in removing
heat from the engine cooling system.
CAUTION!
Driving with a hot cooling system could damage your vehicle. If the temperature gauge
reads “H,” pull over and stop the vehicle. Idle
the vehicle with the air conditioner turned off
until the pointer drops back into the normal
range. If the pointer remains on the “H,” turn
the engine off immediately and call for service.
WARNING!
You or others can be badly burned by hot
engine coolant (antifreeze) or steam from
your radiator. If you see or hear steam coming from under the hood, do not open the
hood until the radiator has had time to cool.
Never try to open a cooling system pressure
cap when the radiator or coolant bottle is hot.
245
TIRE SERVICE KIT — IF
EQUIPPED
Tire Service Kit Storage
The Tire Service Kit is located in the trunk.
Tire Service Kit Components And
Operation
Small punctures up to ¼” (6 mm) in the tire tread
can be sealed with Tire Service Kit. Foreign
objects (e.g., screws or nails) should not be
removed from the tire. Tire Service Kit can be
used in outside temperatures down to approximately -4°F (-20°C).
This kit will provide a temporary tire seal, allowing you to drive your vehicle up to 100 miles
(160 km) with a maximum speed of 55 mph
(90 km/h).
Tire Service Kit Location
Tire Service Kit Components
1 —
Bottle
246
Sealant
5 — Mode Select Knob
2 — Deflation
Button
6 — Sealant
(Clear)
Hose
3 — Pressure
Gauge
7 — Air Pump Hose
(Black)
4 — Power Button
8 — Power Plug (located
on the bottom side of the
Tire Service Kit)
Using The Mode Select Knob And Hoses
Your Tire Service Kit is equipped with the following symbols to indicate the air or sealant
mode.
Selecting Air Mode
Push in the Mode Select Knob (5)
and turn to this position for air
pump operation only. Use the
Black Air Pump Hose (7) when
selecting this mode.
Using The Power Button
Push and release the Power Button (4) once to turn On the Tire
Service Kit. Push and release the
Power Button (4) again to turn Off
the Tire Service Kit.
Using The Deflation Button
Press the Deflation Button (2) to
reduce the air pressure in the tire if
it becomes over-inflated.
Selecting Sealant Mode
Push in the Mode Select
Knob (5) and turn to this
position to inject the Tire
Service Kit Sealant and
to inflate the tire. Use
the Sealant Hose (clear
hose) (6) when selecting this mode.
Tire Service Kit Usage Precautions
• Replace the Tire Service Kit Sealant Bottle
(1) and Sealant Hose (6) prior to the expiration date (printed at the lower right hand
corner on the bottle label) to assure optimum
operation of the system. Refer to “Sealing a
Tire with Tire Service Kit” section (F) “Sealant
Bottle and Hose Replacement”.
Tire Service Kit Expiration Date Location
• The Sealant Bottle (1) and Sealant Hose (6)
are a one tire application use and need to be
replaced after each use. Always replace
these components immediately at your original equipment vehicle dealer.
• When the Tire Service Kit sealant is in a
liquid form, clean water, and a damp cloth will
remove the material from the vehicle or tire
and wheel components. Once the sealant
dries, it can easily be peeled off and properly
discarded.
247
• For optimum performance, make sure the
valve stem on the wheel is free of debris
before connecting the Tire Service Kit.
WARNING!
• Do not attempt to seal a tire on the side of
the vehicle closest to traffic. Pull far
enough off the road to avoid the danger of
being hit when using the Tire Service Kit.
WARNING! (Continued)
• Do not use Tire Service Kit or drive the
vehicle under the following circumstances:
• If the puncture in the tire tread is approximately 1/4” (6 mm) or larger.
• If the tire has any sidewall damage.
• If the tire has any damage from driving
with extremely low tire pressure.
• If the tire has any damage from driving
on a flat tire.
• If the wheel has any damage.
• If you are unsure of the condition of the
tire or the wheel.
• Keep Tire Service Kit away from open
flames or heat source.
• A loose Tire Service Kit thrown forward in a
collision or hard stop could endanger the
occupants of the vehicle. Always stow the
Tire Service Kit in the place provided.
Failure to follow these warnings can result
in injuries that are serious or fatal to you,
your passengers, and others around you.
(Continued)
(Continued)
• You can use the Tire Service Kit air pump to
inflate bicycle tires. The kit also comes with
two needles, located in the Accessory Storage Compartment (on the bottom of the air
pump) for inflating sport balls, rafts, or similar
inflatable items. However, use only the Air
Pump Hose (7) and make sure the Mode
Select Knob (5) is in the Air Mode when
inflating such items to avoid injecting sealant
into them. The Tire Service Kit Sealant is only
intended to seal punctures less than ¼” (6
mm) diameter in the tread of your vehicle.
• Do not lift or carry the Tire Service Kit by the
hoses.
248
WARNING! (Continued)
• Take care not to allow the contents of Tire
Service Kit to come in contact with hair,
eyes, or clothing. Tire Service Kit is harmful if inhaled, swallowed, or absorbed
through the skin. It causes skin, eye, and
respiratory irritation. Flush immediately
with plenty of water if there is any contact
with eyes or skin. Change clothing as soon
as possible, if there is any contact with
clothing.
• Tire Service Kit Sealant solution contains
latex. In case of an allergic reaction or
rash, consult a physician immediately.
Keep Tire Service Kit out of reach of
children. If swallowed, rinse mouth immediately with plenty of water and drink plenty
of water. Do not induce vomiting! Consult a
physician immediately.
Sealing A Tire With Tire Service Kit
(B) Setting Up To Use Tire Service Kit:
(A) Whenever You Stop To Use Tire Service
Kit:
1. Push in the Mode Select Knob (5) and turn to
the Sealant Mode position.
1. Pull over to a safe location and turn on the
vehicle’s Hazard Warning flashers.
2. Uncoil the Sealant Hose (6) and then remove the cap from the fitting at the end of the
hose.
2. Verify that the valve stem (on the wheel with
the deflated tire) is in a position that is near
to the ground. This will allow the Tire Service
Kit Hoses (6) and (7) to reach the valve stem
and keep the Tire Service Kit flat on the
ground. This will provide the best positioning
of the kit when injecting the sealant into the
deflated tire and running the air pump. Move
the vehicle as necessary to place the valve
stem in this position before proceeding.
3. Place the transmission in PARK (auto transmission) or in Gear (manual transmission)
and turn Off the ignition.
4. Set the parking brake.
3. Place the Tire Service Kit flat on the ground
next to the deflated tire.
4. Remove the cap from the valve stem and
then screw the fitting at the end of the
Sealant Hose (6) onto the valve stem.
5. Uncoil the Power Plug (8) and insert the plug
into the vehicle’s 12 Volt power outlet.
NOTE:
Do not remove foreign objects (e.g., screws
or nails) from the tire.
(C) Injecting Tire Service Kit Sealant Into
The Deflated Tire:
• Always start the engine before turning ON
the Tire Service Kit.
NOTE:
Manual transmission vehicles must have the
parking brake engaged and the shift lever in
NEUTRAL.
• After pressing the Power Button (4), the
sealant (white fluid) will flow from the Sealant
Bottle (1) through the Sealant Hose (6) and
into the tire.
NOTE:
Sealant may leak out through the puncture
in the tire.
If the sealant (white fluid) does not flow
within 0 – 10 seconds through the Sealant
Hose (6):
1. Press the Power Button (4) to turn Off the
Tire Service Kit. Disconnect the Sealant
Hose (6) from the valve stem. Make sure the
valve stem is free of debris. Reconnect the
Sealant Hose (6) to the valve stem. Check
that the Mode Select Knob (5) is in the
Sealant Mode position and not Air Mode.
Press the Power Button (4) to turn On the
Tire Service Kit.
249
2. Connect the Power Plug (8) to a different 12
Volt power outlet in your vehicle or another
vehicle, if available. Make sure the engine is
running before turning ON the Tire Service
Kit.
3. The Sealant Bottle (1) may be empty due to
previous use. Call for assistance.
NOTE:
If the Mode Select Knob (5) is on Air Mode
and the pump is operating, air will dispense
from the Air Pump Hose (7) only, not the
Sealant Hose (6).
If the sealant (white fluid) does flow through
the Sealant Hose (6):
1. Continue to operate the pump until sealant is
no longer flowing through hose (typically
takes 30 - 70 seconds). As the sealant flows
through the Sealant Hose (6), the Pressure
Gauge (3) can read as high as 70 psi (4.8
Bar). The Pressure Gauge (3) will decrease
quickly from approximately 70 psi (4.8 Bar)
to the actual tire pressure when the Sealant
Bottle (1) is empty.
250
2. The pump will start to inject air into the tire
immediately after the Sealant Bottle (1) is
empty. Continue to operate the pump and
inflate the tire to the pressure indicated on
the tire pressure label on the driver-side
latch pillar (recommended pressure). Check
the tire pressure by looking at the Pressure
Gauge (3).
If the tire does not inflate to at least 26 psi
(1.8 Bar) pressure within 15 minutes:
• The tire is too badly damaged. Do not attempt to drive the vehicle further. Call for
assistance.
NOTE:
If the tire becomes over-inflated, press the
Deflation Button to reduce the tire pressure
to the recommended inflation pressure before continuing.
If the tire inflates to the recommended pressure or is at least 26 psi (1.8 Bar) pressure
within 15 minutes:
1. Press the Power Button (4) to turn off the
Tire Service Kit.
2. Remove the Speed Limit sticker from the top
of the Sealant Bottle (1) and place the sticker
on the instrument panel.
3. Immediately disconnect the Sealant Hose
(6) from the valve stem, reinstall the cap on
the fitting at the end of the hose, and place
the Tire Service Kit in the vehicle storage
location. Quickly proceed to (D) “Drive Vehicle.”
CAUTION!
• The metal end fitting from Power Plug (8)
may get hot after use, so it should be
handled carefully.
• Failure to reinstall the cap on the fitting at
the end of the Sealant Hose (6) can result
in sealant contacting your skin, clothing,
and the vehicle’s interior. It can also result
in sealant contacting internal Tire Service
Kit components which may cause permanent damage to the kit.
(D) Drive Vehicle:
Immediately after injecting sealant and inflating
the tire, drive the vehicle 5 miles (8 km) or 10
minutes to ensure distribution of the Tire Service Kit Sealant within the tire. Do not exceed
55 mph (90 km/h).
WARNING!
Tire Service Kit is not a permanent flat tire
repair. Have the tire inspected and repaired
or replaced after using Tire Service Kit. Do
not exceed 55 mph (90 km/h) until the tire is
repaired or replaced. Failure to follow this
warning can result in injuries that are serious
or fatal to you, your passengers, and others
around you.
(E) After Driving:
Pull over to a safe location. Refer to “Whenever
You Stop to Use Tire Service Kit” before continuing.
1. Push in the Mode Select Knob (5) and turn to
the Air Mode position.
2. Uncoil the power plug and insert the plug
into the vehicle’s 12 Volt power outlet.
3. Uncoil the Air Pump Hose (7) (black in color)
and screw the fitting at the end of hose (7)
onto the valve stem.
4. Check the pressure in the tire by reading the
Pressure Gauge (3).
If tire pressure is less than 19 psi (1.3 Bar):
The tire is too badly damaged. Do not attempt to
drive the vehicle further. Call for assistance.
If the tire pressure is 19 psi (1.3 Bar) or
higher:
1. Press the Power Button (4) to turn on Tire
Service Kit and inflate the tire to the pressure
indicated on the tire and loading information
label on the driver-side door opening.
NOTE:
If the tire becomes over-inflated, press the
Deflation Button to reduce the tire pressure
to the recommended inflation pressure before continuing.
2. Disconnect the Tire Service Kit from the
valve stem, reinstall the cap on the valve
stem and unplug from 12 Volt outlet.
3. Place the Tire Service Kit in its proper storage area in the vehicle.
4. Have the tire inspected and repaired or
replaced at the earliest opportunity at an
authorized dealer or tire service center.
5. Remove the Speed Limit sticker from the
instrument panel after the tire has been
repaired.
6. Replace the Sealant Bottle (1) and Sealant
Hose (6) assembly at your authorized dealer
as soon as possible. Refer to (F) “Sealant
Bottle and Hose Replacement”.
NOTE:
When having the tire serviced, advise the
authorized dealer or service center that the
tire has been sealed using the Tire Service
Kit.
251
(F) Sealant Bottle And Hose Replacement:
1. Uncoil the Sealant Hose (6) (clear in color).
7. Return the Tire Service Kit to its storage
location in the vehicle.
2. Locate the round Sealant Bottle release button in the recessed area under the sealant
bottle.
WHEEL AND TIRE TORQUE
SPECIFICATIONS
3. Press the Sealant Bottle release button. The
Sealant Bottle (1) will pop up. Remove the
bottle and dispose of it accordingly.
4. Clean any remaining sealant from the Tire
Service Kit housing.
Proper lug nut/bolt torque is very important to
ensure that the wheel is properly mounted to
the vehicle. Any time a wheel has been removed and reinstalled on the vehicle the lug
nuts/bolts should be torqued using a properly
calibrated torque wrench.
5. Position the new Sealant Bottle (1) in the
housing so that the Sealant Hose (6) aligns
with the hose slot in the front of the housing.
Press the bottle into the housing. An audible
click will be heard indicating the bottle is
locked into place.
Torque Specifications
6. Verify that the cap is installed on the fitting at
the end of the Sealant Hose (6) and return
the hose to its storage area (located on the
bottom of the air pump).
**Use only Chrysler recommended lug nuts/
bolts and clean or remove any dirt or oil before
tightening.
252
Inspect the wheel mounting surface prior to
mounting the tire and remove any corrosion or
loose particles.
Lug Nut/
Bolt Torque
**Lug Nut/
Bolt Size
Lug Nut/
Bolt Socket
Size
130 Ft-Lbs
(176 N·m)
M14 x 1.50
22 mm
Wheel Mounting Surface
Tighten the lug nuts/bolts in a star pattern until
each nut/bolt has been tightened twice.
After 25 miles (40 km) check the lug nut/bolt
torque to be sure that all the lug nuts/bolts are
properly seated against the wheel.
JACKING AND TIRE
CHANGING
Torque Patterns
WARNING!
To avoid the risk of forcing the vehicle off the
jack, do not tighten the lug nuts fully until the
vehicle has been lowered. Failure to follow
this warning may result in personal injury.
WARNING!
• Do not attempt to change a tire on the side
of the vehicle close to moving traffic. Pull
far enough off the road to avoid the danger
of being hit when operating the jack or
changing the wheel.
• Being under a jacked-up vehicle is dangerous. The vehicle could slip off the jack and
fall on you. You could be crushed. Never
put any part of your body under a vehicle
that is on a jack. If you need to get under a
raised vehicle, take it to a service center
where it can be raised on a lift.
• Never start or run the engine while the
vehicle is on a jack.
WARNING! (Continued)
• The jack is designed to be used as a tool
for changing tires only. The jack should not
be used to lift the vehicle for service purposes. The vehicle should be jacked on a
firm level surface only. Avoid ice or slippery
areas.
Jack Location/Spare Tire Stowage
The jack and spare tire are both stowed under
an access cover in the trunk. Follow these steps
to access the jack and spare tire.
NOTE:
The spare tire must be removed in order to
access the jack.
1. Open the trunk.
2. Lift the access cover using the pull strap.
(Continued)
253
4. Remove the spare tire.
5. Remove the fastener securing the jack.
WARNING!
A loose tire or jack thrown forward in a
collision or hard stop could endanger the
occupants of the vehicle. Always stow the
jack parts and the spare tire in the places
provided. Have the deflated (flat) tire repaired or replaced immediately.
Preparations For Jacking
Opening The Access Panel
3. Remove the fastener securing the spare tire.
Jack Fastener
6. Remove the jack and lug wrench assembly
from under the spare tire. Turn the jack
screw to the left to loosen the lug wrench,
and remove the wrench from the jack assembly.
1. Park the vehicle on a firm, level surface as
far from the edge of the roadway as possible. Avoid icy or slippery areas.
WARNING!
Do not attempt to change a tire on the side of
the vehicle close to moving traffic, pull far
enough off the road to avoid being hit when
operating the jack or changing the wheel.
2. Turn on the Hazard Warning flasher.
Spare Tire Fastener
254
3. Set the parking brake.
4. Place the shift lever into PARK (automatic
transmission) or 1st gear (manual transmission).
5. Turn OFF the ignition.
6. Block both the front and rear of the wheel
diagonally opposite
of the jacking position. For example, if
changing the right
front tire, block the
left rear wheel.
NOTE:
Passengers
should
not remain in the vehicle when the vehicle is
being jacked.
Jacking And Changing A Tire
WARNING!
Carefully follow these tire changing warnings
to help prevent personal injury or damage to
your vehicle:
• Always park on a firm, level surface as far
from the edge of the roadway as possible
before raising the vehicle.
• Turn on the Hazard Warning flasher.
• Block the wheel diagonally opposite the
wheel to be raised.
• Set the parking brake firmly and set an
automatic transmission in PARK; a manual
transmission in REVERSE.
• Never start or run the engine with the
vehicle on a jack.
• Do not let anyone sit in the vehicle when it
is on a jack.
(Continued)
WARNING! (Continued)
• Do not get under the vehicle when it is on
a jack. If you need to get under a raised
vehicle, take it to a service center where it
can be raised on a lift.
• Only use the jack in the positions indicated
and for lifting this vehicle during a tire
change.
• If working on or near a roadway, be extremely careful of motor traffic.
Jack Warning Label
CAUTION!
Do not attempt to raise the vehicle by jacking
on locations other than those indicated in the
Jacking Instructions for this vehicle.
255
4. Place the jack underneath the lift area that is
closest to the flat tire. Turn the jack screw
clockwise to firmly engage the jack saddle
with the lift area of the sill flange.
NOTE:
If the vehicle is too low for jack placement,
slide the jack on its side and rotate it up into
position.
Jack Engagement Locations
1. Remove the spare tire, jack, and lug wrench.
Rear Jacking Location
2. If equipped with aluminum wheels where the
center cap covers the lug nuts, use the lug
wrench to pry the center cap off carefully
before raising the vehicle.
5. Raise the vehicle just enough to remove the
flat tire and install the spare tire.
3. Before raising the vehicle, use the lug
wrench to loosen, but not remove, the lug
nuts on the wheel with the flat tire. Turn the
lug nuts counterclockwise one turn while the
wheel is still on the ground.
Front Jacking Location
WARNING!
Raising the vehicle higher than necessary
can make the vehicle less stable. It could slip
off the jack and hurt someone near it. Raise
the vehicle only enough to remove the tire.
6. Remove the lug nuts and tire.
7. Mount the spare tire.
256
CAUTION!
Be sure to mount the spare tire with the valve
stem facing outward. The vehicle could be
damaged if the spare tire is mounted incorrectly.
• Refer to “Compact Spare Tire” and to
“Limited-Use Spare” under “Tires—
General Information” in “Starting And Operating” for additional warnings, cautions, and information about the spare
tire, its use, and operation.
8. Install the lug nuts with the cone shaped end
of the lug nut toward the wheel. Lightly
tighten the lug nuts.
WARNING!
To avoid the risk of forcing the vehicle off the
jack, do not tighten the lug nuts fully until the
vehicle has been lowered. Failure to follow
this warning may result in personal injury.
Mounting Spare Tire
NOTE:
• For vehicles so equipped, do not attempt
to install a center cap or wheel cover on
the compact spare.
9. Lower the vehicle to the ground by turning
the jack handle counterclockwise.
11. Stow the jack, tools and flat tire. Make sure
the base of the jack faces the front of the
vehicle before tightening down the fastener.
WARNING!
A loose tire or jack thrown forward in a
collision or hard stop could endanger the
occupants of the vehicle. Always stow the
jack parts and the spare tire in the places
provided. Have the deflated (flat) tire repaired or replaced immediately.
Road Tire Installation
1. Mount the road tire on the axle.
2. Install the remaining lug nuts with the cone
shaped end of the nut toward the wheel.
Lightly tighten the lug nuts.
10. Refer to “Torque Specifications” in this section for proper lug nut torque.
257
WARNING!
To avoid the risk of forcing the vehicle off the
jack, do not tighten the lug nuts fully until the
vehicle has been lowered. Failure to follow
this warning may result in personal injury.
3. Lower the vehicle to the ground by turning
the jack handle counterclockwise.
4. Refer to Torque Table for proper lug nut
torque.
5. After 25 miles (40 km) check the lug nut
torque with a torque wrench to ensure that
all lug nuts are properly seated against the
wheel.
JUMP-STARTING
PROCEDURES
If your vehicle has a discharged battery it can be
jump-started using a set of jumper cables and a
battery in another vehicle or by using a portable
battery booster pack. Jump-starting can be dangerous if done improperly so please follow the
procedures in this section carefully.
258
NOTE:
When using a portable battery booster pack
follow the manufacturer’s operating instructions and precautions.
CAUTION!
Do not use a portable battery booster pack or
any other booster source with a system
voltage greater than 12 Volts or damage to
the battery, starter motor, alternator or electrical system may occur.
Remote Battery Posts Locations
1 — Remote Positive (+) Post
2 — Remote Negative (-) Post
WARNING!
Do not attempt jump-starting if the battery is
frozen. It could rupture or explode and cause
personal injury.
Preparations For Jump-Start
The battery is stored under an access cover in
the trunk. Remote battery posts are located on
the right side of the engine compartment for
jump-starting.
WARNING!
• Take care to avoid the radiator cooling fan
whenever the hood is raised. It can start
anytime the ignition switch is ON. You can
be injured by moving fan blades.
(Continued)
WARNING! (Continued)
• Remove any metal jewelry such as rings,
watch bands and bracelets that could
make an inadvertent electrical contact.
You could be seriously injured.
• Batteries contain sulfuric acid that can
burn your skin or eyes and generate hydrogen gas which is flammable and explosive. Keep open flames or sparks away
from the battery.
1. Set the parking brake, shift into PARK (automatic transmission) or 1st gear (manual
transmission) and place the ignition to
LOCK.
2. Turn off the heater, radio, and all unnecessary electrical accessories.
3. If using another vehicle to jump-start the
battery, park the vehicle within the jumper
cables reach, set the parking brake and
make sure the ignition is OFF.
WARNING!
Do not allow vehicles to touch each other as
this could establish a ground connection and
personal injury could result.
Jump-Starting Procedure
WARNING!
Failure to follow this jump-starting procedure
could result in personal injury or property
damage due to battery explosion.
CAUTION!
Failure to follow these procedures could result in damage to the charging system of the
booster vehicle or the discharged vehicle.
2. Connect the opposite end of the positive (+)
jumper cable to the positive (+) post of the
booster battery.
3. Connect the negative (-) end of the jumper
cable to the negative (-) post of the booster
battery.
4. Connect the opposite end of the negative (-)
jumper cable to the remote negative (-) post
of the vehicle with the discharged battery.
WARNING!
Do not connect the jumper cable to the
negative (-) post of the discharged battery.
The resulting electrical spark could cause
the battery to explode and could result in
personal injury. Only use the specific ground
point, do not use any other exposed metal
parts.
Connecting The Jumper Cables
1. Connect the positive (+) end of the jumper
cable to the remote positive (+) post of the
vehicle with the discharged battery.
5. Start the engine in the vehicle that has the
booster battery, let the engine idle a few
minutes, and then start the engine in the
vehicle with the discharged battery.
259
6. Once the engine is started, remove the
jumper cables in the reverse sequence:
Disconnecting The Jumper Cables
1. Disconnect the negative (-) end of the
jumper cable from the remote negative (-)
post of the vehicle with the discharged battery.
2. Disconnect the opposite end of the negative
(-) jumper cable from the negative (-) post of
the booster battery.
3. Disconnect the positive (+) end of the jumper
cable from the positive (+) post of the
booster battery.
4. Disconnect the opposite end of the positive
(+) jumper cable from the remote positive (+)
post of the vehicle with the discharged battery.
If frequent jump-starting is required to start your
vehicle you should have the battery and charging system inspected at your authorized dealer.
260
CAUTION!
Accessories plugged into the vehicle power
outlets draw power from the vehicle’s battery, even when not in use (i.e., cellular
phones, etc.). Eventually, if plugged in long
enough without engine operation, the vehicle’s battery will discharge sufficiently to degrade battery life and/or prevent the engine
from starting.
FREEING A STUCK VEHICLE
If your vehicle becomes stuck in mud, sand, or
snow, it can often be moved using a rocking
motion. Turn the steering wheel right and left to
clear the area around the front wheels. For
vehicles with automatic transmission, press and
hold the lock button on the shift lever. Then shift
back and forth between DRIVE and REVERSE
(with automatic transmission) or FIRST GEAR
and REVERSE (with manual transmission),
while gently pressing the accelerator. Use the
least amount of accelerator pedal pressure that
will maintain the rocking motion, without spinning the wheels or racing the engine.
NOTE:
For vehicles with automatic transmission:
Shifts between DRIVE and REVERSE can
only be achieved at wheel speeds of 5 mph
(8 km/h) or less. Whenever the transmission
remains in NEUTRAL for more than 2 seconds, you must press the brake pedal to
engage DRIVE or REVERSE.
CAUTION!
Racing the engine or spinning the wheels
may lead to transmission overheating and
failure. Allow the engine to idle with the
transmission in NEUTRAL for at least one
minute after every five rocking-motion
cycles. This will minimize overheating and
reduce the risk of clutch or transmission
failure during prolonged efforts to free a
stuck vehicle.
NOTE:
Press the ⴖESC Offⴖ switch to place the
Electronic Stability Control (ESC) system in
ⴖPartial Offⴖ mode before rocking the vehicle. Refer to “Electronic Brake Control” in
“Starting And Operating” for further information. Once the vehicle has been freed,
press the ⴖESC Offⴖ switch again to restore
ⴖESC Onⴖ mode.
CAUTION!
When “rocking” a stuck vehicle by shifting
between DRIVE / 1ST GEAR and REVERSE, do not spin the wheels faster than
15 mph (24 km/h), or drivetrain damage may
result.
Revving the engine or spinning the wheels
too fast may lead to transmission overheating and failure. It can also damage the tires.
Do not spin the wheels above 30 mph
(48 km/h) while in gear (no transmission
shifting occurring).
WARNING!
Fast spinning tires can be dangerous.
Forces generated by excessive wheel
speeds may cause damage, or even failure,
of the axle and tires. A tire could explode and
injure someone. Do not spin your vehicle’s
wheels faster than 30 mph (48 km/h) or for
longer than 30 seconds continuously without
stopping when you are stuck and do not let
anyone near a spinning wheel, no matter
what the speed.
Tow Eye
Tow Eye Usage Precautions
NOTE:
TOW EYE USAGE
• Ensure that the tow eye is properly seated
and secure in the mounting receptacle.
Your vehicle is equipped with a tow eye that can
be used to tow a disabled vehicle.
• The tow eye is recommended for use with
an approved tow bar and or rope.
When using a tow eye be sure to follow the “Tow
Eye Usage Precautions” and the “Towing A
Disabled Vehicle” instructions in this section.
• Do not use the tow eye to pull the vehicle
onto a flatbed truck.
• Do not use the tow eye to free a stuck
vehicle. Refer to “Freeing A Stuck Vehicle” in this section for further
information.
261
WARNING!
Stand clear of vehicles when pulling with tow
eyes.
• Do not use a chain with a tow eye. Chains
may break, causing serious injury or
death.
• Do not use a tow strap with a tow eye. Tow
straps may break or become disengaged,
causing serious injury or death.
• Failure to follow proper tow eye usage may
cause components to break resulting in
serious injury or death.
Tow Eye Warning Label
CAUTION!
• The tow eye must be used exclusively for
roadside assistance operations. Only use
the tow eye with an appropriate device in
accordance with the highway code (a rigid
bar or rope) to flat tow the vehicle for a
short distance to the nearest service
location.
(Continued)
262
CAUTION! (Continued)
• Tow eyes MUST NOT be used to tow
vehicles off the road or where there are
obstacles.
• In compliance with the above conditions,
towing with a tow eye must take place with
two vehicles (one towing, the other towed)
aligned as much as possible along the
same center line. Damage to your vehicle
may occur if these guidelines are not followed.
Front Tow Eye Installation
The front tow eye receptacle is located behind a
door on the front bumper fascia
To install the tow eye, open the door using the
vehicle key or a small screwdriver, and thread
the tow eye into the receptacle.
Insert the flat end of the jack handle through the
tow eye and tighten, refer to “Jacking and Tire
Changing in Section 6 for information”. The tow
eye must be fully seated to the attaching
bracket through the lower front fascia. If the tow
eye is not fully seated to the attaching bracket,
the vehicle should not be towed.
MANUAL PARK RELEASE — 8
SPEED TRANSMISSION
2. Remove the console storage bin to access
the Manual Park Release lever.
Rear Tow Eye Installation
The rear tow eye receptacle is located behind a
door on the rear bumper fascia.
To install the tow eye, open the door using the
vehicle key or a small screwdriver, and thread
the tow eye into the receptacle.
Insert the flat end of the jack handle through the
tow eye and tighten, refer to “Jacking and Tire
Changing in Section 6 for information”. The tow
eye must be fully seated to the attaching
bracket through the lower front fascia. If the tow
eye is not fully seated to the attaching bracket,
the vehicle should not be towed.
WARNING!
Always secure your vehicle by fully applying
the parking brake, before activating the
Manual Park Release. Activating the Manual
Park Release will allow your vehicle to roll
away if it is not secured by the parking brake
or by proper connection to a tow vehicle.
Activating the Manual Park Release on an
unsecured vehicle could lead to serious injury or death for those in or around the
vehicle.
In order to push or tow the vehicle in cases
where the transmission will not shift out of
PARK (such as a dead battery), a Manual Park
Release is available.
Console Storage Bin
3. Using a small screwdriver or similar tool, fish
the tether strap up through the opening in
the console base.
4. Insert the screwdriver into the slot in the
center of the lever, and disengage the lever
locking tab by pushing it to the right.
Follow these steps to use the Manual Park
Release:
1. Firmly apply the parking brake.
263
4. Tuck the tether strap into the base of the
console. Reinstall the console storage bin.
Locking Tab
5. While holding the locking tab in the disengaged position, pull the tether strap to rotate
the lever up and rearward until it locks in
place in the vertical position. The vehicle is
now out of PARK and can be towed. Release
the parking brake only when the vehicle is
securely connected to a tow vehicle.
Tether Strap
To Reset The Manual Park Release:
1. Push the latch (at the base of the lever, on
the rear side) rearward (away from the lever)
to unlatch the lever.
2. Rotate the Manual Park Release lever forward and down, to its original position, until
the locking tab snaps into place to secure
the lever.
3. Pull up gently on the tether strap to confirm
that the lever is locked in its stowed position.
264
TOWING A DISABLED
VEHICLE
This section describes procedures for towing a
disabled vehicle using a commercial towing
service.
Towing Condition
Wheels OFF The Ground
AUTOMATIC TRANSMISSION
MANUAL TRANSMISSION
NONE
If transmission is operable:
• Transmission in NEUTRAL
• 30 mph (48 km/h) max speed
• 30 miles (48 km) max distance
If transmission is operable:
• Transmission in NEUTRAL
• 65 mph (105 km/h) max speed
Front
NOT ALLOWED
NOT RECOMMENDED
Rear
NOT RECOMMENDED
NOT RECOMMENDED
ALL
BEST METHOD
BEST METHOD
Flat Tow
Wheel Lift or Dolly Tow
Flatbed
Proper towing or lifting equipment is required to
prevent damage to your vehicle. Use only tow
bars and other equipment designed for this
purpose, following equipment manufacturer’s
instructions. Use of safety chains is mandatory.
Attach a tow bar or other towing device to main
structural members of the vehicle, not to bum-
pers or associated brackets. State and local
laws regarding vehicles under tow must be
observed.
If you must use the accessories (wipers, defrosters, etc.) while being towed, the ignition
must be in the ON/RUN position, not the ACC
position.
CAUTION!
• Do not use sling type equipment when
towing. Vehicle damage may occur.
(Continued)
265
CAUTION! (Continued)
• When securing the vehicle to a flatbed
truck, do not attach to front or rear suspension components. Damage to your vehicle
may occur from improper towing.
• The manufacturer does not recommend
towing this vehicle using a tow dolly. Vehicle damage may occur.
Automatic Transmission
The manufacturer recommends towing your vehicle with all four wheels OFF the ground using
a flatbed.
If the transmission is not operable, or the
vehicle must be towed faster than 30 mph
(48 km/h) or farther than 30 miles (48 km),
then the only acceptable method of towing
is with a flatbed truck.
CAUTION!
Towing this vehicle in violation of the above
requirements can cause severe transmission
damage. Damage from improper towing is
not covered under the New Vehicle Limited
Warranty.
If flatbed equipment is not available, and the
transmission is operable, the vehicle may be flat
towed (with all four wheels on the ground) under
the following conditions:
If the key fob is unavailable, or the vehicle’s
battery is discharged, refer to “Manual Park
Release” in this section for instructions on shifting the automatic transmission out of PARK for
towing.
• The transmission must be in NEUTRAL.
Manual Transmission
• The towing distance must not exceed 30
miles (48 km).
The manufacturer recommends towing your vehicle with all four wheels OFF the ground using
a flatbed.
• The towing speed must not exceed 30 mph
(48 km/h).
266
If flatbed equipment is not available, and the
transmission is operable, the vehicle may be flat
towed (with all four wheels on the ground) under
the following conditions:
• The transmission must be in NEUTRAL.
• The towing speed must not exceed 65 mph
(105 km/h).
• There is no limitation on towing distance.
If the transmission is not operable, then the only
acceptable method of towing is with a flatbed
truck.
CAUTION!
Towing this vehicle in violation of the above
requirements can cause severe engine
and/or transmission damage. Damage from
improper towing is not covered under the
New Vehicle Limited Warranty.
7
MAINTAINING YOUR VEHICLE
•
•
•
•
•
•
•
•
ENGINE COMPARTMENT — 3.6L . . . . . . . . . . . . . . . . .
ENGINE COMPARTMENT — 5.7L . . . . . . . . . . . . . . . . .
ENGINE COMPARTMENT — 6.4L (392 HEMI) . . . . . . . . . .
ONBOARD DIAGNOSTIC SYSTEM — OBD II . . . . . . . . . .
• Loose Fuel Filler Cap . . . . . . . . . . . . . . . . . . . . . . .
EMISSIONS INSPECTION AND MAINTENANCE PROGRAMS
REPLACEMENT PARTS . . . . . . . . . . . . . . . . . . . . . . .
DEALER SERVICE . . . . . . . . . . . . . . . . . . . . . . . . . .
MAINTENANCE PROCEDURES . . . . . . . . . . . . . . . . . .
• Engine Oil . . . . . . . . . . . . . . . . . . . . . . . . . . . . . .
• Engine Oil Filter . . . . . . . . . . . . . . . . . . . . . . . . . .
• Engine Air Cleaner Filter . . . . . . . . . . . . . . . . . . . . .
• Maintenance-Free Battery . . . . . . . . . . . . . . . . . . . . .
• Air Conditioner Maintenance . . . . . . . . . . . . . . . . . . .
• Body Lubrication . . . . . . . . . . . . . . . . . . . . . . . . . .
• Windshield Wiper Blades . . . . . . . . . . . . . . . . . . . . .
• Adding Washer Fluid . . . . . . . . . . . . . . . . . . . . . . .
• Exhaust System . . . . . . . . . . . . . . . . . . . . . . . . . .
• Cooling System . . . . . . . . . . . . . . . . . . . . . . . . . .
.
.
.
.
.
.
.
.
.
.
.
.
.
.
.
.
.
.
.
.269
.270
.271
.272
.272
.272
.273
.273
.273
.274
.276
.276
.277
.278
.279
.280
.280
.280
.282
267
•
•
•
•
•
•
•
268
• Brake System . . . . . . . . . . . . . . . . . . . . . . . . . . . . . . .
• Clutch Hydraulic System — Manual Transmission (If Equipped) .
• Manual Transmission — If Equipped . . . . . . . . . . . . . . . . .
• Automatic Transmission — If Equipped . . . . . . . . . . . . . . .
• Rear Axle . . . . . . . . . . . . . . . . . . . . . . . . . . . . . . . . .
• Appearance Care And Protection From Corrosion . . . . . . . . .
FUSES . . . . . . . . . . . . . . . . . . . . . . . . . . . . . . . . . . . . .
• Front Power Distribution Center (Fuses) . . . . . . . . . . . . . . .
• Rear Power Distribution Center (Fuses) . . . . . . . . . . . . . . .
VEHICLE STORAGE . . . . . . . . . . . . . . . . . . . . . . . . . . . .
REPLACEMENT BULBS . . . . . . . . . . . . . . . . . . . . . . . . . .
BULB REPLACEMENT . . . . . . . . . . . . . . . . . . . . . . . . . . .
• Low Beam Headlamp, High Beam Headlamp, Park/Turn Lamp —
Models with Halogen Headlamps — If Equipped . . . . . . . . . . .
• Low Beam Headlamp, High Beam Headlamp, and Park/Turn
Lamp — Models with High Intensity Discharge (HID)
Headlamps — If Equipped . . . . . . . . . . . . . . . . . . . . . . . .
• Front/Rear Side Marker Lamp . . . . . . . . . . . . . . . . . . . . . .
• Tail/Turn And Stop Lamp . . . . . . . . . . . . . . . . . . . . . . . . .
• Center Tail/Backup Lamp . . . . . . . . . . . . . . . . . . . . . . . .
• Center High-Mounted Stop Lamp (CHMSL) . . . . . . . . . . . . . .
• License Lamp . . . . . . . . . . . . . . . . . . . . . . . . . . . . . . .
VEHICLE SPECIFICATIONS . . . . . . . . . . . . . . . . . . . . . . . .
FLUID CAPACITIES . . . . . . . . . . . . . . . . . . . . . . . . . . . .
FLUIDS, LUBRICANTS AND GENUINE PARTS . . . . . . . . . . . .
• Engine . . . . . . . . . . . . . . . . . . . . . . . . . . . . . . . . . . .
• Chassis . . . . . . . . . . . . . . . . . . . . . . . . . . . . . . . . . .
.285
.286
.286
.286
.287
.288
.291
.292
.296
.301
.302
.304
.304
.305
.305
.305
.305
.305
.305
.306
.307
.308
.308
.309
ENGINE COMPARTMENT — 3.6L
1 — Remote Jump Start (Positive Battery Post)
2 — Power Distribution Center (Fuses)
3 — Remote Jump Start (Negative Battery Post)
4 — Engine Oil Dipstick
5 — Brake Fluid Reservoir Access Cover
6 — Engine Coolant Reservoir
7 — Air Cleaner Filter
8 — Engine Oil Fill
9 — Washer Fluid Reservoir
269
ENGINE COMPARTMENT — 5.7L
1 — Remote Jump Start (Positive Battery Post)
2 — Power Distribution Center (Fuses)
3 — Remote Jump Start (Negative Battery Post)
270
4 — Brake Fluid Reservoir Access Cover
5 — Engine Coolant Reservoir
6 — Air Cleaner Filter
7 — Engine Oil Fill
8 — Engine Oil Dipstick
9 — Washer Fluid Reservoir
ENGINE COMPARTMENT — 6.4L (392 HEMI)
1
2
3
4
5
—
—
—
—
—
Remote Jump Start (Positive Battery Post)
Remote Jump Start (Negative Battery Post)
Engine Oil Dipstick
Engine Oil Fill
Brake Fluid Reservoir
6 — Engine Coolant Pressure Cap
7— Engine Coolant Reservoir
8 — Air Cleaner Filter
9 — Power Distribution Center (Fuses)
10 — Washer Fluid Reservoir
271
ONBOARD DIAGNOSTIC
SYSTEM — OBD II
Your vehicle is equipped with a sophisticated
onboard diagnostic system called OBD II. This
system monitors the performance of the emissions, engine, and automatic transmission control systems. When these systems are operating properly, your vehicle will provide excellent
performance and fuel economy, as well as
engine emissions well within current government regulations.
If any of these systems require service, the
OBD II system will turn on the “Malfunction
Indicator Light” (MIL). It will also store diagnostic codes and other information to assist your
service technician in making repairs. Although
your vehicle will usually be drivable and not
need towing, see your authorized dealer for
service as soon as possible.
272
CAUTION!
• Prolonged driving with the MIL on could
cause further damage to the emission control system. It could also affect fuel
economy and driveability. The vehicle
must be serviced before any emissions
tests can be performed.
• If the MIL is flashing while the engine is
running, severe catalytic converter damage and power loss will soon occur. Immediate service is required.
Loose Fuel Filler Cap
If the vehicle diagnostic system determines that
the fuel filler cap is loose, improperly installed,
or damaged, a ”gASCAP” message will display
in the odometer or a “Check Gascap” message
will display in the Driver Information Display
(DID). If this occurs, tighten the fuel filler cap
properly and press the Trip Odometer button to
turn off the message. If the problem continues,
the message will appear the next time the
vehicle is started.
A loose, improperly installed, or damaged fuel
filler cap may also turn on the MIL.
EMISSIONS INSPECTION AND
MAINTENANCE PROGRAMS
In some localities, it may be a legal requirement
to pass an inspection of your vehicle’s emissions control system. Failure to pass could
prevent vehicle registration.
Normally, the OBD II system will be
ready. The OBD II system may not be
ready if your vehicle was recently
serviced, recently had a dead battery
or a battery replacement. If the OBD II system
should be determined not ready for the I/M test,
your vehicle may fail the test.
Your vehicle has a simple ignition actuated test,
which you can use prior to going to the test
station. To check if your vehicle’s OBD II system
is ready, you must do the following:
1. Cycle the ignition switch to the ON position,
but do not crank or start the engine.
NOTE:
If you crank or start the engine, you will have
to start this test over.
2. As soon as you cycle the ignition switch to
the ON position, you will see the Malfunction
Indicator Light (MIL) symbol come on as part
of a normal bulb check.
3. Approximately 15 seconds later, one of two
things will happen:
• The MIL will flash for about 10 seconds and
then return to being fully illuminated until you
turn OFF the ignition or start the engine. This
means that your vehicle’s OBD II system is
not ready and you should not proceed to the
I/M station.
• The MIL will not flash at all and will remain
fully illuminated until you turn OFF the ignition or start the engine. This means that your
vehicle’s OBD II system is ready and you
can proceed to the I/M station.
If your OBD II system is not ready, you should
see your authorized dealer or repair facility. If
your vehicle was recently serviced or had a
battery failure or replacement, you may need to
do nothing more than drive your vehicle as you
normally would in order for your OBD II system
to update. A recheck with the above test routine
may then indicate that the system is now
ready.
Regardless of whether your vehicle’s OBD II
system is ready or not, if the MIL is illuminated
during normal vehicle operation you should
have your vehicle serviced before going to the
I/M station. The I/M station can fail your vehicle
because the MIL is on with the engine running.
REPLACEMENT PARTS
Use of genuine MOPAR® parts for normal/
scheduled maintenance and repairs is highly
recommended to ensure the designed performance. Damage or failures caused by the use
of non-MOPAR® parts for maintenance and
repairs will not be covered by the New Vehicle
Limited Warranty.
form all service operations in an expert manner.
Service Manuals are available which include
detailed service information for your vehicle.
Refer to these Service Manuals before attempting any procedure yourself.
NOTE:
Intentional tampering with emissions control systems may void your warranty and
could result in civil penalties being assessed against you.
WARNING!
You can be badly injured working on or
around a motor vehicle. Only do service work
for which you have the knowledge and the
proper equipment. If you have any doubt
about your ability to perform a service job,
take your vehicle to a competent mechanic.
MAINTENANCE PROCEDURES
DEALER SERVICE
Your authorized dealer has the qualified service
personnel, special tools, and equipment to per-
The pages that follow contain the required
maintenance services determined by the engineers who designed your vehicle.
273
Besides those maintenance items specified in
the fixed “Service and Warranty Handbook”,
there are other components which may require
servicing or replacement in the future.
CAUTION!
• Failure to properly maintain your vehicle or
perform repairs and service when necessary
could result in more costly repairs, damage to
other components or negatively impact vehicle performance. Immediately have potential malfunctions examined by an authorized
dealer or qualified repair center.
• Your vehicle has been built with improved
fluids that protect the performance and
durability of your vehicle and also allow
extended maintenance intervals. Do not
use chemical flushes in these components
as the chemicals can damage your engine,
transmission, power steering or air conditioning. Such damage is not covered by
the New Vehicle Limited Warranty. If a
flush is needed because of component
malfunction, use only the specified fluid for
the flushing procedure.
274
Engine Oil
Checking Oil Level — 3.6L Engine
To assure proper engine lubrication, the engine oil
must be maintained at the correct level. Check the
oil level at regular intervals, such as every fuel stop.
The best time to check the engine oil level is about
five minutes after a fully warmed engine is shut off.
Checking the oil while the vehicle is on level ground
will improve the accuracy of the oil level readings.
Maintain the oil level between the MIN and MAX
markings on the dipstick. Adding 1.0 qt (1.0 L) of oil
when the reading is at the MIN mark will result in a
MAX reading on these engines.
CAUTION!
Overfilling or underfilling will cause oil aeration or loss of oil pressure. This could damage your engine.
Checking Oil Level — 5.7L Engine
To assure proper engine lubrication, the engine
oil must be maintained at the correct level.
Check the oil level at regular intervals, such as
every fuel stop. The best time to check the
engine oil level is about five minutes after a fully
warmed engine is shut off.
Checking the oil while the vehicle is on level
ground will improve the accuracy of the oil level
readings. Maintain the oil level in the “SAFE”
range. Adding 1.0 qt (1.0 L) of oil when the
reading is at the bottom of the “SAFE” range will
result in an oil level at the top of the “SAFE”
range on these engines.
CAUTION!
Overfilling or underfilling will cause oil aeration or loss of oil pressure. This could damage your engine.
Change Engine Oil
Refer to “Service and Warranty Handbook” for
the proper maintenance intervals.
Engine Oil Selection — 3.6L & 5.7L
For best performance and maximum protection
under all types of operating conditions, the
manufacturer only recommends engine oils that
are API certified and meet the requirements of
Chrysler Material Standard MS-6395 or ACEA
A1/B1.
Engine Oil Selection — 6.4L Engine
For best performance and maximum protection
under all types of operating conditions, the
manufacturer only recommends full synthetic
engine oils that meet the American Petroleum
Institute (API) categories of SN.
The manufacturer recommends the use of a full
synthetic SAE 0W-40 engine oil or equivalent
meeting the requirements of Chrysler Material
Standard MS-12633.
CAUTION!
Do not use chemical flushes in your engine
oil as the chemicals can damage your engine. Such damage is not covered by the
New Vehicle Limited Warranty.
American Petroleum Institute (API) Engine
Oil Identification Symbol
This
symbol
means that the oil
has been certified
by the American
Petroleum Institute
(API). The manufacturer only recommends
API
Certified engine
oils.
CAUTION!
Do not use chemical flushes in your engine
oil as the chemicals can damage your engine. Such damage is not covered by the
New Vehicle Limited Warranty.
Engine Oil Viscosity — 3.6L Engine
MOPAR® SAE 5W-20 engine oil or equivalent
Pennzoil® or Shell Helix® is recommended for
all operating temperatures. This engine oil improves low temperature starting and vehicle fuel
economy.
The engine oil filler cap also shows the recommended engine oil viscosity for your vehicle.
For information on engine oil filler cap location,
refer to “Engine Compartment” in “Maintaining
Your Vehicle” for further information.
MOPAR® SAE 5W-30 engine oil approved to
Chrysler MS-6395 such as Pennzoil® or Shell
Helix® may be used when SAE 5W-20 engine
oil meeting MS-6395 is not available.
Engine Oil Viscosity — 5.7L Engine
MOPAR® SAE 5W-20 engine oil or equivalent
such as Pennzoil® or Shell Helix® is recommended for all operating temperatures. This
engine oil improves low temperature starting
and vehicle fuel economy.
The engine oil filler cap also shows the recommended engine oil viscosity for your engine. For
information on engine oil filler cap location, refer
to “Engine Compartment” in “Maintaining Your
Vehicle” for further information.
275
NOTE:
Vehicles equipped with a 5.7L engine must
use SAE 5W-20 oil. Failure to do so may
result in improper operation of the Fuel
Saver Technology. Refer to “Fuel Saver
Technology – If Equipped” in “Starting and
Operating” for further information.
Lubricants that do not have both, the engine oil
certification mark and the correct SAE viscosity
grade number should not be used.
Engine Oil Viscosity — 6.4L Engine
Use Pennzoil Ultra™ 0W-40 engine or equivalent MOPAR® oil meeting the Chrysler Material
Standard MS-12633 for use in all operating
temperatures.
The engine oil filler cap also shows the recommended engine oil viscosity for your engine. For
information on engine oil filler cap location, refer
to “Engine Compartment” in “Maintaining Your
Vehicle” for further information.
Synthetic Engine Oils
You may use synthetic engine oils provided the
recommended oil quality requirements are met,
and the recommended maintenance intervals
for oil and filter changes are followed.
276
Materials Added To Engine Oil
The manufacturer strongly recommends
against the addition of any additives (other than
leak detection dyes) to the engine oil. Engine oil
is an engineered product and its performance
may be impaired by supplemental additives.
Disposing Of Used Engine Oil And Oil
Filters
Care should be taken in disposing of used
engine oil and oil filters from your vehicle. Used
oil and oil filters, indiscriminately discarded, can
present a problem to the environment. Contact
your authorized dealer, service station or governmental agency for advice on how and where
used oil and oil filters can be safely discarded in
your area.
Engine Oil Filter
The engine oil filter should be replaced with a
new filter at every engine oil change.
Engine Oil Filter Selection
This manufacturer’s engines have a full-flow
type oil filter. Use a filter of this type for replacement. The quality of replacement filters varies
considerably. Only high quality filters should be
used to assure most efficient service. MOPAR®
engine oil filters are a high quality oil filter and
are recommended.
Engine Air Cleaner Filter
Refer to the “Service and Warranty Handbook”
for the proper maintenance intervals.
WARNING!
The air induction system (air cleaner, hoses,
etc.) can provide a measure of protection in
the case of engine backfire. Do not remove
the air induction system (air cleaner, hoses,
etc.) unless such removal is necessary for
repair or maintenance. Make sure that no
one is near the engine compartment before
starting the vehicle with the air induction
system (air cleaner, hoses, etc.) removed.
Failure to do so can result in serious personal injury.
Engine Air Cleaner Filter Selection
The quality of replacement engine air cleaner
filters varies considerably. Only high quality
filters should be used to assure most efficient
service. MOPAR® engine air cleaner filters are
a high quality filter and are recommended.
WARNING! (Continued)
other booster source with an output
greater than 12 Volts. Do not allow cable
clamps to touch each other.
• Battery posts, terminals, and related accessories contain lead and lead compounds. Wash hands after handling.
• The battery in this vehicle has a vent hose
that should not be disconnected and
should only be replaced with a battery of
the same type (vented).
Maintenance-Free Battery
Your vehicle is equipped with a maintenancefree battery. You will never have to add water,
nor is periodic maintenance required.
NOTE:
The battery is stored under an access cover
in the trunk. Remote battery terminals are
located in the engine compartment for jumpstarting. Refer to “Jump-Starting Procedures” in “What To Do In Emergencies” for
further information.
Battery Location
WARNING!
• Battery fluid is a corrosive acid solution
and can burn or even blind you. Do not
allow battery fluid to contact your eyes,
skin, or clothing. Do not lean over a battery
when attaching clamps. If acid splashes in
eyes or on skin, flush the area immediately
with large amounts of water.
• Battery gas is flammable and explosive.
Keep flame or sparks away from the battery. Do not use a booster battery or any
(Continued)
CAUTION!
• It is essential when replacing the cables on
the battery that the positive cable is attached to the positive post and the negative cable is attached to the negative post.
Battery posts are marked positive (+) and
negative (-) and are identified on the battery case. Cable clamps should be tight on
the terminal posts and free of corrosion.
(Continued)
277
CAUTION! (Continued)
• If a “fast charger” is used while the battery
is in the vehicle, disconnect both vehicle
battery cables before connecting the charger to the battery. Do not use a “fast
charger” to provide starting voltage.
Air Conditioner Maintenance
For best possible performance, your air conditioner should be checked and serviced by an
authorized dealer at the start of each warm
season. This service should include cleaning of
the condenser fins and a performance test.
Drive belt tension should also be checked at
this time.
WARNING!
• Use only refrigerants and compressor lubricants approved by the manufacturer for your
air conditioning system. Some unapproved
refrigerants are flammable and can explode,
injuring you. Other unapproved refrigerants or
(Continued)
278
WARNING! (Continued)
lubricants can cause the system to fail, requiring costly repairs. Refer to Warranty Information Book, located on the DVD, for further
warranty information.
CAUTION!
Do not use chemical flushes in your air
conditioning system as the chemicals can
damage your air conditioning components.
Such damage is not covered by the New
Vehicle Limited Warranty.
Refrigerant Recovery And Recycling R134a
— If Equipped
R-134a Air Conditioning Refrigerant is a hydrofluorocarbon (HFC) that is endorsed by the
Environmental Protection Agency and is an
ozone-saving product. However, the manufacturer recommends that air conditioning service
be performed by authorized dealer or other
service facilities using recovery and recycling
equipment.
NOTE:
Use only manufacturer approved A/C system PAG compressor oil and refrigerants.
Refrigerant Recovery And Recycling HFO
1234yf — If Equipped
HFO 1234yf Air Conditioning Refrigerant is a
hydrofluorocarbon (HFC) that is endorsed by
the Environmental Protection Agency and is an
ozone-saving product with a low GWP (Global
Warming Potential). However, the manufacturer
recommends that air conditioning service be
performed by authorized dealer or other service
facilities using recovery and recycling equipment.
NOTE:
Use only manufacturer approved A/C system PAG compressor oil and refrigerants.
A/C Air Filter
The filter is located in the fresh air inlet under
the hood, behind a removable panel in the cowl
on the passenger side of the vehicle, next to the
windshield wipers. When installing a new filter,
ensure its proper orientation.
1. Remove the access door in the cowl screen
by pressing the retaining clips.
Filter Access Cover
Access Door
2. Unsnap both ends and lift the filter access
cover.
A/C Air Filter
3. Remove the used filter.
5. Close the filter access cover.
4. Install the new filter with arrows pointing in
the direction of airflow, which is toward the
rear of the vehicle (text and arrows on the
filter will indicate this).
Refer to the “Service and Warranty Handbook”
for the proper maintenance intervals.
Body Lubrication
Locks and all body pivot points, including such
items as seat tracks, door hinge pivot points
and rollers, liftgate, tailgate, decklid, sliding
doors and hood hinges, should be lubricated
periodically with a lithium based grease, such
as MOPAR® Spray White Lube to assure quiet,
easy operation and to protect against rust and
wear. Prior to the application of any lubricant,
the parts concerned should be wiped clean to
279
remove dust and grit; after lubricating excess oil
and grease should be removed. Particular attention should also be given to hood latching
components to ensure proper function. When
performing other underhood services, the hood
latch, release mechanism and safety catch
should be cleaned and lubricated.
The external lock cylinders should be lubricated
twice a year, preferably in the Fall and Spring.
Apply a small amount of a high quality lubricant,
such as MOPAR® Lock Cylinder Lubricant directly into the lock cylinder.
Windshield Wiper Blades
Clean the rubber edges of the wiper blades and
the windshield periodically with a sponge or soft
cloth and a mild nonabrasive cleaner. This will
remove accumulations of salt or road film.
Operation of the wipers on dry glass for long
periods may cause deterioration of the wiper
blades. Always use washer fluid when using the
wipers to remove salt or dirt from a dry windshield.
Avoid using the wiper blades to remove frost or
ice from the windshield. Keep the blade rubber
280
out of contact with petroleum products such as
engine oil, gasoline, etc.
range of your climate. This rating information
can be found on most washer fluid containers.
NOTE:
Life expectancy of wiper blades varies depending on geographical area and frequency of use. Poor performance of blades
may be present with chattering, marks, water lines or wet spots. If any of these conditions are present, clean the wiper blades or
replace as necessary.
The fluid reservoir will hold nearly 1 gal (4 L) of
washer fluid when the message “Low Washer
Fluid” appears in the Driver Information Display
(DID).
Adding Washer Fluid
The windshield washer fluid reservoir is located
in the front of the engine compartment. Be sure
to check the fluid level at regular intervals. Fill
the reservoir with windshield washer solvent
(not radiator antifreeze) and operate the system
for a few seconds to flush out the residual water.
When refilling the washer fluid reservoir, apply
some washer fluid to a cloth or towel and wipe
the wiper blades clean. This will help blade
performance.
To prevent freeze-up of your windshield washer
system in cold weather, select a solution or
mixture that meets or exceeds the temperature
WARNING!
Commercially available windshield washer
solvents are flammable. They could ignite
and burn you. Care must be exercised when
filling or working around the washer solution.
Exhaust System
The best protection against carbon monoxide
entry into the vehicle body is a properly maintained engine exhaust system.
If you notice a change in the sound of the
exhaust system; or if the exhaust fumes can be
detected inside the vehicle; or when the underside or rear of the vehicle is damaged; have an
authorized technician inspect the complete exhaust system and adjacent body areas for broken, damaged, deteriorated, or mispositioned
parts. Open seams or loose connections could
permit exhaust fumes to seep into the passenger compartment. In addition, have the exhaust
system inspected each time the vehicle is
raised for lubrication or oil change. Replace as
required.
WARNING!
• Exhaust gases can injure or kill. They
contain carbon monoxide (CO), which is
colorless and odorless. Breathing it can
make you unconscious and can eventually
poison you. To avoid breathing CO, refer to
“Safety Tips/Exhaust Gas” in “Things To
Know Before Starting Your Vehicle” for
further information.
• A hot exhaust system can start a fire if you
park over materials that can burn. Such
materials might be grass or leaves coming
into contact with your exhaust system. Do
not park or operate your vehicle in areas
where your exhaust system can contact
anything that can burn.
CAUTION!
• The catalytic converter requires the use of
unleaded fuel only. Leaded gasoline will
destroy the effectiveness of the catalyst as
an emissions control device and may seriously reduce engine performance and
cause serious damage to the engine.
• Damage to the catalytic converter can
result if your vehicle is not kept in proper
operating condition. In the event of engine
malfunction, particularly involving engine
misfire or other apparent loss of performance, have your vehicle serviced
promptly. Continued operation of your vehicle with a severe malfunction could
cause the converter to overheat, resulting
in possible damage to the converter and
vehicle.
Under normal operating conditions, the catalytic
converter will not require maintenance. However, it is important to keep the engine properly
tuned to assure proper catalyst operation and
prevent possible catalyst damage.
NOTE:
Intentional tampering with emissions control systems can result in civil penalties
being assessed against you.
In unusual situations involving grossly malfunctioning engine operation, a scorching odor may
suggest severe and abnormal catalyst overheating. If this occurs, stop the vehicle, turn off
the engine and allow it to cool. Service, including a tune-up to manufacturer’s specifications,
should be obtained immediately.
To minimize the possibility of catalytic converter
damage:
• Do not shut off the engine or interrupt the
ignition, when the transmission is in gear and
the vehicle is in motion.
• Do not try to start the engine by pushing or
towing the vehicle.
• Do not idle the engine with any spark plug
wires disconnected or removed, such as
when diagnostic testing, or for prolonged
periods during very rough idle or malfunctioning operating conditions.
281
Cooling System
WARNING!
• When working near the radiator cooling
fan, disconnect the fan motor lead or place
the ignition in the LOCK position (OFF
position for Keyless Enter-N-Go™). The
fan is temperature controlled and can start
at any time the ignition switch is in the ON
position (RUN position for Keyless EnterN-Go™).
• You or others can be badly burned by hot
engine coolant (antifreeze) or steam from
your radiator. If you see or hear steam
coming from under the hood, do not open
the hood until the radiator has had time to
cool. Never try to open a cooling system
pressure cap when the radiator is hot.
Coolant Checks
Check engine coolant (antifreeze) protection
every 12 months (before the onset of freezing
weather, where applicable). If coolant is dirty or
rusty in appearance, the system should be
282
drained, flushed, and refilled with fresh coolant.
Check the front of the radiator for any accumulation of bugs, leaves, etc. If dirty, clean by
gently spraying water from a garden hose vertically down the face of the condenser.
Check the coolant recovery bottle tubing for
brittle rubber, cracking, tears, cuts, and tightness of the connection at the bottle and radiator.
Inspect the entire system for leaks.
With the engine at normal operating temperature (but not running), check the cooling system
pressure cap for proper vacuum sealing by
draining a small amount of coolant from the
radiator drain cock. If the cap is sealing properly, the engine coolant (antifreeze) will begin to
drain from the coolant recovery bottle. DO NOT
REMOVE THE COOLANT PRESSURE CAP
WHEN THE COOLING SYSTEM IS HOT.
Cooling System — Drain Flush And Refill
If the engine coolant (antifreeze) is dirty or
contains a considerable amount of sediment,
clean and flush with a reliable cooling system
cleaner. Follow with a thorough rinsing to remove all deposits and chemicals. Properly dispose of old engine coolant (antifreeze).
Refer to the “Service and Warranty Handbook”
for the proper maintenance intervals.
Selection Of Coolant
Refer to “Fluids, Lubricants, and Genuine Parts”
in “Maintaining Your Vehicle” for further
information.
CAUTION!
• Mixing of engine coolant (antifreeze) other
than specified Organic Additive Technology (OAT) engine coolant (antifreeze),
may result in engine damage and may
decrease corrosion protection. Organic
Additive Technology (OAT) engine coolant
is different and should not be mixed with
Hybrid Organic Additive Technology
(HOAT) engine coolant (antifreeze) or any
“globally compatible” coolant (antifreeze).
If a non-OAT engine coolant (antifreeze) is
introduced into the cooling system in an
emergency, the cooling system will need to
be drained, flushed, and refilled with fresh
(Continued)
CAUTION! (Continued)
OAT coolant (conforming to MS.90032), by
an authorized dealer as soon as possible.
• Do not use water alone or alcohol-based
engine coolant (antifreeze) products. Do
not use additional rust inhibitors or antirust
products, as they may not be compatible
with the radiator engine coolant and may
plug the radiator.
• This vehicle has not been designed for use
with propylene glycol-based engine coolant (antifreeze). Use of propylene glycolbased engine coolant (antifreeze) is not
recommended.
Adding Coolant
Your vehicle has been built with an improved
engine coolant (OAT coolant conforming to
MS.90032) that allows extended maintenance
intervals. This engine coolant (antifreeze) can
be used up to ten years or 150,000 miles
(240,000 km) before replacement. To prevent
reducing this extended maintenance period, it is
important that you use the same engine coolant
(OAT coolant conforming to MS.90032)
throughout the life of your vehicle.
Please review these recommendations for using Organic Additive Technology (OAT) engine
coolant (antifreeze) that meets the requirements of Chrysler Material Standard MS.90032.
When adding engine coolant (antifreeze):
• We recommend using MOPAR® Antifreeze/
Coolant 10 Year/150,000 Mile Formula OAT
(Organic Additive Technology) that meets the
requirements of Chrysler Material Standard
MS.90032.
• Mix a minimum solution of 50% OAT engine
coolant that meets the requirements of
Chrysler Material Standard MS.90032 and
distilled water. Use higher concentrations
(not to exceed 70%) if temperatures below
−34° F (−37° C) are anticipated.
• Use only high purity water such as distilled or
deionized water when mixing the water/
engine coolant (antifreeze) solution. The use
of lower quality water will reduce the amount
of corrosion protection in the engine cooling
system.
Please note that it is the owner’s responsibility
to maintain the proper level of protection
against freezing according to the temperatures
occurring in the area where the vehicle is operated.
NOTE:
• Some vehicles require special tools to
add coolant properly. Failure to fill these
systems properly could lead to severe
internal engine damage. If any coolant is
needed to be added to the system please
contact your local authorized dealer.
• Mixing engine coolant (antifreeze) types
is not recommended and can result in
cooling system damage. If HOAT and OAT
coolant are mixed in an emergency, have
a authorized dealer drain, flush, and refill
with OAT coolant (conforming to
MS.90032) as soon as possible.
Cooling System Pressure Cap
The cap must be fully tightened to prevent loss
of engine coolant (antifreeze), and to ensure
that engine coolant (antifreeze) will return to the
radiator from the coolant recovery bottle.
283
The cap should be inspected and cleaned if
there is any accumulation of foreign material on
the sealing surfaces.
WARNING!
• The warning words “DO NOT OPEN HOT”
on the cooling system pressure cap are a
safety precaution. Never add engine coolant (antifreeze) when the engine is overheated. Do not loosen or remove the cap
to cool an overheated engine. Heat causes
pressure to build up in the cooling system.
To prevent scalding or injury, do not remove the pressure cap while the system is
hot or under pressure.
• Do not use a pressure cap other than the
one specified for your vehicle. Personal
injury or engine damage may result.
Disposal Of Used Engine Coolant
Used ethylene glycol-based engine coolant (antifreeze) is a regulated substance requiring
proper disposal. Check with your local authorities to determine the disposal rules for your
284
community. To prevent ingestion by animals or
children, do not store ethylene glycol-based
engine coolant in open containers or allow it to
remain in puddles on the ground. If ingested by
a child or pet, seek emergency assistance
immediately. Clean up any ground spills immediately.
Coolant Level
The coolant bottle provides a quick visual
method for determining that the engine coolant
(antifreeze) level is adequate. With the engine
OFF and cold, the level of the engine coolant
(antifreeze) in the bottle should be between the
ranges indicated on the bottle.
The radiator normally remains completely full,
so there is no need to remove the radiator cap
unless checking for engine coolant (antifreeze)
freeze point or replacing engine coolant (antifreeze). Advise your service attendant of this.
As long as the engine operating temperature is
satisfactory, the coolant bottle need only be
checked once a month.
When additional engine coolant (antifreeze) is
needed to maintain the proper level, it should be
added to the coolant bottle. Do not overfill.
Points To Remember
NOTE:
When the vehicle is stopped after a few
miles/kilometers of operation, you may observe vapor coming from the front of the
engine compartment. This is normally a result of moisture from rain, snow, or high
humidity accumulating on the radiator and
being vaporized when the thermostat opens,
allowing hot engine coolant (antifreeze) to
enter the radiator.
If an examination of your engine compartment
shows no evidence of radiator or hose leaks,
the vehicle may be safely driven. The vapor will
soon dissipate.
• Do not overfill the coolant expansion bottle.
• Check the coolant freeze point in the radiator
and in the coolant expansion bottle. If engine
coolant (antifreeze) needs to be added, the
contents of the coolant expansion bottle must
also be protected against freezing.
• If frequent engine coolant (antifreeze) additions are required, the cooling system should
be pressure tested for leaks.
• Maintain engine coolant (antifreeze) concentration at a minimum of 50% OAT coolant
(conforming to MS.90032) and distilled water
for proper corrosion protection of your engine
which contains aluminum components.
• Make sure that the coolant expansion bottle
overflow hoses are not kinked or obstructed.
• Keep the front of the radiator clean. If your
vehicle is equipped with air conditioning,
keep the front of the condenser clean.
• Do not change the thermostat for Summer or
Winter operation. If replacement is ever necessary, install ONLY the correct type thermostat.
Other designs may result in unsatisfactory engine coolant (antifreeze) performance, poor gas
mileage, and increased emissions.
Brake System
In order to assure brake system performance,
all brake system components should be inspected periodically. Refer to the “Service and
Warranty Handbook” for the proper maintenance intervals.
WARNING!
Riding the brakes can lead to brake failure
and possibly a collision. Driving with your
foot resting or riding on the brake pedal can
result in abnormally high brake temperatures, excessive lining wear, and possible
brake damage. You would not have your full
braking capacity in an emergency.
Master Cylinder — Brake Fluid Level
Check
Check the fluid level in the master cylinder
immediately if the brake system warning light
indicates system failure.
Check the fluid level in the master cylinder when
performing underhood services.
Clean the top of the master cylinder area before
removing the cap. Add fluid to bring the level up
to the “MAX” mark on the side of the master
cylinder reservoir.
Overfilling of fluid is not recommended because
it may cause leaking in the system.
Add enough fluid to bring the level up to the
requirements described on the brake fluid reservoir. With disc brakes, fluid level can be
expected to fall as the brake pads wear. However, low fluid level may be caused by a leak
and a checkup may be needed.
Use only manufacturer’s recommended brake
fluid. Refer to “Fluids, Lubricants, and Genuine
Parts” in “Maintaining Your Vehicle” for further
information.
WARNING!
• Use only manufacturer’s recommended
brake fluid. Refer to “Fluids, Lubricants,
and Genuine Parts” in “Maintaining Your
Vehicle” for further information. Using the
wrong type of brake fluid can severely
damage your brake system and/or impair
its performance. The proper type of brake
fluid for your vehicle is also identified on
the original factory installed hydraulic master cylinder reservoir.
(Continued)
285
WARNING! (Continued)
• To avoid contamination from foreign matter
or moisture, use only new brake fluid or
fluid that has been in a tightly closed
container. Keep the master cylinder reservoir cap secured at all times. Brake fluid in
a open container absorbs moisture from
the air resulting in a lower boiling point.
This may cause it to boil unexpectedly
during hard or prolonged braking, resulting
in sudden brake failure. This could result in
a collision.
• Overfilling the brake fluid reservoir can
result in spilling brake fluid on hot engine
parts, causing the brake fluid to catch fire.
Brake fluid can also damage painted and
vinyl surfaces, care should be taken to
avoid its contact with these surfaces.
• Do not allow petroleum based fluid to
contaminate the brake fluid. Brake seal
components could be damaged, causing
partial or complete brake failure. This
could result in a collision.
286
Clutch Hydraulic System — Manual
Transmission (If Equipped)
The clutch hydraulic system is fed by a segregated volume of fluid within the brake system
master cylinder reservoir. In the event of leakage or wear, use only the manufacturer’s recommended brake fluid. Refer to “Fluids, Lubricants, and Genuine Parts” in “Maintaining Your
Vehicle” for further information.
Manual Transmission — If Equipped
Fluid Level Check
Check the fluid level by removing the fill plug on
the left side of the transmission. The fluid level
should be 1/4 inch (6.4mm) below the bottom of
the fill hole. Add fluid, if necessary, to maintain
the proper level. Refer to “Fluids, Lubricants,
and Genuine Parts” in “Maintaining Your Vehicle” for further information.
CAUTION!
Using a transmission fluid other than the
manufacturer’s recommended fluid may
cause deterioration in transmission shift
quality and/or damage to the transmission.
Refer to “Fluids, Lubricants, and Genuine
Parts” in this section for fluid specifications.
Change Transmission Fluid
If contaminated with water, change the fluid
immediately. See your authorized dealer for
service.
Refer to the “Service and Warranty Notebook”
for the proper maintenance intervals.
Automatic Transmission — If
Equipped
Selection Of Lubricant
It is important to use the proper transmission
fluid to ensure optimum transmission performance and life. Use only the manufacturer’s
specified transmission fluid. Refer to “Fluids,
Lubricants, and Genuine Parts” in this section
for fluid specifications. It is important to maintain
the transmission fluid at the correct level using
the recommended fluid. No chemical flushes
should be used in any transmission; only the
approved lubricant should be used.
CAUTION!
Using a transmission fluid other than the
manufacturer’s recommended fluid may
cause deterioration in transmission shift
quality and/or torque converter shudder. Refer to “Fluids, Lubricants, and Genuine Parts”
in this section for fluid specifications.
Special Additives
The manufacturer strongly recommends
against using any special additives in the transmission.
Automatic Transmission Fluid (ATF) is an engineered product and its performance may be
impaired by supplemental additives. Therefore,
do not add any fluid additives to the transmission. The only exception to this policy is the use
of special dyes for diagnosing fluid leaks. Avoid
using transmission sealers as they may adversely affect seals.
CAUTION!
Do not use chemical flushes in your transmission as the chemicals can damage your
transmission components. Such damage is
not covered by the New Vehicle Limited
Warranty.
Fluid Level Check
The fluid level is preset at the factory and does
not require adjustment under normal operating
conditions. Routine fluid level checks are not
required, therefore the transmission has no
dipstick. Your authorized dealer can check your
transmission fluid level using special service
tools.
If you notice fluid leakage or transmission malfunction, visit your authorized dealer immediately to have the transmission fluid level
checked. Operating the vehicle with an improper fluid level can cause severe transmission damage.
CAUTION!
If a transmission fluid leak occurs, visit your
authorized dealer immediately. Severe transmission damage may occur. Your authorized
dealer has the proper tools to adjust the fluid
level accurately.
Fluid And Filter Changes
Under normal operating conditions, the fluid
installed at the factory will provide satisfactory
lubrication for the life of the vehicle.
Routine fluid and filter changes are not required. However, change the fluid and filter if
the fluid becomes contaminated (with water,
etc.), or if the transmission is disassembled for
any reason.
Rear Axle
Fluid Level Check
Checking the fluid level while the vehicle is on
level ground and has been stationary for 15
minutes will improve the accuracy of the fluid
level reading.
287
Check the fluid level by removing the fill plug on
the axle. The fluid level should be 1-2.5mm
below the fill plug. Add fluid, if necessary, to
maintain the proper level. Refer to “Fluids,
Lubricants, and Genuine Parts” in “Maintaining
Your Vehicle” for further information.
Change Axle Fluid
Refer to the “Service and Warranty Handbook”
for the proper maintenance intervals.
Appearance Care And Protection
From Corrosion
Protection Of Body And Paint From
Corrosion
Vehicle body care requirements vary according
to geographic locations and usage. Chemicals
that make roads passable in snow and ice, and
chemicals that are sprayed on trees and road
surfaces during other seasons, are highly corrosive to the metal in your vehicle. Outside
parking, which exposes your vehicle to airborne
contaminants, road surfaces on which the vehicle is operated, extreme hot or cold weather
and other extreme conditions will have an adverse effect on paint, metal trim, and underbody
protection.
288
The following maintenance recommendations
will enable you to obtain maximum benefit from
the corrosion resistance built into your vehicle.
What Causes Corrosion?
Corrosion is the result of deterioration or removal of paint and protective coatings from your
vehicle.
• Use a high quality cleaner wax, such as
MOPAR® Cleaner Wax to remove road film,
stains and to protect your paint finish. Take
care never to scratch the paint.
• Avoid using abrasive compounds and power
buffing that may diminish the gloss or thin out
the paint finish.
The most common causes are:
• Road salt, dirt and moisture accumulation.
• Stone and gravel impact.
• Insects, tree sap and tar.
• Salt in the air near seacoast localities.
• Atmospheric fallout/industrial pollutants.
Washing
• Wash your vehicle regularly. Always wash
your vehicle in the shade using MOPAR®
Car Wash, or a mild car wash soap, and rinse
the panels completely with clear water.
• If insects, tar, or other similar deposits have
accumulated on your vehicle, use MOPAR®
Super Kleen Bug and Tar Remover to
remove.
CAUTION!
• Do not use abrasive or strong cleaning
materials such as steel wool or scouring
powder that will scratch metal and painted
surfaces.
• Use of power washers exceeding 1,200
psi (8 274 kPa) can result in damage or
removal of paint and decals.
Special Care
• If you drive on salted or dusty roads or if you
drive near the ocean, hose off the undercarriage at least once a month.
• It is important that the drain holes in the lower
edges of the doors, rocker panels, and trunk
be kept clear and open.
• If you detect any stone chips or scratches in
the paint, touch them up immediately. The
cost of such repairs is considered the responsibility of the owner.
• If your vehicle is damaged due to a collision
or similar cause that destroys the paint and
protective coating, have your vehicle repaired as soon as possible. The cost of such
repairs is considered the responsibility of the
owner.
• If you carry special cargo such as chemicals,
fertilizers, de-icer salt, etc., be sure that such
materials are well packaged and sealed.
• If a lot of driving is done on gravel roads,
consider mud or stone shields behind each
wheel.
• Use MOPAR® Touch Up Paint on scratches
as soon as possible. Your authorized dealer
has touch up paint to match the color of your
vehicle.
Wheel And Wheel Trim Care
• All wheels and wheel trim, especially aluminum and chrome plated wheels, should be
cleaned regularly with a mild soap and water
to prevent corrosion.
• To remove heavy soil and/or excessive brake
dust, use MOPAR® Wheel Cleaner.
NOTE:
If your vehicle is equipped with Dark Vapor
or Black Satin Chrome wheels DO NOT USE
wheel cleaners, abrasives or polishing compounds. They will permanently damage this
finish and such damage is not covered by
the New Vehicle Limited Warranty. USE
ONLY MILD SOAP AND WATER WITH A
SOFT CLOTH. Used on a regular basis this is
all that is required to maintain this finish.
CAUTION!
Do not use scouring pads, steel wool, a
bristle brush, or metal polishes. Do not use
CAUTION! (Continued)
oven cleaner. These products may damage
the wheel’s protective finish. Avoid automatic
car washes that use acidic solutions or harsh
brushes that may damage the wheel’s protective finish. Only MOPAR® Wheel Cleaner
or equivalent is recommended.
Stain Repel Fabric Cleaning Procedure —
If Equipped
Stain Repel seats may be cleaned in the following manner:
• Remove as much of the stain as possible by
blotting with a clean, dry towel.
• Blot any remaining stain with a clean, damp
towel.
• For tough stains, apply MOPAR® Total
Clean, or a mild soap solution to a clean,
damp cloth and remove stain. Use a fresh,
damp towel to remove soap residue.
(Continued)
289
• For grease stains, apply MOPAR® MultiPurpose Cleaner to a clean, damp cloth and
remove stain. Use a fresh, damp towel to
remove soap residue.
• Do not use any harsh solvents or any other
form of protectants on Stain Repel products.
Interior Care
Use MOPAR® Total Clean to clean fabric upholstery and carpeting.
Use MOPAR® Total Clean to clean vinyl upholstery.
MOPAR® Total Clean is specifically recommended for leather upholstery.
Your leather upholstery can be best preserved
by regular cleaning with a damp soft cloth.
Small particles of dirt can act as an abrasive
and damage the leather upholstery and should
be removed promptly with a damp cloth. Stubborn soils can be removed easily with a soft
cloth and MOPAR® Total Clean. Care should be
taken to avoid soaking your leather upholstery
with any liquid. Please do not use polishes, oils,
cleaning fluids, solvents, detergents, or
ammonia-based cleaners to clean your leather
290
upholstery. Application of a leather conditioner
is not required to maintain the original condition.
WARNING!
Do not use volatile solvents for cleaning
purposes. Many are potentially flammable,
and if used in closed areas they may cause
respiratory harm.
CAUTION!
Do not use Alcohol and Alcohol-based and/or
Keton based cleaning products to clean
leather seats, as damage to the seat may
result.
Cleaning Headlights
Your vehicle is equipped with plastic headlights
and fog lights that are lighter and less susceptible to stone breakage than glass headlights.
Plastic is not as scratch resistant as glass and
therefore different lens cleaning procedures
must be followed.
To minimize the possibility of scratching the
lenses and reducing light output, avoid wiping
with a dry cloth. To remove road dirt, wash with
a mild soap solution followed by rinsing.
Do not use abrasive cleaning components, solvents, steel wool or other aggressive material to
clean the lenses.
Glass Surfaces
All glass surfaces should be cleaned on a
regular basis with MOPAR® Glass Cleaner, or
any commercial household-type glass cleaner.
Never use an abrasive type cleaner. Use caution when cleaning the inside rear window
equipped with electric defrosters or the right
rear quarter window equipped with the radio
antenna. Do not use scrapers or other sharp
instrument that may scratch the elements.
When cleaning the rear view mirror, spray
cleaner on the towel or rag that you are using.
Do not spray cleaner directly on the mirror.
Cleaning Plastic Instrument Cluster Lenses
The lenses in front of the instruments in this
vehicle are molded in clear plastic. When cleaning the lenses, care must be taken to avoid
scratching the plastic.
1. Clean with a wet soft rag. A mild soap
solution may be used, but do not use high
alcohol content or abrasive cleaners. If soap
is used, wipe clean with a clean damp rag.
2. Dry with a soft cloth.
Seat Belt Maintenance
Do not bleach, dye, or clean the belts with
chemical solvents or abrasive cleaners. This will
weaken the fabric. Sun damage can also
weaken the fabric.
If the belts need cleaning, use MOPAR® Total
Clean, a mild soap solution, or lukewarm water.
Do not remove the belts from the vehicle to
wash them. Dry with a soft cloth.
Replace the belts if they appear frayed or worn
or if the buckles do not work properly.
WARNING! (Continued)
ing for cuts, frays, or loose parts. Damaged
parts must be replaced immediately. Do not
disassemble or modify the system. Seat belt
assemblies must be replaced after a collision
if they have been damaged (i.e., bent retractor, torn webbing, etc.).
Cleaning The Center Console Cupholders
Clean with a damp cloth or towel using a mild
detergent with the cupholder in the center console.
NOTE:
The cupholder cannot be removed.
FUSES
WARNING!
A frayed or torn belt could rip apart in a
collision and leave you with no protection.
Inspect the belt system periodically, check-
WARNING!
• When replacing a blown fuse, always use
an appropriate replacement fuse with the
same amp rating as the original fuse.
(Continued)
(Continued)
WARNING! (Continued)
Never replace a fuse with another fuse of
higher amp rating. Never replace a blown
fuse with metal wires or any other material.
Failure to use proper fuses may result in
serious personal injury, fire and/or property
damage.
• Before replacing a fuse, make sure that
the ignition is off and that all the other
services are switched off and/or disengaged.
• If the replaced fuse blows again, contact
an authorized dealer.
• If a general protection fuse for safety systems (air bag system, braking system),
power unit systems (engine system, gearbox system) or steering system blows,
contact an authorized dealer.
291
Front Power Distribution Center
(Fuses)
The Front Power Distribution Center is located
in the engine compartment. This module contains fuses and relays.
Front Power Distribution Center
292
CAUTION!
• When installing the power distribution center cover, it is important to ensure the
cover is properly positioned and fully
latched. Failure to do so may allow water
to get into the power distribution center
and possibly result in an electrical system
failure.
• When replacing a blown fuse, it is important to use only a fuse having the correct
amperage rating. The use of a fuse with a
rating other than indicated may result in a
dangerous electrical system overload. If a
properly rated fuse continues to blow, it
indicates a problem in the circuit that must
be corrected.
Cavity
Cartridge Fuse
Mini-Fuse
Description
1
–
–
Fuse – Spare
2
40 Amp Green
–
Radiator Fan #1 – If Equipped
3
50 Amp Red
–
Power Steering #1 / Radiator Fan (6.2L Supercharged) – If
Equipped
4
30 Amp Pink
–
Starter
5
40 Amp Green
–
Electronic Stability Control
6
30 Amp Pink
–
Electronic Stability Control
7
–
–
Fuse – Spare
8
20 Amp Blue
–
Police Ignition Run / ACC # 2
9
–
20 Amp Yellow
All-Wheel Drive Module – If Equipped
10
–
10 Amp Red
Security – If Equipped / Under hood Lamp – Police
11
–
20 Amp Yellow
Horns
12
–
10 Amp Red
Air Conditioning Clutch
13
–
–
Fuse – Spare
14
–
–
Fuse – Spare
15
–
20 Amp Yellow
Left HID – If Equipped
16
–
20 Amp Yellow
Right HID – If Equipped
293
Cavity
Cartridge Fuse
18
40 Amp Green
–
Radiator Fan #2 – If Equipped
19
50 Amp Red
–
Power Steering #2 / Radiator Fan (6.2L Supercharged)
294
Mini-Fuse
Description
20
30 Amp Pink
–
Wiper Motor
21
30 Amp Pink
–
Headlamp Washers – If Equipped / Police Feed
22
40 Amp Green / 20 Amp Blue
– Police
–
Engine Cooling Pump (6.2L Supercharged) / Police Bat Feed # 3
– If Equipped
23
30 Amp Pink
–
Police Bat Feed # 1 – If Equipped
24
20 Amp Blue
–
Police Bat Feed # 3 – If Equipped
28
–
–
Fuse – Spare
29
–
15 Amp Blue
Transmission Control Module (LA/LD Police)
30
–
–
Fuse – Spare
31
–
25 Amp Clear
Engine Module
32
–
–
Fuse – Spare
33
–
–
Fuse – Spare
34
–
25 Amp Clear
Powertrain #1
35
–
20 Amp Yellow
Powertrain #2
36
–
10 Amp Red
Anti-Lock Brake Module
Cavity
Cartridge Fuse
Mini-Fuse
Description
Engine Controller/Rad Fan Relays – If Equipped
37
–
10 Amp Red
38
–
10 Amp Red
Airbag Module
39
–
10 Amp Red
Power Steering Module/AC Clutch Relay
48
–
10 Amp Red
AWD Module/Front Axle Disconnect (LX) / Adaptive Cruise (LA)
– If Equipped
49
–
–
Fuse – Spare
50
–
–
Fuse – Spare
51
–
20 Amp Yellow
Vacuum Pump
52
–
10 Amp Red
Adaptive Cruise (LD/LX) – If Equipped
53
–
–
Fuse – Spare
295
Rear Power Distribution Center
(Fuses)
There is also a power distribution center located
in the trunk under the spare tire access panel.
This center contains fuses and relays.
Rear Power Distribution Center
Opening The Access Cover
296
CAUTION!
• When installing the power distribution center cover, it is important to ensure the
cover is properly positioned and fully
latched. Failure to do so may allow water
to get into the power distribution center
and possibly result in an electrical system
failure.
• When replacing a blown fuse, it is important to use only a fuse having the correct
amperage rating. The use of a fuse with a
rating other than indicated may result in a
dangerous electrical system overload. If a
properly rated fuse continues to blow, it
indicates a problem in the circuit that must
be corrected.
Cavity
Cartridge Fuse
Mini-Fuse
Description
2
60 Amp Yellow
—
Front PDC Feed #1
3
—
—
Fuse – Spare
Front PDC Feed #2
4
60 Amp Yellow
—
5
30 Amp Pink
—
Sunroof / Dome Lamp – Police
6
40 Amp Green
—
Exterior Lighting #1
Exterior Lighting #2
7
40 Amp Green
—
8
30 Amp Pink
—
Interior Lighting
9
40 Amp Green
—
Power Locks
10
30 Amp Pink
—
Driver Door Control Module
11
30 Amp Pink
—
Passenger Door Control Module
—
20 Amp Yellow
15
40 Amp Green
—
HVAC Blower
16
20 Amp Blue
—
Left Spot Lamp – Police
17
—
—
Fuse – Spare
18
30 Amp Pink
—
Mod Network Interface – Police
19
—
—
Fuse — Spare
12
Cigar Lighters / Power Outlet Console
Rear
297
Cavity
Cartridge Fuse
Mini-Fuse
20
—
—
Fuse — Spare
21
30 Amp Pink (6.2L Supercharged)
25 Amp Clear (LD STD)
—
Fuel Pump (6.2L Supercharged)
Fuel Pump (LD STD)
—
20 Amp Yellow – Police
10 Amp Red – LA
22
Right Spot Lamp – Police
Integrated Center Stack – LA
23
—
10 Amp Red
Fuel Door/Diagnostic Port
24
—
15 Amp Blue
Integrated Center Stack – LD/LX
25
—
10 Amp Red
Tire Pressure Monitor
—
15 Amp Blue – LD/LX
25 Amp Clear – LA
30 Amp Green – LA 6.2L Supercharged
27
—
25 Amp Clear
31
—
25 Amp Breaker
32
—
15 Amp Blue
HVAC Module/Cluster
—
15 Amp Blue
Ignition Switch/RF hub Module/Steering
Column Lock-LX If Equipped
—
10 Amp Red
Steering Column Module/Clock/Spare –
Police
26
33
34
298
Description
Transmission / Electronic Shift Module
(LD/LX)
Fuel Pump (LA)
Fuel Pump (LA 6.2L Supercharged)
Amplifier – If Equipped
Power Seats
Cavity
Cartridge Fuse
35
—
5 Amp Tan
36
—
15 Amp Blue
37
—
20 Amp Yellow
—
10 Amp Red – LD/LX
20 Amp Yellow – LA
40
—
—
41
—
—
Fuse — Spare
42
30 Amp Pink
—
Rear Defrost
—
20 Amp Yellow
Rear Heated Seats/Steering Wheel Module
—
10 Amp Red
Park Assist / Blind Spot / Rear View Camera
—
15 Amp Blue
Cluster / Rearview Mirror /
Compass(LDLX)/Humidity Sensor
38
43
44
45
46
47
48
Mini-Fuse
—
—
—
10 Amp Red
—
20 Amp Yellow
Description
Battery Sensor
Electronic Exhaust Valve – If Equipped
Radio
Dual USB Port (LD/LX)
Power Outlet Inside Arm Rest (LA)
Fuse — Spare
Fuse — Spare
Adaptive Front Lighting / Auto High BEAM
/ Day Time Running Lamps- If Equipped
Active Suspension – SRT
299
Cavity
Cartridge Fuse
Mini-Fuse
49
—
—
Fuse — Spare
50
—
—
Fuse — Spare
51
—
20 Amp Yellow
52
—
10 Amp Red
Heated Cupholders/Rear Heated Seat
Switches – If Equipped
53
—
10 Amp Red
HVAC Module/In Car Temperature Sensor
54
—
10 Amp Red
Airbag Module (LA)
55
—
—
Fuse — Spare
56
—
—
Fuse — Spare
57
—
—
Fuse — Spare
58
—
10 Amp Red
59
—
20 Amp Yellow
60
—
5 Amp Tan
61
—
20 Amp Yellow
62
—
—
Fuse — Spare
63
—
—
Fuse — Spare
64
—
25 Amp Breaker
300
Description
Front Heated Seats – If Equipped
Airbag Module (LD/LX)
Adjustable Pedals – Police
Heated Washer Nozzles (LD)
Cigar Lighter (LA) – If Equipped
Rear Windows (LD/LX)
Cavity
Cartridge Fuse
Mini-Fuse
Description
65
—
10 Amp Red
Airbag Module
66
—
—
Fuse — Spare
67
—
10 Amp Red
Rain and Light Sensor/Sunroof
68
—
10 Amp Red
Dual USB Power Outlet – R/A Sense (LD/
LX) Rear Sunshade (LD/LX)
69
—
—
Fuse — Spare
70
—
—
Fuse — Spare
VEHICLE STORAGE
If you are leaving your vehicle dormant for more
than 21 days, you may want to take these steps
to protect your battery.
• Disconnect the negative cable from the battery.
• Anytime you store your vehicle, or keep it out
of service (e.g., vacation) for two weeks or
more, run the air conditioning system at idle
for about five minutes in the fresh air and
high blower setting. This will ensure adequate system lubrication to minimize the
possibility of compressor damage when the
system is started again.
301
REPLACEMENT BULBS
All of the interior bulbs are glass wedge base or
glass cartridge types. Aluminum base bulbs are
not approved and should not be used for replacement.
Interior Bulbs
Bulb Number
Rear Courtesy/Reading Lamps
W5W
Rear Compartment (Trunk) Lamp
562
Overhead Console Reading Lamps
578
Visor Vanity Lamps
Glove Box Lamp – If Equipped
Door Courtesy
Shift Indicator Lamp
Optional Door Map Pocket/Cupholder
For lighted switches, see your authorized dealer for replacement instructions.
302
A6220
194
562
JKLE14140
LED (Serviced at Authorized Dealer)
Exterior Bulbs
Bulb Number
Headlamp – High Intensity Discharge (HID)
Halogen Headlamp
D3S (Serviced at Authorized Dealer) *
HIR2LL
Front Park/Turn Lamp
LED (Serviced at Authorized Dealer)
Front Fog Lamp
LED (Serviced at Authorized Dealer)
Front Side Marker
LED (Serviced at Authorized Dealer)
Tail Lamp
LED (Serviced at Authorized Dealer)
Stop/Turn Lamp
LED (Serviced at Authorized Dealer)
Rear Side Marker
LED (Serviced at Authorized Dealer)
Backup Lamp
LED (Serviced at Authorized Dealer)
Center High-Mount Stop Lamp (CHMSL)
LED (Serviced at Authorized Dealer)
License
LED (Serviced at Authorized Dealer)
* The headlamps are a type of high-voltage
discharge tube. High voltage can remain in the
circuit even with the headlamp switch off and
the key removed. Because of this, you should
not attempt to service a headlamp bulb yourself.
If a headlamp bulb fails, take your vehicle to an
authorized dealer for service.
303
BULB REPLACEMENT
NOTE:
Lens fogging can occur under certain atmospheric conditions. This will usually clear as
atmospheric conditions change to allow the
condensation to change back into a vapor.
Turning the lamps on will usually accelerate
the clearing process.
Low Beam Headlamp, High Beam
Headlamp, Park/Turn Lamp —
Models with Halogen Headlamps —
If Equipped
To replace the passenger side lamps:
1. Open the hood.
2. Remove the headlamp cover.
3. Reach behind the passenger headlamp assembly.
NOTE:
The park/turn lamps can also be accessed at
this point.
304
4. Turn the headlamp access cap counterclockwise to remove.
4. Reach behind the passenger headlamp assembly.
5. Remove bulb by turning it counter clockwise
and disconnect.
5. Remove the headlamp cover.
6. Install new bulb by turning it clockwise and
reconnect.
7. Reinstall headlamp access cap by turning it
clockwise and then reinstall headlamp cover.
To replace the driver side lamps:
1. Open the hood.
2. Remove the air cleaner filter cover by removing three fasteners and loosening the clean
air inlet clamp and then rotate cover off to the
side.
NOTE:
The cover has an electrical connector that
does not need to be disconnected if the
cover is rotated off to the side.
3. Remove one fastener on the lower air box to
remove and access the rear of the headlamp
assembly.
6. Turn the headlamp access cap counterclockwise to remove.
7. Remove bulb by turn it counter clockwise
and disconnect.
8. Install new bulb by turning it clockwise and
reconnect.
9. Reinstall headlamp access cap by turning it
clockwise and then reinstall headlamp cover.
10. Reinstall engine air cleaner assembly.
Low Beam Headlamp, High Beam
Headlamp, and Park/Turn Lamp —
Models with High Intensity
Discharge (HID) Headlamps — If
Equipped
HID Headlamps
The headlamps are a type of high voltage
discharge tube. High voltage can remain in the
circuit even with the headlamp switch off and
the key removed. Because of this, you should
not attempt to service a headlamp bulb yourself. If a headlamp bulb fails, take your
vehicle to an authorized dealer for service.
WARNING!
A transient high voltage occurs at the bulb
sockets of HID headlamps when the headlamp switch is turned ON. It may cause
serious electrical shock or electrocution if not
serviced properly. See your authorized
dealer for service.
NOTE:
On vehicles equipped with HID headlamps,
when the headlamps are turned on, there is
a blue hue to the lamps. This diminishes and
becomes more white after approximately 10
seconds, as the system charges.
Center High-Mounted Stop Lamp
(CHMSL)
Front/Rear Side Marker Lamp
License Lamp
The Side Markers use LED lamps that are not
serviceable separately. The Side Markers must
be replaced as an assembly, see your authorized dealer.
The License Lamp use LED lamps that are not
serviceable separately. The License Lamp must
be replaced as an assembly, see your authorized dealer.
The CHMSL uses LED lamps that are not
serviceable separately. The CHMSL must be
replaced as an assembly, see your authorized
dealer.
Tail/Turn And Stop Lamp
The Tail/Turn and Stop Lamps use LED lamps
that are not serviceable separately. The Tail/
Turn and Stop Lamps must be replaced as an
assembly, see your authorized dealer.
Center Tail/Backup Lamp
The Center Tail/Backup Lamp use LED lamps
that are not serviceable separately. The Center
Tail/Backup Lamp must be replaced as an assembly, see your authorized dealer.
305
VEHICLE SPECIFICATIONS
Engine
3.6L
5.7L
6.4L
Power
150 kW @ 5,000 rpm
240 kW @ 5,000 RPM
362kW @ 6,100 RPM
Torque
319 N.m @ 4,000 rpm
500 N.m @ 4,000 RPM
644 N.m @ 4,100 RPM
Consult your Salesperson
Consult your Salesperson
Consult your Salesperson
Maximum Vehicle Speed
NOTE:
A chime will sound if the vehicle speed
exceeds 75 mph (120 km/h). It will continue
to chime until the vehicle speed is reduced
below 75 mph (120 km/h).
306
FLUID CAPACITIES
U.S.
Metric
18.5 Gallons
70 Liters
3.6 Liter Engine (SAE 5W-20, API Certified)
6 Quarts
5.6 Liters
5.7 Liter Engine (SAE 5W-20, API Certified)
7 Quarts
6.6 Liters
6.4 Liter Engine (SAE 0W-40, Synthetic API Certified)
7 Quarts
6.6 Liters
3.6 Liter Engine (MOPAR® Antifreeze/Engine Coolant 10 Year/150,000 Mile Formula or
equivalent)
11.1 Quarts
10.5 Liters
5.7 Liter Engine (MOPAR® Antifreeze/Engine Coolant 10 Year/150,000 Mile Formula or
equivalent)
14.7 Quarts
13.9 Liters
15 Quarts
14.4 Liters
Fuel (Approximate)
All Engines
Engine Oil With Filter
Cooling System*
6.4 Liter Engine (MOPAR Antifreeze/Engine Coolant (OAT coolant conforming to
MS.90032) 10 Year/150,000 Mile Formula or equivalent)
* Includes heater and coolant recovery bottle filled to MAX level.
307
FLUIDS, LUBRICANTS AND GENUINE PARTS
Engine
Component
Fluid, Lubricant, or Genuine Part
Engine Coolant
We recommend you use MOPAR® Antifreeze/Coolant 10 Year/150,000 Mile Formula OAT (Organic Additive Technology).
Engine Oil – 3.6L/5.7L Engines
We recommend you use API Certified SAE 5W-20 engine oil, such as MOPAR®, Pennzoil®, Shell
Helix® or equivalent meeting the requirements of Chrysler Material Standard MS-6395 or ACEA
A1/B1.
Refer to your engine oil filler cap for correct SAE grade.
SAE 5W-30 engine oil approved to Chrysler Material Standard MS-6395 such as MOPAR®,
Pennzoil® or Shell Helix® may be used when SAE 5W-20 engine oil is not available.
Engine Oil – 6.4L Engines
We recommend you use Pennzoil Ultra™ 0W-40 engine or equivalent MOPAR® oil meeting the
Chrysler Material Standard MS-12633 for use in all operating temperatures.
The engine oil filler cap also shows the recommended engine oil viscosity for your engine. For
information on engine oil filler cap location, refer to “Engine Compartment” in “Maintaining Your
Vehicle” for further information.
Engine Oil Filter
We recommend you use MOPAR® Engine Oil Filter.
Spark Plugs – 3.6L Engine
We recommend you use MOPAR® Spark Plugs.
Spark Plugs – 5.7L Engine
We recommend you use MOPAR® Spark Plugs.
Fuel Selection – 3.6L Engine
Research Octane Number (RON) of 91 or higher.
308
Component
Fluid, Lubricant, or Genuine Part
Fuel Selection – 5.7L Engine (With Automatic
Transmission)
91 Research Octane Number (RON) Acceptable — 95 Research Octane Number (RON) Recommended.
Fuel Selection – 5.7L Engine (With Manual
Transmission)
Research Octane Number (RON) of 95 or higher.
Fuel Selection – 6.4L Engine
Research Octane Number (RON) of 95 or higher.
Chassis
Component
Fluid, Lubricant, or Genuine Part
Manual Transmission – If Equipped
We recommend you use MOPAR® ATF+4® Automatic Transmission Fluid.
8-Speed Automatic Transmission – If Equipped
Use only MOPAR® ZF 8&9 Speed ATF™ Automatic Transmission Fluid, or equivalent. Failure to
use the correct fluid may affect the function or performance of your transmission.
Brake Master Cylinder
We recommend you use MOPAR® DOT 3, SAE J1703. If DOT 3 brake fluid is not available, then
DOT 4 is acceptable.
Rear Axle – If Equipped with Automatic Transmission
We recommend you use MOPAR® OD Synthetic Gear Lubricant SAE 75W85 (API GL-5).
Rear Axle – If Equipped with Manual Transmission
We recommend you use MOPAR® LSD Synthetic Gear Lubricant SAE 75W85 (API GL-5).
309
310
8
MAINTENANCE SCHEDULES
• MAINTENANCE SCHEDULE . . . . . . . . . . . . . . . . . . . . . .312
311
MAINTENANCE SCHEDULE
Refer to the “Service and Warranty Handbook”
for maintenance schedules.
312
9
IF YOU NEED CONSUMER ASSISTANCE
• IF YOU NEED ASSISTANCE . . . . . . . . . . . . . . . . . . . . . .314
313
IF YOU NEED ASSISTANCE
The manufacturer’s distributors are vitally interested in your satisfaction with their products
and services. If a servicing problem or other
difficulty should occur, we recommend that you
take the following steps:
• Discuss the problem at the authorized dealer
with the dealer principal or the service manager. Management personnel at the authorized dealer are in the best position to resolve
the problem quickly.
• Should this fail to resolve the problem, contact the manufacturer’s distributor nearest to
your location.
When you contact the distributor, please provide all of the following information:
• Your name, address and phone number.
• Vehicle Identification Number (this 17–digit
number is available from a plate, visible
through the windshield in the upper corner of
the instrument panel on the driver’s side. It is
also available from your vehicle registration
or title).
• Selling and servicing authorized dealer.
• Vehicle’s delivery date and current odometer
distance.
• Service history of your vehicle.
• An accurate description of the problem and
the conditions under which it occurs.
314
315
316
10
INDEX
317
About Your Brakes . . . . . . . . . . .201, 203
ABS (Anti-Lock Brake System) . . . . . . .203
Adaptive Cruise Control (ACC)
(Cruise Control). . . . . . . . . . . . . . .89
Adding Engine Coolant (Antifreeze) . . . .283
Adding Fuel . . . . . . . . . . . . . . . . . .232
Adding Washer Fluid . . . . . . . . . . . . .280
Air bag . . . . . . . . . . . . . . . . . . . . .32
Air Bag
Advance Front Air Bag . . . . . . . . . .32
Air Bag Components . . . . . . . . . . .32
Air bag Operation . . . . . . . . . . . . .33
Air Bag Warning Light . . . . . . . . .38, 39
Enhanced Accident Response . . . . . .38
Event Data Recorder (EDR) . . . . . . .40
Front Air Bag . . . . . . . . . . . . . . . .32
If A Deployment Occurs . . . . . . . . . .37
Knee Impact Bolsters . . . . . . . . . . .34
Maintaining Your Air Bag System . . . . .39
Side Air Bags . . . . . . . . . . . . . . .34
Transporting Pets . . . . . . . . . . . . .53
Air bag Deployment . . . . . . . . . . . . . .32
Air bag Light . . . . . . . . . . .38, 39, 56, 124
Air bag Maintenance . . . . . . . . . . . . .39
Air Cleaner, Engine (Engine Air Cleaner
Filter) . . . . . . . . . . . . . . . . . . . .276
Air Conditioner Maintenance . . . . . . . .278
318
Air Conditioning Filter . . . . . . . . .173, 278
Air Conditioning Refrigerant . . . . . . . . .278
Air Conditioning System . . . . . . . .172, 278
Air Conditioning, Operating Tips. . . .173, 174
Air Pressure, Tires . . . . . . . . . . . . . .219
Alarm
Arm The System . . . . . . . . . . . . . .15
Disarm The System . . . . . . . . . . . .15
Alarm (Security Alarm) . . . . . . . . . . . .14
Alarm Light . . . . . . . . . . . . . . . . . .122
Alarm System (Security Alarm) . . . . . . . .14
Alarm, Panic . . . . . . . . . . . . . . . . . .17
Alterations/Modifications, Vehicle . . . . . . .7
Anti-Lock Brake System (ABS) . . . . . . .203
Anti-Lock Warning Light . . . . . . . .122, 205
Antifreeze (Engine Coolant) . . . . . .282, 307
Disposal . . . . . . . . . . . . . . . . .284
Appearance Care. . . . . . . . . . . . . . .288
Arming System (Security Alarm) . . . . . . .14
Auto Down Power Windows . . . . . . . . .23
Auto Unlock, Doors . . . . . . . . . . . . . .20
Automatic Dimming Mirror . . . . . . . . . .64
Automatic Door Locks . . . . . . . . . . . . .20
Automatic Headlights . . . . . . . . . . . . .78
Automatic High Beams . . . . . . . . . . . .78
Automatic Temperature Control
(ATC) . . . . . . . . . . . . . . . . .167, 172
Automatic Transmission . . . . .193, 286, 287
Adding Fluid . . . . . . . . . . . .287, 309
Autostick . . . . . . . . . . . . . . . . .197
Fluid and Filter Changes . . . . . . . .287
Fluid Change . . . . . . . . . . . . . .287
Fluid Level Check . . . . . . . . . . . .287
Fluid Type . . . . . . . . . . . . . . . .309
Special Additives . . . . . . . . . . . .287
Automatic Transmission Limp Home
Mode . . . . . . . . . . . . . . . . . . . .196
Autostick . . . . . . . . . . . . . . . . . . .197
Axle Fluid . . . . . . . . . . . . . . . . . . .309
Axle Lubrication . . . . . . . . . . . . . . .309
B-Pillar Location . . . . . . . . . . . . . . .215
Battery. . . . . . . . . . . . . . . . . . . . .277
Keyless Transmitter Replacement
(RKE) . . . . . . . . . . . . . . . . . . .18
Location . . . . . . . . . . . . . . . . .277
Belts, Seat . . . . . . . . . . . . . . . . . . .55
Body Mechanism Lubrication . . . . . . . .279
Brake Assist System . . . . . . . . . . . . .205
Brake Control System, Electronic . . . . . .203
Brake Fluid . . . . . . . . . . . . . . . . . .309
Brake System . . . . . . . . . . . . . .203, 285
Anti-Lock (ABS) . . . . . . . . . . . . .203
Fluid Check . . . . . . . . . . . .285, 309
Master Cylinder . . . . . . . . . . . . .285
Parking . . . . . . . . . . . . . . . . . .201
Warning Light . . . . . . . . . . .123, 203
Brake, Parking . . . . . . . . . . . . . . . .201
Brake/Transmission Interlock . . . . . . . .193
Brakes. . . . . . . . . . . . . . . . . . . . .203
Break-In Recommendations, New Vehicle . .53
Brightness, Interior Lights . . . . . . . . . . .82
Bulb Replacement . . . . . . . . . . .302, 304
Bulbs, Light . . . . . . . . . . . . . . . .57, 302
Camera, Rear. . . . . . . . . . . . . . . . .108
Capacities, Fluid . . . . . . . . . . . . . . .307
Caps, Filler
Fuel . . . . . . . . . . . . . . . . . . . .232
Oil (Engine) . . . . . . . . . . . .275, 276
Radiator (Coolant Pressure) . . . . . .283
Car Washes. . . . . . . . . . . . . . . . . .288
Carbon Monoxide Warning . . . . . . . . . .55
Cellular Phone . . . . . . . . . . . . . . . .167
Center High Mounted Stop Light . . . . . .305
Chains, Tire . . . . . . . . . . . . . . . . . .225
Changing A Flat Tire . . . . . . . . . . . . .253
Chart, Tire Sizing . . . . . . . . . . . . . . .211
Check Engine Light (Malfunction Indicator
Light) . . . . . . . . . . . . . . . . . . . .272
Checking Your Vehicle For Safety . . . . . .55
Checks, Safety . . . . . . . . . . . . . . . . .55
Child Restraint . . . . . . . . . . . . . . . . .41
Child Restraints
Booster Seats . . . . . . . . . . . . . . .43
Center Seat LATCH . . . . . . . . . . . .48
Child Restraints . . . . . . . . . . . . . .41
Child Seat Installation . . . . . . . . . . .51
How To Stow An Unused ALR Seat
Belt . . . . . . . . . . . . . . . . . . . . .49
Infants And Child Restraints . . . . . . .42
Install A LATCH-compatible Child
Restraint . . . . . . . . . . . . . . . . . .49
Installing Child Restraints Using The
Vehicle Seat Belt . . . . . . . . . . . . . .50
Lower Anchors And Tethers For
Children . . . . . . . . . . . . . . . . . . .46
Older Children And Child Restraints . . .43
Seating Positions . . . . . . . . . . . . .45
Using The Top Tether Anchorage . . . . .52
Cleaning
Wheels . . . . . . . . . . . . . . . . . .289
Climate Control . . . . . . . . . . . . . . . .167
Automatic . . . . . . . . . . . . . . . . .167
Cold Weather Operation . . . . . . . . . . .188
Compact Spare Tire . . . . . . . . . . . . .221
Console, Overhead. . . . . . . . . . . . . .109
Coolant Pressure Cap (Radiator Cap) . . .283
Cooling System. . . . . . . . . . . . . . . .282
Adding Coolant (Antifreeze) . . . . . .283
Coolant Capacity . . . . . . . . . . . .307
Coolant Level . . . . . . . . . . .282, 284
Disposal of Used Coolant . . . . . . . .284
Drain, Flush, and Refill . . . . . . . . .282
Inspection . . . . . . . . . . . . . . . .284
Points to Remember . . . . . . . . . .284
Pressure Cap . . . . . . . . . . . . . .283
Radiator Cap . . . . . . . . . . . . . . .283
Selection of Coolant
(Antifreeze) . . . . . . . . . .282, 307, 308
Corrosion Protection . . . . . . . . . . . . .288
Cruise Control (Speed Control) . . . . . . . .89
Cupholders . . . . . . . . . . . . . . .113, 291
Customer Assistance. . . . . . . . . . . . .314
Customer Programmable
Features . . . . . . . . . . . .135, 136, 144
Data Recorder, Event . . . . . . . . . . . . .40
Daytime Brightness, Interior Lights . . . . . .82
Daytime Running Lights . . . . . . . . . . . .79
Dealer Service . . . . . . . . . . . . . . . .273
Deck Lid, Emergency Release . . . . . . . .24
Deck Lid, Power Release . . . . . . . . . . .24
Defroster, Rear Window . . . . . . . . . . .115
Defroster, Windshield . . . . . . . . . . . . .56
319
Delay (Intermittent) Wipers . . . . . . . . . .83
Diagnostic System, Onboard . . . . . . . .272
Dimmer Switch, Headlight. . . . . . . . . . .81
Dipsticks
Oil (Engine) . . . . . . . . . . . . . . . .274
Disabled Vehicle Towing . . . . . . . . . . .265
Disposal
Antifreeze (Engine Coolant) . . . . . .284
Door Locks
Door Locks . . . . . . . . . . . . . . .17, 19
Key Fob . . . . . . . . . . . . . . . . . .19
Remote . . . . . . . . . . . . . . . . . . .19
Remote Keyless Entry (RKE) . . . . . . .19
Door Locks, Automatic . . . . . . . . . . . .20
Driver Information Display
DID . . . . . . . . . . . . . . . . .128, 129
Instrument Cluster Display . . . . .128, 129
Driving
Through Flowing, Rising, or Shallow
Standing Water . . . . . . . . . . . . .199
Electric Remote Mirrors . . . . . . . . . . . .65
Electrical Power Outlets . . . . . . . . . . .111
Electronic Brake Control System . . . . . .203
Electronic Power Distribution Center
(Fuses). . . . . . . . . . . . . . . . . . .292
Electronic Speed Control
320
(Cruise Control) . . . . . . . . . . . .86, 89
Electronic Stability Control (ESC) . . . . . .206
Emergency Deck Lid Release . . . . . . . .24
Emergency Trunk Release . . . . . . . . . .24
Emergency, In Case of
Freeing Vehicle When Stuck . . . . . .260
Jacking . . . . . . . . . . . . . . . . . .253
Jump Starting . . . . . . . . . . . . . .258
Overheating . . . . . . . . . . . . . . .245
Towing . . . . . . . . . . . . . . . . . .265
Emission Control System Maintenance. . .272
Engine . . . . . . . . . . . . . . . . . .270, 271
Air Cleaner . . . . . . . . . . . . . . . .276
Block Heater . . . . . . . . . . . . . . .189
Break-In Recommendations . . . . . . .53
Checking Oil Level . . . . . . . . . . . .274
Compartment . . . . . . . . .269, 270, 271
Compartment Identification . . . . . . .269
Coolant (Antifreeze) . . . . . . . .282, 308
Cooling . . . . . . . . . . . . . . . . . .282
Exhaust Gas Caution . . . . . . . . . . .55
Fails to Start . . . . . . . . . . . . . . .188
Flooded, Starting . . . . . . . . . . . . .188
Fuel Requirements . . . . . . . . . . . .230
Jump Starting . . . . . . . . . . . . . .258
Oil . . . . . . . . . . . . . . .274, 307, 308
Oil Change Interval . . . . . . . . . . .274
Oil Filler Cap . . . . . . . . . . . .275, 276
Oil Selection . . . . . . . . .274, 275, 307
Oil Synthetic . . . . . . . . . . . . . . .276
Overheating . . . . . . . . . . . . . . .245
Starting . . . . . . . . . . . . . . . . . .185
Temperature Gauge . . . . . . . . . . .125
Engine Oil Viscosity . . . . . . . . . .275, 276
Engine Oil Viscosity Chart . . . . . . . . . .275
Enhanced Accident Response Feature . . .38
Entry System, Illuminated . . . . . . . . . . .16
Event Data Recorder . . . . . . . . . . . . .40
Exhaust Gas Caution . . . . . . . . . . . . .55
Exhaust System . . . . . . . . . . . . .55, 280
Exterior Folding Mirrors . . . . . . . . . . . .65
Exterior Lighting . . . . . . . . . . . . . . . .77
Exterior Lights . . . . . . . . . . . . . . . . .57
Filler Location Fuel . . . . . . . . . . . . . .232
Filters
Air Cleaner . . . . . . . . . . . . . . . .276
Air Conditioning . . . . . . . . . .173, 278
Engine Oil . . . . . . . . . . . . .276, 308
Engine Oil Disposal . . . . . . . . . . .276
Flash-To-Pass . . . . . . . . . . . . . . . . .81
Flashers . . . . . . . . . . . . . . . . . . . .245
Hazard Warning . . . . . . . . . . . . .245
Turn Signal . . . . . . . . . . .57, 80, 122
Flooded Engine Starting . . . . . . . . . . .188
Fluid Capacities . . . . . . . . . . . . . . .307
Fluid Leaks . . . . . . . . . . . . . . . . . . .57
Fluid Level Checks
Automatic Transmission . . . . . . . . .287
Brake . . . . . . . . . . . . . . . . . . .285
Cooling System . . . . . . . . . . . . .282
Engine Oil . . . . . . . . . . . . . . . .274
Fluid, Brake . . . . . . . . . . . . . . . . . .309
Fluids, Lubricants and Genuine Parts . . .308
Fog Lights . . . . . . . . . . . . . . . .80, 124
Folding Rear Seat . . . . . . . . . . . . . . .75
Forward Collision Warning. . . . . . . . . .101
Freeing A Stuck Vehicle . . . . . . . . . . .260
Fuel . . . . . . . . . . . . . . . . . . . . . .230
Adding . . . . . . . . . . . . . . . . . .232
Filler Cap (Gas Cap) . . . . . . . . . .232
Gasoline . . . . . . . . . . . . . . . . .230
Gauge . . . . . . . . . . . . . . . . . .124
Octane Rating . . . . . . . .230, 231, 308
Requirements . . . . . . . . . . . . . .230
Specifications . . . . . . . . . . . . . .308
Tank Capacity . . . . . . . . . . . . . .307
Fuel System Caution . . . . . . . . . . . . .232
Fueling . . . . . . . . . . . . . . . . . . . .232
Fuses . . . . . . . . . . . . . . . . . . . . .291
Gas Cap (Fuel Filler Cap) . .
Gasoline (Fuel) . . . . . . . .
Gauges
Coolant Temperature . .
Fuel . . . . . . . . . . . .
Odometer . . . . . . . .
Speedometer . . . . . .
Tachometer . . . . . . .
Gear Ranges . . . . . . . . .
Glass Cleaning . . . . . . . .
Gross Axle Weight Rating . .
Gross Vehicle Weight Rating
. . . . .232, 272
. . . . . . . .230
.
.
.
.
.
.
.
.
.
.
.
.
.
.
.
.
.
.
.
.
.
.
.
.
.
.
.
.
.
.
.
.
.
.
.
.
.
.
.
.
.
.
.
.
.
.
.
.
.
.
.
.
.
.
.
.
.
.
.
.
.
.
.
.125
.124
.123
.124
.122
.194
.290
.233
.233
Hazard
Driving Through Flowing, Rising, or
Shallow Standing Water . . . . . . . .199
Hazard Warning Flasher . . . . . . . . . . .245
Head Restraints . . . . . . . . . . . . . . . .74
Head Rests. . . . . . . . . . . . . . . . . . .74
Headlight Washers . . . . . . . . . . . . . .280
Headlights. . . . . . . . . . . . . . . . . . .305
Automatic . . . . . . . . . . . . . . . . .78
Cleaning . . . . . . . . . . . . . . . . .290
Delay . . . . . . . . . . . . . . . . . . . .79
High Beam/Low Beam Select Switch . .81
Lights On Reminder . . . . . . . . . . .80
On With Wipers . . . . . . . . . . . .78, 83
Passing . . . . . . . . . . . . . . . . . .81
Switch . . . . . . . . . . . . . . . . . . .77
Time Delay . . . . . . . . . . . . . . . .79
Washers . . . . . . . . . . . . . . . . .280
Heated Mirrors . . . . . . . . . . . . . . . . .65
Heated Seats . . . . . . . . . . . . . . . . .152
Heated Steering Wheel . . . . . . . . . . .152
Heater, Engine Block. . . . . . . . . . . . .189
High Beam/Low Beam Select (Dimmer)
Switch . . . . . . . . . . . . . . . . . . . .81
Hill Start Assist . . . . . . . . . . . . . . . .205
Hitches
Trailer Towing . . . . . . . . . . . . . .235
Hood Release . . . . . . . . . . . . . . . . .76
Ignition
Key . . . . . . . . . . . . . . . . . . . . .11
Illuminated Entry . . . . . . . . . . . . . . . .16
Immobilizer (Sentry Key) . . . . . . . . . . .13
Information Center, Vehicle . . . . . . . . .127
Instrument Cluster . . . . . . . . . . . . . .122
Instrument Panel and Controls . . . . . . .119
Instrument Panel Lens Cleaning . . . . . .290
Interior Appearance Care . . . . . . . . . .290
Interior Lights. . . . . . . . . . . . . . . . . .81
Intermittent Wipers (Delay Wipers) . . . . . .83
Introduction . . . . . . . . . . . . . . . . . . .4
321
iPod® Control. . . . . . . . . . . . . . . . .166
iPod®/USB/MP3 Control . . . . . . . . . . .166
Bluetooth® Streaming Audio . . . . . .166
Jack Location . . . .
Jack Operation . . .
Jacking Instructions
Jump Starting . . . .
.
.
.
.
.
.
.
.
.
.
.
.
.
.
.
.
.
.
.
.
.
.
.
.
.
.
.
.
.
.
.
.
.
.
.
.
. . . .253
.253, 255
. . . .255
. . . .258
Key Fob. . . . . . . . . . . . . . . . . . . . .11
Arm The Alarm . . . . . . . . . . . . . . .15
Lock The Doors . . . . . . . . . . . . . .17
Panic Alarm . . . . . . . . . . . . . . . .17
Programming Additional Key Fobs . .14, 18
Programming Additional
Transmitters . . . . . . . . . . . . . .14, 18
Remote Keyless Entry (RKE) . . . . . . .16
Unlatch The Trunk . . . . . . . . . . . . .17
Unlock The Doors . . . . . . . . . . . . .16
Key-In Reminder . . . . . . . . . . . . . . . .12
Key, Replacement . . . . . . . . . . . . . . .14
Key, Sentry (Immobilizer) . . . . . . . . . . .13
Keyless Enter-N-Go . . . . . . . . . . .20, 186
Keyless Enter-N-Go™
Enter The Trunk . . . . . . . . . . . . . .17
Lock The Vehicle’s Doors . . .17, 141, 151
Passive Entry Programming . . . .141, 151
322
Unlock From The Driver’s Side . .
Unlock From The Passenger Side
Keyless Entry System . . . . . . . . .
Keyless Go . . . . . . . . . . . . . . .
Keys. . . . . . . . . . . . . . . . . . .
.
.
.
.
.
.
.
.
.
.
.
.
.
.
.
.16
.16
.16
.11
.11
Lane Change and Turn Signals. . . . . . . .80
Lane Change Assist . . . . . . . . . . . . . .81
Lap/Shoulder Belts . . . . . . . . . . . . . .27
Latches . . . . . . . . . . . . . . . . . . . . .57
Hood . . . . . . . . . . . . . . . . . . . .76
Lead Free Gasoline . . . . . . . . . . . . .230
Leaks, Fluid . . . . . . . . . . . . . . . . . .57
Life of Tires . . . . . . . . . . . . . . . . . .223
Light Bulbs . . . . . . . . . . . . . . . .57, 302
Lights . . . . . . . . . . . . . . . . . . . .57, 77
Airbag . . . . . . . . . . . .38, 39, 56, 124
Alarm . . . . . . . . . . . . . . . . . . .122
Anti-Lock . . . . . . . . . . . . . .122, 205
Automatic Headlights . . . . . . . . . . .78
Brake Assist Warning . . . . . . . . . .208
Brake Warning . . . . . . . . . . .123, 203
Bulb Replacement . . . . . . . . . . . .304
Center Mounted Stop . . . . . . . . . .305
Courtesy/Reading . . . . . . . . . .81, 109
Daytime Running . . . . . . . . . . . . .79
Dimmer Switch, Headlight . . . . . .80, 81
Exterior . . . . . . . . . . . . . . . . . .57
Fog . . . . . . . . . . . . . . . . . .80, 124
Headlight Switch . . . . . . . . . . . . .77
Headlights . . . . . . . . . . . . . .77, 305
Headlights On Reminder . . . . . . . . .80
Headlights On With Wipers . . . . .78, 83
High Beam . . . . . . . . . . . . . .81, 124
High Beam Indicator . . . . . . . . . .124
High Beam/Low Beam Select . . . . . .81
Illuminated Entry . . . . . . . . . . . . .16
Instrument Cluster . . . . . . . . . .77, 122
Intensity Control . . . . . . . . . . . . . .82
Interior . . . . . . . . . . . . . . . .81, 109
License . . . . . . . . . . . . . . . . . .305
Lights On Reminder . . . . . . . . . . . .80
Malfunction Indicator (Check Engine) .122
Map Reading . . . . . . . . . . . .81, 109
Parade Mode (Daytime Brightness) . . .82
Passing . . . . . . . . . . . . . . . . . .81
Reading . . . . . . . . . . . . . . .81, 109
Seat Belt Reminder . . . . . . . . . . .123
Security Alarm . . . . . . . . . . . . . .122
Service . . . . . . . . . . . . . . .302, 304
Service Engine Soon (Malfunction
Indicator) . . . . . . . . . . . . . . . . .122
Tire Pressure Monitoring (TPMS) .125, 226
Traction Control . . . . . . . . . . . . .208
Turn Signal . . . . . . . . . . .57, 80, 122
Vanity Mirror . . . . . . . . . . . . . . . .65
Warning (Instrument Cluster
Description) . . . . . . . . . . . . . . .122
Loading Vehicle
Tires . . . . . . . . . . . . . . . . . . .215
Locks . . . . . . . . . . . . . . . . . . . . . .19
Auto Unlock . . . . . . . . . . . . . . . .20
Automatic Door . . . . . . . . . . . . . .20
Door . . . . . . . . . . . . . . . . . . . .19
Power Door . . . . . . . . . . . . . . . .20
Low Tire Pressure System. . . . . . . . . .226
Lubrication, Body . . . . . . . . . . . . . . .279
Lug Nuts . . . . . . . . . . . . . . . . . . .252
Maintenance Free Battery . . . . . . . . . .277
Maintenance Procedures . . . . . . . . . .273
Maintenance Schedule. . . . . . . . . . . .312
Malfunction Indicator Light
(Check Engine) . . . . . . . . . . . . . .122
Manual Transmission . . . . . . .189, 286, 287
Fluid Level Check . . . . . . . . .286, 287
Map/Reading Lights . . . . . . . . . . .81, 109
Master Cylinder (Brakes) . . . . . . . . . .285
Mirrors . . . . . . . . . . . . . . . . . . . . .64
Automatic Dimming . . . . . . . . . . . .64
Electric Remote . . . . . . . . . . . . . .65
New Vehicle Break-In Period . . . . . . . . .53
Recommendation . . . . . .274, 275, 307
Synthetic . . . . . . . . . . . . . . . . .276
Viscosity . . . . . . . . . . .275, 276, 307
Onboard Diagnostic System. . . . . . . . .272
Operating Precautions . . . . . . . . . . . .272
Operator Manual (Owner’s Manual) . . . . . .5
Outside Rearview Mirrors . . . . . . . . . . .64
Overhead Console . . . . . . . . . . . . . .109
Overheating, Engine . . . . . . . . . .125, 245
Owner’s Manual (Operator Manual) . . . . . .5
Occupant Restraints . . . . . . . . . . . . . .25
Octane Rating, Gasoline
(Fuel) . . . . . . . . . . . . . .230, 231, 308
Odometer . . . . . . . . . . . . . . . . . . .123
Trip . . . . . . . . . . . . . . . . . . . .123
Oil Filter, Selection . . . . . . . . . . . . . .276
Oil, Engine. . . . . . . . . . . . .128, 274, 308
Capacity . . . . . . . . . . . . . . . . .307
Change Interval . . . . . . . . . . . . .274
Checking . . . . . . . . . . . . . . . . .274
Dipstick . . . . . . . . . . . . . . . . . .274
Disposal . . . . . . . . . . . . . . . . .276
Filter . . . . . . . . . . . . . . . .276, 308
Filter Disposal . . . . . . . . . . . . . .276
Identification Logo . . . . . . . . . . . .275
Materials Added to . . . . . . . . . . .276
Paint Care . . . . . . . . . . . . . . . . . .288
Panic Alarm . . . . . . . . . . . . . . . . . .17
Parking Brake. . . . . . . . . . . . . . . . .201
ParkSense® System, Rear . . . . . . . . .103
Passing Light. . . . . . . . . . . . . . . . . .81
Performance . . . . . . . . . . . . . .130, 154
Pets . . . . . . . . . . . . . . . . . . . . . . .53
Placard, Tire and Loading Information . . .215
Power
Brakes . . . . . . . . . . . . . . . . . .203
Deck Lid Release . . . . . . . . . . . . .24
Distribution Center (Fuses) . . . . . . .296
Door Locks . . . . . . . . . . . . . . . .20
Mirrors . . . . . . . . . . . . . . . . . . .65
Outlet (Auxiliary Electrical Outlet) . . . .111
Seats . . . . . . . . . . . . . . . . . . . .71
Exterior Folding . . . . . . . . . . . . . .65
Heated . . . . . . . . . . . . . . . . . . .65
Outside . . . . . . . . . . . . . . . .64, 65
Vanity . . . . . . . . . . . . . . . . . . .65
Modifications/Alterations, Vehicle . . . . . . .7
Monitor, Tire Pressure System . . . . . . .226
MOPAR® Parts . . . . . . . . . . . . . . . .273
Multi-Function Control Lever . . . . . . . . .80
323
Sunroof . . . . . . . . . . . . . . . . . .109
Tilt/Telescoping Steering Column . . . .85
Windows . . . . . . . . . . . . . . . . . .23
Power Steering Fluid . . . . . . . . . . . . .309
Pregnant Women and Seat Belts. . . . . . .30
Preparation for Jacking . . . . . . . . . . .254
Pretensioners
Seat Belts . . . . . . . . . . . . . . . . .30
Programmable Electronic Features . .136, 144
Programmable Features . . . . .135, 136, 144
Radial Ply Tires. . . . . . . . . . . . . . . .220
Radiator Cap (Coolant Pressure Cap) . . .283
Radio (Sound Systems) . . . . . . . . . . .166
Radio Operation . . . . . . . . . . . . . . .167
Radio Remote Controls . . . . . . . . . . .166
Rain Sensitive Wiper System . . . . . . . . .84
Rear Camera . . . . . . . . . . . . . . . . .108
Rear Cupholder. . . . . . . . . . . . . . . .113
Rear ParkSense System. . . . . . . . . . .103
Rear Seat, Folding. . . . . . . . . . . . . . .75
Rear Window Defroster . . . . . . . . . . .115
Rear Window Features. . . . . . . . . . . .115
Recorder, Event Data . . . . . . . . . . . . .40
Recreational Towing . . . . . . . . . . . . .241
Refrigerant . . . . . . . . . . . . . . . . . .278
Release, Hood . . . . . . . . . . . . . . . . .76
324
Reminder, Lights On. . . . . . . . . . . . . .80
Reminder, Seat Belt . . . . . . . . . . . . . .26
Remote Keyless Entry (RKE)
Arm The Alarm . . . . . . . . . . . . . . .15
Lock The Doors . . . . . . . . . . . . . .17
Panic Alarm . . . . . . . . . . . . . . . .17
Programming Additional Key Fobs . .14, 18
Programming Additional
Transmitters . . . . . . . . . . . . . .14, 18
Remote Keyless Entry (RKE) . . . . . . .16
Unlatch The Trunk . . . . . . . . . . . . .17
Unlock The Doors . . . . . . . . . . . . .16
Remote Sound System (Radio) Controls . .166
Remote Starting
Uconnect® Customer Programmable
Features . . . . . . . . . . . . . . . . . .142
Uconnect® Settings . . . . . . . . . . .142
Remote Trunk Release . . . . . . . . . . . .24
Replacement Bulbs . . . . . . . . . . . . .302
Replacement Keys. . . . . . . . . . . . . . .14
Replacement Parts . . . . . . . . . . . . . .273
Replacement Tires . . . . . . . . . . . . . .224
Restraint, Head . . . . . . . . . . . . . . . .74
Restraints, Child . . . . . . . . . . . . . . . .41
Restraints, Occupant . . . . . . . . . . . . .25
Rocking Vehicle When Stuck . . . . . . . .260
Rotation, Tires . . . . . . . . . . . . . . . .225
Safety Checks Inside Vehicle . . . . . . . . .55
Safety Checks Outside Vehicle . . . . . . . .57
Safety Information, Tire . . . . . . . . . . .209
Safety Tips . . . . . . . . . . . . . . . . . . .55
Safety, Exhaust Gas . . . . . . . . . . . . . .55
Schedule, Maintenance . . . . . . . . . . .312
Seat Belt
Automatic Locking Retractor (ALR) . . .30
Energy Management Feature . . . . . . .30
Lap/Shoulder Belt Operation . . . . . . .28
Lap/Shoulder Belt Untwisting . . . . . . .30
Lap/Shoulder Belts . . . . . . . . . . . .27
Pregnant Women . . . . . . . . . . . . .30
Seat Belt Pretensioner . . . . . . . . . .30
Seat Belt Reminder . . . . . . . . . . . .26
Seat Belt System . . . . . . . . . . . . .25
Seat Belt Maintenance . . . . . . . . . . . .291
Seat Belt Reminder . . . . . . . . . . . . . .26
Seat Belts . . . . . . . . . . . . . . . . .26, 55
Child Restraint . . . . . . . . . . . . . .41
Front Seat . . . . . . . . . . . .26, 27, 28
Inspection . . . . . . . . . . . . . . . . .55
Operating Instructions . . . . . . . . . .28
Pregnant Women . . . . . . . . . . . . .30
Pretensioners . . . . . . . . . . . . . . .30
Rear Seat . . . . . . . . . . . . . . . . .27
Reminder . . . . . . . . . . . . . . . . .123
Untwisting Procedure . . . . . . . . . . .30
Seats . . . . . . . . . . . . . . . . . . . . . .71
Adjustment . . . . . . . . . . . . . . . .71
Head Restraints . . . . . . . . . . . . . .74
Height Adjustment . . . . . . . . . . . .71
Power . . . . . . . . . . . . . . . . . . .71
Rear Folding . . . . . . . . . . . . . . .75
Seatback Release . . . . . . . . . . . .75
Tilting . . . . . . . . . . . . . . . . . . .71
Security Alarm . . . . . . . . . . . . . . . . .14
Arm The System . . . . . . . . . . . . . .15
Disarm The System . . . . . . . . . . . .15
Selection of Coolant (Antifreeze) . . . . . .308
Selection of Oil . . . . . . . . . . . . . . . .275
Sentry Key (Immobilizer) . . . . . . . . . . .13
Sentry Key Replacement . . . . . . . . . . .14
SENTRY KEY®
Key Programming . . . . . . . . . . . . .14
Service Assistance . . . . . . . . . . . . . .314
Service Engine Soon Light (Malfunction
Indicator). . . . . . . . . . . . . . . . . .122
Shift Indicator Light. . . . . . . . . . . . . .191
Shifting . . . . . . . . . . . . . . . . . . . .192
Automatic Transmission . . . . . . . . .192
Shoulder Belts . . . . . . . . . . . . . . . . .27
Side View Mirror Adjustment . . . . . . . . .64
Signals, Turn . . . . . . . . . . . . .57, 80, 122
Snow Chains (Tire Chains) . . . . . . . . .225
Snow Tires . . . . . . . . . . . . . . . . . .220
Spare Tire . . . . . . . . . . . . .221, 222, 253
Spark Plugs . . . . . . . . . . . . . . . . . .308
Specifications
Fuel (Gasoline) . . . . . . . . . . . . .308
Oil . . . . . . . . . . . . . . . . . . . . .308
Speed Control (Cruise Control) . . . . .86, 89
Speedometer . . . . . . . . . . . . . . . . .124
Starting . . . . . . . . . . . . . . . . . . . .185
Automatic Transmission . . . . . . . . .185
Cold Weather . . . . . . . . . . . . . .188
Engine Fails to Start . . . . . . . . . .188
Starting and Operating . . . . . . . . . . . .185
Starting Procedures . . . . . . . . . . . . .185
Steering
Column Controls . . . . . . . . . . . . .80
Column Lock . . . . . . . . . . . . . . .84
Tilt Column . . . . . . . . . . . . . .84, 85
Wheel, Heated . . . . . . . . . . . . . .86
Wheel, Tilt . . . . . . . . . . . . . . .84, 85
Steering Wheel Audio Controls . . . . . . .166
Steering Wheel Mounted Sound System
Controls . . . . . . . . . . . . . . . . . .166
Storage . . . . . . . . . . . . . . . . . . . .301
Storage, Vehicle . . . . . . . . . . . .173, 301
Storing Your Vehicle . . . . . . . . . . . . .301
Stuck, Freeing . . . . . . . . . . . . . . . .260
Sun Roof . . . . . . . . . . . . . . . . . . .109
Sunglasses Storage . . . . . . . . . . . . .109
Supplemental Restraint System - Airbag. . .32
Synthetic Engine Oil . . . . . . . . . . . . .276
Tachometer . . . . . . . . . . . . . . . . . .122
Telescoping Steering Column . . . . . .84, 85
Temperature Control, Automatic (ATC) . . .172
Temperature Gauge, Engine
Coolant. . . . . . . . . . . . . . . .125, 245
Tilt Steering Column . . . . . . . . . . .84, 85
Time Delay, Headlight . . . . . . . . . . . . .79
Tire and Loading Information Placard . . .215
Tire Markings . . . . . . . . . . . . . . . . .209
Tire Safety Information . . . . . . . . . . . .209
Tire Service Kit . . . . . . . . . . . . . . . .246
Tires. . . . . . . . . . . . . . . . . . . .57, 218
Aging (Life of Tires) . . . . . . . . . . .223
Air Pressure . . . . . . . . . . . . . . .218
Chains . . . . . . . . . . . . . . . . . .225
Changing . . . . . . . . . . . . . .253, 255
Compact Spare . . . . . . . . . . . . .221
General Information . . . . . . . . . . .218
High Speed . . . . . . . . . . . . . . .219
325
Inflation Pressures . . . . . . . . . . . .219
Jacking . . . . . . . . . . . .253, 254, 255
Life of Tires . . . . . . . . . . . . . . .223
Load Capacity . . . . . . . . . . . . . .215
Pressure Monitor System (TPMS) . . .226
Pressure Warning Light . . . . . . . . .125
Radial . . . . . . . . . . . . . . . . . . .220
Replacement . . . . . . . . . . . . . . .224
Rotation . . . . . . . . . . . . . . . . .225
Safety . . . . . . . . . . . . . . . .209, 218
Sizes . . . . . . . . . . . . . . . . . . .211
Snow Tires . . . . . . . . . . . . . . . .220
Spare Tire . . . . . . . . . . . . . . . .253
Spinning . . . . . . . . . . . . . . . . .223
Trailer Towing . . . . . . . . . . . . . .238
Tread Wear Indicators . . . . . . . . . .223
To Open Hood . . . . . . . . . . . . . . . . .76
Tongue Weight/Trailer Weight . . . . . . . .236
Towing. . . . . . . . . . . . . . . . . . . . .233
Disabled Vehicle . . . . . . . . . . . . .265
Guide . . . . . . . . . . . . . . . . . . .236
Recreational . . . . . . . . . . . . . . .241
Weight . . . . . . . . . . . . . . . . . .236
Towing Eyes . . . . . . . . . . . . . . . . .261
Towing Vehicle Behind a Motorhome . . . .241
Traction . . . . . . . . . . . . . . . . . . . .198
Traction Control. . . . . . . . . . . . . . . .205
326
Trailer Towing . . . . . . . . . . . . . . . . .233
Cooling System Tips . . . . . . . . . .240
Hitches . . . . . . . . . . . . . . . . . .235
Minimum Requirements . . . . . . . . .237
Tips . . . . . . . . . . . . . . . . . . . .240
Trailer and Tongue Weight . . . . . . .236
Wiring . . . . . . . . . . . . . . . . . . .239
Trailer Towing Guide . . . . . . . . . . . . .236
Trailer Weight . . . . . . . . . . . . . . . . .236
Transfer Case
Fluid . . . . . . . . . . . . . . . . . . .309
Transmission . . . . . . . . . . . . . . . . .286
Automatic . . . . . . . . . . .192, 193, 286
Fluid . . . . . . . . . . . . . . . .286, 309
Manual . . . . . . . . . . . . . . . . . .189
Shifting . . . . . . . . . . . . . . . . . .192
Transmitter Battery Service (Remote
Keyless Entry) . . . . . . . . . . . . . . .18
Transmitter Programming (Remote
Keyless Entry) . . . . . . . . . . . . . . .18
Transmitter, Remote Keyless Entry (RKE) . .16
Transporting Pets . . . . . . . . . . . . . . .53
Tread Wear Indicators . . . . . . . . . . . .223
Trip Odometer . . . . . . . . . . . . . . . .123
Trunk Lid (Deck Lid) . . . . . . . . . . . . . .24
Trunk Release Remote Control. . . . . . . .24
Trunk Release, Emergency . . . . . . . . . .24
Turn Signals . . . . . . . . . . . . . . .80, 122
Uconnect®
Customer Programmable
Features . . . . . . . . . . . . . . .142, 152
Operation . . . . . . . . . . . . . . . . .166
Uconnect® Settings . . . . . . . . .17, 142
Uconnect® Settings . . . . . . . . . . . . . .17
Customer Programmable
Features . . . . . . . . . . . . . . .141, 151
Passive Entry Programming . . . .141, 151
Performance Control . . . . . . . . . . .159
Uconnect® Settings . . . . . . . .141, 151
Uconnect® Voice Command . . . . . . . .175
Unleaded Gasoline . . . . . . . . . . . . . .230
Untwisting Procedure, Seat Belt . . . . . . .30
Vanity Mirrors . . . . . . . . . . . . . . . . .65
Vehicle Identification Number (VIN) . . . . . .7
Vehicle Loading. . . . . . . . . . . . . . . .215
Vehicle Modifications/Alterations . . . . . . . .7
Vehicle Security Alarm (Security Alarm) . . .14
Vehicle Storage . . . . . . . . . . . . .173, 301
Viscosity, Engine Oil . . . . . . . . . .275, 276
Voice Recognition System (VR) . . . . . . .175
Warning Lights (Instrument Cluster
Description) . . . . . . . . . . . . . . . .122
Warnings and Cautions . . . . . . . . . . . . .7
Washer
Adding Fluid . . . . . . . . . . . . . . .280
Washers, Windshield . . . . . . . .82, 83, 280
Washing Vehicle . . . . . . . . . . . . . . .288
Water
Driving Through . . . . . . . . . . . . .199
Wheel and Wheel Trim. . . . . . . . . . . .289
Wheel and Wheel Trim Care . . . . . . . .289
Wind Buffeting . . . . . . . . . . . . . . . .111
Window Fogging . . . . . . . . . . . . . . .173
Windows . . . . . . . . . . . . . . . . . . . .23
Power . . . . . . . . . . . . . . . . . . .23
Windshield Defroster . . . . . . . . . . . . .56
Windshield Washers . . . . . . . . . . .82, 83
Fluid . . . . . . . . . . . . . . . . . . .280
Windshield Wiper Blades . . . . . . . . . .280
Windshield Wipers . . . . . . . . . . . . . . .82
Wiper Blade Replacement . . . . . . . . . .280
Wipers, Intermittent . . . . . . . . . . . . . .83
Wipers, Rain Sensitive . . . . . . . . . . . .84
327
328
bم ي آ "RS 6
) Sentry Key
ا@$ك( ١٤.. . . . . . . . . . . . . . . . . .
bم < اBا
" ٢٢٥.. . . . . . . . . . . . . .
bم ? Hا&اء ٣٠٣ ،١٨٧.. . . . . . . . . . . .
",اوس ٢٠٩.. . . . . . . . . . . . . . . . . .
!" ا@آ ا]و&
? ٢٠٩.. . . . . . . . .
",ا@&ات ا]٥٦.. . . . . . . . . . . . . . B
ه3ه3ة رة ٢٨٣.. . . . . . . . . . . . . . ,
وا
ا@' ا٢٦٧.. . . . . . . . . . . FI
وا
8ت
إرة اF2wف ١٣٠ ،٨٣ ،٥٩.. . . . . . . .
ا@' ا٢٦٧.. . . . . . . . . . . . FI
وWة ا@?A @ 2+ُ 4وق ا]
٢٦.. . . 2
وزن ا&F,$رة ٢٥٨.. . . . . . . . . . . . . . . .
وزن &$د ا/+وزن ا&F,$رة ٢٥٨.. . . . . . . .
و 6dا@ك ا>Fء !" ا@آ ا]و&
? ٢١٥.
و
اوز ٨٤.. . . . . . . . . . . . . . . . .
٣٥٥
! "Bأ&+اب ا<رة ١٦٤ ،١٥٢ ،١٨.. . . . . . .
3ة ا&ل <رة دون Bح Keyless
٢٠٣ ،٢٣.. . . . . . . . . . . Enter-N-Go
!" ا@آ ٣١٣.. . . . . . . . . . . . . . . . . .
ا]و&
? ٣١٣ ،٢١١ ،٢٠٩.. . . . . . . .
ا<[" ٣٣٥ ،٣١٣.. . . . . . . . . . . . . . .
اوي ٢٠٧.. . . . . . . . . . . . . . . . . .
Rاوس ٢٠٩.. . . . . . . . . . . . . .
!" ا@آ ا]و&
? ٣١٤ ،٣١٣ ،٢١١.. . . . .
إ dا<[" ٣٣٥ ،٣١٤.. . . . . . . . . . .
ا 52ا]و&
? ٢١٥.. . . . . Autostick
ا&$اد ا 8$ا٣١٤.. . . . . . . . . . AI
Rا<[" ٣١٤.. . . . . . . . . . . . . . .
Rا<&ا[" وا٣١٤.. . . . . . . . . . YB
@&<
tى ا<[" ٣١٤.. . . . . . . . . . .
&ع ا<[" ٣٣٥.. . . . . . . . . . . . . . . .
!" ا@آ اوي ٣١٤ ،٣١٣ ،٢٠٧.. . . . . . . .
@&<
tى ا<[" ٣١٤ ،٣١٣.. . . . . . . .
٥٧.. . . . . . . . . . . . . Y<+ ,2
q[5
!Fت اوس ٢١٢.. . . . . . . . . . . . . . . .
bم ® ،ParkSenseا١١٠.. . . . . . . . BI
٣٥٤
bم ®Uconnect
إادات bم ®١٥٣ ،١٩ ،١٨.. . Uconnect
ا١٨١.. . . . . . . . . . . . . . . . . . "RS
bم ®Uconnect
ا3$ات ا&+ > +,اF
ا١٦٥ ،١٥٣.. . . . . . . . . . . . . . . "$2
bم ا2Sر ا&! ParkSense Hا١١٠.. . BI
bم ا^Jر BIا٢٤٧.. . . . . . . . . . R8
bم ا^'ار )إ'ار ا]
ن( ١٥.. . . . . . . . . . . .
bم ا> ٣٠٨.. . . . . . . . . . . . . . . . . .
إ "[ dا> )
6ا٣٠٩.. . . . . ($
ار [" ا>
)
6ا٣٣٤ ،٣٣٣ ،٣٠٨.. . . . . . . . ($
٣١٠.. . . .
ا "[ tIا> ا"$2<$
ا H5وا Hbوإدة ا٣٠٨.. . . . . g>2
ا٣١١.. . . . . . . . . . . . . . . . . t@B
"[ 2ا> ٣٣٣.. . . . . . . . . . . . .
٣١٠.. . . . . . . . . . . . .
Fء ااد
<&ى [" ا> ٣١١ ،٣٠٨.. . . . . . . .
,ط 3م 'آه ٣١١.. . . . . . . . . . . . .
bم ا>،
Fء ٣١٠.. . . . . . . . . . . . . . . Rd
bم ا k>#ا^ - dا&دة ا&ا[ ٣٥.. . . . .
bم ا@? 4ا? Bا< )) (ACCا@? 4
ا< ا٩٣.. . . . . . . . . . . . . . . (+#
bم ا@? 4ا,wار ا^?و )٢٢٦.. (ESC
bم ا@? 4اBا
" ،ا^?و ٢٢٢.. . . . . .
bم ا2ف ا&5ت )١٩١.. . . . . . . (VR
bم ا&ل دون Bح ١٧.. . . . . . . . . . . . .
bم ا&ل ،ا^dءة ١٧.. . . . . . . . . . . . . .
bم ا2دم ٣٠٦ ،٥٨.. . . . . . . . . . . . . . . .
bم اBا
" ٣١٢ ،٢٢٢.. . . . . . . . . . . . . .
ا]&Fا ا[< ٣١٢.. . . . . . . . . . . .
٢٢٠.. . . . . . . . . . . . . . . . .
ا&!H
اYRY 2$ق )٢٢٣.. . . . . . . . . (ABS
&dء ا@' ٢٢٢ ،١٣١.. . . . . . . . . . .
@ tا<[" ٣٣٥ ،٣١٢.. . . . . . . . . . .
bم اBا
" اYRY 2$ق )٢٢٣.. . . . . (ABS
bم ا@$ت ا@<س ٨٧.. . . . . . . . . . F$
bم k>#ا]BJل ٤٤.. . . . . . . . . . . . . . .
bم ا +اBا
" "!/ا@آ ٢١١.. . . . . . . .
bم ي آ ®SENTRY KEY
+اB$ح ١٥.. . . . . . . . . . . . . . .
"RS 6ا@$ك )bم ي آ
١٤.. . . . . . . . . . . . . . . (Sentry Key
&$أ39ة ا,س ١٣٠.. . . . . . . . . . . . .
iة ا 42ا]و&
? ٦٧.. . . . . . . . . . . .
ا!>b ،م Rdا^Jر ٢٤٧.. . . . . . . . . . .
ا اؤ ا BIاIر٦٧.. . . . . . . . . . 9
ا ا٦٩.. . . . . . . . . . . . . . . . . . . 3
آ 3ا
&2$ت ،ا<رة ١٣٥.. . . . . . . . . . .
آ& 3ز 6ا !Fا^?و )ا5$ات( ٣١٩.. .
"3ا>8ب ا93ج ا]
٥٨.. . . . . . . .
"3ا>8ب ،ا93ج ا]
٥٨.. . . . . . . . .
"3ا>8ب ،ا93ج ا١٢٣.. . . . . . . . . BI
6,A "3ا93ج ا١٢٣.. . . . . . . . . . BI
< +ء ا "RSا2B$ت ٢٢٥.. . . . . . .
<ات Rا@رة ٨٤.. . . . . . . . . . . . .
<ة ا٣٤٠.. . . . . . . . . . . . . . . . I
<ة اY$2ء ٣٤٠.. . . . . . . . . . . . . . . .
< اأس ٧٧.. . . . . . . . . . . . . . . . . .
< ،اأس ٧٧.. . . . . . . . . . . . . . . . . .
q+5ا>8ب ١٣٢ ،٨٣.. . . . . . . . . . . . .
>5ح ا&! Hا$آ3ي ا&2ي ٣٣١.. . . . . . . .
>5ح Uا t@ ) "F2ا@$ك( ١٣٠.. . . . .
2ل ا]وآن ،ا>) 3ا&!&د( ٣٣٤ ،٢٥٣ ،٢٥٢.. .
2ل ا&زن ا^< $9رة ٢٥٥.. . . . . . . . .
2ل ا&زن ا^&@$ $9ر ٢٥٦.. . . . . . . . .
&2ت ا< ،
Yا^Jر ٢٣٠.. . . . . . . . . . .
&2ت Yا^Jر ٢٣٠.. . . . . . . . . . . .
qBا@? 4ا&5ت ا&9&$دة 2+ا,دة ١٨١..
qBا@? 4اbم ا &5ا&9&$دة
ا,دة ١٨١.. . . . . . . . . . . . . . . . . . .
qBا@?b 4م "RSا&5ت ُ2+
)ااد&( ١٨١.. . . . . . . . . . . . . . . . .
Bح ار )ا (42ا&8ء ا/2ا&8ء
ا٨٤.. . . . . . . . . . . . . . . . . . BI$
Bح ا@? 4ا^?و ا<
)ا@? 4ا< ا٩٣ ،٩٠.. . . . . . . (+#
Bح ا@?١٨١.. . . . iPod®/USB/MP3 4
Bح ا@?iPod®/USB/MP3 4
+ا&5ت > ®١٨١.. . . . . Bluetooth
Bح ا@? 4ا< )ا@? 4ا<
ا٩٣ ،٩٠.. . . . . . . . . . . . . . . . . (+#
Bح ا@?9 4ز ®١٨١.. . . . . . . . iPod
Bح ا@? 4در 9ا@ارة
ا]و&
? ١٨٢.. . . . . . . . . . . . . . .
Bح ا@? 4در 9ا@ارة ،ا]و&
?
)١٨٧.. . . . . . . . . . . . . . . . . . (ATC
Bح ا ،42ا q+5$ا]
٨٤.. . . . . . . . .
Bح ،ي آ )
"RS 6ا@$ك( ١٤.. . . . .
٤.. . . . . . . . . . . . . . . . . . . . . . ,
,س در 9ا@ارة> "[ ،
ا@$ك ٢٦٧ ،١٣٣.. . . . . . . . . . . . . . .
?ن @ g>2ا&!&د ٢٥٤.. . . . . . . . . . . .
? Hا&اء q[5 ،ا١٩٠ ،١٨٨.. . . . . . "RS
&2
D5ت ا^Jر وا@٢٣٥.. . . . . . . . "$
' ا !Fا?١١٩.. . . . . . . . . . . . . [+
&! 6اا ٢٧٦.. . . . . . . . . . . . . . . . . 2
&! 6ا&$2د ا + "ABا&ا ' )ب( ٢٣٥.. . . . . .
3ات إ?و !١٥٧ ،١٤٦.. . . . . . > +
3ات ا93ج ا١٢٣.. . . . . . . . . . . . . BI
3ة ا +wا32$زة ا@&ادث ٤١.. . . . . . .
3ة ا&ل دون Bح ١٢.. . . . . Keyless Go
3ة ا&ل دون Bح ™Keyless Enter-N-Go
إRء ا P9 "B,ااآ١٨.. . . . . . . . P
إRء ا P9 "B,ا<[١٨.. . . . . . . . . D
ا&ل 5وق ا]
١٩.. . . . . . . . . . 2
b +م ا&ل ا١٦٤ ،١٥٢.. . . S
٣٥٣
&dء Aا@$ك &ًرا )
Uا١٣٠.. . . ("F2
&dء ", Uا<ت ٢٠٩.. . . . . . . . . . .
Jا$ا اIر٦٨.. . . . . . . . . . . . . . 9
Jا 2,$ا٧٨.. . . . . . . . . . . . . . . . BI
ا,دة ا١٦٥.. . . . . . . . . . . . . . I<$
اد ا< ١٣٢.. . . . . . . . . . . . . . . . .
اد ا١٣١.. . . . . . . . . . . . . . . . . <$
ا١٣١.. . . . . . . . . . . . . . . . . . W
اد ا@$ك )اآ&
( ١٣٠.. . . . . . . .
اد < ا١٣١.. . . . . . . . . . . . . . . W
ة @م ا^Jر ٢٦٨.. . . . . . . . . . . . . . . .
5ا,س
ا) k3ا@$ك( ٢٩٩.. . . . . . . . . . . . .
Yت ا^Jر ٢٣٠.. . . . . . . . . . . . . . . .
> ",اوس
ا<[" ٣٣٥.. . . . . . . . . . . . . . . . . .
$ا^Jرات ٢٤٤.. . . . . . . . . . . . . . . .
$إزا ا&wاء3W ،ام ا]
ن ٣٢.. . . . . . . .
اBا
" ٢٢٢ ،٢٢٠.. . . . . . . . . . . . . . .
Aا@? 2+ُ 4ااد& ١٨١.. . . . . . .
ز ا> ٣٠٤.. . . . . . . . . . . . . . . . . .
Yت ا93ج ا]
٨٦.. . . . . . . . . . . .
٣٥٢
ا<[" ٣٠٦.. . . . . . . . . . . . . . . . . .
Yت ا q+5$ا]
٣٠٦.. . . . . . . . . . .
<" ا<رة ٣١٥.. . . . . . . . . . . . . . . . .
Fء ا>F) 3ء @ g>2ا&!&د( ٢٩٧ ،٢٥٤..
Fء ا@ ،>,ا@ Wا&Fارئ ٢٧.. . . . .
Fء ا@B
،>,ح ا@ ا٢٦.. . . !F+ "
2
Fء ااد )Fء "[ Rdا>( ٣١٠.. . .
Fء Aوق ا]
F) 2ء ا@٢٧ ،٢٦.. . . . (>,
Fء "[ Rdا> )Fء ااد( ٣١٠.. . .
ة ا<رة اة ٥٦.. . . . . . . . . . . .
@&<
tى ا<["
اBا
" ٣١٢.. . . . . . . . . . . . . . . . .
٢٩٩.. . . . . . . . . . . . . .
ز kا@$ك
!" ا@آ ا]و&
? ٣١٤.. . . . . . . . .
bم ا> ٣٠٨.. . . . . . . . . . . . . . .
@>5
tح ا@$ك )
>5ح Uا٢٩٧.. ("F2
@&ص ا< Yرج ا<رة ٥٩.. . . . . . . . . .
@&ص ا< Yدا" ا<رة ٥٨.. . . . . . . . . .
@&ص ،ا<٥٧.. . . . . . . . . . . . . . . . Y
ا
" ا&!٢٢٠.. . . . . . . . . . . . . . . . . H
ا
" ،ا&!٢٢٠.. . . . . . . . . . . . . . . . H
Y
ا tIز kا@$ك ٣٠٢.. . . . . . . . .
9ز ,ا&اء ٣٠٢.. . . . . . . . . . . . .
ز kا@$ك ٣٣٤ ،٣٠٢.. . . . . . . . . . .
? Hا&اء ٣٠٤ ،١٨٩.. . . . . . . . . . . .
ا ،k3اwر ٣٠٢.. . . . . . . . . . . . . .
? Hا&اء ٣٠٤ ،١٨٩.. . . . . . . . . . . .
!>8ن ا+
٢٥٧.. . . . . . . . . . . .
@ Pا&F,$رات
! 6Fر ®٢٩٨.. . . . . . . . . . . . MOPAR
آ
ا١١٥.. . . . . . . . . . . . . . . . . B ،
3و 9ز kا@$ك ٣٠١.. . . . . . . . . . . . . .
F qBء ا@$ك ٧٩.. . . . . . . . . . . . . . .
>$ت ا٣٢٨ ،٥٩.. . . . . . . . . . . . . q+5$
>$ت ،ا&8ء ٣٢٨ ،٥٩.. . . . . . . . . . . . . .
& Wأ39ة ا,س و
qBا@?١٢٧.. . . . . . . 4
Uات Hا$ات ٢٤٤.. . . . . . . . . . . .
@ت ا93ج ا]
٨٦.. . . . . . . . . . . .
@ت٨٧.. . . . . . . . . . . . . F$ <W ،
@ت ،ات ٨٦.. . . . . . . . . . . . . 2F,
6ا > "[) $ا@$ك( ٣٣٣ ،٣٠٨.. . . .
ا٣١٠.. . . . . . . . . . . . . . . . . tI
b W +ت qBإ١٩ ،١٥.. . . . . d
Sا^'ار ١٦.. . . . . . . . . . . . . . . .
9ز إرل bم qا]&+اب ُ 2+دون qB
)١٧.. . . . . . . . . . . . . . . . . . (RKE
A qوق ا]
١٩.. . . . . . . . . . . . . 2
qB
b W
! "Bا]&+اب ١٨.. . . . . . . . . . . . . . . .
"
Wا]آ&اب ا١٢١.. . . . . . . . . . . . . BI
Y
Wت ا]آ&اب ٣١٩ ،١٢١.. . . . . . . . . . . .
3Wام ا]
ن
3W iام ا]
ن ٣٢.. . . . . . . . . . . .
أ 3Wأ
ن ا@&ض/ا?٢٩.. . . . . . . . . H
ا'آ 3W ++ام ا]
ن ٢٩.. . . . . . . . . .
3W "RSام ا@&ض/ا?٣١.. . . . . . . . . H
3Wام ا@&ض/ا? $ Hإزا ا&wاء ٣٢.. . .
<ء ا@&ا
" ٣٢.. . . . . . . . . . . . . . .
3ة إدارة ا٣٣.. . . . . . . . . . . . . . !F
bم 3Wام ا]
ن ٢٧.. . . . . . . . . . . . . .
3Wام ا2,$
P@ iا "B,ا]و&
? )٣٣.. . . . (ALR
,Wت ا<@٢٨٤.. . . . . . . . . . . . . . . . . P
ا&آ" ٢٩٨.. . . . . . . . . . . . . . . . .
در&F 9ع &dء ار ،ا q+5$اا ٨٥.. . .
د" ا) $د" ا٥.. . . . . . . . . . . . . ("RS$
د" ا) "RS$د" ا٥.. . . . . . . . . . . . . ($
د" @ Pا&F,$رات ٢٥٨.. . . . . . . . . . . . .
ذراع ا@?2
4د ا&[٨٣.. . . . . . . . . . . H
ر! H2 4ا<رة )٧.. . . . . . . . . . . . (VIN
ز kا@$ك اآ> ٣٠١.. . . . . . . . . . . . .
[" ا& `9ا32$ز ٣٣٥.. . . . . . . . . . . . .
[" اBا
" ٣٣٥.. . . . . . . . . . . . . . . . .
[" > ? Hا&اء ٣٠٤ ،٣٠٣.. . . . . . . . .
[" @&ر اوران ٣٣٥.. . . . . . . . . . . . . .
@ Pا<رة ا٢٨٨.. . . . . . . . . . . . . F2$
@ Pا&F,$رات ٢٥٥.. . . . . . . . . . . . . . .
أد ا>F$ت ٢٥٩.. . . . . . . . . . . . . .
ا]Yك ٢٦١.. . . . . . . . . . . . . . . . .
!>8ن ا٢٥٧.. . . . . . . . . . . . . . . +
٢٦٢.. . . . . . . . . . . . . . . . . . q[5
*S+ q[5ن bم ا> ٢٦٢.. . . . . . . . .
وزن ا&F,$رة و<ن ا<@٢٥٨.. . . . . . . P
@ Pرة 3
+ Hل @آ ٢٦٣.. . . . .
Iن ،آ ا@$ك ٢٠٦.. . . . . . . . . . . . . .
2ت ا<&ا[" ٣٣٣.. . . . . . . . . . . . . . . . .
2ت ،ا<[" ٣٣٣.. . . . . . . . . . . . . . . . .
"Yا ) "Yا^Jرات( ٢٤٥.. . . . . . .
،"Yا^Jر ٢٤٥.. . . . . . . . . . . . . . . .
ض
&2ت ا<[D
ض &$أ39ة ا,س ١٣٨ ،١٣٧..
ض
&2ت ا<[D
)١٣٨ ،١٣٧.. . . . . . . . . . . . . . (DID
Bات @ ا93ج ا]
٣٠٥.. . . . . . . . .
2$ت ا^2ل ٣٣٤.. . . . . . . . . . . . . . . .
&Aا
" اY2ت ٢٧٤.. . . . . . . . . . . . . . .
Aأ 3Wا]
ن ٣١٨.. . . . . . . . . . . . . .
Aا&دة ا&ا[ ٤٣.. . . . . . . . . . . . .
F+ Aر 9ز ا^رل ) qا]&+اب
ُ 2+دون ١٩.. . . . . . . . . . . . . . . (qB
H?
Aا&اء ٣٠٣.. . . . . . . . . . . . . .
b Aم ا@?2>+ 4ث اRزات ٢٩٧.. . . . . . .
i
>dة اؤ ا> ٦٧.. . . . . . . . . . . .
Rdا&اء ،ا^Jرات ٢٣٩.. . . . . . . . . . . .
&dء ا^'ار ١٣٠.. . . . . . . . . . . . . . . . .
&dء اوز ٨٤.. . . . . . . . . . . . . . . . . .
&dء ا&دة ا&ا[ ١٣٢ ،٥٨ ،٤٢ ،٤١.. . . . . .
&dء @' 6اYRwق ٢٢٤ ،١٣١.. . . . . . . .
٣٥١
ا3$ات ا&+ > +,ا Fاb+ "$2م
®١٥٣.. . . . . . . . . . . . . . Uconnect
9 +ز ا^رل ) qا]&+اب ُ 2+دون
١٩.. . . . . . . . . . . . . . . . . . . (qB
F+ر +ون ٣٠٢.. . . . . . . . . . . . . . A
ٍ 3+ل اAص ٢٥٢.. . . . . . . . . . .
* ) ات (2F,ا@$ت ٨٦.. . . . . . . .
* ز
،ا q+5$ا]
٨٢.. . . . . . . . .
@' ا5دم ا]
١٠٨.. . . . . . . . . . . .
@' ز أول أآ< ا?&+ن ٥٨.. . . . . . . .
@'ات و>ت ٧.. . . . . . . . . . . . . . . .
@ Aوق ا]
٢٦.. . . . . . . . . 2+ُ 2
@ Aوق ا]
wW 2ت ا&Fارئ ٢٧.. . . .
@ Aوق ا]
wW ،2ت ا&Fارئ ٢٧.. . . . .
@ Fء ا@ >,ا&Fارئ ٢٧.. . . . . . . .
@ Fء ا@$ك ٧٩.. . . . . . . . . . . . . .
@ "$ا<رة ٢٣٦.. . . . . . . . . . . . . . . . .
ا^Jرات ٢٣٥.. . . . . . . . . . . . . . . .
3Iا<رة ٣٢٨ ،١٨٩.. . . . . . . . . . . . .
3Iاbرات ا١١٧.. . . . . . . . . . . <$S
،3Iا<رة ٣٢٨ ،١٨٩.. . . . . . . . . . . . .
tIرة ٢٨٣.. . . . . . . . . . . . . . ,
٣٥٠
'آ &9&+د اB$ح ١٣.. . . . . . . . . . . . . .
اآ 4ا>8ب ا&ا ' ١٨٩.. . . . . . . . . . .
&@
k3ر اوران ٣٣٥.. . . . . . . . . . . . .
<ب ا<&ا[" ٦٠.. . . . . . . . . . . . . . . . .
i 4@Sا>ن ٣٠٥.. . . . . . . . . . . . . . . .
"RSااد& ١٨٢.. . . . . . . . . . . . . . . . .
"RSاا ٢٧٧ ،٢٧٥.. . . . . . . . . . . . . 2
F>+ "RSر ا32$زة ٢٨٠.. . . . . . . . . . . .
$2ت ا ٢٧٧.. . . . . . . . . . . . . . . . . 6
Rا@رة وإرات اF2wف ٨٣.. . . . . . . . .
>` *S+ن ز ا2دم ٥٨.. . . . . . . . . . . . . .
>` *S+ن bم ا&!&د ٢٥٤.. . . . . . . . . . . . .
Sاbم )إ'ار ا]
ن( ١٥.. . . . . . . . . . .
Hb
اY2ت ٣١٦.. . . . . . . . . . . . . . . . .
Hbا93ج ٣١٨.. . . . . . . . . . . . . . . .
W& Hbأ39ة ا,س ٣١٨.. . . . . . . .
&Aت ا ،ا<رة اة ٥٦.. . . . . . . . .
9ول ا٣٣٨.. . . . . . . . . . . . . . . . . 5
9ول 3و 9ز kا@$ك ٣٠١.. . . . . . . . . .
9ول ،أWم ا^Jرات ٢٣١.. . . . . . . . . . . .
9ز إرل bم qا]&+اب ُ 2+دون
(RKE) qB
إRء ! "Bا]&+اب ١٨.. . . . . . . . . . . . . .
إ'ار اwرب ١٩.. . . . . . . . . . . . . . .
+أ39ة إرل إ١٩ ،١٥.. . . . . . d
b W +ت qBإ١٩ ،١٥.. . . . . d
Sا^'ار ١٦.. . . . . . . . . . . . . . . .
9ز إرل bم qا]&+اب ُ 2+دون qB
)١٧.. . . . . . . . . . . . . . . . . . (RKE
A qوق ا]
١٩.. . . . . . . . . . . . . 2
! "Bا]&+اب ١٨.. . . . . . . . . . . . . . . .
9ز ا^رل q ،ا]&+اب ُ 2+دون qB
)١٧.. . . . . . . . . . . . . . . . . . (RKE
9ز <ـ" +ت ا@&ادث ٤٣.. . . . . . . . . .
9ز <ـ" +ت ،ا@&ادث ٤٣.. . . . . . . . . .
9ز <"+ ،ت ا@&ادث ٤٣.. . . . . . . . . .
9ز ,ا&اء ،ا@$ك ) 9ز ,ه&اء
ا@$ك( ٣٠٢.. . . . . . . . . . . . . . . . .
b Wا١٢.. . . . . . . . . . . . . . . . . qB$
إRء ! "Bا]&+اب ١٨.. . . . . . . . . . . . . .
إ'ار اwرب ١٩.. . . . . . . . . . . . . . .
+أ39ة إرل إ١٩ ،١٥.. . . . . . d
اB$ح ،ا>wال ١٥.. . . . . . . . . . . . . . . .
ا٧٤.. . . . . . . . . . . . . . . . . . . . . ,$
٧٤.. . . . . . . . . . . . . . . . . . .
إ
٧٤.. . . . . . . . . . . . . . . . . .
ا>8
ا٧٤.. . . . . . . . . . . . . . . . . . . !F
ا٧٨.. . . . . . . . . . . . . . . . HI F
@ < ا٧٨.. . . . . . . . . . . . . b
>dاwرBع ٧٤.. . . . . . . . . . . . . . .
< اأس ٧٧.. . . . . . . . . . . . . . . .
ا ,$ا١٦٥.. . . . . . . . . . . . . . . . I<$
ا{,$
ا&!&د ١٣٣.. . . . . . . . . . . . . . . . . .
درW 9ارة [" ا> ١٣٣.. . . . . . . . .
اد ا< ١٣٢.. . . . . . . . . . . . . . .
اد ا١٣١.. . . . . . . . . . . . . . . <$
اد ا@$ك )اآ&
( ١٣٠.. . . . .
ا 2,$ا ،BIا٧٨.. . . . . . . . . . . . . . . F
ا
&2
،D5$ت ا^Jر وا@٢٣٥.. . . . . . "$
ا5$ات ٣١٩.. . . . . . . . . . . . . . . . . .
ا&$اBAت
ا٣٣٤.. . . . . . . . . . . . . . . . . . k3
ا&!&د )ا>٣٣٤.. . . . . . . . . . . . . (3
ا=$
ا,دة > ٢١٨.. . . . . . . . . . . . . . . .
ا3$ات ا١٥٧ ،١٤٦ ،١٤٥.. . . . . . > +,
ا3$ات ا&+ > +,اF
ا١٥٧ ،١٤٦ ،١٤٥.. . . . . . . . . . . . "$2
ا<ء ا@&ا
" وأ 3Wا]
ن ٣٢.. . . . . . . . . .
اbم ا^?و @? 4اBا
" ٢٢٢.. . . . . .
اbم ا 5ISا<رة ٢٩٧.. . . . . . . . . .
اbم ا ،5ISا<رة ٢٩٧.. . . . . . . . .
ا&ا ' ٢٥.. . . . . . . . . . . . . . . . . . . . .
ا٢٥.. . . . . . . . . . . . . . . !F+ 2
ا Hا&Iي ١٨٢.. . . . . . . . . . . . . . . .
ا&ا
8ت ٢٦٧.. . . . . . . . . . . . . . . . . .
ا&دة ا&ا[ ٣٥ ،٣٤.. . . . . . . . . . . . . .
ا&@ +wادث ا٤١.. . . . . . . . . <@$
ا&[ ا&ا[ ا> ٣٧.. . . . . . . . . . .
ا&دة ا&ا[ ا]
٣٥ ،٣٤.. . . . . . . .
ا&دة ا&ا[ ا]
ا٣٥.. . . . . . ,$
"RSا&دة ا&ا[ ٣٦.. . . . . . . . . . .
9ز <" +ت ا@&ادث )٤٣.. . . . (EDR
b Aم ا&[ ا&ا[ ٤٣.. . . . . . . . .
&dء @' ا&دة ا&ا[ ٤٢ ،٤١.. . . . . .
W Wوث اBخ ٤٠.. . . . . . . . . . . .
?&ت ا&[ ا&ا[ ٣٤.. . . . . . . . . . .
",ا@&ات ا]٥٦.. . . . . . . . . . . . B
و[ $Wاآ> ا
5ت ٣٧.. . . . . .
ا&!&د ٢٥٢.. . . . . . . . . . . . . . . . . . . .
إ٢٥٤.. . . . . . . . . . . . . . . . . . d
٢٥٢.. . . . . . . . . . . . . . . . .
ا>3
ا>F$ت ٢٥٢.. . . . . . . . . . . . . . . .
ا,$س ١٣٣.. . . . . . . . . . . . . . . . .
٣٣٤.. . . . . . . . . . . . . . .
ا&$اBAت
2ا3Iان ٣٣٣.. . . . . . . . . . . . . . .
Fء @ اF) g>2ء ا>٢٥٤.. . . . . (3
٣٣٤ ،٢٥٣ ،٢٥٢.. . . . . . .
2ل ا]وآن
ا
Yء ا@$ك &!&+د ا٢٠٦.. . . . . . . "RS
اBخ ا&[ ا&ا[ ٣٤.. . . . . . . . . . . . . .
اه3از ا<رة P><+ه>&ب اح ١١٩.. . . . . . .
+ء ا٢٠٢.. . . . . . . . . . . . . . . . . . "RS
٢٠٦.. . . . . .
إBق ا@$ك +ء ا"RS
ا {,Fا>رد ٢٠٥.. . . . . . . . . . . . . . .
!" ا@آ ا]و&
? ٢٠٣.. . . . . . . . .
+ء ا2+ُ "RS
إادات bم ®١٥٣.. . . . . . . Uconnect
٣٤٩
ا٦٨.. . . . . . . . . . . . . . . . . . I<$
Jا$ا اIر٦٨.. . . . . . . . . . . . 9
ا$ا ا?٦٨.. . . . . . . . . . . . 2+ُ [+
ا$ا ا٦٨.. . . . . . . . . . . . . . . . . I<$
ا3$ا٥٩.. . . . . . . . . . . . . . . . . . . . Å
Fء ا@$ك ٧٩.. . . . . . . . . . . . . . .
ا٨٠ ،٥٩.. . . . . . . . . . . . . . . . . q+5$
أ&dاء ار ٨٢.. . . . . . . . . . . . . . .
إرة اF2wف ١٣٠ ،٨٣ ،٥٩.. . . . . . . .
إdءة ا&ل ١٧.. . . . . . . . . . . . .
إ'ار ا]
ن ١٣٠.. . . . . . . . . . . . . . .
ار ا&8ء ا / 2ا&8ء ا٨٤.. . . BI$
ا>ال ا>$ت ٣٣٠.. . . . . . . . . . . . . .
ا!اب & Aا@$ك )
U
١٣٠.. . . . . . . . . . . . . . . . .
ا("F2
ا^'ار ١٣٠.. . . . . . . . . . . . . . . . . .
اوز ٨٤.. . . . . . . . . . . . . . . . . .
ا@' )و &$
HAأ39ة ا,س( ١٣٠.. .
٢٢٩.. . . . . . .
ا@' *S+ن < اBا
"
ا@? 4ا ٢٢٩.. . . . . . . . . . . . . .
ا@? 4ا?٨٥.. . . . . . . . . . . . . . #
ا'آ 3W ++ام ا١٣١.. . . . . . . . . 2,$
٣٤٨
ا&! Hا$آ3ي ٣٣١.. . . . . . . . . . . . .
اIر٥٩.. . . . . . . . . . . . . . . . . 9
اا ١١٧ ،٨٤.. . . . . . . . . . . . . . .
ا٣٣١.. . . . . . . . . . . . . . . . . 5
ا / 3ا,اءة ١١٧ ،٨٤.. . . . . . . . . . .
ا٣٣٠ ،٣٢٨.. . . . . . . . . . . . . . 5
ا>8ب ١٣٢ ،٨٣.. . . . . . . . . . . . . . .
ا&8ء ا١٣٣ ،٨٤.. . . . . . . . . . . . 2
ا,اءة ١١٧ ،٨٤.. . . . . . . . . . . . . . .
اYRY 2$ق ٢٢٤ ،١٣١.. . . . . . . . . .
ا q+5$ا]
٣٣١ ،٨٠.. . . . . . . . . .
ا q+5$ا]
ا]و&
? ٨٠.. . . . . . .
ا&دة ا&ا[ ١٣٢ ،٥٨ ،٤٢ ،٤١.. . . . . .
@' اBا
" ٢٢٢ ،١٣١.. . . . . . . . . . .
'آ ك ا q+5$ا]
8ءة ٨٢.. .
'آ ك ا8
q+5$ءة ٨٢.. . . . . .
٨٧ ،٨١..
"$ا q+5$ا]
6ا@$ت
١١٧ ،٨٤.. . . . . . . . . . .
!اءة اFI
Uا&8ء ا١٣٣.. . . . . . . . . . . 2
١٣٠.. . . . . .
Uا t@ ) "F2ا@$ك(
&$أ39ة ا,س ١٣٠ ،٨٠.. . . . . . . .
٦٩.. . . . . . . . . . . . . . . .
iة ا3
ا!> Rdا^Jرات )٢٤٧ ،١٣٣.. (TPMS
Bح ا ،42ا q+5$ا]
٨٤ ،٨٣.. . . .
Bح ا q+5$ا]
٨٠.. . . . . . . . . .
و 6dا2wاض )در&F 9ع
٨٥.. . . . . . . . . . . . . . .
&dء ار(
ا q+5$ا]
٣٣١.. . . . . . . . . . . . . . .
ا]و&
? ٨٠.. . . . . . . . . . . . . . . .
ا* ٨٢.. . . . . . . . . . . . . . . . . .
اوز ٨٤.. . . . . . . . . . . . . . . . . .
ا>` ك ا8
q+5$ءة ٨٢.. . . . . .
ا٣١٧.. . . . . . . . . . . . . . . . . Hb
ا 6
"$2ا@$ت ٨٧ ،٨١.. . . . . . . . . .
٣٠٦.. . . . . . . . . . . . . . . .
اYRت
٨٠.. . . . . . . . . . . . . . . . . .
اB$ح
* ز
٨٢.. . . . . . . . . . . . . . . .
Bح ار ا&8ء ا / 2ا&8ء
ا٨٤.. . . . . . . . . . . . . . . . . BI$
ا q+5$ا]
ا]و&
? ٨٠.. . . . . . . . .
ا q+5$ا]و&
? ا٨١.. . . . . . . . . . 2
ا q+5$اIر٥٩.. . . . . . . . . . . . . . . 9
ا q+5$اا ٨٤.. . . . . . . . . . . . . . . .
ا١٢.. . . . . . . . . . . . . . . . . . . . . qB$
اSادات
أ 3Wا]
ن
ا!F
٢٢.. . . . . . . . . . . . . . .
أ!Bل ا]&+اب
ا< H,ا@$ك ١١٧.. . . . . . . . . . . . .
اBا
" ٢٢٢.. . . . . . . . . . . . . . . . .
ا$ا ٦٨.. . . . . . . . . . . . . . . . . . .
ا٧٤.. . . . . . . . . . . . . . . . . . ,$
ا) 'B$ا 'B$ا? +ا^١١٩.. . . . . . ( d
ا&ا ' ٢٥.. . . . . . . . . . . . . . . . . . .
@ Fء ا@٢٦.. . . . . . . . . . . . >,
&$د ا& `9ا/
¿ "+,ا^ Jوا٨٨.. . 5,
آ& 3ز 6ا) !Fا5$ات( ٣٢٣.. . . . .
ا&FارئwW ،ت
٢٨٨.. . . . . . . . . . . . . . . . .
ا<@P
ا< &Iا3ا[ة ٢٦٧.. . . . . . . . . . . . . .
٢٨٣.. . . . . . . . . . .
tIرة ,
F>+ "RSر ا32$زة ٢٨٠.. . . . . . . . .
ر 6ا<رة ٢٧٥.. . . . . . . . . . . . . . .
ا٢٨٣.. . . . . . . . . . . . . . . . tI ،,2
ا 2و٣١٦.. . . . . . . . . . . . . . . . W
ا 52ا]و&
? ٢١٥.. . . . . . . . Autostick
٣٢.. . . . . . . . . . . . . . .
اYF+ 2ء ٣١٥.. . . . . . . . . . . . . . . . .
اY2+ 2ت واY2ت ا٣١٦.. . . . . . . 2$
ا٣١٥.. . . . . . . . . . . . . . . . b$+ 2
ا b$+ 2اا ٣١٧.. . . . . . . . . . . .
اYRت ،ا93ج ا]
٣٠٦ ،٨٦.. . . . . . . .
اR
إ dا<[" ٣٠٦.. . . . . . . . . . . . . . .
اBا
" ٢٢٢.. . . . . . . . . . . . . . . . . . . .
ا٢١٨.. . . . . . . . . . . . . . . . . . . . . F,
ا,دة
> ا =$ا , $أو ا5ة أو ااآة
ا٢١٨.. . . . . . . . . . . . . . . . . @8
ا?
ا ا١١٥.. . . . . . . . . . . . . . . . BI
ا?&<&ل ا&2ي ١١٧.. . . . . . . . . . . . . . .
ا?&<&ل ،ا&2ي ١١٧.. . . . . . . . . . . . . . .
ا3و ،9ز kا@$ك ٣٠١.. . . . . . . . . . . .
ا@$ت 2F,ا@آ )
ة * ا٨٦.. . (@$
ا@$ك ٢٩٦ ،٢٩٥.. . . . . . . . . . . . . . . .
٣٣٣ ،٣٠٠.. . . . . . . . . . .
ار اk3
ا^Bق اوران ٢٠٦.. . . . . . . . . . . .
ا> ٣٠٨.. . . . . . . . . . . . . . . . . .
ا@ة ٢٩٦ ،٢٩٥ ،٢٩٤.. . . . . . . . . . .
٣٣٤ ،٣٣٣ ،٢٩٩.. . . . . . . . . . .
اk3
ا k3اآ> ٣٠١.. . . . . . . . . . . . . .
ا< &Iا3ا[ة ٢٦٧.. . . . . . . . . . . . . .
ا
Yء ا&!&د ،ا٢٠٦.. . . . . . . . . "RS
+ء ا٢٠٢.. . . . . . . . . . . . . . . "RS
F>+ "RSر ا32$زة ٢٨٠.. . . . . . . . .
H2ا@ة ٢٩٤.. . . . . . . . . . . . . .
>` *S+ن ز ا2دم ٥٨.. . . . . . . . . . . .
&Aت *S+ن ا@$ك ا ٥٦.. . . . .
9ز ,ا&اء ٣٠٢.. . . . . . . . . . . . .
[" ا> )
6ا٣٣٤ ،٣٠٨.. . . . . . ($
Iن ا? ٢٠٦.. . . . . . . . . . . . . . . .
Fء @ g>2ا٣٠١.. . . . . . . . . . k3
ات Rا٣٠٠.. . . . . . . . . . . . k3
@&<
tى ا٢٩٩.. . . . . . . . . . . k3
>Fت ا&!&د ٢٥٢.. . . . . . . . . . . . . .
,س در 9ا@ارة ١٣٣.. . . . . . . . . . .
ا$ا ٦٧.. . . . . . . . . . . . . . . . . . . . .
٦٧.. . . . . . . . . . . .
ا 42ا]و&
?
اIر٦٨ ،٦٧.. . . . . . . . . . . . . . . 9
ا٦٩.. . . . . . . . . . . . . . . . . . . 3
ا?٦٨.. . . . . . . . . . . . . 2+ُ [+
٣٤٧
ا>ال 9ز إرل qا]&+اب دون qB
١٩.. . . . . . . . . . . . . . . . .
)(RKE
ا?$ن ٣٠٣.. . . . . . . . . . . . . . . . . .
ا>) 3ا&!&د( ٢٥٢.. . . . . . . . . . . . . . . .
ا*آ Yا<رة ٥٧.. . . . . . . . . . . . .
ا@F ،ء ا@$ك ٧٩.. . . . . . . . . . . . .
ا@٢٧٧.. . . . . . . . . . . . . . . . 6 8
ا@? 4ا]و&
? +ر 9ا@ارة
)١٨٧ ،١٨٢.. . . . . . . . . . . . . . (ATC
ا@? 4ا ٢٢٤.. . . . . . . . . . . . . . . .
ا@? 4ا< ا) +#ا@? 4ا<( ٩٣.. . .
ا@? 4در 9ا@ارة ١٨٢.. . . . . . . . . . . .
ا٣٢٨.. . . . . . . . . . . . . . . . . . . . 3I
اtI
6ا > "[) $ا@$ك( ٣١٠.. . . . .
او ،ا^Jرات ٢٤٦.. . . . . . . . . . . . . . .
ا'آ 3W ++ام ا]
ن ٢٩.. . . . . . . . . . . .
ا'آ ،إdءة ا٨٢.. . . . . . . . . . . . q+5$
ا'آ3W ++ ،ام ا]
ن ٢٩.. . . . . . . . . . . .
ا3ود &!&+د ٢٥٤.. . . . . . . . . . . . . . . . .
ا< ،Pا<&ا[" ٦٠.. . . . . . . . . . . . . . . .
ا ،4@Sا>ن ٣٠٥.. . . . . . . . . . . . . . . . .
٣٤٦
ا "RSا {,Fا>رد ٢٠٥.. . . . . . . . . . . .
اRات /اY2ت ،ا<رة ٧.. . . . . . . . . . .
اRات/اY2ت ا<رة ٧.. . . . . . . . . .
اRات/اY2ت ،ا<رة ٧.. . . . . . . . . . .
ا&`9
إ
ا&$2د ٨٨.. . . . . . . . . . . . . . . .
ا ،2ا^
٨٨.. . . . . . . . . . . . . . .
ا ،2ا٨٩.. . . . . . . . . . . . . . I<$
4?@ Aا&$2د ٨٣.. . . . . . . . . . . .
! "Bا&$2د ٨٨.. . . . . . . . . . . . . . . . .
اول ،ا٣٣٨.. . . . . . . . . . . . . . . 5
ا
أ "9ا$wم ٢٦٣.. . . . . . . . . . . .
ا أ "9ا$wم ٢٦٣.. . . . . . . . . . . .
ا@ $اÀآ" ٣١٥.. . . . . . . . . . . . . . .
ا@&ات ا]٥٦.. . . . . . . . . . . . . . . . B
اFI
ا,دة ا =$ا , $أو ا5ة أو ااآة
ا٢١٨.. . . . . . . . . . . . . . . . . @8
ااد& )ا] $bا١٨١.. . . . . . . . . . . (&5
ا ،k3ا@$ك ٣٣٤ ،٢٩٩ ،١٣٧.. . . . . . . . .
ا٣٠٢.. . . . . . . . . . . . . . . . . tI
٣٠٢.. . . . . . . . . . . .
ا tIاB
اآ> ٣٠١.. . . . . . . . . . . . . . . . .
ا&Aت ٣٣٣ ،٣٠٠.. . . . . . . . . . . . .
ا<٣٣٣.. . . . . . . . . . . . . . . . . . 2
ا٢٩٩.. . . . . . . . . . . . . . . . . t@B
ا٣٣٤ ،٣٠٢.. . . . . . . . . . . . . . . B
ا3و٣٣٣ ،٣٠١.. . . . . . . . . . . . . . 9
ا&$اد ا 8$إ ٣٠٢.. . . . . . . . . . . .
2ر ا٣٠٠.. . . . . . . . . . . . . . H2
5ا,س ٢٩٩.. . . . . . . . . . . . . . .
٣٠٠.. . . . . . . . . . . . . .
ات اR
ا<[" ،اBا
" ٣٣٥.. . . . . . . . . . . . . . . .
ا<@٢٥٥.. . . . . . . . . . . . . . . . . . . . P
ا&زن ٢٥٨.. . . . . . . . . . . . . . . . . .
د" ٢٥٨.. . . . . . . . . . . . . . . . . . .
٢٨٨.. . . . . . . . . . . . . .
رة F2
ا< &Iا3ا[ة ،ا@$ك ٢٦٧ ،١٣٣.. . . . . . . .
ا<&Fع ،ا q+5$اا ٨٥.. . . . . . . . . . .
ا< H,ا@$ك ١١٧.. . . . . . . . . . . . . . . .
ا< ،
Yزات ا2دم ٥٨.. . . . . . . . . . . . .
ا<&ا[" و
&اد ا 4@Sوا]39اء ا]٣٣٤.. . . . A
إ
&$د ا&٨٨.. . . . . . . . . . . . . . . `9
إ'ار
إRء Sاbم ١٦.. . . . . . . . . . . . .
Sاbم ١٦.. . . . . . . . . . . . . . . .
إ'ار أ
ن ا<رة )إ'ار ا]
ن( ١٥.. . . . . . . . .
إ'ار ا]
ن ١٥.. . . . . . . . . . . . . . . . . . .
إRء Sاbم ١٦.. . . . . . . . . . . . .
Sاbم ١٦.. . . . . . . . . . . . . . . .
إ'ار اwرب ١٩.. . . . . . . . . . . . . . . . .
إ'ار ،اwرب ١٩.. . . . . . . . . . . . . . . . .
اJWت ا٢٩٧.. . . . . . . . . . . . . . . "RS
ار ا٣٠٠.. . . . . . . . . . . . . . . . . k3
ار [" ا> )
6ا٣٣٤.. . . . . . . . ($
ا>ال ا^Jر اB$غ ا&اء ٢٧٥.. . . . . . . .
ا>ال ا^Jرات ٢٤٤.. . . . . . . . . . . . . . .
ا>ال ا>$ت ٣٢٨.. . . . . . . . . . . . . . . .
ا>ال ا٣٣٠ ،٣٢٨.. . . . . . . . . . . . . . >$
ا>ال ا١٥.. . . . . . . . . . . . . . . . . qB$
ا>ال Bة ا٣٠٥.. . . . . . . . . . . . . @$
ا>ال ! 6FاRر ٢٩٨.. . . . . . . . . . . . . .
ا>ال bم ي آ ١٥.. . . . . Sentry Key
ا]داء ١٦٨ ،١٣٨.. . . . . . . . . . . . . . . . .
ا]&Fا ا[< )اBا
"( ٣١٢.. . . . . . . . .
ا]!Bل ٢١.. . . . . . . . . . . . . . . . . . . . .
٢٢.. . . . . . . . . .
إRء ا "B,ا]و&
?
ا>ب ٢١.. . . . . . . . . . . . . . . . . . .
ا>ب ا]و&
? ٢٢.. . . . . . . . . . . . .
ا>ب ا٢٢.. . . . . . . . . . . . !F+ "
2
ا]وا
اb &5م ®١٩١.. . . . . Uconnect
ا^رات ،اF2wف ١٣٠ ،٨٣ ،٥٩.. . . . . . . . .
ا^2ل
١٢.. . . . . . . . . . . . . . . . . .
اB$ح
ا^dءة اIر٨٠.. . . . . . . . . . . . . . . . 9
ا^dءة ا&ل ١٧.. . . . . . . . . . . . . .
ا^Jر ا٢٧٦ ،٢٤٣ ،٢٤٢.. . . . . . . . JWw
ا^Jر ا JWwا٢٤٢.. . . . . . . . . . . R5
ا^Jرات ٢٣٨ ،٥٩.. . . . . . . . . . . . . . . .
إJرات ا ٢٤١.. . . . . . . . . . . . . .
ا]Wم ٢٣١.. . . . . . . . . . . . . . . . .
٢٧٦.. . . . . . . . . . . .
ا^Jر اJWw
ا JWwا٢٤٢.. . . . . . . . . . . . R5
٢٤٤.. . . . . . . . . . . . . . . .
ا>wال
اÀآ" $+ور ا $) 3ا^Jرات( ٢٤٤.. . .
٢٤٦.. . . . . . . . . . . . . . . . .
او
او ا<٢٤٣.. . . . . . . . . . . . . . 6
٢٧٧ ،٢٧٥.. . . . . . . . . . . . . .
اR
ا< ا٢٣٩.. . . . . . . . . . . . . . 2
ا<٢٤٥.. . . . . . . . . . . . . . . . . "Y
ا<٢٣٨ ،٢٣٠.. . . . . . . . . . . . . . Y
ر 6ا<رة ٢٧٧ ،٢٧٥.. . . . . . . . . . . .
٢٦٠.. . . . . . . . . . . .
@ Pا&F,$رات
2ا@٢٣٦ ،٢٣٥.. . . . . . . . . . . . &$
Rdا&اء ٢٣٨.. . . . . . . . . . . . . . .
&dء @'ي *S+ن اBIض ا١٣٣.. . . R8
Jت !٢٤٠.. . . . . . . . . . . . . . . F
$ا^Jرات ٢٤٤.. . . . . . . . . . . . . .
Uات Hا$ات ٢٤٤.. . . . . . . . . .
<&ت Rdا٢٣٩.. . . . . . . . . . . °B
&2ت ٢٣٨.. . . . . . . . . . . . . .
bم ا!> ا٢٤٧.. . . . . . (TPMS) R8
ا^Jرات ذات اFت ا٢٤٠.. . . . . . . . . F,
ا^'ار )إ'ار ا]
ن( ١٥.. . . . . . . . . . . . . .
ا^3ال ا]و&
? &ا ' ا٢٦.. . . . !F+ 2
ا>ء وا٢٠٢.. . . . . . . . . . . . . . . . . "RS
ا>Fر ٣٠٢.. . . . . . . . . . . . . . . . . . .
٣٤٥
b) ABSم اBا
" اYRY 2$ق( ٢٢٣.. . . . .
أ 3Wأ
ن ا@&ض/ا?٢٩.. . . . . . . . . . . H
أ 3Wا]
ن ٥٨ ،٢٩.. . . . . . . . . . . . . . .
٣٢.. . . . . . . . . . . . . . . . .
اSادات
ا٥٨.. . . . . . . . . . . . . . . . . . t@B
٣١ ،٢٩.. . . . . . . . . . . .
ا 2,$ا]
٢٩.. . . . . . . . . . . . . . .
ا 2,$اBI
ا<ء ا@&ا
" ٣٢.. . . . . . . . . . . . . . .
'آ ١٣١.. . . . . . . . . . . . . . . . . .
$2ت ا٣١.. . . . . . . . . . . . . . "RS
٣٢.. . . . . . . . . . . .
$إزا ا&wاء
bم k>#ا]BJل ٤٤.. . . . . . . . . . . . .
أ 3Wا?٢٩.. . . . . . . . . . . . . . . . . . H
أ ،
3Wا٥٨.. . . . . . . . . . . . . . . . . 2,$
أ&dاء ا@' )و &$
HAأ39ة ا,س( ١٣٠.. .
أ&dاء ا/FIا,اءة ١١٧ ،٨٤.. . . . . . . . . .
أ&dاء ار ٨٢.. . . . . . . . . . . . . . . . . .
أg>2 @ ،F
ااد ) "[ Rdا>( ٣١٠.. . . . . .
ا) k3ا@$ك( ٣٠١.. . . . . . . . . . . . .
ا&!&د ٢٥٤.. . . . . . . . . . . . . . . . . .
٣٤٤
أ!Bل ا]&+اب
أ!Bل ا]&+اب ٢١ ،١٨.. . . . . . . . . . . . .
9ز إرل bم qا]&+اب ُ 2+دون qB
)٢١.. . . . . . . . . . . . . . . . . . (RKE
b Wا٢١.. . . . . . . . . . . . . . . qB$
ُ٢١.. . . . . . . . . . . . . . . . . . 2+
أ!Bل ا]&+اب ا]و&
? ٢٢.. . . . . . . . . . .
أ!Bل ا]&+اب ،ا]و&
? ٢٢.. . . . . . . . . . .
أ k># $bا]BJل
أ k># $bا]BJل ٤٤.. . . . . . . . . . . .
أ k># $bا]BJل ا?>ر وا]BJل ٤٦.. . . . .
أ k># $bا 6dوا]BJل ٤٥.. . . . . . . .
أوdع ا&س ٤٨.. . . . . . . . . . . . . . .
٤٨.. .
ا>#$ت ا< Bو اBJ¼ "&Fل
I+ام >#ت أ Jا "&Fا٥٥.. . . &2
آ Pأ k># $bا]BJل I+ام 3Wام أ
ن
ا<رة ٥٣.. . . . . . . . . . . . . . . . . . .
آ 2,
Pا٥٤.. . . . . . . . . . . . . "BF
آb Pم k>#ا]BJل ا&$ا b 6
,م
٥١.. . . . . . . . . . . . . . . . . LATCH
آ3W 3I Bام ا]
ن ا3$ود P@ À+ا"B,
ا]و&
? ) (ALRاI<$م ٥٢.. . . . .
,ا ٤٧.. . . . . . . . . . . . . . . . 6
bم 2,$+ LATCHا]و ٥١.. . . . . . .
أ k># $bاآب ٢٧.. . . . . . . . . . . . . . .
أ ،k># $bا]BJل ٤٤.. . . . . . . . . . . . . .
أ ،k># $bاآب ٢٧.. . . . . . . . . . . . . .
إ9اءات ا٢٩٩.. . . . . . . . . . . . . . . 5
إ9اءات +ء ا٢٠٢.. . . . . . . . . . . . . "RS
إرات اF2wف ١٣٠ ،٨٣.. . . . . . . . . . . .
إ dا&!&د ٢٥٤.. . . . . . . . . . . . . . . . .
إ "[ dا٣٠٦.. . . . . . . . . . . . . . R
إ > "[ dا@$ك )
6ا٣٠٩.. . . . ($
إJرات ا ٢٤١.. . . . . . . . . . . . . . . . .
إ Jو&$ 5,د ا&٨٨.. . . . . . . . . . . `9
إادات bم ®١٨.. . . . . . . . . . Uconnect
إادات bم ®١٦٤ ،١٥٢.. . . . Uconnect
إادات bم ®Uconnect
ا@? 4ا]داء ١٧٣.. . . . . . . . . . . . . .
إادات bم ®Uconnect
ا3$ات ا&+ > +,اF
ا١٦٤ ،١٥٢.. . . . . . . . . . . . . . . "$2
b +م ا&ل ا١٦٤ ،١٥٢.. . . S
إRء ا "B,ا]و&
? ،ا]&+اب ٢٢.. . . . . . . .
١٠
ا"+9س
٣٤٣
٣٤٢
٣٤١
إذا ا B'1إ@ ا?:ة
}ن &ز ا ا&5W 25$ن >
اY 9Wل
`&
,ت و
ت .و
W Wوث Y?Sت ا ،
Iأو &ر أ +&2Aت
أى>+ A&ُ @ ،ع ا&FIات ا:
• ! áا 6
?S$ا&آ" ا ،$2$أو 6ا&آ"
اU<$ول أو ا W .
Iإن <Uو ا^دارة
ا&9&$د ى ا&آ" ا $2$ه 4أ 4?$ "8
"Wا.2ً ?S$
٣٤٠
• وإذا '2ر "W 4ا&$+ "5 ،?S$ز ات
ا 25$ا&9&$د ,+ب &!.2
و Wا5wل &$+زع6$9 & 9ُ ،
ا
&2$ت ا:
• ا $و&ا ور! 4ه.B
• ر! H2 4ا<رة )& 9ه'ا ا2د ا&?$ن 17
ر!ً W& $و ?$رؤ` Yل ا93ج
ا]
اآ ا&2ي & WاP9 =&+
ا<[ .Dآ ?$ $ا@&5ل ` Yل <"
ا<رة أو ا 4wاIص .(+
• ا&آ" ا I $2$وا>.6
• ر 4< °ا<رة وا <$اY &F,$ل اد
ا<.
• ر °ا<رة.
• و HAد! ?S$ Dواbوف ا . k.W
٩
إذا ا B'1إ@ ?:ة ا8+:
• إذا ا B'1إ@ ا?:ة ٣٤٠.. . . . . . . . . . . . . . . . . . . . . . . . . . . . . . . . .
٣٣٩
ول ا>;
را" 69آ Pا Iوا$8ن" 2ف 9اول
ا.5
٣٣٨
٨
اول ا>;
• ول ا>; ٣٣٨.. . . . . . . . . . . . . . . . . . . . . . . . . . . . . . . . . . . . . .
٣٣٧
٣٣٦
اuن
ا:ا 4أو زت ا* أو U5ار ا8<k
ار ا&!&د – @ك 5.7 2ات )
"! 6ا@آ 2ر! 4أوآن ا>@ — wً&>,
(RON) 91ور! 4أوآن ا>@ ).`+ A&
ُ 95 (RON
ا]و&
?(
ار ا&!&د – @ك 5.7 2ات )
"! 6ا@آ ر! 4أوآن ا>@ ) 95 (RONأو ا].
اوي(
ر! 4أوآن ا>@ ) 95 (RONأو ا].
ار ا&!&د -ا@$ك 6.4 2ات
ا
ا<&ا[" أو ز&ت ا 4@Sأو ! 6FاRر ا]A
ا&?$ن
I+ q5ام [" !" ا@آ ا]و&
? ®.MOPAR® ATF+4
!" ا@آ اوي -إذا آ kا<رة 3ودة '+
!" Wآ أو&
? $.ا<ت -إذا آ kا<رة اIم [" !" ا@آ ا]و&
? MOPAR® ZF 8و™ , 9 Speed ATFأو ? ?$ W .`gأن
.Uم اIام ا<[" ا q@5و "! Bا@آ أو أداؤ=.
3ودة '+
I+ q5ام MOPAR® DOT 3و W .SAE J1703م & [" اBا
" &? ،DOT 3ن
أ&Fا اBا
" ا[<
.wً&>,
DOT 4
I+ q5ام ز MOPAR® OD 4@S kاآ> وس ).SAE 75W85 (API GL-5
@&ر اوران ا - BIإذا آ kا<رة 3ودة "!+
ا@آ ا]و&
?
I+ q5ام ز MOPAR® LSD 4@S kاآ> وس ).SAE 75W85 (API GL-5
@&ر اوران ا - BIإذا آ kا<رة 3ودة "!+
ا@آ اوي
٣٣٥
ا:ا 4وزت ا* و U5ار ا8<k
ا"ك
اuن
3ان
ز kا@$ك 3.6 2 -ات 5.7/ات
ز kا@$ك @
-آت 6.4 2ات
ز kا@$ك
2$ت ا^2ل @
-ك 3.6 2ات
2$ت ا^2ل @
-ك 5.7 2ات
ار ا&!&د -ا@$ك 3.6 2ات
٣٣٤
ا:ا 4أو زت ا* أو U5ار ا8<k
I+ @5ام [" 6ا "[/$ا> ® MOPARآ> ,) OATا&$اد ا &82ا ( 8$ا'ي 4
=Rآ" & 10ات أو ."
150000
I+ @5ام ز kا@$ك SAE 5W-20ا@ "Aدة MOPAR® "#
،APIأو ® Pennzoilأو
® Shell Helixأو ? &
D+F $
`gاBAت 2ر ا&$اد MS-6395أو S ACEA A1/B1آ
.Chrysler
راF 69ء g>2ز kا@$ك 2$در SAE 9ا.@@5
! 4اIام ز kا@$ك SAE 5W-30ا $2$ى آ Chryslerوا&$ا 2
6
Dر ا&$اد MS-6395
MOPAR® "#أو ® Pennzoilأو ®& w Shell Helixا ز kا@$ك .SAE 5W-20
I+ @5ام ز kا@$ك Pennzoil Ultra™ 0W–40أو ز MOPAR® kا µ ?$ا'ي &ا 6
D
2ر ا&$اد MS-12633ى آ 6$9 Chryslerدر9ت Wارة ا."RS
3 8و 9ا k3اُ@$ + A&$ك ر&5@ .ل
&2ت &Wل
ُF bء @ g>2ز kا@$ك أ ً
&!F 6ء @ g>2ز kا@$ك ،راW" 69ة ا@$ك" " Aا<رة" @&5ل 3ا
&2$ت.
I+ q5ام ز kا@$ك ®.MOPAR
ُ&I+ Aام 2$ت ا^2ل ®.MOPAR
ُ&I+ Aام 2$ت ا^2ل ®.MOPAR
ر! 4أوآن ا>@ ) 91 (RONأو ا].
#ت ا:ا4
اbم ا]
?
اد )(&"h
6$9ا@$آت
ز Bا"ك Uا"89
6آ&ارت
@ك 3.6 2ات )در 2
$2
،SAE 5W-20 9ا>ول ا]
? )((API
7آ&ارت
@ك 5.7 2ات )در 2
$2
،SAE 5W-20 9ا>ول ا]
? )((API
7آ&ارت
@ك 6.4 2<+ات )در ،SAE 0W-40 9ا 2
$2
FAا>ول ا]
? )((API
;Fم ا"*
11.1آ&ارت
@ك 3.6 2ات )آ> 6ا > "[/$ا@$ك ® MOPARا$8+ FR$ن 10
&ات أو "
150000أو ? (`g
14.7آ&ارت
@ك 5.7 2<+ات )آ> 6ا > "[/$ا@$ك ® MOPARا$8+ FR$ن 10
&ات أو "
150000أو ? (`g
ا@$ك 6.4 2ات )
6ا > "[/$ا@$ك > "[) MOPARذي ,
15آ&ارت
ا^ dت ا (OAT) &82ا&$ا >F
6
Dت 2ر &اد (MS.90032ا$8+ FR$ن وم $ة
& 10ات/و "
150000 <$أو ? (`g
* $8ز "5 99ا&اء /ا9wع <[" ا> و9ز ا ،gوا &<
W ¼$ى ) MAX Yا@ ا]!.(5
&9 18.5ن
اbم ا$ي
70
5.6ات
6.6ات
6.6ات
10.5ات
13.9ات
ً 14.4ا
٣٣٣
ا<9ت ا:رة
ا"ك
ا5
ا)#م
أ>@ "? :8رة
" 6.4
" 5.7ات
" 3.6ات
150آ&وات 5000دورة ا! 240 ,آ&وات 5000دورة ا! 362 ,آ&وات 6100دورة ا!,
4000 & 319دورة ا! 4000 & 500 ,دورة ا! 4100 & 644 ,دورة ا!,
اU<
Sول ا2>$ت
اU<
Sول ا2>$ت
اU<
Sول ا2>$ت
> :F1Gر ' 1 7! 7< Lوز "?
ا:رة 120آ* .(?/Gً 75) ?/و":
ا Lا> ?" 9JL @1 7ا:رة إ@ أ P
120آ*.(?/Gً 75) ?/
٣٣٢
ا>ح ا 7kا#دي ،ا>ح ا 7kا،7#
>ح ا/Mا5#;6ف -اُ"5ز ذات ا>ah
اz kة ا - (HID) È"9إذا آ; Bا:رة
)ودة Hh
7! :F1Gا:رات ا)ودة ah>hأ
zة ا "+F ،(HID) È"9ن أزرق ! 7ا>ah
ا .+8 L? kو @zGذ و> aا>ح
أآ1 #h Wًh "wا 10 7اٍن ،أLء PzاFLم.
ا> ahاz kة ا(HID) È"9
>ح ا ا'; 7ا/7kا798J
ا q+5$ا]
ه &ع أ ºB P+ا&B
ا "b ! .2ا &Bا 2اا[ة Wإ,ف
"RSا>5$ح ا]
وإزا اB$ح .و? &' Hم
و <; ا>ح ا .:9Lh 7kإذا 1ث
8h 8Sا>ح ا:h ! ،7kر إ@ اآ
ا.+;> #
<Iم q+5ا@ ا> ?$ w LED q+5
P .",<
"?S+ Aا>ال q+5ا@
ا> آ ،&$$را 69ا&آ" ا.$2$
!"H
@ث >$ {+,
+ Rdت اq+5$
ا]
ة ا (HID) ºBإدارة Bح
ا>5$ح ا]
إ و) ON 6dا .("RSو!
<>W Pوث AآF +ة أو D2A
آ +إذا .q@A "?S+ A 4 4را 69وآ
ا&5@ $2$ل
&2ت &Wل ا.5
>ح ا"Sة/ا5#;6ف واM
<Iم q+5اU$ة/اF2wف وا&!q+5
H
P .",<
"?S+ A ?$ w LEDا>ال
q+5اU$ة/اF2wف وا&! Hآ ،&$$را69
ا&آ" ا.$2$
>ح ا"Sة اkو/iا"ع M8J8
<Iم >5ح اU$ة ا]و/ا&9ع q+5
HI
P .",<
"?S+ A ?$ w LEDا>ال
>5ح اU$ة ا]و/ا&9ع HIآ،&$$
را 69ا&آ" ا.$2$
>ح ا Mا"آ)ي ا8#ي )(CHMSL
<Iم >5ح ا&! Hا$آ3ي ا&2ي )(CHMSL
U
q+5ة .",<
"?S+ A ?$ wأي أ`
>5
A Pح ا&! Hا$آ3ي ا&2ي
) (CHMSLآ ،&$$را 69ا&آ" ا.$2$
>ح 1اkرم
<Iم >5ح & Wا]ر!م ?$ w LED q+5
P .",<
"?S+ Aا>ال >5ح & Wا]ر!م
آ ،&$$را 69ا&آ" ا.$2$
٣٣١
اال ا8
Pu :F1Gأن "اآ* اب ? @8اL? #
1وث ¼"وف 7! .L#ا& )ول ذ ?L
" ا1kال ا' h Mwu8 a:اX
ا) 9wuاب( إ@ Jhر .دي ا? 8دة إ@
8? U":ا)وال.
ا>ح ا 7kا#دي ،ا>ح ا 7kا،7#
>ح ا/Mا5#;6ف -اُ"5ز ذات >ah
ا P+ا - kإذا آ; Bا:رة )ودة Hh
.5أج ا+ >$وه ?{ ا= ,رب ا<
4.ا .5
&A&+ 4! .4ل إ &$
Hا>5$ح ا]
اآ.P
.6رآ9 >$ Pة DJوه ا= ,رب
ا< 4.أ &.A
.5أزل Fء ا>5$ح ا]
.
.7رآF Pء ا&&Aل إ ا>5$ح ا]
DJو= ا= ,رب ا< 4.أ آP
Fء ا>5$ح ا]
.
.6أدر Fء ا&&Aل إ ا>5$ح ا]
?{ ا=
,رب ا< ^زا`.
.7أج ا+ >$وه ?{ ا= ,رب ا<
4.ا .5
6ال ا> ahادة ! &; 7ا:4:
.8رآ9 >$ Pة DJوه ا= ,رب
ا< 4.أ &.A
.2أزل Fء ,ا&اء DJإزا اY#ث
>#ت و! "
>S
B+ 4ا&اء ا 4. ،Hbأدر
اFRء إ ا.P
.9رآF Pء ا&&Aل إ ا>5$ح ا]
DJو= ا= ,رب ا< 4.أ آP
Fء ا>5$ح ا]
.
&A&+ 4! .3ل إ &$
Hا>5$ح ا]
اآ.P
:F1Gي ا5ء ? < @8آ)8 6 7h"+م
!> 1 7! 8إدارة ا5ء إ@ ا';&.
.10أ آ9 &$
Pز ,ه&اء ا@$ك.
Pu :F1Gأً ا<ل إ@ > ahا/M
ا5#;6ف ? Lه XHا.5L
.3أزل أ Wا>#$ت ا&9&$دة Aوق ا&اء
ا<^ Bزا` وا&&Aل إ ا3ء ا&$
BI
ا>5$ح ا]
.
6ال ا> ahادة ! &; 7ا"اآ&:
.1ا F qء @ك ا<رة.
.2أزل Fء ا>5$ح ا]
.
.4أدر Fء ا&&Aل إ ا>5$ح ا]
?{ ا=
,رب ا< ^زا`.
٣٣٠
.1ا F qء @ك ا<رة.
ا> ahاJر
ا q+5$ا]
ºB -ا @Sا?(HID) #
>5ح ا& 9ا]
>5ح ا&! Hا]
/اF2wف
>5ح ا>8ب ا]
@ q+5أرآن ا<رة ا]
>5ح اU$ة
>5ح ا&!/HاF2wف
&dء @ أرآن ا<رة اBI
>5ح ا&9ع HI
>5ح ا&! Hا&2ي ا$آ3ي )(CHMSL
ا&W
ر! 4ا>5$ح
ا&8ء ا `A 4) D3Sى ا&آ" ا* ($2$
HIR2LL
`A 4) [&d Uى ا&آ" ا($2$
`A 4) [&d Uى ا&آ" ا($2$
`A 4) [&d Uى ا&آ" ا($2$
`A 4) [&d Uى ا&آ" ا($2$
`A 4) [&d Uى ا&آ" ا($2$
`A 4) [&d Uى ا&آ" ا($2$
`A 4) [&d Uى ا&آ" ا($2$
`A 4) [&d Uى ا&آ" ا($2$
`A 4) [&d Uى ا&آ" ا($2$
* ا q+5$ا]
ه &ع أ ºB P+ا&B
ا "b ! .2ا &Bا 2اا[ة Wإ,ف
"RSا>5$ح ا]
وإزا اB$ح .و' Pم
@و >$ Aا>5$ح ا]
.<B+إذا Wث
" >$+ا>5$ح ا]
<+ `9& ،ر إ ا&آ"
ا.5 $2$
٣٢٩
P)Jا:رة
إذا آ& kي ك ا<رة دون B "RSة 21 3
&ً
?$ ،اIذ ا&FIات ا @ $ا>Fر.
• "5ا? "+ا< Pا>Fر.
• أي و!&, kم ` ,}+ف ا<رة أو &! ` H
اIا
)أ.ء &>] (Yً#
Fأو أآ4! #
b "RS+م ? Hا&اء أ.ء > UJا@$ك $ة 5
د![ >ً, Dو 6dا&اء ا ,و ا$وW
ا&5,ى .إن ا,م b >ً
ً3 $8 '+م
",إ
? Hا 8إدة "RSاbم.
ا93ج ا&B$ف5 w .ح I+ام ا q+5$ذات
ا&,ا ا]&$م و> Rم اIا
ا>ال
ا.q+5$
اال ا>ah
6$9 65 4ا q+5$ا 4آ> ا3ء
اا ا<رة !ة ز ،>#
99أو أ&اع
ا> ahاا8S
q+5ا/3ا,اءة اBI
>5ح ا RاA) BIوق ا]
(2
q+5ا,اءة &<&?+ل ا&2ي
q+5اP9@+ 3
>5ح Aوق اB,زات -إذا آ kا<رة 3ودة '+
أ&dاء qا>ب
>5ح ", Uا<ت
F P9ا>ب اwري "
W/ا]آ&اب
qB$ ><+ا ،g8$را 69ا&آ" ا2 $2$ف إردات ا>ا.
٣٢٨
ر! 4ا>5$ح
W5W
562
578
A6220
194
562
JKLE14140
`A 4) [&d Uى ا&آ" ا($2$
ا&Bة
53
54
55
56
57
58
59
60
61
62
63
64
65
66
67
68
ا 5$ا?>
—
—
—
—
—
—
—
—
—
—
—
—
—
—
—
—
ا 5$اR5
10أ
> أ$W
10أ
> أ$W
—
—
—
10أ
> أ$W
20أ
> أBA
5أ
> أ$
20أ
> أBA
—
—
25أ
> !6J
10أ
> أ$W
—
10أ
> أ$W
10أ
> أ$W
69
70
—
—
—
—
ا&HA
وWة 2S<
/HVACدر 9ا@ارة دا" ا<رة
وWة ا&دة ا&ا[ )(LA
ا — 5$اJWw
ا — 5$اJWw
ا — 5$اJWw
وWة ا&دة ا&ا[ )(LD/LX
اوات ا - >8 +,رات اJS
&هت ا Rا(LD) I<$
و wا<[ ) - (LAإذا آ kا<رة 3ودة '+
ا — 5$اJWw
ا — 5$اJWw
ا&ا ' ا(LD/LX) BI
وWة ا&دة ا&ا[
ا — 5$اJWw
< 2Sا F$وا&8ء/ا< H,ا@$ك
*' ا – USB 'B$+ !Fا2Sر )R/A (LD/LX
ا<رة ا <$Sا(LD/LX) BI
ا — 5$اJWw
ا — 5$اJWw
٣٢٧
٣٢٦
ا&Bة
38
ا 5$ا?>
—
40
41
42
43
44
45
—
—
30أ
> وردي
—
—
—
ا 5$اR5
10أ
> أLD/LX - $W
20أ
> أLA - BA
—
—
—
20أ
> أBA
10أ
> أ$W
15أ
> أزرق
46
47
—
—
—
10أ
> أ$W
48
49
50
51
52
—
—
—
—
—
20أ
> أBA
—
—
20أ
> أBA
10أ
> أ$W
ا&HA
USB 'Bا3$دوج )(LD/LX
*' ا !Fدا" < ا'راع )(LA
ا — 5$اJWw
ا — 5$اJWw
"3ا 6,5ا93ج اBI
ا ,$ا I<$ا/BIوWة ا&`9
< ا&!/Hا,ط ا / BIآ
ا اؤ اBI
&$أ39ة ا,سi
/ة اؤ ا/BIا>&A
) 2S<
/(LDLXا+&J
ا — 5$اJWw
q+5ا^dءة ا]
ا? / Bا]&dاء ا2
ا]و&
? q+5
/ا]&dاء ار -إذا آk
ا<رة 3ودة '+
ا D2اJ - Sاز SRT
ا — 5$اJWw
ا — 5$اJWw
ا ,$ا]
ا - I<$إذا آ kا<رة 3ودة '+
Y
W qBت ا]آ&اب ا/I<$ا ,$ا I<$ا- BI
إذا آ kا<رة 3ودة '+
ا&Bة
22
ا 5$ا?>
—
23
24
25
26
—
—
—
—
27
31
32
33
—
—
—
—
34
35
36
37
—
—
—
—
ا&HA
ا 5$اR5
>5ح ا^dءة ا 2d&$ا] - $رات اJS
20أ
> أ - BAرات اJS
آ &$
3أ39ة ا,س اLA – Å
$
10أ
> أLA - $W
+ب g>2ا&!&د/ا 'B$ا5IS
10أ
> أ$W
آ &$
3أ39ة ا,س اLD/LX – Å
$
15أ
> أزرق
bم ا!> Rdا^Jرات
10أ
> أ$W
!" ا@آ/وWة ا ",ا^?و )(LD/LX
15أ
> أزرق – LD/LX
I8ا&!&د )(LA
25أ
> Bف – LA
30أ
> أ LA 6.2 – 8ات [ I8
Dا&!&د ) LA 6.2ات [ Dا(@S
ا@S
4I8ا&5ت -إذا آ kا<رة 3ودة '+
25أ
> Bف
ا ,$ا!F+ 2
25أ
> !6J
وWة &$
/HVACأ39ة ا,س
15أ
> أزرق
Bح ا/"RSوWة @&ر /RFوWة !&$ "Bد ا&- `9
15أ
> أزرق
،LXإذا آ kا<رة 3ودة '+
وWة &$د ا&/`9ا</ا - JWwرات اJS
10أ
> أ$W
< 2Sا>Fر
5أ
> أ$
$Aم ا2دم ا^?و -إذا آ kا<رة 3ودة '+
15أ
> أزرق
) Radioااد&(
20أ
> أBA
٣٢٥
ا&Bة
2
3
4
5
6
7
8
9
10
11
12
15
16
17
18
19
20
21
٣٢٤
ا 5$ا?>
60أ
> أBA
—
60أ
> أBA
30أ
> وردي
40أ
> أ8
40أ
> أ8
30أ
> وردي
40أ
> أ8
30أ
> وردي
30أ
> وردي
—
40أ
> أ8
20أ
> أزرق
—
30أ
> وردي
—
—
30أ
> وردي ) 6.2ات [ Dا(@S
25أ
> Bف )(! LD
ا 5$اR5
—
—
—
—
—
—
—
—
—
—
20أ
> أBA
—
—
—
—
—
—
—
ا&HA
'Rآ& 3ز 6ا (PDC) !Fا]
ر!1 4
ا – 5$اJWw
'Rآ& 3ز 6ا (PDC) !Fا]
ر!2 4
ا< H,ا@$ك >5
/ح ا< - H,رات اJS
ا^dءة اIر 9ر!1 4
ا^dءة اIر 9ر!2 4
ا^dءة اا
ا]!Bل ا!F+ 2
وWة ا@?+ 4ب ا<[D
وWة ا@?+ 4ب ااآP
وwت ا<[ 3 '*
/و ا&<&?+ !Fل اBI
و Wا< Iوا& و
? Hا&اء )(HVAC
>5ح ا^dءة ا 2d&$ا]< -رات اJS
ا – 5$اJWw
وا ?> 9ا& - 6dرات اJS
ا — 5$اJWw
ا — 5$اJWw
I8ا&!&د ) 6.2ات [ Dا(@S
I8ا&!&د )(! LD
"آ) ز Uا 5ا) 798Jا"+>Lات(
(Uh) ! L
• ا>ال @
5ق3 ،م اIام 5
2$+ 6$ل ا]
> ا .P$آ $أن اIام أي
2$+ 5ل HIذ ا2$ل ا! qd&$
Uدي Wوث @ F "$اbم ا? .+و
Wا$ار اWاق ا5$ات ا 4آ>،
}ن ذ ل و&9د ?Sاا[ة 3م
.9Y
8آ& 3زA !J 6وق أ
2ا<رة
& 9أ ً
@ W& kو&Aل ا^Jر ا&@ W .JWwي ه'ا
ا$آ 3ا5$ات واYW$ت.
"آ) ز Uا 5ا798J
!5T aء ا<ل
! L
• آF Pء آ& 3ز 6ا3 ،!Fم ا*آ
`, 8
و 6dاFRء ،@@A ,F+وا*آ أ ً
?W}+م W .إن م إ9اء ذ ! <&+ q$ل ا$ء
إ آ& 3ز 6اU $
!Fدي إ "F2اbم
ا?.+
)(Uh
٣٢٣
ا&Bة
ا 5$ا?>
–
ا 5$اR5
10أ
> أ$W
38
39
48
–
–
–
10أ
> أ$W
10أ
> أ$W
10أ
> أ$W
49
50
51
52
53
–
–
–
–
–
–
–
20أ
> أBA
10أ
> أ$W
–
37
٣٢٢
ا&HA
وWة ا@? 4ا@$كYW
/ت و Wااد -إذا آ kا<رة 3ودة
'+
وWة ا&دة ا&ا[
وWة ا& `9ا32$ز H?
+! "W
/ا&اء
وWة ا 6ا?&@
"5 /ر اوران ا]
) / (LXا< ا +#اg$
) - (LAإذا آ kا<رة 3ودة '+
ا – 5$اJWw
ا – 5$اJWw
I8اºB
ا< ا +#ا - (LD/LX) g$إذا آ kا<رة 3ودة '+
ا – 5$اJWw
ا&Bة
ا 5$ا?>
–
ا 5$اR5
20أ
> أBA
18
19
20
21
22
40أ
> أ8
50أ
> أ$W
30أ
> وردي
30أ
> وردي
40أ
> أ 20/8أ
> أزرق
رات اJS 30أ
> وردي
20أ
> أزرق
–
–
–
–
–
–
–
–
–
–
–
–
–
–
16
23
24
28
29
30
31
32
33
34
35
36
–
–
–
15أ
> أزرق
–
25أ
> Bف
–
–
25أ
> Bف
20أ
> أBA
10أ
> أ$W
ا&HA
ا q+5$ا]
ة ا P+ (HID) ºBا] - $إذا آ kا<رة
3ودة '+
و Wااد ر! - 2 4إذا آ kا<رة 3ودة '+
ا& `9ا32$ز ر!
/ 2 4و Wااد ) 6.2ات [ Dا(@S
&&ر ا@$
Yت ا q+5$ا]
-إذا آ kا<رة 3ودة 'R/'+اJS
> I8ا@$ك ) 6.2ات [ Dا 'R / (@Sا>Fر <+رات
ا JSر! - 3 4إذا آ kا<رة 3ودة '+
'Rا>Fر <+رات ا JSر! - 1 4إذا آ kا<رة 3ودة '+
'Rا>Fر <+رات ا JSر! - 3 4إذا آ kا<رة 3ودة '+
ا – 5$اJWw
وWة ا@? "! 4ا@آ )رات ا(LA/LD JS
ا – 5$اJWw
وWة ا@$ك
ا – 5$اJWw
ا – 5$اJWw
&$ا 6وا@آ ر!1 4
&$ا 6وا@آ ر!2 4
وWة bم اBا
" اYRY 2$ق
٣٢١
ا&Bة
ا 5$ا?>
–
40أ
> أ8
50أ
> أ$W
ا 5$اR5
–
–
–
4
5
6
7
8
9
10
30أ
> وردي
40أ
> أ8
30أ
> وردي
–
20أ
> أزرق
–
–
–
–
–
–
–
20أ
> أBA
10أ
> أ$W
11
12
13
14
15
–
–
–
–
–
20أ
> أBA
10أ
> أ$W
–
–
20أ
> أBA
1
2
3
٣٢٠
ا&HA
ا – 5$اJWw
و Wااد ر! - 1 4إذا آ kا<رة 3ودة '+
ا& `9ا32$ز ر!
/ 1 4و Wااد ) 6.2ات [ Dا - (@Sإذا آk
ا<رة 3ودة '+
9ز +ء ا"RS
bم ا@? 4ا,wار ا^?و
bم ا@? 4ا,wار ا^?و
ا – 5$اJWw
!ص ا "RSو) Run 6dاYFwق( <+رات ا/JSا,@$ت ر!2 4
Jاز ا 6ا? – إذا آ kا<رة 3ودة '+
ا]
ن -إذا آ kا<رة 3ودة >5
/'+ح أF "Bء ا@$ك -رات
اJS
wiت ا>`
! H?
+ا&اء
ا – 5$اJWw
ا – 5$اJWw
ا q+5$ا]
ة ا P+ (HID) ºBا]< -إذا آ kا<رة
3ودة '+
G1 MFLت أآاب ا:;uل ا"آ)ي
!Y
W Hb+ 4ت ا]آ&اب I+ام !$! 2Fش ر>J
أو &I+ Jام HF Hbأ.ء و&9د "
W
ا]آ&اب ا?&<&ل ا$آ3ي.
:F1G
Pu 6إزا 1اkآاب.
ا"+>Lات
!"H
• ا>ال @
5ق ،اIم دا[ًً5
$ا
2
{B+ >ً
Yً+ل أ
> ا 5$ا]w .A
<>ل ً5ا 2$+ À+ل أ
> أ>< w .ل
ً5ا @ً! Y*+ك 2أو أي دة أى! .
Uدي ا "SBاIام ا5$ات ا >$إ
إF 5I +Aة و/أو &Sب DWو/أو H
ا?$$ت.
• !>" ا>ال * ،5آ أن Bح ا "RS
و 6dإ,ف ا "RSوأن 6$9ا
Iت ا]ى !
إ,ف ا "RSو/أو .,S2
)(Uh
(Uh) !"H
• WاWاق ا 5$ا'ي 4ا>ا` ة
أى ،ا&+ "5آ" ا.$2$
• WاWاق $b] $W 5ا]
ن
)bم ا&دة ا&ا[b ،م اBا
"( أو أ$b
وWات اb) !Fم ا@$كb ،م Aوق اوس(
أو bم ا& ،`9ا&+ "5آ" ا.$2$
"آ) ز Uا 5ا) 7kا"+>Lات(
&
9آ& 3ز 6ا !Fا]
Wة ا@$ك.
@&ي ه'= ا&Wة ا5$ات واYW$ت.
! L
• آF Pء آ& 3ز 6ا3 ،!Fم ا*آ
`, 8
و 6dاFRء ،@@A ,F+وا*آ أ ً
?W}+م W .إن م إ9اء ذ ! <&+ q$ل ا$ء
إ آ& 3ز 6اU $
!Fدي إ "F2اbم
ا?.+
• ا>ال @
5ق3 ،م اIام 5
2$+ 6$ل ا]
> ا .P$آ $أن اIام أي
2$+ 5ل HIذ ا2$ل ا! qd&$
Uدي Wوث @ F "$اbم ا? .+و
Wا$ار اWاق ا5$ات ا 4آ>،
}ن ذ ل و&9د ?Sاا[ة 3م
.9Y
"آ) ز Uا 5ا7k
٣١٩
I< wم ?&ت Hbآ Fأو '>ت أو &Aف
اw&Bذ أو أي &اد آ Hb Fا2ت.
ا a5kا)
> 6$9 Hb Rا] qFا4b
"?S+ 993
I+ام Hbا93ج ® MOPARأو أي Hb
ري Hb t5I
3ا93جI< w .م ,ًF
& Hbع .Sا>` Hbا3ء اا
ا 'ة ا BIا3$ودة Y3$+ت 6,Aآ ،+وا 'ة
ا 2+ا BIا $ا3$ودة &+ا[ راد&I< w .م
? أو أدوات Wدة أى I ! $ش ا&?$ت.
i
Hbة اؤ ا+ 4! ،BIش ا Hb$
ا BS$أو ! 2Fا$,ش ا < Iاw .Hb
ش ا>
Hb$ة اi$ة.
? MFLت '? أ)+ة اس اuG
65 4ا2ت ا&9&$دة &$
,أ39ة
ا,س ا&9&$دة ه'= ا<رة ا> YاBSف.
Hbا2ت P ،ا@+ "
2ص Pش
ا>.Y
I+ Hb+ 4! .1ام !$! 2Fش ?$ .$
اIام @&ل &+Aن 2دلI< w ? ،م @&ى
$8آ 3ا?@&ل ،أو اBb$ت ة
اآ W .3اIام ا&+5نI+ Hb+ 4! ،ام
!$! 2Fش .>
Bb
$! 2F,+ HB+ 4! .2ش .$
<; أ )1اkن
> wأو º>5أو Hbا]I+ 3Wام '>ت أو
Bbت آ W .Fإن ذ Uدي إ Hأ<
8إ إ2dف
ا]U ! .
3Wدي ا Hا <$Sأ ً
ا]<.
٣١٨
وإذا PFا]
Hbا] ،
3WاIم & Hbل
® MOPARأو &+Aن 2دل أو ء B w .
ا] 3Wا<رة $! 2F,+ HB+ 4! .<Rش
.$
ا>ل ا] 3Wإذا آÀ
kآ أو +أو إذا ? 4
ا^$3+ت .@@A ,F+ "$2
!"H
! 6F,ا@3ام ا> أو ا3$$ق ا5دم وq>5
دون .$Wا @b tم ا]&5+ 3Wرة دور
*آ م و&9د أ39اء &F,أو !3$أو .+
و Pا>ال ا]39اء اً& Bرا@ w .ول اbم
أو إدل اY2ت ` .و Pا>ال &$ت
ا@3ام ا BIا 2+ Bو!&ع أي 5دم )
"#ا&اء
ا3$ ،$ق ا< Åأو ذ(.
إ"اء MFLا - Stain Repel kإذا آ;B
ا:رة )ودة Hh
ا)'h L#ء اا:8 78Sرة
<" ,F+ Stain Repel ,
Hbا:
اIم & Hbل ® Hb MOPARش
ا وا<د.
• !}+ 4زا أآ> !ر ?$ا> DJ 6,اq<$
Hb J&B+و. 9
اIم & Hbل ® Hb MOPARش
ا ا&5$ع ا."B
• ! q<$+ 4أي I+ !+ 6,+ام & Bb Jور.>J
5
ُ&I+ Aام & Hbل ®ً 5 MOPAR
Hbش ا ا&5$ع ا.
• 6,> ><+ا2ة& Hb
6d&+ 4! ،ل
® MOPARأو @&ل &+Aن 2ل !2F
!$ش Bbر >Jو!}+ 4زا ا> .2,اIم &J
9ة ر^ >Jزا ,+ا&+5ن.
• 6,> ><+ا2
MOPAR® Hb
6d ،4@Sد
ا]اض !$! 2Fش Bbور >Jو!}+ 4زا
ا> .2,اIم &9 Jة ر^ >Jزا ,+ا&+5ن.
• I< wم أي '>ت !& أو أي أ&اع أى
ا&ا!ت ت .Stain Repel
?$ا@Bظ ش ا ا&5$ع ا
Hb+ا$! 2F,+ 4b$ش ر ?$ .>Jأن Iش
g39ت ا]وخ ا! ,ش ا ا&5$ع ا،
'ا > Rإزا $! 2F,+ش ر ?$ .>Jإزا ا>6,
ا2ة I+ &<+ام !$! 2Fش $و
& Hbل
® R> .MOPARا@ص 2 Pض
ش ا ا&5$ع ا ]ي [" Bة .&J
و 9م اIام &اد ا 6$أو ا&3ت أو &ا["
ا Hbأو ا>'$ت أو اF$ات أو اBb$ت ا <
إ !ة اSدر Hbش ا ا&5$ع
ا3 w .م اIام ? ، Hوذ @Bظ
ا "?Sا]B Aش.
!"H
I< wم '>ت Jرة ]اض ا .Hbوذ ]ن
ا? #ا>'$ت !2Y "+ل ،و W
اIا
,ًd P>< ! ,R
DJا.{B
! L
I< wم ا?@&ل و
ت ا Hbذات ا,ة
ا?@& و/أو ذات ا,ة ا Hb &82ا,$
اU ! W ،دي ذ إ إYف ا.,$
MFLا> ahاk
ر 3ودة q+5$+أ
و
>d q+5ب
?Y+وا BI+ 3$وز و
,و
ا]آ> ?<
P><+ا]Wر ,ر q+5$+ا 65ا93ج.
&<
HIى ,و
ا>I Yش ا93ج،
و P +ا>ع إ9اءات Hbأى 2ت.
",ا$Wل ش ا2ت و2
", +ل ا&8ء
اIرج q<
P ،ا2ت $! 2F,+ش ^ . 9زا
أوخ ا ،DFا< &+5+ن 4. HFا$+ BFء.
٣١٧
(Uh) ! L
• ! 4اIام اYRت ا? +ا وز
8274آ& ?+ل ) 1200رA&+ "? "J
H (2+أو إزا اYFء وا,5$ت.
ا L#ا<J
• إذا آ kا<رة @ "#
A @ "$ا&$اد
ا?$و أو ا>5I$ت أو ا q$ا,$وم &#ج ،إ،°
*آ g>2ا&$اد ً9ا وم <.+
• ! Wدة ا<رة Bة J &Jق g
6d&+ 4! ،5@+وا!ت dا]Wر أو اF
Hآ" .
• إذا آ&, kد ا<رة Jق @$أو +أو إذا
!,+ k$دة ا<رة ,+ب ا"$@
"5 ،@$
ا<رة ة واWة ً ا]!".
• اIم YJء ®Y2 MOPARج اIوش أ!ب
& .?$
Aى وآ ا $2$أ&ان YJء
&ا & 6
Dن ا<رة.
• ا]ه?$+ $ن أن 4ا b b @$و q
@ت ا H5ا&9&$دة ا@&اف ا<&+¼ Bاب
و&Wت ا3از وAوق ا]
.2
اG'#h L#ت وأ +5Tا"آ)
• إذا #ت أي أWر أو وش اYFء،
tIا&Bر "$@ .ا B? $إ9اء ه'=
ا^WYAت.
• إذا &!& H kd2ع Wدث أو أ
>`
$
'+أدى إ اYFء أو ا ,>Fا&ا!4, ،
YA}+ح ا<رة *+ع "$@ .?$اB? $
إ9اء ه'= ا^WYAت.
٣١٦
• > 6$9 Hb RاY2ت واY2ت ا،2$
و AI+اY2ت ا ,>F+ F$ا]&$م وا?وم
b+م &+5+ن HFو
ء 6$اÀآ".
• ^زا ا.&$ت ا? B#و/أو أ +اBا
" ا3ا[ة،
اIم HbاY2ت ® MOPARأو
2د`.
:F1Gإذا آ; Bا:رة )ودة G'#hت ا"uوم
اJري ااآ Pأو ا:داءJ: G! ،م 9FLت أو اد
آ 5zأو "آت U8ا:! .8'#دي إ@ إGف
اG5ء وهHا اW 5 6 M8ن ا:رة ا'ة
اود .اJم ! iا>hن ا#دل واء #5 U
ش ;?J: .م "u uhر وهHا آ
@8? F!8اG5ء.
! L
I< wم ا@ Sا SIأو ا&5ف ا P5أو اBش
ا SIأو &اد ا 6$اI< w .2$م Hb
ا] ان P>< , .ه'= ا$ت HاYFء ا&ا!
J P .2ق ا "<Rا]و&
? <رات
4 WاIام @" 8$Wأو ش ! S
Uدي إ Hا ,>Fا&ا! Y2تI+ A&ُ .ام
HbاY2ت ® , MOPARأو ? .`g
ا @&<
tى ا<[" }+زا ادة @ g>2ا&!&د
ا&@$ر P .أن ?&ن <&ى ا<[" 4
2.5- 1أ"B
ادة @ g>2ا&!&د .أً! Hdرا ا<[" ،إذا PF
ا]
b @$ ،ا&<$ى ا ."[< P$را69
"ا<&ا[" وز&ت ا 4@Sو! 6FاRر ا] "A
" Aا<رة" @&5ل 3ا
&2$ت.
" 4ار
را" 69آ Pا Iوا$8ن" 2ف ات
ا 5ا.@@5
ا u+h L#اJر 7وو Pا¾آ
1ا u+واG5ء Pا¾آ
&ع >Fت ا "?+ 2ا<رة >ً&$ 2ا!6
اRا و ,JاIwام H5 .ا&$اد ا?$و ا
<" $ا< اFق 6$ Wا&#ج
وا وا&$اد ا? [$ا 4ر ا]ر
وأ qFاFق أ.ء ا&$ا 4ا]ى &
*+اد أآ
2$دن ا&9&$دة ا<رة .إن إ,ف ا<رة
اIرج2 W ،ض ا<رة .&$ت ا&ا[ ،وأqF
اFق ا "RS 4ا<رات ،وا {,F
ا>ودة أو ا@ارة ،وه اbوف اSة،
ً.* .Uا ًا اYFء وا?&ت ا 2$وا&!
اا.
<ك ا&Aت ا اD,@ 5+ ,2$
أ![ 5ة ,و
اÀآ" ا $8$دا" ا<رة.
اHي دي إ@ 1وث ا¾آ؟
اÀآ" ه& ج ه&ر اYFء و,>Jت ا> Fا&ا! أو
S,ه <+رة.
وا]>ب ا@ 2[Sوث ذ ه:
• qا DFوا]وخ و 6$ا.+&J
• * .ا]Wر وا@.5
• ا@Sات وا]ر واF,ان.
• ا q$ا&9&$د ه&اء ا DJ$ا& >,ا"W
ا>@ر.
• ا.&$ت ا& /ا.5
:Tا:رة
• ا<" ا<رة b+م .اWص دوً
<" ا<رة
اI+ "bام [" <" رات ®MOPAR
و&+Aن <" 2ل <رات ،وا HFا&Wت
$+ ً$ء.Hb
• إذا k2$ا@Sات أو اBI$ت ا +S$ا]ى
ا<رةI ،م "3ا@Sات Super
MOPAR® Kleenو
"3اF,ان.
• اIم "3ا 6$Sا&دة 6$ "3
"#
®^ MOPARزا أ +ا DFوا> 6,و@$
YJء ر .اWص أI wش اYFء.
• PاIام ا$آ>ت ا SIا ! 2$ ",ن
اYFء ،أو Uدي إ ! Dا ,>Fا[ اYFء.
! L
• I< wم &اد ا Hbا &,أو ا"#
SI
ا&5ف ا P5أو <@&ق ا ،",5وا Uدي إ
ش ا] qFا 2$وا.F$
)(Uh
٣١٥
(Uh) ! L
&9دة !" ا@آ و/أو ا?Wك @&ل ا32م .را69
"ا<&ا[" ،وز&ت ا 4@Sو! 6FاRر ا] "A
ه'ا ا2 4<,ف &اBAت ا<[".
! L
I< wم &اد آ "! [$ا@آ "#ا?$وت
ا ?$أن &?
Hت !" ا@آFR w .
$dن ا<رة اة ا@$ود "#ه'ا ا.H
ااد ا! ا<J
! :ى ا4:
& Aا اS+ 25$ة 2+م اIام أ إ dت
Aإ !" ا@آ.
&<
>d 4ى ا<[" <>ً ,ا 65$وPF w
k@ Fً>dوف ا "RSا2د3 w .م إ9اء
@&Aت دور &<$ى ا<["' ،ا &@ wي !"
ا@آ ! 5س& ?$ W .آ" ا$2$
@&<
tى [" !" ا@آ I+ام أدوات
.A
إن [" !" ا@آ ا]و&
? ) (ATFه& أW
ا$ت ا و! * .أداؤ= > "?S+
Iwام &اد إ .$?
dو' d}+ 4, wأي
&ا[" إ dإ !" ا@آ .وا#wء ا& Wذ
ه& اIام R>Aت < DJ
@ Aب ا<[".
PاIام &اد < 6ب !" ا@آ ] ! .U
> "?S+ا<ادات.
٣١٤
إذا kbWwأي <ب ا<[" أو " !" ا@آ،
3+ 4,رة ا&آ" ا $2$ا&Bر &<
t@Bى ["
!" ا@آ ?$ .أن <> "RS Pا<رة " و&9د
<&ى [" W q@Aوث "!+ H
ا@آ.
! L
إذا Wث <ب [" > !" ا@آ3+ 4, ،رة
ا&آ" ا $2$ا&BرU , .دي ذ إ H
!" ا@آ $ .ا&آ" ا $2$ا]دوات ا>$
&<
>8ى ا<[" "?S+د!.D
"ات ا 4:وا"89
وف ا "RSا2د & ،ا<[" ا'ي 4إ` d
ا $2 >ً
$ً@S 65$ا<رة.
3 wم إ9اء $ت Rدور <[" وا .Bإ wأ`
> R Rا<[" وا Bإذا أ q>Aا<[" &ً$+) .ء،
أو (`+أو إذا آن !" ا@آ &??Bك ]ي >.P
ر اوران ا798J
! :ى ا4:
Uدي @&<
tى ا<[" أ.ء &! Hا<رة
أرض <& $ة 15د! ,إ @< <&ى د! !اءة
<&ى ا<[" +ر.&@
9
(Uh) !"H
• ?$أن Uدي "ء 3ان [" اBا
" "?S+زا[
ا@ إ <! [" اBا
" أ39اء ا@$ك
U ! $دي إ ا2ل [" اBا
" .و
ا?$$
H 8ا] qFاF$
أن <> "[ PاBا
" أ ً
وأ qFا ،"Bو'ا & Pا@'ر P
=' `<
Yا].qF
• "[< q$< wذي ا]س ا>و "[ &+
اBا
" ?$ .أن &?
Hت 6ا<ب اIص
B+ا
" U $دي إ "F2اBا
" [39 "?S+أو
آ .و! <> Pذ Wوث 5دم.
اFLم ا+رو ; - h8 7uا"آ اوي )إذا
آ; Bا:رة )ودة (Hh
'R 4اbم ارو? Y +,ل آ"[ $
5Bدا" 3ان ا]&Fا ا[< bم اBا
".
W Wوث <ب أو اهاء ،اIم "[ ,
اBا
" ا'ي ُ& `+ Aا ا .25$را" 69ا<&ا["
وز&ت ا 4@Sو! 6FاRر ا]A" "A
ا<رة" @&5ل 3ا
&2$ت.
; ا"آ اوي — إذا آ; Bا:رة )ودة Hh
! :ى ا4:
ا @&<
tى ا<[" B+ادة @ ا g>2ا&9&$دة
ا Pا]< !" ا@آ P .أن ?&ن
<&ى ا<[" (A&+ 1/4) 4
6.4أ! "Bع @
ا .g>2أً! Hdرا ا<[" ،إذا PFا]
b @$ ،
ا&<$ى ا ."[< P$را" 69ا<&ا[" وز&ت
ا 4@Sو! 6FاRر ا] A" "Aا<رة"
@&5ل 3ا
&2$ت.
! L
إن اIام [" !" Wآ iذ اA&$
I+ا
` ِ!>" 9اU ! 25$دي إ ه&ر
&9دة !" ا@آ و/أو "! Hا@آ .را69
"ا<&ا[" ،وز&ت ا 4@Sو! 6FاRر ا] "A
ه'ا ا2 4<,ف &اBAت ا<[".
" ; 4ا"آ
و $+ `.& Wء R P ،ا<[" &ًرا .را69
وآ ا&5@ $2$ل
&2ت &Wل ا.5
را" 69آ Pا Iوا$8ن" 2ف ات
ا 5ا.@@5
; ا"آ اkو - 7uإذا آ; Bا:رة )ودة
Hh
ز Bا*
ا 4$اIام ز "! kا@آ ا$8 P$ن
ا]داء وا $2ا "! #$ا@آ .اIم "[ ,
!" ا@آ ا@$د ِ!>" ا ا .25$را69
"ا<&ا[" ،وز&ت ا 4@Sو! 6FاRر ا] "Aه'ا
ا2 4<,ف &اBAت ا<[" .ا8وري أن
4اBWwظ "! "[<+ا@آ ا&<$ى اq@5
I+ام ا<[" اُI+ A&$ا
`3 w .م و 6dأي
&اد آ [$أي !" Wآ ،و? ? BاIام زk
ا 4@Sا., $2$
! L
إن اIام [" !" Wآ YI+ iف اُA&$
I+ا
` ِ!>" ا اU ! ،25$دي إ ه&ر
)(Uh
٣١٣
;Fم ا"9ا
*آ <&ى أداء bم اBا
"6$9 t@ R> ،
?&ت bم اBا
" دورً .را" 69آ Pا
I
وا$8ن" 2ف ات ا 5ا.@@5
!"H
Uدي إرا Wا,م اBا
" إ Bوا$Wل و!&ع
Wدث 5دم W .إن ا,دة 6إرا Wا,م
دوا اBا
" ?$أن <> PارBع درW 9ارة
اBا
" 2>J "?S+وÀآ" ا> Fو HاBا
".
و ?$ +اBwدة !رة ا?> qا?
wWت ا&Fارئ.
ا5kا; ا": ! - :4ى 4ا"9ا
@&<
D,ى ا<[" أ&Fا اBا
" ا[< إذا
آن >5ح @' bم اBا
" Sإ و&9د "
اbم.
@&<
D,ى ا<[" ا]&Fا ا[<
إ9اء $ت اF k@ 5ء ا@$ك.
,F
$! Hbا]&Fا ا[< !>" اFRء.
أ Hdآ $ا<[" &<
6ى ا<[" إ <&ى
) "MAX" Yا@ ا]! (5ا&9&$دة P9
3ان ا]&Fا ا[<.
"$+ A&ُ wء ا<[" "?S+زا[ ا@ ا&F$ب W
أن ذ Uدي إ Wوث <ب اbم.
أ Hdآ $آ ا<[" &<
6ى ا<[" إ ا@
ا&F$ب 3ان [" اBا
" .اIام اBا
"
ا 6!& `} ،A,ه>&ط <&ى ا<[" آ $زاد
<&ى ا F+ HاBا
"} ،W .ن اBIض
<&ى ا<[" ! @ث @وث <ب ،و! +
3م @ tاbم.
اIم [" اBا
" ا'ي & `+ Aا ا., 25$
را" 69ا<&ا[" وز&ت ا 4@Sو! 6FاRر ا] "A
" Aا<رة" @&5ل 3ا
&2$ت.
!"H
• اIم [" اBا
" ا'ي & `+ Aا ا25$
.,را" 69ا<&ا[" وز&ت ا 4@Sو! 6FاRر
ا] A" "Aا<رة" @&5ل
3
ا
&2$ت ?$ .أن Uدي اIام &ع
µJ
[" اBا
" إ b Hم اBا
" و/أو Bأدا[`
"?S+آ> 9& .ا&ع ا "[ q@5اBا
"
اIص <+ر ا D5$ا&9&$د 3ان
ا]&Fا ا[< ارو? ا] Aا$آ>
.65$+
• Pا&ث &اد ر 9أو اw ،+&J
<Iم &ى [" ا
" 9أو [" *>2
Wو @? $ا .DRأF D 4?Wء 3ان
ا]&Fا ا[< آ" ا]و!ت"[ t$ .
اBا
" ا&9&$د Wو W&Bا
+&J
ا&اء U $دي إ اBIض F,اRن4 ! .
ذ ن ا<[" @& &! 6أ.ء
اIام اBا
" B ,F+أو &! ،"&J kوا'ي
! Uدي +ور= إ µ9B
"F2اBا
" .و!
<> Pذ Wوث 5دم.
)(Uh
٣١٢
Wوت ،W&Bو+ "? `2$+ q$< wك
RAة ا]رض! W .م ا]BJل أو ا@&ات
ا]+ Bو` PJ ،ا<$ة wWت ا&Fارئ
ا&Bر.i Hb .ر ا<?ب ا k3ا&Bر.
:ى 4ا"
"#$ز "[ 99ا> و [
?$ 2
Yا*آ $إذا آن <&ى [" > ا@$ك
)
6ا ($آ ً `&? .ن ا@$ك &!ًB
و+رًدا P ،أن ?&ن <&ى [" ا> )
6ا($
ا@و +ا !Fا @d&$ا@و.
"bااد ً&$ءا ،2>J "?S+ ً$وw +
&F B 9W 9ء ااد إ wا> @t
> "[ $ F,ا@$ك )
6ا ($أو ا>ا`.
إ دة <Uول ا IاIص ='+ +ا
&2$ت.
و $Jآ kدرW 9ارة "RSا@$ك ،&>,
3م @ tز "[ 99ا> إ
wة واWة آ" .
إذا PFا]
إ@
> "[ dك )
($ 6
@Bظ ا&<$ى ا "[< P$ا>P ،
إ ` dإ ز "[ 99ا> w .وز Wا"$ء.
;ط )8م Hآ"ه
M L? :F1Gا:رة #h U5 #hأل/
آ"8ات #h 88ا Jh ?> Ì1Gر P
!"Tا"ك # .ذ ;' hx"8 #x
ادة ! 7ا+اء &:hا5kر أو ا8wج ،أو آ'L
' Uا" hxا @8? #ا"اد" و"Jه ?a! L
ا"ت " 4: a: ،ا"ك );U
ا'( اSh PS:ل إ@ ا"اد".
إذا S
?$ 4هة أي أ< .ب ااد أو
ا&JIم t@Bا@$ك! ?$ ،دة
ا<رة
*+ن BI W .ا>Iر ً.2
• ¼$ wز 99ا
اد [" ا> "?S+زا[ ا@.
• @ "[ $ F, D,ا> ااد و
ز 99ا
اد [" ا> .وإذا PFا]
إ d
> "[ 3ا@$ك )
6اP ،($
8
&@
$Wت ز 99ا
اد [" ا> أ ً
ا.$
• إذا PFا]
إ > "[ dا@$ك )
6
ا?
"?S+ ($ر R> ،ا>ر <&ى اR8
دا" bم ا> *آ م و&9د أ <+ت.
• ا+ jBWآ > "[ 3ا@$ك )
6ا ($
> "[ 50%ا@$ك ذي ,ا^ dت
ا) (OAT) &82ا&$ا 6
Dا2$ر
(MS-90032آ@ أد وا$ء ا
!& F,$
Àآ" ا@$ك ا'ي @&ي ?&ت ا]&
&م.
• *آ أن ا 4Jا Dا3ا[ 993ا
اد ["
ا> & أو <ودة.
• ,
b j Wااد .إذا آ kا<رة
,
b 8
3ودة & H?$+اء j @ ،أ ً
ا.H#?$
• R wا
&ت "RSا<رة ا H5أو
اSء .إذا PFا]
ا>ال ا
&ت4, ،
+آ&
Pت ا&ع اW ., 4[Y$
اIام $$5ت أى ! Uدي إ H2dأداء
[" > ا@$ك )
6ا ،($أو م إ
اد
ا<رة ،q@A "?S+ 3>+و 5ا.2>wت.
٣١١
• اIم ًء ا,ء "#
,ا$ء ا F,$أو ا$ء
ا&@
*$ل ا$ء &@
6ل ["
> ا@$ك )
6ا ", .($اIام ا$ء
ا BI$ا&دة ,ار ا@ d $ا5أ bم
> ا@$ك.
ُ bWY
9أ` <Uو ا $ا@Bظ
<&ى ا@ d $ا 2ً> $ر9ت ا@ارة ا
@ث ا DJ$ا "RS 4ا<رة.
:F1G
• #h &85ا:رات أدوات 4 !Wm <S
ا" >hر <? &: .م "ا?ة ء
ه XHا>h F;kرة < إ@ 1وث M8دا78S
"h Èhك 1 7! .ا إ@ إ !Wأي 4
" إ@ اFLم @"ُ ،ا>6ل hآ ا#
ا.78
٣١٠
• Jh @<ُ 6ام أ;اع " 4ا"ك );U
ا'( ا Pu 1 58Jأن F; M8 7! &:م
ا" .إذا * 4 i8Sا" L) HOAT
ااد ا #ا! ا 4 U (L'+ا"
) OATذو Lا!Wmت ا1 7! (#
ا5ارئ P &8x! ،اآ ا 9FL #و8:T
وإ?دة Jh Â8ام ) OAT " 4ذو L
ا!Wmت ا) (#ا! 85 Uت #ر اد
7! (MS.90032أ"ع و.Pu B
5Tء F; iWم ا"
Pإ?Wم DاFRء , Pان [" > ا@$ك
)
6ا ($وا*آ ر&9ع [" ا> )
6
ا ($إ ااد ز 99ا9ع [" ا>.
>F t@ Rء "[ Rdا> وW `Bb
اآ 4أي &اد > أ 6
qFا<ب.
!"H
• آ$ت ا@' ""DO NOT OPEN HOT
) (qB wا&9&$دة Fء "[ Rd
ا> 2اJWت ا]
ن> "[ H8 w .
ا@$ك )
6ا ($إذا آ kدرW 9ارة ا@$ك
زا[ة ا@ B w .اFRء أو > ً$ `2
ا@$ك إذا آ kدرW 9ار` زا[ة ا@U .دي
ا< &IاSة إ ر &<
6ى اb R8م
ا>W 6$ .وث اWwاق أو ا^B w ،+A
Fء "[ Rdا> إذا آن bم ا> ً
أو وا!ً.Rd k@ 2
• I< wم Fء Rdا@$د <ر4 , .
ذ ا2ض ^ 5I +Aأو Hا@$ك.
ا " 4 P 8Jا"ك اJ:م
> "[ 2ا@$ك )
6ا ($ا'ي أ` إ#
ا?&ل دة 3 2م ا.@@A ,F+ tI
را 69ا]
6ا<Fت ا @ @$ا&,ا
ا tI $b$ا&$اد وا6$ .2$$+ AI
و` &+ا Fا@&ات أو ا]BJل"[ 3I+ 4, w ،
> ا@$ك ا <$إ !ة &?9ل ا^ #
! L
• ! &@
Pل > ا@$ك )
6
ا$+ ($دة > أى [" > ا@$ك
ذي ,ا^ dت ا (OAT) &82ا@$د H
ا@$ك وا$Wل اBIض ا&! اÀآ""[ .
> ا@$ك ذي ,ا^ dت ا(OAT) &82
HIو Pأ > "[ 6
`F 4 wا@$ك
ذي ,ا^ dت ا &82ا(HOAT) $
)
6ا ($أو أي [" > "
&ا "ً$ D
)
6اW .($ل & [" > ["
ا> ذي ,ا^ dت ا6
) (OAT) &82
اb ($م ا> w@+ت اFر[@ ،ج
bم ا> إ ا H5وا HFSوإدة `g>2
9 > "[<+ذي ,ا^ dت ا&82
)&
) (OATا &+ ،(MS.90032 6
Dا Fوآ"
$2أ!ب و!.k
)(Uh
(Uh) ! L
• I< wم ا$ء ا2دي ,أو ت [" >
ا@$ك )
6ا ($ذات أس آ@&I< w .م
&اد 5 2أ إ dأو ت ,و
5أ،
Wإ ! & wا > "[ 6
Dااد ،و!
< ااد.
• ه'= ا<رة ?$ @+ $$5اIام &ا["
> ا@$ك )
6ا ($ا < إ !ة
+و +ا?&لI+ A&ُ w .ام &ا[" >
ا@$ك )
6ا ($ا < إ !ة
+و +ا?&ل.
إ 4 !Wا"
@&ي ر [" > ا@$ك )[" > ذي
,ا^ dت ا&
(OAT) &82ا >F
6
Dت
2ر &اد "F <@
(MS.90032ا$ة اYز
?$ .5اIام [" > ا@$ك )
6ا($
Bة "5إ & Sات أو 240000آ4
) ">! ("
150000ا>ا` 6$ .اBIض ة ا5
ا$$ة ه'= ،ام اIام > "[ {Bا@$ك
)[" > ذي ,ا^ dت ا(OAT) &82
&ا >F
6
Dت 2ر &اد J ،(MS.90032
ة اIام ا<رة.
ُ 9ا&9ع إ &Aت اIام [" > ا@$ك
)
6ا ($ذي ,ا^ dت ا(OAT) &82
وا'ي &ا >F
6
Dت 2ر ا&$اد ا,
S MS.90032آ .Chryslerإ"[ d
> ا@$ك )
6ا:($
• I+ q5ام آ> 6ا
> "[/$
® MOPARا$8+ FR$ن & 10ات150000/
" ذو ,ا^ dت ا (OAT) &82وا
&ا >F
6
Dت 2ر ا&$اد ا,
S MS.90032آ .Chrysler
• ا
3ج @&ل [" > ا@$ك ذو ,ا^ dت
ا (OAT) &82وا'ي &ا >F
6
Dت 2ر
ا&$اد اS MS.90032 ,آ Chrysler
6
50% ><+ء .F,اIم آ3ات )w
2ى (70%إذا آ kدر 9ا@ارة ا 2!&$أ!"
37در 34-) &g
9در.(k 9٣٠٩
;Fم ا"
!"H
• ا,+ "$2ب و > Wااد؛ ا "5
Jف &&&
"Aر ا$و ،Wأو Wك Bح
ا "RSإ و) LOCK 6dا) ("B,وOFF 6d
)إ,ف اb ("RSم ا&ل دون Bح Keyless
™
"$2 .(Enter-N-Goو Wااد و ً,
ر 9ا@ارة و ?$أن DFأي و!
k
?&ن !ص ا "RSو) ON 6dا("RS
)و) RUN 6dاYFwق( bم ا&ل دون Bح
™.(Keyless Enter-N-Go
• ! 2ض أ kأو ا FIاWwاق &+اF
[" > ا@$ك )
6ا ($أو ا>Iر ا<
ا 5$ااد .إذا رأ kأو &A k2$ت
ا]I+ة ا5$ة أF "Bء ا@$كqB Y ،
اFRء > Wد ااد@ w .ول F qء
b Rdم ا> إذا آن ااد ً.
٣٠٨
! 4ا"
ا @ tوا! [" > ا@$ك )
6ا ($آ" 12
ًا )!>" &Wل "5ا & ،$ت اAB
'( .إذا آن [" ا> <ً Iأو ً&$ءا 5+أ
ا&ا H5 P ،qdاbم و<` وإدة `g
&@$+ل > .9ا @ ,
tااد @$
D,
إذا آ kهك أ SWات ,5أو أوراق إ.°
و Wل و&9د ا<خ Hb ،ااد &+ا Fرش
ا$ء &J D +م ا@&$ ,دً و `9ا.H#?$
ا @ tأ>& +ز 99ا9ع [" ا> *آ م
ه SاF$ط أو و&9د ,,Sت أو !3$ت أو !&Fع أو
Ddا& Aا&9&$دة ا 993وااد.
ا @ tاbم *+آ* `$آ م و&9د أي <ب.
?&ن ا@$ك درW 9ارة ا "RSا2د،
)دون أن ،(`RS 4ا @F tء b Rdم ا>
*آ إ?Wم Dا ,F$ا B$ا&اء ,F+
،@@Aوذ &+ا,
H5 Fار "[ RA
ا> &>Aر H5ااد .إذا آن اFRء
?W}+ ,ًRم>< ،أ [" > ا@$ك )
6ا ($
ا<ب ز 99ا9ع [" ا>F 6 w .ء
"[ Rdا> إذا آن bم ا> ً.
;Fم ا" -ا>" Mوا :وإ?دة اÂ#
إذا آن @&ل > ا@$ك )
6ا Iً<
($أو
@&ي ,ار آ> ا>ت`Bb 2 ،
و<` I+ام b P
Hbم ا> .و P,ذ
اb HFم ا> ^ "
?+زا 6$9ا>ت وا&$اد
ا?$و "?S+ tI .ا&@
q@5ل >
ا@$ك 6
) "Wا.($
را" 69آ Pا Iوا$8ن" 2ف ات
ا 5ا.@@5
اSر 4ا"
را" 69ا<&ا[" وز&ت ا 4@Sو! 6FاRر ا] "A
" Aا<رة" @&5ل 3ا
&2$ت.
!"H
• إن زات ا2دم ?$أن <> Pا]ذى أو ا& ة .
@&ي أول أآ< ا?&+ن ) (COوه& 4
ا&ن واا[@ .و! <>, Pان ا& وا<4$
إذا ا P .`,SاSق أول أآ< ا?&+ن
) ،(COرا" 69ز ا2دم/إردات ا< "
Y
"أ
&ر Pأن "RS ">! 2ر" @&5ل
3ا
&2$ت.
• إن b &Iم ا2دم ! @ث ,ًWإذا آk
ا<رة &!& Bق &اد !2Y +ل .و! ?&ن
ه'= ا&$اد ا@ á[Sأو ا]وراق ا 6
"5
bم ا2دم H!& w .ا<رة أو &,م RS+
W "$@ DJوث ا5ل b +م ا2دم وأي
ء !WY "+اق.
! L
• <3م اIام ا&@$ل ا@Bز اIام ا&!&د اI
اAص .,ا> 3ا&I$ط
A+ص 2ا&@$ل ا@Bز >+ر= 9ز @?4
ا.2>wت و! Uدي إ Bأداء ا@$ك
"?S+آ> و<>@$+ 4<9 H Pك.
• و! @ث Hا&@$ل ا@Bز إذا "RS 4 4
ا<رة وف .@@A "RSو "F2 W
@ك ا<رة ،آ*ن @ث اWاق @$+ µJك
أو أي Bوت وا qdا]داء 2 ،ا =wإ
آ 3ا I 5ا<رة W .إن ا"RS
ا< $<$رة 6و&9د U ! + F "Fدي
إ ارBع درW 9ارة ا&@$ل ا@Bز "?S+زا[،
W ` P $وث Hا&@$ل ا@Bز
وا<رة.
و " وف ا "RSا2د PF w ،ا]
إ9اء
أ$ل Aا&@$ل ا@Bز .إ wأ` ا8وري
ا A "$2ا@$ك * q@A "?S+آ "RS
" ا@ @@A ,F+ 3Bو
W 6وث أي "$@
H
ا&@$ل ا@Bز.
:F1Gدي ا #ا F;Qh #ا7! *u
ا#;6ت إ@ <ور ?hت ; Wك.
ا&$ا! Hا2$دة ا "F2 "$Sا@$ك! ،
Sا>2ث را[@ wذ إ ارBع درW 9ارة
ا&@$ل ا@Bز إ درW W .2>J 9وث
ذ ،أو! Hا<رة ،وأو! "RS Hا@$ك واك
ا@$ك >د R> .إ9اء أ$ل ا 5ا $8
ا >8و ً&$ ,اBAت ا@$دة ِ!>" ا ا25$
ا&Bر.
",ا$Wل Hا&@$ل ا@Bز:
• ,}+ 4, wف "RSا@$ك أو $ 6J,ا"RS
"! DS2ا@آ و@ك ا<رة.
• @ wول +ء "RSا@$ك &+ا Fد 6أو @P
ا<رة.
• @ wول "RSا@$ك دون !دة ا<رة أ.ء "5
أو 3ع أي أYك 2$ا^2ل"> ،
ا#$ل ،أ.ء إ9اء $ت ا ،t@Bأو Bات ز
&Jأ.ء آ" @و @$ B "RSك دون !دة
ا<رة ،أو وف ا "RSا&$ا.
٣٠٧
! Uدي "RSا@$ت ا93ج وه& 9ف Bات
ز
&Jإ B Hات ا .@$اIم دوً
["
ا RاIام ا@$ت ^زا ا q$أو ا]وخ
ا93ج ا]
اف.
PاIام Bات ا^ @$زا ا 6,5أو ا Å#
ا93ج ا]
.اWص إ2+د Fط ا @$
<
Yا$ت ا>و "#ز kا@$ك أو ا>،3
إ.°
M8J :F1Gا "#ا"9 Uات ا
&:1ا 5Lا'"ا! و"uار اJ6ام"+F .
اkداء ا"98 :ات ! Uh uz 7أو ?Gت أو 5Sط
4أو 1 7! .8 Uhود أي Pه XHا"Fوف،
* "9z MFLhات ا أو ا L? +ا)8وم.
إ 4 !Wا8
&3 9ان [" ا93ج ا]
,
ا@$ك* .آ ا@&<
D,ى ا<[" ات
.$bا
¼ ا3Iان &@$+ل ا93ج ا]
)و{ 6
"[<+ا $اI<$م اد( و!4
"RS+اbم >&. 68اٍن tIا<[" ا$اآ 4
ا,ع.
٣٠٦
إدة "ء 3ان [" اً39 ' ،Rءا ["
ا Rو$! 2F! `2dش أو & Jوا
<B qات
ا .@$و< ذ @< أداء اBSات.
b $ 6$م [" <" ا93ج ا]
ا{,F
ا>ردW ،د @&ً wأو F D+F ً3ق در 9ا@ارة
,Fأو ?$ .` 3ار
&2ت
ا H5ه'= W 4b2وت [" ا.R
@&ي 3ان ا<[" 4ات )&9 1ن(
>ً,
[" ا& Rر ر "Low Washer
) "FluidاBIض <&ى [" ا (R
ض
&2ت ا<[.(DID) D
!"H
>'
>2ت [" <" ا93ج ا]
ا &$ة
رً !2Y +ل .أي أ ! "2Sو>5
@+وق .و'ا & Pا@'ر &@
g>2ل
[" ا "<Rأو اIا
`.
;Fم ا#دم
2أ "8و @ $ا<رة <ب ز أول أآ<
ا?&+ن إ دا ه& bم دم ا@$ك.
إذا kbWwو&9د &A Rت bم ا2دم ،أو إذا
5 kbWwأد ا2دم دا" ا<رة ،أو W
Hا Pا< Bا<رة أو ا3ء ا،
BI
?$اء أ Wا BاU$ه b t@Bم ا2دم
"
?+وا&ا Pا >,ا3ء ا Hه?"
ا<رة *آ م و&9د آ<&ر أو Bت ،أو آP
أ39اء ا2دم .gJ ,F+ا&,Sق أو ا&YAت
ا $?@$ا DRوا ! <] q$د ا2دم "<+إ
دا" &5,رة اآب .و d^+إ ذ ،ا @b tم
ا2دم 2$+ا Bآ" ة 4ر 6ا<رة
R+ض ا 4@Sأو Rا .k3ا>` إذا PFا]
.
W $@Sا*آ ^ bزا ا] +وا@>>ت
ا
،و 2+اwء $ا R> ،4@Sإزا أ
8ا =>w
ز&ت 4@Sأو @&
ت زا[ة R> .أ ً
و `9ا&5Iص &?$ت w3ج Fء ا@$ك *آ
.@@A ,F+ $و Wإ9اء أ أ$ل
@F kء ا@$كw3
Hb R> ،ج Fء
ا@$ك و q iاFRء و
ا]
ن و.$@S
W .2ر آ Yا 4. ، Fار F 6ء ا&&Aل .B
! "8هاء +ز Muا+اء
5Tء ا<ل "898
.3أزل ا BاI<$م.
+ 4! .4آ 9 Pأن ?&ن ا] 4ا=
Dر ا&اء أي ا= Uة ا<رة ) Sاt
وا] 4ا&9&$دة ا Bإ ذ(.
.5أF Dء ا&&Aل .B
را" 69آ Pا Iوا$8ن" 2ف ات
ا 5ا.@@5
* ه uا:رة
6$9 4@S Pا,ط ا&@$ر ا&9&$دة <9
ا<رة ا $8أ!Bل ا]&+اب و
Y5Bت ا]&+اب
و `J,ا&@$ر وا>ب ا "?S+ BIدوري I+ام
@&# 4م "#رش &ع ®* MOPARآ
" "?S+ $و@ d $ا>Rر وا] .+و!>"
و 6dأي ز q<
R> ،4@S kا]39اء ا&F$ب
4@S 8أ&Fات ا "B,اIر 9
> Rأ ً
ا2م ،و "8Bإ9اء ذ ة "5ا HIو
ة
أى "5ا,
6d .6+اًرا !ً Yز kا4@S
ا&دة "#ز 4@S kأ&Fا ا
"B,
®>
Moparة دا" أ&Fا ا."B,
"9zات ا)ج ا7k
> Hb Rا3وا اBS JF$ات ا W<$وا93ج
ا]
دورً &+ا 2F! Fا^ ÅBأو ا$,ش
ا HBIو
P>< w HF Hbأي وش'+ 4 W .
ا tIاآ$ت ا q$أو ا] +ا! ,ا
,2
ا.DF
٣٠٥
!"H
• اIم &ا[" ا> وز&ت 4@Sا8
ا$2$ة ">!ِ ,ا اb 25$م ?H
ا&اء& 2+ .ا[" ا> ا$2$ة !+
2Yل و ?$أن U $
،Bدي إ إ.+A
& P>< ! Wا[" ا> أو ز&ت ا4@S
ا]ى ا$2$ة "F2اbمPF $
،
إ9اء إWYAت ?
Bدً .را 69آب
&2ت
ا$8ن ،ا&9&$د !ص 2 ،DVDف
3ا
&2$ت &Wل ا$8ن.
! L
I< wم &اد آ [$أي bم ? Hه&اء W
إن ا?$وت ?$أن &?
Hت ? Hا&اءw .
$d FRن ا<رة اة ا@$ود "#ه'ا ا.H
ا#دة 4ا" R134aوإ?دة اJا —
إذا آ; Bا:رة )ودة Hh
"[ 2ا> R-134aاIص H?$+ا&اء أW
?&ت ارو &روآ&+ن ) (HFCا 4
٣٠٤
اIا
وآ $Wا> ،gآ 2 $أ Wا&?$ت
ا8رة ]+وزون .إ wأن ا ا9}+ A&ُ 25$اء
أ$ل ا H?$ 5ا&اء 2$+ا&آ" ا ،$2$أو
Yل اآ 3ا Iا]ى ا <Iم 2ات
ا2wدة وإدة او.
:F1GاJم ز BاFL PAG iTم Mu
ا+اء وا 4ا" ا#ة Pا' +ا>.i! #L
! "8هاء +ز Muا+اء
& 9ا "
Bا&اء اF k@ ,ء ا@$ك،
¿ +! W& Hزا >? ا& P+ااآP
&+ار @ت ا93ج ا]
.آ،9 P
*آ أ` ?$ Pن ا'ي 4آ>` .`+
.1أزل +ب ا&&Aل ا&9&$د ?> 39Wا&
R8+ا <$ا.>#$
ا#دة 4ا" HFO 1234yfوإ?دة
اJا — إذا آ; Bا:رة )ودة Hh
"[ 2ا> HFO 1234yfاIص H?$+ا&اء
أ&?
Wت ارو &روآ&+ن ) (HFCا 4
اIا
وآ $Wا> ،gآ 2 $أ Wا&?$ت
ا8رة ]+وزون ذو ا$Wل !" 3دة ا@ارة ا$2
) .(GWPإ wأن ا ا9}+ A&ُ 25$اء أ$ل
ا H?$ 5ا&اء 2$+ا&آ" ا ،$2$أو
Yل اآ 3ا Iا]ى ا <Iم 2ات
ا2wدة وإدة او.
:F1GاJم ز BاFL PAG iTم Mu
ا+اء وا 4ا" ا#ة Pا' +ا>.i! #L
hب ا<ل
P)J * :F1Gا5ر 5T Bء ا<ل !7
<Lوق أ #ا:رة .و أ"xاف < ا5ر
ا#ة ! !"T 7ا"ك Pأ ا5ر
ا .9#را" Uإ"اءات رة ذات 5hر
&' " 7! "9#Wأن 7! 8#9ا6ت ا5ر" 4
>8ل ? P ) @8ا8#ت.
uن ا5ر
!"H
• [" ا>Fر @&ل 8
Wأآل و ?$أن <>P
إ@+ +Aوق أو إ! w $2+ +Aر ا`.
اWص إ2+د [" ا>Fر ا 2أو ا>Sة
أو ا<+ "$ w .{+Y$ك &ق ا>Fر أ.ء
&?
"Aت ا& "Aا?. W .+
ا@
ا 2أو ا ،أع "<R+ا,F$
ا +5$ا&Bر ,$+د آ>ة ا$ء.
• ز ا>Fر !2Y "+ل واBwر .اWص
إ2+د ا Pأو أي 5ر Sارة ا>Fرw .
<Iم F+ر 32زة أو أي 5ر 32ز 3
iود
I+ج أآ> @+ q$< w .k& 12وث {
Y
?
+ت ا?."+
• @&ي أ!Fب وأJاف ا>Fر وا,@$ت اAI
+اAص و
آ>` .ا<" "$W 2+
ا>Fر.
• @&ي ا>Fر ا&9&$دة ه'= ا<رة
&Jم @ & Pم `5و Pا>ا`
F>+ ,ر {Bا&ع )ذات @ &(.
! L
• ا8وري و 6dا?Y+ت ا>Fر أن
"A& 4اFف ا PF,+ "+? P9&$اP9&$
ا>Fر واFف ا< PF,+ "+? Pا<P
>Fر 3$ 4 .أ!Fب ا>Fر ا
Y2+ P9&$
) (+وا< ،(-) Y2+ Pوه > Wو
ا>Fر R> .إ?Wم &?
"Aت ا?F!*+ "+ب
ا>Fر ،آ R> $أن ?&ن ا5أ.
• " "A& Wا WSا< "6أ.ء و&9د
ا>Fر ا<رة ،ا "5آ +ا>Fر !>"
& "AاF>+ WSرI< w .م "اWS
ا<+ & & "6ء ا."RS
<; Muا+اء
&&Aل إ أ "8أداء H?
t@ R> ،?$ا&اء
وإ9اء أ$ل ا 2$+ `+ Iا&آ" ا+ $2$ا
& 4ا R> .H5أن $8ه'= اHb I
t@ 8
ز Hا H#?$وإ9اء ا>ر ا]داء R> .أ ً
!&ة ا "RSه'ا ا&!.k
٣٠٣
ااد ا! إ@ ز Bا"ك
! "8ز Bا"ك
& Aا ا "?S+ 25$وا2+ qdم إ dأ &اد
#+) 8ء R>Aت ا@ D,ا<ب( إ زk
ا@$ك W .إن ز kا@$ك 2أ Wا$ت
ا و! * .أداؤ= Iwام ا&$اد ا 8$
ا>.
3 4و @آت ه'= ات ا B+ 25$ز
k
ا&ع ا D $ا?
" ا'ي ?$ا2+ `
tI
اIwام .اIم ه'ا ا&ع ا>wال.
&ع &9دة ا YBا> +ر, R> .&@
9
اIام Yا k3ا&دة @&5ل أ "8
<&ى Y 2 .ز&ت ا@$آت &ع
® Y MOPARا&دة و&I+ Aا
.
ا P 8Jز Bا"ك اJ:م و! "Gا)B
> Rا@ص ا tIز&ت ا@$ك
ا I<$و Yا "#$ ! W .k3ا tIزk
ا@$ك اI<$م و Yا k3ا ,F+ ،
I<$
!&" ?S
،آ>ة > .gا&+ "5آ" ا $2$أو
F@$+ا Iأو &+آ ا@?&
اPF 5I$
ا&S$رة B?+ D2 $ا tIا&3ت واYB
ا I<$وا?$ن ا.
i ,F+ ' P$
! "8ز Bا"ك
> Rا>ال ز kا@$ك 9 B+آ" ة
R 4ز kا@$ك.
! L "8هاء ا"ك
را" 69آ Pا Iوا$8ن" 2ف ات
ا 5ا.@@5
!"H
?$أن & bم ,Wا&اء )9ز ,ا&اء
واIا ،4Jا (°در 9ا@ W $ا2ل
ا&!&د ? "$اWwاق دا" ا@$ك}+ 4, w .زا
bم ,Wا&اء )9ز ,ا&اء واIا ،4Jإ(°
إ wإذا آ kه'= ا^زا dور ¿YAح أو ا.5
)(Uh
٣٠٢
(Uh) !"H
*آ م ا!اب أي tIا@$ك !>"
ا>ء "RSا<رة دون و&9د bم ,Wا&اء
)9ز ,ا&اء واIا ،4Jإ W .(°إن م
ا3wام W ` P ! '+وث إ+Aت Fة.
! L "8هاء ا"ك
&9 HIدة , Yه&اء ا@$ك "?S+آ>R> .
,اIام Yا k3ا&دة @&5ل
أ &<
"8ى , Y 2 .ه&اء ا@$ك
&ع ® Y MOPARا&دة وُ&A
I+ا
.
5hر 6ج إ@ أ?ل ا>;
ر 3ودة F>+ر @ wج إ أ$ل ا.5
3 w Wم إ
dء ،آ3 w $م إ9اء أ$ل A
دور .
! L
I< wم &اد آ [$ز kا@$ك "#
ا?$وت ا ?$أن Hا@$كFR w .
$dن ا<رة اة ا@$ود "#ه'ا ا.H
)و ز Bا"ك " -ك " 3.6 #ات
ُ& k3+ Aا@$ك MOPAR® SAE 5W-20
أو ? Pennzoil® `gأو ®6$ Shell Helix
در9ت Wارة ا "$2 W ."RSه'ا ا&ع @<
+دئ ا "RSدر 9ا@ارة ا 8BI$و& ا&!&د
ا<رة.
8در9ت
&F 9ء "ء ز kا@$ك أ ً
ا3و 9اُI+ A&$ا
6ز@
kك ر.
@&5ل
&2ت &Wل &!F 6ء @ g>2زk
ا@$ك ،راW" 69ة ا@$ك" " Aا<رة"
@&5ل 3ا
&2$ت.
! 4اIام ز kا@$ك
SAE 5W-30
MOPARا $2$ى آ Chryslerوا&$ا 6
D
2ر Pennzoil® "#
MS-6395أو Shell
®& w Helixا ز kا@$ك SAE 5W-20
ا&$ا 2
6
Dر .MS-6395
)و ز Bا"ك " -ك " 5.7 #ات
و Pم اIام ز&ت ا 4@Sا "5@ 4
آ" Yا$د ز kا@$ك ور! 4در3 9و9
SAEا.q@5
)و ز Bا"ك " -ك " 6.4 #ات
ُ& k3+ Aا@$ك MOPAR® SAE 5W-20
أو ? Pennzoil® "#
`gأو ®Shell Helix
6$در9ت Wارة ا "$2 W ."RSه'ا ا&ع
@< +دئ ا "RSدر 9ا@ارة ا 8BI$و&
ا&!&د ا<رة.
اIم ز kا@$ك Pennzoil Ultra™ 0W–40
أو ز MOPAR® kا µ ?$ا'ي &ا 2
6
Dر
ا&$اد MS-12633ى آ 6$9 Chrysler
در9ت Wارة ا."RS
3 8و 9اk3
ُF bء @ g>2ز kا@$ك أ ً
اُ@$ + A&$ك ر&5@ .ل
&2ت
&Wل &!F 6ء @ g>2ز kا@$ك ،راW" 69ة
ا@$ك" " Aا<رة" @&5ل
3
ا
&2$ت.
3 8و 9اk3
ُF bء @ g>2ز kا@$ك أ ً
اُ@$ + A&$ك ر&5@ .ل
&2ت
&Wل &!F 6ء @ g>2ز kا@$ك ،راW" 69ة
ا@$ك" " Aا<رة" @&5ل
3
ا
&2$ت.
&' :F1Gأن J:م ا:رة ا)ودة "hك
" 5.7 #ز .SAE 5W-20 Bدي ?م اع
ذ إ@ ا "Tا> "! L aاد .راU
" "! Lاد – إذا آ; Bا:رة )ودة 7! "Hh
"اء وا" "#8ف ? P ) @8ا8#ت.
زت ا"ك ا?L5<6
?$اIام ز&ت ا@$ك اS+ FAwط
>F$ ,+Fت &9دة ا&3ت اُ + A&$وا>ع
ات ا 5اُ R + A&$ا k3وا.B
٣٠١
3ود &!&+د .أ "8و!&<
t@B kى ز kا@$ك
ه& {$ 2+د![ "$ H!& >ً, Dا@$ك ا'ي
و "Aإ در 9إ$Wء آ
.
?$ا@&<
D,ى ا !+ k3أ.ء !س <&ى
ا k3وا<رة &! .&<
qF Bا&<$+ jBWى
اF k3ق ا&<$ى ) SAFEا
( P .
إ 1) 1 dآ&ارت( ا&? k3ن ا,اءة
أF "Bق ) SAFEا
( إ ارBع <&ى
ا k3إ أ Fق ) SAFEا
( ه'=
ا@$آت.
! L
و! Pزدة <&ى ا k3أو ا `dBI
ه'ا ا@ 6>Sا]+ k3آ< أو Rd ,ا.k3
و! Uدي ذ إ Hا@$ك.
" ز Bا"ك
را" 69آ Pا Iوا$8ن" 2ف ات
ا 5ا.@@5
٣٠٠
اSر ز Bا"ك " 3.6 # -ات و" 5.7ات
&&Aل إ أ w2ت ا]داء وأ!?$
$W 5
6$9وف ا A&ُ ،"RSا ا25$
I+ام ز&ت ا@$ك ا$2$ة 2
,ا>ول
ا]
? ) (APIوا &ا >F
6
Dت 2ر &اد
MS-6395أو S ACEA A1/B1آ .Chrysler
! L
I< wم &اد آ [$ز kا@$ك "#
ا?$وت ا ?$أن Hا@$كFR w .
$dن ا<رة اة ا@$ود "#ه'ا ا.H
ر) M"#ز" Bك +#ا"ول ا(API) 7u"k
اSر ز Bا"ك " 6.4 # -ات
&&Aل إ أ w2ت ا]داء وأ!?$
$W 5
6$9وف ا A&ُ ،"RSا ا25$
I+ام ز&ت ا@$ك اآ> "
?+ا gB+ Bت
ا$2$ة 2ا>ول ا]
? ) (APIـ .SN
ُ& Aا اI+ 25$ام ز kا@$ك SAE
0W-40اآ> "
?+أو ? B @+ `g
>F$+ت 2ر &اد MS-12633ا $2$ى آ
.Chrysler
و 2ه'ا ا
3أ` !
4ا$د اk3
&+ا 2
Fا>ول
).(API
ا]
?
& Aا ا25$
ز&ت
I+ام
ا@$آت ا$2$ة
ا>ول
2
ا]
? )., (API
!"H
?$أن 2ض ¿ W +Aا "$2دا" أW
ا@$آت أو 4, w .`&Wإ$*+ wل Aا
+ 2و $ا2$ات ا, >$م .+وإذا
! k??Sر إ9اء أ$ل ا I
ا<رة 'I ،ر إ أ Wا ??$اU$ه.
إ"اءات ا>;
@&ي ا@B5ت ا ت ا 5اh85
وا @ 4ه &+ا Fا $ا4$5 $[,
ا<رة.
إ &+ P9د ا 5ا&اردة "د" ا5
وا$8ن" ا&?
PF ! ،k+#ت أى ا 5أو
ا>wال ا.">,<$
! L
• ! Uدي م Aا<رة q@A "?S+أو "$
ا^WYAت وا Iا3وم إ $ت إYAح
?ً9 Bا ،و&?
Hت أى أو ا* .ا<>
أداء ا<رة 4! .ا&Bر t@B+ا]Fل
ا $@$ى &زع $2أو آ 3إYAح Uه".
• 65 4 ,ر &ا[" @< @ j
أداء ا<رة و!&ة @ $آB+ q$< $ات A
I< w .&Jم &اد آ [$ه'= ا&?$ت "#
ا?$وت ا ?$أن Hا@$ك أو !"
ا@آ أو bم ا& `9ا32$ز أو ? Hا&اءw .
$d FRن ا<رة اة ا@$ود "#ه'ا ا.H
إذا 3م اIام دة آ&9& [$د " أW
ا&?$تI ،م ا<[" ا? [$ا@$د ,
^9اء ا.H5
ز Bا"ك
ا k3ات ز
Yً#
،$bآ" &!H
3ود &!&+د .أ "8و!&<
t@B kى ز kا@$ك
ه& {$ 2+د![ "$ H!& >ً, Dا@$ك ا'ي
و "Aإ در 9إ$Wء آ
.
?$ا@&<
D,ى ا !+ k3أ.ء !س <&ى
ا k3وا<رة &! j W .&<
qF B
<&ى ا) MIN Y + k3ا@ ا]د( وMAX
)ا@ ا]!! 5 (5س ا P .k3
إ 1) 1 dآ&ارت( ا k3أ.ء و&9د ا,اءة
) MIN Yا@ ا]د( إ ا&&Aل إ
Y
) MAXا@ ا]! (5ه'= ا@$آت.
! L
و! Pزدة <&ى ا k3أو ا `dBI
ه'ا ا@ 6>Sا]+ k3آ< أو Rd ,ا.k3
و! Uدي ذ إ Hا@$ك.
ا : Pى ا)" - Bك " 3.6 #ات
ا : Pى ا)" - Bك " 5.7 #ات
*آ 4@Sا@$ك P ،@@A ,F+أن "b
ز kا@$ك ا&<$ى ا .q@5ا @&<
tى
*آ 4@Sا@$ك P ،@@A ,F+أن "b
ز kا@$ك ا&<$ى ا .q@5ا @&<
tى
ا k3ات ز
Yً#
،$bآ" &!H
٢٩٩
3$ر ?
}+إ9اء ا>ر I+ <+ام
Bح ا ،"RSوا'ي ?$اIا
` !>" ا'هب إ
@ Fا>wر $
D,@ .إذا آن bم ا t@Bا'ا
9 OBD IIهً3ا <+ر أم P ،wا,م : $+
.1أدر Bح ا "RSإ و) ON 6dاw ? ،("RS
+ 4,و ا@$ك أو +ء .`RS
:F1Gإذا h Bو" ا"ك أو P#:! ، 8
? 8إ?دة هHا اS6ر.
$+ .2د إدارة Bح ا "RSإ وON 6d
)ا ،("RSى ر
&d 3ء Uاb (MIL) "F2
آ3ء ا@ D,ا q@5ا.>$
.3و
2+ور @ ،>ً, . 15ث أ Wأ
:
• &
&dء Uا$ (MIL) "F2ة &. 10اٍن
&2 4. >ً,د ¿dءة &, W "
?+م B
6d&+ح
ا "RSو) OFF 6dإ,ف ا ("RSأو "RS
ا@$ك .وه'ا 2أن bم ا t@Bا'ا OBD II
« هً)ا وأ` ? Pم ا,wل إ @F
.I/M
٢٩٨
• &
&dء Uا (MIL) "F2ا^YJق
وً8
"bء "?S+آ
" &, Wم B
6d&+ح
ا "RSو) OFF 6dإ,ف ا ("RSأو "RS
ا@$ك .وه'ا 2أن bم ا t@Bا'ا OBD II
ا<رة ه) و ?$ا,wل إ @.I/M F
إذا آن bم ا t@Bا'ا "T OBD IIه)P ،
ا&9ع إ ا&آ" ا $2$أو ور ا^YAح .إذا آن !
A 4ر #ًWأو F+ kBر أو 4ا>ال
F+ر @ ،#ًWج إ ا,م *+آ! #دة
ا<رة آ2$د ? b @ 4م ا t@Bا'ا
.OBD IIو! $ Sإدة اI+ t@Bام
ا>wر ا'$آ&ر أ =Yإ أن اFLم ه).
و R+ا $ bإذا آن bم ا t@Bا'ا OBD II
9هً3ا أم ،wإذا أdء &dء Uا (MIL) "F2أ.ء
ا "RSا2دي <رة A P ،ر !>" ا,wل
إ @ I/M F@
"$2 ! .I/M FإWاث "
<+ر ]ن &dء Uاً8
(MIL) "F2ء أ.ء
"RSا@$ك.
اال U5ار
ُ&S+ Aة I+ام ! 6Fر ® MOPARا]A
أ$ل ا 5وا^YAح ا2د أو اور ،وذ
*آ ا&<
b @$ى ا]داء$d FR w .ن
ا<رة اة ا@$ود ا "Iأو ا Hا Åم
اIام ! 6Fر ® MOPARا] Aأ$ل
ا 5وا^YAح.
Sاآ
& ى ا&آ" ا $2$ا BاU$ه وا2$ات
وا]دوات ا AIا <ه 4إ9اء 6$9أ$ل
اW+ Iاف & .أد ا 5ا $8
&2ت < 5B
Aر .را 69أد ا 5ه'=
!>" @و ا,م *+ي إ9اء .<B+
:F1Gدي ا #ا F;Qh #ا7! *u
ا#;6ت إ@ إء ان وإ@ <ور ?hت ;
Wك.
;Fم ا 9اHاOBD II - 7
ا<رة 3ودة b+م @ tذا &Fر ` DFا4
W .OBD IIا! Pه'ا اbم <&ى ا.2>wت
وأداء ا@$ك وأ $bا@? "! 4ا@آ
ا]و&
? .و
"$2ه'= ا]،@@A ,F+ $b
}ن ذ Uدي إ ارBع <&ى أداء ا<رة و.U
إ ً+ا!5دت اYك ا&!&د ،إ dإ أ`
@? 4ا>.2ت ا@$ك و ً&, ,ا ا@?&
ااه.
وإذا PFا]
إ9اء 2+أ$ل ا] 5ي ه'=
ا]&,< ،$bم bم >5
" "RS+ OBD IIح U
3I+ 8ر
&ز
ا .(MIL) ""F2آ&, $م ه'ا اbم أ ً
5ISو
&2ت أى <$ة ا I
إ9اء ا^WYAت .و 4+إ
? !دة ا<رة دون
ا@ 9إ ا<@ ،Pإ wأ` > Rا&ء *+ع ?$
إ ا&آ" ا $2$إذا PFا]
إ9اء .A
! L
• Uدي !دة ا<رة Bات 6
&Jإ,+ء ا]&dاء
! ا "RSإ Wوث b Hم ا@? 4
8ا!5دت
ا.2>wت .آ .U ! $أ ً
اYك ا&!&د وا,رة ا,دةA P .
ا<رة !>" إ9اء أي @&ص .2>Yت.
• إذا و
"
>5ح Uا "(MIL) "F2أ.ء "$
ا@$ك} ،ن ذ ل !ب Wوث H
ا&@$ل ا@Bز و ,ان ا .!Fو PF +ا]
ا&Bر إ9اء أ$ل ا.
I
5Tء ! Â#اد *u "Tا8
إذا Wد اbم ا< 5ISرة أن Fء @ g>2
ا&!&د @? 4ا^Yق أو آ q@A "?S+ Pأو
4< ،Hض ا "F) "gASCAPء
ا> (3اد ا <$أو 4ض ا
") "Check Gascapا @F tء ا> (3
ض
&2ت ا<[ .(DID) Dإذا Wث ذ،
*F D 4?Wء @ g>2ا&!&د q@A "?S+واRd
زر إدة >dاد ا,^ <$ف ض ا.
إذا ا$ت ا b< ،?S$ا ا$ة ا
ا "RS 4ا<رة.
و! Uدي Fء @ g>2ا&!&د ا I$أو ا$آP
8إ إdءة &dء U
q@A "?S+أو ا Hأ ً
ا.(MIL) "F2
"hا ! Áا#;6ت و<;+
2+ا&? ! ،DJ$ن ا>F$ت ا &,ا9ز
@b tم ا@?.2>w+ 4ت ر .وUدي م
ا9ز ه'ا ا t@Bإ "< 6ا<رة.
ا& 6dا2$د&? ،ن bم اt@B
ا'ا 9 OBD IIهً3ا&? 6 ! .ن bم
ا t@Bا'ا 9 OBD IIهً3ا إذا آن ! 4
Aر #ًWأو إذا آF+ kر ر
ا #ًW @Sأو إذا آن ! 4ا>ال ا>Fر .#ًWإذا 4
@ أن bم ا t@Bا'ا <+ OBD IIر
9ه>w 3ر ا t@Bوا]داء "SB , ،ر
ا9ز ا>wر.
٢٩٧
!"Tا"ك " 6.4 # -ات )(HEMI 392
+ — 1ء ا) 2+ُ "RSا PF,اF> P9&$ر ا32$زة(
+ — 2ء "RSرة ذات F+ر I+ B2dام F+ر أى ُ) 2+ا PF,ا<F> Pر(
! 5 — 3س ز kا@$ك
g>2 — 4ز kا@$ك
3 — 5ان [" اBا
"
٢٩٦
F — 6ء > "[ Rdا@$ك
3 — 7ان [" > ا@$ك
, — 8ا&اء
— 9آ& 3ز 6ا) !Fا5$ات(
3 — 10ان [" اR
!"Tا"ك " 5.7 -ات
+ — 1ء ا) 2+ُ "RSا PF,اF> P9&$ر ا32$زة(
— 2آ& 3ز 6ا) !Fا5$ات(
+ — 3ء "RSرة ذات F+ر I+ B2dام F+ر
أى ُ) 2+ا PF,ا<F> Pر(
F — 4ء و&Aل 3ان [" اBا
"
3 — 5ان [" > ا@$ك
, — 6ا&اء
g>2 — 7ز kا@$ك
! 5 — 8س ا@$ك
3 — 9ان [" اR
٢٩٥
!"Tا"ك " 3.6 # -ات
+ — 1ء ا) 2+ُ "RSا PF,اF> P9&$ر ا32$زة(
— 2آ& 3ز 6ا) !Fا5$ات(
+ — 3ء "RSرة ذات F+ر I+ B2dام F+ر أى
ُ) 2+ا PF,ا<F> Pر(
٢٩٤
! 5 — 4س ز kا@$ك
F — 5ء و&Aل 3ان [" اBا
"
3 — 6ان [" > ا@$ك
, — 7ا&اء
g>2 — 8ز kا@$ك
3 — 9ان [" اR
• >ح ا"Sة/ا5#;6ف وا. . . . . . M
• >ح ا"Sة اkو/iا"ع . . . . M8J8
• >ح ا Mا"آ)ي ا8#ي )(CHMSL
• >ح 1اkرم . . . . . . . . . . . . .
• ا<9ت ا:رة . . . . . . . . . . . . . . . .
• #ت ا:ا. . . . . . . . . . . . . . . . . 4
• ا:ا 4وزت ا* و U5ار ا. . . 8<k
• ا"ك . . . . . . . . . . . . . . . . . . .
• ا . . . . . . . . . . . . . . . . . . .
.
.
.
.
.
.
.
.
.
.
.
.
.
.
.
.
.
.
.
.
.
.
.
.
.
.
.
.
.
.
.
.
.
.
.
.
.
.
.
.
.
.
.
.
.
.
.
.
.
.
.
.
.
.
.
.
.
.
.
.
.
.
.
.
.
.
.
.
.
.
.
.
.
.
.
.
.
.
.
.
.
.
.
.
.
.
.
.
.
.
.
.
.
.
.
.
.
.
.
.
.
.
.
.
.
.
.
.
.
.
.
.
.
.
.
.
.
.
.
.
.
.
.
.
.
.
.
.
.
.
.
.
.
.
.
.
.
.
.
.
.
.
.
.
.
.
.
.
.
.
.
.
.
.
.
.
.
.
.
.
.
.
.
.
.
.
.
.
.
.
.
٣٣١..
٣٣١..
٣٣١..
٣٣١..
٣٣٢..
٣٣٣..
٣٣٤..
٣٣٤..
٣٣٥..
٢٩٣
•
•
•
•
٢٩٢
٣٠٥..
٣٠٦..
٣٠٦..
٣٠٨..
٣١٢..
٣١٣..
٣١٣..
٣١٣..
٣١٤..
٣١٥..
٣١٩..
٣١٩..
٣٢٣..
٣٢٨..
٣٢٨..
٣٣٠..
• "9zات ا)ج ا. . . . . . . . . . . . . . . . . . . . . . . . . . . 7k
• إ 4 !Wا. . . . . . . . . . . . . . . . . . . . . . . . . . . . . . . . 8
• ;Fم ا#دم . . . . . . . . . . . . . . . . . . . . . . . . . . . . . . . . . . . .
• ;Fم ا" . . . . . . . . . . . . . . . . . . . . . . . . . . . . . . . . . . . .
• ;Fم ا"9ا . . . . . . . . . . . . . . . . . . . . . . . . . . . . . . . . . . . .
• اFLم ا+رو ; - h8 7uا"آ اوي )إذا آ; Bا:رة )ودة . . . (Hh
• ; ا"آ اوي — إذا آ; Bا:رة )ودة . . . . . . . . . . . . . . . . Hh
• ; ا"آ اkو - 7uإذا آ; Bا:رة )ودة . . . . . . . . . . . . . . Hh
• ر اوران ا. . . . . . . . . . . . . . . . . . . . . . . . . . . . . . . 798J
• ا u+h L#اJر 7وو Pا¾آ . . . . . . . . . . . . . . . . . . . . .
ا"+>Lات . . . . . . . . . . . . . . . . . . . . . . . . . . . . . . . . . . . . . .
• "آ) ز Uا 5ا) 7kا"+>Lات( . . . . . . . . . . . . . . . . . . . . . .
• "آ) ز Uا 5ا) 798Jا"+>Lات( . . . . . . . . . . . . . . . . . . . . . .
P)Jا:رة . . . . . . . . . . . . . . . . . . . . . . . . . . . . . . . . . . . .
اال ا>. . . . . . . . . . . . . . . . . . . . . . . . . . . . . . . . . . . ah
اال ا. . . . . . . . . . . . . . . . . . . . . . . . . . . . . . . . . . . . . 8
• ا>ح ا 7kا#دي ،ا>ح ا 7kا> ،7#ح ا/Mا5#;6ف -اُ"5ز ذات
> ahا P+ا - kإذا آ; Bا:رة )ودة ٣٣٠.. . . . . . . . . . . . . . . Hh
• ا>ح ا 7kا#دي ،ا>ح ا 7kا> ،7#ح ا/Mا5#;6ف -اُ"5ز ذات
ا> ahاz kة ا - (HID) È"9إذا آ; Bا:رة )ودة ٣٣١.. . . . . . . . Hh
• >ح ا ا'; 7ا/7kا٣٣١.. . . . . . . . . . . . . . . . . . . . . . . . 798J
٧
<; ا:رة
•
•
•
•
•
•
•
•
!"Tا"ك " 3.6 # -ات . . . . . . . .
!"Tا"ك " 5.7 -ات . . . . . . . . . .
!"Tا"ك " 6.4 # -ات )(HEMI 392
;Fم ا 9اHا. . . . . . . . OBD II - 7
• 5Tء ! Â#اد *u "Tا. . 8
"hا ! Áا#;6ت و<;. . . . . . . . +
اال U5ار . . . . . . . . . . . . . .
Sاآ . . . . . . . . . . . . . . . . . .
إ"اءات ا>; . . . . . . . . . . . . . . .
• ز Bا"ك . . . . . . . . . . . . . . .
• ! "8ز Bا"ك . . . . . . . . . . . . .
• ! L "8هاء ا"ك . . . . . . . . . .
• 5hر 6ج إ@ أ?ل ا>; . . . . .
• <; Muا+اء . . . . . . . . . . . .
• * ه uا:رة . . . . . . . . . . . .
.
.
.
.
.
.
.
.
.
.
.
.
.
.
.
.
.
.
.
.
.
.
.
.
.
.
.
.
.
.
.
.
.
.
.
.
.
.
.
.
.
.
.
.
.
.
.
.
.
.
.
.
.
.
.
.
.
.
.
.
.
.
.
.
.
.
.
.
.
.
.
.
.
.
.
.
.
.
.
.
.
.
.
.
.
.
.
.
.
.
.
.
.
.
.
.
.
.
.
.
.
.
.
.
.
.
.
.
.
.
.
.
.
.
.
.
.
.
.
.
.
.
.
.
.
.
.
.
.
.
.
.
.
.
.
.
.
.
.
.
.
.
.
.
.
.
.
.
.
.
.
.
.
.
.
.
.
.
.
.
.
.
.
.
.
.
.
.
.
.
.
.
.
.
.
.
.
.
.
.
.
.
.
.
.
.
.
.
.
.
.
.
.
.
.
.
.
.
.
.
.
.
.
.
.
.
.
.
.
.
.
.
.
.
.
.
.
.
.
.
.
.
.
.
.
.
.
.
.
.
.
.
.
.
.
.
.
.
.
.
.
.
.
.
.
.
.
.
.
.
.
.
.
.
.
.
.
.
.
.
.
.
.
.
.
.
.
.
.
.
.
.
.
.
.
.
.
.
.
.
.
.
.
.
.
.
.
.
.
.
.
.
.
.
.
.
.
.
.
.
٢٩٤..
٢٩٥..
٢٩٦..
٢٩٧..
٢٩٧..
٢٩٧..
٢٩٨..
٢٩٨..
٢٩٩..
٢٩٩..
٣٠٢..
٣٠٢..
٣٠٢..
٣٠٣..
٣٠٥..
٢٩١
٢٩٠
(Uh) ! L
• و 6dا<رة Wذات &B
qFحw ،
&?
F+ت ا D2ا]
أو اW .BI
! F! Pر W gJ ,F+وث
Bت ا<رة.
• q5 wا ا P@<+ 25$ه'= ا<رة I+ام
د @@ , .Pث <+ Hرة.
; ا"آ اkو7u
q5ا اُ P@<+ 25$ا<رة 6ر 6$9 6
اY2ت ا]ر 2+ا]رض I+ام .@F<
W
وإذا ،@F<
W & 4وآن !" ا@آ ،"$2
P@ ?$ا<رة ) qF<
"?S+ا]رY 6+ت
ا]رض( " اbوف ا:
إذا * ; Puا"آ ،#أو آن '& & ا:رة
?":hأ? 48 P @8آ*/Gً 30) ?/ا (?:أو
!:أ 48 P #hآ* ) "5! ،(Gً 30ا1ة
ا &:8ه 7ا L1ذات ا a5:ا9ح.
! L
?$أن BI
4ا>F$ت ا'$آ&رة أ=Y
<@ Pه'= ا<رة Wوث أdار "! R+
ا@آ .و$d FR wن ا<رة اة ا Hا49
9ه .4 "?S+
إذا آ b W kا &
qB$ة أو Wاغ
F+ر ا<رة ا ،@Sا @" 69ا&!H
اوي" ه'ا ا2 4<,ف ا^ردات &Wل
إاج !" ا@آ ا]و&
? وPARK 6d
)ا&!.P@< (H
• Pأن ?&ن !" ا@آ وNEUTRAL 6d
)ا.(DS2Y
; ا"آ اوي
• Pأ wوز < ا<@ 48) Yً
30 Pآ.(4
q5ا اُ P@<+ 25$ا<رة 6ر 6$9 6
اY2ت ا]ر 2+ا]رض I+ام .@F<
W
وإذا ،@F<
W & 4وآن !" ا@آ ،"$2
P@ ?$ا<رة ) qF<
"?S+ا]رY 6+ت
ا]رض( " اbوف ا:
• Pأن ?&ن !" ا@آ وNEUTRAL 6d
)ا.(DS2Y
• Pأ wوز ا<@ 105 Pآ65) /4
ً.(/Y
• W 9& wود < ا<@.P
إذا آن !" ا@آ ,F ،"$2 wا&Wة ا&>,$
<@ Pه ا WSذات ا< qFا&B$ح.
! L
?$أن BI
4ا>F$ت ا'$آ&رة أ=Y
<@ Pه'= ا<رة Wوث أdار R+ا@$ك
و/أو !" ا@آ .و$d FR wن ا<رة اة
ا Hا9 49ه .4 "?S+
• Pأن wوز ا<@/Yً
30 Pا<
) 48آ.(/4
٢٨٩
& رة 85#
H5ه'ا ا 4<,ا^9اءات ا P@<+ AIرة F2
I+ام @ Pر.
¼"وف ا&:
ا<@ PاqF<$
اG'#ت "!? ? Pاkرض
9& w
ر 6اY2ت أو د @P
ا
,$
اU$ة
اu
@F<
W
أ39ة ا<@ Pأو ا 6اH 6$ +&F
@@5
ا<رة .اIم >8! ,ن ا<@ Pوا2$ات ا]ى
ا' $$5$ا ا2ض >ً$2 2ت ا ا25$
2$ات >2 .اIام "Yا< Yإ3ا
ً4! .
P8! "A&+ا<@ Pأو 9ز @39]+ i Pاء
ا? ا[< <رة -و{ 5$+ات أو ا<ات
٢٨٨
; ا"آ اkو7u
إذا آن ; ا"آ :#
• !" ا@آ وNEUTRAL 6d
)ا(DS2Y
• 48آ (/Yً
30) /4ا
ا< @>k
• < 48) Yً
30آ h (4أ>@
: "Tح
ُ
&`+ A
ا "5ا@8w
ا
P .+ 5$اة !&ا ا& wوا&,ا ا@$
ا D>Fا<رات اري @>.
إذا آن اIام @,ت )ا@$ت أو أدوات إزا
ا ،6,5إ ،(°أ.ء ا<@ P ،Pأن ?&ن Bح
ا "RSو) ON/RUN 6dا/"RSاYFwق(،
و{ و) ACC 6dا,@$ت(.
; ا"آ اوي
إذا آن ; ا"آ :#
• !" ا@آ وNEUTRAL 6d
)ا(DS2Y
• 105آ (/Yً
65) /4ا
ا< @>k
ُ
&`+ A
ُ
&`+ A
ا "5ا@8w
! L
• I< wم ٌ
2ة !3
Fودة J,+ة @P
ا<رة@ , .ث <+ Hرة.
)(Uh
?mدة "" P#ا Mاوي:
.1اد 6اw3$ج )ا&9&$د ,+ة ا'راعP+ ،
اً2+) HI (BIا ا'راع( w3
Bج ا'راع.
.2أدر ذراع @ ا&! Hاوي ¼
م و¼ "Bأو
& 2dا]< ,< W ،Aن ا "B,ا?$ن
^?Wم ا'راع.
.3ا@ D + ] Pا* "&Fآ !"B
ا'راع و.`3I 6d
.4أد" ا! "&Fة ا?&<&ل .أ آP
Wو 3Iا?&<&ل.
i"zا5
٢٨٧
"" ا Mاوي — ; ا"آ ;7
ا?":ت
!"H
أ 4?Wدا[ً D $ا<رة DS2+ا
" ا&!"
?+ H
!>" @ Sا&! Hوً@ S q$< .
ا&! Hاوي <رة @+ك إذا * 4 4
DJاIام ا
" ا&! Hأو DJا&"A
ا<+ q@5رة اU ! .دي @ Sا&!H
اوي ا<رة @? $ا& "Aإ Wوث
إF +Aة أو و ة +ا" ا<رة أو .&W
6ا<رة أو @> &? wن !" ا@آ رج
و) PARK 6dا&!) (Hا>Fر ا،(Yً#
&@S$
&ا @ ا&! Hاوي.
ا> 6ه'= ا&FIات Iwام @ ا&! Hاوي:
.1أ DS2 4?Wا
" ا&!.H
٢٨٦
.2أزل Wو 3Iا?&<&ل &&Aل إ ذراع
@ ا&! Hاوي.
:ن ا9
1و P)Jا:;uل
I+ .3ام RA Bأو أداة ،+Sا @+
ا! @ > "&Fة ا?&<&ل.
.4أد" ا B$ا @Bا&9&$دة H5$+ا'راع،
وWر <ن ! "Bا'راع .$ `2 +
.5أ.ء < D2ن ا "B,و 6dإRء ا،DS2
ا@ Pا "&Fو ا'راع ] وW HI
< `?
,ا& 6dاأ .ا<رة ان < k
و) PARK 6dا&! (HوW .>@ ?$ر ا
"
ا&! 4 , Hإ?Wم & "Aا<رة <+رة
ا<@.P
(Uh) ! L
• & $+ا 6
Dاbوف ا&اردة أ P ،=Yو6d
,Wا<@ + Pر )واWة <@ Pوا]ى
<@&< (+ان @
"?S+ذي ! 5!*+ر ?$
&Jل {Bا Iا$آ3ي@ ! .ث H
<+رة Wم ا>ع ه'= ا^ردات.
81 Bwا &:اk
81 "H >8ا&:
& ,W {+! 9ا<@ Pا]
Hا>ب وا9
ا 5$ا]
! L
• PاIام ,Wا<@$ Pت ا<$ة
ا "> DFا@ .5اIم ,Wا<@, P
9 6ز Pو ً&? ,د اFق ا<P8!) 2
PAأو P@< (PAا<رة <$ "?S+
!5ة إ أ!ب &!.
6
• PأI< wم ,Wت ا<@ P@< Pا<رات
اFق ا&ة أو &? $#Wن هك >,ت.
آ ,W Pا<@ ،Pا qا>ب I+ام Bح ا<رة
أو + Bا 4. ،RAأ ,W k># 4?Wا<@ P
ا.{+,
)(Uh
81 Bwا &:ا98J
& ,W {+! 9ا<@ Pا H BIا>ب وا9
ا 5$ا.BI
آ ,W Pا<@ ،Pا qا>ب I+ام Bح ا<رة
أو + Bا 4. ،RAأ ,W k># 4?Wا<@ P
ا.{+,
!}+ 4دل اFف ا >,$ qF<$اا 2دا" ,W
ا<@ 4. ،Pأ 4?Wا ،Sرا" 69ر 6ا<رة وR
ا^Jرات" ا&5@ 6 4<,ل ا
&2$تP .
,W k>#ا<@?W}+ Pم < ً$ ,آ Bا+
> وا 9ا 5$ا]
ا< .Bإذا ,W ,< 4
ا<@ ً$ Pآ Bا R> ،+م @ Pا<رة.
!}+ 4دل اFف ا >,$ qF<$اا 2دا" ,W
ا<@ 4. ،Pأ 4?Wا ،Sرا" 69ر 6ا<رة وR
ا^Jرات" ا&5@ 6 4<,ل ا
&2$تP .
,W k>#ا<@?W}+ Pم < ً$ ,آ Bا+
> وا 9ا 5$ا]
ا< .Bإذا ,W ,< 4
ا<@ ً$ Pآ Bا R> ،+م @ Pا<رة.
٢٨٥
(Uh) ! L
• ! Pزدة ا@$ك أو و
اY2ت <+آ>ة إ ارBع درW 9ارة
8إ H
@&ر ا ",أو .`F2و! Uدي ذ أ ً
ا^Jرات+ 4, w .و اY2ت 3 <+
48آ (/Yً
30) /4أ.ء ا,دة س
)@ wث ",ا<(.
!"H
إدارة ا^Jرات ?$ <+أن ًF "?Sا آ>ًا .و!
Uدي ا&,ة ا ت Y2ت إ H
@&ر اوران وا^Jرات أو Wوث " .$+و!
Bا^Jر و<> Pا^+ 4, w .
tIS +Aو
Yت ا<رة <+أآ> 48آ30) /4
ً (/Yأو ]آ&
. 30 #ا&? Aن
ً ,و wك أي ,+ tIب ا 2
وه $آ kا<.
اJام 81ا&:
إن ر 3ودة P@ ,@+وا ?$اIا
<@ Pرة .F2
اIام * ،P@ ,Wآ ا>ع ا$2ت ا&اردة
"اJWت اIام ,Wا<@ "Pو "@ Pرة
"F2ه'ا ا.4<,
81ا&:
اx1ت اJام 81ا&:
:F1G
• Qآ 81 Bw Pاu1h &:م وو>h +#Wرة
< ! «h 7ا"آ&.
٢٨٤
• ُJh a>Lام 81ا & U &:ا &:و/أو
8ا.&:
• J: 6م 81ا & 7! &:رة ?L1z @8
.5:
• J: 6م 81ا "" &:رة ? .راU
""" رة ?" ! 7هHا ا>8 *:ل ?@8
) Pا8#ت.
!"H
!ً2+ Hا ا<رات ا<@I+ Pام ,Wت
ا<@.P
• I< wم < ,W 6ا<@"5B , .P
ا< P>< $
"YإF +Aة أو ا& ة.
• I< wم ا<@ ,W 6
Pا<@<? ! .P
أ Jا<@ Pأو W P>< $
"5Bوث
إF +Aة أو ا& ة.
• ! PاIام ,Wا<@ "?S+ P
q@Aآ< ا&?$ت W P>< $وث إ+A
Fة أو ا& ة.
إ"Sاج رة ?
إذا k,ر ا Fأو ا
ل أو ا?$ ،Å#
@? ً> &+ا Fا@آ اwه3از+ 4! .و
ا,دة 9ا 9 4. $ا<ر ^Yء ا,F$
اY2+ F@$ت ا]
< ><+ .رات ا3$ودة
W "!+آ أو&
? ،ا wً&F
Rdزر ا"B,
'+راع ا HI ">+ 4! ،4. .",وا]
م DRIVE +
)ا,دة( و) REVERSEا&9ع "! 6
) (HI
ا@آ ا]و&
?( أو اس ا]ول وو6d
) REVERSEا&9ع "! 6
) (HIا@آ
اوي( 6ا D + R8دوا ا&!&د 2 .اIام
ا R8دوا ا&!&د !ًBWY Yظ .*+ا@آ
اwه3از دون او ا<Y2 6ت أو <6
ا@$ك .R 2 $
:8 :Lh :F1Gرات ا)ودة "1 Lhآ
أو i! Pu :7uا;6ل Phو7#W
) DRIVEادة( و) REVERSEا"ع (M8J8
?u Lن "?ت اG'#ت 8آ* 5) ?/أل/
ا (?:أو أu L? .ن ; ا"آ ! 7وUW
) NEUTRALا (#Gة ) ?&' ،P; P
أن @8? iدوا ا"9ا S8ل إ@ وUW
) DRIVEادة( أو ) REVERSEا"ع .(M8J8
! L
! Pزدة ا@$ك أو و اY2ت
<+آ>ة إ ارBع درW 9ارة @&ر ا ",أو
.`F2دع ا@$ك > *Jأ.ء و&9د !" ا@آ
و 6dا$ DS2Yة د! ,واWة ا]!" 2+آ"
{$دورات ا ", .3ذ ارBع در9
Wارة ا +,أو !" ا@آ و&! `Bا "$2أ.ء
زدة ا @ ا<رة ا.,2
:F1Gا9 @8? iWح ") "ESC Offإف
;Fم ا 7! *uا"6ار(F; UW ،م ا*u
ا"umو; 7! 7ا"6ار 7! (ESC) ،وPartial" UW
) "Offاmف ا') ،(74أر ا:رة .راU
"ا *uا"umو; 7! 7ا"9ا" !" 7اء وا"
>8ل ? P ) @8ا8#ت"'h .د ""
ا:رة ،ا9 @8? iWح ") "ESC Offإف
ا 7! *uا"6ار ا"umو;" (7ة أ"Sى #6دة
و ) "ESC On" UWا 7! *uا"6ار
ا"umو;.(7
! L
• "ه "3رة F2ا@آ DJ
ا,wل ) DRIVE +ا,دة(/اس ا]ول/
) REVERSEر&9ع "2 w ،(HIاY2ت
ور <+أآ> 24آ/Yً
15) /4
ا<( P>< w Wذ &$
Hا 6
وا@آ.
)(Uh
٢٨٣
! L
و! Uدي ا^Bق ا>ع ه'= ا^9اءات إ Wوث
b+ Hم ا<+ @Sرة ا32$زة أو ا<رة B
ا.@S
< آGhت ا<
"A&+ 4! .1اFف ا (+) P9&$آ "+ا&"A
إ ا PF,ا (+) P9&$ا> 2ا<رة Bا.@S
!"H
.3ا J "5ف آ "+ا& "Aا (+) P9&$اPF,
اF> (+) P9&$ر ا.332
"A& Pآ "+ا& PF,+ "Aا<(-) P
>Fر اU ! .&@S$دي Wوث ارة آ+
إ اBر ا>Fر و! 4ذ إ.5I +A
اIم F,ا*ر ا ،, 2$وI< wم أ
أ39اء 2ر أى.
.4ا "5اFف ا "+? "+,$ا& "Aا(+) P9&$
ا PF,ا (+) P9&$ا>< 2رة ذات ا>Fر
Bا.@S
"A&+ 4! .2اFف ا "+? "+,$ا& "AاP9&$
) PF,+ (+اF> (+) P9&$ر ا.332
.5ا+أ @
"RSك ا<رة ا&9&$د +ا>Fر
ا32$زة ،واك ا@$ك دا[ًا Wا>2 UJة
د![ 4. ،Dا+أ @
"RSك ا<رة ا&9&$د +ا>Fر
Bا.@S
"A&+ 4! .3اFف ا< (-) Pآ "+ا&"A
PF,+ا<F> (-) Pر ا.332
$+ .6د +ء "RSا@$ك}+ 4! ،زا آY+ت
ا& P+ "Aا:<?2
"A&+ 4! .4اFف ا "+,$آ "+ا& "Aا<P
) PF,+ (-ا< (-) Pا> 2ا<رة ا @&ي
F+ر Bا.@S
!> آGhت ا<
.1ا J "5ف ا PF,ا< (-) Pآ "+ا&"A
ا< (-) Pا> 2ا<رة ذات ا>Fر Bا.@S
.2ا "5اFف ا "+? "+,$ا& "Aا<
(-) P
ا PF,ا<F> (-) Pر ا.332
٢٨٢
إذا PFا]
"RSا>Fر ا<+ A&+ B28رة
أى ?
"?S+ر أ+ "9ء "RSا<رةP ،
@ tا>Fر وbم ا @Sا&آ" ا.$2$
! L
"$2ا,@$ت ا ' $+ A& ?$ا!F
ا?<+ +رة @ PاF+ !Fر
ا<رة W ،م اIا
)
"#ا&ا Hا&I
و
إ ذ( .و ،+إذا B A& 4ات &J
دون "RSا@$كU< ،دي إ @ ºBا>Fر
+رU 9دي إ 5,ا $2ا wاF> dر
و/أو 6ا@$ك +ء ا."RS
')+ات hء ا 5h <hر أ"Sى
3I 4ا>Fر @F kء ا&&Aل Aوق
أ
2ا<رة>F! 9& .ن 2+ان >Fر اP
ا]W $ة ا@$ك "RSرة ذات F+ر
<+ A&+ B2dرة أى.
!"H
• اWص ا2+wد و Wا> ا&9&$دة
ااد أ.ء ر F 6ء ا@$ك> , .أ ا"$2
أي و! $J kآن Bح ا Jً&>8
"RS
و) ON 6dا2 ! .("RSض ¿ +A
@ Bات ا$و.W
• ِ wأ &هات "Y "#
2ا&Iا4
وا<ت وا]ور ،وا ! Uدي إ Wوث
{
Yآ&5,
+د2 ! .ض ^+A
Fة.
• @&ي ا>Fرت $Wآ> ?$أن Uدي
إ إWاق ا>Sة أو ا ،2آ $أ & ز
ارو 9ا2Y "+,ل و 6اBwر .اWص
إ2+د ا Pأو أي 5ر Sر ا>Fر.
ا UWأ5ب ا5ر ا#
— 1ا PF,ا (+) P9&$ا>2
— 2ا PF,ا< (-) Pا>2
.1ا >dا
" ا&! Hو "! 6dا@آ و6d
) PARKا&! "!) (Hا@آ ا]و&
?( أو اس
ا]ول )!" ا@آ اوي( 4.أدر Bح ا "RSإ
و) LOCK 6dا.("B,
.3إذا آI< kم رة أى >ء ا"A&+ "RS
F>+ر أى,}+ 4, ،ف ا<رة F $dق آY+ت
ا& "Aوا >dا
" ا&! ،Hو*آ B
>dح
ا "RSو) OFF 6dإ,ف ا.("RS
!"H
{
Y+ q$< wا<ر $82+ 6ا>! W 2
Åذ Wوث ا5ل أر dو! Pذ
Wوث إ+Aت.
إ"اء رة ذات 5hر +8<h 9#W
5hر أ"Sى
!"H
! Uدي ا^Bق ا>ع إ9اء "RSرة ذات
F+ر F>+ A&+ B2dر أى إ ا^+A
ا 5ISأو Hا?$$ت P><+اBر ا>Fر.
.2أو!9 "RS Hز ا gوااد& و 6$9ا,@$ت
ا? +ا8ور.
٢٨١
3I+ 4! .11اا 2وا]دوات وا^Jر اB$غ* .آ
&ا! 9ة اا 3 2ء ا]
ا<رة !>"
إ?Wم ر +ا.k>#$
!"H
! Pا ع ا^Jر أو اا 2اk>#$
?W}+م دا" ا<رة ا2ض @دث اFAام أو
P><+ا&! Hا2 ،µ9B$ض Wة اآب ا&9&$د
دا" ا<رة .FIاWص دوً
و 6dأ39اء
اا 2وا^Jر ا JWwا]
آ ا55I$
'YA}+ 4! .ح أو ا>ال ا^Jر ا&Bر.
"آ& إxر ا"5
+ 4! .1آ PإJر ا&@
DFر اوران.
+ 4! .2آ&A Pا
" اY2ت ا`9& 6
,>$
اFف Iو Jا "?Sا&5ا
" Wا.2
أ 4?Wر +ا&5ا
" !ً.Y
!"H
? JI
Pاw3ق ا<رة اا 4?@ w ،2
ر&A +ا
" اY2ت BI W ً$ا<رة
اا .2و Pم ا>ع ه'ا ا@' ا2ض
^.5I +A
.3ا Bا<رة &+ا H Fا$<$ر ا&> اIص
+ا , {? 2رب ا<.
.4را9 69ول ا32م 2$ا32م ا&
5 q@5
ا.2
2+ .5ور 40آ (Yً
25) 4ا @3 tم &Aا
"
اY2ت I+ام Bح ر +ذي !&ة 3م > *آ
أن &A 6$9ا
" اY2ت q@A "?S+ >#
اY2ت.
إ"اءات رة ذات 5hر 9#W
إذا آ kا<رة @&ي F+ر ?$ ،&@S
<+ A&+ RSرة أى I+ام آY+ت
ا& "AوF+ر رة أى أو I+ام
3W
@ 332 &$ا>Fر ?$ .أن ?&ن "RSرة
٢٨٠
ذات F+ر <+ A&+ B2dرة أى أ
ًا ًFا
إذا ' ،q@A "?S+ ='B 4ا 9ا>ع ا^9اءات
ا&اردة ه'ا ا.
2+ 4<,
و? LاJام ))# )1
:F1G
ا5ر ،ا Uاx16ت وإرzدات ا ا<J
+'hا>.#L
! L
I< wم ا@ 3ا 332 &$@$ا>Fر أو أي
5ر b & 6
i 332م ،k& 12 3
وإ H , wا>Fر أو &&ر 9ز +ء ا "RSأو
& ار ا$دد أو اbم ا?.+
!"H
@ wول "RSا<رة ذات ا>Fر اB28
<+ A&+رة أى إذا آ kا>Fر ! وkA
رW 9ارة ا3$ , .$ق أو BوUدي إ
Wوث إ+Aت .5I
+ 4! .7آ Pا^Jر ا.JWw
! L
*آ آ Pا^Jر ا JWwوق ا$5م &ا`9
Iرج D@ ! .ا<+ Hرة Wآ Pا^Jر
ا.@@A ,F+ JWw
• را" Uاxmر ا 7x16ا>"" ورا" Uاxmر
ا 7x16ود اJ6ام" " PWاxmرات -
8#ت ?" !" 7اء وا" GxGع ?@8
) Pا"Hات وا+Lت وا8#ت 1ل
اxmر ا 7x16واJا و. 8
+ 4! .8آ&A Pا
" اY2ت `9& 6اFف
Iو Jا "?Sا&5ا
" Wا .2أ 4?Wر+
ا&5ا
" !ً.Y
Uا"! Uا798J
!"H
? JI
Pاw3ق ا<رة اا 4?@ w ،2
ر&A +ا
" اY2ت BI W ً$ا<رة
اا .2و Pم ا>ع ه'ا ا@' ا2ض
^.5I +A
.5ار 6ا<رة B , B? $+ا^Jر اB$غ
وآ Pا^Jر ا.JWw
!"H
U ,دي ارBع ا<رة إ <&ى أ ا&F$ب
إ ا* ً> .ا,ار ا<رةD3 , .
ا<رة &ق اا * 2ة وH, P5
&+اره .ار 6ا<رة B , B? $+ا^Jر.
&A B+ 4! .6ا
" اY2ت وا^Jر.
"آ& اxmر ا7x16
:F1G
• :8 :Lhرات ا)ودة 6 ،Hhول "آ&
5Tء "آ)ي أو 5Tء ?' @8? 8اxmر ا7x16
ا>".
.9ا Bا<رة &+ا H Fا$<$ر ا&> اIص
+ا , {? 2رب ا<.
.10را&
" 69اBAت ا32م" ه'ا ا 2$ "5B
ا32م ا &
5 P$ا.2
٢٧٩
(Uh) !"H
• k@ " wا<رة ?&ن را .2وإذا
آًF8
kا &ل @ kرة &'I ،
ا<رة إ آ 2 A 3را A 2
.'+
• اIم اا 2ا&$ا 6dاS$ر إ ,و 6
ه'= ا<رة أ.ء RإJر.
• ا DJ "$2رات أو ,+ب ` ،آ
ً'Wرا Rا<رات ا$رة.
"H >8ا"ا!#
! L
@ wول ر 6ا<رة 6d&+اا &
2ا! 6
ا$2 @d&$ت و 6dاا =' 2ا<رة.
٢٧٨
6d .4اا 2أ ,F
"Bا 6ا]!ب إ ا^Jر
اB$غ ا&اء H+ 4! .ا$<$ر ا&> اIص
+ا , =+ 2رب ا< ? DS2د
اا ,F
6
2ا >2+ 6ا>ب.
ا # Uا"ا!#
:F1G
إذا آ; Bا:رة >"ة 8ر UW 79u 6
ا"ا! Q! ،#ا"ا! @8? #أ +; 1وأدره 7! @8?k
.+#W
}+ 4! .1زا ا^Jر ا JWwواا 2و
Bح ر+
ا&5ا
".
.2إذا آ kر 3ودة Y2+ت ا]&
&م W
اFRء ا$آ3ي &A FRا
" اY2تI ،م
Bح ر +ا&5ا
" 6اFRء ا$آ3ي @+ص !>"
ر 6ا<رة.
">! .3ر 6ا<رة ،اIم Bح ر +ا&5ا
" B
و? { ^زا ا&5ا
" ا&9&$دة ا^Jر اB$غ
ا&اء H+ 4! .ا&5ا
" BواWة ?{ ا=
,رب ا< أ.ء و&9د ا 2ا]رض.
Uا"! Uا7k
!"H
! Pا ع ا^Jر أو اا 2اk>#$
?W}+م دا" ا<رة ا2ض @دث اFAام أو
P><+ا&! Hا2 ،µ9B$ض Wة اآب ا&9&$د
دا" ا<رة .FIاWص دوً
و 6dأ39اء
اا 2وا^Jر ا JWwا]
آ ا55I$
'YA}+ 4! .ح أو ا>ال ا^Jر ا&Bر.
ا" "! Uا:رة
,}+ 4! .1ف ا<رة &ٍ<
qFوً2+ PAا
Wا! DFر ا^
?ن P .ا DJ$ا #أو
ا.,3
!"H
@ wول Rا^Jر P+ا<رة ,+ب Wآ
ا$ور ! ،ر ً2+ا ا+ DFر 9آ
Bدى ا2ض ه{ اIا
ا 2أو أ.ء
Rا.2
6d .4ذراع ا ",و) PARK 6dا&!"!) (H
ا@آ ا]و&
?( أو و 6dاس ا]ول )!"
ا@آ اوي(.
B
6d .5ح ا "RSو) OFF 6dإ,ف
ا.("RS
&W 6d .6ا 39أ
م ,و
Uة ا 2ا+,$
6d&$ا Yً#
.6إذا أردت
Rا^Jر ا]
ا]$
6dا@&ا 39أ
م ا2
ا BIا<ى.
:F1G
'& "Sوج ا"آب Pا:رة ? Lر!.+#
ر! Uاxmر و"X
!"H
ا>'@ 6ات Rا^Jرات ه'= <$ة 6
ا^ +Aا> أو Hا<رة:
• ! 4دا[ً,}+ $ف ا<رة &ٍ<
qFوً2+ PAا
Wا! DFر ا^
?ن !>" ر 6ا<رة.
• ّ "Rوا
8ت ا@' ا.FI
• ! H 39W 6d&+ 4ا 2ا2 ًF! +,$
ا 4ر .2
• اIم ا
" ا&!?W}+ Hم و "! 6dا@آ
ا]و&
? و) PARK 6dا&! ،(Hأو !"
ا@آ اوي و) REVERSE 6dا&9ع
.(HI
• "RS+ 4, wا<رة أو و ا@$ك أ.ء و&9د
ا<رة اا .2
• wع أي { tIدا" ا<رة ?&ن
را .2
)(Uh
"Rّ .2وا
8ت ا@' ا.FI
DS2+ 4! .3ا
" ا&!.H
٢٧٧
Uا"ا! P)J/#اxmر ا7x16
}+ 4! .3زا أداة ا k>#اJ¿ >#$ر ا.JWw
3I 4اا 2وا^Jر اF k@ JWwء
ا&&Aل Aوق ا]
.2ا> 6ا&FIات ا
&&Aل إ اا 2وا^Jر ا.JWw
:F1G
ا"ا!.#
'& إزا اxmر ا<8 7x16ل إ@
.1ا A qوق ا]
.2
أداة Bwا"ا!#
.2ار F 6ء ا&&Aل I+ام @.P
أداة Bwاxmر ا7x16
}+ 4! .4زا ا^Jر ا.JWw
}+ 4! .5زا أداة ا k>#ا >#$ا .2
! 1 aا<ل
٢٧٦
.6أزل اا 2و
B
&$ح ر +ا&5ا
"
أ "Bا^Jر ا + H+ 4! .JWwاا 2إ ا<ر
B
Bح ا +وأج Bح ا&$
+
اا .2
ر! Uا:رة و" اxmرات
ا @ qF tآ Pا ">! 2آ Pا^Jر و!}+ 4زا
أي Àآ" أو أ39اء .&F,
أ;ط ا)#م
" a5آ& ا8'#
أ 4?Wر&A +ا
" <
/اY2ت ?" $
4 @+إ?Wم ر +آ" $<
/&
Aر .
2+ور 40آ (Yً
25) 4ا @3 tم &Aا
"/
<
اY2ت *آ أن &A 6$9ا
"
<
/
اY2ت q@A "?S+ >#اY2ت.
!"H
? JI
Pاw3ق ا<رة اا 4?@ w ،2
ر&A +ا
" اY2ت BI W ً$ا<رة
اا .2و Pم ا>ع ه'ا ا@' ا2ض
^.5I +A
!"H
• @ wول Rا^Jر ا PاW P,آ
ا$ور .أو! Hر ً2+ا اB ? DFدى
ا2ض ه{ اIا
ا 2أو أ.ء R
ا^Jر.
• 2و&9دك أ "BإWى ا<رات ا&+ & $اF
را ًF gً 2ا D3 , .,ًWا<رة اا 2
و< . ,و! <@ ,ا<رة " w .أي 39ء
k@ $<9رة & را .2وإذا آk
ًF8ا &ل @ kرة & 'I ،ا<رة
إ آ 2 A 3را .'+ A 2
• S wع "RSا<رة أو و ا@$ك أ.ء
و&9د ا<رة اا .2
• 4$5 4 ,اا IY 2ام آ*داة Rا^Jرات
.,و Pم اIا
6ا<رة ,م
I+ت ا P .5ر 6ا<رة k+. qF
و
<& P .ا] qFاFR$ة +أو ا.,3
٢٧٥
:F1G
! 1 7ا ¸9Lا)اxÅ 4ر ،ا @8? iWزر È"9ا+اء
Pاxmر iW 8اxmر إ@ ا iاُ<@ h
ا.#h
.2ا "5ة @م ا^Jر ق ا$5م 4. ،أ
آ PاFRء ق ا$5م وا {>,
"5ا
!F
*' ا.k& 12 !F
6d .3ة @م ا^Jر ,Fا 3Iا>$
<+رة.
t@B+ 4! .4ا^Jر وإ `WYAأ!ب Aي
ا&آ" ا $2$أو آ A 3إJرات.
.5أزل W D5ا< & Wأ39ة ا,س 2+
إYAح ا^Jر.
.6ا>ل >&ة دة 6ا<ب ) (1و
&$
&Jم دة 6ا<ب ) (6أ!ب وآ" $2
أ!ب و! .?$
kرا 69ا) 4<,و( "ا>ال >&ة
و&Jم دة 6ا<ب".
;< L? :F1Gاxmر ،أ "Sاآ ا #أو "آ)
ا>; Qhن اxmر * * Jhام ?ة م اxmر.
٢٧٤
)و( اال ?ة وx"Sم دة ULا":ب:
ا<9ت ?)م ا 8'#واxmر
&J B+ 4! .1م دة 6ا<ب )B) (6ف ا&ن(.
2ا32م ا$<
/&
A + q@5ر اd 2ورً
ً9ا $8ن آ Pا 2ا<رة .q@A "?S+و
Wإزا ا<رة وإدة آ> أي و!P k
D>Fا32م $<
/&
Aر اI+ 2ام Bح
ر.q@A "?S+ `2
k$ +
2 .2ف & 6dزر @ >&ة دة 6ا<ب
ا ,F$ا &$أ&> "Bة دة 6ا<ب.
.3زر @ >&ة دة 6ا<ب@ .ر >&ة دة
6ا<ب 1و bأ
}+ 4! .اج ا&>2ة وtI
.P
"?S+
Hb .4أ $ ,+دة 6ا<ب > kة @م
ا^Jر.
&> 6d .5ة دة 6ا<ب اة ) (1اk>$
@
4 @+ذاة &Jم دة 6ا<ب )@ 6
(6
ا&JIم ا3ء ا]
.k>$ا Rdا&>2ة
إ دا" ا S ً&A 6$< .k>$إ ا,ار ا&>2ة
&.2d
D,@ .6آ PاFRء اآ> ا&9&$دة
Jف &Jم دة 6ا<ب اBSف ) (6وأ
ا&JIم إ ,Fا 3Iا2) `+ AIف
& 2dأ I8
"Bا&اء(.
.7أ ة @م ا^Jر إ & 6dا<+ 3Iرة.
ا<9ت ا)#م
?)م رih
<:/ر
ا8'#
·& 176
)! 130م-ر("J
***'1
</
:ر
ا8'#
× M14
1.50
« *'1
</
:ر
ا8'#
4
22
**اIم &Aا
" <
/اY2ت اُ">!ِ + A&$
, Chryslerو! Hb+ 4أي ا<خ أو ز kأو إزا`
!>" إ?Wم ا.+
.3ا &J "5م دة 6ا<ب ) (6ق
ا$5م ا&Bر ،وأ آ PاFRء اآ>
ا&9&$دة F+ف ا&JIم و 6dة @م ا^Jر
?ن 3Iا<رة 6+ .ا,م ً 2إ !<) 4د( "!دة
ا<رة".
! L
• ! q>5اFف ا 2$اIرج {>,ا!F
) 2+ ً (8اIwام' ،ا Pو` @+ص.
• ! Åا "SBآ PاFRء اآ>
ا&9&$دة Jف &Jم دة 6ا<ب )(6
<
Yدة 6ا<ب ك أو <+Y$أو
8إ
¼39اء اا ا<رة .و! Uدي ذ أ ً
6
<
Yا<ب &?$ت اا 2ة @م
ا^Jر وه& ا]
ا'ي <> H Pدا[2+ 4ة @م
ا^Jر.
)د( دة ا:رة:
2+إدل دة 6ا<ب و °Bا^Jر 4! ،ا&Bر
,+دة ا<رة 8 <$آ 5) 4أ
ل( أو 10د![$8 Dن
&ز
6دة < 6ب ا^Jر دا" ا^Jر w .وز
90آ/Yً
55) /4ا<(.
!"H
إن ة @م ا^Jر >2 wإ WًYAدا[ًJ¿ $ر
اB$غ ا&اء .ا @ tا^Jر و! `WYA}+ 4أو
ا>ا` 2+اIام ة @م ا^Jر w .وز
90آ/Yً
55) /4ا<( 4 WإYAح
ا^Jر أو ا>ا` .إن م ا>ع ه'ا ا@' ! 4
` إ+Aت Fة أو $وآب و
ه&
,+ب .
)هـ( #hادة:
! ا<رة إ ?ن .
iرا " 69ا&!Iw Hام
ة @م ا^Jر" !>" ا.2+$
{>,
B+ 4! .2ا !Fوأد" ا '*
{>,$ا!F
<+ k& 12 +رة.
&J B+ 4! .3م I8ا&اء )) (7أ&د ا&ن( و
ا3ات ا&JIم ) (7ق ا$5م.
D,@ .4ا R8ا^Jر ! DJاءة اد
ا.(3) R8
إذا آن iWاxmر أ h 1.3 Pر ) 19رu Gًx
:(#h" <h
+ Hر 9آ>ة ً9ا@ w .ول
2ه'ا أن ا^Jر ٌ
!دة ا<رة ]ي < أى .ا PF "5ا<$ة.
إذا آن اh 1.3 iر ) 19ر (#h" <h u Gًxأو
أ?:@8
.1ا Rdزر ا "RS (4) !Fة @م ا^Jر
وا °Bا^Jر إ <&ى ا R8اS$ر إ` D5
&2ت ا^Jر وا@ @ "$ا>ب Wا<[.D
.1ا @ >,
Rdا& (5) 6dوأدر= إ
و 6dا&اء.
٢٧٣
": :F1Gب دة ULا":ب ?" ا&w
اد ! 7اxmر.
:F1Gإذا آن ا 7! (5) UWوUW
ا+اء وا:! ،8 Jف ! ا+اء P
x"Sم Jا+اء ) ،i! (7و« x"Sم دة UL
ا":ب ).(6
.1ا Rdزر ا,^ (4) !Fف "RSة @م
ا^Jر .ا &J "5م دة 6ا<ب ) (6ق
ا$5م* .آ & ق ا$5م ا]وخ .أ
&&J "Aم دة 6ا<ب )<+ (6ق ا$5م.
@ D,أن @ >,ا& (5) 6dو
6dدة 6
ا<ب و{ و 6dا&اء .ا Rdزر ا!F
) "RS (4ة @م ا^Jر.
إذا * ! دة ULا":ب ) 4أx"S "? (hم
دة ULا":ب ):(6
إذا * ! دة ULا":ب ) 4أGS (hل 0إ@
10اٍن ?" x"Sم دة ULا":ب ):(6
{>,
"A&+ 4! .2اHI
!J '*$+ (8) !F
<+ k& 12 +ر أو <+رة أى ،إذا & ذ.
*آ "RSا@$ك !>" "RSة @م ا^Jر.
&? ! .3ن >&ة دة 6ا<ب 1ر P><+
اIا
<>ً .,ا PF "5ا<$ة.
٢٧٢
"RS $ .1ا
D H!& W I8$دة 6
ا<ب ا&JIم )<Rق ه'ا "?S+ . 70 - 30
&$ذ .(9وأ.ء
Dدة 6ا<ب &Jم دة
6ا<ب ) ?$ ،(6أن ,
Sس ا (3) R8إ
!اءة "5إ + 4.8ر ) 70رA&+ "? "J
.(2+و! BIاءة ,س ا
<+ (3) R8
&Wا + 4.8ر ) 70ر (2+
A&+ "? YًJإ
ا R8ا@J¿ ,,ر &> q>5ة دة 6
ا<ب ) (1ر.
> .2أ ا ,W I8$ا&اء ا^Jر >ة 2+
اغ >&ة دة 6ا<ب ) "RS 6+ .(1ا I8$وا°B
ا^Jر إ <&ى ا R8اS$ر إ` Rd D5
ا^Jر &$د w3ج P9ا<[) Dا R8اُA&$
D,@ .(`+ا b+ R8إ اد ا.(3) R8
إذا * * ; ¸9اxmر إ@ h 1.8 iWر ) 26ر7! Gًx
ا< ا" @8? (#hاT 7! kن 15د:
• 2ه'ا أن ا^Jر ٌ+ Hر 9آ>ة ً9ا@ w .ول
!دة ا<رة ]ي < أى .ا PF "5ا<$ة.
1 7! :F1Gا ¸9Lا)اxÅ 4ر ،ا @8? iWزر
È"9ا+اء Pاxmر iW 8اxmر إ@ اi
اُ<@ hا.#h
إذا * ; ¸9اxmر إ@ ا iاُ<@ hأو 1.8 iW
hر ) 26ر 7! Gًxا< ا" @8? (#hاT 7! kن
15د:
.1ا Rdزر ا,^ (4) !Fف "RSة @م
ا^Jر.
}+ 4! .2زا W D5ا< ا3ء ا&2ي
>&ة دة 6ا<ب 1و 6dا W& D5$أ39ة
ا,س.
(Uh) !"H
• @&ي دة < 6ب ة @م ا^Jر
اW W .{?Yوث رد > <@+أو
Wوث 9 qBJي ،ا Sا P>Fا&Bر .اjBW
2+ة @م ا^Jر ً2+ا ول ا]BJل .وإذا !k$
$ "< ،`2>+ا&Bر $+ء 3واب
,اًرا آ>ًا ا$ء <B > w .ا,ء!
ا Sا P>Fا&Bر.
اB$غ ا&اء و I8
"RSا&اءW .ك ا<رة
إذا 3م ا]
& 6dق ا$5م ه'ا ا&">! 6d
ا,م.
"! 6d .3ا@آ و) PARK 6dا&!"!) (H
ا@آ ا]و&
?( أو ! "!) `,S2+ 4ا@آ اوي(
وأو! "RS Hا@$ك.
DS2+ 4! .4ا
" ا&!.H
)ب( ا'J6 )+ام ?ة م اxmر:
م اxmر Jhام ?ة م اxmرات
)أ( ? LاJ6 Mام ?ة م اxmر:
.1ا @ >,
Rdا& (5) 6dوأدر= إ
و
6dدة 6ا<ب.
! .1ا<رة إ ?ن iوّ "Rوا
8ت ا@'
ا<+ FIرة.
&J B+ 4! .2م دة 6ا<ب )}+ 4! 4. ،(6زا
اFRء اآ> ا&9&$دة Jف ا&JIم.
* .2آ أن ق ا$5م ) ا 2ا$8$
ا^Jر اB$غ ا&اء( و P! 6dا]رض.
< q$ذ &JIة @م ا^Jر ) (6و)(7
&A&+ل إ ق ا$5م وا^,+ء ة @م ا^Jر
و qF<
6dا]رض & .ذ أ "8و6d
2ة @م ا^Jر
,Wدة 6ا<ب ا^Jر
6d .3ة @م ا^Jر qF<
"?S+ا]رض
&+ار ا^Jر اB$غ ا&اء.
}+ 4! 4. (8) {>,
B+ 4! .5دل ا'*
{>,$
ا<+ k& 12 + !Fرة.
h * 6 :F1Gزا أ اد Sر )w
ا P (":اxmر.
)ج( P1دة ULا":ب #hة م اxmر ! 7اxmر
ا"9غ Pا+اء:
• ا+أ "RSا@$ك دا[ً "RS ">! $ة @م ا^Jر.
:F1G
'& أن uن !"ا ا Mوذراع ا 7! LوUW
) NEUTRALا 7! (#Gرات ; ا"آ
اوي.
• Rd 2+زر ا> ،(4) !Fأ دة 6ا<ب )["
أ (+ا &> Dة 6ا<ب )> (1
&Jم دة 6ا<ب ) (6إ ا^Jر.
}+ 4! .4زا اFRء &$د ا$5م H+ 4! 4. ،اآ>
ا&9&$دة Jف &Jم دة 6ا<ب ) (6
&$د ا$5م.
٢٧١
• ?$اIام I8ا&اء 2+ة @م ا^Jر °B
8إ+
إJرات درا * .9ا2ة @& أ ً
دا" Wة ا 3Iا ) ,@$ا3ء ا<
B
I8ا&اء( °Bا?ات ا dوأ&اح اÅ3
ا JF$وا]ء ا +S$ا .°B +,و? اIم
&Jم I8ا&اء ) , (7و*آ و&9د >,
@ ا& (5) 6dو 6dا&اء "#
°Bه'=
ا]ء وذ
,W Pدة 6ا<ب .+إن دة
6ا<ب ة @م ا^Jر < , $$5
ا&,#ب اR5ة ا >F! ºه (A&+ ¼) 4
6
ات ا^Jرات ='+ا<رة.
• 6 wة @م ا^Jر أو @Y $ل اIا.4J
!"H
• @ wول &,.ب ا^Jر ا Pا
P,
Wآ ا$ور .أو! Hر ً2+ا ا? DF
Bدى ا2ض ه{ اIا
ة @م
ا^Jر.
)(Uh
٢٧٠
(Uh) !"H
• I< wم ة @م ا^Jر أو &,م ,+دة ا<رة
اbوف ا:
• إذا آ W<
kا
P,#اس ا^Jر 1/4) 4
6
(A&+أو أآ>.
• إذا آن هك + Hار ا> ¿Jر.
• إذا آن ا^Jر $8أي Hآ ,دة 6
اBIwض ا@د Rdا^Jر.
• إذا آن ا^Jر $8أي Hآ ,دة "
اغ ا^Jر ا&اء.
• إذا آن هك .2+ H
• إذا *
? 4آًا Wا^Jر أو ا.2
• ا2+ jBWة @م ا^Jر 2+ة ا Pأو 5در
ا@ارة.
)(Uh
(Uh) !"H
• ! Pا ع ة @م ا^Jر ا>#$
?W}+م ا2ض @دث اFAام أو P><+ا&!H
ا2 µ9B$ض Wة اآب ا&9&$د دا"
ا<رة 4! .FIدا[ً 3I+ $ة @م ا^Jر
ا?$ن ا . t5I$إن م ا>ع ه'= ا@'ات !
` 4إ+Aت Fة أو $وآب و
ه& ,+ب .
• اWص م &?
<
Yت ة @م ا^Jر
2Sأو ا 2أو ا >2 .{+Y$ة @م ا^Jر
dرة ا !Sأو 2+أو ا
&+ A5اF
ا Åُ P>< .ا وا 2واز
ا$+ "<R+ 4! .<Bء 3إذا k<
wا 2أو
ا R+ 4! .ا*+ {+Y$ع ?$إذا k<
w
ا.{+Y$
)(Uh
اJام ا UWوا"Jا*x
اJام زر ا5
! ?&ن ة @م ا^Jر 3ودة &
+ز ا
¿رة إ و 6dا&اء أو دة 6ا<ب.
و UWا+اء
ا Rdزر ا
(4) !Fة واWة
وWر= "RSة @م ا^Jر .اRd
زر ا
(4) !Fة أى وWر=
^,ف "RSة @م ا^Jر.
اJام زر È"9ا+اء Pاxmر
ا @ >,
Rdا&(5) 6d
وأدر= إ ه'ا ا&I8
"RS 6d
ا&اء .,اIم &Jم I8ا&اء
ا]&د ) @ (7ه'ا ا&.6d
و UWدة ; Uا":ب
ا@ >,
Rd
ا& (5) 6dوأدر= إ ه'ا
ا&
,@ 6dدة < 6ب
@م ا^Jر و °Bا^Jر.
اIم &Jم دة 6
ا<ب )ا&JIم اBSف(
) @ (6ه'ا ا&.6d
ا Rdزر ºBا&اء )", (2
Rdا&اء ا^Jر Wا°B
ا3ا[.
اx1ت اJام ?ة م اxmر
• ا>ل >&ة دة 6ا<ب ) (1ة @م ا^Jر
و&Jم دة 6ا<ب ) ">! (6ر °اء
ا) WY5ا&>F$ع ا3او ا< Bا<ى
D5ا&>2ة( $8ن أ b "RS "8م .را69
ا) 4<,و( "@م ا^Jر I+ام ة @م ا^Jر"
و"ا>ال >&ة و&Jم دة 6ا<ب".
Uر¸ ا;+ء <? 1Gة م اxmر
• <Iم >&ة دة 6ا<ب ) (1و&Jم دة 6
ا<ب )@ (6م إJر وا , Wو>Y 9@+ال
2+آ" اIام>+ 4! .ال ه'= ا&?$ت دا[ً $ى
ا&آ" ا]2$ Aات ا<رة ا&Bر.
• إذا آ
kدة 6ا<ب 2+ة @م ا^Jر [ً،Y
?$إزا` ا<رة أو ا^Jر و
?&ت ا2
I+ام ء Hbو!$! 2Fش >H .
دة 6ا<بS, ?$ ،ه &<+واtI
.P
"?S+
• @&5ل أ "8أداء* ،آ & ق ا$5م
ا 2ا]وخ !>" & "Aة @م ا^Jر.
٢٦٩
?ة م اxmر -إذا آ; Bا:رة )ودة Hh
? P)Jة م اxmر
?$إYAح ا&,#ب اR5ة (A&+ ¼) 4
6 W
ا&9&$دة اس ا^Jر DJاIام ة @م
ا^Jر P .م إزا ا]ء اIر "#
) 9ا>ا
أو ا (
<$ا^Jر ?$ .اIام ة @م ا^Jر
در9ت ا@ارة اIر 9وا "5إ أ!"
20-در 4-) &g
9در9ت .>ً, (k
& 9ة @م ا^Jر Aوق ا]
.2
;uت ?ة م اxmر وا
& ه'= ا2ة @ً
J¿ ً!Uر! ?$ $
،دة
ا<رة 160 <$آ <+ ("
100) 4أ!5ه 90
آ/Yً
55) /4ا<(.
;uت ?ة م اxmر
? Uة م اxmر
&> — 1ة دة 6
ا<ب
— 2زر ºB
ا&اء ا^Jر
,
— 3س اR8
— 4زر ا!F
٢٦٨
@ >,
— 5ا&6d
&J — 6م ادة @م
ا^Jر )Bف(
&J — 7م I8ا&اء
)أ&د(
{>,
— 8ا) !Fا&9&$د
ا Pا< Bة
@م ا^Jر(
وات ا P "Hا"5J
B
6,ح ا&8ء ا&ا
@' اW& FI
أ39ة ا,س ،أ "Bااد&.
ا RdاB$ح "RSوا
ا@'
ا S .FIاB$ح6$9
& ،
إرات اF2wف @' ا<رات ا,د
و&9د
J Wر[ .ا RdاB$ح ة ,^ .ف "RS
وا
8ت ا@' ا.FI
"$2< wه'= ا^رة ا [&8أ.ء ا<رة ]
@' wWت ا .FIا&? $2ن ر
F2ا DFوًF "?Sا Yا<[,
ا.
إذا آن ا8وري ك ا<رة PFا<$ة،
<&ف < $وا
8ت ا@' اW "$2+ FI
! @ 2+ص ا "RSإ و) OFF 6dإ,ف
ا.("RS
:F1Gإن اJام وات ا P "Hا "5Jة
M# 8xا5ر.
! 1 7ار9ع در "1ارة ا"ك uh
زا P? 4ا
أي ا@wت ا ", ?$إ
? ارBع
درW 9ارة ا@$ك >+ع &Fات و![ >.
• اFق ا< "! - 2ا<.
• دا" ا H!& - $ا<رة "! 6dا@آ
س ) NEUTRALا (DS2Yو? 6 w
> UJا@$ك.
:F1GهLك 5Sات Puا? 8 +ار9ع
"1ارة ا"ك ا:z
• إذا آن Muا+اء اQ! ،وM
. 8وذ kن ;Fم Muا+اء ُ"1 Mارة
إ@ ;Fم " ا"ك و ?:إ9xء Muا+اء
! 7إزا ه XHا"ارة ا!.
• ;uhأً و9 UWح ا 7! *uدر ا"ارة
! 7و UWا"ارة ا>ى وو9 UWح ا*u
H!Lhا+اء ! 7و UWا H!Lاkر Wو9ح ا*u
"hو 7! 1و? UWل .إن ذ +' aز ا!Â
ا #آ"8 ?:اد" P 8J8ا"ارة !F; 7م
" ا"ك.
! L
! Uدي !دة ا<رة ?&ن bم > ا@$ك
ً إ Hا<رة .إذا آن 9ز !س در9
ا@ارة و 6dا@ارة ا P ،"H" 2ا&!H
ا,دة وإ,ف ا<رة .أو! Hا<رة وأو!"RS H
9ز ? Hا&اء > Wا U$إ اFق
ا2دي .إذا ,+ا U$و 6dا@ارة ا"H" 2
وً$<
ًJ k2$ا* ،و! "RS Hا@$ك &ًرا
وا.5+ "5
!"H
?$آ Ø ?$ $ا2ض FIاWwاق
&+ا > "[ Fا@$ك )
6ا ($أو ا>Iر
ا< ا 5$ااد .إذا رأ kأو k2$
&Aت ا]I+ة ا5$ة أF "Bء ا@$كY ،
qBاFRء > Wد ااد@ w .ول F qء
b Rdم ا> إذا آن ااد أو Fء ["
ا> .
٢٦٧
•
•
•
•
٢٦٦
• إ"اء رة ذات 5hر 5h +8<h 9#Wر أ"Sى
إ"Sاج رة ? . . . . . . . . . . . . . . . . . . . . . . .
اJام 81ا. . . . . . . . . . . . . . . . . . . . . . . &:
• 81 Bwا &:ا. . . . . . . . . . . . . . . . . . k
• 81 Bwا &:ا. . . . . . . . . . . . . . . . . . 98J
"" ا Mاوي — ; ا"آ ; 7ا?":ت . . . . . .
& رة . . . . . . . . . . . . . . . . . . . . . . . 85#
• ; ا"آ اkو. . . . . . . . . . . . . . . . . . . 7u
• ; ا"آ اوي . . . . . . . . . . . . . . . . . . . . . .
.
.
.
.
.
.
.
.
.
.
.
.
.
.
.
.
.
.
.
.
.
.
.
.
.
.
.
.
.
.
.
.
.
.
.
.
.
.
.
.
.
.
.
.
.
.
.
.
.
.
.
.
.
.
.
.
.
.
.
.
.
.
.
.
.
.
.
.
.
.
.
.
.
.
.
.
.
.
.
.
.
.
.
.
.
.
.
.
.
.
.
.
.
.
.
.
.
.
.
٢٨١..
٢٨٣..
٢٨٤..
٢٨٥..
٢٨٥..
٢٨٦..
٢٨٨..
٢٨٩..
٢٨٩..
٦
'& أن 7! 8#9ا6ت ا5ر4
•
•
•
•
•
•
وات ا P "Hا. . . . . . . . . . . . . . "5J
! 1 7ار9ع در "1ارة ا"ك uhزا P? 4ا
?ة م اxmر -إذا آ; Bا:رة )ودة . . . . . Hh
• ? P)Jة م اxmر . . . . . . . . . . . . . . .
• ;uت ?ة م اxmر وا . . . . . . . . . .
• اx1ت اJام ?ة م اxmر . . . . . . . . .
• م اxmر Jhام ?ة م اxmرات . . . . . . .
ا<9ت ?)م ا 8'#واxmر . . . . . . . . . . . . .
• ا<9ت ا)#م . . . . . . . . . . . . . . . . . .
ر! Uا:رة و" اxmرات . . . . . . . . . . . . . .
• Uا"ا! P)J/#اxmر ا. . . . . . . . 7x16
• ا" "! Uا:رة . . . . . . . . . . . . . . .
• ر! Uاxmر و". . . . . . . . . . . . . . . . X
• "آ& إxر ا. . . . . . . . . . . . . . . . . "5
إ"اءات رة ذات 5hر . . . . . . . 9#W
• ')+ات hء ا 5h <hر أ"Sى . . . .
.
.
.
.
.
.
.
.
.
.
.
.
.
.
.
.
.
.
.
.
.
.
.
.
.
.
.
.
.
.
.
.
.
.
.
.
.
.
.
.
.
.
.
.
.
.
.
.
.
.
.
.
.
.
.
.
.
.
.
.
.
.
.
.
.
.
.
.
.
.
.
.
.
.
.
.
.
.
.
.
.
.
.
.
.
.
.
.
.
.
.
.
.
.
.
.
.
.
.
.
.
.
.
.
.
.
.
.
.
.
.
.
.
.
.
.
.
.
.
.
.
.
.
.
.
.
.
.
.
.
.
.
.
.
.
.
.
.
.
.
.
.
.
.
.
.
.
.
.
.
.
.
.
.
.
.
.
.
.
.
.
.
.
.
.
.
.
.
.
.
.
.
.
.
.
.
.
.
.
.
.
.
.
.
.
.
.
.
.
.
.
.
.
.
.
.
.
.
.
.
.
.
.
.
.
.
.
.
.
.
.
.
.
.
.
.
.
.
.
.
.
.
.
.
.
.
.
.
.
.
.
.
.
.
.
.
.
.
.
.
.
.
.
.
.
.
.
.
.
.
.
.
.
.
.
.
٢٦٧..
٢٦٧..
٢٦٨..
٢٦٨..
٢٦٨..
٢٦٩..
٢٧١..
٢٧٤..
٢٧٤..
٢٧٥..
٢٧٦..
٢٧٧..
٢٧٧..
٢٨٠..
٢٨٠..
٢٨١..
٢٦٥
! L
?$أن BI
4ا>F$ت ا'$آ&رة أ=Y
<@ Pه'= ا<رة Wوث أdار "! R+
ا@آ .و$d FR wن ا<رة اة ا Hا49
9ه .4 "?S+
; ا"آ اوي -إذا آ; Bا:رة )ودة Hh
P@ ?$ا<رات ذات !" ا@آ اوي "?S+
<) qFا]رY 6+ت ا]رض( " اbوف
ا:
• Pأن ?&ن !" ا@آ وNEUTRAL 6d
)ا.(DS2Y
• Pأ wوز ا<@ 105 Pآ65) /4
ً.(/Y
• W 9& wود < ا<@.P
٢٦٤
P@ ?$رات !" ا@آ اوي I+ام
&F,رة رة )
6ر 6اY2ت ا]ر 6+ا]رض(.
اIام د @U ! W ،`+ A&
ُ Pدي ذ
إ Hا<رة.
! L
?$أن BI
4ا>F$ت ا'$آ&رة أ=Y
<@ Pه'= ا<رة Wوث أdار R+ا@$ك
و/أو !" ا@آ .و$d FR wن ا<رة اة
ا Hا9 49ه .4 "?S+
ا'" Pأ ا'6م ))L h"? M8Sل
،Lإ¸(.
& ه XHا:رة M8Sرة أ"Sى
وف ا<@P
ا<@ PاqF<$
اY2ت & ا]رض
9& w
د ا<@P
ا&F,$رة
L? :F1Gا'" Pأ ا'6م ،ا Uداً4
اا; Pا#ل 7! +hا6ت وا#xت .ا>
G &uhا"5ق اh #":و وا#xت
"#8ف ? P ) @8ا.<9
ا
,$
اU$ة
ا?"
!" ا@آ اوي
• !" ا@آ وNEUTRAL 6d
)ا(DS2Y
• 105آ Yً
65) /4ا<(
ا@ ا]!< 5
h @<ُ "T
h @<ُ "T
&ا D
; ا"آ اkو - 7uإذا آ; Bا:رة )ودة
Hh
ا أ "9ا$wم )
?&ن اY2ت اBI
ا]رض أو I+ام د @: "T (Pح . h
ا ,Fا&Wة ا P@< &>,$ه'= ا<رة ) Hرة
أى( ه& @ Pا<رة I+ام &F,رة رة 6ر!U
اY2ت ا]ر 6+ا]رض.
!" ا@آ ا]و&
?
: "Tح
: "Tح
h @<ُ "T
&ا D
اIام د @ 6
) Pو&9د اY2ت ا BI
ا]رض( : "Tح U W ، hدي ذ إ H
!" ا@آ .اIام د @ 6
) Pو&9د اY2ت
ا]
ا]رض( ُ
&U ! W ،`+ Aدي ذ
إ Hا<رة.
٢٦٣
;>Qh a4ن ا&:
!>" ا>ء ر ++ 4! ،WاF2ف و&! Hور&9ع
&F,$+رة إ ا2+ ,F
HIة اwزدWم
ا$وري.
; ا"آ اkو - 7uإذا آ; Bا:رة )ودة
Hh
F @ ?$ق س ) DRIVEا,دة( ا<@.P
"! 4?@ qB
$8ا@آ اا د P 6
ا ",ا?$ر أ.ء ا<@ .Pو? W ،م Wوث
?
",ر أ.ء ا&ا 9س ) DRIVEا,دة(،
?$اIام Bح ا@? ", 4ا 52ا]و&
?
® @ AutoStickس أ!" وً.
:F1Gدي اSر "س أ أLء ا:رة
!"¼ 7وف ا ا إ@ P:اkداء وإx
?" ; ا"آ وذ ; 8hا"وس ا)اP? 4
ا وا 8دون ار9ع در ا"ارة .دي هHا
ا"mاء أً إ@ !" رة أ! ? @8اJام !"8
ا"ك.
ا *uا"umو; 7! 7ا — ?":إذا آ; Bا:رة
)ودة Hh
• I< wم Bح ا@? 4اYل أو 6ا]$Wل
ا?>ة.
• إذا k.WاdBIت ا< أآ> 16آ/4
ا< ) 10أ
ل/ا<( اIام Bح ا@?4
ا< "5 ،اB$ح "5 Wا<رة إ
ا "RSا.>$
• اIم Bح ا@? 4ا< ا]راd
ا "$@ 6
@F<$ا 5!*+ q+5$آBءة &!&د.
ا >#اkوAutoStick u
• اIام Bح ا@? ", 4ا 52ا]و&
?
W ،AutoStickد أ س qا]داء ا!D
و 6$ا ",ا?$ر إ س "> .BI
ا#$ل ،ا " "4إذا آن ا ?$$اBWwظ <+
ا .+&$ا " "3أو " "2إذا 3م ا]
BWYظ
<+ا.+&$
• & 6$ا@ارة ا3ا[ة P ،ا,دة Bات &J
<+دورات ا@$ك ا! "! . ,
ا<رة &5+رة اYز
Pا,دة Bات &J
<+دورات @ك ا! ُ . ,إ Fق
س أ أو < رة أ < q$وف
ا@wار أو ا.DF
;Fم ا"
",ا$Wل اwرBع ا3ا[ رW 9ارة ا@$ك و!"
ا@آ9^+ 4! ،اءات ا:
ادة ! 7ان
ا&!B Hات ز
!5ة "! 6d ،ا@آ
و) NEUTRAL 6dا (DS2Yو!3+ 4دة
> UJا@$ك.
ادة ! 7ا"5ق ا#":
Bا<.
Muا+اء
!,}+ 4ف .ً!U
`RS
٢٦٢
! L
إذا آن وزن ا&F,$رة أآ> 1000ر454) "J
آ P ،$@ 2+ (4أن ?&ن 3ودة b+م ا
"
ص +ذي !رة آ>} .>
qن م ا,م '+
?$أن Uدي إ F+ HاBا
" <+وازدد
ا ا'>$ول R8دوا اBا
" و
< ت
أ&Jل ^,ف ا<رة.
6$9ا&YAت ا? +آ
<رة و? P
&$
,+Fا]Yك "A&$+ا&F,$رة .را69
ا^W8ت ا.
85ت ا ah> - &:وأGك ا5رة
@ Pأ &F,رة R+اA&ُ ،$W b
,}+ف q+5
"RSا&!&ف ا BIوإرات
اF2wف ا&9&$دة &F,$+رة $8ن ا< Y
ا.DF
! P@ 3W $8ا&F,$رة &$ت أYك
ر +و> ا<&ن .اIم &$أYك
و
&&F,
"Aرة $2ا.65$
h * 6 :F1Gأو و< أ أGك !?' 7
أGك ا:رة.
< ذو L #ن
< ذو أرL #hن
& — 1ن أ#
— 2ذآ
— 3أرd
H!& — 4
/H!& — 5اF2ف
أ<
/H!& — 6اF2ف
أ$
— 1ا>Fر
q+5
— 2ا&9ع
HI
/H!& — 3اF2ف
أ$
— 4ا
" آ+
— 5أرd
/H!& — 6اF2ف
أ<
q+5
— 7ا<
٢٦١
(Uh) !"H
• & Pز 6ا&زن ا^ + $9رة ا<@P
وا&F,$رة 4 w @+وز اw2$ت ا]ر2+
ا:
.1أ!@ &$W 5ده
&2
" D5ت
ا^Jرات وا@.""$
.2إ $9وزن ا&F,$رة )(GTW
2
.3ل ا&زن ا^&@$ $9ر اوران )(GAWR
2
.4ل وزن <ن @ P8! Pر+
ا&F,$رة اI<$م.
85ت ا - &:اxmرات
• @ wول @&F,
Pرة اIام إJر RA
ا.JW
• &<
>2ت Rdا&اء اJ^ >$را $
ً9ا & 4 "RSو
ض <ر 2$ .
٢٦٠
إ9اءات °Bا^Jرات ،q@A "?S+را69
"ا^Jرات
&2
-ت " ا&اردة "ا>ء
وا.""RS
8إJرات ا&F,$رة 2ف
• @ D,أ ً
<&ت °B Rdا^Jرات !>" اIام ا&F,$رة.
• ا @+دÀ "[wآ" ا^Jر أو و&9د [
H
P@ ">! `+ا&F,$رة 2$ .آt@ B
ا^Jرات ،را" 69ا^Jرات
&2
-ت " ا&اردة
"ا>ء وا.""RS
• ا>ال ا^Jرات ،را" 69ا^Jرات
&2
-ت
" ا&اردة !<" 4ا>ء وا 2$ ""RS
إ9اءات ا>ال ا^Jرات ا "$2 .>$ا>ال
ا^Jرات J}+رات ذات !رة w&$W "$Wت
زدة Wود 2ل ا&زن ا^< $9رة )(GVWR
أو 2ل ا&زن ا^&@$ $9ر اوران ).(GAWR
85ت ا"! - &:ا ا5رة
• b "A&+ 4, 6م اBا
" ارو? <رة b+م
اBا
" اIص &F,$+رة P>< , .ذ $ت
آ> $[Y
qوا$Wل Wوث إ.5I +A
• 3م أداة @? 4ا
" ا&F,$رة "$2أو&
?ً
@&F,
Pرة I+ام اBا
" ا "$2
أو&
?ً&F,
P@ .رة 3ودة b+م ا
"
w+ "$2ع ارو?3 Y ،م اIام أداة
@? 4اBا
" إ?و.
• ُI+ q5ام ا
" ا&F,$رة &F,$رات ا 3
أوزا 454آ 1000) 4ر ،("Jأ` P
اIا
&F,$رات ا 3أوزا 907
آ 2000) 4ر.("J
!"H
• "A&+ 4, wا
" ا&F,$رة P+*+اBا
"
ارو? <رU , .دي ذ إ زدة ا@"$
bم اBا
" ر و ."I `d2و!
+! ,Bا?> qا 9Wإ ?$ $أن <>P
و!&ع اFAام.
• وUدي @ Pأ &F,رة إ زدة ا <$اYز
&!&F,
P@ .Hرة P ،أن < <$+ q$
إ + dر وا<رة ا أ
! W .
Uدي م ا,م '+إ و!&ع اFAام.
H :F1Gآ" أن آ 7zء UWدا Sا5رة أو
? M +8إ@ ا اWع ? @8ا:رة .و'&
أًَ ا?ر ا#ات اS6ر ا" * 7آ7! +
ا> ULأو ا#ات اS6ر ا 7م اآ "hآ+
)ًءا Pإ 7ا اWع ? @8ا:رة .راU
8#" >8ت اxmرات وا" "#8ف ?@8
أ>@ وزن إ"8 7آب وا :ر.
(Uh) ! L
• Y ،4.ل أول 805آP@ ("
500) 4
ا&F,$رة,+ 4, w ،دة <+أ 80آ/4
)/Yً
50ا<( و>+ 4, wء "RSا<رة
$A q 6م اwق "?S+آ
"< .ك ه'ا
ا@$ك وا]39اء ا]ى <رة
اIام ا]$Wل ا.,#
85ت ا&:
ُ>+ q5ع ا^ردات ا ?&ت &$
ا 6وا@آ ر اة :q@A "?S+
! L
• &F,
P@<+ 4, wرة أول 805) "
500آ(4
!د ر اة ?$ .أن Hا@$ك أو
ا&@$ر أو أ39اء أى.
)(Uh
!"H
! Uدي ا<@ Pا q@5إ Wوث 5دم .ا>6
ه'= ا^ردات P@ $ "2ا&F,$رة ! iر
ا^
?ن:
• *آ إ?Wم k>#ا@ "$ا&F,$رة وأ`
@ك Yل ا< ?$ w &$W P@ .إ?Wم
"?S+ >#آ
"@ ! ،ث Wآ <$ة ا@"$
وا ! P25ا<[ Dا@?,B , . 4
ا,رة ا@? 4ا<رة ،و! @ث 5دم.
)(Uh
(Uh) !"H
• @ &$W Pأو @&F,
Pرة"$@+ 4, w ،
ا<رة أو ا&F,$رة "?S+زا[U , .دي ا@"$
ا3ا[ إ ,ان ا<Fة ا<رة أو اBIض
ا]داء أو HاBا
" أو @&ر اوران أو ا@$ك أو
!" ا@آ أو ا,دة أو ا D2أو ه?"
ا `Sأو ا^Jرات.
• و Pدا[ً $اIام "Yا]
ن +ا<رة
وا&F,$رة 4! .دا[ً>#$+ "Y "A&+ $ت ا^Jر
أو ا?ّYب ا P8,+ AIر +ا<رة .ار+
ا<
"?S+ "Yا" @< kن @ Pا&F,$رة
وا+ q$رIء آف ]رآن اF2wف.
• Pم إ,ف ا<رات ا&F,$+ F>$رات
@ر .إ,ف ا<رات ،ا "$2ا
"
ا&! Hرة ا<@ "! 6d .Pا@آ
ا]و&
? <رة ا<@ PوPARK 6d
)ا&! 4! .(Hدا[ً&W 6d&+ $ا 39أو "أود" Y2ت
ا&F,$رة.
• Pم وز ا&زن ا^ $9اS$ك <رة.
)(Uh
٢٥٩
أوزان & ا5رة )6#ت أ>@ وزن 58رة(
& اول ا w2ت أ! 5وزن &F,$رة !"+
<@Y Pل &$ا 6وا@آ اAI
<+ر.
ا ,F$ا]
ا@$ك "!/ا@آ
1.11) 2ً+
ً! 12أ
ر (2+
أو&
? 3.6ات
1.11) 2ً+
ً! 12أ
ر (2+
أو&
? 5.7ات
را 69ا&,ا ا2 @$ف أ! 5ت <@ Pا&F,$رة.
وزن ا5رة و:ن ا&:
! 4دا[ً "$@+ $ا&F,$رة %60 6, @+إ
%65
ا&زن ,ا&F,$رة .وه'ا %10 68إ %15
إ $9وزن ا&F,$رة ! P@ P8ا<رة! .
<> Pا@w&$ت ا 3$اY2ت أو ا@w&$ت
ا] ",.ا&9&$دة اU$ة *ر q9ا&F,$رة hة
P9إ , P>< $
iان ا<Fة
ا<رة وا&F,$رةU .دي م @ "$ا&F,$رات
w&$@+ت ا] ",.ا]
م إ و!&ع &Wادث 5دم
ة &F,$رات.
٢٥٨
إ $9وزن ا&F,$رة ا]!5
454آ 1000) 4ر("J
454آ 1000) 4ر("J
wوز أ! 5وزن <ن ا<@ Pا&9&$د ا5$
أو ! P8ر +ا&F,$رة.
أ! 5وزن <ن ا<@P
45آ 100) 4ر("J
45آ 100) 4ر("J
Pأ' ا A2ا 2+ا>wر <Wب ا&زن
ا&ا!&@
6ر اوران ا:BI
• وزن <ن @ Pا&F,$رة.
• وزن أي &ع iا@Sت أو ا2$ات ا&d&$
أو ا<رة.
• وزن ا<[ Dو 6$9اآب.
]وزان <ن ا<@ Pا?>ة ،و! 3م اIا
ً+ $ء
?& ا<رة وا&F,$رة /ا@ "$وذ &ا 6
D
>Fت 2ل ا&زن ا^&@$ $9ر اوران
).(GAWR
!"H
• ! b ",م ! P8ر& +ز 6ا@ "$ا&>8$ط
q@A "?S+إ
? ا@? 4ا<رة
وا,اره وأداء اBا
" و! <> Pو!&ع
5دم.
• ! & wا Dأ& $bز 6ا@! 6
"$رت اBا
"
ا .2 $را 69ا ا P8, 25$ا+
وا&F,$رة أو وآ" رات ذي 9 2$ة
@&5ل
&2ت إ. d
> & MLر ihا5رة
& اول ا 2ا 5ا5!*+ AI
وزن &F,$رة g gB ?$ت !>8ن ر+
ا&F,$رات @>` و PاIا
` <$ة @
! P8ر +ا&F,$رة ا q@5اb P$وف
ا<@.P
B2ت P8! H5ر +ا&F,$رة
أ>@ & ?L> "#ر ihا5رة
اÂ9
907آ 2000) 4ر("J
ا gBا]و -اIwام اHBI
1587آ 3500) 4ر("J
ا gBا - #اIwام & ا&زن
2268آ 5000) 4ر("J
ا gBا - ##اIwام 6ا]وزان ا?>ة
4540آ 10000) 4ر("J
ا gBاا - 2+اIwام 6ا]وزان ا?>ة R
را9 69ول "أوزان @ Pا&F,$رة )
w2ت أ! 5وزن &F,$رة(" ]! 5وزن إ&F,$ $9رة )Y P@< "+! (GTWل &$ا 6وا@آ ا<+ AIر.
Pآ>8! 6$9 Pن ر +ا&F,$رات ا<رة .q@A "?S+
٢٥٧
#ل ازن ا 7mا"ك )(GCWR
وزن :ن ا(TW) &:
& ا" ihا
2ل ا&زن ا^ $9اS$ك ) (GCWRه& إ$9
ا&زن ا&$<$ح < `+ر وا&F,$رة وز.2ً
$
وزن <ن ا<@ Pه& ا&,ة ا "B] F8آة
! P8ا&+ +ا Fا&F,$رة º> .وزن <ن ا<@P
اُ,
`+ A&$ار 10%إ P8! 15%ا+
ا,ي P .ا>ر ه'= ا&,ة ً39ءا &$Wا<رة.
P8! 4ا +ا@
" وزن <ن @ Pا&F,$رة،
"$2 Wآ*` أ
&9&
2دة آة ! P8ا +أو
F,ر +أى ا<رة .ه'= ا]&اع !>8ن
ا +ه ا]آ ً& #ا]&اق ان وه <Iم
"?S+م @ Pا&F,$رات ذات ا]Wم اR5ة
وا.F&$
#ل ازن ا 7mر اوران )(GAWR
2ل ا&زن ا^&@$ $9ر اوران ) (GAWRه&
أ! 5وزن <&$ح &@
`+ري اوران ا]
وا .BIو& Pز 6ا@ &$ا&@$ر ا]
واٍ<
"?S+ BIو* .آ م وز 2ل ا&زن
ا? &@$ري اوران ) (GAWRا]
أو ا.BI
را "$@" 69ا<رة D5
/دة & D.ا<رة"
"ا>ء وا 3$ ""RSا
&2$ت.
!"H
ا]ه?$+ $ن م وز ا@ ا]!2$ 5ل
ا&زن ا^&@$ $9ر اوران ) (GAWRا]
أو
ا *S , .BIوف !دة Fة Wوز
أي ا&ز ا,$ر ,B , .ا,رة ا@? 4
ا<رة ،و! @ث 5دم.
٢٥٦
ا 5Lاk
ا ,F$ا]
ه أ! 5ارBع أ! 5ض
,$ا&F,$رة.
و1ة اQ 7! *uر aا5رة
?$أن ?&ن وWة ا@?* 4ر q9ا&F,$رة وA
ا ?$آ> P8! ">,<
+ا +و<ن
@ Pا&F,$رة ،وا & اً?Wآ !> >8 Yً+
@+آ ا$ا `$آ> qأ Wآت *ر q9
&ب &F,$رة أ.ء ا<.
إذا آ kا<رة 3ودة &< ،'+ف 2ف وWة ا@?4
ا&F,$رة ا^?و ) (TSCو&9د &F,رة
*ر @9و&,م I+ ً[,ام اBا
" Yت
2و/أو !J ",ا@$ك @$و * ",رq9
ا&F,$رة.
& ر ihز Uا
b "$2م &ز 6ا@'+ DJ "$ل !&ة ر Y 6ل
ا>8,ن ا>3آ .وُ<Iم ه'= ا] 6
$bا]وزان
ا?>ة &ز 6وزن <ن @ Pا&F,$رة @&ر
اوران ا]
<رة ا<@ Pو
@&ر )
@ور( دوران
ا&F,$رة .و اIام ه'= ا] $bو ً9& ,ت
ات ا ً9& & } ،25$و@?ًB+ $ا
"
أآ #ا,اًرا و ً<@ +أ
ن $ا<@.P
وUدي إ dوWة @? 4إ?و ا*ر/q9ا?Wwك
8إ Bا*ر q9اW Åآ ا$ور واح
أ ً
ا <?2و< "?S+ 4إ P@ +ا<رة وا,ار
ا&F,$رةI+ q5ُ .ام وWة ا@?* 4رq9
ا&F,$رة و! P8ر& +ز 6ا@&
) "$از ا@(&$
:F1G
• ?> Lر ?! Pه ! اد <ت "،"5x
أو ?! ،+89 Lن ذ " إ@ أن )Sان اد
.8
• أ5T 8Tء ! ء اد < U: @1ت
" " ."5xهHا ا>ت إ@ أن 5Tء اد
* إu1م 7 .a< uh 8Tء Wء "z
ا ?' 7! 5#أ)+ة اس !? 1 7م "آ&
5Tء اد Q .a< uhآ Pإu1م 8T
ا5ء ? Lا)ود hد.
ر ?م ر5T ihء ! Â#اد
إذا Wد اbم ا< 5ISرة أن Fء @ g>2
ا&!&د @? 4ا^Yق أو آ q@A "?S+ Pأو
4< ،Hض ا "F) "gASCAPء
ا> (3اد ا <$أو 4ض ا
") "Check Gascapا @F tء ا> (3
ض
&2ت ا<[ .(DID) Dإذا Wث ذ،
*F D 4?Wء @ g>2ا&!&د q@A "?S+واRd
زر إدة >dاد ا,^ <$ف ض ا.
إذا ا$ت ا b< ،?S$ا ا$ة ا
ا "RS 4ا<رة.
و! Uدي Fء @ g>2ا&!&د ا I$أو ا$آP
8إ إdءة &dء U
q@A "?S+أو ا Hأ ً
ا .(MIL) "F2راb" 69م ا t@Bا'ا" ا&ارد
" Aا<رة" @&5ل 3ا
&2$ت.
& ا5رة
ه'ا ا Y< q[5 4<,و
&2ت ا&,د
ا
Pا *S+ن أ$ل ا<@ Pا <6F
ا,م <+ +ر P@ ">! .ا&F,$رة ،را 69ه'=
ا
&2$ت <@ Pا@*+ "$آ> !ر ?$اB
وا]
ن.
@Bظ FRا$8ن ،ا> 6ا>F$ت وا^ردات
ه'ا ا" ا<+ ,2$رات اP@< I<$
ا&F,$رات.
; ا"آ اوي -إذا آ; Bا:رة )ودة Hh
P@<+ A&ُ wا&F,$رة I+ام ه'= ا<رة.
9"#ت ا &:ا#
<ك اB2ت ا ا P@<+ AIا&F,$رات
4ا
&2$ت ا:
#ل ازن ا:8 7mرة )(GVWR
2
>2ل ا&زن ا^< $9رة ) (GVWRه&
أ! 5وزن <&$ح < `+رة .و $8ذ وزن
ا<[ Dواآب وا@ &$ووزن <ن ا<@ .Pو Pأw
وز ا@ &$ا? 2ل ا&زن ا^< $9رة
) .(GVWRرا "$@" 69ا<رة D5
/دة &D.
ا<رة" "ا>ء وا 3$ ""RSا
&2$ت.
إ 7وزن ا5رة )(GTW
إ $9وزن ا&F,$رة ) (GTWه& وزن ا&F,$رة
d^+إ وزن ا@ "
?+ &$وا&$اد ا+,
YYك وا2$ات )اا[ $أو ا (!U$ا $@$أو
ا&F,$رة " Wا@ "$وا2wاد .""RS
وا ,Fاُ, + A&$س إ $9وزن ا&F,$رة
) (GTWه و 6dا&F,$رة ا "?S+ $@$آ
"
3ان رات .و Pأن 4ا3$ان وزن ا&F,$رة
."
?+
٢٥٥
@$ك .إذا "#
kbWwه'= اY?S$ت ،ب &ً
iا> ">! 3ا ?BإYAح ا<رة.
(Uh) ! L
• ! <> Pم إYق Fء g>2ا&!&د ً9ا
إdءة "
>5ح Uا."(MIL) "F2
• Bدي ا<?ب ا&!&د و $ا3Iان & wا°d "A
ا> 2+ 3ا
Yء ا3Iان5 .ر &ه
@ ا&!&د &Aت " ،",F,Jأو !} ،Bن ذ
Sإ أن 3ان ا&!&د .µ$
!م 40 3ات ا< 25$رات &Wل
أ@ء اA}+ 42ار &اBAت *S+ +.ن ا> 3ود$
)
#ق ا&!&د اt[5 H2 (WWFC ،$2
ا&!&د ا8ور & ا>2ث R Hbزات وأداء 9
@$آت و
<ر .وُ& Aا ا25$
$2+ل و!&د &
6
D+FاBAت #ق ا&!&د ا$2
).= & (WWFC
إ !Wاد
5Tء ! Â#اد )5Tء ا(P)L
&F 9ء ا>+ H 3ب g>2ا&!&د اP
ا]< ا<رة .اIم إ qB 2ً>Aا>ب .إذا ,
اFRء أو * ،Hآ أن ا 2F,اة $2Y @Aل
'= ا<رة.
5Tء ! Â#اد
5T ! L? :F1Gء ! Â#ادUW ،
ا" iاّ5ل 58ء ! 7ا5Jف اد ?h @8ب
! Â#اد.
! L
• ! b Hم ا&!&د أو bم ا@? 4ا.2>wت
آ Iwام Fء &>] Pب "ء
3ان ا&!&د.
• و! <> Pم إYق Fء g>2ا&!&د ً9ا
&ث bم ا&!&د.
)(Uh
٢٥٤
!"H
• ا
ً+ 6إ2ل ا<[ دا" أو !ب ا<رة
?&ن Fء @ g>2ا&!&د Wً&Bأو أ.ء
g>2ا3Iان.
• H8 wا&!&د ً+إ ا<رة أ.ء دوران
ا@$ك.
• ! @ث °d W DWآ $ا> 3دا"
Wو &9&
,دة دا" ا<رة .و! 5ب
@+وق .دا[ً 6d $ا@و ا]رض .g>2
)
#ق ا&!&د اt[5 H2 (WWFC ،$2
ا&!&د ا8ور & ا>2ث R Hbزات وأداء 9
@$آت و
<ر .وُ& Aا ا25$
I+ام و!&د &
6
D+FاBAت #ق ا&!&د ا$2
).= & (WWFC
d^+إ اIام ٍ 3+ل اAص ذي ر!4
أوآن I+ A&ُ Pام ا> 3ا'ي @&ي
Bb
Aو Aإ,
dو
Àآ" و&
&>.ت ا@$ك .إن اIام ا> 3ا'ي @&ي ه'=
ا A2ا^ ", < dاYك ا&!&د
وا>2ث اRزات و@ jأداء $ز <رة.
! Uدي ا&ت اد 3> gإ Sآ" +&2A "#
+ء ا "RSوا&! Hا µ9B$وا "RSا@$ 6F,$ك.
إذا "#
kbWwه'= اS$آ" ،ب &ً
i
ا> ">! 3ا ?BإYAح ا<رة.
"ك " 5.7 #ات ) ; Uا"آ اوي(
4$5 4ا@$ك 5.7 2ات )
"! 6ا@آ
اوي( @+ا 6$9ا&,ا ا.2>+ ,2$ت
اRزات وً & @+ا Yw ًdك ا&!&د
وأداًء ًdاIام 3+ذي &9دة
اAص 6أد ر! 4أوآن ا>@ ) (RONوه& 91
إ .95
2! >2 wا^2ل ا@
k@ BBIك
d 8BIرة @$ك ر .إ wأن ا 2!Bا2
ا$<$ة ت ا@$ك اU 2دي إ Wوث
أdار @$+ك و A 'gW Pا@$ك ا&Bر.
! Uدي ا&ت اد gا> 3إ Sآ" "#
+ +&2Aء ا "RSوا&! Hا µ9B$وا "RSا6F,$
@$ك .إذا "#
kbWwه'= اY?S$ت ،ب &ً
iا> ">! 3ا ?BإYAح ا<رة.
!م 40 3ات ا< 25$رات &Wل
أ@ء اA}+ 42ار &اBAت *S+ +.ن ا> 3ود$
)
#ق ا&!&د اt[5 H2 (WWFC ،$2
ا&!&د ا8ور & ا>2ث R Hbزات وأداء 9
@$آت و
<ر .وُ& Aا ا25$
I+ام و!&د &
6
D+FاBAت #ق ا&!&د ا$2
).= & (WWFC
d^+إ اIام ٍ 3+ل اAص ذي ر!4
أوآن I+ A&ُ Pام ا> 3ا'ي @&ي
Bb
Aو Aإ,
dو
Àآ" و&
&>.ت ا@$ك .إن اIام ا> 3ا'ي @&ي ه'=
ا A2ا^ ", < dاYك ا&!&د
وا>2ث اRزات و@ jأداء $ز <رة.
! Uدي ا&ت اد 3> gإ Sآ" +&2A "#
+ء ا "RSوا&! Hا µ9B$وا "RSا@$ 6F,$ك.
إذا "#
kbWwه'= اS$آ" ،ب &ً
i
ا> ">! 3ا ?BإYAح ا<رة.
"ك " 6.4 #:hات
4$5 4ا@$ك 6.4 2ات 6$9 D+F @+
&ا[ qا.2>wت و& ًا ً$زا اYك ا&!&د
وأداًء را[ً 2اIام ٍ 3+ل اAص
ا&دة ! 4أوآن ا>@ (RON) 95أو ا]
2! >2 wا^2ل ا@
k@ BBIك
d 8BIرة @$ك ر .إ wأن ا 2!Bا2
ا$<$ة ت ا@$ك اU 2دي إ Wوث
أdار @$+ك و A 'gW Pا@$ك ا&Bر.
! Uدي ا&ت اد gا> 3إ Sآ" "#
+ +&2Aء ا "RSوا&! Hا µ9B$وا "RSا6F,$
٢٥٣
و2ض ض
&2ت ا<[ (DID) Dر
"b) "SERVICE TPM SYSTEMم ا!>
Rdا^Jرات 9@+إ & .(Aف 2ض
4! 8ا R8
ض
&2ت ا<[ (DID) Dأ ً
& 6dاً+ .JSءا دورة ا "RSا4 ،
ض ر ""SERVICE TPM SYSTEM
)bم ا!> Rdا^Jرات 9@+إ w $J (A
&b+ " 9م.
85ت اد
"ك " 3.6 #:hات
4$5 4ه'= ا@$آت @+ا 6$9ا&,ا
ا.2>+ ,2$ت اRزات و & @+ا!ً5دا آ>ًا
اYك ا&!&د وأداًء ً$زا ا$2ل 3+ذي &9دة
اAص 6أد ر! 4أوآن ا>@
) (RONوه& .91
2! >2 wا^2ل ا@
k@ BBIك
d 8BIرة @$ك ر .إ wأن ا 2!Bا2
ا$<$ة ت ا@$ك اU 2دي إ Wوث
أdار @$+ك و A 'gW Pا@$ك ا&Bر.
٢٥٢
! Uدي ا&ت اد gا> 3إ Sآ" "#
+ +&2Aء ا "RSوا&! Hا µ9B$وا "RSا6F,$
@$ك .إذا "#
kbWwه'= اY?S$ت ،ب &ً
iا> ">! 3ا ?BإYAح ا<رة.
!م 40 3ات ا< 25$رات &Wل
أ@ء اA}+ 42ار &اBAت *S+ +.ن ا> 3ود$
)
#ق ا&!&د اt[5 H2 (WWFC ،$2
ا&!&د ا8ور & ا>2ث R Hbزات وأداء 9
@$آت و
<ر .وُ& Aا ا25$
I+ام و!&د &
6
D+FاBAت #ق ا&!&د ا$2
).= & (WWFC
d^+إ اIام 3$
3+وج A+ص ذي ر!4
أوآن I+ A&ُ Pام ا> 3ا'ي @&ي
Bb
Aو Aإ,
dو
Àآ" و&
&>.ت ا@$ك .إن اIام ا> 3ا'ي @&ي ه'=
ا A2ا^ ", < dاYك ا&!&د
وا>2ث اRزات و@ jأداء $ز <رة.
! Uدي ا&ت اد 3> gإ Sآ" +&2A "#
+ء ا "RSوا&! Hا µ9B$وا "RSا@$ 6F,$ك.
إذا "#
kbWwه'= اS$آ" ،ب &ً
i
ا> ">! 3ا ?BإYAح ا<رة.
"ك " 5.7 #ات ) ; Uا"آ اkو(7u
4$5 4ا@$ك 5.7 2ات )
"! 6ا@آ
ا]و&
?( @+ا 6$9ا&,ا ا,2$
.2>+ت اRزات وً & @+ا Yw ًdك
ا&!&د وأداًء ًdاIام 3+ذي &9دة
اAص 6أد ر! 4أوآن ا>@ )(RON
وه& 91إ A&ُ .95ا اI+ 25$ام ر!4
أوآن ا>@ &5@ 95ل أ "8أداء.
2! >2 wا^2ل ا@
k@ BBIك
d 8BIرة @$ك ر .إ wأن ا 2!Bا2
ا$<$ة ت ا@$ك اU 2دي إ Wوث
أdار @$+ك و A 'gW Pا@$ك ا&Bر.
! Uدي ا&ت اد gا> 3إ Sآ" "#
+ +&2Aء ا "RSوا&! Hا µ9B$وا "RSا6F,$
@$ك .إذا "#
kbWwه'= اY?S$ت ،ب &ً
iا> ">! 3ا ?BإYAح ا<رة.
!م 40 3ات ا< 25$رات &Wل
أ@ء اA}+ 42ار &اBAت *S+ +.ن ا> 3ود$
ا&+ BI$ن & 6
HIر ا "Inflate
) "Tire to XXا °Bا^Jر إ .(XX
! 2+ .3دة ا<رة $ة 20د! <+ ,أ 24
آ/Yً
15) /4ا<(&d"
& ،ء @' bم
ا!> Rdا^Jرات )$ "(TPMة k># 4. . 75
Wا^dءة d^+ .إ ذ2 ،ض
ض
&2ت ا<[ (DID) Dر "SERVICE
b) "TPM SYSTEMم ا!> Rdا^Jرات
9@+إ $ (Aة &. {$اٍن ا]!" 2 4.ض
$! wً+ (- -) Jا.R8
"? ><+ .4دورة B$ح ا5 ،"RSر إرة
&Aو&
"&dء @' bم ا!> Rd
ا^Jرات )$ "(TPMة W k># 4. . 75
ا^dءة و2ض ض
&2ت ا<[D
) (DIDر ""SERVICE TPM SYSTEM
)bم ا!> Rdا^Jرات 9@+إ $ (Aة 5
&.اٍن 2 4.ض $! wً+ (- -) Jا.R8
$+ .5د إYAح أو ا>ال إJر ا DFا]A
وإدة آ>` ا<رة wً+ا^Jر ا4 ،R5
@ bم ا!> Rdا^Jرات )(TPMS
أو&
?ً d^+ .إ ذ&d µBF ،ء @' bم
ا!> Rdا^Jرات ) (TPMو2ض اS
ا&
ض
&2ت ا<[$! (DID) D
9 Rdة wً+ا $J (--) JSأ` 9& w
إJر '@ W `FRd BIا R8ا BI$
أي إJرات ا DFا]ر 2+ا3 ! .
I<$م !دة
ا<رة $ة "5إ Sد! <+ ,أ 24
آ/4ا< )/Yً
15ا<( ? b ,م ا!>
Rdا^Jرات ) (TPMSه'= ا
&2$ت.
F; 5#م "ا iWاxmرات ) - (TPMSإذا
آ; Bا:رة )ودة Hh
b "F2 ?$م ا!> Rdا^Jرات ) (TPMSإذا
آ&, kم >+ال &$
6$9ت اY2ت وا^Jرات
ا]ر) 6+إJرات ا&$$+ (DFت Yت وإJرات
&@ wي <2Sات bم ا!> Rdا^Jرات
) ،(TPMSوذ آ $ه& ا@ل آ&$
Pت
Yت وإJرات اSء <+رb "F2 .م ا!>
Rdا^Jرات ) ،(TPMSا>ل أوً&$
wت
اY2ت وا^Jرات ا]ر) 6+إJرات اJ}+ (DFرات
3ودة 2S<$+ات ا!> Rdا^Jرات
) 2+ 4! .(TPMذ,+ ،دة ا<رة $ة 20د!,
<+أ /Yً
15ا< ) 24آ.(/4
5ر bم ا!> Rdا^Jرات ) (TPMSإرة
&Aو&
"&dء @' bم ا!> Rd
ا^Jرات" $ة W k># 4. . 75ا^dءة
و2ض ض
&2ت ا<[ (DID) Dر
"b) "SERVICE TPM SYSTEMم ا!>
Rdا^Jرات 9@+إ 2 4. (Aض J
) 4! wً+ (--اً+ .R8ءا دورة ا "RSا ،
5ر bم ا!> Rdا^Jرات ) (TPMSإرة
&Aأو 2ض ر "SERVICE TPM
b) "SYSTEMم ا!> Rdا^Jرات 9@+إ
(Aض
&2ت ا<[ (DID) Dو?
> ,اJSن )?
(--ن ! 4ا.R8
^دة b "RSم ا!> Rdا^Jرات )،(TPMS
ا>ل &$ت اY2ت وا^Jرات ا]ر) 6+إJرات
اJ}+ (DFرات 3ة 2S<$+ات ا!> Rd
ا^Jرات 2+ 4! .ذ,+ ،دة ا<رة $ة 20د!,
<+أ /Yً
15ا< ) 24آ.(/4
5ر bم ا!> Rdا^Jرات ) (TPMSإرة
&Aو&
"&dء @' bم ا!> Rd
ا^Jرات" $ة H!& 4. . 75ا^dءة،
٢٥١
F; ;< "Hم "ا iWهاء اxmرات
)(TPMS
اآSف b+ *Fم&d
& ،ء @' bم
ا!> Rdا^Jرات )$ (TPMة k># 4. . 75
8اآSف
Wا^dءة5 .ر إرة &Aأ ً
b+ *Fم d^+ .إ ذ2 ،ض ض
&2ت ا<[ (DID) Dر "SERVICE TPM
b) "SYSTEMم ا!> Rdا^Jرات 9@+إ
$ (Aة &. {$اٍن @+أد 2 4.ض J
) $! wً+ (- -ا¿ R8رة إ ا 2S<$ا'ي 4
4ا>,ل إرة `.
Wو Bح ا? ،"RSر ه'ا ا<<"،
ًF2أن *Fاbم 3 wال &ً&9دا .إذا ا Bا"I
b+م H!&< ،و
&dء @' ا!> Rd
ا^Jرات ) (TPMو&! Hض ر
"b) "SERVICE TPM SYSTEMم ا!>
Rdا^Jرات 9@+إ (Aو $! bاR8
wً+ا ?$ .JSأن @ث *Fاbم ]ي
ا]>ب ا:
٢٥٠
.1ا P><+ á&Sا]39ة ا^?و أو ا,دة ,+ب
اÀS$ت ا 5ر {Bاددات ا?Y
ا 5ره <2Sات bم ا!> Rdا^Jرات
).(TPM
ر&
6ا$ار ض ! 4ا .R8وه'ا Sإ
ا$ار ا>,ل ! 4ا2S<
R8ات bم ا!>
Rdا^Jرات )&? w ! ? (TPMن ?
ا<+ q@5رة .و
6ذ "b ،اbم 9Wإ
k $J Aر "SERVICE TPM
b) "SYSTEMم ا!> Rdا^Jرات 9@+إ
2
(Aو.d
.3اآ 4آ$ت آ>ة ا&#ج &Wل اY2ت أو
>ت اY2ت.
ا:رات ا)ودة xhر ا"< 7x1
.2آ Pأ ?Y+ Sا >ع ا]&اق
ا&ا ' وا @&ي &اًدا ! @ Pإرات
ا9&$ت ا.?Y
.4اIام "Yا^Jرات ا<رة.
.5اIام Yت/إJرات 3ودة 2S<$+ات
bم ا!> Rdا^Jرات ).(TPM
2ض ض
&2ت ا<[ (DID) Dر
"b) "SERVICE TPM SYSTEMم ا!>
Rdا^Jرات 9@+إ $ (Aة &. {$اٍن
ا]!" اآSف b+ *Fم + D2آSف *F
& 6dأ Wا2S<$ات .ه'= ا@ > 6ض
ر "b) "SERVICE TPM SYSTEMم
ا!> Rdا^Jرات 9@+إ (Aض
&@ w .1ي ا^Jر ا JWwا2S<
R5
$ا!> Rdا^Jرات ) .(TPMو&, ،+م bم
ا!> Rdا^Jرات )$+ (TPMSا!> ا R8
ا^Jر ا JWwا.R5
.2إذا !+ k$آ Pا^Jر ا JWwا
wً+ R5
إJر BI
`FRd DJا@ اIص '@+
اBIض ا5< ،R8ر إرة &Aو8ء &dء
@' bم ا!> Rdا^Jرات ا$ة ا ا
&,م }+دارة Bح ا "RSإ و 6dا."RS
d^+إ ذ "b ،ا 4اbه
ض
&2ت ا<[2 (DID) Dض ! 4اR8
• و" "ات در ا"ارة ا ?iW @8
اxmر ،و"ا& ;Fم "ا iWاxmرات
) iW (TPMSاxmر ا.78#9
:F1Gو PاS uh *+ص ! :ت
ا U 7! iإxرات ا:رة ً"+zوا9ظ ?@8
ا iا>.+ a
اFLم ا)
?&ن bم ا!> Rdا^Jرات ا&?$ت ا:
<Iم bم ا!> Rdا^Jرات )(TPMS
?&&2S<
6
?w 9ات إ?و آ>
اY2ت ا 2$اا $ا!> <&ت Rd
ا^Jرات ", W .ا2S<$ات ا >#$آ"
آ3ء ا$5م !اءا R8ا^Jر إ وWة
ا>,wل.
• وWة ا>,wل،
• أر2S<
2+ات bم ا!> Rdا^Jرات
(TPMS)،
• ر[" & bم ا!> Rdا^Jرات ا&$
&2
bت ا<[ ،(DID) Dو
• &dء @' bم ا!> Rdا^Jرات )(TPM
"Hات ا iاGS 9JLل "ا iWاxmرات
F; zzم "ا iWاxmر
8ء &dء @' bم ا!> Rd
ا^Jرات ) &$
(TPMأ39ة ا,س
و5ر إرة &AاBIض ا R8
وا Wأو أآ #إJرات ا DFا]ر 2+ا.
I<$
d^+إ ذ2 ،ض ض
&2ت
ا<[ (DID) Dر "Rd) "LOW TIRE
ا^Jرات (BIورً Rd 4! qd& $آ" إJر ذو
&+ b W BI
Rdن & .HIف ُ2ض
8ر ") "Inflate Tire to XXا °Bا^Jر إ
أ ً
(XXض
&2ت ا<[.(DID) D
W Wوث ذ P ،ا&!*+ Hع ?$
و °Bا^Jرات 8BIا) R8ا &+ bن HI
ا Sا&
Sض
&2ت ا<[D
) ((DIDإ ! Rd $ا^Jر ا>رد اُ`+ A&$
<رة ا qd&$ا D5$آ $ه& & qdر
") "Inflate Tire to XXا °Bا^Jر إ $+ .(XXد
ا>,ل اbم &<$ت Rdا^Jرات ا&, ،.@$م
اbم `<B @+أو&
?ً و&2د ا Sا&
ض
&2ت ا<[2 (DID) Dض !4
ا R8اbهة &+ا] Aو&d" µBFء @'
ا!> Rdا^Jرات )3 ! ."(TPMم !دة ا<رة
$ة "5إ Sد! <+ ,أ 24آ/4
ا< )/Yً
15ا<( ? b ,م ا!> Rd
ا^Jرات ) (TPMSه'= ا
&2$ت.
٢٤٩
&d" "RSء @' ا!> Rdا^Jرات" .و!
<>! Pدة ا<رة ارBع Rdا^Jر إ 186
آ&?+ل ) 27ر (2+
A&+ "? "Jو? "b
"&dء @' bم ا!> Rdا^Jرات" W
"#
."RSه'ا ا&d "RS H!& ،H!&$ء @'
bم ا!> Rdا^Jرات )°B 2+ , (TPM
ا^Jرات إ ! Rd $ا^Jر ا>رد اُ`+ A&$
<رة.
٢٤٨
! L
• b <@ 4م ا!> Rdا^Jرات )(TPMS
"$2 @+أ &A "8رة ` &?
6ت
ا^Jرات واY2ت ا]&<
@ 4 .Aت
b Rdم ا!> Rdا^Jرات )(TPMS
و@'ا` و ً 4@ ,ا^Jر ا3$ود ر! .
@ث b 4 "RSم أو 2S<$+ H
اIام 2ات {B+ k< +ا@ 4أو ا&ع أو
ا P>< ! ."?SاY2ت ا&]+ >$اق
Wوث P>< ! .2S<$ HاIام &ا6
<ب ا^Jرات ا&]+ >$اق "F2
<b 2Sم ا!> Rdا^Jرات ).(TPMS
2+اIام &ا< 6ب ا^Jرات ا&]+ >$اق
ُ&@FA+ Aب ا<رة إ ا&آ" ا&, @$م
t@B+و Bا.2S<$
• 2+ا,م t@B+أو Rd >dا^Jر 4! ،دا[ً$
}+دة آF Pء ق ا$5م 6$ .ذ ا+&J
وا]وخ ا&ل إ $Aم ا^Jر ،وه& ا]
ا'ي ! Uدي إ b 2S<
Hم ا!> Rd
ا^Jرات.
:F1G
• وهHا اFLم P? 7L 6إ"اءات ا L#ا#د
xmhر أو <; آ أ; « "H "!h ًL#
?1 Lوث xmh M8ر.
• Jh a>L 6ام ;Fم "ا iWاxmرات
) (TPMSآ#اد س iWاxmر أLء iW iW
اxmر.
• إن ادة ! 7ود إxر uh 9JL iW h
8ظ &:زدة "1ارة اxmر و دي إ@ 5#
اxmر .آ أن ا;9Jض iWاxmر 8آ9ءة
اد و?" اس اxmر ،و " ? @8ارة ?@8
دة ا:رة وإ!.+
• إن ;Fم "ا iWاxmرات )Gًh « (TPMS
? Pا>; اxÅ Lرات ،وإ; : Pو
ا 4:ا916ظ ihاxmرات ا>Jh aام
س iWإxرات د @1إذا * > ا9J;6ض
! iW 7اxmرات إ@ ا:ى اHي @8? #
إWءة Wء F; "Hم "ا iWاxmرات
).(TPM
وا ,Fا&
R + A&$ا! 6ا^Jرات ه
"ا 6J,ا]
" آ $ه& & qdاD>F w ."?S
$او ه'ا 2+ا^Jرات ذات ا =wا&اW
ا Pم ?{ و.2d
در 6.5) k 9در9ت .(&gو 2ذ أ`
اBIض در 9ا@ارة اIر Rd BI ،9ا^Jر.
Pأن ?&ن Rdا^Jر دا[ً Jً&>8
$اًدا إ
Rdا^Jر ا>رد .وُ2ف RdاBخ ا^Jر ا>رد
أ` Rdا^Jر
2+ور Y.ث ت م
!دة ا<رة ا]!" ،أو !د ]!" 1.6آ1) 4
"( 2+ة Y.ث ت P .أ wوز RdاBخ
ا^Jر ا>رد أ! Rd 5اBخ &>Fع اار
ا> ¿Jر .را" 69ا^Jرات
&2
-ت "
"ا>ء وا&5@ ""RSل
&2ت &Wل آ°B B
8
إJرات ا<رة 3 .q@A "?S+داد Rdا^Jر أ ً
! 6دة ا<رة وه'ا ا]
2>Jو P wا,م *+
$ت ' >dا ا R8ا3ا[.
" ا Uاxmرات
;Fم "ا iWهاء اxmرات )(TPMS
@'ر bم ا!> Rdا^Jرات ) (TPMSا<[
D
اBIض Rdا^Jر <ًا ذ إ Rdا^Jر
ا>رد اُ.`+ A&$
Rd HIا^Jرات >ً 2ر 9ا@ارة ,$+ار 1
ر "Jا>& Aا 7) 2+$آ& ?+ل( 12 "? >ً,
@'ر bم ا!> Rdا^Jرات ) (TPMSا<[
D
اBIض Rdأ Wا^Jرات إذا ا Rd BIا^Jر
ا@ اIص '@+اBIض Rdا^Jر ]ي >P
$+ذ *.ات اBIض در 9ا@ارة أو ا,Bان
ا R8 2>Fدا" ا^Jر.
<b $م ا!> Rdا^Jرات @' ا<[
D
اBIض Rdا^Jر & $Jا9ت {Bاbوف ،و
&! Rd "5 W Hا^Jر إ Rdا^Jر ا>رد
اُ `+ A&$أو أ ذ$+ .د إdءة &dء @'
اBIض Rdا^Jر )&dء @' bم ا!> Rd
ا^Jرات] P ،([TPMزدة Rdا^Jر إ
Rdا^Jر ا>رد اُ `+ A&$اµBF W D5$
&dء @' bم ا!> Rdا^Jرات )&, .(TPMم
اbم `<B @+أو&
?ً و&d µBFء @' bم
ا!> Rdا^Jرات )$+ (TPMد ,اbم
R8ا^Jر ا2$ل3 ! .م !دة ا<رة $ة "5إ
Sد! <+ ,أ 24آ/4ا< )15
ً/Yا<( ? b ,م ا!> Rdا^Jرات
) (TPMSه'= ا
&2$ت.
>" ا#$ل&? ! ،ن RdاBwخ ا>رد اُA&$
< `+ر ا&9&$د D5ا^Jر ) H!& 2+ا<رة
]آ 3 #ت( ه& 207آ&?+ل ) 30ر YًJ
ا>& Aا .(2+$إذا آ kدر 9ا@ارة ا F@$ه
68در 20) k 9در (&g
9وآن Rd
ا^Jر ا,$س ه& 27ر YًJا>& Aا186) 2+$
آ&?+ل(U< ،دي اBIض در 9ا@ارة إ 20
در 7-) k 9در9ت (&gإ Rd B
ا^Jر إ 23ر YًJا>& Aا158) 2+$
آ&?+ل( .>ً,و Rdا^Jر ه'ا B? $+ BI
٢٤٧
!"H
! Uدي اIام آY+ت 4Wأو &ع HI
) M+Sأو + (Snowا&@$ر ا]
وا&@$ر
ا BIإ Wوث إ9اء &! .6ا ?$$أن ,B
ا<Fة ا<رة &!& d2 $ع 5دم.
! L
Bدي Wوث أdار <ر أو إJرا
Pاة
اJWwت ا:
• ًbا &Iص ا@$ود ز ا +ا^Jرات
وأ39اء ا D2ا]ى ،ا8وري اIام
أ39ة 9 9ة 39] .,ة ا ?$ Bأن Uدي
إ إ@ق أdار <+ $<9رة .أو! Hا<رة
&ًرا إذا S ً&A k2$إ اF,ع 9ز ا.
و tIا]39اء ا9 Bز ا !>"
اIا
` ة ..
• !+ 4آ Pاز 5!*+إ?Wم 4. ?$أ 4?WرF+
ًدا ! 2+دة ا<رة 0.8) "
H5 <$آ(4
.>ً,
)(Uh
٢٤٦
(Uh) ! L
• wوز 48آ/Yً
30) /4ا<(.
• آ ً'Wرا ا,دة و PاF2wف ا Sوا@B
ا?>ة "$@ Aا<رة.
• ,+ 4, wدة ا<رة Bة 9 DJ &Jف.
•
+ wاة $2ت ا ا 25$ز ا
,J 2$اآ Pوا< ا@$دة ووف
اIwام .اIم دا[ً $ا "RSا W,
ا ا 25$ز إذا آ kأ!" 48آ/4
)/Yً
30ا<(.
• I< wم أ39ة ا 6إJر ا.RA JW
<ت ? " Pا Uاxmرات
"$2ا^Jرات @&ر اوران ا]
واBI
<رة @ kأوزان BIو&,م *+د و[BI
H
& `9ا<رة و!د وإ . ,و'= ا]>ب} ،
> w2$+ت <و.
و ", ?$ا.U$ات &
R+ا! 6ا^Jرات +
ة وأى .و& >2ا[ &
Rا! 6ا^Jرات ً&$
ًAا^Jرات ذات ا$ات ا ,$2آ ا
< "$2ا^Jرات ا "?+ AIا&5Bل&
R .ا!6
ا^Jرات
$ 3ات ا^Jر و<ه
& @ٍ Pل ا Fوا Å#وا F$و<ه 4
& !دة @ وهد[.
را" 69آ Pا Iوا$8ن" 2ف ات
ا 5ا .@@5و q@5 Pأي U *Fدي إ H
6أو ادي ¿Jرات !>" ا,م R+
&ا!.2
4W FIا^Jرات ا&9&$د ا
&2
" 4<,ت أ
ن
ا^Jر" ه'ا ا" 2ف ا 3$ا
&2$ت
ا HA tIا@ "$ور
3ا< ¿Jر.
ُ&>+ Aال ا^Jر ا]
أو ا^Jر اBI
آ3و&? ! W .9ن >wال إJر واً> .* W
ا@? 4ا<رة .إذا !>+ k$ال * ،آ
&
D+FاBAت ا&
6
2اBAت اY2ت ا].A
ُ&5w+ Aل &+آ" ا^Jرات أو وآ" ا2$ات
ا] Aا +9¿ $2$أي أ&W gل
&اBAت أو !رات ا^Jرات .U .م اIام
إJرات &<
g ?
+ت ا< Yوا&`9
و!دة ا<رة.
!"H
• "$2< wإJرات أو Yت ذات 4Wأو در9ت
$ HI 4,ه& &&Aف IYام ر.
U ,دي اIام &ت &ا
D
ا^Jرات أو اY2ت إ {,
RاD2
و t[5ا]داء R B< $ات &`9
ا<رة وا<Fة وأداء اBا
" .ه'ا ! <>P
Rات & `9ا<رة و< 9أ39اء
ا,دة وا .D2و
ا ?$$أن ,Bا<Fة
ا<رة وأن 2ض @دث Uدي إ إ+Aت
Fة أو ا& ة .ا , "$2ا^Jرات واY2ت
W]+م و
w2ت ا@ "$ا &ا D
اIا
<ر.
• I< wم إًJرا ذي RA "$W "
2أو !رة
RAة YI+ف ا^Jر ا] Aا3$ود 6ا<رة.
Uدي اIام إJر ذي RA "$W "
2إ زدة
"$Wا^Jر و .`Bا ?$$أن ,Bا<Fة
ا<رة &!& d2 $ع 5دم.
• إن م 3و ا<رة J}+رات ذات !رة > 6
ا< ?$أن Uدي إ 3$ق J¿ µ9Bر
و ,ان ا<Fة ا<رة.
! L
ا>ال ا^Jرات ا]J}+ Aرات ذات أWم BI
! <>! Pاءة 2 gJاد ا< واد ا. <$
Gاxmرات )أ)+ة ا(&:
Aآ ً ا^Jر
PFاIام أ39ة ا<@ً & P
إ ا?" .ا> 6ه'= ا&Aت W Pوث ا.H
• Pأن 9 4W Pز ا 4W 6ا^Jر آ$
أو kAا ا 25$ز ا<@.P
• !+ 4آ Pا^Jرات ا., BI
• ًbا &Iص ا@$ود ،اIم "Yا@
Å#ودة
ا@ 4أو أ39ة ا 2 6ض @+ 4
6أ!5
Hو 6dا^Jر ا^Jرات P235/
.55R18 99V
٢٤٥
"zات M8اات
إن ه'= اU$ات & &dا^Jرات ا] A
ا<رة @ <$ا&! kا'ي Pا>ال
ا^Jر `.
Uات +ا$ات P ،ا>ال ا^Jر .را69
"ا>ال ا^Jرات" ه'ا ا&5@ 4<,ل
3
ا
&2$ت.
?" اxmر
$ $2ا^Jر &ا
" & و "$Sذ
>" ا#$ل wا@:5
• أ&ب ا,دة.
• Rdا^Jرات ?$ -أن Uدي RdاBwخ ا>رد
ا >$إ <
Hو ات ا^Jر.
U $دي إ $ ",ا^Jر وا@ 9إ >`
و!.?>
k
—1إJر +ل
—2إJر 9
ه'= اU$ات @&Bرة أ3W "Bوز ا$ات.
و "? bأ D$ "5 Jا$اس إ 2
+ .(A&+ 1/16) 4ا$ات وا&&Aل إ
٢٤٤
• < ا,دة.
• إJرات ا]داء ،ا^Jرات ذات 4,ا< ا] V
أو أ ،وإJرات ا
$ ،H5ات @ود
&5+رة &$ذS+ A&ُ .9ة +و ه'= ا^Jرات
P<Wه& & qdآ Pا$8ن وا5
<رة.
!"H
Pا>ال ا^Jرات وا^Jرات ا 2+ JWw
أ&ام R+ ،ا $ bا$ات .وUدي م
ا>ع ه'ا ا@' إ Wوث J^+ µ9B
"Fر .و
ا ?$$أن ,Bا<Fة ا<رة وأن 2ض
@دث Uدي إ إ+Aت Fة أو ا& ة.
اJ^+ jBWرات ا$آ> ?ن +رد و9ف 6
أ!" !ر ?$ا&8 2ء $@+ 4! .ا^Jرات
ا5wل 6ا k3وا 4@Sوا>.3
اال اxmرات
& ا^Jرات ا3$ودة +ر اة &از ذات
3$ات ة .و 5@ Pات #ً@+ $b
+ Hو Rd q@5اBخ ا^Jر ا>رد .و&A
ا اS+ 25$ة I+ام إJرات ذات &9دة وأداء
J¿ +Sرات ا]3 Aم ا>ا .را69
ا,Bة &Wل "
Uات Hا$ات ".راD5
69
&2ت ا^Jر وا@ "$أو D5دة & D.ا<رة
2$ا@ 4ا@$د ¿Jر HA 9& .ا@ "$ور
3
ا< ¿Jر 9ار ا^Jر ا] .Aرا#
69ل
Pا>ال ا^Jر ا JWwا k!U$ذو ا@ 4ا?
".
وًbا ]` ".$ wا^Jر ا]>+ 4, ،Aال )أو
إYAح( ا^Jر ا] Aوإدة آ>` ا<رة
أول .A
اxmر ا 7x16ود اJ6ام — إذا آ; Bا:رة
)ودة Hh
ُ<Iم ا^Jر ا@
JWwود اIwام wWت
ا&Fارئ ., !U
B5+و 3$ 4ه'ا ا^Jر D5$+
&&9د 2+ا^Jر ا@
JWwود اIwام.
و@&ي ه'ا ا D5$ا&,د ا,+ ,2$دة ><+
'ا ا^Jر ا> ! .JWwو ه'ا ا^Jر "#ا^Jر
ا] Aا3$ود @&ر اوران ا]
أو اBI
<رة و?` { ه& .U .آ Pه'ا ا^Jر اJWw
@ود اIwام إ
? ا@? 4ا<رة .وًbا
]` ".$ wا^Jر ا]>+ 4, ،Aال )أو إYAح(
ا^Jر ا] Aوإدة آ>` ا<رة أول .A
!"H
4$5 4 ! Wا^Jرات ا@
JWwودة
اIwام IYام ا@wت اFر[ !U
B5+
.U .,آ Pه'ا ا^Jر ا@
JWwود
اIwام إ
? ا@? 4ا<رة .أ.ء آP
ه'ا ا^Jر , w ،ا<رة <+وز ا<ت
ا,$رة Y2ت ا^Jرات ا@
JWwودة
اIwام .ا °B+ jBWا^Jر <&ى RdاBخ
ا^Jر ا>رد ا'$آ&ر
&2
D5ت ا^Jر
وا@ "$ا&$2د ا + "ABا&ا ' )ب( 9
ا<[ Dأو ا@ ا> BIب ا<[ .Dا>ل )أو
أ (qAا^Jر ا] Aأول Aوأ آ>`
ا<رةU .دي م ا,م '+إ ,ان ا<Fة
ا<رة.
دوران اxmر اU":
+ 4, wو Yت ا<رة <+أ /Yً
30
ا< ) 48آ (/4أو $ة أ&Jل "?S+ . 30
< $دون &! Hإذا آ kا<رة ,ا Fأو
ا
" أو ا.
را @" 69رة P " ",أن `2B
ا@wت اFر[" @&5ل 3ا
&2$ت.
!"H
إدارة ا^Jرات ?$ <+أن ًF "?Sا آ>ًا.
?$ Wأن Uدي ا&,ة ا $9ا<ت ا2
Y2ت إ إYف @&ر اوران وا^Jرات أو
Wوث " .و! Bا^Jر و<> Pا^tIS +A
+ 4, w .و Yت ا<رة <+أآ> 48
آ (/Yً
30) /4أو ]آ. 30 #
&ا&? Aن ً ,و wك أي ,+ tIب
ا 2وه أً آ kا<.
٢٤٣
اxmرات ا - x16إذا آ; Bا:رة )ودة Hh
:8 :Lh :F1Gرات ا)ودة #hة م اxmر
P 6ًhاxmر ا @"ُ ،7x16ا"ع إ@ "?ة م
اxmر" ! &' " 7أن 7! 8#9ا6ت ا5ر"4
>8ل ? P ) @8ا8#ت.
! L
وًbا &Iص ا<+ $ w ،BI$رة Yل
<Rرات أو&
? أ.ء آ Pا^Jر
ا JWwا k!U$ا R5أو اIص Iw+ام
ا@$ود2 , .ض ا<رة .H
اxmر ا h5 7x16اxmرات ا1 P 8<k
اxmر وا — 8'#إذا آ; Bا:رة )ودة Hh
! ?&ن ر 3ودة J}+ر ا JWو اJW
`>Sا "?Sوا&J¿ Bر وا2$+ 2ة ا]A
وا&9&$د ا&@$ر ا]
أو ا<+ BIر .و! 4
اIام ه'ا ا^Jر ا&
R $ JWwا!6
ا^Jرات .إذا آ kا<رة 3ودة '+ا اIر ،ا69
وآ" ا^Jرات ا2 $2$ف &
R $ا!6
ا^Jرات اُ.`+ A&$
٢٤٢
اxmر ا 7x16ا>" — إذا آ; Bا:رة )ودة
Hh
4$5 4ا^Jر ا JWwاIY R5ام
ا@wت اFر[ 2
?$ ., !U
B5+إذا
آ kا<رة 3ودة J}+ر ا&R8
JWط b+إ
و HAا^Jر ا JWwا&9&$د
&2
D5$+ت
ا^Jر وا@ "$ا&9&$د + @B+ب ا<[ Dأو اار
ا> ¿Jر> W .أ &اBAت ا^Jر اJWw
ا&R8$ط @+ف " "Tأو " Y D>< "Sا@#
.4ل:
.T145/80D18 103M
!"H
4$5 4 ! Wا^Jرات ا JWwاR5ة
IYام ا@wت اFر[ ., !U
B5+و
آ Pه'= ا^Jرات ا , w JWwا<رة <+
80 3آ/4ا< )/Y
50ا<( .إن
ا^Jرات ا JWwا
$ !U$ات @ود.
+ا$ات وا&&Aل إ Uات +
ا$ات P ،ا>ال ا^Jر ا JWwاt5I$
IYام ا .k!U$اWص اة ا@'ات ا
D>Fا^Jر ا .JWwوإن م ا,م '+
?$أن Uدي إ "Fا^Jر ا JWwو ,ان
ا<Fة ا<رة.
و Wإن ا $2ا' 6!&$ا ا^Jر !q5 P ،5
)أو >"( ا^Jر ا] Aوإدة آ>` <+رة
أ!ب و!.?$
k
اxmر ا 7x16ذو ا'* ا — uإذا آ; Bا:رة
)ودة Hh
و wآ 2 ًY Pأو إًJرا أ ًAا^Jر
5
ا JWwا R5وذ ]ن اً 5 $$5
2
¿Jر ا JWwا+ 4, w .R5آ Pأآ #إJر
و اRA JWة واWة ا<رة ا&!k
.`<B
4$5 4ا^Jر ا JWwا R5ذو ا@ 4ا?
"
IYام ا@wت اFر[ > ! ., !U
B5+و
ه'ا ا^Jر "#ا^Jر ا] Aا3$ود @&ر
اوران ا]
أو ا< BIرة و?` { ه& .إن ه'=
ا^Jرات ا&? ! JWwن
$ات @ود.
+ا$ات وا&&Aل إ Uات +ا$ات،
= S ،TإJر اk!U
JW
آ kاFق FRة +أو ا2 .Å#ف 3
ا
&2$ت ،ا&+ "5آ" ا.$2$
$8إJرات ا 4$5 H5إJرات 6$9
ا&5Bل أو ر
3ا>"/ا!! ا #اار ا>
¿Jر .اIم إJرات ا&$
H5ت أر2+
إJرات .U w Wذ ?<ً أ
ن ا<رة
وإ
? ا.2
"
2
!"H
I< wم إJرات ا H5وف ا/ا, .Å#
,Bا@? 4ا<رة W P>< $وث إ+A
8ا,دة <+آ>ة
Fة أو ا& ة .آ *S $أ ً
bوف 2ا$Wل ,ان ا@? 4ا<رة.
إxرات ا'8
DJ
2+ PFا>Yد اIام إJرات ا أ.ء
اSء ?$ .ا2ف إJرات ا Yل ر
3
"ا>"/ا!! ا "#اار ا> ¿Jر.
إذا د kا@ 9إ اIام
$
ا،
إJرات
ا8وري ار إJرات
? gا@ 4وا&ع
¿Jرات ا] .AاIم
إJرات ا&$
Å#ت
أر 2+إJرات w W
.Uذ ?<ً أ
ن
ا<رة وإ
? ا.2
"
2
^Jرات ا w2ت أ!" اAI
J^+رات ا] Aو P wاIا
$<
"?S+
ت أآ> /Yً
75ا< ) 120آ.(/4
< ><+ت أ /Yً
75ا< ) 120آ/4
( ،را 69ا2$ات ا] Aأو وآ" إJرات $2
2ف ت ا "RSا
اُ+ A&$
وا@ "$و
<&ت °Bا^Jرات ا>ردة.
ا 4أن ا^Jرات ا3$ودة
<@ <$+
ا]داء ا Å#وا,رة اw3wق وا
ا]رض ا >$وا &? ! ،ن أ qFا!Fت أ&أ
ا] qFاJ¿ >$رات ا3$ودة b@ .
<$+
2+اول ا^Jرات ا3$ودة <$+و' P
ا@ D,ا&,ا ا ">! @$اIام ه'= ا^Jرات.
ا ?"! Lاغ ا+اء Pاxmرات – إذا آ;B
ا:رة )ودة Hh
qا "RSاغ ا&اء ا^Jرات إ
?
ا,دة 80) Yً
50 <$آ 2+ (4ا ,Bا<R8 6
اBwخS .ر 'ا ا ,Bا< R8 6اBwخ 6d&+
ا "RSاغ ا&اء ا^Jرات@ .ث و6d
ا "RSاغ ا&اء ا^Jرات ?&ن Rd
اBخ ا^Jرات 14ر 96) 2+
A&+ "? YًJآ&
?+ل( أو أ!" ذ$+ .د أن "5ا "RS
اغ ا&اء ا^Jرات إ و 6dا "RSاغ
ا&اء ا^Jرات&? ،ن إ
?ت !دة @ودة
و@ج إ ا>ال ا^Jرات ا&Bر .ا^Jر ا'ي
"$2ا` ا&اء ?&ن !YA¿ Yً+ح.
,+ A&ُ wدة رة @ 2 "
?+ $أو P@<+
&F,رة أ.ء ا&ا 9و 6dا "RSاغ ا&اء
ا^Jرات.
را
" 4<! 69ا!> Rdا^Jرات" 2ف 3
ا
&2$ت.
٢٤١
<رات ا2 $2$ف ت ا "RSا
اُ + A&$وا@ "$و
<&ت °Bا^Jرات ا>ردة.
!"H
ا! FIدة رة @<+ &$W 5!*+ $
& .زن ا8$ف إJرات ر ?$أن
<> .B Pو! 2ض @دث 5دم F
',+ 4, w .دة رة @ $إ أ! 2 5
<+ت &ا Aأ 120آ75) /4
ً.(/Y
اxmرات ذات ا5ت ا"5
!"H
إن اIام إJرات F+ت ! 6
FإJرات اد
Uدي إ ",وب ر @آ ا,دة! .
<> Pم ا,wار ه'ا و!&ع Wدث .اIم
دا[ً $ا^Jرات ذات اFت ا&$
F,ت
أر 6+إJرات .وI< wم 2أً+ا إJرات &ع
.i
٢٤٠
إ<Gح اxmرات
أ;اع اxmرات
إذا أ q>Aا^Jر ً 4 , ،Bإ W `WYAا& ء
2$+ا:
إxرات Uا>9ل — إذا آ; Bا:رة )ودة Hh
• ! 4 4دة ا<رة وا^Jر رغ ا&اء.
• ا&9&
Hد 39 ,ء ا$ات ا^Jر )w
?$إYAح ا Hا@دث +ار ا> ¿Jر(.
• ا 4 P,#وز ر.(4
6) A&+ 6+
ا Sوآ" ا^Jرات ا2 $2$ف إWYAت
ا^Jرات وا
&2$ت ا^. d
Pا>ال ا^Jرات ا Bا RS 4ا
ا&اء أو ا^Jرات ا B$ا&اء ا
k
t,اً& R8را J}+رات "$2ا ا&اء
{Bا@ 4وو HAا HA) Iا@ "$ور
3
ا<(.
& إJرات 6$9ا&5Bل ا 6$9ا&5Bل
)ا 6+وا H5وا HIواSء(& ! .ع <&ت
ا +إJرات 6$9ا&5Bل ا ?$ .BI$ا2ف
إJرات 6$9ا&5Bل Yل M+S 4$5أو
M&Sأو M/Sأو MSاار ا> ¿Jر.
اIم إJرات 6$9ا&5Bل &$ت أر2+
إJرات .U w Wذ ?<ً أ
ن ا<رة
وإ
? ا.2
"
2
إxرات ا> Mأو ا>9ل ا — Gwإذا آ; Bا:رة
)ودة Hh
& إJرات ا H5ا آ" اbوف ا>J
وا ،و<, 55I
kدة ا Å#أو ا .إذا
آ kا<رة 3ودة J}+رات ا R> ،H5ا =>wإ
أن ه'= ا^Jرات <, $$5
kدة اSء أو
وف ا,دة ا {,Fا>رد+ 4! .آ PإJرات
اSء ر ?&ن در9ت Wارة اF@$
أ!" 5در9ت 40) &gدر (k 9أو إذا
ا"ا L? 1ا"آب وا"ار ا:رة
<ه 4اBwخ اJ¿ P$رات & رآ&ب .q
و<> Pزدة اBwخ ارً gً9B
9ورآ&ً.q
+
iWا+اء ! 7اxmرات
Rd qd& 4اBخ ا^Jر ا>رد ا&$2د "ب"
ا + "ABا&ا ' ا&9&$د Wا<[ Dأو ا@
ا> BIب ا<[.D
ة ا Sا]!":
• @ Rd D,ا^Jر واI+ `F>dام ,س
ا&دة ا&ع ا> @ D,ا$2 w .R8
ا&<
@ bى اBwخ ا> ! .P$و
ا^Jرات W q@A "?S+ IBإذا آ k
"?S+ IBآف.
• ا @ tا^Jرات #ً@+و&9د دÀ "[wآ"
ا^Jر أو .[
H
! L
2+ا,م t@B+أو Rd >dا^Jر 4! ،دا[ً}+ $دة
آF Pء ق ا$5مU .دي ذ إ 6
ا +&Jوا]وخ ا&ل إ أ>&ب ا$5م$
،
! Uدي إ .`B
Rd 4! "#$اBwخ ا@$دة اRd" D5$
اBخ ا^Jر ا>رد" .و2ف RdاBwخ ا>رد `*+
Rdا^Jر 2+ا&!! Hدة ا<رة Y#ث ت
ا]!" أو !د <$أ!" 1.6آ2+ ("
1) 4
ة Y.ث ت ا&! P .Hأ wوز Rd
اBخ ا^Jر ا>رد أ! Rd 5اBخ &>Fع
اار ا> ¿Jر.
ا @&<
tت Rdا^Jرات ات أ! 5إذا
آن ا^Jر dر9ت Wارة رR
9ة "?S+
آ> &Rd R Wط ا^Jرات R 6در9ت
ا@ارة.
Rd Rا^Jر &Wا 7آ& ?+ل ) 1ر"? YًJ
R "? (2+
A&+در 9ا@ارة ,ار= 7
در9ت 12) &gدر' P .(k 9آ
ه'ا ا]
ا,م Rd t@B+إJر ا<رة +ا"
"5 AاSء.
اi$ب ً &5
#ل :إذا آ kدرW 9ارة اi$ب = 20در&g
9
) (k 68ودر 9ا@ارة اIر&g
BA = 9
) P ،(k 32زدة RdاBخ ا^Jر ا>رد
,$+ار 21آ& ?+ل ) 3أرJل ?" (2+
A&+
وه& <وي 7آ& ?+ل ) 1رA&+ "? YًJ
7 "? (2+در9ت 12) &gدر(k 9
6
Pدر 9ا@ارة اIر.9
و! 3داد Rdا^Jر 2إ 6أرJل ?" A&+
13) 2+إ 40آ& ?+ل( أ.ء اIwام4, w .
",+ه'ا اwزدد ا] 2>Fن Rdا^Jر q>5
!ًً9 Yا.
iWاxmر ? ?":h 8
q5ا ا,+ 25$دة ا<رة $ <+وP<W
ا&,ا ا .
3$و
< q$اbوف أو !&ا @
ا< ,+دة ا<رة Rd "2 >2 <+
ا&اء ا^Jرات أ
ًا ً3 ! .$م زدة Rd
ا^Jر و &$W Bا<رة "RSا<رة <+ت
.را 69وآ" ا^Jرات أو وآ" ا2$ات ا]A
٢٣٩
!"H
إن و ",. 6dأآ> اYزم ا^Jرات >2أ
ًا
ًFا P>< , .زدة ا@ &$ا@ ا,$ر
Wوث J^+ ?Sر أو ا* .ا 6
"
2ا<رة
أو زدة ا <$اYز
^,ف ا<رة .اIم
إJرات ذات !رة @< + A&
ُ "$ر .وw
@ $أآ! #ر أً+ا.
اxmرات 8# -ت ?
iWاxmر
Rd >2ا&اء اJ^ P$را ًً9 $ا &
4 "RSو
ض <ر .وهك أر 2+أ
&ر أ
* R8+ .ه&اء ا^Jرات ا q@5وه آ: $
• Yا<رة وا,اره
• اYwك
• Hا$ات
• اا Wاآ&ب
٢٣٨
اG:
!"H
• °Bا^Jرات &5+رة ًF >2 @@Aا
و ?$أن Uدي إ و!&ع &Wادث.
• ! Rdا&اء ا^Jر $ 3د ا^Jر و!
Uدي إ زدة `&Iو.`B
• ",زدة Rdا&اء ا^Jر ! +ا^Jر
HBIا
5ت .و! <> Pا]ء وا@B
ا&9&$دة ا Bً DFا^Jر.
• ! .Uا^Jرات ذات <&ت اBwخ ا3ا[ة أو
ا 8BI$إ
? ا@? 4ا<رة و! H
*ة Uد إ ,ان ا<Fة ا<رة.
• م <وي ا R8ا^Jرات ?$أن <>P
Sآ" & `9ا,دة .و,B ! +
ا<Fة ا<رة.
• ! <> PاYف Rdه&اء ا^Jرات +أW
>9ا<رة وا Pا ا@اف ا<رة إ
ا $أو ا<ر.
• اWص !دة ا<رة دا[ً&? $ن آ" إJر
IًBإ RdاBخ ا^Jر ا>رد.
.Uآ" اBwخ ا BI$وا3ا[ ا,ار
ا<رة و
ا ?$$أن & ً&2را >+ء ا +wأو
.
:F1G
• Puأن دي Wط اxmرات "Tا:و P
أ 7; 1ا:رة إ@ ا;"اف ا:رة إ@ اP
وا:ر !'Qة و?م ا"5:ة ? 8'? @8ادة.
• Puأن دي Wط اxmرات "Tا:و إ@
ا;"اف ا:رة إ@ ا Pوا:ر.
" zاG+6ك
ُ 3اBIض <&ى اBخ ا^Jر ,و
ا^Jر
وران U $دي إ زدة اYك ا&!&د.
M8اات
! <> Rd PاBwخ ا>رد ا H q@5
دي ¼$ط و
$ ",ات ا^JرU $
،دي إ
ا@ 9إ ا>ال ا^Jر >?ًا.
٢٣٧
ا
P wأن وز أ! &$W 5ا<رة !رة
ا@J^ &$رات ر .و وز 2ا@&$
¿Jر إذا اb+ k
3وف ا@ "$و 4Wا^Jر وRd
اBwخ ا>رد ا@$د
&2
" D5ت ا^Jر
وا@ ""$و !< "$@" 4ا<رة" $dه'ا ا".
"¼ 7! :F1Gوف ا:رة 1 @>Qh
' &' 6 ،+وز 7#ازن ا 7mري
اوران ا 7kوا P ) .798Jا8#ت 1ل
#ل ازن ا 7mر اوران و ا:رة
و& ا5رة ،را " *: Uا:رة" ! 7هHا
ا.*:
@ وف ا@ "$ا&5,ى <رة ،ا> @+رة
"The combined weight of occupants and
cargo should never exceed XXX lbs or
&$
) "XXX kgع أوزان اآب وا@w&$ت Pأw
وز XXXآ 4أو XXXر
&2
D5
("Jت
ا^Jر وا@ P ."$أ wوز ا&زن ا^$9
٢٣٦
آب وا@/&$ا]
2و<ن @ Pا&F,$رة )إذا
و (9ا&زن اS$ر إ` ا.D5$
5Sات ا ا @>kا>8 a
.1ا> @+رة "The combined weight of
occupants and cargo should never
&$
) "exceed XXX lbs or XXX kgع أوزان
اآب وا@w&$ت Pأ wوز XXXآ 4أو
XXXر D5
("Jر.
W .2د &$ع أوزان ا<[ Dواآب ا' آ>&ن
ر.
.3اJح &$ع أوزان ا<[ Dواآب XXX
آ 4أو XXXر."J
.4ا! 4ا< Åوي ا,$ار ا$ح ا@&$
وا@ P[,ا "> ., ?$ا#$ل ،إذا آk
ا@2 "XXX" &$دل 635آ 1400) 4ر("J
?&ن هك <$رآب وز 68 4آ 150) 4ر(YًJ
ر ،وا,$ار ا$ح ا@ &$وا@ P[,ا
, ?$ه& 295آ 650) 4ر68 × 5 W) (YًJ
آ 150) 4ر 340 = (YًJآ 750) 4ر ،("Jو635
آ 1400) 4ر 340 - ("Jآ 750) 4ر295 = ("J
آ 650] 4ر.([YًJ
W .5د &$ع أوزان ا@ P[,وا@ &$ا 4
@ $ر P .أ2 wى ذ ا&زن ", 2
ا@ &$وا@ P[,ا +<W 4ا&FIة ر!.4 4
:F1G
• إذا آ; Bر 5 &:رة! ،ن أ1ل
ا5رة Lإ@ ر"# .ض ا'ول ا7
أ @8? 8wآ:1 9ب إ 7ا وا#k
ورة ا:8 &:رة ! ¼ 7أوWع ?8 98J
و?kاد ا"آب وأ .*+'1هHا ا'ول "Tkاض
i! Wو u 6ن دً ! #:h 8#
ا? وا ! 7ر.
• '& أ' 6وز ازن ا"8 7mآب وا !7
هHا اwل 392آ'* ) 865ر.(x
8# >8ت اxmر وا
1وWط اxmرات
8# >8 Uت اxmر وا
iW aW * :F1Gا;9خ اxmر ارد ?@8
ا#د "ب" ا Ph <9اLا! Hاد ; 1ا4:
أو ? @8ا! ا 98Jب ا.4:
wل >8 Uاxmر )ا#د ا Ph <9اLا!) Hب((
8# >8ت اxmر وا
F2ه'ا ا
&2
D5$ت ه
&Wل:
.1د ا]Iص ا $W ?$ا<رة.
wل >8 Uاxmر )اب(
.2ا&زن ا^ $9ا'ي ?$أن @ `$ا<رة.
4W .3ا^Jر ا< 4$5$رة.
°B Rd 4! .4ا^Jرات ا>ردة ا]
واBI
وا^Jرات ا.JWw
٢٣٥
ا>85ت اxmh 8#رات وا9"#ت
ا>a85
ا#د ا Ph <9اLا!) Hب(
iWا;9خ اxmر ارد
أ>@ iWا;9خ
iWا;9خ اxmر ارد اُ<@ h
>8اxmر
٢٣٤
اM"#
ا&$2د ا + "ABا&ا ' )ب( ه& 39ء ه? 4<9ا<رة ا&9&$د Hا>ب ا]
.
Rd H2 4اBخ ا^Jر ا>رد أ` Rdا^Jر H!& 2+ا<رة $ة Y. ", wث
ت ا]!" ،أو !د <$أ!" 1.6آY. 2+ ("
1) 4ث ت ا]!"! 4 .س
RdاBwخ W&+ات ر 2+
A&+ "? "Jأو آ& ?+ل.
أ! Rd 5اBخ ه& أ! Rd 5اBخ +رد <&$ح ' `+ا ا^Jر .أ! Rd 5اBخ & qd
اار ا>.
RdاBخ ا^Jر ا>رد اُ ">!ِ `+ A&$ا ا< 25$رة آ $ه& &D5
qd
ا^Jر.
&9&
D5د "?S+دا[ 4ا<رة & &$W 2 HAا<رة ا] AوأWم ا^Jرات 2$ة
ا] Aو RdاBwخ ا>رد اُ.`+ A&$
ر* M"#اxmر )(TIN
?$ار ر! H2 4ا^Jر )P9 (TIN
وا Wأو آ" >9ا^Jر ،أن آ&د ارP? °
P9وا&@ ., Wي ا^Jرات ذات اران
ا> ا>8ء ر! H2 4إJر آ
" $8آ&ًدا
ر P9 9& °اار ا> ا]
+
ا^Jر .ا @+ر! H2 4ا^Jر اP
اIر 9ا^Jرات ذات اران ا> ا<&داء إذا
آ kه ا^Jرات ا$آ> ا<رة .إذا #2 4
ر! H2 4ا^Jر ) (TINا PاIر،9
< ` #2ا Pاا ا^Jر.
#ل:
DOT MA L9 ABCD 0301
= DOTوزارة ا",
Sه'ا ا
3إ أن ا^Jر &ا Y 2
6
Dا^Jرات &زارة ا ",ا]
? و
< $2اFق ا<2 = MAر
65 6!&
"#$ 3ا^Jر )ر!$ن(
= L9ر
4W "#$ 3ا^Jر )ر!$ن(
= ABCDر
`
I< 3ا اJ¿ 25$ر )
1إ 4أر!م(
= 03ر! "#$ 4ا]>&ع ا'ي 65 ` 4ا^Jر )ر!$ن(
S 03ا&>wع ا# = 01ر! "#$ 4ا< ا 65 4ا^Jر )ر!$ن(
2 01ا2م 2001 !>" && ،2000آن ات اJ¿ 25$رات اIام ر! 4وا "#$ Wا2م ا'ي 65 4ا^Jر#
.ل "#$ ! :ا! 031 4ا]>&ع ا
#م 1981أو م 1991
٢٣٣
#ل:
و< Mا:J
U
= 95ا@&$
آ&د ر!J¿ ?$ &$W 5!*+ > $ر $W = Hر
3ا<
ر
S 3إ Fق ا<ت ا J¿ ?$ر 6
P &$W "$Wد" `&$Wوف 2
"RS Pا&&Aل إ أ!
5ة 3ا< وف @
"RSدة ) ,أي و ً R8 ,ا^Jر و &$Wا<رة ووف اDFوWود ا<(
hن ا:
Sب ر
&ز H2ا@ &$ا ا&9&$دة اار ا> ¿Jر إ أن ا^Jر ذو :(SL) ! &$W
• = XLإJر ذو !رة "$Wإ) dأو ،($أو
• = LLإJر ذو !رة BB "$Wأو
• Cأو Dأو Eأو Fأو F = Gق ا@ ?$ &$W 5!*+ >
&$أن @ $ا^Jر @
Rdد
أ>@ S - 1أ! &$W 5إ أ! 4$5 4 &$W 5ه'ا ا^Jر @$
أ>@ S - iWأ! Rd 5إ أ! Rd 5اBخ +رد <&$ح ' `+ا ا^Jر
٢٣٢
*'1 i5Jاxmرات
#ل:
wل ? G? @8ا'* اد xÅرP215/65R15XL 95H، 215/65R15 96H، LT235/85R16C، T145/80D18 103M، 31×10.5 R15 LT:
4W = PإJر رة رآب < إ 2ا 4$5ا]
? ،أو
" ! ....رغ = " ....إJر رات رآب < إ 2ا 4$5ا]ور ،+أو
= LTإJر Wت < BBإ 2ا 4$5ا]
? ،أو
Tأو = SإJر ا k!U
JWأو
= 31ا F,ا^A&>+ $9
215أو 235أو = 145ض ا$$+ 4<,ات
65أو 85أو = 80ا<> ا> ><+ا(% ) &g$
<> ارBع ا 4<,إ ض اJ¿ 4<,ر ،أو = 10.5ض اA&>+ 4<,ت
,J = Rا4$5
Sا@ف " "Rإ ا 4$5اF,ي ،أو Sا@ف " "Dإ ا 4$5اF,ي أو ا"[$ 15أو 16أو F! = 18ا 2اا A&>+
٢٣١
8#ت Gاxmر
:F1G
• ) Pراآ&( *'1 # -اxmرات ا" ?"# @8
ا>* ا6h <Jت اة .ي إxرات
ا"آب ا" ? @8ا"ف "ً9 "Pرا ? @8ا'ار
ا'; G# ًh 7ا'*w .ل :
.P215/65R15 95H
?Gت اxmر
- 1ر
Y 2
3
وزارة ا ",ا]
?
)ر! H2 4ا^Jر(
Y - 2ا@4
- 3و HAا
I
٢٣٠
- 4أ!&$W 5
- 5أ!Rd 5
+ - 6ا$ات وا
ودر9ت ا@ارة
• اkورو *'1 # - hاxmرات ا" ?"# @8
ا>* اkور .hوه XHاxmرات ا> و!ً H+ا
ا#ر ي ? *'1 @8اxmر ً9را ? @8ا'ار
ا'; * 1 ،7اء hس ?"ض ا .*:و6
ا"ف " *'1 G? PW "Pه XHاP ?L
اxmراتw .ل.215/65R15 96H :
• ) LTاL1ت ا *'1 # - (99Jاxmرات
ا" ? "# @8ا>* 6hت اة.
و G? "#ا'* xmرات اL1ت ا99J
ا" ه +:9; 7اxh <Jرات ا"آب ا"
! ?ا ا"! "LT" Pا9ر @8? Pا'ار
ا'; G? 7ا'*w .ل.LT235/85R16 :
• * >* اxmرات ا x16ا JGام !7
61ت ا5ارئ ! .iي اxmرات اx16
ا ذات ا iا"1 @8? 7#ف " "Tأو ""S
ً9را ? @8ا'ار ا'; G? 7ا'*w .ل:
.T145/80D18 103M
• *'1 #اxmرات ? ا "# @8? 95ا>*
68ت اة وأ ? Gا'* ا9رة ?@8
ا'ار ا'; "5h 7اxmرw .لR15 10.5×31 :
.LT
Wء F; 5?/iL "zم ا 7! *uا"6ار
ا"umو; (ESC) 7وWء F; M "zم ا*u
! 7ا"6ار ا"umو;(ESC) 7
bم ا@? 4ا,wار ا^?و ) (ESCأً
8
?&ن bم ا@? 4ا .FًSإذا +أ "&dء U
b H!&/Sم ا@? 4ا,wار ا^?و
) "(ESCا&
أ.ء ا<رع HBI ،ا R8
دوا ا&!&د و!" ,+ر ا^
?ن اIام $Aم اwق.
*آ &ا Dوأ&ب !د bوف ا.DF
8ء "&dء b "F/S Uم
ا,wار ا^?و
ا@?4
) &$
"(ESCأ39ة ا,س
إدارة Bح ا "RSإ وON/ 6d
) RUNا/"RSاYFwق( .و µBFأ.ء "RS
ا@$ك .إذا ا&d" $ء b Sم ا@? 4
ا,wار ا^?و )&d/(ESCء Uا ""F2
ا^dءة أ.ء "$ا@$ك} ،ن ه'ا ل أ` ! 4
اآSف b "Fم ا@? 4ا,wار ا^?و
) .(ESCإذا " ه'ا ا>5$ح ً8ء 2+ة دورات
ا ،"RSو! k$دة ا<رة 2ة آ&
ات/أ
ل
<+ت أ 48آ ،(/Yً
30) /4ا69
ا&آ" ا*+ $2$ع tIS ?$ا ?S$و.W
• F; #م ا 7! *uا"6ار ا"umو;(ESC) 7
! 7آ "ة * ! +إدارة 9ح ا إ@ وUW
) ON/RUNا/اG5;6ق( @1إذا آن *
إ! ! 7و.h B
>أ &dء b H!&/S Uم ا@? 4ا,wار
ا^?و ) (ESCا&9&$د &$أ39ة ا,س
$+
&+د ,ان ا^Jرات !Fا وb "$م
ا,wار ا^?و .و&
&dء H!&/S U
• >ر ?F; Pم ا 7! *uا"6ار ا"umو;7
)< (ESCت PLxأو ;" ?u Lن ;ً .5وهHا
أ" ?دي ،و Mا<kات ?F; a> Lم
ا 7! *uا"6ار ا"umو;iٍ; "T (ESC) 7
:F1G
• 7ء آ W" Pء F; M "zم ا7! *u
ا"6ار ا"umو; "(ESC) 7و"Wء "z
F; 5?/iLم ا 7! *uا"6ار ا"umو;7
)"9 "(ESCة >"ة ! 7آ "ة * ! +إدارة
9ح ا إ@ وON/RUN UW
)ا/اG5;6ق(.
#hاLورة اF; iL 7! B: 7م ا7! *u
ا"6ار ا"umو;.(ESC) 7
&d" Sء b H!& Uم ا@? 4
ا,wار ا^?و ) "(ESCإ إ,ف
b "RSم ا@? 4ا,wار
ا^?و ).[39 "?S+ (ESC
)اF; Lم ا 7! *uا"6ار ا"umو;(ESC) 7
إذا ا5
6F,ر ا) !Fأي "5 4
ا>Fر أو } ،(@ Bن "&dء U
b S/"Fم ا@? 4ا,wار
ا^?و ) ?$ "(ESCأن 8ء
أ.ء "RSا@$ك .إذا Wث ذ @+ 4, ،
ا,دة "
?+إ ا<ر 4.إ ا .$ه'= ا@
Pأن &d" µBFء b S/"F Uم ا@? 4
ا,wار ا^?و ) ."(ESCو? إذا ا $ا&8ء
ً8ءb t@B+ 4, ،م ا@? 4ا,wار ا^?و
) (ESCوbم < اBا
" ) (BASا&آ"
ا*+ $2$ع .?$
٢٢٩
و) Full Off UWاmف ا - (uإذا آ; Bا:رة
)ودة Hh
4$5 4ه'ا ا&IY 6dام اFق ا<2
أو ا&ة و P wاIا
` أ Jق .ه'ا
ا&3
"RS H!& ،6dات ا,wار ا & ه bم
ا@? 4ا ) (TCSوbم ا@? 4ا,wار
ا^?و )& .(ESCل إ و"Full Off" 6d
)ا^,ف ا?
"( ،ا wً&F
Rdزر ""ESC Off
)إ,ف bم ا@? 4ا,wار ا^?و( $ة {$
&.ان أ.ء &! Hا<رة و "$ا@$ك
2+ .ور {$
&.اٍن$ 4 ،ع إرة ،&Aو8ء "&dء U
إ,ف bم ا@? 4ا,wار ا^?و )،"(ESC
و bر ") "ESC Offإ,ف bم ا@? 4
ا,wار ا^?و( اد < ا<رةb ! .
ر ") "ESC offإ,ف bم ا,wار ا^?و(
ض
&2ت ا<[ .(DID) Dرا" 69
ض
&2ت ا<[W& 4 " 4<! "(DID) D
أ39ة ا,س" @&5ل 3ا
&2$ت.
b "RSم ا@? 4ا,wار ا^?و )(ESC
ة أى ،اb@ Rdت Bح ""ESC OFF
)إ,ف bم ا@? 4ا,wار ا^?و(.
٢٢٨
"? * :F1Gض ر ") "ESC offإف
;Fم ا 7! *uا"6ار ا"umو; (7و>ر
إzرة < ? ; Lذراع ا 7! LوPARK UW
)ا P (Mأي و "T UWو) PARK UWا* ،(M
إ"Sا Pو) PARK UWا .(Mث ذ إذا آن
* a:ا" .ًh
!"H
و) "Full Off" 6dا^,ف ا?
"( bم ا@?4
ا,wار ا^?و )3
"F2 4 ،(ESCات
3 ",م ا@$ك وا,wار3
& w ' .ة
ا,wار ا< <@$رة ا & ه bم ا@? 4
ا,wار ا^?و ) .(ESCا$ورات اFر[،
b "RS 4م ا@? 4ا,wار ا^?و
)<$ (ESCة ا@Bظ ا,wار4$5 4 .
و) "ESC Off" 6dإ,ف bم ا@? 4ا,wار
ا^?و( IYام رج اFق ا< 2أو
اFق ا&ة .,
L? :F1Gإف ;Fم ا 7! *uا"6ار
ا"umو; @ ،(ESC) 7إ1ى )ات اFLم ;.5
وه XHا)ة ه 7اh *u 7وران اG'#ت ?" ر
دوران ً ا"س ا 78W9اد 6);Gق! .ذا
آ; Bإ1ى اG'#ت ? @8ر اوران ور ?":h
أآ" Pا"Skى:! ،ف م اFLم #hا"9ا
وا:ح )? P )hم ا"ك ? @8ا 8'#ا 7ور
أ P: .Q5hرة ا'" :8رة ? Lادة Jhام
Gاxmرات أو ?h Lء ا ! 7ا8wج ا#
أو ا"ل أو ا>@ P ،ا P::ا;6ل إ@ وUW
") "Partial Offاmف ا') "x P? (74اi
9 @8? F8ح ") "ESC OFFإف ;Fم ا*u
! 7ا"6ار ا"umو;.(7
أوWع ;Fم ا 7! *uا"6ار ا"umو;7
)(ESC
@&ي bم ا@? 4ا,wار ا^?و )(ESC
و 2dأو .Y.أوdع :"RS
F; ) ESC Onم ا 7! *uا"6ار
ا"umو;(7
>2ه'ا ا& 6dه& و 6dا "RSا2دي bم ا@?4
ا,wار ا^?و )+ 6$ .(ESCا "RS
ا<رةb q>5 ،م ا@? 4ا,wار ا^?و
) (ESCه'ا ا& P .6dاIام ه'ا ا& 6d
4b2وف ا,دة .و P wإ,ف b "RSم ا@?4
ا,wار ا^?و ) (ESCإ>] wب A
واردة ا,Bات ا.
اmف ا')74
4$5 4و) "Partial Off" 6dا^,ف ا([3
<Iم ا]و!ت ا > 3$+ Pة
, 8دة ا]را dا#
ا,دة ا .FSو<Iم أ ً
وا
واFR$ة 5@+ا "F2 .,$2ه'ا ا&6d
39ء bم ا@?b (TCS) + 4م ا@? 4
ا,wار ا^?و ) (ESCو b S W 6م
ا@? 4ا,wار ا^?و ) ،(ESCوه& <q$
3$+و اY2ت ]آ> b `+ q$< $م ا@?4
ا,wار ا^?و )B
9& .(ESCح "ESC
) "OFFإ,ف b "RSم ا@? 4ا,wار
ا^?و( &$ا qB$ا&9&$دة ,+ب
ا3ء ا< Bا]و & Wأ39ة ا,س أو
{$ااد&& .ل و) "Partial Off" 6dا^,ف
ا ،([3اb@ Rdت Bح ""ESC Off
)إ,ف bم ا@? 4ا,wار ا^?و( و8ء
"&dء Uإ,ف bم ا@? 4ا,wار
ا^?و"b "RS .م ا@? 4ا,wار
ا^?و )
(ESCة أى ،اb@ Rdت
Bح ") "ESC Offإ,ف bم ا@? 4ا,wار
ا^?و( و&d" µBFء Uإ,ف bم ا@?4
ا,wار ا^?و".
P: :F1Gرة ا'" :8رة ? Lادة U
ود ا G:ا ،Á8wh <Jأو ?h Lء ا !7
ا8wج ا #أو ا"ل أو ا>@ P ،اP::
ا;6ل إ@ و) "Partial Off" UWاmف ا')(74
? "x Pا iا9 @8? U":ح ""ESC OFF
)إف Á;"hا"6ار ا"umو; .(7و"'hد ا&8
? @8ا MاHي &85و"Partial Off" UW
)اmف ا')?h * ،(74دة ;Fم ا7! *u
ا"6ار ا"umو;9 @8? F8 ih 7ح "ESC
) "Offإف ;Fم ا 7! *uا"6ار ا"umو;.(7
و Puام HhأLء ود ا:رة !"1 1 7آ.
!"H
ا&ا 9و) "Partial Off" 6dا^,ف
ا39 "F2 4 ،([3ء bم ا@? 4ا
)b (TCSم ا@? 4ا,wار ا^?و
)#+ ،(ESCء 3ة "اوران ا@$ود "2
اb 4<! &A&$م ا@? 4ا ،و8ء
"
>5ح Uإ,ف bم ا@? 4ا,wار
ا^?و"&? .ن و"Partial Off" 6d
)ا^,ف ا B 4 ،([3ا,wار ا<@$
اb &$م Å
+ا,wار ا^?و
).(ESC
٢٢٧
!"H
! ?&ن هك 2+ا&$ا!2B
Hت RAة
ا@ 4وا<رة @ $أو أ.ء @&F,
Pرة W
Sاbم 6ا$Wل Wوث دوران .HBإن ذ !
<>W Pوث 5دم 6رة أو ' .i 4<9آ
دا[ً $أن ا<[U<
Dول ا<رة.
إف ;Fم h ?:ء ا ? @8ا"#9ت
)(HSA
إذا ر> kإ,ف b "RSم < +ء ا "RS
ا2B$ت ) ?$ ،(HSAا,م I+ '+ام إادات
bم ® .Uconnectرا" 69إادات bم
® W& 4 " "Uconnectأ39ة ا,س"
3$
ا
&2$ت.
;Fم ا 7! *uا"6ار ا"umو;(ESC) 7
@< ه'ا اbم ا@? 4ا& `9وا,ار ا<رة
وف ا,دة اb q@5 .&$م ا@? 4
ا,wار ا^?و ) (ESCا& `9ا3ا[ أو ا!t
<رة Yل اIام اBا
" ا 2ا.>$
<$ 8ة 2د
!J ", ?$ا@$ك أ ً
٢٢٦
وف زدة أو اBIض ا& `9وا<$ة ا@Bظ
ا<رة ا<$ر ا.q@5
<Iم bم ا@? 4ا,wار ا^?و )(ESC
ا2S<$ات ا<رة @ ا<$ر ا'ي 5,ا<[D
& `9ا<رة إ` و,ر` <$+ر ا'ي <?` ا<رة !
ا&ا! D+F w .6ا<$ر ا 6
2Bا<$ر ا'ي
= ا<[I< ،Dم bم ا@? 4ا,wار
ا^?و ) (ESCا
" ا 2ا<$ >$ة
ا PRا< ا3ا[ة أو ا 8BI$ا@
ا&F$ب.
• ا< ا3ا[ة -ور رة &5+رة أآ>
ا 6d& >$ا,دة.
• ا< ا - 8BI$ور رة &5+رة أ!"
ا 6d& >$ا,دة.
!"H
b 6F< wم ا@? 4ا,wار ا^?و
)&! 6
(ESCا ا3Bء ا 2>Fا* .
ا<رة آ $أ` `?$ wزدة !رة ا ا & ه
وف ا .DFوb 6F< wم ا@? 4ا,wار
ا^?و ) 6$9 6
(ESCا@&ادث $+ذ
ا@&ادث ا ا< ا3ا[ة اBF2$ت أو
ا,دة ا] qFة اw3wق أو اw3wق ا.[$
b 8م ا@? 4ا,wار
آ $أ` ?$ wأ ً
ا^?و ) (ESCأن 6$و!&ع ا@&ادث $+ذ
ا@&ادث ا, $9ان ا@? 4ا<رة P><+
" Pا<[ Dا 6
"
2وف
ا D[< .DFا `>$وا$ه وا@'ر ه& ا&W
ا'ي P `?$و!&ع ا@&ادث P .م اYRل
!رات ا<رات ا3$ودة b+م ا@? 4ا,wار
ا^?و ) (ESCأً+ا &
,F+رة أو Fة
وا ! 2ض Yا<[ Dأو Yا
.FI
;Fم ?:ا"9ا )(BAS
? "$ه'ا اbم bم اBا
" اYRY 2$ق )(ABS
Yل @< !رة ا<رة ا
Bورات
اBا
" اFر[ HS? .ه'ا اbم ا@wت ا <
اIام اBا
" J "?S+رئ DJا2Sر 2ل
و
,ار اIام اBا
" I< 4.م أ! Rd 5
اBا
" .إن ذ < ",ا <$ت ا 2F,
اBا
" ^Wاث .
وUدي ا R8اBا
" 5!*+إ اBwدة
ا&5,ى ا<$ة ا & ه bم < اBا
".
BYدة ه'ا اbم P ،ا R8دوا اBا
"
&
"?S+ا "Aأ.ء 6+ا&! BI w .Hا R8
دوا اBا
" * Wآ م ا@ 9إ اIام
اBا
"b H!& .م < اBا
" ) (BASا"$2
$+د @ دوا اBا
".
!"H
b 6F< wم < اBا
" &! 6ا ا3Bء
ا 2>Fا* .ا<رة آ $أ` `?$ wزدة
!رة ا ا & ه وف ا .DFآ6F< w $
bم < اBا
" ) 6
(BASا5د
ت $+
ذ ا5د
ت ا ا< ا3ا[ة
اBF2$ت أو ا,دة ا] qFة اw3wق أو
اw3wق ا P .[$م اYRل !رات ا<رات
ا3$ودة b+م < اBا
" )&
,F+ (BASرة
أو Fة وا ! 2ض Yا<[ Dأو
Y
ا .FI
h ?:ء ا ? @8ا"#9ت )(HSA
b 4$5 4م < +ء ا "RSا2B$ت
)<$ (HSAة ا<[+ Dء "RSا<رة
أرض + <
jB@ .2Bء ا "RSا2B$ت
)&<
(HSAى RdاBا
" ا'ي < `$2ا<[D
Bة !5ة 2+ر 6ا<[ `
! Dدوا
اBا
" .إذا I< 4م ا<[$A Dم اwق ه'=
اBة ا5,ة&< ،ف @ر اbم RdاBا
" و>أ
ا<رة اوران وا3ول &ق ا@ .6B$ر
اbم RdاBا
" 6
P+آ $ا R8
$Aم اwق +ء "RSا<رة @ك ا=
ا< ا&F$ب.
h ?: iL "#ء ا ? @8ا"#9ت
)(HSA
Pا& ء S+وط ا + <
Sء ا"RS
ا2B$ت ):(HSA
• Pأن ?&ن ا<رة &!.B
• Pأن ?&ن ا<رة < (>ً,) 3%رات
ا3$ودة "!+ا@آ اوي و< (>ً,) 6%رات
ا3$ودة "!+ا@آ ا]و&
?.
• ,+Fار اس =wا<رة )أي أن ا<رة
` ] +س أ
،وا 69إ ا+ HIس
) REVERSEر&9ع إ ا.((HI
٢٢٥
(Uh) !"H
• آb ?$ w $م اBا
" اYRY 2$ق )(ABS
أن 6$و!&ع ا5د
ت $+ذ ا Å
ا<ت ا3ا[ة اBF2$ت أو ,WYرة
أى !ب أو ا< &ق Jق ز.,
• Pم اYRل !رات ا<رات ا3$ودة b+م
اBا
" اYRY 2$ق )&
,F+ (ABSرة أو
Fة ! 2ض Yا<[ Dأو Yا
.FI
Pأن ?&ن Y 6$9ت ا<رة وا^Jرات 4W
و&ع وا Wو °B Pا^Jرات & 4 "?S+أدق
ا^رات ?.&>$
Wء "Hا"9ا ا;G;G #ق
ا!&d" Pء @' bم اBا
" ا2$
YRYق )b "$ "(ABSم اBا
" ا2$
YRYق .و bه'ا ا&8ء ?&ن Bح ا"RS
و) ON 6dا ("RSو! < $ا^dءة $ة
أر&. 6+ان .>ً,
٢٢٤
وإذا ا&d" $ء @' bم اBا
" اYRY 2$ق"
ا&bر أو أdء أ.ء ا,دة} ،ن ذ ل أن
39ء 6اYRwق bم اBا
" &5+ "$2 wرة
@@Aوأن هك 9Wإ Aاbم 6
.ذ
<b $م اBا
" ا,ي ا&5+ "$2رة اد
&d" µ8 4ء @' اBا
"".
إذا "&dء @' bم اBا
" اYRY 2$ق"؛
b A Pم اBا
" أع و!?$
k
9wع 3ا اBا
" اYRY 2$ق .إذا µ8 4
"&dء @' bم اBا
" اYRY 2$ق" إدارة
Bح ا "RSإ و) ON 6dا P ،("RSإYAح
ا >$أ!ب و!.?$
k
وإذا ا&d" $ء @' اBا
"" و"&dء @' bم
اBا
" اYRY 2$ق" d^+ءة ' ،ل م
b "$م اBا
" اYRY 2$ق ) (ABSواbم
ا^?و &ز&! 6ة اBا
" ) .(EBDو ه'= ا@
PإYAح bم اBا
" اYRY 2$ق )(ABS
&ًرا.
;Fم ا 7! *uا'" )(TCS
ا! Pه'ا اbم ,ار دوران 6$9اY2ت ا.
I<$
WاآSف دوران اY2ت 4 ،اIام Rd
اBا
" )ا (2اY2ت ا ,3$و!J B 4
ا@$ك @< إ
? ا< 6وا,wار.
وهك 3ة bم ا@? 4ا ) (TCSوا"B,
ا (BLD) dBوا @? 4دوران ا> 2
@&ر اوران ا W ."$2<$دوران إWى اY2ت
@&ر دوران ُ
"?S+ "RSأع ا&, ،م
اbم I+ام ا
" ا 2اا[ة .و qذ
اIام ا3 3$م ا@$ك ا 2اا[ة.
و "bه'= ا3$ة W W FSو&9د bم ا@?4
ا ) (TCSوا@? 4ا,wار ا^?و
) (ESCو) "Partial Off" 6dا^,ف ا ([3أو
و) "Full Off" 6dا^,ف ا?
"( .راb" 69م ا@?4
ا,wار ا^?و ) "(ESCه'ا ا3$ 4<,
ا
&2$ت.
;Fم ا"9ا ا;G;G #ق )(ABS
b 3م اBا
" اYRY 2$ق ) (ABSا,ار
ا<رة و
أداء اBا
" أwW Pت اIا
.
و&,م اbم " "°8+اBا
" أو&
? wWت ا?>q
اB >25دي اYRق اY2ت.
b 6$م &ز&! 6ة اBا
" ا^?و ) (EBDا
B
ا3ا[ة Y2ت ا BIو& ً3ا ا@?&, 4ى
ا Bا &$ة ا&@
6
I<$ر اوران ا.BI
!دة ا<رة <+أآ> 11آ/4ا< )7
أ
ل/ا<(&A 6$< ! ،ت F<+ ,F,Jأو 2+
ا]&Aات ا5درة ا@$ك .وه'= ا]&Aات ه
! +#$+م اbم t@B+ذا *آ b "$ @Aم
اBا
" اYRY 2$ق )@ .(ABSث ه'ا ا@D,
ا'ا آ" ة "RS 4ا<رة و< 2إ
أ 11آ/4ا< ) 7أ
ل/ا<(.
وb "$2م اBا
" اYRY 2$ق ) (ABSا?>q
وف &+ D2 2ا DFأو آ Bا&!&ف.
واbوف ا @b "$ 3Bم اBا
" اYRY 2$ق
) (ABSه اFق ا&<?$ة +أو ا Å#أو ا@5
أو اFق ا&ة أو !>8ن ? ا@ أو ا]+
ا&ة أو ا&!&ف ا.µ9B$
و! @ث b "RSم اBا
" ا2$
YRYق:
• @
"$ك bم اBا
" اYRY 2$ق )(ABS
)و! <B "$2+ $ة و39ة 2+ا&!&ف(
• &Aت
$A ,F,Jت ا H$ا?+
• اه3از دوا اBا
"
• ه>&ط <+أو اBIض دوا اBا
" 2+ا&!H
و >2ه'= ا t[5Iاb 2>Fم اBا
" ا2$
YRYق ).(ABS
!"H
• @&ي bم اBا
" اYRY 2$ق ) (ABS
2ات إ?و &Fرة ! ?&ن = <W
ااYت ا <>> 2ات ا^رل ا ?Yا
4آ> &5+رة @@Aأو ذات اIج
ا .2و! <> Pه'= ااYت ,ان !رة 6
اYRwق ا P .
Bآ "#
Pه'= ا2$ات
ِ!>" أU
[5ه ]داء ذ.
• إن °dاBا
" اYRY 2$ق 2 ",و!
<> Pذ و!&ع 5دم °8 .اBا
" "2ا <$
ا&!& +&F$ف أ&Jل .ا?W}+ Rdم دوا
اBا
" @ج إ Bا< أو ا&!&ف.
• { ,$+ور bم اBا
" اYRY 2$ق )(ABS
&! 6ا ا3Bء ا 2>Fا<Fة
ا<رة ،آ $أ` 6F< wزدة آBءة ا?> qأو
ا<Fة ا& `9أآ #ا & ?$ه
ا
" ا<رة أو ا^Jرات أو ! +ا@? 4
ا.
)(Uh
٢٢٣
(Uh) !"H
• *آ إYJق ا
" ا&! ">! Hا>ء ,+دة ا<رة:
]ن م ا,م U ! '+دي إ "FاBا
" وو!&ع
Wدث.
• ! 4دا[ًI+ $ام ا
" ا&! Hك ا<رة،
وإ P, , wا<رة و<> H Pا?$$ت أو
8ك !" ا@آ و6d
ا^* .+Aآ أ ً
) PARKا&! .(Hإن م 'Bذ ! <q$
W+ج ا<رة وWوث Bت أو إ+Aت.
! L
إذا ا&d" $ء @' اBا
"" ا^dءة 2+
@ ا
" ا&!} ،Hن ذ Sإ ا$Wل و&9د
" b+م اBا
" .ا @b tم اBا
" ى ا&آ"
ا $2$ا&Bر.
;Fم ا"9ا
إن ر 3ودة b+م ا
" هرو?
3دوج} .ذا ,أ Wا
b
ارو? ا,رة ا2$دة < $اbم
ا ا ."$2و? ?&ن ذ 6
2+ا! !Bرة ا?> qا? .و! ?&ن ذ ً&$
زدة ى Wآ اوا ا R8وا@9
إ !&ة Rdأآ> BIا< أو ا&! Hوا$Wل
&ر "&dء @' اBا
"".
, Wان ا !Fا32$زة ]ي > "#
) PاIwام
ا?$ر Bا
" 6و&9د ا@$ك ! إ,ف ا("RS
< $اBا
" أداء .$و q>5ا ا&F$ب
^,ف ا<رة أآ> $ه& wزم b "RSم اBا
"
ا.!F+ 2
:F1Gر )ودة FLhم !"ا ? 7اkداء1 .
uن ;5hت ا"9ا ?رة ?u Pن 7;# zواHي
!" و را 8 #4ا .":ا "QاHي
P? ÁLاJام هHا اLع ;5h Pت ا"9ا ه أن
ا"9ا ÁLاT P "wuر ا"9ا وأن ا"9ا
>ر أ<ات ? #h ¼ 7! Gً8ا"Fوف ا'
وأ1ال ا )أي أLء اJات ا 8"9ا،(99J
و #هHا Pاkر ا#د.
;Fم ا *uا"umو; 7! 7ا"9ا
3 4ر b+م @?B+ 4ا
" إ?و ,م
2ف b+م ا,wار ا^?و ) $8 .(ESCه'ا
اbم أ $bاBا
" اYRY 2$ق ) (ABSوا@?4
ا ) (TCSو
< اBا
" ) (BASوbم ا@?4
ا,wار ا^?و ) "$2 .(ESCه'= ا]2ً
$b
@< آ" ا,ار ا<رة وإ
? ا@? + 4
وف ا,دة ا.BI$
ا3$ة ا^ 4?@ dا^?و اBا
" DF
< +ء ا "RSا2B$ت ) (HSAه !
6$9اُFز.
٢٢٢
; ا"آ اوي -إذا آ; Bا:رة )ودة Hh
4و 6dا
" ا&! Hا ,+ RS 4م أ"B
ا3او ا<ى ا< W& Bأ39ة ا,س@ .
ا
" ا&! ،Hا@ @ >,
Pا
" ا&!.H
; ا"آ اkو - 7uإذا آ; Bا:رة )ودة
Hh
& 9ا
" ا&! Hا ,+ RS 4م أ "Bا3او
ا<ى ا< W& Bأ39ة ا,س$2w .ل ا
"
ا&! ،Hاد S+ 6ة دوا ا
" ا&!@ ."
?+ H
ا
" ا&! ،Hا Rdدوا ا
" ا&!
Hة
.وار &2 ¼ ! 6رك DS2 B+
اBا
".
"" !"ا ا Lh Mا"آ اوي
!"ا ا Lh Mا"آ اkو7u
!"H
• I< wم و) PARK 6dا&! (Hآ>" Bا
"
ا&! .Hوا "$2ا
" ا&! Hدا[ً&5+ $رة آ
Bدي @ك ا<رة وWوث إ+Aت.
• Rدرة ا<رة 4! ،دا[ً}+ $اج b WاqB$
!ص ا "RSو! "B,+ 4ا<رة.
• wك أً+ا ا]BJل B$+ده 4ا<رة أو <4 q$
!w+اب رة 2 .B,ك ا]BJل
ا<رة دون ا!> أ
ًا ًFا ]>ب ة, .
5ب ا]BJل أو اون +A}+ت Fة أو
.$و` Pا>` ا]BJل 2+م {$
ا
" ا&! Hأو دوا اBا
" أو ذراع ا.",
• wك b Wا qB$ا<رة أو ,+ب )أو
?ن ?$ا]BJل ا&&Aل إ`( ،و wك
Bح ا<+ "RSرة 3ودة 3$+ة ا&ل دون Bح
™ Keyless Enter-N-GoوACC 6d
)ا,@$ت( أو و) ON/RUN 6dا/"RS
اYFwق( F> .ا]BJل "RSا&ا ' ا
2
!F+وأزرار ا@? 4ا]ى أو @ ا<رة.
)(Uh
٢٢١
& Wر ر
) Steering 3ا&(`9
و&ر ا "SERVICE POWER
b) "STEERINGم ا& `9ا32$ز
@ج إ (Aأو "POWER
STEERING ASSIST OFF) "SERVICE SYSTEMإ,ف < ا& `9ا32$ز
3م Aاbم( ض
&2ت ا<[D) ،(DIDه'ا 2أن ا<رة 9@+إ ا 5ى ا&آ".
را " 69ض
&2ت ا<[4 " 4<! "(DID) D
& Wأ39ة ا,س" @&5ل 3ا
&2$ت.
:F1G
• و? 1 7! @1م ? ?:ة ا ا)#ز،
Puا:رة .و &85ه XHا Hhل
'+د أآ" ا:رة و 7! <Sا?":ت
ا Â5أو أLء Lورات ا.M
• إذا ا"ت ا"! ،ا Uاآ ا>8 #ل
? @8ا>;.
"! Lاد "8آت 5.7 #:h
"ات" 6.4/ات ! — iإذا آ; Bا:رة
)ودة Hh
& ه'= ا3$ة ً3ا ا& ا&!&د DJ
إYق أر 2+أ&Fات ا@$ك ا $#أ.ء ا<
" و&9د BB &$Wو اYWت .إن ه'ا اbم
أو&
? و@ wج إ أي إ9اء ا<[ Dأو أ
رات !دة إ. d
": :F1Gق اFLم #hا#8 Bدة إ@
اkداء ا¼ 79ا >! #h uا5ر.
!"ا اM
!>" Rدرة ا<رة* ،آ اIام ا
" ا&!H
6d 4. ،"
?+ذراع ا ",و) PARK 6dا&!(H
أو ) REVERSEا&9ع "!) (HIا@آ اوي
.(,
ا$2ل ا
" ا&! Hو
Bح ا "RSو6d
) ONا) ("RSو) RUN 6dاYFwق( 3$+ة ا@آ
٢٢٠
دون Bح ™8 ،(Keyless Enter-N-Goء
"&dء @' اBا
"" &$أ39ة ا,س.
:F1G
• ? Lا#ل !"ا ا Mوو ; UWا"آ !7
"سW" ،ء "Hا"9ا"1 7! .
اآف "? ا:رة> ،ر إzرة < L
ا"! ""h * .4:ا ا uh Mآ
و " ا:رة.
• ل هHا اء ! @8? iأن !"ا ا.8#: M
و P 6در ! #اJام ا"9ا.
ا&! ،" Hا 4$و اY2ت ا]
إ Wا HAا@$ر وً2+ا W
ا HAا< ><+ .6B$رات ا3$ودة "!+
ا@آ ا]و&
? "RS+ 4! ،ا
" ا&! ">! Hو6d
ذراع ا ",و) PARK 6dا&! (Hوإ} wن ا@"$
ا&9&$د "! "B! iا@آ ! "2اP25
@ ذراع ا ",إ رج و) PARK 6dا&!.(H
PاIم ا
" ا&! Hدا[ً&? w $ن ا<[D
&ً&9دا ا<رة.
!"H
• إن ا,دة > ا$ء ااآ ",إ
?ت ا
<+رة w .وز 8آ 5) /4أ
ل/
ا<( ا,دة > ا$ء ااآ.
• إن ا,دة > ا$ء ااآ ",إ
?ت اBا
"
<+رة وه& 3ا <$ت اYز
&!.H
' ,+دة ا<رة >+ء 6ا R8اHBI
دوا اBا
" ة ات HBاBا
" 2+
ا,دة > ا$ء ااآ.
• إن م ا>ع ه'= ا@'ات ! ` 4إ+Aت
Fة أو $وآب و
ه& ,+ب .
! L
• *آ دا[ً D$ $ا$ء ااآ !>" ا,دة w .`Y
> ,ًF
,ا$ء ااآ ا] D$أ&W "Bاف
ا^Jر ا$آ> ا<رة.
• Wد Wا DFأو ا<$ر أ "Bا =$وإذا آن
هك أي &ا[ ">! `+ Dا,دة > ا$ء ااآ.
)(Uh
(Uh) ! L
• wوز 8آ 5) /4أ
ل/ا<(
ا,دة > ا$ء ااآ& .ف ",ذ *.
ا.9&$
• ! <> Pا,دة > ا$ء ااآ &?
Hت
&$ا 6وا@آ <+رة .ا @ tدا[ً& $ا["
ا<رة )
"#ز kا@$ك و!" ا@آ و
@&ر
اوران ،إ* (°آ م و&9د
Yت
و&9د &ث & "#
) +ر ا<[" > b$+أو
ر&ي( ! 2+دة ا<رة > ا$ء ااآ$< w .
"RSا<رة إذا أي [" &
"?S+ث ]ن
ذ ! H ` 4أآ>$d FR w .ن ا<رة
اة ا@$ود "#ه'ا ا.H
• إن د&ل ا$ء دا" @ك ا<رة ! <> P
&! Bو Hدا @$+ Fك$d FR w .ن
ا<رة اة ا@$ود "#ه'ا ا.H
ا ا)#ز آًh"+
ا .,8و qاbم &ً 2ا<$ة اW `+ AI
& ا<& أ.ء ا&! Hو,م ! +دة 9ة .إذا
Jأ b "Fم ا& `9ا32$ز آ&@ ً+ل `+
و 4, +ا<$ة "b< ،إ
? & `9ا<رة
وً.
?$ار &9د ا& `9ا32$ز آ ً+ا> Yل
bم ® .Uconnectرا" 69ا3$ات ا
> +,
&+ا Fا ""$2أو "ا@? 4ا]داء -إذا آ kا<رة
3ودة" " $d '+إادات bم "Uconnect
W& 4 " "5أ39ة ا,س" @&5ل
3
ا
&2$ت.
!"H
! 2ض <Bوا إ ا FIا$wار
!دة ا<رة 2+اBIض ا<$ة bم
ا& P .`9إ9اء أ$ل ا 5أع و!k
.?$
&,م bم ا& `9ا32$ز آF &+ ً+ة $زة
ا<رة و & 3اwارة اDJ$
٢١٩
ادة ? @8ا a5kا)
ا'"
ادة ?"x @8ق رة Xh
ا:رع
!دة ا<رة اFق ا >$أو اD2 ! ،W&$
ا$ء +ا^Jر و qFا .DFوه'ا ُ2ف w3w+ق
ا ،[$و! Uدي إ Wوث [39 ,أو آ
" @? 4
ا<رة ،أو ا,رة ا&! ", .Hا$Wل Wوث
ذ
R> ،اة اJWwت ا:
PFا,دة ا$ء ا'ي `,$ "5إ أآ #ة
$اتA&+/ت & 3ا@'ر $8ن
ا< Yو H Pا<رة.
! Åا<رع اF$د ا] qFاFR$ة &#+ج
أو ا] qFا >$أو أي أ qFز ,أى إ ا@اف
Yت ا,دة Wا $أو ا<ر@ .ث ه'= اbهة
&ر اYف !&ة ا ا<Y k@ @Fت
)ا,دة( ا.BI
!"H
2ا<رع اF$د ا] qFاًF ,3ا! .
Uدي ا ا<$وي إ Wوث @µ9B
P
Y2ت ا ,B ! .BIا,رة ا@? 4ا<رة،
و! @ث اFAام .اWص زدة ا<رة
>+ء وا>` Wوث اBIض !&ة اW F,
إ ) iا< ا Å#أو ا أو ا Fا">$
أو ا
ل ا@$آ ،إ.(°
• ا< >+ء أ.ء ا&2ا HAاF$$ة أو ?&ن
اFق &.W
!"H
, wا<رة DJأو > `+ D DJا$ء أو
) 5آ $ا]
Fر ا =$ .(8Bا, $
<> qF + Pا DFوه& "2ر
&Rص ا$ء اY .D$2وة ذ =$ ?$
ا , $و/أو ا5ة "$Wر ً2+ا .µ9B
"?S+
إن م ا>ع ه'ا ا@' ! ` 4إ+Aت Fة
أو $وآب و
ه& ,+ب .
• <
j Wآ +ر وا<رة ا&9&$دة
أ
Pو!&ع اFAام ا&! Hا.µ9B$
اء ا 75:ا"اآ
• ا< >+ء و&9د 2$ت $ء أو +ك RAة
اFق.
• ا>ال ا^Jرات &ر ا^رات اا
Àآ" ا^Jر.
• اBWwظ &<$+ى °Bا^Jر .@@A ,F+
ر 3ودة +س @
dBود اw3wق )(LSD
,
",ار اw3ق ا ،2و? &@
> ،
ً$ `3 wر
دوران @د @< ا.2
"
2
٢١٨
اء ا!/ا>?
ا 4إ
? ر > ا$ء ا<@F
ااآ} ،ن اة اJWwت وا@'ات ا
!>" ا,م ذ.
• "! ",ا@آ أو&
?ً ¼ "Bإ س ا<
ا]ول ا> ا&! 2+ .Hا&! P ،H
ا<[ Dأن "! ",ا@آ وً ] ) (+أ.ء
<رع ا<رة.
• + ?$ء ا@آ ا&!I+ Hام اس ا]ول أو
ا q$< .#ا R8دوا ) ) (+ا&!(H
>+ء "RSا<رة و 6dاس ا+ 2 .#ء
"RSا<رة اس اًB
#ا وف
ا]را dاFR$ة +أو ا.Å#
• إذا آن ا,wل ا&F$ب إ س أد <> P
زدة ا@$ك ا@ ا,$ر 4 ،ا.",
• وه" اbم @وwت ",اوس ]
ا< ا< 8BI$رة.
• "$2إ,+ء اوا )) J&R8
(-إذا آ kا<رة
3ودة ('+أو إ,+ء ذراع ا ",و (-) 6d
"! Bا@آ إ أ!" س ?$ا<
ا@.
• ! &2د اbم إ و 6dا ",ا]و&
? W
اآSف "Fأو اآSف .JB
&I
و) SPORT UWا"h - (Wون ا7! *u
اkداء
^Rء DS2و 6dا 52ا]و&
? ،AutoStick
أ ذراع ا ",إ و) DRIVE 6dا,دة( ،أو اRd
wً&Fدوا ا) (+) ",إذا آ kا<رة 3ودة
،'+وو&9د ذراع ا ",و) DRIVE 6dا,دة(
4 W ("2B+ا^رة إ "
"Dة أى &$
أ39ة ا,س @ ?$ .ذراع ",اوس إ دا"
أو رج و 6dا 52ا]و&
? AutoStickأي
و! kدون ر ! 6دوا ا&!&د.
إن ر 3ودة 3$+ة و) Sport 6dا2 .(d
ه'ا ا& &? 6dإاد S2 Pق ا,دة4 W .
>dا@$ك و!" ا@آ )إذا آ kا<رة 3ودة
"!+ا@آ ا]و&
?( وأ $bا& `9إادات
) SPORTا & .(dو) Sport 6dا(d
ا$5 <@
+م اwق و$ت ",وس
d^+ ،2إ أآ> !ر ا&S ?$ .`9
ه'ا ا& 6dو R8+ `F2زر Sport
)ا W& qB
HA (dأ39ة ا,س.
!"H
BI wا< @&5ل 3ا
B
@$ك اFق ا] .,3ن ذ ! ,BاY2ت
ا! 9&$ر ا $و D3ا<رة ! $
<> Pو!&ع 5دم أو إ.5I +A
< ><+رات ا3$ودة *+وdع ا,دة ،را" 69ا@?4
ا]داء -إذا آ kا<رة 3ودة " $d "'+إادات
bم W& 4 " "5 "Uconnectأ39ة ا,س"
@&5ل 3ا
&2$ت.
• و q>5اw,ت !" ا@آ أآ #وDS2 Wً&d
ا 52ا]و&
? .AutoStick
٢١٧
وف ا]را dا ،,3وا,دة ا>ل ،و@P
ا&F,$رة ،وا? #ا&$ا! Hا]ى.
ا
?&ن ذراع ا ",و 6dا,دة )"! "$2 ،(D
ا@آ + Yً,
،ً[,اوس ا $#ا &$ة.
Sا 52ا]و&
? W ،AutoStickك ذراع
ا ",إ ا& 6dاوي )) (Mإ P9وDRIVE 6d
)ا,دة((& .ف bاس ا@ !" ا@آ
&$أ39ة ا,س) "M" 3$ 6
،وي(
.
?&ن ذراع ا ",ا& 6dاوي ) ،(Mا Rd
ذراع ا ",إ ا]
م )) (-أو ا Rdدوا ا(-) ",
ا,دة ،إذا آ kا<رة 3ودة ,Y ('+ل
إ اس ا ا]!" !" ا@آ ،أو ا Rd
ا'راع ) (+) HIأو ا Rdدوا ا ،(+) ",إذا
آ kا<رة 3ودة ,Y ('+ل إ اس ا].
٢١٦
:F1Gدي ا @8? iدوات ; ا"آ
ا"آ ? 8'? @8ادة ) ،(-/+إذا آ; Bا:رة
)ودة u L? ،Hhن ذراع ا 7! LوDRIVE UW
)ادة( ،إ@ iLو UWا >#اkوu
.ً AutoStickدي ا P (-) @8? iأ
اSل إ@ و UWا >#اkوAutoStick u
إ@ ; ; ا"آ إ@ ا"س ا 7ا Lh ،kدي
اJام ) P (+أ اSل إ@ و UWا>#
اkو AutoStick uإ@ ا! @8? Fاء
! 7ا"س ا"? * .7ض ا"س ا7! 7
'? أ)+ة اس ،و# ."M" ) * P Puد
; ا"آ إ@ ا ا#د )إذا ا" ود ذراع
ا 7! Lو) DRIVE UWادة(( "! #hة PاB
وذ ; &:1ط دوا اد.
و 6dا 52ا]و&
? ", 4 ،AutoStick
!" ا@آ إ أ أو أ (-/+) @ "Bوً
&+ا Fا<[I+) Dام ذراع ا ،",أو دوات ا",
]إذا آ kا<رة 3ودة ،(['+إ wإذا آن ذ Uدي
إ Wإ9د ا@$ك أو ا< ا3ا[ة .و "b
اس ا@$د 4 Wار ",س iأ أو
أ#+ ،"Bء ه& &&Aف أد=.
• و 6dا 52ا]و&
? AutoStickاk!U$
)ذراع ا ",و) DRIVE 6dا,دة(("! ", ،
ا@آ أو&
?ً ] ا&&Aل إ
ا@$ك ا&5,ى W .ا R8دوا ا&!&د
"! ", ،"
?+ا@آ س أ!" ?&ن
ذ ً+) ً?$ء ا< ا@ <رة واس
ا@(U .دي م Sط دوا ا&!&د إ &دة
!" ا@آ إ ا "RSا]و&
?.
• DS2 Wو 6dا 52ا]و&
?
AutoStickا2د )ذراع ا ",ا&6d
) MANUALاوي(( 4 ،اBWwظ @+اس
اوي Wإ
اIوج و) DRIVE 6dا,دة(
أو آ $ه& &&Aف أد= "! ", .ا@آ إ
اس ا] أو&
?ً ا Iا] $Wه'ا
ا& ،6dو ",إ اس ا]!" WاR8
دوا ا&!&د إ ا]ر.d
• "! ",ا@آ أو&
?ً إ س أ!"
> *Jا<رة ) 6$إ9د ا@$ك( و2ض اس
ا@.
اوي )(M
"$2ا& 6dاوي )) (- / + ،Mإ P9و6d
) DRIVEا,دة(( ?$ا@? 4اوي ا?
"
4+ 8و 6dا52
>" !" ا@آ )ا2$و أ ً
ا]و&
? ،AutoStickرا" 69ا 52ا]و&
?
"AutoStickه'ا ا&5@ 4<,ل
3
ا
&2$ت( "> "$2 .ذراع ا ",إ ا]
م ) (-أو إ
ا (+) HIأ.ء ا&ا 9ا&MANUAL 6d
)اوي( )ا 52ا]و&
? @ (AutoStick
س !" ا@آ وً 4 4. ،ض اس ا@
&$أ39ة ا,س آـ M1أو M2أو M3أو
.`+
و UWا"ك ا75ء Lا"آ
4ا!> و "! Bا@آ إ?وً &ا9
وف د .اآSف أي Wا@wت
ا ! <> "! H Pا@آ S 4 ،و6d
ا@ك ا>Fء !" ا@آ .ه'ا ا&"$2 ! ،6d
!" ا@آ وس @دة ,أو ! ", wإ أي
س BI ! .أداء ا<رة &@
"?S+ظ و! &!H
ا@$ك 2+ .ا&$ا! "! DS2 4 w ! ،Hا@آ
ة أى إذا 4إ,ف ا@$ك وإدة 8 ! .`RSء
>5ح Uا b .(MIL) "F2ر &$
أ39ة ا,س ^Yم ا<[b+ Dوف ة ا&FIرة
آ S $إ ا^9اءات ا ! ?&ن dور ه'=
ا@wت.
W Wوث ?$ ،!U
?Sإدة "! >d
ا@آ wداد 6$9 "$اوس ا]
وذ
'B DJا&FIات ا.
7! :F1Gا6ت ا +! " 7ر '?
أ)+ة اس إ@ ا? 1م إ?دة ; #
ا"آ #hإف ا"ك H9; ،هHا ا"mاء !7! i
اuن ا85ب ) 9أن * ذ ? Lاآ ا.(#
.1أو! Hا<رة.
"! R+ 4! .2ا@آ إ و) PARK 6dا&!،(H
إن أ
? .إذا ? 4ا@ل ه?'ا "! ", ،ا@آ إ
و) NEUTRAL 6dا.(DS2Y
.3اB
wً&F
Rdح ا 4 W "RSإ,ف
"RSا@$ك.
.4ا.>ً, . 30 b
.5أ "RSا@$ك.
6d .6ذراع Rاوس Fق اس ا&F$ب.
اء ا&2 ،?S$د !" ا@آ إ وف ا"RS
ا2د.
)h a>L :F1Gرة اآ ا 7! #أ"ب !"<
@1 Luو آن umhن إ?دة ; iWا"آ.
!8ى اآ ا# #ات <S Jإذا
آ; Bه XHا"u 8uر أم .6
إذا '2ر إدة "! >dا@آ $ ،ا8وري
ا 29ا&آ" ا.$2$
ا >#اkوAUTOSTICK u
ا 52ا]و&
? > AutoStickرة 3ة B
!" ا@آ & <[ Dا@? ", 4ا@آ
اوي ،و
4.ا@? 4ا<رة "?S+أ q ."8
ا 52ا]و&
? AutoStickإ
? زدة !رة
ا@$ك إ أ!! 5ر ،?$وا", tI
اوس ¼ و¼&F
"?S+ "Bب و@< أداء
ا<رة ا? .آ & $ه'ا اbم ً3ا ا@? 4أ.ء
ا$ور ا<رات وا,دة دا" ا$ن ،وا,دة
٢١٥
> Rا>ع اU$ات ا $8ن "! DS2ا@آ
و) PARK 6dا&!:(H
• ا ",إ و) PARK 6dا&! ،(Hا Rd
زر ا "B,ا&9&$د ذراع ا 4. ",اد 6ا'راع "
?+
¼
م إ أن &! Hو<."
?+ ,
• ا bإ و 6dس !" ا@آ و@
D,
أ Sإ و) PARK 6dا&!.(H
• @ دوا اBا
" D,@ ،أن ذراع ا4 ",
Iج و) PARK 6dا&!.(H
و UWا"ع (R) M8J8
<Iم ه'ا اFق @ ا<رة إ ا .HIا ",ذراع
Rاوس إ و) REVERSE 6dا&9ع
2+ , (HIإ,ف ا<رة .
ً$
ا(N) #G
اIم ه'ا اFق و!&ف ا<رة Bات 6
&J
"RSا@$ك .اIم ا
" ا&! Hو+ل !" ا@آ
إ و) PARK 6dا&! ،(Hإذا آن ا8وري
Rدرة ا<رة.
٢١٤
!"H
&>+ 4, wط ?ن 6
6BاIام و6d
) NEUTRALا (DS2Yو,}+ 4, wف "RS
ا@$ك ه'= اbوف >2 .ه'= ا$$رت
ا
,ة R +wوف ا$ور أو
ا ,B , .DFا,رة ا@? 4ا<رة ،و!
@ث 5دم.
! L
! P@ 4ا<رة أو آ > "2B+اذ+
أو ا,دة ]ي > " Pو&9د !" ا@آ و6d
) NEUTRALا H (DS2Yآ> "!+ا@آ.
را" 69ا أ "9ا$wم" "ا>ء وا""RS
و"@ Pرة P " $d "F2أن `2B
ا@wت اFر[" 2ف 3ا
&2$ت.
ادة )(D
> RاIام ه'ا اFق ا< دا" > ا$ن
و اFق ا< 2 W .2ه'ا أآ #وس ا<
Yا ",س أ أو أ!" وأآ#ه ًا
Ywك ا&!&د "! ", .ا@آ أو&
?ً إ س
أ Yل 6$9اوس ا]
.و& و6d
) DRIVEا,دة( &اص ا,دة ا&5,ى 6$9
وف ا "RSا.2>F
?ار "! ",ا@آ )آ@ $ث "RSا<رة
" وف @ ! "$أو ا2B$ت أو
&ا 9ا qا &,أو أ.ء @&F,
Pرات ،($Id
اIم Bح ا@? ", 4ا 52ا]و&
?
ا]و&
?
"ا52
)را69
AutoStick
"AutoStickه'ا ا 3$ 4<,ا
&2$ت( @
س U .BIدي اIام س "#
BIه'=
اbوف إ @< ا]داء وإ "! $ Jا@آ وذ
", ",+اوس }+اط وا@& دون ارBع در9
Wارة !" ا@آ.
أ.ء در 9ا@ارة ة ا>ودة ) -30در&g
9
] -22در [k 9أو أ!"("! "RS "2 4 ! ،
8
ا@آ و ً ,رW 9ارة ا@$ك و!" ا@آ وأ ً
ا<رة 4 .اgف ا "RSا2دي ارBع
درW 9ارة !" ا@آ إ <&ى .P
(Uh) !"H
• ! @ك ر و<> Pإ +Aوا إذا
? 4و) PARK 6dا&! D,@ .(Hذ
@
DJو @ ذراع ا ",رج و6d
) PARKا&! @ 6
(Hدوا اBا
"* .آ
و&9د !" ا@آ و) PARK 6dا&!">! (H
Rدرة ا<رة.
• إن Rاوس و) PARK 6dا&! (Hأو
و) NEUTRAL 6dا&? (DS2Yن
ا@$ك أ ا>&F UJي
&Fرة} .ذا ! ? 4دوا اBا
"
*+آ F> ،$ا<رة ا &@ "2ا]
م أو
ا . <+ HIو! ,Bا<Fة ا<رة
و W*+ 4Fأو S+ء R+ 4! .اوس ,
> UJا@$ك &? $+ 2>J "?S+ن !
دوا اBا
" &5+رة .
)(Uh
(Uh) !"H
• Uدي Wآ ا<رة &5,
"?S+د إ إ
+A
H,دا" ا<رة أو ,+ب .و6$ ><+
ا<راتR
,ًF
R> w ،درة ا<رة أ.ء
"RSا@$ك ">! P .اIوج ا<رة،
ا,م دوً
DS2+ا
" ا&! Hو "! ",ا@آ
إ و) PARK 6dا&! (Hوإ,ف "RSا@$ك
وإاج b Wا&? .qB$ن Bح ا"RS
و) OFF 6dإ,ف ا 4 ،("RSاWز !"
ا@آ و) PARK 6dا&! * (Hا<رة
أي Wآ @.+&
$
• Rدرة ا<رة* ،آ دوً
أن Bح ا "RS
و) OFF 6dإ,ف ا ،("RSو!}+ 4زا b W
ا qB$ا<رة و! "Bا<رة.
• wك أً+ا ا]BJل B$+ده 4ا<رة أو <4 q$
!w+اب رة 2 .B,ك ا]BJل
ا<رة دون ا!> أ
ًا ًFا ]>ب ة, .
5ب ا]BJل أو اون +A}+ت Fة أو
.$و` Pا>` ا]BJل 2+م {$
ا
" ا&! Hأو دوا اBا
" أو ذراع ا.",
(Uh) !"H
• wك b Wا qB$ا<رة أو ,+ب )أو
?ن ?$ا]BJل ا&&Aل إ`( ،و wك
Bح ا "RSو) ACC 6dا,@$ت( أو
>F
) ON/RUNا/"RSاYFwق(.
ا]BJل "RSا&ا ' ا !F+ 2وأزرار ا@?4
ا]ى أو @ ا<رة.
! L
• !>" @ ذراع ا ",إ رج وPARK 6d
8
)ا&!+ P ،(Hء "RSا@$ك وأ ً
ا R8دوا اBا
" .وإU , wدي ذ إ
Wوث Hذراع ا.",
• 6<+ 4, wا@$ك ",اوس و6d
) PARKا&! (Hأو وNEUTRAL 6d
)ا (DS2Yإ Fق س ] iن ذ ! H
&$ا 6وا@آ.
)(Uh
٢١٣
@&ي ذراع !" ا@آ أوdع ) PARKا&!(H
و) REVERSEا&9ع (HIوNEUTRAL
)ا (DS2Yو) DRIVEا,دة( وأوdع ) ",ا52
ا]و&
? ?$ .(Autostickا,م Y,+ت او
I+ام Bح ا@? ", 4ا 52ا]و&
?
ا]و&
?
"ا52
)را69
AutoStick
"AutoStickه'ا ا 3$ 4<,ا
&2$ت("$2 .
>" ذراع ا ",إ ا]
م ) (-أو إ ا (+) HIأ.ء
ا&ا 9ا&) MANUAL 6dاوي( )ا52
ا]و&
? ) (AutoStickإ P9وDRIVE 6d
)ا,دة(( @ س !" ا@آ وً4 4. ،
ض اس ا@ &$أ39ة ا,س آـ M1
أو M2أو M3أو .`+
:F1Gإذا H#ر " ذراع ا Lإ@ وPARK UW
)ا (Mأو و) REVERSE UWا"ع (M8J8أو
و) NEUTRAL UWا L?) (#Gا¬ iم(،
!u:ن ? @8اkر 7! aا) MANUAL UWوي(
)ا >#اkو) (-/+ ،AutoStick uإ@ ;&
و) DRIVE UWادة(( 7! .اMANUAL UW
)اوي( )ا >#اkو* ،(AutoStick u
?"ض "س ; ا"آ ! ?' 7أ)+ة اس )آـ
M1أو M2أو M3أو "1 .( hzك ذراع ا Lإ@
ا) Pإ@ و) DRIVE UWادة(( <8ل إ@ وUW
) PARKا (Mو) REVERSEا"ع (M8J8
و) NEUTRALا.(#G
;5ت ا"وس
6<+ 4, wا@$ك ",اوس وPARK 6d
)ا&! (Hأو ) NEUTRALا (DS2Yإ Fق س
.i
#h :F1GاSر أي و"8 UWوس ،ا;Gً8 "F
:8ح #hا"س اد hء ا:رع .وهHا
ا # "kهً ?u Lن ا"ك hرًدا.
ا(P) M
>2ه'ا اFق ?B Yً$ا
" ا&! Hإذ إ` &,م "B,+
!" ا@آ .و?
^+ن +ء "RSا@$ك و6d
!" ا@آ ه'ا ا& .6dا
ً+ 2ً
6اIام
و) PARK 6dا&! (Hأ.ء @ك ا<رةS+ 4! .
ا
" ا&! Hك ا<رة ه'ا اFق.
ا&! "! ", ?$ ،&ٍ<
qF Hا@آ إ
و) PARK 6dا&! (Hأوً 4. wاIام ا
" ا&!.H
ا&! ،6B
HاIم ا
" ا&!", ">! H
!" ا@آ إ و) PARK 6dا&! .(Hو
3$
اWwط أدر اY2ت ا]
=+ا HA
ا&!&ف @
qBر وً2+ا ا HA
ا&!&ف .6B
qB
!"H
• I< wم و) PARK 6dا&! (Hآ>" Bا
"
ا&! .Hوا "$2ا
" ا&! Hدا[ً&5+ $رة آ
Bدي @ك ا<رة وWوث إ+Aت.
)(Uh
٢١٢
;Fم "ا ihو UWا9 U Mح ا
ه'= ا<رة 3ودة b+م ا +ا&!B
6
Hح ا"RS
وا'ي PFأن & "! 6dا@آ وPARK 6d
)ا&! ">! (Hإ,ف "RSا@$ك .و&ف < ه'ا
ا<[ P Dك ا<رة &5,
"?S+د دون و6d
!" ا@آ و) PARK 6dا&! .(Hآ&, $م ه'ا
W+ 8ز !" ا@آ وPARK 6d
اbم أ ً
)ا&!&? (Hن Bح ا "RSوOFF 6d
)إ,ف ا.("RS
;Fم "ا ihا"9ا ;/ا"آ
3 4و ه'= ا<رة b+م ا + +اBا
" و!"
ا@آ ) (BTSIوا'ي @'+ jBراع ا ",و6d
) PARKا&! 4 w (Hا R8اBا
"@ .
ذراع ا ",رج و) PARK 6dا&!"RS P@ ،(H
ا@$ك وا R8دوا اBا
".
Pا R8دوا اBا
" ,Yل و6d
) NEUTRALا (DS2Yإ ) DRIVEا,دة( أو
) REVERSEا&9ع &? (HIن ا<رة
&! Bأو @آ .8BI
<+
; "1آ أو 7; 7uا?":ت -إذا آ;B
ا:رة )ودة Hh
4ض Fق س !" ا@آ ) (PRNDMآ"
ذراع ا ",و ض
&2ت ا<[D
).(DID
@ Fق أ Wاوس ،ا Rdزر ا'+ "B,راع
8أن R8
ا ",وWك ا'راع ¼
م و P .HIأ ً
دوا اBا
" "! ",ا@آ رج و6d
) PARKا&! (Hأو ,Yل وNEUTRAL 6d
)ا (DS2Yإ ) DRIVEا,دة( أو REVERSE
)ا&9ع &? (HIن ا<رة &! Bأو @آ
) 8BI
<+راb" 69م ا +اBا
""!/
ا@آ"(W .د Fق ) DRIVEا,دة( ,دة ا2د.
ذراع ; ا"آ اkو7u
& !" ا@آ ا$ار إ?وً 9ول ",د!D
وس .و 3$ا]39ة ا^?و !" ا@آ
2$+ة ا'ا' ،ا ! 2F, jWYت [ Yل
>Yت اوس ا]و ا<رة اة اIwام.
وه'ا ا]
2>Jو 4ا&9ع إ ت ا,wل
ا! 2+ا,دة >g
28ت ا?&
ات )ا]
ل(.
4ا,wل و) DRIVE 6dا,دة( إ و6d
) PARKا&! (Hأو ) REVERSEا&9ع (HI
@ دوا ا&!&د و&! Hا<رة * .,آ
إ,+ء !
دوا اBا
" ا + ",ه'= اوس.
٢١١
(Uh) !"H
• Uدي Wآ ا<رة &5,
"?S+د إ إ
+A
H,دا" ا<رة أو ,+ب .و6$ ><+
ا<راتR
,ًF
R> w ،درة ا<رة أ.ء
"RSا@$ك ">! P .اIوج ا<رة
DS2ا
" ا&! Hو "! ",ا@آ إ و6d
) PARKا&! (Hوإ,ف "RSا@$ك وإاج
b Wا&? .qB$ن Bح ا "RSو6d
) OFFإ,ف ا 4 ،("RSاWز !" ا@آ
و) PARK 6dا&! * (Hا<رة أي Wآ
@.+&
$
• Rدرة ا<رة* ،آ دوً
أن Bح ا "RS
و) OFF 6dإ,ف ا ،("RSو!}+ 4زا b W
ا qB$ا<رة و! "Bا<رة.
)(Uh
٢١٠
(Uh) !"H
• wك أً+ا ا]BJل B$+ده 4ا<رة أو <4 q$
!w+اب رة 2 .B,ك ا]BJل
ا<رة دون ا!> أ
ًا ًFا ]>ب ة, .
5ب ا]BJل أو اون +A}+ت Fة أو
.$و` Pا>` ا]BJل 2+م {$
ا
" ا&! Hأو دوا اBا
" أو @د س !"
ا@آ.
• wك b Wا qB$ا<رة أو ,+ب )أو
?ن ?$ا]BJل ا&&Aل إ`( ،و wك
Bح ا "RSو) ACC 6dا,@$ت( أو
) ON/RUNا/"RSاYFwق( F> .ا]BJل
"RSا&ا ' ا !F+ 2وأزرار ا@? 4ا]ى
أو @ ا<رة.
! L
! 2ض !" ا@آ Hإذا 4اع اJWwت
ا&اردة أد=:
• ا ",إ و) PARK 6dا&! (Hأو و6d
) REVERSEا&9ع (HIأو !",+ 4
ر 2+ , $9إ,ف ا<رة .
ً$
• + ">+ 4, wو) PARK 6dا&! (Hأو و6d
) REVERSEا&9ع (HIأو و6d
) NEUTRALا (DS2Yأو وDRIVE 6d
)ا,دة( ?&ن ا@$ك أآ>
ا>.UJ
• !>" @ ذراع Rاوس إ أي س *آ
و ! 6dدوا اBا
" &5+رة @?.$
&' :F1Gا @8? 6ً5 iدوا ا"9ا أLء
ا"Jوج Pو) PARK UWا.(M
• ;"ًFا #5اkداء ا ; ?' 7! 7#ا"آ،
!; < U:ت ; ا"آ .و F1G Pu
هHا ا uh "kوا aWأآu L? "wن ا:رة !7
و) NEUTRAL UWا # U (#Gاh
)"" دوا ا ،(hآ Puأً ? ?L
ادة ?":hت "8 Â5hك .آF1G Pu ،H
هHا ا uh "kأوu L? aWن ; ا"آ دا!ً.Â
وه XHا ?د و 7! 8u u 6ا hأو ;
ا"آ.
'وز ا P Lا"س 1إ@ 4
2+ا]Wن "! "> P ! ،ا@آ >ة
اس ا]ول إ اا wً+ 6+ا]ول إ ا .#وذ
<$ة @ D,أ "8اYك &!&د ا<رة.
@ث ذ ?&ن درW 9ارة [" ا> )
6
ا ($أ 41در 106) &g
9در9
،(kو ا$آ> أ 30آ19) /4
ً/Yا<( ? أ!" 34آ/Yً
21) /4ا<(
و!" ا@آ اس ا]ول ،ودوا ا&!&د J&R8
FRd 6+أو أ!" $Aم اwق.
و "! "> 2+ا@آ إ اس ااRd ?$ ،6+
دوا ا +,وا,wل إ س أ
.i
ا;6ل إ@ "س أ
و@Bظ iو $أ&Jل Bا
" ،ا",
س أ!" 3 i b @$ول
ا@$رات.
!"H
Uدي وز أآ #س أ.ء ",اوس ] "Bإ
ا$Wل ,ان Fا<رةU ! $
.دي إ
و!&ع 5دم.
! L
• FI Wأآ #س وا Wأ.ء
ا,wل س أ إ س أد أو ا,wل
إ س أد أ.ء ا< U ! ، <+دي ذ
إ Hا@$ك أو !" ا@آ أو ا.+,
(Uh) ! L
• ", wاوس إ اس ا]ول ?&ن
ا<رة أ 24آ/Yً
15) /4ا<(،
]ن ذ ! Hا@$ك و/أو ا.+,
; ا"آ اkو7u
!"H
• إن Rاوس و) PARK 6dا&! (Hأو
و) NEUTRAL 6dا&? (DS2Yن
ا@$ك أ ا>&F UJي &Fرة.
}ذا ! ? 4دوا اBا
" *+آ،$
> Fا<رة ا &@ "2ا]
م أو اHI
. <+و! ,Bا<Fة ا<رة و4F
W*+أو S+ء R+ 4! .اوس UJ> ,
ا@$ك &? $+ 2>J "?S+ن !
دوا
اBا
" &5+رة .
)(Uh
٢٠٩
<@ول ا>3ك @ Pا'راع @& اس ا#
واا* .6+آ @ ا'راع دا" اس ا #أو
ا ] .{
Iإذا آ kا'راع @ك ا= ا<@،P
,أ ",اس ا]ول إ اا 6+أو
ا<دس إ ا.#
! L
اWص دا[ً $أن &! Hا<رة ">! ً$ا",
&) REVERSE 6dا&9ع .(HIإن م ا,م
"! H ` P ! '+ا@آ.
"?ت ا"وس اُ<@ +h
Iwام !" ا@آ اوي & "?S+اYك ا&!&د،
> ", Rاوس إ ا] آ $ه& > 9ول
ت ا ",ا.+ A&$
و Pدا[ً $اIام اس ا]ول )أو ا&9ع
(HIا>ء و.H!& 6d
; ا"آ اوي ?" -ت ا ا<@ +h
<> ا&@$ر
3.90
ً/Y
)آ(/4
! Uدي Rا< اY ] ?>$ل اYWت ذات
ا< ا) +#ت (ً>< +.إ زدة اYك
ا&!&د.
?$اIام ت &A& ] ",ل إ 2ل
ا<رع ا&F$ب.
٢٠٨
1-4
20
)(32
:F1G
• ه XHا:رة )ودة FLhم ; Uرع ; ا"آ.
!u L#ن ا ?":أ? 5 P @8آ* 3) ?/أل/
?( U; iL ،ا"ع ?:8 M8J8ة !UL 7
" #س ) REVERSEا"ع 7! .(M8J8
1ا MامHh Ì1G ،ل +أ ! 7ا Lإ@
"س ) REVERSEا"ع L? (M8J8ود
9ح ا ! 7و) ON UWا( )وUW
) RUNاG5;6ق( )ة اSل دون 9ح
4-5
37
)(59
5-6
48
)(77
™ (Keyless-Enter-N-Goر; UWh
9ح ا ) LOCKا) (9و) OFF UWإف
ا( )ة اSل دون 9ح Keyless
™ .(Enter-N-GoوهHا أ" ?دي FLم ;U
ا"ع ; 7! M8J8ا"آ.
I $ 4ن آ ا@$ك أF "Bء ا@$ك
P9ا<[ Dا<رة&@ .ي Fء !"+
¿زا &,+ 9ب 6+ا&اء.
!"H
'آ I "5ن آ ا@$ك !>" ا,دة! .
<> H Pار ا? +ا'ي اوح `
110إ W k& 115وث Aآ.+
; ا"آ اوي — إذا آ; Bا:رة
)ودة Hh
; ا"آ اوي ا 7ا?":ت
!"H
! 2ض أ kأو ا ¿ +Aإذا آ kا<رة
دون ا!> +ون DS2ا
" ا&! P .
ً$ Hدا[ً$
DS2ا
" ا&!&? w Hن ا [,ا<رة،
Aا@$رات.
! L
• Pا,دة 6و 6dا,م دوا ا ،+,وw
@ول ا&!&ف <+رة @
qBر 6اR8
ً[39دوا اU ! W +,دي ذ إ H
دي .+,+راb" 69م ا@? 4ا^?و
اBا
"+ <
/ء ا "RSا2B$ت"
ا" 4<,ا>ء وا&5@ ""RSل
3
ا
&2$ت.
• إن م Rdدوا ا "
?+ +,إ ا]ر! d
ً9 PFا أآ ،"> #و! Uدي إ Hا+,
و!" ا@آ.
• wح ك ذراع ا ",أ.ء ا,دة] ،ن ذ !
Uدي إ 3
Hا
!" ا@آ.
• @ wول >" !" ا@آ Wدوران اY2ت
ا P><+ BIم ا?Wwك@ ! W .ث "! H
ا@آ.
7! :F1Gا «5ارد ،ا ً+ا زاً4ا !7
? 8ا ; 4 PJ: * @1 Lا"آ .وهHا
ا.7#x "k
ذراع ; ا"آ اوي
; ا"وس
ا Rdدوا ا "
?+ +,وار ! 6دوا
ا&!&د !>" Rاس&, .م @+دوا ا+,
!ً ،Yا Rdدوا ا&!&د2 ! .ض !" ا@آ
أو ا H +,إذا "
?+ R8 4دوا ا+,
ور ! k2دوا ا&!&د ",ا@آ.
@&ي !" ا@آ اوي ذو ا<ت ا<
ز>ك &ازن ذراع ا ",ا!اب اس ا#
واا .6+وه'ا ا>3ك < 2اس ا'ي
& .`,S2ا'Wر ا,wل ا]ول إ ا#
أو ا3ول ا<دس إ ا.{
I
٢٠٧
إذا * أ ا"ك
!"H
• @ wول أً+ا "RSا<رة P?<+ا&!&د أو أي
&ا[" أى !2Y "+ل 'Bا&اء اIص
$5+م ا] .DIن ذ ! <>& Pر ر
ري U ! µ9Bدي إ إF 5I +Aة.
• @ wول د 6أو @ Pر >ء "RSا<رة.
ا<رات ا3$ودة W "!+آ أو&
? + ?$ wء
='+ RSا 2+ "5 , .,Fا&!&د
ا@$ق إ ا&@$ل ا@Bز $+ "2Sد دوران
ا@$ك U $دي إ Hا&@$ل وا<رة.
• }ذا آ kا>Fر ?$ ،&@SاIام
أYك ُ
َ3ِ2زة @&5ل @ ا>ء F+ر
ُ
32زة أو رة أى .و "#$ذ ا&ع
ا&F "RSرة ,F+ ='B 4 4 ,,W
ا .@@5را "RS" 69رة ذات F+ر B2d
I+ام F+ر 32زة" "
Pأن `2B
ا@wت اFر[ " @&5ل 3ا
&2$ت.
٢٠٦
إزا "Tا"ك )Jhام ا)ر ENGINE
h) START/STOPء /إف ا"ك(( —
; ا"آ اkوi! 7u
Wل م +ء "RSا@$ك 2+ا>ع إ9اءات
"ا "RSا2$د" أو "ا {,Fا>ودة"&? , ،ن
3+) $ Wزا[( tI .أي و!&د زا[،
ا wً&F
Rdدوا اBا
" ،وا Rdدوا ا&!&د
"
?+إ ا]رض وأ ,+ه'ا ا& 4. ،6dا Rd
زر +) ENGINE START/STOPء /"RSإ,ف
ا@$ك( ة واWة وWر=@
DS2 .ك 9ز +ء
ا "RSأو&
?ً و$ "$2ة &. 10اٍن."5B 4. ،
['W ،ر دوا ا&!&د ودوا اBا
" ،وا
b
10إ 4. . 15آر إ9اء "+ء ا "RSا2دي".
إزا "Tا"ك )Jhام ا)ر ENGINE
h) START/STOPء /إف ا"ك(( —
; ا"آ اوي !i
Wل م +ء "RSا@$ك 2+ا>ع إ9اءات
"ا "RSا2$د" أو "ا {,Fا>ودة"&? , ،ن
3+) $ Wزا[( tI .أي و!&د زا[،
ا wً&F
Rdدوا ا ،+,وا Rdدوا ا&!&د
"
?+إ ا]رض وأ ,+ه'ا ا& 4. ،6dاRd
wً&Fا3ر +) ENGINE START/STOPء
/"RSإ,ف ا@$ك( W .. 15 3 w $ر
دوا ا&!&د ودوا ا ،+,وا 10 bإ 15
4. .آر إ9اء "+ء ا "RSا2دي".
h #hء ا
4ا@? 4ا> UJأو&
?ً و&ف BI
ه'= ا< &Iا@$ك.
Jن آ 8ا"ك -إذا آ; Bا:رة )ودة
Hh
&,م Iن آ ا@$ك I<+ا@$ك و<$2+ q$ت
2 "RSا {,Fا>رد "A&+ 4! .ا< 'B$+
ر آ
+دد ! اوح ` 110إ 115
&U
"&F 6
kرض ..Y.
I "A& Pن آ ا@$ك Yل واWة
ا]!" @&5ل * g .آف ا@$ك.
9xmء ا"ك Jhام ا)ر ENGINE START/
h) STOPء /إف ا"ك( ; -ا"آ
اوي !i
2+ .1إ,ف ا<رة 6d ،ذراع ا ",و6d
) NEUTRALا 4. ،(DS2Yا Rdا3ر زر
+) ENGINE START/STOPء /"RSإ,ف
ا@$ك( وWر=.
&2 .2د Bح ا "RSإ و) OFF 6dإ,ف
ا.("RS
6d .3ذراع ا ",اس ا]ول أو REVERSE
)ا&9ع DSّ 4. (HIا
" ا&!.H
:F1G
• إذا ُ"ك 9ح ا ! 7و) ACC UWا8ت(،
!ن اFLم "FLأو ًّuة 30د و?? Lم
إ"اء أي ;ط ،+GSو" Lص ا إ@
ا) OFF UWإف ا(.
• إذا ُ"ك 9ح ا ! 7ا) RUN UWاG5;6ق(،
! "FL:اFLم أو 8+ ًuره 30د ?L
?م إ"اء أي ;ط وإذا آ; ?" Bا:رة ه0 7
آ* (?/ 0) ?/وآن ا"ك .# 6
• إذا آ; ?" Bا:رة أ? 8 P @8آ*5) ?/
أل Bw &'! ،(?/ا)ر ENGINE
h) START/STOPء /إف ا"ك(
P;wإف ا"ك F .و9 UWح
ا ! 7و) ACC UWا8ت( إ@ أن M
ا:رة و* iWا)ر " Pإ@ وOFF UW
)إف ا(.
و¼ M4اSل دون 9ح ™Keyless Enter-N-Go
– ? Uم ود م ا @8? 4:دوا ا/hدوا
ا"9ا )! 7و) PARK UWا (Mأو NEUTRAL
)ا((#G
3
"$2ة ا&ل دون Bح Keyless Enter-
™B
`>S "?S+ N-Goح ا&@ ."RSي
.Y.أوdع) OFF :إ,ف ا ("RSوACC
)ا,@$ت( و) RUNاYFwق( .و&
RاB
6dح
ا "RSدون +ء "RSا<رة واIام ا,@$ت،
ا> 6ا&FIات ا 6ا>ء و
Bح ا "RSو6d
) OFFإ,ف ا:("RS
.1ا Rdزر ENGINE START/STOP
)+ء /"RSإ,ف ا@$ك( ة B
Rح ا "RSإ
و) ACC 6dا,@$ت(،
.2ا Rdزر ENGINE START/STOP
)+ء /"RSإ,ف ا@$ك( ة B
R .ح ا"RS
إ و) ON/RUN 6dا/"RSاYFwق(،
.3ا Rdزر ENGINE START/STOP
)+ء /"RSإ,ف ا@$ك( ة B
R #.ح ا"RS
إ و) OFF 6dإ,ف ا.("RS
ا z «5ا"ودة )أ 20- Pدر ! B+;"+أو
29در (Â$8ن +ء ا q@A "?S+ "RSدر9ت ا@ارة
ه'=I+ A&ُ ،ام Iن آ @ك إ?و آ+
ار اIرج )
& ى ا&آ"(.
٢٠٥
.2ا$+ Rdار دوا اBا
" Rd 6ا3ر
+) ENGINE START/STOPء /"RSإ,ف
ا@$ك( ة واWة.
4?@ .3اbم و@ول "RSا<رة .إذا > 4أ
"RSا<رة9 H!&< ،ز +ء ا "RSأو&
?ً
&. 10 2+اٍن.
.4إذا ر> kإ,ف و ا@$ك !>" ،`RS
Rdا3ر ة ..
.3إذا ر> kإ,ف و ا@$ك !>" @ ،`RSر
ا3ر.
&85 6 :F1Gا ا#دي "8ك اء أآن
hرًدا أو دا!ً Âا iا U5أو ا iا#دي ?@8
دوا اد.
9xmء ا"ك Jhام ا)ر ENGINE START/
h) STOPء /إف ا"ك( ; -ا"آ
اkوi! 7u
&85 6 :F1Gا ا#دي "8ك اء أآن
hرًدا أو دا!ً Âا iا U5أو ا iا#دي ?@8
دوا اد.
6d .1ذراع ا ",و) PARK 6dا&!4. ،(H
ا RdوWر ا3ر +) ENGINE START/STOPء
/"RSإ,ف ا@$ك(.
اJام ا)ر ; — ENGINE START/STOP
ا"آ اوي !i
&2 .2د Bح ا "RSإ و) OFF 6dإ,ف
ا.("RS
.1ا wً&F
Rdدوا ا 6
+,ا R8ا&F$ل
ا3ر +) ENGINE START/STOPء
/"RSإ,ف ا@$ك(.
.3إذا آن ذراع ا { ",و) PARK 6dا&!،(H
Pا R8ا3ر ENGINE START/STOP
)+ء /"RSإ,ف ا@$ك( $ة .و Pأن 3
ا<رة 8آ 5) /4أ
ل ">! (/إ,ف
"RSا@$ك "b .وB
6dح ا "RSو6d
) ACCا,@$ت( إ أن q>5ذراع ا ",و6d
W .2ر ا3ر +ء "RSا@$ك .وإذا > 4أ ا<رة
ا&8 "$2ن @ ،. 15ر ا3ر وا10 b
إ 4. ،. 15آر إ9اء "+ء ا "RSا2دي".
٢٠٤
) PARKا&! (Hو Rd 4ا3ر إ و6d
) OFFإ,ف ا .("RSوإذا ? 4ذراع ا ",و6d
) PARKا&! (Hو Rd 4ا3ر ENGINE
+) START/STOPء /"RSإ,ف ا@$ك( ة،
<2ض ض
&2ت ا<[ (DID) Dر
") "VEHICLE NOT IN PARKا<رة < k
و 6dا&! (Hو< $ا@$ك ا w ."$2ك ا<رة
أً+ا رج و) PARK 6dا&! (Hآ W wج.
" L? :F1Gك 9ح ا ! 7وACC UW
)ا8ت( أو ) RUNاG5;6ق( )ا"ك (# 6وآن
; ا 7! ?":و) PARK UWا"FL:! ،(M
اFLم أو 8+ ًuره 30د و?? Lم إ"اء
أي ;ط +GSل "ص ا إ@ وOFF UW
)إف ا(.
; ا"آ اkو - 7uإذا آ; Bا:رة )ودة
Hh
Pأن ?&ن ذراع ا ",وNEUTRAL 6d
)ا (DS2Yأو و) PARK 6dا&! ">! (Hأن >أ
"RSا@$ك .اIم اBا
" !>" ",ذراع ا ",إ أي
س وس ا,دة.
! L
! 2ض !" ا@آ Hإذا 4اع اJWwت
ا&اردة أد=:
• ", wذراع Rاوس وREVERSE 6d
)ا&9ع (HIأو و) PARK 6dا&! (Hأو
و) NEUTRAL 6dا (DS2Yإ أي و6d
وس iإ ا]
م ?&ن ا@$ك
أآ> ا>.UJ
• ا ",ذراع Rاوس إ و) PARK 6dا&!(H
2+ ,إ,ف ا<رة .
ً$
)(Uh
(Uh) ! L
• ا ",ذراع Rاوس أو إ و6d
) REVERSEا&9ع 2+ , (HIإ,ف
ا<رة ً$و
?&ن ا@$ك ا>.UJ
• !>" @ ذراع Rاوس إ أي س* ،آ
و ! 6dدوا اBا
" &5+رة @?.$
اJام ا! Fذات ا9ح اh) Áء ا
ا(7!"5
&85 6 :F1Gا ا#دي "8ك اء أآن
hرًدا أو دا!ً Âا iا U5أو ا iا#دي ?@8
دوا اد.
i 6دوا ا&!&د .اIم ا@ bذات اB$ح
ا^ Å
$دارة Bح ا "RSإ و+) START 6dء
ا ("RSوWر= $+د 9 "RSز +ء ا$< ."RS
&&ر 9ز +ء ا "RSا "$2و&! Hأو&
?ً
"RSا@$ك .إذا > 4أ "RSا@$كH!&< ،
9ز +ء ا "RSأو&
?ً Yل &. 10اٍن .إذا Wث
ذ* ،در Bح ا "RSإ وLOCK/OFF 6d
)ا/"B,إ,ف ا ("RSوا 10 bإ 4. . 15
آر إ9اء "+ء ا "RSا2دي".
)ة اSل دون 9ح ™Keyless Enter-N-Go
qه'= ا3$ة <["RS D
Bح ا FR8+ "RSزر،
$Jآن زر ENGINE
)+ء
START/STOP
/"RSإ,ف ا@$ك( آً>
وآ b W kا3
qB$ودة
3$+ة ا&ل دون Bح
™&5,
Keyless Enter-N-Goرة اآب.
hء ا ا#دي
اJام ا)ر h) ENGINE START/STOPء
/إف ا"ك( ; -ا"آ اkوi! 7u
P .1أن ?&ن !" ا@آ وPARK 6d
)ا&! (Hأو ) NEUTRALا.(DS2Y
٢٠٣
إ"اءات hء ا
!>" "RSا<رة ،ا >dا 2,$وا$ا اا
واIر 9و!3W ++ 4ام ا]
ن وإذا آن هك رآب
ا 2ً$9 4
PJر +أ 3Wا]
ن ا.4+ AI
!"H
• Rدرة ا<رة* ،آ دوً
أن Bح ا "RS
و) OFF 6dإ,ف ا ،("RSو!}+ 4زا b W
ا qB$ا<رة و! "Bا<رة.
• wك أً+ا ا]BJل B$+ده 4ا<رة أو <4 q$
!w+اب رة >2 .B,ك ا]BJل
<+رة دون ا!> أ
ًا ًFا
2
ا]>ب5 , .ب ا]BJل أو اون +A}+ت
Fة أو .$و` Pا>` ا]BJل 2+م
{$ا
" ا&! Hأو دوا اBا
" أو @د س
!" ا@آ.
)(Uh
(Uh) !"H
• wك b Wا qB$ا<رة أو ,+ب )أو
?ن ?$ا]BJل ا&&Aل إ`( ،و wك
Bح ا<) "RSرة 3ودة 3$+ة ا&ل دون
Bح ™ (Keyless Enter-N-Goو6d
) ACCا,@$ت( أو وON/RUN 6d
)ا/"RSاYFwق( F> .ا]BJل "RS
ا&ا ' ا !F+ 2وأزرار ا@? 4ا]ى أو
@ ا<رة.
; ا"آ اوي -إذا آ; Bا:رة )ودة Hh
اIم ا
" ا&! 6d 4. ،Hذراع ا ",و6d
) NEUTRAا 4. ،(DS2Yا Rdدوا ا+,
!>" "RSا<رة .ه'= ا<رة 3ودة b+م >
"RS
.+,+و "$2إ wا R8دوا ا+,
.
ً$
hء ا ا#دي 9hح ا ; — Áا"آ
اوي
+ PF wء ا "RSا2دي @$ك &اء أآن +رًدا أو
دا ً gا R8ا 6F,$أو ا R8ا2دي دوا ا&!&د.
٢٠٢
ا Rdدوا ا "
?+ +,إ ا]رض ،وأدر Bح
ا "RSإ و+) START 6dء ا ،("RSوWر=
>أ "RSا@$ك .إذا > 4أ "RSا@$ك Yل
* ،. 15در Bح ا "RSإ و) OFF 6dإ,ف
ا ،("RSوا 10 bإ 4. ،. 15آر إ9اء
"ا "RSا2$د".
!"H
@ wول د 6أو @ Pر >ء "RSا<رة, .
2+ "5ا&!&د ا@$ق إ ا&@$ل ا@Bز
$+ "2Sد دوران ا@$ك U $دي إ H
ا&@$ل وا<رة .إذا آ kا<رة 3ودة F>+ر
?$ ،&@SاIام ا?Y+ت ا32$زة &"A
ا<رة <+رة أى >ء &? ! .RSن ه'ا ا&ع
+ء اًF "RSا إذا ' ،@@A ,F+ 4ا !4
'B+ه'ا ا^9اء @+ص .را "RS" 69رة ذات
F+ر I+ B2dام F+ر 32زة" "
P
أن `2Bا@wت اFر[ " @&5ل
3
ا
&2$ت.
• أوزان & ا5رة )6#ت أ>@ وزن 58رة(
• وزن ا5رة و:ن ا. . . . . . . . . . . &:
• 85ت ا. . . . . . . . . . . . . . . . . . &:
• ;>Qh a4ن ا. . . . . . . . . . . . . . . . &:
• ا'" Pأ ا'6م ))L h"? M8Sل ،Lإ¸. (.
• & ه XHا:رة M8Sرة أ"Sى . . . . . . . .
.
.
.
.
.
.
.
.
.
.
.
.
.
.
.
.
.
.
.
.
.
.
.
.
.
.
.
.
.
.
.
.
.
.
.
.
.
.
.
.
.
.
.
.
.
.
.
.
.
.
.
.
.
.
.
.
.
.
.
.
.
.
.
.
.
.
.
.
.
.
.
.
.
.
.
.
.
.
.
.
.
.
.
.
.
.
.
.
.
.
.
.
.
.
.
٢٥٨..
٢٥٨..
٢٥٩..
٢٦٢..
٢٦٣..
٢٦٣..
٢٠١
•
•
•
•
•
•
٢٠٠
.
.
.
.
.
.
.
.
.
• اxmرات ا - x16إذا آ; Bا:رة )ودة . . . . . . . . . . . Hh
• دوران اxmر ا. . . . . . . . . . . . . . . . . . . . . . . . . U":
• "zات M8اات . . . . . . . . . . . . . . . . . . . . . . . .
• ?" اxmر . . . . . . . . . . . . . . . . . . . . . . . . . . . . . .
• اال اxmرات . . . . . . . . . . . . . . . . . . . . . . . . . . .
Gاxmرات )أ)+ة ا. . . . . . . . . . . . . . . . . . . . . (&:
<ت ? " Pا Uاxmرات . . . . . . . . . . . . . . . . . . . . .
;Fم "ا iWهاء اxmرات ). . . . . . . . . . . . . . . . (TPMS
• اFLم ا) . . . . . . . . . . . . . . . . . . . . . . . . . . . . .
• F; 5#م "ا iWاxmرات ) - (TPMSإذا آ; Bا:رة )ودة Hh
85ت اد . . . . . . . . . . . . . . . . . . . . . . . . . . . . . . .
• "ك " 3.6 #:hات . . . . . . . . . . . . . . . . . . . . . . . . .
• "ك " 5.7 #ات ) ; Uا"آ اkو. . . . . . . . . . . (7u
• "ك " 5.7 #ات ) ; Uا"آ اوي( . . . . . . . . . . . . .
• "ك " 6.4 #:hات . . . . . . . . . . . . . . . . . . . . . . . . .
إ !Wاد . . . . . . . . . . . . . . . . . . . . . . . . . . . . . . . .
• 5Tء ! Â#اد )5Tء ا. . . . . . . . . . . . . . . . . (P)L
• ر ?م ر5T ihء ! Â#اد . . . . . . . . . . . . . . . . .
& ا5رة . . . . . . . . . . . . . . . . . . . . . . . . . . . . . . .
• 9"#ت ا &:ا. . . . . . . . . . . . . . . . . . . . . . . . . . #
• > & MLر ihا5رة . . . . . . . . . . . . . . . . . . . . . .
.
.
.
.
.
.
.
.
.
.
.
.
.
.
.
.
.
.
.
.
.
.
.
.
.
.
.
.
.
.
.
.
.
.
.
.
.
.
.
.
.
.
.
.
.
.
.
.
.
.
.
.
.
.
.
.
.
.
.
.
.
.
.
.
.
.
.
.
.
.
.
.
.
.
.
.
.
.
.
.
.
.
.
.
.
.
.
.
.
.
.
.
.
.
.
.
.
.
.
.
.
.
.
.
.
٢٤٢..
٢٤٣..
٢٤٤..
٢٤٤..
٢٤٤..
٢٤٥..
٢٤٦..
٢٤٧..
٢٤٩..
٢٥١..
٢٥٢..
٢٥٢..
٢٥٢..
٢٥٣..
٢٥٣..
٢٥٤..
٢٥٤..
٢٥٥..
٢٥٥..
٢٥٥..
٢٥٧..
• ;Fم ا *uا"umو; 7! 7ا"9ا ٢٢٢.. . . . . . . . . . . . . . . . . . . . . . . . . . . .
• ;Fم ا"9ا ا;G;G #ق )٢٢٣.. . . . . . . . . . . . . . . . . . . . . . . . (ABS
• ;Fم ا 7! *uا'" )٢٢٤.. . . . . . . . . . . . . . . . . . . . . . . . . . . . (TCS
• ;Fم ?:ا"9ا )٢٢٥.. . . . . . . . . . . . . . . . . . . . . . . . . . . . (BAS
• h ?:ء ا ? @8ا"#9ت )٢٢٥.. . . . . . . . . . . . . . . . . . . . . (HSA
• ;Fم ا 7! *uا"6ار ا"umو;٢٢٦.. . . . . . . . . . . . . . . . . . . . . (ESC) 7
• Wء F; 5?/iL "zم ا 7! *uا"6ار ا"umو; (ESC) 7وWء M "z
;Fم ا 7! *uا"6ار ا"umو;٢٢٩.. . . . . . . . . . . . . . . . . . . . . (ESC) 7
• )اF; Lم ا 7! *uا"6ار ا"umو;٢٢٩.. . . . . . . . . . . . . . . . . (ESC) 7
• 8#ت Gاxmر ٢٣٠.. . . . . . . . . . . . . . . . . . . . . . . . . . . . . . . . . .
• ?Gت اxmر ٢٣٠.. . . . . . . . . . . . . . . . . . . . . . . . . . . . . . . . . . . .
• ر* M"#اxmر )٢٣٣.. . . . . . . . . . . . . . . . . . . . . . . . . . . . . . . (TIN
• ا>85ت اxmh 8#رات وا9"#ت ٢٣٤.. . . . . . . . . . . . . . . . . . . . . .
• 1وWط اxmرات ٢٣٥.. . . . . . . . . . . . . . . . . . . . . . . . . . . . . . .
• اxmرات 8# -ت ? ٢٣٨.. . . . . . . . . . . . . . . . . . . . . . . . . . . . . . . .
• iWاxmر ٢٣٨.. . . . . . . . . . . . . . . . . . . . . . . . . . . . . . . . . . . . .
• iWا+اء ! 7اxmرات ٢٣٩.. . . . . . . . . . . . . . . . . . . . . . . . . . . . . .
• iWاxmر ٢٣٩.. . . . . . . . . . . . . . . . . . . . . . . . . . ? ?":h 8
• اxmرات ذات ا5ت ا٢٤٠.. . . . . . . . . . . . . . . . . . . . . . . . . . . . "5
• أ;اع اxmرات ٢٤٠.. . . . . . . . . . . . . . . . . . . . . . . . . . . . . . . . . . . .
• ا ?"! Lاغ ا+اء Pاxmرات – إذا آ; Bا:رة )ودة ٢٤١.. . . . . . . . . Hh
١٩٩
•
•
•
•
•
•
•
•
•
١٩٨
.
.
.
.
.
.
.
.
.
.
.
.
.
.
; ا"آ اkو. . . . . . . . . . . . . . . . . . . . . . . . . . . . . . 7u
• ;Fم "ا ihو UWا9 U Mح ا . . . . . . . . . . . . . . . . . . . .
• ;Fم "ا ihا"9ا ;/ا"آ . . . . . . . . . . . . . . . . . . . . . . . . . .
• ; "1آ أو 7; 7uا?":ت -إذا آ; Bا:رة )ودة . . . . . . . Hh
ا >#اkو. . . . . . . . . . . . . . . . . . . . . . . . AUTOSTICK u
• ا . . . . . . . . . . . . . . . . . . . . . . . . . . . . . . . . . . . . .
و) SPORT UWا"h - (Wون ا 7! *uاkداء . . . . . . . . . . . . . . . . . .
ادة ? @8ا a5kا) . . . . . . . . . . . . . . . . . . . . . . . . . . . . . .
• ا:رع . . . . . . . . . . . . . . . . . . . . . . . . . . . . . . . . . . . . .
• ا'" . . . . . . . . . . . . . . . . . . . . . . . . . . . . . . . . . . . . . . .
ادة ?"x @8ق رة . . . . . . . . . . . . . . . . . . . . . . . . . . . Xh
• اء ا!/ا>? . . . . . . . . . . . . . . . . . . . . . . . . . . . . . . .
• اء ا 75:ا"اآ . . . . . . . . . . . . . . . . . . . . . . . . . . . . . . .
ا ا)#ز آ. . . . . . . . . . . . . . . . . . . . . . . . . . . . . . . . ًh"+
"! Lاد "8آت " 5.7 #:hات" 6.4/ات ! — iإذا آ; Bا:رة )ودة
. . . . . . . . . . . . . . . . . . . . . . . . . . . . . . . . . . . . . . . . . . Hh
!"ا ا. . . . . . . . . . . . . . . . . . . . . . . . . . . . . . . . . . . . . M
• ; ا"آ اوي -إذا آ; Bا:رة )ودة . . . . . . . . . . . . . . . . . . Hh
• ; ا"آ اkو - 7uإذا آ; Bا:رة )ودة . . . . . . . . . . . . . . . Hh
;Fم ا"9ا . . . . . . . . . . . . . . . . . . . . . . . . . . . . . . . . . . . . . .
٢٠٩..
٢١١..
٢١١..
٢١١..
٢١٥..
٢١٦..
٢١٧..
٢١٨..
٢١٨..
٢١٨..
٢١٨..
٢١٨..
٢١٨..
٢١٩..
٢٢٠..
٢٢٠..
٢٢١..
٢٢١..
٢٢٢..
٥
اء وا
• إ"اءات hء ا . . . . . . . . . . . . . . . . . . . . . . . . . .
• ; ا"آ اوي -إذا آ; Bا:رة )ودة . . . . . . . . . . . Hh
• ; ا"آ اkو - 7uإذا آ; Bا:رة )ودة . . . . . . . Hh
• )ة اSل دون 9ح ™. . . . . . . Keyless Enter-N-Go
• hء ا ا#دي . . . . . . . . . . . . . . . . . . . . . . . . . .
• ا z «5ا"ودة )أ 20- Pدر ! B+;"+أو 29-در (Â
• إذا * أ ا"ك . . . . . . . . . . . . . . . . . . . . . . .
• h #hء ا . . . . . . . . . . . . . . . . . . . . . . . . . . .
• Jن آ 8ا"ك -إذا آ; Bا:رة )ودة . . . . . . . . . . . . Hh
• ; ا"آ اوي — إذا آ; Bا:رة )ودة . . . . . . . . . . . Hh
• ; ا"آ اوي ا 7ا?":ت . . . . . . . . . . . . . . . . .
• ; ا"وس . . . . . . . . . . . . . . . . . . . . . . . . . . . . .
• "?ت ا"وس اُ<@ . . . . . . . . . . . . . . . . . . . . . +h
• 'وز ا P Lا"س 1إ@ . . . . . . . . . . . . . . . . . . . 4
• ا;6ل إ@ "س أ . . . . . . . . . . . . . . . . . . . . . . . . .
.
.
.
.
.
.
.
.
.
.
.
.
.
.
.
.
.
.
.
.
.
.
.
.
.
.
.
.
.
.
.
.
.
.
.
.
.
.
.
.
.
.
.
.
.
.
.
.
.
.
.
.
.
.
.
.
.
.
.
.
.
.
.
.
.
.
.
.
.
.
.
.
.
.
.
.
.
.
.
.
.
.
.
.
.
.
.
.
.
.
.
.
.
.
.
.
.
.
.
.
.
.
.
.
٢٠٢..
٢٠٢..
٢٠٣..
٢٠٣..
٢٠٣..
٢٠٥..
٢٠٦..
٢٠٦..
٢٠٦..
٢٠٧..
٢٠٧..
٢٠٧..
٢٠٨..
٢٠٩..
٢٠٩..
١٩٧
:Uconnect® مb 4د
!Wت إ8#
DriveUconnect.com •
Chrysler آq5 &B@
S&ق ا,W ©
2 .&B@
&ق,@ ا6$9 .2014 م2 Group LLC
أن$ آ،<
ت رY Uconnect وMopar
آS
رY هMopar Owner Connect
Y Android 2 .Chrysler Group LLC
ر2 وYelp 2 $ آGoogle Inc. آS ر
ت رY 5
ت ذات اY2 واYelp وYelp
.Yelp q5 <
،Wً>A 12:00 W Wً>A 7:00 ،2$ ا.wا
ّ!Sّ اk!&ّ+
k!&ّ+ ، <ًء10:00 W Wً>A 8:00 ،k><ا
ّ!Sّا
k!&ّ+ ، <ًء5:00 W Wً>A 9:00 ،W]ا
ّ!Sّا
:"!
8.4AN
Uconnect® مb ><+ •
(ل إ, )اNavigate to"
800 Chrysler Drive
".Auburn Hills, Michigan
.مb>ت اF
6> ا4. .2
VR @ زر8? iW ا،ن همu P? ء ا:a8
: ، ع ا>!"ة#h .
(@ ا>ت8? "ف#)ا
".@+ ( أ"بP? )اFind nearest"
Uconnect® 8.4 Navigation مF;
١٩٦
(8.4A/8.4AN مF;) در ا"ارة
ارة ا<رةW 9> در8+ 4! ا@ ؟ ا>د ؟
ء. أtI " آW راj Wام ا وIدون ا
مb+ ودة3
ا<رةk )إذا آ.DFا@ك !ً
ا
(. ا@ارة9 در4?@ا
ً !" أ، ة5ع ا$ 2+ .
Uconnect 8.4 مFLh در ا"ارة
(8.4A/8.4AN مF;) 1Gا
Uconnect® navigation مb ة3
<ك
Bً
آ$ ف2 9 إ# أآq>5 وk!&& ا
ة3
2) .`ل إ,w ا'ي ا6!&$&ل إ اA&ا
69 را.Uconnect8.4A® مb ارWY$ا
(.k! أي وWY$ة ا3
S "ا&آ
ف2 )اVR زرRd ا،9 &ل إ و.1
:"! ، ة5ع ا$ 2+ .
(&ت5 ا
VR زرRdا
:
ا]وا
ا
9> درd) Set driver temperature to •
(9 )درdegrees 70 ( إD[< ا@ارة
Uconnect® 5.0 Phone مF;
>d) Set passenger temperature to •
(9 )درdegrees 70 ( إPارة ااآW 9در
ر ا"ارة7>" اkام اJ اPu :a8
مF; # 6 .رة: اP 8S در ا"ارة ااi
8'? أوLJ: ا? اiW @8? >وا" اkا
.Hh رة )ودة: اB; إذا آLJ:ادة ا
Uconnect® 8.4 Phone مF;
Enter" :"! 8.4A Uconnect® مb ><+ •
.(" )إدل دوstate
١٩٥
ً !" أ، ة5ع ا$ 2+ .
H زر اRdا
...
ا]وا
ا
@8? ("اض# )اBrowse @ زر8? iW ا:a8
ز+ @8? @ت ا98 U « هة8 اzz
h <Jوا" ا> اk ا.USB ة1 أو وiPod®
ن أوL9ت ا8# ?"ض9 آU ً h5 '& أن
.@ أو ;ع اLTkم أو اkا
$ &ن+ (ل5w )اCall •
>تF
6> وا123-456-7890 4!( رPJ) Dial •
مbا
,+< ا$?$ اH ه4!( )رPF )إدة اRedial •
(درة5ا
$?$ اH ه4!ل( )ر5wودة ا2
) Call back •
( ا&اردة,+<ا
@ زر8? iW ا،7< "ء أ5? إL? :a8
* ،(" )ا>لCall" و
(M+ )اPhone
>ل6 اL? . M+ د!" ا7! "+F * ً آ6ا
'نh ( )ا>لCall" لLu ،دة# Mرم هQh
."(# )اwork
Uconnect 8.4® مFLh i4ا
M+ا
أو اد2+ُ ا@ثAI+ Bت ه$?
اء9إ
.Uconnect® مb امI+ &<+ (H )د اPhonebook ء زر8
6!&$ اD,@ .ا3ًه9 مb أن ا2 'ا،{$ا
H اD ى &ا2$ UconnectPhone.com
.ت ا^!ان$2&ل و$@$ا
Uconnect 5.0® مFLh i4ا
١٩٤
i4ا
( )ا"ادRadio
USB ' > تw5w اUconnect® مb &
d^ة ا39] ' ا$ أو اBluetooth® أوSD أو
, &ت5" اRS &ا.('+ ودة3
ا<رةk)إذا آ
"RS
ز9) .5$ اiPod® أوUSB ة39]
6$9 & w اري و2+ُ J&R8$ا]!اص ا
(.ا<رات
FM أوAM 9&
إ2ً &لA& &A مIا
تF@
'( أو+ ودة3
ا<رةk )إذا آMW/LW أو
.ع إ$w اP ااد& ا'ي
ً !" أ، ة5ع ا$ 2+ .
VR زرRdا
ر5
ل إ,Y >تF$ ا6> وا،
ا]وا
ا
.ر نw ا&[ أو
إ
(ر5$ا
R)
... "! ، ة5ع ا$ 2+ .
9&
<$ "A <$ 2< @ إMh * •
FM
Uconnect® 5.0 مF; راد
Change source •
Bluetooth®
iPod® ر( إ5$ اR) Change source •
USB ر( إ5$ اR) Change source •
Play& ؛+ (نB" اRS) Play Artist •
Play song " ا]>&م( ا؛RS) album
"RS) Play genre ي؛$ k" ا]( أRS)
?Y( آ,&
&ع
١٩٣
VR زرRdا
Uconnect® 8.4 مF; راد
7! &T" آاQ Pu * إذا،B أي و7! :a8
@8? iW ا،7>" اkام اJh Â+ 7! &T" أو
"Help" و
(@ ا>ت8? "ف# )اVR زر
."واk اP 4 مFLف !" ا:! .(?ة:)
2J,
?$ .5ر ا$2ت أو >Fت اbم
DJا R8زر ) VRا2ف ا&5ت( أو
) Phoneا (Hو DFأ
&Aا gBا@.
اkوا" ا> اk
?$إFء ا]وا
ا &5ا] ا @d&$أد=
أي و! kأ.ء اIام bم ®.Uconnect
ا Rdزر VR
$ 2+ .ع ا 5ة... "! ،
• ) CancelإRء( ^,ف W &A <9
• <
) Helpة( <$ع ![ $ا]وا
ا&5
اW,$
;Fم Uconnect® 5.0
• ?) Repeatار( $Yع إ >Fت اbم ة
أى
اkوا" ا> FLم ®Uconnect
- 1ا> Rdء ? $ه Bأو اد ،أو
إرل tأو ا`
Y
6$ - 2أ39ة ااد& :ا> Rdء ااد& أو
و[ Hا&[b ><+ .م :, 8.4A/8.4AN
ا> Rdء ا WY$وا,>Fت وو[ Hدر9
ا@ارة
- 3ا^ Rdء ا$?$
١٩٢
jWwا^رات ا [$ا >Iك b @+م ا2ف
ا&5ت b W .ا^رات ا.{$
;Fم Uconnect® 8.4
8ت "1 #ل ;Fم ا"#ف ? @8ا>ت
FLم ®Uconnect
ا3$ات ا[<:
8ء
• ا,+ {$س A&+ 5ت
* ;Fم ®Uconnect
• .Y.أزرار آ" >9 P9ا2ض
آ" @b 4?@ `9م ®&A 6
Uconnect
ه ا]زرار ا&9&$دة ا,دة.
3+ "8B .1رة UconnectPhone.com
@& D,ا Dاز وا3$ة ور $2ت
إ!ان ا.H
ا>ء I+ام 3ة ا2ف ا&5ت b+م
® 6
Uconnectه'= @$ت ا< 2اB$ة .وه
& ا]وا
ا &5ا] وا@$ت ا @ج إ
b+ 4?@ 2م Uconnect® 5.0أو 8.4A/
.8.4AN
", .2اd&8ء ا&9&$دة ا .BIاح
و
@د.ت اآب أ
#اd&8ء ا ! .U
3ة ا2ف.
;Fم Uconnect® 8.4
.3ا@ث &d&+ح >+ة د و&<$+ى &Aت دي
6ا =wإ ا]
م .4,<
"?S+ا?$و &ن &&dع
iة اؤ ا BIو
& W `9ا<[.D
.4آ" ة &,م F}+ء أ
P ،&A
أوً Rd wزر ) VRا2ف ا&5ت( أو Phone
)ا ،(Hا$ #h W bع ا 5ة "! 4.ا]
ا.&5
;Fم Uconnect® 5.0
١٩١
ا"ا1ت إ?اد ا 7! *uا1kال ا' ا98J
١٩٠
Ì91ا:رة أLء ا85#
أي و!&, kم ` ,}+ف ا<رة أو &! ` H
اIا
)أ.ء &>] (Yً#
Fأو أآ"RS+ 4! ،#
bم ? Hا&اء أ.ء > UJا@$ك $ة 5د![>ً, D
و 6dا&اء ا ,و ا$و Wا&5,ى .إن
ا,م b >ً
ً3 $8 '+م ",إ
? H
ا 8إدة "RSاbم.
"اآ* اب ? @8اLا!H
و ?$إزا ا>8ب ا 6$$اا" ا93ج
ا]
}+ <+دارة ذراع ار ا& 6dإ و6d
"3ا .6,5و ?$اIام و "3
6dا/6,5
ا]ر, b @$ dء ا93ج ا]
و 4,ا g
ا? .وإذا أ>d q>Aب ا&ا ' ا> 4, ،?S
"#$
3+دة @< Dا&اء و Hbا&ا ' ا>.
! اآ 4ا>8ب ز9ج ا<رة اا" ا]م
اF$$ة أو ا.>J
:F1G
• &' 6اJام إ?دة و" ا+اء دون Mu
ا+اء "9ات " 6 @1 8xاآ* اب.
• م F; *u a9م ا *uاkوh 7uر
ا"ارة ) ih (ATCإ?ادات ا 7! *uدر
ا"ارة أو 8 ًuأو إزا "اآ* اب ?@8
اLا!)h Hج ا .7kو Pا!" و UWإ?دة و"
ا+اء ?1 Lوث ذ.
! "8هاء +ز Muا+اء
&,م bم ا@?+ 4ر9ت ا@ارة q+ا] +وا>Rر
و 2+اوا[ qا&اء اIر .9وq ?$ w
اوا[ qا &,آً .را" 69إ9اءات اA" "5
ا<رة" 2ف إردات ا>ال ا.B
ا H!LاJر Sل ا+اء
*آ م و&9د أء "#أوراق ا]ر وه
&Wل @ت إدل ا&اء ا&ا! 2أ
م ا93ج ا]
, .
",أوراق ا]ر ا$اآ&W $ل @ت إدل ا&اء
,ار ا&اء اا" وUدي إ اYRق @ت H5
ا$ء .و "5اSء* ،آ & ' د&ل ا&اء
ا وا Fوا.Å#
١٨٩
:F1G
• « Pا"وري " إ?ادات در ا"ارةk .ن
اFLم م أو ih ًuدرت ا"ارة
وا UWو"? ا"و "! 1و7! a" i
أ"ع و.Pu B
• Pا"? Puض در ا"ارة 1hات اu"k
أو ا" وذ hا)ة اh '"8 8hا5
اFLh #م ® .Uconnectرا" Uإ?ادات ;Fم
® 7! "UconnectهHا ا P *:ا.
& ا@ ا]! 5اا Wو 6dا"RS
ا]و&
? أ.ء "RSا@$ك ا]م ا>ردة} ،ن
و Wا&اء > 8BI
,إ أن <I
ا@$ك 3 .ا$و Wو" و6d
) AUTOأو&
?(.
'وز ا اوي
إرzدات ا
qاbم ا@ اوي < ا$و Wوو& 6dز6
ا&اء و H?
Wا&اء وا@? 4إدة او.
:F1Gرا Uا'ول اد ! +; 7هHا ا*:
"#8ف ? @8إ?ادات ا *uا""F 1وف ا«5
ا.?L
>d ?$ا$و Wأي +.
B
>d DJح ا@? 4ا$و "$2 .Wا$وW
ان @ 4 W +. <+ت إ . dوq
ذ آب ا]
م ا@? 4@+ 4ا&اء ا<رة
وإRء و) AUTO 6dأو&
?(.
@ 8ا= Dا&اء +ر أW
"RS$ ?$أ ً
H?
"RS @ 8
إادات ا]وdع ا ?$ .W$أ ً
ا&اء وا@? 4إدة او وً ا "RSاوي.
# :F1Gآ )ة Pه XHا)ات : uh
? Pا"Skى 1 7! .ا1h *uى ا)ات وً،
? ":ا 7! *uدر ا"ارة أو.ًu
ا ! >! 7ا>M
b $W Pم > [" ا@$ك I+ام [" >
$ 6ذي &9دة & $[Y
$WاÀآ"
و 6$اwرBع اB$ط Wارة ا@$كA&ُ .
I+ام @&ل [" ا> ذو ,ا^ dت ا&82
) 50% ><+ (OATوا'ي >F$+ Bت 2ر ا&$اد
اS MS.90032 ,آ Chryslerو
50%ء.
ار 69إ "إ9اءات ا "5ا&اردة " Aا<رة"
wر [" ا> ا.P$
ا ! >! 7اء
وI+ q5ُ wام و ا&اء اا Yل "5
اSء ]` ! <> 6$ Pا>8ب ا&ا '.
١٨٨
إ?اد ) MAX A/Cا ا Mu @>kا+اء(
"$2إاد ) MAX A/Cا@ ا]! H?$ 5ا&اء(
>dا@? 4أداء ا@ ا]!.> 5
ا RdوWر >" +إاد ) MAX A/Cا@
ا]! H?$ 5ا&اء( وا^ادات ا<8 .,+ء ا3ر
ا&9&$د ا) MAX A/C "RS {$ا@
ا]! H?$ 5ا&اء(.
و) MAX A/C 6dا@ ا]! H?$ 5ا&اء(،
&<
6d&
>d ?$ى ا$و Wوا& 6d
إادات اI<$م ا& .+&F$ف <> Pا R8
إادات أى ) MAX A/C "RSا@ ا]!5
H?$ا&اء( >" إ ا^ادات ا< ,+و&ف
) MAX A/C U
µBFا@ ا]! H?$ 5ا&اء(.
إ?دة و" ا+اء
?&ن ا&اء اIر+ 2ً>S
9ن
أو اوا[ qا? أو ا +&Jا 2أو إذا
ر> >+ kا<رة P , ،<+
و ا&اء اا R8+زر
@? 4و) Recirculation 6dإدة او(8 .ء
Uإدة او @ ه'ا ا3ر .ا Rdا3ر
$ة ,^ .ف "RSو) Recirculation 6dإدة
او( وا<$ح &+ل ا&اء اIر 9إ ا<رة.
7! :F1Gا «5ارد دي اJام و"
ا+اء إ@ "اآ* اب ? @8اLا! 6 .Hا!" )ة
إ?دة او" ) "+Fا)ر ? zz @8ا(iL "T «8
! 1 7ود ¼"وف uh a:ن Wب ? @8ا')ء
اا P 78Sا)ج ا 7! .7kا F;kا)ودة a9h
ا *uاوي ! 7درت ا"ارةUWh a:ُ 6 ،
) Recirculationإ?دة او"( ! 7وUW
)) Defrostا>MFL 8? P: (U
اLا!) Recirculation 5# * 1 .Hإ?دة
او"( أو 1 7! ًuهHا ا .UWإن
و اJام و) Recirculation UWإ?دة
او"( أLء اا ! 7ه XHا7! &: UW
و >ح LEDاد ! 7زر ا9 * *u
? PاWmءة.
ا *uاkوh 7uر ا"ارة )(ATC
ا اkو7u
.1ا Rdا3ر ) AUTOأو&
?( ا&ا9
أو زر ") "AUTOأو&
?( ا.{$
،4. .2ا >dدر 9ا@ارة ا &د أن @ j
اbم وذ >8+أزرار ا@? 4در 9ا@ارة <[D
وااآ Pا&ا 9أو ا]زرار ا.{$
و$+د ض در 9ا@ارة ا&, ،+&$م اbم
&A&+ل إ <&ى اا Wا&F$ب و` b @$+
أو&
?ً.
.3و "5 $Wاbم إ ا&<$ى ا'ي &
اا&? ،Wن { ا8وري Rدر 9ا@ارة.
و أن اbم B?+ "$2ءة #إذا آ` &5+ "$2رة
أو&
?.
١٨٧
.13زر ا"" 7! *u8 9kدر ا"ارة
F;) 4:8م (i! Uconnect® 8.4
qا@? 4ا ",<$در 9ا@ارة <[ .Dا Rd
ا3ر ا&9&$د ا&ا >8 9إادات در 9ا@ارة
ا>ردة أو ا ،{$ا RdوWك زر
در 9ا@ارة @& ا< 4ا]زرق >8إادات در9
ا@ارة ا>ردة.
.15ا 7! *uدر ا"ارة )راد ;Fم
(i! Uconnect® 5.0
ا Rdزر در 9ا@ارة ا4b {$
درW 9ارة ا&اء دا" &5,رة اآب&@ S .ل
در 9ا@ارة إ $W ,Fاء إ در9ت Wارة
أد *&@ S .ل در 9ا@ارة إ ,Fزر!ء
إ در9ت Wارة أ+د.
7! :F1Gو) Sync UWا)ا # ،(LهHا ا)ر
أً ? iW @8إ?اد در "1ارة ا"اآ& !«9; 7
ا Bأو.ًu
و¼ M4ا 7! *uدرت ا"ارة
.14زر ا"" 7! *u8 @8?kدر ا"ارة
F;) 4:8م (i! Uconnect® 8.4
qا@? 4ا ",<$در 9ا@ارة <[ .Dا Rd
ا3ر ا&9&$د ا&ا >8 9إادات در 9ا@ارة
اا gأو ا ،{$ا RdوWك زر
در 9ا@ارة @& ا< 4ا] >8 $Wإادات در9
ا@ارة اا .g
7! :F1Gو) Sync UWا)ا # ،(LهHا ا)ر
أً ? iW @8إ?اد در "1ارة ا"اآ& !«9; 7
ا Bأو.ًu
١٨٦
Mu) A/Cا+اء(
qزر H?
) A/Cا&اء( "RS$ا Sأو إRء
ا Sاوي bم ? Hا&اءb "RS .م ?H
ا&اء D ،ا&اء ا>رد BIاY +&Jل
ا ' $ا@$دة إ ا? <@ .+اYك
ا&!&د ،ا Rdزر H?
) A/Cا&اء( ^,ف
H?
"RSا&اء و >8ا$و Wوً 6إادات
* ،8آ @ و 6dا& Wأو
و D 6dا&اء .أ ً
[.ا&<$ى أو ا]ر.d
:F1G
• a9 :Lhا *uاوي ! 7در ا"ارة ،إذا
آن اFLم ! 7و) Mix UWا)ج( أو Floor
)اkر (Wأو )) Defrostا> Pu ،(Uإف
Muا+اء ،وF; Puم ا5ً; F Mu
u ULن اب ? @8اLا!.H
• !+¼ 1 7ر اب أو ا"ذاذ ? @8ا)ج ا7k
أو ا)ج ا'; ،7ا "Sو) Defrost UWإزا
ا> (Uوا ?" iWا"و 1إذا )م ا."k
• وإذا hا :ى أداء Muا+اء P? ً9JL
اU؛ !! Mu Mwuا+اء )اد
! 7ا"اد"( P 8J8ا h"kأو ا"ات
اu 7ن ' MF; . 8? #ا"h Mwuش اء
? M8S P !"h 8ا"اد" وGS Pل ا .Mwu
8اد ا ا> ! P h ?Lا+اء
إ@ ا: P 8 ،Mwuى أداء ا.Mu
.9و) SYNC UWا)ا(L
ا Rdزر ) SYNCا3$ا
( ا{$
>" /"RS +إ,ف 3ة ) SYNCا3$ا
(.
8ء ) SYNC Uا3$ا
( ?$ه'= ا3$ة.
<Iم 3ة ) SYNCا3$ا
( 3$ا
إاد در9
Wارة ااآ 6
Pإاد درW 9ارة ا<["$2 .D
Rإاد درW 9ارة ااآ Pأ.ء ا&ا 9و6d
) SYNCا3$ا
( اIوج ً[,ه'= ا3$ة.
9 .10ح *uا"و1
<Iم Bح ا@? 4ا$و 4b Wآ $ا&اء
اا" > bم ا@? 4در 9ا@ارة .و$و6> W
ت .WوUدي >dا$و Wإ >" ا&6d
ا]و&
? إ ا "RSاوي .و @ ?$ا<ت
I+ام إ
>,ا@? 4ا$و Wا&ا 9أو
ا]زرار ا&9&$دة ا {$آ: $
ا 7! *uا"و 1اد ? @8اا+
3ا$و Wو >,ا@? 4ا$وW
, =+رب ا< ً+ء ا^اد ا]!" $و$+ .W
",ا$و Wو >,ا@? 4ا$وW
?{ ا= ,رب ا<.
ا)ر ? zz @8ا«8
اIم ر
3ا$و WاR5ة ",إاد ا$وW
8
ور
3ا$و Wا?>ة 3دة إاد ا$و ?$ .Wأ ً
@ ا$و ,F
R8+ Wا$وW
ا&9&$دة +ا
&ز.
.11اkوWع
>d ?$و& 6dز D 6ا&اء I @+ج ا&اء
' & Wأ39ة ا,س وا ' $ا]ر dو
'
إزا ا>8ب .وإادات ) Modeا& (6dه آ: $
و) Panel UWا(18
• Iج ا&اء ا ' $ا&ا!W& 2
أ39ة ا,س .و
ا >d ?$$آ" 'B
Wة & `9ر ا&اء @ ?$ .رSت
ا&اء ' $+ا$آ 3واIر ] 9أو
أ "Bأو 4b P P9ا= D
ا&اء! 9& .ص ¿,ف أ "BرSت
ا&اء ^,ف Dا&اء أو >dا,$ار
ا D $ه'= ا.' $
و 74L) Bi-Level UWا:ى(
• Iج ا&اء ' & Wأ39ة ا,س
وا ' $ا]ر,
6
.dار "3
> "gd
ا 6,5و
' إزا ا>8ب ا&ا '
ا>.
*> * :F1Gو 74L) Bi-Level UWا:ى(
!"¼ ¼ 7وف ا"ا "! 1هاء أ"hد "Jج H!L P
1اس وهاء أد! H!L P Qاkر.W
و) Floor UWاkر(W
• Iج ا&اء > ا ' $ا]ر,
6
.dار
"3
> "gdا 6,5و
' إزا ا>8ب
ا&ا ' ا>.
و) Mix UWا)ج(
• `9& 4ا&اء > ا ' $ا]ر dو
"3
ا 6,5و
' إزا ا>8ب ا&ا '
ا> .و<Bد ه'= ا3$ة ا]م
ا>ردة و &,ط ا.Å#
.12زر إف اh *uر ا"ارة
ا Rdه'ا ا3ر وWر= "RSا@? 4در9
ا@ارة أو إ,ف .`RS
١٨٥
.4زر ) AUTOأو 8 (7uاkو7u
&,م 4?@+أو&
?ً درW 9ارة ا&5,$رة
اا & >d DJز D 6ا&اء وآ $ا&اء.
Uدي إ9اء ه'= ا& Bإ >" اbم +ا&6d
اوي وا]وdع ا]و&
? .را" 69ا"RS
ا]و&
?" 3$ا
&2$ت.
.6زر ) ا> Uا798J
ا Rdه'ا ا3رW 4. ،ر= "3
"RSا 6,5
ا 'ة ا BIوا$ا اIر 9ا) I<$إذا آ kا<رة
3ودة 8 .('+ء >5ح "3
"RS U
ا 6,5ا 'ة ا 4 .BIأو&
?ًّ إ,ف "RS
"3ا 6,5ا 'ة ا 10 2+ BIد![.D
.5زر ) ا> Uا7k
ا Rdا3ر W 4.ر= Rإاد Dا&اء ا@
إ و "3
) Defrost 6dا8 .(6,5ء ا U$
>dه'= ا3$ة و) ON 6dاI .("RSج ا&اء
' ا93ج ا]
و
' إزا ا>8ب ا&ا '
ا> @ .زر إزا ا&<
3 ! ،6,5ى
ا$و .WاIم و) Defrost 6dإزا ا6
(6,5
"RSإادات ا@ ا]! 5ر 9ا@ارة ^زا
ا 6,5ا 6$$ا93ج ا]
وا&ا ' ا>
U ."? "8 *+دي إ9اء ه'= ا& Bإ @&" ا@?4
ا]و&
? در 9ا@ارة ) (ATCإ ا&6d
اوي&2 .د bم در 9ا@ارة ¿اد ا< D+
Wإ,ف "RSو "3
6dا 6,5ا.BI
.7زر ا"" 7! *u8 @8?kدر ا"ارة "8اآ&
);Fم (i! Uconnect® 8.4
qا@? 4ا ",<$در 9ا@ارة اآ .PاRd
ا3ر ا&9&$د ا&ا >8 9إادات در9
ا@ارة اا gأو ا ،{$ا RdوWك زر
در 9ا@ارة @& ا< 4ا] >8 $Wإادات
در 9ا@ارة اا .g
! L
إن م ا>ع ه'= ا>ت ! <>A H P
ا<:I
• &+ا@'ر <" ا3ء اا ا 'ة
اI< w .BIم Bbت ا&ا ' ا? F
ا< qFاا 'ة .اIم !$! 2Fش $
و
@&ل <" 2ل ،و!&
"?S+ q<$+ 4ازي
]39اء ا< .Iو?
^+ن إزا ا,5$ت ا&9&$دة
ا93ج 2+أن >" $+ء دا .µ
•I< wم أدوات Hbآ Fأو أدوات Wدة أو
Bbت ا&ا ' ا? Fا< qFاا 'ة.
•ا 6$+ jBWا,2$ت < iا 'ة.
# :F1Gا @8? iهHا ا)ر أLء اا !7
و) Sync UWا)ا @8? (Lا"Jوج Sync P ً48
)ا)ا.(L
١٨٤
.8زر ا"" 7! *u8 9kدر ا"ارة "8اآ&
)راد ;Fم (i! Uconnect® 8.4
qا@? 4ا ",<$در 9ا@ارة اآ .PاRd
ا3ر ا&9&$د ا&ا >8 9إادات در9
ا@ارة ا>ردة أو ا ،{$ا RdوWك زر
در 9ا@ارة @& ا< 4ا]زرق >8إادات
در 9ا@ارة ا>ردة.
# :F1Gا @8? iهHا ا)ر أLء اا !7
و) Sync UWا)ا @8? (Lا"Jوج Sync P ً48
)ا)ا.(L
و< Mاkزرار ) @8? 5Lآ Gا)ر 7! Pاا+
واkزرار ادة ? zz @8ا(«8
;"Fة ?
اkزرار ادة ! 7اا+
& 9ا]زرار ا&9&$دة ا&ا 9أb "Bم
®.Uconnect
a9ا *uاkو 7! 7uدر ا"ارة FLhم
- Uconnect® 5.0اkزرار ادة ? zz @8ا«8
a9ا *uاkو 7! 7uدر ا"ارة -اkزرار ادة !7
اا+
اkزرار ادة ? zz @8ا«8
.1زر ) MAX A/Cا ا Mu @>kا+اء(
ا Rdا3ر وWر= Rا^اد ا@8 ،ء
ا "RS U$إاد ) MAX A/Cا@ ا]!5
H?$ا&اء(& .ف Uدي 'Bه'= ا&
Bة أى
إ @&" "RSإاد ) MAX A/Cا@ ا]!5
H?$ا&اء( إ ا& 6dاوي و&ف U
µBF
إاد ) MAX A/Cا@ ا]! H?$ 5ا&اء(.
.2زر Mu) A/Cا+اء(
ا Rdا3ر وWر= Rا^اد ا@ ،و8ء
ا H?
) A/C "RS U$ا&اء(& .ف Uدي
'Bه'= ا&
Bة أى إ @&" A/C "RS
)
? Hا&اء( إ ا& 6dاوي و&ف U
µBF
H?
) A/Cا&اء(.
.3زر إ?دة او"
ا Rdا3ر وWر= Rا^اد ا@ ،و8ء
ا U$ا."RS
ا]زرار ا&9&$دة ا ?$ {$ا&&Aل إ
bم ®.Uconnect
a9ا *uاkو 7! 7uدر ا"ارة FLhم
- Uconnect® 8.4اkزرار ادة ? zz @8ا«8
١٨٣
اB$ح ا3از ر &<
6ى ا&5ت"$2 $+ ،
ا R8ا3ء ا< BاB$ح ا3از B
<&ى ا&5ت.
&,م ا3ر ا&9&$د B
H5$+ح ا@? 4ا]< H&+
إ ا F@$ا ,ً><
J&>8$ا وا !
>+ k$
I+ام زر ا >8ا D><$اد&.
وUدي ا R8ا3ر ا]و إ "29ااد& ",
+ا]وdع ا &$ا AM/FM/AUX) W$و
ذ(.
و UWاi4
B
>2ح ا@? 4ا]< ا&ع ا3از و@&ي
زر ! R8 "+ا& .و HIوB
Bح ا@?4
ا]< Y+ف ا& 6dا'ي &ا.`+ 9
و $وB
"RS ,F BًAح ا@? 4ا]<
آ" و.6d
ا"اد
Uدي ا R8ا3ء ا&2ي اB$ح إ "ا>@"
ا =wا&2ي ا F@$ا ا ?$ا$wع
إ وUدي ا R8ا3ء ا< BاB$ح إ
ا>@ ا =wا< Bا F@$ا ا ?$
ا$wع إ.
١٨٢
Uدي ا R8ا3ء ا&2ي اB$ح ة واWة
إ ا,wل إ ا<$ر ا ا&[ ا@$دة
)) AUXا]39ة ا^ ( dأو® Bluetoothأو SD
U .((SD !F+) Cardدي ا R8ا3ء ا<B
اB$ح ة واWة إ ا,wل إ +ا ا<$ر ا@
أو إ +ا ا<$ر ا< D+إذا آن &8 6,ن $.
&.اٍن +ا "RSا<$ر ا@.
إذا ! R8+ k$اB$ح ] أو ]،
"B
< "RS 4ا<$ر ا ،#وإذا !Y. R8+ k$ث
ات < "RS 4ا<$ر ا ،#وه?'ا.
ا"اد وا+ا Mا
وف U ! ،2دي "RSا Hا&$@$ل
<+ر إ "$ااد& &S
"?S+ش أو @ً.d .
", ?$ه'ا ا á&Sأو إؤ= 6!&
R+ه&ا[
ا Hا&$@$ل .وه'ا اًd >2 w á&Sرا +اد&.
إذا ? 4أداء ااد& 6d&
R 6
W ًd
ا&ا[ BI+ q5 ،أو إ,ف &Aت ااد& أ.ء
"RSا Hا&Iي م اIام bم
®) Uconnectإذا آ kا<رة 3ودة .('+
a9ا 7! *uدرت ا"ارة
b 4$Aم ? Hو gا&اء & اا Wآ"
اbوف $آ W kا "RS ?$ .{,Fه'ا اbم
Yل qBا@? 4ا&9&$دة & Wأ39ة ا,س
أو Yل ض bم ®.Uconnect
?&ن bم ® Uconnectأوdع BI
)) Radioااد&( أو ) Playerا ("RS$أو Settings
)ا^ادات( أو ) Moreا (3$أو 4 ،(`+
ا^رة إ إادات درW 9ارة ا<[ Dواآب
ا3ء ا&2ي ا2ض.
3$ا
&2$ت ،را 69د" <Iم bم
®.Uconnect
• ا"ا1
ا Rdزر ") "Comfاا (Wا{$
& &ازن ا& `9ا<{ و 9ا&.`9
a9ا 7! *uا>ت ادة ?'8
ادة — إذا آ; Bا:رة )ودة Hh
أ)+ة ا"اد ا)ودة FLhم ®Uconnect
إذا آ; Bا:رة )ودة Hh2ف
&2ت &W 5Bل ااد& ا3$ود b+م
® ،Uconnectرا 69د" @b Dم ®.Uconnect
9ح ا+ 7! *uز ®/iPodو1ة
/USBو1ة - MP3إذا آ; Bا:رة )ودة
Hh
< q$ه'= ا3$ة 9 "A&+ز ® iPodأو وWة USB
ر 9دا" .USB 'B
و P><+و&9د= 3I ,Fا?&<&ل ا$آ3ي} ،ن
ه'= ا3$ة iPod®/MP3 "RS$ qأو 9ز USB
ر ،9ا5wل b+م ا&5ت ا]
.
& qB
9ا@?b 2+ُ 4م ا&5ت ا<qF
ا 2 BIا,دة&A&+ 4! .ل إ Hا2
&&Aل إ ا.qB$
SD 5h/USB/AUX H!L
) Aux {>,
- 1ا]39ة ا^( d
USB 'B
- 2
SD !F+ - 3
3
4ة ا@? 4أ39ة ® iPodأ39ة Miniو4G
و Photoو Nanoو® 5G iPodو®w ! .iPhone
2+ 4إAارات +ا
3
iPod® Åات ا@? 4
+ا
9 Åز ® "?S+ iPodآ
" 9ُ .زرة &!6
Appleا^#@ 2$ kت ا>ا
.Å
a9ا 7! #hُ P? *uا>ت ) 8'# 798S "FLادة(
B
>2ح ا@? 4ا] $ا&ع ا3از وه& @&ي
زر ! R8 "+ا H5$و@? 4در9
ووb 6dم ا&5ت "$2 .ا R8ا3ء ا&2ي
١٨١
أذرع ا
ا'"
أذرع ا
ا
ا'"
ا
• ) ONا(
• و) SPORT UWا"(W
• و) Sport UWا"(W
ا Rdزر ") "ONا S+ ("RSا?$ {$
أذرع ا>" 2+ا,دة.
• ) OFFإف ا(
ا Rdزر ) SPORTا (dا{$
^,ف b "RSم ا@? 4ا و ",ا@? 4
ا,wار.
• ?) NORMALدي(
ا Rdزر ") "Sportا (dا{$
& أآ> !ر ا& `9ا<{'+ PF $
،ل 9
أآ>.
• ?) Normalدي(
ا Rdزر ") "Normدي( ا{$
& ا@? 4ا ا?
" وا@? 4ا,wار
ا?
".
ا Rdزر ") "Normا2دي( ا{$
& 3ا& `9ا<{'+ PF $
،ل 9أآ>.
ا Rdزر ") "OFFإ,ف ا S+ ("RSا{$
"F2أذرع ا>" 2+ا,دة.
١٨٠
4د ?&ت و) Drive 6dا,دة( ا ?$$أد= 6
8ا&&Aل إ
ا]وAف ا ?$ .+ ,2$أ ً
ا
&2$ت ا @d&$ا $[,أد= Yل !&ا[ 4إاد
ا&&A& .6dل إ ا
&2$ت ،ا Rdزر
") "Infoا
&2$ت( ا {$و 6dإاد،
واIم أ< 4ر + "> $/ا]وAف
ا ?$ .W$ا& R8ان ?" bم ![$
إاد & $
،و "? BًAو Bه'ا اbم.
ا"ك ;/ا"آ
ا"ك
ا"ك
ا"ك ;/ا"آ
• و) Sport UWا"(W
• و) Sport UWا"(W
ا Rdزر ) Sportا (dا{$
@&5ل ا$A <@
+م اwق
$Yع ! ++دة @<.
• ?) Normalدي(
ا Rdزر ) Sportا (dا{$
@&5ل ا$A <@
+م اwق و",
2ل $Yع ! ++دة @<.
• ?) Normalدي(
ا Rdزر ") "Normدي( ا{$
@&5ل ا$A ! +م اwق
$Yع ,+دة د.
ا Rdزر ") "Normدي( ا{$
wد &ازن $A +wم اwق واا", W
اوس و اYwك ,دة ا2د.
١٧٩
ا UWا"!6ا7W
إ?اد ا UWا"!6ا7W
و) Sport UWا"(W
2و) Sport 6dا &? (dإاد S2 Pق
ا,دة "! >d 4 .ا@آ وا& `9إ إادات
) Sportا qB
?$ 4 .$ (dاوا 2+
ا,دة >d 4 .ا^ادات ا wاb dم ا@? 4
ا ا& 6dا2دي R ?$ .أي ه'=
ا^ادات ا]ر 2+إ Y8Bت ا<[ R8+ D
ا]زرار ا&9&$دة ا .{$ا Rdزر
) Sportا (dا&9&$دة &$$+اW&+ qB$
أ39ة ا,س & 6dا<رة ) Sportا (dو!4
S+ه'= ا^ادات&? .ن ا^ادات ا55I$
S , FSزر ) Sportا.(d
ا UWا"!6ا7W
4دوً
+ء "RSا<رة ا& 6dا wا .dه'ا
ا&b 2
6dوف ا,دة ا&$ذ .9أ.ء ا&ا 9
ا& 6dا wا "$2 ،dا@$ك و!" ا@آ وا
و 6dا^ادات ) Normalدي( و?$ w
Rه <
g ?$ .ا& `9إ Normal
)دي( أو ) Sportا (dأو ) Comfortاا(W
R8+ا]زرار ا$ة ا4 ! .{$
?$أذرع ا>" أو F2أ.ء ا&ا 9ه'ا
ا&.6d
إ?اد و) Sport UWا"(W
و) Sport UWا"(W
١٧٨
ا اH ه7! آرةHرات اJ آ اB: :F1G
تLu uh i5J X; أد، رةuh !"ة
.رة:8 1 ادة( اUW )وDrive Mode
ا!"ةUWت اLu
ا4?@ا
X
X
">أذرع ا
X
N/A
`9&ا
X
X
!" ا@آ/@ك$ا
X
N/A
@ك$ا
N/A
X
!" ا@آ
?
&أو
وي
Default 6d&( واd )اSport 6d و69را
.`RS "AB &ل5@ (d اw)ا
امJ اL? #! ?اداتm اXH هF :F1G
.(قG5;6 ا7! *u )اLaunch Control )ة
١٧٧
.5ا "
?+ Rdدوا ا +,و*آ أن ا<رة
اس ا]ول.
.6أ.ء ا R8ا ،+,ا Rdدوا ا&!&د
ً$A qB 2م اwق "?S+وا& .6ف k>#
ا@$ك د اورات ا! ,ا 4
) "Launch RPM Set-up" `F>dإاد
د اورات ا! ,اYFwق(.
:F1Gف "+Fر"? zz @8? 4ض
8#ت اG?m (DID) 4:م ا 4:إذا * *
ا9ء وا 1أو أآ P "wا"وط ااردة أ?.XG
.7ا& ء S+وط 4و& ،6 Wف b
ض
&2ت ا<[ (DID) Dا
") "Launch Ready Release Clutchو6d
اYFwق 9هW ،3ر اW .(+,ر ا6
+,
ا$wار إ,+ء $Aم اwق "RS Wً&B
اYFwق 'B+ 4! .ا ",آ $ه& &"!" 4<! qd
ا@آ اوي ", -اوس".
`9& j W .8ا<رة <&? .4,ن
3ة ا@? 4اYFwق "5 FS
ا<رة إ 100آ/Yً
62) /4ا<(.
١٧٦
&! Hا@? 4اYFwق !>" اآ$ل اYFwق وb
ا " 4) "Launch Abortedإ,ف ا@? 4
اYFwق( ض
&2ت ا<[ (DID) D
أي اbوف ا:
إ?اد و UWادة
• 4اIام اBا
" أ.ء اYFwق.
• اآSف b) ESCم ا@? 4ا,wار
ا^?و( أن ا<رة @ 2 4ك <.4,
• 4ا R8زر ") "ESC OFFإ,ف bم
ا,wار ا^?و( Rاbم إ و i 6d
3
?$ Wة ) Launch Controlا@? 4
اYFwق(.
"! 6 :F1Gو) Launch UWاG5;6ق( ! 7أول
P8 P 500ا"ك.
6 :F1Gول ; ا"وس ? Lدوران ?'Gت
ادة ? Uم ا'" 1 .ث L M8
ا"آ.
إ?اد و UWادة
"$2ا R8زر ""Drive Mode Set-Up
)إاد و 6dا,دة( ا {$
) Performance Controlا@? 4ا]داء(
ا^رة إ Wا&! kا@ $b¼ ,,ا.BI$
R8+أزرار ") "Sport Mode Set-Upإاد
و 6dا (dأو ""Default Mode Set-Up
)إاد ا& 6dا wا (dا?$ ،{$
<[ g Dأوdع ا,دة اBد ،ورؤ آ .U Hه'=
ا?&ت أداء ا<رة.
) "Launch RPM Set-up" `F>dإاد
د اورات ا! ,اYFwق(.
• اآSف b) ESCم ا@? 4ا,wار
ا^?و( أن ا<رة @ 2 4ك <.4,
:F1Gف "+Fر"? zz @8? 4ض
8#ت اG?m (DID) 4:م ا 4:إذا * *
ا9ء وا 1أو أآ P "wا"وط ااردة أ?.XG
• 4ا R8زر ") "ESC OFFإ,ف bم
ا,wار ا^?و( Rاbم إ و i 6d
3
?$ Wة ) Launch Controlا@? 4
اYFwق(.
.7ا& ء S+وط 4و& ،6 Wف b
ض
&2ت ا<[ (DID) Dا
") "Launch Ready Release Brakeو6d
اYFwق 9هW ،3ر اBا
"(W .ر اBا
" 6
ا$wار إ,+ء $Aم اwق "RS Wً&B
اYFwق.
`9& j W .8ا<رة <&? .4,ن
3ة ا@? 4اYFwق "5 FS
ا<رة إ 100آ/Yً
62) /4ا<(.
&! Hا@? 4اYFwق !>" اآ$ل اYFwق وb
ا " 4) "Launch Abortedإ,ف ا@? 4
اYFwق( ض
&2ت ا<[ (DID) D
أي اbوف ا:
• @ 4دوا ا&!&د أ.ء اYFwق.
"! 6 :F1Gو) Launch UWاG5;6ق( ! 7أول
P8 P 500ا"ك.
; ا"آ اوي -إذا آ; Bا:رة )ودة Hh
& ) Launch Controlا@? 4اYFwق(
ا>ع ا^9اء ا :,
ا >8+ Sد اورات ا! ,اYFwق
@&5ل أ "8اYFقLaunch >8 .9/
) RPMد اورات ا! ,اYFwق( ،اRd
وا@ Pا ،$أو ا Rdا] 4ا&9&$دة
ا >8 ،{$د اورات ا! .,اRd
زر HI 4اwء jBW 4 .ا^اد.
:F1Gا?mاد ا"!6ا 7! *u8 7WاG5;6ق 3000
دورة/د .ف ? #د اورات ! 7ا ?L
اG5;6ق ا @8? 7wا"ك واxmرات :hرةGً! ،
? Pا "5و¼"وف ا B: .«5آ إ?ادات RPM
)?د اورات ! 7ا( JG 8hام !U 7
اLuت واا .Mإذا H#ر ا>ل ?? @8د اورات
! 7ا ? LاG5;6ق ا85ب !،P# M 7
!:ف !" ا"ك ا ا P @>kا)#م اPu
uن "& ر اumن ? Pد اورات ! 7ا
ا85ب.
.1ا Rdزر ") "Appsا,>Fت(
اW 4. ،{$د ") "Performance Controlا@?4
ا]داء( ،وا Rdزر ""Launch Control
)ا@? 4اYFwق( ا {$أو ا Rdزر
&$
qB
&$$+ Super Track Pakأ39ة
ا,س ا$آ.3
.3ا"Activate Launch Mode" Rd
) Sو 6dاYFwق( ا.{$
.2ا Rdا3ر ""Launch RPM Set-Up
)إاد +ء (RPMا q$< .{$ه'=
* .4آ م @ك ا<رة و
& `9ا,دة
&5+رة <.$,
١٧٥
اYFق ا<رة .ه'= ا3$ة IY $$5ام أ.ء
>ت ا<>ق <ر &? W DRن رk+. "
6+
و
ا B5إ ا< .+&Fاbم { $ً$5
> t, &2ة ا<[ Dأو <$+ ` 2
t,ر
ا<>ق P>< ! .اIام ه'= ا3$ة وف ا
ا) 8BI$ا>ودة ،ا ،+&Jا@ ،5وه(
زدة اw3ق ا 2رج @? 4ا] P>< $
$b
إ,ف اYFwق.
:F1G
• '& أJ: 6م ا 7! *uاG5;6ق ? @8ا"5ق
ا .#دا"¼ P ً4وف ا &:وا5L
ا.5
• F; "! 6م ) Launch Controlا7! *u
اG5;6ق( GSل 500اkو@ "? Pا:رة.
• '& أن J:م ;Fم ) Launch Controlا*u
! 7اG5;6ق( ?u Lن ا"ك و; ا"آ !7
در "1ارة ا !.i
• * >* ) Launch Controlا7! *u
اG5;6ق( JGام ? @8ا"5ق ا'! ا89k
١٧٤
! &: .iاJا ? @8ا a5kا) أو
ا"Sة ! 7إGف ;uت ا:رة و. h @<ُ "T
; ا"آ اkو - 7uإذا آ; Bا:رة )ودة Hh
& ) Launch Controlا@? 4اYFwق(
ا>ع ا^9اء ا :,
.1ا Rdزر ") "Appsا,>Fت(
اW 4. ،{$د ") "Performance Controlا@?4
ا]داء( ،وا Rdزر ""Launch Control
)ا@? 4اYFwق( ا {$أو ا Rdزر
&$
qB
&$$+ Super Track Pakأ39ة
ا,س ا$آ 3ا.
$
.2إذا ر> ،kا Rdا3ر "Launch RPM
) "Set-Upإاد +ء (RPMاq$< .{$
ه'= ا >8+ Sد اورات ا! ,
اYFwق @&5ل أ "8اYFق>8 .9/
) Launch RPMد اورات ا! ,
اYFwق( ،ا Rdوا@ Pا ،$أو اRd
ا] 4ا&9&$دة ا >8 ،{$د
اورات ا! .,ا Rdزر " "HI 4
ا {$اwء jBW 4 .ا^اد.
u :F1Gن ?د اورات ! 7ا ?L
اG5;6ق ا"!6ا) Wة ا 7! *uاG5;6ق
.UL>h ً: xف ? #د اورات !7
ا ? LاG5;6ق ا @8? 7wا"ك واxmرات
:hرة P? Gً! ،ا "5و¼"وف ا B: .«5آ
إ?ادات ?) RPMد اورات ! 7ا( 8h
JGام ! U 7اLuت واا .Mإذا H#ر
ا>ل ?? @8د اورات ! 7ا ? LاG5;6ق
ا85ب !:! ،P# M 7ف !" ا"ك ا
ا P @>kا)#م اu Puن "& ر اumن P
?د اورات ! 7ا ا85ب.
.3ا"Activate Launch Mode" Rd
) Sو 6dاYFwق( ا.{$
* .4آ م @ك ا<رة و
& `9ا,دة
&5+رة <.$,
.5ا Rdدوا اBا
" ،و@ D,أن ا$آ>
و) "Drive" 6dا,دة(.
.6أ.ء ا^
<ك B+ا
" ،ا Rdدوا ا&!&د
ً$A qB 2م اwق "?S+وا& .6ف k>#
ا@$ك د اورات ا! ,ا 4
(Uh) !"H
&رة,F+ @ت ا]داءBA لY ! 4 ا
اY أوD[<
اY ض2 ! ةF أو
ا'يW&ه وا@'ر ه& ا$>` وا$ اD[< .FI
. و!&ع ا@&ادثP `?$
4?@" )اPerformance Control" @ •
Performance Pages $[! (ا]داء
.(@ت ا]داءBA)
B وt5I" وF2? و$ ?&ن !دًرا
ات3
ق( وYFw ا4?@ )اLaunch Control
ة3
(دة, ا6d )إاد وDrive Mode Set-Up
.( ا]داء4?@ )اPerformance Control
&
ت2
&ل إA& .=ات أد3$ ه'= اHAد و
مb لY ات3$ ه'= اH[&ل وW
(&
ت2$" )اInfo" زرRd ا،Uconnect®
.{$ اS+
(قG5;6 )اLaunch UWو
(قG5;6 )اLaunch UWو
Launch Control مb+ ودة3
ا<رةkإذا آ
D[< ح$< 4$5
&ق( وهYFw ا4?@)ا
2 .4,<
<رع <رة5!&ل إ أA&+
Yً? (قYFw ا4?@ )اLaunch Control مb
ء.ر أJ^ق اw3 ا ا'ي ا4?@
أ?ل ا
١٧٣
!"H
قFام اIY قYFw ا6d و4$5 4
قJ ا
` أI اP w أو ا&ة و2<ا
&?@
g+ ة3$ام ه'= اI+ q5 و.
ل !رات ا<راتYR م اP .&ن,ود اW و
(Uh)
(ري9)م ا# )اInstantaneous Torque •
.&ريBم ا32ض ا2
(B) اiW) Oil Pressure •
.2B@ك ا$ اk زRd ض2
(i! 7uوk )ا"وس( ); ا"آ اGear •
.( ا<رةD2$" ا@ )أو اRSض س ا2
Hh رة )ودة: اB; إذا آ- داءk ا7! *uا
Performance ة3$+ ودة3
! ?&ن ر
$b أD<+ q$< ا]داء( ا4?@ )اControl
دة ا<&ك,ًء &ع ا+ BI$ا<رة ا
Performance ة3
4?@ ا4 .&بF$ا
مb &ل رادY ( ا]داء4?@ )اControl
$
' أيB+ `&ل إA& ا4 ! و،Uconnect®
:
Super Track Pack زرR8• ا
.س,ة ا39 أW& qB
&$
4?@" )اPerformance Control" @ •
.(ت,>F" )اApps" $[! (ا]داء
• ة ا:رع ا¬ 5م وM8J8
ة ا:رع
ا"ك
&! {,ة ا<رع ا&! &Fة ا<رع واBا
" <رة.
• ى ا:رع ا>ى ¬م و M8J8وا":ى
وا@L
2ض ه'ا !&ى ا<رع ا&5,ى ا @i '
k,,
$إدة >dض
&2ت ا<[D
) 4 .(DIDا b @$ا 4,ا&5,ى Yل
دورات ا&+ "RSا Fض
&2ت ا<[D
)&, W (DIDم ا<[.@<$+ D
• "? ا:رة
<9ت اkداء -ة ا:رع
@ه2 ،ض ه'= ا&! 4! Sة ا<رع ا]ر2+
8زاو ا&.`9
)ا.ن &Jن وا.ن >9ن( وأ ً
@ &!) G-Forceة ا<رع(& ،ف &ا
ا3$ات ا:
• ة ا:رع ا'; ا @Lوا":ى
&! {,ة ا<رع ا> !&ة ا<رة ا Pا]$
وا]< )ا>(.
١٧٢
<9ت اkداء -ا"ك
{,ا<رة ا< ا@ <رة ,رة إ
+ـ
آ /4أو "/ا<ً+ ،ءا + 0ون و&9د !$
!&5ى.
• زاو ?' 8ادة
<Iم زاو ا,دة < 2Sزاو ا&, `9س
در 9ا,دة إ ا! S .B5س در 9اB5
إ أن ا,دة ا& 6dا&? .4,<$ن !$
زاو ا&' ،> $! `9ا Sإ اF2wف
<ر ،و
?&ن ! $زاو ا&،>9&
$! `9
'ا Sإ اF2wف .$
@ه2 ،ض ه'= ا Sا 4,ا:
• ?") Vehicle Speedا:رة(
> ا<رة ا.2B
• Instantaneous Horsepower/
) KilowattsاG+6ك ا9ري ًرا hرة
ا>;/آ 8وات(
2ض اYwك ا&Bري ً,را ,+رة ا@.5
• "? ا"9ا
2ض ا<رة ا R8دوا
اBا
".
:F1Gف "#ض !:ا"9ا وت
ا ?":آ) "ready" 8ه)( ? Lدة ا:رة
/Gً 30 P? ) ?":hا 48) ?:آ*.(?/
ا#ادات 1
@ه2 ،ض ه'= ا Sا 4,ا:
• ) Coolant Temperatureدر "1ارة 4
ا"(
2ض درW 9ارة [" ا> ا.2B
• iW) Oil Pressureا)(B
2ض Rdا k3ا.2B
• ) Oil Temperatureدر "1ارة ا)(B
2ض درW 9ارة ا k3ا.2B
ا#ادات 2
<9ت اkداء -ا#ادات ;) 2ا"آ اوي(
@ه2 ،ض ه'= ا Sا 4,ا:
• !) Battery Voltageا5ر(
2ض & ا>Fر ا.2B
• ) Intake Air Temperatureدر "1ارة
هاء ا(&:
2ض درW 9ارة ه&اء ا<@ Pا.2B
• ) Transmission Temperatureدر
"1ارة ; ا"آ( ); ا"آ اkو(i! 7u
<9ت اkداء -ا#ادات 1
2ض درW 9ارة !" ا@آ ا.2B
<9ت اkداء -ا#ادات ;) 2ا"آ اkو(7u
١٧١
• ا!k
Uدي ا R8زر ") "Bestا] ("8إ ض
أ "8دورة !&$ <
"RSت ا]داء $ ،ا +ت
اBا
".
• Ì91
Uدي ا R8زر " (jBW) "Saveإ ا<$ح
i jB@+دورة ."RSأي دورة "RSوز 10
"$2ا? +أ دورة 3I+ A "RS
bم ® 4 .Uconnectد 3
"RSة Save
) (jBWأد=:
6آ@
Pك أ!اص ،USBا Rdزر
" jB@ "USBدورات @
"RSك ا]!اص.
• 0 Pإ@ /Gً 60ا 0 P) ?:إ@ 100
آ*(?/
6آ ،SD !F+ Pا!F+) "SD Card" Rd
jB@ (SDدورات ا "RSإ .SD !F+
2ض ا$ة ا < !Rا<رة ,Yل 0إ 60
ً/Yا< )
0إ 100آ.(/4
• 0 Pإ@ /Gً 100ا 0 P) ?:إ@ 160
آ*(?/
ا Rdزر " jB@ "Uconnectدورات ا"RS
إ @BAو Pا.$
ا Rdزر ") "CancelإRء( 2ض "!F+" i
ا.k!&$
@&ي "ا>!Fت" ا!&$ت ا$ر 9أد=:
• و Bرد !#
{,و! kرد "2ا<[ Dا&!> kء "RSا<رة
&d "+,ء &! kا<@ Pا@$آ )>d 4
ا<&ك 2+ا$ور 500ة( ا2$وض
ض
&2ت ا<[.(DID) D
<9ت اkداء Ì91 -
١٧٠
:F1Gف uن ت "و Bرد ا "#9و"
"? uو"⅛ " و"¼ " "ه)ة" ?L
uن "? ا:رة 0آ*/ 0) ?/ا(?:
2ض ا$ة ا < !Rا<رة ,Yل 0إ
/Yً
100ا< )
0إ 160آ.(/4
• ⅛ )(" 200
2ض ا$ة ا < !Rا<رة ,Yل < ⅛
.(
200) "
A&+
• ¼ )(" 400
2ض ا$ة ا < !Rا<رة ,Yل < ر6+
" ).(
400
• !:ا"9ا
2ض ا <$ا'ي ='Iا<رة H!& "$2آ
".
* :F1Gإء س ا !:إذا * "" دوا
ا"9ا Mا:رة ً ،أو ? Lا#ل ا"9ا
!61 7ت ا5ارئ.
!"H
! 4$5 4س إ[5Wت ا<رة Yل @BAت
ا]داء IYام اFق ا< 2أو
ا$$ة ,و P wاIا
` أ Jق .
وI+ q5ام ه'= ا3$ات &?@
g+و
Wود ا&,ن P .م اYRل !رات ا<رات ا
Y ! 4ل @BAت ا]داء &
,F+رة أو
Fة ! 2ض Yا<[ Dأو Yا
D[< .FIا `>$وا$ه وا@'ر ه& ا& Wا'ي
P `?$و!&ع ا@&ادث.
$ح ?" 3ة و:RS ,J
ا> 9ا":4
<9ت اkداء -ات
@BA "$Sت ا]داء :
• ا @B5ا[<
<9ت اkداء -ا> 9ا":4
• ا!&$ت
ار ) Homeا @B5ا[<( & ،
اIرات ا:
• ا2ادات 1
• < &A 6ر وا I<$ ?$م @ه.
• ا2ادات 2
• < 4ر وI<$ q $م اY $ل
&Aر ا<رة.
• !&ة ا<رع
• ا@$ك
ات
• ا5ر &&Aل إ 3ة Performance
) Controlا@? 4ا]داء(.
@ ) Timers @BAا!&$ت(
?$
ا@ " +ا>!Fت" ا:
• ا7
Uدي ا R8زر ") "Currentا@( إ ض
" tIا&! kا@!&$ ",,ت ا]داء.
• ا"Sk
Uدي ا R8زر ") "Lastا]( إ ض
iدورة !&$ <
"RSت ا]داء.
١٦٩
مFLت ا8#
>J ا;ت اa:
?اداتmدة ا#ا
"System Information" زرR8 ا2+
&
ت2${ ?&ن ا$م( اb&
ت ا2
)
:W
ا
مFLت ا8# •
Clear Personal Data" زرR8 ا2+
(5IS ا>ت اq<
" )إاداتSettings
:W
{ ?&ن ا^ادات ا$ ا
>J ا;ت اa: •
دة2" )اRestore Settings" زرR8 ا2+
{ ?&ن ا^ادات ا$ا^ادات( ا
:W
?اداتmدة ا#• ا
&
ت2
) System Information 6d ار و
System Information b &ف،(مbا
.مb اÅ
+ ارAض إ2 (مb&
ت ا2
)
5IS إزا ا>ت ا4 ،ة3$ @ ه'= ا4 >8 اqB
وBluetooth® ة39 ذ أ$+
زرRd ا،5IS&
ت ا2$ ^زا ا.D><$ا
ا>تq<
) "Clear Personal Data"
Are you" *< ,#>
'ةb و&ف،(5ISا
sure you want to clear all personal
6$9 q<
> *آ رk" )ه" أdata?
أوq<$ (D " )
&اOK" دW (؟5ISا>ت ا
، ا>تq<
د$+ .وجI (ءR" )إCancel"
4) "Personal data cleared" ,#>
رb
HI 4 زرRd ا.(5IS ا>ت اq<
.,+< ا$[,&ع إ ا9 {$ ا
إادات2< &ف،ة3$ @ ه'= ا4 (< )اClockض( و2 ) اDisplay
)ااد&( إ إاداRadio&ت( و5 )اAudioو
،d اwدة ا^ادات إ ا^اد ا2w .d اwا
دة2 )اRestore Settings زرRdا
Are you" <*ل,#>
'ةb &ف.(ا^ادات
sure you want to reset your settings to
> ا^ادات إd *آ إدة+ "" )هdefault?
4 (42) "Yes" دW ،(؟d اwا^ادات ا
دة2د ا$+ .وجI (ءR" )إCancel" دة أو2wا
settings" ` أB ,#>
رb ،ا^ادات
دة ا^ادات إ2 اk$) "reset to default
D زر &اRd ا.(d اw ا6d&ا
.وجI {$ا
Hh رة )ودة: اB; إذا آ- داءkت ا9<
& ضD>F @ت ا]داء ه >رةBA
،س,ة ا39& أ$
وردت$ آ،ات ا]داءU
ف !رات2ا]
ا'ي &ف <ك ا
.2B اk!&ر ا
"Apps" زرRd ا،@ت ا]داءBA &ل إA&
زرRd ا4. ،{$ت( ا,>F)ا
(@ت ا]داءBA) "Performance Pages"
&بF$ر ا3 اRd ا.{$ ا
.@دة$@ ا]داء اBA ='&ل إ هA& {$ا
١٦٨
Bluetooth®/M+ا
"Phone/Bluetooth®" زرR8 ا2+
{ ?&ن$( اBluetooth®/H)ا
:W
ا^ادات ا
;" اMا+• ا
مb+ ,
Hة أي ا&ا3$ض ه'= ا2
.(Bluetooth®/H )اPhone/Bluetooth®
مb D@
" د69 را،&
ت2$ ا3$
.Uconnect®
;"• ا>در ا> ا
مb+ ,$&ت ا5ة ا39ة أ3$ض ه'= ا2
.(Bluetooth®/H )اPhone/Bluetooth®
مb D@
" د69 را،&
ت2$ ا3$
.Uconnect®
١٦٧
B; إذا آ- 7!Wmز ا+'ى <ت ا: 1• إزا
Hh رة )ودة:ا
<&ىH& رة,ة & ا3$" ه'= ا$2
ل إدلY 5$& ا$@$ة ا39¼ &ت5ا
Rd ا،@اء ا9^ .( d^ )از اAUX
&تA )
> <&ىAUX Volume Match زر
وا <&ى،{$ ( اd^از ا
HI 4 زرRd ا.3+ إ3.,+< ا$[,&ع إ ا9 {$ا
Hh رة )ودة: اB; ا>ت — إذا آ8? •
&ت5&دة ا9 <@ &ت5ة & ا3
"$2
Rd ا،@اء ا9^ .8BI$&ت ا5
<&ت ا
(&ت5" )& اLoudness" زر
Rd ا.(w) "No" ( أو42) "Yes" دW و،{$ا
$[,&ع إ ا9 {$ اHI 4 زر
.,+<ا
Mid/("+' )اBass إ?ادa :F1G
" (U9" )ا>ت اTreble/(iق ا5L)ا
!Wmh ?ادm " ا9k @ أو8?k x:h #<إ
."ةz ب85?اد اm@ ا8? iإ@ ا
?":h ل#ى ا>ت ا: •
P<W `8BI &ت أو5ة <&ى ا3$ ه'= ا3
Speed Adjusted Volume R .ا<رة
"Off" Rd ا،(<+ ل2$&ت ا5)
<&ى ا
Rd ا.{$" ا3" " أو2" " أو1" ف( أو,)إ
$[,&ع إ ا9 {$ اHI 4 زر
.,+<ا
Hh رة )ودة: اB; — إذا آ75• ا>ت ا
اء9^ .F@
&تA @آة6dة و3$& ه'= ا
"Surround Sound" زرRd ا،@ا
"On" دW و،{$( اF@$&ت ا5)ا
4 زرRd ا.("RSف ا," )إOff" "( أوRS)
.,+< ا$[,&ع إ ا9 {$ اHI
• #ا 4:ا/PJ:ا)ود +hو?' 8ادة
ا/LJ:ا)ودة +hأو L? ًu
ا:رة — إذا آ; Bا:رة )ودة Hh
@ ه'= ا3$ة "RS 4 ،ا 2,$اD[< I<$
و ا,دة ا&? ً[, I<$ن در9ت ا@ارة
أ!" 40در 4.4) k 9در9ت
.(&g
?&ن در9ت ا@ارة أ 80درk 9
) 26.7در 2,
"RS 4 ( &g
9ا<[ Dا3$ود
@B+ت &9^ .اء ا@ ،ا Rdزر "Auto
) "Heated Seatsا ,$ا I<$ا]و&
?(
ا Y b W ،{$ار &+ار ا^اد S
إ أ` ! 4ار ا^اد .ا Rdزر HI 4
ا&9 {$ع إ ا $[,ا<.,+
Sرات إف ا"ك
2+ا R8زر ""Engine Off Options
)رات إ,ف "RSا@$ك( ا&? {$ن
ا^ادات ا :W
• ? ا"Jوج ا — +:إذا آ; Bا:رة )ودة Hh
@ ه'= ا3$ة@ ،ك 2,ا<[ Dأو&
?ً
$+ HIد إ,ف "RSا@$ك9^ .اء ا@،
١٦٦
ا Rdزر " 2,
) "Easy Exit SeatاIوج
ا<"( ا Y b W ،{$ار
&+ار ا^اد Sإ أ` ! 4ار ا^اد .اRd
زر HI 4ا&9 {$ع إ ا$[,
ا<.,+
• "SQإف xا"ك
@ ه'= ا3$ة qB
"b ،ا&ا ' ا!F+ 2
وااد& وbم ) Uconnect® phoneإذا آk
ا<رة 3ودة ('+وbم & ) DVDإذا آk
ا<رة 3ودة ('+وا< H,ا@$ك ا) !F+ "
2إذا
آ kا<رة 3ودة ('+و,ط 3و ا$ FS !Fة
"5إ 10د![B
>d 2+ Dح ا "RSو6d
) OFFإ,ف اU .("RSدي qأي ا]&+اب
ا]
إ إRء ه'= ا3$ةEngine Off W R .
*) Power Delayإ,ف !Jا@$ك( ،اRd
زر " "+أو " "-ا @ {$ة ا&!k
ا&F$ب 4. ،ا "". 0أو " ". 45أو "5
د![ "Dأو " 10د![ ."Dا Rdزر HI 4
ا&9 {$ع إ ا $[,ا<.,+
ا>ت
2+ا R8زر ") "Audioا&5ت(
ا&? {$ن ا^ادات ا .W
• اازن/اB9J
qه'= ا3$ة >dإادات ) Balanceا&ازن(
و) Fadeا .(kBIا Rdوا@ Pر
>?
3ا&5ت أو
اIم ا] ،>8 4أو ا Rdر
^ "C" 3دة
ا >8إ ا$آ .3ا Rdزر HI 4
ا&9 {$ع إ ا $[,ا<.,+
• ا#دل
qه'= ا3$ة >8إادات ) Bassا(
و) MidاFق ا (&$و) Trebleا&5ت ا.(6B$
ا >dا^ادات I+ام زري ا^اد " "+أو " "-
ا {$أو Yل @ أي F,
ا,$س +زري " "+و" "-ا .{$اRd
زر HI 4ا&9 {$ع إ ا$[,
ا<.,+
a! '"دh و،(4:ب اh) "Driver Door"رSا
اب9 إء/9 ح9 امJ اPu ،4:ب اh
ز+ امJاب )أو اhk اU 9 ءm 78Sاا
.((RKE) a9 دون#hُ P? ابhk اa! مF; إرل
iL" اT لS• ا
`B! ءR&اب( ا<رة وإ+ب )أ+ "B! ة3$ ه'= اq
"B,ء اR" أو إB, أزرار اR8 إ ا9@دون ا
qB
دون2+ُ &اب+] اq مb ز إرل+
Passive" زرRd ا،@اء ا9^ .(RKE)
W ،{$( اS" )ا&ل اEntry
4 ! ` إ أS &ار ا^اد+
ارY b
HI 4 زرRd ا.ار ا^اد
ة ا&ل3
" 69 را.,+< ا$[,&ع إ ا9 {$ا
" "أ
&رKeyless Enter-N-Go™ حB
دون
."" رRS ">! 2 أنP
1 ا"اL? 748ا ا
"RS" )اAuto-On Comfort" زرR8 ا2+
{ ?&ن ا^ادات$( اW[ اا,ا
.W
ا
١٦٥
All" ار.&اب اآب+ أqB (RKE)
1st Press Of" @ 6
(&اب+] ا6$9) "Doors
ا]وFR8+ "B,ء اR" )إKey Fob Unlocks
&اب+] ا6$9 "B! ءR إ4 ،(qB$ اb W ز إرل9 "B,ء اR ا]و زر إFR8ا
.(RKE) qB
دون2+ُ &اب+] اq مb
1st Press @8? '" رة: اB; إذا آ:F1G
5h 9 )إء اOf Key Fob Unlocks
"All Doors" U (a9 اF!1 @8? @وkا
"FL اh ابhk اU 9 * إء:! ،(ابhk)آ ا
* iL" اT لSم اFLh ب )ودh أيP?
1st Press Of Key Fob '"h B إذا. u:
F!1 @8? @وk ا5h 9 )إء اUnlocks
،(4:ب اh) "Driver Door" U (a9ا
بh : L? i! 4:ب اh 9 * إء:!
1 7! و،iL" اT لSم اF; امJh .4:ا
1st Press Of Key Fob Unlocks '"h
U (a9 اF!1 @8? @وk ا5h 9)إء ا
« دي،(4:ب اh) "Driver Door" 1 7! .i! 4:ب اh a! @ "ة إP "wا أآ
Y b W ،{$( ا# اFR8)ا
. ار ا^اد4 ! ` إ أS &ار ا^اد+ ار
&ع إ9 {$ اHI 4 زرRdا
.,+< ا$[,ا
#hُ P? اL? L• <ور <ت ا
ة5! &A `> ر إرة5 ،ة3$ @ ه'= ا
اء9^ .2+ُ " ا<رةRS S `> اi Sound Horn with" زرRd ا،@ا
`> اi &تA ورA) "Remote Start
Y b W ،{$( ا2+ُ "RSا
. ار ا^اد4 ! ` إ أS &ار ا^اد+ ار
&ع إ9 {$ اHI 4 زرRdا
.,+< ا$[,ا
a9 اF!1 @8? @وk ا5h 9• إء ا
@ 6
(D[<ب ا+) "Driver Door" ار
"B,ء اR )إ1st Press Of Key Fob Unlocks
ب+ "B! ءR إ4 ،(qB$ اb W ا]وFR8+
"B,ء اR ا]و زر إFR8 ا, D[<ا
qB
دون2+ُ &اب+] اq مb ز إرل9
"B,ء اR زر إR8 اP .(RKE)
qB
دون2+ُ &اب+] اq مb ز إرل9
• *#اWkاء ا #أو - ًuإذا آ; Bا:رة
)ودة Hh
@ ه'= ا3$ة/S 4 ،إRء Sاq+5$
ا]
ا 2أو&
?ً أ&Wال 9^ .2اء
ا@ ،ا Rdزر ""Auto High Beams
)ا q+5$ا]و&
? ا&8ء( ا،{$
Y b Wار &+ار ا^اد Sإ أ` ! 4
ار ا^اد .ا Rdزر HI 4
ا&9 {$ع إ ا $[,ا< ,+أو ا Rdزر
ر&9ع ا&ا .9را" 69ا - q+5$إذا آ kا<رة
3ودة 3
4 " "'+ا ر"
3$
ا
&2$ت.
• أWاء ا+Lر -إذا آ; Bا:رة )ودة Hh
@ ه'= ا3$ة "RS 4 ،ا q+5$ا]
آ$
"RS 4ا@$ك9^ .اء ا@ ،ا Rdزر
") "Daytime Running Lightsأ&dاء ار(
ا Y b W ،{$ار &+ار ا^اد
Sإ أ` ! 4ار ا^اد .ا Rdزر 4
HIا&9 {$ع إ ا $[,ا< ,+أو
ا Rdزر ر&9ع ا&ا.9
١٦٤
• و اWkاء ? Lا9
@ ه'= ا3$ة q+5
& ،ا@' اFI
! "Bا]&+اب أو إRء !I+ Bام 9ز إرل 4b
qا]&+اب ُ+ 2+ون (RKE) qBأو I+ام
3ة ا&ل ا ?$ .Sار ه'= ا3$ة 6أو
دون ار 3ة إYJق &Aت ا^'ار ا9^ ."B,اء
ا@ ،ا Rdزر "Flash Lights with
) "Lockو
ا]&dاء ا ("B,ا،{$
Y b Wار &+ار ا^اد Sإ أ` ! 4
ار ا^اد .ا Rdزر HI 4
ا&9 {$ع إ ا $[,ا< ,+أو ا Rdزر
ر&9ع ا&ا.9
اhkاب وا9kل
2+ا R8زر ") "Doors & Locksا]&+اب
وا]!Bل( ا&? {$ن ا^ادات ا :W
• إء ا 9اkو L? 7uا"Jوج
ار ه'= ا3$ة 4 ،إRء ! 6$9 "Bا]&+اب
&! Hا<رة وو&9د !" ا@آ وPARK 6d
)ا&! (Hأو و) NEUTRAL 6dاq 6
(DS2Y
+ب ا<[9^ .Dاء ا@ ،ا Rdزر "Auto
) "Unlock On ExitإRء ا "B,ا]و&
?
اIوج( ا Y b W {$ار
&+ار ا^اد Sإ أ` ! 4ار ا^اد .اRd
زر HI 4ا&9 {$ع إ ا$[,
ا<.,+
• و اWkاء ? Lا9
@ ه'= ا3$ة
& ،ا q+5$اIر 9
! "Bا]&+اب أو إRء !I+ Bام 9ز إرل q 4b
ا]&+اب ُ+ 2+ون (RKE) qBأو I+ام 3ة
ا&ل ا ?$ .Sار ه'= ا3$ة 6أو دون
ار 3ة إYJق &Aت ا^'ار ا9^ ."B,اء
ا@ ،ا Rdزر "Flash Lights with
) "Lockو
ا]&dاء ا ("B,ا،{$
Y b Wار &+ار ا^اد Sإ أ` ! 4
ار ا^اد .ا Rdزر HI 4
ا&9 {$ع إ ا $[,ا<.,+
• <ور <ت ا L? Lا9
@ ه'= ا3$ة5 ،ر إرة >` 5! &Aة
iا>` Sأ!Bل ا>ب9^ .اء ا@،
ا Rdإ
زر ") "Offإ,ف ا ("RSأو "1st
) "Pressا FR8ا]و( أو ""2nd Press
") "Safety & Driving Assistanceا<
Y
وا<$ة ا,دة( ا .{$ا Rdزر
"*) "Parkview Backup camera Delay
آ
ا ا&9ع ا (Parkview BIا{$
* "RSآ
ا ا&9ع ا ParkView® BIأو
إ,ف .RS
• ت ا#ر ا "5اkوu
ار ه'= ا3$ة S ،اbم @ت ا93ج
ا]
أو&
?ً إذا ا 2Sو&9د ء ا93ج
ا]
9^ .اء ا@ ،ا Rdزر "Rain
) "Sensingا2Sر ا (F$اW ،{$
Y bار &+ار ا^اد Sإ أ` ! 4
ار ا^اد .ا Rdزر HI 4
ا&9 {$ع إ ا $[,ا<.,+
• h ?:ء ا ? @8ا"#9ت -إذا آ;B
ا:رة )ودة Hh
ار ه'= ا3$ة3
S 4 ،ة < +ء ا"RS
ا2B$ت ) .(HSAراb" 69م ا@? 4ا^?و
اBا
"" !<" 4ا>ء وا&5@ ""RSل
&2ت &Wل و Bاbم وآ9^ .`RS Bاء
ا@ ،ا Rdزر "<
) "Hill Start Assist
+ء ا "RSا2B$ت( اW ،{$
Y bار &+ار ا^اد Sإ أ` ! 4
ار ا^اد .ا Rdزر HI 4
ا&9 {$ع إ ا $[,ا<.,+
ا>ah
2+ا R8زر ") "Lightsا (q+5$
ا&? {$ن ا^ادات ا .W
• "SQإ9xء ا> ahاk
@ 4ه'= ا3$ة,
>d q } ،ار ا&!k
ا'ي ` "bا q+5$ا]
! ا 2+ "RSإ,ف
"RSا@$ك R .إاد * إBJء اq+5$
ا]
،ا Rdزر " "+أو " "-ا{$
@ ة ا&! kا&F$ب 4. ،ا إ
. 0أو 30
.أو . 60أو .. 90ا Rdزر HI 4
ا&9 {$ع إ ا $[,ا< ,+أو اRd
زر ر&9ع ا&ا.9
• إWءة ا> ahا @8? kا"5
ار ه'= ا3$ة S 4ا q+5$ا]
و>,
S Wـ$ "Rة 0أو 30أو 60أو ،. 90وذ
qا]&+اب I+ام 9ز إرل bم qا]&+اب
ُ+ 2+ون W R .(RKE) qB
) Illumination Approachأ&dاء ا!wاب(،
ا Rdاز " "+أو " "-ا@ {$
ا "ABا .
3ا Rdزر HI 4
ا&9 {$ع إ ا $[,ا< ,+أو ا Rdزر
ر&9ع ا&ا.9
• ا> ahا U kات — إذا آ;B
ا:رة )ودة Hh
ار ه'= ا3$ة وو&9د Bح ا>5$ح ا]
و) AUTO 6dأو&
?( "$2 ،ا q+5$ا]
$ة &. 10اٍن "RS 2+ >ً,ا@$ت 4 .إ,ف
8إ,ف "RS
"RSا q+5$ا]
أ ً
ا@$ت إذا آن ! I+ RS 4ام ه'= ا3$ة.
^9اء ا@ ،ا Rdزر "Headlights With
) "Wipersا q+5$ا]
6ا@$ت(
ا Y b W ،{$ار &+ار ا^اد Sإ
أ` ! 4ار ا^اد .ا Rdزر HI 4
ا&9 {$ع إ ا $[,ا< ,+أو ا Rd
زر ر&9ع ا&ا.9
١٦٣
ار4 ! ` إ أS &ار ا^اد+
ارY
{$ اHI 4 زرRd ا.ا^اد
.,+< ا$[,&ع إ ا9
ParkView® 98J" آ"ا ا"ع اSQ •
&ع9 )اREVERSE 6d إاج ا<رة و
،("RSف ا,> * ا?
ا إd 6
) (HI
ض4 وBI ا?
ا ا6dوج وI ا4
إاج ا<رة. أو ااد& ة أىWY$ا
* >d 6
) (HI &ع9 )اREVERSE 6dو
6
BI&رة ا5 ض ا4 ،("RSا?
ا ا
2+ &اٍن. 10 " إ5 ة$ ?
>? اS&ط اF
w( إHI &ع9" )اREVERSE" 6dوج وIا
8) /4 آ12 إذا وزت ا<رة ¼
م
6d" !" ا@آ إ و, 4 ا<( أو/أ
ل
" إRSح اB
إدارةk$ ( أوH!&" )اPARK"
> * آ
ا8 .("RSف ا, )إOFF 6dو
زرRd ا،ParkView® BI&ع ا9ا
زر4. ،{$( ا4?@ اA) "Controls"
زر4. ،{$" )ا^ادات( اsettings"
5L 7! ر:h M8 وث1 1 7! :F1G
نu ،+ ااM8 ?م1 7! @1 ،"#:ا
ر إ@ وآ:h ."#: ذاة ا7! Q5S كLه
دي ود."#: < ذاة اP آQ8 #
طLم "ا اF; ? " إ@ ?م#:ذاة اh Q5S
.ت9<ا8 ًx (BSM) 9Jا
98J"ا ا"ع اu 5Lدات اzرm• ا
ParkView®
?
اFSة ا^ردات ا3$+ ودة3
! ?&ن ر
ضq واParkView® BI&ع ا9ا
&ع9ل ض آ
ا اY FSا^ردات ا
6d" و, ذراع ا6d و4 BIا
&رة5 اb .(HI &ع9 )اREVERSE
check" '@ bWY
6
&{ ااد$ @ " آD,@" )اentire surroundings
{$ 2+ و.S&ي ا2ء ا3&ل اF+ (<رة+
Rd ا،@اء ا9^ .bWY$ ه'= اBI &اٍن.
ParkView Backup Camera Active" زر
&ع9 ?
ا اFS" )ا^ردات اGuidelines
b W ،{$( اParkView BIا
ار4 ! ` إ أS &ار ا^اد+
ارY
{$ اHI 4 زرRd ا.ا^اد
مb jB@ &ف.,+< ا$[,&ع إ ا9
ل دوراتY و2
g W À+ ParkSense®
."RSا
9Jط اL اL •
، >تBIط ا,ة >` ا3
& ،ة3$ @ ه'= ا
ط, ا,F
<م9&د أ9 إ وS ،&A أو/
[ و
6d وBIط ا,ة >` ا3
S ?$ .BIا
S 4 6d& @ ه'ا ا.(q+5$" )اLights"
ً[
ً> ض2( وBSM) BIط ا,م ا!> اb
6d& ?&ن ا.9رIا ا$ ا,
،FًS ( ة5 واq+5$" )اLights & Chime"
ً[
ً> (BSM) BIط ا,م ا!> اb ض2
" إرةRS &A `> إd^+ 9رIا ا$ا
مb S ءR إ4 ،(ف," )إOff" @ .فF2wا
Blind Spot W R .(BSM) BIط ا,
ا!> ا
"Off" ر3 اRd ا،(BIط ا, )>` اAlert
أو
(q+5$)ا
"Lights"
أو
(ف,)إ
( ة5 واq+5$" )اLights & Chime"
.{$ اHI 4 زرRd ا4. .{$ا
١٦٢
ا G:وا?:ة ! 7ادة
2+ا R8زر "Safety & Driving
) "Assistanceا< Yوا<$ة ا,دة(
ا&? {$ن ا^ادات ا :W
• "Hا>دم ا - 7kإذا آ; Bا:رة )ودة
Hh
& 3ة @' ا5دم ا]
)'@ (FCW
&Aو/أو [ @' 5د
ت أ
@.$
>d ?$ا3$ة (2+) Farأو F>d
.(P!) Nearوا@ ا wا3$ dة @' ا5دم
ا]
) (FCWه إاد .(2+) Farو 2ذ أن
اbم @'رك 5دم @ 6
"$ا<رة ا أ
?&ن < أ .2+و @$ذ أ&Jل و!k
, ?$م +د ا R ."2Bا^اد @&5ل !دة
أآ #د
?W ،د ا^اد .(P!) Nearو "$2ه'ا
" @'ك ا5دم ا&? "$@$ن أ!ب إ
رة أ
'@ W R .ا5دم ا]
) ،(FCWا Rdا3ر " (P!) "Nearأو ""Far
) (2+وWر= 4. .ا Rdزر HI 4
ا.{$
را" 69وWة ا@? 4ا< ا +#ا"(ACC) g$
" 3
4ا ر" @&5ل
3
ا
&2$ت.
• Sرات ا ا - «8:إذا آ; Bا:رة )ودة
Hh
?&ن ا<رة 3ودة b+م ا@? 4ا]داء،
<&ف 3
qة رات ا& `9ا<{ >d
ا& `9ا<{ و 9ا& .`9ا Rdزر ""Sport
)ا (dا & {$أآ> !ر ا&`9
ا<{'+ PF $
،ل 9أآ> .ا Rdزر
") "Normalا2دي( ا
3
& {$
ا& `9ا<{'+ PF $
،ل 9أآ> .ا Rd
زر ") "Comfortاا (Wا & {$
&ازن ا& `9ا<{ و 9ا& .`9ا Rdزر 4
HIا&9 {$ع إ ا $[,ا<.,+
• ;Fم ®ParkSense
&,م bم ® 6$9 @>+ ParkSenseا]<9م
ا&9&$دة Hا<رة ?&ن ذراع !" ا@آ
و) REVERSE 6dا&9ع (HIو ا<رة
أ!" 18آ .(/Yً
11) /4و&ف &
إ'اًرا ) ً&Aو/أو [ً( Sإ ى ا!wاب
ا]<9م ا]ى ?$ 4 .اbم 6اIر Sound
) Onlyا&5ت (,أو Sound and Display
bم
W
R
وا2ض(.
)ا&5ت
® ،ParkSenseا Rdا3ر ""Sound Only
)ا&5ت (,أو ") "Sound and Displayا&5ت
وا2ض( وWر= 4. .ا Rdزر HI 4
ا .{$راb" 69م ®4<! "ParkSense
" 3
4ا ر" YJYع و Bاbم
و
&2ت ا."RS
• :ى <ت <!"ة ;Fم ®ParkSense
ا798J
@ ?$إادات <&ى &Aت Aة bم
® ParkSenseا BIض
&2ت
ا<[ (DID) Dأو bم ® - Uconnectإذا آk
ا<رة 3ودة "$S .'+إادات <&ى &Aت
ا 5ة (BI
) LOWو(&
) MEDIUM
وٍ) HIGHل( .إاد <&ى ا&5ت ا wاd
65$ه& 9^ .(&
) MEDIUMاء ا@،
ا Rdزر "ParkSense® Rear Chime
&<
) "Volumeى &Aت Aة bم
® ParkSenseا (BIاb W ،{$
١٦١
• "? 4ض اkوا"
ا&ا 9ه'= ا R ?$ ،Sإادات
" $[!) "Show Command Listض ا]وا
(.
Rإادات $[!) Show Command List
ض ا]وا
( ،ا Rdزر ") "Alwaysدا[ً ($أو
" 6
) "With Helpا$2ت( أو "(,ًF
) "Never
ا Y b W {$ار &+ار ا^اد
Sإ أ` ! 4ار ا^اد .ا Rdزر 4
HIا&9 {$ع إ ا $[,ا<.,+
ا?:
2+ا R8زر ") "Clockا<(
ا&? {$ن ا^ادات ا :W
• )ا LاF; U Bم اا Uا7#
)(GPS
< q$ه'= ا3$ة >8+ا&!Y kل ااد& .ً[,
Rإاد 3
) Sync Timeا
ا&! ،(kا Rd
زر ") "Sync with GPS Timeا3$ا
k!& 6
bم @ ا&$ا! 6ا ($2اW ،{$
Y bار &+ار ا^اد Sإ أ` ! 4
١٦٠
ار ا^اد .ا Rdزر HI 4
ا&9 {$ع إ ا $[,ا<.,+
• ? iWت اB
< q$ه'= ا3$ة >8+ا<ت P .أ 4 wإزا
Yاwر زر ""Sync with GPS Time
)ا3$ا
6و!b kم @ ا&$ا! 6ا ($2
ا9^ .{$اء ا@ ،ا Rdزري " "+أو " "-
ا >8 {$ا<ت ] أو ] ."BاRd
زر HI 4ا&9 {$ع إ ا$[,
ا<.,+
• iWد 4اB
< q$ه'= ا3$ة >8+ا![ P .Dأ 4 wإزا
Yاwر زر ""Sync with GPS Time
)ا3$ا
6و!b kم @ ا&$ا! 6ا ($2
ا9^ .{$اء ا@ ،ا Rdزري " "+أو ""-
ا >8 {$ا![ ] Dأو ] ."BاRd
زر HI 4ا&9 {$ع إ ا$[,
ا<.,+
• :LاB
< q$ه'= ا3$ة @+إاد ض < Dا&!.k
ا Rdزر " D<) "Time Formatا&! (k
ا Y b W {$ار &+ار ا^اد 12
أو S 24إ أ` ! 4ار ا^اد.
ا Rdزر HI 4ا&9 {$ع إ
ا $[,ا<.,+
• ?"ض ا i"z 7! Bا – إذا آ; Bا:رة
)ودة Hh
qه'= ا3$ة "RSا< ا! $ا@
أو إ,ف R .RSإاد Show Time Status
)ض Wا&! ،(kاShow Time in" Rd
) "Status Barض ا&! kا@( W
Y bار &+ار ا^اد Sإ أ` ! 4
ار ا^اد .ا Rdزر HI 4
ا&9 {$ع إ ا $[,ا< ,+أو ا Rdا3ر
" "XاY^ {$ق ا^ادات.
&+ار ا^اد Sإ أ` 4ار ا^اد .ا Rd
زر HI 4ا&9 {$ع إ ا$[,
ا<.,+
ا1ات
2+ا R8زر ") "Unitsا&Wات(
ا&? {$ن ا^ادات ا :W
• ا1ات
ا&ا 9ه'= ا @ ?$ ،Sآ" وWة
وWات ا,س &5+ d 4رة 5B
&2ت ا<[ (DID) Dوbم ا) WY$إذا آ kا<رة
3ودة 4 .('+د وWات ا,س ا ا@ +,
أد=:
• ا?":
Wد /"
) "MPH" :ا<( أو ""km/h
)آ.(/4
• ا!:
Wد ("
) "mi" :أو ") "kmآ.(4
• اG+ك اد
• ا)#م
Wد &9 "? "
) "MPG" :ن( )اbم ا]
?(
"&9 "? "
) "MPGن( )اbم ا>,(F
" 100/) "L/100 kmآ (4أو ") "km/Lآ(/4
• ا#:
Wد ) "lb-ft" :ر!-"Jم( أو "(
&) "Nm
Wد &9) "gal" :ن( )اbم ا]
?( أو ""gal
)&9ن( )اbم ا> (Fأو ".() "L
• اi
Wد ) "psi" :ا (2+
A&+ "? "Jأو ""kPa
)آ& ?+ل( أو "+) "barر(.
• در ا"ارة
ا ) "C°" :در (&g
9أو ") "F°در9
.(k
• ا5
Wد !) "HP" :رة ) (5Wاbم ا]
?( أو
"!) "HPرة ) (5Wاbم ا> (Fأو ""kW
)آ& وات(.
2+ار ا^اد ا&F$ب ،ا Rdزر HI 4
ا&9 {$ع إ ا $[,ا<.,+
ا>ت
2+ا R8زر ") "Voiceا&5ت(
ا&? {$ن ا^ادات ا :W
• xل ا h'6ا>
ا&ا 9ه'= ا R ?$ ،Sإادات
&J) Voice Response Lengthل ا+w
اVoice Response Length R .(&5
)&Jل ا +wا ،(&5ا Rdزر ""Brief
)! (5أو "
Y b W ("5B
) "Detailed
ار &+ار ا^اد Sإ أ` ! 4ار ا^اد.
ا Rdزر HI 4ا&9 {$ع إ
ا $[,ا<.,+
١٥٩
• 5ع zzا"#ض Uإف ا>ah
اk
ا&ا 9ه'= ا&F @ ?$ ،Sع
ا2ض 6إ,ف "RSا q+5$ا]
.ا>d
ا<&Fع I+ام زري ا^اد " "+أو " "-
ا {$أو Yل @ أي F,ا,$س +زري
" "+و" "-ا 4. .{$ا Rdزر 4
HIا.{$
"m :F1Gاء "ات ? @8إ?اد "5ع zz
ا"#ض Uإف ا> ahا &' ،"kأن
uن ا> ahاQ95 kة وأu 6ن ?9 @8ح
*#ا> ahاا 7! 8Sو" 7#Wا "89أو
"ا"#6اض".
• - iWإذا آ; Bا:رة )ودة Hh
< q$ه'= ا3$ة +ر S $ا2ض& .ف
"$2ا<& R $ن ا BIو&ن ا "bو&ن زر
ا2ض.
١٥٨
• P#ا8
ا&ا 9ه'= ا @ ?$ ،SإWى اRت
ا2$دة )) Brasileiroا>از( Deutsche /
)ا]) English / ($ا^Español / (3
)ا^>( ) Français /اItaliano / (<B
)ا^) Nederlands / (Fا&( Polski /
)ا>&( ) Português /ا>Türk / (R
)اآ(( ^ر @F5
6$9ت ا2ض ،+
$+ذ و[ Hا Wوbم ا) WY$إذا آk
ا<رة 3ودة .('+ا Rdزر "Set
>d) "Languageا (Rا4. ،{$
ا Rdزر ا Rا +&F$اW {$
Y bار &+ار ا S Rإ أ` ! 4ار
ا^اد .ا Rdزر HI 4ا{$
&9ع إ ا $[,ا<.,+
• <!"ة zzا«8
ا&ا 9ه'= ا "RS ?$ ،Sا&5ت
ا&$<$ع أو إ,ف `RSا R8أ Wا]زرار
S+ا) {$زر ا .({$ا Rdزر
" A) Touchscreen Beepة ا ({$
ا Y b W {$ار &+ار ا^اد S
إ أ` ! 4ار ا^اد .ا Rdزر HI 4
ا&9 {$ع إ ا $[,ا<.,+
• ا;+ء zz 8+ا - *uإذا آ; Bا:رة )ودة
Hh
@ ه'= ا3$ة qB
"b ،ا@?W&B
4
$ة &. 5اٍن !>" اء ا .SإRء @ ه'=
ا3$ة "b ،ا 4 W W&B
Sإ !Yوً.
ا Rdزر ""Controls Screen Time-Out
)اء qBا@? (4اW {$
Y bار &+ار ا^اد Sإ أ` ! 4
ار ا^اد .ا Rdزر HI 4
ا&9 {$ع إ ا $[,ا<.,+
• :ر ا"? U 1Gض ا;5#ف 8ا7! "SÕ
'? أ)+ة اس -إذا آ; Bا:رة )ودة Hh
@ ه'= ا3$ة9& b ،ت اF2ف & ا
ا2ض وذ $+د ا!اب ا<رة أي
@
HF2د ا DFا9^ .Å
>$اء ا@،
ا Rdزر "Navigation Turn-By-Turn In
<
) "Clusterر ا 6
WY$آ" اF2ف &$
أ39ة ا,س( ا Y b W ،{$ار
ا)ات اh '"8 8hا 5ا - #إ?ادات ;Fم
Uconnect® 8.4
ا Rdزر ") "Settingsا^ادات(
ا2 {$ض إاد ا .$[,ه'ا ا& q 6d
bم ® Uconnectا&&Aل إ ا3$ات ا+,
>
ا ! ?&ن 3ودة ) Display "#
ا2ض( و) Clockا<( وSafety/Assistance
و
)ا(q+5$
وLights
)ا]
ن/ا<$ة(
) Doors & Locksا]&+اب وا]!Bل( وAuto-On
3
) Comfortة ا "RSا [,اا(W
و) Engine Off Operationإ,ف "RSا@$ك(
و) Compass Settingsإادات ا>&(A
و®Phone/Bluetooth
)ا&5ت(
وAudio
)ا.(Bluetooth®/H
5L « Lu :F1Gوا1ة !zz 7! i
ا 7! «8آ "ة.
ا@ ،ا Rdا3ر ا&9&$د ا{$
&ل إ ا& 6dا&F$ب .و$+د ا&ل إ ا&6d
ا&F$ب ،ا Rdا^اد ا "8B$وWر= W
Y bار &+ار ا^اد Sإ أ` ! 4
ار ا^اد$+ .د اآ$ل ا^اد ا Rdإ
زر
HI 4ا {$أو زر BACK
)ر&9ع( ا&ا&2 9دة إ ا $[,ا< ,+أو اRd
زر " "XاY^ {$ق ا^ادات.
qا R8زري ا "]" $أو "]""B
ا P+ {$ا] $ا Sا] ",
أو ] > "Bا^ادات ا.W$
zzا"#ض
2+ا R8زر " ) "Displayا2ض(
ا&? {$ن ا^ادات ا :W
• و zz UWا"#ض
ا&ا 9ه'= اW Sد أ Wإادات ا2ض
ا) Mode W R .[,ا& ،(6dا Rdزر
") "Manualوي( أو "S+ ([,) "AUTO
ا {$وWر= 4. .ا Rdزر HI 4
ا.{$
L? :F1Gو) Day UWام( أو Night
)ا zz UW (8ا"#ض ،ف دي اJام )ة
و UWا"#6اض إ@ iLا"اد )ة ا7! *u
5) Display Brightness Dayع ام
zا"#ض( ? @8ا" P *TإWءة ا>ah
ا.k
• 5ع zzا"#ض Uا> ahاk
ا&ا 9ه'= ا&F @ ?$ ،Sع
ا2ض "RS 6ا q+5$ا]
.ا >dا<&Fع
I+ام زري ا^اد " "+أو " "-ا {$أو
Yل @ أي F,ا,$س +زري " "+و"
" ا 4. .{$ا Rdزر HI 4 ا.{$
"m :F1Gاء "ات ? @8إ?اد "5ع zz
ا"#ض Uا> ahا &' ،"kأن uن
ا> ahا kءة وأu 6ن ?9 @8ح *#
ا> ahاا 7! 8Sو" 7#Wا "89أو
"ا"#6اض".
١٥٧
>J ا;ت اa:
?اداتmدة ا#ا
Clear Personal Data" زرR8 ا2+
(5IS ا>ت اq<
" )إاداتSettings
:W
{ ?&ن ا^ادات ا$ ا
>J ا;ت اa: •
دة2" )اRestore Settings" زرR8 ا2+
{ ?&ن ا^ادات ا$ا^ادات( ا
:W
?اداتmدة ا#• ا
ا>ت6$9 إزا4 ،ة3$ @ ه'= ا4 qB
وBluetooth® ة39 ذ أ$+ 5ISا
Rd ا،5IS ا>ت ا6$9 ^زا.D><$> ا8ا
ا>تq<
) "Clear Personal Data" زر
إذا.(w) "No" ( أو42) "Yes" + دW( و5ISا
<*ل,#>
'ةb <&ف،(42) "Yes" @ 4
"Are you sure you want to clear all
آ" ا>تq<
*آ+ "" )هpersonal data?
دة أو2w ا4 (42) "Yes" دW ،(؟5ISا
4 زرRd ا.وجI (ءR" )إCancel"
&ع إ9 {$( ا4) Done زر/HI
.,+< ا$[,ا
إادات2< &ف،ة3$ @ ه'= ا4 (< )اClockض( و2 ) اDisplay
)ااد&( إ إاداRadio&ت( و5 )اAudioو
،d اwدة ا^ادات إ ا^اد ا2w .d اwا
دة2" )اRestore Settings" زرRdا
.(w) "No" ( أو42) "Yes" + دWا^ادات( و
<*ل,#>
'ةb <&ف،(42) "Yes" @ 4 إذا
"Are you sure you want to reset your
>d *آ إدة+ "" )هsettings to default?
"Yes" دW ،(؟d اwا^ادات إ ا^ادات ا
.وجI (ءR" )إCancel" دة أو2w ا4 (42)
(4) Done زر/HI 4 زرRdا
.,+< ا$[,&ع إ ا9
دW و،{$&ت( ا5" )& اLoudness"
Rd ا.("RSف ا," )إOff" "( أوRS) "On"
{$( ا4) Done زر/HI 4 زر
.,+< ا$[,&ع إ ا9
Bluetooth®/M+ا
"Phone/Bluetooth®" زرR8 ا2+
{ ?&ن$( اBluetooth®/H)ا
:W
ا^ادات ا
;" اMا+• ا
مb+ ,
Hة أي ا&ا3$ض ه'= ا2
.(Bluetooth®/H )اPhone/Bluetooth®
مb D@
" د69 را،&
ت2$ ا3$
.Uconnect®
;"• ا>در ا> ا
مb+ ,$&ت ا5ة ا39ة أ3$ض ه'= ا2
.(Bluetooth®/H )اPhone/Bluetooth®
مb D@
" د69 را،&
ت2$ ا3$
.Uconnect®
١٥٦
• "# 8? H9Lة ا<8
ا Rdزر ") "Calibrationا2$ة(
ا R {$ه'ا ا^اد 3$ .ا>&2$+ Aة ا'ا
R $ا@ 9إ إدة F>dوً&? .ن
ا<رة 9ة b ! ،ا>& W AاFdاب و!
@ج إ ا2$ة2
?$ .ة ا>& @+ Aزر
") "Calibrationا2$ة( ا {$و&ف
}+ >F ,#>
$[! bء $ا2$ة DJ
إآ$ل دورة أو أآ3+ #او 360در ,F
) 9
ا&$اد ا 2$ا $I8أو ا]<9م ا$+ .(2$د
اآ$ل $ا2$ة +ح& ،ف bر
ا qd& Sأن ا]
! + 4ح& .ف "$2ا>&A
2+ 2>J "?S+ذ.
ا>ت
2+ا R8زر ") "Audioا&5ت(
ا&? {$ن ا^ادات ا :W
• اازن/اB9J
qه'= ا3$ة >dإادات ) Balanceا&ازن(
و) Fadeا .(kBIا Rdوا@ Pر
>?
3ا&5ت أو
اIم ا] >8 4أو ا Rdر
^ "C" 3دة
ا >8إ ا$آ .3ا Rdزر /HI 4زر
(4) Doneا&9 {$ع إ ا$[,
ا<.,+
• ا#دل
ا&ا 9ه'= ا >d ?$ Sإادات Bass
)ا( و) Midا (&$و) Trebleا&5ت ا.(2
ا >dا^ادات I+ام زري " "+أو " "-
ا {$أو Yل @ أي F,ا,$س +زري
" "+و" "-ا .{$ا Rdزر 4
/HIزر (4) Doneا&9 {$ع إ
ا $[,ا<.,+
• :ى ا>ت ا#ل ?":h
3ه'= ا3$ة <&ى ا&5ت أو P<W `8BI
ا<رةSpeed Adjusted Volume R .
)
<&ى ا&5ت ا2$ل ،(<+ا Rdزر
"&<
) "Speed Adjusted Volumeى ا&5ت
ا2$ل (<+ا&9&$د ا {$وWد +
أزرار ") "Offإ,ف ا ("RSأو " "1أو " "2أو ""3
ا .{$ا Rdزر /HI 4زر
(4) Doneا&9 {$ع إ ا$[,
ا<.,+
• ا>ت ا — 75إذا آ; Bا:رة )ودة Hh
& ه'= ا3$ة و@
6dآة &Aت @9^ .Fاء
ا@ ،ا Rdزر ""Surround Sound
)ا&5ت ا (F@$ا ،{$وWد ""On
) ("RSأو ") "Offإ,ف ا .("RSا Rdزر 4
/HIزر (4) Doneا&9 {$ع إ
ا $[,ا<.,+
• إزا: 1ى <ت ا'+ز ا - 7!Wmإذا آ;B
ا:رة )ودة Hh
"$2ه'= ا3$ة & ا,رة &&<
Hى
ا&5ت ¼39ة ا &$@$اY 5$ل إدل
) AUXاز ا^9^ .( dاء ا@ ،ا Rd
زر ") "AUX Volume Offsetإزا&<
Wى &Aت
از ا^ ( dا ،{$وWد ""On
) ("RSأو ") "Offإ,ف ا .("RSا Rdزر 4
/HIزر (4) Doneا&9 {$ع إ
ا $[,ا<.,+
• ? 8ا>ت — إذا آ; Bا:رة )ودة Hh
&,م ه'= ا3$ة @< &9دة ا&5ت <&ت
ا&5ت ا9^ .8BI$اء ا@ ،ا Rdزر
١٥٥
$ت +ء ا .("RSا Rdزر /HI 4زر
(4) Doneا&9 {$ع إ ا$[,
ا<.,+
Sرات إف ا"ك
2+ا R8زر ""Engine Off Options
)رات إ,ف "RSا@$ك( ا&? {$ن
ا^ادات ا .W
• "SQإ9xء ا> ahاk
@ ه'= ا3$ة ?&ن ?
}+ن ا<[ Dار ,+ء
ا q+5$ا]
$ RSة 0أو 30أو 60أو 90
2+ .اIوج ا<رةHeadlights W R .
) Off Delayإاد * إBJء ا q+5$ا]
(،
ا Rdزر "*) "Headlight Off Delay
إBJء ا q+5$ا]
( ا {$وا إ
زر
" ". 0أو " ". 30أو " ". 60أو " ". 90
ا @ {$ة ا&! kا&F$ب .ا Rdزر
/HI 4زر (4) Doneا&9 {$ع
إ ا $[,ا<.,+
١٥٤
• "SQإف xا"ك
• اP
@ ه'= ا3$ة qB
,> ،ا&ا ' ا!F+ 2
وااد& وbم ) Uconnect® phoneإذا آk
ا<رة 3ودة ('+وbم & ) DVDإذا آk
ا<رة 3ودة ('+وا< H,ا@$ك ا) !F+ "
2إذا
آ kا<رة 3ودة ('+و
3 'Àو ا$ FS !Fة
"5إ 10د![B
>d 2+ Dح ا "RSو6d
) OFFإ,ف اU .("RSدي qأي ا]&+اب
ا]
إ إRء ه'= ا3$ةEngine Off W R .
*) Power Delayإ,ف !Jا@$ك(،اRd
زر "*) "Engine Off Power Delay
إ,ف !Jا@$ك( وWد زر " ". 0أو "". 45
أو " 5د![ "Dأو " 10د![ "Dا .{$اRd
زر /HI 4زر (4) Doneا{$
&9ع إ ا $[,ا<.,+
> ا>& Aه& اBق +ا$Sل ا <JR$وا$Sل
اRا &2 .ه'ا اBق >d P ،ا> ,F$
ا < +ا<رة ،وذ ?" $+ .,F
Fد
>dذ &, ،q@A "?S+م ا>& Aأو&
?ًّ
&2+اBرق و! 4,اءة د!.,
:F1Gأ ِhا:kم ا w ،:xLأ)+ة iPod
وا+ا Mا وأ)+ة ا "uا وأ)+ة
آ Mا"ادار#h ،ة ? Pأ? 1 @8أ)+ة اس .وذ
1ا< ،8و &:ا"#: @8? Ô
ا< ،8دي إ@ "اءات .ÂxS
إ?اد ا< – 8إذا آ; Bا:رة )ودة Hh
2+ا R8زر ""Compass Settings
)إادات ا>& (Aا&? {$ن ا^ادات
ا .W
P 5"Sا<8
ا Rdزر "&A) "Horn w/Lockت iا>`
6ا ("B,ا ،{$وWد ") "Offإ,ف
ا ("RSأو ") "1st Pressا FR8ا]و( أو "2nd
) "Pressا FR8ا .(#ا Rdزر 4
/HIزر (4) Doneا&9 {$ع إ
ا $[,ا<.,+
• إء 9اhkاب ?#hُ P
qه'= ا3$ة +أ!Bل ا]&+اب ُ+ qB 2+ب
"آ" ا]&+اب" أو "+ب ا<[ , "Dا FR8ا]و
9ز إرل bم qا]&+اب ُ 2+دون qB
) (RKEأو إ
<ك + >,ب ا&ل ا.S
^9اء ا@ ،ا Rdزر "Remote Door
) "UnlockإRء ! "Bا]&+اب ُ (2+
ا ،{$وWد ") "Allا?"( أو ") "Driverا<[.(D
ا Rdزر /HI 4زر (4) Done
ا&9 {$ع إ ا $[,ا<.,+
h) "Driver Door" 1 7! :F1Gب
اu ،(4:ن Pا"وري ا+ @8? P" iز
إرل ;Fم ! aاhkاب ? #hُ Pدون (RKE) a9
mء U 9اhkاب.
• اSل "TاiL
qه'= ا3$ة ! "Bأ&+اب ا<رة وإRء ! Bدون
ا@ 9إ ا R8أزرار ا "B,أو إRء ا+ "B,ز
إرل bم qا]&+اب ُ 2+دون .(RKE) qB
&,م R}+ء ! "Bا]&+اب >,
<
4ا>ب
اIر9^ .9اء ا@ ،ا Rdزر "Passive
) "Entryا&ل ا (Sا ،{$وWد
" ("RS) "Onأو ") "Offإ,ف ا .("RSا Rd
زر /HI 4زر (4) Doneا{$
&9ع إ ا $[,ا< .,+را3
" 69ة ا&ل دون
Bح ™" "Keyless Enter-N-Goأ
&ر P
أن "RS ">! 2ر" 2ف
3
ا
&2$ت.
• و اWkاء ? Lا9
@ ه'= ا3$ة
& ،ا q+5$ا]
!"B
ا]&+اب أو إRء !I+ Bام 9ز إرل q 4b
ا]&+اب ُ+ 2+ون ?$ .(RKE) qBار ه'=
ا3$ة 6أو دون ار 3ة إYJق &Aت ا^'ار
ا9^ ."B,اء ا@ ،ا Rdزر "Flash Lights
) "w/Lockو
ا]&dاء 6ا ("B,
ا ،{$وWد " ("RS) "Onأو ") "Offإ,ف ا.("RS
ا Rdزر /HI 4زر (4) Done
ا&9 {$ع إ ا $[,ا<.,+
أ; Fا"ا 1ا - 48إذا آ; Bا:رة )ودة Hh
2+ا R8زر "& Auto-On Comfort
) "Remote Startا "RSا [,ااW
وا (2+ُ "RSا&? {$ن ا^ادات
ا :W
• #ا 4:ا/PJ:ا)ود +hو?' 8ادة
ا/LJ:ا)ودة +hأو L? ًu
ا:رة — إذا آ; Bا:رة )ودة Hh
@ ه'= ا3$ة "RS 4 ،ا 2,$اD[< I<$
و ا,دة ا&? ً[, I<$ن در9ت ا@ارة
أ!" 40در 4.4) k 9در9ت
.(&g
?&ن در9ت ا@ارة أ 80درk 9
) 26.7در 2,
"RS 4 ( &g
9ا<[ Dا3$ود
@B+ت &9^ .اء ا@ ،ا Rdزر "Auto
) "Heated Seatsا ,$ا I<$ا]و&
?(
اW 4. ،{$د ") "Offإ,ف( أو "Remote
+) "Startء ا (2+ُ "RSأو "6$9) "All Starts
١٥٣
") "Illuminated Approachأ&dاء ا!wاب(
ا {$وا إ
زر . 0أو . 30أو 60
.أو . 90ا @ {$ة ا&!k
ا&F$ب .ا Rdزر /HI 4زر (4) Done
ا&9 {$ع إ ا $[,ا<.,+
• ا> ahا U kات — إذا آ;B
ا:رة )ودة Hh
ار ه'= ا3$ة وو&9د Bح ا>5$ح ا]
و) AUTO 6dأو&
?( "$2 ،ا q+5$ا]
$ة
&. 10اٍن "RS 2+ >ً,ا@$ت 4 .إ,ف "RS
ا q+5$ا]
أً 8إ,ف "RSا@$ت إذا آن
! I+ RS 4ام ه'= ا3$ة9^ .اء ا@ ،اRd
زر ") "Lights w/Wipersا q+5$ا]
6
ا@$ت( ا ،{$وWد " ("RS) "Onأو
") "Offإ,ف ا .("RSا Rdزر /HI 4زر
(4) Doneا&9 {$ع إ ا $[,ا<.,+
• *#اWkاء ا #أو - ًuإذا آ; Bا:رة
)ودة Hh
@ ه'= ا3$ة/S 4 ،إRء Sاq+5$
ا]
ا 2أو&
?ً أ&Wال 9^ .2اء
ا@ ،ا Rdزر ""Auto High Beams
١٥٢
)ا q+5$ا]و&
? ا&8ء( ا،{$
وWد " ("RS) "Onأو ") "Offإ,ف ا .("RSاRd
زر /HI 4زر (4) Doneا{$
&9ع إ ا $[,ا< .,+را" 69اq+5$
ا]و&
? ا&8ء -إذا آ kا<رة 3ودة
3
4 " "'+ا ر" @&5ل
3
ا
&2$ت.
• أWاء ا+Lر -إذا آ; Bا:رة )ودة Hh
@ ه'= ا3$ة "RS 4 ،ا q+5$ا]
آ$
"RS 4ا@$ك9^ .اء ا@ ،ا Rdزر
") "Daytime Running Lightsأ&dاء ار(
ا ،{$وWد " ("RS) "Onأو ") "Offإ,ف
ا .("RSا Rdزر /HI 4زر (4) Done
ا&9 {$ع إ ا $[,ا<.,+
• و اWkاء ? Lا9
@ ه'= ا3$ة
& ،ا q+5$ا]
!"B
ا]&+اب أو إRء !I+ Bام 9ز إرل q 4b
ا]&+اب ُ+ 2+ون ?$ .(RKE) qBار ه'=
ا3$ة 6أو دون ار 3ة إYJق &Aت ا^'ار
ا9^ ."B,اء ا@ ،ا Rdزر "Flash Lights
) "w/Lockو
ا]&dاء 6ا ("B,
ا ،{$وWد " ("RS) "Onأو ") "Offإ,ف ا.("RS
ا Rdزر /HI 4زر (4) Done
ا&9 {$ع إ ا $[,ا<.,+
اhkاب وا9kل
2+ا R8زر ") "Doors & Locksا]&+اب
وا]!Bل( ا&? {$ن ا^ادات ا :W
• إء ا 9اkو L? 7uا"Jوج
ار ه'= ا3$ة 4 ،إRء ! 6$9 "Bا]&+اب
&! Hا<رة وو&9د !" ا@آ وPARK 6d
)ا&! (Hأو و) NEUTRAL 6dاq 6
(DS2Y
+ب ا<[9^ .Dاء ا@ ،ا Rdزر "Auto
) "Unlock On ExitإRء ا "B,ا]و&
?
اIوج( ا ،{$وWد " ("RS) "Onأو
") "Offإ,ف ا .("RSا Rdزر /HI 4زر
(4) Doneا&9 {$ع إ ا$[,
ا<.,+
• <ور <ت ا L? Lا9
@ ه'= ا3$ة5 ،ر إرة >` 5! &Aة
iا>` Sأ!Bل ا>ب9^ .اء ا@،
• "SQآ"ا ا"ع اParkView® 98J
• ت ا#ر ا "5اkوu
ا>ah
إاج ا<رة و) REVERSE 6dا&9ع
* >d 6
) (HIا?
ا إ,ف ا،("RS
4اIوج و 6dا?
ا ا BIو 4ض
ا WY$أو ااد& ة أى .إاج ا<رة
و) REVERSE 6dا&9ع * >d 6
) (HI
ا?
ا ا 4 ،("RSض ا&5رة ا6
BI
&Fط ا ?>Sا
? $ة "5إ &. 10اٍن 2+
اIوج و) "REVERSE" 6dا&9ع (HIإw
إذا وزت ا<رة ¼
م 12آ/4
) 8أ
ل/ا<( أو "! ", 4ا@آ إ و6d
) PARKا&! (Hأو k$إدارة Bح ا "RSإ و6d
) OFFإ,ف ا * >8 .("RSآ
ا ا&9ع
ا ،ParkView® BIا Rdزر ""Controls
) Aا@? (4ا 4. ،{$زر ""settings
)ا^ادات( ا 4. ،{$زر
") "Safety & Assistanceا< Yوا<$ة(
ا .{$ا Rdزر "Parkview Backup
*) "camera Delayآ
ا ا&9ع اBI
(ParkviewاW 4. ،{$د "ON" +
)ا ("RSأو ") "OFFإ,ف ا.("RS
ار ه'= ا3$ة S ،اbم @ت ا93ج
ا]
أو&
?ً إذا ا 2Sو&9د ء ا93ج
ا]
?$ .أو ا ،"F2ا Rdزر "Rain
) "Sensingا2Sر ا (F$اW 4. ،{$د
") "Onا ("RSأو ") "Offإ,ف ا .("RSا Rd
زر /HI 4زر (4) Doneا{$
&9ع إ ا $[,ا<.,+
• h ?:ء ا ? @8ا"#9ت -إذا آ;B
ا:رة )ودة Hh
2+ا R8زر ") "Lightsا (q+5$
ا&? {$ن ا^ادات ا :W
• "SQإ9xء ا> ahاk
ار ه'= ا3$ة3
S 4 ،ة < +ء ا"RS
ا2B$ت ) .(HSAراb" 69م ا@? 4ا^?و
اBا
"" !<" 4ا>ء وا&5@ ""RSل
&2ت &Wل و Bاbم وآ ?$ .`RS Bأو
ا ،"F2ا Rdزر "<
) "Hill Start Assist
+ء ا "RSا2B$ت( اW 4. ،{$د
") "Onا ("RSأو ") "Offإ,ف ا .("RSا Rd
زر /HI 4زر (4) Doneا{$
&9ع إ ا $[,ا<.,+
@ 4ه'= ا3$ة,
>d q } ،ار ا&!k
ا'ي ` "bا q+5$ا]
! ا 2+ "RSإ,ف
"RSا@$ك R .إاد Headlights Off
) Delayإاد * إBJء ا q+5$ا]
( ،اRd
زر " *) "Headlight Off DelayإBJء
ا q+5$ا]
( ا {$وا إ
زر 0
.أو . 30أو . 60أو . 90
ا @ {$ة ا&! kا&F$ب .ا Rdزر 4
/HIزر (4) Doneا&9 {$ع إ
ا $[,ا<.,+
• إWءة ا> ahا @8? kا"5
@ 4ه'= ا3$ة,
>d q } ،ار ا&!k
ا'ي ` "bا q+5$ا]
! ا "RSإRء !"B
ا]&+اب I+ام 9ز إرل bم qا]&+اب ُ2+
دون R .(RKE) qBإاد Illuminated
) Approachأ&dاء ا!wاب( ،ا Rdزر
١٥١
98J"ا ا"ع اu 5Lدات اzرm• ا
ParkView®
?
اFSة ا^ردات ا3$+ ودة3
! ?&ن ر
ضq واParkView® BI&ع ا9ا
&ع9ل ض آ
ا اY FSا^ردات ا
@د اوس/", ذراع ا6d و4 BIا
&رة5 اb .(HI &ع9 )اREVERSE 6dو
check" '@ bWY
6
&{ ااد$ @ " آD,@" )اentire surroundings
{$ 2+ و.S&ي ا2ء ا3&ل اF+ (<رة+
Rd ا،"F2? أو ا$ .bWY$ ه'= اBI &اٍن.
ParkView® Backup Camera" زر
?
اFS" )ا^ردات اActive Guidelines
4. ،{$( اParkView® BI&ع ا9ا
Rd ا.("RSف ا," )إOff" "( أوRS" )اOn" دW
{$( ا4) Done زر/HI 4 زر
.,+< ا$[,&ع إ ا9
ض2( وBSM) BIط ا,م ا!> اb S
6d& ?&ن ا.9رIا ا$ ا, ً[
ً>
،FًS ( ة5 واq+5$ )اLights & Chime
ً[
ً> (BSM) BIط ا,م ا!> اb ض2
"RS &A `> إd^+ 9رIا ا$ ا
S ءR إ4 ،(ف, )إOff @ .فF2wإرة ا
Blind W R .(BSM) BIط ا,م ا!> اb
ر3 اRd ا،(BIط ا, )>` اSpot Alert
( أوq+5$" )اLights" ف( أو," )إOff"
( ة5 واq+5$" )اLights & Chime"
Done زر/HI 4 زرRd ا4. .{$ ا
.{$( ا4)
5L 7! ر:h M8 وث1 1 7! :F1G
نu ،+ ااM8 ?م1 7! @1 ،"#:ا
ر إ@ وآ:h ."#: ذاة ا7! Q5S كLه
دي ود."#: < ذاة اP آQ8 #
طLم "ا اF; ? " إ@ ?م#:ذاة اh Q5S
.ت9<ا8 ًx (BSM) 9Jا
ParkSense® مF; ى <ت <!"ة: •
798Jا
مb ةA &تA ? @ إادات <&ى$
&
ت2
ضBI اParkSense®
k إذا آ- Uconnect® مb ( أوDID) D[<ا
&تA " إادات <&ى$S .'+ ودة3
ا<رة
(&
) MEDIUM( وBI
) LOW ة5ا
d اw&ت ا5 إاد <&ى ا.( )ٍلHIGHو
،@اء ا9^ .(&
) MEDIUM & ه65$
"Rear ParkSense® Volume" زرRdا
(BI اParkSense® مb &تA )
<&ى
( أوBI
) "Low" + دW 4. ،{$ ا
زرRd ا.(" )ٍلHigh" " )
&( أوMed"
&ع9 {$( ا4) Done زر/HI 4
ParkSense® مb jB@ &ف.,+< ا$[,إ ا
."RSل دورات اY و2
g W À+
9Jط اL اL •
BIط ا,ة >` ا3
& ،ة3$ @ ه'= ا
<م9&د أ9 إ وS ،&A أو/ [ و،>ت
BIط ا,ة >` ا3
S ?$ .BIط ا, ا,F
4 6d& @ ه'ا ا.(q+5$ )اLights 6d و
١٥٠
اW 4. ،{$د ) "ON" +ا ("RSأو
") "OFFإ,ف ا .("RSا Rdزر 4
/HIزر (4) Doneا&9 {$ع إ
ا $[,ا<.,+
• iWار¸
ا&ا 9ه'= ا >d ?$ ،Sار °وً.
ا Rdزر " >d) "Set Dateار (°
ا 4. ،{$ا Rdا] 4ا$ة أ وأ"B
ار °ا@ ,م .>8+ا Rdزر 4
/HIزر (4) Doneا&9 {$ع إ
ا $[,ا<.,+
اkن/ا?:ة
2+ا R8زر ""Safety/Assistance
)ا]
ن/ا<$ة( ا&? {$ن ا^ادات
ا :W
• "Hا>دم ا - 7kإذا آ; Bا:رة )ودة
Hh
& 3ة @' ا5دم ا]
)'@ (FCW
&Aو/أو [ @' 5د
ت أ
@.$
>d ?$ا3$ة (2+) Farأو F>d
.(P!) Nearوا@ ا wا3$ dة @' ا5دم
ا]
) (FCWه إاد .(2+) Farو 2ذ أن
اbم @'رك 5دم @ 6
"$ا<رة ا أ
?&ن < أ .2+و @$ذ أ&Jل و!k
, ?$م +د ا R ."2Bا^اد @&5ل !دة
أآ #د
?W ،د ا^اد .(P!) Nearو "$2ه'ا
" @'ك ا5دم ا&? "$@$ن أ!ب إ
رة أ
'@ W R .ا5دم ا]
) ،(FCWا Rdا3ر " (P!) "Nearأو ""Far
) (2+وWر= .ا Rdزر /HI 4زر Done
) (4ا&9 {$ع إ ا $[,ا<.,+
3$ا
&2$ت ،را" 69وWة ا@? 4ا<
ا +#ا3
4 " "(ACC) g$ا ر".
• Sرات ا ا - «8:إذا آ; Bا:رة )ودة
Hh
?&ن ا<رة 3ودة b+م ا@? 4ا]داء،
<&ف 3
qة رات ا& `9ا<{ >d
ا& `9ا<{ و 9ا& .`9ا Rdزر ""Sport
)ا (dا & {$أآ> !ر ا&`9
ا<{'+ PF $
،ل 9أآ> .ا Rdزر
") "Normalا2دي( ا
3
& {$
ا& `9ا<{'+ PF $
،ل 9أآ> .ا Rd
زر ") "Comfortاا (Wا & {$
&ازن ا& `9ا<{ و 9ا& .`9ا Rdزر 4
/HIزر (4) Doneا&9 {$ع إ
ا $[,ا<.,+
• ;Fم ®ParkSense
&,م bم ® 6$9 @>+ ParkSenseا]<9م
ا&9&$دة Hا<رة ?&ن ذراع ا@
/",د
اوس و) REVERSE 6dا&9ع (HI
و ا<رة أ!" 18آ/Yً
11) /4ا<(.
و&ف & إ'اًرا ) ً&Aو/أو [ً( Sإ ى
ا!wاب ا]<9م ا]ى ?$ 4 .اbم 6اIر
) Sound Onlyا&5ت (,أو Sound and
) Displayا&5ت وا2ض(b W R .م
® ،ParkSenseا Rdا3ر ""Sound Only
)ا&5ت (,أو ") "Sound and Displayا&5ت
وا2ض( وWر= 4. .ا Rdزر /HI 4زر
(4) Doneا .{$راb" 69م
®3
4 " 4<! "ParkSenseا ر" YJYع
و Bاbم و
&2ت ا."RS
١٤٩
(ت$2 ا6
) "With Help" ( أو$ً[" )داAlways"
زرRd ا.{$( ا,ًF
) "Never" أو
&ع9 {$( ا4) Done زر/HI 4
.,+< ا$[,إ ا
¸? وار:ا
<" )اClock & Date" زرR8 ا2+
:W
{ ?&ن ا^ادات ا$( ا°وار
B اiW •
D< واk!&> اd ?$ ،S ه'= ا9 ا&ا
4. (k!&> اd) "Set Time" زرRd ا.ًو
4< اRd ا. 24 أو12 D< ا
دW 4. ،>8 @ اk!&" اB أ وأ$ا
زرRd ا.(" )
<ًءاPM" ( أوWً>A) "AM"
&ع9 {$( ا4) Done زر/HI 4
.,+< ا$[,إ ا
B ا1 • ?"ض
$!" ا< اRS ?$ ،S ه'= ا9 ا&ا
Show إادR .RS ف, ا@ أو إ
زرRd ا،(k!& اW )ضTime Status
(k!& اW " )ضShow Time Status"
)م#• ا
ك ادG+• ا
(
&) "Nm" !م( أو-"J" )رlb-ft" :
دW
(?
]م اb&ن( )ا9 "? "
) "MPG" :
دW
,(F>م اb&ن( )ا9 "? "
) "MPG"
(/4" )آkm/L" ( أو4 آ100/) "L/100 km"
#:• ا
4 زرRd ا،&بF$ @ ا^اد ا2+
&ع إ9 {$( ا4) Done زر/HI
.,+< ا$[,ا
ا>ت
(&ت5" )اVoice" زرR8 ا2+
:W
{ ?&ن ا^ادات ا$ا
> اh'6ل اx •
إاداتR ?$ ،S ه'= ا9 ا&ا
+w&ل اJ) Voice Response Length
Rd ا،(6d& )اMode W R .(&5ا
{$ اS+ (&لF
) "Long" ( أو39&
) "Brief" زر
(4) Done زر/HI 4 زرRd ا.=رWو
.,+< ا$[,&ع إ ا9 {$ ا
"واk ?"ض ا4 •
إاداتR ?$ ،S ه'= ا9 ا&ا
.(
ض ا]وا$[!) "Show Command List"
زرRd ا،(6d& )اMode W R
"gal" م ا]
?( أوb&ن( )ا9) "gal" :
دW
.() "L" ( أوF>م اb&ن( )ا9)
i• ا
"kPa" ( أو2+
A&+ "? "J" )اpsi" :
دW
.(ر+) "bar" ?ل( أو+ &)آ
• در ا"ارة
9" )درF°" &( أوg
9" )درC°" :
ا
."k
5• ا
م ا]
?( أوb( )ا5W " )!رةHP" :
دW
"kW" ( أوF>م اb( )ا5W " )!رةHP"
.()آ& وات
١٤٨
ا@ ،ا Rdا3ر ا&9&$د ا{$
&ل إ ا& 6dا&F$ب$+ .د ا&ا 9ا&6d
ا&F$بW ،د ا^اد ا$+ ."8B$د اآ$ل ا^اد،
ا Rdإ
/HI 4زر (4) Done
ا {$أو زر ) BACKر&9ع( ا&ا&2 9دة
إ ا $[,ا< ,+أو ا Rdزر " "X
اY^ {$ق ا^ادات q .زر ] 4
أو زر "B] 4ا Pا] $ا Sا",
] أو ] > "Bا^ادات ا.W$
zzا"#ض
2+ا R8زر " ) "Displayا2ض(
ا&? {$ن ا^ادات ا :W
• و zz UWا"#ض
ا&ا 9ه'= ا @ ?$ ،Sإادات
ا2ض ([,) Autoأو ) Manualوي(R .
) Mode Wا& ،(6dا Rdزر ""Auto
)أو&
?( أو ") "Manualوي( ا&9&$د
ا {$وWر= .ا Rdزر /HI 4زر
(4) Doneا&9 {$ع إ ا$[,
ا<.,+
• P#ا8
ا&ا 9ه'= ا @ ?$ ،SإWى اRت
ا2$دة )) Brasileiroا>از( Deutsche /
)ا]) English / ($ا^Español / (3
)ا^>( ) Français /اItaliano / (<B
)ا^) Nederlands / (Fا&( Polski /
)ا>&( ) Português /ا>Türk / (R
)اآ(( ^ر @F5
6$9ت ا2ض ،+
$+ذ و[ Hا Wوbم ا) WY$إذا آk
ا<رة 3ودة .('+ا Rdزر "Set
>d) "Languageا (Rا4. ،{$
ا Rdزر ا Rا +&F$ا .{$اRd
زر HI 4ا&9 {$ع إ ا$[,
ا<.,+
• <!"ة zzا«8
ا&ا 9ه'= ا "RS ?$ ،Sا&5ت
ا&$<$ع أو إ,ف `RSا R8أ Wا]زرار
S+ا) Mode W R .{$ا& ،(6dا Rd
زر ") "Onا ("RSأو ") "Offإ,ف ا ("RS
اW 4. ،{$ر= .ا Rdزر /HI 4زر
(4) Doneا&9 {$ع إ ا$[,
ا<.,+
ا1ات
2+ا R8زر ") "Unitsا&Wات(
ا&? {$ن ا^ادات ا :W
• ا1ات
ا&ا 9ه'= ا @ ?$ ،Sآ" وWة
وWات ا,س &5+ d 4رة 5B
&2ت ا<[ (DID) Dوbم ا) WY$إذا آ kا<رة
3ودة 4 .('+د وWات ا,س ا ا@ +,
أد=:
• ا?":
Wد /"
) "MPH" :ا<( أو ""km/h
)آ.(/4
• ا!:
Wد ("
) "mi" :أو ") "kmآ.(4
١٤٧
مF; إ?ادات- # ا5اh '"8 8hا)ات ا
Uconnect® 5.0
،9&د ا&ا9&$ ا+ (3$ )اMORE زرRdا
(" )ا^اداتSettings" زرRd ا4.
q ،6d& ه'ا ا.$[,ض إاد ا2 {$ا
> +,ات ا3$&ل إ اA& اUconnect® مb
Unitsض( و2 ) اDisplay "#
ودة3
ا ! ?&ن
(< )اClock&ت( و5 )اVoiceات( وW&)ا
Lights<ة( و$ا/
Y< )اSafety Assistance/و
(لB!]&اب وا+] )اDoors & Locks( وq+5$)ا
(W[ اا," اRSة ا3
) Auto-On Comfortو
(@ك$" اRS )راتEngine Off Optionsو
Audio( وA&> )إادات اCompass Settingsو
Phone/Bluetooth®و
(&ت5)ا
دة2 )اRestore Settings( وBluetooth®/H)ا
ا>تq<
) Clear Personal Dataا^ادات( و
.(مb&
ت ا2
) System Information( و5ISا
zz 7! i! ة1 وا5L « Lu :F1G
. آ "ة7! «8ا
ة أو4?@> ا,
3 آRd ا،(90 ،60 ،30
،("RS )اON ،Yً#
) =R @ ا^اد أو#أآ
.(("RSف ا, )إOFF
Screen زريUconnect® مb ! @&ي
(&ع9 )رBack( وS" اRS ف, )إOff
.9ا&ا
(S" اRS ف, )إScreen Off زرRdا
.Uconnect® مb "RS ف,^ 9 ا&ا
(S" اRS ف, )إScreen Off زرRdا
.S" اRS ة أى9 ا&ا
9&ع( ا&ا9 )رBACK ر3 اRdا
مb راتI ا2+ أو$[! وجI
.Uconnect®
«8 اzz @8? زرار ادةkا
&ل إA&? ا$ {$&دة ا9&$ا]زرار ا
.Uconnect® مb ض
Uconnect® 8.4 مF; أزرار
Uconnect® مb+ <[ ا$[, أزرار ا- 1
{$ ا
+ اا7! زرار ادةkا
مb "B أ9&دة ا&ا9&$ ا]زرار ا9&
.س,ة ا39 أW& H5
Uconnect®
/$ ا4?@> ا,
9& ، إ ذd^+
>,
أدر.$] اP+ &د9&$ )إدل( اEnter
،Yً#
) ا^اداتR+ 4! و4[&ا, > ا$ 4?@ا
١٤٦
اFLم ا — 7>Jإذا آ; Bا:رة )ودة Hh
ا Rdزر ] 4أو ]W 4. ،"Bر= 4 W
ض $[! 2+اbم ا6F< W 5IS
ا<[ Dض 2+أFء ا<رة ا@$دة.
• ا&
) OK Rdا 2 (Dف ا
3ا]ول
ا &$$ا 4إر
• هك PJا ا 5ISا أ.ء &ر
ا ا:
"Checking System for Diagnostic
!) "CodesاFLم P? wًhا"ز
ا(>J
• Pا<[ Dا R8زر &
) OKا
(Dة
أى ؤ ا
3ا وإ "b wا ا@
2و.d
• Iج ا<[ 4 Dا,wل إ ![ $أى
)] أو ].("B
• اIوج ا ">! $[,ا&&Aل إ ا
&ز
&,م ا<[}+ Dدة ا&ل إ ا4< ،$[,إدة +ء ا "RSا>ا.
• م &ر ر
&ز أو ا&&Aل إ أ ر
= 3
)& 6
(P000ر ه'= ا:
"No Further or End of Diagnostic
6) "Codesا) أو ; +ا"ز
ا(>J
أزرار ;Fم zz @8? Uconnect® 5.0ا «8واkزرار
ادة ! 7اا+
إ?ادات ;Fم ®Uconnect
<Iم bم ®
&$
Uconnect
ا]زرار ا {$و
&$ا]زرار
ا&ا ،9ا&9&$دة W& H5أ39ة ا,س ا
qا&&Aل إ ا3$ات ا&+ > +,اF
ا "$2وRه.
- 1أزرار bم ® Uconnectا{$
- 2أزرار bم ® Uconnectا&ا9
• 4ض ا]Fء ا]!م إ ا]Wث.
١٤٥
" zاG+ك اد
ا Rdزر ] 4أو "B] 4وWر= W
$[!) Fuel Economy Menu 5 3$ 4
اYك ا&!&د( ض
&2ت ا<[D
).(DID
• &! @BAا[ 4واWة 2ض ا 4,ا@
وا]ى دون أن 2ض ا $,ا@:
• اYك ا&!&د ا@ ,ر &9 "? "$+ن /
100 "? +آ4
• اFق )ا]
ل أو آ(4
• ّ2ل اYك ا&!&د ,ر &9 "? "$+ن )أو
100 "? +آ(4
• &ف &ا ) Max 4! Dا@ ا]! (5و) Minا@
ا]د( >F
6ت ا@$ك
• 4ض أ!" !,$ $س &+ن ا?
و@&ل &ن ا]Fuel Economy <@ 8
) اYك ا&!&د(.
• &ف "$2اYك ا&!&د ً,را &9 "? "$+ن
"ء ا,$س ا<ر ) ا= ,رب
ا<(.
١٤٤
• &ف "$2اYك ا&!&د ً,را 100 "? +آ4
"ء ا,$س ا {? )$ا= ,رب
ا<(.
• ا&
) OK Rdا ^ (Dدة
&2
>dت
2ل اYك ا&!&د.
8#ت ا"81
ا Rdزر ] 4أو "B] 4وWر= W
$[!) Trip Menu 5 3$ 4ا (W
ض
&2ت ا<[ $ ">+ 4!) (DID) Dأو
ا<ر @ ) Trip Aا Wأ( أو ) Trip BاW
ب((2 .ض
&2ت ) Tripا (Wا:
• ا <$
• 2ل اYك ا&!&د
• ا&! kا8,$
ا wً&F
Rdزر &
) OKا ^ (Dدة
&2ت
ا3$ة.
ا>ت
ا Rdزر ] 4أو "B] 4وWر= W
4ض $[!) Audio Menuا&5ت(
ض
&2ت ا<[.(DID) D
ا" 4ا;)J
ا Rdزر ] 4أو "B] 4وWر= W
$[!) Messages Menu 5 3$ 4ا["(
ض
&2ت ا<[2 .(DID) Dض ه'=
ا3$ة د ر[" ا@' ا q .3I$اR8
زر $ 4رؤ ه ا[" ا.3I$
إ?اد اz
ا Rdزر ] 4أو "B] 4وWر= W
4ض $[!) Screen Setup Menuإاد
ا (Sض
&2ت ا<[.(DID) D
ا Rdزر &
) OKا W 4. ،(Dر= &ل إ
ا&,ا[ 4ا3
q .Bة ) Screen Setupإاد
ا R (Sأي ا
&2$ت ا W& d 4
أ39ة ا,س d^+إ ا 6!&$ا'ي 4ض
ا
&2$ت `.
ا Rdزر /"RSإ,ف "RSوWة ا@? 4
ا< ا +#ا) (ACC) g$ا&9&$د 2+ا,دة(
4 Wض أي $ض
&2ت
ا<[:(DID) D
إف و1ة ا 7! *uا ?":ا hwاÂ+
إRء SوWة ا@? 4ا< ا +#اg$
)2 ،(ACCض اAdaptive Cruise" S
) "Control Offإ,ف "RSوWة ا@? 4ا<
ا +#ا.(g$
و1ة ا 7! *uا ?":ا hwا Â+ه)ة
SوWة ا@? 4ا< ا +#ا 6
g$م
ار إاد ا<رة2< ،ض اS
") "Adaptive Cruise Control ReadyوWة
ا@? 4ا< ا +#ا9 g$ه3ة(.
ا Rdزر ) SET+ا (+ >8أو SET-
)ا) (- >8ا&9&$د 2+ا,دة( و&ف ُ2ض
ض
&2ت ا<[:(DID) D
* iWو1ة ا 7! *uا ?":ا hwاÂ+
)(ACC
>dوWة ا@? 4ا< ا +#اg$
)& ،(ACCف 2ض ا< ا&$
J&>8$
أ39ة ا,س.
! bوWة ا@? 4ا< ا +#اg$
)
(ACCة أى إذا Wث أي Sط &Wة ا@? 4
ا< ا +#ا ،(ACC) g$وا'ي ! $8أً $
:
• Rإاد ا <$
• إRء اbم
• وز ا<[D
• إ,ف "RSاbم
• @' ا!wاب &Wة ا@? 4ا< ا+#
ا(ACC) g$
• @' وWة ا@? 4ا< ا +#اg$
) &
(ACCة
• &2د ض
&2ت ا<[ (DID) Dإ i
@دة &. 5 2+اٍن م و&9د أي Sط S
وWة ا@? 4ا< ا +#ا.(ACC) g$
2ف 3ا
&2$ت ،را" 69وWة ا@? 4
ا< ا +#ا - (ACC) g$إذا آ kا<رة 3ودة
3
4 " "'+ا ر".
)ة ) LaneSenseا#ر ارة( -إذا آ;B
ا:رة )ودة Hh
2ض ض
&2ت ا<[ (DID) Dإادات
) LaneSenseا2Sر ا@رة( ا@$2 .
ا
&2$ت ا2$وb W dم LaneSense
)ا2Sر ا@رة( وو `Jا Pأن 4اBؤه.
3$ا
&2$ت ،را3
" 69ة LaneSense
)ا2Sر ا@رة( -إذا آ kا<رة 3ودة "'+
" 3
4ا ر".
١٤٣
• 4ا&
) OK R8ا @ 4 ،(D
ا&! kو ً.' ,
• $+د أن Iج ا<[@BA Dت"
&! kاورات"،
&ف &!" k!&
Hا@" و 4إدة >dا&!k
إ 0:00.00
• إذا " ا<[@BA Dت "
&! kاورات"& ،ف
4إدة " k!&
>dا@" 0:00.0و6d
Bح ا "RSو 6dإ,ف ا "RSأو وB
6dح
ا "RSو) ON 6dا) ("RSوإ& wف P,
59:59.99إذا آن ذ .(ً?$
• آ" ة &,م ا<[&
) OK R8+ Dا (D
أ "9ا,م +ورة&, ،م ا&! kا@ g>2+ا&!k
g>2 8ا <$ا]و )ا
(&2
"ا]" وأ ً
"" @BAا "k!&$و 4إدة >dا&! kا@
0:00.0آ" ة 4ا R8زر OK
)
&ا .(D
• &ف &! Hا&, k!&$م ا<[I+ Dوج
ه'= ا.@B5
١٤٢
' اورات
أ??" @8
@=& ،ف 2ض ه'= ا " Sاورات
و&ف &,م 3$+ا&$ن &! kا'ي 2أ "8و!k
" @BAا."k!&$
@ه2 ،ض ه'= ا2 Sض Top Speed
)أ ( ' iإدة :>d
• آ" ة &,م ا<[ R8+ Dزر OK
)
&ا ) (Dأ.ء ا&ا k!&
" @BA 9اورات"(،
&ف &,م "و! kااآ "Pا@ g>2+ا F,ا]و
و !+ا>ت ."B] , 4
• &ف Sا]&ان إ ا&! kا'ي 2أ "8و!
k
" @BAا."k!&$
• "$2ا R8ا&F$ل زر &
) OKا , (D
إدة >dا @B5ا &.+ 9
• "" @BAاورات" >رة ض +.
]و!ت ااآ., P
• ! g>2+ 4أ أول دورة !دة و آ" ة
وز ا< ا! 4ا&B@$ظ ه &, W/4م
ا<[}+ Dدة >dا.S
• ا > k>#دورات ا."RS
• R 4ا&Wات R 6ا "
Sا&Wات.
?:ا4:
4و1ة ا 7! *uا ?":ا hwا(ACC) Â+
2ض ض
&2ت ا<[ (DID) Dإادات
bم وWة ا@? 4ا< ا +#ا(ACC) g$
ا@ .و $2ا
&2$ت ا b W d2م
وWة ا@? 4ا< ا +#ا.(ACC) g$
1/4
!:ا8"9
ة ا:رع ا
@ ه'= ا2 } ،Sض ا&! kا'ي <`!R
ا<رة Y "
1/4 <
6F,ل . 25و
ا<رة >."
1/4 <
º
@ه2 ،ض ه'= ا Sا <$ا 2F,
اBا
" ^Wاث ا<رة وا< ا 4ه
ا R8دوا اBا
".
ار ه'= ا3$ة2 ،ض ا&! Sة ا<رع
)ا &Fوا>( ا@ ا 2ض اهت ا&,ى.
ة ا:رع ا>ى
• ?&ن ه'= ا3$ة &9 Wز ?&ن
ا<رة 0آ
& .(/"
0) /4آ$
") "READYا2wاد( &ا وط +ء
ا@ث.
• "$2ه'= ا3$ة ,ا$2ل اBا
"
ت أ 48آ/Yً
30) /4ا<(.
ار ه'= ا3$ة2 ،ض ه'= ا 4! Sا<رع
ا]ر) 2+ا.ن &Jن وا.ن >9ن(.
• Uدي DS2ا
" ا&! Hإ "F2ه'= ا3$ة.
• !س !&ة أآ> @ 4 ،BAا $,
ا2ض ار .Bو
6ه>&ط !&ة ا<رع،
< $ض !&ى ا<رع ا&5,ى.
• <J bت إذا 6F, 4ا<رة "
1/4أ!"
.. 25
• و< $ض ا 3وا< 4 Wا R8
زر &
) OKا .(D
• &ف "$2ا R8زر &
) OKا q<
(D
دورة ا "RSا@ و2ض أ "8دورة "RS
<رة }+اد ."
1/4
• q<$أ "8دورة < "RSرة }+اد ،"
1/4
ا wً&F
Rdزر &
) OKا $ (Dة &. 5اٍن.
• ُ2ض ا?) "READY" $ا2wاد( &ا
وط +ء ا@ث.
• 4ض ! ا <$وا< أ.ء ا@ث.
• Uدي ا R8ا3ر &
) OKا (Dإ <4! q
!&ة ا<رع ا&5,ى.
• 4إRء !س ا <$إذا @ 4دوا اBا
" !>"
&! Hا<رة .
ً$
Bاورات
• و< $ض ! ا <$وا< WاR8
زر &
) OKا .(D
• Uدي ا R8زر &
) OKا (Dإ <+ qت
اورة ا@ و &$
3أ39ة ا,س <"
دورة 9ة.
ار k!&
" @BAاورات"& ،ف 2ض دا[ً$
+ 6
0:00.00ت ا&!" kا] ""8و"ا]"
ا< 4, 4 ) ,+ا<[&@$+ Dه R8+ا&F$ل ^دة
ا.(>8
• "$2ا&
) OK R8ا + (Dء &!k
"ا@" 0:00.0
١٤١
• J bت إذا º> 4ا<رة /"
60
) 100آ (/4أ!" &. 10اٍن.
• و< $ض ا 4 W 3ا R8زر OK
)
&ا .(D
• وUدي ا R8ا3ر &
) OKا (Dإ < qز
ا "RSا@ و2ض أ "8و! kا `!Rا<رة
,Yل 0إ 100آ 0) /4إ 60
"/ا<(.
• 0 q<$إ 100آ 0) /4إ /"
60ا<(،
ا wً&F
Rdا3ر &
) OKا $ (Dة &. 5اٍن.
0إ@ 161آ* 0) ?/إ@ / 100ا(?:
ار ه'= ا3$ة2 ،ض ا Sا$ة ا
< !Rا<رة ,Yل 0إ 161آ/4
) 0إ &8 (/Yً
100ن &. 20اٍن.
• ?&ن ه'= ا3$ة &9 Wز ?&ن
ا<رة 0آ
& .(/"
0) /4آ$
") "READYا2wاد( &ا وط +ء
ا@ث.
١٤٠
• J bت إذا "5 4ا<رة إ 0إ
161آ/"
100) /4ا<( أ!" 20
..
• و< $ض ا 4 W 3ا R8زر OK
)
&ا .(D
• وUدي ا R8ا3ر &
) OKا (Dإ < qز
ا "RSا@ و2ض أ "8و! kا `!Rا<رة
,Yل 0إ 161آ 0) /4إ 100
"/ا<(.
• q<$أ "8و! kا `!Rا<رة ,Yل
0إ 161آ 0) /4إ /"
100ا<(،
ا wً&F
Rdا3ر &
) OKا $ (Dة &. 5اٍن.
1/8
@ ه'= ا2 } ،Sض ا&! kا'ي <`!R
ا<رة Y "
1/8 <
6F,ل . 15و
ا<رة >."
1/8 <
º
• ?&ن ه'= ا3$ة &9 Wز ?&ن
ا<رة 0آ
& .(/"
0) /4آ$
") "READYا2wاد( &ا وط +ء
ا@ث.
• J bت إذا 6F, 4ا<رة "
1/8أ!"
.. 15
• و< $ض ا 3وا< 4 Wا R8
زر &
) OKا .(D
• &ف "$2ا R8زر &
) OKا q<
(D
دورة ا "RSا@ و2ض أ "8دورة "RS
<رة }+اد ."
1/8
• q<$أ "8دورة < "RSرة }+اد ،"
1/8
ا wً&F
Rdزر &
) OKا $ (Dة &. 5اٍن.
(Uh) !"H
Fة ! 2ض Yا<[ Dأو Yا
D[< .FIا `>$وا$ه وا@'ر ه& ا& Wا'ي
P `?$و!&ع ا@&ادث.
را " 69ض
&2ت ا<[4<! "(DID)