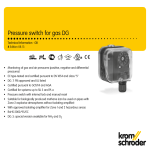
1
Control system EnergyLogic Wireless control Touchline USER MANUAL ECO ENERGY AND SANITARY SYSTEMS © Roth UK Ltd. Taunton, Somerset TA4 2 RL Telephone: +44 (0) 19 84/62 39 82 (address sticker installer) Telephone: +44 (0) 19 84/62 39 15 E-Mail: sales@roth-uk.com www.roth-uk.com Revision number: A Revision date: December 2011 2 P10009989 A User Manual Roth EnergyLogic Touchline/Wireless Table of Content Table of Content 1 General ...................................................................................................7 1.1 Information regarding this user manual ........................................7 1.2 Explanation of symbols .................................................................8 1.3 Limitation of liability .......................................................................9 1.3.1 2 3 4 1.4 Copyrights ...................................................................................10 1.5 Scope of supply...........................................................................10 1.6 Customer service ........................................................................10 1.7 Area of application radio system .................................................11 Safety....................................................................................................12 2.1 Intended use................................................................................12 2.2 Changes and modifications.........................................................12 2.3 Requirements for professionals ..................................................13 2.4 Safety and health hazards ..........................................................13 P10009989 A 2.4.1 Warning sign ...................................................................13 2.4.2 Risk and safety ...............................................................14 Identification ........................................................................................15 3.1 Name plate ..................................................................................15 3.2 Part numbers of product range ...................................................15 3.2.1 Wireless connection module...........................................15 3.2.2 Wireless room thermostat...............................................16 Design and function ............................................................................17 4.1 5 Information in case of failure of the radio system .............9 Design .........................................................................................17 4.1.1 Wireless connection module...........................................17 4.1.2 Wireless room thermostat...............................................18 4.2 Function.......................................................................................18 4.3 Operating and monitoring elements ............................................21 4.3.1 Wireless connection module...........................................21 4.3.2 Wireless room thermostat...............................................23 Installation............................................................................................26 5.1 Wireless connection module .......................................................26 5.2 Wireless room thermostat ...........................................................27 5.3 Wireless room thermostat with 230 V connection.......................30 3 User Manual Roth EnergyLogic Touchline/Wireless Table of Content 6 7 Electrical connections........................................................................ 32 6.1 Safety.......................................................................................... 32 6.2 Wireless connection module ...................................................... 33 6.2.1 Connection diagram ....................................................... 33 6.2.2 Electrical connections .................................................... 33 Commissioning and operation .......................................................... 42 7.1 7.2 7.3 Addressing.................................................................................. 42 7.1.1 Address one wireless room thermostat to one radio channel........................................................................... 43 7.1.2 Address one wireless room thermostats to several radio channels ................................................... 43 7.1.3 Address several wireless room thermostats to one radio channel (sensor mode) .................................. 44 7.1.4 Test addressing.............................................................. 46 7.1.5 Delete addressing .......................................................... 46 7.1.6 Address up to 3 wireless connection modules to each other ...................................................................... 47 Zones.......................................................................................... 48 7.2.1 Zone building, assign radio channels to one zone......... 49 7.2.2 Delete assignment of a radio channel to a zone............ 50 7.2.3 Delete zone .................................................................... 50 Change setpoints........................................................................ 51 7.3.1 Set room temperature .................................................... 51 7.3.2 Set floor temperature ..................................................... 51 7.4 Select mode of operation ........................................................... 52 7.5 Set time and date ....................................................................... 54 7.6 Time programs ........................................................................... 55 7.6.1 Overview of the three time programs”............................ 55 7.6.2 Definition "switched-on period" and "switching points" .. 55 7.6.3 Factory settings time program........................................ 56 7.6.4 Select time program ....................................................... 57 7.6.5 Change time program .................................................... 58 7.6.6 Reset time programs to factory settings ........................ 61 7.7 "eco" - Indicator .......................................................................... 62 7.8 Lock / unlock operation of wireless room thermostat ................. 62 7.9 Reset to factory settings ............................................................. 63 7.10 Software-Update with mini SD-card ........................................... 64 4 P10009989 A User Manual Roth EnergyLogic Touchline/Wireless Table of Content 8 Parameter descriptions ......................................................................65 8.1 Parameter overview ....................................................................65 8.2 User menu...................................................................................67 8.3 Service menu ..............................................................................70 8.3.1 Enter service menu .........................................................70 8.3.2 Select parameter group ..................................................70 8.3.3 P-20 "General parameters".............................................71 8.3.4 P-30 "Parameters for all wireless room thermostats" .....73 8.3.5 P-40 "Parameters for individual wireless room thermostats" ....................................................................76 8.3.6 P-50 "Plant- and topology related parameter" ................80 8.3.7 P-60 "Control parameters" ..............................................82 9 Cleaning and maintenance.................................................................87 10 Troubleshooting ..................................................................................88 10.1 Wireless connection module .......................................................88 10.2 Wireless room thermostat ...........................................................88 10.2.1 Procedure when "radio signal lost" .................................89 10.2.2 Replace batteries of wireless room thermostat ..............90 10.3 FAQs ...........................................................................................90 10.4 Tips and tricks .............................................................................91 11 Waste disposal ....................................................................................91 12 Accessories .........................................................................................92 12.1 Active Antenna ............................................................................92 12.2 Repeater......................................................................................93 12.2.1 Address repeater to wireless connection module...........93 13 Technical data......................................................................................94 13.1 Radio system...............................................................................94 13.2 Wireless connection module .......................................................94 13.2.1 Construction and dimensions .........................................94 13.2.2 Electrical connections .....................................................95 13.2.3 Inputs ..............................................................................95 13.2.4 Outputs ...........................................................................96 13.2.5 Performance data ...........................................................96 13.2.6 Environmental conditions................................................96 P10009989 A 5 User Manual Roth EnergyLogic Touchline/Wireless Table of Content 13.3 Wireless room thermostat........................................................... 97 13.3.1 Construction and dimensions......................................... 97 13.3.2 Power supply – Battery .................................................. 97 13.3.3 Power supply – 230 V AC .............................................. 97 13.3.4 Performance data........................................................... 98 13.3.5 Environmental conditions ............................................... 98 14 Menu structure.................................................................................... 99 15 Plant examples and communication .............................................. 101 15.1 Plant examples with one wireless connection module ............. 101 15.2 Plant examples with up to three wireless connection modules.................................................................. 104 16 Reset radio system to factory settings .......................................... 105 Index .......................................................................................................... 107 6 P10009989 A User Manual Roth EnergyLogic Touchline/Wireless General 1 1.1 General Information regarding this user manual This user manual provides important instructions with respect to the use of the Wireless Connection Module and the Wireless Room Thermostat Touchline. Compliance with all safety and installation instructions is the basis for safe working. Read this manual carefully before the start of any work! It is a part of the product and need to be made accessible to the user at any time. P10009989 A 7 User Manual Roth EnergyLogic Touchline/Wireless General 1.2 Explanation of symbols Warnings In this user manual warnings are indicated by symbols. The notes are preceded by signal words that express the extent of the risks caused expression. Always comply with the instructions and act prudently to avoid accidents, and damages to people and property. DANGER ... points to an immediate hazardous situation, which leads to death or serious injury if not avoided. WARNING … points to a possible dangerous situation that can result in death or serious injury if not avoided. CAUTION ... points to a possible dangerous situation that can lead to minor injuries, if not avoided. ATTENTION ... points to a possible adverse situation that can lead to property damage, if not avoided. Tips and recommendations NOTE 8 ... highlights useful tips, information and recommendations for efficient and trouble-free operation. P10009989 A User Manual Roth EnergyLogic Touchline/Wireless General 1.3 Limitation of liability All information and instructions in this manual are in accordance with applicable standards and regulations, the state of art technology as well as our many years of knowledge and experience. The manufacturer assumes no liability for damages due to: • Failure to follow the user manual • Improper use • Use of untrained personnel • Unauthorized modifications • Technical changes. In addition the following applies: the duties as agreed in the contract, the "General Terms and Conditions" and the "Terms of Supply" of the manufacturer and the at time of the contract applicable statutory regulations. 1.3.1 Information in case of failure of the radio system The radio system is not failsafe. The radio system is equipped with an emergency function in which the system continues to function in a reduced mode. In this emergency mode, the LED of the channel blinks and the display of the wireless room thermostat shows a warning symbol. For the correct operation of the emergency mode following conditions must be met: ATTENTION • The wireless connection module must be powered. • The wireless connection module can not by external influences such as lightning to be destroyed. Possible damage to property due to failure of the system! The radio system is not failsafe. Note the following points to ensure that the system is operating properly. – The wireless connection module must be powered – The wireless connection module may not be destroyed by external influences such as lightning. P10009989 A 9 User Manual Roth EnergyLogic Touchline/Wireless General 1.4 Copyrights The transfer of user manual to third parties without written permission of the manufacturer is prohibited. NOTE All content, texts, drawings, pictures and other illustrations are copyrighted and are subject to intellectual property rights. Any improper exploitation is punishable. Reproduction in any shape or form - even partially - as well as the exploitation and / or notification of the content without written consent of the manufacturer is not allowed. 1.5 Scope of supply Wireless room thermostat Wireless connection module 1.6 The scope of supply of the wireless room thermostat comprises of: • Wireless room thermostat • Installation material • Battery version: 2 Batteries 1,5 V AAA. • Brief installation instructions wireless room thermostat P10007455 The scope of supply of the wireless connection module comprises of: • Wireless connection module • Transformer 230 V AC / 24 V • DIN-rail • Brief installation instructions wireless connection module P10007749 • CD-ROM with user manual P10009989, multi languages. Customer service For additional technical information please contact your dealer or installer. Address, see invoice, delivery note or the second page of this manual. NOTE 10 For efficient support please note the data on the name plate(s) before calling. P10009989 A User Manual Roth EnergyLogic Touchline/Wireless General 1.7 Area of application radio system NOTE The bidirectional radio system EnergyLogic Touchline with 868 MHz radio transmission is only approved for use in Europe. In particular the radio system may not be used in the following countries: USA, Canada, Australia and Japan P10009989 A 11 User Manual Roth EnergyLogic Touchline/Wireless Safety 2 2.1 Safety Intended use The wireless connection module Touchline is intended solely for the comfort control of surface heating and cooling systems. The wireless room thermostat Touchline is intended solely for the operation and configuration of the wireless connection module. The wireless connection module and the wireless room thermostat are approved for use in households and industry. CAUTION Risk of injury from improper use! Any improper use can lead to dangerous situations. – Use the wireless room thermostat and wireless connection module only for their intended use. – All instructions mentioned in the user manual have to be observed. Claims of any kind for damage from improper use are excluded. The responsibility for all damages from improper use lies solely with the operator. 2.2 Changes and modifications Changes and modifications to the wireless connection module and wireless room thermostat can cause unexpected hazards and are therefore expressly forbidden. 12 P10009989 A User Manual Roth EnergyLogic Touchline/Wireless Safety 2.3 Requirements for professionals Risk of injury due to insufficient qualifications! WARNING Improper handling can result in significant personal injury and property damage. – Any activity needs to be performed by qualified persons only. The following qualification requirements for the various activities are identified in this user manual: 2.4 • Professionals Because of their specialized training, knowledge, experience and knowledge of the relevant provisions, professionals are in the position to execute their assigned tasks and identify potential hazards on their own. • Electricians Because of their specialized training, knowledge and experience, as well as knowledge of relevant standards and regulations, electricians are in the position to carry out work on electrical systems and identify potential hazards on their own. The electrician needs to observe the provisions of the local accident prevention regulation. Safety and health hazards Observe the safety instructions listed here and the warnings in subsequent chapters of this manual to reduce health hazards and avoid dangerous situations. 2.4.1 Warning sign Danger from electrical voltage! ... identifies life-threatening situations due to electrical voltage. Failure to observe the safety instructions can result in severe injury or death. The work may be performed only by a qualified electrician. A warning sign is located on the following components: – Wireless connection module – Wireless room thermostat with 230 V power connection. P10009989 A 13 User Manual Roth EnergyLogic Touchline/Wireless Safety 2.4.2 Risk and safety The following instructions should be observed to ensure your own safety and that of the devices: DANGER Danger from electrical voltage! Contact with live parts is an immediate danger to life. Damage to the insulation or individual components can be life threatening. – When insulation is damaged turn off power immediately and arrange for repair. – Only a qualified electrician should perform work on the electrical system. – Prior to any work on the system, shut off the power supply and secure against restart. Check for the absence of power! – Fuses should never be bridged or put out of service. – When changing fuses check the correct amperage specification. – Moisture and dust should be kept away from energized parts. Moisture or dust can cause a short circuit. 14 P10009989 A User Manual Roth EnergyLogic Touchline/Wireless Identification 3 3.1 Identification Name plate The name plate of the wireless connection module on the left side. The name plate of the wireless room thermostat is at the backside and on the inside of the front panel. a) b) c) 230V AC +/-10% 868 MHz Fig. 1: 3.2 Name plate a) wireless connection module, b) wireless room thermostat, c) wireless room thermostat Part numbers of product range 3.2.1 Wireless connection module Type Material numbers Europe Nordic Denmark Sweden Norway Finland 4 Channel 1135006441 17466393.004 466393.004 2420667 8357507 2070885 8 Channel 1135006442 17466393.008 466393.008 2420668 8357508 2070886 12 Channel 1135006443 17466393.012 466393.012 2420669 8357509 2070887 Table 1: Material numbers wireless connection module P10009989 A 15 User Manual Roth EnergyLogic Touchline/Wireless Identification 3.2.2 Wireless room thermostat Type Material numbers Europe Nordic Denmark Sweden Norway Finland Battery, white 1135006444 17466393.100 466393.100 2420579 8357544 2070875 230V, white 1135006445 17466393.110 466393.110 2420580 8357545 2070876 Battery, with IR Sensor, white 1135006446 17466393.120 466393.120 2420581 8357546 2070877 Battery, black 1135006447 17466393.102 466393.102 2420582 8357547 2070878 230V, black 1135006448 17466393.112 466393.112 2420583 8357548 2070879 Battery, with IR Sensor, black 1135006449 17466393.122 466393.122 2420584 8357549 2070880 Table 2: 16 Material numbers wireless room thermostat P10009989 A User Manual Roth EnergyLogic Touchline/Wireless Design and function 4 Design and function 4.1 4.1.1 Design Wireless connection module 1 2 3 4 c/o in 2A T 24V 230 V TB 24V 01 02 c/o out 230V eco c/o in %H system 230V + B A 03 04 05 06 07 08 09 10 11 12 17 18 19 20 CH 1 24V 24V CH 2 24V 24V CH 3 CH 4 24V 24V 5 21 22 23 24 25 26 27 28 29 30 31 32 9 Fig. 2: 1 2 3 4 5 8 Bxxxx1 6 7 Design wireless connection module, 4-channel version shown. Transformer 230 / 24 V AC Wireless connection module LEDs Push buttons Terminals P10009989 A 6 7 8 9 Strain reliefs mini SD-card for Software-Update RJ-12 for external active antenna RJ-45 for LAN 17 User Manual Roth EnergyLogic Touchline/Wireless Design and function 4.1.2 Wireless room thermostat °C 1 3 IR 3 4 Fig. 3: 1 2 3 4 4.2 Bxxxxx2 2 Design wireless room thermostat Display Sensor buttons Opening, to open the wireless room thermostat IR-Sensor Function The bi-directional wireless connection module Touchline and the wireless room thermostat Touchline are components of a control system for comfort control of surface heating and cooling systems. The wireless connection module and the wireless room thermostat communicate securely via wireless transmission. The wireless room thermostat measures the room temperature with an internal nickel-temperature sensor. Setpoints, mode of operation and parameters such as setpoint limits and time programs can be changed and configured with sensor buttons. The wireless connection module equipped with short-circuit protected outputs, a stand-by mode and separate relays for the pump and burner control. The control of the actuators is either on / off control or pulse width modulation (PWM). The system is equipped with a self-diagnostics and error display. Radio link tests can be performed easily ensuring the correct function. There are various possibilities for addressing of the wireless room thermostats and wireless connection module. For example, it is possible to assign several wireless room thermostats to a wireless connection module and it is possible to combine to 3 wireless connection modules. Pump connection 18 The integrated pump logic with anti-blocking function provides for an appropriate control of the pump. P10009989 A User Manual Roth EnergyLogic Touchline/Wireless Design and function Energy saving mode (reduced mode) The optimal comfort with minimal energy consumption is guaranteed by the selection of an individual temperature profile for each day provided by the time program. In the wireless room thermostat three different time programs can be selected and customized. In addition, it is possible to connect an external time switch to the potentialfree input "Eco (N / R)". The signal of this time switch reduces the setpoint of the wireless room thermostats by 3 K or more when active. Cooling Cooling can be activated through an external signal from e.g. a heat pump or an external switch. For this function two inputs are available: a potential free input "C / O" and the "hot" input "24 ... 230 V TB / C / O". In addition it is possible to provide a signal to a cooling unit with the potential free output C / O. Depending on the configuration of the wireless room thermostat, the cooling mode can be activated with the wireless room thermostat with master function, or with any wireless room thermostat. Anti-blocking function for pump and valves To prevent blocking of the pump and valves, once per week the anti-blocking function is activated. The function is started when one of the outputs was not active for a week. In this anti-blocking function, the pump is turned on for 3 minutes. The actuators are controlled per channel and will be switched on for 20 minutes. The pump and the actuators run independently without warning. Emergency mode When the radio signal between the wireless room thermostat and the wireless connection module is lost for more than 30 minutes, then the addressed channels switch over into emergency mode. During the emergency mode the thermal actuators are in a 30%-on / 70%-off mode of the standard time. The standard time is determined by the selected control algorithm. The channel LED(s) is (are) blinking. A warning symbol is shown on the display of the wireless room thermostat indicating that the emergency function is active. For a proper functioning of the emergency mode the wireless connection module must be provided with power not be destroyed by external influences such as a lightning strike. Temperature control The wireless room thermostat measures the room temperature. The temperature setpoint is specified via the wireless room thermostat. Every 10 minutes the measured room temperature setpoint and the actual temperature are transmitted to the wireless connection module. After a change of the setpoint the new setpoint and the actual value are sent immediately to the wireless connection module. For an efficient temperature control, three different control algorithms and an optimized thermal actuator control are available. For the temperature control one can select between one on/off and two PWM control algorithms. With the on / off control the heating will be switched on or off when the temperature difference is greater than 0.5 K. If the setpoint is higher than the measured temperature, the valves are opened. If the setpoint5 is lower than the measured temperature, the valves are closed. During PWM control, the opening and closing time of the valves is calculated from the temperature difference between the setpoint and the actual value. The higher this difference, the higher the opening or the closing time. P10009989 A 19 User Manual Roth EnergyLogic Touchline/Wireless Design and function The optimized actuator control is a specially developed control for thermal actuators to save energy. At start, the thermal actuator becomes a constant signal for a defined period. Then, the actuator is controlled with a pulse/pause-signal, so less energy is needed. Each channel has its own control loop. If a wireless room thermostat is addressed to multiple radio channels, then radio channels are grouped in one control loop. Temperature control with IR Floor temperature Sensor 20 When using a wireless room thermostat with integrated IR floor temperature sensor, the measurement of the floor temperature makes sure that a comfortable floor temperature is established. Under normal conditions, the room temperature is controlled with the setpoint and the actual measured room temperature. The comfort control of the floor is activated when the actual room temperature is above the setpoint. P10009989 A User Manual Roth EnergyLogic Touchline/Wireless Design and function CH 4 CH 3 CH 2 CH 1 NO % rH Cool Power C/O Out Pump Zone Master Wireless connection module Fuse 4.3.1 Operating and monitoring elements System 4.3 1 2 c/o in 2A T 24V 01 02 c/o out 230V eco c/o in system %H 230V + B A 03 04 05 06 07 08 09 10 11 12 17 18 19 20 CH 1 24V 24V CH 2 24V 24V CH 3 CH 4 24V 24V 21 22 23 24 25 26 27 28 29 30 31 32 Bxxxx 24V 230 V TB Fig. 4: 1 2 Overview wireless connection module: push buttons and LEDs Push buttons LEDs Push buttons Push buttons Description System Several (up to 3) wireless connection modules combined into one system. In addition, also I / O boxes and outdoor temperature sensors can be integrated into one system. Master Define a wireless connection module as master in a system with multiple wireless connection modules. Each system must have one master. As factory settings, the wireless connection modules are configured as slaves. See also page 47, chapter 7.1.6. Zone Combine multiple radio channels in one zone up to a maximum of three zones. Channels • Address wireless room thermostat and wireless connection module. • Delete addressing. Table 3: Push buttons wireless connection module P10009989 A 21 User Manual Roth EnergyLogic Touchline/Wireless Design and function LEDs LEDs Description Fuse: Red LED • On: Fuse 2 A T of power supply defect System: Yellow LED • On: communication between two or three wireless connection modules Master: Green LED • • On: wireless connection module is configured as master Zone, LED Power (blinking simultaneously) • • • Blue (Cool): Zone 1 Red (% rH): Zone 2 Yellow (NO): Zone 3 Pump: Green LED • • C/O Out: Green LED The function of the LED "C/O Out" is depending on the settings of parameters P-51. See also parameter description, page 80. Off: wireless connection module is configured as slave On: Pump on Off: Pump off • • Function "Burner" active: On: heating demand Power: Green LED • • On: power supply on Cool: Blue LED • On: Potential free C/O-contact closed (cooling mode active) • On: TB-C/O 24…230V input active (as C/O-input configured) • On: switch over heating/cooling by wireless room thermostat (C/O-Output active) % rH: Red LED • • On: Dew-point active only in cooling mode NO: Yellow LED • • On: Actuator NO (normally open) • • • On: Addressing completed and output active CH 1…CH 12: Green LEDs • Function "C/O" active: On: cooling demand Off: power supply off Blinking: TB active only in heating mode Off: Actuator NC (normally closed) Blinking: ready for addressing Blinking, followed by rapidly blinking: warning before deleting, respectively deleting Blinking fast: channel in emergency mode The number of channels (CH) depends on the version. Table 4: LEDs wireless connection module 22 P10009989 A User Manual Roth EnergyLogic Touchline/Wireless Design and function 4.3.2 Wireless room thermostat 1 1 2 3 4 5 6 2 3 4 5 6 7 °C % °F 7 °C % °F RESET TIMEDATETEMP SERV RESET TIMEDATETEMP SERV 1 2 3 4 5 6 7 Bxxxx3 8 Fig. 5: 1 2 3 4 5 6 7 8 Overview display and sensor buttons wireless room thermostat General information such as battery status, energy saving mode, alarms for window contact and dew point, wireless connection, general alarm, key lock, weekdays for time programs Temperature setpoint and actual value, time, time program, outdoor and floor temperature Help text for configuration Modes of operation Select setpoints, time and date and other values change, time programs Confirm changed value, confirm selection Cancel: exit current parameter or menu Select mode of operation, activate menu mode, select parameter Sensor buttons Sensor buttons Description 2 s: Activate operation with any button. Menu button: • • • Activate menu mode. Select mode of operation. Possible modes of operation: frost protection (off), reduced, normal, time program, heating or cooling. Select parameter (menu mode). Change value. • • P10009989 A Save value Confirm selection. 23 User Manual Roth EnergyLogic Touchline/Wireless Design and function Sensor buttons Description 10 s: Change time and date. Cancel 5 s: • • + 5 s: Addressing Test addressing. Disable/enable operation (key-lock) + Table 5: Sensor buttons wireless room thermostat Symbols Symbols Description Battery nearly empty Relative energy consumption Dew-point alarm (only when dew-point sensor is connected) Window contact (only with accessory) Wireless signal Loss of wireless connection General alarm Operation disabled Working days Weekend • • °C Time and date Time program Actual temperature Room temperature Floor temperature (only IR-version) Outdoor temperature (only with accessory) Off (frost protection) Reduced operation Normal operation Time program with external clock , , Time program 1, 2 and 3 Cooling mode Cooling lock Heating mode Auto mode: heating and cooling mode controlled by wireless connection module. Table 6: Symbols wireless room thermostat 24 P10009989 A User Manual Roth EnergyLogic Touchline/Wireless Design and function Display modes 4 Stand-by mode Bxxxx4 °C Bxxxx3 °C Operation mode Fig. 6: Display modes wireless room thermostat P10009989 A 25 User Manual Roth EnergyLogic Touchline/Wireless Installation 5 Installation 5.1 Wireless connection module Information on dimensions, see page 94, chapter 13.3.1. 1 2 3 3 5 5 B12184 min. 33 4 Fig. 7: Installation wireless connection module NOTE If LAN communication over PowerLAN is planned, then a double socket should be provided for the connections of the wireless connection module and the PowerLAN. Type 1CY EN 60730 Fig. 8: 26 10-85%RH Wireless connection module in distribution box P10009989 A User Manual Roth EnergyLogic Touchline/Wireless Installation 5.2 Wireless room thermostat Information on dimensions, see page 97, chapter 13.3.1. The place of installation for the wireless room thermostat must meet the following conditions: • Interior wall • Not in direct sunlight • Not directly beside the entrance door • Away from sources of moisture • Away from splashing water • Away from heat sources such as fireplaces, heaters, televisions or other electronic devices. B09522a ~1.5 m Conditions for place of installation Fig. 9: Open wireless room thermostat Installation instruction ► Hold the cover of the wireless room thermostat with one hand. ► Open the cover by applying a 5 mm Phillips-tip screwdriver in the hole. ► Remove the cover. ATTENTION Damage due to improper opening! – Please hold the cover tight while opening the wireless room thermostat. – Use the correct hole for opening the wireless room thermostat with IR sensor as shown below. P10009989 A 27 User Manual Roth EnergyLogic Touchline/Wireless Installation 1 4 IR 5 mm 3 Fig. 10: Install bottom part B12170 2 Open the wireless room thermostat ► Install the bottom part of the wireless room thermostat with the 2 included screws and plugs. 61 4 2 3 1 B12171 4 mm Fig. 11: 28 Installation bottom part of wireless room thermostat P10009989 A User Manual Roth EnergyLogic Touchline/Wireless Installation B12172 Insert batteries Fig. 12: ATTENTION Insert batteries Possible malfunction of the sensor buttons! After inserting the batteries the sensor buttons are automatically calibrated on the surface. – Do not touch the sensor buttons when inserting the batteries. – If a sensor button does not work, remove the battery and insert it again. Close wireless room thermostat 1 click Fig. 13: P10009989 A B12173 2 Close the wireless room thermostat 29 User Manual Roth EnergyLogic Touchline/Wireless Installation 5.3 Wireless room thermostat with 230 V connection DANGER Danger from electrical voltage! Contact with live parts is an immediate danger to life. Damage to the insulation or individual components can be life threatening. – When insulation is damaged turn off power immediately and arrange for repair. – Only a qualified electrician should perform work on the electrical system. – Prior to any work on the system, shut off the power supply and secure against restart. Check for the absence of power! – Fuses should never be bridged or put out of service. – When changing fuses check the correct amperage specification. – Moisture and dust should be kept away from energized parts. Moisture or dust can cause a short circuit. ► Open the cover of the wireless room thermostat. See page 28. ► Install the bottom part of the wireless room thermostat with the 2 included screws and plugs. 42 1 3 4 2 5 2 4 mm Fig. 14: 30 4 Installation bottom part of wireless room thermostat P10009989 A User Manual Roth EnergyLogic Touchline/Wireless Installation ► Connect the wireless room thermostat. t 230 V~ Fig. 15: N L 1 2 Close the wireless room thermostat ► Close the cover of the wireless room thermostat. See page 29. P10009989 A 31 User Manual Roth EnergyLogic Touchline/Wireless Electrical connections 6 6.1 Electrical connections Safety DANGER Danger from electrical voltage! Contact with live parts is an immediate danger to life. Damage to the insulation or individual components can be life threatening. – When insulation is damaged turn off power immediately and arrange for repair. – Only a qualified electrician should perform work on the electrical system. – Prior to any work on the system, shut off the power supply and secure against restart. Check for the absence of power! – Fuses should never be bridged or put out of service. – When changing fuses check the correct amperage specification. – Moisture and dust should be kept away from energized parts. Moisture or dust can cause a short circuit. 32 P10009989 A User Manual Roth EnergyLogic Touchline/Wireless Electrical connections c/o in 2A T 24V 230 V TB 24V c/o out 230V 230 V TB 24V 05 06 c/o in 2A T 24V 01 02 eco c/o in 07 08 09 10 1124V12 24V 230 V TB CH c/o1 out 230V 24V 230V 24V 230V 24V system c/o in 2A T 24V eco c/o in CH 9 CH 10 CH 11 CH 12 CH 5 CH 6 CH 7 CH 8 3 CH 4 CH 2 c/o in CH%H eco 24V 24V + B A 31 32 23 06 1701180219 20 03 04 21 22 05 24 25072608270928102911301224V c/o out 230V CH 1 CH 2 CH 3 CH 4 system c/o in %H 2A T 230V + B A 03 04 01 02 C/O Out Power Cool % rH NO Connection diagram Fuse System 6.2.1 Wireless connection module Master Zone Pump 6.2 230 V TB 24V 17 1801190220 %H CH 5 c/o out CHeco 6 230V 24V 230V 24V 24V 24V CH 8 c/oCH in 7 %H 24V system 24V CH 9 24V + B A 034104 45 4607470848094910501151 4406 42 4305 1252 17 18 19 20 system 05 06 07 08 09 10 11 12 24V 24V CH 11 CH 12 24V 24V 61 62 63 64 65 66 67 68 69 70 71 72 CH 1 24V + B A 03 04 CH 10 24V 17 18 19 20 CH 2 24V 24V 24V CH 3 CH 4 24V 24V 21 22 23 24 25 26 27 28 29 30 31 32 CH 5 CH 6 CH 7 CH 8 CH 9 CH 10 CH 11 CH 12 61 62 63 64 65 66 67 68 69 70 71 72 6.2.2 Connection diagram Electrical connections Remove cover ► Remove the cover as shown below. 1 click 3 Fig. 17: 2 4 B12185 Fig. 16: A10660a 41 42 43 44 45 46 47 48 49 50 51 52 Remove cover P10009989 A 33 User Manual Roth EnergyLogic Touchline/Wireless Electrical connections Connect transformer ATTENTION ► Connect the transformer to the 24 V input terminals. Malfunctioning due to improper connection! Improper connection may cause malfunction of the system. – Each wireless connection module must have a separate transformer. 01 02 B12186 24V Abb. 18: NOTE 34 Connect transformer The 24 V output is used only as support voltage for a dew-point sensor or as a voltage signal to the TB input (temperature limit). P10009989 A User Manual Roth EnergyLogic Touchline/Wireless Electrical connections Danger from electrical voltage on terminals 1 to 6! DANGER Contact with live parts is an immediate danger to life – Shut off the power supply and secure against restart. Check for the absence of power! Connect wires ► Press down the terminal pin with a screwdriver ► At the same time put the wire into the terminal opening. ► Release the terminal pin. ► Press the cable into the matching strain relief. 230 V AC 1 c/o in c/o out 230 V TB 230V 2 230V 01 02 Fig. 19: 03 04 05 06 3 B12187a 4 Connect wires Connect 230 V pump ► Connect the pump to terminals 03 and 04. ► Contact rating: 230 V, 4 A, 1 A inductive switchable. N L Fig. 20: B12188 04 03 Connect pump, 230 V P10009989 A 35 User Manual Roth EnergyLogic Touchline/Wireless Electrical connections C/O- or burner output, potential free contact The output "c/o out" is a configurable output for cooling (C / O: Change-Over) or burner start. ► Attach a refrigeration unit or a burner on the terminals 05 and 06. The radio system must be configured for either application. ► Contact rating: 230 V, 4 A, 1 A inductive switchable. c/o out 230V 06 05 1 B12188 N 05 06 L Fig. 21: C/O- or burner output, 230 V Contact 05 / 06 closed: open: 1 cooling or burner start ON cooling or burner start OFF Cooling device or burner Connect thermal actuators ► Connect the thermal actuators to the following terminals: – 4-channel version: terminals 21 to 32 for max. 6 actuators – 8-channel version: terminals 21 to 52 for max. 12 actuators – 12-channel version: terminals 21 to 72 for max. 18 actuators CH 1 24V 24V CH 2 24V 24V CH 3 CH 4 24V 24V B12189 21 22 23 24 25 26 27 28 29 30 31 32 Fig. 22: 36 Connect thermal actuators P10009989 A User Manual Roth EnergyLogic Touchline/Wireless Electrical connections TB-input for activation cooling mode The TB input is a configurable input for a C / O-signal of 24 V or 230 V to switch from heating to cooling mode. ► Connect the C/O-Signal to terminals 01 and 02. 24 V c/o in 24V 01 02 230 V TB 24V Fig. 23: TB-input, control with 24 V voltage from wireless connection module Terminal 01 1 B12188_24 1 Voltage ON: cooling ON Voltage OFF: cooling OFF e.g. heat pump 230 V c/o in 230 V TB 1 L N FP2 Fig. 24: TB-input, control with 230 V Terminal 01 1 B12188_230 01 02 Voltage ON: cooling ON Voltage OFF: cooling OFF e.g. Roth heat pump Terra Compact ATTENTION Do not interchange the connection to terminals 01 (L) and 02 (N)! Improper connection may cause malfunctioning of the system. – Connect the phase and neutral wires correctly. Phase (L) to terminal 01 and neutral (N) to terminal 02. P10009989 A 37 User Manual Roth EnergyLogic Touchline/Wireless Electrical connections TB-input for temperature monitoring The TB-input can be used for temperature monitoring by an external maximum temperature limiter. ► Connect the signal of the external temperature limiter to terminals 01 and 02. TB 01 04 03 01 02 02 B12188 N L Fig. 25: TB-input for temperature monitoring Voltage on terminal 01 ON: all valves closed OFF: all valves are controlled by demand. ATTENTION Limitation of liability for safety function! The safety function of the maximum floor temperature is provided by the separate, external temperature limiter by switching the pump off. The signal on terminal 01 triggers the additional closure of all valves; however, this does NOT replace the security function. – Use only an approved temperature limiter – Use the information regarding the maximum allowed water supply temperature provided by the manufacturers of the floor respectively the floor covering. C/O-input, for activation cooling mode with a potential free contact ► Connect a heat pump or another cooling device to terminals 09 and 10. c/o in 09 10 Fig. 26: C/O-input, potential free contact Terminal 09 / 10, external contact 38 09 10 B12188_CO c/o in closed: open: cooling ON cooling OFF P10009989 A User Manual Roth EnergyLogic Touchline/Wireless Electrical connections Eco-input, for reduced mode with potential free contact ► Connect the contact of an external clock or modem to terminals 07 and 08. eco 07 08 07 08 Eco-input, potential free contact Terminal 07 / 08, external contact: %rH-input for optional humidity control during cooling mode closed: open: reduced mode normal mode ► Connect terminal 1 and 2 of the dew-point sensor to the 24 V support voltages terminals of the wireless connection module. ► Connect the switching output of the dew-point sensor, terminal 4 and 6 to the terminals 11 and 12 of the wireless connection module. 24V 1 2 Fig. 28: 4 6 1 Humidity input Terminal 11 and 12, 1 %H 01 02 B12188_RH Fig. 27: B12188_ECO eco contact closed: contact open: maximum allowable humidity exceeded, cooling OFF maximum allowable humidity not exceeded, cooling at demand ON Roth dew-point monitor (material number: 1135000327) P10009989 A 39 User Manual Roth EnergyLogic Touchline/Wireless Electrical connections Connection LAN-network ► Connect the LAN-network as show below. RJ-45 RJ-12 mini SD LAN Options: 1.) PowerLAN 45 J- R 12 J- R i in M D S 45 J- R 12 J- R M in D iS 2.) LAN Router B12237 3.) WLAN Router Fig. 29: LAN-network 40 P10009989 A User Manual Roth EnergyLogic Touchline/Wireless Electrical connections Install cover ► Put on the cover as shown below ► Insert the plug from the transformer into the outlet. ► At the wireless connection module the Power LED must light. 3 4 click Fig. 30: 2 Power B12190 1 Install cover and connect power supply P10009989 A 41 User Manual Roth EnergyLogic Touchline/Wireless Commissioning and operation 7 Commissioning and operation Steps during commission- The commissioning of the control system comprises the following steps: ing ► Execute the addressing between wireless connection module and wireless room thermostats. ► Test addressing. ► If applicable: set time and date with one wireless room thermostat. ► Configure wireless connection modules and wireless room thermostats ► Configure wireless room thermostat into temperature sensor (sensor mode). 7.1 Addressing During addressing a wireless room thermostat is assigned to a radio channel. The following combinations between a wireless connection module and a wireless room thermostat are possible: NOTE 42 • Address one wireless room thermostat to one radio channel. • Address one wireless room thermostat to several radio channels. • Address several wireless room thermostats to one radio channel (sensor mode) • Address up to 3 wireless connection modules to each other. • Combine several radio channels into one zone. • Up to 20 wireless room units can be addressed to one wireless connection module, 4-, 8- or 12 channel version. • One wireless room thermostat and up to five wireless room thermostats in sensor mode can be addressed to one channel. The additional wireless room thermostats have to be set into sensor mode before addressing to the channel. • Each wireless connection module can be divided into up to 3 zones. If for example 12 channels are needed for one installation, but the number of wireless room units (thermostats, window contacts, etc.) is exceeding the maximum of 20 pieces, then one 4- and one 8-channel wireless connection module should be selected in order to be able to incorporate up to 40 wireless room units. P10009989 A User Manual Roth EnergyLogic Touchline/Wireless Commissioning and operation 7.1.1 Address one wireless room thermostat to one radio channel. Example One wireless room thermostat shall be addressed to radio channel CH 1. ► Press push button CH 1 of the wireless connection module. ► The corresponding LED CH 1 blinks. ► Press the sensor buttons seconds simultaneously. and of the wireless room thermostat for 5 ► LED CH 1 of the wireless connection module lights. ► After 5 seconds LED CH 1 goes off. If a demand is present, then LED CH 1 would continue to light. ► The display of the wireless room thermostat is activated (operation mode) The symbol will be shown and the setpoint is blinking. The setpoint can be changed. One wireless room thermostat is addressed to radio channel CH 1. 7.1.2 Address one wireless room thermostats to several radio channels Example Radio channel CH 1 and CH 2 shall be addressed to one wireless room thermostat. ► Press push button CH 1 of the wireless connection module. ► The corresponding LED CH 1 blinks. ► Press push button CH 2 of the wireless connection module. ► The corresponding LED CH 2 blinks. ► Press the sensor buttons seconds simultaneously. and of the wireless room thermostat for 5 ► LED CH 1 and CH 2 of the wireless connection module light. ► After 5 seconds LEDs CH 1 and CH 2 go off. ► The display of the wireless room thermostat shows the symbol . Radio channel CH 1 and CH 2 are addressed to one wireless room thermostat. NOTE P10009989 A The radio channels can be selected and addressed in any sequence. 43 User Manual Roth EnergyLogic Touchline/Wireless Commissioning and operation 7.1.3 Address several wireless room thermostats to one radio channel (sensor mode) When several wireless room thermostats in sensor mode are addressed to one channel, then all actual measured temperatures will be used to calculate the average room temperature. NOTE Before addressing more than one wireless room thermostats to one radio channel, the additional wireless room thermostats have to be set into sensor mode. In addition to one wireless room thermostat it is possible to add up to five wireless room thermostats in sensor mode. When a wireless room thermostat will be addressed to a radio channel that is addressed already with another wireless room thermostat, then the address of the firstly addressed wireless room thermostat will be overwritten. With parameter P-24 it is possible to put a wireless room thermostat back to factory settings. See parameter description P-24, Option "4", Page 72. Example Assign several wireless room thermostats to radio channel CH 1 for average temperature building. Address the first wireless room thermostat ► Assign the first wireless room thermostat to a radio channel in accordance with chapter 7.1.1. See page 43, chapter 7.1.1. Second wireless room thermostat, set sensor mode ► Press the sensor buttons seconds simultaneously and of the wireless room thermostat for 10 ► The display shows "– – – –" first permanently for 5 seconds and then blinks for another 5 seconds. ► The display shows SENS. NOTE Sensor buttons and are inactive when the wireless room thermostat is set in sensor mode. The setpoint can only be changed at the wireless room thermostat which is in operation mode. However, configuration of parameters can still be done by pressing the sensor button . Address second wireless room thermostat as temperature sensor ► Press push button CH 1 of the wireless connection module. ► The corresponding LED CH 1 blinks. and ► Press the sensor buttons for 5 seconds simultaneously. of the second wireless room thermostat ► LED CH 1 of the wireless connection module lights. ► After 5 seconds LED CH 1 goes off. ► The display of the second wireless room thermostat shows the symbol . A second wireless room thermostat has been addressed to radio channel CH 1, the first which is in sensor mode. Up to 5 units in sensor mode can be assigned to one radio channel. 44 P10009989 A User Manual Roth EnergyLogic Touchline/Wireless Commissioning and operation NOTE It is possible to configure a wireless room thermostat with IR sensor also in the "temperature sensor" mode. In the "temperature sensor" mode the measured room temperature of the internal sensors are averaged. The measured floor temperatures of the IR sensors are not averaged. Only the value of the wireless room thermostat with IR sensor is processed. A wireless room thermostat in sensor mode can be reset to the function "room operating unit" by the following instructions. NOTE Version A In order to be able to reset the wireless room thermostat in sensor mode to the function "room operating unit", this wireless room thermostat must be assigned to a radio channel. ► Select parameter P-24, Option 4 of the service menu. See parameter description P-24, page 72. The wireless room thermostat will be reset to factory settings. The assignment of the wireless room thermostat in sensor mode will be deleted. Version B ► Delete the connection of the wireless room thermostat according to page 46, chapter 7.1.5. ► Execute the following steps: – Press sensor button of the wireless room thermostat 5 seconds. – Wait 10 minutes. ► The display shows "SENS" and symbol ► Press sensor buttons onds simultaneously. and . of the wireless room thermostat 5 sec- ► The display shows "– – – –". The wireless room thermostat can be used again. P10009989 A 45 User Manual Roth EnergyLogic Touchline/Wireless Commissioning and operation 7.1.4 Test addressing Execute the following steps to check if the wireless thermostat room are properly assigned to the wireless connection module. ► The display of the wireless room thermostat shows the symbol . The wireless room thermostat is assigned to a wireless connection module. and of the wireless room thermostat 5 sec► Press sensor buttons onds simultaneously. The display of the wireless room thermostat shows "Pair" – "Test" as long as the LED of the wireless connection module lights. ► On the wireless connection module the LED of the assigned channel lights. If the wireless room thermostat is assigned to more than one channels then all assigned channel LEDs light. ► The LED/LEDs goes/go off after 5 seconds. The addressing has been tested. NOTE When the display shows the symbol , then the radio connection between the wireless room thermostat and the wireless connection module is interrupted. For possible causes see page 88, chapter 10.2. 7.1.5 Example Delete addressing A wireless room thermostat, which is assigned to the radio channel CH 1 has to be deleted. ► Press channel button CH 1 of the wireless connection module 12 seconds without interruption. ► After 2 seconds LED CH 1 blinks 5 seconds. ► LED CH 1 blinks fast another 5 seconds. ► LED CH 1 goes off. ► After the next radio refreshing cycle the display of wireless room thermoand "– – – –". As this may take up to 10 minutes, press any stat shows button on the wireless room thermostat to check immediately if the channel has been deleted. The addressing has been deleted. 46 P10009989 A User Manual Roth EnergyLogic Touchline/Wireless Commissioning and operation 7.1.6 Address up to 3 wireless connection modules to each other Up to three wireless connection modules can be combined into one system. One of the wireless connection modules have to be defined as master. Ex factory all wireless connection modules are configured as slave. NOTE Configure wireless connection module as "Master" The wireless connection module has to be configured as master before any wireless room thermostats are assigned. When the wireless connection module is configured as master afterwards, then it is possible that certain parameter settings are lost. ► Press push button Master of the wireless connection module at least 10 seconds. ► After a short time the LED Master blinks 5 seconds. ► The LED Master blinks fast another 5 seconds. ► After 2 seconds the LED Master lights. Address wireless connection module "Slave" to "Master" ► The LED Master lights. ► Press push button System of the wireless connection module "Master" until the LED System blinks. ► Press push button System of the wireless connection module "Slave" until the LED System blinks. ► At successful addressing: – the LED System of the wireless connection module "Slave" lights. – the LED System of the wireless connection module "Master" changes from blinking to off. – the LED System of the wireless connection module "Master" lights as soon as the first communication with the wireless connection module "Slave" has been built up. Test addressing of wireless connection modules "Slave" and "Master" NOTE Delete addressing of wireless connection modules "Master" and "Slave" P10009989 A The wireless connection module "Slave" is connected to the wireless connection module "Master" when at both the LED System lights. Further testing is not required. If desired the proper assignment can be tested by installing a bridge at terminals 09 and 10 (C/O-Input) of the wireless connection module "Master". The wireless connection module "Master" will switch into cooling mode and will send this signal to the wireless connection module "Slave". After max. 3 minutes the LED "Cool" of the "Slave" also lights blue. ► Press push button Master wireless connection module for 10 seconds ► After a short time the LED Master blinks 5 seconds. ► The LED Master blinks fast another 5 seconds. ► At the wireless connection module "Master" the LEDs Master and System go off and at the "Slave" the LED System goes off. 47 User Manual Roth EnergyLogic Touchline/Wireless Commissioning and operation NOTE 7.2 All central plant devices such as a central pump, burner control, C/O-signal for a heat pump etc. are connected to the wireless connection module "Master". To a wireless connection module "Slaves" only a local pump, if any, is connected. For the configuration of the relevant parameters P-51, P-61, P62 und P-63 see parameter description page 80, chapter 8.3.6 and page 82, chapter 8.3.7. Zones Applications for zoning Each wireless connection module can be divided in up to 3 zones. Zones can be used fort he following applications: • Within one zone the modes of operation, "Off (frost protection)", "Eco", "Normal Operation" or the same time program will be shared. The mode or operation can be changed at each wireless room thermostat. • One wireless room thermostat will have the highest priority for heating and cooling. The change of mode will transferred to all wireless room thermostats within the zone. See parameter description P-51, page 80. • One wireless room thermostat will be assigned as master. With this wireless room thermostat there are following possibilities available: – Changing the mode of operation. – Changing the time program for the wireless connection module. – Selecting the mode of operation heating/cooling for the entire plant. See parameter description P-48, page 79. • 48 All wireless room thermostats share the same setpoint within the zone. See parameter description P-46, page 78. P10009989 A User Manual Roth EnergyLogic Touchline/Wireless Commissioning and operation 7.2.1 Zone building, assign radio channels to one zone NOTE In the following example three zones are built. However, it is also possible to build one or two zones only, and to keep certain channels outside the zone(s). Zoning building can be done only after the assignment of the wireless room thermostats to radio channels. After zoning building it is possible to add any wireless room thermostat to a zone. Build first zone ► Press Zone button of the wireless connection module ► The green Power LED blinks. ► The blue LED indicating the first zone and the CH LEDs for channels not yet assigned to a zone blink. ► Press the CH buttons for the radio channels that need to be assigned to the first zone. ► The LEDs of the assigned channels light. Build second zone ► Press Zone button for the second time. ► The red LED indicating the second zone and the CH LEDs for channels not yet assigned to a zone blink. ► Press the CH buttons for the radio channels that need to be assigned to the second zone. ► The LEDs of the assigned channels light. Build third zone ► Press Zone button for the third time. ► The yellow LED indicating the third zone and the CH LEDs for channels not yet assigned to a zone blink. ► Press the CH buttons for the radio channels that need to be assigned to the third zone. ► The LEDs of the assigned channels light. End zone building ► Press Zone button for the fourth time. ► The LEDs for zoning go off. The green Power LED lights. The wireless connection is in operation. Zones are built. P10009989 A 49 User Manual Roth EnergyLogic Touchline/Wireless Commissioning and operation 7.2.2 Delete assignment of a radio channel to a zone Delete the assignment of a radio channel to a zone in reverse order compared to the addressing ► Press the Zone button of the wireless connection module repeatedly until the LED for the zone from which the radio channel must be deleted lights. – Zone 1: blue LED – Zone 2: red LED – Zone 3: yellow LED. ► The CH LEDs that are assigned to the selected zone light. ► Press the CH button of the radio channel that needs to be deleted from the zone. ► The relevant LED blinks. The radio channel is no longer assigned to the zone. ► Repeat this procedure in case further assignments need to be deleted. 7.2.3 Delete zone NOTE When all CH LEDs blink after the first press of the Zone button, then no zones are built. ► Press the Zone button of the wireless connection module repeatedly until the LED for the zone from which the radio channel must be deleted lights. – Zone 1: blue LED – Zone 2: red LED – Zone 3: yellow LED. ► The CH LEDs that are assigned to the selected zone light. ► Press all CH buttons of the radio channels of which the CH LED lights. The CH LEDs blink. The zone is deleted. ► Repeat this procedure in case further zones need to be deleted. The wireless connection module is in standard operation when all zones are deleted. 50 P10009989 A User Manual Roth EnergyLogic Touchline/Wireless Commissioning and operation 7.3 7.3.1 Change setpoints Set room temperature The wireless room thermostat is in stand-by mode. ► Press any button on the wireless room thermostat for 2 seconds. ► The display changes into operation mode. The setpoint blinks. ► Press sensor button or ► Press sensor button to confirm the new setpoint. , to change the setpoint. – If no sensor button is pressed, then the new setpoint will be automatically saved after 5 seconds. – To interrupt this procedure press the sensor button point will not be saved. . The new set- ► If no sensor button is pressed, the wireless room thermostat returns into stand-by mode. 7.3.2 Set floor temperature The setting of the floor temperature is only available for the type with IR floor temperature measurement. The wireless room thermostat is in stand-by mode. ► Press any button on the wireless room thermostat for 2 seconds. ► The display changes into operation mode. The room temperature setpoint blinks. ► Press sensor button shows P01. 5 seconds to enter the user menu. The display ► Press sensor button . The display shows P02. ► Press sensor button . The display shows the setpoint for the floor temperature and the symbol . ► Press sensor button or , to change the setpoint. ► Select one of the following options: – Press sensor button P03. to confirm the new setpoint. The display shows – Press sensor button , to interrupt the procedure. The new setpoint is not saved. The display shows P02. – If no sensor button is pressed, the wireless room thermostat returns into stand-by mode after 1 minute. The new setpoint is not saved. ► To leave the user menu press sensor button operation mode. P10009989 A . The display shows the 51 User Manual Roth EnergyLogic Touchline/Wireless Commissioning and operation NOTE If for the stand-by mode for the parameter P-01 the option "Actual value" is selected, the actual value of the IR sensor (floor temperature) will be displayed for the first four seconds. Afterwards the actual value of the room temperature sensor is displayed. If for the parameter P-01 the option "IR sensor" (floor temperature) is selected, the display is in reverse order. The floor temperature is measured every three minutes. The value shown and the value used in the wireless connection module is the average of the last three measurements. 7.4 Select mode of operation With the wireless room thermostat the following modes of operation can be selected: Symbol Description Off (frost protection) Reduced operation Normal operation Time program I "Pro 1", II "Pro 2" and III "Pro 3" Cooling mode (only selectable if the wireless room thermostat has priority over the heating/cooling device) Heating mode (only selectable if the wireless room thermostat has priority over the heating/cooling device) AUTO Auto cooling mode (can not be changed by wireless room thermostat as the mode is determined by the cooling device through a C/O input) Table 7: Modes of operation Select mode of operation The wireless room thermostat is in stand-by mode. ► Press any button on the wireless room thermostat for 2 seconds. ► The display changes into operation mode. The room temperature setpoint blinks. ► Press shortly the sensor button . The symbol blinks. ► Press shortly the sensor button , to change to the next mode of operation symbol. The symbol of the next mode of operation blinks. repeatedly, until the symbol of the desired ► Press the sensor button mode of operation blinks. ► Press the sensor button , to confirm the new mode of operation. – If no sensor button is pressed, the selection is interrupted after 10 seconds and the wireless room thermostat returns into stand-by mode. The new mode of operation is not saved. – Press the sensor button , to interrupt the procedure. The new mode of operation is not saved. 52 P10009989 A User Manual Roth EnergyLogic Touchline/Wireless Commissioning and operation NOTE The modes of operation heating and cooling are only selectable if the wireless room thermostat has the priority over the C/O input. If a wireless room thermostat has been defined as master, then heating and cooling can only be selected with the master wireless room thermostat. For the configuration of the relevant parameters P-48 and P-51 see parameter description page 79 and page 80. Select and change time program NOTE See page 55, chapter 7.6. If a time program is activated it is possible to manually override the mode of operation determined by the time program. At the next switching point of the time program, the manual override is deactivated again by the time program. However, if "Off (frost protection)" has been selected, the mode of operation will remain "Off (frost protection)" at any time. In order to permanently operate the wireless room thermostat manually, the time program must be deactivated. P10009989 A 53 User Manual Roth EnergyLogic Touchline/Wireless Commissioning and operation 7.5 Set time and date At commissioning For proper functioning of the plant it is necessary to set the time and date of each wireless connection module. During addressing of the first wireless room thermostat to a wireless connection module, the setting of the time and date is automatically prompted. If this procedure is skipped, then it will be repeated when the next wireless room thermostat is assigned. ► The value for the hour blinks. ► Press sensor button or ► Press sensor button to confirm. The value for the minutes blinks. , to set the actual value for the hours. ► Set minutes, year, month and day as described for the hours. ► When time and date have been set press sensor button shows the operation mode. . The display Check and adjust time and If necessary the time and date can be checked and adjusted directly at the wireless room thermostat. date, when needed The wireless room thermostat is in stand-by mode. ► Press any button on the wireless room thermostat for 2 seconds. ► The display changes into operation mode. The room temperature setpoint blinks. ► Press sensor button ► Press sensor buttons ► Press sensor button 5 seconds. The value for the hours blinks. or , to set the actual value for the hours. to confirm. The value for the minutes blinks. ► Set minutes, year, month and day as described for the hours. ► When time and date have been set press sensor button shows the operation mode. 54 . The display P10009989 A User Manual Roth EnergyLogic Touchline/Wireless Commissioning and operation 7.6 7.6.1 Time programs Overview of the three time programs” The wireless connection module has three different types of time programs that can be changed. • I: One profile for all weekdays (one profile) Profile symbol: 1 2 3 4 5 6 7 Time program I has just one profile with three switched-on periods that are the same for every day. • II: One profile for working days and one profile for the weekend (2 profiles) Profile symbols: working days: 1 2 3 4 5 , weekend: 6 7 With time program II one can distinguish between "working days" and "weekends", each with three switched-on periods. • III: One profile for each weekday (7 profiles) Profile symbols: Monday 1 , Tuesday 2 , … Saturday 6 , Sunday 7 The most advanced time program can be made with time program III: it is possible to create different profiles for every weekday, each with three switched-on periods. Das Zeitprogramm I umfasst nur ein Profil. Das Profil ist identisch für jeden Tag. Mit dem Zeitprogramm II können Sie unterschiedliche Zeiten für die Arbeitstagen und das Wochenende programmieren. Die größte Auswahl von Profilen bietet das Zeitprogramm III. Hier können Sie für verschiedene Profile für jeden Tag auswählen. Definition "switched-on period" and "switching points" NOTE Definition switched-on period: A switched-on period always comprises of two switching points. Each switching point is defined by a time and an action: switch from "reduced" to "normal", display symbol , or from "normal" to "reduced", display symbol . 00:00 02:00 04:00 06:00 08:00 10:00 1 12:00 14:00 2 3 Fig. 31: 2 1 1 16:00 2 18:00 4 20:00 22:00 24:00 5 6 Bxxxx1 7.6.2 Explanation "switched-on period" and "switching point" 1 First switching point "reduced" "normal" 2 Second switching point "reduced" "normal" 3 First switching point "normal" "reduced" 5 First switched-on period 4 Second switching point "normal" "reduced" 6 Second switched-on period P10009989 A 55 User Manual Roth EnergyLogic Touchline/Wireless Commissioning and operation 7.6.3 Factory settings time program 1 1 2 2 3 3 1 1 2 2 3 3 1 1 2 2 3 3 A 06:00...08:30 11:30...13:30 16:30...23:00 A 06:00...08:30 16:30...23:00 OFF A 06:00...23:00 OFF B 06:00...08:30 11:30...13:30 16:30...23:00 C 06:00...08:30 11:30...13:30 16:30...23:00 D 06:00...08:30 11:30...13:30 16:30...23:00 E 06:00...08:30 11:30...13:30 16:30...23:00 – B 06:00...23:00 OFF OFF F 06:00...23:00 00:00...00:00 00:00...00:00 G 06:00...23:00 00:00...00:00 00:00...00:00 A B C A e.g. e.g. D A 06:00...14:00 17:00...22:00 E F B G 00:00 Fig. 32: 02:00 04:00 06:00 08:00 10:00 12:00 14:00 2 16:00 2 18:00 20:00 22:00 24:00 Bxxxxx2 1 1 Factory settings time programs NOTE It is possible to enter one to three switched-on periods. If only one switched-on period is entered, then during programming the second period is shown at the display as "OFF" and the third is not shown at all. When a second period is entered, then the third period will appear as "OFF", and can be programmed too. NOTE The temperature difference between "normal" and "reduced" can be adjusted individually for each wireless room thermostat. Factory setting is 3 K. During "reduced operation" the display in operation mode shows the setpoint of "normal operation". If the setpoint has to be changed during "reduced operation", please note that the wireless connection module is actually controlling with the shown setpoint MINUS the set reduction. See parameter description P-44, page 77. 56 P10009989 A User Manual Roth EnergyLogic Touchline/Wireless Commissioning and operation 7.6.4 Select time program In the mode of operation "time program" one of the three time programs I, II, or III can be selected. The time programs are shown with the symbols , , or . If the symbol and the message OFF is shown, then no time program is active. If only the symbol without the message OFF is shown, then the "ECO" input of the wireless connection module is active. The wireless room thermostat is in stand-by mode. ► Press any button on the wireless room thermostat for 2 seconds. ► The display changes into operation mode. The room temperature setpoint blinks. ► Press shortly the sensor button selection. The symbol blinks. in order to enter the mode of operation repeatedly, until the symbol of the time program ► Press the sensor button blinks: . The display shows OFF. or , to select time program I, II, III, or OFF. ► Press the sensor buttons Corresponding to the symbols the display also shows Pro1, Pro2 or Pro3. ► Press sensor button , to confirm the selected time program. – If no sensor button is pressed, the selection is interrupted after 10 seconds and the wireless room thermostat returns into stand-by mode. The new mode of operation is not saved. – Press the sensor button , to interrupt the procedure. The new mode of operation is not saved. P10009989 A 57 User Manual Roth EnergyLogic Touchline/Wireless Commissioning and operation 7.6.5 Change time program NOTE The sequence of the switching points has to be fix and ascending: Switching point reduced normal normal reduced reduced normal normal reduced reduced normal normal reduced Switched-on period 1 Switched-on period 2 Switched-on period 3 The switching points can be shifted in any direction. However, they should not overlap each other. For example the second switching point reduced normal should not lie before the first switching point reduced normal. The switching points of a switched-on period may not lie between the switching points of another switched-on period. At midnight "00:00" means begin of day and "24:00" end of day. a 1 00:00 02:00 04:00 06:00 1 08:00 2 2 10:00 12:00 14:00 16:00 18:00 20:00 22:00 24:00 16:00 18:00 20:00 22:00 24:00 20:00 22:00 24:00 b 1 00:00 02:00 04:00 06:00 2 08:00 1 2 10:00 12:00 14:00 c 00:00 Fig. 33: a b c 58 02:00 04:00 06:00 2 08:00 1 10:00 12:00 14:00 2 16:00 18:00 Bxxxx1 1 Right and wrong settings of the time program Right setting: The switching points are configured in ascending order. Wrong setting: The switching points of the second switched-on period lie between the switching points of the first switched-on period. Wrong setting: Switched-on period 1 and 2 overlap. P10009989 A User Manual Roth EnergyLogic Touchline/Wireless Commissioning and operation Change an existing time program Time program Pro1 has to be changed. The wireless room thermostat is in stand-by mode. ► Press any button on the wireless room thermostat for 2 seconds. ► The display changes into operation mode. The room temperature setpoint blinks. ► Press sensor button shows P01. 5 seconds to enter the user menu. The display ► Press sensor button shortly 3 times until the display shows P04. . The symbol ► Press sensor button . The display shows message blinks and all weekdays 1 2 3 4 5 6 7 are shown. Example , to select time program 2 (Pro2) or time ► Press sensor button program 3 (Pro3). or ► Press sensor button , to confirm the selection of the time program. The default value of the first time program has to be changed. Switching points Factory settings Change Switched-on period 1 "reduced" "normal" 06:00 06:00 (unchanged) Switched-on period 1 "normal" "reduced" 23:00 09:00 Switched-on period 2 "reduced" "normal" OFF 16:00 Switched-on period 2 "normal" "reduced" OFF 22:00 Table 8: Example change of time program 1 a 1 1 00:00 02:00 04:00 06:00 08:00 10:00 12:00 14:00 16:00 18:00 20:00 22:00 24:00 c b 00:00 Fig. 34: 02:00 04:00 06:00 1 08:00 2 2 10:00 12:00 14:00 16:00 18:00 20:00 22:00 24:00 Bxxxx1 1 Change of time program 1 A Factory settings B New settings according to example C In this example a third switched-on period can only lie in the grey area. P10009989 A 59 User Manual Roth EnergyLogic Touchline/Wireless Commissioning and operation Time program Pro1 – change first switched-on period Time program Pro1 is selected. The factory settings need to be changed. ► Press sensor button . The display shows the time of the first switching point for "reduced to normal". Time 06:00 blinks. Symbol is shown. ► Press sensor button to confirm the default time 06:00. The display shows the time of the first switching point "normal to reduced". Time 23:00 blinks. Symbol is shown. ► Press sensor button , to set the new time at 09:00. ► Press sensor button , to save the changes of the first switch-on period. The time for the first switching point "reduced to normal" has not been changed. The time for the first switching point "normal to reduced" has been changed to 09:00. Set second switched-on period ► The display shows the message OFF. The second switched-on period is not used. ► Press sensor button , to set the new time at 16:00. The time for the second switching point "reduced to normal" has been set at 16:00. Symbol is shown. ► Press sensor button . The display shows the time of the second switching point "normal to reduced". Time 16:00 blinks. Symbol is shown. ► Press sensor button , to set the new time at 22:00. ► Press sensor button period. , to save the changes of the second switch-on The time for the second switching point "normal to reduced" has been set at 23:00. Symbol is shown. Set third switched-on period NOTE The second switched-on period must first be set in time program Pro1 in order to enable the message OFF of the third switched-on period. If the second switched-on period is not set, the message OFF is not shown. ► The display shows the message OFF. The third switched-on period is not used. ► Select one of the following options: – Press sensor button , to set the time of the third switching point "reduced to normal". As the last switching point of the second switched-on period is set at 23:00, the time of the third switching points "reduced to normal" and "normal to reduced" have to be set between 23:00 and 24:00. Otherwise the second switched-on period has to be shifted. – Press sensor button and all working days 60 1 . The display shows Pro2. Symbol 2 3 4 5 are shown. blinks P10009989 A User Manual Roth EnergyLogic Touchline/Wireless Commissioning and operation Time program Pro2 ► Select one of the following options: – Press sensor button program Pro3. , to skip time program Pro2 and to go to time – Press sensor button shows P-04. , to leave the time program Pro2. The display – Press sensor button , to configure time program Pro2. ► After pressing the sensor button working days 1 2 3 4 5 . , the display shows the symbol for ► Set all switching points of the desired switched-on periods for the working days as described for Pro1. ► Repeat this procedure for the weekend. The display shows the symbol for the weekend 6 7 . Time program Pro2 has be set. Time program Pro3 ► Procedure as described for time program Pro 2. With time program Pro3 all switching points of the desired switched-on periods are set per individual day of the week. NOTE To remove a switched-on period set the time of both switching points at the same value. First remove the third switched-on period, then the second switched-on period. When the second of three switched-on periods is removed, then also the third is deleted. Please note that if sensor buttons are not pressed for more than one minute the wireless room thermostat return to its battery saving mode before the time program is completed. 7.6.6 Reset time programs to factory settings The three time programs can be reset to factory settings individually with parameter P-05. P10009989 A 61 User Manual Roth EnergyLogic Touchline/Wireless Commissioning and operation 7.7 "eco" - Indicator The "eco”- indicator displays the relative energy consumption of the plant. The "eco"- indicator has five levels. The "eco”- level is depending on the following factors: • Setpoint • Actual room temperature • Mode of operation • Duration of the control deviation • At heating and cooling plants: settings of the dead-zone. Symbol Description "eco”- level 1: low relative energy consumption, high energy efficiency "eco”-level 5: high relative energy consumption, low energy efficiency Table 9: "eco"- indicator Energy efficiency The energy efficiency can be increased by the following measures: ► Reduce the setpoint of the room temperature and if applicable the minimum floor temperature. ► Use the time program and adapt this program to the end-user's daily schedule. ► For plants with heating and cooling: increase the dead-zone between heating and cooling. ► Use the optional accessory "Universal I/O Box" for an optimized control of the heat pump. 7.8 Lock / unlock operation of wireless room thermostat Lock operation and ► Press sensor buttons ously for at least 5 seconds. ► The display shows symbol Unlock operation ► Press sensor buttons and ously for at least 5 seconds. ► Symbol 62 of the wireless room thermostat simultane. Operation is locked. of the wireless room thermostat simultane- is no longer shown at the display. Operation is unlocked. P10009989 A User Manual Roth EnergyLogic Touchline/Wireless Commissioning and operation 7.9 Reset to factory settings See parameter description P-24, page 72. Reset values to factory settings via wireless connection module ► Press push buttons Master and System of the wireless connection module simultaneously for 10 seconds. ► After a short time the LEDs Master and System blink 5 seconds. ► The LEDs Master and System blink fast another 5 seconds. ► At the wireless connection module "Master" the LEDs Master and System go off. P10009989 A 63 User Manual Roth EnergyLogic Touchline/Wireless Commissioning and operation 7.10 Software-Update with mini SD-card c/o in 2A T 24V 230 V TB 24V 01 02 c/o out 230V eco c/o in %H system 230V + B A 03 04 05 06 07 08 09 10 11 12 17 18 19 20 CH 1 24V 24V CH 3 CH 4 CH 2 24V 24V 24V 24V 21 22 23 24 25 26 27 28 29 30 31 32 B12189 RJ-45 RJ-12 mini SD Fig. 35: 1 2 3 mini SD-card LAN connection, RJ-45 Active antenna connection, RJ-12 Slot for mini SD-card ► Disconnect power supply. Power LED off. ► Change SD-card. ► Reconnect power supply. Power LED on. ► The software update is automatically flashed into the micro controllers of the wireless connection module with the integrated boot loader. NOTE For the proper function of the plant it is normally not necessary to update the software. However, if a plant extension is made some time after the installation and commissioning of the first wireless connection module and for example a second wireless connection module that should communicate with the existing wireless connection module is added, then it is appropriate that the software release of both wireless connection modules are the same. As it is not possible to downgrade the software of the added wireless connection module, the software of the already installed wireless connection module should be updated with the software release of the added wireless connection module. The latest software release can be obtained at any time from the Roth webpage. Please read the accompanying instructions before executing the software update. 64 P10009989 A User Manual Roth EnergyLogic Touchline/Wireless Parameter descriptions 8 Parameter descriptions The menu is divided in a user menu and a service menu. The user menu is freely accessible. The service menu can only be entered through a service code. NOTE 8.1 Parameters can only be set by a wireless room thermostat at the same time. Once an attempt is made to set parameters via another room thermostat at the same time, the display shows the following symbol . Parameter overview User menu Parameter Description P-01 Set display in stand-by-mode: actual value or time. P-02 Set setpoint for the minimal floor temperature. (only for versions with integrated IR-sensor) P-03 Set upper and lower limits for room temperature setpoint. P-04 Change time programs. P-05 Reset time programs to factory settings. P-06 Set display for stand-by-mode. (max. battery saving mode) P-07 Activate or deactivate sound of sensor button. P-08 Show ID-number of wireless room thermostat P-09 Show ID-number of wireless connection module Parameter Description P-SE Access only with service code, factory settings "1234" P-21 Show software-version of wireless room thermostat P-22 Show software-version of wireless connection module P-23 Show actual status of wireless connection module and I/OBox P-24 Reset parameter to factory settings. Service menu P-20 General parameters P10009989 A 65 User Manual Roth EnergyLogic Touchline/Wireless Parameter descriptions P-30 Parameters for all wireless room thermostats P-40 Parameters for individual wireless room thermostats P-50 Plant and topology related parameters 66 Parameter Description P-31 Set increment for room temperature setpoint adjustment. P-32 Set temperature for frost protection function. P-33 Set unit for temperature. P-34 Set dead-zone for change-over between heating and cooling. P-35 Change service code for service menu. P-36 Change access code for public spaces. P-37 Activate or deactivate "summer-/wintertime". Parameter Description P-41 Set wall temperature correction of wireless room thermostat. P-42 Set floor temperature correction of wireless room thermostat with integrated IR-sensor. P-43 Set maximum floor temperature of wireless room thermostat with integrated IR-sensor. P-44 Set reduction of room temperature for "Eco" function. P-45 Activate or deactivate cooling lock and/or bypass, e.g. for a heat pump. P-46 Activate or deactivate "setpoint sharing within one zone" P-47 Activate or deactivate lock for public spaces or hotels. P-48 Activate or deactivate master function of a wireless room thermostat. Parameter Description P-51 Set priorities for change-over of heating/cooling and configure output for heating/cooling or burner start. P-52 Activate or deactivate "optimized time program". P-53 Set communication between wireless connection modules radio frequency or BUS. P10009989 A User Manual Roth EnergyLogic Touchline/Wireless Parameter descriptions P-60 Control parameters 8.2 Parameter Description P-61 Configure ECO or N/R input. P-62 Configure C/O in-/TB-input. P-63 Select control of pump "local" or "Master-wireless connection module" (only with activated communication between wireless connection modules). P-64 Select NC or NO function of thermal actuators. P-65 Select control algorithm. P-66 Activate or deactivate function "optimized actuator control". P-67 Select controlled first start-up of floor heating. User menu Enter user menu The wireless room thermostat is in stand-by mode. ► Press any button on the wireless room thermostat for 2 seconds. ► The display changes into operation mode. The room temperature setpoint blinks. ► Press sensor button shows P01. 5 seconds to enter the user menu. The display ► Select one of the following options: – Press sensor button , to confirm the parameter selection. – Press sensor button , to select parameter P02. ► Press sensor button parameter. or , to change the settings of the selected ► Select one of the following options: to save the parameter change. The display – Press sensor button shows the next parameter Pxx. – Press sensor button , to interrupt the procedure. The parameter change is not saved. The display shows the actual selected parameter. – If no sensor button is pressed, the wireless room thermostat returns into stand-by mode after 1 minute. The changed parameter is not saved. ► To leave the user menu press sensor button . Any confirmed parameter setting will be sent to the wireless connection module. The display shows the operation mode. P10009989 A 67 User Manual Roth EnergyLogic Touchline/Wireless Parameter descriptions Parameter P-01 Description Set display in stand-by-mode. • Factory settings: room temperature Operation or , to select the displayed value change: room-, floor-, ► Press sensor button outdoor temperature or time. Floor and outdoor temperature are only available with certain versions and accessories. ► Press sensor button P-02 to confirm selection. The display shows P-02. Set setpoint for the minimal floor temperature. IR • • • Factory settings: 15 °C Setting range: 15…30 °C Increment: 0.5 °C Operation P-03 ► Press sensor button or ► Press sensor button to confirm the setpoint. The display shows P-03. , to adjust the setpoint. Set upper and lower limits for room temperature setpoint. • Factory settings: – Maximal setpoint temperature: 30 °C – Minimal setpoint temperature: 5 °C Operation P-04 ► Press sensor button . The display shows Hi30. (Hi: high). ► Press sensor button or , to set the upper limit. ► Press sensor button . The display shows Lo05. (Lo: low). ► Press sensor button or ► Press sensor button to confirm the changed limits. The display shows P-04. , to set the lower limit. Change time programs. Operation See page 54, chapter 7.5. P-05 Reset time programs to factory settings. Operation 68 ► Press sensor button . The display shows Pro1 for time program 1. ► Press sensor button Pro3. or ► Press sensor button . The display shows no. ► Press sensor button or ► Press sensor button to confirm the selection. The display shows P-06. , to select between time programs Pro1, Pro2 or , to select between options no and yes. P10009989 A User Manual Roth EnergyLogic Touchline/Wireless Parameter descriptions Parameter Description P-06 Set display for stand-by-mode. (max. battery saving mode) To minimize battery consumption the display can be switched off in stand-by- mode. Only the symbol "low battery" will be shown when applicable. • • Factory settings: option "On" Options – On: normal, as defined with parameter P-01. – Off: no symbols are shown (max. battery saving mode) Operation P-07 ► Press sensor button . The display shows shortly diSP and then On. ► Press sensor button or ► Press sensor button to confirm selection. The display shows P-07. , to select option On or OFF. Activate or deactivate sound of sensor button. • • Factory settings: Option "On" Options – On: activate – OFF: deactivate Operation P-08 ► Press sensor button . The display shows On. ► Press sensor button or ► Press sensor button to confirm selection. The display shows P-08. , to select option On or OFF. Show ID-number of wireless room thermostat. This ID-Number is needed to configure a smart phone web-application! Operation P-09 ► Press sensor button . The display shows the ID-number. ► Press sensor button . The display shows P-09. Show ID-number of wireless connection module. This ID-Number is needed to configure a smart phone web-application! Operation Table 10: ► Press sensor button . The display shows the ID-number. ► Press sensor button . The display shows P-SE (enter service menu). User menu P10009989 A 69 User Manual Roth EnergyLogic Touchline/Wireless Parameter descriptions 8.3 8.3.1 P-SE Service menu Enter service menu The service menu is protected with a service code. This service code can be changed with parameter P-36. See parameter description P-36, page 75. The wireless room thermostat is in stand-by mode. ► Press any button on the wireless room thermostat for 2 seconds. ► The display changes into operation mode. The room temperature setpoint blinks. ► Press sensor button shows P01. 5 seconds to enter the user menu. The display ► Press sensor button repeatedly until the display shows P-SE. ► Press sensor button . The display shows 0000. and to enter the service code. The factory ► Press sensor button setting of the service code is 1234. Confirm each selected digit with sensor button . ► If the service code is correct then the display shows P-20, otherwise the display shows P-SE. 8.3.2 Select parameter group ► Press sensor button , to select parameter group P-20, P-30, P-40, P-50 or P-60, e.g. P-30. ► Press sensor button , to confirm the selected parameter group P-30. The display shows parameter P-31. ► Press sensor button , repeatedly to select a parameter of the parameter e.g. twice. The display shows P-33. group P-30. Press sensor button ► Select one of the following steps: – Press sensor button , to confirm selection. – Press sensor button . The display shows P-34. ► Press sensor button parameter. or , to change the settings of the selected ► Select one of the following steps: – Press sensor button , to save the changed settings. The display shows the next parameter Pxx. – Press sensor button , to interrupt the procedure. Any changed settings are not saved. The display shows the actual selected parameter. ► Press sensor button , to leave the parameter group. The display shows the next parameter group, here e.g. P-40. ► To leave the user menu press sensor button . Any confirmed parameter setting will be sent to the wireless connection module. The display shows the operation mode. The room temperature setpoint blinks. 70 P10009989 A User Manual Roth EnergyLogic Touchline/Wireless Parameter descriptions 8.3.3 P-20 "General parameters" For the following parameter descriptions the relevant parameter was already selected. The display shows P-xx. Parameter Description P-21 Show software-version of wireless room thermostat. Operation P-22 ► Press sensor button . The display shows the Software-Version. ► Press sensor button . The display shows P-22. Show software-version of wireless connection module Operation P-23 ► Press sensor button . The display shows the Software-Version. ► Press sensor button . The display shows P-23. Show actual status of wireless connection module and I/O-Box. • Options – – – – 0: no errors detected. 1: Alarm wireless connection module, TB-input active 2: Alarm external signal I/O-Box 3: Error wireless connection module and I/O-Box Operation ► Press sensor button . The display shows 0 if no error is detected. If an error is are shown. detected, then 1, 2 or 3 and the warning symbol ► Press sensor button P10009989 A . The display shows P-24. 71 User Manual Roth EnergyLogic Touchline/Wireless Parameter descriptions Parameter Description P-24 Reset parameter to factory settings. Parameters are partly stored in the wireless connection module and partly in the wireless room thermostat. Which parameters can be reset under which conditions is defined in chapter 15.3. • Options – 0: Not active, no reset will be executed. – 1: Reset wireless connection module to factory settings. The addressing of wireless room thermostat and wireless connection module will not be deleted. – 2: Reset wireless connection module to factory settings. The addressing of wireless room thermostats, wireless connection module and accessories will be deleted. – 3: Reset wireless room thermostat to factory settings. The addressing of a wireless room thermostat or temperature sensor (sensor mode) will not be deleted. – 4: Reset wireless room thermostat to factory settings. The addressing of wireless room thermostat or temperature sensor (sensor mode) will be deleted. Operation ► Press sensor button . The display shows 0. ► Press sensor button or ► Press sensor button . The display shows no. ► Press sensor button or , to select an option. , to select between options no or yes. ► Select one of the following options: – Press sensor button , to save the changed settings. The display shows the next parameter P-21. – Press sensor button , to interrupt the procedure. The display shows the selected parameter. Table 11: 72 Service menu – P-20 "General parameter" P10009989 A User Manual Roth EnergyLogic Touchline/Wireless Parameter descriptions 8.3.4 P-30 "Parameters for all wireless room thermostats" Any change of the following parameters will be transmitted to all wireless room thermostats that are assigned to the wireless connection module. It can take up to 10 minutes before all wireless room thermostats that are in stand-by-mode have received the transmitted data. If the wireless room thermostat is manually changed from stand-by-mode to operation-mode, the new data is immediately collected from the wireless connection module. Parameter P-31 Description Set increment for room temperature setpoint adjustment. • • factory settings: option "0" Options: – 0: 0.5 K (1 F) – 1: 0.1 K (0.2 F) – 2: 0.2 K (0.4 F) Operation ► Press sensor button . The display shows 0. ► Press sensor button or , to select option 1 or 2. ► Select one of the following options: – Press sensor button , to save the changed settings. The display shows the next parameter P-32. – Press sensor button , to interrupt the procedure. The display shows the selected parameter. P-32 Set temperature for frost protection function. The frost protection function will be activated as soon as the measured room temperature is below the set frost protection temperature. • • Factory settings: 8.0 °C Setting range: 3…13 °C Operation ► Press sensor button . The display shows 8.0. ► Press sensor button or , to change the value. ► Select one of the following options: – Press sensor button , to save the changed settings. The display shows the next parameter P-33. – Press sensor button , to interrupt the procedure. The display shows the selected parameter. P10009989 A 73 User Manual Roth EnergyLogic Touchline/Wireless Parameter descriptions Parameter Description P-33 Set unit for temperature. • • Factory settings: Option "0" Options: – 0: °C – 1: F Operation ► Press sensor button . The display shows 0. ► Press sensor button or , to select option 1. ► Select one of the following options: – Press sensor button , to save the changed settings. The display shows the next parameter P-34. – Press sensor button , to interrupt the procedure. The display shows the selected parameter. P-34 Set dead-zone for change-over between heating and cooling. The dead-zone will be applied by the wireless connection module as soon as the mode of operation changes over from heating to cooling and visa versa. The value of the dead-zone will be added to the setpoint "heating". The dead-zone is incorporated in the displayed room temperature setpoint. Calculation: Setpoint "cooling" = Setpoint "heating" + dead-zone Example: Setpoint "heating" = 21°C (shown setpoint during heating) Dead-zone = 2 K, Result: Setpoint "cooling" = 21 + 2 = 23°C. (shown setpoint during cooling) NOTE The value for the "dead-zone" may only be changed if the mode of operation is set at "heating". If this value is set during "cooling", the value will be doubled! • • Factory settings: Option "0" Options: – – – – 0: 2 K 1: 4 K 2: 6 K 3: 0 K, dead-zone deactivated Operation ► Press sensor button . The display shows 0. ► Press sensor button or , to select option 1, 2, or 3. ► Select one of the following options: – Press sensor button , to save the changed settings. The display shows the next parameter P-35. – Press sensor button , to interrupt the procedure. The display shows the selected parameter. 74 P10009989 A User Manual Roth EnergyLogic Touchline/Wireless Parameter descriptions Parameter Description P-35 Change service code for service menu. • Factory settings: 1234 Operation ► Press sensor button . The display shows 1234. ► Press sensor button or , to change the service code. Confirm each selected digit with sensor button . ► Select one of the following options: – Press sensor button , to save the changed settings. The display shows the next parameter P-36. – Press sensor button , to interrupt the procedure. The display shows the selected parameter. ATTENTION In order to avoid unwanted access to the service parameters, the service code should be changed and safely documented by the installer. P-36 Change access code for public spaces. The access code for public spaces is independent from the service code protecting the service menu. The access code is only active if parameter P-47 is activated. • Factory settings: 1234 Operation ► Press sensor button . The display shows 1234. ► Press sensor button or , to change the access code. Confirm each selected digit with sensor button . ► Select one of the following options: – Press sensor button , to save the changed settings. The display shows the next parameter P-37. – Press sensor button , to interrupt the procedure. The display shows the selected parameter. ATTENTION The access code has to be changed in order to avoid unwanted access. P-37 Activate or deactivate "summer-/wintertime". If time and date are synchronized through the LAN-connection, then the automatic summertime / wintertime adaptation must be deactivated. • • Factory settings: Option "0" Options: – 0: activate – 1: deactivate Operation ► Press sensor button . The display shows 0. ► Press sensor button or , to select option 0 or 1. ► Select one of the following options: – Press sensor button , to save the changed settings. The display shows the next parameter P-31. – Press sensor button , to interrupt the procedure. The display shows the selected parameter. ► Press sensor button Table 12: . The display shows P-40. Service menu –P-30 " Parameters for all wireless room thermostats" P10009989 A 75 User Manual Roth EnergyLogic Touchline/Wireless Parameter descriptions 8.3.5 P-40 "Parameters for individual wireless room thermostats" Parameter P-41 Description Set wall temperature correction of wireless room thermostat. The compensated temperature will be shown at the display as actual value. • • • Factory settings: 0 K Setting range: –3…+3 K Increment: 0.1 K Operation ► Press sensor button . The display shows 0. ► Press sensor button or , to change the value. ► Select one of the following options: – Press sensor button , to save the changed settings. The display shows the next parameter P-42. – Press sensor button , to interrupt the procedure. The display shows the selected parameter. Set floor temperature correction of wireless room thermostat with integrated IRsensor. P-42 IR • • Factory settings: Option "0" Options: – 0: standard setting – 1: average compensation – 2: high compensation Operation ► Press sensor button . The display shows 0. ► Press sensor button or , to select option 1 or 2. ► Select one of the following options: – Press sensor button , to save the changed settings. The display shows the next parameter P-43. – Press sensor button , to interrupt the procedure. The display shows the selected parameter. Set maximum floor temperature of wireless room thermostat with integrated IRsensor. P-43 IR This parameter avoids that the floor temperature exceeds a maximum temperature level. ATTENTION This function is not designed as a safety limiter. Therefore any liability for damages to the floor construction or plant components is expressly excluded. If a safety temperature limiter function is required then this has to be provided by an external hardwired safety temperature limiter (STB). • • • 76 Factory settings: 35 °C Setting range: 26…35 °C Increment: 1 K P10009989 A User Manual Roth EnergyLogic Touchline/Wireless Parameter descriptions Parameter Description P-43 (continued) Operation ► Press sensor button . The display shows 30. ► Press sensor button or , to change the value. ► Select one of the following options: – Press sensor button , to save the changed settings. The display shows the next parameter P-44. – Press sensor button , to interrupt the procedure. The display shows the selected parameter. P-44 Set reduction of room temperature for "Eco" function. The frost protection function has a higher priority than the Eco function. See parameter description P-32, page 73. Independently of the set value, the reduced temperature can not lower than 11 °C and not higher than 21 °C. This limitation will be selected automatically. • • • Factory settings: 3 K below the actual setpoint. Setting range: 0…+10 K Step size: 1 K Operation ► Press sensor button . The display shows 3. ► Press sensor button or , to change the value. ► Select one of the following options: – Press sensor button , to save the changed settings. The display shows the next parameter P-45. – Press sensor button , to interrupt the procedure. The display shows the se- lected parameter. P-45 Activate or deactivate cooling lock and/or by-pass, e.g. for a heat pump. NOTE • For applications that can lead to high temperatures, like solar heating, we strongly advise not to activate the function "By-pass heating" as the radio channel of the "by-pass heating" is not closed by the alarm of the TB-input. • When a heat pump is not equipped with a pressure overload by-pass, we advise to configure one or more heating loops (depending on the minimum load requirements), as by-pass. • • Factory settings: Option "0" Options: The function is only activated for the channel(s) that are assigned to the wireless room thermostat. – – – – – – P10009989 A 0: By-pass inactive, cooling lock inactive 1: By-pass "heating" active, cooling lock inactive 2: By-pass "cooling" active, cooling lock inactive 3: By-pass "heating" and by-pass "cooling" active, cooling lock inactive 4: By-pass inactive, cooling lock active 5: By-pass "heating" active, cooling lock active 77 User Manual Roth EnergyLogic Touchline/Wireless Parameter descriptions Parameter Description P-45 (continued) Operation ► Press sensor button . The display shows 0. ► Press sensor button or , to select option 1, 2, 3, 4 or 5. ► Select one of the following options: – Press sensor button , to save the changed settings. The display shows the next parameter P-46. – Press sensor button , to interrupt the procedure. The display shows the selected parameter. P-46 Activate or deactivate "setpoint sharing within one zone". Refer to also page 101, chapter 15. Setpoint sharing is typically used for large rooms that have different temperature profiles for different parts of the room. The room is divided into several heating zones each with its own wireless room thermostat. Each heating zone will control the part of the room according to its own control loop. However, all setpoints are the same. A change of the setpoint at one wireless room thermostat initiates a change of all relevant wireless room thermostats. All relevant room thermostats need to be within one zone of the wireless connection module and enabled for setpoint sharing by the settings of parameter P-46. • • Factory settings: Option "0" Options: – 0: deactivate – 1: activate Operation ► Press sensor button . The display shows 0. ► Press sensor button or , to select option 0 or 1. ► Select one of the following options: – Press sensor button , to save the changed settings. The display shows the next parameter P-47. – Press sensor button , to interrupt the procedure. The display shows the se- lected parameter. P-47 Activate or deactivate lock for public spaces or hotels. • • factory settings: Option "0" Options: – 0: deactivate lock. – 1: activate lock for public spaces. All sensor buttons are locked. When pressing sensor button the access code for public spaces is prompted. See parameter description P-36, page 75. – 2: activate lock for hotels. and are locked. With senAll sensor buttons except for sensor buttons sor buttons and it is possible to change the room temperature setpoint. When pressing sensor button the access code for public spaces is prompted. See parameter description P-36, page 75. 78 P10009989 A User Manual Roth EnergyLogic Touchline/Wireless Parameter descriptions Parameter Description P-47 (continued) Operation ► Press sensor button . The display shows 0. ► Press sensor button or , to select option 0, 1 or 2. ► Select one of the following options: – Press sensor button , to save the changed settings. The display shows the next parameter P-48. – Press sensor button , to interrupt the procedure. The display shows the selected parameter. P-48 Activate or deactivate master function of a wireless room thermostat. One wireless room thermostat per wireless connection module or per tone can be defined as master. With this master wireless room thermostat the modes of operation "Off (frost protection)", "reduced operation", "normal operation" and the time programs can be changed for the complete plant. Modes of operation can be changed locally with every wireless room thermostat. However, if the mode of operation is changed with the master wireless room thermostat then all local modes of operation are overridden. With parameter P-51 it is possible to provide any wireless room thermostat with the priority to change also the mode "heating/cooling", either centrally or locally (but valid for the entire plant). See parameter description P-51, page 80. The master function of a wireless room thermostat is permanently shown in the display with 1 (left of the actual value). • • factory settings: Option "0" Options: – 0: deactivate – 1: activate Operation ► Press sensor button . The display shows 0. ► Press sensor button or , to select option 0 or 1. ► Select one of the following options: – Press sensor button , to save the changed settings. The display shows the next parameter P-41. – Press sensor button , to interrupt the procedure. The display shows the selected parameter. ► Press sensor button Table 13: . The display shows P-50. Service menu – P-40 "Parameters for individual wireless room thermostats" P10009989 A 79 User Manual Roth EnergyLogic Touchline/Wireless Parameter descriptions 8.3.6 P-50 "Plant- and topology related parameter" Parameter Description P-51 Set priorities for change-over of heating/cooling and configure output for heating/cooling or burner start. ATTENTION If communication between wireless connection modules has been selected, then the settings of P-51 must be the same at all wireless connection modules with a wireless room thermostat. Otherwise the plant will not function properly. If option "0" or "1" has been selected, then the heating/cooling unit performs the master function and determines the heating/cooling mode. The mode of operation for heating/cooling can not be set by any wireless room thermostat nor be influenced by the wireless connection module. If option "2" has been selected, then the mode of operation for heating/cooling is determined by any wireless room thermostat. The heating/cooling unit has no influence on the mode of operation for heating/cooling. In addition it is possible to set one wireless room thermostat as master for heating/cooling. See parameter description P-48, page 79. • • Factory settings: Option "0" Options: – 0: C/O-Input and C/O-Output of the wireless connection module have priority. – 1: Burner start and C/O-Input of the wireless connection module have priority. The C/O-Output is configured as burner start and switches off immediately when heating demand is not required. In cooling mode this output is inactive. – 2: The change-over between heating and cooling can only be done with the wireless room thermostat. In cooling mode the C/O-Output of the wireless connection module is active. Operation ► Press sensor button . The display shows 0. ► Press sensor button or , to select option 0, 1 or 2. ► Select one of the following options: – Press sensor button , to save the changed settings. The display shows the next parameter P-52. – Press sensor button , to interrupt the procedure. The display shows the se- lected parameter. P-52 Activate or deactivate "optimized time program". If the function "optimized time program" is activated then the time of switching point "reduced to normal" shall be the time that the setpoint "normal operation" is reached. Hence, the wireless connection module will calculate an early start of the heating or cooling mode in order to do so. • • Factory settings: Option "0" Options: – 0: deactivated – 1: activated 80 P10009989 A User Manual Roth EnergyLogic Touchline/Wireless Parameter descriptions Parameter Description P-52 (continued) Operation ► Press sensor button . The display shows 0. ► Press sensor button or , to select option 0 or 1. ► Select one of the following options: – Press sensor button , to save the changed settings. The display shows the next parameter P-53. – Press sensor button , to interrupt the procedure. The display shows the selected parameter. P-53 Set communication between wireless connection modules radio frequency or BUS. Defines the communication between wireless connection modules: with radio frequency or BUS. Within one system either up to 3 wireless connection modules can communicate per radio frequency, or up to 16 units per BUS. Within one system this can not be mixed. See page 101, chapter 5. • • Factory settings: Option "0" Options: – 0: Communication per radio frequency active, communication per BUS inactive – 1: Communication per BUS active, communication per radio frequency inactive – 2: Communication per radio frequency and BUS inactive Operation ► Press sensor button . The display shows 0. ► Press sensor button or , to select option 0, 1 or 2. ► Select one of the following options: – Press sensor button , to save the changed settings. The display shows the next parameter P-51. – Press sensor button , to interrupt the procedure. The display shows the selected parameter. ► Press sensor button Table 14: . The display shows P-60. Service menu – P-50 "Plant- and topology related parameters" P10009989 A 81 User Manual Roth EnergyLogic Touchline/Wireless Parameter descriptions 8.3.7 P-60 "Control parameters" Parameter Description P-61 Configure ECO or N/R input. With the ECO-input it is possible to override the actual mode of operation of all wireless room thermostats with an additional main switch or SMS-modem. Depending on the selected option this function can either switch between "normal" and "reduced" or between "normal" and "frost protection (off)". If the ECO-Input is activated, then the display shows the symbol • • . Factory settings: Option "0" Options: – 0: N/R-Input is inactive. If at the wireless room thermostats a time program is selected, then this time program has priority. – 1: The ECO-Input has the highest priority, switches to "reduced". - ECO-Input active: time program wireless room thermostat deactivated, mode of operation and setpoint can be changed. - ECO-Input inactive: all functions of wireless room thermostat available, including time program. – 2: The ECO-Input has the highest priority, switches to "reduced". - ECO-Input active: time program wireless room thermostat deactivated, mode of operation and setpoint can be changed. - ECO-Input inactive: all functions of wireless room thermostat available, excluding time program. Symbol is fix. – 3: The ECO-Input has the highest priority, switches to "frost protection". - ECO-Input active: time program wireless room thermostat deactivated, mode of operation and setpoint can be changed. - ECO-Input inactive: all functions of wireless room thermostat available, including time program. Symbol – 4: The ECO-Input has the highest priority, switches to "frost protection". - ECO-Input active: time program wireless room thermostat deactivated, mode of operation and setpoint can be changed. - ECO-Input inactive: all functions of wireless room thermostat available, excluding time program. Symbol is fix. Operation ► Press sensor button . The display shows 0. ► Press sensor button or , to select option 0, 1, 2, 3 or 4. ► Select one of the following options: – Press sensor button , to save the changed settings. The display shows the next parameter P-62. – Press sensor button , to interrupt the procedure. The display shows the selected parameter. 82 P10009989 A User Manual Roth EnergyLogic Touchline/Wireless Parameter descriptions Parameter Description P-62 Configure C/O in-/TB-input. The TB-Inputs detects a voltage between 24 V and 230 V. • C/O in-/TB-Input: As soon as a voltage is detected the mode of operation of the wireless connection module is changed to cooling. If this wireless connection module is addressed to other wireless connection modules, then this C/O signal will be sent to the other wireless connection modules within 3 minutes. Please note wiring diagram Fig. 24, page 37. Phase and neutral have to be connected as defined in this diagram. The connection to terminals 01 (L) and 02 (N) may not be interchanged. • TB-Input for temperature monitoring: When the maximum supply water temperature is reached, an external safety limiter will switch off the pump and transfers this signal to the wireless connection module. Due to a primary pump or natural circulation it is possible that water further circulates through the heating loops. ATTENTION The TB-Input may not be used as safety temperature limiter. NOTE A radio channel configured as by-pass will not close when TB-Input is activated. • • Factory settings: Option "2" Options – 0: TB-Input is configured as temperature monitor. When the input is activated then the pump will be switched off immediately and all actuators are closed. When activated the red LED lights at the wireless connection module and the warning symbol is shown at the display of the wireless room thermostat. – 1: TB-Input is configured as temperature monitor. When the input is activated then the pump will be not be switched off, but all actuators are closed. When activated the red LED lights at the wireless connection module and the warning symbol is shown at the display of the wireless room thermostat. – 2: The "C/O in"-Input is configured as change-over for heating and cooling and as additional C/O-Input. When this input is activated, then the wireless connection module switches to cooling. The C/O-output is active. Operation ► Press sensor button . The display shows 0. ► Press sensor button or , to select option 0, 1, or 2. ► Select one of the following options: – Press sensor button , to save the changed settings. The display shows the next parameter P-63. – Press sensor button , to interrupt the procedure. The display shows the se- lected parameter. P10009989 A 83 User Manual Roth EnergyLogic Touchline/Wireless Parameter descriptions Parameter Description P-63 Select control of pump "local" or "Master-wireless connection module". This parameter can only be configured when two or more wireless connection modules are combined into a system and communicate with each other via radio frequency or BUS. • • Factory settings: Options – 0: Pump output is configured as local pump. The pump will be switched on only when heating or cooling demand is caused by one of the channels of by the wireless connection module to which the pump is connected. The pump will not be switched on when demand is caused by another wireless connection. – 1: Only the pump output of the Master-wireless connection module is activated. When demand is caused by any channel ate any wireless connection module then the pump connected to the Master wireless connection module will be switched on. Operation ► Press sensor button . The display shows 0. ► Press sensor button or , to select option 0, 1, or 2. ► Select one of the following options: – Press sensor button , to save the changed settings. The display shows the next parameter P-64. – Press sensor button , to interrupt the procedure. The display shows the selected parameter. P-64 Select NC or NO function of thermal actuators. Option "NC" (normally closed) should be selected for thermal actuators that open the valve when the actuator is connected to power. Option "NO" (normally open) should be selected for thermal actuators that close the valve when the actuator is connected to power. • • Factory settings: Option "0” Options – 0: normally closed NC – 1: normally open NO Operation ► Press sensor button . The display shows 0. ► Press sensor button or , to select 0 or 1 ► Select one of the following options: – Press sensor button , to save the changed settings. The display shows the next parameter P-65. – Press sensor button , to interrupt the procedure. The display shows the selected parameter. 84 P10009989 A User Manual Roth EnergyLogic Touchline/Wireless Parameter descriptions Parameter Description P-65 Select control algorithm. For efficient temperature control one can select between three control algorithms and an optimized actuator control. For optimized actuator control see next parameter description P-66. The following control algorithms can be selected: On/Off-control, PWM control for heat pump in combination with surface heating with high inertia (slow systems) and PWM control for surface heating with medium inertia (medium-lag systems) e.g. convection with wall heating. To save energy the pump is released 2 minutes after demand detection. • • Factory settings: 0 Options: – 0: On/Off-Control The heating will be switched on when the deviation between actual value and setpoint is larger than 0,5 K. The heating will be switched off when the deviation between actual value and setpoint is smaller than 0,5 K. On/Offcontrol is ideal for floor heating systems with higher supply water temperatures. The after run time of the pump control is 5 minutes. – 1: PWM-control with a period of 20 minutes. This control mode is ideal for floor heating in combination with a heat pump or with low supply water temperature. The after run time of the pump control is 20 minutes. – 2: PWM-control with a period of 12 minutes. This control mode is ideal for wall heating and low supply water temperatures. The after run time of the pump control is 12 minutes. Operation ► Press sensor button . The display shows 0. ► Press sensor button or , to select option 0, 1 or 2. ► Select one of the following options: – Press sensor button , to save the changed settings. The display shows the next parameter P-66. – Press sensor button , to interrupt the procedure. The display shows the selected parameter. P10009989 A 85 User Manual Roth EnergyLogic Touchline/Wireless Parameter descriptions Parameter Description P-66 Activate or deactivate function "optimized actuator control". The optimized actuator control is a specially developed actuator control that saves energy. This control also replaces a quasi-proportional control. At the start the thermal actuator will receive a 100% signal for a certain period. After this heat up period the actuator receives pulse/pause signal that is depending on the ambient temperature, configured with the options of this P-66. This control yields a significant energy reduction. NOTE We recommend to deactivate the optimized actuator control at ambient temperatures below 10°C. • • Factory settings: Option "0" Options: – 0: deactivated, ambient temperature below 10 °C – 1: activated, ambient temperature between ca. 10 °C and 25°C – 2: activated, ambient temperature between ca. 25°C and 50°C Operation ► Press sensor button . The display shows 0. ► Press sensor button or , to set option 0, 1 or 2. ► Select one of the following options: – Press sensor button , to save the changed settings. The display shows the next parameter P-67. – Press sensor button , to interrupt the procedure. The display shows the selected parameter. P-67 Select controlled first start-up of floor heating. It is recommended to heat-up the floor slowly when a new floor heating system is installed. The heating up period takes 36 hours and is divided into three steps: • • • First step of 12 hours with a setpoint of 7 °C Second step of 12 hours with a setpoint of 12 °C Third step of 12 hours with a setpoint of 15 °C When the setpoint of the room temperature is reached, the valves will be closed. • • Factory settings: Option "0" Options: – 0: deactivate start-up-mode. – 1: activate start-up-mode. When this parameter is selected this start-up-mode can only be deactivated with the wireless room thermostat or by resetting the wireless connection module. When power is interrupted the start-up-mode is stopped and will continue after the power connection has been restored. 86 P10009989 A User Manual Roth EnergyLogic Touchline/Wireless Cleaning and maintenance Parameter Description P-67 (continued) Operation ► Press sensor button . The display shows 0. ► Press sensor button or , to select option 0 or 1. ► Select one of the following options: – Press sensor button , to save the changed settings. The display shows the next parameter P-61. – Press sensor button , to interrupt the procedure. The display shows the selected parameter. ► Press sensor button . The display shows P-60. To stop the start-up-mode during execution or to deactivate before begin: ► Press any button on the wireless room thermostat for 2 seconds. ► The display changes into operation mode. The setpoint blinks.. ► Press sensor button . The display shows the remaining running time of the start-up-mode. Press sensor button , to change to the standard display. ► Press sensor button , to reduce the remaining running time. The start-upmode is deactivated at 0 hours. ► Press sensor button . The display shows no. ► Press sensor button or , to select option no or yes. – Select option no, to continue the start-up-mode. – Select option yes, to confirm the interruption of the start-up-mode. ► Press sensor button Table 15: 9 . The display shows the standard display. Service menu – P-60 "Control parameters" Cleaning and maintenance Cleaning Clean the wireless room thermostat with a lint-free, dry cloth. Do not use abrasive or caustic cleaning agents. Maintenance The wireless connection module and the wireless room thermostat do not require any maintenance. P10009989 A 87 User Manual Roth EnergyLogic Touchline/Wireless Troubleshooting 10 Troubleshooting The following tables describe possible problems and measures to remedy. Contact your installer for any issues, which can not be resolved with to the following description. See page 2. 10.1 Wireless connection module Problem Possible cause Remedy To be executed by LED Fuse lights red Fuse defect • • Electrician LED CH blinks Table 16: No radio signal between wireless room thermostat and wireless connection module • Replace fuse (2 A T). Check electrical connections. Address wireless room thermostat to wireless connection module. Professional Troubleshooting wireless connection module 10.2 Wireless room thermostat Problem ____ Err1 No radio signal between wireless room thermostat and wireless connection module for more than 30 minutes. 88 Possible cause Remedy To be executed by Battery almost empty. Replace batteries. User Battery critically low. Radio connection between wireless room thermostat and wireless connection module is no longer guaranteed. Replace batteries immediately. User Power failure wireless connection module Restore power supply. Electrician Fuse defect • • Electrician Replace fuse (2 A T). Check electrical connections. P10009989 A User Manual Roth EnergyLogic Touchline/Wireless Troubleshooting Problem Err2 No radio signal between wireless room thermostat in sensor mode and wireless connection module for more than 30 minutes. Err3 Changed parameters can not be saved Err4 Possible cause Remedy To be executed by Power failure wireless connection module Restore power supply. Electrician Fuse defect • • Electrician Replace fuse (2 A T). Check electrical connections. Power failure wireless connection module Restore power supply. Electrician Fuse defect • • Electrician Replace fuse (2 A T). Check electrical connections. Battery too weak Replace batteries User IR-Sensor broken Replace wireless room thermostat with IR-sensor. Professional Dew-point exceeded. Check supply water temperature of cooling unit. If possible increase supply water temperature. Professional Another wireless room thermostat is in the user or service menu. Set one of the wireless room thermostats into sleeping mode by pressing the sensor button . Professional IR-Sensor defect Short-time display Table 17: Troubleshooting wireless room thermostat 10.2.1 Procedure when "radio signal lost" ► Resolve problem according to "Table 17: thermostat". Troubleshooting wireless room ► Execute following steps: – Press any sensor button of the wireless room thermostat for 2 seconds. The display changes to operation mode. – Wait until all wireless room thermostats have rebuilt the connection with the wireless connection module. This procedure takes at least one hour after power supply has been restored. P10009989 A 89 User Manual Roth EnergyLogic Touchline/Wireless Troubleshooting 10.2.2 Replace batteries of wireless room thermostat NOTE Use high quality alkaline batteries with a long lifetime in order to enjoy long and problem free operation of the wireless room thermostat. During battery replacement addressing and parameter settings remain stored. The radio connection and parameter settings are restored within 10 minutes after battery replacement. ► Open wireless room thermostat. See also page 27 ► Replace batteries. Dispose batteries environmental friendly! ► Close wireless room thermostat. See also page 29, Fig. 12. 10.3 FAQs FAQ Note Time and date is requested for every wireless room thermostat that is addressed. During addressing of wireless room thermostats to a new connection module the input of time and date is prompted. This input can be skipped, however, with every next wireless room thermostat that is added the time and date prompt will pop-up until time and date are set. See page 54, chapter 7.5. Sensor buttons of the wireless room thermostat do not function properly. Remove and replace the batteries. The wireless room thermostat executes a calibration of the sensor buttons automatically. Do not touch the sensor buttons during calibration. Alternatively, one can wait for 4 minutes until the next regular calibration has been executed. During this 4 minutes period the sensor buttons my not be touched. Is it possible to show other values at the display than the room temperature? Time or temperature can be selected. See parameter description P-01, page 68. Is it possible to deactivate the display? Deactivate the display with parameter P-06, option "1". See parameter description P-06, page 69. How to correct the addressing of a wireless room thermostat? It is possible to directly address a wrongly addressed wireless room thermostat to another channel. However, we recommend to delete the first connection before addressing to the new channel. See page 46, chapter 7.1.5 and page 43, chapter 7.1.1. How to find out which channels are already assigned to a zone? Press the button Zone of wireless connection module once, twice, or three times. Each time the LEDs of the channels those are assigned to a zone light. See page 48, page 7.2. Is information lost during replacement of batteries? Information is not lost during replacement of the batteries. Date is stored at the wireless connection module. The pump doesn't switch on. • • • Table 18: 90 One or more radio channels are configured as "by-pass". The wireless room thermostat is addressed to another channel. The wireless room thermostat is in emergency mode. No information is sent anymore. Press the relevant channel button on the wireless connection for 10 seconds. The corresponding LED goes off. FAQs P10009989 A User Manual Roth EnergyLogic Touchline/Wireless Waste disposal 10.4 Tips and tricks Application Description Wall heating with "by-pass"-function When using the system for wall heating we recommend not to use the "bypass-function" of the wireless connection module, but to realize this with special piping and separate valve. Transfer of C/O-Signal In case that the C/O signal between wireless connection modules is wired, we advice to connect the C/O output of the master wireless connection module to the C/O-input of the slave wireless connection module. If this C/O-signal is wired parallel with further wireless connection modules, then polarity of the wiring has to be correct. Floor heating temperature monitoring. At cooling the min. of the min / max configuration may not be used as dewpoint monitor. Table 19: Tips and tricks 11 Waste disposal ATTENTION Danger to the environment through improper disposal! Improper disposal of the wireless room thermostat, the wireless connection modules or accessories may cause damage to the environment. – Don't dispose batteries with household waste. – Don't dispose the wireless connection module and the wireless room thermostat with household waste. – Dispose the wireless connection modules and wireless room thermostat in accordance with the appropriate country-specific regulations. P10009989 A 91 User Manual Roth EnergyLogic Touchline/Wireless Accessories 12 Accessories 12.1 Active Antenna To improve the transmission of a wireless connection module, e.g. when the wireless connection module is installed in a metal cabinet, an active antenna can be installed. See page 21, Fig. 4. Bxxxxx The active antenna doesn't need external power supply. The unit receives power with the included cable. This cable has RJ12 connections at both ends and its length is five meter. Fig. 36: Active Antenna 92 P10009989 A User Manual Roth EnergyLogic Touchline/Wireless Accessories 12.2 Repeater Bxxxxx A repeater can be installed to amplify the radio signal and to increase the reach. The repeater transmits the information of a wireless room thermostat or a wireless connection module, when the radio connection can not be established. The repeater will be assigned automatically to the wireless connection module per radio signal, but uses a power source 230 V / 5 V (included in the delivery of the repeater) Fig. 37: Repeater When the white cover is removed, two push buttons and three LEDs become visible. Red LED: Addressing Yellow LED: System net Green LED: Wireless room thermostat Push button for assignment to the system network Push button for assignment to the room thermostats network 12.2.1 Address repeater to wireless connection module A repeater shall be assigned to a wireless connection module. It has to be determined if the repeat has to be assigned to the system net or the room net. See installation instructions of repeater. P10009989 A 93 User Manual Roth EnergyLogic Touchline/Wireless Technical data 13 Technical data 13.1 Radio system Radio frequency 868 MHz (coded) Transmission rate 70 kbit/s Direction Bidirectional Reach 40 m in buildings, depending on environment, 200 m in free field 50 m in "normal housings", 300 m free air (depending on obstacles, surfaces, local disturbances) • • • Standards Radio: EN 300220 RTTE-Immunity: EN 301489-3 RTTE-Radiation: EN 300220-3 13.2 Wireless connection module 13.2.1 Construction and dimensions 52 225 290 4 Channel 8 Channel 74 355 230 V / 24 V 12 Channel Bxxx2 78 Fig. 38: 94 Dimensions wireless connection module with transformer P10009989 A User Manual Roth EnergyLogic Touchline/Wireless Technical data Dimensions(width x height x depth) Dimensions connection module without transformer Weight incl. transformer • • • • 4-channel: 225 mm x 74 mm x 52 mm • • • 4-channel: 1,3 kg 8-channel: 290 mm x 74 mm x 52 mm 12-channel: 355 mm x 74 mm x 52 mm Transformer: 78 mm x 74 mm x 52 mm 8- channel: 1,5 kg 12- channel: 1,7 kg Cable retention Meander shape Monitoring LEDs 13.2.2 Electrical connections Power supply wireless connection module 24 V AC 2 % via separate 230 V/24 V-Transformer Power source 24 V External transformer with cable 230 V AC Power consumption at 24 V, transformer included, without thermal actuators, 4-, 8- or 12-channel version 2.6 W Power consumption in operation • • • 4-channel: max. 27 W 8-channel: max. 40 W 12-channel: max. 60 W Power consumption is depending on the number of actuator that is connected. Max. current at stand-by 200 mA / 250 mA Max. number of thermal actuators • • • Protection class 13.2.3 4-channel: 6 (2 channels / 2 actuators, 2 channels / 1 actuator) 8-channel: 12 (4 channels / 2 actuators, 2 channels / 1 actuator) 12-channel: 18 (6 channels / 2 actuators, 6 channels / 1 actuator) II (EN60730) Inputs C/O Potential free, low voltage from wireless connection module Eco (N/R) Potential free, low voltage from wireless connection module Dew-point monitoring Potential free, low voltage from wireless connection module C/O in-/TB-input General input 24…230 V P10009989 A 95 User Manual Roth EnergyLogic Touchline/Wireless Technical data 13.2.4 Outputs Max. number of thermal actuators Outputs for thermal actuators Configurable output for C/O or burner start Relays for pump output 13.2.5 4-channel: 6 (2 channels / 2 actuators, 2 channels / 1 actuator) • • • • 24 V Triac-outputs, potential free • • • 230 V / 4 A, 1 A inductive • • • • 230 V / 4 A, 1 A inductive • • Room control network: max. 10 min 8-channel: 12 (4 channels / 2 actuators, 2 channels / 1 actuator) 12-channel: 18 (6 channels / 2 actuators, 6 channels / 1 actuator) NO (normally open) / NC (normally closed), configurable PWM- or On/Off-control Shortcut protected Potential free Without time delay and after-run time Potential free 2 min delay (configurable) 30 s after-run time (configurable) Performance data Data transmission Transmission power 13.2.6 • • • System network: max. 3 min < 13 mW Environmental conditions Ambient temperature 0…+60 °C Ambient humidity 5…80 % r.F. Storing and transport temperature –25…+70 °C Degree of protection IP 30 (EN 60529) 96 P10009989 A User Manual Roth EnergyLogic Touchline/Wireless Technical data 13.3 Wireless room thermostat 13.3.1 Construction and dimensions 21 21 61 117 4 19.5 Bxxx1 65 Fig. 39: Dimensions wireless room thermostat Dimensions(width x height x depth) 65 x 117 x 19.5 mm Weight 0.11 kg Display • • 13.3.2 TFT LCD, black on grey, 76 Symbols Dimensions: 32 mm x 38 mm Power supply – Battery Battery 2 x 1.5 V AAA Battery lifetime > 1.5 years Protection class III (EN 60730) 13.3.3 Power supply – 230 V AC Power supply 230 V AC 10 % Power consumption in operation 1.7 VA Power consumption Stand-by 0.13 W Protection class II (EN 60730) P10009989 A 97 User Manual Roth EnergyLogic Touchline/Wireless Technical data 13.3.4 Performance data Setting range setpoint +5 … +30 °C Accuracy (resolution) 0,1 K/0,5 K Time constant (time delay) Ca. 10 min / 12…20 min Dead-time Ca. 50 s Transmission interval • • • 1 … 10 min 1 min after change of setpoint or mode of operation 10 min for transmission of / 2 … 10 min Activation time (wake-up time) <2s Max. forced refresh time of data wireless connection module 10 sec Sleeping mode • • • 13.3.5 Without operation: after max. 5 s After programming at user level: 30 s After programming at service level: 20 min Environmental conditions Ambient temperature 0…+55 °C Ambient humidity 5…80 % r.F. Storing and transport temperature –25…+70 °C Degree of protection IP 20 (EN 60529) 98 P10009989 A User Manual Roth EnergyLogic Touchline/Wireless Menu structure 14 Menu structure Stand-bymode 10 s time-out (changed value is saved) Operation mode (save point) 10 s time-out (changed value is NOT saved) Operation mode Any button 2 s (only one button) Save value Change mode of operation Operation mode <5s Save value Save value Change setpoint Change setpoint with one step Operation mode <5s Save value Change time and date Operation mode hh:mm >5s Change hours YYYY Change year DD:MM Change month DD:MM Change day Save value Fig. 40: Change minutes Bxxxxx hh:mm Menu structure operation P10009989 A 99 User Manual Roth EnergyLogic Touchline/Wireless Menu structure 20 min Time-out Stand-bymode 1 min Time-out Any button 2 s (only one button) Operation mode User menu P-01 >5s P-01 Change value Save value P-02 P-SE P-01 Enter service code Service menu Service menu P-20 P-21 P-30 P-2x P-24 P-01 P-40 Change value P-50 Save value P-25 P-2x P-29 Fig. 41: 100 Bxxxxx P-60 Menu structure parameter settings for user and service level P10009989 A User Manual Roth EnergyLogic Touchline/Wireless Plant examples and communication 15 Plant examples and communication 15.1 Plant examples with one wireless connection module CH 1 Fig. 42: 2 CH 2 CH 3 CH 4 3 CH 5 CH 6 CH 8 CH 8 Bxxxx 1 Radio channel group with equal priority 1 Radio channel group 1 2 Radio channel group 2 3 Single addressing CH 1…CH 8: radio-channels CH 1 Fig. 43: 3 2 CH 2 CH 3 CH 4 SENS SENS SENS CH 5 CH 6 CH 8 CH 8 Bxxxx 1 Radio channel groups with equal priority and average temperature building 1 Radio channel group 1 2 Radio channel group 2 with average temperature building 3 Single addressing CH 1…CH 8: radio-channels SENS: wireless room thermostat Sensor mode, see page 44, chapter 44. P10009989 A 101 User Manual Roth EnergyLogic Touchline/Wireless Plant examples and communication 1 SENS P-46 CH 1 Fig. 44: CH 2 3 CH 3 P-46 CH 4 CH 5 P-46 CH 6 P-46 CH 8 CH 8 Bxxxx SENS 2 Radio channel groups with zone building 1 Zone 1 with average temperature building 2 Zone 2 with setpoint sharing 3 Zone 3 CH 1…CH 8: radio-channels Setpoint sharing see page 78, parameter P-46. 1 2 3 P-46 P-46 CH 2 CH 3 CH 4 P-46 CH 5 CH 6 CH 8 CH 8 Bxxxx CH 1 4 Fig. 45: Setpoint sharing for all wireless room thermostat within one zone 1 Zone 1 with setpoint sharing 2 Radio channel group 1 3 Radio channel group 2 4 Single addressing CH 1…CH 8: radio-channels Setpoint sharing, see page 78, parameter P-46. 102 P10009989 A User Manual Roth EnergyLogic Touchline/Wireless Plant examples and communication CH 1 Fig. 46: 3 2 CH 2 CH 3 CH 4 CH 5 CH 6 CH 8 CH 8 Bxxxx 1 Wireless room thermostat as "Master" for changing mode of operation – Wireless room thermostat als "Master" with own zone. 1 Zone 1 Wireless room thermostat as "Master" 2 Zone 2 3 Zone 3 CH 1…CH 8: radio-channels Master function see page 79, parameter P-48. CH 1 Fig. 47: 3 2 CH 2 CH 3 CH 4 4 CH 5 CH 6 CH 8 CH 8 Bxxxx 1 Wireless room thermostat as "Master" for mode of operation – wireless room thermostat outside the zones 1 Wireless room thermostat as "Master", outside the zones 2 Zone 1 3 Zone 2 4 Zone 3 CH 1…CH 8: radio-channels Master function see page 79, parameter P-48. P10009989 A 103 User Manual Roth EnergyLogic Touchline/Wireless Plant examples and communication 15.2 Plant examples with up to three wireless connection modules 7 8 9 C Slave CH 1 CH 2 CH 3 CH 4 CH 5 4 SENS CH 6 CH 8 5 CH 8 6 SENS P-46 P-46 P-46 P-46 B Slave CH 1 CH 2 CH 3 CH 4 1 CH 5 CH 6 2 CH 8 CH 8 3 Master Fig. 48: 104 CH 1 CH 2 CH 3 CH 4 CH 5 CH 6 CH 8 CH 8 Bxxxx A Example with three wireless connection modules A 1 2 3 Basement Zone 1, basement Zone 2, basement Single addressing C 7 8 9 B 4 5 6 1. Floor Zone 1 with average temp. building Zone 2 with setpoint sharing Zone 3 CH 1…CH 8: radio-channels 2. Floor Radio channel group 1 Radio channel group 2 Single addressing P10009989 A User Manual Roth EnergyLogic Touchline/Wireless Reset radio system to factory settings 16 Reset radio system to factory settings With the following procedure the wireless room thermostat and the relevant wireless connection module can be reset to factory settings. ► Reset all wireless room thermostats that are assigned to the wireless connection module with parameter P-24, option "4" to factory settings. See page 72, parameter description P-24, option "4". ► Press push buttons Master and System. of the wireless connection module simultaneously for 10 seconds. ► The LED Power of the wireless connection module goes off. ► The radio system is reset to factory settings as soon as the LED Power is off. P10009989 A 105 User Manual Roth EnergyLogic Touchline/Wireless 106 P10009989 A User Manual Roth EnergyLogic Touchline/Wireless Index Index A Code Access code public spaces (P-36) ................75 Accessories Active antenna...............................................92 Service menu (P-35)......................................75 Repeater........................................................93 Commissioning ...................................................42 Active antenna....................................................92 Set time and date ..........................................54 Addressing..........................................................42 Communication.................................................101 Delete ............................................................46 Configure C/O in-/TB input .................................83 Delete addressing between wireless connection modules ......................................47 Connect pump ....................................................35 Different combinations of addressing............42 Connect wires .....................................................35 One thermostat to one channel .....................43 Connection Connect transformator ........................................34 One thermostat to several channels .............43 LAN................................................................40 Sequence of addressing................................43 Connection diagram............................................33 Several thermostats to one channel..............44 Connections Test................................................................46 Central plant devices to master .....................48 Test addressing between wireless connection modules ......................................47 Cooling lock (P-45) .............................................77 Tip – more than 20 room devices?................42 Wireless connection modules to each other .47 Anti-blocking function .........................................19 Area of application..............................................11 B Batteries Insertion.........................................................29 Replace .........................................................90 Cooling mode......................................................19 Copyrights...........................................................10 Customer service................................................10 D Date Set time and date ..........................................54 Dead-zone heating/cooling (P-34)......................74 Delete Channel from zone ........................................50 Burner start output Electrical connections....................................36 Bus communication between connection modules (P-53) ..................................................81 Zones.............................................................50 Design Wireless connection module..........................17 Wireless room thermostat..............................18 By-pass heat pump (P-45)..................................77 Dew-point input...................................................39 C C/O-input ............................................................38 Display Wireless room thermostat..............................25 C/O-output Electrical connections....................................36 C/O-signal...........................................................37 Display elements Wireless room thermostat..............................23 Change setpoints................................................51 E Changes .............................................................12 eco-indicator .......................................................62 Cleaning..............................................................87 eco–indicator Energy efficiency ...........................................62 P10009989 A 107 User Manual Roth EnergyLogic Touchline/Wireless Index Eco-input............................................................ 39 L Electrical connections ........................................ 32 LAN connection.................................................. 40 Burner start output ........................................ 36 LED description.................................................. 22 C/O-output .................................................... 36 LEDs Connect wires ............................................... 35 Wireless connection module......................... 21 Heat pump .............................................. 37, 38 Limitation of liability.............................................. 9 Pump ............................................................ 35 Lock operation Thermal actuators......................................... 36 Wireless room thermostat............................. 62 Transformer .................................................. 34 Lost radio connection......................................... 46 Wireless room thermostat 230 V version.......................................... 30, 31 M Electricians......................................................... 13 Emergency mode........................................... 9, 19 Maintenance....................................................... 87 Master wireless room thermostat (P-48)............ 79 Material numbers Energy efficiency Dew-point monitor......................................... 39 eco-indicator ................................................. 62 Wireless connection module......................... 15 Measures to increase energy efficiency ....... 62 Energy saving mode .......................................... 19 Explanation of symbols........................................ 8 F Wireless room thermostat............................. 16 Max. floor temperature (P-43)............................ 76 Menu structure ................................................... 99 Operation ...................................................... 99 FAQs.................................................................. 90 First start-up of floor heating (P-67)................... 86 Parameter setting user and service level.... 100 Mode of operation Floor temperature control with IR ...................... 20 Select ............................................................ 52 Floor temperature correction (P-42) .................. 76 Modifications ...................................................... 12 Frost protection temperature (P-32) .................. 73 Monitoring elements Function ............................................................. 18 Wireless connection module......................... 21 H N Health hazards................................................... 13 N/R input Heat pump ................................................... 37, 38 Configure (P-61) ........................................... 82 Hotel function (P-47).......................................... 78 Name plate......................................................... 15 I NC actuators Identification....................................................... 15 ID-number Wireless connection module (P-09).............. 69 Wireless room thermostat (P-08).................. 69 Select (P-64) ................................................. 84 NO actuators Select (P-64) ................................................. 84 Notes Improper use...................................................... 12 Accredited countries ..................................... 11 Increment room temperature setpoint (P-31) .... 73 Address thermostats before building zones . 49 Indended use ..................................................... 12 Central plant devices connected to master connection module............................ 48 Installation Wireless connection module......................... 26 Change dead-zone during heating only........ 74 Wireless room thermostat............................. 27 Change heating/cooling with room thermostat............................................ 53 Wireless room thermostat 230 V-version ..... 30 108 P10009989 A User Manual Roth EnergyLogic Touchline/Wireless Index Deactivate optimized actuator control below 10 °C ...................................................86 P Definition switched-on period and switching point ...............................................55 Parameter overview............................................65 Display value setpoint reduced .....................56 Efficient support.............................................10 Function test radio connection between connection modules ......................................47 How to detect that no zones are built............50 Parameter descriptions.......................................65 Part numbers of product range...........................15 Professionals ......................................................13 Public spaces (P-47)...........................................78 Pump connection ................................................18 Push buttons description Inactive sensor buttons in sensor mode........44 Wireless connection module..........................21 Information regarding software updates........64 PWM control .......................................................19 Intellectual property rights .............................10 Select PWM control (P-65) ............................85 Limitation 24V output voltage ........................34 R Lost radio connection ....................................46 Radio communication between connection modules (P-53) ...................................................81 Manual override of time programs ................53 Meaning of OFF during programming time programs..........................................56, 60 Radio system Reset to factory settings ..............................105 More than 20 room devices?.........................42 Reduced mode ...................................................19 No by-pass for systems with possible high temperatures .........................................77 Reduction of room temperature (P-44)...............77 PowerLAN .....................................................26 Reset Repeater .............................................................93 Reset of sensor mode ...................................45 Parameter ......................................................63 Rules for removing switched-on periodes .....61 Radio system ...............................................105 Sequence addressing channels ....................43 Time program ................................................61 Sequence of switching points........................58 Reset to factory settings .....................................63 Set master before assigning thermostats......47 Room temperature control ..................................19 TB input does not protect by-pass channels .83 S Tips – Sensor mode ......................................44 Safety............................................................12, 13 Use high quality alkaline batteries.................90 Electrical connections....................................32 O Scope of supply ..................................................10 On/Off control .....................................................19 Select PWM control (P-65)............................85 Operating elements SD-card Software-Update............................................64 Select Wireless connection module .........................21 Mode of operation..........................................52 Wireless room thermostat .............................23 Parameter group............................................70 Operation ............................................................42 Sensor button Modes of operation........................................52 Sound on/off (P-07) .......................................69 Operation mode wireless room thermostat ........25 Wireless room thermostat..............................23 Optimized actuator control..................................20 Sensor buttons Optimized actuator control (P-66 ) .....................86 Lock operation ...............................................62 Optimized time program (P-52) ..........................80 Unlock operation............................................62 Overview time programs.....................................55 P10009989 A 109 User Manual Roth EnergyLogic Touchline/Wireless Index Sensor mode...................................................... 44 Set communication between connection modules, radio or bus (P-53) ........................ 81 Condition for reset ........................................ 45 Set priorities C/O heating/colling (P-51) ....... 80 Sequence Addressing.................................................... 43 Setpoint sharing within one zone (P-46)....... 78 Building zones .............................................. 49 Show software version connection module (P-22) ............................................... 71 Switching points............................................ 58 Show software version thermostat (P-21)..... 71 Service code ...................................................... 70 Service menu ..................................................... 70 Show status connection module and I/O box (P-23) ............................................... 71 Access code public spaces (P-36) ............... 75 Summertime/wintertime (P-37) ..................... 75 By-pass heat pump (P-45)............................ 77 Unit for temperature(P-33)............................ 74 Configure burner start (P-51)........................ 80 Wall temperature correction (P-41)............... 76 Configure C/O in-/TB input (P-61) ................ 83 Set Configure N/R (eco) input (P-61).................. 82 Floor temperature setpoint............................ 51 Cooling lock (P-45) ....................................... 77 Room temperature setpoint .......................... 51 Dead-zone heating/cooling (P-34)................ 74 Time and date at commissioning .................. 54 Enter service menu....................................... 70 Setpoint First start-up of floor heating (P-67).............. 86 Normal operation .......................................... 56 Floor temperature correction (P-42) ............. 76 Reduced operation........................................ 56 Frost protection temperature (P-32) ............. 73 Set floor temperature setpoint ...................... 51 Increment room temperature setpoint (P-31)............................................................ 73 Set room temperature setpoint ..................... 51 Lock for hotel function (P-47) ....................... 78 Lock for public spaces (P-47) ....................... 78 Master wireless room thermostat (P-48) ...... 79 Max. floor temperature (P-43) ...................... 76 Optimized actuator control (P-66 )................ 86 Optimized time program (P-52) .................... 80 Overview....................................................... 65 P-20 – General parameters .................... 65, 71 P-30 – For all room thermostats ............. 66, 73 P-40 – For individual room thermostats.. 66, 76 P-50 – Plant and topology related .......... 66, 80 P-60 – Control parameters ..................... 67, 82 Reduction of room temperature (P-44)......... 77 Reset to factory settings (P-24) .................... 72 Select local or master pump (P-63) .............. 84 Select NO/NC actuators (P-64) .................... 84 Select On/Off control (P-65) ......................... 85 Sharing within one zone (P-46) .................... 78 Software-Update SD-card......................................................... 64 Sound sensor button On/off (P-07) ................................................. 69 Stand-by mode wireless room thermostat ......... 25 Steps during commissioning .............................. 42 Summertime (P-37)............................................ 75 Switched-on period (Definition).......................... 55 Switching point (Definition) ................................ 55 Symbols Wireless room thermostat............................. 24 System failure ...................................................... 9 T TB-input C/O-signal ..................................................... 37 Temperature monitoring ............................... 38 Select PWM control (P-65) ........................... 85 Service code (P-35) ...................................... 75 110 P10009989 A User Manual Roth EnergyLogic Touchline/Wireless Index Technical data Wireless connection module..........................88 Dimensions....................................................94 Wireless room thermostat..............................88 Radio system.................................................94 U Wireless connection module .........................94 Unit for temperature(P-33)..................................74 Wireless room thermostat .............................97 Unlock operation Temperature control Wireless room thermostat..............................62 Floor temperature control IR .........................20 User manual .........................................................7 Room temperature ........................................19 User menu ..........................................................67 Temperature monitoring .....................................38 Change time programs (P-04) .......................68 Test Display battery saving mode (P-06) ..............69 Addressing.....................................................46 Enter user menu ............................................67 Addressing between wireless connection modules .........................................................47 ID-number connection module (P-09) ...........69 ID-number thermostat (P-08).........................69 Thermal actuators Limits room temperature (P-03).....................68 Electrical connections....................................36 Overview........................................................65 Optimized actuator control ............................20 Reset time programs (P-05) ..........................68 Time and date Setpoint floor temperature (P-02) ..................68 Adjust time and date......................................54 Shown value in stand-by mode .....................68 Set time and date ..........................................54 Sound sensor buttons (P-07).........................69 Time program Change existing program ..............................59 Change time program....................................58 Factory settings .............................................56 Factory settings time program.......................56 For all weekdays ...........................................55 For each day of the week ..............................55 For working days and weekend.....................55 Overview time programs ...............................55 Reset time programs to factory settings........61 Rules for removing switched-on periodes .....61 Select time program ......................................57 Switched-on period (Definition) .....................55 Switching point (Definition)............................55 Time out during programming .......................61 Tips and tricks ....................................................91 Topology ...........................................................101 One wireless connection module ................101 Up to 3 wireless connection modules..........104 Troubleshooting..................................................88 Lost radio connection ....................................88 W Wall temperature correction (P-41) ....................76 Warning symbols ..................................................8 Waste disposal ...................................................91 Wintertime (P-37)................................................75 Wireless connection module Addressing to each other...............................47 Connect power ..............................................41 Design............................................................17 Dimensions ....................................................94 Electrical connections....................................33 Install cover....................................................41 Installation......................................................26 LED description .............................................22 LEDs ..............................................................21 Material numbers...........................................15 Monitoring elements ......................................21 Operating elements .......................................21 Push buttons description ...............................21 Remove cover................................................33 Set master .....................................................47 Radio signal lost ............................................89 P10009989 A 111 User Manual Roth EnergyLogic Touchline/Wireless Index Technical data .............................................. 94 Operation mode ............................................ 25 Troubleshooting ............................................ 88 Place of installation ....................................... 27 Wireless room thermostat Reduction of room temperature (P-44) ......... 77 230 V version................................................ 30 Sensor button................................................ 23 Close housing ............................................... 29 Stand-by mode.............................................. 25 Connect 230 V version ................................. 31 Symbols ........................................................ 24 Connection 230 V version ............................ 30 Technical data............................................... 97 Design........................................................... 18 Troubleshooting ............................................ 88 Display .......................................................... 25 Unlock operation ........................................... 62 Display elements .......................................... 23 Wall temperature correction (P-41)............... 76 Floor temperature correction (P-42) ............. 76 Z Installation..................................................... 27 Zones ................................................................. 48 Lock operation .............................................. 62 Applications for zoning.................................. 48 Master function (P-48) .................................. 79 Building ......................................................... 49 Material numbers .......................................... 16 Delete............................................................ 50 Max. floor temperature (P-43) ...................... 76 Delete channel from zone............................. 50 Maximum number of room devices .............. 42 Number of zones........................................... 49 Mount 230 V version..................................... 30 Sequence...................................................... 49 Open housing ............................................... 27 Setpoint sharing within one zone (P-46)....... 78 Operation elements ...................................... 23 112 P10009989 A