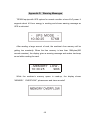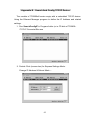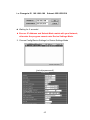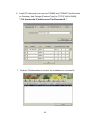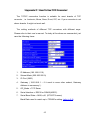
1
www.wittz.com CONTENTS Chapter 1 General Information ............................................................... 4 1.1 Introduction..................................................................................... 4 1.2 Hardware Specifications................................................................ 6 1.3 Appearance Illustration And Status Keys .................................... 8 Chapter 2 Hardware Installation ............................................................. 9 2.1 Hardware Requirements .............................................................. 10 2.2 How To Read The ID Card............................................................ 11 2.3 How To Settle The Machine ......................................................... 12 2.4 Internal Connectors Of TR3800................................................... 14 2.5 How To Set Machine ID ................................................................ 15 2.6 Link Modes.................................................................................... 16 2.7 LCD Display And External Alarm/Access Controller ................ 19 2.8 UPS Battery................................................................................... 20 2.9 Using Setup Card ......................................................................... 21 Chapter 3 Software Installation ............................................................ 24 3.1 Communication Wizard Installation............................................ 24 3.2 Copyright Declaration .................................................................. 26 3.3 Start-up .......................................................................................... 27 Chapter 4 System Settings.................................................................... 29 4.1 Communication ............................................................................ 29 4.2 Caption .......................................................................................... 31 1 4.3 Trancard File Edition .................................................................... 33 4.4 Record’s Format ........................................................................... 34 4.5 Extras............................................................................................. 35 Chapter 5 Records Saving .................................................................... 36 Chapter 6 Time-Recorder Settings ....................................................... 38 6.1 TR Setting...................................................................................... 38 6.2 Alarm Time Setting....................................................................... 41 6.3 Shift Time ...................................................................................... 42 6.4 Access Control ............................................................................. 45 Chapter 7 Real-time Monitor ................................................................. 49 7.1 Staff File Edition ........................................................................... 50 7.2 Real-time Monitor And Record Saving ....................................... 52 7.3 Real-time Monitor Under Modem Connection ........................... 53 Chapter 8 Scan Time-Recorders........................................................... 54 Chapter 9 Records Rescuing ................................................................ 55 Chapter 10 System Reset ...................................................................... 56 Appendix A Records Path And Setting Value ..................................... 57 Appendix B How To Make A Standard Bar Code Card ...................... 58 Appendix C Communication Cable’s Pin Assignment....................... 59 Appendix D Warning Messages............................................................ 60 2 Appendix E Search And Config TCP/IP Device................................... 61 Appendix F How To Use TCP Converter.............................................. 65 Appendix G How To Connect TR3800 Via Public IP ........................... 66 3 Chapter 1 General Information 1.1 Introduction TR3800 is a multi-function time recorder combining the cutting edge proximity (RF), bar code and magstripe technology. The TR3800 possess with superior reading device, STN backlight display and versatile a mulit IO (input & output) outlet. The TR3800 is not only for storing employee attendance records, but also serves as a powerful access control system. Preventing from pleonasm, we take the TR3800B-128 (bar code type) Time Recorder for instance in the following chapters. Except the method of using card, the proximity and magstripe types are mostly the same in function and operation. If necessary, we will take example to clarify the difference between them. Henceforth, we call the TR3800 Time-Record as “TR3800”, “Time-Recorder”, “the machine” or “the unit”. 4 TR3800’s Features: 1. Easy, fast and error-free data collection for personnel attendanceemployee’s ID number, year, date, time, shift and status of entry. 2. Embeds the high-voltage surge protection circuit. 3. 10 years of data preservation after a loss of main power. Normally work is available for 4.5 hours by using UPS battery. 4. A 128KB double-low-power consumption memory under dymatic mode. Its storage capacity is approximately 10,000 records. 5. Records-rescuing function that allows to recall the deleted records within 180 days. 6. The ability of shift-management provides 4 shifts, out and return keys. 7. The real-time (on line) function allows the computer to monitor 20,000 persons. And save into the hard disk in synchronous. 8. Auto detect serial port and auto-configuration system settings -- the progress of computer technology that bring much convience, but the hardware and peripheral devices are getting more complicated. The TR3800 provides a auto-searching function to dectect computer’s serial ports and save to setting value. 9. Offers flexible record format that suit the output pattern to diversity of personnel management application systems. 10. An external alarm system provides 112 alarms (16 alarms for each day a week) , the definable duration from 1 to 99 second(s). 11. Embeds 2,000 perssons security volume and 3-level access control. 12. Supports full function TCP/IP LAN links – Local LAN, WAN, IntraNet and InterNet 5 1.2 Hardware Specifications Housing ABS+PC+SyntheticFiber Display STN back-light LCD (16x2 characters) Keypad 24-key-membrane keypad (water-resistant) Memory 128K low power consumption SRAM Calendar 1950 ~ 2999 Clock +- 15 seconds/per month Battery Ni-Mh 4.8V Recharageable/1700mA Li Card Reader 3V CR2032H /220mA Bar code sloter/code 39 Magstripe sloter/ISO Trk1,2,3 (200oe,,4000oe) EM Weigan RF sensor/10-digit and 8-digit External Alarm 1-99 second(s) , 2Amp/250AC Access Controller 1-99 second(s) , 2Amp/250AC Comm. Model RS232 Multi-Drops(RS485) Modem (V.32, V.34, V34+, V90) TCP/IP – LAN, WAN, Interanet, Internet(optional) Bluetooth Wireless (optional) Comm. Speed 2400,9600,19200,38400 bps Cable 232-30 (for RS232 & Lan) MDP-30 (for multi-drops & Lan) MOD-30 (for Modem) Power Consumption Normal mode UPS 9V/350mA --3.15W mode 4.8V/320mA --1.54W 6 Temperature Operation: -10 ~ 50 degrees Celsius Storage : -40 ~ 70 degrees Celsius Humidity Operation: 10 ~ 95 % Storage : 5 ~ 95 % Sea Level -304.8 ~ 3657.6 meter Dimension 114mm(X) Weight Net x 165mm(Y) X 44mm(Z) : 0.5Kg Gross : 1.0Kg (accessories and package included) 7 1.3 Appearance Illustration And Status Keys Appearance Illustration LCD Display Card Reader Shift Keys Status Keys Membrane Keypads Alarm/Security/Printer Outlet Power Socket Ground Connection Outlet Multi-communication Port Keylock Status Keys 8 Chapter 2 Hardware Installation The package of TR3800 includes the following units, please check them before installation. 1. TR3800 Time-Recorder 2. Two Keys 3. Power Adaptor (100-240V AC / 9V 1200mA DC) 4. TR3800 CD (for Communication Wizard software and user’s manual) 5. Setup Card 6. 232-30 Cable (for RS232 & External TCP/IP converter) 7. MDP-30 Cable (for Multi-drops & External TCP/IP converter) 8. MOD-30 Cable (for Modem) The package of model TR3800xN(TCP/IP embedded) don’t provide above 3 cables (item 6,7,8). 9 2.1 Hardware Requirements The TR3800 is designed for using with IBM PC/AT PC (with Pentium, Pentium2, Pentium3 , Pentium4 or above processor) and other compatible computers under Microsoft Windows(95, 98 ,98se, Me, NT, 2000, XP) system. Besides the TR3800 Time-Recorder, be sure that you have the necessary equipments as follows: RS232 – for Single Unit 1. A serial port (Com1 ~ Com10) in the computer 2. A 232-30 cable --- can be extended to 15M by standard DB9P cable(one end with male connector, the other end with femal connector) Multi-drops – for Multi Units or Single Unit (above 15M) 1. A serial port(Com1~Com10) in the computer 2. A A52(485 ADDC) signal converter (optional) 3. A MDP-30 cable --- can be extended up to 1,200M via 24AWG cable Modem Link – for Single Unit 1. A serial port(Com1~Com10) in the computer 2. Two sets of Modem(one for computer, the other for TR3800) 3. A MOD-30 cable TCP/IP LAN Link – for Multi Units or Single Unit 1. A 10/100M Lan device with RJ45 connector in the computer 2. An E-P132 TCP/IP convertor (optional) 3. A 232-30 or MDP-30 cable TCP/IP LAN Link – TCP/IP embedded Model(TR3800xN) 1. A 10/100M Lan device with RJ45 connector in the computer * * * IBM is the trademark of International Business Machine Corporation Pentium are registered by Intel Corporation Windows 95, 98, Me, NT4, 2000, XP are registered by Microsoft Corporation 10 2.2 How To Read The ID Card Reading Bar Code Card/ Magstripe Card 1. Keep the bar code toward the keypad( the other side for magstripe card) 2. Slide the card from top to bottom smoothly 3. A sound of beep and ID number showed on display Reading Proximity Card 1. Take the card approach to the machine ( 8-15cm) 2. A sound of beep and ID number showed on display 11 2.3 How To Settle The Machine Sit On The Counter 1. Unplug the power cord 2. Outspread the stands 12 Mount On The Wall 1. Unplug the power cord 2. Press and turn the key in right-hand (unlock) to separate the cover from bottom 3. Mount the bottom on the wall 4. Unite the cover with bottom 5. Turn the key in left-hand (lock it. If not turn to the correct angel, the key cannot be removed) 6. Remove the key 13 2.4 Internal Connectors Of TR3800 Opening the TR3800, it appears various kinds of connectors, all of these connectors are designed under anti-fool notion and all connectors marked the function with text description as well. All mistaken connections will not cause hardware damage, but it might cause communication failed. VR1 VR1 : LCD Contrast Adjuster S1 : UPS Switch T1 : External Alarm Terminal T2 : Access Controller Terminal D23 : Power LED JP5 ON D34 BAT UPS 1 ALARM T1 JP9 : 2nd RS232 Connector D34 D23 SEC T2 JP9 JP10 : 2nd Multi-drops Connector TX RX G JP8 : 2nd DC Power Connector JP10 D+ D- JP7 : 2nd LAN Pin JP7 E TX + LAN RST E TX - S2 : LAN Reset E R X+ E R X- S2 - 9V + JP8 * Items of D34,JP7 and S2 are workable for model TR3800xN only. 14 2.5 How To Set Machine ID When many machines link on the line together that need to set the machine’s ID for unique identity (“001” is factory setting). Any machine’s ID can not be equal to any of others ,otherwise link-error! 1. Read the Setup Card (or press&hold Exit-key and than power-on) 2. Input Password “3198” – date and clock blinking 3. Press Combined Func-key 4. Input “210” 5. Use forward 6. Press or backward to confirm and to change machine ID to exit 15 2.6 Link Modes RS232 (maximum distance 15M) PC RS232 232-30 CABLE Multi-drops RS485 ADDC (maximum distance up to 1,200M) TR01 Transio A52 DC Adaptor 1 2 RS-2 32 PC RS232 MDP-30 CABLE TR02 Maximum 1200M(6,000 feet) Red : D+ Black : D- 16 Modem Link PC RS232 MODEM MODEM MOD-30 CABLE TCP/IP LAN Link (with external TCP/IP converter) LAN LAN 17 TCP/IP LAN Link (TCP/IP Embedded Model – TR3800xN) HUB 18 2.7 LCD Display And External Alarm/Access Controller LCD Display: When the TR3800 work normally, the LCD display shows date/week on the first row, the second row for time and space(free space) information. 10:30:25 2001-06-01 209387476 10:30:25 57KB FRI 0576 While reading the ID card, the display shows the ID number, time and storaged records for 20 seconds. External Alarm and Access Controller: The external alarm and access controller terminal are located on the right-side of mainboard. The relative information, please refer to 6.1.3 and 6.4. External Alarm Connection Power Alarm Unit Access Controller Connection Power Controller Unit 19 Circuit Diagram Loading Circuit Diagram Loading 2.4, 6.2, 2.8 UPS Battery The TR3800 use Ni-Mh battery for UPS. When the AC power is shutted down , the UPS will take over the machine for operation within 0.5 second. Disable the battery if the machine is scheduled to be powered off for days UPS battery is recommended for those areas where have unstable power. For UPS life, the circuit charge the battery moderately, it need to take about 96-hour (4 days) for full charage For international aviation regulation, the UPS battery is disabled under transporation. Make sure the UPS switch(refer to 2.4) is enabled after supporting AC power. Once the battery is nearly exhausted, the machine have difficulty to boot up, a constant beep sound might occur, please disable the battery(refer to 2.4) temporarily before supporting AC power. 20 2.9 Using Setup Card There are two methods to change the TR3800’s setting values--the most formal method is by software(Communication Wizard), but some of simplier (or special) functions still can be set by Setup card (i.e. Date/Time, Alarm, Shift, Machin ID…). The former is not the subject of this paragraph and the precedence of Communication Wizard is prior to Setup card. When Setup card is disabled by software, Setup card is inoperative! ( refer to 6.1.3) Please follow the steps: 1. Read Setup Card. 2. Input password“ 3198” (factory setting)within 15 seconds If the password is correct, the display is blinking with date/time. 3. After changing the value , press to confirm and to exit. There are 6 function keys on the keypad, each of them has its particular definition as belows: --- Reset second to “00” --- Forward / Selection Key --- Backward / Selection Key 21 --- Enter --- Exit --- Tool and Combined Function Key ( + 3 keys) ** Press & Hold tool key and then power-on for hardware self-test. The machine ID, BIOS version, Baud Rate and Memory Disposal will be showed on display before testing. 201 Set Password --- 4 digital keys 202 Date/Time 203 External Alarm --- Enable/Disable 204 Alarm Table 205 Shift Mode --- Mode 1/2/3 206 Access Controller --- Enable/Disable 207 Access Control Mode --- Mode 1/2/3 208 Clear All Records --- Yes/No 22 210* Machine ID --- 001 to 255 211 Baud Rate --- 2,400 to 38,400 212 Proximity Card Type ---10 digits/ 8 digits 213 Magstripe Card Track --- track 1,2,3 214 Truncate Leading --- 00 to 32 215 Code Length --- 02 to 16 216 Date Format On Display --YYYY-MM-DD, MM-DD-YYYY, DD-MM-YYYY 217* Memory Disposal --- Standard or Cycled 218* Set To Factory Default (Reset Completely) 219* Time Base --- Enable/Disable Notice: 1. Function 210 ~ 219 cannot be reset by software. It can be reset only by function 218. 2. Function 217(Memory Disposal) includes two modes: one for standard, the other for cycled. While memory disposal is switched to “cycled”, the memory will keep the last (newest) records that comply with the rule of “First In first Out”. 3. Function 218(Factory Default) is much extreme than software’s (Communication Wizard) reset, Function 218 will clear all records/all settings values and return to factory default settings. 4. While Function 219 is enabled, the machine will send synchronous clock at 00:10 to adjust all machines. 23 Chapter 3 Software Installation 3.1 Communication Wizard Installation Pentium-133 or above (Pentium II, Pentium III, Pentium 4..) (2) 16M memory (3) 20M hard disk space (4) Microsoft Windows 95, 98(Se), Me, NT4, 2000, XP (5) CD-ROM 2X (6) Serial port or RJ45 10/100M LAN device (7) Mouse MHZ (1) Compatible MB 1. Basic System Requirements 16MB RAM P-133 20 MB 2X Drive W indows Serial 2. Install Communication Wizard Mouse Put the TR3800 CD in CD driver, and then the system will install all the demanded file automatically ( about 40 seconds). If the auto-run can not work well, please execute “Asetup.exe”. If you computer doesn’t equip CD driver, please prepare 3 1/2” diskettes and copy all the files (\English\ folder) into the diskettes. 24 After finishing all procedures, shut down the computer and reboot again. You will find a “3800 Time-Recorder” , “InitiateModem”, ”Trancard” and “Staff“ in program files. And A “TR 3800 Time-Recorder” icon on Windows desktop. If all the procedures comform to the default installation, the \Program Files\ TR3800 Time-Recorder” folder contains the files(folders) as below: After installation, you might not find all above folders. Some folders have not being created until executing specific functions. 25 3.2 Copyright Declaration TR3800 Communication Wizard is designed for Windows 95, 98, 98Se, Me, NT4, 2000, XP. Our Company-Arex Technology Corporation possess the authority and final modification right. Trying to modify (or disperse) the main program , parts and all attached link-files are forbidden! 26 3.3 Start-up TR3800 Communication Wizard is thoughtful to user. It has embedded system-help interface in program. Most of functional description have shown on the screen. Any unreasonable event occurred to system, the program will notify operator by cautionary warning. Thus, we suggest the user doesn’t rush to read the following chapters. Just try it! Any mistaken operation will not cause system confusion or hardware broken. -- the program will filter out and expunge all conflicting settings automatically. This manual divided all main functions into single chapter. After blind-trying, a rough system framework has been built in your(user’s) mind’s eye. Then only read the chapters that you want to know further. At the first time to execute main program-TR3800.exe. The function of communication is the starting point. Choose the correct connection type and port . If you are not sure Com port, please click Auto Search. The program will detect the Com port automatically. 27 After entering the main menu, the TR3800 information showed on the screen. it includes --- ID,TR-Caption(Time-Recorder’s caption), BIOS version, date, time, free space percentage, records, shift’s alias and status’s alias. The TR-Caption,Shif and Stat(status) are definable by system setting/caption (please refer to chapter 4.2 system setting /caption). 28 Chapter 4 System Settings System settings allows users to set a Start-Up point. The system will run the start-up function directly while running the main program. Save-Go-Quit will jump off the system in 3 seconds. Save-Go-ShutDown will turn the computer off in 9 seconds after finshing all procedures. 4.1 Communication 4.1.1 Connection type TR3800 offers 4 types of connection modes ─ RS232, Multi-Drops, Modem and TCP/IP. (1) RS232 – 50 feet connection distance, for one machine only (2) Multi-Drops – over 50 feet for one machine or some machines are linked via a serial port (3) Modem – long distance communication, supports V.32, V.34, V34+, V90 communication protocol (a) Offers 3 aux-mnemonic codes and a pause code (b) Keeps the last 10 phone numbers i.e. : (886)-2-23961720,,2001 The “(“, “)” and “-“ are aux-mnemonic codes. (c) The ”,” is a pause code for 2 seconds, double ”,” for 4-second delay 29 Besides above mention, the system provides 6 levels of Idle Hangup Time in preventing from wasting phone charge. Most importantly, make sure to initiate Modem (that connected with the machine) by using the program of InitiateMODEM. (4) TCP/IP LAN – long distance communication, full LAN and WAN (a). Supports 255 IP and 65,535 IP ports (b). Allows the same IP address, at the multiple IP ports (c). Allows the multiple IP address, at the same IP port z Please refer to Appendix E,F for TCP/IP hardware configuration z If LAN quality is not stable, please try to adjust TCP_BlueTooth_TimeOut value (from 5 to 50) – refer to Appendix A z Although Modem-to-WAN is not forbidden, the communicating speed may not acceptable because of the band limit. 30 4.2 Caption refer to chapter 3.3 4.2.1 TR-Caption (maximum 10 bytes) For even easier to remember machines’ position. Creating a caption for specific machine is recommendatory. For example, the TR001 is located at lobby, then you can name TR001 as ”Lobby”. This function doesn’t support putting a caption for ID that is above “016”. If you want to name it , please refer to Appendix A. refer to 3.3 4.2.2 Shift Alias (maximum 4 bytes) The “Shift” means the four keys on the machine - I, II, III, IV. The “Status” means - Duty-on, Duty-off, Out, Off. When the machine read a card, it will write the current shift and status code into memory. For easier to read the record, you can change default value “8”, ”4” , ”2” , ”1” to “Sh1”, “Sh2”, “Sh3”, “Sh4”. Here, the “None” means the shift/status light is setted on “No(off)”. 31 4.2.3 Status Alias (maximum 4bytes) The “Status” contains “Duty On”, “Duty Off”, “Out”, “In”. you can change the status-code -- “8”, “4”, “2”, “1” to “DuOn”, “DuOf”, “Out”, “In” or whatever you want. 4.2.4 The Interaction Between Caption/Alias And Other Functions The Caption/Alias will affect TR-Info.(Time-Recorder’s information), Real(Real-time monitor) and Record’s format. Regarding the interaction, please refer to the table as below: TR Information Real Time Monitor Record’s Format TR Caption Affected Affected No-affected Shift Alias Affected Affected Affected Status Alias Affected Affected Affected According to the above table, it shows the shift/status alias can affect the record’s format – Please continue to read next paragraph for more detailed. 32 4.3 Trancard File Edition After installation of TR3800 Communication Wizard, you will find a file “Trancard.txt” in programs folder. This text file allows the card number changing into a new number(Staff_ID_No). The precedence of “Trancard.txt” is superior to “Staff.txt”. (see 7.1 Staff File Edition) Card NumberÆ Trancard.txtÆStaff.txt 33 4.4 Record’s Format TR3800 provides 6 types of common-used record’s formats. Each of them still can be modified into a brand-new format -- The system allows user to create the certain format to suit existent personnel management application. The factory setting are compatible with former 3001/3002/3001P/3500. If your application has been models of developed under above models, just keeps it on factory default. As finishing edition, click Test function for output demonstration. Most importantly, all parameters ought to follow the Symbol Table. If not, the system might respond you with a warning message. In paragraph 4.2.2, we have changed the Shift Alias from “8” to “Sh1”. Thus, don’t forget to keyin three of “$$$”! 34 4.5 Extras The Extras function includes only one item currently- Reset Password (4 bytes)—the default value is ”3198”. 35 Chapter 5 Records Saving Data in Time-recorder’s memory we call them -- “record” : To prevent getting confusion from the similar word such as “information”, “message”, “data”, “parameter” and “setting value”. Hereafter, we give a definition for “record” --- The data that are generated by reading employee ID cards. Regarding the file Path, please refer to Appendix A. Here, Save function don’t allow the user to change file’s path. 36 The FileName supports 9 types of common-used name. The parameters’ meaning are the same as symbol table (on paragraph 4.3). It also allows user to keyin file name by Manual Input. Choosing Append to add new records at the end of existent file or using OverWrite to replace the old records. Save & Clear means save and then delete machine’s records. Don’t worry about the records that received by Save & Clear -- Even though the machine’s records are deleted, they still can be rescued by Rescue function (rescue cleared records). So, we recommend strongly – just keep it on default setting! Selecting Time-recorders and then click Go, all machines you marked begin to transmit records to computer. After dumping all records, the system will make a (or some) files and FreeSpc (free space) return to 100%. 37 Chapter 6 Time-Recorder Settings 6.1 TR Setting 6.1.1 Time-Recorder Panel The function of Time-Recorder panel is similar to TR Info, but the Free Space shows accurate space(not percentage). Click the Get TR[xxx] Panel to get the present information. 6.1.2 Set Time-Recorders’ Date/Time The system allows user to adjust the date/time base on PC clock or by manual input. The valid range of date is from 2000/01/01 to 9999/12/31. 38 refer to 6.4 6.1.3 Advanced Setting The function contains [Setup Card Enable/Disable], [Printer Port Enable/Disable], [Card’s Digits Limit], [External Alarm Controller Duration], [Access Controller Duration]. About the relative information, please refer to 2.7 The External Alarm And Access Controller, 6.2 Alarm Time and 6.4 Access Control. When this function is disable, the machine’s setting value cannot be changed by Setup card. The machine shows ” SETUP DISABLED ” while reading the Setup card When this function is disable, the machine will not send any information/ data via printer port When this function is set on limited, the machine only allows to read a fixed digits card. If it set on limited/digits 10, the machine will not give you any response while reading a non-10-digit card. Thus, be careful to use this function! 39 The external alarm controller can be set from 1 to 99 seconds. When it set on “20”, the “ALARM” terminal keeps “ON” (circuit short) for 20 seconds. (refer to 2.7 The External Alarm And Access Controller and 6.2 Alarm Time) The access controller can be set from 1 to 99 seconds. When it set on “2”, the “SEC” terminal keeps “ON” (circuit short) for 2 seconds. (refer to 2.7 The External Alarm And Access Controller, 40 6.4 Access Control) 6.2 Alarm Time refer to 6.1.3 Advanced Setting TR3800 Time-Recorder embeds 112 sets of alarm-time. They were divided into 7 days (16 alarms for each day). When the clock “fall” to alarm-time, the internal speaker will generate a long-interval buzzer for 30 seconds. The duration of external alarm is definable by Ext. Alarm Duration. (refer to 2.7 The External Alarm And Access Controller. 6.1.3 External Alarm Duration) Choosing Enable and fill the blanks with alarm-time for Monday blanks. Then click Tue(Tuesday) to duplicate the contents from Mon…. and (if need,) modify some of them. Finishing the contents and send to machine. Moving the mouse pointer to a certain alarm-time blank and click right-key , the express tools will come out - undo, delete, copy, paste…. 41 6.3 Shift Time refer to 4.2.2 Shift Alias 6.3.1 Shift Mode TR3800 provides four “shift”, two “duty”, one “out” and a “return” keys. * The way of duplication is as the same as Alarm Time 42 Mode1: The most flexible mode, the shift/status is controlled by table and still can be changed temporarily. To simply the situation and clarify the notion. The following example is only for Monday / 2 Shifts. The rest are with the same say. i.e. Shift 1 : 07:00 - 16:00 Shift 2 : 13:00 - 23:00 The principle is -- forward 1 or 2 hours for Duty On, exact time for Duty Off The employee need to press the Shift key only, the Status light will change automatically conforming to Shift-time table. If need, the Status light still can be changed temporarily. After reading a card, the Shift-time table will take over the system again. Mode1/Lock: a simpler mode, the Shift/Status light is controlled by Shift-time table, the system doesn’t allow the employee to change Shift/status light by pressing Shift/status key. 43 Mode2: Shift/status could auto-alternate by table-list. The system doesn’t allow the employee to change Shift/Status light by pressing Shift/Status key. Mode3: The most simplest mode, to prevent employee from pressing incorrect key. Shift-table is inoperative! The Shift/Status light are settled into a specific condition. 44 6.4 Access Control refer to 6.1.3 Advanced Setting TR3800 provides 2,000 groups, wild-card edition and 3-level access control. Mode1: Check PIN code only. The most simply security mode— input 4 digits for opening the door. The system drive access controller and shows “< ACC. GRANTED >“ on LCD display as input the correct PIN code. Mode2: Check card number only. Click [Edit] to edit access control data (max. 2,000 records) by Windows Notepad . And the format must match with the format of “card number” + ”,” + ”available period” + ”password”. See the illustration as belows: 45 According to above illustration, while reading the card “3452435167” at period of 00:00-23:00, the machine willl drive the door. If not at avilable period the LCD display shows “ < DENIED ! >”. Mode3: Check card number and password. Refer to above illustration, while reading the card “3452435167” at period of 00:00-23:00, the system will ask user for password. If the password is correct –“3726”, the system will open the door. If not, the display shows “< DENIED > ” only. If you want to download the contents from the machine, just click [Restore] function— this funciton will dump all security data from the machine and write back into security file - “Acctrlxxx.txt”. The [Restore] function will correct all of erroroneous format in “Acctrlxxx.txt”. See the tips: 1. If the security data lack available-period and password. The system will regard the available-period as “0000-2359”. 2. For more effective to use free memory, the memory is divided into 20 blocks for access control. When the security data (become more and more) need to cross the next block. The system will warn you – “Memory Disposal Overlapped! Please Save & Clear Records Firstly.”. Conversely, while the security data is getting less, system will also release free memory automatically 46 3. While executing [Send] function, the machined have to do masses of calculating , moving and enrolling in memory. Please don’t execute [Send] at high speed - 38,400 bps. 4. If communication failure on [Send] function, please check all format of the security file - “Acctrlxxx.txt”. 5. Using the [Restore] function to retrieve back security data from the machine. 47 6.4.1 Memory Disposal This function includes two items: one for standard, the other for cycled. While switching to cycled mode, the memory will keep the last (newest) records that is complied with the rule of “First In First Out”. 6.4.2 How To Use Wild Card Edition By using wild card edition, the Access Control can control over 2,000 staff (employees). i.e. ”A12345783” and “A12345784” are replaced by “A1234578” I t means a “A1234578” includes “A12345783” and “A12345784” A123456783 => A123457784 => A12345678 48 Chapter 7 Real-time Monitor The Real function offers the ability to manage about 20,000 persons and get the users’ name within 0.1 second. And the data will be saved in (\Programs files\TR3800 Time-Recorder\Real ) immediately. It contains ID, TR-Caption, Date, Time, Shift, Status, Name and Staff_ID Number. Executing the Real function, the on-the-spot is broadcast live. Before adding the staff name in file “staff.txt”, the Name field shows “Unknown” as above. Some of word processors might change the “staff.txt” to “staff.txt.txt” after edition -- just delete a needless “.txt “ !!! 49 7.1 Staff File Edition To check the C:\Program Files\TR3800 Time-Recorder folder and find the “Staff”. The file’s contents is as below: The program offers a sample text file for “staff.txt” – Staff_ID_No(maximun 16 bytes), a separate code, <Tab> key, and Staff_Name (maximun 16 bytes). You can add new Staff_ID/Staff_Name into “staff.txt”. (1). Open the file “staff.txt” by any of word processor program (2). Input a staff_ID number, a <Tab> key and staff name (3). save & close it 50 Re-execute the main program and choose [Real] function. You can find Name messages as below: 51 7.2 Real-time Monitor And Record Saving TR3800 bring in a new Mirror-Compression technology. While reading a card, it will make a compressed copy for Real-Time-Monitor’s register. As Real is executed, the machine will dump all data to computer and move the index to current memory address. Even if, the Real-Time-Monitor has it own register, but it is controlled by original records. When the original is cleared, The Real-Time-Monitor lose its reference “indicator”. In short, if recorders is cleared by Save function, the data for Real-Time-Monitor will be cleared as well. Save & Clear Records >>> Delete real-time data Dump Real-Time Data >>> No harm original records 52 7.3 Real-time Monitor Under Modem Connection On paragraph 3.1, We mentioned about Modem-connection mode. This mode offers 3,6,9,15,25 and 30 minutes Idle Hangup time. When the system (phone line) is Idle for certain minutes, the system will hang-up the phone automatically. But, this function is not available for Real-Time-Monitor. Because the both sides(PC and the machine) have to communicate momentarily for confirming the system is work well. So, after dumping all records by Real-Time-Monitor we recommend -- (1) Choose other functions or (2) Hang-up the phone or (3) Exit the program 53 Chapter 8 Scan Time-Recorders While executing the program, the system will scan the machines automatically. If the amount (or machine’s ID) of machines are not equal to the previous connection. The system will give you a warning –” Linkable Time-Recorder in amount or ID does not match up previous-linked ! Do you want to search all ? “ . For speedup on performance, when the program is running, the system only scan machines they have been recognized. When the new machine is added on the line. Please run Scan Time-Recorders. Be sure all machines are in different ID, otherwise those units with the same Machine ID can not be found! 54 Chapter 9 Records Rescuing While executing Save & Clear Records once, the system will duplicate a copy for backup. Sometimes, operators intend to export the record to personnel attendance application for further process. And they found some records are lost! To make up operators’ indavertence fault. The system keeps the rescuable records within 180 days. You don’t need to care the rescuable file. It will be deleted automatically under the rule of “First In - First Out”. Rescuable List Format: YYYYMMDD.TR001 Æ Year+Month+Day.machine’s ID Double-click the rescuable item and then press Go, the system will rescue all records you selected. 55 Chapter 10 System Reset refer to 4.4 When the machine get impact by surge voltage, The unstable electricity might force the memory to close up the address register. If this unexpectable mistake occurred to machine, it probably damage recorders/data of the machine. --- Try to save all records (if it possible) and run System Reset . The functions 210-219 will not be reset/cleared by software. If you intend to reset to “Factory Default”, please use function 218 – (refer to 56 2.9) Appendix A Records Path And Setting Value While installing the TR3800 Communication Wizard under default procedure, the system will create a “C:\Program Files\TR3800 Time-Recorder” folder. All files will be stored under this folder. The paths of all files are as belows: Item Function Name Path 1 Main Program \Program Files\TR3800 Time-Recorder\TR3800.exe 2 Initiate Modem \Program Files\TR3800 Time-Recorder\InitiateModem.exe 3 Trancard File \Program Files\TR3800 Time-Recorder\Trancard.txt 4 Staff File \Program Files\TR3800 Time-Recorder\Staff.txt 5 Records \Program Files\TR3800 Time-Recorder\Data\.. 6 Real-time Data \Program Files\TR3800 Time-Recorder\Real\.. 7 System Settings \Program Files\TR3800 Time-Recorder\SYSINI\.. 8 Rescuable Backup \Program Files\TR3800 Time-Recorder\Rescue\.. 9 Security File \Program Files\TR3800\ Time-Recorder\ACCTRL\Acctrlxxx.txt If we want to change some settings that main program does not support (i.e. Records path). We need to edit – “\Program Files\TR3800 Time-Recorder\SYSINI\”. The folder includes general settings - “TR3800.INI” and individual settings - “TRxxx.INI”. All the phrases are complied with the rules of Windows INI standard. The following sections are the descriptions for Caption, Records’ Path and TCP Recorder --[Name] TR020=Gate 1 [Path] DataPath=C:\Program Files\TR3800 Time-Recorder\Data [TCP Recorder] TCP_BlueTooth_TimeOut=5 57 Appendix B How To Make A Standard Bar Code Card 1. Make an ID card with barcode label. 2. The horizontal center of the barcode is 10 mm from the bottom edge. 3. The thickness of ID card is 1.5 mm. (maximum) 4. The height of barcode label is 10 mm. (minimum) SAMPLE CARD 1.5 mm Maximum 10 mm Minimum Scanning Line 10 mm Bottom Edge 58 Appendix C Communication Cable’s Pin Assignment Cable: 232-30 (for RS232) 8P8C DB9P(female) 1 6 1 2 34 56 78 5 9 Black Pin 4 -------------------------- Pin 5 Orange Pin 6 -------------------------- Pin 2 Red Pin 7 -------------------------Pin 3 Cable: MDP-30 (for Multi-drops) 8P8C 1 2 34 56 78 Red Black Red Pin 1 -------------------------D+ Black Pin 6 -------------------------D- Cable: MOD-30 (for Modem) 8P8C DB9P(male) 1 6 1 2 34 56 78 5 Black Pin 4 -------------------------- Pin 5 Orange Pin 6 -------------------------- Pin 3 Red Pin 7 -------------------------Pin 2 59 9 Appendix D Warning Messages TR3800 equips with UPS system for normal use after a loss of AC power. It supports about 4.5-hour energy in working and shows warning message as UPS is activated. After reading a large amount of card, the machine’s free memory will be getting low constantly. When the free memory is less than 10Kbytes(500 records remains), the display gives a warning message and makes two-beep sound while reading the card. - MEMORY LOW 10:30:25 9KB While the machine’s memory space is used-up, the display shows “MEMORY OVERFLOW”, please save and clear records!! 60 Appendix E Search And Config TCP/IP Device The models of TR3800xN series equip with a embedded TCP/IP device. Using the Ethernet Manager program to define the IP Address and related settings. 1. Run SearchConfigIP in Program folder (or in CD disk of TR3800-\TCP-IP Converter\Etm.exe 2. Double Click (inverse bar) for Express Settings Mode: Change IP Address & Subnet Mask -- 61 i.e. Change to IP: 192.168.0.180 Subnet: 255.255.255.0 z Waiting for 3 seconds! z Be sure IP-Address and Subnet-Mask match with your Network, otherwise the program cannot enter Device Settings Mode. 3. Choose Config/Device Settings for Device Settings Mode (just skip password!) 62 4. Change [Socket Port of serial I/O] and [Serial I/O] -- Don’t forget to Update ! 5. Re-login for double check – 63 6. Install CD disk (auto-run) and run TR3800.exe (TR3800 Time-Recorder on Desktop). And Change [Connect Type] to [TCP/IP LAN & WAN]: ** Fill blanks with IP Address and Tim-Recorder ID ** 7. Find the TR-Information’s content, the installation is successful! 64 Appendix F How To Use TCP Converter The TCP/IP connection function is suitable for most brands of TCP converter , i.e. Lantronic, Moxa, Sena, E-net, ICP, etc. If your converter is not above brands. It might not work well. The setting methods of different TCP converters with different ways. Please refer to their user’s manual. To study all functions are unessential, just care the following items: 1. IP Address (192.168.0.110) 2. Subnet Mask (255.255.255.0) 3. IP-Port (3800) 4. Gateway ( 192.168.0.1 – if it need to cross other subnet, Gateway Address is necessary ! ) 5. OP_Mode = TCP Sever 6. Serial Interface = RS232 or RS485(ADDC) 7. Serial Baud Rate = 9600,n,8,1 (RTS/CTS=none) Baud Rate need to match up to TR3800’s setting (refer to 2.9) 65 Appendix G How To Connect TR3800 Via Public IP The Communication Wizard supports full IP-Port range for using under WAN. While using a single Public IP to connect with many Time-Recroders, IP-Port setting is most important ! See illustration as belows: * The phrase of “NAT” is equal to “Virtual Server” or “Local Server” 66 3800010530 67