1
AQUADOPP
CURRENT METER
USER MANUAL
www.nortek-as.com
Copyright by NORTEK AS. All rights reserved. This document may not, in whole or in part, be copied, photocopied,
reproduced, translated, or reduced to any electronic medium or Machine readable form without prior consent in writing
from NORTEK AS. Every effort has been made to ensure the accuracy of this manual. However, NORTEK AS makes no
warranties with respect to this documentation and disclaims any implied warranties of merchantability and fitness for a
particular purpose. NORTEK AS shall not be liable for any errors or for incidental or consequential damages in connection with the furnishing, performance or use of this manual or the examples herein. The information in this document is
subject to change without notice.
Nortek AS
Industriveien 33
1337 Sandvika
Norway
Phone: +47 67 55 62 00
Fax: +47 67 54 61 50
E-mail: inquiry@nortek.no
Web: www.nortek-as.com
TABLE OF CONTENT
1. INTRODUCTION ................................................................. 5
1.1. Software updates and technical support ................................. 6
1.2. Your Feedback is appreciated................................................... 6
1.3. Nortek Forum Support ............................................................... 6
1.4. Warranty ...................................................................................... 6
1.5. Copyright statement................................................................... 7
2. MAIN DATA ........................................................................ 9
2.1. Weight and outline dimensions................................................. 9
2.2. Environmental............................................................................. 9
2.3. Power ........................................................................................... 9
2.4. Dimensions and Beam Locations ........................................... 10
2.5. Materials .................................................................................... 11
2.6. Sensors...................................................................................... 11
2.7. Data Communication................................................................ 11
2.8. Water Velocity Measurement................................................... 12
2.9. Measurement area .................................................................... 12
2.10. Doppler uncertainty (noise) ................................................... 12
2.11. Echo intensity ......................................................................... 12
2.12. Analog inputs.......................................................................... 13
2.13. Software................................................................................... 13
2.14. Data Recording ....................................................................... 13
2.15. Connectors.............................................................................. 13
2.16. Options .................................................................................... 14
3. TECHNICAL DESCRIPTION ............................................ 15
3.1. Aquadopp components............................................................ 15
3.1.1. The Sensor head .................................................................................... 15
3.1.2. Electronics module ................................................................................. 16
3.1.3. Compass ................................................................................................ 16
3.1.4. Internal battery pack ............................................................................... 16
3.1.5. Battery Pack Voltage and Remaining Capacity...................................... 16
3.1.6. Power & communication cable ............................................................... 16
3.2. Functional description ............................................................. 19
3.2.1. Modes of operation................................................................................. 19
3.2.2. Using the Doppler Effect......................................................................... 20
3.2.3. Doppler Beams....................................................................................... 21
3.2.4. Maximum Range to the Measurement Cell ............................................ 24
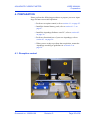
4. PREPARATION ................................................................ 25
4.1. Reception control ..................................................................... 25
4.2. Install the Aquadopp software on a PC .................................. 26
4.3. Perform a functional test ......................................................... 26
4.3.1. Test the recorder function....................................................................... 27
4.4. Mounting guidelines................................................................. 28
4.4.1. Flow Disturbance.................................................................................... 28
4.4.2. Other Mounting Considerations.............................................................. 29
4.5. Using long cables ..................................................................... 30
4.5.1. Changing the baud rate .......................................................................... 30
5. OPERATION ..................................................................... 31
5.1. Introduction to the main menu ................................................ 31
5.2. Data collection .......................................................................... 32
5.2.1. Deployment planning.............................................................................. 33
5.2.2. Start recorder deployment ...................................................................... 38
5.2.3. Stop recorder Deployment...................................................................... 39
5.2.4. Recording Data Internally as a Backup .................................................. 39
5.2.5. Getting Data out of the Aquadopp .......................................................... 40
5.2.6. Finish operations .................................................................................... 41
5.2.7. Erasing Recorded Data .......................................................................... 41
5.3. Interpret and analyse Data....................................................... 41
5.4. Operational concerns............................................................... 41
5.4.1. My data doesn't look right....................................................................... 41
5.4.2. Boundaries. ............................................................................................ 42
5.4.3. Sidelobes................................................................................................ 42
5.4.4. Grounding problems ............................................................................... 44
5.4.5. Mooring tilt .............................................................................................. 44
5.4.6. Mooring vibration .................................................................................... 44
5.5. Troubleshooting ....................................................................... 45
5.5.1. Simple Problems .................................................................................... 45
5.5.2. Problems detecting the instrument on the Serial Port ............................ 45
6. MAINTENANCE ................................................................ 47
6.1. Preventive maintenance........................................................... 47
6.1.1. Cleaning ................................................................................................. 47
6.1.2. Replacing the desiccant ......................................................................... 47
6.1.3. Installing/changing batteries ................................................................... 47
6.2. Corrective Maintenance ........................................................... 49
7. SPARE PARTS ................................................................. 51
8. OPTIONAL CONFIGURATIONS AND FEATURES ......... 55
8.1. Active-X components ............................................................... 55
8.2. Available Head Configurations................................................ 55
8.2.1. Symmetric sensor head.......................................................................... 55
8.2.2. 2D side-looking Aquadopp head ............................................................ 55
8.2.3. Asymmetric Aquadopp head .................................................................. 55
9. RETURNING THE INSTRUMENT FOR REPAIR ............. 57
AQUADOPP CURRENT METER
USER MANUAL
- Introduction
1. INTRODUCTION
Thank you for purchasing a NORTEK Aquadopp Current Meter.
The Aquadopp uses the Doppler effect to measure current velocity
by transmitting a short pulse of sound, listening to its echo and measuring the change in pitch or frequency of the echo. You hear the
Doppler effect whenever a train passes by - the change in pitch you
hear tells you how fast the train is moving.
Getting started
• Before you start using the Aquadopp, please familiarize with
the Current Meter by reading sections 1, 2 and 3 of this user
manual.
• Perform reception control and functional test of the Aquadopp according to procedures in section 4.
Document no.: N3009-100
Revision C
Page 5 of 58
USER MANUAL
- Introduction
AQUADOPP CURRENT METER
• Start using the Aquadopp according to procedures in
section 5.
• Perform regular maintenance according to procedures in
section 6.
1.1. Software updates and technical support
Please visit our website for software updates and technical support:
www.nortek-as.com
1.2. Your Feedback is appreciated
If you find errors, misspelled words, omissions or sections poorly
explained, please do not hesitate to contact us and tell us about it at:
inquiry@nortek.no
We appreciate your comments, and your fellow users will as well.
1.3. Nortek Forum Support
If you have comments, application tips, suggestions to improvements, etc. that you think will be of general interest you should register on Nortek’s Forums at
www.nortek-as.com/cgi-bin/ib/ikonboard.cgi,
and post your message there. The Forums also offer a great opportunity to share your experience using Nortek sensors with other users
around the world, and to learn from their experience.
1.4. Warranty
The Aquadopp is covered under a one year limited warranty that
extends to all parts and labor and covers any malfunction that is due
to poor workmanship or due to errors in the manufacturing process.
The warranty does not cover shortcomings that are due to the
design, nor does it cover any form of consequential damage as a
result of errors in the measurements.
Page 6 of 58
Revision C
Document no.: N3009-100
AQUADOPP CURRENT METER
USER MANUAL
- Introduction
If there is a problem with your Aquadopp, first try to identify the
problem by following the procedure outlined in the troubleshooting
section of this manual.
Please contact your representative or NORTEK AS if the problem is
identified as a hardware problem or if you need additional help in
identifying the problem. Please make sure you receive a Return
Merchandise Authorization (RMA) number before the Aquadopp or
any module is returned to the factory.
NOTE: Detailed instructions for repairs (RMA) on page in this
manual.
For systems under warranty, NORTEK AS will attempt to ship
replacement parts before the malfunctioning part is returned. We
encourage you to contact us immediately if a problem is detected
and we will do our best to minimize the downtime.
Every effort has been made to ensure the accuracy of this manual.
However, NORTEK AS makes no warranties with respect to this
documentation and disclaims any implied warranties of merchantability and fitness for a particular purpose. NORTEK AS shall not
be liable for any errors or for incidental or consequential damages in
connection with the furnishing, performance or use of this manual or
the examples herein. The information in this document is subject to
change without notice.
1.5. Copyright statement
Copyright NORTEK AS.
All rights reserved.
This document may not, in whole or in part, be copied, photocopied,
reproduced, translated, or reduced to any electronic medium or
machine-readable form without prior consent in writing from
NORTEK AS.
Document no.: N3009-100
Revision C
Page 7 of 58
USER MANUAL
- Introduction
Page 8 of 58
AQUADOPP CURRENT METER
Revision C
Document no.: N3009-100
AQUADOPP CURRENT METER
USER MANUAL
- Main Data
2. MAIN DATA
2.1. Weight and outline dimensions
Transport weight: 7 kg (transport box, all inclusive)
Transport box dimensions: 38 x 70 x11 cm
Weight in air: 3.5 kg
Weight in water: Neutral
Length: 550 mm with batteries or 450 mm without
Diameter: 75 mm
2.2. Environmental
Operating temperature:
- 5°C to 45°C
Storage temperature:
-15°C to 60C°
Shock and vibration:
IEC 721 - 3 - 2
Pressure rating:
300 m (pressure sensor OK to .5*range)
2.3. Power
DC Input:
9-16 VDC
Peak current:
2 amp at 12 VDC
(user adjustable)
Max consumption at 1 Hz:
0.2-1.0 W
Max consumption at 0.02 Hz:
0.1 W
Max consumption at 0.002 Hz:
0.01 W
Sleep consumption:
0.0013 W
Battery capacity:
50 Wh
New battery voltage:
13.5 VDC
Data collection (alkaline):
6 months at 10-min,
± 1.0 cm/s noise
Document no.: N3009-100
Revision C
Page 9 of 58
USER MANUAL
- Main Data
AQUADOPP CURRENT METER
Data collection (lithium):
12 months at 10-min,
± 1.0 cm/s noise
The battery is able to sustain sleep state for 4 years (RS232 only).
The AC power adapter requires a 100-240VAC 50/60Hz voltage
supply.
External Power
You can supply external power to the Aquadopp. If you use an internal battery to backup data collection, an external supply of 15 VDC
provides a higher voltage than the battery pack, which prevents the
internal pack from discharging. Then, if external power fails, the
internal battery pack takes over and sustains operation.
CAUTION: Be careful not to exceed maximum voltage
supply (16 VDC).
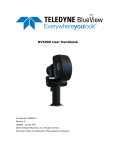
2.4. Dimensions and Beam Locations
Aquadopp "mooring head" with two beams in the horizontal plane and one slanted 45 degrees with respect to
the vertical.
Page 10 of 58
Revision C
Document no.: N3009-100
AQUADOPP CURRENT METER
USER MANUAL
- Main Data
2.5. Materials
Standard model: Delrin and polyurethane plastics with titanium
screws
2.6. Sensors
Temperature (thermistor embedded in head)
Range:
-4°C to 40°C
Accuracy/Resolution:
0.1°C/0.01°C
Time response:
10 min
Compass (flux-gate with liquid tilt)
Maximum tilt:
30°
Accuracy/Resolution:
2°/0.1°
Tilt (liquid level)
Accuracy/Resolution:
0.2°/0.1°
Up or down:
Automatic detect
Pressure (piezoresistive)
Range:
0-200 m (standard)
Accuracy/Resolution:
0.25% / Better than 0.005% of full scale
per sample
2.7. Data Communication
I / 0:
RS232 or RS422
Baud rate:
300-115200
User control:
Handled via WIN32 software, ActiveX
function calls, or direct commands
Document no.: N3009-100
Revision C
Page 11 of 58
USER MANUAL
- Main Data
AQUADOPP CURRENT METER
2.8. Water Velocity Measurement
Range:
± 5 m/s (inquire for higher ranges)
Accuracy:
1% of measured value ± 0.5 cm/s
Max sampling rate (output):
1s
Internal sampling rate:
23 Hz
2.9. Measurement area
Measurement cell size
(user selectable):
0.75 m
Measurement cell position
(user selectable):
0.3-5.0 m
Default position
(along beam):
0.3-1.8 m
2.10. Doppler uncertainty (noise)
Typical uncertainty for
default configurations:
0.5-1.0 cm/s
Uncertainty in U, V at 1 Hz
sampling rate:
1.5 cm/s
2.11. Echo intensity
Page 12 of 58
Acoustic frequency:
2 MHz
Resolution:
0.45 dB
Dynamic range:
90 dB
Revision C
Document no.: N3009-100
AQUADOPP CURRENT METER
USER MANUAL
- Main Data
2.12. Analog inputs
Number of channels:
2
Voltage supply:
12V. Hardware can be modified to
provide 5V or battery voltage.
Voltage input:
0-5V
Resolution:
16 bit A/D
Operating system:
WIN95/98, NT 4.0, WIN2000
Functions:
Deployment planning, start with
alarm, data retrieval, ASCII conversion.
Online data collection and graphical
display. Test modes.
2.13. Software
2.14. Data Recording
Capacity (standard):
2 MB, expandable to 22 MB or
78MB
Data record:
40 bytes
Diagnostic record:
40 bytes
2.15. Connectors
Bulkhead (Impulse):
LPMBH-5-FS (bronze, titanium
optional)
Cable:
LPMIL-5MP on 5-m neoprene cable
Document no.: N3009-100
Revision C
Page 13 of 58
USER MANUAL
- Main Data
AQUADOPP CURRENT METER
2.16. Options
Page 14 of 58
Acoustic beams:
Several different sensor heads available. See separate specification
sheet
Battery:
Rechargeable Ni-Mn and Lithium
available
External battery:
4 battery packs in 75 mm diameter,
500mm length. External canister
Connectors:
LPMBH-8-FS with PLPMIL-8-MP
on 10-m polyurethane cable for
optional RS 422 systems
Revision C
Document no.: N3009-100
AQUADOPP CURRENT METER
USER MANUAL
- Technical Description
3. TECHNICAL DESCRIPTION
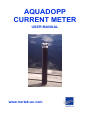
3.1. Aquadopp components
Outside
Inside
O-Rings
Connector
End cap Pressure case
Sensor head
Dessicant
Battery
Pressure
sensor
Beam 1
Beam 3
Beam 2
Tilt sensor
Compass
Battery
Bulkhead
O-Ring
detail
The figure above shows a standard Aquadopp, and particular models can vary from the above.
The list below describes the major system components.
3.1.1. The Sensor head
Head Configurations
The sensor head contains three acoustic transducers and a pressure
sensor, all visible from the outside. The sensor head also holds the
following sensors:
Tilt sensor
The tilt sensor is on a small round daughter board attached to the
head, inside the case. The tilt sensor orientation is set in accordance
with the system orientation during normal operation. The standard
Aquadopp is designed for vertical orientation. Tilt sensors in heads
designed for horizontal orientations will be mounted at right angles.
The tilt sensor can be inverted 180 degrees - you can use it pointing
up or down.
Temperature sensor
The temperature sensor, standard on all Aquadopps, is mounted
internally in the sensor head.
Pressure sensor
The pressure sensor is mounted in the Aquadopp sensor head.
Document no.: N3009-100
Revision C
Page 15 of 58
USER MANUAL
- Technical Description
AQUADOPP CURRENT METER
3.1.2. Electronics module
The electronics module is a single board that holds the power transmitter, analog and digital signal processing, power conditioning and
the standard data recorder.
3.1.3. Compass
The compass measures the earth's magnetic field. Combined with
the tilt sensor on the head, the compass enables the Aquadopp to
obtain the heading. Without a compass, the Aquadopp still measures
tilt. This data enables the Aquadopp to convert velocity measurements to Earth coordinates.
3.1.4. Internal battery pack
The internal battery pack is located inside the pressure case, and
enables autonomous deployments of up to a year. It also provides
backup power in the event of failure of the external supply. Standard
alkaline battery packs use 18 AA cell batteries at a nominal starting
voltage of 13.5VDC.
3.1.5. Battery Pack Voltage and Remaining Capacity
NORTEK alkaline battery packs start life at a voltage of 13.5 VDC
or higher. The voltage of alkaline batteries falls quickly at the beginning, slowly during most of its life, then again quickly at the end.
Thus a 13.5 VDC battery pack will spend the largest part of its life
somewhere in a voltage range of 10.5-12.5 VDC.
3.1.6. Power & communication cable
This enables you to supply external DC power (9-16 V) and to connect an external computer to the Aquadopp via 2-way serial communication.
Cable Wiring
The Aquadopp comes standard with a 5-conductor cable, but it can
be special ordered with an 8-conductor cable for use with RS422
communication. The tables list the pin assignments for the five-conductor cable, the 8-conductor RS422 cable and the 8-conductor
cable with analog inputs & RS232.
The Aquadopp power and battery lines are diode protected, so you
don't have to worry about wiring the Aquadopp power backwards this will not damage your instrument.
Page 16 of 58
Revision C
Document no.: N3009-100
AQUADOPP CURRENT METER
USER MANUAL
- Technical Description
Table 1: Wiring of 5-conductor cable for RS232 Communication
Underwater connector
Pin number
Pin numbers,
looking at the
pins
Wire color
Dry-end connect or pin
2
White
2
White
4
Green
5
Green
5
Blue
3
Blue
1
Black
Power ground
3
Red
Power positive
Connector type
9-pin
Dsub,
female
Facing sockets
Table 2: RS232 Cable with option for analog outputs
Underwater connector
Pin number
Pin numbers,
looking at the
pins
Wire color
Termination
Purpose
3
Black
RS232 Tx
4
White
RS232 Rx
5
Black
Ground
6
White/purple
Analog Z
7
Black
Analog X
8
White/orange
Analog Y
1
Black
Power ground
2
White
Power positive
Screen
Bare
Ground
Document no.: N3009-100
Revision C
Pins
twisted
pair
twisted
pair
Description
2
3
5
1
9-pin
Dsub,
female
5
6
9
Facing sockets
Red wire
twisted
pair
twisted
pair
Green wire
Yellow wire
Black wire
Red wire
3 bare wires for grounds, connected internally
to power ground
Page 17 of 58
USER MANUAL
- Technical Description
AQUADOPP CURRENT METER
Table 3: RS232 Cable with analog inputs
Underwater connector
Pin number
3
Pin numbers, looking
at the pins
Wire color
Black
Termination
Purpose
RS232 Tx
4
White
RS232 Rx
5
Black
RS232 ground
6
White/purple
power output
7
Black
analogue input 2
8
White/orange
analogue input 1
1
Black
power ground
2
White
power positive
Screen
Bare
ground
Pins
twisted
pair
2
3
5
twisted
pair
Description
1
9-pin
Dsub,
female
6
9
5
Facing sockets
Red wire
Green wire
twisted
pair
Yellow wire
Black wire
twisted
pair
Red wire
3 bare wires for grounds, connected internally
to power ground
Table 4: Wiring of 8-conductor cable for RS422 communication.
Underwater connector
Pin number
Pin numbers,
looking at the
pins
Wire color
Termination
Purpose
3
Black
RS422 Tx+
4
White
RS422 Tx-
7
Black
RS422 Rx-
8
White/orange
RS422 Rx+
5
Black
Synch out
6
White/purple
Synch in
1
Black
Power ground
2
White
Power positive
Screen
Bare
Power ground
Pins
twisted
pair
2
twisted
pair
1
twisted
pair
twisted
pair
3
Description
9-pin
Dsub,
female
9
Facing sockets
Black wire
Green wire
black wire
Red wire
three ground lines through shield
Please note that TX and Rx refers to the Aquadopp and not the PC
Page 18 of 58
Revision C
Document no.: N3009-100
AQUADOPP CURRENT METER
USER MANUAL
- Technical Description
3.2. Functional description
This section briefly describes some of the underlying principles that
control the operation and application of the Aquadopp Current
meter.
3.2.1. Modes of operation
The Aquadopp has three different modes of operation:
• Command Mode
• Data Acquisition Mode
• Power Down Mode
Command Mode
An Aquadopp in command mode is powered up and ready to accept
your instructions. If it gets no commands for about five minutes, it
automatically powers down and goes into sleep mode.
You cannot send commands directly to the Aquadopp. Instead, you
must enter commands through the Aquadopp software. The Aquadopp software and hardware interact with each other using low-level
binary data structures. This approach simplifies the design of the
Aquadopp hardware and increases its overall reliability.
Data Acquisition Mode
The Aquadopp enters data acquisition mode when you click any of
the "Start" commands (i.e. "Start Recorder Deployment") in the
Aquadopp software. When you initiate a deployment sequence, the
software converts your setup parameters into binary structures,
downloads the structures to the Aquadopp and tells it to start data
collection.
To get the instrument out of data collection mode, use one of the
"Stop" commands in the Aquadopp software. You might notice that
sending a break to an Aquadopp in data acquisition mode gets a
response, but that data collection does not stop. The purpose of this
design is to protect the system from stopping after an accidental
break.
Power Down Mode
The Power Down Mode saves power during deployments and prevents your battery from dissipating between deployments. The Aquadopp automatically powers down from command mode after about
five minutes of inactivity.
Document no.: N3009-100
Revision C
Page 19 of 58
USER MANUAL
- Technical Description
AQUADOPP CURRENT METER
To conserve your battery when the Aquadopp is on the shelf, be sure
it is not in data acquisition mode. Stop data collection using one of
the "Stop" buttons before you store an Aquadopp.
NOTE: If you set the Aquadopp to collect data, remove power,
then reapply power later, the Aquadopp will immediately
resume data collection. Remember that the time may be
lost.
3.2.2. Using the Doppler Effect.
You hear the Doppler effect whenever a train passes by - the change
in pitch you hear tells you how fast the train is moving. The Aquadopp uses the Doppler effect to measure current velocity by transmitting a short pulse of sound, listening to its echo and measuring
the change in pitch or frequency of the echo.
There are many ways to measure the Doppler effect, each with its
own advantages and drawbacks. NORTEK implements a narrowband auto covariance method because it has been established as
robust, reliable and accurate.
Sound does not reflect from the water itself, but rather from particles
suspended in the water. These particles are typically zooplankton or
suspended sediment. Long experience with Doppler current sensors
tells us that the small particles the Aquadopp sees move on average
at the same speed as the water - the velocity it measures is the velocity of the water.
Page 20 of 58
Revision C
Document no.: N3009-100
AQUADOPP CURRENT METER
USER MANUAL
- Technical Description
3.2.3. Doppler Beams.
Measurement cell location. The 75 cm dimension that applies to the
transmit pulse and measurement cell is fixed by the Aquadopp software, but you can adjust the blank. Given the default 35 cm blank, the
center of the measurement cell is located at 110 cm (=35+75) from the
sensor head.
Doppler current sensors use large transducers (relative to the wavelength of the sound) to obtain narrow acoustic beams. The Aquadopp's beams have a beam width of 1.7°. Narrow beams are
essential for obtaining good data.
Each beam measures velocity parallel to the beam and does not
sense the velocity perpendicular to the beam at all. The Aquadopp
senses the full 3D velocity with three beams, all pointed in different
directions. The Aquadopp measures horizontal velocity with two
horizontal, orthogonal beams, and the vertical component with the
beam slanted up (or down) at 45°. If you assume the flow is uniform
across the three beams, simple trigonometry is sufficient to compute
the vertical velocity.
The measurement cell is shaped like a triangle. The triangular shape
means that it is more sensitive to currents in the middle of the cell
than at either end. The maximum extent of the cell is double the
length of the transmit pulse.
Document no.: N3009-100
Revision C
Page 21 of 58
USER MANUAL
- Technical Description
AQUADOPP CURRENT METER
Coordinate System
The Aquadopp measures velocity components parallel to its three
beams, or in beam coordinates, but it reports data in east, north and
up or ENU coordinates. To get to ENU components, it first converts
the data to XYZ coordinates, an orthogonal coordinates system relative to the Aquadopp. The Aquadopp then uses its compass and tilt
measurements to convert this velocity to components relative to the
earth, or ENU coordinates.
In beam coordinates, a positive velocity along beam 1 goes in the
direction beam 1 points toward. In XYZ coordinates, a positive
velocity in the X-direction goes in the direction of the X-axis arrow.
In ENU coordinates, a positive east velocity goes toward east.
Definition of the XYZ coordinate system for an Aquadopp deployed
upright. The Z component is up, along the axis of the pressure case.
If the Aquadopp is deployed upside down, the Z axis and Y-axis are
reversed relative to the pressure case.
NOTE: Please contact NORTEK if you want detailed information about the coordinate transformation equations used
in the Aquadopp.
Attitude Correction.
Typical moorings allow the Aquadopp to tilt and rotate freely. It
measures its tilt and heading and uses this information to correct the
data to true earth coordinates. Because the compass uses energy, the
Aquadopp reads heading only as often as it needs to. In a near-surface mooring, it will read the compass more often than it would on a
fixed bottom mount.
Page 22 of 58
Revision C
Document no.: N3009-100
AQUADOPP CURRENT METER
USER MANUAL
- Technical Description
Velocity Uncertainty.
The Aquadopp velocity is an average of many velocity estimates
(called pings). The uncertainty of each ping is dominated by the
short-term error. We reduce the measurement uncertainty by averaging together many pings. There is a limit to how much you can
reduce your uncertainty. We call this limit the long-term bias.
The long-term bias depends on internal signal processing, especially
filters, and by your beam geometry. The long-term bias in the Aquadopp is typically a fraction of 1 cm/s. The Aquadopp software predicts errors based on the short-term error of a single ping and the
number of pings averaged together. The short term error of a single
ping depends on the size of the transmit pulse and the measurement
volume, and it depends on the beam geometry. Beams parallel to the
dominant flow will have smaller short-term errors than beams at a
steep angle relative to the flow. Averaging multiple pings reduces
errors according to the formula:
Where σ is standard deviation and N is the number of pings
you average together.
NOTE: The Aquadopp software predicts only the instrumental
error. In many situations, the environment itself dominates the short-term error.
In a wavy surface and in turbulent flow such as boundary layers and
rivers, your data collection strategy should take into account the
nature and the time scales of the environmental fluctuations. Here
are two examples:
Waves. A good rule of thumb to follow when measuring mean
velocities in the presence of waves is that you should sample velocity at roughly ¼ the interval of the dominant wave period, and you
should sample through 6-10 wave cycles. If your peak wave velocities tend to be around 5 or 6 s, then sampling at a 1 s interval for a
minute would make sense. In this case, you could reduce the measurement load to a relatively small fraction (say 4 or 8%).
Turbulent flow. A rough rule of thumb in boundary layers is that
the rms turbulent velocity is 10% of the mean velocity. If, for example, your mean velocity is 1 m/s, you could estimate turbulent fluctuations to be 10 cm/s. Obtaining 1 cm/s rms uncertainty would
require at least 100 pings.
Document no.: N3009-100
Revision C
Page 23 of 58
USER MANUAL
- Technical Description
AQUADOPP CURRENT METER
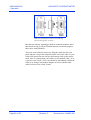
3.2.4. Maximum Range to the Measurement Cell
The Aquadopp software sets the default distance to the measurement cell at 0.35-1.1 m from the sensor head, but you can adjust the
range out further. The figure shows how signal strength varies with
range, based on the sonar equation. Signal strength varies with
transmit power, backscatter strength and distance. If you know the
signal strength at a given power level and a given range, you can use
the figure to predict the signal strength you would have at a different
power level and range.
If you keep the same power level and change the range, follow the
curve closest to the value you started with. If you change the power
level, move up or down one curve for each power level (the curves
are 6 dB apart).
Measurement range vs. signal strength at 2 MHz. The "+" symbols show
actual data from a river at power level 2.
The noise floor is typically found at 20-30 counts. The range figure
arbitrarily assigns 25 counts the value 0 dB. Because of the way we
compute the signal strength, you can actually obtain good data at
signal strengths a few dB below the noise floor. This means the
noise floor gives you a conservative cutoff for good data.
Page 24 of 58
Revision C
Document no.: N3009-100
AQUADOPP CURRENT METER
USER MANUAL
- Preparation
4. PREPARATION
Please perform the following procedures to prepare your new Aquadopp for future successful operation:
• Perform a reception control, refer to section 4.1. on page 25.
• Install the internal battery pack, refer to section 6.1.3. on
page 47.
• Install the Aquadopp Software on a PC, refer to section 4.2.
on page 26.
• Perform a functional test of your new Aquadopp, refer to
section 4.3. on page 26.
• When you are ready to perform data acquisition, mount the
Aquadopp according to guidelines in section 4.4. on
page 28.
4.1. Reception control
Document no.: N3009-100
Revision C
Page 25 of 58
USER MANUAL
- Preparation
AQUADOPP CURRENT METER
Please check that the following equipment is included in the
delivery:
1.
Transportation box
2.
Aquadopp current meter
3.
External power/signal cable
4.
NORTEK equipment storage box
5.
Packing list
6.
Aquadopp user manual
7.
Aquadopp software
8.
Warranty card
9.
Voltage transformer (110-230 VAC to 9-16 VDC)
10.
Internal battery pack
11.
Power cable
Please contact NORTEK immediately if you find parts of the
delivery are missing.
4.2. Install the Aquadopp software on a PC
1.
Insert Disk 1 and run the Setup.exe file
2.
Follow the instructions presented "on-screen". Accept
default settings.
3.
Restart your PC to finalize the installation process.
4.3. Perform a functional test
Page 26 of 58
1.
Plug in the AC adapter and connect the Aquadopp to the PC
serial port.
2.
Select Serial Port from the Communication menu to specify
the port number to use.
3.
Accept the default baud rate settings (9600 baud), which is
also the default instrument baud rate.
Revision C
Document no.: N3009-100
AQUADOPP CURRENT METER
USER MANUAL
- Preparation
4.
Check the instrument communication and verify that the
instrument is alive by activating the Terminal Emulator window and press the Send Break button to send a BREAK signal over the serial port. A break causes the instrument to
report an identification string.
5.
Check the noise level of the instrument. Pinging in air should
produce a signal strength (Amplitude) of 22-30 counts. This
signal level is called the noise floor. When the instrument
pings in air, the velocity measurements will be nothing but
noise.Put the instrument in a bucket of water and observe the
signal strength and the velocity. The signal strength should
rise noticeably (the actual level depends on the size, shape
and material of the bucket), and the velocity data should
appear less noisy.
6.
Check sensor readings
• Tilt and rotate the Aquadopp to verify that the readings are
sensible.
• Temperature should be close to your room temperature,
assuming the Aquadopp has been in the room for a while.
• Pressure should be near zero. Check the pressure sensor in a
bucket 50 cm deep, or put your mouth over the pressure sensor and blow to create a pressure of around 50 cm.
• Battery voltage shall be greater than 13 V DC (new battery).
NOTE: Diagnostics data give you the ability to obtain the in-situ
noise floor of the instrument after it is deployed.
4.3.1. Test the recorder function
You can test the recorder with the same set-up as the above.
1.
Start data collection with "Test" followed by "Start With
Recorder".
2.
Write a name to use for the file you will record internally.
3.
After a few minutes, stop the data collection.
4.
Retrieve your data by clicking "Deployment" followed by
"Retrieve Data".
5.
Convert it to ASCII by clicking "Deployment" followed by
"Data Conversion".
Document no.: N3009-100
Revision C
Page 27 of 58
USER MANUAL
- Preparation
AQUADOPP CURRENT METER
6.
Review the collected data with an ASCII text editor (i.e.
Notepad).
NOTE: If you leave the Aquadopp collecting data, it will continue to run until the batteries are dead. Always make
sure to stop data collection when testing is complete.
This puts the Aquadopp into command mode and it will
then enter into a sleep state (the lowest possible power)
after 5 minutes of inactivity.
4.4. Mounting guidelines
CAUTION: The best way to hold an Aquadopp to a fixed structure is to clamp it around its circumference.
For mounting Aquadopps on a mooring line, NORTEK provides a
fairing called the Aquafin that holds the Aquadopp and allows it to
swivel freely around a mooring line to keep its beams oriented into
undisturbed flow.
4.4.1. Flow Disturbance.
The Aquadopp's beam geometry is one of its innovative features. A
standard current profiler is forced to use its vertically slanted beam
geometry in order to obtain profiles. The Aquadopp gives you more
flexibility in the beam geometry - this allows you to design your
mooring to minimize disturbance caused by the mooring itself. Selfdisturbance of flow is a chief source of data contamination with traditional current meters.
A good example is a mooring that places the Aquadopp in a streamlined fin or torpedo can ensure that the beams always point into
undisturbed flow. You can choose where to place your measurement
volume to gain additional control over flow disturbance.
For example, if you simply attach the Aquadopp directly to a rope or
cable, the middle of the standard measurement cell position (about
110 cm) is more than 10 times the diameter of the Aquadopp. While
this is acceptable according to a standard rule of thumb, you can
increase the ratio by putting the cell even further out (up to 5 m).
Keep in mind that increasing the distance to the measurement cell
may require an increase in transmit power.
Page 28 of 58
Revision C
Document no.: N3009-100
AQUADOPP CURRENT METER
USER MANUAL
- Preparation
4.4.2. Other Mounting Considerations
The Aquadopp has been designed for easy mounting and deployment. The following guidelines should give you the best possible
data.
1.
When mounting the Aquadopp near large obstructions
(bridges, piers, walls, etc.), ensure that the acoustic beams
do not "see" any obstructions.
2.
Keep the Aquadopp away from magnetic materials. Consider
the frame or cable holding the Aquadopp, and the structure it
is mounted on. Nearby magnetic materials could cause the
directional readings to be in error. If magnetic materials are
near by, the best recommendation is to use XYZ coordinates,
as the Aquadopp then do not use the compass.
3.
Consider the effects large objects will have on the flow itself.
A rough rule of thumb is that objects disturb the flow as far
as 10 diameters away from the object. Flow disturbance is
greatest directly downstream in the wake behind the object.
Flow disturbance affects your measurements by changing
the flow and by making it non-uniform across the Aquadopp's beams.
4.
All acoustic transducers must be submerged during data collection. Operating with the transducers out of water will not
cause damage, but your data will be meaningless.
The pressure sensor can handle pressure that is about double its
maximum reading. For example, the standard 200 m pressure sensor
can safely withstand 400 m depth, which is also the rating of the
plastic housing.
Document no.: N3009-100
Revision C
Page 29 of 58
USER MANUAL
- Preparation
AQUADOPP CURRENT METER
4.5. Using long cables
RS232 data communication at 9600 baud will normally work fine
for cables up to 50-100 m long, depending on the environment. If
you want to run a longer cable, you can switch to RS422 by installing a kit you can get from NORTEK.
You can also try using RS232 with longer cables by reducing the
baud rate. Keep in mind that RS422 is a more reliable means of
communication than RS232 - changing environmental conditions
could cause RS232 communications to fail over a long wire without
apparent reason.
4.5.1. Changing the baud rate
You are allowed to set two baud rates for the Aquadopp. The primary baud rate setting applies to normal communication and data
transfer. You can also set a separate baud rate for data download and
firmware upgrades (the "download/configuration baud rate"). A
higher baud rate speeds up large file transfers and is appropriate
when you have a short serial cable and a relatively noise-free environment.
The standard baud rate is 9600, and we recommend that you use this
baud rate unless you have a good reason to change it. To change the
baud rate and make it permanent, do the following:
• Set up the Aquadopp and connect it to your computer.
• Set the baud rate in "Communication", "Serial Port" to the
baud rate you prefer. Start a deployment, and then stop it.
The last step makes the new baud rate permanent. If you
remove power and reapply it, the Aquadopp will re-awake
with the new baud rate.
NOTE: If data download is interrupted the Aquadopp may be
left with a baud rate setting other than the one used for
normal communication. When the software tries to establish communication in such cases, it may spend a few
moments searching for the current baud rate.
Page 30 of 58
Revision C
Document no.: N3009-100
AQUADOPP CURRENT METER
USER MANUAL
- Operation
5. OPERATION
The Aquadopp program is designed to aid in the planning, execution, recovery and processing of autonomous Aquadopp deployments. It also contains a test section, including all functions required
to operate the Aquadopp in real-time applications.
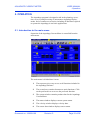
5.1. Introduction to the main menu
Operation of the Aquadopp Current Meter is controlled from the
main menu:
The main menu is divided into 8 areas:
1.
The top menu gives easy access to all functions included in
the Aquadopp software.
2.
The second row contains shortcuts to main functions. Click
on the preferred icon to access the preferred function.
3.
The system window contains product data for the Aquadopp
Current Meter.
4.
The status window displays current system status.
5.
The velocity window displays velocity data.
6.
The sensor data window displays sensor status.
Document no.: N3009-100
Revision C
Page 31 of 58
USER MANUAL
- Operation
AQUADOPP CURRENT METER
7.
The graphic view gives a graphical presentation of data
selected in the data selection menu (8).
8.
The data selection menu is used for selecting the types of
data to be viewed.
NOTE: Please familiarize with the on-line help system integrated
in the Aquadopp software.
Click on the symbol below and select a menu item. A detailed explanation of the selected item is presented on-screen.
5.2. Data collection
The Aquadopp system allows for both self-recording and real-time
data collection. A typical sequence includes:
Page 32 of 58
1.
Install and/or plug in battery pack. Refer to procedure in
section 6.1.3. on page 47.
2.
Install new desiccant, if necessary. Refer to procedure in
section 6.1.2. on page 47.
3.
Test Aquadopp according to procedure in part section 4.3. on
page 26.
4.
Set PC time.
5.
Use Aquadopp software to plan deployment. Click "Deployment", "Planning".
6.
Erase recorder. Click "Deployment", "Erase Recorder".
7.
Start deployment. Click "Deployment", "Start Deployment".
8.
Enter 6-character deployment name.
9.
Set Aquadopp time to PC time.
10.
If appropriate, set a delayed start-up time.
11.
Disconnect cable and install dummy plug.
12.
Verify pinging with AM radio just prior to deployment.
13.
Install on site. Ensure the acoustic beams point where you
want and that they are not obstructed.
Revision C
Document no.: N3009-100
AQUADOPP CURRENT METER
USER MANUAL
- Operation
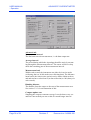
5.2.1. Deployment planning
On the main menu, select Planning from the Deployment pulldown menu or press the Deployment Planning toolbar button to
activate the planning dialog box. The Planning submenu displays
three options that may serve as a starting point for your deployment
planning.
• Select Use Existing to start with the previous settings (This
selection corresponds to the Deployment Planning toolbar
button).
• Select Load From File to read settings from a deployment
(.dep) file.
• Select Load From Instrument to read settings from the
instrument.
The dialog contains all parameters required to specify the operation
of the instrument. The Deployment planning frame on the right hand
of the dialog displays performance parameters that are automatically
updated as you change the parameter settings. When finished, press
OK to accept the changes. By using the Open/Save commands in
the File menu (or the corresponding toolbar buttons) the deployment
parameters can be saved to file at any given time and re-loaded
when it is time to actually deploy the instrument.
Document no.: N3009-100
Revision C
Page 33 of 58
USER MANUAL
- Operation
AQUADOPP CURRENT METER
The deployment planning dialog allows you to specify the instrument operation at two levels. Use the Standard tab to configure the
system with default settings for various environments and mounting
arrangements. Use the Advanced tab to fine tune the operation
parameters. Note that the Use Advanced Settings box (Standard
tab) must be checked for the advanced settings to be effective. To
show the advanced parameters that correspond with the current standard settings press the Update from Standard button (Advanced
tab).
NOTE: The Aquadopp software will not enable diagnostics data
if there is not sufficient time between normal data collection cycles to enable the Aquadopp to collect the diagnostic data.
Standard tab
Measurement interval
The time between each measurement, i.e. the data output rate.
Environment, Mounting and Geography
Choose the setting that best fits your deployment. The setting determines the Aquadopp transmit level. To see the consequence of the
different choices watch the effect on battery utilization. For direct
control, use the Advanced tab.
Page 34 of 58
Revision C
Document no.: N3009-100
AQUADOPP CURRENT METER
USER MANUAL
- Operation
NOTE: Because shallow water, wave zone, and coastal waters
normally have high backscatter, these choices reduce
transmit power (and therefore battery utilization). If you
are working in such areas but still know you have low
backscatter, select Deep Water and/or Arctic Region
instead.
Use advanced settings
Must be checked for the advanced settings to be effective.
Assumed duration
Enter the number of days you would like to collect data. This value,
together with the other deployment parameters and the hardware
configuration, will be used for calculating the performance parameters, i.e. battery utilization, recorder memory requirements and
velocity range.
NOTE: This value has no other effect on the actual deployment
configuration and the system will not stop after the number of days entered here.
Battery utilization
The expected battery life based upon total battery capacity and current duty cycle.
NOTE: The basis for the battery utilization calculations is an
unused battery. If you are using a partly depleted battery,
the calculated percentage will be incorrect.
Memory required
The recorder memory required to fulfil the planned deployment as
entered by the user configuration parameters and the planned length
of the deployment.
Vertical/Horizontal velocity precision
An estimate of the velocity precision along the vertical axis and in
the horizontal plane.
Document no.: N3009-100
Revision C
Page 35 of 58
USER MANUAL
- Operation
AQUADOPP CURRENT METER
Advanced tab
Measurement interval
The line between each measurement, i.e. the data output rate.
Average interval
The period during which the Aquadopp should be actively measuring through the measurement interval. The sensor will be in sleep
mode the remaining part of the measurement interval.
Measurement load
Within each second, the instrument can either be in active mode
(collecting data) or in idle mode (not collecting data). The Measurement load is the relative time spent in active mode within each second and can have value from 0 (no data collection) to 100 (always in
active mode).
Blanking distance
The distance from the sensor to the start of the measurement area.
See section 3.2.3. for an illustration of this.
Compass update rate
Sampling the compass consumes energy. It can be done every second but if not needed you can set this to a much longer interval.
Page 36 of 58
Revision C
Document no.: N3009-100
AQUADOPP CURRENT METER
USER MANUAL
- Operation
Power level
The power level bar sets how much acoustic energy the instrument
transmits into the water. The difference between the highest level
and the lowest level is about 20dB. Unless you know your environment has high backscatter, you should generally use HIGH power.
Speed of sound
Speed of sound can be set by the user (Fixed) or calculated by the
instrument based on the measured temperature and a user-input
value for salinity (Measured). The salinity is 0 for fresh water and
typically 35 for the ocean.
Coordinate system
The coordinate system can be selected to Beam, XYZ, or ENU.
Beam means that the recorded velocities will be in the coordinate
system of the acoustic beams. XYZ means that the measurements
are transformed to a fixed orthogonal XYZ coordinate system and
ENU means that the data are converted to geographic coordinates
every second.
Analog inputs
The instrument can read two analog inputs at the same time. The
input range is 0-5 Volt, where 0 Volt equals 0 counts, 5 Volts equals
65535 counts and 2.5 Volts equals 32768 counts.
Check the Output power box to supply power from the instrument
to your external sensor. The voltage output is fixed in production to
either 5 Volts, 12 Volts or to the instrument voltage. The use of analog inputs requires a special internal harness. Some systems are
equipped with this at the time of purchase. It is also possible to purchase the harness separately and upgrade the Aquadopp.
File wrapping
If checked, data are logged to the internal instrument recorder in
ring-buffer mode. This ensures that the recorder always holds the
latest data. If not checked data logging will stop when the recorder is
full.
The deployment planning is described under the previous section
for the Standard tab.
Document no.: N3009-100
Revision C
Page 37 of 58
USER MANUAL
- Operation
AQUADOPP CURRENT METER
5.2.2. Start recorder deployment
Before you start a deployment, either define a new deployment configuration or load a saved configuration from memory. Then click
"Deployment", "Start Deployment", and enter a short deployment
name (used for the internal data file). The program allows you to set
the Aquadopp's internal clock (see below), and then gives you a
final review on the instrument set-up, just before you start it up. The
software creates a log file using your deployment name with the setup parameters. You should keep this file in your records.
Setting the Time and using Delayed Start-up
The software allows you to set the Aquadopp time and a delayed
start-up time when you start the deployment. The easiest way to set
the Aquadopp time is to make sure the PC time is set correctly
before you start the deployment. An important reason to set the correct time may be to synchronize a group of Aquadopps with one
another or with other sensors. Refer to the previous section for more
information about synchronization.
Use a delayed start-up either to make sure the Aquadopp starts data
collection on the hour or to conserve batteries for a deployment that
starts some time in the future. You can start an Aquadopp deployment well in advance of when you plan to install it on site, and use a
delayed start-up to conserve the Aquadopp's battery and recording
resources for the actual deployment.
Page 38 of 58
Revision C
Document no.: N3009-100
AQUADOPP CURRENT METER
USER MANUAL
- Operation
Verifying Operation with a Radio
You can easily check that the Aquadopp is running with a radio. The
Aquadopp transmits energy at 2 MHz, and a radio will pick up signals at this frequency and at sub-harmonics such as 1 MHz, 500 kHz
and 250 kHz. Both 1 MHz and 500 kHz are inside the AM radio
band. Be sure to listen first with the Aquadopp on the bench to
choose the best frequency and to learn to identify the Aquadopp's
distinctive sounds.
5.2.3. Stop recorder Deployment
Before you tell the Aquadopp to stop collecting data, verify that the
computer time is accurate. The software will compare the computer
time with the Aquadopp time, and you can use this information to
quantify clock drifts. After you recover your Aquadopp, use the
Aquadopp software to stop recording. After you connect the Aquadopp to your computer, click "Deployment", "Stop Recorder
Deployment" or click the following shortcut button:
When the program tells the Aquadopp to stop collecting data, it displays both the Aquadopp time and the computer time. Keep a record
of the differences.
5.2.4. Recording Data Internally as a Backup
You can set the instrument to record data internally as it sends data
out the serial port. To do this, use "Online", "Start with recorder" or
click the following shortcut button:
Document no.: N3009-100
Revision C
Page 39 of 58
USER MANUAL
- Operation
AQUADOPP CURRENT METER
If you have an internal backup battery, then you can record backup
data in the event of power failures.
The Aquadopp has two modes of internal recording. The standard
mode is to stop recording when the recorder is full. The Aquadopp
can also use a wrap-around mode in which it keeps only the most
recent data, overwriting the oldest data when the recorder is full.
Wrap-around data recording makes good sense when you are backing up external recording against the possibility of power failures.
5.2.5. Getting Data out of the Aquadopp
Use the Aquadopp software to retrieve data from the instrument. To
do so, click "Deployment", "Data retrieval" or click the shortcut button:
In a moment, you will see a list of the recorded data files - the most
recent file is the last one listed. Highlight the file(s) you want, click
"Retrieve" and select the location for the file. The software recovers
the files you select and puts it on your hard drive.
You can immediately convert the data into an ASCII format by
clicking "Deployment", "Data Conversion" or click the shortcut button:
When conversion is complete, you will find three files on your hard
drive:
• Data file (".DAT")
• Header data (".HDR") including set-up parameters
• System data (".SYS").
Page 40 of 58
Revision C
Document no.: N3009-100
AQUADOPP CURRENT METER
USER MANUAL
- Operation
5.2.6. Finish operations
Stop data collection using one of the "Stop" buttons before you store
an Aquadopp.
NOTE: To conserve your battery when the Aquadopp is on the
shelf, be sure it is not in data acquisition mode.
5.2.7. Erasing Recorded Data
Erase the recorder by clicking "Deployment", "Erase Recorder".
Before you do this, make sure that you have recovered your data,
that the data file has not been corrupted and that you have stored a
backup copy.
5.3. Interpret and analyse Data
NOTE: We highly recommend that you use our internet-page to
get access to the latest tech-notes and user experiences
regarding data analysis.
5.4. Operational concerns
5.4.1. My data doesn't look right
The Aquadopp cannot measure velocity properly if the water has too
few scatterers. Your data will be questionable when signal levels are
down around the noise level (around 20-30 counts).
If your data doesn't look right, particularly if you have unrealistic
vertical velocities, consider the possibility that one or more of the
beams were blocked. If the blockage is somewhere inside the measurement cell of one beam, you should see elevated signal strength
for that beam. If the blockage is closer to the instrument, the signal
strength may not look very different from the other beams, or it
could be substantially reduced. If you can collect data in real time
while the instrument is deployed, run the range check function to see
if there are any obvious obstructions in any of the beams.
Document no.: N3009-100
Revision C
Page 41 of 58
USER MANUAL
- Operation
AQUADOPP CURRENT METER
5.4.2. Boundaries.
In open waters, boundaries are not a concern, but if you want to use
the Aquadopp near the bottom or surface, you should think about the
boundaries as you design your experiment.
NOTE: If one of your beams crosses a hard boundary, whether
surface, bottom or wall, data from that beam will be bad.
There are several different ways to improve the situation:
1.
Change the orientation. For example, you can
turn the Aquadopp upside down.
2.
Use XYZ coordinates instead of ENU and coordinate transform your data later. You could use this
approach when the water level changes a lot, and
ignore the vertical velocity when the surface is in
beam 3. This approach works only if your system
is fixed in place and not allowed to move while
measurements are taken.
5.4.3. Sidelobes.
Transducer sidelobes are rays of acoustic energy that go in directions other than the main beam. Because the Aquadopp's beams are
narrow, sidelobes are not always a factor in your measurements. In
general, sidelobes may be unimportant in water with strong backscatter (i.e. sediment-laden rivers), but they may contaminate your
data when backscatter is weak.
When the Aquadopp is near a boundary, avoid letting
the measurement cell touch the boundary.
If you are concerned about sidelobes, the following figure illustrates
how to minimize the influence of sidelobes on your data, when you
are near the water surface.
Page 42 of 58
Revision C
Document no.: N3009-100
AQUADOPP CURRENT METER
USER MANUAL
- Operation
The figure defines three positions along the beam.
1.
Position A is where the distance along the beam equals the
distance straight up to the surface.
2.
Position B is the distance along the beam equal to the distance to the surface along a 45° angle.
3.
Position C is the distance along the beam equal to the distance to the surface along a 15° angle.
Sidelobes returning vertically from a smooth water surface (Position
A) pose the most likely source of contamination. Even though sidelobes in this direction are very weak, a smooth water surface is the
strongest reflector you will encounter - it behaves like a mirror. As
the angle increases (i.e. between Positions A and B), the strength of
the surface echo weakens substantially. Inside a 15° cone around the
beam (Position C and beyond), sidelobes begin to increase and your
beam may begin to be affected by surface velocities. This may not
be such a problem because the surface velocity is typically close to
the velocity just below the surface.
If you turn the picture upside down and place the Aquadopp near the
bottom, the situation changes. Echoes vertically from the bottom are
typically much weaker than the mirror reflection from the surface,
so contamination at Position A will be less serious. However, contamination at Position C could be more serious, for two reasons:
• Backscatter from hard reflectors (i.e. rocks) can be large.
• The bottom does not move.
Document no.: N3009-100
Revision C
Page 43 of 58
USER MANUAL
- Operation
AQUADOPP CURRENT METER
5.4.4. Grounding problems
Tests in laboratory tanks can sometimes lead to grounding problems,
which show up as elevated noise levels, but only after the instrument
is placed in the water. You will not automatically see the increased
noise level in your data if your signal from the water is above the
noise, but the increased noise level could look like signal. One way
to tell the noise level in the tank is to collect diagnostic data. The
first measurement made using diagnostic data is made without transmitting - its signal strength gives you the noise level directly.
If grounding problems cause elevated noise levels, you may be able
to reduce your problems by coiling your cable into a tight bundle
and raising the cable above the floor (i.e. placing it on a chair. Also,
feel free to call NORTEK for further guidance. Keep in mind that
grounding problems occur around man-made structures, but are not
normally a problem in the field.
5.4.5. Mooring tilt
Sometimes moorings tilt excessively or even fall over. If the Aquadopp's tilt reading is 20º or less, your data should be okay. Tilt readings between 20º and 30° mean that the Aquadopp is no longer able
to read the tilt accurately which means that your data may be unrecoverable.
5.4.6. Mooring vibration
Excessive mooring vibration can adversely affect your data. Vibration introduces spurious velocities and interferes with the proper
operation of the tilt sensor. You may be able to detect intervals of
excessive vibration if you record diagnostic data and use this information to identify data that might be questionable. If you discover
that mooring vibration is a problem, you should try to find ways to
reduce the vibration. Diagnostics data then gives you the means to
verify improvement.
Page 44 of 58
Revision C
Document no.: N3009-100
AQUADOPP CURRENT METER
USER MANUAL
- Operation
5.5. Troubleshooting
5.5.1. Simple Problems
Most initial problems can be traced to forgetting to power the system, the DB-9 connector falling out of the computer, or using the
wrong serial port. Remember that new Aquadopps ship with the battery disconnected.
Computers don't always behave as they should and not all of them
have serial ports available. If one computer is giving you a problem,
try another one instead.
5.5.2. Problems detecting the instrument on the Serial Port
If you cannot connect to the instrument, first try sending a break to
the Aquadopp. Send a break by clicking "Communication", "Terminal emulator", and then clicking the "Send Break" button. If the
Aquadopp is powered and properly connected, and if the terminal is
set to use the correct serial port, then you will see the Aquadopp's
wake-up message.
If you see a response consisting of garbled text or strange characters,
then the Aquadopp and terminal program are probably using different baud rates - you could experiment by trying different baud rates
("Terminal", "Serial port"). If you suspect your computer is having
problems, try a different one. You can also verify your serial port
and cable with a serial loop-back test.
Serial loop-back test
The serial loop-back test verifies that the serial port can receive the
same characters it sends. First, make a loop-back connector (Figure
below) and plug it into your serial port. Run the test by typing characters - whatever you type should be echoed to the screen. When
you remove the connector, the characters stop echoing back.
Document no.: N3009-100
Revision C
Page 45 of 58
USER MANUAL
- Operation
AQUADOPP CURRENT METER
Make a serial loopback connector by soldering
pins 2 and 3 together, as shown.
Run the test with the Aquadopp's built-in terminal emulator, and if
that doesn't work, try HyperTerminal instead (a terminal program
that comes with Windows).
Test your serial cable the same way. Plug the cable into the computer and put a loop-back connector on the end of the cable. If your
serial cable passes the test and you still cannot wake up the instrument, there is a chance that your cable is a null modem cable - if so,
it crosses wires 2 and 3. You can test this by substituting a different
cable or by using a null-modem adapter in series with the cable
(which crosses wires 2 and 3 back).
Page 46 of 58
Revision C
Document no.: N3009-100
AQUADOPP CURRENT METER
USER MANUAL
- Maintenance
6. MAINTENANCE
Before you assemble a system that involves custom cables, power
supplies or the like, first assemble and test the Aquadopp using just
the cables and battery that come with the system. This is the easiest
way to get the system to work, and if you have trouble you can
always return to this setup to confirm that problems are not caused
by a faulty instrument.
6.1. Preventive maintenance
6.1.1. Cleaning
Perform regular cleaning of the Aquadopp Current Meter. Use a
mild detergent to clean the Aquadopp. Pay special attention to the
transducers.
Check the pressure sensor and remove any dirt in the two front
holes.
6.1.2. Replacing the desiccant
Keep water out of the open pressure case. Both fresh and salt water
can corrode the circuitry.
At least once a year, replace the desiccant located behind the internal battery. Refer to the battery installation procedure for detailed
information.
6.1.3. Installing/changing batteries
NOTES: Batteries should be degaussed before you use them in
your instruments - you can do this yourself by placing
the padded end of the battery up against the center of
your PC monitor and using the monitor's degaussing
function.
Always be sure to include desiccant in the pressure case.
Humid air can condense enough water to damage the
electrical circuitry.
Document no.: N3009-100
Revision C
Page 47 of 58
USER MANUAL
- Maintenance
AQUADOPP CURRENT METER
The Aquadopp is shipped with a battery pack installed in the pressure case, but disconnected. The following procedure outlines how
to connect the battery pack or to install a new one.
1.
Remove the four screws (1) and washers holding the end cap
to the pressure case and remove the pressure case
2.
Disconnect the 2-pin connector (2) and pull the old battery
(3) out of the pressure case.
3.
Slide in a new battery and connect it to the 2-pin connector.
4.
Insert the end cap to the pressure case and mount the four
screws and washers.Tighten the screws carefully to avoid
damaging the threads in the pressure case. Tighten the
screws only until the end-cap touches the pressure case and
you can just feel that they are seated. Keep in mind that
ocean pressure holds the end cap in tightly - all the screws
have to do is to keep the end cap from falling out when the
system is above water.
CAUTION: Be careful of the O-ring and the O-ring
surfaces.
5.
Page 48 of 58
Test communication with the Aquadopp's built-in terminal
emulator program by sending a 'break' command to the
instrument. If it is wired correctly then you should see the
Aquadopp's wake-up message on the screen (it will give you
the model of your instrument plus the firmware version
number). If you get a string of garbage characters try another
baud rate setting. When the instrument responds to a 'break'
properly then the communication lines are correctly connected. An easy alternative for using the terminal emulator
is to read the configuration file directly from the instrument
("Deployment", "Planning", "Load from instrument”). If the
instrument is set for a different baud rate than the software
expects, it will search for the correct baud rate and connect
automatically.
Revision C
Document no.: N3009-100
AQUADOPP CURRENT METER
USER MANUAL
- Maintenance
6.
Test the instrument by collecting data without using an external power source to ensure that the battery is properly connected. Make sure to stop data collection so that the
instrument will power down after you are through testing it.
7.
Check and/or reset the clock if necessary.
8.
Because the battery pack uses standard alkaline batteries,
you do not normally need to observe any special precautions
when you dispose of old batteries.
CAUTION: If you have lithium batteries, keep in mind that you
must be very careful and that disposal requires special precautions and/or procedures. Rules for disposal of batteries, especially lithium batteries, vary
from country to country.
6.2. Corrective Maintenance
Only qualified personnel are allowed to perform corrective maintenance activities. Please refer to the separate service manual or contact NORTEK for further assistance.
Document no.: N3009-100
Revision C
Page 49 of 58
USER MANUAL
- Maintenance
Page 50 of 58
AQUADOPP CURRENT METER
Revision C
Document no.: N3009-100
AQUADOPP CURRENT METER
USER MANUAL
- Spare Parts
7. SPARE PARTS
Always use the spare part number (next pages) when ordering spare
parts from NORTEK.
Document no.: N3009-100
Revision C
Page 51 of 58
USER MANUAL
- Spare Parts
Item #
AQUADOPP CURRENT METER
Title
Part Number
1
Aquadopp Main Board
N2001-003
2
PCB mounting block
N2001-008
3
Aqua PCB Bulkhead
N2011-014
4
4-40x1/4” Button head
92949A106
18-8 SS
5
5
#4 Flat Washer
92141A005
18-8 SS
4
6
4-40x1/2” Button head
9249A110
18-8 SS
2
7
Paradopp Head PCB
N2002-003
1
8
Aquadopp Std. Head assy.
N2011-005
1
9
Paradopp Tilt Sensor
A166004-B-002
1
10
4-40x5/8” Button head
92949A112
18-8-SS
2
11
#4x1/4” Nylon Binding
Hd.
95000A106
Binding
Natural Nylon
4
12
Compass
TCM-2-20
13
4-40x1/4” Nylon Binding
Hd.
95000A115
Binding
14
Aqua/Vector Recorder PCB
N2012-003
15
4-40x1” Nylon Binding
Hd.
95000A115
Binding
Natural Nylon
2
16
#4 Nylon Nut
94812A112
Natural Nylon
2
17
4-40x1/2” Cup Point
92311A110
18-8-SS
2
Revision C
Document no.: N3009-100
Page 52 of 58
Material
Quantity
1
Delrin POM
8
1
1
Natural Nylon
4
1
AQUADOPP CURRENT METER
USER MANUAL
- Spare Parts
Item No
Title
Part Number
Material
Quantity
1
Aquadopp Housing
N2011-007
Delrin (POM) Black
1
2
Aquadopp Std. Head
Assy.
N2011-005
3
#6 Titanium Washer
Titanium gr.2
8
4
#6 Spring Washer
Titanium gr.2
8
5
6-32x1” Titanium
Bolt
Titanium gr.2
8
6
Aquadopp Endbell
Assy.
7
O-ring 55,25 x 2,62
Document no.: N3009-100
1
N2011-003
1
Nitrile N70
Revision C
4
Page 53 of 58
USER MANUAL
- Spare Parts
Page 54 of 58
AQUADOPP CURRENT METER
Revision C
Document no.: N3009-100
AQUADOPP CURRENT METER
USER MANUAL
- Optional Configurations and Features
8. OPTIONAL CONFIGURATIONS AND FEATURES
8.1. Active-X components
If you wish to create real-time software to operate an Aquadopp,
NORTEK will provide you with Active-X controls which you can
integrate into Windows-based software. These software modules
give you full control over the Aquadopp and its data structures, and
simplify your software development job.
Please contact NORTEK for further information.
8.2. Available Head Configurations
8.2.1. Symmetric sensor head
Symmetric sensor heads are used to measure above or below the
Aquadopp. The geometry assures a precise definition of the vertical
extent of sample area. The head is typically used for Aquadopps
mounted in bottom frames.
8.2.2. 2D side-looking Aquadopp head
The 2D side-looking Aquadopp head is used to measure 2D flow
away from walls or boundaries. Typical applications are river or
channel flow monitoring where the Aquadopp is mounted on the
channel wall, protected from floating debris but where the actual
measurements are made in the free flow.
8.2.3. Asymmetric Aquadopp head
The asymmetric Aquadopp head is used in situations where the sample area is best located above (or below) the instrument and over to
the side. An example is buoy mounted Aquadopps, where the measurement area is best positioned both below the hull and away from
the anchor chain.
Document no.: N3009-100
Revision C
Page 55 of 58
USER MANUAL
- Optional Configurations and Features
Page 56 of 58
Revision C
AQUADOPP CURRENT METER
Document no.: N3009-100
AQUADOPP CURRENT METER
USER MANUAL
- Returning the Instrument For Repair
9. RETURNING THE INSTRUMENT FOR REPAIR
1.
Please contact Nortek for Return Merchandise Authorization
(RMA number).
2.
Please use the Proforma Invoice template on the following
page or make your own invoice containing the same information.
3.
Please enclose copies of all export documents inside the
freight box.
IMPORTANT:
NORTEK AS does not cover freight insurance on repairs. Please make sure your goods
are insured before shipping. NORTEK AS is
not liable if the instrument is damaged or
disappear during shipping.
We will insure the instrument upon returning
the goods to you and invoice you along with
the freight cost.
If the instrument is under warranty repair the
return freight and insurance will be covered by
NORTEK AS.
Document no.: N3009-100
Revision C
Page 57 of 58
USER MANUAL
- Returning the Instrument For Repair
AQUADOPP CURRENT METER
PROFORMA INVOICE
SENDER
RECEIVER
Name:
Name:
Nortek AS
Address:
Address:
Industriveien 33
City:
City:
1337 Sandvika
Country:
Country:
Norway
Tel.:
Tel.:
+4767556200
Fax:
Fax:
+4767546150
Ref.:
Ref.:
Date:
Units:
Freight forwarder:
RMA no:
AWB no.:
Description:
Customs
account no:
28605-56
VAT/company no:
976119185
Value:
Total value:
NOT A SALE - TEMPORARY EXPORT TO NORWAY FOR REPAIR
Place:
Exporters name:
Date:
Exporters signature:
Page 58 of 58
Revision C
Document no.: N3009-100