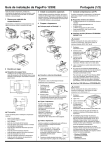
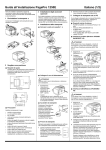
1
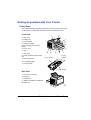
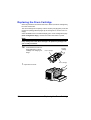
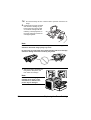
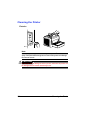
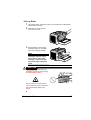
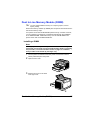
PagePro™ 1350EN User’s Guide 4136-9562-01A 1800813-001B Trademarks KONICA MINOLTA and the KONICA MINOLTA logo are trademarks or registered trademarks of KONICA MINOLTA HOLDINGS, INC. PagePro is a trademark or registered trademark of KONICA MINOLTA BUSINESS TECHNOLOGIES, INC. All other trademarks and registered trademarks are the property of their respective owners. Copyright Notice Copyright © 2006 KONICA MINOLTA BUSINESS TECHNOLOGIES, INC., Marunouchi Center Building, 1-6-1 Marunouchi, Chiyoda-ku, Tokyo, 100-0005, Japan. All Rights Reserved. This document may not be copied, in whole or part, nor transferred to any other media or language, without written permission of KONICA MINOLTA BUSINESS TECHNOLOGIES, INC. Notice KONICA MINOLTA BUSINESS TECHNOLOGIES, INC. reserves the right to make changes to this guide and to the equipment described herein without notice. Considerable effort has been made to ensure that this guide is free of inaccuracies and omissions. However, KONICA MINOLTA BUSINESS TECHNOLOGIES, INC. makes no warranty of any kind including, but not limited to, any implied warranties of merchantability and fitness for a particular purpose with regard to this guide. KONICA MINOLTA BUSINESS TECHNOLOGIES, INC. assumes no responsibility for, or liability for, errors contained in this guide or for incidental, special, or consequential damages arising out of the furnishing of this guide, or the use of this guide in operating the equipment, or in connection with the performance of the equipment when so operated. SOFTWARE LICENSE AGREEMENT This package contains the following materials provided by Konica Minolta Business Technologies, Inc. (KMBT): software included as part of the printing system, the digitally-encoded machine-readable outline data encoded in the special format and in the encrypted form (“Font Programs”), other software which runs on a computer system for use in conjunction with the Printing Software (“Host Software”), and related explanatory written materials (“Documentation”). The term “Software” shall be used to describe Printing Software, Font Programs and/or Host Software and also include any upgrades, modified versions, additions, and copies of the Software. The Software is being licensed to you under the terms of this Agreement. KMBT grants to you a non-exclusive sublicense to use the Software and Documentation, provided that you agree to the following: 1. You may use the Printing Software and accompanying Font Programs for imaging to the licensed output device(s), solely for your own internal business purposes. 2. In addition to the license for Font Programs set forth in Section 1 (“Printing Software”) above, you may use Roman Font Programs to reproduce weights, styles, and versions of letters, numerals, characters and symbols (“Typefaces”) on the display or monitor for your own internal business purposes. 3. You may make one backup copy of the Host Software, provided your backup copy is not installed or used on any computer. Notwithstanding the above restrictions, you may install the Host Software on any number of computers solely for use with one or more printing systems running the Printing Software. 4. You may assign its rights under this Agreement to an assignee of all of Licensee’s right and interest to such Software and Documentation (“Assignee”) provided you transfer to Assignee all copies of such Software and Documentation Assignee agrees to be bound by all of the terms and conditions of this Agreement. 5. You agree not to modify, adapt or translate the Software and Documentation. 6. You agree that you will not attempt to alter, disassemble, decrypt, reverse engineer or decompile the Software. 7. Title to and ownership of the Software and Documentation and any reproductions thereof shall remain with KMBT and its Licensor. 8. Trademarks shall be used in accordance with accepted trademark practice, including identification of the trademark owner’s name. Trademarks can only be used to identify printed output produced by the Software. Such use of any trademark does not give you any rights of ownership in that trademark. 9. You may not rent, lease, sublicense, lend or transfer versions or copies of the Software that the Licensee does not use, or Software contained on any unused media, except as part of the permanent transfer of all Software and Documentation as described above. 10. In no event will KMBT or its licensor be liable to you for any consequential, incidental INDIRECT, PUNITIVE or special damages, including any lost profits or lost saving, even if KMBT has been advised of the possibility of such damages, or for any claim by any third party. KMBT or its licensor disclaims all warranties with regard to the software, express or implied, including, without limitation implied warranties of merchantability, fitness for a particular purpose, title and non-infringement of third party rights. Some states or jurisdictions do not allow the exclusion or limitation of incidental, consequential or special damages, so the above limitations may not apply to you. 11. Notice to Government End Users: The Software is a “commercial item,” as that term is defined at 48 C.F.R.2.101, consisting of “commercial computer software” and “commercial computer software documentation,” as such terms are used in 48 C.F.R. 12.212. Consistent with 48 C.F.R. 12.212 and 48 C.F.R. 227.7202-1 through 227.7202-4, all U.S. Government End Users acquire the Software with only those rights set forth herein. 12. You agree that you will not export the Software in any form in violation of any applicable laws and regulations regarding export control of any countries. For EU member states only This symbol means: Do not dispose of this product together with your household waste! Please contact the Local Authority for appropriate disposal instructions. In the case of a new device being purchased, the used one can also be given to our dealer for appropriate disposal. Recycling of this product will help to conserve natural resources and prevent potential negative consequences for the environment and human health caused by inappropriate waste handling. Contents 1 Introduction ....................................................................................................... 1 Getting Acquainted with Your Printer 2 Printer Parts 2 Front View 2 Rear View 2 About the Indicator Functions 3 Indicator Functions 3 Continuing a Print Job after an Error Message 3 Printing a Test Page 3 Cancelling a Print Job 4 About the Software Utilities CD-ROM 5 PCL Drivers. 5 Utilities 5 System Requirements 7 Selecting Driver Defaults 8 Windows XP/Server 2003/2000/NT 4.0 8 Windows Me/98SE 8 Uninstalling the Printer Driver 9 2 Working with the PCL 6 Printer Driver .......................................................... 11 Contents i Displaying PCL 6 Printer Driver Settings 12 Displaying Settings under Windows XP/Server 2003 12 Displaying Settings under Windows 2000/Me/98SE/NT 4.0 Using the PCL 6 Printer Driver 13 Common Buttons 13 OK 13 Cancel 13 Apply 13 Help 13 Easy Set 13 Page Layout 13 Printer Figure 13 Setup Tab 14 Paper Tab 14 Quality Tab 14 Device Options Setting Tab 15 12 3 Working with the PCL 5e Printer Driver ........................................................17 Displaying PCL 5e Printer Driver Settings 18 Displaying Settings under Windows XP/Server 2003 18 Displaying Settings under Windows 2000/Me/98SE/NT 4.0 18 Using the PCL 5e Printer Driver 19 Common Buttons 19 OK 19 Cancel 19 Apply 19 Layout Tab (Windows XP/Server 2003/2000) 19 Paper/Quality Tab (Windows XP/Server 2003/2000) 19 Advanced Document Settings Dialog Box (Windows XP/Server 2003/ 2000) 20 Device Settings Tab (Windows XP/Server 2003/2000) 20 Paper Tab (Windows Me/98SE) 20 Device Options Tab (Windows Me/98SE) 20 Page Setup Tab (Windows NT 4.0) 21 Advanced Tab (Windows NT 4.0) 21 Device Settings Tab (Windows NT 4.0) 21 4 Working with the Status Display ....................................................................23 Working with the Status Display 24 Introduction 24 Environment 24 Opening the Status Display 24 Altering the Size of the Status Display Window 24 Printing Special Pages 24 Opening the Control Panel 25 Paper tab 25 ii Contents Printer Setting Tab (USB and Parallel) 25 Counter Tab 26 Configuration Tab 26 Using the Status Display 26 Recognizing Status Display Alerts 26 Recovering from a Status Display Alert 27 Closing the Status Display 27 5 Using Media ..................................................................................................... 29 About Media 30 What sizes/weights of media can I use? 30 What type and amount of media can I load? 31 Media Storage 31 Media Not Suitable for Printing 32 What is the guaranteed imageable (printable) area? 33 Page Margins 33 Loading Media 34 How do I refill Tray 1? 34 How do I refill the manual feed tray? 35 Printing on Media 36 How do I load and print custom media? 36 How do I load and print envelopes? 36 How do I load and print labels? 38 How do I load and print postcards? 39 How do I load and print thick stock? 40 How do I load and print transparencies? 41 Manual Duplexing 42 How do I manually duplex? 42 6 Replacing Consumables ................................................................................ 43 Replacing the Toner Cartridge 45 Replacing the Drum Cartridge 50 7 Maintaining the Printer ................................................................................... 55 Cleaning the Printer 56 Exterior 56 Pick-up Roller 57 8 Troubleshooting .............................................................................................. 59 Indicator Messages 60 Status Message 60 Error Messages 62 Service Messages 64 Clearing Jams 65 Solving Problems-Printing Quality 68 Note for Windows Me/98SE USB users 71 Contents iii 9 Installing Accessories ....................................................................................73 Introduction 74 Antistatic Protection 74 Dual In-Line Memory Module (DIMM) 75 Installing a DIMM 75 A Appendix ..........................................................................................................77 Safety Specifications 78 Technical Specifications 78 Printer 78 Consumables Life Expectancies Chart 80 iv Contents Introduction Getting Acquainted with Your Printer Printer Parts The following drawings illustrate the parts of your printer referred to throughout this guide, so please take some time to become familiar with them. Front View 1 2 1—Top cover 2—Output tray 3 3—Control panel 4 4—Imaging cartridge (Toner cartridge plus Drum cartridge) 5 5—Front cover 6 6—Tray 1 11 7—Tray cover 8—Paper guides for manual feed tray 9—Manual feed tray 10 9 8 7 Imaging cartridge Drum cartridge 10—Ventilation grilles 11—Power switch Toner cartridge Rear View 1—AC power connection 2—USB port 3—Parallel port 4—10Base-T/100Base-TX Ethernet Interface port 2 2 3 1 4 Getting Acquainted with Your Printer About the Indicator Functions Indicator Functions The control panel has two indicators and one button. The control panel indicators provide information on the status of the printer. 1 1—Ready indicator 2—Error indicator 2 3—Cancel button The Cancel button allows you to: Continue a print job after an 3 error message Print a test page Cancel a print job Continuing a Print Job after an Error Message You can continue the print job after correcting the following types of errors: When there is no more paper in the tray When paper of a different format than that set in the printer driver was fed 1 2 3 into the printer Check that one of the above errors has occurred. Perform the remedial action according to the error. Press the Cancel button to operate the media feed. The print job continues. For details on the error messages, refer to Chapter 8, “Troubleshooting” on page 59. Printing a Test Page You can print the following four kinds of test pages by pressing the Cancel button with the printer in idle mode: Operator Panel Status Sheet: Hold the Cancel button down for a second and then press the Cancel key once. " We advise you to print this sheet and keep it close to your printer for reference. About the Indicator Functions 3 Configuration Page: Hold the Cancel button down for a second and then press press the Cancel key twice. PCL Font List: Hold the Cancel button down for a second and then press press the Cancel key three times. " See also “Printing Special Pages” on page 24. Cancelling a Print Job You can cancel a print job that is currently being processed. 1 2 4 While data is being processed or printed (the green “Ready” indicator is blinking), hold down the Cancel button for more than 5 seconds. Release the Cancel button after both indicators light up. The current print job has now been cancelled. About the Indicator Functions About the Software Utilities CD-ROM PCL Drivers. Operating System Windows XP/Server 2003/2000 Windows Me/98SE Windows NT 4.0 Use/Benefit These drivers give you access to all of the printer features, including finishing and advanced layout. Utilities Utility Use/Benefit Crown Print Monitor for Windows Using the TCP/IP protocol, print jobs can be sent directly to the printer. For details, refer to the PagePro 1350EN Reference Guide on the Utilities & Documentation CD-ROM. PageScope Net Care Printer management functions such as status monitoring and network settings can be accessed. For details, refer to the PageScope Net Care Quick Guide on the Utilities & Documentation CD-ROM. PageScope Web Connection With a Web browser, the status of printers can be checked, and the various settings can be changed. For details, refer to the PagePro 1350EN Reference Guide on the Utilities & Documentation CD-ROM. PageScope Network Setup Using the TCP/IP and IPX protocols, basic network printer settings can be specified. For details, refer to the PageScope Network Setup User Manual on the Utilities & Documentation CD-ROM. PageScope NDPS Gateway This network utility enables printers and KONICA MINOLTA multifunctional products to be used in an NDPS environment. For details, refer to the PageScope NDPS Gateway User Manual on the Utilities & Documentation CD-ROM. About the Software Utilities CD-ROM 5 Utility Use/Benefit Peer-to-Peer Printing tool Setups for peer-to-peer printing in Windows 98, Windows 98SE and Windows Me. Peer-to-peer printing refers to printing direcly to a device on the network instead of through the Server. For details, refer to the Peer-to-peer Printing Tool User’s Guide on the Utilities & Documentatioin CD-ROM. Font Manager 6 The font Manager helps you to manage your printer fonts. For more information, see the Font Manager online help. About the Software Utilities CD-ROM System Requirements Personal computer – Pentium 2: 400 MHz (Pentium 3: 500 MHz or higher is recommended) Operating System – Microsoft Windows XP Home Edition/Professional (Service Pack 1 or later; Service Pack 2 or later is recommended), Windows Server 2003, Windows 2000 (Service Pack 4 or later), Windows Me, Windows 98SE, Windows NT 4.0 (Service Pack 6) Free hard disk space – Approximately 20 MB of free hard disk space for printer driver and Status Monitor – Approximately 128 MB of free hard disk space for image processing RAM 128 MB or more CD-ROM/DVD drive I/O interface – 10Base-T/100Base-TX Ethernet interface port – USB Revision 2.0 compliant port – Parallel (IEEE 1284) port System Requirements 7 Selecting Driver Defaults Before you start working with your printer, you are advised to verify/change the default driver settings. Windows XP/Server 2003/2000/NT 4.0 1 Choose the driver’s properties as follows: – (Windows XP/Server 2003) From the Start menu, choose Printers and Faxes to display the Printers and Faxes directory. Right-click the KONICA MINOLTA PagePro 1350EN or KONICA MINOLTA PagePro 1350EN 5e printer icon and choose Printing Preferences. – (Windows 2000/NT 4.0) 2 3 4 From the Start menu, choose Settings and then Printers to display the Printers directory. Right-click the KONICA MINOLTA PagePro 1350EN or KONICA MINOLTA PagePro 1350EN 5e printer icon and choose Printing Preferences. Select the default settings for your printer, such as the default media format you use, on the appropriate tabs. Click Apply. Click OK to exit from the Print preference dialog box. Windows Me/98SE 1 Choose the driver’s properties as follows: – From the Start menu, choose Settings and then Printers to display 2 3 4 5 8 the Printers directory. Right-click the KONICA MINOLTA PagePro 1350EN or KONICA MINOLTA PagePro 1350EN 5e printer icon and choose Properties. Select the Configure tab. Select the default settings for your printer, such as the default media format you use, on the appropriate tabs. Click Apply. Click OK. Selecting Driver Defaults Uninstalling the Printer Driver This section describes how to uninstall the KONICA MINOLTA PagePro 1350EN printer driver if necessary. 1 2 3 4 5 Close all applications. From the Start menu, choose Programs (Windows XP: All Programs), then KONICA MINOLTA PagePro 1350EN, and then KONICA MINOLTA PagePro 1350EN Uninstall. Confirm the deletion by clicking on Yes. Restart your computer. The KONICA MINOLTA PagPro 1350EN printer driver will be uninstalled from your computer. Uninstalling the Printer Driver 9 10 Uninstalling the Printer Driver Working with the PCL 6 Printer Driver Displaying PCL 6 Printer Driver Settings Displaying Settings under Windows XP/Server 2003 1 2 3 4 5 From the Start menu, click Control Panel. In Pick a category, click Printers and Other Hardware. In Pick a task…, click View installed printers or fax printers. In the Printers and Faxes directory, select the KONICA MINOLTA PagePro 1350EN printer icon. To display the printer driver settings, from the File menu, click Printing Preferences.... Displaying Settings under Windows 2000/Me/98SE/ NT 4.0 1 2 3 From the Start menu, point to Settings, and then click Printers to display the Printers directory. Select the KONICA MINOLTA PagePro 1350EN printer icon. Display the printer driver settings: Windows 2000—From the File menu, click Printing Preferences.... Windows Me/98SE—From the File menu, click Properties, and then click the Printer Properties tab. Windows NT 4.0—From the File menu, click Document Defaults.... 12 Displaying PCL 6 Printer Driver Settings Using the PCL 6 Printer Driver " Refer to the printer drivers online help for information on all of the functions. Common Buttons The buttons described below appear on each tab. OK Click to exit the Properties dialog box, saving any changes made. Cancel Click to exit the Properties dialog box without saving any changes made. Apply Click to save all changes without exiting the Properties dialog box. Help Click to view online help. Easy Set Click on Default to reset the functions of the tab to their original values. Page Layout Check this option button to display a sample of the page layout in the figure area. Printer Figure Check this option button to display an image of the printer in the figure area. Using the PCL 6 Printer Driver 13 Setup Tab The Setup tab allows you to Print several pages of a document on the same page (n-up printing) Provide a watermark on printed documents Design custom watermarks Specify manual duplex printing Specify the paper source Define the type of media Print using a form overlay Create/edit a form overlay Paper Tab The Paper tab allows you to Specify the size of the original document Define custom media sizes Fit printed documents to a specified media size Select the output media size Scale (enlarge/reduce) documents Adjust the printing position Specify the number of copies Turn on/off the printer’s sorting function Turn on/off the Proof Print function Specify the orientation of the media Rotate the print image 180° to the media orientation Quality Tab The Quality tab allows you to Specify the resolution Turn on/off Toner Save mode Optimize the exchange of text and graphics data with the printer (All Raster) Optimize the print quality of text and graphics (Fine-Art) Specify the toner density Activate/deactivate the use of TrueType fonts 14 Using the PCL 6 Printer Driver Device Options Setting Tab The Device Options Setting tab allows you to Specify the total amount of memory installed in the printer View version and copyright information about the printer driver Using the PCL 6 Printer Driver 15 16 Using the PCL 6 Printer Driver Working with the PCL 5e Printer Driver Displaying PCL 5e Printer Driver Settings Displaying Settings under Windows XP/Server 2003 1 2 3 4 5 From the Start menu, click Control Panel. In Pick a category, click Printers and Other Hardware. In Pick a task…, click View installed printers or fax printers. In the Printers and Faxes directory, select the KONICA MINOLTA PagePro 1350EN 5e printer icon. To display the printer driver settings, from the File menu, click Printing Preferences.... Displaying Settings under Windows 2000/Me/98SE/ NT 4.0 1 2 3 From the Start menu, point to Settings, and then click Printers to display the Printers directory. Select the KONICA MINOLTA PagePro 1350EN 5e printer icon. Display the printer driver settings: Windows 2000—From the File menu, click Printing Preferences.... Windows Me/98SE—From the File menu, click Properties, and then click the Printer Properties tab. Windows NT 4.0—From the File menu, click Document Defaults.... 18 Displaying PCL 5e Printer Driver Settings Using the PCL 5e Printer Driver " Refer to the printer driver’s online help for information on all of the functions. Common Buttons The buttons described below appear on each tab. OK Click to exit the Properties dialog box, saving any changes made. Cancel Click to exit the Properties dialog box without saving any changes made. Apply Click to save all changes without exiting the Properties dialog box. Layout Tab (Windows XP/Server 2003/2000) The Layout tab allows you to Specify the orientation of the media Specify the order in which the pages of a document should be printed Print several pages of a document on the same sheet of media (n-up printing) Paper/Quality Tab (Windows XP/Server 2003/2000) The Paper/Quality tab allows you to Specify a media source Identify the type of media to be printed Using the PCL 5e Printer Driver 19 Advanced Document Settings Dialog Box (Windows XP/ Server 2003/2000) Click the Advanced... button on either the Layout tab or the Paper/Quality tab to open the Advanced Document Settings dialog box. The settings in this dialog box allow you to control and fine-tune many of the advanced features of your printer driver. The features are organized in a tree format with three main branches: Paper/Output, Graphic and Document Options. Device Settings Tab (Windows XP/Server 2003/2000) The Device Settings tab is in a different location and must be called up as follows: 1 2 3 Click the KONICA MINOLTA PagePro 1350EN 5e printer icon. From the File menu, click Properties. Click the Device Settings tab. The Device Settings tab allows you to view and change the setup of the printer and its options. To change a setting, select the item that you want to change, and then select the desired setting from either the box or dropdown list that appears. Paper Tab (Windows Me/98SE) The Paper tab allows you to Specify the media size (see chapter 5 for a list of supported media sizes) Define custom media sizes Print several pages of a document on the same sheet of media (n-up printing) Specify the orientation of the media Specify a media source Specify the number of copies Device Options Tab (Windows Me/98SE) The Device Options tab allows you to Adjust the density of the toner used during printing Improve the appearance of text and graphics by using fewer dots (Light) or more (Dark) dots Specify the total amount of memory installed in your printer 20 Using the PCL 5e Printer Driver Specify how much memory is reserved for special printer functions, such as macros Reserve some of the printer’s memory for an output buffer (Some very complex documents require page protection in order to print. However, page protection uses more of your printer’s memory.) Control printer memory tracking Page Setup Tab (Windows NT 4.0) The Page Setup tab allows you to Specify the media size (see chapter 5 for a list of supported media sizes) Specify a media source Specify the number of copies Specify the orientation of the media Advanced Tab (Windows NT 4.0) The settings in this window allow you to control and fine-tune many of the advanced features of your printer driver. The features are organized in a tree format with three main branches: Paper/Output, Graphic and Document Options. To change the setting for a feature, first select the feature in the top window and then select one of the corresponding settings in the bottom window. Device Settings Tab (Windows NT 4.0) The Device Settings tab is integrated in a different system sector and must be called up separately. 1 2 3 Select the KONICA MINOLTA PagePro 1350EN 5e printer icon. From the File menu, click Properties. Click the Device Settings tab. The Device Settings tab allow you to view and change the setup of the printer and its options. To change a setting, select the item that you want to change, and then select the desired setting from either the box or dropdown list that appears. To change the setting for a feature, first select the feature in the top window and then select one of the corresponding settings in the bottom window. Using the PCL 5e Printer Driver 21 22 Using the PCL 5e Printer Driver Working with the Status Display Working with the Status Display " Refer to the Status Display’s online help for more information on all of these functions. Introduction The Status Display shows information about the current status of the computer’s local printer. Environment The Status Display can be used with Windows XP, Server 2003, 2000, Me, 98SE and NT 4.0 connected via a parallel cable, USB or network cable. " Windows NT 4.0 does not support a USB connection. Opening the Status Display Use one of the following steps to open the Status Display. Windows XP/Server 2003—Choose Start, All Programs, then KONICA MINOLTA PagePro 1350EN, and then KONICA MINOLTA PagePro 1350EN status. Windows 2000/Me/98SE/NT 4.0—From the Start menu, choose Programs, then KONICA MINOLTA PagePro 1350EN, and then KONICA MINOLTA PagePro 1350EN status. Altering the Size of the Status Display Window From the Display menu, choose Reduce to decrease the size of the window, or From the Display menu, choose Expand to increase the size of the window. Printing Special Pages Print Operator Panel Status Sheet. Print Configuration Page. Print PCL font list Print Demo Page 24 Working with the Status Display Opening the Control Panel The Control Panel lets you check the basic settings of the printer and set alerts. Perform the following step to open the Control Panel. From the Display menu, choose Printer Setting.... " When your printer is connected to a network by means of the Ethernet interface, choosing ‘Printer Setting’ automatically opens the PageScope web connection. For details, refer to the Reference Guide on the PagePro 1350EN Utlities & Documentation CD-ROM. Paper tab The Paper tab allows you to Specify how the printer should respond to a media size error (the requested media size is not available) Specify whether Tray 1 is to be used as a multipurpose tray or as a tray set to a single media size Printer Setting Tab (USB and Parallel) The Printer Setting tab allows you to Specify whether a print job is to continue after a certain amount of time has elapsed despite a media size error Turn on/off the detection of a media size error Define Personality. Default is Auto. Define the internal Printer language. Define Courier type. Default is Regular. Determine the time elapsed before the printer will go into Energy Save mode. Turn on/off the Midnight Mode and specify the length of time until the printer automatically enters the Midnight Mode Define the length of time the printer waits for the end of a print job before timing out Define the language used for the internal printer test pages Working with the Status Display 25 Counter Tab The Counter tab allows you to Check the status of papertrays and toner. Configuration Tab The Configuration tab summarizes the most important printer settings for quick reference. No settings can be specified on this tab. Using the Status Display When the background of the right-hand printer graphic is green, the printer is in standby mode or a job is printing normally. When the background of the right-hand printer graphic is red, there is an error and the job has been interrupted. The status of the printer and the error message are shown in the dialog boxes on the left. The function areas include: Printer Status—Displays text messages that describe the current operational status of the printer. How to recover—Provides you with explanations of what you need to do in order to correct problems and recover from error conditions. Warning Status—Displays text messages that alerts you of such conditions as low toner. Printer Status figure—Shows a graphic representation of the printer and indicates where the problem is. Printing Status—Displays the status of the current print job. Popup Setting—Allows you to choose which message(s) you want to bring to the foreground when that particular condition occurs with the printer. Supplies Status—Displays toner cartridge usage status (percentage remaining). Recognizing Status Display Alerts When the Status Display detects a printing problem, several actions occur at the same time, depending on your settings. First, the icon changes from green to yellow or red, depending on the severity of the printer problem. 26 Recognizing Status Display Alerts Recovering from a Status Display Alert When the Status Display notifies you of a printing problem, double-click on its icon to open the Status Display. The Status Display identifies which printer has an error and what type of error has occurred. Closing the Status Display To close the Status Display from the File menu, choose Exit. " If you click the X button in the upper-right corner of the Status Display window to close the window, the Status Display remains available at the bottom right of the taskbar. Double-click the icon to open it again. Recovering from a Status Display Alert 27 28 Closing the Status Display Using Media About Media What sizes/weights of media can I use? Media Media Size Weights Millimeters Inches A4 210.0 × 297.0 8.2 × 11.7 B5 (JIS) 182.0 × 257.0 7.2 × 10.1 A5 148.0 × 210.0 5.9 × 8.3 Legal 215.9 × 355.6 8.5 × 14.0 Letter 215.9 × 279.4 8.5 × 11.0 Statement 140.0 × 216.0 5.5 × 8.5 Executive 184.0 × 267.0 7.25 × 10.5 Folio 210 × 330.0 8.25 × 13.0 Letter Plus 216 × 322 8.5 × 12.69 UK Quarto 203 × 254 8 × 10 Foolscap 203 × 330 8 × 13 G. Letter 203 × 267.0 8 × 10.5 G. Legal 216 × 330 8 1/2 × 13 Chinese 16K 185.0 × 260.0 7.3 × 10.2 Chinese 32K 130.0 × 185.0 5.1 × 7.3 7 3/4 × 10 3/4 16K 195 × 270 B5 (ISO) 176.0 × 250.0 6.6 × 9.8 Envelope #10 105 × 241 4.125 × 9.5 Envelope C5 162.0 × 229.0 6.4 × 9.0 Envelope DL 110.0 × 220.0 4.3 × 8.7 Envelope Monarch 98.0 × 191.0 3.875 × 7.5 Envelope C6 114.0 × 162.0 4.5 × 6.4 Envelope Cho #3 120 × 235 4 3/4 × 9 1/4 Envelope Cho #4 90 × 205 3 1/2 × 8 Japanese Postcard 100.0 × 148.0 3.9 × 5.8 Double Postcard 148 × 200 5 3/4 × 7 3/4 Thick stock 30 60–90 g/m² (16–24 lb) 91–163 g/m² (25–90 lb) 91–163g/m² (25–90 lb) About Media What type and amount of media can I load? Media Source/Maximum Amount Media Type Plain Paper Special Media Input Capacity Tray 1 Manual Feed Tray 60–90 g/m (16–24 lb) 250 sheets 1 sheet Envelopes 10 sheets 1 sheet Label sheets 10 sheets 1 sheet Letter head 10 sheets 1 sheet Postcards (Japanese Size) 50 sheets (first face) 1 sheet 20 sheets (second face) 1 sheet 10 sheets 1 sheet 5 sheets 1 sheet 2 Thick paper 91–163 g/m (24–90 lb) Transparencies 2 Note Do not allow media to go above the fill limit mark inside the tray or the media may not be fed correctly. Media Storage Keep media on a flat, level surface in its original wrapper until it is time to load it. If media has been removed from its wrapper, place it in its original packaging and store in a cool, dark place. When storing media, avoid Moisture, excess humidity Keep media between 30% to 65% relative humidity. Toner does not adhere well to moist or wet paper On the other hand, media that has been stored for a long time without staying in its packaging may dry up too much and also cause jamming. Direct sunlight Excess heat (up to 35° C/95° F) Dust Leaning against other objects or placed in an upright position About Media 31 Before purchasing a large quantity or special media, do a trial printing with the same media and check the print quality. Media Not Suitable for Printing Note Do not use the media types listed below. These could cause poor print quality, media jams, or damage to the printer. Also, using them will void your warranty. Coated with a processed surface (such as carbon paper, digitally glosscoated media, colored paper that has been treated) Carbon backed Iron-on transfer media (heat-sensitive paper, heat-pressure paper, heat-press transfer paper) Cold water transfer paper Pressure sensitive Special media designed specifically for inkjet printers (superfine paper, glossy paper, glossy film, postcards, etc.) Media that has already been printed with – – – – An inkjet printer A monochrome or color laser printer or copier A heat-transfer printer Another printer or fax machine Wet (or damp) Layered Adhesive Folded, creased, curled, embossed, warped, or wrinkled Perforated, three-hole punched, or torn Too slick, too coarse, too textured Different in texture (roughness) on the front and back Too thin or too thick Stuck together because of static electricity Composed of foil or gilt; too luminous Heat sensitive or cannot withstand the fusing temperature (205° C/401° F) Irregularly shaped (not rectangular or not cut at right angles) Attached with glue, tape, paper clips, staples, ribbons, hooks, or buttons 32 About Media Acidic Any other media that is not approved Use media that is Suitable for plain-paper laser printers, such as standard paper What is the guaranteed imageable (printable) area? Each media size has a specific imageable area, the maximum area on which the printer can print clearly and without distortion. 4 mm (0.157") 4 mm (0.157") 4 mm (0.157") 4 mm (0.157") Page Margins Margins are set through your application. Some applications allow you to set custom page sizes and margins while others have only standard page sizes and margins from which to choose. If you choose a standard format, you may lose part of your image (due to imageable area constraints). If you can custom-size your page in your application, use those sizes given for the imageable area for optimum results. About Media 33 Loading Media How do I refill Tray 1? " 1 2 Refill the tray only when it is completely empty. Remove the tray cover from Tray 1. Squeeze the right paper guide and open the paper guides. Load the media lengthwise and printing-side up in the tray. A maximum of 250 sheets (75 g/m2 [20 lb] plain paper) can be loaded. If media is loaded past the media limit mark, it may not be fed correctly. 3 34 Load letterhead with the side to be printed facing up and the preprinted letterhead at the top (facing the printer). Squeeze the right paper guide and adjust the paper guides so that both the left and right sides of the media are secure. Then, re-place the tray cover onto Tray 1. Loading Media How do I refill the manual feed tray? " 1 2 3 When using the manual feed tray, the sheet of paper must be fed in one at a time. Make sure that the tray cover is properly attached to Tray 1. Open the paper guides. Insert the sheet of paper as far as possible into the manual feed tray with the side to be printed on facing up, and then adjust the paper guides so that both sides of paper are aecure. Loading Media 35 Printing on Media How do I load and print custom media? Do not use custom media that does not have approved dimensions Width: 76 mm (3") up to 216 mm (8.5") Length: 127 mm (5") up to 356 mm (14") 1 2 3 4 In the printer driver (Setup tab/Media Type option), select Plain Paper. Set the media size (Paper tab/Original Document Size/Edit Custom...) Load the custom media lengthwise and printing-side up in Tray 1. Adjust the paper guides to the width of the custom media. Note Improperly adjusted guides may cause poor print quality, media jams, or printer damage. 5 Print the custom media. How do I load and print envelopes? " Before printing on envelopes, we recommend printing a test page. If the print result is not oriented as desired, select Rotated (Paper tab/ Orientation option). Do not use envelopes that have Sticky flaps Tape seals, metal objects, paper clips, fasteners, or peel-off strips for sealing Transparent windows Rough surface Material that will melt, vaporize, or emit dangerous fumes Been presealed 36 Printing on Media Use envelopes that are Common office envelopes with diagonal joints, sharp folds and edges, and ordinary gummed flaps Approved for laser printing Dry 1 2 3 4 5 6 7 In the printer driver (Setup tab/Media Type option), select Envelope. Select the size of the envelope (Paper tab/Original Document Size option). Remove the tray cover from Tray 1. Place the envelopes on a flat surface, and flatten them by pressing down the corners. Flex the envelope stack (including the edges) to remove any stiffness. Correct any bent corners, and tap the envelopes on a flat surface to align them. Squeeze the right paper guide and open the paper guides. Load the envelopes lengthwise and the printing-side up as shown in the illustrations. Printing on Media 37 Note Print envelopes on the front address side only. Some parts of the envelope consist of three layers of paper—the front, back, and flap. Anything printed in these layered regions may be lost or faded. 8 Recheck the paper guides to make sure they are adjusted to the width of the envelopes. Note Improperly adjusted guides may cause poor print quality, media jams, or printer damage. 9 10 Print the envelopes. Open the flap of each envelope immediately (before it cools) after the envelope is delivered to the output tray. " Because the envelopes pass through heated rollers, the gummed area on the flaps may seal. Using envelopes with emulsion-based glue avoids this problem. How do I load and print labels? A label consists of a face sheet (the printing surface), adhesive, and a carrier sheet: The face sheet must follow the plain paper specification. The face sheet surface must cover the entire carrier sheet, and no adhesive should come through on the surface. You can print continuously with label paper. However, this could affect the media feed, depending on the media quality and printing environment. If problems occur, stop the continuous print and print one sheet at a time. Format label data within your application. Try printing your data on a plain sheet of paper first to check placement. Check your application documentation for other information on printing labels. Do not use label sheets that Have labels that easily peel off Labels may stick to the fuser, causing them to peel off and media jams to occur. 38 Printing on Media Are precut OK to use Do not use Full page labels (uncut) Use label sheets that are Recommended for laser printers 1 2 3 4 In the printer driver (Setup tab/Media Type option), select Thick Paper. Select the size of the label (Paper tab/Original Document Size option). Remove the tray cover from Tray 1. Load the label media lengthwise and printing-side up in Tray 1. Adjust the paper guides to the width of the label media. Note Improperly adjusted guides may cause poor print quality, media jams, or printer damage. 5 Print the labels. How do I load and print postcards? Do not use postcards that are Coated Warped or bent Designed for inkjet printers Multicolored Preprinted or multicolored (may result in printer jamming) Use postcards that are Postcards (100 × 148 mm/3.9 × 5.8 in.) recommended for laser printers 1 2 In the printer driver (Setup tab/Media Type option), select Postcard. Select the size of the postcard (Paper tab/Original Document Size option). Printing on Media 39 3 4 5 6 Remove the tray cover from Tray 1. Place the postcards on a flat surface, and flatten them by pressing down the corners. Remove any media in Tray 1. Load the postcard media lengthwise and printing-side up in Tray 1. Adjust the paper guides to the width of the postcards. Note Improperly adjusted guides may cause poor print quality, media jams, or printer damage. 7 Print the postcards. How do I load and print thick stock? Test all thick stock to ensure acceptable performance and to ensure that the image does not shift. Do not use thick stock that is Mixed with any other media in the media trays (as this will cause printer jamming) Note Do not mix thick stock with any other media in the same tray, as this will cause printer jamming. 1 2 3 4 In the printer driver (Setup tab/Media Type option), select Thick Paper. Select the size of the stock (Paper tab/Original Document Size option). Remove the tray cover from Tray 1. Load the thick stock media lengthwise and printing-side up in Tray 1. Adjust the paper guides to the width of the thick stock. Note Improperly adjusted guides may cause poor print quality, media jams, or printer damage. 5 40 Print the thick stock. Printing on Media How do I load and print transparencies? Note Using unsupported transparency media such as coated color transparencies will result in damaging the printer and in voiding your warranty. Remove transparency media as soon as possible from the output tray to avoid static buildup. If you touch the face of transparencies with your bare hands, print quality may be affected. Do not handle transparency media too much. You can print continuously with transparencies. However, this could affect the media feed, depending on the media quality, static buildup, and printing environment. If you have problems loading a large number of transparencies at a time, try loading only 1–10 sheets. Do not use transparencies that Are coated, such as transparencies designed for color printers or copiers Have static electricity that will cause them to stick together Use transparencies that are Monochrome, uncoated transparencies (also known as OHP film) 1 2 3 In the printer driver (Setup tab/Media Type option) select Transparency. Select the size of the transparency (Paper tab/Original Document Size option). Fan a few transparencies. " 4 5 Fanning a large number will build up static electricity. Remove the tray cover from Tray 1. Load the transparency media lengthwise and printing-side up in Tray 1. Adjust the paper guides to the width of the transparencies. Note Improperly adjusted guides may cause poor print quality, media jams, or printer damage. 6 7 Print the transparencies. Immediately remove the printed transparencies from the output tray. Printing on Media 41 Manual Duplexing Select paper with high opacity for duplex (2-sided) printing. For best results, print a small quantity to make sure the opacity is acceptable. How do I manually duplex? " 1 2 3 4 42 Media jams may occur if the printed sheet(s) reinserted are not entirely flat. In the printer driver (Setup tab/Duplex/Booklet option), select the appropriate setting from Short Edge Binding, Long Edge Binding, Booklet Left Binding, or Booklet Right Binding. From the print dialog box of your software, select the necessary settings and print all pages. Remove the single-sided printouts from the output tray, and then insert them into Tray 1 with the same orientation that they were fed out. Click Proceed on the screen of your PC or press the Cancel button. Manual Duplexing Replacing Consumables When replacing a toner cartridge, refer to the following table. For optimum print quality and performance, use only approved KONICA MINOLTA toner cartridges for your specific printer type, as listed in the table below. You can find your printer type and the toner cartridge part numbers on the consumables reorder label on the inside of the front cover of your printer. Printer Type Printer Part Number Toner Cartridge Type Toner Cartridge Part Number EU 5250232-200 Standard-Capacity Toner Cartridge 1710566-002 High-Capacity Toner Cartridge 1710567-002 Drum Cartridge 1710568-001 Note If a toner cartridge used is of an unapproved type, cleaning will be performed after each page is printed, which reduces the print speed. 44 Replacing the Toner Cartridge When it is time to replace the toner cartridge, “Toner Cartridge Low” displays in the Status Display. The supplies status indication in the Status Display is only a reference. Printing can continue even though the warning appears. However, printing gradually fades out, so replace the toner cartridge as soon as possible. " In this manual, a toner cartridge attached to a drum cartridge is referred to as an imaging cartridge. Imaging cartridge Drum cartridge Toner cartridge 1 2 Open the front cover. Pull the handle of the imaging cartridge toward you, and then pull out the imaging cartridge. Note Do not expose the imaging cartridge to light for a long period of time. If the drum cartridge is exposed to light, decreased image quality may result. Replacing the Toner Cartridge 45 3 4 Move the lever on the toner cartridge in the direction of the arrow. Using both hands, separate the toner cartridge and drum cartridge. Toner cartridge Drum cartridge 46 Replacing the Toner Cartridge Note When separating the toner cartridge and drum cartridge, keep them level. Do not touch the OPC drum under the flap of the drum cartridge, otherwise decreased image quality may result. Do not touch any metal parts of the drum cartridge and toner cartridge, otherwise damage from static electricity may result. Replacing the Toner Cartridge 47 5 Remove a new toner cartridge from its box. " 6 7 Do not throw away the box. It may be used to pack the used toner cartridge. Holding it firmly with both hands, rock the toner cartridge left and right, to distribute the toner evenly. Remove the protective cover from the toner cartridge. Note Do not touch the developing roller of the toner cartridge, otherwise decreased image quality may result. 48 Replacing the Toner Cartridge 8 9 Holding both the toner cartridge and the drum cartridge in your hands, align the colored guide on the drum cartridge with the matching colored projection on the toner cartridge to fit the two cartridges together. Align the imaging cartridge with the guides in the printer, and then insert the cartridge. Note Do not insert the imaging cartridge at an angle or with extreme force, otherwise the printer may be damaged. 10 Close the front cover. Replacing the Toner Cartridge 49 Replacing the Drum Cartridge When the printed documents become faint or blurred, the drum cartridge may be at the end of its life. The drum cartridge has a capacity of about 16,000 (one-page jobs) to 20,000 (continuous printing) letter/A4 pages (at an average of 5% or less toner coverage). Select the Print menu in the Status Display, print out the Configuration page (Print Configuration Page), and then check the total number of prints. Note The OPC drum is extremely sensitive to bright light, direct sunlight, and touch. Always leave the drum cartridge in its protective package until you’re ready to install it. " In this manual, a toner cartridge attached to a drum cartridge is an imaging cartridge. Imaging cartridge Drum cartridge Toner cartridge 1 50 Open the front cover. Replacing the Drum Cartridge 2 3 4 Pull the handle of the imaging cartridge toward you, and then pull out the imaging cartridge. Move the lever on the toner cartridge in the direction of the arrow. Using both hands, separate the toner cartridge and drum cartridge. Toner cartridge Drum cartridge Note When separating the toner cartridge and drum cartridge, keep them level. Do not touch the developing roller of the toner cartridge, otherwise decreased image quality may result. 5 Remove a new drum cartridge from its box. Replacing the Drum Cartridge 51 " 6 Do not throw away the box. It will be used to pack the used drum cartridge. Holding both the toner cartridge and the drum cartridge in your hands, align the colored guide on the drum cartridge with the matching colored projection on the toner cartridge to fit the two cartridges together. Note Do not touch the OPC drum under the flap of the drum cartridge, otherwise decreased image quality way result. Do not touch any metal parts of the drum cartridge and toner cartridge, otherwise damage from static electricity may result. 7 Align the imaging cartridge with the guides in the printer, and then insert the cartridge. Note Do not insert the imaging cartridge at an angle or with extreme force, otherwise the printer may be damaged. 52 Replacing the Drum Cartridge 8 Press on the front cover grip and close the front cover. Replacing the Drum Cartridge 53 54 Replacing the Drum Cartridge Maintaining the Printer Cleaning the Printer Exterior Note Never spray cleaning solutions directly on the printer’s surface; the spray could penetrate through the air vents of the printer and damage the internal circuits. CAUTION Do not spill water or detergent into the printer, otherwise the printer will be damaged and an electric shock may occur. 56 Cleaning the Printer Pick-up Roller 1 2 3 Turn off the printer, unplug the power cord, and disconnect all interface cables before cleaning. Grab the front cover grip and open the front cover. Pull the handle of the imaging cartridge toward you, and then pull out the imaging cartridge. Note Do not expose the imaging cartridge to light for a long period of time. If the drum cartridge is exposed to light, decreased image quality may result. CAUTION The fusing unit is extremely hot. Touching any part near the fusing unit may result in burns. Do not touch the image transfer roller inside the printer, otherwise decreased image quality may result. Cleaning the Printer 57 4 5 Wipe the pick-up roller with a soft, dry cloth. Align the imaging cartridge with the guides in the printer, and then insert the cartridge. Note Do not insert the imaging cartridge at an angle or with extreme force; otherwise, the printer may be damaged. 6 58 Close the front cover. Cleaning the Printer Troubleshooting Indicator Messages The control panel indicators (Ready, Error) provide information about your printer and help you locate each problem. The indicators may show six types of signals: Off On Slow blinking—1 blink every 2 seconds Blinking—1 blink per second Rapid blinking—2 blinks per second Alternate blinking—Alternate Status Message Status messages indicate the current condition of the printer. The printer status also can be checked on the Status Display. (Refer to the “Working with the Status Display” on page 24.) Ready indicator (green) Error indicator (orange) Condition Action Off Off Power off None On Off Ready to print None Rapid blinking Off Warming up None Blinking Off Processing data None Printing On On Initializing (power on) None Canceling a print job Resetting a counter Slow blinking Off 60 Power save mode None Indicator Messages Ready indicator (green) Error indicator (orange) Condition Action On Slow blinking Toner near empty Prepare the toner cartridge. On Blinking Toner empty Replace the toner cartridge. On Rapid blinking End of toner cartridge service life Replace the toner cartridge. No toner cartridge is installed. Install the toner cartridge. Unapproved toner car- Install a tridge installed. KONICA MINOLTA toner cartridge. Note If a toner cartridge used is of an unapproved type, cleaning will be performed after each page is printed, which reduces the print speed. Indicator Messages 61 Error Messages These messages indicate errors which you must correct before a print job can continue or the printer status returned to “Ready”. Ready indicator (green) Blinking 62 Error indicator (orange) Condition Action Memory Overflow or Job Hold down the Cancel too Complex button for more than 5 seconds to cancel the print job. Decrease the amount of data to be printed (for example, by decreasing the resolution or by printing only a few pages at a time), and then try printing again. If that does not solve the problem, install an optional memory module. Communication Error. Check the printer cable. Video Under-run Hold down the Cancel button for more than 5 seconds to cancel the print job. Decrease the amount of data to be printed (for example, by decreasing the resolution), and then try printing again. Indicator Messages Ready indicator (green) Error indicator (orange) Rapid blinking alternately Condition Action No media in the tray specified in the printer driver. Load the appropriate type of media into Tray 1 or the manual feed tray, and then press the Cancel button (less than 5 seconds.) Media size error Load the appropriate size media into Tray 1 or the manual feed tray, and then press the Cancel button (less than 5 seconds.) If the “Auto Continue” option has been activated in the Status Display, the sheet already fed in, is automatically ejected after a predetermined time. Off Waiting for the Manual Duplex. Reload the media so the second side can be printed, and then press the Cancel button (less than 5 seconds.) (Refer to the “Manual Duplexing” on page 42.) Waiting for a proof print Press the Cancel button (less than 5 seconds) if the proof print is acceptable to continue the print job. If it is not acceptable, hold down the Cancel button for more than 5 seconds to cancel the current job. Slow blink- Paper empty ing Indicator Messages Load media into Tray 1 or the manual feed tray, and then press the Cancel button (less than 5 seconds.) 63 Ready indicator (green) Error indicator (orange) Condition Action Off Blinking Media jam Clear the jam, close the front cover, and then continue with the print job. Off On Front cover or top cover is open. Close the front cover or top cover. Service Messages This message indicates a more serious fault that can only be corrected by a customer service engineer. 64 Ready indicator (green) Error indicator (orange) Condition Action Off Rapid blinking Fatal error Turn the printer off, then on again. If the problem persists, contact your vendor or authorized service provider. Indicator Messages Clearing Jams Understanding the printer’s media path will help you locate media jams. Manual feed Transfer roller Feed roller Pick-up roller Tray 1 1 2 Open the front cover. Pull the handle of the imaging cartridge toward you, and then pull out the imaging cartridge. Note Do not expose the imaging cartridge to light for a long period of time, otherwise decreased image quality may result. Clearing Jams 65 3 Pull out the jammed media along the feeding direction. Note If media is jammed in the fusing unit, pull the media downward to remove it. CAUTION The fusing unit is extremely hot. Touching any part near the fusing unit may result in burns. Do not touch the image transfer roller inside the printer, otherwise decreased image quality may result. 66 Clearing Jams 4 Align the imaging cartridge with the guides in the printer, and then insert the cartridge. Note Do not insert the imaging cartridge at an angle or with extreme force, otherwise the printer may be damaged. 5 Close the front cover. Clearing Jams 67 Solving Problems-Printing Quality Symptom Cause Solution Blank page The toner cartridge may be defective. Remove the toner cartridge and check it for damage. Replace the toner cartridge, if necessary. Black page The toner cartridge may be defective. Remove the toner cartridge and check it for damage. Replace the toner cartridge, if necessary. Your printer may require servicing. Contact your local vendor, or refer to the General Information Guide. The toner cartridge may running out of toner. Remove the toner cartridge and shake it left and right a few times to distribute remaining toner. Print too light If the problem persists, replace the toner cartridge. The toner cartridge may be defective. 68 Remove the toner cartridge and check it for damage. Replace the toner cartridge, if necessary. Solving Problems-Printing Quality Symptom Cause Solution Print too dark The toner cartridge may be defective. Remove the toner cartridge and check it for damage. Replace the toner cartridge, if necessary. Blurred background The toner cartridge may be defective. Remove the toner cartridge and check it for damage. Replace the toner cartridge, if necessary. Uneven print density The toner may be unevenly distributed inside the toner cartridge. Remove the toner cartridge and shake it left and right a few times to distribute the remaining toner. The toner cartridge may be defective. Remove the toner cartridge and check it for damage. Replace the toner cartridge, if necessary. The image transfer roller may be defective. Contact your local vendor. The media may have absorbed some moisture due to high humidity or because of direct contact with water. Since toner will not adhere well to wet media, replace the media you are using with dry media and try printing again. Irregularities Solving Problems-Printing Quality 69 Symptom 70 Cause Solution White or black The toner cartridge may be lines defective. Remove the toner cartridge and check it for damage. Replace the toner cartridge, if necessary. Dark lines on the edges. The transfer roller is dirty. Contact your local vendor. Toner smudges The toner may be unevenly distributed inside the toner cartridge. Remove the toner cartridge and shake it left and right a few times to distribute remaining toner. The toner cartridge may be defective. Remove the toner cartridge and check it for damage. Replace the toner cartridge, if necessary. Smudges on the media indicate a dirty feed roller. Contact your local vendor. Solving Problems-Printing Quality Symptom Cause Solution There is insufficient fusing or the image comes off when rubbed. The media is moist from humidity. Remove the moist media and replace it with new, dry media. Media with specifications not Use media that is covered by covered by the printer warranty the printer warranty. is being used. The media type may be incorrectly set. When printing envelopes, labels, thick stock, and transparencies, the appropriate media type must be specified in the printer driver. Note for Windows Me/98SE USB users When you are using a USB connection and you cannot select the USB port during the installation of the KONICA MINOLTA PagePro 1350EN driver and utilities in Windows Me or Windows 98SE, cancel the CD-ROM installation procedure and remove the PagePro 1350EN Utilities & Documentation CD-ROM from the PC’s CD-ROM/DVD drive. Then proceed as follows : 1 2 3 4 5 6 Disconnect the USB cable from the printer side (leave the connector on the PC side). Turn off the printer and the PC. Then turn both on again. Wait until the PC and printer are ready. Insert the PagePro 1350EN Utilities & Documentation CD-ROM in the CD-ROM/DVD drive of your PC. When the CD-ROM Installer shows up, cancel it. Connect the USB cable with the printer. Now, the ‘New Hardware Found’ wizard shows up. Windows Me : Proceed with step 5. Windows 98SE : Wait until the ‘Add New Hardware’ wizard screen appears. Then click on Next. In the ‘Add New Hardware’ screen, select Automatic search for a better driver (Recommended). Then click on Next. Windows Me : Proceed with step 7. Windows 98SE : When the next dialog appears, check the ‘Specify a Note for Windows Me/98SE USB users 71 7 8 9 10 72 location’ box and then click on Browse. Browse the CD-ROM and navigate to : drivers\Win9x\USB. Then click on OK. Click on Next to display the next dialog. Click on Next again to display the next dialog. Wait until Windows finished the installation and then click on Finish. You have now installed the USB Printing Support driver (this is not the printer driver). The ‘New Hardware Found’ wizard shows up for a second time. Wait until the (second) ‘Add New Hardware’ wizard displays. Now, select Cancel. Do not install the printer driver using the (second) wizard! Browse the PagePro 1350EN Utilities & Documentation CD-ROM and double-click on setup.exe. Proceed with the driver installation. You should now be able to select ‘USB001’. Note for Windows Me/98SE USB users Installing Accessories Introduction Note Use of accessories not manufactured or supported by KONICA MINOLTA will void your warranty. This chapter provides information about the following accessory. Dual In-Line Memory Modules (DIMMs) 128 MB DIMM (unbuffered) Note Installing accessories always requires that the printer and accessories are turned off and unplugged during installation. Antistatic Protection Note If an antistatic wrist strap is provided in your printer option kit, attach one end of it to your wrist and the other end to any convenient electrical ground (for example, the bare metal chassis of equipment, as on the back of a computer, that is plugged in but turned off). Never attach the wrist strap to any piece of equipment with an electrical current present. Turn off all power switches first. Plastic, rubber, wood, painted metal surfaces, and telephones are not acceptable grounding points. The printer is not an acceptable grounding point either because it must be unplugged before you perform this task. If you do not have an antistatic wrist strap, discharge your body’s static electric charge by touching a grounded surface before you handle any printer boards or components and before removing the controller board. Also avoid walking around after grounding yourself. 74 Introduction Dual In-Line Memory Module (DIMM) " You may need additional memory for complex graphics, and for duplex printing. Dual in-line memory modules (or DIMMs) are compact circuit boards with surface-mount memory chips. Your printer comes with 32 MB SDRAM printer memory on board. However, you can upgrade to a maximum of 160 MB of RAM through the installation of an additional DIMM. Additional memory must be 128 MB DIMM. Your printer comes with one available DIMM slot. Installing a DIMM Note It is very important to protect the printer controller board and any associated circuit boards from electrostatic damage. Before performing this procedure, review the antistatic caution on page 74. In addition, always handle circuit boards by the edges only. 1 2 3 Turn the printer off and disconnect the power cord and the interface cables (if attached) from the printer. Open the front cover. Remove the screw on the back of the right cover. Dual In-Line Memory Module (DIMM) 75 4 Unhook the tab on the inside of the right cover by inserting your finger from the bottom of the printer, then pressing on the tab backward. Remove the right cover by lifting it up and out. 5 Remove the two screws at the top of the inner metal panel, and then loosen the screw at the front tab. Remove the left side of this panel out, and then slide the panel up to remove it. 6 Insert the new DIMM straight into the DIMM connector until the latches snap into the locked position. Move the left side of this panel out, and then slide the panel up to remove it. 7 8 9 10 11 76 Reattach the inner metal panel. Reattach the right cover. Close the front cover. Select the total amount of RAM in the driver (Device Options Setting -> Total Memory) Print a configuration page (Refer to “Printing a Test Page” on page 3) and verify that the amount of RAM installed in your printer is listed. Dual In-Line Memory Module (DIMM) Appendix Safety Specifications Printer Safety standards EMC standards U.S. model UL 60950, CSA C22.2 No. 60950 European model EU Directive 73/23/EEC EU Directive 93/68/EEC EN 60950 (IEC 60950) China model GB 4943 U.S. model FCC part 15 subpart B class B ICES-003 European model EU Directive 89/336/EEC EN 55022 (CISPR Pub. 22) class B EN 61000-3-2 EN 61000-3-3 China model GB 9254 class B, GB 17625.1 Australian model AS/NZS 3548 class B Technical Specifications Printer 78 Type Desktop laser beam printer Print system Electrostatic dry powder imaging system Exposure system Laser diode + polygon mirror scanning Developing system Electrophotographic printing system Resolution 1200dpi × 1200dpi (at half speed), 600dpi × 600dpi or 1200dpi × 600dpi Print speed 600dpi × 600dpi or 1200dpi × 600dpi 20 pages per minute for A4 21 pages per minute for letter 1200dpi × 1200dpi 10 pages per minute for A4 or letter First print 1200dpi × 600 dpi Within 13 seconds (A4/Letter) 1200dpi × 1200 dpi Within 22 seconds (A4/Letter) Warm-up time 21 seconds or less at startup Safety Specifications Media sizes • Paper—Letter, Legal, Executive, G Letter, Statement, Folio, Letter Plus, UK Quarto, Foolscap, G Legal, 16K, A4, A5, B5 JIS, Chinese 16K, Chinese 32K, custom paper sizes • Envelopes—#10, Monarch, DL, C5, C6, B5 (ISO), Choukei-3Gou and Choukei-4Gou • Postcard, Double Postcard Paper/Media • • • • • • • • Paper feeding • Tray 1 • Manual feed tray Input capacity • Tray 1: 250 sheets • Manual feed tray: 1 sheet Output capacity • Output tray: 100 sheets Operating temperature 10° to 35°C (50° to 95°F) Plain paper (60 to 90g/m2; 16 to 24 lb.) Recycled paper (60 to 90g/m2; 16 to 24 lb.) Transparencies Envelopes Thick paper (90 to 163g/m2; 24 to 43 lb.) Postcard Letterhead Label sheet Operating humidity 15 to 85% Power supply 220-240 V, 50-60 Hz Power consumption 220-240 V: 900 W Amperage 220-240 V: 4.5 A or less Acoustic Noise Printing: 54 dB or less Standby: 39 dB or less External dimensions (with Tray1 and the output tray closed) Height: 283 mm (11.1 in.) Width: 387 mm (15.2 in.) Depth: 455 mm (17.9 in.) Weight Printer: approximately 7kg (15.4 lb.) Drum cartridge: approximately 0.3kg (0.7 lb.) Toner cartridge: approximately 0.5kg (1.1 lb.) Interface IEEE 1284 compliant type B (Compatible/Nibble/ECP) USB 2.0 (High speed) compliant 10Base-T/100Base-TX Ethernet Interface port CPU D8701 (200 MHz) Standard memory 32 MB Technical Specifications 79 Consumables Life Expectancies Chart Item Average Life Expectancy (in Simplex Pages) Toner Cartridge Starter Cartridge : Average Cartridge Yield 1,500 standard pages Replacement Cartridge (Standard Capacity): Average Cartrdige Yield 3,000 standard pages. Replacement Cartridge (High Capacity): Average Cartridge Yield 6,000 standard pages. Declared yield value in accordance with ISO/ IEC 19752 " The toner cartridge life will be shorter when using intermittent printing. Drum cartridge 20,000 continuous printing " The drum cartridge life will be shorter when using intermittent printing. 80 Technical Specifications Technical Specifications 81 82 Technical Specifications Index A E Accessories 74 DIMMs 75 Additional memory 75 Antistatic protection 74 Electrostatic discharge 74 C Cleaning Exterior 56 Pick-up Roller 57 I Indicator 3 Error messages 62 Service messages 64 Status message 60 L D Loading Media 31, 34 Drum cartridge Replacing 50 Dual in-line memory modules 75 Duplex 42 M Index Manual Duplexing 42 Media Clearing jams 65 Loading 31, 34 83 Size 30 Storage 31 Type 31 Weight 30 P Page margins 33 Paper tab 14, 19 Printable area 33 Printer Parts 2 Printer driver 13, 19 Paper tab 14, 19 Quality tab 14, 20, 21 Setting 12, 18 Setup tab 14, 20, 25, 26 Printing Envelope 36 Label 38 Postcard 39 Thick stock 40 Transparency 41 Q Quality tab 14, 20, 21 S Setup tab 14, 20, 25, 26 Static electricity discharge 74 Status display Closing 27 Opening 24 Using 26 T Toner cartridge Replacing 45 Troubleshooting 59 Clearing jams 65 W Wrist strap for antistatic protection 74 84 Index