1
AudioSculpt 2
User’s manual
by Alain LITHAUD
AudioSculpt 2: User’s manual
Edited by Karim Haddad
Published Date: 18/02/2003 19:25
This manual can not be copied, in whole or part, without the written consent of IRCAM.
This manual was written by Alain Lithaud, and was produced under the editorial responsibility of Karim Haddad, Marketing and
Communication Dept. , IRCAM.
AudioSculpt was conceived and programmed by Philippe Depalle, Chris Rogers, Alberto Ricci, David Ralley, David Ralley,
Marc Locascio under the supervision of Xavier Rodet.
SuperVP was conceived by Philippe Depalle and programmed by Philippe Depalle, Gilles Poirot, Chris Rogers, Jean Carrive,
Axel Roebel.
The analysis algorithm models where conceived and designed by Xavier Rodet, Philippe Depalle, Guillermo Garcia, Ernst
Terhardt, Boris Doval, Axel Roebel.
This documentation corresponds to version 2.01 of AudioSculpt (Sept. 2002 edition).
Apple Macintosh™ is a trademark of Apple Computer, Inc.
AudioSculpt™ is a trademark of IRCAM.
SuperVP™ is a trademark of IRCAM.
Copyright © 2003 by IRCAM. All rights reserved.
The use of this software and its documentation is restricted to members of the IRCAM software users’ group. For any
supplementary information, contact:
Marketing and Communication Dept.,
IRCAM
1 place Igor-Stravinsky
F-75004,Paris
FRANCE
Phone:(33) (1) 44 78 49 62
Fax: (33) (1) 42 77 29 47
Email: palumbo@ircam.fr
Comments or suggestions to the editor:
Karim Haddad
Marketing and Communication Dept.,
IRCAM
1 place Igor-Stravinsky
F-75004,Paris
FRANCE
Phone:(33) (1) 44 78 16 05
Email: haddad@ircam.fr
For more information: http://www.forumnet.ircam.fr
Table of Contents
Introduction ..........................................................................................................................i
1. Foreword.................................................................................................................... i
2. Warning ..................................................................................................................... i
1. Getting started.................................................................................................................1
1.1. Important Notice ....................................................................................................1
1.2. Starting AudioSculpt ............................................................................................1
1.3. AudioSculpt’s window ..........................................................................................1
1.4. The sonogram .......................................................................................................3
1.5. Scales....................................................................................................................4
1.6. Zooms....................................................................................................................4
1.7. The tool palette (Tools) ..........................................................................................5
1.8. Spectrum and tuning fork ......................................................................................6
1.9. The Inspector Window ...........................................................................................7
2. Processing .......................................................................................................................9
2.1. Normalization.........................................................................................................9
2.2. General information ...............................................................................................9
2.3. Surface filtering......................................................................................................9
2.3.1. Rectangular surface tool ..........................................................................10
2.3.2. Free surface tool ......................................................................................11
2.3.3. General notes to all surfaces ...................................................................12
2.3.3.1. Reminder......................................................................................12
2.3.3.2. Selection of several surfaces........................................................12
2.3.3.3. Gain..............................................................................................13
2.3.3.4. "Replicate in Frequency...".........................................................13
2.3.3.5. "Replicate in Time..." ..................................................................13
2.3.3.6. "Invert" .........................................................................................14
2.4. Other "constant" processes .................................................................................14
2.4.1. Constant TimeStretching: expansion/compression..................................15
2.4.2. Constant Transposition ............................................................................15
2.4.3. Constant Formant ....................................................................................16
2.4.4. Band.........................................................................................................17
2.4.5. Clipping ....................................................................................................18
2.5. Processing using Bpfs .........................................................................................18
2.5.1. Breakpoint Filter: filter by Bpf...................................................................19
2.5.2. Dynamic Transposition.............................................................................20
2.5.3. Dynamic TimeStretching: expansion/compression ..................................20
2.5.4. Dynamic Formant.....................................................................................21
2.6. the pencil .............................................................................................................21
2.7. Source Filter Synthesis........................................................................................23
2.8. Selection and removal of processes....................................................................24
2.9. Multiple Processing .............................................................................................24
2.10. Calculation of processings.................................................................................25
2.10.1. Calculation on the totality of the sound: "Process Treatments"............25
2.10.2. Calculation of one part of the sound: "Process Selection"...................25
2.10.3. AudioSculpt and SuperVP messages..................................................26
2.10.4. temporary files .......................................................................................26
Ircam documentation
v
3. The sequencer...............................................................................................................27
3.1. The sequencer’s tracks........................................................................................27
3.2. The sequencer’s grid ...........................................................................................28
4. Savings ..........................................................................................................................29
4.1. Processing...........................................................................................................29
4.2. Bpfs .....................................................................................................................29
4.3. Fft files .................................................................................................................29
5. the Bpf editor.................................................................................................................31
6. Menus .............................................................................................................................33
6.1. "File" menu ..........................................................................................................33
6.2. "Edit" menu .........................................................................................................33
6.3. "Processing" menu.............................................................................................34
6.4. "Treatments" menu .............................................................................................34
6.5. "Window" menu ..................................................................................................35
6.6. "Bpf" menu ..........................................................................................................36
7. Stereophonic sounds ...................................................................................................37
8. AudioSculpt and MacOS X ...........................................................................................39
9. command-lines..............................................................................................................41
10. Bugs and Errors ..........................................................................................................43
A. SuperVP Help................................................................................................................45
B. SuperVP Help : Filter module description..................................................................55
vi
Ircam documentation
Introduction
1. Foreword
This document will not consider the basic concepts of AudioSculpt. Those could be consulted in the AudioSculpt 1.2b1 documentation. The "AS2" directory contains the following
elements:
•
"AudioSculpt 2" - the application itself.
•
"Fft" - an empty directory storing the temporary Fft files.
•
"Kernels" - a directory which contains the SuperVP binary (in this version: SuperVP 2.03).
•
"Sounds" - a directory containing "africa.aiff", a sound-file example and in which can be
stored other sound-files.
•
"svp" - a directory which contains essential files used for running the application.
•
"Temp" - an empty directory storing the application’s temporary files.
•
"Treatments" - an empty directory storing processing files.
It’s very important not to move any of these directories or files except the "Sounds" directory.
If this would be the case, Audiosculpt would crash or result in errors.
AudioSculpt was tested on MacOS 9 and MacOs X (10.2).
2. Warning
Warning
AudioSculpt 2.01 is still in its development phase.
However a great number of bugs have been corrected and new functions are
available.
In chapter 11 you will find a non exhaustive list of bugs and known features.
All observations and comments can be send to: audiosculpt@ircam.fr1.
Please try to describe the different steps that caused error messages or bugs (
if possible,join some screen shots). That way we can reproduce them in order
to fix them.
Some bugs may occur only on certain software configurations (systems) or
machines communicating those details could also help bug fixing.
Some functions appear in gray or do not appear in the menus:they are still
under development.
For the expert users, it is possible to use SuperVP 2.03 for using
AudioSculpt’s processing starting from command-lines (see chapter 9).
Ircam documentation
i
Introduction
ii
Ircam documentation
Chapter 1. Getting started
1.1. Important Notice
Unless your computer is powerful enough, it’s not recommended to open mono sounds of
more than 2 or 3 minute long. Beyond this limit, the system will slow down the display which
uses most of the resources of the machine. This could lead to an unexpected failure of the
application.
The processing of SDII sounds doesn’t work (error message and an unreadable sound-file).
1.2. Starting AudioSculpt
AudioSculpt can be started up either by double-clicking on the application’s icon, or by
using drag-and-drop of a sound file on the application’s icon.
In the first case, AudioSculpt will open different windows on the desktop. These are already
checked in the "Window" menu.(see section 6.5)
Note: The Tab key allows switching between these palettes ("Tools", "Inspector" and "Color
Palette").
After that, go to the menu "File" and select "Open...".
Choose your sound in the dialog window. Audiosculpt’s main window will open and the
name of the sound-file will appear as follows:
Ircam documentation
1
Chapter 1. Getting started
When using the drag-and-drop method, the window will open automatically.
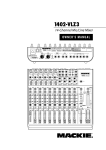
1.3. AudioSculpt’s window
This window can be adjusted in the ordinary way (see the box bellow on the right). In top, on
the left, you will find information concerning the opened sound.
Zone 1 (Upper zone) displays the sound as a waveform. The red frame displays the visible
part of the sound in zone 2.
2
Ircam documentation
Chapter 1. Getting started
To play the sound, press on space bar. To stop, press again.
Note: If one part of the sound is selected (see chapter 6), only this part will be played. If you want
to hear the whole sound, the selection will be lost. Right now it’s not possible yet to put the cursor
at any position and start playing from there.
Note: Do not use the sonogram while the sound is played.
Zone 2 is the "sound window". It’s possible to navigate throughout the sound by using the
zoom. First, it shows the entire sound (except the end which is hidden by the vertical slider).
Zone 3 displays the sonogram as well as the spectrum, on the right.
Zone 4 is the sequencer: tracks on which you will position your processing commandds.
Zones 2,3 and 4 are provided with an identical horizontal time axis. They are synchronized.
You can move the horizontal slider which will appear on the bottom of the window once you
zoomed into a sound.
In all zones, you will find a small triangle which can be used to close the windows.
Ircam documentation
3
Chapter 1. Getting started
The size of zones 1,2 and 3 can be adjusted by bringing the pointer on the bar located
between two zones.
When you click, the pointer will become a hand holding the bar and will allow you to move it
upward or downward.
The same function exists to adjust the widths of the sonogram and the spectrum.
Note: In this case, it is not advised to use it to its extreme position on the right, because the
spectrum will not be displayed any more.
1.4. The sonogram
In the menu "Processing", choose "Sonogram Analysis":
A dialog box opens and you can choose your parameters:
4
Ircam documentation
Chapter 1. Getting started
Note: By default, the box " Verbose Output" is not checked, this allows fast calculation. If you
check this option (for expert users: flag - v) , all information will be displayed in SuperVP’s console.
When you click on "Do Analysis" a dialog window will ask you under which name (here
"africa.fft" by default) and where you want to save the Fft file.
After having clicked on OK, the console of AudioSculpt will open in the foreground and will
allow you to see the progress of the processing. After that, the console will appear in the
background and the sonogram will be displayed.
By default, this one displays the band ranging between 0 and 7000 Hz, the section where
there are the most interesting elements. By double-clicking on the vertical scale the totality
of the sonogram between 0 and 22050 Hz will be displayed.
The value of the different gray tones can be modified in the "Edit Colors" floating palette. To
open this, check "Show Color Palette" in the menu "Window" ( see section 6.5 ). Default
settings are: +10 dB for black and -40 dB for white.
By using the Tab key you can choose to hide or to show this palette as well as each of the
two others ("Tools" and "Inspector").
In the "Window" menu, "Optimize Sonogram" toggles the display of the sonogram and the
"sound window" (zones 2 and 3) in full screen mode. The corresponding keyboard short cut
is "command+u".
1.5. Scales
By doing "Control+click" on a scale, you can open a contextual menu proposing a choice.
•
Time scale (sound, sonogram, tracks, Bpf for transposition and expansion/compression):
Ircam documentation
5
Chapter 1. Getting started
•
Frequency scale (sonogram and spectrum, Bpf filter):
•
Transposition scale (Bpf transposition):
•
Amplitude scale: linear for the "sound window" and logarithmic for the Bpf filter). As for
the spectrum, the scale is in dB, although the indications of value and type (linear) are
incorrect.
1.6. Zooms
These actions are valid for all scales (horizontal and vertical for AudioSculpt window and
Bpf).
You can put the pointer on any value of any scale and, while holding the mouse button, you
can zoom in it by moving the mouse slightly to the right and zoom out by moving slightly to
the left.
The same action can be obtained with the "command" key ("apple") starting from the value
on the left of the window.
By positioning any tool on any value of any scale and by holding the mouse button, the
scale will get bigger and bigger around this value until the release of the mouse button.
The magnifying glass tool has the particular characteristic that it can become negatif: when
pressing on the option key, you can zoom backward.
Double-clicking on a scale will turn it into its initial dimension.
The magnifying glass (see section 1.7) allows you to select a part of the sonogram or the
sound ("sound window") and to readjust the size of the window. Double-clicking in the sonogram or on a ruler will return it to the initial width.
6
Ircam documentation
Chapter 1. Getting started
By positioning the magnifying glass on the "sound window" or on the sonogram and by
using option-click, the magnifying glass becomes negative and a back zoom centered on
this position is done.
Once you zoomed in the sound or the sonogram, the red frame on the upper zone reduces
the part of the sound which is visible in zone 2.
Note: If the zoom is too big, the red frame cannot be displayed
Positioning any tool on this red frame and holding the mouse button allows you to move
along in the sound and the sonogram.
Note: :The red frame is not very precise.
The "hand" tool (see section 1.7 ) allows you to grab the image of the sonogram and to move
it into any direction in its window (the "sound window" will be automatically displayed).
In the "Window" menu, "Optimize Sonogram" allows you to display the sonogram and the
"sound window" (zones 2 and 3) in full screen mode and vice-versa. The corresponding
keyboard short cut is "command+u".
1.7. The tool palette (Tools)
The tool palette appears if you check "Show Tools" in the "Window" menu (it is advised to
check this option once for all).
Ircam documentation
7
Chapter 1. Getting started
The tools have about the same functions as in the previous versions of AudioSculpt. Their
particular use is described in the corresponding paragraphs.
Keyboards Shortcuts make it possible to change quickly from one tool to another:
a = Arrow pointer
h = Hand tool
s = Frame surface tool
l = Lasso tool
d = Tuning fork tool
z = Magnifying glass tool (Zoom)
b = Selection cursor (Beam)
r = Area tool - disabled in this version
e = pencil tool - disabled in this version
Note: The Tab key allows switching between these palettes ("Tools", "Inspector" and "Color
Palette").
1.8. Spectrum and tuning fork
When playing a whole sound or a part of a sound whose sonogram is opened, the spectrum
display will follow the movement of the cursor.
Positioning the tuning fork tool into a sonogram, the spectrum which corresponds to this
particular moment in the sound will be displayed. The active part of the tuning fork is the
small bullet located below.
8
Ircam documentation
Chapter 1. Getting started
A pure sinusoidal sound is played using the frequency and the amplitude which corresponds
to the position where has been clicked in the sonogram.
Its frequency and its amplitude are indicated in the "Inspector Window" (see section 1.9 ).
1.9. The Inspector Window
This floating window will open ounce you clicked on the item "Show Inspector" in the
"Window" menu.
Note: The Tab key allows you to switch between these palettes ("Tools"and "Color Palette").
This window gives detailed information about the position and the values of processing and
the tuning fork.
Ircam documentation
9
Chapter 1. Getting started
It displays information relating to one element selected on a track.
This palette is very useful for measuring with precision the parameters of a processing object.
To modify a parameter’s value, click to select it, then type the new value and press "return"
or "enter" to validate.
That way, it’s very simple to position and measure with great precision an object, by defining
two of the three parameters: starting time (Horiz.), ending time (End) or length (Width).
It also gives you access to the gain, the coefficient of "expansion/compression", etc...
According to the process in use, the change of certain parameters will not affect the process
itself, but only its display on the screen. For example, for a "expansion/compression", the
modification of the frequency values (Vert. and Height ) does not have any effect to the
result.
In Bpf processing , the variable is marked " nan " and cannot be modified.
10
Ircam documentation
Chapter 2. Processing
2.1. Normalization
Normalization is applied to the total length of the soundfile.
The "Normalize" function can be found in the "Processing" menu. It opens up a dialog box
which allows you to adjust (in dB) the remaining margin after normalizing.
Of course, Normalization is done in relation to the maximum which is generally zerodb : the
use of 116 dB corresponds to the gain obtained during processing.
2.2. General information
There are two processing types:
Constant processing:
- Surfaces: filtering by rectangular or free surfaces.
Surfaces can only be accessed by using the "Tools" floating palette.
The following processes are accessible only by the "Treatments" menu and only if the whole
of a sound or part of it is selected:
- Constant Time-Stretch: "Expansion/compression" with constant coefficient.
- Constant Transposition: constant "Transposition" with or without time correction.
- Constant Formant: filtering by "Formant".
- Band: "Band" type filtering (band pass or reject).
- Clipping: "Clipping" filtering.
Bpf processing (accessible only from the "Treatments" menu and only if the whole of a
sound or part of it is selected):
- Breakpoint : Bpf filtering .
- Dynamic Time-Stretch: "Expansion/compression" with variable coefficient.
- Dynamic Transposition: Time variable "Transposition".
- Forming Dynamic: variable filtering by "Formant".
Note: It is not necessary to display the sonogram to start processing.
Ircam documentation
11
Chapter 2. Processing
2.3. Surface filtering
2.3.1. Rectangular surface tool
With the rectangle surface tool, you can draw a surface on the sonogram. The rectangle
surface tool is gray and, at the same time, a rectangle of the same duration appears on the
first track (zone 4) showing the corresponding icon of the processing.
To give a value (positive or negative in dB):
- double-click on the rectangle of the track opens a dialog box in which you can type your
value.
Note: The value limits are -116 dB and +116 dB (if you exceed these limits, the value which will
appear will be -116 dB or +116 dB).
- Another possibility: position any tool (except the tuning fork) on the surface placed in the
sonogram. By pressing on the control key, then by keeping the mouse button pressed and
by moving this one, the values can be scrolled. The limits are -116 dB and +116 dB.
12
Ircam documentation
Chapter 2. Processing
You can move as you like the surface placed on the sonogram by using the pointer tool: the
rectangle track will follow.
You can temporally move the rectangle of the track using any tool.
By pressing on the option key, the pointer tool allows you to copy the surface and to place
it wherever you want . While copying the track, you may choose only the temporary position
of the copy, while copying the sonogram, you may choose the temporary position and the
frequency position of the duplication.
To readjust the surface, place the end of the pointer tool on the edge of this one, it will be
transformed into two small black triangles. By clicking, you can enlarge or reduce the surface
vertically or horizontally.
The same procedure on the tracks will allow you to modify in time.
The Inspector window indicates the position, dimensions and gain of the processed selected
surface.
Ircam documentation
13
Chapter 2. Processing
It is possible to modify any parameters by using this window (see section 1.9).
To remove one or more surfaces, select them (on the track or the sonogram) in the usual
way (shift key) then press on the backspace key or choose "Clear" in the Edit menu. The
lasso tool also enables multiple selection.
Dragging and dropping one or more surfaces on the desk allows you to save all the characteristics of these surfaces (horizontal and vertical positions as well as the corresponding
gains): the processing will be called "extrait de AudioSculpt x". To use the same processing
on any other sound, drop "extrait de AudioSculpt x" on the sonogram (see chapter 4). You
can re-name these excerpts if you want.
2.3.2. Free surface tool
With the free surface tool, you can draw two kinds of surfaces on the sonogram: polygonal
or freehand.
A polygonal surface is obtained by positioning the tool wherever you want for the first point,
then by clicking once and by moving the tool at the location of the second point. Again,
by clicking once, the same procedure can be repeated. Double-click will close again the
polygon.
14
Ircam documentation
Chapter 2. Processing
It is possible to move a point using the pointer tool: this one is transformed into a red cross
when it reaches a point. You can click on it to move it.
It is possible to create a new point by using the pointer tool: this one is transformed into a
black cross when it touches a line. You can click on it to move it.
Ircam documentation
15
Chapter 2. Processing
A freehand surface is obtained while positioning the tool at the location you want , by maintaining the button of the mouse clicked and then drawing the desired contour. The surface
will be closed again automatically (by a segment) once the button of the mouse is released.
Surfaces are gray. At the same time, rectangles (track elements) are created on one same
track (zone 4) having the same duration of each surface and corresponding icons.
To give a value (in dB) to a surface, use one of the two methods described for rectangular
surfaces (by opening the window "Edit dB Value" by double-clicking on the element of the
track or by pressing on the control key, then by maintaining the button of the mouse pressed
and by moving it).
Moving, duplicating, deleting and saving by Drag and Drop on the finder of surfaces can be
done in the same way as for rectangular surfaces.
To readjust one of these surfaces in time, place the end of any tool on the border of the
corresponding track element, it will be transformed into two small black triangles, then while
clicking, stretch or reduce the element horizontally.
Modifications on the surface itself is impossible.
16
Ircam documentation
Chapter 2. Processing
The "Inspector" window indicates the position, dimensions and gain of the selected processing.
It is possible to modify the gain and time positioning by using this window. But it is not
recommended at all to modify the frequency positions.
2.3.3. General notes to all surfaces
2.3.3.1. Reminder
Moving, duplicating, deleting and saving by Drag and Drop can be applied to an unspecified
number of surfaces of any type.
2.3.3.2. Selection of several surfaces
In addition to the usual method (holding the shift key), the selection of several surfaces on
the sonogram can be made in the same way as on the Finder with the pointer tool by drawing
a rectangle around them.
It can also be done with the lasso tool (it is not necessary to include them completely).
2.3.3.3. Gain
It is possible to give the same gain at the same time to several surfaces (rectangular or
freehand). Select the elements in the usual way (by holding the shift key) then use one
of the two methods described above (by opening the window "Edit dB Valuee" by doubleclicking on the rectangle of the track or by pressing on the control key, then by holding the
mouse button pressed and by moving this one).
The color of the surfaces depends on the value of the gain: blue for a positive value and red
for a negative value.
2.3.3.4. "Replicate in Frequency..."
This function can be found in the " Processing" menu. It is used for duplicating selected
surfaces along the frequency axis.
Ircam documentation
17
Chapter 2. Processing
It is necessary to choose the number of replicates and their frequency shift upward or downward in Hertz or Cents (one hundredth of a semitone) or in interval.
It should be noted that the track elements are superposed.You can change the gain of each
replicate only by selecting them one by one with the pointer tool. Each one of them could be
moved horizontally (and even vertically).
18
Ircam documentation
Chapter 2. Processing
Please note that this function is valid only for surfaces and the pencil.
2.3.3.5. "Replicate in Time..."
This function can be found in the "Processing" menu. It is used for duplicating selected
surfaces along the time axis.
It is necessary to choose the number of replicates and their time shift on the right (positive
time in seconds) or on the left side (negative time in seconds).
Ircam documentation
19
Chapter 2. Processing
Please note that this function is valid for any processing.
2.3.3.6. "Invert"
This function can be found in the "Treatments" menu. It allows you to change the gain sign
of selected surfaces.
20
Ircam documentation
Chapter 2. Processing
Please note that this function is valid for any processing (see below) except for "Clipping".
It will react to the gain or to any other parameter.
Ircam documentation
21
Chapter 2. Processing
2.4. Other "constant" processes
These processes are available only if the whole sound or a part of it is selected with any
tool (except the magnifying glass) on the "sound window", or only with the cursor tool for the
sonogram.
In order to select the whole sound, choose "Select All" in the "Edit" menu or double-click in
the "sound window" (zone 2).
The processing will be applied to the selected part of the sound.
The proposed processes can be found in the first part of the "Treatment" menu):
- Constant TimeStretch: to apply a variation in the temporal field, defined by a constant
coefficient.
- Constant Transposition: to apply a constant transposition with or without correction of
time.
22
Ircam documentation
Chapter 2. Processing
- Constant Formant: constant filtering of formantic type.
- Band: filtering of the type "Band" (band-widths or rejection of bands).
- Clipping: filtering by " Clipping ".
2.4.1. Constant TimeStretching: expansion/compression
In the "Treatment" menu, choose"Add Constant TimeStretch...". The following dialog box
will open and allows you to choose the coefficient of expansion/compression.
The threshold values are 0.01 for compression and 10 for expansion (if you exceed these
limits, the number will be automatically corrected).
A rectangle of the same duration carrying the corresponding icon of the processing (track
element) will be created.
To modify the coefficient, it is necessary to reopen the dialog box by double-clicking on the
the track element.
You can move, readjust or duplicate the rectangle (thus the processing itself) on the track in
the same way as it is done with surface elements.
You can also modify your processing by using the "Inspector" palette.
Ircam documentation
23
Chapter 2. Processing
The "Replicate in Time..." and "Invert" functions are active.
The "Invert" function gives the opposite coefficient:
X = 1 / y (2 for 0.5 for example).
2.4.2. Constant Transposition
In the "Treatment" menu, choose "Add Constant Transposition...". The following dialog
box will open and allows you to choose your parameters.
Values can be entered in Cents or interval.
A box enables you to choose time correction or not (time correction is checked by default).
The transposition is limited to about 5 octaves.
A rectangle of the same duration carrying the corresponding icon of the processing (track
element) will be created.
24
Ircam documentation
Chapter 2. Processing
To modify the transposition, it is necessary to reopen the dialog box by double-clicking on
the track element.
You can move or readjust time-wise or duplicate the rectangle (therefore process) on the
track in the same way as surface elements.
You can also modify your processing by using the "Inspector"palette.
"Replicate in Time..." and " Invert " functions are active. The "Invert" function changes the
transposition sign.
2.4.3. Constant Formant
In the "Treatment" menu, choose "Add Constant Formant...". The following dialog box will
open and allows you to choose your parameters.
Ircam documentation
25
Chapter 2. Processing
If you ask for a positive gain, AudioSculpt warns you that it is necessary to normalize the
output by checking the adequate box in the calculation dialog box of (see section 2.10).
A rectangle of the same duration carrying the corresponding icon of the processing (track
element) will be created.
To modify the processing, it is necessary to reopen the dialog box by double-clicking on the
track element.
You can move or readjust time-wise or duplicate the rectangle (therefore process) on the
track in the same way as surface elements.
You can also move the selection on the sonogram vertically with the pointer tool, but the
position of the formants will not be changed.
You can also modify your processing by using the "Inspector" palette.
"Replicate in Time..." and "Invert" are active. The "Invert" function changes the sign of
gain.
26
Ircam documentation
Chapter 2. Processing
2.4.4. Band
In the "Treatment" menu, choose "Add Band...". The following dialog box will open and
allows you to choose your parameters.
A rectangle of the same duration represented by an icon which corresponds to the processing (track element) will be created.
You can modify the bands as you like.
It is possible to move a point by using the pointer tool: this one is transformed into a red
cross when it moves over one of them. Click above and move it.
It is possible to create a pair of points by using the pointer tool: this one is transformed into
red cross when it moves over a line that indicates the limit of a band.Click on it to move it.
Bands could be crossed.
Ircam documentation
27
Chapter 2. Processing
If you reopen the dialog box while double-clicking on a track element, you can choose only
between "Band Pass" and "Band Reject" without changing the bands themselves. You get
the same result with the "Invert" function. But if you choose "More Options", AudioSculpt
warns you that you will lose all changes previously made.
You can move or readjust time-wise or duplicate the rectangle (therefore process) on the
track in the same way as other elements.
You can also move the selection on the sonogram vertically with the pointer tool.
You can also modify your processing (only temporally) by using the "Inspector" palette.
"Replicate in Time..." and " Invert " functions are active.
2.4.5. Clipping
For this function, the sonogram is needs to be displayed as well as the floating palette "Edit
Colors" that has to be is opened.This will open if you check "the Show Color Palette" item
in the "Window" menu.
28
Ircam documentation
Chapter 2. Processing
The Tab key hides or show in turn this palette as well as the two others ("Tools" and "Inspector").
The values by default are: +10 dB for black and -40 dB for white.
In the "Treatment" menu, choose "Add Clipping...".
On the sonogram, two yellow vertical lines will represent the limits of the time selection.
The filtering is applied by using the two cursors of the floating palette "Edit Colors". While
the whole sonogram is affected by the changes, only the selected part of the sound will be
modified during calculation.
To Modify the two values, you can either use the floating palette "Edit Colors", or open the
dialog box by double-clicking on the track element. For this, also the "Inspector" palette can
be used.
You can move or readjust time-wise or duplicate the rectangle (therefore process) on the
track in the same way as surface elements.
You can also modify your processing by using the "Inspector" palette.
The function "Replicate in Time..." is active.
Ircam documentation
29
Chapter 2. Processing
2.5. Processing using Bpfs
The Bpf processing is available only if the whole sound or part of it is selected with any tool
except the magnifying glass for the "sound window",(for the sonogram only with the cursor
tool).
To select the whole sound, choose "Select All" in the "Edit" menu or double-click in the
"sound window" (zone 2).
The processing will be applied to the selected sound part.
The processings available in this version are as follows (you will find them in the Treatments
menu):
Breakpoint Filter: to apply a "breakpoint" filtering on the duration which was selected.
- Dynamic Transposition: to apply a transposition defined by a Bpf.
- Dynamic Time Stretching: to apply a variation in the temporal field, defined by a Bpf.
- Dynamic Time Formant: formant filter type, defined by a Bpf .
The "Inspector" window shows the position and dimensions of the processing for each Bpf
that was selected and makes it possible to modify these parameters. The other parameters
can be modified only if they are constant, if not they are will be validated as "nan".
"Replicate in Time..." and "Invert" functions are active.
30
Ircam documentation
Chapter 2. Processing
2.5.1. Breakpoint Filter: filter by Bpf
In the "Treatment" menu , use "Add Breakpoint...": a window which is well-known for Diphone’s users will open. It is a Bpf editor called "sound, Bpf type, time of beginning and time
of end" (here "africa.aiff breakpoint 1.22-3.08") in which you can draw and edit the Bpf that
represent your filter (see chapter 4).
The frequencies can be found on the horizontal axis, the amplitude on the vertical axis. The
editor limits the gain to +116 dB and the attenuation to -116 dB. The window name makes it
possible to identify and find it among other opened windows through the" Window" menu.
Note: It loses its name and becomes simply "Breakpoint filter" in a general saving process (see
chapter 4).
At the same time on another track the rectangle of the same duration appears and is represented by the icon which corresponds to the processing.
Ircam documentation
31
Chapter 2. Processing
To modify a Bpf, it is necessary to reopen the window by double-clicking on the element of
the track (or the corresponding surface of the sonogram, only for the "BreakPoint Filter").
You can move, readjust time-wise or duplicate the rectangle (thus processing) on the track
in the same way as in surfaces.
"Replicate in Time..." and "Invert" functions are active. The "Invert" function changes the
sign of gain.
2.5.2. Dynamic Transposition
In the "Treatment" menu, choose "Add Dynamic Transposition...": the process is the same
one as for the "Breakpoint filter".
The horizontal axis represents time and the vertical axis the transposition in Cents (hundredth of a semitone) and in semitone.
The editor limits the transposition to about 5 octaves.
The corresponding element will be placed on another track.
32
Ircam documentation
Chapter 2. Processing
"Replicate in Time..." and "Invert" are active. The "Invert" function gives the opposite transposition.
2.5.3. Dynamic TimeStretching: expansion/compression
In the "Treatment" menu, choose "Add Dynamic TimeStretch...": the process is the same
one as for the "Breakpoint filter" and "Dynamic Transposition".
The horizontal axis represents
expansion/compression.
time
and
the
vertical
axis
the
coefficient
of
The editor limits the coefficient to -0,01 for compression and 10 for expansion.
The corresponding element will be placed on another track.
Ircam documentation
33
Chapter 2. Processing
The modifications are done as for any Bpf.
"Replicate in Time..." and "Invert" are active. The "Invert" function gives opposite Bpf .
2.5.4. Dynamic Formant
Important: This processing does not work with this version of SuperVP. However, if you start
the calculation, SuperVP’s will start up and stop without giving any error message. It is then
necessary to click on the console’s "Stop" button.A empty window "Untitled" will open which has
to be closed.
The general performance is the same as in "Constant Formant" filtering.
In the "Treatment" menu, choose "Add Dynamic Formant...". The following dialog box will
open and allows you to choose your parameters.
34
Ircam documentation
Chapter 2. Processing
If you ask for a positive gain, AudioSculpt warns you that the output should be normalized.
After having defined the parameters and having clicked on OK, the Bpf editor window will be
displayed and will show the formantic filters which you can modify as usual.
The corresponding element will be put on another track.
Ircam documentation
35
Chapter 2. Processing
The modifications are done as in any Bpf.
"Replicate in Time..." and "Invert" are active. The "Invert" function changes the sign of
gain.
2.6. the pencil
Important: This function is not yet completely implemented and its performance is not the same
as in the well-known pencil found in 1.x AudioSculpt’s versions.
For this processing, the display of the sonogram is essential.
In the "Tools" floating palette, choose the tool pencil and at the same time choose the
thickness of the stroke (if the default value is not appropriate):
36
Ircam documentation
Chapter 2. Processing
By default, the thickness of the stroke is 6 pixels and the attenuation of -50 dB.
Tip: These two default values can be modified: go in the preferences ("Edit" menu, "Preferences"
item) and click on the "Pencil Tool" tab.
Tip: The thickness of the stroke is not taken into account in the preferences, it is better to define
it in the corresponding menu.
Tip: By holding the shift key, it seems that it’s possible to draw a rectilinear displacement, but
actually no object is created.
Tip: By holding the option key, you reverse the value of the pencil: the gain changes its sign.
Now, you can draw something on the sonogram:
Ircam documentation
37
Chapter 2. Processing
This element behaves EXACTLY like a rectangular surface: on the sonogram, horizontal and
vertical displacement, horizontal and vertical readjusting.
You can move or temporally readjust or duplicate the rectangle (thus process) on the track
in the usual way.
You can also modify this processing by using the "Inspector" palette: you have now access
to time parameters such as gain and thickness of the stroke are accessible.
To change the gain, position any tool (except the tuning fork) on the rectangle placed in the
sonogram. Press on the control key, then hold the mouse button and move this one. The
values will scroll.
By double-clicking on a track element, the "Edit Pencil Filter" dialog box allows you to change
the gain and thickness of the stroke.
"Replicate in Frequency..." is, of course, active.
"Replicate in Time..." and "Invert" are active. The "Invert" function changes the sign of
gain.
NEVERTHELESS, it should be well understood that, at the present time, EACH stroke of
the pencil tool is a surface and that if two strokes are crossed or are overlapped, the gains
will be added up. One should be careful using many strokes.
38
Ircam documentation
Chapter 2. Processing
Example:
These two pencil strokes using 116 dB gives the following result:
By the way, using a great number of strokes will require much time for AudioSculpt because
of the creation of all corresponding files.
2.7. Source Filter Synthesis
The opened sound in the foreground is the filtered sound.
In the "Processing" menu, choose "Source Filter Synthesis". The following dialog box will
open and allows you to choose the filtering sound while clicking on the icon which represents
a directory.
Ircam documentation
39
Chapter 2. Processing
By clicking on the triangle "Show Analysis Parameters", you have access to various parameters related to source-filter synthesis:
40
Ircam documentation
Chapter 2. Processing
The output is normalized by default.
This is the result of the synthesis (filtered sound :"noise.aiff " filtering sound: "Cymbal.AIFF"):
Note: The filtering sound will have the size of the filtered sound.
2.8. Selection and removal of processes
To remove one or more surfaces, select them (on the track or the sonogram) in the usual way
(using shift key for multiple selection) then press backspace key or choose "Clear" from the
Edit menu. The pointer tool also allows you to choose several ones in the sonogram.
The lasso tool (see section 1.7) is used only in the sonogram and allows you to choose
several surfaces, BUT it also selects other processes which will appear only on the tracks.
Ircam documentation
41
Chapter 2. Processing
With the lasso tool you just need to touch a process in order to select it (selecting all elements
is not necessary).
To remove one or more processes which do not appear on the sonogram as well as surfaces,
select them on the track, then press backspace key or choose "Clear" from the Edit menu.
To select all the processing, choose "Select All Treatments" in the Edit menu.
2.9. Multiple Processing
You may have noticed that the processes can overlap. In fact, they can be overlapped and
defined in no matter which order. AudioSculpt will use them all and sound processing will
be done in one time.
Tip: It is preferable to carry out the least possible successive number of processing in SuperVP.
It is thus advised to save your processing (see chapter 4) as a whole in order to modify them
again and to be able to apply them to the original sound-file.
Important: Do not forget that the gains are added when several filterings overlap. Be careful with
overlapping several processes which could result in conflicts.
Tip: Reminder: Displacement, duplication, deletion and saving by drag-and-drop can be applied
to an unspecified number of processing of any type.
"Invert", " Replicate in Time..." and (if the filtering which was selected allows it)"Replicate in
Frequency..." functions can be applied to an unspecified number of processing.
2.10. Calculation of processings
2.10.1. Calculation on the totality of the sound: "Process Treatments"
To launch the processing, choose "Process Treatments" in the "Processing" menu. This
command will be marked in gray as long as a processing command hasn’t been chosen.
A dialog box opens and allows you now to choose your parameters:
42
Ircam documentation
Chapter 2. Processing
Note: It is better not to normalize the output (default value) except if AudioSculpt warned you
before during the choice of the parameters.
Note: If the option "Verbose Output" box wasn’t selected, calculation is remarkably accelerated.
If you do choose to select this option (for expert users: flag - v), all information will be displayed
in SuperVP’s console.
Note: The option "Phase Synchronous Processing" has to be selected (for expert users: flag U) unless you know what you are doing.
When you click on "Process", AudioSculpt asks you under which name (here "africa1.aiff"
by default) and where you would like to to save the result.
After having clicked on OK, the console of AudioSculpt will open in the foreground and
will allow you to follow the calculation progress. Once processing is finished, the console
will appear in the background and the sonogram containing the processed sound will be
displayed.
2.10.2. Calculation of one part of the sound: "Process Selection"
It is possible to calculate only one part of the sound while using the corresponding
processing. After having selected the desired region, choose "Process Selection" in the
"Processing" menu. This option will be marked in gray as long as one part of the sound
hasn’t been defined. Any tool can be used (except the magnifying glass) for the "sound
window", or only with the cursor tool for the sonogram.
Ircam documentation
43
Chapter 2. Processing
2.10.3. AudioSculpt and SuperVP messages
Note: If SuperVP detects an error, AudioSculpt will warn through two alert dialogs.
For example:
In most of the cases this kind of error can be corrected ( in the example above, the sound
you used requires checking the "Normalize Output" option), if not please contact us1 in
order to report the bug. The "AudioSculpt 2.0 (VP)" console can give you some interesting
information.
2.10.4. temporary files
The files generated by AudioSculpt for SuperVP are temporarily stored in the "temp" directory. They will be immediately replaced whenever you make a calculation of the same type .
They will be deleted forever if you quit AudioSculpt. (It is completely useless to keep them,
they will be regenerated during the next calculation, if you save the processing).
On the other hand, for the expert user who would like to consult them (they are text files which
can be sometimes extremely long and which can also be edited with any text processor such
as BBEddit), and who would like to modify them in order to use them again in a commandline processing, it is necessary to move them in another directory (see chapter 9).
1.
44
audiosculpt@listes.ircam.fr
Ircam documentation
Chapter 3. The sequencer
3.1. The sequencer’s tracks
The tracks (zone 4 of the AudioSculpt window) represent the processing including their
duration which is ordered in time.
The track header is as follows:
The two buttons are not active yet.
If you have defined several identical processes, they will be added on the same processing
track.
A second type of processing automatically opens a second track .
Note: If you return to a type of processing which has been already used, a new track will be
created.
Note: Even if you deleted all the elements of one or more tracks, a new processing will be added
on a new track
Note: If you open a "fichier.trt" (containing processings which has been already saved), one or
more new tracks will be opened.
Ircam documentation
45
Chapter 3. The sequencer
Note: It is not possible yet to remove a track, even if it is empty.
Note: You can move any element on any track with any tool. This is possible with an unspecified
number of elements.
To lock the time position of an element during its change of track, hold the shift key while
moving it. It is possible with an unspecified number of elements.
Important: Saving the whole processing (in "fichier.trt"), unfortunately does not save the track
changes.
You can open a new empty track by choosing "Add Track..." in the "Window" menu.
3.2. The sequencer’s grid
It is possible to display a grid on the sequencer.
In the "Window" menu, choose "Show Grid..." and the following dialog box will be displayed:
With the "show grid" and "hide grid" buttons you can choose to display or not to display the
grid.
Steps of the grid are defined in bpm or seconds.
"Snap to Grid" makes it possible to make this grid magnetic: if one or more elements of a
track are moved, they will be automatically placed against the leftmost reference mark.
46
Ircam documentation
Chapter 3. The sequencer
When holding the shift key, "Snap to Grid" overrides the locking of position.
Ircam documentation
47
Chapter 3. The sequencer
48
Ircam documentation
Chapter 4. Savings
4.1. Processing
A process represents all defined elements of a sound (all track elements).
When you close an AudioSculpt window or when you leave the application, a dialog box
asks you if you wish to save the whole process by choosing its name("sound_file_name.trt"
by default) and where to save it. The default directory is called "Treatments" in the application’s directory. You can of course choose any other directory. It is recommended to keep the
".trt" extension.
It will be now possible to reload it in the AudioSculpt window while reopening it or to apply
the same process to another sound.
For this, after having opened a sound, go in the "File" menu, choose "Open Filter..." and
again choose in the dialog box a ".trt" file. The processing will be displayed in the window
and eventually added to the current processes.
You can save this file at any time: go in the "File" menu and choose "Save Treatment As...".
Important: You can save one or more or all elements by "Drag-and-Drop" the selected track
elements on the Finder. All elements characteristics (horizontal and vertical positions, gains, coefficients, Bpfs, etc...) will be saved as "extrait d’ AudioSculpt x". To use this same set again with
the same or any other sound, just drop the file "extrait d’AudioSculpt x" on the sonogram. You can
re-name these excerpts as you wish.
Note: For expert users:
If you save only one element in this way, you can open it by a double-clicking and you can examine
the tables of values. You can also drag-and-drop it in a text-document and modify it. When this
new content is dragged-and-dropped on the Desktop it is possible to use again the modified
element.
4.2. Bpfs
At any moment, Bpfs can be saved during a work session (on the condition that it appears in
the foreground): go in the menu "File" and choose "Save Treatment As..." or "Save Treatment". These are ’txt’ type files that you can read and modify in a text editor.
Note: It is not very useful for the moment since you cannot use them again.
4.3. Fft files
The Fft files contain the image of the sonogram and are stored, by default, during the calculation of the sonogram, in the "Fft" directory.
Ircam documentation
49
Chapter 4. Savings
First of all, it is necessary to go in the preferences ( "Edit" menu, in "Preferences") and to
click on "Analysis" tab:
If the "Empty Fft directory on quit" box is checked, the Fft files (and also the sonograms)
will be deleted once the application is closed. If not they will be saved.
It is useful to keep them if you want that your sonogram is displayed instantly at each new
working session or if you created different sonograms of the same sound with each different
parameters. Once the sound is opened, go in the "File" menu, choose "Open Analysis..."
and then choose in the dialog box an ".fft" file.
It is recommended to keep the ".fft" extension.
Note: There won’t be a warning if you open an analysis B starting from a sound A: if it is too long,
the sonogram takes the appropriate size but will not be correct.
Note: Even if the "Empty Fft directory on quit" box is checked, the Fft files will be kept, on the
condition that you choose to save them in a different directory.
Note: The size of the Fft files is about the double of the corresponding sound file: 1 Mo approximately for 500 KB sound file.
50
Ircam documentation
Chapter 5. the Bpf editor
The Bpf editor is the same editor which is used in Diphone. Refer to Diphone’s documentation (on Forum CDRom:Diphone_Studio-Français.pdf and its update).
It is quite obvious that only the use of simple Bbf concerns AudioSculpt.
Do not forget the small "practical" tool which allows you to readjusting of a Bpf window.
Ircam documentation
51
Chapter 5. the Bpf editor
52
Ircam documentation
Chapter 6. Menus
6.1. "File" menu
- New Text: opens a text editor (not used for the moment).
- New Console: opens a new SuperVP console.
- New Bpf: disabled.
- New Sonogram: opens a new empty sonogram (useless for the moment).
- Open...: opens a sound.
- Open Analysis...: opens an ".fft" file (containing the image of the sonogram) if a sound
already had been opened.
- Open Treatment...: opens a ".trt" file if a sound already had been opened.
- Open As Text...: opens a text file (in particular temporary processing files that can be found
in the "temp" directory).
- Open Movie&Sound...: opens a sound in QuickTime player.
- Close: closes the current window.
- Save Treatment: saves the current processing file.
- Save Treatment As...: saves the current processing file.
- Save Sound As...: saves the current sound file.
Ircam documentation
53
Chapter 6. Menus
- Revert: disabled.
- Page Setup...: useless.
- Print: disabled.
- Quit: exits AudioSculpt.
6.2. "Edit" menu
- Can’ T Undo: disabled.
- Cut: disabled.
- Copy: disabled.
- Paste: disabled.
- Clear: deletes all selected processes.
- Select All: select the whole sound.
- Select All Treatments: select all processes.
- Select by Attribute...: disabled.
- Preferences...: access to the preferences.
54
Ircam documentation
Chapter 6. Menus
6.3. "Processing" menu
- Sonogram Analysis: launches the sonogram calculation on the totality of the sound.
- Process Treatments: launches the processing calculation on the totality of the sound (in
gray as long as a processing is not defined).
- Process Selection : launches the processing calculation on the sound selection (in gray
as long as a processing is not defined or a part of a sound has not been selected).
- Normalize: opens the normalize dialog box.
- Source Filter Synthesis: opens the source-filter synthesis dialog box.
- Convert to Surface: disabled.
- Replicate in Frequency: opens the dialog box allowing to adjust duplication in frequency
of surfaces and the pencil.
- Replicate in Time: disabled.
- Add markers: opens the dialog box allowing to adjust duplication in the time (positively or
negatively) of the selected processing.
Ircam documentation
55
Chapter 6. Menus
6.4. "Treatments" menu
The items of the menu are in gray and are not displayed while the whole sound or part of it
is not selected.
- Add Constant TimeStretch: opens the dialog box allowing to adjust the coefficient of
"expansion/compression".
- Constant Add Transposition: opens the dialog box allowing to adjust transposition.
- Constant Add Formant : opens the dialog box allowing to parameterize the filter by "Formant".
- Add Band: opens the dialog box allowing to parameterize the band filter.
- Add Clipping : defines "Clipping" filter parameters through the "Color Palette".
For the following items , if the whole sound or part of it is selected, the Bpf editor opens a
window which allows you to edit the corresponding Bpf.
- Add Breakpoint... :edit a "Breakpoint Filter".
- Add TimeStretch... :edit a Bpf "expansion/compression".
- Add Transposition...: edit a Bpf "Transposition".
- Add Dynamic Forming : edit a "Formant" multi-Bpf. DISABLED IN THIS VERSION
- Invert : allows you "to revert" selected filters (works only with certain filters).
56
Ircam documentation
Chapter 6. Menus
6.5. "Window" menu
- Show Tools: displays the floating palette tools (if the item is checked).
- Show Inspector :displays the inspector’s floating palette (if the item is checked).
- Show Color Palette: displays the palette allowing to select the depth level of gray of the
sonogram, i.e. the sensitivity of black and white (if the item is checked).
When a new session of AudioSculpt is opened, the checked windows will open automatically.
Note: The tab key allows you to hide or to show the following palettes ("Tools", "Inspector" and
"Color Palette").
- Below, you will find:
- Add Track: allows you to add, one by one, empty processing tracks.
- Optimize Sonogram : allows you to display in full screen the sonogram and the "sound
window" (zones 2 and 3), and to return to the original size. The corresponding keyboard
short cut is: commande+u .
- Show Grid : allows you to open the "Grid Edit" window where the parameters and the
magnetic grid display can be adjusted.
Below, you will find the list of all open windows. You can bring to the foreground any window
you choose.
6.6. "Bpf" menu
This menu appears only when a Bpf editor is opened.
Ircam documentation
57
Chapter 6. Menus
- Show Bpf Tools: allows you to open the "Bpf Tools" window with tabs (also accessible
directly from the Bpf window).
- Show Points: allows you to display Bpf points.
- Show Double Line :if this item has been selected, the Bpf is displayed with a thicker line.
The others items of the menu do not concern AudioSculpt.
Important: If you choose "Resampling..." (which is not related to AudioSculpt), an alert dialog
is opened and you have to quit the application.
58
Ircam documentation
Chapter 7. Stereophonic sounds
- AudioSculpt displays the sound of the left channel.
- AudioSculpt processes the sonogram of the left channel.
- AudioSculpt plays only the left channel.
- BUT AudioSculpt processes the two channels.
Ircam documentation
59
Chapter 7. Stereophonic sounds
60
Ircam documentation
Chapter 8. AudioSculpt and MacOS X
AudioSculpt runs under Mac OS X (10.2 "Jaguar").
A certain number of errors still remain but can also depend on the machine which is used
and as well as its configuration.
Small problems related to the display still remain.
The cursor does not always appear during the playing.
Copy-Paste and Drag-and-drop in the console can cause some problems
"Constant TimeStretch " and "Constant Transposition" won’t work if the whole sound has
been selected.
Ircam documentation
61
Chapter 8. AudioSculpt and MacOS X
62
Ircam documentation
Chapter 9. command-lines
For expert users, it is possible to launch processing for SuperVP directly in the commandline.
Just write (or paste, or drag-and-drop) a command-line in the current AudioSculpt 2.0 ( VP
) console and validate it by using the Enter key: the calculation will be launched.
A new console is created with "New Console" in "Window" menu.
You can use parameter files (in particular, those which are generated by AudioSculpt (see
section 2.10)).
The command-line will be written down on just one line, without return carriage.
The console can give you some valuable information about certain remarks or errors returned by SuperVP . AudioSculpt displays those most of the time.
Note: The editor is very basic. The console window is limited to 32 KB and so it cannot display
the help of SuperVP .
The editor’s window is difficult when it is used for writing.
Selection, copy-paste in this window often will cause bad displays. In this case, it is necessary to
refreshed the window (by clicking twice on the box on the right side above the window).
You will find the SuperVP help files and the Filter module description in the appendix (section
13).
Ircam documentation
63
Chapter 9. command-lines
64
Ircam documentation
Chapter 10. Bugs and Errors
You can send your observations and comments to: audiosculpt@ircam.fr1.
Please try to describe the steps that caused the error messages or bugs (with, if possible,
some screen shots) so that we can reproduce them in order to debug.
Some bugs may occur only in certain software configurations (system,...) or machine (please
indicate precisely those details).
This list is not exhaustive.
If you have a problem with running the application after the installation,you have to check in
the preferences ("Edit" menu, "Preferences"), choose the "Environment" tab and click on
" Defaults ", then on " OK ".
The processing "Dynamic Formant" does not work with this version of SuperVP.
The pencil is only active in the surface method.
As for the pencil, the preferences will not include the width of the stroke.Therefore, it is better
to define this in its corresponding menu.
By holding the shift key it seems that you are able to obtain a rectilinear movement of the
pencil,while actually no object is created.
In fact, it’s not possible yet to remove points which has been created on surfaces or bands.
A certain number of bad displays will require refreshing (by clicking twice on the box in the
top right corner of the window).
Zone 2 of the "sound window" makes it possible to travel in the sound, but first , it will show
the sound in its totality, except the end which is hidden by the vertical scrollbar.
The sonogram is not really displayed from zero Hz.
By pointing on the vertical bar of the sonogram and by clicking on it, the pointer will be
transformed into a hand which holds the bar and allows you to move it laterally in order to
adjust the width of the sonogram. It is not advised though to use it in its extreme position on
the right, because in this case, the spectrum will not be displayed any more. Moreover, the
bar will disappear almost completely except a small part of it.
The red rectangle is not of a high degree of accuracy.
The scale of the amplitudes is only linear for the "sound window" and only logarithmic for the
Bpf filter).
As for the spectrum, the scale is in fact in dB, although the indications of value and type
(linear) are false.
Note: There won’t be any warning if you open an analysis B from a sound A: if it is too long, the
sonogram takes the size which has been indicated but will not be correct.
1.
audiosculpt@listes.ircam.fr
Ircam documentation
65
Chapter 10. Bugs and Errors
If one part of the sound is selected, only this part will be played. If you want to hear the whole
sound , you will lose the selection. It is not possible yet to put the cursor somewhere and to
start playing from this place.
Do not use the sonogram while the sound is played.
While reading a sound file, the cursor will be slightly shifted compared to the signal.
The "inspector" Window does not give any information about the pointer and the selection.
The spectrum will only appear with the tuning fork or when the sound is played.
It is not possible to move vertically the tuning fork.
The window of the console is limited to 32 KB and therefore it cannot display the SuperVP’s
help.
The editor’s window is difficult to use for writing.
Selection, copy-paste in this window will often cause bad displays. In this case, the window has to be refreshed (this is done by clicking twice on the upper rightmost box of the
aforementioned window).
Bpf windows will lose their name and become simply "Breakpoint filter" (or another type) in
a set of processings which has been saved in a ".trt" file (except the first one).
The value will indicate 0, even if the Bpf line does not seem to be aligned on zero. The
"Resampling..." item will not appear in gray in the "Bpf" menu. If you select it, AudioSculpt
will crash .
The "Resampling..." item will not appear in gray in the "Bpf" menu. If you select it, AudioSculpt will crash.
The sequencer: If you get back to a type of processing which has already been used, a new
track will be created.
If you deleted all the elements of one or more tracks, a new processing on a new track will
be added anyhow.
If you open a ".trt" file (a group of processes which has been saved before), this will be done
on one or more new tracks.
Right now, it is not possible to remove a track, even if it is empty.
Saving a set of processes (in a ".trt" file) unfortunately does not save track changes.
66
Ircam documentation
Appendix A. SuperVP Help
Note: This document corresponds to the output of "supervp -ha" command.
===================================================
SuperVP (IRCAM) 1990-2002 version : 2.03 (compiled by roebel for i686-Linux2.4.9-13smp on Mon Sep 9 12:09:52 CEST 2002)
===================================================
helpoptions::
==============
-h
-ha
-hi
-hp
-hf
-ho
:prints
:prints
filter
:prints
:prints
:prints
:prints
out this help description.
out all sections of the help besides the extended
description.
out the help message for input options.
out the help message for processing options.
out the description of the different filtering modules.
out the help message for output options.
Generally, SuperVP has two input tracks, if applicable on both tracks
the options for track 1 are in upper case, for track 2 in lower case.
Option flags specified in <> are mandatory. If option flags are
specified in [] they may be omitted resulting in a default value.
---------------------------------------------------------Input options ::
================
-Ss<filename> : specifies input file name (Def: stdin)
which is relative to $SFDIR if no full path is given
filename can be either a soundfile or a data file
(see output options -Og3 or -Og5 format)
generated by an earlier call to SuperVP.
Supported sound files comprise AIFF/AIFC/WAV/NEXT/SDII
with all variations of sample size and withu-law/a-law
compression.
------ Example: -Sflute
Specifies input data to be read from $SFDIR/flute!
----------------------------------------------------------Bb<start> :
specifies start position (Def: 0.0) in the input file.
The starting point may be negative which will
add silence in the beginning of the sound.
If start contains a decimal point it is interpreted as
time in seconds if not it specifies time in sample number!
The first sample is at position 0;
Ircam documentation
67
Appendix A. SuperVP Help
------ Examples: -B1.4
starts processing 1.4s after the first sample
-B44100 starts processing at sample position 44100
----------------------------------------------------------Cc<channel> :
specifies the channel to process (Def. all channels or 1).
Channel numbers start from 1. The default value depends
on the selected output format. For sounds the default
is to process all channels, for analysis data only one
channel can be processed and the default channel is channel 1.
------ Examples: -C2
selects the second channel from a stereo sound file.
----------------------------------------------------------Ee<end> :
specifies last selected sample in the input file
(Def: end of file), if end points to samples past the end of
file zeros are added to the file content.
If end contains a decimal point it is interpreted as
time in seconds if not it specifies time in sample number!
------ Examples: -E5.0
-E88200
---------------------------------------------------------Processing options ::
=====================
-Aa[analysis type (Def: fft)] [] : specifies the analysis procedure. type is:
ATTENTION: all analysis types besides fft/lpc/lpc_inv are not tested for
the current version of svp. Use at your own risk!!
fft : fast fourier transform
------ Example: -Afft
lpc [order (Def: 30)] : linear prediction analysis. order is the
number of poles. The lpc filter is multiplied by the
residual energy to have a proper spectral representation.
See -ns/ -truelpc switches for further information on lpc
normalization.
------ Example: -Alpc 50
lpc_inv [order (Def: 30)] linear prediction analysis with
envelope inversion. order is the number of poles.
LPC analysis with with inverted spectrum for inverse
filtering (for possible application see -G option or -Fgabarit).
The inverse lpc filter is multiplied by the inverse
residual energy such that it may be used to create
normalized excitation signal with the -Gmul mixer.
If you apply inverse lpc filtering using the same signal
for both tracks you create an energy normalized
excitation signal that may be used as excitation for an
lpc spectral envelope obtained with a second
-alpc analysis recreating the energy contour of the related
second signal.
See -ns/ -truelpc switches for further information
68
Ircam documentation
Appendix A. SuperVP Help
on lpc normalization.
------ Example : -Alpc_inv 50
pic [theshold] [nnumber]: peaks detection
threshold is in dB (no threshold)
number is the max. number of peaks in the output
(no blank between n and value)
------ Example: -Apic 3 n20
mask [list] [threshold] [nnumber]: Terhardt algorithm for
spectral smoothing list is a list of words in:
amp, freq, weight, all, (weight)
threshold for peak detection is in dB (25dB)
number is the max. number of peaks in the output
(no blank between n and value)
------ Example: -Amask amp, weight 10 n20
ced [order] : discrete cepstrum analysis. Provides a spectral envelope.
default order is (30).
------ Example: -Aced 55
f0 [fmmin,][fMmax,][FFmax,][snthreshold] : pitch detection
fm is followed by minimum value for pitch in Hertz (Def: 50)
fM is followed by maximum value for pitch in Hertz (Def: 2500)
F is followed by maximum frequency in spectrum (Def: 7500)
sn is followed by noise threshold in dB (50)
There is no blank between the parameter name and its value.
------ Examples: -Af0 fm100, fM1000, F2500, sn60
-Af0 fm10, sn25
formant_lpc [nnumber] [lpc order] : formant detection
from a spectral envelope computed via lpc.
number is the max. number of formants to detect (Def: 15)
(in frequencial order) (no blank between n and value)
order is the lpc order (45).
------ Example: -Aformat_lpc n3 10
formant_ced [nnumber] [ced order] : formant detection
from a spectral envelope computed with discrete cepstrum.
number is the max number of formants to detect (Def: 45)
(in frequencial order) (no blank between n and value)
order is the ced order (45).
------ Example: -Aformant_ced n16 55
ced_inv [order] discrete cepstrum analysis with envelope inversion.
Use it like CED analysis but only for inverse
filtering (see -G option).
Order is the number of pole (Def: 30).
------ Example : -Aced_inv 50
Please read -O section for the formatting of the output data.
----------------------------------------------------------D[coefficient (Def.: 1)] or -D<filename> : constant or time-varying time-stretching
Apply time dilation to input sound.
---
Ircam documentation
Examples: -D2.0
-D0.5
(dilation of 2, duration is doubled)
(compression, duration will be divided by 2)
69
Appendix A. SuperVP Help
parameter files are used for time varying operations. The files contain
multiple lines indicating:
time dilate_coefficient
The entries are linearly interpolated to derive the time dependent
dilation. The dilation coefficient before the first and after the
last file entry is extrapolated keeping its value constant.
Time varying dilation and transposition may be applied in a
single SuperVP call in which case the requested dilation is and the time
compensation from the transposition are added.
The optimal analysis step size is calculated automatically if no -I option
is specified. This is recommended especially for time-varying
dilation/transposition.
You may use the -P switch for phase synchronized processing.
----------------------------------------------------------Ff<filtertype> <filename> specifies filter
filtertype is one of
bande
gabarit
breakpt
surface
fof
fifof
clip
denois
fshift
filename is a file containing filter parameters.
Multiple filters can be applied during one call to SuperVP.
use option "-hf" for a desription of available filters
and the related parameter file format.
------ Example: -Fbande file
----------------------------------------------------------G<cross-synthesis type> [filename] or
<cross-synthesis type> [-X<val>(Def:1.)] [-x<val>(Def:1.)]
[-Y<val>(Def:1.)] [-y<val>(Def:1.)] [-q<val>(Def:1.)]
Combine the two different tracks into a single track. Suppose S1 S2
are the short time FT spectra of the two input channels and SO
is the resulting spectrum of the cross-synthesis and X/x/Y/y/qval is
the value specified with flag -X/x/Y/y/q then the mixer operation
is for
cross type add: transform input spectra into representation
using real/imaginary part and calculate
70
Ircam documentation
Appendix A. SuperVP Help
SO = Xval * S1 + xval * S2,
cross type cross: S1 and S2 are calculated in amplitude/freq
representation and the output is
Amp(SO) = Xval*Amp(S1) + xval*Amp(S2) +qval*Amp(S1)*Amp(S2)
Fre(SO) = Yval*Fre(S1) + yval*Fre(S2),
cross type mul: (source-filter), S1 and S2 are transformed
into Amp/Phase representation and the output is
Amp(SO) = Amp(S1)*Amp(S2)
Pha(SO) = Pha(S1)+Pha(S2),
cross type amul: (source-filter), S1 and S2 are transformed
into Amp/Phase representation and the output is
Amp(SO) = Amp(S1)*Amp(S2)
Pha(SO) = Pha(S1),
cross type pmul: (source-filter), S1 and S2 are transformed into
Amp/Phase representation and the output is
Amp(SO) = Amp(S1)
Pha(SO) = Pha(S1)+Pha(S2).
filename is the parameter file for add and cross modes.
for cross mode the file is made of lines with: time X x Y y q
for add mode the file is made of lines with: time X x
Notes:
Order and position of the -XxYyq flags is free.
The processing is stopped in cross and add mode if both files are finished,
in mul/amul/pmul mode if either source is finished.
Note that the increment step of the second track is adapted
to match the duration of both sources if you do not specify the
step size for the second channel with -i explicitely
------ Examples: -Gadd file
-Gadd -X1.0 -x2.0
-Gcross -X0.5 -x0.5 -Y1.0 -y1.0 -q0.0
with mul mode inverse filtering to obtain a normalized excitation
can be performed with the same sound on both channels.
------ Example :
supervp -Ssound_file -ssound_file -Gmul -Z -Afft -alpc_inv 15 output_file
----------------------------------------------------------ggain <filename> or -gtremolo <mode> <filename>: amplitude modulation
gain <filename>: multiplies output samples with envelope specified in file
Ircam documentation
71
Appendix A. SuperVP Help
file contains lines with time envelope
tremolo [mode] [filename]
[mode] is the type of amplitude modulation
sinus
carre (square wave)
triangle
scie (sawtooth wave)
file contains lines with time depth
------ Examples: -ggain file
-gtremolo sinus file
----------------------------------------------------------H<sample rate> : specifies new sampling rate
the header of the sound file will be changed
If this option is used, don’t use -A and -Z.
------ Example: -H32000
----------------------------------------------------------Ii<step> or -Ii<method> <filename> -I<num/mem> <step>:
specifies analysis step
the step for analysis is in samples
(Def I : max(1,min(window_size/8,window_size/time_dilation/8))
(Def i : step size track 1 /*length track 2/length track 1)
<method> is the method for reading parameter file name
num same as giving a numerical value (no parameter file)
mem input is callback (only for use in svp library applications)
sync ordered pairs in parameter file (time, fundamental frequency)
dep ordered pairs in parameter file (time, step value)
pos sample position in the sound file is given for each window
------ Examples: -I256
-Isync file
----------------------------------------------------------inplace inplace processing of snd data in input sound file.
Currently only possible for non compressed mono sounds and if no -D (dilation)
-trans (transposition) or -Ffshift (frequency shifting) is requested.
---------------------------------------------------------------------J<type> : specifies synthesis window type (same as the principal track)
----------------------------------------------------------logfile filename : sets message output file to filename, the filename
stderr is treated as special indicator for stderr output
----------------------------------------------------------Mm<window size> or -M<method> <filename> : specifies analysis window size
the window size for analysis is in samples (Def: 1024)
<method> is the method for reading the parameter file name
num same as giving a numerical value (no parameter file)
sync ordered pairs in parameter file (time, fundamental frequency)
dep ordered pairs in parameter file (time, window size)
------ Examples: -M2000
-Mdep file
72
Ircam documentation
Appendix A. SuperVP Help
----------------------------------------------------------
-N<FFT size> : specifies FFT size
the FFT size in samples (Def: 1024)
must be greater than window size, see -Mm
------ Examples: -N4096
-N8192
----------------------------------------------------------nn do not normalize output sound file (this is default now)!
ATTENTION : The use of -nn is strongly discouraged. Since version 1.75
no normalization is the default behavior and -nn flag is no
longer supported and wil be swtiched of in future versions!
See -norm flag
---------------------------------------------------------------------norm [level (Def.: 0)] normalize output sound file to level dB below
maximum range of the output data type.
0dB normalization produces data in the range
between +/- 1.0 for floating point sample format and
in the range between +/- (2^(N-1)-1 for N Bit integer sample format.
NORMALIZATION Behavior changed!! If -norm option is not given normalization
is NOT performed.
IMPORTANT : when normalizing, SuperVP uses a temporary file. It’s length is
the same length of the processed sound file when using 32bit floating point
packing mode or twice the length when using 16bit short packing mode.
Temporary file is created in SVPTMP (setenv SVPTMP mytemporarydirectory).
When SVPTMP is not set, SFDIR is used. If SFDIR is not set, current
directory is used. If the choosen directory is not writable, then /var/tmp
is used.
---------------------------------------------------------------------ns requests spectral normalization for analysis output, which
results in amplitude values to be below 1 (Def: no normalization)
----------------------------------------------------------P : switches on phase synchronization (Def: no phase sync)
mode for time dilation (see -D). It generally improves
amplitude reproduction and decreases the phasiness
when processing non stationary sounds. This switch
will be ignored if no dilation is requested.
----------------------------------------------------------Rr<samplerate> : specifies sampling rate
used when performing resynthesis on analysis data file
----------------------------------------------------------resS <value> : specifies stopband attenuation of the interpolation filter
used for resampling (Def: 70dB)!
The window size and oversampling of the interpolation filter
are automatically adjusted to achieve the requested
attenuation of aliasing resulting from the interpolation
process! To prevent excessive filter sizes attenuation of
Ircam documentation
73
Appendix A. SuperVP Help
more than 120dB are not supported.
----------------------------------------------------------t :displays the current processing time in the input file
----------------------------------------------------------T :displays the current processing time in the output file
----------------------------------------------------------trans <cents> or <filename> : transposes by the given number of cents.
Transposition requires the -A and -Z flag. To transpose
without changing duration (time correction)
the -D switch has to be added.
For time varying transposition a parameter file has to be used
which contains lines with:
time transposition
Which are linearly interpolated.
------ Example: -trans 1200 (will transpose one octave up)
----------------------------------------------------------truelpc : do not apply any normalization after lpc in the analysis section.
Intended for using lpc analysis for lpc filtering.
----------------------------------------------------------Uu : specifies the position of the first window with respect to
the first sample (Def: window centered at first sample)
-U/-u moves the window such that its first sample matches the
first sample of the sound.
----------------------------------------------------------v :prints out details about the SVP patch structure and parameters
----------------------------------------------------------Ww<type> : specifies analysis window type
the analysis window type (Def: hanning)
rectangular
triangular
hamming
hanning
blackman
exactblackman
------ Example: -Wblackman
----------------------------------------------------------Z : performs a resynthesis (inverse fft and overlap/add)
---------------------------------------------------------Output options ::
=================
74
Ircam documentation
Appendix A. SuperVP Help
<output filename>
The outputfile is specified without option switch as
last parameter of the command line. If no output file is specified the
result is directed to stdout.
-O<mode>:<list> or -O<mode> <file>
<mode> is the output type (b)
SOUND modes :
sa for AIFF 16bit integer soundfile format.
sa8,sa16,sa24,sa32 select the different sample size in bits
sA for AIFC 16bit integer soundfile format.
sA8,sA16,sA24,sA32 select the different sample size in bits
sis for Ircam 16bit integer soundfile format.
sif for Ircam 32bit float
soundfile format.
sn for NeXT 16bit integer soundfile format.
srs for raw
srf for raw
16bit integer soundfile.
32bit float
soundfile.
IMPORTANT : default format and packing mode (integer or float) differ
according to the output type (a file or a pipe):
File output : those of the input processed sound (not normalized).
Pipe output : raw 32bit float (not normalized).
ANALYSIS Output Modes :
a for ASCII analysis data output
b for binary analysis data output (default)
g0, special spectral data file for audiosculpt
g1,g2,g3,g4,g5: Output file is created with a Unified File
Format ( binary file + header like gabarit file ) using
FFT, LPC, CEPSTRE.
File content is respectivelly t,amp ; t,phase ; t,amp,phase ;
t,freq,amp ; t,pr,pi.
g1,g2 formats work with gabarit filtering and g4,g5 ones
work with the synthesis module with data on input channel.
g3 format works with both.
Use these format with -Oxx option (no more arguments on
command line)
------------- Ex : -Og3
Using other format arguments will print a warning but
the right output format will be set.
<list> is a list of strings separated by ’,’
number, time, amplitude, frequency, phase, etc..
<file> is a text file where output format is specified
------ Examples: -Oa:number,amplitude,phase
-Oa foo.format
----------------------------------------------------------
Ircam documentation
75
Appendix A. SuperVP Help
List of available strings as output data
t,time: time
number: number
a,amp,ampl,amplitude: linear amplitude
adb,amp_db,ampl_db,amplitude_db: amplitude in dB
pr,partie_reelle: real part of a complex number
pi,partie_imaginaire: imaginary part of a complex number
f,fhz,freq,frequence: frequency in Hz
midicents,fmc: frequency in midicents
ph,phase: phase
spl: sound press excess
weight: harmonic weight
tsp,truesp,truepitch: harmonic true pitch
sc,score: score
coeff,coeff_pitch: pitch coefficient
largeur,largeur_formant: formant width
cf,coeff_filtre: autoregressive lpc filter coefficients
------------------------ Allowed combinations ----------------------fft
cepstre
masquage
f0
formant
lpc
partie_reelle
OK,
OK,
NO,
NO,
NO,
OK
partie_imagin
OK,
OK,
NO,
NO,
NO,
OK
frequence_hz
OK,
OK,
OK,
OK,
OK,
OK
frequ_cents
OK,
OK,
OK,
OK,
OK,
OK
frequ_midicents OK,
OK,
OK,
OK,
OK,
OK
frequ_inst
OK,
OK,
NO,
NO,
NO,
OK
amplitude_lin
OK,
OK,
OK,
OK,
OK,
OK
amplitude_dB
OK,
OK,
OK,
OK,
OK,
OK
phase
OK,
OK,
NO,
NO,
NO,
OK
sndpressexcess
NO,
NO,
OK,
NO,
NO,
NO
truepitch
NO,
NO,
OK,
NO,
NO,
NO
weight
NO,
NO,
OK,
NO,
NO,
NO
score f0
NO,
NO,
NO,
OK,
NO,
NO
coef pitch
NO,
NO,
NO,
OK,
NO,
NO
largeur formant NO,
NO,
NO,
NO,
OK,
NO
coeff filtre LPC NO,
NO,
NO,
OK,
NO,
OK
76
Ircam documentation
Appendix B. SuperVP Help : Filter module
description
Note: This document corresponds to the output of "supervp -hf" command.
===================================================
SuperVP (IRCAM) 1990-2002 version : 2.03 (compiled by roebel for i686-Linux2.4.9-13smp on Mon Sep 9 12:09:52 CEST 2002)
===================================================
Filter module description ::
============================
bande : applies a band pass/band stop filter with possibly time varying
band edges. The parameter file contains multiple lines of
Example: time
num
bandtype
f0 f1 f2 .... fnum
time positions description in time
num number of band edge frequencies to follow
each pair of frequencies consitutes a band
so num has to be even
bandtype bands given are pass=1 or stop=0 bands
fi
num frequencies that specify the edges of
the alternating pass/stop bands
included into the band are those freq. bins that
are min(edge1,edge2) <= freq <= max(edge1,edge2)
the order of the edge frequencies of a single band
may change order so that the band may be
self-intersecting.
For time varying filters only the fi entries may change with time.
If time of first/last lines are within the sound the respective
values are extrapolated without changes to start/end of sound
-------------------------------------------------------breakpt: This filter applies a piece wise linear description
of a time varying or constant frequency response specified in dB/rad.
The parameter may contain an ascii or binary description of
the filter. In the binary case the file has to start with the 8 characters
BPBINARY.
The parameter file consists of sets of numbers describing the
filter as a break point function for a given time, as follows:
time mode numpairs freq value freq value
time(float): time position to apply following filter response definition
mode(int): filter mode (0=amplitude/1=phase/2=amplitude and phase)
mode parameter can not change within a single file
Ircam documentation
77
Appendix B. SuperVP Help : Filter module description
numpairs(int):
number of freq-value breakpoints to follow in current line
freq value(float): depending of the selected mode pair or triple of values
describing a break point of the frequency response
freq [Hz] and amplitude [dB] for mode = 0
freq [Hz] and phase [rad] for mode = 1
freq [Hz], amplitude [dB] and phase [rad] for mode = 2
The type given in parenthesis is the data type of the entries
for the binary parameter file.
The break point description is extended over the full frequency
range using a constant extrapolation of the start and end break points.
The envelopes amplitude and phase values for each frequency bin
are linearly interpolated over time and extended to the start and
end of the file using constant extrapolation. For correct interpolation
the phase values are required to be unwrapped! For instantanous
changes with respect to time or frequency you may give the same
frequency or time value
twice.
Example for breakpt file using amplitude mode :
0.1 0 4 100 0 500 -30 1000 -30 4000 0
0.5 0 5 100 0 500 -30 1000 -30 4000 -10 5000 0
This file would attenuate the amplitudes in the region
between 100 and 4000Hz to 100 and 5000Hz respectively.
-------------------------------------------------------clip: apply clipping filter within time slices of the sound.
The clipping filter sets all amplitudes of a spectrum
below the lower threshold to zero, sets the amplitudes above
the upper threshold to the upper threshold
and transforms the remaining region in between 0 and upper
thershold.
A clipping filter can be described in two modes:
First mode describes a clipping filter operating
on the whole sound file:
Example: low_threshold high_threshold
this will result in applying clipping with the given parameters
globaly for the whole sound or
Example: low_threshold high_threshold start_time end_time
this will apply the respective clipping parameters only within
the specified time region. Multiple lines may be specified.
For overlapping regions the first region takes precedence
thresholds parameters are assumed to be in dB with respect to a
normalized amplitude spectrum (max. = 0dB)
--------------------------------------------------------
78
Ircam documentation
Appendix B. SuperVP Help : Filter module description
denoise: clipping all amplitudes inside a time frequency
surface that are below the specified clipping value
to zero.
The parameter file is equivalent to the surface filter with
the gain parameter specifying a cliiping level in dB relative
to the maximum of a normalized spectrum (0dB).
-------------------------------------------------------formant: fof/fifof filtering applies a collection of second order
resonance or formant filters to the sound signal.
In case of fof the number of formant filters has to be the same
throughout the file.
In case of fifof the number of formants can change.
and the formants describe the amplitude transfer function at the time
specified. Interpolation with respect to time is done using linear
interpolation and extrapolation as specifie for the breakpt filter.
In case of the fof filter the number of formants is fixed, but,
their parameters may change.
-------------------------------------------------------fshift: this filter applies a time varying
frequency shift to the signal
the parameter file contains a breakpoint
description of the shift to apply at a given time
point in Herz. The first and last parameter
are extended till the start/end of the sound respectively
example:
0.1 -50.
this file would shift the sound down by 50Hz.
NOTE: due to the internal representation you may not
combine a frequency shift filter with time stretching
or transposition.
-------------------------------------------------------gabarit: apply a fft analysis output file that has been
stored in gabarit format as a filter to the input sound file.
The gabarit mode has to be 1 (amplitude only), 2 (phase only) or 3
for amplitude and phase filtering (See option -Og). Since SuperVP 1.83
the filter analysis data sampling rate and fftsize are no longer
required to match the respective values for
the filtered sound. Any mismatch will result in a
proper resampling of the filter data using linear interpolation
Ircam documentation
79
Appendix B. SuperVP Help : Filter module description
of phase and amplitude (amplitude interpolated in log domain) such
that the frequency response is kept.
Gabrit format description
All the different formats share a common file header specifying
gabarit mode (4 byte int)
sample rate (4 byte float)
soundfilenamelen (4 byte int)
soundfilenamechars (namelen chars)
The length of the input sound file is always including
the limiting zero byte of a c-string and rounded
up to regard a 4 byte boundary, the unused part of the name
is filled with zeros.
Following the file header are the frames
each with a unified frame header consisting of
frameCenterTime
nbdata
windowSize
frameSize
(4
(4
(4
(4
byte
byte
byte
byte
float)
int)
int)
int)
The samplerate is used to derive the data spacing in frequency as
samplerate/(nbdata-1)/2. Windowsize is used to adjust the phase
prior to using it by adding/substracting a linear phase component that
compensates for the center of the window being shifted (windowsize-1)/2
away from the start of the frame. Framesize is not used
for filtering and can be left 0. After each header there are
nbdata multi element values. The meaning of the values
depend on the mode and are:
mode | data
==============================
1
| single amplitude
2
| single phase value
3
| pair of amplitude and phase value
4
| pair of frequency and amplitude value (not suitable for filtering)
5
| pair of real imaginary value (not suitable for filtering)
All data points are in 32 bit float format
The phase interpolation is done after phase unwrapping. Therefore,
the maximal spacing of synthetic phase transfer functions has to be
selected such that phase differences of the phase transfer
function between the bins are smaller then PI.
-------------------------------------------------------surface : Applies constant gain to a piece wise
linear surface of the spectrogram.
The parameter file contains multiple lines for each surface,
and may contain multiple surfaces. General syntax
80
Ircam documentation
Appendix B. SuperVP Help : Filter module description
First line of a surface:
start_time num end_time gain_dB
start_time/end_time: the minimum and maximum
time covered by that surface.
num: the number of lines to follow describing the shape of
the surface.
gain_dB: The fixed attenuation/amplification for this surface.
surface description is given by num lines of format
time low_freq high_freq
time: specifies the time the description applies
low_freq/high_freq: specify the frequency boundaries
(end points belonging to the surface) for the given time.
The description specifies a piece wise linear bounded surface
in the time/frequency plane. The start_time/end_time locations
of the surface are centered between the first and last
frequency boundary pairs.
Due to this format only convex surfaces can be described.
Example for single surface with
0.0 4 5.0 -40
1.0 1000 2000
2.0 1000 2000
3.0 2000 3000
4.0 2000 3000
40dB attenuation:
Time and frequency vaues have to be non decreasing.
--------------------------------------------------------
Ircam documentation
81
Appendix B. SuperVP Help : Filter module description
82
Ircam documentation