1
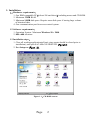
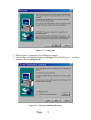
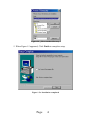
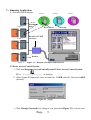
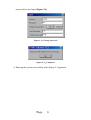
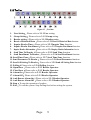
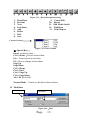
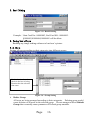
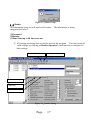
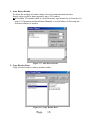
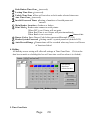
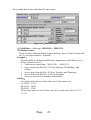
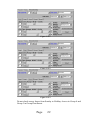
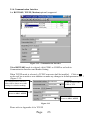
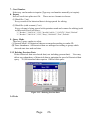
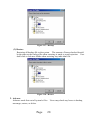
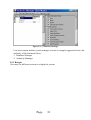
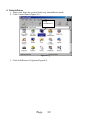
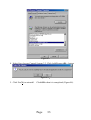
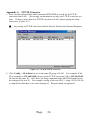
ST-680
Network Proximity Access Control
Software Operation Manual
(For Windows 98/2000)
v3.2
SOCA TECHNOLOGY CO.,LTD.
2003 MAY
Contents
1. Installation .................................................. 2
1.1 Hardware requirements :...........................................................................................................2
1.2 Software requirements :............................................................................................................2
1.3 Installation steps : .....................................................................................................................2
2、Running Application ........................................... 5
2.1 Software and Hardware ............................................................................................................5
2.2 Enter Access Control System ...................................................................................................5
2.3 System Mainframe....................................................................................................................7
2.3.1 Main Selections .............................................................................................................8
2.3.2 Tool bar ..........................................................................................................................9
2.3.3 Reader Operator...........................................................................................................10
Reader Display tool bar ................................................................................................10
Display Function........................................................................................................... 11
Reader display .............................................................................................................. 11
Reader Error Status....................................................................................................... 11
Reader Function Selections ..........................................................................................12
2.4 Frequent Function...................................................................................................................12
2.4.1 Press Mouse right key..................................................................................................12
2.4.2 Basic Information Setting ............................................................................................12
2.4.3 Report Tool Bar ...........................................................................................................14
3. Main Selection Functions ...................................... 15
3.1 Basic Information Setting .......................................................................................................15
3.1.1 User..............................................................................................................................15
3.1.2 Group ...........................................................................................................................16
3.1.3 Reader ..........................................................................................................................17
3.1.4 Communication Interface ............................................................................................23
3.2 Reader Operator......................................................................................................................24
3.2.1 Receive Historical Data ...............................................................................................24
3.2.2 Inquire Time ................................................................................................................24
3.2.3 Inquire Enrollment.......................................................................................................24
3.2.4 Inquire Reader Information .........................................................................................24
3.2.5 Send Time ....................................................................................................................24
3.2.6 Send Enrollment ..........................................................................................................24
3.2.7 Send Time Zone/Holiday.............................................................................................24
3.2.8 Send Parameter ............................................................................................................24
3.2.9 Send all setting data .....................................................................................................24
3.2.10 Polling........................................................................................................................24
3.3 Historical Data ........................................................................................................................25
3.3.1 Inquire Historical Data ................................................................................................25
3.3.2 Deleting Previous Data ................................................................................................26
3.4 Tools .......................................................................................................................................26
3.4.1 Database Manager .......................................................................................................27
3.5
System Setting ..............................................................................................................29
3.5.1 System Parameter ........................................................................................................29
3.5.2 Authority Manager.......................................................................................................30
3.5.3 Relogin.........................................................................................................................31
4. Uninstallaton ................................................ 32
5. Troubleshooting .............................................. 35
Appendix A TCP/IP Converter .................................... 36
Page
1
1. Installation
1.1 Hardware requirements :
1. One IBM compatible PC (at least 586 and above), including mouse and CD-ROM.
2. Minimum 32MB RAM.
3. Minimum 10MB disk space. Require more disk space if storing large volume
of historical data.
4. One communication port for access control system.
1.2 Software requirements :
1. Operation System : Minimum Windows 98、2000.
2. 800 x 600 solutions
1.3 Installation steps :
1. Close all working applications(all anti-virus agents should be closed prior to
installation), and open SAC-680v302\IINSTALL (Figure1.1).
2. Run Setup.exe (Figure 1.2).
Figure 1.1、CD-ROM content
Page
2
Figure 1.2、Setup frame
3. When Figure1.2 appeared, click Next to continue.
4. Any change of installation directory(Figure1.3). Click Browse… or select
another directory(Figure1.4).
Figure 1.3、Change installation directory
Page
3
Figure1.4、Select another directory
5. When Figure1.5 appeared, Click Finish to complete setup.
Figure 1.5、Installation completed
Page
4
2、Running Application
2.1 Software and Hardware
Group 2
Group 1
Reader 1
Enrollment
data
Reader 2
RS-485 or TCP/IP
converter
ID card(user)
Group 3
Group
Reader 3
Reader
Reader 4
Figure 2.1、Diagram of software and hardware
2.2 Enter Access Control System
1. Click Star\Programs\AccessControlSystem3.2\Soca Access Control System
3.2 or Soca Access Control System 3.2.lnk on desktop.
2. When Figure 2.2 appeared, enter Account No.:USER (default), Password:0000
(default).
Figure 2.2、Login
3. Click Change Password<<to change a new password (Figure 2.3), and use new
Page
5
password for next login (Figure 2.4).
Figure 2.3、Change Password
Figure 2.4、Completed
4. Entering the system successfully when Figure 2.5 appeared.
Page
6
2.3 System Mainframe
Main Selection
System Version and
Serial Number
Tool List
Time
Readers Display
Message Area
Show Reader
Reader No.
Communication
Mode
System Running time
(for Reference)
Figure 2.5、System Mainframe
Page
7
2.3.1 Main Selections
Speed Key
Access Control System
Basic Information
Setting
User
U
Reader
R
Group
G
Communication
Interface
C
Receive
Historical Data
Ctrl + H
Inquire Time
T
Inquire
Enrollment
A
Inquire Reader
Info.
I
Send Time
Ctrl + T
Send Enrollment
Ctrl + A
Send Time Zone
Ctrl + Z
Send Parameter
Ctrl + S
Send All Setting
Ctrl + E
Polling
Ctrl + P
Inquire
Historical Data
Ctrl + Q
Delete Previous
Data
Ctrl + D
Tools
Database Manager
Ctrl + 1
System Setting
System Parameter
Reader Operator
Historical Data
Authority Manager
Ctrl + Y
Relogin
Ctrl + L
Figure 2.6、Main Selections
Page
Ctrl + O
8
Icon
2.3.2 Tool bar
1
2
3
4
5
6
7
8
9
13
14
15
16
17
18
19
20
21
10
11
12
Figure 2.7、Tool bar
1. User Setting:Please refer to 3.1.1 User setting.
2. Group Setting:Please refer to 3.1.2 Group setting.
3. Reader setting:Please refer to 3.1.3 Reader setting.
4. Receive Historical Data:Please refer to 3.2.1 Receive Historical Data function.
5. Inquire Reader Time:Please refer to 3.2.2 Inquire Time function.
6. Inquire Reader Enrollment:Please refer to 3.2.3 Inquire Enrollment function.
7. Inquire Reader Information:Please refer to 3.2.4 Inquiry Reader Information function.
8. Send Time To Reader:Please refer to 3.2.5 Send Time function.
9. Send Enrollment To Reader:Please refer to 3.2.6 Send Enrollment function.
10. Send Time Zone:Please refer to 3.2.7 Send Time Zone function.
11. Send Parameter To Reader:Please refer to 3.2.8 Send Parameter function.
12. Send All Setting To Reader:Please refer to 3.2.9 Send All Setting Date function.
13. Polling:Please refer to 3.2.10 Polling function.
14. Open Door:Please refer to 2.3.3 Reader Operator.
15. Close Door:Please refer to 2.3.3 Reader Operator.
16. Alarm On:Please refer to 2.3.3 Reader Operator.
17. Alarm Off:Please refer to 2.3.3 Reader Operator.
18. Anti-Duress Alarm On:Please refer to 2.3.3 Reader Operator.
19. Anti-Duress Alarm Off:Please refer to 2.3.3 Reader Operator.
20. Stop:To stop the operation of readers.
21. Exit:To exit the system. Stop Polling first before exiting the system.
Page
9
2.3.3 Reader Operator
Reader’s tool list
Reader No.
Display
Selected Reader
Unselected
Reader
Figure 2.8、Reader Display
Reader Display shows all online readers and all their data.
Reader Display tool bar
1
2
3
4
5
6
7
8
Figure 2.9、Reader Display tool bar
1.
2.
3.
4.
5.
6.
Polling
Select reader to receive online data.
Minimize Reader Display
Maximize Reader Display
All Reader
List all readers.
Monitor Reader
List all selected readers which are under monitoring.
Reader Error
All errors will be listed when the following situation occurred:
Page
10
(1)Any selected reader did not respond when polling is mode.
(2)Alarm or anti-duress alarm is being activated.
7. Error Message
8. Refresh
Display Function
1. Arrange Icon
Rearrange the readers by sizes.
2. Large
Display all readers in normal size.
3. Medium
Hide all readers’ status.
4. Small
Minimize all readers to the smallest.
Reader display
Reader No. and Name
Priority
Reader
Status Lights
Image or Photo
Reader respond
Reader OK light
Reader DENY light
Setting mode
Message
Status
Reader Function
Selection
Figure 2.10、Reader display
Reader Error Status
Anti-Duress
Alarm activated
Alarm is activated
Figure 2.11、Reader Error Status
Page
11
Reader Function Selections
1. Priority
Setting priority of selected readers.
Example:
Reader
Priority
Reader 1
1
Reader 2
2
Reader 3
4
Reader 4
3
Reader 5
2
When polling, all information received will be arranged as :
Reader 1
-Reader 1
Reader 2
Reader 5
-Reader 1
Reader 2
Reader 4
Reader 5
-Reader 1
Reader 2
Reader 3
Reader 4
Reader 5
2.
3.
4.
5.
6.
7.
Open Door
Close Door
Alarm On
Alarm Off
Anti-Duress Alarm On
Anti-Duress Alarm Off
2.4 Frequent Functions
2.4.1 Right click the mouse
2.4.2 Basic Information Setting
Setting all reader’s basic information. (Figure 2.13)All settings can be made using the
frequent functions or tool bars as below.
Page
12
1
2
3
4
5
6
7
8
9
10
11
12
Figure 2.12、Basic Information Setting
1.
2.
3.
4.
5.
6.
7.
8.
First(Data)
Previous
Next
Last(Data)
Add
Delete
Edit
Save
9.
10.
11.
12.
13.
Cancel Edit
Renew
Edit Mode Switch
Find Data
Print Report
Current Position
Figure 2.13、Data Column
※ Special Keys:
Insert:Add new data.
Ctrl + Delete:Delete selected data.
Esc:Cancel previous selection.
F2:Alter or change selected data.
Page Up
Page Down
Ctrl + Home
Ctrl + End
Ctrl + Page Up
Ctrl + Page Down
Alt + F4:Exit Edit.
Normal Mode:Unable to edit data in data column.
12. Find Data
Selection
Parameter
Figure 2.14、Find
Page
13
13
2.4.3 Report Tool Bar
1
2
3
4
5
6
7
8
9
10
Figure 2.15、Report Tool Bars
1.
2.
3.
4.
5.
6.
7.
8.
9.
10.
Whole Page
Normal Page
Maximum Page
First Page
Previous Page
Next Page
Last Page
Printer Setting
Start Printing
Save as File
Save all data as file to be used for other programs.
(1)QuickReport file(*.QRP)
(2)Text file (*.TXT)
(3)Comma Separated (*.CSV)
(4)HTML document (*.HTM)
11. Open File(*.QRP)
12. Close
Page
14
11
12
3. Main Selection Functions
Setting user’s names, user IDs, passwords, groups, photos, and as follows:
3.1 Basic Information Setting
3.1.1 User
1.Batch Adding
2.Batch Deleting
User Picture
Click on the
column name to
arrange
Delete Picture
3. Pasting User’s Picture
Open File (*.BMP or JPEG)
Figure 3.1、User Setting
1. Batch Adding
Select Amount or
End Card No. to
add
Figure 3.2、Batch Adding
Page
15
2. Batch Deleting
Figure 3.3、Batch Deleting
Example:Start Card No.: 00000003, End Card NO.: 00000005.
00000003,00000004,00000005 will be delete.
3. Pasting User’s Picture
Running any image making software to load user’s picture.
3.1.2 Group
Sorting all users according to their categories into different groups.
Reader that is selected or
check in the box is being
Restricted to the selected
time zone.
Figure 3.4、Group Setting
1.
Delete Group
All users are being arranged according to their categories. Deleting group would
cause deletion of all users in the selected group. Do not attempt to delete Default
Group that eventually cause parameter of Default group unstable.
Page
16
Figure 3.5、Delete Group
3.1.3 Reader
All information being set will send to all readers. The information is being
categorized as below:
(1)Parameter
(2)Holiday
(3)Time Zone(up to 48 time zone no.)
※ All settings are being done would be saved in the program. User must send all
valid settings by clicking on Reader Operator’s send function to complete all
data settings.
1.Auto Detect Reader
2.Copy Reader Data
3.Parameter
4.Holiday
5.Time Zone Data
Figure 3.6、Reader Setting
Page
17
1. Auto Detect Reader
To detect the number of reader under selected communication interface.
Search range could be done manually up to 255 readers.
※All readers’ ID number shall be set without any repetition(refer to Function 10,
page 10, Operation and Installation Manual) to avoid failure of detecting the
accurate number of readers.
Figure 3.7、Auto Detect Reader
2. Copy Reader Data
Copy selected reader’s data to another reader.
Figure 3.8、Copy Reader Data
Page
18
3. Parameter
Figure 3.9、Parameter
※
□
□
□
□
□
□
□
□
□
□
□
△
△
△
△
△
Get parameter from
selected reader
Click any function box of Parameter below to enable the required functions.
Alarm ON: When reader is tampered with force, alarm will be activated.
Anti-Duress Alarm ON:Alarm will be activated when users enter duress code.
Door Sensor ON:When this function is set, sensor will sense if the door is
closed or not.
Anti-theft Detector Activated:When intruding occurred, signal will be sent to
any security department.
Push Button Enable:Push button to open door.
Beep:Beep sound appears when button pressed or proximity of card used.
Card with Password Mode:When sensing is done, user must enter password to
gain access.
Anti-Pass ON:The card control only be used for matching single entry and
exit.(When gaining entry without card, access denial will occur
when users try to make an exit)
Display Card No.:Reader’s LCD indicator shows user’s card number.
Sub Reader Time Zone No.:(reserved)
Aux. Sensor ON:(reserved)
Alarm Delay:(reserved)
Anti-Duress Delay:(reserved)
Door Sensor Delay:Delay time to sense if door is not closed.
Shut Time:Setting door open time when user card is sensed.
Error Time:(reserved)
Page
19
△
△
△
△
△
○
○
○
○
○
Push Button Time Zone:(reserved)
Lockup Time Zone:(reserved)
Unlock Time Zone:Door will not close or lock under selected time zone.
Aux. Time Zone:(reserved)
Invalid Password Times:Setting of numbers of invalid password
entered.
Main Reader Location:Outdoor or Indoor.
Print Mode:Reader must connect a serial printer.
When OFF is set: Printer will not print.
When Real Time is set: Printer will print immediately.
Duress Code
When Batch is set: reserved.
Duress Code:Enter Duress Code before password(Example 9 1234)
Reader System Password:Setting reader’s system password (default:5678)
Auto Record Range:Transactions will be recorded when any boxes or all boxes
of function clicked.
4. Holiday
All holiday access setting will affect all settings at Time Zone Data. Click on the
date box to mark as a holiday(the box will turn into a red box when it is clicked.)
Get holiday
data from
selected reader
Figure 3.10、Holiday Setting
5. Time Zone Data
Page
20
Every reader has its own individual 48 time zones.
Figure 3.11、Time Zone Data
(1) Valid Date:valid range 1999/01/01 ~ 2098/12/31
(2) Display Format
There are three different display format: Holiday Access, Floor Control, and
SE-18 (elevator controller ; optional )
Example:
Hypothetically, an Information Resource department would like to set its
access control as below:
1. Valid access control date:2003/01/01 ~ 2004/12/31
2. Access time from 08:00 to 17:30 on Mondays, Wednesdays, and
Fridays.
3. Access time from 08:00 to 18:00 on Tuesdays and Thursdays.
4. Access time from 08:00 to 12:00 on Saturdays.
5. Access is restricted on Sundays and holidays.
Setting:
According to the above criteria, these are 3 time zone to set.
(1) 08:00 ~ 17:30
(2) 08:00 ~ 18:00
(3) 08:00 ~ 12:00
All the time zones are set at Time zone No.2 as shown as below (3.11.1~
3.11.3).
Page
21
Figure 3.11.1
Figure 3.11.2
Figure 3.11.3
Do not check on any boxes from Sunday to Holiday Access in Group 4 and
Group 5 in Group Enrollment.
Page
22
3.1.4 Communication Interface
It is RS232/485, TCP/IP, Modem(optional) supported.
Figure 3.12、Communication Interface
When RS232/485 mode is selected, click COM1 or COM2 to set both in
Communication Interface and Reader Setting.
When TCP/IP mode is selected, a TCP/IP converter shall be installed. Click on
on the tool bar to make a new addition or make any changes in default parameter No. 3
(Figure 3.13).
All communication Interface
titles will be shown on reader
setting for selection making.
Click to select either
UDP or TCP
Receive Port shall be
between 1024 ~ 65535
Send Port shall be
between 1024 ~ 65535
Figure 3.13
Please refer to Appendix A for TCP/IP
Page
23
3.2 Reader Operator
1. Selected reader will operate when any one of the Reader Number is clicked in
Reader Screen.
2. Click an any boxes of readers to select on Select Reader.
3. Click Esc or STOP to cancel all operation, except when receiving all historical data.
4. When reader is operating, all other functions are not available.
3.2.1 Receive Historical Data
Receiving reader’s historical data and any changes of status. Any new addition of
card number will be received and saved as Default.
3.2.2 Inquire Time
3.2.3 Inquire Enrollment
Inquiring reader’s enrollment data. All data are saved at
Program Files/soca/Access Control 3.2/*.txt as text file.
3.2.4 Inquire Reader Information
Inquiring reader’s hardware information, historical records and enrollment records.
3.2.5 Send Time
All reader’s time is set as time shown in the computer.
3.2.6 Send Enrollment
Sending all enrollment data to all readers. (Setting of send enrollment, please refer to
3.1.2 or 3.1.3)
3.2.7 Send Time Zone/Holiday
Sending time zone data to all readers.(Please refer to 3.1.3)
3.2.8 Send Parameter
Sending all parameter to all readers.(Please refer to 3.1.3)
3.2.9 Send all setting data
Sending all parameter, time Zone, and enrollment data to readers.
3.2.10 Polling
Supervising all selected readers. All latest statuses or basic information of the last
user will be shown on reader screen. When it is online simultaneously, all functions
are not available except Open Door, Close Door, Alarm ON, Alarm OFF,
Anti-Duress Alarm ON, Anti-Duress Alarm OFF, Polling.
Page
24
3.3 Historical Data
Inquiring or deleting historical data.
3.3.1 Inquire Historical Data
Inquiring historical data depends on CPU speed, total of historical records, and range of
historical data inquired.
Select Normal or
Time Attendance
Click the column
name to rearrange
Figure 3.14、Inquire Historical Data
1. Sort
Arrange all data according to their categories.
2. Select Status
Select status according to different statuses.
3. Date
Select historical data between selected date.
4. Time
Select historical data between selected time. If start time is greater than end time
as below: 22:00 ~ 20:00 will select historical data between 22:00 ~ 23:59 and
00:00 ~ 20:00.
5. Reader
Select any readers to inquire.
6. Group
Select any groups to inquire.
Page
25
7. Card Number
Select any card number to inquire.(Type any card number manually to inquire)
8. Export
Save all result into plain text file. There are two formats to choose:
(1)Word file (*.txt)
Every record of the historical data is being spaced for editing.
(2)Word file (with comma) (*.txt)
Every column is being spaced with quotation mark and comma for editing (such
as Mircosoft Excel) as below:
"1","Reader1","20021114","1522","Invalid Card No.","13432579","John","Default"
"1","Reader1","20021114","1522","Entry","00010605","Tom","Default"
9. Query Mode
There are 2 query modes to select:
(1) Normal Mode: All historical data are arranged according to reader ID.
(2) Time Attendance: All historical data are arranged according to group which
showed start time and end time.
3.3.2 Deleting Previous Data
Delete historical data on selected date( not including present date). User may
delete any redundancy of historical data to maintain the speed of historical data
query. 30,000 historical data requires 1 MB of disk space.
Figure 3.15、Deleting Previous Data
3.4 Tools
Page
26
3.4.1 Database Manager
Management of internal database.
1. Standard
Check any boxes for backup or restoring purpose. User is advised to check all the
boxes except Historical Data when backup is being made. User shall backup
another set of Historical Data when backup is being made. User shall backup
another set of historical data alone.
Figure 3.16、Database Manager(Standard)
(1) Backup
Backup all selected data to a file which appears as a file called
YearMonthDayHourMinuteSecond(YMDHMS) to save in any selected
directory.
For example: Select D: directory to backup to D:\20021216130003
Page
27
Figure 3.17、Backup
(2) Restore
Restoring all backup file to the system. The amount of boxes checked should
be the same as the backup file when restoring is made to avoid rejection. User
shall click to Advance Mode when restoring any individual file.
Figure 3.18、Restore
2. Advance
Advance mode lists out all system’s files. Users may check any boxes to backup,
rearrange, restore, or delete.
Page
28
Figure 3.19、Database Manager(Advance)
(1) Backup
For example: Click D:\Bak to make a backup to D:\Bak\20021216130003
(2) Restore
Restoring all backup files to the system. User may select many files to restore
at one time.
(3) Rearrange
Rearrange all checked files.
(4) Delete
Delete all checked files.
3.5 System Setting
3.5.1 System Parameter
Figure 3.20、System Parameter
1. Reader Status Message
When polling is made, the system detects all readers’ latest status to show on
Message Area. Check the box to display the status message.
Page
29
2. Maximum Message Lines
Setting message lines up to 9999 lines.
3. Time Out Retry Times
User may set the number of time out retry times when polling is made. No
respond may occur when system or reader is busy or connection fault.
4. Time Out Wait Second
Setting the number of time out wait second when reconnecting.
5. Latest Message Lines
When receiving historical data, user may set the amount of desired lines to show
the latest historical message lines.
6. Historical Buffer
All historical records are temporarily saved (use default value) when receiving
historical data.
7. Historical Data Saving Methods (Use default Setting)
● Batch Saving
Saving is made when all historical data from every reader received.
○ Real Time Saving
Saving is made simultaneously when every historical record from the reader
received.
3.5.2 Authority Manager
Check boxes for different account users as every user has different authority of the
system. Default account (USER) has the highest authority. Please be sure to reset
USER’s password.
Range of account setting:less than 20 alphabets or numbers.
Range of password setting:less than 10 alphabets or numbers.
Page
30
Figure 3.21、Authority Manager
User who creates and has system manager account is strongly suggested to have the
authority of the functions below:
1. Database Manager
2. Authority Manager
3.5.3 Relogin
User may use different account to relogin the system.
Page
31
4. Uninstallaton
1. Please shut down the system before any uninstallation made.
2. Click Control Panel (Figure 4.1).
Click
Add/Remove
Figure 4.1、
3. Click Add/Remove Programs(Figure4.2)
Page
32
Figure 4.2
4. Select Soca Access Control System 3.2, Click Add/Remove(R)…button
Figure 4.3、
5. Click Yes(Y) to uninstall. Click OK when it is completed (Figure4.4).
Page
33
Figure 4.4
Page
34
5. Troubleshooting
1. Communication port has been used by other program when “ ie_Open – device already
open” appeared. Please close or shut down all programs and restart the system again.
If the above message still appeared, please restart the computer and execute the program
before activating any other programs.
2. When “Key violation” appeared, please check if information has been entered
repeatedly.
3. Please enter all records in all columns when “Field "xxxxx" must have a
value”appeared.
4. When Esc or STOP is clicked to interrupt or terminate the system process might cause
the program unable to function or close. Press Shift + Esc for several times or restart
the computer again.
Page
35
Appendix A
TCP/IP Converter
1. First, run the enclosed disk which contained ETM.EXE to search for its TCP/IP
converter from LAN. We strongly recommend to set only one TCP/IP converter at a
time. If there is more than one TCP/IP converter in LAN, please unplug the other
converters. (Figure A-1)
※
Any setting of TCP/IP converter shall be done by Professional Internet Engineer.
Figure A-1、Search TCP/IP converter
2. Click Config -> IP Address to set as the same IP group of LAN. For example, if the
IP of computer is 192.168.10.88, please set the TCP/IP converter’s IP to 192.168.10.89.
Do not use the same IP. After then, use Ping command under MS-DOS format to test
the setting of the new IP. Fro example, setting of the new IP(C:\> ping 192.168.10.89)
is completed when there is no error message of Request timed out appeared.
Page
36
3. Type the new IP in any browser
Figure A-2、Login
4. Click Login to enter as there is no default password.
5. Follow A-3 to complete the remaining settings.
Page
37
1
2
3
4
5
6
7
Figure A-3、
1. IP address of TCP/IP converter.
2. Depending on TCP/IP converter’s location, use default value for both Subnet mask
and Gateway address.
3. The value of TCP/IP converter’s socket port shall be between 1024 ~ 65535 Setting
of communication mode depending on software’s communication interface setting.
! Please set UDP Client if the software’s communication interface mode is
TCP/IP (UDP).
! Please set TCP Server if the software’s communication interface mode is
TCP/IP (TCP).
4. We recommend Client mode server IP address shall be the same as TCP/IP
converter’s IP address.
Page
38
5. Please set its Serial I/O settings 9600,N,8,2 for ST-680.
! Please select RS 485 (Half Duplex) for ST-680.
6. Setup and access password for TCP/IP converter.
Page
39