1
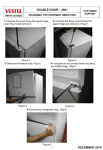
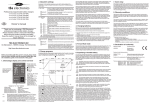
SERVICE MANUAL
Models
M
d l
230
260
280
230
260
280
Dimentions : WxHxD (mm)
540x1169x634
540x1440x634
540x1600x634
DOUBLE DOOR – 230 – 260 – 280
CUSTOMER
SUPPORT
ASSEMBLE & DISASSEMBLE
WHITE GOODS
A- Changing The Door Swing Direction to Right Hand
2- Dismantle the refrigerator and freezer
door from cabinet by pulling towards to you
together with the middle hinge. (Fig-2)
1- Remove the freezer door panel caps.
Unscrew the two screws which are fixing
the middle hinge. (Fig-1)
Freezer door
panel right cap
Freezer door
panel left cap
Pull the doors towards to
you with middle hinge
Unscrew the two
middle hinge screws
Figure-1
Figure
1
Figure-2
Figure
2
3- Lie down the appliance to the left side. Dismantle both leveling feet and unscrew the
bottom hinge fixing screws and remove it. (Fig-3) Unscrew the bottom hinge pin and screw in
the next hole.(Fig-4) Then screw the hinge to the left side of the refrigerator. Screw the both
leveling feet.
Figure-3
Figure-4
1
DECEMBER 2011
DOUBLE DOOR – 230 – 260 – 280
CUSTOMER
SUPPORT
ASSEMBLE & DISASSEMBLE
WHITE GOODS
4- Remove the two big caps on the middle
bracket. Unscrew the two screws fixing the top
hinge and remove it. Remove the top hinge
screw left cap on the left side. Remove the
middle hinge screw cap (big) on the right side.
(Fig-4)
Remove the
middle hinge
screw cap (big)
Remove top
hinge screw
left cap
Unscrew the
top hinge
Remove the two
middle hinge
screw caps (big)
Figure-4
5- Unscrew the screw fixing the top hinge pin.
Turn the pin by 180° then fix it to the top hinge
by screwing it. (Fig-5)
Rotate the top
hinge pin by 180°
180
Figure-5
6- Assemble the top hinge to the left side.
(Fig-6) Insert the two middle hinge screw caps
(big) to the right side of the middle bracket.
(You can find the new caps in the user manual
bag) Insert the middle hinge screw cap big to
the left side. (You can find the cap in the user
manual bag) Insert the top hinge screw right
cap to the right side. (You can find the top
hinge screw right cap in the user manual bag)
Insert the
top hinge screw
right cap
Insert the middle
hinge screw cap (big)
Insert the two
middle hinge
screw caps
(big) here
Figure-6
2
DECEMBER 2011
DOUBLE DOOR – 230 – 260 – 280
CUSTOMER
SUPPORT
ASSEMBLE & DISASSEMBLE
WHITE GOODS
7- Replace the top bushing and top bushing
cap. (Fig-7) (You can find the new bushing cap
in the user manual bag)
Remove the bottom bushing, bottom stopper
g, bottom
and then assemble the bottom bushing,
stopper to the left side. (Fig-7)
REFRIGERATOR
DOOR
BOTTOM STOPPER
Figure-7
8- Remove the top bushing and insert it into left
hole (Fig
hole.
(Fig-8)
8)
FREEZER
DOOR
Unscrew the screw fixing the freezer door
stopper (right) on the right side and remove it.
Than assembly the freezer door stopper (left)
on the left side. (Fig-8)
(You can find the freezer door stopper (left) in
the user manual bag)
F DOOR STOPPER
F DOOR STOPPER (LEFT)
Figure-8
3
DECEMBER 2011
DOUBLE DOOR – 230 – 260 – 280
WHITE GOODS
CUSTOMER
SUPPORT
ASSEMBLE & DISASSEMBLE
9- Turn the middle hinge by 180º . Assemble the freezer door and refrigerator door together
with middle hinge. (Reverse operation of item 2)
Fix the middle hinge by tighting the screws. (Fig-9) And insert the freezer door panel caps.
Turn the middle
hinge 180°
Figure-9
4
DECEMBER 2011
DOUBLE DOOR – 230 – 260 – 280
WHITE GOODS
ASSEMBLE & DISASSEMBLE
CUSTOMER
SUPPORT
B - Changing The Thermostat :
1) Remove the lamp cover and unscrew the fixing screw.
2) Remove the screw cap and unscrew the fixing screw.
3) Remove the thermostat box by pulling it and disconnecting the wire connector.
4) Remove the thermostat knob by pulling forward. Loosen the nut fixing the thermostat.
5) Pull
P ll outt the
th thermostat
th
t t bulb
b lb from
f
the
th h
housing.
i
6) Replace the thermostat with a new one and assemble the thermostat box following the
steps backwards.
C - Thermostat Knob
• This
Thi knob
k b is
i used
d to
t control
t l the
th temperature
t
t
off the
th freezer
f
and
d
refrigerator parts automatically. It can be set to any value between “0“ and “5“positions.
• “ 0 ” position indicates that the thermostat is “off ”.The refrigerator is “off ” on this setting.
• By turning the knob between “1” and “5”, you can increase or decrease the cooling degree.
• The refrigerator is designed to get optimum performance when the thermostat knob is set
between position “2” to “4”.
5
DECEMBER 2011
DOUBLE DOOR – 230 – 260 – 280
CUSTOMER
SUPPORT
REFRIGERANT CYCLE DIAGRAM
WHITE GOODS
F EVAPORATOR
CONDENSER
DRYER
R EVAPORATOR
CAPILLARY
HOT PIPE
SUCTION PIPE
6
SUCTION
N PIPE
R EVAPOR
RATOR
F EVAPOR
RATOR
CAPILLA
ARY
DRYE
ER
HOT P
PIPE
CONDEN
NSER
COMPRE
ESSOR
COMPRESSOR
DECEMBER 2011
DOUBLE DOOR – 230 – 260 – 280
CUSTOMER
SUPPORT
TROUBLE-SHOOTING CHART
WHITE GOODS
No/Insufficient cooling
Check the
supply
voltage
(220-240v)
Is it ok?
Inform
customer
(220-240v)
No
Yes
Check the
voltage at
compressor
terminals
((220-240v))
Is it ok?
No
No
Is compressor
working?
Yes
Is the power
consumption of
compressor
normal?
No
Yes
Is the
thermostat
ok?
No
Yes
Replace the
thermostat
Check
thermostat
connections
No
Yes
There might
be clogging
Evacuate the
system, (**)
Charge the
gas again.
Yes
Break the
service pipe,
is there any
gas
evacuation?
No
Is over load
relay ok?
Yes
Is it
working
normally
?
Yes
No
Replace
over load
relay
group
Compressor
windings might be
faulty or there might
mechanical jamming
(***).
Check the
compressor replace
compressor,
if needed.
Check the
compressor,
replace if
there is
problem with
pressure.
Adjust the
thermostat
according to
seasonal
conditions.
Check if there
is any
leakage by
the help of
foam (*). Fix
and Charge
the gas again
(**).
Check the
thermostat
settings.
Adjust the
thermostat
according to
seasonall
conditions.
(*) Check all pipes, tubes and welding points against gas leakage. (**) Before charging gas to system,
change dryer and vacuum at least 30 minutes, then charge the system with amount written on label
(***) Compressor primary winding should be around 10 Ω and secondary around 15 Ω (at 250C ambiance
temp.)
7
DECEMBER 2011
DOUBLE DOOR – 230 – 260 – 280
CUSTOMER
SUPPORT
TROUBLE-SHOOTING CHART
WHITE GOODS
Excessive Cooling
Is the thermostat
setting appropriate
to season
conditions?
No
Adjust the
thermostat
according to
seasonal
conditions.
Yes
Is there any
icing
formation in
refrigerator
section?
No
Is the icing at
the whole of
back wall (on
serpentine)?
Yes
Yes
Set thermostat to a
lower setting; did
thermostat cut-out?
(Compressor stops
running)
Yes
Check the
thermostat bulb;
does it touch the
end of the pipe? If
not push the bulb
until end
No
Check the
temperature
values of fridge
section (***)
Are they
normal?
No
Is thermostat
connections
ok?
Yes
No
Compressor pressure
might be low or there
might me clogging at
the system, Check the
gas and pressure level,
If there is clogging;
clean the system (*)
and gas charge
again.(**)
No
Yes
Correct the
thermostat
connections
Replace
thermostat
Adjust the
thermostat.
Inform the
customer
Replace
thermostat
8
DECEMBER 2011
DOUBLE DOOR – 230 – 260 – 280
CUSTOMER
SUPPORT
TROUBLE-SHOOTING CHART
WHITE GOODS
Door/Gasket Adjustment
Is the
ground
under the
unit is
flat?
No
Product
should be on
a firm and flat
surface
Yes
Are the
adjustable
dj
bl
feet in correct
position?
No
Adjust the feet
properly
according to
ground surface
Yes
Is there any
misalignment at
hinge axis or
loose screws?
Yes
Correct the axis
and tighten the
screws
No
Is the form of
gasket
deformed?
No
As a service
solution add 3
washers between
the door bottom
and hinge.
Yes
Correct the
gasket form with
hot water (*).
Check after
correction. Is the
gasket closing
properly?
No
If the gasket is
changeable replace
the gasket; if not
replace the door.
Yes
Heavy foods/drinks on
th d
the
door shelves
h l
mustt
be shifted to the
hinged side.
(*) Correct the gasket form by the help of hot water and hair dryer.
9
DECEMBER 2011
DOUBLE DOOR – 230 – 260 – 280
CUSTOMER
SUPPORT
TROUBLE-SHOOTING CHART
WHITE GOODS
Abnormal Noise
Is the ground
under the unit is
flat?
Adjust the
feet
properly
according
to ground
d
surface
No
Are the
adjustable
feet in correct
position?
iti ?
Hayır
Product
P
d t should
h ld be
b
on a firm and flat
surface
Yes
Yes
Yes
Tighten the
compressor
feet.
Are
compressor
feet
loose?
No
Are capillary or other
loadside pipes touching
somewhere?
Yes
Pipes should not
touch any other
surfaces.
No
Is there bitumen on the capillary
Yes
and on the place that capillary
Vacuum the system
and make
gas charge
leaves the heat exchanger ?
No
Place the bitumen on
capillary and on point that
capillary leaves the heat
exchanger.
10
DECEMBER 2011