1
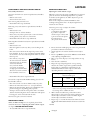
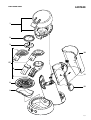
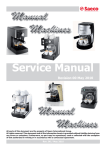
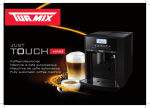
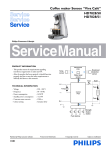
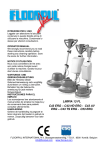
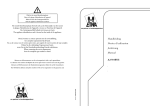
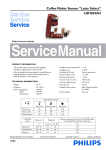
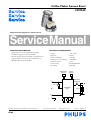
Coffee Maker Senseo Excel
HD7840
Philips Domestic Appliances and Personal Care
Service Manual
PRODUCT INFORMATION
TECHNICAL INFORMATION
- This product meets the requirements regarding
interference suppression on radio and TV.
- After the product has been repaired, it should function
properly and has to meet the safety requirements as
officially laid down at this moment.
-
Voltage
Frequency
Power consumption
Standby power consumption
Contents reservoir
Colour setting
Sap coding
Waterlevel
Sensor
:
:
:
:
:
:
:
220 - 230 V
50 Hz
1450 W
0.002 kWh
753 cc
Black/Aluminium
HD7840
Temp.
Sensor
Automatic
thermostat
L
Pump M
CONTROL
PCB
Boiler
N
Push buttons
Published by Philips Domestic Appliances and Personal Care
05/04
Printed in the Netherlands
© Copyright reserved
Subject to modification
HD7840
DISASSEMBLY- AND RE-ASSEMBLY ADVISE
REPAIR INSTRUCTION
Disassembly information
To remove the back cover (item 12 exploded view) handle as
follows:
- Remove valve outlet.
- Unscrew the 4 Torx screws.
Now remove gently the back cover.
- Reassemble follow steps backwards.
Adjusting the Coffee Volume output.
When for some reason the pump or PCB had to be replaced,
please be aware for the following adjustments to perform.
At the factory all appliances are 100% adjusted to get the
right volume output.
If one of the components (PCB or PUMP) has been
exchanged, the appliance has to be adjusted again before
returned to the end user.
Removing 3-way valve (item 19 exploded view) handle as
follows:
- Remove back cover.
- Unsnap boiler out of brew chamber.
- Rotate the 3-way valve a quarter (90°) counter clockwise.
- Gently pull the 3-way valve out of the boiler.
- Reassemble follow the above steps backwards.
Necessary process steps to adjust the volume:
1. To get access to the
potentiometer that makes
it possible to adjust the
volume output, remove with
a pair of tweezers the plastic
lip under the base.
(See picture 2 for location)
Removing Brew chamber head (item 1 exploded view) handle
as follows:
- Remove back cover.
- Place the appliance such a way that you are looking at the
boiler.
- First remove the boiler from the snap lock position of the
brew chamber. To do so use a screwdriver and bend slightly
the both ribs to the outer side and pull the boiler out of the
fixation point.
- Now remove 3-way valve.
To remove the brew chamber
unlock snap lock at the front
of the brew chamber.
Use your both thumbs
(see picture 1) and push
strongly upwards with a little
distortion (rotation) until the
brew chamber comes loose.
picture 1
- Reassemble follow above steps backwards.
To reach the components like PCB and Pump placed on the
base handle as follows:
- First remove back cover, brew chamber and 3-way valve.
- Remove the 4 Torx T15 screws (A) (see exploded view)
- Remove the metal housing (Item 13 in combination with
plastic housing part) by pulling gently upwards.
- Unsnap at the base side the 4 snap locks with a screwdriver
and the metal housing (Item 14 in combination with plastic
housing part) can be removed from the base.
The necessary parts can now be reached.
IMPORTANT NOTE!
When the PCB or Pump has to be replaced, please follow
careful the instruction - adjusting the Coffee volume output,
see chapter REPAIR INSTRUCTION
- To reassemble follow above steps backwards.
picture 2
2. Be sure the boiler is filled properly, other wise perform fill
procedure see DFU for instructions.
3. Switch appliance on and wait until the unit is ready to
brew.
4. Be sure a podholder is placed, but without a Coffee POD.
(only adjusting with plain water)
5. Place a cup on the drip tray cover and push the one-cup
button.
6. Now the unit is stabilized.
7. Empty the cup and push again for one cup setting,
measure the volume output with a graduated beaker.
In the table you can find the requirements for the
minimum/maximum volume output cc/mL values
depending from the country version:
One cup setting, Including Podholder, water spec.
(without Coffee pod)
Min. water
cc/mL
Max. water
cc/mL
France version
104
120
General version
127
143
* Each time the potentiometer has been adjusted, make
twice a one cup setting and measure the volume of the
last setting, this to stabilize the unit.
8. With a small screwdriver the potentiometer can be
adjusted (if you look at the front of the appliance, lower
volume adjust screwdriver counter clockwise, higher
volume adjust screwdriver clockwise)
9. Repeat step 7 to 8 until the measured volume is between
the allowed minimum/maximum tolerances stated in the
table.
10. End.
= changed
2-7
HD7840
Descaling
Regular descaling will prolong the life of your appliance and
will guarantee optimal brewing results for a long time.
- Follow the steps in the section headed “Preparing the
appliance for use” see DFU (Direction For Use manual).
- In stead of only water use a mix of water and Lemon sour.
- For the best result leave the mix of water and Lemon sour
for about 30 minutes in the appliance, before you start with
flushing the appliance.
- To get the best results repeat above mentioned step once or
twice.
- When finished, flush the appliance twice by repeating the
above mentioned steps only use water instead.
OPTIONAL (ACCESSORIES)
- No specific issues
PARTS LIST
Pos
Service code
1
2
3
4*
5*
6
7*
8
9
10
11
12
13
14
15
16
17
18
19
20
21
22
23
24
25
26
27
4222 259 34470
4222 247 06810
4222 259 06890
4222 259 34720
4222 259 34770
4222 247 38480
4222 247 39570
4222 259 21860
4222 247 38360
4222 259 21770
4222 247 38460
4222 247 38450
4222 259 21550
4222 259 21540
4222 247 06860
4222 247 35880
4222 247 06840
4222 259 22110
4222 259 22010
4222 259 24480
4222 259 11160
4222 246 16300
4222 247 35870
4222 247 06820
4222 259 03590
4213 247 05250
4222 259 28110
Description
Brewchamber assy complete
Brewchamber radial seal
Distrubutor assy
Pad holder single
Pad holder double
Foam chamber cover
Black
Foam chamber
Drip tray cover
Drip tray
Water tank assy
Transperancy blue
Valve outlet
Black
Back cover
Black
Metal housing
Metal front cover printed
O-ring (elbo)
Pump Elbo
Hose 0.25 meter
PCB assy EXCEL
Valve (3way)
Boiler assy compl.
230 V / 1400 W
Temp. sensor
Water level sensor
Filter
Water socket
Pump ULKA ER-EP8R 1.4 bar 230 V
Foot
Service podholder kit assy
* Remark:
New parts may not be used in combination with old parts, otherwise the Coffee foam layer will be very bad!
Throw the old materials away, so no chance exsist for mixing up old and new parts, see also order no Service podholder kit assy
for new parts!
To determine “old” and “new” parts please check the latest 2 pages of the service manual for details.
= changed
3-7
EXPLODED VIEW
HD7840
1
2
3
4
10
MA
X
MI
N
27
5
MI
N
6
7
11
8
12
9
4-7
EXPLODED VIEW
HD7840
A
A
13
19
14
20
21
22
23
24
15
25
16
17
18
26
5-7
HD7840
NEDERLANDS
Geachte klant,
Hierbij ontvangt u uw Senseo koffiezetapparaat retour, met onze excuses voor het ongemak.
Onze reparatiedienst garandeert u een weer 100% goed werkend product.
Tevens laten we u weten dat we uw Senseo hebben voorzien van een nieuw koffieuitstroomgedeelte en
2 nieuwe padhouders (1- en 2-kops padhouder).
Nieuwe onderdelen
Belangrijk
Gebruik de nieuwe onderdelen (padhouder(s)
en koffieuitstroomgedeelte) nooit in combinatie
met de oude padhouder(s) en/of het oude koffieuitstroomgedeelte.
1
Nieuwe uitloop
2
Figuur 1
Grotere opening
Figuur 2
Het door elkaar gebruiken van oude en nieuwe
onderdelen heeft een negatief resultaat op het
crema-laagje, daarom adviseren wij u de oude
onderdelen weg te gooien.
U kunt de nieuwe onderdelen als volgt herkennen
(zie figuur 1 en 2 in het linker kader).
ENGLISH
Dear customer,
We are happy to return your repaired Senseo coffee machine and apologise for the inconvenience caused.
Our repair service guarantees a perfectly working machine.
Your Senseo machine has been provided with a new coffee outflow unit and 2 new pod holders (a 1-cup
pod holder and a 2-cup pod holder).
New parts
Important
Never use the new parts (pod holders and coffee
outflow unit) together with the old pod holders
and/or coffee outflow unit.
1
If you mix old and new parts, this will have a
negative effect on the crema layer. That’s why we
advise you to dispose of the old parts.
New outflow hole
2
Figure 1
Larger opening
You can recognise the new parts by looking at figures
1 and 2 shown on the left.
Figure 2
6-7
HD7840
FRANÇAIS
Cher consommateur,
Nous sommes heureux de vous rendre votre cafetière Senseo et nous nous excusons pour tout inconvénient
occasionné.
Notre service réparations garantit le bon fonctionnement de l’appareil. Votre cafetière Senseo a été fournie
avec une nouvelle unité d’écoulement du café et 2 nouveaux supports à dosettes (support à dosettes pour 1
et 2 tasses).
Nouveaux composants
Important
N’utilisez jamais les nouveaux composants (supports
à dosettes et unité d’écoulement de café) avec les
supports à dosettes et/ou l’unité d’écoulement de
café usagé(es).
1
Nouveau orifice
d’écoulement
2
Figure 1
Orifice plus large
Figure 2
Si vous intervertissez les nouveaux composants avec
les vieux composants, cela affectera négativement la
couche de mousse.
Nous vous conseillons de jeter les vieux composants.
Les nouveaux composants sont présentés dans les
figures 1 et 2 à gauche.
DEUTSCH
Liebe Kundin, lieber Kunde,
Anbei erhalten Sie Ihre reparierte Senseo Kaffeemaschine. Wir möchten unser Bedauern für die Ihnen
entstandenen Unannehmlichkeiten ausdrücken. Unsere Reparatur-Abteilung garantiert Ihnen eine perfekt
funktionierende Kaffeemaschine.
Ihre Senseo Kaffeemaschine ist mit einem neuen Kaffeeauslauf ausgestattet worden sowie mit zwei neuen
Padhaltern (ein Padhalter für 1 Tasse und ein für 2 Tassen).
Neuen teile
Wichtig
Benutzen Sie die neuen Teile (Padhalter und
Kaffeeauslauf ) niemals mit den alten Padhaltern
bzw. der alten Auslaufeinheit.
1
Neue Auslauf
Öffnung
2
Abbildung 1
Größere Öffnung
Abbildung 2
Wenn Sie die alten Teile mit den neuen
kombinierten, wird die Qualität der Schaumkrone
stark beeinträchtigt. Deshalb empfehlen wir Ihnen,
die alten Teile zu entsorgen.
Auf den Abbildungen 1 und 2 (links) können Sie
die neuen Teile erkennen.
7-7