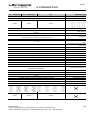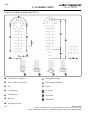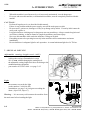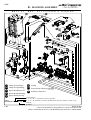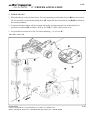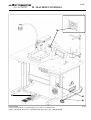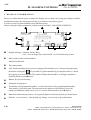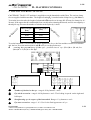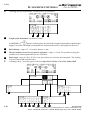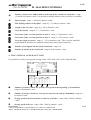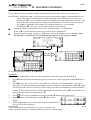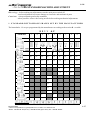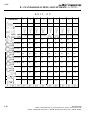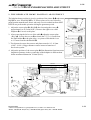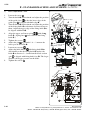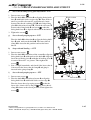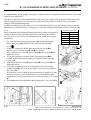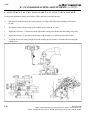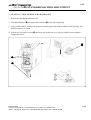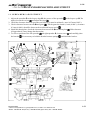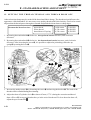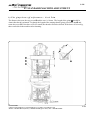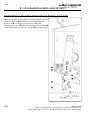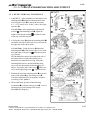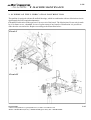
1
MODEL S-211 ELECTRONIC EYELET BUTTONHOLE MACHINE PARTS AND SERVICE MANUAL MACHINE SERIAL No. PART NUMBER 97. 1990.0.001 This manual is valid from the machine serial No.: G190137 AMF is trademark of AMF Group, Inc. 04/ 2 0 0 4 97.1990.0.001 ELECTRONIC EYELET BUTTONHOLE MACHINE PARTS AND SERVICE MANUAL 97.1990.0.001 ELECTRONIC EYELET BUTTONHOLE MACHINE PARTS AND SERVICE MANUAL 97.1990.0.001 ELECTRONIC EYELET BUTTONHOLE MACHINE PARTS AND SERVICE MANUAL 97.1990.0.001 ELECTRONIC EYELET BUTTONHOLE MACHINE PARTS AND SERVICE MANUAL 97.1990.0.001 ELECTRONIC EYELET BUTTONHOLE MACHINE PARTS AND SERVICE MANUAL 97.1990.0.001 ELECTRONIC EYELET BUTTONHOLE MACHINE PARTS AND SERVICE MANUAL S-211 S-211 S-211 S-211 S-211 S-211 LIMITED WARRANTY ON NEW AMF REECE EQUIPMENT Warranty provisions: A ninety (90) day limited service labor warranty to correct defects in installation, workmanship, or material without charge for labor. This portion of the warranty applies to machines sold as ”installed” only. A one (1) year limited material warranty on major component parts to replace materials with defects. Any new part believed defective must be returned freight prepaid to AMF Reece, Inc. for inspection. If, upon inspection, the part or material is determined to be defective, AMF Reece, Inc. will replace it without charge to the customer for parts or material. Service labor warranty period shall begin on the completed installation date. Material warranty shall begin on the date the equipment is shipped from AMF Reece, Inc. Exclusions: Excluded from both service labor warranty and material warranty are: (1) Consumable parts which would be normally considered replaceable in day-to-day operations. These include parts such as needles, knives, loopers and spreaders. (2) Normal adjustment and routine maintenance. This is the sole responsibility of the customer. (3) Cleaning and lubrication of equipment. (4) Parts found to be altered, broken or damaged due to neglect or improper installation or application. (5) Damage caused by the use of non-Genuine AMF Reece parts. (6) Shipping or delivery charges. There is no service labor warranty for machines sold as ”uninstalled”. Equipment installed without the assistance of a certified technician (either an AMF Reece Employee, a Certified Contractor, or that of an Authorized Distributor) will have the limited material warranty only. Only the defective material will be covered. Any charges associated with the use of an AMF Reece Technician or that of a Distributor to replace the defective part will be the customer’s responsibility. NO OTHER WARRANTY, EXPRESS OR IMPLIED, AS TO DESCRIPTION, QUALITY, MERCHANTABILITY, and FITNESS FOR A PARTICULAR PURPOSE, OR ANY OTHER MATTER IS GIVEN BY SELLER OR SELLER’S AGENT IN CONNECTION HEREWITH. UNDER NO CIRCUMSTANCES SHALL SELLER OR SELLER’S AGENT BE LIABLE FOR LOSS OF PROFITS OR ANY OTHER DIRECT OR INDIRECT COSTS, EXPENSES, LOSSES OR DAMAGES ARISING OUT OF DEFECTS IN OR FAILURE OF THE EQUIPMENT OR ANY PART THEREOF. WHAT TO DO IF THERE IS A QUESTION REGARDING WARRANTY If a machine is purchased through an authorized AMF Reece, Inc. distributor, warranty questions should be first directed to that distributor. However, the satisfaction and goodwill of our customers are of primary concern to AMF Reece, Inc. In the event that a warranty matter is not handled to your satisfaction, please contact the appropriate AMF Reece office: Europe/Africa/Americas Prostejov, Czech Republic Phone: (+420) 582-309-275 Fax: (+420) 582-360-608 e-mail: service@amfreece.cz Southwest Asia Istanbul, Turkey Phone: (+90) 212-465-0707 Fax: (+90) 212-465-0711 e-mail: amfreeceturkey@superonline.com Southeast Asia Kowloon, Hong Kong Phone: (+852) 2787-2273 Fax: (+852) 2787-5642 e-mail: amfreece@netvigator.com Warranty Registration Card (Please Fax or Mail immediately after installation) Note: All Warranty Claims Void, unless Registration Card on file at AMF Reece HQ Machine model number: (S101, S100, S104, S311, Decostitch, S4000 BH, etc) Manufacturer‘s serial or production number: Installation Site Information: Customer‘s Name: Customer‘s Mailing Address: Customer‘s Telephone Number: Supervising Mechanic‘s or Technician‘s Name: Signature of Supervising Technician: AMF Reece Technician‘s Name: AMF Reece Technician‘s Signature: Type of garment produced at this location? Average Daily Production Expected from this machine? (number of buttonholes, jackets sewn, pants produced, buttons sewn, etc) Any special requirements required at this location? What other AMF Reece Machines are at this location? How can we serve you better? Tovární 582, 796 25 Prostějov, Czech Republic Fax: +420 582 360 606, e-mail: service@amfreece.cz, website: www.amfreece.com S-211 TABLE OF CONTENTS PAGE A - INTRODUCTION 1. Basic information ...................................................................................................... 1-1 2. Safety labels and device ............................................................................................ 1-2 3. General machine parts description ............................................................................. 1-3 4. Specification ............................................................................................................. 1-4 5. Buttonhole description .............................................................................................. 1-6 6. Instructions for operator safety and maintenance of the machine ................................. 1-7 7. Special device .......................................................................................................... 1-8 B - MACHINE ASSEMBLY 1. Content of the shipping box ....................................................................................... 1-10 2. Accesories ................................................................................................................ 1-10 3. Table adjustment....................................................................................................... 1-10 4. Connection of the machine head with the control box ................................................. 1-12 5. Belt tension ............................................................................................................... 1-17 6. Power and air connection .......................................................................................... 1-18 7. Thread stand installation ............................................................................................ 1-19 8 Lubrication ................................................................................................................ 1-20 C - PROPER APPLICATION 1. Power up/ home position .......................................................................................... 1-21 2. Needle installation ..................................................................................................... 1-22 3. Threading ................................................................................................................. 1-23 D - MACHINE CONTROLS 1. Operation ................................................................................................................. 1-26 2. Display information ................................................................................................... 1-28 3. The buttonhole setting ............................................................................................... 1-29 4. The sewing speed setting ........................................................................................... 1-31 5. Parameters saving ..................................................................................................... 1-32 6. Setting the cutting ...................................................................................................... 1-33 7. Service mode - cycle counter .................................................................................... 1-33 8. Cycle mode .............................................................................................................. 1-35 9. Manual cut mode ...................................................................................................... 1-36 E - STANDARD MACHINE ADJUSTMENT 1. Standard buttonhole shapes set by the manufacturer .................................................. 1-37 2. The bedplate home position adjustment ..................................................................... 1-39 3. The race mechanism adjustment ................................................................................ 1-40 Revised 04/2004 e-mail: service@amfreece.cz; parts@amfreece.cz; website: www.amfreece.com Phones: +420 582 309 146 (Service); +420 582 309 286 (Spare Parts); Fax: +420 582 360 606 S-211 TABLE OF CONTENTS PAGE E - STANDARD MACHINE ADJUSTMENT 4. Clamp plates spreading adjustment ............................................................................ 1-41 5. Adjustment of the cutting mechanism ......................................................................... 1-46 6. Adjustment of the adjustable cutting steel holder ........................................................ 1-48 7. Setting the needle bar height ...................................................................................... 1-49 8. Adjustment of the bite mechanism .............................................................................. 1-50 9. Spreader and looper cam adjustment ........................................................................ 1-52 10. Loopers adjustment ................................................................................................ 1-52 11. Spreaders adjustment .............................................................................................. 1-53 12. Setting the thread tension and thread draw-off ......................................................... 1-54 13. Upper thread trimming ............................................................................................ 1-57 14. Spreading of the material ......................................................................................... 1-59 F- MACHINE MAINTENANCE 1. Cleaning and maintenance of the machine .................................................................. 1-60 2. Periodic maintenance ................................................................................................ 1-62 3. Scheme of the lubrication distribution ......................................................................... 1-63 4. Machine lubrication ................................................................................................... 1-64 5. Machine disposal ...................................................................................................... 1-65 Revised 04/2004 e-mail: service@amfreece.cz; parts@amfreece.cz; website: www.amfreece.com Phones:+420 582 309 146 (Service); +420 582 309 286 (Spare Parts); Fax: +420 582 360 606 S-211 A - INTRODUCTION 1. BASIC INFORMATION The sewing machine S-211 is designed and produced to be very reliable. Important design goals have been made to provide a safe machine that is simple and inexpensive to maintain. Special electronic and mechanical safety devices protect the operator and the machine. There is a special power lock out switch that permits the machine to be locked in the off position, so that it cannot be cycled accidentally. The drive cover is equipped with a safety switch that will not allow machine operation while the cover is open. There is an emergency off switch. There is a low air pressure detector that will not permit machine operation if air pressure is dangerously low. There are safety-warning labels on the machine in all areas that require special care. These must not be removed. If they are lost replace them immediately. You are the most important safety equipment of all. Be sure you understand the proper operation of the machine. Never remove safety mechanisms or labels. We have made every effort to provide the safest possible machine, but without complete knowledge of how this machine operates, and the use of proper care by the operator, this machine can cause serious injury or death. That is why there are safety warnings throughout these instructions that carry one of these messages. DANGER! Possible loss of life. WARNING! Possible serious injury or machine damage. NOTICE! Possible injury or machine damage. We recommend that service workers from AMF Reece oversee the installation and initial training of your mechanics and operators. The most effective safety precaution is a well-managed safety program. Be sure those who use this machine are properly trained. Never disable safety equipment. Always wear safety goggles when operating or servicing the machine. EXPLANATION OF ABBREVIATIONS CA CB AF ACL CT ST AKC LTT Cut after Cut before Adjustable flybar Adjustable cutting length Cord trim Short travel Automatic knife change Long Tail Trimming Revised 04/2004 e-mail: service@amfreece.cz; parts@amfreece.cz; website: www.amfreece.com Phones: +420 582 309 146 (Service); +420 582 309 286 (Spare Parts); Fax: +420 582 360 606 1-1 S-211 A - INTRODUCTION 2. SAFETY LABELS AND DEVICE Ì Ê Ñ Ó Ë Ë Ð Ì Í Î Ï Ð Ê Ë Ì Í Î Ï Ð 1-2 Warning Danger possible injury Covers removed possible injury Main power switch mark Grounding Rotational direction Standard label Ñ Ò Ó Needle bar cover Eye guard Drive belt cover Top cover Rear cover Motor pulley cover Safety switch Air pressure switch Revised 04/2004 e-mail: service@amfreece.cz; parts@amfreece.cz; website: www.amfreece.com Phones: +420 582 309 146 (Service); +420 582 309 286 (Spare Parts); Fax: +420 582 360 606 S-211 A - INTRODUCTION 3. GENERAL MACHINE PARTS DESCRIPTIONS Ï Ò Ï Display Table Control box Hand wheel Emergency Stop button Motor Table top Thread stand Ê Main power switch Cutting activation button Air pressure regulator Air pressure adjustment knob Foot pedal Revised 04/2004 e-mail: service@amfreece.cz; parts@amfreece.cz; website: www.amfreece.com Phones: +420 582 309 146 (Service); +420 582 309 286 (Spare Parts); Fax: +420 582 360 606 1-3 S-211 A - INTRODUCTION 4. S P E C I F I C AT I O N Machine Type Description Sewing speed The length of cutting CT/ST — 16-20 mm CT/ST — 20-24 mm AF Bite Range Buttonhole style Eye type Flybar length Number of stitches in the eye Number of stitches in the round end Length of the cross bar Cross bar density Clamp foot height Maximum work thickness Buttonhole Cutting Mode Cutting Space Cut position (Y axis) Bedplate movement Needle system Recommended threads * Operating Conditions Air pressure Machine db Level Machine Head Dimension Machine Head Weight Table Dimensions Machine Weight Electrical requirements Thread trimming Lower thread trimming CT – 16-20 mm CT – 20-24 mm Electronic eyelet buttonhole machine with chain stitch and with or without gimp 1000 — 2000 stitches/min (500 — 1000 rev/min of the drive shaft) 10-50 Stitch Density CT – 16-32 mm 16-32 16-20 20-24 0,5 — 2,0 mm (0.0197 – 0.0787”) (increments of 0.1 mm (0.004”)) 2,0 — 2,6 mm (0.0787 – 0.102”); 2,7 — 3,3 mm (0.106 – 0.13”); 3,4 — 4,0 mm (0.13 – 0.157”) eye, no eye, flybar, open end, cross bar, round end No eye; 2,2 x 3,0 mm (0.086 x 0.118”); 2,8 x 4,2 mm (0.110 x 0.165”); 3,0 x 4,6 mm (0.118 x 0.181”); 3,2 x 5,0 mm (0.126 x 0.197”) 3,0 - 20,0 mm Recommended standard 6 mm 4 — 20 4-20 - 4-8 mm 0,5 – 1,5 mm - 12 mm (0.472”) to 8,0 mm (0.315”) Cut before (CB), cut after (CA), no cut (OFF) -0,5 to +1,2 mm ± 1,5 mm (0.059”) 64 mm Reece 02.0501 (type 1807D) Size 80, 100, 120 according to IEC 364-3, IEC 364-5-51 temperature from +5°C to 40°C, relative air humidity from 30 to 80 % 0.45 MPa 0.6 MPa LwA = 86,9db; LpfA = 74,8 db; Noise measurement according to EN ISO 3746:1995 490 mm (height) x 405 mm (width) x 600 mm (depth) 64 kg 750 mm (height) x 1100 mm (width) x 600 mm (depth) 175 kg 1NPE~60Hz 230 V/TN/S; 1NPE~50Hz 230 V/TN/S Upper thread only Upper and lower threads Lower thread trimming - * Note: 1-4 16-20 mm 20-24 mm 24-28 mm 28-32 mm 16-20 20-24 If a customer uses thread size 100 and less, the manufacturer recommends to use the left looper 17.0069.4.019 Revised 04/2004 e-mail: service@amfreece.cz; parts@amfreece.cz; website: www.amfreece.com Phones: +420 582 309 146 (Service); +420 582 309 286 (Spare Parts); Fax: +420 582 360 606 S-211 A - INTRODUCTION CT – 24-28 mm CT – 28-32 mm LTT Electronic eyelet buttonhole machine with chain stitch and with or without gimp 1000 — 2000 stitches/min (500 — 1000 rev/min of the drive shaft) 24-28 28-32 Machine Type Description Sewing speed The length of cutting 16-35 0,5 — 2,0 mm (0.0197 – 0.0787”) (increments of 0.1 mm (0.004”)) 2,0 — 2,6 mm (0.0787 – 0.102”); 2,7 — 3,3 mm (0.106 – 0.13”); 3,4 — 4,0 mm (0.13 – 0.157”) eye, no eye, flybar, open end, cross bar, round end No eye; 2,2 x 3,0 mm (0.086 x 0.118”); 2,8 x 4,2 mm (0.110 x 0.165”); 3,0 x 4,6 mm (0.118 x 0.181”); 3,2 x 5,0 mm (0.126 x 0.197”) Recommended standard 6 mm 3,0 - 20,0 mm 4 — 20 12 mm (0.472”) to 8,0 mm (0.315”) Cut before (CB), cut after (CA), no cut (OFF) -0,5 to +1,2 mm ± 1,5 mm (0.059”) 64 mm Reece 02.0501 (type 1807D) Size 80, 100, 120 according to IEC 364-3, IEC 364-5-51 temperature from +5°C to 40°C, relative air humidity from 30 to 80 % 0.6 MPa LwA = 86,9db; LpfA = 74,8 db; Noise measurement according to EN ISO 3746:1995 490 mm (height) x 405 mm (width) x 600 mm (depth) 64 kg 750 mm (height) x 1100 mm (width) x 600 mm (depth) 175 kg 1NPE~60Hz 230 V/TN/S; 1NPE~50Hz 230 V/TN/S Upper and lower threads Stitch Denstiy Bite Range Buttonhole style Eye type Flybar length Number of stitches in the eye Number of stitches in the round end Length of the cross bar Cross bar density Clamp foot height Maximum work thickness Buttonhole Cutting Mode Cutting Space Cut position (Y axis) Bedplate movement Needle system *Recommended threads Operating Conditions Air pressure Machine db Level Machine Head Dimension Machine Head Weight Table Dimensions Machine Weight Electrical requirements Thread trimming Lower thread trimming Lower thread trimming 24-28 28-32 16-35 Revised 04/2004 e-mail: service@amfreece.cz; parts@amfreece.cz; website: www.amfreece.com Phones: +420 582 309 146 (Service); +420 582 309 286 (Spare Parts); Fax: +420 582 360 606 1-5 S-211 A - INTRODUCTION 5. B U T T O N H O L E D E S C R I P T I O N Ê The first row of stitches Ñ The length of cutting Ë The second row of stitches Ò The length of buttonhole Ì Eye Ó Fly bar Í Cutting space Cross bar Î Stitch density Open End Ï Bite size Round End Ð The length of a bar 1-6 Revised 04/2004 e-mail: service@amfreece.cz; parts@amfreece.cz; website: www.amfreece.com Phones: +420 582 309 146 (Service); +420 582 309 286 (Spare Parts); Fax: +420 582 360 606 S-211 A - INTRODUCTION 6. INSTRUCTIONS FOR OPERATOR SAFETY AND MAINTENANCE OF T H E M A C H I N E S - 211 When installing the machine the manufacturer recommends the minimum clearance mentioned above around the machine. Read all of the instructions that follow. DO NOT PUT THE MACHINE INTO OPERATION UNTIL YOU ARE COMPLETELY FAMILIAR WITH ALL INSTALLATION AND OPERATING INSTRUCTIONS. DANGER! Before connecting the machine to the power supply, be positive that all safety covers are correctly installed. Always engage the power lockout switch, or disconnect the main power supply, before removing any safety covers. Never connect the machine to the power supply when any cover is removed. It is forbidden to disconnect all connectors when the machine is switched on and connected to the power supply. T h e e l e c t r i c a l c o m p o n e n t s a n d m o t o r s c a n b e d a m a g e d . WARNING! Locate the Emergency Stop button. Be sure you know how to use it. Be sure that you have a reliable and uniform power supply. Be sure that all electrical cables are in good condition and have no signs of damage to avoid electrical shock. If any covers become damaged, they must be repaired or replaced immediately. Do not touch moving parts of the machine while it is operating. Keep clear of the needle. Always switch off the main power before changing the needle. Before cleaning the machine or performing service to the machine, engage the power lock out switch or disconnect the main power supply. When the machine is not in use engage the power lock out switch or disconnect the main power supply. Revised 04/2004 1-7 e-mail: service@amfreece.cz; parts@amfreece.cz; website: www.amfreece.com Phones: +420 582 309 146 (Service); +420 582 309 286 (Spare Parts); Fax: +420 582 360 606 S-211 A - INTRODUCTION - When this machine is used incorrectly, or is incorrectly maintained, it can be dangerous. Everyone who uses this machine, or maintains this machine, must be completely familiar with this manual. CAUTION! Perform all regular service as described in this manual. If there is any problem with the power supply, turn off the main power switch. Do not remove, paint over, damage or in any way change safety labels. If a safety label cannot be easily read, replace it. Long hair and loose clothing may be dangerous near any machinery. Always contain long hair and avoid loose clothing, so that it cannot be caught by machinery and cause injury. Never use this machine while under the influence of drugs or alcohol. If anything seems to be operating incorrectly in the machine call for maintenance assistance immediately. Be sure that there is adequate light for safe operation. A normal minimum light level is 750 lux. 7. SPECIAL DEVICE Adjustable cutting length steel (ACL) - it allows the sewing of buttonholes in range 1 6 - 3 5 m m without changing the cutting steels the adjustable cutting length steel does not belong to the standard machine equipment part number 03.5509.0.000 - see page 3-62 Light - the customer can order the light (order number 12.0008.4.403) inastalation, see page 3-66, integrate according the chart ( cliper XO; clips 6,7) Warning — It is necessary to disconnect the machine from the main ware before instaling the light. 1-8 RO GS1 GS2 F1F2 F3 F4 Revised 04/2004 e-mail: service@amfreece.cz; parts@amfreece.cz; website: www.amfreece.com Phones: +420 582 309 146 (Service); +420 582 309 286 (Spare Parts); Fax: +420 582 360 606 S-211 A - INTRODUCTION Short travel (ST) - - - - it is possible to sew the buttonholes in range 1 6 - 2 0 mm and in range 2 0 - 2 4 mm after installation the clamp plate from accessories it is designed for sewing the buttonholes in trousers. The buttonhole sewing in back pockets is possible by the short travel of the table, which is 44 mm. it is not included in the standard machine equipment part number 03.5509.0.009 short travel - to falicitate sewing the buttonholes in back pockets, there is a metal needle guard Ê installed on the front side of the machine cover the plastic needle guard Ë is enclosed in the accessories Ë Ê Long tail trimming (LTT) - - it is possible to sew the buttonholes with long trimmed tails. The shorter the sewn buttonhole, the longer the trimmed tails. The longer the sewn buttonhole, the shorter the trimmed tails. it is not included in the standard machine equipment part number 03.5509.0.008 Revised 04/2004 e-mail: service@amfreece.cz; parts@amfreece.cz; website: www.amfreece.com Phones: +420 582 309 146 (Service); +420 582 309 286 (Spare Parts); Fax: +420 582 360 606 1-9 S-211 B - MACHINE ASSEMBLY 1. CONTENT OF THE SHIPPING BOX 1.1. If it is not mentioned otherwise during ordering, the shipping container usually contains: — assembled machine — box with the accessories — dis-assembled thread stand Ê — operation manual with the spare parts manual Ê 1.2. When unpacking the container, follow labels which are on a cover. CAUTION: If the container was damaged during the transport, inform the carrier. Check the contents of the container with order. In the event of an error, immediately inform the manufacturer- late notification of an error in shipment may result in loss of claim. 2. A C C E S S O R I E S Accessories are supplied with the machine. The list is mentioned on page 3-81. 3. TABLE ADJUSTMENT 3.1. After you will unpack the machine, move the machine to its appointed place. The height of the table is adjustable by loosening 4 screws Ë. The recommended height of the stand (table) is 870—880 mm. Tighten the screws Ë very well. 3.2. To stabilize the table, use the floor pads Ì, which are controlled by hand screw Í. Check the levelness of the adjusted table. 3.3 Eliminate the shipping band Î, which holds the head in place. If transporting machine to a different location, it is necessary to fasten the table to prevent shifting in transit. 1-10 Revised 04/2004 e-mail: service@amfreece.cz; parts@amfreece.cz; website: www.amfreece.com Phones: +420 582 309 146 (Service); +420 582 309 286 (Spare Parts); Fax: +420 582 360 606 S-211 Ë 870 — 880 mm B - MACHINE ASSEMBLY Í Ì Î Ë Í Ì Revised 04/2004 e-mail: service@amfreece.cz; parts@amfreece.cz; website: www.amfreece.com Phones: +420 582 309 146 (Service); +420 582 309 286 (Spare Parts); Fax: +420 582 360 606 1-11 S-211 B - MACHINE ASSEMBLY 4. C O N N E C T I O N O F T H E M A C H I N E H E A D W I T H T H E C O N T R O L B O X 1. The control box Ê contains the control system, regulator Ë and valve terminal Ì for controlling the pneumatic cylinders. 2. Remove covers from the guide gib at the bottom of the table. 3. From the rear view pull the air distribution tubes through the left hole in the frame and table board. Do not pull through this hole the tubes J6A, J6B, which are for cutting cylinders. These tubes pull through the right hole. To enter to the tubes inside of the machine, lift the folding cover according to the section B4, point 6 . 4. Connect the blue tubes of the air distribution with appropriate outputs of regulator Ë and with air valves Ì. The tubes are marked J1A J6A /possibly B or C. Connect them according to the picture and insert to the guide gibs. 5. Cable connectors for connection of the step motors are marked XX, XY, XR and XT (for ACL modification). Pull them through the bottom rear right hole of the table and a frame (rear view) and connect them to the sockets inside of the machine frame. The sockets have the same marks. Insert the tubes to the guide gibs. Ê Ì Ë Ì 6. Through the same hole, pull the cables X7, X8 and X9 for connection of the sensors and machine head switches and connect them into only one space here you have the connectors, which are placed on the rear side of the control box - see page 1-16. 1-12 Revised 04/2004 e-mail: service@amfreece.cz; parts@amfreece.cz; website: www.amfreece.com Phones: +420 582 309 146 (Service); +420 582 309 286 (Spare Parts); Fax: +420 582 360 606 S-211 B - MACHINE ASSEMBLY S 2 1 1 A F P n e u m a t i c d i a g r a m Ë Ï Í Ê Ì 1 3 4 1 2 clamp feet up/down 3 upper thread draw-off 4 upper thread trimming 6 cutting clamp feet spreading Tubes identification J X X X air distribution 0, 1, 2 — X => distribution from a regulator 0, 1, 2 — X pneumatic cylinder identification (the first number is 0 but is not marked) A ; B; C Revised 04/2004 e-mail: service@amfreece.cz; parts@amfreece.cz; website: www.amfreece.com Phones: +420 582 309 146 (Service); +420 582 309 286 (Spare Parts); Fax: +420 582 360 606 1-13 S-211 B - MACHINE ASSEMBLY S 2 1 1 C T , A C L , L T T P n e u m a t i c Ï d i a g r a m Ë ÊÍ Î Ì Ð Ñ clamp feet up/down 6 cutting 7 lower thread trimming ( LTT ) 3 clamp feet spreading upper thread draw-off auxiliary clamp feet 4 upper thread trimming 8 5 upper thread pick-up 1 2 Tubes identification J X X X 1-14 air distribution 0, 1, 2 — X => distribution from a regulator 0, 1, 2 — X pneumatic cylinder identification (the first number is 0 but is not marked) A ; B; C Revised 04/2004 e-mail: service@amfreece.cz; parts@amfreece.cz; website: www.amfreece.com Phones: +420 582 309 146 (Service); +420 582 309 286 (Spare Parts); Fax: +420 582 360 606 S-211 B - MACHINE ASSEMBLY 7. Fix the pedal Ð on the table with two screws Ï. To connect the pedal with control box, insert the connecting cable into socket Ñ on the control box. Route the cable according to the drawing. Standard connection of the pedal guides are shown below. 8. Using the cable, connect the motor with the control box. Connect the single wires of the cable with appropriate brackets of the terminal U, V, W, PE after loosening the screw Ò of the cover Ó - see drawing. Ó ➒ U - black V - blue W - black PE - yellow-green Ñ Ï Ð Cable connection of the pedal Revised 04/2004 e-mail: service@amfreece.cz; parts@amfreece.cz; website: www.amfreece.com Phones: +420 582 309 146 (Service); +420 582 309 286 (Spare Parts); Fax: +420 582 360 606 1-15 S-211 B - MACHINE ASSEMBLY BQ1 synchronizer BQ2 sensor of the axis X BQ3 sensor of the axis Y BQ4 sensor of the axis R BQ5 sensor of the axis T 1-16 BQ7 sensor of the cutting cylinders BQ8 needle bar position SA1 Emergency stop button Revised 04/2004 e-mail: service@amfreece.cz; parts@amfreece.cz; website: www.amfreece.com Phones: +420 582 309 146 (Service); +420 582 309 286 (Spare Parts); Fax: +420 582 360 606 S-211 B - MACHINE ASSEMBLY 5. B E L T T E N S I O N 1. Lower belt Ê of sewing mechanism drive is installed on machine head pulley during the transport. To access this pulley : loosen screw Ë on drive belt cover Í, shift the cover aside and remove the cover. Then loosen two screws Î and screw Ï of the drive belt cover Ì. 2. To remove the cover Í, loosen the screw Ð. It allows insertion of the panel Ñ with the Emergency Stop button, inside the cover. Ž 3. Put the belt onto the motor pulley Ò through the slot in the table. 4. After loosening the screws Ó of the tension pulley tighten the belt by moving the pulley. Tighten the screws again. , 5. Check the tension by pressure approximately 10 N above the plate. The deflection of the belt should be approximately 10 mm (0,394“). 6. After loosening the screws , it is possible to stretch the upper drive belt using the pulley . 7. Install the motor pulley cover and machine covers Ì, Í . By turning the hand wheel check, whether the belts are clear from all covers. Revised 04/2004 e-mail: service@amfreece.cz; parts@amfreece.cz; website: www.amfreece.com Phones: +420 582 309 146 (Service); +420 582 309 286 (Spare Parts); Fax: +420 582 360 606 1-17 S-211 B - MACHINE ASSEMBLY 6. P O W E R A N D A I R C O N N E C T I O N 1. Simple connection of air lines are made by quick connector. Socket 25 KEAK 13 (order number FESTO 151776 - marking KD 1/4 - S, order number RECTUS 38044) is used as standard. Unit has corresponding input Ê. Input pressure must minimally be 1 bar (0,1 MPa) greater than output pressure set on regulator. The manufacturer recommends addition of a shut-off valve so that it is possible to close the air supply. 2. After air connection check, set the air pressure on the dial of the regulator. It should be in the range 0.45-0.6 MPa. To correct it: pull the stopper Ë out. To increase the set pressure turn clockwise, to decrease, turn counterclockwise. Tighten the stopper Ë again. The pressure for the cutting cylinders is set to 0.4 MPa (4bar) from manufacturer by screw Ì and loosening the nut Î. Ë Ì Î Ê Í If a material is incorrectly cut, check the cutting steel and a pressure on the regulator Í. N o t e : Set lower air pressure for short cutting steels and higher air pressure for long cutting steels. 3. Power input supply requires using 230 V net. Socket for plug must correspond to requirements of IEC standard 364-4-41. The right connection will ensure turning of the hand wheel Ñ counterclockwise. 1-18 Ñ Revised 04/2004 e-mail: service@amfreece.cz; parts@amfreece.cz; website: www.amfreece.com Phones: +420 582 309 146 (Service); +420 582 309 286 (Spare Parts); Fax: +420 582 360 606 S-211 B - MACHINE ASSEMBLY 7. T H R E A D S T A N D I N S T A L L A T I O N 1. Put the thread stand together according to the drawing. 2. Position of the locking ring Ê allows assembly of the thread stand for various thickness of the table top. Threaded end of the post Ï must not extend more that 1 mm (1/32”) through the locking nut Î. 3. Insert the washer Ë and the post into the hole provided in the right rear of the table top Ì. Insert the washer Í and tighten the nut Î. Revised 04/2004 e-mail: service@amfreece.cz; parts@amfreece.cz; website: www.amfreece.com Phones: +420 582 309 146 (Service); +420 582 309 286 (Spare Parts); Fax: +420 582 360 606 1-19 S-211 B - MACHINE ASSEMBLY 8. L U B R I C A T I O N 1. Put the rubber ring Ë on threaded part of reservoir holder Ê. 2. Insert the holder with reservoir Í through the slot in the table plate, from the bottom, on lower part of machine frame, as shown in drawing and fasten holder Ê to the machine frame by the screws Ì. Ì Ê Ë Í 1-20 Revised 04/2004 e-mail: service@amfreece.cz; parts@amfreece.cz; website: www.amfreece.com Phones: +420 582 309 146 (Service); +420 582 309 286 (Spare Parts); Fax: +420 582 360 606 S-211 C - PROPER APPLICATION 1. POWER UP / HOME POSITION 1. Turn the main power switch on Ê by turning clockwise to the „I“ position. 2. The display is activated and illuminated. The screen Ï displays information about manufacturer and version of program installed in the machine. Wait until the main screen Ì appears on the display. 3. If the error message E01 Í (machine is not in the home position) appears on the display press the button Î. If a different error message appears on the display - follow the Troubleshooting section. 4. The machine is ready for operation when Ready message appears on the display, in location Í. Ï Ì Í Î Ê Revised 04/2004 e-mail: service@amfreece.cz; parts@amfreece.cz; website: www.amfreece.com Phones: +420 582 309 146 (Service); +420 582 309 286 (Spare Parts); Fax: +420 582 360 606 1-21 S-211 C - PROPER APPLICATION 2. NEEDLE INSTALLATION Use needles AMF Reece 02.0505.0.111/113…. (1807D Nm 100 – 120) only. 1. Lift the transparent needle cover up Ê. Ê 2. Loosen the screw Ë and remove the needle. 3. Insert the new needle so that the needle scarf A is on opposite side from screw Ì of the tension. Do not install a bent or broken needle. Roll the needle on a flat surface to check for straightness. 4. Tighten the screw Ë well. Ë 1-22 Revised 04/2004 e-mail: service@amfreece.cz; parts@amfreece.cz; website: www.amfreece.com Phones: +420 582 309 146 (Service); +420 582 309 286 (Spare Parts); Fax: +420 582 360 606 S-211 C - PROPER APPLICATION 3. THREADING 1. When threading, see the pictures below. For easy threading use threading devices Ê from accessories kit. It is possible to order the threading device Ë. Adjust the thread tension by nuts Ì, Í according to the sewing conditions. 2. To increase the thread draw-off (for example during the sewing of narrow bite on thin fabric) it is possible to install arm Î (19.0082.1.402) by screw Ï (17.0012.0.605) on the lever. 3. It is possible to turn the race 180° for better threading - see section D7 . Ne e d l e t h r e a d Revised 04/2004 e-mail: service@amfreece.cz; parts@amfreece.cz; website: www.amfreece.com Phones: +420 582 309 146 (Service); +420 582 309 286 (Spare Parts); Fax: +420 582 360 606 1-23 S-211 C - PROPER APPLICATION Lo w e r t h r e a d - tilt back the rear cover and lift the machine head to thread the lower thread 1-24 Revised 04/2004 e-mail: service@amfreece.cz; parts@amfreece.cz; website: www.amfreece.com Phones: +420 582 309 146 (Service); +420 582 309 286 (Spare Parts); Fax: +420 582 360 606 S-211 C - PROPER APPLICATION Gimp The appearance and quality of the buttonhole may be affected by one or more of the following: - stitch density ( number of stitches in the first and - tension of upper and lower thread the second row of stitches) - type of thread (size, etc.) - number of stitches in the eye - needle bite - amount of fabric spread - sewn material (thickness, density) - cutting space Revised 04/2004 e-mail: service@amfreece.cz; parts@amfreece.cz; website: www.amfreece.com Phones: +420 582 309 146 (Service); +420 582 309 286 (Spare Parts); Fax: +420 582 360 606 1-25 S-211 D - MACHINE CONTROLS 1. OPERATION 1. With the machine in the home position, before sewing, the manufacturer recommends 3 minutes for warm up. 2. Be certain that the machine is threaded correctly see section C3, and required buttonhole appears on the display. Insert the fabric under the clamp feet. Use the rear stops Ê to position the buttonhole. 3. When the foot pedal Ë is pressed to the first position, the fabric is clamped by the clamp feet. (When the pedal is released, the clamp feet rise.) Ê 4. When the foot pedal is pressed to the its second position, the sewing is started. When the buttonhole is sewn, fabric is cut and the upper thread is trimmed, clamp feet rise and machine returns to its home position. 5. When the clamp feet are up, it is possible to move the fabric for sewing the next buttonhole. 6. Immediate stopping in any place of the cycle is possible by the EMERGENCY STOP button Ì on the machine head. The machine finishes the cycle after releasing the Emergency Stop Button and again pressing the foot pedal. 7. If the foot pedal Ë is pressed before the buttonhole is finished, the clamp feet will not rise. It is possible to sew the buttonhole again after the foot pedal is pressed. 8. When your work is finished, switch off the switch Í , pull out the plug Î from the socket and close the air supplyand close the air supply. 1-26 Revised 04/2004 e-mail: service@amfreece.cz; parts@amfreece.cz; website: www.amfreece.com Phones: +420 582 309 146 (Service); +420 582 309 286 (Spare Parts); Fax: +420 582 360 606 S-211 D - MACHINE CONTROLS Ì Ë Í Î Revised 04/2004 e-mail: service@amfreece.cz; parts@amfreece.cz; website: www.amfreece.com Phones: +420 582 309 146 (Service); +420 582 309 286 (Spare Parts); Fax: +420 582 360 606 1-27 S-211 D - MACHINE CONTROLS 2. DISPLAY INFORMATION Be sure you understand the proper setting of the display: the eye shape, the sewing speed change, machine modification change, the cutting space setting, cycle mode use and button jog use. It is also necessary to understand the proper machine testing. Before setting the display parameters, read the manual section D - MACHINE CONTROLS. Ê Display messages - standard - Ready; Busy - error - error messages start with letter E - see Troubleshooting section Ë Daily counter of the sewn buttonholes Machine modification Í The cutting setting Î JOG - hand controlling of the successive jogging of the machine cycle. After pressing this button, the button is changed to . It is possible to jog the buttonhole by pressing the button. To finish the jogging, press the foot pedal. The machine finishes the buttonhole. To bring the machine to the home position, press Ò button. Ï Buttons for cycle mode setting Ð Setting the sewing speed Ñ The number of programmed buttonhole - to select the number of the programmed buttonhole from memory, press this button. The numerical screen appears on the display. Choose the number of buttonhole which will be sewn. To save the chosen number, press Ó button. Ò Button for machine home position - to bring the bedplate to the home position, press this button Ó Diskette - save to memory - after making any change, it is necessary to press this button. 1-28 Revised 04/2004 e-mail: service@amfreece.cz; parts@amfreece.cz; website: www.amfreece.com Phones: +420 582 309 146 (Service); +420 582 309 286 (Spare Parts); Fax: +420 582 360 606 S-211 D - MACHINE CONTROLS 3. THE BUTTONHOLE SETTING C A U T I O N ! The S211 CT machine is supplied to sew the buttonholes with flybar. The various clamp feet are supplied with the machine. The length of cutting L1 is marked on the clamp feet (e.g. 16-20 mm). To trim the lower threads, the length of a buttonhole L must be set in range 23 - 27 mm (for clamp feet 16 20 mm). If the upper thread is unthreaded from a needle after trimming the thread, and it is not caught by a thread pick-up, decrease the number of stitches in the flybar by 1 stitch. IM PO R TA N T! Cutting Length L1 Buttonhole length L (mm) (mm) 16-20 23-27 20-24 27-31 24-28 31-35 28-32 35-39 IM PO R TA N T! To set the buttonhole, it is necessary to set the parameters of eye, the first and the second row of stitches and the bar. Press the marked places (A, B or C), to set the parameters. A - s e t t i n g t h e p a r a m e t e r s o f t h e e y e - possible sizes of eye: 2,2x3,0 or 2,8 x4,2 or 3,0x4,6 or 3,2x5,0 or No Eye Number of stitches in the eye - range 4-20 by buttons + and -. Eye stitch correction - range 0-100 by buttons + and -. The feeding is spread on the right and left looper. Straightening eye in respect of the buttonhole. Range ±1 by buttons + and -. Eye start correction - range 0 - 0.2. Use for the final appearance of eye. Revised 04/2004 e-mail: service@amfreece.cz; parts@amfreece.cz; website: www.amfreece.com Phones: +420 582 309 146 (Service); +420 582 309 286 (Spare Parts); Fax: +420 582 360 606 1-29 S-211 D - MACHINE CONTROLS B - setting the first and the second row of stitches Length of the buttonhole -by buttons + and -. CAUTION: If appears on the display, the total of the length of a buttonhole and the flybar length is exceeded. The length of a buttonhole is automatically set to 23 and length of a flybar to 7. Stitch density - range 0,5 - 2,0 mm by buttons + and -. The first and the second row of stitches alignment - range ±1,5 mm. It is possible to align the second row of stitches against the first row of stitches. Stitch angle - range 0-100 %. If 50% is set, the stitches are vertical to the buttonhole. The feeding is spread on the right and left looper. - s e t t i n g a b a r - possible types of the bar: Open End, Fly Bar, Cross Bar, Round End C ¡ 1-30 ¢ ¡ Revised 04/2004 e-mail: service@amfreece.cz; parts@amfreece.cz; website: www.amfreece.com Phones: +420 582 309 146 (Service); +420 582 309 286 (Spare Parts); Fax: +420 582 360 606 S-211 D - MACHINE CONTROLS Ò Number of removed or added stitches at the end of the second row of stitches - range ± 2 stitches by buttons + and -. It is possible to add the stitches to the second row of stitches. Ó Flybar length - range 3 - 20 mm by buttons + and -. Side shifting relative to the flybar - range 0,5 - 2,0 mm by buttons + and -. Length of the cross bar - range 4,0 - 8,0 by buttons + and -. Cross bar density - range 0,5 - 1,5 by buttons + and -. Correction of the cross bar position in axis X - range ± 2 by buttons + and -. Correction of the cross bar position in axis Y - range ± 1,5 by buttons + and -. Cross bar angle correction - range 0° - 15° by buttons + and -. The cross bar should be perpendicular to the both row of stitches (when using various type of material) Number of overlapped stitches of the round end - range 0-2. Number of stitches in the round end - range 4-20 by buttons + and -. 4. THE SEWING SPEED SETTING It is possible to set the sewing speed in range 1000, 1300, 1600, 1700, 1800, 1900 and 2000. Ê Ë Ì Í Ê Number of stitches, which are sewn by slow speed at the beginning of a buttonholerange 0-9 by buttons + and -. Ë Number of stitches, which are sewn by slow speed at the end of a buttonhole- range 0-9 by buttons + and -. Ì Sewing speed in the first and the second row of stitches - range 1000 - 2000 by buttons + and - . Í Sewing speed in the eye - range 1000 - 2000 by buttons + and - . Revised 04/2004 e-mail: service@amfreece.cz; parts@amfreece.cz; website: www.amfreece.com Phones: +420 582 309 146 (Service); +420 582 309 286 (Spare Parts); Fax: +420 582 360 606 1-31 S-211 D - MACHINE CONTROLS 5. PARAMETERS SAVING 1. T o s a v e t h e s e t p a r a m e t e r s t o t h e s a m e a s s i g n e d n u m b e r o f a b u t t o n h o l e Ê, press button Ë. Ë Ê appears on the display and parameters are saved. 2. T o s a v e t h e s e t p a r a m e t e r s t o a n e w n u m b e r o f a b u t t o n h o l e : press the number of a buttonhole button Ê. The numerical display appears on the display. Ê 3. Choose the number and press the button Ì. Ì 4. Set needed parameters. 5. To save the parameters, press button Ë. 1-32 Revised 04/2004 e-mail: service@amfreece.cz; parts@amfreece.cz; website: www.amfreece.com Phones: +420 582 309 146 (Service); +420 582 309 286 (Spare Parts); Fax: +420 582 360 606 S-211 D - MACHINE CONTROLS 6. SETTING THE CUTTING Press button Ê to set the cutting. Possible setting: No cut Cut after sewing the buttonhole Cut before sewing the buttonhole Ê Ë Ë Ì Í Ë Cutting space - range from -0,5 to +1,2 mm by buttons + and -. Choose required value. Negative values are usually used for sewing with CB. Ì Centering the knife cut (axis X) - range ±1,5 mm. To move the knife to the left, choose negative value, to move the knife to the right, choose positive value. Í Centering the knife cut (axis Y) - range ±1,5 mm. 7. SERVICE MODE - CYCLE COUNTER To enter, press cycle counter button Î. Î Revised 04/2004 e-mail: service@amfreece.cz; parts@amfreece.cz; website: www.amfreece.com Phones: +420 582 309 146 (Service); +420 582 309 286 (Spare Parts); Fax: +420 582 360 606 1-33 S-211 D - MACHINE CONTROLS Ï Ï For easier threading, press this button and the Ð race turns by 180° Ð Ñ Life cycle counter Ò Ñ Cycle counter range Ó Ò SET button Ó / button - Choose and press button - value which is set on the cycle counter range Ñ will be transferred to the cycle counter Î Choose and press button to reset the cycle counter Î ST / STA - if this button is shown and lighted, the short travel with auxiliary clamps is activated AKC - if this button is shown and lighted, the automatic knife change is activated ACL - if this button is shown and lighted, the adjustable cutting length steel is activated This button is intended for service personnel only. This button is intended for service personnel only. Setting the foot pedal position - 2 positions of the foot pedal. After pressing the foot pedal to the first position, the clamp feet are lowered and after pressing to the second position the sewing is started. - 1 position of the foot pedal. After pressing the foot pedal, the clamp feet are lowered and the sewing is started Service Mode - press this button to activate the Service Mode. Error message E - 4 0 appears on the display. After pressing the foot pedal, the clamp feet are lowered and it is possible to sew the buttonhole by turning the handwheel. To deactivate the Service Mode, press and release the Emergency Stop button, the clamp feet will raise and press button. Note: Service Mode is intended for use by the service personnel only. Cycle counter Possible setting: a) set b) button and press descending counting range Ñ, set 1-34 to ascend the buttonholes, set the value of the cycle counter range Ñ, ascending counting - button to descend the buttonholes, set the value of the cycle counter button and press button. Revised 04/2004 e-mail: service@amfreece.cz; parts@amfreece.cz; website: www.amfreece.com Phones: +420 582 309 146 (Service); +420 582 309 286 (Spare Parts); Fax: +420 582 360 606 S-211 D - MACHINE CONTROLS 8. CYCLE MODE It is possible to set the type and the number of buttonholes which will be sewn in one sewing cycle. C A U T I O N : Modification AF - it is necessary to use the same cutting length for all buttonholes in one cycle. Imitation (no cut) buttonholes of different length can be included in the sewing cycle. Modification CT - to prevent the machine from damage, the length of buttonholes in one cycle must be the same as the length of a cutting steel in the machine. To trim the lower threads, set the length of a buttonhole according to the installed clamp feet - see section D3. Modification ST - do no use cycle mode for short travel mechanism Ê Ë Setting the number of buttonholes in the cycle - possible setting: 1-16 buttonholes N o t e : If 0 is set, the machine starts to sew from the first set buttonhole. Program number setting - range 0-9. If 0 is set, the cycle mode is not activated. After the machine is switched on, the 0 automatically appears in the program number. Ì Ê Ë To save the performed changes, press Ì button. Example: In the program number 5 you want to sew the buttonholes in the following order: 2, 1, 3, 4, 1. 1. Press Ë button.The numerical display appears on the screen. Choose program number 5 and press ENT. 2. Press Ê button. The screen, where it is possible to set the order of sewn buttonholes, appears on the display. Press the first number and using the numerical display set the buttonhole number 2, which will be sewn as the first. Press ENT to confirm. Next, press the second number to set the buttonhole number 1. Follow these steps to set all the buttonholes which will be sewn. If 0 is selected, the cycle mode will return to the first set buttonhole ( 2). to save the set buttonholes to program number 5. Return to the main screen. 3. Press 4. Program number 5 and buttonhole number 2 appear on the display. When the buttonhole is sewn,the number of the next buttonhole in the cycle ( 1) will be displayed. 5. Revised 04/2004 e-mail: service@amfreece.cz; parts@amfreece.cz; website: www.amfreece.com Phones: +420 582 309 146 (Service); +420 582 309 286 (Spare Parts); Fax: +420 582 360 606 1-35 S-211 D - MACHINE CONTROLS 9. M A N U A L C U T M O D E The green button Ê outside of the control box, activates cutting independently of the program. It may be used with or without the fabric clamps (closed by pressing the foot pedal to the first position). P r o g r e s s : Insert the fabric under the clamp feet, switch the foot pedal into the first position, hold this pedal in this position and press button Ê. Cutting lever will cut the fabric everytime, when the button Ê is pressed. Then release the foot pedal. 1-36 Ê Revised 04/2004 e-mail: service@amfreece.cz; parts@amfreece.cz; website: www.amfreece.com Phones: +420 582 309 146 (Service); +420 582 309 286 (Spare Parts); Fax: +420 582 360 606 S-211 E - STANDARD MACHINE ADJUSTMENT W a r n i n g : - before making any adjustments, turn the main power switch off - careless adjustment can cause damage to electronic and mechanical parts C a u t i o n : - always maintain good safety standards - where possible, remove the sewing needle before making mechanical adjustments 1. STANDARD BUTTONHOLE SHAPES SET BY THE MANUFACTURER The buttonholes 1-9 are pre-programmed by the manufacturer according to the section D - see table. S 2 1 1 PARAMETERS D3 A A F 1 2 3 4 5 6 7 8 9 1800 2000 1800 1900 2000 2000 1900 1900 1000 3,0 x 5,0 3,0 x 5,0 3,0 x 5,0 3,0 x 5,0 2,8 x 4,2 3,0 x 4,6 3,0 x 5,0 9 10 11 12 4 6 8 10 4 24 22 22 24 18 18 32 44 50 1,0 1,0 1,0 1,0 1,2 1,2 1,1 1,1 1,5 0,0 0,1 0,1 0,2 0,0 0,0 0,0 0,0 0,0 7 8 6 3 1, 4 1, 5 1, 5 0, 5 0 0 0 6 0,6 0,0 0,0 0 0 0 6 5 1 1 Revised 04/2004 e-mail: service@amfreece.cz; parts@amfreece.cz; website: www.amfreece.com Phones: +420 582 309 146 (Service); +420 582 309 286 (Spare Parts); Fax: +420 582 360 606 1-37 S-211 E - STANDARD MACHINE ADJUSTMENT S 2 1 1 PARAMETERS 1 2 3 4 5 6 7 8 9 1800 2000 1800 1900 2000 2000 1900 1900 1000 3,2 x 5,0 3,2 x 5,0 3,2 x 5,0 1-38 C T 3,2 x 5,0 2,8 x 4,2 3,0 x 4,6 3,2 x 5,0 9 10 11 12 4 6 8 10 4 CT 16-32 16 18 20 22 24 26 28 30 32 CT 16-20 16 16 17 17 18 18 19 19 20 CT 20-24 20 20 21 21 22 22 23 23 24 CT 24-28 24 24 25 25 26 26 27 27 28 CT 28-32 28 28 29 29 30 30 31 31 32 1,0 1,0 1,0 1,0 1,2 1,2 1,1 1,1 1,5 0,0 0,1 0,1 0,2 0,0 0,0 0,0 0,0 0,0 7 7 7 7 7 7 7 7 7 1,4 1, 4 1,5 0,5 1,4 1, 5 1, 5 0, 5 1,5 Revised 04/2004 e-mail: service@amfreece.cz; parts@amfreece.cz; website: www.amfreece.com Phones: +420 582 309 146 (Service); +420 582 309 286 (Spare Parts); Fax: +420 582 360 606 S-211 E - STANDARD MACHINE ADJUSTMENT 2. THE BEDPLATE HOME POSITION ADJUSTMENT The bedplate home position is given by position of the plates Í,Ð and sensor BQ2 Ñ for axes X and BQ3 Î for Y. Sensor plate screws are locked by paint from the manufacturer, that is why only a service technician from AMF REECE can perform this operation during the guarantee period . 1. Adjust the sensor plate Í (BQ2) Ñ after loosening the screws Ì approximately to 16,2 mm (0.64“). Remove the right cover of the bedplate Ò to access to the plate. Ò Ê 2. After removing the left cover of the table Ê adjust the sensor plate (BQ3) Î. Loosen the screws Ï to obtain the 127,5 ± 0.2 mm from the shaft holder Ë to the plate edge - see picture. Belt holder is set to 135 mm from the shaft holder Ë. Ñ 3. The distance between the sensors and plates must be 0.2 - 0.5mm (0.007 - 0.019“). Bigger distance causes incorrect function of the electric system. Í 4. Adjust the position of the sensor plate Î if the dimension from inner most lengthwise puncture in the eye and edge of the bedplate is different than below mentioned dimension 154 mm (6.06“). Ì 135 mm 127,5 ± 0,2 mm Ê Î Ð Ï Ë ÑÎ Ò ÍÐ Revised 04/2004 e-mail: service@amfreece.cz; parts@amfreece.cz; website: www.amfreece.com Phones: +420 582 309 146 (Service); +420 582 309 286 (Spare Parts); Fax: +420 582 360 606 1-39 S-211 E - STANDARD MACHINE ADJUSTMENT 3. THE RACE MECHANISM ADJUSTMENT Home position of the working plate is given by position of the plate Î and sensor Ð (BQ4). Screw of the sensor plate Ï is locked by paint from the manufacturer, that is why only a service technician from AMF REECE can perform this operation during the guarantee period. 1. In the bedplate home position adjust the assembly of the sewing mechanism by the looper beam Ê to the operator side. For exact adjustment of the position, you can use gauges Ò, Ó from accessory kit. 2. Adjust the block Ë of the needle bar, after loosening the screws Ì of the bevel gear, so that screw Ñ in the needle bar is on the left and tighten the screws. When you sew a side stitch, the distance between the needle and the edge of the throat plate Í must be the same as when sewing a centre stitch. 3. After loosening the screws Ï, turn the plate of sensor Î clockwise to the extreme position. 4. When the service mode is activated, punch in the buttonhole shape on the paper. Find if the stitches in the straight part of the buttonhole are vertical to the buttonhole axis and center stitches are turned by 90o. To correct it, rotate the sensor plate Î. BQ4 BQ4 1-40 Revised 04/2004 e-mail: service@amfreece.cz; parts@amfreece.cz; website: www.amfreece.com Phones: +420 582 309 146 (Service); +420 582 309 286 (Spare Parts); Fax: +420 582 360 606 S-211 E - STANDARD MACHINE ADJUSTMENT 4. CLAMP PLATES SPREADING ADJUSTMENT W A R N I N G ! Before making any adjustments, switch the main power switch off. Ë ÒÎ A To perform the basic adjustment of clamp plates Ê with clamp feet Ë , remove it out of the machine 1. Loosen screws Ì, Î. 2. Equally adjust the clamp feet Ë over the clamp plates Ò (A mm) and tighten the screws Ì, Î. 3. Remove the side covers Ï by unscrewing the screws Ð and loosening the screw Ñ. 4. Install the clamp plates Ê to the machine. 5. Loosen screws Í and position the clamp plates to the machine. 6. Adjust clamp feet Ë to 12 mm (0,472“) and tighten the screws Í. 7. Install the side covers Ï and tighten by screws. Ì Recommended space between the clamp foot and needle during the outer penetration is 1 mm (0.040"). If the bite size is changed, ensure this space by covering the clamp feet Ë over clamp plate Ò - measure A to values. Adjust after loosening the screw Î and shifting the clamp plate arm to the correct needed clearance. Bite A 2,0-2,6 mm 2,2 mm 2,7-3,3 mm 1,6 mm 3,4-4,0 mm 1,0 mm Ë ‘ Í “ Ì • ’ Ë Ò Í Ê Revised 04/2004 e-mail: service@amfreece.cz; parts@amfreece.cz; website: www.amfreece.com Phones: +420 582 309 146 (Service); +420 582 309 286 (Spare Parts); Fax: +420 582 360 606 1-41 S-211 E - STANDARD MACHINE ADJUSTMENT a) T h e a d j u s t m e n t o f t h e a u x i l i a r y c l a m p f o o t h e i g h t - Short Travel only The auxiliary clamp foot Ê must be parallel with the clamp foot. Adjust by screw Ë. 1. To adjust the auxiliary clamp foot height Ê, loosen the nut Ì and using the screw Í adjust the height to 5 mm from the clamp plate Î. The auxiliary clamp foot must move freely on the arm. 2. When the clamp feet are raised, using the nuts Ï adjust the distance 0.5 mm from the end of the pneumatic valve piston to the lever Ð. b) S h e a r s a d j u s t m e n t There is a trimming mechanism on the right clamp plate. Loosen the screw Ò and adjust the center of the roller Ñ to 43 mm from the edge of the clamp plate. Tighten the screw Ò. To adjust the shears, loosen the screws Ó and , and measure 3,8 mm from the top shear to the top of the clamp plate Î by loosening or tightening screw . Tighten the screw Ó and test the cutting of thread. If trimming is not correct, change the dimension to 3.5 mm. Properly adjusted, the shears should show no scratches but trim positively and return to the full open position. If not, check for damage and replace if needed. c) Lower thread and gimp trimming mechanism Adjust the distance 33.5 mm between the rod and the air cylinder . Adjust the adjusting screw (locked by LOCTITE 243) to the minimal clearance 0.05 mm, to allow the free movement of the rod . 1-42 Revised 04/2004 e-mail: service@amfreece.cz; parts@amfreece.cz; website: www.amfreece.com Phones: +420 582 309 146 (Service); +420 582 309 286 (Spare Parts); Fax: +420 582 360 606 S-211 E - STANDARD MACHINE ADJUSTMENT d) t h e t r i m m i n g m e c h a n is m a d j u s t m e n t - L T T Ï Ñ Ð Í Ê Ë Ì Ï Í Î Ð Ì Ë Ò Ó 14 11 The lower thread and gimp thread are trimmed before the clamp feet are raised. 1. Adjust so that looper thread and gimp are separated upward and downward by thread catching plate ➊. 2. The clamp fixing plate ➋ ensures the correct holding of the upper and gimp thread by lower thread clamp ➌ and gimp clamp ➍. 3. Loosen the screw and adjust the distance 46 mm between the clamp plate edge and the bushing axis Tighten the screw . 4. . Using the stop screw ➓ adjust the maximal position of the cylinder click ➒ and the actuating arm ➎ so that the fixing knife edge ➏ is aligned with mark ➑ on the knife ➐. Fasten the stop screw by nut Revised 04/2004 e-mail: service@amfreece.cz; parts@amfreece.cz; website: www.amfreece.com Phones: +420 582 309 146 (Service); +420 582 309 286 (Spare Parts); Fax: +420 582 360 606 . 1-43 S-211 E - STANDARD MACHINE ADJUSTMENT knives adjustment - LTT 1. 2. Loosen the screw . Turn the knife Ð in direction A and adjust the position of the guide plate so that the lower edge of the guide plate is aligned with knife edge ➐ . Turn the knife Ð in direction A and adjust the position of the fixing knife Ï to obtain no clearance between them. Adjust the upper edge of the fixing knife Ï to be aligned with knife Ð. Align the upper and lower spring with fixing ng knife Ï. (Spring boss faces towards the fixing knife Ï.) Tighten the screws . Adjust the pin to protrude 1.8 — 2 mm on the lower part of the knife Ð. Loosen two screws . Adjust the knife holder with fixing knife Ï inn direction D so that the fixing knife Ï touches the knife Ð in distance 2—3 mm from the blade section (pin is aligned with fixing knife face Ï). The larger distance, the bigger pressure on the blade. Tighten the screws 3. 4. 5. 6. 7. 8. 9. 16 Blade section 17 A 15 Ð 16 B 18 Ï 20 14 ÏContact section 15 Ð B 20 Align to edge 1,8 — 2 mm e) 14 A Blade face 2 — 3 m m Ð Î 26 Ï 20 D 25 22 14 1-44 Revised 04/2004 e-mail: service@amfreece.cz; parts@amfreece.cz; website: www.amfreece.com Phones: +420 582 309 146 (Service); +420 582 309 286 (Spare Parts); Fax: +420 582 360 606 S-211 E - STANDARD MACHINE ADJUSTMENT f) lower thread clamp fixing plate adjustment - LTT 1. Loosen two screws . 2. Turn the knife Ð in direction A to align the fixing knife face Ï with knife blade section edge Ð. Then make as small as possible clearance C (approximately 1mm) between the thread catching plate Ê and clamp fixing plate Ë in direction of arrow B. Check the clearance D between the fixing knife Ï and screw , when the fixing knife face Ï is aligned with mark on the knife Đ. 3. Tighten the screws . Ï g) lower thread grasping opener - LTT Turn the knife Ð in direction A to align the fixing knife face Ï with mark on the knife Ð. The lower thread clamp Ì is closed in this position and retains lower thread. h) A Ð 20 23 C 22 Ë 24 B Mark Ï looper thread hauling — LTT 1. Loosen two screws . 2. Turn the knife Ð in direction of the arrow A to align the fixing knife face Ï with mark on the knife Ð. Align the lower thread fixing plate Ë with thread hauling plate Ê in vertical direction - see picture. Then tighten the screws . 3. Sew a sample buttonhole and check if the lower thread is inserted in the lower thread clamp Ì and gimp is inserted in the gimp clamp Í. i) Blade section 19 D Ë Ê 24 Gimp Ë 22 lower thread grasping opener - LTT 1. Loosen two screws . 2. Turn the knife Ð in direction of arrow A to align the fixing knife face Ï with knife blade section edge Ð. Turn the lower thread grasping opener so that the lower side (slant) releases the pin and lower thread clamp Ì returns to the closed position. Then tighten the screws . Í Ê 19 C 21 Revised 04/2004 e-mail: service@amfreece.cz; parts@amfreece.cz; website: www.amfreece.com Phones: +420 582 309 146 (Service); +420 582 309 286 (Spare Parts); Fax: +420 582 360 606 Ì 20 Lower thread 1-45 S-211 E - STANDARD MACHINE ADJUSTMENT 5. ADJUSTMENT OF THE CUTTING MECHANISM a ) a d j u s t m e n t w i t h g a u g e - the gauge 19.0064.6.469 is not supplied with the machine. This can be ordered from AMF Reece. A position of the intersection and dimension of the sewn eyes is prepared by program for movement of the table by stepping motors. If it is necessary to modify the knife position for intersection, it is possible to change it in the programming mode. If a different dimensions of the knife eyes are used and the cut before is set, the sewing design around the buttonhole eye can be deformed. The bigger eye of the knife damages the stitches in the eye when cut after is set. Basic adjustment of the cutting mechanism position, perform only during assembly of the new parts, especially cutting lever and cutting steel holder. Previous process is a base for next adjustment of the bedplate movement mechanisms. 1. For correct position use adjusting support Í (install it instead of a throat plate) and jig Î (install it to the cutting steel holder Ó by screw ). 2. Locate the cutting steel holder after loosening the screws Ì so that the grooves of both parts Í and Î are covered. 3. After loosening the screws Ñ, lean a limiter Ï to the jig face Î and tighten the screws. Í 4. Locate the cutting lever sideways after loosening the nuts Ê by nuts Ë. Adjust it when the air supply is switched off after lowering to the jig Î. 5. After loosening the screws Ñ, lean a limiter Ð to the jig face Î and tighten the screws. 6. To modify a contact between knife and washer, move the cutting cylinder sensor Ò. To cut an inserted fabric, use button according to Ï the section D9. Ñ 7. The pressure is set to 4 MPa by the manufacturer for length to 25 mm. It may be necessary to increase the pressure for buttonhole lengths Ì longer than 25 mm, by turning the screw counter clockwise -see section B7. 8. The adjustment of the adjustable cutting length steel - see section E14. Ò Standard knife eye sizes Eye shape Dimension 2,2 x 3,0 mm 2,8 x 4,2 mm 3,0 x 4,6 mm 3,2 x 5,0 mm I No eye “ ’ • Ž • Î Í Ë 6,8 mm Ê 1-46 Revised 04/2004 e-mail: service@amfreece.cz; parts@amfreece.cz; website: www.amfreece.com Phones: +420 582 309 146 (Service); +420 582 309 286 (Spare Parts); Fax: +420 582 360 606 S-211 E - STANDARD MACHINE ADJUSTMENT b) adjustment without gauge C A U T I O N : Before making this adjustment be sure all parameters in section D6 are set to 0. 1. Ë Ê First, adjust the cutting lever in axis X. N o t e : Bring the machine to the home position before making this adjustment. K n i f e i s i n s t a l l e d o n t h e c u t t i n g l e v e r - when the cutting lever is in the upper position, loosen the nut Ê and adjust by nut Ë. Move the cutting lever to the left or right as needed. K n i f e i s i n s t a l l e d o n t h e c u t t i n g s t e e l h o l d e r - loosen 3 screws Ì. Move the cutting steel holder to the left or right as needed. 2. Adjust the cutting lever in axis Y as follows: - prick a needle to a paper and press button for cutting (see section D9) to cut a paper. The distance between the needle penetration and the end of the eye must be 64 mm (CT/AF) or 44 mm (ST). Î Í K n i f e i s i n s t a l l e d o n t h e c u t t i n g l e v e r - if the distance is not correct, loosen the stop screw Í and knife holder screw Î. If the distance is longer, move the knife towards a operator. If the distance is shorter, move the knife backwards a operator. Tighten the screws Î and Í. Ì K n i f e i s i n s t a l l e d o n t h e c u t t i n g s t e e l h o l d e r - move the stop screw Ï and screw Ð. Move the cutting steel holder towards the operator if the distance is longer. Move the cutting steel holder backwards the operator if the distance is shorter. Ï Ð Revised 04/2004 e-mail: service@amfreece.cz; parts@amfreece.cz; website: www.amfreece.com Phones: +420 582 309 146 (Service); +420 582 309 286 (Spare Parts); Fax: +420 582 360 606 1-47 S-211 E - STANDARD MACHINE ADJUSTMENT 6. ADJUSTMENT OF THE ADJUSTABLE CUTTING STEEL HOLDER To adjust the adjustable cutting steel holder, follow the below mentioned steps: 1. The distance between the sensor plate and the rear edge of the adjustable cutting steel holder is 14 mm. 2. The distance between the sensor plate and the sensor must be 0.3 mm. 3. Adjust the clearance 3.5 mm between the adjustable cutting steel holder and the timing belt pulley. 4. Adjust the distance 71 mm between the stop of the cutting lever and the point of the needle. 5. To adjust the correct cutting length, move the cutting steel to distance 16 mmm after loosening the clamp screw. 1-48 Revised 04/2004 e-mail: service@amfreece.cz; parts@amfreece.cz; website: www.amfreece.com Phones: +420 582 309 146 (Service); +420 582 309 286 (Spare Parts); Fax: +420 582 360 606 S-211 E - STANDARD MACHINE ADJUSTMENT 7. S E T T I N G T H E N E E D L E B A R H E I G H T 1. Remove the machine head front cover. 2. Turn the handwheel Ê and adjust the needle bar Ë to the lowest position. 3. Using a slide calliper, measure the distance from the upper side of the needle bar to the bearing. The distance must be 10.5 mm. 4. If incorrect, loosen the screws Ì and move the needle bar up or down to obtain correct distance. Tighten the screws. Revised 04/2004 e-mail: service@amfreece.cz; parts@amfreece.cz; website: www.amfreece.com Phones: +420 582 309 146 (Service); +420 582 309 286 (Spare Parts); Fax: +420 582 360 606 1-49 S-211 E - STANDARD MACHINE ADJUSTMENT 8. ADJUSTMENT OF THE BITE MECHANISM The bite size is mechanically changed by the button Ê. The standard adjustment is 2,0 ... 2,6 mm (0.0787 0.102“). It is possible to adjust the bite in range 2,7 ... 3,3 mm (0.106 - 1.130“) or 3,4 ... 4,0 mm (0.134 0.157“). (C A U T I O N : AF modification - it is necessary to change the throat plate when changing the bite size. It is possible to order the throat plate according to the table - see Parts 3-85) 1. To dismantle the machine covers: Open the rear cover Ë after loosening of the screw Ì. Remove the upper cover Í after removing the screw Î, the front cover Ï after removing the screw Ð and the button Ê by loosening the screw Ñ. Remove the left cover Ò after loosening the screw Ó and . Ë Ê Î Í Ó Ï Ð Ñ Ê 2. 1-50 Ò Ì After loosening the screw and unscrewing the screw , turn the limiter . It must be possible to install the screw through the hole which is marked 3 for sewing 2,7 ... 3,3, or hole which is marked 4 for sewing 3,4 ... 4,0 and tighten the screws and . During this operation it is necessary to remove the spring and turn the eccentric shaft by using the appropriate tool. Revised 04/2004 e-mail: service@amfreece.cz; parts@amfreece.cz; website: www.amfreece.com Phones: +420 582 309 146 (Service); +420 582 309 286 (Spare Parts); Fax: +420 582 360 606 S-211 E - STANDARD MACHINE ADJUSTMENT 3. After the limiter is turned to the position 2, 3, 4, it is necessary to check the sewing mechanism according to the section E9 and check clamp feet position according to the section E4. 4. Install the covers according to the point 1 by reverse process. 4 3 2 Throat plate Throat plate Throat plate AF standard CT standard LTT standard AF Extra Parts see 3-85 CT standard LTT standard AF Extra Parts see 3-85 CT standard LTT standard Revised 04/2004 e-mail: service@amfreece.cz; parts@amfreece.cz; website: www.amfreece.com Phones: +420 582 309 146 (Service); +420 582 309 286 (Spare Parts); Fax: +420 582 360 606 1-51 S-211 E - STANDARD MACHINE ADJUSTMENT 9. SPREADER AND LOOPER CAM ADJUSTMENT Locate the cam Ê on the holder gauge line Ë when the needle bar is in the lowest position according to the section E3, point 2. To turn a cam, loosen the screw Í. Gauge line Ë Í Ê 10. LOOPERS ADJUSTMENT 1. 2. 3. 4. To perform this adjustment, remove the plates and holder by loosening the screw . After the loosening the bracket screws Î, locate left looper Ï on the axis of the needle Ð. By turning the handwheel, raise the needle bar from the lowest position, to insert a gauge Ì by its higher end between gauge support and the needle bar end. After loosening the screw Ñ adjust the distance 0.1 - 0.2 mm (0.004 - 0.008“) between the needle and looper tip Ï . Tighten the screw again. Adjust the same space on the right looper Ò when it passes the needle. To perform it, turn the hand wheel. Ñ Ï Ð Ò Ì Ð Î 1-52 Ï Ò Revised 04/2004 e-mail: service@amfreece.cz; parts@amfreece.cz; website: www.amfreece.com Phones: +420 582 309 146 (Service); +420 582 309 286 (Spare Parts); Fax: +420 582 360 606 S-211 E - STANDARD MACHINE ADJUSTMENT 11. SPREADERS ADJUSTMENT 1. Adjust the spreader Ó to the looper edge Ò, the groove of the spreader to the looper eye Ï. Too adjust, loosen the screws and adjust the stops . 2. Check the clearance between spreaders and loopers (it must be minimal) - max 0,05 mm (0.002“). 3. Check clearance between needle Ð and guard . Tilt the guard to obtain 0,1 mm (0.004“), clearance 0,2 mm (0.008“) should be between the needle and looper carrier . 4. Install the throat plate, check the clearance between needle Ð and throat plate . If the clearance is bigger than 0,2 mm, change the throat plate. 5. To correct position of the left spreader and right spreader •, loosen screw and carefully place the bracket . It is necessary to hold the bracket because springs could shift the bracket. Revised 04/2004 e-mail: service@amfreece.cz; parts@amfreece.cz; website: www.amfreece.com Phones: +420 582 309 146 (Service); +420 582 309 286 (Spare Parts); Fax: +420 582 360 606 1-53 S-211 E - STANDARD MACHINE ADJUSTMENT 1 2 . S E T T I N G T H E T H R E A D T E N S I O N A N D T H R E A D D R AW O F F A thread tension change may be needed if the thread and fabric change. The thread tension influences the appearance of the buttonhole. It is necessary to use quality threads with little elasticity. Check to be certain all parts that the thread passes through are smooth and polished with no burrs or sharp edges. Recomended thread tension: 1. By turning the tension knob decreases. upper thread lower thread thread draw off spring 0,8N cotton 0,3N cotton 0,3N cotton 1,0N PES 0,8N PES 0,5N PES clockwise, the top thread tension increases, anti-clockwise 2. By turning the tension knob clockwise, the bottom thread tension increases, anti-clockwise decreases. After loosening the screw , it is possible to adjust the preloading of the take-up spring by turning the lever . n sio n te ex e h gt n i r du 3. Increase the stud pressure by loosening the screw threads will be extended during the trimming. and moving the bracket . The ends of the 4. Adjust the draw off cylinder clevis as shown 45 mm (1.772“) during the extension and thread draw off lever in stop position has the eye in the axis of the thread. To slow down the draw-off, adjust the speed controller . 1-54 Revised 04/2004 e-mail: service@amfreece.cz; parts@amfreece.cz; website: www.amfreece.com Phones: +420 582 309 146 (Service); +420 582 309 286 (Spare Parts); Fax: +420 582 360 606 S-211 E - STANDARD MACHINE ADJUSTMENT b ) T h e g i m p d r a w - o ff a d j u s t m e n t - C o r d Tr i m The distance between the stop screw and the race is 14 mm. The length of the gimp should be 4 mm after thread is trimmed. To change the length of the starting thread (gimp), loosen the nut and rotate the screw . If the draw-off is too small, the thread will not be stitched. If the draw-off is too big, there can be dirt in the machine after trimming. Revised 04/2004 e-mail: service@amfreece.cz; parts@amfreece.cz; website: www.amfreece.com Phones: +420 582 309 146 (Service); +420 582 309 286 (Spare Parts); Fax: +420 582 360 606 1-55 S-211 E - STANDARD MACHINE ADJUSTMENT c) A d j u s t m e n t o f t h e u p p e r t h r e a d p i c k - u p h e i g h t - C o r d T r i m When the thread pick-up cylinder is in the extended position, the thread pick-up Ê should be 11.5 mm from the clamp plate cover Ì. To adjust, loosen the screw Ë. After loosening the screws Í, adjust the thread pick-up bracket Î so the thread pick-up clears the needle Ï by 0.8 to 0.9 mm. 1-56 Revised 04/2004 e-mail: service@amfreece.cz; parts@amfreece.cz; website: www.amfreece.com Phones: +420 582 309 146 (Service); +420 582 309 286 (Spare Parts); Fax: +420 582 360 606 S-211 E - STANDARD MACHINE ADJUSTMENT 1 3. U P P E R T H R E A D T R I M M I N G AF/LTT 1. a) AF/LTT - After installation of the holder with trimming knife Ê adjust the trimming knife after loosening the screw Ì to obtain the clearance 0,1 ... 0,15 mm (0.004 - 0.006“) above the right spreader Í. b) Cord Trim - after installation of the thread retainer with trimming knife Ê, adjust the height of the thread retainer to within 0.2 mm of the top of the throat plate. 2. a) Using the screw Ë adjust the trimming knife Ê so that the left side of the knife was covered with the right side of the throat plate. b) Cord Trim - Using the screw Ë adjust the trimming knife Ê so that its left edge is even with the right edge of the groove in the throat plate (see picture). The thread holder must lean on the front side of the throat plate to catch and hold the lower thread for next buttonhole sewing. When the trimming knife moves, the thread holder must move over the throat plate without binding. To adjust - loosen the nut of the screw and screw out or in the adjusting screw . Tighten the nut. EDGE 3. Position the tip of the trimming knife Ê 0.9 mm in front of the needle Ï by loosening screw Î. Check the adjustment for keeping the clearance according to the point 2. 4. The normal home position of the trimming mechanism Ê is adjusted using screw Ð. Correct adjustment prevents cutting of the looper thread Ñ (See diagram). Revised 04/2004 e-mail: service@amfreece.cz; parts@amfreece.cz; website: www.amfreece.com Phones: +420 582 309 146 (Service); +420 582 309 286 (Spare Parts); Fax: +420 582 360 606 1-57 S-211 E - STANDARD MACHINE ADJUSTMENT 5. Adjust the initial position of the control lever Ò to the space 0,2 ... 0,3 mm (0.008 - 0.012“) from stud Ó by the screw after loosening its nut. 6. Adjust the terminal position of the control lever by stopper to the measure 9 ±1 mm to obtain space at least 0,1 ... 0,15 mm (0.004 - 0.006“) between the lever Ò and stud Ó during the full tilting of the knife Ê. Ó Ò Ð 1-58 Revised 04/2004 e-mail: service@amfreece.cz; parts@amfreece.cz; website: www.amfreece.com Phones: +420 582 309 146 (Service); +420 582 309 286 (Spare Parts); Fax: +420 582 360 606 S-211 E - STANDARD MACHINE ADJUSTMENT 14. SPREADING OF A MATERIAL Loose fabric, especially thin, can cause missing stitches unless it is spread. The machine is equipped by a mechanism to control the extent of fabric spreading. It is possible to adjust the mechanism after removing the table covers. Size of the spreading is possible to adjust with covered table. 1. Home position of the levers in spread state is set by the screw Ê under the table covers Ë. The screw is locked by the yellow colour from the manufacturer, that is why it is not possible to adjust it during the guarantee period. It is adjusted to the measure approximately 9.5 mm (0.374“) (71.5 mm (2.815“) when the plate is inserted and spread). 2. Basic measure for a control yoke Ð adjustment is 27 mm (1.063“) from base for the cylinder holder Ñ. 3. After loosening the screws Ì is possible to change the spreading size of the every foot clamp separately by the screws Í. By turning the screws Í clockwise, decreases spreading , counterclockwise increases, maximum is 2,5 mm (0.098“) on one clamp plate. 4. The manufacturer recommends to adjust approximately. 0,6 mm (0.024“). It is difference between the lever stud Ï distances before and after spreading. Ð Í Ì Î Ì Ê Revised 04/2004 e-mail: service@amfreece.cz; parts@amfreece.cz; website: www.amfreece.com Phones: +420 582 309 146 (Service); +420 582 309 286 (Spare Parts); Fax: +420 582 360 606 Ï Í Ê Ê 9,5mm 1-59 S-211 F - MACHINE MAINTENANCE Warning: - Check electrical cables for damage. Check if the safety covers are in a good condition. Replace damaged covers! Keep your hands out from the needle space. Do not modify the machine in any way, which can eliminate its safety parts. Caution: - Do not neglect periodic maintenance. If you have fault in electrical power supply, switch off the operating switch (circuit breaker). Do not damage, correct and remove safety labels. Do not work with the machine when you are under the influence of drugs or alcohol. User has to ensure the lighting of the working area minimal 750 Luxes. - 1. CLEANING AND MAINTENANCE OF THE MACHINE 1. Switch the power off and disconnect the air supply. 2. For cleaning and maintenance, remove the clamp feet by removing the protecting latches Ê. Lift the clamp feet and pull it to the operator. Remove the locking screw Ì and fold the rear cover Í. Lift up and swing the upper cover Î for access to the tension. Ð 3. Clean the thread lints and fabric from the sewing area - guides and thread tension. To move the sewing mechanism, turn the hand wheel Ð. It is also possible to turn the race by hand. The machine head can be raised to the position where it is locked by a strut which is controlled by a button Ï. By pressing the button Ï, the machine can lowered to the working position. W A R N I N G ! Possible serious injury when lowering the machine head. 4. Lubricate the machine according to the section F4. 1-60 Revised 04/2004 e-mail: service@amfreece.cz; parts@amfreece.cz; website: www.amfreece.com Phones: +420 582 309 146 (Service); +420 582 309 286 (Spare Parts); Fax: +420 582 360 606 S-211 F - MACHINE MAINTENANCE 5. Check if the oil reservoir , under the machine, is full. It is necessary to liquidate used oil according to the environment regulation. 6. Using a screwdriver, loosen the locks on the control box door. Using a wrench, loosen 4 screws on the fan rack . C A U T I O N ! When loosening the last screw, hold the fan by hand inside the control box to prevent it from dropping into the control box. Insert the screwdriver into the rack and by pushing the screwdriver through the cleaning pad remove the plastic cover . Remove the cleaning pad. Remove the dust from the cleaning pad or in case of considerable dirt, wash it using a mild detergent. Perform the same cleaning on the rear fan . 7. Maintenance of air regulator contains check of the condensate and possible replacement of the filter element ¡. The level of condensate must be 10 mm (0.394“) below the filter inside of the desliming receptacle ¢. Lower ring of the nut signalizes this height. Open the bleeder screw by turning it counter clockwise. The condensate can then flow out. Tighten the screw again. With worse flow despite same pressure setting replace the filter element ¡ after stopping the air supply. Exhaust the desliming receptacle ¢ by loosening the screw and unscrew the desliming receptacle ¢ anticlockwise. By unscrewing the nut , loosen the filter element ¡, place the new one and assemble the device in reverse order. 8. Perform visual check of mechanism especially in area of sewing mechanism. 9. When the maintenance and checking is finished, close covers , folding cover lock by the locking screw , put back the clamp plates and lock them by clamp support plates , , then continue with work. Revised 04/2004 e-mail: service@amfreece.cz; parts@amfreece.cz; website: www.amfreece.com Phones: +420 582 309 146 (Service); +420 582 309 286 (Spare Parts); Fax: +420 582 360 606 1-61 S-211 F - MACHINE MAINTENANCE 2. PERIODIC MAINTENANCE once a day (8 hours of operation) - cleaning of the sewing mechanism area and inner frame of the machine once a week (40 hours of operation) - visual check - external and internal mechanism lubrication of needle bar and sewing mechanism fill oil into reservoir with oil level indicator check the clearance in sewing mechanism drive check the screw connections tightening (obtain values below) check the condensate in regulator check the waste oil reservoir once a month (300 hours of operation) - Recommended values for screws tightening (Nm): M3 M4 M5 M6 M8 M10 1-62 0,5 1,2 2,5 4,0 0,6 1,5 3,0 5,0 8,0 10,0 0,8 2,0 4,0 7,0 16,0 30,0 Revised 04/2004 e-mail: service@amfreece.cz; parts@amfreece.cz; website: www.amfreece.com Phones: +420 582 309 146 (Service); +420 582 309 286 (Spare Parts); Fax: +420 582 360 606 S-211 F - MACHINE MAINTENANCE 3 . S C H E M E O F T H E L U B R I C AT I O N D I S T R I B U T I O N The machine is equipped with needle and ball bearings, which in combination with two lubrication circuits significantly decrease required maintenance. Circuit I for lubrication of the arm has oil in reservoir of the barrel. The lubrication of lower unit is made by oil in frame recess - circuit II. In case of replacement of any branch of distribution it is possible to order the tube sets and wicks. Replace according to the illustration below: Circuit I Circuit II Revised 04/2004 e-mail: service@amfreece.cz; parts@amfreece.cz; website: www.amfreece.com Phones: +420 582 309 146 (Service); +420 582 309 286 (Spare Parts); Fax: +420 582 360 606 1-63 S-211 F - MACHINE MAINTENANCE 4 . M A C H I N E L U B R I C AT I O N 1. It is necessary to lubricate the places shown below before the machine is switched on for the first time or after a long idle period. Use ESSO TERESSO 32 or similar quality. 2. The amount of oil in the reservior is indicated by the red mark. Too much oil may cause its overflowing from the base area. 3. The reservoir is filled by approximately 10 cm3 of oil through filling opening . n 4. The lubrication of the needle bar is performed after unscrewing the screw and removing the cover . Few drops of oil drop on needle bar above the bearing , on the centre of the needle bar to the area where the spiral lubricating groove is and to the space between the washers and surface. Install the cover . Í Ë Ì Î Ï • 1-64 • Revised 04/2004 e-mail: service@amfreece.cz; parts@amfreece.cz; website: www.amfreece.com Phones: +420 582 309 146 (Service); +420 582 309 286 (Spare Parts); Fax: +420 582 360 606 S-211 F - MACHINE MAINTENANCE 5. Remove the feet plate according to the part E2, point 2 and oil the bushing Ð and Ñ, rod of the spreader Ò and Ó, stud and shafts , by one or two drops of oil to the marked places on the drawing. To access to the shafts, tilt the machine head after opening the rear cover and after turning the race by hand according to the section E2 point 2,3. Ñ • • Ò Ð • • • Ó • Ñ • • • 6. Remove the side covers, unscrew the screws and loosen the screws . Apply several drops of oil on the side edges of the clamp feet closing levers and to the marked lubrication holes . 7. After lubrication it is important to sew a minimum 10 buttonholes on scrap fabric to dispel any excess oil. Wipe all visible excess oil from the mechanism in the work area. 8. Reassemble all removed parts, fix the feet plates again. 9. To lubricate the adjustable cutting length steel, remove the clamp plates and apply one drop of oil on the screw and on the screw bearing. 5. MACHINE DISPOSAL 1. 2. 3. To ensure machine ecological disposal it is necessary to remove especially nonmetallic parts from the machine. To take these parts out, it is necessary to perform the partial dismantling of the machine, remove covers, dismantle the machine arm and remove the frame. Aluminium and duralumin parts must be treated separately, also nonferrous metal parts and plastic parts. Parts mentioned in point 2 can be found in the spare parts manual with these marks: l aluminium parts ll non-ferrous metal parts lll plastic and non-metallic parts Revised 04/2004 e-mail: service@amfreece.cz; parts@amfreece.cz; website: www.amfreece.com Phones: +420 582 309 146 (Service); +420 582 309 286 (Spare Parts); Fax: +420 582 360 606 1-65 S-211 1-66 Revised 04/2004 e-mail: service@amfreece.cz; parts@amfreece.cz; website: www.amfreece.com Phones: +420 582 309 146 (Service); +420 582 309 286 (Spare Parts); Fax: +420 582 360 606 S211 TROUBLESHOOTING TABLE OF CONTENTS SYMPTOM POSSIBLE CAUSE PROBABLE Page SOLUTION 1. INTRODUCTION ..................................................................................... 2-2 2. FAULTS WITHOUT ERROR MESSAGES ........................................... 2-3 3. THE ELECTRONIC SYSTEM ERROR MESSAGES........................... 2-5 4. ELECTRICAL FAULTS ........................................................................... 2-6 Revised 04/2004 e-mail: service@amfreece.cz; parts@amfreece.cz; website: www.amfreece.com Phones: +420 582 309 146 (Service), +420 582 309 286 (Spare Parts); Fax: +420 582 360 606 2-1 S211 TROUBLESHOOTING Wa r n i n g ! Inspect the machine on a regular basis and use only quality parts. The manufacturer recommends using original AMF ReecePOSSIBLE parts, especially needles, loopers, spreaders, and throat plates. SYMPTOM CAUSE PROBABLE SOLUTION 1. INTRODUCTION The S211 electronically displays error messages, when worn or damaged parts are detected. If machine problems occur and the error is not displayed, ensure correct needle installation and threading. The other troubles are eliminated according to the detailed descriptions listed. Adjustments Quick Reference List Note: Required machine settings are variable according to the fabric and thread variations used. The type of thread and fabric will affect the amount of wear on machine parts. The components marked in yellow are set by manufacturer and do no require further adjustments. Changing the position of components marked in yellow, without the approval of the manufacturer, may cancel the warranty. To obtain the highest quality buttonhole maintain the following values: - clearance between the needle and the loopers is 0.05 to 0.1 mm, (0.002 to0.004”) - clearance between the needle and the needle support is 0.05 to 0.1 mm. - the same distance of the left spreader tip and the right spreader tip when they pass the needle. - left looper on the centre of the needle when the stroke is 3.4 mm from the lowest position. - with the needle bar in the lowest position, the axial clearance is 0.25 mm, (0.010") when the pressure power is 5N - with the needle bar in the lowest position, the radial clearance is 0.05 mm, (0.002") when the pressure power is 5N - looper holder axial clearance is 0.05 to 0.1 mm, (0.002 to 0.004”). - looper holder radial clearance is 0.1 to 0.2 mm (0.004 to 0.008”). - looper holder angular clearance is 1.2 on the arm 28.5 mm when the pressure power is 5N. - distance between the flags and sensors BQ1, BQ2, BQ3, BQ8 to 0.5 mm on the sensor BQ4 to 0.3 mm. - air pressure regulator set to 0.45 MPa. - BQ1 is activated when the needle bar raises 22 mm above the lowest position - BQ8 is activated when the needle bar raises 32 mm above the lowest position 2-2 Revised 04/2004 e-mail: service@amfreece.cz; parts@amfreece.cz; website: www.amfreece.com Phones: +420 582 309 146 (Service), +420 582 309 286 (Spare Parts); Fax: +420 582 360 606 S211 TROUBLESHOOTING 2 . FA U LT S W I T H O U T E R R O R M E S S A G E S SYMPTOM SYMPTOM Thread breakage. The machine does not sew. Skip stitches. Sewn fabric is incorrectly cut. Top thread is not trimmed. SERVICE POSSIBLE POSSIBLE CAUSE CAUSE PROBABLE SOLUTION PROBABLE SOLUTION SECTION Thread draw-off is too tight Damaged loopers, spreaders, or throat plate. Incorrect needle and sewing mechanism adjustment. Poor thread quality. Thread holes in the needle and the looper are too small. Reduce thread tension. Bent or broken needle. Roll the needle on a smooth flat surface, if bent, replace the needle. Needle track on a looper. Damaged throat plate. Deburr or replace the looper. Incorrect sewing system adjustment Correctly adjust. Incorrectly adjusted thread drawoff. Bent needle or damaged stitch forming parts. Incorrectly adjusted sewing mechanism. Incorrect needle guard distance. Defective spreader return springs Correctly adjust the sewing mechanism Replace the damaged parts. Knife and cutting steel are incorrectly installed. Cutting cylinder pressure is too low. Check the knife impression on the cutting steel, adjust or replace as needed. Check the knife. Replace if damaged. Tighten the adjusting screw by 1/2 rotation and check the cutting. Damaged knife. Knife does not return. Knife incorrectly installed. Replace the knife. Adjust or replace the spring. Correctly install the knife. E12 Replace damaged parts. Correctly adjust the needle bar, loopers, openers and tension. Replace thread. Use correct parts. E4,E10,E7, E11,E12 Deburr or replace the throat plate. Correctly adjust the sewing mechanism. Set the distance to 0.05 mm. E12 E10,E11 Replace the springs. Revised 04/2004 e-mail: service@amfreece.cz; parts@amfreece.cz; website: www.amfreece.com Phones: +420 582 309 146 (Service), +420 582 309 286 (Spare Parts); Fax: +420 582 360 606 B7 E13 2-3 S211 TROUBLESHOOTING SYMPTOM SYMPTOM The lower thread is not caught in the thread retainer after sewing the buttonhole The lower thread is trimmed, but is held in the looper Thread pick-up does not catch the upper thread The lower thread is not trimmed Broken needle SERVICE POSSIBLE CAUSE PROBABLE SOLUTION SECTION POSSIBLE CAUSE PROBABLE SOLUTION Bent thread retainer Change damaged thread retainer, readjust The thread retainer is adjusted incorrectly Re-adjust the thread retainer Knife for trimming the upper thread is damaged Check the knife, re-adjust Check the shears on the clamp plate for dullness or damage Grind or replace Low air pressure Set the air pressure to 0.45 MPa and higher E13 E13 E13 B7 Length of a buttonhole and Incorrectly set parameters for flybar length must be set in length of a buttonhole and flybar accordance with installed length clamp plates D3 Loopers are incorrectly adjusted E10 Re-adjust The shears on the clamp plate do Check the shears, clean or lubricate not operate the right way The machine switched off when sewing the buttonhole 2-4 The power supply was disconnected Switch the machine on and continue according to section C1 Revised 04/2004 e-mail: service@amfreece.cz; parts@amfreece.cz; website: www.amfreece.com Phones: +420 582 309 146 (Service), +420 582 309 286 (Spare Parts); Fax: +420 582 360 606 S211 TROUBLESHOOTING 3. THE ELECTRONIC SYSTEM ERROR MESSAGES If an error message appears on the displayPOSSIBLE (see pictureCAUSE ), press it. The screen with a description and SYMPTOM PROBABLE SOLUTION a correction of an error message appears on the display (see picture ). SYMPTOM POSSIBLE CAUSE PROBABLE SOLUTION Axes are not home Press button to bring the machine to the home position Needle is not in the upper position and the marks on the handwheel and the cover are not aligned. Turn the handwheel to align marks. Ensure the needle is in the left position Rear cover is open Close the cover. Ensure, the locking screw is tightened. Low air pressure. Air pressure is below 3,5 bar Check the air supply The cutting lever is not home. Check BQ7 sensor and the air supply Low voltage (if there is the relay VC1) Check the power supply, voltage. X axis error Press button Y axis error Press button R axis error Press button ACL error Press button Sew motor error Check the frequency inverter Stepping motor driver error Check stepping motor driver Service mode Press and release the Emergency stop button and then button Emergency Stop button Release the Emergency Stop button Revised 04/2004 e-mail: service@amfreece.cz; parts@amfreece.cz; website: www.amfreece.com Phones: +420 582 309 146 (Service), +420 582 309 286 (Spare Parts); Fax: +420 582 360 606 2-5 S211 TROUBLESHOOTING SYMPTOM The length of the buttonhole and the Set correct length of a buttonhole and length of a flybar - see section length of a flybar is incorrectly set POSSIBLE CAUSE D3. ThePROBABLE total can not SOLUTION exceed 50. 4 . E L E C T R I C A L FA U LT S SYMPTOM When switch in position I, neither the work light or the cooling fan operate POSSIBLE CAUSE PROBABLE SOLUTION No power supply Check main power supply or voltage in the socket Fuse F1, F2 failure Replace fuse PN 12.0008.4.665 Power switch QS1 damaged Replace the switch 12.0008.4.835 The supply voltage is above Call electronic engineer in the plant 255 V (red LED lights on relay VC1 — if there is the relay VC1) After the machine is switched on, display does not light When sewing operation started, motor does not operate. Frequency inverter U5 error - check its display does not light. Contactor KM1 switched on. When sewing operation started, motor fails to operate. Frequency inverter U5 error check its display - does not light. Contactor KM1 switched off. Relay VC1 damaged Replace the relay 12.0008.4.690 GS1, GS2 Power damaged Replace the power 12.0008.4.709 Cable from the display disconnected Check the display connection Display or its control damaged Replace display or control units, call AMF Reece Service Fuse F4 failure Replace fuse PN 12.0008.4.664 Frequency inverter U5 error or filter Z1 error Call AMF Reece service Fuse F3 failure Replace fuse PN 12.0008.4.063 Contactor KM1 damaged Replace contactor 12.0008.4.833 Emergency stop turned off Turn on emergency stop Defective emergency stop button Change the stop button PN 12.0008.4.563 Disconnected girth 2-6 Check the girth button Revised 04/2004 e-mail: service@amfreece.cz; parts@amfreece.cz; website: www.amfreece.com Phones: +420 582 309 146 (Service), +420 582 309 286 (Spare Parts); Fax: +420 582 360 606 S211 TROUBLESHOOTING SYMPTOM POSSIBLE CAUSE PROBABLE SOLUTION When sewing operation started, air valves do not operate. The air pressure correct. Contactor KM1 damaged Replace contactor 12.0008.4.833 GS2 Power damaged Replace the power 12.0008.4.709 Incorrect function of the air valves Inadequate contact of contactor KM1,or sockets X3 and X4 Replace contactor 12.0008.4.833 Check the main power supply with socket X3 and X4 Stepping motors do not hold their position Fuse F3 failure. (No LED light on Replace fuse PN 12.0008.4.664 CB1) Some part of one of the stepping motor does not keep its position Driver error Change the driver PN 12.008.4.754 —see page 3-72 Stepping motor supply is connected Check a connection: motor - driver Stepping motor fault Change motor Contactor KM1 fault.(No LED light on CB1 plate ) Replace contactor PN 12.0008.4.833 Burned fuse F5,F6 (Just one LED Replace fuse PN 12.0008.4.664 light on CB1) After the machine is in the home position, the bedplate shakes in one place. It is not possible to sew next buttonhole. Incorrect indication of the home position. Press Emergency Stop button. Manually move the bedplate so it is out of a table sensors. Release Emergency Stop button and press button to bring the machine to the home position. Revised 04/2004 e-mail: service@amfreece.cz; parts@amfreece.cz; website: www.amfreece.com Phones: +420 582 309 146 (Service), +420 582 309 286 (Spare Parts); Fax: +420 582 360 606 2-7 S211 TROUBLESHOOTING SYMPTOM 2-8 POSSIBLE CAUSE PROBABLE SOLUTION Revised 04/2004 e-mail: service@amfreece.cz; parts@amfreece.cz; website: www.amfreece.com Phones: +420 582 309 146 (Service), +420 582 309 286 (Spare Parts); Fax: +420 582 360 606