1
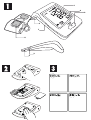
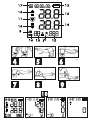
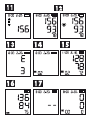
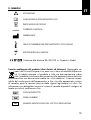
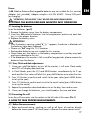
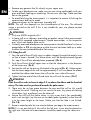
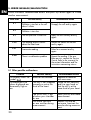
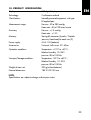
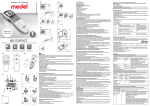
MANUALE D’USO - INSTRUCTION MANUAL
1
4
5
7
8
MEM
3
6
2
9
IT
1. INTRODUZIONE
Il misuratore di pressione MEDEL CHECK è un dispositivo digitale completamente automatizzato, che mediante metodo di misurazione oscillometrico, permette
una misurazione rapida ed affidabile. L’apparecchio offre una precisione di
misurazione molto elevata, ed è stato progettato per essere di semplice utilizzo.
E’un dispositivo destinato all’ utilizzo domiciliare.
ATTENZIONE!
Prima dell’utilizzo si prega di leggere attentamente e per intero questo libretto
di istruzioni. Per ulteriori informazioni in merito alla pressione sanguigna e alla
sua misurazione, si prega di contattare il proprio medico.
! ATTENZIONE!
1.1 Informazioni importanti sull’auto-misurazione
•Non dimenticare: auto-misurazione significa controllo, non diagnosi o trattamento. I valori insoliti devono essere sempre discussi con il proprio medico.
In nessuna circostanza si devono modificare i dosaggi di qualsiasi farmaco
prescritto dal proprio medico.
•Il display del battito non è adatto per controllare la frequenza dei pacemaker
cardiaci!
•I valori della pressione sanguigna devono trovarsi entro certi valori normali in
modo da evitare specifiche malattie.
•Nei casi di irregolarità cardiaca (I.H.B.), le misurazioni effettuate con questo
strumento devono essere valutate solo dopo aver consultato il medico.
•Non sono ammesse modifiche al dispositivo da parte dell’utente.
•Non utilizzare il misuratore di pressione su neonati e pazienti con preeclampsia. Prima di utilizzare il misuratore in gravidanza si consiglia di consultare
il medico.
•L’ apparecchio non necessita di calibrazione.
•Non immergere il dispositivo in acqua.
1.2 Interferenza elettromagnetica
Il dispositivo contiene componenti elettronici sensibili. Evitare perciò forti
campi elettrici o elettromagnetici nelle immediate vicinanze del dispositivo (ad
es. telefoni cellulari, forni a microonde). Questi possono causare una temporanea mancanza di precisione nella misurazione della pressione sanguigna
diastolica.
2. COMPONENTI DEL MISURATORE DI PRESSIONE (fig.1)
1. Display LCD
11. Indicatore battito cardiaco
2. Pulsante O/I (Start / Stop)
irregolare
3. Pulsante memoria (MEM)
12. Indicatore batterie
4. Pulsante media (T3)
13. Pressione sistolica
5. Presa per il bracciale
14. Pressione diastolica
6. USB per alimentazione
15. Pulsazioni
7. Vano batterie
16. Simbolo gonfiaggio/sgonfiaggio
8. Bracciale adulti Universale per
17. Data/orologio
braccio con circ. cm 22~42
18. Valori memorizzati
9. Indicatore memoria
19. Utente (
)
10. Indicatore valore medio
6
Alimentazione:
4 Batterie alcaline tipo AA. Le batterie ricaricabili non sono adatte per questo
apparecchio. Alimentatore (non incluso). Si consiglia l’ utilizzo con un alimentatore 5V DC min 1 A conforme alla normativa EN60601.1 con connessione
micro usb*.
!
* Non è una porta USB per lo scarico dati.
3. MESSA IN FUNZIONE DEL MISURATORE DI PRESSIONE
3.1 Inserimento delle batterie
Inserire le batterie.(fig.2)
1. Sollevare il coperchio del vano batteria
2. Inserire 4 batterie AA accertandosi che la polarità sia corretta
3. Riposizionare il coperchio del vano batterie.
! ATTENZIONE!
Lo“ batterie scariche, l’apparecchio
•Una volta che è apparso il simbolo “
è bloccato fino a che le batterie non verranno sostituite.
•Si prega di utilizzare batterie AA - 1,5V.
•Rimuovere sempre le batterie se l’apparecchio non è utilizzato per un mese
o più.
•Non lasciare mai nel vano batterie, delle batterie esauste, poichè eventuali
perdite potrebbero danneggiare l’unità.
3.2 Impostazione utente, data e orologio
1. Inserite le batterie e acceso l’ apparecchio, verranno visualizzate sul display data e ora (modalità Orologio)
2. In modalità Orologio, premere il tasto O/I e MEM contemporaneamente
per 2 secondi, per prima cosa lampeggerà il simbolo utente; premere il
tasto MEM per selezionare l’ utente desiderato (
).
3. Premere O/I per passare alla regolazione dell’anno e premere il tasto
MEM per impostarlo (fig.3)
4. Premere il pulsante O/I per confermare e passare alla regolazione del
mese (impostare con tasto MEM)
5. Ripetere la procedura sopra descritta per regolare il giorno, l’ ora e i
minuti.
6. L’ apparecchio si spegnerà automaticamente dopo circa 1 minuto se lasciato inattivo, in questo caso data e ora rimarranno invariate.
7. Ogni volta che si sostituiscono le batterie si dovrà impostare nuovamente
data, ora e utente come descritto sopra.
3.3 Connessione del bracciale
Inserire il connettore del bracciale nella presa per il bracciale sul lato sinistro
del misuratore (fig.1)
NOTA:
Se il bracciale è rotto o non funzionante, utilizzarne uno nuovo; se questo non include
il connettore, utilizzare quello del vecchio bracciale.
7
IT
IT
4. COME EFFETTUARE UNA MISURAZIONE
4.1. Prima della misurazione
•Rilassarsi per circa 10 min. evitando di mangiare, fumare e fare esercizio
fisico. Tutti questi fattori influenzano il risultato della misurazione.
•Se si indossano indumenti molto aderenti al braccio, toglierli.
•Sedersi in posizione comoda per la misurazione della pressione. Appoggiare
la schiena e le braccia. Non incrociare le gambe. Appoggiare la pianta dei
piedi al pavimento.
•Per non falsare l’esito, è importante restare tranquilli e non parlare durante
la misurazione
•Misurare sempre sullo stesso braccio (normalmente il sinistro)
•Cercare di effettuare le misurazioni regolarmente alla stessa ora del giorno,
perchè la pressione sanguigna cambia durante il corso della giornata.
NOTA:
Le dimensioni del bracciale dovranno essere adeguate alla circonferenza del
braccio. Sul bracciale sono riportate le misure limite della circonferenza del
braccio entro le quali esso può essere impiegato, misurata con i muscoli rilassati; qualora la circonferenza del braccio del paziente non rientrasse in tali
misure, rivolgersi ai rivenditori specializzati.
! ATTENZIONE:
•Usare solamente bracciali originali MEDEL
•Un bracciale non ben serrato o una camera d’aria sporgente lateralmente
sono causa di misurazioni falsa
•In caso di ripetute misurazioni, il sangue non scorre fisiologicamente nel braccio e questo può provocare risultati non attendibili.
•Misurazioni della pressione sanguigna eseguite correttamente dovrebbero
perciò essere ripetute dopo una pausa di 2/3 minuti o dopo che il braccio è
stato tenuto sollevato, in modo da permettere al sangue accumulato di scorrere normalmente.
4.2. Applicazione del bracciale
1.Passare l’estremità del bracciale (con fermo di gomma integrato) attraverso l’archetto metallico, formando un laccio. La chiusura a strappo si dovrà
trovare all’esterno. (Se il bracciale è già preparato come descritto, saltare
questo passaggio.)(fig.4)
2.Infilare il bracciale sul braccio sinistro in modo tale che il tubo sia rivolto
verso l’avambraccio. (fig.5)
3.Applicare il bracciale al braccio come illustrato in figura (fig.6) , avendo
cura che il bordo inferiore si trovi 2-3 cm al di sopra dell’incavo del gomito
e che l’uscita del tubo in gomma dal bracciale sia situata sul lato interno del
braccio.
4.Tendere l’estremità libera del bracciale e chiuderlo con la chiusura a strappo.
(fig.7)
8
!
ATTENZIONE!
Posizionare il bracciale in modo tale che il bordo inferiore si trovi a 2-3 cm al di
sopra del gomito e della arteria brachiale. Il tubo deve essere orientato verso il
centro del palmo della mano.
5. Tra il braccio ed il bracciale non dovranno rimanere spazi liberi, che condizionerebbero il risultato della misurazione. Inoltre, il braccio non dovrà
essere compresso da maniche rimboccate: in caso contrario, l’indumento
andrà tolto.
6. Assicurare il bracciale con la chiusura a strappo in modo da farlo aderire
comodamente al braccio senza essere troppo stretto.Distendere il braccio
sul tavolo (il palmo della mano dovrà essere rivolto verso l’alto) in modo
tale che il bracciale si venga a trovare all’altezza del cuore. Aver cura di
non piegare il tubo. (fig.8-9)
7. Rimanere tranquillamente seduti per due minuti prima di iniziare la misurazione.
NOTA:
Qualora non fosse possibile applicare il bracciale al braccio sinistro, esso potrà
essere applicato anche al braccio destro. L’importante è che le misurazioni
vengano effettuate sempre sullo stesso braccio.
4.3 Procedura di misurazione
Dopo che il bracciale è stato adeguatamente posizionato, la misurazione può
iniziare.
1.Premere il pulsante O/I. Tutti i simboli del display vengono visualizzati per
1 secondo Se l’ apparecchio ha memorizzato delle misurazioni, il display
visualizzerà per prima la più recente. Se non vi sono dati in memoria, il display visualizzerà 0 in ogni campo. Dopo nella colonna diastolica apparirà
0 (fig.10). L’apparecchio ora è pronto per la misurazione.
2.Il bracciale inizia a gonfiarsi automaticamente.Viene visualizzato il simbolo
“ ” (fig.10)
3.Non appena viene rilevato un battito, il simbolo “ ” inizia a lampeggiare
(fig.11)
4.Una volta raggiunta la corretta pressione, il gonfiaggio si arresta e il bracciale inizia a sgonfiarsi.
5.Quando la misurazione risulta completata, la pressione sistolica/diastolica e
il battito vengono visualizzati contemporaneamente nel display.
6.Nel caso in cui la misurazione mostri un battito del cuore irregolare (I.H.B.),
viene visualizzato il simbolo“ ”.In questo caso i risultati della misurazione
possono deviare rispetto ad una situazione normale. Occorre quindi ripetere
la misurazione. In molti casi, questo non è motivo di preoccupazione. Se il
simbolo “ “ appare con regolarità (per esempio molte volte alla settimana
durante le diverse misurazioni giornaliere) si consiglia di parlarne con il
proprio medico curante. (fig.12)
9
IT
IT
4.4 Come utilizzare la funzione di memoria
• In modalità Orologio (OFF) premere il pulsante MEM; viene visualizzato il numero di misurazioni memorizzate (fig.14), successivamente viene visualizzato
l’ ultimo valore memorizzato con data e ora. (fig.15)
• Per visualizzare i valori successivi premere nuovamente il pulsante MEM.
4.5 Funzione T3. (Media calcolata su 3 misurazioni rilevate in 15 minuti).
1.Premere il tasto O/I ed effettuare la prima misurazione.
2.Alla fine della prima misurazione attendere almeno 2-3 minuti in posizione
rilassata. Poi ripetere la misurazione seguendo nuovamente il passo 1.
3.All fine della seconda misurazione, attendere almeno altri 2-3 minuti in posizione rilassata per poi ripetere nuovamente la misurazione seguendo nuovamente il passo 1.
4.Alla fine della terza misurazione, in modalità spento, premere il tasto T3 per
avere la media delle ultime 3 misurazioni effettuate (il simbolo AVG lampeggerà sul display) (fig.16).
NOTA:
La visualizzazione tramite pulsante T3 si ha solo se si effettuano le misurazioni
nell’arco di 15 minuti, altrimenti il valore visualizzato sarà 0.
4.6 Per cancellare tutti i valori memorizzati
In modalità Orologio (OFF), premere il pulsante MEM, una volta che i valori memorizzati sono visualizzati, premere e tenere premuto per 3 secondi il pulsante
MEM tutti i risultati saranno cancellati. (fig. 17). Premere il tasto MEM o il tasto
O/I per spegnere il display.
5. MESSAGGI DI ERRORE/MALFUNZIONAMENTO
Seguire le azioni consigliate nelle seguenti tabelle e premere di nuovo il pulsante
O/I per iniziare un’altra misurazione.
Codice
di
errore
Causa/e possibile/i
Azione consigliata
E1
Sgonfiaggio troppo veloce o
non gonfia
Riallacciare il bracciale e riprovare
E2
Sgonfiaggio troppo lento
10
E3
La pressione del bracciale è
eccessiva
Rilassarsi per un momento e riprovare
E20
Il processo di misurazione
non riesce a rilevare il battito
Il movimento può compromettere la misurazione.
Rilassarsi per un momento e riprovare.
Allentare i vestiti al braccio e riprovare.
IT
E21
Lettura inaccurata
Rilassarsi per un momento e riprovare.
E Exx
Si è verificato un problema
di
calibrazione
Ripetere la misurazione. Se il problema persiste contattare il Centro Assistenza. Consultare la garanzia per le informazioni di
contatto e le istruzioni di restituzione.
5.1 Altre possibili disfunzioni
Problema
Nel display LCD
compare il simbolo
“
“
Causa/e possibile/i
Azione consigliata
Le batterie sono scariche.
Sostituire tutte le batterie con
batterie nuove.
Il bracciale non è stato avvolto
correttamente intorno al
braccio.
Avvolgere correttamente il manicotto e posizionarlo alla stessa
altezza del cuore.
I valori di pressione sanLa spalla o il braccio sono sotto
guigna visualizzati sono tensione eccessiva.
estremamente alti o bassi.
Rilassarsi e ripetere la misurazione.
Il braccio o i muscoli del
Rimanere immobili e non spostarbraccio vengono mossi durante si/contrarre i muscoli durante la
la misurazione.
misurazione.
Viene visualizzato
il simbolo ”
“
(I.H.B.), ma la frequenza del battito
cardiaco è normale.
La luce nel display è
tenue o non è accesa
Rimanere immobili e non spoIl braccio o i muscoli del starsi /contrarre i muscoli dubraccio vengono mossi du- rante la misurazione.
rante la misurazione.
Sostituire le batterie con batterie nuove. Inserire le batterie in
Le batterie sono scariche o modo corretto.
inserite in modo scorretto.
11
IT
6. MANUTENZIONE E RIPARAZIONE
Se l’azione sopra descritta non risolve il problema, rivolgersi a personale qualificato autorizzato da Medel Group S.p.A. Non aprire in alcun caso l’apparecchio.
L’apparecchio non ha alcuna parte al suo interno che possa essere riparata da
personale non qualificato e non necessita di manutenzione interna e/o di lubrificazione. Nel caso in cui l’apparecchio non funzioni in modo corretto, rivolgersi
al CUSTOMER SERVICE MEDEL.
7. CURA, MANUTENZIONE E CONSERVAZIONE
1.Per la pulizia, usare solo un tessuto morbido e leggermente inumidito.
2.Non usare alcoli a base di petrolio, diluenti o solventi simili.
3.Non lavare il bracciale. Le macchie sul bracciale possono essere tolte con
cautela con un panno umido.
4. Prestare la massima attenzione al fine di evitare che il bracciale venga
danneggiato da estremità taglienti o da oggetti appuntiti come forbici,
coltelli ecc…
5. Estrarre le batterie se si prevede di non utilizzare il dispositivo per un periodo
di tempo prolungato.
6. Nel caso in cui il dispositivo non funzioni correttamente a causa dell’influenza di forti campi elettromagnetici presenti nelle vicinanze, spegnere il dispositivo e ripetere nuovamente la procedura di misurazione.
7. Lo smaltimento del dispositivo (e delle batterie esauste) deve essere realizzato conformemente alle regolamentazioni nazionali in materia di smaltimento
di prodotti elettronici.
8. NORMATIVE DI RIFERIMENTO
L’apparecchio soddisfa i requisiti degli standard europei per il controllo non
invasivo della pressione sanguigna.
• EN1060 -3 Sfigmomanometri non invasivi - Requisiti supplementari per sistemi elettromeccanici di misurazione della pressione sanguigna.
• EN 60601-1
• EN 60601-1-2
• EN 81060-1 Sfigmomanometri invasivi parte 1: requisiti e metodi di prova
per la tipologia di misurazione non automatica.
12
9. SIMBOLI
!
IT
ATTENZIONE!
CONSULTARE LE ISTRUZIONI PER L’ USO
PARTE APPLICATA TIPO BF
CORRENTE CONTINUA
FABBRICANTE
LIMITI DI TEMPERATURA PER TRASPORTO E STOCCAGGIO
PROTEGGERE DALL’ UMIDITA’
Conforme alla direttiva 93/42/CEE sui Dispositivi Medici
Corretto smaltimento del prodotto (rifiuti elettrici ed elettronici) (Applicabile nei
paesi dell’Unione Europea e nei paesi con sistemi di raccolta differenziata). Il simbolo riportato sul prodotto o sulla sua documentazione indica
che il prodotto è conforme alla normativa sulle apparecchiature elettriche
ed elettroniche e non deve essere smaltito tra i rifiuti domestici. L’utente è responsabile del conferimento dell’apparecchio a fine vita alle appropriate strutture
di raccolta, pena le sanzioni previste dalla vigente legislazione sui rifiuti. Per
informazioni più dettagliate inerenti ai sistemi di raccolta disponibili rivolgersi al
locale servizio di smaltimento rifiuti.
CODICE PRODOTTO
SERIAL NUMBER
ID
NUMERO IDENTIFICATIVO DEL LOTTO DI PRODUZIONE
13
IT
10. SPECIFICHE TECNICHE
Display:
Tecnologia:
Classificazione:
Display digitale a cristalli liquidi
Metodo oscillometrico
Apparecchio ad alimentazione interna,
con parte applicata tipo BF
Intervallo di misura:
Pressione da 30 a 280 mmHg
Battito cardiaco: da 40 a 199 battiti/min.
Accuratezza:
Pressione sanguigna: +/- 3 mmHg
Battito cardiaco: +/- 5%
60 set di dati (pressione sist.; diast.; e battito cardiaco)
per ciascun utente (2)
4 batterie AA da 1,5 V
Bracciale universale circonferenza 22 - 42 cm
Memoria max:
Alimentazione:
Accessori:
Condizioni operative:
Temperatura: da +10°C a +40°C
Umidità relativa:10 - 85%
Pressione 80 ~ 105 kPa
Condizioni di trasporto/conservazione:
Temperatura: da -20°C a +60°C
Umidità relativa: da 10 a 95%
Pressione: da 80 a 105 kPa
Peso dell’unità principale:
320 g (senza batterie)
Dimensioni esterne(mm):
185 x 100 x 55 mm
NOTA:
Le specifiche sono soggette a modifica senza preavviso.
14
11. CONDIZIONI DI GARANZIA
• L’apparecchio è garantito 5 anni dalla data di acquisto contro qualsiasi
difetto originario di materiali o di costruzione.
• La garanzia consiste nella sostituzione e/o riparazione gratuita dei componenti difettosi all’origine.
• La garanzia non copre gli accessori forniti a corredo e le parti soggette a
normale usura.
• L’apparecchio deve essere riparato solo da centri di assistenza tecnica autorizzati.
• L’apparecchio deve essere inviato al CUSTOMER SERVICE MEDEL
(800-504964) per la riparazione.
• Le spese di spedizione dell’apparecchio sono a carico dell’utente.
• Le riparazioni al di fuori delle condizioni di garanzia sono addebitate all’utente.
• La garanzia decade se l’apparecchio è stato manomesso, se il difetto deriva
da uso improprio o se il danneggiamento non è imputabile al produttore
(caduta accidentale, trasporto non accurato, ecc.).
• La garanzia non comporta alcun risarcimento di danni, diretti o indiretti, di
qualsiasi natura verso persone o cose durante il periodo di inefficienza del
prodotto.
• La garanzia è valida dalla data d’acquisto del prodotto certificata dallo
scontrino fiscale o dalla fattura d’acquisto da allegare tassativamente al tagliando di garanzia.
• La mancanza del tagliando appositamente compilato e convalidato dal certificato d’acquisto non dà diritto ad alcuna assistenza in garanzia.
TAGLIANDO DA RESTITUIRE IN CASO DI RIPARAZIONE
LA GARANZIA E’ VALIDA SOLO ALLEGANDO LO SCONTRINO FISCALE
Apparecchio tipo:
Modello:
Numero serie:
Data d’acquisto:
DATI DELL’ ACQUIRENTE
Nome:
Indirizzo:
Telefono:
Descrizione difetto:
Firma per accettazione delle condizioni di garanzia
15
Autorizzo l’uso delle informazioni sopra riportate ai sensi della legge 675/96 sulla Privacy.
IT
EN
1. INTRODUCTION
MEDEL CHECK blood-pressure monitor is a automatic, digital blood pressure
measuring device. The device offers a very high measurement accuracy and
has been designed to provide the maximum user-friendliness. Medel CHECK is
a device suitable for homeuse.
ATTENTION!
Before using, please read through this instruction manual carefully. For further
questions on the subject of blood-pressure and its measurement, please contact
your doctor. Keep MEDEL CHECK out of the reach of children. Do not use MEDEL
CHECK near anaesthetic, flammable or oxygen mixture, or with nitrous oxide.
!
ATTENTION!
1.1 Important information about self-measurement
Do not forget: self-measurement means control, not diagnosis or treatment. Unusual values must always be discussed with your doctor. Under no circumstances
should you alter the dosages of any drugs prescribed by your doctor.
• The pulse display is not suitable for checking the frequency of heart pacemakers!
• In cases of cardiac irregularity (I.H.B.), measurements made with this instrument should only be evaluated after consultation with the doctor.
• Changes to the unit by the user are not admitted
• Do not use the blood pressure monitor on newborns or patients with preeclampsia. We recommend consulting a doctor before using the blood pressure
monitor during pregnancy.
• The device does not require any calibration
• Do not dip the device in water
1.2 Electromagnetic interference
The device contains sensitive electronic components. Therefore, avoid strong
electrical or electromagnetic fields close to the device (e.g. mobile telephones,
microwave ovens).These can lead to temporary impairment of the accuracy.
2. COMPONENTS OF THE BLOOD-PRESSURE MONITOR( fig.1)
1.
2.
3.
4.
5.
6.
7.
8.
LCD
10. Average value symbol
O/I (Start / Stop)
11. Heartbeat symbol
Memory button
12. Battery symbol
Average button (T3)
13. Systolic blood pressure
Air socket
14. Diastolic blood pressure
USB port for charge
15. Pulse display
Battery compartement
16. Inflation/Deflation symbol
Universal adult Cuff
17. Date/Time display
for 22~42 cm arm
18. Stored data
9. Memory symbol
19. User (
)
NOTE:
If your arm Cuff is broken or not functional, please use a new Cuff. If the new
arm Cuff does not include an air plug, please continue to use the old air plug.
16
Power:
4 AA Alkaline Batteries(Rechargeable batteries are not suitable for this monitor)
Adapter (not included). Adapter complies with EN 60601-. Micro USB port*
for charging.*
!
*ATTENTION ! THE USB PORT CAN’T BE USED FOR DATA DOWNOLADING.
3 PUTTING THE BLOOD-PRESSURE MONITOR INTO OPERATION
3.1 Inserting the batteries
Insert the batteries. (pic.2)
1.Remove the battery cover from the battery compartment.
2.Insert four AA powerful batteries into the compartment and ensure each battery is in the proper direction.
3.Replace the battery cover.
! ATTENTION !
• After the battery warning symbol”
” appears, the device is blocked until
the batteries have been replaced.
• Please use “AA”Long-Life 1.5 V batteries.
• Recharcable batteries are not suitable for this monitor.
• Never leave any low battery in the battery compartment since they may leak
and cause damage to the unit.
• If the blood-pressure monitor is left unused for long periods, please remove the
batteries from the device.
3.2 User, Clock and date adjustement
1. Once you install the battery or turn off the monitor, it will enter Clock mode,
and LCD will display date and time.
2. In Clock Mode, press the O/I and MEM buttons simoultaneously for 2 seconds and the User value will blink first, press MEM button to to select the user.
3. Press O/I button to confirm and switch to the year value (press MEM button
to set up the year)
4. Press O/I button to confirm and switch to the month value (press MEM button
to set up the month)
5. Repeat the procedure described above to set the day, hour and minutes.
6. Once you change the batteries, you should readjust the time and date.
3.3 Connecting the cuff
Insert the cuff connector into the socket on the left side of the meter (Pic.1)
4. HOW TO TAKE PROPER MEASUREMENTS
4.1. Before the measurement:
• Relax and avoid eating, smoking as well as all forms of exertion directly
before the measurement. All these factors influence the measurement result.
17
EN
EN
• Remove any garment that fits closely to your upper arm.
• To take your blood pressure, make sure you are sitting comfortably with your
arms and back leaning on something. Do not cross your legs. Place your feet
flat on the ground.
• To avoid falsifying the measurement, it is important to remain still during the
measurement and not to speak.
• Measure always on the same arm (normally left)
NOTE: The cuff size depends on the circumference of the arm. The allowed
range is printed on the cuff. If this is not suitable for your use, please contact
your dealer.
!
ATTENTION!
• Only use MEDEL original cuffs!
• A loose cuff or a sideways protruding air-pocket causes false measurement
values.With repeated measurements, blood accumulates in the respective
arm, which can lead to false results.
• Correctly executed blood-pressure measurements should therefore first be repeated after a 2/3 minute pause or after the arm has been held up in order
to allow the accumulated blood to flow away.
4.2. Fitting the cuff
1. Pass the end of the cuff (with sewn-in rubber stopper) through the metal stirrup
so that a loop is formed. The Velcro closer must be facing outwards.(Ignore
this step if the cuff has already been prepared.) (Pic 4)
2. Push the cuff over the left upper arm so that the tube points in the direction
of the lower arm. (Pic 5)
3. Position the cuff on the arm as illustrated in the picture (Pic. 6). Make certain
that the lower edge of the cuff lies approximately 2 to 3 cm above the elbow
and that the rubber tube leaves the cuff on the inner side of the arm )
4. Tighten the free end of the cuff and close the cuff with the closer. (Pic 7)
!
ATTENTION!
Place the cuff in order to have its edge 2-3 cm above the elbow and the brachial
artery. The tube must be positioned towards the palm center.
5. There must be no free space between the arm and the cuff as this would
influence the result. Clothing must not restrict the arm. Any piece of clothing
which does (e.g. a pullover) must be taken off.
6. Secure the cuff with the Velcro closer in such a way that it lies comfortably
and is not too tight. Lay the arm on the table (palm upwards) so that the cuff
is at the same height as the heart. Make sure that the tube is not kinked.
(Pic 7-8).
7. Remain seated quietly for two minutes before you begin the measurement.
NOTE:If it is not possible to fit the cuff to the left arm, it can also be placed on
the right one. However all measurements should be made using the same arm.
18
4.3. Measuring procedure
After the cuff has been appropriately positioned, the measurement can begin
1. Press O/I button. All display symbols appear for 1 second. Then 0 will appear on LCD on the DIA column. (pic. 10). The monitor is ready for the
measurement.
2. Then the cuff inflates automatically. The symbol “ “ will appear. (pic. 10)
3. Once a pulse is detected, the “
“symbol blinks. (pic. 11)
4. When appropriate pressure is reached, inflation stops and the cuff starts to
deflate.
5. When the measurement is completed, the systolic / diastolic pressure and
pulse are shown simultaneously .
6. In case the measurement shows irregular heartbeat (I.H.B.), the ” ”symbol
is displayed. In this case the results of the measurement have deviated from a
normal situation. Then the measurement needs to be repeated. In the majority
of cases, this is not cause for concern. If the symbol ” ” appears regularly
(for example several times a week during different daily measurements) it is
advisable to discuss it with your medical advisor (pic. 12).
4.4 How to use the memory function
•
•
4.5 T3 Function. (The average is calculated upon last 3 readings measured within
15 minutes).
1. Press O/I button and take the first measurement.
2. At the end of the first measurement wait at least 2-3 minutes in a relaxed
position. Then repeat the measurement following step 1 again.
3. At the end of the second measurement wait at least 2-3 minutes in a relaxed
position. Then repeat the measurement following step 1 again.
4. At the end of the third measurement press T3 button to perform the average
of the last three measurements taken (the AVG symbol will appear) (pic. 16).
NOTE:
The average data using T3 button is shown only if the last 3 measurements have
been done within 15 minutes. Otherwise, the data will be shown as 0.
4.6 To delete all values stored in the memory
In Clock mode (Off mode) press MEM button, after the latest data stored will be
displayed press again and hold the MEM button for 3 sec. All results will be
deleted. Press the MEM or O/I button to turn off the display (pic. 17).
19
EN
EN
5. ERROR MESSAGE/MALFUNCTION
Follow the below recommended actions and press O/I button again to initiate
another measurement.
Error code
Possible cause(s)
E1
Recommended Action
Deflation is too fast or the cuff
doesn’t inflate
E2
Deflation is too slow
E3
The cuff pressure is excessive
Apply the cuff correctly and try
again
E 20
The reading process cannot
detect the heart beat
Loosen the clothes on the arm
and try again
E 21
Inaccurate reading
Relax for a moment and try
again
E Exx
There is a calibration problem
Repeat the reading. If the problem persists, contact the Service
Centre. Refer to the warranty for
the contact information and the
instructions concerning returns.
Re-apply the cuff and try again
5.1 Other possible malfunctions:
Problem
Possible cause(s)
Recommended Action
The display shows the
symbol
Batteries are drained.
Replace all batteries
with new ones.
The blood pressure
values displayed are
abnormally high or
low.
The cuff is not wrapped
correctly or not at the
level of the heart.
Wrap the cuff correctly
and rise your hand so
that the cuff is at the
same level of your heart.
Too much stress is applied on your shoulder
or arm.
Relax yourself and make
measurement.
You move your arm
or arm muscles during
measurement.
Remain still and do
not move /contract the
muscles during measurement.
20
The (I.H.B.) symbol
”
“ is displayed,
but my heart beat rate
should be normal.
You move your arm
or arm muscles during
measurement.
Remain still and do
not move /contract the
muscles during measurement.
The light on the display
is dim or not lit
The batteries are flat or
inserted incorrectly
Replace the flat batteries
with new ones. Insert the
batteries correctly.
6. MAINTENANCE AND REPAIRS
For any repair operations, only refer to a technical assistance centre authorized by the Medel Group S.p.A. and request original spare parts. Never open
the device. There are no user-serviceable parts within. The device requires no
lubrication or maintenance. Failure to comply with what expressed above may
compromise the safety of MEDEL CHECK.
7. CARE, MAINTENANCE AND STORAGE
1.For cleaning only use a soft, lightly moistened cloth.
2.Do not use petroleum spirits, thinners or similar solvents.
3.Do not wash the cuff.
4.Take care to ensure the cuff is not damaged by sharp or pointed objects such
as scissors, knives, etc.
5.Take the batteries out if the device is not used for a long period.
6.In case the device becomes malfunction due to the influence of strong electromagnetic fields, power off the device and repeat the procedure again.
7.Disposal of the device (and used batteries) should be carried out according to
the national regulations for the disposal of electronic products.
8. REFERENCE TO STANDARDS
Device standard: Device corresponds to the requirements of the European standard for non-invasive blood-pressure monitor.
• EN1060-3 Non-invasive sphygmomanometers - Supplementary
requirements for electro-mechanical blood pressure measuring
systems.
• EN 60601-1
• EN 60601-1-2
• EN 81060 -1 Non-invasive sphygmomanometers. Part 1: requirements and
test method for non-automated measurement type.
21
EN
EN
9. SYMBOLS
!
WARNING!
REFER TO THE INSTRUCTIONS
TYPE BF APPLIED PART
DIRECT CURRENT
MANUFACTURER
TEMPERATURE LIMITATION FOR TRANSPORT AND STORAGE
KEEP DRY
Comply with the Medical Device Directive 93/42/EEC
Separate collection for waste electrical and electronic equipment.
Applicable to European Union countries and countries with separate collection systems) This symbol on the product or its literature indicates that
the product complies with the Electrical and electronic equipment and should not
be disposed of as household waste. The user is responsible for the transfer of
the equipment at end of life with the appropriate collection facilities, subject to
the penalties provided for by current legislation on waste. For more detailed information collection systems available contact your local waste disposal service.
MANUFACTURER’S CATALOGUE DEVICE NUMBER
SERIAL NUMBER
ID
22
IDENTIFICATION NUMBER OF PRODUCTION LOT
10. PRODUCT SPECIFICATION
Display :
LCD digital display
Technology: Oscillometric method
Classification : Internally powered equipment, with type
EN
BF applied part
Measurement range: Pressure : 30 to 280 mmHg
Heart rate : 40 to 199 times/minute
Accuracy
:
Pressure : +/- 3 mmHg
Heart rate : +/- 5%
Memory :
Storing 60 memories (Systolic / Diastolic
Power supply:
4 AA 1.5V (batteries)
pressure, Heart beat) for each user (2)
Accessories:
Universal cuff circum. 22 - 42cm
Operation conditions:
Temperature : +10°C to +40° C;
Relative Humidity: 10 - 85%
pressure: 80 to 105 kPa
Transport/Storage conditions:
Temperature : -20°C to +60°C ;
Relative Humidity : 10 - 95%
pressure: 80 to 105 kPa
Weight of main unit :
320 g (without batteries)
External dimensions:
185 X 100 X 55 mm
NOTE:
Specifications are subject to change without prior notice.
23
EN
10. WARRANTY CONDITIONS
•
•
•
•
•
•
•
•
•
•
The device is covered by a 5-year warranty from date of purchase for any
defects in the design or in the material used.
The warranty consists in the replacement and/or repair free of charge of
originally detective components.
The warranty does not cover the accessories supplied with the equipment
and those parts subject to normal wear and tear.
The equipment must be repaired by authorized technical service centres
only.
The equipment must be sent to the authorized technical service centre for
repair within 8 days after the defect is noticed.
The transport costs for the equipment are at user’s charge. Any repair out
of the warranty conditions are at user’s charge.
The warranty does not cover failures resulting from misuse, abuse of the
product or in case the damage is not due to manufacturer’s liability (accidental fall, rough transportation, etc…)
The warranty does not involve any compensation for any kind of damages
to persons or things, either direct or indirect, occurred when the equipment
is not operating.
The warranty is valid from the date of purchase certified by the ticket or the
invoice which have to be peremptorily attached to the warranty coupon.
The lack of warranty coupon properly filled in and validated by a certification of purchase voids the warranty.
COUPON TO BE RETURNED IN CASE OF REPAIRS
THE WARRANTY IS VALID ONLY IF ACCOMPANIED BY THE TICKET/INVOICE
Product type:
Model:
Serial No.:
Date of purchase:
BUYER’S DATA
Name:
Address:
Telephone:
Defect description:
24
Signature for acceptance of the above mentioned warranty conditions
Guidelines and declaration of the manufacturer – electromagnetic emissions
The MEDEL CHECK Blood Pressure Monitor is designed to be operated in the electromagnetic environmentdescribed below. The client or user of the MEDEL CHECK
must ensurethat the product is used in such environment.
Emission test
Emissions RF
CISPR 11
Conformity
Group 1
Electromagnetic environment
– guide
The MEDEL CHECK uses RF energy
for its internal operation only.
Consequently its RF emissions
are very low and cause no
interference of nearby electronic
equipment.
Emissions RF
CISPR 11
Class B
Harmonic emissions
IEC 61000-3-2
Class A
Emissions of voltage
fl uctuations / fl icker
IEC 61000-3-3
Complying
The MEDEL CHECK is suitable
for use in all types of facilities,
domestic buildings included,
and in those buildings directly
connected to the low voltage
public electricity supply system of
domestic buildings always keeping
in mind what follows:
Caution: This apparatus/system
has to be used by health care
professionals only. This apparatus/ system could cause radio
interferences or alter operation of
nearby equipment.
Attenuation measures could be
necessary, such as re-orienting
or re-positioning of the MEDEL
CHECK or shielding of the current
position.
25
Guidelines and declaration of the manufacturer – electromagnetic immunity
The MEDEL CHECK blood pressure monitor is designed to be operated in the electromagnetic environment described below. The client or user of the MEDEL CHECK
must ensure that the product is used in such environment.
Immunity
test
Test level
Conformity level
± 6kV in contact
± 6kV in contact
± 8kV in air
± 8kV in air
Transients
/ Fast
electric
trains
IEC 610004-4
± 2kV for power
supply lines
± 1kV for
input/output lines
± 2kV for power
supply lines
± 1kV for
input/output lines
The quality of the mains
voltage should be that of a
typical commercial or hospital
environment.
Pulses
IEC 610004-5
± 1kV in differential
way
± 2kV in common
way
± 1kV in differential way
± 2kV in common
way
The quality of the mains
voltage should be that of a
typical commercial or hospital
environment.
Voltage
holes,
voltage short
interruptions
and
variations
on the
power
supply input
lines
IEC 610004-11
<5% UT (<95% of
hole UT) for 0,5 cycles
40% UT (60% hole of
UT) for 5 cycles
70% UT (30% hole of
UT) for 25 cycles
<5% UT (<95% hole
of UT) for 5 sec
0% UT for 10 ms
40% UT for 100 ms
70% UT for 500 ms
0% UT for 5 sec
The quality of the mains
voltage should be that of a
typical commercial or hospital
environment.
If the user of the MEDEL CHECK
requires continuous operations
even in case of power supply
cutoff, it is recommended to
plug the MEDEL CHECK to a
uninterruptible power supply
or batteries.
Mains
frequency
magnetic
fi eld (50/60
Hz)
IEC 610004-8
3 A/m
Non applicable
Mains frequency magnetic
field has to be at a level typical
of a commercial or hospital
environment.
Electrostatic
discharges
IEC 610004-2
Electromagnetic environment
- guidelines
Floors have to be made in
wood, cement, or ceramic. If fl
oors are coated with synthetic
materials relative humidity
must range at least at 30%.
NOTE: UT is the a.c. mains voltage before the application of the test level
26
Guidelines and declaration of the manufacturer – electromagnetic immunity
The MEDEL CHECK blood pressure monitor is designed to be operated in the
electromagnetic environment described below. The client or user of the MEDEL
CHECK must ensure that the product is used in such environment.
Immunity
test
Test level
IEC 60601
Conformity
Level
Conducted RF
3Vrms
3Vrms
IEC 61000-4-6
to 150kHz from
80MHz
to 150kHz from
80MHz
Irradiated RF
3V/m
3V/m
IEC 61000-4-3
to 80MHz from
2,5GHz
to 80MHz from
2,5GHzz
Electromagnetic environment
- guidelines
RF portable and mobile
communication equipment
should not be used closer than
the separation distance calculated through the equation
applicable to the transmitter
frequency to any part of the
MEDEL CHECK, Cables included.
Recommended separation
distances
d = 1,17 √P
d = 4√P from 80MHz to
800MHz
d = 2,33 √P from 800MHz to
2,5GHz
where P is the maximum
rated Watt (W) power from
the transmitter as declared
by the manufacturer while is
the recommended separation
distance expressed in metres
(m).
Field intensity produced by
fi xed
RF transmitters, as set by
electromagnetic test on site
a, should be lower than the
conformity level of every frequency interval. Interferences
nearby the systems signalled
by the following symbol could
occur:
NOTE 1: For 80MHz and 800MHz, the highest frequency interval is applied.
NOTE 2: These guidelines cannot always be applied. Electromagnetic propagation
is altered by absorption and refl ection of facilities, objects and people.
27
a.For field intensity of fi xed transmitters, such as the base stations for radiophones (cellular and cordless) EN and terrestrial radiophones, radio amateur
equipment, AM and FM radio and TV transmitters whose presence cannot be
foreseen an on-site electromagnetic test should be planned. If field intensity measured where the MEDEL CHECK blood pressure monitor is used exceeds the RF
conformity level then the MEDEL CHECK has to be kept under control to check for
its correct operation. If anomalies are detected, additional measures can be taken
such as a re- orienting or repositioning of the MEDEL CHECK
b. Over the frequency interval of 150kHz - 80MHz, fi eld intensity has to be lower
than 3V/m.
Recommended separation distances between portable or mobile radiocommunication tools and the MEDEL CHECK BLOOD PRESSURE MONITOR
MEDEL CHECK is designed to be operated in electromagnetic environments where RF
irradiated disturbances are kept under control. The client or user of the MEDEL CHECK
can favour electromagnetic interferences prevention by keeping a minimum distance
between portable or mobile RF communication systems (transmitters) and the MEDEL
CHECK as recommended, according to the maximum output power of
radio-communication tools.
Separation distance according to the transmitter frequency (m)
Transmitter maximum rated output
power (W)
150kHz to 80MHz
80MHz to 800MHz
800MHz to 2,5 GHz
1,17 √P
4 √P
2,33 √P
0,01
0,12
0,40
0,23
0,1
0,37
1,26
0,74
1
1,17
4,00
2,33
10
3,70
12,65
7,37
100
11,70
40,00
23,3
For those transmitters whose maximum rated output power is not indicated in the above list, the
recommended separation distance in metres (m) can be calculated by the equation applicable to
the transmitter frequency, where P is the maximum rated output of the transmitter in Watt (W) as
declared by the manufacturer.
NOTE 1: For 80MHz and 800MHz, the highest frequency interval is applied.
NOTE 2: These guidelines cannot always be applied. Electromagnetic propagation is altered by
absorption and refl ection of facilities, objects and people.
28
29
MEDEL CHECK - MANUALE D’USO - REV. 00 - SEPTEMBER 2015 - CODE 92821