1
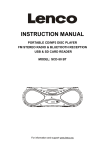
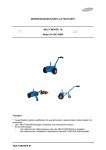
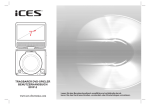
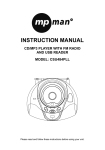
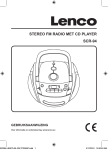
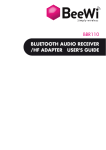
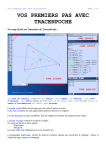
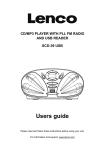
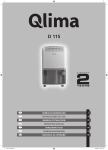
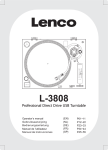
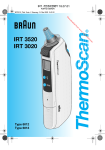
INSTRUCTION MANUAL FM RADIO WITH USB & SD CARD READER MODEL: MPR-033 Please read and follow these instructions before using your unit. www.lenco.com 7 8 9 10 11 12 13 14 1 2 3 4 5 6 17 15 16 18 LOCATION OF CONTROLS 1. PHONES JACK 2. DC IN JACK 3. SPEAKER 4. NUMERIC BUTTONS 5. REPEAT BUTTON 6. SKIP/SEARCH BACKWARD BUTTON 7. STANDBY BUTTON 8. LCD DISPLAY 9. MODE BUTTON 10. PLAY/PAUSE BUTTON 11. STOP BUTTON 12. VOL- BUTTON 13. VOL+ BUTTON 14. SKIP/SEARCH FORWARD BUTTON 15. SD CARD SLOT 16. USB PORT 17. FM TELESCOPIC ANTENNA 18. BATTERY COMPARTMENT GB-1 Getting Started Before using your Radio for FM, fully extend the FM TELESCOPIC ANTENNA and position for the best reception. Before connecting the power, check that the mains voltage on the rating plate of the AC/DC adaptor is same as the voltage in your area. Plug the DC cord from the AC/DC adaptor into the DC jack on the side of the unit. Plug the AC/DC adaptor into the wall socket and switch the mains power on. Battery Operation 1. Remove the Battery Compartment Cover by gently pushing the clips downward and outwards. 2. Install 4 x 'AA' size batteries (UM-3 or equivalent) and take care that the correct polarities are observed. 3. Replace the battery compartment cover. NOTE: The DC cord must be removed for battery operation. To avoid damage which may result from leaking batteries, remove the batteries when they become exhausted or when the unit is not to be used for a long period of time. NOTE: If there’s no audio signal input to the unit in about one hour, the unit will enter to power off mode automatically. FM RADIO TUNING THE FM RADIO 1. Press the STANDBY button on the front of the unit to power on the unit. 2. Switch to the FM radio mode by pressing the MODE button on the front of the unit repeatedly. 3. Press the SKIP/SEARCH FORWARD or SKIP/SEARCH BACKWARD button on the front of the unit to fine tune radio station. Press and hold the SKIP/SEARCH FORWARD or SKIP/SEARCH BACKWARD button to auto search radio station forward or backward respectively (When an available station is found, the unit will broadcast it immediately and the searching will be stopped). 4. Press the VOL+/- button on the front of the unit to adjust the volume level. 5. Press the STANDBY button to turn off the unit. STORING YOUR FAVORITE RADIO STATION (UP TO 6 PRESET STATIONS) 1. Tune to your favorite radio station first. 2. Press and hold one of the NUMERIC buttons (1~6) to store the radio station on the corresponding memory cell (the “S-1”~”S-6” displays on the screen). 3. To store other stations, follow the above steps. 4. During radio playback, short press the corresponding numeric button to recall the preset station. USB/SD CARD PLAYBACK 1. Press the STANDBY button on the front of the unit. 2. Insert an USB or a SD card into the USB port or SD card slot on the right side of the unit. 3. Press the MODE button repeatedly to switch to USB or card mode. The playback will start automatically. 4. Press the VOL+/- button to adjust the volume level. 5. Press the SKIP/SEARCH FORWARD or SKIP/SEARCH BACKWARD button on the front of the unit to skip to the next/previous track. 6. Press and hold the SKIP/SEARCH FORWARD or SKIP/SEARCH BACKWARD button to search through the track forward or backward. 7. Press the REPEAT button on the front of the unit once to repeat play the current track; press GB-2 the button twice to repeat play all tracks; press the button three times to exit the repeat play mode. 8. Press the PLAY/PAUSE button on the front of the unit to pause the playback; press the button again to resume the normal playback. 9. Press the STOP button on the front of the unit to cease the playback. PHONES JACK If you want to listen to the unit without disturbing others, please use the phones jack on the left side of the unit. To use the phones jack, plug in the headphones/earphones (not included), adjust the volume level accordingly. NOTE: When external headphones/earphones are connected to the unit, the speakers of the unit will be muted. CAUTION: Listening at high power for a long moment could damage the user’s ears. IMPORTANT SAFETY INSTRUCTIONS The apparatus shall not be exposed to dripping or splashing and that no objects filled with liquids, such as vases, shall be placed on the apparatus. When the AC/DC adapter is used as the disconnect device, the disconnect device shall remain readily operable. To be completely disconnected the power input, the AC/DC adapter shall be disconnected from the mains completely. No naked flame sources, such as lighted candles, should be placed on the apparatus. Minimum distances 2.0cm around the apparatus for sufficient ventilation. The ventilation should not be impeded by covering the ventilation openings with items, such as newspapers, table-cloths, curtains, etc. The use of apparatus is in tropical and/or moderate climates. Attention should be drawn to the environmental aspects of battery disposal. CAUTION: Danger of explosion if battery is incorrectly replaced. Replace only with the same or equivalent type. Battery shall not be exposed to excessive heat such as sunshine, fire or the like. The marking plate is located at the back of the apparatus. WARNING: Prolonged exposure to loud sounds from personal music players may lead to temporary or permanent hearing loss. The USB memory stick should be plugged into the unit directly. Don’t use an USB extension cable because it can cause interference resulting in failing of data. SPECIFICATIONS AC power adaptor: Input: AC 100 - 240V, 50/60Hz Output: DC 5V, 1.2A Batteries: AA or "UM-3" size, 1.5V x 4 Power consumption: 5W Output power RMS at 10% THD: around 1.2W x 1 Dimensions: 170 (L) x 38.5 (W) x 105 (H) mm Operating humidity range: 10% to 75% Operating temperature range: -5°C to +40°C Compatible with USB & SD card Specifications are subject to change without notice. GB-3 Service and support For information: www.lenco.com For support: http://lencosupport.zendesk.com Lenco helpdesk: Germany The Netherlands Belgium 0900-1520530 0900-23553626 02-6200115 (Local charges) (Local charges + 1ct p/min) (Local charges) The helpdesk is accessible from Monday till Friday from 9 AM till 6 PM. When contacting Lenco, you will always be asked for the model and serial number of your product. The serial number can be found on the back of the device. Please write down the serial number below: Model: MPR-033 Serial number:_________________________________ Lenco offers service and warranty in accordance to European law, which means that in case of repairs (both during and after the warranty period) you should contact your local dealer. Important note: It is not possible to send products that need repairs to Lenco directly. Important note: If this unit is opened or accessed by a non-official service center in any way, the warranty expires. This device is not suitable for professional use. In case of professional use, all warranty obligations of the manufacturer will be voided. If at any time in the future you should need to dispose of this product please note that: Waste electrical products should not be disposed of with household waste. Please recycle where facilities exist. Check with your Local Authority or retailer for recycling advice. (Waste Electrical and Electronic Equipment Directive) GB-4 MANUAL DE INSTRUCCIONES RADIO FM RADIO CON USB Y LECTOR DE TARJETAS SD MODELO: MPR-033 Por favor, lea y siga estas instrucciones antes de usar la unidad. www.lenco.com 7 8 9 10 11 12 13 14 1 2 3 4 5 6 17 15 16 18 LOCALIZACIÓN DE LOS CONTROLES 1. TOMA PARA AURICULARES 2. TOMA DC IN 3. ALTAVOZ 4. BOTONES NUMÉRICOS 5. BOTÓN REPEAT 6. BOTÓN SALTO/BÚSQUEDA ATRÁS 7. BOTÓN STANDBY 8. DISPLAY LCD 9. BOTÓN MODE 10. BOTÓN REPR/PAUSA 11. BOTÓN STOP 12. BOTÓN VOL13. BOTÓN VOL+ 14. BOTÓN SALTO/BÚSQUEDA ADELANTE 15. RANURA PARA TARJETAS SD 16. PUERTP USB 17. ANTENA TELESCÓPICA FM 18. COMPARTIMENTO PARA PILAS ES-1 Iniciación Antes de usar su radio para FM, extienda por completo la ANTENA TELESCÓPICA FM y posiciónela para obtener la mejor recepción. Antes de alimentar el aparato, compruebe que el voltaje de la placa de clasificación del adaptador AC/DC coincide con el de su área. Conecte el cable DC del adaptador AC/DC a la toma DC del lateral de la radio. Conecte el adaptador AC/DC a la toma de pared y encienda el interruptor principal. Uso de las pilas 1. Retire el compartimento para pilas presionando las pestañas sin fuerza hacia abajo y hacia fuera. 2. Instale 4 pilas del tamaño 'AA' ç (UM-3 o equivalente) procurando tener en cuenta la polaridad. 3. Vuelva a colocar la tapa del compartimento para pilas. NOTA: El cable DC deberá ser retirado para el uso con pilas. Para evitar los daños resultantes de pilas con pérdidas, sáquelas cuando se hayan agotado o cuando no vaya a usar la unidad por un periodo prolongado. NOTA: Si no hay ninguna señal de audio entrante en la unidad durante al menos una hora, la unidad entrará en el modo de apagado automáticamente. RADIO FM SINTONIZACIÓN DE LA RADIO FM 1. Pulse el botón STANDBY de la parte frontal de la unidad para encenderla. 2. Seleccione el modo de radio FM pulsando repetidamente el botón MODE de la parte frontal de la unidad. 3. Pulse el botón SALTO/BÚSQUEDA ADELANTE o SALTO/BÚSQUEDA ATRÁS de la parte frontal de la unidad para sintonizar una emisora de forma afinada. Mantenga pulsado el botón SALTO/BÚSQUEDA ADELANTE o SALTO/BÚSQUEDA ATRÁS para realizar la búsqueda automática de una emisora de radio hacia delante o hacia atrás respectivamente (cuando se encuentre una emisora, la unidad la retransmitirá inmediatamente y la búsqueda se detendrá). 4. Pulse el botón VOL+/- de la parte frontal de la unidad para ajustar el volumen. 5. Pulse el botón STANDBY para apagar la unidad. ALMACENAMIENTO DE SUS EMISORAS DE RADIO FAVORITAS (HASTA 6 EMISORAS PRESINTONIZADAS) 1. Primero sintonice su emisora de radio favorita. 2. Mantenga pulsado uno de los botones NUMÉRICOS (1~6) para almacenar la emisora de radio de la celda de memoria correspondiente (“S-1”~”S-6” se mostrará en la pantalla). 3. Para almacenar otras emisoras, siga los pasos anteriores. 4. Durante la reproducción de radio, pulse el botón numérico correspondiente para seleccionar la emisora presintonizada. REPRODUCCIÓN DE USB/TARJETA SD 1. Pulse el botón STANDBY de la parte frontal de la unidad. 2. Conecte una unidad USB o introduzca una tarjeta de memoria SD en el puerto USB o en la ranura para tarjetas SD de la parte derecha de la unidad. 3. Pulse el botón MODE repetidamente para seleccionar el modo USB o tarjeta. La reproducción comenzará automáticamente. 4. Pulse el botón VOL+/- para ajustar el volumen. 5. Pulse el botón SALTO/BÚSQUEDA ADELANTE o SALTO/BÚSQUEDA ATRÁS de la parte frontal de la unidad para pasar a la pista siguiente / anterior. 6. Mantenga pulsado el botón SALTO/BÚSQUEDA ADELANTE o SALTO/BÚSQUEDA ATRÁS ES-2 para realizar una búsqueda en la pista hacia delante o hacia atrás. 7. Pulse el botón REPEAT de la parte frontal de la unidad para repetir la reproducción de la pista actual; pulse el botón dos veces para repetir la reproducción de todas las pistas; pulse el botón tres veces para salir del modo de repetición de la reproducción. 8. Pulse el botón REPR/PAUSA de la parte frontal de la unidad para dejar la reproducción en pausa; pulse de nuevo este botón para reanudar la reproducción normal. 9. Pulse el botón STOP de la parte frontal de la unidad para detener la reproducción. TOMA PARA AURICULARES Si desea escuchar con la unidad sin molestar a los que le rodean, por favor, use la toma de auriculares de la parte izquierda de la unidad. Para usar la toma para auriculares, conecte a ella unos auriculares (no incluidos) y ajuste el volumen a su gusto. NOTA: Cuando los auriculares externos estén conectados a esta unidad, los altavoces estarán silenciados. PRECAUCIÓN: La escucha a un volumen elevado durante periodos prolongados puede afectar a la capacidad auditiva del usuario. IMPORTANTES INSTRUCCIONES DE SEGURIDAD No exponga el aparato a goteos ni salpicaduras, y no coloque objetos que contengan líquidos, como jarrones, sobre este. Cuando el adaptador de corriente AC/DC se emplee como dispositivo de desconexión, este deberá permanecer operativo en todo momento. Para desconectarlo completamente de la alimentación, el adaptador de corriente deberá estar desenchufado de la red de suministro. No coloque fuentes de llama viva, como una vela, sobre el aparato. Deje una distancia mínima de 2 centímetros alrededor del aparato para una suficiente ventilación. La ventilación no deberá ser impedida cubriendo las aberturas de la unidad con elementos como periódicos, manteles, cortinas, etc. El uso del aparato está indicado para climas tropicales y/o moderados. Preste atención a los aspectos medioambientales del desechado de la pila. PRECAUCIÓN: Peligro de explosión en caso de sustituir incorrectamente la pila. Sustitúyala solo por una pila del mismo tipo o de tipo equivalente. No exponga la pila a un calor excesivo, como el de la luz solar, un fuego, etc. La placa de clasificación está situada en la parte posterior del aparato. ADVERTENCIA: Una exposición prolongada a sonidos fuertes de reproductores de música personales podría acarrear la pérdida temporal o permanente de oído. La unidad de memoria USB deberá ser conectada directamente en la unidad. No use un cable de extensión USB, ya que podría causar interferencias que producirían fallos o pérdida de datos. ESPECIFICACIONES Adaptador de corriente AC: Entrada: AC 100 - 240V, 50/60Hz Salida: DC 5V, 1.2A Pilas: Tamaño AA o "UM-3", 1,5V x 4 Consumo: 5W Potencia de salida RMS a 10% THD: unos 1,2W x 1 Dimensiones: 170 (L) x 38.5 (W) x 105 (H) mm Intervalo operativo de humedad: Entre 10% y 75% Intervalo operativo de temperatura: Entre -5°C y +40°C Compatible con USB y tarjetas SD Las especificaciones están sujetas a cambios sin notificación previa. ES-3 Servicio y asistencia Para información: www.lenco.com Para asistencia: http://lencosupport.zendesk.com Teléfono de asistencia Lenco: Alemania Países Bajos Bélgica 0900-1520530 0900-23553626 02-6200115 (Tarifa local) (Tarifa local + 1ct P/min) (Tarifa local) El teléfono de asistencia está disponible de lunes a jueves, de 9 de la mañana a 6 de la tarde. Cuando se ponga en contacto con Lenco, se le pedirá el modelo y el número de serie de su producto. El número de serie se encuentra en la parte posterior del aparato. Por favor, escriba debajo el número de serie: Modelo: MPR-033 Número de serie:_________________________________ Lenco ofrece servicio y garantía en cumplimiento de la ley de la Unión Europea, lo cual implica que, en caso de que su producto precise ser reparado (tanto durante como después del periodo de garantía), deberá contactar directamente con su distribuidor. Nota importante: No es posible enviar sus reparaciones directamente a Lenco Nota importante: Si la unidad es abierta por un centro de servicio no oficial, la garantía quedará anulada. Este aparato no es adecuado para el uso profesional. En caso de darle un uso profesional, todas las obligaciones de garantía del fabricante quedarán anuladas. Si, en lo sucesivo, usted tuviera que deshacerse de este producto, por favor, tenga en cuenta que los productos eléctricos usados no deben ser depositados junto con los desechos del hogar. Por favor, recicle allá donde se disponga de instalaciones para estos fines. Consulte a las autoridades locales o a su distribuidor sobre consejos de reciclaje (Directiva de Residuos de Equipos Eléctricos y Electrónicos). ES-4 MANUEL D’INSTRUCTION RADIO FM AVEC LECTEUR USB ET CARTE SD MODÈLE : MPR-033 Veuillez lire et comprendre ces instructions avant d’utiliser votre unité www.lenco.com 7 8 9 10 11 12 13 14 1 2 3 4 5 6 17 15 16 18 EMPLACEMENT DES COMMANDES 1. PRISE ÉCOUTEURS 2. PRISE ENTRÉE DC 3. HAUT-PARLEUR 4. PAVÉ NUMÉRIQUE 5. TOUCHE RÉPÉTER 6. Touche SAUT/RECHERCHE ARRIERE 7. TOUCHE VEILLE 8. ÉCRAN LCD 9. TOUCHE MODE 10. TOUCHE LECTURE/PAUSE 11. TOUCHE STOP 12. TOUCHE VOLUME 13. TOUCHE VOLUME + 14. Touche SAUT/RECHERCHE AVANT 15. FENTE CARTE SD 16. PORT USB 17. ANTENNE TÉLÉSCOPIQUE FM 18. COMPARTIMENT DES PILES FR-1 Pour commencer Avant d’utiliser votre radio pour le FM, étendez complètement l’ANTENNE TÉLESCOPIQUE FM et positionnez-la pour une meilleure réception. Avant de connecter l’alimentation, vérifiez que la tension du secteur indiquée sur la plaque-marque est bien la même que dans votre zone. Branchez le cordon CC depuis l’adaptateur CC dans la prise CC à l’arrière de l’unité. Branchez l’adaptateur CA/CC dans la prise murale et activez la tension du secteur. Utilisation sur piles 1. Enlevez le couvercle du compartiment des piles en appuyant légèrement sur les crochets vers le bas et l’extérieur. 2. Installez 4 piles de taille AA (UM-3 ou équivalent) et prenez soin de respecter les polarités. 3. Replacez le couvercle du compartiment de batteries REMARQUE : Le cordon CC doit être enlevé lors du fonctionnement sur pile. Pour éviter des dégâts qui pourraient survenir du fait de fuite des batteries, enlevez les batteries lorsqu’elles se vident ou lorsque l’unité n’est pas utilisée pendant une longue période REMARQUE : S’il n’y a pas d’entrée de signal audio sur l’unité pendant environ 1 heure, l’unité passera en mode veille automatiquement. RADIO FM RÉGLER LA RADIO FM 1. Appuyez sur la touche STANDBY sur l'avant de l'unité pour alimenter l'unité. 2. Passez en mode radio en appuyant sur la touche MODE sur l'avant de l'unité à plusieurs reprises. 3. Appuyez sur la touche SAUT/RECHERCHE AVANT ou SAUT/RECHERCHE ARRIERE sur l'avant de l'unité pour régler une station de radio en précision. Tenez les touches SAUT/RECHERCHE AVANT ou SAUT/RECHERCHE ARRIERE appuyées sur la télécommande pour rechercher des stations de radio vers l’avant ou vers l’arrière respectivement (lorsqu’une station disponible est détectée, l’unité la diffusera immédiatement et la recherche s’arrêtera). 4. Appuyez sur la touche VOL+/- sur l'avant de l'unité pour régler le niveau du son. 5. Appuyez sur le bouton VEILLE pour éteindre l’unité. ENREGISTRER VOS STATIONS DE RADIO (JUSQU'A 6 STATIONS EN PRESELECTION) 1. Réglez votre station favorite pour commencer. 2. Tenez les touches NUMÉRIQUES (1-6) pour enregistrer la station de radio sur l'espace de mémoire correspondant (l'un des espaces“S-1”~”S-6” apparait à l'écran). 3. Pour enregistrer d'autres stations, suivez les étapes ci-dessus. 4. Pendant la lecture de radio, appuyez brièvement sur la touche numérique correspondante pour rappeler la station présélectionnée. UTILISATION USB/CARTE SD 1. Appuyez sur la touche VEILLE sur l'avant de l'unité. 2. Insérez une clé USB ou une carte SD sur le port USB ou la fente SD sur le coté droit de l'unité. 3. Appuyez plusieurs fois sur la touche MODE pour passer en mode USB ou carte. La lecture commencera automatiquement. 4. Appuyez sur les touches Vol +/- pour régler le volume. 5. Appuyez sur la touche SAUT/RECHERCHE AVANT ou SAUT/RECHERCHE ARRIERE sur l'avant de l'unité pour passer à la piste suivante/précédente. 6. Tenez la touche SAUT/RECHERCHE AVANT ou SAUT/RECHERCHE ARRIERE pour faire une recherche avant ou arrière dans la piste. 7. Appuyez une fois sur la touche REPETER sur l'avant de l'unité pour répéter la piste en cours FR-2 de lecture, appuyez deux fois pour répéter toutes les pistes, appuyez trois fois pour quitter le mode répéter. 8. Appuyez sur la touche LECTURE/PAUSE à l'avant de l'unité pour mettre la lecture en pause; appuyez de nouveau pour reprendre la lecture. 9. Appuyez sur la touche STOP sur l'avant de l'unité pour terminer la lecture. PRISE ÉCOUTEURS Si vous souhaitez écouter l'unité sans déranger les autres, veuillez utiliser la prise casque sur la gauche de l'unité. Pour utiliser la prise casque, branchez les écouteurs/ le casque (non fourni), réglez le niveau de volume en conséquence. REMARQUE : Lorsque des écouteurs / un casque sont connectés sur l'unité, les haut-parleurs de l'unité seront désactivés. ATTENTION : Écouter au volume le plus fort pendant de longues période peut endommager l'audition de l’utilisateur. INSTRUCTIONS IMPORTANTES CONCERNANT LA SÉCURITÉ L’appareil ne doit pas être exposé aux gouttes ou aux éclaboussements et les objets remplis de liquides, tels que des vases, ne doivent pas être placés près de l'appareil. Si le cordon d’alimentation sert de sectionneur, le sectionneur doit toujours rester en état de marche. Pour être complètement déconnecté de l’alimentation électrique, l’adaptateur CA/CC doit être complètement débranché du secteur. Aucune source de flamme telle que des bougies allumées ne devraient être placée près de l'appareil. Une distance minimum de 2,0 cm autour de l’appareil doit être préservée pour une ventilation suffisante. La ventilation ne doit pas être empêchée du fait que les ouvertures de ventilation soient couvertes avec des accessoires tels que journaux, serviettes de table, rideaux, etc. L’utilisation de cet appareil est réservée aux climats tropicaux ou modérés. Votre attention devrait se porter sur l’aspect écologique de l’élimination des piles. ATTENTION : Danger d’explosion si les piles ne sont pas correctement remplacées. Remplacez seulement avec les mêmes ou un type équivalent. Les batteries ne doivent pas être exposées à des chaleurs excessives telles que la lumière du soleil, le feu ou autres. La plaque marque est située à l’arrière de l’appareil. AVERTISSEMENT: Une exposition prolongée à de forts volumes sonores provenant de baladeurs peut causer des pertes d’audition temporaires ou permanentes. La clé USB doit être branchée directement dans l’appareil. N’utilisez pas de câble d’extension car cela peut causer des interférences résultant sur une perte de données. SPÉCIFICATIONS Adaptateur d’alimentation CA : Tension d’entrée : AC 100 - 240V, 50/60Hz Sortie : CC 5V, 1,2A Batteries: 4 piles 1,5V taille « AA » ou « UM-3 » Consommation énergétique : 5W Puissance de sortie RMS à 10% THD: environ 1,2W X 1 Dimensions : 170(L) x 38,5(L) x 105(H) mm Plage d’humidité d’utilisation: 10% à 75% Plage de température d’utilisation: -5°C à +40°C Compatible avec USB & carte SD Ces spécifications peuvent faire l’objet de changement sans notification. FR-3 Service et support Pour plus d'informations : www.lenco.com Pour de l'aide : http://lencosupport.zendesk.com Service d’assistance Lenco : Allemagne 0900-1520530 (Prix d’un appel local) Pays-Bas 0900-23553626 (Prix d’un appel local + 1ct P/min) Belgique 02-6200115 (Prix d’un appel local) Le centre d’assistance est joignable du lundi au vendredi entre 9 heures et 18 heures. Lorsque vous contactez Lenco, on vous demandera systématiquement le modèle et le numéro de série de votre produit. Le numéro de série se trouve à l'arrière de l'appareil. Écrivez le numéro de série ci-dessous: Modèle : MPR-033 Numéro de série : _______________________________ Lenco propose un service et une garantie conformément aux lois européenne, ce qui signifie qu’en besoin de réparation (aussi bien pendant et après la période de garantie), vous pouvez contacter votre revendeur le plus proche. Remarque importante : Il n’est pas possible de renvoyer l’appareil pour réparation directement à Lenco. Remarque importante : Si l’unité est ouverte ou modifiée de quelque manière par un centre de service non agréé, cela mettra fin à la garantie. Cet appareil ne convient pas pour une utilisation professionnelle. En cas d’utilisation professionnelle, les obligations de garantie du fabricant seront annulées. Si vous devez vous débarrasser de ce produit à l’ avenir, veuillez prendre en considération ce qui suit : Les produits contenant des déchets électriques ne doivent pas être éliminés avec les autres déchets ménagers. Veuillez les emmener dans votre centre de recyclage le plus proche. Demandez conseil à vos autorités locales ou à votre revendeur concernant le recyclage. (Directive sur les déchets d’équipements électroniques et électrique) FR-4 BENUTZERHANDBUCH FM-RADIO MIT USB & SD-KARTENLESER MODELL: MPR-033 Lesen Sie die nachfolgenden Anleitungen vor dem Gebrauch des Geräts sorgfältig durch. www.lenco.com 7 8 9 10 11 12 13 14 1 2 3 4 5 6 17 15 16 18 TASTEN UND FUNKTIONEN 1. KOPFHÖRERBUCHSE 2. DC-EINGANGSBUCHSE 3. LAUTSPRECHER 4. NUMMERNTASTEN 5. WIEDERHOLTE WIEDERGABE 6. ZURÜCK/SUCHLAUF RÜCKWÄRTS 7. STANDBY 8. LCD-DISPLAY 9. MODUS-TASTE 10. WIEDERGABE/PAUSE 11. STOPP-TASTE 12. VOL13. VOL+ 14. WEITER/SUCHLAUF VORWÄRTS 15. SD-KARTENSCHLITZ 16. USB-PORT 17. FM-TELESKOPANTENNE 18. BATTERIEFACH DE-1 Erste Schritte Ziehen Sie die FM-TELESKOPANTENNE für einen optimalen Empfang im FM-Radiomodus vollständig aus. Überprüfen Sie vor dem Anschluss an die Stromversorgung, dass die Netzspannung mit den Angaben auf dem Typenschild des AC/DC-Adapters übereinstimmt. Schließen Sie das Netzkabel (DC) des AC/DC-Adapters an die DC-Eingangsbuchse an der Seite des Geräts an. Schließen Sie den AC/DC-Adapter an eine Steckdose an und schalten Sie das Gerät ein. Batteriebetrieb 1. Öffnen Sie das Batteriefach, indem Sie die Clips vorsichtig nach unten und außen drücken. 2. Legen Sie 4 Batterien der Größe AA (UM-3 oder gleichwertig) der Polarität entsprechend ein. 3. Schließen Sie das Batteriefach. HINWEIS: Während des Batteriebetriebs muss das Netzkabel (DC) getrennt werden. Um Schäden durch auslaufende Batterien zu vermeiden, entfernen Sie die Batterien, wenn diese leer sind oder das Gerät über einen längeren Zeitraum nicht verwendet wird. HINWEIS: Wenn das Gerät eine Stunde lang kein Audiosignal empfängt, wird das Gerät automatisch ausgeschaltet. FM-RADIO FM-RADIOSENDER EINSTELLEN 1. Drücken Sie an der Vorderseite des Geräts die Taste STANDBY, um das Gerät einzuschalten. 2. Drücken Sie wiederholt die Taste MODUS, um den FM-Radiomodus einzuschalten. 3. Mit den Tasten WEITER/SUCHLAUF VORWÄRTS oder ZURÜCK/SUCHLAUF RÜCKWÄRTS an der Vorderseite des Geräts können Sie Radiosender fein einstellen. Halten Sie die Taste WEITER/SUCHLAUF VORWÄRTS oder ZURÜCK/SUCHLAUF RÜCKWÄRTS gedrückt, um automatisch vorwärts bzw. rückwärts nach Radiosendern zu suchen. (Sobald ein Sender gefunden wurde, wird dieser wiedergegeben und die Suche abgebrochen). 4. Mit den Tasten VOL+/- an der Vorderseite des Geräts stellen Sie die Lautstärke entsprechend ein. 5. Drücken Sie die Taste STANDBY, um das Gerät auszuschalten. LIEBLINGSSENDER SPEICHERN (BIS ZU 6 SPEICHERPLÄTZE) 1. Schalten Sie zunächst den gewünschten Radiosender ein. 2. Halten Sie dann eine der NUMMERNTASTEN (1~6) gedrückt, um den Radiosender auf dem entsprechenden Speicherplatz zu hinterlegen (im Display erscheint „S-1“ ~ „S-6“). 3. Weitere Radiosender speichern Sie gemäß der oben genannten Vorgehensweise. 4. Drücken Sie während des Radiobetriebs die entsprechende Nummerntaste, um den jeweiligen gespeicherten Radiosender einzuschalten. WIEDERGABE VON USB-GERÄTEN / SD-KARTEN 1. Drücken Sie die Taste STANDBY an der Vorderseite des Geräts. 2. Schließen Sie ein USB-Gerät oder eine SD-Karte am USB-Port bzw. dem SD-Kartenschlitz rechts am Gerät an. 3. Drücken Sie die Taste MODUS wiederholt, um den USB- oder Kartenmodus einzustellen. Die Wiedergabe startet automatisch. 4. Mit den Tasten VOL+/- stellen Sie die Lautstärke entsprechend ein. 5. Durch Drücken der Taste WEITER/SUCHLAUF VORWÄRTS oder ZURÜCK/SUCHLAUF RÜCKWÄRTS gelangen Sie zum nächsten/vorhergehenden Titel. 6. Halten Sie die Tasten WEITER/SUCHLAUF VORWÄRTS oder ZURÜCK/SUCHLAUF RÜCKWÄRTS gedrückt, um den aktuellen Titel vor- oder zurückzuspulen. 7. Drücken Sie die Taste WIEDERHOLTE WIEDERGABE an der Vorderseite des Geräts einmal, um den aktuellen Titel wiederholt abzuspielen. Drücken Sie die Taste ein zweites Mal, um alle DE-2 Titel zu wiederholen, und ein drittes Mal, um die Funktion der wiederholten Wiedergabe zu beenden. 8. Drücken Sie die Taste WIEDERGABE/PAUSE an der Vorderseite des Geräts, um die Wiedergabe zu unterbrechen. Durch erneutes Drücken der Taste wird die Wiedergabe fortgesetzt. 9. Drücken Sie die Taste STOPP an der Vorderseite des Geräts, um die Wiedergabe zu beenden. KOPFHÖRERBUCHSE Sie haben die Möglichkeit, durch den Anschluss von Kopfhörern Musik zu hören ohne andere zu stören. Schließen Sie Kopf- oder Ohrhörer (nicht enthalten) an die Kopfhörerbuchse links am Gerät an. Stellen Sie die Lautstärke entsprechend ein. HINWEIS: Während des Anschlusses von Kopfhörern bleiben die Lautsprecher des Geräts stumm. VORSICHT: Eine langfristige Belastung durch laute Musik kann zu Gehörschäden führen. WICHTIGE SICHERHEITSINFORMATIONEN Das Gerät ist nicht spritz- oder tropfwasserdicht. Stellen Sie keine mit Flüssigkeit gefüllten Gegenstände wie Vasen auf das Gerät. Wenn der AC/DC-Adapter als Trennvorrichtung verwendet wird, muss diese Trennvorrichtung immer betriebsbereit sein. Ziehen Sie den Stecker des AC/DC-Adapters aus der Steckdose, um das Gerät vollständig von der Stromversorgung zu trennen. Stellen Sie kein offenes Feuer, wie z.B. angezündete Kerzen, auf das Gerät. Lassen Sie mindestens 2,0 cm Platz um das Gerät herum für eine ausreichente Belüftung. Die Belüftung darf nicht beeinträchtigt werden, indem die Belüftungsöffnungen durch Gegenstände wie Zeitungen, Tischdecken, Gardinen usw. bedeckt werden. Verwenden Sie das Gerät unter tropischen und/oder moderaten Klimabedingungen. Entsorgen Sie Batterien umweltgerecht. VORSICHT: Es besteht Explosionsgefahr, wenn Batterien nicht sachgemäß ausgetauscht werden. Ersetzen Sie Batterien nur durch Batterien des gleichen oder ähnlichen Typs. Schützen Sie Batterien vor Wärme, z.B. Sonneneinstrahlung, Feuer oder ähnlichem. Das Typenschild befindet sich auf der Rückseite des Geräts. WARNUNG: Eine langfristige Belastung durch laute Musik von Musikspielern kann vorübergehend oder permanent zu Gehörschäden führen. Schließen Sie USB-Speichergeräte direkt an das Gerät an. Verwenden Sie keine USB-Verlängerungskabel, da solche Kabel Störungen verursachen und zu einem Verlust von Daten führen können. TECHNISCHE DATEN AC-Netzadapter: Eingang: AC 100 - 240V, 50/60Hz Ausgang: DC 5V, 1,2A Batterien: AA oder "UM-3", 1,5V x 4 Energieverbrauch: 5W RMS-Ausgangsleistung bei 10% THD: ungefähr 1,2W x 1 Abmessungen: 170 (L) x 38,5 (B) x 105 (H) mm Betriebsfeuchtigkeit: 10% bis 75% Betriebstemperatur: -5°C bis +40°C Kompatibel mit USB-Geräten & SD-Karten Technische Daten unterliegen unangekündigten Änderungen. DE-3 Service und Hilfe Für Informationen: www.lenco.com Für Hilfe: http://lencosupport.zendesk.com Lenco Hotlines: Deutschland Die Niederlande Belgien 0900-1520530 0900-23553626 02-6200115 (Örtliche Gebühren) (Örtliche Gebühren + 1ct p/min) (Örtliche Gebühren) Die Hotline erreichen Sie montags bis freitags von 9 bis 18 Uhr. Wenn Sie Lenco kontaktieren, werden Sie immer nach der Modell- und Seriennummer des Geräts gefragt. Die Seriennummer finden Sie auf der Rückseite des Geräts. Bitte notieren Sie hier die Seriennummer: Modell: MPR-033 Seriennummer:_________________________________ Lenco bietet Leistungen und Garantien im Einklang mit Europäischem Recht. Im Falle von Reparaturen (sowohl während als auch nach Ablauf der Garantiezeit) sollten Sie deshalb Ihren Einzelhändler kontaktieren. Beachten Sie: Es ist nicht möglich, Geräte für Reparaturen direkt an Lenco zu schicken. Wichtiger Hinweis: Falls dieses Gerät von einem nicht autorisierten Kundendienst geöffnet oder darauf zugegriffen wird, erlischt die Garantie. Dieses Gerät ist nicht für professionelle Zwecke geeignet. Falls das Gerät für professionelle Zwecke eingesetzt wird, erlöschen alle Garantieverpflichtungen seitens des Herstellers. Beachten Sie bei der Entsorgung des Geräts folgendes: Elektrische Altgeräte dürfen nicht über den normalen Haushaltsmüll entsorgt werden. Recyceln Sie Altgeräte an entsprechenden Sammelstellen, sofern vorhanden. Informationen über die Entsorgung erhalten Sie auf Ihrer Gemeindeverwaltung und von Ihrem Einzelhändler. (Richtlinie zur Entsorgung elektrischer und elektronischer Altgeräte) DE-4 HANDLEIDING FM RADIO MET USB & SD KAARTLEZER MODEL: MPR-033 Lees en volg deze gebruiksaanwijzingen op voordat u het apparaat in gebruik neemt. www.lenco.com 7 8 9 10 11 12 13 14 1 2 3 4 5 6 17 15 16 18 Locatie van het controlepaneel 1. HOOFDTELEFOON INGANG 2. STROOMINGANG 3. LUIDSPREKER 4. NUMERIEKE KNOPPEN 5. HERHAALKNOP 6. ACHTERUIT OVERSLAAN/ZOEKEN KNOP 7. STANDBY KNOP 8. LCD WEERGAVE 9. MODUS KNOP 10. AFSPELEN/PAUZE KNOP 11. STOP KNOP 12. VOL- KNOP 13. VOL+ KNOP 14. VOORUIT OVERSLAAN/ZOEKEN KNOP 15. SD KAARTINGANG 16. USB POORT 17. FM TELESCOOP ANTENNE 18. BATTERIJ COMPARTIMENT NL-1 BEGINNEN Voordat u uw FM Radio gebruikt, zorg ervoor dat u de FM TELESCOOP ANTENNE volledig uitgetrokken en gepositioneerd heeft voor het beste ontvangst. Voordat u de stroom aansluit, controleer of de wisselspanning op het vermogenplaatje op de stroomadapter overeenkomt met de netspanning in uw woongebied. • Verbind het stroomsnoer van de stroomadapter met het apparaat via de stroomingang aan de zijkant van het apparaat. • Stop de stekker van de stroomadapter in het stopcontact en druk de aan/uitknop in. Batterijbediening 1. Verwijder het klepje van het batterij compartiment door voorzichtig de klemmen naar beneden en naar buiten te drukken. 2. Plaats 4 x 'AA' batterijen (UM-3 of gelijk aan deze) en zorg ervoor dat de polariteiten (+ en -) aan de juiste kanten zijn geplaatst. 3. Plaats het batterijklepje terug. OPMERKING: Het stroomsnoer moet worden verwijderd voor werking op batterijen. Verwijder de batterijen wanneer deze leeg zijn, of het apparaat lang niet gebruikt wordt om schade door lekkende batterijen te voorkomen. OPMERKING: Wanneer er na ongeveer een uur geen audiosignalen meer worden ontvangen door het apparaat, zal het apparaat zich automatisch uitschakelen. FM RADIO AFSTEMMEN VAN DE FM RADIO 1. Druk op de STANDBY knop aan de voorkant van het apparaat om deze aan te zetten. 2. Ga naar de FM Radio modus door herhaaldelijk op de MODUS knop aan de voorkant van het apparaat te drukken. 3. Druk op de VOORUIT OVERSLAAN/ZOEKEN of de ACHTERUIT OVERSLAAN/ZOEKEN knop aan de voorkant van het apparaat. Houd de VOORUIT OVERSLAAN/ZOEKEN of de ACHTERUIT OVERSLAAN/ZOEKEN knop ingedrukt om automatisch respectievelijk vooruit of achteruit naar radiostations te zoeken (wanneer er een beschikbare station is gevonden, zal het apparaat deze meteen laten horen en het automatische zoeken zal stoppen). 4. Druk op de VOL+/- knop aan de voorkant van het apparaat om het geluidsvolume aan te passen. 5. Druk op de STANDBY knop om het apparaat uit te schakelen. OPSLAAN VAN UW FAVORIETE RADIOSTATION (TOT AAN 6 VOORAF INGESTELDE STATIONS) 1. Stem eerst af op uw favoriete radiostation. 2. Houd één van de NUMERIEKE knoppen (1~6) ingedrukt om het radiostation op te slaan in de corresponderende geheugencel (S-1 ~ S-6 zal getoond worden op het scherm). 3. Volg bovengenoemde stappen om andere radiostations op te slaan. 4. Druk tijdens het beluisteren van de radio kort op de betreffende numerieke knop om naar uw vooraf ingestelde radiostation te gaan. AFSPELEN VAN EEN USB/SD KAART 1. Druk op de STANDBY knop aan de voorkant van het apparaat. 2. Plaats een USB of een SD kaart in de USB poort of the SD kaartingang aan de rechterzijde van het apparaat. 3. Druk herhaaldelijk op de MODUS knop om naar de USB of kaartmodus te gaan, het afspelen zal automatisch starten. 4. Druk op de VOL+/- knop om het geluidsvolume aan te passen. 5. Druk op de VOORUIT OVERSLAAN/ZOEKEN of de ACHTERUIT OVERSLAAN/ZOEKEN knop aan de voorkant van het apparaat om naar het volgende/vorige nummer te gaan. 6. Houd de VOORUIT OVERSLAAN/ZOEKEN of de ACHTERUIT OVERSLAAN/ZOEKEN knop NL-2 ingedrukt om het nummer vooruit of achteruit te spoelen. 7. Druk eenmaal op de HERHAAL knop aan de voorzijde van het apparaat om het huidige nummer herhaaldelijk af te spelen; druk tweemaal op deze knop om alle nummers te herhalen; druk driemaal op deze knop om de herhaalmodus uit te schakelen. 8. Druk op de AFSPELEN/PAUZE knop aan de voorkant van het apparaat om het afspelen te pauzeren; druk nogmaals op deze knop om het afspelen te hervatten. 9. Druk op de STOP knop aan de voorkant van het apparaat om het afspelen te stoppen. HOOFDTELEFOON INGANG Als u naar het apparaat wilt luisteren zonder anderen te storen, gebruik dan de hoofdtelefoon ingang aan de linkerzijde van het apparaat. Om deze functie te gebruiken, sluit u een hoofdtelefoon of koptelefoontjes (niet bijgevoegd) aan, en past u het geluidsvolume dienovereenkomstig aan. OPMERKING: Wanneer u externe hoofdtelefoon/koptelefoontjes aansluit op het apparaat, zullen de luidsprekers van het apparaat uitgeschakeld worden. WAARSCHUWING: Luisteren naar een hoge geluidsvolume voor langere tijd kan het gehoor beschadigen. BELANGRIJKE VEILIGHEIDSINFORMATIE. Het apparaat mag niet blootgesteld worden aan gedrup of gespat en objecten gevuld met vloeistof zoals vazen mogen niet op het apparaat geplaatst worden. Wanneer u de stroomadapter gebruikt als uitschakel-apparaat dan zal het apparaat operationeel blijven. Om volledig het apparaat van de stroom af te halen, zal de stroomadapter volledig ontkoppeld moeten worden van het lichtnet. Plaats geen open vuurbronnen zoals aangestoken kaarsen op het apparaat. Zorg ervoor dat er een minimale afstand van 2.0 cm rondom het apparaat is om voldoende ventilatie te garanderen. De ventilatie mag niet geblokkeerd worden door het bedekken van de ventilatiesleuven met voorwerpen zoals kranten, tafelkleden, gordijnen etc. Gebruik het apparaat in tropische en/of gematigde klimaten. Houd rekening met milieuaspecten bij het verwijderen van de batterijen. WAARSCHUWING: Als de batterij verkeerd is geplaatst bestaat er het risico op explosie. Vervang de batterij alleen met dezelfde of gelijksoortige type batterijen. De batterij mag niet blootgesteld worden aan overmatige hitte zoals zonneschijn, vuur en dergelijke. Het markeringsplaatje bevindt zich aan de achterkant van het apparaat. WAARSCHUWING: Langdurige blootstelling aan harde geluiden van persoonlijke muziekspelers kan leiden tot tijdelijk of permanent gehoorverlies. Het USB geheugen moet direct in het apparaat gestoken worden. Gebruik geen USB extensie-snoeren aangezien dit kan leiden tot interferentie resulterend in fouten in de data. SPECIFICATIES AC stroomadapter: Inkomend: AC 100 - 240V, 50/60Hz Uitgaand: DC 5V, 1.2A Batterijen: AA of "UM-3", 1.5V x 4 Stroomverbruik: 5W Uitgaande stroom RMS op10% THD: rond1.2W x 1 Afmetingen: 170 (L) x 38.5 (B) x 105 (H) mm Bediening vochtigheidsreikwijdte: 10% tot 75% Bediening temperatuurreikwijdte: -5°C tot +40°C Compatibel met USB & SD kaart Wijzigingen in specificaties zijn voorbehouden. NL-3 Service en ondersteuning Voor informatie: www.lenco.com Voor ondersteuning: http://lencosupport.zendesk.com Lenco helpdesk: Duitsland 0900-1520530 Nederland 0900-23553626 België 02-6200115 (Lokale kosten) (Lokale kosten + 1ct p/min) (Lokale kosten) De helpdesk is bereikbaar van maandag tot en met vrijdag van 09:00 tot 18:00 uur. Wanneer u Lenco contacteert, zal u altijd gevraagd worden naar het modelnummer en het serienummer van uw product. Het serienummer bevindt zich aan de achterkant van het apparaat. Gelieve dit nummer hier op te schrijven: Model: MPR-033 Serienummer: _________________________________ Lenco biedt service en garantie aan overeenkomstig met de Europese wetgeving. Dit houdt in dat in het geval van reparaties (zowel tijdens en na de garantieperiode), u uw lokale handelaar moet contacteren. Belangrijke opmerking: Het is niet mogelijk om producten die gerepareerd moeten worden direct naar Lenco te sturen. Belangrijke opmerking: De garantie verloopt als een onofficieel servicecenter het apparaat op wat voor manier dan ook heeft geopend, of er toegang toe heeft gekregen. Het apparaat is niet geschikt voor professioneel gebruik. In het geval van professioneel gebruik worden alle garantieverplichtingen van de fabrikant nietig verklaard. Mocht u in de toekomst dit apparaat willen verwijderen, houd dan rekening met het volgende: Elektronisch afval mag niet weggegooid worden met het huishoudelijke afval. Gelieve te recyclen bij de aangewezen faciliteiten. Vraag uw lokale autoriteiten of lokale handelaar om advies over recyclen. (Elektrisch en Elektronisch Afvalmateriaal Richtlijnen). NL-4