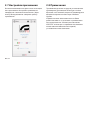
1
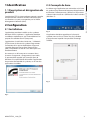
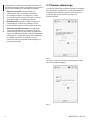
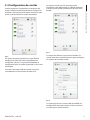
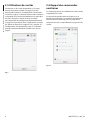
PTZ Assistant
Functions management software of the IP Pan & Tilts
EN English - Instructions manual
IT Italiano - Manuale di istruzioni
FR Français - Manuel d’instructions
DE Deutsch - Bedienungslanleitung
RU Русский - Руководство по эксплуатации
PTZ Assistant
Functions management software of the IP Pan & Tilts
EN English - Instructions manual
Contents
ENGLISH
1 Identification................................................................................................................... 3
1.1 Product description and type designation..................................................................................................... 3
2 Configuration.................................................................................................................. 3
2.1 Installation................................................................................................................................................................... 3
2.2 Basic concepts........................................................................................................................................................... 3
2.3 First start-up............................................................................................................................................................... 4
2.4 Unit configuration.................................................................................................................................................... 5
2.5 Unit use........................................................................................................................................................................ 6
2.6 Call up auxiliary controls........................................................................................................................................ 6
2.7 Application settings................................................................................................................................................. 7
2.8 Notes............................................................................................................................................................................. 7
2.2 Basic concepts
1.1 Product description and type
designation
On start-up, the application is minimised in the
system's bar. Should many applications be running,
the icon can appear in the Show hidden icons panel
(Windows 7).
PTZ Assistant application was designed to restore
ONVIF auxiliary controls when these functions are not
exported by Video Management Software (VMS).
Instructions manual - English - EN
1 Identification
2 Configuration
2.1 Installation
The application can be installed on Windows XP or
higher. The application must be installed in desktop
mode by means of the supplied installation package
(Setup.exe).
Fig. 2
The application must be called up from the system's
bar by clicking the icon. When clicking, the main
mask appears where you can interact
The application is installed in the folder ...\Videotec\
PTZAssistant of the system's Program folder.
Depending on the version of Windows, it can be
called Program Files or Program Files (x86). This
folder only will be used for its operation.
A connection is created on the Desktop and Programs
menu, which can be called up from the Windows
Start button. It is possible to uninstall the application
from the list of installed applications from the system
control panel.
Fig. 3
Fig. 1
MNVCPTZAS_1449_EN
3
EN - English - Instructions manual The application is intended to guide the user by
means of a few icons. By means of these icons, it is
possible to carry out the main functions:
• Add a unit: Once you have selected the unit, you
must add it to the main mask by clicking the Pin
icon. The unit will switch from an Un-pinned status
to a Pinned status. The unit is now available in the
main mask.
2.3 First start-up
On first start-up, you must specify a few parameters
to configure the application. The first operation to
carry out in order to add a unit to the network is to
configure a new Administrator password.
• Unit status: The unit status is indicated by the
ON/OFF icon. The OFF icon indicates that it is not
possible to send auxiliary controls.
• User and Administrator: Operators in possession
of a User profile can send auxiliary controls to the
units. Operators in possession of an Administrator
profile can configure and add units. A password is
required to configure or add a unit, which can be
set on first start-up.
Fig. 4
Subsequent access to this menu will request the
password just configured.
Fig. 5
4
MNVCPTZAS_1449_EN
2.4 Unit configuration
Instructions manual - English - EN
Once you have accessed the application, search
for the unit is carried out automatically in the
background. A few seconds may be required for the
system to identify the units available.
Once you have identified the units you want
available, simply confirm the choice by the relative
button and exit the mask.
Fig. 7
Fig. 6
By means of this display, it is possible to import
unit lists that were previously configured. It is also
possible to export the configuration to make it
available on other computers.
By means of the relative icon, it is possible to access
the area reserved to Administrators in order to
configure or add new units.
If you know the IP address, it is also possible to add a
unit manually.
Fig. 8
From this display, it is possible to change the
settings of each individual unit. Access is reserved to
Administrator users.
MNVCPTZAS_1449_EN
5
EN - English - Instructions manual 2.5 Unit use
2.6 Call up auxiliary controls
Click on the available units on the main screen to
access the auxiliary controls screen. (2.6 Call up
auxiliary controls, page 6). The list of auxiliary controls
is displayed in alphabetical order, however, it can also
be set up as desired via drag and drop.
This display shows the controls supported by the
unit.
It is possible to set the position of the main display.
By default in the lower right corner, or in the lower
left corner. (2.7 Application settings, page 7). The
display can be reduced in height but not in width.
The control is started by clicking the relative button.
Control reception will be confirmed by the display.
The button to access the web will display the unit's
web page.
Fig. 10
Fig. 9
6
MNVCPTZAS_1449_EN
2.7 Application settings
2.8 Notes
From this display, it is possible to configure the
language and the position of the application window.
Settings are applied immediately and are permanent.
It is possible to end an application via the Escape
button.
The application does not affect other applications
installed. The application uses runtime Microsoft .net
Framework, version 4. It is recommended to keep the
system version updated via Windows Update.
Fig. 11
VIDEOTEC is not responsible to any system
malfunction caused by installation of the application
or use of the said system by a user. VIDEOTEC is not
responsible for problems related to the use of unsafe
passwords set by the user.
Headquarters Italy Videotec S.p.A.
France Videotec France SARL
Asia Pacific Videotec (HK) Ltd
Americas Videotec Security, Inc.
Via Friuli, 6 - I-36015 Schio (VI) - Italy
Tel. +39 0445 697411 - Fax +39 0445 697414
Email: info@videotec.com
Flat 8, 19/F. On Dak Industrial Building, No. 2-6 Wah Sing Street
Kwai Chung, New Territories - Hong Kong
Tel. +852 2333 0601 - Fax +852 2311 0026
Email: info.hk@videotec.com
Immeuble Le Montreal, 19bis Avenue du Québec, ZA de Courtaboeuf
91140 Villebon sur Yvette - France
Tel. +33 1 60491816 - Fax +33 1 69284736
Email: info.fr@videotec.com
Gateway Industrial Park, 35 Gateway Drive, Suite 100
Plattsburgh, NY 12901 - U.S.A.
Tel. +1 518 825 0020 - Fax +1 518 825 0022
Email: info.usa@videotec.com - www.videotec.us
www.videotec.com
MNVCPTZAS_1449_EN
PTZ Assistant
Software di gestione delle funzionalità dei brandeggi IP
IT Italiano - Manuale di istruzioni
Sommario
ITALIANO
1 Identificazione................................................................................................................ 3
1.1 Descrizione e designazione del prodotto........................................................................................................ 3
2 Configurazione............................................................................................................... 3
2.1 Installazione................................................................................................................................................................ 3
2.2 Concetti di base......................................................................................................................................................... 3
2.3 Primo avvio................................................................................................................................................................. 4
2.4 Configurazione delle unità.................................................................................................................................... 5
2.5 Utilizzo delle unità.................................................................................................................................................... 6
2.6 Richiamo dei comandi ausiliari............................................................................................................................ 6
2.7 Impostazioni dell'applicazione............................................................................................................................ 7
2.8 Note............................................................................................................................................................................... 7
2.2 Concetti di base
1.1 Descrizione e designazione
del prodotto
All’avvio l’applicazione viene minimizzata nella barra
di sistema. Nel caso vi siano molte applicazioni in
funzione l'icona potrebbe apparire nel pannello
Mostra icone nascoste (Windows 7).
L’applicazione PTZ Assistant nasce per poter
richiamare i comandi ausiliari di ONVIF anche quando
queste funzionalità non sono esportate dai Video
Management Software (VMS).
Manuale di istruzioni - Italiano - IT
1 Identificazione
2 Configurazione
2.1 Installazione
Fig. 2
L’applicazione può essere installata su sistemi
Windows XP o superiori. L'applicazione deve essere
installata in modalità desktop, tramite il pacchetto
d’installazione fornito (Setup.exe).
L'applicazione deve essere richiamata della barra
di sistema con un click sull’icona. Al click appare
la maschera principale con la quale è possibile
interagire.
L'applicazione si installa nella cartella ...\Videotec\
PTZAssistant della cartella di sistema Programmi.
A seconda della versione di Windows potrebbe
chiamarsi Program Files oppure Program Files (x86).
Verrà utilizzata solamente questa cartella per il suo
funzionamento.
Vengono creati un collegamento sul Desktop e uno
nel menù Programmi, che può essere richiamato
dal tasto Start di Windows. È possibile disintallare
l’applicazione dal pannello di controllo di sistema,
nell’elenco delle applicazioni installate.
Fig. 3
Fig. 1
MNVCPTZAS_1449_IT
3
IT - Italiano - Manuale di istruzioni L’applicazione è pensata per guidare l’utente tramite
alcune icone. Tramite queste icone è possibile
svolgere le funzioni principali:
• Aggiungere una unità: Una volta selezionato
l'unità, è necessario aggiungerla alla maschera
principale cliccando sull’icona Pin. L'unità passerà
dallo stato Un-pinned a Pinned. L'unità è ora
disponibile nella maschera principale.
2.3 Primo avvio
Al primo avvio è necessario specificare alcuni
parametri per configurare l’applicazione. La prima
operazione da effettuare per poter aggiungere
unità alla rete è configurare una nuova password di
Amministratore.
• Stato dell'unità: Lo stato dell'unità è indicato
dall'icona ON/OFF. L'icona OFF indica che non è
possibile inviare comandi ausiliari.
• Utente e Amministratore: Gli operatori con
profilo Utente possono inviare comandi ausiliari
alle unità. Gli operatori con profilo Amministratore
possono inoltre configurare o aggiungere unità.
Per configurare o aggiungere unità è richiesta una
password che è possibile impostare al primo avvio.
Fig. 4
I successivi accessi a questo menù richiederanno la
password appena configurata.
Fig. 5
4
MNVCPTZAS_1449_IT
2.4 Configurazione delle unità
Manuale di istruzioni - Italiano - IT
Una volta entrati nell'applicazione, la ricerca delle
unità avviene automaticamente in background.
Potrebbe essere necessario qualche secondo perchè
il sistema individui le unità disponibili.
Una volta individuate le unità che si intende rendere
disponibili, basta confermare la scelta con l’apposito
pulsante ed uscire dalla maschera.
Fig. 7
Fig. 6
Tramite questa schermata è possibile importare liste
di unità precedentemente configurate. È possibile
inoltre esportare la configurazione per renderla
disponibile su altri computer.
Tramite l'apposita icona è possibile accedere alla
sezione riservata agli Amministratori per configurare
o aggiungere nuove unità.
È possibile inoltre aggiungere una unità
manualmente se si è a conoscenza del suo indirizzo
IP.
Fig. 8
In questa schermata è possibile modificare le
impostazioni di ogni singola unità. L'accesso è
riservato agli utenti Amministratori.
MNVCPTZAS_1449_IT
5
IT - Italiano - Manuale di istruzioni 2.5 Utilizzo delle unità
Cliccando sulle unità disponibili nella schermata
principale si accede alla schermata dei comandi
ausiliari (2.6 Richiamo dei comandi ausiliari, pagina 6). La lista dei comandi ausiliari si presenta in ordine
alfabetico ma può essere ordinata a piacere tramite
drag and drop.
È possibile impostare il posizionamento della
schermata principale. In angolo in basso a destra
di default, oppure in angolo in basso a sinistra.
(2.7 Impostazioni dell'applicazione, pagina 7). La
schermata è ridimensionabile in altezza, ma non in
larghezza.
2.6 Richiamo dei comandi
ausiliari
In questa schermata vengono visualizzati i comandi
supportati dall'unità.
Il comando viene avviato cliccando il relativo
pulsante. L'avvenuta ricezione del comando sarà
confermata da una schermata.
Il pulsante di accesso al web mostrerà la pagina web
dell'unità.
Fig. 10
Fig. 9
6
MNVCPTZAS_1449_IT
2.7 Impostazioni
dell'applicazione
In questa schermata è possibile configurare la lingua
e la posizione della finestra dell'applicazione. I
settaggi vengono applicati immediatamente e sono
persistenti. Tramite il pulsante Uscita è possibile
terminare l'applicazione
Fig. 11
2.8 Note
L'applicazione non influisce su altre applicazioni
installate. L'applicazione utilizza il runtime Microsoft
.net Framework, versione 4. Si consiglia di tenere
aggiornata la versione del sistema tramite Windows
Update.
VIDEOTEC non è responsabile per eventuali
malfunzionamenti di sistema dovuti all’installazione
dell’applicazione o dall’utilizzo del sistema stesso
da parte di un utente. VIDEOTEC non risponde per
problemi relativi all’utilizzo di password poco sicure
impostate dall’utente.
Headquarters Italy Videotec S.p.A.
France Videotec France SARL
Asia Pacific Videotec (HK) Ltd
Americas Videotec Security, Inc.
Via Friuli, 6 - I-36015 Schio (VI) - Italy
Tel. +39 0445 697411 - Fax +39 0445 697414
Email: info@videotec.com
Flat 8, 19/F. On Dak Industrial Building, No. 2-6 Wah Sing Street
Kwai Chung, New Territories - Hong Kong
Tel. +852 2333 0601 - Fax +852 2311 0026
Email: info.hk@videotec.com
Immeuble Le Montreal, 19bis Avenue du Québec, ZA de Courtaboeuf
91140 Villebon sur Yvette - France
Tel. +33 1 60491816 - Fax +33 1 69284736
Email: info.fr@videotec.com
Gateway Industrial Park, 35 Gateway Drive, Suite 100
Plattsburgh, NY 12901 - U.S.A.
Tel. +1 518 825 0020 - Fax +1 518 825 0022
Email: info.usa@videotec.com - www.videotec.us
www.videotec.com
MNVCPTZAS_1449_IT
PTZ Assistant
Logiciel de gestion des fonctions des tourelles IP
FR Français - Manuel d’instructions
Sommaire
FRANÇAIS
1 Identification................................................................................................................... 3
1.1 Description et désignation du produit............................................................................................................. 3
2 Configuration.................................................................................................................. 3
2.1 Installation................................................................................................................................................................... 3
2.2 Concepts de base..................................................................................................................................................... 3
2.3 Premier démarrage.................................................................................................................................................. 4
2.4 Configuration des unités........................................................................................................................................ 5
2.5 Utilisation des unités............................................................................................................................................... 6
2.6 Rappel des commandes auxiliaires.................................................................................................................... 6
2.7 Configurations de l'application........................................................................................................................... 7
2.8 Remarques.................................................................................................................................................................. 7
2.2 Concepts de base
1.1 Description et désignation du
produit
Au démarrage l'application est minimisée sur la barre
du système. En présence de beaucoup d'applications
en fonction, l'icône pourrait s'afficher sur le panneau
« Mostra icone nascoste » (Afficher les icônes cachées)
(Windows 7).
L'application PTZ Assistant naît pour pouvoir rappeler
les commandes auxiliaires d'ONVIF même lorsque
ces fonctions ne sont pas exportées par les Video
Management Software (VMS).
2 Configuration
2.1 Installation
L'application peut être installée sur les systèmes
Windows XP ou supérieurs. L'application doit être
installée en mode bureau, par l'intermédiaire d'un
paquet d'installation fourni (Setup.exe).
L'application s'installe dans le dossier ...\Videotec\
PTZAssistant du dossier du système Programmes.
En fonction de la version de Windows il pourrait
s'appeler Program Files ou bien Program Files
(x86). Uniquement ce dossier sera utilisé pour son
fonctionnement.
Fig. 2
L'application doit être rappelée par la barre du
système avec un clic sur l'icône. Au clic, la fenêtre
principale avec laquelle il est possible d'interagir
s'affiche.
Un raccourci sur le bureau et un raccourci dans
le menu « Programmi » (Programmes) sont créés,
ils peuvent être rappelés par la touche Start de
Windows. Il est possible de désinstaller l'application
du panneau de contrôle du système, sur la liste des
applications installées.
Fig. 3
Fig. 1
MNVCPTZAS_1449_FR
3
Manuel d’instructions - Français - FR
1 Identification
FR - Français - Manuel d’instructions L'application est conçue pour guider l'utilisateur au
moyen de quelques icônes. Au moyen de ces icônes il
est possible d'exécuter les fonctions principales :
• Rajouter une unité: Lorsque l'unité est
sélectionnée, il faut la rajouter à la fenêtre
principale en cliquant sur l'icône Pin. L'unité
passera de l'état Un-pinned à Pinned. L'unité est
alors disponible sur la fenêtre principale.
2.3 Premier démarrage
Au premier démarrage spécifier quelques paramètres
pour configurer l'application. La première opération
à effectuer pour pouvoir rajouter l'unité au réseau
est de configurer un nouveau mot de passe
d'Administrateur.
• État de l'unité: L'état de l'unité est indiqué par
l'icône ON/OFF. L'icône OFF indique qu'il est
impossible d'envoyer les commandes auxiliaires.
• Utilisateur et Administrateur: Les opérateurs
ayant un profil Utilisateur peuvent envoyer les
commandes auxiliaires aux unités. Les opérateurs
ayant un profil Administrateur peuvent également
configurer ou rajouter des unités. Pour configurer
ou rajouter une unité, un mot de passe est
nécessaire avec la possibilité de le configurer au
premier démarrage.
Fig. 4
Les accès successifs à ce menu nécessiteront le mot
de passe à peine configuré.
Fig. 5
4
MNVCPTZAS_1449_FR
2.4 Configuration des unités
Manuel d’instructions - Français - FR
Une fois entré dans l'application, la recherche des
unités s'effectue automatiquement en background.
Quelques secondes pourraient être nécessaires pour
que le système localise les unités disponibles.
Lorsque les unités que l'on souhaite rendre
disponibles sont déterminées, il suffit de confirmer
le choix avec le bouton spécifique et de sortir de la
fenêtre.
Fig. 7
Fig. 6
Au moyen de cette page-écran il est possible de
configurer les listes des unités précédemment
configurées. De plus, il est possible d'exporter la
configuration pour la rendre disponible sur les autres
ordinateurs.
Au moyen de l'icône il est possible d'accéder à la
section réservée aux Administrateurs pour configurer
ou rajouter de nouvelles unités.
En outre, il est impossible de rajouter une unité
manuellement si l'on connaît son adresse IP.
Fig. 8
Sur cette page-écran il est possible de modifier les
configurations de chaque unité. L'accès est réservé
aux utilisateurs Administrateurs.
MNVCPTZAS_1449_FR
5
FR - Français - Manuel d’instructions 2.5 Utilisation des unités
En cliquant sur les unités disponibles sur la pageécran principale on accède à la page-écran des
commandes auxiliaires. (2.6 Rappel des commandes
auxiliaires, page 6). La liste des commandes auxiliaires
se présente dans l'ordre alphabétique mais peut être
classée à souhait au moyen de drag and drop.
Il est impossible de configurer le positionnement de
la page-écran principale. Dans l'angle en bas à droite
par défaut ou bien dans l'angle en bas à gauche. (2.7
Configurations de l'application, page 7). La fenêtre
peut être redimensionnée en hauteur mais pas en
largeur.
2.6 Rappel des commandes
auxiliaires
Sur cette page-écran sont affichées les commandes
supportées par l'unité.
La commande est démarrée en cliquant sur le
bouton correspondant. La réception exécutée de la
commande sera confirmée par une page-écran.
Le bouton d'accès au web affichera la page web de
l'unité.
Fig. 10
Fig. 9
6
MNVCPTZAS_1449_FR
2.7 Configurations de
l'application
Sur cette page-écran il est possible de configurer la
langue et la position de la fenêtre de l'application.
Les réglages sont appliqués immédiatement et sont
persistants. Au moyen du bouton « Uscita » (Sortie) il
est possible de terminer l'application
Fig. 11
2.8 Remarques
L'application n'influence pas les autres applications
installées. L'application utilise le run time Microsoft.
net Framework, version 4. Il est conseillé de tenir à
jour la version du système avec Windows Update.
VIDEOTEC n'est pas responsable des éventuels
dysfonctionnements du système dus à l'installation
de l'application ou de l'utilisation du système de la
part d'un utilisateur. VIDEOTEC ne répond pas des
problèmes relatifs à l'utilisation des mots de passe
peu sûrs configurés par l'utilisateur.
Headquarters Italy Videotec S.p.A.
France Videotec France SARL
Asia Pacific Videotec (HK) Ltd
Americas Videotec Security, Inc.
Via Friuli, 6 - I-36015 Schio (VI) - Italy
Tel. +39 0445 697411 - Fax +39 0445 697414
Email: info@videotec.com
Flat 8, 19/F. On Dak Industrial Building, No. 2-6 Wah Sing Street
Kwai Chung, New Territories - Hong Kong
Tel. +852 2333 0601 - Fax +852 2311 0026
Email: info.hk@videotec.com
Immeuble Le Montreal, 19bis Avenue du Québec, ZA de Courtaboeuf
91140 Villebon sur Yvette - France
Tel. +33 1 60491816 - Fax +33 1 69284736
Email: info.fr@videotec.com
Gateway Industrial Park, 35 Gateway Drive, Suite 100
Plattsburgh, NY 12901 - U.S.A.
Tel. +1 518 825 0020 - Fax +1 518 825 0022
Email: info.usa@videotec.com - www.videotec.us
www.videotec.com
MNVCPTZAS_1449_FR
PTZ Assistant
Software zur Verwaltung der Funktionen der IP S-N-Köpfe
DE Deutsch - Bedienungslanleitung
Inhaltsverzeichnis
DEUTSCH
1 Identifizierung................................................................................................................ 3
1.1 Beschreibung und Bezeichnung des Produktes............................................................................................ 3
2 Konfiguration.................................................................................................................. 3
2.1 Installation................................................................................................................................................................... 3
2.2 Grundlegende Konzepte........................................................................................................................................ 3
2.3 Erster Start................................................................................................................................................................... 4
2.4 Konfiguration der Einheiten................................................................................................................................. 5
2.5 Verwendung der Einheiten................................................................................................................................... 6
2.6 Aufrufen der Hilfsbefehle....................................................................................................................................... 6
2.7 Einstellungen der Anwendung............................................................................................................................ 7
2.8 Anmerkungen............................................................................................................................................................ 7
2.2 Grundlegende Konzepte
1.1 Beschreibung und
Bezeichnung des Produktes
Beim Start wird die Anwendung in der Taskleiste
minimiert. Falls viele Anwendungen in Ausführung
sind, könnte das Symbol in dem Infobereich
"ausgeblendete Symbole einblenden" erscheinen
(Windows 7).
Die Anwendung PTZ Assistant wurde entwickelt,
um die ONVIF-Hilfsbefehle aufrufen zu können,
auch wenn diese Funktionen nicht von den Video
Management Softwares (VMS) exportiert werden.
Bedienungslanleitung - Deutsch - DE
1 Identifizierung
2 Konfiguration
2.1 Installation
Die Anwendung kann auf Systemen mit Windows
XP oder höher installiert werden. Die Anwendung
muss im Desktopmodus mit dem gelieferten
Installationspaket (Setup.exe) installiert werden.
Die Anwendung wird in dem Ordner ...\Videotec\
PTZAssistant in dem Systemordner Programme
installiert. Je nach Version von Windows könnte der
Ordner Program Files oder Program Files (x86) heißen.
Für dessen Betrieb wird nur dieser Ordner benutzt.
Abb. 2
Die Anwendung muss mit einem Klick auf das
Symbol aus der Taskleiste aufgerufen werden. Beim
Klick erscheint die Hauptmaske, über die Aktionen
ausgeführt werden können.
Es wird eine Verknüpfung auf dem Desktop und eine
Verknüpfung im Menü Programme erzeugt, welches
durch die Windows Schaltfläche Start aufgerufen
werden kann. Die Anwendung kann über die
Systemsteuerung, Liste der installierten Programme,
deinstalliert werden.
Abb. 3
Abb. 1
MNVCPTZAS_1449_DE
3
DE - Deutsch - Bedienungslanleitung Die Anwendung wurde entworfen, um den Benutzer
mithilfe einiger Bildsymbolen zu leiten. Mit diesen
Symbolen können die Hauptfunktionen ausgeführt
werden:
• Eine Einheit hinzufügen: Wenn die Einheit
ausgewählt ist, muss diese durch Klick auf das PinSymbol der Hauptmaske hinzugefügt werden. Die
Einheit wechselt aus dem Status "Un-Pinned" nach
"Pinned". Die Einheit steht nun in der Hauptmaske
zur Verfügung.
2.3 Erster Start
Beim ersten Start müssen einige Parameter
spezifiziert werden, um die Anwendung zu
konfigurieren. Die erste Handlung, die notwendig ist,
um dem Netzwerk Einheiten hinzuzufügen, ist die
Konfiguration eines neuen Administrator-Passworts.
• Status der Einheit: Der Status der Einheit wird
von dem Bildsymbol ON/OFF angezeigt. Das
Bildsymbol OFF bedeutet, dass keine Hilfsbefehle
erteilt werden können.
• Benutzer und Administrator: Die Bediener
mit Benutzer-Profil können Hilfsbefehle an die
Einheiten senden. Die Bediener mit AdministratorProfil können außerdem Einheiten konfigurieren
oder hinzufügen. Um Einheiten zu konfigurieren
oder hinzuzufügen ist ein Passwort erforderlich,
das beim ersten Programmstart eingegeben
werden kann.
Abb. 4
Die folgenden Aufrufe dieses Menüs erfordern das
gerade konfigurierte Passwort.
Abb. 5
4
MNVCPTZAS_1449_DE
2.4 Konfiguration der Einheiten
Bedienungslanleitung - Deutsch - DE
Wenn die Anwendung ausgeführt wird, erfolgt die
Suche der Einheiten im Hintergrund. Es könnten
einige Sekunden notwendig sein, bis das System die
verfügbaren Einheiten erkennt.
Sobald die verfügbar zu machenden Einheiten
ausgewählt wurden, kann die Auswahl mit der
entsprechenden Schaltfläche bestätigt und die
Bildschirmmaske verlassen werden.
Abb. 7
Abb. 6
Mit dieser Bildschirmansicht können Listen mit
bereits konfigurierten Einheiten importiert werden.
Die Konfiguration kann außerdem exportiert werden,
um sie auf anderen Computern verfügbar zu machen.
Mit dem entsprechenden Bildsymbol kann der für die
Administratoren reservierte Bereich geöffnet werden,
um Einheiten zu konfigurieren oder hinzuzufügen.
Eine Einheit kann manuell hinzugefügt werden, wenn
deren IP-Adresse bekannt ist.
Abb. 8
Auf dieser Bildschirmansicht können die
Einstellungen jeder einzelnen Einheit verändert
werden. Der Zugang ist den Administratoren
vorbehalten.
MNVCPTZAS_1449_DE
5
DE - Deutsch - Bedienungslanleitung 2.5 Verwendung der Einheiten
2.6 Aufrufen der Hilfsbefehle
Ein Klick auf die verfügbaren Einheiten in der
Hauptmaske öffnet das Fenster der Hilfsbefehle
(2.6 Aufrufen der Hilfsbefehle, Seite 6). Die Liste
der Hilfsbefehle steht alphabetisch geordnet zur
Verfügung, kann aber durch Drag and Drop beliebig
geordnet werden.
Auf dieser Bildschirmansicht werden die von der
Einheit unterstützten Befehle angezeigt.
Die Position des Hauptfensters kann eingestellt
werden. In der rechten unteren Ecke als
Standardeinstellung oder in der linken unteren
Ecke. (2.7 Einstellungen der Anwendung, Seite 7).
Die Bildschirmanzeige kann in der Höhe angepasst
werden, aber nicht in der Breite.
Der Befehl wird durch Klick auf die entsprechende
Schaltfläche erteilt. Der erfolgte Empfang eines
Befehls wird durch eine Bildschirmanzeige bestätigt.
Die Schaltfläche für den Webzugriff zeigt die
Webseite der Einheit.
Abb. 10
Abb. 9
6
MNVCPTZAS_1449_DE
2.7 Einstellungen der
Anwendung
Auf dieser Bildschirmansicht können die Sprache
und die Position des Programmfensters konfiguriert
werden. Die Einstellungen werden sofort
übernommen und sind anhaltend wirksam. Mit
dem Schaltfeld Uscita (Exit, Beenden) kann die
Anwendung beendet werden.
Abb. 11
2.8 Anmerkungen
Die Anwendung hat keine Auswirkungen auf
andere installierte Anwendungen. Die Anwendung
verwendet die Runtime von Microsoft .net
Framework, Version 4. Es wird empfohlen, die
Betriebssystemversion mit Windows Update auf dem
aktuellen Stand zu halten.
VIDEOTEC haftet nicht für eventuelle Fehlfunktionen
des Systems, die aus der mangelhaften Installation
der Anwendung oder der Verwendung des System
durch einen Benutzer entstehen können. VIDEOTEC
haftet nicht für Probleme, die durch die Verwendung
von schwachen Passwörtern durch die Benutzer
entstehen.
Headquarters Italy Videotec S.p.A.
France Videotec France SARL
Asia Pacific Videotec (HK) Ltd
Americas Videotec Security, Inc.
Via Friuli, 6 - I-36015 Schio (VI) - Italy
Tel. +39 0445 697411 - Fax +39 0445 697414
Email: info@videotec.com
Flat 8, 19/F. On Dak Industrial Building, No. 2-6 Wah Sing Street
Kwai Chung, New Territories - Hong Kong
Tel. +852 2333 0601 - Fax +852 2311 0026
Email: info.hk@videotec.com
Immeuble Le Montreal, 19bis Avenue du Québec, ZA de Courtaboeuf
91140 Villebon sur Yvette - France
Tel. +33 1 60491816 - Fax +33 1 69284736
Email: info.fr@videotec.com
Gateway Industrial Park, 35 Gateway Drive, Suite 100
Plattsburgh, NY 12901 - U.S.A.
Tel. +1 518 825 0020 - Fax +1 518 825 0022
Email: info.usa@videotec.com - www.videotec.us
www.videotec.com
MNVCPTZAS_1449_DE
PTZ Assistant
Программное обеспечение для управления
функциональности IP PTZ
RU Русский - Руководство по эксплуатации
Индекс
РУССКИЙ
1 Идентификация............................................................................................................. 3
1.1 Описание и назначение изделия.................................................................................................................... 3
2 Конфигурация............................................................................................................... 3
2.1 Монтаж........................................................................................................................................................................ 3
2.2 Основные концепции........................................................................................................................................... 3
2.3 Первый запуск.......................................................................................................................................................... 4
2.4 Конфигурация элементов................................................................................................................................... 5
2.5 Использование элементов................................................................................................................................. 6
2.6 Вызов вспомогательных программ................................................................................................................ 6
2.7 Настройки приложения....................................................................................................................................... 7
2.8 Примечания.............................................................................................................................................................. 7
2.2 Основные концепции
1.1 Описание и назначение
изделия
При запуске приложение уменьшится в тяге
системы Если имеется много работающих
приложений, икона отображается на панели
Отображать скрытые значки (Windows 7).
Приложение PTZ Ассистент появилось, чтобы
вызывать вспомогательные элементы управления
ONVIF, даже если эти функции не экспортированы
из программное обеспечение управления видео
(VMS).
2 Конфигурация
2.1 Монтаж
Приложение может быть установлено на
Windows XP или выше. Приложение должно быть
установлено в режиме рабочего стола, с помощью
прилагаемого инсталляционного пакета (Setup.
exe).
Рис. 2
Приложение должно вызываться с системной тяги
кликом на иконку. По клику появляется главная
форма, с которой возможно взаимодействовать.
Приложение устанавливается в папку ...\Videotec\
PTZAssistant системной папки Программы.
В зависимости от версии Windows, может
называться Program Files или Program Files (x86).
Будет использоваться только эта папка для его
работы.
Создается ярлык на рабочем столе и один в
меню программ, которые могут быть вызваны
с помощью кнопки Пуск в Windows. Возможно
удалить программу из панели управления
системы, в списке установленных приложений.
Рис. 3
Рис. 1
MNVCPTZAS_1449_RU
3
Руководство по эксплуатации - Русский - RU
1 Идентификация
RU - Русский - Руководство по эксплуатации Приложение предназначено для ведения
пользователя через некоторые иконы. Через эт
эконы возможна работа главных функций:
• Добавить элемент: После выбора элемента,
необходимо добавить его на главный экран,
кликом на икону Pin. Элемент переходит из
положения Un-pinned на Pinned. Элемент теперь
доступен в главном виде.
2.3 Первый запуск
При первом запуске необходимо
специфицировать некоторые параметры для
конфигурации приложения. Первая операция,
которую нужно осуществить чтобы добавить
элемент в сеть - это произвести конфигурацию
нового пароля Администратора.
• Положение элемента: Положение элемента
указывается с иконы ON/OFF. Икона OFF
указывает, что не возможно отправить
вспомогательные системы.
• Пользователь и Администратор: Операторы
с профилем Пользователь могут отправлять
вспомогательные команды элементам.
Операторы с профилем администраторамогут
также установить или добавить элементы.
Для конфигурации или чтобы добавить
элемент требуется пароль, который возможно
установить при первом запуске.
Рис. 4
Последующий доступ к этому меню будет
запрашивать только что созданный пароль.
Рис. 5
4
MNVCPTZAS_1449_RU
2.4 Конфигурация элементов
Руководство по эксплуатации - Русский - RU
После входа в приложение, поиск элементов
происходит автоматически в background.
Возможно, потребуется несколько секунд, пока
система определит доступные элементы.
После определения элементов, который
необходимо сделать доступными, достаточно
подтвердить кнопкой и выйти из формы.
Рис. 7
Рис. 6
На этом экране возможно импортировать списки
единиц настроенных ранее. Возможно также
экспортировать конфигурацию, чтобы сделать ее
доступной на других компьютерах.
Через соответствующую иконку можно открыть
раздел, доступный для Администраторов, чтобы
установить или добавить новые элементы.
Возможно также добавить элемент вручную, если
известен его IP.
Рис. 8
В этом окне возможно изменить настройки
отдельных элементов. Доступ только для
пользователей Администраторов.
MNVCPTZAS_1449_RU
5
RU - Русский - Руководство по эксплуатации 2.5 Использование элементов
Нажав на объекты, доступные на главном
экране производится доступ на экран
вспомогательных элементов управления (2.6
Вызов вспомогательных программ, страница 6).
Список вспомогательных элементов управления
представлен в алфавитном порядке, но могут быть
заказаны по желанию с помощью перетаскивания.
Возможно установить расположение с главного
экрана. В правом нижнем углу по умолчанию, или
в левом нижнем углу. (2.7 Настройки приложения,
страница 7). Экран можно изменять по высоте, но
не по ширине.
2.6 Вызов вспомогательных
программ
Этот экран показывает команды, поддерживаемые
элементом.
Команда запускается при нажатии на
соответствующую кнопку. Получение команды
будет подтверждено экране.
Кнопка доступа к вэб покажет страницу вэб
элемента.
Рис. 10
Рис. 9
6
MNVCPTZAS_1449_RU
2.7 Настройки приложения
2.8 Примечания
В этом окне возможно настроить язык и позицию
окна приложения. Настройки применяются
немедленно и являются постоянными. Через
кнопку Выход возможно завершить работу
приложения
Приложение не влияет на другие установленные
приложения. Приложение использует runtime
Microsoft .net Framework, версия 4. Рекомендуется
обновлять версию системы через Windows
Update.
Videotec не несет ответственности за сбои в
работе системы из-за установки с применением
или использования системы пользователем.
VIDEOTEC не отвечает за проблемы в отношении
использования небезопасных паролей,
установленных пользователем.
Рис. 11
Headquarters Italy Videotec S.p.A.
France Videotec France SARL
Asia Pacific Videotec (HK) Ltd
Americas Videotec Security, Inc.
Via Friuli, 6 - I-36015 Schio (VI) - Italy
Tel. +39 0445 697411 - Fax +39 0445 697414
Email: info@videotec.com
Flat 8, 19/F. On Dak Industrial Building, No. 2-6 Wah Sing Street
Kwai Chung, New Territories - Hong Kong
Tel. +852 2333 0601 - Fax +852 2311 0026
Email: info.hk@videotec.com
Immeuble Le Montreal, 19bis Avenue du Québec, ZA de Courtaboeuf
91140 Villebon sur Yvette - France
Tel. +33 1 60491816 - Fax +33 1 69284736
Email: info.fr@videotec.com
Gateway Industrial Park, 35 Gateway Drive, Suite 100
Plattsburgh, NY 12901 - U.S.A.
Tel. +1 518 825 0020 - Fax +1 518 825 0022
Email: info.usa@videotec.com - www.videotec.us
www.videotec.com
MNVCPTZAS_1449_RU
Headquarters Italy Videotec S.p.A.
France Videotec France SARL
Asia Pacific Videotec (HK) Ltd
Americas Videotec Security, Inc.
Via Friuli, 6 - I-36015 Schio (VI) - Italy
Tel. +39 0445 697411 - Fax +39 0445 697414
Email: info@videotec.com
Flat 8, 19/F. On Dak Industrial Building, No. 2-6 Wah Sing Street
Kwai Chung, New Territories - Hong Kong
Tel. +852 2333 0601 - Fax +852 2311 0026
Email: info.hk@videotec.com
Immeuble Le Montreal, 19bis Avenue du Québec, ZA de Courtaboeuf
91140 Villebon sur Yvette - France
Tel. +33 1 60491816 - Fax +33 1 69284736
Email: info.fr@videotec.com
Gateway Industrial Park, 35 Gateway Drive, Suite 100
Plattsburgh, NY 12901 - U.S.A.
Tel. +1 518 825 0020 - Fax +1 518 825 0022
Email: info.usa@videotec.com - www.videotec.us
www.videotec.com
MNVCPTZAS_1449