1
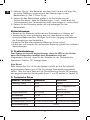
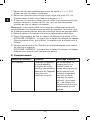
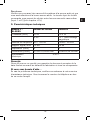
Bedienungsanleitung
User manual
Mode d’emploi
Manual de instrucciones
Manuale d‘istruzioni
SL-8225
D
GB
F
E
I
Sicherheitshinweise
Bevor Sie dieses Produkt verwenden, lesen Sie bitte die Sicherheits- und
Warnhinweise im Handbuch. Bewahren Sie dieses Handbuch auf, um zu
einem späteren Zeitpunkt darauf zurückgreifen zu können.
Geben Sie acht, dass Verpackungsmaterialien nicht in Kinderhände gelangen, da
beim Spielen Erstickungsgefahr droht.
Fehlerbeseitigung/Reparatur:
Versuchen Sie nicht, das Gerät selbst
zu warten oder zu reparieren. Überlassen Sie jegliche Wartungsarbeiten
dem zuständigen Fachpersonal.
Nehmen Sie keine Veränderungen am
Gerät vor. Dadurch verlieren Sie jegliche Garantie-ansprüche.
Belüftung:
Verdecken Sie die Öffnungen der Lautsprechergehäuse nicht, führen Sie keine Gegenstände in die Öffnungen ein,
und achten Sie darauf, dass zwischen
den Lautsprechern und anderen Geräten bzw. der Wand ein ausreichender
Abstand besteht.
Feuchtigkeit und Wärmequellen:
Verwenden Sie das Gerät nicht in der
Nähe von Wasser (z.B. Waschbecken,
Badewannen oder Schwimmbecken),
und halten Sie es von Feuchtigkeit,
tropfenden oder spritzenden Flüssigkeiten sowie Regen fern.
Stellen Sie die Lautsprecher nicht in
der Nähe von Wärmequellen auf, um
Schäden am Gerät zu vermeiden.
Abwesenheit:
Bei längerer Abwesenheit oder Nichtgebrauch sollten Sie das Stromkabel
des Systems aus der Steckdose
ziehen.
Lautstärke:
Zu große Lautstärke kann zu Hörschäden führen.
Gewitter:
Um die Lautsprecher bei einem Gewitter zu schützen, ziehen Sie den
Netzstecker des Subwoofer, und
schalten Sie den Computer aus.
Reinigung
Benutzen Sie zum Reinigen des Gerätes bitte ein weiches, trockenes Tuch.
Lassen Sie das Gerät nie mit Benzol,
Verdünner oder anderen Chemikalien
in Berührung kommen.
Bestimmungsgemäßer Gebrauch:
Das Gerät darf nur mit den dafür
vorgesehenen Originalteilen verwendet
werden.
Das Produkt darf nur in geschlossenen
und trockenen Räumen verwendet
werden.
Die bestimmungsgemäße Verwendung
beinhaltet das Vorgehen gemäß der
Installationsanleitung. Für Schäden,
die durch unsachgemäßen Gebrauch
entstehen übernimmt der Hersteller
keine Haftung.
Standort:
Die Lautsprecher müssen auf einer
stabilen Unterlage stehen, um zu
verhindern, dass sie herunterfallen
und dabei Personen oder das Gerät zu
Schaden kommen.
2
Einleitung
Vielen Dank für den Kauf der Powerstixx 2.1. Dieses LautsprecherSystem bietet neben seinem außergewöhnlichen Design by F.A. Porsche
exzellenten 2.1 Sound am PC. Die schlanken Satelliten sind ideal geeignet zur Verwendung neben einem Flachbildschirm.
D
GB
F
E
Lieferumfang
•
•
•
•
1x Subwoofer
2x Satelliten
1x Infrarot-Fernbedienung
1x Kabel (3,5mm Klinke auf
3,5mm Klinke)
• 1x Kabel (Cinch auf 3,5mm Klinke)
• 1x Bedienungsanleitung
• 4x Gummifüße
3.5 mm stereo to 3.5 mm stereo
1x
Cinch (RCA) to 3.5 mm stereo
1x
Abb.1
1. Anschluss an eine Soundquelle
AUDIO SOURCE
2nd AUDIO SOURCE (optional)
INPUT 1 INPUT 2
R
L
OUTPUT
POWER
Abb. 2
3
I
Sie die beiden Satelliten-Lautsprecher an die OutputD 1. Schließen
Buchsen („L“+“R“) an der Rückseite des Subwoofers an.
GB 2. Schließen Sie dabei den Lautsprecher mit rotem Cinch-Stecker an die
F
E
I
Buchse „R“ an und den Lautsprecher mit weißem Cinch-Stecker an
die Buchse „L“ an.
3. Schließen Sie mit Hilfe eines der beiden mitgelieferten Kabel Ihre
Soundquelle (z.B. Soundkarte, CD-Player, etc.) an eine der beiden
Input-Buchsen an der Rückseite des Subwoofers an.
Hinweis: Mit Hilfe des zweiten mitgelieferten Kabels, kann optional eine
zweite Soundquelle gleichzeitig an das System angeschlossen werden.
Zwischen den Soundquellen kann über die Input-Taste auf der Fernbedienung gewählt werden.
4. Schließen Sie den Subwoofer an die Stromversorgung an.
5. Bewegen Sie den Schalter an der Rückseite des Subwoofers in
Position „ON“.
LED-ANZEIGE: Die LED an der Vorderseite des Subwoofers blinkt
mehrmals blau auf und erlischt dann. Das System ist nun betriebsbereit.
6. Drücken Sie die On/Standby-Taste auf der Fernbedienung, um das
System einzuschalten.
LED-ANZEIGE: Die LED an der Vorderseite des Subwoofers leuchtet
blau auf und zeigt an, dass das Gerät eingeschaltet wurde.
2. Funktionsbeschreibung der Fernbedienung
Funktionstaste:
Funktion:
LED-Anzeige
On/Standby:
Schaltet das System
in Standby- bzw. Aktiv-Modus. Das Gerät
wird im Standby-Modus
nicht vollständig von
der Stromversorgung
getrennt!
Die LED leuchtet im AktivModus je nach gewählter
Soundquelle blau bzw. rot
auf. Wird das System in
Standby-Modus versetzt
(LED erlischt) und wieder
aktiviert, ist immer die
zuletzt gewählte Soundquelle aktiv.
Input
Zum Wechseln
zwischen 2 angeschlossenen Soundquellen (an „Input 1“
und „2“).
Blaue LED: Die Soundquelle an Input 1 ist aktiv
(Standard-Einstellung).
Rote LED: Die Soundquelle an Input 2 ist aktiv.
4
Master (-/+):
Sub
Power On/Off
(Rückseite
Subwoofer)
Reguliert die GesamtLautstärke des
Systems.
Je nach gewählter Soundquelle (Input 1 oder 2)
blinkt die LED blau bzw.
rot auf, wenn die Lautstärke verändert wird.
Reguliert den BassJe nach gewählter SoundSound des Subwoofers. quelle (Input 1 oder 2)
blinkt die LED blau bzw.
rot auf, wenn der Bass
verändert wird.
Netzschalter zum vollständigen Abschalten
des Systems.
Nach Abschalten und
erneutem Einschalten des
Systems wird automatisch „Input1“ aktiviert.
Die LED blinkt mehrmals
auf (blau) und erlischt
wieder.
3. Einlegen oder Wechsel der Batterien:
Abb.3
1. Entfernen Sie mit Hilfe eines Schraubenziehers die Schraube
an der Unterseite der Fernbedienung (s. Abb.3 Punkt 1).
2. Bevor Sie das Batteriefach herausziehen, sollten Sie die gesamte
Fernbedienung mit den Funktionstasten nach oben auf einen ebenen
Untergrund legen (s. Abb. 3 Punkt 2). Ziehen Sie jetzt das
Batteriefach an der Hinterseite der Fernbedienung heraus
(s. Abb. Punkt 3). (Falls keine Batterien im Batteriefach enthalten
sind, bitte daraufachten, dass die Federung des im Batteriefach
liegenden Kontaktblechs nach unten zeigt).
5
D
GB
F
E
I
Sie ggf. alte Batterien aus dem Fach heraus und legen Sie
D 3. Nehmen
die neuen Batterien entsprechend der Markierungen in das
Batteriefach (s. Abb.3 Punkt 3) ein.
GB
F
E
I
4. Setzen Sie das Batteriefach wieder in die Fernbedienung ein.
Achten Sie darauf, dass die Markierungen + und - sowie auch die
Funktionstasten der Fernbedienung nach oben zeigen (s. rechte Abb.)!
5. Setzen Sie die Schraube wieder ein und befestigen Sie das
Batteriefach.
Batteriehinweise:
• Bewahren Sie Batterien außerhalb der Reichweite von Kindern auf.
• Verwenden Sie nicht gleichzeitig alte und neue Batterien oder verschiedene Batteriesorten. Befolgen Sie für den Umgang mit Batterien
die Anweisungen des Herstellers.
• Ersetzen Sie alte oder schwache Batterien immer sofort.
• Entsorgen und recyceln Sie verbrauchte Batterien gemäß den örtlichen
Bestimmungen.
4. Problembehebung
Das System ist korrekt angeschlossen, doch die LED an der Vorderseite des Subwoofers leuchtet beim Einschalten nicht auf.
Vergewissern Sie sich, dass Sie den Schalter an der Rückseite des
Systems in Position „On“ bewegt haben.
Kein Sound
Bitte überprüfen Sie, ob Sie das System korrekt an Ihre Soundquelle
angeschlossen haben und ob Sie die richtige Soundquelle ausgewählt
haben. Über die Input-Taste auf der Fernbedienung können Sie zwischen
den angeschlossenen Soundquellen (Input 1 und 2) wählen (s. Kapitel 2).
5. Technische Daten
Modelnr.: SL-8225
Subwoofer
Satelliten
Leistung (RMS)
30W
2x6W
5,25“
2x1“ magnetisch abgeschirmt
Frequenzbereich
40-150Hz
150Hz.-20kHz
Störabstand
72 dB
68 dB
Impedanz (Ohm)
4
4
Abmessungen (BxHxT) 310x319,5x360mm
Stromversorgung
100x245,5x100mm
230V
6
Garantie
Für dieses Produkt gewähren wir Ihnen eine Garantie von zwei Jahren ab
Kaufdatum auf Verarbeitung und alle eingebauten Teile.
Falls Sie Hilfe benötigen...
Bei technischen Problemen wenden Sie sich bitte an unseren technischen Support. Die Hotline-Nummer finden Sie auf der Rückseite dieser
Bedienungsanleitung.
7
D
GB
F
E
I
D
GB
F
E
I
Important Safety Information
Before using this product, read the instruction manual for important safety
information. Please retain this manual for future reference.
Make sure packaging materials do not get into the hands of children as there is a
danger of asphyxiation if they play with them.
Volume:
Prolonged listening at high volume levels
may cause hearing damage.
Troubleshooting& Servicing:
Do not attempt to service or repair the
device yourself. Refer all servicing to
qualified service personnel.
Do not attempt to modify the device in
any way. Doing so could invalidate your
warranty.
Lightning storms:
For added protection during lightning
storms, unplug the speakers from
the elctrical outlet and turn off the
computer.
Moisture and heat sources:
Do not use this apparatus near water
(for example, sinks, baths, pools) or
expose it to rain, moisture, or dripping
or splashing liquids.
Place the speakers away from all heat
sources.
Intended use:
The product may only be used with the
original parts intended for it.
The product may only be used in closed
and dry rooms.
The intended use includes adherence
to the specified installation instructions.
The manufacturer accepts no liability for
damage arising due to improper use.
Cleaning:
When cleaning the device, please use
a soft, dry cloth. Never use benzine,
paint thinner, or other chemicals on the
device.
Location:
Place the speakers in a stable location
so they will not fall causing damage to
the speakers or bodily harm.
Ventilation:
Do not block the openings in speaker
cabinets, never push objects into
speaker vents or slots because of fire
or electric shock hazards, and provide
sufficient space around thespeakers for
proper ventilation.
Periods of absence:
During longer periods of absence
please unplug the speaker system from
electric power.
8
Introduction
Thank you for purchasing the Powerstixx 2.1. This loudspeaker system
offers, in addition to outstanding design by F.A. Porsche, excellent 2.1
sound on the PC. The slim satellites are ideal for use alongside a flat
screen.
D
GB
F
E
Product includes
•
•
•
•
1x subwoofer
2x satellites
1x infrared remote control
1x cable (3.5 mm jack to
3.5 mm jack)
• 1x cable (3.5 mm jack to RCA/
cinch plug)
• 1x user manual
• 4x rubber feet
3.5 mm stereo to 3.5 mm stereo
1x
Cinch (RCA) to 3.5 mm stereo
1x
Fig.1
1. Connecting to a sound source
AUDIO SOURCE
2nd AUDIO SOURCE (optional)
INPUT 1 INPUT 2
R
L
OUTPUT
POWER
Fig. 2
9
I
the two satellite speakers to the output sockets (“L”+ “R”) on
D 1. Connect
the back of the subwoofer.
GB 2. When doing this, connect the speaker with red cinch plug to the “R”
F
E
I
socket and the speaker with the white cinch plug to the “L” socket.
3. Use one of the two supplied cables to connect your sound source
(e.g. sound card, CD player, etc.) to one of the two input sockets on
the back of the subwoofer.
Note: You can use the second cable to simultaneously connect a second
sound source to the system. You can switch between the sound sources
with the Input button on the remote control.
4. Connect the subwoofer to the power supply.
5. Move the switch on the back of the subwoofer to ON.
LED: The LED on the front of the subwoofer flashes blue several times
and then goes out. The system is then ready.
6. Press the On/Standby button on the remote control to switch on the
system.
LED: The LED on the front of the subwoofer lights blue, indicating that
the speaker is switched on.
2. Functions of the remote control
Button:
Function:
LED
On/Standby:
Switches the system
to standby or active
mode. The system
is not completely
disconnected from the
power supply in this
mode!
The LED lights blue
or red in active mode
depending on the
chosen sound source.
If the system is put
in standby mode
(LED goes out) and
re-activated, the last
chosen sound source
is always active.
Input
Changes between
2 connected sound
sources (to “Input 1”
and “2”).
Blue LED: the sound
source connected
to Input 1 is active
(default setting).
Red LED: the sound
source connected to
Input 2 is active.
10
Master (-/+):
Controls the overall
volume of the system
Depending on the
selected sound source
(Input 1 or 2), the
LED flashes blue or
red when the volume
is altered.
Sub
Controls the bass
sound of the
subwoofer
Depending on the
selected sound source
(Input 1 or 2), the
LED flashes blue or
red when the bass is
altered.
Power On/Off
(back of Subwoofer)
Power switch to
completely switch off
the system
After switching the
system off and then
on again, Input 1
is automatically
activated. The LED
flashes blue several
times and goes out.
3. How to fit or change batteries:
Fig. 3
1. Using a screwdriver, remove the screw on the back of the remote
control (point 1 of diagram).
2. Before you remove the battery compartment, lay the remote control
on a suitable surface with function buttons pointing upwards (point 2
of diagram). Pull out the battery compartment at the bottom end of
the remote control (point 3 of diagram).
11
D
GB
F
E
I
D
GB
F
E
I
If there are no batteries in the remote control, note that the spring of
the contact plate inside the battery compartment points downwards.
3. Remove old batteries and insert new batteries in the battery
compartment as indicated by the markings (see point 3 of
diagram).
4. Fit the battery compartment into the remote control. Make sure
the + and - markings and the function buttons of the remote control
all point upwards (see right-hand diagrams)!
5. Replace the screw and fasten the battery compartment.
Notes about batteries:
• Keep batteries out of reach of children.
• Do not mix old and new batteries, or batteries of different types.
Follow manufacturer‘s instructions on battery use.
• Remove old, weak or worn-out batteries promptly.
• Always recycle or dispose of used batteries in accordance with local
regulations.
4. Troubleshooting
The system is correctly connected but the LED on the front of the
subwoofer does not light when switching on.
Make sure you have moved the switch on the back of the system to ON.
No sound
Check you have correctly connected the system to your sound source
and that you have selected the correct sound source. Use the Input
button on the remote control to switch between the connected sound
sources (Input 1 and 2) (see section 2).
5. Technical data
Model no.: SL-8225
Subwoofer
Satellites
Output, (RMS)
30 W
2x6 W
5.25”
2x1” magnetically
shielded
Frequency range
40-150 Hz
150 Hz.-20 kHz
S/N ratio
72 dB
68 dB
Impedance (Ohm)
4
4
Dimensions (WxHxD)
310x319.5x360 mm
100x245.5x100 mm
Power supply
230V
12
Guarantee
We guarantee this product for two years from the date of purchase in
respect of workmanship and all built-in components.
If you need help...
In the event of technical problems, please contact our technical support.
The hotline number can be found on the back of this manual.
D
GB
F
E
I
13
D
Instructions de sécurité
GB
Avant d‘utiliser ce produit, consultez le manuel d‘instructions. Vous y
trouverez des informations importantes sur la sécurité. Conservez ce
manuel pour une référence ultérieure.
F
E
I
Faites attention à ce que les matériaux d’emballage ne tombent pas entre les
mains d’enfants, car ils risqueraient de s’étouffer en jouant.
Entretien:
Ne tenez pas d‘effectuer vous-même
l‘entretien du dispositif ni de le réparer.
Pour
les
opérations
d‘entretien,
adressez-vous à du personnel qualifié.
N‘essayez jamais d‘apporter une
quelconque modification au dispositif.
Cela pourrait annuler votre garantie.
Humidité et sources de chaleur :
Évitez d‘utiliser l‘appareil à proximité
de l‘eau (évier, baignoire ou piscine par
ex.) ou de l‘exposer aux intempéries, à
l‘humidité, ou à des écoulements ou des
projections de liquides.
Eloignez les haut-parleurs de toute
source de chaleur.
Nettoyer l‘unité
Pour nettoyer l‘unité, veuillez utilisez un
chiffon doux et sec. N‘appliquez jamais
de benzine, de diluant ou autre produit
chimique sur le dispositif.
Emplacement:
Placez les haut-parleurs de manière à
ce qu‘ils soient stables, car toute chute
risquerait de les endommager ou de
cuser des dommages corporels.
En cas d‘absence:
En cas d’absence ou de non-utilisation
prolongée,
débranchez
le
câble
d’alimentation électrique de la prise.
Volume:
Un volume trop élevé peut entraîner
des troubles de l’audition.
Foudre:
Pour une meilleure protection contre la
foudre, débranchez les haut-parleurs de
la prise électrique et mettez l‘ordinateur
hors tension en cas d‘orage
Utilisation conforme:
L’appareil ne doit être utilisé qu’avec les
pièces originales prévues à cet effet.
Le produit ne doit être utilisé que dans
des locaux fermés et secs.
L’utilisation conforme implique de
respecter les instructions d’installation.
Le fabricant décline toute responsabilité
en cas de dommages dus à une
utilisation incorrecte.
Ventilation:
Ne bloquez pas les ouvertures des hautparleurs. N‘enfoncez jamais d‘objets
dans les ouvertures ou les fentes
des haut-parleurs, du fait du risque
d‘électrocution ou d‘incendie, et laissez
un espace suffisant autour des hautparleurs pour assurer une ventilation
correcte.
14
Introduction
Merci d’avoir choisi Powerstixx 2.1. Outre son design exceptionnel by
F.A. Porsche, cet ensemble d’enceintes offre un excellent son 2.1 pour
toutes les applications sur ordinateur. Les satellites à la ligne élancée
sont parfaits pour être utilisés avec un écran plat.
D
GB
F
E
Éléments fournis
•
•
•
•
1x caisson de basses
2x satellites
1x télécommande à infrarouges
1x câble (fiche jack 3,5 mm sur
fiche jack 3,5 mm)
• 1x câble (fiche jack 3,5 mm sur
fiche cinch)
• 1x mode d’emploi
• 4x pieds en caoutchouc
3.5 mm stereo to 3.5 mm stereo
1x
Cinch (RCA) to 3.5 mm stereo
1x
ill.1
1. Raccordement à une source audio
AUDIO SOURCE
2nd AUDIO SOURCE (optional)
INPUT 1 INPUT 2
R
L
OUTPUT
POWER
ill. 2
15
I
les deux satellites aux prises de sortie (« L » + « R »)
D 1. Raccordez
situées au dos du caisson de basses.
GB 2. Raccordez l’enceinte avec la fiche cinch rouge à la prise « R » et
F
E
I
l’enceinte avec la fiche cinch blanche à la prise « L ».
3. À l’aide de l’un des deux câbles fournis, reliez votre source audio (par
exemple carte son, lecteur de CD, etc.) à l’une des deux prises
d’entrée au dos du caisson de basses.
Remarque : le deuxième câble fourni peut être utilisé pour raccorder
simultanément une deuxième source audio au système. La touche Input
de la télécommande permet alors de commuter entre les sources audio.
4. Reliez le caisson de basses à la source d’alimentation électrique.
5. Placez l’interrupteur au dos du caisson de basses en position « ON ».
AFFICHAGE LUMINEUX : le voyant bleu à l’avant du caisson de basses
clignote plusieurs fois, puis s’éteint. Le système est à présent prêt à
l’emploi.
6. Appuyez sur la touche On/Standby de la télécommande pour mettre
en marche le système.
AFFICHAGE LUMINEUX : le voyant bleu à l’avant du caisson de basses
s’allume pour indiquer que l’appareil est allumé.
2. Fonctionnement
Touche de fonction :
Fonction :
Affichage lumineux
On/Standby :
Commute le système
en mode standby
ou activé. En mode
standby, l’alimentation
électrique de l’appareil
n’est pas complètement coupée !
En mode activé, le
voyant prend une
couleur bleue ou
rouge selon la source
audio sélectionnée.
Lorsque le système
est mis en mode
standby (le voyant
s’éteint), puis réactivé, c’est toujours la
dernière source audio
sélectionnée qui est
activée.
16
Input
Commute entre les 2
sources audio
raccordées
(aux prises « Input 1 »
et « 2 »)
Voyant bleu : la
source audio raccordée à l’entrée « Input
1 » est activée (réglage par défaut).
Voyant rouge : la
source audio raccordée à l’entrée « Input
2 » est activée.
Master (-/+) :
Ajuste le volume géné- Selon la source audio
ral du système
sélectionnée (Input 1
ou 2), le voyant prend
une couleur bleue ou
rouge lorsque vous
modifiez le volume.
Sub
Ajuste les graves au
niveau du caisson de
basses
Selon la source audio
sélectionnée (Input 1
ou 2), le voyant
clignote de couleur
bleue ou rouge
lorsque vous ajustez
les graves.
Power On/Off
(caisson de basses)
Interrupteur
d’alimentation
permettant de
déconnecter
complètement le
système
Lorsque vous
éteignez et rallumez
le système, l’entrée
« Input 1 » est
automatiquement
activée. Le voyant
clignote plusieurs fois
(couleur bleue), puis
s’éteint à nouveau.
17
D
GB
F
E
I
D 3. Insérer ou remplacer les piles:
GB
F
E
I
ill. 3
1. Retirez avec un tournevis la vis qui se trouve sous la télécommande
(voir illustration 3 point 1).
2. Avant de dégager le compartiment à piles, posez toute la télécommande sur un support plat en plaçant les touches de fonction
vers le haut (voir illustration 3 point 2). Dégagez ensuite le compartiment à piles au dos de la télécommande (voir illustration point 3).
(Si le compartiment à piles est vide, faites attention à ce que le
ressort de la borne de contact métallique à l’intérieur du compartiment à piles soit tourné vers le bas.)
3. Retirez au besoin les anciennes piles et insérez les nouvelles piles en
respectant les repères figurant dans le compartiment à piles (voir
illustration 3 point 3).
4. Replacez le compartiment à piles dans la télécommande. Veillez à ce
que les repères + et – et les touches de fonction de la télécommande
soient tournés vers le haut (voir illustration 3 de droite) !
5. Remettez la vis en place et vissez le compartiment à piles.
Remarques concernant les piles:
• Rangez les piles hors de portée des enfants.
• Evitez d‘utiliser des piles usagées conjointement à des piles neuves, ou
des piles de types différents. Suivez les instructions fournies par le
fabricant pour l’emploi des piles.
• Retirez les piles dès qu’elles sont usagées ou faibles.
• Recyclez-les ou mettez-les au rebut conformément à la réglementation
en vigueur.
4. En cas de problème
Le système est correctement raccordé, mais le voyant situé à l’avant
du caisson de basses ne s’allume pas à la mise en marche.
Vérifiez que vous avez bien amené l’interrupteur au dos du caisson de
basses en position « On ».
18
Pas de son
Vérifiez que vous avez bien raccordé le système à la source audio et que
vous avez sélectionné la bonne source audio. La touche Input de la télécommande vous permet de choisir entre les sources audio raccordées
(Input 1 et 2) (voir chapitre « 2»).
Modèle nº :
SL-8225
Caisson de basses
Satellites
Puissance (RMS)
30 W
2x6W
5,25“
2 x 1“ avec blindage
magnétique
Gamme de fréquence 40 – 150 Hz
150Hz – 20 kHz
Rapport signal/bruit
72 dB
68 dB
Impédance (Ohm)
4
4
Dimensions (LxHxP)
310x319,5x360 mm
100x245,5x100mm
230 V
Garantie
Nous offrons sur ce produit une garantie de deux ans à compter de la
date d’achat couvrant les défauts de fabrication et tous les composants.
Si vous avez besoin d’aide...
En cas de problèmes techniques, veuillez vous adresser à notre service
d’assistance technique. Vous trouverez le numéro de téléphone au dos
de ce mode d’emploi.
19
GB
F
E
5. Caractéristiques techniques
Alimentation
électrique
D
I
D
GB
F
E
I
NOTAS IMPORTANTES SOBRE LA SEGURIDAD
Antes de utilizar este producto, lea el manual de instrucciones para obtener
informaciónes importantes acerca de la seguridad. Guarde el manual de
instrucciones para consultas en el futuro.
Ponga atención para que los materiales de embalaje no caigan en manos de los
niños, jugando pueden correr peligro de asfixia.
Solución de problemas/Reparatur:
No intentes en ningún caso repararlo
por su cuenta. Deja cualquier trabajo de
mantenimiento en manos de personal
especializado.
No hagas cambios en el aparato. De
lo contrario perderás la garantía que te
ampara.
Humedad y fuentes de calor:
No utilices el aparato cerca del agua
(p. ej. lavabos, bañeras o piscinas)
y mantenlo alejado de la humedad,
líquidos que salpiquen, goteen o de la
lluvia. Mantenga el producto alejado de
fuentes de calor.
Limpiar el dispositivo
Cuando limpie el dispositivo, por favor
utilice un paño suave y seco. Nunca
utilice bencina, removedor u otro
químico para limpiarlo.
Colocación:
Coloque los altavoces en un lugar
seguro para evitar posibles caídas que
pudieran ocasionar lesiones físicas o
dañar el producto.
Ausencia:
En caso de ausencias prolongadas, o
si no usa el aparato, es conveniente
desenchufar el sistema de la corriente.
Volumen:
Un exceso de volumen puede causar
daños auditivos.
Relámpagos:
Como medida de seguridad durante
tormentas con relámpagos, desenchufe
los altavoces de la toma de corriente y
apague el ordenador.
Uso según instrucciones:
El dispositivo sólo se puede usar con las
piezas originales correspondientes.
El producto se utilizará siempre en
espacios cerrados y secos.
El uso según las instrucciones incluye
un procedimiento de instalación según
las mismas instrucciones. El fabricante
no se hace responsable de los daños
que pudieran derivarse de un uso
inadecuado del producto.
Ventilación:
No bloquee las aberturas de los
altavoces ni introduzca ningún objeto
en las ranuras u orificios de ventilación,
ya que podrían producirse incendios o
descargas eléctricas. Procure siempre
que haya suficiente espacio alrededor
de los altavoces para garantizar una
ventilación.
20
Introducción
Muchas gracias por la compra de este Powerstixx 2.1. Este sistema de
altavoces te ofrece, además de un extraordinario diseño de F. A.
Porsche, todo un impresionante 2.1 en tu ordenador. Los estilizados
satélites de delgada línea son ideales para colocarlos junto a monitores
TFT.
Componentes suministrados:
•
•
•
•
1x Subwoofer
2x Satélites
1 Mando a distancia por infrarrojos
1x Cable (3,5mm jack en 3,5mm
jack)
• 1x Cable (3,5mm jack en cinch)
• 1x Instrucciones de manejo
• 4x Patas de goma
3.5 mm stereo to 3.5 mm stereo
1x
Cinch (RCA) to 3.5 mm stereo
1x
Fig.1
1. Conexión a una fuente de audio
AUDIO SOURCE
2nd AUDIO SOURCE (optional)
INPUT 1 INPUT 2
R
L
OUTPUT
POWER
Fig. 2
21
D
GB
F
E
I
los dos satélites a los conectores de salida (Output)
D 1. Enchufa
[“L” + “R”] en la parte trasera del subwoofer.
GB 2. Enchufar el altavoz con el conector RCA rojo a la salida “R” y el altavoz
F
E
I
con el conector RCA blanco a la salida „L“.
3. Con uno de los dos cables que viene adjunto conecta la fuente de
audio (p. ej. tarjeta de sonido, lector de CDs, etc.) a una de las dos
entradas Input de la parte trasera del subwoofer.
Nota: Con el segundo cable suministrado, se puede conectar simultáneamente otra fuente de sonido al mismo sistema. Puedes elegir entre las
diferentes fuentes con el botón Input del mando a distancia.
4. Conecta el subwoofer a la corriente.
5. Coloca el interruptor de la parte trasera del subwoofer en la posición
“ON”.
INDICADOR LED: El LED situado en parte frontal del subwoofer
parpadea repetidamente en azul y a continuación se apaga. El
sistema está entonces funcionando normalmente.
6. Pulsa el botón On/Standby en el mando a distancia para activar el
sistema.
INDICADOR LED: El LED en la parte frontal del subwoofer se enciende
en color azul e indica que el aparato está encendido.
2. Funciones del mando a distancia
Botones de
funciones
Función:
Indicador LED
On/Standby:
Conecta el sistema
a standby y al modo
activo. En modo standby el aparato no se
desconecta totalmente de la corriente.
El LED se enciende
cuando está el modo
activo en los colores
azul o rojo, según que
fuente de audio está
conectada. Cuando se
pone todo el sistema
en standby (se apaga
el LED), al volverlo a
encender disponemos
de la fuente de audio
que estuvo activada la
última vez.
22
Input:
Cambio entre dos
fuentes de audio
conectadas (“Input 1”
y “2”).
LED azul: La fuente de
audio en Input 1 está
activada (ajuste por
defecto)
LED rojo: La fuente de
audio en Input 2 está
activada.
Master (-/+):
Regula el volumen
total del sistema
Según la fuente de
audio (Input 1 o 2) el
LED se enciende en
rojo o en azul, incluso
si se varía el volumen.
Sub
Regula los graves del
subwoofer
Según la fuente de
audio seleccionada
(Input 1 o 2) el LED
se enciende en azul
o rojo, incluso si se
varían los graves.
Power On/Off
(Subwoofer)
Interruptor de
encendido/apagado
para desconectar
totalmente el sistema
Tras haber
desconectado y
volverlo a encender,
el sistema se activa
automáticamente
en „Input 1“. El LED
se enciente varias
veces (azul) y luego se
apaga.
3. Insertar o cambiar las pilas:
Fig. 3
23
D
GB
F
E
I
un destornillador saca el tornillo situado en la parte inferior del
D 1. Con
mando a distancia (ver fig. punto 1).
GB 2. Antes de sacar el compartimento, coloca el mando completo sobre
F
E
I
una superficie lisa con las teclas de funciones boca arriba (ver fig.
punto 2). Saca primero el compartimento de pilas de la parte trasera
del mando a distancia (ver fig. punto 3). (Si no hay pilas dentro de
compartimento, ten en cuenta que los muelles del compartimento
con la lengüeta de contacto tienen que mirar hacia abajo).
3. Saca las pilas viejas del compartimento, si las hay, y coloca las nuevas
según está marcado. (ver fig. punto 3).
4. Coloca el compartimento de nuevo dentro del mando a distancia.
Ten en cuenta que las marcas + y – al igual que los botones de las
funciones del mando estén para arriba (ver fig. dcha.)
5. Vuelve a colocar el tornillo y róscalo para sujetar el compartimento de
pilas.
Notas sobre las pilas:
• Mantenga las pilas fuera del alcance de los niños.
• No mezcle pilas usadas y nuevas o de distintos tipos. Siga las instrucciones del fabricante sobre el uso de las pilas.
• Retire inmediatamente las pilas usadas, casi agotadas o desgastadas.
• Recicle o elimine las pilas usadas de acuerdo con las disposiciones
locales.
4. Resolución de problemas
El sistema está correctamente conectado pero el LED de la parte
frontal del subwoofer no se enciende.
Comprueba si está colocado el interruptor de la parte trasera del sistema en la posición “On”.
No hay sonido
Comprueba si el sistema está bien conectado a la fuente de audio y si la
fuente seleccionada es la correcta. A través del botón Input del mando
a distancia puedes seleccionar la fuente de sonido (Input 1 y 2), ver
apartado „2“.
24
5. Datos técnicos
D
Nº de modelo:
SL-8225
Subwoofer
Satélites
Potencia (RMS)
30W
2x6W
F
5,25“
2x1“ apantallado
magnético
E
Respuesta de
frecuencias
40-150Hz
150Hz - 20kHz
I
Relación señal/ruido
72 dB
68 dB
Impedancia (Ohm)
4
4
Medidas (AnxAlxF)
310x319,5x360mm
100x245,5x100mm
Alimentación de red
230V
Garantía
Este producto está garantizado durante un periodo de dos años a partir
de la fecha de compra contra materiales defectuosos o de fabricación.
Si precisas ayuda...
En caso de surgir cualquier problema técnico, acude a los especialistas
que te proporcionarán todo tipo de soporte técnico. El número de
nuestra línea Hotline, se encuentra al dorso de este manual de
instrucciones.
25
GB
D
Importanti informazioni in materia di sicurezza
GB
Prima di utilizzare il prodotto, è necessario leggere attentamente nel
manuale d’istruzione le avvertenze sulla sicurezza, nonché generali.
Conservare accuratamente il presente manuale d‘istruzioni al fine di poterlo
successivamente consultare nuovamente.
F
E
I
Osservare che è necessario tenere i materiali di imballaggio lontani dalla portata
dei bambini poiché sussiste pericolo di soffocamento.
Ricerca guasti/riparazione:
Non cercare di eseguire la manutenzione
o effettuare riparazioni al dispositivo.
Affidare tutte le operazioni di riparazione
a personale qualificato.
Umidità e fonti di calore:
Non utilizzare l‘apparecchio vicino
all‘acqua (ad esempio, lavandini o
vasche), né esporlo a pioggia, umidità,
gocce o spruzzi.Tenere gli altoparlanti
lontano da fonti di calore.
Pulitura
Pulire il dispositivo utilizzando un panno
morbido e asciutto. Non usare mai
benzina, diluenti o altri prodotti chimici.
Collocazione:
Collocare gli altoparlanti in posizione
stabile onde evitare di ferirsi o
danneggiare gli altoparlanti stessi se
questi dovessero cadere.
Ventilazione:
Non ostruire le aperture situate negli
altoparlanti né forzare oggetti di alcun
tipo attraverso i fori o le aperture
in quanto ciò può causare incendi o
scosse elettriche; assicurarsi inoltre
che vi sia spazio asufficienza intorno
agli altoparlanti per una ventilazione
adeguata.
Periodi di assenza:
In caso di lunghi periodi di assenza o di
non utilizzo del sistema, è consigliabile
disinserire il cavo di alimentazione del
sistema dalla presa di corrente.
26
Livello di volume:
Un livello di volume audio eccessivamente
alto potrebbe provocare danni all’udito.
Temporale:
Per maggiore protezione durante un
temporale scollegare gli altoparlanti
dalla presa a muro e spegnere il
computer.
Uso appropriato dei dispositivi:
È consentito utilizzare il dispositivo solo
ed esclusivamente con i componenti
originali previsti.
È consentito utilizzare il prodotto solo
ed esclusivamente in ambienti chiusi,
nonché asciutti.
Un uso appropriato del dispositivo
implica un procedimento conforme alle
disposizioni di installazione. Il costruttore
esclude ogni tipo di responsabilità per
danni derivanti da un uso improprio del
dispositivo.
Introduzione
Vi ringraziamo per l’acquisto di Powerstixx. Oltre allo straordinario design
di F.A. Porsche, questo sistema di altoparlanti offre un eccellente suono
2.1 al PC. I satelliti di forma snella sono ideali per l’utilizzo accanto ad
uno schermo piatto.
D
GB
F
E
Fornitura
3.5 mm stereo to 3.5 mm stereo
•
•
•
•
1x subwoofer
2x satelliti
1x telecomando a infrarossi
1x cavo (presa jack 3,5mm/presa
jack 3,5mm)
• 1x cavo (presa jack 3,5mm/cinch)
• 1x istruzioni per l’uso
• 4x piedini di gomma
1x
Cinch (RCA) to 3.5 mm stereo
1x
ill.1
1. Collegamento ad una fonte di suono
AUDIO SOURCE
2nd AUDIO SOURCE (optional)
INPUT 1 INPUT 2
R
L
OUTPUT
POWER
ill. 2
1. Collegare i due altoparlanti satelliti alle prese di uscita („L“+“R“) situate
sul retro del subwoofer.
27
I
l’altoparlante con il connettore Cinch rosso alla presa „R“ e
D 2. Collegare
l’altoparlante con il connettore Cinch bianco alla presa „L“.
GB 3. Collegare mediante uno dei due cavi la fonte di suono (ad es.
F
E
I
scheda suono, CD-player, ecc.) ad una delle due prese di entrata
situate sul retro del subwoofer.
Nota: il secondo cavo compreso nella confezione permette di collegare
contemporaneamente una seconda fonte di suono al sistema. Il tasto
input sul telecomando permette di selezionare la fonte di suono.
4. Collegare il subwoofer alla corrente.
5. Posizionare l’interruttore sul retro del subwoofer su „ON“.
INDICATORE LED: l’indicatore LED di colore blu sul lato anteriore del
subwoofer lampeggia più volte e si spegne. Il sistema è pronto per il
funzionamento.
6. Per accendere il sistema, premere il tasto on/standby sul telecomando.
INDICATORE LED: l’indicatore LED di colore blu sul lato anteriore del
subwoofer lampeggia e segnala che l’apparecchio è acceso.
2. Descrizione delle funzioni
Tasto delle funzioni
Funzione:
Indicatore LED
On/standby:
accende il sistema
(modo attivo) o aziona
il modo standby. Se
si trova in standby,
l’apparecchio non
è completamente
staccato
dall’alimentazione di
corrente!
quando l’apparecchio
è acceso (modo
attivo), l’indicatore
LED lampeggia in
rosso o in blu in
base alla fonte di
suono selezionata.
Se si aziona il modo
standby (l’indicatore
LED si spegne) e
successivamente si
accende l’apparecchio,
resta attiva la fonte di
suono selezionata per
ultima.
28
Input
cambio tra due fonti
di suono collegate (ad
„input 1“ e „2“).
indicatore LED blu: è
attiva la fonte di suono
collegata all’input
1 (impostazione
standard), indicatore
LED rosso: è attiva
la fonte di suono
collegata all’input 2
Master (-/+):
regola il volume
complessivo del
sistema
variando il volume,
l’indicatore LED
lampeggia in blu o
in rosso, in base
alla fonte di suono
selezionata (input 1 o
2).
Sub
regola il suono dei
bassi del subwoofer
variando i bassi,
l’indicatore LED
lampeggia in blu o
in rosso, in base
alla fonte di suono
selezionata (input 1 o
2).
On/off (subwoofer)
interruttore per il
spegnendo e
completo spegnimento riaccendendo il
del sistema
sistema, si attiva
automaticamente
l’input 1. L’indicatore
LED di colore blu
lampeggia più volte e
si spegne.
29
D
GB
F
E
I
D 3. Inserimento o cambio delle batterie:
GB
F
E
I
ill. 3
1. Rimuovete svitando con un cacciavite la vite situata dietro il telecomando (v. ill.3, punto 1).
2. Prima di rimuovere l’alloggiamento delle batterie, è necessario
poggiare su una superficie piana l’intero telecomando con i
tasti di funzione rivolti verso l’alto (v. ill.3, punto 2). Occorre estrarre
l’alloggiamento delle batterie afferrando il telecomando dalla parte
posteriore (v. ill.3, punto 3). (Nel caso in cui le batterie non fossero
inserite nell’apposito alloggiamento, è necessario accertarsi che le
molle dei contatti metallici situati all’interno dell’alloggiamento siano
rivolti verso il basso).
3. Qualora il caso lo richiedesse, occorre estrarre le vecchie batterie
ed inserirne nell’alloggiamento delle nuove come indicato dalla rispettiva marcatura all’interno di esso (v. ill.3, punto 3).
4. Inserite infine l’alloggiamento delle batterie nel telecomando. È
necessario accertarsi che la marcatura + e – così come i tasti di funzione del telecomando siano rivolti verso l’alto! (v. ill. 3 qui a destra)
5. Inserite infine la vite riavvitandola e fissando quindi l’alloggiamento
delle batterie.
Indicazioni riguardanti le batterie:
• Conservate le batterie lontano dalla portata dei bambini.
• Non utilizzate contemporaneamente vecchie e nuove batterie o
batterie di tipo diverso. Utilizzando le batterie, atteneteVi alle indicazioni
e alle avvertenze della casa produttrice.
• Cambiate sempre immediatamente le batterie vecchie o a bassa
potenza.
• Portate le batterie usate presso gli appositi centri di raccolta secondo
le norme locali vigenti.
30
4. Eliminazione dei problemi
Il sistema è collegato correttamente ma, quando viene acceso,
l’indicatore LED sul lato anteriore del subwoofer non lampeggia.
Accertarsi di aver posizionato su „ON“ l’interruttore sul retro del sistema.
Nessun suono
Verificare se il sistema è stato collegato correttamente alla fonte di suono e se quest’ultima è stata correttamente selezionata. Il tasto input sul
telecomando permette di selezionare la fonte di suono (input 1 e 2) (vedi
il capitolo „2“).
5. Dati tecnici
N. modello: SL-8225 subwoofer
satelliti
Potenza (RMS)
30W
2x6W
5,25“
2x1“ schermati magneticamente
Gamma di frequenze
40-150Hz
150Hz.-20kHz
Rapporto segnale-rumore
72 dB
68 dB
Impedanza (Ohm)
4
4
Dimensioni (BxHxT)
310x319,5x360mm
100x245,5x100mm
Corrente
230V
Garanzia
Per questo prodotto concediamo una garanzia della durata di due anni a
partire dalla data di acquisto. La garanzia copre i difetti di fabbricazione,
nonché quelli derivanti dalle componenti integrate.
In caso di supporto tecnico ...
Nel caso in cui dovessero verificarsi ulteriori problemi tecnici, Vi preghiamo di contattare i nostri tecnici. A tale proposito, troverete sul retro di
questo manuale di istruzioni il numero del servizio di assistenza tecnica.
31
D
GB
F
E
I
© 2005 Jöllenbeck. All rights reserved. Information contained herein is subject to change
without notice.
SL-8225 Version3.0