1
STRATEGIC INTELLIGENCE
AND PLANNING UNIT
Opinio User Manual
November 2011
© Deakin University, 2011
Opinio Training Manual
November 2011
Prepared by
The Strategic Intelligence and Planning Unit
Deakin University
VIC, 3217
Tel: +61 3 522 78552
Fax: +61 3 522 78558
Web: http://www.deakin.edu.au/planning_unit
Contents
Introduction
6
Accessing Opinio
7
Creating a Survey
8
New Survey
8
Survey Administration
9
Creating Questions
10
Multiple Choice Questions
11
Validation Rules
13
Numeric Questions
15
Dropdown boxes
16
Rating questions
17
Matrix questions
18
Open ended questions
21
Question Library
22
Organising questions
23
Split Sections – *Updated Feature*
24
Conditional Branching
25
Look and Feel
29
Templates
29
Survey Texts
30
Privacy and Behaviour
31
Security and Privacy
31
Survey Behaviour
33
Publish a survey
34
Invitations
34
Add Invitees
36
Invitation lists that include attributes
38
Personalising invitations and reminder emails
38
Manage Invitees
39
Manage Responses
40
Print Survey - *New Feature*
41
Reports and Data Analysis
43
Summary Report
43
Comment Report
45
Raw Data Report
46
SPSS Data Export - *New Feature*
48
Raw data export settings
49
Customising Reports
50
Customising reports to look at particular cohorts- Report Filters and Autoreports
51
Advanced Options
53
Piping- *New Feature*
53
Hiding Questions and Pre-Population of Questions - *New Feature*
54
Conducting Surveys in the field
58
Opinio Mobile Interviewer - *New Feature*
58
Setup of the Opinio mobile interviewer application
58
Transferring responses
58
Limitations to surveys undertaken using the Opinio mobile interviewer application
59
Introduction
Opinio is a complete web-based survey system that allows surveys and polls to be created,
administered and reported online. Deakin University has purchased a limited number of licences from
ObjectPlanet Inc.
Opinio has been linked to the Deakin User Management System (UMS) and uses your Deakin
username and password for authentication. Only users with Deakin UMS permissions are able to create
and manage surveys. However, non-Deakin staff and students are able to participate in surveys and
polls.
The ITSD help desk its-helpdesk@deakin.edu.au is responsible for technical assistance, however for
user assistance; please contact the Strategic Intelligence and Planning Unit deakin-surveysopinio@deakin.edu.au.
The request for an Opinio licence must be made by a senior manager. It is expected that there will be a
survey subject matter expert who has completed Opinio training within the area requesting a licence. All
staff with the administration of surveys should be familiar with the University’s Survey Evaluation
Framework www.deakin.edu.au/plannin-unit/surveys/sef/ and in particular the survey policy and
procedures document. The Opinio licence request form is available from the Survey Evaluation
Framework webpage.
Using this manual you will develop the basic skills required to develop surveys in Opinio. Advanced
survey development techniques can be found on the Opinio Documentation website:
http://www.objectplanet.com/opinio/userguide/index.htm?page=index.html.
For more information regarding Opinio, survey approval process or Opinio licences, please contact
Helen Jacob, Manager Evaluations and Surveys helen.jacob@deakin.edu.au or phone 5227 8562.
6|Page
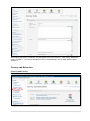
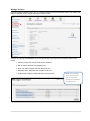
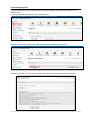
Accessing Opinio
Open a browser (Mozilla, Internet Explorer, Safari etc) and type the following address into the URL:
http://www.deakin.edu.au/deakinsurveys
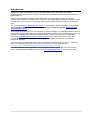
A dialogue box will appear asking for a login and password. Use your Deakin UMS username and
password. Click “Login”.
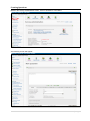
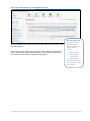
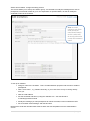
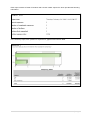
The following screen should appear:
Note: Each user has
specifically assigned
Folders and
Sub-folders in
relation to your
Division, Unit, or
Faculty that are not
necessarily depicted
in this image.
7|Page
Creating a Survey
Using this manual you will develop the basic skills required to develop surveys in Opinio. As mentioned
advanced survey development techniques can be found on the Opinio Documentation website:
http://www.objectplanet.com/opinio/userguide/index.htm?page=index.html.
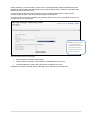
New Survey
Click on the folder in which you would like to house your survey. In this case, use the folder that has
been assigned to your unit, division, or faculty. Users do not have the necessary permissions to create
a survey in the Main Folder.
Click on New Survey in the Menu:
The following screen should appear:
In the space provided, type the name of the survey; then click on “create”.
The Folder Content screen will appear. Your survey should now appear within your folder.
8|Page
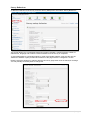
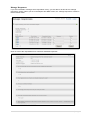
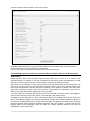
Survey Administration
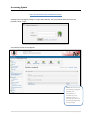
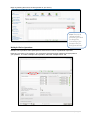
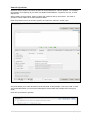
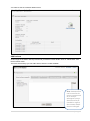
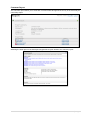
Click on the name of the survey. The Survey Administration screen will appear:
Notice that the List
of Menu items has
changed in the left
vertical menu.
Note the following:
• The survey URL is automatically generated – this will be used to issue your
survey electronically to participants.
• Start and stop dates are set to default from the day you create the survey
until one week after. You will need to change these to allow for the survey
approval process.
Each functional area
has its own set of
menu items,
depending on the
available functions
for that area.
• The traffic light indicates the status of the survey. Red indicates the survey is locked and not
available for responses. Green indicates the survey is available for responses however the start
date must be current in order for responses to be captured.
• The Survey Attributes provides a summary of the features of the survey.
• In the left vertical menu, the second box “Guide” provides the suggested steps to help you create
the survey and have it ready for use.
9|Page
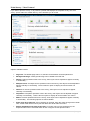
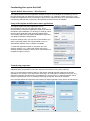
Creating Questions
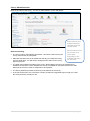
Whilst in the Survey Administration screen, click on “Questions” in the Menu:
The following screen will appear:
10 | P a g e
Begin by entering the text for the first question in your survey.
Note: There is an
“advanced edit”
function if you wish
to change the
formatting of the
question text (i.e
bold, font size etc).
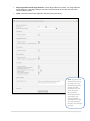
Multiple Choice Questions
Multiple choice questions allow participants to select from a number of predefined responses.
Each time you enter a new question, you will need to select the answer method most appropriate to
your question. To create a multiple choice question, select the “multiple choice” tab.
11 | P a g e
Under the heading “Choice labels” enter the response options for your question.
Note the following:
• Multiple Choice style questions default to allow for only one answer to be selected. “Allow multiple
selections” can be selected if more than one answer is desired.
• If your list of answers is very long, and you require more choice labels, click on the green plus 5
symbol to add another 5 label fields at a time.
• You can select to spread you choice labels across more than one column. Select the number of
columns you want from the “Display columns” under “Options”.
• If you want to randomise the order that the options are displayed then tick the check box next to
‘Answer rotation, if applicable’ checkbox under Advanced settings.
12 | P a g e
Validation Rules
One method of ensuring that your respondents answer the question is to use a validation rule. Under
“Validation” select “1 selection required” and complete the validation message to read “Please select at
least one option.” Once this is activated, if a respondent tries to skip this question, a warning dialogue
box will appear forcing the respondent to answer before they are able to continue with the rest of the
survey.
Note: If you selected
the “Allow multiple
selections” and you
required more than
one answer to be
chosen, then you can
use the validation
rule by choosing the
number of answers
you require in the
dropdown box
located next to the
“selections allowed”
validation rule.
13 | P a g e
Click “save” which will take you to the Questions screen:
This screen allows you to view how your questions will look and in which order
they will appear in.
If you need to make changes to the question click on edit and it will take you
back to the previous screen, otherwise click on “new question” either at the
top or bottom of the section to create the next question.
Note the following:
The options above
and below each
question are placed
in the relevant
section
• Add new text
• New question
from library
• Split sections
These options will be
discussed later in the
user manual.
14 | P a g e
Numeric Questions
Questions which request a numerical answer can be presented as a numeric question. For example,
the question ‘How regularly do you check your Deakin email address?’ requires a one, two, or three
digit answer.
When creating a new question, Opinio numbers the questions as they are entered. The order of
questions can be edited via the main Questions Menu.
Enter the question text for the numeric question and select the “Numeric” answer style.
The prefix allows you to enter text before the answer field, in this example “I check my email” is used.
The postfix label allows you to enter text following the answer field, this example uses “time(s) per
week”.
Click save to preview the question.
15 | P a g e
Dropdown boxes
Dropdown boxes allow participants to select from multiple predefined responses through use of a
dropdown box.
Enter the question text within the space provided. Select “Dropdown” from the answer types and enter
the list of possible answers.
Note: The Dropdown
Label allows you to
display an initial title
on the dropdown box.
The dropdown bank allows you to access previously saved dropdown lists.
When entering items, each response option within the dropdown box must be on a new line.
If you want to randomise the order that the options are displayed then tick the check box next to
‘Answer rotation, if applicable’ checkbox under Advanced settings.
Click save to return to the question screen.
16 | P a g e
Rating questions
If participants are required to rate a single item, a Rating question can be used.
The Rating question will present the participant with a minimum value (e.g. Unimportant) and a
maximum value (e.g. Very Important) with a predefined numerical scale in-between.
Select the “Rating” tab and enter the value labels, and number of scale options. If you wish to provide
participants with a ‘no selection’ option, enter ‘N/A’ within the No selection label area.
Click on save to view the question.
17 | P a g e
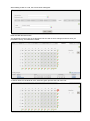
Matrix questions
Matrix questions present the participant with one or more question and a range of response options that
can be applied to each question.
To create a Matrix question, select the “Matrix” tab within the question editing screen. Select the
appropriate number of columns rows for the question. This number will also need to allow for a row of
headings and a column of labels for the matrix.
Then select “Dual scale (rating + importance)” from the dropdown list and click “create matrix”.
A dual scale matrix is automatically separated into two parts: rating, and importance. They are shaded
slightly differently so you can tell them apart. There are 11 columns and 6 rows. The first row and first
column is used for headings and labels (indicated by the ABC box). All other boxes are possible answer
choices. This will become clearer when we view the question in the question screen.
Hint: There are two
ways to add labels to
your matrix; either
click on individual
cells or select the
entire row or
column.
This is achieved by
clicking on the green
pencil at the end of
the row or column.
18 | P a g e
When adding a label to a cell, the screen below will appear:
Enter the label and select save.
The appearance of the matrix in the Question Edit view will not have changed, however when you
preview the survey, the label will be visible.
To edit an entire row of labels at once, select the green pencil at the end of the row:
19 | P a g e
Opinio automatically labels the dual scale matrix with “Good/Bad” and “Important/Not important”.
However you can edit these to suit the scale relevant to your survey.
Click “save”, then “close” in the next screen to return to the Question Edit
screen.
Tip: Notice that
there is a “<br>” in
the labels: this is a
command that
means “line break”
and would be the
same as using the
carriage return on
your keyboard. This
is a formatting
function and is not
essential to use in
your surveys.
Without the line
break, the labels
would just sit on one
line.
You can then return to the main Questions screen to view your matrix:
20 | P a g e
Open ended questions
Each question type allows the addition of a text box below the main question. This enables participants
to leave additional comments relating to the question.
It is also possible to create questions that are solely asking for written feedback. This type of question
is an Open Ended question.
To create an Open Ended question, select the “no type” answer style and select “open ended question”.
Depending on how much detail you expect respondents to provide, you will need to adjust the number
of rows and columns of white space for them to write in (remembering the maximum number of
characters for an open ended question is 255 characters).
Note: 255 characters is approximately the length of the above paragraph. The maximum number of
columns and rows allowed is 99.
21 | P a g e
Question Library
The question library allows you to store and re-use questions that you have previously created, even for
other surveys. Once you have created a new question and return to the question screen simply click on
“add to library”. Question libraries may be shared so you can add to them or they can be specific to
certain users.
Note: you will only
have access to the
Deakin University
Question Library, or
the library allocated
to your area.
You can add questions to existing question libraries or you can start a new one. Click on an existing
library and add the question, then click on “close” in the next screen.
When you wish to use a question from the library you need to be in the Questions screen. Above and
below each question there is an option “new question from library”.
A list of questions that have previously been added to the library will be available for you to choose
from.
Select a question by clicking on “copy this”.
22 | P a g e
Click close to return to the question screen. The question from the library will now be inserted into your
survey.
Organising questions
Once you have created the questions for the survey, you may wish to change the order of them. In the
Questions screen, for each question there are arrow heads on the right hand side of the question box.
Use these to rearrange the order of the questions.
23 | P a g e
Split Sections – *Updated Feature*
The split section function is available to allow for questions to be grouped or split across screens using
a page break function. Select split section above a question to add a new page to the survey at that
point.
The following dialogue box will appear:
This allows you to give the section a heading, change the background colour and format the font. If you
wish to randomise the question order within the section to avoid a bias/priming effect you can do this
here.
There is also an option to remove all section breaks, or to add section breaks to every question.
The option can be found in the main ‘Questions’ menu.
24 | P a g e
Conditional Branching
Conditional branching is used to filter out or skip irrelevant questions based on a condition that you set
within the survey. For example, if question 1 asks ‘Do you have a cat’ and question 2 asks ‘what colour
is your cat’ you would need to set a condition on the first question so that respondents who answer ‘no”
(i.e. they do not have a cat) are not asked the second question as it is not relevant to them. It is
essential that you use the validation rule for questions that will be linked to a conditional branch.
Click on “branching” in the left vertical menu while you are in the questions screen.
Important:
branching questions
cannot occur
without splitting
each section of the
survey, ensuring
that each question is
on a separate page.
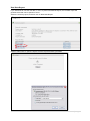
You will be presented with the Branching Overview screen:
Branching can be set to either include questions within a survey based on conditions, or to exclude
questions based on certain conditions. Select Change Branching Type in the left vertical menu to edit
this setting.
25 | P a g e
For this example, we want to include questions with conditional branching. The first step is to exclude
all questions that will not be relevant to all respondents. This will stop these questions from being
displayed until the participant meets the assigned condition.
To do this, click on “exclude questions” in the left vertical menu and select the relevant questions.
The “Filters” key on the top of the screen shows which questions do not form part of the main survey
(red blocks).
At this stage the only condition that is set is to initially skip questions 2 and 5. There are no conditions
set for individual questions.
26 | P a g e
To set the first condition, click on the green plus sign next to question one (this will give you the ability
to set the condition to include question 2 for some respondents depending on what answer they give to
question 1).
Give the condition a name, for example ‘internet’.
Check the box next to “yes”
Check the box next to question 2
Click Save then OK in the next screen.
27 | P a g e
The branching overview screen will now display a green box under question 2, indicating that if the
condition is met on question 1, question 2 will be displayed.
Note: You will be
able to confirm that
branching conditions
are functioning as
desired in the
Preview Survey
window.
28 | P a g e
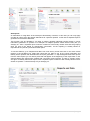
Look and Feel
The Look and Feel section of Opinio allows you to add headings, introductions, footers and other
functions to the survey. To get to the Look and Feel section from the questions screen, select “Look and
Feel” from the left vertical menu of the Survey Administration screen.
Templates
All Deakin University webpages need to comply with the pre-approved branding and colour schemes. A
Deakin University template has been included for your use.
Below is an example of the ‘Deakin’ template within a survey, including a progress bar.
To add a progress bar to the survey click on the progress bar label and select either a percentage or
count, then save and OK. This will take you back to the Survey administration screen.
A progress bars gives respondents an idea of how much of the survey they have completed and how
much more there is to complete.
29 | P a g e
Viewing of surveys using these templates is not optimised on an ipad due to their smaller screen and
the way the ipad zooms into text question answer boxes, thereby hiding the original question text. A
Style sheet (CSS) has been created to optimise viewing on both computers and ipads (template/survey/
common/default/style.css). This CSS file utilises the Deakin University 2011 banner.
Survey Texts
All good surveys have an introduction that explains the ‘who what why and where’ of the survey. You
may also wish to have a header and footer, as well as a parting “thank-you” comment once the
respondent comes to the end of the survey.
Click on “Look and Feel” in the left vertical menu.
Select “Survey Texts”
On the ‘Survey Texts’ page you can add a heading that will displaying throughout the survey, a survey
window title, introduction text that will display at the beginning of the survey, a header and footer for the
survey, and a thankyou note at the end of the survey.
30 | P a g e
When editing the survey, introduction text will appear at the top of section 1, which will by default also
include question 1. To move the introduction text to a separate page, click on ‘Split Section’ above
question 1.
Privacy and Behaviour
Security and Privacy
From the Survey Administration screen, select Survey Setup.
31 | P a g e
Opinio defaults to “no authentication”, but for surveys that target Deakin staff and students with UMS
passwords, use the LDAP Authorised plug-in as this will prompt the staff or student to enter their UMS
details before they take the survey.
For surveys that include respondents who do not have a UMS password and are being sent an
invitation email via Opinio, use the “password assigned by invitations”.
In situations where the Opinio invitations are not being used, you can set one password for the survey
and give this to your respondents.
Note: It is important
to remember that
reminder emails can
only be sent if the
anonymity is set to
None or Partial.
There are three levels of anonymity:
•
None (Invitees are linked to respondents),
•
Partly (Invitees are linked to respondents at the database level only) and
•
Full (link between the invitee and respondent is completely removed)
Regardless of the level selected, Opinio will assign each respondent with a unique ID.
32 | P a g e
Survey Behaviour
To alter the behaviour of the survey, enter the Survey Setup menu, then select ‘Survey Behaviour’.
This screen allows you to manipulate functions including navigation, response quotas, number of
submissions, language and to select a redirect website once the survey is completed.
To send participants to a particular website, or area of the Deakin website, enter the URL into the
“Redirect to address” space provided at the bottom of the page under the “Integration” section.
Please not that the default is to redirect after the last survey page rather than the thankyou message.
You will probably most likely want to change this.
33 | P a g e
Publish a survey
Before you publish your survey, complete the following checklist:
Thoroughly test the survey using the Preview Survey option in the Survey Home menu
Set survey open and close dates from the Survey Home menu
Confirm that the survey is unlocked (green light)
Check the survey texts for typos or other errors
Set privacy rules
Once you have created the questions, finalised formatting and selected the privacy and behaviour rules,
you are now ready to send the survey out to the respondents. Select “publish survey” from the left
vertical menu. This screen lists all the options you can select from when publishing your survey.
Invitations
The ‘Invitations’ link from the left vertical menu will allow you to set up email invitations that Opinio will
send out.
34 | P a g e
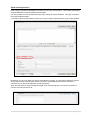
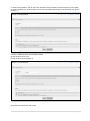
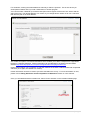
Select ‘New Invitation’ to begin the setup process.
The screen allows you to set up an invitation group. You are able to modify the message that is sent to
participants, set reminder emails to go to non-responders on specified dates, as well as modify the
email that is sent as the reminder.
Note: to avoid
confusion, the From
name and From
email should match
as this is what will
be seen by those who
receive the invitation
email.
To set up an invitation:
• Assign a name to the invitation. This is for administration purposes and will not be visible to
participants.
• Add a “from name”, e.g. Deakin University, or your name if the survey is coming directly
from you.
• Add an email address
• Set the send date and time by using the calendar icon – the date format is
month/day/year/hour/minute
• Modify the message you want participants to read in the email, but do not delete the URL.
• Set a reminder email message, and date and time
Note that the send and reminder dates must be within the start stop dates set in the administration
screen.
35 | P a g e
You will then see the invitation details screen.
Add Invitees
At this stage the invitation cannot proceed until you add the invitee details. Click on “add invitees” from
the left vertical menu.
There are several ways you can add invitees, there are 4 tabs available.
Note: Invitation lists
can be saved in the
resource section and
be re-used for
subsequent surveys
but will need to be
checked to confirm
that contact details
have not changed.
36 | P a g e
For small lists, entering the email addresses manually is often the quickest. This is also where you
would paste invitation lists if you had created them in another program.
You need to select a delimiter (a character that Opinio will recognise as the end of one invitee and the
start of the next). The default delimiter is a comma, if you change this be careful not to use a character
that will form part of an email address.
The “select from panel” is an advanced feature which enables you to draw a sample from a population
based on a sampling definition. Further information can be obtained on the Opinio Documentation
website http://www.objectplanet.com/opinio/userguide/index.htm?page=index.html.
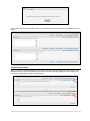
Import Invitees allows you to upload a csv file that contains the invitees emails delimited with a specified
character (once again, the default is a comma).
Invitee information can also be used to pre-enter data within the survey. For more information on this,
please refer to Hiding Questions and Pre-Population of Questions further on in this manual.
Once you are satisfied with the invitation list, select ‘Click to Activate’ on the Invitation Details page.
37 | P a g e
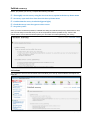
Invitation lists that include attributes
When entering an invitation list the default is to put the email then name. However, it is also possible to
add attributes (i.e. known details about the respondent) that can be used for piping (invitee piping) or
downloading along with responses when downloading the raw data (see relevant sections). There is no
limit to the number of attributes; however each data element must be less than 255 characters.
Setting up an invitation lists with attributes
The data you supply when adding invitees must be in the format described below.
email, name, attribute-name1, attribute-name2, attribute-name3, ...
joe@smith.com, Joe Smith, abc, def, xyz, ...
The first line sets the label of the attributes. While this line is optional it is recommended in case you
want to use any attribute related features. If labels are not specified then the default is "attribute1",
"attribute2", "attribute3" etc.
The first column must be valid emails and the second column must be invitee names you’re your invitee
list is missing names but has attributes then an additional delimiter must be included after the email
address to indicate that names are absent. This example and other common invitee list formats are
given below.
Email only
Email and name
Email, name and two attributes
email
Email, name
Email, name, employment area, staff number
joe@mydomain.com,
joe@joe.com, Joe Smith
joe@mydomain.com, Joe Smith, sales, 1342
mike@mydomain.com,
mike@mydomain.com, Mike Jones
mike@mydomain.com, Mike Jones, administration, 8623
mary@yourdomain.com,
mary@yourdomain.com ,Mary Brown
mary@yourdomain.com, Mary Brown, research, 0381
Email and two attributes but no name.
Note: a delimiter
only needs to be put
at the end of an
invitee entry if only
an email is supplied.
joe@mydomain.com,, sales,1342
mike@mydomain.com,, administrations, 8623
mary@yourdomain.com,, research, 0381
Pre-population of the survey also requires special instructions put into the invitation list (see section on
Hiding Questions and Pre-population of Questions).
Personalising invitations and reminder emails
If an invitee list has been set up with names then these can be used to personalise invitation text and
reminder emails. To do this simply put [NAME] in the invitation text where required e.g. Dear [NAME].
38 | P a g e
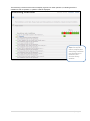
Manage Invitees
From the Invitation details screen click on “manage invitees” from the left vertical menu. The details and
status of invitees can be viewed and deleted via this screen.
Invitees are listed by email address and name (if entered). This screen also shows the status of the
invitee;
• Pending: invitee has not yet received the invitation
• OK: Invitation has been successfully sent
• Error, not sent: Invitation was not able to be sent
• Reminder error: Reminder was not able to be sent
• Invalid email: email is invalid and invite cannot be sent.
Note: If any emails
were not successful,
you can select to
resend the invitation
via this screen.
39 | P a g e
Manage Responses
If you are interested in looking at each respondent survey, you are able to do this via the “manage
responses” section. When you are in the Reports and Data screen, the “manage responses” is listed in
the left vertical menu.
Click on each of the respondent IDs to view their individual responses.
40 | P a g e
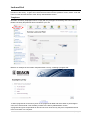
Print Survey - *New Feature*
If you wish to print the survey, or to produce a pdf file that displays the complete survey, the ‘Print
survey’ option within the ‘Publish Survey’ menu will allow you to do this.
Options available include:
•
Page size: The default page size is A4, but this can be altered via the dropdown box.
•
Background image: A background image can be added to the PDF file.
•
Rating: If rating questions exist in the survey, their layout can be adjusted to appear vertically
or horizontally.
•
Multiple choice: If multiple choice questions exist in the survey, their layout can be adjusted to
appear vertically or horizontally. There is also an option to display all choices within one
column.
•
Numeric: If numeric questions exist in the survey, their layout can be adjusted to appear
vertically or horizontally.
•
Dropdown: If dropdown questions exist in the survey, their layout can be adjusted to appear
vertically or horizontally. There is also an option to display all choices within one column.
•
Matrix: If matrix questions exist in the survey, their layout can be adjusted to appear vertically
or horizontally. The following options are also available:
•
Scale down large matrices: If this checkbox is checked, when the matrix is larger than certain
size, smaller fonts will be used to print the labels and texts within the matrix.
•
Extract dropdowns with sizes larger than: If a matrix cell is of type dropdown list, the
dropdown items will be extracted when its size is larger than this specified value.
41 | P a g e
•
Drop large matrices/Cut large matrices: If Drop large matrices is chosen, very large matrices
will be dropped. If Cut large matrices is chosen, the matrices will be cut and only part of the
columns will be printed.
•
Texts: These are various text segments used for printing the survey.
Note: If you plan to
send out the survey
as a paper survey,
the Branching Text
option will add
instructions to the
print out of the
survey where
branching would
normally occur.
This will enable
participants to skip
over the questions
that are not relevant
to them.
42 | P a g e
Reports and Data Analysis
All report options for a survey are listed when you click on “Reports and data” in the left vertical menu.
Two reports are automatically generated the moment the survey is created: The Summary report which
lists each question and contains charts; and the Comment report, which lists all the questions and gives
the answers to the free text questions. Custom reports can be generated if additional analyses are
required.
Summary Report
The summary report is a default report that will generate a basic analysis of your data.
Each report allows you to select the type of file, such as html, pdf, raw data as a comma separated text
file, or an SPSS data file. The raw data and SPSS data files will generate unanalysed data.
43 | P a g e
Each report contains a Table of Contents and a section called “report info” which provides the following
information:
In the summary report, each question is reported in a graphical and numeric table.
44 | P a g e
Comment Report
The comment report allows you to view each comment made throughout the survey in the same way as
a summary report.
Selecting the Html report or the Pdf report will generate a report similar to the summary report.
45 | P a g e
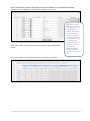
Raw Data Report
If you would like to view the raw data, or use it to perform detailed analyses, the raw data report will
generate a file that can be opened in excel.
Select the summary report, and then click on Raw Data Report.
Select to either save or open the zip file once the report has been generated.
46 | P a g e
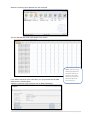
Select the summary report data file from the winzip file.
The raw data will then show each question in a column.
If you wish to export all of the comments, you can generate the raw data
report for the comment report.
Note: If your survey
allows participants
to select N/A for a
question, you will
need to account for
this data point in
your analysis.
Select the comment report, and then click on Raw Data Report:
47 | P a g e
Open the winzip file and then select the file to view the raw data.
The file contains all the free text comments each separated by a comma.
Once you open this text file in excel, you will see that the first row contains headings.
SPSS Data Export - *New Feature*
If you wish to analyse survey data with SPSS, the SPSS data export feature will generate the required
data file in the same manner as the raw data report.
Opinio exports all data as string in SPSS, therefore to analyse accurately the data type will need to be
changed from string to numeric within SPSS.
48 | P a g e
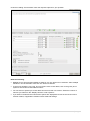
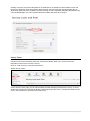
Raw data export settings
If you have selected no or partial anonymity and you need the respondents username or email in the
raw data file to link other information (such as demographic information from Callista in the case of a
student survey) you will need to include the identifier in the raw data file. Here you can also download
any attributes that you set up in the invitation list.
When you are in the Report screen, click on the “Raw data settings” in the left vertical menu
Then select the identifying information that you require and click save and then OK which will take you
back to the report screen so you can then download the raw data file.
49 | P a g e
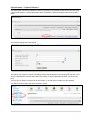
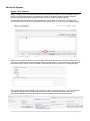
Customising Reports
Information within each type of report can be customised, enabling you to present the data in a few
different ways.
From within the Summary Report menu, select Structure.
Select main element to choose which data you would like to include within the report.
Select the questions you would like to include in the report by ticking the appropriate checkboxes.
50 | P a g e
The below options can be altered in each type of report.
Selecting detailed statistics will generate detailed data for each question, while selecting summary
report will generate a summary analysis of all questions.
You can also select to include text comments within the summary report.
Customising reports to look at particular cohorts- Report Filters and Autoreports
Report Filters
Filters provide a way to build powerful reports as they allow one to "zoom" in on a subset of the
respondent data. For example, if you had a question that asks about gender (male/female) you could
generate a summary report that only includes females’ responses by filtering out males.
Many filters can be created per report, with the data-set being generated from the sum of all filters. For
example you might expand on the aforementioned gender filter to also specify that the dataset only
have those that picked a particular response to question 5 and question 8. Please note that a filter
might take a long time to create if your survey receives a large number of responses. In this case it is
better to set up the filters before starting the survey if possible.
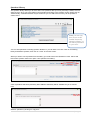
To create a filter go to “Reports and data then select the report that you want the filter to be applied to.
Then from the left menu screen click “Filters”, then “Add filter” (see picture below).
If setting up a new filter give it a name. Alternatively select a pre-existing filter from the drop down
menu. Then indicate whether you want the respondents meeting the condition should be included in
the report or excluded (filtered out). Finally, select what types of conditions you want to filter by (date,
response language and/or based on question responses) and click 'continue'. A screen with all your
filtering option is then presented. Enter the details (e.g. dates, question answers) that meet the
specification of your desired filter.
51 | P a g e
Autoreports
An alternative to using filters is the Autoreport functionality. However, in this case you can only apply
one filter at a time, being the answer alternatives to a specific question. In this case a separate report is
generated for all answer alternates.
This function may be desirable if you want to quickly generate individual reports based on cohort
information gathered in a question. For example if a multiple question asked “which Faculty are you
studying in?” then a separate report could be created for each faculty. Please note that the grouping
does not have to be based on demographic information, as the reporting is actually based on
respondents who picked a particular answer option.
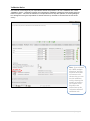
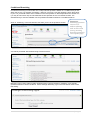
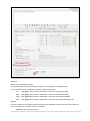
To use this feature, go to "Reports and data" from main survey screen and click on the "Auto create
reports" in the left Menu box. Select the report that you want to use for the report generation and
identify which question that will determine the report generation. To help distinguish these auto reports
from the main reports you can add a prefix that will appear at the beginning of the report titles. In the
example below auto reports were created with a summary report structure. A prefix of “Faculty cohort”
was given to identify these auto-reports, with a separate report created for each Faculty based on their
answer to question 1 “Which Faculty are you studying in?.
52 | P a g e
Advanced Options
Piping- *New Feature*
Piping is a way to make a survey dynamic and more personal as it allows you to insert/replace texts in
the survey dynamically based on a respondent’s answer to an earlier question (question response
piping) or personal information added when setting up the invitation list (invitee piping).
To insert the piping put the cursor in the appropriate position and then click on the new piping icon
(circled below). You will then be prompted by several menus where you can set up your desired piping.
Below is an example of question response piping where the response from question "What colour do
you like?" is carried out to the next question "Why do you like Green?”. Please note that in order to work
the question where piping comes from MUST come before the piping tag and be on a separate page.
The question design of this example would appear as "Why do you like ${colour}?”. However, when the
respondent answers the first question the responded value is copied and entered in place of the
${colour} tag. Below are images detailing the selections made to set up this question piping.
53 | P a g e
Another useful from of piping is that which uses invitee data. In this case the question is populated with
already known information supplied in the invitee list. To undertake this kind of piping the invitee list
must be set up appropriately with the included attributes clearly labelled.
Below is an example of how you would set up invitee piping to answer the same example question
“Why do you like the colour ……? In this example the attribute is labelled colour (see details below).
Piping can also be set up using a fixed value or a survey URL parameter. For more details see the
online Opinio help guide (http://www.objectplanet.com/opinio/userguide/index.htm?page=index. html)
Hiding Questions and Pre-Population of Questions - *New Feature*
It is possible to hide questions within a survey so that they are not presented to participants. This
option is mostly used in conjunction with the pre-population of question responses.
Example:
If you were planning to administer a survey to a group of participants but wanted to present a different
selection of the questions to each participant, you could add information about the participant to the
invitation list.
Step One:
Gather the required information about your participants (Email address, name, and relevant questions).
Eg:
Jill – jill@deakin, works in ITSD, only needs to be presented with Q2, Q6, and Q10
Bob – bob@deakin, works in DSA, only needs to be presented with Q4, Q7, and Q9
Mary – mary@deakin, works in KMD, only needs to be presented with Q3, Q5, and Q8
Sue – sue@deakin, works in the Strategic Intelligence and Planning Unit, needs to be
presented with all questions
Step Two:
Add a question at the beginning of your survey that will collect the required participant data. Eg. Area of
employment:
54 | P a g e
Step Three:
Add branching conditions from question 1 to exclude the irrelevant questions from the survey.
In our example, Jill who works in ITSD would only be presented with questions 2, 6 and 10. The
branching for a selection of ITSD at question 1 would look like this:
Since the branching is set to exclude questions, all questions other than 2, 6, and 10 are skipped in the
survey if the participant has selected ITSD at question 1.
Step Four:
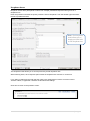
Hide Question 1 from participants by selecting Advanced settings, and ticking ‘Hide Question’.
55 | P a g e
Step Five:
Define the pre-population criteria.
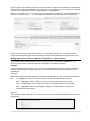
The general format for pre-populating a question is: pre_q[question_number]=[value]
For our example the pre-population information would look like this:
Jill –
pre_q[1]=1 which means, at Question 1 select the first option (ITSD)
Bob – pre_q[1]=4 which means, at Question 1 select the fourth option (DSA)
Mary – pre_q[1]=2 which means, at Question 1 select the second option (KMD)
Sue – pre_q[1]=3 which means, at Question 1 select the third option (Planning Unit)
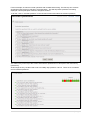
Step Six:
Convert invitation list into Opinio format (email,name,pre-population criteria,) and enter into invitee list.
For our example, the invitation would be as follows:
jill@deakin.edu.au,Jill,pre_q[1]=1,
56 | P a g e
bob@deakin.edu.au,Bob,pre_q[1]=4,
mary@deakin.edu.au,Mary,pre_q[1]=2,
sue@deakin.edu.au,Sue,pre_q[1]=3,
When the participants follow the link within the survey invitation, question 1 will be pre-populated with
responses. This will now enable to survey to present them with the relevant questions.
Note: For this example to function correctly, the following criteria must apply:
•
Branching must be set to exclude, not include
•
Question 1 must be in a separate section
•
All respondents must have been invited to participate in the survey. Without the pre-population
data assigned to invitees, participants will be presented with all questions following Question 1.
57 | P a g e
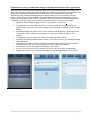
Conducting Surveys in the field
Opinio Mobile Interviewer - *New Feature*
The Opinio Mobile Interviewer application enables surveys to be undertaken in the field (e.g. face to
face interviews) and may better suit some survey situations e.g. collection of data at an event. A key
benefit to this application is the functionality to store survey responses when in an area without internet
connectivity. Data transfer in real time is also possible if internet access is available.
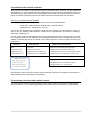
Setup of the Opinio mobile interviewer application
The Opinio mobile interviewer application can be
downloaded for free from the Apple app store. Once
downloaded the interviewer application needs to be linked to
the Deakin Opinio database. To do this go to settings, select
the interviewer application then enter the Deakin Opinio
sever details (http://surveys.deakin.edu/deakinsurveys) and
your Deakin username and password.
Under this settings menu you can also choose whether you
want to manually transfer the response data or set it to
automatically transfer when a network is available.
To make the application easier to use switch the Autoadvance option to “on”. If this is left off then the person
entering the data will always need to use to arrow buttons to
navigate through the survey.
Transferring responses
After completing the survey you can either save the response and start the survey again with a new
individual (Save and Restart) or save the response and exit the survey (Save and Exit).
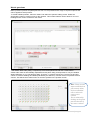
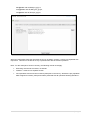
Once you have finished collecting data you will need to manually transfer responses if this was
specified in your setup or if you have been surveying in an area without continual wi fi access. Any
responses requiring manual transfer is indicated on the home screen. To make the transfer select
transfer responses then send. A message confirming the transfer will then be displayed.
In the example below two responses to the testing for Opinio upgrade survey need to be transferred.
58 | P a g e
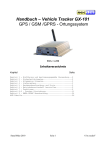
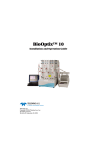
Limitations to surveys undertaken using the Opinio mobile interviewer application
While the Opinio mobile interviewer application offers some great benefits it should only be used when
appropriate as not all question types and formatting are compatible (see list below). Such limitations will
need to be considered when designing survey instruments. If you simply want to ensure that
respondents using a ipad/iphone/ipod touch have optimal viewing of your survey then you should
design a normal survey and select default css file (template/survey/common/default/style.css) when
setting up the look and feel (see section on templates). This css file has been created so that users on
a computer or ipad get optimal viewing without any limitations of the survey instrument design.
•
Application only available for apple products i.e. ipad, iphone or ipod touch.
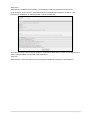
•
The application can’t read matrix questions or in-text questions. If a survey contains these
question types you will receive an error message (see picture below) and such questions will be
skipped.
Formatting limitations in question text. You are unable to bold, highlight or colour question text
or put text in a table, number list or paragraphs. You also can’t include an image in your
question.
The application will only display one question per page (see pictures below)
Not able to randomise questions within a section, or the order of items in any dropdown/multiple
choice questions.
Formatting of drop down questions is different to standard Opinio survey. All items are listed
underneath each other even if set up to appear in columns (see picture below).
As people are not sent an invitation invitee piping is not possible.
A survey can only be saved once completed i.e. cannot return to survey to complete later.
Multiple responses can’t be prevented as invitations or personal login details are not utilised.
•
•
•
•
•
•
•
59 | P a g e