1
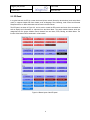
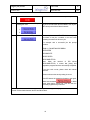
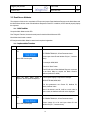
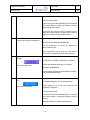
Telegesis
TG-UG-0500 ETRX3IPDDVK DevKit
ETRX357 IPD
User Guide 0500r2
User Guide
Using Telegesis Terminal with ETRX3 IPD and
Mock Meter Firmware
IPD firmware version r300
Mock Meter firmware version r301
©2012 Telegesis (UK) Ltd
ETRX357 IPD Devkit
Telegesis (UK) Limited
User Guide
ETRX357 IPD
Document No.
1
500
Table of Contents
1.
Introduction ............................................................................................................................................................. 2
2.
Telegesis Terminal Panel....................................................................................................................................... 3
3.
2.1
Mock Meter Panel ......................................................................................................................................... 3
2.2
IPD Panel....................................................................................................................................................... 4
2.3
Function of the Buttons ................................................................................................................................. 5
Application Examples ............................................................................................................................................. 9
3.1
3.1.1
Initial Condition .......................................................................................................................................... 9
3.1.2
Implementation Procedure ....................................................................................................................... 9
3.2
Read Server Attributes................................................................................................................................11
3.2.1
Initial Condition ........................................................................................................................................11
3.2.2
Implementation Procedure .....................................................................................................................11
3.3
Publish price command ..............................................................................................................................13
3.3.1
Initial Condition ........................................................................................................................................13
3.3.2
Implementation Procedure .....................................................................................................................14
3.4
Get current price..........................................................................................................................................15
3.4.1
Initial Condition ........................................................................................................................................15
3.4.2
Implement Procedure .............................................................................................................................15
3.5
Display and Cancel message command ...................................................................................................15
3.5.1
Initial Condition ........................................................................................................................................15
3.5.2
Test Procedure .......................................................................................................................................16
3.6
Get last message ........................................................................................................................................16
3.6.1
Initial Condition ........................................................................................................................................16
3.6.2
Test Procedure .......................................................................................................................................17
3.7
4.
Network formation ......................................................................................................................................... 9
Issue Load Control Event ...........................................................................................................................17
3.7.1
Initial Condition ........................................................................................................................................17
3.7.2
Test Procedure .......................................................................................................................................18
Contact Information ..............................................................................................................................................19
1
Telegesis (UK) Limited
User Guide
ETRX357 IPD
Document No.
2
500
1. Introduction
Telegesis have launched the SEP1.1 compliant ZigBee AT Command layer on the EM357 Ember platform. The
ZigBee SEP AT commands allow developers to build a ZigBee Smart Energy compliant In-Premise Display
without the need for any in-depth knowledge of the ZigBee PRO stack. To assist user in practising with the IPD
AT command set, a Mock Meter has been developed, which can be used with the IPD for further development
purpose.
Although a description of the supported AT command set has been included in the provided IPD AT command
manual (TG-PM-0500 ETRX3 IPDDVK IPD Manual r1), and the AT command set can work with a serial port
communication tool (such as HyperTerminal), Telegesis Terminal provides an easy way to start practising with
the IPD and Mock Meter. A pre-configured panel is provided as shown in Figure 1-1, which contains multiple
buttons. It can be observed that each button has a specific name on it, for example Info, Bootloader, help and so
on. The user can easily click one of the buttons to issue an AT command.
Figure 1-1 Telegesis Terminal for IPD and Mock Meter
This document provides a user guide to use the Telegesis Terminal. Following sections will introduce the
preconfigured panels for both IPD and Mock Meter, then give several examples of using the Telegesis Terminal
to implement applications, for example network form and join, publish price and so on.
2
Telegesis (UK) Limited
User Guide
ETRX357 IPD
Document No.
3
500
2. Telegesis Terminal Panel
This section introduces the pre-configured Telegesis Terminal panels of both IPD and Mock Meter.
2.1 Mock Meter Panel
Typically, the Mock Meter should be a coordinator and trust centre in a network, it supports multiple SE server
clusters, including Message, Price, Metering, Load Control and Demand Response. More information can be
found in the Mock Meter manual.
The Mock Meter panel can be used to control the Mock Meter module and issue server-related commands as
well as display local information or response from the IPD. Figure 2-1 shows the buttons. It can be observed that
the buttons are categorized into five groups: Module control, Network Management, ZDO, Binding, and Mock
Meter. The function of the buttons will be introduced in a later section.
Figure 2-1 Button layout of the Mock meter panel
3
Telegesis (UK) Limited
User Guide
ETRX357 IPD
Document No.
4
500
2.2 IPD Panel
In a typical scenario, the IPD is a router device and joins a network formed by other devices (such as the Mock
meter). It supports multiple SE client clusters, such as Message, Price, Metering, Load Control and Demand
Response and so on. More information can be found in the IPD manual.
The IPD panel, as shown in Figure 2-2, can be used to control the IPD module and issue client commands as
well as display local information or response from the Mock Meter. The panel contains buttons which are
categorized into five groups: Module control, Network form and leave, ZDO, Binding, and Mock Meter. The
function of the buttons will be introduced in a later section.
Figure 2-2 Button layout of the IPD panel
4
Telegesis (UK) Limited
User Guide
ETRX357 IPD
Document No.
5
500
2.3 Function of the Buttons
The following table maps the buttons with their linked AT commands and a brief description is also given. More
information about a specific command and its prompt has been included in the IPD or Mock Meter manual.
Button Name
Linked AT Command
Description
Module Control-R3xx (includes the buttons on both Mock Meter and IPD panels)
Info
ATI
Display Product Identification Information
Z-Reset
ATZ
Software Reset (this will not change the previous Sregister settings such as link key and so on)
Factory Default
AT&F
Restore Factory Defaults (Clear all S-Register setting)
Bootloader
AT+BLOAD
Enter The Bootloader Menu (will used to update firmware )
Display All S
AT+TOKDUMP
Display All S-Register Settings
Remove All Keys
AT+RMALLKEYS
Clear local key table
Neighbour Table
AT+NTABLE
Display Neighbour Table
Routing Table
AT+RTABLE
Display Routing Table
Address Table
AT+ATABLE
Display Address Table
NWK Info
AT+N
Display Network Information
Help
AT+HELP
Display All Available Commands
Network Management
Energy Scan
AT+ESCAN
Scan the background energy of all channels
Scan for Pan
AT+PANSCAN
Scan for active PANs
Security Mode
ATS0A
Set security mode to establish network or join network
(please refer to S-Register section in TG-PM-0500 ETRX3
IPDDVK IPD Manual r1)
Set Link Key
ATS09
Set preconfigured link key for establishing or joining a
network
Set NWK Key
ATS08
Set network key for establishing a network
Form A Network
AT+EN
Establish a Personal Area Network
5
Telegesis (UK) Limited
User Guide
ETRX357 IPD
Document No.
6
500
PJOIN
AT+PJOIN
Switch on “Permit Joining” Flag
Disas Local
AT+DASSL
Disassociate Local Node from PAN
Disas Remote
AT+DASSR
Disassociate Remote Node from PAN
Join any PAN
AT+JN
Join an open network with matched preconfigured link key
Join a Spec PAN
AT+JPAN
Join specific PAN
CBKE
AT+CBKE
Initiate CBKE with ESI or a partner device
ZDO
ID Request
AT+IDREQ
Request node’s NodeID
EUI request
AT+EUIREQ
Request node’s EUI
Node Descriptor
AT+NODEDESC
Request node’s descriptor
Power Des
AT+POWERDESC
Request node’s power descriptor
ACT EP
AT+ACTEPDESC
Request node’s active endpoint list
Simple Des
AT+SIMPLEDESC
Request endpoint’s simple descriptor
Match Des
AT+MATCHREQ
Find nodes which match a specific descriptor
ANNCE
AT+ANNCE
Announce local device in the network
Binding
Local BTable
AT+LBTABLE
Display local binding table
BSET
AT+BSET
Set local binding table entry
Remote BTable
AT+BTABLE
Display remote binding table
DEI BTable
AT+BCLR
Clear local binding table entry
Bind to Remote
AT+BIND
Create binding on remote device
Del Remote B
AT+UNBIND
Delete binding on remote device
BindMtr
AT+BINDMTR
Bind the IPD to the mock meter
UnbindMtr
AT+UNBINDMTR
Unbind the IPD to the mock meter
MockMeter Functions
6
Telegesis (UK) Limited
User Guide
ETRX357 IPD
Document No.
Get Time
AT+SETTIME
Set the local time on the mock meter
Set Time
AT+GETTIME
Get the local time on the mock meter
Get Attribute
AT+GETATR
Get value of a local ZCL attribute
Set Attribute
AT+SETATR
Set value of a local ZCL attribute
Print Price
AT+PRINTPRC
Get and print price from local price table
Clear PrcTabl
AT+CPRCTABLE
Clear local price table
Set Price
AT+SETPRICE
Set a price entry in local price table
Valid Price
AT+PRCVALID
Store the temporary price in the Price plug-in
Publish Price
AT+PUBLISHPRC
Publish price
Display MSG
AT+DISPLAYMSG
Send a display message command
Cancel MSG
AT+CANCELMSG
Send a cancel message command
Set MSG
AT+SETMSG
Set a local message
LC Event
AT+LCEVENT
Set and send a Load Control event
Cancel Event
AT+CEVENT
Cancel a Load Control event
7
500
IPD Functions
Get Time
AT+SETTIME
Set the local time on the IPD
Set Time
AT+GETTIME
Get the local time on the IPD
Get Attribute
AT+GETATR
Get value of a local ZCL attribute
Set Attribute
AT+SETATR
Set value of a local ZCL attribute
Synctime
AT+SYNCTIME
Sync the IPD’s clock with ESI
Discover Device
AT+DISCOVER
Discover SE device on the HAN
Find Cluster
AT+CLUSDISC
Discover all supported clusters on a remote device
Discover Attrs
AT+ATTRDISC
Discover supported attributes on a remote device
Read Attribute
AT+READATR
Gets an attribute from a remote device which supports a
specified cluster
7
Telegesis (UK) Limited
User Guide
ETRX357 IPD
Document No.
8
500
Write Attribute
AT+WRITEATR
Writes an attribute to a remote device which supports a
specified cluster
Scheduled Event
AT+GSE
Get Scheduled Events from Mock Meter
OPT In/Out Event
AT+OPT
Opt In or Out Event
Current price
AT+CURPRICE
Gets the Current Pricing from the Mock Meter
Scheduled Price
AT+SCHPRICE
Gets all the Scheduled Pricing from the Mock Meter
Price Label
AT+PRICELBL
Gets the label assigned to the Price Tier 1 to 6 from the
price cluster
Get last MSG
AT+LASTMSG
Gets the last message from the Mock Meter
ACKMSG
AT+ACKMSG
Used to acknowledge a message
8
Telegesis (UK) Limited
User Guide
ETRX357 IPD
Document No.
9
500
3. Application Examples
This section gives several examples of utilizing Telegesis Terminal to test some SE applications upon the IPD
and Mock Meter. These applications are simple. The user can practice them to gain further understanding of the
IPD supported AT command sets and propose a marketing competitive IPD device.
3.1 Network formation
The objective of this test is to test that the Mock Meter can form a SE network and the IPD can join the formed
network with proper security settings.
3.1.1 Initial Condition
Set up the Mock Meter and the IPD (e.g. plug each into a PC)
Run Telegesis Terminal; choose the serial ports for both the Mock Meter and IPD
3.1.2 Implementation Procedure
Item
1.
Test Step
Note
Click the buttons in the Mock Meter
panel following the order:
This is to set security of the Mock Meter before forming
a network
1.
2.
3.
2.
Then click the button in the Mock Meter
panel:
The MockMeter will form a network with the security
settings set in step 1. In the Mock Meter panel, there
will be some prompt to show a network is formed, for
example:
JPAN:11,1789,9EF383A7AFA5BD61
FORM:0x00
OK
REGCOMPLETE:00
This means a network is formed on channel 11, the
PANID is 0x1789, and network power is 3. Also the
Smart Energy registration progress is completed.
Network formation progress completed.
9
Telegesis (UK) Limited
User Guide
10
ETRX357 IPD
Document No.
500
3.
In the terminal for the Mock Meter, click
Open the network for 102 seconds to permit join
4.
Click the buttons in the IPD panel
following the order:
Set the security mode and link key for the IPD. If the
key does not match with the Mock Meter’s Link key the
IPD cannot join the Mock Meter’s network.
1.
2.
5.
Click the buttons in the IPD panel:
Scan and join a network. The IPD will show a prompt
to indicate it has join a network or an error code
indicating the reason for failure to joini.
For example: with a successful join the prompt
includes:
JPAN:11,1789,9EF383A7AFA5BD61
KESTARTED
KECOMPLETE
REGSTARTED
REGCOMPLETE:00
Note: When the terminal of IPD shows
REGCOMPLETE:00, it means that joining and
registration progress has been successfully completed.
If an error code occurs, please check the manual
section 4.
Please make sure the security setting is correct.
If the IPD leaves the network and wants to join again,
please use the button
in Mock
meter panel before permit join. This will clear the
previously registered key of the IPD.
The IPD joins the Mock meter’s network and completes SE registration progress. Then the user can
practise communication between the IPD and Mock Meter.
10
Telegesis (UK) Limited
User Guide
11
ETRX357 IPD
Document No.
500
3.2 Read Server Attributes
The objective of this test is to test that the IPD can send proper Read Attributes Request to the Mock Meter and
the Mock Meter will then send a Read Attribute Response to the IPD. In addition, the IPD should properly display
the response.
3.2.1 Initial Condition
Set up the Mock Meter and the IPD
Run Telegesis Terminal; choose the serial ports for both the Mock Meter and IPD
Mock Meter has formed a network
IPD has joined the Mock Meter’s network and completed registration
3.2.2 Implementation Procedure
Item
1.
Test Step
Click the button in the terminal for the
IPD
Note
The command line will show
AT+READATR:0000,01,<Enter Parameter here>
(In the IPD Function part)
Please input cluster ID and Attribute ID (use “,” between
them)
For example: 0000,0000
Then click “Send” button
The IPD will send a Read Attribute Request command
to the Mock Meter to request the Basic Cluster’s
attribute (Attribute ID: 0000)
2.
When the Mock Meter sends a
response, the IPD panel will display it.
The IPD panel display a response for example:
RESPATTR:0000,0000,00,01
The four parameters are: Cluster ID, Attribute ID,
Status, Attribute Value
Note: if the status is not 00, it will be a error code. In
such a case, the Attribute value will not be displayed.
3.
Click the button in the terminal for the
IPD
The command line will show
AT+READATR:0000,01,<Enter Parameter here>
(In the IPD Function part)
Please change 01 to 0A and input cluster ID and
Attribute ID (use “,” between them)
11
Telegesis (UK) Limited
User Guide
12
ETRX357 IPD
Document No.
500
For example: AT+READATR:0000,0A,0702,0000
Then click “Send” button
The IPD will send a Read Attribute Request command
to the Mock Meter to request the Metering Cluster’s
attribute (Attribute ID: 0000)
Please note: the end point must be changed to 0A to
read meter cluster attributes, as Meter server cluster is
supported on Endpoint 0A of the Mock Meter.
4.
When the Mock Meter sends a
response, the IPD panel will display it.
The IPD panel displays a response, for example:
RESPATTR:0702,0000,00,000000000000
The four parameters are: Cluster ID, Attribute ID,
Status, Attribute Value
Note: if the status is not 00, it will be a error code. In
such a case, the Attribute value will not be displayed.
5.
Use the button in the Mock Meter
terminal
The command line shows:
AT+SETATR: <ClusterID>,<AttributeID>,<AttrValue>
(In the Mock Meter part)
Please input the three parameters, for example:
0702,0000, 000000000001
This will change the metering cluster attribute (0x0000
CurrentSummationDelivered )
6.
Click the button in the terminal for the
IPD
The command line will show
AT+READATR:0000,01,<Enter Parameter here>
(In the IPD Function part)
Please change 01 to 0A and input cluster ID and
Attribute ID : 0702,0000
Then click “Send” button
The IPD will send a Read Attribute Request command
to the Mock Meter to request the Metering Cluster’s
attribute
(Attribute ID:0000 CurrentSummationDelivered)
12
Telegesis (UK) Limited
User Guide
13
ETRX357 IPD
Document No.
500
7.
When the Mock Meter sends a
response, the IPD panel will display it.
The IPD panel display a response for example:
RESPATTR:0702,0000,00,000000000001
The four parameters are: Cluster ID, Attribute ID,
Status, Attribute Value
The last parameter is CurrentSummationDelivered. The
user can manually change the value of
CurrentSummationDelivered on the Mock Meter
This scenario could be used in practise to get meter
reading.
Please note: in a real scenario, multiple meter attributes
are required to calculate the meter reading, for
example:
0x0300 UnitofMeasure
0x0301 Multiplier
0x0302 Divisor
0x0303 SummationFormatting
0x0304 DemandFormatting
0x0305 HistoricalConsumptionFormatting
3.3 Publish price command
This test is to test that the Mock Meter publishes the price and the IPD can display the received price information
properly.
3.3.1 Initial Condition
Set up the Mock Meter and the IPD
Run Telegesis Terminal; choose the serial ports for both the Mock Meter and IPD
Mock Meter has formed a network
IPD has joined the MockMeter’s network and completed registration
13
Telegesis (UK) Limited
User Guide
14
ETRX357 IPD
Document No.
500
3.3.2 Implementation Procedure
Item
1.
Test Step
Note
Click the buttons in the terminal for the
Mock Meter following the order:
The “Set Price” buttons is used for the Mock Meter to
set local price information. After set price, the user must
set an entry for it using “Valid Price” button.
1.
Note:
2.
(In the Mock Meter part)
can be used to check the set price. Currently the entry
1 is used to store the user configured price.
Entry 0 is used to store default price information.
2.
Click the buttons in the terminal for the
Mock Meter
In the command line, it should show:
AT+PUBLISHPRC:1<Enter Parameter here>
(In the Mock Meter part)
Please just delete <Enter Parameter here>, then click
“Send” button. The Mock Meter will send the price
information in local price table entry 1
Alternatively, the user can change the 1 to 0, and then
click “Send” button. Price information of entry 0 will be
sent.
3.
The terminal of the IPD will display the
received price information, for example:
PRICE:00000001,NORMAL,00000003,
00,0840,10,40,00000000,003C,000000
12,FF,FFFFFFFF,FF,FFFFFFFF,FF,FF
,1
Note: please be advised that according to SE 1.1 specification, the event id (the third parameter in above
command) should be increased, if the user wants to publish new price entry. If the Mock Meter terminal displays
a response: DFTREP:0700,00,8A,it means duplicated price information has been received.
The user can use the manual and construct a new price entry on the Mock meter then send it to the IPD
In addition, the user can specify the target node and endpoint in this command. In above example, node ID and
End point are not used. In that case, the MockMeter will use a binding table to send message. This assumes that
a binding entry has been added automatically during registration progress (if the user has seen
“REGCOMPLETE:00” prompt in the terminal for IPD).
14
Telegesis (UK) Limited
User Guide
15
ETRX357 IPD
Document No.
500
3.4 Get current price
Apart from receiving published price from the Mock Meter, the IPD can request the current available price. This
test is to verify that the IPD can request Price information stored in the Mock Meter.
3.4.1 Initial Condition
Set up the Mock Meter and the IPD
Run Telegesis Terminal; choose the serial ports for both the Mock Meter and IPD
Mock Meter has formed a network
IPD has joined the Mock Meter’s network and completed registration
3.4.2 Implement Procedure
Item
1.
Test Step
Note
Click the buttons in the terminal for the
Mock Meter following the order:
The “Set Price” buttons is used for the Mock Meter to
set local price information. After set price, the user must
set an entry for it using “Valid Price” button.
1.
Note:
2.
(In the Mock Meter part)
can be used to check the set price. Currently the entry
1 is used to store the user configured price.
Entry 0 is used to store default price information.
2.
In the terminal for the IPD use:
The user can use IPD to request price information from
the Mock meter
(In the IPD Function part)
3.
The terminal of the IPD will display the
received price information, for example:
PRICE:00000001,BASE,00000004,00,
0840,10,40,00000000,003C,00000015,
FF,FFFFFFFF,FF,FFFFFFFF,FF,FF,1
3.5 Display and Cancel message command
3.5.1 Initial Condition
Set up the Mock Meter and the IPD
Run Telegesis Terminal; choose the serial ports for both the Mock Meter and IPD
15
Telegesis (UK) Limited
User Guide
16
ETRX357 IPD
Document No.
500
Mock Meter has formed a network
IPD has joined the MockMeter’s network and completed registration
3.5.2 Test Procedure
Item
1.
Test Step
Note
In the terminal for the Mock Meter use the button:
(In the Mock Meter part)
2.
The terminal of the IPD will display the received price
information, for example:
MESSAGE: 00000001,00,00000000,0001,Hi Telegesis
This button will trigger a display
message command to be sent
from the Mock Meter to the IPD for
display
The displayed message includes:
<MessageID>,<MessageControl>,
<StartTime>,<DurationinMinutes>,
<Message>
If the user does not take any action, after about a minute the IPD terminal will show:
MSGCANCEL:00000001,00
because the message validation time is set to 1 minute in step 1.
If MSGCANCEL:00000001,00 has not disappeared after step 1, the user can test Cancel Message
command by following the next two steps:
3.
In the terminal for the Mock Meter use the button:
This command is to use for the
Mock Meter to send a message to
the IPD for cancel message
(In the Mock Meter part)
4.
The terminal of the IPD will display:
Note: when the period for display
message expired, the prompt will
also be shown, even if the user
does
not
send
a
AT+CANCELMSG for cancellation
MSGCANCEL:00000001,00
Note: the user can specify the target node and endpoint in this command. In above example, node ID and End
point are not used. In that case, the MockMeter will use a binding table to send message, assunimg that a
binding entry has been added automatically during registration progress (if the user has seen
“REGCOMPLETE:00” prompt in the terminal for IPD).
3.6 Get last message
Apart from receiving a message sent by the Mock Meter, the IPD can request the last available message for local
display. This test is to test that the IPD can request a message stored in the Mock Meter.
3.6.1 Initial Condition
Set up the Mock Meter and the IPD
Run Telegesis Terminal; choose the serial ports for both the Mock Meter and IPD
16
Telegesis (UK) Limited
User Guide
17
ETRX357 IPD
Document No.
500
Mock Meter has formed a network
IPD has joined the MockMeter’s network and completed registration
3.6.2 Test Procedure
Item
1.
Test Step
Note
In the terminal for the Mock Meter use the button:
(In the Mock Meter part)
2.
This button is to use for the Mock
Meter set a local message. But it
will not send the message to the
IPD until the IPD requests it.
In the terminal for the IPD use the button:
(In the IPD Function part)
3.
In the IPD terminal, it shows:
MESSAGE:00000001,00,0002A34E,0001,HELLO
WORLD!
If the user does not take any action, after about a minute, the IPD terminal will show:
MSGCANCEL:00000001,00
because the message validation time is set to 1 minute in step 1.
3.7 Issue Load Control Event
This test is to test that the Mock Meter sends a Load Control Event to the IPD and that the IPD takes proper
actions after receiving the Event.
3.7.1 Initial Condition
Set up the Mock Meter and the IPD
Open Telegesis Terminal; choose the serial ports for both the Mock Meter and IPD
Mock Meter has formed a network
IPD has joined the Mock Meter’s network and completed registration
17
Telegesis (UK) Limited
User Guide
18
ETRX357 IPD
Document No.
500
3.7.2 Test Procedure
Item
1.
Test Step
Note
In the terminal for the Mock Meter use the button:
This button is to use for the Mock Meter to
send a Load Control Event to the IPD
(In the Mock Meter part)
2.
In the terminal for the IPD, it will shows:
DRLCRECEIVED:00000001,0002A7F3,001C,0FF
F,00,01,00,00,1A09,1A09,0A,00,00
This means the IPD has received a load
control event, and the event has been
started.
DRLCSTART:00000001,0002A7F3,001C,0FFF,00,
01,00,00,1A09,1A09,0A,00,00
3.
In the terminal for the Mock Meter use the button:
4.
In the terminal for the IPD, it will shows:
DRLCCANCELED:00000001,00000000,001C,0FF
F,00,01,00,00,1A09,1A09,0A,00,00
This means the IPD has been instructed to
cancel the load control event, and the event
has been canceled.
Please note:
This document only gives some typical examples of the SE applications, which can be built using the IPD and
Mock Meter. In fact, the IPD AT command set has more functions that can be utilized with a properly-selected
series of AT commands. For more information about the AT commands, please check the provided manual.
18
Telegesis (UK) Limited
User Guide
19
ETRX357 IPD
Document No.
500
4. Contact Information
Website:
E-mail:
www.telegesis.com
sales@telegesis.com
Telegesis (UK) Ltd.
Abbey Barn Business Centre
Abbey Barn Lane
High Wycombe
Bucks
HP10 9QQ
United Kingdom
Tel: +44 (0)1494 510199
Fax: +44 (0) 5603 436999
19