1
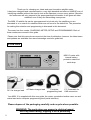
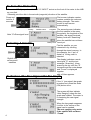
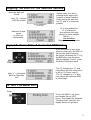
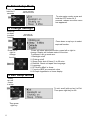
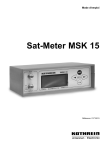
Owner´s Manual
Sat-Meter MSK 15
Order No.: 217 100 13
Thank you for choosing our latest and most innovative satellite meter.
It has been designed and manufactured to a very high standard and offers a UNIQUE way of
identifying satellites without the need to look at the spectrum or even see a picture. Because
the instrument will only respond to the preprogrammed information it will ignore all other
satellites, even if they are transmitting more power.
The MSK 15 satellite list can be reprogrammed to include only the satellites you are
interested in or to search for satellites which are not found in the default list. The procedure
for making this selection and programming is discussed in this document.
The meter has four modes, CHARGING, METER, SETUP and PROGRAMMING. Each of
these modes are covered in this guide.
Please note that this manual was current at the time of publication, however, the latest news
and updates are available from www.horizonhge.com/user guide.html
In the box
MSK 15 meter with
internal battery,
protective case and
neck strap.
DC Car charger lead
AC Mains charger lead
Computer
programming lead
F-F-Coaxcable for
LNB-connection
Your MSK 15 is supplied with this user guide, the meter, a protective leather case, car and
mains lead and a computer programming lead (serial interface).
Please depose of the packaging carefully and recycle where possible.
WARNING: The neck strap can present a choking hazard.
Use only when falling, slipping is not a possibility
2
Charging The Battery
The meter’s battery will NOT be charged when you receive it. We recommend that you
charge the unit overnight to fully charge the batteries. If you absolutely can’t wait that long, at
least give it a four hour charge. Overnight charging will allow some trickle charging which
prolongs the battery life of the internal NiMH batteries.
The batteries will need to be recharged occasionally even if the meter is not used. Recharge
batteries every three weeks to keep the battery pack charged.
The battery pack is replaceable, slide the meter out of it’s protective case and simply open
the cover on the bottom of the unit to access the batteries. Simply disconnect the batteries
from it’s connector. If the battery is disconnected the meter will indicate flat batteries (0%)
even if the replacement pack is partly charged. This is because the meter will lose it’s
calibration for the pack. Simply recharge the battery fully to reset the battery indicator. Please
not that if the replacement pack is charged to 50% it will only take half the normal time to
charged it.
There is no difference between charging the unit from the mains or in a vehicle.
PLEASE NOTE that it is NOT possible to use the MSK 15 when the batteries are being
charged.
Charging with the AC mains lead.
Open the flap at the back of the MSK 15
to access the mains inlet. Plug the AC
mains lead into this port and the other end
to your local supply socket. The battery is
fully charged when you see the words
“Trickle Charge” on the screen.
Charging from a Vehicle (DC car lead).
The Vehicle (12 VDc) charge port is on the
right side of the unit. Plug the DC car
charger lead into the bottom socket and the
other end to the vehicles ‘lighter’ socket.
Please note that on certain vehicles the
lighter socket is switched off, unless the
vehicle is running.
The DC car charger lead supplied with the
MSK 15 is the only lead to be used for
vehicle charging. The use of another lead
will damage the meter and will void the
warranty.
The MSK 15 can remain connected to either power source, in a “Trickle Charge” state, for an
extended period of time without damaging any internal components or the battery pack.
3
To Turn The Meter ON
Connect a RG-6 jumper from the MSK 15 “INPUT” socket on the front of the meter to the LNB
on your dish.
Generally point the dish in the azimuth (magnetic) direction of the satellite.
Press and
hold for 5
seconds
First screen indicates version
number, satellite list code and
battery strength. The meter
scrolls to next screen
automatically.
Polarity
Note “S”=Raw signal level
Selecting A Satellite
Right & Left
arrows scroll
satellites
Satellite name
Longitude
The second screen indicates
the first satellite in the menu,
the polarity, the longitude of the
satellite, raw signal received,
battery level and “Searching”
since the satellite has not been
Battery level found yet.
Find the satellite you are
interested in by scrolling
through the stored memory. In
this example, the V pol. of
Astra1 at 19 deg. east is
selected.
The display indicates a weak
raw signal “S” and the text
message “Searching”. Keep
scanning the sky until the “S”
increases and the meter beeps
and “Found” is displayed
together
with a Q bar appears.
To Reduce The Raw Signal “S” Bar Graph
If the “s” (raw signal) bar graph
is peaked out, press the down
(ON) button once.
The screen will then indicate
“Auto Ranging” where the bar
graph was located. The meter is
re-centering the raw signal
strength.
4
When the bar graph reappears
it will be in the centre so the
signal can be peaked.
The auto ranging only works
if the satellite has not been
“Found”
Aligning The Dish On The Selected Satellite
Move the dish until
“Found”
Note “Q” = Inverse
of Bit Error Rate
Correct Satellite Is
Confirmed
Maximize Q and
repeat
or other pol.
tighten bolts.
Getting close, the dish is
pointing at the edge of the
footprint of Astra1 satellite.
Keep moving the dish until
the “Q” and “s” is levels are
peaked.
“Q” is now peaked out,
“S” is peaked out.
Now proceed with next
polarity for same satellite.
That’s it……….
You are done.
Tighten the mounting bolts.
Signal To Noise Ratio & Corrected BER Value
Press
Note “V” = Corrected
Bit Error Rate after
Verti
If you would like to look at the
signal to noise ratio, the MSK 15
can provide that information.
As well as confirming the “V’ E.g.
the BER after error correction.
With the satellite “Found”, press
the down (ON) button once.
The “S” changes to a “C” and
now reflects the C/N noise ration
in dB (or % if lower case C).
The “Q” changes to a “V” and
now reflects the corrected BER
in percentage.
To Turn The Meter OFF
Press
To turn the MSK 15 off, press
and release the up (OFF)
button. The display will indicated
“Shutting Down” and then the
display screen will go blank.
5
To Enter Setup Mode
Press and
hold for 5
seconds
Arrow indicates
selected function
To enter setup mode, press and
hold the OFF button for 5
seconds, release once this menu
has appeared.
To Change Settings
Press up
or down
to select
function
Auto shut off
timer selected
Press down or up keys to select
required function.
Press left or
right to
change
function
Cursor will show selected function, press left or right to
change. Display will indicate status of function.
Functions in set up mode are:
1. Backlight on/off
2. Clicking on/off
3. Sleep (Auto shut off timer) 0 to 20 mins
4. Defaults. Reset unit apart from language
5. Language
6. RF-level in dBµV or linear
7. Found or BER as numerical value
8. Q-Graph logarithmic or linear display
To Exit Setup Mode
Press
up until
curser
is at top
To exit, scroll (with up key) to Exit.
Then press right key to exit.
Then press
right key
6
Transmitting DiSEqC-Instructions
The DiSEqC commands of the MSK 15 are not compatible with all matrices. A list of the switching
options of the MSK 15 on Kathrein matrices is given on the last page of this operating manual.
Press and hold
for more than 5
seconds
Is the LNB is supplied via
DiSEqC-switch, the correct
DiSEqC-instruction has to be
sent.
To select the wanted transponder keep down button pressed
for more than 5 seconds to call
the DiSEqC-Menu.
Press down or up button to
select the wanted switch
Press up or down
to select function
Press right for
executing an
instruction or
press left to leave
Set the switch by pressing the
right button or leave the position
with left button.
If the wrong instruction was sent
you may repeat the procedure by
pressing the down button.
Note:
The instruction will be sent once
only and not stored, it has to be
sent for each transponder separately.
7
Overview of Downloading & Programming the Satellite Lists
You can change the pre-loaded satellite list which is currently in the memory of the MSK 15 to a
custom list of your choosing by going to
http://www.esc-kathrein.de/download/
Here you will find some explanations for the download procedure.
The default satellite list which is pre-loaded at the factory will be overwritten by any uploads you
perform.
You can load from one two thirty two transponder in the memory of the MSK 15. The fewer lines
you select from your custom list, the quicker you can step through to the one you want when lining up dishes. Just keep in mind, only one list will be retained in the MSK 15 memory. The
previous list is overwritten by the next programming you do.
Computer Requirements
This features requires a Microsoft Operating Systems
of Windows98, Windows 98ME, Windows NT, Windows
200 or Windows XP. You will also need an Internet
Service Provider (ISP) connection to the internet and an
active available 9-pin (COM 1,2,3 or4) serial port
connection on your computer.
Please note that Horizon or it’s agents /dealer will NOT
advice you on how to modify the software or bios settings on your PC. Contact you computer provider if you
have any questions concerning COM port setups.
8
TECHNICAL SPECIFICATIONS
RFinput range
Input impedance
Input connector
LNB supply voltage
LNB supply current
LNB short circuit protection
RF input range
Level indication
Number of satellite stored in memory
C/N-indivation (carrier noise)
Symbolrate
DVB, C&Ku Band, MPEG, compatible
indication
BER-Bar Graph
950-2150 MHz
75 Ohm
F-Connector
13 V for V and 18 V for H
250 mA
Automatically @ 500 mA
-65 dBm to 25 dBm
in dBµV or linear (256 steps)
32 Transponders (16 satellites)
in dB
1 Msps~45 Msps
Acoustical support
LC-Display with backlight
linear or logarithmic
selectable before or after viterbi
display "Found" or BER-value for
indication
Computer interface
Serial via RS232
Battery pack
Intelligent Charger with delta V/T detection
Universal charger input range
Battery life with full charge (Single LNB on H)
Unit discharge time (idle state)
NiMH 2.4 A, 7.2 V
Fast charge (4 hours), then trickle
100-240 V Ac @ 0.3 A
More than 3 hours
~24 days
Electronic equipment is not household waste - in accordance with directive 2002/96/EC OF
THE EUROPEAN PARLIAMENT AND THE COUNCIL of 27th January 2003 on used electrical and
electronic equipment, it must be disposed of properly.
At the end of its service life, take this unit for disposal at a relevant offi cial collection point.
9
Appendix
Bit Error Rate (BER)
BER-Value
Reception (Rating)
Remark
10-3
insufficient
no picture, heavy distortions
10-4
nearly sufficient
brickwall effect, no reserves,
(restricted reception possible)
10-5
good
small reserves
10-6
and higher
very good
enough reserves (even with
bad weather)
Switching options with MSK 15 on Kathrein matrices
Satellite B (2)
Satellite A (1)
Matrix
HL
HorizontalLow
VL
VerticalLow
HH
HorizontalHigh
VH
VerticalHigh
HL
HorizontalLow
VL
VerticalLow
HH
HorizontalHigh
VH
VerticalHigh
Yes
Yes
-
-
-
-
-
-
Yes
Yes
-
-
-
-
-
-
EXR 5xx
Yes
Yes
Yes
Yes
-
-
-
-
EXR 9xx
without Switch
Band DiSEqC
setting:
Yes
Doesn‘t
matter
Yes
Doesn‘t
matter
No
No
No
No
No
No
EXR 9xx
with Switch
Band DiSEqC
setting:
Yes
Doesn‘t
matter
Yes
Doesn‘t
matter
Yes
Doesn‘t
matter
Yes
Doesn‘t
matter
No
No
No
No
EXR 20
DiSEqC
setting:
Yes
Doesn‘t
matter
Yes
Doesn‘t
matter
No
No
No
No
Yes
Doesn‘t
matter
Yes
Doesn‘t
matter
EXR 21 Yes
Option DiSEqC A or C
setting:
Yes
A or C
Yes
A or C
Yes
A or C
Yes
B or D
Yes
B or D
Yes
B or D
Yes
B or D
EXR 21 Position
DiSEqC
setting:
Yes
A or C
Yes
A or C
Yes
A or C
Yes
A or C
Yes
B or D
Yes
B or D
Yes
B or D
Yes
B or D
EXR 21 UC1 DiSEqC
setting:
Yes
Doesn‘t
matter
Yes
Doesn‘t
matter
Yes
Doesn‘t
matter
Yes
Doesn‘t
matter
No
No
No
No
EXR 23
as EXR 21
as EXR 21
as EXR 21
as EXR 21
as EXR 21
as EXR 21
as EXR 21
as EXR 21
936.2463/D/0705/ZWT Subject to technical alterations!
EXR 2xx
EXR 3xx
Internet: http://www.kathrein.de
KATHREIN-Werke KG . Phone +49 8031 184-0 . Fax +49 8031 184-306
Anton-Kathrein-Straße 1 – 3 . P.O. Box 10 04 44 . 83004 Rosenheim . Germany