1
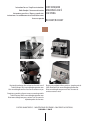
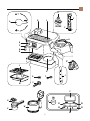
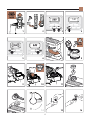
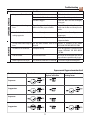
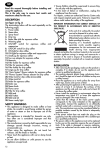
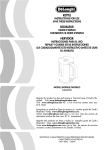
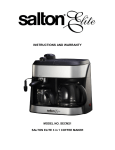
5713215761/10.10 - Printed in China
www.delonghi.com
Instructions for use. Keep these instructions
Mode d’emploi. Conservez cette notice
Instrucciones para el uso . Repase y guarde estas
instrucciones. Lea cuidadosamente este instructivo antes
de usar su aparato
Register this product on-line and receive a free trial issue of
Cook’s Illustrated. Visit www.delonghiregistration.com.
Visit www.delonghi.com for a list of service centers near you.
Enregistrez ce produit en ligne et recevez un numéro gratuit de
Cook’s Illustrated. Visitez www.delonghiregistration.com.
Visitez www.delonghi.com pour y voir une liste des centres de
réparation proches de chez vous.
coffee maker
Machine à café
cafetera
BCO320T/BCO330T
Registre este producto en línea y reciba un ejemplar gratis de
Cook’s Illustrated. Visite www.delonghiregistration.com.
Visite www.delonghi.com para ver la lista de centros de
servicios cercanos a usted.
Electric Characteristics: Caractéristiques électriques: CARACTERISTICAS ELECTRICAS:
120V˜ 60Hz - 1 500 W
2
D
B
A
E
C
F
G
Q
P
O
N
H
I
X*
L
K
R
J
T
S
M
Z
U
Y
W
V
3
Z1
Z2
Z3
Z5
Z4
7.30
1
2
3
4
10
MAX
5
6
7
8
*
9
10
11
12
13
14
15
16
4
18
19
20
21
22
23
24
25
26
27
28
17
18
5
IMPORTANT SAFEGUARDS en
When using electrical appliances, basic safety precautions should always be followed, including the following:
• Read all instructions.
• Do not touch hot surfaces. Use handles and knobs.
• To protect against fire, electrical shock and personal injury, do not immerse cord, plug or appliance in water or other
liquid.
• Never allow the appliance to be used by children.
• Unplug from the outlet when not in use and before cleaning. Allow to cool before fitting or taking off parts, and
before cleaning the appliance.
• Do not operate with a damaged cord or plug, or after the appliance malfunctions, or has been damaged in any
manner. Return the appliance to the nearest authorized service facility for examination, repair or adjustment.
• The use of accessory attachments or spare parts not recommended by the appliance manufacturer may result in
fire, electrical shock or personal injury.
• Do not use outdoors.
• Do not let the cord hang over the edge of the table or counter, or touch hot surfaces.
• Do not place on or near a hot gas or electrical burner, or in a heated oven.
• Plug cord into the wall outlet. To disconnect, turn any control to “off”, then remove plug from wall outlet.
• Do not use the appliance for other than the intended use. This appliance is to be utilized for domestic use only. Any
other use is to be considered improper and, therefore, dangerous.
• For machines with glass carafe:
A. The carafe is an accessory to be used exclusively with this appliance. Never use it on a cooking surface.
B. Do not set the hot container on a damp or cold surface.
C. Do not use the carafe if it is cracked or the handle is not completely sturdy.
D. Do not use abrasive detergents or sponges to clean.
WARNING: To reduce the risk of fire or electric shock, do not remove the cover. Don’t attempt to repair
or modify the machine, doing so will void the warranty. Repair should be done by authorized service
personnel only!
SAVE THESE INSTRUCTIONS
This product is for household use only
short cord instructions
- A short power cord is provided to reduce risks resulting from becoming entangled in or tripping over a longer
cord.
- Longer, detachable power supply cords or extension cords are available and may be used if care is exercised in
their use.
- If an extension cord is used, the marked electrical rating should be at least as great as the electrical rating of the
appliance. If the appliance is provided with 3- wire, grounding type cord, the extension should be a GROUNDING
TYPE 3 - WIRE CORD. The longer cord should be arranged so that it will not drape over the counter-top or table top
where it can be pulled on by children or tripped over.
- Your product is equipped with a polarized alternating current line plug (a plug having one blade wider than the
other). This plug will fit into the power outlet only one way. This is a safety feature. If you are unable to insert the
plug fully into the outlet, try reversing the plug. If the plug should still fail to fit, contact your electrician to replace
your obsolete outlet. Do not defeat the safety purpose of the polarized plug.
6
Description · Safety Warnings · Installation
en
Safety Warnings
• This appliance is designed to “make coffee” and “hot
drinks”. Use with care to avoid scalds from the water and
steam jets or through incorrect use.
• Never touch hot parts.
• After removing the packaging, make sure the product is
complete. If in doubt, do not use the appliance and contact a De’Longhi customer service representative.
• The packing elements (plastic bags, polystyrene foam,
etc.) should be kept out of reach of children as they are a
safety hazard.
• This appliance is intended for domestic use only. Any
other use is considered improper and thus dangerous.
• The manufacturer cannot be held responsible for any
damage caused through incorrect, wrong or unreasonable use.
• Never touch the appliance with wet or damp hands.
• Never let children use the appliance without supervision.
• Never allow children to play with the appliance.
• Should the appliance break or not function correctly, turn
it off and do not tamper with it. For all repairs, contact
authorized service centers only and insist on the use of
original spare parts.
Failure to respect the above could reduce the safety of the
appliance.
• The power cord for this appliance must not be replaced by
the user as this operation requires the use of special tools.
In the event of damage, contact an authorized service
center only to avoid all risks.
Read this instruction booklet carefully before installing
and using the appliance. This is the only way to ensure
the best results and maximum safety for the user.
Description (see page 3)
The terminology below will be used on subsequent pages.
A Espresso/steam knob
B Espresso boiler cap
C Cup storage tray
D Antichlorine filter cover
E Antichlorine filter support
F Antichlorine filter
G Filter-holder for drip coffee
H Opening handle
I Water filling compartment
J Water tank level indicator
K Warming plate
L Cup tray
M Drip tray
N Boiler outlet
O Cappuccino nozzle
P Steam spout
Q Control panel
R 2-4 cups espresso filter
S Espresso filter holder
T Measuring spoon
U Cover for small espresso carafe
V Small carafe for espresso
W Large carafe for drip coffee
X Permanent gold tone filter (*some models only)
Installation
• Place the appliance on a work surface away from water
faucets and sinks.
• Check that the voltage of the outlet corresponds to the
value indicated on the appliance rating plate. Connect
the appliance to an efficiently grounded electrical socket
with a minimum rating of 10A only. The manufacturer
declines all liability for any accidents caused by the absence of an efficient ground system.
• If the plug fitted to the appliance does not match the
electrical socket, have the outlet replaced with a suitable
type by a qualified electrician.
• Never install the appliance in environments where the
temperature may reach 0°C (32°F) or lower (the appliance may be damaged if the water freezes).
Control panel description
Y On/off button for espresso coffee with power light
Z Display
Z1 On/off button for drip coffee with power light
Z2 AROMA button with light
Z3 AUTO button (automatic switch-on) for drip coffee with
AUTO ON light
Z4 HOUR button
Z5 MIN button
When using the appliance for the first time, all the accessories and the internal circuits must be washed as follows:
• DRIP COFFEE MAKER: Make at least two carafes of coffee
without using ground coffee.
• ESPRESSO MAKER: Make at least four cappuccinos without using ground coffee and using water instead of milk.
7
Drip coffee
above, just press the AUTO button to have coffee made at
the time set (the AUTO indicator light will illuminate).
Please note:
• If you want to change the start time after it has been set,
press the AUTO button for about 2 seconds and then set a
new time as described starting from point 2.
• Keep in mind that at the time set, the appliance will start
to make drip coffee only. The espresso maker does not
come on.
Antichlorine filter
The filter eliminates the taste of chlorine in the water. To install
the filter, proceed as follows:
• Release the filter support from its slot by pulling it upwards (fig. 1).
• Remove the Antichlorine filter from the plastic sachet and
rinse it under a running tap (fig. 2).
• Open the filter support and carefully put the filter in place
as shown in fig. 2.
• Close the filter container carefully (fig. 2), and reposition
it in its slot, pushing it firmly downwards.
• The Antichlorine filter should be replaced after 80 cycles,
and at least after every 6 months of operation.
Length of warming time (Automatic shut-off time)
The appliance is factory-set to keep the coffee warm for two
hours after startup.
However, this setting can be changed as follows:
1. Press the ON/OFF button (Z- Fig. 5) for about 2 seconds
until 0:00 flashes on the display.
2. Modify the time by repeatedly pressing the HOUR button
(and also the MIN button if required).
3. After setting the time, wait 5 seconds. When the display
stops flashing, the time will be stored.
Please note: If 0:00 is set, the appliance switches off. (You
can set a time within 1 minute and 11hours and 59 minutes).
Aroma
You can enhance the flavor of your coffee by pressing the AROMA button after the ON/OFF button. This feature activates
a unique brewing process, slowly releasing water into the filter
basket; saturating coffee grounds a little at a time extracting
the best flavor and aroma from your coffee.
To activate, press the AROMA button (fig. 6); the light on the
button will illuminate. Press the button again to turn the selection off.
It is recommended to use the aroma button when preparing 5
cups or less: do not use this button if brewing an entire carafe
of coffee.
You can select this function even when using the auto function.
Preparation of drip coffee
Setting the clock
When the coffee machine is connected to the outlet for the
first time, the numbers 0:00 will flash on the display.
To set the time, proceed as follows:
1. Press the “HOUR” button (Fig. 3) for about 2 seconds until
the number of hours on the display begins to increase.
2. Before the display stops flashing (about 5 seconds), set
the hour by pressing the HOUR button repeatedly.
3. Set the minutes by pressing the MIN button (Fig. 3) repeatedly. (To speed up the operation, hold the button
down.)
4. After setting the time, wait 5 seconds. When the display
stops flashing, the time set is stored.
To reset the time, press the HOUR button for about 2 seconds, and then follow the procedure as described starting
from point 2.
Please note: In the event of a temporary power failure, the
time set does not remain stored in the memory.
Programming the automatic start (AUTO BUTTON)
The appliance can be programmed to make drip coffee automatically.
First, make sure that the time is set correctly.
To set the delayed start (i.e. the time you want the coffee to be
made), proceed as follows:
1. Press the AUTO button (Fig. 4) for about 2 seconds until
0:00 flashes on the display.
2. Before the display stops flashing (about 5 seconds), set
the desired hour by pressing the HOUR button repeatedly.
3. Set the minutes by pressing the MIN button repeatedly.
4. After 5 seconds, the display will stop flashing and the
programmed time will be stored.
5. After you have programmed the machine as described
en
Making drip coffee
• Open the filter-holder door, rotating it towards the right
(fig. 7).
• Fill the carafe to the level indicator relative to number
of cups of coffee you wish to prepare, taking care not to
exceed the MAX level (fig. 8), otherwise, in order to not
overfill the machine, the excess water will spill out from
the back of the unit.
• Then pour the water into the water-fill compartment of the
appliance (fig. 9).
• Position the gold tone filter (if applicable), or paper filter,
into the filter-holder (fig. 10).
8
How to make Cappuccino · Hot water production · Cleaning and maintenance
• Put the ground coffee in the filter using the measuring
spoon supplied, and level it off evenly (fig. 11). As a general rule, use a level measure of coffee (approx 7 grams)
for every cup of coffee required (for example, 10 measures to obtain 10 cups).
• Close the filter-holder door and place the carafe, with
cover in place, onto the warming plate.
• Press the ON/OFF button. The light on the button indicates that the drip coffee-maker is in operation.
• The coffee will begin to dispense after a short time.
It is perfectly normal for the appliance to emit steam while the
coffee is percolating.
To keep the coffee hot after the percolation process has finished, place the carafe on the hot plate and leave the machine
turned on (with the drip coffee light on): the coffee in the carafe will be kept at the right temperature.
• To turn off the machine press the ON/OFF switch.
en
button comes on.
12. After about two minutes, the espresso coffee starts to run
out from the filter-holder spouts.
CAUTION: To prevent splashes, never remove the filter-holder
while the appliance is dispensing coffee.
13. When coffee no longer runs out of the filter-holder, press
the ON/OFF button to turn the coffee maker off.
14. Pour the coffee into cups (fig. 21).
15. To dispose of the used coffee grounds, unfasten the filterholder. Block the filter using the lever incorporated in
the handle and empty the grounds by turning the filterholder upside down and tapping (Fig. 22).
CAUTION: Before removing the filter-holder, to avoid puffs of
steam, completely eliminate any residual steam in the boiler
by turning the espresso/steam knob to position (Fig. 23).
NOTE: For safety reasons, when the boiler is hot the cap cannot
be opened, but turns without catching. If you need to remove
it for any reason, first vent all the steam in the boiler as described above.
Espresso coffee
1. Unscrew the boiler cap by turning it counter-clockwise
(fig. 12). 2. Fill the small carafe for espresso with the quantity of
water corresponding to the number of cups you want to
make (see chart on page 11).
3. Pour the water into the boiler (Fig. 13).
4. Close the boiler cap by turning it firmly clockwise.
5. Turn the espresso/steam knob to position (fig. 14).
6. Place the filter for espresso coffee into the filter-holder
(Fig. 15).
7. Fill the filter with ground coffee according to the quantity shown in the chart on page 11 and distribute evenly
without pressing down (Fig. 16): never exceed the
quantity described in the chart.
It is important to use top quality medium grind coffee
to avoid blocking the filter while the coffee is being dispensed.
8. Remove excess coffee from the edge of the filter (Fig.
17).
9. To attach the filter-holder, position it under the boiler
outlet with the handle aligned with the triangle (Fig.
18), and push it upwards while turning the handle firmly
toward the right as far as it reaches the arrow on the front
side.
10. Place the small carafe for espresso under the filter-holder
(Fig. 19). Make sure the filter-holder spouts are inside
the opening in the carafe lid. Do not use the carafe without lid, to avoid splashes.
11. Press the ON/OFF button (fig. 20): the light on the
How to make cappuccino
• To make two cappuccinos, prepare the espresso coffee as
described in the section “ESPRESSO COFFEE” from point
1 to point 11, but add the quantity of water required to
make two cappuccinos (see chart on page 11). (Note: the
quantity of water for making cappuccinos is greater than
that needed for espresso. The additional water is used to
produce steam to froth the milk).
• Press the ON/OFF button (fig. 20).
• Let the coffee drip into the espresso carafe. When the
darker coffee (which is below the lighter colored cream)
reaches level 2 on the the carafe turn the knob to CLOSE (Fig. 24). This must be done with the utmost care. If the
coffee goes above level 2, there will not be enough steam
left afterward to froth the milk.
• Pour about 3.5 oz./100gr of milk for each cappuccino you
want to make into a container. Use only fresh milk, not
boiled and in particular not hot. When choosing the size
of container to use, keep in mind that the volume of the
milk will double or triple.
• Immerse the cappuccino nozzle into the milk to about 5
mm and turn the espresso/steam knob to (Fig. 25).
The milk will begin to increase in volume and take on a
creamy appearance. Close the espresso/steam knob only
after all the steam has been released from the boiler.
• Press the ON/OFF button to turn off the machine and
turn the espresso/steam knob to position.
• Pour the coffee into two sufficiently large cups.
9
Descaling
•
Pour the frothed milk slowly over the coffee with the aid
of a spoon, then sprinkle a bit of cocoa powder on top for
a perfect cappuccino.
• To make 4 cappuccinos, repeat the previous steps, paying
attention to the quantity of water, milk and ground coffee indicated in the table in the table on page 11.
IMPORTANT: The cappuccino nozzle must always be cleaned
after each use. Proceed as follows:
• Remove the cappuccino nozzle by turning it clockwise
(Fig. 26) and wash it thoroughly with warm water (fig.
27).
• Check that the three holes indicated in Fig. 28 are not
obstructed. Clean if necessary using a pin.
• Clean the steam spout, being careful not to burn yourself.
• Screw the cappuccino nozzle back on.
en
5. Leave the solution to act for 15 minutes. Repeat operations 4 and 5 another time.
6. Switch on the machine and continue production until the
tank is completely empty.
7. Rinse out by running the appliance just using water at
least three times (3 full tanks of water).
Descaling the espresso section
Over time, heating the water used to make the coffee leads to
lime scale buildup in the internal circuits of the appliance.
We, therefore, recommend that you descale the espresso maker every 2-6 months (depending on the hardness of the water
and the frequency of use), or, in any case, not more than 150
coffees. Proceed as follows:
1. Fill the small espresso carafe with water up to level 4 on
the WATER LEVEL side.
2. Dissolve 1 spoonful (about 15-20 grams) of citric acid (sold at drug stores or at grocery stores) in the water.
3. Pour the solution into the boiler and screw on the cap.
4. Make sure the espresso/steam knob is closed and attach
the filter-holder.
5. Place the small espresso carafe under the espresso filter
holder.
6. After a few minutes, the solution begins to run into the
carafe. Every now and then, turn the espresso/steam
knob to position to let out a little of the solution from
the cappuccino nozzle.
8. When all the solution has run through, turn the appliance
off and let it cool down.
9. To eliminate the descaling solution residues, repeat steps
1 to 8 at least twice, using water only (without adding
citric acid).
Cleaning and maintenance
• During the cleaning operation, never immerse the machine in water. It is an electrical appliance.
• Before carrying out any cleaning of the external parts of
the appliance, switch off the machine, remove the plug
from the change to electrical outlet and let the machine
cool down.
• Do not use solvents or abrasive detergents to clean the
appliance. A soft damp cloth is sufficient.
• Clean the filter-holder, drip tray, boiler outlet, carafe and
water tank regularly. Never wash the filter-holder and
the other accessories in the dishwasher.
• Rinse all the components and clean the espresso filter
thoroughly with warm water and a small brush.
• From time to time, check to make sure the holes in the
espresso filter are not obstructed. If necessary, clean using a pin.
Descaling the drip coffee section
With time, the limestone content of the water can cause obstructions which may effect the correct functioning of the appliance. It is advisable to carry out descaling of the machine
after about every 40 uses. For this descaling procedure, use an
appropriate descaler for filter coffee machines, available in the
shops. If such a product is not obtainable, the operation can be
carried out in the following way:
1. Pour 4 cupfuls of water into the drip coffee carafe;
2. Dissolve 2 spoonfuls (about 30 grams) of citric acid in the
water (sold at drug stores or at grocery stores);
3. Place the drip coffee carafe onto on the hot plate;
4. Press the ON/OFF button, percolate the equivalent of a
cupful and then switch off the appliance;
10
Troubleshooting
Problem
CAPPUCCINO / ESPRESSO
No espresso coffee is delivered
en
Possible causes
Solution
No water in the boiler
Fill the boiler with water
The holes in the filter holder are blocked
Clean the filter holder spout holes
The filter is clogged.
Clean the filter and holes thoroughly
using a pin
The espresso takes longer to The coffee is ground too fine, or too much Use a different kind of coffee, put less
brew
coffee in the filter, or pressed coffee.
coffee into the filter and do not press the
coffee.
No milk froth is formed when Milk not cold enough
making cappuccino
Always use skim milk at refrigerator temperature.
Cappuccino maker dirty
Thoroughly clean the holes in the cappuccino frother
DRIP COFFEE
The drip coffee takes longer to The drip coffee machine needs to be Descale as described in the section
brew
descaled
DESCALING THE DRIP COFFEE SECTION
The coffee has an acidic taste
Inadequate rinsing
Rinse the appliance as described in the
section DESCALING THE DRIP COFFEE SECTION
Leaks on counter
Filled too much water
Be sure to do not fill more than the 10
cups of water as specified on fig. 8, pg.4.
ON/OFF light does not stay on
The automatic shutoff time is set at 0.00
See section “Length of warming time”
Espresso and Cappuccino water level
To make
Quantity of ground coffee
to place in the filter
Water level
4
2
2 espressos
2 cappuccinos
4
2
4 espressos
4
2
4 cappuccinos
4
2
11
Quantity of coffee before
making steam
Limited warranty
en
This warranty applies to all products with De’Longhi or Kenwood brand names.
What does the warranty cover?
We warrant each appliance to be free from defects in material and workmanship. Our obligation under this warranty is limited to repair at our factory or authorized service center of any defective parts or part thereof, other than parts damaged in transit. In the event
of a products replacement or return, the unit must be returned transportation prepaid. The repaired or new model will be returned
at the company expense.
This warranty shall apply only if the appliance is used in accordance with the factory directions, which accompany it, and on an
Alternating current ( AC ) circuit.
How long does the coverage last?
This warranty runs for one year (1) from the purchase date found on your receipt and applies only to the original purchaser for use.
What is not covered by the warranty?
The warranty does not cover defects or damage of the appliance, which result from repairs or alterations to the appliance outside
our factory or authorized service centers, nor shall it apply to any appliance, which has been subject to abuse, misuse, negligence or
accidents. Also, consequential and incidental damage resulting from the use of this product or arising out of any breach of contract or
breach of this warranty are not recoverable under this warranty. Some states do not allow the exclusion or limitation of incidental or
consequential damage, so the above limitation may not apply to you.
How do you get service?
If repairs become necessary, see contact information below:
U.S. Residents: Please contact our toll free hotline at 1-800-322-3848 or log onto our website at www.delonghi.com
Residents of Canada: Please contact our toll free hotline at 1-888-335-6644 or log onto our website at www.delonghi.com
Residents of Mexico: Please contact our toll free number 01-800-711-8805 for assistance or log onto our website at www.delonghi.com
The above warranty is in lieu of all other express warranties and representations. All implied warranties are limited to the applicable
warranty period set forth above. This limitation does not apply if you enter into an extended warranty with De’Longhi. Some states/
countries do not allow limitations on how long an implied warranty lasts, so the above exclusions may not apply to you. De’Longhi
does not authorize any other person or company to assume for it any liability in connection with the sale or use of its appliance.
How does country law apply?
This warranty gives you specific legal rights, and you may also have other rights, which vary from state to state/country to country.
12