1
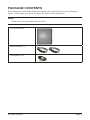
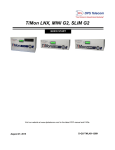
Quick Install Guide
Tsunami MP.11
Model 5012-SUR
Version 3.0.1
Part Number: 73226 (CD version)
73227 (Print version)
Notices
Copyright
Copyright ©2006 Proxim Wireless Corporation, San Jose, CA. All rights
reserved. Covered by one or more of the following U.S. patents: 5,231,634;
5,875,179; 6,006,090; 5,809,060; 6,075,812; 5,077,753. This manual and
the software described herein are copyrighted with all rights reserved. No
part of this publication may be reproduced, transmitted, transcribed, stored in
a retrieval system, or translated into any language in any form by any means
without the written permission of Proxim Wireless Corporation.
Trademarks
Tsunami, Proxim, and the Proxim logo are trademarks of Proxim Wireless
Corporation. All other trademarks mentioned herein are the property of their
respective owners.
Page Copyright © 2006 Proxim Wireless
Contents
Introduction.................................................................... 4
Key Features.........................................................................................4
Package Contents..................................................................................5
Hardware and Software Installation................................ 6
Step 1: Choose a location.......................................................................7
Step 2: Attach cables.............................................................................8
Step 3: Mount Unit to Pole.................................................................... 10
Step 4: View LEDs/Adjust Mounting........................................................ 12
Step 5: Close Cable Compartment.......................................................... 13
Step 6: Tighten Band Clamps................................................................ 15
Step 7: Install Documentation and Software............................................ 16
Initialization.................................................................. 17
Setting the IP Address.......................................................................... 17
Accessing the Web Browser .................................................................. 19
Accessing the Command Line Interface .................................................. 20
Default Settings............................................................ 21
Technical services and support...................................... 23
Support Options................................................................................... 23
All rights reserved
Page Introduction
The Tsunami MP.11 Model 5012-SUR is a flexible wireless outdoor client that let
you design solutions for point-to-point links and point-to-multipoint networks.
The 5012-SUR is part of the Tsunami MP.11 product family, which is comprised
of several additional products, including the 5054 Base Station and Subscriber
Units, and the 5012-SUI Subscriber Unit for indoor installation; and the 5054R, 5054-R-LR, and 2454-R Base Station and Subscriber Units for outdoor
installation. The 5012-SUR is fully compatible with Base Station models 5054,
5054-R, and 5054-R-LR.
Key Features
Some of the key features of the Tsunami MP.11 5012-SUR are:
▪
The use of a highly optimized protocol for outdoor situations
▪
Routing and bridging capability
▪
Asymmetric bandwidth management
▪
Management through a Web Interface, a Command Line Interface (CLI), or
Simple Network Management Protocol (SNMP)
▪
Software and configuration upgrade through file transfer (TFTP)
▪
Integrated antenna
▪
VLAN support (configured on Base Station)
This document shows the basics of setting up the units. For detailed
information, see the Tsunami MP.11 Model 5012-SUR Installation and
Management Guide.
Page Copyright © 2006 Proxim Wireless
Package Contents
Each Tsunami 5012-SUR shipment includes the items listed in the following
table. Verify that you have received all parts of the shipment.
Note: Cables are not provided with the unit.
5012-SUR unit
Band clamps (2)
Installation CD
All rights reserved
Page Hardware and Software Installation
IMPORTANT!
Before installing this product, see “Safety and Regulatory Information” on
the product CD for important safety and regulatory compliance information.
Notes:
▪
Be sure to read the Release Notes file on the installation CD as it contains
software version and driver information that may not have been available
when this document was produced.
▪
The Configure System window provides a selectable Country field that
automatically provides the allowed bandwidth and frequencies for the
selected country as well as, where applicable, Dynamic Frequency Selection
(DFS) and Transmit Power Control (TPC).
▪
Equipment is to be used with and powered by an 802.3af-compliant power
injector (purchased separately).
Page Copyright © 2006 Proxim Wireless
Step 1: Choose a location
To make optimal use of the unit, you must find a suitable location for the
hardware. The range of the unit largely depends upon the position of the
integrated antenna. Proxim recommends you do a site survey, observing the
following requirements, before mounting the hardware.
▪
The location must allow easy disconnection of the unit from the power
outlet if necessary.
▪
The unit must not be covered and the air must be able to flow freely around
the unit.
▪
The unit must be kept away from vibration, excessive heat, and humidity,
and kept free from dust buildup.
▪
The installation must conform to local regulations at all times.
The units are designed to mount directly to a 1” - 1.5” pole (not included)
using the supplied band clamps. An optional universal pole mounting kit is also
available from Proxim (P/N 1087-UMK); this kit is designed to mount directly to
a flat surface such as a roof, wall, or under an eave.
As the units are electrically isolated from the mounting pole, there is no need to
ground the unit.
Caution!
Local regulations may require the use of a lightning arrestor at the building
ingress point. Be sure to comply with this and all local regulations. You
can purchase the Proxim Lightning Protector MP.11/QB.11 (70251); see
the documentation that comes with the unit for more information and
installation instructions.
All rights reserved
Page Step 2: Attach cables
Note:
Depending on your application and location, you may find it easier to mount
the unit before you attach cables to it. If this is the case, remove the cable
cover (as explained in step 1 below), and then complete Step 3: Mount Unit
to Pole. Return to this step for cabling instructions.
1.
With the laying unit face down, depress both buttons on the back of the
5012-SUR unit, and pull the plastic cover downward to open. Remove
cover.
2.
Connect one end of an Ethernet cable (5.5 mm/.217 in OD maximum; not
supplied) to the unit’s LAN port.
3.
Route the Ethernet cable as shown below.
4.
Connect the other end of the Ethernet cable to the Data and Power Out
port of the DC Injector.
Note:
You must use an 802.3af-compliant power injector, such as the Proxim 1Port Power Injector (P/N 4301-xx).
5.
Connect one end of a second Ethernet cable (not supplied) to the Data In
port of the DC Injector and the other end to a switch, hub, patch panel, or
single computer:
▪
Page Use a straight-through Ethernet cable if you are connecting the unit to
Copyright © 2006 Proxim Wireless
a switch, hub, or patch panel.
▪
Use a cross-over Ethernet cable or adapter if you are connecting the
unit to a single computer or most router ports.
All rights reserved
Page Step 3: Mount Unit to Pole
Mount the 5012-SUR to a pole as follows:
1.
Using a screwdriver, turn the screw on the band clamp counter-clockwise
until the clamp opens.
2.
Place the back of the 5012-SUR against the pole such that the pole fits into
the curved portion of the unit.
3.
With the 5012-SUR aimed in the direction of the BSU, slide the flat end of
the band clamp around the pole and through the top opening in the 5012SUR unit, threading the flat end of the band clamp into the metal catch at
the other end.
4.
Using a 5/16” nutdriver or a screwdriver, turn the screw on the band clamp
clockwise until it is tight enough to hold the unit in place
Note:
Do not fully tighten band clamps; you must first ensure a functional link to
the BSU (see Step 4: View LEDs/Adjust Mounting).
Page 10
Copyright © 2006 Proxim Wireless
5.
Repeat procedure to attach other band clamp through bottom opening in
the 5012-SUR unit.
Note:
Do not fully tighten band clamps; you must first ensure a functional link to
the BSU (Step 4: View LEDs/Adjust Mounting).
The mounted unit, using the optional Proxim universal pole mounting kit (P/N
1087-UMK), is shown below.
All rights reserved
Page 11
Step 4: View LEDs/Adjust Mounting
LEDs are located in the cable compartment.
When the unit is powered on, the 5012-SUR performs startup diagnostics.
When startup is completed, the LEDs show the operational state of the 5012SUR.
The following table shows the status of the LEDs when the 5012-SUR is
operational.
Status
Power
Wireless Link
Ethernet Link
Starting up
Three red blinks
followed by a
temporary solid
amber
N/A
N/A
Radio scanning
Blinking green
N/A
N/A
WORP link is up
Solid green
N/A
N/A
No WORP link
Blinking amber/
green
N/A
N/A
System failure
Solid red
N/A
N/A
No traffic on
interface
N/A
Solid green
Solid green
Normal operation
/ passing traffic
Solid green
Blinking green
Blinking green
Bootloader mode
Permanent solid
amber
N/A
N/A
If a wireless link is not established with the BSU, adjust the direction of the unit
so that the integrated antenna is more precisely aimed toward the BSU. When
the Power LED is solid green, the link is correctly established.
Page 12
Copyright © 2006 Proxim Wireless
Step 5: Close Cable Compartment
1.
Ensure that the Ethernet cable is properly routed and exiting the unit
through the notch at the bottom of the cable compartment.
2.
Position the cable cover so that the notch in the cover fits over the Ethernet
cable (not pictured) and the large tabs on the cover are aligned below the
holes in the unit.
3.
Align the small tabs in the bottom cover with the holes in the unit.
4.
Slide cover upward until all tabs (large and small) on the cover snap into
their respective holes on the enclosure.
All rights reserved
Page 13
The assembly with the cable cover attached is shown below.
Page 14
Copyright © 2006 Proxim Wireless
Step 6: Tighten Band Clamps
1.
Using a 5/16” nutdriver or a screwdriver, fully tighten both band clamps
(maximum torque 50 kg-cm/3.6 lbf-ft).
2.
Secure Ethernet cable to the pole with cable ties. Provide some slack
between the unit and the first cable tie, which should be within 12 inches of
the unit. Continue to secure cable with cable ties at 3-foot intervals.
The final assembly, using the optional Proxim universal pole mounting kit (P/N
1087-UMK), is shown below.
All rights reserved
Page 15
Step 7: Install Documentation and Software
1.
Place the CD in a CD-ROM drive. The installer normally starts
automatically. (If the installation program does not start automatically,
click setup.exe on the installation CD.)
2.
Click the Install Software and Documentation button and follow
the instructions displayed on the installer windows. The following
documentation and software products are installed:
▪
Available from Start > All Programs > Tsunami > .
MP.11 5012-SUR:
-
Documentation (in Docs subdirectory):
-
Installation and Management Guide
-
Quick Installation Guide
-
Reference Manual
-
Safety and Regulatory Guide
-
Release Notes
-
MP.11 5012-SUR Online Help
-
Scan Tool (in Scan Tool subdirectory)
-
TFTP Server (in TFTP Server subdirectory)
All of these items are also available from C:\Program Files\
Tsunami\MP.11 5012-SUR.
▪
Page 16
Available from C:\Program Files\Tsunami\MP.11 5012-SUR:
-
Scan Tool program
-
Documentation (in Docs folder): See list above
-
Help files (in Help folder; click on index.htm to access)
-
Extras folder containing TFTP Server and Scan Tool program
-
MIBs (in MIBs folder)
Copyright © 2006 Proxim Wireless
Initialization
Connecting to the unit requires either:
▪
A direct physical connection with an Ethernet cable or with a serial RS-232
cable
▪
A network connection
Connecting with the Ethernet cable allows you to use of the Web Interface and
SNMP in addition to the CLI. Connecting with a serial connection allows you to
configure and manage the unit with the CLI.
Using a serial connection, you can access the unit through a terminal emulation
program such as HyperTerminal. (See “HyperTerminal Connection Properties” in
the Tsunami MP.11 Reference Manual.)
Setting the IP Address
With ScanTool (a software utility that is included on the product installation
CD), you can find out the current IP address of the unit and, if necessary,
change it so that is appropriate for your network.
ScanTool lets you find the IP address of a Tsunami MP.11 5012-SUR by
referencing the MAC address in a Scan List, or to assign an IP address if the
correct one has not been assigned. The tool automatically detects the units
installed on your network segment, regardless of IP address, and lets you
configure each unit’s IP settings. In addition, you can use ScanTool to download
new software to a unit that does not have a valid software image installed.
To discover and set/change the IP address of the unit:
1.
Run ScanTool on a computer connected to the same LAN subnet as the
unit, or a computer directly connected to the unit with a cross-over
Ethernet cable. Double-click the ScanTool icon on the Windows desktop to
launch the program. If the icon is not on your desktop, click Start > All
Programs > Tsunami > MP.11 5012-SUR > Scan Tool.
ScanTool scans the subnet for 5012-SUR units and displays a list of the
units it finds in the Scan List window (shown below). If necessary, click
Rescan to re-scan the subnet and update the display.
All rights reserved
Page 17
2.
Select the unit for which you want to set the IP address and click Change.
The Change dialog window is displayed.
3.
To set the IP address manually, ensure that Static is selected as the IP
Address Type and fill in the IP Address and Subnet Mask suitable for
the LAN subnet to which the unit is connected.
To set the IP address dynamically, ensure that Dynamic is selected as
the IP Address Type. The unit will request its IP address from a DHCP
server on your network.
4.
Enter the Read/Write Password (the default value is public) and click
OK to confirm your changes. The respective unit reboots to make the
changes effective.
Page 18
Copyright © 2006 Proxim Wireless
Accessing the Web Browser
To access the unit with a Web browser:
1.
Start your Web browser and enter the IP address of the unit in the
Address box. The Web address should appear as http://<ip address>
(for example, http://10.0.0.1).
A login window is displayed.
2.
A login window is displayed. Do not fill in the User name; enter only the
default password public or the configured password.
3.
Upon successful login, the System Status window is displayed.
All rights reserved
Page 19
Accessing the Command Line Interface
Ethernet Port
To use the CLI through the Ethernet port, you must have a telnet program, the
CLI password, and the unit’s IP address.
To access the unit through Ethernet on a Windows PC:
1.
Open a DOS command window: from the Windows Start menu, select
Run; enter cmd.
2.
In the DOS window displayed, enter the IP address (for example, telnet
10.0.0.1).
3.
Click OK to start the telnet program; you are prompted for your password.
4.
Enter the password (the default password is public).
Serial Port
In some cases, it may not be possible to retrieve the unit’s IP address. In this
case, you can connect to the serial port by connecting to the unit through the
serial port. You still need the CLI password of the unit. Proxim recommends
you power off the radio and the computer before connecting or disconnecting
the serial cable.
To access the unit through the serial port:
1.
Start your terminal program.
2.
Set the following connection properties; then connect:
COM port:
such as COM1 or COM2, to which the unit’s serial
port is connected
Bits per second:
9600
Data bits:
8
Stop bit:
1
Flow control:
None
Parity:
None
Line ends:
Carriage return with line feed
3.
Disconnect and reconnect power to reset the unit. The terminal
emulation program displays Power On Self Test (POST) messages. After
approximately one minute (four minutes if DFS is enabled), you are
prompted for your password.
4.
Enter the default password public.
Page 20
Copyright © 2006 Proxim Wireless
Default Settings
Setting
Default
Mode of Operation
Bridge
Routing
Disabled
IP Address Assignment
Static
IP Address
10.0.0.1
Subnet Mask
255.255.255.0
Default Router IP Address
10.0.0.1
Default TTL
64
RIPv2 (if in routing Mode)
Enabled
Base Station System Name
<blank>
Network Name
OR_WORP
Frequency Channel
Chnl. 149,
5.745 GHz (for FCC devices)
DFS Enabled (World Mode devices)
Transmit Power Control
0 dB
Data Rate
36 Mbps
Registration Timeout
5
Network Secret
public
Turbo Mode
Disabled
Channel Bandwidth
20 MHz
Serial Port Baud Rate
9600
SNMP Management Interface
Enabled
Telnet Management Interface Enabled
HTTP Management Interface
Enabled
HTTP Port
80
Telnet Port
23
Password
public
Maximum Satellites (per
BSU)
250
MAC Authentication
Disabled
Radius Authentication
Disabled
Encryption
Disabled
Static MAC Address Filter
Disabled / No Entries
Ethernet Protocol Filtering
All Filters Disabled
DFS Priority Frequency
Channel
Disabled
Announcement Period (when
roaming enabled)
100 ms
All rights reserved
Page 21
Setting
Default
Multi-Frame Bursting
Enabled
Storm Threshold
Broadcast/Multicast Unlimited
Broadcast Protocol Filtering
All Protocols Allowed
Dynamic Data Rate Selection
Disabled
Roaming
Disabled
NAT
Disabled
Intra-Cell Blocking
Disabled
Country Selection
US-only device–US
World device – GB
DHCP Server
Disabled
DHCP Relay
Disabled
Spanning Tree Protocol
Disabled
Antenna Gain (For DFS
Threshold compensation)
0
Satellite Density
Large
VLAN Mode
BSU: Transparent mode
SU: Transparent mode when BSU is in
Transparent mode; Trunk mode when BSU is in
Trunk mode.
Access VLAN ID
BSU: N/A; SU: 1
Access VLAN Priority
BSU: N/A; SU: 0
Management VLAN ID
BSU: -1; SU: -1
Management VLAN Priority
BSU: 0; SU: 0
VLAN ID in Trunk VLAN Table
BSU: N/A; SU: 1
Page 22
Copyright © 2006 Proxim Wireless
Technical services and support
If you are having trouble utilizing your Proxim product, please review the
Tsunami MP.11 5012-SUR Installation and Management Guide and the
additional documentation provided with your product.
If you require additional support, please refer to the “Technical Services and
Support” chapter in the Tsunami MP.11 5012-SUR Installation and Management
Guide for details about the information you will need to gather before using the
Support Options listed below.
Support Options
Proxim eService Web Site Support
The Proxim eService Web site is available 7x24x365 at:
▪
http://support.proxim.com
Telephone Support
Contact technical support via telephone as follows:
▪
Domestic: 866-674-6626
▪
International: +1-408-542-5390
Hours of Operation
▪
North America: 8 a.m. to 5 p.m. PST, Monday through Friday
▪
EMEA: 8 a.m. to 5 p.m. GMT, Monday through Friday
ServPak Support
Proxim understands that service and support requirements vary from customer
to customer. In recognition of these varying requirements we have developed
a support program called ServPak. ServPak is a program of Enhanced Service
Options that can be purchased individually or in combinations to meet your
needs.
▪
Advanced Replacement
▪
Extended Warranty
▪
7x24x365 Technical Support
▪
Priority Queuing
To learn more, please call Proxim Support at +1-408-542-5390 or send an
email to servpak@proxim.com. To purchase ServPak support services, please
contact your authorized Proxim distributor.
All rights reserved
Page 23
www.proxim.com
2115 O’Nel Drive
San Jose, CA
(408) 731-2700