1
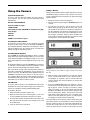
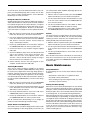
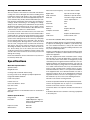
INSTRUCTION MANUAL
Orion eView 8x32 LCD
Digital Camera-Binocular
®
™
#9459
Customer Support (800)-676-1343
E-mail: support@telescope.com
Corporate Offices (831)-763-7000
Providing Exceptional Consumer Optical Products Since 1975
P.O. Box 1815, Santa Cruz, CA 95061
IN 261 Rev. A 7/05
ON/MODE button
LCD screen
Function Selection buttons (up and down)
Focus knob
Camera lens
Binocular objective lens
Rear hatch
Binocular eyepieces
Figure 1. The eView 8x32 LCD digital camera-binocular.
2
CAMERA/SET button
Introduction
3. Close the battery cover.
The eView is a full-featured binocular with an integrated digital camera. The camera’s field of view matches what you see
in the binoculars, so you can keep the sights and scenes for
later. Great for travel, concerts/sporting events, or wildlife
activities, you’ll find the eView to be an effective and fun tool
for exploring and documenting the world around you. Share
your views with your friends and family by downloading images from the camera to your computer.
Getting Started
Parts List
eView 8x32 LCD Digital Camera-Binocular
The eView has a battery level display in the upper right corner of the LCD status screen (appears when the eView is
turned on). When the battery is too low, you will hear a long
beep and the eView will turn off after 10 seconds.
Using the Binocular
Adjusting the Distance Between Your Eyes
Hold each barrel firmly and move the two barrels together to
match the distance between your eyes. You should see a single round field when looking through the binocular with both
eyes. Make this adjustment before you focus.
Focusing
The small knob between the two barrels is for focusing the
binoculars. The knob focuses both barrels simultaneously.
Turn the knob until the image is clearest. The left eyepiece
does not rotate; the right one does. The rotating right eyepiece is called the diopter adjustment.
Carry case
Neck strap
CD-ROM
SD card
USB cable
WARNING: Never look directly at the Sun through
your telescope—even for an instant—without a
professionally made solar filter that completely
covers the front of the instrument, or permanent
eye damage could result. Young children should use
this telescope only with adult supervision.
Installing the Batteries
Four AAA batteries are required. For best performance, we
recommend using high-quality alkaline batteries.
1. From underneath the binocular, open the battery cover (Figure
2).
2. Install four AAA batteries into the battery compartment.
The batteries should be oriented as indicated in the plastic
mold in the bottom of the battery compartment.
1⁄4"-20 mounting hole
Diopter Adjustment
Because all eyes are slightly different, the eView features a
right eye diopter adjustment. The purpose of this is to compensate for slight focus differences between a person’s two
eyes. With both eyes open, cover the right objective lens with
your hand. Turn the focus knob until the image in the left side
is sharp. Now, cover the left objective lens with your hand and
focus the right side by rotating the right eyepiece until the
image is sharp. The binocular is now adjusted to your eyes.
Make a note of the diopter adjustment and turn the right eyepiece to that diopter adjustment whenever you look through
the binoculars. Once you make this adjustment, you do not
have to touch the diopter adjustment again. Simply focus both
sides by turning the focus knob.
Use of a Tripod
The eView can be attached directly to a photo tripod. The
mounting hole on the underside of the eView (Figure 2)
accepts the 1⁄4"-20 mounting stud that is standard on most
photo tripods. Simply thread the tripod’s 1⁄4"-20 mounting
stud into the hole in the bottom of the eView until secure.
Roll-Down Eyecups
The eView features roll-down eyecups. The eyecups are usually left in the up position for use without eyeglasses. To use
the binocular with eyeglasses, simply roll down the eyeguard
by folding down one side, then slide your fingers around to the
opposite side of the eyepiece.
Battery cover
Figure 2. Underside of the eView.
3
Using the Camera
System Requirements
In order to view and download images from the camera to
your computer, your PC must meet the following system
requirements:
Windows 98SE/2000/ME/XP
Pentium 233MHz or higher
128MB SDRAM
Video (VGA) card with 2MB RAM for minimum 16-bit (high
color) display
CD-ROM
USB port
600MB of free hard drive space
Taking a Picture
Taking a picture with the eView is simple to do. Once you have
identified the object you wish to take a picture of in the binoculars, simply follow these instructions to capture the image
with the camera:
1. Flip up the eView’s LCD screen (Figure 1).
2. Turn the eView on by pressing the ON/MODE button for 3
seconds.
3. You will hear two “beeps”, and the status screen will
appear briefly (Figure 3). On the first line of this screen,
“HI” will indicate the camera is currently set to high resolution. The full battery icon will show your batteries are fresh.
The second line of the status screen will display the number of images currently in memory, which should be zero
at this point. The bottom line indicates the camera is ready
to take pictures, and the SD card is installed.
Installing the eView Driver
To install the necessary driver for the computer to acquire
images from the camera, insert the included CD-ROM into
your computer. When the introduction screen appears, choose
“Driver Installation” from the selection menu, and follow the
prompts through the installation process.
Installing Photo Explorer
The CD-ROM also includes Photo Explorer, which is a handy
image processing software program. While you can use many
other software packages to manipulate images on your computer, Photo Explorer has many applications and is very easy
to use.
To install Photo Explorer, insert the CD-ROM into your computer, and choose “Photo Explorer” from the introduction screen
choices. Then follow the prompts to install the software.
We recommend viewing and/or printing Photo Explorer’s
instruction manual before attempting to use the program. To
do this, choose the “User Manual of Photo Explorer” from the
CD-ROM’s introduction screen choices; it will copy a file to
your computer which can then be read or printed. If you do not
have Adobe Reader 5.0 or greater, you must download it from
www.adobe.com in order to read the manual.
The SD Card
To use the camera functions, the included SD card must be
installed in the eView. This allows images to be saved in the
camera for subsequent viewing and downloading later.
To install the SD card:
1. Remove the SD card from its plastic case.
2. Open the rear hatch on the eView (Figure 1). This is the
cover located directly below the binocular focus knob.
3. Insert the SD card into the SD card slot in the eView. The
SD card should be oriented so the printing on the card
faces downward.
4. Close the rear hatch on the eView.
4
Figure 3. The eView status screen lets you know the resolution
setting, battery life, and number of images currently stored in the
SD card.
4. After the status screen disappears, you will hear another
“beep”, and the LCD screen is now in preview mode. It
now displays, in “real time”, what is currently within the
camera’s field of view. Frame the picture you wish to take
on LCD screen.
5. Press the CAMERA/SET button. You will hear a “beep”,
and the LCD screen will go blank. The camera is now taking the picture. It takes a couple of seconds to actually
capture the image, so be sure to hold the eView steady
during this time. When the camera is done taking the picture, you will hear two “beeps”, and the status screen will
again briefly appear. Note that on the second line of the
status screen, the display now shows “1”, indicating that
one image is currently stored in the SD card.
The eView will now revert back to preview mode. Frame and
take another picture, if you wish. When no action is performed
with the camera functions, the eView will automatically turn
off after 90 seconds. Also, the close focus distance for the
camera is about 50 feet, so make sure the picture you have
framed is at least that distance away, or the focus of the image
will not be sharp.
Reviewing Images on the LCD Screen
After you have taken several pictures, you may want to review
the images stored in the SD card to determine which ones you
want to discard and which ones you want to keep.
1. With the camera in preview mode, press the ON/MODE
button. This will take you to the eView’s internal menu.
2. Use the up and down Function Selection buttons to scroll
to the “Review” menu selection. Press the CAMERA/SET
button to enter the review mode.
3. Use the up and down buttons to scroll through the images
currently stored in the SD card.
4. Select the image you wish to delete. Press the ON/MODE
button. You are now on the eView’s delete screen (Figure
4).
Turning the eView Off
With the camera in preview mode, press the ON/MODE button. This will take you to the eView’s internal menu. Then use
the up and down Function Selection buttons to scroll to the
“Power Off” menu selection. Press the CAMERA/SET button,
and the eView will turn off.
Downloading Image Files
Transferring images from the SD card to your computer is
quite easy. The eView acts as an external hard drive, so you
can easily “click and drag” image files from the eView to your
PC. But first you’ll need to connect the eView and computer
with the USB cable.
1. Make sure the eView is off, and open its rear hatch (Figure
1). Plug the USB cable into the jack near the SD card slot.
2. Plug the other end of the USB cable into your computer. You
will hear two “beeps” indicating the eView is now actively
connected to the computer.
3. Click on the “My Computer” icon on the PC’s desktop
screen.
4. Click on the “Removable Disk” icon under the heading of
“Devices with Removable Storage”.
5. Click on the folder “DCIM”.
6. Click on the folder “100Image”. The image files (and/or
video files) will now be displayed. You can now use image
processing software (such as the included Photo Explorer)
to manipulate and save the images. Or you can just “click
and drag” the images to your PC desktop for processing
later.
Other Camera Functions
Figure 4. The eView delete screen allows you to select one or all
images in the SD card for deletion.
5. Use the up and down arrows to select “1” from the choices
at the bottom of the screen and press the CAMERA/SET
button. The image selected is now deleted from the SD
card. If you want to delete all images currently stored in the
SD card, select “ALL” instead of “1”.
6. To exit the review mode, press the ON/MODE button, and
select “EXIT” from the choices on the bottom of the delete
screen. Press the CAMERA/SET button to exit. This will
take you back to the eView’s internal menu. To get back to
regular preview mode, use the up and down arrow keys to
select “EXIT” from this menu, and press the CAMERA/SET
button.
Another easy way to review images is to simply press either
the up or down button when the eView LCD is in preview
mode. You can then scroll through full screen images to see
what your pictures currently stored in the SD card look like. You
cannot delete images when reviewing in this way, however. To
exit, press the ON/MODE button to return to the eView’s internal menu, select “EXIT”, and press the CAMERA/SET button.
Besides taking pictures, the eView is also capable of making
movies and acting as a webcam. In addition, there are several
other built-in functions designed to give you flexibility in adjusting camera settings for your specific usage.
Making a Movie
The eView is capable of recording video up to 80 seconds in
length.
1. With the camera in preview mode, press the ON/MODE
button. This will take you to the eView’s internal menu.
2. Use the up and down Function Selection buttons to scroll
to the “Movie” menu selection. Press the CAMERA/SET
button to select this function.
3. Use the up and down buttons to scroll to “EXIT”, and press
the CAMERA/SET button to return to preview mode.
4. Press the CAMERA/SET button to begin taking the movie.
You will hear a single “beep” when the camera begins to
record the video. The small green LED light on the front of
the LCD screen will be shining. The LCD screen itself will
still appear in preview mode.
5. When done making the movie, press the CAMERA/SET button again.
5
To view the movie, you must download the video to your computer (see “Downloading Image Files” section). You can then
use a variety of video viewing programs, such as Windows
Media Player, to watch your movie.
can select between 50Hz and 60Hz, depending upon the frequency of the lighting used.
Using the eView as a Webcam
Another handy feature of the eView is its ability to be used as a
simple webcam. When in webcam mode, the eView will deliver
live real-time images from the camera directly to a computer
screen for virtually simultaneous viewing. This feature is especially useful for security purposes. Of course, you will need to
connect the eView to a computer to use the webcam functionality.
2. Use the up and down Function Selection buttons to scroll
to the “Hz” menu selection. Press the CAMERA/SET button to enter this function.
1. With the camera in preview mode, press the ON/MODE
button. This will take you to the eView’s internal menu.
Format
The format function essentially deletes all images and movies stored in the SD card. Make sure you have downloaded
anything you wish to keep onto your computer before reformatting the SD card. To format the SD card:
2. Use the up and down Function Selection buttons to scroll
to the “PC Camera” menu selection. Press the CAMERA/
SET button to select this function, and the eView will
“beep”, confirming the selection.
3. Use the up and down buttons to scroll to “EXIT”, and press
the CAMERA/SET button to return to preview mode.
4. Connect the eView to your computer using the supplied
USB cable.
5. Click on the Windows “Start” menu at the bottom left hand
side of your computer screen. Choose “Program”, then
“DBC”, then “PC Cam”. In the “Options” menu, select
“Preview”, and you should now be viewing live images
from the eView on your computer screen.
To exit the webcam, close the “PC Cam” program on your
computer, and disconnect the USB cable.
Selecting Resolution
There are two image resolutions available for the eView’s
camera. The “HI” resolution (1600x1200 pixels) setting should
be used for most applications where high image quality is
required, especially if the image will be enlarged. However,
if only minimal image quality is required (i.e. the final image
size will be kept small), the SD card can hold more pictures if
the “LO” resolution (640x480 pixels) is used. To select image
resolution:
1. With the camera in preview mode, press the ON/MODE
button. This will take you to the eView’s internal menu.
2. Use the up and down Function Selection buttons to scroll
to the “Resolution” menu selection. Press the CAMERA/
SET button to enter this function.
3. Use the up and down buttons to select “HI” or “LO”. Press
CAMERA/SET button to enable the setting.
4. Use the up and down buttons to scroll to “EXIT”, and press
the CAMERA/SET button to return to preview mode.
The “HI” resolution is the default setting, so if no changes are
made, the camera will take high resolution images.
Indoor Fluorescent Frequency
This feature can be used when taking pictures indoors under
fluorescent lighting. For best image quality and contrast, you
6
1. With the camera in preview mode, press the ON/MODE
button. This will take you to the eView’s internal menu.
3. Use the up and down buttons to select “50Hz” or “60Hz”.
Press CAMERA/SET button to enable the setting.
4. Use the up and down buttons to scroll to “EXIT”, and press
the CAMERA/SET button to return to preview mode.
1. With the camera in preview mode, press the ON/MODE
button. This will take you to the eView’s internal menu.
2. Use the up and down Function Selection buttons to scroll
to the “Format” menu selection. Press the CAMERA/SET
button.
3. Use the up and down buttons to select “YES”. Press the
CAMERA/SET button.
Once the SD card has been reformatted, the eView will go
back into its internal menu. Use the up and down keys to
select “EXIT” and press the CAMERA/SET button to get back
to preview mode.
Basic Maintenance
Usage Guidelines
To avoid damage, do not use the eView under the following
conditions:
• Temperature is lower than 41° or higher than 104°F.
• Very damp or dusty environments.
• Areas emitting strong electromagnetic fields (i.e. under
power lines or power stations).
Storing and Transporting
When not in use, the eView should be kept in its case with the
caps on. The instrument should be stored in a cool dry place;
storing it in a moist environment will result in mold growth and
destroy the optics. This is not covered by warranty. If the eView
is stored long-term, we recommend removing the batteries.
When transporting the eView, common sense prevails. Avoid
excessive bumping or rough handling, as the binoculars’ optical alignment may be affected. Do not bring the eView out in
the rain, but if water does get on the exterior, wipe it off immediately with a soft cloth or towel. When bringing the instrument
from the cold outdoors back inside a warm house, leave it in
a cool, dry area for a couple of hours. It is important to then
open up the case, remove the instrument, remove the caps,
and let everything dry out.
Cleaning and Care of Binoculars
The lens surfaces of the eView are coated with anti-reflection
coatings that can be damaged with careless handling. Avoid
touching lens surfaces with fingers or any coarse material. All
optics, even if stored, must be cleaned approximately twice a
year or whenever they are dirty. The dust that builds up on coatings promotes mold growth, which etches glass and destroys
coatings. Avoid over-cleaning; it can damage the coatings.
Always use lens cleaning tissue and fluid that are specifically
designed for multi-coated lenses. Do not use fluids or tissue
that is for eyeglasses or household use. Most binoculars and
camera lenses are cared for in a similar manner.
To clean the binocular and camera lenses, first make sure
your hands are clean. Blow off the lens with a blower bulb or
compressed air to remove the larger particles. Have several
pieces of tissue ready. Put two drops of lens cleaning fluid on
a piece of lens cleaning tissue (never on the lens). Gently wipe
the lens. Quickly wipe the excess fluid with a new, dry piece
of lens cleaning tissue. On larger lenses, clean only a small
area at a time, using new tissue each time. On excessively
dirty lenses, wipe across using one stroke for each tissue,
alternating wet and dry. The more fresh, clean lens tissue you
use, the less likely you are to scratch your lenses. Always
avoid excessive pressure or rubbing. It is better to leave a tiny
amount of dirt on the lens than to use too much pressure and
damage the coatings.
Never disassemble the camera or binocular for any reason, or
the warranty will be void.
Indoor fluorescent frequency: Can select 50 Hz or 60 Hz
Digital video:
Up to 80 seconds in length
Video resolution:
320x240, 12 Fps AVI format
Web cam:
“Real-time” images and video
can be acquired by PC
Aperture:
9mm
Focal ratio:
F/5.1
Near focus:
18m
Memory:
Requires SD card
Computer connection:
USB 1.1
Power:
Requires 4x AAA batteries
LCD screen:
31mm x 23mm, color
U.S. Patent No. 6,088,053. Other patents pending.
This device complies with Part 15 of the FCC Rules. Operation
is subject to the following two conditions: (1) this device may
not cause harmful interference, and (2) this device must
accept any interference received, including interference that
may cause undesired operation.
Changes of modifications not expressly approved by the party
responsible for compliance could void the user’s authority to
operate the equipment.
Eyeguards: Rubber, fold-down
Note: This equipment has been tested and found to comply
with the limits for a Class B digital device, pursuant to Part
15 of the FCC Rules. These limits are designed to provide
reasonable protection against harmful interference in a residential installation. This equipment generates, uses and can
radiate radio frequency energy and, if not installed and used
in accordance with the instructions, may cause harmful interference to radio communications. However, there is no guarantee that interference will no occur in a particular installation.
If this equipment does cause harmful interference to radio or
television reception, which can be determined by turning the
equipment off and on, the user is encouraged to try to correct
the interference by one or more of the following measures:
Prisms: Roof prisms
Reorient or relocate the receiving antenna.
Field of view: 6.3° �
Increase the separation between the equi--pment and receiver.
Close focus distance: 16 feet
Connect the equipment into an output on a circuit different
from that to which the receiver in connected.
Specifications
Binocular Specifications
Aperture: 32mm
Magnification: 8x
Coatings: Fully coated with multi-coatings
Focusing: Center focus with right-eye diopter adjustment
Eye relief: 17mm
Weight: 14.4 oz
Tripod attachment: 1⁄4"-20 threaded socket on underside of
binocular
Camera Specifications
Image sensor:
Consult the dealer or an experienced radio/TV technician for
help.
A shielded cable must be used when connecting a peripheral
to the serial ports.
2.1 megapixel CMOS
Resolution:
1600x1200 pixels in high resolution mode, 640x480 in low
resolution mode
Exposure control:
Automatic
White balance:
Automatic
7
One-Year Limited Warranty
This Orion eView™ 8x32 LCD Digital Camera-Binocular is warranted against defects in materials or workmanship for a period of one year from the date of purchase. This warranty is for the benefit of the original
retail purchaser only. During this warranty period Orion Telescopes & Binoculars will repair or replace, at
Orion’s option, any warranted instrument that proves to be defective, provided it is returned postage paid
to: Orion Warranty Repair, 89 Hangar Way, Watsonville, CA 95076. If the product is not registered, proof
of purchase (such as a copy of the original invoice) is required.
This warranty does not apply if, in Orion’s judgment, the instrument has been abused, mishandled, or
modified, nor does it apply to normal wear and tear. This warranty gives you specific legal rights, and
you may also have other rights, which vary from state to state. For further warranty service information,
contact: Customer Service Department, Orion Telescopes & Binoculars, P. O. Box 1815, Santa Cruz, CA
95061; (800)-676-1343.
Orion Telescopes & Binoculars
Post Office Box 1815, Santa Cruz, CA 95061
Customer Support Help Line (800)-676-1343 • Day or Evening
8