1
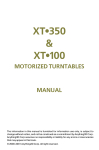
VR180
www.asaelectronics.com
AM/FM Cassette radio with CD player.
Overview
------------- Content-------------
Overview- - - - - - - - - - - - - - - - - - - - - - - - - - - - - - - - - - - - - - - - - - 2
Important notes- - - - - - - - - - - - - - - - - - - - - - - - - - - - - - - - - - - - - 4
Operating Instructions- - - - - - - - - - - - - - - - - - - - - - - - - - - - - - - - 4
Care and Maintenance - - - - - - - - - - - - - - - - - - - - - - - - - - - - - - - 12
Handing Compact Discs - - - - - - - - - - - - - - - - - - - - - - - - - - - - - 13
AM and FM Reception In a Mobile Environment - - - - - - - - - - - - 13
Some Facts About AM and FM Reception - - - - - - - - - - - - - - - - 14
FM Reception While You Are Driving - - - - - - - - - - - - - - - - - - - - 15
Specifications - - - - - - - - - - - - - - - - - - - - - - - - - - - - - - - - - - - - - 15
Warranty - - - - - - - - - - - - - - - - - - - - - - - - - - - - - - - - - - - - - - - - - 17
Overview
1. PWR button
--Press the button to turn on/off the radio
2. Audio and time Settings: Rotary / push knob
--volume control: turn the knob to raise or lower the sound level
--sound setting: press this knob to change the sound settings (see
below)
--time control: turn this knob to adjust the time in time setting mode
Sound Settings
Press and adjust as required by pressing and then turning the knob:
--Treble setting (TRE)
--Bass setting (BAS)
--Balance setting (BAL)
--Fader setting (FAD)
3. Auto-Seek button
-1-
-2-
Overview
OPERATING INSTRUCTIONS
--Radio mode: seek tuning up/down.
--CD mode: Select track up /down, or long press, fast forward/ rewind.
4. Mute and DSP function
Mute function
--Radio mode: mute function on/off .
--CD/CDC/TP mode: pause function and DSP (Digital Signal Processing) function
This button can select FLAT, JAZZ, POP, CLASS, ROCK, VOCAL,
DSP off.
5. Manual Setting
--Radio mode: Manual tuning up/down
--CDC mode: Select Disc up/ down
6. AMS and T/F button
AMS function
--If pressed briefly, the radio will Scan the memory preset stations
--If pressed for more than 2 seconds, the radio will auto-Store the
six strong stations into preset memory.
T/F function
--frequency and clock convert, To enter clock setting mode,
press for more than 2 seconds and then select hour or minutes with the audio settings knob.
7. Preset button 1
--Radio mode: press briefly to recall the preset station or press for
two seconds to memorize the current station frequency.The radio
can store 12 AM, 18 FM
--CD/CDC mode: track repeat play.
--CDC mode: track or whole disc repeat play.
8. Preset button 2
--Radio mode: press briefly to recall the preset station or press for
two seconds to memorize
--CDC mode: track or whole disc scan play
--CD mode : track scan play
9. preset button 3
--Radio mode: press briefly to recall the preset station or press for
two seconds to memorize
--CDC mode: track or whole disc shuffle play
--CD mode : track shuffle play.
-3-
10. Preset button 4
--Radio mode: press briefly to recall the preset station or press for
two seconds to memorize
-- CDC/CD mode:Program track memory
11. Preset button 5
--Radio mode: press briefly to recall the preset station or press for
two seconds to memorize
--CDC/CD mode: Program play
12. Preset button 6
--Radio mode: press briefly to recall the preset station or press for
two seconds to memorize
--CDC/CD mode: Program clear.
13. Source selection buttons
The individual sources or memory levels can be selected by briefly pressing the button.
--BAND button (VHF and MW)
--WB button (Weather Band selected)
--CD button (CD & CDC operation / EAS on/off)
--AUX button (AUX mode selected)
14. Eject button for Disc
Eject CD
15. CD slot
Insert CD into CD slot with the label surface upward. When inserted,
the CD will play automatically.
16. Eject button for Cassette
Eject Cassette
17. Fast rewind button
18. Fast forward button
19. Cassette Slot
Important notes
Operating the radio while driving can be dangerous. Traffic conditions can demand the constant attention of the vehicle operator..
Warning
Please concentrate on your driving above all!
Operating Instructions
-4-
OPERATING INSTRUCTIONS
OPERATING INSTRUCTIONS
1. PWR button
Press the button to turn on or off radio.
Maximum for front medium Maximum for rear
Fader FAD FRONT9 FAD CENTER FAD REAR 9
2. Rotary / Push knob
The knob serves:
- Sound setting
- Volume control
- Clock control
Reset
If no alterations are made for 5 seconds, the system will automatically leave the menu and store the last setting.
Sound setting
Press the button repeatedly to select
Treble setting (TRE)
Bass setting (BAS)
Balance setting (BAL)
Fader setting (FAD)
Volume Control
Turn the knob to the desired position.
Clockwise: Increase volume
Counterclockwise: Decrease volume
Radio operation seek tuning
It is possible to seek tuning backwards and forwards by pressing
either the up or the down hand side of the switch. Search station
in the direction selected in both AM and FM mode.
3. Auto-seek tuning button
Note: Please adjust volume in moderate position so you can hear
traffic sounds.
CD/CDC operation
Search track
Select track up/down in the direction selected by briefly pressing the switch. Fast forward and reverse .The switch is used for audible fast forward and reverse of a track during CD/CDC operation by
pressing the switch for more than 2 seconds.
4. Mute and DSP button
Clock control
With the time displayed, select any one: HOUR MINUTE
The scale value in the display can be set by turning the knob. ( see 6)
Mute function (
)
Radio operation: The radio enters into mute state by pressing the
up of the rock switch ( volume for 0, "MUTE" displaying) ; Press again, return to the normal play state.
Sound setting
Press the knob to select TRE/BAS setting
---Set the required value by turning the button to the left or right.
Bass: +7 0 -7
Treble: +7 0 -7
Tape operation: Press the up of the rock switch; current play pause; the word "PAUSE" appears in the display. Press again to cancel PAUSE function. Cassette play from the pause position.
Changing the mode in pause state can cancel the state.
CD/CDC operation: in CD play state, press the button to pause play and the word "PAUSE" appears in the display. Press again to cancel PAUSE function. CD play from the pause position.
Changing mode in pause state can cancel the state.
Balance control
Fader control
Maximum for left medium Maximum for right
Balance BAL LEFT 9 BAL CENTER BAL RIGHT 9
-5-
DSP function
-6-
OPERATING INSTRUCTIONS
Press the down of the rock switch to select the following in turn:
FLAT-JAZZ-POP-CLASS-ROCK-VOCAL-DSP Off
5. Manual Setting
Manual tuning
Briefly press the button and start to tune in the required direction. During tuning, sound is muted. Hold the button, tuning changes rapidly
in the required direction.
CDC operation: Disc selection
Select disc forward or reward in the desired direction.
6. AMS and T/F button
Preset scan / Auto Store station
Preset scan
Briefly pressing can scan preset station rang 1 to 6 in desired band.
Auto-store station
Hold button down and the 6 stations with the strongest signals can be
stored automatically in the desired band. If less than 6 stations, other
settings don't change. Or if no station found, the radio automatically tunes to the former station.
Frequency/Time
Briefly press button to alter between frequency and clock. In time state,
hold button down and the hour digit flashes. The hour digit can be adjusted by turning the knob(2); Press again, minute can be adjusted as well. If no alternation within 5 seconds, radio exits the time state.
7. Preset button 1
The button serves :
--Store station and Play stored station
--In CDC mode, repeat track or disc play.
--In CD mode, repeat track play
OPERATING INSTRUCTIONS
--Tune radio to desired station.
--Press the button for approximately 2 seconds and when the word
"M1"appears in the display, the station has be stored. Other preset
buttons appear relevant words, such as M2...
Note: When the new station stored, the old station stored can be replaced.
Play preset station
--Select desired waveband
--Briefly press button and emit the stored station.
--The band , frequency and preset digit appear in the display.
CD/CDC repeat play
--In CD/CDC mode, briefly press button, repeat current track to play.
--In CDC mode, press long for approximately 2 seconds, and repeat
the track of current disc to play.
--Press again to cancel the function of repeating play.
8. Preset button 2
The button serves:
--Store station and Play stored station
--Scan play in CD/CDC mode
Store station/ Play stored station , repeat the steps as 7
CD/CDC Scan play
--In CD mode, all tracks can be played for 10 seconds by pressing
the SCAN button.
--In CDC mode, the tracks of all the CDs in the CD changer can be
played for 10 seconds by pressing SCAN button.
--Press again to exit the SCAN function.
9. Preset button 3
The button serves:
Store station
--Select desired waveband
-7-
-8-
OPERATING INSTRUCTIONS
--Store station and Play stored station
--Shuffle play in CD/CDC mode
Store station/ Play stored station , repeat the steps as 7
CD/CDC shuffle play
--In CD mode, play the tracks of one CD in a random order by pressing button briefly.
--In CDC mode, play all tracks of all CDs in the changer in a random
order by pressing button.
--Cancel the SHUFFLE function by pressing the button again and the
radio return the normal play.
10. Preset button 4
The button serves:
--Store station and Play stored station
--Program memory in CD/CDC mode
Store station/ Play stored station , repeat the steps as 7
CD/CDC program memory
--In CD mode, one program track can be stored by pressing button for
2 seconds; the word "P.XX"(XX from 1-10) Appears in the display and flashes for 5 seconds; during the 5 seconds, press again to verify the program track being stored.The next program track repeats the steps above. Return normal play state after completing verification.
--After the disc for program memory exited, program memory can be
clear automatically.
11. Preset button 5
The button serves:
--Store station and Play stored station
--Program play in CD/CDC mode
Store station/ Play stored station , repeat the steps as 7
OPERATING INSTRUCTIONS
--In CD/CDC mode, If the program track existed, program memory
track will start to play from P1 by pressing the button.
--Select the next program track by pressing 3 in the desired direction.
--Cancel program play function by pressing the button again.
12. Preset button 6
The button serves:
--Store station and Play stored station
--Program clear in CD/CDC mode
Store station/ Play stored station , repeat the steps as 7
In CD/CDC mode, clear all program tracks by pressing the button for
2 seconds. The word "CLR" appears and flashes in the displays. During the time, verify the clearance action by pressing the button again.
Return the normal play.
13. Sources selector button
BAND button
The button select
--FM1
--FM2
--FM3
--AM1
--AM2
Press BAND button to select band among FM1, FM2,FM3,AM1,AM2.
WB button
Press WB button to select weather Band .
TP button
Cassette operation is selected with this button once a cassette has
been inserted.
Note:
Full insert cassette into slot with exposed side of tape facing to the
right. Then play tape.If have tape in slot, play tape by pressing butt-
CD/CDC
-9-
- 10 -
OPERATING INSTRUCTIONS
CARE AND MAINTENANCE
on. The word "PLAY" appears in the display.If no tape in slot, the button doesn't function.
til cassette is fixed by machine setting and is loaded in desired position. Then cassette is played.
CD button
Press this button can select CD and CDC mode directly, long press in
CD mode is to change EAS on/off. In other modes, press this key it will
Enter to CD mode, if there is a disc in CD slot otherwise it will go to CDC
mode. If no CD in slot and CDC changer not connecting this button
doesn't function.
Note:
It is recommended that the recording time of tapes used not exceed
90 minutes (C90 cassettes). sixty minute cassettes (C60) are well
suited for use.
AUX button
Press AUX button can enter AUX mode directly.
Advise to use high quality cassettes. The cassette is ejected when not using preventing it or head from being destroyed .If cassette is loo
se, this may be remedied by winding the tape backwards and forwards a few times on using pencil or other thing.
14. Eject Disc button
CD is ejected by pressing button
CARE AND MAINTENANCE
15. CD slot
Full insert CD with the data facing downward. Then automatically play
CD.
The radio section of your new sound system does not require any
maintenance. We recommend that you keep this manual for reference on the many features found in this unit as well as how to set the
clock.
Cassette maintenance
After cassette is used for long time, the head can collect dirt. This
can impede clear sound.
--Clean dirt with a cleaning tape at fixed intervals.
--Protect tapes from direct exposure to sunlight and high temperature to prevent distortion.
16. Eject Cassette button
Tape is ejected by pressing button.
17. Fast rewind button for cassette
Press the button to lock in rapid winding. The fast rewind mode is indicated by "FAST"in the display. Rapid winding is canceled by pressing
the button again. At the end of tape, automatically switches to the other side and begins play-back .(auto-reverse)
18. Fast forward button
Press the button to lock in rapid winding. The fast forward mode is indicated by "FAST" in the display. Rapid winding is canceled by pressing
the button again.At the end of tape, automatically switches to the other
side and begins play-back .(auto-reverse)
Auto-reverse: During playback, press both buttons simultaneously. The
radio will switch over and play the other side of Cassette.
19. Cassette slot
Full insert cassette with exposed side of cassette facing to the right un-
- 11 -
The compact disc player section also requires no routine maintenance but proper understanding of its use and handling will help you obtain maximum enjoyment of its capabilities. The following points should be observed.
--When cleaning the interior of the vehicle, do not get water or cleaning solution on the unit.
--The CD player is a precision instrument and will not operate properly in extreme heat or cold. In case of such conditions, wait until the
interior temperature of the vehicle reaches a normal temperature befor-e using the player.
--Never insert anything other than a 5" (12CM) compact disc into the
player as the mechanism can be damaged by foreign objects.
- 12 -
HANDLING COMPACT DISCS
--Do not attempt to use 3"(8cm) CD-Single discs in this unit, either with or without an adaptor, as damage to the player and/or disc may occur. Such damage will not be covered by the Warranty on this product.
-- When not using the disc player, always remove the compact disc.
Do not leave an ejected disc sitting in the disc slot as this can expose it to sunlight and other causes of damage.
--Do not attempt to open the unit chassis. There are no user serviceable parts or adjustments inside .
--When the vehicle warms up during cold weather or under damp conditions, moisture may condense on the lens of the disc player, should
this occur, the player will not operate properly until the moisture has
evaporated.
--The unit is designed with a vibration dampening CD mechanism to minimize interruption of disc play due to normal vibration in a moving
vehicle. When driving on very rough roads, however, occasional sound skips may occur. This will not scratch or damage the disc and normal play will resume when the rough conditions cease.
HANDLING COMPACT DISCS
Dirt, dust, scratches, and warped discs can cause skips in the playback
and deterioration of sound quality. Please follow these guidelines to take care of your compact discs:
-- Use only compact discs with the mark
-- Fingerprints, dust, and dirt should be carefully wiped off the disc's playing surface(shiny side) with a soft cloth. Wipe in a straight motion
from the inside to the outside of the disc.
-- Never use chemicals such as record sprays, household cleaners or
thinner to clean compact discs. Such chemicals can irreparably damage the disc's surface.
-- Discs should be kept in their storage cases when not in use.
--Do not expose discs to direct sunlight, high temperatures or high humidity for extended periods.
-- Do not stick paper, tape, or labels on the disc surfaces.
AM AND FM RECEPTION IN A MOBILE ENVIRONMENT
Although you may be familiar with both AM and FM reception in your
- 13 -
SOME FACTS ABOUT AM AND FM RECEPTION
home, you will experience notable differences in reception while driving your vehicle.
Both AM and FM provide excellent listening enjoyment and supply the diversified entertainment while in your vehicle. FM reception provides a different listening experience compared to that of AM. The few
reception inconveniences common to FM are compensated by the rich sound quality of its wide frequency response and stereo effect.
Your new AM/FM radio has been built to the strictest engineering standards available today and through quality under all conditions. A few
minutes reading this section will enable you to obtain the most from
the unit and answer your questions about the differences between mobile AM and FM reception.
SOME FACTS ABOUT AM AND FM RECEPTION
1. RECEPTION IN TUNNELS: Although you will lose AM reception when driving through tunnels and large bridges, it is common to continue to receive FM reception under the same conditions.
2. THE NUMBER OF STATIONS IN YOOUR AREA: Depending on
your location, you may find that you can receive a greater number
of AM stations in your area than FM stations. In most urban and
suburban areas, the numbers of AM and FM stations are comparable.
3. RECEPTION DURING STORMS: Local electrical thunderstorm activity often produces sharp static sound when listening to AM stations although you will find that FM is unaffected.
4. ELECTRICAL INTERFFRENCE: When listening to AM stations,
you may experience some buzzing sounds or static when passing
roadside electric power lines which do not interfere with FM reception. Conversely, FM reception may be affected by electrical noise
from passing cars and trucks while AM reception is not affected.
5. FM RECEPTION RANGE: FM reception range is usually limited to
about 50 miles from the broadcast station. FM signals radiate straight out from the broadcast antenna. They do not follow the earth's
curve and are not reflected back to the earth by the atmosphere resulting in"line-of-sight"reception range.
6. AM RECEPTION RANGE: AM stations can often be received hundreds of miles from the broadcast station. AM signals follow the earth's curve and are easily reflected back to earth by the atmosphere.
- 14 -
WARRANTY
90 DAY / 12 MO N T H L IMIT E D W A R R A N T Y
AUDIOVOX SPEC IALIZED APPLIC AT IO N , LLC (the C ompany) warrants to the
original retail purchaser of this product that should this product or any part thereof,
under normal use and conditions, be proven defective in material or workmanship
within 90 days from the date of original purchase, such defect(s) will be repaired or
replaced (at the C ompany's option) without charge for parts and repair labor. After the
initial 90 day period and for a period of 12 months from the date of original purchase,
the C ompany will supply at no charge a replacement for any defective part(s), but will
charge for the labor to repair the product.
To obtain repair or replacement within the terms of this warranty, the product is to
be delivered with proof of warranty coverage (e.g. dated bill of sale), specification of
defect(s), transportation prepaid, to an approved warranty station, or the C ompany at
the address shown below.
T his warranty does not extend to the elimination of externally generated static or
noise, to the correction of antenna problems, to costs incurred for removal or
reinstallation of the product, or to damage to any tapes, speakers, accessories, or
electrical systems.
T his warranty does not apply to any product or part thereof which, in the opinion of
the C ompany, has been damaged through alteration, improper installation, mishandling,
misuse, neglect, or accident. T HE EX T EN T O F T HE C O MPAN Y'S LIABILIT Y UN DER
T HIS W ARRAN T Y IS LIMIT ED TO T HE REPAIR O R REPLAC EMEN T PROVIDED
ABOVE, AN D, IN N O EVEN T, SHALL T HE C O MPAN Y'S LIABILIT Y EX C EED T HE
PURC HASE PRIC E PAID BY T HE PURC HASER FO R T HE PRO DUC T.
T his warranty is in lieu of all other express warranties or liabilities. AN Y IMPLIED
W ARRAN T IES, IN C LUDIN G AN Y IMPLIED W ARRAN T Y O F MERC HAN TABILIT Y,
SHALL BE LIMIT ED TO T HE DURAT IO N O F T HIS W ARRAN T Y. AN Y AC T IO N FO R
BREEC H O F AN Y W ARRAN T Y HEREUN DER IN C LUDIN G AN Y IMPLIED
W ARRAN T Y O F MERC HAN TABILIT Y MUST BE BRO UGHT W IT HIN A PERIO D O F
30 DAYS FRO M T HE DAT E O F O RIGIN AL PURC HASE. IN N O C ASE SHALL T HE
C O MPAN Y BE LIABLE FO R AN Y C O N SEQ UEN T IAL O R IN C IDEN TAL DAMAGES
FO R BREEC H O F T HIS O R AN Y OT HER W ARRAN T Y, EX PRESS O R IMPLIED,
W HAT SO EVER. N o person or representative is authorized to assume for the
C ompany any liability other that expressed herein in connection with the sale of
this product.
Some states do not allow limitations on how long an implied warranty lasts or the
exclusion or limitation of incidental or consequential damages so the above limitations
or exclusions may not apply to you. T his warranty gives you specific legal rights and
you may also have other rights which vary from state to state.
AUDIOVOX SPEC IALIZED APPLIC AT IO N S, LLC
Visit us at www.asaelectronics.com
- 17 -