1
B & K Components, Ltd.
AVR505 SERIES 2
AVR507 SERIES 2
User Manual
Five or Seven Channel
Surround A/V Processor Receiver
13791 1104
ii
ACCESSORIES AND LIMITED WARRANTY
USER MANUAL - AVR505 Series2, AVR507 Series2
© 2004 B & K Components Ltd. All rights reserved.
The information in this manual is copyright protected. No part of this manual may be copied or reproduced in any form without prior
written consent from B & K Components, Ltd.
B & K Components Ltd. SHALL NOT BE LIABLE FOR OPERATIONAL, TECHNICAL OR EDITORIAL ERRORS/OMISSIONS MADE
IN THIS MANUAL. The information in this manual is subject to change without prior notice.
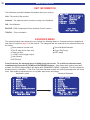
Accessories Included
B&K
S IMPLY B ETTER!
1
1
1
1
- SR10.1 Remote Control
- AM Antenna
- FM Dipole Antenna
- Power Cord
1
1
1
1
- Warranty Card
- User Manual
- Serial to RJ-45 Adapter
- BKcSuite CD-ROM
SIMPLY BETTER! is a registered trademark of B & K Components, Ltd. Manufactured under license from Dolby Laboratories. "Dolby", "Surround EX",
“Pro Logic” and the double-D symbol are trademarks of Dolby Laboratories. Manufactured under license from Digital Theater Systems, Inc. US Pat.
No.5,451,942, 5,956,674, 5,974,380, 5,978,762, 6,487,535 and other U.S and worldwide patents issued and pending. “DTS”, "DTS-ES" and "Neo:6"
trademarks of Digital Theater Systems, Inc. Copyright 1996, 2003 Digital Theater Systems, Inc. All Rights Reserved. Motorola® , * DigitalDNA™,
"Powered by Motorola™, Motorola name and logo are registered trademarks of Motorola, Inc. All Rights Reserved.
Limited Warranty
B & K Components Ltd., referred to herein as B & K , warrants your B & K equipment against all defects in material and workmanship for a period of five
years from the date of purchase. This warranty applies only to the original purchaser and only to equipment in normal residential use and service.
Defective equipment must be returned to B & K , prepaid, accompanied by proof of purchase and sufficient payment to cover the cost of return shipping
and handling, and will be repaired or replaced at the discretion of B & K whose decision as to the method of reparation will be final.
This warranty shall not apply to any equipment which is found to have been improperly installed, incorrectly fused, misused, abused, or subjected to
harmful elements, used in any way not in accordance with instructions supplied with the unit, or to have been modified, repaired or altered in any way
without the expressed, written consent of B & K . This warranty does not apply to the cabinet or appearance items such as the faceplate or control
buttons, nor does it cover any expenses incurred in shipping the unit to and from the manufacturer's service department.
This warranty on B & K Components, Ltd. products is NOT VALID if the products have been purchased from an unauthorized dealer or an E-tailer or if
the original factory serial number has been removed, defaced or replaced in any way. B & K Components, Ltd. sells its products through authorized
dealers in order to ensure that consumers obtain proper dealer service and support. Buying from an authorized B & K Components, Ltd. dealer insures
that you have a FACTORY WARRANTY on your B & K Components, Ltd. product. If you have any questions concerning your Factory Warranty call
B & K Components, Ltd. at 716-656-0026.
Upgradeability: B & K is one of the first manufacturers in the audio/video industry to consistently offer software and hardware upgrades to its
processing of audio signals. Through upgrades B & K delivers exceptional value to its customers. But what is "upgradeability"? Upgradeability is not a
guarantee; we define it as a philosophy of designing and manufacturing products so that as audio technology evolves, B & K can provide enhancements and improvements to its products that are economically viable.
THE EXPRESS FACTORY WARRANTY HEREIN CONTAINED IS IN LIEU OF ANY AND ALL OTHER WARRANTIES, EXPRESSED OR IMPLIED,
INCLUDING ANY WARRANTY OF MERCHANTABILITY, UPGRADEABILITY OR OF FITNESS FOR ANY PARTICULAR PURPOSE. B & K COMPONENTS, LTD. SHALL NOT UNDER ANY CIRCUMSTANCES BE LIABLE FOR DAMAGES, INCLUDING SPECIAL, INCIDENTAL, EXEMPLARY,
PUNITIVE OR CONSEQUENTIAL DAMAGES ARISING OUT OF OR IN CONNECTION WITH THE PURCHASE, USE OR PERFORMANCE OF ANY
B & K PRODUCT.
This warranty gives you specific legal rights. You may also have other rights which vary from State to State. Some States do not allow the exclusion or
limitation of incidental or consequential damages and the foregoing exclusions may not apply to you.
No agent, representative, dealer or employee of B & K has the authority to increase or alter the obligations or terms of this warranty.
Returning Equipment
No equipment may be returned to B & K Components Ltd. without a RETURN AUTHORIZATION (RA). Should you find it necessary to return equipment to B & K , for any reason, a RETURN AUTHORIZATION (RA) number must be issued by B & K in respect to the equipment being returned. You
may request an RA number by calling B & K at the numbers below. We will need the following information to issue your RA number. Please have it
ready before you call.
1.
2.
3.
4.
Your name, address, and phone number.
The model and serial number of the equipment being returned.
A description of the problem being experienced.
Your sales receipt.
Your call will be referred to a Technical Service Representative who will work with you to resolve the problem. If it is determined that the unit must be
returned for repair, an RA number will be issued.
2100 Old Union Road Buffalo, NY 14227 1-800-543-5252 In NY: 716-656-0026
e-mail: info@bkcomp.com Web Site: www.bkcomp.com
fax: 716-656-1291
1
TABLE OF CONTENTS
ACCESSORIES AND LIMITED WARRANTY
TABLE OF CONTENTS
SAFETY PRECAUTIONS
FEATURES
AUDIO OVERVIEW
AUDIO AND SURROUND FORMATS
FRONT PANEL DESCRIPTION
BACK PANEL DESCRIPTION
QUICK START CONSIDERATIONS
HARDWARE CONNECTIONS
SOURCE CONNECTIONS
Source Connection Diagram
SACD or DVD-Audio Connection
VIDEO MONITOR CONNECTION
Component Video Monitor Connection
S-Video Monitor Connection
Composite Video Monitor Connection
SURROUND SPEAKER CONNECTIONS
7.1 Speaker Output Connections
6.1 / 5.1 Speaker Output Connections
RCA Surround Outputs / Subwoofer Connection
PASS THROUGH / RECORD LOOP CONNECTIONS
CONTROL OUTPUT CONNECTIONS
IR Emitter Connection
+12VDC Control Connection
ZONE B CONNECTIONS
Zone B Amplification and Video Connection
AVR507 Series2 BACK CHANNEL AMPLIFICATION CONVERSION
KEYPAD CONNECTION DESCRIPTION
ZONE A & ZONE B IR INPUTS
AM / FM ANTENNA CONNECTION
SETTING UP THE SYSTEM
THE MENU SYSTEM
MAIN MENU SELECTIONS
SYSTEM SETUP
SETUP SPEAKERS
1. Speaker Size
2. Setup Speaker Location
3. Setup Speaker Levels
4. Setup Crossover + LFE
5. Setup Room Equalization
6. Room Resonance (Notch Filters)
SETUP INPUTS
SETUP PRESETS
SETUP DISPLAYS
SETUP MUSIC MODES
MEMORY BACKUP/RESTORE
UNIT INFORMATION
ADVANCED MENU
Zone ‘1’ Home Theater
Control Outputs
Power on Titles
ii
1
3
4
5
6
10
11
12
13
13
13
13
14
14
14
14
15
15
16
17
18
18
18
19
19
19
20
21
21
21
22
22
23
24
25
25
26
26
26
27
27
29
30
31
31
31
32
32
33
34
34
2
TABLE OF CONTENTS
DSP Usage
Security Options
RS-232 Control Port
Plug and Play Timing Setup
Zone 2 ‘B’ Second Zone
FACTORY RESET
SR10.1 REMOTE CONTROL OPERATION
UNIT OPERATION
Master Power On / Off
On / Standby
Adjusting Volume
Center, Rear and Subwoofer Volume
Source Selection
Z1 Operation - Theater (menu)
Sleep Timer
Z2 Operation - Second Zone (menu)
Zone Operation Button
Tuner Operation
Headphone Operation
FRONT PANEL DISPLAY OPERATION
Processor Status
AUDIO MODES & SPEAKER SELECTIONS
Audio Mode Usages
Speaker Selections
Equalization Settings and Adjustments
PRESETS
Saving a Preset
Recalling a Preset
Favorite Presets
SR10.1 REMOTE EDITOR SOFTWARE
Learning IR Codes
BKcSuite SETUP SOFTWARE
Troubleshooting Guide For BKcSuite
TROUBLESHOOTING
BACK PANEL PICTURE
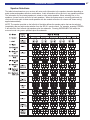
ON SCREEN MENU FLOW CHART
SPECIFICATIONS
Product Information
Date of Purchase:
Receiver Model #:
Receiver Serial #:
Purchased From:
Address:
Phone #:
35
35
36
37
38
38
39
40
40
40
40
40
40
41
41
41
41
42
42
43
43
45
45
47
48
49
49
51
51
51
53
54
55
56
57
58
Back
SAFETY
CAUTION
RISK OF ELECTRIC SHOCK
DO NOT OPEN
SAFETY PRECAUTIONS
WARNING: to prevent fire or shock hazard, do not expose this unit to rain or moisture. Care should
be taken to prevent objects or liquid from entering the enclosure. Never handle the power cord with
wet hands.
• The lightning flash with arrowhead within a triangle is intended to alert the user of the presence of
uninsulated "dangerous voltage" within the product's enclosure that may constitute a risk of electric
shock to you.
• The exclamation point within a triangle is intended to alert the user of the presence of important
operating and maintenance (servicing) instructions in the literature accompanying the unit.
• Caution: To prevent the risk of electric shock, do not remove cover. No user-serviceable parts inside.
Refer servicing to qualified service personnel.
• If an outdoor antenna is installed, be sure it is grounded to provide some protection against voltage
surges and built up static charges. Keep outdoor antennas away from power lines.
• Unplug the receiver from the AC outlet when plugging in or unplugging cables, when left unused for
an extended period of time, when moving the receiver, or when you suspect lightning in your area.
• Prevent damage to the power cord. Replace the power cord if it becomes damaged in any way.
Always grasp the plug on the power cord when plugging or unplugging the receiver from the AC outlet.
• Your system may produce sound levels capable of causing permanent hearing loss. Do not operate
for extended periods of time at high volume levels.
• Protect the receiver from impact and place the receiver on a level surface.
• The receiver is equipped with raised feet to provide ventilation, reduce acoustic feedback, and
protect against scratching the surface the unit is resting on. B & K advises against removing the feet.
• Do not stack anything on top of the receiver (processor, source, etc.) Leave a minimum of 3" clearance from the top of the receiver to the next shelf (or component).
• The receiver should be located away from sources sensitive to heat.
• Do not perform any internal modifications to the receiver.
• Always connect the receiver's power cord to a dedicated AC outlet for normal operation.
• If young children are present, adult supervision should be provided until the children are capable of
following all rules for safe operation.
• Mistaking CONTROL OUTPUT or IR INPUT connectors for audio/video inputs or outputs may
damage your receiver or other components.
•System impedance SHOULD NOT fall below the nominal impedance of the amplifier stage, i.e two
8Ω speakers in parallel = 4Ω (system impedance). Minimum stability refers to the periodic audio
passages that demand large amounts of current at which time the output impedance drops.
The receiver should be serviced by qualified personnel when:
A.
B.
C.
D.
The receiver is not functioning properly.
Objects have entered the chassis.
The receiver was exposed to rain or any other type of moisture.
The receiver was dropped, or the chassis is damaged.
3
4
FEATURES
FEATURES
Both the AVR505 Series2 and AVR507 Series2 receivers are versatile Audio/Video control centers.
State-of-the-art high current power amplifier section:
•
•
•
•
Toroidal transformer and computer-grade electrolytic capacitors allow more dynamic range.
Discrete Circuitry for more accurate, 3-dimensional reproduction.
Class A Predriver improves low-level detail for smoother, more musical sound.
AB MOSFET Output Stage for efficient and linear power delivery.
Video Transcoding - Allows composite and S-Video inputs to source the composite, S-Video and component
video outputs. Composite video will transcode to S-Video and S-Video will transcode to composite. Video
transcoding allows a single set of component video cables to be used with a video monitor.
Room Equalization (Notch Filters) - Three sweepable notch filters and variable equalization are available in
the digital domain for use in achieving the best possible room response.
371
Motorola
Processor - The latest in Motorola technology provides outstanding processing power.
Two-zone operation - One main digital & analog A/V zone, (Theater Zone) plus a separate independent
analog A/V zone for use with a second listening/viewing area (2nd zone).
CK1.2 Keypad Compatible - B & K ’s CK1.2 Keypad easily integrates with the B & K processor/receivers for
control of the main theater zone or the second A/V Zone B.
Sleep Timer - 30 minutes to 4 hours in 30 minute increments.
5 Year Parts and Labor Warranty - For all B & K products sold through authorized dealers.
Gold Plated Connectors - Improved sound with minimum signal loss and degradation.
Internal Digitally Synthesized AM/FM Stereo tuner - Store up to 40 AM or FM stations in A/V presets.
Digital inputs/outputs - Six coaxial and five optical inputs. Two coaxial outputs (Theater zone & Second
zone) and one optical output for the Theater zone.
Analog inputs/outputs - Seven A/V inputs each with stereo audio, composite video and S-video inputs. One
assignable SACD or DVD-Audio input. One set of 7.1 line-level outputs. Three analog (record) loop outputs.
Control Outputs - Four 12 VDC @ 50 mA outputs for turning on (triggering) B & K amplifiers and controlling
external systems such as a projection screen. Up to three control outputs can be configured for IR outputs to
allow integration with a keypad or IR repeater control system.
IR inputs - Two IR inputs for keypads or external IR repeater control systems.
A/V presets - 40 preset memories allow instant recall of user settings and system configuration.
Customized Input and Preset Names - Assign custom names to presets, inputs, and the power on message.
RS-232 Control - Easy control and interface of your B & K product with other system controllers.
96/24 bit A/D and 192/24 bit capable D/A Conversion - Ultra high reproduction resolution of musical details.
96/24 Bit Processing - 96/24 bit digital data and analog source material use 96 kHz, 24 bit DSP processing
during all stereo listening modes.
Selectable Bass Management Crossover Frequency and Slope - Allows system versatility for bass adjustments and management to assure superior performance from your speaker system. Shelving equalization
adjustments can be made to either end of the response frequency spectrum to further enhance the listening
room for optimal playback.
Upgradeable - Modular design allows for future A/D, D/A, DSP, and Digital Receiver upgrades. State of the
art today, state of the art tomorrow.
AUDIO / VIDEO OVERVIEW
AUDIO / VIDEO OVERVIEW
Definitions
Sources - A source is considered any device that can be connected to the audio/video receiver or processor
and transmit a signal that can be seen or heard. Typical sources include DVD players, satellite boxes, CD
players, etc. Your receiver can provide audio from its built-in AM/FM tuner. Your receiver is designed to
accommodate a wide range of audio and video signals.
Zone - A zone is usually a room or section of the house that has speakers and/or video installed in it. Your
receiver includes a full preamp/processor for Zone A , the main theater zone, plus an additional analog audio
and video preamp for Zone B - the second zone. Two zones allow for watching a Dolby Digital movie in the
main theater while simultaneously using the built-in AM/FM tuner in the second zone.
Amplifier - An amplifier takes the output of a pre-amplifier/processor and increases its levels necessary to
drive a speaker. In a receiver the amplifier is combined into the same box with the processor. B & K employs
high current amplifiers in their receivers. These amplifiers are also available as separate components.
Speakers - A surround sound system typically uses 5 speakers located left front, center front, right front, right
surround, and left surround plus a subwoofer located anywhere in the room. With the new developments in
surround technology from companies such as Dolby Laboratories and DTS, it is now possible to improve
spatial expressions with an additional channel of information for use with a 6th or 7th surround back
speaker(s). Although best results are achieved using seven large speakers plus a subwoofer, this is not
always practical. Excellent results can be achieved using small and/or fewer speakers, as long as you go
through the setup procedures described later in the manual. Your processor includes the capability of reproducing up to 7.1 channels of surround information.
A/V Preamplifier - An A/V preamplifier has the capability to select from a number of A/V sources, adjust
volume levels and route the audio to an amplifier and video to a video monitor. An A/V preamplifier requires
the use of an external power amplifier.
Surround Processor - A processor typically includes the capability to decode one or more surround formats,
and convert between digital and analog as required. Your A/V receiver includes a high quality MotorolaTM
processor capable of decoding the various audio surround formats.
Composite video vs. S-video vs. Component video - Composite video is the oldest standard for color
video. It combines the luminance (brightness or black-and-white) and chrominance (color) information onto a
single conductor. At the monitor, this composite video signal must be separated again for it’s display which
results in some degradation of the original video quality. S-video is a standard that uses separate conductors
for the luminance (Y) and chrominance (C) information resulting in better video quality. Component video is a
form of video which first became popular with the introduction of the DVD player. Most component video
signals are a variation of the red, green and blue signals that make up a television image. The simplest type,
RGB, consists of the three discrete R, G & B signals sent over three video cables. Another type consists of RY, B-Y and Y (also known as YUV), that is also sent over three video cables. Y is the luminance channel, R-Y
is the red component minus the luminance information, and B-Y is the blue component minus the luminance
information. Your receiver is capable of switching composite, S-video and component video signals, and
converting between signal types. Your A/V receiver is capable of transcoding composite video and S-video to
component YUV video signals.
Transcoding - Video transcoding is the process of converting one video format to another. Video
transcoding is a new technology brought about by the need to integrate these many different video formats.
Video transcoding does not change the resolution of the original video signal and allows different video
formats to be viewed on one video monitor. Video transcoding research is being driven by the need to
integrate video technologies pertaining to computer networks, cell phone, PDAs, television and satellite. Your
A/V receiver is capable of transcoding composite video and S-video to component YUV signals.
5
6
AUDIO / VIDEO OVERVIEW
Analog vs. Digital Audio - This refers to the method used to place audio information on the source material
and how they are delivered to your receiver from the source. Analog signals exactly represent the sound you
will hear through a continuously varying voltage. Audio cassettes are analog recordings and are normally
delivered to your receiver over a pair of coaxial audio cables.
Digital signals closely approximate the original audio signals with a set of numbers referred to as a bitstream.
CDs and DVDs are sources of digital audio and are normally connected to your receiver through a single
coaxial or optical digital cable. There are several different bitstream formats available. The simplest format is
called Pulse Code Modulation (PCM). In PCM, the bitstream directly represents the original 2-channel audio.
In Dolby Digital and DTS (see "Audio and Surround Formats" below) bitstreams are modified using a process
called compression to squeeze more information into limited space. DTS squeezes 5.1 channels into the
space normally required for two uncompressed channels, while Dolby Digital squeezes 5.1 channels into
about ¼ the space required for two channels. Your receiver automatically detects the bitstream currently
being provided from the source and performs the required decompression and surround processing. If no
digital signal is present your receiver will automatically switch to analog processing. All sounds that you hear
from your speakers are analog. Digital signals are automatically converted to analog by your receiver before
being output to the speakers.
If analog signals exactly represent the audio, while digital signals only approximate it, why would I
want to use digital?
All analog sources add some amount of noise and distortion to the audio signal. Additional noise can be
picked up through the cables from the source to your receiver. It is impossible for the receiver to tell the difference between the desired signal and the added noise and distortion, so it reproduces both of them. The
result is increased background noise and decreased dynamic range and fidelity. Digital signals are virtually
immune to noise and distortion. The receiver can, therefore, reproduce the signal with the greatest possible
fidelity. We recommend you use digital signals whenever possible. Also Dolby Digital and DTS (see "Audio
and Surround Formats" below) work only with digital signals.
AUDIO AND SURROUND FORMATS
Your source material will be played back on your B & K processor in one of the following possible formats
described below. Each format can be used for various listening conditions.
Monaural (Mono) - Mono is the oldest format available. It contains a single, full range audio channel. Modern
recordings are seldom made in this format, however older movies and music may only be available in this
format. You may get mono from any source - digital or analog. Your receiver can produce mono in one to
seven channels depending on speaker and audio setup. Since all modern sources are stereo, the mono information is usually replicated on both the left and right channels.
Stereo - Stereo contains two discrete, full-range front left and right audio channels. This is the most common
format for music and is also used on many movies. You may get stereo from any source - digital or analog.
Sound will normally come from the seven speaker channels, but your receiver can produce stereo in two to
seven channels, depending on speaker and audio setup.
Dolby Digital 5.1 - Dolby Digital 5.1 is a method of transmitting and storing 5.1-channel soundtracks via
digital media such as DVDs, digital cable, digital broadcast TV (DTV), and satellite transmissions. Dolby
Digital 5.1 is transmitted over the optical digital or coax digital connections. Unlike the Dolby Surround
encode/decode Pro Logic process, which sacrifices channel separation to get surround onto any stereo
soundtrack, Dolby Digital 5.1 is a discrete system that keeps the multiple channels fully separated throughout
the encoding and decoding processes. In addition to having full-range front left, center, right, left surround,
and right surround channels, Dolby Digital 5.1 soundtracks carry a sixth (“.1”) channel recorded with lowfrequency effects. For more information on Dolby Laboratories, please visit www.dolby.com.
AUDIO / VIDEO OVERVIEW
Dolby Digital Surround EX - Dolby® Digital Surround EX™ provides a third surround channel on Dolby
Digital movie soundtracks. The third surround channel can be decoded at the cinema's or home viewer's
option for playback over surround speakers located behind the seating area. The left and right surround
channels are reproduced by surround speakers to the sides. To maintain compatibility, the back surround
channel is matrix-encoded onto the left and right surround channels of an otherwise conventional 5.1 mix, so
no information is lost when the film is played in conventional 5.1.
A 5.1-channel soundtrack can be played on a 5.1-speaker system. But it is not always understood that it can
also be played on a 6.1- or a 7.1-speaker system. To do this, the two surround signals on the 5.1 soundtrack
are spread across the three or four surround speakers. This distribution can be accomplished by a Dolby
Digital EX decoder, or other proprietary methods provided in home theater equipment by various manufacturers.
Dolby Pro Logic II - Pro Logic II brings exciting features and advanced performance for decoding the many
thousands of existing Dolby Surround programs, making them sound more like a discrete Dolby Digital 5.1channel version than ever before. Pro Logic II is able to decode the thousands of existing Dolby Surround
movies and TV shows already on the shelf, compatibly, and with enhanced image stability. The improvements
in decoding techniques mean that the discreteness of the sound field elements are better preserved in the
decoding process than was possible with the standard Pro Logic technology. Pro Logic II offers a music mode
to expand stereo non-matrix recordings into a five-channel layout in a way that does not diminish the subtlety
and integrity of the original stereo recordings.
Dolby Pro Logic IIx - Dolby Pro Logic IIx is a new extension of Dolby Pro Logic II technology. This highly
sophisticated algorithm processes native stereo audio signals and 5.1-channel multi-channel content to
produce 6.1 or 7.1 output channels. Dolby Pro Logic IIx expands the choice in playback system configuration
(allowing 5.1, 6.1, or 7.1 playback channels) and, when incorporated into an A/V receiver or processor such
as B & K , it allows a convenient upgrade path from a traditional 5.1-channel sound system to 7.1 output
channels. The two surround back channels are decoded into stereo.
Center width - The Center Width control allows the user to modify the amount of steering that is
applied to Center signals. As steering is reduced, the Center signal originates increasingly from the Left and
Right speakers, and is concurrently reduced in the Center speaker. The purpose of the Center Width control
is to reduce the “hard Center channel” phenomenon that sometimes results from Center signal steering of
stereo encoded soundtracks.
Panorama - The function of the Panorama mode is to create a more enveloping front surround field. It
is equally useful when applied to Dolby Pro Logic IIx processing.
Movie or Music - Surround programs are primarily movie based. Even TV dramas are essentially
mixed like movies. When programs are mixed in surround, they are monitored through the surround decoder
that will be used for playback in the cinema or home. Movie mode is the reference decoder mode for any
such surround-encoded program.
Music, on the other hand, is commonly mixed for stereo playback, and no surround monitoring is done by the
mixer. When played back through a surround decoder, the results may not always be optimal. This is
because a movie-type decoder is expecting a signal that has been deliberately surround encoded. Music
mode brings the benefits of a highly natural and balanced multichannel surround sound field to content that
was not specifically encoded for surround playback.
7
8
AUDIO / VIDEO OVERVIEW
DTS 5.1 (Digital Theater Systems) - DTS is a multi-channel digital audio compression format transmitted
over optical digital or coaxial digital connections. DTS is dedicated to delivering the “Ultimate Entertainment
Experience.” DTS has created a media-delivery format that makes audio tracks sound more dynamic, more
realistic and more closely matching the original than other digitally encoded soundtracks and consumer
media. Coupled with the multi-dimensional playback benefit of surround sound technology, DTS audio quality
dramatically improves and enhances content. DTS 5.1 is an ultra realistic home theater environment, it
delivers discrete channel precision plus the all-enveloping realism for which DTS is renown. For more information on the various DTS formats, visit www.DTSonline.com.
DTS NEO:6 - An advanced matrix decoder. It will take any two-channel source and expand it into five or six
channels, depending on the user's speaker layout. Two-channel sources include VHS tapes, broadcast television, stereo CDs and DVDs. DTS Neo:6 provides separate, optimized modes for stereo music materials and
matrix surround motion picture soundtracks. DTS Neo:6 also decodes a center-surround channel from
Extended Surround matrix soundtracks. Music and movie filters can be applied to the NEO:6 decoder. The
differences between these two filters apply primarily to the differences in the type of soundtrack being played
back.
DTS-ES 6.1 (Extended Surround) - The Extended Surround (ES) adds a discrete back center-surround
channel to the existing 5.1-channel array. DTS-ES Discrete 6.1 is the only home format that can deliver 6.1
discrete channels. DTS-ES is fully compatible with all types of multi-channel systems. All sounds will be
heard even when played back on a system with less than 6.1 speakers
DTS Neo:6 Movie - Movie steers decoded material toward the center channel while preserving the integrity
of the stereo mix. When listening to movies using the DTS Neo:6 movie decoder with stereo TV shows or
other surround-encoded programs, there is further enhancement to soundfield directionally, which is close to
the quality of discrete 6.1-channel sound. Conventional narrow band monaural surround channel is played as
stereo with a more realistic feel and movement.
DTS Neo:6 Music - Music steers the effects into the soundfield by utilizing the surround channels for a more
spacious, 3-dimensional feeling. When listening to music using the DTS Neo:6 music decoder, stereo music
recordings are able to provide a wide and deep soundfield. DTS Neo:6 music decoder allows you to tailor the
Center Image to your own preference. The Center Image control allows the sound of the center channel to be
placed between its own speaker and the left and right front speakers.
Bass Management - Dolby Digital and DTS-ES formats may contain up to 6 full range channels plus an LFE
(Low Frequency Effects) channel. Only a system with six full-range (large) speakers plus a subwoofer can
directly reproduce these formats. However, almost all commercially available center channel speakers and
bookshelf speakers are considered small and incapable of reproducing the lowest bass frequencies without
distortion or even damage to the speaker. Many people use small speakers in the rear of their system, while
others use small speakers for all channels. Some people may choose not to use a center channel or
surround speakers at all. Use of a subwoofer is mandatory when using small speakers to reproduce low
frequencies. In order to handle any possible combination of large, small, or missing speakers, a home theater
system must contain good bass management. Your B & K receiver contains a complete bass management
system. You can use as few as two large (full range) front left and right speakers or two small front left and
right speakers. Wherever a small speaker is used, the bass management system filters low frequency information from going to that speaker ("high pass"). This bass information is re-routed to a speaker that can
handle it, usually a subwoofer. If no subwoofer is present, it can send the low frequency and LFE to large
front or surround speakers. The bass management crossover point can be adjusted by the user according to
the types of speakers being used.
Notch Filters (Parametric Equalization)- Notch filters are used to enhance the frequency response of a
given room. The full range frequency spectrum in an ideal scenario is completely flat. This means that there
is no variation in the decibel level between any of the frequencies as you sweep up or down the frequency
range. This type of response is almost impossible to achieve. Due to the physical geometry of any given
room, the sound waves will bounce off walls, doors or windows within the room. This reflection of sound
AUDIO / VIDEO OVERVIEW
waves is a desirable effect to a point. Different locations in the room will have waves that collide with one
another. This collision can cause a superposition (addition or subtraction) of the audible wavelength. In
either case, these locations are referred to as nodes. If a positive node occurs in the primary listening
position, that frequency drowns out all other frequencies at that location, resulting in limited frequency
response for that location in the room. A node can occur at any frequency, however nodes are much more
prevalent in the lower frequency ranges (below 130Hz). In these lower frequencies, the wavelengths are
physically long enough that a superposition can have a more dramatic effect than frequencies at a higher
(shorter) wavelength. A notch filter provides a means by which the receiver can effectively ‘notch’ out
resonant frequencies to achieve a balanced frequency response for a given room. Once the frequency
response has been returned to its reference level, a fuller, more dynamic audio reproduction can be heard.
B & K supports three separate notch filters for the frequency range of 20 Hz to 300Hz.
DVD-Audio (also referred to as MLP) - DVD-Audio (also referred to as MLPTM) - MeridianR Lossless
Packing. MLPTM is a lossless compression system for high-quality linear PCM audio. For DVD-Audio MLPTM
performs lossless compression of 1 to 6 channels of 14 to 24-bit material sampled at rates between 32kHz
and 192kHz. With lossless compression, the decompressed signal is bit-for-bit identical to the master, just
'packed' into a lower data rate which ultimately results in a reduced size to be stored on the disc. Currently,
DVD-Audio can only be delivered to your receiver via the analog 5.1 inputs. Sound will normally come from
your front left, front right, center, left surround, and right surround speakers, as well as your subwoofer, but
your processor can produce sound in one (mono) to seven channels. Dolby Pro Logic IIx is used to matrix
the surround back left and surround back right channels if a seven channel configuration is used.
SACD (Super Audio CD) - Is a new audio recording format aimed at providing higher fidelity audio reproduction than the compact disc. It was developed by Sony and Philips. The sound of SACD comes directly
from Direct Stream Digital (DSD) recording technology. SACD disks generally contain a 2-channel stereo mix.
Many also contain a 5.1 surround sound mix. DSD's simplified mechanism for recording and playback results
in a frequency response over 100kHz and a dynamic range over 120dB across the audible frequency range.
DSD increases the resolution of music by more closely following the original wave form of the music, which
results in music reproduction that is remarkably pure and faithful to the original. For additional information
concerning the technology behind SACD, visit Sony Electronics SACD.
Cinema Processing - Cinema is an exclusive set of standards and technologies that can be applied to any
B & K surround mode. In a typical movie theater the front left, right, and center speakers are located behind
the screen. The screen tends to block high frequency information. Therefore, movie soundtracks often have
boosted high frequency content to compensate for the effects of the screen. This boost can cause some
soundtracks to sound overly bright in a home theater where speakers are typically not behind a screen. B & K
cinema mode adjusts the front left, right, and center frequency response to compensate for the boost applied
for the movie theater.
High Current Amplifiers - A high-current amplifier is capable of delivering power into low impedance
speakers without going into protection and/or shutting down. Ideally, an amplifier's output power would double
every time the load presented at its output is halved. In a typical amplifier-speaker circuit, voltage and current
are delivered to a very complex load consisting of speaker drivers, resistors, inductors, and capacitors.
Voltage may be thought of as the potential to do work, and current as what actually flows to do the work.
Although basic power may be calculated by the simple multiplication of voltage and current, it is the delivery
of the power from the amplifier to the complex speaker load that accounts for why two amplifiers may have
the same power rating into identical impedances (speaker loads), but deliver a significantly different sound
quality. Some of these sound quality differences may include perceived loudness, depth, and clarity. High
quality speakers can have nominal impedances from 8 - 2 Ohms. During very loud and dynamic audio
passages, the speaker load may dip below 2 Ohms. These low impedance drops may cause a high voltage
power amplifier with limited power storage capacity to sound harsh and distorted. A high-current amplifier
operates with much less effort and typically does not have any problem with low impedance speakers. B & K
amplifiers and receivers are High Current Power amplifiers.
9
10
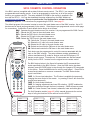
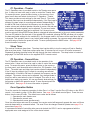
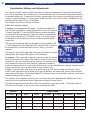
FRONT PANEL DESCRIPTION
AVR507 S2 Receiver
B
&
K
C
O
M
P
O
N
E
N
T
S
,
L
T
D
.
DVD DTS-ES MOV 7
ON / STANDBY
PRESET
DOWN
ENTER
UP
MODE
MENU
MASTER
POWER
A
A U D I O
1
2
/
V
R
5
V I D E O
0
7
R E C E I V E R
S2
3
4
5
6
1. Headphone Jack - Headphones having a standard ¼” (6.3mm) stereo plug can be connected to the
headphone output.
2. Source Selector - Turning the selector clockwise or counterclockwise will cycle through the available
inputs. Available inputs are V1, V2, TV, DVD, CD, SAT, TAPE, FM and AM.
3. Front panel buttons ON/STANDBY
Toggles the receiver in and out of standby mode, (ON or OFF).
PRESET
Cycles through audio presets for instant preset recall.
ENTER
Confirm Selection. Presets, menu options, unit status.
DOWN & UP
Steps through audio options or menu selections when in the menu system.
Allows AM/FM tune - (down) or tune + (up).
MODE
Steps through audio modes
MENU
Enters into and out of the menu system.
4. Display - The receiver display contains a 16 character display. It will display current status of the receiver
and any changes being performed.
5. Main power switch - Removes all power to the receiver. Normal operation of the receiver requires the
power switch to remain on. Use the ON/STANDBY button for daily on and off of the receiver. ON/STANDBY
places the unit in standby mode that allows turning back on with the remote control. Only turn the receiver off
with the main power switch when not using the receiver for an extended period of time.
6. Volume control - Turning the volume control clockwise increases the volume level, counterclockwise
decreases the volume level. The volume knob is also used to change other receiver settings.
11
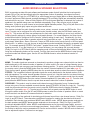
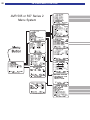
BACK PANEL DESCRIPTION
16
15
COAX S/PDIF DIGITAL
B&K
ZA OUT
TV
V2
SAT
CD
OPTICAL S/PDIF DIGITAL
V1
OUT
SAT
CD
DVD
13
14
OUTPUTS
V2
ZONE A
V1
ZONE B
A/V SOURCE OUTPUTS
ZB/V2
V1
TAPE
12
A/V SOURCE INPUTS
TAPE
SAT
CD
DVD
11
COMPONENT VIDEO
TV
V2
V1
IN 1
IN 2
IN 3
OUTPUT
S IMPLY B ETTER!
CAUTION
RISK OF ELECTRIC
SHOCK DO NOT OPEN
50 mA
RS-232
PORT
+
CENTER
SURRND
FRONT
DVD
IEEE
1394
E X PA N S I O N
SUB
AUDIO
IR INPUT
ZONE A
3
IR INPUT
ZONE B
4
Audio/Video Systems Hand-Made in the U.S.A.
SURROUND OUTPUTS
DVD
CONTROL OUT
1 12VDC 2
CENTER
INPUT
SUB
ZB OUT
SERIAL #
AM
SURRND
FRONT
S BACK
ZONE B
FM
ANTENNA
FUSE
C AU T I O N : F O R C O N T I N U E D
PROTECTION AGAINST RISK
O F F I R E R E P L A C E O N LY W I T H
S A M E T Y P E A N D VA LU E F U S E
SURROUND LEFT
POSITIVE
N E G AT I V E
SURROUND RIGHT
POSITIVE
N E G AT I V E
CENTER
POSITIVE
SURROUND BACK LEFT
N E G AT I V E
POSITIVE
N E G AT I V E
SURROUND BACK RIGHT
POSITIVE
N E G AT I V E
FRONT LEFT
POSITIVE
N E G AT I V E
FRONT RIGHT
POSITIVE
N E G AT I V E
AC LINE
www.bkcomp.com
1
2
3
4
5
6
7
8
9
10
1. AC fuse holder - Holds the AC Line fuse. Replace only with same type and value - 12amp Slow Blow.
Note: The voltage rating label is located on the AC fuse holder cover plate.
2. AC input receptacle - For attaching the supplied AC power cord to the receiver.
3. Four 10-12VDC @ 50mA Control Outputs - 1/8" (3.5mm) mono mini plug. Trigger outputs for controlling
external devices, such as amplifiers, projection screens, IR emitter, etc. Page 18.
4. ZA & ZB IR Data Input - Accepts IR from an external IR source. Internally summed.
5. Main RJ-45 jack - RS-232 input/output for computer interface and RS-232 controller applications. A B & K
CK1.2 keypad can also be connected to the RJ-45 jack. Page 36.
6. DVD-Audio 5.1 inputs - Connections for a DVD-Audio or other 5.1 analog source device. Page 13.
7. Surround outputs - Variable level outputs for driving external power amplifiers or powered speakers. Page 17.
8. Zone B Output - Line outputs for supplying the second zone. Configurable fixed or variable. Page 19.
9. Speaker outputs - Connections for speakers in the main theater zone. Page 15.
10. Antenna inputs - Connections for the AM and FM antennas. Page 21.
11. Component Video output - Component video pass through. Transcoded component video output. Page 14.
12. Component Video inputs - Three assignable component video inputs. Page 14.
13. A/V Source inputs - Seven sources can be connected using analog audio, composite video or S-Video.
14. A/V Source record outputs - Tape loop outputs will provide analog audio / video source signals for Zone
A or Zone B recording. Page 18.
15. Optical SPDIF Digital - Optical digital connections for connecting optical digital audio signals from the
source to the receiver. 5 optical digital inputs, 1 digital output. Page 13.
16. Coax SPDIF Digital - Coax digital inputs are used to connect coax digital audio signals from the source
to the receiver. 6 coax digital inputs, 2 digital outputs. Page 13.
12
QUICK START
QUICK START CONSIDERATIONS
Your B & K receiver is pre-programmed for ease of operation right out of the box. In general, there is minimal
setup required to start listening to your new receiver. To quickly setup and begin operating your receiver,
follow these quick steps:
1 Start with all AC power cords unplugged from their designated AC outlet.
2 From each source device, connect the A/V cables to the appropriate A/V SOURCE INPUTS on the
receiver’s back panel.
3 Connect the appropriate speakers to the receiver.
4 Connect the appropriate video cables from the receiver’s video OUTPUTS to the video monitor’s
input(s).
5 Plug each AC power cord into its designated AC outlet.
6 Turn on the main power switch on the front of each unit. On the receiver, press the ON/STANDBY
button on the front panel, or the ON button of the remote. Turn on all A/V sources.
7 Select a source with the SR10.1 remote control or front panel source control of the receiver.
8 For use with a component video monitor, please see Setup Inputs page 30, Component Video
Assignment.
The rest of this manual will describe in detail the many aspects of your new receiver. Some additional installation considerations should be noted as follows:
• It is important that your electronic equipment has proper ventilation. Failure to ventilate your receiver
could result in erratic operation and possible failure caused by overheating. A minimum of 3” clearance
should be maintained above the receiver. Do not place items directly on top of the receiver.
Do not place flammable items on, around or near the A/V equipment (Curtains, paper, etc.).
• B & K supports various software programs that are able to aide in the setup process of the
receiver/preamplifier, SR10.1 remote and CK1.2 Keypad. This software is available online at B & K ’s
website at www.bkcomp.com or by request from B & K ’s customer service. The setup software is easy
to use and is intended to simplify the setup process of your new B & K products.
• Configure a system diagram of all components that are to be connected into the system. The receiver
has seven sets of inputs. Even though the back panel is labeled for specific sources, in most cases it
is possible to connect any source to any input. For example, if you have a satellite receiver you can
connect it to the V2 input and it will work the same way as connecting it to the SAT input. Select V2
instead of SAT. The source name that will appear on the receiver’s front panel and on the remote or
keypad can be relabeled to match the source equipment that is being used.
• Determine the type of cable that is needed. Keep in mind that the quality of the cabling that is used
can make a difference in the overall audio and video quality. Try to keep interconnecting cable runs as
short as possible. When routing cables between equipment, be sure to keep AC cables separate from
audio cables. It is a good idea to bundle like cables together to keep interference (noise) to a
minimum.
• Decide on what types of audio and video signals are going to be used in the system. Determine the
length of the cable for each component's connection and how it should be routed. It is a good idea to
label each cable with a name or number at both ends when allocating each cable. Have all the cables
you need before you begin the installation because it is inconvenient to run to the store when you are
excited to hear what the system will sound like.
• Plan enough cable length and space to allow future access to the back panel.
• For best tuner reception, make sure the antenna is several feet away from the receiver and any other
equipment that may produce high frequency interference such as personal computers, CD players,
halogen lamps, etc.
• For best performance it is recommended that a dedicated AC power line be used for the best
audio reproduction. If the equipment is installed in a rack, be sure to insulate the equipment from the
rack itself.
13
HARDWARE CONNECTIONS
SOURCE CONNECTIONS
Your receiver supports several A/V input and output formats. In most cases only one audio and one video
connection is needed for each source device. Shown below are the available options:
Analog audio (Stereo): left and right.
Digital audio: either coaxial or optical.
DVD-Audio & Super Audio CD (SACD): Analog 5.1
Composite video: coaxial (Yellow RCA).
Super-Video: S-Video.
Component video: Red, Green & Blue.
Connect an audio / video source to the surround receiver. Use the diagrams that follow as a guide for each of
the seven source inputs. For analog audio connections, use the left and right (white and red) RCA connections. For composite video, use the yellow RCA connections. For S-video use the S-video connections. For
digital audio, use EITHER the coaxial digital connection (orange RCA) or the optical digital connection per
each source. The order of audio signal precedence per each input is: Optical Digital > Coax Digital > Analog
left and right. For component video, use the red, green and blue RCA component connections. See
Video Monitor Connection page 14 for details on connecting a video monitor.
If the second zone of the surround receiver or the record loop outputs are going to be used, the analog audio
and composite video and/or S-video signals must be connected to the surround receiver. The receiver will
neither process nor convert digital audio or component video for use in the the second zone.
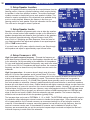
Source Connection Diagram
Coaxial Digital Connection
Optical Digital Connection
OR
SACD or DVD-Audio Connection
DVD-Audio or SACD is a discrete 5.1 channel analog audio mode. If the source gear contains connections
for DVD-Audio or SACD, use the DVD-Audio input connections on the back panel of the surround receiver.
The DVD-Audio input can be assigned to any source input except Tape (see Setup Inputs page 29). Be sure
to maintain the discrete channel connections.
Each channel is labeled appropriately
according to the speaker location in the
room.
Many times, DVD-Audio players have
multiple configuration options. The receiver
does not supply bass or delay management
for the DVD-Audio/SACD input. You should
adjust your player's bass and delay management to match that of the receiver.
14
HARDWARE CONNECTIONS
VIDEO MONITOR CONNECTION
There are many types of video monitors that can be used with your B & K system. Some popular video
monitors are televisions, plasma screens, LCD screens and projectors. The B & K A/V receiver has video and
audio switching capability. The system source devices should be connected to the B & K receiver for both
audio and video. One set of video cables may be connected from the B&K receiver's component video OUT
to the video monitor. The B & K video processor features video transcoding. Video transcoding allows multiple
video formats to be combined onto one. Transcoding will not change the resolution of the image. Specifically
composite video is transcoded to S-video (S) and component video. S-video is transcoded to composite video
and component video. Component video is not transcoded. The On Screen Setup Menu is available in all
three video formats. B & K recommends using the component video inputs for High Definition source signals.
Component Video Monitor Connection
The B & K surround receiver provides three
sets of component video inputs and one
component video output. Since there are seven
A/V inputs and only three component inputs,
the receiver must be configured for which
component input to use with the selected A/V
source. For example, component Input 1 is
assigned to DVD, whenever DVD is selected, the
component output will come from component
Input 1. Composite to S or S to composite
transcoding will continue to function for the
DVD input. Component video is not transcoded to
composite or S. If no component assignment is made to a particular input, the component output will be
transcoded from the appropriate composite or S-video input. The receiver automatically detects the presence
of composite or S-Video. No user assignment is necessary.
IMPORTANT: By factory default, all Component Video inputs are unassigned. For use with component
video sources, HDTV receivers or progressive scan DVD players, each COMPONENT VIDEO must be
assigned for use with an A/V SOURCE INPUT (page 29) to operate correctly.
S-Video Monitor Connection
Each of the seven A/V inputs are provided with
an S-video input. There is an S-video output
for each zone of the surround receiver. Zone A
output will pass through S-Video or transcode
from composite video. Zone B S-video output will
provide output only from S-video inputs - there is
no transcoding for Zone B. The Line Output
section provides S-video outputs for recording
devices in Zone A or Zone B. S-Video record
outputs provide output only from S-video inputs there is no video transcoding for the record
outputs.
Composite Video Monitor Connection
Each of the seven A/V inputs are provided with a composite RCA video input (yellow). There is a composite
RCA video output for each of the zones of the surround receiver. Zone A video output will pass composite
video through or transcode from S-video. Zone B composite video output will provide output only from
composite video inputs - there is no transcoding of video in Zone B. The Line Output section provides
composite outputs for recording devices used in Zone A or Zone B. The composite video record outputs
provide output only from composite video inputs - there is no video transcoding with the record outputs.
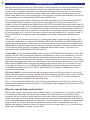
HARDWARE CONNECTIONS
SURROUND SPEAKER CONNECTIONS
Your B & K receiver has two types of surround outputs: speaker outputs and preamplifier RCA outputs.
Speaker outputs connect from the receiver directly to the speakers in the system using a five-way binding
post. The RCA outputs are used to connect external amplifiers and/or the
subwoofer to the system. RCA connections are described on page 17.
Five-way binding posts are provided for direct speaker connection, one pair for
each channel. Up to 4 gauge speaker wire can be terminated directly into the
bottom of the binding post. Additionally each binding post is designed to
Spade Connector
Banana Jack
accept a banana-type plug or a spade plug connector. They are color coded
for easy identification. OBSERVE POLARITY WHEN CONNECTING
SPEAKERS! The positive (red) post should always be connected to the speaker's positive (red) jack. The
negative (black) post should always be connected to the speaker's negative (black) jack.
For best acoustic results, be sure to set up speakers using the speaker setup menu. To Setup System
Speakers see page 25. Note: The AVR505 Series2 has five surround speaker output channels.
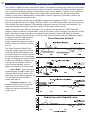
7.1 Speaker Connection
To connect speakers using a 7.1 or 7.0 speaker configuration see the connection diagram below. The point
one (.1) indicates whether or not the system will use a subwoofer. If a subwoofer is used, connect an RCA
type coaxial cable from the Zone A SUB OUT to the subwoofer.
15
16
HARDWARE CONNECTIONS
6.1 / 5.1 Speaker Output Connections
For use in a 6.1 or 6.0 audio setup, refer to the diagram below. We recommend the 6th speaker be
connected to the surround back left channel of the surround receiver. However, either the back left or back
right output will operate correctly when the system is configured for use with one back speaker. The point one
(.1) indicates whether or not the system will use a subwoofer. If a subwoofer is used, connect an RCA cable
from the receiver’s Zone A SUB OUT to the subwoofer input. An AVR 505 Series2 receiver only has speaker
connections for up to a five channels (5.1). For use in a 5.1 speaker setup, do not use the 6th or 7th surround
back channel(s) and only connect five speakers using the surround speaker channels. The speaker setup
menu will used to configure the internal software for proper audio selection and operation (see page 25).
B&K
COAX S/PDIF DIGITAL
ZA OUT
TV
V2
SAT
CD
OPTICAL S/PDIF DIGITAL
V1
OUT
SAT
CD
DVD
V2
OUTPUTS
ZONE A
V1
ZONE B
A/V SOURCE OUTPUTS
ZB/V2
TAPE
V1
A/V SOURCE INPUTS
TAPE
SAT
CD
DVD
COMPONENT VIDEO
TV
V2
V1
IN 1
IN 2
IN 3
OUTPUT
S IMPLY B ETTER!
CAUTION
DVD
IR INPUT
ZONE A
50 mA
AVR507 Series2
CENTER
RS-232
PORT
+
CENTER
DVD
IEEE
1394
E X PA N S I O N
SUB
PB
AUDIO
CONTROL OUT
1 12VDC 2
INPUT
SUB
ZB OUT
SERIAL #
3
4
IR INPUT
ZONE B
Audio/Video Systems Hand-Made in the U.S.A.
SURROUND OUTPUTS
RISK OF ELECTRIC
SHOCK DO NOT OPEN
AM
SURRND
FRONT
SURRND
FRONT
S BACK
ZONE B
FM
ANTENNA
FUSE
C AU T I O N : F O R C O N T I N U E D
PROTECTION AGAINST RISK
O F F I R E R E P L A C E O N LY W I T H
S A M E T Y P E A N D VA LU E F U S E
SURROUND LEFT
POSITIVE
N E G AT I V E
SURROUND RIGHT
POSITIVE
N E G AT I V E
CENTER
POSITIVE
SURROUND BACK LEFT
N E G AT I V E
POSITIVE
SURROUND BACK RIGHT
N E G AT I V E
POSITIVE
N E G AT I V E
FRONT LEFT
POSITIVE
N E G AT I V E
FRONT RIGHT
POSITIVE
N E G AT I V E
AC LINE
www.bkcomp.com
NEG (-)
POS (+)
NEG (-)
POS (+)
POS (+)
NEG (-)
Center
Front Right
Front Left
POS (+)
NEG (-)
X
POS (+)
NEG (-)
Listening Area
Surround Left
Surround Right
POS (+)
ON
NEG (-)
SUBWOOFER I/O
I
OUT
IN
AO C L i n e
OFF
B
Subwoofer
P
Surround
Back L
Connect this channel
if 6.1 or 6.0 is desired
17
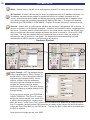
HARDWARE CONNECTIONS
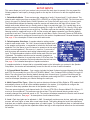
RCA Surround Output / Subwoofer Connection
Both the AVR505 Series2 and AVR507 Series2 supply 7.1 RCA surround processor outputs. These surround
outputs can be used to connect external amplifiers or the subwoofer. The subwoofer for the system will be
connected to the SUB OUT. If the subwoofer does not contain its own amplifier (powered subwoofer) an
external power amplifier will be needed for the subwoofer. Once the subwoofer has been connected, to setup
the subwoofer see page 25.
If an external speaker amplifier is supplied, each speaker channel can be connected to the appropriate RCA
output.
To use the surround outputs, simply connect an RCA type audio cable between the receiver and the external
amplifier. The diagram below shows a B & K Reference 200.2 Series2 amplifying the front left and right
speakers. This configuration can be performed without any hardware or software modifications.
External Amplifier
AVR507 Series2
COAX S/PDIF DIGITAL
ZA OUT
TV
V2
OPTICAL S/PDIF DIGITAL
V1
OUT
SAT
CD
DVD
OUTPUTS
ZONE A
V2
V1
SUB
CENTER
ZONE B
A/V SOURCE OUTPUTS
ZB/V2
V1
A/V SOURCE INPUTS
TAPE
TAPE
SAT
CD
DVD
COMPONENT VIDEO
TV
V2
V1
IN 1
IN 2
IN 3
OUTPUT
Reference 200.2 S2
CAUTION
DVD
4
IR INPUT
ZONE B
AM
SURRND
FRONT
SURRND
FRONT
S BACK
ZONE B
FM
ANTENNA
CONTROL I/O
CHANNEL 1 INPUT
CTRL
IN
Y
SURROUND BACK RIGHT
FRONT LEFT
RCA INPUT
XLR INPUT
POSITIVE
N E G AT I V E
N E G AT I V E
POSITIVE
POSITIVE
N E G AT I V E
N E G AT I V E
POSITIVE
N E G AT I V E
POSITIVE
U
U
POSITIVE
US
B&K
CHANNEL 2 OUTPUT
S IMPLY B ETTER!
SERIAL #
N E G AT I V E
XLR INPUT
RCA (UNBALANCED)
US
C AU T I O N : F O R C O N T I N U E D
PROTECTION AGAINST RISK
O F F I R E R E P L A C E O N LY W I T H
S A M E T Y P E A N D R AT I N G .
CHANNEL 1 OUTPUT
POSITIVE
XLR (BALANCED)
RCA INPUT
RCA (UNBALANCED)
FUSE
FRONT RIGHT
SE F
SURROUND BACK LEFT
SE F U
CENTER
EF
SURROUND RIGHT
EF
SURROUND LEFT
PB
www.bkcomp.com
12VDC
200mA
FUSE
C AU T I O N : F O R C O N T I N U E D
PROTECTION AGAINST RISK
O F F I R E R E P L A C E O N LY W I T H
S A M E T Y P E A N D VA LU E F U S E
CHANNEL 2 INPUT
H i g h Pe r f o r m a n c e
Audio/Video Systems
Hand-Made in the U.S.A.
XLR (BALANCED)
CTRL
OUT
SE F
+
3
CONTROL IN ALLOWS AMPLIFIER
OPERATION WHEN A 5-24V SIGNAL
IS APPLIED WITH A 3.5mm MINI JACK
P
Y
IEEE
1394
E X PA N S I O N
PB
B
RS-232
PORT
TIP +12V CTRL ENABLE
DVD
IR INPUT
ZONE A
SLEEVE GROUND
CD
50 mA
Audio/Video Systems Hand-Made in the U.S.A.
R I N G + 1 2 V LO W P O W E R
SAT
CONTROL OUT
1 12VDC 2
AUDIO
ZB OUT
SERIAL #
CENTER
INPUT
SUB
SURROUND OUTPUTS
RISK OF ELECTRIC
SHOCK DO NOT OPEN
SE F U
B&K
S IMPLY B ETTER!
N E G AT I V E
POSITIVE
POSITIVE
N E G AT I V E
N E G AT I V E
AC LINE
www.bkcomp.com
RISK OF ELECTRIC SHOCK
DO NOT OPEN
AC LINE
POS (+)
NEG (-)
NEG (-)
POS (+)
NEG (-)
POS (+)
Center
Front Right
Front Left
X
NEG (-)
POS (+)
POS (+)
NEG (-)
Listening Area
Surround Left
Surround Right
POS (+)
ON
SUBWOOFER I/O
I
OUT
IN
NEG (-)
Surround
Back L
POS (+)
NEG (-)
Surround
Back R
AO C L i n e
OFF
PB
Subwoofer
Note: All B & K receivers contain software for processing 7.1 channels of surround audio. The AVR505
Series2 can be expanded to 6.1 or 7.1 operation by connecting an external amplifier to the Surround Back
RCA outputs
18
HARDWARE CONNECTIONS
PASS THROUGH / RECORD LOOP CONNECTIONS
The B & K receiver has a few options for record/pass through outputs. There is a Zone A optical digital
output, a Zone A coaxial digital output and a Zone B coaxial digital output. The B & K receiver provides
three analog audio, composite & S-video outputs. These outputs are labeled TAPE, V1 and Z2/V2 in the Line
Outputs section of the back panel.
Optical Digital Output - The optical digital output will output the digital signal of the source selected in the
main theater zone (Zone A). Coaxial digital inputs are converted to optical. You need only connect one or the
other. Analog inputs are not converted to digital output. If you wish to record both analog and digital sources
you must connect both analog and digital inputs to your recorder.
Zone A and Zone B Coaxial Digital Outputs - The Zone A and Zone B coaxial digital outputs will output the
digital signal of the source selected in the corresponding zone. Optical digital inputs are converted to coaxial.
You need only connect one or the other. Analog inputs are not converted to digital output. If you wish to
record both analog and digital sources you must connect both analog and digital to your recorder.
Tape Out - The analog Tape output is a pass through / record loop output for the source that is selected in
the main theater zone. To prevent possible speaker damaging feedback, tape out will not output the TAPE
source input. Digital audio is not converted to analog audio on the Tape output. You must connect analog
audio to the A/V inputs if you want to make analog recordings from the input device. Only LtRt mode will
downmix a digital bitstream into left and right analog. Video is not transcoded on the Tape output. If you have
a composite recorder you must connect composite from each A/V source you wish to record. If you have a Svideo recorder you must connect S-video from each A/V source you wish to record.
V1 Out - The V1 output can be configured as an output for a second recording device in Zone A or as a Zone
A line output to connect a second video monitor and/or audio amplifier. As a record output, V1 will output the
analog audio and video from the selected input in Zone A except when V1 is selected. This prevents
feedback through the recording device which could damage your speakers. As a line output V1 will output the
analog audio and video from whatever input is selected in Zone A. LtRt mode will downmix a digital bitstream
to left and right. Record/Line settings also apply to the Zone A optical and coaxial digital outputs. Similar to
the Tape output, digital audio is not converted to analog on the V1 output. Video is also not transcoded on the
V1 output. To configure the V1 output see page 33.
ZB / V2 Out - The V2 output can be configured as an output for a second recording device in Zone B or as a
Zone B line output to connect a second video monitor and/or audio amplifier. As a record output, V2 will
output the analog audio and video from the selected input in Zone B except when V2 is selected. This
prevents feedback through the recording device which could damage your speakers. As a line output V2 will
output the analog audio and video from whatever input is selected in Zone B. Record/Line settings also apply
to the Zone B optical and coaxial digital outputs. As with the Tape output, digital audio is not converted to
analog on the V2 output. Nor is video transcoded on the V2 output. To configure the V2 output, see page 38.
CONTROL OUTPUT CONNECTIONS
The B & K surround receiver is supplied with four control outputs. These control outputs can be used for a
variety of applications that require a 12 volt control or an IR output (pass through). The control outputs use a
1/8” (3.5mm) mono mini plug. Each output is 10-12VDC @ 50 mA. Control output 1 is strictly a +12VDC
control trigger. Control outputs 2-4 can be set up as either +12VDC controls or as an IR pass through. To
configure the control outputs, see the control setup section on page 35.
COAX S/PDIF DIGITAL
TV
V2
SAT
CD
OPTICAL S/PDIF DIGITAL
V1
OUT
CD
DVD
DVD
IR INPUT
ZONE A
50 mA
CENTER
RS-232
PORT
+
SUB
CENTER
SURRND
FRONT
DVD
3
4
IR INPUT
ZONE B
ZONE A
V1
AUDIO
CONTROL OUT
1 12VDC 2
IEEE
1394
OUTPUTS
V2
INPUT
SUB
ZB OUT
ZONE B
A/V SOURCE OUTPUTS
ZB/V2
V1
TAPE
A/V SOURCE INPUTS
TAPE
SAT
CD
DVD
TV
COMPONENT VIDEO
V2
V1
IN 1
IN 2
IN 3
AM
SURRND
OUTPUT
Audio/Video Systems Hand-Made in the U.S.A.
FRONT
S BACK
ZONE B
FM
ANTENNA
L
To connect an IR emitter to the control output, one end should be
terminated into a 3.5mm mono mini plug, tip (+), sleeve (-). The IR
output will pass through IR signals received by the surround
receiver. Only industry standard 38kHz IR can be used with the IR
outputs. Additional resistance may be required in series with the IR
emitter, check the current rating of the emitter you are using.
SAT
SURROUND OUTPUTS
ZA OUT
IR Emitter Connection
PLAY 8:33
19
HARDWARE CONNECTIONS
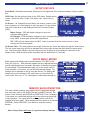
+12VDC Control Connection
If the +12VDC trigger is going to be used, it
should be connected as shown right. An
external amplifier is being used for this
example, however the external device could
be any device that employs a control trigger
circuit. The plug must be wired as tip (+) and
the sleeve (-). The diagram at right shows a
B & K amplifier controlled with the +12Volt
control.
ZONE B CONNECTIONS
Your B & K receiver is capable of controlling a second independent analog audio and composite video or Svideo zone This second zone could encompass a small room or large area depending on how much amplification is supplied. The second zone is strictly analog audio, composite video and/or S-Video. There is no
transcoding for Zone B. The composite video and analog (stereo) audio must be connected to the receiver in
order to be seen and heard in the second zone. Control for the second zone can be accomplished by using
a remote control or by connecting a CK1.2 Keypad. See page 21 for keypad connection description.
The audio and video output signals are connected from the Zone B outputs on the back panel of the receiver
to a Zone B video monitor and a Zone B amplifier.
Zone B Amplification and Video Connection
To connect an amplifier for Zone B (second zone) audio, connect RCA type audio cables between the Zone B
left and right output to the second zone amplifier. Connect the second zone video cable to the Zone B
composite or S-video output to the Zone B video monitor. The Zone B audio output can be configured fixed
or variable. The second zone has the ability to link power and/or source input to the main theater zone.
From the factory, the second zone is configured as a separate, independent audio and video zone. The
figure below shows a B & K Reference 200.2 supplying power for the second zone. To configure the Zone 2
settings, see page 38.
Zone B amplifier
20
HARDWARE CONNECTIONS
AVR507 Series2 BACK CHANNEL AMPLIFICATION CONVERSION
If both zones of the AVR507 Series2 are being used, you have the option of either using an external amplifier
(see page 19) or converting the surround back channels to supply the amplification for Zone B. The main
theater zone would then become a 5.1 surround system. This modification can be ordered directly from the
factory, or you may contact you local B & K dealer. If you any questions about converting the AVR507 Series2
receiver for Zone B amplification, please contact customer service at 716-656-0026 M-F 8:30 - 5:30 EST.
HARDWARE CONNECTIONS
KEYPAD CONNECTION DESCRIPTION
To connect a CK1.2 Keypad to the AVR505 Series2 or 507 Series2, run a straight through Category 5 (CAT5)
cable from the keypad location to the RS-232 jack on the receiver back panel. Terminate both ends of the
CAT5 cable into RJ-45 using the T568B standard. Plug one RJ45 end into the main RJ-45 jack on the back panel of the
receiver. Plug the other end into the RJ-45 jack labeled Master
IN on the back of the keypad. The main RJ-45 jack on the
receiver will supply connections for +12VDC power @ 200mA,
IR data and +12V control @ 50mA. See page 36 for the main
RJ-45 pin out description.
A keypad can be configured to control connected sources with
IR by setting the control outputs to REMOTE. See the control
output configuration page 34. A CK1.2 keypad can be
programmed to control either the main theater zone, Zone B or
both. Theater Zone status can be displayed on the keypad by
pressing the backlight button.
ZONE A & ZONE B IR INPUTS
Two IR inputs are located on the back panel of the receiver. They are labeled IR IN, Zone A & Zone B. The
IR inputs use a 3.5mm mono mini jack. Internally, both the Zone A and Zone B IR signals are summed
before they are sent to the processor. Your processor can be controlled by a directly connected IR repeater
system in combination with or in place of the supplied remote control. Connect the IR input cable to the
processor using a mono 3.5 mm plug. The plug must be wired as tip (+) and the sleeve (-). The inputs are
standard 38kHz modulated IR type with a voltage range of +5 to +12 VDC.
AM / FM ANTENNA CONNECTION
The B & K receiver contains one internal AM/FM tuner. To connect the AM antenna, use the AM antenna
connection block and the AM antenna supplied. The AM is a push type. Strip ¼ inch of insulation off your AM
antenna wires and insert one wire end into each hole while holding the tabs down. Release the tabs to lock in
the AM antenna wires. The FM jack is a standard screw on F-type connector. To connect the FM antenna
use the dipole antenna supplied.
21
22
MENU SYSTEM SETUP
SETTING UP THE SYSTEM
The setup of the receiver will require navigation through the menu system. T he system menu will display on
the front panel as well as an On-Screen Menu format. The OSD menu is available on all three video format
types. B & K recommends that a video monitor, connected to a Zone A video output, be used in conjunction
with the SR10.1 remote to setup the system using the OSD menu. It is possible to set up your receiver
directly from the front panel. The descriptions below are general instructions for using and navigating the
menu system. A complete navigational menu system flow chart is located on page 58.
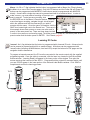
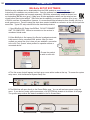
B & K supports setup software (BKcSuite) that can be used to assist in the setup of the receiver. BKcSuite
setup software is available on our website at www.bkcomp.com/support. BKcSuite provides a fast and easy
way to configure the system parameters of the receiver using a personal computer or laptop equipped
with a serial port. You can save the configuration files for later use or as a backup. Directions for
installing the BKcSuite are available on page 54 or on our website. BKcSuite is compatible with any
B & K audio processor and can be used in conjunction with the SR10.1 Remote or CK1.2 Keypad programming software.
THE MENU SYSTEM
MENU Button - Pressing the MENU button either on the remote or on the front panel will activate the menu
system. Once you are in the menu system, the MENU button will step back to the next higher-level menu or,
if you are already at the highest level, it will exit from the menu system.
EXIT (remote only) - From the remote control you may instantly exit the menu system by pressing the EXIT
button. From the front panel press Menu repeatedly until you leave the menu system
UP/DOWN ARROWS - Once you are in the menu system, use the UP/DOWN ARROWS to move to the
desired menu selection. With the supplied SR10.1 remote, rocking the thumb pad forward and backwards act
as the up and down arrows.The current active menu line is highlighted in a contrasting color in the On-screen
display and also shown on the front panel display.
SELECT / ENTER - Some menu selections select another menu level to be activated. Use the UP/DOWN
ARROWS to move to the desired menu line. Pressing SEL or ENTER will activate the next menu. With the
supplied SR10.1 remote, pressing on the center of the thumb pad also acts as the ENTER key.
NUMERIC KEY DIRECT ENTRY (remote only) - From the remote control you may also go directly to a
menu line by typing the corresponding line number. If there is another menu level below that line it will be
activated immediately (no ENTER required).
LEFT / RIGHT ARROWS (remote) or Volume Knob (front panel) - To change menu parameters, press the
LEFT or RIGHT arrows to change the setting. There are no LEFT or RIGHT arrows on the front panel. The
volume knob acts as the LEFT or RIGHT arrows. With the supplied SR10.1 remote, rocking the thumb pad
left and right act as the left and right arrows.
TEXT EDITING - Some menu selections will allow you to edit text. Use the UP/DOWN ARROWS to change
the current (blinking) character. Use the LEFT/RIGHT ARROWS (or VOLUME KNOB) to move to another
character position. Additionally, while in the edit text mode, a successive press of a numeric key allows direct
recall of the alphanumeric character map. It will allow a step through selecting between numbers, letters
and/or symbols. The selection options for each of the numeric keys are as follows:
0
1
2
3
=
=
=
=
[-, +, /, ?, space, 0]
[A, B, C, a, b, c, 1]
[D, E, F, d, e, f, 2]
[G, H, I, g, h, i, 3]
4
5
6
7
=
=
=
=
[J, K, L, j, k, l, 4]
[M, N, O, m, n, o, 5]
[P, Q, R, p, q, r, 6]
[S, T, U, s, t, u, 7]
8 = [V, W, X, v, w, x, 8]
9 = [Y, Z, y, z, 9]
MENU SYSTEM SETUP
MAIN MENU SELECTIONS
The main menu descriptions are accompanied by the On Screen Menu layout below. In some cases, the
front panel will display a slightly abbreviated version of what the On Screen Menu shows due to character
space limitations. The On Screen Menu is accessible from the component video output, the Zone A S-video
output and the Zone A composite video output. B & K recommends using the On Screen Menu for adjusting
unit parameters. The On Screen Menu is not available in Zone B.
On Screen Menu Format
MAIN MENU
1
2
3
4
System Setup
Unit Information
Z
Oa
pt
ei
ro
an
tio
Tt
her
ater
O1
per
-n Thea
Z2 Operation - 2nd Zone
↑↓ next item
ENT select
MENU exit menu system
Front Panel Menu Format
1 System Setup - System setup should be used when initially setting up the receiver, or if system parameters need to be adjusted. Page 24.
2 Unit Information - Contains information about the unit make, model, serial number, software version,
BKC-DIP version, phase locked loop chip version. This information may be needed when contacting
customer service. Page 32.
3 Z1 Operation-Theater - Allows viewing and changing the entire state of Zone A. See Unit Operation
page 41.
4 Z2 Operation-2nd Zone - Allows viewing and changing the entire state of Zone B. See Unit Operation
page 41.
23
24
MENU SYSTEM SETUP
SYSTEM SETUP
1
2
3
4
5
6
7
S Y S T EM S E T UP
Speakers
Inputs
Presets
Displays
Music Modes
Memory Backup/Restore
Advanced
↑↓ next item
ENT select
MENU main menu
1. Setup Speakers
This menu configures the receiver for the number of speakers, speaker size, and location of the speakers in
the room. It also contains room equalization options that can optimize the sound for a particular room. The
overall sound quality of your system will depend upon how the parameters of this menu are setup. It is very
important that the speaker setup is performed when the receiver is initially installed or if any speakers are
moved or changed. Page 25.
2. Setup Inputs
This menu configures the receiver for the audio/video source devices that are connected to the system. This
setup should be performed when the system is initially installed and whenever source components are added
or removed. Setup inputs also describes the various audio modes and how each input is configured when it
is selected. See page 29.
3. Setup Presets
This menu configures the receiver for how the presets will operate and be recalled. Presets allow virtual
“snapshots” of the current settings to be saved. The presets can then be recalled at a later time.
See page 30.
4. Setup Displays
This configures the receiver for preferences relating to the front panel and on-screen displays. To setup the
display menu, see Page 31.
5. Music Modes
This menu configures the receiver for user preferred settings pertaining to the surround decoders. The
receiver includes Dolby Pro Logic IIx and DTS NEO:6 processing which expands 2 channel stereo information into 6 or 7 channels. To setup music modes see Page 31.
6. Memory Backup/Restore
This menu allows a backup to be made of all system settings for restore at a later date. Once the setup of
your receiver is complete it is recommended that you perform a memory backup. In case that an undesired
change is made, the memory restore will allow you to restore your original settings. See Page 31.
25
MENU SYSTEM SETUP
SETUP SPEAKERS
1. Speaker Size
The speaker setup menu defines how many speakers are installed in the
system, the relative size of the speakers, and their location in the room.
This is the most important setup procedure that will be performed. The
receiver comes from the factory setup for 7 small speakers and a
subwoofer. If this does not match your speakers then audio information
may be lost.
1
2
3
4
5
6
SETUP SPEAKERS
Speaker Size
Speaker Location
Speaker Levels
Crossover + LFE
Room Equalization
Room Resonance
Speaker size refers to the frequency range the speaker(s) can handle.
↑↓ next item
ENT select
MENU main menu
Audio material, particularly Dolby Digital and DTS movies, often contain
large amounts of bass. If this bass information is sent to small speakers
that are incapable of reproducing bass, then this information will be lost or distorted. TOO MUCH BASS MAY
DAMAGE MANY SMALL SPEAKERS. By configuring the receiver for the correct type of speakers, it will
appropriately route the bass information to the speakers that can reproduce it correctly. Typically, all
bookshelf or satellite speakers are considered small. Smaller floor standing speakers with single woofers 8"
or less should also be considered small. Floor standing speakers with 10" or larger woofers, or multiple
smaller woofers may be considered large. These are general guidelines only - if you are unsure consult your
speaker manufacturer or dealer. If there are all small speakers we strongly recommend the use of a
subwoofer. If the speakers are large then the system may not require a subwoofer, but better results may be
obtained with the use of a subwoofer, especially with Dolby Digital and DTS movies. Even if the speakers are
capable of reproducing deep bass, better overall bass response may be obtained by setting these speakers
to small. This allows bass to be reproduced from a single point (the subwoofer) and avoids the possibility of
phase cancellation which can occur when bass is reproduced from multiple speakers.
Front Speakers - There must be at least 2 front speakers in order to use your receiver. Set them to
small or large based on the guidelines above.
Center Speaker - It is not necessary to have a center speaker.
Set it to small or large based on the guidelines above, or if there is no
center speaker, set it to none. The center information will be reproduced
in the front left and right speakers. No audio information is lost however
the sense of voices coming from the screen may be lost.
1
2
3
4
5
SETUP SPEAKER SIZE
Front
Large
Center
Small
Surround
Small
Surround Back 2 Small
Subwoofer
Yes
Surround Speakers - It is not necessary to have surround
speakers. Set them to small or large based on the guidelines above. Or,
↑↓ next item
adjust ←→
if there are no surround speakers, set them to none. The surround inforMENU setup speakers
mation will be reproduced in the front left and right speakers. No information is lost but the sense of spaciousness provided by discrete 5.1
channel soundtracks or 2 channel tracks enhanced by Dolby Pro Logic IIx or DTS NEO:6 may be lost.
Back Speakers - It is not necessary to have back speakers, however back speakers cannot be used
unless the surround speakers are used. If surround speakers are set to none, no options will appear for back
speakers. There is the option to use 1 or 2 back speakers in either large or small varieties. If set to none, the
back information will be reproduced in the surround speakers and although no information is lost, the sense
of sounds coming from directly behind you may be lost.
Subwoofer - There are three choices for subwoofer. If set to none, all bass information, including LFE
(.1 channel) will be routed to any large speakers in the setup above. If there are no large speakers and no
sub, the bass information will be lost. The most common setting for subwoofer is Yes. The LFE channel and
bass information from any small speakers is reproduced in the sub. Bass information from large speakers is
reproduced only in the large speakers - it is not sent to the sub. B & K provides a third setting called Ultra.
Ultra is identical to Yes as far as LFE and small speakers, but bass from large speakers is reproduced in the
large speakers AND the sub therefore allowing bass to be reproduced from multiple locations in the room.
The ultra setting also allows bass to be sent to the subwoofer when listening in Direct mode.
26
MENU SYSTEM SETUP
2. Setup Speaker Location
Ideally the speakers should be positioned at an equal distance from the
listening position. However, physical limitations usually require placing
the speaker in other than optimum locations. The surround processor
contains a means to electronically move each speaker’s location. This
allows for superior reproduction of the directional cues available during
movie or music playback. Measure the distance in feet from your
listening position to each speaker. Enter this information into the menu.
The units can be changed to meters if preferred.
3. Setup Speaker Levels
Speaker level calibration will generate pink noise to allow the equalization of the volume levels of each speaker to make up for differences in
speaker characteristics and distances from the listener to the speakers.
Best results will be achieved using a Sound Pressure Level (SPL)
meter. Set it to C Weighting and Slow Response. Place the meter at
your listening position and adjust each speaker for an equal response.
(SPL of 75dB recommended).
SPEAKER LOCATION
feet
Left Center Right
Front
10.0
10.0
10.0
Surround 10.0
10.0
Back
10.0
10.0
Subwoofer
10.0
↑↓ next item
adjust ←→
MENU setup speakers
SETUP SPEAKER LEVELS dB
Left Center Right
Front
0.0
0.0
0.0
Surround 0.0
0.0
Back
0.0
0.0
Subwoofer
0.0
If you don't have an SPL meter, adjust the levels by ear. Step through
each speaker and adjust for approximately equal volume levels.
4. Setup Crossover + LFE
1
High / Low pass crossover frequency - This sets the frequency at
2
which bass tones are filtered from the small speaker channels and sent
to the subwoofer. Set this according to the capabilities of the speakers. 3
4
For very small bookshelf speakers the frequency may need to be raised
to 100 or even 150 Hz. For speakers with larger woofers, the crossover
frequency can then be lowered so only the lowest tones are sent to the
subwoofer.
↑↓ next item
adjust ←→
MENU setup speakers
SETUP CROSSOVER + LFE
Crossover Freq
80.0
High Pass Slope
12.0
Low Pass Slope
24.0
LFE Level
0.0
↑↓ next item
Hz
dB
dB
dB
adjust ←→
High / Low pass slope - A crossover doesn't simply send all content
MENU setup speakers
above 81 Hz to the main speakers and all content below 79 Hz to the
sub. Instead there is a gradual transition. The crossover point is the frequency at which the amount of information in the subwoofer and main speaker(s) is equal. The crossover slope determines how gradual or
abrupt this transition occurs (6, 12 or 24dB). More gradual slopes generally result in a smoother transition
from main speakers to subwoofer. However, gradual transitions can cause distortion in small main speakers
because too much bass is sent to them. Gradual transitions with higher crossover settings can also cause the
perceived location of a sound to move from the correct main speaker location. Normally, you will want to use
identical slopes for high pass and low pass. However, many small speakers include a 12dB high pass slope
in the speaker itself. If this is the case, you will want to choose a 24dB low pass slope and 12dB high pass
slope so that the end result is 24dB in both the subwoofer and main speakers. The crossover frequency
should be set to match that built into the speakers (typically 80Hz).
The low pass slope can be set to EXTERNAL, 6, 12, or 24dB. The EXTERNAL setting will send full range to
the subwoofer output allowing an external crossover to handle the low pass slope. If the subwoofer has an
off or bypass selection for it's internal crossover, we recommend setting it to off and using the receiver's
crossover. If the subwoofer's crossover cannot be bypassed, but can be set to a high frequency, then the
receiver’s crossover can be used. If the subwoofer’s crossover can't be defeated or raised to a high
frequency we recommend that you set the receivers's low pass slope to external and adjust the receiver's
crossover frequency to match that of the subwoofer.
27
MENU SYSTEM SETUP
LFE (0.1) channel level - Usually this will be set to 0.0 dB (default). However, if there is no subwoofer you
may wish to reduce the Low Frequency Effects (LFE) channel to lessen its contribution to the bass going to
the remaining large speakers. Or, even with a subwoofer, you may just wish to reduce the overall LFE level,
especially in a smaller situation such as an apartment. Note that this effects only the separate LFE (.1)
channel available on Dolby Digital and DTS material it has no effect on the reproduction of normal bass from
the front, center, or surround channels.
5. Setup Room Equalization
Sometimes it may be desirable to boost or reduce the levels above or SETUP ROOM EQUALIZATION
Low
High
below a certain frequency. This might be used to make up for small
100.0 Hz
10.0kHz
deficiencies in the listening room or speakers. The equalization can Frequency
0.0 dB
+1.0dB
be applied only to certain speakers. This might be used to obtain a Gain
F
r
o
n
t
O
f
f
On
more consistent timbre between unmatched speakers. For example,
Center
Off
Off
if only the front speakers need to have frequencies above 10kHz
Surround
Off
Off
boosted 1dB, then room equalization setup menu will be adjusted as
Back
Off
Off
shown right.
Subwoofer
Off
In some home theaters the center speaker is installed behind a
↑↓ next item
adjust ←→
projection screen. The screen will tend to cut the high frequencies.
MENU setup speakers
Applying a high boost only to the center channel can compensate for
the losses introduced by the screen. Or possibly center and front left/right speakers are behind the screen. A
high boost can be applied to all three of these speakers with no effect on the surround or back speakers.
Shelving equalization helps to adjust level and frequency to aid in adjusting your room for a flat frequency
response. Room Equalization parameters are applied globally regardless of the selected user EQ (The
Variable EQ, the Loudness EQ, or the Vocal EQ). The graphs on the next page help describe how shelving
equalization can affect the frequency response for a room. Room equalization is applied in all listening
modes except DVD-Audio, Direct, and LtRt.
6. Room Resonance (Notch Filters)
No speaker has perfectly flat frequency response. These deviations in
frequency response contribute to each speaker's characteristic sound.
This is why one speaker might be preferred over another. When a
speaker is put into a room with walls, floor and a ceiling, reflected
sounds can cancel or reinforce one another which further alters the
frequency response.
SETUP ROOM RESONANCE
Test Tone 100.0 Hz
-30.0 dB
Notch 1 150.0 Hz
0.0 dB
Notch 1 Width 146.4-153.6 Hz
Notch 2 100.0 Hz
0.0 dB
Notch 2 Width 146.4-153.6 Hz
Notch 3
50.0 Hz
0.0 dB
Notch 3 Width 146.3-153.6 Hz
Subwoofer Phase
Invert
↑↓ next item
adjust ←→
MENU setup speakers
At higher frequencies, hundreds of small peaks and dips can be
measured in the frequency response. Attempts to remove all these
small deviations would result in colorations to the sound that may not
be desirable. The characteristic sound that made the particular
speaker(s) attractive could be completely lost. Even if the hundreds of small peaks and dips would be
adjusted, it would only be correct for a single position in the room. Moving your head just a few inches would
require a completely different set of corrections.
At low frequencies, the picture is different. There are fewer peaks and dips, but they are much more dramatic.
The peaks and dips persist over a much larger portion of the listening area. Dips can't be corrected electronically. Putting out more power at the dip frequency won't help. If the original and reflected waves cancel each
other, they will cancel at 1 watt or 1000 watts. If you have major dips in the frequency response you can try
repositioning your speakers, particularly the subwoofer. Fortunately, dips in the bass response are typically
not that noticeable. When an instrument plays that particular frequency, the bass is lost, but the higher
harmonics of the instruments tone are still there. To some degree, your ear and brain will fill in the missing
information. Continued on next page...
28
MENU SYSTEM SETUP
The situation is different for large low-frequency peaks. These peaks are what tend to shake the knick-knacks
off the shelves and result in an overall tubby sound to the bass. Fortunately, this CAN be remedied electronically…and without drastically altering the characteristic sound of your speakers. Typically a room will have 3
large peaks due to the distance between the front/back walls, left/right walls, and the floor/ceiling. B & K
provides 3 notch filters to address each of these peaks. A test tone generator is provided to assist in the
process of identifying the resonant peaks.
The test tone generator will generate an adjustable frequency tone between 20-300Hz. The test tone generator can generate the test tone at -42dB, -36dB and -30dB. The -30dB setting matches the levels you set up
in the speaker level menu assuming 75dB spkeaker calibration. Normally you would use this setting. Two
lower level settings are provided if you wish to perform these tests at lower volumes.
Initially, all filters are set to 0dB from the factory. Turn on the test tone generator at -30dB. Sweep the
frequency range to locate the 3 highest peaks. Using an SPL meter, note the frequency and the level of these
peaks. Also note the frequencies above and below the peak where the level is 3dB less than the peak.
Adjust notch 1 frequency to the frequency of the first peak. Adjust the notch level to the difference between
the peak level and the 75dB reference
Room Response Example
level. Adjust the notch width to the
setting nearest those where the peak or
peaks is 3dB lower. Repeat for notches
2 and 3.
This Room Response Example illustrates the frequency spectrum and how
notch filters and shelf equalization can
be effective. Note the “problem” spikes in
the room response curve in the diagram
at right. By applying the notch filters and
the shelving equalization, a flatter room
response can be obtained. Once the
notch filters are adjusted, they are
applied to all inputs in all music modes.
Notch Width - Some resonating
frequencies span a greater width in the
frequency spectrum than others. Each
notch width can be adjusted between 4.8
- 33.4Hz depending on how wide or
narrow each spike is.
Subwoofer Inversion - The
subwoofer phase can be inverted 180
degrees. Set the test tone to the
crossover frequency and adjust for the
loudest sound.
29
MENU SYSTEM SETUP
SETUP INPUTS
This menu allows you to tell your receiver how you would like each input to operate. You may repeat the
following steps for each input by changing inputs on the top line of the menu or with the supplied remote
control.
1. Default Audio Modes - There are two major categories of audio, 2-channel and 5.1 multi-channel. Two
channel audio might come from an analog VCR, a PCM CD or a Dolby Digital 2.0 DVD. The first three selections in this menu for Default Mode, Default Speakers and 2-chan Decoder apply only to 2-channel audio.
The Default Mode defines the listening mode the receiver will select when the input is first chosen. This
default audio mode defines how you usually prefer to listen to a particular input. Do I usually listen to my
satellite receiver with some sort of surround processing (Pro Logic IIx or NEO:6)? Do I like my CDs in pure
stereo mode? Here is where you can set this up. The audio mode can be manually changed to a different
listening mode for a particular movie or CD, but the receiver will always remember your favorite (default)
mode that is set here. There are five audio modes in total; Mono, Stereo, Surround, Cinema or DVD-Audio.
Each audio mode can be configured for each input for the number of speakers and 2-channel decoder used.
See page 45 for a description of how to use each audio mode.
2. Default speaker Selections - A speaker selection setting can be
made for each audio mode. Do I like 2 channel material played back in 1
a five speaker configuration, or expanded to include the surround back 2
speakers? Do I like stereo in pure 2-channel or spread out to the center 3
4
and/or surround speakers? Set mono to 1, stereo to 2, surround to 7
5
and the system will remember each setting independently per each
6
input. The default speaker selection will be chosen each time the input 7
is selected. The speaker selection can be manually changed to a
8
different speaker selection for a particular movie or CD at any time. The
receiver will always remember the favorite selections that are set here.
See page 47 for a detailed description of speaker selections.
SETUP DVD INPUT
Default Mode
Surround
Default Speakers
6
2-chan decoder DPLIIx Movie
Multi-chan type Surr Movie
Level
+2.5 dB
Name
DVD
Component Video
1
DVD Audio Input
Yes
↑↓ next item
adjust ←→
MENU setup system
If a speaker selection is chosen that is not possible based on the information you entered in the Speaker
Setup Menu, the receiver will automatically correct for this with no loss of audio information.
3. 2-Channel Matrix Decoders - Your receiver includes the latest 2-channel surround decoders from Dolby
and DTS. Do you usually like your CDs in DTS NEO:6 Music?; Your 2-channel DVDs in Dolby Pro Logic IIx
Movie? You can choose your favorite (default) decoder here for each input. If you don't like that mode for
some particular CD, you can manually change to a different mode using the SR10.1 remote supplied. The
receiver will always remember your favorite settings for each input.
4. Multi-Channel Filter Types - When the receiver detects multi-channel Dolby Digital or DTS material it will
automatically choose to use all of the available speakers in the system. (It is important to configure the
receiver for how many speakers there are in the speaker setup menus).
There are some choices for multi-channel audio. Do I like my DTS CDs in Surround Music? Do I like my 5.1
movies in Surround Movie? The preference can be set here. The multi-channel listening mode can be
manually changed for a particular movie or CD. The receiver will always remember the favorite multi-channel
mode that is set here. See page 7 for descriptions of multi-channel modes.
5. Level - Each input gain can be adjusted +/- 6dB. Occasionally certain source devices, particularly analog
sources, will have higher or lower than normal output levels. This setting allows the level to be adjusted so
that there are no drastic volume changes when you switch inputs. Try a few different discs or channels before
adjusting the level. It might be that a particular station has high or low output level rather than the entire satellite receiver.
30
MENU SYSTEM SETUP
6. Input name - Five characters maximum. From the factory, the receiver will display source names that
match those printed on the back of the receiver and on the supplied SR10.1 remote. These names can be
changed to match the type of source that is being used. For example, if a cable box is connected on the SAT
input instead of a satellite receiver, the SAT name can be renamed to CABLE. The AM/FM Tuner name
cannot be changed.
7. Component Video Assignment - The receiver includes 3 component video inputs that can be assigned to
any of the 7 A/V inputs. Component video is unassigned on all inputs from the factory. For example, if
there is a DVD player that has component video outputs, component input 1 can be assigned to the DVD
input. Connect the DVD player's component outputs to component input 1. When DVD is selected, the
component output will source from component input 1.
If the component video has been assigned for any input, transcoding from S to composite or composite to S
will continue.
8. DVD-Audio input Assignment - DVD-Audio and Super Audio CD (SACD) introduce a third category of
audio: multi-channel analog. The receiver provides one set of multi-channel analog inputs that can be
assigned to any one A/V input except TAPE. When DVD Audio is selected as YES for a particular input, the
default listening mode is automatically changed to DVD-Audio with 7 speakers. (The number of speakers can
used be changed) When YES is selected for a particular input, any previously selected DVD-Audio input will
automatically be reset to NO. Selecting 5 speakers is direct pass through.
SETUP PRESETS
The Setup Presets menu describes how the presets will operate.
1
2
Volume in Preset - YES or NO. If the volume of the receiver should be 3
set to the preset level when the preset is recalled, select YES. If the
4
volume of the receiver should remain at the current listening level when 5
the preset is recalled, select NO.
6
Preset Names - AUTO or MANUAL. When saving a preset, the system
automatically generates a simple name for the preset. The generic
name consists of the source input and volume level. The name can be
changed before saving the preset. The automatic naming can be
defeated so that a custom title that was previously entered will not get
erased if the preset settings are re-saved. Turning auto naming off
(manual) allows that the name that is already present in the preset to
be re-used when a new preset is saved to that location.
Zone A Favorite Recall - AUTO or ENTER. A preset can be recalled in
one of two ways. Enter requires the ENTER button to be pressed to
recall the preset. AUTO will allow the preset to recall automatically as
you scroll through presets using the channel up/down buttons.
Zone A Favorite Presets - Press ENTER to bring up the FAVORITE
PRESET MENU. Any preset can be recalled by typing in its number.
Use this menu to mark or un-mark presets as favorites (Yes or No).
Favorite presets can be recalled when using the preset up and down
buttons. This menu can also be used to edit preset names.
S E T UP P R ES ET S
Volume in Presets
Preset Names
ZA Favorite Recall
ZA Favorite Presets
ZB Favorite Recall
ZB Favorite Presets
Yes
Auto
ENTER
ENTER
↑↓ next item
adjust ←→
MENU main menu
ZONE 1 FAVORITES
PPrreesseett 00 YYeess
‘AM Traffic
‘
↑↓ next item
adjust ←→
0..9 +10 preset
recall ENT
MENU system setup
Zone B Favorite Recall - Zone B has a separate set of presets with the same options as the Zone A presets.
Zone B Favorite Presets - Press ENTER to bring up the FAVORITE PRESET MENU. Any preset can be
recalled by typing in its number. Use this menu to mark or un-mark presets as favorites (Yes or No). Favorite
presets can be recalled when using the preset up and down buttons. This menu can also be used to edit
preset names.
31
MENU SYSTEM SETUP
SETUP DISPLAYS
Front Panel - Describes the possible selections for the brightness of the front panel display. Bright, medium,
dim.
OSD Color - Set the preferred color for the OSD menu. Default setting
1
is blue. Select from Blue, Purple, Pink, Aqua, Lilac, Yellow, Red, or
2
Green.
3
On Screen - All changes that are made to the receiver (volume, input, 4
tuner frequency, etc. are displayed on the front panel. You can choose
how much information is also displayed with the On-Screen Display
(OSD).
Major Change - OSD will display changes to input and
saving/recalling presets.
SETUP DISPLAYS
Front Panel
Bright
OSD Color
Blue
On Screen Major Change
On Screen Time
3.0
↑↓ next item
adjust ←→
MENU main menu
All Changes - OSD will display changes to input, saving/recalling presets, tuner station entry, Volume,
bass, treble, channel gain and decoder adjustments.
Off - OSD will only display when the INFO button is pressed from the remote control or when
entering into the menu system.
On Screen Time - This setting defines the length of time the info screen will display through the video output.
The info screen timer may need to be adjusted when using video devices that auto detect the video resolution. Sometimes high definition monitors need more time to adjust to the low definition resolution of the
splash screen. Most monitors will be compatible with the default time of 3 seconds.
SETUP MUSIC MODES
B & K supports two different two-channel decoders; DTS NEO:6 and
Dolby Pro Logic IIx. Each decoder supports surround adjustments that
can be made pertaining to how audio information is directed throughout
the soundstage. These adjustments apply only to the music mode of
these decoders. In this menu you can set the preferred settings. The
settings can be adjusted on the fly using the remote. The settings will
always return to the settings in this menu when you first select the
music mode. See page 45 for a description of what these settings do.
SETUP MUSIC MODES
1 NEO:6 Center Image
0.3
2 PLIIx
Center Width
3 PLIIx Dimension
rear
4 PLIIx Panorama
3
0
front
YES
↑↓ next item
ENT select
MENU main menu
MEMORY BACKUP/RESTORE
This menu allows a backup to be made of all the customized settings
that have been made to the AVR505 Series2 or AVR507 Series2. The
options in this selection are BACKUP and RESTORE. Even if a backup
is not made, any customized settings will not be lost during normal day
to day operation. It is a good idea to create a backup once all the
settings have been made. These settings are then stored on an internal
EEPROM. Select RESTORE, if you desire to recall the memory
backup.
Note: Factory Reset will erase of a previous memory backup.
MEMORY BACKUP RESTORE
1
Memory Operation Backup
Save ALL memory
settings in EEPROM
ENT perform
adjust ←→
MENU main menu
32
MENU SYSTEM SETUP
UNIT INFORMATION
Unit information provides hardware information about your receiver.
1
2
3
4
5
Unit - The model of the receiver
software - The software version currently running in the hardware.
UNIT INFO
Unit
software
S/N
BKC-DIP
TUN-PLL
Ref 50 Series 2
version 1.00
123456789
1.2.01
LC72146
S/N - Serial Number
next item
MENU Main Menu
BKC-DIP - B & K Components Device Interface Protocol version.
TUN-PLL - Tuner information
ADVANCED MENU
The advanced setup menu allows the user to adjust the following features. An advanced menu navigational
flow chart is located on page 58 of this manual. The categories that are reserved for the advanced menu are
as follows:
• Zone maximum volume level.
• Surround Mode Detection
• The IR code-set for each zone
• Plug n Play timing
• Power on titles.
• DSP usage
• +12VDC control trigger output.
• User Security
• RS-232 port.
From the factory, the advanced menu is hidden from user access. To un-hide the advanced menu,
simultaneously press the UP, DOWN and ON/STANDBY buttons. Once these three buttons have been
pressed, the Security Options Menu will display with “ADVANCED VISIBLE” highlighted. This will indicate the
advanced menu is unhidden. If the IR or front panel has been locked, this button press sequence will unlock
them. After enabling advanced menu, the system setup menu will change:
Advanced Locked
1
2
3
4
5
6
SETUP SYSTEM
Speakers
Inputs
Presets
Displays
Music Modes
Memory Backup/Restore
↑↓ next item
ENT select
MENU main menu
Advanced Unlocked
1
2
3
4
5
6
7
↑↓
SETUP SYSTEM
Speakers
Inputs
Presets
Displays
Music Modes
Memory Backup/Restore
Advanced
next item
ENT select
MENU main menu
33
ADVANCED MENU SYSTEM SETUP
Descriptions of each option of the advanced system setup menu are as follows:
Zone ‘1’ Home Theater - Allows adjustments for the main home theater zone. Set the max volume,
zone ID, Record loop and surround mode options.
Power On Titles - Customize power on titles for customized
personal greetings.
1
2
Control Out - Configure the 12VDC control outputs for control of 3
external devices via IR or voltage.
4
5
Security Options - Lock the front panel, memory or front panel IR
6
sensor.
7
DSP Usage - Displays processor status in MIPS.
8
RS-232 Control Port - Configure the main RJ-45 jack for RS-232
communication.
ADVANCED SYSTEM SETUP
Zone ‘1’ Home Theater
Power On Titles
Control Out
Security Options
DSP Usage
RS-232 Control Port
Plug and Play Timing
Zone ‘B' Second Zone
↑↓ next item
ENT select
MENU main menu
Plug n Play Timing - Adjust the timers for the digital Plug n Play
system. This is useful when adjusting for digital error muting.
Zone ‘B’ Second zone - Allows adjustments for the second zone. Set the max volume, zone ID, Record
loop and the Zone A&B linking options.
Zone ‘1’ Home Theater
Max Level - Set the maximum volume for the main theater zone. This can be used to protect your speakers
or ears from inadvertent excessive volume.
Zone ID - The product ID (IR code set) can be adjusted if operation
with other B & K is gear is required. The default ID is 001 for the main
theater zone and 002 for Zone B. The receiver can be assigned to any
ID (B & K code-set) between 001 and 099. This allows ninety nine
different B&K surround processors to operate independently using
different remote controls. This feature is typically useful if multiple
surround processors are used in the same system (B & K CT whole
house audio systems). Zone A and Zone B cannot be assigned the
same code set. The code-set 000 operates both zones of the receiver
simultaneously.
1
2
3
4
ADVANCED ZONE A SETTINGS
Max Level
+15 dB
Zone ID
1
V1 Output
Tape
Surround Modes
Auto
↑↓ next item
adjust ←→
MENU advanced setup
NOTE: If the code set of the receiver is changed, you will need to reprogram the IR code of the remote
control being used. B & K offers the SR10.1 programming remote (supplied with the B & K AVR507 Series2
and AVR505 Series2), the CK1.2 Keypad or MZ-128 remote.
V1 Output - TAPE or LINE. The V1 output can be configured as an output for a second recording device in
Zone A (TAPE). The V1 output can also be configured as a Zone A line output to connect a second video
monitor and/or audio amplifier (LINE). As a record output, V1 will output the analog audio and video from the
selected input in Zone A except when V1 is selected. This prevents feedback through the recording device
which could damage your speakers. As a line output V1 will output the analog audio and video from whatever
input is selected in Zone A. Record/Line settings also apply to the Zone A optical and coaxial digital outputs.
Surround Modes - Select from AUTO or MANUAL. Auto or manual engages or disengages the B & K Plug n
Play System.
Auto - If set to AUTO, each time an input is selected the Plug n Play system will scan the various source
signals and determine if a multi-channel digital bitstream is present. The main theater zone will then use
the maximum number of hardware speakers specified in the speaker setup menu.
Manual - If set for MANUAL, each time an input is selected, the user will select the audio mode that will
be used with the source signal, regardless of a what bitstream is present. Manual mode allows the
preferences setup in the Surround audio mode to apply both to multi-channel and 2 channel source input
signals.
34
ADVANCED MENU SYSTEM SETUP
Power on Titles
POWER ON TITLES
Personal power on greeting can be programmed to display on your
B & K ’s front panel display. Both power on lines contain 16 alphanumeric 1 Power On Line 1
characters. Power on titles will appear when the receiver is taken out of
'
BK Components '
Standby.
2 Power On Line 2
'
* Digital DNA
'
Have fun with your power on titles, and try to WOW everyone. Power on
titles are easy to set up using BKcSuite setup software.
↑↓ next item
ENT select
MENU advanced setup
Control Output (12VDC control)
The receiver contains 4 control outputs. Control outputs are supplied to
control external source devices such as amplifiers, projection screens,
curtains, etc. The control outputs can also be configured to control an
external device with IR. Each control can be configured as shown in the
following table. Each input can dictate how that each control output can
function. Control outputs are terminated using 1/8” (3.5mm) mono mini
jacks. +12VDC control outputs supply 50mA maximum current each.
Actual voltage can vary between 10-12VDC depending on the load. See
below for control output table.
Off - Control output is off when the input is selected.
Zone A - The control output is on when Zone A is on and the input is
selected in Zone A.
CONTROL OUT
1 TUNER
2 V1
3 V2
4 TV
5 DVD
6 CD
7 SAT
8 Tape
1 SETUP
Phones
Phones
Phones
Phones
Phones
Phones
Phones
Phones
↑↓ next item
adjust ←→
MENU advanced setup
Zone B - The control output is on when Zone B is on and the input is selected in Zone B.
Zone A / B - The control output is on when Zone A or Zone B is on and that source is selected in either
zone.
Remote - IR will pass-through from the front panel or a connected keypad to the control output. An IR
emitter can be connected for control of an IR device. IR will only pass-through when the source is
selected and the control is set for remote.
RS-232 - The control output can be controlled from a RS-232 command or RS-232 controller.
Phones - The control output is off when the receiver is in headphone mode. This way, if an external
amplifier is used, it will be off when the headphones are in use.
Each control output can be configured differently if desired. The following table defines the possible choices
each control output can be set to. Note the shaded boxes are the default settings.
Control
Possible selections for each Input
1
Off
Phones
(default)
Zone A
RS-232
N/A
N/A
2
Off
Zone A
Zone B
(default)
Zone A/B
Remote
RS-232
3
Off
Zone A
Zone B
Zone A/B
(default)
Remote
RS-232
4
Off
Zone A
Zone B
Zone A/B
Remote
(default)
RS-232
35
ADVANCED MENU SYSTEM SETUP
DSP Usage
This screen monitors the amount of processing power being used.
Expressed in MIPS (Millions Instructions per Second)
DSP USAGE
1
Utilized DSP
Processing Power
165 MIPS
MENU advanced setup
Security Options
In the security menu, the user can protect the receiver from accidental
SECURITY OPTIONS
changes to unit settings or reprogramming. Changes made to the security
menu will not take effect until you exit the setup menu. Once a security
1 Advanced Menu
Visible
option has been activated, you may re-enter this menu by simultaneously 2 Memory Locked
No
3 Front Locked
No
pressing the UP, DOWN and STANDBY.
Advanced Menu - Visible or Hidden. This selection will hide or un-hide
the advanced options menu. The advanced menu is choice seven in the
System Setup menu. If the advanced menu is locked (default) pressing
UP/DOWN/STANDBY will unlock the advanced menu and automatically
display the security options menu.
4 IR Locked
No
↑↓ next item
ENT select
MENU advanced setup
Memory Locked - Locking memory will prevent changing of your presets or system settings.
Front Locked - Locking the front panel will only allow operation of your receiver with a B & K remote or RS232 computer Interface. Note if you inadvertently lock the front panel, simultaneously pressing STANDBY, UP
and DOWN on the front panel will always enter the advanced security options to allow changing these
settings. Locking the Front will still allow RS-232 “F” messages to be accepted.
IR Locked - YES or NO. Locking the IR will deactivate the IR sensor on the receiver front panel. If the front
panel IR is locked, it will not allow a connected keypad or IR sensor to operate. Locking the IR will still allow
RS-232 “I” messages (IR) to be accepted.
36
ADVANCED MENU SYSTEM SETUP
RS-232 Control Port
The RS-232 port refers to the main RJ-45 connection
located on the receiver's back panel. The RJ-45
contains connections for transmission and reception of
RS-232 data. See pin-out at right. The RJ-45 also
supports power supply and IR input for CK1.2 Keypad
interface.
Port - When disabling the RS-232 port, RS-232 strings
will be neither transmitted nor received through the
main RJ-45 jack. By default the RS-232 port is enabled.
12v
TX
RS-232 Host Transmit
RCV
RS-232 Host Receive
IR
12v
IR
TX
RCV
CTR
12VDC Power Supply
Signal/Common Ground
12v
CTR
IR Input
12VDC Control Output
Baud rate - The default baud rate is 9600. B & K does not recommend using any baud rate other than 9600.
When a Baud rate other than 9600 is used, Keypad status will not function.
Echo - Enabled or Disabled.This setting is for those with external control systems communicating to B & K
products via RS-232. Echo will repeat RS-232 transmissions received through the main RJ-45 receive port.
Feedback (RS-232 Continuous Reply):
RS-232 PORT SETUP
None (Default) = Neither BKC-DIP Update or Reply is generated.
1 Port
Enabled
Update = A change affecting a logical zone from the Front Panel or 2 Baud rate
9600
B & K IR generates an update message representing the specific front panel 3 Echo
Disabled
button or B & K IR command. The receiver must then be polled to determine 4 Feedback
None
the current status.
5 Receive ID
0
6 T r a n s m i t ID
0
Reply = When set to “REPLY”, the receiver will automatically
generate BKC-DIP reply messages to allow unsolicited continuous feedback
to an external RS-232 controller. A change affecting Zone A or Zone B from
ENT select
the Front Panel or B & K IR generates a reply message representing the new ↑↓ next item
M
E
N
U
a
d
v
a
n
c
e
d
setup
status of the parameter that was changed.
Typical format example of a BKC-DIP Reply :
An example BKC-DIP Reply message the AVR507 Series2 or AVR505 Series2 will automatically generate
when a master volume change is executed in Logical Zone 1 is (0,R,P1=FF,1=60;). Reply message Logical
Zone 1 current Preset parameter Volume value is set to 60 hex or 0dB (assumes 0dB is the current setting).
“0” is the transmit ID
“R” is the BKC-DIP Reply message.
“P1=FF” is the BKC-DIP command for the current preset in logical Zone 1 (P1: main theater zone ID).
“1=60” is the current preset parameter (1: Volume), is set to the Hex value of 60 (volume at 0dB ).
For a complete list of B & K RS-232 parameter Protocol, see the Series_IIIS2_10000.pdf or greater located in
the documentation of BKcSuite or online at B & K ’s website.
All (Both) = Outputs both a BKC-DIP Update and Reply messages.
Receive ID / Transmit ID - This is the identifier in B & K RS-232 protocol that allows B & K to “listen” (receive
ID) or “talk” (transmit ID) to other B & K products. Change this identifier if you are using an external automation system to control more than one B & K products in series. The transmit and receive IDs are denoted by
the first number in an RS-232 message i.e. (0,S,I,1=45;).
Note - If you change the Receive or Transmit ID, it does not affect setup with BKcSuite.
ADVANCED MENU SYSTEM SETUP
Plug and Play Timing Setup
Plug and play timing pertains to the internal delays associated with the Plug n Play audio detection system.
DO NOT ADJUST THESE PARAMETERS UNLESS THERE IS A PROBLEM HEARING AUDIO
Your receiver has default audio Plug n Play settings that work with the majority of A/V sources and digital
audio bitsreams. However, with the introduction of new A/V products into the market place, these Plug n Play
audio detection parameters may need to be adjusted to improve upon the listening experience. An example
might be that there is an inordinate amount of audio pops or snaps while changing Cable, HDTV or SAT
channels. The quality of the original digital bitstream depends on many factors. It is our desire to minimize the
amount of audio pops and snaps that may be transmitted thru to the speakers. Your receiver does not “filter”
any imperfect digital bitstreams, nor does it make the digital bitstream a valid signal. However, because audio
pops and snaps are undesirable, your receiver will try to mute the audio before you hear it when there is a
digital audio bitstream error. Although your receiver’s muting circuitry may stop most of the digital errors from
being heard, it does not guarantee that a digital error may never be heard.
The Plug n Play menu may be used to adjust mute times while the receiver is automatically switching
between different types of digital audio formats (AC3 / DTS 5.0 / DTS 5.1, PCM). Usually these audio pops
and snaps may be traced to a digital error on the incoming digital audio bitstream and corrected with a simple
Mute Time adjustment.
Default Settings
Mute Time
- 0.5 Sets the mute time for use with invalid digital audio information. In
addition it is used to mute when a digital signal first appears or changes modes. Most notably, some DVD
recorders output about 1.5 seconds of invalid digital bitsreams after you close the drawer.
Digital Sticky
- 2.0 Only applies to changes from any digital audio mode back to analog.
Changes from analog to digital are always fast. This parameter may be set long because most Cable and
SAT receivers drop the digital audio bitstream when changing channels and there is really no need to revert
back to analog. Note, some Cable and SAT receivers only output analog audio for certain broadcast
channels. If the Digital Sticky parameter is set too long there may be a longer period of silence before you
hear the audio with an analog only broadcast channel.
Mode Sticky
- 1.0 Only applies to changes from AC3 or DTS to PCM. Changes from PCM to
AC3 or DTS are typically fast. Many DVD players drop to PCM when skipping tracks. There is no need for the
receiver to drop to PCM processing during this interval. However, because many DVDs contain AC3, DTS
and PCM data on different tracks, setting the Mode Sticky parameter too long may cut off the audio from the
beginning of AC3, DTS or PCM digital audio bitsreams.
Parameters Sticky - 1.0 Applies to how quickly the receiver will react to changes in sample rate,
number of speaker channels in the bitstream, etc. Occasionally some players erroneously indicate these
changes which causes the r e c e i v e r to needlessly mute and adjust itself to these new parameters. Setting
this parameter longer reduces the chance that the receiver will respond to an erroneous change but does
increases the likelihood of muting the audio at the start of an audio playback.
PLUG AND PLAY TIMING
1
2
3
4
Mute Time
Digital Sticky
Mode Sticky
Parameters Sticky
0.5
2.0
1.0
1.0
37
38
ADVANCED MENU SYSTEM SETUP
Zone 2 ‘B’ Second Zone
Level Control - Variable or fixed. The second zone can be configured ADVANCED ZONE B SETTINGS
for a fixed volume level if external volume control is desired.
1 Level Control
Variable
Max Level - Set the maximum volume for the second zone. This can
be used to protect your speakers or ears from inadvertent excessive
volume. If Level Control is set to fixed, the max level will define the
fixed volume level output for Zone B.
2
3
4
5
6
Maximum Level
+15 dB
Zone ID
2
V2 Output
Tape
Link Input to Zone A
No
Link Power to Zone A
No
↑↓ next item
adjust ←→
Zone ID - The product ID (IR code set) can be adjusted if operation
M
E
N
U
a
d
v
a
n
c
e
d
setup
with other B & K is gear is required. The default ID is 001 for the main
theater zone and 002 for Zone B. The receiver can be assigned to any
ID (B & K code-set) between 001 and 099. This allows ninety nine different B & K surround processors to
operate independently using different remote controls. This feature is typically useful if multiple surround
processors are used in the same system (B & K CT whole house audio systems). Zone A and Zone B cannot
be assigned the same code set. The code-set 000 operates both zones of the receiver simultaneously.
NOTE: If the code set of the receiver is changed, you will need to reprogram the IR code of the remote
control being used. B & K offers the SR10.1 programmable remote (supplied with the B & K AVR507 Series2
and AVR505 Series2), the CK1.2 Keypad or MZ-128 remote.
V2 Output - TAPE or LINE. The V2 output can be configured as an output for a second recording device in
Zone B (TAPE). The V2 output can also be configured as a Zone B line output to connect a second video
monitor and/or audio amplifier (LINE). As a record output, V2 will output the analog audio and video from the
selected input in Zone B except when V2 is selected. This prevents feedback through the recording device
which could damage your speakers. As a line output V2 will output the analog audio and video from whatever
input is selected in Zone B.
Link input to Zone A - YES or NO. The second zone’s source selection may be linked with the Zone A
source selection. In operation, whenever a source selection is made in the main theater zone, the source
linkage will cause same the source to be selected in the second zone. Independent source selection is still
available with the Zone B remote control, but any Zone A source selection supersedes the previous Zone B
selection.
Link power to Zone A - YES or NO. Zone B power On/Off may be linked to Zone A . In operation, whenever
power is set to ON in Zone A the power linkage feature will cause power to be set accordingly on Zone B.
Zone B Independent power On/Off is still operational with the Zone B remote control, but any Zone A power
command supersedes the previous Zone B power On/Off.
FACTORY RESET
Sometimes a factory reset is necessary in order to clear problematic symptoms sometimes experienced in
the field. A factory reset will clear all system settings and all presets. A factory reset will also clear any information backed up onto the EEPROM that may have been accomplished by a Memory Backup.
To perform a Factory Reset on an AVR505 Series2 or AVR 507 Series2,
simultaneously press and release the ON/STANDBY, DOWN and MENU buttons.
Once you see "Reset Preset" on the front panel you can release the buttons. A reset will take approximately
60 seconds.
39
REMOTE CONTROL
SR10.1 REMOTE CONTROL OPERATION
Your B & K receiver is supplied with a state-of-the-art remote control. The SR10.1 is a computer
programmable and learning remote. It can be programmed to control any or all of the components in your system using IR. The setup software CD-ROM for the remote is supplied in the
box with the SR10.1. You can also download the setup software from the B & K website at
www.bkcomp.com/support. Be sure to perform the Live Update after a software has been
installed on your PC. For instructions on programming the SR10.1 see page 51.
Bktask.lnk
BKcSuite
The default program of the remote is setup to control the main theater zone of the B & K receiver. Up to 20
devices can be stored and programmed on the remote. 10 devices are pre-programmed onto the main page
for convenience. A definition of each default device button is as follows:
B&K: Operates the main theater zone of the receiver. It is pre-programmed for B & K Control.
SAT: Selects the SAT input in the main theater zone.
DVD: Selects the DVD input in the main theater zone.
CD: Selects the CD input in the main theater zone.
TAPE: Selects the TAPE input in the main theater zone.
TV: Selects the TV input in the main theater zone.
V1: Selects the V1 input in the main theater zone.
V2: Selects the V2 input in the main theater zone.
FM: Selects and controls the FM tuner in the main theater zone.
ON
OFF
MAIN
AM: Selects and controls the FM tuner in the main theater zone.
B&K
SAT
DVD
CD
TAPE
TV
V1
V2
FM
AM
PAGE 1
Each device can be programmed to control the source associated with the
input on the B & K receiver. The setup software contains a database of
various manufacturers' IR codes for devices, such as DVD players, CD
players, music servers, TVs and more. IR commands can also be learned
directly into the SR10.1 remote from the original source remote control.
PA
GE
V
FA
MAIN
+
_
PREV
CH
MUTE
VOL
GUIDE
The B & K device button in the figure left contains the IR commands that
pertain specifically to the B & K receiver. Once the B & K device has been
selected, press the PAGE button to step through the 4 pages of IR commands
for the device. Press the MAIN button to return to main page 1. Press FAV to
access favorite stations or common commands. The B & K device button
layout is as follows:
+
_
CH
INFO
EXIT
MENU
1
2
3
4
5
6
7
8
9
+10
0
ENT
PAGE 1 = Source input selections. The Z button is available for temporarily
changing the zone control of the remote. i.e. pressing Z then 2 will control the
second zone temporarily.
PAGE 2 = Audio mode selections.
PAGE 3 = Imaging adjustments and user EQ selection. SLEEP enables the
sleep timer and steps through the timer increments. SAVE will save a preset
PAGE 4 = Center channel, rear channel, subwoofer, bass and treble gains.
The Unit Operation section (page 40) of this manual documents the various
ways of using the functions of the receiver from the SR10.1.
B&K SYSTEM REMOTE
SR10.1
B&K
DVD
SAT
DVD-A MUSIC
B&K
B&K
IMG-
IMG+
CNTR- CNTR+
CD
TV
CINMA MOVIE
DIM-
DIM+
REAR- REAR+
V1
V2
SURR
GAME
PAN-
PAN+
SUB-
FM
AM
STER
PLIIX
SLEEP
Z
MONO
NEO:6
SAVE
TAPE
PAGE 1
PAGE 2
B&K
PAGE 3
SUB+
BASS- BASS+
EQ
TREB- TREB+
PAGE 4
40
OPERATION & CONTROL
UNIT OPERATION
The following pages outline the normal day-to-day operation of your receiver from the supplied SR10.1
remote control. All unit functions can also be directly controlled from the front panel. The SR10.1 remote is
capable of controlling both the B & K receiver plus other source gear in your system. This section will outline
the usage of the SR10.1 Remote with your B & K processor. For a brief overview of the SR10.1 programming
software, refer to page 51 of this manual. The full programming manual is available on our website. All
programming software and product manuals are available online at www.bkcomp.com.
Master Power On/Off
The master power switch located on the front panel of your receiver must be “ON” (pressed in) for the
receiver to operate. When this switch is OFF (pressed out) all power is shut off. This will prevent turning it
back on with the remote control or keypad. For normal day to day operation, leave the master power switch in
the ON position. Use the ON/STANDBY function for daily power on and off. This will allow the receiver to be
turned on and off from the remote control or keypad.
Whenever turning on the master power switch, you must wait approximately 15 seconds while the processor
restores its internal memory and initializes system parameters. You may want to turn off the master power
switch only when your receiver will be idle for extended periods of time or during periods of power line fluctuations. The memory will not be lost while the master power switch is off.
On / Standby
For normal day to day operation, you will put your receiver in STANDBY or by using the ON and OFF buttons
of the remote control. Standby mode keeps minimal functions running in order to allow the remote control or
keypad to quickly power the unit up. Note that the front panel ON/STANDBY button is lit while your receiver is
in standby and is not lit when your receiver is operating. The front panel display is off during standby. The
remote control or keypad has discrete power OFF and ON IR commands to put the receiver in and out of
standby mode. The power on titles will display every time the unit is brought out of standby mode.
Adjusting Volume
The front panel VOLUME control knob will control the volume. The volume knob is on the right side of the
front panel. Volume can also be adjusted up or down using the remote control or a keypad. Volume ranges
from -96dB to +15dB. 0dB is Dolby Reference level.
Center, Rear and Subwoofer Volume
The center channel, rear channels (surrounds and backs together) and/or the subwoofer volume levels can
be tweaked independently. To adjust the volume for these channels, use the CNTR-/+, REAR-/+ or SUB-/+
from the remote control to adjust. These are temporary level adjustments and will reset to zero after an input
change or standby on/off.
Source Selection
The front panel is equipped with a Source knob that allows you to rotate it to select any of the 7 inputs or the
internal AM and FM tuner. The source knob is on the left hand side of the front panel. From the remote, press
the button corresponding to the input you wish to select.
When using DVD-Audio, it is recommended to set DVD-Audio as the default audio mode for that particular
input. If DVD-audio is not set as the default mode, first select the input to which DVD-Audio has been
assigned, then press the DVD-A button from the remote control.
OPERATION & CONTROL
Z1 Operation - Theater
The Z1 Operation menu is provided to aide in the Theater zone operaZA OPERATION
tion. It does not have to be used in order to control the Theater zone.
Source FM
Stereo
103.3
To access this menu, press the Menu button on the remote or front
Video V1
Volume
-10.0
panel, scroll down and select choice three; Z1 Operation - Theater.
Mode Surround Center
+3.5
This menu provides current settings for the main Zone A. The audio
DPLIIx Musi c Rear
-1.5
input and video input can be selected independently. If the Tape input is Spkrs
6 Sub
+1.5
selected, the tape output for recording can selected independently. If
Eq 2 Loudness
↑↓ next item
adjust ←→
the AM or FM tuner is selected, the frequency can be changed. The
master volume and individual speaker volumes for center, sub and rear 0..9 +10 recall preset SAVE
MENU main menu
(surrounds and backs together) can be adjusted. The surround mode
and number of speakers used can be selected. If a 2-channel music
mode is selected, hitting ENTER when Mode is selected will allow adjustment to the music mode parameters.
The user EQ selection can be made. If the variable EQ is selected, pressing ENTER will allow you to adjust
the bass and treble settings for the variable EQ. Any changes made in this menu will be reset when the input
is changed. This operation menu is very helpful when setting up presets. You can see exactly what settings
you have setup up before the preset is saved. To save a preset press the SAVE button. See page 49 for
more information on presets.
Sleep Timer
The receiver contains a sleep timer. The sleep timer has the ability to turn the receiver off (set to Standby)
after a set time period. Sleep timer options span from 30 minutes up to 4 hours in 30 minute increments.
Repeatedly pressing the sleep button will step through the timer increments. The sleep button is located on
page page 3 of the B & K device on the supplied SR10.1 remote control.
Z2 Operation - Second Zone
The Z2 Operation menu is provided to aide in the operation of the
Z B O P E R AT IO N
second zone. It does not have to be used in order to control the second
Power Off
zone. To access this menu, press the Menu button on the remote or
Source DVD
Record DVD
the front panel, scroll down and select choice four; Z2 Operation - 2nd Video DVD
Volume -25.0
Zone. The audio input and video input can be selected independently.
If the V2 input is selected, the V2 output for recording can selected
independently. If the AM or FM tuner is selected, the frequency can be
↑↓ next item
adjust ←→
changed. The master volume can be adjusted. Any changes made in
0..9 +10 recall preset SAVE
this menu will be reset when the input is changed. This menu is very
MENU main menu
helpful when setting up presets. You can see exactly what settings you
have setup up before the preset is saved. To save a preset press the
SAVE button. See page 49 for more information on presets.
Zone Operation Button
To set the receiver for temporary operation of either Zone 1 or Zone 2 use the Zone (Z) button on the SR10.1
remote. It is located on page 1 of the B & K device. See page 39 for default remote layout. Press the zone
button, then the zone ID code. The default zone codes are as follows:
1 - Operates the main theater zone.
2 - Operates the second zone.
0 - Operates both zones simultaneously.
Once the zone button and zone ID is pressed, the remote control will temporarily operate the zone until three
seconds elapse with no command issued. The zone ID can be changed if desired (theater zone page 33 or
second zone page 38).
If a permanent method of controlling other zones is desired, the SR10.1 can be reprogrammed with the
appropriate zone code assigned to one of the device buttons.
41
42
OPERATION & CONTROL
Tuner Operation
All TUNER operations require the receiver source be set to TUNER. Press the FM or AM button to access
the tuner.
Manual Tuning - From the remote control or the front panel, tap the UP or DOWN arrow to tune one
frequency step at a time. Hold the up or down arrow to automatically seek up or down to the next available
strong station. Very strong stations may cause seeking to stop one step away from the station’s actual
frequency. Check one step above or below if you are not sure. Your favorite stations can be saved in presets
(see page 49).
Direct Frequency Entry Tuning - To directly recall a tuner frequency, press the FM or AM button, then enter
the frequency of the station within the next 3 seconds.
Example - Button press steps for directly entering the radio station for 103.3 FM = FM - 1 - 0 - 3 - 3
Headphone Operation
Headphone mode allows output of the source selection using a set of headphones. The headphone jack
uses a 1/4” (6.3mm) stereo jack. From the remote control select STEREO - 0. SURROUND - 0 is identical
to STEREO-0. To select headphone mode from the front panel, select a source, press the MODE button.
Press the UP or DOWN arrows to step through until the receiver switches into headphone mode. When in
headphone mode, CONTROL OUT #1 is set to off (default). This feature allows your receiver to turn off
external amplifiers or powered subwoofers with compatible 12VDC CONTROL inputs. The receiver will mute
the surround output channels when in headphone mode. Headphone mode can also be set up to be recalled
using a preset. (See speaker selection page 47).
While in 'HEADPHONE', equalization features of the receiver remain operational. The unit will stay in
headphone mode until a different speaker selection is made. This feature allows the 'Headphone' selection to
stay in effect until the unit is put into STANDBY.
WARNING: In order to provide full range audio to your headphones, it is necessary to override the
bass management processing in your receiver. If you are using external amplifiers or powered
speakers with no CONTROL OUT capability then full range audio will be sent to your front left and
right speakers. If you have small front speakers we strongly suggest you manually turn off your
external amplifiers or powered speakers before selecting 'HEADPHONE' operation. Otherwise speaker
damage may occur.
43
OPERATION & CONTROL
FRONT PANEL DISPLAY OPERATION
The front panel display is capable of displaying 16 characters. The first five characters identify the current
source input. The remaining 10 characters identify the the audio mode and the number of active speakers.
All changes to volume, input, audio mode, etc. will be displayed for a few seconds on the front panel. When
no changes are in progress, the front panel will display the input and surround mode. Some abbreviations are
necessary. The various abbreviations are as follows:
Display definitions:
4
4B
5
5B
SUR
=
=
=
=
=
4 Surround
4 Back
5 Surround
5 Back
Surround
DTS
DTS ES DSC
DTS ES MTX
NEO6
= DTS
DOLBY D
= Dolby Digital
= DTS Discrete 6.1 DOLBY D EX = Dolby Digital Surround EX
= DTS Matrix 6.1
PL2X
= Dolby Pro Logic IIx
= DTS NEO:6
MU
= Music Filter
MV
= Movie Filter
Processor Status
DVD
DTS SUR 5B
Processor status will display after an input selection or any time by pressing the INFO or ENTER
button on the remote control. INFO will display
Source Input
Audio Mode Description and
the status on both the OSD and front panel,
number active speakers
while ENTER will display status on the front
panel only. The info status will display status for
the source input selection, bitstream type, sampling rate, video type, audio mode, speaker selections, EQ
setting, and surround processing types. The video source type is very important if you are mixing component,
composite and S-video types. It will describe the video type the processor is using. The bitstream and
speaker channel information is particularly important with DVDs since they may or may not contain certain
soundtracks. When you initially start the DVD you may get a Dolby Digital (AC3) 2.0 soundtrack. To get the
best possible sound, you may have to use the DVD player's menu system to activate the Dolby Digital 5.1 or
DTS-ES multi-channel soundtracks. The last line will provide additional information about the surround or
cinema mode processing currently in use. If you need to call B & K regarding a problem with your receiver
be sure to note the status display before calling.
Current Source
Current audio mode
and speaker selection
DVD
Current Bitstream and
sampling rate
Current video
source type
DTS 5.1 48K
Composite
Surround 6
Variable EQ
DTS Surround + NEO:6
Current EQ selection
Current multi-channel bitstream type and/or
multi-channel surround matrix format
Note: Status display will scroll through each line of the display message on the front panel of the receiver.
The ENTER button will not trigger the OSD.
44
OPERATION & CONTROL
The following tables represent a visual synopsis of how the front will respond depending on the audio mode,
number of speakers and the audio signal type. The first table shows how the front panel will display multichannel digital bitstreams. The second table shows how the front panel will display two channel audio types.
Digital Multi-Channel Bitstreams
Front Panel Display
# of Speakers
Used
MONO
STEREO
SURROUND
CINEMA
1
Mono 1
Mono 1
Mono 1
Mono 1
2
Mono 2
STEREO 2
STEREO 2
STEREO 2
3
Mono 3
STEREO 3
DOLBY D 3
DTS SUR 3
DOLBY D 3
DTS SUR 3
4 Surrounds
Mono 4
STEREO 4
DOLBY D 4
DTS SUR 4
DOLBY D 4
DTS SUR 4
4 Backs
Mono 4B
STEREO 4B
DOLBY D 4B
DTS SUR 4B
DOLBY D 4B
DTS SUR 4B
5 Surrounds
Mono 5
STEREO 5
DOLBY D 5
DTS SUR 5
DOLBY D 5
DTS SUR 5
5 Backs
Mono 5B
STEREO 5B
DOLBY D 5B
DTS SUR 5B
DOLBY D 5B
DTS SUR 5B
DOLBY D EX
DOLBY D MU
DOLBY D MV
DTS ES DSC
DTS ES MTX
DOLBY D
DOLBY D
DTS SUR
DTS SUR
6
Mono 6
STEREO 6
DOLBY D EX
DOLBY D MU
DOLBY D MV
DTS ES DSC
DTS ES MTX
7
Mono 7
STEREO 7
DOLBY D
DOLBY D
DTS SUR
DTS SUR
MU
MV
MV
MU
MU
MV
MV
MU
Analog, PCM, AC3 2.0 Audio Signals
Front Panel Display
# of Speakers
Used
MONO
STEREO
SURROUND
CINEMA
1
Mono 1
Mono 1
Mono 1
Mono 1
2
Mono 2
STEREO 2
STEREO 2
STEREO 2
3
Mono 3
STEREO 3
4 Surrounds
Mono 4
STEREO 4
4 Backs
Mono 4B
STEREO 4B
5 Surrounds
Mono 5
STEREO 5
5 Backs
Mono 5B
STEREO 5B
6
Mono 6
STEREO 6
7
Mono 7
STEREO 7
PL2X
PL2X
NEO6
NEO6
PL2X
PL2X
NEO6
NEO6
PL2X
PL2X
NEO6
NEO6
PL2X
PL2X
NEO6
NEO6
PL2X
PL2X
NEO6
NEO6
PL2X
PL2X
NEO6
NEO6
PL2X
PL2X
NEO6
NEO6
PL2X
PL2X
NEO6
NEO6
PL2X
PL2X
NEO6
NEO6
PL2X
PL2X
NEO6
NEO6
PL2X
PL2X
NEO6
NEO6
PL2X
PL2X
NEO6
NEO6
PL2X
PL2X
NEO6
NEO6
PL2X
PL2X
NEO6
NEO6
MV
MU
MU
MV
MV
MU
MU
MV
MV
MU
MU
MV
MV
MU
MU
MV
MV
MU
MU
MV
MV
MU
MU
MV
MV
MU
MU
MV
3
3
3
3
4
4
4
4
4B
4B
4B
4B
5
5
5
5
5B
5B
5B
5B
6
6
6
6
7
7
7
7
MV
MU
MU
MV
MV
MU
MU
MV
MV
MU
MU
MV
MV
MU
MU
MV
MV
MU
MU
MV
MV
MU
MU
MV
MV
MU
MU
MV
3
3
3
3
4
4
4
4
4B
4B
4B
4B
5
5
5
5
5B
5B
5B
5B
6
6
6
6
7
7
7
7
OPERATION & CONTROL
AUDIO MODES & SPEAKER SELECTIONS
B & K incorporates a state-of-the-art software and hardware system that will prioritize the incoming audio
signals (Plug n Play) and accordingly select the appropriate number of speakers, two-channel surround
decoder (Dolby Pro Logic IIx or DTS NEO:6) or multi-channel surround mode (Movie or Music) depending on
the user’s preference. Multi-channel encoded bitstreams (DTS and Dolby Digital) are automatically detected
and selected for any input. When a Dolby Digital or DTS multi-channel bitstream is detected, the number of
speakers in the speaker setup menu are selected automatically. Plug n Play will give priority to digital
bitstreams. If there is no multi-channel or two-channel digital bitstream present, Plug n Play will revert to the
analog audio (left and right) inputs using the default audio mode.
This receiver includes five audio listening modes; mono, stereo, surround, cinema and DVD-audio. Each
input (7 inputs) can be configured for each audio mode (4 audio modes), plus the DVD-Audio mode (see
page 29). The receiver will store user preferences for each audio mode resulting in a one touch solution for
recalling specific settings for various types of multi-media formats. For normal operation, the Setup Inputs
preferences should be configured for the “favorite” (default) setting for each input. Occasionally, you may
want to change the audio mode or speaker selection being used with an input. To quickly change the audio
mode simply select Mono, Stereo, Surround, Cinema or DVD Audio via the remote control or the front panel
Mode button. In addition, you may choose an audio listening mode immediately followed by a speaker selection. For example pressing STEREO-7 will select 7 speaker stereo mode. Pressing SURR - 5 will select 5
speaker surround. If you are listening to a 2-channel bitstream, you may change the surround decoder
(Dolby Pro Logic IIx or DTS Neo:6) and the operating mode of the surround decoder (Movie, Music, Game)
using the corresponding buttons on the remote. From the front panel use the MODE button to step through
surround modes and decoder types. Use the UP and DOWN arrows to select the desired number of
speakers.
Audio Mode Usages
MONO - The audio signals are summed or downmixed to produce a single mono channel which can then be
distributed evenly to the desired number of speakers. It is also useful in the case of a large listening group
when it is difficult to put everyone near the optimum listening position. To quickly recall the mono mode from
the remote control, press the MONO button then the number of desired speakers 0-9 (see table page 47).
From the front panel, press the MODE button then the up and down arrows to select the number of speakers.
STEREO - The unmodified Left and right audio signals are evenly distributed to the desired number of left
and right speakers. The center channel speaker receives a mono mix. Use this mode for true stereo listening
or for expanding the stereo image to additional speakers. To quickly recall the stereo mode from the remote
control, press the STER button then the number of desired speakers 0-9 (see table page 47). From the front
panel press the MODE button, then the up and down arrows to select the number of speakers.
SURROUND - This mode is used to extract multi-channel surround information from a 2-channel audio
source using one of the two available surround decoder types (DTS NEO:6 & Dolby Pro Logic IIx). To quickly
recall the surround mode from the remote control, press the SURR button then the number of desired
speakers 0-9 (see table page 47). To select surround from the front panel press the MODE button to scroll
through the audio modes, then the UP and DOWN arrows to select the number of speakers. Movie or music
mode have their own discrete IR command buttons for selection.
You have a choice of two methods for simulating multi-channel sound from a two channel source - Dolby Pro
Logic IIx and DTS Neo:6. These decoders use different formulas for creating the simulated multi-channel
soundfield. Each decoder type provides a MOVIE and a MUSIC mode. MOVIE places greater emphasis on
the back speakers and MUSIC places greater emphasis on the surrounds. Dolby Pro Logic IIx and DTS
provide an adjustable MUSIC mode. MUSIC mode adjustments are for the center image (width), surround
image (dimension), and front-to-surround image (panorama). Use the IMG+/-, DIM+/- and PAN+/- buttons on
the remote to adjust the various parameters for how the surround field is created. MOVIE mode is fixed and
has no adjustment options. Continued on next page...
45
46
OPERATION & CONTROL
Material correctly mixed for Dolby Pro Logic contains no bass information in the surround channels and therefore, Dolby requires that no surround bass is mixed to the subwoofer when you have small surrounds.
However, many video game systems do end up with bass information in the surrounds. In order to prevent
loss of this bass information, PLIIx also provides GAME mode. GAME mode is otherwise identical to the
MOVIE mode. NEO:6 has no such requirements on surround bass - surround bass is allowed to be mixed to
the sub regardless of the mode selected. NEO:6 has no GAME mode.
The Surround mode is also used for multi-channel encoded bitstreams such as Dolby Digital and DTS-ES.
Selecting SURROUND-5 passes the 5 main channels unmodified to the fronts, center, and surround
speakers. Surround-6 engages Dolby Digital Surround EX or DTS Surround ES processing. Dolby Digital EX
must be selected manually. Both of these processes extract monophonic information from the surrounds and
places it in the back speaker(s). This is effective for material that has been mixed specifically for EX/ES, but
may drastically reduce surround information for material that is not specifically mixed for 6-channels. Dolby
provides a variation of Pro Logic IIx for processing surround and back channels for 5.1 material to make 7.1.
Press SURROUND-7 to access this mode. Back speakers will contain 2 independent channels (stereo
backs).
SURROUND-7 is the recommended mode for 5.1 material played back in seven channels. However, DTS
provides two variations for 6.1 material; DTS-ES Matrix (MTX) and DTS-ES Discrete. DTS-ES Matrix (MTX)
is specifically mixed to provide a single matrix surround back channel. The receiver will automatically select
SURROUND-6 for ES MTX material with the same surround back information in both back channels (mono).
DTS-ES Discrete (DSC) provides a completely independent discrete back channel. The receiver will
automatically select SURROUND 6 for ES DSC material.
Cinema Mode - As with 2-channel,CINEMA mode is identical to SURROUND mode except that it adds highfrequency roll off to the front and center channels to compensate for certain movie soundtracks. In a movie
theater the left, center, and right front speakers are typically located behind the movie screen. The movie
screen tends to reduce the high frequency response. To compensate for this, movie soundtracks are mixed
with boosted high frequencies. Often, this compensation is not removed when transferring the movie to DVD.
B & K provides CINEMA mode to remove this undesirable high frequency boost. If a movie seems to have
overly bright or harsh sound, use CINEMA mode. CINEMA mode is otherwise identical to surround mode,
providing all of the same choices PLIIx, NEO:6, MOVIE, MUSIC, etc. However, CINEMA is not usually
required for music material.
DVD Audio (SACD) - Use this audio mode with the analog outputs of a DVD-Audio player or any other 5.1
analog audio source device. To quickly recall the DVD-Audio mode from the remote control, press the DVDA
button then the number of desired speakers 0-9 (see page 47). DVD-AUDIO - 5 is a direct analog passthrough. No equalization is applied to the DVD Audio input.
Note: In order to select the DVD-Audio mode, the source input assigned to the DVD-Audio mode must be
selected before selecting the DVD-Audio mode. If no DVD Audio input is assigned (factory default), the DVD
Audio mode is inactive.
Why do I need all these audio modes?
With the wide variety of audio source material available today, i.e. 2 channel stereo, 2 channel surround and
multi-channel encoded audio, we believe that the reproduction of this material is best handled in audio
categories. We have decided to define these five "audio modes" which are actually different Plug and Play
modes of operating our audio processor. Simply selecting an audio mode will automatically recall a plethora
of user designated settings associated with each mode. Those settings are then applied to the audio signal
being received. The Plug and Play system simplifies the process further by automatically detecting a
bitstream and selecting a maximum number of speakers, so the user doesn’t have to. Any of the five Audio
Modes can be designated as “default” per each input.
OPERATION & CONTROL
Speaker Selections
The table below shows how your receiver will route audio information to the speaker channels depending on
audio modes and speaker selection combinations. Audio information will not be lost in any speaker selection.
The information for the missing speakers is mixed to other active speakers. When selecting four or five
speakers, choose from the surround or back speakers. When the system setup is correctly performed, the
receiver will route audio to fewer small speakers with the needed corrections to volume and "down mixing"
applied automatically.
NOTE: The number provided on the left side of the table defines the speaker option that can be selected
immediately after an audio mode selection from the SR10.1 remote control. For example, pressing STEREO2 will select the front left and right speakers plus the subwoofer. Pressing SURROUND-7 will select the
surround mode using seven speakers plus the subwoofer.
47
48
OPERATION & CONTROL
Equalization Settings and Adjustments
The receiver provides 3 ways to modify the frequency response (equalization) for particular listening situations. These equalization are in addition to the room equalization and room resonance adjustments made in
the speaker setup menu. Pressing the EQ button consecutively on the remote control will step through the
receiver’s user EQ selections. To quickly select an EQ, press EQ, then the EQ number. Equalization is not
available for DVD-Audio, Direct, or LtRt Modes.
The available user EQ’s are defined as follows:
ZA OPERATION
Source DVD
Stereo 103.3
1 Variable - User designated EQ settings. To adjust the variable EQ
Video DVD
Volume -10.0
0.0
from the OSD, highlight the Variable EQ selection from the Z1 Operation Mode Surround Center
DPLIIx Movie Rear
0.0
- Theater Zone Menu. Press the ENTER button to access and adjust
Spkrs
7 Sub
0.0
the variable EQ settings as shown. Bass and treble level adjustments
E
q
1
V
a
r
i
a
b
l
e
can be made using the LEFT and RIGHT arrows. The receiver allows
↑↓ next item
adjust ←→
the designation of the frequency at which the bass and treble adjust0
.
.
9
+
1
0
r
e
c
a
l
l
p
reset SAVE
ments occur.
MENU main menu
0 Flat - No equalization applied.
LFE gain can be adjusted. Note that this affects only the separate LFE
(.1) track available on Dolby Digital and DTS material it has no effect on
VARIABLE EQUALIZATION
Frequency
Level
the reproduction of normal bass from the front, center, or surround
Bass
100.0 Hz
0.0 dB
channels.
Treble
10.0 kHz
The dynamic range (Dolby Night-time mode) can be limited for late night LFE Level
listening while processing Dolby Digital or DTS bitstreams.
Dynamic Range
0.0 dB
0.0 dB
Normal
2 Loudness - The human ear's frequency response varies with volume
↑↓ next item
adjust ←→
level. At high levels it has relatively flat response, while at low levels its
M
E
N
U
z
o
n
e
o
p
e
ration
sensitivity to high and low frequencies are reduced. The loudness equalizer is designed to cancel the ear's frequency response anomalies to
provide consistent tone at all volume levels. Note that you will hear little difference using the loudness control
at high volumes as it has its greatest effect at lower volume levels.
3 Vocal - Frequency gains have been cut on both the high and low end for vocals only listening. This is
useful for late night listening as it allows you to hear the dialogue, but reduces the volume of sound effects
which might disturb others. Unlike Dolby Digital/DTS nighttime modes, the vocal filter is effective for all source
material including PCM and analog.
This equalizer is also effective in reducing the vocal boominess often associated with FM talk radio. Some
crackly old movie soundtracks will have improved clarity with the vocal filter on.
The table below outlines how the various EQs can be applied in each audio mode. To manually select an
EQ, press the EQ button on the remote control followed by the EQ#.
Audio Mode
Equalizer
EQ Name
EQ #
Mono
Stereo
Surround
Cinema
DVD Audio
Direct
Off (Flat)
0
No EQ
No EQ
No EQ
No EQ
No EQ
No EQ
Variable
1
User set
User set
User set
User set
Bypassed
Bypassed
Loudness
2
fixed response fixed response fixed response fixed response
Bypassed
Bypassed
Vocal
3
fixed response fixed response fixed response fixed response
Bypassed
Bypassed
49
OPERATION & CONTROL
PRESETS
Saving a user preset is like taking a virtual picture of ALL USER settings in the receiver. This preset may
then be recalled at any time. Up to 40 presets may be saved in either the main theater zone or the second
zone. Presets provide a powerful method to recall favorite settings. Presets are easily recalled from the
SR10.1 remote control. The parameters that may be saved with a preset are:
Audio Source
Video Source
Audio Mode
Volume
Speaker Selection
Radio Station
User EQ
Record Loop
Center channel volume
Subwoofer volume
Rear channels volume
Preset titles can be customized according to the preset function. The following steps outline the procedure to
save a preset.
Quick Preset Outline - Set the unit exactly for the desired user settings. Press the SAVE button. Then select
the preset number you want to save it to. Press ENTER to save the settings. To recall a preset, press the
preset number, then ENTER.
Saving a Preset
The following steps detail the procedure that is used to setup and save a preset. The procedure references
the SR10.1 Remote Control that came with the AVR507 Series2 or AVR507 Series2 receiver.
Step 1
First, setup the receiver for the desired speaker selection, input, volume level and/or EQ. The Z1 or Z2
Operation Menu is helpful when setting up system parameters. It is accessed from the first page of the On
Screen Setup menu.
Step 2
From the SR10.1 remote, press the B & K button in the upper left corner of the remote screen. Then press
the PAGE button two times. In the lower left corner of Page 3, you will see the SAVE button. Press the
SAVE button one time. Pressing the SAVE button will activate the on screen display. The on screen display
will show the settings of the preset that is about to be saved. If a preset is saved from the front panel,
pressing ENTER and PRESET at the same time acts like the SAVE button.
ON
OFF
MAIN
ON
OFF
SAT
SAT
IMG-
IMG+
DVD
CD
CD
TV
DIM-
DIM+
TAPE
TV
V1
V2
PAN-
PAN+
V1
V2
FM
AM
MUSIC
MOVIE
FM
AM
PAGE 1
TAPE
Z
PAGE 1
SAVE
EQ
DVD
V
FA
PA
GE
MAIN
VOL
OFF
B&K
B&K
PA
GE
+
_
ON
B&K
MUTE
PAGE 3
V
FA
PA
GE
PREV
CH
GUIDE
+
_
CH
+
_
VOL
MUTE
V
FA
MAIN
MAIN
PREV
CH
GUIDE
+
_
CH
+
_
VOL
MUTE
PREV
CH
GUIDE
+
_
CH
50
OPERATION & CONTROL
Step 3
Select the preset number. If you wish to save the preset to a particular number, you can directly select the
preset number from the number pad on the remote control. Use the +10 button to choose presets above the
number 10. For example: 12 is selected as +10 button then the number 2 button (+10 - 2).
Use the left and right arrows from the thumb pad to select the preset number to save. If a preset number is
not chosen, the preset will saved to the next un-used favorite preset number.
EXIT
MENU
EXIT
MENU
OR
1
2
3
4
5
6
9
7
8
9
ENT
+10
0
ENT
1
2
3
4
5
6
7
8
+10
0
B&K SYSTEM REMOTE
B&K SYSTEM REMOTE
SR10.1
SR10.1
Step 4
EXIT
MENU
Press the ENTER button or the center of the thumb pad
when you are satisfied with the preset settings. Once the
ENTER button is pressed, SAVING SETTINGS will be
displayed.
1
2
3
4
5
6
7
8
9
+10
0
ENT
B&K SYSTEM REMOTE
SR10.1
Step 5
Once the settings have been saved, the preset can be named or renamed with a custom title. If Preset Auto Naming is ON, then the
processor will automatically assign a generic name to the preset (see
page 30). Use the thump pad UP or DOWN to change the blinking
character. Use left/right to move to a different character. Press ENTER
again to save the name. From the front panel use UP or DOWN
buttons to change the character and the volume knob to mode to a
different character.
To save the preset name from the front panel, press the PRESET and
ENTER buttons simultaneously to save preset settings. The PRESET
and ENTER buttons operate the same as the SAVE button would from
the remote.
SAVE PRESET
New Name
Source DVD
Video
DVD
Mode Surround
PLIIx Movie
Spkrs
7
EQ 1 Variable
1 DVD SUR
DVV1D -56 d
-B
56
Record DVD
Volume -56.0
Center
0.0
Rear
0.0
Sub
0.0
0..9 +10 preset
ENT save preset
preset
cancel menu
OPERATION & CONTROL
Recalling a Preset
To recall a preset from the SR10.1 remote control, press the preset number, then the ENTER button. For
example, to recall preset number 2, press 2 - ENTER. Three steps are necessary in the case of a preset
above the number 10, (preset 12 = +10 - 2 - ENTER).
To recall a preset from the front panel, press the PRESET button to scroll through the saved favorite presets.
Once the desired preset is found, press the ENTER button to recall the preset.
If a preset is recalled in zone two, then the zone code for Zone B (002 default) must used to recall the preset.
Favorite Presets
The receiver saves a list of favorite presets which can be quickly accessed using the channel up/down button
on the remote, or the PRESET button on the front panel. The receiver can be setup to recall the chosen
favorites instantly or only after an ENTER command. When a preset is saved it is automatically added to the
favorites list. The list can be edited in the favorites menu (page 30). If there are no favorites in the list, then
CHANNEL or PRESET will step through all 40 presets.
SR10.1 REMOTE EDITOR SOFTWARE
The SR10.1 is supplied with a CD-ROM containing the setup program. This software can also be obtained
from the B & K website. If the SR10.1 editor program is installed from the CD, be sure to do a LIVE
UPDATE. The live update is found under Help ->Live Update. A live update ensures that you have the latest
version of setup software. Your PC will need to be connected to the internet to execute the update. The
editor software can be used to program your SR10.1 to control other source devices your system may
contain. The SR10.1 can be programmed to control devices such as DVD players, CD players, music
servers, satellite set top boxes, TVs, and more. You can customize particular devices so frequently used
commands are readily accessible.
SR10.1 Editor
The following pages summarize some key points of
the programming software. The full version of the
programming manual is found under Help -> User
Guide or go to www.bkcomp.com.
The SR10.1 comes pre-programmed with 10
devices. Each device is pre-programmed on the
Main Page 1 of the SR10.1. Each device button is
labeled to match the inputs on the back panel of the
receiver. Pressing a device button will change the
input on the receiver. Once a device button is
pressed, the remote will automatically flip to page
one to display device functions. Page one of the
device can contain specific commands to control the
source component. For example, pressing DVD will
change the receiver to the DVD input and then
show the controls for the DVD player.
The editor software can also be used to program
macros to further simplify the operation of your
system. A macro is a series of recorded IR steps
that can be executed with one button press. A
simple macro might execute a preset recall, a more
complex macro can be setup to turn ON all source
devices or turn OFF all source devices.
51
52
SOFTWARE SETUP
Blank - A button with no flag will not do anything when pressed. It is empty and has no programming.
IR Command - A red dot indicates that the button is programmed with an IR database command. An
IR database command can be pressed or pressed and held for a scrollable command (such as
volume). All buttons except the MAIN and FAV devices can be programmed with IR database codes
(you cannot program the navigation buttons-PAGE, MAIN or FAV either). To program IR database
commands, goto PROGRAM -> IR DATABASE. Program IR devices according to make and model.
Shortcut - A black arrow on yellow square indicates that the button is programmed with a shortcut. A
shortcut is a pointer to a IR database command. A shortcut can be made to various commands within
any device. To make a shortcut, choose the button on the virtual remote, then click the DEVICE drop
down in the Edit and Label buttons window and select the device to shortcut to. Click the IR CODE
drop down. The drop down displays the list of commands within a device. Once you select the
command you want to shortcut to, click SAVE. The diagram below illustrates putting the B & K
command for the NEO:6 decoder in the DVD device as a shortcut.
Creating a Shortcut
Punch Through - A PT flag indicates that the
button is programmed to “Punch Through” to
another device. Punch throughs are used for
programming multiple devices for volume,
channel, numbers, play stop and pause.
Punch throughs can eliminate the need to
navigate the remote control for simple
functions such as volume. The Punch through
window is a fast way to assign multiple Punch
throughs quickly.
To set up a punch through, goto PROGRAM ->
PUNCH THROUGH. The ‘Punch To’ column
defines the devices that will have control from
a different device assigned to certain buttons
within the device. In the ‘Punch From’ column, select the device from where the IR codes will source
from. For example, devices such as DVD players do not usually control volume, the punch through for
volume will Punch From B & K for the DVD device . This way, the B & K volume will be controlled when
the DVD is selected.
Once the punch throughs are set, click SAVE.
53
SOFTWARE SETUP
Learning IR Codes
Learned - An L flag indicates that the button is programmed with a learned IR code. A learned code
can be pressed or pressed and held for a sustained burst. All buttons can be programmed with
learned codes (including all MAIN buttons, hard and LCD) except the buttons on FAV pages and the
navigation buttons themselves.
To program a learned command, the PC must be connected to the remote control with the supplied
programming cable. Once the cable is connected, click the learn icon located in the Edit and label
buttons window. ‘Learning Ready’ will appear in the lower portion of the window. Then point the
source remote at the head end of the SR10.1. Press and hold the original IR command button until
you see ‘GOOD’ appear in the lower portion of the Edit and Label Buttons window. Click SAVE to
complete and confirm the learning process.
Hi Fi Tech Company
With Cool Remote
OFF
TUNE+
ON
STA+
STA-
VIDEO +
FM
B-
T-
V+
BASS
TREBLE
ST/M
T+
M
S-
To PC
AM
SOURCE
S+
B+
LOUDNESS
0
+10
ENTER
LOUD
DEDICATED
8
5
9
D-IN
6
IN 9
3
IN 8
EXIT
ZONE
®
DOWN
T
SEL
ENTER
R
I
G¯
H
T
CH
L
UP
Õ
SAVE
GUIDE
+
_
° EF
VOL
2
PREV
CH
MUTE
1
V
FA
MAIN
+
_
7
PA
GE
4
MENU
INFO
OFF
VOLUME
ON/OFF
EXIT
PRESET
MENU
MUTE
POWER
IN 5
IN 4
IN 1
B&K
IN 6
IN 7
IN 2
IN 3
ON
F
TUNE-
M
Macro - An ‘M’ or ‘F’ flag indicates that the button is programmed with a Macro (the F flag indicates
the Macro is on one of the Favorites pages). Only the LCD buttons and the Power ON and Power OFF
buttons can be programmed with MACROS. Hard buttons cannot be programmed with MACROS
directly. A macro with a single step cannot be pressed and held for a sustained burst. In order to
make a macro, you must make a recording of the steps you
want to execute. To start a macro recording, click
the RECORD icon in the Macro & Favorite window. Once the
macro has begun recording, navigate through virtual keypad
within the software and find the command(s) you wish to
execute with the macro. Once the macro is complete, click the
SAVE icon located right next to the Record icon. The macro in
this example shows how a power-on macro can also recall a
preset, in this case preset one. There are three steps involved
in order to turn power on and recall a preset: The button press for power on, the button press for the
preset number and the button press for ENTER. See Presets, page 49.
1
2
3
4
5
6
7
8
9
+10
0
ENT
B&K SYSTEM REMOTE
SR10.1
OFF
ON
To PC
PA
GE
V
FA
MAIN
+
_
PREV
CH
MUTE
VOL
GUIDE
+
_
CH
INFO
EXIT
MENU
1
2
3
4
5
6
7
8
9
+10
0
ENT
B&K SYSTEM REMOTE
SR10.1
54
SOFTWARE SETUP
BKcSuite SETUP SOFTWARE
BKcSuite setup software can be downloaded from the B & K website at www.bkcomp.com.
Instructions for installation are provided online. Once the software has been installed, download
and install the appropriate user manuals separately. BKcSuite automatically installs a shortcut icon
on the desktop [BKTask icon (grey)]. Make sure all other applications which use the serial port are
closed before opening the taskbar. B K c Suite has the capability to connect in real-time (live) to any
of B & K ’s receivers or preamplifiers. However, it is recommended that all setup be done virtually (not live) to
avoid system errors. Once the setup files have been created, establish a connection to the unit and open the
saved files. Typical PC setup should follow the described procedure:
1. Open BKcSuite A/V Setup from BKTask. DO NOT CONNECT
UNIT TO COMPUTER. Without a connection to the receiver is
considered virtual mode.
2. When BKcSuite is first opened, the Device Investigator automatically scans to find a connected B & K product. After you have
created your setup files, this is how you can establish a connection
to the unit. First, choose “select product for operation without a
connected device.”
Click
Here!
3. Choose the product
you wish to work with.
4. The first screen that will appear is a blank grey screen with a toolbar at the top. To access the system
setup menu, click the Advanced System Setup icon.
5. The BKcSuite will open directly to the Preset Editor page. You can edit and save preset using this
menu. If you desire to setup system parameters, click SYSTEM tab located at the bottom of the page.
The system setup outlines the features available in the On Screen Menu.
SOFTWARE SETUP
6. Once you have configured the settings for your system, save the BKcSuite file. Goto File->Save
settings To File. Both the system settings and presets for zone A and zone B will be saved together in
one file (.bkd extension). Once the settings have been saved to file, you are ready to establish a live
connection to the preamplifier.
B&K
COAX S/PDIF DIGITAL
ZA OUT
TV
V2
SAT
CD
OPTICAL S/PDIF DIGITAL
V1
OUT
SAT
CD
DVD
V2
OUTPUTS
ZONE A
V1
ZONE B
A/V SOURCE OUTPUTS
ZB/V2
V1
TAPE
A/V SOURCE INPUTS
TAPE
SAT
CD
DVD
COMPONENT VIDEO
TV
V2
V1
IN 1
IN 2
IN 3
OUTPUT
S IMPLY B ETTER!
CAUTION
RISK OF ELECTRIC
SHOCK DO NOT OPEN
CENTER
RS-232
PORT
+
CENTER
SURRND
FRONT
DVD
IEEE
1394
E X PA N S I O N
SUB
3
IR INPUT
ZONE B
4
Audio/Video Systems Hand-Made in the U.S.A.
SURROUND OUTPUTS
DVD
IR INPUT
ZONE A
50 mA
AUDIO
CONTROL OUT
1 12VDC 2
INPUT
SUB
ZB OUT
SERIAL #
AM
SURRND
FRONT
S BACK
ZONE B
FM
ANTENNA
FUSE
C AU T I O N : F O R C O N T I N U E D
PROTECTION AGAINST RISK
O F F I R E R E P L A C E O N LY W I T H
S A M E T Y P E A N D VA LU E F U S E
SURROUND LEFT
POSITIVE
N E G AT I V E
SURROUND RIGHT
POSITIVE
N E G AT I V E
CENTER
POSITIVE
N E G AT I V E
SURROUND BACK LEFT
POSITIVE
N E G AT I V E
SURROUND BACK RIGHT
POSITIVE
N E G AT I V E
FRONT LEFT
POSITIVE
N E G AT I V E
AC LINE
www.bkcomp.com
CAT5 Network Cable
FRONT RIGHT
POSITIVE
N E G AT I V E
7. Connect a straight through CAT5 network cable between the RJ-45
jack and the serial port of the PC (pictured at left). If the PC does not
have a DB-9 type serial port, a serial to USB adapter can be used. To
establish a live connection, close and re-open BKcSuite. BKcSuite will
search all com ports for a connected
USB to Serial adapter
device. While a live connection is established, BKcSuite will operate the same
way as when in virtual mode, however
any changes made in BKcSuite will
immediately update inside the unit itself.
To upload a saved file, goto File->Open
and open the saved system setting file
while a live connection is established.
Troubleshooting Guide For BKcSuite
1.
PC requirements - 128MB RAM, Pentium grade or better processor, Windows 98SE operating system or
greater. (Exception- BKcSuite not supported on Windows NT) ***
2.
Make sure the CT/CK/SR product is connected to the PC’s serial port. (DB-9, nine pin or USB)
3.
Be sure to select “Local Com” in the BKcSuite software, as “Network” is not currently supported.
4.
If the unit will not communicate through RS-232, perform a factory reset. (See Factory Reset Section)
5.
Know how to properly set the COM port protocol in your version of Windows:
Window 9x/Me - Go to your system’s “Control Panel.” Double click the icon labeled “System.” Click
the Device Manager button. Scroll down until the section labeled “Ports.” Click the small “+” located next to
“Ports” to expand the tree and view the installed communication ports. Double click the COM port that corresponds to the port on the PC that the CT/CK/SR product will be physically connected to. Locate the tab in
the Window labeled “Port Settings,” click it and go to section 6 below.
Windows 2000/XP - Go to your system’s “Control Panel.” Click the icon labeled “System.” In the
Hardware tab, click the Device Manager button. Double click on the icon labeled “Ports” to expand the tree
and view the installed communication ports. Double click the COM port corresponding to the port the
CT/CK/SR product is physically connected to and go to section 6 below.
6.
Set the proper communication properties. The parameters for Port Settings should be entered as
follows:
Bits per second
- 9600
Data Bits
-8
Parity
- None
Stop Bits
-1
Flow Control
- None
In the advanced section of the Communication properties window is the “FIFO Buffer” configuration. Most
modern laptops have the ability to take full advantage of these buffers, so it is recommended to enable them
and drag their slider to the “max” setting. Once you have finished making the selections, click “OK” to all
windows and prompt to return to the Control Panel. At that point you can close the Control Panel.
7.
Disable any and all power management services including any Universal Power Supplies (UPS).
8.
Disable any handheld computer / PDA syncing software and services.
9.
Disable any other RS-232 / Serial protocol programs that may be using a COM port. i.e CK1.2 Keypad
Editor, SR10.1 Remote Editor or serial controller.
10.
In case you encounter an “Out of Memory” or “Out of Resources” error, be sure your PC meets the
minimum requirements outlined in the BKcSuite section of this manual. Close all unnecessary programs that
may be running. It is recommended to let Windows manage your virtual memory, however, if you manually
set the virtual memory size, set it at least to 1.5 times your actual RAM size.
55
56
TROUBLESHOOTING
TROUBLESHOOTING
PROBLEM
POSSIBLE CAUSE
POSSIBLE SOLUTION
No sound
Display will not
illuminate.
1. Power cord not plugged in.
2. Power off at AC source.
3. AC power inlet fuse blown or
faulty.
4. Power switch in off position (out).
1. Reconnect power cord.
2. Check AC switch or fuse.
3. Check AC line fuse, replace line fuse with
.12A 250V Slow Blow fuse.
4. Push in the main power switch.
No sound
Display on.
1. Receiver is in mute.
2. Volume control to a minimum.
3. Un-used source selected
4. Line stage or source not correctly
selected.
5. Speaker fuse blown.
1. Un-mute the receiver.
2. Turn up volume.
3. Select an active source
4. Check ALL connections. Try substituting
cables.
5. Check all speaker fuses and replace if blown.
Replace fuse with same type and value.
Loud hum or buzz on
one or more channels.
Channel sounds “bad.”
1. Poor ground connection in the
interconnect cables.
2. Poor AC ground in main AC supply
3. Audio cables installed across AC
power.
1. Check all connections making sure that
cables are connected (+) to (+) and (-) to (-).
2. Check all cables and repair where necessary.
3. Reposition cables, bundle like cables
together.
4. Try substituting cables.
Remote / Keypad / IR
sensor(s) will not work.
1. Batteries dead, missing, installed
wrong.
2. IR lock is enabled
3. IR inference.
4. IR code-set should be set to 0-0-2.
5. Wires are crossed
1. Check and replace batteries.
2. Unlock IR sensor, see Advanced Security
menu.
3. Check for nearby sunlight, plasma TV’s or
fluorescent light. Block where needed.
4. Check IR code-set.
5. Check wiring diagram on page 21.
Surround speakers are
not very loud in
SURROUND mode.
1. Normal operation.
2. Speaker channels may not be
turned on.
1. When in SURROUND Mode, most audio
information is directed to the center channel.
Surround and back channels are used for
“effects” scenes.
2. Check speaker setup page 25.
Unit is locked
1. Poor power supply
2. Processor lockup
1. Check AC power.
2. Cold boot (power switch) or reset the unit.
No component video
1. Component video input is not
assigned
1. Assign the component video to the appropriate source input.
S-Video and Composite 1. DVD player set to progressive
video not visible when
scan.
using DVD player.
1. Progressive scan (480p) can only be viewed
using component video.
2. Reset DVD player to interlaced (480i).
Receiver is not recognizing multi-channel
bitstreams.
1. Go into the DVD players setup menu and
turn on the appropriate digital output.
1. DVD player needs to be configured for digital output.
IEEE
1394
ZB OUT
AC LINE
C AU T I O N : F O R C O N T I N U E D
PROTECTION AGAINST RISK
O F F I R E R E P L A C E O N LY W I T H
S A M E T Y P E A N D VA LU E F U S E
FUSE
E X PA N S I O N
SERIAL #
RISK OF ELECTRIC
SHOCK DO NOT OPEN
CAUTION
S IMPLY B ETTER!
ZA OUT
DVD
CD
3
N E G AT I V E
N E G AT I V E
SURRND
S BACK
N E G AT I V E
ZONE B
ZONE B
OUTPUTS
ZONE A
CENTER
SURROUND OUTPUTS
POSITIVE
FRONT
CENTER
SUB
CENTER
FRONT
V1
V2
DVD
POSITIVE
SURRND
SUB
CD
OPTICAL S/PDIF DIGITAL
POSITIVE
IR INPUT
ZONE B
SAT
SURROUND RIGHT
4
RS-232
PORT
OUT
SURROUND LEFT
50 mA
IR INPUT
ZONE A
V1
V2
CONTROL OUT
1 12VDC 2
SAT
TV
COAX S/PDIF DIGITAL
+
B&K
INPUT
AUDIO
DVD
AVR 507 Series 2
TAPE
N E G AT I V E
www.bkcomp.com
POSITIVE
SURROUND BACK LEFT
V1
A/V SOURCE OUTPUTS
ZB/V2
SAT
DVD
TV
A/V SOURCE INPUTS
CD
V2
POSITIVE
N E G AT I V E
SURROUND BACK RIGHT
POSITIVE
V1
N E G AT I V E
FRONT LEFT
Audio/Video Systems Hand-Made in the U.S.A.
TAPE
ANTENNA
IN 3
POSITIVE
N E G AT I V E
FRONT RIGHT
AM
IN 2
COMPONENT VIDEO
IN 1
FM
OUTPUT
BACK PANEL PICTURE
57
58
ON SCREEN MENU FLOW CHART
AVR 505 or 507 Series 2
Menu System
ON SCREEN MENU FLOW CHART
59
60
NOTES
NOTES
61
SPECIFICATIONS
AVR505 Series 2 & AVR 507 Series 2 Receivers
Specification
AVR 505 Series2
Speaker Outputs
Surround Sound Processing
Frequency Response
Input Sensitivity
Signal to Noise Ratio
Input Impedance
Output Impedance
Maximum Output Level
User Presets
Audio / Video Source Inputs
Digital Audio Inputs
CK1.2 Keypad Compatible
DVD-Audio Inputs
Tape Record Loop Outputs
Pre-Amplifier Outputs
RS-232 Controllable
Number of zones
AC Line Voltage
Control Outputs
Dimensions in Inches
(Cutout Dimensions)
Width
Height
Depth
Shipping Weight
Power Consumption
5
7
Dolby Digital / Dolby Pro Logic IIx / Dolby Digital Surround-EX
DTS / DTS-ES Discrete / NEO:6
5 - 45kHz
90 mV
89 dB
50 K Ω
221 Ω
8V
40
7
5 Optical / 6 Coaxial
Yes
5.1 (assignable)
3 Analog / 3 Digital (2 Coax - 1 Optical)
7.1
Yes
2
120 / 220 / 240 VAC (optional / switchable)
Four 10 - 12VDC triggers @ 50mA
17.00 (17.12)
7.50 (7.62)
16.19 (17.5)
55 lbs
1200 watts max - (10 amps @ 120 V) / 31 watts standby
AC Line - 12 Amp / 250 Volt Slow Blow
Rail
- 4 Amp / 250 Volt Slow Blow (surround channels)
6 Amp / 250 Volt Time Lag (Mains)
Replacement Fuses
Tuner Specifications
Spec
AVR 507 Series2
Amplifier Specifications
FM Section
AM Section
Frequency Range
87.5 - 107.9 MHz
520 - 1670 kHz
Frequency response
Total Harmonic Distortion
Less than 0.25%
Less than .3%
THD (S + N)
Frequency Response
Power rating @ 8 ohms
20 Hz - 15 kHz
300 - 3 kHz
12 dBf
28 dBf
Current (peak to peak)
Alternate Chan. Selectivity
65 dB
30 dB
Slew rate
Signal to Noise Ratio
70 dB
50 dB
Dynamic headroom
Antenna Input Impedance
75 Ω
300 Ω
15 / 35 dBf
N/A
2 dB
N/A
Capture Ratio
AVR 507_505_S2_UM_13791.pdf
5 Hz - 45 kHz
0.09 %
IHF (Usable) Sensitivity
Mono/Stereo Sensitivity
150 watts
Damping factor
150
28 Amps per channel
14 V / µS
1.4 dB
Video Specifications
Freq. Response Composite / S-Video
20 Hz - 10 MHz
Freq. Response Component Video
10 Hz - 100 MHz
Input & Output Impedance
75 Ω
Composite & S-Vid Inputs / Outputs
7/5
Component Video Inputs / Outputs
3/1
Max. Input / Output Level (RCA & S)
2 V P-P