1
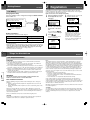
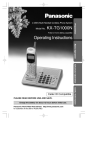
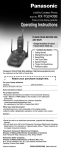
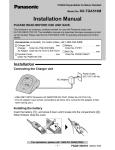
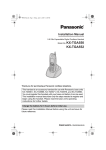
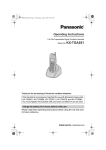
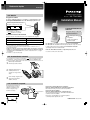
Referencia rápida
Sección 4
2.4GHz Cordless Handset
4-D Batería
Model No.
Carga de la batería
Ponga la unidad portátil en el cargador y cárguela durante 12
horas aproximadamente antes de utilizarla por primera vez.
KX-TGA100N
Installation Manual
Durante la carga de la batería, el icono
de batería se mostrará como abajo.
PLEASE READ BEFORE USE
AND SAVE.
•Cargue la batería cuando:
— se visualice “LOW BATTERY”, o
—“
” parpadee en la pantalla.
Charge the battery for about 12
hours before initial use.
Información acerca de la batería
Después de que su batería Panasonic esté completamente cargada:
Operación
Duración aproximada de la batería
Mientras se utiliza (HABLAR)
Hasta 10 horas*
Mientras no se utiliza (Espera)
Hasta 5.5 dias
∗En caso de que el modo Range Extender esté puesto en “OFF”, consulte la página
48 de las instrucciones de funcionamiento en inglés.
•La vida de la batería podrá acortarse dependiendo de las condiciones de uso y
temperatura ambiental.
•Limpie los contactos de carga de la unidad portátil y del cargador con un paño
blando y seco una vez al mes. Limpie más a menudo si la unidad está expuesta
a la grasa, polvo o humedad alta. De lo contrario, la batería tal vez no se cargue
correctamente.
•La batería no se puede sobrecargar.
1
2
3
4
Contents by Section
Getting Started
Registration
Things You Should Know
Referencia rápida
KX-TGA100N is the optional cordless handset for the KX-TG1000N/
KX-TG1050N. The installation manual only describes the steps necessary
to start up the hanset. Please read the KX-TG1000N/KX-TG1050N
operating instructions for further details.
Panasonic World Wide Web address: http://www.panasonic.com
for customers in the USA or Puerto Rico
4-H Sustitución de la batería
Si se visualiza “LOW BATTERY” y/o parpadea “
” después de haberla cargado
completamente, sustituya la batería con una nueva Panasonic PQWBTG1000N.
Para hacer el pedido, llame al número de teléfono para accesorios de la sección 1-A.
1
Quite la tapa deslizándola
mientras presiona la flecha.
2
Sustituya la batería de la
unidad portátil con los
contactos de carga hacia
abajo.
3
Contactos
de carga
Cierre la tapa. Asegúrese de
cargar la nueva batería
durante 12 horas.
3-D Instalación en pared
El cargador puede instalarse en
una pared. Instale los tornillos
utilizando la plantilla de abajo.
Instale el cargador y luego
deslícelo hacia abajo.
Tornillos
Panasonic Consumer Electronics Company,
Division of Matsushita Electric Corporation of America
One Panasonic Way, Secaucus, New Jersey 07094
Al tomacorriente
Plantilla de pared
Panasonic Sales Company,
Division of Matsushita Electric of Puerto Rico, Inc.
Ave. 65 de Infantería, Km. 9.5, San Gabriel Industrial Park
Carolina, Puerto Rico 00985
Panasonic’s e-mail address for customer inquiries:
consumerproducts@panasonic.com
PQQX13106ZA SV0301HT0
1
Getting Started
1-A Accessories
Charger unit ....................1
Order No. PQWETGA100N
1-B Location of Controls
Handset
1-C Settings
1
Connect the charger unit as shown.
Power Outlet
(AC 120 V, 60 Hz)
Speaker
Battery ............................1
Order No. PQWBTG1000N
AC Adaptor
Display
Function Buttons
Headset Jack
1
4
7
Belt Clip ..........................1
Order No. PQZHTG1000N
2
5
8
3
6
• The AC adaptor must remain connected at all times. (It is normal for the adaptor to
feel warm during use.)
9
0
2
Charge Contacts
Handset Cover ................1
Order No. PQYNTG1000N
Install the battery in the handset.
Install the battery in the handset with the charge contacts
facing down and close the handset cover, locking it into place.
Charger unit
AC Adaptor
Charge Contacts
H
Charge
Contacts
• For extra orders, call 1-800-332-5368.
Charger
3
Things You Should Know
3-C Battery Replacement
3-A Belt Clip
You can hang the handset on your belt or pocket using the belt clip.
To attach the belt clip
To remove the belt clip
3-B Optional Headset
Plugging an optional headset into the handset allows a hands-free phone
conversation. Please use only the Panasonic KX-TCA88 headset.
To order, call the accessories telephone number in section 1-A.
Connecting the optional headset to the handset
Open the headset jack cover,
and connect the optional
headset to the headset jack
as shown.
H
Headset
Jack
When the optional headset is connected to the handset, make sure to use the
headset to talk with the caller. If you want to have a normal cordless phone
conversation, disconnect the headset.
If “LOW BATTERY” is displayed and/or “
” flashes after being fully charged,
replace the battery with a new Panasonic PQWBTG1000N battery.
To order, call the accessories telephone number in section 1-A.
1
Remove the cover by sliding
while pressing the arrow.
2
Replace the battery in the
handset with the charge
contacts facing down.
3
Close the cover.
Make sure to charge the
new battery for 12 hours.
Charge
Contacts
3-D Wall Mounting
The charger can be wall mounted.
Install screws using the wall
template below. Mount the charger,
then slide it down.
Screws
To Power
Outlet
Wall Template
Getting Started
Section 1
2
Registration
Section 2
Registration is necessary for cordless handsets. An handset will be assigned the
number at registration. The number is used as the handset number. You can register
up to 4 handsets at the KX-TG1000N base unit.
Make sure the unit is in the standby mode initially.
1-D Battery
Charging the battery
Place the handset on the charger and charge for about 12 hours
before initial use.
During charging the battery, the battery
icon cycles as shown below.
1
After charging the handset,
the display will show the
following.
R
ENTER BASE ID
###############
I
OK
the 15-digit Base
2 Enter
Unit ID code located on
the bottom of the base
•Recharge the battery when:
—“LOW BATTERY” is displayed, or
—“
” flashes on the display.
unit.
Battery information
Operation
Approx. battery life
While in use (TALK)
Up to 10 hours*
While not in use (Standby)
Up to 5.5 days
∗In case the Range Extender Mode is set to “OFF”, see page 48 in the English
operating instructions.
•Battery life may be shortened depending on usage conditions and ambient temperature.
•Clean the charge contacts of the handset and the charger with a soft, dry cloth
once a month. Clean more often if the unit is subject to grease, dust or high
humidity. Otherwise the battery may not charge properly.
•The battery cannot be overcharged.
Things You Should Know
Wait until a beep sounds on the
handset and base unit.
FOUND
BASE
RDL
3 Press
(
OK
).
•A beep sounds and “PLEASE
WAIT!!” is displayed.
PLEASE
WAIT!!
MENU
MEM
•After a few seconds, the handset
number (1 to 4) will be displayed.
HANDSET 2
RDL
•If you misdial, press
(
).
Digits are erased from the right.
After your Panasonic battery is fully charged:
4
MENU
MEM
•If “BASE BUSY TRY LATER” is
displayed in step 4, the unit is in use.
Wait until the unit is in the standby
mode, and repeat steps from 2.
•If “ENTER BASE ID” is displayed in
step 3, you entered a wrong Base ID
code. Enter the correct code.
R
SEARCHING
FOR BASE
NEW
MENU
Section 3
3-E Helpful Information
CAUTION:
To reduce the risk of fire or injury to persons, read and follow these instructions.
1. Use only the battery(ies) specified.
2. Do not dispose of the battery(ies) in a fire. They may explode. Check with local
waste management codes for special disposal instructions.
3. Do not open or mutilate the battery(ies). Released electrolyte is corrosive and may
cause burns or injury to the eyes or skin. The electrolyte may be toxic if swallowed.
4. Exercise care in handling batteries in order not to short the battery to conductive
materials such as rings, bracelets, and keys. The battery and/or conductor may
overheat and cause burns.
5. Charge the battery(ies) provided with or identified for use with this product only in
accordance with the instructions and limitations specified in this manual.
WARNING:
rge
tacts
TO PREVENT FIRE OF SHOCK HAZARD, DO NOT EXPOSE THIS
PRODUCT TO RAIN OR ANY TYPE OF MOISTURE.
FCC and Other Information
When programming emergency numbers and/or making test calls to emergency
numbers:
1. Remain on the line and briefly explain to the dispatcher the reason for the call
before hanging up.
2. Perform such activities in the off-peak hours, such as early morning hours or late
evenings.
This device complies with Part 15 of the FCC Rules. Operation is subject to the
following two conditions: (1) This device may not cause harmful interference, and (2)
this device must accept any interference received, including interference that may
cause undesired operation.
Privacy of communications may not be ensured when using this phone.
CAUTION:
Any changes or modifications not expressly approved by the party responsible for
compliance could void the user’s authority to operate this device.
Note:
This equipment has been tested and found to comply with the limits for a Class B
digital device, pursuant to Part 15 of the FCC Rules. These limits are designed to
provide reasonable protection against harmful interference in a residential installation.
This equipment generates, uses, and can radiate radio frequency energy and, if not
installed and used in accordance with the instructions, may cause harmful interference
to radio communications. However, there is no guarantee that interference will not
occur in a particular installation. If this equipment does cause harmful interference to
radio or television reception, which can be determined by turning the equipment off
and on, the user is encouraged to try to correct the interference by one or more of the
following measures:
— Reorient or relocate the receiving antenna.
— Increase the separation between the equipment and receiver.
— Connect the equipment into an outlet on a circuit different from that to which the
receiver is connected.
— Consult the dealer or an experienced radio/TV technician for help.
Some cordless telephones operate at frequencies that may cause interference to
nearby TVs and VCRs. To minimize or prevent such interference, the base of the
cordless telephone should not be placed near or on top of a TV or VCR. If interference
is experienced, move the cordless telephone further away from the TV or VCR. This
will often reduce, or eliminate, interference.
Operating near 2.4GHz electrical appliances may cause interference. Move away from
the electrical appliances.
CAUTION:
To comply with FCC RF exposure requirements, the handset should be carried with
the specific belt-clip provided for the handset to ensure compliance. Other non-tested
belt-clips or similar body-worn accessories may not comply, therefore, should be
avoided.
4
Referencia rápida
La KX-TGA100N es la unidad portátil inalámbrica opcional para la
KX-TG1000N/KX-TG1050N. El manual de instalación solamente describe los
pasos necesarios para iniciar la unidad portátil.
4-A Accesorios
Cargador ..............................1
N.° de pedido PQWETGA1000
4-B Ubicación de los controles
Unidad portátil
4-C Ajustes
1
Conecte la unidad de carga.
Tomacorriente
(AC 120 V, 60 Hz)
Adaptador
de CA
Batería ..................................1
N.° de pedido PQWBTG1000N
1
4
7
Presilla para cinturón ..........1
2
5
8
3
6
9
• El adaptador de CA deberá permanecer conectado en todo momento. (Durante la
utilización es normal que se caliente el adaptador.)
0
N.° de pedido PQZHTG1000N
2
Cubierta de la unidad portátil ..1
N.° de pedido PQYNTG1000N
Cargador
Instale la batería en la unidad portátil.
Instale la batería en la unidad portátil con los contactos de
carga hacia abajo y cierre la tapa de la unidad portátil,
bloqueándola en su sitio.
H
• Para solicitar accesorios extra,
llane al 1-800-332-5368.
Contactos
de carga
4-E Registro
4-F Presilla para el cinturón
El registro resulta necesario para las unidades portátiles. Al hacerse el registro se le
asignará un número a la unidad portátil. El número de la unidad portátil se utiliza
como número de extensión. Podrá registrar un máximo de 4 unidades portátiles en la
unidad base del KX-TG1000N.
Asegúrese de que la unidad base esté en el modo de espera inicialmente.
1
Después de cargar la
unidad portátil, se
mostrará la visualización
de la derecha.
R
ENTER BASE ID
###############
I
2
OK
Introduzca el código de
identificación (ID) de 15dígitos de la unidad base.
•Si se equivoca, pulse
(
).
Los dígitos serán borrados desde
la derecha.
3
Presione
(
OK
).
•Sonará un pitido y se visualizará
“PLEASE WAIT!!”.
PLEASE
WAIT!!
R
SEARCHING
FOR BASE
NEW
MENU
4
Puede colgar la unidad portátil en su cinturón o bolsillo urilizando la presilla de cinturón.
Para fijar la presilla de cinturón
Para quitar la presilla de cinturón
Espere hasta que suene un
pitido en la unidad portátil y en
la unidad base.
FOUND
BASE
RDL
MENU
MEM
•Después de unos pocos segundos,
se visualizará el número de la
unidad portátil (1 a 4).
HANDSET 2
RDL
MENU
MEM
•Si se visualiza “BASE BUSY TRY
LATER” en el paso 4, la unidad está
siendo usada. Espere hasta que la
unidad esté en el modo de espera, y
repita los pasos desde el 2.
•Si se visualiza “ENTER BASE ID” en el
paso 3, habrá introducido un número de
código ID de unidad base incorrecto.
Introduzca el código correcto.
4-G Auricular opcional
Conectando un auricular opcional a la unidad portátil se pueden realizar
conversaciones telefónicas con las manos libres. Utilice solamente el auricular
KX-TCA88 de Panasonic.
Para hacer el pedido, llame al número de teléfono para accesorios de la sección 1-A.
Conexión del auricular a la unidad portátil
Abra la cubierta de la toma
del auricular y conecte el
auricular a la toma del
auricular como se muestra
en la ilustración.
H
Toma de
auricular
Cuando el auricular esté conectado, asegúrese de utilizarlo para conversar con la
persona que llame. Desconéctelo si desea mantener una conversación telefónica
normal con la unidad portátil.