1
Wireless Notebook Adapter
Instructions for use
VERSION 1.0 Table of Contents
11a/g
CPWNA100
3
English
Hereby, Philips Consumer Electronics, BLC P&A CC, declares that this CPWNA100 is in
compliance with the essential requirements and other relevant provisions of Directive 1999/5/EC.
Finnish
Philips Consumer Electronics, BLC P&A CC vakuuttaa täten että CPWNA100 tyyppinen laite on
direktiivin 1999/5/EY oleellisten vaatimusten ja sitä koskevien direktiivin muiden ehtojen mukainen.
Dutch
Hierbij verklaart, Philips Consumer Electronics, BLC P&A CC dat het toestel CPWNA100 in
overeenstemming is met de essentiële eisen en de andere relevante bepalingen van richtlijn
1999/5/EG.
French
Par la présente, Philips Consumer Electronics, BLC P&A CC, déclare que l'appareil CPWNA100 est
conforme aux exigences essentielles et aux autres dispositions pertinentes de la directive
1999/5/CE
Swedish
Härmed intygar, Philips Consumer Electronics, BLC P&A CC, att denna CPWNA100 står I
överensstämmelse med de väsentliga egenskapskrav och övriga relevanta bestämmelser som
framgår av direktiv 1999/5/EG.
Danish
Undertegnede Philips Consumer Electronics, BLC P&A CC erklærer herved, at følgende udstyr
CPWNA100 overholder de væsentlige krav og øvrige relevante krav i direktiv 1999/5/EF
German
Hiermit erklärt Philips Consumer Electronics, BLC P&A CC die Übereinstimmung des Gerätes
CPWNA100 mit den grundlegenden Anforderungen und den anderen relevanten Festlegungen der
Richtlinie 1999/5/EG.
Greek
O
Philips Consumer Electronics, B.U. Peripherals & Accessories O CPWUA054 O O
O
O
O
1999/5/
Italian
Con la presente Philips Consumer Electronics, BLC P&A CC dichiara che questo CPWNA100 è
conforme ai requisiti essenziali ed alle altre disposizioni pertinenti stabilite dalla direttiva 1999/5/CE.
Spanish
Por medio de la presente, Philips Consumer Electronics, BLC P&A CC, declara que el CPWNA100
cumple con los requisitos esenciales y cualesquiera otras disposiciones aplicables o exigibles de la
Directiva 1999/5/CE
Portuguese
Philips Consumer Electronics, BLC P&A CC declara que este CPWNA100 está conforme com os
requisitos essenciais e outras disposições da Directiva 1999/5/CE.
4
ENGLISH
☎
Helpline
België/Belgique/Belgien/
02 275 0701
Nederland
053 482 9800
Luxemburg/Luxembourg
26 84 3000
Norge
22 70 82 50
Danmark
35 25 87 61
Österreich
01 546 575 603
Deutschland
0696 698 4712
Portugal
0800 831 363
España
09 17 45 62 46
Schweiz/ Suisse/ Svizzera
02 23 10 21 16
France
03 8717 0033
Suomi
09 2290 1908
00800 3122 1223
Sverige
08 632 0016
Ireland
01 601 1161
UK (United Kingdom)
0207 949 0069
Italia
02 48 27 11 53
Cyprus
800 92256
European Regulations
This product has been designed, tested and manufactured according to the
European R&TTE Directive 1999/5/EC.
Following this Directive, this product
following states:
B ✔ DK ✔ E ✔ GR ✘ F
IRL ✔ I ✔ L ✔ NL ✔ A
P ✘ SU ✔ S ✔ UK ✘ N
D ✔ CH ✔
can be brought into service in the
✔
✔
✔
ENGLISH
5
Table of Contents
Introduction of the Wireless Notebook Adapter 11a/g................6
What are wireless network connections?....................................................................6
Factors determining your network range and network speed ...............6
Securing your wireless network.................................................................................7
Packaging contents.....................................................................................................................7
Your Wireless Notebook Adapter 11a/g......................................................................8
Important information.....................................................................9
Safety Precautions ......................................................................................................................9
Environmental information....................................................................................................9
Disclaimer.....................................................................................................................................10
Installing the Wireless Notebook Adapter 11a/g ........................11
3.1 -Decide in what way you want the Wireless
Notebook Adapter 11a/g to connect to other wireless network devices....11
Infrastructure wireless network...............................................................................11
Ad Hoc wireless network ..........................................................................................12
3.2 - Use the 'How to...?" booklet to help you through
the installation procedure...................................................................................................12
Checking and changing settings: CPWNA Monitor ...................13
4.1 - How to access the settings....................................................................................13
4.2 - What do the settings mean ...................................................................................15
General network and security related information....................21
The DOs and DON'Ts of securing your wireless network ..........................21
Securing your network from Internet access..........................................................22
Example of how to secure your wireless network ......................23
Example of use: how to set-up a computer network? ................27
Which Windows version do you have installed....................................................27
For Windows XP and Windows 2000................................................................27
For Windows 98SE and Windows Me................................................................33
Network terminology ....................................................................37
Technical specifications ..................................................................40
Troubleshooting ..............................................................................41
6
ENGLISH
Chapter 1 - Introduction of the Wireless Notebook Adapter 11a/g
CPWNA100
Thank you for purchasing the Philips Wireless Notebook Adapter 11a/g.This
Wireless Notebook Adapter 11a/g is a WiFi (IEEE 802.11a/g) compatible
Notebook device. It fully supports high data rates up to 54 Mbps with
automatic fallback to lower speeds for secure operation at lower data rates
in even the most difficult of wireless environments.
In this manual we will expand on how to install, configure, and use your
Wireless Notebook Adapter 11a/g.
This chapter will give you background information on wireless networks and
their security in general.
What are wireless network connections?
Your wireless network adapter uses a wireless protocol
(called IEEE 802.11a/g or WiFi) to communicate with other network
computers by means of radio transmissions.WiFi radio waves travel
outwards from the antenna in all directions, and can transmit through walls
and floors.Wireless transmissions can theoretically reach up to 450 meters
in an open environment and reach speeds of up to 100 megabits per
second (Mbps) at close range. However, the actual network range and data
throughput rate will be less, depending on the wireless link quality.
Factors determining your network range and network speed
• The environment: Radio signals can travel farther outside of buildings,
and if the wireless components are in direct line of sight to one another.
Putting wireless components in high places helps avoid physical obstacles
and provides better coverage.
• Building construction such as metal framing and concrete or masonry
walls and floors will reduce radio signal strength. Avoid putting wireless
components next to walls and other large, solid objects; or next to large
metal objects such as computers, monitors, and appliances.
• Wireless signal range, speed, and strength can be affected by
interference from neighbouring wireless networks and devices. Electromagnetic devices such as televisions, radios, microwave ovens, and
cordless phones, especially those with frequencies in the 2.4 GHz range,
may also interfere with wireless transmission.
• Standing or sitting too close to wireless equipment can also affect radio
signal quality.
• Adjusting the antenna: Do not place antennas next to large pieces of
metal, because this might cause interference.
ENGLISH
7
Securing your wireless network
As wireless computer networks use radio signals, it is possible for other
wireless network devices outside your immediate area to pick up the
wireless signals and either connect to your network or to capture the
network traffic.Therefore, you should always enable the Wired Equivalent
Privacy (WEP) or WiFi Protected Access (WPA) network encryption key
to help prevent unauthorised connections or the possibility of
eavesdroppers listening in on your network traffic.
For an example of how to secure your network, please see the chapter on
"An example of how to secure your wireless network."
Packaging contents
Please check whether all of the following items are present in the box of
the Wireless Notebook Adapter 11a/g.These are provided to help you set
up and use your Wireless Notebook Adapter 11a/g. Contact your Philips
retailer if any items are missing.
• Wireless Notebook Adapter 11a/g
• Installation CD
• "How to…?" booklet
8
ENGLISH
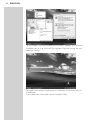
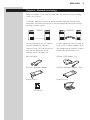
Your Wireless Notebook Adapter 11a/g
1 Connector to PC
For connecting the Wireless Notebook Adapter 11a/g into a PC Card
slot of your laptop.
2 Integrated antenna
Built-in antenna for establishing wireless connections.
3 Indicator LED
Displays the network status.
LED
LED
colour
Meaning
Power
Blue
• Off when not connected or with PC switched off.
• On when receiving power and ready for operation.
• Blinking when scanning for wireless networks
Act
Blue
Flashing when transmitting data (network activity).
4 Label with MAC address
The designation consisting of 12 characters (e.g. 00:30:F1:A1:F4:A5 or, in
general, xx:xx:xx:xx:xx:xx) is the unique MAC address of this network
device. Some safety features or network identification purposes need
this MAC address.
ENGLISH
9
Chapter 2 - Important information
• Please install and connect the product in the order as described in the
"How to..." booklet only.This assures best installation results with the least
technical hassles.
• Please read this manual and the "How to…?" booklet carefully before using
the Wireless Notebook Adapter 11a/g; and keep these documents for
future reference.
• The most recent downloads and information on this product will be
available through our web site www.philips.com/support
• During set-up and installation, it may be helpful to have the instructions for
your PC and other network components at hand.
Safety Precautions
• Radio equipment for wireless applications is not protected against
disturbance from other radio services.
• Do not expose the system to excessive moisture, rain, sand or heat sources.
• The product should not be exposed to dripping or splashing. No object
filled with liquids, such as vases, should be placed on the product.
• Keep the product away from domestic heating equipment and direct
sunlight.
• Allow a sufficient amount of free space all around the product for adequate
ventilation.
• Do not open this product. Contact your Philips retailer if you experience
technical difficulties.
Environmental information
All redundant packing material has been omitted. We have done our utmost
to make the packaging easily separable into three mono materials:
cardboard (box), polystyrene foam (buffer) and polyethylene (bags,
protective foam sheet).Your set consists of materials that can be recycled if
disassembled by a specialised company. Please observe the local regulations
regarding the disposal of packing materials, exhausted batteries and old
equipment.
10
ENGLISH
Disclaimer
This product is provided by "Philips" "as is'' and without any express or
implied warranty of any kind of warranties, including, but not limited to, the
implied warranties of merchantability and fitness for a particular purpose are
disclaimed.
In no event shall Philips be liable for any direct, indirect, incidental, special,
exemplary, or consequential damages (including, but not limited to,
procurement of substitute goods or services; loss of information, data, or
profits; or business interruption) howsoever caused and on any theory of
liability, whether in contract, strict liability, or tort (including negligence or
otherwise) arising in any way out of the use of inability to use this product,
even if advised of the possibility of such damages.
Philips further does not warrant the accuracy or completeness of the
information, text, graphics, links or other items transmitted by this product.
ENGLISH
11
Chapter 3 - Installing the Wireless Notebook Adapter 11a/g
This chapter will give you information on what you need to do when
installing the Wireless Notebook Adapter 11a/g.You need to do two things:
• Decide in what way you want the Wireless Notebook Adapter 11a/g to
connect to other wireless network devices. See below at 3.1. Note:You can
always change your settings afterwards to make a different type of
connection.
• Use the 'How to...?" booklet to help you through the installation procedure.
See below at 3.2.
Note: If you need to know more about the (network) terminology used,
please read the chapter on Network Terminology at the end of this manual.
3.1 - Decide in what way you want the Wireless
Notebook Adapter 11a/g to connect to other
wireless network devices.Your options are:
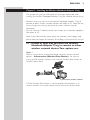
Option 1
Make an Infrastructure wireless connection to other wireless network
devices. – Infrastructure (Wireless Base Station) - for Internet
sharing and for wireless networks with a central Wireless Base Station or
Wireless Access Point .
Infrastructure wireless network
A Philips Wireless Base Station is used to provide the computers in its
wireless network with wireless access to the Internet or to each other.
Infrastructure wireless network
12
ENGLISH
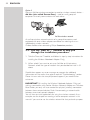
Option 2
Make an Ad-Hoc wireless connection to another wireless network device. –
Ad Hoc (also called Peer-to-Peer) - used for small groups of
computers that only communicate with each other.
d Hoc wireless network
Ad Hoc wireless network
An ad hoc wireless network consists of a group of computers, each
equipped with one wireless adapter, connected via radio signals as an
independent wireless network.
Choose AdHoc when connecting Philips Streamium products.
3.2 - Use the 'How to...?" booklet to help you
through the installation procedure.
1. Take the "How to...?" booklet, and follow its step by step instructions for
installing the Wireless Notebook Adapter 11a/g.
2. When asked if you want to set-up an Ad-Hoc or Infrastructure
Network, select the type of network that you decided to install in 3.1
above.
Should there appear any error messages or requests for additional
information on the screen, then please read the "Troubleshooting" section.
Please visit our web site www.philips.com/support if you need further
assistance.
IMPORTANT: By installing the Wireless Notebook Adapter 11a/g and
making a connection with another Wireless Network Adapter or a Wireless
Base Station, you only will have created the physical (wireless) connection
between these network devices. Much like connecting a network cable
between two wired network adapters.
You still have to install applications for using the wireless network. As an
example, see the chapter on creating a home computer network in this
manual if you want to use the wireless network for that particular purpose.
Ad Hoc wireless network
ENGLISH
13
Chapter 4 - Checking and changing settings: CPWNA Monitor
After installing the Wireless Notebook Adapter 11a/g, you may want to
check its settings or change them.
In the following sections we will explain:
4.1 - How to access the settings
4.2 - What do the settings mean.
Please refer to the "How to..?" booklet if you want to perform basic tasks like
setting up a wireless connection.
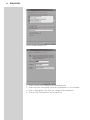
4.1 - How to access the settings
You can access the settings by double-clicking the CPWNA Monitor
program that loads during start-up of the PC, and that stays active in the
system tray in the lower right corner of your laptop screen.
Note: if the program icon is not present in the system tray, click on
CPWNA Monitor in the Philips Wireless Network Manager program group.
System tray icon
1 The icon represents signal strength and wireless link status. In addition, it
gives you access to the Philips Wireless Network Manager and its
configuration menus.
2 Right-clicking the system tray icon displays the following options:
• Profiles (e.g. DEFAULT and others in the top part of this menu)
For choosing one of your profiles.The active profile is marked.You need to
open (click Show) the Philips Wireless Network Manager if you want to add
or delete a profile.
• Wireless On/Off:
Gives you control over enabling and disabling the wireless link
• Show: Philips Wireless Network Manager (CPWNA Monitor)
Opens the Philips utility program for viewing and changing your wireless
network adapter settings.
14
ENGLISH
• Hide
Hides the system tray icon from the system tray until you restart your
laptop, without disabling the wireless network adapter.
• Exit
Disables the wireless network adapter and removes the system tray icon
from the system tray until you restart your laptop.
ENGLISH
15
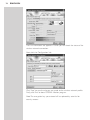
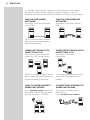
4.2 - What do the settings mean
The Wireless Network Manager program (CPWNA Monitor) has five main
tabs with information and settings.
Note:The Wireless On/Off button appears on the bottom of every tab to
give you control over enabling and disabling the wireless link.
• Configuration
The Configuration tab lets you manage your profiles, and gives you access
to your wireless network and encryption settings.
A profile is a set of all settings needed for a particular wireless connection. If
you want to change between wireless networks, you can simply switch from
one saved profile to the other.
Use the New, Save and Delete buttons for managing your profiles.
Note: refer to the "How to..?" booklet on how to set-up a wireless connection.
The Configuration tab contains three sub-tabs: Common, Security, and
Advanced. See below for an explanation of the settings of these sub-tabs.
16
ENGLISH
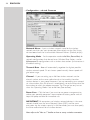
• Configuration - sub-tab Common
Network Name – Input a wireless network name for the wireless
network to which you want to connect. Alternatively, use the Site Survey
tab to choose from the list of available Network Names. (Default: philips.)
Operating Mode – Set the operation mode to Ad Hoc (Peer-to-Peer) for
network configurations that do not have a Wireless Base Station , and to
Infrastructure for configurations with a wireless base station. (Infrastructure is
the default setting.)
Transmit Rate – Auto will automatically negotiate the highest possible
wireless network speed. Or set a lower speed manually. Lower speeds will
give better range.
Channel – If you are setting up an Ad Hoc wireless network, set the
channel number to the same radio channel as that used by the other
wireless devices in your group. However, if you are connecting to a network
via a base station, then the channel is automatically set to the channel of the
base station to which the adapter connects.The Channel can only be set
when the Operating Mode is set to Ad Hoc (Peer-to-Peer).
Power Save – Click the box if you want to use power management to
reduce your portable computer's consumption of battery power and still
keep the laptop available for immediate use.
IMPORTANT: All computers and wireless network devices in the same
network should have the same Network Name (SSID) and the same
encryption key for wireless security. In Ad Hoc mode, you must also specify
the same radio channel for all wireless devices.
Note: refer to the "How to..?" booklet on how to set-up a wireless connection.
ENGLISH
17
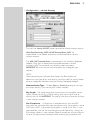
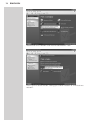
• Configuration - sub-tab Security
First, click the Security ON/OFF button to enable or disable wireless security.
Wired Equivalent Privacy (WEP) and WiFi Protected Access (WPA) are
implemented in the adapter to prevent unauthorized access to your
wireless network.
The WPA (WiFi Protected Access) implemented in this Wireless Notebook
Adapter 11a/g uses an alphanumeric password between 8 and 63
characters long.This password may include symbols and spaces.
IMPORTANT:You must use the same encryption key throughout your
network.
NOTE:
When connecting to a Wireless Base Station, the Base Station will
determine what type of key and security are to be used.The settings below
are only needed for Ad-Hoc use of the Wireless Notebook Adapter.
Authentication Type – Choose Open or Shared depending on the type
of wireless security in the rest of your wireless network.
Key length – For more secure data transmissions, set encryption to the
highest number of bits. E.g. a 128-bit setting gives you a higher level of
security than 64-bit. IMPORTANT: The setting must be the same for all clients
in your wireless network.
Use Passphrase – If Passphrase is selected, security keys for WEP
encryption are generated from your passphrase string. If encryption is set to
128 bit, only Key 1 is generated. If encryption is set to 64 bit, Keys 1-4 are
generated.You must use the same Passphrase and Default Key settings on
all the other stations in your network. Note: A passphrase string can consist
of up to 32 alphanumeric characters. After entering the passphrase, click
18
ENGLISH
Apply.
Key Type
– If the Key Type is set to Hex, the security keys are four 10 digit keys for the
64-bit WEP setting and four 26-digit keys for the 128-bit WEP setting.
(The hexadecimal digits can be 0~9 & A~F, e.g. D7 0A 9C 7F E5.)
– If the Key Type is set to ASCII, the security keys are four 5-digit keys for
the 64-bit WEP setting and four 13-digit keys for the 128-bit WEP setting.
Default Key – Choose the Key ID that has the encryption string you
prefer. If you are using a key generated from the passphrase, you must use
the same passphrase and key on each wireless device.
For an example of how to change your encryption settings, please see the
chapter on "An example of how to secure your wireless network."
• Configuration - sub-tab Advanced
Keep the Advanced settings at their default values, unless you have a specific
reason for changing them.
Click Help if you need more information on these settings.
ENGLISH
19
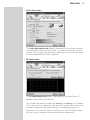
• Link information
The Link information tab displays information on the wireless network
name (Network Name) to which there is a wireless connection, the signal
strength and link quality, the connection speed, the channel and the number
of transmitted/received (Tx/Rx) fragments.
• IP information
The IP information tab displays information on the Host Name, IP
Address, Subnet Mask, and Gateway.
This window also contains buttons for releasing and renewing the IP address.
This is done to bring a computer back onto the network after moving it to
a different location, or after experiencing an unexpected outage. First
release, then renew the IP address. Computers on DHCP networks often
(but not always) re-establish network connectivity automatically.
20
ENGLISH
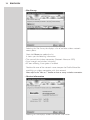
• Site Survey
Selecting the Site Survey tab displays a list of available wireless network
access points.
Next, click Rescan to update the list.
It shows you the following information:
• The name of the wireless connection (Network Name, or SSID)
• Signal strength and wireless link quality
• An icon reflecting if encryption is enabled
Double-click one of the network names to open the Profile Wizard for
establishing a wireless connection with that network.
Note: refer to the "How to..?" booklet on how to set-up a wireless connection.
• Version information
Selecting this tab displays vendor and version information.
ENGLISH
21
Chapter 5 - General network and security related information
The DOs and DON'Ts of securing your wireless network
Note: For an example of how to encrypt your wireless network, please see the
chapter on "An example of how to secure your wireless network."
DO
Enable the highest encryption key level that your hardware provides for.
Upgrade your hardware, if possible. If you do not protect your wireless
network, all data from your PC might be accessible by, for example, your
neighbours or passers-by.
Use a wireless base station or router with Network Address Translation
(NAT) and firewall enabled for sharing your Internet connection.
Change the default passwords for your network devices. Leaving these at
default makes it easy for an outsider to gain access.
Position wireless base stations away from windows and toward the centre
of your home.This decreases the strength of the signal outside your home.
Some wireless base stations allow you to control access based on the
unique Media Access Control (MAC) address of the network adapter trying
to associate with it. If a MAC address has not been registered in the
wireless base station, it will not associate with it. If your base station has this
feature, enable it and add the MAC addresses of the network adapters.
Just use common sense: Install an anti-virus program on each computer on
your network and use it regularly to check your computers for viruses.
Remember to update the anti-virus program on a regular basis.
DON'T
Do not rely on radio transmission range limitations to secure your network.
Enable wireless security (WEP/WPA) to protect your network from
unwanted access.
Use encryption keys and passwords that are hard to guess. Do not change
passwords to reflect your name, address, or anything that would be easy to
guess.
Never open attachments to email messages that you are not expecting. In
addition, scan all diskettes and home-made CDs for viruses before opening
files from them, or before starting your computer from them.
Do not load a program from an unknown source onto one of your
network computers.
Do not ignore the common signs of viruses: unusual messages that appear
22
ENGLISH
on your screen, decreased system performance, missing data, and inability to
access your hard drive. If you notice any of these problems on your
computer, run your anti-virus program immediately to minimise the chances
of losing data.
Do not connect your home network to broadband Internet without taking
security measures: If you do not have a wireless base station installed on
your network and you are sharing Internet access through one of the
computers, you may want to consider installing firewall software.
Securing your network from Internet access
Check in the documentation of your wireless base station or router
whether it provides you with a built-in firewall and network address
translation (NAT), which provide security for an “always-on” broadband
Internet connection that is shared among the computers and devices on
your home network.
Computers on an Ad Hoc network may share an Internet connection that
is set up on one of the computers (ICS). However, a firewall is usually not
built-in and you should install one on the computer that is sharing the
Internet connection.
ENGLISH
23
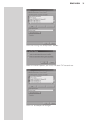
Chapter 6 - Example of how to secure your wireless network
This is an example of how to secure your wireless network using the Philips
Wireless Notebook Adapter 11a/g Monitor program.
Double-click the CPWNA Monitor icon in the lower right corner of the
screen.
Click the ‘Configuration’ tab.Then click the Security sub-tab.The encryption
settings are in the lower part of this window.
The encryption (or WEP code) can be seen as a password for your wireless
network. Only devices with the correct password may use the network.
Set ‘Key Length' to exactly the same wireless security strength (64 bit or
128 bit) as your Wireless Base Station or other wireless network
adapters.The higher the better.Therefore, select ‘128 bit'.
24
ENGLISH
Select ‘ASCII' as your Key Type.This enables you to enter an encryption key
in normal text.
After ‘Key 1’, enter a code in text and numbers that will be hard to guess.
IMPORTANT:
– You need to make a difference between upper case and lower case
characters. I.e.: "SecretCode" is not the same as "secretcode".
– Use 13 characters for 128-bit encryption (e.g. "topsecretcode") and 5
characters for 64-bit encryption (e.g. "my1st").
ENGLISH
Set the Default Key to be used to ‘1’.
Click ‘Apply changes’.
25
26
ENGLISH
The ‘Link information’ tab appears in which you can check the status of the
wireless network connection.
Next, click the ‘Configuration’ tab.
Click 'Save' to save the changes you made to the wireless network profile.
Finally, click ‘Exit’ to close CPWNA Monitor program.
Note:The encryption key you entered will be replaced by asterisks for
security reasons.
ENGLISH
27
Chapter 7 - Example of use: how to set-up a computer network?
After installing the Philips Wireless Notebook Adapter 11a/g and
establishing a wireless network connection with another wireless network
device, you are ready to start using the network for the application you
want to use the network for.
A popular application is to set-up a Windows home network between two
or more computers.
The next pages will show you an example of how to set-up a computer
network using the Philips Wireless Notebook Adapter 11a/g.
Warning:
The wireless network adapter itself, only enables your laptop to
connect to other similar wireless network devices. How you use
this connection is up to you.
Setting-up a computer network is to be seen as an independent application
that requires networking software from other manufacturers. For example,
the networking software that has been incorporated in the Windows
Operating System by Microsoft.
Therefore, the description below is to be seen as an example only.
Which Windows version do you have installed
1 Start setting-up your network with the computer that has the latest
operating system.
> The order of preference being:Windows XP,Windows 2000,Windows
Me, and finally Windows 98SE.
2 Use its Networking Setup Wizard and allow it to make a networking
setup diskette.
3 With this diskette, set-up your remaining computer.
For Windows XP and Windows 2000
See further on in this chapter for Windows Me and Windows 98SE.
Click the Windows Start button, and click "Control Panel" from the list.
28
ENGLISH
Double-click the "Network and Internet connections" icon.
Click in the list to the left on "Setting-up a home network or small business
network".
ENGLISH
29
The Wizard Network Setup appears. Click ‘Next’ to continue.
Wizard Network Settings
1 Please, carefully read the instructions the Wizard gives you, and adapt
your choices to the type of network you want to set-up. Use the Help
feature within the Wizard if you need more information while using the
Wizard.
2 In each window, click ‘Next’ to go to the next step.
3 Below, we will describe some of the crucial steps of this Wizard.
Place a check mark to ignore any broken network connections before
clicking ‘Next’ to continue.
30
ENGLISH
1 Enter a description that helps you recognize the computer.
2 Enter a name that is different for each computer.
3 Click ‘Next’ to continue.
Enter the same workgroup name for all computers in the network, then
click ‘Next’ to continue.
ENGLISH
31
Choose to make a networking setup disk.Then click 'Next'.
Click ‘Finish’ to close the Wizard, and then use the disk you made to set-up
your other computers.
32
ENGLISH
To share folders with the network: Start Windows Explorer and right-click
the folder you wish to share with the network. Click the ‘Sharing’ tab and
adapt the settings.
To explore the network: Double-click the Network Environment icon on
the desktop.
If you need more information, consult Windows Help.
ENGLISH
For Windows 98SE and Windows Me
See earlier on in this chapter for Windows XP and Windows 2000.
Click the Windows Start button, click "Settings", and click "Control Panel"
from the list.
Double-click the "Network" icon.
33
34
ENGLISH
Click the ‘Identification’ tab.
1
2
3
4
Enter a name that is different for each computer.
Enter the same workgroup name for all computers in the network.
Enter a description that helps you recognize the computer.
Click on the ‘Configuration’ tab to continue.
ENGLISH
Click the ‘Sharing files and printers’ button.
Select the access options you want, and click ‘OK’ to continue.
Click ‘OK’ to accept the changes.
35
36
ENGLISH
To share folders with the network: Start Windows Explorer and right-click
the folder you wish to share with the network.
Click the ‘Sharing’ tab and adapt the settings.
To explore the network: Double-click the Network Environment icon on
the desktop.
If you need more information, consult Windows Help.
ENGLISH
37
Chapter 8 - Network terminology
Read this chapter if you want to know how to interpret the terminology
used in this manual.
A network provides a means of communication between two or more
computers (and other devices) that are connected to each other through
wired or wireless means.
WIRED
WIRELESS
At each computer, you will need a
network adapter or Network
Interface Card (NIC) to be able to
connect the computer to the
network cable. Examples are:
At each computer, you will need to
install a WiFi wireless adapter to be
able to connect to another wireless
enabled device. Examples are:
Ethernet cable
Wireless USB adapter 11g
Ethernet notebook adapter
Wireless notebook adapter 11a/g
Already built-in
Already built-in
ETHERNET
38
ENGLISH
In a network, the computers need to be able to connect to each other
physically.Therefore, another important network property is how the
computers connect to each other, either directly or through a central device.
ONE-ON-ONE WIRED
NETWORK
also known as: Direct connection
(max. 2 PCs)
ONE-ON-ONE WIRELESS
NETWORK
also known as: Ad Hoc / Peer-toPeer
NOTE: Use a crossover Ethernet
cable to connect two computers
directly to each other.
WIRED NETWORK WITH
MORE THAN 2 PCs
Use a hub or switch to connect
more than 2 PCs to each other.
WIRELESS NETWORK WITH
MORE THAN 2 PCs
also known as: Ad Hoc /
Peer-to-Peer
NOTE: Use straight-through Ethernet
cables to connect the computers to
the central device (hub/switch).
The wireless medium forms a hub in
and of itself. No hardware hub is
needed.
HOW TO INTERCONNECT
WIRED NETWORKS
Use a gateway router to connect
one network to another (e.g. to the
Internet, also known as WAN).
CONNECTING WIRELESS TO
WIRED NETWORKS
also known as: Infrastructure /
Access Point
Use a wireless base station.
ENGLISH
39
Central devices, like a hub, switch, router or wireless access point may be
stand-alone devices or built into a computer.
• A hub has multiple ports and serves as a central connection point for
communication lines from all computers on a wired network. It copies
all data arriving at one port to the other ports. A switch is similar to a
hub, but is able to handle different network speeds at each port.
• Gateway routers and wireless access points route network traffic
from one network to another (e.g. from a wired network to the
Internet, or from a wireless network to a wired network or to the
Internet).
40
ENGLISH
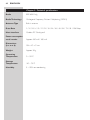
Chapter 9 - Technical specifications
Radio
IEEE 802.11a/g
Radio Technology
Orthogonal Frequency Division Multiplexing (OFDM)
Antenna Type
Built-in antenna
Data Rate
1 / 2 / 5.5 / 6 / 9 / 11 /12 / 18 / 24 / 36 / 48 / 54 / 72 / 96 / 108 Mbps
Host interface
Cardbus PC Card type II
Power consumption
send / receive
Approx. 650 mA / 360 mA
Dimensions
(h x w x d)
104 x 47 x 7 mm
Weight
Approx. 35 g
Operating
Temperature
0 ~ 55°C
Storage
Temperature
-20 ~ 75°C
Humidity
5 ~ 90% non-condensing
ENGLISH
41
Chapter 10 - Troubleshooting
Please, check the following troubleshooting items and our web site
www.philips.com/support before contacting our technical support.
Problem
Possible cause
Solution
ADAPTER INSTALLATION PROBLEMS
Your PC cannot find
the wireless Notebook
Adapter or the
network driver does
not install correctly
Notebook Adapter
not connected
Make sure the Notebook Adapter is securely
connected to the PC cards connectors of your PC
Notebook Adapter
damaged
Check for any hardware problems, such as physical
damage to the adapter's connector.
Notebook Adapter
defective
Try to connect the adapter to another PC Card
slot or port. If this also fails, test your laptop with
another Wireless Notebook Adapter 11a/g that is
known to operate correctly.
Conflicting network
adapters.
If there are other network adapters in the
laptop, they may be causing conflicts. Remove all
other adapters from the laptop and test
thewireless adapter separately.
If it still does not work, try re-installing the wireless Notebook adapter
11a/g from the original Installation CD. Restart your PC.
42
ENGLISH
Problem
Possible cause
Solution
NETWORK CONNECTION PROBLEMS
If the Link LED on
the Wireless Notebook
Adapter11a/g does not
light, or if you cannot
access any network
resources from
the computer.
PC or other network
devices switched off.
Make sure the computer and other network
devices are receiving power.
No access to a
Windows or NetWare service on the
network.
Service unavailable.
Check that you have enabled and configured the
service correctly.
If you cannot connect to a particular server, be
sure that you have access rights and a valid ID and
password.
If you cannot access the Internet, be sure you have
configured your system for TCP/IP.
If your wireless
adapter cannot
communicate with a
computer in the
network when
configured for
Infrastructure mode.
Base Station / Access
Point is switched off.
Make sure the access point that the station is
associated with is powered on.
Range too long
(weak radio signal).
Reposition your Wireless Adapter.
Wrong settings
Make sure the SSID and the network encryption
key are the same as those used by the wireless
access point.
Network speed
does not
exceed 11 Mbps.
Other network
components are
unsuitable for higher
network speeds.
Make sure all network components are suitable for
high network speeds.
Certificat de garantie
Certificado de garantia
Garantibevis
2
year warranty
année garantie
Jahr Garantie
jaar garantie
año garantia
anno garanzia
Type:
Garantieschein
Certificato di garanzia
Garanticertifikat
Takuutodistus
år garanti
år garanti
år garanti
vuosi takuu
año garantia
CPWNA100
Serial nr: ___________________________________________________________________
Date of purchase - Date de la vente - Verkaufsdatum - Aankoopdatum - Fecha de compra - Date d’acquisito Data da adquirição - G-! !2 - Inköpsdatum - Anskaffelsesdato - Kjøpedato - Oatopäivä -
Dealer’s name, address and signature
Nom, adresse et signature du revendeur
Name, Anschrift und Unterschrift des Händlers
Naam, adres en handtekening v.d. handelaar
Nombre, direccion y firma del distribudor
Nome, indirizzo e firma del fornitore
www.philips.com/support
Go to www.philips.com/support for your guarantee.
Data subject to change without notice
9082 100 03013
!"#$, %&'( )!& (#!*+ "( #. #'("
Återförsäljarens namn, adress och signatur
Forhandlerens navn, adresse og unterskrift
Forhandlerens navn, adresse og unterskrift
Jälleenmyyjän nimi, osoite ja allekirjoitus
Nome, morada e assinature da loja
0682